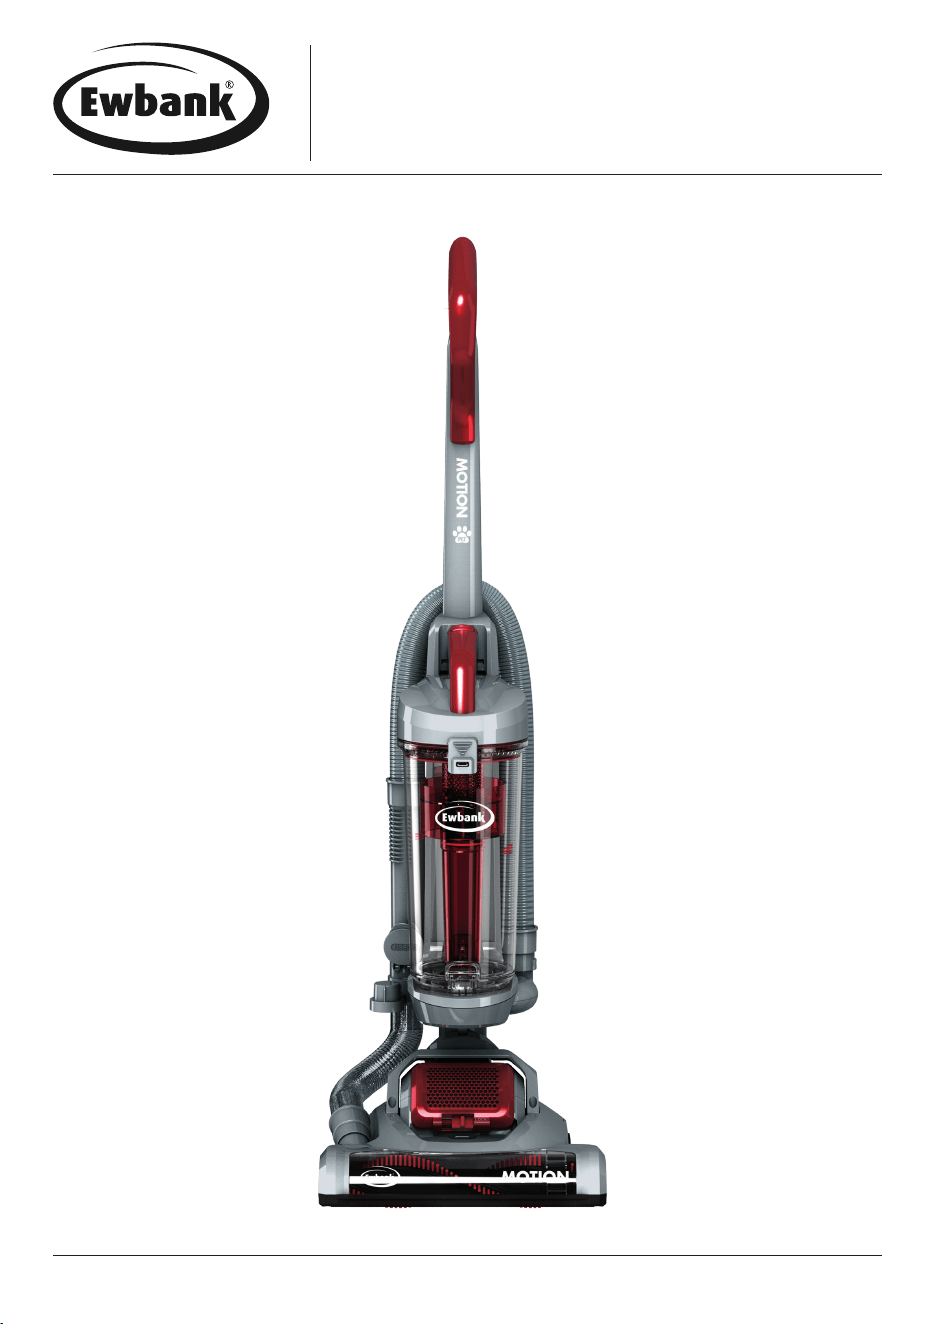
INSTRUCTION MANUAL
MOTION 700W Bagless Pet Upright Vacuum Cleaner
EW3001
Ewbank has a British heritage to be proud of. It’s a household favourite and much loved brand that has been providing innovative cleaning solutions for 140 years.

2
CONTENTS
Safety Instructions .............................................................................................3-5
Appliance Overview ...........................................................................................6
Operating Instructions .......................................................................................7-8
Cleaning & Maintenance ................................................................................9-12
Troubleshooting & Damage Prevention .................................................................13
Fuse Replacement..............................................................................................14
Disposal of the Appliance ..................................................................................14
Warranty Terms & Conditions .............................................................................15

3
Ewbank, 38 Bluestem Road, Ipswich, Suffolk, IP3 9RR Tel. 01473 271 272
SAFETY INSTRUCTIONS
PLEASE READ ALL THE INSTRUCTIONS BEFORE
USE AND WHEN USING THE APPLIANCE, THE
FOLLOWING PRECAUTIONS MUST BE TAKEN:
WARNING! TO REDUCE THE RISK OF FIRE,
ELECTRIC SHOCK, OR INJURY:
1. Do not leave the vacuum cleaner plugged in when not in
use. Unplug from the socket before servicing.
2. To reduce the risk of electric shock, do not use outdoors
or on wet surfaces.
3. Only use as described in this manual, including
attachments. Attachments used should only be that of the
manufacturers.
4. Do not use when the cord or plug are damaged. If
the vacuum cleaner is not working as it should be or
has been dropped, damaged, left outdoors, or fallen
into water, the vacuum cleaner must be serviced by an
engineer.
5. Do not pull or carry by the cord, use the cord as a
handle, trap the cord, or pull the cord around sharp
edges and corners. Do not run the vacuum cleaner over
the cord and keep the cord away from heated surfaces.
6. Do not unplug the vacuum cleaner by pulling on the
cord. To unplug, grasp the plug.
7. Do not handle the plug or the vacuum cleaner with wet
hands.
8. Do not actively put any objects into any of the vacuum
cleaners openings. Do not use with any of the opening
blocked. Keep free of dust, lint, hair and anything that
may reduce airflow.
9. Keep hair, loose clothing, fingers and all parts of the
body away from any openings and/or moving parts.

4
10. Turn all controls off before unplugging.
11. Take extra care when cleaning the stairs.
12. Do not use to pick up flammable or combustible liquids
such as gasoline. Do not use in areas where this may be
present.
13. Hold the plug when rewinding the cord. If this is not
done, the plug may whip.
14. Unplug before connecting the hose.
15. Do not pick anything up that is burning or smoking such
as cigarettes, matches or hot ashes.
16. Do not use without filter in place.
17. If the cord is damaged, it must be replaced by the
manufacturer, or a service engineer.
18. This appliance is not intended for use by persons
(including children) with reduced physical, sensory
or mental capabilities, or lack of experience and
knowledge. Only when they have been given supervision
or instruction to use the appliance by a person
responsible for their safety, can they then use it.
19. Children should be supervised to ensure that they do not
play with the appliance.
20. The mains power supply should comply with the
information on the appliance’s rating plate.
21. Do not vacuum water or other liquids.
22. Do not use or store the vacuum cleaner in humid
environments.
23. Do not use with an extension cable.
24. Never dismantle any part of the appliance.
25. When cleaning the stairs, ensure the vacuum cleaner is
located below the user. Keep on the floor when possible.
26. When retaining the packaging, store out of the reach of
children.
27. Do not store outdoors. Store out of the way with the
power cord neatly wrapped up, to prevent accidents.
SAFETY INSTRUCTIONS

5
Ewbank, 38 Bluestem Road, Ipswich, Suffolk, IP3 9RR Tel. 01473 271 272
Read the safety and operating instructions through carefully
before using the vacuum cleaner. This is the only way to
ensure safe and reliable use of the device. If the appliance is
sold or passed on, ensure it is equipped with this instruction
manual. You will also need these operating instructions
for ordering spare parts and accessories. Please keep this
booklet in a safe place.
SAFETY INSTRUCTIONS
28. When vacuum cleaning static electricity may be created.
To prevent shocks, do not access any parts with your
hand until the area is clear.
29. Check the recommended cleaning instructions of your
flooring before vacuum cleaning.
30. Do not use the vacuum cleaner to vacuum powders such
as flour and cement. It can damage, block or break the
motor.
31. Do not use or store the vacuum cleaner in excessively
high or low temperatures, outside of 0-40°C. Avoid
the vacuum cleaner being in direct sunshine for a long
period.
32. If the vacuum cleaner is broken do not disassemble it.
This must be done by a qualified technician.
READ AND SAVE THESE INSTRUCTIONS
This vacuum cleaner is intended for household use only.
6
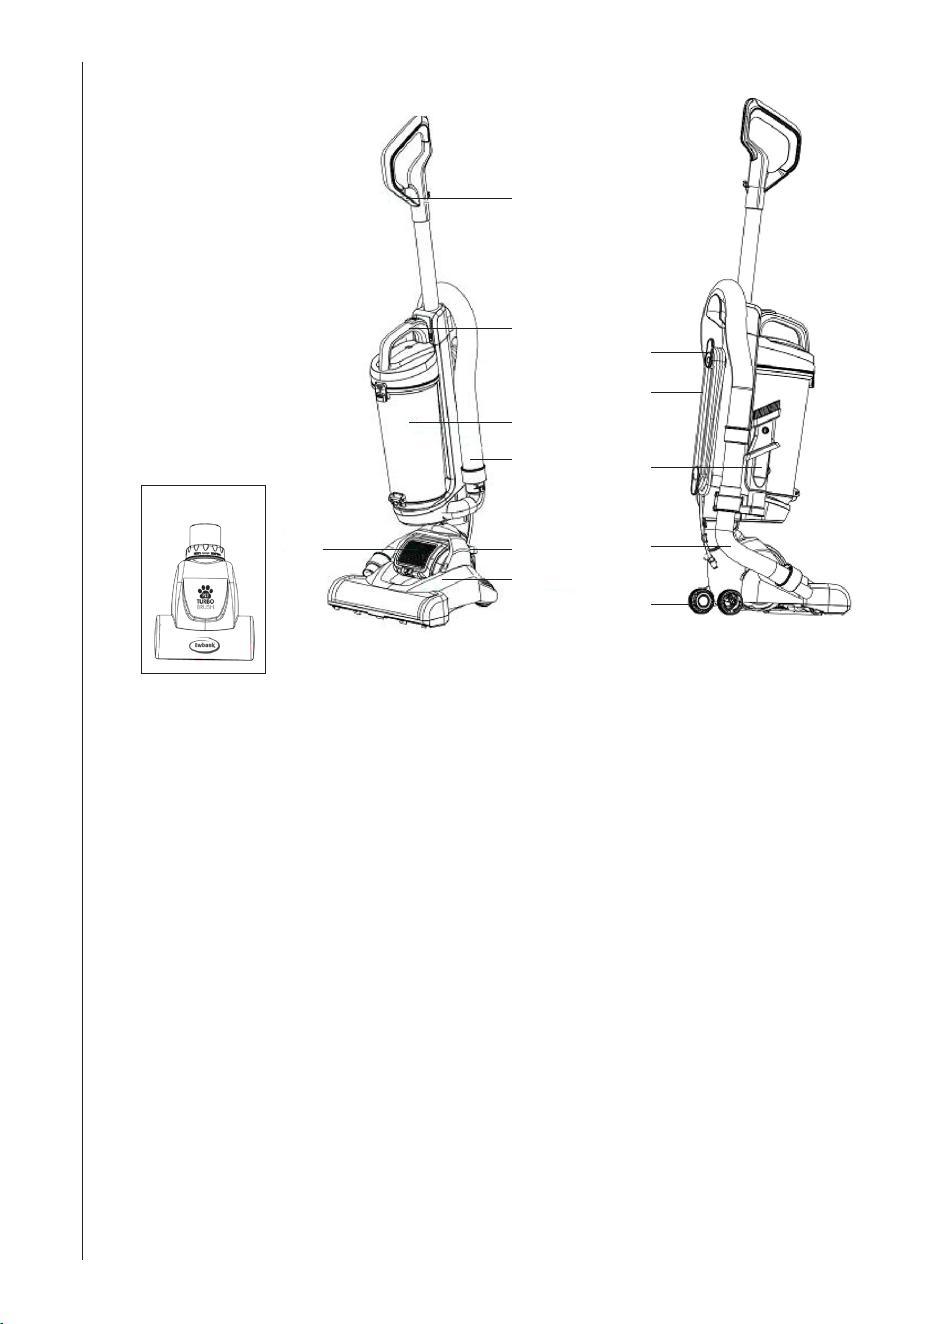
APPLIANCE OVERVIEW
Features
2L capacity
3m flexible extension hose
700W motor power
9.3m power cord
Includes 3-in-1 crevice brush and turbo pet brush
Easy handling with Air Swivel technology
Hygienic HEPA outlet filtration for the environment
Single Cyclone filtration system for high cleaning efficiency
Lightweight: 4kg
12
11
10
9
8
7
1
2
3
4
5
6
1. Handle
2. Dust container release button
3. Dust container
4. Extension hose
5. Power button
6. Brush assembly
7. Exhaust filter
8. Wheel(s)
9. Floor brush suction hose
10. Crevice brush
11. Power cord
12. Power cord holder
13. Turbo pet brush
13
7
Ewbank, 38 Bluestem Road, Ipswich, Suffolk, IP3 9RR Tel. 01473 271 272
OPERATING INSTRUCTIONS
Getting Started
Remove the appliance from the box and remove the packaging from the appliance.
Either store or dispose of the box and packaging safely and recycle where possible.
Before first use, please wipe all the parts with a soft, damp cloth and dry thoroughly.
Do not immerse the vacuum in any liquid.
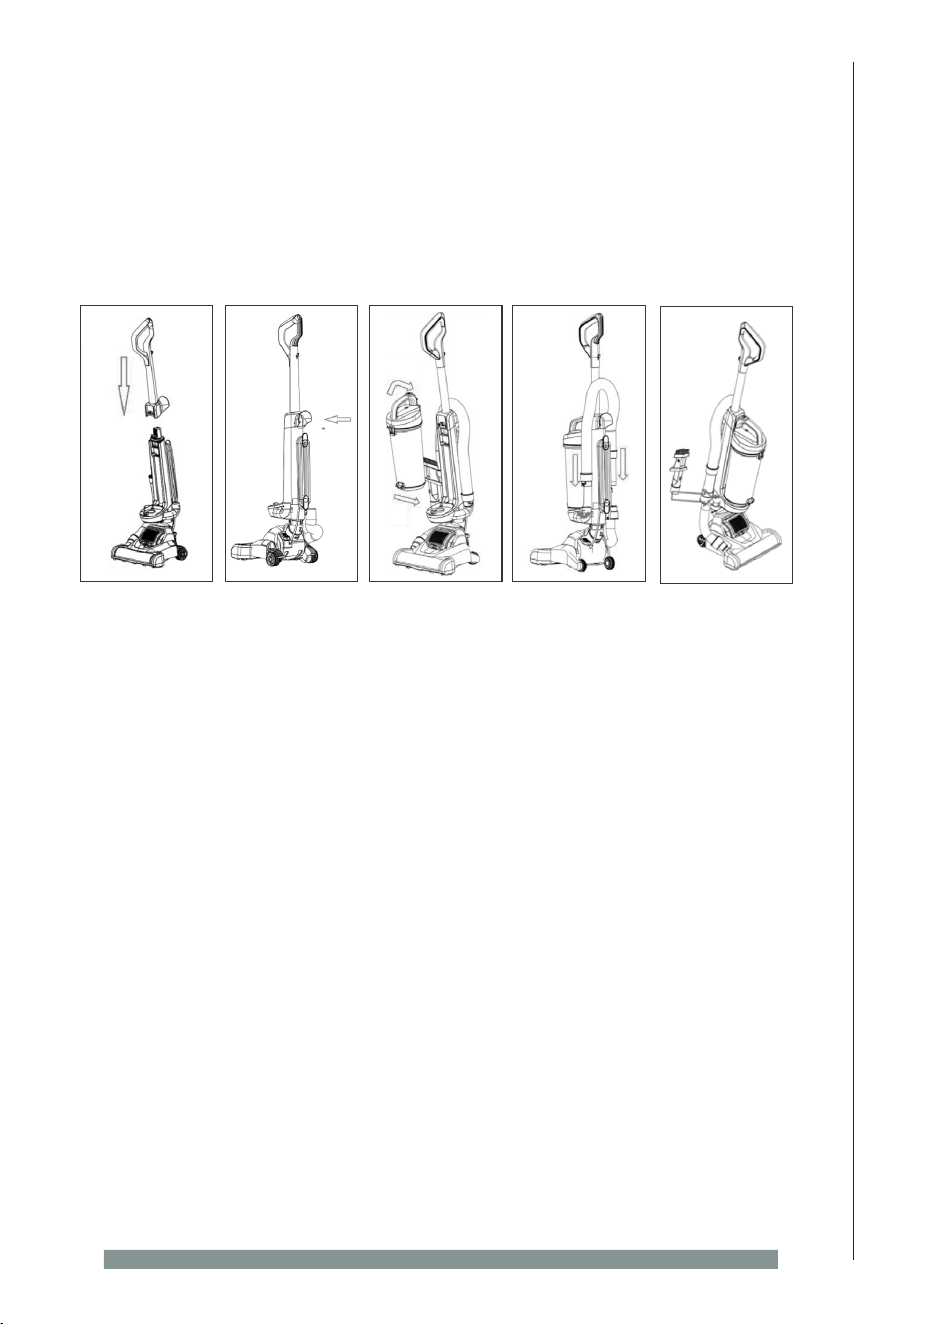
Assembly
Step 1: Insert the handle into the body, and rotate the screw to secure.
Step 2: Place the dust container onto the machine and push until it clicks into place.
Step 3: Insert one end of the hose into the floor brush and rotate clockwise to join.
Then insert the other end into the body of the machine.
Step 4: Insert the crevice brush into the machine.
Note: Make sure all parts are firmly attached otherwise suction may be reduced.
8
OPERATING INSTRUCTIONS
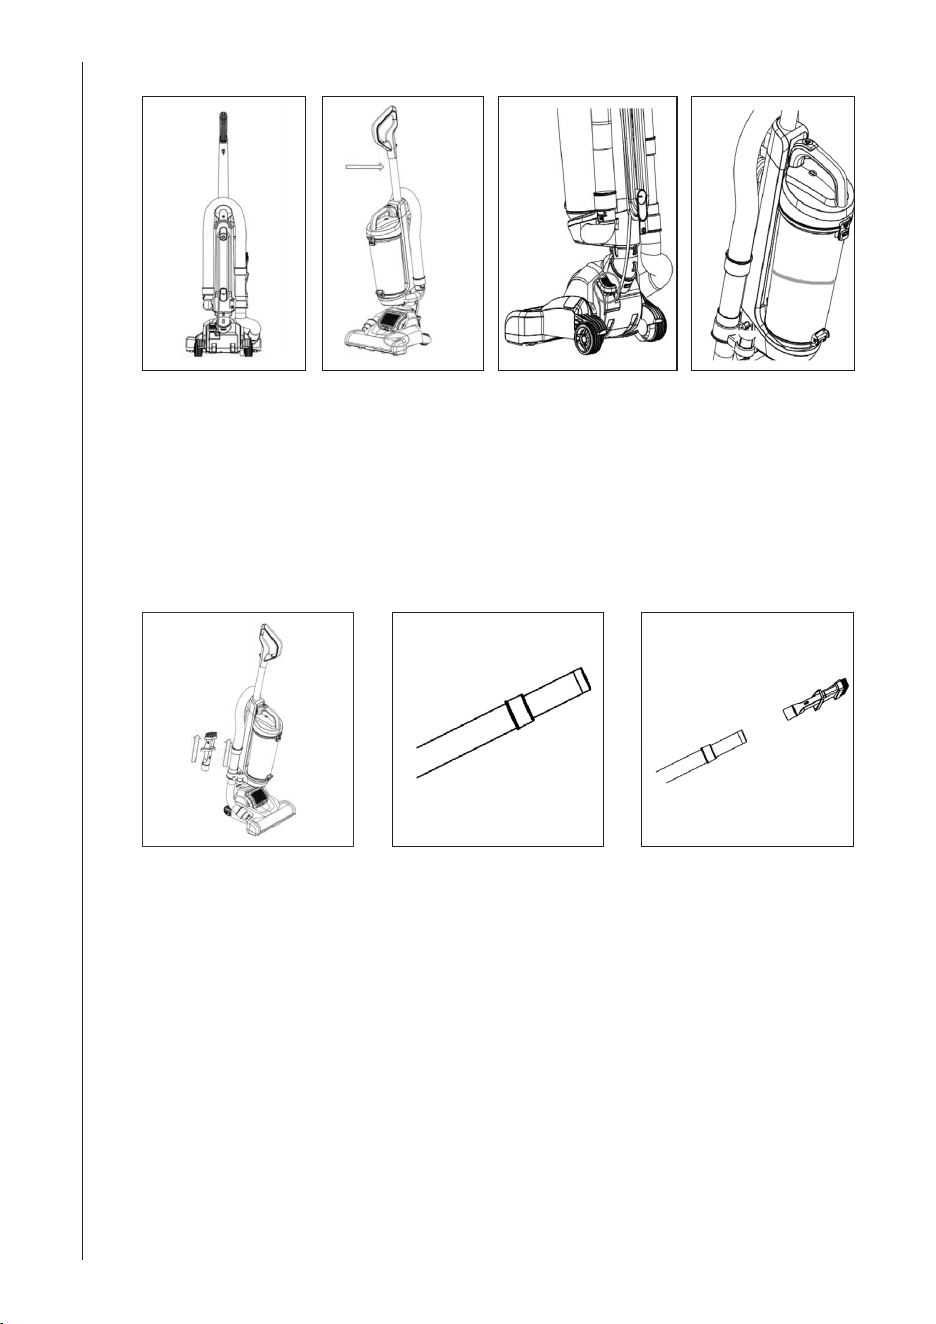
Using the Crevice Brush
Step 1: Remove the hose and crevice brush from the machine.
Step 2: The hose can be used like so.
Step 3: For further precision insert the crevice brush.
Using the Vacuum
Step 1: Twist the quick release cord hook to release the power cord.
Step 2: Step on the floor brush cover and straighten the body of the machine.
Step 3: Plug in your machine and push ON/OFF button to switch on.
Warning: Do not over fill the dirt container to avoid clogging your filter.
Warning: Do not use the vacuum cleaner without the filter or dust container in place.
9
Ewbank, 38 Bluestem Road, Ipswich, Suffolk, IP3 9RR Tel. 01473 271 272
CLEANING AND MAINTENANCE
Before emptying the dirt container, cleaning the sponge or cleaning the dust filter,
ensure the vacuum is either off or the plug is disconnected. It is advised that the
cleaning is undertaken outdoors.
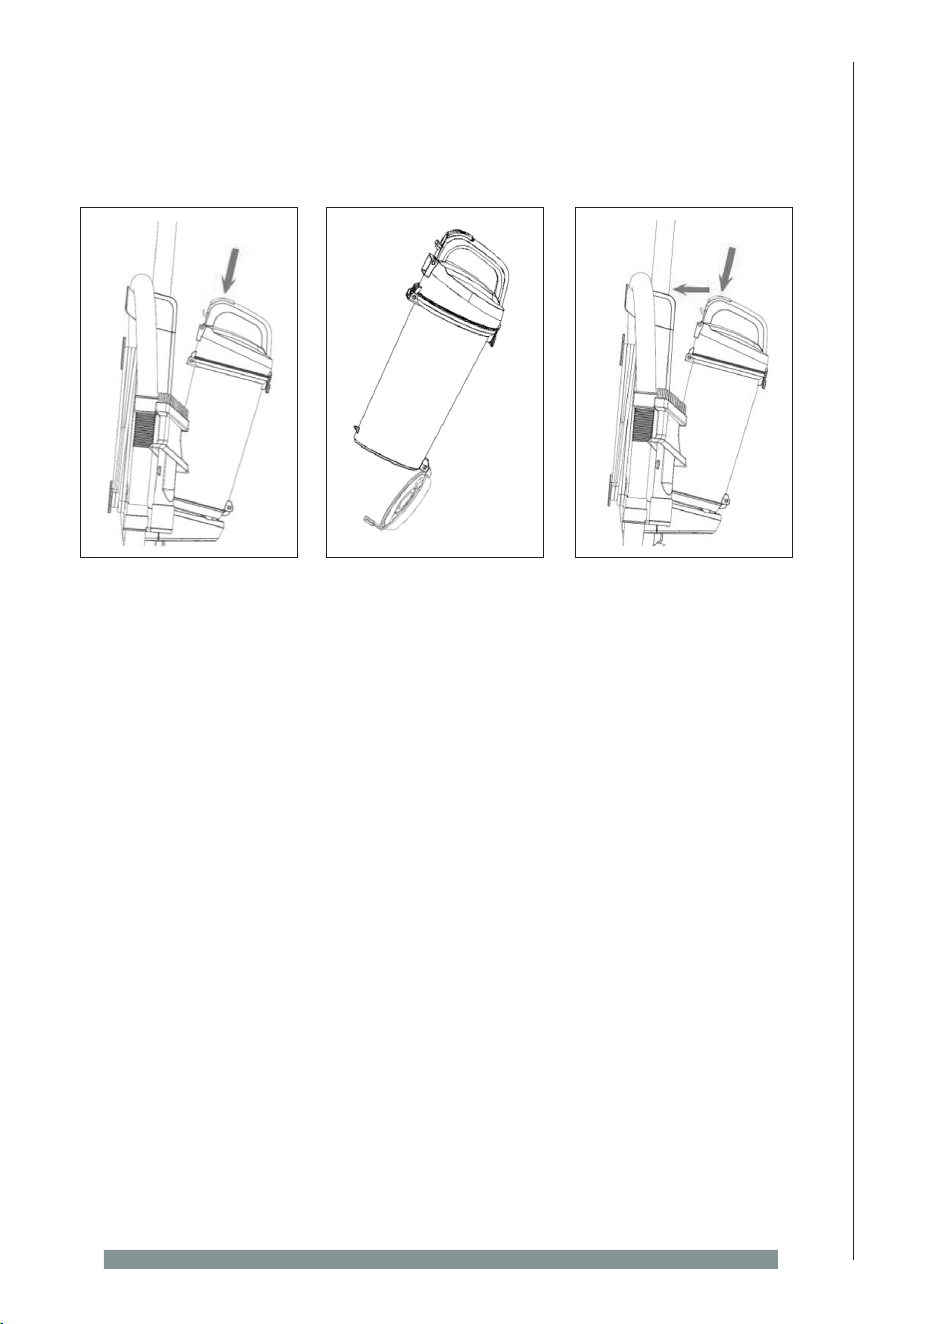
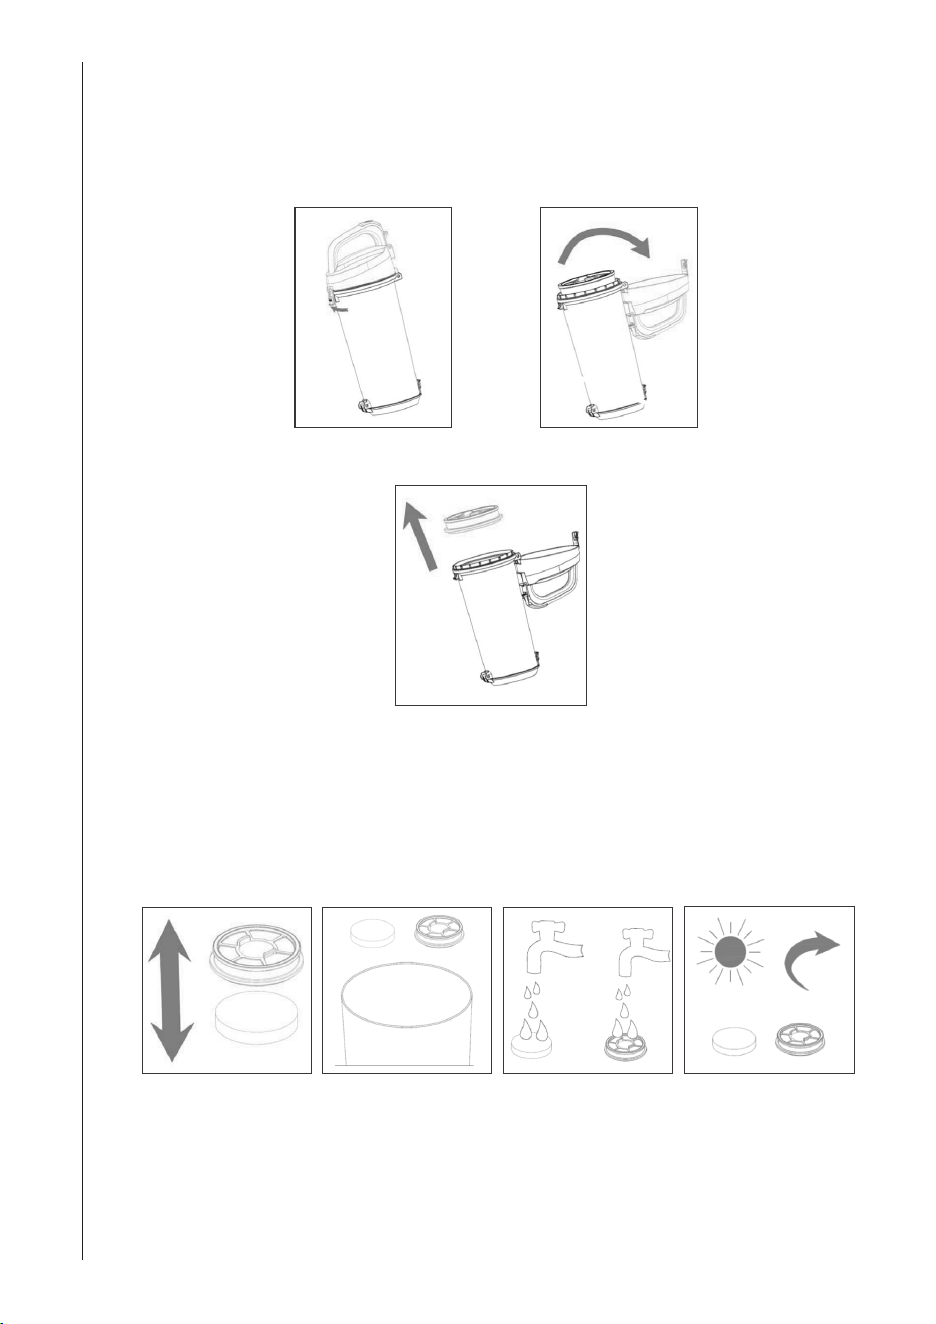
Step 1: Press dust container release button to remove the dust container.
Step 2: Hold the dust container over a bin and unclip the lock at the base, allowing
the dust to fall out.
Step 3: Close the base of the dust container. Align the base back onto the machine
and push so that it clicks back into place.
Emptying and Cleaning the Dust Container
Warning: The plug must be removed from the power socket before any maintenance
or replacement. If the power cord is damaged, it should only be replaced by a
maintenance centre or similarly qualified persons.
10
CLEANING AND MAINTENANCE
Cleaning the Sponge
Keeping the sponge clear of dust and dirt will preserve the suction of the machine and
so will prolong its lifespan.
Step 1: Pull open the dust container by lifting the lock on the handle.
Step 2: Rotate the filter to remove.
Step 3: Separate the filter so that you have the sponge and the HEPA.
Step 4: Gently knock the sponge repeatedly over a bin to release the dirt.
Step 5: Wash the sponge and HEPA under running water (40°C max).
Step 6: Leave to fully dry for at least 24 hours before placing back in the machine.
Warning: Do not use detergent to clean the sponge. The sponge must be air
dried – never use external heat sources. Do not wring the sponge otherwise it can
be damaged.
24hr
11
Ewbank, 38 Bluestem Road, Ipswich, Suffolk, IP3 9RR Tel. 01473 271 272
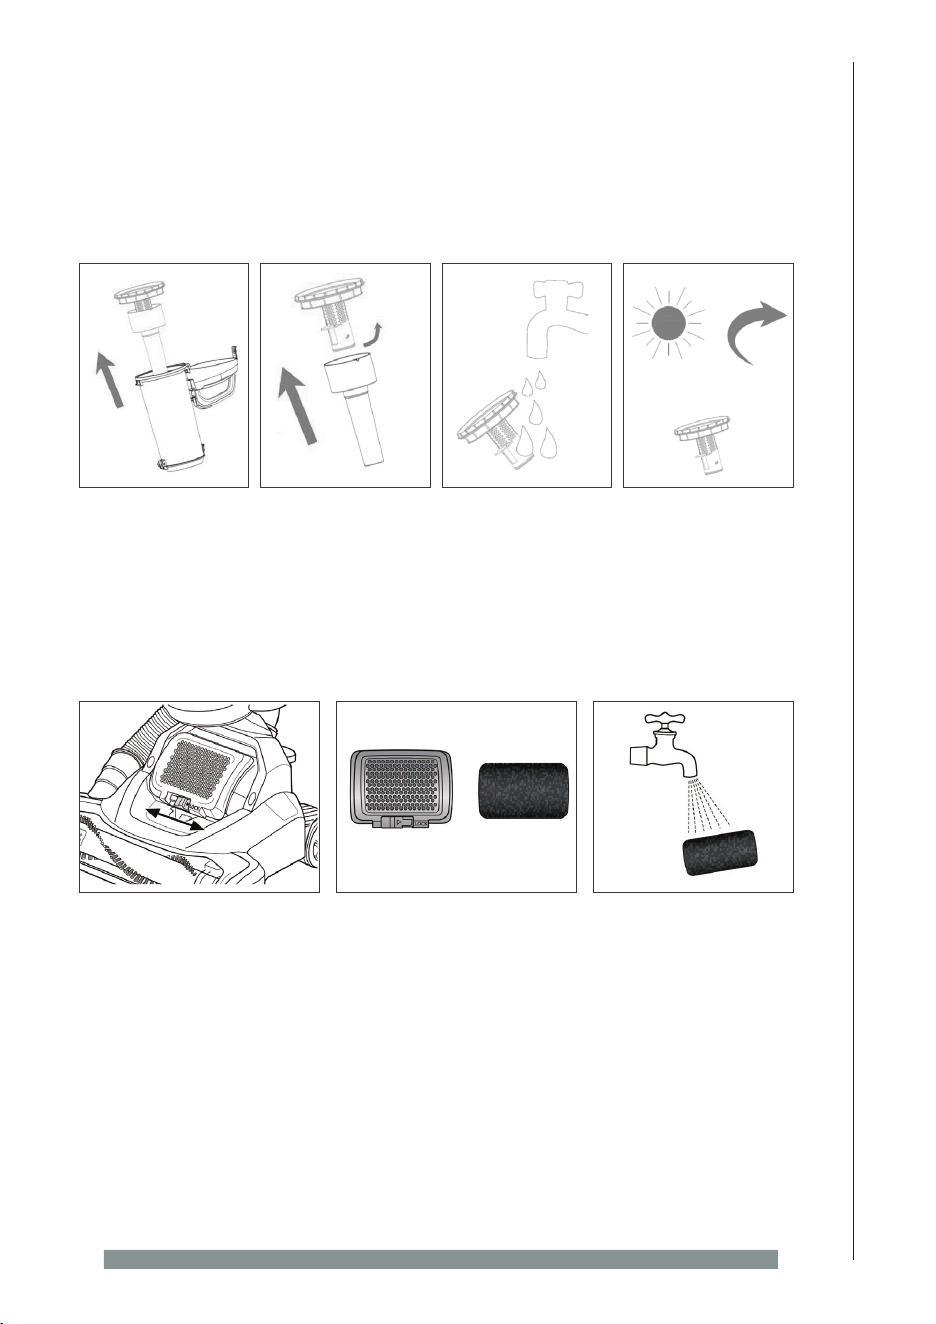
Cleaning The Dust Filter
Step 1: Remove the centre of the dust container.
Step 2: Turn the dust filter, and remove.
Step 3: Wash the dust filter under running water.
Step 4: Leave to fully dry for at least 24 hours before placing back in the machine.
Warning: Do not use detergent to clean the dust filter. The dust filter must be air
dried – never use external heat sources.
Cleaning the Exhaust Filter
Step 1: Locate and unlock the filter cover as shown. Slide left to unlock, right to lock.
Step 2: Remove the filter cover and filter. Wipe with a cloth over a bin, removing dirt
and debris.
Step 3: Wash with water every 3 months and allow at least 24 hours to dry making
sure it is completely dry before placing back into the machine.
24hr
Filter Cover Filter
CLEANING AND MAINTENANCE
12
CLEANING AND MAINTENANCE
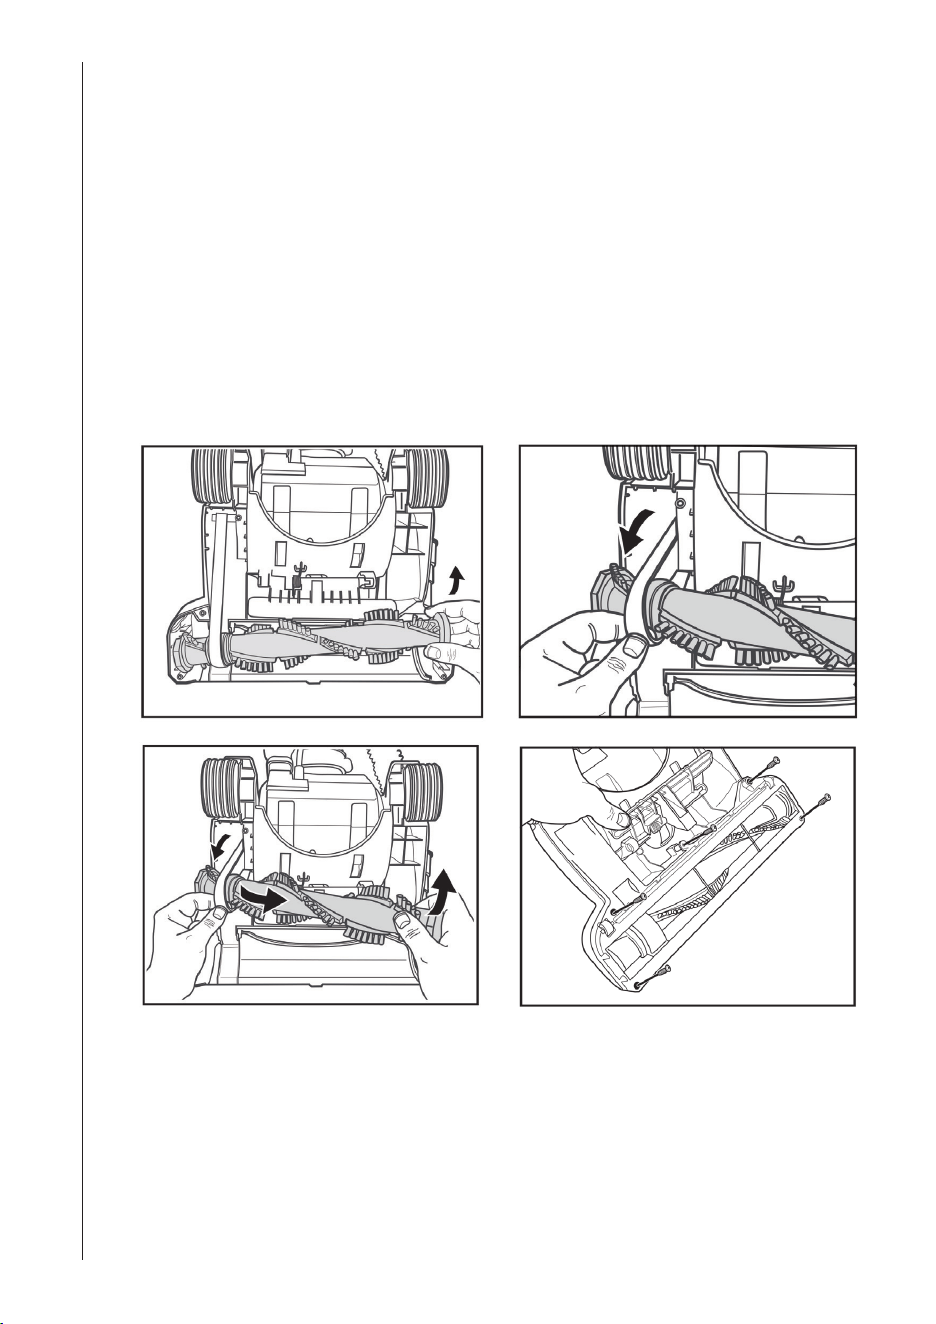
Changing the Drive Belt
Check the drive belt carefully for wear, cuts and stressed areas. If the drive belt
appears worn, you will need to replace it.
To remove the drive belt, read the instructions and follow the drawings below:
Ensure the machine is switched off and unplugged.
Step 1: Use a cross head screwdriver to remove the six screws at the base of the
machine – this will release the cover. Make sure to put them safe to one side.
Grasp the old drive belt and remove from the motor shaft. Discard the old drive belt.
Step 2: Loop the new drive belt over the motor shaft. Stretch the other end over the
floor brush in the space provided between the bristles.
Place ends of floor brush down into slots on sides as shown.
Step 3: Turn the floor brush by hand several times in the direction of the motor shaft.
If properly installed, drive belt will align itself on floor brush.
Step 4: Replace the brush cover and six screws.
13
Ewbank, 38 Bluestem Road, Ipswich, Suffolk, IP3 9RR Tel. 01473 271 272
TROUBLESHOOTING & DAMAGE PREVENTION
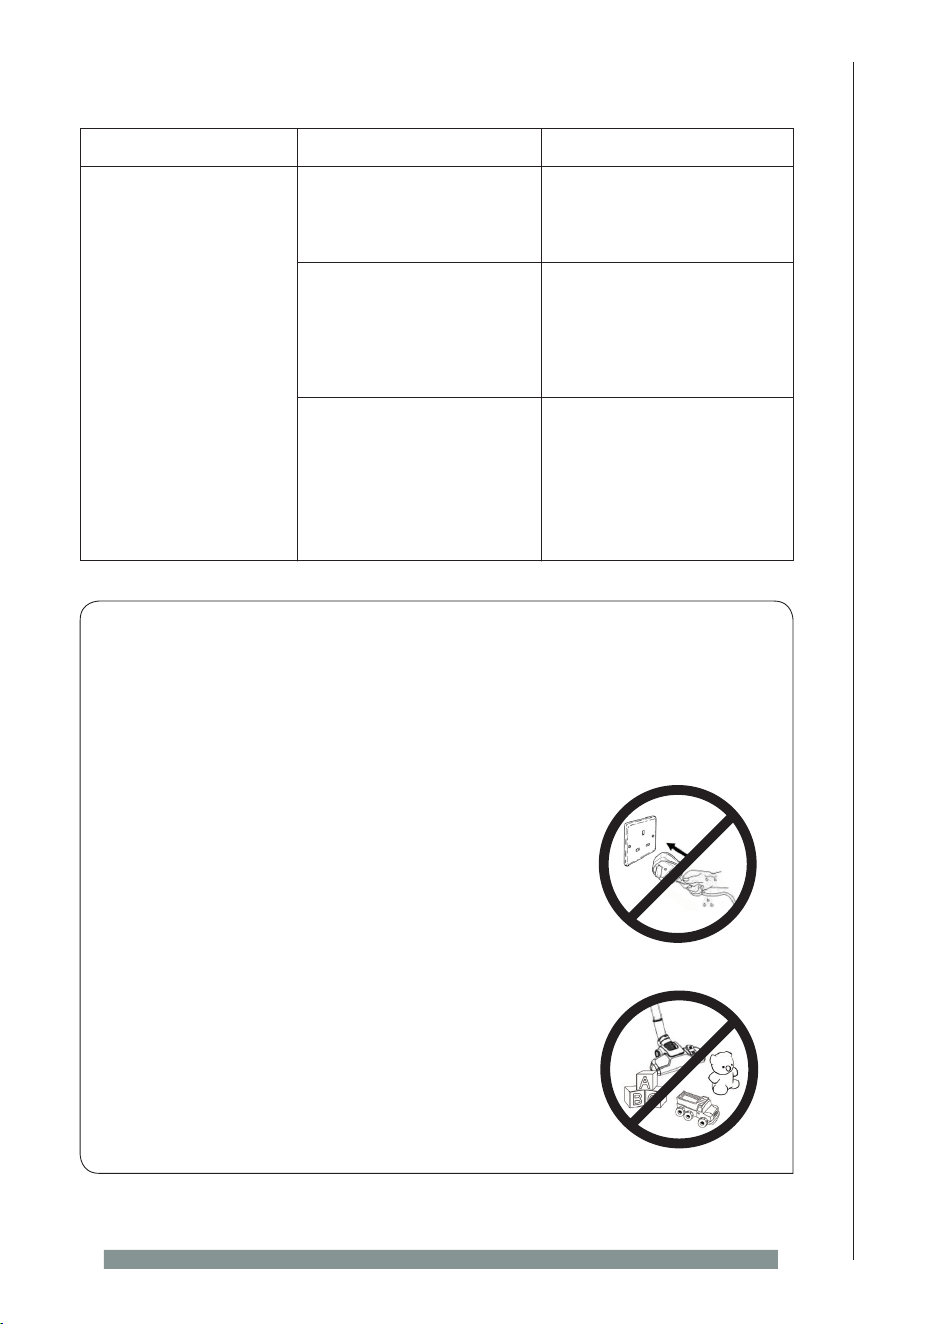
Do not use the appliance if your hands are wet.
Remove all large objects from the floor before use to
avoid any possible damage to the vacuum.
Switch off the vacuum cleaner immediately if the air intake, floor head or the
telescopic tube becomes blocked. Remove any substance which appears to be
causing the blockage.
Do not use the vacuum cleaner in the immediate vicinity of hot bodies such as a
radiator.
If you experience difficulties with the appliance, please check the suggestions below
before contacting customer services on 01473 271272:
PROBLEM POSSIBLE CAUSES
SOLUTIONS/TIPS
The suction is poor. The hose is blocked. Disconnect the
attachments and remove
the blockage.
The dust container is
almost full.
Empty the dust container
following the instructions
in the section entitled
‘Emptying and Cleaning
the Dirt Container’.
The sponge and/or dust
filter are blocked.
Clean the sponge and/
or dust filter following the
instructions in the section
entitled ‘Cleaning the
Sponge’ and/or ‘Cleaning
the Dust Filter’.

14
MAINS PLUG FUSE REPLACEMENT & DISPOSAL INFORMATION
Disposal Information
The European Directive 2012/19/EU on Waste Electrical and Electronic
Equipment (WEEE), requires that old household electrical appliances must
not be disposed of in normal unsorted municipal waste.
Old appliances must be collected separately in order to optimise the recovery and
recycling of the materials they contain and reduce the impact on human health and the
environment.
The crossed out “wheeled bin” symbol on the product reminds you of your obligation,
that when you dispose of the appliance it must be separately collected. Consumers
should contact their local authority or retailer for information concerning the correct
disposal of their old appliance.
Fuse Cover
Fuse Replacement (Class II)
Remove the fuse cover with a small flat head screw driver. Take
out the fuse and replace with a new fuse of the same Amp.
Replace the fuse cover and push back into place.

15
Ewbank, 38 Bluestem Road, Ipswich, Suffolk, IP3 9RR Tel. 01473 271 272
WARRANTY TERMS & CONDITIONS
Ewbank Warranty Terms & Conditions
This product is guaranteed for a period of 24 months as standard from the date of
purchase against mechanical and electrical defects.
To qualify for the warranty, the product must be used for domestic household use
only and in accordance with the instructions in the user manual. Any misuse of the
product will result in the warranty being void.
The warranty does not cover accidental damage, misuse, neglect, tampering or
incorrect adjustment or installation.
The warranty will be rendered invalid if the product is resold, has had its serial
number removed (or has an invalid serial number), or if an unauthorised person
has carried out any repairs or alterations.
The warranty does not cover accessories or consumable parts that require
replacement under normal use. This includes shelving, dials, filters, belts and trays
etc.
In the unlikely event of a breakdown please refer to the Troubleshooting guide in
your user manual and check all plugs, fuses and the electricity supply.
If you still require assistance please contact our Customer Service department on
01473 271 272 or write to us at the following address:
Customer Service Department
Ewbank, 38 Bluestem Road,
Ipswich, Suffolk, IP3 9RR
Please quote the Product Code and the PO Number on the rating label and give
details of the exact fault. We will then decide whether to repair or replace the
item.
Before we arrange the repair or replacement you will be required to return a copy
of your proof of purchase. Please retain your original.
If an item is replaced within the agreed warranty period, the warranty for the
replacement item will be calculated from the purchase date of the original.
In the event that the product is inspected and no fault is found or the product is not
within the warranty period you will be charged for the repair and any carriage
costs.
Disclaimer: Ewbank operate a policy of continual improvement and development.
We therefore reserve the right to change/alter the specification and appearance of our appliances without prior notice.
All diagrams and images shown in this manual are for illustration purposes only.
Your Guarantee
This product is covered by a 2 year guarantee.
This does not cover normal wear and tear or abuse.
For guarantee purposes, please retain your original receipt as proof of purchase.
This guarantee does not affect your statuatory rights.
For spares, service and further information please contact;
Ewbank, 38 Bluestem Road, Ipswich, Suffolk, IP3 9RR
Tel: 01473 271 272