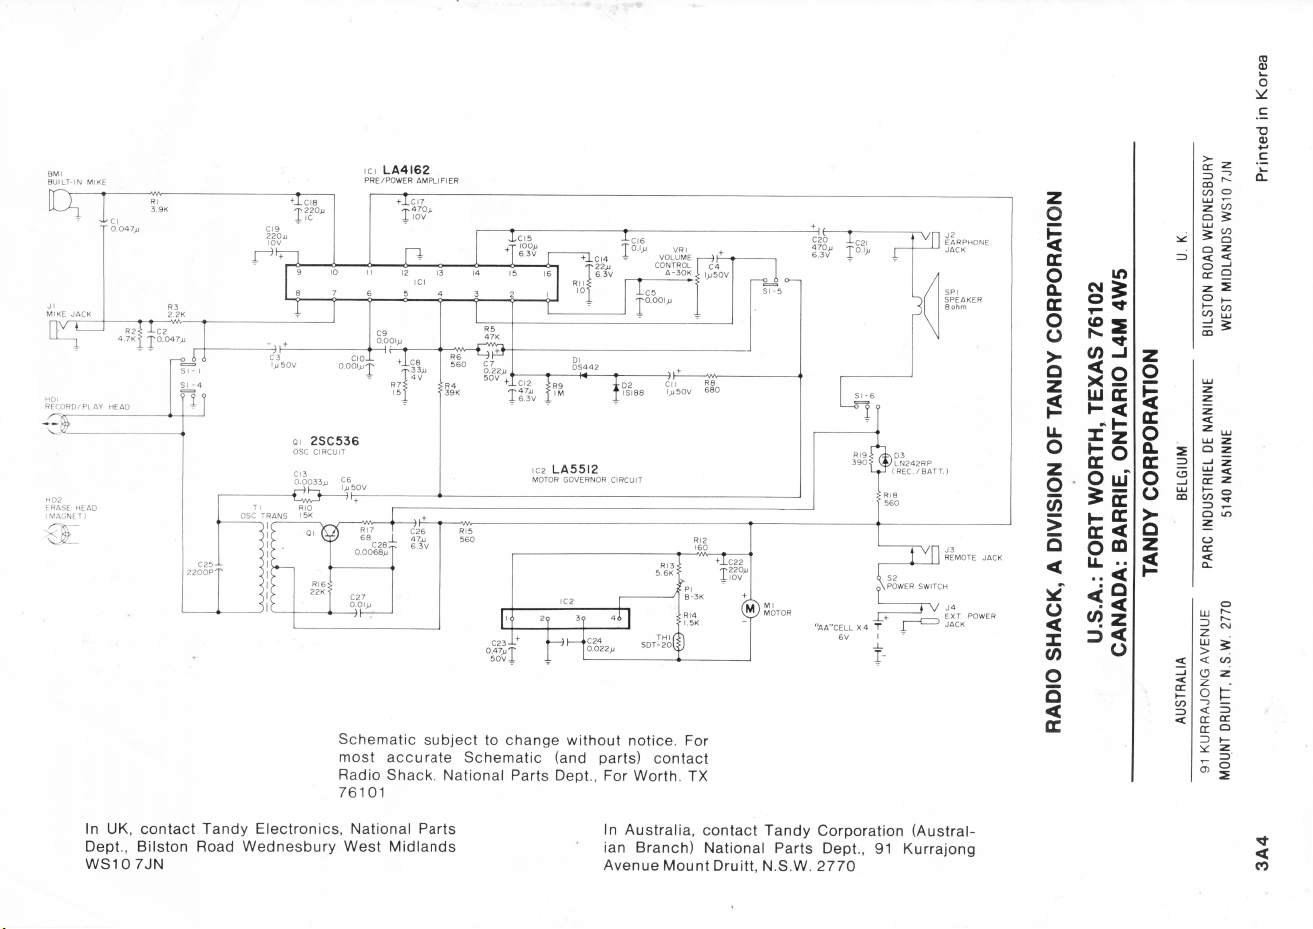


Your
REALISTIC MINISETTE
14
is a
compact
recorder
with
a
built-in
sensi
-
tive
condenser
microphone.
Although
small
in size,
the
MINISETTE
14
is big in
performance
.
The
built-
in
condenser
mic
makes
this
Recorder
ideal
for
dictation
,
taking
notes
,
confer-
ence
meetings
and
other
applications
that
require
a
sensitive
microphone
pick
up
.
Your
MINISETTE
14
is
a
powered
by
batteries
or
external
adapters
. It has a
6-
volt
DC
jack,
so you can use it
with
standard
AC
power
or
even in
your
au-
tomobile
.
(Adapters
are
available
at
your
local Radio
Shack
.) •
Ot
her
useful
features
include
:
• RECORD/ BATTERY Ind
ic
ator
tells
you if
the
batteries
need
replace
-
ment
.
• Digital
Tape
Counter
lets
you
quickly
return
to
any
spot
on
the
cassette
you
desire
.
•
Built-in
Automatic
Level
Control
automatically
adjusts
recording
level
for
perfect
recordings
every
time.
• PAUSE
Button
allows
you to
temporarily
stop
in
either
play
or
record
mode
without
di
se
ngaging
either
function.
•
Cue
and
Review
Function
allows
you to
locate
a
desired
portion
of
the
tape easily. In
the
PLAY mode, you
can
instantly
review
or
cue
the
tape,
whil
e lis
tening
to the
sound
simultaneously
.
Copyright
1984
, Radio Shn ·k, a division of
Tandy
Corporation
::>

SPECIFICATIONS
Tape
System
.. . .. .
..
.
.....
.
..
.
...
. . . .... ... . . . . 2-
track
,
monophonic
cassette
Tape
Sp
e
ed
.. .. ..
....
..
...
. . . .. .. ..
..
.
....
. . .
...
.
....
.
1-7
/ 8
ips
(4.
75cm
/ sec.)
Wow &
Flutter
.
....
.
...
.
......
.
..
...
.
......................
....
.
..
. 0.3% (WRMS)
Signal
-to-
Noise
Ratio
. .
....
. . .
...
..
. . .
..
. . .. .. . .. . ..
....
. .
...
. .. .
..
. . . .. ..
35
dB
Circuit
.
...
..
....
. .. .
..
.
....
...
. .. .. ..
.....
...
...
. . .. . .
...
. . . . 2
integrated
circuit
1
transistor
2
diodes
, 1 LED
Erase
System
. . . . . . . . . . . . . . . . . . . . . . . . . . . . . . . . . . . . . . . . . . . . . . . . . . . . . . . . . . . .
magnet
Record
System
.
...
..
.....
.
......
...
..
.
........
. . .. .
..
.
...
...............
AC
bias
Power Requirements
4
size
AA Penl i
ght
batter
ies
(6
volts
DC) .
Or
may
be
powered
from
120
vo
lt
s (or
240
V) AC
with
273-1
454
AC
adapter
[use
14-9854
(UK)
or
14
-9521 (A
ustra
lia) for 2
40V
AC),
or
from a
vehicle
's
cigarette
lighter
socket with
14
-
844
0 , DC auto adapter.
Size . . . . . . . . . . . . . . . . . . . . . . . . . . . . . . . . . . . . . . . . . . . . . . 1 -3/ 1 6" x 6- 1 / 4" x 4- 7 / 1 6"
(46
x
159
x
113
mm)
Wei
ght
.
...
.
..
. . .. . .
..
....
.
........
.....
..
..
.....
1- 1 / 4
Lbs
.
(without
batteries)
(570g)
~
tJ·1
, -i!{f!.f:~
'
;,;
· fh,s product ,s warranted against defects for 90 days from date of purchase from Radio
~.~
S
t1,1
c.k
company-owned stores and authorized Radio Shack
fr
anchisees and dealers. Within
~1
!111
s period. we will repair
11
without charge for pans and labor. Simply bring your Radio
~
J!n•
Shack
sales
sl
ip
as proof of purchase date to any Radio Shack store. Warranty does not
I
;_:_,/.
cove, 11,lllspor1.1
11
on cost
s.
Nor does
11
cover a product subJected to misuse or acc
id
ental
.
drnrrnqP
,.
S
rxcr
I' f
i\
S l'
ll
OV IDED HEREIN. RADIO SHACK MAKES NO WARRANTIE
S.
EXPRESS
F;
0 11 IMl' I I
ll)
,
IN
LUDING
WARRANTIES
OF MERCHANTABILITY AND FITNESS FOR A
Pi\11
I I
CUL
i\l
I PU RPO E Some states
do
not permit llm,tat,on or exclusion of implied
,
w.111.i111I1•
s.
IIH•1efor ..
11
10
aforesaid
1,m,1a
11on(s) or exclus,on(s) may not apply 10 the
t!
'
!t
;,'.',:c:~::~::,
1
,v
q,v,--,
V""
,,
,,,,
,
''"
l1•q,,I
11qt1h
dll(I
yo
o,
,n,iy
<1lso
lldV('
olh
e,
"qtlls
whi
ch
v,iry from stale lo s
lal
e
if
~~~~~~
W
e
Service
Wh
at We Sell
i ,
/J.
.,''.(:s;:
~t
GJ4-~'\'
'~
h,_'.'.~t
'
··
;:':
':-"
5.;~~;L
c--c;;..,,.,'
]5)-\
,
"'"'@
\!i\-,t'
,-,,
;;}=,:"'
-< .
::--,,,~=
~,,,..-,~,,,,,,.----,,,
- 3 -

CONTROLS
@
--~
@
----,
@
'-----------,
@---
1.
VOLUME
control
2. REMote
control
jack
3.
MICroptione
jack
4. EAR
phone
jack
5.
Built-in
microphone
6.
Tape
Counter
and
Reset
button
7. RECORD
button
8.
Cassette
compartment
---
@
9. PLAY
button
1 0.
DC
6V
jack
(on
the
right
side)
11
.
Battery
compartment
(on
the
bottom)
12
. PAUSE
button
13. FAST
Forward
/ CUE
button
14
.
REWind/REVIEW
button
15
.
STOP/EJECT
button
16
. RECORD
BATTERY
indicator
- 4 -

PREPARING FOR USE
To Operate from Batteries
1.
Open
the
battery
compartment
cover
by
sliding
it
off.
2. In sert 4 AA-size batteri es.
Observe
proper
battery
polarity
as
shown
.
3.
Close
the
battery
compartment
cover.
Ch
ec
k
the
condition
of
the
batteries
during
the
record
function
by
pr
ess
ing
the
RECORD
button
with
an
unrecorded
cassette
inserted
.
If th e red LED
fails
to
light
(or
lights
dimly)
,
it
is
time
for
new
batteries
.
CAUTION
: Never leave
weak
or
dead
batteries
in
your
unit
;
even
"
leak
-
pr
oo
f" typ
es
ca
n lea k
dam
a
ging
chemicals
.
To Oper
at
e from an AC Adapter
You
can
use yo
ur
MINISETTE
14
anywhere
stand
ard
volt
AC
power
is
available
, and thus save th e batteri es.
Just
obt
ain an AC
adapter
from
your
local
Radio Sh
ac
k store. (See page 3
for
adapter
catalog
number
.)
Insert
the
plug
into
the DC
6V
jack
on
the
right
side
of
your
Recorder
and
plug
the
adapter
into
a
source
of
AC
power
.
When
you
are
using
an
adapter
,
the
internal
batteries
are
disconnected
au-
tomatically
.
- 5 -

To Operate
in
Your Car
You
can
use
the
MINISETTE
14
in
your
vehicle
(or boat), too -
providing
it
has
a
12
volt,
negative
ground
system
and
a
cigarette
lighter
. Use
Radio
Shack's
catalog
number
14-844D,
DC
auto
adapter.
Plug
one
end
into
DC
6V
jack
on
the
right
of
your
MINISETTE 14,
set
the
voltage
switch
on
the
adapter
to 6
volts
and
plug
the
other
end
into
the
cigarette
lighter
socket.
DC6V
Note
:
Center
terminal
of
DC
6V
jack
has
negative
polarity
and
the
outside
has
positive
polarity.
If you use an
adapter
other
than
recommended
above,
be
sure
to
observe
correct
polarity
.
Checking the Cassette Tape
Before
inserting
the
cassette,
take
up
any
slack
in
the
tape
with
a
pencil.
Avoid
touching
the
tape
.
Unless
the
tape
is tight, it may
wind
around
the
head
mechanism
and
trouble
may
result.
- 6 -

OPERATION
To Play Tapes
1. Press the
STOP/EJECT
button
to
open
the
cassette
compartment
door.
2.
Press
a
cassette
gently
in
place,
w ith the
full
reel to the
left
, the side to
be
played
facing
upward
,
the
exposed
tape
toward
you .
3.
Close
the
cassette
compartment
door
.
4.
Press
the
counter
reset
button
to
set
the
counter
to "
000
."
- 7 -

5.
Press
the
PLAY
button
.
The
recorder
plays
the
cassette
automatically
.
6.
Adjust
the
VOLUME
control
to
your
d
esired
listening
level.
s
VOLUME
~
7.
Press
the
PAUSE
button
to
pause
while
playing
back
.
- 8 -

)
)
8.
Press
the
STOP
/ JECT
button
to
stop
playing
back.
If the
end
of
the
tape
is
reach
ed
whil
e
playing
back
, the
unit
stops
automatically.
Press
and
hold
FAST
Forward/CUE
button
to
advance
tape
rapidly.
To
rewind
tape
,
press
and
hold
REWind/REVIEW
button.
The
built
-in
auto
-
stop
feature
automatica
lly
stops
tape
movement
and
turns
the
unit
off
at the
end
of
the
tape
in
play
and
record
operation
.
Press
the
STOP
/
EJECT
button
to
remove
the
cassette
.
The
cassette
has
two
sides
for
playing
(or
recording);
when
one
side
is
com-
plete
,
stop
the
mechanism
,
eject
the
cassette
and
turn
it
over
.
Then
you
can
play
(or
record)
the
other
side
.
- 9 -

To Record from the Built-in Condenser Microphone
CAUTION
:
Be
sure
nothing
is
plugged
into
the
MICrophone
jack
on
the top
of
the
unit.
1.
Insert
a
blank
cassette
and
press
the
counter
reset
button
to
set
the
counter
to
"000
."
2.
Press
the
RECORD
button
.
The
PLAY
button
will
move
down
simultane-
ously
and
then
the
RECORD/ BATTERY
indicator
will
light
.
3.
Talk
normally
into
the
built-in
microphone
. Now you are
recording
.
NOTE:
The
built
-i
n
automatic
level
control
circuit
sets
automatically
the
proper
recording
level - no need to
adjust
the
VOLUME
control
for
proper
level.
-
10
-

4.
Press
the
PAUSE
button
to
pause
while
recording.
To
start
again,
press
the
PAUSE
button
again to
release
.
5.
Backspace
the
tape
by
pressing
the
REWind/REVIEW
button
to
make
corrections
or
to
edit.
Then
the
RECORD
button
will
be
released
auto
-
matically
.
Hold
the
REWind
/ REVIEW
button
until
the
portion
of
the
recording
before
the
correction
point.
Release
the
REWind
/ REVIEW
button
and
listen
to
your
recording.
At
the
exact
point
where
the
correction
is
to
begin
,
press
the
STOP/EJECT
button
.
Press
the
RECORD
button
agai n and
proceed
with
the
dictation
.
6.
Press
the
STOP/ EJECT
button
to
stop
recording
completely
. If
the
end
of
the
tape
is
reached
while
recording
,
the
RECORD
and
PLAY
buttons
will
be
released
automatically
(and
recording
stops)
.
-
11
-

To Record from an External Microphone
Connect
an
external
microphone
(not
provided)
to
the
MICrophone
jack
.
When
the
external
microphone
is
connected,
the
built-in
mic
is
disconnect-
ed. If
it
has an
on-off
switch
for
remote
control,
connect
that
plug
to
the
REMote
jack
.
Your
local
Radio
Shack
store
has a
number
of
such
mies
to
choose
from, for
example
,
catalog
number
33-1060,
33-1040
or
33-1034
.
~
iiiiiiii---
-------jCJI:=
~
I
MIC
Note
:
When
you
plug
the
microphone,
insert
till
you feel
slight
"catch".
Do
not
force
the
plug
all
the
way
in.
Proceed
with
recording
as
outlined
above
. If
your
microphone
has a
remote
control
on-off
switch,
you can
turn
the
recorder
on
and
off
with
the
switch.
When
you are
done
with
the
recording
,
press
the
STOP/ EJECT
button
.
Don 't
turn
the
unit
off
and
leave
it
off
just
with
the
remote
switch
. If you
do
,
the
capstan
remains
in
constant
pressure
against
the
pressure
roller
,
and
dimple
or
flat
spot
will
develop
(which
produces
wavering
sound)
.
To Record from an External Source
You
can
record
from a
tuner
,
radio
or
TV
sound
.
Obtain
a
dubbing
cord
such
as
our
42-2152
or
42-2461
and
make
connection
between
the
MICrophone
jack
on
the
top of
your
unit
and
earphone
jack
or
tape
out
jack
of
the
exter-
nal
tuner,
radio
etc
.
Then
proceed
with
recording
as
outlined
above
.
~
ij
~
~
T
~
I
MIC
-
12
-

Review(Rewind) and Cue(Fast Forward)
An
extremely
useful
feature
of
the
MINISETTE
14
is
its
ability
to
review
and
cue
.
If you
want
to
locate
a
particular
portion
of
the
tape
rapidly,
and
you are in
the
play
mode
,
there
is no need to release
the
PLAY
button
-
just
press
the
REWind/REVIEW
button.
Release
and
you're
playing
the
tape
.
Need
to
rewind
more?
Just
hold
down
REWind/REVIEW
button
a
little
longer;
release
to
play
again.
You
can
use FAST
Forward
/ CUE in the
same
manner
to
cue
the tape. For
example,
to
rapidly
find the
end
of
a
partially
record
ed tape; lea ve th e PLAY
button
pressed
down
and
just
press
FAST Forward / CU E
butt
on to advan
ce
the
tape
rapidly
. Release to li sten; and repeat as oft en
as
re
qu
ired.
You
can
use
both
of
these
fe a
tur
es
even
whil
e r
eco
rding
. Thu
s,
if you
want
to go
back
to
review
and re-
record
,
pr
ess
th e RE
Wind
/ RE
VI
W
button
.
The
RECORD
button
pops
up,
but
the PLAY
button
remain s down . Then
when
you
release
the
REWind
/ REVIEW
button
,
playback
st
a
rts
immediately. You
can
also
use FAST
Forward
/ CUE to
advance
th e tap
e,
wi
thout
sto
pping
the
tape
.
To Erase a Recording
If you
do
want
to
erase
a
cassette
,
or
just
a
portion
of a
recording
,
insert
the
special
dummy
plug
(provided)
into
the
MICrophone
jack
.
Then,
operate
the
MINISETTE
14
as
though
you
were
recording
. As
the
tape
moves, it
is
erased
(no
sound
pick
up
from
MICrophone
when
using
this
dummy
plug).
Use
the
tape
counter
to
make
sure
you
erase
the
right
portion!
I
MIC
-
13
-

Listening through an Earphone or External Speaker
You
can
use
the
earphone
(provided)
for
private
listening
.
Just
plug
it
into
the
EARphone
jack
on the
top
.
This
disconnects
the
internal
speaker
auto-
matically.
You
can
use
an
external
speaker
or
a
pillow
speaker
connected
to
this
jack
.
.......
,----
-----\.._JjJ
!pcl
(i)
I
EAR
Accidental Erasure Prevention
Cassettes
have a
built-in
device
to
automatically
prevent
erasure
of
a
previ-
ous
recording
. It
is
a
small
plastic
tab
at
the
back
of
the
cassette.
To
activate
the
erase-protect
feature
,
break
off
the
plastic
tab
with
a
screwdriver
.
There
is a
tab
for
each
side;
be
sure
you
break
off
the
correct
one
. If you
want
to
record
again
on
that
cassette,
just
put
a
piece
of
tape
over
the
hole
where
you
broke
off
the
tab.
CAUTION:
If you
have
loaded
a
cassette
with
the
tabs
broken
off,
don't
try
to
force
the
RECORD
button
down.
You can
damage
a
part
of
the
mechanism
by
forcing
the
RECORD
button.
MAINTENANCE
Your
unit
uses
conservatively
rated
parts
. It
requires
little
if
any
service
or
repair
- if you
treat
it
with
care
.
Don't
expose
it to
hot
or
cold
temperature
extremes
.
-
14-

And
don't
use
il
in ,
Ir
'i
i ' of e
xcessi
ve
du
st or
dirt.
Periodically
clean lh tap head and tape ha
ndling
parts
with
cotton
tips
(Radio Sh
ac
k Ca talog N
umber
44
-
1093)
and head
cleaner
(44
-
1010)
.
Or
,
much
eas
ier
, use a
casse
tte hea d c lea ner ca
rtridge
(44
-
1160)
. It
is
abso-
lutely
vital
that
you keep lhe head and
tape
handling
parts
clean
or
you'll
end
up
with
tape
wrap
-
ups
(which
may
damage
the
tape),
distortion
and
poor
frequency
response
.
Remove the
batteries
.
Press
the
RECORD
button
while
pushing
the
erase-prevention
lever
located
inside
the
cassette
compartment
.
This
will
expose
the
parts
you need to
clean.
rn
l)r
' V '
11
1
1011
lovor
~ -
1
11
1 T
J
II
I
RECO
RD
/P
LAYBACK
Head
Pinc h Ro
ller
Erase Head
Capstan
Items
to
clean
You
should
periodically
demagnetize
the
tape
head too. Use
one
of
our
tape
head
demagnetizers.
-
15
-