YOSUDA
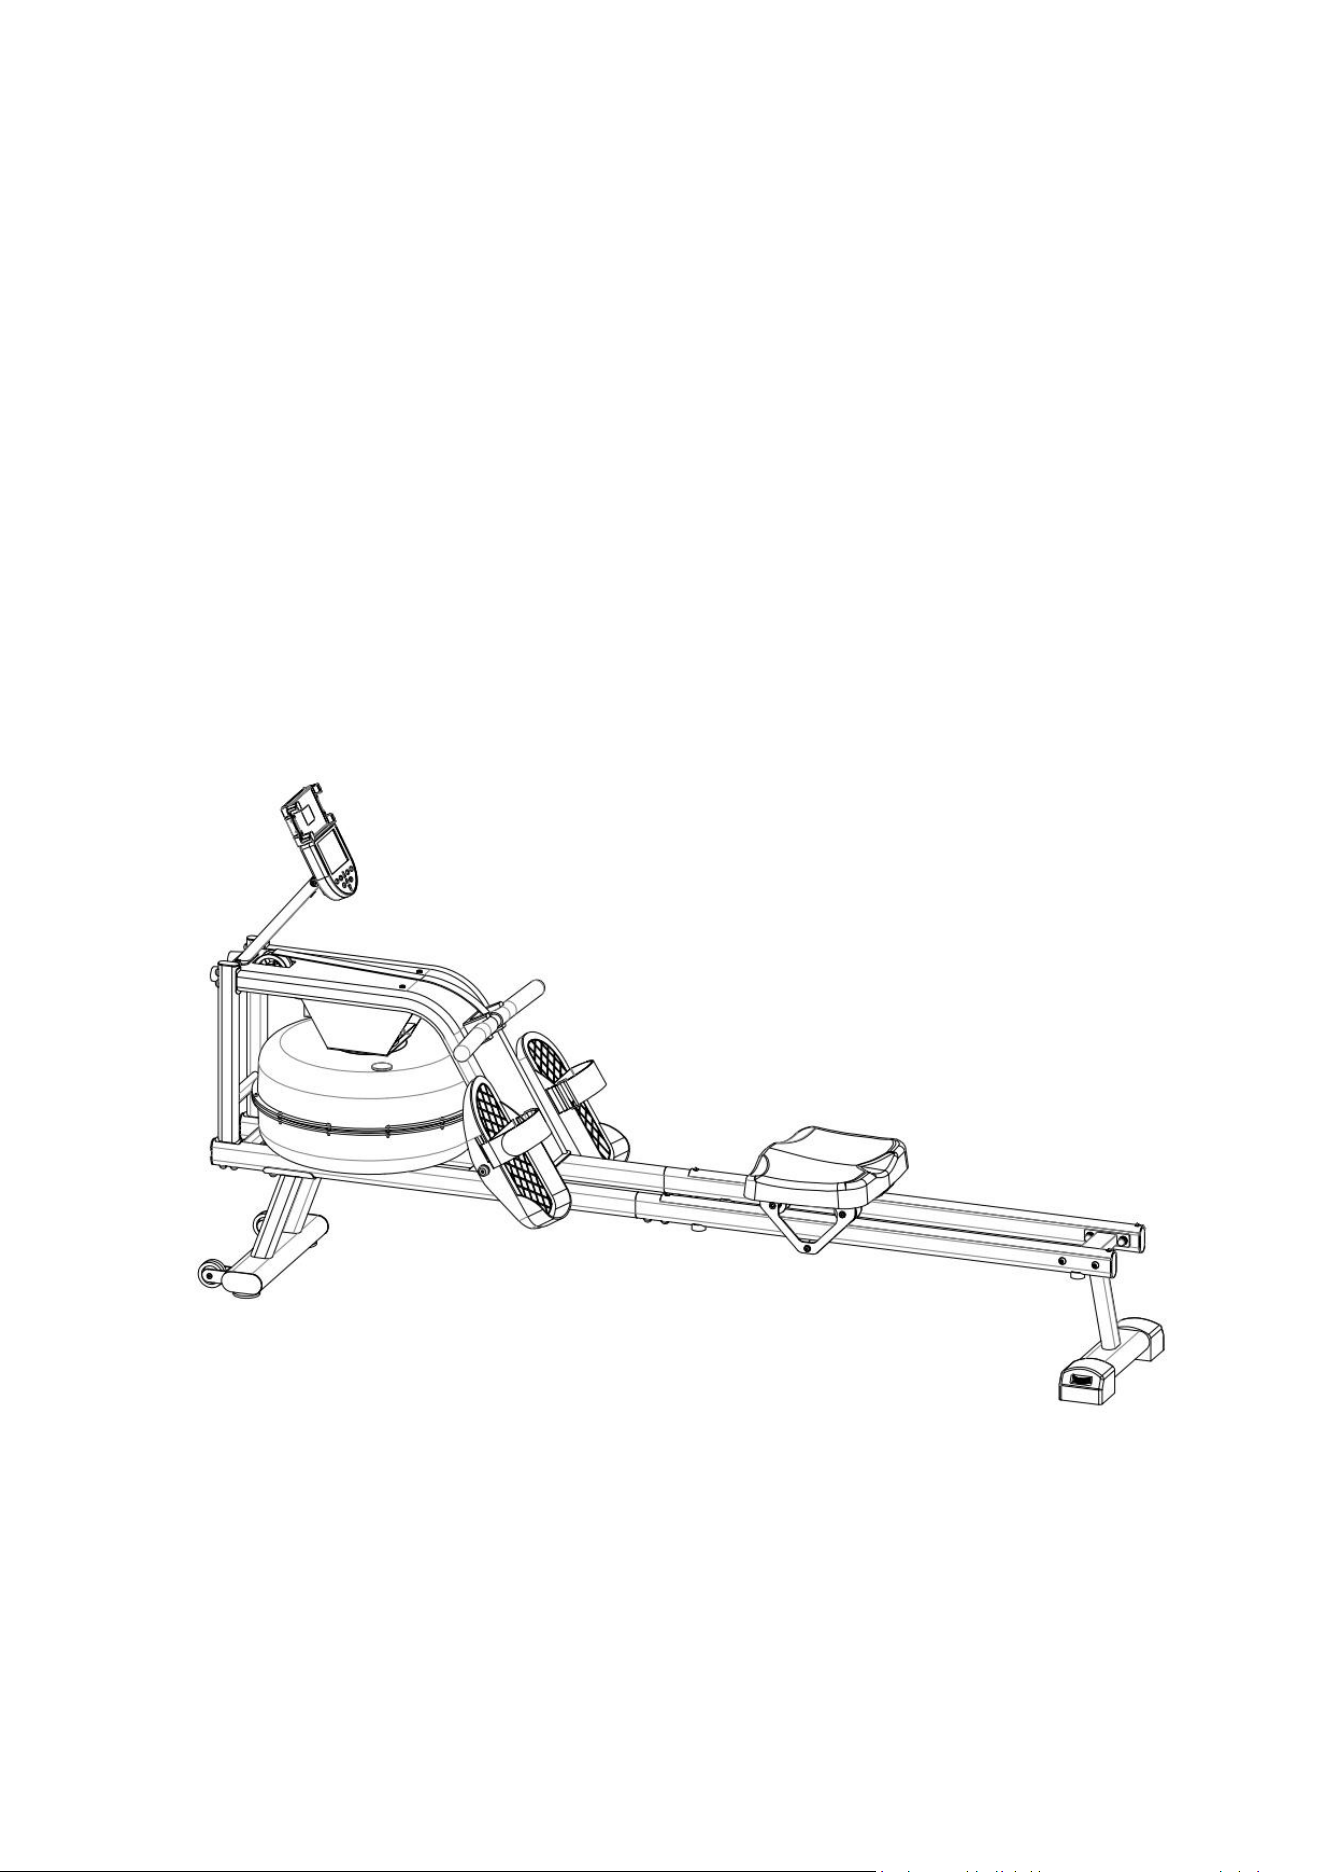
Water Rowing Machine-RW207-01
Installation & Operation Instructions
Please read the instruction manual before installing and using the product

2
TABLE OF CONTENTS
Safety Attentions & Warning Descriptions........................................................3
Container Loading List........................................................................................4
Installation instructions........................................................................................5
Training instruction chart...................................................................................10
Training Introductions........................................................................................11
MONITOR...........................................................................................................13
Accessory Kit........................................................................................................15
Explosion Diagram...............................................................................................16
Parts List ...............................................................................................................17

3
Safety Attentions & Warning Descriptions
Please keep the instruction manual properly for future inquiry.
1. Before assembling and using the training equipment, it is very important to carefully read all the contents of
the instruction manual. Only the correct installation, maintenance and use of the training equipment can
achieve a safe and effective training effect. It must be ensured that all users are familiar with all warnings and
precautions of the training equipment.
2. In order to prevent health/safety incidents during training that may prevent normal training, users should
consult a physician before using training equipment based on their physical condition. If the user is taking
medication that affects heart rate, blood pressure and cholesterol levels, please be sure to follow the advice of
your doctor before training.
3. Always pay attention to your physical condition when training. Incorrect/excessive training will be
detrimental to your health. If you have the following symptoms (including headache, chest tightness, irregular
heartbeat, shortness of breath, dizziness, dizziness, nausea, etc.), please stop training immediately and
continue training only after the doctor checks and confirms that it is OK.
4. Please keep your children and pets away from this training equipment, which is for adults only.
5. Please place the training equipment in a solid, flat place to use, and place a protective layer on the floor and
carpet surface to prevent ground damage. For your safety, please ensure that the distance between the
perimeter of the training equipment and each obstacle is not less than 0.5m.
6. Before using the training equipment, please check all the bolts and nuts that need to be locked to ensure that
they are locked before use.
7. Only regular repair and maintenance of easily damaged, easily worn, and easily broken parts can ensure the
safe use of the training equipment.
8. Please ensure that the equipment is used in the way specified in the manual. When defective parts are found
during assembly and maintenance or noise is emitted during use, please stop the operation and use
immediately and ensure that all problems are solved before continuing.
9. When using the training equipment, please wear clothes suitable for training and avoid wearing loose clothes.
The loose clothes will be caught by the machine, which will hinder the operation and may be trapped on the
equipment and cannot move.
10. The training equipment has passed the EN957 Class HC certification and is only suitable for home use, and
the trainer weighs less than 350 pounds.
11. The training equipment is not suitable for use as medical equipment.
12. When lifting or moving the training equipment, be careful not to injure your back. Please use the correct
movement method, or do it with the assistance of others.
4
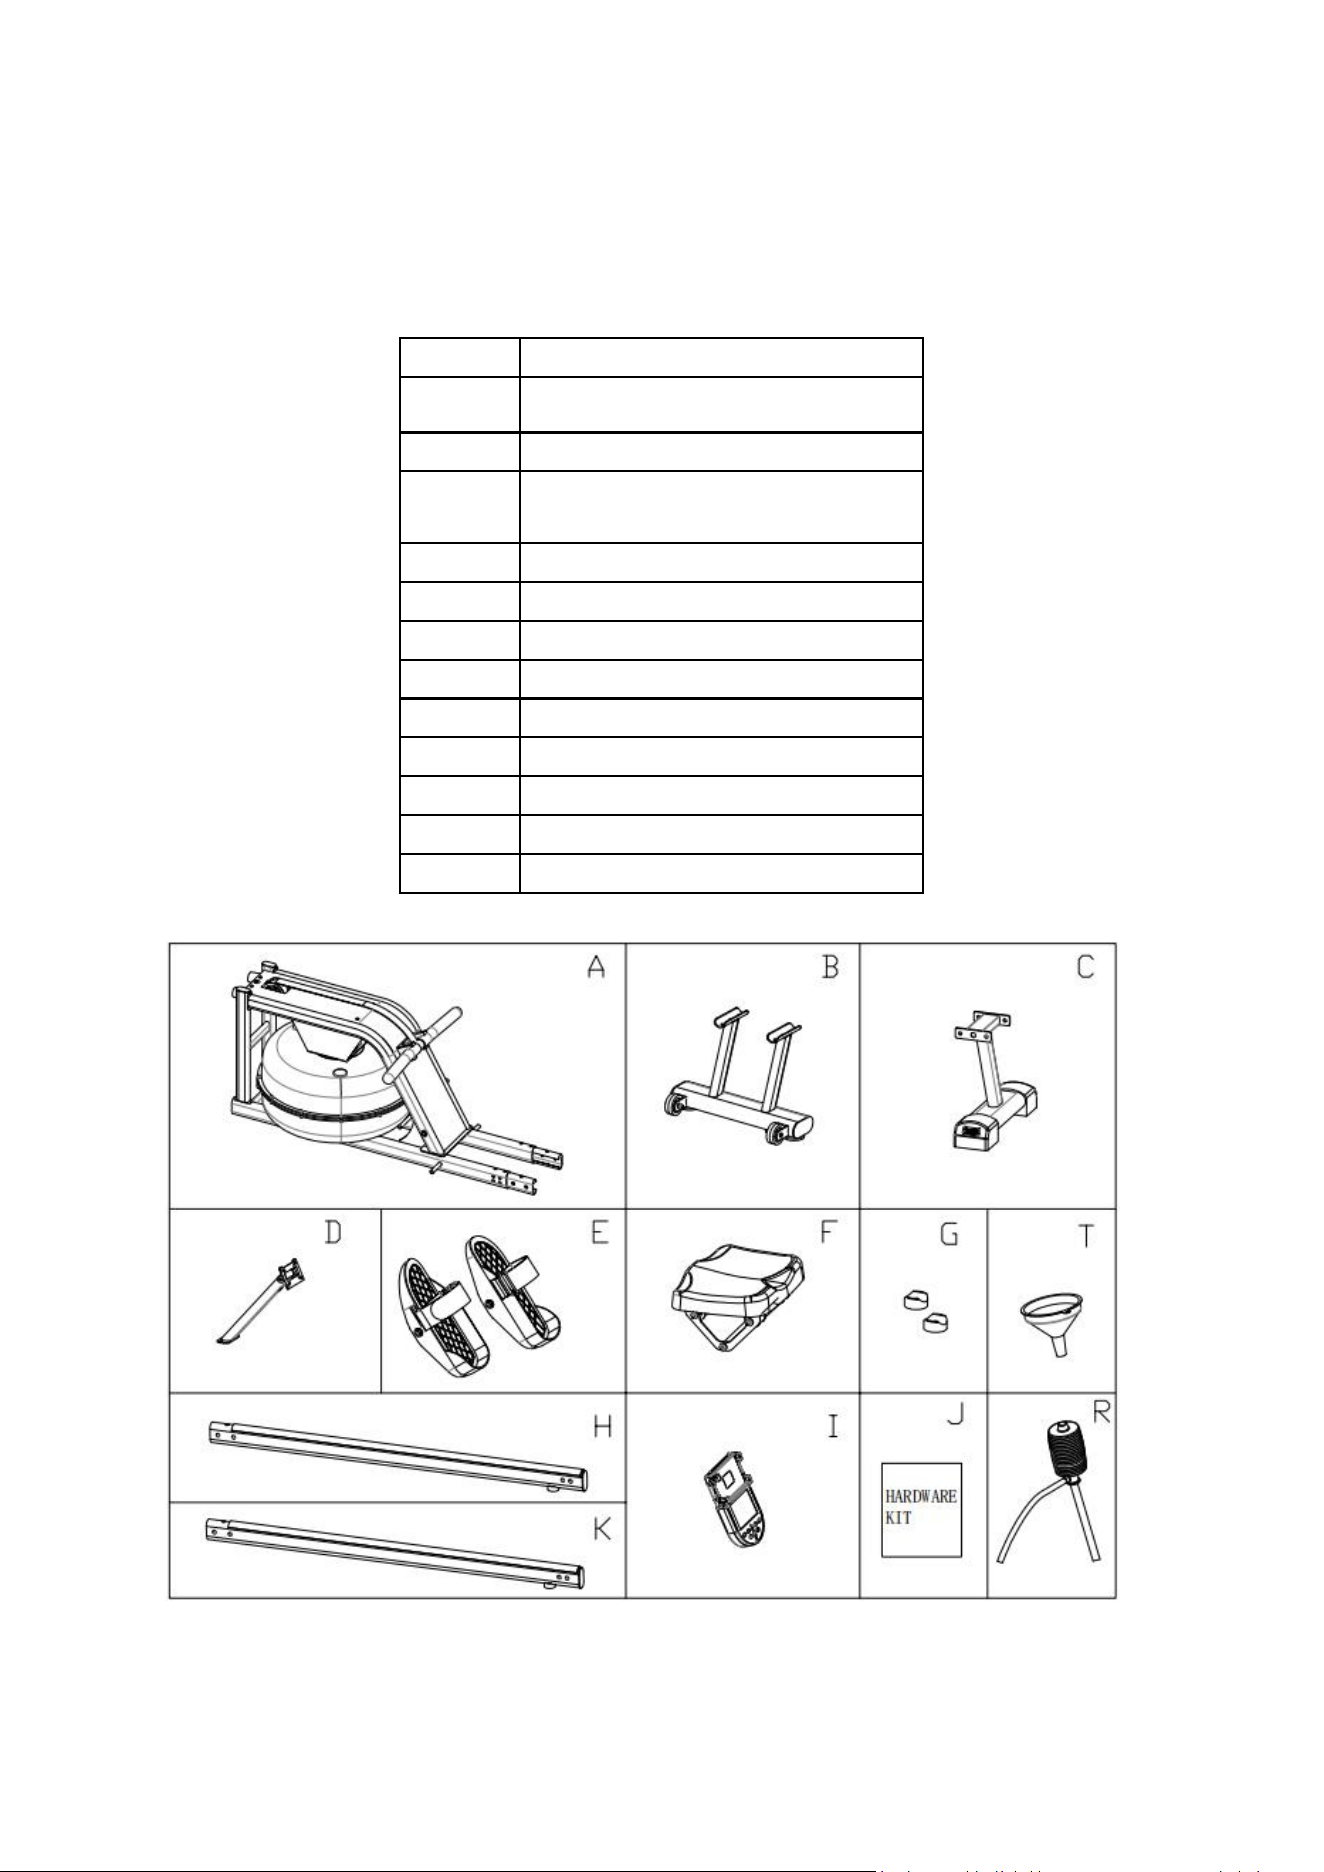
Container Loading List
A
Main frame assembly
B
Front stabilizer assembly
C
Rear stabilizer assembly
D
Electronic monitor support
assembly
E
Left and right foot pedal
F
Cushion assembly
G
Limit mat
H
Right-slide rail assembly
I
E-meter
J
Accessory kit
K
Left -slide rail assembly
R
Water pump
T
Funnel
5
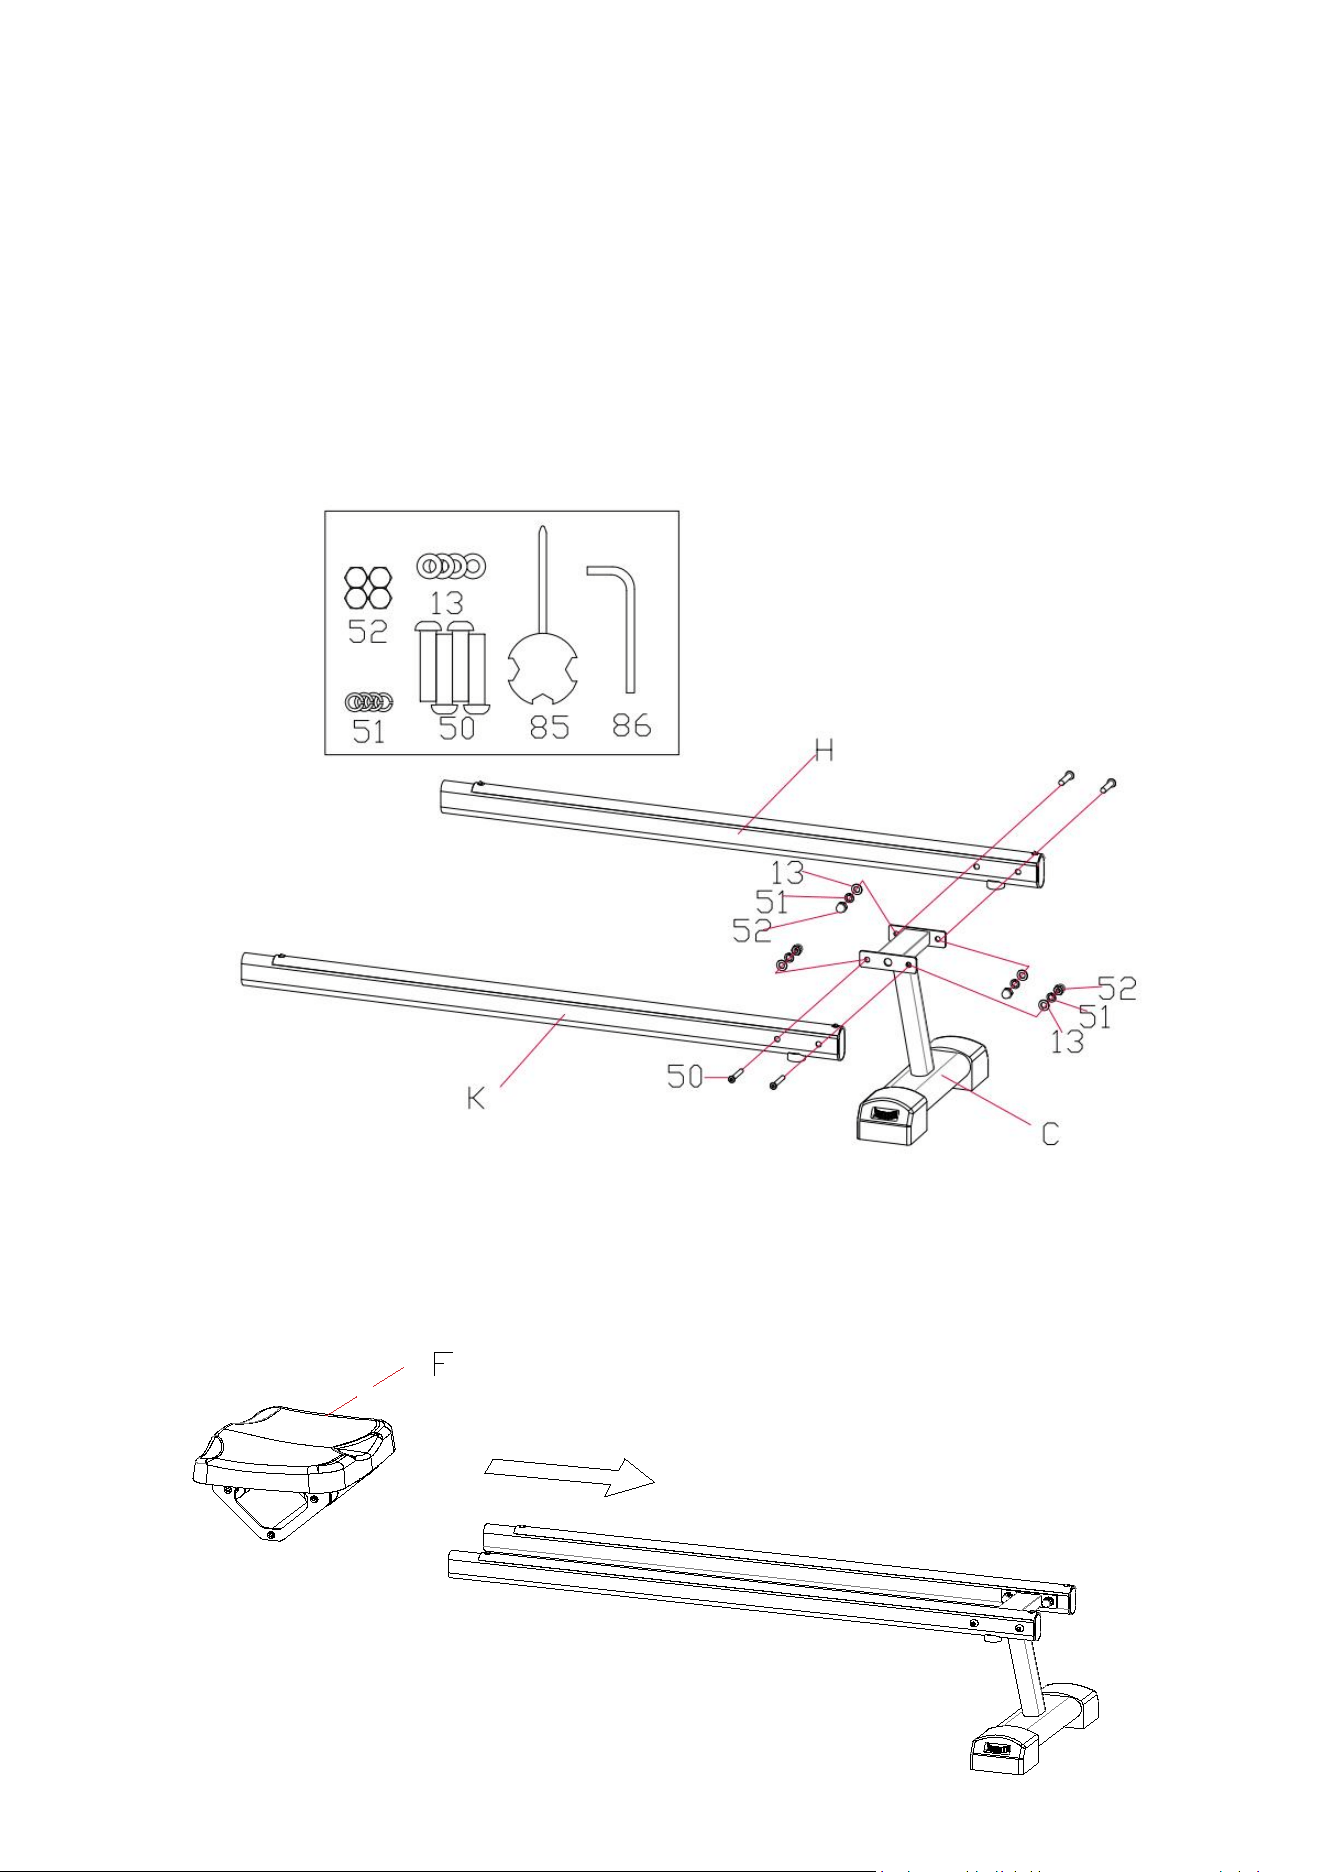
Installation instructions
1. Take out the screw M8*40 (50) 4PCS, washer (13) 4PCS, spring washer
φ
8 (51) 4PCS, nut M8 (52)
4PCS from the accessory kit, use the allen wrench #5 (86), and cross wrench (85) to lock the right-slide rail
(H), left-slide rail (K), and rear stabilizer (C) together, please note not to lock them too tightly.
2. Take out the cushion assembly (F) and install it into the slide rail in the direction of the arrow.
6
35
87
51
87
35
51
86
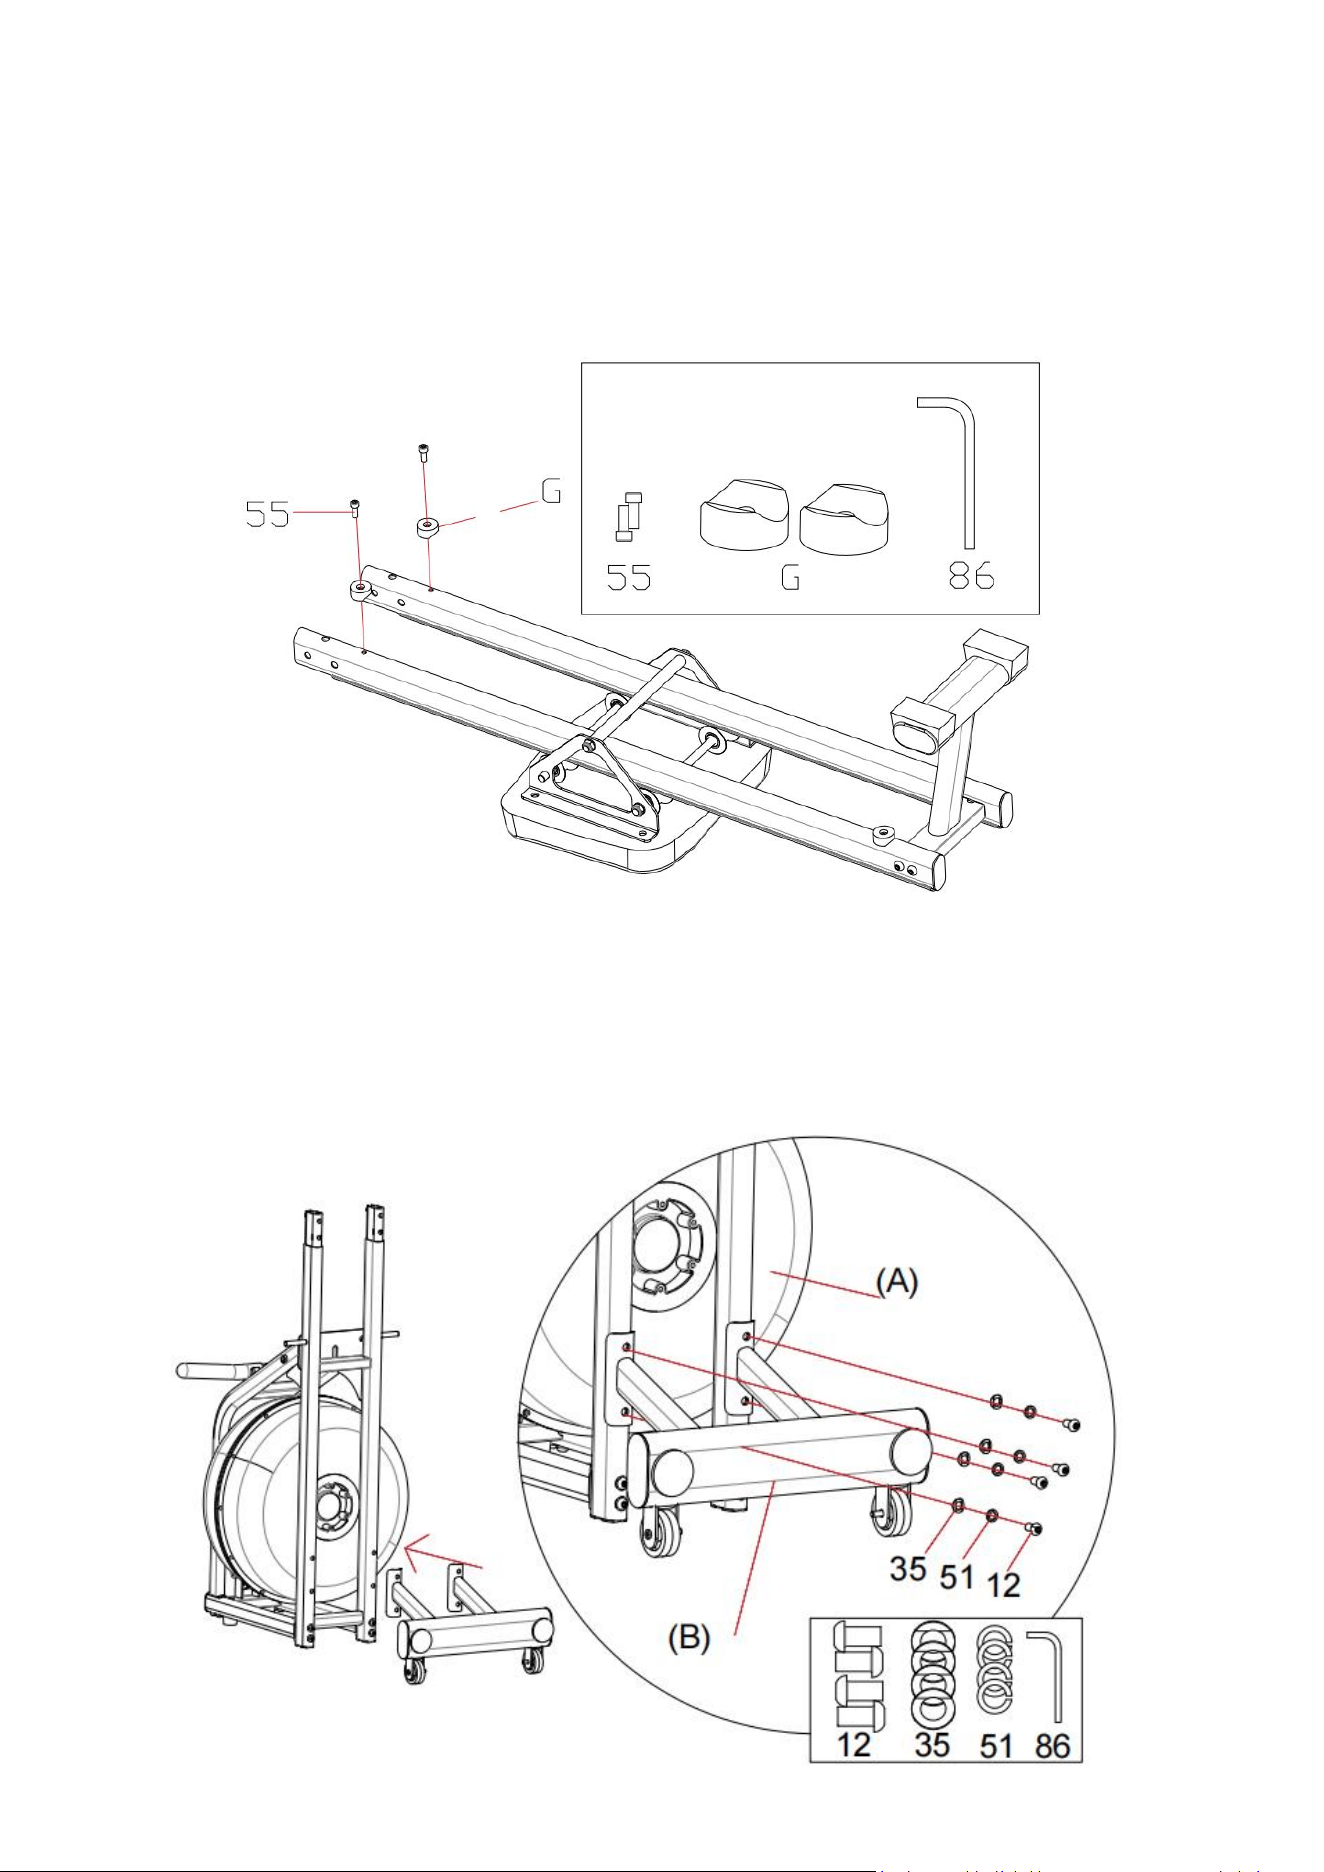
3. After installed the cushion assembly (F) in step 2, turn it upside down. Then take out the limit mat (G)
and the hexagonal socket head screws M6*16 (55) 2PCS from the kit. Install the limit mat to the slide rail
with allen wrench #5 (86).
4. Install the front stabilizer (B) into the main frame (A). Take out the hexagonal pan head screws M8*15
(12) 4PCS, wave gaskets (35) 2PCS, and spring washer
φ
8 (51) 4PCS from the kit. Install them as the
picture shown, then use allen wrench # 5 (86) to lock the front stabilizer (B) and main frame(A) together.
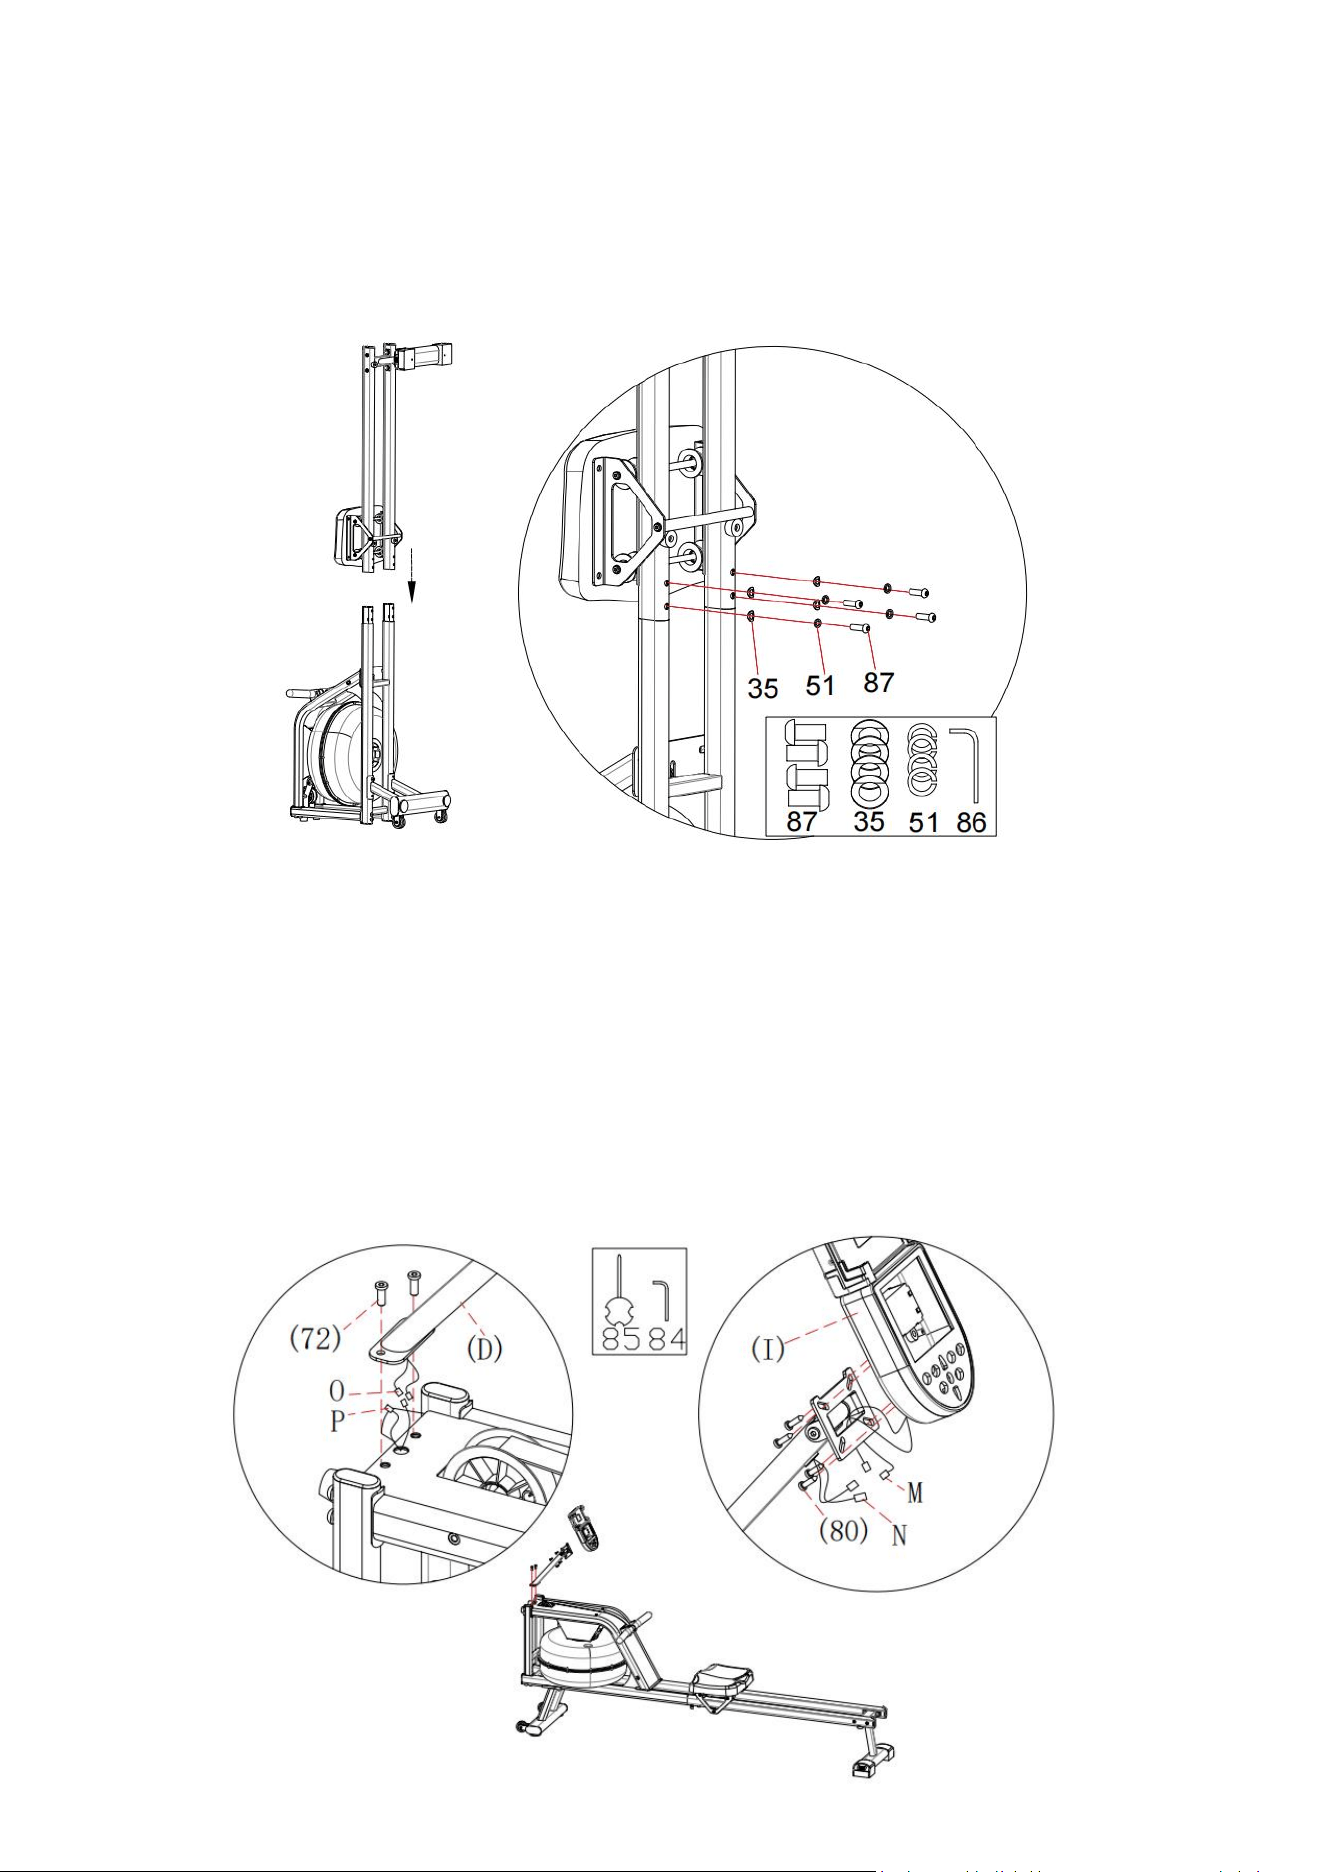
7
5. Take out the hexagonal pan head screw M8*30 (87)4PCS, spring washer
φ
8 (51)4PCS, and wave
gaskets (35)4PCS from the accessory kit. Lock the front assembly and rear assembly together with allen
wrench # 5 (86), and lock the unlocked screws in step 1 tightly at the same time.
6. Unscrew the inner hexagonal flat round head screw M6 * 10 (72) 2PCS on the main frame with allen
wrench #4 (84). Then connect the interfaces O and P, and plug them into the electronic gauge assembly
pipe, Install the electronic monitor support assembly (D) into the main frame with Allen wrench #4 (84)
and the inner hexagonal flat round head screw M6 * 10 (72) 2PCS. Using the cross spanner (85) to
remove the cross pan head screw (80) 4PCS which were preinstalled on the electronic monitor (I), then
connect the wire head M through the center hole in the support plate, and connect the electronic monitor
support assembly (D) of the electronic monitor (I) as shown.
8
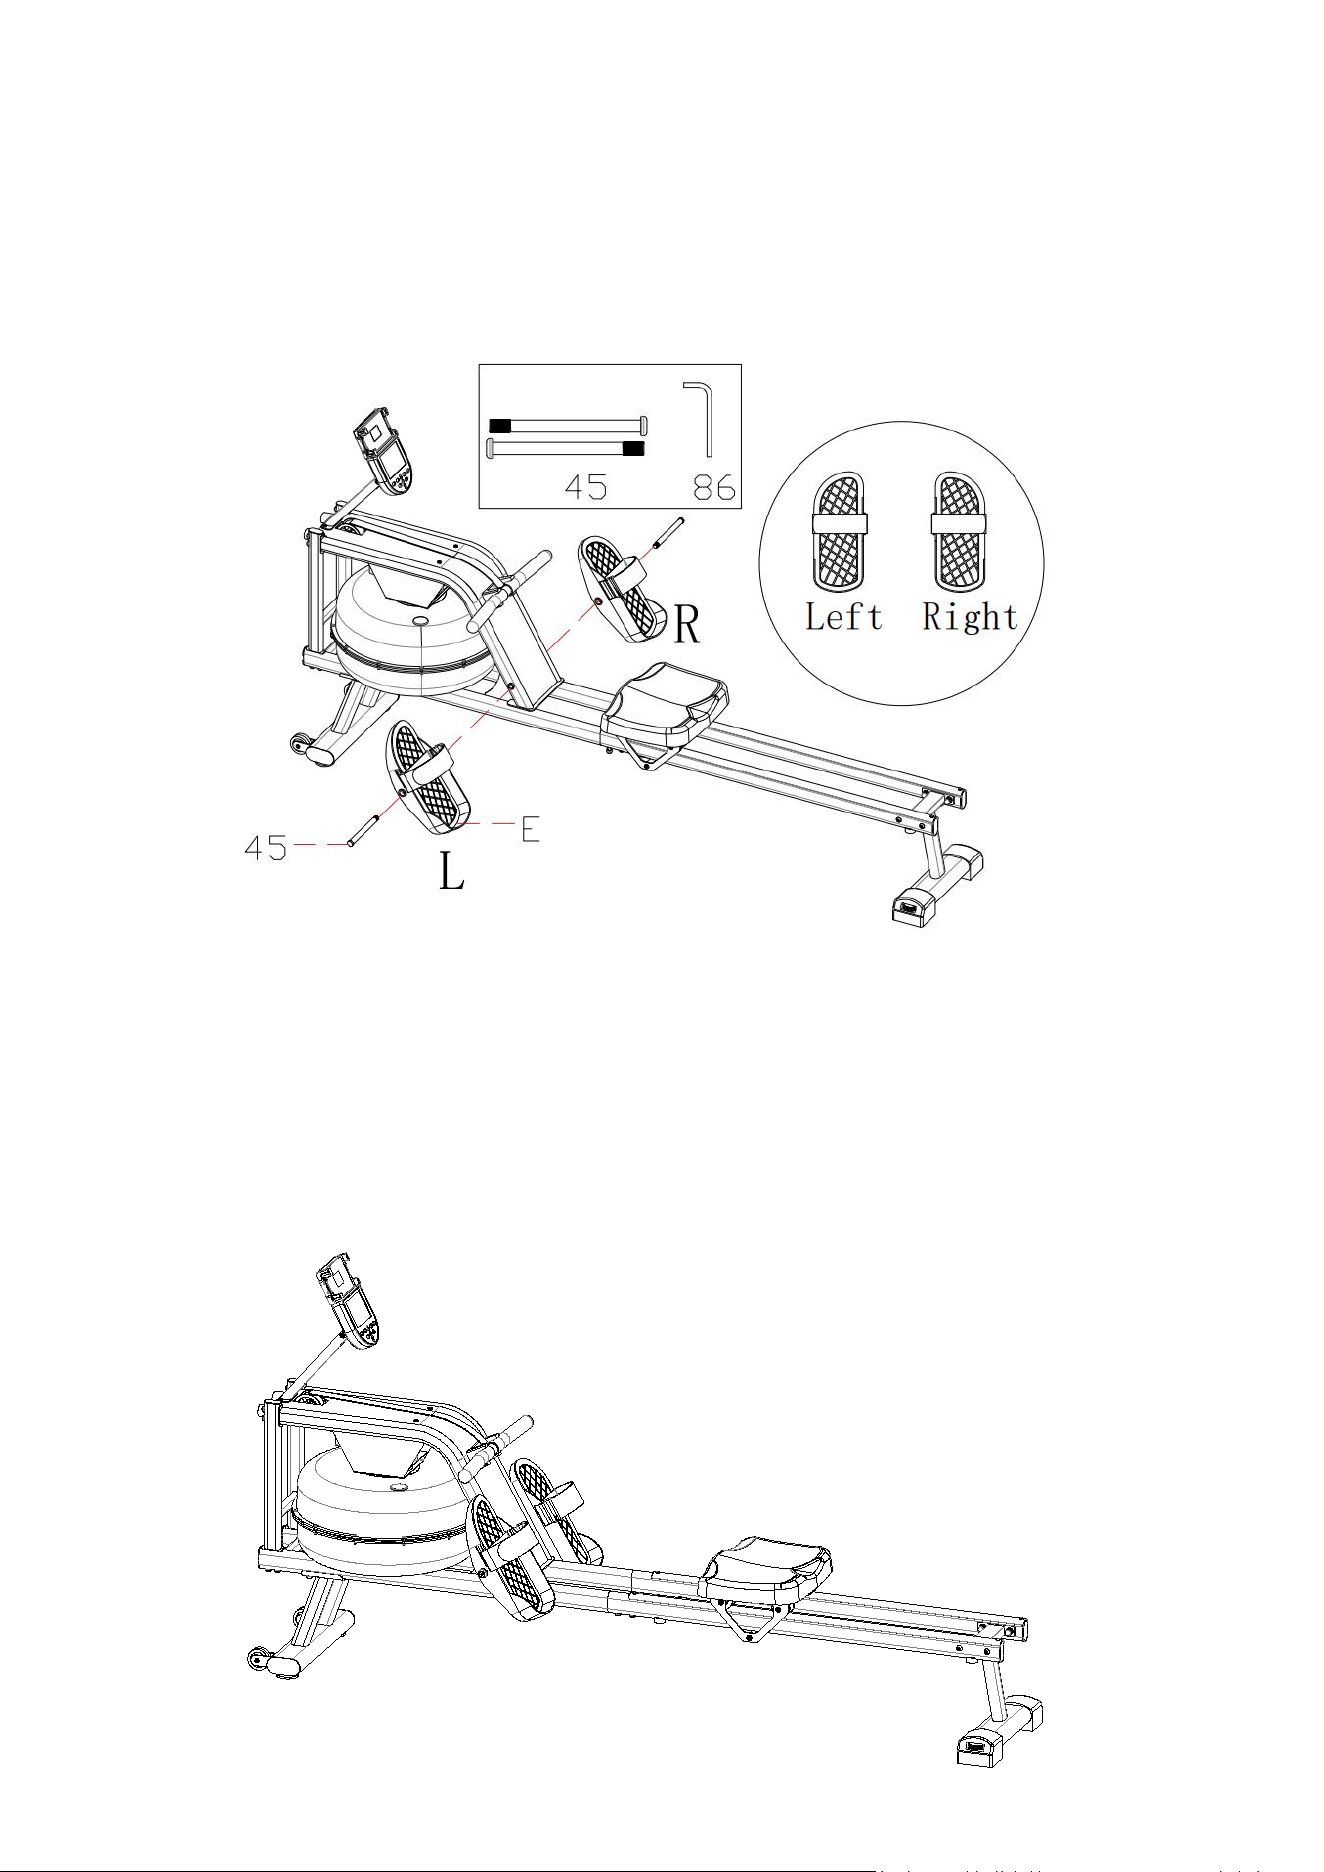
7. Install left and right pedals. Take out the foot pedal spindle (45) 2PCS from the accessory kit, then use
allen wrench # 5 (86) to install the left and right foot pedals (E) to the main frame. Please note the difference
between the left and right pedals.
8. Assembly finished.
9
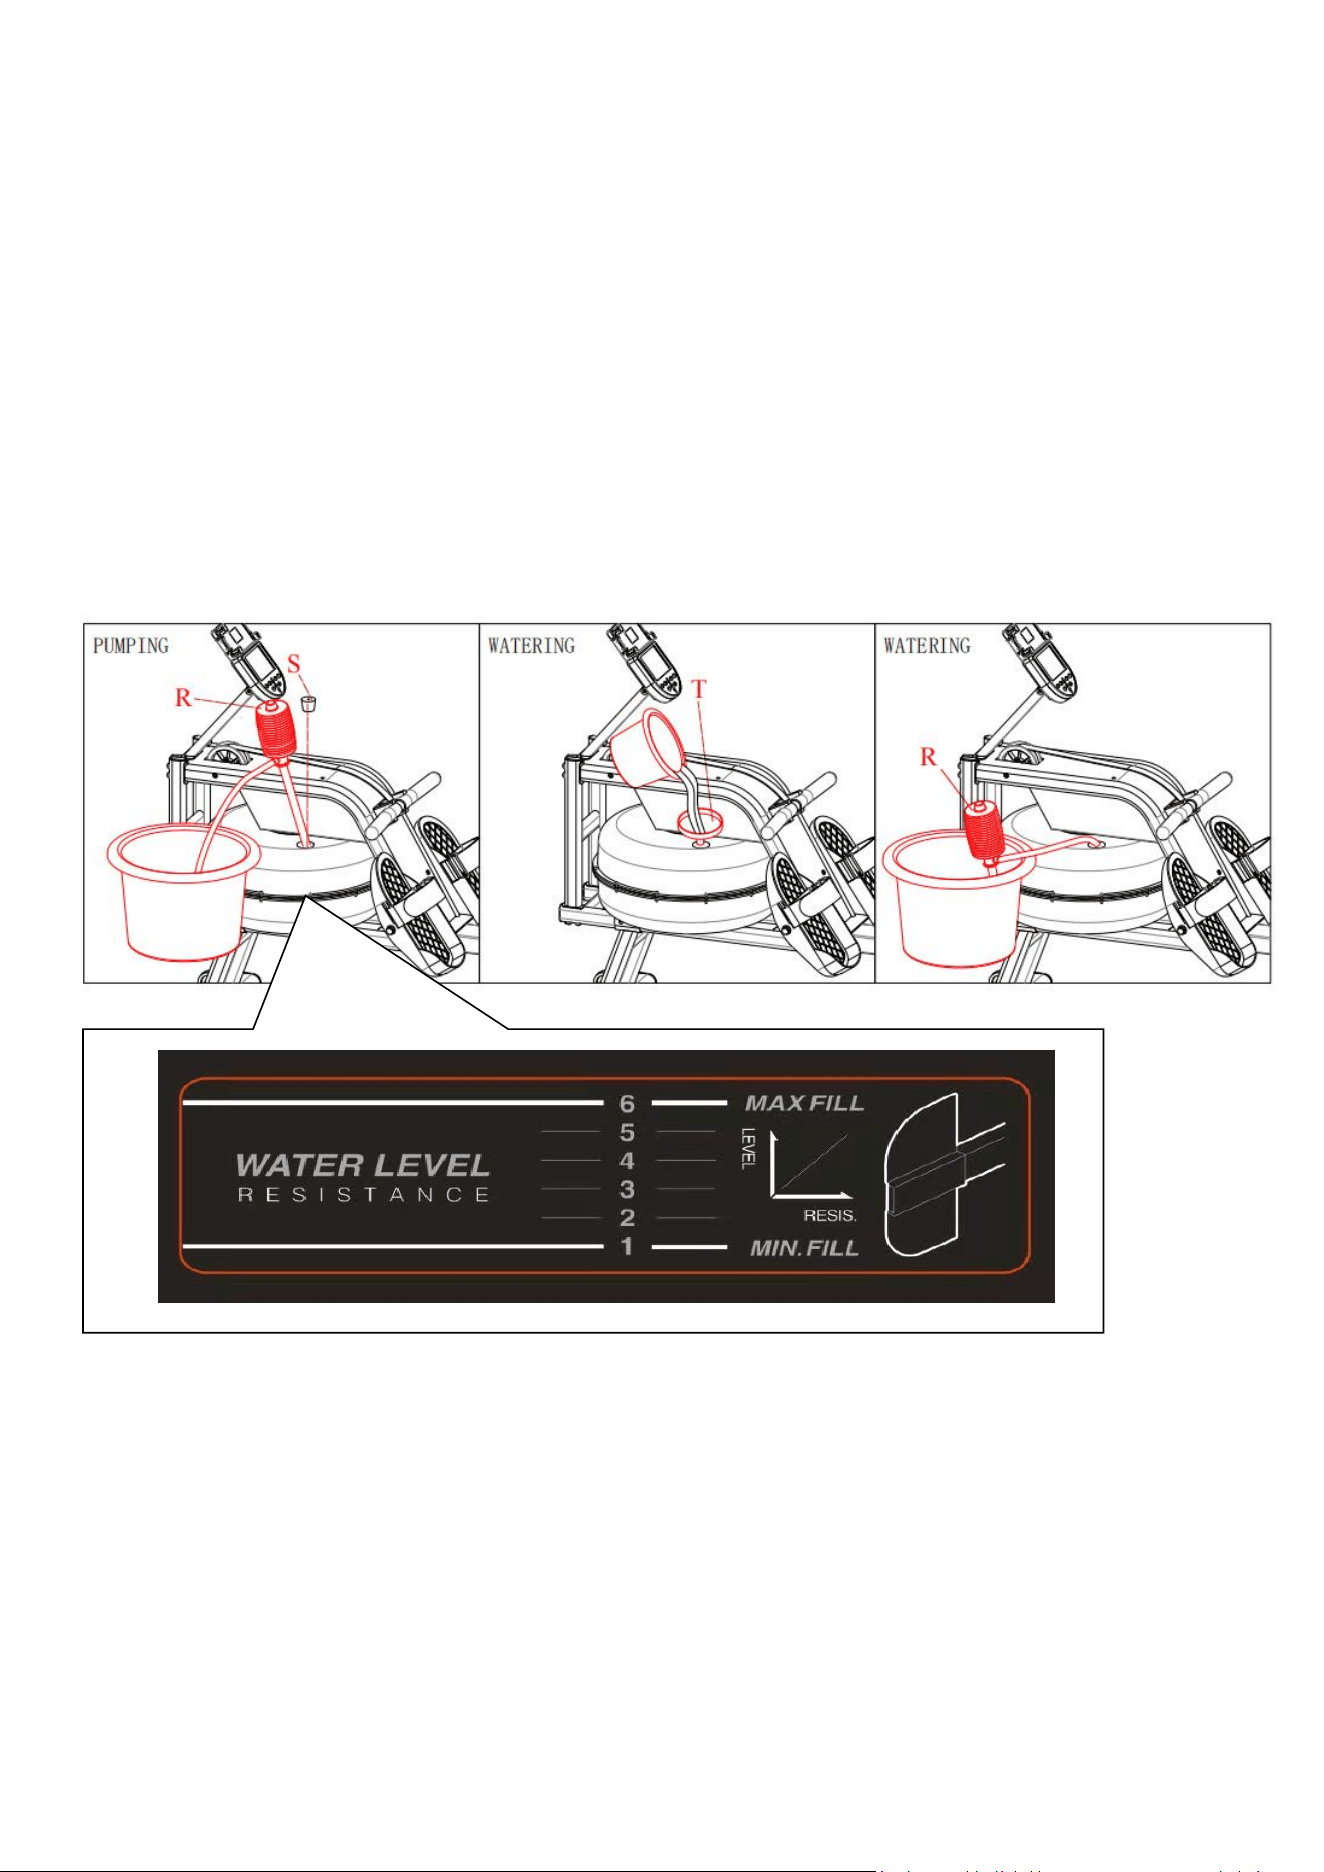
9. Remove the tank plug(S) from the upper tank.
10. Fill water according to the diagram shows. Insert the pump (R) into the tank, then fill the tank with the
pump (R) and the bucket. Measure the amount of water in the tank by referring to the digit mark on the side
of the tank.
11. Pump water as shown. Place a bucket next to the machine and use the pump (R) to pump water from the
tank into the bucket. Insert the water tank plug (S) into the upper water tank and dry the water on and around
the machine with a dry cloth, then the assembly is completed.
10
Training instruction Chart
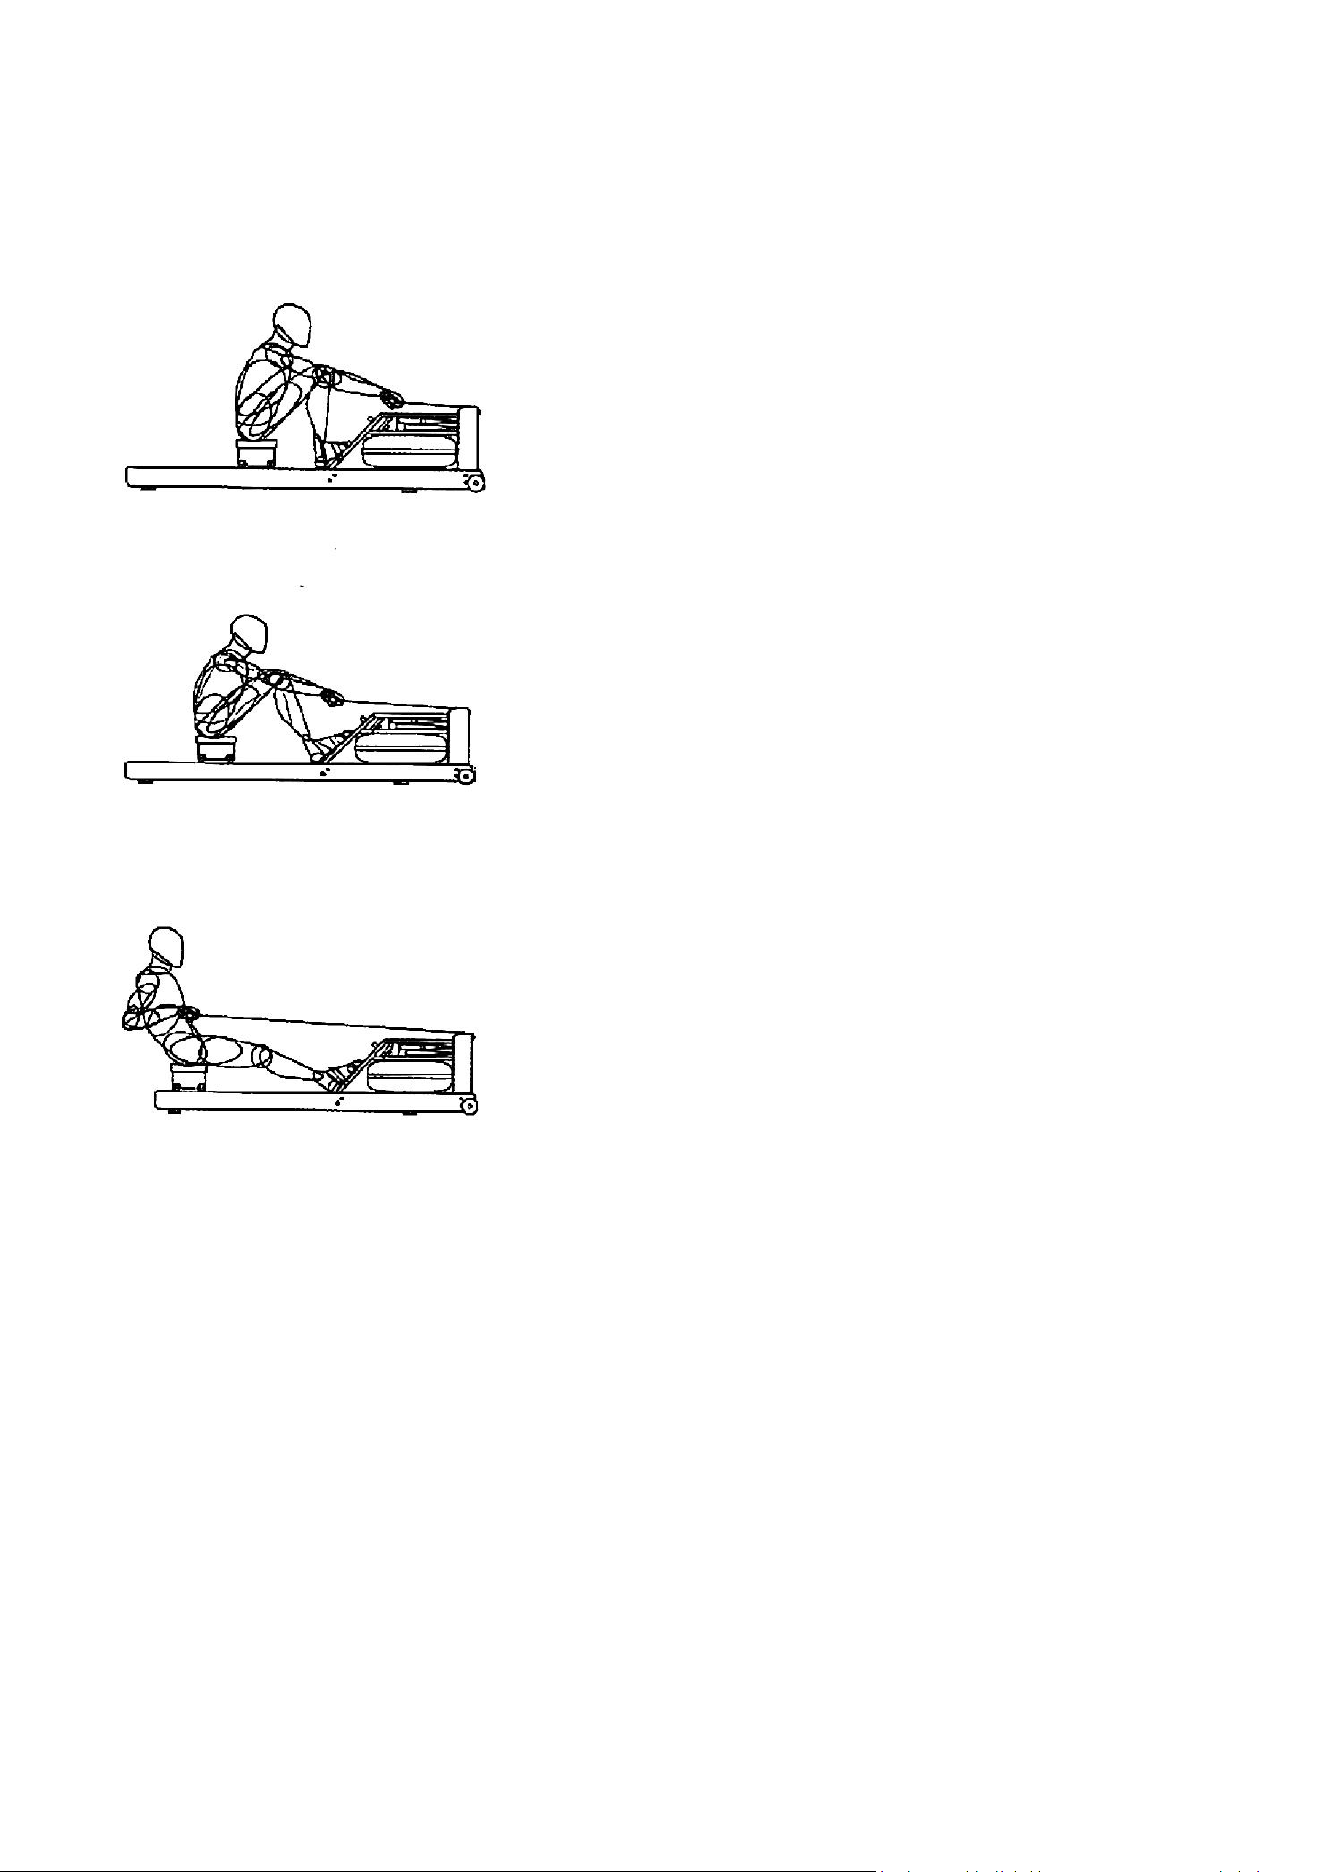
Starting position
Straighten your arms forward, relax your shoulders, raise
your head, look forward, and compress your feet and
lower legs vertically.
Sliding process
Grasp the arm with your hands, keep your body in the
correct position and angle , slowly open your legs and
climb forward.
Return position
Straighten your legs forward, pull the handle to your chest,
relax your shoulders and look forward with your eyes.
After several stages of rowing practice and mastering the correct rowing posture and rhythm, this technology
will be easier than ordinary rowing, and you will soon experience the benefits of rowing training.
11
Training Introductions
The use of this product can not only enhance the physique and exercise muscles, but also through a
reasonable diet with the effect of weight loss.
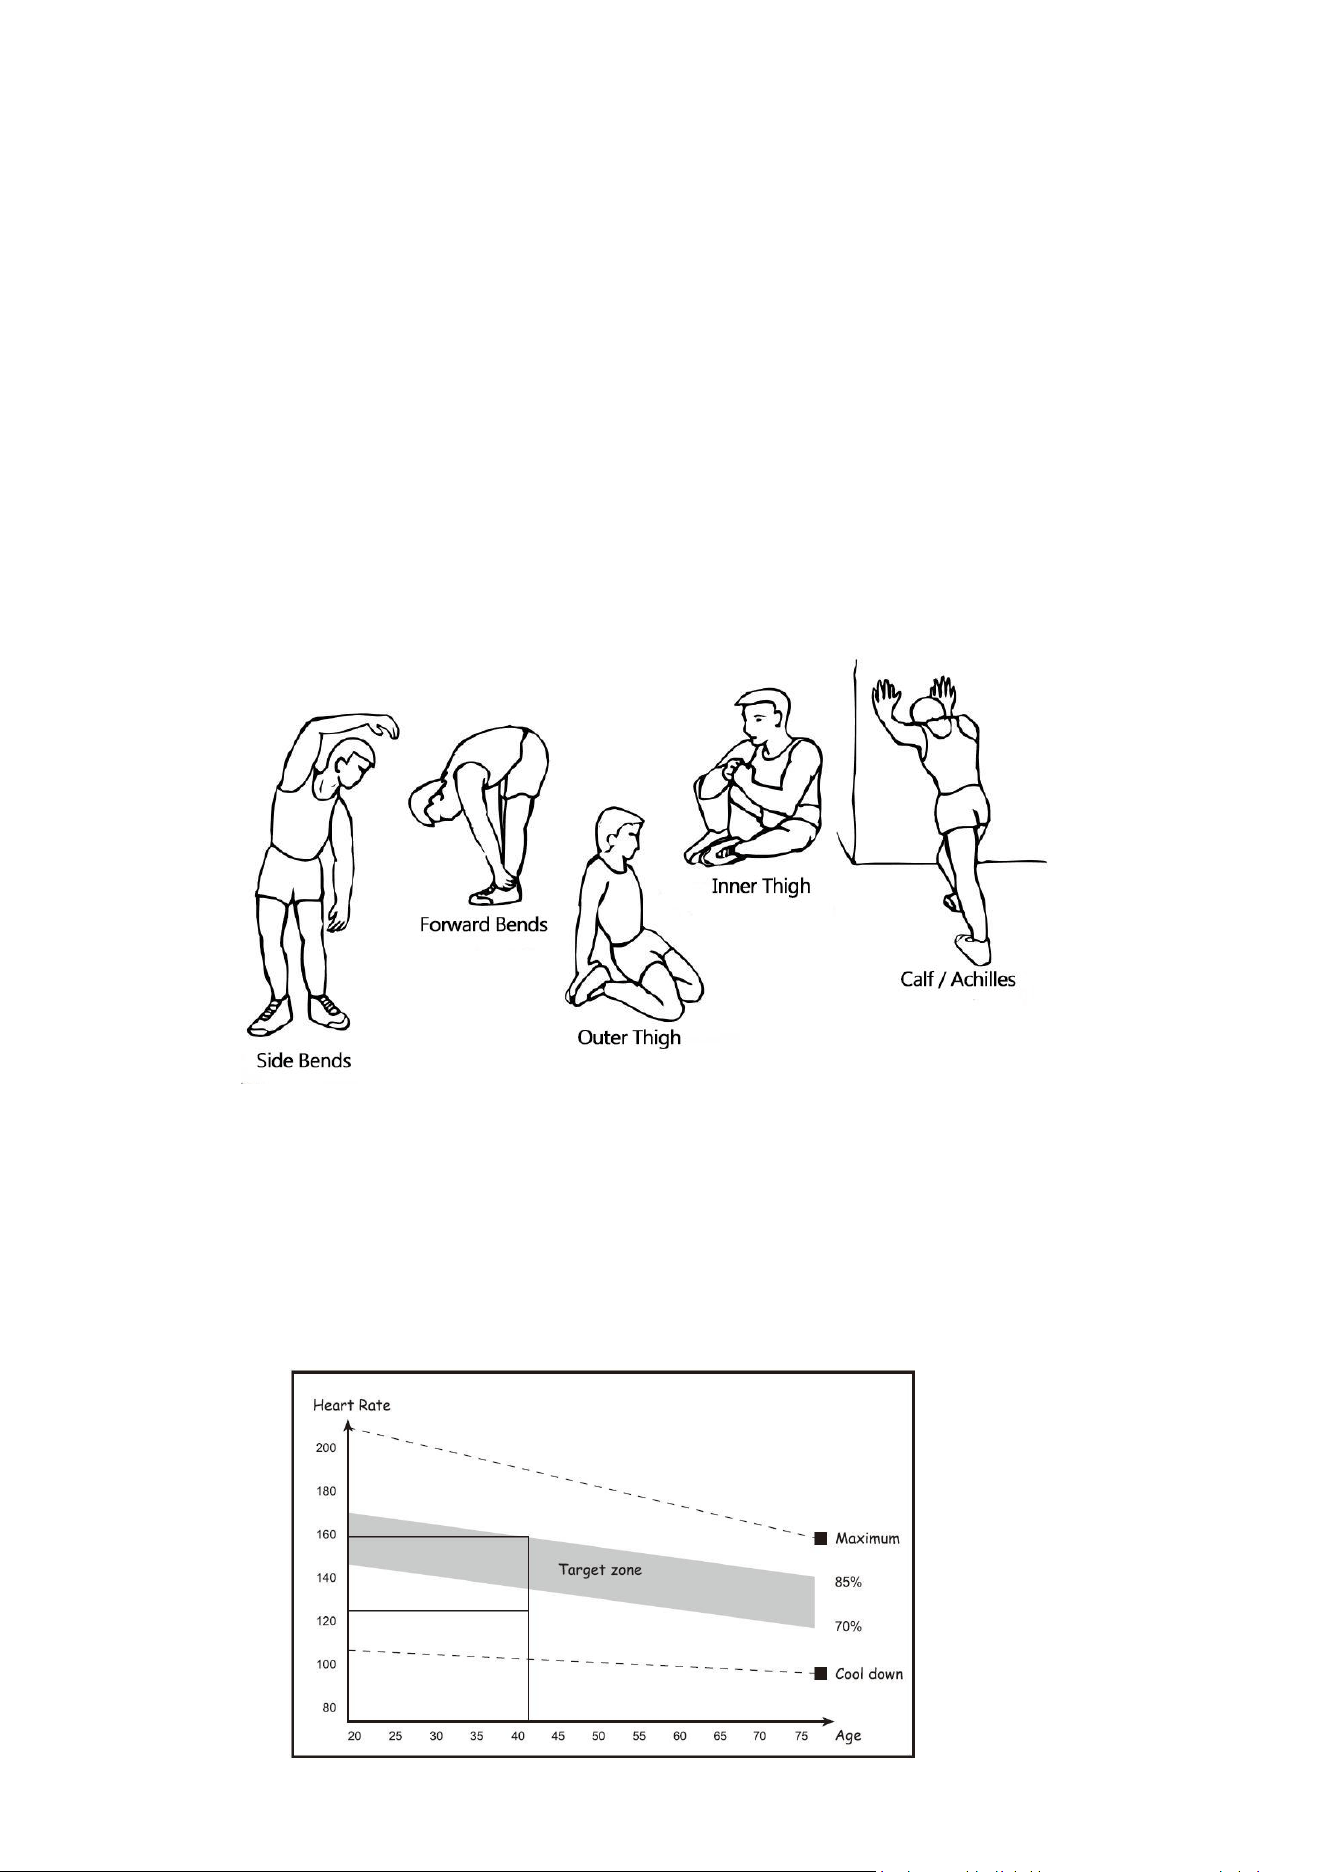
1. Warm-up before training
This stage of warm-up exercises can enhance the blood circulation of the trainer's body , make the muscles
reach a good training condition, while reducing the risk of cramping or muscle strain during training. Before
each training session, please do the warm-up exercises as suggested below. Each stretching exercise must be
held for about 30 seconds, and be careful not to do strenuous stretching exercises when doing the exercises
to prevent muscle damage.
2. Training phase
This phase is the formal training phase. After long-term regular practice can improve the flexibility of the leg
muscles. In the training process, the key is to practice with a stable training intensity according to your own
training situation. During the training, you should choose a reasonable training intensity and keep your heart
rate within the target value range listed in the table below.

12
To keep the heart rate within the corresponding target range, train for at least 12 minutes. Most
people start training for 15-20 minutes.
Recovery phase after training
In this recovery stage, repeat the activities done in the preparation stage. In the process, the amplitude and
speed of exercise can be appropriately reduced for about 5 minutes. Adjust the heat in the body through
exercise to relax the muscles. It should be noted that strenuous stretching activities should not be done
during exercise to avoid muscle damage.
When you are used to training, you can gradually increase the training time and intensity. It is recommended
to train at least 3 times a week. If you can, record the average level of practice every week.
Build muscle
If you want to use this product to strengthen the muscles, you need to adjust the resistance during the
exercise very high, so that you can achieve the effect of strengthening the muscles by increasing the exercise
intensity in a short time if you want to strengthen the muscles at the same time For the purpose of fitness,
you need to use another training method, do warm-up activities first, then do regular exercises, increase the
training intensity at the end of the training, increase the resistance of the legs, but pay attention to slow down
while increasing the intensity The speed of training so that the heart rate is kept within the target value range,
and the post-training finishing activities should be done after the training.
Reduce weight
To achieve the effect of losing weight, the key lies in the training time and intensity. The greater the training
intensity, the longer the time, and the more calories will be burned, thereby achieving the effect of losing
weight. The same can also be achieved through exercise to achieve the effect of fitness and enhance physical
fitness. During the training process, you can do appropriate exercises according to different needs.

13
MONITOR
1: Display Effect Diagram:
2: Key Function:
NO/OFF
Switch on and off (long press for 3 seconds to power off, short press to power on)
MODE
Set mode switch
▲(UP)
Set value increased
▼(DOWN)
Set value reduced
RESET
Short press to clear the current value, and long press for 3 seconds to clear all
values
CAL
Displays cumulative calories burned
STROKES
Displays the cumulative number of paddles
SPEED
Displays the current speed of motion
KM/MI
Display current mileage (km/mi)
3: Function description:
3.1 The electricity
Put on the battery, short press the NO/OFF key "BI" once, and the display will enter standby mode.
3.2 Button function
There are 9 buttons on the monitor, and you will hear a “di” sound when the button is pressed.
ON/OFF:
Long press for 3 seconds to shut down, short press to start up, when there is no signal for 2 minutes and no
button operation for 2 minutes,it will enter the shutdown state. Only press ON/OFF to start the machine, all
data is retained after the machine is started, and other keys and signals do not start the machine.
Set up:
When setting the sports target, first press the MODE button, the current function flashes (TIME), and can be
set, the ▲ (UP) button is up, and the ▼ (DOWN) button is down. After pressing UP, you can use the MODE
button to switch the set function (the setting sequence TIME, DIST, can be set).
14
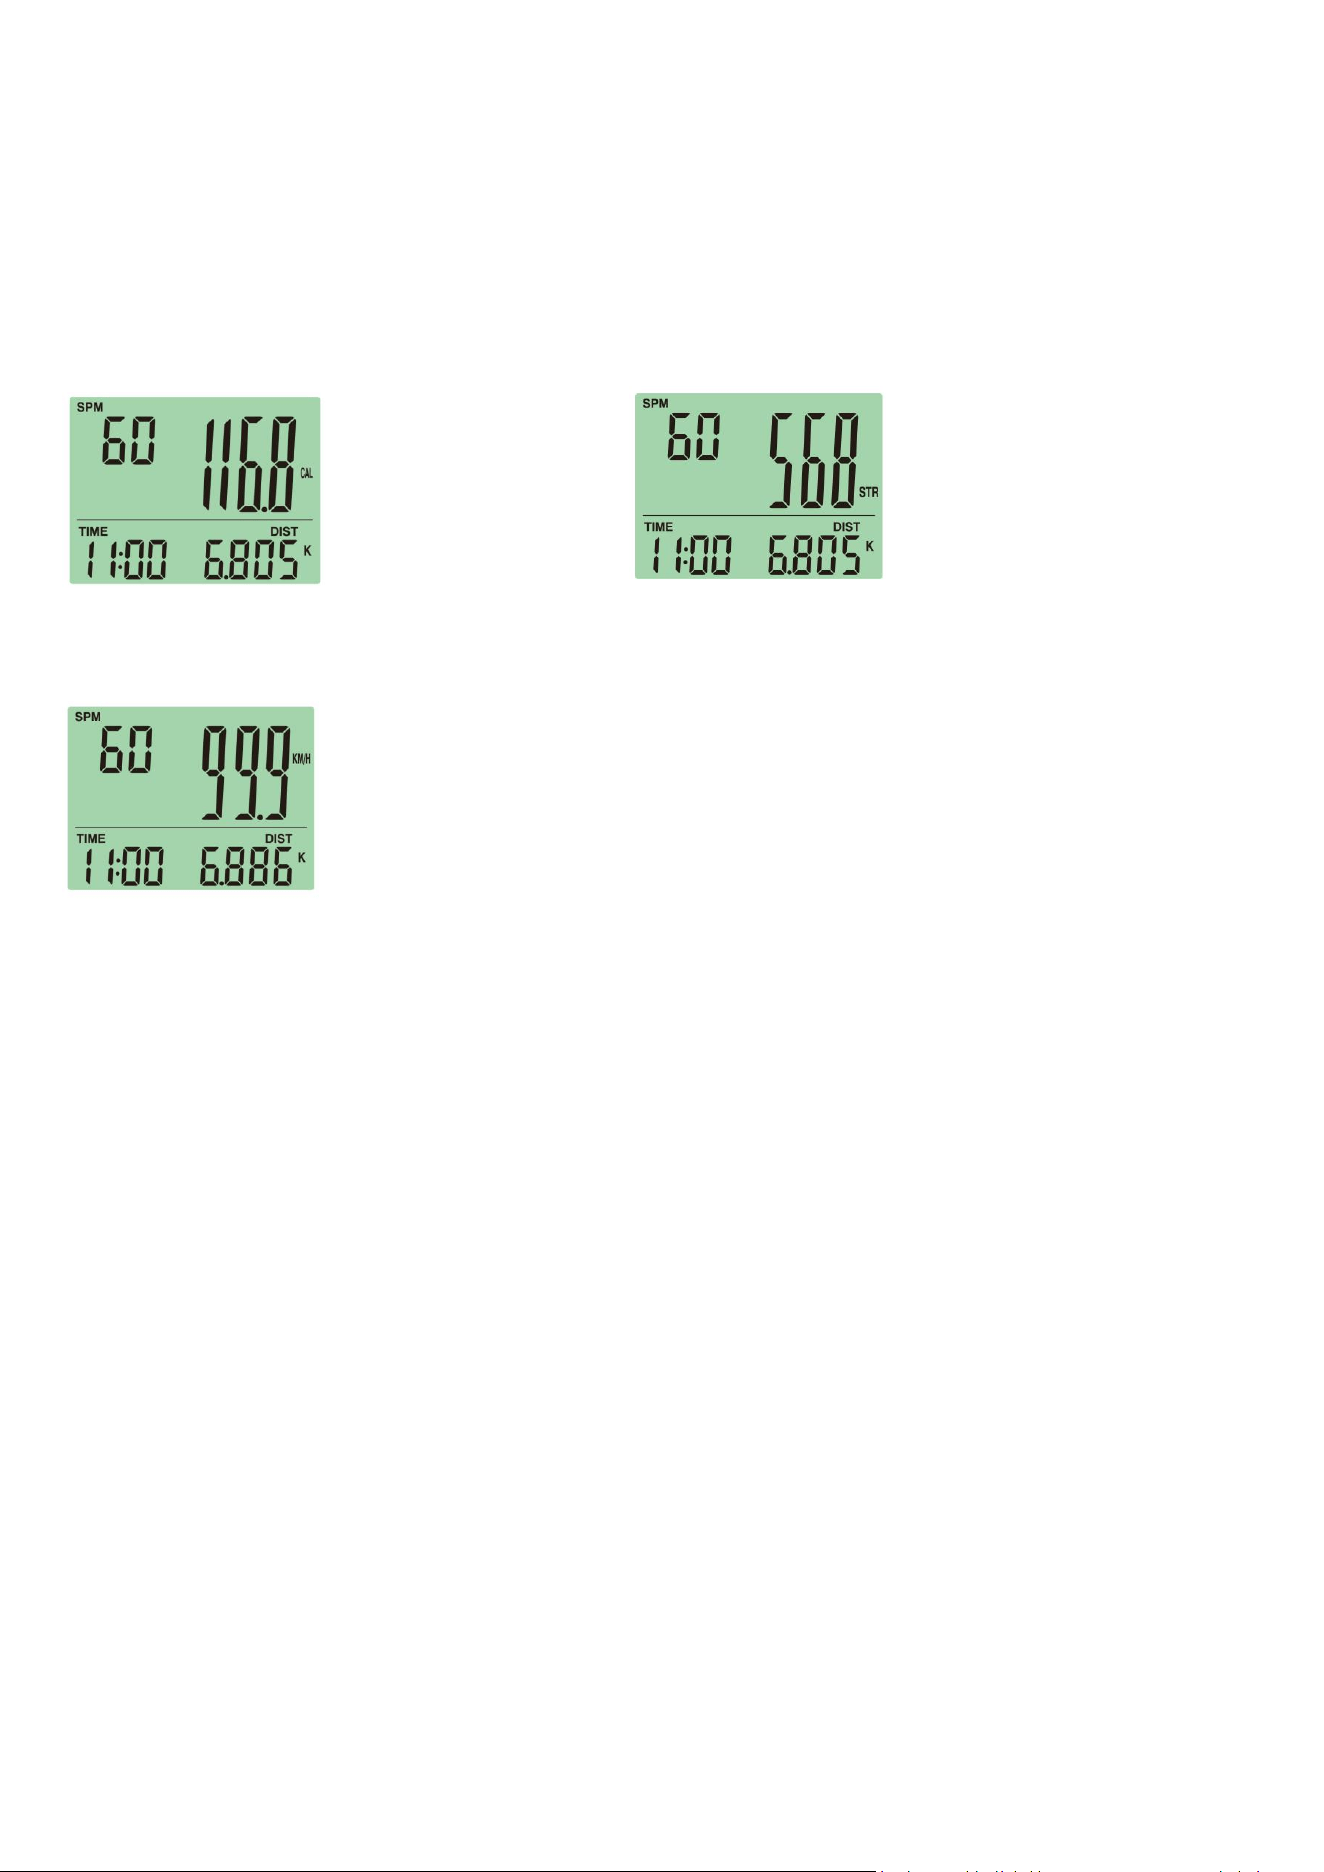
4: Function shortcut buttons:
(1) Press and hold the KM/ML button for 3 seconds to switch the sports mile mode.
(2) Press and hold the RESET button for 3 seconds to clear the last exercise data, and short press the RESET
button to clear the current setting data.
(3) Press the button CAL, the display screen can directly display the calories consumed during the current
exercise (CAL) (Figure 1)
(Figure 1) (Figure 2)
(Figure 3)
(4) Press the button STROKES, the display can directly display the current motion paddle frequency
(Figure 2)
(5) By pressing SPEED, the display screen can directly display the current exercise mileage (KM/ ML
KM/ML) (Figure 3)
15
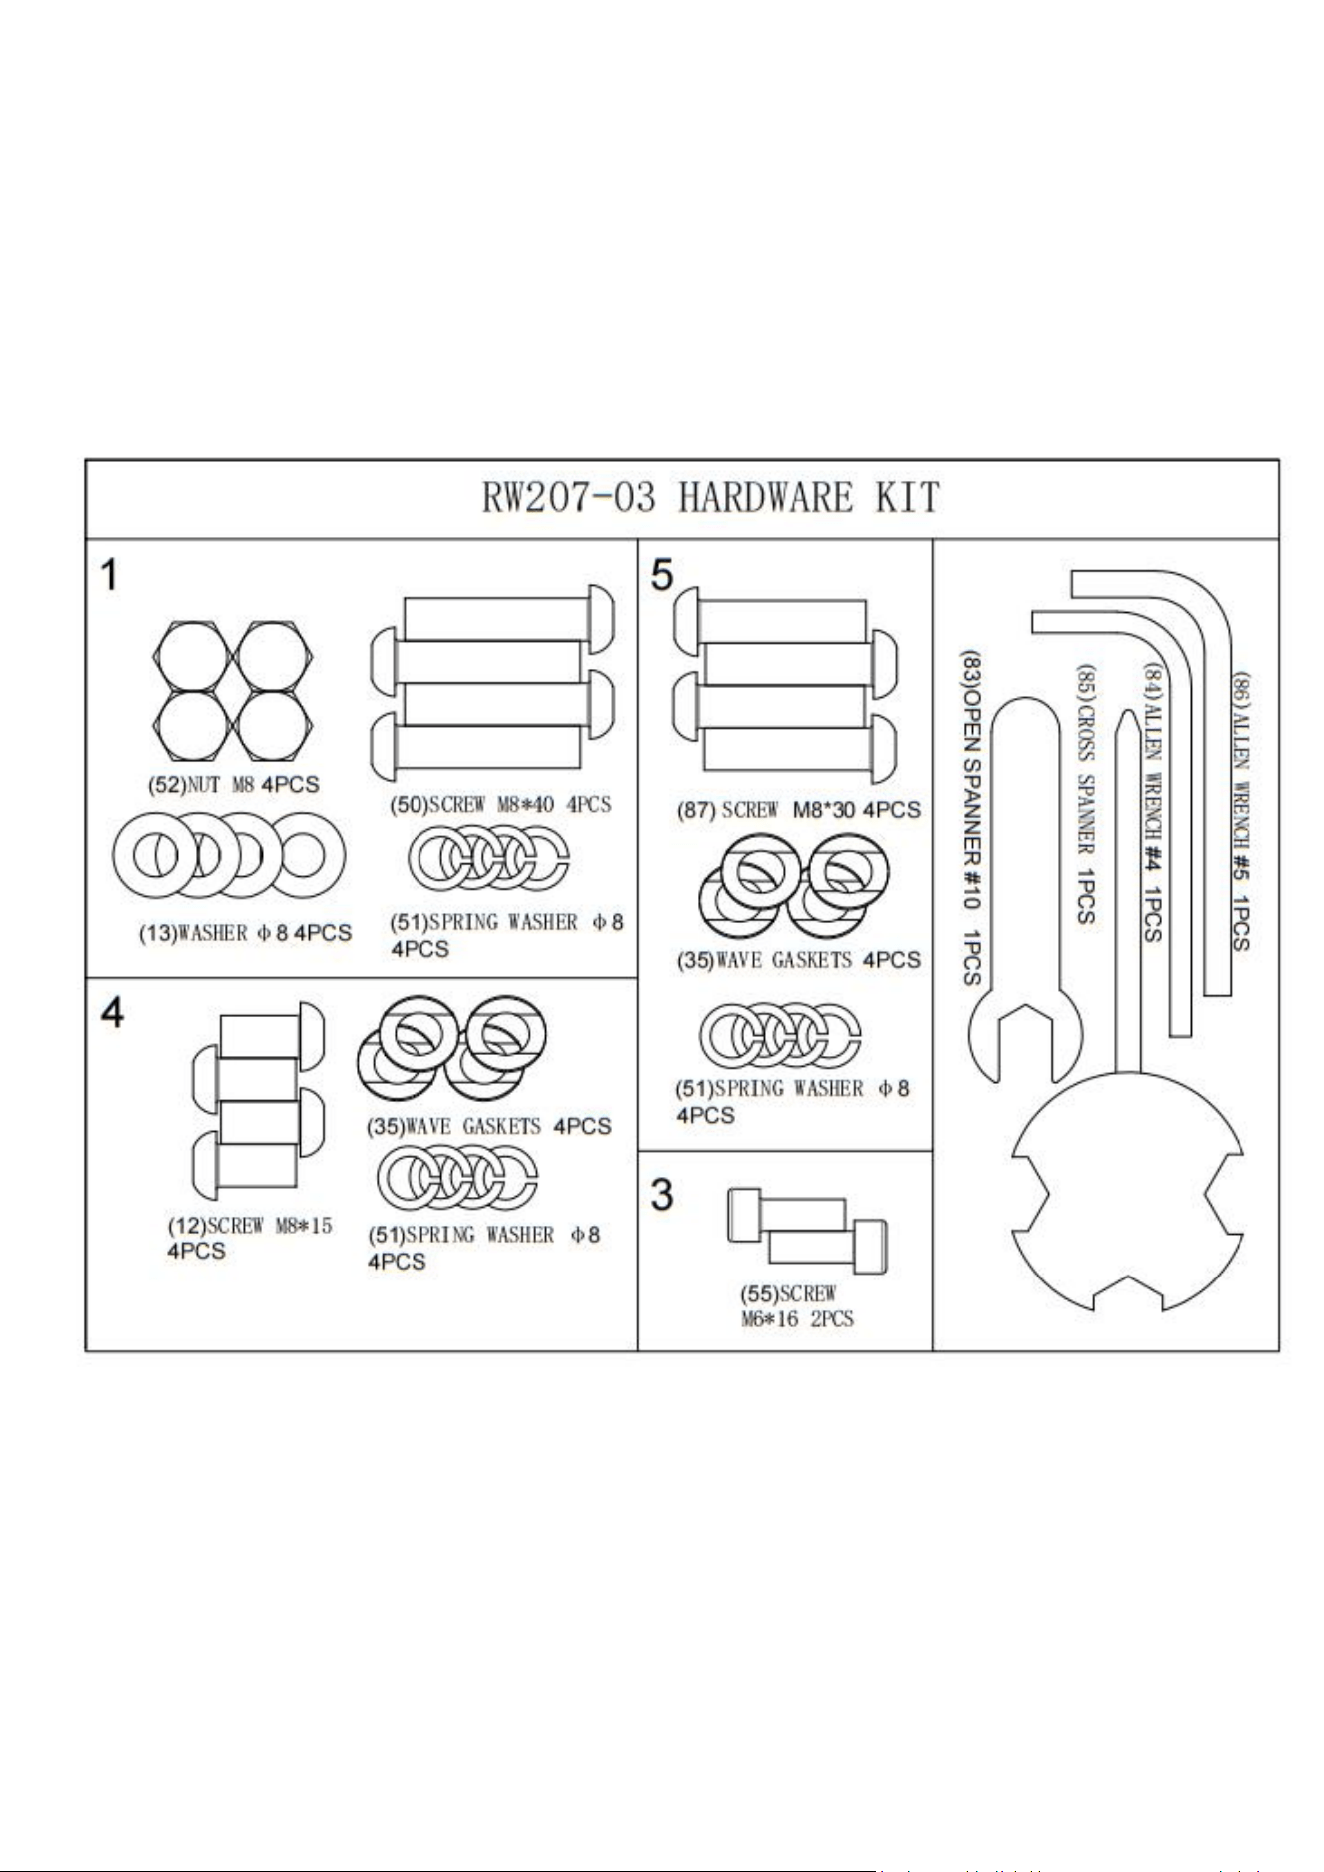
Accessory Kit
16
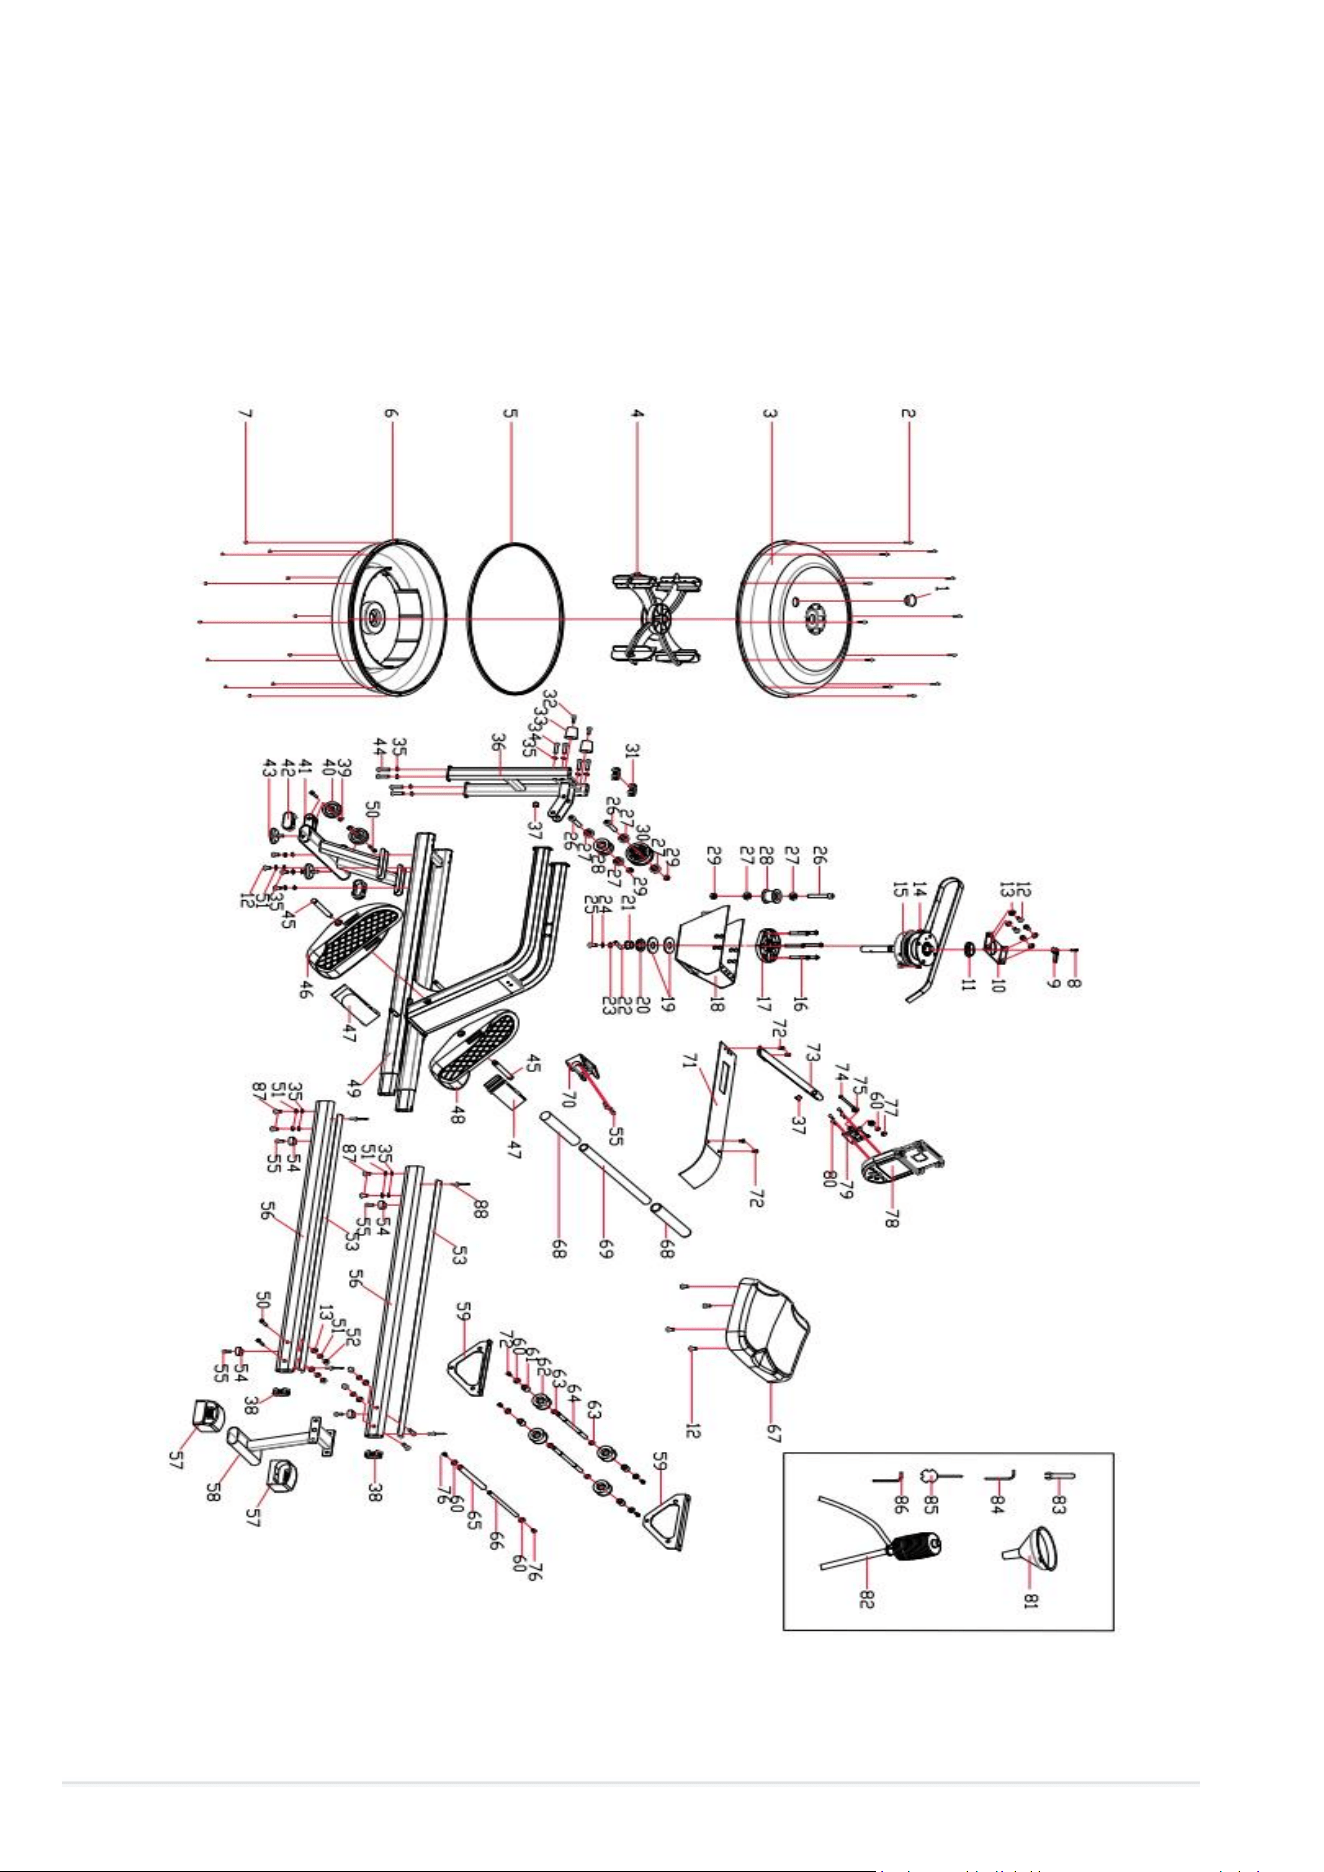
Explosion Diagram

17
PARTS LIST
No.
Part Name
Instruction
Qty
1
Water tank mouth plug
silica gel/A-φ30.5black
1
2
Cross recessed pan head screws
M3x20xΦ6 Stainless steel grade 8.8 with gasket
12
3
Water tank top cover
φ440*100 (with two round holes)
1
4
Paddle
φ391.3*132
1
5
Water tank seal ring
φ423*7 Hardness 80 degrees
1
6
Water tank lower cover
φ440*100 (No round holes)
1
7
Nylon nut
M3xH3.8xS6 stainless steel
12
8
Cross recessed pan head self-tapping screws
ST4.2*10
1
9
Sensing head
1
10
Retractor fixing plate
1
11
The upper shaft sleeve
1
12
Screw M8*15
M8*15*S5
12
13
Washer
φ
8
D8*Φ16*1.5
8
14
Cross slot disc head tapping screw
ST4.2*16
2
15
The pullback assembly
Nylon + bearing + ribbon + worm coil
+304stainless steelφ110*220,A magnet
1
16
Internal hexagonal head screw
M6*25*S4
6
17
Plastic bearing seat
1
18
Retractor mounting assembly
1
19
Elastomer gasket
φ50*3φ20.5 Black rubber hardness of 80
degrees
2
20
Rubber washer
φ40*7 Black rubber hardness of 80 degrees
1
21
Tank shaft sleeve
1
22
Stationary pin
SUS304/φ8*40
1
23
Flat washer
d8×Φ16×1.5 stainless steel
1
24
Elastic washer
D8 stainless steel
1
25
Hexagon socket pan head screws
M8×20×S5 stainless steel
1
26
Inner hexagonal cylindrical screw
M10*55 A thick pole half tooth
3
27
Deep trench ball bearing with shoulder
6000ZZWith steps of 2mm on one side
6
28
Small woven belt wheel
PP/φ51*φ38*32 black
2
29
Nylon nut
M10
3
30
New big pulley
1
31
End cap
Equipped with a 40 * 20 elliptical tube
2
32
Inner hexagonal cylindrical screw
M6*35*S5
2
33
Hand mat
2
34
Hexagon socket pan head screws
M8*50*S5
4
35
Wave gaskets
D8
16
36
Column assembly
1
37
The cable plug
2
38
End cap
Equipped with a 50 * 25 elliptical tube
2
39
Nylon nut
M8
2
40
Transport wheel
2

18
41
Front support assembly
1
42
End cap
Equipped with an 80 * 40 elliptical tube
2
43
Adjust the foot pad
2
44
Internal hexagonal head screw
M8×65×25×S5
4
45
Pedal spindle
2
46
Left foot
1
47
Tie foot woven belt combination
2
48
Right foot
1
49
Main frame assembly
1
50
Screw M8*40
M8*40*S5
6
51
Spring washer φ8
D8
12
52
Nut M8
M8
4
53
Edgings
2
54
Limit pad
4
55
Screw M6*16
M6*16*S5
6
56
Slide
2
57
After adjustable foot sleeve
Equipped with an 80 * 40 elliptical tube
2
58
Rear support assembly
1
59
Supper support plate
2
60
Flat washer
D6
7
61
PVC bushing
φ16*φ10.5*22.5
4
62
Pad roller
4
63
Axis with retaining ring
D10
4
64
Seat axle
2
65
PVC bushing
φ16*φ8.5*204
1
66
Seat cushion limit shaft
1
67
Cushion
1
68
PVC grips
2
69
Armor tube
1
70
The handle seat
1
71
Guard
1
72
Inner hexagonal flat round head screw
M6*10
8
73
Electronic meter mounting assembly
1
74
Inner hexagonal cylindrical screw
M6*70
1
75
Axle sleeve
2
76
Inner hexagonal flat round head screw
M5*10*S4
2
77
Nylon nut
M6
1
78
Electronic meter
1
79
Electronic table fixed board
1
80
Cross pan head screw
4
81
Funnel
1
82
Manual pump
1
83
Open spanner #10
1
84
Allen wrench # 4
1
85
Cross spanner
1
86
Allen wrench # 5
1

19
87
Screw M8*30
M8*30*S5
4
88
Open-type core rivet
3.2*9
4