TOOLS REQUIRED TABLE OF CONTENTS
ASSEMBLY INSTRUCTIONS
QUESTIONS?
Model Number: 90757
Product ID:
Icon legend..................................................3
Warnings & notices......................................4
Pole assembly..............................................5
Pole-to-base assembly...............................10
Backboard-to-rim assembly......................15
Backboard-to-pole assembly.....................19
Parts identifi er..........................................i–iv
Handle assembly.......................................24
Final assembly...........................................30
Moving the system.....................................35
Maintenance.............................................36
Warning sticker...........................................37
(x2)
(x1)
(x1)
(x1)
(x1)
(x1)
(x1)
(x1)
1/2" (≈13 mm), 7/16" (≈11 mm),
9/16" (≈14 mm), 3/4" (≈19 mm)
3/16" (≈5 mm)
(included)
325 lb (≈147 kg)
1/2" (≈13 mm)
(x2)
(x1)
(x1)
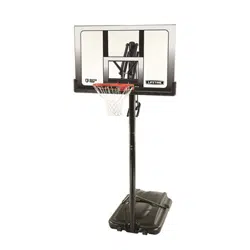
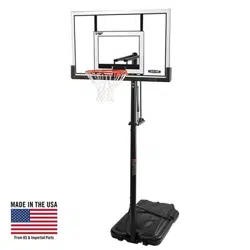
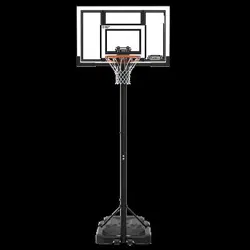
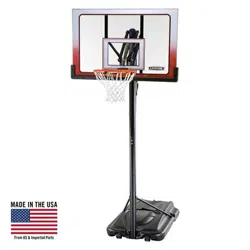
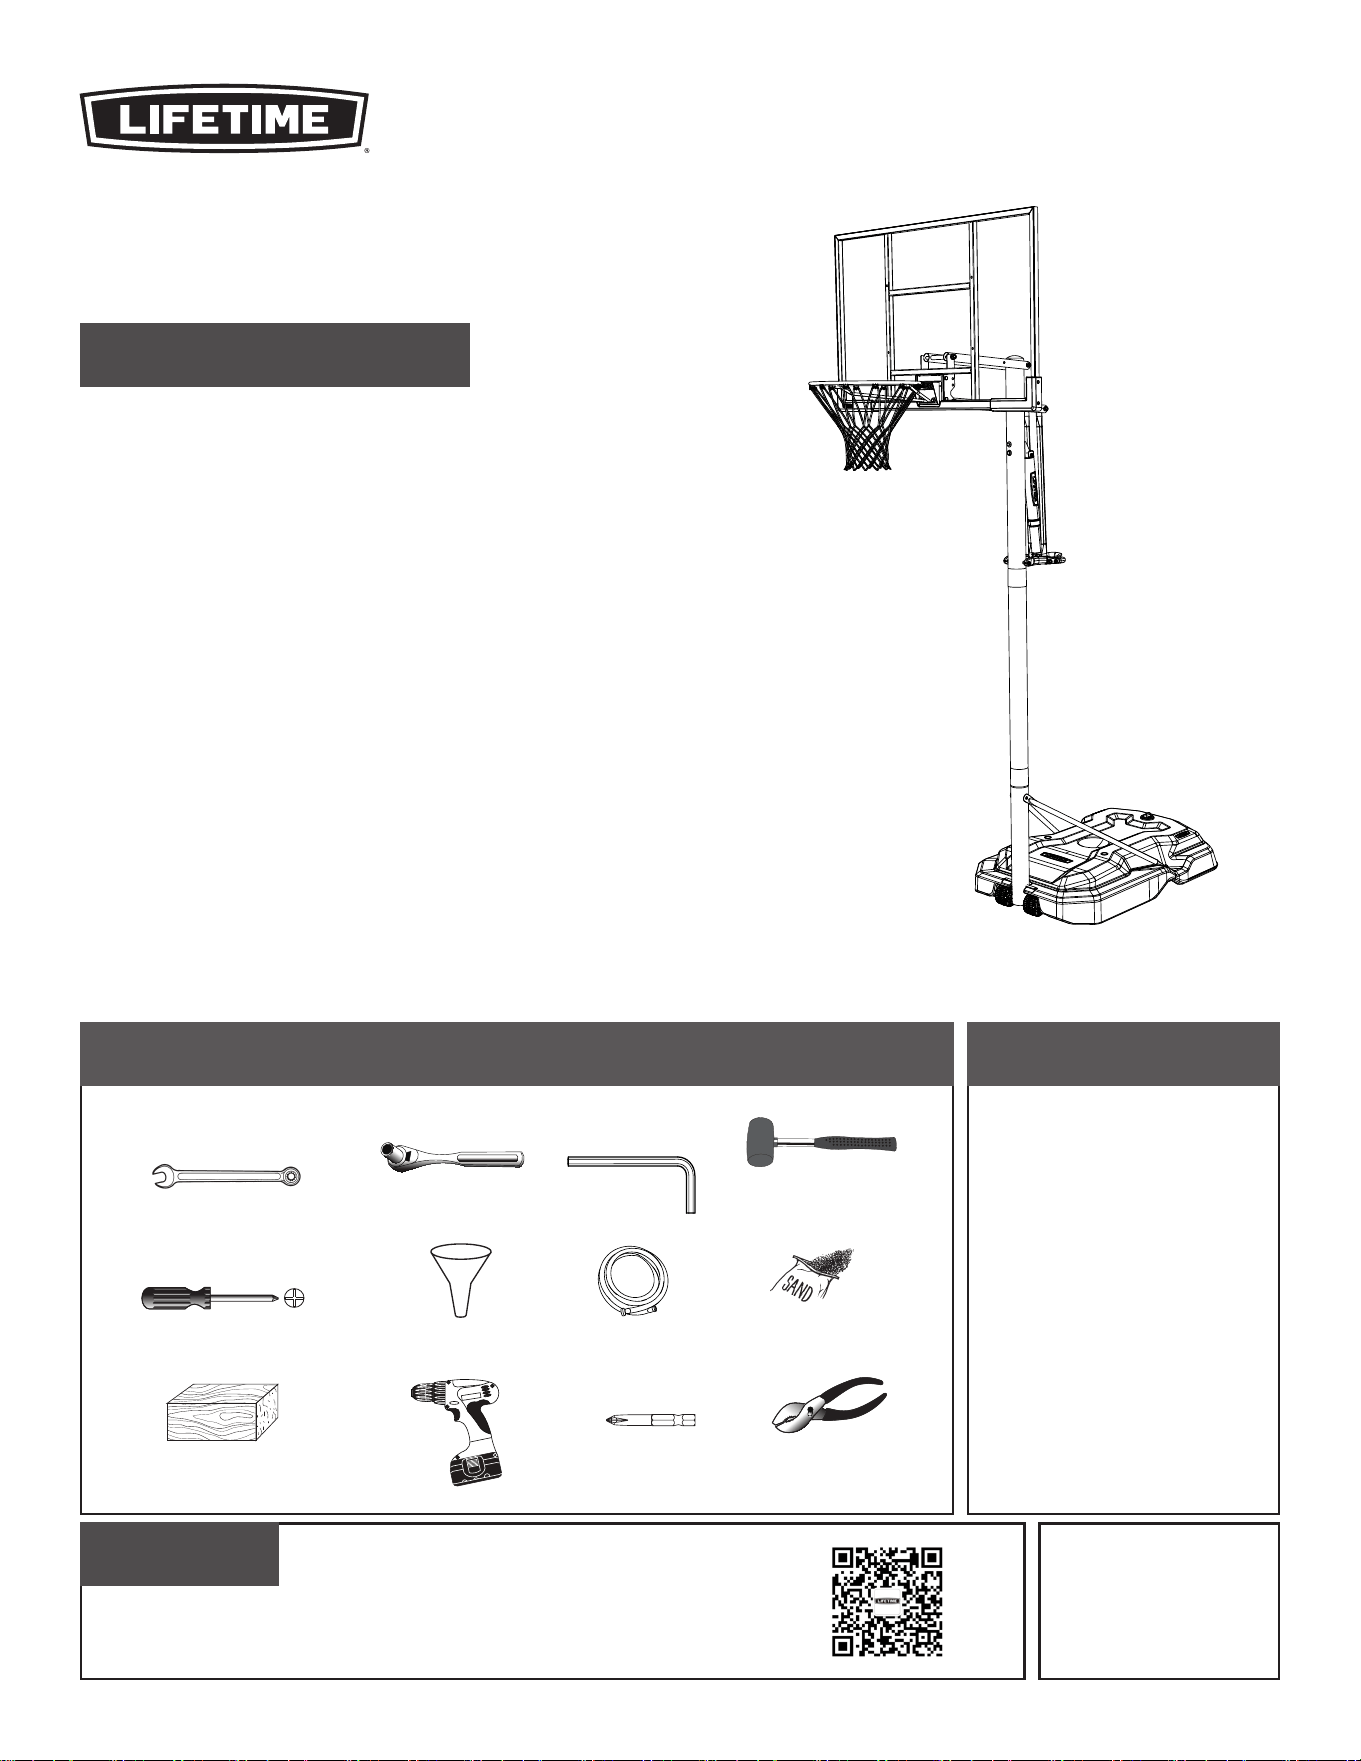
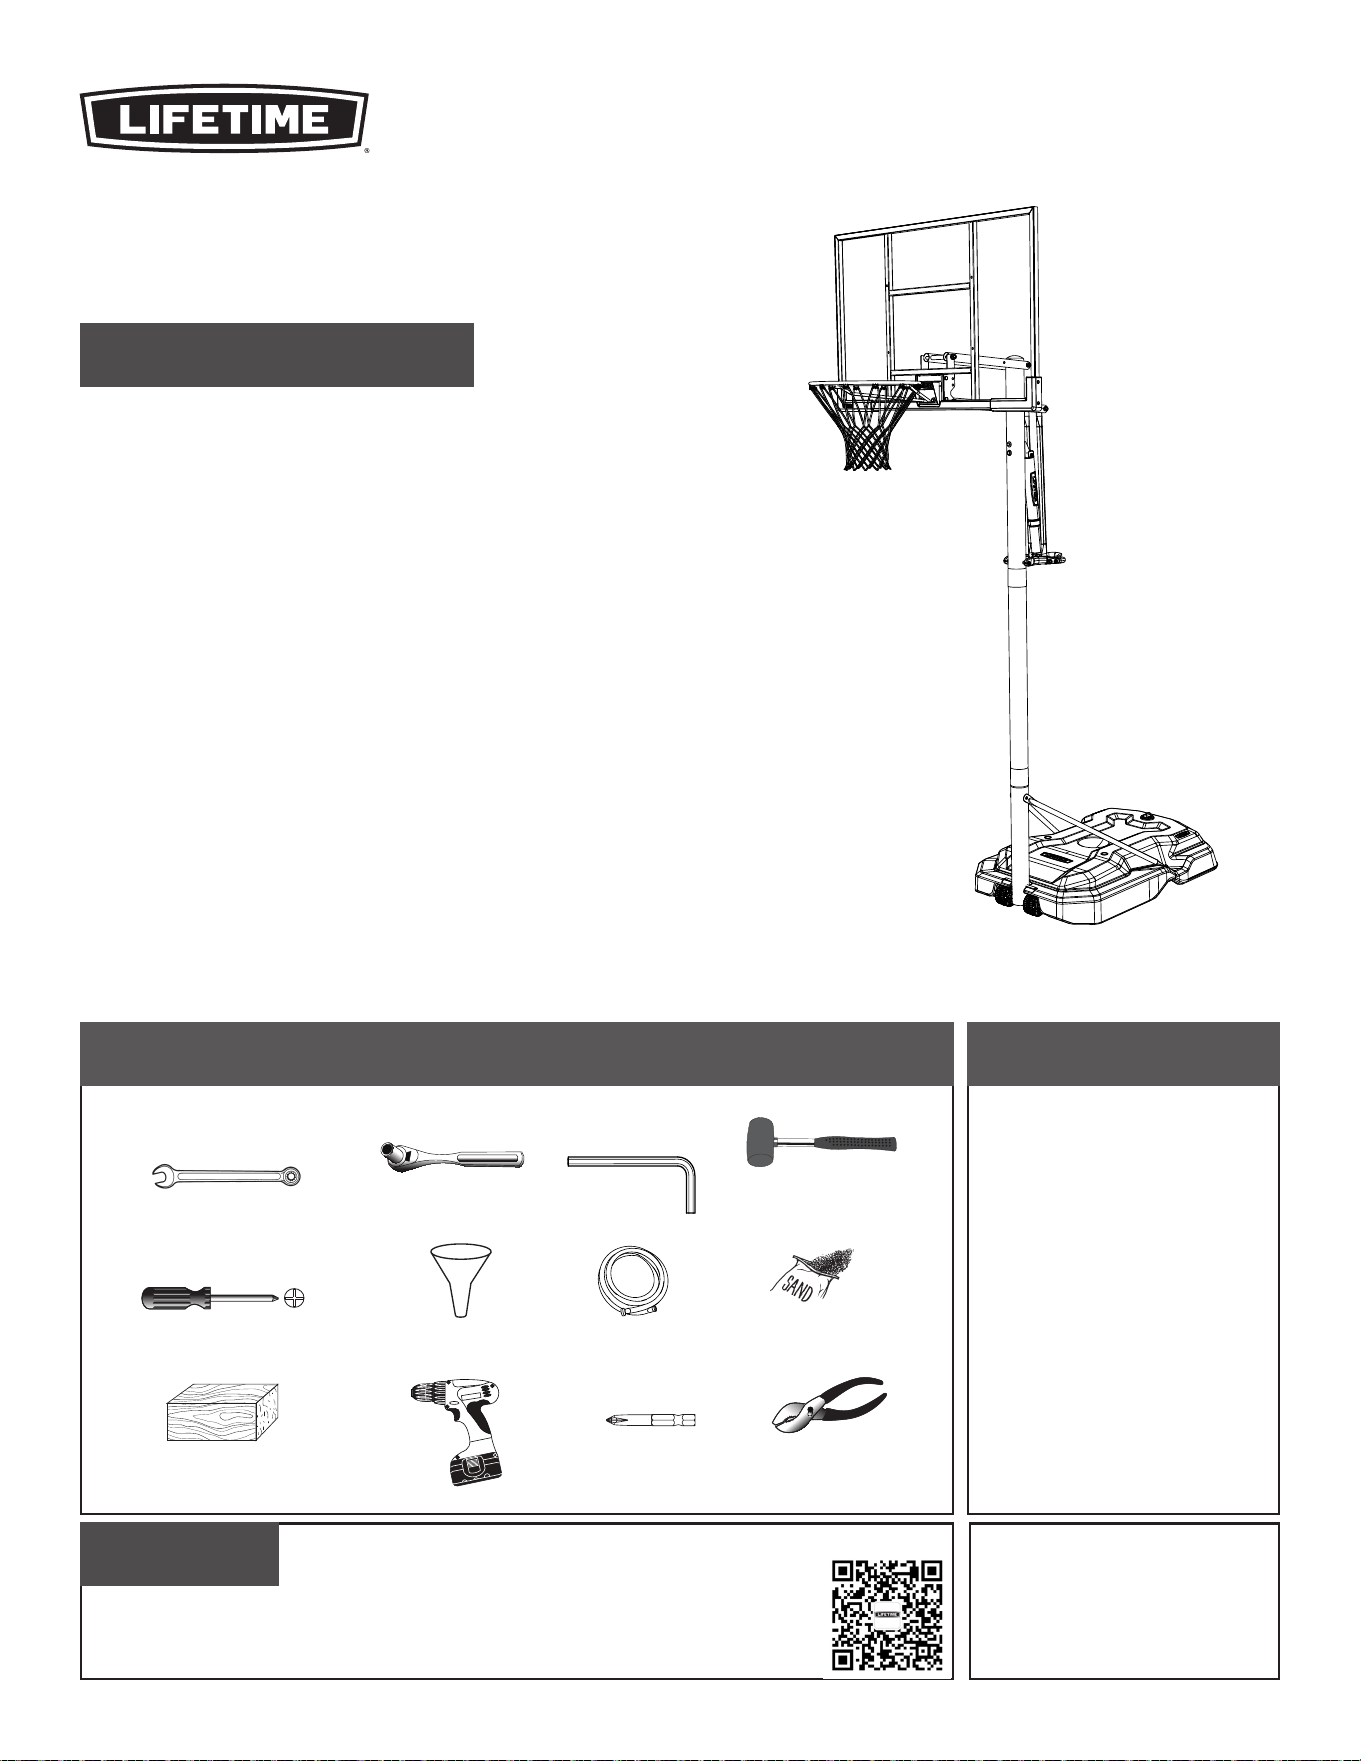
POWER LIFT
™
BASKETBALL SYSTEM
MODEL 90757
Save this instruction in the event that the manufacturer has to be contacted for replacement parts.
IMPORTANT, RETAIN FOR FUTURE REFERENCE: READ CAREFULLY
• Decide with what to fi ll the base
(sand is recommended)
• At least 2 adults recommended for setup
BEFORE ASSEMBLY:
中文版,详见第2页。
Web Site: cn.lifetime.com
2
(x2)
(x1)
(x1)
(x1)
(x1)
(x1)
(x1)
(x1)
1/2" (≈13 mm), 7/16" (≈11 mm),
9/16" (≈14 mm), 3/4" (≈19 mm)
3/16" (≈5 mm)
(
包括
)
325 lb (≈147 kg)
1/2" (≈13 mm)
(x2)
(x1)
(x1)
POWER LIFT
™
篮 球 架
MODEL 90757
Web Site: cn.lifetime.com
For English, see page 1.
安装说明书
· 准备场地
安装开始前,请您决定如何填充底座(推荐使
用沙子)。
· 征集亲朋好友
安装此产品需2个成年人。
烦请妥善保管本说明书以便更换零件时联系制造商。
所需工具
图标示意...............................3
警告与注意事项..................4
立柱安装步骤.....................5
立柱固定到底座的安装步骤...10
篮板和篮筐的安装步骤......15
篮板固定到立柱的安装步骤...19
零件识别..........................i–iv
把手的安装步骤..........24
填充底座........................30
移动篮球架.......................35
维护说明...........................36
警告贴纸....................37
目录
产品型号#与产品生产编码
(联系我们时需用到这两个号码)
产品型号:90757
产品生产编码:
联系我们
微信公众号:

3
• Indicates the parts to be used for a section.
• 表示组装该部份时所需的部件。
• Indicates special heed should be taken when reading.
• 表示在阅读时需特别留意。
• Indicates the hardware to be used for a section.
• 表示组装该部份时所需的五金器具。
• Indicates the tools to be used for a section.
• 表示组装该部份时所需的工具。
• Indicates no hardware required for a specifi c page.
• 表示该特定页面的组装不需要任何部件。
• Indicates no parts required for a specifi c section.
• 表示组装该特定部份时不需要任何部件。
• Indicates to use/not to use an electric drill for a specifi c step.
• 表示该特定步骤使用/不使用电钻。
ICON LEGEND / 图标图例
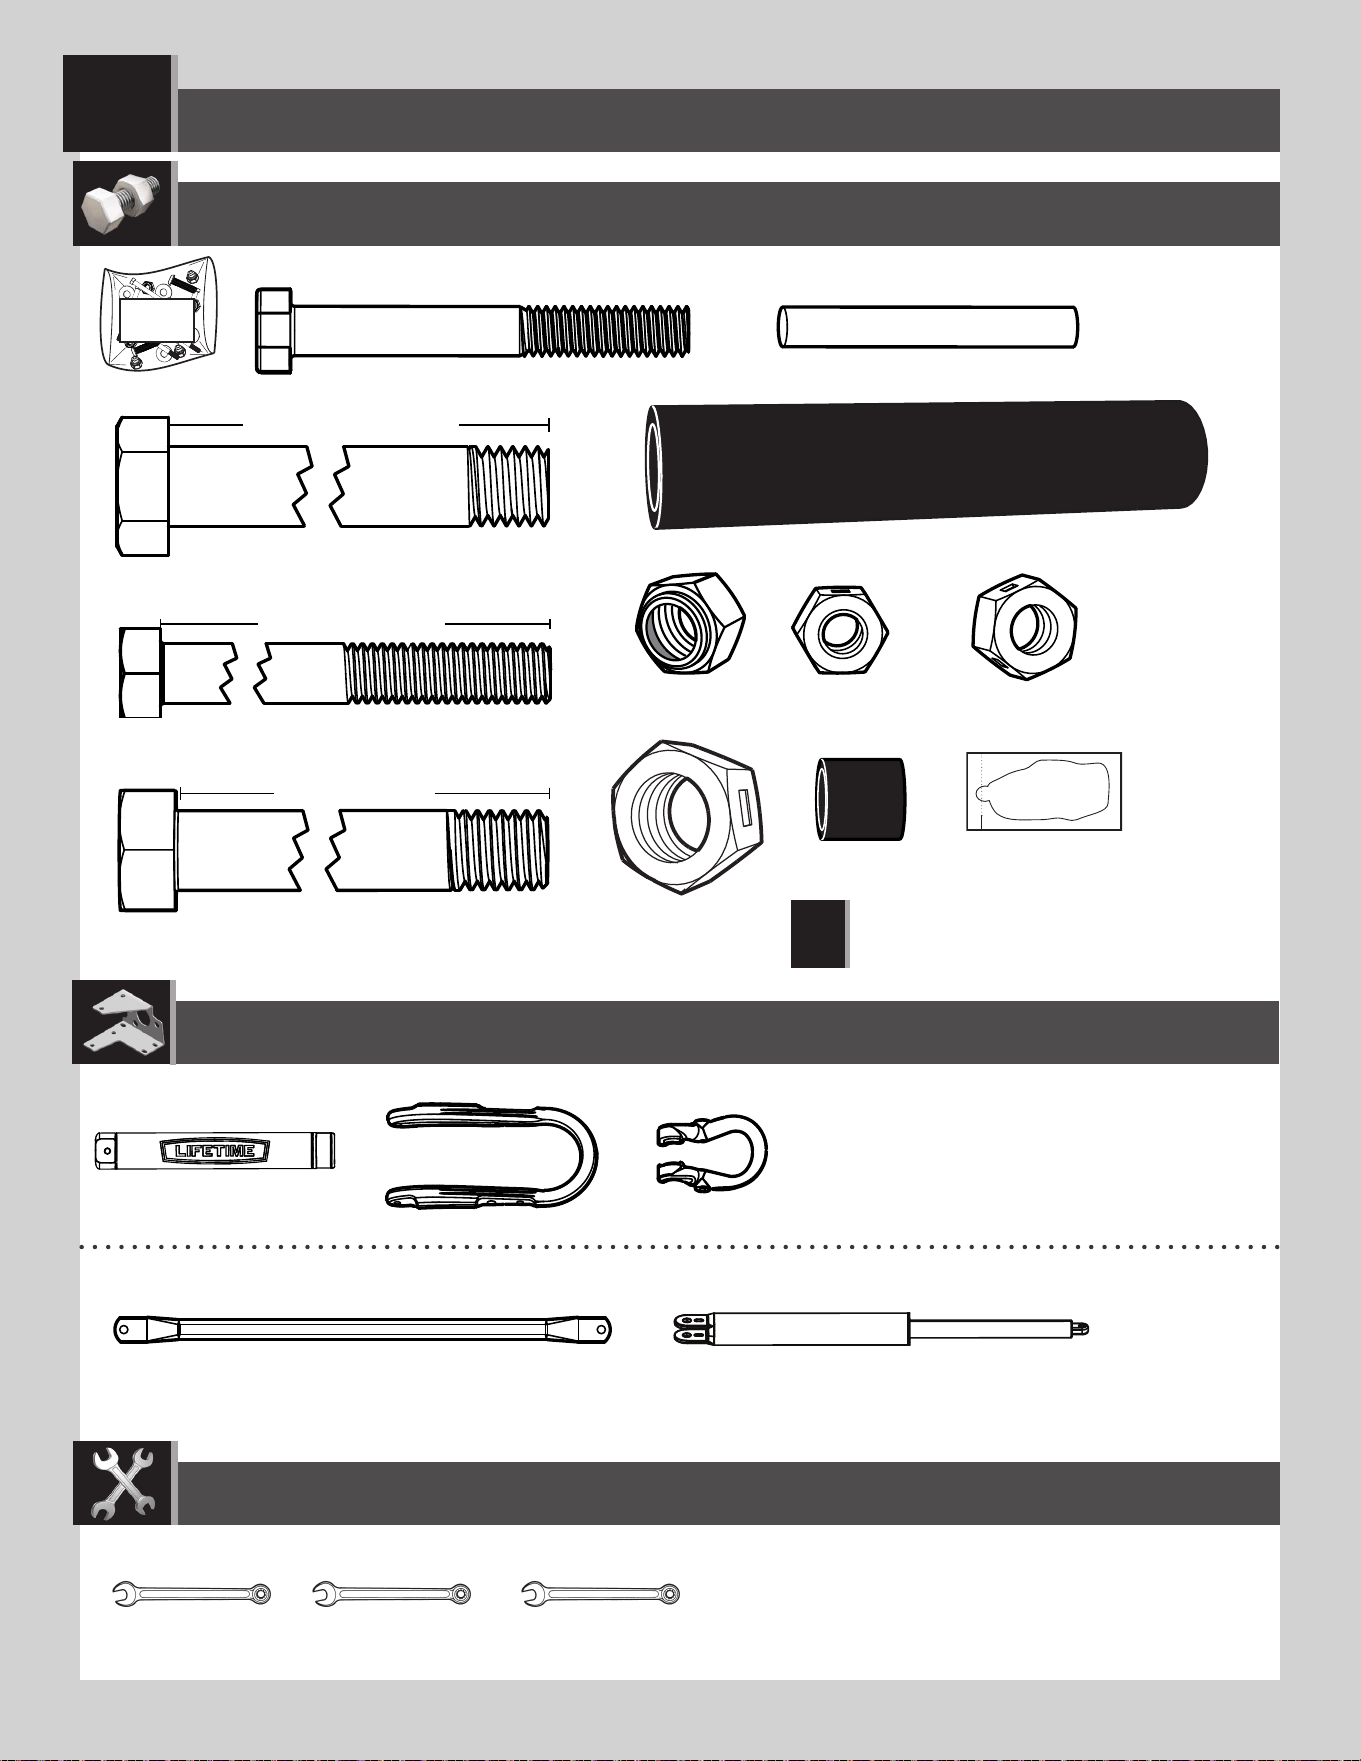
• These nuts are centerlock nuts. They are designed to be tight; therefore, they will be harder to tighten. Tighten until fl ush
with the metal or plastic.
• 这些螺帽为中心锁定螺帽。它们旨在起紧固作用;因此,它们在拧紧时需要用力。
LIFETIME
®
4
• If using a ladder during assembly, use extreme caution.
• Two capable adults are recommended for this operation.
• Check base daily for leakage. Leaks will cause system to fall.
• Assemble the pole sections properly. Failure to do so could cause the pole sections to separate during play or transport.
• Minimum operational height is 7 ft 6 in (2.3m) to the bottom of the backboard.
WARNINGS & NOTICES / 警告与注意事项
Most injuries are caused by misuse and/or not following instructions. Use caution when using this product.
To ensure safety, do not attempt to assemble this product without following the instructions carefully. Check entire box and inside all packing
material for parts and/or additional instruction material. Before beginning assembly, read the instructions and identify parts using the hardware
identifi er and parts list in this document. Proper and complete assembly, use and supervision are essential for proper operation and to reduce the
risk of accident or injury. A high probability of serious injury exists if this product is not installed, maintained, and operated properly.
FAILURE TO FOLLOW THESE WARNINGS MAY RESULT IN SERIOUS INJURY OR PROPERTY DAMAGE AND WILL VOID WARRANTY.
Owner must ensure that all players know and follow these rules for safe operation of the system.
SAFETY INSTRUCTIONS
安全事项
未遵守以下警告事项,可能导致人员严重受伤或财产损失并导致保修失效。
大部分受伤是由错误使用且/或未遵守安装说明造成的。使用本产品时请注意安全。
为确保本产品正常且安全运行,请所有者务必确保所有人员清楚了解注意事项并遵循操作守则。
为确保安全,请勿在未仔细阅读并遵守说明书指示的情况下,试图组装本产品。请检查整个包装盒及内部所有的零部件及/
或补充说明材料。开始组装之前,使用本文件中的零部件识别页面,辨别并清点零部件。恰当地完成组装、合理地使用及监督
是确保本产品正常运行并减少意外或受伤风险的基本前提。如果本产品未能恰当地组装、维护与操作,很可能会受伤严重。
• 若在组装期间使用梯子,请特别小心,注意安全!
• 建议由两名有能力的成年人来组装本产品。
• 每日检查底座有无泄漏。泄漏将导致篮球架翻倒。
• 请正确安装立柱。否则在使用或移动过程中会导致立柱分离。
• 最小工作高度为距离篮板底部7英尺6英寸(2.3m)。
WARNING
Do not hang or swing on the ring.
警告
请勿吊挂或摇晃篮筐。
LIFETIME
®
5
BCO
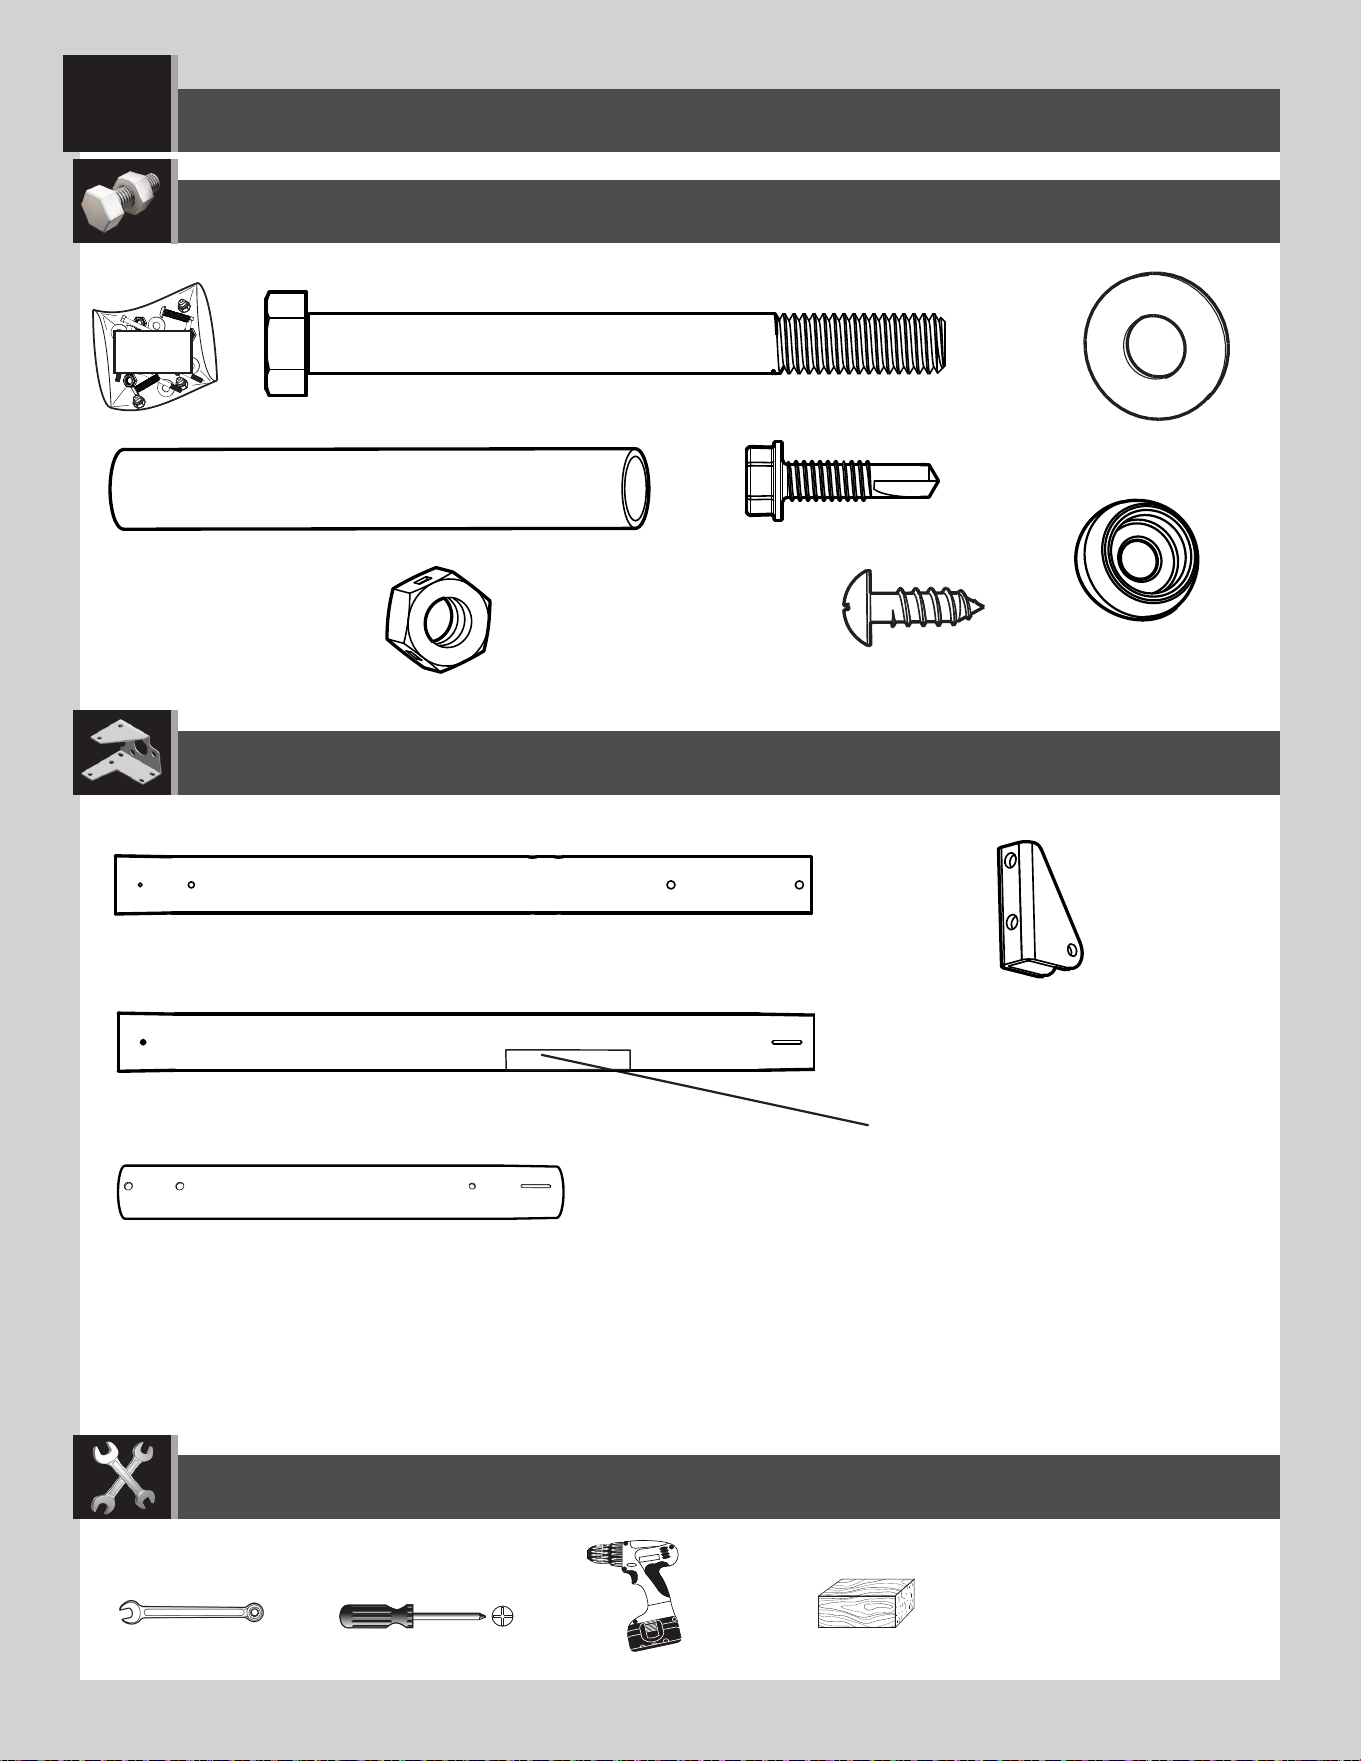
1
ADS (x2)
ABZ (x2)
ABB (x2)
AAF (x2)
ABE (x2)
ABR (x2)
CIH (x2)
9/16”
(≈14 mm)
(x2)
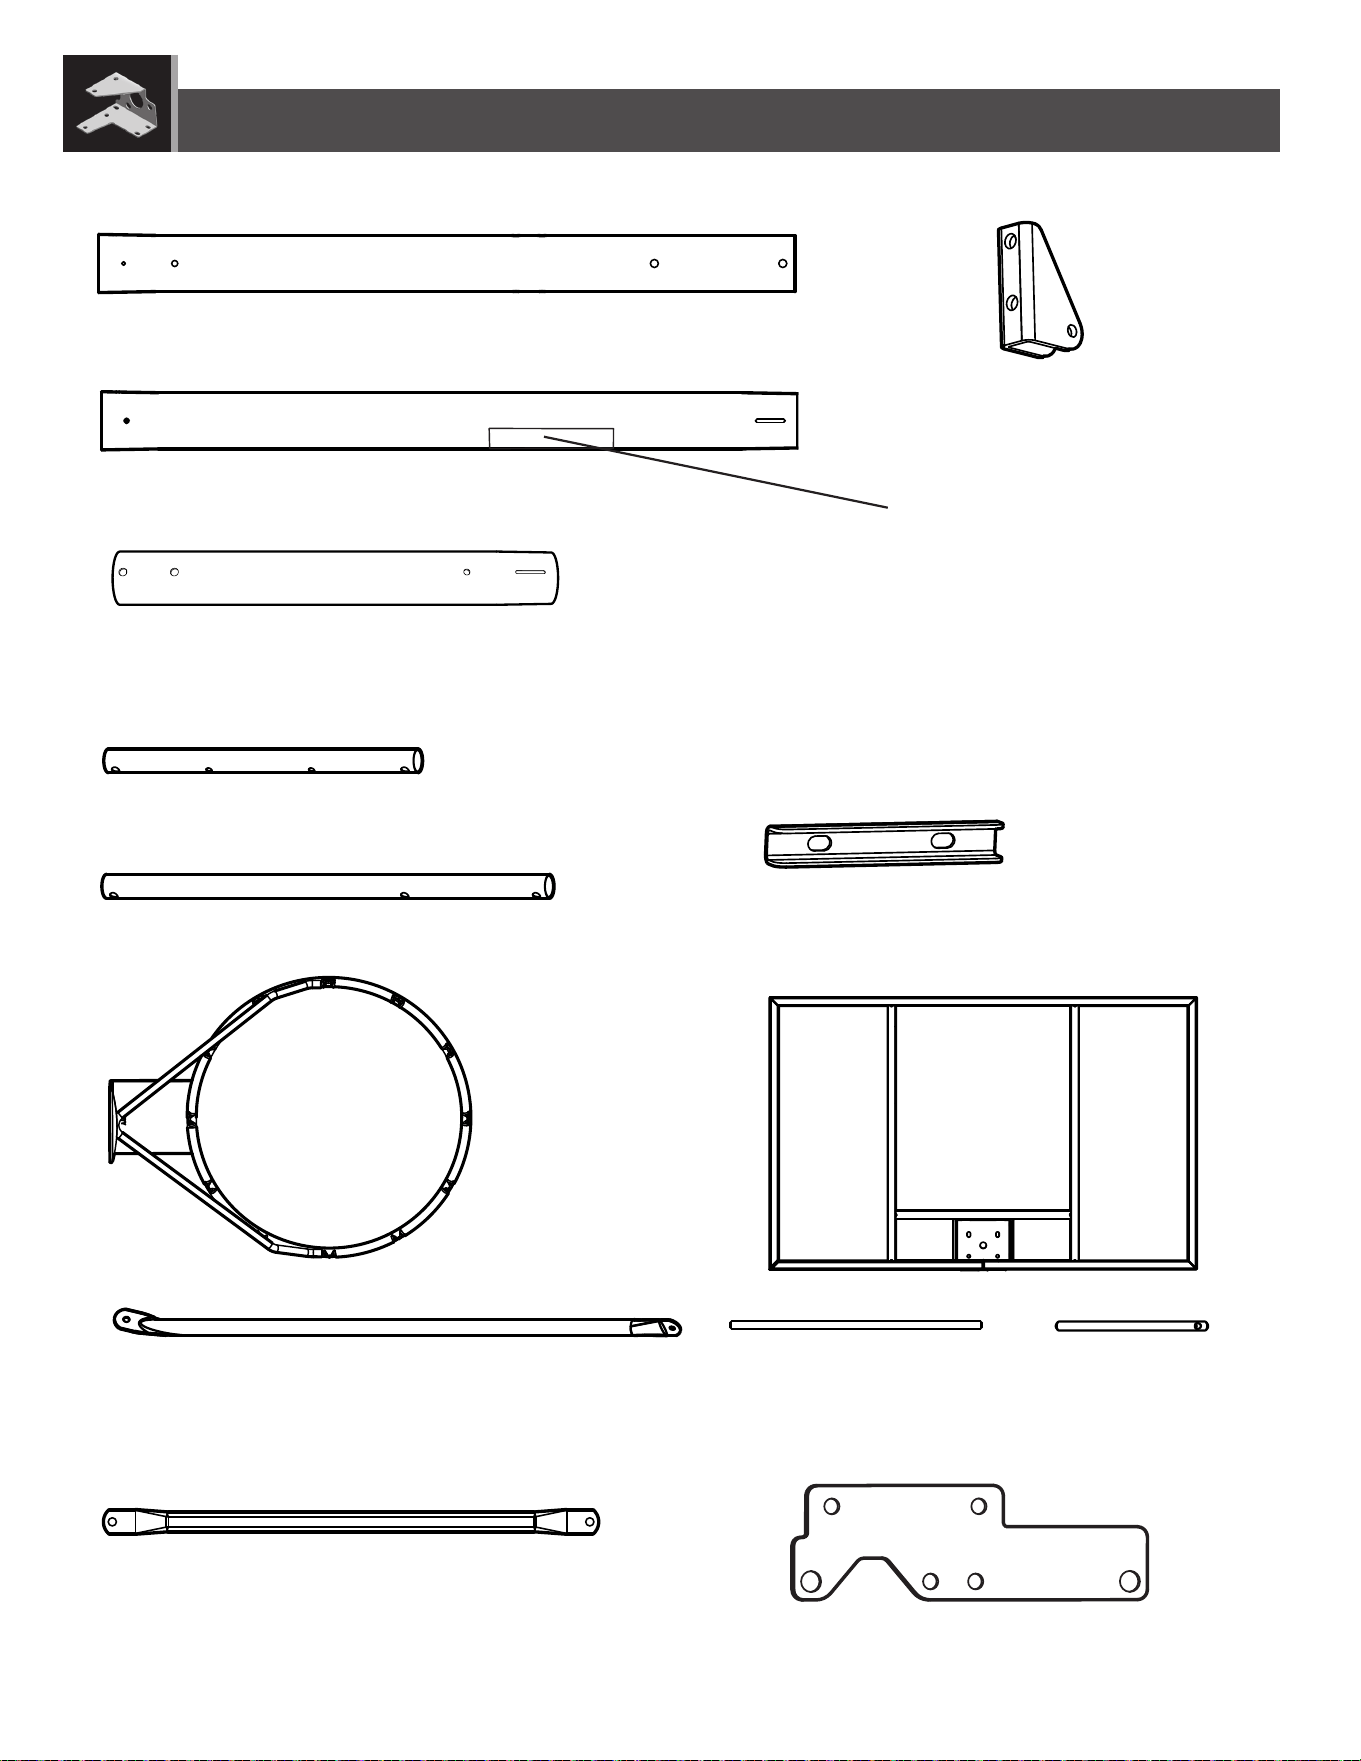
ALH (x1)
ALF (x1)
(x1)
(x1)
(x1)
ALL (x1)
ALE (x1)
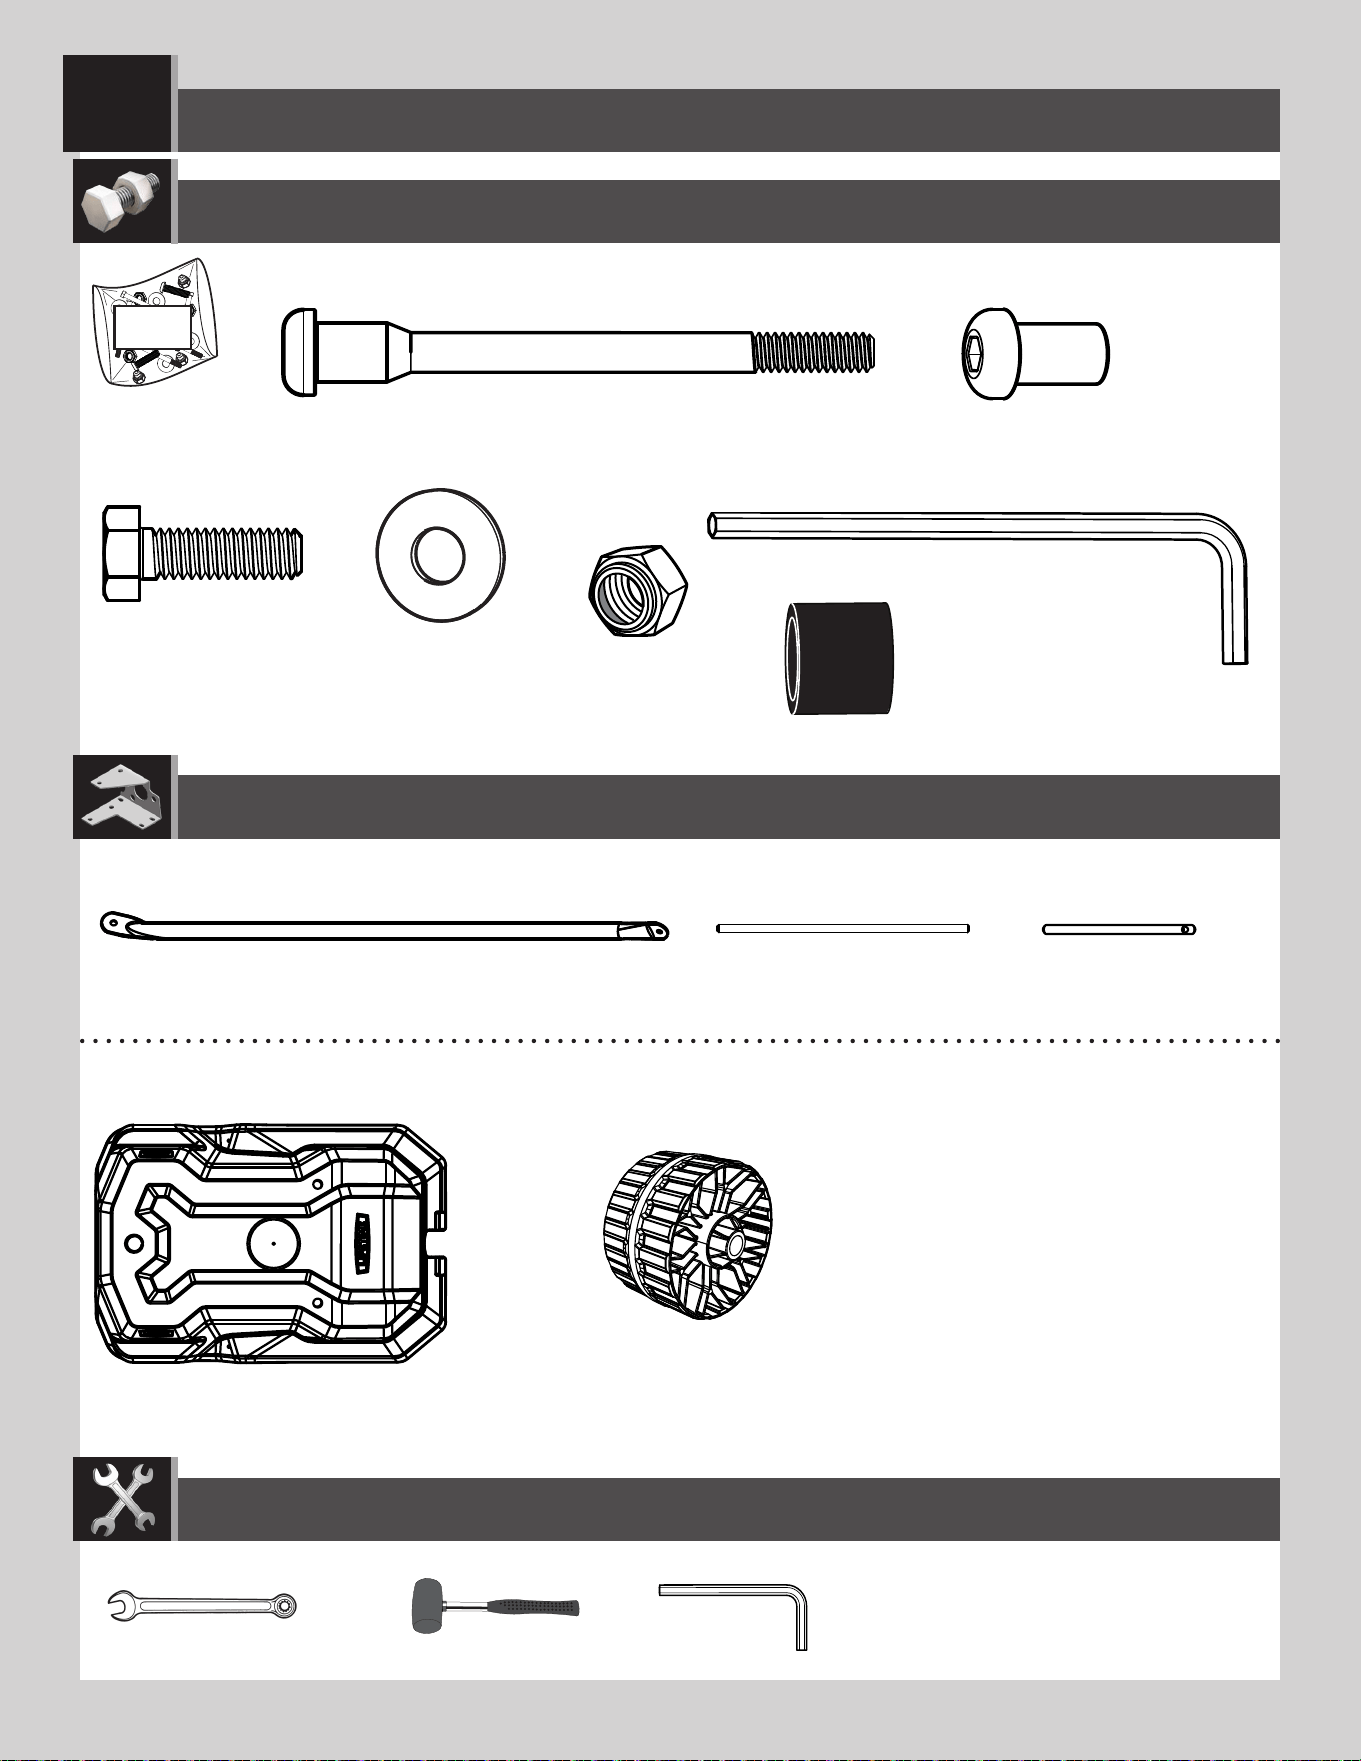
Hardware Bag /
五金配件包
HARDWARE REQUIRED / 所需五金配件
POLE ASSEMBLY / 立柱安装步骤
TOOLS REQUIRED / 所需工具
PARTS REQUIRED / 所需部件
Metal Part /
金属部件
• Warning Sticker applied to side not shown
• 警告贴纸粘在没有显示的那一侧。
6
SECTION 1 (CONTINUED) / 步骤1(续)
TOOLS AND HARDWARE REQUIRED / 所需工具及五金配件
1.1
Large holes
大孔
Small holes
小孔
AAF (x2)
ABE (x2)
ABR (x2)
9/16"
(≈14 mm)
ABB (x2)
ABE
AAF
ALH
ALH
ALL
ABB
ABE
ABR
(x2)
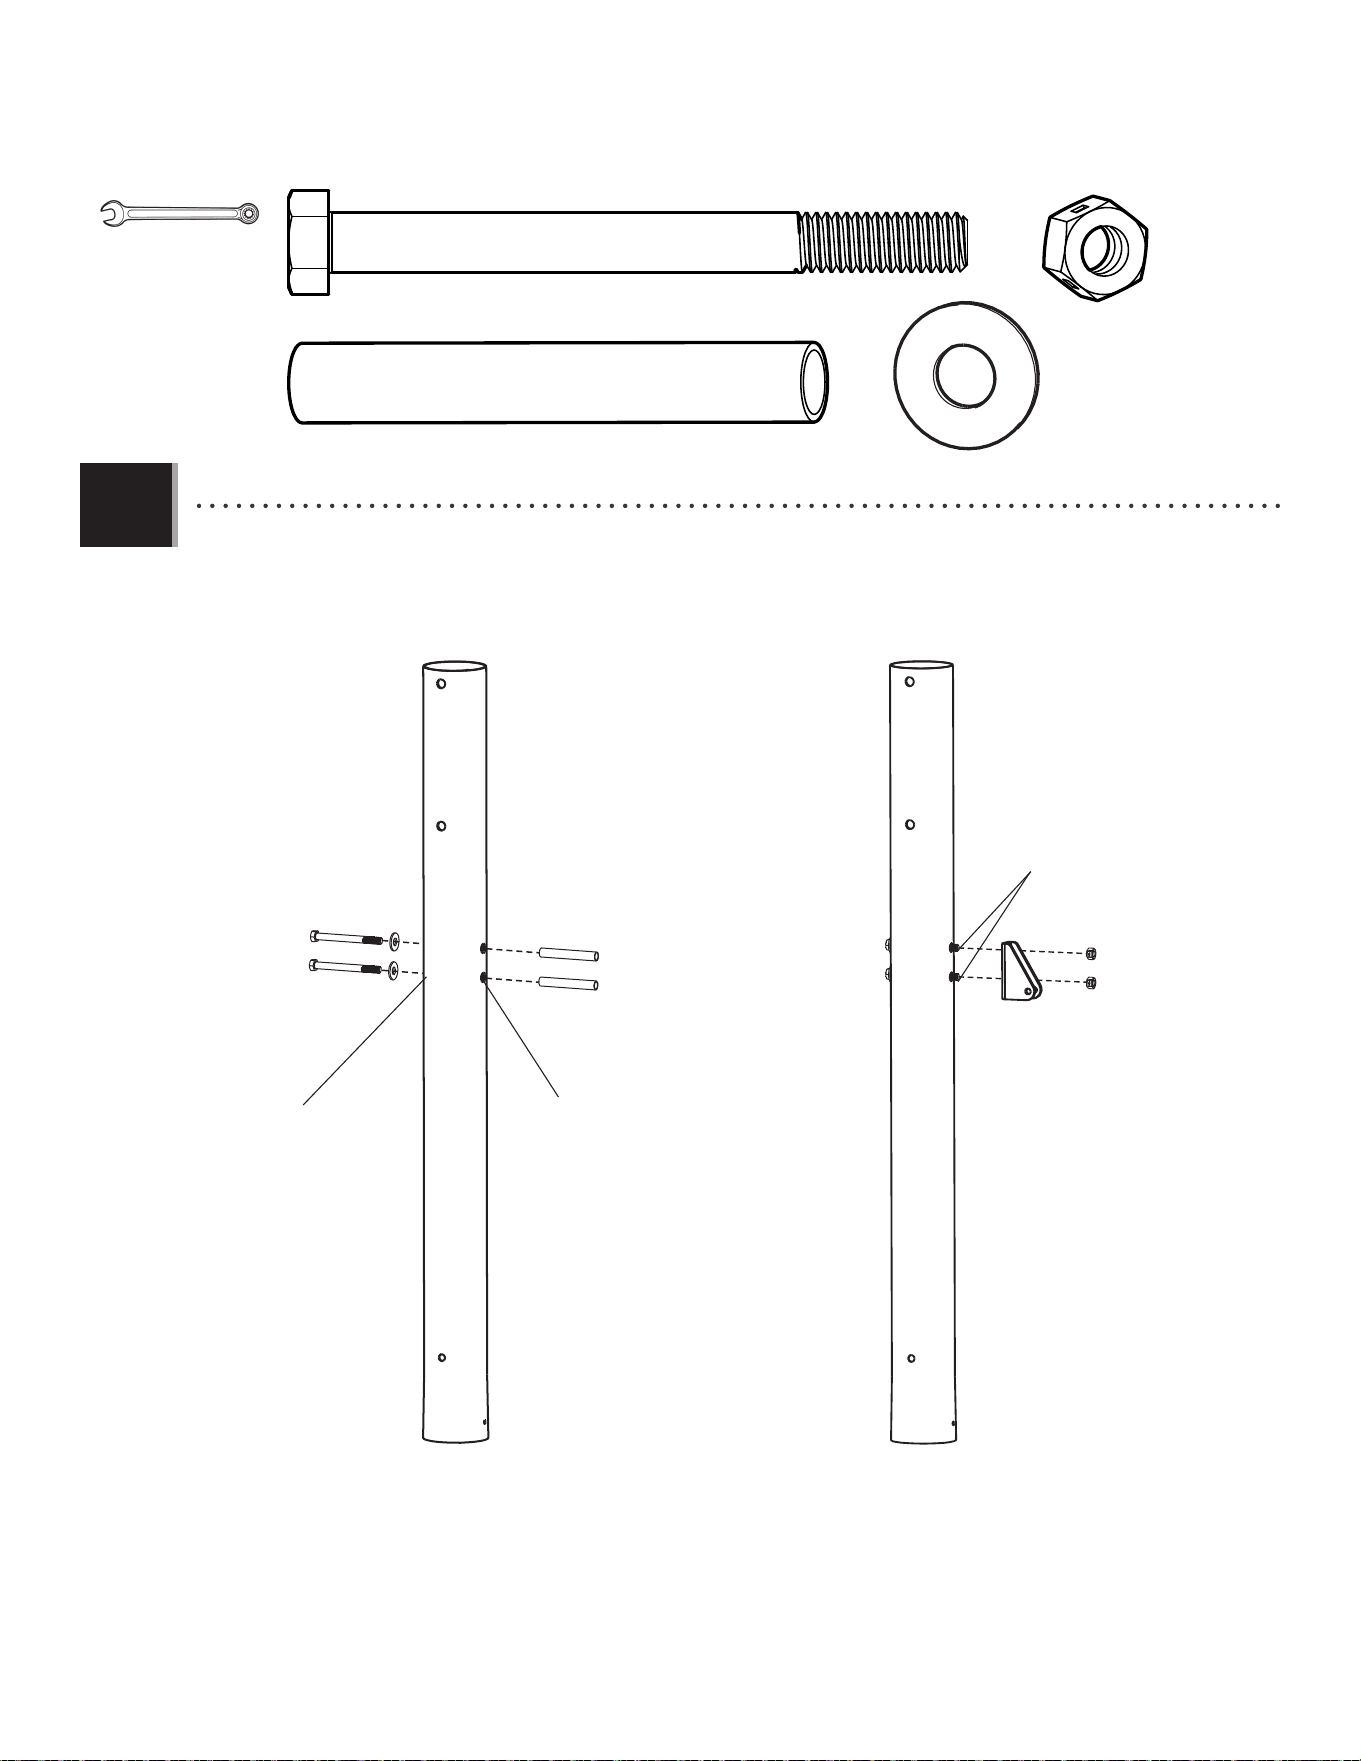
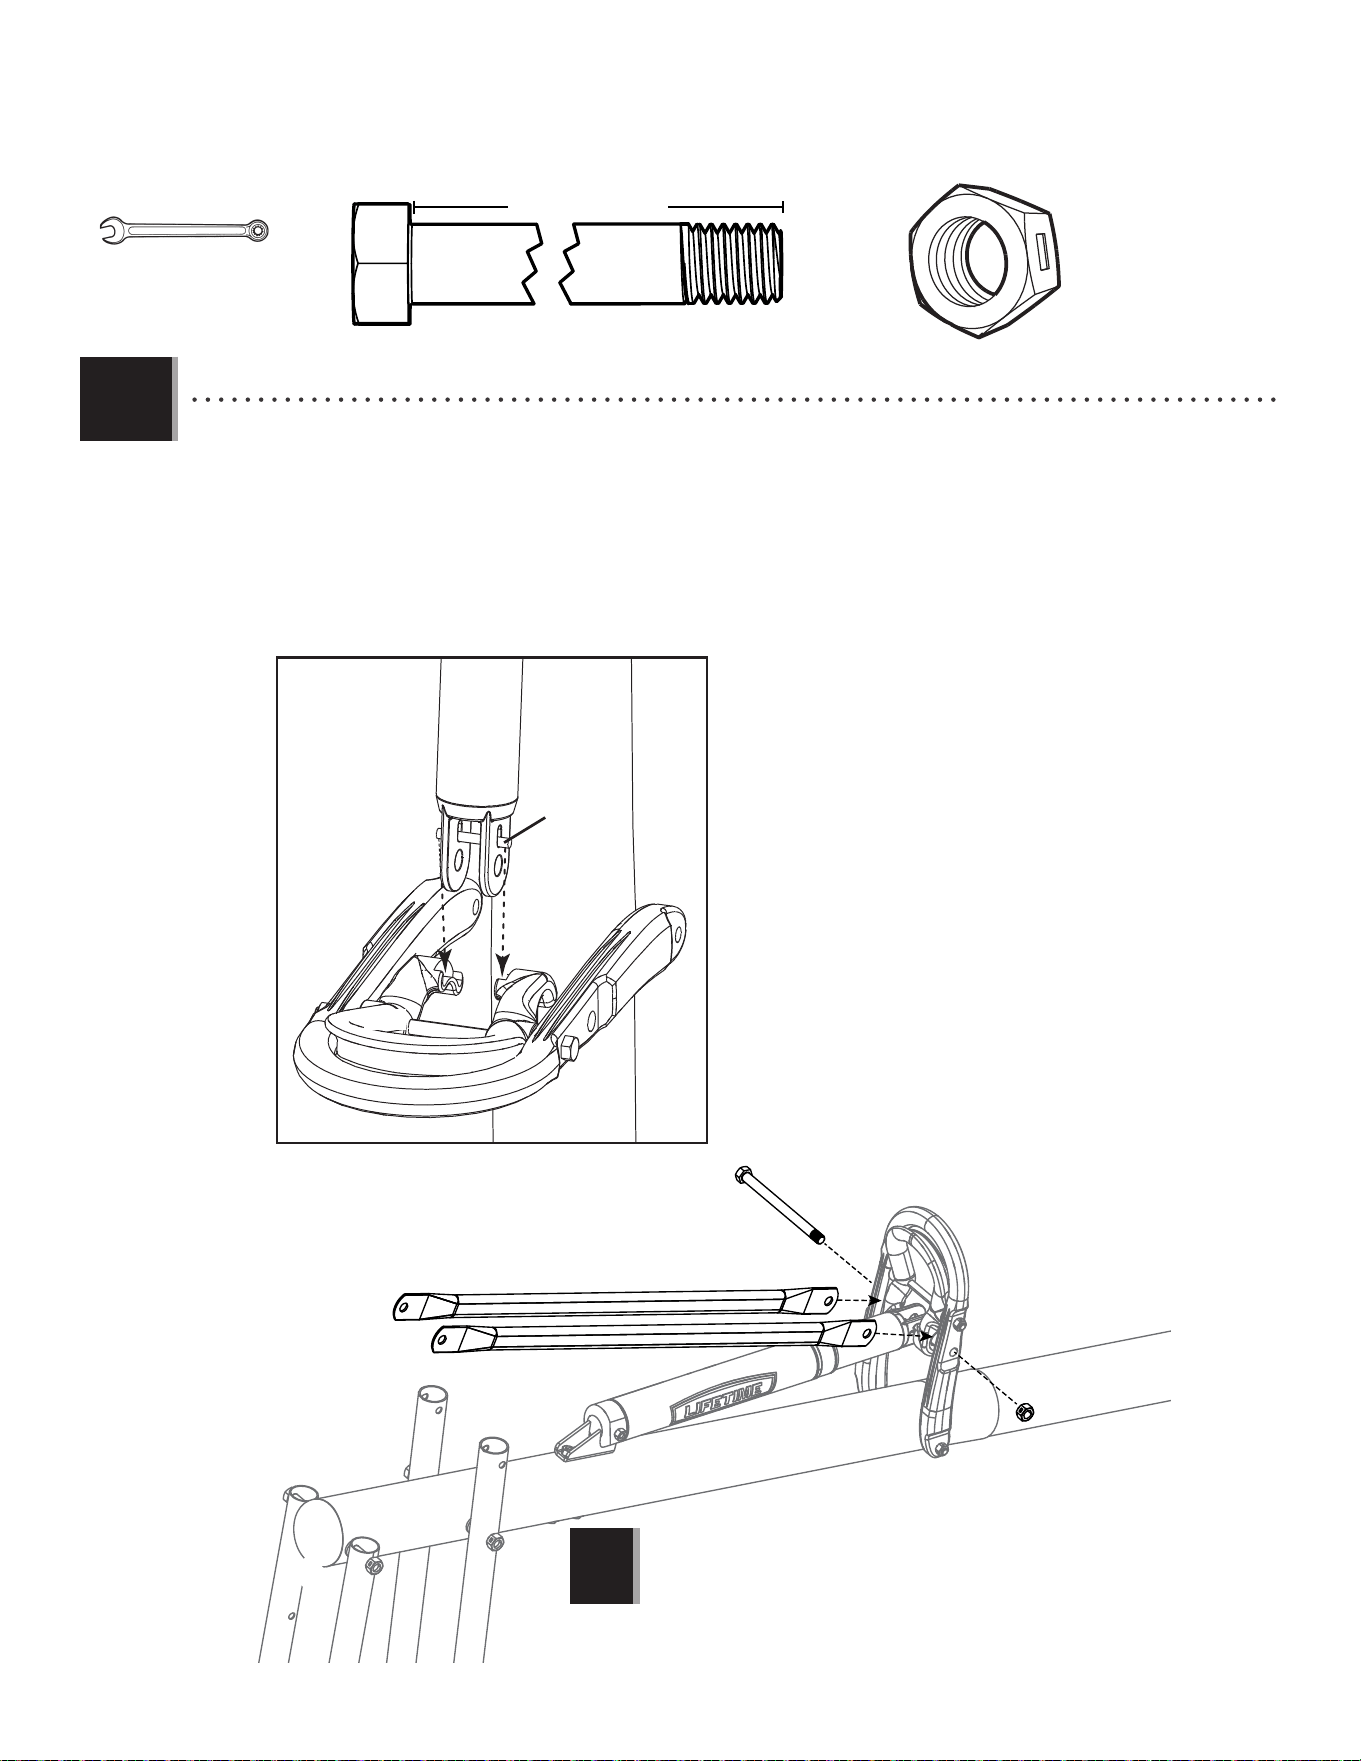
• Secure the pole bracket (ALL) to the top pole (ALH) with the hardware as shown.
•
使用如图所示的五金零件,将立柱托架(ALL)固定至上立柱(ALH)。
7
SECTION 1 (CONTINUED) / 步骤1(续)
TOOLS AND HARDWARE REQUIRED / 所需工具及五金配件
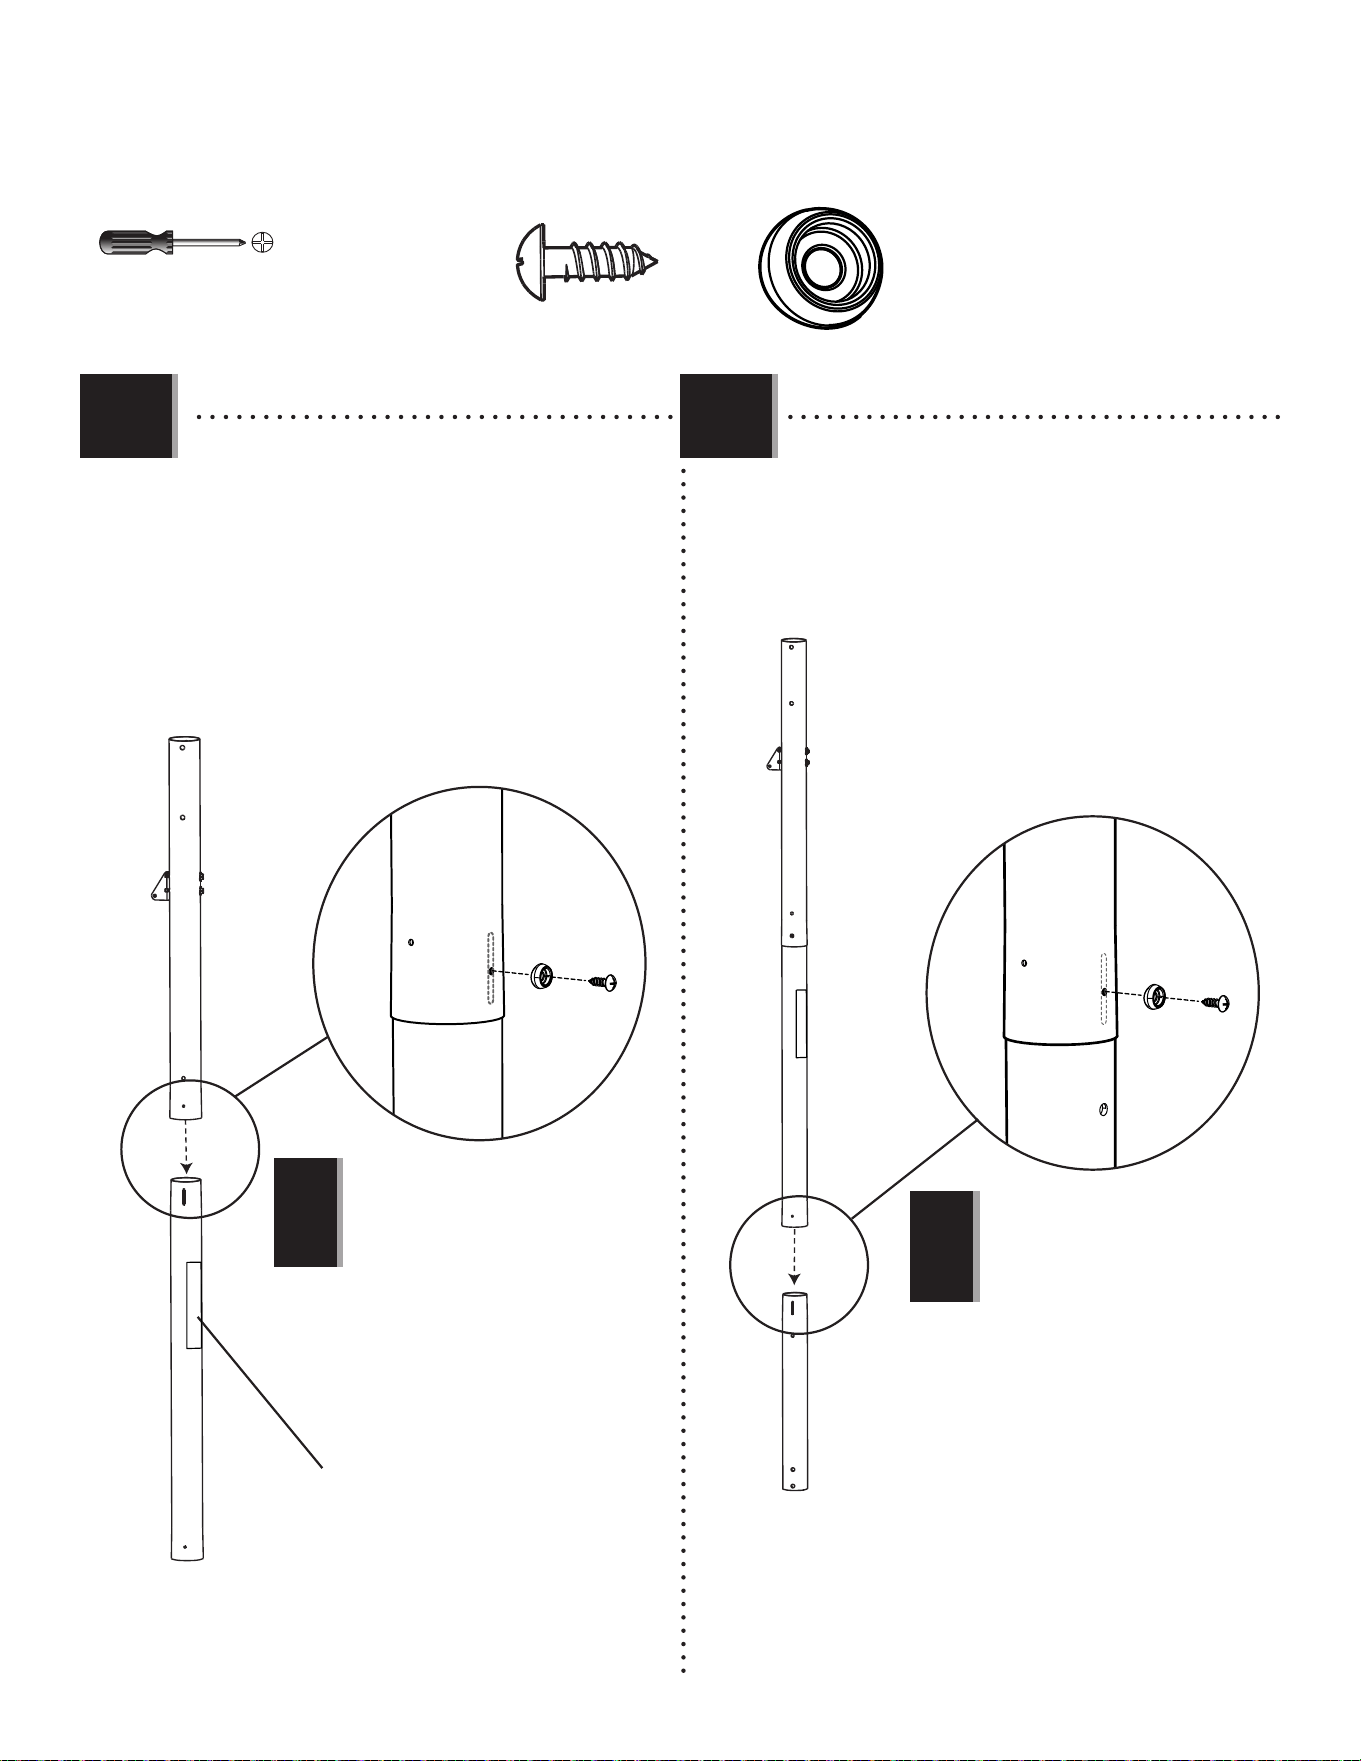
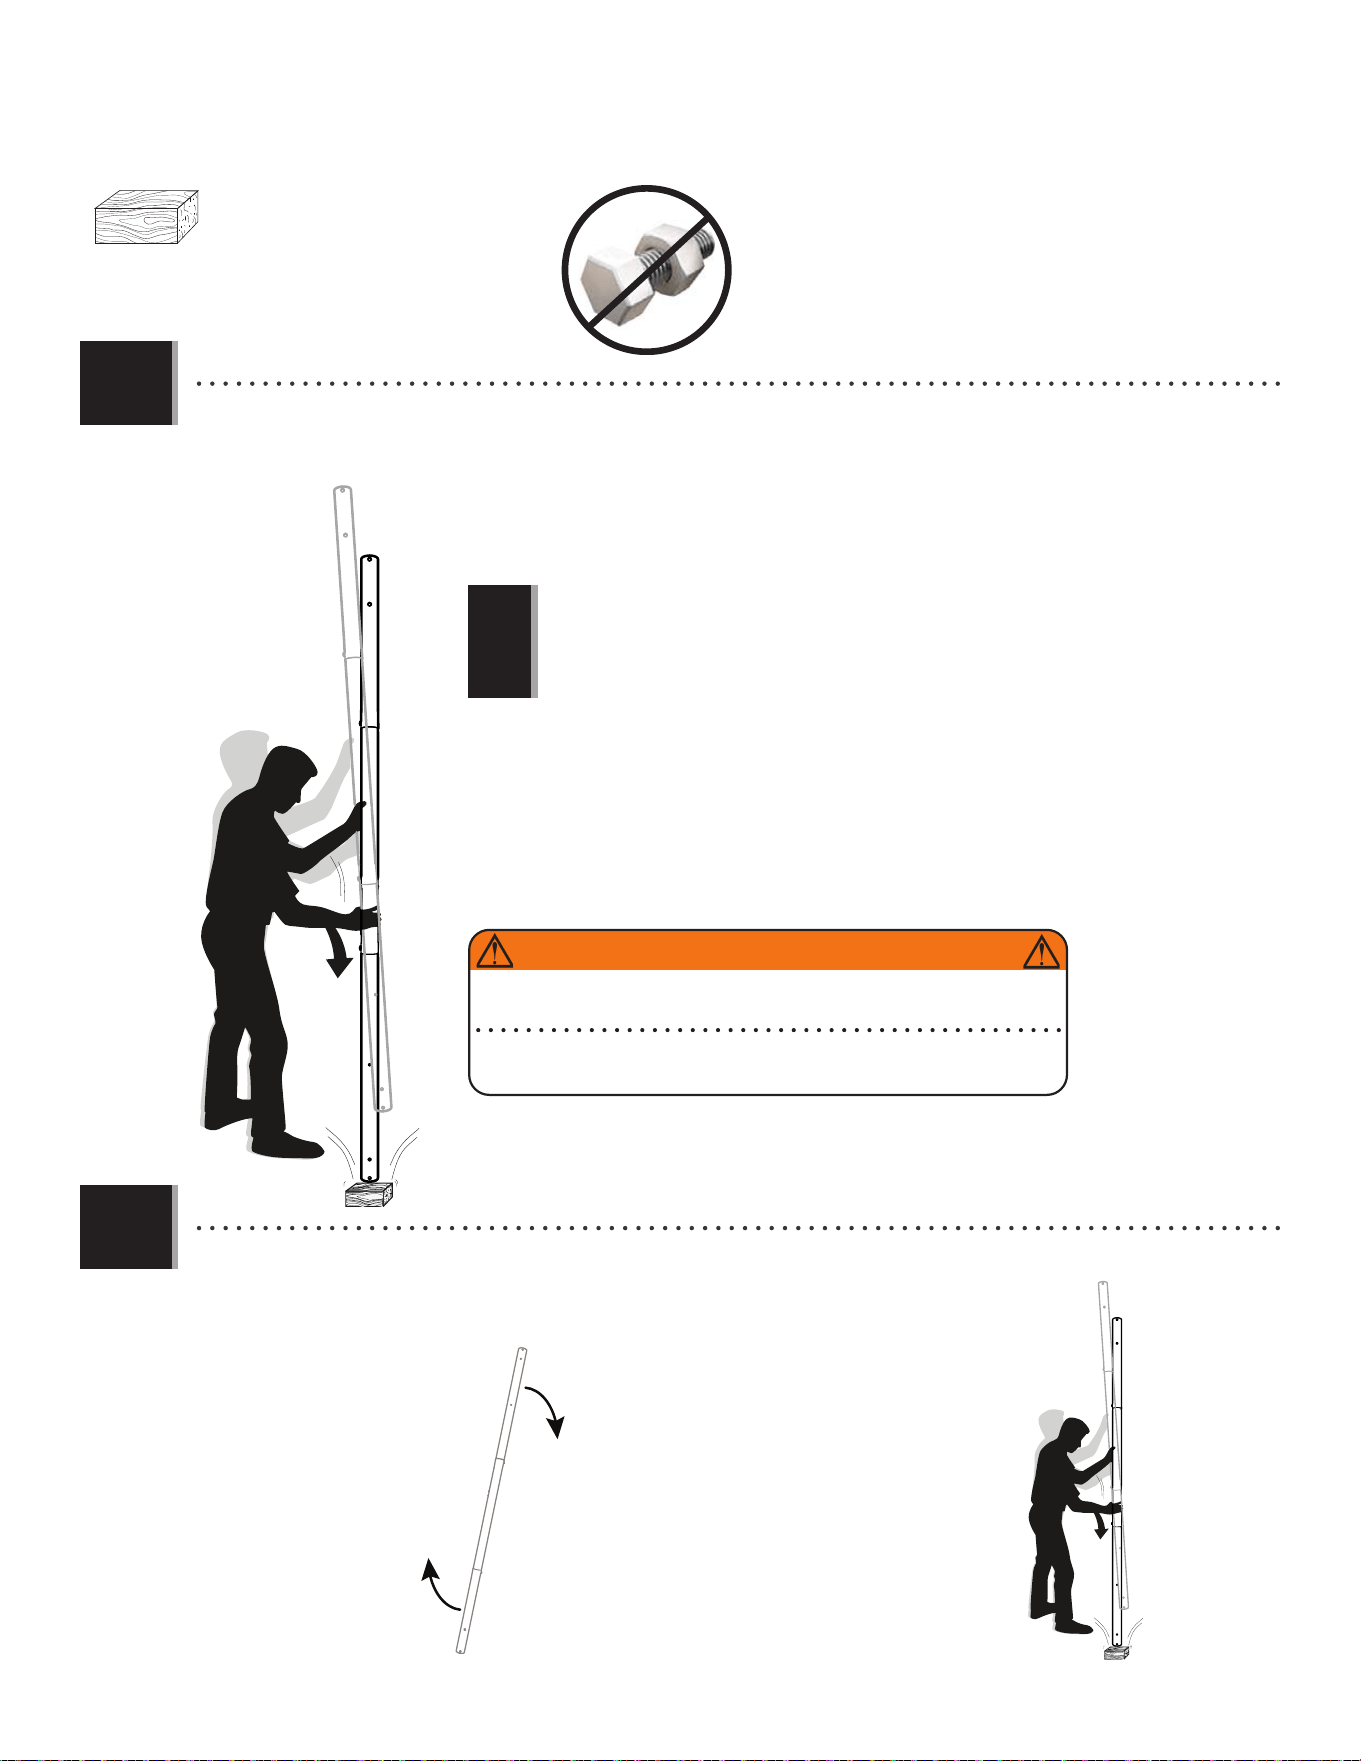
• Align the hole in the bottom of the top pole (ALH)
with the slot in the top of the middle pole (ALF).
• 将上立柱(ALH)底部的孔位对准中立柱(ALF)顶部的
长孔。
• Secure the middle pole to the bottom pole (ALE) using
the same method as step 1.2.
• 使用与步骤 1.2 中相同的方法,固定中立柱(ALF)至下
立柱(
ALE)。
1.2 1.3
!
• The screw should be fl ush with the pole,
but will spin freely once inserted.
•
螺丝应该会与立柱齐平,但是插入后可
以自由转动。
Warning sticker
警示贴纸
!
• The screw should be fl ush with the pole,
but will spin freely once inserted.
•
螺丝应该会与立柱齐平,但是插入
后可以自由转动。
1.2
ADS (x2)
1.3
CIH (x2)
ALH
ALF
ADS
ADS
ALF
ALH
CIH
ALH
ALF
ALE
ALE
ALF
CIH
(x1)
8
SECTION 1 (CONTINUED) / 步骤1(续)
TOOLS AND HARDWARE REQUIRED / 所需工具及五金配件
• Strike the end of the pole assembly on a piece of scrap wood or cardboard 5–6 times.
• 为了确保上中下三根立柱牢固的连接在一起,我们分别用立柱的两端用力撞击木块 5到 6 次。即使前面组装
时立柱已经很好的连接在一起亦不能跳过这个步骤。
1.4
6x
• Do not strike your feet with the pole sections, as
serious injury may occur.
•
撞击时注意脚下安全,以免受伤。 请误撞
击水泥或任何硬质地板,以免管身损坏。
!
• Flip the pole over and repeat step 1.4 for the opposite end of the pole assembly.
• 将立柱反过来,并且对立柱组件的另一端重复步骤 1.4。
1.5
6x
(x1)
WARNING / 警告
The Poles must be seated together! The Poles must be struck on a hard surface fi ve to
six times! Failure to seat the Poles correctly could allow the Poles to separate during use.
务必使立柱紧紧卡在一起!立柱组件必须在硬面上锤打5-6下!如若立柱不能正
确地卡住,在使用过程中,将导致立柱坍塌。
9
SECTION 1 (CONTINUED) / 步骤1(续)
TOOLS AND HARDWARE REQUIRED / 所需工具及五金配件
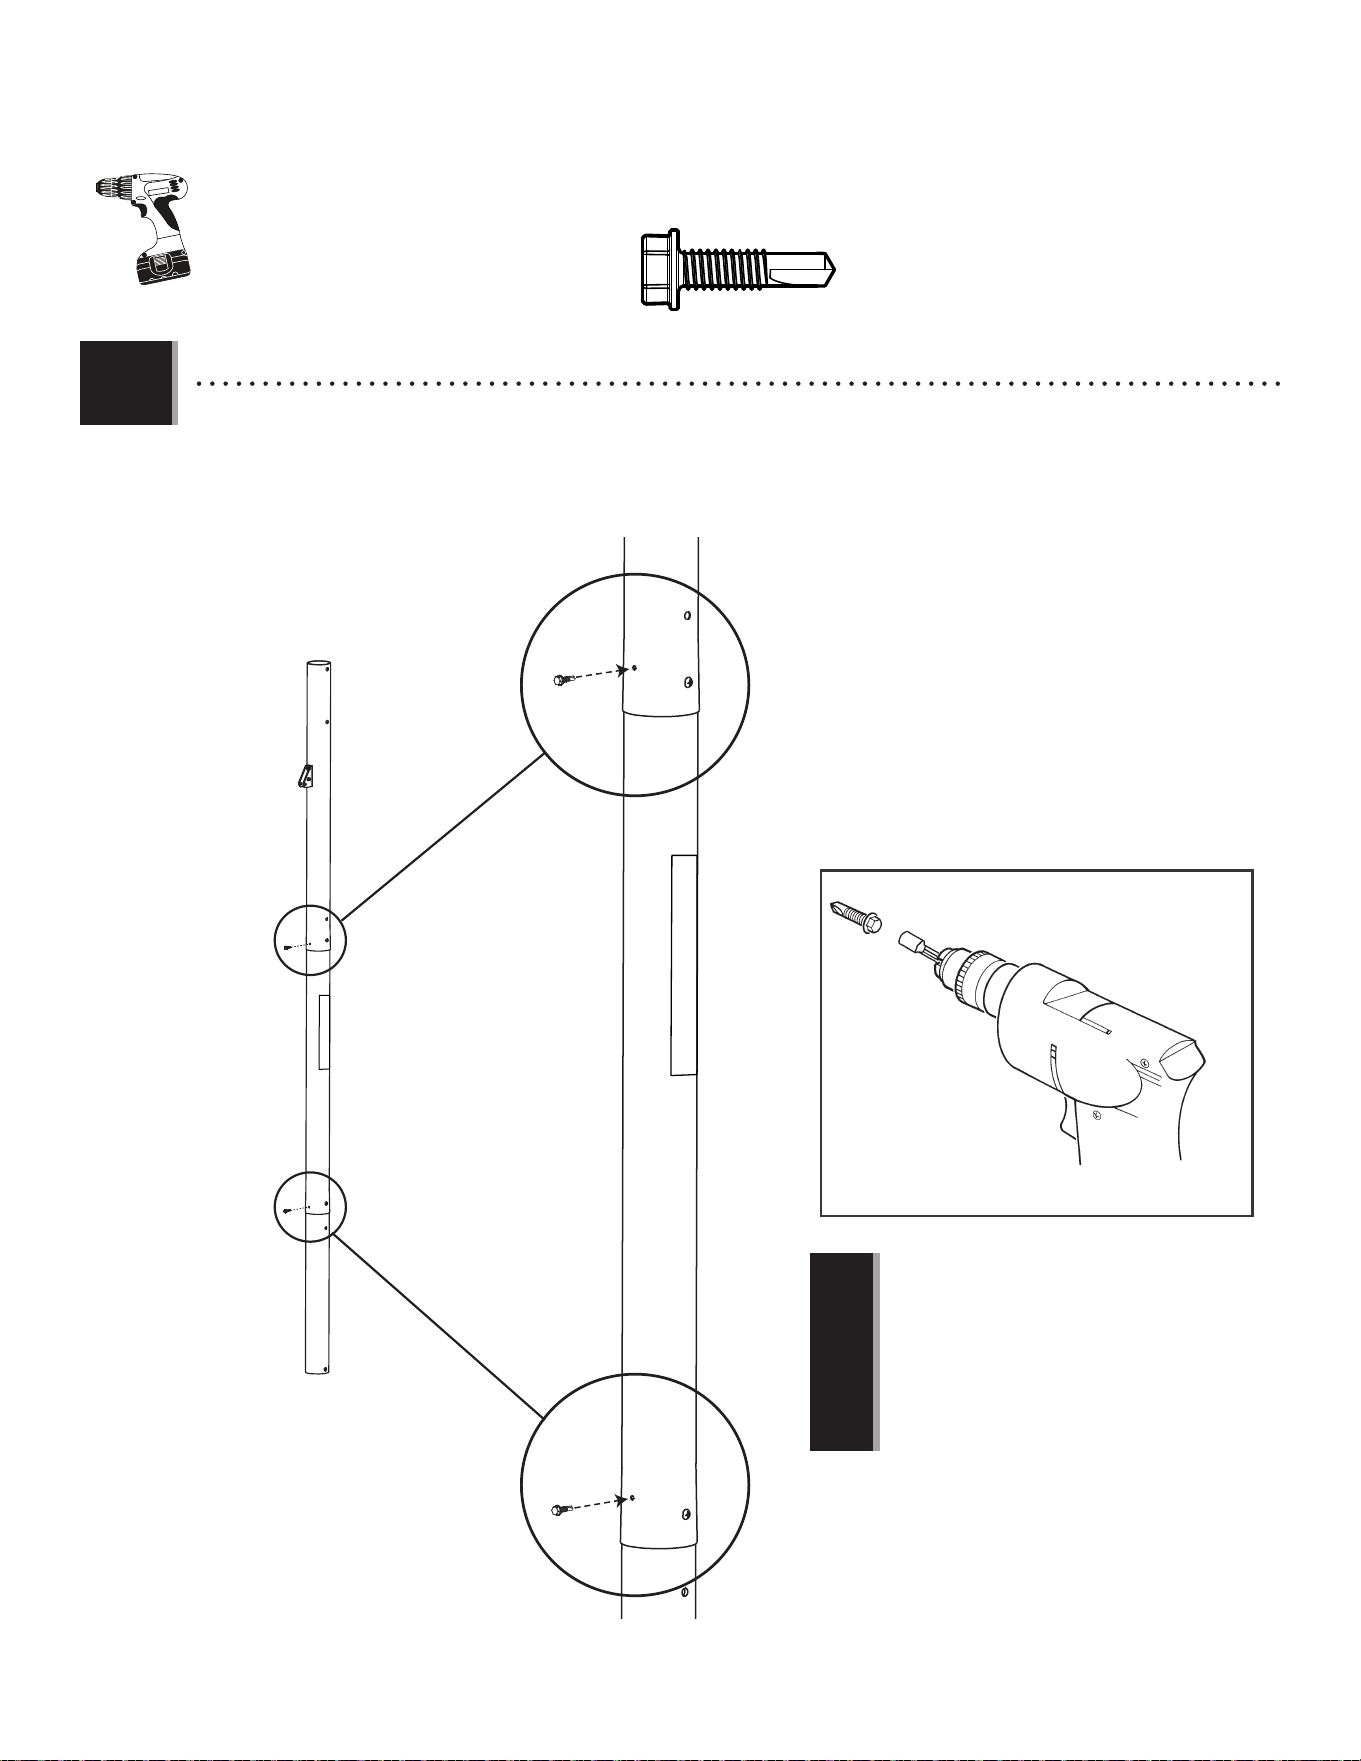
• Secure the poles together with self-drilling screws (ABZ).
• 使用自攻螺丝(ABZ)将立柱固定在一起。
1.6
ABZ (x2)
ABZ
ABZ
(x1)
• THE SCREWS (ABZ) ARE DESIGNED TO DRILL
INTO THE METAL OF THE UNDERLYING POLE.
For ease of installation, chuck the self-drilling
screws directly into the drill, or use a 3/8-inch
(≈10 mm) hex driver.
•
为了易于安装,将自攻螺丝直接用钻孔机钻
孔,或是使用一个 3/8”(10 mm)的六角起子。
!
10
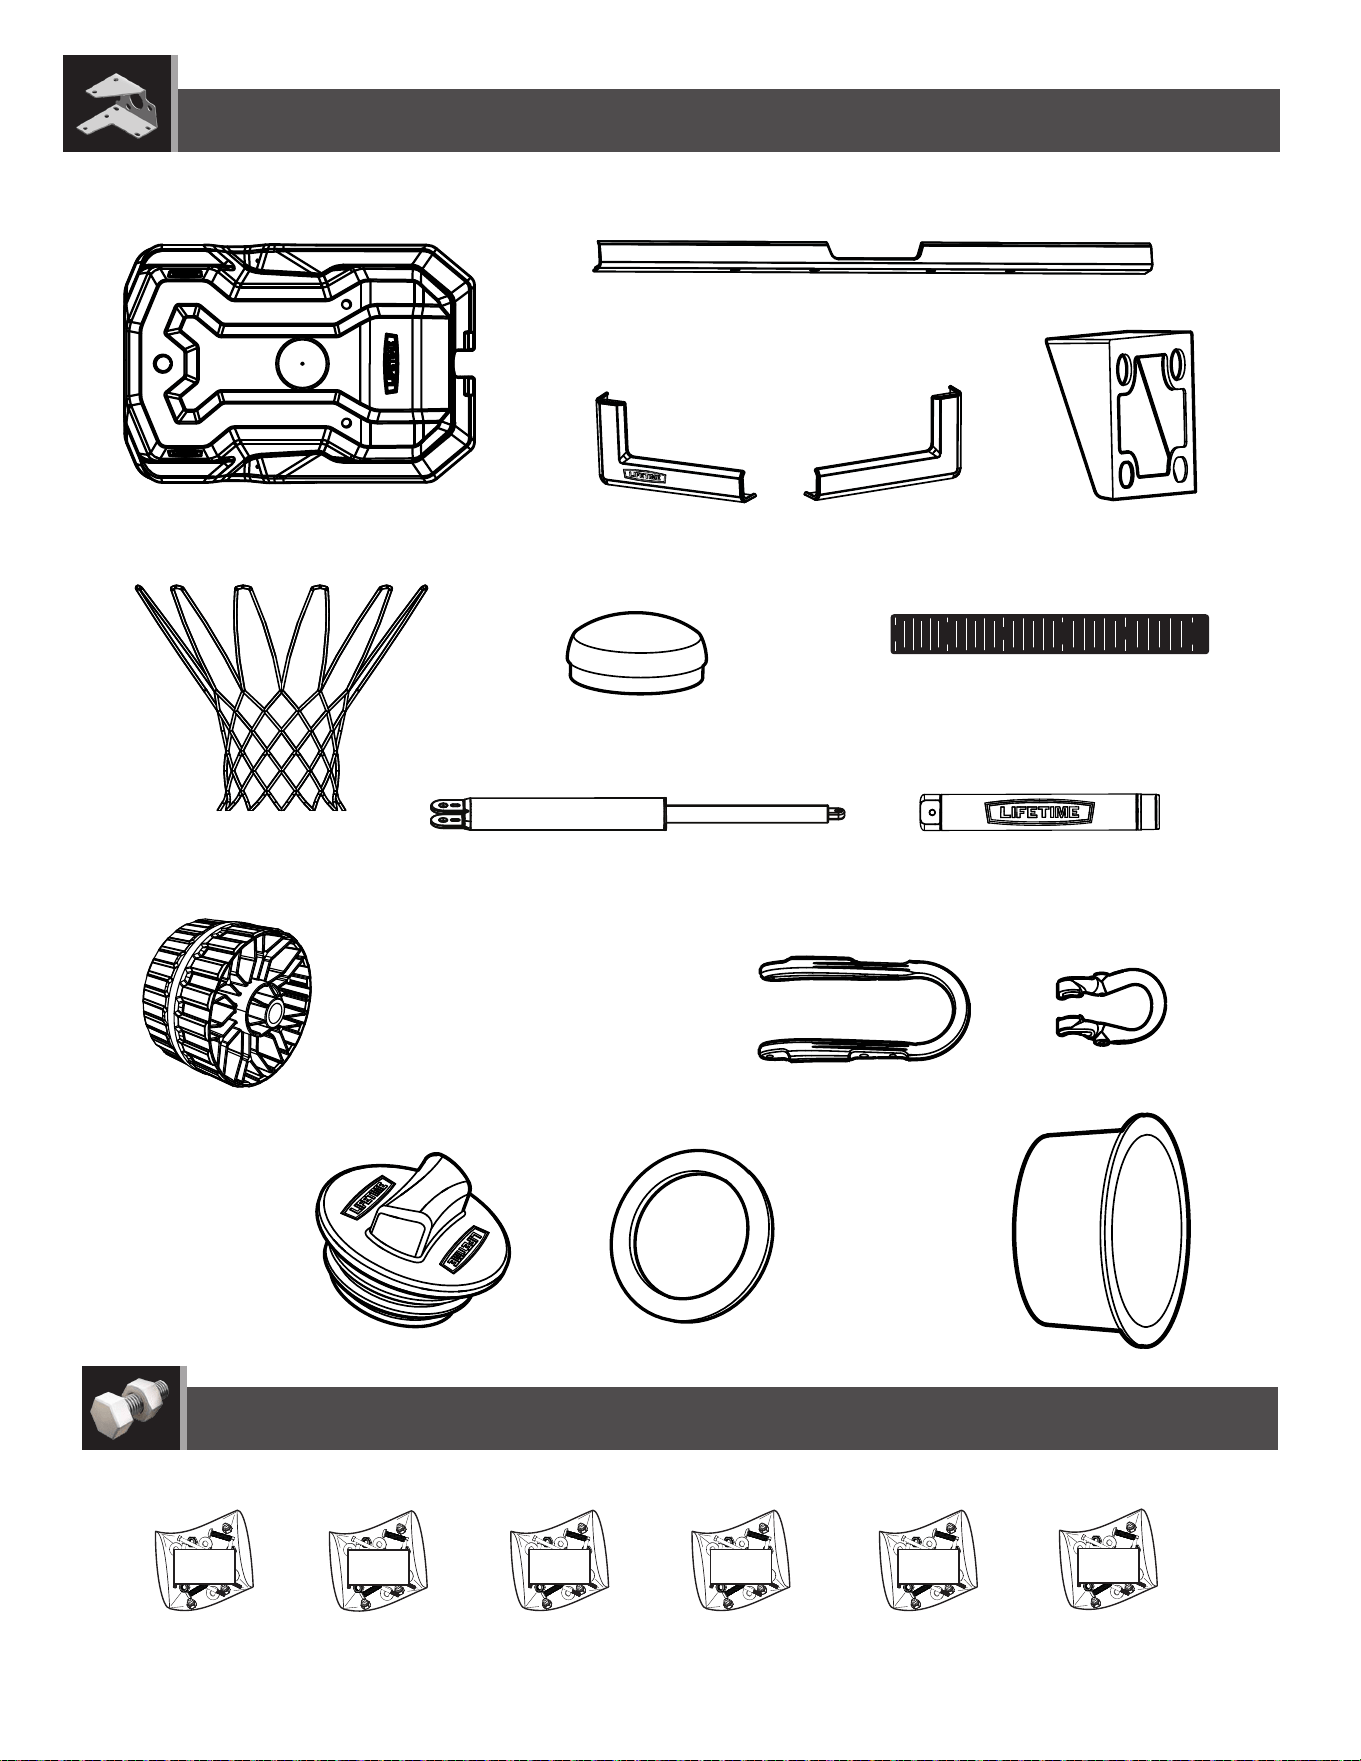
2
BCQ
AAE (x2)
BTS (x1)
ABD (x4)
AAO (x2)
EEO (x2)
AMU (x2)
AJM (x1)
(x2) (x1)
3/16" (≈5 mm)
(x2)
DRZ (x1)
1/2" (≈13 mm)
TOOLS REQUIRED / 所需工具
PARTS REQUIRED / 所需部件
HARDWARE REQUIRED / 所需五金配件
Plastic Parts /
塑胶部件
POLE-TO-BASE ASSEMBLY / 立柱固定到底座的安装步骤
Metal Part /
金属部件
AJC (x1)
HJX (x1)
ALI (x2)
Long Axle / 长轴 Short axle / 短轴
ABL (x4)
11
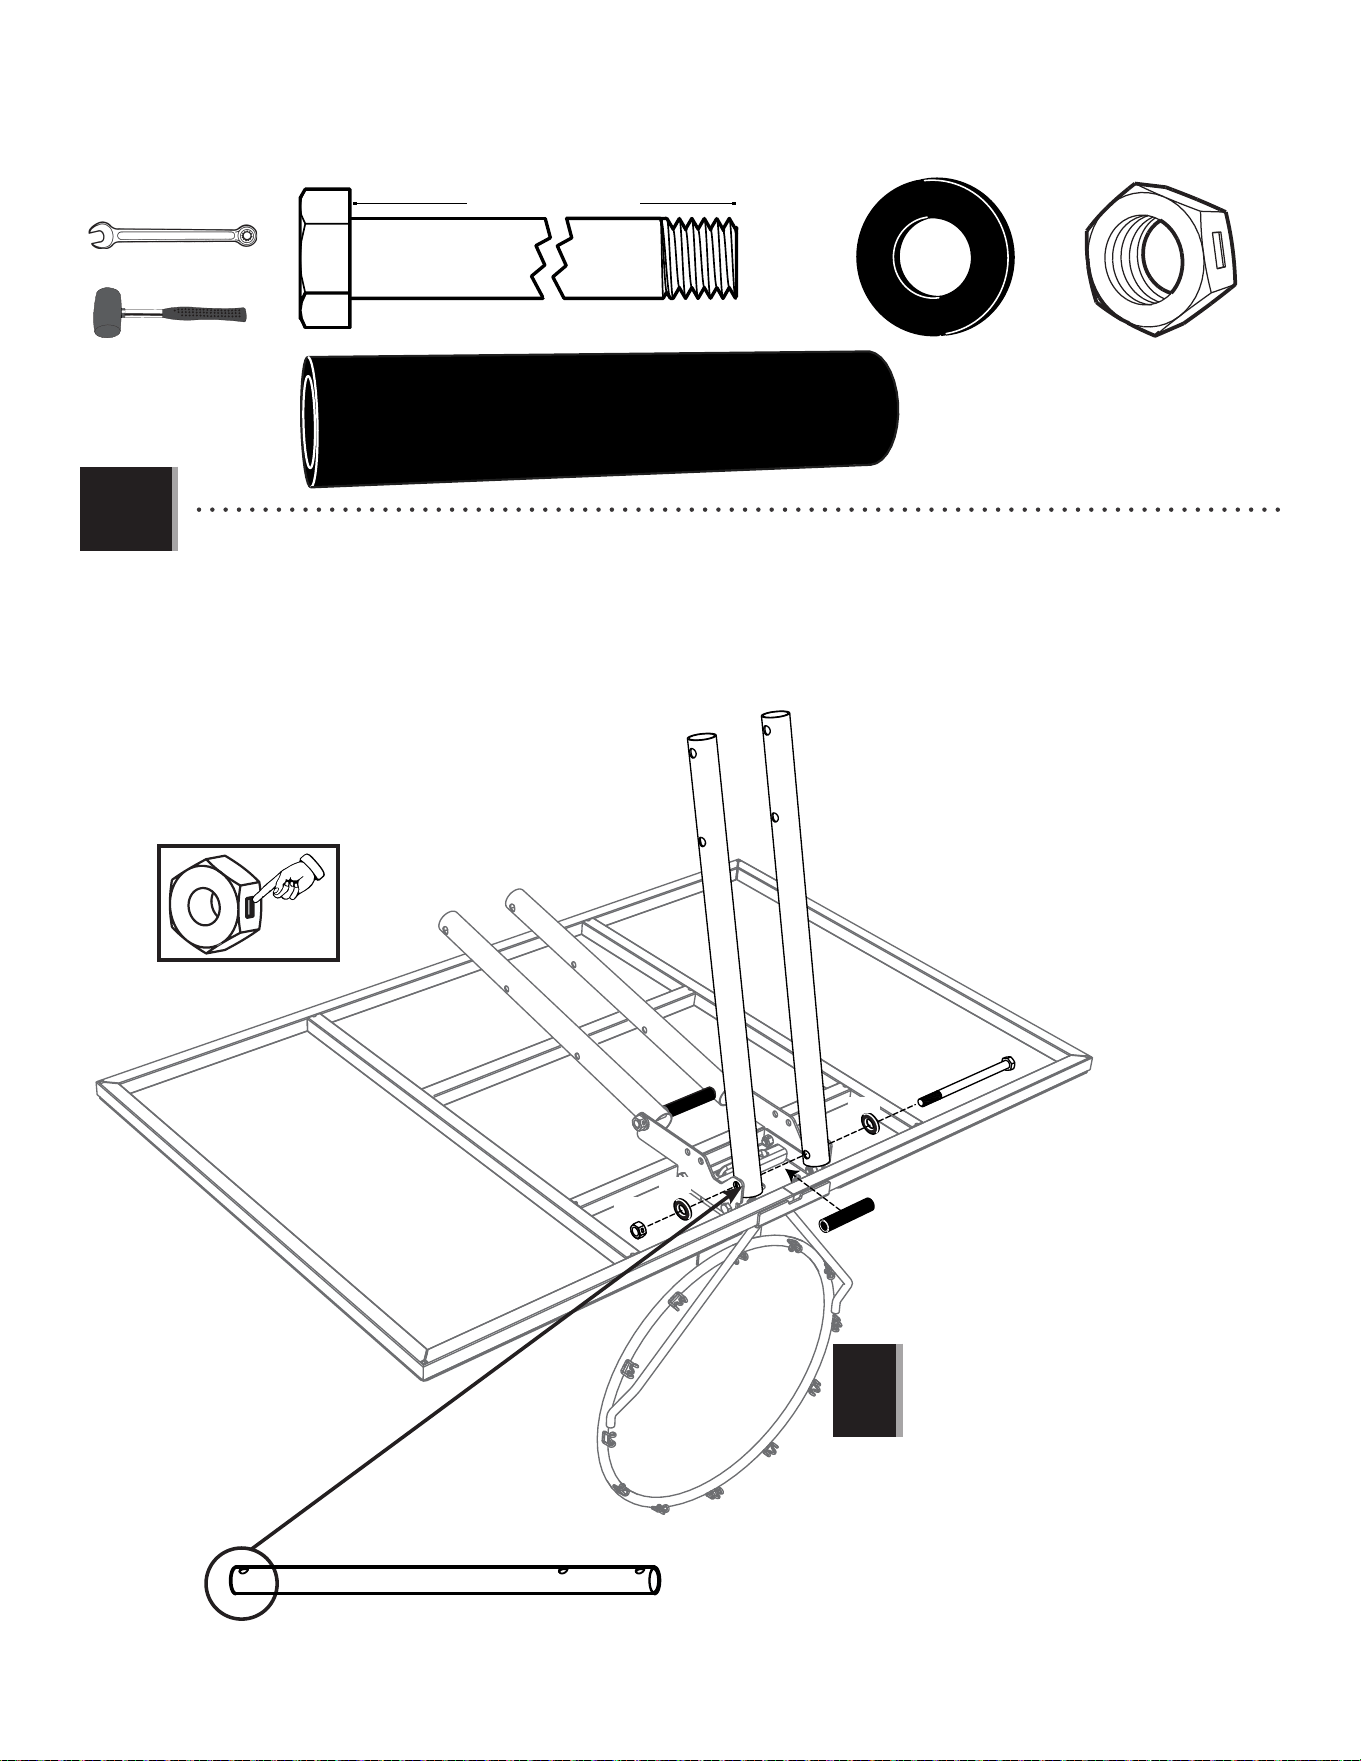
SECTION 2 (CONTINUED) / 步骤2(续)
TOOLS AND HARDWARE REQUIRED / 所需工具及五金配件
2.1
2.2
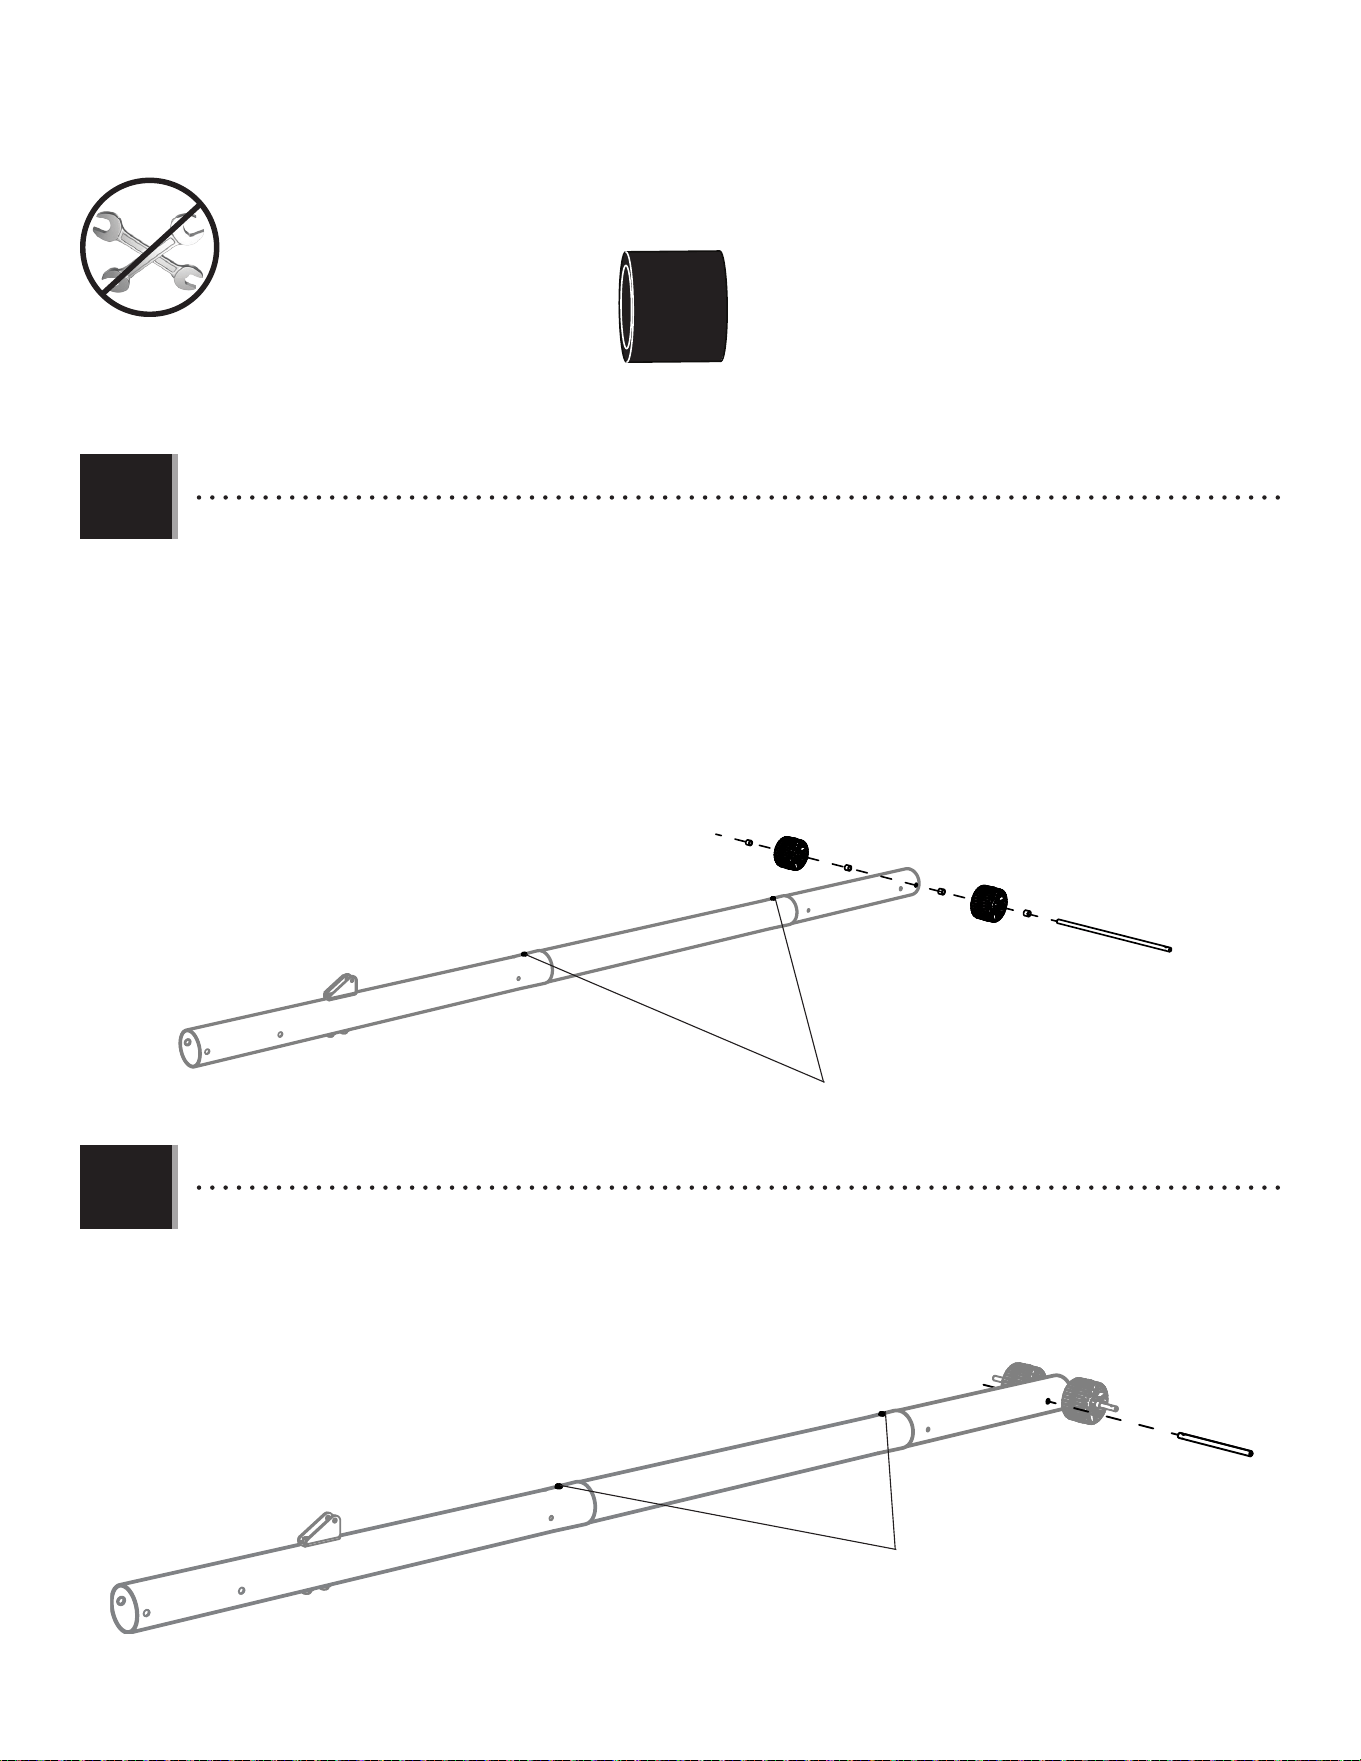
• Lay the pole assembly down and slide the long axle (AJC) through a spacer (ABL), a wheel (AMU), a second spacer (ABL) and the
hole at the end of the bottom pole. Continue sliding the axle through a third spacer (ABL), the second wheel (AMU) and a fourth
spacer (ABL) as indicated. The ends of the axle should be equidistant from the center of the pole.
• 平放立柱组合,如图将长轮轴(AJC)穿过一个垫片(ABL),一 个 轮子(AMU)和另一个垫片(ABL)后插入下立柱最底下的
圆孔,在露出的轮轴一侧继续穿入第三个垫片(ABL)和第二个轮子(AMU),最后再穿入第四个垫片(ABL)。请保持轮轴
和下立柱居中对齐。
• Slide the short axle (HJX) through hole next to the bottom hole so the ends of the axle are equidistant from the pole. Please
note that the two self-tapping screws from step 1.6 are on top.
• 如图将短轴(HJX)插入最底下圆孔上方的圆孔,同样保持短轴和下立柱居中对齐。请注意此时我们在步骤�.�安装的
两颗自攻螺丝是朝上的。
ABL (x4)
Self-tapping screws
自攻螺丝
Self-tapping screws
自攻螺丝
ABL
ABL
AMU
AMU
ABL
ABL
AJC
HJX
12
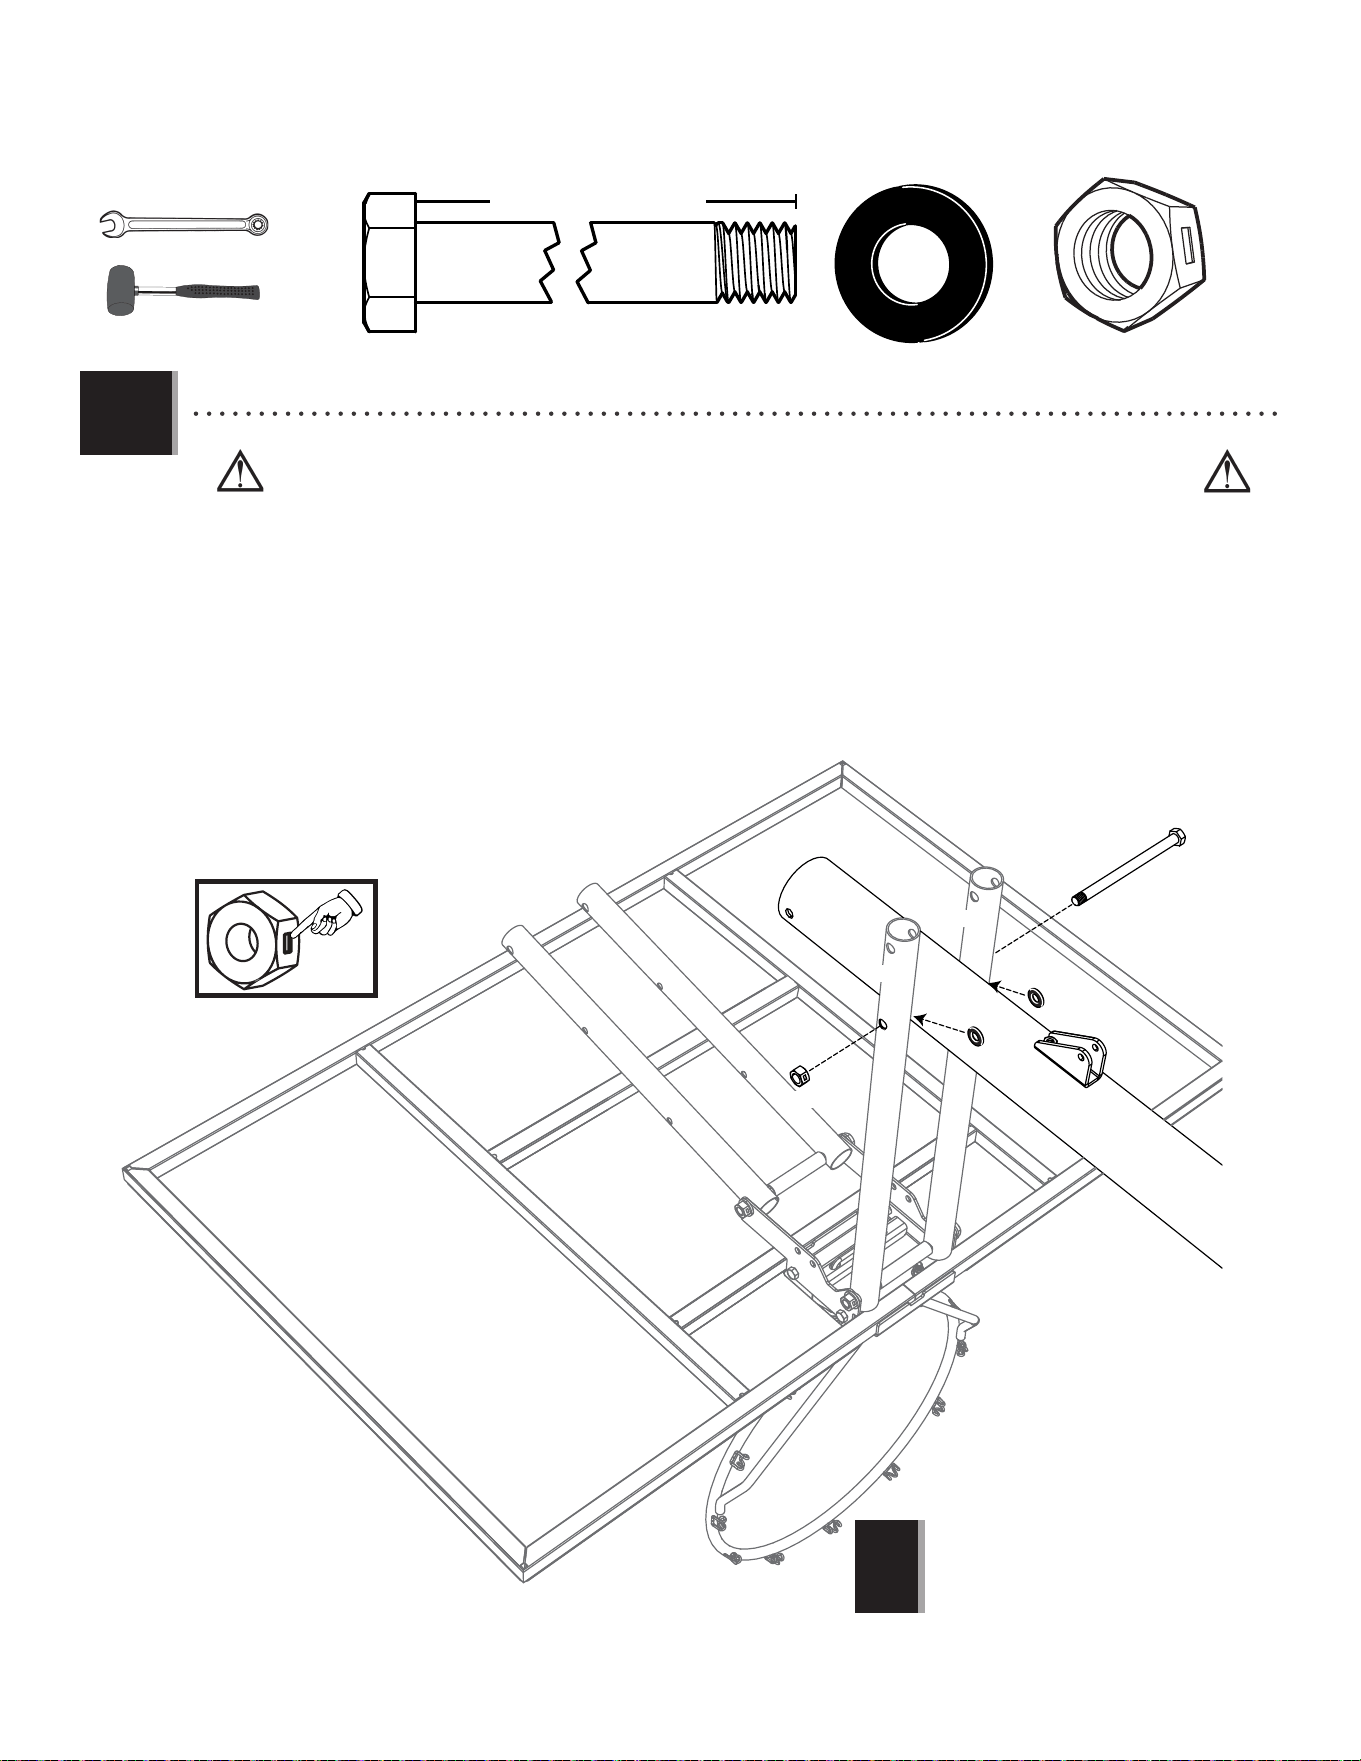
SECTION 2 (CONTINUED) / 步骤2(续)
TOOLS AND HARDWARE REQUIRED / 所需工具及五金配件
Self-tapping screws
自攻螺丝
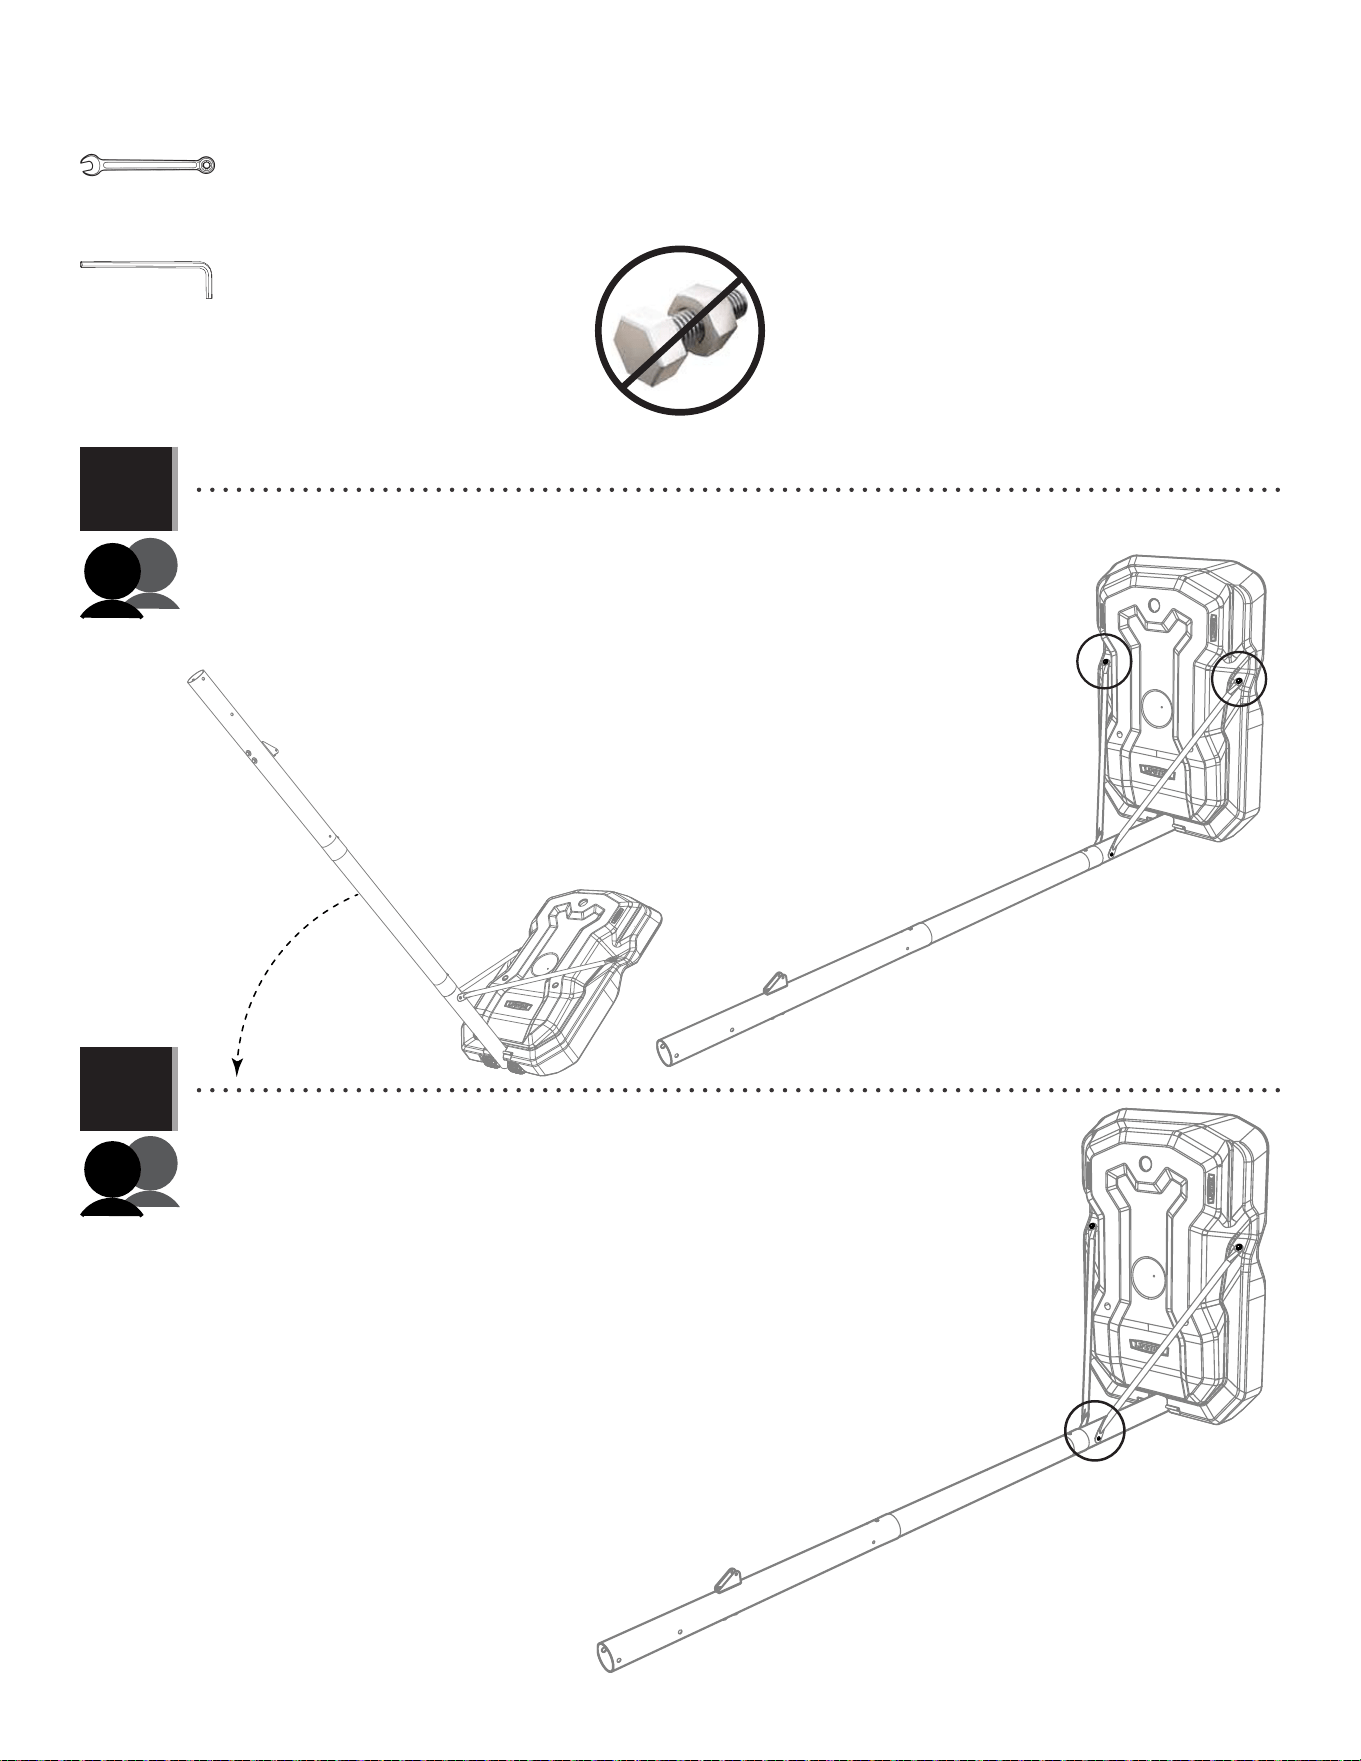
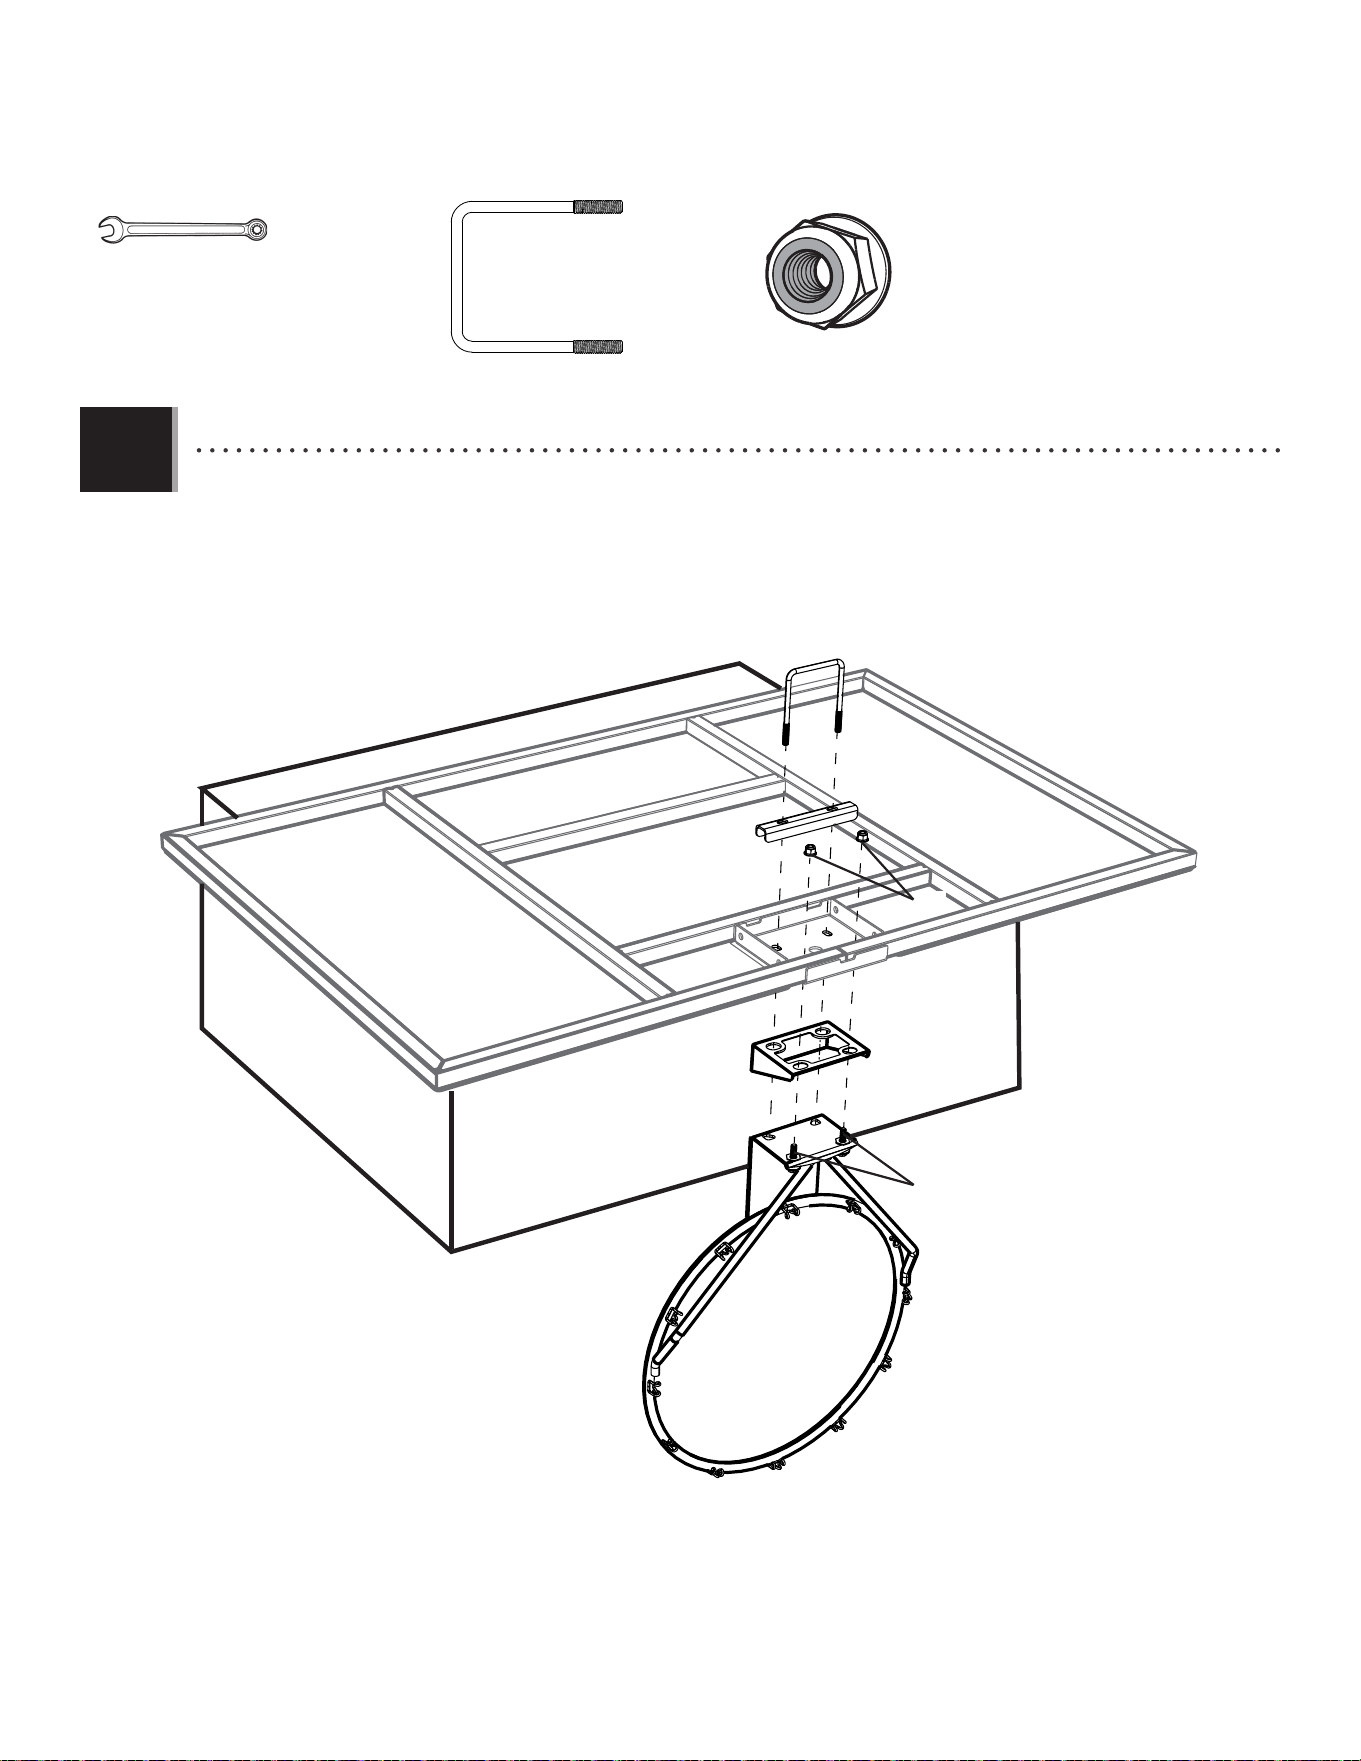
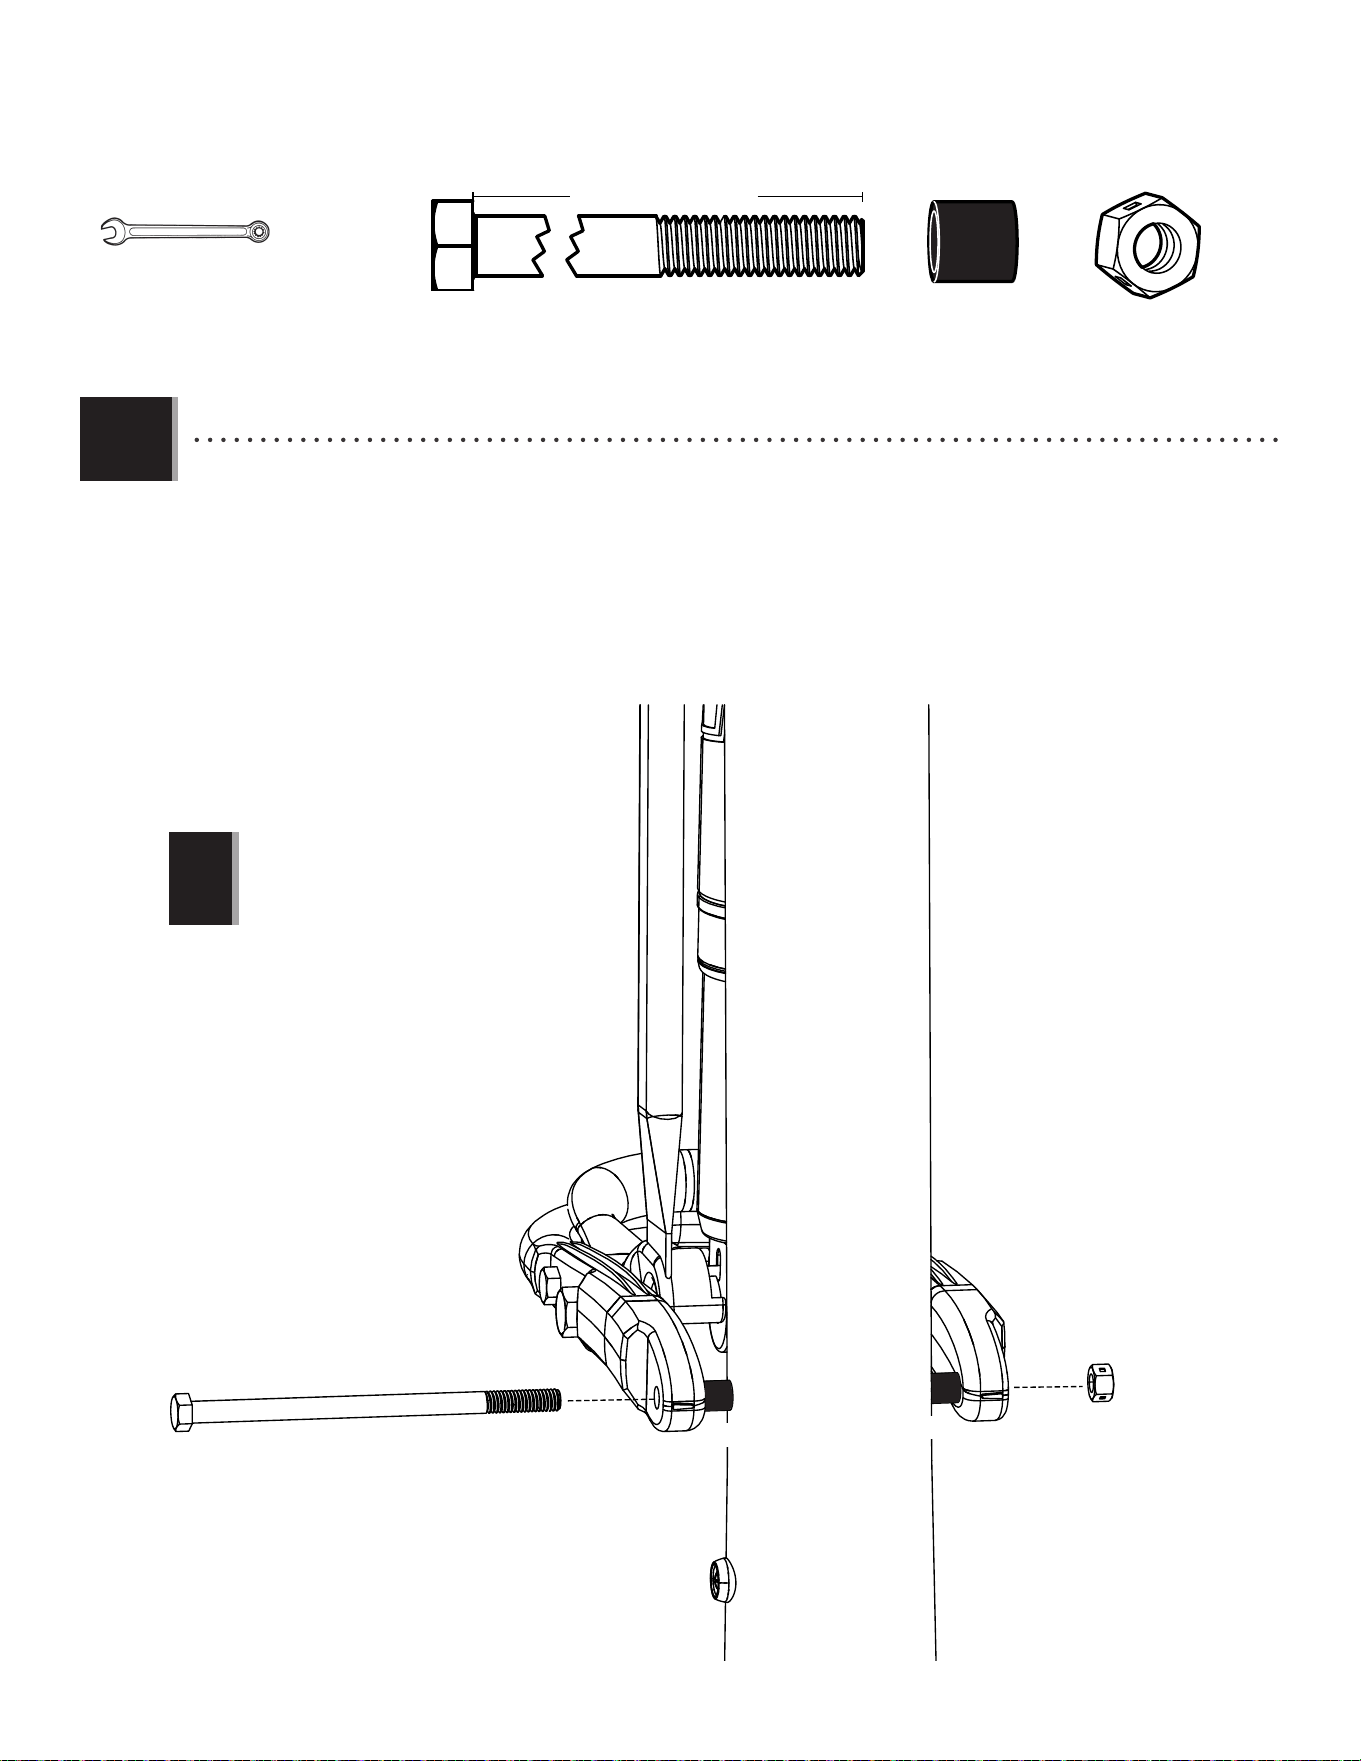
• Set the front of the base (AJM) over the long axle as indicated. The ends of the long axle should be up inside the recesses in
the bottom of the base. Please note that the two self-tapping screws from step 1.6 are on top. These should be on top in order to have all the
other holes in the pole sections oriented correctly.
• 如图将底座(AJM)的前部卡进长轮轴,长轮轴的两端应卡入底座底部的凹槽内。请注意此时步骤�.�安装的两颗自攻
螺丝应朝上,以确保正确定向立柱上的所有其它孔。
2.3
2.4
• Rotate the pole assembly upright until the short axle rests in the recess on top of the base.
• 如图旋转抬起立柱组合直至短轴卡进底座上的凹槽。
Short axle
Short axle
AJM
13
SECTION 2 (CONTINUED) / 步骤2(续)
TOOLS AND HARDWARE REQUIRED / 所需工具及五金配件
2.5
2.6
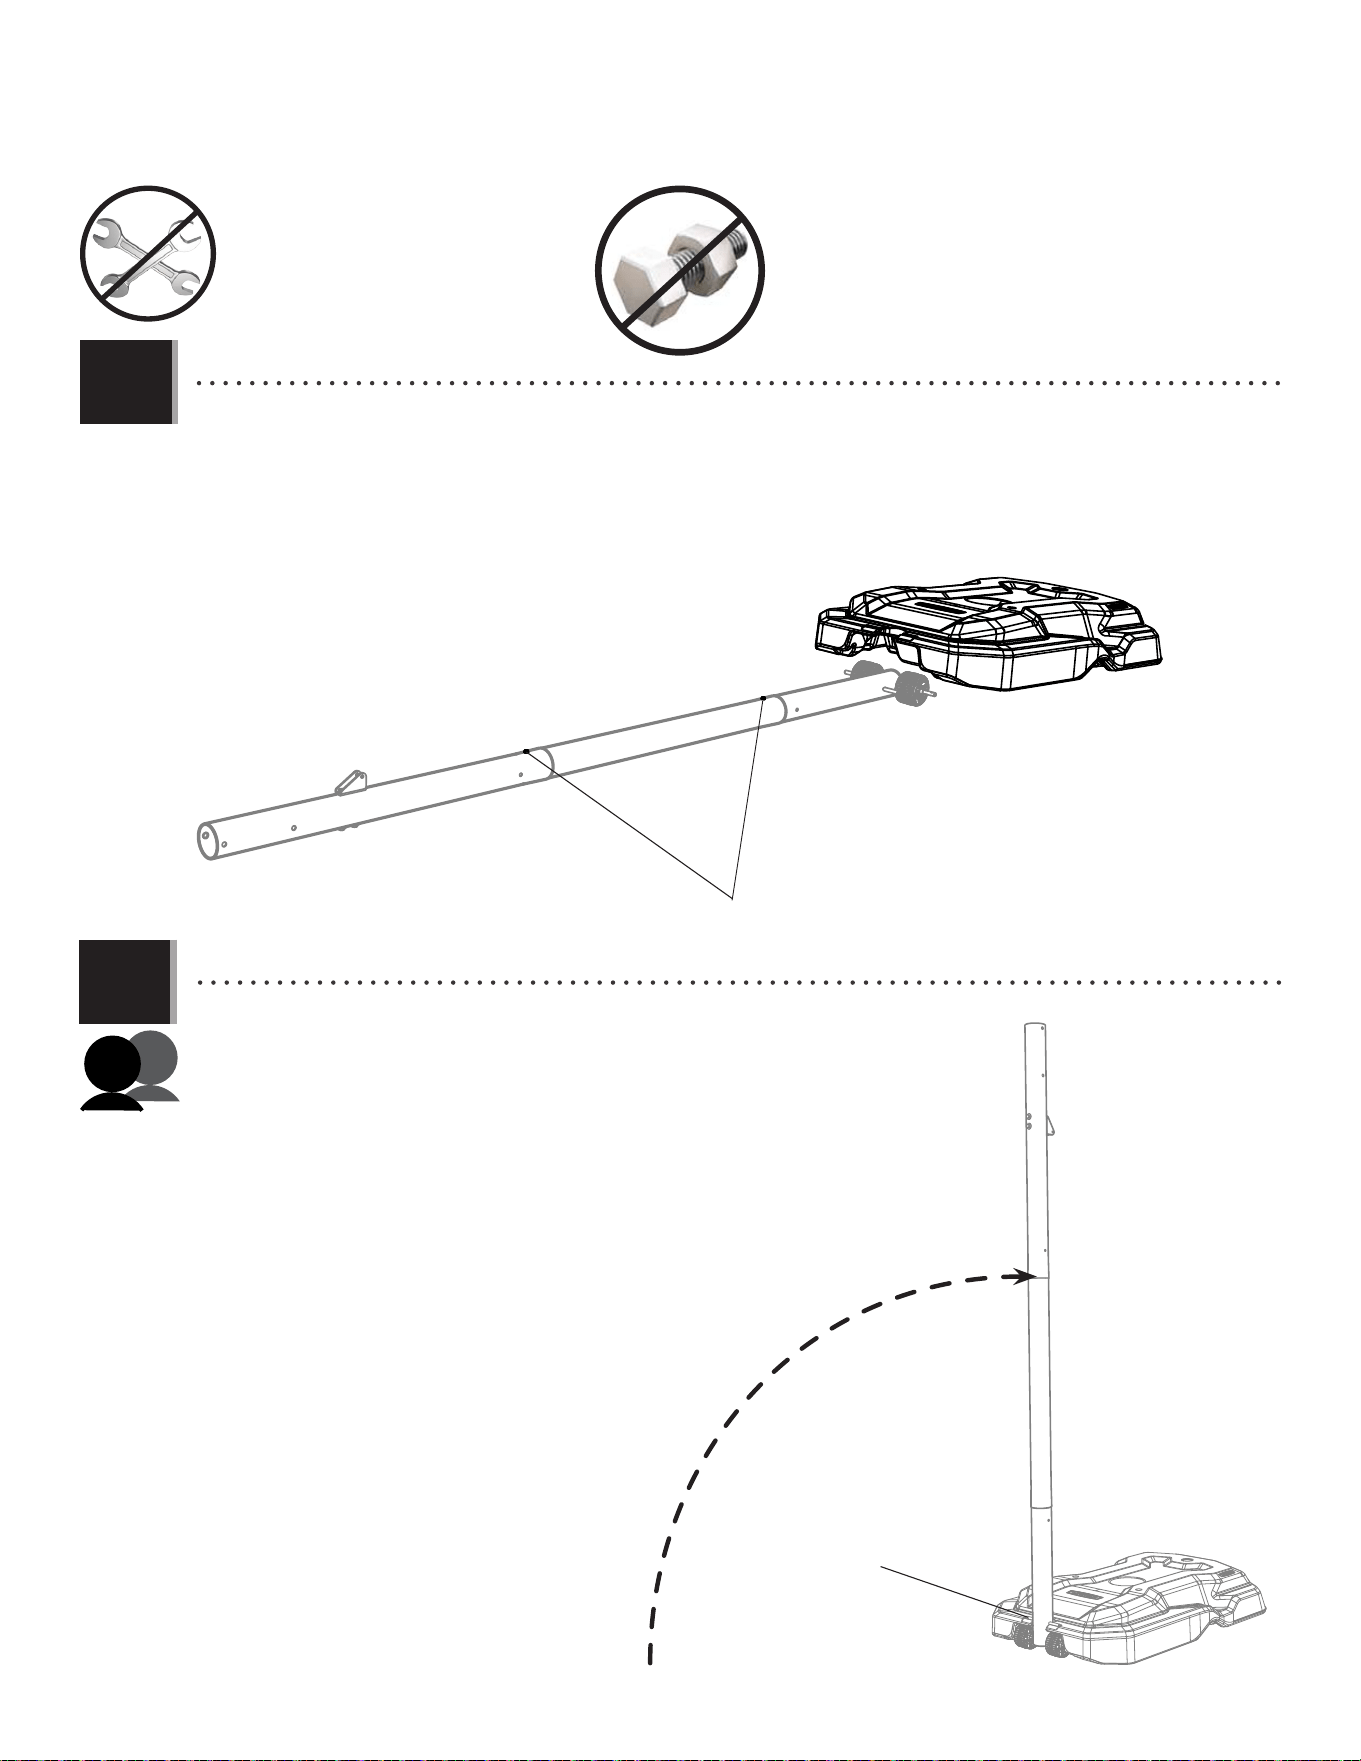
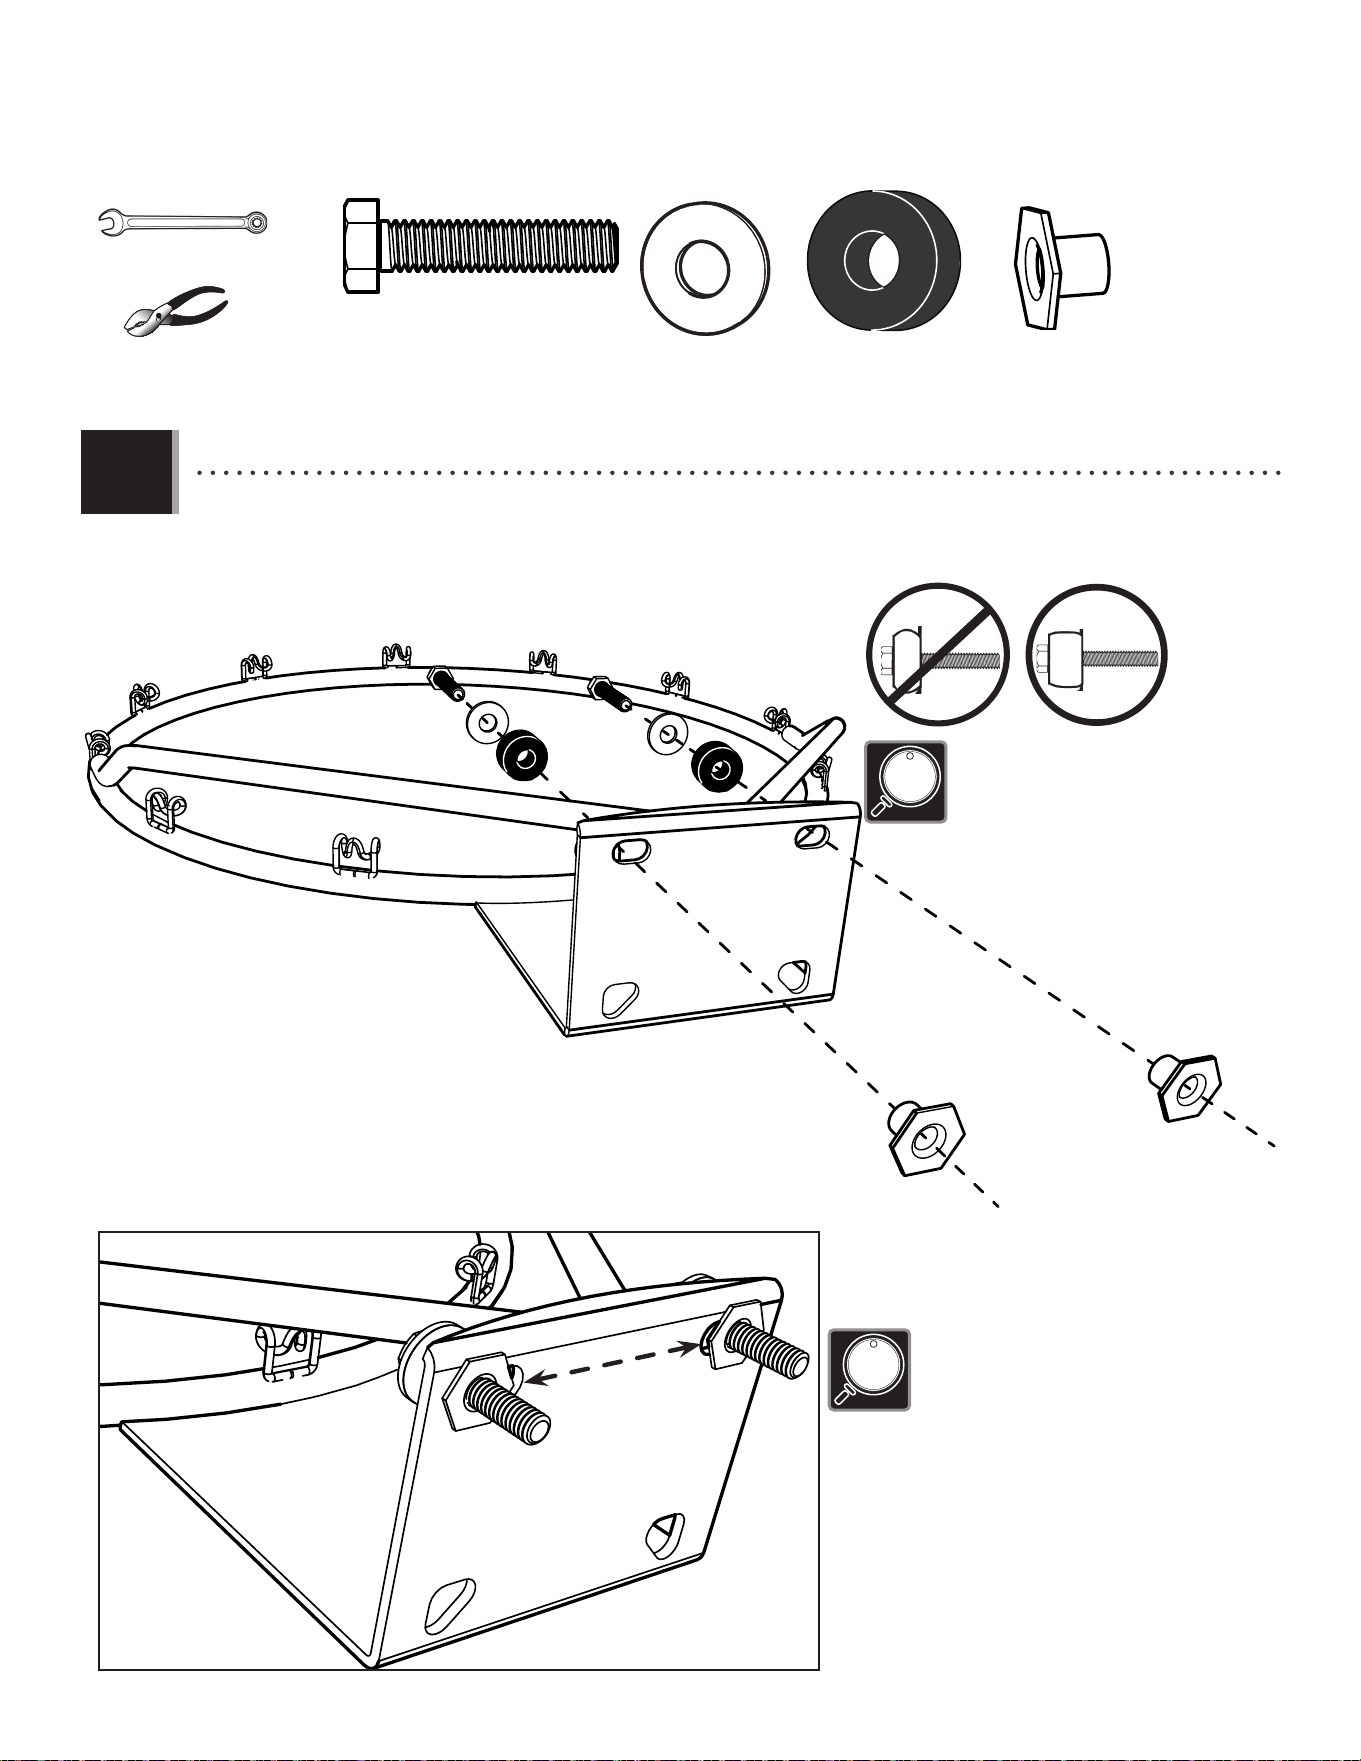
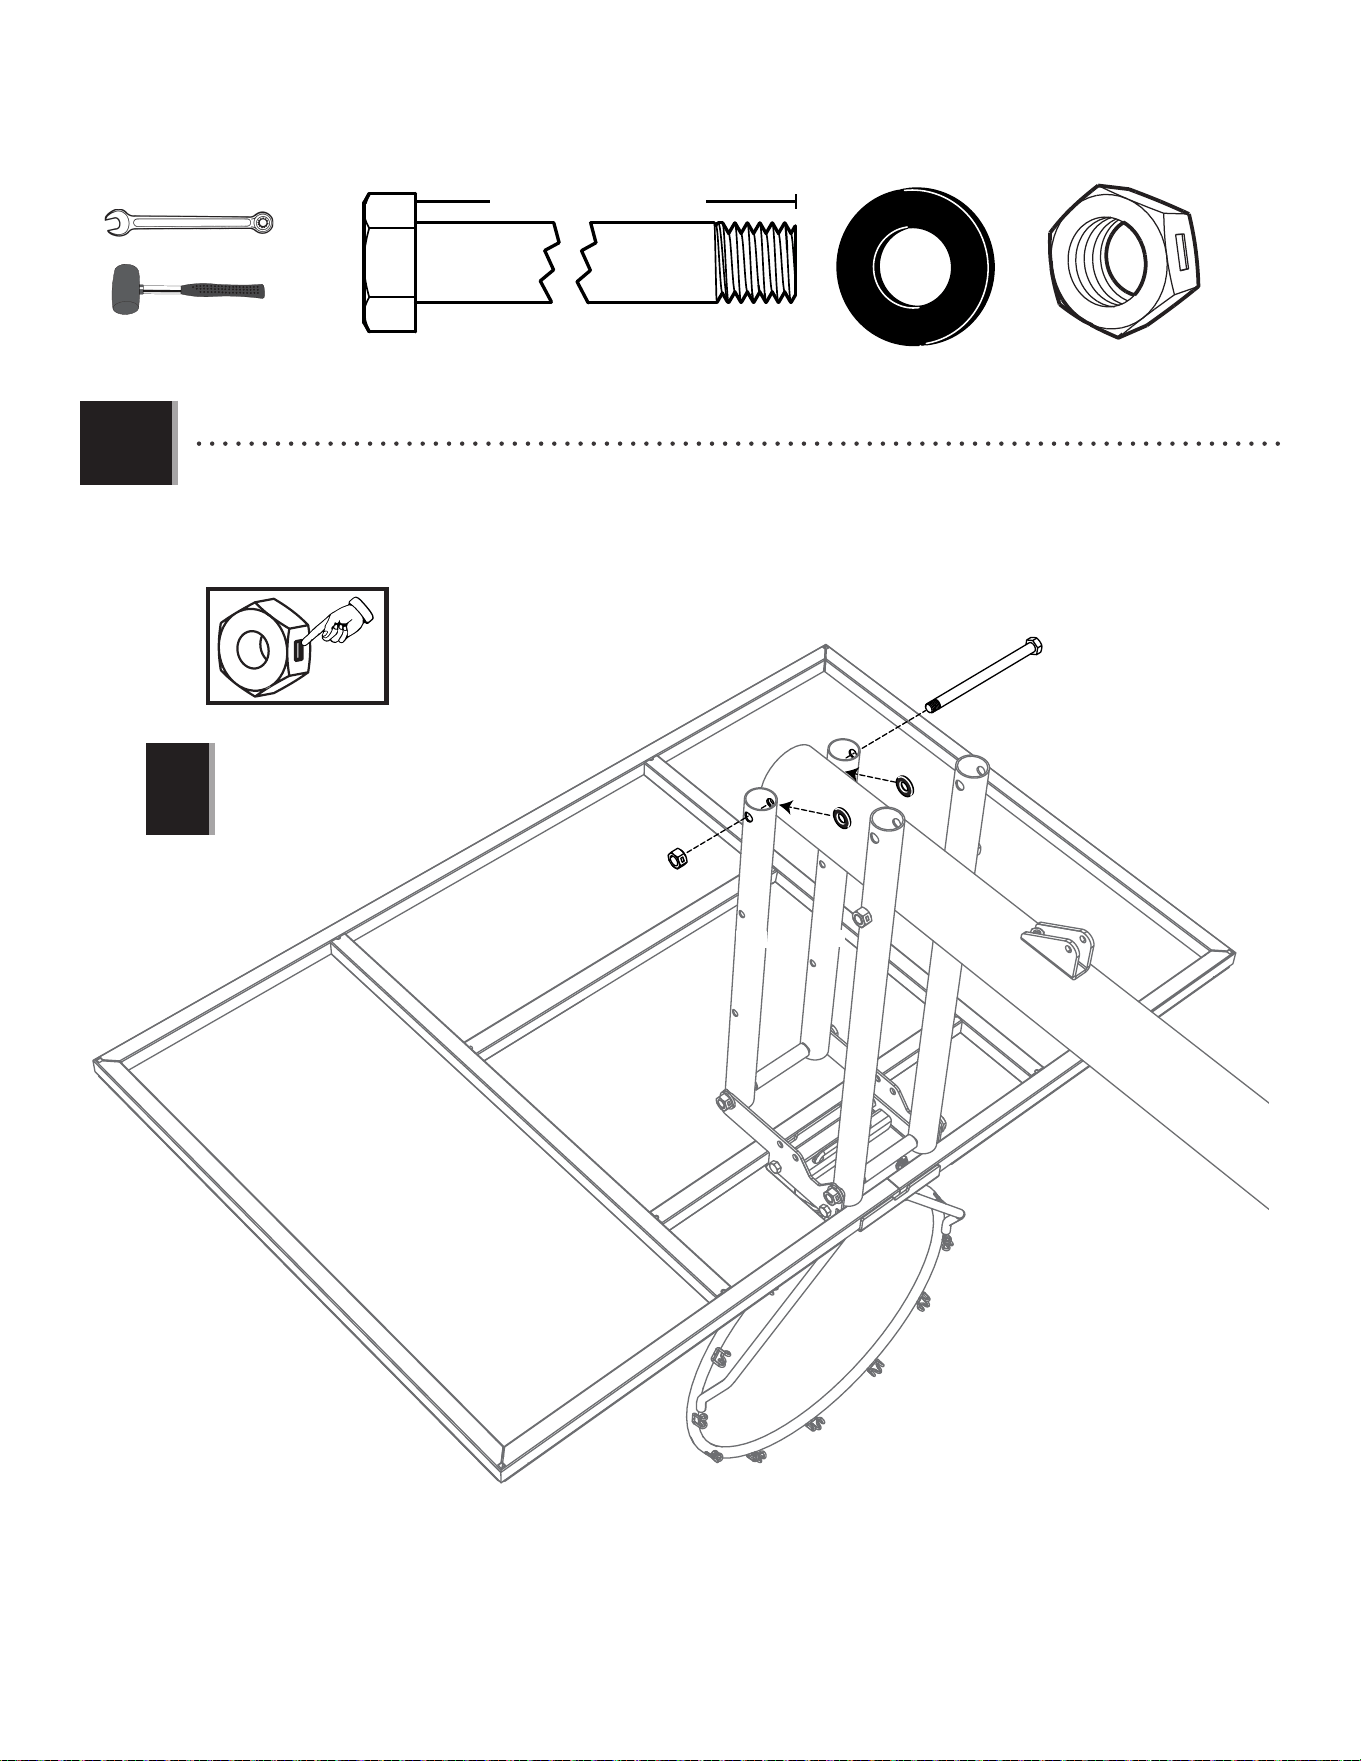
• While a second adult holds the pole upright, attach a pole brace (ALI) to the base as
indicated. Tighten only by hand at this time. Repeat this step for the second pole brace on the
other side of the pole and base.
• 一名成年人扶着立柱组合,另一名成年人按图示配件将支撑臂(ALI)固定到底
座上,此步骤仅用手拧紧螺丝即可。相同的方法安装另一侧支撑臂。
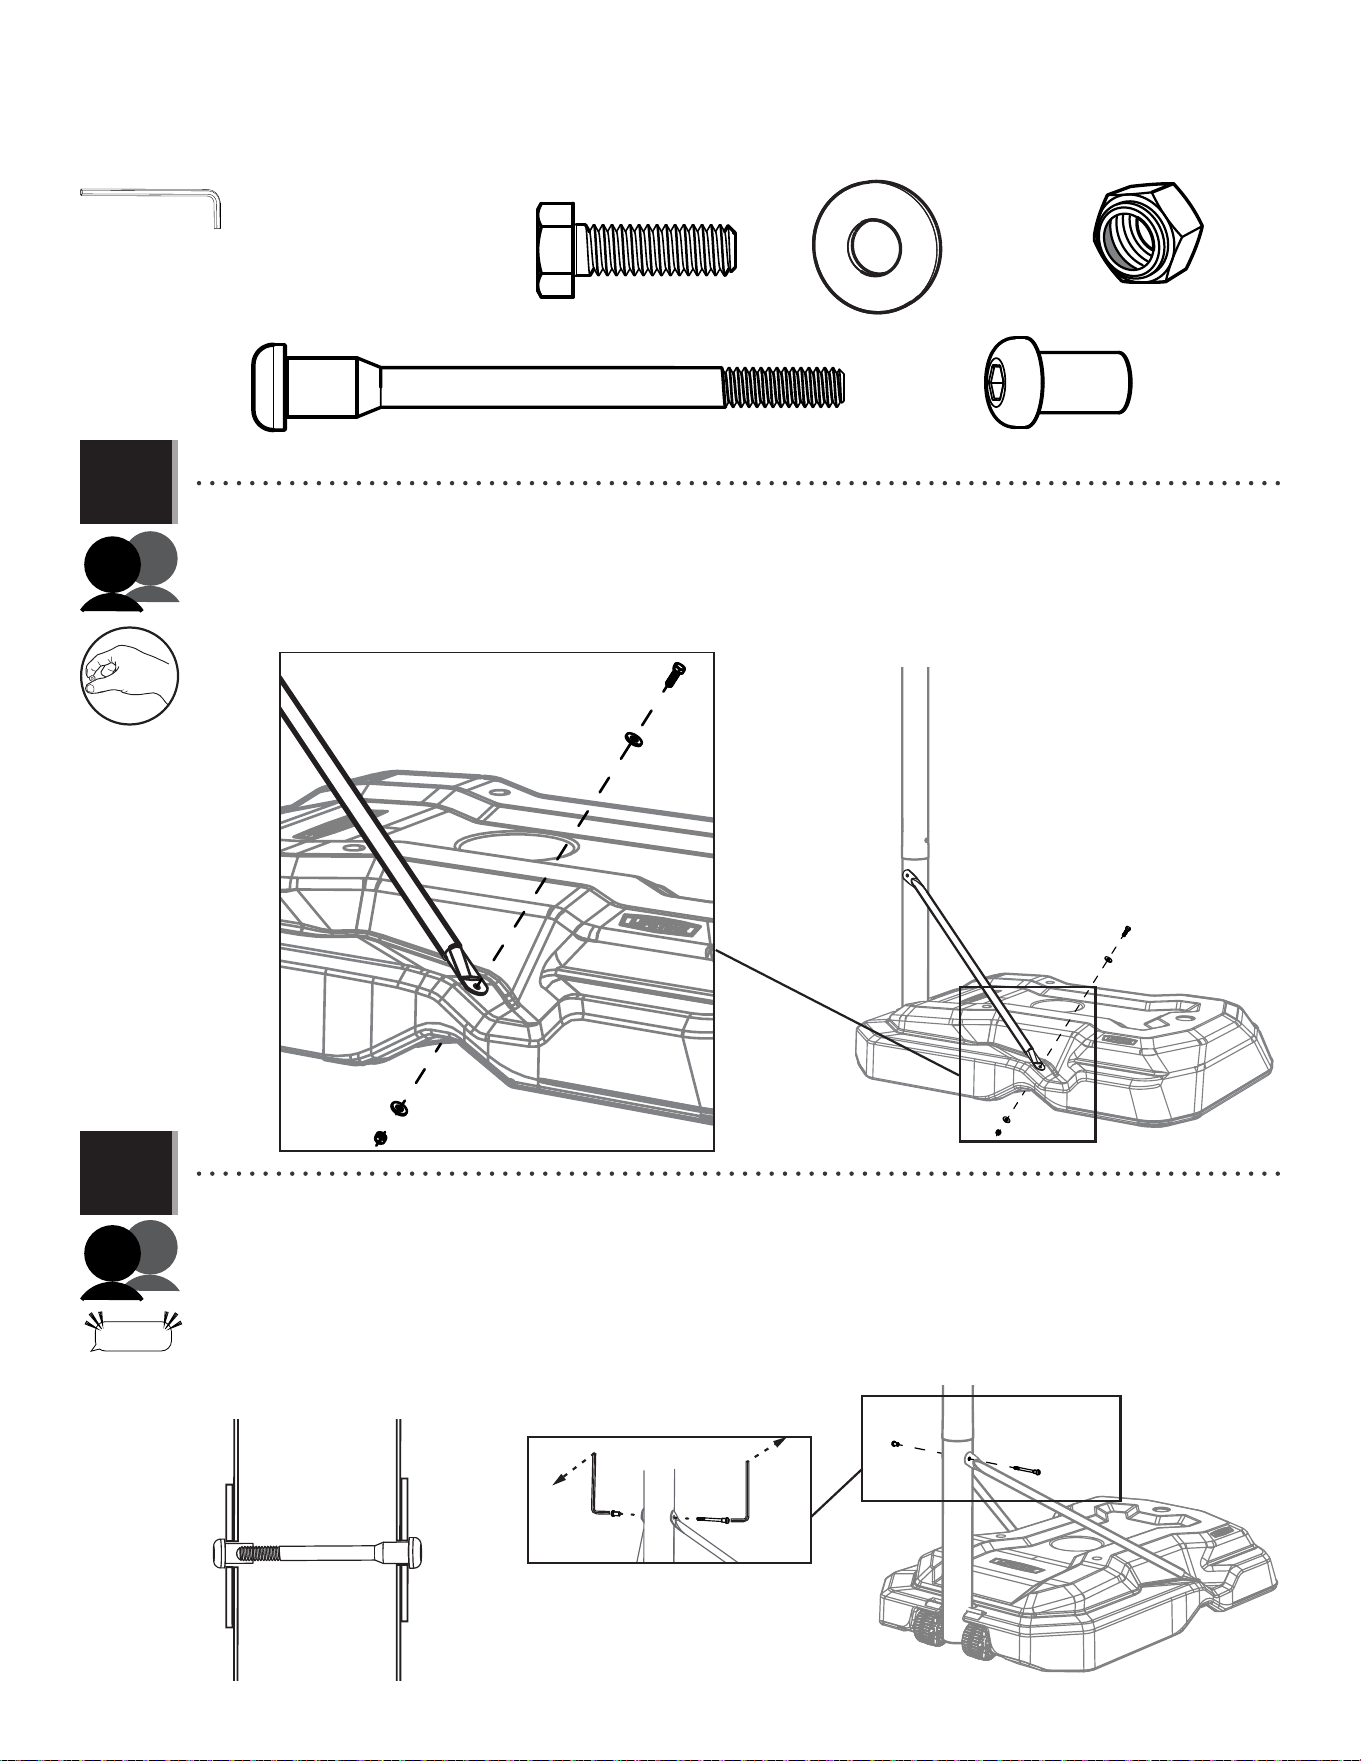
• Align the holes in the braces with those in the pole and secure the braces to the pole using the hardware indicated. Note the
bolt (DRZ) does not go all the way through the pole; the barrel nut (BTS) connects to it inside the pole. DO NOT completely tighten at this time.
• 如图对齐支撑臂和立柱上的孔锁入螺栓和螺母。注意此处的螺栓(DRZ)不会穿出立柱另一侧,枪管螺母(BTS)和它在
立柱内部连接。此步骤不用完全锁紧螺栓和螺母。
AAE (x2)
ABD (x4)
AAO (x2)
BTS (x1)
DRZ (x1)
“$#@*%!”
THIS STEP CAN BE DIFFICULT
EEO (x2)
AAO
ABD
ABD
ABD
ALI
ALI
DRZ
BTS
DRZ
BTS
14
SECTION 2 (CONTINUED) / 步骤2(续)
TOOLS AND HARDWARE REQUIRED / 所需工具及五金配件
2.7
2.8
• Lay the system down and keep it down until instructed otherwise. Securely tighten the hardware
indicated. DO NOT overtighten.
• 如图示方向放倒篮球架,拧紧圆圈标记的螺丝,但不要过紧。
• Now, securely tighten the hardware from step 2.6.
• 拧紧步骤�.�安装的螺丝(图片圆圈标记)。
1/2" (≈13 mm)
(x2)
EEO (x2)
15
BCS
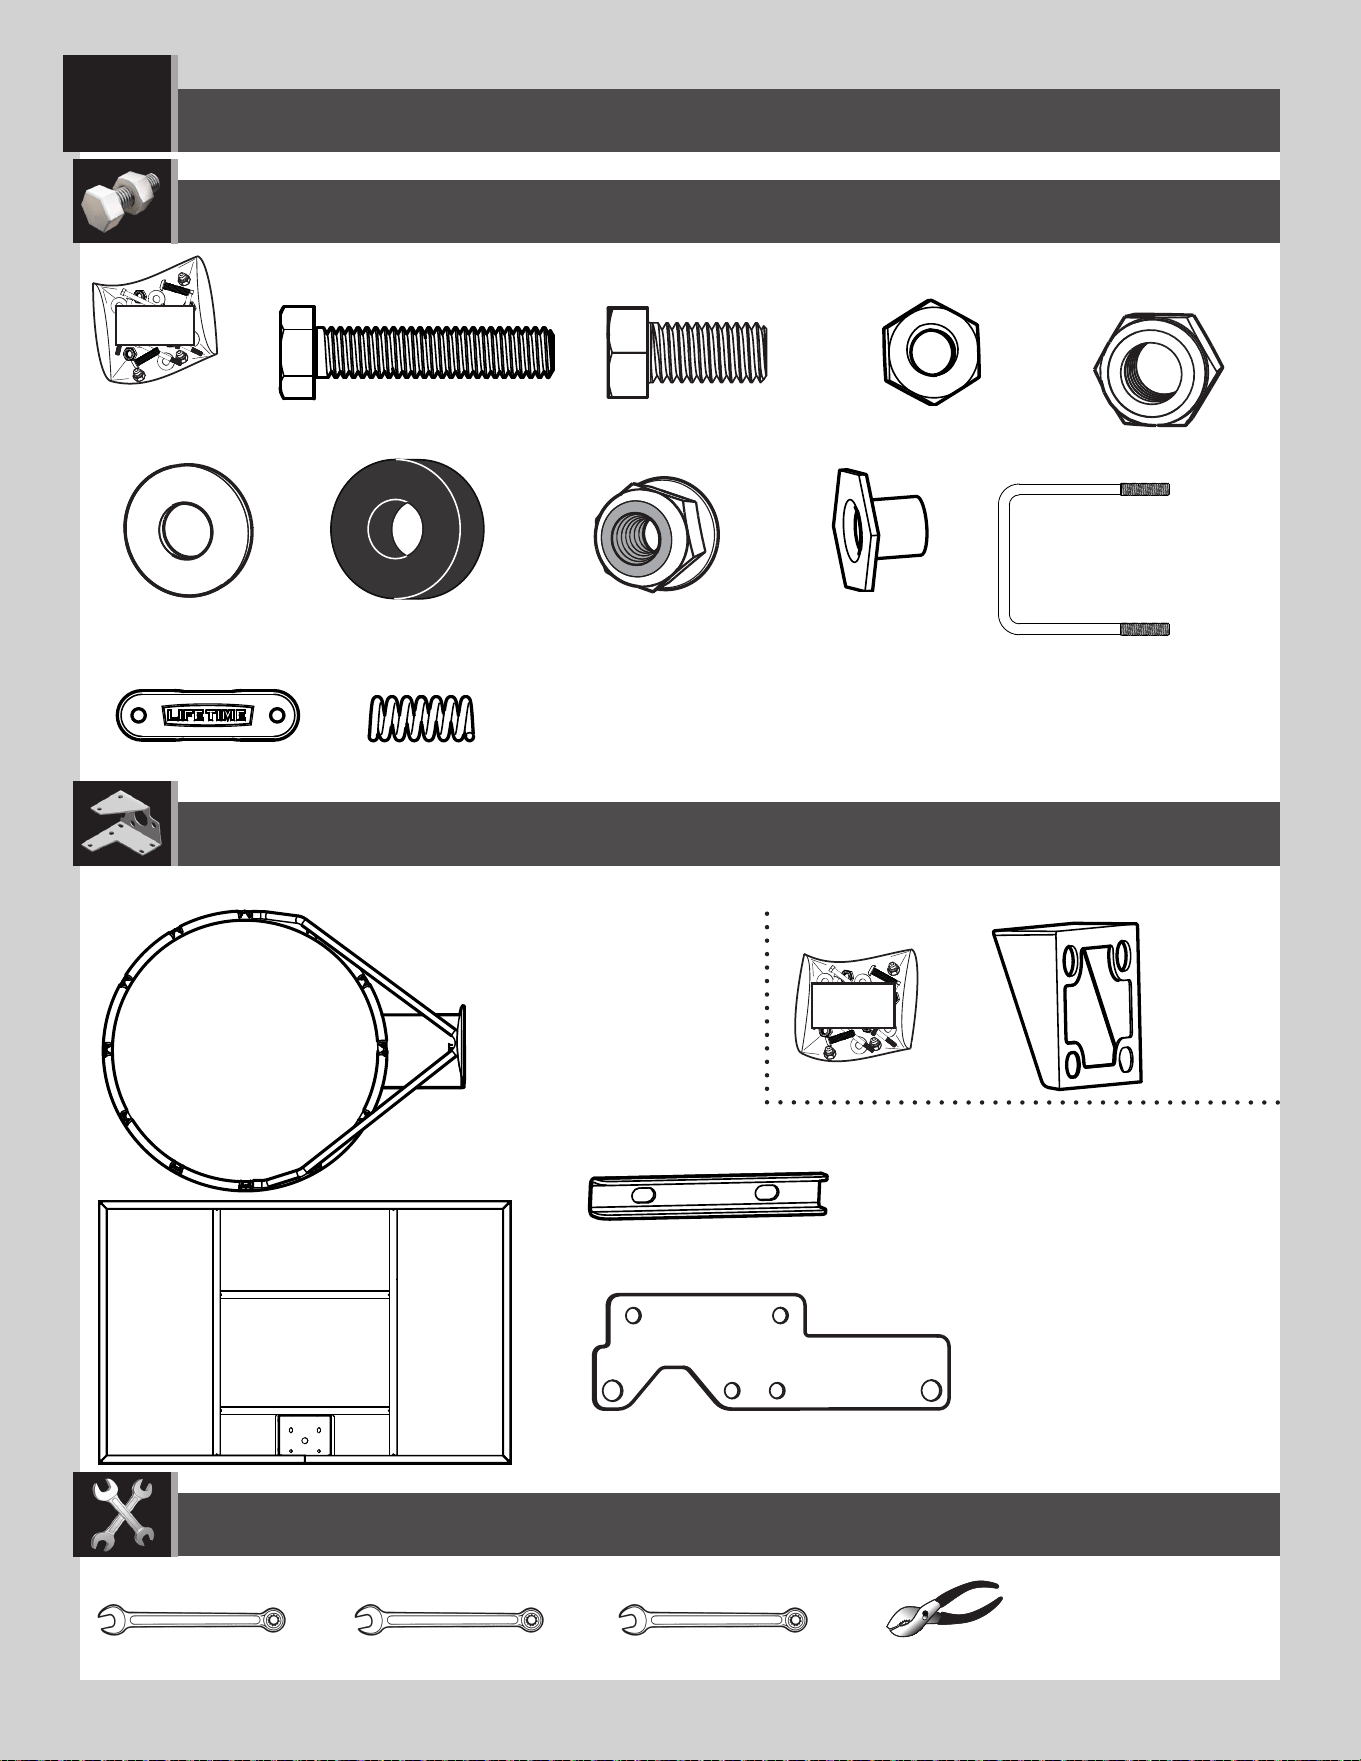
HARDWARE REQUIRED / 需要的零件
ABD (x2)
ABF (x2)
AAM (x2)
ABK (x4)
AJW (x2)
APZ (x1)
AOW (x1)
AAV (x2)
DFE (x4)
AAA (x4)
AAJ (x2)
AJI (x1)
ALX (x1)
(x2) (x2) (x2)
7/16" (≈11 mm) 1/2" (≈13 mm) 9/16" (≈14 mm)
(x1)
BACKBOARD-TO-RIM ASSEMBLY / 背板与球框的组装
3
TOOLS REQUIRED / 所需工具
Plastic Parts /
塑胶部件
Metal Parts /
金属部件
PARTS REQUIRED / 所需部件
DFD (x1)
AMY (x2)
ALD (x1)
DUC
16
SECTION 3 (CONTINUED) / 步骤3(续)
TOOLS AND HARDWARE REQUIRED / 所需工具及五金配件
• Insert two bolts (AAM) with washers (ABD) and rubber washers (ABF) through the holes indicated in the back of the rim (ALX) as
shown. Secure the hardware with two T-nuts (AAJ).
• 插入两个螺栓(AAM),附有垫圈(ABD)与橡胶垫圈(ABF),穿过篮框(ALX)背后所指示的孔位,如图所示。使用两个 T 螺帽(AAJ)
固定五金零件。
• Ensure that the tap bolts (AAM) are positioned
on the outside edge of the holes as shown.
• 请确认带头螺栓(ABG)是装在如图靠外侧边
缘的孔上。
• Do not overtighten the hardware so much
that the rubber washers bulge as shown.
• 请勿过分拧紧螺丝以保持橡胶垫片向外
膨胀的状态。
1/2" (≈13 mm)
ABD (x2)
ABF (x2)
AAM (x2)
AAJ
AAM
ABD
ABF
ALX
ABF
ABF
AAJ (x2)
(x2)
(x1)
AAJ
AAM
ABD
ABF
3.1
17
SECTION 3 (CONTINUED) / 步骤3(续)
TOOLS AND HARDWARE REQUIRED / 所需工具及五金配件
1/2" (≈13 mm)
3.2
ABK (x2)
APZ (x1)
(x2)
APZ
ALX
ABK
ALD
AAM
AJI
DFD
• Place the backboard face down onto a table, box or similar. Secure the rim (ALX) and plastic guard (ALD) to the backboard (AJI) with
the hardware shown.
• 将将篮板面朝下放在桌子、盒子或类似物上。 如图将球框(ALX)和塑料保护片(ALD)安装到篮板(AJI)上。
18
SECTION 3 (CONTINUED) / 步骤3(续)
TOOLS AND HARDWARE REQUIRED / 所需工具及五金配件
AAV
ABK
AOW
AJW
APZ
3.4
• Turn the backboard assembly over. Thread the jam nuts (AAV) onto each end of the U-bolt (APZ) and to the end of
the threads. Slide the compression springs (AJW) onto the U-bolt, and place the spring retainer plate (AOW) over the
compression springs. Secure the plate to the springs with the hardware indicated.
• 将篮板组件翻过来。将防松螺帽(AAV)锁在 U 形螺栓(APZ)的两端,尽可能锁紧。将压缩弹簧(AJW)滑入 U 形螺栓,并且将弹
簧固定片(
AOW)置于压缩弹簧上。使用如图所示五金零件固定固定片至弹簧上。
AAV (x2)
ABK (x2)
AJW (x2)
AOW (x1)
• DO NOT COMPLETELY TIGHTEN THE FLANGE NUTS IN THIS STEP!
Only tighten the nuts until the rim does not wobble. Tightening the
nuts will adjust the rim tension.
• 在这一步骤请勿过分拧紧尼龙凸缘螺母(ABK),确保球框(ALX)
不会摇晃即可。
DFE (x4)
AAA (x4)
7/16" (≈11mm)
1/2" (≈13mm)
9/16" (≈14mm)
(x2)
3.3
• Attach the backboard brackets (AMY) to the backboard using the hardware indicated.
• 使用所指示的五金零件安装篮板托架(AMY)至篮板。
AAA
DFE
DFE
DFE
DFE
AAA
AMY
9/16" (≈14mm)
(x2)
19
7 5/8 in/po (≈19cm)
7 1/16 in/po (≈18cm)
4
(x2)
3/4”
(≈19 mm)
(x1)
BCR
AKC (x2)
AAX (x4)
GBU (x2)
ABN (x8)
AAD (x2)
HMP (x2)
AKB (x2)
TOOLS REQUIRED / 所需工具
PARTS REQUIRED / 所需部件
HARDWARE REQUIRED / 所需五金配件
BACKBOARD TO POLE ASSEMBLY / 背板与立柱的组装
Metal Part /
金属部件

20
SECTION 4 (CONTINUED) / 步骤4(续)
TOOLS AND HARDWARE REQUIRED / 所需工具及五金配件
7 5/8 in/po (≈19cm)
4.1
AAX (x1)
GBU (x1)
• Tighten the centerlock nut (AAX) until it is fl ush
with the end of the bolt.
•
拧紧六角螺栓(AAD)直到它的尾端与螺母
(AAX)齐平。
!
AKC
AKC
HMP
GBU
AAX
ABN
ABN
AKC
ABN (x2)
3/4”
(≈19 mm)
(x2)
!
!
• Attach the short extension arms (AKC) to the backboard brackets in the location shown with the hardware indicated.
• 如图将短伸展臂(AKC)用螺丝锁到背板支架上。
• A centerlock nut requires some effort to thread onto a
bolt. See page 3 for details.
•
中心锁紧螺帽需要一些力气才能拧到螺栓
上。详见第 3 页。
• If necessary, use a bolt to remove any
excess powder coating from the holes in
the backboard brackets.
• 如必要,使用一颗螺栓从篮板托
架的孔中除去多余的粉末涂层。
• DO NOT strike this bolt (GBU) with a mallet! If
there is diffi culty sliding the bolt into place, use
a wrench to turn the bolt until it has advanced
into position.
• 请勿使用木槌敲击这个螺栓(DFB)!如
果滑入这个螺栓至定位有困难,使用
扳手转动螺栓,直到它向前进入位置
为止。
HMP (x2)

i
This page intentionally left blank
本页面有意留白
PARTS IDENTIFIER / 部件识别
Detach this yellow section for use as a quick reference /
拆下黄色部分,作为快速参考
ii
ALH (x1)
ALF (x1)
ALX (x1)
AKC (x2)
AKB (x2)
ALS (x2)
ALL (x1)
DFD (x1)
AMY (x2)
AJI (x1)
ALE (x1)
Detach this yellow section for use as a quick reference /
拆下黄色部分,作为快速参考
PARTS IDENTIFIER / 部件识别
Metal Part /
金属部件
• Warning Sticker applied to side not shown
• 警告贴纸粘在没有显示的那一侧。
AJC (x1)
HJX (x1)
ALI (x2)
Long Axle / 长轴 Short axle / 短轴
iii
BCO BCS BCTBCR
AKP (x1)
1109 02 5
10’
9’6”
9’
8’6”
7’6”
8’
AKZ (x1)
ALM (x1)
ALD (x1)
BCQ
AKF (x1) AKG (x1)
BCU
AKI (x1)
AMN (x1)
BAA (x1)
AJQ (x1)
BAB (x1)
HARDWARE REQUIRED / 所需五金配件
Plastic Parts /
塑胶部件
PARTS IDENTIFIER / 部件识别
Detach this yellow section for use as a quick reference /
拆下黄色部分,作为快速参考
AMU (x2)
AJM (x1)
AEF (x2)
FIQ (x1)
FIR (x1)

iv
This page intentionally left blank
本页面有意留白
PARTS IDENTIFIER / 部件识别
Detach this yellow section for use as a quick reference /
拆下黄色部分,作为快速参考
21
SECTION 4 (CONTINUED) / 步骤4(续)
TOOLS AND HARDWARE REQUIRED / 所需工具及五金配件
7 5/8 in/po (≈19cm)
• Tighten the centerlock nut (AAX) until
it is fl ush with the end of the bolt.
• 拧紧六角螺栓(AAD)直到它的尾端
与螺母(AAX)齐平。
!
4.2
AAX
ABN
ABN
GBU
HMP
AKB
AKB
AKB
• Attach the ends of the long extension arms (AKB) (that only have one hole) to the backboard brackets in the
location shown with the hardware indicated.
• 如图将长伸展臂(AKB)只有一个孔的一端用螺丝锁到背板支架上。
AAX (x1)
GBU (x1)
ABN (x2)
3/4”
(≈19 mm)
(x2)
(x1)
HMP (x2)
22
SECTION 4 (CONTINUED) / 步骤4(续)
TOOLS AND HARDWARE REQUIRED / 所需工具及五金配件
AAX (x1)
• Lay the backboard and rim assembly next to the pole assembly. Rest the rim on cardboard to prevent scratching. Then
secure the long extension arms (AKB) to the top pole (ALH) with the hardware shown. Do not overtighten the hardware in this step.
• 将篮板与篮框组件放在立柱组件旁边。将篮框置于硬纸板以避免刮伤。然后使用如图所示的五金零件固定长伸展臂(AKB)
至上立柱(
ALH)。在这个步骤中请勿过度锁紧五金零件。
ABN (x2)
!
CAUTION: HAVE ONE ADULT HOLD THE BACKBOARD IN PLACE UNTIL ASSEMBLY HAS BEEN COMPLETED!
注意:拧紧六角螺栓(AAD)直到它的尾端与螺母(AAX)齐平。
AKB
AKB
AAD
ABN
ABN
AAX
ALH
4.3
3/4” (≈19 mm)
(x2)
(x1)
7 1/16 in/po (≈18cm)
AAD (x1)
• Tighten the centerlock nut (AAX) until
it is fl ush with the end of the bolt.
• 拧紧六角螺栓(AAD)直到它的尾端
与螺母(AAX)齐平。
23
SECTION 4 (CONTINUED) / 步骤4(续)
TOOLS AND HARDWARE REQUIRED / 所需工具及五金配件
4.4
• Secure the short extension arms (AKC) to the top pole (ALH) with the hardware shown.
• 使用如图所示的五金零件固定短延伸臂(AKC)至上立柱(ALH)。
AAX
AAD
AKC
AKC
ABN
ABN
!
AAX (x1)
ABN (x2)
7 1/16 in/po (≈18cm)
3/4" (≈19 mm)
(x2)
(x1)
AAD (x1)
• Tighten the centerlock nut (AAX) until
it is fl ush with the end of the bolt.
• 拧紧六角螺栓(AAD)直到它的尾端
与螺母(AAX)齐平。
24
!
5
AAX (x2)
AAO* (x1)
ABM (x2)
ABB (x2)
BSG (x1)
AKH (x1)
ACX (x1)
AQE (x1)
ABA (x2)
AAW (x1)
AAD (x1)
* The nylock nut (AAO) will not be used in this assembly.
* Nylock 螺帽(AAO)不会用于这个组件上。
7 1/16 in/po (≈18cm)
6 1/2 in/po (≈17cm)
6 1/2 in/po (≈17cm)
BCT
ALS (x2)
AKF (x1)
AKI (x1)
AMN (x1)
AKG (x1)
(x2) (x2) (x2)
3/4" (≈19 mm)
1/2" (≈13 mm)
9/16" (≈15 mm)
HANDLE ASSEMBLY / 把手的安装步骤
TOOLS REQUIRED / 所需工具
PARTS REQUIRED / 所需部件
HARDWARE REQUIRED / 所需五金配件
Metal Parts /
金属部件
Plastic Parts /
塑胶部件
HNX (x1)
25
SECTION 5 (CONTINUED) / 步骤5(续)
TOOLS AND HARDWARE REQUIRED / 所需工具及五金配件
ACX (x1)
BSG (x1)
(x2)
1/2"
(≈13 mm)
AKG
AKF
5.2
BSG
ACX
ALL
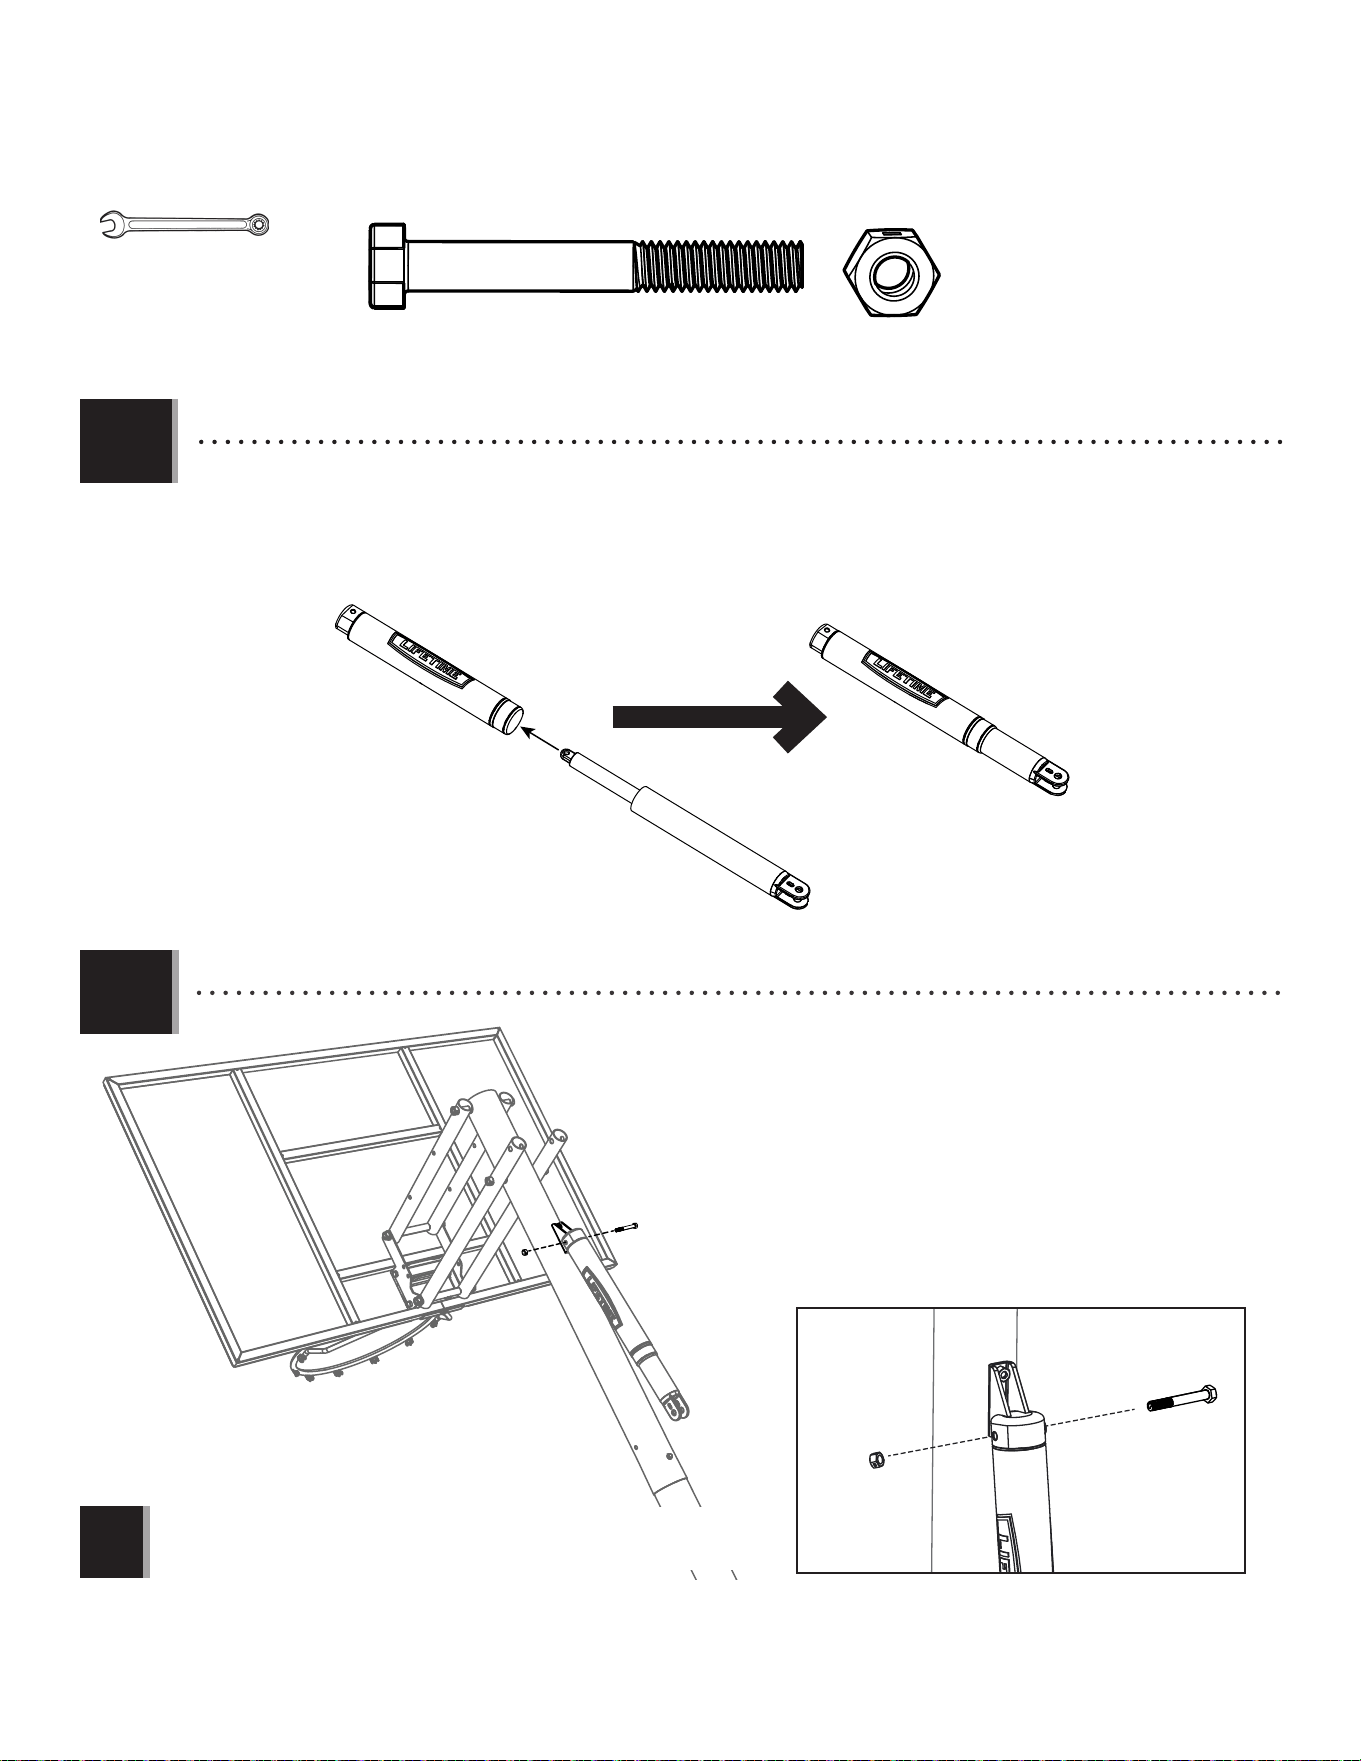
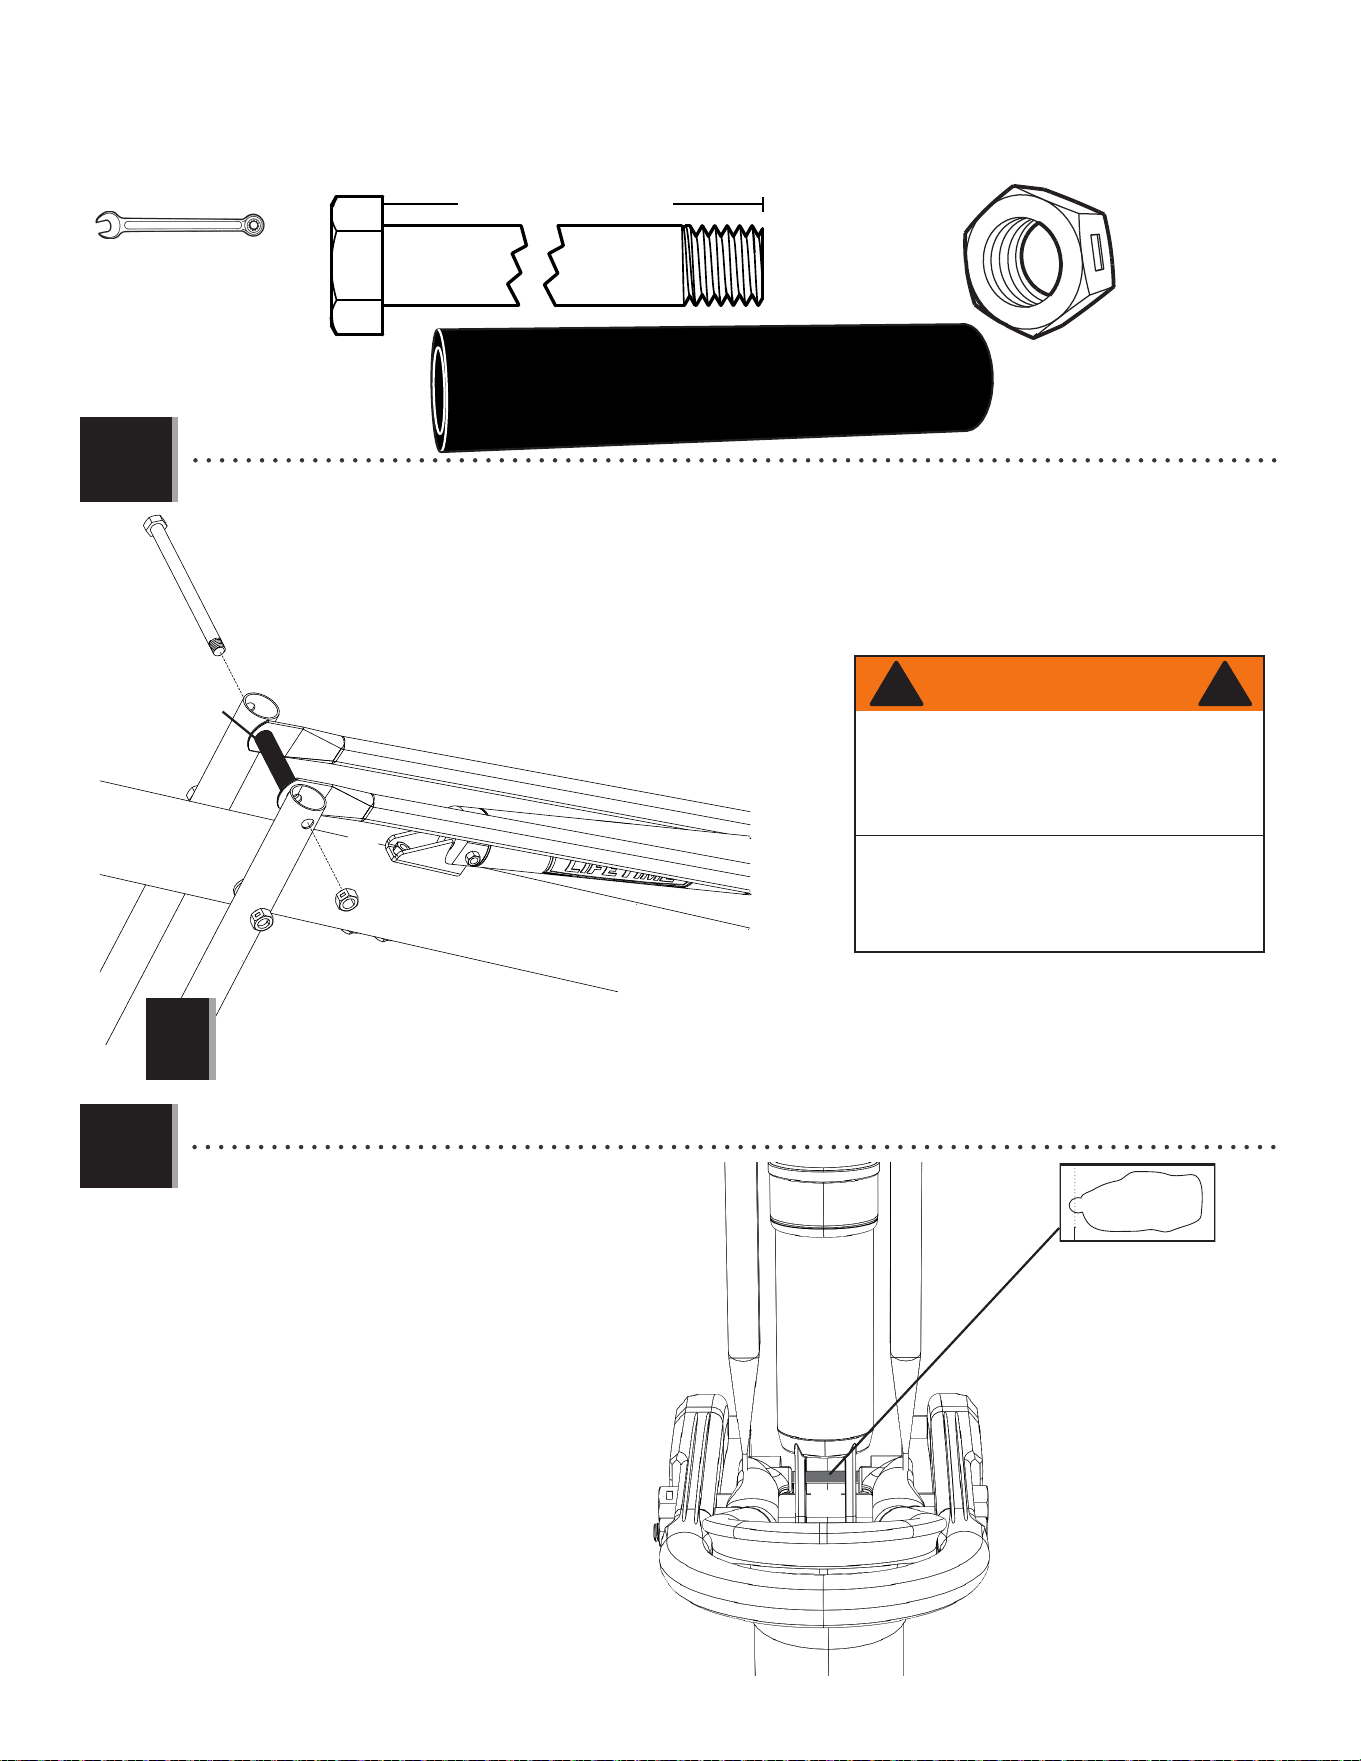
• Slide the gas spring cover (AKG) onto the gas spring (AKF) as indicated.
•
将气气压弹簧(AKF)滑入压弹簧盖(AKG),如图所示。
• Align the holes in the gas spring cover (AKG) and the gas spring (AKF)
with the holes in the pole bracket (ALL), and attach the gas spring
assembly to the pole bracket with the hardware indicated.
• 气压弹簧盖(AKG)与气压弹簧(AKF)上的孔位对准上立柱上的托架
(
ALL)上的孔位,并且使用如图所示的五金零件安装气压弹簧组件至
立柱托架。
• Tighten the centerlock nut (BSG) until it is fl ush with the end of the bolt.
•
锁紧 Centerlock 螺帽(BSG)直到它与螺栓末端切齐为止。
!
5.1
26
SECTION 5 (CONTINUED) / 步骤5(续)
TOOLS AND HARDWARE REQUIRED / 所需工具及五金配件
AQE (x1)
(x2)
ABA (x1)
ABB (x1)
6 1/2 in/po (≈17cm)
5.3
9/16" (≈15 mm)
ABA
ABB
AMN
AKI
!
5.4
AQE
AKF
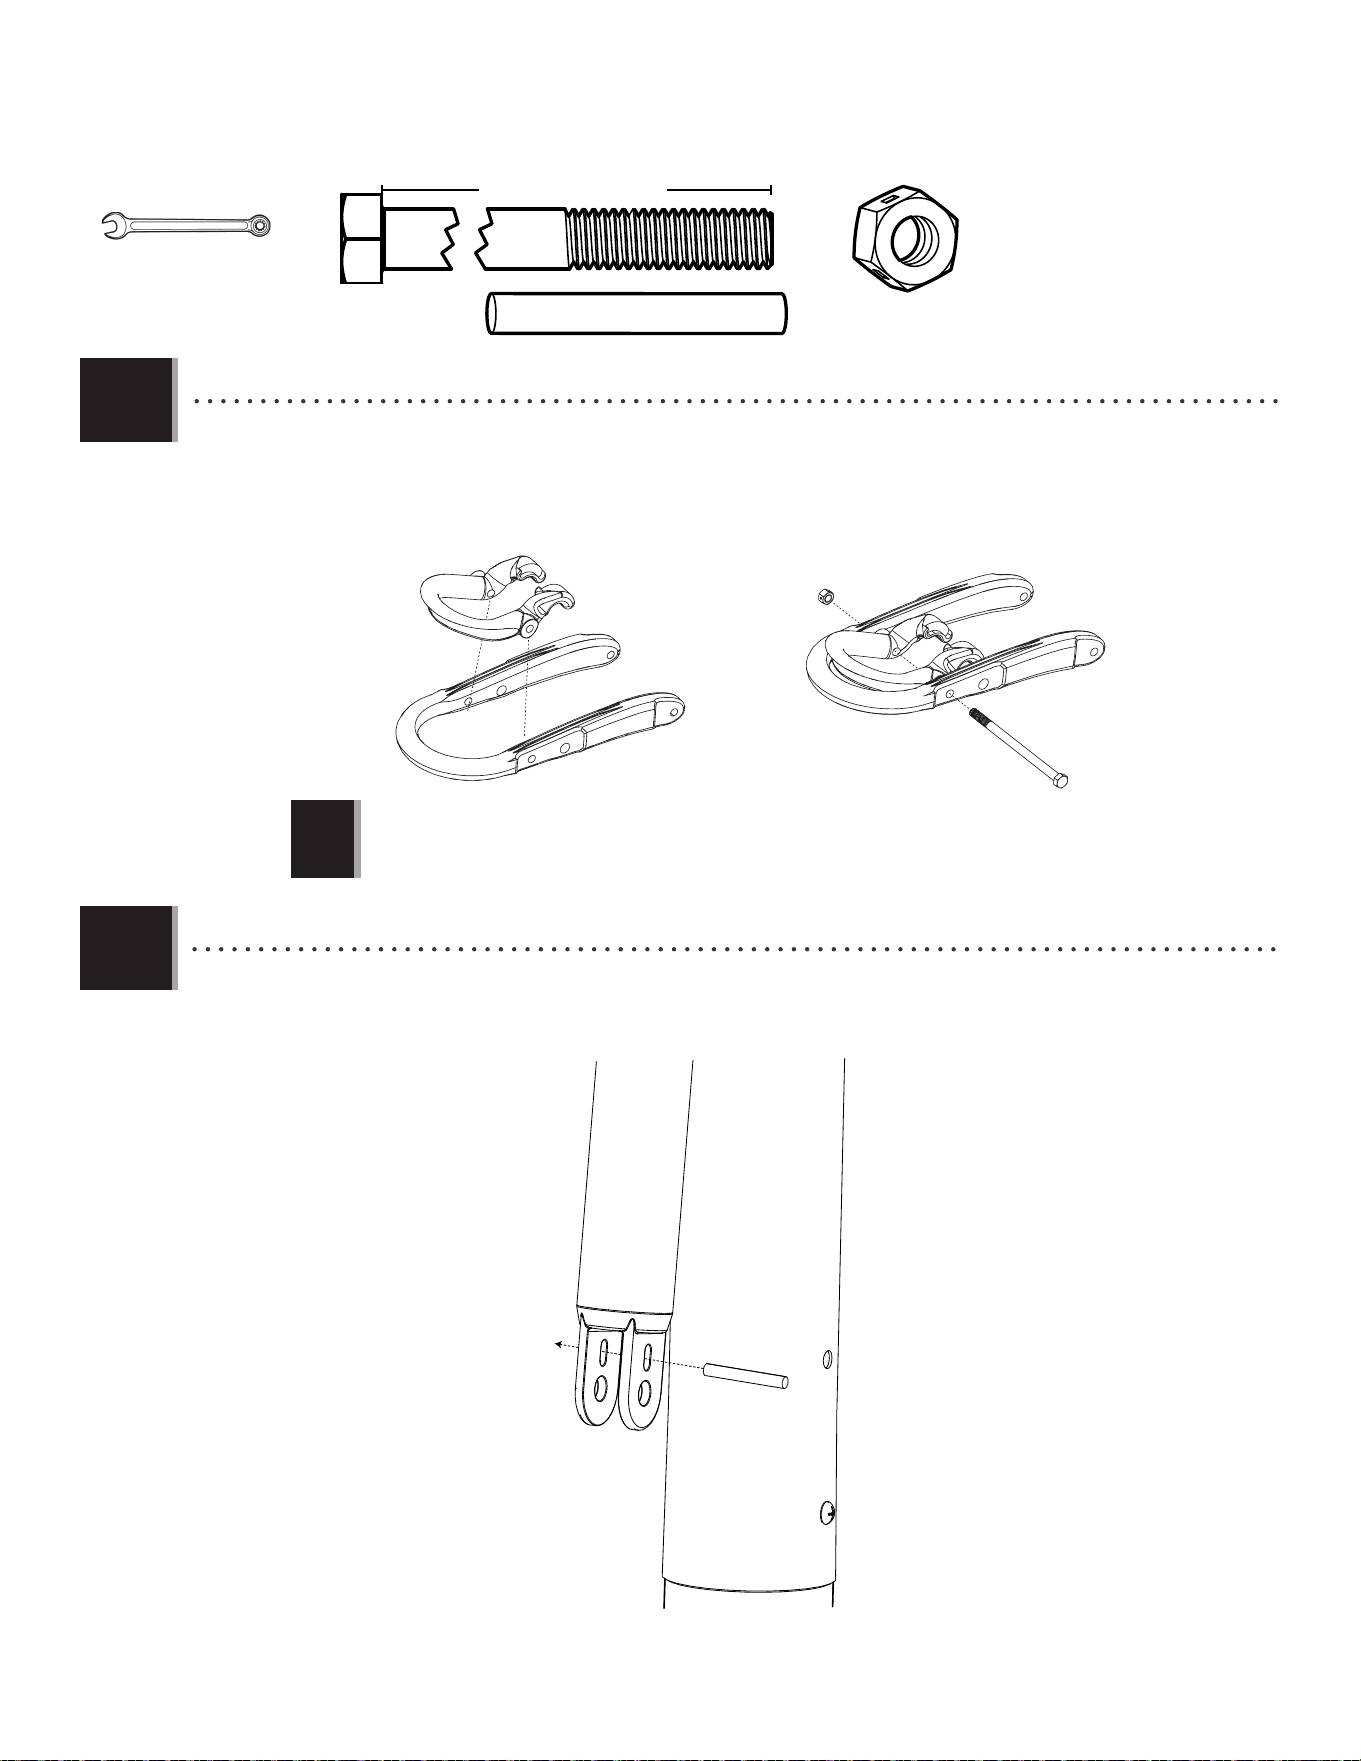
• Position the trigger (AMN) inside of the handle (AKI), and secure the trigger to the handle with the hardware indicated.
•
将扳机(AMN)定位至把手(AKI)的内侧,并且使用如图所示的五金零件固定扳机至把手上。
• Tighten the centerlock nut (BSG) until it is fl ush with the end of the bolt.
•
锁紧 Centerlock螺帽直到它与螺栓末端切齐为止。
• Insert the release pin (AQE) through the gas spring (AKF).
• 插入释放销(AQE)穿过气压弹簧(AKF)。
27
SECTION 5 (CONTINUED) / 步骤5(续)
TOOLS AND HARDWARE REQUIRED / 所需工具及五金配件
5.5
6 1/2 in/po (≈17cm)
AAW (x1)
(x2)
AAX (x1)
3/4" (≈19 mm)
AAW
AAX
ALS
ALS
AKI
AKF
AMN
AQE
!
• Slide the handle (AKI) under the gas spring (AKF) so that the release pin (AQE) rests in the channels of the trigger
(AMN). Position the rear lifter arms (ALS) between the handle and trigger, and secure with the hardware indicated.
• 将把手(AKI)滑入气压弹簧(AKF)下方,以使释放销(AQE)置于板机(AMN)的凹槽内。定位后举升臂(ALS)于把手与扳机之间,
并且使用如图所示的五金零件固定。
• Tighten the centerlock nut (AAX) until it is fl ush with the end of the bolt.
•
锁紧 Centerlock螺帽直到它与螺栓末端切齐为止。
28
SECTION 5 (CONTINUED) / 步骤5(续)
TOOLS AND HARDWARE REQUIRED / 所需工具及五金配件
5.6
(x2)
ABA (x1)
ABB (x1)
ABM (x2)
6 1/2 in/po (≈17cm)
9/16" (≈15 mm)
ABA
ABB
ABM
ABM
AKI
ALH
• Secure the handle (AKI) to the top pole (ALH) with the hardware shown. Make sure to place the spacers (ABM) between
the handle assembly and the top pole as indicated.
•
使用如图所示五金零件固定把手(AKI)至中间立柱(ALF)上。确认将间隔件(ABM)置于把手组件与中间立柱之间,如图所示。
!
• Tighten the centerlock nut (ABB) until it is fl ush with
the end of the bolt.
•
锁紧 Centerlock螺帽直到它与螺栓末端切
齐为止。
29
SECTION 5 (CONTINUED) / 步骤5(续)
TOOLS AND HARDWARE REQUIRED / 所需工具及五金配件
7 1/16 in/po (≈18cm)
5.7
AAX (x1)
AAD (x1)
3/4" (≈19 mm)
(x2)
!
AAD
HNX
AKB
AAX
ALS
ALS
WARNING/警告
The Handle mechanism is designed to lift
only the weight of the Backboard and Rim.
Do not hang anything from the Handle, Rim,
Backboard, or Lifter Arms as this will damage
the system and void the warranty.
!
!
把手机构仅设计用来举升篮板与篮圈的
重量。请勿挂任何东西在把手、篮框、
篮板或举升臂上,因为这会损坏系统并
使保固失效。
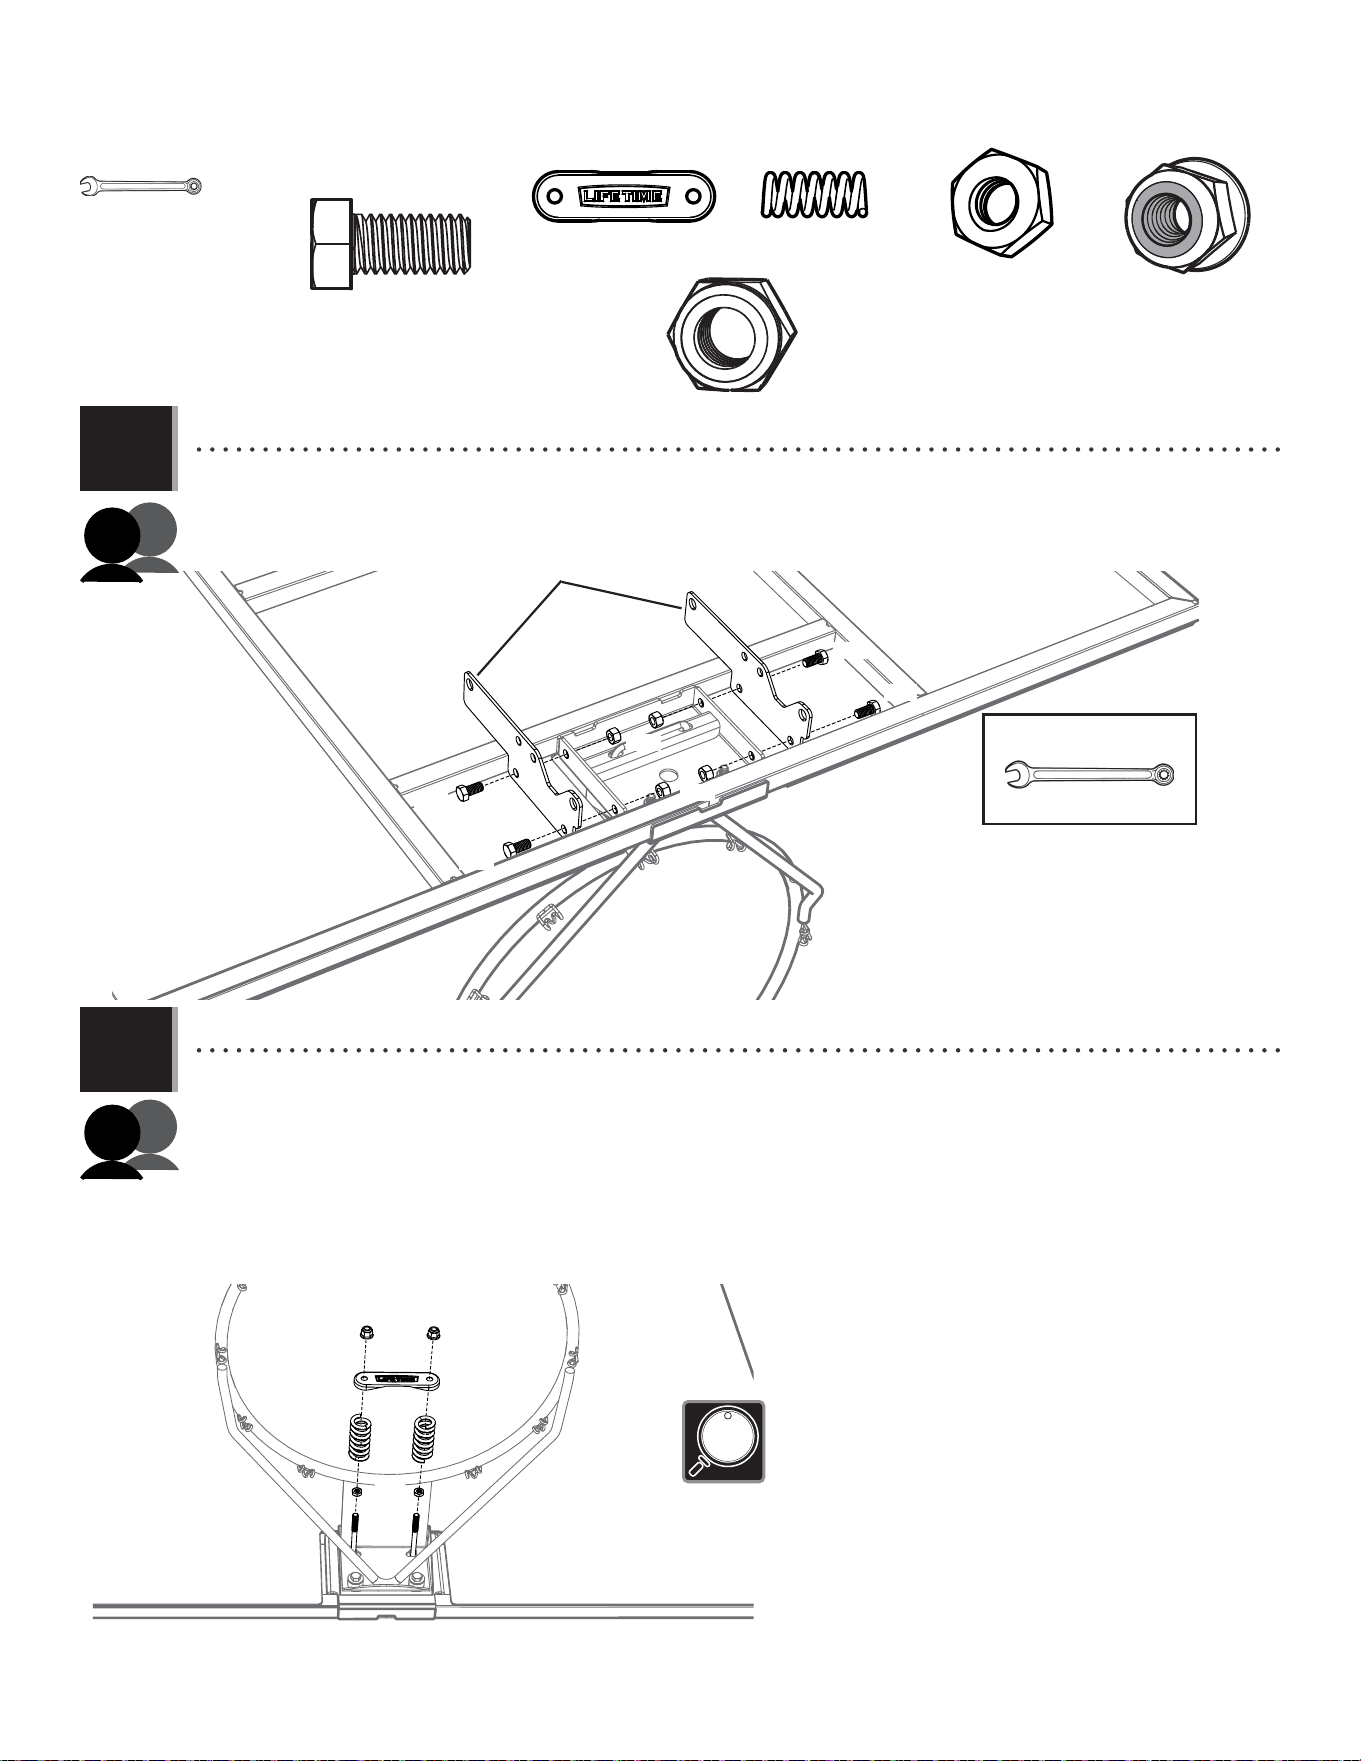
• Connect the rear lifter arms (ALS) to the inside of the lower extension arms (AKB) with the hardware shown. Place a spacer (HNX)
between the rear lifter arms as shown. Tighten the hardware in this step and in steps 4.3 and 4.4 securely now.
• 使用所示的五金件将后升降臂(ALS)连接到下延长臂(AKB)的内侧。将垫片(HNX)放置在后升降臂之间,如图所示。
现在牢固地拧紧在此步和第 4.3 和 4.4 步中的五金件。
• The rear lifter arms must be on the inside of the long extension arms.
•
后举升臂必须在长延伸臂的内侧
。
5.8
AQE
• Apply grease from the grease packet (AKH) on to the release
pin (AQE).
• 在释放销(AQE)上涂覆来自油包(AKH)的油脂。
AKH (x1)
HNX (x1)
30
AKZ (x1)
(x1) (x1)
325 lb (≈147kg)
ADP (x10)
BCU
AKP (x1)
1109 02 5
10’
9’6”
9’
8’6”
7’6”
8’
ALM (x1)
BAA (x1)
AJQ (x1)
BAB (x1)
(x1)
(x1)
(x1)
6
FINAL ASSEMBLY / 收尾
TOOLS REQUIRED /
所需工具
PARTS REQUIRED / 所需部件
HARDWARE REQUIRED / 所需五金配件
Plastic Parts /
塑胶部件
AEF (x2)
FIQ (x1)
FIR (x1)
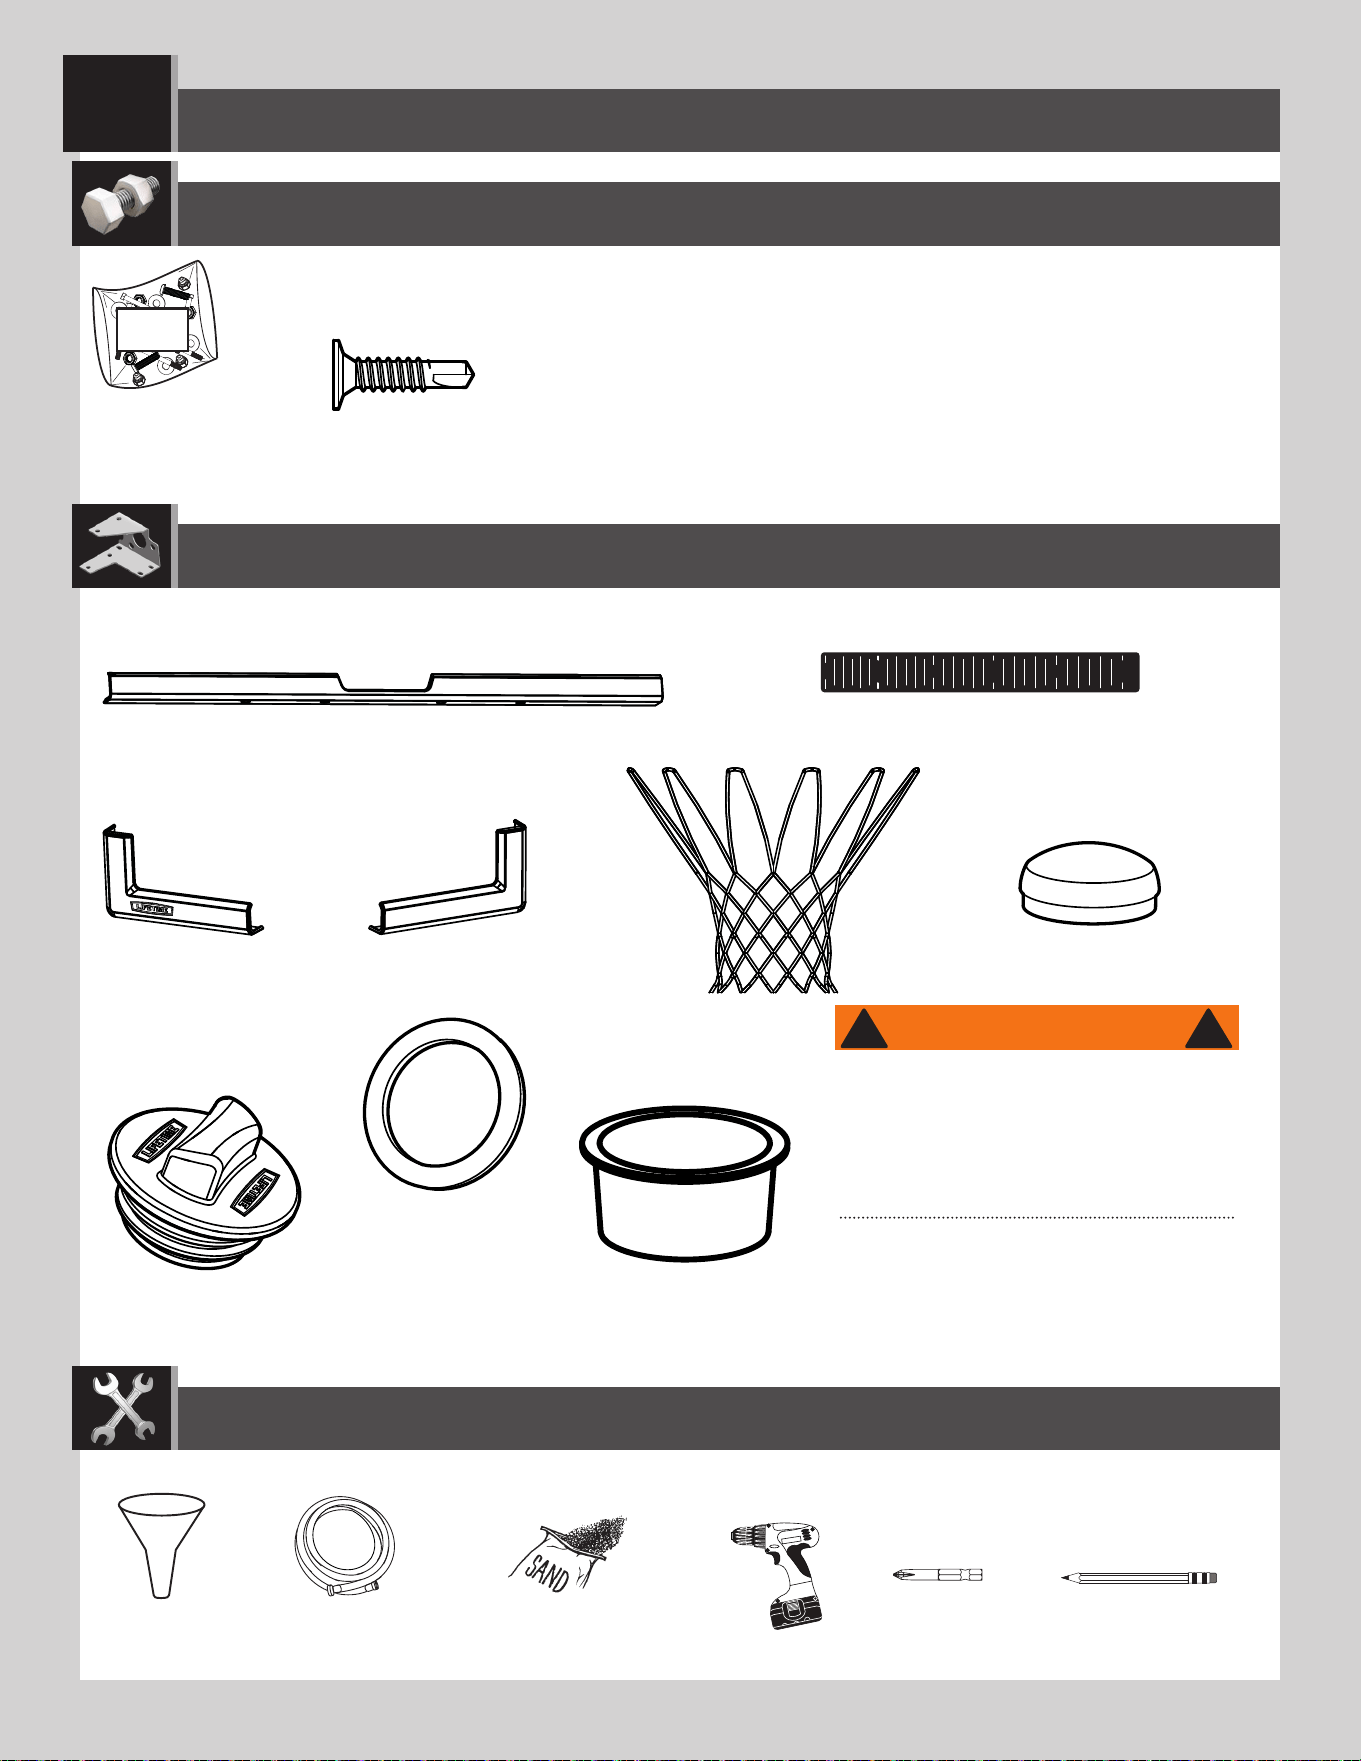
WARNING / 警告
For safety reasons, we recommend that sand be used
instead of water to fill the Base. If a leak develops, water
could run out unnoticed, allowing the system to fall over,
resulting in serious personal injuries or property damage.
If using Water, check the Base carefully for leaks. If a
leak is found, lay the system down on the ground and
call Customer Service. Do not use, stand up, or play on
a leaking system.
出于安全考虑,我们建议您使用沙子填充底座而不是
水。如若出现一点泄漏,在不经意间,水会漏光,将
造成篮球架翻倒, 从而导致人员严重受伤或财产严重
损失。若您使用水填充,请细致地检查底座,查看是
否有泄漏。如果有找到泄漏点,将篮球架平放在地面
上并联系客服。切勿使用,竖立一个有泄漏的篮球架
或在其上玩耍。
!
!
31
SECTION 6 (CONTINUED) / 步骤6(续)
TOOLS AND HARDWARE REQUIRED / 所需工具及五金配件
6.1
ADP (x10)
(x1)
6.2
(x1)
AJI
ADP
BAB
BAA
ADP
ADP
ADP
ADP
ADP
ADP
ADP
ADP
ADP
AJQ
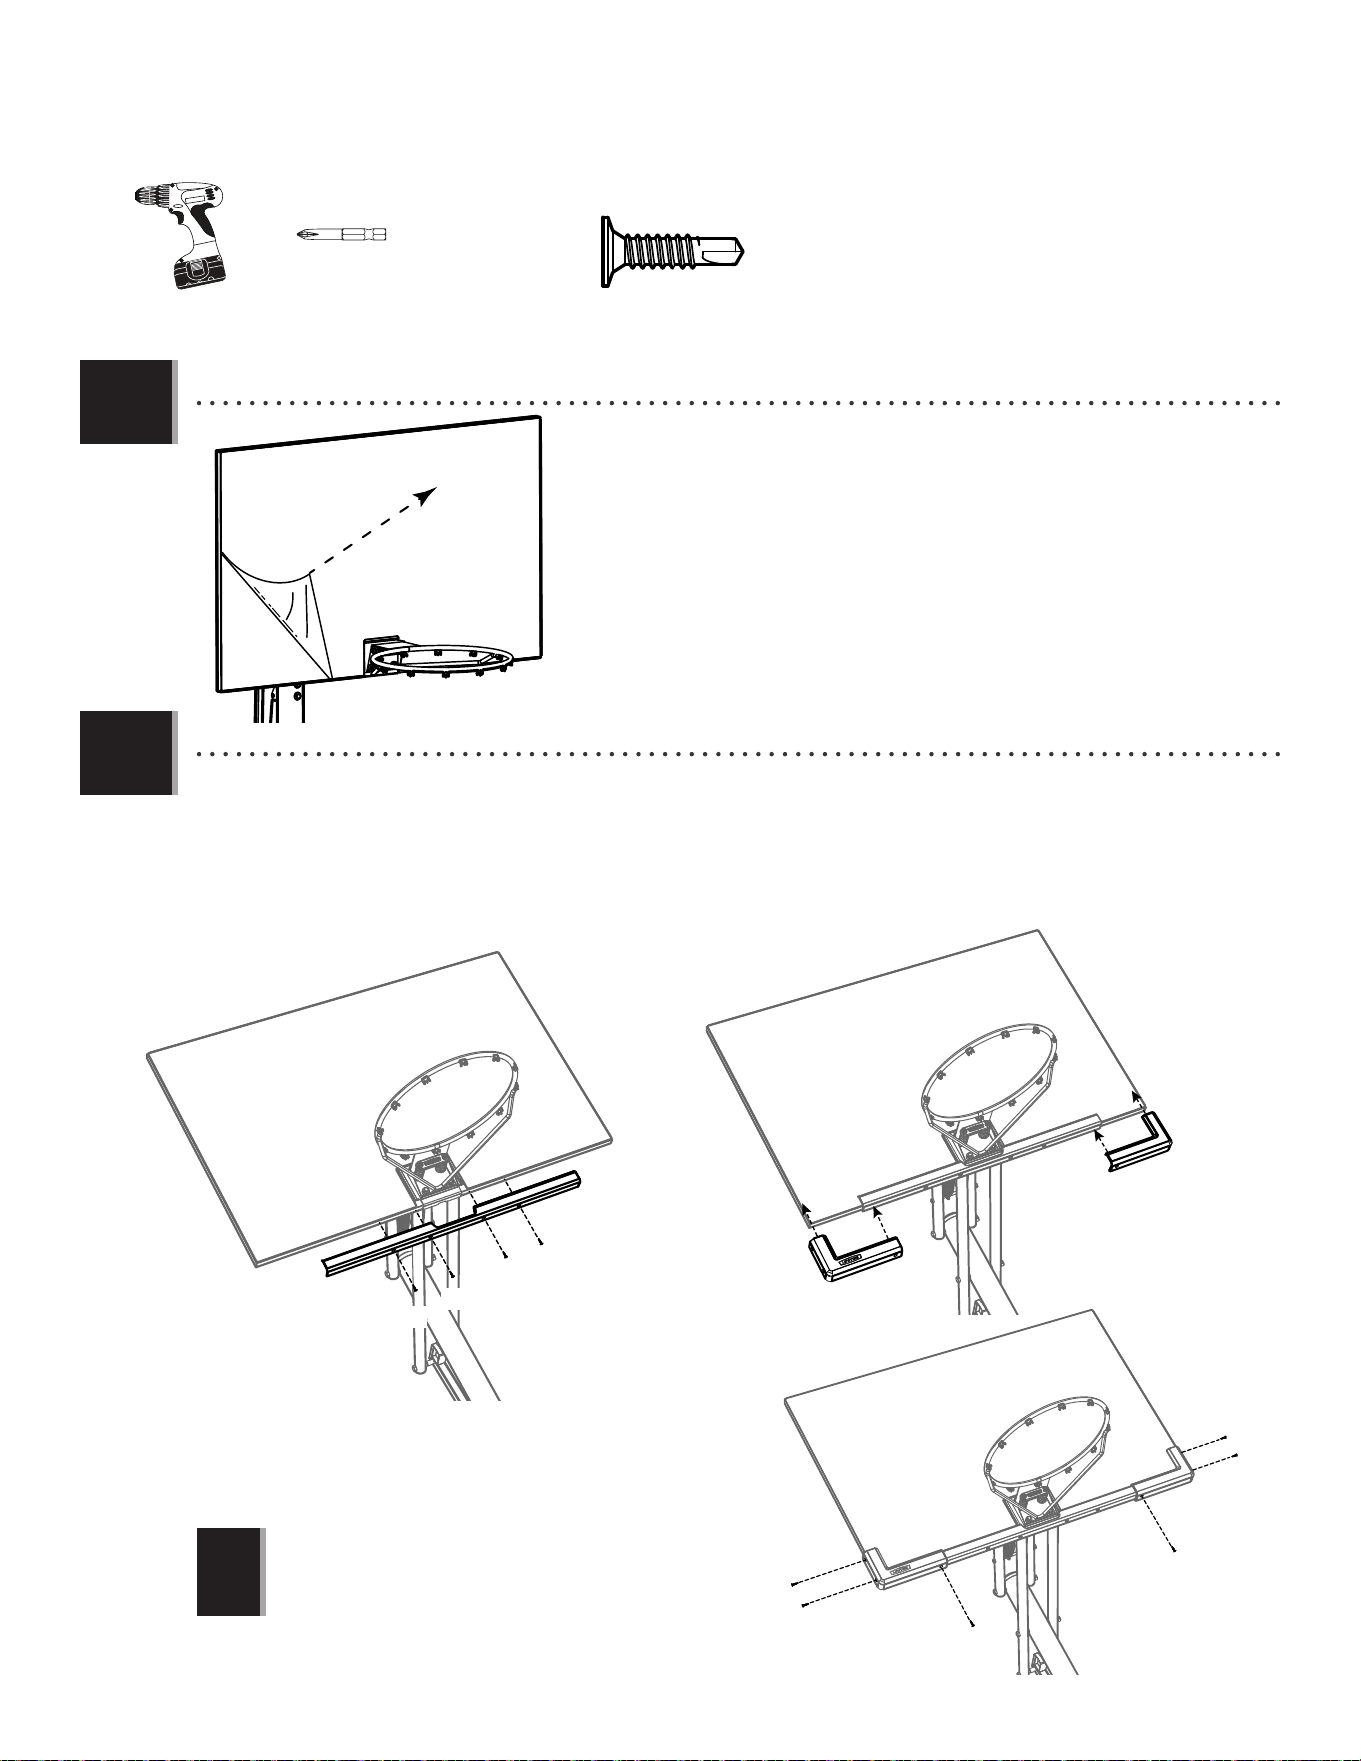
• Remove the plastic fi lm from the backboard (AJI).
•
撕掉篮板(AJI)上的薄膜
• Attach the center frame pad (AJQ) and corner frame pads (BAA and BAB) to the backboard in the location shown with the
hardware indicated. Make sure that the center frame pad is centered on the metal piece of the backboard as shown.
• 用螺丝将背板底部保护条(AJQ)锁到背板底部如图显示的位置。请确认居中安装。 如图安装背板角保护条(BAA)到背板(BAB)
底部的两个转角.
!
• The corner frame pads (BAA and BAB) will overlap
the center frame pad (AJQ).
• 角保护条(BAA, BAB)与背板保护条(AJQ)连
接处有部分重叠。
32
SECTION 6 (CONTINUED) / 步骤6(续)
TOOLS AND HARDWARE REQUIRED / 所需工具及五金配件
6.3a
325 lb (≈147kg)
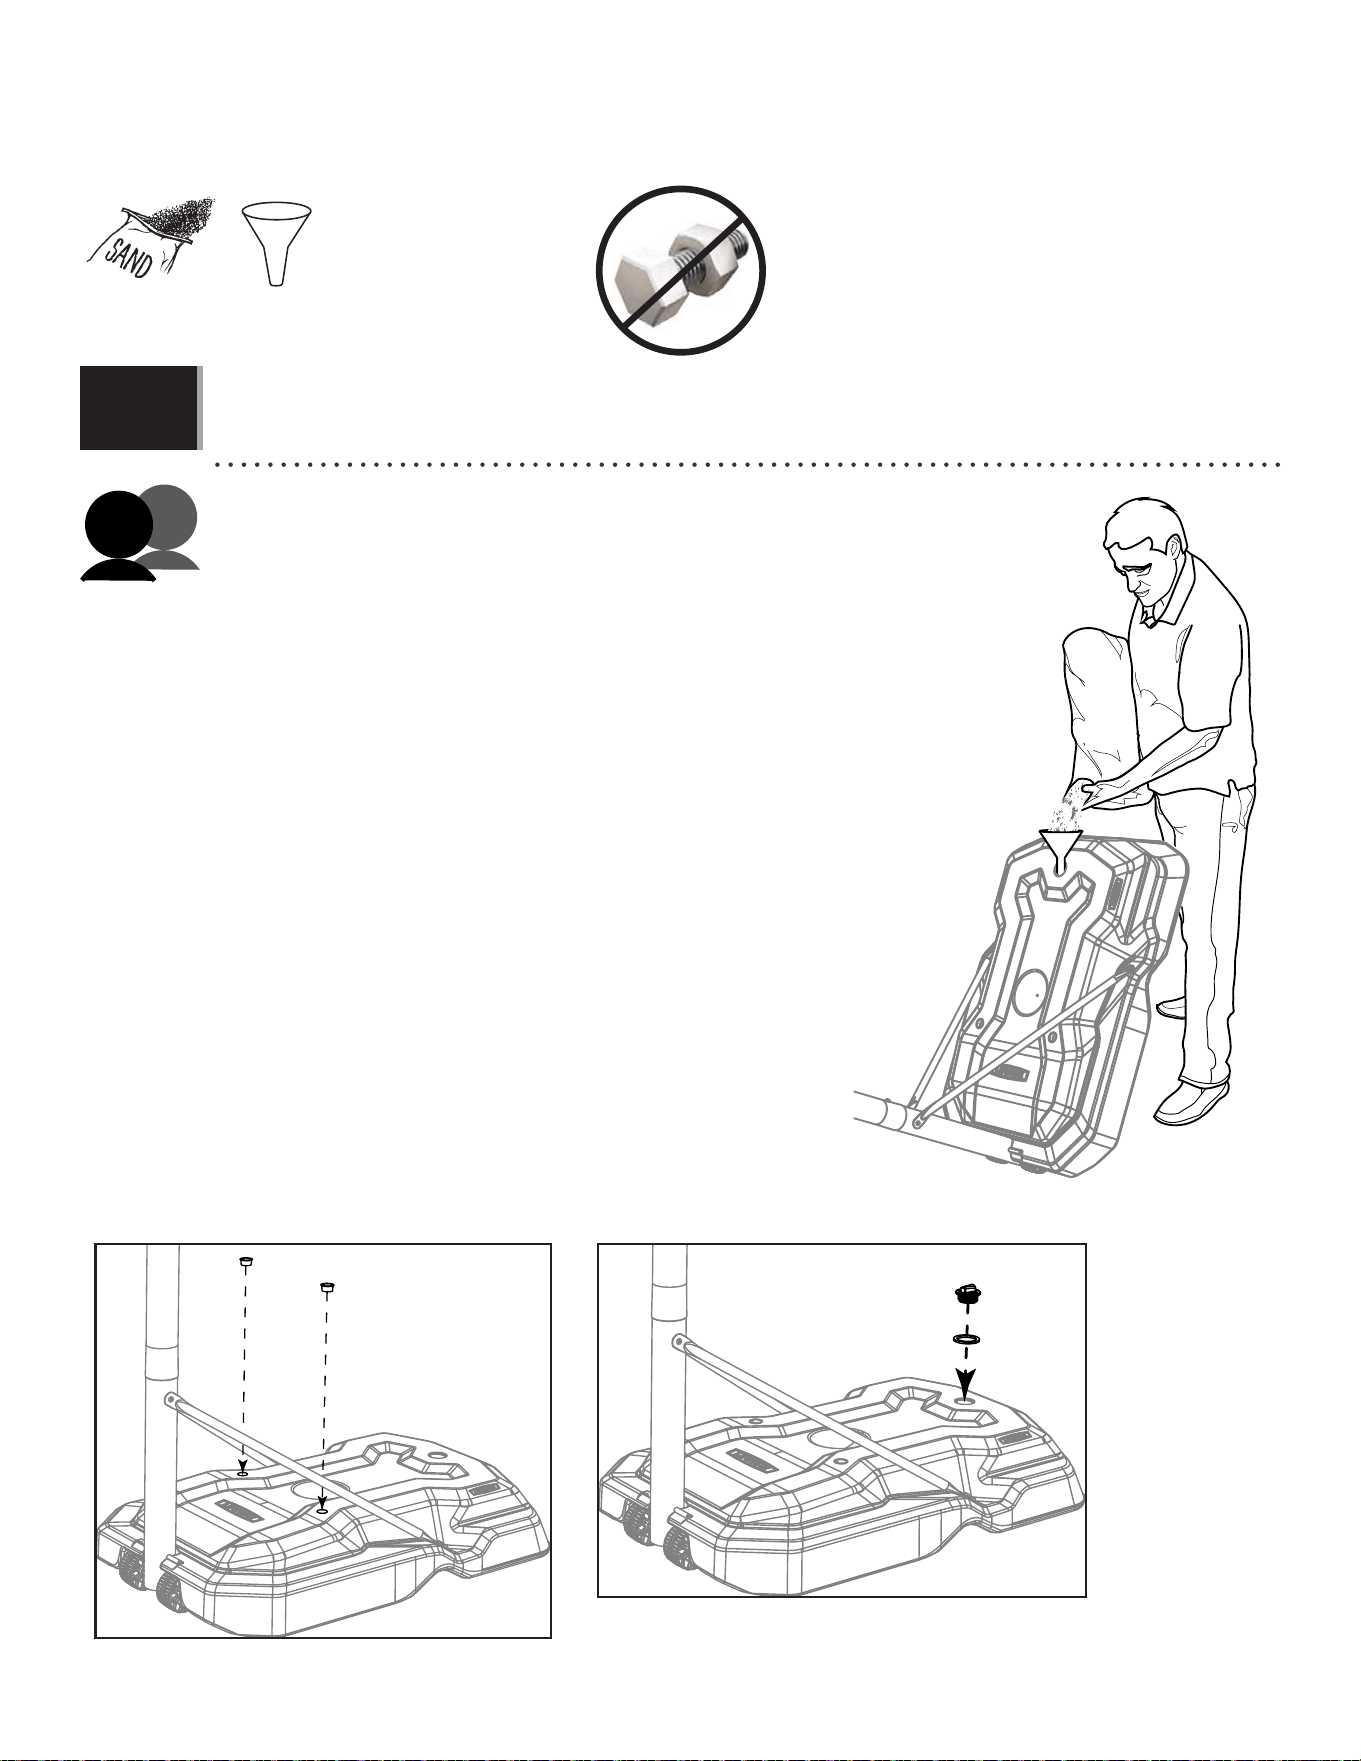
Two adults are required to complete assembly. To prevent serious injuries, the pole should be held down by one adult
at all times while the base is being fi lled.
此步骤需由两个成年人来完成。为防止严重受伤,在填充底座时,应由一人始终扶住立柱。
Option a: fi lling the base with sand:
(325 lb (≈147 kg) of sand required)
1. Insert a plug (AEF) into each of the two holes in the base (Fig. 1).
2. Using a funnel, fi ll the base with sand (Fig. 2).
3. Using two adults, stand the base up on a smooth surface and
continue fi lling until you have, at least, 325 lb (≈147kg) of sand
in the base.
4. Place the gasket (FIR) onto the cap (FIQ) and screw the cap onto the
base until tight (Fig. 3).
选项a: 沙子填充底座
需要沙子��� lb (≈���kg)
�. 如图�将两个塞子(AEF)塞入底座上的圆孔。
�. 如图�用漏斗往底座倒入沙子。
�. 两名成年人将底座抬放置光滑水平的地面上,继续倒入沙子直至
重量达到���lb(≈���kg)
�. 如图�将垫圈(FIR)放在盖子(FIQ)上,并将盖子拧紧到底座上。
(x1)
AEF
AEF
FIQ
FIR
Fig. 1
Fig. 3
Fig. 2
Sand
Sable
Arena
33
SECTION 6 (CONTINUED) / 步骤6(续)
TOOLS AND HARDWARE REQUIRED / 所需工具及五金配件
AJM
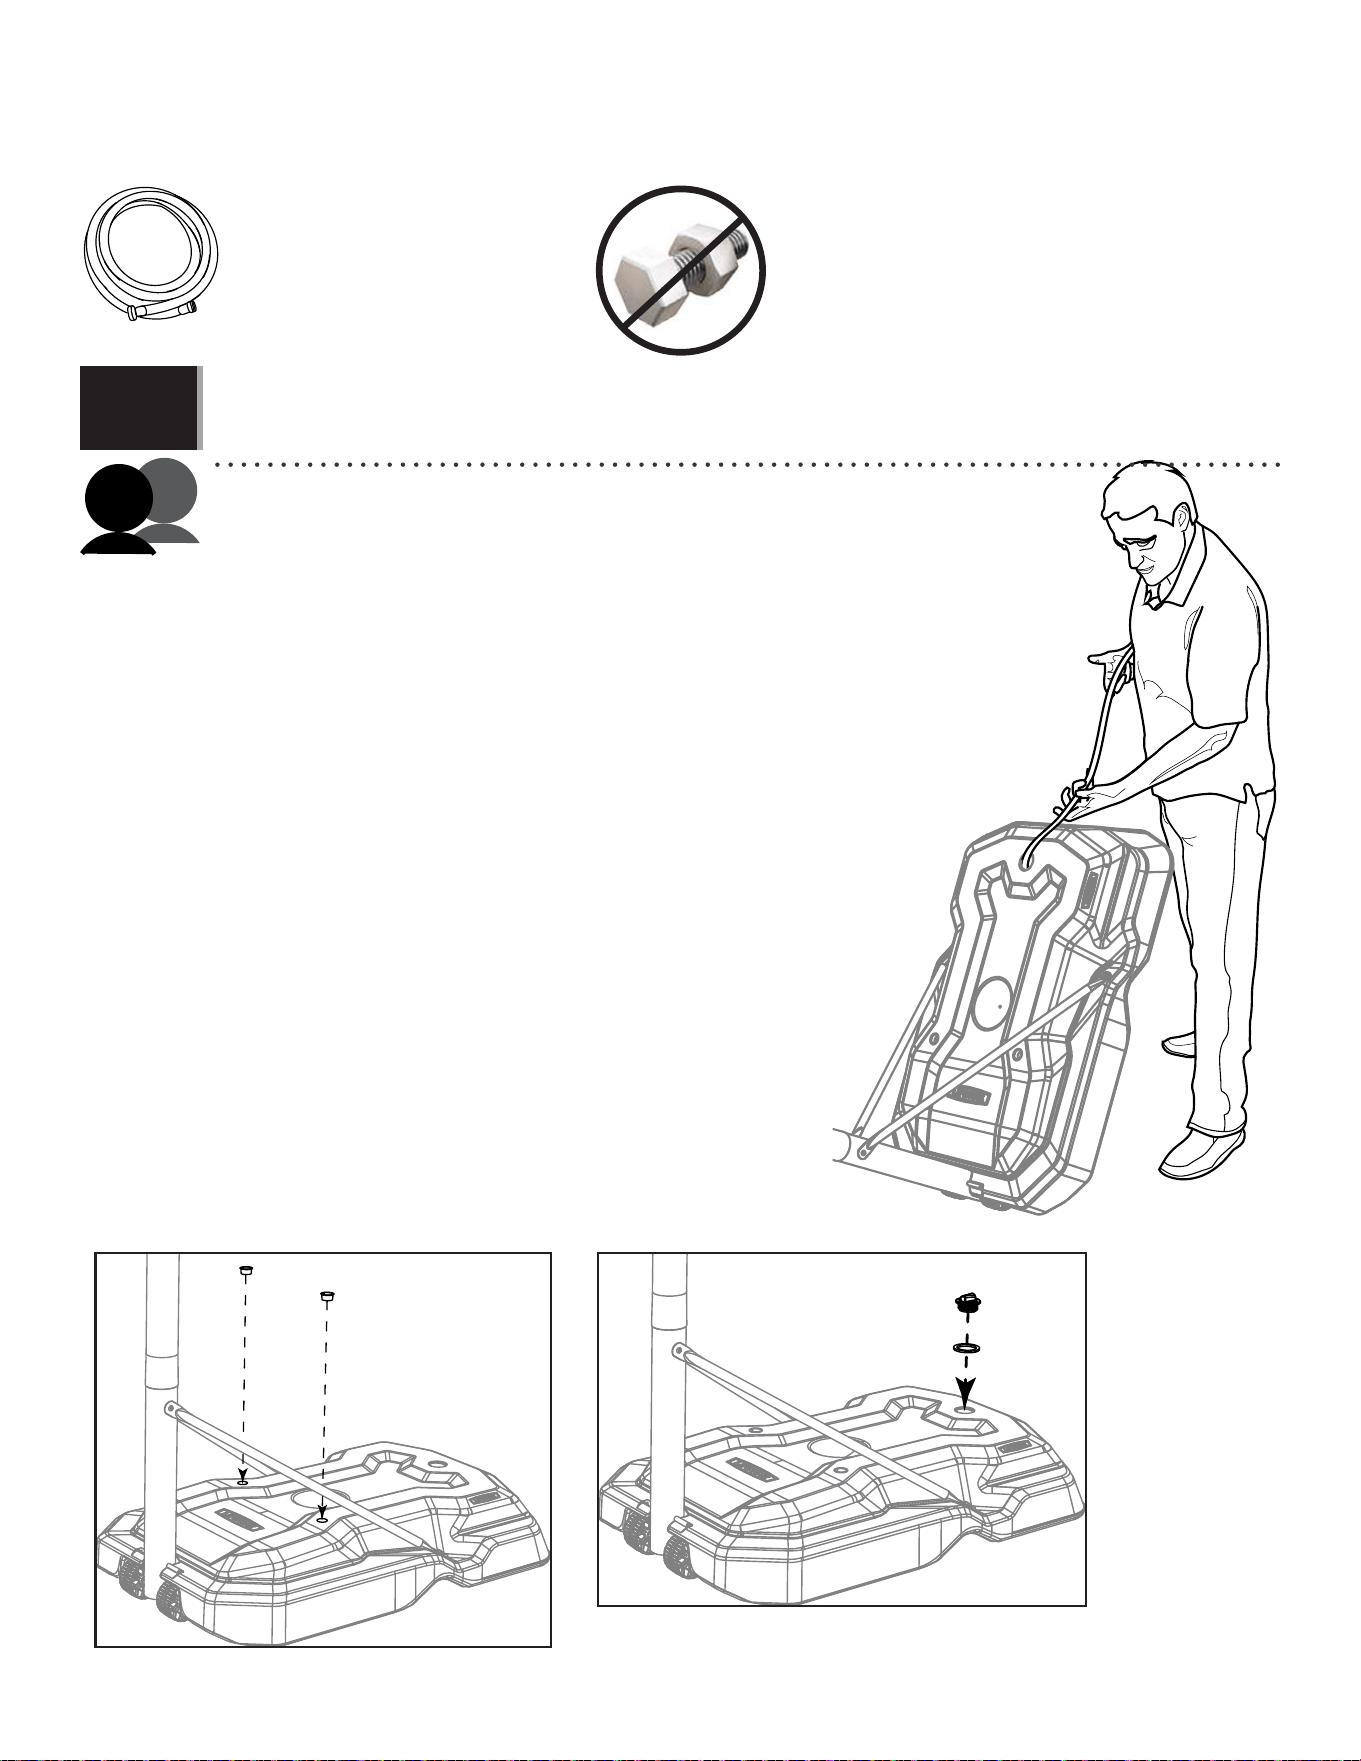
Option b: fi lling the base with water:
1. Insert a plug (AEF) into each of the two holes in the base (Fig. 1).
2. Using a hose, fi ll the base with cold water up to the fi ll hole, leaving two inches of space at the
top for expansion (Fig. 2).
3. Add one tablespoon of chlorine bleach to the water to prevent algae formation.
4. Using two adults, stand the base up on a smooth surface.
5. Place the gasket (FIR) onto the cap (FIQ) and screw the cap onto the base until tight (Fig. 3).
6. Check for leaks.
选项b: 水填充底座
�. 如图�将两个塞子(AEF)塞入底座上的圆孔。
�. 如图�使用软管给底座注水至距离注满�英寸的位置,请勿注满以防止水膨胀。
�. 在水中加一汤勺氯漂白剂以防止藻类植物的生长。
�. 两名成年人将底座抬放置水平光滑的地面。
�. 如图�将垫圈(FIR)放在盖子(FIQ)上,并将盖子拧紧到底座上。
�. 检查是否漏水。
(x1)
6.3b
Fig. 2
AEF
AEF
FIQ
FIR
Fig. 1
Fig. 3
Two adults are required to complete assembly. To prevent serious injuries, the pole should be held down by one adult
at all times while the base is being fi lled.
此步骤需由两个成年人来完成。为防止严重受伤,在填充底座时,应由一人始终扶住立柱。
34
SECTION 6 (CONTINUED) / 步骤6(续)
TOOLS AND HARDWARE REQUIRED / 所需工具及五金配件
6.6
(x1)
6.4 6.5
AKZ
ALX
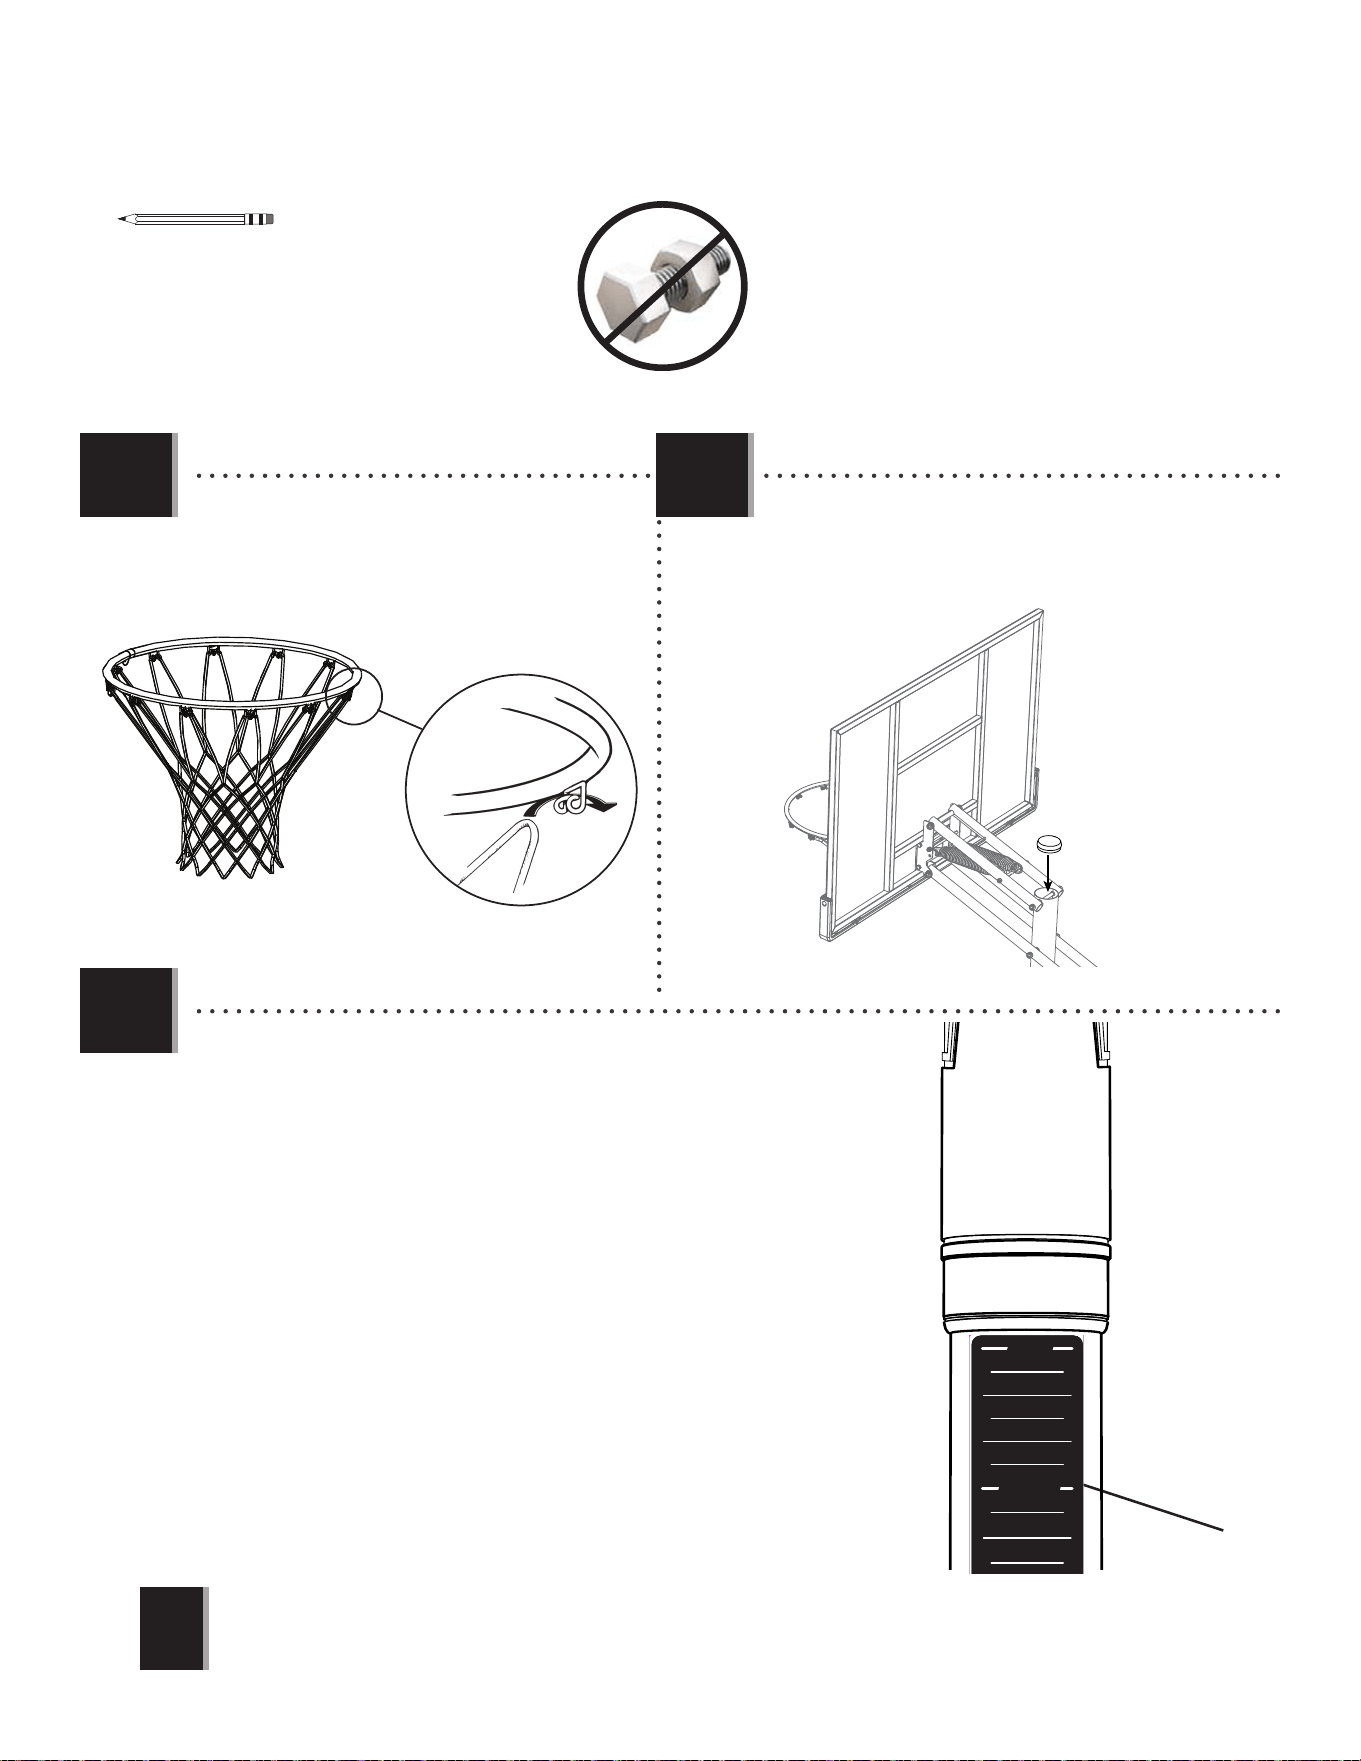
• Place pole cap (ALM) to the top pole.
• 将立柱盖(ALM)盖到顶部立柱上。
ALM
• Raise the backboard until the top of the rim measures 10 feet from
the playing surface. Apply the height adjustment sticker (AKP) onto the
gas spring (GFL), lining up the edge of the gas spring cover with the 10-
foot mark on the sticker. Press the sticker into place while carefully
removing the rest of the backing.
• 抬起篮板直到没办法更高为止。用铅笔标记气压弹簧盖(AKG)的底部与
气压弹簧(
GFL)接合处。挤压气压弹簧盖并贴上高度调整贴纸(AKP)至气
压弹簧背面,10’的线对准铅笔标记。将贴纸压入定位,而慢慢地撕掉
剩下的背纸。
AKP
120 24 57
10'
9.5'
9'
8.5'
7.5'
8'
AKF
AKG
!
• Actual height sticker (AKP) and gas spring cover (AKG) may vary from those shown here.
• 实物高度标尺贴纸(AKP)和气压弹簧外套(AKG)可能与图示有所差异,以实物为准。
• Attach the net (AKZ) to the rim (ALX).
• 请挂上篮网(AKZ)。

35
LIFETIME
®
!
!
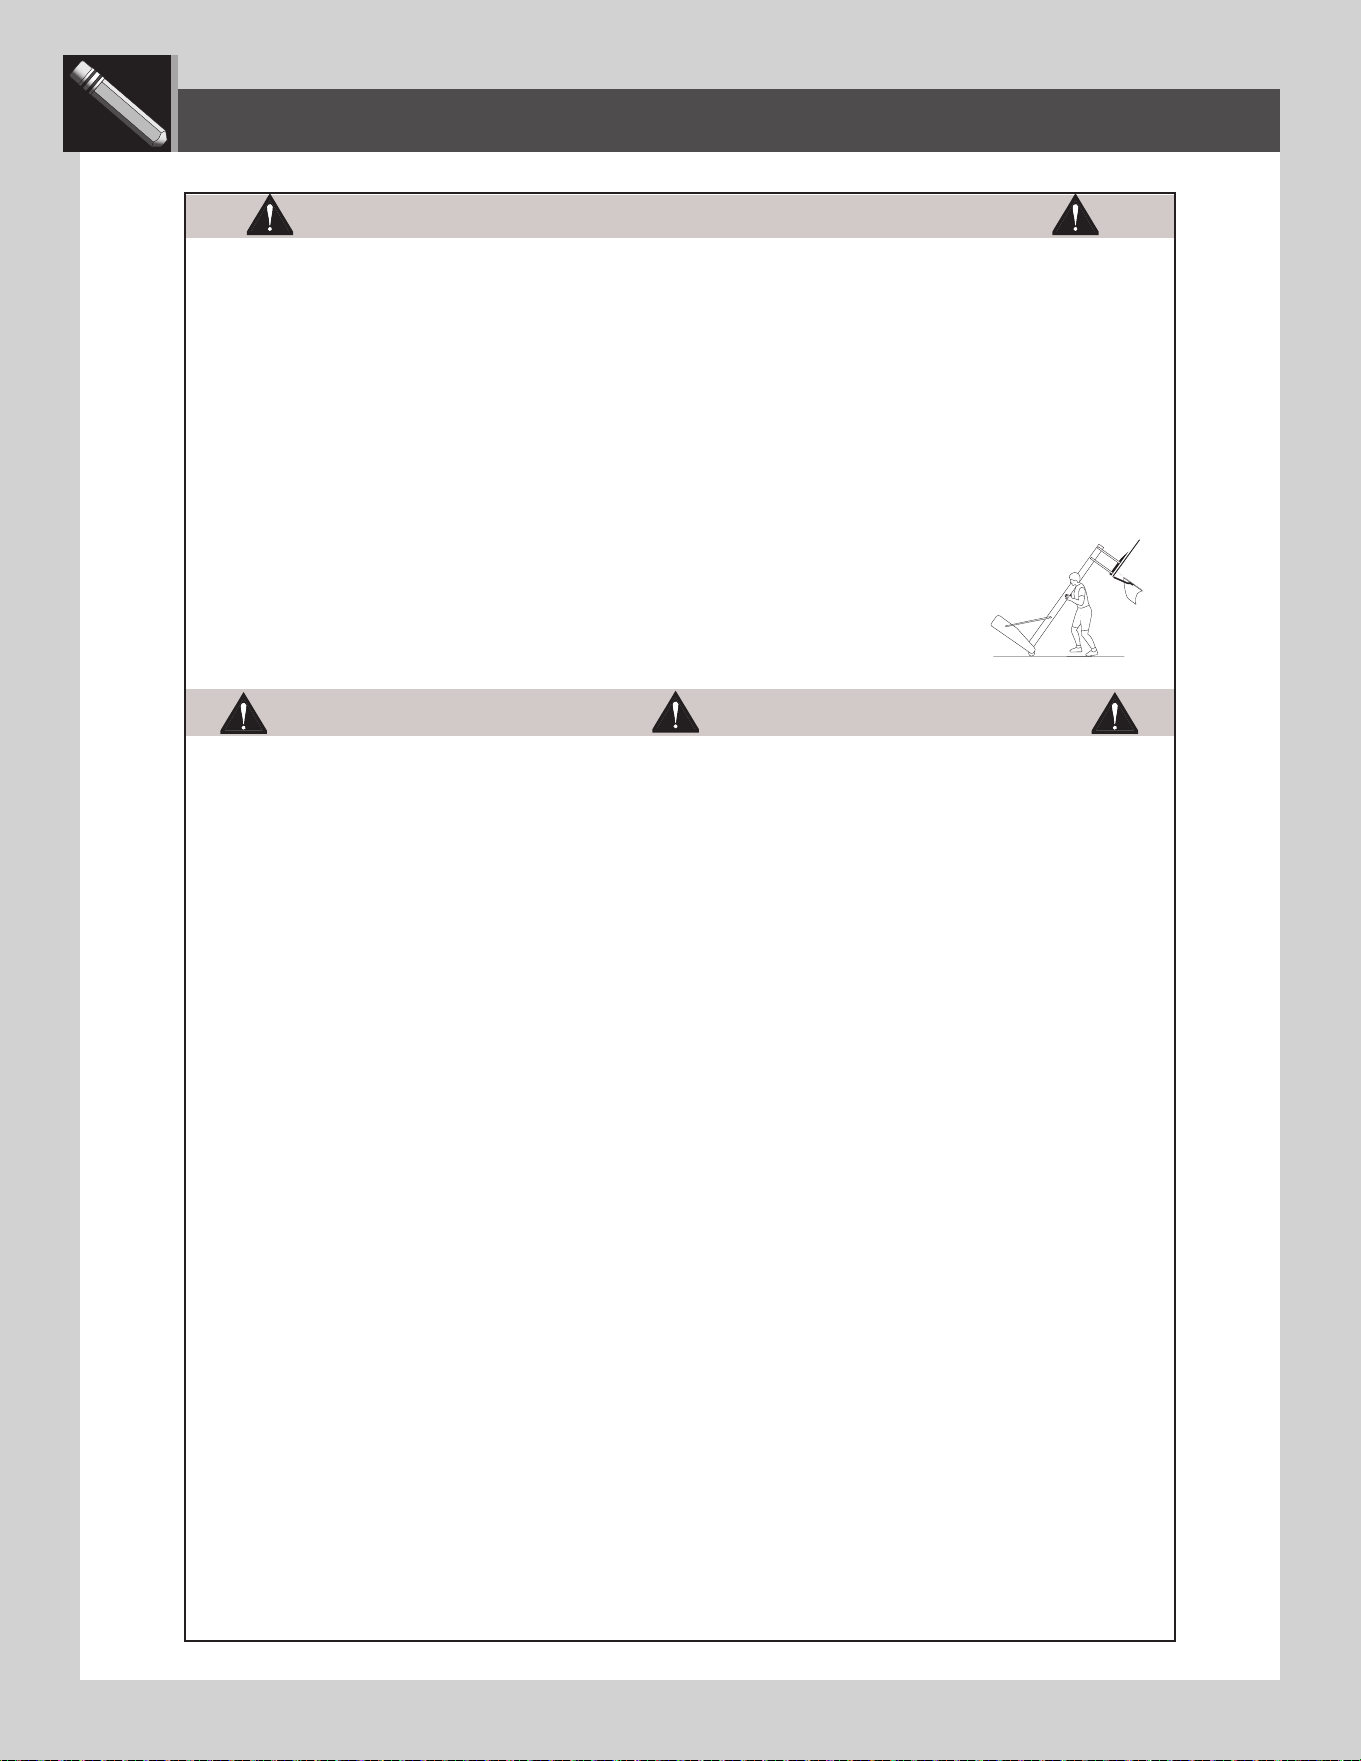
MOVING THE SYSTEM / 移动篮球架
WARNING: The system must only be moved by people capable of handling its weight. Children should not be allowed
to move the system.
1. Adjust the system to its lowest position, and use caution to prevent the height mechanism from adjusting.
2. Stand in front of the system and pull on the Pole until the unit is balanced on its Wheels.
3. Move the system to the desired location and carefully set the Base down.
CAUTION: The system must only be moved on its Wheels. Sliding the Base may damage the Base which could result
in leakage and the system tipping over.
警告 : 系统仅可由能够处理系统重量的成年人移动。未成年人不可移动系统。
1. 调整系统至最低的位置,并且注意避免高度机构被调整。
2. 站在系统前方,并且拉动立柱,直到单元在轮子上达成平衡为止。
3. 移动系统至所想要的地点,并且小心地放下底座。
注意 : 系统必须以其轮子移动。滑动底座可能损坏底座,这可能造成泄漏,并且系统会倾倒。
!
!

36
The life of your basketball system depends on many variables. The climate, exposure to corrosives such as salt, pesticides, or herbicides,
and excessive use or misuse can all contribute to Pole failure, which may cause property damage or personal injury.
Check your basketball system frequently for loose hardware, excessive wear, and signs of corrosion. For safety reasons, and to
prolong the life of your basketball system, you must take the following preventive measures.
a. Check all Nuts and Bolts. If any are loose, tighten them.
b. Check all parts for excessive wear and tear. If necessary, replace any parts that have been worn or damaged through usage.
Contact our Customer Service Department for replacement parts.
c. Inspect the Warning Sticker on the Pole. If it is ripped, faded, or illegible, call our Customer Service Department to request
a replacement Sticker.
d. Check all Pole sections for visible rust or chipped or cracked paint. If either are present, do the following:
1. Use an emery cloth to completely remove any rust or chipped paint.
2. Clean the area with a damp cloth and allow it to dry.
3. Apply two coats of a rust preventative, high gloss enamel paint to the area. Allow the paint to dry between coats.
IF RUST HAS PENETRATED THROUGH THE POLE ANYWHERE, REPLACE IT IMMEDIATELY!
MAINTENANCE / 维护
诸多因素影响您的篮球架的寿命。比如 天气、暴露于有腐蚀性物品中,如盐、杀虫剂、或除草剂。 过度使用或误用本产品都将导致产品
损坏,从而导致财产损失与人员受伤。
请经常检查您的篮球架,查看其零部件是否有松动、磨损以及腐蚀的现象。为了安全起见以及延长产品的使用寿命,请您务必按照以下
方法进行例行检查。
a. 检查所有螺母和螺栓。如有松动,请锁紧。
b. 检查所有部件,确认其有无过度磨损。如有必要,请在使用过程中及时更换磨损或损坏的部件。请联系客服,购买损坏部件。
c. 检查立柱上的警告贴纸。如若其剥落、褪色或模糊, 请联系客服索取贴纸以便替换。
d. 检查所有立柱组件,查看其是否有生锈、脱落及开裂。如果有其一发生,请按如下操作:
1. 使用砂纸彻底擦除锈迹或脱落的地方。
2. 用湿布擦拭干净后,放置任其干燥。
3. 刷两遍防锈剂以及高光搪瓷漆。刷第二遍时,请确保上一遍已干透。
如若锈迹已穿透立柱,请立刻更换立柱!
LIFETIME
®
37
WARNING STICKER / AUTOCOLLANT D’AVERTISSEMENT / ETIQUETA DE ADVERTENCIA
FAUTE DE NE PAS SUIVRE CES AVERTISSEMENTS, VOUS RISQUEZ DE CAUSER
DES BLESSURES GRAVES ET/OU DES DOMMAGES À L’ÉQUIPEMENT.
Le propriétaire doit s’assurer que tous les joueurs
connaissent et appliquent les règles suivantes afin d’utiliser
l’équipement en toute sécurité.
SI NO SE OBEDECEN ESTAS ADVERTENCIAS PUEDEN PRODUCIRSE
GRAVES LESIONES Y/O DAÑOS A LA PROPIEDAD.
El propietario del sistema debe asegurarse de que todos
los jugadores conozcan y respeten estas reglas para que el
sistema se use en forma segura.
FAILURE TO FOLLOW THESE WARNINGS MAY RESULT IN SERIOUS INJURY
AND/OR PROPERTY DAMAGE.
Owners must ensure that all players know and follow these
rules for safe operation of the system.
• Only hang from the rim briefly to regain balance or avoid injuring
others. Release the rim as soon as safely possible.
• During play, especially when performing dunk type activities, keep
player’s face away from the backboard, rim, and net. Serious injury
could occur if teeth/face come in contact with the backboard, rim, or
Net. Player should wear a mouth guard during play.
• Do not slide, climb, or play on base or pole.
• Completely fill base according to manufacturer’s instructions. Never
leave the unit standing in an upright position without first filling the base
with weight or the system will tip quickly causing serious personal injury.
• When adjusting height or moving system, keep hands and fingers
away from moving parts.
• Do not allow children to move or adjust system.
• Do not wear jewelry (rings, watches, necklaces, etc.) during play.
Objects may entangle in net.
• Keep water and organic material away from pole base. Grass, litter,
etc. could cause corrosion and/or deterioration.
• Never play on damaged equipment.
• Surface beneath the base must be smooth and free of gravel or other
objects. Punctures cause leakage and could cause system to tip over.
• Once a month check pole and all metal parts for signs of
corrosion (rust, pitting, chipping). Completely remove rust and
repaint with exterior enamel. If rust has penetrated any steel part,
replace that part immediately.
• Check system before each use for proper ballast, loose hardware,
excessive wear, instability, and signs of corrosion and repair before use.
• Do not use system during windy or severe weather. System may
tip over. Place system in an area protected from the wind or in an
area away from property that may be damaged if the system falls,
and from overhead power lines.
• Do not use the system to lift or hoist anything. The mechanism is
designed to lift only the weight of the backboard and rim. Do not
hang anything from the handle, rim, backboard, or lifter arms as
this will damage the system and void the warranty.
• Ne pas se suspendre à l’anneau plus que nécessaire pour
retrouver l'équilibre ou éviter de blesser les autres joueurs.
Relâcher l’anneau aussitôt que possible.
• Lors d’un match, particulièrement dans le cas des smashs, le
visage du joueur ne doit pas faire face au panneau, à l’anneau, ni au
filet. Le joueur risque de graves blessures si ses dents ou son visage
entrent en contact avec le panneau, l’anneau, ou le filet. Les joueurs
doivent toujours porter un protège-dents lorsqu’ils jouent.
• Ne pas glisser, ne pas grimper, et ne pas jouer sur la base ou le
poteau.
• Remplir complètement la base selon les instructions du fabricant.
Ne jamais laisser l’unité debout de plein pied sans avoir d’abord rempli
la base avec un poids ou l’équipement pourrait basculer rapidement
et causer de graves blessures.
• Lors du réglage de la hauteur ou lors du déplacement
de l’équipement, garder les mains et doigts loin des pièces mobiles.
• Ne pas permettre aux enfants de déplacer ou d’ajuster l’équipement.
• Ne pas porter de bijoux (bagues, montres, colliers, etc.) pendant le
jeu. Ces objets pourraient s’accrocher au filet.
• La surface sur laquelle est posée la base doit être lisse et sans
gravier ou tout autre objet qui pourrait trouer la base entraînant ainsi
une fuite ce qui pourrait faire basculer l’équipement.
• Garder de l’eau et de la matiére organique loin de la base. Le
gazon, les déchets, etc. pourraient provoquer la corrosion et/ou la
détérioration.
• Une fois par mois, vérifier que le poteau et toutes les pièces en métal
ne montrent pas de signes de corrosion (rouille, piqûres, écaillage).
Enlever toute la rouille et repeindre complètement avec une peinture
pour extérieur. Si la rouille a pénétré une des pièces en acier, il
faut la remplacer immédiatement la pièce en question.
• Chaque fois avant d'utiliser le système, vérifier d’abord l’équilibre,
la possibilité de pièces desserrées ou usées, la stabilité de
l’équipement et tout signe de corrosion ou réparation nécessaire avant
utilisation.
• Ne jamais jouer avec un équipement endommagé.
• Ne pas utiliser l’équipement lors de fortes rafales de vent ou
de mauvais temps. L’équipement pourrait basculer. Placer
l’équipement dans un endroit abrité du vent ou loin des structures
qu’il pourrait endommager s’il basculait, et loin des fils électriques.
• Ne pas utiliser l’équipement pour lever ou soulever quoique ce
soit. Son mécanisme a été conçu uniquement pour soutenir le
poids du panneau et de l’anneau. Ne rien accrocher au manche,
à l’anneau, au panneau ni aux leviers sous peine d’endommager
l’équipement et d’annuler la garantie.
•Colgarse del aro sólo en forma breve, para recuperar el equilibrio
o evitar lesionar a otros jugadores. Soltarse del aro lo más pronto que
pueda hacerlo con seguridad.
• Durante el juego, especialmente al embocar violentamente de alto,
la cara de los jugadores debe mantenerse alejada del tablero, el aro
y la red. Pueden producirse lesiones graves si los dientes o la cara
entran en contacto con el tablero, el aro o la red. Los jugadores deben
usar un protector bucal durante el juego.
• No deslizarse, no trepar ni jugar sobre la base o el poste.
• Llenar la base completamente siguiendo las instrucciones del
fabricante. Nunca dejar la unidad en posición de uso sin haber
llenado previamente la base con material de contrapeso, pues el
sistema podría tumbarse rápidamente y causar graves lesiones
personales.
• Mantener las manos y los dedos alejados de las piezas movibles
al regular la altura o al desplazar el sistema.
• No dejar que los niños regulen ni desplacen el sistema.
• No usar joyas (anillos, relojes, collares o gargantillas, etc.) durante
el juego. Estos objetos pueden engancharse en la red.
• La superficie donde se coloque la base debe estar lisa y desprovista
de piedras, grava u otros objetos. Las perforaciones pueden originar
pérdidas, y éstas pueden hacer que el sistema se tumbe.
• Guardar aqua y materia orgánica. Césped, basura, etc.,
prodrian causar corrosión et/o deterioros.
• Controlar el poste y todas las piezas metálicas una vez al mes
en busca de signos visibles de corrosión (oxidación, picaduras,
escamado). Eliminar todo rastro de óxido y volver a pintar con esmalte
para exteriores. Si el óxido ha penetrado cualquier pieza de acero,
reemplazar esa pieza de inmediato.
• Inspeccionar el sistema antes de cada uso para verificar que esté
adecuadamente contrapesado, que los elementos de fijación no
estén flojos, que no haya desgaste excesivo, inestabilidad ni signos
de corrosión. Al encontrar irregularidades, repararlas antes de usar
el sistema. Nunca jugar con un equipo dañado.
• No usar el sistema en presencia de vientos fuertes o condiciones
climáticas adversas, ya que puede tumbarse. Colocar la unidad en
una posición de almacenamiento y/o en una zona a resguardo
del viento, lejos de propiedades personales que puedan dañarse
si el sistema se cae, y de líneas de suministro de energía.
• No usar el sistema para levantar ningún objeto. El mecanismo está
diseñado para elevar solamente el peso del tablero con el aro. No
colgar nada de la agarradera, el aro, el tablero ni los brazos de
elevación, ya que esto puede dañar el sistema y anular la garantía.
www.lifetime.com
# 1180194
11/23/2015
Lifetime Products, Inc., Clearfield, UT 84016
1-800-225-3865
WARNING
ADVERTENCIAAVERTISSEMENT
LIFETIME
®

38
IMPORT INFORMATION / 进口信息
Distributed by:
Costco Wholesale Corporation
P.O. Box 34535
Seattle, WA 98124-1535
USA
1-800-774-2678
www.costco.com
Costco Wholesale Canada Ltd.*
415 W. Hunt Club Road
Ottawa, Ontario
K2E 1C5, Canada
1-800-463-3783
www.costco.ca
* faisant affaire au Québec sous
le nom les Entrepôts Costco
Costco Wholesale UK Ltd /
Costco Online UK Ltd
Hartspring Lane
Watford, Herts
WD25 8JS
United Kingdom
01923 213113
www.costco.co.uk
Costco Wholesale Japan Ltd.
2 Kakuchi, 2 Gaiku,
Kaneda-Nishi
361 Urikura, Kisarazu shi
Chiba, 292-0007 Japan
0570-200-800
www.costco.co.jp
Costco Wholesale Spain S.L.U.
Polígono Empresarial Los Gavilanes
C/ Agustín de Betancourt, 17
28906 Getafe (Madrid) España
NIF: B86509460
900 111 155
www.costco.es
Costco Wholesale Iceland ehf.
Kauptún 3-7, 210 Gardabaer
Iceland
www.costco.is
Costco Wholesale Korea, Ltd.
40, Iljik-ro
Gwangmyeong-si
Gyeonggi-do, 14347, Korea
1899-9900
www.costco.co.kr
Importado por:
Importadora Primex S.A. de C.V.
Blvd. Magnocentro No. 4
San Fernando La Herradura
Huixquilucan, Estado de México
C.P. 52765
RFC: IPR-930907-S70
(55)-5246-5500
www.costco.com.mx
Costco Wholesale Australia Pty Ltd
17-21 Parramatta Road
Lidcombe NSW 2141
Australia
www.costco.com.au
Costco Wholesale New Zealand Limited
2 Gunton Drive
Westgate
Auckland 0814
New Zealand
www.costco.co.nz
Costco (China) Investment Co., Ltd.
Room 01 Mezzanine
No. 5178, Kang Xin Highway
Pudong New District
Shanghai
China 201315
+86-21-6257-7065
Costco France
1 avenue de Bréhat
91140 Villebon-sur-Yvette
France
01 80 45 01 10
www.costco.fr
Costco Wholesale Sweden AB
Box 614
114 11 Stockholm
Sweden
www.costco.se
Made in the U.S.A.
美国制造

39
NOTES / 笔记
LIFETIME
®

40
cn.lifetime.com
1234803_B
7/10/2024