YEV104/YEV105
YEV104PRO/YEV105PRO
Electric Violin
YEV105
VGZ9010
© 2016 Yamaha Corporation
Published 01/2024 改版 IP-D0
版次 2401 R6
雅马哈乐器音响(中国)投资有限公司
上海市静安区新闸路1818号云和大厦2楼
客户服务热线:
4000517700
公司网址:http://www.yamaha.com.cn
厂名:萧山雅马哈乐器有限公司
厂址:浙江省杭州市萧山经济技术开发区红泰六路777号
10-1 Nakazawa-cho, Chuo-ku, Hamamatsu, 430-8650 Japan
取扱説明書
Owner’s Manual
Benutzerhandbuch
Mode d’emploi
Manuale di istruzioni
Manual de instrucciones
Manual do Proprietário
Руководство пользователя
使用说明书
使用說明書
사용 설명서
Электроскрипка
电小提琴
ITFRDE PTESENJA
RU KOZH-CN ZH-TW
Deutsch
Français
ItalianoEspañol
Português
Pусский
日本語
English

10
MEMO

3
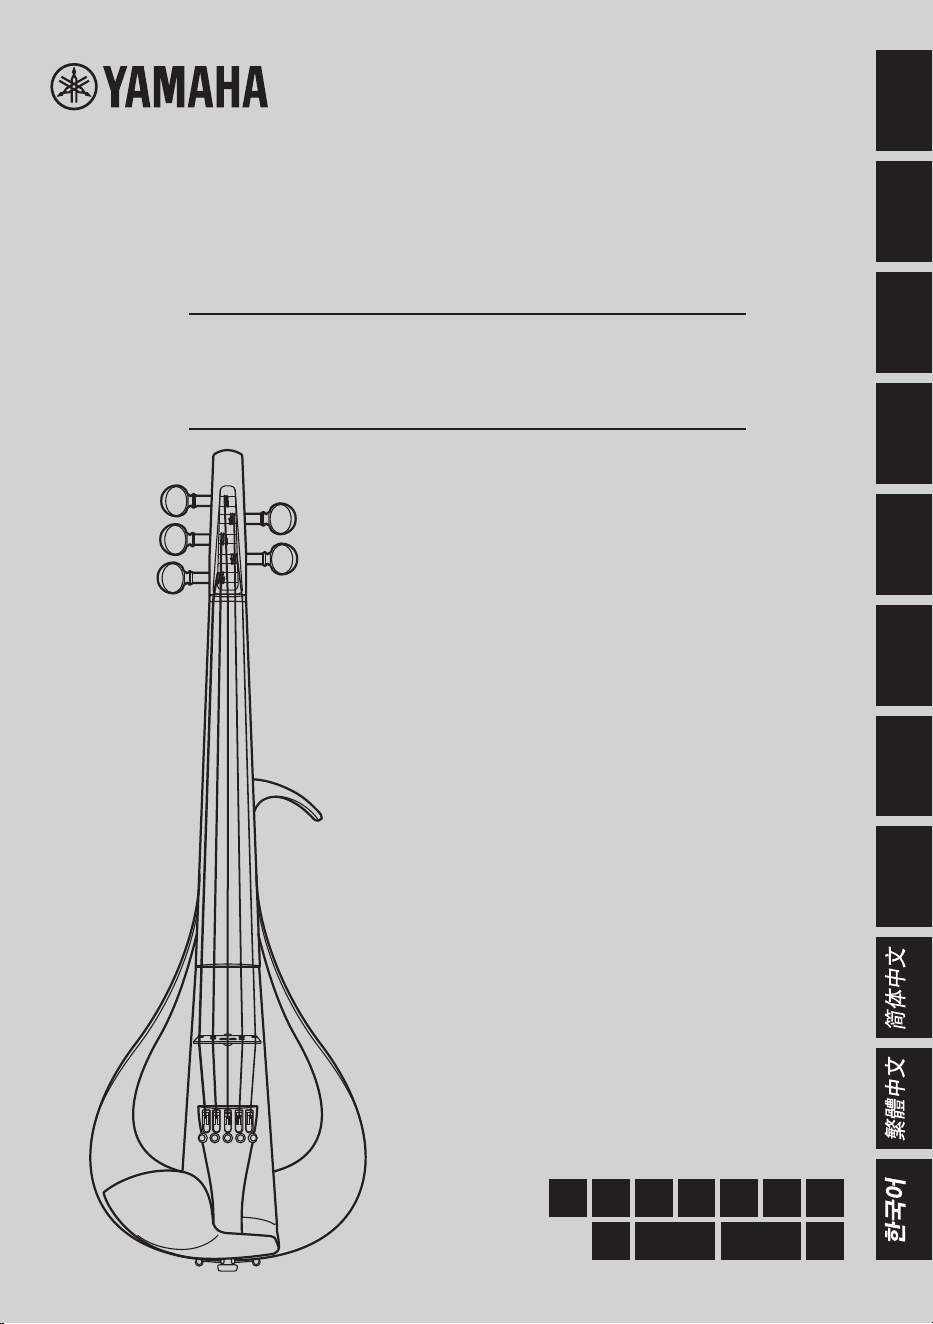
Thank you for purchasing the Yamaha Electric Violin.
The YEV104/YEV105/YEV104PRO/YEV105PRO are a new genera-
tion of Electric Violins delivering high performance that meet the
demands of stage use.
The instrument incorporates a beautiful, unique shape crafted with
Yamaha’s advanced wood processing technologies, and utilizes a
simple pickup system that delivers a passive signal to the output jack.
In order to obtain maximum performance and enjoyment from this
instrument, we urge you to read this Owner’s Manual thoroughly
before using the instrument. We recommend that you keep it in a con-
venient place for future reference.
Owner’s Manual
Electric Violin
YEV104/YEV105
YEV104PRO/YEV105PRO
Contents
PRECAUTIONS ...........................................5
Parts Diagram ............................................ 6
Set up ......................................................8
Tuning and Changing the Strings .................................8
The Shoulder Rest ......................................................11
Specifications .......................................... 11
English
4
SPECIAL MESSAGE SECTION
This product should be used only with the components
supplied or; a cart, rack, or stand that is recommended by
Yamaha. If a cart, etc., is used, please observe all safety
markings and instructions that accompany the accessory
product.
SPECIFICATIONS SUBJECT TO CHANGE:
The information contained in this manual is believed
to be correct at the time of printing. However, Yamaha
reserves the right to change or modify any of the speci-
cations without notice or obligation to update existing
units.
Do not attempt to service this product beyond that
described in the user-maintenance instructions. All other
servicing should be referred to qualied service person-
nel.
This product, either alone or in combination with an
amplier and headphones or speaker/s, may be capable
of producing sound levels that could cause permanent
hearing loss. DO NOT operate for long periods of time
at a high volume level or at a level that is uncomfortable.
If you experience any hearing loss or ringing in the ears,
you should consult an audiologist.
IMPORTANT: The louder the sound, the shorter the time
period before damage occurs.
NOTICE:
Service charges incurred due to a lack of
knowledge relating to how a function or effect works (when
the unit is operating as designed) are not covered by the
manufacturer’s warranty, and are therefore the owner’s
responsibility. Please study this manual carefully and
consult your dealer before requesting service.
ENVIRONMENTAL ISSUES:
Yamaha strives to
produce products that are both user safe and environmen-
tally friendly. We sincerely believe that our products and
the production methods used to produce them meet these
goals. In keeping with both the letter and the spirit of the
law, we want you to be aware of the following:
Disposal Notice:
Should this product become
damaged beyond repair, or for some reason its useful life
is considered to be at an end, please observe all local,
state, and federal regulations that relate to the disposal of
products that contain lead, plastics, etc. If your dealer is
unable to assist you, please contact Yamaha directly.
NAMEPLATE LOCATION:
The nameplate is
located on the back of the product. The model number,
serial number, etc., are located on this plate. You should
record the model number, serial number, and the date
of purchase in the spaces provided below and retain this
manual as a permanent record of your purchase.
Model Serial No.
Purchase Date
PLEASE KEEP THIS MANUAL
Information for Users on Collection and Disposal of Old Equipment
This symbol on the products, packaging, and/or accompanying documents means that used electrical and electronic products should
not be mixed with general household waste.
For proper treatment, recovery and recycling of old products, please take them to applicable collection points, in accordance with your
national legislation and the Directives 2002/96/EC.
By disposing of these products correctly, you will help to save valuable resources and prevent any potential negative effects on human
health and the environment which could otherwise arise from inappropriate waste handling.
For more information about collection and recycling of old products, please contact your local municipality, your waste disposal
service or the point of sale where you purchased the items.
[For business users in the European Union]
If you wish to discard electrical and electronic equipment, please contact your dealer or supplier for further information.
[Information on Disposal in other Countries outside the European Union]
This symbol is only valid in the European Union. If you wish to discard these items, please contact your local authorities or dealer and ask for the
correct method of disposal.
(weee_eu_en_01)
5
PRECAUTIONS
PLEASE READ CAREFULLY BEFORE PROCEEDING
Please keep this manual in a safe and handy place for future reference.
WARNING
Always follow the basic precautions listed below to avoid the possibility of serious injury
or even death from electrical shock, short-circuiting, damages, re or other hazards. These
precautions include, but are not limited to, the following:
Do not open
• This instrument contains no user-serviceable parts.
Do not open the instrument or attempt to disassem-
ble or modify the internal components in any way. If
it should appear to be malfunctioning, discontinue
use immediately and have it inspected by qualied
Yamaha service personnel.
Connections
• Before connecting the instrument to other electronic
components, turn o the power for all components.
Before turning the power on or o for all compo-
nents, set all volume levels to minimum.
Location
• Do not expose to direct sunlight (in a car during the
day), high temperatures such as near a stove, or
extremely low temperatures, and do not expose to
vibrations or dust to prevent damage to the internal
components or disguration.
• Do not place the instrument in an unstable position
where it might accidentally fall over.
• Before moving the instrument, remove all con-
nected cables, to prevent damage to the cables or
injury to anyone who might trip over them.
CAUTION
Always follow the basic precautions listed below to avoid the possibility of physical injury to
you or others, or damage to the instrument or other property. These precautions include, but
are not limited to, the following:
Yamaha cannot be held responsible for damage caused by improper use or modications to the instrument.
Handling caution
• If cleaning is required, wipe with a soft cloth. Do
not use thinners, solvents, cleaning uids, or wipes
soaked with chemicals. Also. Do not place vinyl or
plastic products on the instrument. Doing so can
cause discoloration/deterioration.
• Do not rest your weight on, or place heavy objects
on the instrument, and do not use excessive force
on the buttons, switches or connectors.
• Do not use the instrument for a long period of time
at a high or uncomfortable volume level, since this
can cause permanent hearing loss. If you experi-
ence any hearing loss or ringing in the ears, consult
a physician.
•
Take care not to pierce your nger with the end of the
string. String ends are sharp and may cause injury.
• Never hold the instrument close to your face when
adjusting or replacing strings. A string may unex-
pectedly break damaging your eyes.
Water warning
• Do not expose the instrument to rain, use it near
water or in damp or wet conditions.

6
Fingerboard
Chin rest
[Main Unit]
Tuning peg
Nut
5th string (C)
*YEV105/YEV105PRO only
Adjuster
Frame
Tailpiece
Body
●
Front
●
Rear
4th string (G)
2nd string (A)
1st string (E)
Bridge
Neck
3rd string (D)
Parts Diagram
The YEV105/YEV105PRO (5-string model) is used in the illustration.
The number of strings/tuners, and the shape of the ngerboard and
tailpiece are different on the YEV104/YEV104PRO (4-string model).
e
Selector Switch
w
Volume Control
q
Output Jack
7
●
Rear Control Section
q
Output Jack
This is the pickup’s passive signal output jack.
Connect this jack to a device with a high-impedance input such as a preamplier, direct
box, or musical instrument amplier.
* The input impedance of the rst device (preamp, direct box, etc.) the instrument connects to has
a major inuence on the sound quality produced by the speakers. In order to obtain the maximum
performance from the instrument, we recommend connecting to a device with an input impedance
of more than 1MΩ.
* Since signal strength decreases in relation to the length of the cable connecting the instrument
to the rst device, we recommend using the shortest possible cable length that does not interfere
with your performance.
Using an equalizer, etc., to cut frequencies below the instrument’s lowest pitch
(around 200Hz for the G on the 4-string and about 150Hz for the C on the 5-string)
can reduce unwanted noise such as bow return, hum, etc., with minimal impact on
sound quality.
w
Volume Control
Adjusts the volume. Turning to the right increases volume, turning to the left decreases. (The
volume control is active only when the output selector switch is depressed (
).)
e
Selector Switch (Volume Control Enable Switch)
Selects whether the signal output path goes from the pickup straight to the output jack (direct
out:
), or passes through the volume control ( ).
* The direct out signal offers the full tonal potential of the instrument, with low-end tone that is fat
and punchy.
* Noise can occur when switching the selector. Before switching, lower the volume on the amplier,
external equipment, etc.
CAUTION
• Before connecting the Electric Violin to any external equipment, make sure the power is switched
OFF or the volume is fully lowered on all devices. Failure to do so can result in a loud sound that
can damage equipment or your hearing.

8
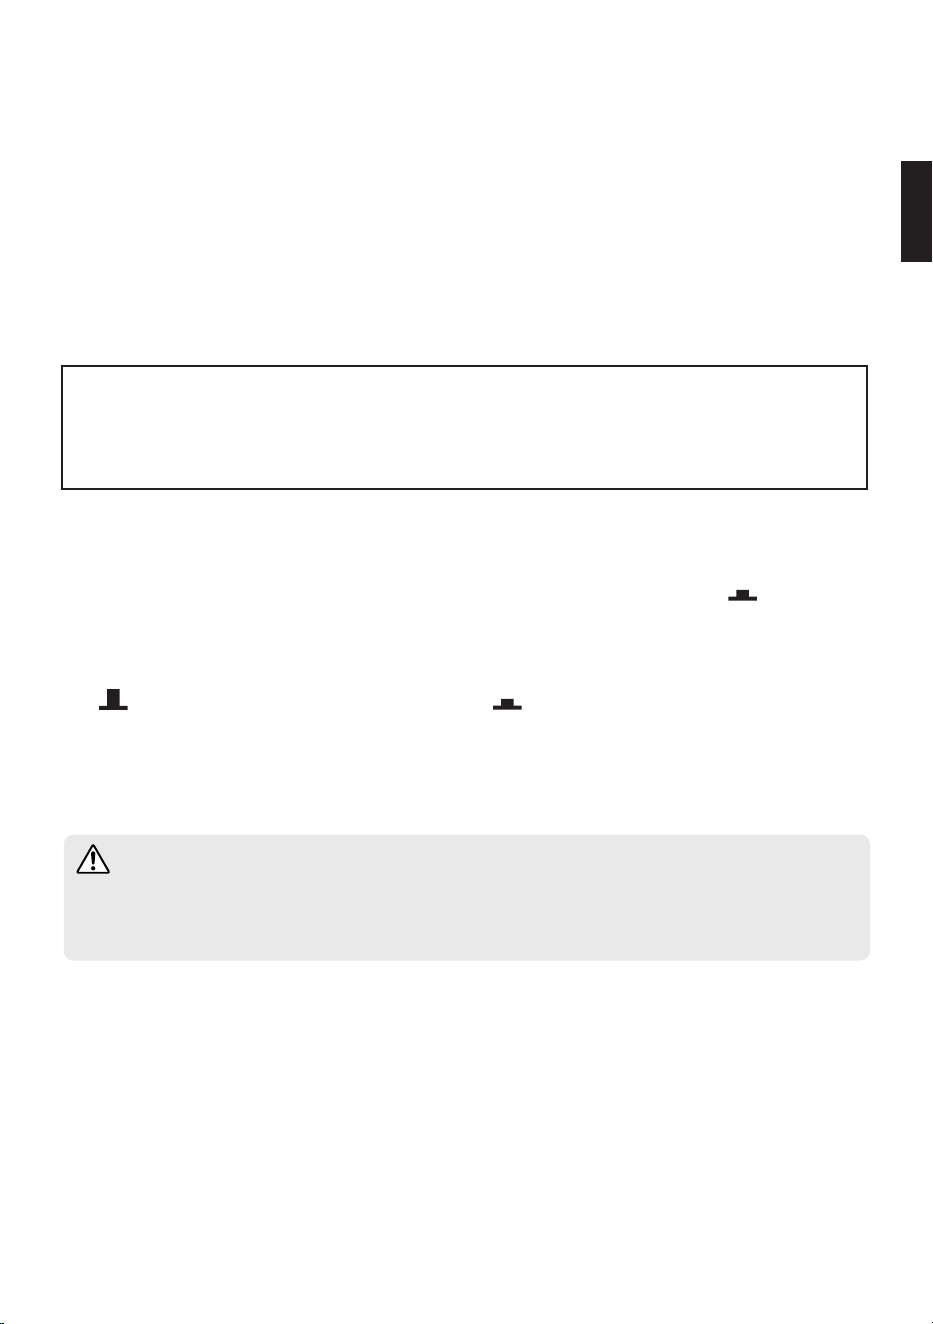
■ Tuning and Changing the Strings
Because the bridge includes a built-in pickup, which is connected to the body with a thin
cable, the instrument ships from the factory with the bridge laying down. First, set up the
bridge and then proceed with tuning. As the strings get old, sound quality will gradually
decrease, and it will become difficult to tune the instrument. Change the strings as soon as
you think they are getting old.
CAUTION
• The end of the strings are sharp and can cut ngers. Use caution when changing strings.
• When changing or adjusting strings, do not put your face close to the instrument. The string may
suddenly break resulting in eye or other unexpected injuries.
• The lower side of the bridge supports the 1st string (E), the higher side supports the 4th string
(G)/5th string (C). Please note the bridge orientation and center the bridge over the pickup cable
hole as shown in the illustration below.
Set up
Correct
Tailpiece
Body
Bad
Bad
Vertical
E
E
A
A
D
D
G
G
1st string
1st string
4th string
5th string
* The illustrations show
the view looking from
the tailpiece.
Groove
Groove
[Bridge is placed vertically]
YEV104/
YEV104PRO
YEV105/
YEV105PRO
C
Pickup Cable Pickup Cable
Pickup Cable
Bridge
Hole
• Ensure that the bridge stands vertically. If it leans to one side, use both hands to adjust. Make
sure that each string passes over the corresponding slits in the bridge.
9
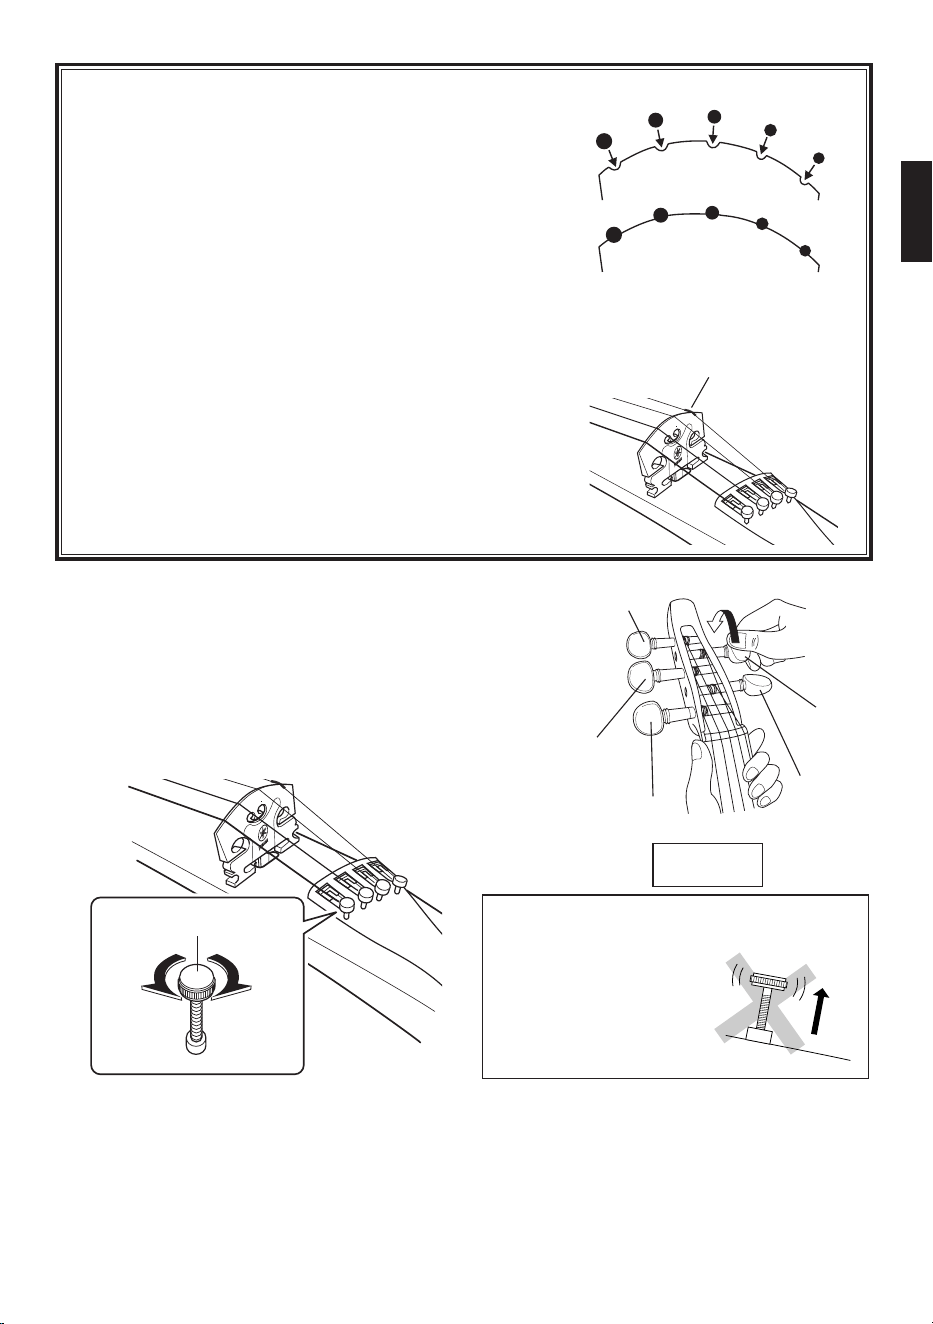
•
String tunings are, 1st string E, 2nd string A, 3rd string
D, 4th string G, 5th string C (YEV105/YEV105PRO
only). Rotate the tuning peg to tune. Use a piano, tuning
fork, or tuner to tune the instrument.
• Finally, use the adjuster to ne tune the strings.
NOTICE
• When the instrument is not going to be used for an extended period of time, loosen the strings until
the pitch drops a whole tone.
• Before using the instrument, make sure that the bridge is positioned vertically. Damage to the bridge
and poor sound quality may result if the bridge is not properly positioned.
Don’t loosen
too much.
[Make sure that the strings do
not come out of their grooves]
E
A
D
G
Protective tube on
the 1st (E) string
YEV105/
YEV105PRO
C
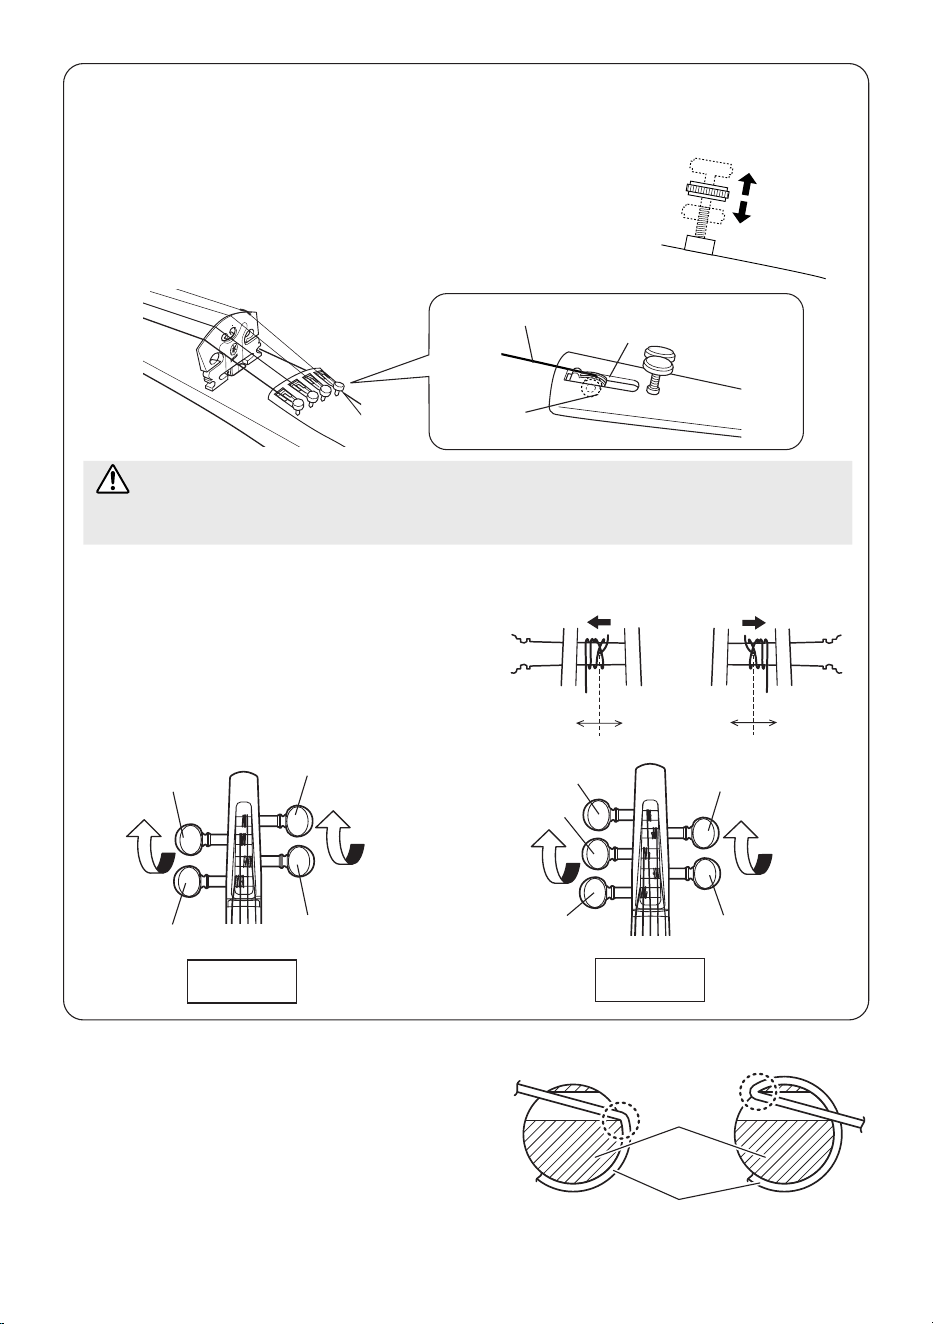
NOTICE
Make sure that the strings are resting in
their appropriate grooves in the bridge when
playing the instrument.
Strings may come out of their grooves when adjusting
the bridge or changing strings. Since the 1st (E) and
4th (G)/5th (C) strings tend to come out of their grooves
easily, use your ngers to hold the strings gently in
place when tuning the instrument.
Also, the 1st (E) string is tted with a protective tube.
Make sure that the tube rests on the bridge.
Always make sure that the bridge is standing
vertically, whether the instrument is being
played or stored. (see diagram on page 8)
Even if the bridge is standing vertically before tuning,
it may tilt during the tuning process. If so, readjust the
bridge so it stands vertically.
It is very important that the bridge stands vertically. If
it leans in either direction it will impair the sound and
risk damaging the instrument.
NOTICE
If the adjuster is too
loose, it could produce
noise while playing.
4th string
(G)
2nd string
(A)
3rd string
(D)
5th string
(C)
1st string
(E)
Adjuster
Raise
pitch
Lower
pitch
10
● Winding the Strings
(Please refer to this section when changing the strings)
1
Before you string the instrument, set the adjuster so that it is in
the middle of its adjustment range. (All adjusters)
2
Place the ball (on the end of the string) in the notch on the adjust-
er. Make sure the ball is properly inserted in the adjuster’s notch.
3
After threading the string through the hole in
the tuning peg, turn the tuning peg making
one wrap on one side of the hole and the re-
maining wraps on the other side as shown in
the diagram on the right.
Adjuster’s notch
String
Ball
The adjuster should be
set to the middle of its
adjustment range.
Winding the 1st and
2nd strings
Remaining
winds
1st
wind
Winding the 3rd,
4th and 5th strings
1st
wind
Remaining
winds
1st string (E)
4th string (G)
2nd string (A)
3rd string (D)
YEV104/
YEV104PRO
1st string (E)
4th string (G)
2nd string (A)
3rd string (D)
YEV105/
YEV105PRO
5th string (C)
CAUTION
Do not use loop end E strings. It may damage the strings or ne tuner, and can cause injury.
NOTICE
• The YEV104PRO and YEV105PRO feature Wittner
Finetune-Pegs. When threading the string through
the hole in the tuning peg, insert the string in such
a direction so that it will not bend sharply.
• Do not pull the tuning peg knobs forcefully. Doing
so might cause damage.
Peg
String
Good
example
Bad
example
11
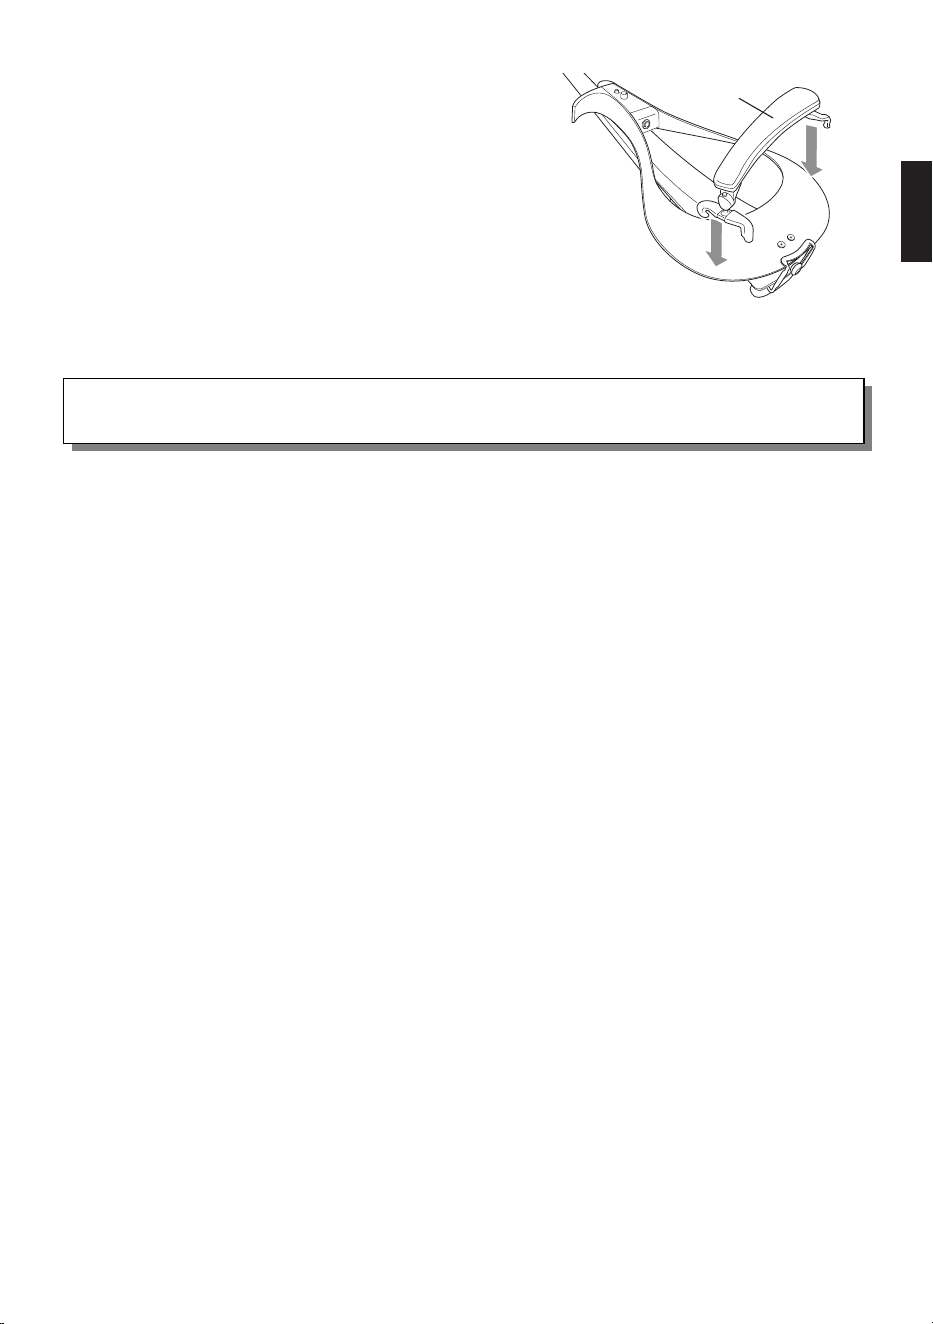
Shoulder rest
■ The Shoulder Rest
A commercially available violin shoulder rest (4/4
size) can be attached to the instrument.
* Some shoulder rests are incompatible (air cushion
type, etc.).
Specications
Neck
Maple
Body
Spruce + Mahogany + Maple (YEV104/YEV105)
Spruce + Maple (YEV104PRO/YEV105PRO)
Tuning Pegs
Ebony (YEV104/YEV105)
Wittner Finetune-Peg (YEV104PRO/YEV105PRO)
Bridge
Maple (Built-in Pickup Type)
Frame
Walnut
Tailpiece
Synthetic Resin (equipped with adjusters)
Strings
Ball-end type violin strings (D’Addario Zyex)
* D’Addario Helicore on the 5-string YEV105/YEV105PRO only
Pickup
Bridge w/ Built-in Piezo-electric Pickup
Controls
• Volume Control
• Selector Switch (Volume Control activation switch)
Output Jack
Passive Output
(Φ6.3 Standard Monaural)
String Length
328 mm (12-15/16”)
Dimensions
YEV104/YEV104PRO : 592 (L) x 204 (W) x 111 (H) mm
23-5/16” (L) x 8-1/16” (W) x 4-3/8” (H)
YEV105/YEV105PRO : 607 (L) x 204 (W) x 120 (H) mm
23-7/8” (L) x 8-1/16” (W) x 4-3/4” (H)
Weight
YEV104 : approximately 560 g (1 lbs. 4 oz.)
YEV105 : approximately 590 g (1 lbs. 5 oz.)
YEV104PRO : approximately 510 g (1 lbs. 2 oz.)
YEV105PRO : approximately 550 g (1 lbs. 3 oz.)
Accessory
Owner’s Manual (this booklet)
* The contents of this manual apply to the latest specications as of the publishing date.
To obtain the latest manual, access the Yamaha website then download the manual le.

YEV104/YEV105
YEV104PRO/YEV105PRO
Electric Violin
YEV105
VGZ9010
© 2016 Yamaha Corporation
Published 03/2024 改版 IP-D1
版次 2403 R7
雅马哈乐器音响(中国)投资有限公司
上海市静安区新闸路1818号云和大厦2楼
客户服务热线:
4000517700
公司网址:http://www.yamaha.com.cn
厂名:萧山雅马哈乐器有限公司
厂址:浙江省杭州市萧山经济技术开发区红泰六路777号
10-1 Nakazawa-cho, Chuo-ku, Hamamatsu, 430-8650 Japan
取扱説明書
Owner’s Manual
Benutzerhandbuch
Mode d’emploi
Manuale di istruzioni
Manual de instrucciones
Manual do Proprietário
Руководство пользователя
使用说明书
使用說明書
사용 설명서
Электроскрипка
电小提琴
ITFRDE PTESENJA
RU KOZH-CN ZH-TW
Deutsch
Français
ItalianoEspañol
Português
Pусский
日本語
English