
Technical Support and E-Warranty Certificate www.vevor.com/support
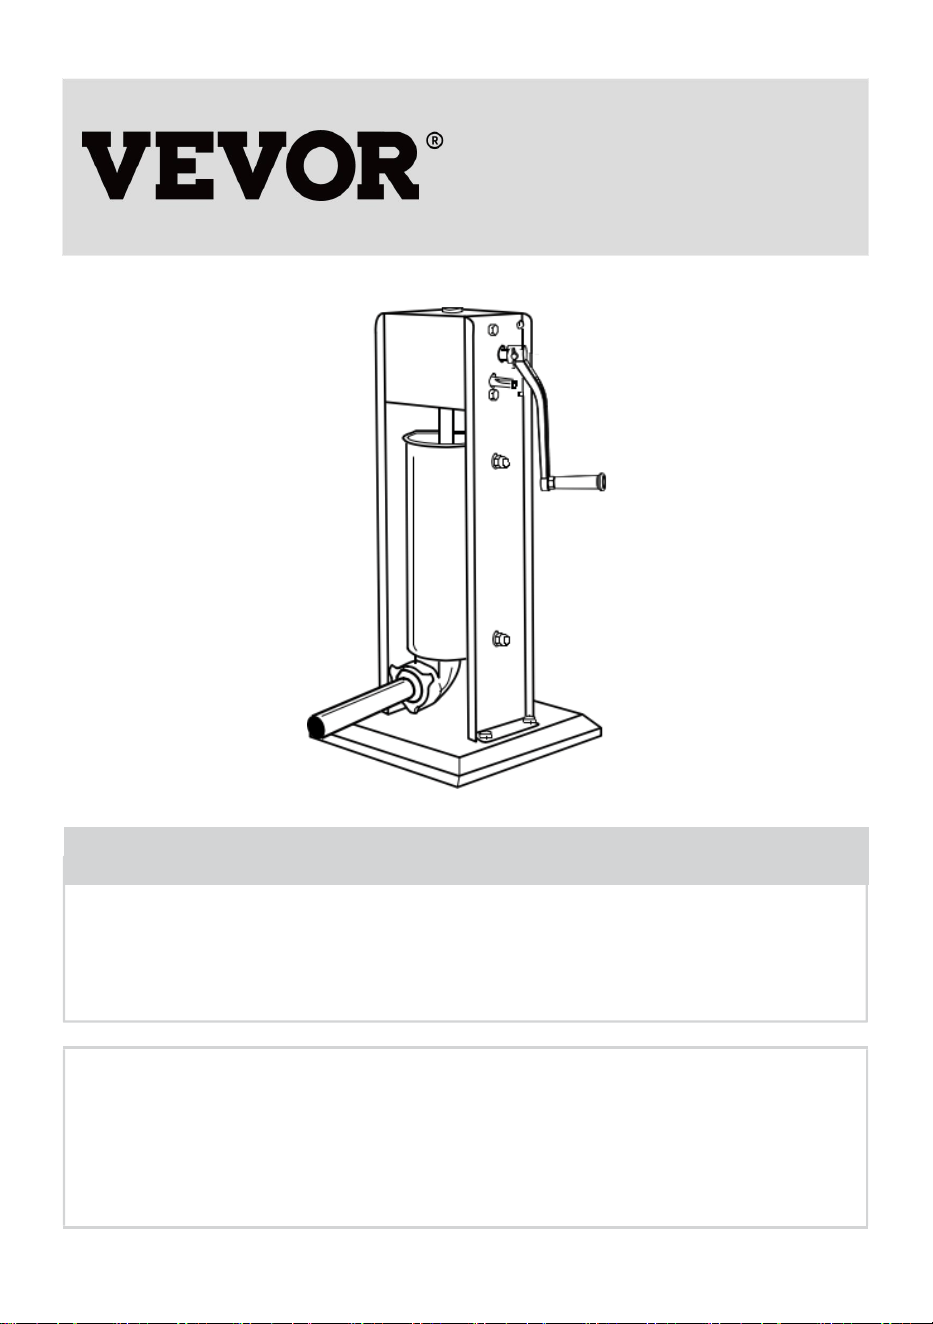
SAUSAGE STUFFER
MODEL:1A-SS715
We continue to be committed to provide you tools with competitive price.
"Save Half", "Half Price" or any other similar expressions used by us only represents an
estimate of savings you might benefit from buying certain tools with us compared to the major
top brands and doses not necessarily mean to cover all categories of tools offered by us. You
are kindly reminded to verify carefully when you are placing an order with us if you are
actually saving half in comparison with the top major brands.

- 1 -
MODEL:1A-SS715
Have product questions? Need technical support? Please feel free to
contact us:
Technical Support and E-Warranty Certificate
www.vevor.com/support
NEED HELP? CONTACT US!
This is the original instruction, please read all manual instructions
carefully before operating. VEVOR reserves a clear interpretation of our
user manual. The appearance of the product shall be subject to the
product you received. Please forgive us that we won't inform you again if
there are any technology or software updates on our product.
SAUSAGE STUFFER

- 2 -
Warning-To reduce the risk of injury, user must read
instructions manual carefully.
WARNING: Before operating this device, please read this instruction manual
completely and keep it handy for future reference. Always follow basic safety
precautions when using these devices. These include:
1.Do not allow children younger than 14 years old to use the machine. This
product may only be used or maintained by children 14 years of age or older,
individuals with reduced physical, sensory, or mental capacities, or unskilled
individuals with adequate adult supervision. Children must not play with the
device.
2.For optimal operation and service life of the device, please follow the
instructions.
3.Food acids will corrode the metal. Always clean this food preparation equipment
immediately after every use. To maintain the appearance and increase the service
life, clean it daily.
4.The use of accessories or modifications not provided by the manufacturer may
cause hazards. This product must only be used for its intended purpose and in the
manner indicated in the instructions. All other types of use shall be considered
inappropriate and hazardous. The manufacturer shall not be responsible for any
improper or incorrect use and installation damage.
General Safety Regulations
WARNING: The warnings, cautions, and instructions discussed in this
instruction manual cannot cover all possible conditions or situations that
could occur. It must be understood by the operator that common sense and
caution are factors that cannot be built into this product, but must be
supplied by the operator.
Please use this machine according to these cautions. The user should
understand all rules. Please carefully read them before you operate the
machine. This machine may cause harm to the health of the operator if the

- 3 -
user removes or changes equipment in the machine.
We are not responsible for any injuries resulting from improper operation of
this machine. Please operate according to “Operation Method” instructions
and follow the proper operation procedures while using. Take care while
assembling and operating, in order to avoid scratching skin. Please read
the instruction manual.
1.CHECK FOR DAMAGED PARTS. Before using the stuffer, check that all
parts are operating properly and perform the intended functions. Check for
binding of moving parts, mounting and any other conditions that may affect
the operation.
2.The Manufacturer declines any responsibility in the case of improper use
of the stuffer. Improper use of the stuffer will VOID the warranty.
3.Repair must be done by an authorized dealer. Use only factory original
parts and accessories. Modification of the stuffer will VOID the warranty.
4.Be sure the stuffer is stable during use.
5.NEVER operate the stuffer with the gear housing cover open or removed.
WEAR EYE PROTECTION! Everyday eye glasses are not safety glasses.
Safety glasses conform to ANSI Z87.1 requirement. Note: Approved safety
glasses have Z87 printed or stamped on them.
6.Do not use outdoors.
SAVE THESE INSTRUCTIONS
- 4 -
Assembly and Installation
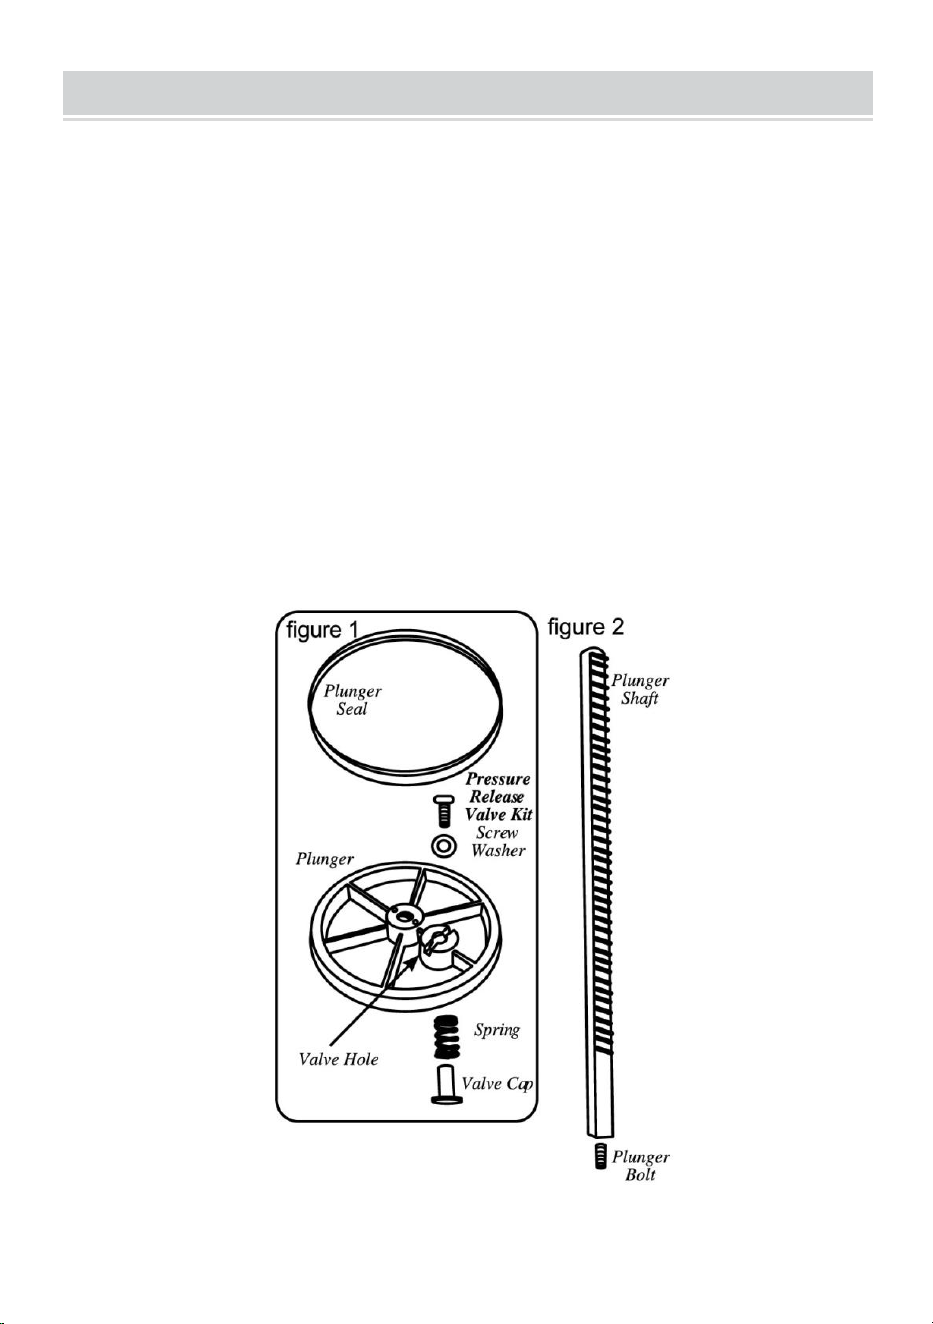
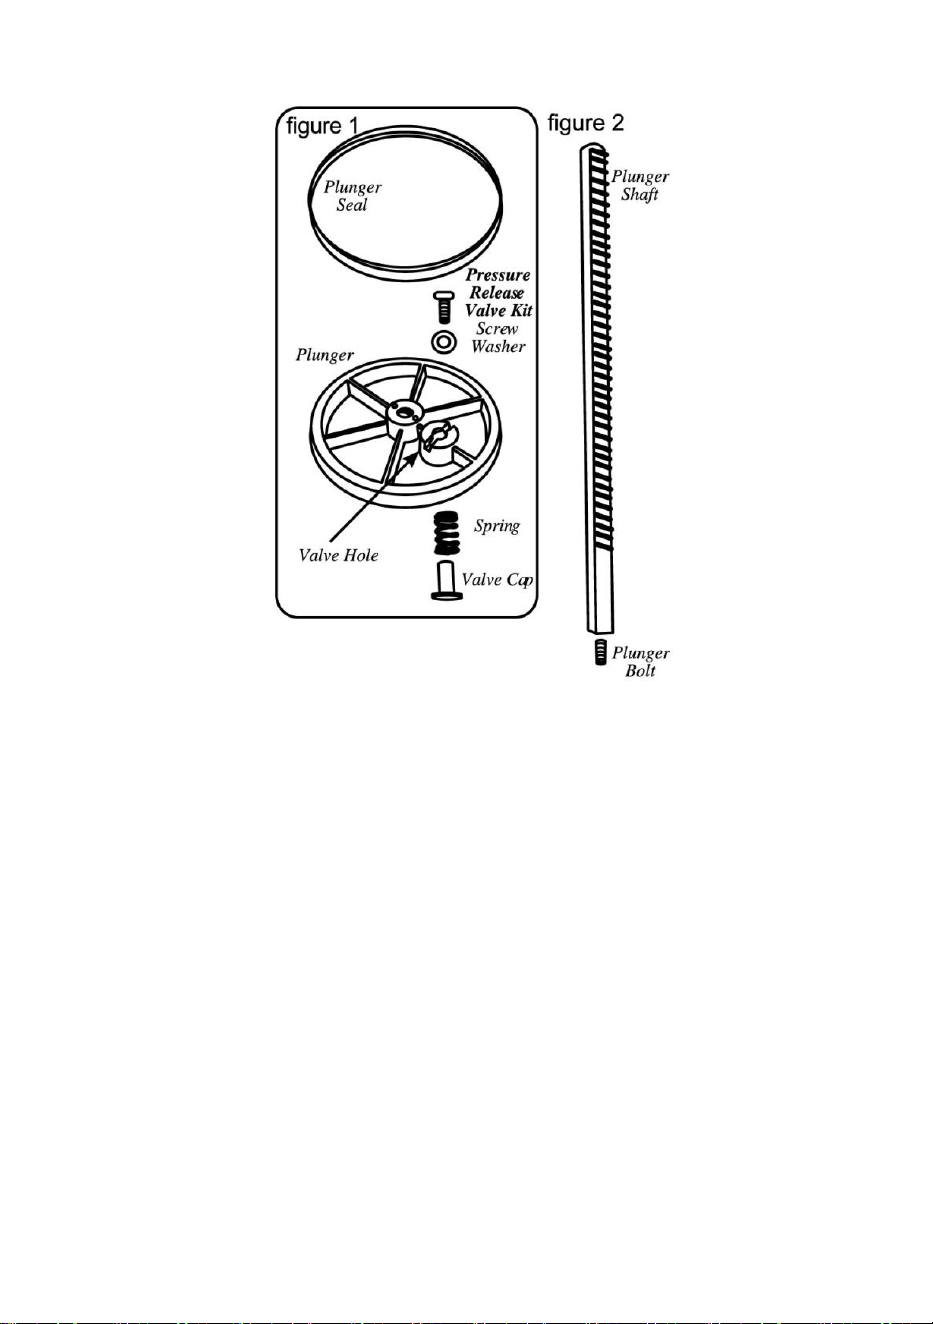
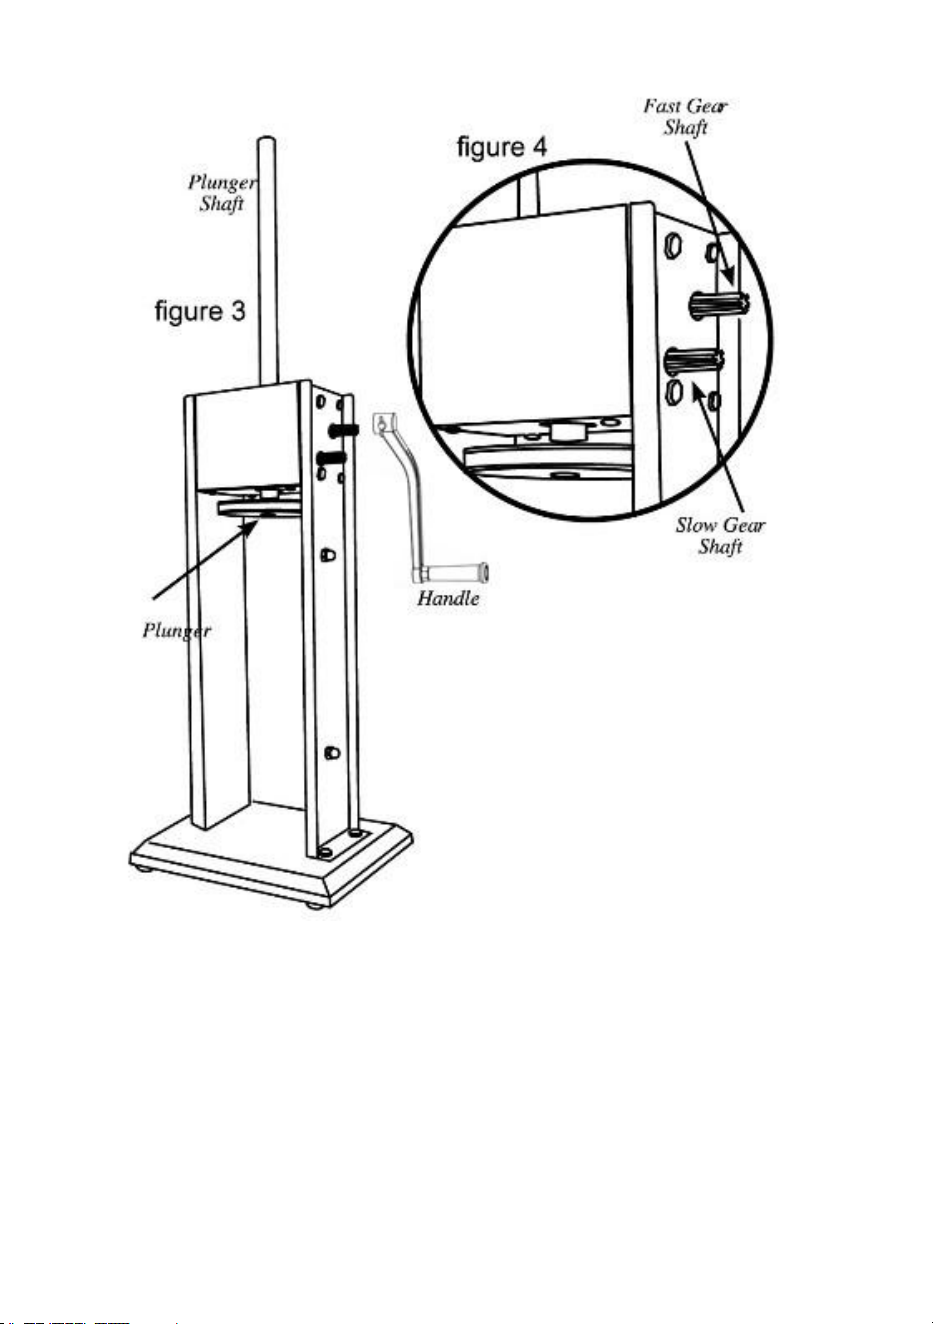
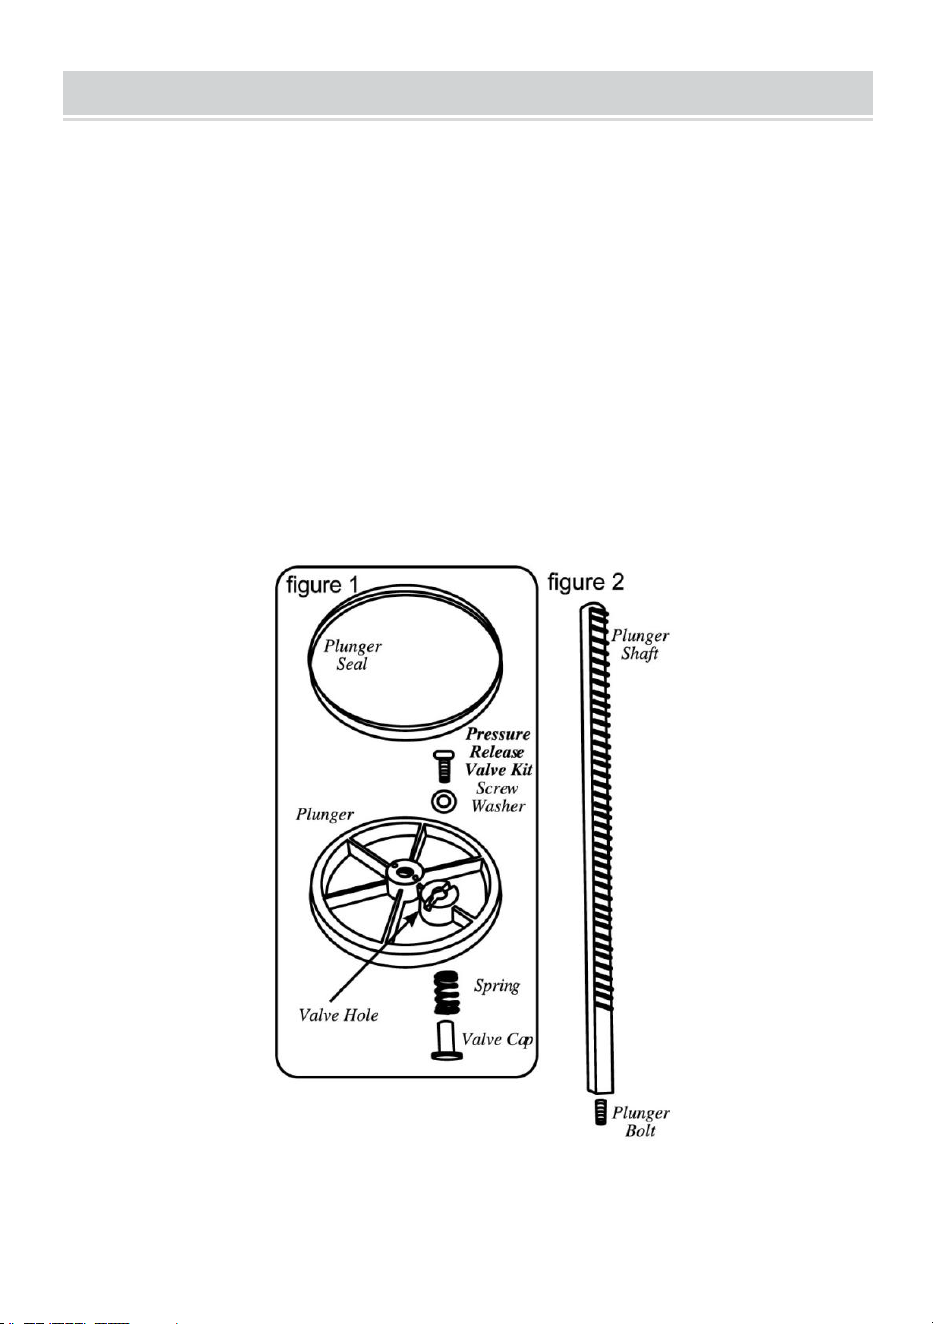
PLUNGER ASSEMBLY
1. Slide the Plunger Seal onto the Plunger (figure 1).
2. Assemble the Pressure Release Valve Kit onto the Plunger. From the
top of the Plunger, place the Washer onto the Valve Hole, then insert
the Screw through the Washer and into the Valve Hole. From the
underside of the Plunger, place the Spring onto the end of the Screw,
then place the Valve Cap onto the end of the Screw and twist to secure.
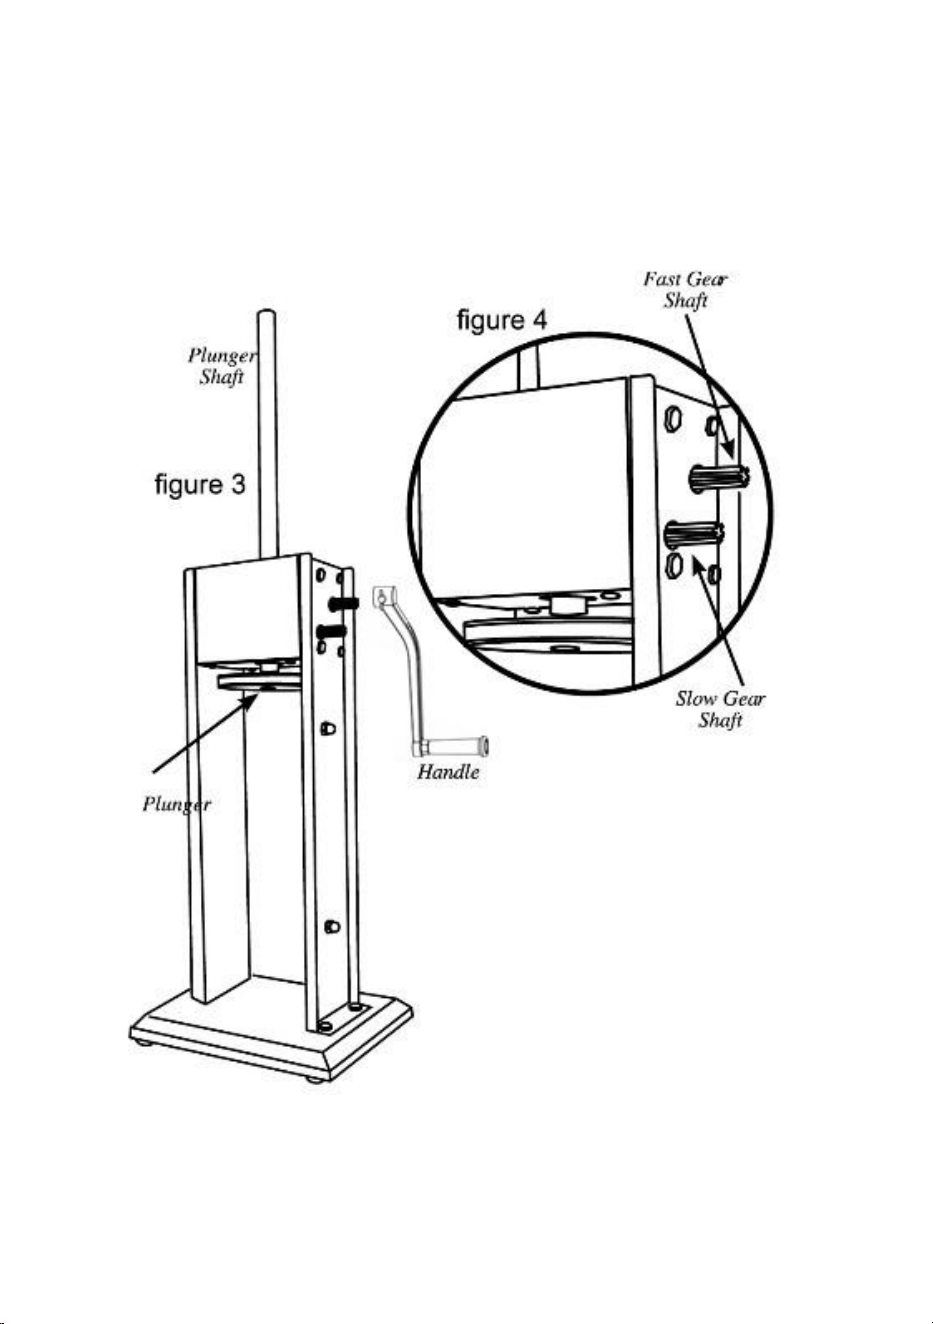
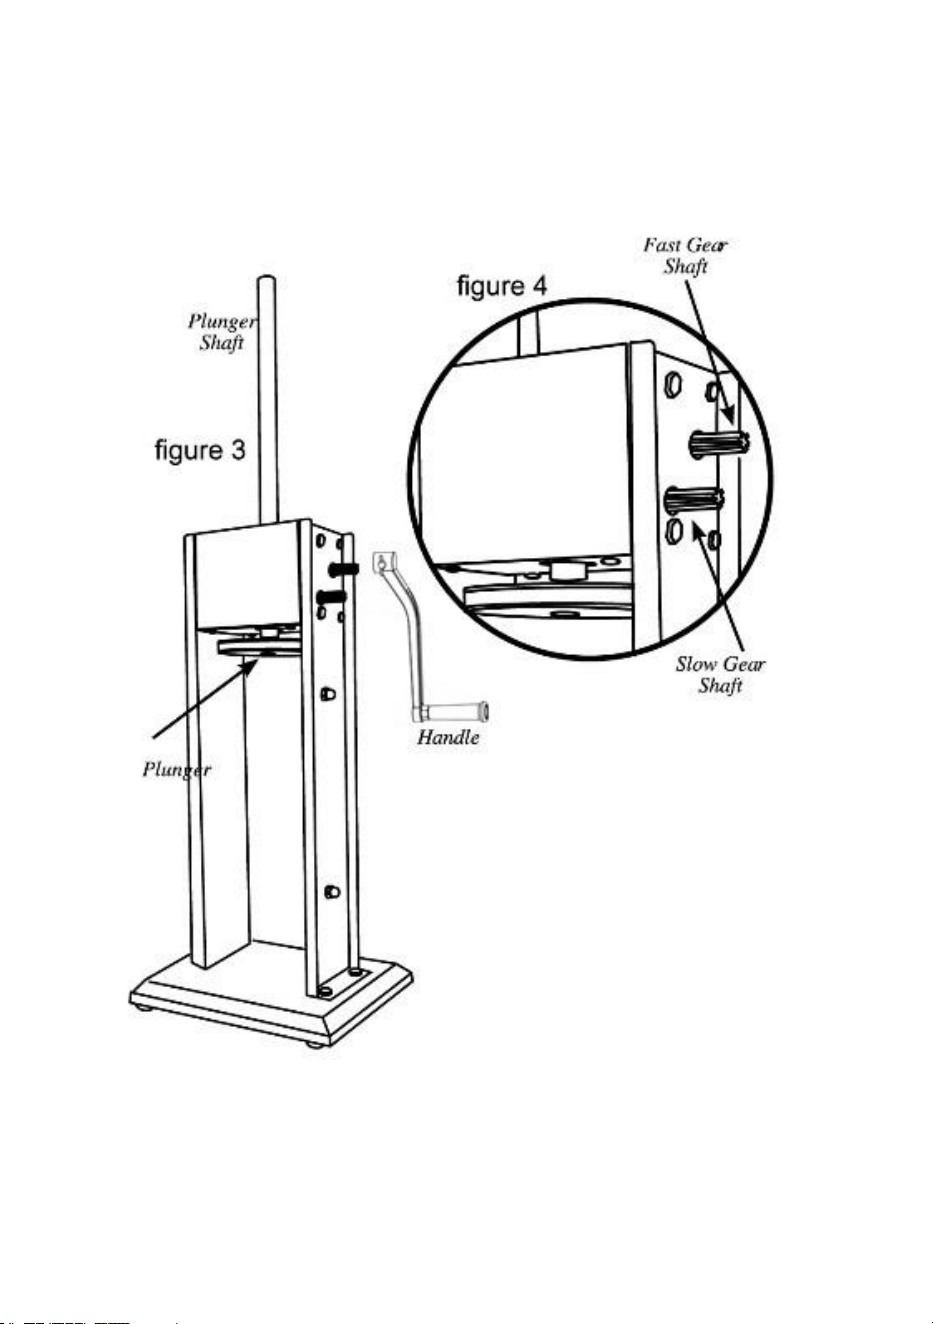
3. Screw the Plunger Bolt onto the Plunger Shaft (figure 2).
4. Place the assembled Plunger onto the end of the Plunger Shaft (figure
3).
- 5 -
STUFFER ASSEMBLY
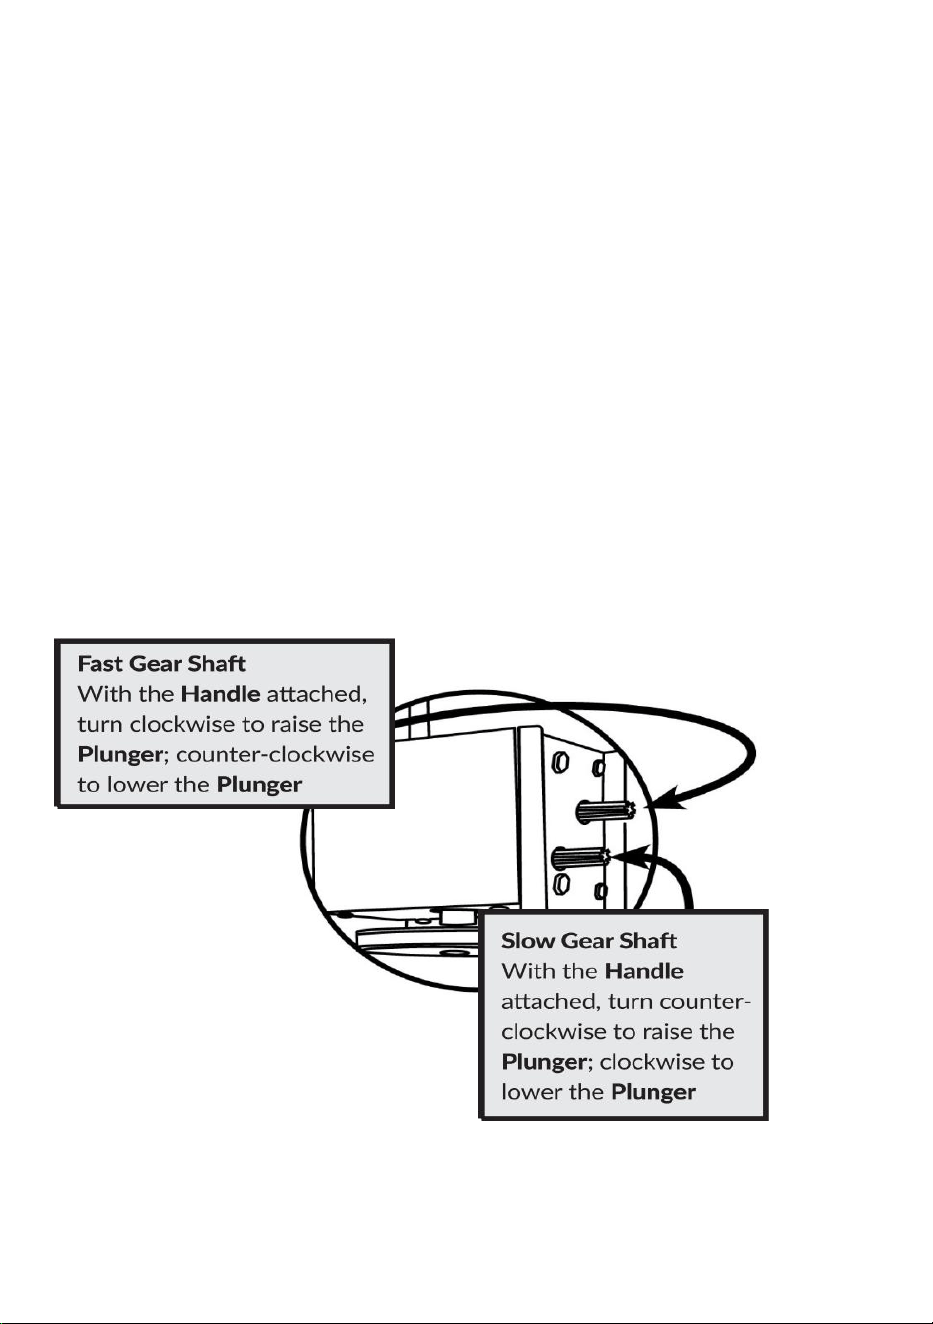
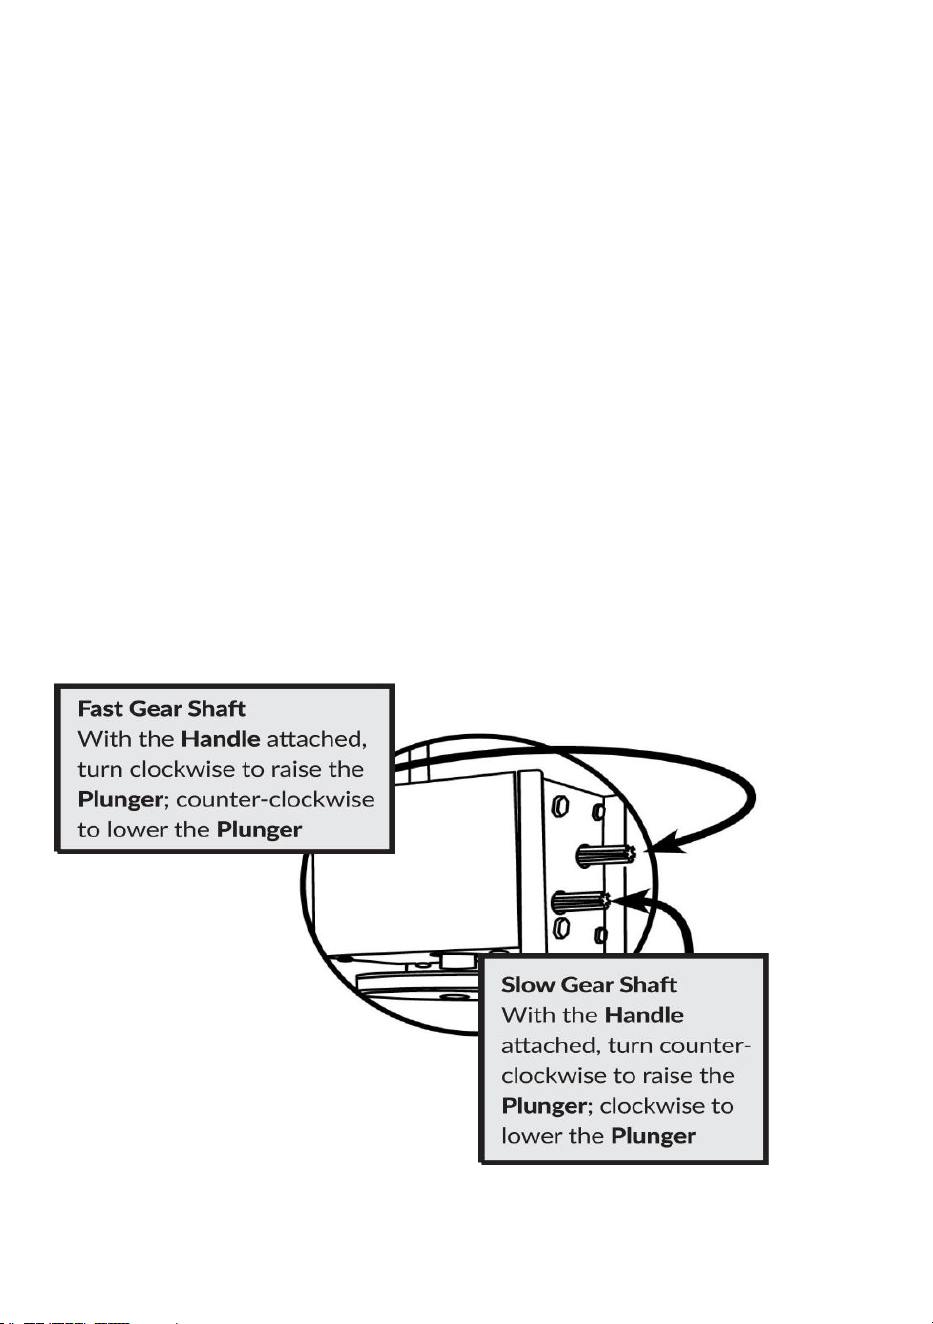
5. Attached and fixed the Handle by sliding it onto either the Fast or
the Slow Gear (figure 4).
6. Crank the Handle to bring the Plunger to the top of the Stuffer.
...continued on next page
- 6 -
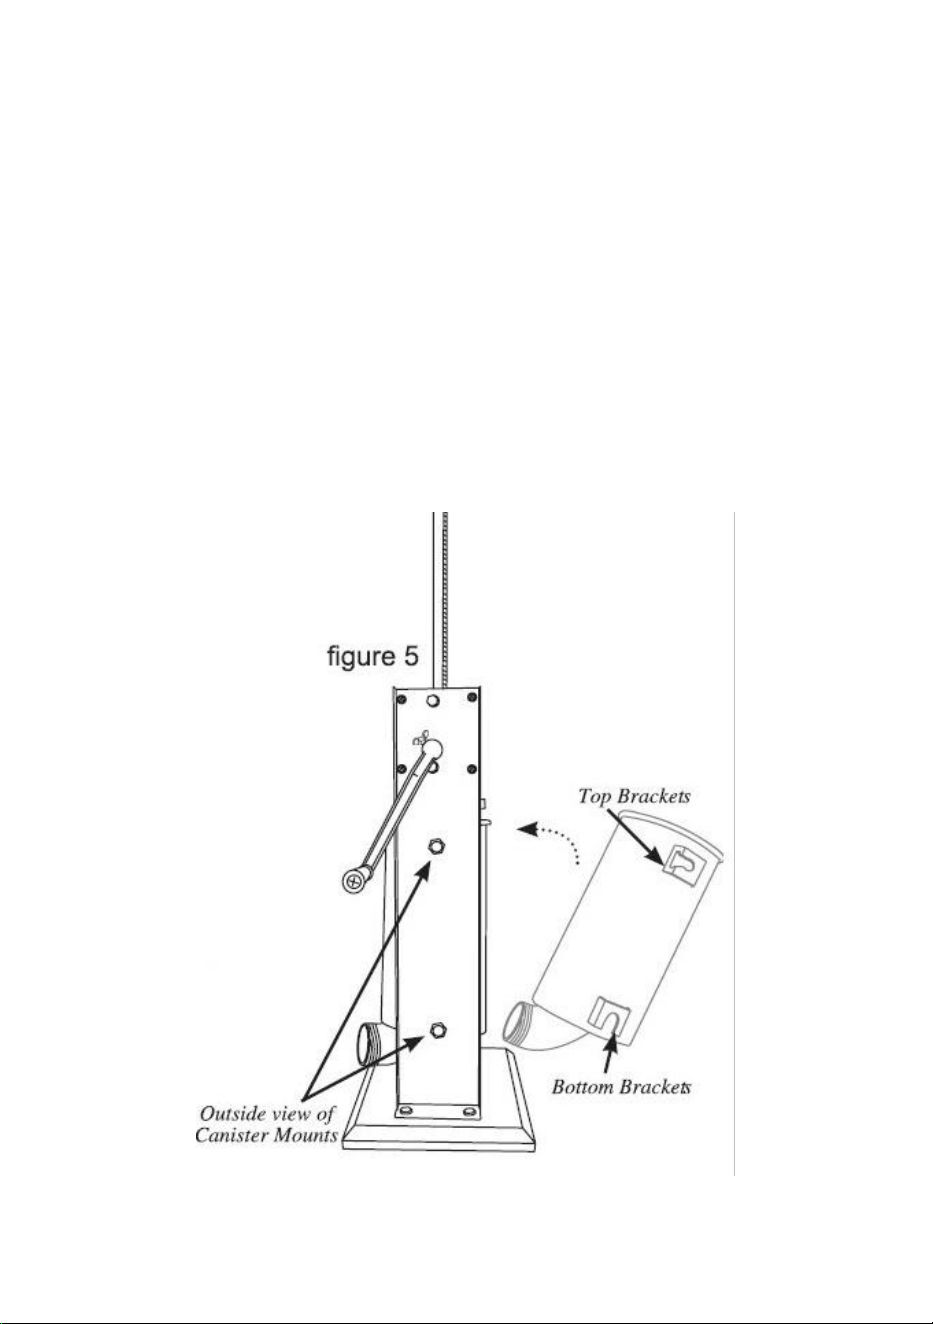
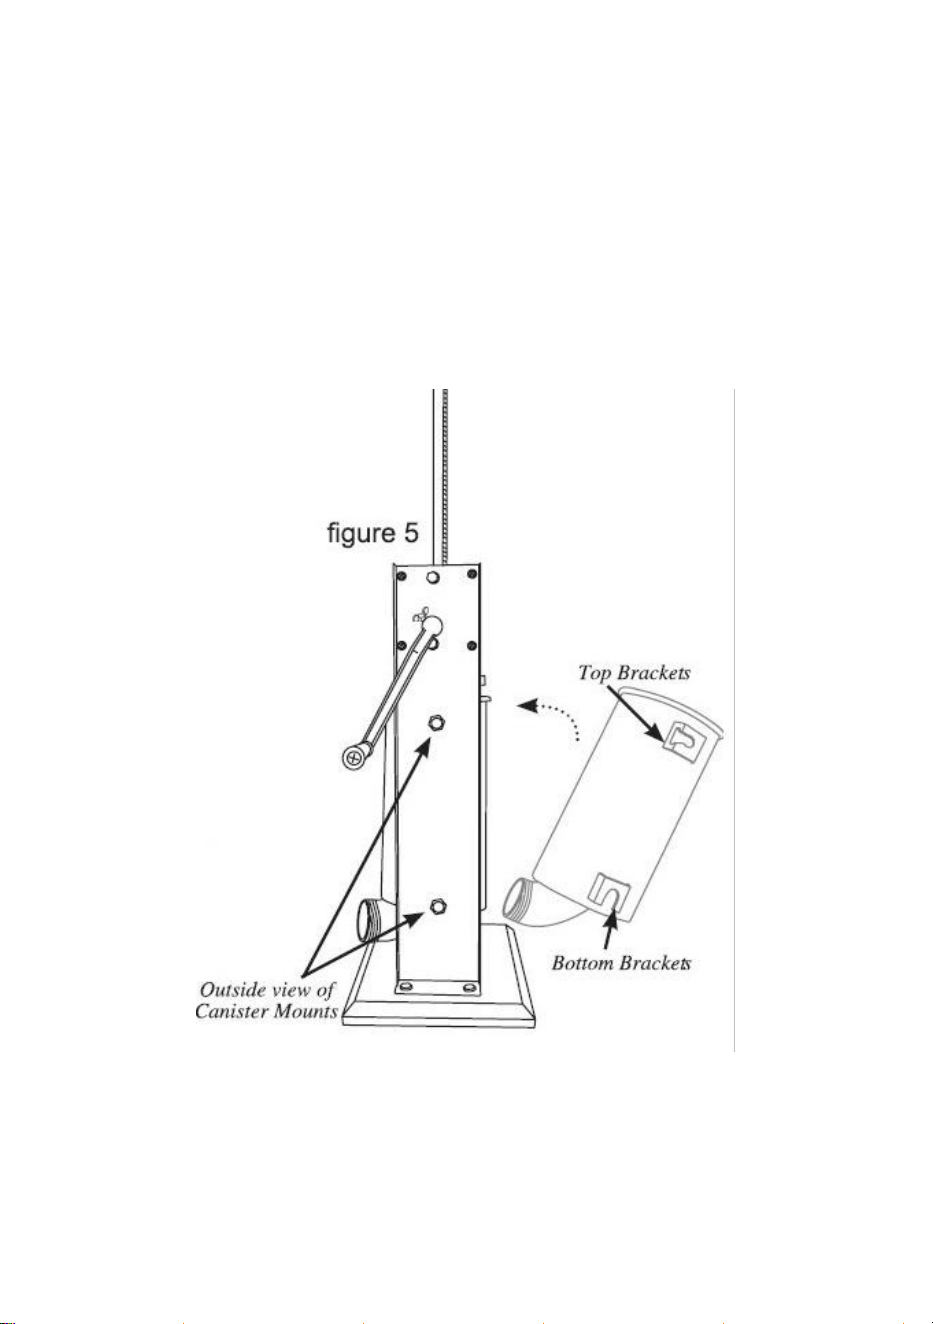
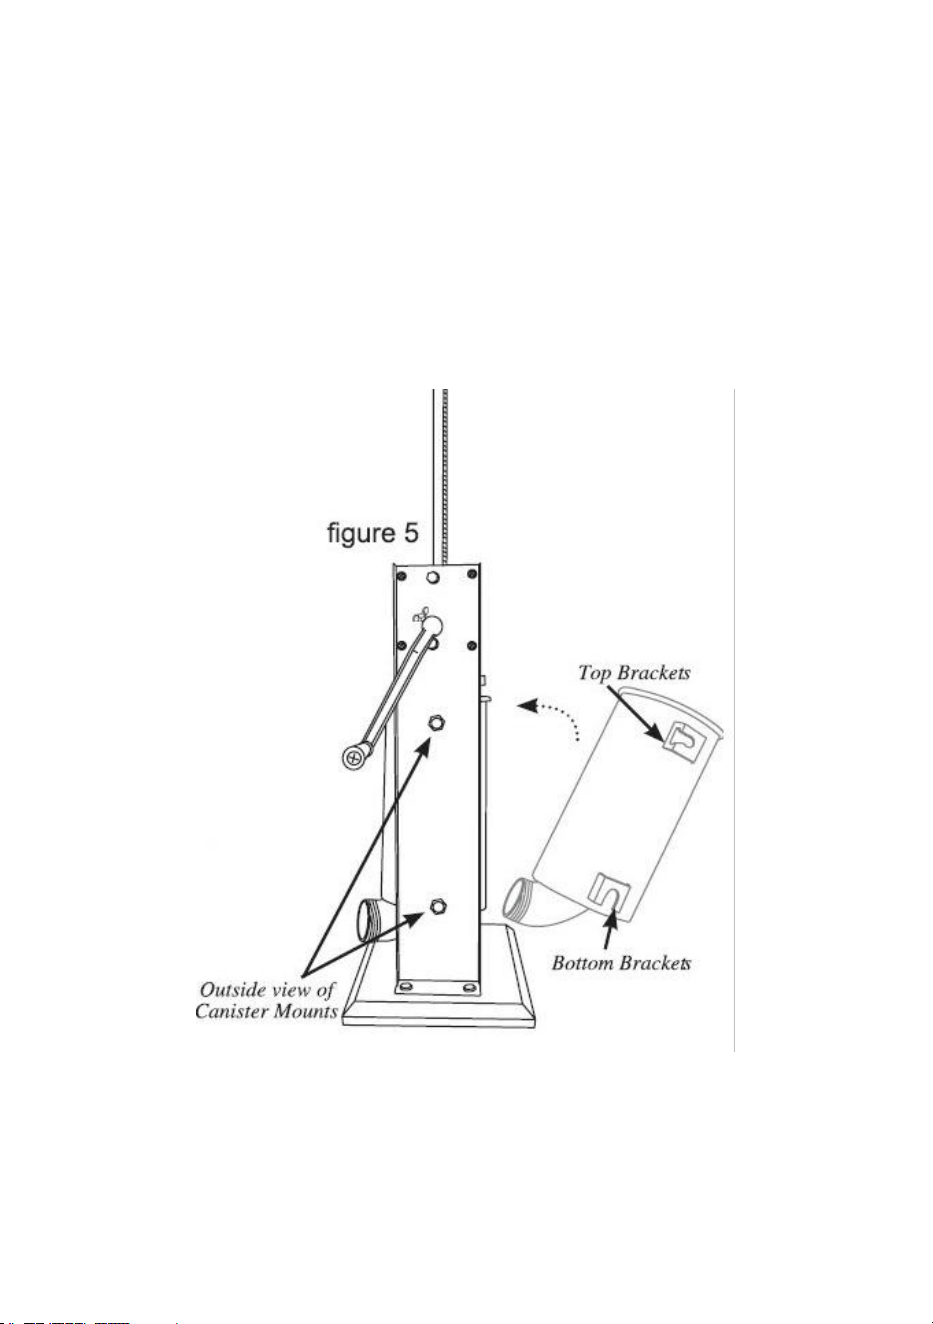
STUFFER ASSEMBLY continued
7. Rest Canister’s Bottom Brackets onto the Canister Mounts inside the
Housing of the Stuffer. Pivot the Canister fully into the Stuffer Housing,
snapping the Top Brackets into the Canister Mounts (figure 5).
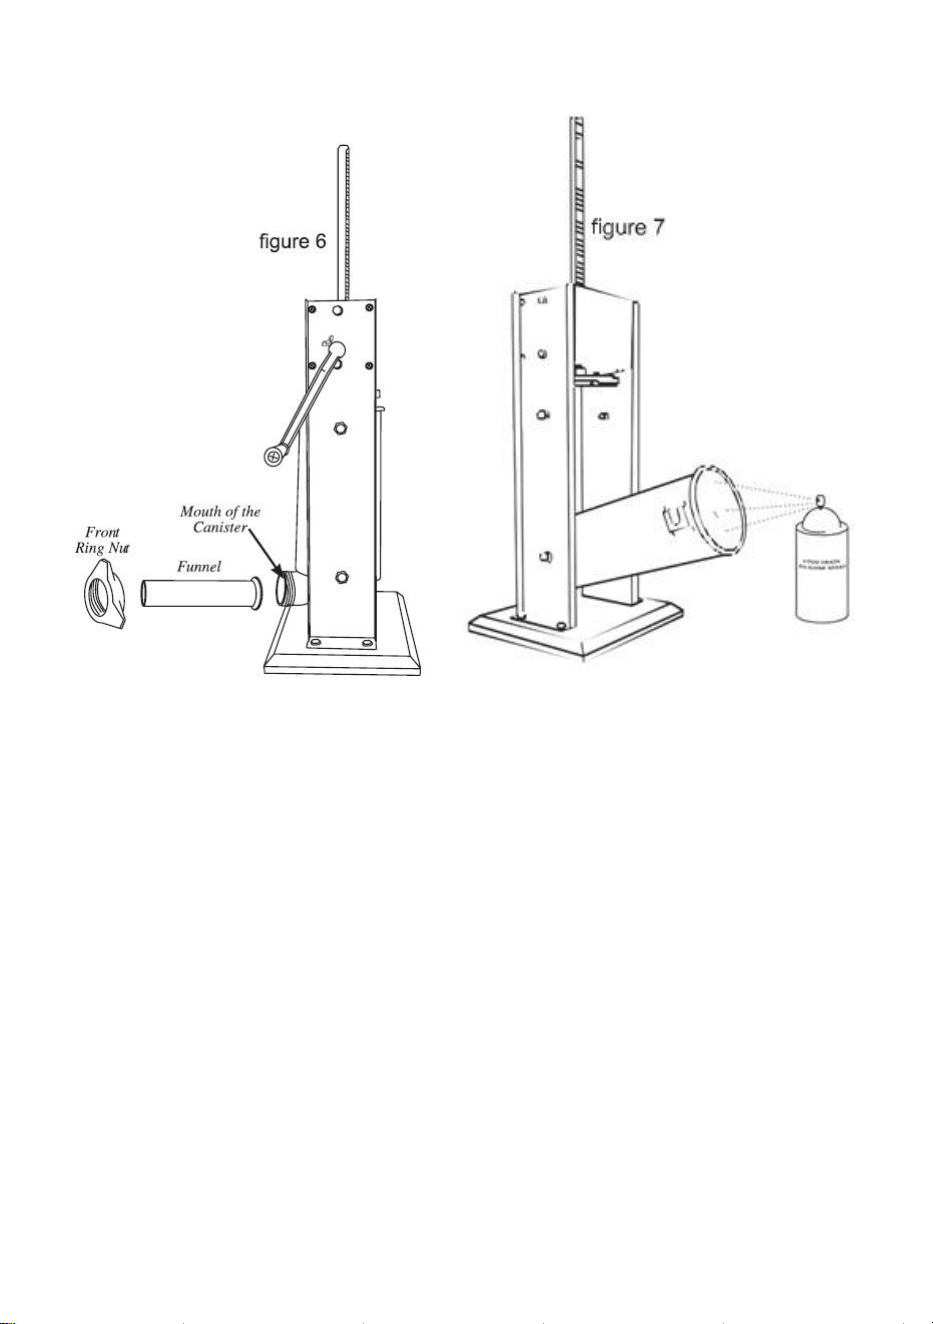
8. Insert the Stuffing Funnel of choice through the Front Ring Nut. Screw
the Front Ring Nut and Stuffing Funnel onto the mouth of the Canister until
snug. DO NOT OVERTIGHTEN the Front Ring Nut, as it may damage the
Funnel. (figure 6)
9. Thoroughly coat the inside of the Canister with a food- grade lubricant
prior to use. (figure 7)

- 7 -
Disassembly and Cleaning
NOTE: BE SURE TO CLEAN ALL PARTS IMMEDIATELY AFTER USE.
1. Remove the Stuffing Funnel by unscrewing the Front Ring Nut, and
pulling the Funnel out.
2. Tum the Handle until the Plunger comes up and out of the Canister.
3. Pivot the Canister outward, then pull the Canister up to remove the
Canister from the Stuffer Housing.
4. Unscrew the Plunger from the Plunger Shaft.
5. Disassemble the pressure release valve from the plunger.
6. Remove the plunger seal from the plunger.
7. Wash all parts that have come in contact with meat in hot soapy water.
- 8 -
8. Rinse and thoroughly dry all parts immediately.
9. Sterilize as needed.
10. Fully lubricate the Shaft, Canister, Pressure-Release Valve
components and the Front Ring Nut with a food-grade lubricant before and
after each use.
Stuffing Instructions
CAUTION! When the plunger is pulled out of the Canister, RELEASE THE
HANDLE SLOWLY! Pressure or gravity could cause the Handle to spin
back slightly and cause injury.
NOTE: Apply a food-grade lubricant to the inside of the Canister before
filling with the meat mixture.
- 9 -
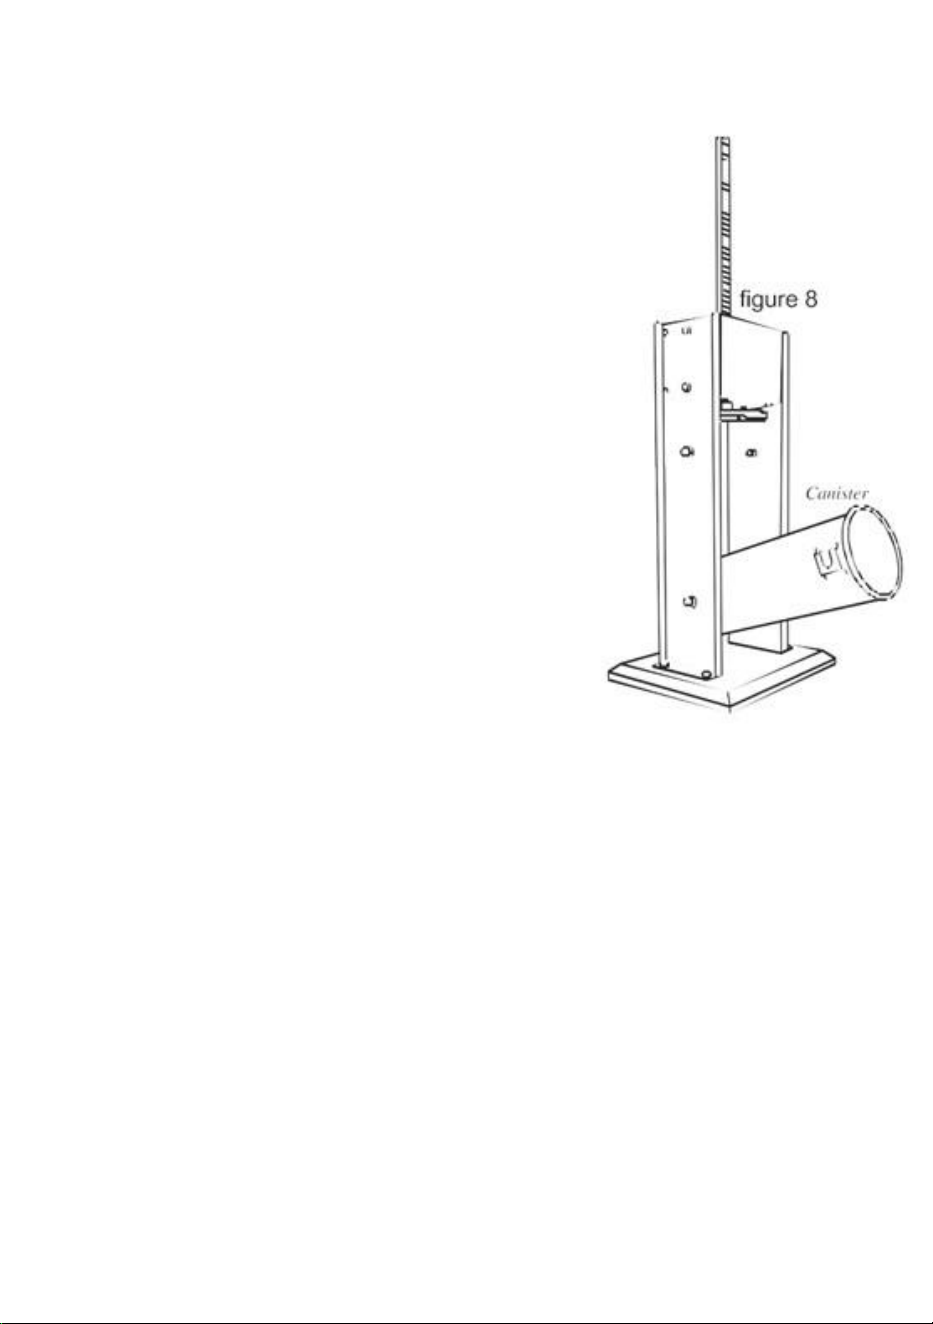
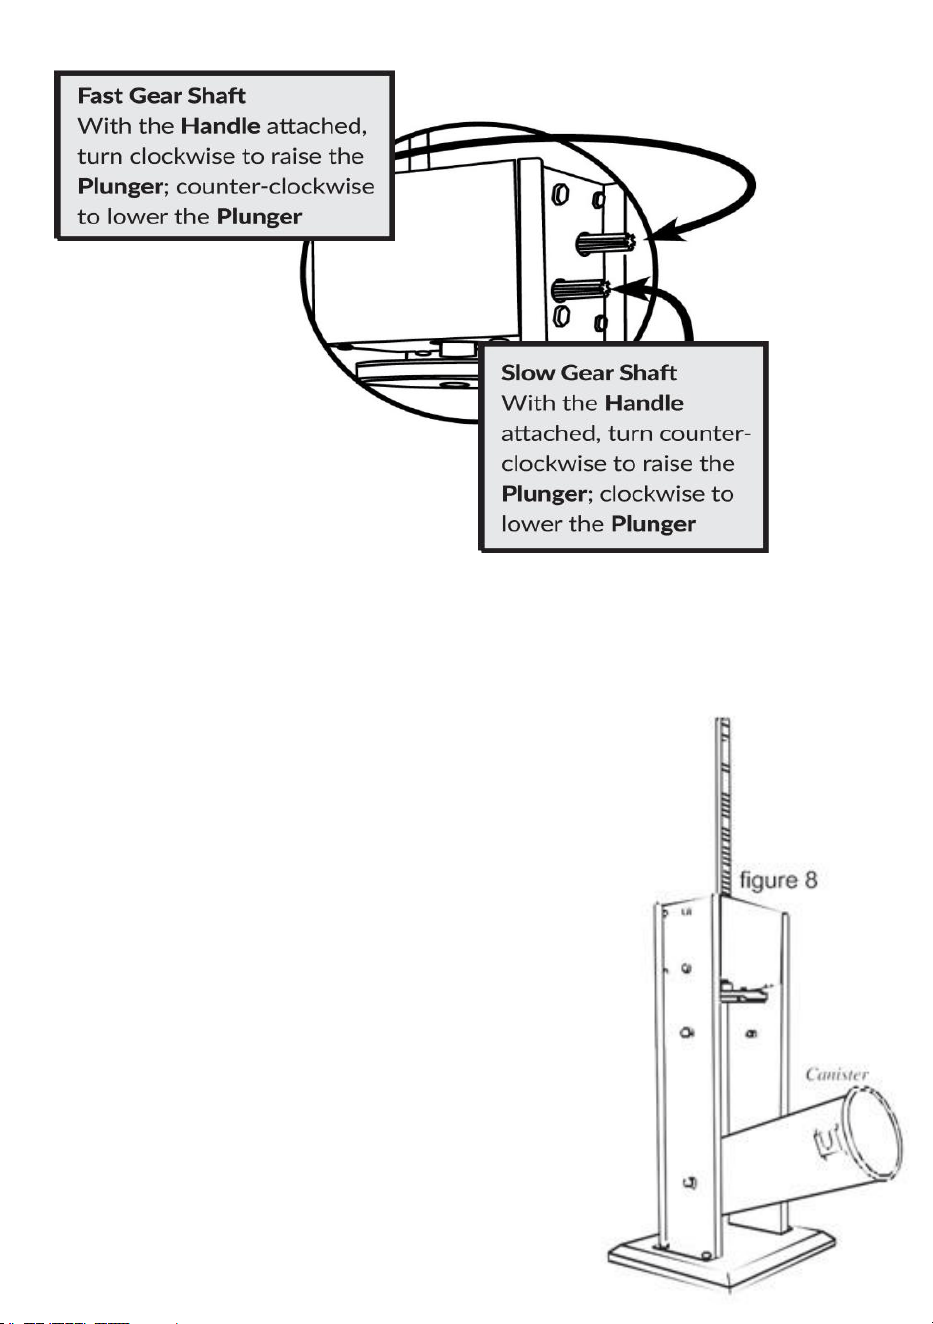
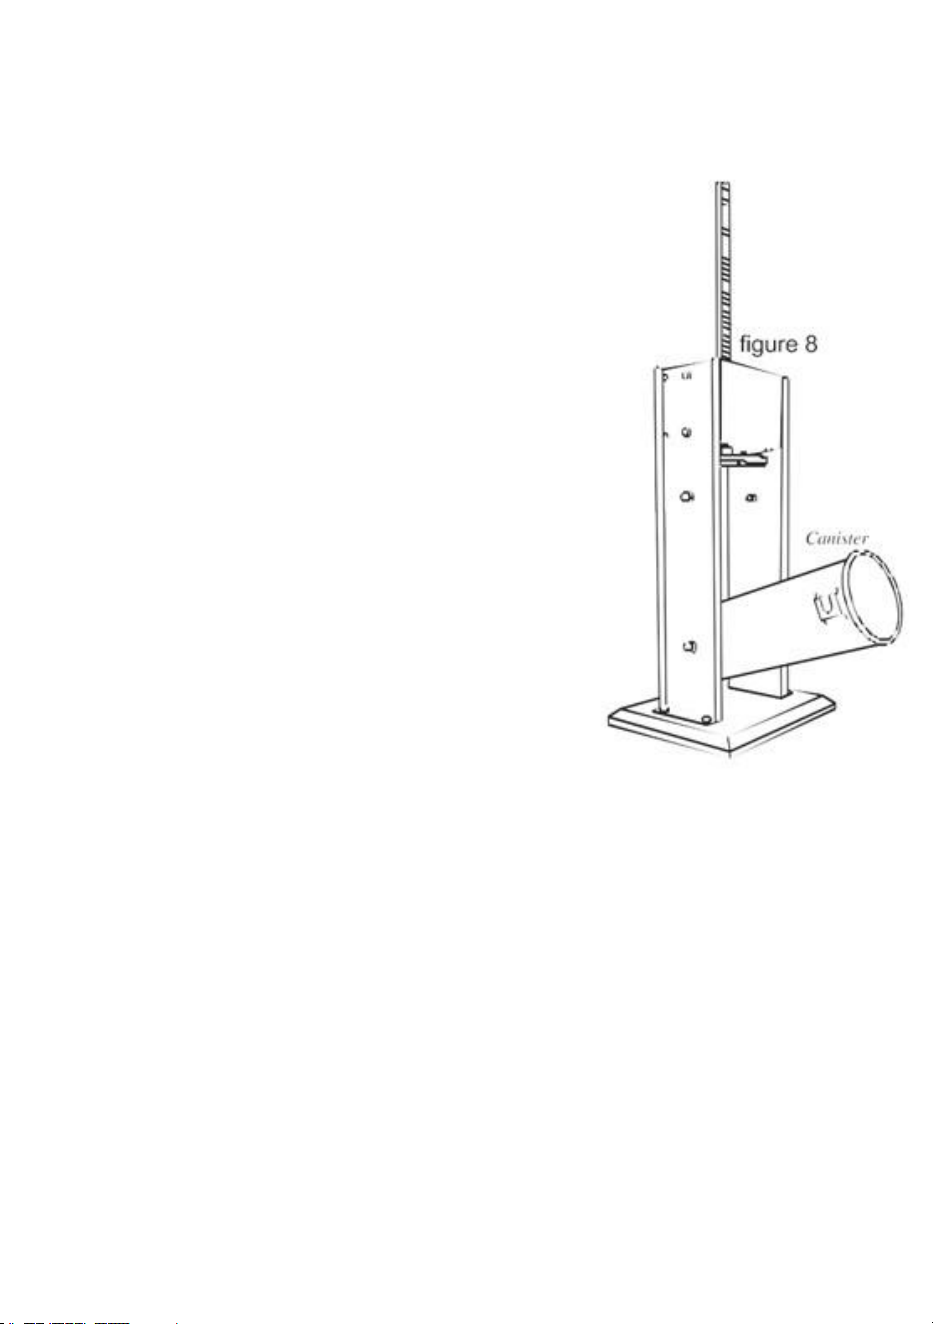
1. Tilt out the Canister
2. Fill the Canister with the meat and
seasoning mixture (figure 8).
3. Press the mixture down into the Canister
firmly to release any trapped air.
4. Pivot the Canister back into the upright
position and snap the Top Brackets onto the
Canister Mounts.
5. Turn the Handle until the Plunger comes in
contact with the meat and the mixture is ready
to extrude out the end of the Stuffing Funnel
6. Slip a casing on the end of the Stuffing
Funnel until the entire casing has slid onto the
Funnel.
7. Tie, twist or hog ring the end of the casing to
seal it.
8. Turn the Handle to extrude the mixture into the casing.
9. For best results, apply pressure around the casing, close to the end of
the Stuffing Funnel. This will hold the casing tight and will cause the
mixture to pack firmly into the casing.
10. When the end of the casing has been reached, tie, twist or hog ring the
end of the casing to seal the contents inside.

- 10 -
STUFFING TIPS:
The following are suggestions to help reduce the resistance when stuffing with
the 13 mm Stuffing Funnel.
A . Add up to 1½ cups (400mL) of water per every 2.3 kg of seasoned meat.
B . Add ¼ cup (60ml) of vegetable or olive oil per every 2.3 kg of seasoned meat
for better flow.
Exploded Diagram and Parts List
Part #
Description
1
Handle
2
Plunger
3
Plunger Seal
4
Pressure Release Valve (4 Piece Set)
5
Stainless Steel Funnel Set (4 Funnels)
6
Stainless Steel Canister
7
Front Ring Nut
8
Canister Mounting Hardware Kit (4 Sets)
9
Plunger Shaft
10
Plunger Bolt
11
Gear Housing Cover with Hardware Kit
12
Gear Housing Cover Bottom Plate with Hardware Kit
13
Gear Housing with Hardware Kit
14
Main Driving Gear
15
Slow Speed Control Gear
16
Fast Speed Control Gear
17
Rubber Foot (4 Piece Set)
18
Butterfly Screw

- 11 -

- 12 -
Manufacturer: Shanghaimuxinmuyeyouxiangongsi
Address: Shuangchenglu 803nong11hao1602A-1609shi, baoshanqu,
shanghai 200000 CN.
Imported to AUS: SIHAO PTY LTD. 1 ROKEVA STREETEASTWOOD
NSW 2122 Australia
Imported to USA: Sanven Technology Ltd. Suite 250, 9166 Anaheim
Place, Rancho Cucamonga, CA 91730


Techniczny Certyfikat wsparcia i e-gwarancji www.vevor.com/support
NADZIEWANIE KIEŁBAS
MODEL: 1A-SS715
We continue to be committed to provide you tools with competitive price.
"Save Half", "Half Price" or any other similar expressions used by us only represents an
estimate of savings you might benefit from buying certain tools with us compared to the major
top brands and doses not necessarily mean to cover all categories of tools offered by us. You
are kindly reminded to verify carefully when you are placing an order with us if you are
actually saving half in comparison with the top major brands.

- 1 -
MODEL: 1A-SS715
Have product questions? Need technical support? Please feel free to
contact us:
Technical Support and E-Warranty Certificate
www.vevor.com/support
NEED HELP? CONTACT US!
This is the original instruction, please read all manual instructions
carefully before operating. VEVOR reserves a clear interpretation of our
user manual. The appearance of the product shall be subject to the
product you received. Please forgive us that we won't inform you again if
there are any technology or software updates on our product.
SAUSAGE STUFFER

- 2 -
Ostrzeżenie — aby zmniejszyć ryzyko obrażeń, użytkownik
musi uważnie przeczytać instrukcję obsługi.
OSTRZEŻENIE: Przed rozpoczęciem korzystania z tego urządzenia należy
dokładnie przeczytać niniejszą instrukcję obsługi i zachować ją do wykorzystania
w przyszłości. Podczas korzystania z tych urządzeń należy zawsze przestrzegać
podstawowych zasad bezpieczeństwa. Obejmują one:
1. Nie pozwalaj dzieciom poniżej 14 roku życia korzystać z urządzenia. Ten
produkt może być używany i konserwowany wyłącznie przez dzieci w wieku 14 lat
lub starsze, osoby o ograniczonych zdolnościach fizycznych, sensorycznych lub
umysłowych lub osoby niewykwalifikowane pod odpowiednim nadzorem osoby
dorosłej. Dzieciom nie wolno bawić się urządzeniem.
2. Dla optymalnego działania i żywotności urządzenia należy postępować zgodnie
z instrukcją.
3. Kwasy spożywcze powodują korozję metalu. Zawsze czyść ten sprzęt do
przygotowywania żywności natychmiast po każdym użyciu. Aby zachować wygląd
i wydłużyć żywotność, czyść go codziennie.
4. Używanie akcesoriów lub modyfikacji niedostarczonych przez producenta może
spowodować zagrożenie. Produkt ten może być używany wyłącznie zgodnie z
jego przeznaczeniem i w sposób wskazany w instrukcji. Wszelkie inne rodzaje
zastosowań uważa się za niewłaściwe i niebezpieczne. Producent nie ponosi
odpowiedzialności za niewłaściwe lub nieprawidłowe użytkowanie oraz
uszkodzenia montażowe.
General Safety Regulations
OSTRZEŻENIE: Ostrzeżenia, przestrogi i instrukcje omówione w niniejszej
instrukcji obsługi nie obejmują wszystkich możliwych warunków i sytuacji,
które mogą wystąpić. Operator musi zrozumieć, że zdrowy rozsądek i
ostrożność to czynniki, których nie można wbudować w ten produkt, ale
które muszą być zapewnione przez operatora.
Proszę używać tego urządzenia zgodnie z poniższymi przestrogami.

- 3 -
Użytkownik powinien rozumieć wszystkie zasady. Przeczytaj je uważnie
zanim uruchomisz maszynę. Niniejsza maszyna może spowodować
zagrożenie dla zdrowia operatora, jeśli użytkownik usunie lub zmieni
wyposażenie maszyny.
Nie ponosimy odpowiedzialności za jakiekolwiek obrażenia wynikające z
niewłaściwej obsługi tej maszyny. Podczas użytkowania należy
postępować zgodnie z instrukcjami „Metoda obsługi” i przestrzegać
odpowiednich procedur obsługi. Podczas montażu i obsługi należy
zachować ostrożność, aby uniknąć zarysowania skóry. Proszę zapoznać
się z instrukcją obsługi.
1. SPRAWDŹ CZY CZĘŚCI NIE USZKODZONE. Przed użyciem
nadziewarki należy sprawdzić czy wszystkie części działają prawidłowo i
spełniają zamierzone funkcje. Sprawdź połączenie ruchomych części,
mocowania i innych warunków, które mogą mieć wpływ na działanie.
2. Producent nie ponosi żadnej odpowiedzialności w przypadku
nieprawidłowego użytkowania nadziewarki. Niewłaściwe użycie
nadziewarki spowoduje unieważnienie gwarancji.
3. Naprawy musi dokonać autoryzowany dealer. Używaj wyłącznie
fabrycznych oryginalnych części i akcesoriów. Modyfikacja nadziewarki
spowoduje unieważnienie gwarancji.
4. Upewnij się, że nadziewarka jest stabilna podczas użytkowania.
5. NIGDY nie używaj nadziewarki przy otwartej lub zdjętej pokrywie
obudowy przekładni.
NOŚ OCHRONĘ OCZU! Okulary do codziennego użytku nie są okularami
ochronnymi. Okulary ochronne spełniają wymagania ANSI Z87.1. Uwaga:
Zatwierdzone okulary ochronne mają nadruk lub stempel Z87.
6. Nie stosować na zewnątrz .
ZACHOWAJ TE INSTRUKCJE

- 4 -
Assembly and Installation
MONTAŻ TŁOKA
1. Nasuń uszczelkę tłoka na tłok (rysunek 1).
2. Zamontuj zestaw zaworu spustowego ciśnienia na tłoku. Z góry tłoka
umieść podkładkę na otworze zaworu, następnie włóż śrubę przez
podkładkę i do otworu zaworu. Od spodu tłoka umieść sprężynę na
końcu śruby, następnie umieść nasadkę zaworu na końcu śruby i
przekręć, aby zabezpieczyć.
3. Wkręć śrubę tłoka na wał tłoka (rysunek 2).
4. Umieść zmontowany tłok na końcu wału tłoka (rysunek 3).
- 5 -
NADUJNIK MONTAŻ
5. Przyłączony i zamocowałem uchwyt, nasuwając go albo bieg
szybki, albo wolny (rysunek 4).
6. Obróć uchwyt, aby ustawić tłok górę nadziewarki.
...kontynuacja na następnej stronie

- 6 -
MONTAŻ NAPEŁNIACZA – ciąg dalszy
7. Oprzyj dolne wsporniki kanistra na mocowaniach kanistra wewnątrz
obudowy nadziewarki. Całkowicie obróć zbiornik do obudowy wypełniacza,
zatrzaskując górne wsporniki w mocowaniach zbiornika (rysunek 5).
- 7 -
8. Włóż wybrany lejek farszowy przez przednią nakrętkę pierścieniową.
Wkręć przednią nakrętkę pierścieniową i lejek napełniający do otworu
pojemnika, aż będą dobrze dopasowane. NIE DOKRĘCAJ PRZEDNIEJ
nakrętki pierścieniowej, ponieważ może to spowodować uszkodzenie lejka.
(rysunek 6)
9. Przed użyciem dokładnie pokryj wnętrze pojemnika środkiem smarnym
dopuszczonym do kontaktu z żywnością. (rysunek 7)
- 8 -
Demontaż i czyszczenie
UWAGA: NALEŻY WYCZYŚCIĆ WSZYSTKIE CZĘŚCI BEZPOŚREDNIO
PO UŻYCIU.
1. Wyjmij lejek napełniający, odkręcając przednią nakrętkę pierścieniową i
wyciągając lejek.
2. Obracaj uchwyt, aż tłok wyjdzie z pojemnika.
3. Odchyl zbiornik na zewnątrz, a następnie pociągnij zbiornik do góry, aby
wyjąć go z obudowy wypełniacza.
4. Odkręcić tłok od wału tłoka.
5. Zdemontuj zawór spustowy ciśnienia z tłoka.
6. Zdjąć uszczelkę tłoka z tłoka.

- 9 -
7. Umyj wszystkie części mające kontakt z mięsem w gorącej wodzie z
mydłem.
8. Natychmiast opłucz i dokładnie wysusz wszystkie części.
9. Sterylizuj w razie potrzeby.
10. Przed i po każdym użyciu nasmaruj wał, zbiornik, elementy zaworu
zwalniającego ciśnienie i nakrętkę przedniego pierścienia smarem
dopuszczonym do kontaktu z żywnością.
Instrukcje farszu
OSTROŻNOŚĆ! Po wyciągnięciu tłoka z pojemnika, POWOLI ZWOLNIJ
UCHWYT! Nacisk lub grawitacja mogą spowodować lekkie obrócenie
rączki i spowodować obrażenia.
UWAGA: Przed napełnieniem pojemnika mieszanką mięsną nałóż smar
dopuszczony do kontaktu z żywnością.

- 10 -
1. Odchylić pojemnik
2. Napełnij kanister mieszanką mięsa i
przypraw (rysunek 8).
3. Mocno wciśnij mieszaninę do pojemnika,
aby uwolnić uwięzione powietrze.
4. Obróć zbiornik z powrotem do pozycji
pionowej i zatrzaśnij górne wsporniki na
mocowaniach zbiornika.
5. Obracaj uchwyt, aż tłok zetknie się z
mięsem i mieszanina będzie gotowa do
wypchnięcia z końca lejka do farszu
6. Nasuń osłonkę na koniec lejka do farszu, aż
cała osłonka zsunie się na lejek.

- 11 -
7. Zawiąż, przekręć lub zaciśnij koniec osłonki, aby ją uszczelnić.
8. Obróć uchwyt, aby wycisnąć mieszaninę do osłonki.
9. Aby uzyskać najlepsze rezultaty, naciśnij wokół osłonki, blisko końca
lejka nadziewającego. Spowoduje to szczelne zamknięcie osłonki i sprawi,
że mieszanina będzie ściśle przylegać do osłonki.
10. Po osiągnięciu końca osłonki zawiązać, przekręcić lub zacisnąć
pierścień na końcu osłonki, aby zamknąć zawartość wewnątrz.
STUFFING TIPS:
The following are suggestions to help reduce the resistance when stuffing with
the 13 mm Stuffing Funnel.
A . Add up to 1½ cups (400mL) of water per every 2.3 kg of seasoned meat.
B . Add ¼ cup (60ml) of vegetable or olive oil per every 2.3 kg of seasoned meat
for better flow.
Exploded Diagram and Parts List
Część #
Opis
1
Uchwyt
2
Tłok nurnikowy
3
Uszczelka tłoka
4
Zawór zwalniający ciśnienie (zestaw 4-częściowy)
5
Zestaw lejków ze stali nierdzewnej (4 lejki)
6
Kanister ze stali nierdzewnej
7
Nakrętka przedniego pierścienia
8
Zestaw elementów montażowych kanistra (4 zestawy)
9
Wał tłokowy
10
Śruba tłoka

- 12 -
11
Pokrywa obudowy przekładni z zestawem okuć
12
Dolna płyta pokrywy obudowy przekładni z zestawem okuć
13
Obudowa przekładni z zestawem okuć
14
Główny bieg jazdy
15
Przekładnia kontrolująca małą prędkość
16
Przekładnia kontroli dużej prędkości
17
Gumowa stopka (zestaw 4-częściowy)
18
Śruba motylkowa

- 13 -

- 14 -
Producent: Shanghaimuxinmuyeyouxiangongsi
Adres: Shuangchenglu 803nong11hao1602A-1609shi, baoshanqu,
szanghaj 200000 CN.
Import do AUS: SIHAO PTY LTD. 1 ROKEVA STREETEASTWOOD
NSW 2122 Australia
Import do USA: Sanven Technology Ltd. Suite 250, 9166 Anaheim
Place, Rancho Cucamonga, CA 91730


Technisch Support- und E-Garantie-Zertifikat www.vevor.com/support
WURSTSTUFFER
MODELL: 1A-SS715
We continue to be committed to provide you tools with competitive price.
"Save Half", "Half Price" or any other similar expressions used by us only represents an
estimate of savings you might benefit from buying certain tools with us compared to the major
top brands and doses not necessarily mean to cover all categories of tools offered by us. You
are kindly reminded to verify carefully when you are placing an order with us if you are
actually saving half in comparison with the top major brands.


- 1 -
MODELL: 1A-SS715
Have product questions? Need technical support? Please feel free to
contact us:
Technical Support and E-Warranty Certificate
www.vevor.com/support
NEED HELP? CONTACT US!
This is the original instruction, please read all manual instructions
carefully before operating. VEVOR reserves a clear interpretation of our
user manual. The appearance of the product shall be subject to the
product you received. Please forgive us that we won't inform you again if
there are any technology or software updates on our product.
SAUSAGE STUFFER

- 2 -
Warnung: Um das Verletzungsrisiko zu verringern, muss der
Benutzer die Bedienungsanleitung sorgfältig lesen.
WARNUNG: Bevor Sie dieses Gerät in Betrieb nehmen, lesen Sie bitte diese
Bedienungsanleitung vollständig durch und bewahren Sie sie zum späteren
Nachschlagen griffbereit auf. Befolgen Sie bei der Verwendung dieser Geräte
stets die grundlegenden Sicherheitsvorkehrungen. Diese beinhalten:
1. Erlauben Sie Kindern unter 14 Jahren nicht, die Maschine zu benutzen. Dieses
Produkt darf nur von Kindern ab 14 Jahren, Personen mit eingeschränkten
körperlichen, sensorischen oder geistigen Fähigkeiten oder ungelernten Personen
unter angemessener Aufsicht eines Erwachsenen verwendet oder gewartet
werden. Kinder dürfen nicht mit dem Gerät spielen.
2.Für einen optimalen Betrieb und eine optimale Lebensdauer des Gerätes
befolgen Sie bitte die Anweisungen.
3. Lebensmittelsäuren korrodieren das Metall. Reinigen Sie dieses
Lebensmittelzubereitungsgerät immer sofort nach jedem Gebrauch. Um das
Aussehen zu erhalten und die Lebensdauer zu erhöhen, reinigen Sie es täglich.
4. Die Verwendung von Zubehör oder Modifikationen, die nicht vom Hersteller
bereitgestellt wurden, kann zu Gefahren führen. Dieses Produkt darf nur für den
vorgesehenen Zweck und auf die in der Anleitung angegebene Weise verwendet
werden. Alle anderen Verwendungsarten gelten als ungeeignet und gefährlich. Der
Hersteller übernimmt keine Haftung für unsachgemäße oder unsachgemäße
Verwendung und Installationsschäden.
General Safety Regulations
WARNUNG: Die in dieser Bedienungsanleitung beschriebenen
Warnungen, Vorsichtsmaßnahmen und Anweisungen können nicht alle
möglichen Bedingungen oder Situationen abdecken, die auftreten können.
Der Betreiber muss verstehen, dass gesunder Menschenverstand und
Vorsicht Faktoren sind, die nicht in dieses Produkt eingebaut werden
können, sondern vom Betreiber bereitgestellt werden müssen.

- 3 -
Bitte verwenden Sie diese Maschine gemäß diesen Vorsichtsmaßnahmen.
Der Benutzer sollte alle Regeln verstehen. Bitte lesen Sie sie sorgfältig
durch bevor Sie die Maschine in Betrieb nehmen. Diese Maschine kann
die Gesundheit des Bedieners schädigen, wenn der Benutzer Geräte an
der Maschine entfernt oder verändert.
Wir übernehmen keine Haftung für Verletzungen, die durch
unsachgemäßen Betrieb dieser Maschine entstehen. Bitte befolgen Sie die
Anweisungen zur „Bedienungsmethode“ und befolgen Sie bei der
Verwendung die ordnungsgemäßen Betriebsabläufe. Seien Sie beim
Zusammenbau und Betrieb vorsichtig, um Kratzer auf der Haut zu
vermeiden. Bitte lesen Sie die Bedienungsanleitung.
1. AUF BESCHÄDIGTE TEILE PRÜFEN. Überprüfen Sie vor der
Verwendung des Füllers, ob alle Teile ordnungsgemäß funktionieren und
die vorgesehenen Funktionen erfüllen. Prüfen Sie, ob die beweglichen
Teile, die Montage usw. festsitzen Bedingungen, die den Betrieb
beeinträchtigen können.
2. Der Hersteller lehnt jegliche Verantwortung im Falle einer
unsachgemäßen Verwendung des Füllers ab. Unsachgemäßer Gebrauch
des Stuffers führt zum Erlöschen der Garantie.
3. Die Reparatur muss von einem autorisierten Händler durchgeführt
werden. Verwenden Sie nur Originalteile und Zubehör vom Hersteller. Eine
Änderung des Füllers führt zum Erlöschen der Garantie.
4. Stellen Sie sicher, dass der Füller während des Gebrauchs stabil ist.
5. Betreiben Sie den Füller NIEMALS, wenn der Getriebegehäusedeckel
geöffnet oder entfernt ist.
TRAGEN SIE EINEN AUGENSCHUTZ! Alltagsbrillen sind keine
Schutzbrillen. Schutzbrillen entsprechen den ANSI Z87.1-Anforderungen.
Hinweis: Auf zugelassenen Schutzbrillen ist „Z87“ aufgedruckt oder
eingeprägt.
6. Nicht im Freien verwenden .
ANLEITUNG AUFBEWAHREN

- 4 -
Assembly and Installation
KOLBENBAUGRUPPE
1. Schieben Sie die Kolbendichtung auf den Kolben (Abbildung 1).
2. Montieren Sie das Druckentlastungsventil-Kit am Kolben. Setzen Sie
die Unterlegscheibe von der Oberseite des Kolbens auf das Ventilloch
und führen Sie dann die Schraube durch die Unterlegscheibe und in
das Ventilloch ein. Setzen Sie die Feder von der Unterseite des
Kolbens auf das Ende der Schraube, setzen Sie dann die Ventilkappe
auf das Ende der Schraube und drehen Sie sie, um sie zu befestigen.
3. Schrauben Sie den Kolbenbolzen auf die Kolbenwelle (Abbildung 2).
4. Platzieren Sie den zusammengebauten Kolben auf dem Ende der
Kolbenwelle (Abbildung 3).

- 5 -
STUFFER MONTAGE
5. Beigefügt und fixierte den Griff durch Aufschieben entweder den
schnellen oder den langsamen Gang (Abbildung 4).
6. Drehen Sie den Griff, um den Kolben zu bewegen die Spitze des
Stuffers.
...Fortsetzung auf der nächsten Seite

- 6 -
Fortsetzung der STUFFER-MONTAGE
7. Legen Sie die unteren Halterungen des Kanisters auf die
Kanisterhalterungen im Gehäuse des Stuffers. Drehen Sie den Kanister
vollständig in das Stuffer-Gehäuse und lassen Sie die oberen Halterungen
- 7 -
in den Kanisterhalterungen einrasten (Abbildung 5).
8. Führen Sie den Fülltrichter Ihrer Wahl durch die vordere Ringmutter ein.
Schrauben Sie die vordere Ringmutter und den Fülltrichter auf die Öffnung
des Kanisters, bis sie fest sitzen. Ziehen Sie die vordere Ringmutter
NICHT zu fest an, da dies den Trichter beschädigen kann. (Abbildung 6)
9. Beschichten Sie die Innenseite des Kanisters vor der Verwendung
gründlich mit einem lebensmittelechten Gleitmittel. (Abbildung 7)

- 8 -
Demontage und Reinigung
HINWEIS: ACHTEN SIE DARAUF, ALLE TEILE SOFORT NACH DEM
GEBRAUCH ZU REINIGEN.
1. Entfernen Sie den Fülltrichter, indem Sie die vordere Ringmutter
abschrauben und den Trichter herausziehen.
2. Drehen Sie den Griff, bis der Kolben nach oben aus dem Kanister
herauskommt.
3. Drehen Sie den Kanister nach außen und ziehen Sie ihn dann nach
oben, um ihn aus dem Füllergehäuse zu entfernen.
4. Schrauben Sie den Kolben von der Kolbenwelle ab.
5. Demontieren Sie das Druckentlastungsventil vom Kolben.

- 9 -
6. Entfernen Sie die Kolbendichtung vom Kolben.
7. Waschen Sie alle Teile, die mit Fleisch in Berührung gekommen sind,
in heißem Seifenwasser.
8. Spülen und trocknen Sie alle Teile sofort gründlich.
9. Bei Bedarf sterilisieren.
10. Schmieren Sie die Welle, den Kanister, die Komponenten des
Druckentlastungsventils und die vordere Ringmutter vor und nach jedem
Gebrauch vollständig mit einem lebensmittelechten Schmiermittel.
Anleitung zum Füllen
VORSICHT! Wenn der Kolben aus dem Kanister herausgezogen ist,
lassen Sie den Griff langsam los! Durch Druck oder Schwerkraft könnte
sich der Griff leicht zurückdrehen und Verletzungen verursachen.
HINWEIS: Tragen Sie ein lebensmittelechtes Gleitmittel auf die Innenseite
des Behälters auf, bevor Sie ihn mit der Fleischmischung füllen.

- 10 -
1. Kippen Sie den Kanister heraus
2. Füllen Sie den Kanister mit der Fleisch- und
Gewürzmischung (Abbildung 8).
3. Drücken Sie die Mischung fest in den
Kanister, um eventuell eingeschlossene Luft
zu entweichen.
4. Drehen Sie den Kanister zurück in die
aufrechte Position und lassen Sie die oberen
Halterungen an den Kanisterhalterungen
einrasten.
5. Drehen Sie den Griff, bis der Kolben mit
dem Fleisch in Kontakt kommt und die
Mischung aus dem Ende des Fülltrichters

- 11 -
austreten kann
6. Schieben Sie eine Hülle auf das Ende des Fülltrichters, bis die gesamte
Hülle auf den Trichter geschoben ist.
7. Binden, drehen oder haken Sie das Ende des Gehäuses fest, um es
abzudichten.
8. Drehen Sie den Griff, um die Mischung in die Hülle zu extrudieren.
9. Um optimale Ergebnisse zu erzielen, üben Sie Druck rund um die Hülle
aus, nahe am Ende des Fülltrichters. Dadurch wird die Hülle festgehalten
und die Mischung fest in der Hülle verdichtet.
10. Wenn das Ende der Hülle erreicht ist, binden, drehen oder binden Sie
das Ende der Hülle fest, um den Inhalt darin zu verschließen.
STUFFING TIPS:
The following are suggestions to help reduce the resistance when stuffing with
the 13 mm Stuffing Funnel.
A . Add up to 1½ cups (400mL) of water per every 2.3 kg of seasoned meat.
B . Add ¼ cup (60ml) of vegetable or olive oil per every 2.3 kg of seasoned meat
for better flow.
Exploded Diagram and Parts List
Teil #
Beschreibung
1
Handhaben
2
Kolben
3
Kolbendichtung
4
Druckentlastungsventil (4-teiliges Set)
5
Edelstahl-Trichter-Set (4 Trichter)

- 12 -
6
Edelstahlkanister
7
Vordere Ringmutter
8
Kanister-Montage-Hardware-Kit (4 Sätze)
9
Kolbenschaft
10
Kolbenbolzen
11
Getriebegehäusedeckel mit Hardware-Kit
12
Bodenplatte der Getriebegehäuseabdeckung mit
Hardware-Kit
13
Getriebegehäuse mit Hardware-Kit
14
Hauptfahrwerk
15
Vorschaltgerät für langsame Geschwindigkeit
16
Schnelles Geschwindigkeitsregelgerät
17
Gummifuß (4-teiliges Set)
18
Schmetterlingsschraube

- 13 -

- 14 -
Hersteller: Shanghaimuxinmuyeyouxiangongsi
Adresse: Shuangchenglu 803nong11hao1602A-1609shi, baoshanqu,
Shanghai 200000 CN.
Importiert nach AUS: SIHAO PTY LTD. 1 ROKEVA
STREETEASTWOOD NSW 2122 Australien
In die USA importiert: Sanven Technology Ltd. Suite 250, 9166
Anaheim Place, Rancho Cucamonga, CA 91730


Technique Assistance et certificat de garantie électronique
www.vevor.com/support
REMPLISSEUR DE SAUCISSES
MODÈLE : 1A-SS715
We continue to be committed to provide you tools with competitive price.
"Save Half", "Half Price" or any other similar expressions used by us only represents an
estimate of savings you might benefit from buying certain tools with us compared to the major
top brands and doses not necessarily mean to cover all categories of tools offered by us. You
are kindly reminded to verify carefully when you are placing an order with us if you are
actually saving half in comparison with the top major brands.


- 1 -
MODÈLE : 1A-SS715
Have product questions? Need technical support? Please feel free to
contact us:
Technical Support and E-Warranty Certificate
www.vevor.com/support
NEED HELP? CONTACT US!
This is the original instruction, please read all manual instructions
carefully before operating. VEVOR reserves a clear interpretation of our
user manual. The appearance of the product shall be subject to the
product you received. Please forgive us that we won't inform you again if
there are any technology or software updates on our product.
SAUSAGE STUFFER

- 2 -
Avertissement : Pour réduire le risque de blessure, l'utilisateur
doit lire attentivement le manuel d'instructions.
AVERTISSEMENT : avant d'utiliser cet appareil, veuillez lire entièrement ce
manuel d'instructions et le conserver à portée de main pour référence future.
Suivez toujours les précautions de sécurité de base lorsque vous utilisez ces
appareils. Ceux-ci inclus:
1.Ne laissez pas les enfants de moins de 14 ans utiliser la machine. Ce produit ne
peut être utilisé ou entretenu que par des enfants de 14 ans ou plus, des
personnes ayant des capacités physiques, sensorielles ou mentales réduites, ou
des personnes non qualifiées sous la surveillance adéquate d'un adulte. Les
enfants ne doivent pas jouer avec l'appareil.
2.Pour un fonctionnement et une durée de vie optimaux de l'appareil, veuillez
suivre les instructions.
3. Les acides alimentaires corroderont le métal. Nettoyez toujours cet équipement
de préparation des aliments immédiatement après chaque utilisation. Pour
conserver l'apparence et augmenter la durée de vie, nettoyez-le quotidiennement.
4. L'utilisation d'accessoires ou de modifications non fournis par le fabricant peut
entraîner des dangers. Ce produit doit être utilisé uniquement aux fins prévues et
de la manière indiquée dans les instructions. Tout autre type d'utilisation doit être
considéré comme inapproprié et dangereux. Le fabricant ne sera pas responsable
de toute utilisation inappropriée ou incorrecte et des dommages causés par
l'installation.
General Safety Regulations
AVERTISSEMENT : les avertissements, mises en garde et instructions
abordés dans ce manuel d'instructions ne peuvent pas couvrir toutes les
conditions ou situations possibles qui pourraient survenir. L'opérateur doit
comprendre que le bon sens et la prudence sont des facteurs qui ne
peuvent pas être intégrés à ce produit, mais doivent être fournis par
l'opérateur.

- 3 -
Veuillez utiliser cette machine conformément à ces précautions.
L'utilisateur doit comprendre toutes les règles. Merci de les lire
attentivement avant d'utiliser la machine. Cette machine peut nuire à la
santé de l'opérateur si l'utilisateur retire ou modifie un équipement dans la
machine.
Nous ne sommes pas responsables des blessures résultant d'un mauvais
fonctionnement de cette machine. Veuillez opérer conformément aux
instructions de la « Méthode de fonctionnement » et suivre les procédures
de fonctionnement appropriées lors de l'utilisation. Faites attention lors de
l'assemblage et de l'utilisation, afin d'éviter de rayer la peau. Veuillez lire le
manuel d'instructions.
1. VÉRIFIEZ LES PIÈCES ENDOMMAGÉES. Avant d'utiliser le poussoir,
vérifiez que toutes les pièces fonctionnent correctement et remplissent les
fonctions prévues. Vérifiez le grippage des pièces mobiles, du montage et
de tout autre conditions pouvant affecter le fonctionnement.
2. Le Fabricant décline toute responsabilité en cas d'utilisation
inappropriée du poussoir. Mauvaise utilisation du poussoir annulera la
garantie.
3. La réparation doit être effectuée par un revendeur agréé. Utilisez
uniquement des pièces et accessoires d’origine. La modification du
poussoir annulera la garantie.
4. Assurez-vous que le rembourrage est stable pendant l'utilisation.
5. NE JAMAIS faire fonctionner le poussoir avec le couvercle du boîtier
d'engrenage ouvert ou retiré.
PORTEZ UNE PROTECTION DES YEUX ! Les lunettes de vue de tous les
jours ne sont pas des lunettes de sécurité. Les lunettes de sécurité sont
conformes aux exigences ANSI Z87.1. Remarque : Les lunettes de
sécurité approuvées portent le Z87 imprimé ou estampillé.
6. Ne pas utiliser à l'extérieur .
CONSERVEZ CES INSTRUCTIONS

- 4 -
Assembly and Installation
ASSEMBLAGE DU PISTON
1. Faites glisser le joint du piston sur le piston (Figure 1).
2. Assemblez le kit de soupape de décompression sur le piston. Depuis le
haut du piston, placez la rondelle sur le trou de valve, puis insérez la
vis à travers la rondelle et dans le trou de valve. Depuis le dessous du
piston, placez le ressort sur l'extrémité de la vis, puis placez le
capuchon de valve sur l'extrémité de la vis et tournez pour le fixer.
3. Vissez le boulon du piston sur l’arbre du piston (figure 2).
4. Placez le piston assemblé sur l'extrémité de l'arbre du piston (figure 3).

- 5 -
STUFFER ASSEMBLÉE
5. Ci-joint et fixez la poignée en la faisant glisser sur soit la vitesse
rapide, soit la vitesse lente (figure 4).
6. Tournez la poignée pour amener le piston à le haut du Stuffer.
...Suite à la page suivante
- 6 -
ASSEMBLAGE DU STUFFER (suite)
7. Posez les supports inférieurs du bidon sur les supports du bidon à
l'intérieur du boîtier du Stuffer. Faites pivoter complètement la cartouche
dans le boîtier de remplissage, en enclenchant les supports supérieurs

- 7 -
dans les supports de cartouche (figure 5).
8. Insérez l'entonnoir de remplissage de votre choix dans la bague avant.
Vissez la bague avant et l'entonnoir de remplissage sur l'embouchure du
bidon jusqu'à ce qu'ils soient bien serrés. NE SERREZ PAS TROP l'écrou
à bague avant, car cela pourrait endommager l'entonnoir. (figure 6)
9. Enduisez soigneusement l’intérieur du bidon avec un lubrifiant de qualité
alimentaire avant utilisation. (figure 7)

- 8 -
Démontage et nettoyage
REMARQUE : ASSUREZ-VOUS DE NETTOYER TOUTES LES PIÈCES
IMMÉDIATEMENT APRÈS UTILISATION.
1. Retirez l'entonnoir de remplissage en dévissant la bague avant et en
retirant l'entonnoir.
2. Tournez la poignée jusqu'à ce que le piston remonte et sorte du
réservoir.
3. Faites pivoter le bidon vers l'extérieur, puis tirez-le vers le haut pour le
retirer du boîtier de remplissage.
4. Dévissez le piston de l'arbre du piston.
5. Démontez la soupape de surpression du piston.

- 9 -
6. Retirez le joint du piston.
7. Lavez toutes les pièces qui ont été en contact avec la viande dans de
l'eau chaude savonneuse.
8. Rincez et séchez immédiatement toutes les pièces.
9. Stérilisez si nécessaire.
10. Lubrifiez entièrement l'arbre, le réservoir, les composants de la
soupape de décompression et la bague avant avec un lubrifiant de qualité
alimentaire avant et après chaque utilisation.
Instructions pour la farce
PRUDENCE! Lorsque le piston est retiré du réservoir, RELÂCHEZ LA
POIGNÉE LENTEMENT ! La pression ou la gravité pourraient faire
légèrement tourner la poignée et provoquer des blessures.
REMARQUE : appliquez un lubrifiant de qualité alimentaire à l'intérieur du
récipient avant de le remplir avec le mélange de viande.
- 10 -
1. Inclinez la cartouche
2. Remplissez le récipient avec le mélange de
viande et d'assaisonnement (figure 8).
3. Appuyez fermement sur le mélange dans le
bidon pour libérer l'air emprisonné.
4. Faites pivoter la cartouche en position
verticale et fixez les supports supérieurs sur
les supports de cartouche.
5. Tournez la poignée jusqu'à ce que le piston
entre en contact avec la viande et que le
mélange soit prêt à extruder l'extrémité de
l'entonnoir à farce.
6. Glissez un boyau à l'extrémité de l'entonnoir

- 11 -
jusqu'à ce que tout le boyau ait glissé sur l'entonnoir.
7. Attachez, tordez ou nouez l'extrémité du boîtier pour le sceller.
8. Tournez la poignée pour extruder le mélange dans le boîtier.
9. Pour de meilleurs résultats, appliquez une pression autour du boîtier,
près de l'extrémité de l'entonnoir de remplissage. Cela maintiendra le
boîtier serré et permettra au mélange de se tasser fermement dans le
boîtier.
10. Lorsque l'extrémité du boîtier est atteinte, attachez, tordez ou nouez
l'extrémité du boîtier pour sceller le contenu à l'intérieur.
STUFFING TIPS:
The following are suggestions to help reduce the resistance when stuffing with
the 13 mm Stuffing Funnel.
A . Add up to 1½ cups (400mL) of water per every 2.3 kg of seasoned meat.
B . Add ¼ cup (60ml) of vegetable or olive oil per every 2.3 kg of seasoned meat
for better flow.
Exploded Diagram and Parts List
Partie #
Description
1
Poignée
2
Piston
3
Joint de piston
4
Soupape de décompression (ensemble de 4 pièces)
5
Ensemble d'entonnoirs en acier inoxydable (4 entonnoirs)
6
Bidon en acier inoxydable
7
Écrou à bague avant

- 12 -
8
Kit de matériel de montage de cartouche (4 jeux)
9
Arbre de piston
dix
Boulon de piston
11
Couvercle du boîtier d'engrenage avec kit de matériel
12
Plaque inférieure du couvercle du boîtier d'engrenage avec
kit de matériel
13
Boîtier d'engrenage avec kit de matériel
14
Engrenage principal
15
Équipement de contrôle de vitesse lente
16
Équipement de contrôle de vitesse rapide
17
Pied en caoutchouc (ensemble de 4 pièces)
18
Vis papillon

- 13 -

- 14 -
Fabricant : Shanghaimuxinmuyeyouxiangongsi
Adresse : Shuangchenglu 803nong11hao1602A-1609shi, baoshanqu,
Shanghai 200000 CN.
Importé en Australie : SIHAO PTY LTD. 1 ROKEVA STREETASTWOOD
NSW 2122 Australie
Importé aux États-Unis : Sanven Technology Ltd. Suite 250, 9166
Anaheim Place, Rancho Cucamonga, CA 91730


Technisch Ondersteuning en e-garantiecertificaat www.vevor.com/support
WORSTVUL
MODEL: 1A-SS715
We continue to be committed to provide you tools with competitive price.
"Save Half", "Half Price" or any other similar expressions used by us only represents an
estimate of savings you might benefit from buying certain tools with us compared to the major
top brands and doses not necessarily mean to cover all categories of tools offered by us. You
are kindly reminded to verify carefully when you are placing an order with us if you are
actually saving half in comparison with the top major brands.


- 1 -
MODEL: 1A-SS715
Have product questions? Need technical support? Please feel free to
contact us:
Technical Support and E-Warranty Certificate
www.vevor.com/support
NEED HELP? CONTACT US!
This is the original instruction, please read all manual instructions
carefully before operating. VEVOR reserves a clear interpretation of our
user manual. The appearance of the product shall be subject to the
product you received. Please forgive us that we won't inform you again if
there are any technology or software updates on our product.
SAUSAGE STUFFER

- 2 -
Waarschuwing-Om het risico op letsel te verminderen, moet
de gebruiker de handleiding zorgvuldig lezen.
WAARSCHUWING: Lees deze handleiding volledig door voordat u dit apparaat
gebruikt en bewaar deze bij de hand voor toekomstig gebruik. Volg altijd de
basisveiligheidsmaatregelen bij het gebruik van deze apparaten. Deze omvatten:
1. Laat kinderen jonger dan 14 jaar de machine niet gebruiken. Dit product mag
alleen worden gebruikt of onderhouden door kinderen van 14 jaar of ouder,
personen met verminderde fysieke, zintuiglijke of mentale capaciteiten, of
ongeschoolde personen onder voldoende toezicht van een volwassene. Kinderen
mogen niet met het apparaat spelen.
2. Volg de instructies voor een optimale werking en levensduur van het apparaat.
3. Voedingszuren zullen het metaal aantasten. Maak deze
voedselbereidingsapparatuur altijd onmiddellijk na elk gebruik schoon. Om het
uiterlijk te behouden en de levensduur te verlengen, moet u het dagelijks reinigen.
4.Het gebruik van accessoires of wijzigingen die niet door de fabrikant zijn
geleverd, kan gevaren veroorzaken. Dit product mag alleen worden gebruikt voor
het beoogde doel en op de manier zoals aangegeven in de instructies. Alle andere
vormen van gebruik moeten als ongepast en gevaarlijk worden beschouwd. De
fabrikant is niet verantwoordelijk voor oneigenlijk of onjuist gebruik en schade aan
de installatie.
General Safety Regulations
WAARSCHUWING: De waarschuwingen, waarschuwingen en instructies
die in deze handleiding worden besproken, kunnen niet alle mogelijke
omstandigheden of situaties dekken die zich kunnen voordoen. De
operator moet begrijpen dat gezond verstand en voorzichtigheid factoren
zijn die niet in dit product kunnen worden ingebouwd, maar die door de
operator moeten worden aangeleverd.
Gebruik deze machine in overeenstemming met deze waarschuwingen.
De gebruiker moet alle regels begrijpen. Lees ze aandachtig door voordat

- 3 -
u de machine bedient. Deze machine kan de gezondheid van de bediener
schaden als de gebruiker apparatuur in de machine verwijdert of wijzigt.
Wij zijn niet verantwoordelijk voor enig letsel als gevolg van onjuist gebruik
van deze machine. Ga te werk volgens de instructies bij
“Bedieningsmethode” en volg de juiste bedieningsprocedures tijdens het
gebruik. Wees voorzichtig tijdens het monteren en bedienen, om krassen
op de huid te voorkomen. Lees de handleiding.
1. CONTROLEER OP BESCHADIGDE ONDERDELEN. Controleer
voordat u de vuller gebruikt of alle onderdelen goed werken en de beoogde
functies uitvoeren. Controleer op vastlopen van bewegende delen,
montage en andere omstandigheden die de werking kunnen beïnvloeden.
2. De Fabrikant wijst elke verantwoordelijkheid af in geval van oneigenlijk
gebruik van de vuller. Onjuist gebruik van de vuller maakt de garantie
ongeldig.
3. Reparatie moet worden uitgevoerd door een erkende dealer. Gebruik
alleen originele fabrieksonderdelen en accessoires. Door wijziging van de
vuller vervalt de garantie.
4. Zorg ervoor dat de vuller tijdens gebruik stabiel is.
5. Bedien de vuller NOOIT als het deksel van het tandwielhuis open of
verwijderd is.
DRAAG OOGBESCHERMING! Een gewone bril is geen veiligheidsbril.
Een veiligheidsbril voldoet aan de ANSI Z87.1-vereiste. Opmerking: Op
goedgekeurde veiligheidsbrillen is Z87 gedrukt of gestempeld.
6. Niet buitenshuis gebruiken .
BEWAAR DEZE INSTRUCTIES

- 4 -
Assembly and Installation
PLUNJERMONTAGE
1. Schuif de plunjerafdichting op de plunjer (Figuur 1).
2. Monteer de drukontlastklepset op de plunjer. Plaats vanaf de
bovenkant van de plunjer de sluitring op het klepgat en steek
vervolgens de schroef door de sluitring en in het klepgat. Plaats vanaf
de onderkant van de plunjer de veer op het uiteinde van de schroef,
plaats vervolgens de klepdop op het uiteinde van de schroef en draai
om hem vast te zetten.
3. Schroef de plunjerbout op de plunjeras (figuur 2).
4. Plaats de gemonteerde plunjer op het uiteinde van de plunjeras (figuur
3).

- 5 -
VULLER MONTAGE
5. Bijgevoegd en bevestig de handgreep door deze erop te
schuiven ofwel de snelle ofwel de langzame versnelling (figuur
4).
6. Draai aan de hendel om de plunjer naar voren te brengen de
bovenkant van de Stuffer.
...ga verder op de volgende pagina

- 6 -
VULLERMONTAGE vervolgd
7. Laat de bodembeugels van de opvangbeker op de
opvangbekerbevestigingen in de behuizing van de vuller rusten. Draai de
opvangbeker volledig in de vulbehuizing, waarbij u de bovenste beugels in

- 7 -
de opvangbekerbevestigingen klikt (figuur 5).
8. Steek de vultrechter van uw keuze door de voorste ringmoer. Schroef de
voorste ringmoer en vultrechter op de opening van de opvangbeker totdat
deze goed vastzit. DRAAI de voorste ringmoer NIET TE DRAAI AAN,
aangezien dit de trechter kan beschadigen. (figuur 6)
9. Bestrijk de binnenkant van de opvangbeker vóór gebruik grondig met
een smeermiddel van voedingskwaliteit. (figuur 7)

- 8 -
Demontage en reiniging
OPMERKING: ZORG ERVOOR DAT U ALLE ONDERDELEN
ONMIDDELLIJK NA GEBRUIK REINIGT.
1. Verwijder de vultrechter door de voorste ringmoer los te draaien en de
trechter eruit te trekken.
2. Draai aan de hendel totdat de plunjer omhoog komt en uit de
opvangbeker komt.
3. Draai de opvangbeker naar buiten en trek de opvangbeker vervolgens
omhoog om de opvangbeker uit de vulbehuizing te verwijderen.
4. Schroef de plunjer los van de plunjeras.
5. Demonteer het drukontlastventiel van de plunjer.

- 9 -
6. Verwijder de plunjerafdichting van de plunjer.
7. Was alle onderdelen die in contact zijn geweest met vlees in heet
zeepsop.
8. Spoel alle onderdelen onmiddellijk af en droog ze grondig.
9. Steriliseer indien nodig.
10. Smeer de onderdelen van de as, het reservoir, het drukontlastventiel
en de voorste ringmoer voor en na elk gebruik volledig met een
voedselveilig smeermiddel.
Instructies voor het vullen
VOORZICHTIGHEID! Wanneer de zuiger uit de opvangbeker wordt
getrokken, LAAT U DE HENDEL LANGZAAM LOS! Druk of zwaartekracht
kunnen ervoor zorgen dat de hendel iets terugdraait en letsel veroorzaken.
OPMERKING: Breng een smeermiddel van voedingskwaliteit aan op de
binnenkant van de bus voordat u deze met het vleesmengsel vult.

- 10 -
1. Kantel de opvangbeker naar buiten
2. Vul de bus met het vlees-kruidenmengsel
(figuur 8).
3. Druk het mengsel stevig in de bus om
eventuele opgesloten lucht te laten
ontsnappen.
4. Draai de opvangbeker terug in de
rechtopstaande positie en klik de bovenste
beugels op de opvangbekerbevestigingen.
5. Draai aan de hendel totdat de plunjer in
contact komt met het vlees en het mengsel
klaar is om uit het uiteinde van de vultrechter
te komen

- 11 -
6. Schuif een omhulsel op het uiteinde van de vultrechter totdat het hele
omhulsel op de trechter is geschoven.
7. Bind, draai of draai het uiteinde van de behuizing vast om deze af te
dichten.
8. Draai aan de hendel om het mengsel in de behuizing te extruderen.
9. Voor het beste resultaat oefent u druk uit rond de behuizing, dicht bij het
uiteinde van de vultrechter. Hierdoor wordt de omhulling stevig
vastgehouden en wordt het mengsel stevig in de omhulling verpakt.
10. Wanneer het uiteinde van de behuizing is bereikt, bindt, draait of draait
u het uiteinde van de behuizing vast om de inhoud binnenin af te dichten.
STUFFING TIPS:
The following are suggestions to help reduce the resistance when stuffing with
the 13 mm Stuffing Funnel.
A . Add up to 1½ cups (400mL) of water per every 2.3 kg of seasoned meat.
B . Add ¼ cup (60ml) of vegetable or olive oil per every 2.3 kg of seasoned meat
for better flow.
Exploded Diagram and Parts List
Deel #
Beschrijving
1
Hendel
2
Plunjer
3
Plunjer afdichting
4
Drukontlastventiel (set van 4 stuks)
5
Roestvrijstalen trechterset (4 trechters)
6
Roestvrijstalen bus

- 12 -
7
Voorste ringmoer
8
Montagemateriaalset voor bus (4 sets)
9
Plunjerschacht
10
Plunjerbout
11
Tandwielbehuizingsdeksel met hardwareset
12
Bodemplaat van tandwielhuisdeksel met hardwareset
13
Tandwielbehuizing met hardwarekit
14
Belangrijkste aandrijfuitrusting
15
Regeluitrusting voor lage snelheid
16
Snelle snelheidsregeling
17
Rubberen voet (set van 4 stuks)
18
Vlinderschroef

- 13 -

- 14 -
Fabrikant: Shanghaimuxinmuyeyouxiangongsi
Adres: Shuangchenglu 803nong11hao1602A-1609shi, baoshanqu,
shanghai 200000 CN.
Geïmporteerd naar AUS: SIHAO PTY LTD. 1 ROKEVA
STREETEASTWOOD NSW 2122 Australië
Geïmporteerd naar de VS: Sanven Technology Ltd. Suite 250, 9166
Anaheim Place, Rancho Cucamonga, CA 91730


Teknisk Support och e-garanticertifikat www.vevor.com/support
KORVSTÄLLARE
MODELL: 1A-SS715
We continue to be committed to provide you tools with competitive price.
"Save Half", "Half Price" or any other similar expressions used by us only represents an
estimate of savings you might benefit from buying certain tools with us compared to the major
top brands and doses not necessarily mean to cover all categories of tools offered by us. You
are kindly reminded to verify carefully when you are placing an order with us if you are
actually saving half in comparison with the top major brands.


- 1 -
MODELL: 1A-SS715
Have product questions? Need technical support? Please feel free to
contact us:
Technical Support and E-Warranty Certificate
www.vevor.com/support
NEED HELP? CONTACT US!
This is the original instruction, please read all manual instructions
carefully before operating. VEVOR reserves a clear interpretation of our
user manual. The appearance of the product shall be subject to the
product you received. Please forgive us that we won't inform you again if
there are any technology or software updates on our product.
SAUSAGE STUFFER

- 2 -
Varning - För att minska risken för skada måste användaren
läsa instruktionerna noggrant.
VARNING: Innan du använder denna enhet, vänligen läs denna bruksanvisning
fullständigt och förvara den till hands för framtida referens. Följ alltid
grundläggande säkerhetsföreskrifter när du använder dessa enheter. Dessa
inkluderar:
1. Låt inte barn under 14 år använda maskinen. Denna produkt får endast
användas eller underhållas av barn som är 14 år eller äldre, individer med nedsatt
fysisk, sensorisk eller mental kapacitet, eller outbildade individer med adekvat
vuxen övervakning. Barn får inte leka med enheten.
2.Följ instruktionerna för optimal drift och livslängd för enheten.
3. Matsyror kommer att fräta på metallen. Rengör alltid denna
matberedningsutrustning omedelbart efter varje användning. För att behålla
utseendet och öka livslängden, rengör den dagligen.
4. Användning av tillbehör eller modifieringar som inte tillhandahålls av tillverkaren
kan orsaka faror. Denna produkt får endast användas för avsett ändamål och på
det sätt som anges i instruktionerna. Alla andra typer av användning ska anses
vara olämpliga och farliga. Tillverkaren ansvarar inte för felaktig eller felaktig
användning och installationsskador.
General Safety Regulations
VARNING: Varningarna, varningarna och instruktionerna som diskuteras i
denna bruksanvisning kan inte täcka alla möjliga tillstånd eller situationer
som kan uppstå. Operatören måste förstå att sunt förnuft och försiktighet
är faktorer som inte kan byggas in i denna produkt, utan måste
tillhandahållas av operatören.
Använd denna maskin enligt dessa försiktighetsåtgärder. Användaren bör
förstå alla regler. Läs dem noggrant innan du använder maskinen. Denna
maskin kan skada förarens hälsa om användaren tar bort eller byter
utrustning i maskinen.

- 3 -
Vi ansvarar inte för skador som uppstår på grund av felaktig användning av
denna maskin. Vänligen kör enligt instruktionerna för "Operation Method"
och följ de korrekta driftsprocedurerna under användning. Var försiktig vid
montering och drift för att undvika repor på huden. Läs bruksanvisningen.
1. KONTROLLERA FÖR SKADADE DELAR. Innan du använder fyllaren,
kontrollera att alla delar fungerar korrekt och utför de avsedda funktionerna.
Kontrollera om rörliga delar, montering och annat har fastnat förhållanden
som kan påverka verksamheten.
2. Tillverkaren frånsäger sig allt ansvar i händelse av felaktig användning
av fyllaren. Felaktig användning av fyllaren Ogiltigförklarar garantin.
3. Reparation måste utföras av en auktoriserad återförsäljare. Använd
endast originaldelar och tillbehör från fabriken. Ändring av fyllaren kommer
att Ogiltigförklara garantin.
4. Se till att fyllaren är stabil under användning.
5. Använd ALDRIG fyllaren med växelhuskåpan öppen eller borttagen.
BÄR ÖGONSKYDD! Vardagsglasögon är inte skyddsglasögon.
Skyddsglasögon uppfyller kraven i ANSI Z87.1. Obs: Godkända
skyddsglasögon har Z87 tryckt eller stämplat.
6. Använd inte utomhus .
SPARA DESSA INSTRUKTIONER
- 4 -
Assembly and Installation
KOLVMONTERING
1. Skjut kolvtätningen på kolven (Figur 1).
2. Montera tryckavlastningsventilsatsen på kolven. Från toppen av kolven,
placera brickan på ventilhålet och sätt sedan in skruven genom brickan
och in i ventilhålet. Från undersidan av kolven, placera fjädern på
änden av skruven, placera sedan ventilkåpan på änden av skruven och
vrid för att säkra.
3. Skruva fast kolvbulten på kolvaxeln (figur 2).
4. Placera den monterade kolven på änden av kolvaxeln (figur 3).
STUPPER HOPSÄTTNING
- 5 -
5. Bifogad och fixerade handtaget genom att skjuta på det antingen
den snabba eller den långsamma växeln (figur 4).
6. Veva handtaget för att föra kolven till toppen av Stuffer.
...fortsättning på nästa sida

- 6 -
STUPFER MONTERING fortsatte
7. Placera behållarens bottenfästen på behållarens fästen inuti fyllarens
hölje. Sväng behållaren helt in i påfyllningshuset och snäpp fast de övre
fästena i behållarens fästen (figur 5).
8. Sätt i valfri fyllningstratt genom den främre ringmuttern. Skruva fast den
främre ringmuttern och stoppningstratten på behållarens mynning tills den
sitter åt. STRÄCK INTE den främre ringmuttern för hårt, eftersom det kan
skada tratten. (figur 6)
9. Bestryk insidan av behållaren noggrant med ett smörjmedel av
livsmedelskvalitet före användning. (figur 7)

- 7 -
Demontering och rengöring
OBS: SE TILL ATT RENGÖRA ALLA DELAR OMEDELBART EFTER
ANVÄNDNING.
1. Ta bort stoppningstratten genom att skruva loss den främre ringmuttern
och dra ut tratten.
2. Vrid på handtaget tills kolven kommer upp och ut ur behållaren.
3. Sväng behållaren utåt och dra sedan behållaren uppåt för att ta bort
behållaren från påfyllningshuset.
4. Skruva loss kolven från kolvaxeln.
5. Ta isär tryckavlastningsventilen från kolven.
6. Ta bort kolvtätningen från kolven.
- 8 -
7. Tvätta alla delar som har kommit i kontakt med kött i varmt tvålvatten.
8. Skölj och torka omedelbart alla delar noggrant.
9. Sterilisera vid behov.
10. Smörj axeln, behållaren, tryckavlastningsventilens komponenter och
den främre ringmuttern helt med ett smörjmedel av livsmedelskvalitet före
och efter varje användning.
Fyllningsinstruktioner
VARNING! När kolven dras ut ur behållaren, SLÄPP HANDTAGET
LÅNGSAMT! Tryck eller gravitation kan få handtaget att snurra tillbaka
något och orsaka skada.
OBS: Applicera ett smörjmedel av livsmedelskvalitet på insidan av
behållaren innan du fyller på med köttblandningen.
- 9 -
1. Luta ut behållaren
2. Fyll behållaren med kött- och
kryddblandningen (figur 8).
3. Tryck ned blandningen i behållaren
ordentligt för att släppa ut eventuell instängd
luft.
4. Sväng tillbaka behållaren till upprätt läge
och snäpp fast de övre fästena på behållarens
fästen.
5. Vrid handtaget tills kolven kommer i kontakt
med köttet och blandningen är redo att pressa
ut änden av fyllningstratten
6. Skjut in ett hölje på änden av
stoppningstratten tills hela höljet har glidit på
tratten.
7. Knyt, vrid eller ring i änden av höljet för att
täta det.
8. Vrid på handtaget för att extrudera blandningen i höljet.
9. För bästa resultat, applicera tryck runt höljet, nära slutet av
stoppningstratten. Detta kommer att hålla höljet tätt och gör att
blandningen packas ordentligt i höljet.
10. När änden av höljet har nåtts, knyt, vrid eller ring ändan av höljet för att
täta innehållet inuti.

- 10 -
STUFFING TIPS:
The following are suggestions to help reduce the resistance when stuffing with
the 13 mm Stuffing Funnel.
A . Add up to 1½ cups (400mL) of water per every 2.3 kg of seasoned meat.
B . Add ¼ cup (60ml) of vegetable or olive oil per every 2.3 kg of seasoned meat
for better flow.
Exploded Diagram and Parts List
Del #
Beskrivning
1
Hantera
2
Kolv
3
Kolvtätning
4
Tryckavlastningsventil (4-delat set)
5
Trattset i rostfritt stål (4 trattar)
6
Kapsel i rostfritt stål
7
Främre ringmutter
8
Monteringssats för kapsel (4 set)
9
Kolvskaft
10
Kolvbult
11
Växelhuskåpa med hårdvarusats
12
Kugghjulshusets bottenplatta med hårdvarusats
13
Växelhus med hårdvarusats
14
Huvuddriven redskap
15
Långsam hastighetskontroll
16
Snabbhastighetskontroll
17
Gummifot (set med 4 delar)
18
Fjärilsskruv

- 11 -

- 12 -
Tillverkare: Shanghaimuxinmuyeyouxiangongsi
Adress: Shuangchenglu 803nong11hao1602A-1609shi, baoshanqu,
shanghai 200000 CN.
Importerad till AUS: SIHAO PTY LTD. 1 ROKEVA STREETEASTWOOD
NSW 2122 Australien
Importerad till USA: Sanven Technology Ltd. Suite 250, 9166 Anaheim
Place, Rancho Cucamonga, CA 91730


Técnico Soporte y certificado de garantía electrónica www.vevor.com/support
EMBUTIDOR DE SALCHICHAS
MODELO: 1A-SS715
We continue to be committed to provide you tools with competitive price.
"Save Half", "Half Price" or any other similar expressions used by us only represents an
estimate of savings you might benefit from buying certain tools with us compared to the major
top brands and doses not necessarily mean to cover all categories of tools offered by us. You
are kindly reminded to verify carefully when you are placing an order with us if you are
actually saving half in comparison with the top major brands.


- 1 -
MODELO: 1A-SS715
Have product questions? Need technical support? Please feel free to
contact us:
Technical Support and E-Warranty Certificate
www.vevor.com/support
NEED HELP? CONTACT US!
This is the original instruction, please read all manual instructions
carefully before operating. VEVOR reserves a clear interpretation of our
user manual. The appearance of the product shall be subject to the
product you received. Please forgive us that we won't inform you again if
there are any technology or software updates on our product.
SAUSAGE STUFFER

- 2 -
Advertencia: para reducir el riesgo de lesiones, el usuario
debe leer atentamente el manual de instrucciones.
ADVERTENCIA: Antes de utilizar este dispositivo, lea este manual de
instrucciones en su totalidad y manténgalo a mano para consultarlo en el futuro.
Siga siempre las precauciones básicas de seguridad al utilizar estos dispositivos.
Éstas incluyen:
1. No permita que niños menores de 14 años utilicen la máquina. Este producto
solo puede ser utilizado o mantenido por niños de 14 años o más, personas con
capacidades físicas, sensoriales o mentales reducidas o personas no calificadas
con la supervisión adecuada de un adulto. Los niños no deben jugar con el
dispositivo.
2. Para un funcionamiento y vida útil óptimos del dispositivo, siga las
instrucciones.
3. Los ácidos alimentarios corroerán el metal. Limpie siempre este equipo de
preparación de alimentos inmediatamente después de cada uso. Para mantener
la apariencia y aumentar la vida útil, límpielo diariamente.
4.El uso de accesorios o modificaciones no proporcionadas por el fabricante
puede causar peligros. Este producto sólo debe utilizarse para el fin previsto y de
la forma indicada en las instrucciones. Todos los demás tipos de uso se
considerarán inapropiados y peligrosos. El fabricante no será responsable de
ningún uso inadecuado o incorrecto ni de daños en la instalación.
General Safety Regulations
ADVERTENCIA: Las advertencias, precauciones e instrucciones
analizadas en este manual de instrucciones no pueden cubrir todas las
condiciones o situaciones posibles que podrían ocurrir. El operador debe
entender que el sentido común y la precaución son factores que no
pueden incorporarse a este producto, sino que deben ser proporcionados
por el operador.
Utilice esta máquina de acuerdo con estas precauciones. El usuario debe

- 3 -
comprender todas las reglas. Por favor léelos atentamente antes de operar
la máquina. Esta máquina puede causar daños a la salud del operador si
el usuario retira o cambia el equipo de la máquina.
No somos responsables de ninguna lesión resultante del funcionamiento
inadecuado de esta máquina. Opere de acuerdo con las instrucciones del
"Método de operación" y siga los procedimientos de operación adecuados
durante el uso. Tenga cuidado durante el montaje y el funcionamiento para
evitar rayar la piel. Por favor lea el manual de instrucciones.
1. COMPROBAR SI HAY PIEZAS DAÑADAS. Antes de usar la embutidora,
verifique que todas las piezas funcionen correctamente y realicen las
funciones previstas. Compruebe si hay atascamientos de piezas móviles,
montaje y cualquier otro condiciones que puedan afectar la operación.
2. El Fabricante declina cualquier responsabilidad en caso de uso
inadecuado de la embutidora. Uso inadecuado de la embutidora.
ANULARÁ la garantía.
3. La reparación debe ser realizada por un distribuidor autorizado. Utilice
únicamente piezas y accesorios originales de fábrica. La modificación de
la embutidora ANULARÁ la garantía.
4. Asegúrese de que la embutidora esté estable durante el uso.
5. NUNCA opere la embutidora con la cubierta de la caja de engranajes
abierta o quitada.
¡USE PROTECCIÓN PARA LOS OJOS! Los anteojos de uso diario no son
anteojos de seguridad. Las gafas de seguridad cumplen con el requisito
ANSI Z87.1. Nota: Las gafas de seguridad aprobadas tienen Z87 impreso
o estampado.
6. No utilizar al aire libre .
GUARDA ESTAS INSTRUCCIONES

- 4 -
Assembly and Installation
CONJUNTO DEL ÉMBOLO
1. Deslice el sello del émbolo sobre el émbolo. (Figura 1).
2. Monte el kit de válvula de liberación de presión en el émbolo. Desde la
parte superior del émbolo, coloque la arandela en el orificio de la
válvula, luego inserte el tornillo a través de la arandela y dentro del
orificio de la válvula. Desde la parte inferior del émbolo, coloque el
resorte en el extremo del tornillo, luego coloque la tapa de la válvula en
el extremo del tornillo y gírela para asegurarla.
3. Atornille el perno del émbolo en el eje del émbolo (figura 2).
4. Coloque el émbolo ensamblado en el extremo del eje del émbolo
(figura 3).

- 5 -
EMBUTIDOR ASAMBLEA
5. Adjunto y fijó el mango deslizándolo sobre ya sea la marcha
rápida o la lenta (figura 4).
6. Gire la manija para llevar el émbolo a la parte superior del
embutidor.
...Continúa en la siguiente página

- 6 -
MONTAJE DE LA EMBUTIDORA continuación
7. Apoye los soportes inferiores del recipiente sobre los soportes del
recipiente dentro de la carcasa del embutidor. Gire el recipiente
completamente hacia la carcasa del embutidor, encajando los soportes

- 7 -
superiores en los soportes del recipiente (figura 5).
8. Inserte el embudo de relleno de su elección a través de la tuerca anular
delantera. Atornille la tuerca anular frontal y el embudo de relleno en la
boca del recipiente hasta que queden ajustados. NO APRIETE
DEMASIADO la tuerca anular delantera, ya que podría dañar el embudo.
(figura 6)
9. Cubra completamente el interior del recipiente con un lubricante de
calidad alimentaria antes de usarlo. (figura 7)

- 8 -
Desmontaje y limpieza
NOTA: ASEGÚRESE DE LIMPIAR TODAS LAS PIEZAS
INMEDIATAMENTE DESPUÉS DE SU USO.
1. Retire el embudo de relleno desenroscando la tuerca anular delantera y
tirando del embudo hacia afuera.
2. Gire la manija hasta que el émbolo suba y salga del recipiente.
3. Gire el recipiente hacia afuera y luego tire del recipiente hacia arriba
para retirarlo de la carcasa del embutidor.
4. Desenrosque el émbolo del eje del émbolo.
5. Desmonte la válvula de liberación de presión del émbolo.
6. Retire el sello del émbolo del émbolo.

- 9 -
7. Lave todas las partes que hayan estado en contacto con la carne en
agua caliente y jabón.
8. Enjuague y seque completamente todas las piezas inmediatamente.
9. Esterilice según sea necesario.
10. Lubrique completamente los componentes del eje, el recipiente, la
válvula de liberación de presión y la tuerca anular delantera con un
lubricante apto para uso alimentario antes y después de cada uso.
Instrucciones de relleno
¡PRECAUCIÓN! Cuando saque el émbolo del recipiente, ¡SUELTE LA
MANIJA LENTAMENTE! La presión o la gravedad podrían hacer que el
mango gire ligeramente hacia atrás y provocar lesiones.
NOTA: Aplique un lubricante de calidad alimentaria en el interior del
recipiente antes de llenarlo con la mezcla de carne.

- 10 -
1. Incline el recipiente
2. Llene el recipiente con la mezcla de carne y
condimentos (figura 8).
3. Presione firmemente la mezcla dentro del
recipiente para liberar el aire atrapado.
4. Gire el recipiente nuevamente a la posición
vertical y encaje los soportes superiores en los
soportes del recipiente.
5. Gire la manija hasta que el émbolo entre en
contacto con la carne y la mezcla esté lista
para salir por el extremo del embudo de
relleno.
6. Deslice una funda en el extremo del

- 11 -
embudo de relleno hasta que toda la funda se haya deslizado sobre el
embudo.
7. Ate, tuerza o aros el extremo de la carcasa para sellarlo.
8. Gire la manija para extruir la mezcla dentro de la carcasa.
9. Para obtener mejores resultados, aplique presión alrededor de la
carcasa, cerca del extremo del embudo de relleno. Esto mantendrá la
carcasa apretada y hará que la mezcla se acumule firmemente en la
carcasa.
10. Cuando haya llegado al final de la carcasa, ate, tuerza o aros el
extremo de la carcasa para sellar el contenido en el interior.
STUFFING TIPS:
The following are suggestions to help reduce the resistance when stuffing with
the 13 mm Stuffing Funnel.
A . Add up to 1½ cups (400mL) of water per every 2.3 kg of seasoned meat.
B . Add ¼ cup (60ml) of vegetable or olive oil per every 2.3 kg of seasoned meat
for better flow.
Exploded Diagram and Parts List
Parte #
Descripción
1
Manejar
2
Émbolo
3
Sello del émbolo
4
Válvula de liberación de presión (juego de 4 piezas)
5
Juego de embudos de acero inoxidable (4 embudos)
6
Bote de acero inoxidable

- 12 -
7
Tuerca de anillo frontal
8
Kit de accesorios de montaje del recipiente (4 juegos)
9
Eje del émbolo
10
Perno del émbolo
11
Cubierta de la carcasa del engranaje con kit de tornillería
12
Placa inferior de la cubierta de la caja de engranajes con kit
de tornillería
13
Caja de engranajes con kit de hardware
14
Engranaje impulsor principal
15
Engranaje de control de velocidad lenta
dieciséis
Engranaje de control de velocidad rápida
17
Pie de goma (juego de 4 piezas)
18
Tornillo de mariposa

- 13 -

- 14 -
Fabricante: Shanghaimuxinmuyeyouxiangongsi
Dirección: Shuangchenglu 803nong11hao1602A-1609shi, baoshanqu,
shanghai 200000 CN.
Importado a AUS: SIHAO PTY LTD. 1 ROKEVA STREET ASTWOOD
NSW 2122 Australia
Importado a EE. UU.: Sanven Technology Ltd. Suite 250, 9166
Anaheim Place, Rancho Cucamonga, CA 91730


Tecnico Supporto e certificato di garanzia elettronica www.vevor.com/support
INSIEME DI SALSICCIA
MODELLO: 1A-SS715
We continue to be committed to provide you tools with competitive price.
"Save Half", "Half Price" or any other similar expressions used by us only represents an
estimate of savings you might benefit from buying certain tools with us compared to the major
top brands and doses not necessarily mean to cover all categories of tools offered by us. You
are kindly reminded to verify carefully when you are placing an order with us if you are
actually saving half in comparison with the top major brands.


- 1 -
MODELLO: 1A-SS715
Have product questions? Need technical support? Please feel free to
contact us:
Technical Support and E-Warranty Certificate
www.vevor.com/support
NEED HELP? CONTACT US!
This is the original instruction, please read all manual instructions
carefully before operating. VEVOR reserves a clear interpretation of our
user manual. The appearance of the product shall be subject to the
product you received. Please forgive us that we won't inform you again if
there are any technology or software updates on our product.
SAUSAGE STUFFER

- 2 -
Avvertenza: per ridurre il rischio di lesioni, l'utente deve
leggere attentamente il manuale di istruzioni.
ATTENZIONE: prima di utilizzare questo dispositivo, leggere completamente
questo manuale di istruzioni e tenerlo a portata di mano per riferimento futuro.
Seguire sempre le precauzioni di sicurezza di base quando si utilizzano questi
dispositivi. Questi includono:
1.Non consentire ai bambini di età inferiore a 14 anni di utilizzare la macchina.
Questo prodotto può essere utilizzato o sottoposto a manutenzione solo da
bambini di età pari o superiore a 14 anni, da individui con capacità fisiche,
sensoriali o mentali ridotte o da individui inesperti con adeguata supervisione di un
adulto. I bambini non devono giocare con l'apparecchio.
2.Per un funzionamento e una durata ottimali del dispositivo, seguire le istruzioni.
3. Gli acidi alimentari corrodono il metallo. Pulisci sempre questa attrezzatura per
la preparazione del cibo immediatamente dopo ogni utilizzo. Per mantenere
l'aspetto e aumentare la durata, pulirlo quotidianamente.
4.L'uso di accessori o modifiche non forniti dal produttore può causare pericoli.
Questo prodotto deve essere utilizzato solo per lo scopo previsto e nel modo
indicato nelle istruzioni. Ogni altro tipo di utilizzo è da considerarsi inappropriato e
pericoloso. Il produttore non sarà responsabile per eventuali usi impropri o errati e
danni all'installazione.
General Safety Regulations
AVVERTENZA: le avvertenze, le precauzioni e le istruzioni descritte nel
presente manuale di istruzioni non possono coprire tutte le possibili
condizioni o situazioni che potrebbero verificarsi. L'operatore deve
comprendere che il buon senso e la cautela sono fattori che non possono
essere incorporati in questo prodotto, ma devono essere forniti
dall'operatore.
Si prega di utilizzare questa macchina rispettando queste precauzioni.
L'utente deve comprendere tutte le regole. Si prega di leggerli

- 3 -
attentamente prima di utilizzare la macchina. Questa macchina può
causare danni alla salute dell'operatore se l'utente rimuove o modifica
l'attrezzatura della macchina.
Non siamo responsabili per eventuali lesioni derivanti dal funzionamento
improprio di questa macchina. Si prega di operare secondo le istruzioni del
"Metodo operativo" e di seguire le procedure operative corrette durante
l'utilizzo. Fare attenzione durante il montaggio e il funzionamento per
evitare di graffiare la pelle. Si prega di leggere il manuale di istruzioni.
1. VERIFICARE PARTI DANNEGGIATE. Prima di utilizzare l'insaccatrice,
verificare che tutte le parti funzionino correttamente ed eseguano le
funzioni previste. Verificare l'eventuale inceppamento delle parti mobili, del
montaggio e altro condizioni che possono influenzare il funzionamento.
2. Il Costruttore declina ogni responsabilità in caso di uso improprio
dell'insaccatrice. Uso improprio del ripieno ANNULLERA' la garanzia.
3. La riparazione deve essere eseguita da un rivenditore autorizzato.
Utilizzare solo parti e accessori originali di fabbrica. La modifica del
riempitore ANNULLA la garanzia.
4. Assicurarsi che il riempitore sia stabile durante l'uso.
5. Non azionare MAI l'insaccatrice con il coperchio dell'alloggiamento degli
ingranaggi aperto o rimosso.
INDOSSARE LA PROTEZIONE PER GLI OCCHI! Gli occhiali da vista di
tutti i giorni non sono occhiali di sicurezza. Gli occhiali di sicurezza sono
conformi ai requisiti ANSI Z87.1. Nota: sugli occhiali di sicurezza approvati
è stampato o impresso il marchio Z87.
6. Non utilizzare all'aperto .
CONSERVA QUESTE ISTRUZIONI

- 4 -
Assembly and Installation
GRUPPO PISTONE
1. Far scorrere la guarnizione dello stantuffo sullo stantuffo (Figura 1).
2. Assemblare il kit della valvola di rilascio della pressione sullo stantuffo.
Dalla parte superiore dello stantuffo, posizionare la rondella sul foro
della valvola, quindi inserire la vite attraverso la rondella e nel foro
della valvola. Dalla parte inferiore dello stantuffo, posizionare la molla
sull'estremità della vite, quindi posizionare il cappuccio della valvola
sull'estremità della vite e ruotare per fissarlo.
3. Avvitare il bullone dello stantuffo sull'albero dello stantuffo (figura 2).
4. Posizionare lo stantuffo assemblato sull'estremità dell'albero dello
stantuffo (figura 3).

- 5 -
STUFFER ASSEMBLEA
5. Allegato e fissa la maniglia facendola scorrere sia la marcia
veloce che quella lenta (figura 4).
6. Azionare la maniglia per portare lo stantuffo la parte superiore
dello Stuffer.
...continua alla pagina successiva

- 6 -
ASSEMBLEA STUFFER continua
7. Appoggiare le staffe inferiori del contenitore sui supporti del contenitore
all'interno dell'alloggiamento del riempitore. Ruotare completamente il
contenitore nell'alloggiamento del riempitivo, agganciando le staffe
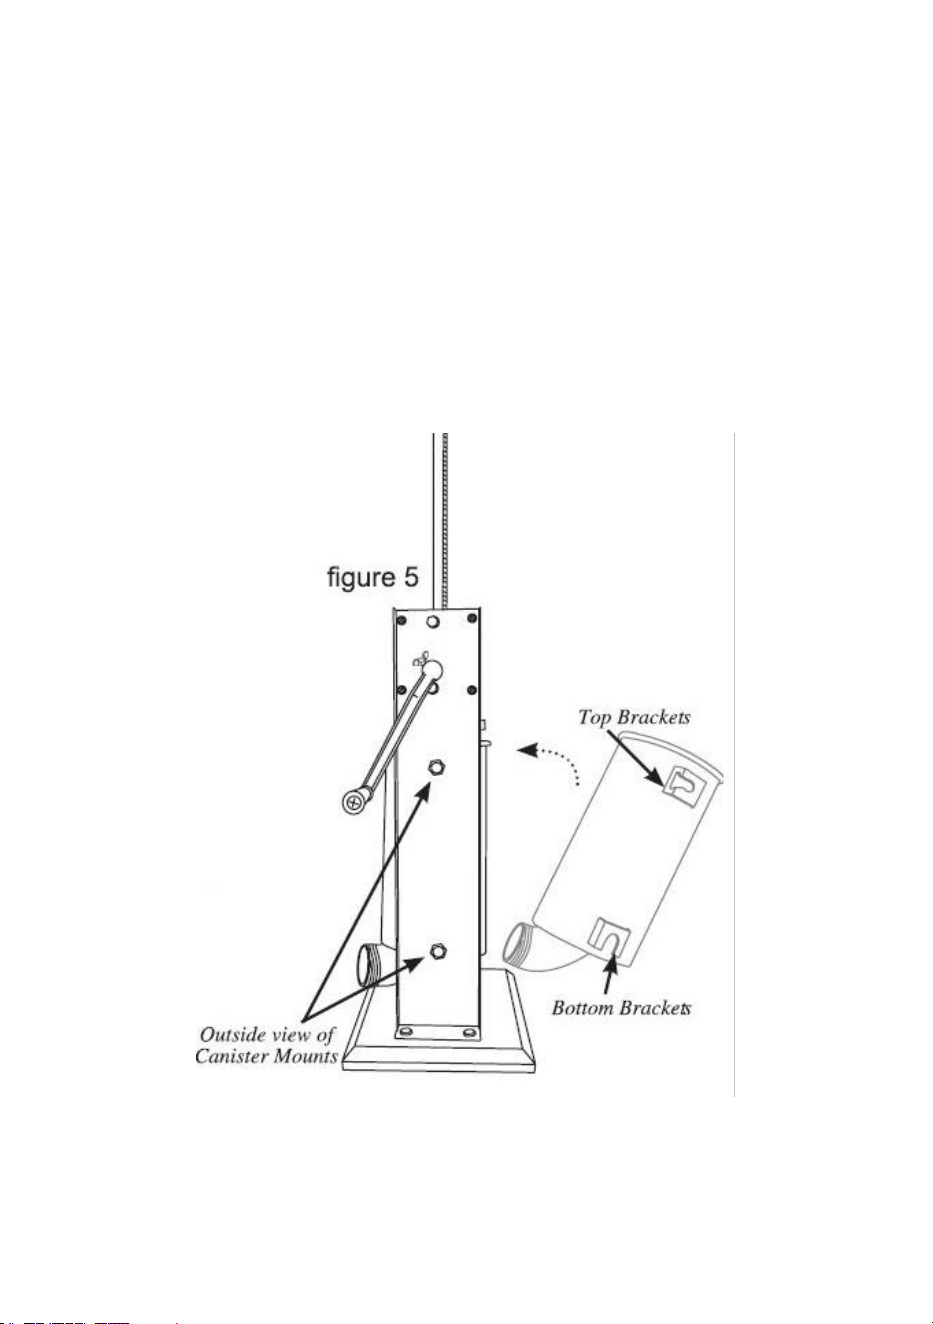
- 7 -
superiori ai supporti del contenitore (figura 5).
8. Inserire l'imbuto di ripieno scelto attraverso la ghiera anteriore. Avvitare
la ghiera anteriore e l'imbuto di riempimento sull'imboccatura del
contenitore fino a quando non sono ben aderenti. NON SERRARE
ECCESSIVAMENTE la ghiera anteriore, poiché potrebbe danneggiare
l'imbuto. (figura 6)
9. Rivestire accuratamente l'interno del contenitore con un lubrificante per
alimenti prima dell'uso. (figura 7)
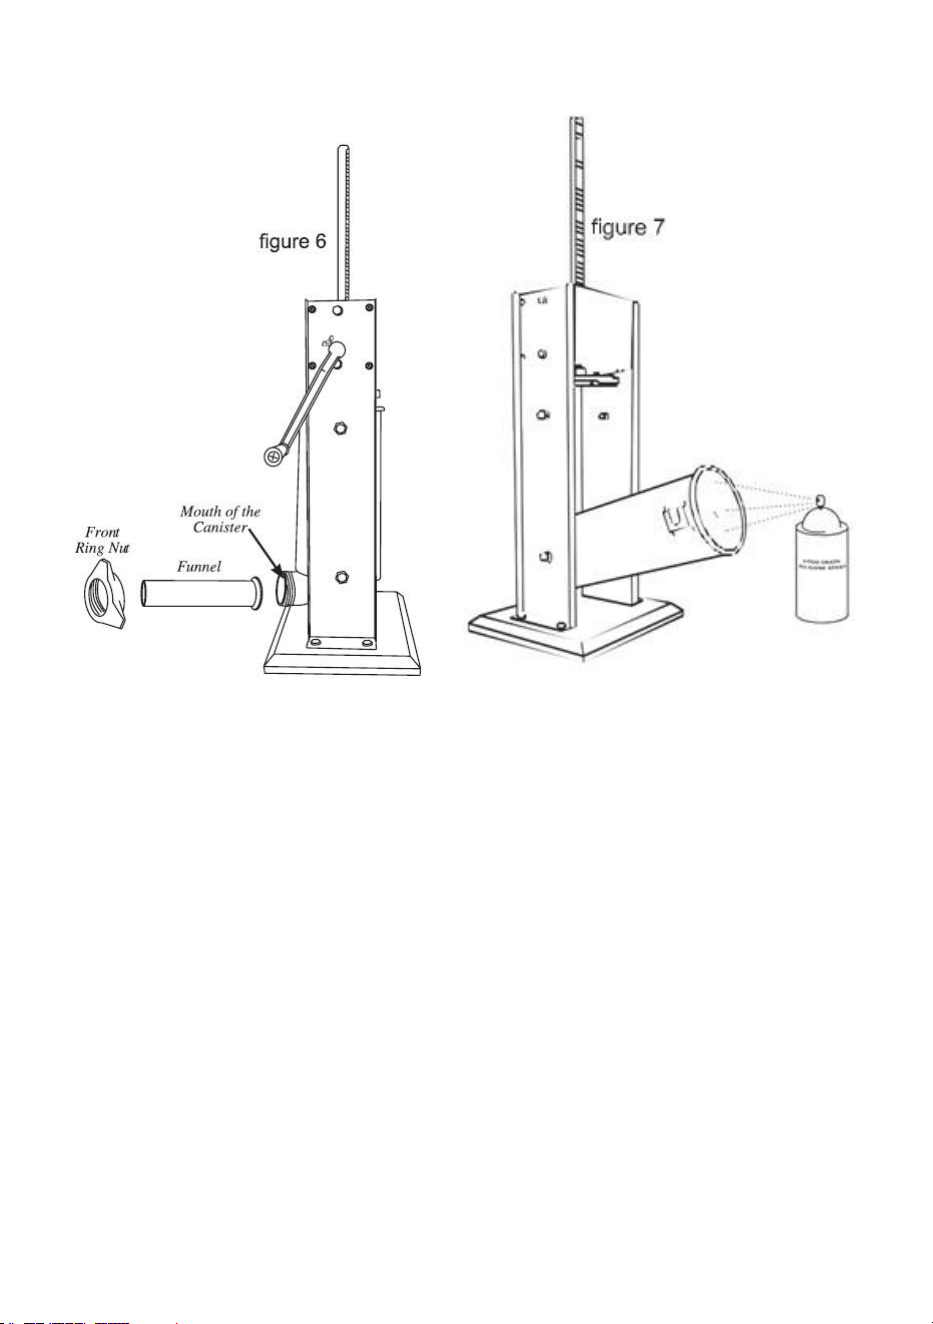
- 8 -
Smontaggio e pulizia
NOTA: ASSICURARSI DI PULIRE TUTTE LE PARTI IMMEDIATAMENTE
DOPO L'USO.
1. Rimuovere l'imbuto di ripieno svitando la ghiera anteriore ed estraendo
l'imbuto.
2. Ruotare la maniglia finché lo stantuffo non si solleva ed esce dal
contenitore.
3. Ruotare il contenitore verso l'esterno, quindi sollevarlo per rimuoverlo
dall'alloggiamento del riempitivo.
4. Svitare lo stantuffo dall'albero dello stantuffo.
5. Smontare la valvola di rilascio della pressione dallo stantuffo.

- 9 -
6. Rimuovere la guarnizione dello stantuffo dallo stantuffo.
7. Lavare tutte le parti che sono entrate in contatto con la carne in acqua
calda e sapone.
8. Sciacquare e asciugare immediatamente tutte le parti.
9. Sterilizzare secondo necessità.
10. Lubrificare completamente l'albero, il contenitore, i componenti della
valvola di rilascio della pressione e la ghiera anteriore con un lubrificante
per alimenti prima e dopo ogni utilizzo.
Istruzioni per il ripieno
ATTENZIONE! Quando lo stantuffo viene estratto dal contenitore,
RILASCIARE LENTAMENTE LA MANIGLIA! La pressione o la gravità
potrebbero far ruotare leggermente la maniglia all'indietro e causare
lesioni.
NOTA: applicare un lubrificante per alimenti all'interno del contenitore
prima di riempirlo con il composto di carne.

- 10 -
1. Inclinare il contenitore
2. Riempire il contenitore con la miscela di
carne e condimenti (figura 8).
3. Premere saldamente la miscela nel
contenitore per rilasciare l'aria intrappolata.
4. Riportare il contenitore in posizione verticale
e agganciare le staffe superiori ai supporti del
contenitore.
5. Ruota la maniglia finché lo stantuffo non
entra in contatto con la carne e il composto è
pronto per fuoriuscire dall'estremità dell'imbuto
di ripieno
6. Infilare un involucro sull'estremità

- 11 -
dell'imbuto di ripieno finché l'intero involucro non è scivolato sull'imbuto.
7. Legare, torcere o agganciare l'estremità dell'involucro per sigillarlo.
8. Ruotare la Maniglia per estrudere la miscela nell'involucro.
9. Per ottenere i migliori risultati, esercitare pressione attorno all'involucro,
vicino all'estremità dell'imbuto di ripieno. Ciò manterrà stretto l'involucro e
farà sì che la miscela si impacchi saldamente all'interno dell'involucro.
10. Una volta raggiunta l'estremità dell'involucro, legare, torcere o
agganciare l'estremità dell'involucro per sigillare il contenuto all'interno.
STUFFING TIPS:
The following are suggestions to help reduce the resistance when stuffing with
the 13 mm Stuffing Funnel.
A . Add up to 1½ cups (400mL) of water per every 2.3 kg of seasoned meat.
B . Add ¼ cup (60ml) of vegetable or olive oil per every 2.3 kg of seasoned meat
for better flow.
Exploded Diagram and Parts List
Parte #
Descrizione
1
Maniglia
2
Stantuffo
3
Guarnizione dello stantuffo
4
Valvola di rilascio della pressione (set da 4 pezzi)
5
Set di imbuti in acciaio inossidabile (4 imbuti)
6
Contenitore in acciaio inossidabile
7
Ghiera anteriore
8
Kit hardware di montaggio del contenitore (4 set)

- 12 -
9
Albero dello stantuffo
10
Bullone dello stantuffo
11
Coperchio dell'alloggiamento degli ingranaggi con kit
hardware
12
Piastra inferiore del coperchio dell'alloggiamento degli
ingranaggi con kit hardware
13
Alloggiamento ingranaggi con kit hardware
14
Attrezzatura di guida principale
15
Ingranaggio di controllo a bassa velocità
16
Ingranaggio di controllo della velocità veloce
17
Piedino in gomma (set da 4 pezzi)
18
Vite a farfalla

- 13 -

- 14 -
Produttore: Shanghaimuxinmuyeyouxiangongsi
Indirizzo: Shuangchenglu 803nong11hao1602A-1609shi, baoshanqu,
shanghai 200000 CN.
Importato in AUS: SIHAO PTY LTD. 1 ROKEVA STREETEASTWOOD
NSW 2122 Australia
Importato negli Stati Uniti: Sanven Technology Ltd. Suite 250, 9166
Anaheim Place, Rancho Cucamonga, CA 91730