
Technical Support and E-Warranty Certificate www.vevor.com/support
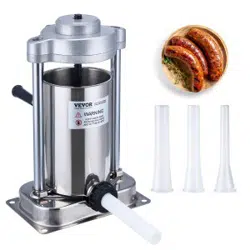
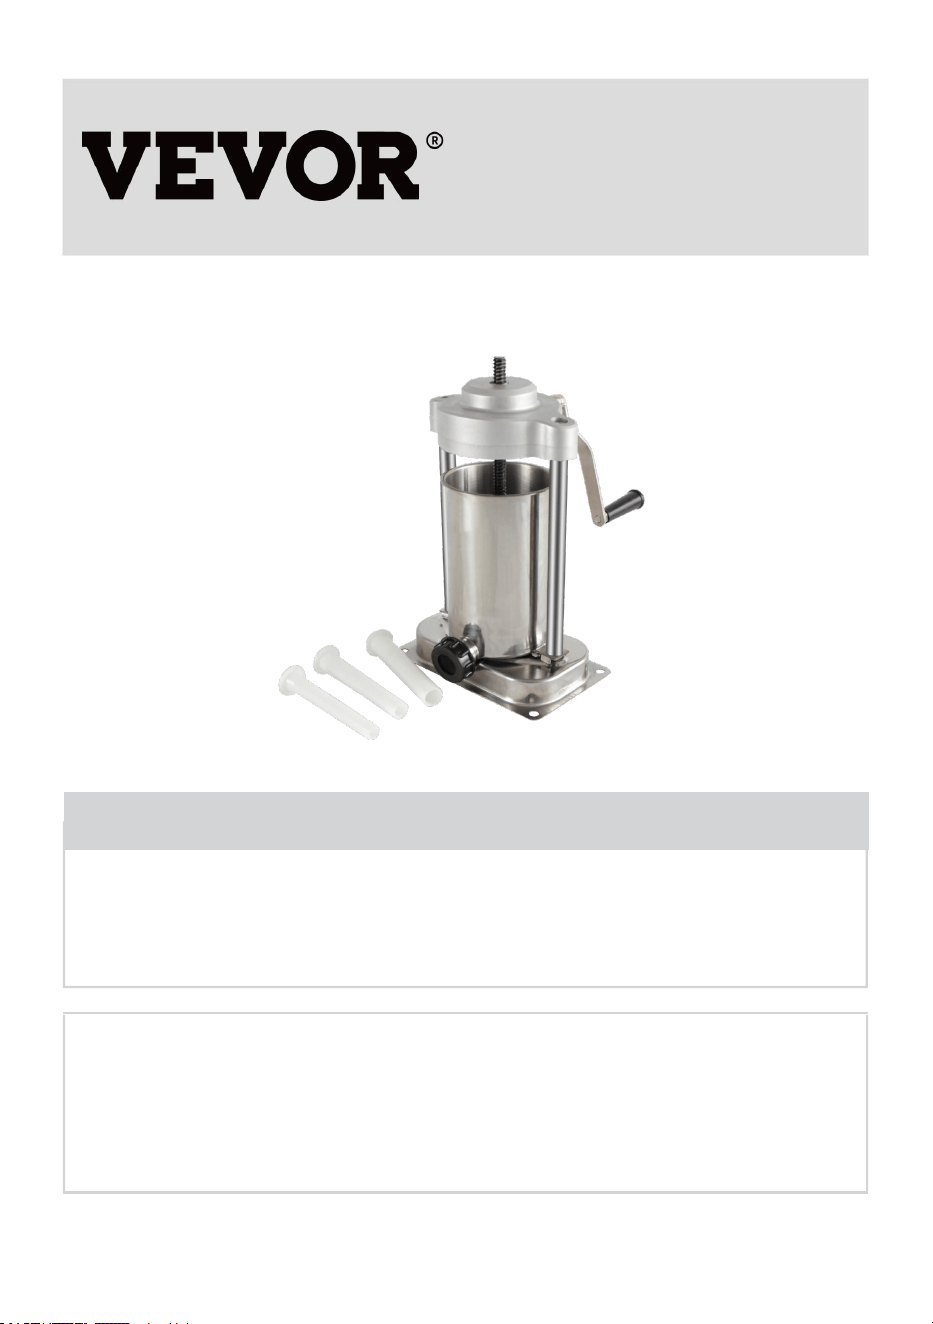
SAUSAGE STUFFER
MODEL:1A-SS305
We continue to be committed to provide you tools with competitive price.
"Save Half", "Half Price" or any other similar expressions used by us only represents an
estimate of savings you might benefit from buying certain tools with us compared to the major
top brands and does not necessarily mean to cover all categories of tools offered by us. You
are kindly reminded to verify carefully when you are placing an order with us if you are
actually saving half in comparison with the top major brands.
- 1 -
MODEL:1A-SS305
Have product questions? Need technical support? Please feel free to
contact us:
Technical Support and E-Warranty Certificate
www.vevor.com/support
NEED HELP? CONTACT US!
This is the original instruction, please read all manual instructions
carefully before operating. VEVOR reserves a clear interpretation of our
user manual. The appearance of the product shall be subject to the
product you received. Please forgive us that we won't inform you again if
there are any technology or software updates on our product.
SAUSAGE STUFFER

- 2 -
Warning-To reduce the risk of injury, user must read
instructions manual carefully.
WARNING: Before operating this device, please read this instruction
manual completely and keep it handy for future reference. Always follow
basic safety precautions when using these devices. These include:
1.Do not allow children younger than 14 years old to use the machine. This
product may only be used or maintained by children 14 years of age or
older, individuals with reduced physical, sensory, or mental capacities, or
unskilled individuals with adequate adult supervision. Children must not
play with the device.
2.For optimal operation and service life of the device, please follow the
instructions.
3.Food acids will corrode the metal. Always clean this food preparation
equipment immediately after every use. To maintain the appearance and
increase the service life, clean it daily.
4.The use of accessories or modifications not provided by the
manufacturer may cause hazards. This product must only be used for its
intended purpose and in the manner indicated in the instructions. All
other types of use shall be considered inappropriate and hazardous. The
manufacturer shall not be responsible for any improper or incorrect use
and installation damage.
General Information and Instructions
INTRODUCTION
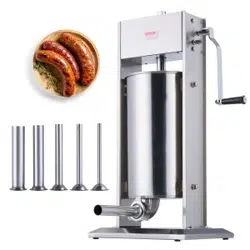
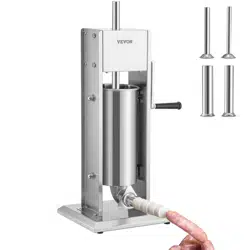
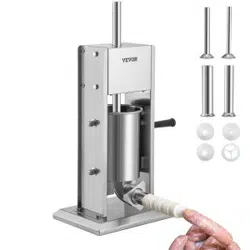
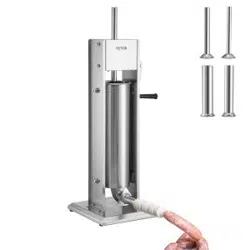
Thank you, and congratulations on purchasing our 5 lb. sausage stuffer.
Your stuffer comes complete with everything you need to safely and easily
stuff sausage. Please take a few minutes to read through this booklet to
learn more about your sausage stuffer. Your stuffer is made of the finest
materials to ensure extended use for all of your meat processing needs.

- 3 -
TECHNICAL DETAILS
Description
Capacity
Dimension
Weight
5lb. Manual Sausage Stuffer
5lb. (2L)
9.45" x 18.7" x 15.75
10.5 lb.
CAUTION! Any time the piston is raised out of the cylinder, release the
handle slowly! Pressure or gravity could cause the handle to spin back
slightly causing injury!
OPERATION INSTRUCTIONS
Step 1: Clean the parts with soap and water, and affix the tube.
Step2: Attach the handle with nut, and then turn the handle counter-clockwise
so that the piston moves out of the cylinder.
Step 3: Take the cylinder out and put meat inside.
Step 4: Put the cylinder back.
Step 5: Turn the handle clockwise so that the piston moves into the cylinder.
This will begin to push the meat into the casing.
Step 6: Repeat step 3 through 5.
Step 7: When finished, to be sure to clean all parts properly with warm soapy
water, let them dry, and reassemble.
MAINTENANCE
1. Remove piston and cylinder after using, and wash with warm soapy water.
2. Dry body and reassemble, and wipe the body.
WARNING: Always be as thorough as possible when cleaning and sanitizing
components. Any parts exposed to raw meat may harbor or develop bacteria
causes illness or death.
WARNING: When cleaning with sanitizers, always follow the manufacturer’s
recommendations. Never use products that cause exposed surfaces to
render meat unsafe for consumption. Failure to follow this warning may lead
to sickness or death!

- 4 -
General Information and Instructions
TROUBLE-SHOOTING
Problems
Solutions
The stuffer is hard to crank.
1. Sausage mixture has become too stiff. Add water to
mix
2. Add lubricant (mineral oil or vegetable oil) to the
piston gasket and the interior of the cylinder.
Meat is passing by the piston.
1. Gasket is not installed.
2. Gasket needs to be lubricated.
Casings are bursting when filling.
1. Casings are old and brittle.
2. Casings were not soaked long enough.
3. Casings were soaked too long.
4. Casings should not have been soaked.
5. Casings were filled too tightly.
6. Stuffing Tube has a burr and is puncturing the
casing.
7. Stuffing tube is too large for casings.
- 5 -
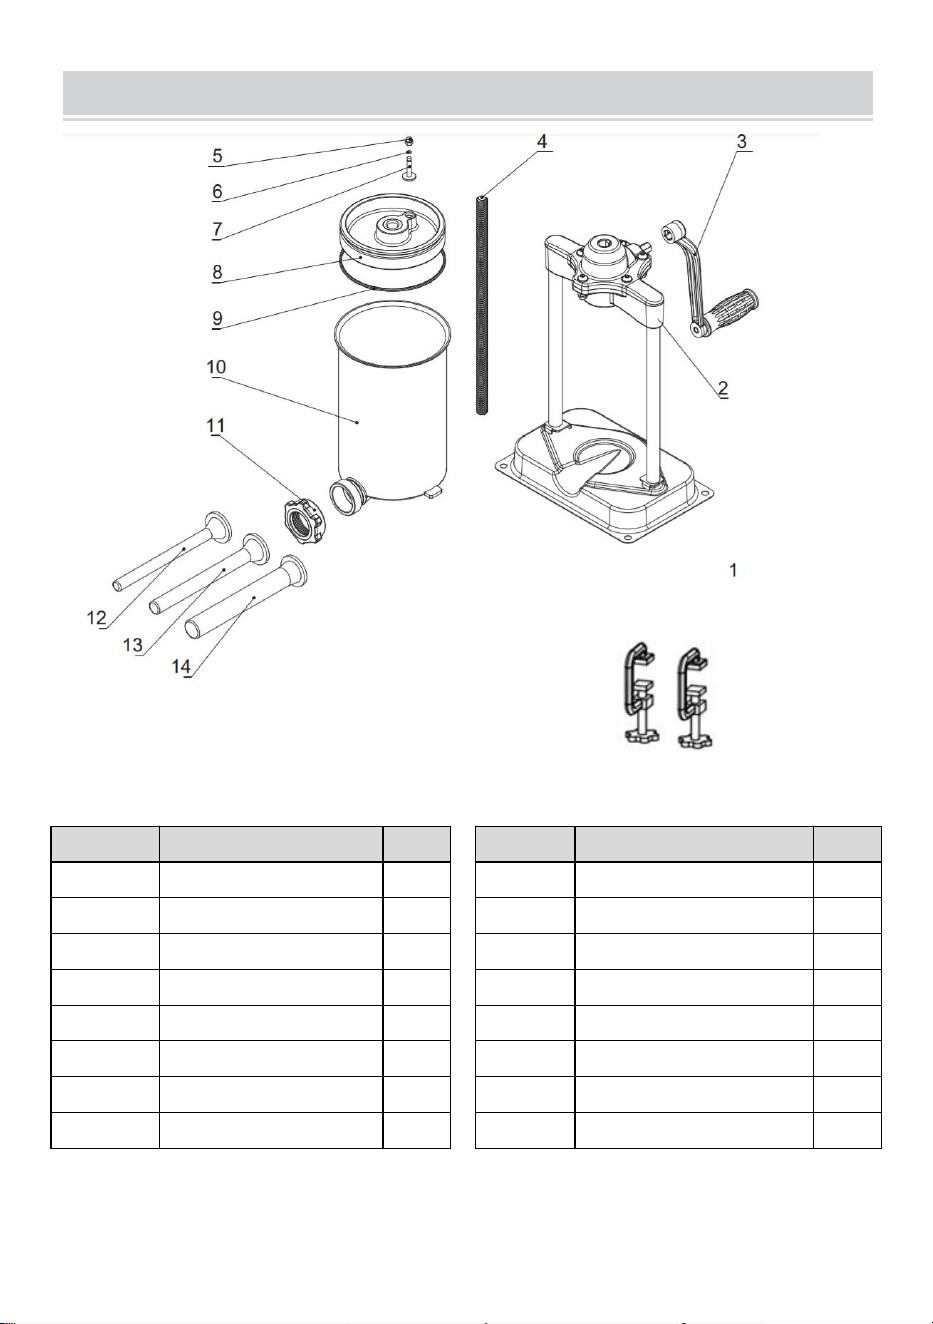
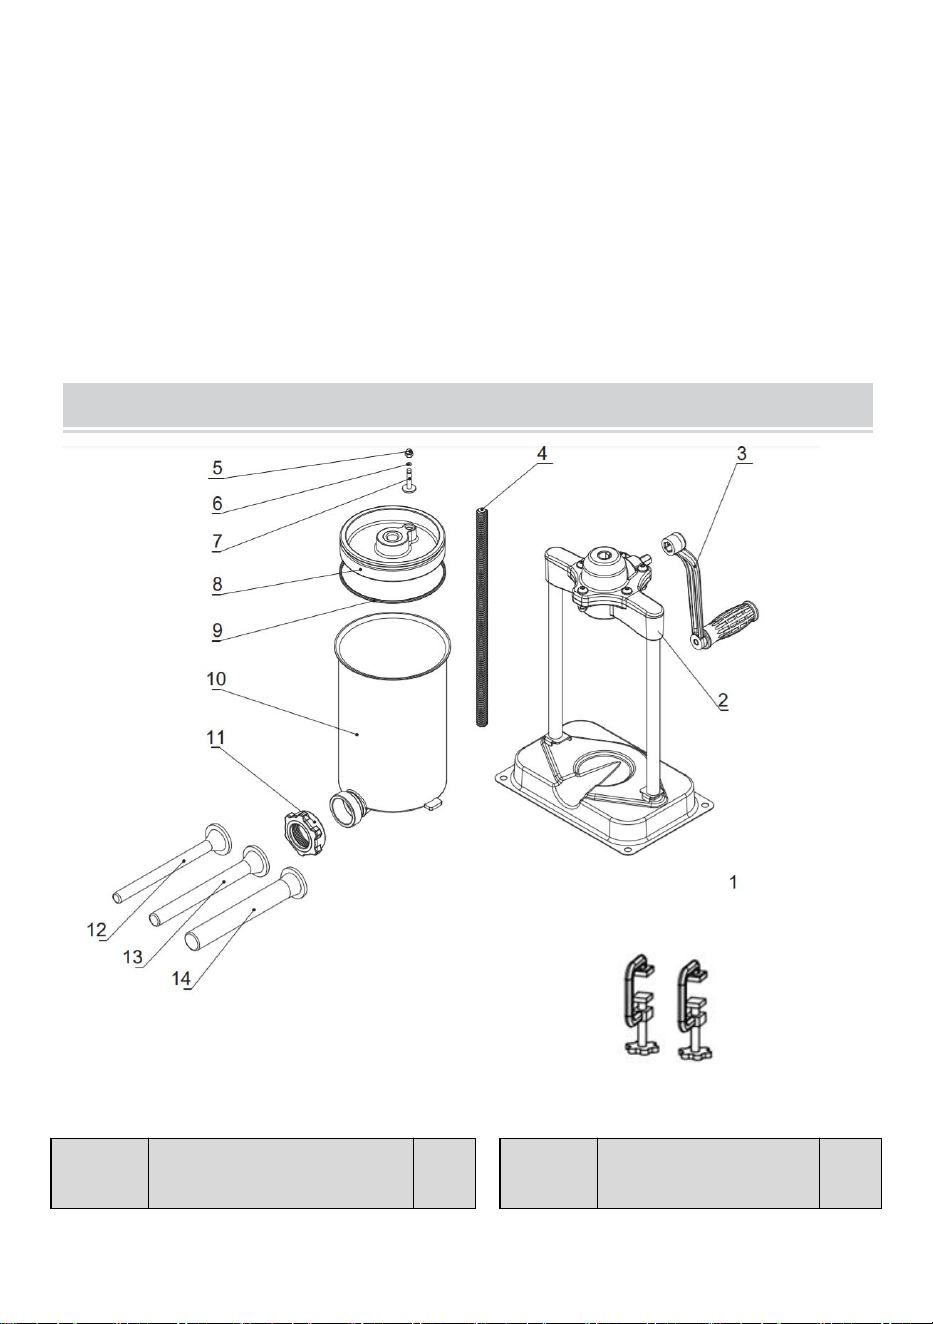
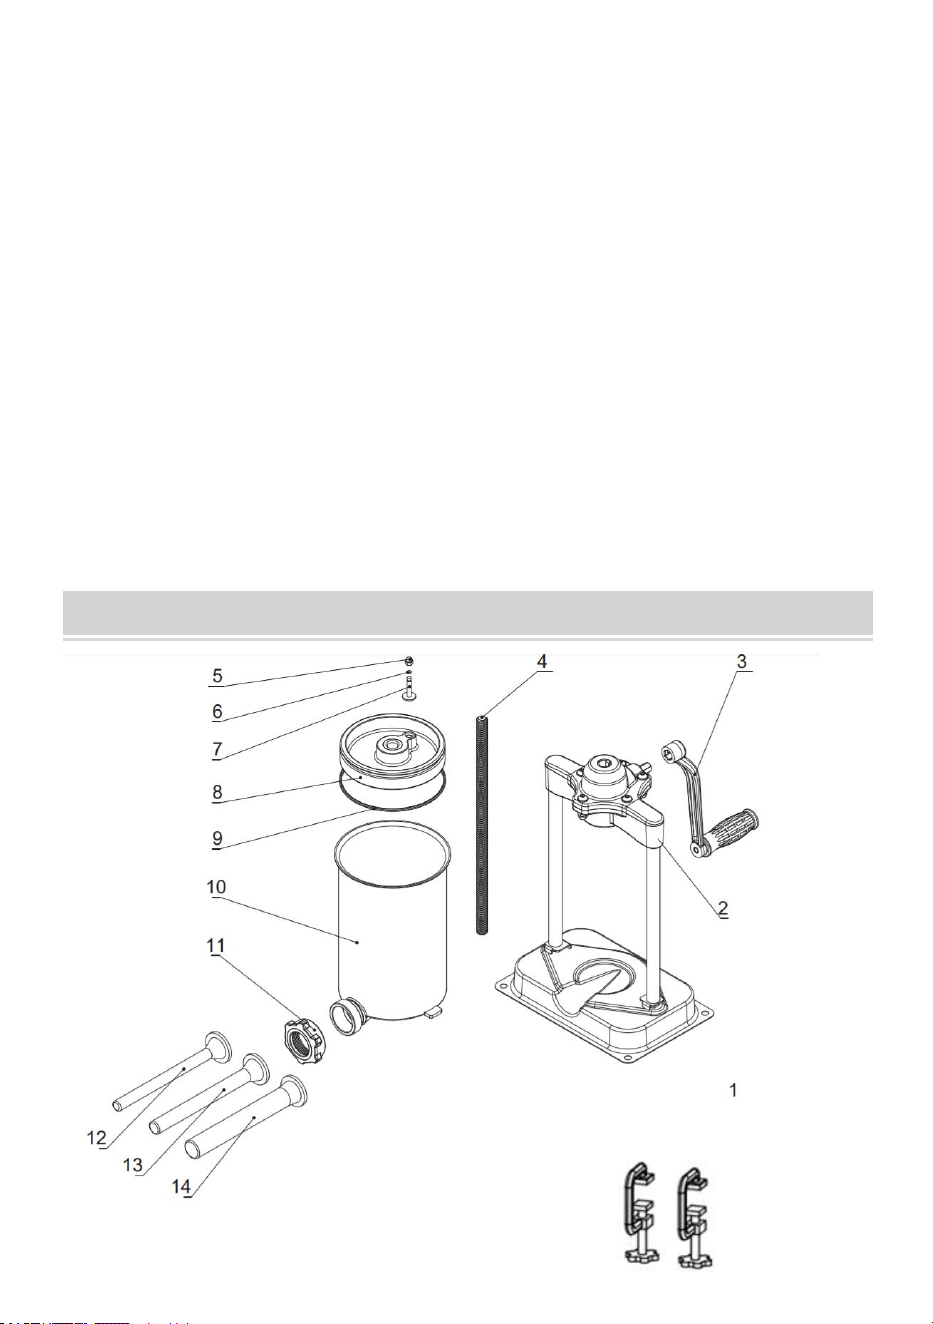
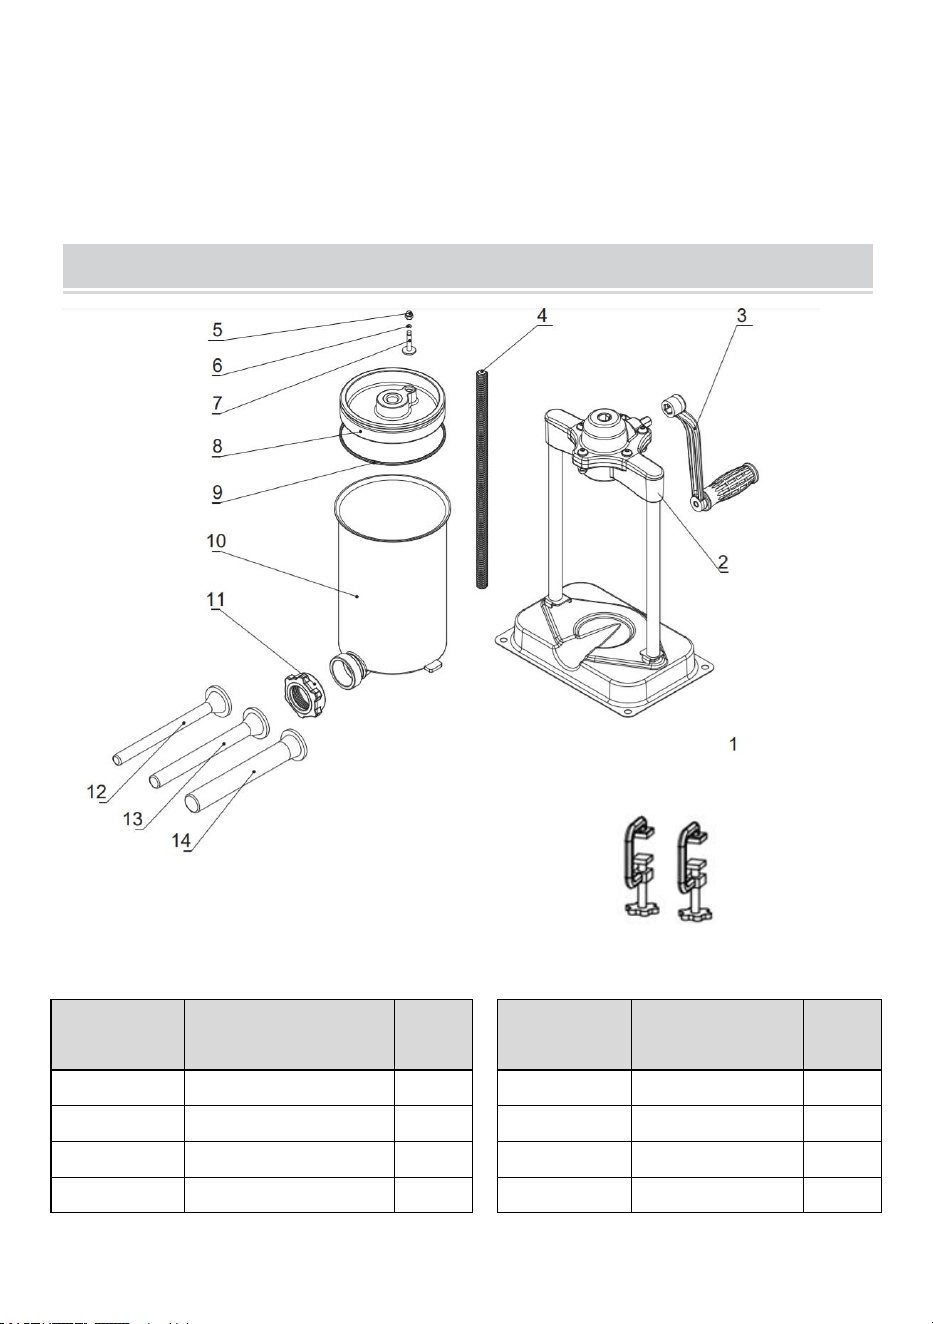
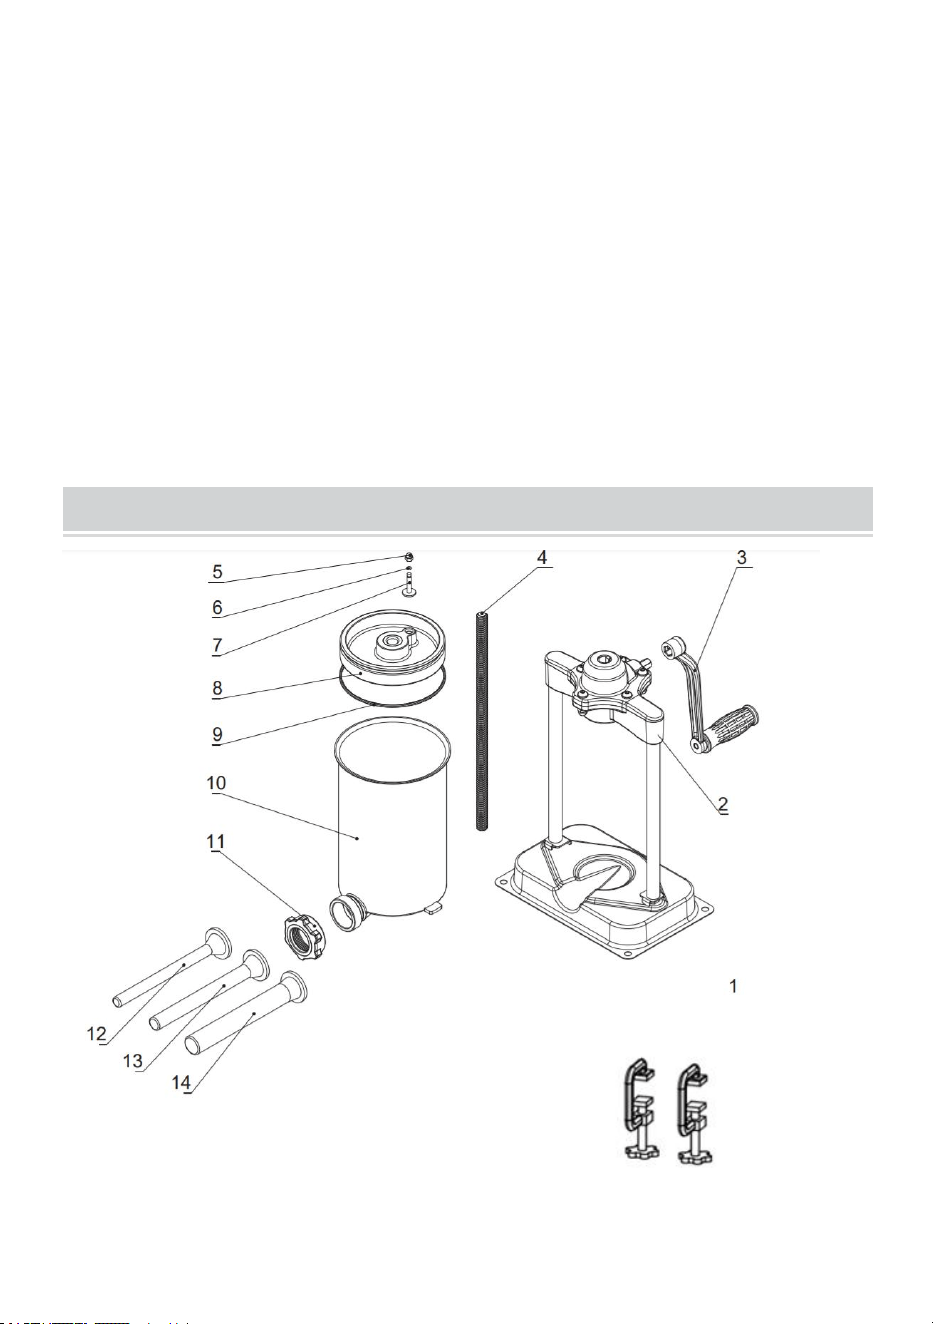
Exploded View and Parts List
Part No.
Description
Qty.
Part No.
Description
Qty.
1
Base
1
9
Piston Gasket
1
2
Frame
1
10
Cylinder
1
3
Handle
1
11
Ring Lock
1
4
Center Thread Rod
1
12
Stuffing Tube (Small)
1
5
Release Valve Nut
1
13
Stuffing Tube (Medium)
1
6
O-ring
1
14
Stuffing Tube (Large)
1
7
Air Release Valve
1
15
Clamps
2
8
Piston
1
15
- 6 -
Manufacturer: Shanghaimuxinmuyeyouxiangongsi
Address: Shuangchenglu 803nong11hao1602A-1609shi, baoshanqu,
shanghai 200000 CN.
Imported to AUS: SIHAO PTY LTD. 1 ROKEVA STREETEASTWOOD
NSW 2122 Australia
Imported to USA: Sanven Technology Ltd. Suite 250, 9166 Anaheim
Place, Rancho Cucamonga, CA 91730


Techniczny Certyfikat wsparcia i e-gwarancji www.vevor.com/support
NADZIEWANIE KIEŁBAS
MODEL: 1A-SS305
We continue to be committed to provide you tools with competitive price.
"Save Half", "Half Price" or any other similar expressions used by us only represents an
estimate of savings you might benefit from buying certain tools with us compared to the major
top brands and does not necessarily mean to cover all categories of tools offered by us. You
are kindly reminded to verify carefully when you are placing an order with us if you are
actually saving half in comparison with the top major brands.

- 1 -
MODEL: 1A-SS305
Have product questions? Need technical support? Please feel free to
contact us:
Technical Support and E-Warranty Certificate
www.vevor.com/support
NEED HELP? CONTACT US!
This is the original instruction, please read all manual instructions
carefully before operating. VEVOR reserves a clear interpretation of our
user manual. The appearance of the product shall be subject to the
product you received. Please forgive us that we won't inform you again if
there are any technology or software updates on our product.
SAUSAGE STUFFER

- 2 -
Ostrzeżenie — aby zmniejszyć ryzyko obrażeń, użytkownik
musi uważnie przeczytać instrukcję obsługi.
OSTRZEŻENIE: Przed rozpoczęciem korzystania z tego urządzenia
należy dokładnie przeczytać niniejszą instrukcję obsługi i zachować ją do
wykorzystania w przyszłości. Podczas korzystania z tych urządzeń należy
zawsze przestrzegać podstawowych zasad bezpieczeństwa. Obejmują
one:
1. Nie pozwalaj dzieciom poniżej 14 roku życia korzystać z urządzenia. Ten
produkt może być używany i konserwowany wyłącznie przez dzieci w
wieku 14 lat lub starsze, osoby o ograniczonych zdolnościach fizycznych,
sensorycznych lub umysłowych lub osoby niewykwalifikowane pod
odpowiednim nadzorem osoby dorosłej. Dzieciom nie wolno bawić się
urządzeniem.
2. Dla optymalnego działania i żywotności urządzenia należy postępować
zgodnie z instrukcją.
3. Kwasy spożywcze powodują korozję metalu. Zawsze czyść ten sprzęt
do przygotowywania żywności natychmiast po każdym użyciu. Aby
zachować wygląd i wydłużyć żywotność, czyść go codziennie.
4. Używanie akcesoriów lub modyfikacji niedostarczonych przez
producenta może spowodować zagrożenie. Produkt ten może być
używany wyłącznie zgodnie z jego przeznaczeniem i w sposób wskazany
w instrukcji. Wszelkie inne rodzaje zastosowań uważa się za niewłaściwe i
niebezpieczne. Producent nie ponosi odpowiedzialności za niewłaściwe
lub nieprawidłowe użytkowanie oraz uszkodzenia montażowe.
General Information and Instructions
WSTĘP
Dziękujemy i gratulujemy zakupu naszego 5-funtowego nadziewacza do
kiełbasy. Nadziewarka zawiera wszystko, czego potrzebujesz do
bezpiecznego i łatwego nadziewania kiełbasy. Prosimy o poświęcenie kilku
minut na przeczytanie tej broszury, aby dowiedzieć się więcej o

- 3 -
nadziewarce do kiełbas. Nadziewarka jest wykonana z najlepszych
materiałów, aby zapewnić długotrwałe użytkowanie przy wszystkich
potrzebach związanych z przetwarzaniem mięsa.
SZCZEGÓŁY TECHNICZNE
Opis
Pojemność
Wymiar
Waga
5 funtów Ręczny nadziewarka do
kiełbas
5 funtów
(2L)
9,45 cala x 18,7 cala x
15,75
10,5
funta
OSTROŻNOŚĆ! Za każdym razem, gdy tłok jest podniesiony z cylindra,
powoli zwalniaj uchwyt! Nacisk lub grawitacja mogą spowodować lekkie
obrócenie rączki, powodując obrażenia!
INSTRUKCJA OBSŁUGI
Krok 1: Oczyść części wodą z mydłem i przymocuj rurkę.
Krok 2: Przymocuj uchwyt za pomocą nakrętki, a następnie obróć uchwyt w
kierunku przeciwnym do ruchu wskazówek zegara, tak aby tłok wysunął się z
cylindra.
Krok 3: Wyjmij cylinder i włóż mięso do środka.
Krok 4: Załóż cylinder z powrotem.
Krok 5: Obróć uchwyt w kierunku zgodnym z ruchem wskazówek zegara,
aby tłok wsunął się do cylindra. Spowoduje to wpychanie mięsa do osłonki.
Krok 6: Powtórz kroki od 3 do 5.
Krok 7: Po zakończeniu dokładnie umyj wszystkie części ciepłą wodą z
mydłem, pozostaw je do wyschnięcia i ponownie złóż.
KONSERWACJA
1. Po użyciu wyjmij tłok i cylinder i umyj je ciepłą wodą z mydłem.
2. Wysuszyć obudowę, zmontować ją ponownie i wytrzeć obudowę.
OSTRZEŻENIE: Czyszcząc i odkażając elementy, należy zawsze
postępować tak dokładnie, jak to możliwe. Wszelkie części wystawione na
kontakt z surowym mięsem mogą zawierać lub rozwijać bakterie powodujące

- 4 -
chorobę lub śmierć.
OSTRZEŻENIE: Podczas czyszczenia środkami dezynfekującymi należy
zawsze postępować zgodnie z zaleceniami producenta. Nigdy nie używaj
produktów, które powodują, że odsłonięte powierzchnie sprawiają, że mięso
staje się niebezpieczne do spożycia. Niezastosowanie się do tego
ostrzeżenia może prowadzić do choroby lub śmierci!
General Information and Instructions
ROZWIĄZYWANIE PROBLEMÓW
Problemy
Rozwiązania
Nadziewarkę ciężko zakręcić.
1. Mieszanka kiełbasy stała się zbyt sztywna. Dodaj
wodę i wymieszaj
. 2. Dodaj smar (olej mineralny lub olej roślinny)
do uszczelki tłoka i wnętrza cylindra.
Mięso przechodzi obok tłoka.
1. Uszczelka nie jest zamontowana.
2. Należy nasmarować uszczelkę.
Osłonki pękają podczas napełniania.
1. Osłonki są stare i łamliwe.
2. Osłonki nie były wystarczająco długo moczone.
3. Osłonki były zbyt długo moczone.
4. Osłonki nie powinny być moczone.
5. Osłonki zostały zbyt szczelnie wypełnione.
6. Rurka farszowa ma zadzior i przebija osłonkę.
7. Rurka farszowa jest za duża dla osłonek.
- 5 -
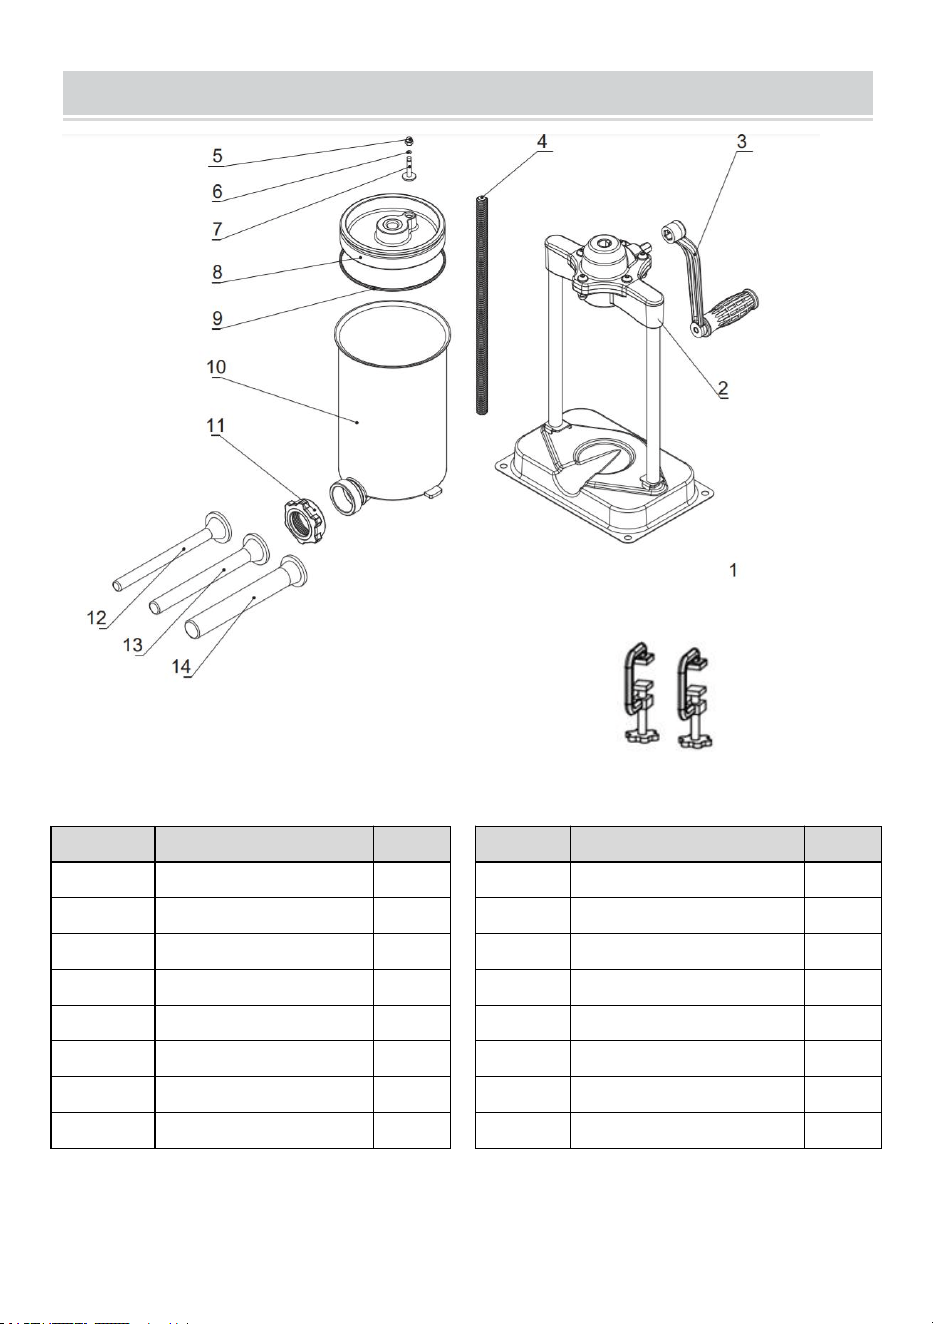
Exploded View and Parts List
Nr
części
Opis
Iloś
ć
Nr
części
Opis
Iloś
ć
15
- 6 -
1
Baza
1
9
Uszczelka tłoka
1
2
Rama
1
10
Cylinder
1
3
Uchwyt
1
11
Blokada pierścienia
1
4
Środkowy pręt
gwintowany
1
12
Tubka do farszu
(mała)
1
5
Zwolnić nakrętkę zaworu
1
13
Tuba do farszu
(średnia)
1
6
O-ring
1
14
Tuba do farszu (duża)
1
7
Zawór uwalniający
powietrze
1
1 5
Lampa C
2
8
Tłok
1
Producent: Shanghaimuxinmuyeyouxiangongsi
Adres: Shuangchenglu 803nong11hao1602A-1609shi, baoshanqu,
szanghaj 200000 CN.
Import do AUS: SIHAO PTY LTD. 1 ROKEVA STREETEASTWOOD
NSW 2122 Australia
Import do USA: Sanven Technology Ltd. Suite 250, 9166 Anaheim
Place, Rancho Cucamonga, CA 91730

- 7 -


Technisch Support- und E-Garantie-Zertifikat www.vevor.com/support
WURSTSTUFFER
MODELL: 1A-SS305
We continue to be committed to provide you tools with competitive price.
"Save Half", "Half Price" or any other similar expressions used by us only represents an
estimate of savings you might benefit from buying certain tools with us compared to the major
top brands and does not necessarily mean to cover all categories of tools offered by us. You
are kindly reminded to verify carefully when you are placing an order with us if you are
actually saving half in comparison with the top major brands.

- 1 -
MODELL: 1A-SS305
Have product questions? Need technical support? Please feel free to
contact us:
Technical Support and E-Warranty Certificate
www.vevor.com/support
NEED HELP? CONTACT US!
This is the original instruction, please read all manual instructions
carefully before operating. VEVOR reserves a clear interpretation of our
user manual. The appearance of the product shall be subject to the
product you received. Please forgive us that we won't inform you again if
there are any technology or software updates on our product.
SAUSAGE STUFFER

- 2 -
Warnung: Um das Verletzungsrisiko zu verringern, muss der
Benutzer die Bedienungsanleitung sorgfältig lesen.
WARNUNG: Bevor Sie dieses Gerät in Betrieb nehmen, lesen Sie bitte
diese Bedienungsanleitung vollständig durch und bewahren Sie sie zum
späteren Nachschlagen griffbereit auf. Befolgen Sie bei der Verwendung
dieser Geräte stets die grundlegenden Sicherheitsvorkehrungen. Diese
beinhalten:
1. Erlauben Sie Kindern unter 14 Jahren nicht, die Maschine zu benutzen.
Dieses Produkt darf nur von Kindern ab 14 Jahren, Personen mit
eingeschränkten körperlichen, sensorischen oder geistigen Fähigkeiten
oder ungelernten Personen unter angemessener Aufsicht eines
Erwachsenen verwendet oder gewartet werden. Kinder dürfen nicht mit
dem Gerät spielen.
2.Für einen optimalen Betrieb und eine optimale Lebensdauer des Gerätes
befolgen Sie bitte die Anweisungen.
3. Lebensmittelsäuren korrodieren das Metall. Reinigen Sie dieses
Lebensmittelzubereitungsgerät immer sofort nach jedem Gebrauch. Um
das Aussehen zu erhalten und die Lebensdauer zu erhöhen, reinigen Sie
es täglich.
4. Die Verwendung von Zubehör oder Modifikationen, die nicht vom
Hersteller bereitgestellt wurden, kann zu Gefahren führen. Dieses Produkt
darf nur für den vorgesehenen Zweck und auf die in der Anleitung
angegebene Weise verwendet werden. Alle anderen Verwendungsarten
gelten als ungeeignet und gefährlich. Der Hersteller übernimmt keine
Haftung für unsachgemäße oder unsachgemäße Verwendung und
Installationsschäden.
General Information and Instructions
EINFÜHRUNG
Vielen Dank und herzlichen Glückwunsch zum Kauf unseres
5-Pfund-Wurstfüllers. Ihr Füller wird komplett mit allem geliefert, was Sie

- 3 -
zum sicheren und einfachen Füllen von Wurst benötigen. Bitte nehmen Sie
sich ein paar Minuten Zeit, um diese Broschüre durchzulesen und mehr
über Ihren Wurstfüller zu erfahren. Ihr Füller besteht aus den besten
Materialien, um eine lange Nutzung für alle Ihre
Fleischverarbeitungsanforderungen zu gewährleisten.
TECHNISCHE DETAILS
Beschreibung
Kapazität
Abmessungen
Gewicht
5 Pfund. Manueller Wurstfüller
5 Pfund. (2L)
9,45" x 18,7" x 15,75
10,5 Pfund.
VORSICHT! Lassen Sie den Griff immer dann langsam los, wenn der Kolben
aus dem Zylinder gehoben wird! Durch Druck oder Schwerkraft könnte der
Griff leicht zurückdrehen und Verletzungen verursachen!
BEDIENUNGSANLEITUNGEN
Schritt 1: Reinigen Sie die Teile mit Wasser und Seife und befestigen Sie den
Schlauch.
Schritt 2: Befestigen Sie den Griff mit der Mutter und drehen Sie ihn dann
gegen den Uhrzeigersinn, sodass sich der Kolben aus dem Zylinder bewegt.
Schritt 3: Nehmen Sie den Zylinder heraus und legen Sie das Fleisch hinein.
Schritt 4: Setzen Sie den Zylinder wieder ein.
Schritt 5: Drehen Sie den Griff im Uhrzeigersinn, sodass sich der Kolben in
den Zylinder bewegt. Dadurch wird das Fleisch in die Hülle gedrückt.
Schritt 6: Wiederholen Sie die Schritte 3 bis 5.
Schritt 7: Wenn Sie fertig sind, reinigen Sie alle Teile gründlich mit warmem
Seifenwasser, lassen Sie sie trocknen und bauen Sie sie wieder zusammen.
WARTUNG
1. Entfernen Sie Kolben und Zylinder nach dem Gebrauch und waschen Sie
sie mit warmem Seifenwasser.
2. Das Gehäuse trocknen, wieder zusammenbauen und das Gehäuse

- 4 -
abwischen.
WARNUNG: Gehen Sie beim Reinigen und Desinfizieren von Komponenten
immer so gründlich wie möglich vor. Alle Teile, die rohem Fleisch ausgesetzt
sind, können Bakterien beherbergen oder entwickeln, die zu Krankheiten
oder zum Tod führen können.
WARNUNG: Befolgen Sie beim Reinigen mit Desinfektionsmitteln stets die
Empfehlungen des Herstellers. Verwenden Sie niemals Produkte, die dazu
führen, dass freiliegende Oberflächen das Fleisch für den Verzehr unsicher
machen. Die Nichtbeachtung dieser Warnung kann zu Krankheit oder Tod
führen!
General Information and Instructions
FEHLERBEHEBUNG
Probleme
Lösungen
Der Stuffer lässt sich nur schwer ankurbeln.
1. Die Wurstmasse ist zu steif geworden.
Zum Mischen Wasser hinzufügen
. 2. Schmiermittel (Mineralöl oder
Pflanzenöl) auf die Kolbendichtung und das
Innere des Zylinders auftragen.
Fleisch läuft am Kolben vorbei.
1. Dichtung ist nicht installiert.
2. Dichtung muss geschmiert werden.
Beim Befüllen platzen die Därme.
1. Gehäuse sind alt und spröde.
2. Die Hüllen wurden nicht lange genug
eingeweicht.
3. Die Hüllen waren zu lange eingeweicht.
4. Die Hüllen sollten nicht durchnässt sein.
5. Die Hüllen waren zu dicht gefüllt.
6. Das Stopfrohr weist einen Grat auf und
durchsticht die Hülle.
7. Stopfrohr ist zu groß für Därme.
- 5 -
Exploded View and Parts List
15
- 6 -
Teile-Nr.
Beschreibung
Menge.
Teile-Nr.
Beschreibung
Menge.
1
Base
1
9
Kolbendichtung
1
2
Rahmen
1
10
Zylinder
1
3
Handhaben
1
11
Ringschloss
1
4
Mittelgewindestange
1
12
Stopfrohr (klein)
1
5
Ventilmutter lösen
1
13
Stopfrohr (mittel)
1
6
O-Ring
1
14
Stopfrohr (groß)
1
7
Luftablassventil
1
15
C- Lampe s
2
8
Kolben
1
Hersteller: Shanghaimuxinmuyeyouxiangongsi
Adresse: Shuangchenglu 803nong11hao1602A-1609shi, baoshanqu,
Shanghai 200000 CN.
Importiert nach AUS: SIHAO PTY LTD. 1 ROKEVA
STREETEASTWOOD NSW 2122 Australien
In die USA importiert: Sanven Technology Ltd. Suite 250, 9166
Anaheim Place, Rancho Cucamonga, CA 91730

- 7 -


Technique Assistance et certificat de garantie électronique
www.vevor.com/support
REMPLISSEUR DE SAUCISSES
MODÈLE : 1A-SS305
We continue to be committed to provide you tools with competitive price.
"Save Half", "Half Price" or any other similar expressions used by us only represents an
estimate of savings you might benefit from buying certain tools with us compared to the major
top brands and does not necessarily mean to cover all categories of tools offered by us. You
are kindly reminded to verify carefully when you are placing an order with us if you are
actually saving half in comparison with the top major brands.

- 1 -
MODÈLE : 1A-SS305
Have product questions? Need technical support? Please feel free to
contact us:
Technical Support and E-Warranty Certificate
www.vevor.com/support
NEED HELP? CONTACT US!
This is the original instruction, please read all manual instructions
carefully before operating. VEVOR reserves a clear interpretation of our
user manual. The appearance of the product shall be subject to the
product you received. Please forgive us that we won't inform you again if
there are any technology or software updates on our product.
SAUSAGE STUFFER

- 2 -
Avertissement : Pour réduire le risque de blessure, l'utilisateur
doit lire attentivement le manuel d'instructions.
AVERTISSEMENT : avant d'utiliser cet appareil, veuillez lire entièrement
ce manuel d'instructions et le conserver à portée de main pour référence
future. Suivez toujours les précautions de sécurité de base lorsque vous
utilisez ces appareils. Ceux-ci inclus:
1.Ne laissez pas les enfants de moins de 14 ans utiliser la machine. Ce
produit ne peut être utilisé ou entretenu que par des enfants de 14 ans ou
plus, des personnes ayant des capacités physiques, sensorielles ou
mentales réduites, ou des personnes non qualifiées sous la surveillance
adéquate d'un adulte. Les enfants ne doivent pas jouer avec l'appareil.
2.Pour un fonctionnement et une durée de vie optimaux de l'appareil,
veuillez suivre les instructions.
3. Les acides alimentaires corroderont le métal. Nettoyez toujours cet
équipement de préparation des aliments immédiatement après chaque
utilisation. Pour conserver l'apparence et augmenter la durée de vie,
nettoyez-le quotidiennement.
4. L'utilisation d'accessoires ou de modifications non fournis par le
fabricant peut entraîner des dangers. Ce produit doit être utilisé
uniquement aux fins prévues et de la manière indiquée dans les
instructions. Tout autre type d'utilisation doit être considéré comme
inapproprié et dangereux. Le fabricant ne sera pas responsable de toute
utilisation inappropriée ou incorrecte et des dommages causés par
l'installation.
General Information and Instructions
INTRODUCTION
Merci et félicitations pour l'achat de notre poussoir à saucisses de 5 lb.
Votre poussoir est livré avec tout ce dont vous avez besoin pour farcir
facilement et en toute sécurité des saucisses. Veuillez prendre quelques
minutes pour lire ce livret afin d'en savoir plus sur votre poussoir à

- 3 -
saucisses. Votre poussoir est fabriqué à partir des meilleurs matériaux
pour garantir une utilisation prolongée pour tous vos besoins en matière de
transformation de la viande.
DÉTAILS TECHNIQUES
Description
Capacité
Dimension
Poids
5 livres. Poussoir à saucisses manuel
5 livres. (2L)
9,45" x 18,7" x 15,75
10,5 livres.
PRUDENCE! Chaque fois que le piston est soulevé hors du cylindre,
relâchez lentement la poignée ! La pression ou la gravité pourraient faire
légèrement pivoter la poignée et provoquer des blessures !
INSTRUCTIONS D'UTILISATION
Étape 1 : nettoyez les pièces avec de l'eau et du savon et fixez le tube.
Étape 2 : fixez la poignée avec l'écrou, puis tournez la poignée dans le sens
inverse des aiguilles d'une montre pour que le piston sorte du cylindre.
Étape 3 : Retirez le cylindre et mettez la viande à l’intérieur.
Étape 4 : Remettez le cylindre.
Étape 5 : Tournez la poignée dans le sens des aiguilles d'une montre pour
que le piston entre dans le cylindre. Cela commencera à pousser la viande
dans le boyau.
Étape 6 : répétez les étapes 3 à 5.
Étape 7 : Une fois terminé, assurez-vous de nettoyer correctement toutes les
pièces avec de l'eau tiède savonneuse, laissez-les sécher et remontez-les.
ENTRETIEN
1. Retirez le piston et le cylindre après utilisation et lavez-les à l'eau tiède
savonneuse.
2. Séchez le corps, remontez-le et essuyez le corps.
AVERTISSEMENT : soyez toujours aussi minutieux que possible lors du
nettoyage et de la désinfection des composants. Toutes les parties exposées
à la viande crue peuvent héberger ou développer des bactéries provoquant

- 4 -
des maladies ou la mort.
AVERTISSEMENT : lors du nettoyage avec des désinfectants, suivez
toujours les recommandations du fabricant. N’utilisez jamais de produits qui
rendent la viande impropre à la consommation sur les surfaces exposées. Le
non-respect de cet avertissement peut entraîner des maladies, voire la mort !
General Information and Instructions
DÉPANNAGE
Problèmes
Solutions
Le poussoir est difficile à démarrer.
1. Le mélange de saucisses est devenu trop
ferme. Ajoutez de l'eau pour mélanger
. 2. Ajoutez du lubrifiant (huile minérale ou
huile végétale) au joint du piston et à
l'intérieur du cylindre.
La viande passe par le piston.
1. Le joint n’est pas installé.
2. Le joint doit être lubrifié.
Les boyaux éclatent lors du remplissage.
1. Les boîtiers sont vieux et cassants.
2. Les boyaux n’ont pas été trempés assez
longtemps.
3. Les boyaux ont été trempés trop longtemps.
4. Les boyaux ne doivent pas avoir été
trempés.
5. Les boyaux étaient trop remplis.
6. Le tube de remplissage présente une
bavure et perce le boîtier.
7. Le tube de remplissage est trop grand pour
les boyaux.

- 5 -
Exploded View and Parts List
15

- 6 -
Numéro de
pièce.
Description
Qt
é.
Numéro de
pièce.
Description
Qt
é.
1
Base
1
9
Joint de piston
1
2
Cadre
1
dix
Cylindre
1
3
Poignée
1
11
Anneau de
verrouillage
1
4
Tige filetée centrale
1
12
Tube de farce
(petit)
1
5
Écrou de soupape de
déverrouillage
1
13
Tube de farce
(moyen)
1
6
Joint torique
1
14
Tube de farce
(grand)
1
7
Soupape de libération
d'air
1
1 5
Lampes C
2
8
Piston
1
Fabricant : Shanghaimuxinmuyeyouxiangongsi
Adresse : Shuangchenglu 803nong11hao1602A-1609shi, baoshanqu,
Shanghai 200000 CN.
Importé en Australie : SIHAO PTY LTD. 1 ROKEVA STREETASTWOOD
NSW 2122 Australie
Importé aux États-Unis : Sanven Technology Ltd. Suite 250, 9166
Anaheim Place, Rancho Cucamonga, CA 91730

- 7 -


Technisch Ondersteuning en e-garantiecertificaat www.vevor.com/support
WORSTVUL
MODEL: 1A-SS305
We continue to be committed to provide you tools with competitive price.
"Save Half", "Half Price" or any other similar expressions used by us only represents an
estimate of savings you might benefit from buying certain tools with us compared to the major
top brands and does not necessarily mean to cover all categories of tools offered by us. You
are kindly reminded to verify carefully when you are placing an order with us if you are
actually saving half in comparison with the top major brands.

- 1 -
MODEL: 1A-SS305
Have product questions? Need technical support? Please feel free to
contact us:
Technical Support and E-Warranty Certificate
www.vevor.com/support
NEED HELP? CONTACT US!
This is the original instruction, please read all manual instructions
carefully before operating. VEVOR reserves a clear interpretation of our
user manual. The appearance of the product shall be subject to the
product you received. Please forgive us that we won't inform you again if
there are any technology or software updates on our product.
SAUSAGE STUFFER

- 2 -
Waarschuwing-Om het risico op letsel te verminderen, moet
de gebruiker de handleiding zorgvuldig lezen.
WAARSCHUWING: Lees deze handleiding volledig door voordat u dit
apparaat gebruikt en bewaar deze bij de hand voor toekomstig gebruik.
Volg altijd de basisveiligheidsmaatregelen bij het gebruik van deze
apparaten. Deze omvatten:
1. Laat kinderen jonger dan 14 jaar de machine niet gebruiken. Dit product
mag alleen worden gebruikt of onderhouden door kinderen van 14 jaar of
ouder, personen met verminderde fysieke, zintuiglijke of mentale
capaciteiten, of ongeschoolde personen onder voldoende toezicht van een
volwassene. Kinderen mogen niet met het apparaat spelen.
2. Volg de instructies voor een optimale werking en levensduur van het
apparaat.
3. Voedingszuren zullen het metaal aantasten. Maak deze
voedselbereidingsapparatuur altijd onmiddellijk na elk gebruik schoon. Om
het uiterlijk te behouden en de levensduur te verlengen, moet u het
dagelijks reinigen.
4.Het gebruik van accessoires of wijzigingen die niet door de fabrikant zijn
geleverd, kan gevaren veroorzaken. Dit product mag alleen worden
gebruikt voor het beoogde doel en op de manier zoals aangegeven in de
instructies. Alle andere vormen van gebruik moeten als ongepast en
gevaarlijk worden beschouwd. De fabrikant is niet verantwoordelijk voor
oneigenlijk of onjuist gebruik en schade aan de installatie.
General Information and Instructions
INVOERING
Bedankt en gefeliciteerd met de aankoop van onze worstenvuller van 2,5
kg. Je vulmachine wordt compleet geleverd met alles wat je nodig hebt om
worst veilig en gemakkelijk te vullen. Neem een paar minuten de tijd om dit
boekje door te lezen en meer te weten te komen over uw worstvuller. Uw
vulmachine is gemaakt van de beste materialen om langdurig gebruik voor

- 3 -
al uw vleesverwerkingsbehoeften te garanderen.
TECHNISCHE DETAILS
Beschrijving
Capaciteit
Dimensie
Gewicht
5 pond Handmatige worstvuller
5 pond (2L)
9,45 inch x 18,7 inch x 15,75
10,5 pond
VOORZICHTIGHEID! Elke keer dat de zuiger uit de cilinder wordt getild, laat
u de hendel langzaam los! Druk of zwaartekracht kunnen ervoor zorgen dat
de hendel iets terugdraait, wat letsel kan veroorzaken!
GEBRUIKSAANWIJZING
Stap 1: Reinig de onderdelen met water en zeep en bevestig de buis.
Stap 2: Bevestig de hendel met een moer en draai de hendel vervolgens
tegen de klok in zodat de zuiger uit de cilinder beweegt.
Stap 3: Haal de cilinder eruit en doe het vlees erin.
Stap 4: Plaats de cilinder terug.
Stap 5: Draai de hendel met de klok mee zodat de zuiger in de cilinder
beweegt. Hierdoor begint het vlees in de behuizing te duwen.
Stap 6: Herhaal stap 3 tot en met 5.
Stap 7: Als u klaar bent, zorg er dan voor dat u alle onderdelen goed
schoonmaakt met warm zeepsop, laat ze drogen en zet ze weer in elkaar.
ONDERHOUD
1. Verwijder de zuiger en cilinder na gebruik en was ze met warm zeepsop.
2. Droog de behuizing, zet hem weer in elkaar en veeg de behuizing af.
WAARSCHUWING: Wees altijd zo grondig mogelijk bij het reinigen en
ontsmetten van onderdelen. Alle delen die aan rauw vlees worden
blootgesteld, kunnen bacteriën bevatten of ontwikkelen, wat ziekte of de
dood kan veroorzaken.
WAARSCHUWING: Volg bij het reinigen met ontsmettingsmiddelen altijd de
aanbevelingen van de fabrikant. Gebruik nooit producten die ervoor zorgen
dat blootgestelde oppervlakken vlees onveilig maken voor consumptie. Het

- 4 -
niet opvolgen van deze waarschuwing kan leiden tot ziekte of overlijden!
General Information and Instructions
PROBLEEMOPLOSSEN
Problemen
Oplossingen
De vuller is moeilijk aan te zwengelen.
1. Worstenmengsel is te stijf geworden. Voeg
water toe om te mengen
. 2. Voeg smeermiddel (minerale olie of
plantaardige olie) toe aan de zuigerpakking en
de binnenkant van de cilinder.
Vlees passeert de zuiger.
1. Pakking is niet geïnstalleerd.
2. Pakking moet worden gesmeerd.
Omhulsels barsten tijdens het vullen.
1. De behuizingen zijn oud en broos.
2. De darmen zijn niet lang genoeg geweekt.
3. De behuizingen zijn te lang geweekt.
4. De behuizingen mogen niet doorweekt zijn.
5. Omhulsels waren te strak gevuld.
6. De vulbuis heeft een braam en doorboort de
behuizing.
7. De vulbuis is te groot voor de omhulsels.
- 5 -
Exploded View and Parts List
Onderdeeln
r.
Beschrijving
Aanta
l
Onderdeeln
r.
Beschrijving
Aanta
l
1
Baseren
1
9
Zuiger pakking
1
2
Kader
1
10
Cilinder
1
3
Hendel
1
11
Ringslot
1
4
Middelste
1
12
Vulbuis (klein)
1
15
- 6 -
draadstang
5
Maak de klepmoer
los
1
13
Vulbuis
(medium)
1
6
O-ring
1
14
Vulbuis (groot)
1
7
Luchtontlastklep
1
1 5
C lamp s
2
8
Zuiger
1
Fabrikant: Shanghaimuxinmuyeyouxiangongsi
Adres: Shuangchenglu 803nong11hao1602A-1609shi, baoshanqu,
shanghai 200000 CN.
Geïmporteerd naar AUS: SIHAO PTY LTD. 1 ROKEVA
STREETEASTWOOD NSW 2122 Australië
Geïmporteerd naar de VS: Sanven Technology Ltd. Suite 250, 9166
Anaheim Place, Rancho Cucamonga, CA 91730


Teknisk Support och e-garanticertifikat www.vevor.com/support
KORVSTÄLLARE
MODELL: 1A-SS305
We continue to be committed to provide you tools with competitive price.
"Save Half", "Half Price" or any other similar expressions used by us only represents an
estimate of savings you might benefit from buying certain tools with us compared to the major
top brands and does not necessarily mean to cover all categories of tools offered by us. You
are kindly reminded to verify carefully when you are placing an order with us if you are
actually saving half in comparison with the top major brands.

- 1 -
MODELL: 1A-SS305
Have product questions? Need technical support? Please feel free to
contact us:
Technical Support and E-Warranty Certificate
www.vevor.com/support
NEED HELP? CONTACT US!
This is the original instruction, please read all manual instructions
carefully before operating. VEVOR reserves a clear interpretation of our
user manual. The appearance of the product shall be subject to the
product you received. Please forgive us that we won't inform you again if
there are any technology or software updates on our product.
SAUSAGE STUFFER

- 2 -
Varning - För att minska risken för skada måste användaren
läsa instruktionerna noggrant.
VARNING: Innan du använder denna enhet, vänligen läs denna
bruksanvisning fullständigt och förvara den till hands för framtida referens.
Följ alltid grundläggande säkerhetsföreskrifter när du använder dessa
enheter. Dessa inkluderar:
1. Låt inte barn under 14 år använda maskinen. Denna produkt får endast
användas eller underhållas av barn som är 14 år eller äldre, individer med
nedsatt fysisk, sensorisk eller mental kapacitet, eller outbildade individer
med adekvat vuxen övervakning. Barn får inte leka med enheten.
2.Följ instruktionerna för optimal drift och livslängd för enheten.
3. Matsyror kommer att fräta på metallen. Rengör alltid denna
matberedningsutrustning omedelbart efter varje användning. För att
behålla utseendet och öka livslängden, rengör den dagligen.
4. Användning av tillbehör eller modifieringar som inte tillhandahålls av
tillverkaren kan orsaka faror. Denna produkt får endast användas för avsett
ändamål och på det sätt som anges i instruktionerna. Alla andra typer av
användning ska anses vara olämpliga och farliga. Tillverkaren ansvarar
inte för felaktig eller felaktig användning och installationsskador.
General Information and Instructions
INTRODUKTION
Tack, och grattis till köpet av vår 5 lb. korvpåfyllare. Din fyllare levereras
komplett med allt du behöver för att stoppa korv på ett säkert och enkelt
sätt. Vänligen ägna några minuter åt att läsa igenom det här häftet för att
lära dig mer om din korvstoppare. Din fyllare är gjord av de finaste
materialen för att säkerställa utökad användning för alla dina
köttbearbetningsbehov.
TEKNISKA DETALJER

- 3 -
Beskrivning
Kapacitet
Dimensionera
Vikt
5 lb. Manuell korvstoppare
5 lb. (2L)
9,45" x 18,7" x 15,75
10,5 lb.
VARNING! Varje gång kolven lyfts ur cylindern, släpp handtaget långsamt!
Tryck eller gravitation kan få handtaget att snurra tillbaka något och orsaka
skada!
DRIFTINSTRUKTIONER
Steg 1: Rengör delarna med tvål och vatten och fäst röret.
Steg 2: Fäst handtaget med mutter och vrid sedan handtaget moturs så att
kolven rör sig ut ur cylindern.
Steg 3: Ta ut cylindern och lägg köttet inuti.
Steg 4: Sätt tillbaka cylindern.
Steg 5: Vrid handtaget medurs så att kolven rör sig in i cylindern. Detta
kommer att börja trycka in köttet i höljet.
Steg 6: Upprepa steg 3 till 5.
Steg 7: När du är klar, för att vara säker på att rengöra alla delar ordentligt
med varmt tvålvatten, låt dem torka och sätt ihop dem igen.
UNDERHÅLL
1. Ta bort kolven och cylindern efter användning och tvätta med varmt
tvålvatten.
2. Torka kroppen och sätt tillbaka den och torka av kroppen.
VARNING: Var alltid så noggrann som möjligt när du rengör och desinficerar
komponenter. Alla delar som utsätts för rått kött kan hysa eller utveckla
bakterier som orsakar sjukdom eller dödsfall.
VARNING: När du rengör med desinfektionsmedel, följ alltid tillverkarens
rekommendationer. Använd aldrig produkter som orsakar utsatta ytor för att
göra kött osäkert för konsumtion. Underlåtenhet att följa denna varning kan
leda till sjukdom eller död!

- 4 -
General Information and Instructions
FELSÖKNING
Problem
Lösningar
Fyllaren är svår att veva.
1. Korvblandningen har blivit för stel. Tillsätt vatten för
att blanda
2. Tillsätt smörjmedel (mineralolja eller vegetabilisk
olja) till kolvpackningen och cylinderns inre.
Kött passerar förbi kolven.
1. Packning är inte installerad.
2. Packning behöver smörjas.
Höljen spricker vid fyllning.
1. Höljen är gamla och spröda.
2. Höljena var inte blötlagda tillräckligt länge.
3. Höljena var blötlagda för länge.
4. Höljen ska inte ha blötts.
5. Höljena var för hårt fyllda.
6. Fyllningsröret har en grad och punkterar höljet.
7. Fyllningsröret är för stort för höljen.
- 5 -
Exploded View and Parts List
Delnr.
Beskrivning
Antal.
Delnr.
Beskrivning
Antal.
1
Bas
1
9
Kolvpackning
1
2
Ram
1
10
Cylinder
1
3
Hantera
1
11
Ringlås
1
4
Mittgängstång
1
12
Fyllningsrör (liten)
1
5
Lossa ventilmutter
1
13
Fyllningsrör (medium)
1
6
O-ring
1
14
Fyllningsrör (stor)
1
7
Luftutsläppsventil
1
1 5
C lampa s
2
8
Kolv
1
15
- 6 -
Tillverkare: Shanghaimuxinmuyeyouxiangongsi
Adress: Shuangchenglu 803nong11hao1602A-1609shi, baoshanqu,
shanghai 200000 CN.
Importerad till AUS: SIHAO PTY LTD. 1 ROKEVA STREETEASTWOOD
NSW 2122 Australien
Importerad till USA: Sanven Technology Ltd. Suite 250, 9166 Anaheim
Place, Rancho Cucamonga, CA 91730


Técnico Soporte y certificado de garantía electrónica www.vevor.com/support
EMBUTIDOR DE SALCHICHAS
MODELO: 1A-SS305
We continue to be committed to provide you tools with competitive price.
"Save Half", "Half Price" or any other similar expressions used by us only represents an
estimate of savings you might benefit from buying certain tools with us compared to the major
top brands and does not necessarily mean to cover all categories of tools offered by us. You
are kindly reminded to verify carefully when you are placing an order with us if you are
actually saving half in comparison with the top major brands.
- 1 -
MODELO: 1A-SS305
Have product questions? Need technical support? Please feel free to
contact us:
Technical Support and E-Warranty Certificate
www.vevor.com/support
NEED HELP? CONTACT US!
This is the original instruction, please read all manual instructions
carefully before operating. VEVOR reserves a clear interpretation of our
user manual. The appearance of the product shall be subject to the
product you received. Please forgive us that we won't inform you again if
there are any technology or software updates on our product.
SAUSAGE STUFFER

- 2 -
Advertencia: para reducir el riesgo de lesiones, el usuario
debe leer atentamente el manual de instrucciones.
ADVERTENCIA: Antes de utilizar este dispositivo, lea este manual de
instrucciones en su totalidad y manténgalo a mano para consultarlo en el
futuro. Siga siempre las precauciones básicas de seguridad al utilizar
estos dispositivos. Éstas incluyen:
1. No permita que niños menores de 14 años utilicen la máquina. Este
producto solo puede ser utilizado o mantenido por niños de 14 años o más,
personas con capacidades físicas, sensoriales o mentales reducidas o
personas no calificadas con la supervisión adecuada de un adulto. Los
niños no deben jugar con el dispositivo.
2. Para un funcionamiento y vida útil óptimos del dispositivo, siga las
instrucciones.
3. Los ácidos alimentarios corroerán el metal. Limpie siempre este equipo
de preparación de alimentos inmediatamente después de cada uso. Para
mantener la apariencia y aumentar la vida útil, límpielo diariamente.
4.El uso de accesorios o modificaciones no proporcionadas por el
fabricante puede causar peligros. Este producto sólo debe utilizarse para
el fin previsto y de la forma indicada en las instrucciones. Todos los demás
tipos de uso se considerarán inapropiados y peligrosos. El fabricante no
será responsable de ningún uso inadecuado o incorrecto ni de daños en la
instalación.
General Information and Instructions
INTRODUCCIÓN
Gracias y felicitaciones por comprar nuestra embutidora de salchichas de
5 libras. Su embutidora viene completa con todo lo que necesita para
rellenar salchichas de forma segura y sencilla. Tómese unos minutos para
leer este folleto y obtener más información sobre su embutidora de
salchichas. Su embutidora está fabricada con los mejores materiales para
garantizar un uso prolongado para todas sus necesidades de

- 3 -
procesamiento de carne.
DETALLES TÉCNICOS
Descripción
Capacidad
Dimensión
Peso
5 libras. Embutidora manual de
salchichas
5 libras.
(2L)
9,45" x 18,7" x
15,75
10,5
libras.
¡PRECAUCIÓN! ¡Cada vez que el pistón se levante del cilindro, suelte la
manija lentamente! ¡La presión o la gravedad podrían hacer que el mango
gire ligeramente hacia atrás y provoque lesiones!
INSTRUCCIONES DE OPERACIÓN
Paso 1: Limpia las piezas con agua y jabón y fija el tubo.
Paso 2: fije la manija con la tuerca y luego gírela en el sentido contrario a las
agujas del reloj para que el pistón salga del cilindro.
Paso 3: Saca el cilindro y mete la carne dentro.
Paso 4: Vuelva a colocar el cilindro.
Paso 5: Gire la manija en el sentido de las agujas del reloj para que el pistón
entre en el cilindro. Esto comenzará a empujar la carne hacia la tripa.
Paso 6: repita los pasos 3 al 5.
Paso 7: Cuando termine, asegúrese de limpiar todas las piezas
correctamente con agua tibia y jabón, déjelas secar y vuelva a ensamblarlas.
MANTENIMIENTO
1. Retire el pistón y el cilindro después de usarlos y lávelos con agua tibia y
jabón.
2. Seque el cuerpo, vuelva a montarlo y límpielo.
ADVERTENCIA: Sea siempre lo más minucioso posible al limpiar y
desinfectar los componentes. Cualquier parte expuesta a la carne cruda
puede albergar o desarrollar bacterias que causen enfermedades o la
muerte.
ADVERTENCIA: Al limpiar con desinfectantes, siga siempre las

- 4 -
recomendaciones del fabricante. Nunca utilice productos que hagan que las
superficies expuestas hagan que la carne no sea segura para el consumo.
¡El incumplimiento de esta advertencia puede provocar enfermedades o la
muerte!
General Information and Instructions
SOLUCIÓN DE PROBLEMAS
Problemas
Soluciones
El embutidor es difícil de poner en marcha.
1. La mezcla de salchicha se ha vuelto
demasiado dura. Agregue agua a la mezcla
. 2. Agregue lubricante (aceite mineral o
aceite vegetal) a la junta del pistón y al
interior del cilindro.
La carne pasa por el pistón.
1. La junta no está instalada.
2. Es necesario lubricar la junta.
Las tripas estallan al llenar.
1. Las carcasas son viejas y quebradizas.
2. Las tripas no estuvieron en remojo el
tiempo suficiente.
3. Las tripas estuvieron empapadas por
mucho tiempo.
4. Las tripas no deberían haberse
empapado.
5. Las tripas estaban demasiado apretadas.
6. El tubo de relleno tiene una rebaba y
perfora la carcasa.
7. El tubo de relleno es demasiado grande
para las tripas.
- 5 -
Exploded View and Parts List
15

- 6 -
Número de
pieza
Descripción
Ca
nt.
Número de
pieza
Descripción
Ca
nt.
1
Base
1
9
Junta de pistón
1
2
Marco
1
10
Cilindro
1
3
Manejar
1
11
Bloqueo de anillo
1
4
Varilla de rosca central
1
12
Tubo de relleno
(pequeño)
1
5
Tuerca de la válvula de
liberación
1
13
Tubo de relleno
(mediano)
1
6
junta tórica
1
14
Tubo de relleno
(grande)
1
7
Válvula de liberación
de aire
1
15
lámpara C
2
8
Pistón
1
Fabricante: Shanghaimuxinmuyeyouxiangongsi
Dirección: Shuangchenglu 803nong11hao1602A-1609shi, baoshanqu,
shanghai 200000 CN.
Importado a AUS: SIHAO PTY LTD. 1 ROKEVA STREET ASTWOOD
NSW 2122 Australia
Importado a EE. UU.: Sanven Technology Ltd. Suite 250, 9166
Anaheim Place, Rancho Cucamonga, CA 91730

- 7 -


Tecnico Supporto e certificato di garanzia elettronica www.vevor.com/support
INSIEME DI SALSICCIA
MODELLO: 1A-SS305
We continue to be committed to provide you tools with competitive price.
"Save Half", "Half Price" or any other similar expressions used by us only represents an
estimate of savings you might benefit from buying certain tools with us compared to the major
top brands and does not necessarily mean to cover all categories of tools offered by us. You
are kindly reminded to verify carefully when you are placing an order with us if you are
actually saving half in comparison with the top major brands.

- 1 -
MODELLO: 1A-SS305
Have product questions? Need technical support? Please feel free to
contact us:
Technical Support and E-Warranty Certificate
www.vevor.com/support
NEED HELP? CONTACT US!
This is the original instruction, please read all manual instructions
carefully before operating. VEVOR reserves a clear interpretation of our
user manual. The appearance of the product shall be subject to the
product you received. Please forgive us that we won't inform you again if
there are any technology or software updates on our product.
SAUSAGE STUFFER

- 2 -
Avvertenza: per ridurre il rischio di lesioni, l'utente deve
leggere attentamente il manuale di istruzioni.
ATTENZIONE: prima di utilizzare questo dispositivo, leggere
completamente questo manuale di istruzioni e tenerlo a portata di mano
per riferimento futuro. Seguire sempre le precauzioni di sicurezza di base
quando si utilizzano questi dispositivi. Questi includono:
1.Non consentire ai bambini di età inferiore a 14 anni di utilizzare la
macchina. Questo prodotto può essere utilizzato o sottoposto a
manutenzione solo da bambini di età pari o superiore a 14 anni, da
individui con capacità fisiche, sensoriali o mentali ridotte o da individui
inesperti con adeguata supervisione di un adulto. I bambini non devono
giocare con l'apparecchio.
2.Per un funzionamento e una durata ottimali del dispositivo, seguire le
istruzioni.
3. Gli acidi alimentari corrodono il metallo. Pulisci sempre questa
attrezzatura per la preparazione del cibo immediatamente dopo ogni
utilizzo. Per mantenere l'aspetto e aumentare la durata, pulirlo
quotidianamente.
4.L'uso di accessori o modifiche non forniti dal produttore può causare
pericoli. Questo prodotto deve essere utilizzato solo per lo scopo previsto e
nel modo indicato nelle istruzioni. Ogni altro tipo di utilizzo è da
considerarsi inappropriato e pericoloso. Il produttore non sarà responsabile
per eventuali usi impropri o errati e danni all'installazione.
General Information and Instructions
INTRODUZIONE
Grazie e congratulazioni per aver acquistato il nostro ripieno per salsicce
da 5 libbre. Il tuo insaccatore viene fornito completo di tutto il necessario
per farcire la salsiccia in modo facile e sicuro. Ti invitiamo a dedicare
qualche minuto alla lettura di questo opuscolo per saperne di più sul tuo
insaccatore per salsicce. Il tuo ripieno è realizzato con i migliori materiali

- 3 -
per garantire un uso prolungato per tutte le tue esigenze di lavorazione
della carne.
DETTAGLI TECNICI
Descrizione
Capacità
Dimensione
Peso
5 libbre. Insaccatrice manuale per
salsicce
5 libbre.
(2L)
9,45"x18,7"x15,7
5
10,5
libbre
ATTENZIONE! Ogni volta che il pistone viene sollevato dal cilindro, rilasciare
lentamente la maniglia! La pressione o la gravità potrebbero far ruotare
leggermente la maniglia all'indietro causando lesioni!
ISTRUZIONI PER L'USO
Passaggio 1: pulire le parti con acqua e sapone e fissare il tubo.
Passaggio 2: collegare la maniglia con il dado, quindi ruotare la maniglia in
senso antiorario in modo che il pistone esca dal cilindro.
Passaggio 3: estrarre il cilindro e inserire la carne.
Passaggio 4: rimettere a posto il cilindro.
Passaggio 5: ruotare la maniglia in senso orario in modo che il pistone si
sposti nel cilindro. Questo inizierà a spingere la carne nell'involucro.
Passaggio 6: ripetere i passaggi da 3 a 5.
Passaggio 7: al termine, assicurarsi di pulire correttamente tutte le parti con
acqua tiepida e sapone, lasciarle asciugare e rimontare.
MANUTENZIONE
1. Rimuovere il pistone e il cilindro dopo l'uso e lavarli con acqua tiepida e
sapone.
2. Asciugare il corpo, rimontarlo e pulirlo.
AVVERTENZA: prestare sempre la massima attenzione durante la pulizia e
la sanificazione dei componenti. Qualsiasi parte esposta alla carne cruda
può ospitare o sviluppare batteri che causano malattie o morte.
ATTENZIONE: durante la pulizia con disinfettanti, seguire sempre le

- 4 -
raccomandazioni del produttore. Non utilizzare mai prodotti che facciano sì
che le superfici esposte rendano la carne non sicura per il consumo. La
mancata osservanza di questo avvertimento può portare a malattie o morte!
General Information and Instructions
RISOLUZIONE DEI PROBLEMI
I problemi
Soluzioni
Il ripieno è difficile da avviare.
1. Il composto della salsiccia è
diventato troppo duro. Aggiungere
acqua per mescolare
2. Aggiungere lubrificante (olio
minerale o olio vegetale) alla
guarnizione del pistone e all'interno del
cilindro.
La carne passa attraverso il pistone.
1. La guarnizione non è installata.
2. La guarnizione deve essere
lubrificata.
Gli involucri scoppiano durante il riempimento.
1. Gli involucri sono vecchi e fragili.
2. Gli involucri non sono stati immersi
abbastanza a lungo.
3. Gli involucri sono rimasti immersi
troppo a lungo.
4. Gli involucri non devono essere
lasciati a bagno.
5. Gli involucri sono stati riempiti
eccessivamente.
6. Il tubo di riempimento presenta una
sbavatura e fora l'involucro.
7. Il tubo di riempimento è troppo
grande per i budelli.

- 5 -
Exploded View and Parts List
15

- 6 -
Parte
n.
Descrizione
Qtà
.
Parte
n.
Descrizione
Qtà
.
1
Base
1
9
Guarnizione pistone
1
2
Telaio
1
10
Cilindro
1
3
Maniglia
1
11
Blocco ad anello
1
4
Asta filettata centrale
1
12
Tubo di Ripieno
(Piccolo)
1
5
Dado della valvola di
rilascio
1
13
Tubo di Ripieno
(Medio)
1
6
O-ring
1
14
Tubo di Ripieno
(Grande)
1
7
Valvola di rilascio dell'aria
1
1 5
Lampada C s
2
8
Pistone
1
Produttore: Shanghaimuxinmuyeyouxiangongsi
Indirizzo: Shuangchenglu 803nong11hao1602A-1609shi, baoshanqu,
shanghai 200000 CN.
Importato in AUS: SIHAO PTY LTD. 1 ROKEVA STREETEASTWOOD
NSW 2122 Australia
Importato negli Stati Uniti: Sanven Technology Ltd. Suite 250, 9166
Anaheim Place, Rancho Cucamonga, CA 91730

- 7 -