
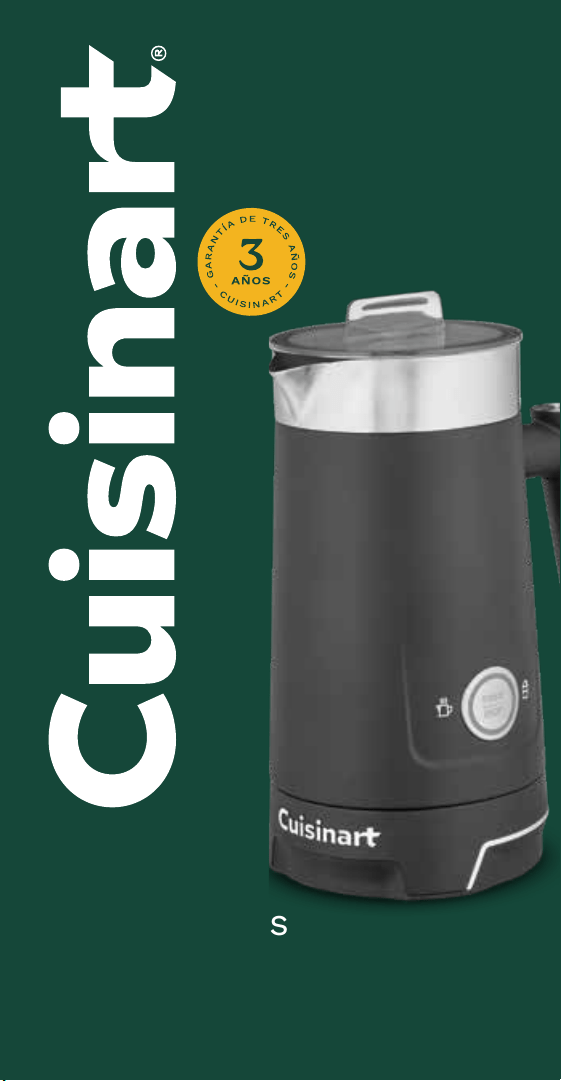
Hot/Cold Foam
Milk Frother
FR-16 SERIES
Instruction
& Recipe
Booklet
For your safety and continued
enjoyment of this product, always
read the instruction book
carefully before using.

2
Important
Safeguards
When using electrical appliances, basic safety
precautions should always be followed, including:
1. READ ALL INSTRUCTIONS.
2. Always unplug unit from outlet when not in use, before
putting on or taking o parts, and before cleaning. To
unplug, grasp plug and pull from electrical outlet. Never
pull cord.
3. To protect against risk of electric shock, do not put
the main unit, base, power cord, or plug in water or
other liquids.
4. Close supervision is necessary when any appliance is
used by or near children.
5. Do not operate any appliance with a damaged cord or
plug, after the appliance malfunctions, or if appliance
has been dropped or damaged in any manner. Return the
appliance to the nearest authorized Cuisinart Service
Facility for examination, repair, and electrical or
mechanical adjustment.
6. The use of attachments not recommended or sold by
Cuisinart may cause re, electric shock, or injury.
7. Do not let cord hang over edge of table or counter, or
touch hot surfaces.
8. Do not plug in or take out plug when your hands are wet.
9. Do not use outdoors.
10. Do not touch hot surfaces. Use Handles or knobs.
11. Do not operate your appliance in an appliance garage or
under a wall cabinet. When storing in an appliance
garage, always unplug the unit from the electrical outlet.
Not doing so could create a risk of re, especially if the
appliance touches the walls of the garage or the door
touches the unit as it closes.
12. Do not use the appliance for other than intended use.
13. Where applicable, always attach plug to appliance and
check that the control is o before plugging cord into
wall outlet. To disconnect, turn the control to OFF, then
remove plug from wall outlet.

3
14. Do not place on or near a hot gas or electric burner, or
in a heated oven.
15 Be especially careful when opening the cover; the
contents in the unit tank can splash out.
16. Do not move the unit while it is switched on. While
being moved, hot liquid can escape from the unit.
17. Allow unit to cool completely before handling.
18. During the operation of the machine, do not remove the
top cover. If you need to open the lid, press the START/
STOP Button to turn o the machine. Once the machine
is o and the whisk/stirrer has stopped rotating you can
remove the lid.
Save These
Instructions
For Household
Use Only
Special Cord
Set Instructions
A short power supply cord is provided to reduce the risks
of becoming entangled in or tripping over a longer cord.
Extension cords may be used if care is exercised. If an
extension cord is used, the marked electrical rating of
the extension cord should be at least as great as the
electrical rating of the appliance. The longer cord should
be arranged so that it will not drape over the countertop
or tabletop, where it can be pulled on by children or tripped
over unintentionally.
Notice
This appliance is supplied with a molded 3-prong
grounding-type plug and should be used in combination
with a properly connected grounding-type outlet.

4
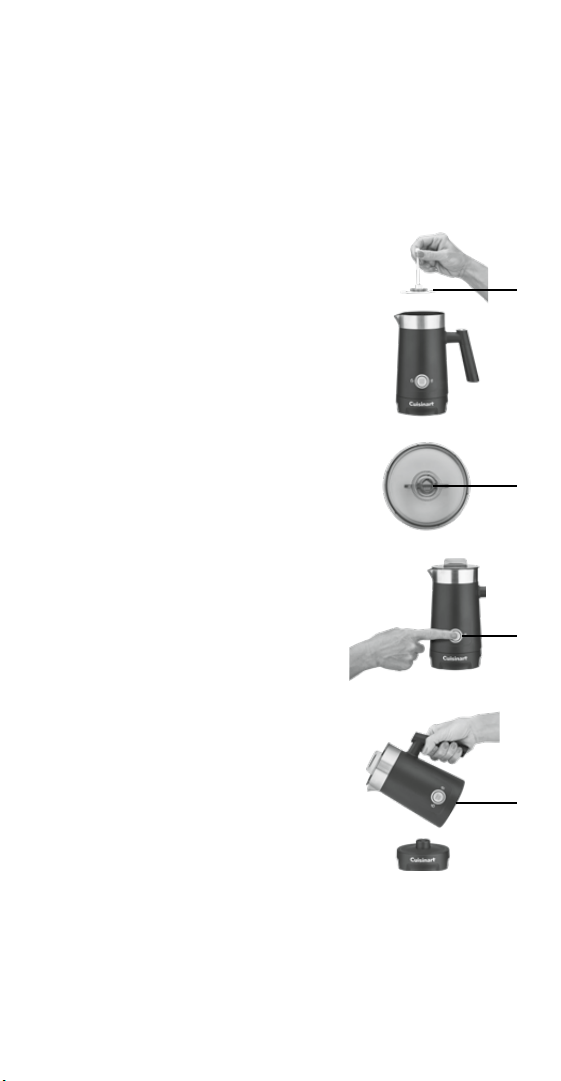
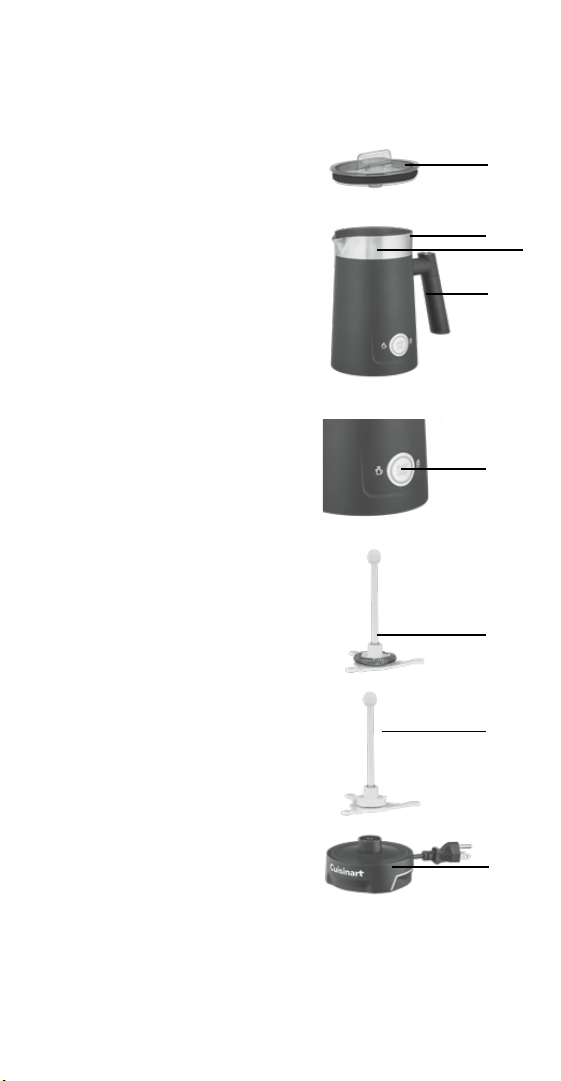
Features And Benefits
1. Transparent Cover with Seal
eliminates leaks and lets you
watch frothing
or warming process.
2. Integrated Spout
for easy pouring and
latte art designs.
3. Double-Walled Housing
stays cool to the touch when
frothing or warming milk.
4. Easy Grip Handle
features ergonomic design
for a precise pour.
5. START/STOP Button
with LED indicators
A. Press it once to warm
milk or froth hot milk.
The icon on the left
side of the button
will illuminate.
B. Keep it pressed for 5
seconds to froth cold
milk. The icon on the
right side of the button
will illuminate.
6. Whisk/Stirrer
A. Hot & Cold Milk
Frothing Whisk
(with spring) aerates
milk to create
creamy foam.
B. Milk Warming Stirrer
(without spring)
stirs milk as it heats
to prevent burning.
7. Base with Cord Wrap
for easier storage.
6B
1
2
4
3
6A
7
5

5
Before The First Use
Carefully unpack the unit and remove any packaging and
promotional labels in or on the milk frother. Rinse all
accessories thoroughly in warm soapy water and then
dry completely.
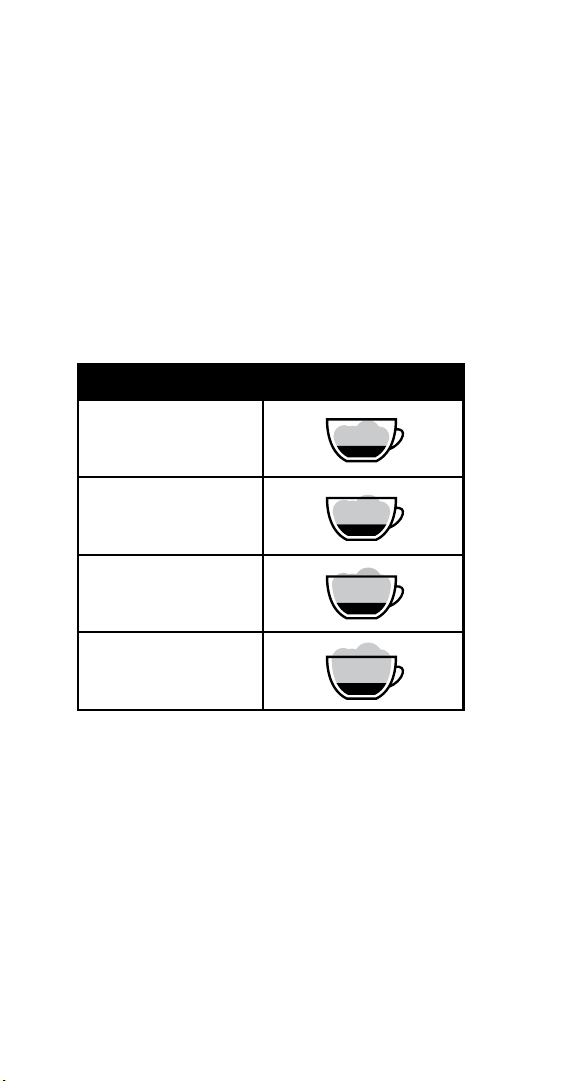
Tips For Frothing
Milk frothing is the steaming of milk. The steam does two
things: It heats milk and it mixes in air to form a foamy
texture. For best results use cold, refrigerated milk.
NOTE: Frothing levels depend on the amount of milk
being used.
Milk Frothing Levels
Whole Milk
Low-Fat Milk
Fat-Free Milk
Non-Dairy
Milk
6
Operating Instructions
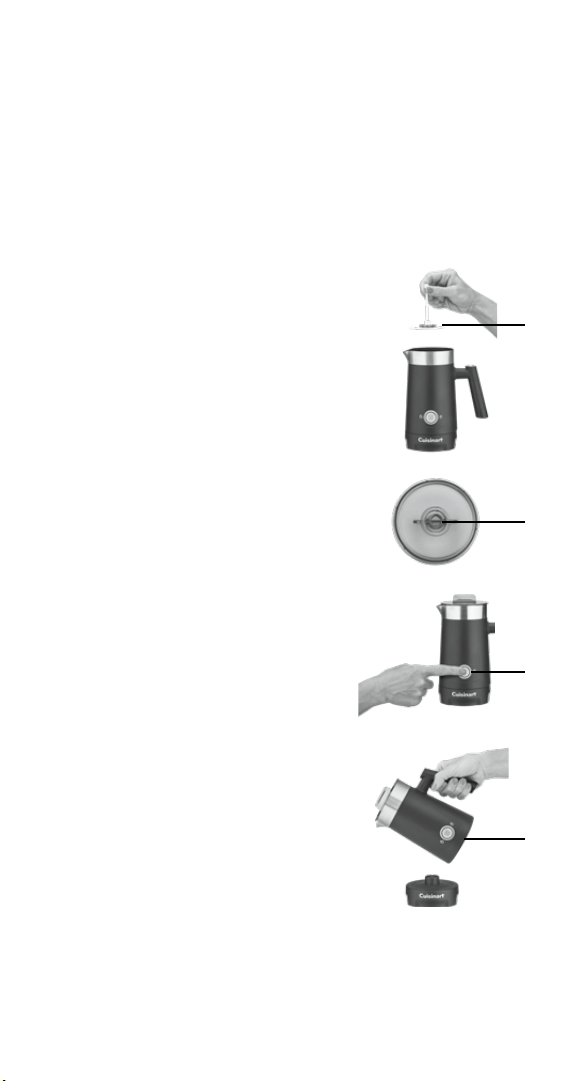
Frothing Milk
1. Remove the cover and insert the Hot & Cold Milk Frothing
Whisk (with spring) into the center bottom of the housing.
2. Fill the tank with the desired amount
of milk.
Note: Never ll milk over the
Froth Max ll line. Frothed milk
expands and it will overow the
tank if the level is too high.
3. Put the cover back on the tank.
Make sure the top of the whisk
is aligned with the center
of the cover.
4. Start frothing by pressing the
START/STOP Button. The LED light
will be illuminated during operation.
A. For hot milk foam: Press the
START/STOP Button once.
The left side of the button will
illuminate and frothing will begin.
B. For cold milk foam: Press and
hold the START/STOP Button
for 5 seconds. The right side of
the button will illuminate and
frothing will begin.
Note: The unit will automatically turn
o at the end of the frothing cycle.
5. Open the cover after frothing
is complete.
6. Pour or ladle the milk froth into
a cup or glass.
7. After using the unit, clean it as
described in the Cleaning and
Maintenance section, page 8.
Note: Wait for tank to cool
before cleaning.
1
3
4
6

7
Warming Milk
1. Remove the cover and insert the Milk Warming Stirrer
(without spring) into the center bottom of the housing.
Note: Ensure the spring is removed. To remove, carefully
apply upward pressure to the spring to disengage it from
the stirrer.
Once removed, you can store the spring by inserting
it under the cover.
2. Fill the tank with the desired amount of milk.
Note: Never ll milk over the Warm Max ll line.
3. Put the cover back on the tank. Make sure the top of the
stirrer is aligned with the center of the cover.
4. Start warming milk by pressing the START/STOP Button
once. The left side of the LED light will be illuminated
during operation.
Note: When preparation is done, the unit will
automatically turn o.
5. Open the cover after warming is complete.
6. Pour the warmed milk into a cup or glass.
7. After using the unit, clean it as described in the
Cleaning and Maintenance section.
Note: Wait for tank to cool before cleaning.

8
Cleaning And Maintenance
Always make sure the appliance is unplugged before you
start cleaning it.
1. Clean the exterior of the unit with a soft, moist cloth. If
heavily soiled, a mild detergent can be used.
2. Remove the whisk/stirrer from the tank and wash it with
soap under warm running water. The seal on the cover
can also be removed and washed under warm, soapy
water. Rinse all parts well.
3. Clean out the tank with hot water and a soft cloth after
use. If the tank is still soiled, wash using a soap solution
and rinse thoroughly. Use a soft cloth to prevent
damaging the nonstick coating.
CAUTION: Never submerge the main unit, base, power
cord, or plug in water or other liquids.
4. Maintenance: Any other servicing should be performed by
an authorized service representative.

9
Troubleshooting
Q: Why is the LED light not illuminating after I push
the START/STOP Button?
A: The plug is not plugged in. Make sure plug is placed
correctly in the outlet.
A: Temperature monitoring has been triggered. Let the unit
cool for 5 minutes.
Q: Why is milk leaking from around the cover?
A: Filling level was too high. Reduce the amount of milk in
the tank.
A: The seal ring is missing or dirty. Clean the seal ring
and replace.
A: The cover is not placed correctly over the milk tank. Put
the cover on so that it is ush with the tank and the seal
is not showing.
Q: Why is the milk froth not coming out the way I want?
A: Check the whisk/stirrer. To prepare hot or cold milk
foam, make sure the spring is attached. For warm milk,
remove the spring. Follow instructions under Warming
Milk on page 7 for spring removal and storage.

10
Recipes
Cappuccino
The traditional espresso-based drink topped with a lush
layer of foam. Non-dairy milk can easily be substituted.
Makes 1 serving
¼ cup cold whole milk
1 shot freshly brewed espresso
1. Assemble the milk frother with the frothing whisk (with
spring). Add the milk to the frother. Put the cover on the
tank and press the START/STOP Button once.
2. Pour the brewed espresso into a mug.
3. When the frothing process is complete, pour the milk
into the mug and spoon the remaining foam on top.
Serve immediately.
Café au Lait
Strongly brewed coee and heated milk come together
for this French classic.
Makes 1 serving
½ cup cold whole milk
½ cupstrongfreshlybrewedcoee
1. Assemble the milk frother with the milk warming stirrer
(without spring). Add the milk to the frother. Put the
cover on the tank.
2. Press the START/STOP Button once. When the steaming
process is complete, simultaneously pour the milk and
coee into a large mug. Serve immediately.

11
Flat White
Get your morning burst of energy with
this classically small yet strong latte.
Makes 1 serving (3/4 cup)
¼ cup whole milk
2 shots freshly brewed espresso
1. Assemble the milk frother with the milk warming stirrer
(without spring). Add the milk to the tank and put the
cover on.
2. Press the START/STOP Button once to begin steaming the
milk. When the steaming process is complete, pour the
espresso into a mug, and then the steamed milk. Serve
immediately.
Toffee Chai Latte
Sweet toee syrup meets spicy tea
to create a treat-worthy latte.
Makes 1 serving
ToeeSyrup:
½ cupwater
½ cupbrownsugar
½ cuptoeebits,suchasHeathbrand
Pinchkoshersalt
Latte:
½ cup chai concentrate
½ cup whole milk
1 tablespoontoeesyrup
Groundcinnamon,forgarnish
1. Put the water, brown sugar, toee, and salt in a small pot
set over medium heat. Bring to a simmer, stirring until the
toee is completely dissolved. Remove from the heat,
and strain if necessary. Chill completely before using.

12
2. Assemble the milk frother with the milk warming stirrer
(without spring). Add the chai concentrate to the frother
and put the cover on the tank.
3. Press the START/STOP Button once. When the steaming
process is complete, pour the hot tea into a mug.
Carefully remove the milk warming stirrer.
4. Install spring back onto the whisk/stirrer and insert the
frothing whisk (with spring) into the frother. Add the milk
and toee syrup. Put the cover on the tank.
5. Press the START/STOP Button once. When the frothing
process is complete, pour the toee milk into the hot tea.
Garnish with ground cinnamon and serve immediately.
Note: Toee syrup can be stored in an airtight container in
the refrigerator for up to a week.
London Fog Steamer
Pair this citrus-forward drink with a piece of toast or a
sweet shortbread.
Makes 1 serving
½ cup milk (any variety)
1 tablespoon simple syrup*
2 teaspoons pure vanilla extract
½ cup freshly brewed double-strength
Earl Grey tea
1 1-inch piece orange rind
1. Assemble the milk frother with the milk warming stirrer
(without spring). Add the milk, simple syrup, and vanilla to
the frother. Put the cover on the tank.
2. Press the START/STOP Button once. When the steaming
process is complete, pour the hot tea into a mug, and
then follow with the steamed milk mixture. Garnish with
orange rind and serve immediately.
*Simple syrup is equal parts water and sugar cooked over
medium-low heat until the sugar has dissolved. Cool
completely before using. When stored in a sealed container
the simple syrup will last in a refrigerator for up to 2 weeks.

13
Hot Chocolate
Cozy snow-day treat for one.
Makes 1 serving
1/2 cup whole milk
1/4 cup half-and-half
2 tablespoons cocoa powder
2 tablespoons granulated sugar
½ teaspoon pure vanilla extract
Pinch kosher salt
1. Assemble the milk frother with the milk warming stirrer
(without spring). Add all ingredients, in the order listed, to
the frother. Put the cover on the tank.
2. Press the START/STOP Button once. When steaming is
complete, pour into a mug. Serve immediately.
Honey Lavender Iced Latte
Use leftover lavender simple syrup in steamed milk
or try it in a cocktail!
Makes 1 serving
Lavender Simple Syrup:
1 cup granulated sugar
1 cup water
1 tablespoon dried culinary
lavender
Latte:
¼ cup milk (any variety)
2½ teaspoons lavender simple syrup
½ teaspoon honey
1 cup ice
2 shots freshly brewed espresso

14
1. Put the water and sugar in a small pot over medium heat.
Bring to a simmer, stirring until the sugar is completely
dissolved. Remove from the heat and add the dried
lavender. Let steep for 30 minutes. Strain the syrup
through a ne-mesh strainer placed over a small bowl.
Discard the lavender. Cover the syrup, and chill
completely before using.
2. Assemble the milk frother with the frothing whisk
(with spring). Add the milk, syrup, and honey to the
frother. Put the cover on the tank.
3. Press and hold the START/STOP Button for 5 seconds.
The right side of the button will illuminate for the cold
foam option. When the frothing process is complete, ll a
glass with ice. Pour the espresso over the ice, then top
with the lavender milk. Serve immediately.
Note: Lavender simple syrup can be stored in an airtight
container in the refrigerator for up to a week.
Tiramisu Cold Foam
A generous dollop of this sweetened mascarpone cream
makes any iced coee beverage an instant dessert.
Makes 2 servings
¼ cup whole milk
1½ teaspoons granulated sugar
1 tablespoon mascarpone
2 tablespoons heavy cream
2 servingsicedcoeeorcoldbrew
½ teaspooncocoapowder,forgarnish
1. Add the milk, granulated sugar, and mascarpone to a
small bowl. Whisk together until the sugar is dissolved
and the mascarpone is well incorporated. Stir in the
heavy cream.
2. Assemble the milk frother with the frothing whisk (with
spring). Add the mascarpone cream to the frother. Put
the cover on the tank.

15
3. Press and hold the START/STOP Button for 5 seconds.
The right side of the button will illuminate. When the
frothing process is complete, pour the cold foam over
the iced coee or cold brew, and garnish with the cocoa
powder. Serve immediately.
Iced Matcha Latte
Refreshing on a hot day, this latte uses the Cold Foam
feature, so you can get a boost from this favorite
drink in no time.
Makes 1 serving
1/2 cupoatmilk(baristablendworksbest)
1 teaspoon honey (optional)
1 teaspoon matcha powder
Ice
1. Assemble the milk frother with the frothing whisk (with
spring). Add the milk, honey, and matcha. Put the cover
on the tank.
2. Press and hold the START/STOP Button for 5 seconds.
The right side of the button will illuminate.
3. While the milk mixture is frothing, ll a tall glass with ice.
When the frothing process is complete, pour the latte
over the ice. Serve immediately.

16
Warranty
Limited Three-Year Warranty
This warranty is available to U.S. consumers who
purchase products directly from Cuisinart or an
authorized Cuisinart
®
reseller. You are a consumer if
you own a Cuisinart
®
Hot/Cold Foam Milk Frother that was
purchased at retail for personal, family, or household use.
Except as otherwise required under applicable law, this
warranty is not available to retailers or other
commercial purchasers, owners, or consumers who
purchase from unauthorized Cuisinart
®
resellers. We
warrant that your Cuisinart
®
Hot/Cold Foam Milk Frother will
be free of defects in materials and workmanship under
normal home use for 3 years from the date of original
purchase. We recommend that you visit our
website, https://cuisinart.registria.com, for a fast, ecient
way to complete your product registration. However,
product registration does not eliminate the need for the
consumer to maintain the original proof of purchase in order
to obtain the warranty benets. In the event that you do not
have proof of purchase date, the purchase date for
purposes of this warranty will be the date of manufacture.
California Residents Only
California law provides that for In-Warranty Service,
California residents have the option of returning a
nonconforming product (A) to the store where it was
purchased or (B) to another retail store that sells Cuisinart
products of the same type. The retail store shall then,
according to its preference, either repair the product, refer
the consumer to an independent repair facility, replace the
product, or refund the purchase price less the amount
directly attributable to the consumer’s prior usage of the
product. If neither of the above two options results in the
appropriate relief to the consumer, the consumer may then
take the product to an independent repair facility, if service
or repair can be economically accomplished.
Cuisinart and not the consumer will be responsible for the
reasonable cost of such service, repair, replacement, or
refund for nonconforming products under warranty.
California residents may also, according to their preference,
return nonconforming products directly to Cuisinart for
repair or, if necessary, replacement by calling our Consumer

17
Service Center toll-free at 1-800-726-0190.
Cuisinart will be responsible for the cost of the repair,
replacement, and shipping and handling for such
nonconforming products under warranty.
Hassle-Free Replacement Warranty
Your ultimate satisfaction in Cuisinart products is our goal,
so if your Cuisinart
®
Hot/Cold Foam Milk Frother should fail
within the generous warranty period, we will repair it or, if
necessary, replace it at no cost to you.
To obtain a return shipping label, visit us at https://www.
cuisinart.com/customer-care/product-assistance/product-
inquiry/. Or call our toll-free customer service department
at 1-800-726-0190 to speak with a representative.
Your Cuisinart
®
Hot/Cold Foam Milk Frother has been
manufactured to the strictest specications and has been
designed for use only in 120-volt outlets and only with
authorized accessories and replacement parts.
This warranty expressly excludes any defects or damages
caused by attempted use of this unit with a converter,
as well as use with accessories, replacement parts, or repair
service other than those authorized by Cuisinart. This
warranty does not cover any damage caused by accident,
misuse, shipment, or other than ordinary household use.
This warranty excludes all incidental or consequential
damages. Some states do not allow the exclusion or
limitation of these damages, so these
exclusions may not apply to you. You may also have other
rights, which vary from state to state.
Important: If the nonconforming product is to be serviced
by someone other than Cuisinart’s Authorized Service
Center, please remind the servicer to call our Consumer
Service Center at 1-800-726-0190 to ensure that the
problem is properly diagnosed, to ensure the product is
serviced with the correct parts, and to ensure that the
product is still under warranty.

IB-18559-ESP
© 2024 Cuisinart
Glendale, AZ 85307
Printed in China
24ce93061
Espumador de
Leche Caliente/Fría
SERIE FR-16
Manual de
Instrucciones
& Libro de
Recetas
Para su seguridad y para disfrutar
plenamente de este producto,
siempre lea atentamente las
instrucciones antes del uso.

2
Medidas de
Seguridad
Importantes
Al usar aparatos eléctricos, siempre se deben tomar
precauciones básicas de seguridad, entre ellas las
siguientes:
1. LEA TODAS LAS INSTRUCCIONES.
2. Siempre desenchufe el aparato cuando no esté en uso,
antes de instalar/quitar piezas y antes de limpiarlo. Para
desenchufar, agarre el enchufe y jálelo para sacarlo de la
toma de corriente; nunca jale el cable.
3. Para reducir el riesgo de descarga eléctrica, no ponga la
base, el cable ni el enchufe en agua u otros líquidos.
4. Supervise el uso de este aparato con cuidado cuando
sea usado por o cerca de niños.
5. No use este aparato si el cable o el enchufe están
dañados, después de un mal funcionamiento, después
de una caída, o si está dañado. devuélvalo a un centro de
servicio autorizado para su revisión, reparación o ajuste
(eléctrico o mecánico)
6. El uso de accesorios/aditamentos no recomendados o
vendidos por Cuisinart presenta un riesgo de incendio,
descarga eléctrica o lesiones personales.
7. No deje que el cable cuelgue de la encimera o de la
mesa, ni que tenga contacto con supercies calientes.
8. No enchufe/desenchufe el cable con las manos mojadas.
9. No lo use en exteriores.
10. No toque las supercies calientes; use los mangos/asas/
agarraderas y los botones/perillas/diales.
11. Do not operate your appliance in an appliance garage or
under a wall cabinet. When storing in an appliance
garage, always unplug the unit from the electrical outlet.
Not doing so could create a risk of re, especially if the
appliance touches the walls of the garage or the door
touches the unit as it closes.
12. Do not use the appliance for other than intended use.

3
13. Si corresponde, conecte el cable al aparato y compruebe
que el aparato esté apagado antes de conectar el cable a
la toma de corriente. Para desconectar, ponga todos los
controles en la posición de apagado “OFF”, y luego
desenchufe el aparato.
14.
No coloque el aparato sobre o cerca de un quemador a gas
o de un hornillo eléctrico caliente, ni en un horno caliente.
15. Tenga mucho cuidado al abrir la tapa; el contenido del
depósito puede salpicar.
16. Nunca mueva el aparato mientras está encendido; líquido
caliente podría derramarse.
17. Deje que aparato se enfríe completamente antes de
manipularlo.
18. No quite la tapa durante el funcionamiento. Si necesita
abrir la tapa, apague el aparato, presionando el botón de
START/STOP. Cuando el batidor/agitador deje de girar,
puede quitar la tapa.
Guarde estas
Instrucciones
Para Uso Doméstico
Solamente
USO DE ALARGADORES
El cable provisto con este aparato es corto, para reducir
el riesgo de que alguien se enganche o tropiece con un cable
más largo. Se puede usar un cable alargador/de extensión,
siempre que respete las precauciones siguientes. La
clasicación nominal del cable alargador/de extensión debe ser
por lo menos igual a la del aparato. El cable más largo debe ser
acomodado de tal manera que no cuelgue de la encimera/
mesa, donde puede ser jalado por niños o causar tropiezos.
Aviso
Para su protección, el cable de este aparato cuenta con un
enchufe con puesta a tierra, el cual debe ser conectado a
una toma de corriente debidamente puesta a tierra.
4
Piezas y Características
1. Tapa transparente con sello
Evita las fugas y permite observar
el proceso de calentamiento/
espumado.
2. Pico vertedor integrado
Para un fácil vertido y diseños
artísticos en latte.
3. Depósito de doble pared
Permanece frío al tacto
durando el proceso
de espumado
4. Asa ergonómica
Diseño de fácil agarre para
un vertido preciso.
5. Botón START/STOP
(encendido/apagado)
con indicadores LED
A. Presiónelo una vez para
calentar leche o espumar
leche caliente; el ícono a la
izquierda del botón se
encenderá.
B. Manténgalo presionado
para espumar leche fría;
el ícono a la derecha del
botón se encenderá.
6. Batidor/Agitador 2 en 1
A. Batidor espumador
(con el resorte puesto);
emulsiona la leche caliente/fría
para crear una espuma cremosa.
B. Agitador (sin el resorte);
revuelve la leche mientras
se calienta para evitar que
se queme.
7. Base con espacio para
enrollar el cable
Para un fácil almacenamiento.
6B
1
2
4
3
6A
7
5
5
Antes del Primer Uso
Retire con cuidado el aparato del material de embalaje y
quite las etiquetas promocionales pegadas a su carcasa.
Lave todos los accesorios en agua tibia con jabón y
séquelos bien.
Consejos
Espumar leche consiste en calentarla con vapor. El vapor
incorpora aire en la leche mientras la caliente para
espumarla. Para conseguir resultados óptimos, use
leche refrigerada.
NOTA: El nivel de espuma depende de la cantidad de
leche usada.
Leche Nivel de espuma
Leche entera
Leche baja en grasa/
semidescremada
Leche sin grasa/
descremada
Leche vegetal
6
Instrucciones de Uso
Cómo espumar leche
1. Quite la tapa e introduzca el batidor espumador (con el
resorte puesto) en la cavidad en el fondo del depósito.
2. Vierta la cantidad deseada de leche en
el depósito, sin exceder la línea
“FROTH MAX”.
La leche se dilata al espumarse y
se derramará si el depósito está
muy lleno.
3. Cierre la tapa, comprobando que la
parte superior del batidor/agitador
esté alineada con el centro de la tapa.
4. Presione el botón START/STOP para
empezar a espumar la leche; el indicador
luminoso se encenderá y permanecerá
encendido durante el funcionamiento.
A. Para espumar leche caliente:
Presione el botón START/STOP una
vez; el indicador luminoso al lado
izquierdo del botón se encenderá.
B. Para espumar leche fría: Mantenga
presionado el botón START/ STOP
por 5 segundos; el indicador
luminoso al lado derecho del
botón se encenderá.
Nota: El aparato se apagará
automáticamente al nal del ciclo
de espumado.
5. Quite la tapa.
6. Vierta la espuma de leche en una
taza o un vaso.
7. Después del uso, limpie el aparato
como se describe en la sección
“Limpieza y mantenimiento”.
Nota: Deje que el depósito se enfríe
completamente antes de limpiar el aparato.
1
3
4
6

7
Cómo calentar leche
1. Quite la tapa e introduzca el agitador (sin el resorte) en la
cavidad en el fondo del depósito.
Nota: Cerciórese de quitar el resorte
del batidor/agitador, jalándolo hacia arriba hasta
que salga.
Después de quitar el resorte, guárdelo debajo de la tapa
para no perderlo.
2. Vierta la cantidad deseada de leche en el depósito, sin
exceder la línea “WARM MAX”.
3. Cierre la tapa, comprobando que la parte superior del
batidor/agitador esté alineada con el centro de la tapa.
4. Presione el botón START/STOP una vez para empezar a
calentar la leche; el indicador luminoso al lado izquierdo
del botón se encenderá.
Nota: El aparato se apagará automáticamente al nal del
ciclo de calentamiento.
5. Quite la tapa.
6. Vierta la leche caliente en una taza o un vaso.
7. Después del uso, limpie el aparato como se describe en
la sección “Limpieza y mantenimiento”.
Nota: Deje que el depósito se enfríe completamente
antes de limpiar el aparato.

8
Limpieza y Mantenimiento
Siempre desenchufe el aparato antes de limpiarlo.
1. Limpie el exterior del aparato con un paño suave
humedecido con agua. Si está muy sucio, puede usar un
detergente suave.
2. Retire el batidor/agitador del depósito y lávelo en agua
jabonosa tibia. Quite el sello de la tapa y lávelo en agua
jabonosa tibia. Enjuague bien las piezas.
3. Enjuague el interior del depósito con agua caliente y
séquelo con un paño suave. De ser necesario, lávelo con
detergente y enjuáguelo bien. Use un paño suave para
evitar dañar el revestimiento antiadherente.
PRECAUCIÓN: Nunca sumerja la base, el cable ni el
enchufe en agua u otros líquidos.
4. Mantenimiento: Cualquier otro servicio debe ser realizado
por un técnico de servicio autorizado.

9
Resolución de Problemas
Problema: El indicador luminoso no se enciende al presionar
el botón START/STOP.
Solución: El aparato no está enchufado. Compruebe que el
cable esté enchufado en la toma de corriente.
Solución: El aparato se ha sobrecalentado. Deje que se
enfríe por 5 minutos.
Problema: Leche está saliendo por la tapa.
Solución: Se ha llenado demasiado el depósito. Reduzca
la cantidad de leche.
Solución: El sello no está en su sitio o está sucio. Lave el
sello y vuelva a instalarlo.
Solución: La tapa no está correctamente instalada.
Coloque la tapa sobre el depósito de manera que
el sello no sea visible.
Problema: La espuma no es como la quiero.
Solución: Compruebe el batidor/agitador. Para espumar
leche caliente/fría, instale el resorte. Para
calentar leche, quite el resorte. Véase las
instrucciones en la página 7.

10
Recetas
Capuchino
La tradicional bebida a base de expreso, coronada con una
exuberante capa de espuma. Se puede sustituir fácilmente
por leche no láctea.
Rinde 1 porción
¼ taza(60ml)delecheenterafría
1 tacita de expreso fresco
1. Colocar el batidor/agitador (con el resorte puesto) en el
depósito. Agregar la leche. Cerrar la tapa y presionar el
botón START/STOP una vez.
2. Verter el expreso en una taza grande.
3. Finalizado el ciclo de espumado, agregar la leche al café,
usando una cuchara para retener la espuma. Servir
inmediatamente.
“Café au lait” (café con leche)
Café fuerte y leche caliente se unen en este
clásico francés.
Rinde 1 porción
½ taza(120ml)delecheenterafría
½ taza(120ml)decaféfuertefresco
1. Colocar el batidor/agitador (sin el resorte) en el depósito.
Agregar la leche. Cerrar la tapa.
2. Presionar el botón START/STOP una vez. Finalizado el
ciclo de calentamiento, verter al mismo tiempo la leche y
el café en una taza grande. Servir inmediatamente.

11
“Flat White”
Llénese de energía por las mañanas con este clásico café
con leche pequeño pero fuerte.
Rinde 1 porción de ¾ de taza (175ml)
¼ taza(60ml)delecheentera
2 tacitas de expreso fresco
1. Colocar el batidor/agitador (sin el resorte) en el depósito.
Agregar la leche y cerrar la tapa.
2. Presionar el botón START/STOP una vez. Finalizado el
ciclo de calentamiento, verter el expreso en una taza y
agregar la leche. Servir inmediatamente.
Latte de té Chai con sabor a tofi
El jarabe de to dulce se combina deliciosamente con el té
especiado para crear un latte digno de un capricho.
Rinde 1 porción
Jarabedeto:
½ taza(120ml)deagua
½ taza llena (100 g) de azúcar moreno
½ taza(100g)detrocitosdeto(p.ej.,Heath®)
1 pizca de sal kosher
Latte:
½ taza(120ml)deconcentradodetéChai
½ taza(120ml)delecheentera
1 cucharadadejarabedeto
Canelaenpolvo,paradecorar
1. Colocar el agua, el azúcar, los tos y la sal en una
cacerola pequeña; poner a calentar a fuego medio hasta
que la mezcla empiece a hervir, revolviendo hasta que los
caramelos se hayan disuelto por completo. Retirar del
fuego y colar si es necesario. Refrigerar completamente
antes de usar.

12
2. Colocar el batidor/agitador (sin el resorte) en el depósito.
Colocar el concentrado de té Chai en el depósito y cerrar
la tapa.
3. Presionar el botón START/STOP una vez. Finalizado el
ciclo de calentamiento, verter el té en una taza grande.
Quitar con cuidado el batidor/agitador.
4. Volver a instalar el resorte en el batidor/agitador y colocar
este en el depósito. Agregar la leche y el jarabe de to
Cerrar la tapa.
5. Presionar el botón START/STOP una vez. Finalizado el
ciclo, agregar lentamente la leche al té caliente.
Espolvorear con canela en polvo y servir inmediatamente.
Nota: El jarabe de to puede refrigerase por un máximo de
una semana, en un recipiente hermético
“London Fog Steamer”
Combine esta bebida con sabor a cítricos con una tostada
o un pan dulce.
Rinde 1 porción
½ taza(120ml)deleche(cualquiervariedad)
1 cucharadadejarabesimple*
2 cucharaditas de extracto natural de vainilla
½ taza(120ml)detéEarlGreyfuertefresco
1 trozodecáscaradenaranjade1in(2.5cm)
1. Colocar el batidor/agitador (sin el resorte) en el depósito.
Agregar la leche, el jarabe simple y la vainilla. Cerrar la
tapa.
2. Presionar el botón START/STOP una vez. Finalizado el
ciclo de calentamiento, verter el té caliente en una taza y
agregar la leche. Decorar con cáscara de naranja y servir
inmediatamente.
*Calentar partes iguales de agua y azúcar a fuego medio-
bajo hasta que el azúcar se hay disuelto. Dejar enfriar antes
de usar. El jarabe simple puede refrigerase por un máximo
de dos semanas, en un recipiente hermético.

13
Chocolate caliente
Una delicia para los días de nieve.
Rinde 1 porción
½ taza(120ml)delecheentera
¼ taza (60 ml) de crema líquida “half-and-half”
(mitad leche/mitad crema)
2 cucharadas (10 g) de cacao en polvo
2 cucharadas(35g)deazúcargranulada
½ cucharadita de extracto natural de vainilla
1 pizca de sal kosher
1. Colocar el batidor/agitador (sin el resorte) en el depósito.
Colocar los ingredientes en el depósito, en el orden
indicado. Cerrar la tapa.
2. Presionar el botón START/STOP una vez. Finalizado el
ciclo de calentamiento, verter la mezcla en una taza
grande. Servir inmediatamente.
Latte helado con miel y jarabe
de lavanda
¡Agregue el jarabe de lavanda sobrante a leche
caliente o cócteles!
Rinde 1 porción
Jarabe de lavanda:
1 taza (200 g) de azúcar granulada
1 taza(235ml)deagua
1 cucharada de lavanda seca de grado alimenticio
Latte:
¼ taza (60 ml) de leche (cualquier variedad)
2½ cucharaditasdejarabedelavanda
½ cucharadita de miel

14
1 taza de cubitos de hielo (aprox. 8)
2 tacitas de expreso fresco
1. Colocar el agua y el azúcar en una cacerola pequeña..
Calentar hasta que la mezcla empiece a hervir,
revolviendo hasta que el azúcar se haya disuelto por
completo. Retirar del fuego y agregar la lavanda seca.
Dejar reposar por 30 minutos. Colar la salsa con un
colador de malla na puesto por encima de un tazón
pequeño (tirar la lavanda). Dejar enfriar completamente
antes de usar.
2. Colocar el batidor/agitador (con el resorte puesto) en el
depósito. Agregar la leche, el jarabe y la miel. Cerrar la
tapa.
3. Mantener presionado el botón START/STOP por 5
segundos; el indicador luminoso al lado derecho del
botón se encenderá. Finalizado el ciclo de espumado,
llenar un vaso con hielo. Agregar el expreso y la leche con
sabor a lavanda. Servir inmediatamente.
Nota: El jarabe de lavanda puede refrigerase por un máximo
de una semana, en un recipiente hermético.
Espuma fría con sabor a tiramisú
Una generosa porción de esta crema de mascarpone
azucarada convierte cualquier bebida de café helado en un
postre instantáneo.
Rinde 2 porciones
¼ taza(60ml)delecheentera
1½ cucharaditas de azúcar granulada
1 cucharada de mascarpone
2 cucharadas de crema líquida para batir
(“heavycream”)
2 porcionesdecaféheladoocafépreparado
en frío
½ cucharaditadecacaoenpolvo,paradecorar

15
1. Colocar la leche, el azúcar y el mascarpone en un tazón
pequeño. Batir hasta que el azúcar se haya disuelto.
Agregar la crema líquida; combinar.
2. Colocar el batidor/agitador (con el resorte puesto) en el
depósito. Agregar la crema de mascarpone. Cerrar la
tapa.
3. Mantener presionado el botón START/STOP por 5
segundos; el indicador luminoso al lado derecho del
botón se encenderá. Finalizado el ciclo de espumado,
agregar la espuma fría al café helado y espolvorear con
cacao en polvo. Servir inmediatamente.
Latte de té matcha
Refrescante en un día caluroso, este café con leche usa la
función de espumado en frío, para que esta bebida
favorita esté lista en un instante.
Rinde 1 porción
½ taza (120 ml) de leche de avena (preferiblemente
de barista)
1 cucharadita de miel (opcional)
1 cucharaditadetéverdematchaenpolvo
Hielo
1. Colocar el batidor/agitador (con el resorte puesto) en el
depósito. Agregar la leche, la miel y el té matcha. Cerrar
la tapa.
2. Mantener presionado el botón START/STOP por 5
segundos; el indicador luminoso al lado derecho del
botón se encenderá.
3. Llenar un vaso alto con hielo. Finalizado el ciclo de
espumado, agregar el latte. Servir inmediatamente.

16
Garantía
Garantía Limitada de Tres Años
Esta garantía es válida en los Estados Unidos, para los
consumidores que hayan comprado este producto
directamente a Cuisinart o a un revendedor autorizado de
Cuisinart. Usted es un consumidor si posee un espumador
de leche caliente/fría Cuisinart® que haya sido comprado
en una tienda para uso personal, familiar o casero. A menos
que la ley aplicable exija lo contrario, esta garantía no es
para los minoristas u otros consumidores/compradores
comerciales, ni propietarios/consumidores que hayan
comprado este producto a revendedores no autorizados por
Cuisinart. Cuisinart garantiza este producto contra todo
defecto de materiales o fabricación durante 3 años después
de la fecha de compra original, siempre que haya sido usado
para uso doméstico y de acuerdo con las instrucciones. Se
recomienda llenar el formulario de registro disponible en
https://cuisinart.registria.com a n de facilitar la vericación
de la fecha de compra original de este producto. Sin
embargo, no es necesario registrar el producto para recibir
servicio bajo esta garantía. En ausencia de prueba de la
fecha de compra, el período de garantía será calculado a
partir de la fecha de fabricación del producto.
Residentes de California
La ley del Estado de California ofrece dos opciones
adicionales de servicio de garantía. Los residentes del
Estado de California pueden devolver el producto
defectuoso (A) a la tienda donde lo compraron, o (B) a
otra tienda que venda productos Cuisinart del mismo tipo.
La tienda podrá, a su elección, reparar el producto, referir
al consumidor a un centro de servicio independiente,
sustituir el producto, o reembolsar al consumidor el
precio de compra menos la cantidad directamente
atribuible al uso anterior del producto por el consumidor.
Si estas dos opciones no satisfacen al consumidor, podrá
llevar el aparato a un centro de servicio independiente,
siempre que se pueda arreglar o reparar el aparato de
manera económica.
Cuisinart (no el consumidor) será responsable por los gastos
de servicio, reparación, sustitución o reembolso de los
productos defectuosos bajo garantía.

17
Los residentes de California también pueden, si lo desean,
enviar el producto defectuoso directamente a Cuisinart para
que sea reparado o sustituido. Para esto, se debe llamar a
nuestro servicio de atención al cliente al 1-800-726-0190.
Cuisinart será responsable por los gastos de reparación,
reemplazo, manejo y envío de los productos defectuosos
durante el período de garantía.
Garantía de Reemplazo sin Dificultades
Su máxima satisfacción es nuestra prioridad, así que, si este
producto Cuisinart
®
falla dentro del generoso período de
garantía, lo repararemos o, de ser necesario, lo
reemplazaremos, sin costo alguno para usted
Para obtener una etiqueta de devolución, visite https://
www.cuisinart.com/customer-care/product-assistance/
product-inquiry/. O llame sin cargo a nuestro servicio de
atención al cliente, al 1-800-726-0190 para hablar con
un representante.
Este producto satisface las más altas exigencias de
fabricación y ha sido diseñado para funcionar con 120V,
usando accesorios y repuestos autorizados solamente.
Esta garantía excluye expresamente los defectos o daños
causados por accesorios, piezas o reparaciones no
autorizados por Cuisinart, así como los defectos o daños
causados por el uso de un convertidor de voltaje. Esta
garantía no cubre el uso comercial o industrial del producto,
y no es válida en caso de daños causados por mal uso,
negligencia o accidente. Esta garantía excluye todos los
daños incidentales o consecuentes. Algunos Estados no
permiten la exclusión o limitación de daños incidentales o
consecuentes, de modo que las limitaciones mencionadas
pueden no regir para usted. Usted puede tener otros
derechos que varían de un Estado a otro.
Importante: Si debe llevar el producto defectuoso a un
centro de servicio no autorizado, por favor informe al
personal del centro de servicio que deben llamar al servicio
de atención al cliente de Cuisinart, al 1-800-726-0190, a n
de diagnosticar el problema correctamente, usar las piezas
correctas para repararlo y comprobar que el producto aún
esté bajo garantía

IB-18559-ESP
© 2024 Cuisinart
Glendale, AZ 85307
Impreso en China
24ce93061