
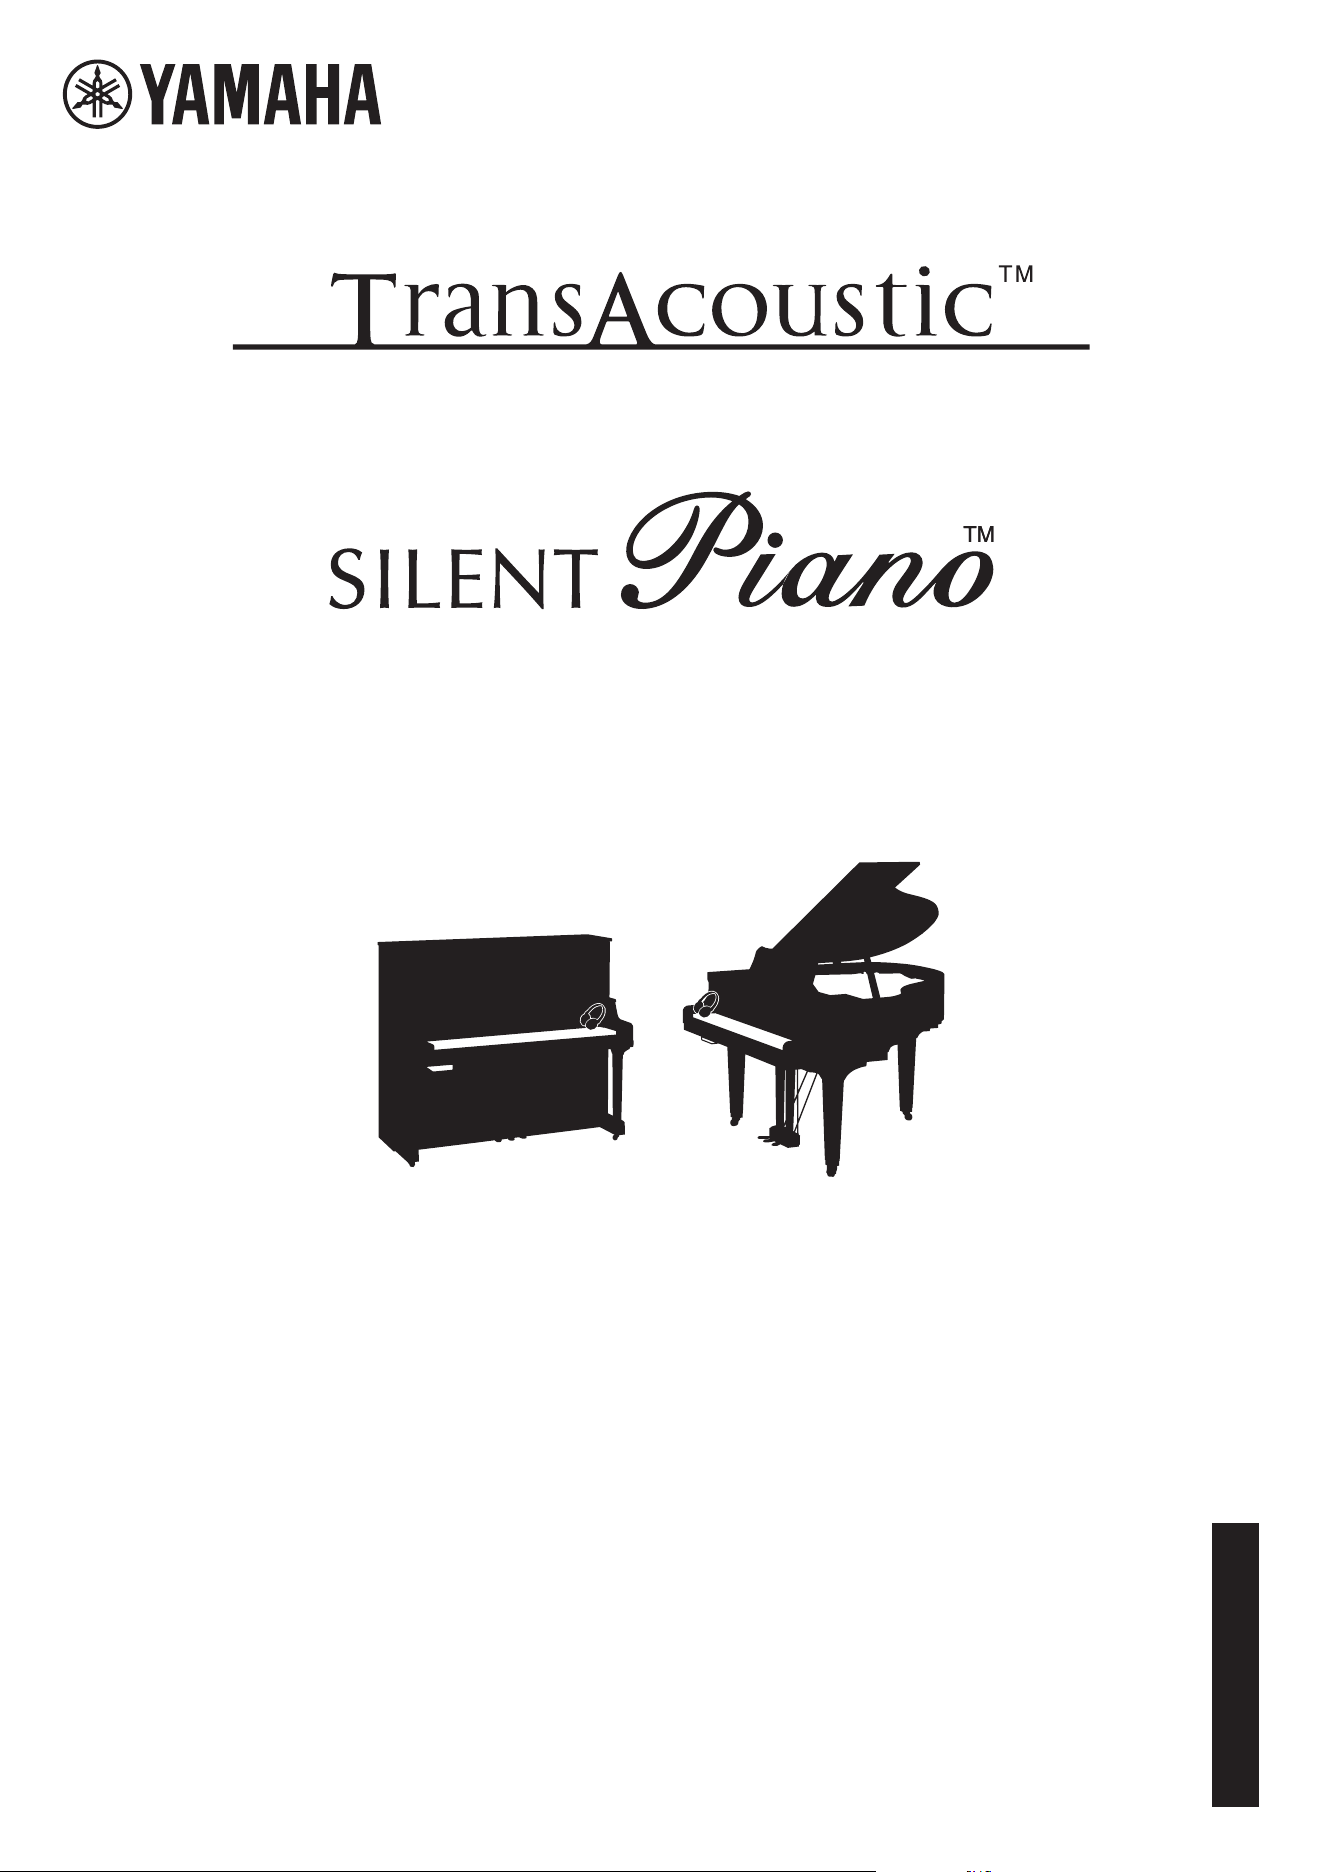
SH3 SC3
TA3 TC3
Owner’s Manual
Manual de instrucciones
Mode d’emploi
Benutzerhandbuch
Manuale di istruzioni
Ɋɭɤɨɜɨɞɫɬɜɨɩɨɥɶɡɨɜɚɬɟɥɹ
IT
DE
RU
ES
FR
EN
Before using the instrument, be sure to read “PRECAUTIONS” on pages 6-7.
Antes de utilizar el instrumento, lea la sección “PRECAUCIONES”, en las páginas 6-7.
Avant d’utiliser cet instrument, lisez attentivement la section « PRÉCAUTIONS D’USAGE » aux pages 6-7.
$FKWHQ6LHGDUDXIYRU(LQVDW]GLHVHV,QVWUXPHQWVGLHÄ9256,&+760$െ1$+0(1³DXI6HLWHQGXUFK]XOHVHQ
Prima di utilizzare lo strumento, assicurarsi di leggere la sezione “PRECAUZIONI”, alle pagine 6-7.
ɉɟɪɟɞɧɚɱɚɥɨɦɪɚɛɨɬɵɫɢɧɫɬɪɭɦɟɧɬɨɦɩɪɨɱɢɬɚɣɬɟɪɚɡɞɟɥ©ɉɊȺȼɂɅȺɌȿɏɇɂɄɂȻȿɁɈɉȺɋɇɈɋɌɂªɧɚɫɬɪ
The name plate is located on the bottom of the unit.
La placa con el nombre se encuentra en la parte inferior de la unidad.
La plaque signalétique de ce produit se trouve dans le bas de l'unité.
Das Namensschild befindet sich an der Geräteunterseite.
La targhetta del nome si trova sul fondo dell'unità.
Табличка с заводскими характеристиками находится на нижней панели модуля.
The model number, serial number, power requirements, etc.,
may be found on or near the name plate, which is at the bottom
of the unit. You should note this serial number in the space pro-
vided below and retain this manual as a permanent record of
your purchase to aid identification in the event of theft.
Model No.
Serial No.
(1003-M06 plate bottom en 01)
El número de modelo, el número de serie, los requisitos de ali-
mentación, etc. pueden encontrarse en la placa de identifi-
cación o cerca de ella. Esta placa se encuentra en la parte
inferior de la unidad. Debe anotar dicho número en el espacio
proporcionado a continuación y conservar este manual como
comprobante permanente de su compra para facilitar la identi-
ficación en caso de robo.
Nº de modelo
Nº de serie
(1003-M06 plate bottom es 01)
Le numéro de modèle, le numéro de série, l'alimentation req-
uise, etc., se trouvent sur ou près de la plaque signalétique du
produit, située dans la partie inférieure de l'unité. Notez le
numéro de série dans l'espace fourni ci-dessous et conservez
ce manuel en tant que preuve permanente de votre achat afin
de faciliter l'identification du produit en cas de vol.
N° de modèle
N° de série
(1003-M06 plate bottom fr 01)
Die Nummer des Modells, die Seriennummer, der Leistungsbe-
darf usw. sind auf dem Typenschild, das sich auf der Unter-
seite des Geräts befindet, oder in der Nähe davon angegeben.
Sie sollten diese Seriennummer an der unten vorgesehenen
Stelle eintragen und dieses Handbuch als dauerhaften Beleg
für Ihren Kauf aufbewahren, um im Fall eines Diebstahls die
Identifikation zu erleichtern.
Modell Nr.
Seriennr.
(1003-M06 plate bottom de 01)
Il numero di modello e quello di serie, i requisiti di alimentazi-
one e altre informazioni del prodotto si trovano sulla piastrina o
vicino alla stessa. La piastrina del prodotto si trova nella parte
inferiore dell'unità. Annotare il numero di serie nello spazio
indicato di seguito e conservare il manuale come documento di
comprovazione dell'acquisto; in tal modo, in caso di furto,
l'identificazione sarà più semplice.
Numero del modello
Numero di serie
(1003-M06 plate bottom it 01)
Номер модели, серийный номер, требования к источнику
питания и пр. указаны на табличке с названием изделия в
нижней части устройства или рядом с ней. Запишите
серийный номер в расположенном ниже поле и сохраните
данное руководство как подтверждение покупки; это
поможет идентифицировать принадлежность устройства в
случае кражи.
Номер модели.
Cерийный номер.
(1003-M06 plate bottom ru 01)
TA3 TC3 SH3 SC3 Owner’s Manual
3
1. IMPORTANT NOTICE: DO NOT MODIFY THIS UNIT!
This product, when installed as indicated in the instructions contained in this manual, meets FCC requirements. Modifications
not expressly approved by Yamaha may void your authority, granted by the FCC, to use the product.
2. IMPORTANT: When connecting this product to accessories and/or another product use only high quality shielded cables.
Cable/s supplied with this product MUST be used. Follow all installation instructions. Failure to follow instructions could void your
FCC authorization to use this product in the USA.
3. NOTE: This product has been tested and found to comply with the requirements listed in FCC Regulations, Part 15 for Class “B”
digital devices. Compliance with these requirements provides a reasonable level of assurance that your use of this product in a
residential environment will not result in harmful interference with other electronic devices. This equipment generates/uses radio
frequencies and, if not installed and used according to the instructions found in the users manual, may cause interference harm-
ful to the operation of other electronic devices. Compliance with FCC regulations does not guarantee that interference will not
occur in all installations. If this product is found to be the source of interference, which can be determined by turning the unit
“OFF” and “ON”, please try to eliminate the problem by using one of the following measures:
- Relocate either this product or the device that is being affected by the interference.
- Utilize power outlets that are on different branch (circuit breaker or fuse) circuits or install AC line filter/s.
- In the case of radio or TV interference, relocate/reorient the antenna. If the antenna lead-in is 300 ohm ribbon lead, change the
lead-in to co-axial type cable.
If these corrective measures do not produce satisfactory results, please contact the local retailer authorized to distribute this type of
product. If you cannot locate the appropriate retailer, please contact Yamaha Corporation of America, 6600 Orangethorpe Avenue,
Buena Park, CA 90620, U.S.A.
The above statements apply ONLY to those products distributed by Yamaha Corporation of America or its subsidiaries.
(529-M04 FCC class B YCA 02)
FCC INFORMATION (U.S.A.)
(529-M02 FCC sdoc YCA 02)
COMPLIANCE INFORMATION STATEMENT
(Supplierʼs declaration of conformity procedure)
Responsible Party: Yamaha Corporation of America
Address: 6600 Orangethorpe Avenue, Buena Park, CA. 90620, U.S.A.
Telephone: 714-522-9011
Type of Equipment: TransAcoustic™ Piano
Model Name: U1TA3, U3TA3, YUS1TA3, YUS3TA3, YUS5TA3, C1XTA3,
C3XTA3, GC1TA3, B1TC3, B2TC3, B3TC3
This device complies with Part 15 of the FCC Rules.
Operation is subject to two following conditions:
1) this device may not cause harmful interference, and
2) this device must accept any interference received including interference that may cause undesired operation.
(529-M02 FCC sdoc YCA 02)
COMPLIANCE INFORMATION STATEMENT
(Supplierʼs declaration of conformity procedure)
Responsible Party: Yamaha Corporation of America
Address: 6600 Orangethorpe Avenue, Buena Park, CA. 90620, U.S.A.
Telephone: 714-522-9011
Type of Equipment: SILENT Piano™
Model Name: U1SH3, U3SH3, YUS1SH3, YUS3SH3, YUS5SH3, C1XSH3,
C2XSH3, C3XSH3, C5XSH3, C6XSH3, C7XSH3, GC1SH3,
GC2SH3, S3XSH3, S5XSH3, S6XSH3, S7XSH3, B1SC3, B2SC3,
B3SC3, P22DSC3, GB1KSC3
This device complies with Part 15 of the FCC Rules.
Operation is subject to two following conditions:
1) this device may not cause harmful interference, and
2) this device must accept any interference received including interference that may cause undesired operation.

TA3 TC3 SH3 SC3 Owner’s Manual
4
(529-M02 FCC sdoc YCA 02)
COMPLIANCE INFORMATION STATEMENT
(Supplierʼs declaration of conformity procedure)
Responsible Party: Yamaha Corporation of America
Address: 6600 Orangethorpe Avenue, Buena Park, CA. 90620, U.S.A.
Telephone: 714-522-9011
Type of Equipment: SILENT Conversion kit
Model Name: RSC3-1, RSC3-3, RSC3-5, RSC3-10, RSC3-30
This device complies with Part 15 of the FCC Rules.
Operation is subject to two following conditions:
1) this device may not cause harmful interference, and
2) this device must accept any interference received including interference that may cause undesired operation.
TA3 TC3 SH3 SC3 Owner’s Manual
5
TA3 TC3 SH3 SC3 Owner’s Manual
Table of Contents
PRECAUTIONS ...................................................................... 6
NOTICE................................................................................... 7
Information ............................................................................. 8
Main Features 9
Getting Started 10
About the Manuals ................................................................ 10
Included Accessories .............................................................11
Part Names and Functions.................................................... 12
1 Preparing the Power Supply 14
2 Enjoy Playing the Piano 17
Playing as an acoustic piano (Acoustic mode) ..................... 17
Playing with digital sounds using the headphones
(Quiet mode) ......................................................................... 18
Attaching the headphone hanger............................................... 19
Playing with digital sounds using soundboard resonance
(TransAcoustic mode) ........................... 20
Layering the digital sound with the acoustic piano sound
(Layer mode) ......................................... 21
Selecting a Voice for playing with digital sound ................. 22
Voice List....................................................................................... 23
3 Playing Back and Recording Songs 24
Playing back Songs ...............................................................24
Playback operations..................................................................... 27
Specifying the playback part (right-hand/left-hand) for a MIDI
Song................................................................................................ 28
Recording your performance ............................................... 29
Basic procedure for recording (MIDI recording/Audio
recording)...................................................................................... 29
Recording the right-hand and left-hand parts independently
(MIDI recording) ......................................................................... 31
Handling User Song files ...................................................... 34
Copying User Songs in internal memory to a USB flash drive
........................................................................................................ 34
Deleting User Songs..................................................................... 35
Setting the appropriate Character Code for Song file names
................................................................................................ 37
4 Other Important Functions (UTILITY) 38
Using the metronome .......................................................... 38
Turning the metronome on/off ................................................. 38
Adjusting the tempo .................................................................... 39
Selecting the time signature (beat) ............................................ 39
Adjusting the metronome volume ............................................ 40
Playing the piano along with Rhythm playback .................. 41
Playing back a Rhythm................................................................ 41
Rhythm List ................................................................................. 42
Adjusting the Rhythm volume................................................... 43
Customizing with the various Function parameters .......... 44
Basic Function-setting operations ............................................. 44
Function List................................................................................. 45
Glossary of terms ......................................................................... 53
Initializing the instrument (Clearing the Backup data).......... 54
5 Connecting to Other Devices 55
Connecting USB devices ([USB TO DEVICE] terminal) .... 55
Precautions when using the [USB TO DEVICE] terminal .... 55
Using USB Flash Drives .............................................................. 55
Formatting a USB flash drive .................................................... 56
Connecting to external audio devices................................... 57
Output the digital sound of the instrument to an external
device (AUX OUT jacks) ....................... 57
Listening to Audio playback on an external device through this
instrument ([AUX IN] jack)....................................................... 58
Listening to audio data played by a Bluetooth-equipped device
through this instrument (Bluetooth Audio function) ............ 59
Connecting with the smart device app “Smart Pianist” ..... 61
Connecting via USB cables ......................................................... 61
Connecting via Bluetooth ........................................................... 61
Connecting via Wi-Fi (wireless LAN) ...................................... 62
Connecting to a computer ([USB TO HOST] terminal) .... 63
Transmitting/receiving audio data (USB Audio Interface
function)........................................................................................ 63
Turning Audio Loopback on/off ............................................... 64
Connecting to a MIDI device (MIDI terminals)
................................................................ 64
Appendix 65
Message List .......................................................................... 65
Troubleshooting ................................................................... 67
Voice List............................................................................... 69
Song List................................................................................ 72
Voice Demo Songs....................................................................... 72
Preset Songs .................................................................................. 73
Specifications ........................................................................ 75
Index...................................................................................... 77
TC3TA3 SH3 SC3
TC3TA3 SH3 SC3
TC3TA3 SH3 SC3
TC3TA3 SH3 SC3
English
TA3 TC3 SH3 SC3 Owner’s Manual
6
PRECAUTIONS
PLEASE READ CAREFULLY BEFORE
PROCEEDING
Especially in the case of children, a guardian should provide
guidance on how to properly use and handle the product before
actual use.
Please keep this manual in a safe and handy place for future
reference.
WA RN I NG
Always follow the basic precautions listed below to
avoid the possibility of serious injury or even death
from electrical shock, short-circuiting, damages, fire or
other hazards. These precautions include, but are not
limited to, the following:
Power supply
• Do not place the power cord near heat sources such as heaters
or radiators. Also, do not excessively bend or otherwise
damage the cord, or place heavy objects on it.
• Do not touch the product or the power plug during an
electrical storm.
• Use only the correct voltage specified for the product. The
required voltage is printed on the name plate of the product.
• Use only the supplied or the specified AC adaptor (page 76)/
power cord. Do not use the supplied AC adaptor/power cord
for other products.
• Check the power plug periodically and remove any dirt or
dust which may have accumulated on it.
• Insert the power plug firmly all the way into the AC outlet.
Using the product when it is not plugged in sufficiently can
cause dust to accumulate on the plug, possibly resulting in fire
or skin burns.
• When setting up the product, make sure that the AC outlet
you are using is easily accessible. If some trouble or
malfunction occurs, immediately turn off the power switch
and disconnect the plug from the outlet. Even when the
power switch is turned off, as long as the power cord is not
unplugged from the wall AC outlet, the product will not be
disconnected from the power source.
• Do not connect the product to an electrical outlet using a
multi-plug outlet extender. Doing so can result in lower
sound quality, or possibly cause overheating in the outlet.
• When disconnecting the power plug, always hold the plug
itself and not the cord. Pulling by the cord can damage it and
cause electric shocks or a fire.
• If not using the product for long periods of time, be sure to
pull the power plug from the AC outlet.
Do not disassemble
• This product contains no user-serviceable parts. Do not
attempt to disassemble the internal parts or modify them in
any way.
Water warning
• Do not expose the product to rain, use it near water or in
damp or wet conditions, or place on it any containers (such as
vases, bottles or glasses) containing liquids which might spill
into any openings or places where water may drop. A liquid
such as water getting into the product may cause a fire,
electric shocks, or malfunctions.
• Use the AC adaptor indoors only. Do not use in any wet
environments.
• Never insert or remove a power plug with wet hands.
Fire warning
• Do not place any burning items or open flames near the
product, since they may cause a fire.
Wireless unit
• Radio waves from this product may affect electro-medical
devices, such as a heart pacemaker implant or defibrillator
implant.
- Do not use the product near medical devices or inside
medical facilities. Radio waves from this product may affect
electro-medical devices.
- Do not use the product within 15 cm (6 in.) of persons with
a heart pacemaker implant or a defibrillator implant.
Connections
• Be sure to read the manual of the device to be connected, and
follow the instructions. Failure to observe this may cause a
fire, overheating, explosion, or malfunction.
If you notice any abnormality
• If any of the following problems occur, immediately turn off
the power switch and disconnect the power plug from the
outlet.
Finally have the device inspected by Yamaha service
personnel.
- The power cord or plug becomes frayed or damaged.
- Unusual smells or smoke are emitted.
- Some object, or water has been dropped into the product.
- There is a sudden loss of sound during use of the product.
- Cracks or other visible damage appear on the product.
TA3 TC3 SH3 SC3 Owner’s Manual
7
CAUTION
Always follow the basic precautions listed below to
avoid the possibility of physical injury to you or others,
or damage to the product or other property. These
precautions include, but are not limited to, the
following:
Location
• Before placing or moving the piano, consult with a specialist
experienced in handling pianos. Pianos are extremely heavy,
so one must be careful to avoid back injury or scratching the
floor when moving it. Before moving the piano, remove all
connected cables to prevent damage to the cables or injury to
anyone who might trip over them.
Connections
• Before connecting the product to other electronic
components, turn off the power for all components. Before
turning the power on or off for all components, set all volume
levels to minimum.
• Be sure to set the volumes of all components at their
minimum levels and gradually raise the volume controls
while playing the product to set the desired listening level.
Handling
• Do not use excessive force on the buttons, switches or
connectors.
• Keep small parts out of the reach of infants. Your children
may accidentally swallow them.
• Do not use the product or headphones for a long period of
time at a high or uncomfortable volume level, since this can
cause permanent hearing loss. If you experience any hearing
loss or ringing in the ears, consult a physician.
• Remove the power plug from the AC outlet before cleaning
the unit. Failure to observe this may cause electric shocks.
Always turn the power off when the product is not in use.
Even when the [P] (Standby/On) switch is in standby status
(power lamp is off), electricity is still flowing to the product at
the minimum level.
When you are not using the product for a long time, make sure
you unplug the power cord from the wall AC outlet.
(DMI-10)
NOTICE
To avoid the possibility of malfunction/ damage to the product,
damage to data, or damage to other property, follow the notices
below.
Handling
• Do not connect this product to a public Wi-Fi and/or Internet
service directly. Only connect this product to the Internet
through a router with strong password protections. Consult
your router manufacturer for information on optimum
security practices.
• Do not use the instrument in the vicinity of a TV, radio, stereo
equipment, mobile phone, or other electric devices.
Otherwise, the instrument, TV, or radio may generate noise.
• When you use the instrument along with an app on your
smart device, such as a smartphone or tablet, we recommend
that you enable “Airplane Mode” on the device to avoid noise
caused by communication. When wirelessly connecting a
smart device with this product, make sure that the Wi-Fi or
Bluetooth® setting on the device is turned on.
• Do not expose the instrument to excessive dust or vibrations,
or extreme cold or heat (such as in direct sunlight, near a
heater, or in a car during the day) to prevent the possibility of
disfiguration, damage to the internal components or unstable
operation.
Maintenance
• When cleaning the instrument, use a soft and dry/slightly
damp cloth. Do not use paint thinners, solvents, alcohol,
cleaning fluids, or chemical-impregnated wiping cloths.
Saving data
• Some of the data of this product (page 54) are retained when
the power is turned off. However, the saved data may be lost
due to some failure, an operation mistake, etc. Save your
important data onto USB flash drive/an external device such
as a computer (pages 34, 63).
• To protect against data loss through USB flash drive damage,
we recommend that you save your important data onto spare
USB flash drive or an external device such as a computer as
backup data.
Yamaha cannot be held responsible for damage caused by
improper use or modifications to the product, or data that is
lost or destroyed.
TA3 TC3 SH3 SC3 Owner’s Manual
8
Information
About copyrights
• The copyright of the “content”
*1
installed in this product
belongs to Yamaha Corporation or its copyright holder.
Except as permitted by copyright laws and other relevant
laws, such as copying for personal use, it is prohibited to
“reproduce or divert”
*2
without the permission of the
copyright holder. When using the content, consult with a
copyright expert.
If you create music or perform with the contents through the
original use of the product, and then record and distribute
them, the permission of Yamaha Corporation is not required
regardless of whether the distribution method is paid or free
of charge.
*1: The word “content” includes a computer program, audio data,
Accompaniment Style data, MIDI data, waveform data, voice
recording data, music score, and score data, etc.
*2: The phrase “reproduce or divert” includes taking out the content
itself in this product, or recording and distributing it without
changes in a similar manner.
About functions/data bundled with the
instrument
• Some of the preset Songs have been edited for length or
arrangement, and may not be exactly the same as the original.
About this manual
• The illustrations as shown in this manual are for instructional
purposes only.
• Windows is a registered trademark of Microsoft® Corporation
in the United States and other countries.
• Wi-Fi is a registered trademark of Wi-Fi Alliance®.
• The Bluetooth® word mark and logos are registered
trademarks owned by Bluetooth SIG, Inc. and any use of such
marks by Yamaha Corporation is under license.
• The company names and product names in this manual are
the trademarks or registered trademarks of their respective
companies.
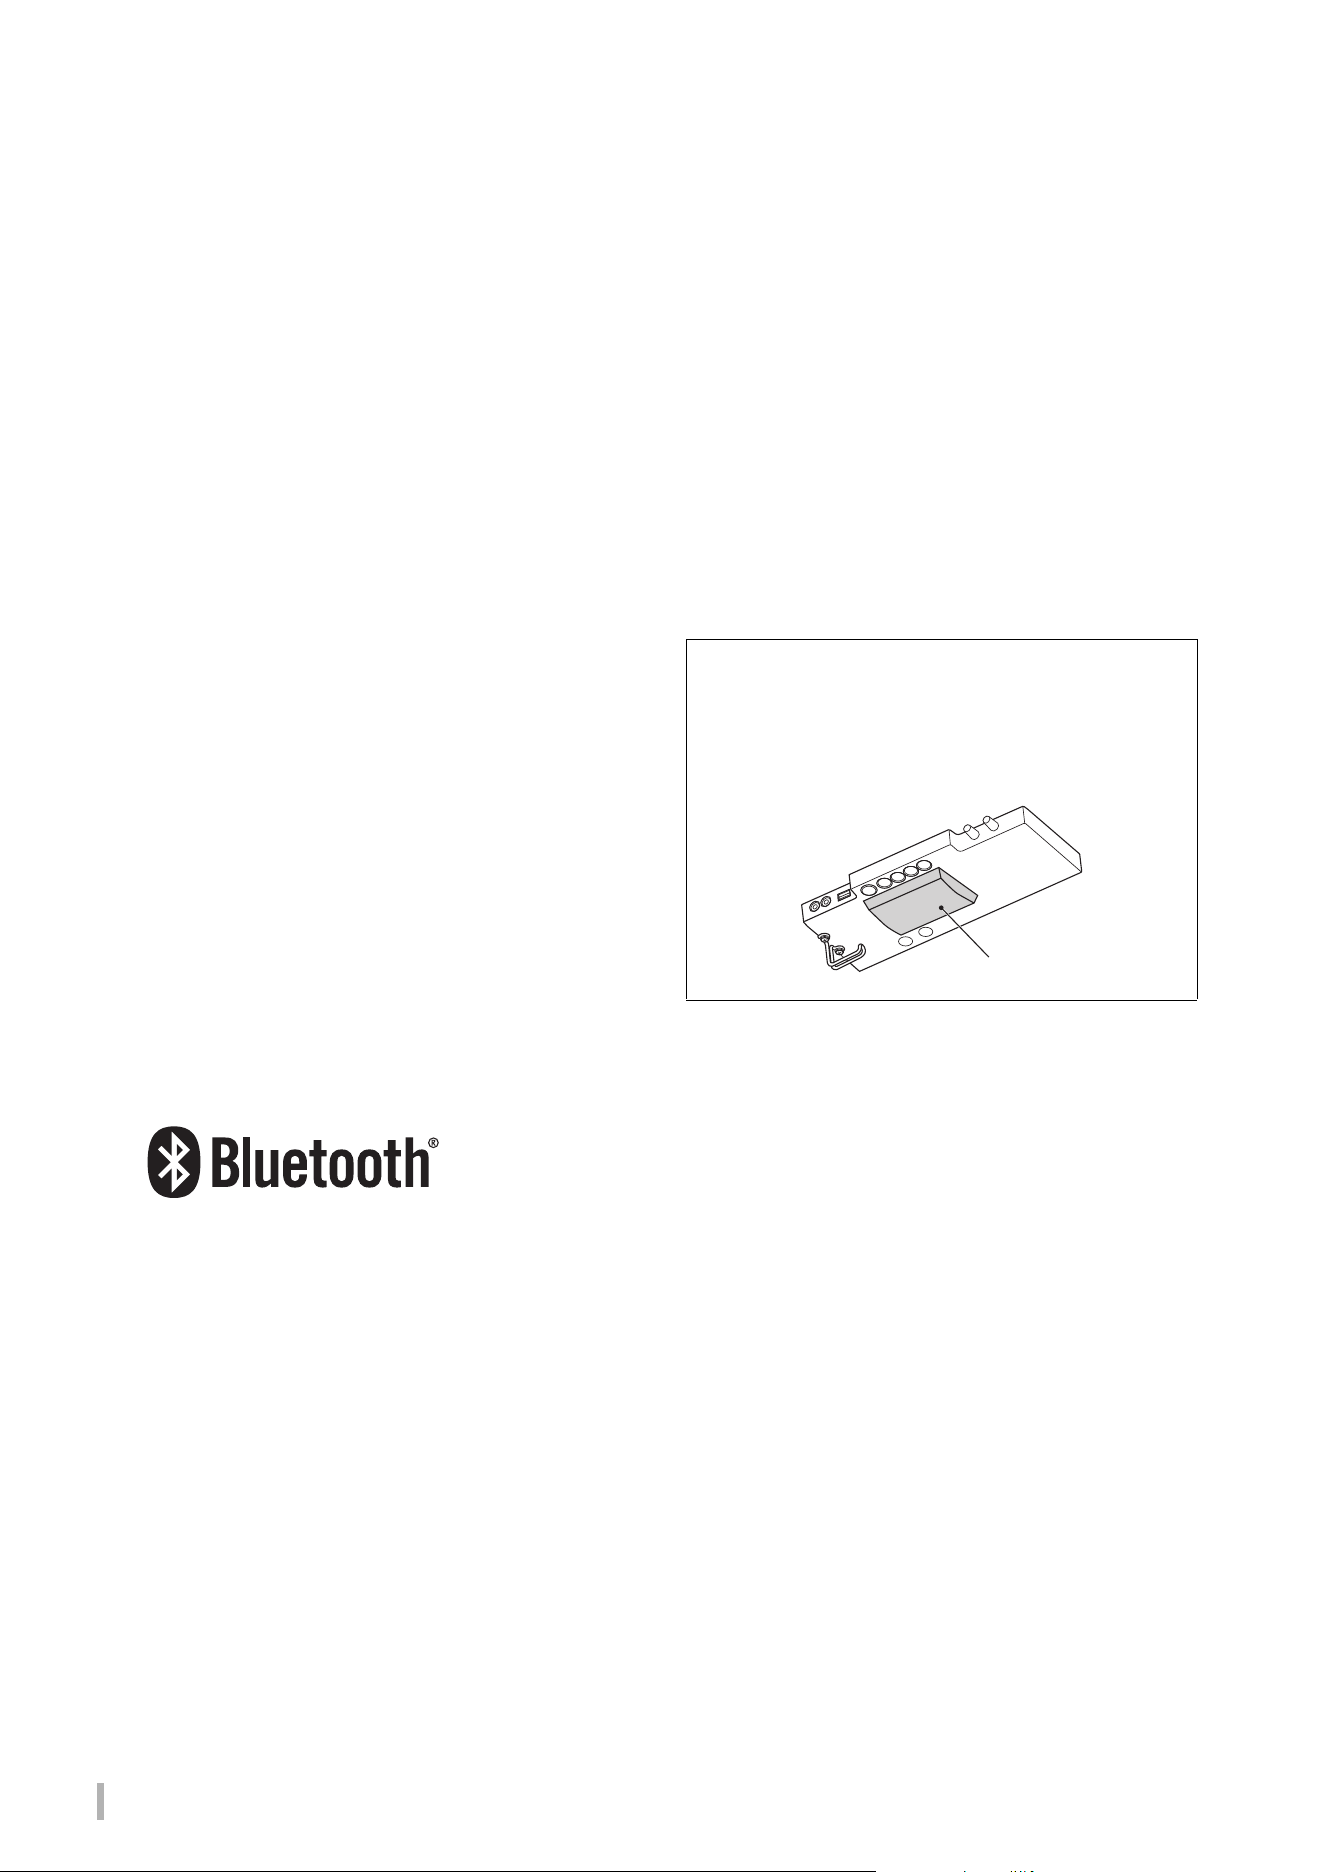
About Bluetooth®
Bluetooth is a technology for wireless communication between
devices within an area of about 10 meters (33 ft.) employing the
2.4 GHz frequency band.
Handling Bluetooth communications
• The 2.4 GHz band used by Bluetooth compatible devices is a
radio band shared by many types of equipment. While
Bluetooth compatible devices use a technology minimizing
the influence of other components using the same radio band,
such influence may reduce the speed or distance of
communications and in some cases interrupt
communications.
• The speed of signal transfer and the distance at which
communication is possible differs according to the distance
between the communicating devices, the presence of
obstacles, radio wave conditions and the type of equipment.
• Yamaha does not guarantee all wireless connections between
this unit and devices compatible with Bluetooth function.
Bluetooth capability
Depending on the country in which you purchased the
product, the instrument may not have Bluetooth capability. If
a Bluetooth unit is installed at the bottom of the control unit,
this means that the product is equipped with Bluetooth
functionality.
Bluetooth unit
TA3 TC3 SH3 SC3 Owner’s Manual
9
Main Features
What is the TransAcoustic™ Piano?
The TransAcoustic™ Piano is an acoustic piano that allows the player to adjust the volume through the use of Yamaha’s innovative
TransAcoustic technology. When in the TransAcoustic mode, the soundboard of the piano amplifies the built-in digital sounds and
produces the same natural resonance found on an acoustic piano. The technology enables you to play with the authentic touch and feel
of an actual acoustic piano, and yet have control over the volume. You can also play this instrument as a conventional acoustic piano,
and can switch it to the Quiet mode, just as on the SILENT Piano™ below, and listen to the sound through the headphones.
What is the SILENT Piano™?
The SILENT Piano™ is an acoustic piano equipped with Yamaha’s original muting technology. While in the Quiet mode, the hammers
stop just before striking the strings when keys are pressed, and no sound is emitted from the piano. The sensors accurately detect the
movement of the keys, and the keystroke data activates the built-in digital tone generator for producing sound that is them output from
the headphones. This lets you play or practice any time you want, without worrying about your surroundings or disturbing others
nearby. It can also be used as a conventional acoustic piano.
Both the TransAcoustic™ Piano and SILENT Piano™ provide you with highly useful and advanced functions as described below for
enhancing your life with music.
Variety of Voices including the Yamaha CFX concert grand piano RR page 22
This instrument features piano sounds created with samples of the Yamaha CFX flagship concert grand piano and the famed Vienna-
made Bösendorfer grand piano. The sound of the Yamaha CFX is powerful, sparkling and with a rich bass resonance. As an alternative,
the Bösendorfer sound is soft and deep in the mid to bass range and beautiful for pianissimo parts. Along with these two gorgeous
piano sounds, a variety of other Voices are provided—allowing you to select the instrument sound that best matches the music you
want to play.
* Bösendorfer is a subsidiary company of Yamaha.
Realistic feeling of being immersed in the sound—even when using headphones
RR page 18
When playing with the binaural-sampled sounds of the CFX or Bösendorfer Voices, you feel yourself immersed in the sound as if it was
actually emanating from the piano—even when listening through the headphones. The other piano Voices also provide the sense of a
natural sound distance.
Preset Songs for efficient practicing RR page 24
50 classical music masterpieces are built into this instrument. You can simply enjoy listening to these built-in Songs, or use them for
one-hand practice by separately playing back the right-hand or left-hand parts as desired.
Recording and playing back your performance RR page 29
The instrument lets you record your performance to internal memory or a USB flash drive. Listening back to your recordings helps
immensely in improving your performance.
Simple Rhythm Patterns to play along with RR page 41
A variety of simple rhythm patters (drums and bass accompaniment) are provided, letting you enjoy playing the piano along with
dynamic Rhythm playback.
Convenient smart device compatibility RR page 61
Connect this instrument to a smart device, such as smart phone or tablet, and use it with the compatible Smart Pianist app. It enables
convenient operations such as selecting Voices, controlling the metronome intuitively with the visual interface, or displaying the score
of the preset Songs on your smart device.
TA3 TC3 SH3 SC3 Owner’s Manual
10
Getting Started
Thank you for purchasing this Yamaha piano! This is an acoustic piano equipped with a control unit and other devices,
enabling you to play the piano just like an acoustic piano, but also with the modern conveniences of digital sound. It lets
you enjoy a wide variety of functions such as selecting different Voices, playing back Songs, or recording your own
performances. In order to make the most of your piano’s performance potential and features, please read this Owner’s
Manual thoroughly, and keep it in a safe place for later reference.
About the Manuals
This instrument has the following manuals.
Supplied with the instrument
TA3/TC3/SH3/SC3 Owner’s Manual (this book)
Explains the functions of TransAcoustic™ Piano (TA3 or TC3) and SILENT Piano™ (SH3 or SC3) and how to use them.
Since all functions for multiple models are explained in this single book, specific functions mentioned here may not be
available on your piano. Make sure to understand the instructions below beforehand, and then read the manual while
checking whether or not the function is available on your piano.
To confirm the model name:
To confirm available functions:
In this manual, each function’s instructions have icons that indicate which model is compatible with the function. This
example indicates that the relevant function is available on the TA3 or TC3 (TransAcoustic™ Piano) but not on the SH3 or
SC3 (SILENT Piano™).
Rules for the notes
WARNING
Important information to avoid the possibility of serious injury or even death from electrical
shock, short-circuiting, damages, fire or other hazards.
CAUTION
Important information to avoid the possibility of physical injury to you or others, or damage to
the instrument or other property.
NOTICE
Important information to avoid the possibility of malfunction/ damage to the product, damage to
data, or damage to other property.
NOTE
Helpful information and tips.
The model number can be found on or near the name plate,
which is at the bottom of the control unit as shown in the
illustration. Confirm the model name first since the availability
of functions differs depending on the model.
Example: YUS1SH3
The characters TA3, TC3, SH3, or SC3 in the string identify the
model name as a TransAcoustic™ Piano or a SILENT Piano™.
Example:
TA3 TC3 SH3 SC3
TA3 TC3 SH3 SC3 Owner’s Manual
11
Available on the website
Smart Pianist User Guide
Explains how to set up and use a smart device with the dedicated Smart Pianist app (page 61) for controlling this
instrument.
Computer-related Operations
Includes instructions on connecting this instrument to a computer, and other operations. Read this along with page 63 of
this Owner’s Manual.
MIDI Reference
Contains MIDI-related information for this instrument.
Included Accessories
TA3/TC3/SH3/SC3 Owner’s Manual (this book) ×1
“50 Classical Music Masterpieces” (Music Book) ×1 (TA3/SH3 only)
Headphones ×1
Headphone hanger ×1 (see page 19)
Attachment screws for headphone hanger ×2 (see page 19)
AC adaptor* ×1
Power cord* ×1
* May not be included depending on your area. Check with your Yamaha dealer.
To obtain these manuals, access the Yamaha website below:
Yamaha Downloads
https://download.yamaha.com/
Enter the model name for searching the desired manuals.
TA3 TC3 SH3 SC3 Owner’s Manual
12
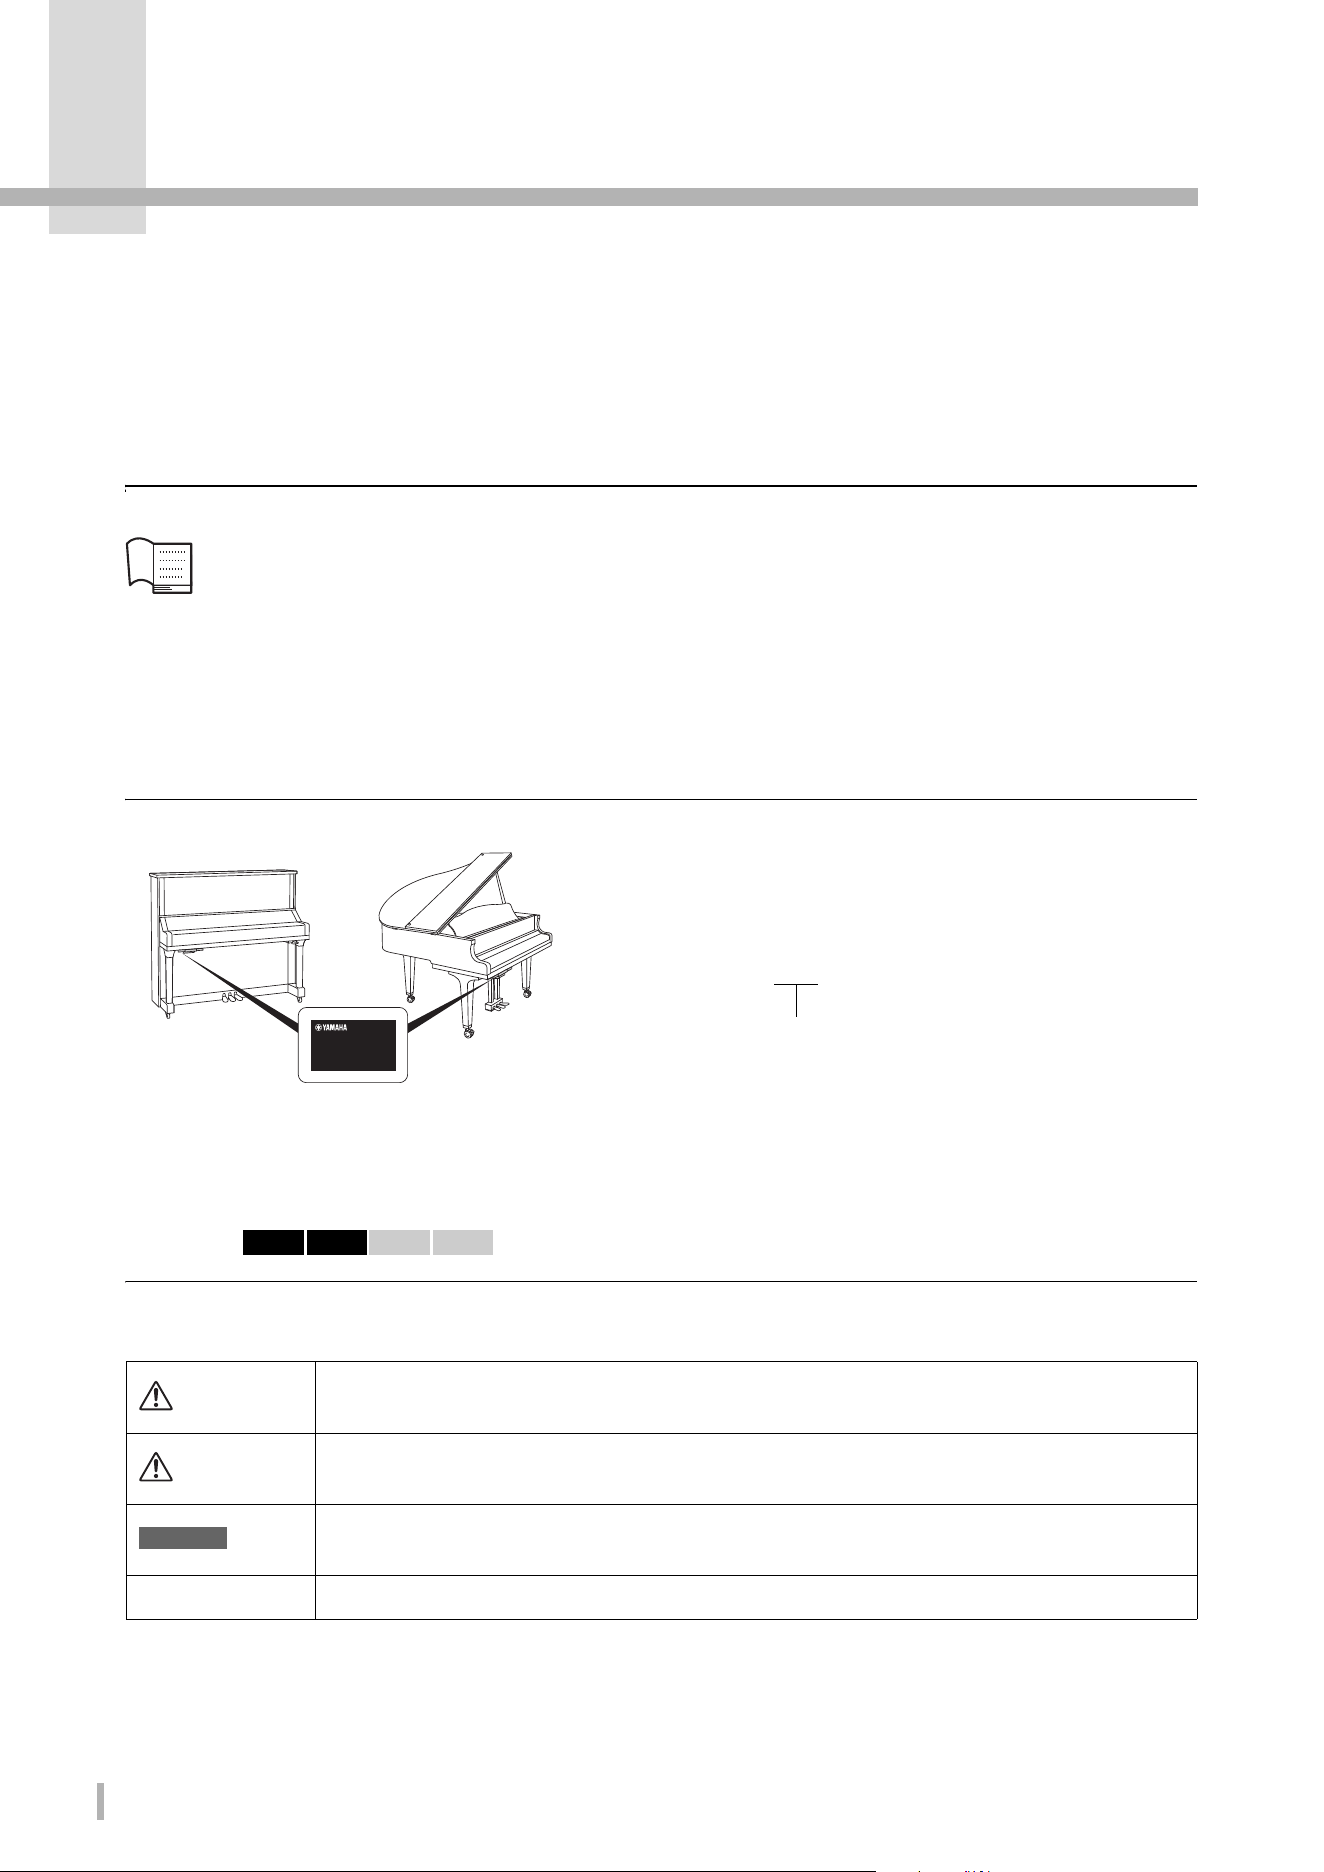
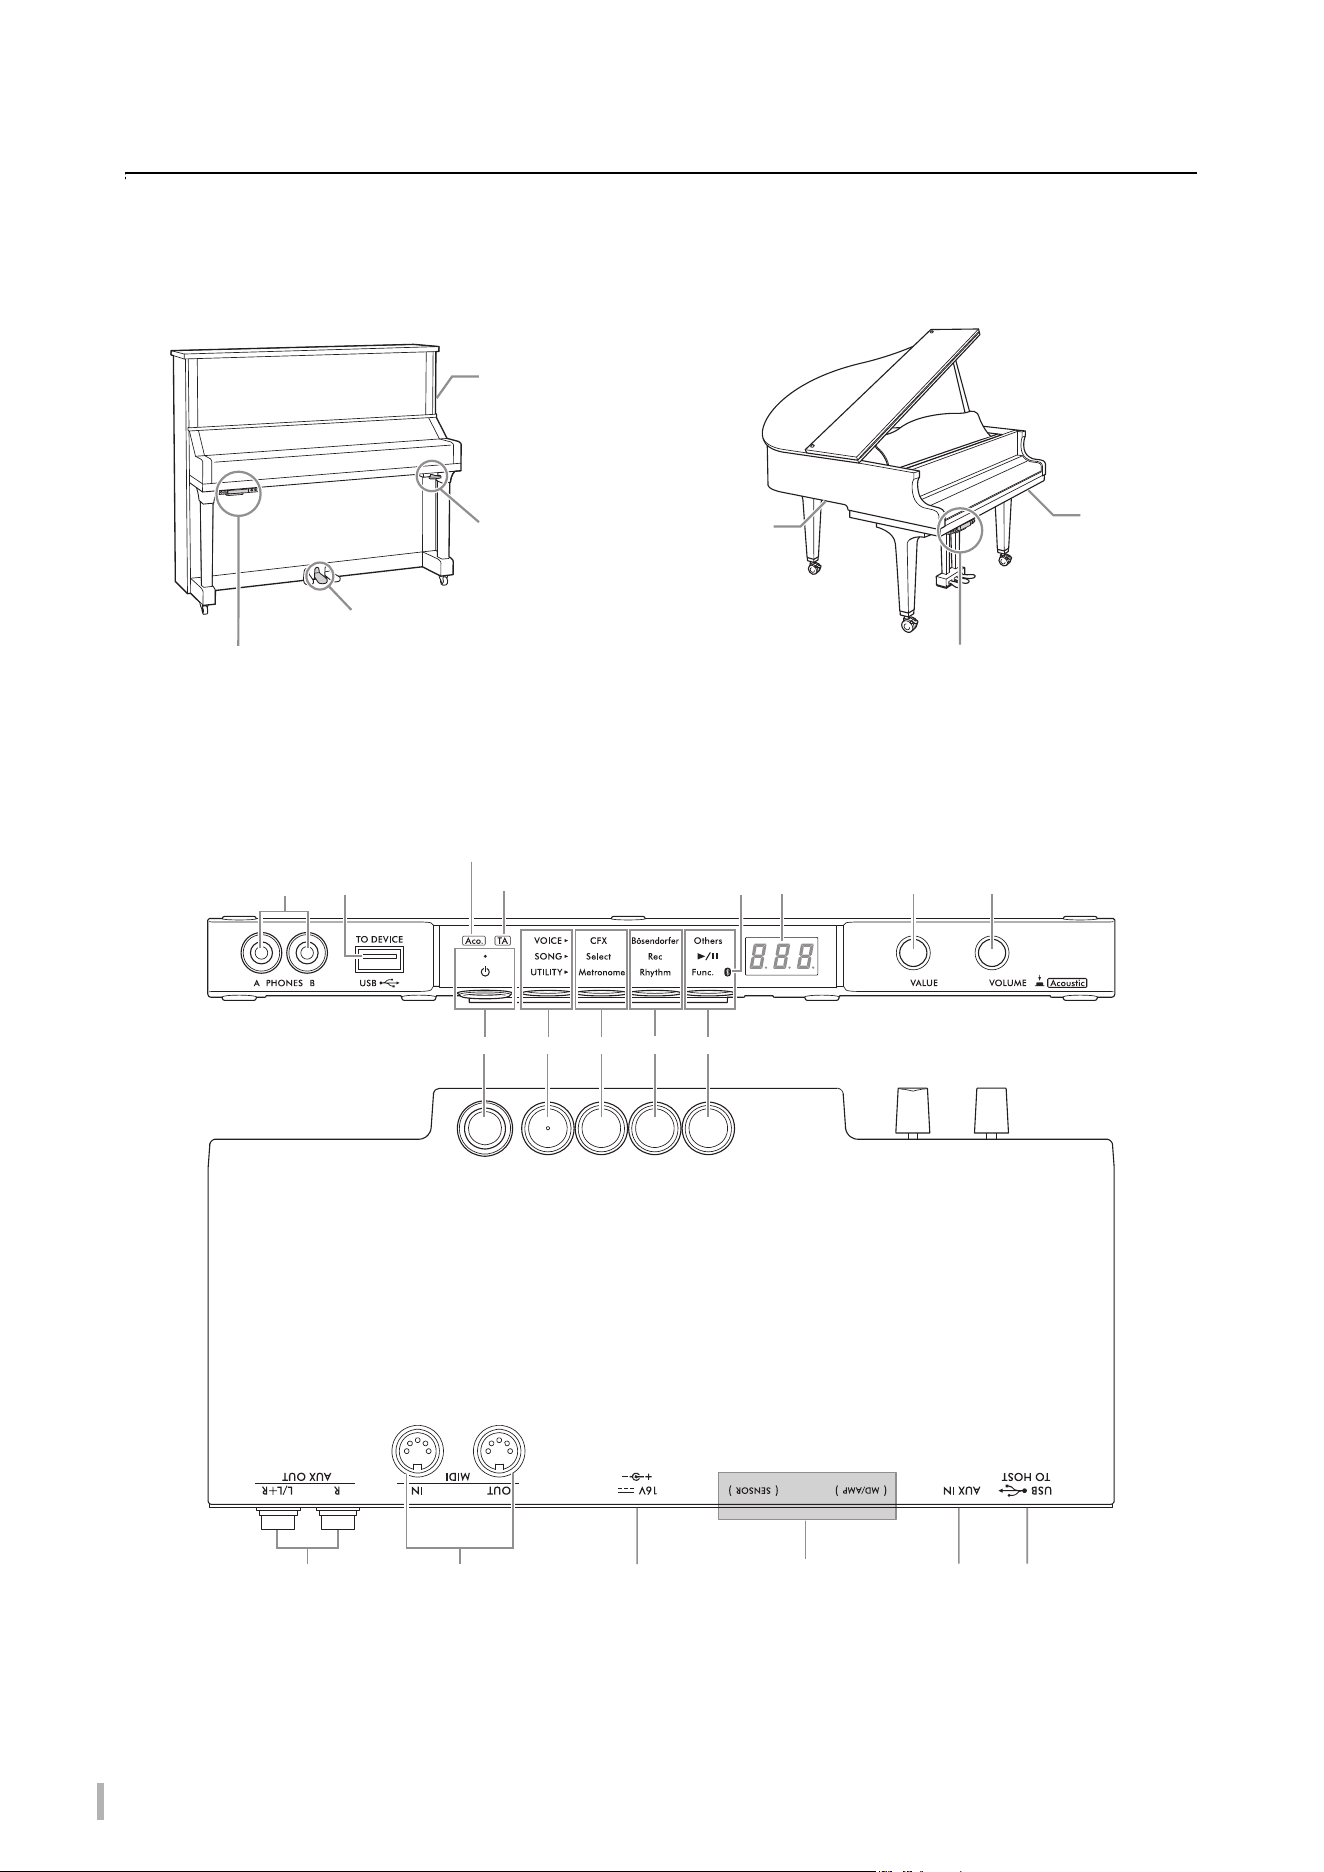
Part Names and Functions
The control unit lets you operate the functions of the TransAcoustic™ Piano and SILENT Piano™. The silencing lever or
silencing pedal (center pedal) is also used on some piano models.
Control unit
Upright piano Grand piano
Control unit
1 Silencing lever
(for certain
pianos)
1 Silencing pedal
(for pianos without
a silencing lever)
2 DC IN jack (rear;
for certain pianos)
Control unit
2 DC IN jack
(bottom;
TA3 only)
1 Silencing
lever (for
certain
pianos)
34
7
89
!
@
)
$
#
%
A
*
(
^ &
6
5 Only for grand pianos
without silencing lever
TA3/TC3 only
For qualified Yamaha
personnel only.
These are connected to the
sensor and to the internal unit.
Front panel
Bottom panel
These buttons are pressed upward from the bottom.
TA3/SH3 only TA3/SH3 only
TA3 TC3 SH3 SC3 Owner’s Manual
13
1 Silencing lever/Silencing pedal . . . . page 18
Turns the acoustic piano sound on/off. For upright
pianos, a silencing lever or silencing pedal is installed
for control over this function. For grand pianos, most
do not include these, and only some specific pianos
are equipped with the silencing lever.
2 DC IN jack . . . . . . . . . . . . . . . . . pages 14, 15
For connecting the power cord and the AC adaptor.
This jack is not installed on some pianos, which use
jack A instead.
3 [PHONES] jacks . . . . . . . . . . . . . . . . page 18
For connecting headphones.
4 [USB TO DEVICE] terminal. . . . . . page 55
For connecting a USB flash drive or a USB wireless
LAN adaptor (sold separately).
5 [Aco.] lamp. . . . . . . . . . . . . . . . . . . . . page 17
For grand pianos not equipped with a silencing lever,
this lamp lights up when the Acoustic mode is
enabled.
6 [TA] lamp . . . . . . . . . . . . . . . . . pages 20, 21
This lamp lights to indicate that the instrument is in
the TransAcoustic mode or Layer mode.
7 [P] (Standby/On) switch . . . . . . . . . page 15
For turning the power on or setting it to standby.
8 Menu button
Each time you press this button, VOICE, SONG or
UTILITY is selected and its lamp lights up in orange.
• VOICE . . . . . . . . . . . . . . . . . . . . . . . . page 22
For selecting a Voice.
• SONG . . . . . . . . . . . . . . . . . . . . . . . . . page 24
For controlling Songs, such as playing back the preset
Songs or recording your own performance.
• UTILITY . . . . . . . . . . . . . . . . . . . . . . page 38
For using the metronome, playing back a rhythm, or
making various settings.
9 Button 1/) Button 2/! Button 3
Depending on the selection made from VOICE/
SONG/UTILITY by using the Menu button, different
functions are assigned and can be controlled by
pressing the respective button.
@ Bluetooth lamp . . . . . . . . . . . . . . . . .page 59
Lights up when the Bluetooth function is on. It lights
up in blue when the unit is connected with a
Bluetooth-equipped device, or in white when no
Bluetooth-equipped device is connected, and
UTILITY is selected.
# Display
Indicates the Voice number, Song number, other
parameter values, or messages. For a list of messages,
see page 65.
$ [VALUE] control
For selecting items or setting values.
% [VOLUME] control
For adjusting the volume of the sound by rotating the
control. The volume of the performance in the Quiet
mode, TransAcoustic mode and Layer mode
(page 17), as well as the volume of the sound output to
an external device (pages 57, 63, 64) can be adjusted.
On the grand pianos without a silencing lever,
pressing the control can turn the Acoustic mode on/
off (page 17).
^ AUX OUT [R]/[L/L+R] jacks . . . . . .page 57
For connecting to and outputting this instrument’s
sound to an external audio device, such as powered
speakers.
& MIDI [IN]/[OUT] terminals . . . . . .page 64
For connecting an external MIDI device.
* [AUX IN] jack. . . . . . . . . . . . . . . . . . .page 58
For connecting to an external audio device, such as a
portable audio player, for inputting the sound from
that device to this instrument.
( [USB TO HOST] jack . . . . . . . . . . . .page 63
For connecting to a computer or smart device, such as
a smartphone or tablet.
A DC IN jack
For connecting the power cord and the AC adaptor
(page 15).
For pianos having jack 2, only qualified Yamaha
personnel should handle this A jack. The plug is
already connected when the instrument is shipped.
TA3 TC3 SH3 SC3
Parameter value Message
TA3 TC3 SH3 SC3
TA3 TC3 SH3 SC3
TA3 TC3 SH3 SC3 Owner’s Manual
14
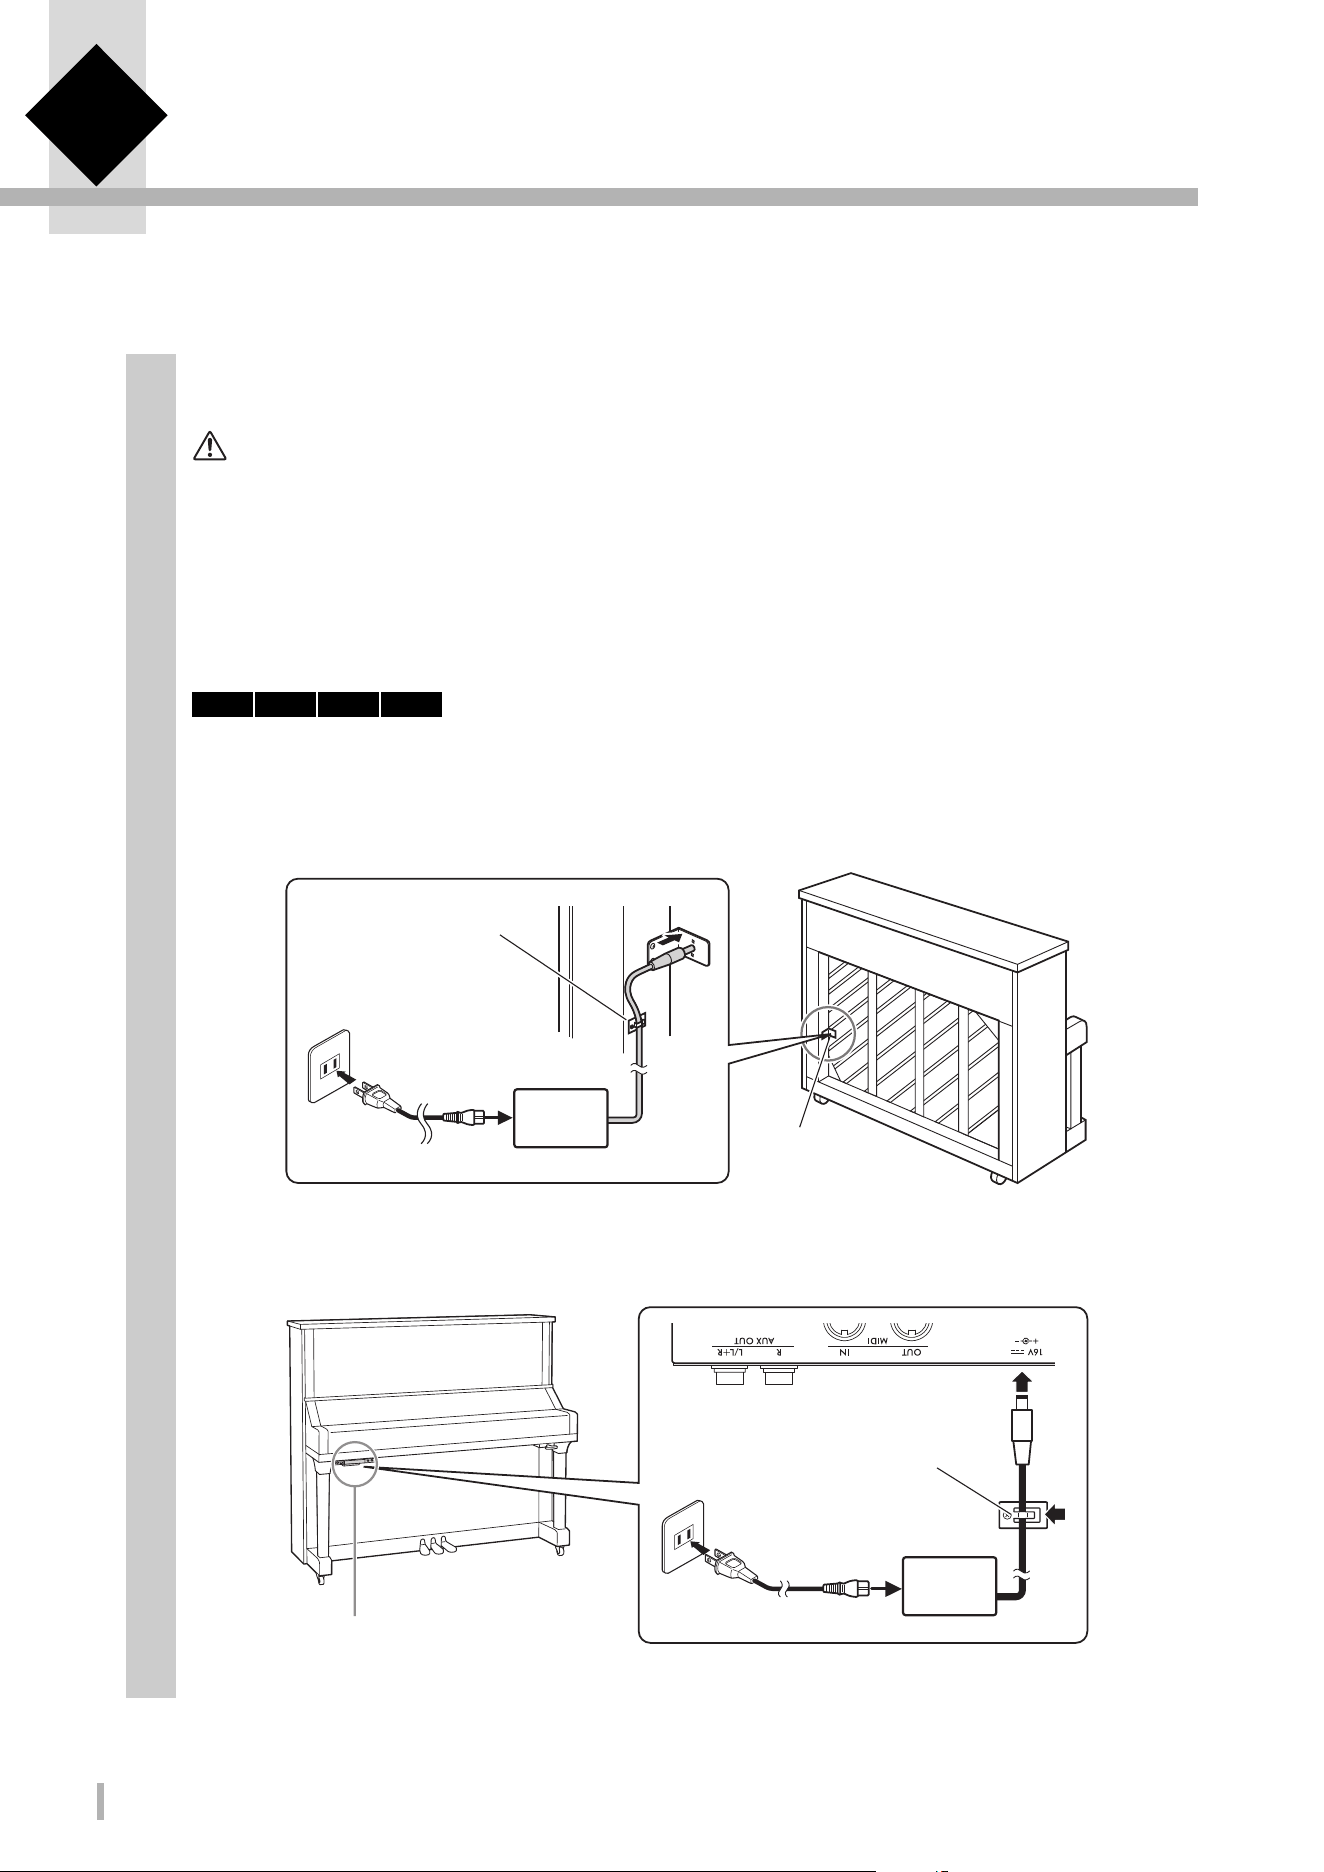
1 Preparing the Power Supply
In order to use the special functions on the TransAcoustic™ Piano or the Silent Piano™, the power to the instrument must
be turned on. If you are using the instrument as a conventional acoustic piano, it is not necessary to turn on the power.
1
Connect the plugs of the AC adaptor and power cord.
The connection method differs depending on the instrument.
WARNING
• Use the specified adaptor (page 76) only. Using the wrong AC adaptor can result in damage to the instrument or
overheating.
• When setting up the product, make sure that the AC outlet you are using is easily accessible. If some trouble or
malfunction occurs, immediately turn the power off and disconnect the plug from the outlet.
NOTE
When disconnecting the power cord/AC adaptor, first turn off the power, and then follow this procedure in reverse order.
• For upright pianos:
Connect the plugs to the DC IN jack (DC IN 24V or DC IN 16V) located at the rear of the piano, and to the AC
outlet in the order shown in the illustration. Use the provided hooks to hold and organize any excess cord.
* Depending on the specific model, the connection method may differ.
TA3 TC3 SH3 SC3
1-2
1-1
1-3
Hook
AC outlet
AC plug
Power cord
AC
adaptor
DC IN jack
(DC IN 24V or
DC IN 16V)
The shape of the plug and outlet may differ depending on your locale.
For pianos having the DC IN jack located at the rear:
1-2
1-1
1-3
AC outlet
AC plug
Power cord
AC
adaptor
Control unit
Hook
For pianos NOT having the DC IN jack located at the rear:
The shape of the plug and outlet may differ depending on your locale.
TA3 TC3 SH3 SC3 Owner’s Manual
15
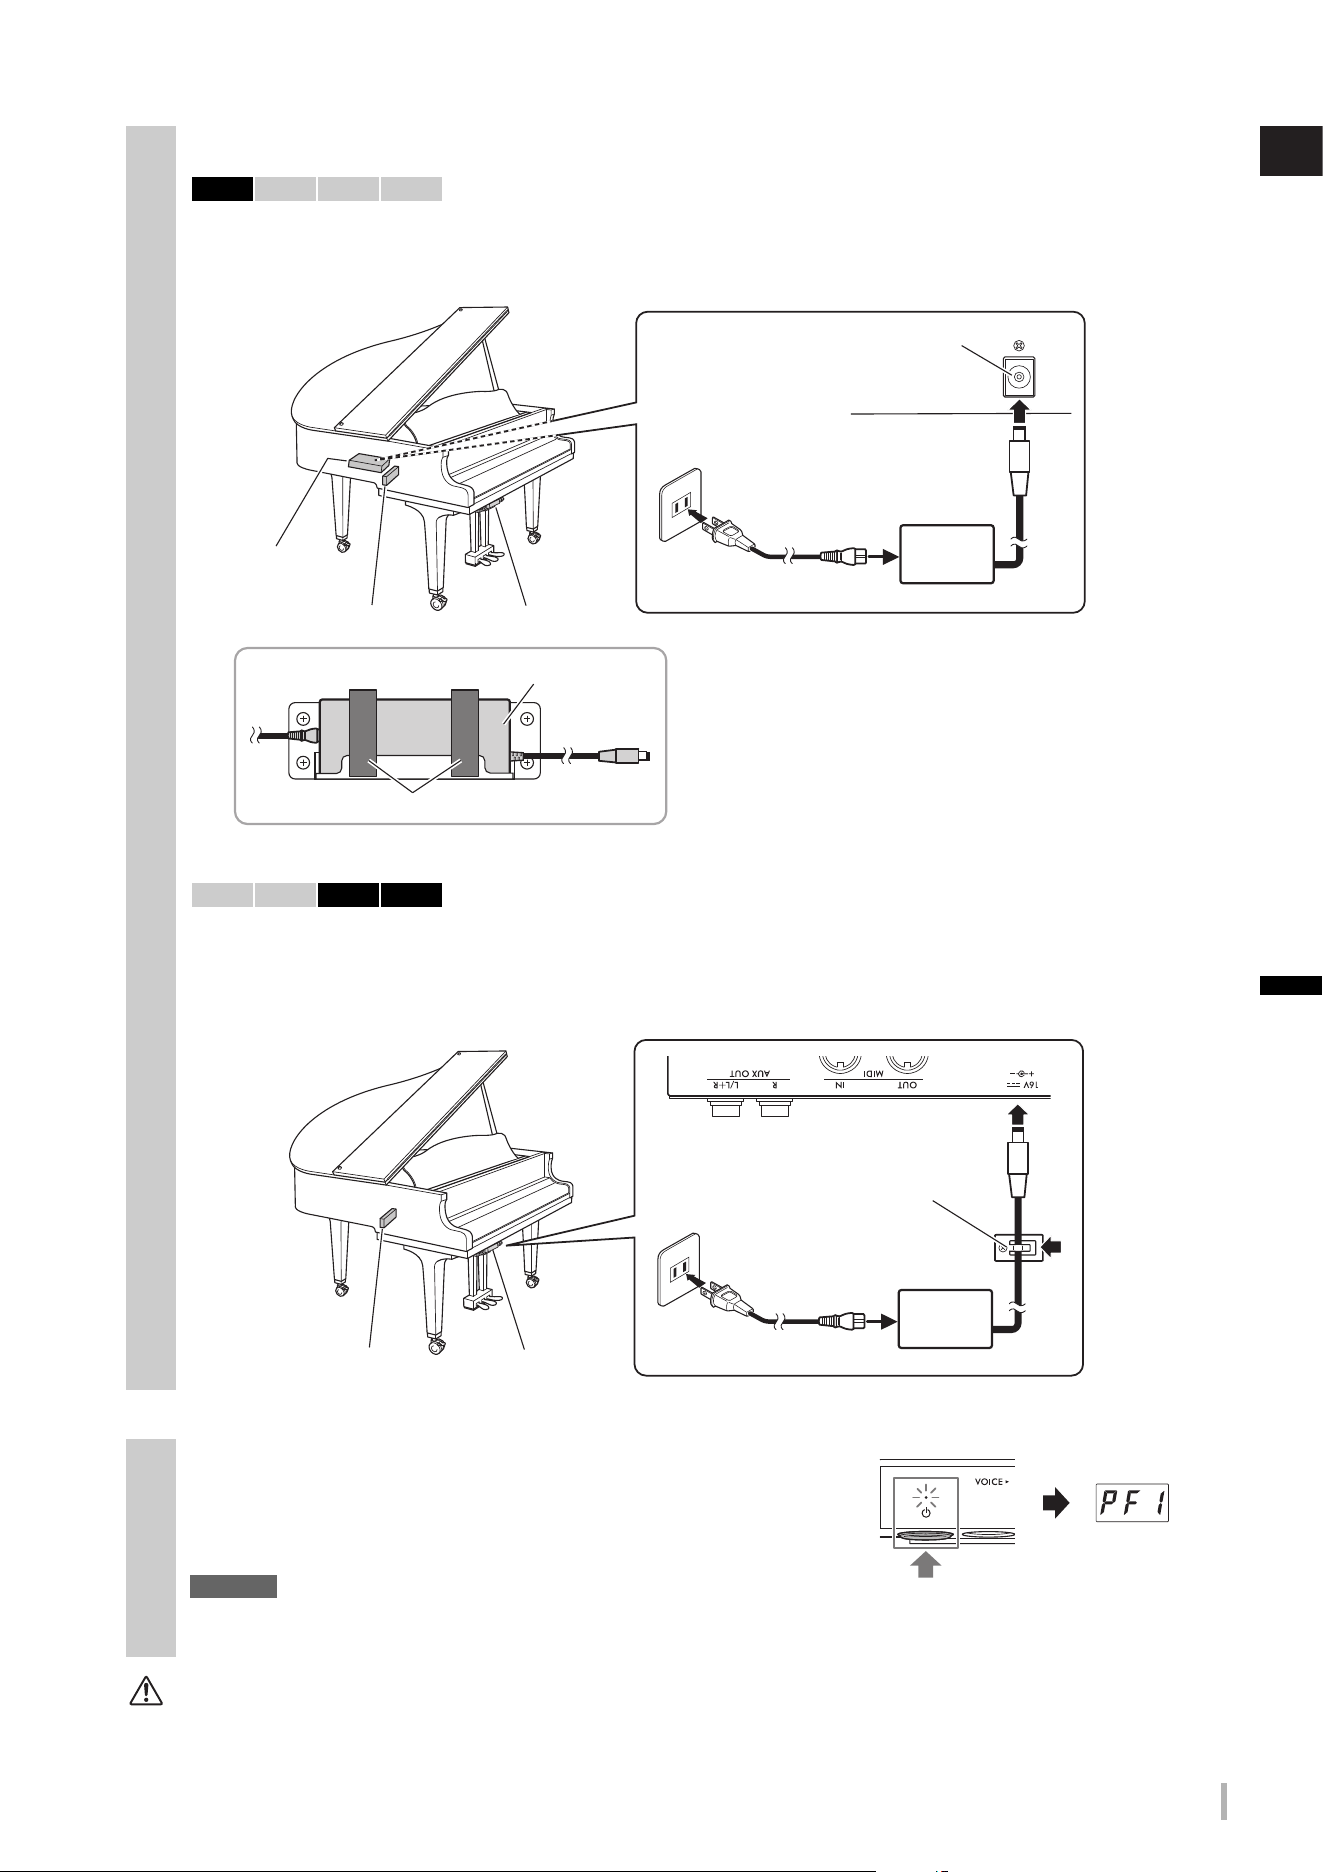
1
Preparing the Power Supply
CAUTION
Even when the power is turned off, electricity is still flowing to the instrument at the minimum level. Remove the electric plug
from the outlet when the instrument is not to be used for extended periods of time, or during electrical storms.
1
• For grand pianos:
Connect the plugs to the DC IN jack (DC IN 24V) located at bottom the piano, and to the AC outlet in the order
shown in the illustration. If you desire a cleaner installation, you can attach the AC adaptor to the adaptor holder
which is located at behind the control unit.
• For grand pianos:
Connect the plugs of the AC adaptor to the DC IN jack (DC IN 16V) on the control unit in the order shown in the
illustration. If you desire a cleaner installation, you can attach the AC adaptor to the adaptor holder (see the
illustration above), and also use the hooks to hold excess cord. The adaptor holder and the hooks are located
behind the control unit.
2
Press the [P] (Standby/On) switch on the control unit to
turn the power on.
The power lamp and the display light. To turn the power off, press the
switch again.
NOTICE
Press only the [
P] (Standby/On) switch when turning the power on. Any other operations, such as pressing the keys,
buttons or pedals may cause the instrument to malfunction.
TA3 TC3 SH3 SC3
1-2
1-1
1-3
AC outlet
AC plug
Power cord
AC
adaptor
DC IN 24V
The shape of the plug and outlet may
differ depending on your locale.
Rear side
DC IN 24V
Control unitAdaptor holder
Adaptor holder
AC adaptor
Hold by hook-and-loop fasteners
TA3 TC3 SH3 SC3
1-2
1-1
1-3
AC outlet
AC plug
Power cord
AC
adaptor
Control unit
Hook
Adaptor holder
The shape of the plug and outlet may differ depending on your locale.
TA3 TC3 SH3 SC3 Owner’s Manual
16
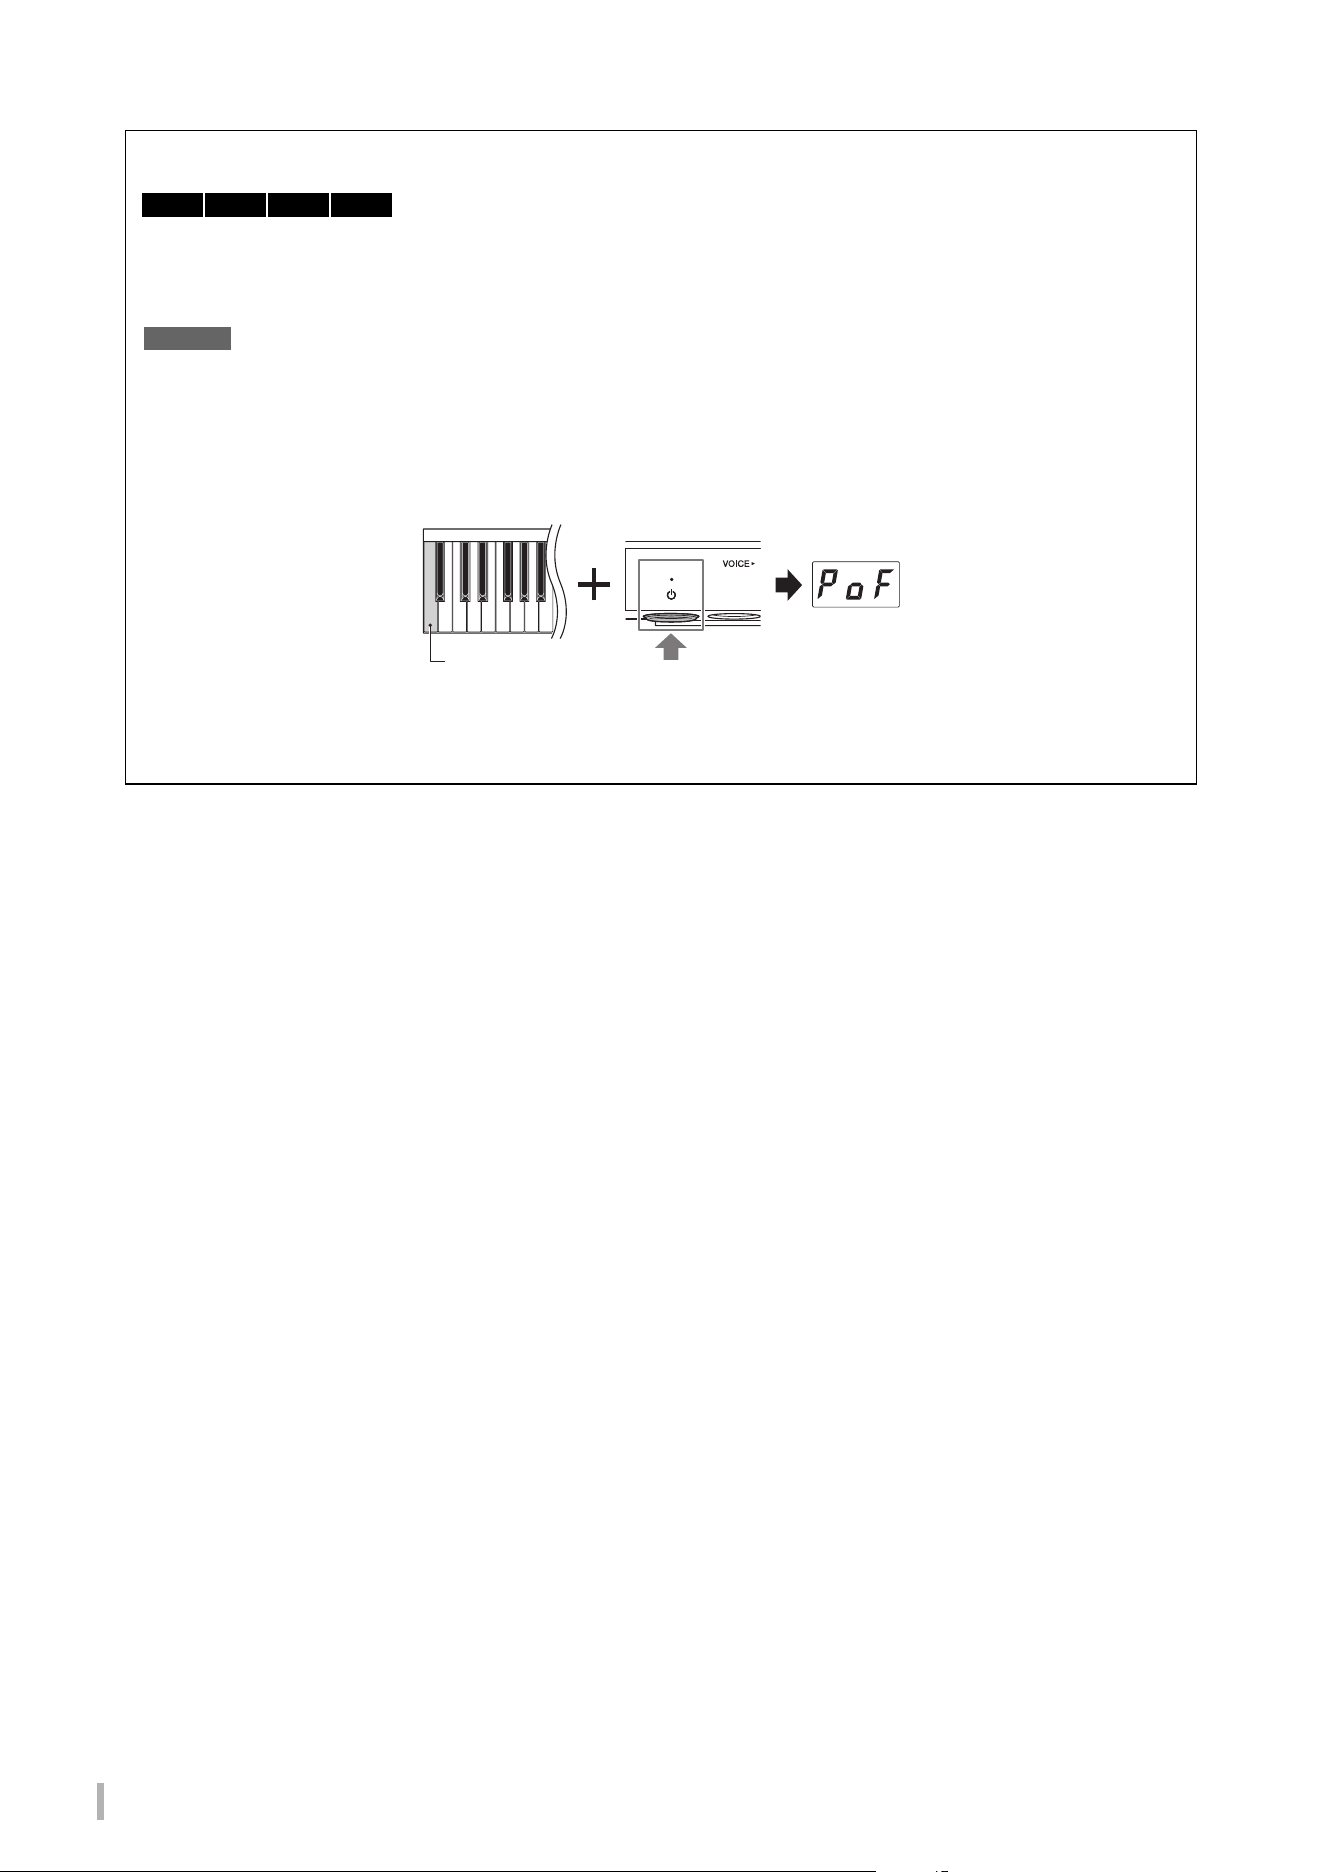
Auto Power Off function
To prevent unnecessary power consumption, this instrument features an Auto Power Off function that automatically
turns the power off if the instrument is not operated for approximately 15 minutes. This function is enabled by
default.
NOTICE
When the instrument is communicating with other devices or Songs are being played back, the power will not be turned off
automatically. Make sure to turn off the power by pressing the [
P] (Standby/On) switch when the instrument is not in use.
Disabling the Auto Power Off function:
Turn the power on while holding down the lowest key. “PoF” appears on the display and the unit starts up with the
Auto Power Off function disabled.
NOTE
You can also disable the Auto Power Off function by turning the power on while holding down the Menu button. To enable or disable
the Auto Power Off function while the power is on, set it in Function F8.1 (page 52).
TA3 TC3 SH3 SC3
Lowest key (A−1)
TA3 TC3 SH3 SC3 Owner’s Manual
17
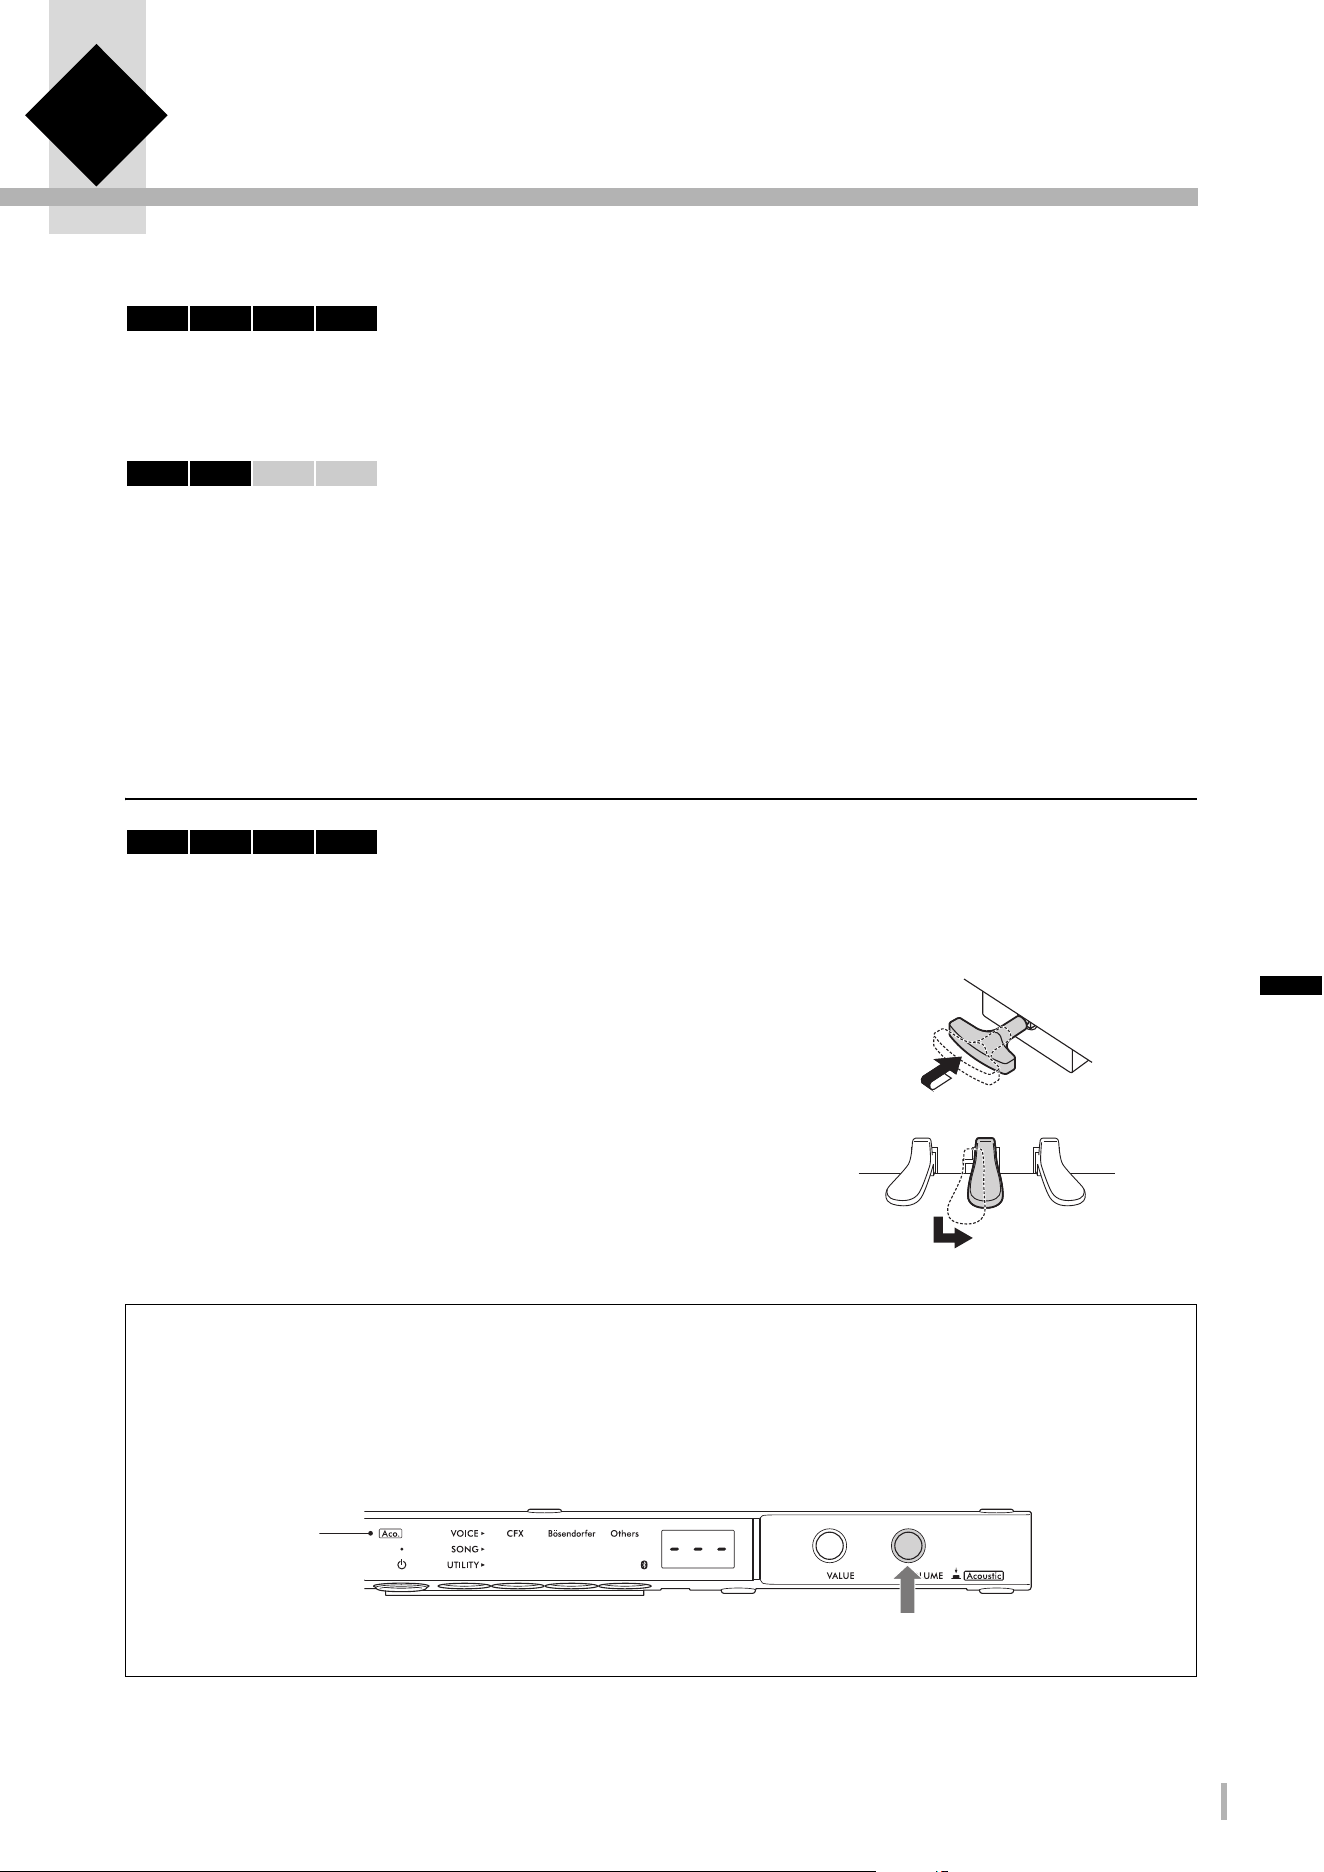
2 Enjoy Playing the Piano
This instrument can be played in the following modes depending on the circumstances and your personal preferences.
• Acoustic mode: You can play as a normal acoustic piano (see below).
• Quiet mode: You can play with the acoustic piano sound muted and listen to a digital sound through the headphones
(page 18).
• TransAcoustic mode: You can play with a digital sound and hear it through the resonance of the piano soundboard by
means of TransAcoustic technology (page 20). The acoustic piano sound is muted.
• Layer mode: You can play with a digital sound layered over the acoustic piano sound (page 21).
When the instrument is in the Quiet mode, TransAcoustic mode, or Layer mode, you can use various functions such as
playing with preset Voices or recording your performances. These functions can be used only when the power is turned
on. If you simply want to play in the Acoustic mode, turning on the power is not necessary.
Playing as an acoustic piano (Acoustic mode)
If you want to play the instrument as a normal acoustic piano, turning on the power is not necessary; simply play the
piano with the power turned off. If you are using an upright piano, or a grand piano equipped with a silencing lever, make
sure that the silencing lever or the silencing pedal is in the following position.
For pianos with a silencing lever:
Pull the silencing lever forward to return it to the back position.
For upright pianos without a silencing lever:
Press the silencing pedal (center pedal) to slide it to the right.
For grand pianos without a silencing lever:
No operations are required.
To play with the acoustic piano sound while the power is turned on, press the [VOLUME] control to turn off the
digital sounds.
On grand pianos without a silencing lever, the [Aco.] lamp lights up and the Voice is automatically set to “---”
(page 22).
On pianos with a silencing lever or a silencing pedal, make sure that the Voice is set to “---,” and then move the
silencing lever or silencing pedal to the position as shown above.
NOTE
Pressing the [VOLUME] control again turns on the digital sounds allowing you to play in the Quiet mode. For details, refer to page 18.
TA3 TC3 SH3 SC3
TA3 TC3 SH3 SC3
TA3 TC3 SH3 SC3
Lights up
(Only on grand pianos
without a silencing lever)
TA3 TC3 SH3 SC3 Owner’s Manual
18
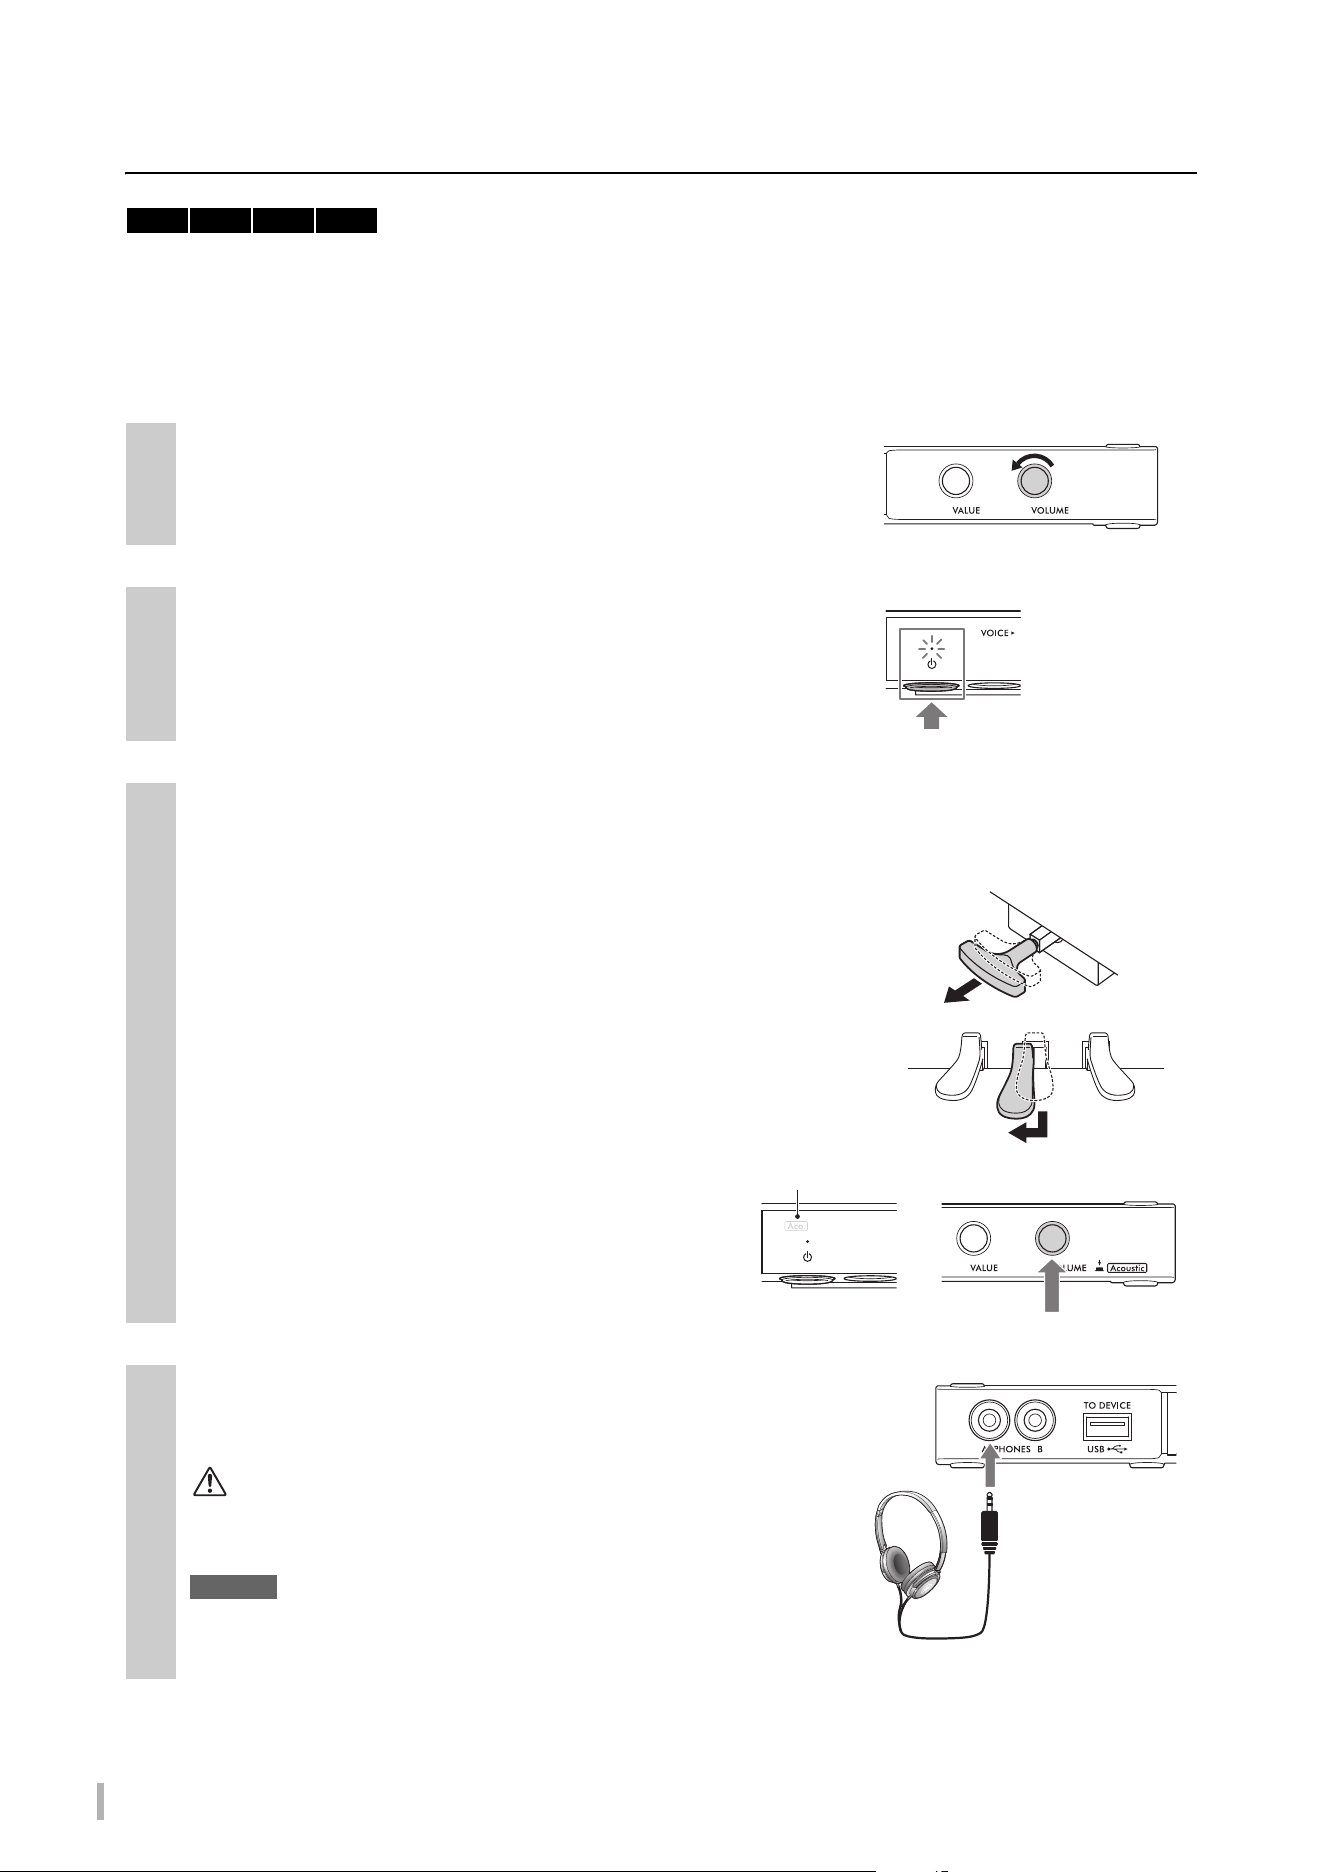
Playing with digital sounds using the headphones (Quiet mode)
This lets you play with the acoustic piano sound muted and listen to the digital sound through the headphones. In this
condition, no piano sound can be heard from the instrument. The movement of the keys is detected by the sensors and
transmitted to the tone generator, and then the sound is output from the headphones.
NOTE
The physical sound of the keyboard mechanism remains even when playing in the Quiet mode.
1
Rotate the [VOLUME] control to the far-left position to set
the volume to minimum.
2
Press the [P] (Standby/On) switch to turn the power on.
3
Stop the acoustic piano sound (or activate the Quiet mode) by one of the following
operations.
For pianos with a silencing lever:
Pull the silencing lever towards you until you hear a click and feel the
mechanism catch.
For upright pianos without a silencing lever:
Press the silencing pedal (center pedal) and slide it to the left until it is
locked in that position.
For grand pianos without a silencing lever:
Make sure that the [Aco.] lamp is turned off. If the lamp is
lit, press the [VOLUME] control to turn it off.
4
Plug the headphones into the [PHONES] jack.
You can connect a pair of headphones to each of the two jacks. If you
are using only one pair, insert the plug into either of these jacks.
CAUTION
Do not use the headphones for a long period of time at a high or
uncomfortable volume level, since this can cause permanent hearing
loss.
NOTICE
Do not pull the cord of the headphones or apply excessive force on the
plug. This can damage the headphones or the control unit and result in
sound degradation.
TA3 TC3 SH3 SC3
Off
Phone plug
(stereo mini)
TA3 TC3 SH3 SC3 Owner’s Manual
19
2
Enjoy Playing the Piano
Attaching the headphone hanger
Attach the headphone hanger to the bottom of the control unit with the supplied
two screws.
NOTICE
Do not hang anything other than the headphones on the hanger. Otherwise, the
control unit or the hanger may be damaged.
5
While playing the keyboard, adjust the volume level by rotating the [VOLUME] control.
Reproducing a natural sound distance sensation (even when using headphones) — Binaural
Sampling and Stereophonic Optimizer
This instrument features two advanced technologies that allow you to enjoy exceptionally realistic, natural piano
sound, even when listening on headphones.
Binaural Sampling
Binaural Sampling is a method that uses two special microphones set at the ear position of a performer and records
the sound from a piano as it would actually be heard. Listening to the sound with this effect through headphones
gives the impression of being immersed in the sound, as if it was actually emanating from the piano. Moreover, you
can enjoy the sound naturally for a long time without ear fatigue. When “CFX Grand” (PF1) or “Bösendorfer” (PF2) is
selected (page 22), connecting the headphones automatically enables binaural sampling sound.
Sampling
A technology which records the sounds of an acoustic instrument then stores them to the tone generator to be played based on
information received from the keyboard.
Stereophonic Optimizer
Stereophonic Optimizer is an effect which reproduces natural sound distance as with the sound of Binaural Sampling,
even when listening on headphones. When one of the Piano Voices besides “CFX Grand” or “Bösendorfer” (PF3–
PF5) is selected, connecting the headphones automatically enables the Stereophonic Optimizer.
This function is turned on by default. Since these sounds are optimized for listening with headphones, we
recommend that you set this function to “Off” in the following situations. (The On/Off setting can be changed in
Function F4.1; page 49.)
• Playing the digital sound of this instrument through the connected external device (page 57), while listening to the
sound from the headphones connected to this instrument.
• Making an audio recording (page 29) while using headphones, and then listening to that recorded audio Song
without using headphones.
NOTE
Before connecting an external device, be sure to read “Connecting to Other Devices” (page 55).
Decreases the level. Increases the level.
Phillips-head (+) screwdriver
TA3 TC3 SH3 SC3 Owner’s Manual
20
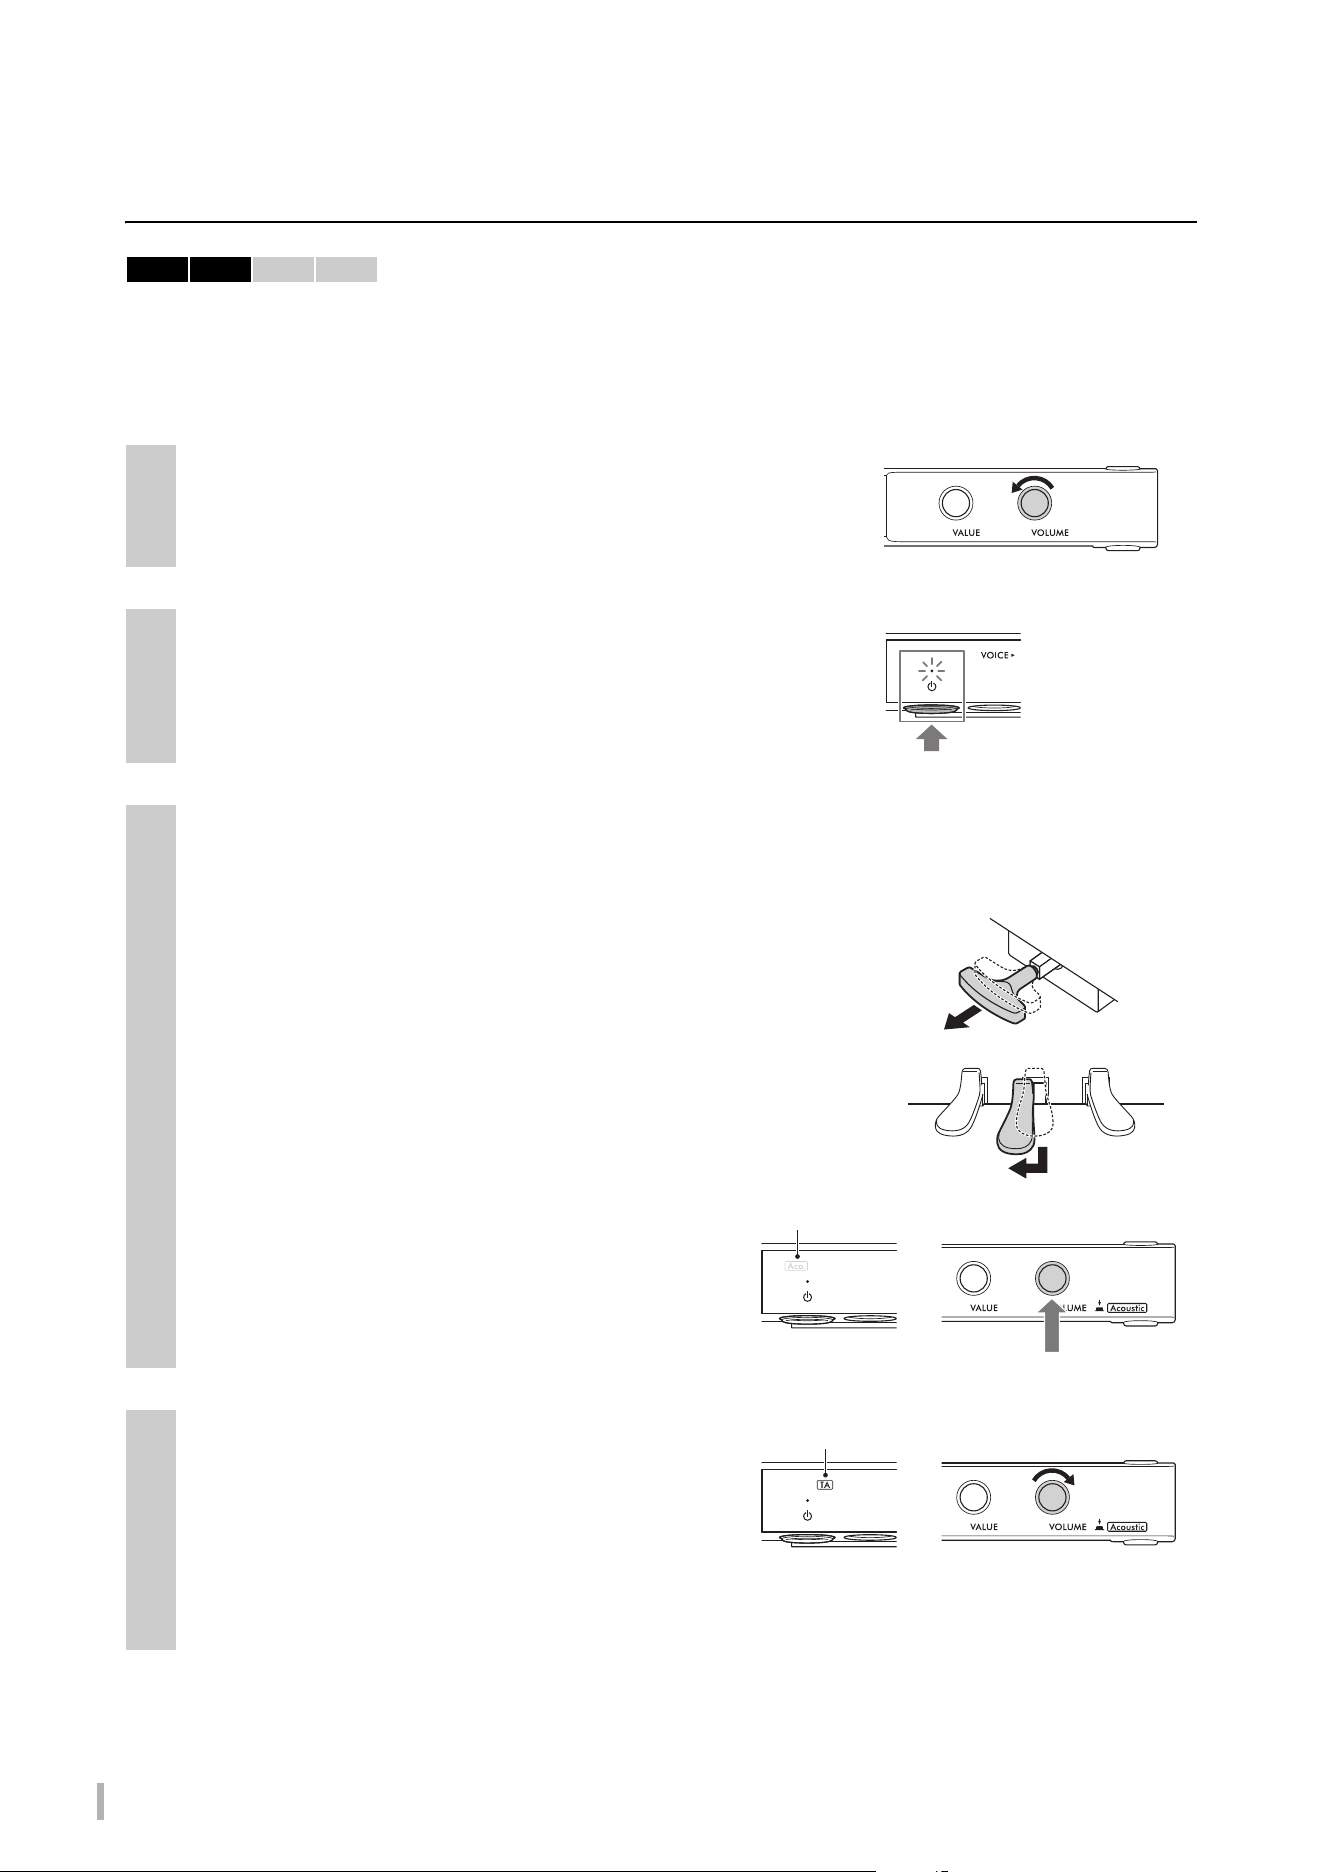
Playing with digital sounds using soundboard resonance
(TransAcoustic mode)
This lets you play the digital sounds and hear them through the resonance of the piano soundboard by means of
TransAcoustic technology. In this condition, no piano sound can be heard from the instrument.
NOTE
The physical sound of the keyboard mechanism remains even when playing in the TransAcoustic mode.
1
Rotate the [VOLUME] control to the far-left position to set
the volume to minimum.
2
Press the [P] (Standby/On) switch to turn the power on.
3
Disable the acoustic piano sound (or activate the Quiet mode) by one of the following
operations.
For pianos with a silencing lever:
Pull the silencing lever towards you until you hear a click and feel the
mechanism catch.
For upright pianos without a silencing lever:
Press the silencing pedal (center pedal) and slide it to the left until it is
locked in that position.
For grand pianos without a silencing lever:
Make sure that the [Aco.] lamp is turned off. If the lamp is
lit, press the [VOLUME] control to turn it off.
4
Rotate the [VOLUME] control to the right so
that the [TA] lamp lights, indicating the
TransAcoustic mode is enabled.
NOTE
When the volume is set to minimum, when the Voice is set to “---”
(page 22), or when headphones are plugged in, the TransAcoustic
mode cannot be activated. Select a Voice other than “---,” and
unplug the headphones.
TA3 TC3 SH3 SC3
Off
Lights up
TA3 TC3 SH3 SC3 Owner’s Manual
21
2
Enjoy Playing the Piano
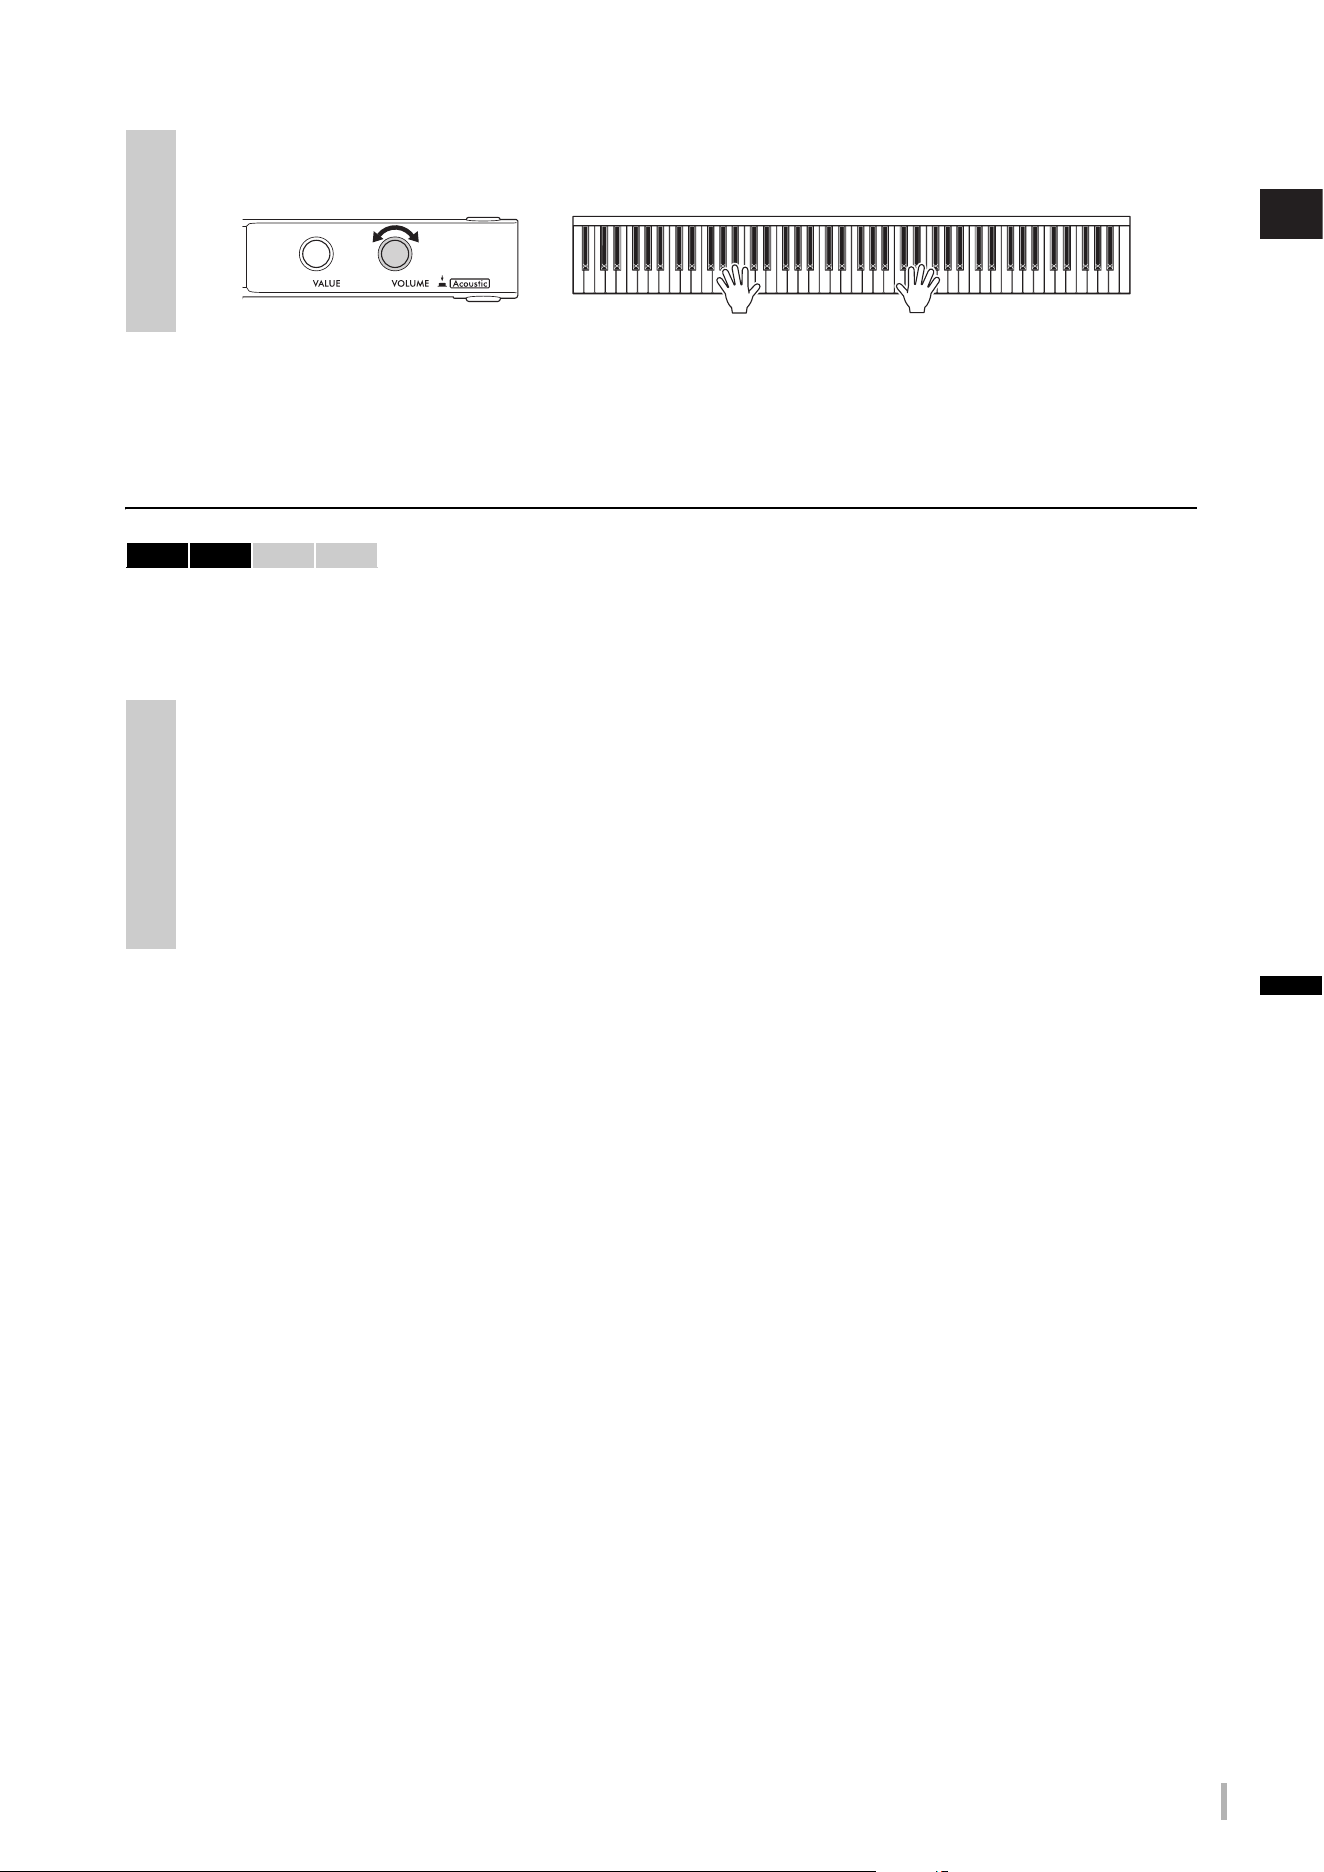
Layering the digital sound with the acoustic piano sound
(Layer mode)
With the Layer mode, you can play a digital sound layered over the acoustic piano sound. To enable the Layer mode,
generally follow the steps of TransAcoustic mode on page 20, but make sure to turn on the acoustic piano sound in step 3
as shown below. Also, make sure a Voice other than “---” is selected (page 22).
NOTE
• This instrument is expertly tuned before it is shipped. However, the pitch may gradually go out of tune, depending on circumstances
such as temperature and humidity. When you detect a difference between the pitch of the digital sound and acoustic piano sound, tune
the piano mechanism, or adjust the Master Tune for the digital sound in the Function F3.4 (page 47). For tuning, consult a professional
piano technician.
• The volume of the acoustic piano sound cannot be adjusted by using the [VOLUME] control.
5
While playing the keyboard, adjust the volume level by rotating the [VOLUME] control.
3
For pianos with a silencing lever:
Return the silencing lever back to the Acoustic mode position (page 17).
For upright pianos without a silencing lever:
Return the silencing pedal back to the Acoustic mode position (page 17).
For grand pianos without a silencing lever:
Press the [VOLUME] control to turn the [Aco.] lamp on.
Decreases the level. Increases the level.
TA3 TC3 SH3 SC3
TA3 TC3 SH3 SC3 Owner’s Manual
22
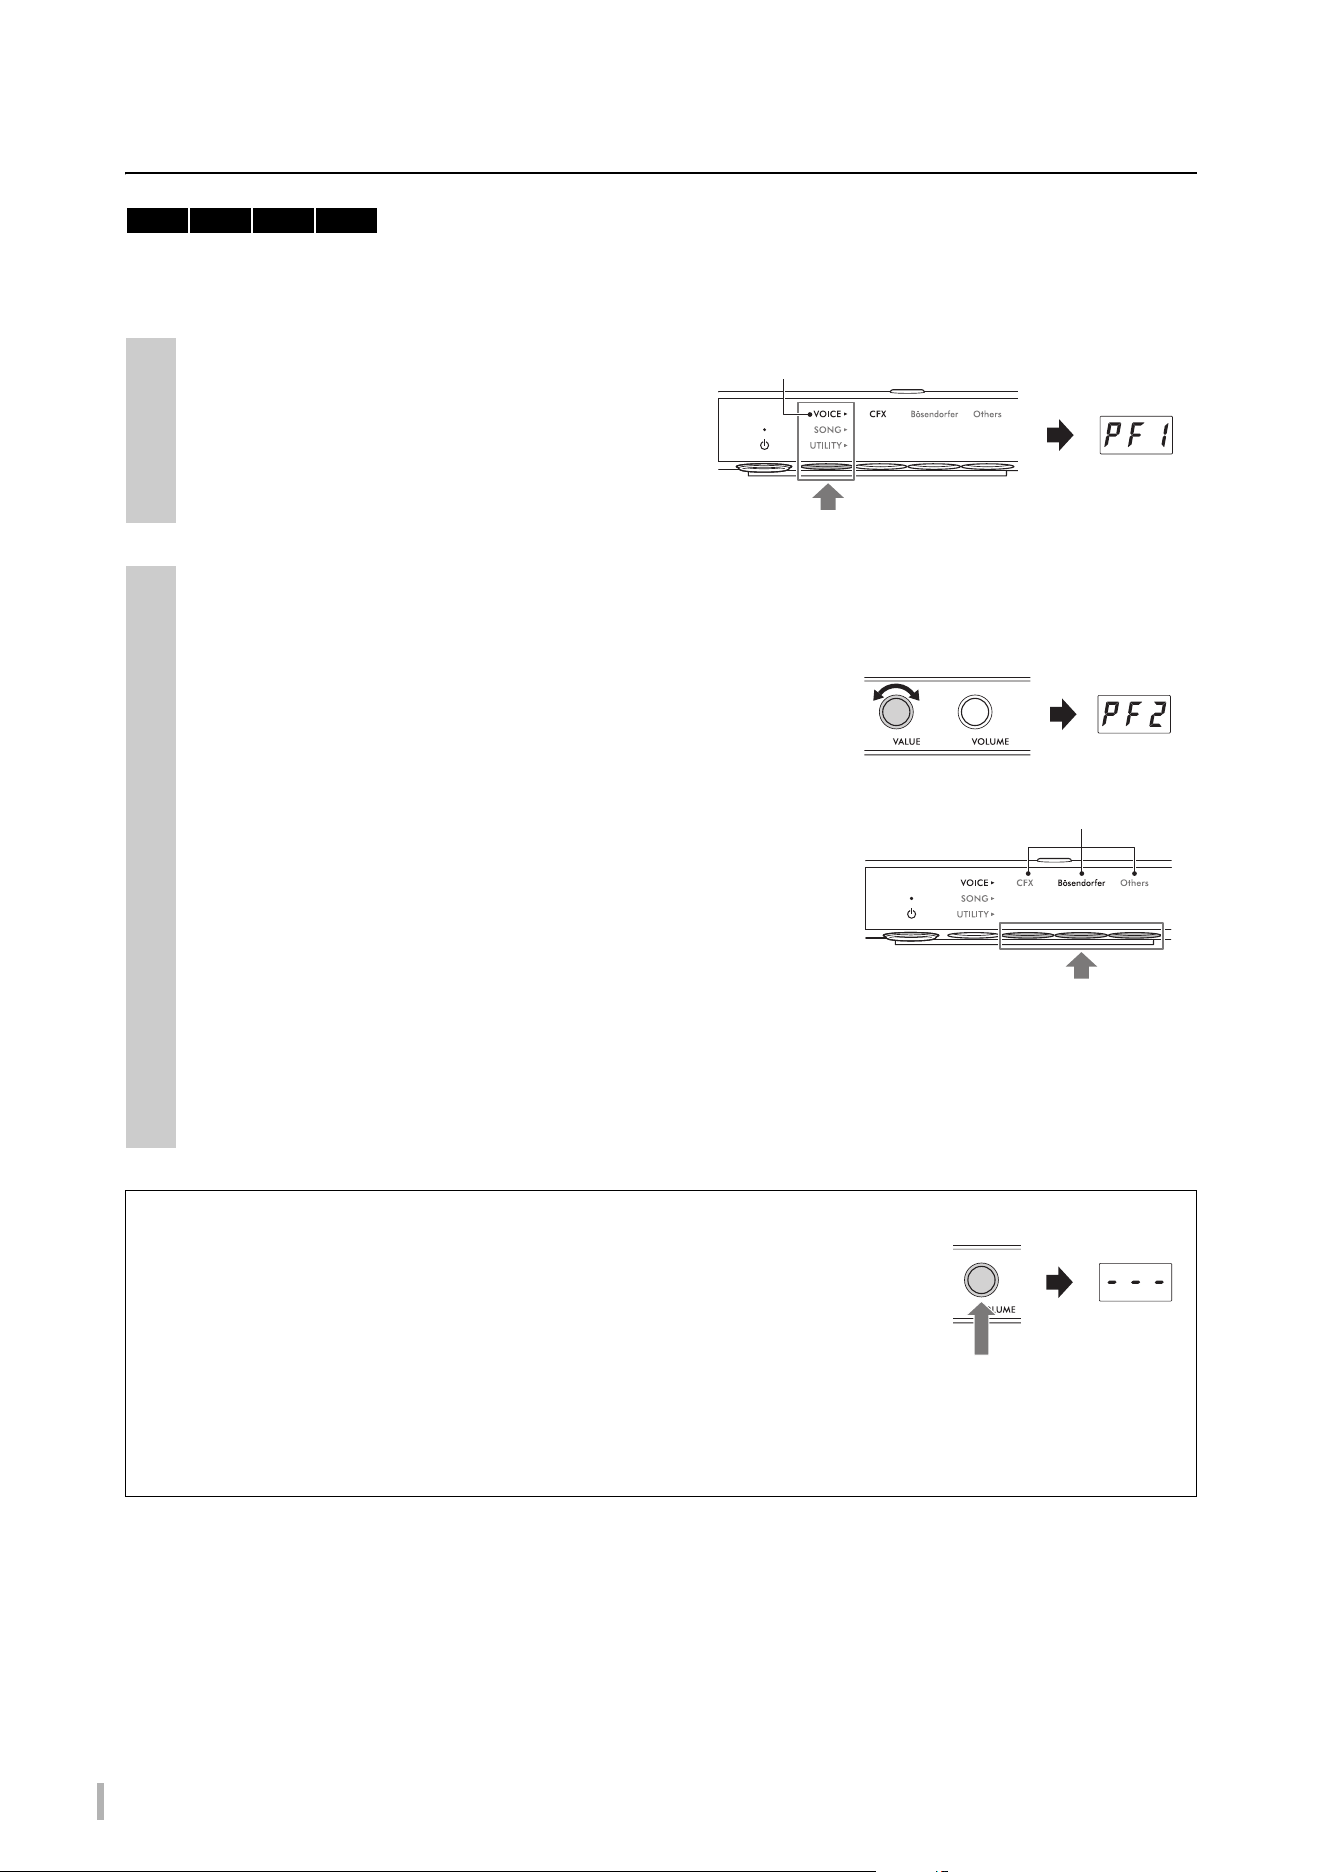
Selecting a Voice for playing with digital sound
When in the Quiet mode, TransAcoustic mode, or Layer mode, you can play various preset Voices on the piano. For
information on available Voices, refer to the “Voice List” on page 23.
By default, the CFX Grand Voice (PF1) is selected when the power is turned on. When the Voice Backup function is set to
on in Function F7.3 (page 51), the last selected Voice before the power was turned off will be called up when you turn the
power on next time.
1
Press the Menu button several times until the
[VOICE] lamp lights up in orange.
The currently selected Voice number is shown on the
display.
2
Use the [VALUE] control or one of the Buttons 1 – 3 to select the desired Voice.
The selected Voice can be confirmed by the lamp and the display.
[VALUE] control
Rotating the control step by step switches the Voice to the next or
previous one in the order of the Voice List. Pressing this control
instantly selects the CFX Grand (PF1) Voice.
Button 1 [CFX]
Pressing this button selects the CFX Grand (PF1) Voice.
Button 2 [Bösendorfer]
Pressing this button selects the Bösendorfer (PF2) Voice.
Button 3 [Others]
Pressing this button selects the first Voice in each category in order.
While the power is on, the Voice last selected by Button 3 [Others] is retained. Pressing Button 3 [Others] allows
you to call up the last selected Voice instantly. When the power is turned off, the Voice for Button 3 resets to “PF3.”
NOTE
Listen to the Demo Songs for each Voice to hear and experience the characteristics of the Voices (page 24).
Setting the Voice to “---” (Muting the digital sound)
Pressing the [VOLUME] control sets the Voice to “---,” allowing you to play the
keyboard without producing any digital sound. However, other functions can be
used. This setting can be used in situations such as playing an acoustic piano
sound while using the Rhythm function (page 41) or recording function (page 29).
You can also select “---” by rotating the [VALUE] control.
NOTE
• On pianos with a silencing lever or a silencing pedal, the lever or pedal must be moved to the position of the Acoustic mode
(page 17) to enable playing with the acoustic piano sound.
• On grand pianos without a silencing lever, selecting “---” by rotating the [VALUE] control can be done only when the [Aco.] lamp is lit.
TA3 TC3 SH3 SC3
Lights up in orange
Current Voice
number PF1
The lamp of the selected button
lights up in orange.
Press one of these buttons.
TA3 TC3 SH3 SC3 Owner’s Manual
23
2
Enjoy Playing the Piano
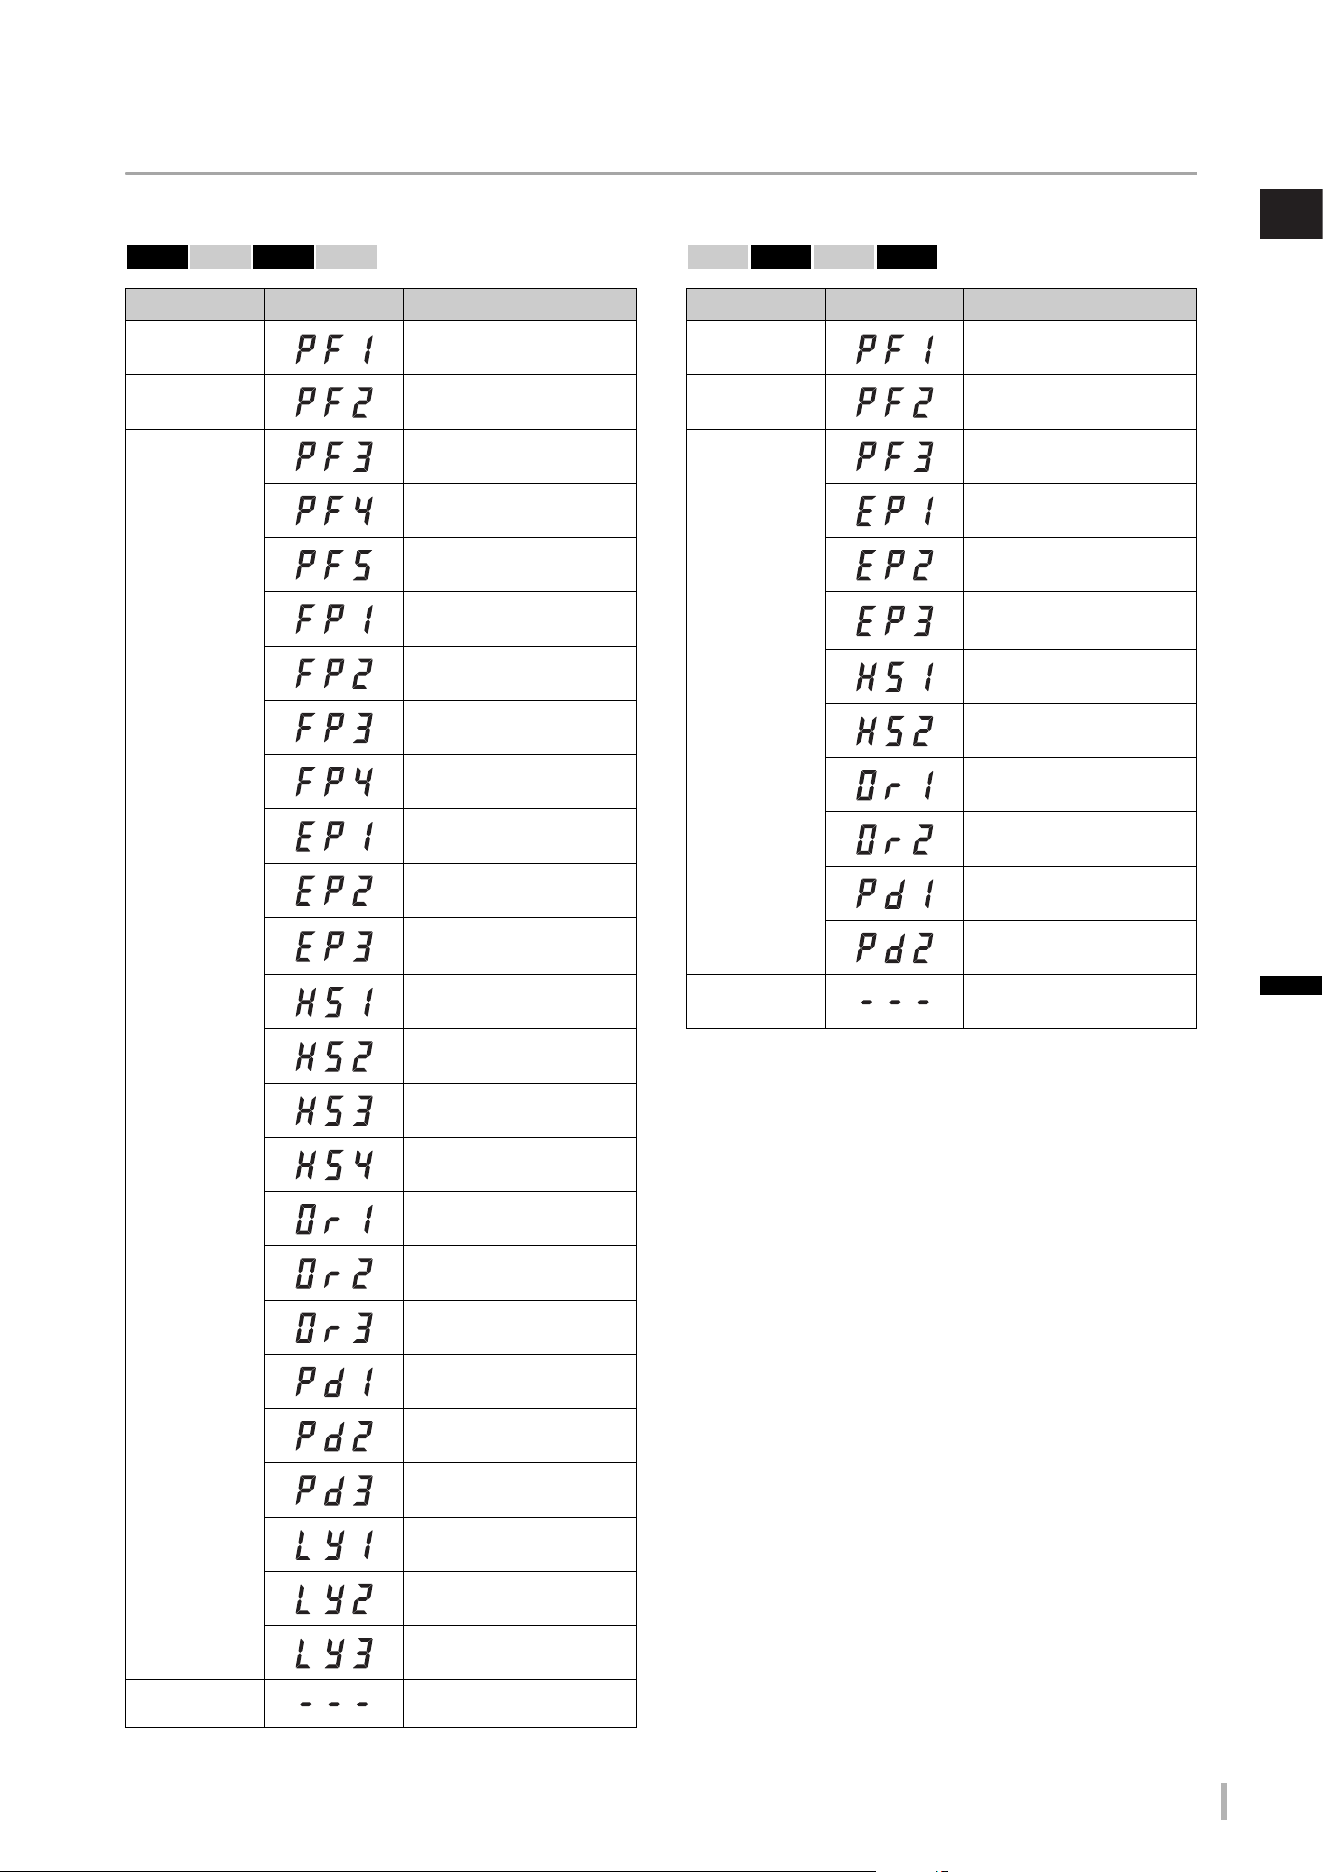
Voice List
For details on each Voice, refer to page 69.
* When Function F4.1 (Binaural) is set to on (page 49),
connecting the headphones automatically enables Binaural
Sampling sound for the PF1 (CFX Grand) or PF2 (Bösendorfer)
Voice.
Button Display Voice Name
Button 1
[CFX]
CFX Grand
(Binaural CFX Grand*)
Button 2
[Bösendorfer]
Bösendorfer
(Binaural Bösendorfer*)
Button 3
[Others]
Pop Grand
Ballad Grand
Upright Piano
Scarlatti Piano
Mozart Piano
Beethoven Piano
Chopin Piano
Stage E.Piano
DX E.Piano
Vintage EP
Harpsichord 8'
Harpsi. 8'+4'
Vibraphone
Celesta
Organ Principal
Organ Tutti
Jazz Organ
Strings
Choir
Synth Pad
Piano + Strings
Piano + Pad
Piano + DX E.Piano
— (No digital sound)
TA3 TC3 SH3 SC3
Button Display Voice Name
Button 1
[CFX]
CFX Grand
(Binaural CFX Grand*)
Button 2
[Bösendorfer]
Bösendorfer
(Binaural Bösendorfer*)
Button 3
[Others]
Upright Piano
Stage E.Piano
DX E.Piano
Vintage EP
Harpsichord 8'
Celesta
Organ Principal
Jazz Organ
Strings
Synth Pad
— (No digital sound)
TA3 TC3 SH3 SC3
TA3 TC3 SH3 SC3 Owner’s Manual
24
3 Playing Back and Recording Songs
The preset songs, your recorded performances, and commercially available songs are referred to as “Songs” in this
manual. This instrument allows you to play or record both MIDI Songs and Audio Songs.
• MIDI Songs
A MIDI Song is comprised of your keyboard performance information and is not a recording of the actual sound itself.
The performance information refers to which keys are played, at what timing, and at what strength—just as in a musical
score. Based on the recorded performance information, the tone generator outputs the corresponding sound. This
instrument can play back MIDI Songs in the SMF (Standard MIDI File) format (file extension: .mid).
• Audio Songs
An Audio Song is a recording of the performed sound itself. This data is recorded in the same way as that used with
voice recorders, etc. Just as with a smartphone or portable music player, etc., this instrument can play back the Audio
Songs in the WAV format (file extension: .wav with 44.1 kHz/16-bit resolution, stereo).
Playing back Songs
Song Category (Songs that can be played)
* The categories for USB flash drive are shown only when a USB flash drive is connected. The categories for External Songs are shown
only when relevant data exist.
NOTE
Songs recorded by this instrument are called “User” Songs, while Songs created in other ways or on other devices are called “External”
Songs. When you record a Song to a USB flash drive, a “USER FILES” folder is created automatically, and the resulting User Song is
saved in this folder. Songs in the “USER FILES” folder are handled as User Songs while Songs in a location other than the “USER FILES”
folder are handled as External Songs. For information about the playback sequence of Songs in the USB flash drive, refer to page 26.
Song Category Song No. Description
Voice Demo (MIDI)
d.01–d.25/
d.01–d.12
Demo Songs which effectively demonstrate each Voice on this
instrument (page 72).
Preset (MIDI) P.01–P.50 50 classical piano preset Songs stored to this instrument (page 73).
USB flash
drive*
User (Audio) A.00–A.99
Audio Songs which have been recorded with this instrument and
saved to a USB flash drive (page 29).
External (Audio)
C.00–C.99,
100–399
External Audio Songs, commercially available or which have been
recorded on a computer, etc. and saved to a USB flash drive.
User (MIDI) S.00–S.99
MIDI Songs which have been recorded with this instrument and saved
to a USB flash drive (page 29).
External (MIDI)
F.00–F.99,
100–399
External MIDI Songs, commercially available or which have been
recorded on a computer, etc. and saved to a USB flash drive.
Internal
memory
User (MIDI) U.01–U.10
MIDI Songs which have been recorded to internal memory of this
instrument (page 29).
TA3 TC3 SH3 SC3
TA3 TC3 SH3 SC3 Owner’s Manual
25
3
Playing Back and Recording Songs
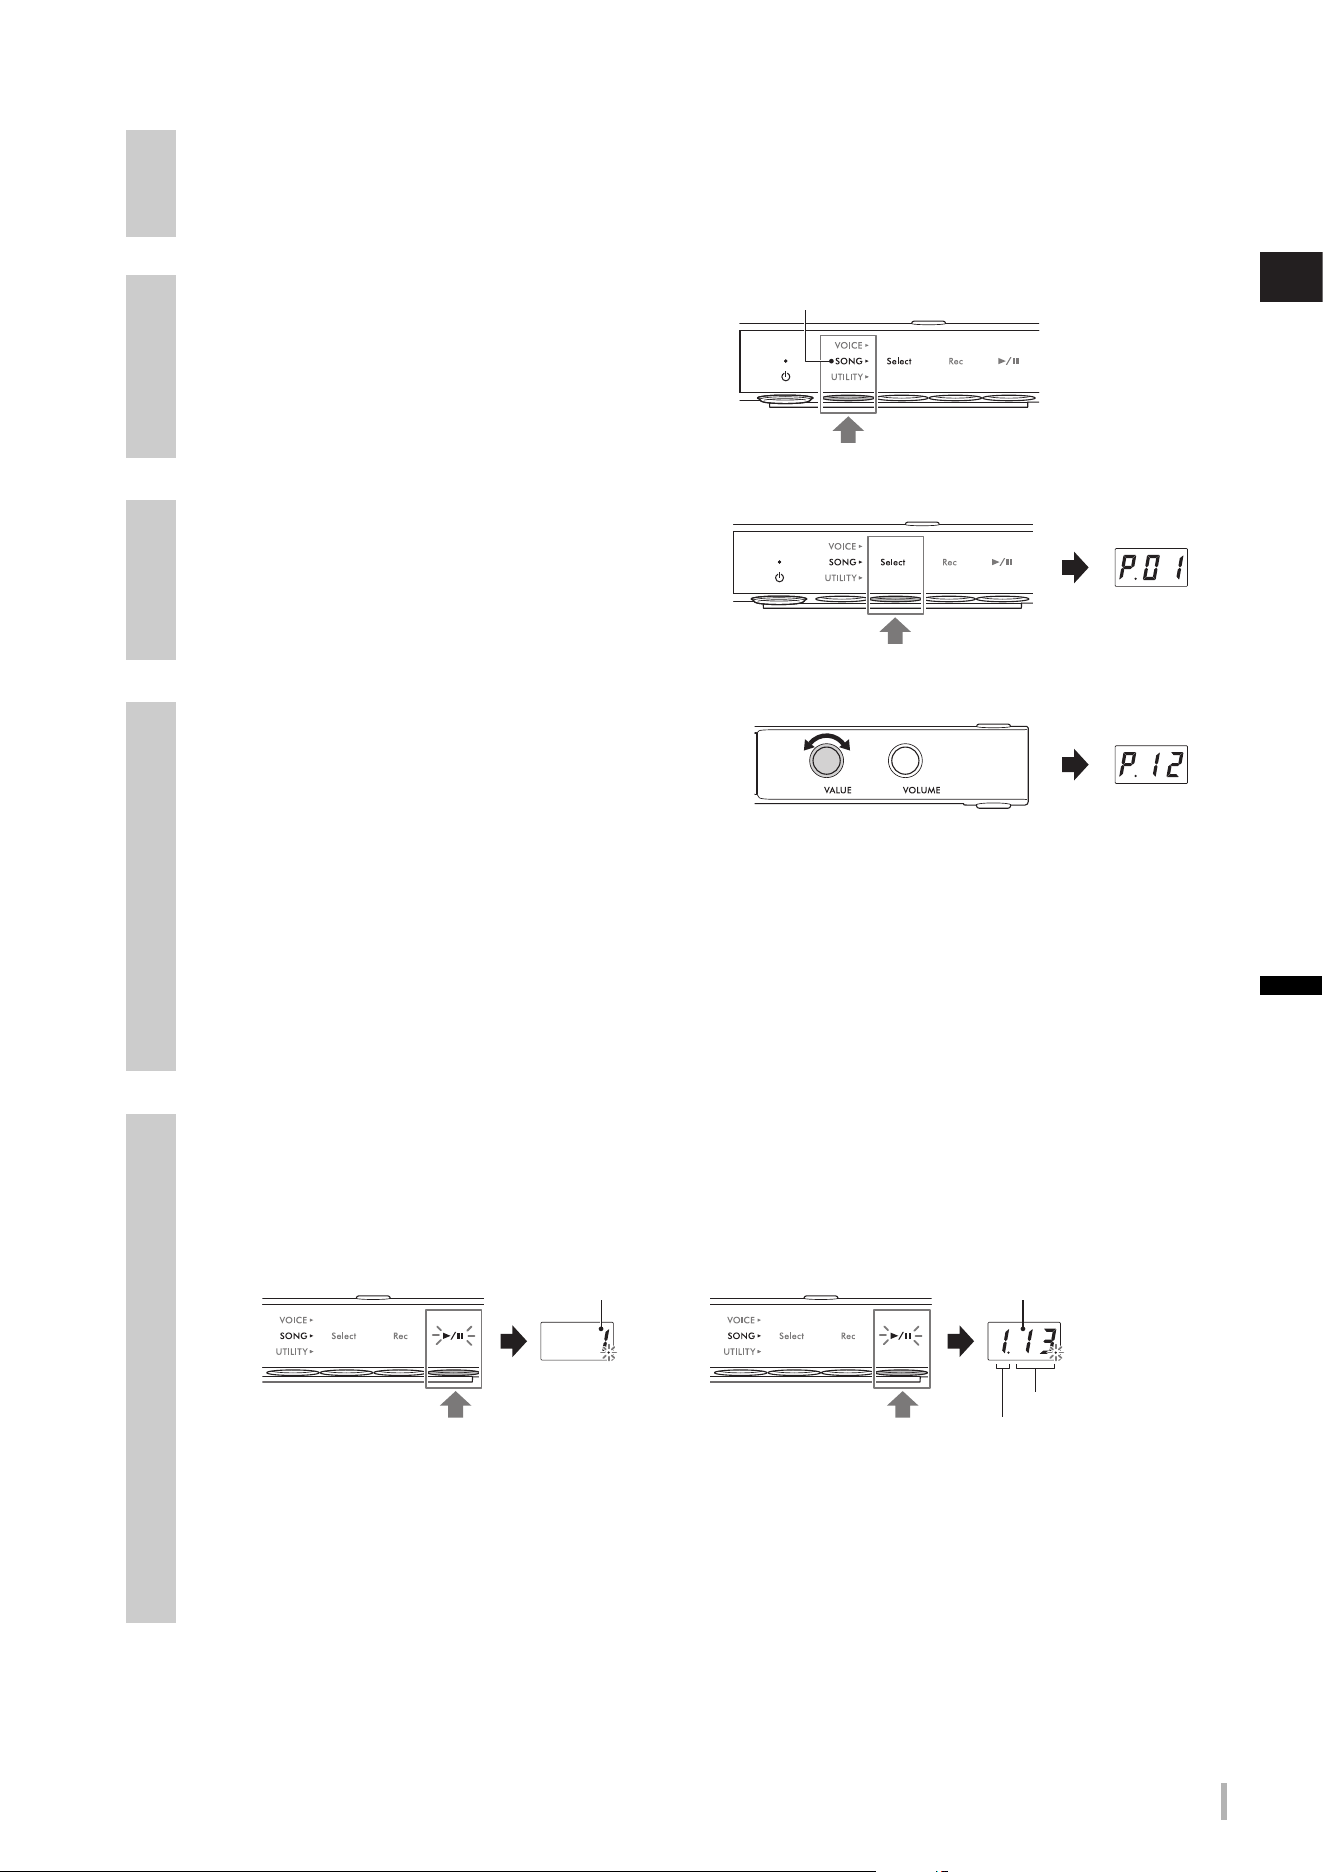
1
(Only when playing a Song from a USB flash drive)
Connect the USB flash drive to the [USB TO DEVICE] terminal.
Before using the USB flash drive, be sure to read “Connecting USB devices” on page 55.
2
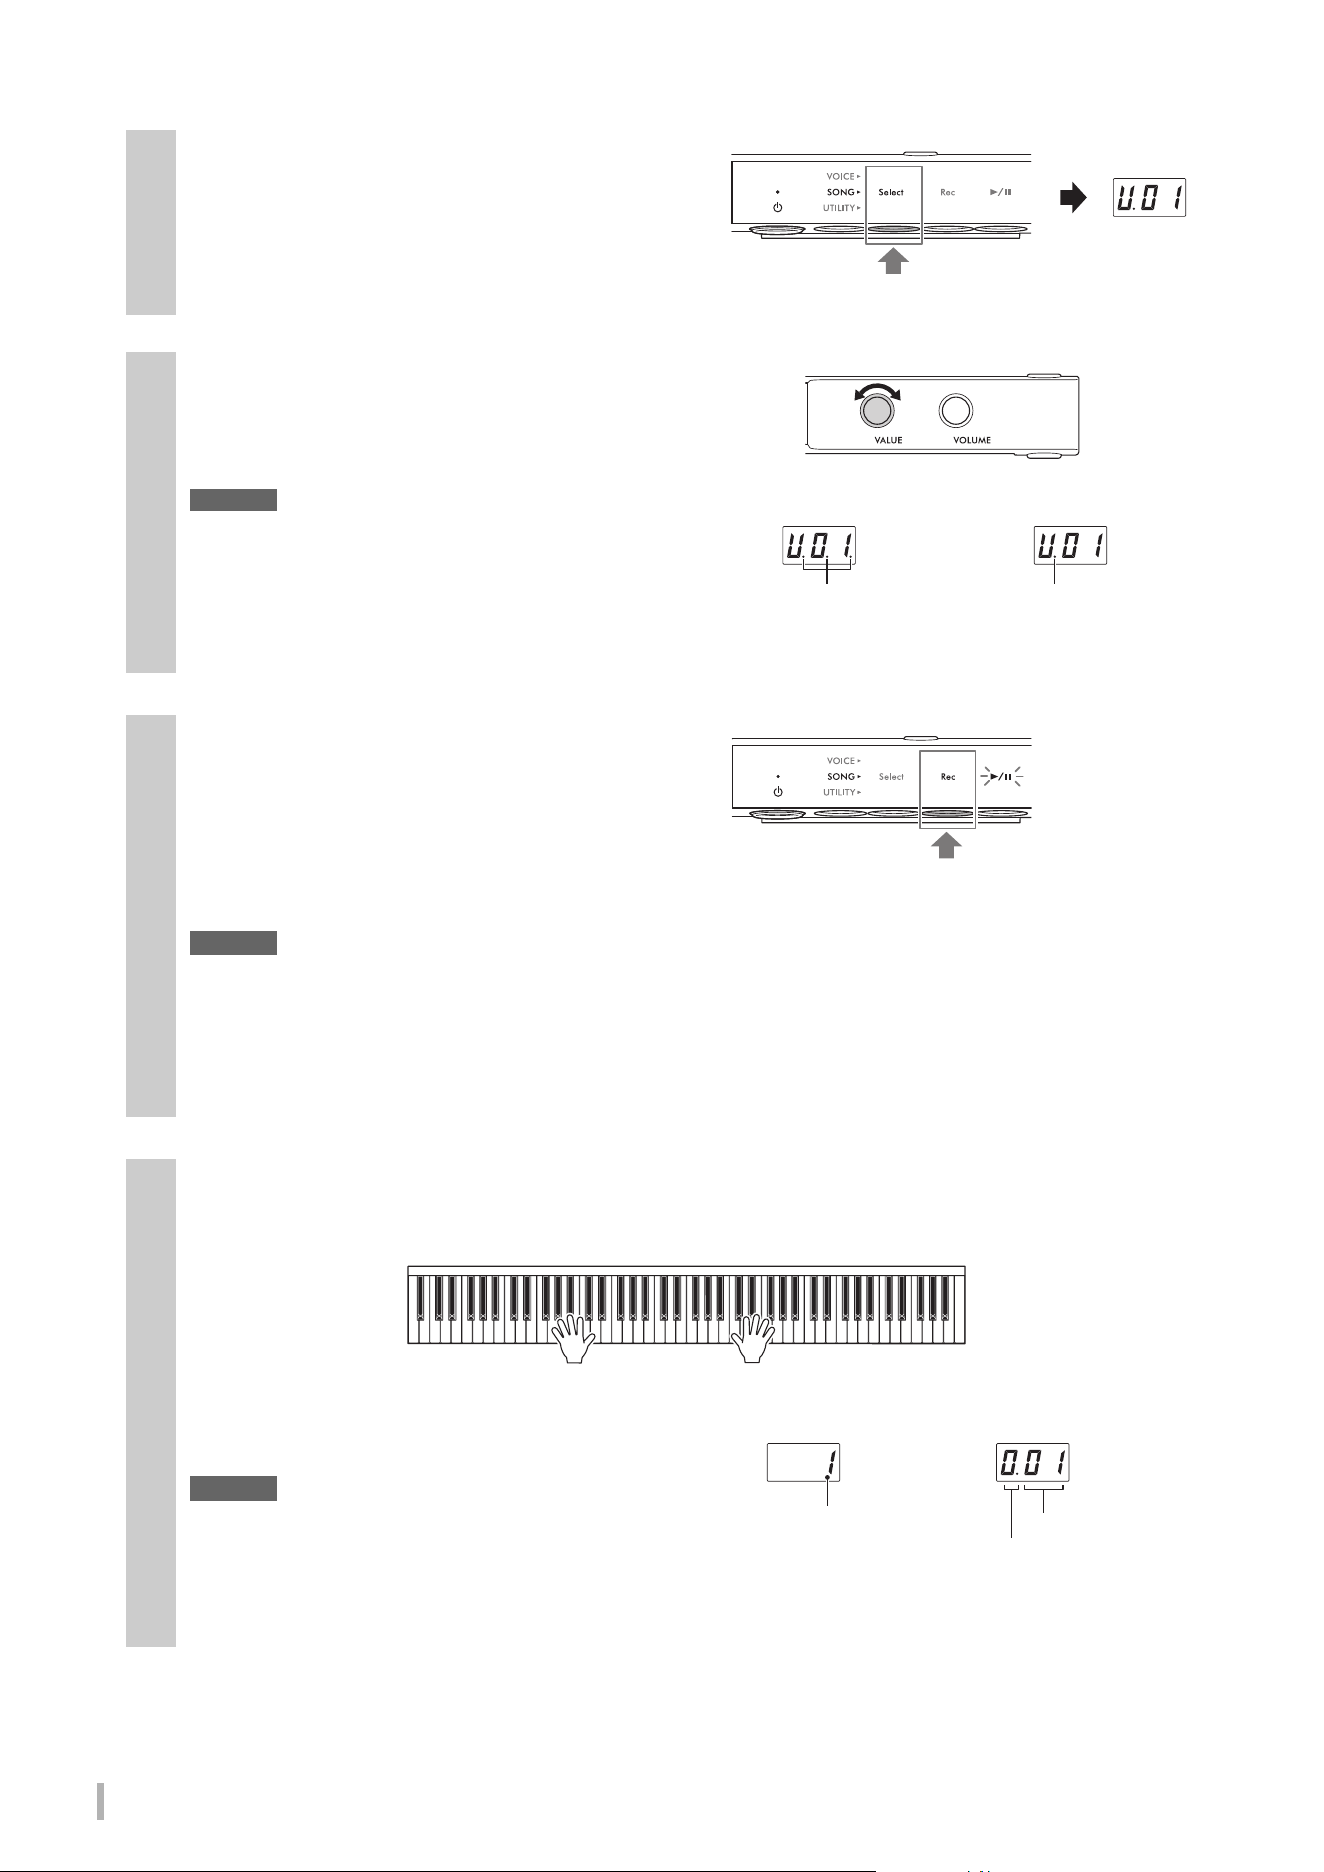
Press the Menu button several times until the
[SONG] lamp lights up in orange.
3
Press Button 1 [Select] several times to select
the Song category (page 24).
4
Rotate the [VALUE] control to select the
desired Song.
When one of the following displays is called up, all Songs
in the category play back in turn continuously until you
stop playback. When you call up any other Song numbers, only the selected Song plays back.
• *.rd (Random Playback): Continuously plays back all Songs in the selected category in random order.
• *.AL (All-repeat Playback): Continuously plays back all Songs in the selected category in number order.
The asterisk (*) indicates one of the Song categories. For example, selecting “P.rd” plays all preset Songs in random order.
NOTE
• Pressing the [VALUE] control selects the first Song in the selected Song category.
• Continuous playback is not available for Voice Demo Songs.
5
Press Button 3 [R/K] (Play/Pause) to start playback.
The [R/K] (Play/Pause) lamp lights up and the current position (measure number or elapsed time) appears in the
display. The dot at the lower right of the display flashes at the MIDI Song tempo (or the metronome tempo when
playing back an Audio Song). For information on playback-related operations, see page 27.
NOTE
The current position is not displayed when playing back Voice Demo Songs.
Usually, the Song stops automatically when playback of the selected Song reaches the end. To stop manually during
playback, press Button 1 [Select].
Lights up in orange
MIDI Song
Audio Song
Current
measure number
Elapsed time
Seconds
Minutes
(In case of 10 minutes or more,
only the lowest digit is shown).
TA3 TC3 SH3 SC3 Owner’s Manual
26
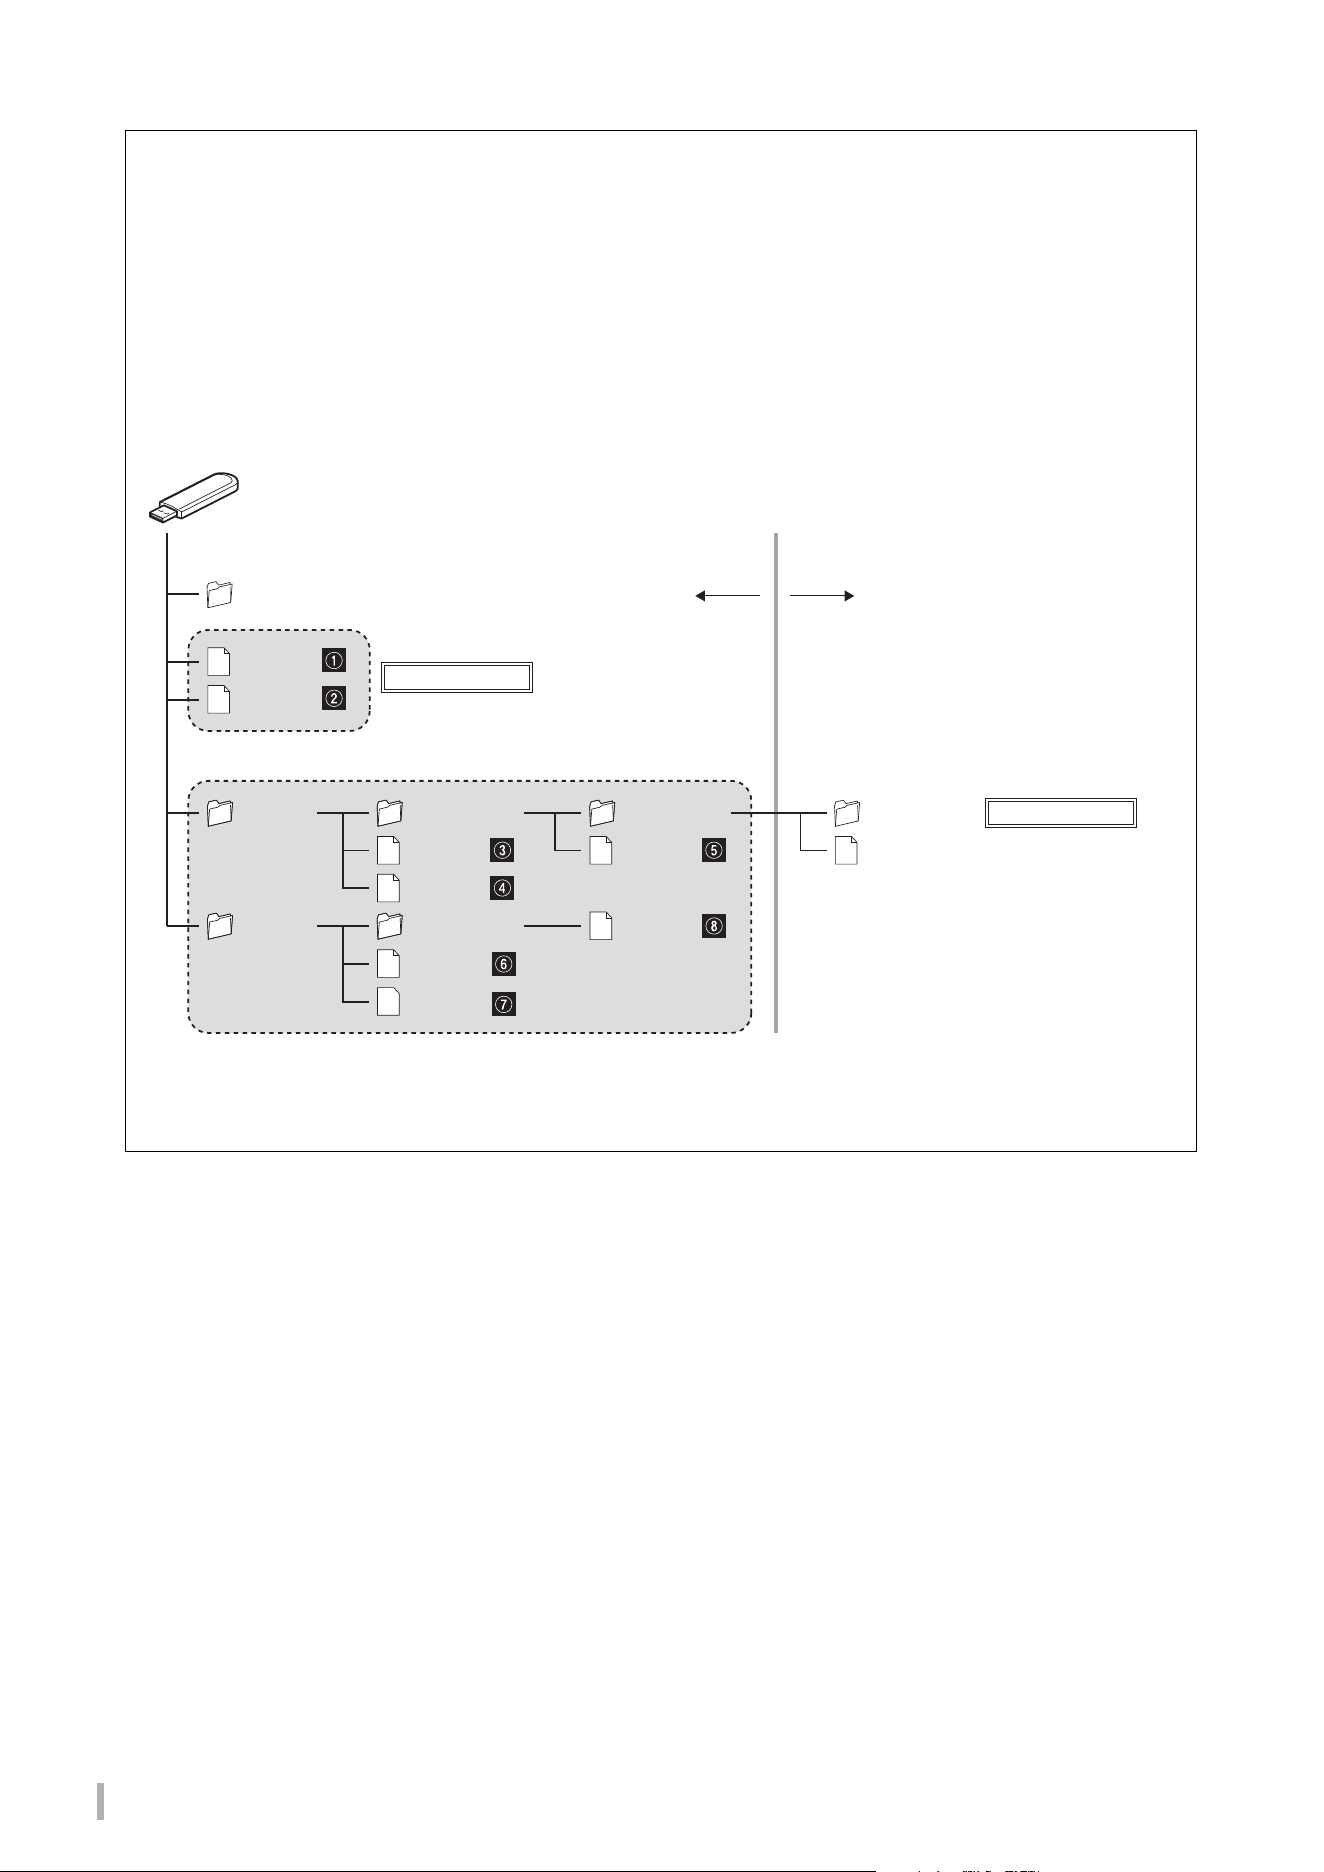
Playback sequence of Songs in a USB flash drive
The Songs stored in the USB flash drive are sorted and played back in the order below.
User Songs are named as follows, and are saved in the “USER FILES” folder. Songs are played back in ascending order
of the Song number (**).
• USERSONG**.MID (MIDI Song)
• USERAUDIO**.WAV (Audio Song)
External Songs are played back first in numeric order, and then from successive folders in alphabetical order. The
Root folder has priority over the general folders.
NOTE
This instrument cannot recognize Song files saved in a folder lower than the third level. If you manage Song files in a USB flash drive
with a computer, make sure to save them to the first, second or third level folder.
USB flash drive
BBB.mid
AAA.mid
Folder A
Folder B
USER FILES
Can be played.
Sub Folder A
Second levelFirst level Third level Fourth level
General folders
Root folder
AAA.mid
BBB.mid
Sub Folder A
AAA.mid
BBB.mid
Sub Folder B
AAA.mid
Sub Folder A
AAA.mid
AAA.mid
Cannot be played.
TA3 TC3 SH3 SC3 Owner’s Manual
27
3
Playing Back and Recording Songs
Playback operations
Playback continues even when you change the menu (VOICE/SONG/UTILITY) while a Song is playing. Only when
SONG is selected, the following operations are available during playback.
• Pause
Press Button 3 [R/K] (Play/Pause) to pause playback. The playback position shown in the display also pauses and the
[
R/K] (Play/Pause) lamp flashes. Pressing the button again resumes Song playback from the current position.
• Stop
Press Button 1 [Select] to stop playback. When the end of the current Song is reached, playback stops automatically.
When the Song is played back next time by pressing Button 3 [
R/K] (Play/Pause), it starts from the beginning.
• Fast forward/Rewind
Rotate the [VALUE] control to the left to rewind, and to the right to fast forward. MIDI Songs are moved one
measure back or forward, while Audio Songs are moved in one-second increments.
NOTE
Fast forward and rewind operations are not available for Voice Demo Songs.
• Returning to the Song top
Press the [VALUE] control to jump to the top of the Song.
NOTE
During playback of a Voice Demo Song, this operation selects Voice Demo Song “d.01.”
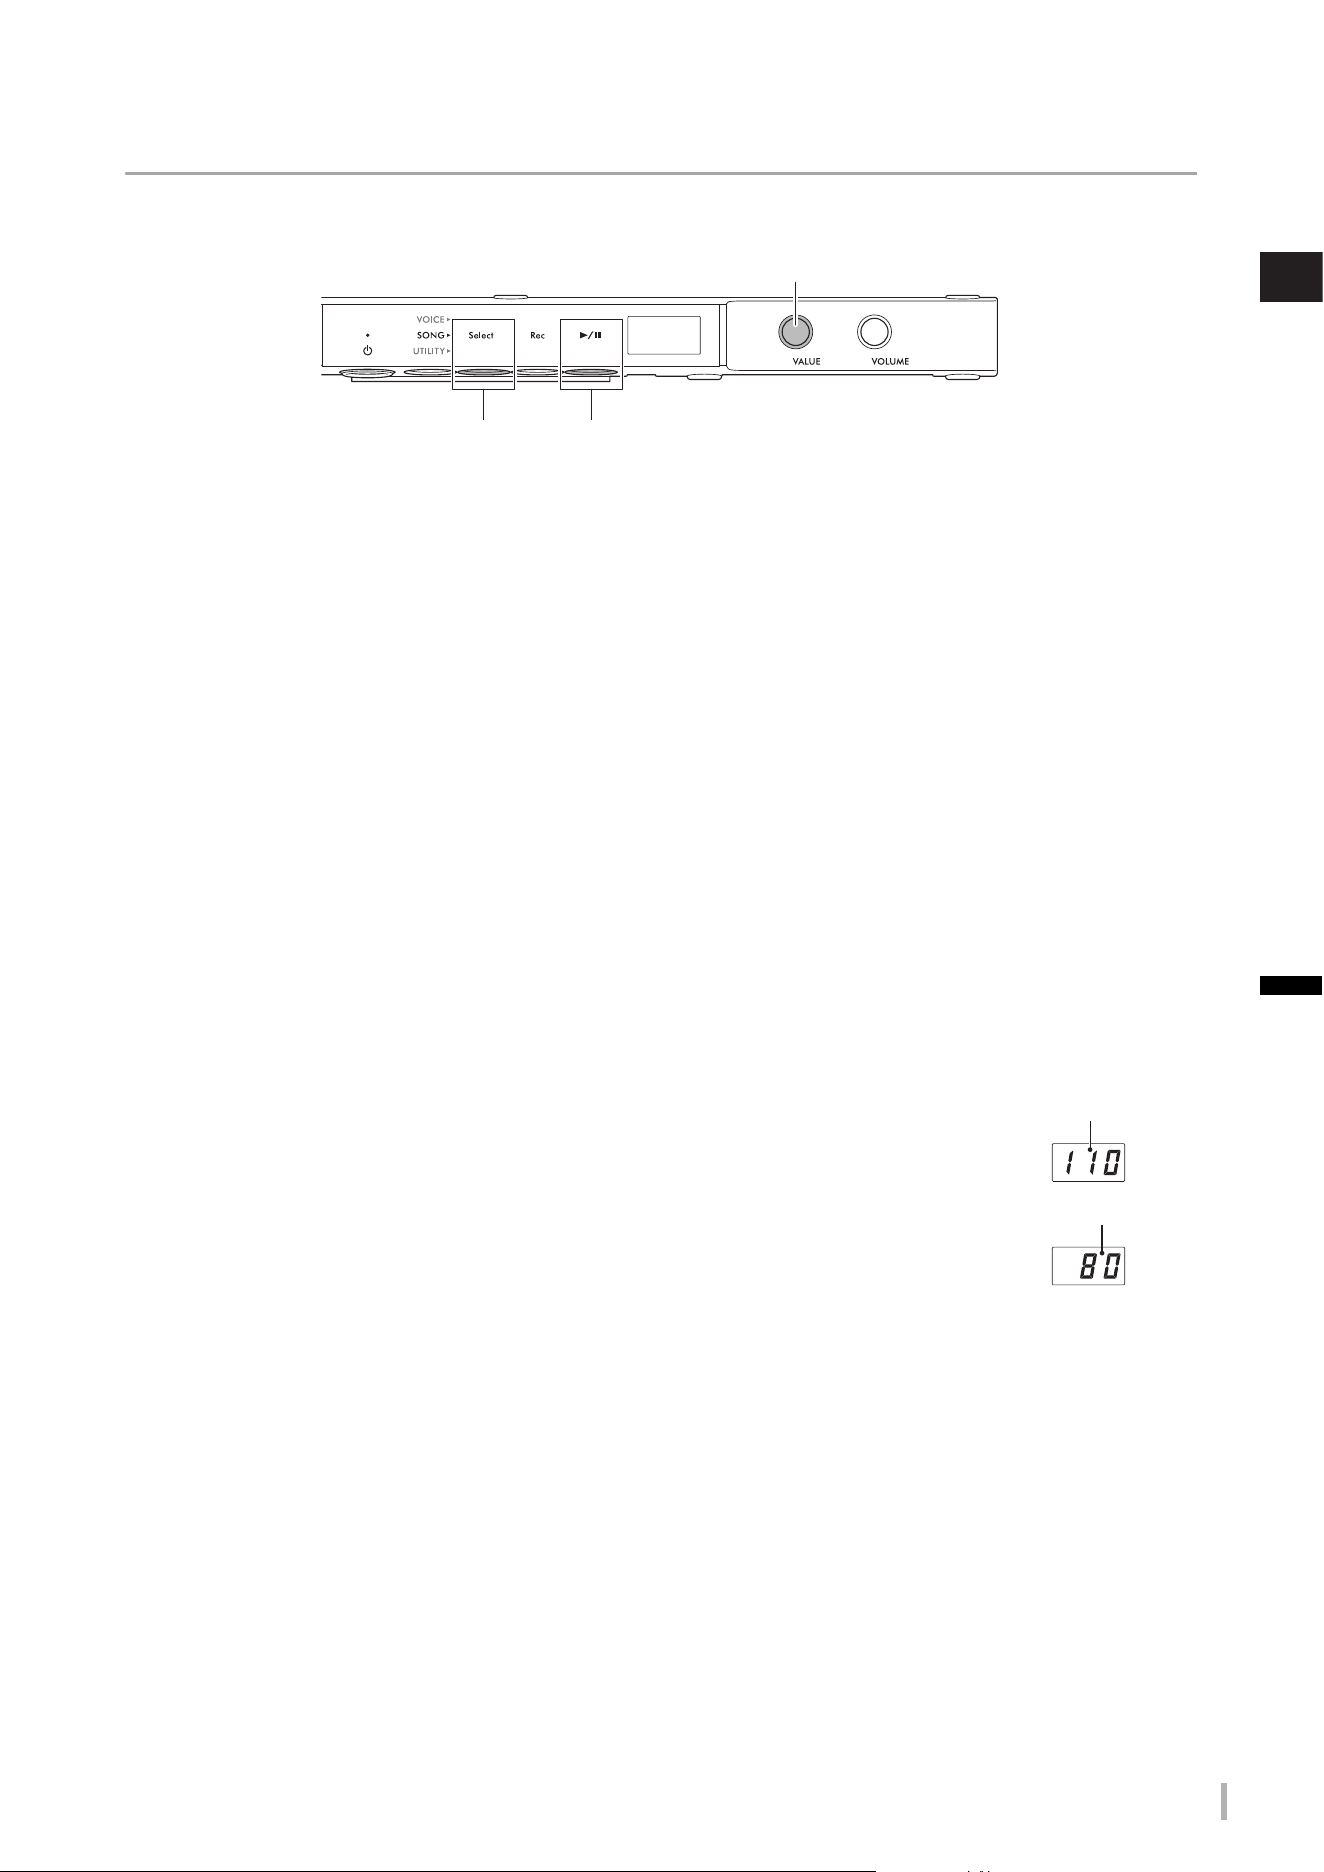
• Adjusting the playback tempo
You can change the tempo of a MIDI Song or the speed of an Audio Song during playback. It can be adjusted with the
same operation as metronome tempo. For details, refer to page 39.
MIDI Songs:
The tempo can be adjusted from 5 to 500 beats per minutes. It can also be adjusted while the
Song is paused. When the Song stops, it is reset to the default setting.
Audio Songs:
Compared to an original speed of 100%, tempo can be adjusted over a range of 75%–125%.
The setting value is maintained until another Song is selected.
NOTE
• For MIDI Songs having tempo changes in the middle of the Song, changing the tempo relatively alters the entire tempo. For example,
in a Song that is set to a tempo of 100 at the start and changes midway during the Song to 120, changing the starting tempo to 110
(10% faster) will result in a midway tempo of 132 (10% faster).
• When the MIDI Song tempo is changed, the metronome tempo is also changed to the same tempo. The Audio Song speed does not
affect the metronome tempo.
• While an Audio Song is paused and the metronome is played back, this operation changes only the metronome tempo and the Audio
Song speed does not change.
Button 1 Button 3
[VALUE] control
Tem p o
Speed (%)
TA3 TC3 SH3 SC3 Owner’s Manual
28
Specifying the playback part (right-hand/left-hand) for a MIDI Song
Depending on the particular MIDI Song, such as preset Songs, the Song data may include independent right-hand and
left-hand parts. This type of Song data allows you to specify the playback part, and practice the part of one hand while the
other part is playing back.
NOTE
• A MIDI Song consists of 16 channels and on each of the preset Songs, the right-hand part is assigned to channel 1 and the left is
assigned to channel 2. On this instrument, only channels 1 and 2 can be independently muted; channels 3–16 are always played back.
• You cannot specify the playback part for Songs that have no data in channels 1 or 2, or for the Voice Demo Songs.
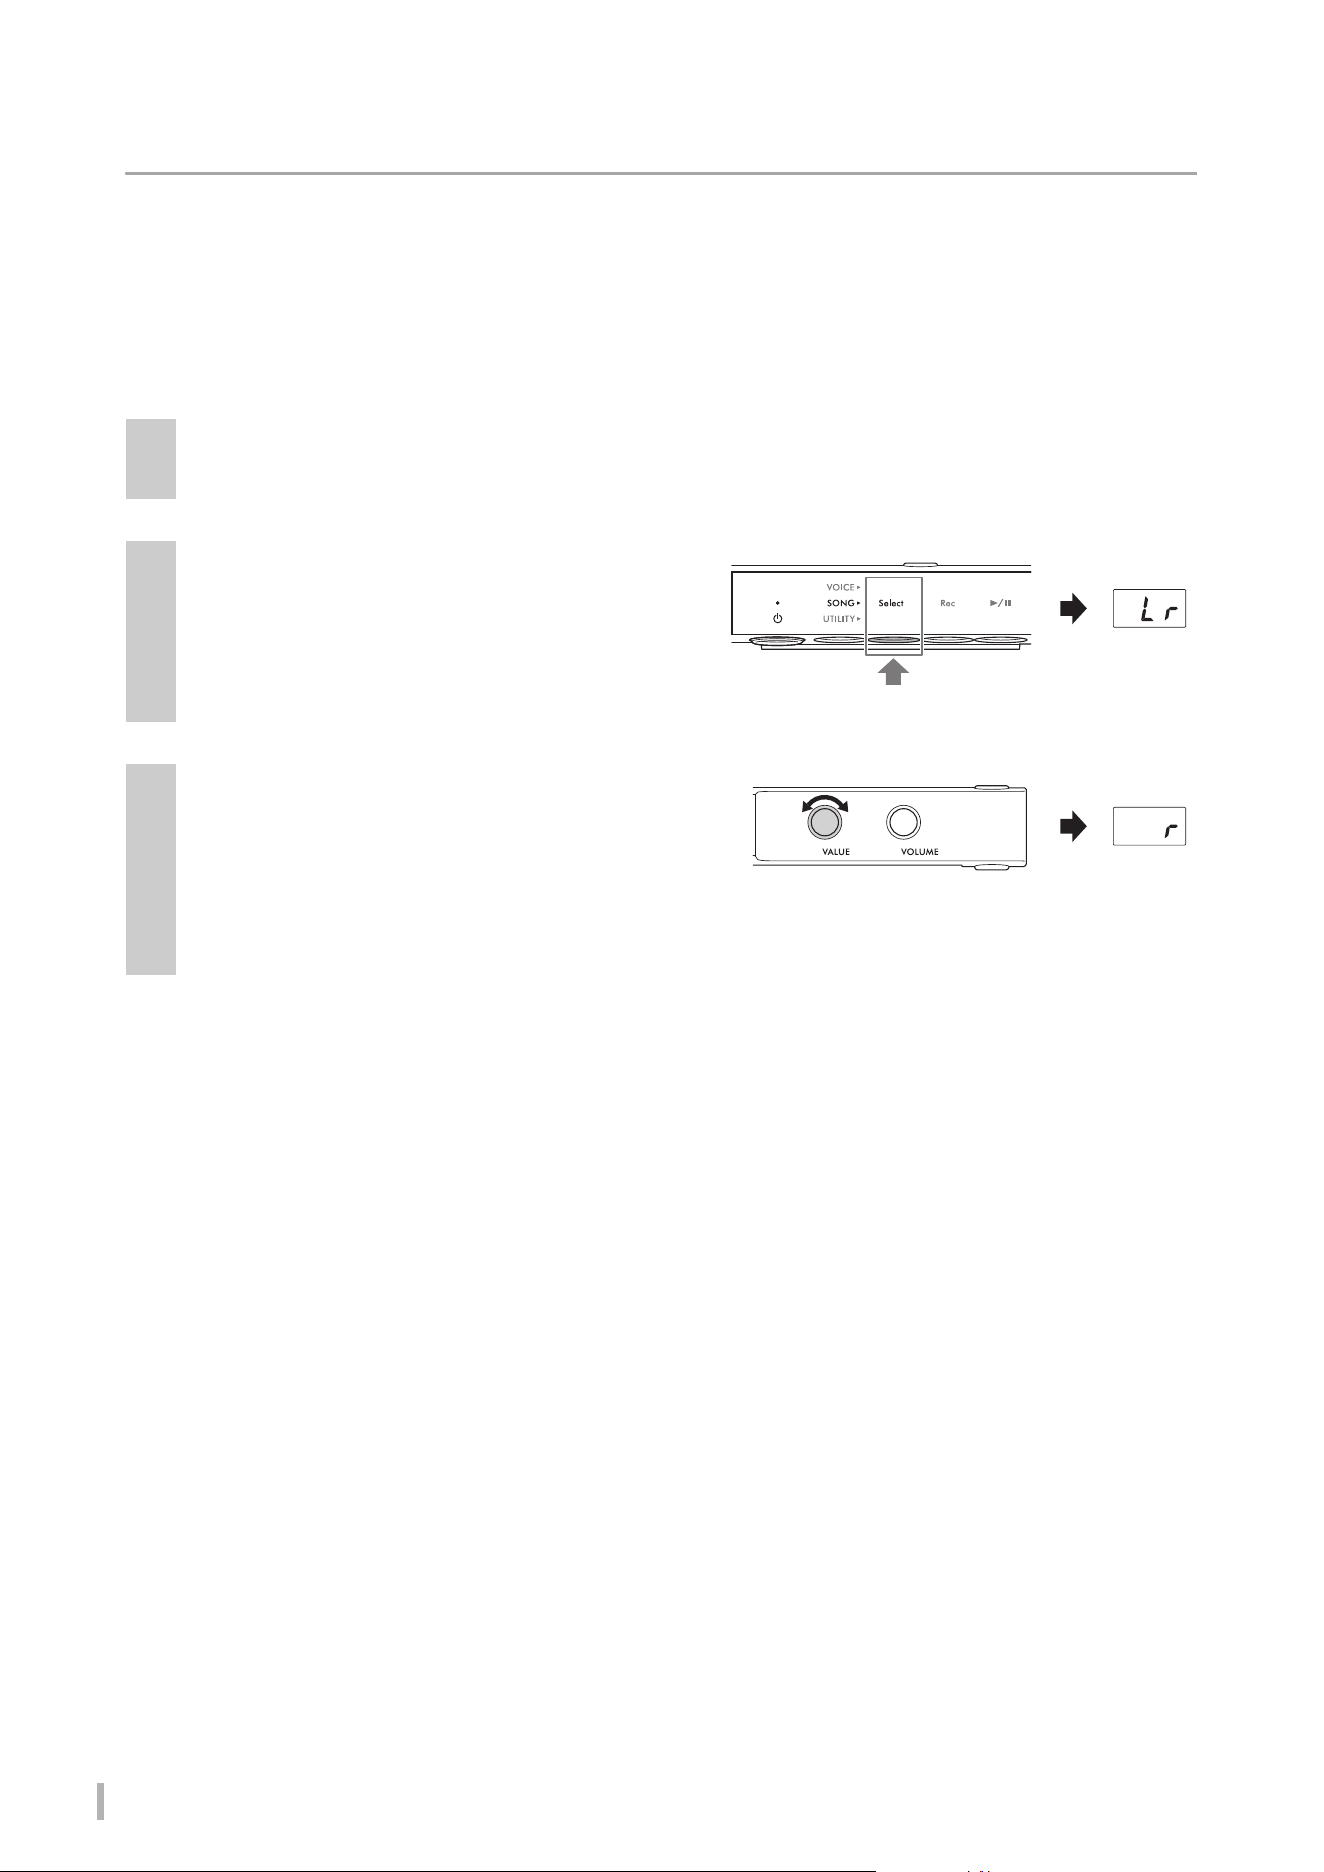
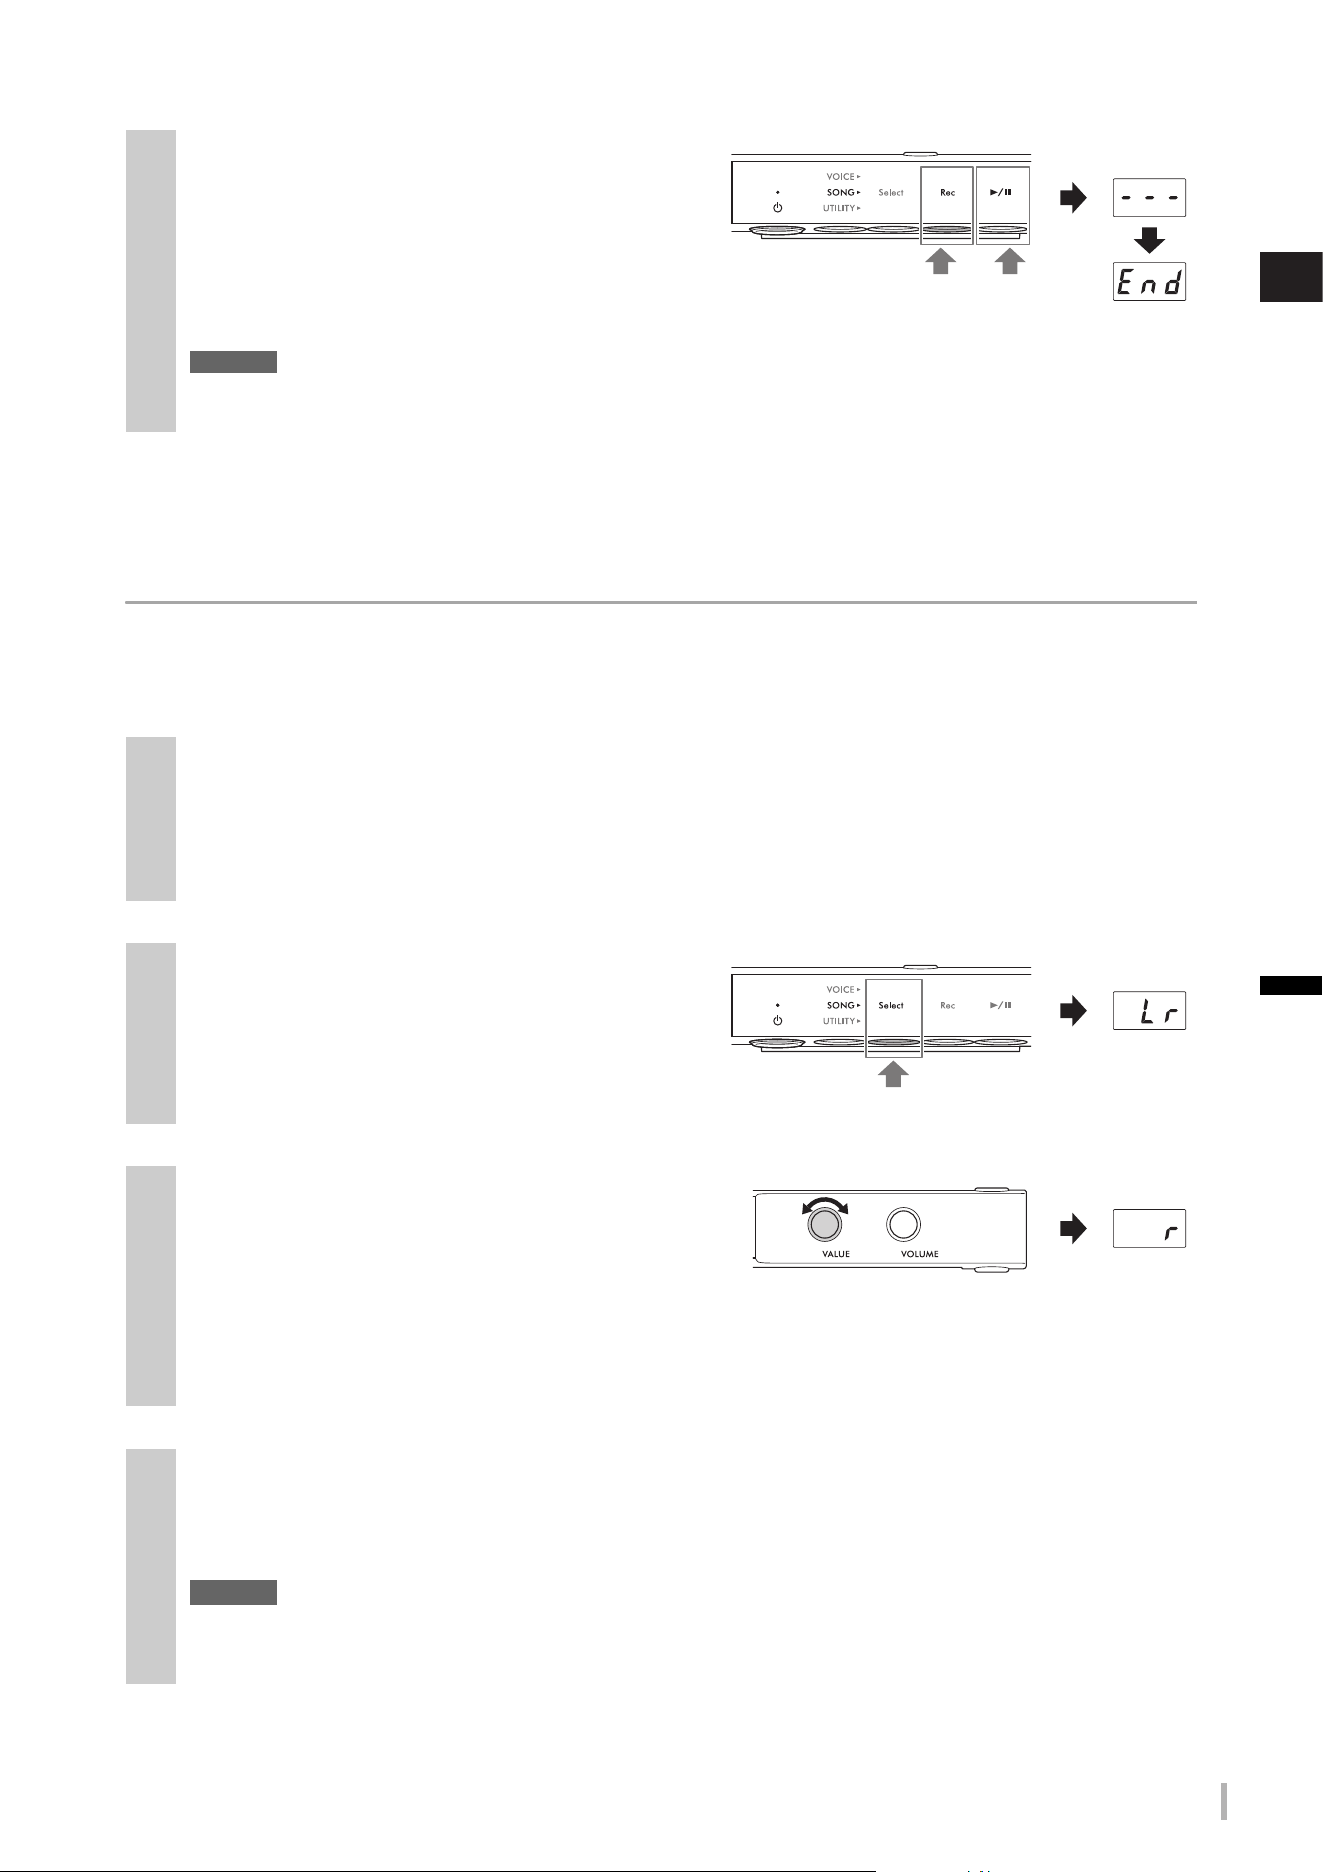
You can specify the playback part also when the Song is paused. When you stop playback, the setting is reset to “Lr.”
1
Select a MIDI Song, and then start playback (steps 1–5 on page 25).
2
Hold down Button 1 [Select] for two seconds
to call up the playback part on the display.
3
Rotate the [VALUE] control to select the
part to play back.
Playback continues with the selected part(s).
• Lr: Plays both right-hand and left-hand parts.
• r: Plays only the right-hand part.
• L: Plays only the left-hand part.
Hold down for two seconds
TA3 TC3 SH3 SC3 Owner’s Manual
29
3
Playing Back and Recording Songs
Recording your performance
This instrument allows you to record your performance by using one of the following two methods.
• MIDI recording
With this method, you can record your performance on this instrument as a MIDI Song (SMF format 0). Up to 10 MIDI
Songs can be saved to internal memory and up to 100 to a USB flash drive (at 500 KB/Song max.). A MIDI Song uses a
small amount of data capacity in comparison to an Audio Song. MIDI recording allows you to record each part
separately.
• Audio recording
With this method, you can record your performance on this instrument as an Audio Song (WAV). Up to 100 Audio
Songs can be saved (at 80 minutes/Song max.) to a USB flash drive. The audio input sound* from the connected
external device (computer, smart device, etc.) can also be recorded.
When the Song is recorded to a USB flash drive, a MIDI Song will be named “USERSONG**.MID” (**: 00–99) and an
Audio Song will be named “AUDIOSONG**.WAV”, and saved to the “USER FILES” folder.
NOTE
• The phrase “audio input sound” here refers to audio data sent to this instrument from external devices, such as a computer or a smart
device, when connecting the instrument with such devices via [AUX IN] jack, [USB TO HOST] terminal, wireless LAN, or Bluetooth. For
information on connecting to external devices, refer to Chapter 5 (page 55).
• You cannot start recording during Song playback. Make sure to stop playback beforehand.
• The acoustic piano sound cannot be recorded. When in the Layer mode (page 21), only the digital sound is recorded.
• If the Voice is set to “---,” it is recorded with the CFX Grand Voice in MIDI recording, while no sound is recorded in Audio recording.
Basic procedure for recording (MIDI recording/Audio recording)
1
(Only when recording a Song to a USB flash drive)
Connect a USB flash drive to the [USB TO DEVICE] terminal.
Before using the USB flash drive, be sure to read “Connecting USB devices” on page 55.
2
Make any necessary settings, such as Voice selection (page 22).
3
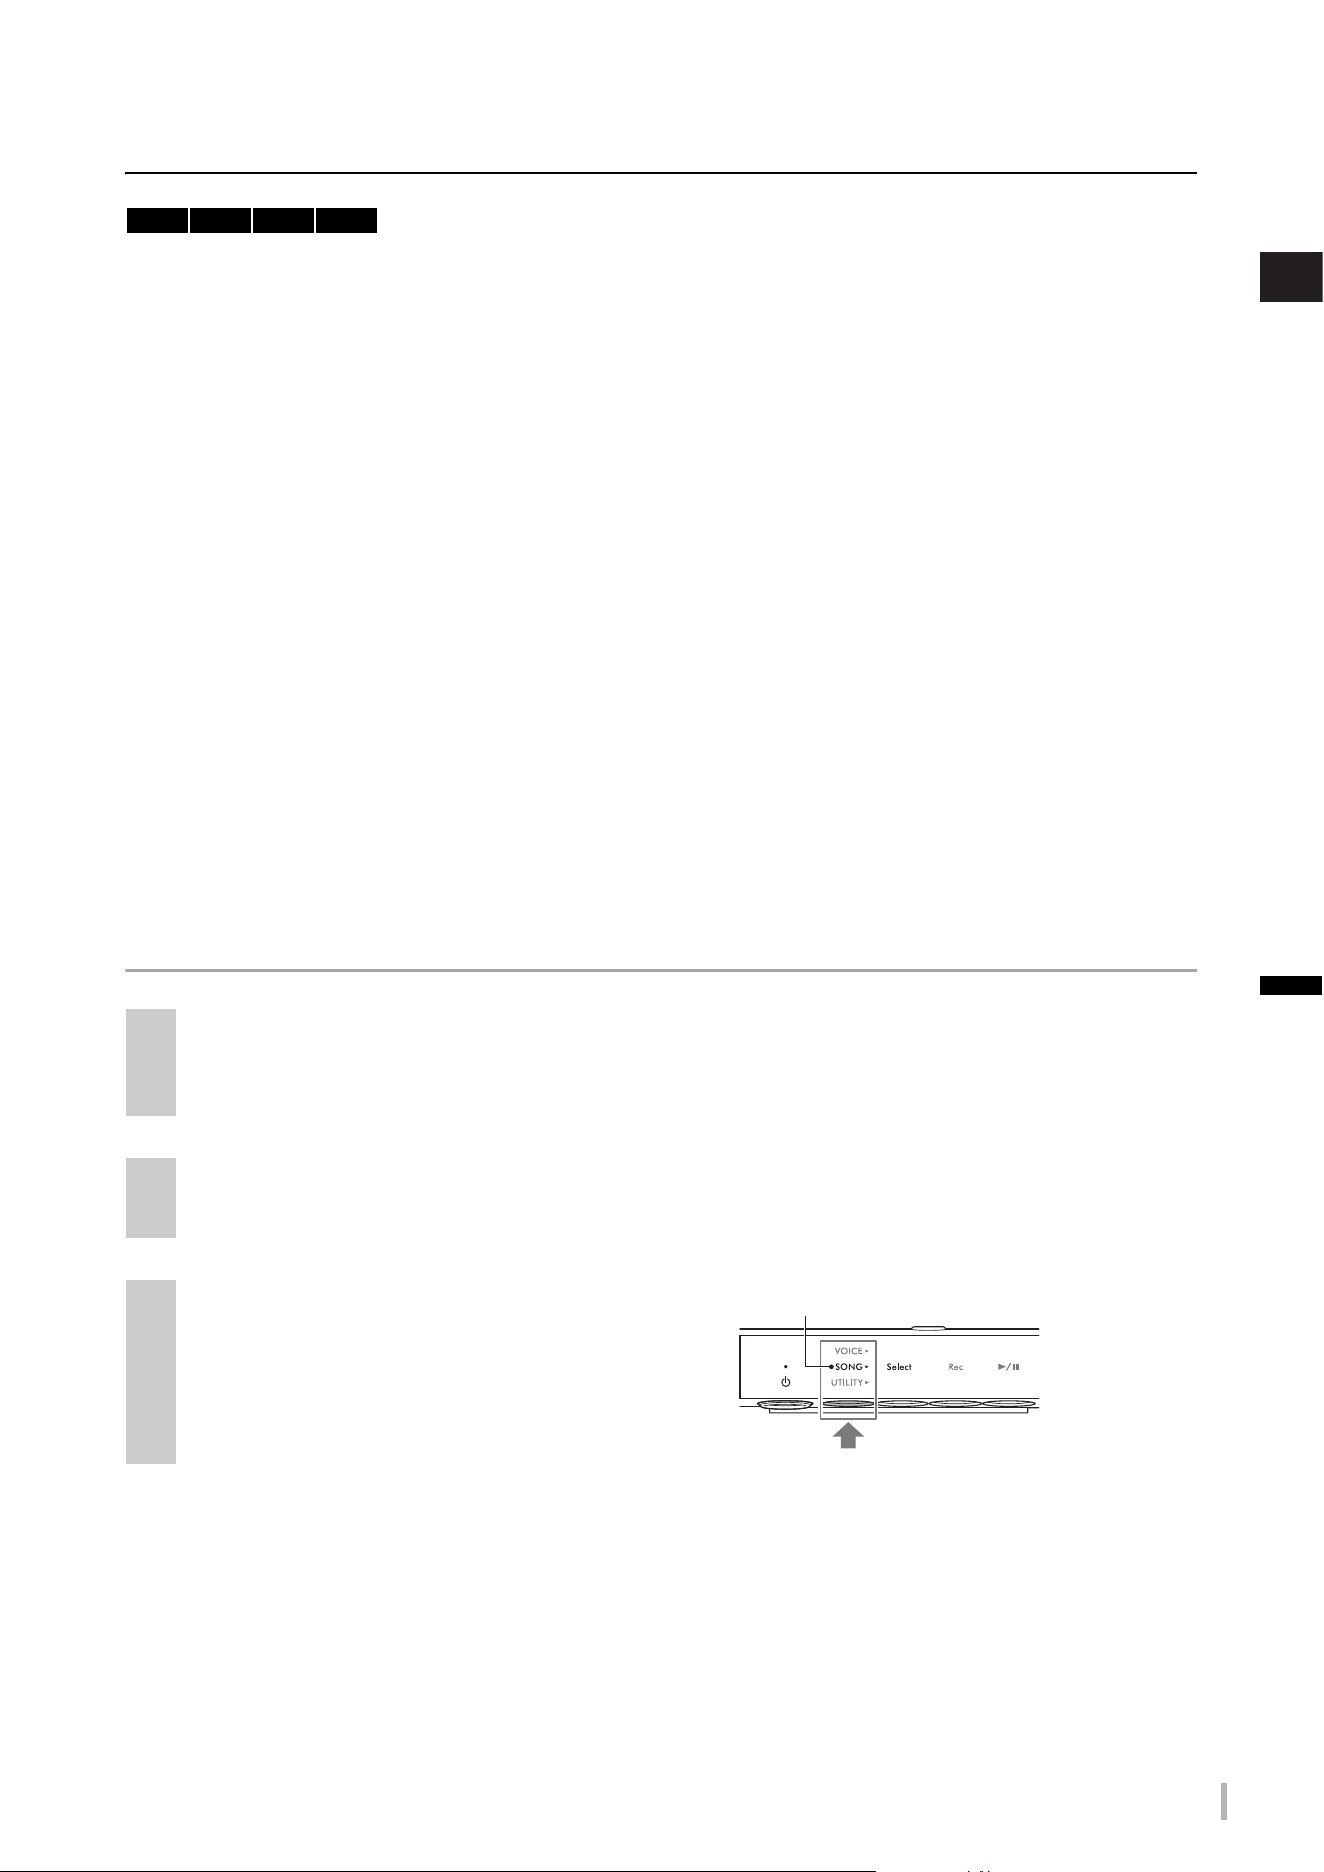
Press the Menu button several times until the
[SONG] lamp lights up in orange.
TA3 TC3 SH3 SC3
Lights up in orange
TA3 TC3 SH3 SC3 Owner’s Manual
30
4
Press Button 1 [Select] several times to select
the recording format (Song category).
• For MIDI recording to internal memory: U. (U.01–U.10)
• For MIDI recording to a USB flash drive: S. (S.00–S.99)
• For Audio recording to a USB flash drive: A. (A.00–A.99)
5
Rotate the [VALUE] control to select the Song
number for recording.
You can confirm whether the selected Song contains
already-recorded data by checking the display.
NOTICE
When the selected Song number contains data, keep in
mind that recording new data will overwrite the previously
recorded data.
If you want to play along with the metronome sound,
turn the metronome on here (page 38). The metronome sound is not recorded.
6
Press Button 2 [Rec] to put recording in
standby.
The [Rec] lamp lights in red, and the [R/K] (Play/Pause)
lamp flashes.
If you want to record Rhythm playback with your
performance, start the Rhythm in this step (page 41). To start playback at the timing when you play the keyboard,
turn on the Synchro Start function in Function F6.5 (page 51).
NOTICE
When an “EnP” or “FUL” message appears on the display, the memory capacity of the internal memory or the USB flash
drive is nearly full. We recommend that you first remove any unnecessary User Songs (page 35) to ensure sufficient
memory capacity. If “EnP” appears, you can start recording, but your performance data may not be correctly saved or
recording may stop automatically. If “FUL” appears, you cannot start recording.
NOTE
To cancel recording standby status, press Button 2 [Rec] again.
7
Play the keyboard to start recording.
If you want to record an empty section at the start of the Song, press Button 3 [R/K] (Play/Pause) to start
recording.
The [
R/K] (Play/Pause) lamp lights, and the current
position (measure number or elapsed time) is shown on
the display while recording.
NOTICE
If “FUL” appears on the display while or after recording, this
indicates the internal memory or USB flash drive capacity
has become full and all or the part of the data will not be
saved. We recommend that you first delete any
unnecessary User Songs (page 35) to ensure sufficient
memory capacity.
When a Song
contains data:
When a Song does not
contain data:
Three dots light up. Only the left-most dot
lights up.
MIDI Song
Audio Song
Measure number
Elapsed time
Seconds
Minutes
(In case of 10 minutes or more,
only the lowest digit is shown).
TA3 TC3 SH3 SC3 Owner’s Manual
31
3
Playing Back and Recording Songs
Recording the right-hand and left-hand parts independently (MIDI
recording)
With MIDI recording, you can record the right-hand part and left-hand part independently. For example, you can record
the right-hand part first, and then record the left-hand part while listening to the already recorded right-hand part. This
allows you to create a complex Song you might not otherwise be able to play with both hands.
8
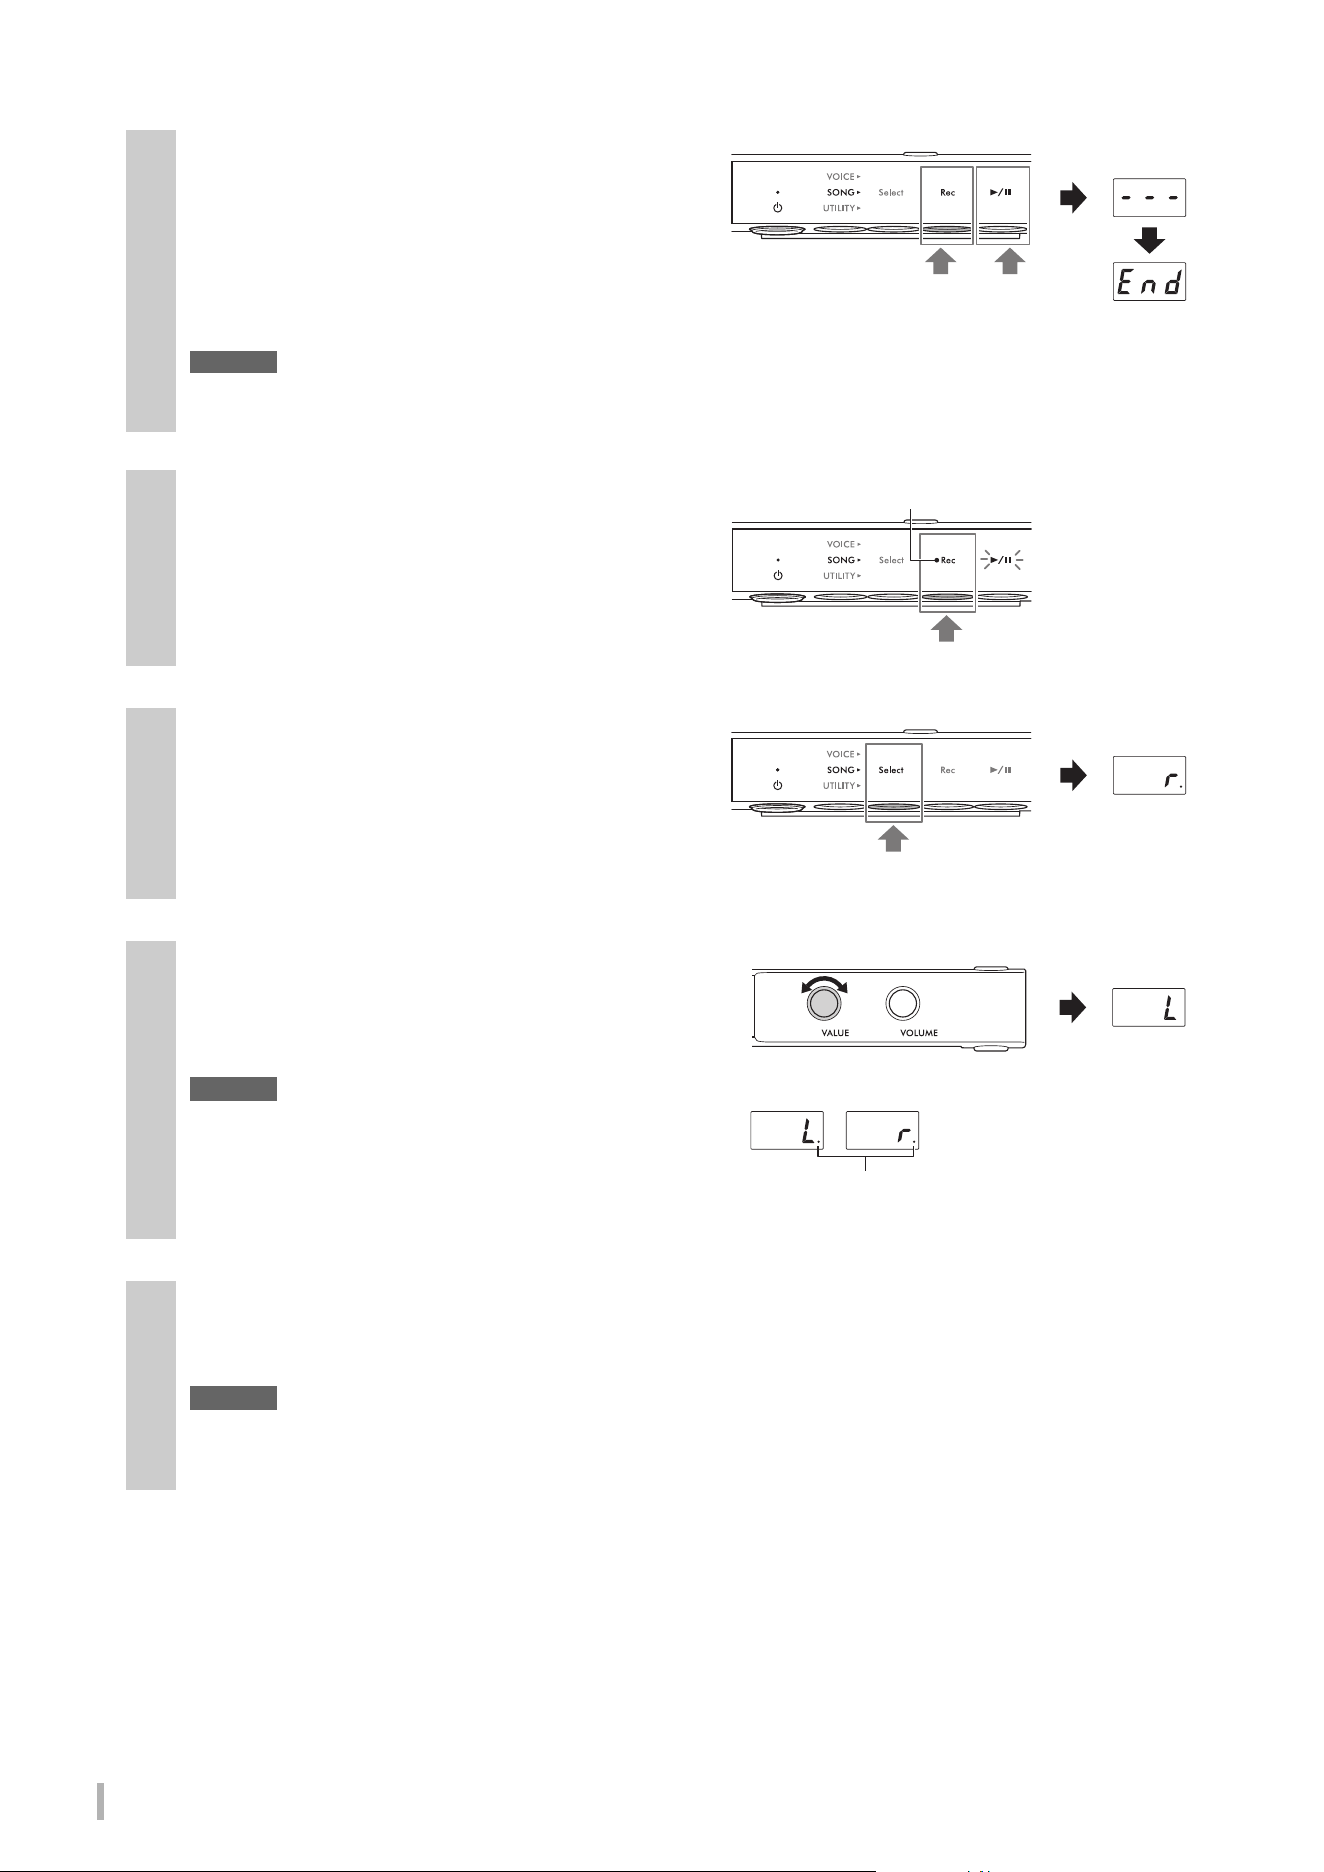
When your performance is finished, press
Button 2 [Rec] or Button 3 [R/K] (Play/
Pause) to stop recording.
Dashes appear on the display in succession, indicating
that the recorded data is being saved. After the data is
saved, an “End” message appears, and the recorded Song
number appears. Pressing Button 3 [
R/K] (Play/Pause) plays back the recorded Song.
NOTICE
While dashes appear on the display in succession, never turn off the power. Doing so may corrupt the data or damage
the internal memory or USB flash drive.
1
Record the first part. Follow the “Basic procedure for recording” (steps 1–6 on page 29) to
put recording in standby.
In step 4, select the MIDI Song category (U.01–U.10 or S.00–S.99).
If you want to record a Rhythm, make sure to record it with the first part. The Rhythm part cannot be added
afterwards.
2
Hold down Button 1 [Select] for two seconds
to call up the recording part on the display.
3
Rotate the [VALUE] control to select the part
to record.
• r: For recording the right-hand part.
• L: For recording the left-hand part.
NOTE
• Selecting “Lr” lets you record both the right- and left-hand parts (with the same operation as in “Basic procedure for recording”).
• To cancel recording standby status, press Button 2 [Rec] again.
4
Play the keyboard to start recording.
If you want to record an empty section at the start of the Song, press Button 3 [R/K] (Play/Pause) to start
recording. The [
R/K] (Play/Pause) lamp lights, and the current measure number is shown on the display while
recording.
NOTICE
If “FUL” appears on the display while or after recording, this indicates the internal memory or USB flash drive capacity
has become full and all or the part of the data will not be saved. We recommend that you first delete any unnecessary
User Songs (page 35) to ensure sufficient memory capacity.
Or
Hold down for two seconds.
TA3 TC3 SH3 SC3 Owner’s Manual
32
5
When your performance is finished, press
Button 2 [Rec] or Button 3 [R/K] (Play/
Pause) to stop recording.
Dashes appear on the display in succession, indicating
that the recorded data is being saved. After the data is
saved, an “End” message appears, and the recorded Song
number appears. Pressing Button 3 [
R/K] (Play/Pause) plays back the recorded Song.
NOTICE
While dashes appear on the display in succession, never turn off the power. Doing so may corrupt the data or damage
the internal memory or USB flash drive.
6
Record the second part. Press Button 2 [Rec]
to put recording in standby again.
The [Rec] lamp lights in red, and the [R/K] (Play/Pause)
lamp flashes.
NOTE
To cancel recording standby status, press Button 2 [Rec] again.
7
Hold down Button 1 [Select] for two seconds
to call up the recording part on the display.
8
Rotate the [VALUE] control to select the part
to record.
If the selected part contains already-recorded data, a dot
lights up at the right side of “L” or “r” on the display.
NOTICE
When the selected part contains data, keep in mind that
recording new data will overwrite the previously recorded
data.
NOTE
To cancel recording, press Button 2 [Rec].
9
Play the keyboard to start recording.
If you want to start playback of the recorded part previously, press Button 3 [R/K] (Play/Pause) to start recording.
The [
R/K] (Play/Pause) lamp lights, and the current measure number is shown on the display while recording.
NOTICE
If “FUL” appears on the display while or after recording, this indicates the internal memory or USB flash drive capacity
has become full and all or the part of the data will not be saved. We recommend that you first delete any unnecessary
User Songs (page 35) to ensure sufficient memory capacity.
Or
Lights up in red
Hold down for two seconds.
When the part contains data:
A dot lights up.
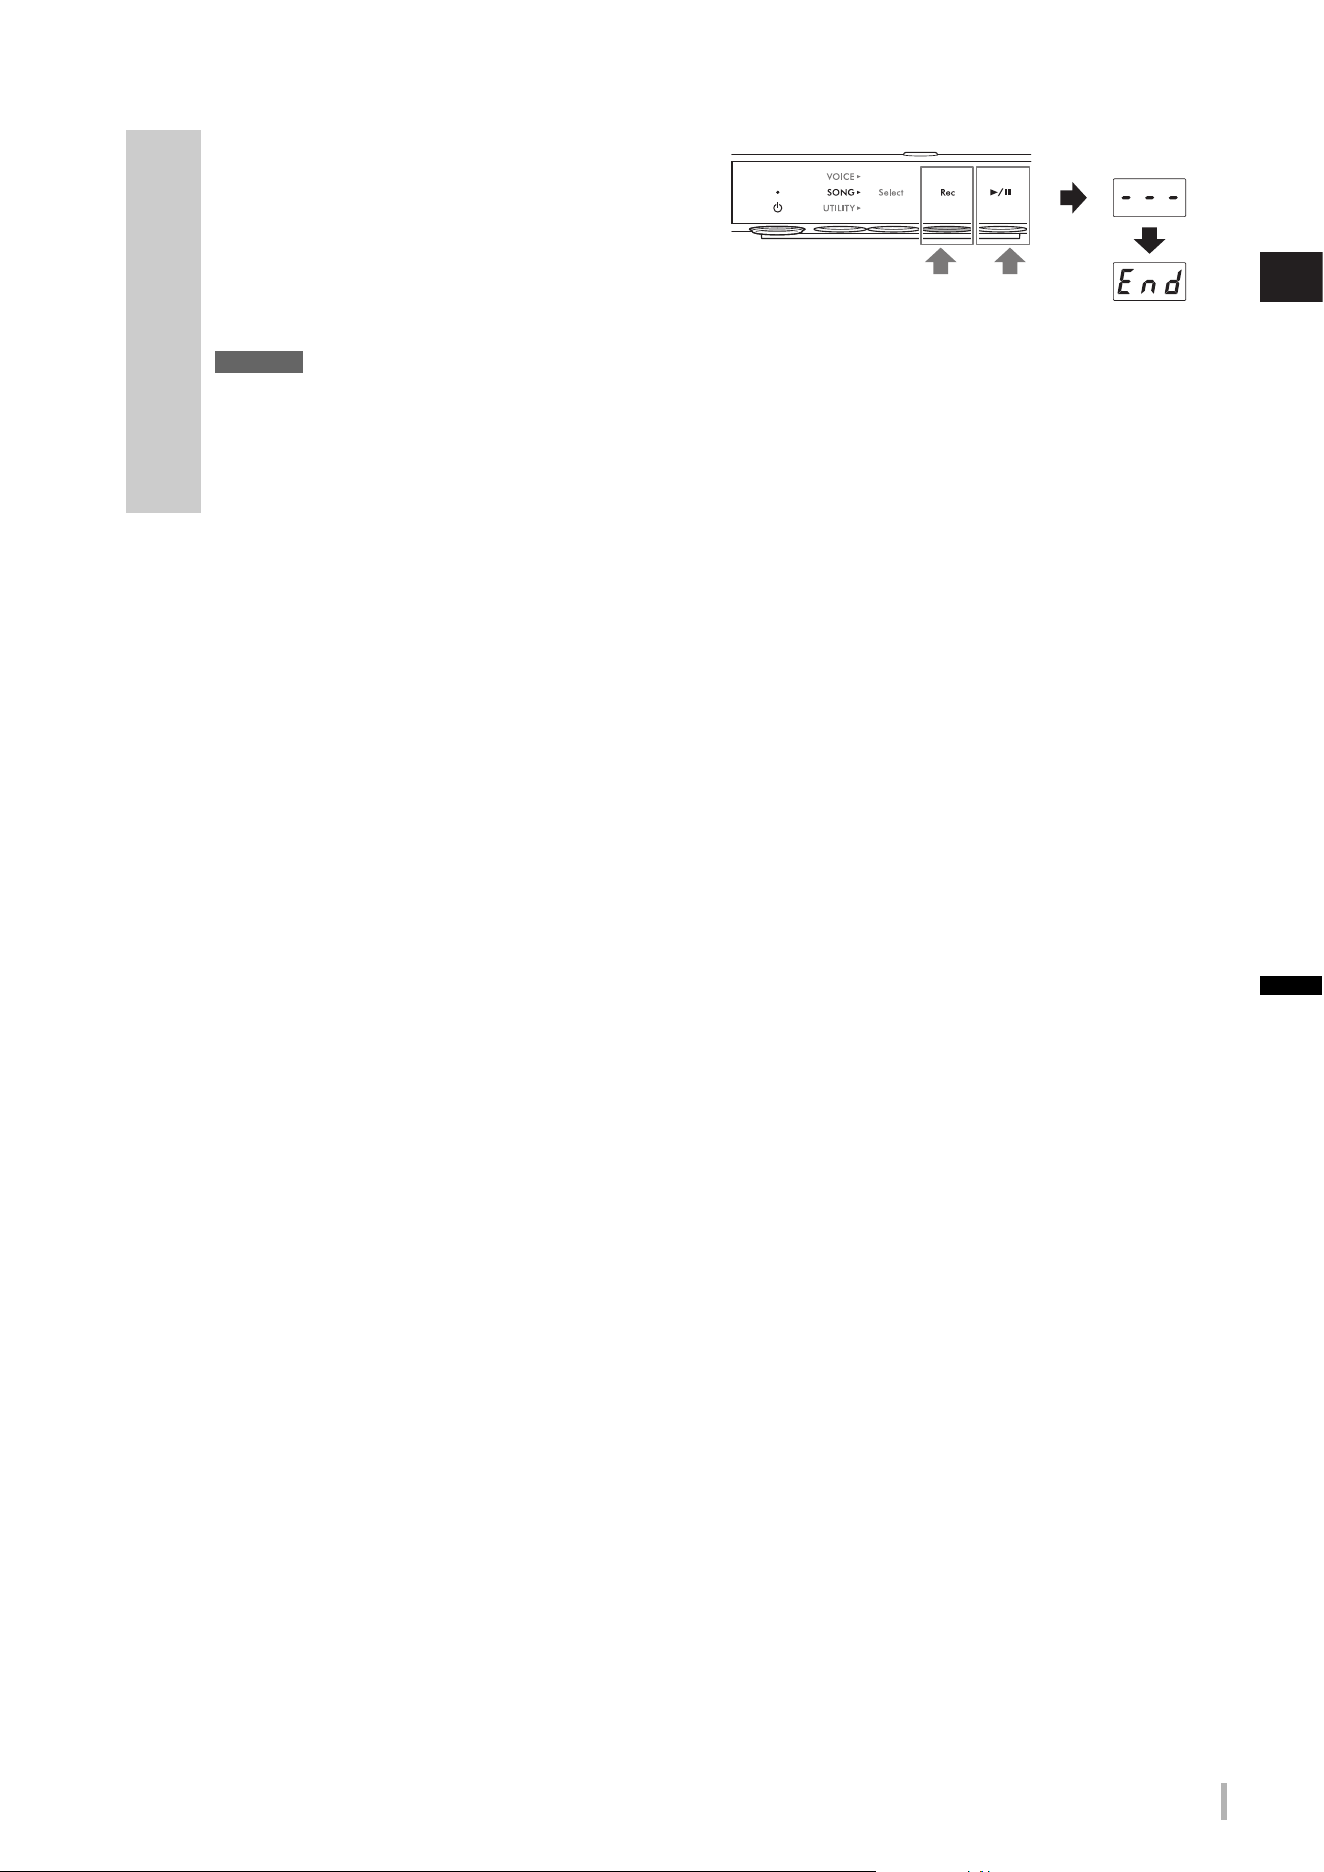
TA3 TC3 SH3 SC3 Owner’s Manual
33
3
Playing Back and Recording Songs
10
When your performance is finished, press
Button 2 [Rec] or Button 3 [R/K] (Play/
Pause) to stop recording.
Dashes appear on the display in succession, indicating
that the recorded data is being saved. After the data is
saved, an “End” message appears, and the recorded
Song number appears. Pressing Button 3 [
R/K] (Play/Pause) plays back the recorded Song.
NOTICE
While dashes appear on the display in succession, never turn off the power. Doing so may corrupt the data or
damage the internal memory or USB flash drive.
NOTE
If you want to re-record either of the recorded parts, repeat the procedure from step 6 on the previous page. In step 8, make
sure to select the part to be re-recorded.
Or
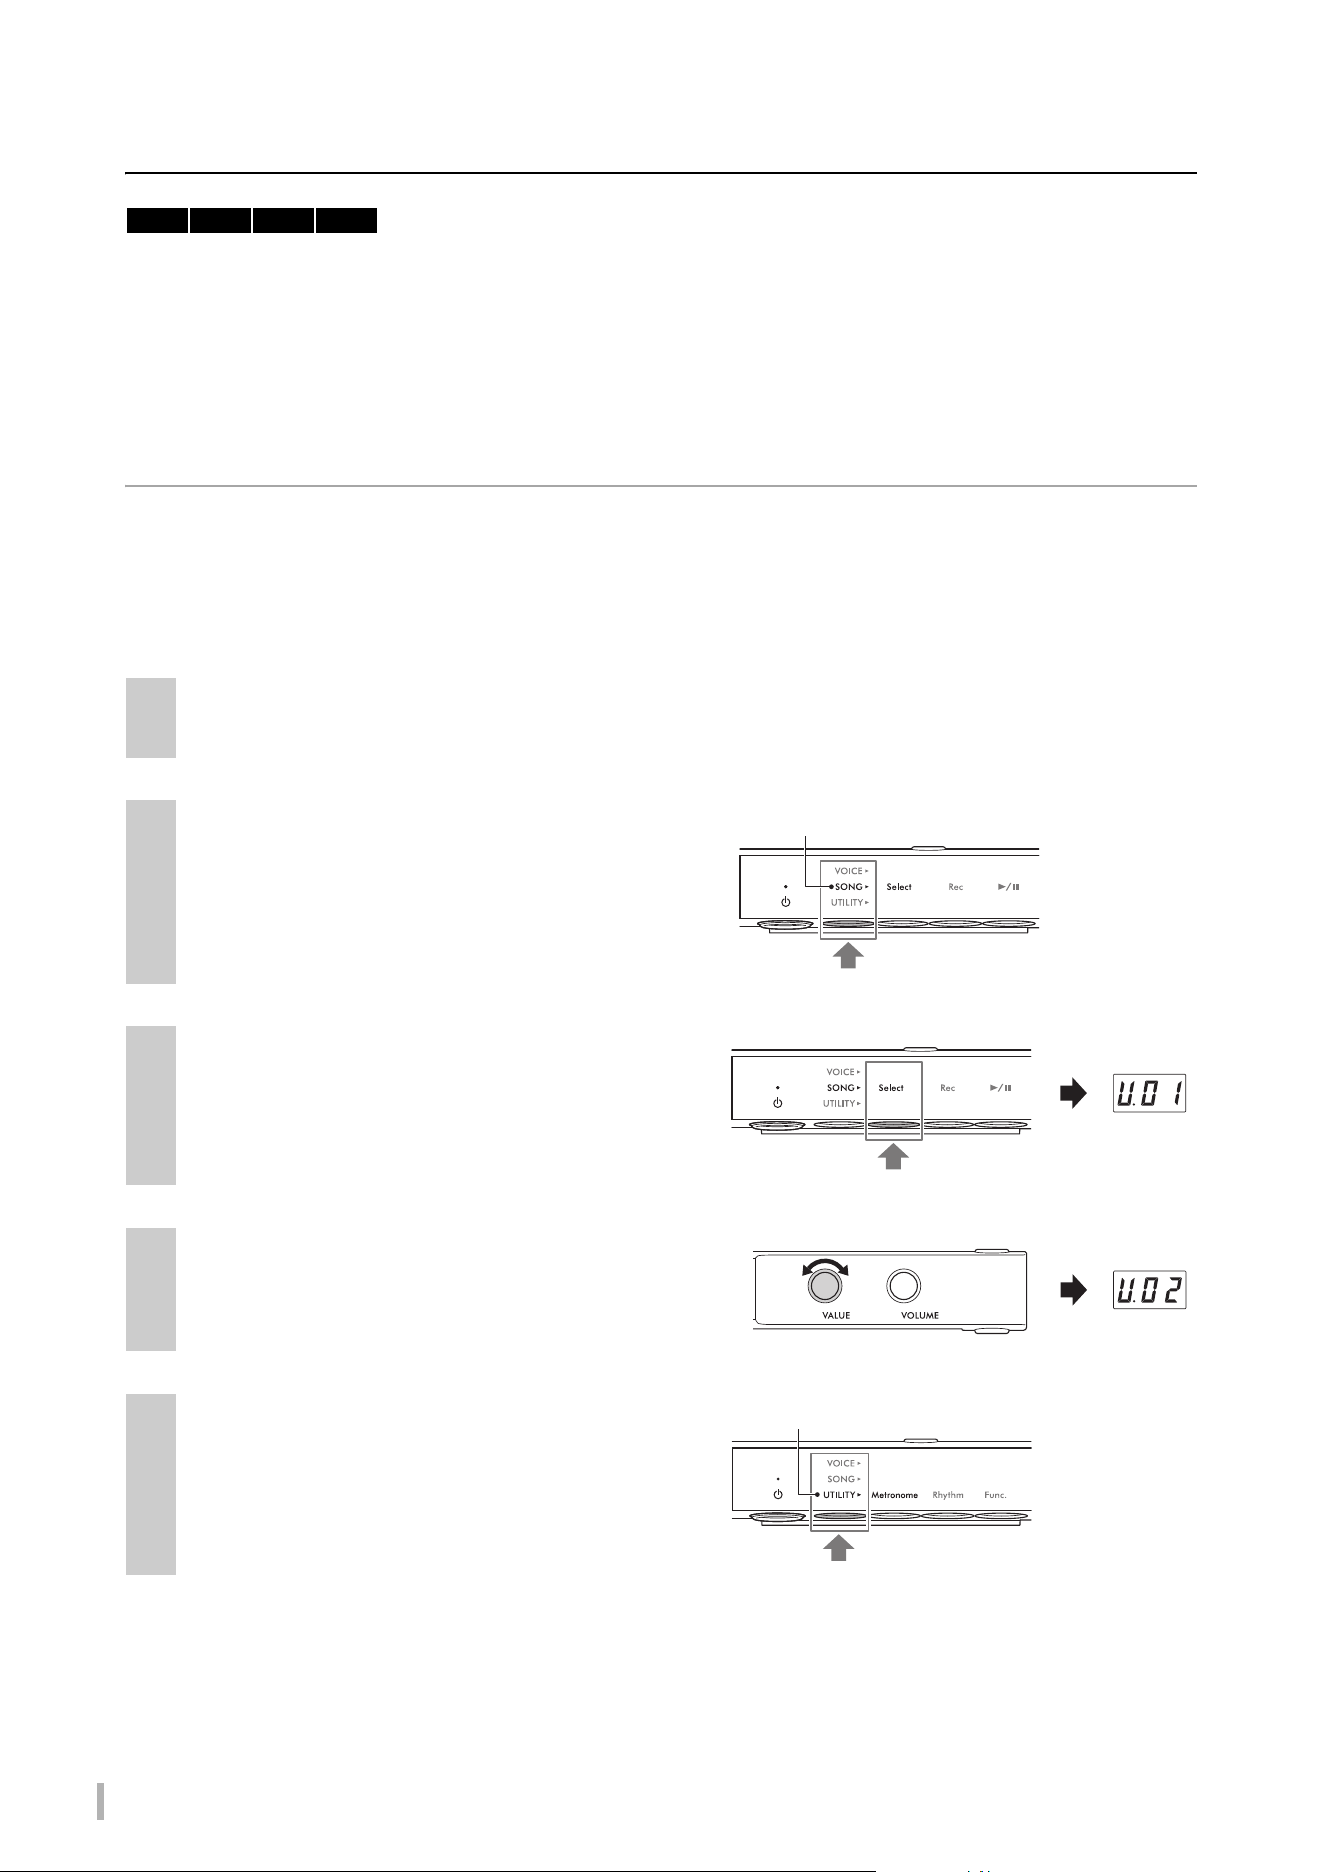
TA3 TC3 SH3 SC3 Owner’s Manual
34
Handling User Song files
You can copy a User Song saved in the internal memory to a USB flash drive. Also, you can delete User Songs from
internal memory or a USB flash drive. Before using a USB flash drive, be sure to read “Connecting USB devices” on
page 55.
NOTE
While a Song is being recorded, played back or paused, these operations cannot be started. Make sure to stop the Song beforehand.
Copying User Songs in internal memory to a USB flash drive
You can copy the User Song in internal memory to the connected USB flash drive. We recommend to copy your
important Song data to a USB flash drive. The copied Song is saved as SMF format 0 to the “USER FILES” folder in the
USB flash drive, and the file is automatically named as “USERSONG**.MID” (**: numerals).
NOTE
Voice Demo Songs and preset Songs cannot be copied.
1
Connect a USB flash drive to the [USB TO DEVICE] terminal.
2
Press the Menu button several times until the
[SONG] lamp lights up in orange.
3
Press Button 1 [Select] to select the Song
category “U.” (User Song).
4
Rotate the [VALUE] control to select the Song
number (U.01–U.10) to copy.
5
Press the Menu button several times until the
[UTILITY] lamp lights up in orange.
TA3 TC3 SH3 SC3
Lights up in orange
Lights up in orange
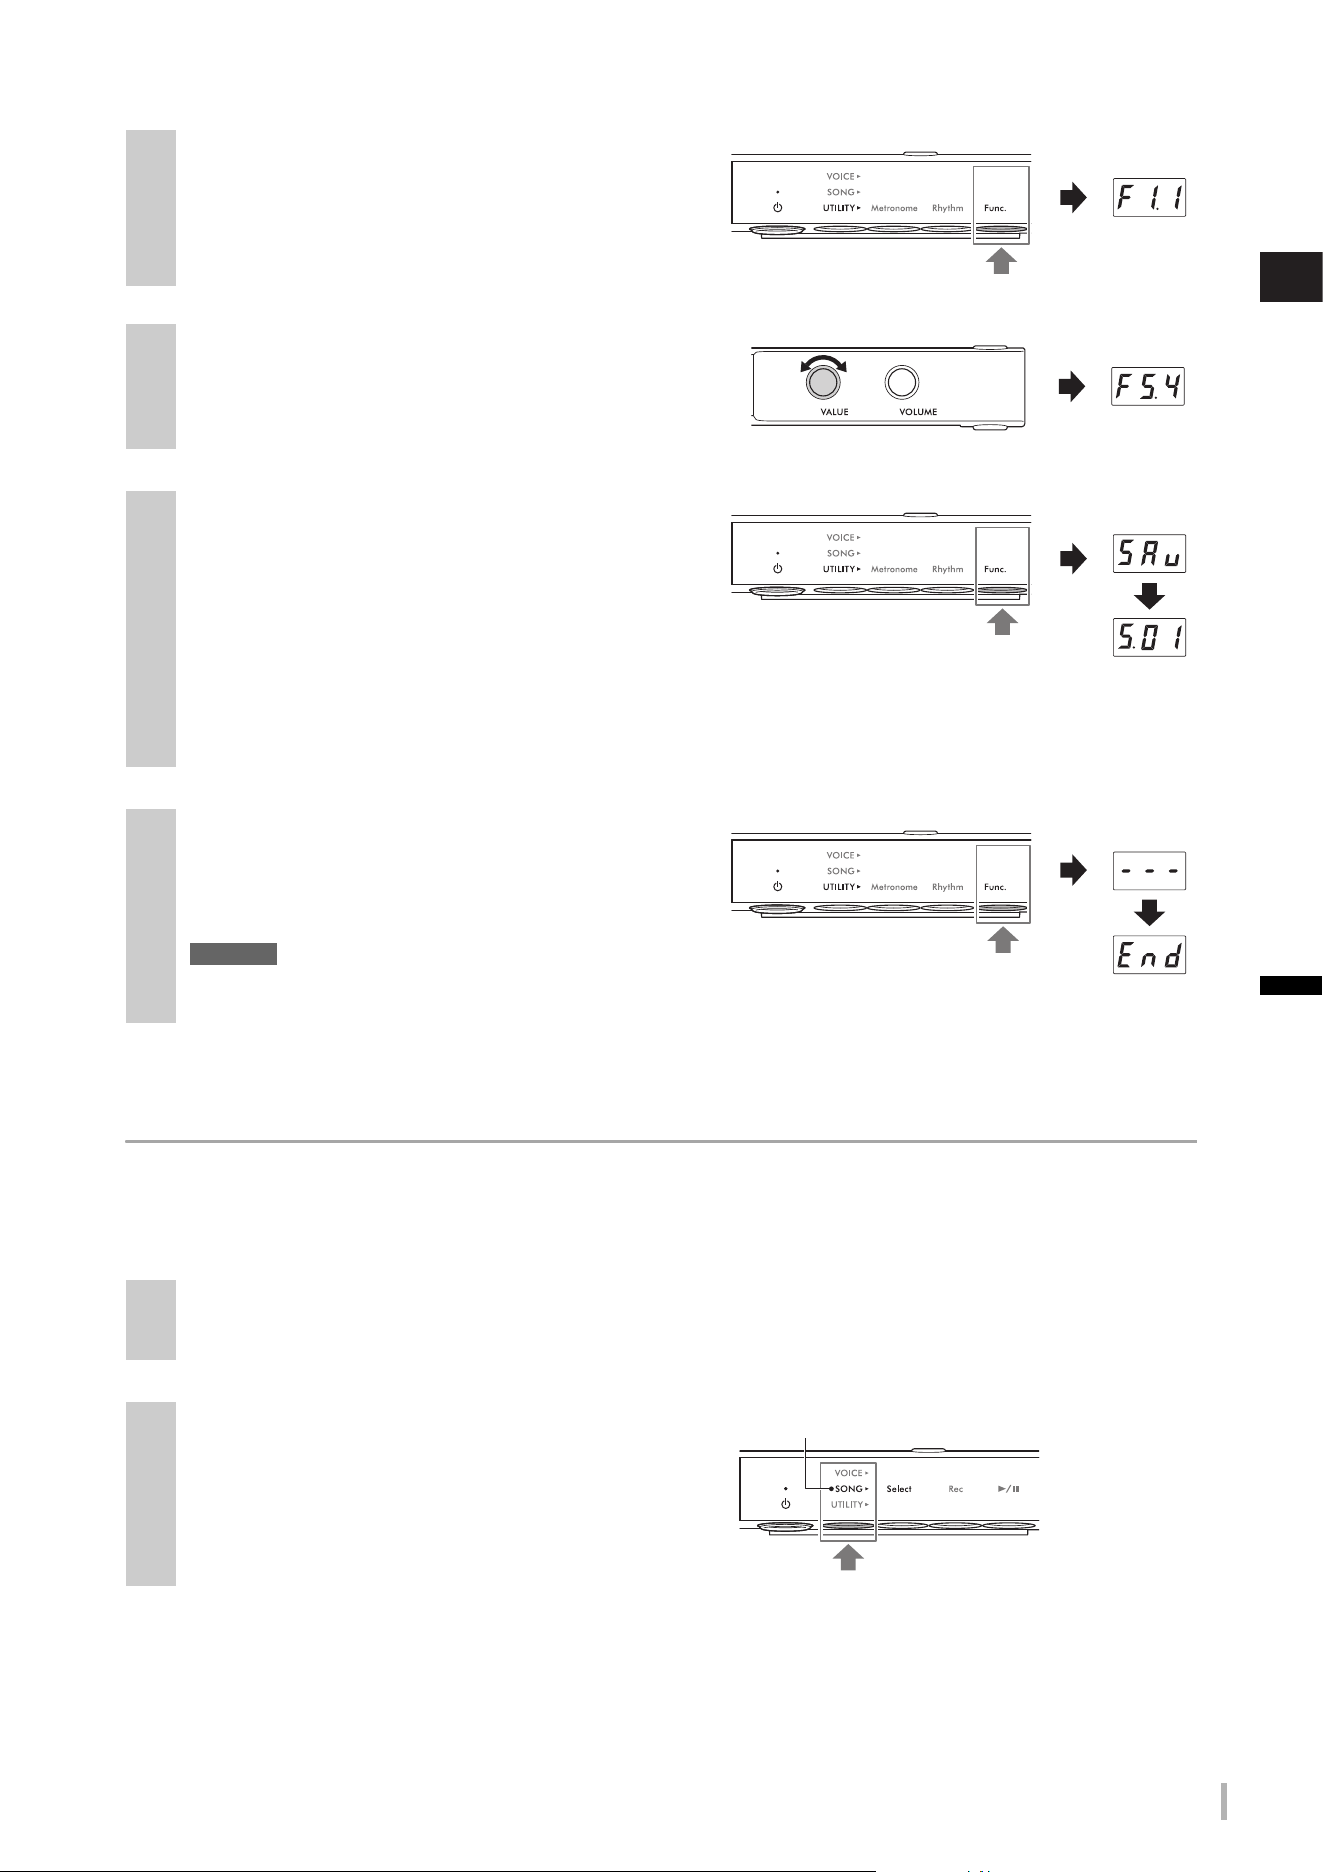
TA3 TC3 SH3 SC3 Owner’s Manual
35
3
Playing Back and Recording Songs
Deleting User Songs
You can delete User Songs saved in the internal memory or the USB flash drive.
NOTE
Songs other than User Songs cannot be deleted.
6
Press Button 3 [Func.] to call up the Function
number in the display.
7
Rotate the [VALUE] control to select “F5.4”
(Copying User Songs).
8
Press Button 3 [Func.] to call up “SAv” in the
display.
The lowest MIDI Song number which has no data in the
USB flash drive is automatically selected as the copy
destination and the number is shown in the display.
NOTE
• To cancel the copying operation, press any button other than Button 3 while the Song number is shown.
• If there is no empty MIDI Song number in the USB flash drive, “FUL” appears on the display and the copying operation cannot
be completed. Delete any unnecessary User Songs (see below), and then execute the copy operation again.
9
Press Button 3 [Func.] again to start copying.
Dashes appear in succession on the display, indicating
that the copy operation is in progress. When the
operation is completed, “End” appears on the display.
NOTICE
While dashes appear on the display in succession, never
turn off the power. Doing so may corrupt the data or damage the internal memory or USB flash drive.
1
(Only when deleting Songs in a USB flash drive)
Connect a USB flash drive to the [USB TO DEVICE] terminal.
2
Press the Menu button several times until the
[SONG] lamp lights up in orange.
Function
number
Lights up in orange
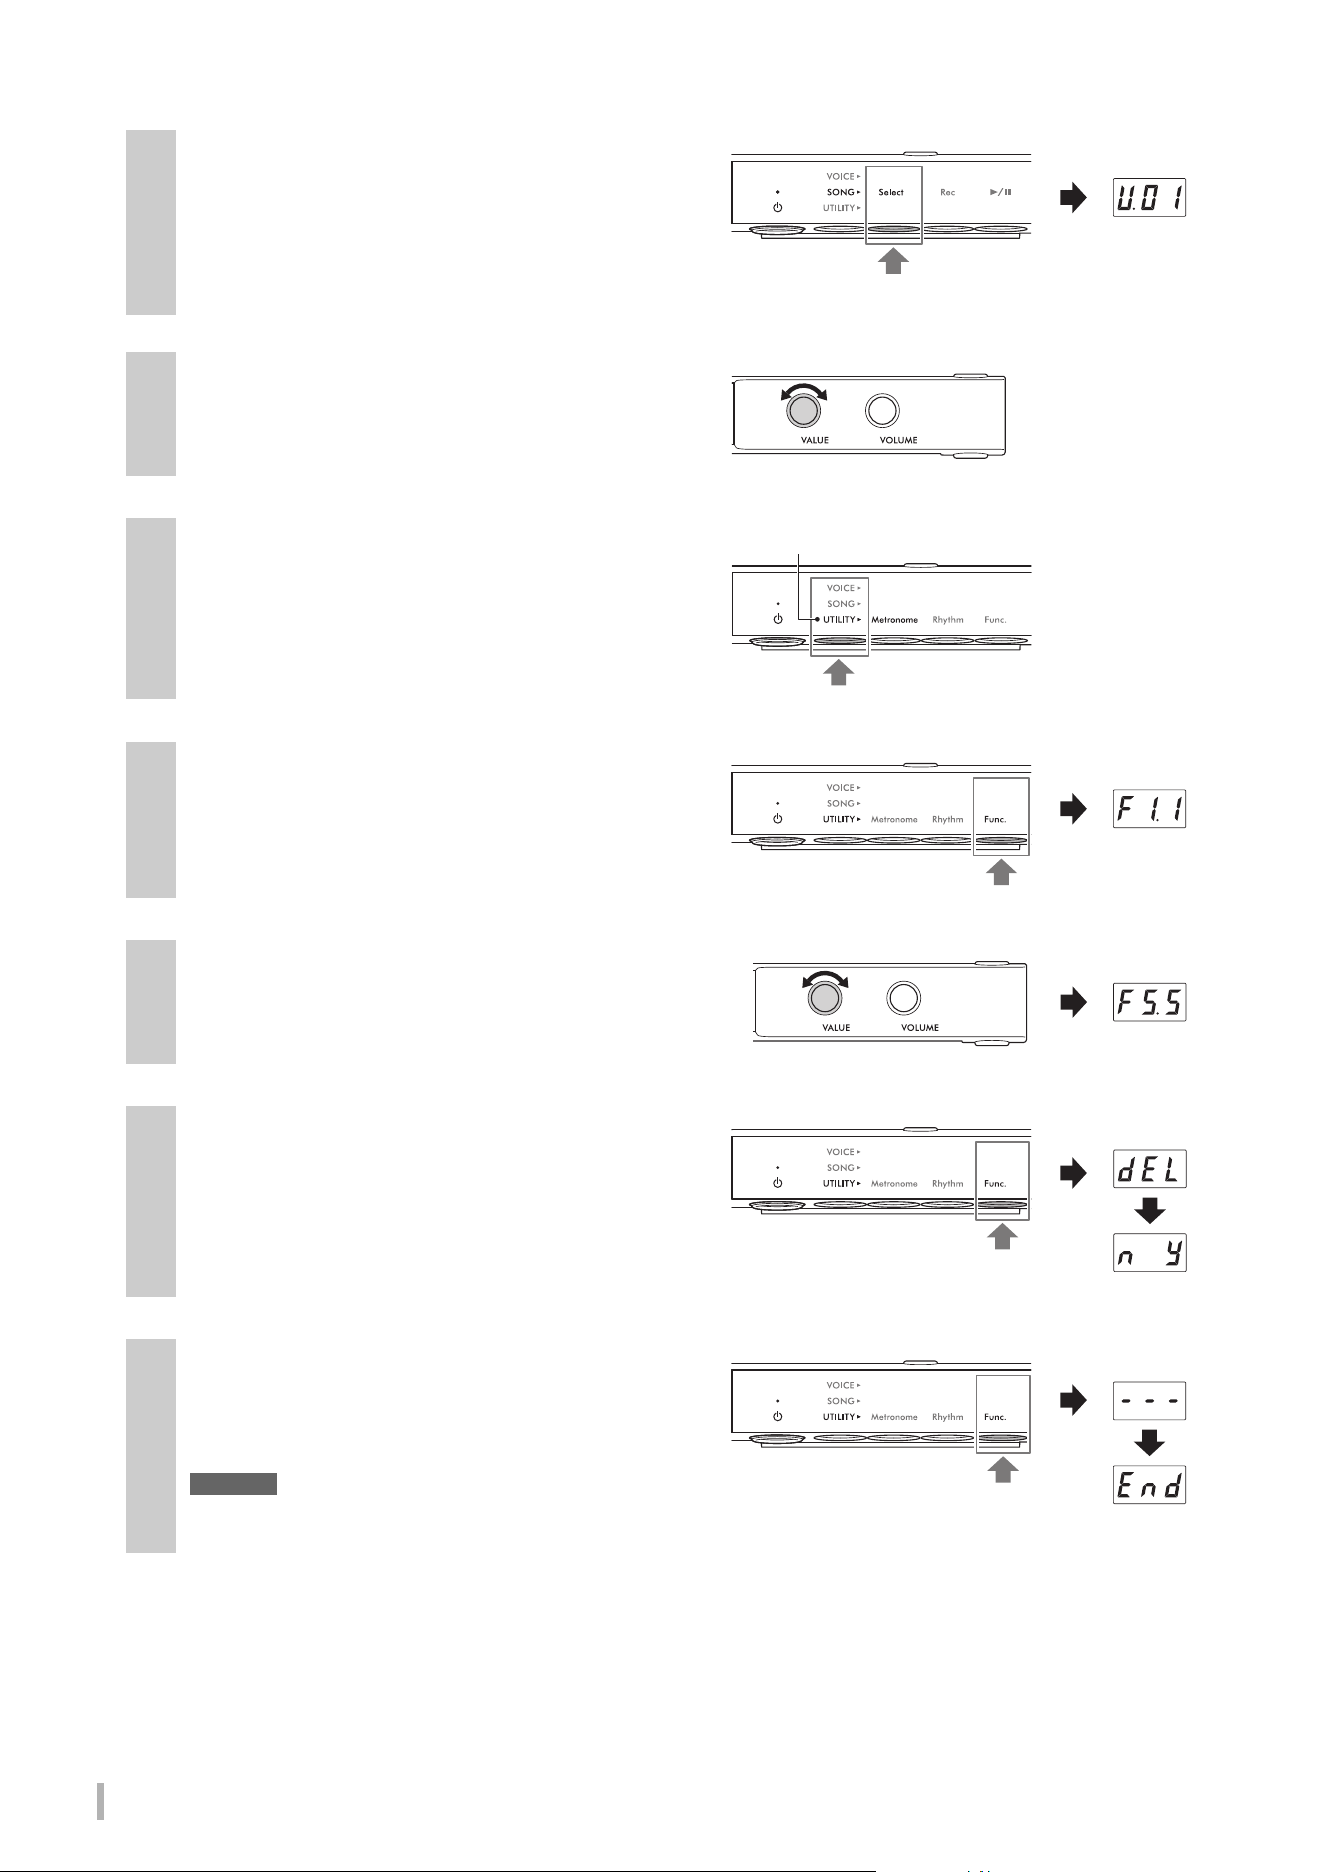
TA3 TC3 SH3 SC3 Owner’s Manual
36
3
Press Button 1 [Select] to select the category of
the Song to be deleted.
• U. (U.01–U.10): User Songs in internal memory (MIDI)
• S. (S.00–S.99): User Songs in a USB flash drive (MIDI)
• A. (A.00–A.99): User Songs in a USB flash drive (Audio)
4
Rotate the [VALUE] control to select the Song
number to delete.
5
Press the Menu button several times until the
[UTILITY] lamp lights up in orange.
6
Press Button 3 [Func.] to call up the Function
number in the display.
7
Rotate the [VALUE] control to select “F5.5”
(Deleting User Songs).
8
Press Button 3 [Func.] to call up “dEL” in the
display.
Following that, “n y” appears on the display.
NOTE
To cancel the delete operation, press any button other than
Button 3 [Func.] while “n y” is shown.
9
Press Button 3 [Func.] again to start deleting.
Dashes appears in succession on the display, indicating
that the delete operation is in progress. When the
operation is completed, “End” appears on the display.
NOTICE
While dashes appear on the display in succession, never
turn off the power. Doing so may corrupt the data or damage the internal memory or USB flash drive.
Lights up in orange
Function
number
TA3 TC3 SH3 SC3 Owner’s Manual
37
3
Playing Back and Recording Songs
Setting the appropriate Character Code for Song file names
If the Song in the connected USB flash drive cannot be called up, you may need to select the Character Code which is
compatible with the file/folder name, from the following two settings. The default setting is “Int.”
• Int (International): For playing back Songs with names using western European characters (including umlaut or
diacritic marks).
• JA (Japanese): For playing back Songs with names using Japanese characters and alphabets (excluding umlaut or
diacritic marks).
• To set to “JA”
While holding down the Menu button and Button 2, turn on
the power by pressing the [
P] (Standby/On) switch. “JA”
appears on the display.
• To set to “Int”
While holding down Button 2, turn on the power by pressing
the [
P] (Standby/On) switch. “Int” appears on the display.
NOTE
This setting is maintained even when the power is turned off.
TA3 TC3 SH3 SC3
1. Hold down2. Press
1. Hold down2. Press
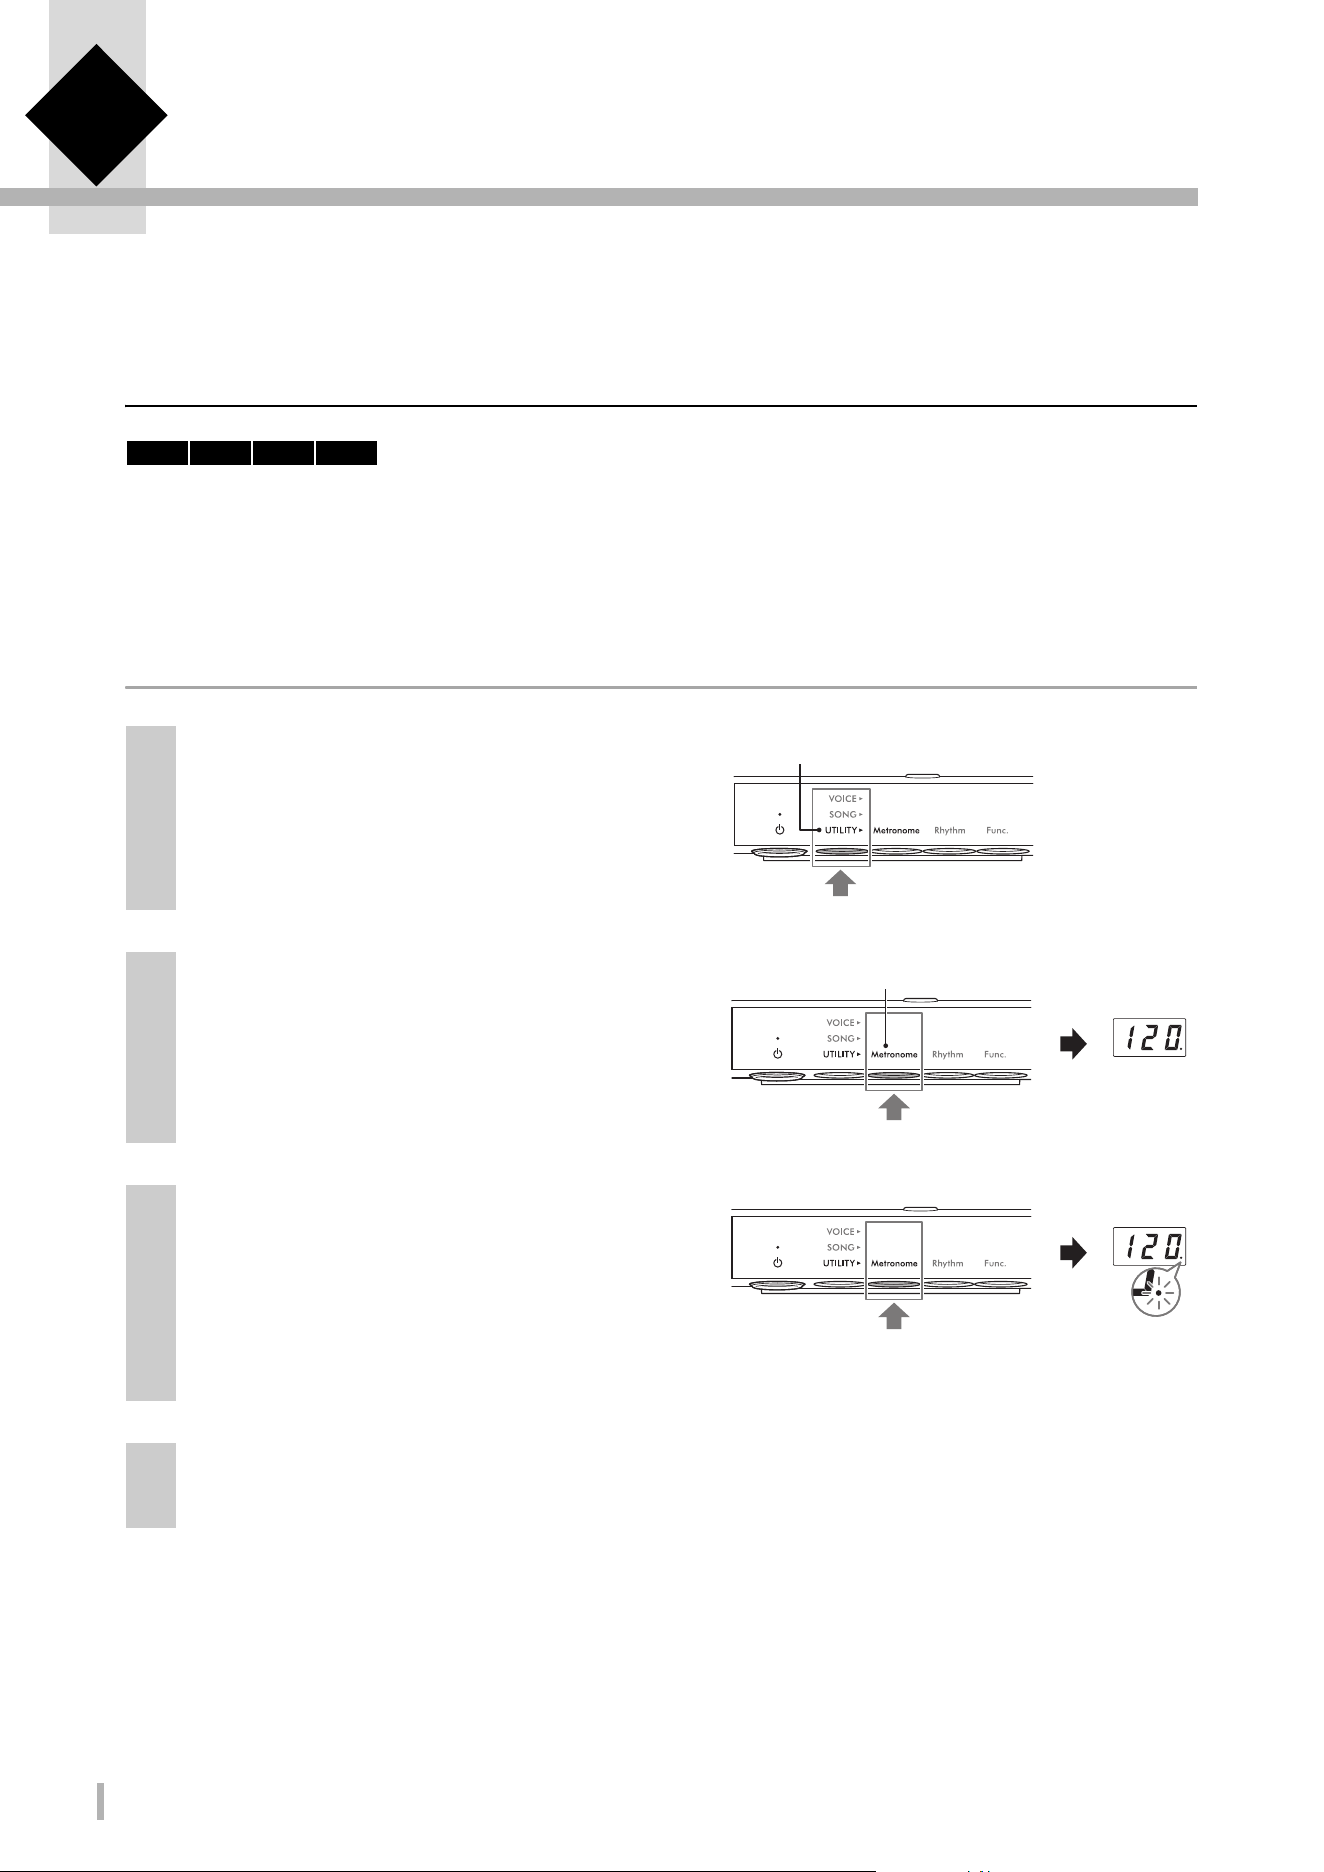
TA3 TC3 SH3 SC3 Owner’s Manual
38
4
Other Important Functions (UTILITY)
The Utility operations described here allow you to use the metronome, play Rhythms and make other important and
convenient settings for the instrument.
Using the metronome
By using the metronome, you can practice with an accurate tempo, and confirm the actual tempo by hearing it.
NOTE
(TA3/TC3 only) When in the Layer mode (page 21), you can play along with the metronome using only the acoustic piano sound by setting
the Voice to “---” (page 22).
Turning the metronome on/off
1
Press the Menu button several times until the
[UTILITY] lamp lights up in orange.
2
If the [Metronome] lamp is not lit in orange,
press Button 1.
The current tempo appears on the display.
NOTE
If the [Metronome] lamp is already lit in orange, pressing
Button 1 here starts metronome.
3
Press Button 1 [Metronome] to turn on the
metronome.
While the metronome sounds, a dot at the lower right of
the display flashes at the current tempo. Even when you
change the menu (VOICE/SONG/UTILITY), the dot
keeps flashing while the metronome is playing.
4
To stop the metronome, press Button 1 [Metronome] while the [Metronome] lamp is lit in
orange.
TA3 TC3 SH3 SC3
Lights up in orange
Te mpo
Lights up in orange
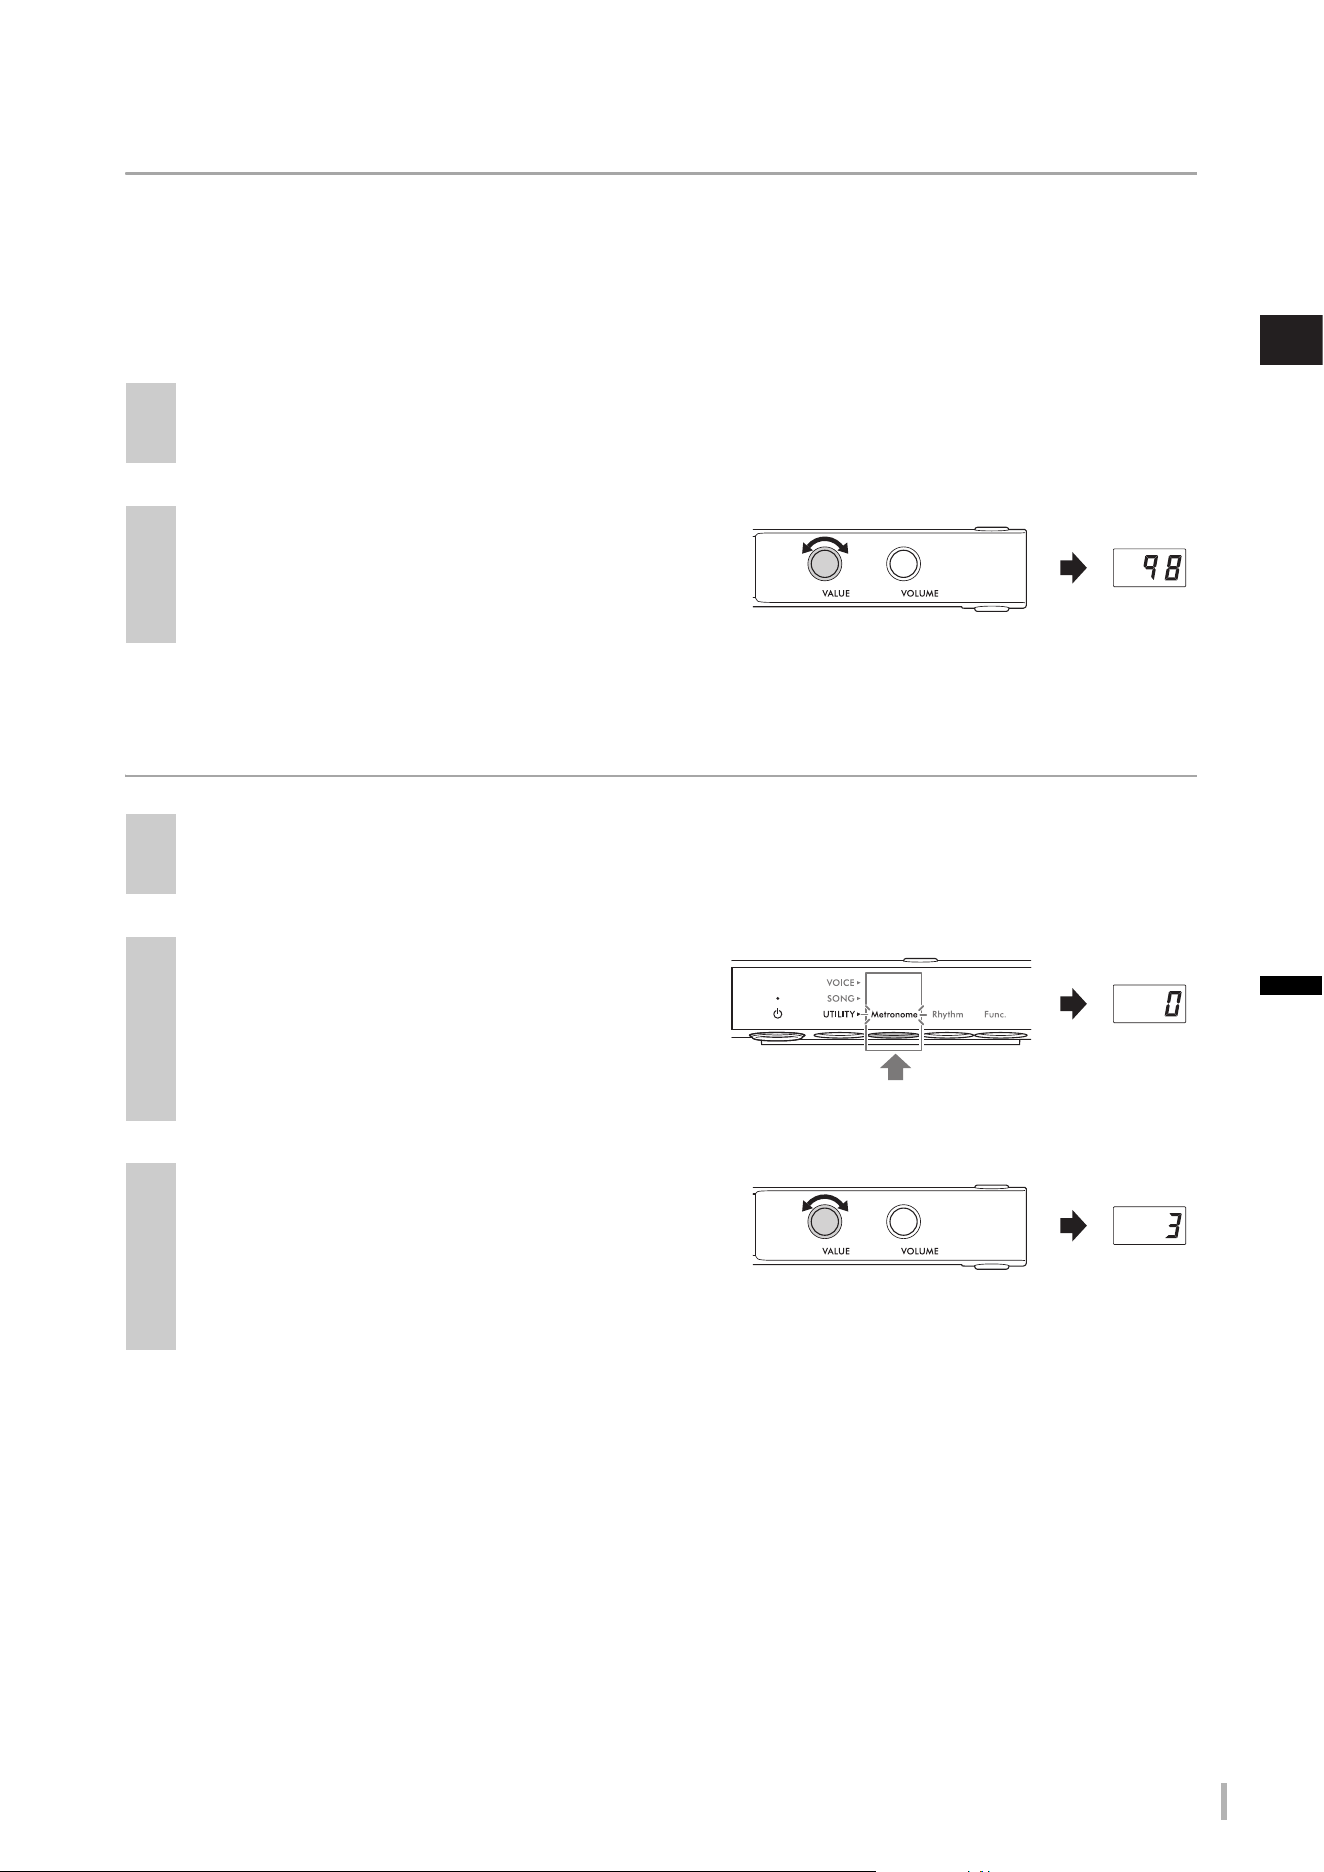
TA3 TC3 SH3 SC3 Owner’s Manual
39
4
Other Important Functions (UTILITY)
Adjusting the tempo
The metronome tempo can be set from 5 to 500 beats per minute. During Song playback (page 27), you can adjust the
tempo of a MIDI Song or the speed of an Audio Song by using the operation described below.
NOTE
• When a MIDI Song is being played back, the metronome plays back at the tempo and beat of the Song.
• When an Audio Song is being played back, this operation changes only the playback speed of the Song. The metronome tempo does
not change.
Selecting the time signature (beat)
NOTE
One beat is equal to a quarter note on this instrument. When playing a song written in non-quarter-note units, change the setting
accordingly (for example, when playing a song in 3/2 time, set Beat to 6).
1
Press Button 1 [Metronome] in the UTILITY to call up the current tempo on the display.
2
Rotate the [VALUE] control to adjust the
tempo.
Pressing the [VALUE] control restores the default
setting (120).
1
Press Button 1 [Metronome] in the UTILITY so that the lamp lights up in orange.
2
Hold down Button 1 [Metronome] for three
seconds to call up the beat setting value on
the display.
3
Rotate the [VALUE] control to select the beat.
The beat can be selected from 0 and 2–6. For values
other than 0, the first beat is accented with a bell sound
to signal the start of a measure. Pressing the [VALUE]
control restores the default setting (0; no 1st beat accent).
Pressing Button 1 [Metronome] displays the tempo value.
Beat
Hold down for three seconds.
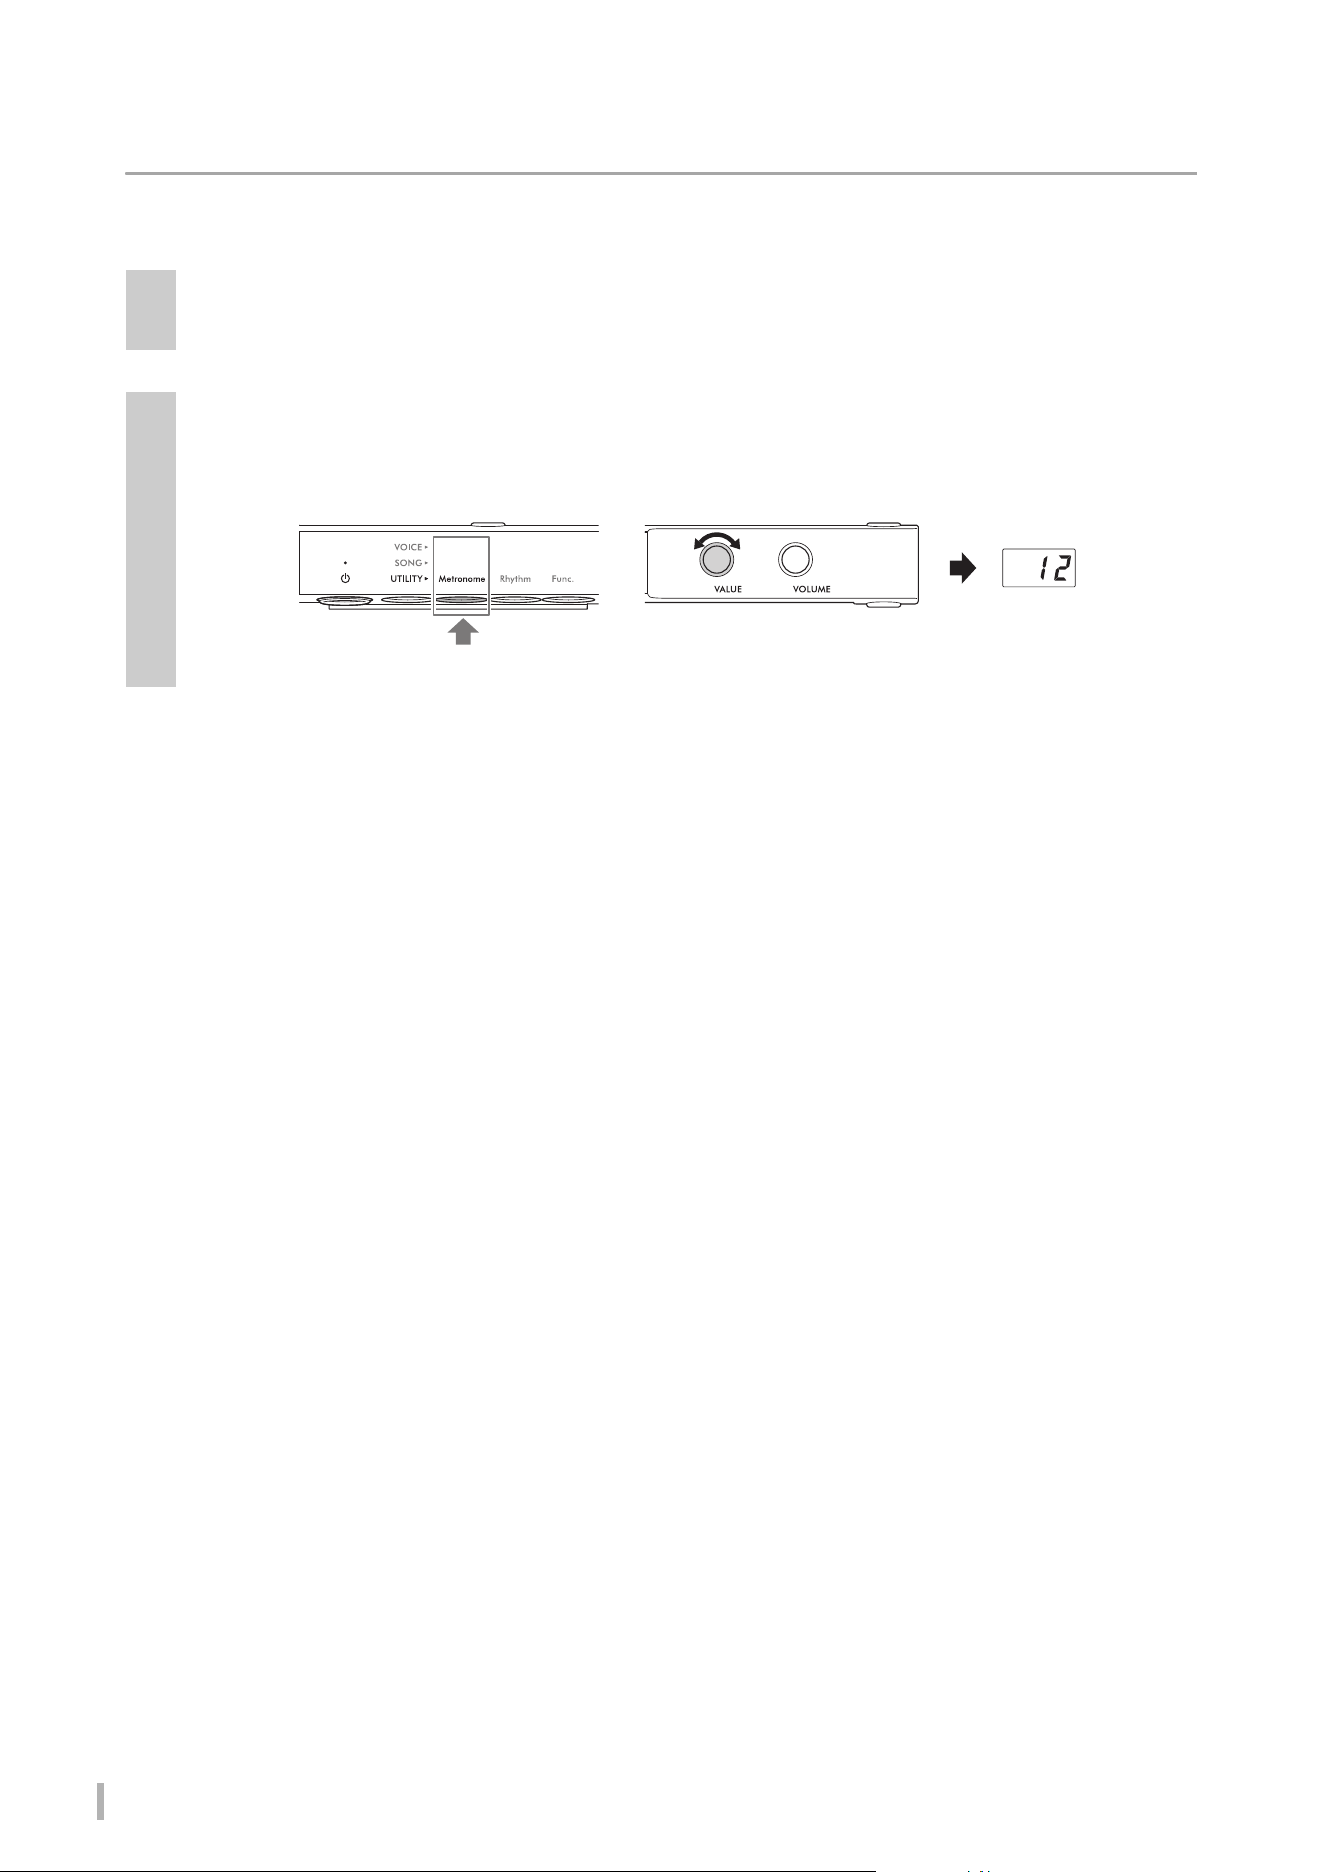
TA3 TC3 SH3 SC3 Owner’s Manual
40
Adjusting the metronome volume
NOTE
Changing the metronome volume also changes the Rhythm volume (page 43). The volume also can be set in Function F6.1 (page 50).
1
Press Button 1 [Metronome] in the UTILITY so that the lamp lights up in orange.
2
While holding down Button 1 [Metronome], rotate the [VALUE] control to adjust the
metronome volume.
The volume can be adjusted over a range of 1–20. Pressing the [VALUE] control restores the default setting (15).
1. Hold down
2. Rotate
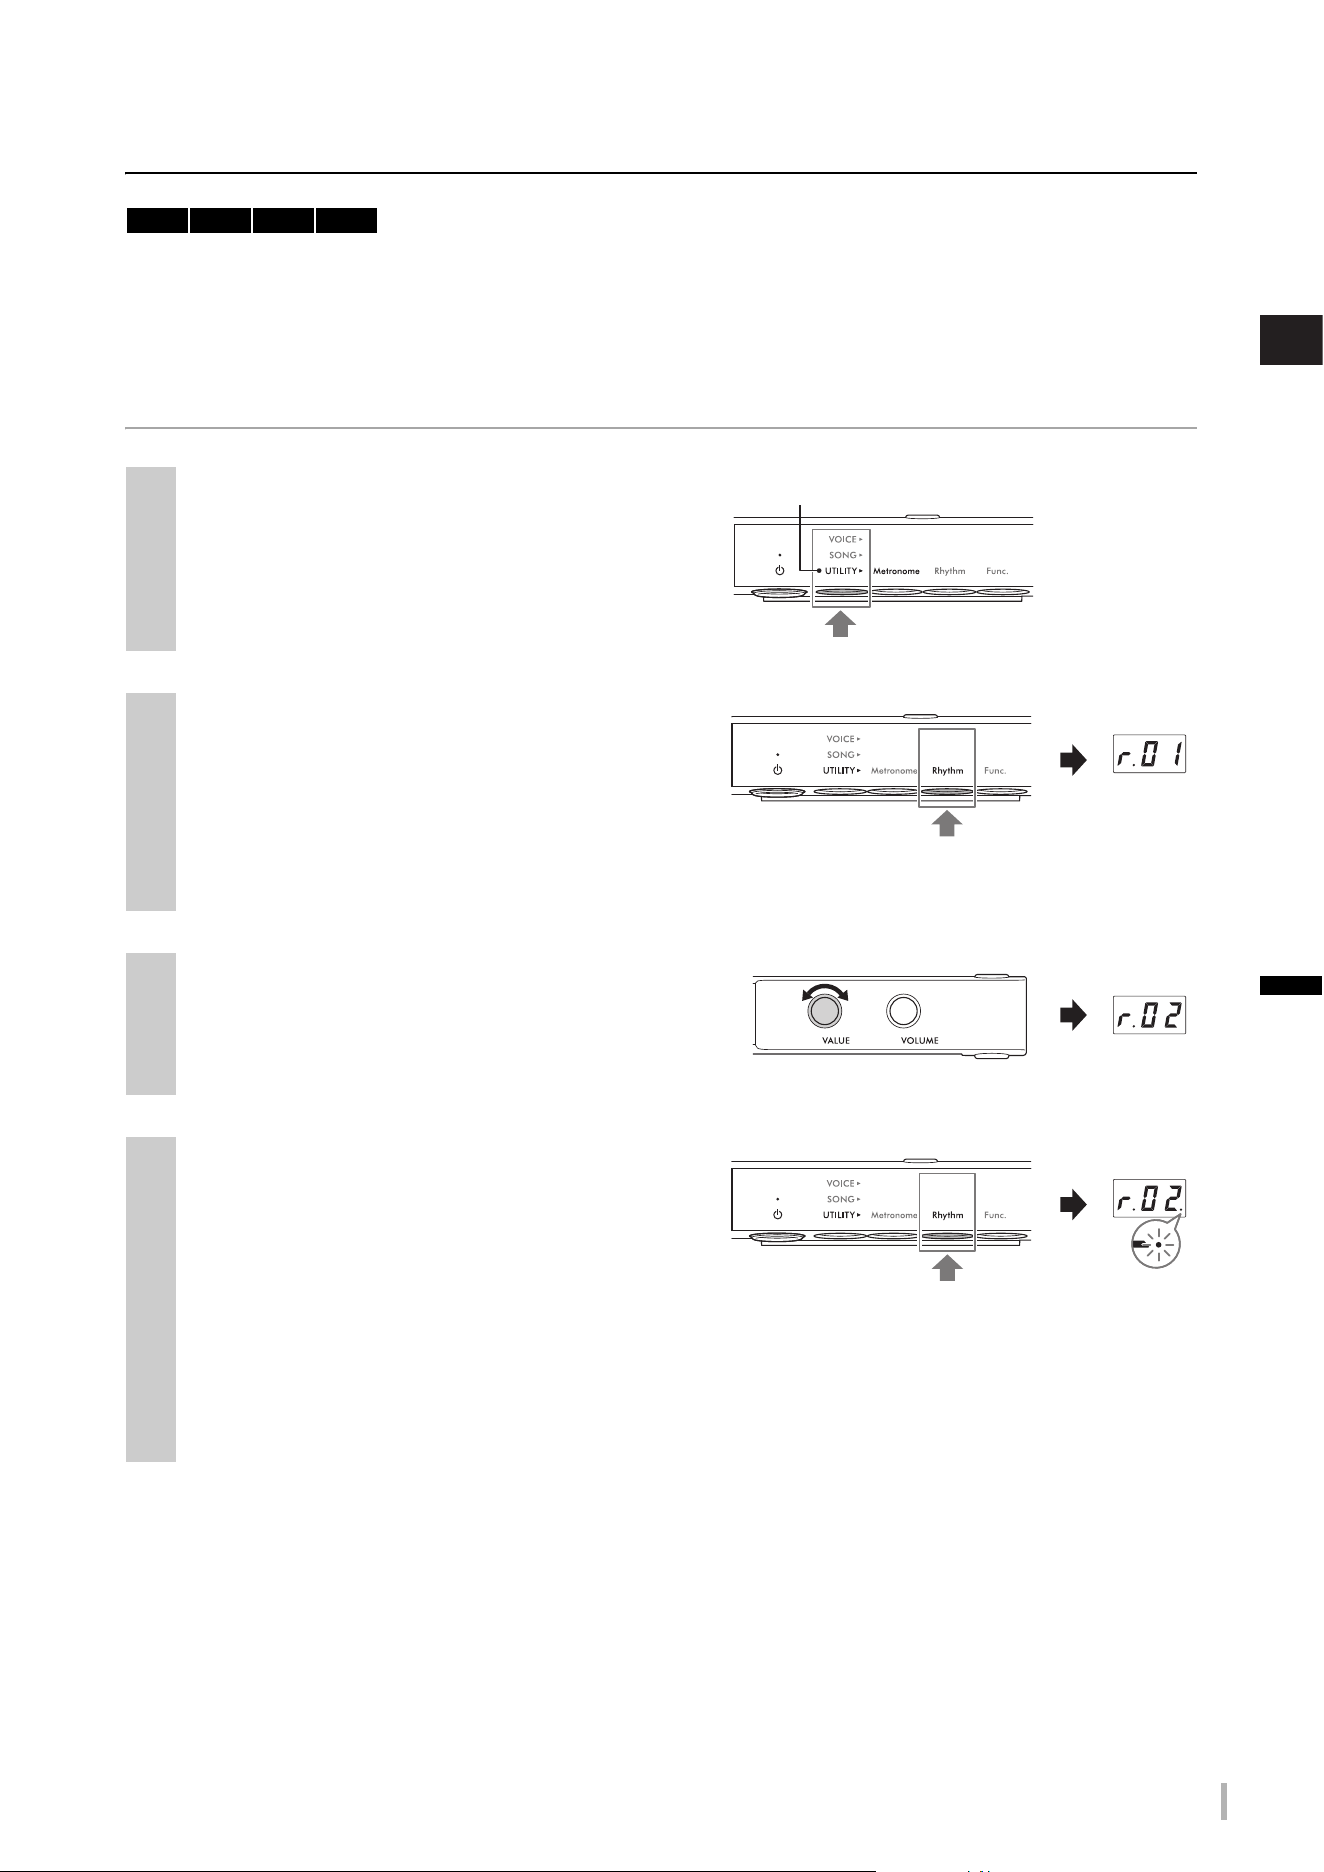
TA3 TC3 SH3 SC3 Owner’s Manual
41
4
Other Important Functions (UTILITY)
Playing the piano along with Rhythm playback
This instrument features rhythm patterns (combinations of drums and bass accompaniment) in various music genres,
allowing you to play and perform along with dynamic Rhythm playback. For information on the available Rhythms, refer
to the “Rhythm List” on page 42.
Playing back a Rhythm
1
Press the Menu button several times until the
[UTILITY] lamp lights up in orange.
2
If the [Rhythm] lamp is not lit in orange,
press Button 2.
The currently selected Rhythm number appears on the
display.
NOTE
If the [Rhythm] lamp is already lit in orange, pressing Button 2 here starts Rhythm playback. To stop playback, press Button 2
[Rhythm] again..
3
Rotate the [VALUE] control to select the
desired Rhythm.
NOTE
The Rhythm cannot be changed while playing or recording a Song.
4
Press Button 2 [Rhythm] to start Rhythm
playback.
During Rhythm playback, a dot at the lower right of the
display flashes at the current tempo. Even when you
change the menu (VOICE/SONG/UTILITY), the dot
keeps flashing while the Rhythm is playing.
NOTE
• Intro and Ending sections are played back at the beginning and ending of the Rhythm playback to vary the arrangement of the
accompaniment. You can turn each of them on or off in Function F6.2 or F6.3 (page 50).
• When Synchro Start is set to on, the [Rhythm] lamp flashes, indicating Rhythm playback is in standby. Pressing any of the keys
starts Rhythm playback. The Synchro Start function can be turned on/off in Function F6.5 (page 51).
TA3 TC3 SH3 SC3
Lights up in orange
Rhythm
number
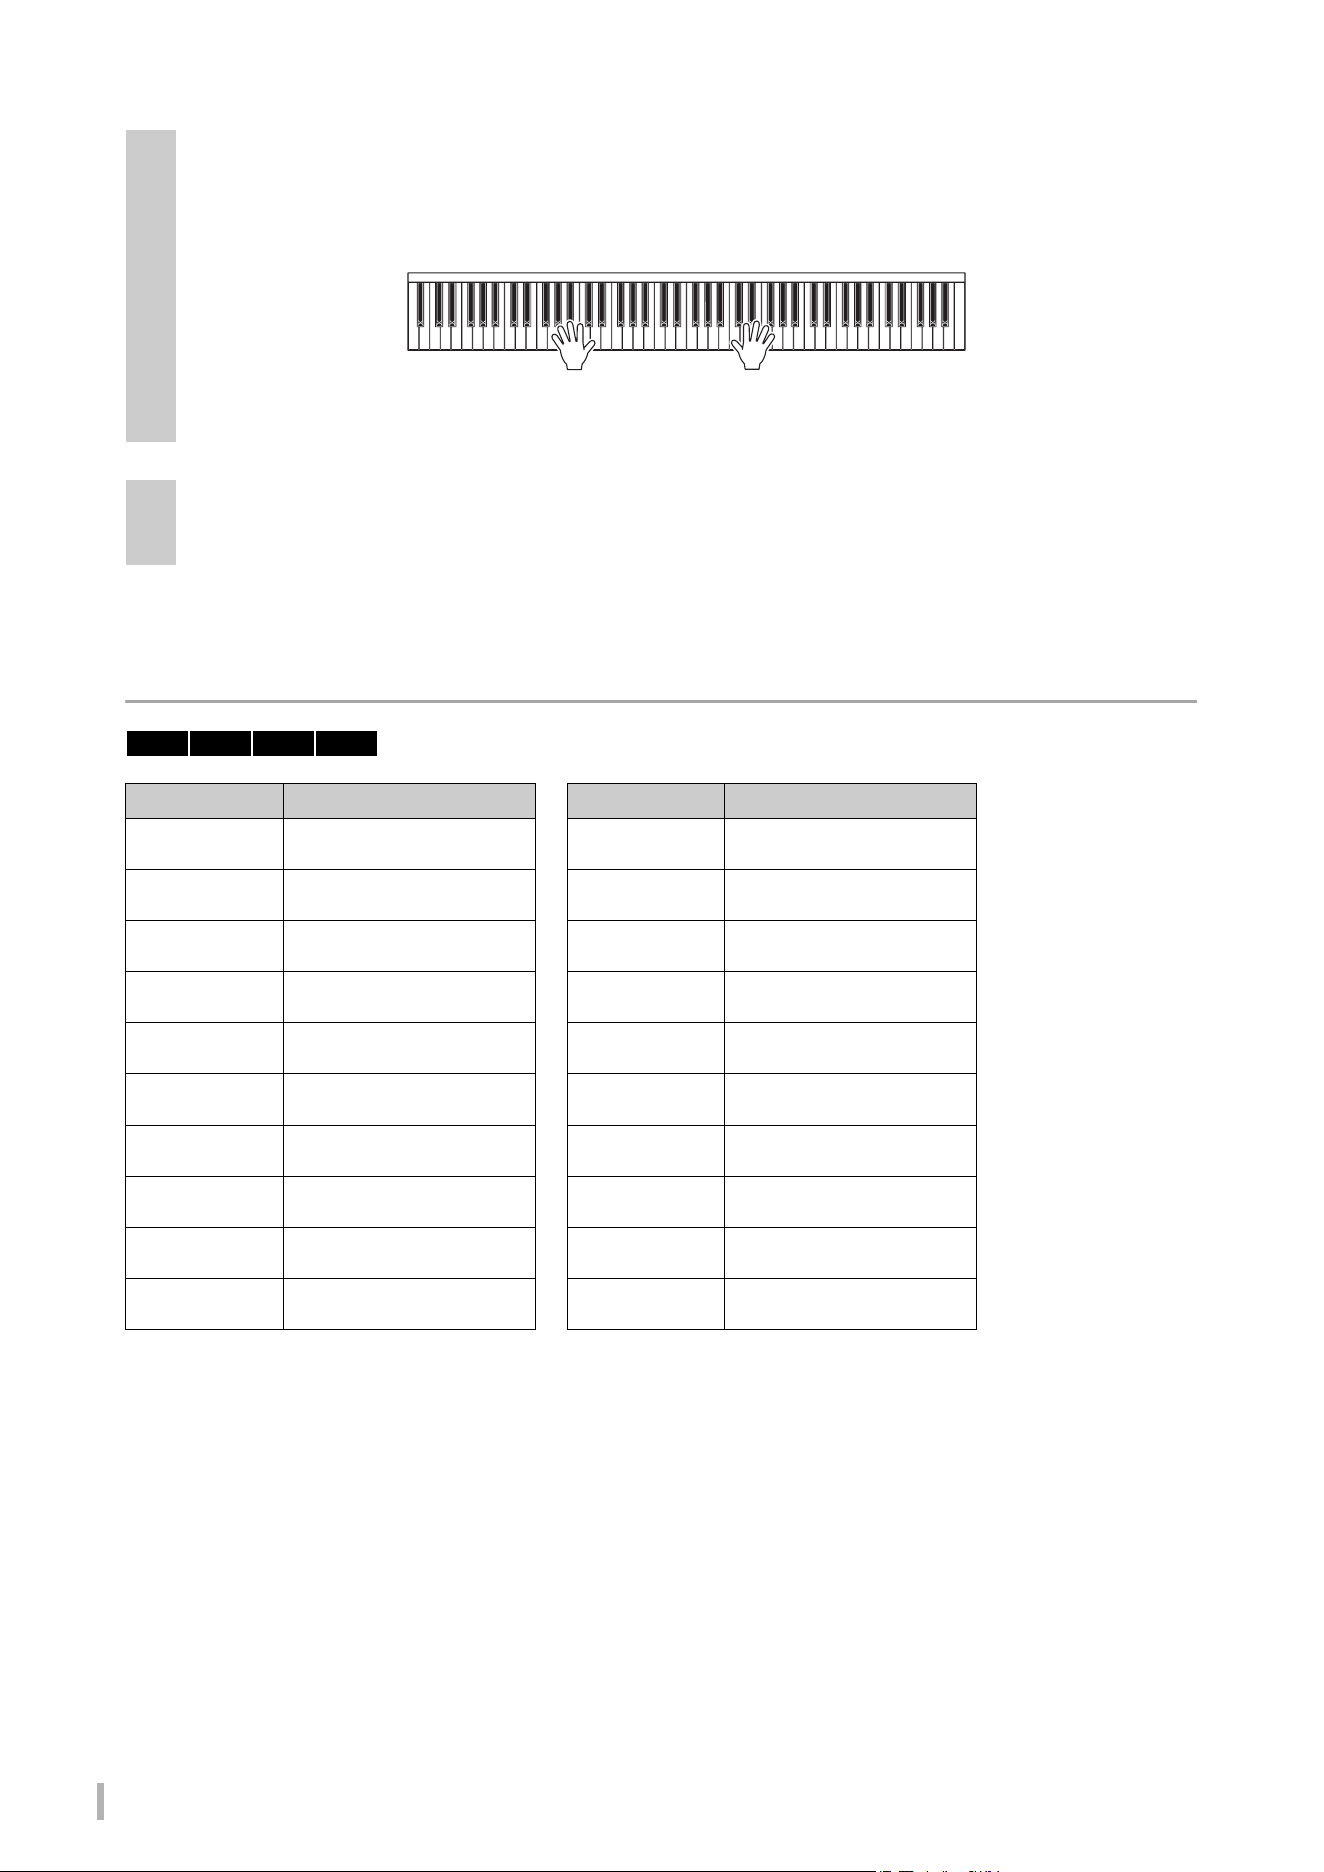
TA3 TC3 SH3 SC3 Owner’s Manual
42
Rhythm List
5
Play the keyboard along with Rhythm playback.
The instrument will automatically create appropriate accompaniment bass patterns while you play, based on the
chords you play. If you do not want to have the bass accompaniment sound, you can turn it off (or on, as desired)
in Function F6.4 (page 51).
NOTE
Some arrangements may not be suitable for use with this feature.
6
To stop Rhythm playback, press Button 2 [Rhythm] while the [Rhythm] lamp is lit in
orange.
Display Rhythm Name Display Rhythm Name
R01
8 Beat
R11
Swing
R02
16 Beat
R12
Jazz Waltz
R03
Shuffle 1
R13
Samba
R04
Shuffle 2
R14
Bossa Nova
R05
Shuffle 3
R15
Rumba
R06
Gospel
R16
Salsa
R07
8 Beat Ballad
R17
Kids Pop
R08
6/8 Slow Rock
R18
6/8 March
R09
Fast Jazz
R19
Christmas Swing
R10
Slow Jazz
R20
Christmas 3/4
TA3 TC3 SH3 SC3
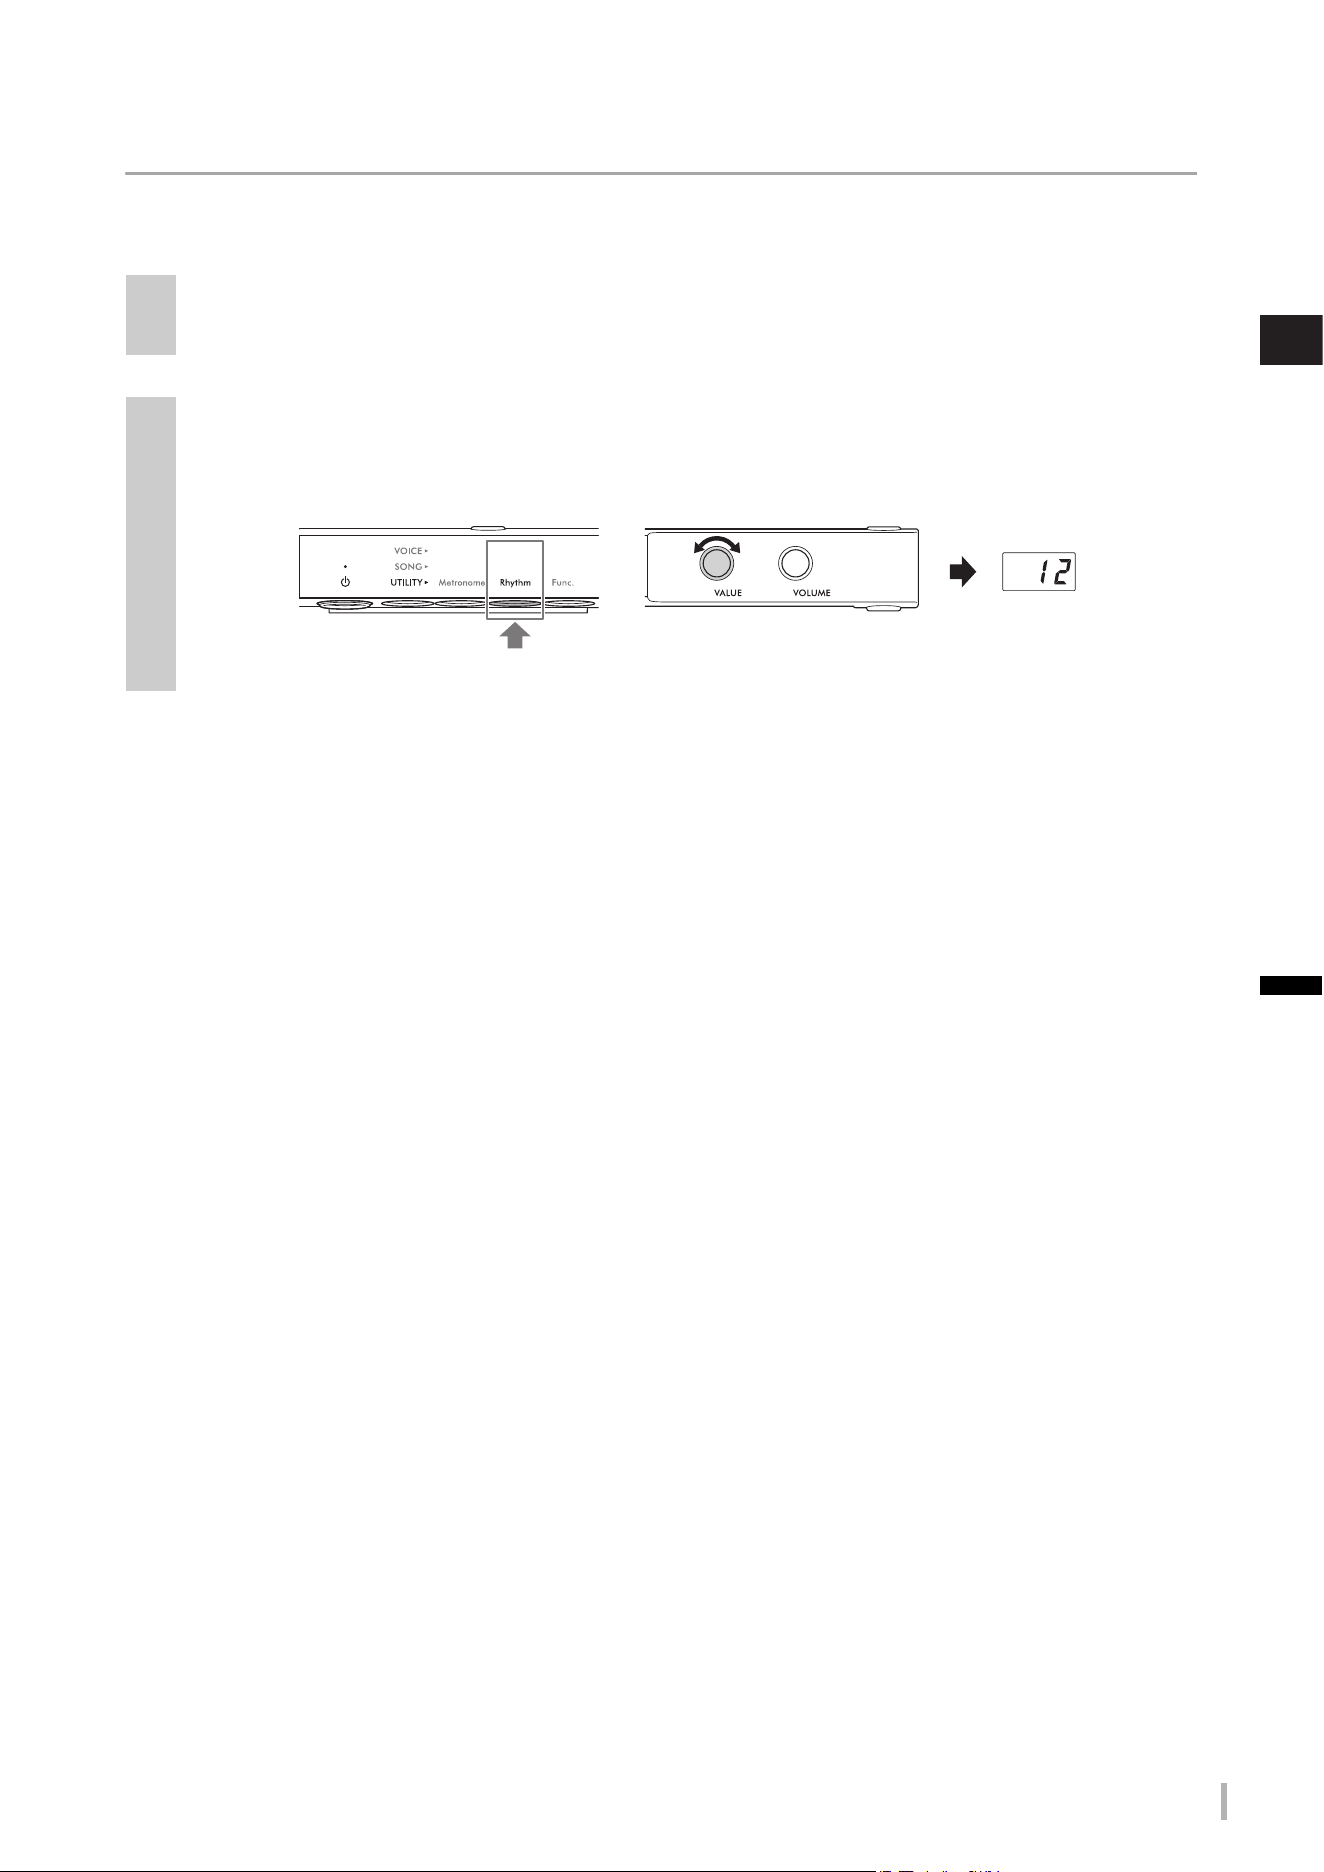
TA3 TC3 SH3 SC3 Owner’s Manual
43
4
Other Important Functions (UTILITY)
Adjusting the Rhythm volume
NOTE
Changing the Rhythm volume also changes the metronome volume (page 40). The volume also can be set in Function F6.1 (page 50).
1
Press Button 2 [Rhythm] in the UTILITY so that the lamp lights up in orange.
2
While holding down Button 2 [Rhythm], rotate the [VALUE] control to adjust the
metronome volume.
The volume can be adjusted over a range of 1–20. Pressing the [VALUE] control restores the default setting (15).
1. Hold down
2. Rotate
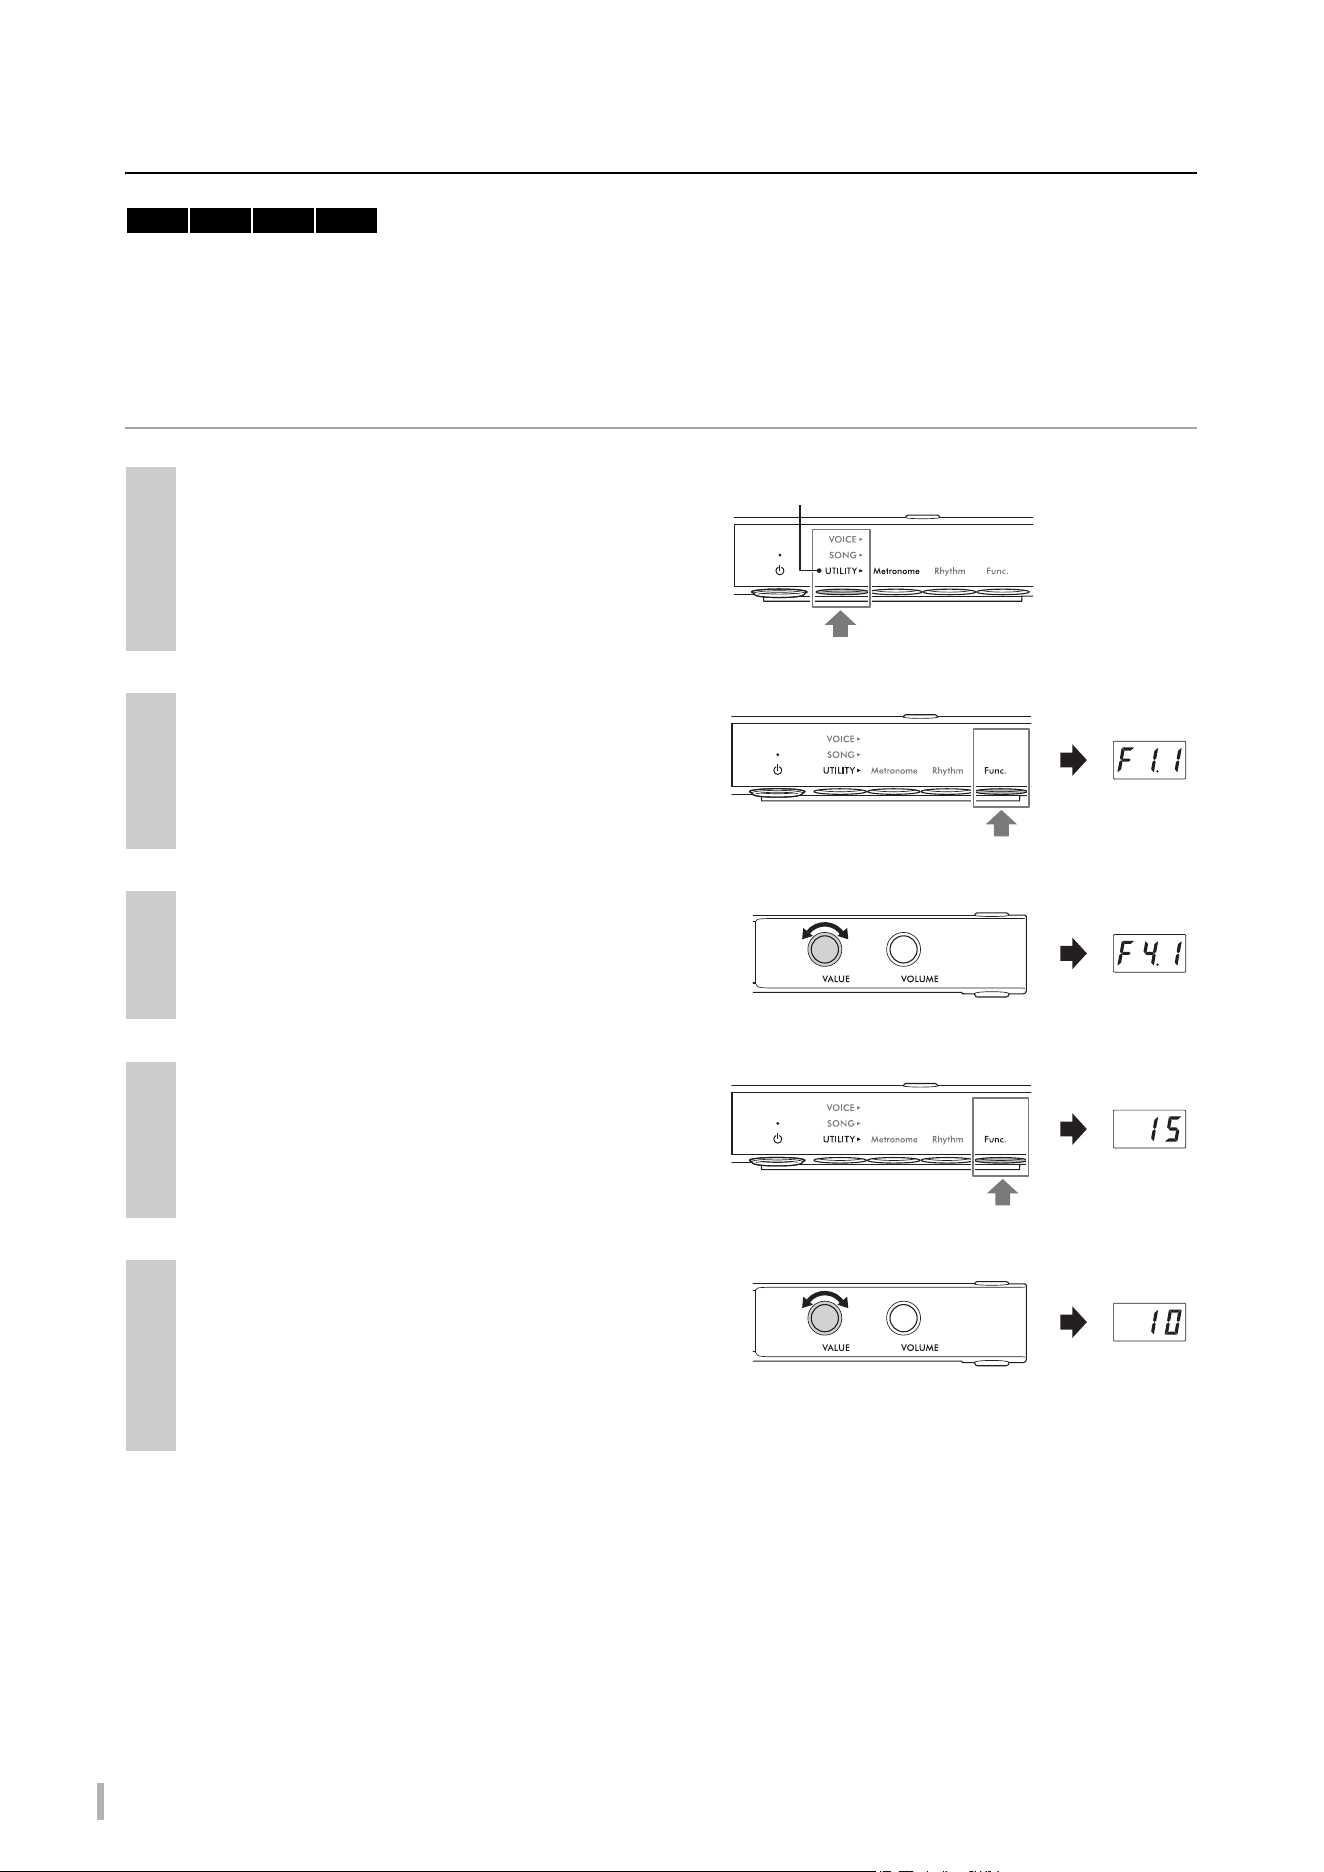
TA3 TC3 SH3 SC3 Owner’s Manual
44
Customizing with the various Function parameters
You can tune the instrument, adjust the metronome volume, and set a wide range of other convenient Function
parameters to customize the instrument to suit your personal/performance preferences. For information on the available
functions, refer to the “Function List” on page 45.
Basic Function-setting operations
1
Press the Menu button several times until the
[UTILITY] lamp lights up in orange.
2
Press Button 3 [Func.] to call up the Function
number in the display.
3
Rotate the [VALUE] control to select the
desired Function number.
4
Press Button 3 [Func.] to display the
parameter value.
5
Rotate the [VALUE] control to change the
parameter value.
Pressing the [VALUE] control restores the default value.
To continue to set other Functions, repeat the operation
from step 2 above. To exit from the Function settings,
press any button other than Button 3.
TA3 TC3 SH3 SC3
Lights up in orange
Function
number
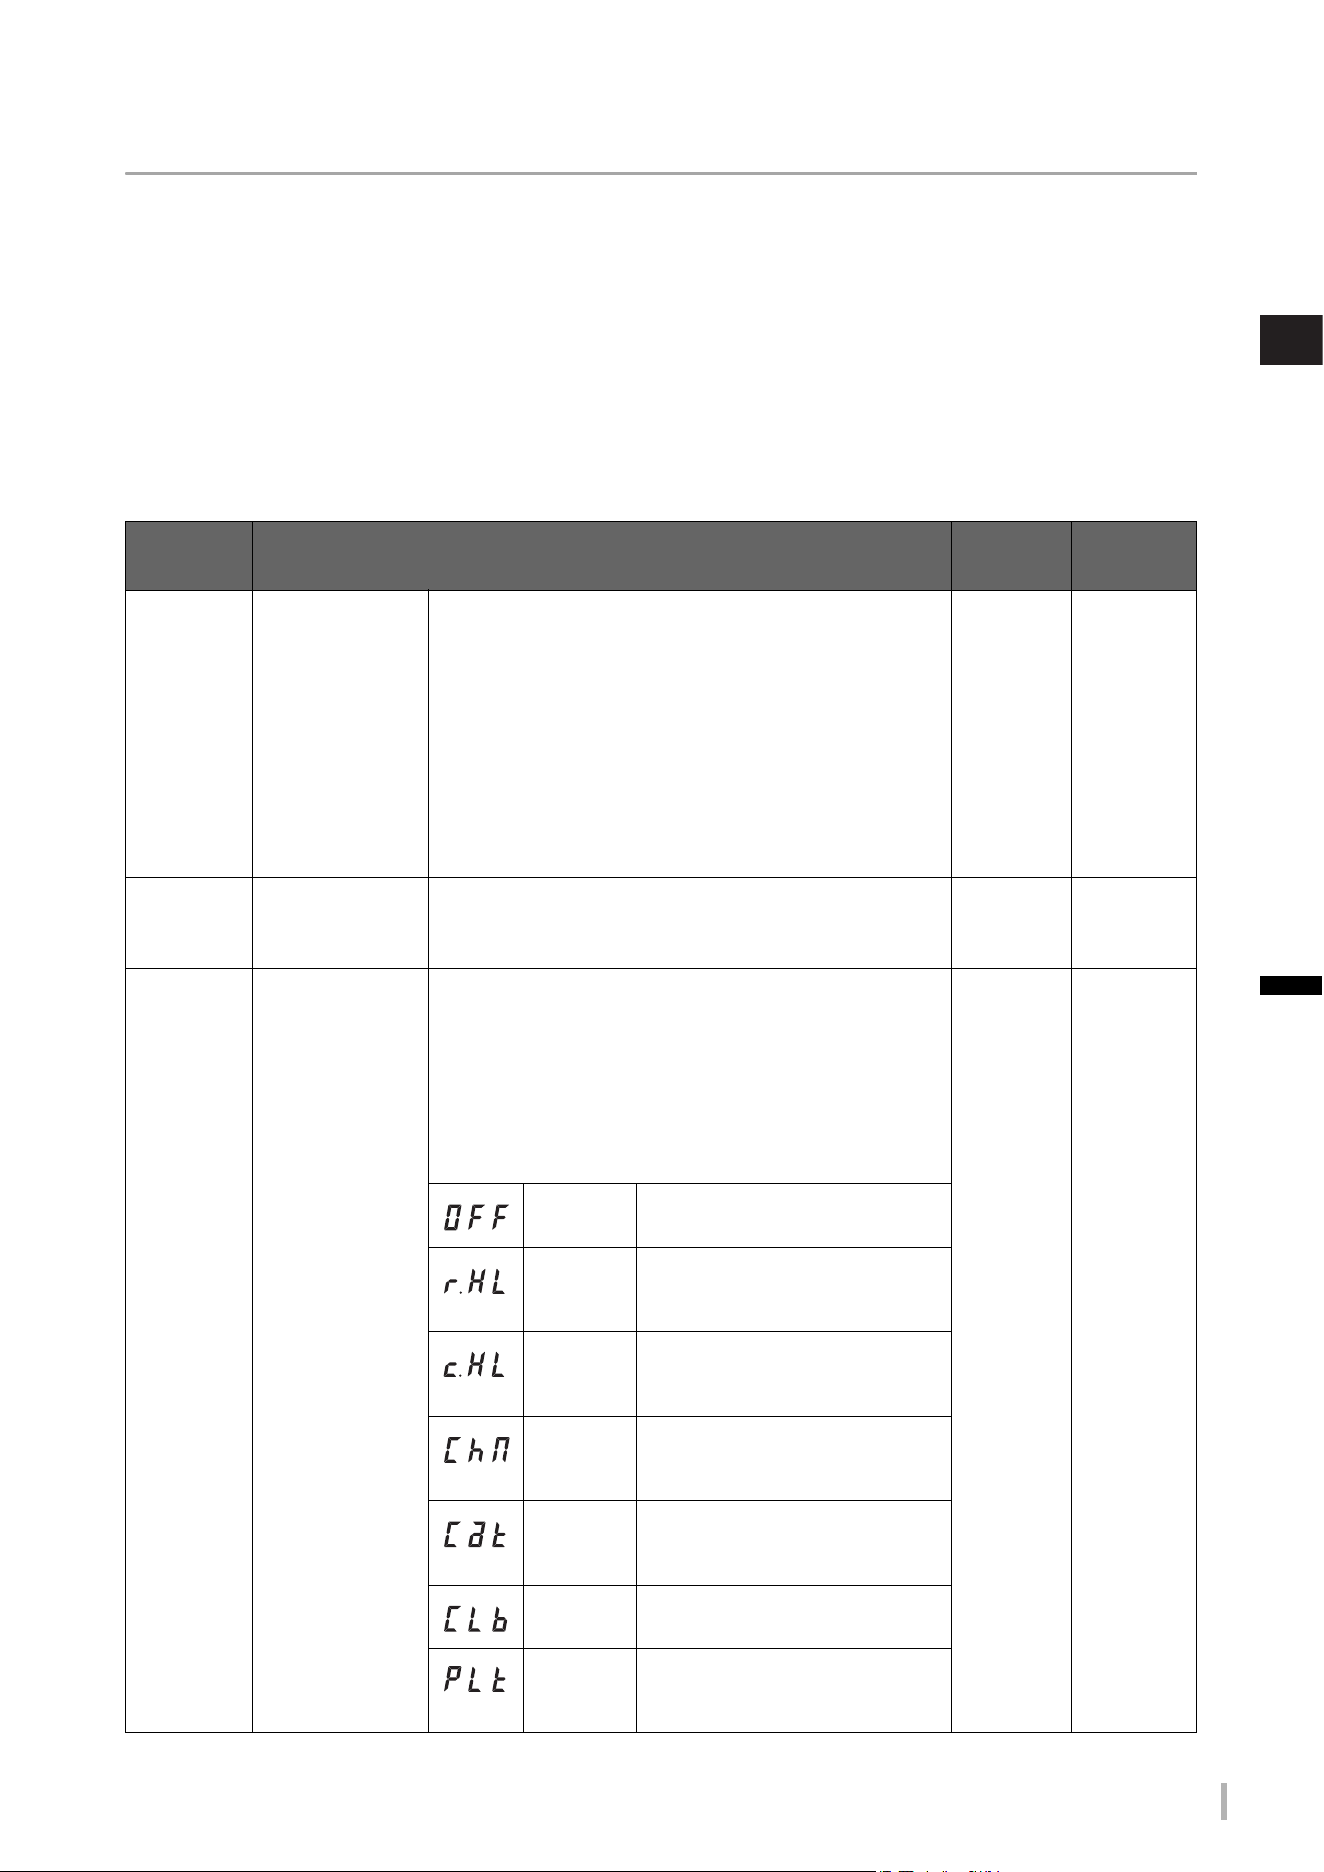
TA3 TC3 SH3 SC3 Owner’s Manual
45
4
Other Important Functions (UTILITY)
Function List
The Functions are categorized as follows.
• Reverb settings: F1.1–F1.3 (see below)
• Voice effect s ettings: F2.1–F2.9 (page 46)
• Performance settings: F3.1–F3.6 (page 47)
• Sound settings: F4.1–F4.9 (page 49)
• Song settings: F5.1–F5.6 (page 50)
• Metronome/Rhythm settings: F6.1–F6.5 (page 50)
• Overall settings: F7.1–F8.5 (page 51)
Reverb settings
Function
No.
Description Setting
range
Default
setting
f!1
Reverb On/Off This function adds reverberation to the sound, including
the keyboard performance and Song playback. Turning
this function on and simulating the reverberation in a
concert hall, etc. gives you the feeling of the being at a
live performance.
NOTE
(TA3/TC3 only) When the [TA] lamp is lit (i.e. while in the
TransAcoustic mode or Layer mode), the Reverb is automatically
turned off. If the [TA] lamp is lit, the Reverb on/off setting (F1.1) will
not be backed up even when the Backup of Voice settings (F7.3) is
set to on.
On/OFF On
f!2
Reverb Depth Adjusts the Reverb depth. This cannot be set when the
Reverb (F1.1) above is set to OFF and dashes are shown
in the display.
1–20 Differs
depending
on the Voice
f!3
Reverb Type Selects a Reverb type. This cannot be set when the
Reverb (F1.1) above is set to OFF and dashes are shown
in the display.
NOTE
When an external Song (page 24) is played back, or when the MIDI
data is received (from a computer or MIDI device; pages 63, 64),
dashes may appear on the display. This indicates that the data uses
a Reverb type which is not available on this instrument.
(See the
column at
left)
Differs
depending
on the Voice
Off
No effect is applied.
Recital
Hall
Simulates clear reverberation in a
mid-sized hall suitable for piano
recital.
Concert
Hall
Simulates brilliant reverberation in a
large hall for public orchestra
performances.
Chamber
Simulates the elegant reverberation
in a small room suitable for chamber
music.
Cathedral
Simulates the solemn reverberation
in a high-ceiling stone-made
cathedral.
Club
Simulates the lively reverberation in a
jazz club or a small bar.
Plate
Simulates the bright sound of vintage
reverb equipment used in recording
studios.
TA3 TC3 SH3 SC3 Owner’s Manual
46
Voice effect settings
The terms marked with an asterisk (*) are explained in the “Glossary of terms” on page 53.
NOTE
On the TA3 and TC3, the effects F2.1–F2.6 are effective only when headphones are connected.
Function
No.
Description Setting
range
Default
setting
f/1
VRM On/Off Turns the VRM (Virtual Resonance Modeling) effect*
on/off. When set to on, the VRM effect is applied only
to piano Voices (PF.1–PF.5). Damper Resonance,
Damper Noise, String Resonance, Duplex Scale
Resonance and Body Resonance produced by VRM
can be adjusted separately in F2.2–F2.6.
On/OFF On
f/2
Damper
Resonance
Determines the depth of the resonance effect
produced by VRM which is applied when the damper
pedal is pressed. This parameter is effective only when
VRM (F2.1) is on and one of the piano Voices (PF.1–
PF.5) is selected.
0–10 5
f/3
Damper Noise Turns the Damper Noise* produced by the VRM effect
on/off. This parameter is effective only when VRM
(F2.1) is on and one of the piano Voices (PF.1–PF.5) is
selected. When the Damper Resonance (F2.2) is set to
0, this effect will be disabled.
On/OFF On
f/4
String Resonance Determines the depth of the string resonance effect
produced by VRM which is applied when a note on the
keyboard is pressed. This parameter is effective only
when VRM (F2.1) is on and one of the piano Voices
(PF.1–PF.5) is selected.
0–10 5
f/5
Duplex Scale
Resonance
Adjusts the sympathetic vibrations of the duplex
scaling* resonance effect in VRM. This parameter is
effective only when VRM (F2.1) is set to on and one of
the piano Voices (PF.1–PF.5) is selected.
0–10 5
f/6
Body Resonance Determines the depth of the Body resonance effect
which simulates the resonance of the piano itself—i.e,
the soundboard, the sides, the frame and so on. This
parameter is effective only when VRM (F2.1) is on and
one of the piano Voices (PF.1–PF.5) is selected.
0–10 5
f/7
Grand Expression
Modeling
Selects the type of the Grand Expression Modeling*
effect. When this feature is set to “Dynamic,” you can
control extremely subtle nuances in the performance
and sound by changing your playing strength or touch.
When set to “Static,” the nuances are generally fixed.
Grand Expression Modeling is effective only for the
Voices of “CFX Grand” and “Bösendorfer.”
dYn
(Dynamic)/
Stc (Static)
dYn
(Dynamic)
f/8
Pan Adjusts the stereo pan position for the Voice played on
the keyboard.
L64
(leftmost)–C
(center) –r63
(rightmost)
Differs
depending
on the Voice
TA3 TC3 SH3 SC3 Owner’s Manual
47
4
Other Important Functions (UTILITY)
Performance settings
f/9
Keyboard
Transpose
Shifts the pitch of the entire keyboard up or down in
semitone intervals to facilitate playing in difficult key
signatures, and to let you easily match the pitch of the
keyboard to the range of a singer or other instruments.
For example, if you set this parameter to “5,” playing
key C produces pitch F. In this way, you can play the
F major song as if it were in C major.
NOTE
Your keyboard performance data will be transmitted with the
transposed note numbers while MIDI note numbers received
from an external MIDI device or computer will not be affected
by the transpose setting here.
−12–0–+12 0
Function
No.
Description Setting
range
Default
setting
f#1
Half Pedal Point The Half-pedal function allows you to use half-damper
techniques, in which the damper is pressed
somewhere between all the way down and all the way
up. In this half-damper state (on a real piano), the
damper felts only partially mute the strings. This
parameter determines the point to which you must
depress the right pedal to apply the half-pedal effect.
The larger the value, the deeper you need to press the
pedal for the half-pedal effect.
−2–0–+4 0
f#2
Touch Sensitivity Determines how the sound responds to your playing
strength.
(See the
column at
left)
0 (Medium)
−2 (Soft)
Produces relatively high volume even
with light playing strength.
−1 (Soft/Medium)
Produces high volume with moderate
playing strength.
0 (Medium)
Standard Touch Sensitivity
1 (Medium/Hard)
Requires moderately strong playing
for high volume.
2 (Hard)
Requires strong playing to produce
high volume.
OFF (Fixed)
The volume level will be the same
regardless of your playing strength.
The velocity (or volume) can be set in
F3.3.
f#3
Fixed Velocity Determines the velocity with which the sound
responds when Touch Sensitivity is set to “OFF”
(Fixed).
1–127 64
f#4
Master Tune Fine-tunes the pitch of the entire instrument in 0.2 Hz
steps. This lets you accurately match the keyboard
pitch to that of other instruments or music on a music
player, etc.
NOTE
The hundreds digit is omitted for the value shown in the
display (e.g., “40.2” stands for 440.2 Hz).
414.8–466.8
(Hz)
440.0 (Hz)
Function
No.
Description Setting
range
Default
setting
TA3 TC3 SH3 SC3 Owner’s Manual
48
f#5
Scale Type
(Temperament)
Modern acoustic pianos are tuned almost exclusively
in equal temperaments. Likewise, this instrument
employs equal temperament, but you can select one of
various scales for playing in custom tunings for specific
historical periods or music genres.
(See the
column at
left)
1 (Equal)
1 (Equal)
The pitch range of each octave is
divided equally into twelve parts, with
each half-step evenly spaced in pitch.
This is the most commonly used
tuning in music today.
2 (Pure Major)
These tunings preserve the pure
mathematical intervals of each scale,
especially for triad chords (root, third,
fifth). You can hear this best in actual
vocal harmonies—such as choirs
and a cappella singing.
3 (Pure Minor)
4 (Pythagorean)
This scale was devised by the
famous Greek philosopher and is
created from a series of perfect fifths,
which are collapsed into a single
octave. The 3rd in this tuning are
slightly unstable, but the 4th and 5th
are beautiful and suitable for some
leads.
5 (Mean-Tone)
This scale was created as an
improvement on the Pythagorean
scale, by making the major third
interval more “in tune.” It was
especially popular from the 16th
century to the 18th century. Handel,
among others, used this scale.
6 (Werckmeister)
This composite scale combines the
Werckmeister and Kirnberger
systems, which were themselves
improvements on the mean-tone and
Pythagorean scales. The main
feature of this scale is that each key
has its own unique character. The
scale was used extensively during
the time of Bach and Beethoven, and
even now it is often used when
performing period music on the
harpsichord.
7 (Kirnberger)
f#6
Base Note When the Scale above is set to something other than
“Equal Temperament,” you need to set the base note
for the selected Scale. When the base note is
changed, the pitch of the keyboard is transposed, yet
maintains the original pitch relationship between the
notes.
In the display, the note is followed by a high bar if
sharp, and the note is followed by a low bar if flat.
C, C#, D, Eb,
E, F, F#, G,
Ab, A, Bb, B
C
Function
No.
Description Setting
range
Default
setting
C
#
E
b
TA3 TC3 SH3 SC3 Owner’s Manual
49
4
Other Important Functions (UTILITY)
Sound settings
Function
No.
Description Setting
range
Default
setting
f$1
Binaural On/Off Turns the Binaural (or Stereophonic Optimizer)
function (page 19) on or off. When this function is on
and a piano Voice (PF1–PF5) is selected, the sound
from this instrument changes to the sound of Binaural
Sampling or the sound enhanced with the
Stereophonic Optimizer, allowing you to enjoy more
realistic sound even when listening with headphones.
NOTE
This is effective only when headphones are connected.
On/OFF On
f$2
Brilliance Adjusts the timbre brilliance of the entire keyboard
sound from mellow to bright.
−2 (Mellow)
–0 (Normal)
–+2 (Bright)
0 (Normal)
f$3
IAC On/Off IAC is a function which automatically adjusts and
controls the sound quality according to the volume of
the instrument. Even when the volume is low, it permits
both low sounds and high sounds to be clearly heard.
On/OFF On
f$4
IAC Depth Determines the depth of the IAC. The higher the value,
the more clearly the low/high frequencies sound at
lower volume levels.
−3–0–+3 0
f$5
Audio EQ Determines whether the optimum EQ (or Equalizer)
settings are applied for audio input sound from the
external device (such as a computer or a smart device)
or not. When this function is set to on, audio input
sound from the external device will be optimized to be
played on this instrument. We recommend that you
turn this function off when outputting audio input to an
external device along with the performance played on
the instrument.
NOTE
The phrase “audio input sound” here refers to audio data sent
to this instrument from external devices, such as a computer
or a smart device, when connecting the instrument with
devices via [AUX IN] jack, [USB TO HOST] terminal, wireless
LAN, or Bluetooth. For information on connecting to external
devices, refer to Chapter 5 (page 55).
On/OFF On
f$6
TransAcoustic
Resonance
Adjustment
Optimizes the resonance so that it sounds natural even
when the lid is closed (or open), while playing in the
TransAcoustic mode or Layer mode. Set it to “OPn”
when the lid is open, and to “CLS” when the lid is
closed.
OPn (Open)/
CLS (Close)
Upright
pianos: CLS,
Grand
pianos: OPn
f$7
TransAcoustic
Tone Control
Adjusts the tone of sounds from the soundboard in the
low (F4.7), mid (F4.8) or high (F4.9) frequency ranges,
while playing in the TransAcoustic mode or Layer
mode.
−12–0–+12 0
f$8
f$9
TA3 TC3 SH3 SC3
TA3 TC3 SH3 SC3
TA3 TC3 SH3 SC3
TA3 TC3 SH3 SC3 Owner’s Manual
50
Song settings
Metronome/Rhythm settings
Function
No.
Description Setting
range
Default
setting
f%1
MIDI Song/
Keyboard Volume
Balance
Adjusts the volume balance between the keyboard
performance and MIDI Song playback. The higher the
value, the lower the Song playback volume becomes;
the lower the value, the lower the keyboard
performance volume becomes. To adjust the balance
with Audio Song, adjust the Audio Song volume in
F5.3.
NOTE
Some PianoSoft Songs have their own volume balance
settings. These settings take priority to the balance setting
here.
−64–0–+64 0
f%2
Song Transpose Shifts the pitch of the MIDI Song or Audio Song up or
down in semitone intervals. For example, if you set this
parameter to “5,” the pitch of key C is played back as F.
In this way, an F major song is played back as if it were
in C major.
NOTE
• MIDI note numbers received from an external MIDI device or
computer will not be affected by the transpose setting here.
• Applying transpose to an Audio Song may change its tonal
characteristics.
−12–0–+12 0
f%3
Audio Song
Volume
Adjusts the volume of Audio Song playback.
1–20 16
f%4
Copying User
Songs
Copies the User Songs saved in the internal memory
to the connected USB flash drive. For details, refer to
page 34.
——
f%5
Deleting User
Songs
Deletes the User Songs in the internal memory or the
connected USB flash drive. For details, refer to
page 35.
——
f%6
Formatting a USB
flash drive
Formats or initializes the USB flash drive. For details,
refer to page 56.
NOTICE
Executing the Format operation will delete all data saved
in the USB flash drive. Save important data to a computer
or another storage device.
——
Function
No.
Description Setting
range
Default
setting
f&1
Metronome/
Rhythm Volume
Adjusts the volume of both the metronome and
Rhythm.
1–20 15
f&2
Rhythm Intro Determines whether the Intro is played back (On) or
not (OFF) before the Rhythm pattern is started.
NOTE
During Song playback, the Intro cannot be played back even if
you start the Rhythm with this parameter set to “On.”
On/OFF On
f&3
Rhythm Ending Determines whether the Ending is played back (On) or
not (OFF) before the Rhythm pattern is stopped.
On/OFF On
TA3 TC3 SH3 SC3 Owner’s Manual
51
4
Other Important Functions (UTILITY)
Overall settings
f&4
Rhythm Bass Determines whether the auto bass accompaniment for
the Rhythm is on or off.
On/OFF On
f&5
Rhythm Synchro
Start
Determines how the Rhythm playback starts.
• On: You can start Rhythm playback by pressing any key on
the keyboard. Pressing Button 2 [Rhythm] in Utility (step 4
on page 41) makes the [Rhythm] lamp flash, and puts
Rhythm playback in standby. In this status, pressing any key
starts Rhythm playback.
• OFF: Press Button 2 [Rhythm] in the UTILITY to start
Rhythm playback (step 4 on page 41).
On/OFF OFF
Function
No.
Description Setting
range
Default
setting
f'1
MIDI Transmit
Channel
Determines the MIDI channel over which the MIDI data
of the keyboard performance will be transmitted to
external MIDI devices. When this parameter is set to
“OFF,” MIDI data is not transmitted.
1–16, OFF 1
f'2
Local Control Determines whether the sound played on the keyboard
is produced from the tone generator of this instrument
or not.
• On: The keyboard performance data is transmitted to the
internal tone generator of this instrument and it produces
the sound.
• OFF: The keyboard performance data is not transmitted to
the internal tone generator of this instrument. This means
that even if you play the keyboard, this instrument will
produce no sound. Instead, the keyboard data can be
transmitted via MIDI to a connected external MIDI device,
which can produce the sound.
On/OFF On
f'3
Backup (Voice) Determines whether the following Voice-related
settings are backed up (maintained even if the power is
turned off) or not. To back up the settings, set this
parameter to On.
• Current Voice
• Reverb settings (F1.1–F1.3)
• Voice effect settings (F2.1–F2.8)
On/OFF OFF
f'4
Backup (Others) Determines whether the following performance-related
settings are backed up (maintained even if the power is
turned off) or not. To back up the settings, set this
parameter to On.
• Performance settings (F3.1–F3.6)
• Sound settings (F4.1–F4.7)
• Song settings (F5.1, F5.3)
• Rhythm settings (F6.1–F6.4)
• MIDI settings (F7.1–F7.2)
On/OFF On
f'5
Bluetooth On/Off Turns the Bluetooth function on/off. To connect with a
Bluetooth-equipped device such as a smartphone, set
this to On. For details, refer to page 59.
NOTE
Depending on the country in which you purchased the
product, the instrument may not have Bluetooth capability. For
information on whether Bluetooth functionality is included or
not, refer to page 8.
On/OFF On
Function
No.
Description Setting
range
Default
setting
TA3 TC3 SH3 SC3 Owner’s Manual
52
f'6
Bluetooth Pairing Registers the Bluetooth-equipped device on this
instrument. While “F7.6” is shown in the display, press
Button 3 [Func.] to put pairing in standby on the
instrument. After that, make settings on the Bluetooth
equipped-device. For detailed instructions, refer to
page 59.
——
f(1
Auto Power Off Enables or disables the Auto Power Off function
(page 16).
• On: The power is automatically turned off if the instrument is
not operated for approximately 15 minutes.
• OFF: The power will not be turned off automatically. Press
the [
P] (Standby/On) switch to turn off the power.
NOTICE
When the instrument is communicating with other
devices or the Songs are played back, the power will not
be turned off automatically. Make sure to turn off the
power by pressing the [
P] (Standby/On) switch when the
instrument is not in use.
On/OFF On
f(2
AUX IN Noise
Gate
The AUX IN Noise Gate function conveniently cuts
unwanted noise from the sound input via the [AUX IN]
jack. However, this may result in wanted sounds also
being cut, such as the soft decay sound of a piano. To
avoid this, set this function to OFF.
On/OFF On
f(3
Audio Loopback Determines whether audio input from the computer or
smart device (via the USB Audio Interface function,
page 63; or wireless LAN connection, page 62) is
output to a computer or a smart device or not, along
with the performance played on the instrument. To
output the audio input, set Audio Loopback to On. For
example, if you want to record the audio sound input as
well as the sound played on the instrument to a
computer or the smart device, set this to on. If you
intend to record only the sound played on the
instrument to a computer or smart device, set this to
off.
CAUTION
If you are using a DAW (digital audio workstation)
application with this instrument, set Audio Loopback to
OFF. Otherwise, a loud sound may occur, depending on
the settings of the computer or the application software.
NOTE
• The sound cannot be output to a device connected by
Bluetooth or the [AUX IN] jack.
• The playback sound of an Audio Song on this instrument is
also output to the external device when this is set to On,
while the sound is not output when this is set to OFF.
• With Audio recording on this instrument, the audio input
sound from the external device is recorded when this is set
to On, while the sound is not recorded when this is set to
OFF.
On/OFF On
f(4
Version The firmware version of this unit is shown in the
display.
(Example) version 1.00
——
Function
No.
Description Setting
range
Default
setting
TA3 TC3 SH3 SC3 Owner’s Manual
53
4
Other Important Functions (UTILITY)
Glossary of terms
f(5
Startup Mode
(Only for grand
pianos without
silencing lever)
Determines whether the Quiet mode (Qt) is enabled or
the Acoustic mode (Aco) is enabled when the power is
turned on.
Qt/Aco Qt
Term Description
Damper Noise Damper noise is the sound made on an acoustic piano when the damper pedal is pressed.
The damper noise changes in tone and volume depending on how quickly the damper pedal is
pressed down. Pressing the damper pedal slowly will make a quieter sound when the damper
heads are released from the strings. Pressing the damper pedal with force will transmit the
vibrations to the strings, which adds a lower and louder sound.
Duplex Scale Duplex scaling is a stringing method for pianos that uses extra, un-struck strings in the upper
octaves to enhance the tone. These strings sympathetically vibrate with other strings in an
acoustic piano, resonating with overtones, and adding richness, brilliance and complex color
to the sound. Since the dampers do not touch them, they will continue sounding even after you
release your hands from the keyboard.
Grand Expression Modeling On an actual acoustic piano, subtle changes in the sound can be produced by changing your
playing touch from when you press a key to when you release it. For example, when you press
a key all the way to its bottom, the key hits the keybed underneath and the noise reaches the
strings, changing the sound slightly. Furthermore, the tone when the damper is lowered onto
strings to mute the sound is changed by how quickly you release the key. Grand Expression
Modeling technology recreates these subtle changes in the sound that respond to your touch.
This allows you to add accents by playing strongly or add resonance by playing softly to
produce superbly expressive sound. A crisp tone can be heard when playing staccato as well
as a lingering sound produced when releasing the keys slowly.
VRM
(Virtual Resonance Modeling)
The VRM (Virtual Resonance Modeling) function uses sophisticated physical modeling to
simulate the actual string resonance sound that occurs when the damper pedal on a real
piano is pressed or keys are played and held. On an actual acoustic piano, if you press the
damper pedal and play a key, not only does the string of the pressed key vibrate, it also
causes other strings and the soundboard to vibrate, each influencing the rest and creating a
rich and brilliant resonance that sustains and spreads. The VRM (Virtual Resonance
Modeling) technology featured in this instrument reproduces the complicated interaction of
both string and soundboard resonance faithfully using a virtual musical instrument (physical
modeling), and makes the sound more like a real acoustic piano. Since instantaneous
resonance is made at the moment according to the state of the keyboard or pedal, you can
vary the sound expressively by changing the timing of your pressing the keys, and the timing
and depth of your pressing the pedal.
Function
No.
Description Setting
range
Default
setting
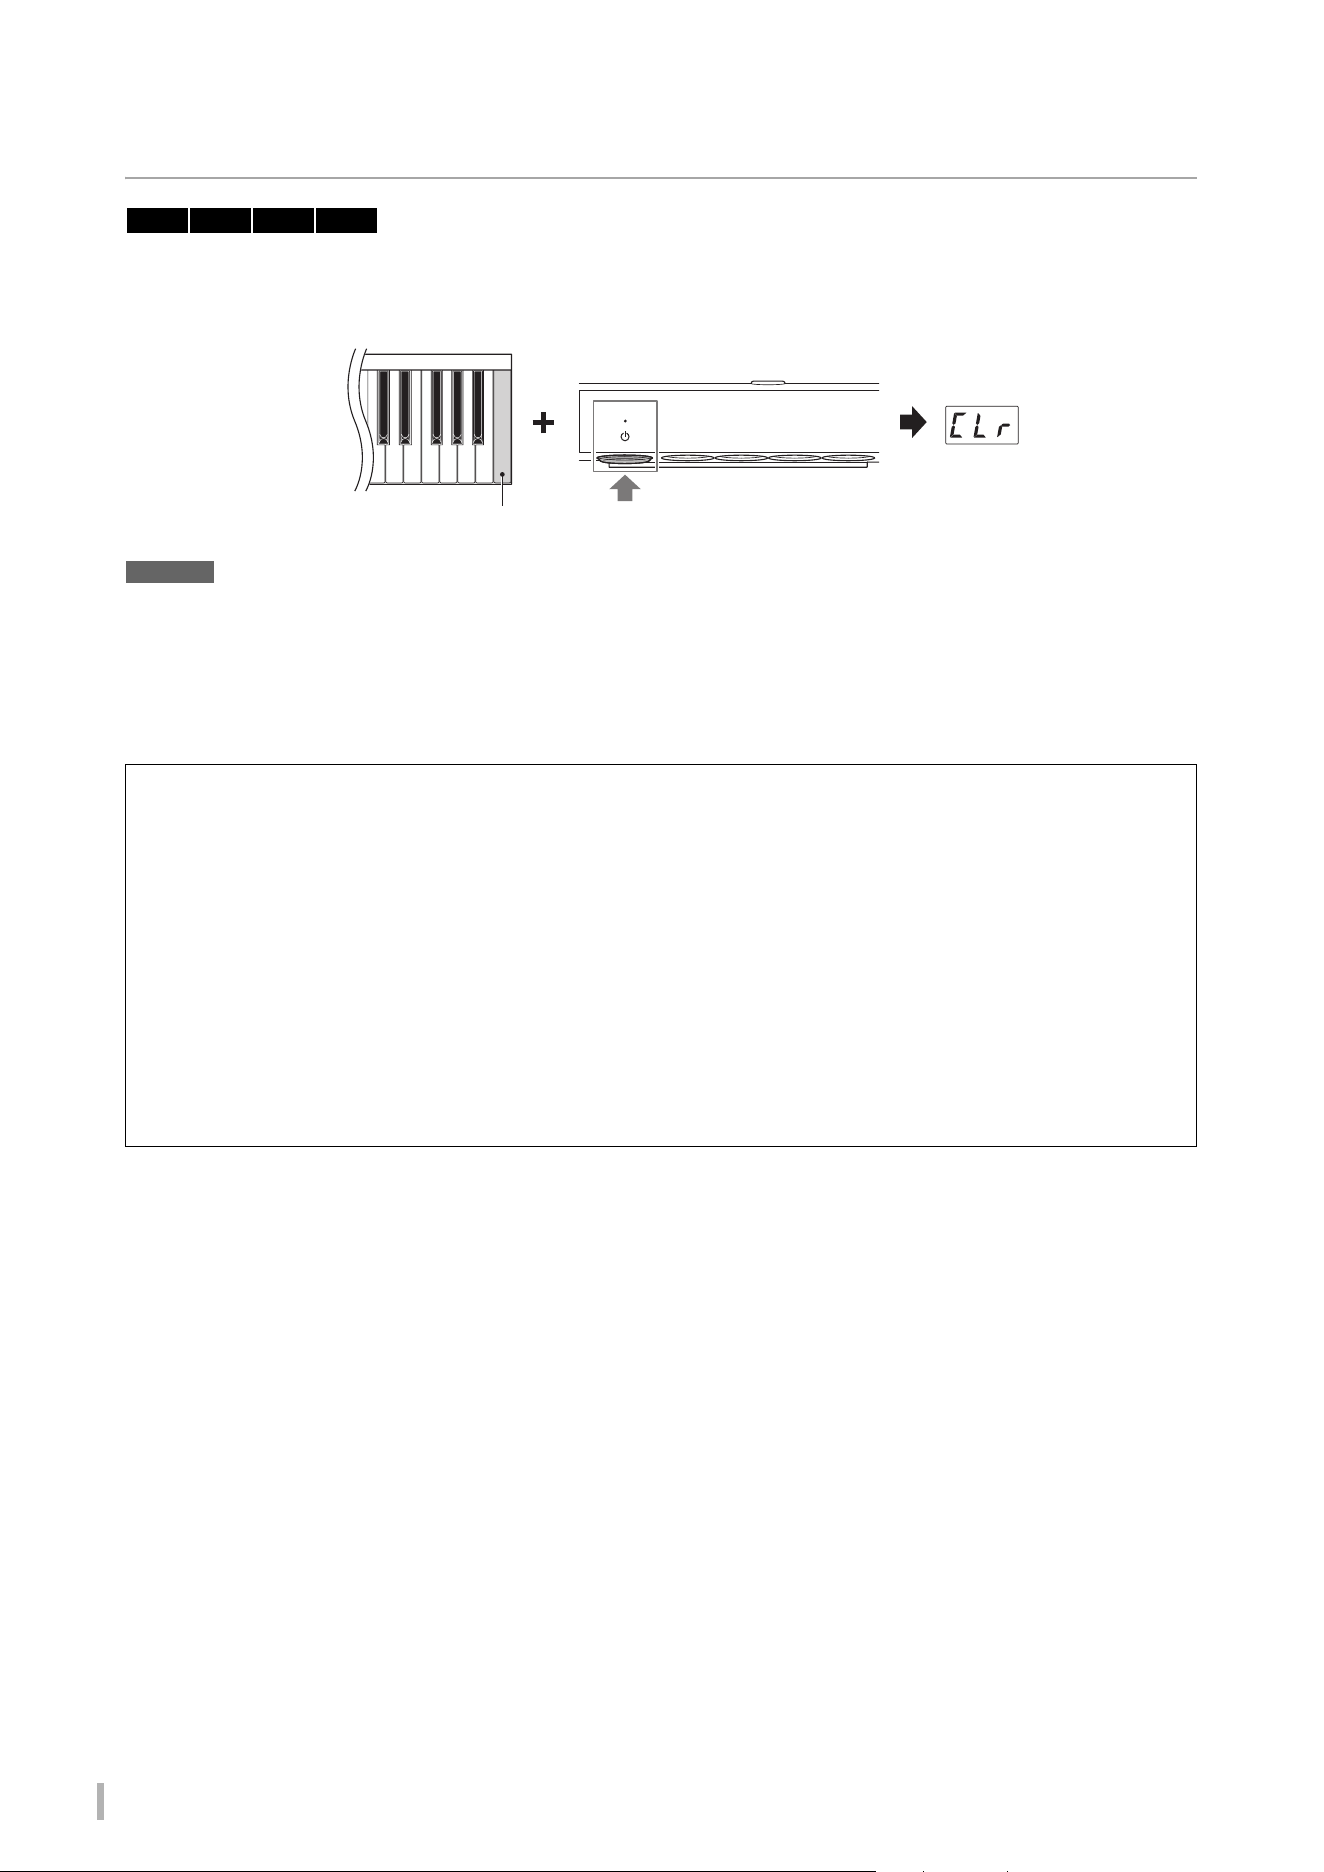
TA3 TC3 SH3 SC3 Owner’s Manual
54
Initializing the instrument (Clearing the Backup data)
While holding down the highest key (C7), turn on the power by pressing the [P] (Standby/On) switch. “CLr” appears on
the display and the Backup data (see below) will be initialized. Note that the Character Code for Song files, Bluetooth
pairing information, and User Songs are not cleared.
NOTICE
While “CLr” is shown in the display, never turn off the power. Doing so may delete the User Song, or damage the internal
memory.
NOTE
If this instrument somehow becomes disabled or malfunctions, turn off the power to the instrument, and then perform the initialization
procedure; this may remedy the situation.
Backup data
The following settings, referred to as Backup data, are automatically saved to the internal memory of this instrument.
The Backup data and the User Songs saved to the internal memory will be retained even if the power is turned off.
• Bluetooth on/off (Function F7.5)
• Auto Power Off setting (Function F8.1)
• Mode setting for grand pianos when the power is turned on (Function F8.5)
• Backup (Voice/Others) settings (Function F7.3–F7.4)
• Character code for Song files (page 37)
• Bluetooth pairing information (page 59)
• (Backed up only when the Function F7.3 is On) Voice settings
* See description of F7.3 for details
• (Backed up only when the Function F7.4 is On) Performance settings * See description of F7.4 for details
TA3 TC3 SH3 SC3
Highest key (C7)
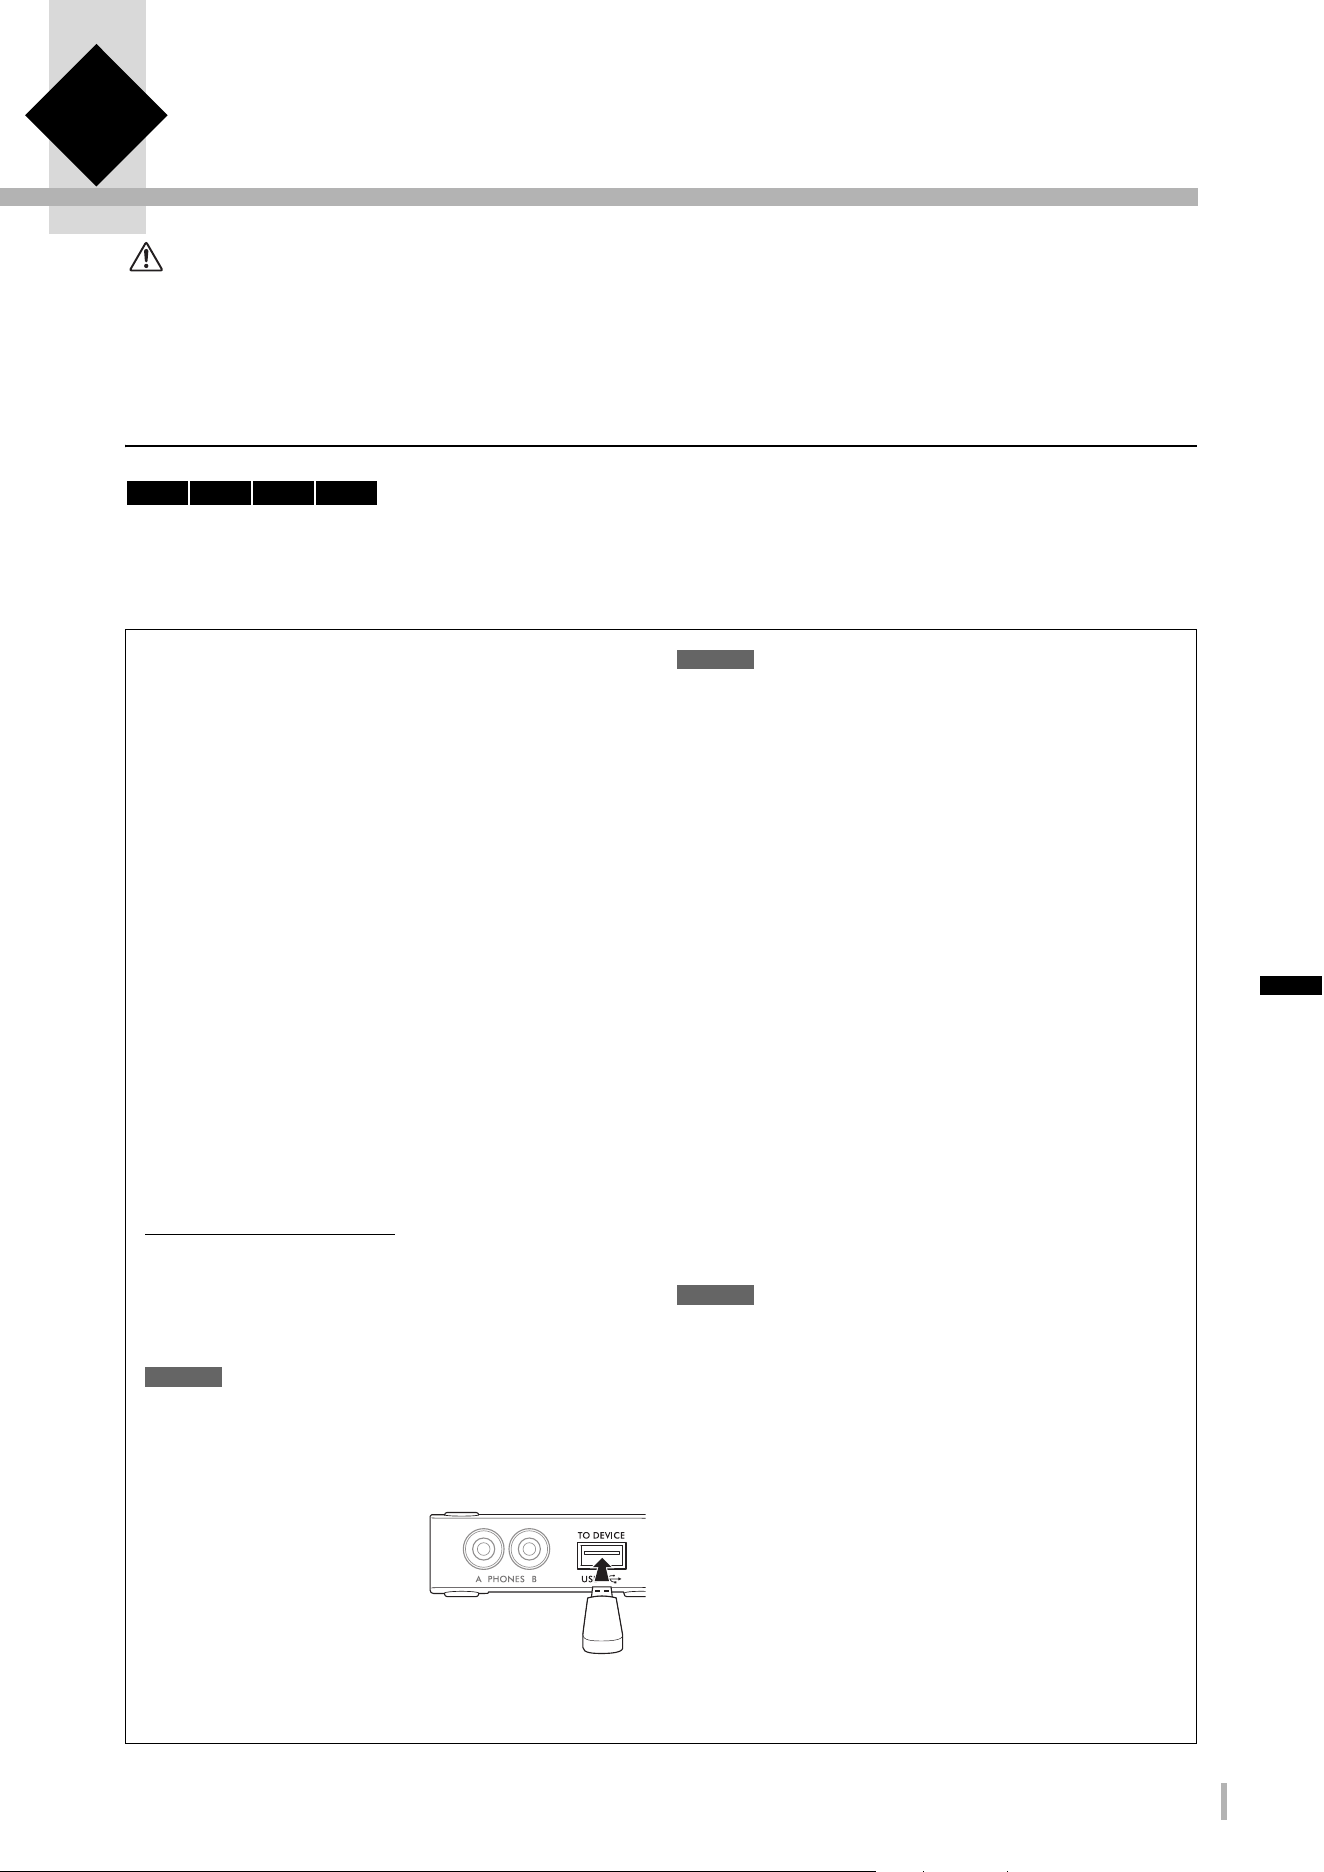
TA3 TC3 SH3 SC3 Owner’s Manual
55
5 Connecting to Other Devices
CAUTION
Before connecting the instrument to other electronic devices, turn off the power of all the devices. Also, before turning any
devices on or off, make sure to set all volume levels to minimum (0). Otherwise, damage to the devices, electrical shock, or even
permanent hearing loss may occur.
Connecting USB devices ([USB TO DEVICE] terminal)
You can connect a USB flash drive or a USB wireless LAN adaptor (sold separately) to the [USB TO DEVICE] terminal.
You can save or call up the data to/from the USB flash drive (page 24), or you can connect the instrument to a smart
device via wireless LAN (page 62).
TA3 TC3 SH3 SC3
Precautions when using the [USB TO
DEVICE] terminal
This instrument features a built-in [USB TO DEVICE]
terminal. When connecting a USB device to the terminal, be
sure to handle the USB device with care. Follow the important
precautions below.
NOTE
For more information about the handling of USB devices, refer to the
owner’s manual of the USB device.
Compatible USB devices
• USB flash drive
• USB wireless LAN adaptor UD-WL01 (sold separately; may
not be available in some areas)
Other USB devices such as a USB hub, computer keyboard or
mouse cannot be used.
The instrument does not necessarily support all commercially
available USB devices. Yamaha cannot guarantee operation of
USB devices that you purchase. Before purchasing a USB
device for use with this instrument, please visit the following
web page:
https://download.yamaha.com/
Although USB devices 2.0 or 3.0 can be used on this
instrument, the amount of time for saving to or loading from
the USB device may differ depending on the type of data or the
status of the instrument.
NOTICE
The rating of the [USB TO DEVICE] terminal is a maximum of 5V/
500mA. Do not connect USB devices having a rating above this,
since this can cause damage to the instrument itself.
Connecting a USB device
When connecting a USB device
to the [USB TO DEVICE]
terminal, make sure that the
connector on the device is
appropriate and that it is
connected in the proper
direction.
NOTICE
• Avoid connecting or disconnecting the USB device during
playback/recording and file management operations (such as
Copy, Delete and Format), or when accessing the USB device.
Failure to observe this may result in “freezing” of the operation of
the instrument or corruption of the USB device and the data.
• When connecting then disconnecting the USB device (and vice
versa), make sure to wait a few seconds between the two
operations.
• Do not use an extension cable when connecting a USB device.
Using USB Flash Drives
By connecting a USB flash drive to the [USB TO DEVICE]
terminal, you can record your performance (not including
acoustic piano sound) on this instrument to the USB flash
drive (page 29), as well as play back the data saved in the USB
flash drive (page 24).
Number of USB flash drives that can be used
Only one USB flash drive can be connected to the [USB TO
DEVICE] terminal.
Formatting a USB flash drive
You should format the USB flash drive only with this
instrument (page 56). A USB flash drive formatted on another
device may not operate properly.
NOTICE
The format operation overwrites any previously existing data. Make
sure that the USB flash drive you are formatting does not contain
important data.
To protect your data (write-protect)
To prevent important data from being inadvertently erased,
apply the write-protect provided with each USB flash drive. If
you are saving data to the USB flash drive, make sure to disable
write-protect.
Turning off the instrument
When turning off the instrument, make sure that the
instrument is NOT accessing the USB flash drive by playback/
recording or file management operations (such as during Copy,
Delete and Format). Failure to do so may corrupt the USB flash
drive and the data.
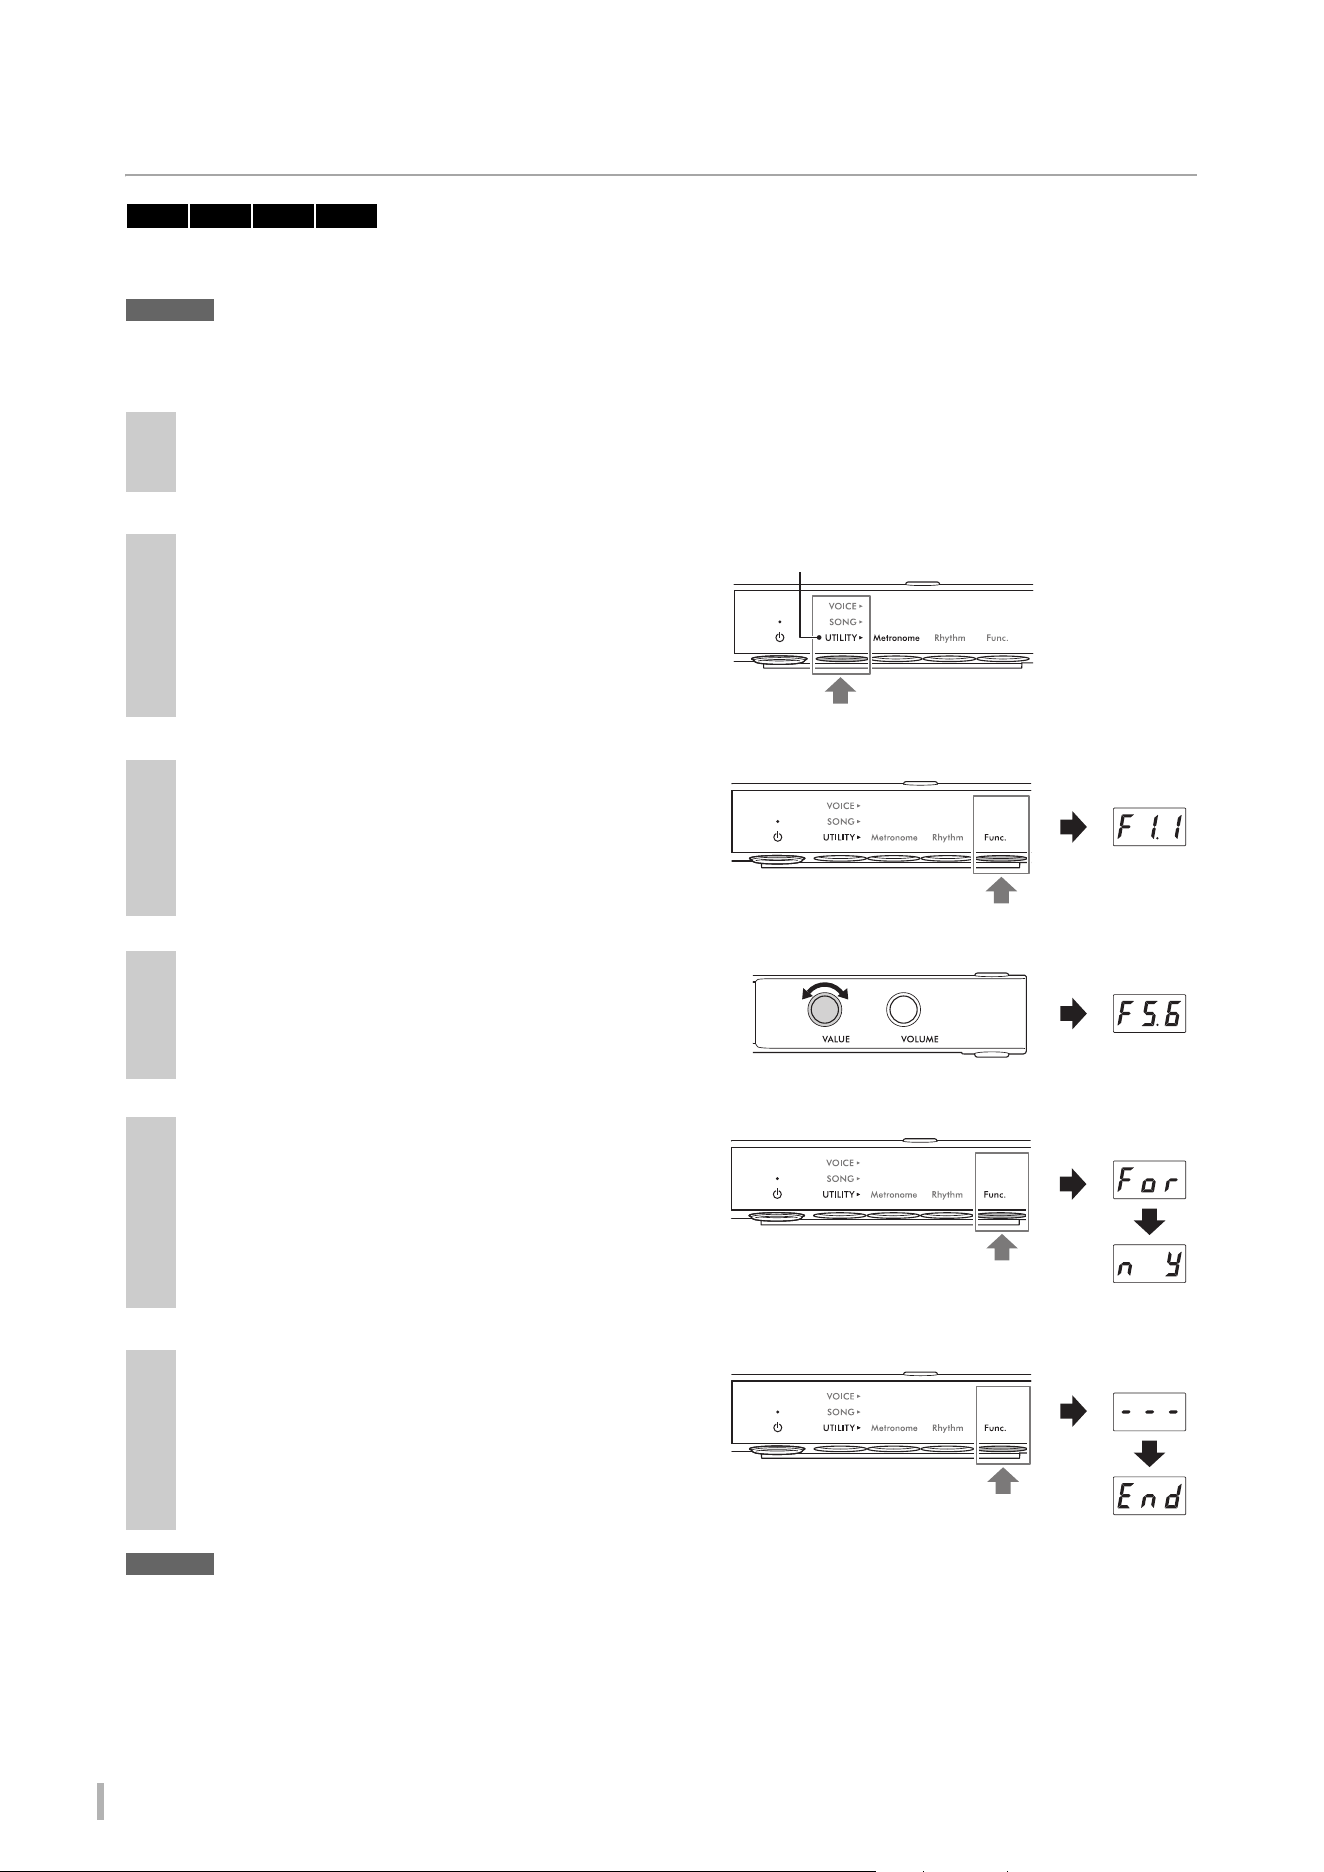
TA3 TC3 SH3 SC3 Owner’s Manual
56
Formatting a USB flash drive
When a “UnF” message appears on the display indicating that the USB flash drive has not been formatted, format the
drive by the operation below.
NOTICE
Executing the Format operation will delete all data saved in the USB flash drive. Save important data to a computer or another
storage device.
NOTICE
While dashes appear in succession on the display, never turn off the power or disconnect the USB flash drive. Doing so may
corrupt the data on the USB flash drive, and the Format operation will not be executed properly.
1
Connect a USB flash drive to the [USB TO DEVICE] terminal.
2
Press the Menu button several times until the
[UTILITY] lamp lights up in orange.
3
Press Button 3 [Func.] to call up the Function
number in the display.
4
Rotate the [VALUE] control to select “F5.6”
(Formatting a USB flash drive).
5
Press Button 3 [Func.] to call up “For”
(Format) in the display.
An “n y” message appears.
NOTE
While “n y” is shown in the display, you can cancel the Format
operation by pressing a button other than Button 3 [Func.].
6
When “n y” appears, press Button 3 [Func.]
to execute the Format operation.
Dashes appear in succession on the display, indicating
that Formatting is in progress. When the operation is
completed, “End” appears on the display.
TA3 TC3 SH3 SC3
Lights up in orange
Function
number
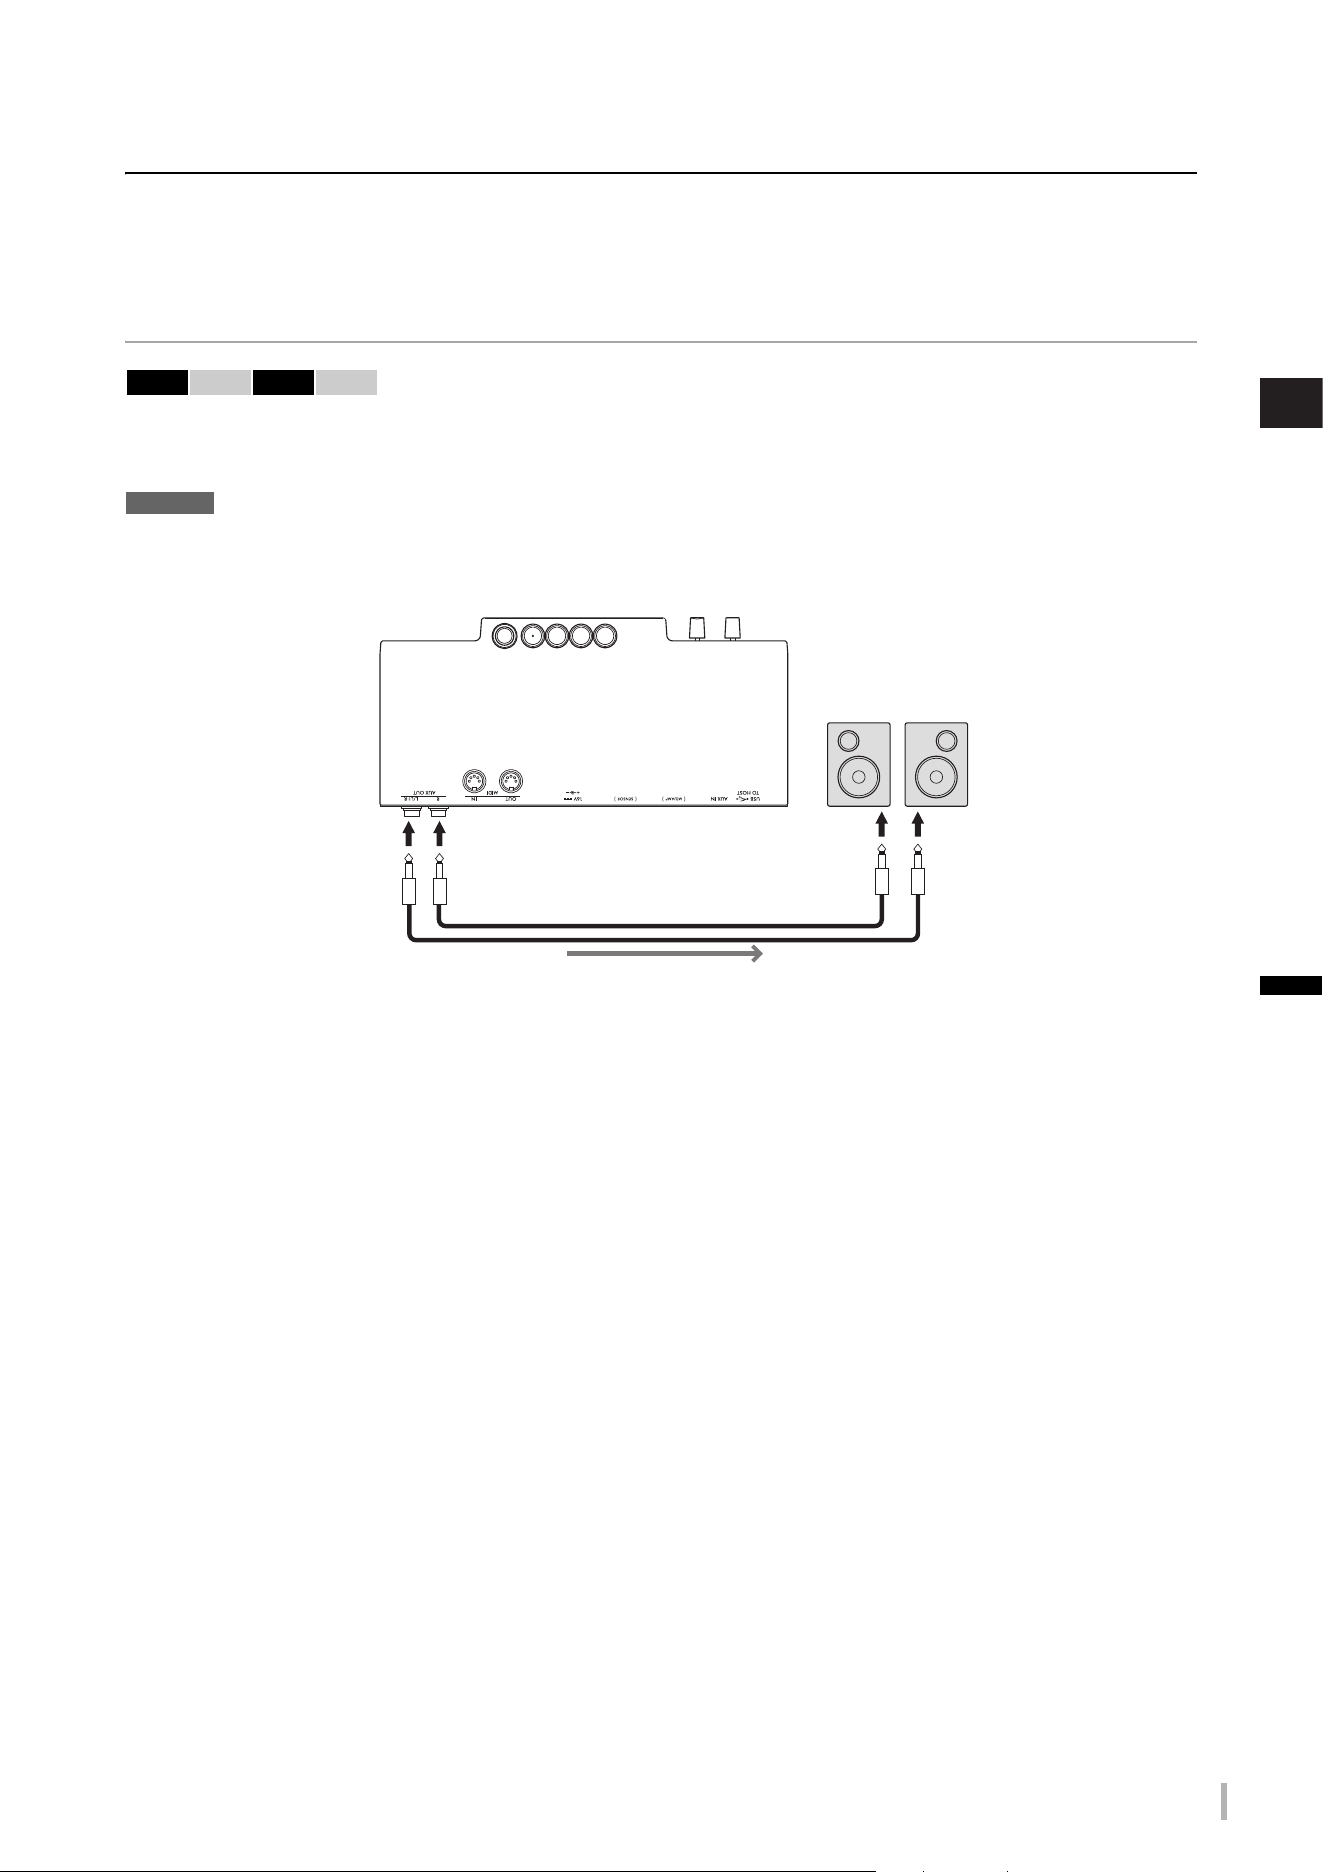
TA3 TC3 SH3 SC3 Owner’s Manual
57
5
Connecting to Other Devices
Connecting to external audio devices
Output the digital sound of the instrument to an external device
(AUX OUT jacks)
By connecting powered speakers or a stereo system to the AUX OUT [R]/[L/L+R] jacks via an audio cable, you can listen
to the performances (digital sound) played on this instrument through the external speakers. Also, if you connect an
audio recorder such as an IC recorder, you can record performances played on this instrument.
NOTICE
To avoid possible damage, first turn on the power to the instrument, and then to the external device(s). When turning off the
power, first turn off the power to the external device(s), and then to the instrument.
NOTE
• You can use the [VOLUME] control on this instrument to adjust the output volume from the AUX OUT jacks.
• The acoustic piano sound is not output from the AUX OUT jacks.
• Use only the [L/L+R] jack for connection with a monaural device.
• When you are listening to the digital sound output to the external device via the AUX OUT jacks from headphones connected to this
instrument, we recommend that you set the Binaural function to off. The on/off setting can be changed in Function F4.1 (page 49).
TA3 TC3 SH3 SC3
Example:
Control unit bottom panel
Powered speakers
AUX OUT
[R]/[L/L+R]
Stereo phone plug
(standard)
Audio cable
Audio signal
Stereo phone plug
(standard)
TA3 TC3 SH3 SC3 Owner’s Manual
58
Listening to Audio playback on an external device through this
instrument ([AUX IN] jack)
By connecting an audio player such as smartphone or portable music player to the [AUX IN] jack via an audio cable, you
can listen to the sound played on the connected audio player through this instrument. In the Quiet mode (page 18), the
sound input to the [AUX IN] jack can be heard from the headphones, while in the TransAcoustic mode (page 20) or Layer
mode (page 21), the sound is output from the soundboard.
NOTICE
• To avoid damage to the devices, first turn on the power to the external device(s), and then to the instrument. When turning off
the power, first turn off the power to the instrument, and then to the external device(s).
• Do not route the output from the AUX OUT jacks to the AUX IN jack. If you make this connection, the signal input at the [AUX
IN] jack is output from the AUX OUT jacks. These connections could result in a feedback loop that will make normal
performance impossible, and may even damage the equipment.
NOTE
• Use audio cables and adaptor plugs having no (zero) resistance.
• This instrument cuts unwanted noise from the input sound via the [AUX IN] jack. However, this may result in wanted sounds also being
cut, such as the soft decay sound of a piano. To avoid this, set the AUX IN Noise Gate function to off in Function F8.2 (page 52).
TA3 TC3 SH3 SC3
Control unit bottom panel
Audio player
[AUX IN]
Stereo mini plug
Audio cable
Audio signal
Stereo mini plug
Example:

TA3 TC3 SH3 SC3 Owner’s Manual
59
5
Connecting to Other Devices
Listening to audio data played by a Bluetooth-equipped device through
this instrument (Bluetooth Audio function)
This Bluetooth Audio function lets you listen to the audio data played on a Bluetooth-equipped device such as a smart
device (smartphone or tablet) or portable audio player through this instrument. In the Quiet mode (page 18), the sound
can be heard from the headphones, while in the TransAcoustic mode (page 20) or Layer mode (page 21), the sound is
output from the soundboard.
Before using the Bluetooth function, be sure to read “About Bluetooth” on page 8. Depending on the country in which you
purchased the product, the instrument may not have Bluetooth capability.
NOTE
In this manual, “Bluetooth-equipped device” refers to a device that can transmit audio data on it to the instrument using the Bluetooth
function, via wireless communication. For proper operation, the device must be compatible with A2DP (Advanced Audio Distribution
Profile). The Bluetooth Audio function is explained here by using a smart device as an example of such Bluetooth-equipped devices.
This instrument cannot transmit audio data to devices via Bluetooth. Thus, any Bluetooth headphones and Bluetooth speakers cannot be
connected.
1
Press the Menu button several times until the
[UTILITY] lamp lights up in orange.
2
Hold down Button 3 [Func.] for two seconds
to put pairing in standby.
The Bluetooth lamp will flash in blue and a “bt” message
will appear on the display.
NOTE
• “Pairing” means to register Bluetooth-equipped devices on this
instrument, and establish mutual recognition for wireless
communication between the two.
• The Bluetooth function of the instrument should be on (the Bluetooth lamp should light up in white) to start pairing. It is set to on
by default. The Bluetooth function can be turned on/off in Function F7.5 (page 51). The Bluetooth lamp lights up when UTILITY
is selected and turns off when VOICE or SONG is selected.
• Only one Bluetooth-equipped device can be connected to this instrument at a time (although up to 8 Bluetooth-equipped
devices can be paired to this instrument). When pairing with the 9th Bluetooth-equipped device has succeeded, pairing data for
the device with the oldest connection date will be deleted.
• The pairing operation can also be done by Function F7.6 (page 52). After enabling pairing, go on to step 3 here.
• To cancel pairing, press Button 3 [Func.] while “bt” is shown in the display.
Bluetooth Audio
Bluetooth-equipped device
Lights up in orange
Hold down for
two seconds
Bluetooth lamp
flashes in blue

TA3 TC3 SH3 SC3 Owner’s Manual
60
3
On the Bluetooth-equipped device, set the Bluetooth function to on and select “YAMAHA
*** AUDIO” (*** indicates the model name) from the connection list.
For details, refer to the Bluetooth-equipped device’s manual. After pairing is completed, the Bluetooth lamp will
light up in blue and the “bt” message will disappear.
NOTE
• Make sure to complete the settings on the Bluetooth-equipped device within 5 minutes. After 5 minutes elapses, the pairing
standby status is canceled automatically.
• If you are required to enter a passkey, enter the numerals “0000.”
4
Play back audio data on the Bluetooth-equipped device to confirm that the sound can be
output from this instrument.
When you turn on the instrument the next time, the Bluetooth-equipped device will be connected to this
instrument automatically, if the Bluetooth function of the device and the instrument is set to on. If it is not
connected automatically, select the model name of the instrument from the connection list on the device.
NOTE
You can adjust the volume of the sound input via Bluetooth by the [VOLUME] control on this instrument. To adjust the volume
balance between your keyboard performance and the input sound via Bluetooth, adjust the volume on the Bluetooth-equipped
device.

TA3 TC3 SH3 SC3 Owner’s Manual
61
5
Connecting to Other Devices
Connecting with the smart device app “Smart Pianist”
By connecting a smart device such as a smartphone or tablet and using the Smart Pianist app, you can view the score of
the preset Songs on the smart device, record your performance to the smart device, and perform other convenient
operations. The intuitive visual interface helps you to confirm the current settings of the instrument.
For details on the app and compatible devices, see the website below or search “Yamaha Smart
Pianist” on a web search engine.
https://www.yamaha.com/kbdapps/
After installing the Smart Pianist app on your smart device, connect this instrument to the device
via USB cables, Bluetooth or Wi-Fi.
NOTICE
• All settings on the instrument are replaced by the settings on Smart Pianist when the instrument is connected with Smart
Pianist.
• Do not place the smart device in an unstable position. Doing so may cause the device to fall and result in damage.
Connecting via USB cables
You can connect a smart device to the [USB TO HOST] terminal by using USB cables. For details on connection, refer to
the “Smart Pianist User Guide” on the website (page 11).
NOTICE
Use an AB type USB cable of less than 3 meters. USB 3.0 cables cannot be used.
Connecting via Bluetooth
Before using the Bluetooth function, be sure to read “About Bluetooth” on page 8. Depending on the country in which you
purchased the product, the instrument does not have Bluetooth capability.
NOTE
• To connect via Bluetooth, make sure that the Bluetooth function is turned on (Bluetooth lamp is lit). It is set to on by default. The
Bluetooth on/off setting can be changed in Function F7.5 (page 51).
• This instrument cannot transmit audio data to the smart devices via Bluetooth. Thus, when the device is connected by Bluetooth, you
cannot record in audio format by using Smart Pianist. If you want to record while Bluetooth connection is enabled, record in MIDI format.
You can record in audio format when the instrument is connected to the smart device in a method other than Bluetooth.
1
Make the Bluetooth Audio function settings on this instrument to receive audio data
(page 59).
2
Connect with the smart device via Bluetooth MIDI by using Smart Pianist.
For details on connection, refer to the “Smart Pianist User Guide” on the website (page 11). When the connection
is successful, the MIDI data can be transmitted/received between the instrument and the smart device.
TA3 TC3 SH3 SC3
TA3 TC3 SH3 SC3 Owner’s Manual
62
Connecting via Wi-Fi (wireless LAN)
For Wi-Fi connection, a separately sold USB wireless LAN adaptor (UD-WL01) is required. The UD-WL01 may not be
available depending on your area. Before connecting the USB wireless LAN adaptor, be sure to read “Connecting USB
devices” on page 55.
NOTICE
Do not connect this product to a public Wi-Fi and/or Internet service directly. Only connect this product to the Internet through a
router with strong password protections. Consult your router manufacturer for information on optimum security practices.
There are two types of connections via Wi-Fi as described below. For details on connection, refer to the “Smart Pianist
User Guide” on the website (page 11).
Connecting by the Access Point mode
The Access Point mode allows you to directly connect the USB wireless LAN adaptor and a smart device, without the
need for using an access point. You can use this mode when there is not any access point available for connection to the
instrument, or when it is unnecessary to connect to another network while a smart device is connected to the instrument.
When connected by this mode, Internet access is disabled on your smart device, and some functions of Smart Pianist
cannot be used.
If you switch from the Infrastructure mode to the Access Point mode, initialize the instrument (page 54) before
connecting.
Connecting by the Infrastructure mode (automatic setup by WPS)
The Infrastructure mode uses an access point for data communication between a USB wireless LAN adaptor and a
network. You can use this mode when you connect to another network while a smart device is connected to the
instrument.
When a message as shown at right appear on the display of this instrument during the connection
procedure, press the WPS button on your access point within two minutes.
NOTE
An “access point” refers to a device which acts as a base station when data is transmitted/received via a USB wireless LAN adaptor.
Some access points are combined with router or modem functions.
USB wireless LAN adaptor
(UD-WL01)
Wireless LAN
Smart device
TA3 TC3 SH3 SC3 Owner’s Manual
63
5
Connecting to Other Devices
Connecting to a computer ([USB TO HOST] terminal)
By connecting a computer to the [USB TO HOST] terminal via a USB cable, you can transfer MIDI data or Audio data
between the instrument and the computer. For details on using a computer with this instrument, refer to the “Computer-
related Operations” on the website (page 11).
CAUTION
If you are using a DAW (digital audio workstation) application with this instrument, set Audio Loopback (page 64) to off.
Otherwise, a loud sound may occur, depending on the settings of the computer or the application software.
NOTICE
• Use an AB type USB cable of less than 3 meters. USB 3.0 cables cannot be used.
• Do not place your computer in an unstable position. Doing so may cause the device to fall and result in damage.
NOTE
• When using a USB cable to connect the instrument to your computer, make the connection directly without passing through a USB hub.
• The instrument will begin transmission a short time after the computer is connected.
• For information on setting up your computer and/or software, refer to the relevant documentation.
• Unexpected sounds may occur if you edit MIDI data related to the Grand Expression Modeling function (page 53) on a computer.
Transmitting/receiving audio data (USB Audio Interface function)
By connecting a computer or a smart device to the [USB TO HOST] terminal via a USB cable, digital audio data can be
transmitted/received. This USB Audio Interface function provides the following advantages:
• Playing back audio data input from the computer with high sound quality on this instrument
This gives you direct, clear sound in which the sound quality has less noise and deterioration than that from the [AUX
IN] jack.
• Recording digital sound played on this instrument as audio data by using recording software or
music production software on the computer
The recorded audio data can be played back on the computer or smart device.
NOTE
• When transmitting or receiving audio signals by using a computer running Windows, the Yamaha Steinberg USB Driver should be
installed to the computer. For details, refer to the “Computer-related Operations” on the website (page 11).
• The volume of the audio sound input can be adjusted from a computer or smart device.
TA3 TC3 SH3 SC3
Control unit bottom panel
USB terminal
[USB TO HOST]
USB cable
Computer
Example:
TA3 TC3 SH3 SC3 Owner’s Manual
64
Turning Audio L oopback on/off
The Audio Loopback function allows you to set whether audio input from the computer or smart device by the USB
Audio Interface function (page 63) or by Smart Pianist with Wi-Fi connection (page 62), is output to a computer or a
smart device or not along with the performance played on the instrument. To output the audio input, set the Audio
Loopback to on. For example, if you want to record the audio input sound as well as the sound played on the instrument
by using the connected computer or smart device, set this to on. If you intend to record only the sound played on the
instrument by using the computer or smart device, set this to off. This function is set to on by default. The on/off setting
can be changed in the Function F8.3 (page 52).
Connecting to a MIDI device (MIDI terminals)
By connecting a MIDI device, you can control an external MIDI device from this instrument or vice versa. Use the MIDI
terminals and standard MIDI cables to connect external MIDI devices (keyboard, synthesizer, sequencer, etc.).
• MIDI [IN]: Receives MIDI messages from another MIDI device.
• MIDI [OUT]: Transmits MIDI messages generated on this instrument to another MIDI device.
NOTE
• For details about MIDI, refer to the “MIDI Basics” document, downloadable from the website (page 11).
• Since MIDI data that can be transmitted or received varies depending on the type of MIDI device, check the “MIDI Reference” on the
website (page 11) to find out what MIDI data and commands your devices can transmit or receive.
• Voice Demo Song data and Preset Song data cannot be transmitted.
• When the instrument is connected to Smart Pianist, MIDI messages cannot be output from the MIDI [OUT] terminal.
• When transmitting MIDI data from this instrument to an external MIDI device, unexpected sounds may occur because of data related to
the Grand Expression Modeling function (page 53).
TA3 TC3 SH3 SC3
MIDI [OUT]
MIDI IN
MIDI [IN]
MIDI OUT
Control unit bottom panel
MIDI transmit
MIDI cable
External MIDI device
MIDI receive
Example:
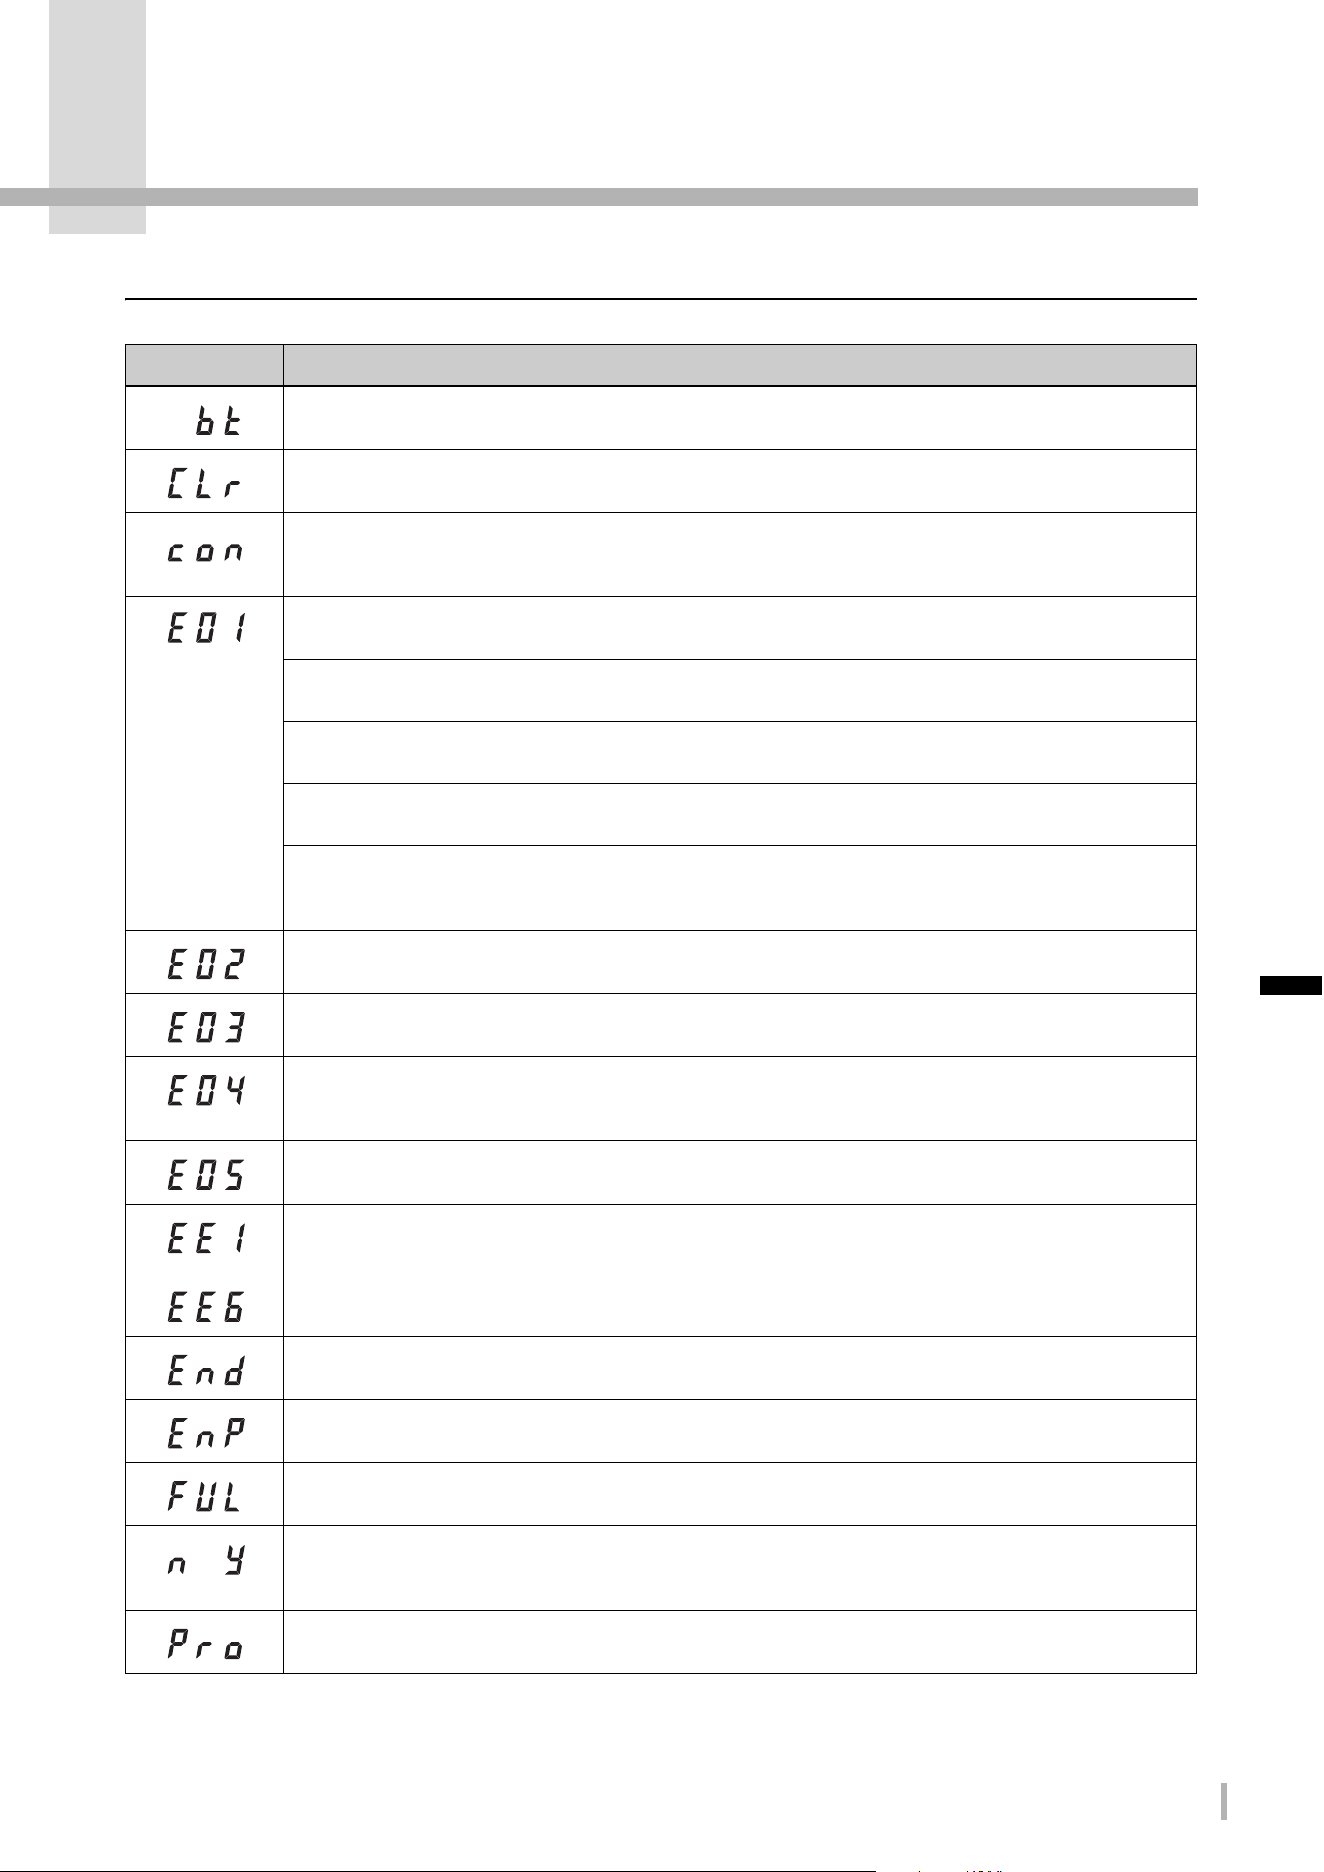
TA3 TC3 SH3 SC3 Owner’s Manual
65
Appendix
Message List
Message Description
The instrument is standing by for Bluetooth pairing (page 59). While this message is shown, you cannot operate
the instrument.
The instrument is being initialized (page 54). Do not turn the power off while this message is shown.
The instrument is connected to a smart device and the app “Smart Pianist” is being used (page 61). While this
message is shown, control the instrument by using Smart Pianist. To disconnect, close Smart Pianist on the smart
device.
The Character Code setting (page 37) is not appropriate for the file name of the Song which you are selecting.
Change the Character Code setting.
The data format is not compatible with this instrument, or the data has some other problems. This Song cannot be
selected.
The memory or the number of the files in the copy destination USB flash drive is full. Delete any unnecessary
Songs or files in the USB flash drive (page 35).
The Song you have selected cannot be copied or deleted on this instrument. Copy or delete these types of Songs
on a computer.
No USB flash drive can be found, or a problem has occurred in the USB flash drive. Disconnect and connect the
USB flash drive again, and then execute the operation again. If this message appears repeatedly even when there
aren’t any other likely problems, the USB flash drive may be damaged.
Indicates that the USB flash drive is write-protected. Disable write-protect before using.
The memory of the USB flash drive has become full, or the number of files and folders exceeds the system limit.
Audio Song playback or recording has failed. If you are using a USB flash drive to which data has already been
stored or deleted a number of times, first make sure that the USB flash drive does not contain important data, and
then format it (page 56) to use it on this instrument.
The surrounding temperature is too high for playing the instrument in the TransAcoustic mode. Lower the
temperature of the room where the instrument is placed.
–
A malfunction has occurred in the instrument. Contact your nearest Yamaha dealer or authorized distributor.
The operation has been completed.
The available memory of the instrument or the USB flash drive is at a low level. We recommend that you remove
any unnecessary User Songs (page 35) to ensure sufficient memory capacity before starting to record.
The operation could not be completed because the available memory of the instrument or the USB flash drive is
nearly empty. If this message is shown while recording, your performance data may not be correctly saved.
This is a confirmation prompt asking if you are sure you want to delete the User Song (page 35) or format the USB
flash drive (page 56). Press Button 3 [Func.] to execute. Pressing a button other than Button 3 [Func.] cancels the
operation.
The selected Song is a read-only file and cannot be deleted or overwritten.
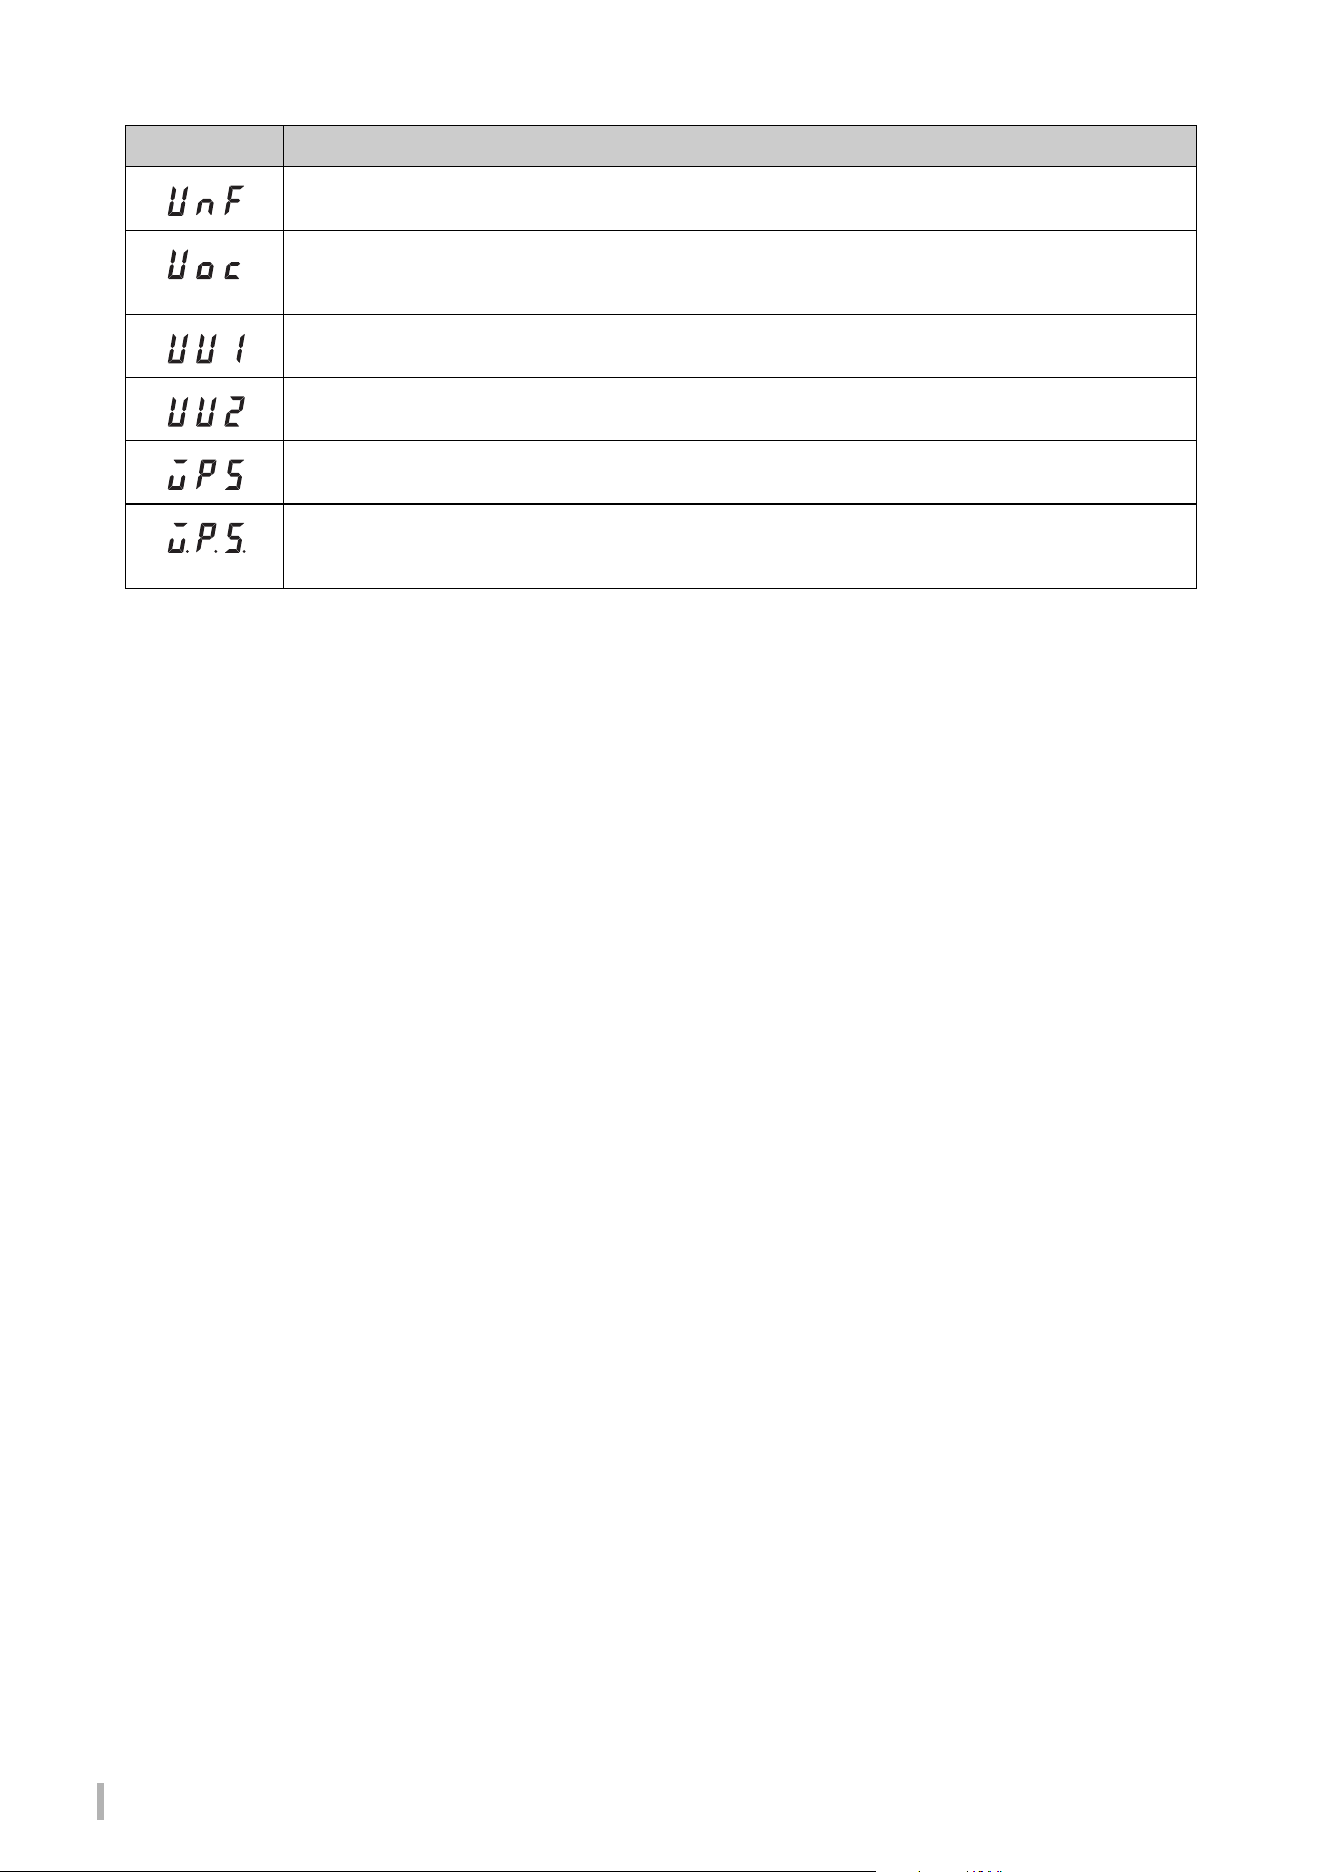
TA3 TC3 SH3 SC3 Owner’s Manual
66
* When an operation (such as saving or data transfer) is in progress, the display shows a sequence of flashing dashes.
* Press any button to exit from these message displays.
An unformatted USB flash drive is connected. First make sure that the USB flash drive does not contain important
data, and then format it (page 56).
Communication with the USB flash drive has been shut down because of overcurrent to the USB flash drive.
Disconnect the USB flash drive from the [USB TO DEVICE] terminal, and then turn on the power of the instrument
again.
Communication with the USB flash drive has failed. Remove the USB flash drive and make the connection again.
If the message appears even when the USB flash drive is connected properly, try using another USB flash drive.
This USB flash drive is not supported on this instrument, or too many USB flash drives may have been connected.
Refer to “Using USB Flash Drives” (page 55) for information on the USB flash drive connection.
The instrument is in standby for connection to an access point by WPS (page 62). While this message is shown,
you cannot operate the instrument.
A malfunction occurred in the instrument while it was standing by for connection to an access point by WPS
(page 62). Reconnect the USB wireless LAN adaptor (UD-WL01; sold separately) to the instrument and try to
connect to the access point by WPS again.
Message Description
TA3 TC3 SH3 SC3 Owner’s Manual
67
Appendix
Troubleshooting
If you have problems with the unit, here are a few troubleshooting tips. If you cannot solve the problem easily yourself,
consult your Yamaha piano dealer. DO NOT attempt to repair the instrument yourself.
When a message is shown in the display, check the Message List on page 65.
Problem Possible Cause and Solution
The power does not turn on. The AC adaptor and power cord may not be plugged in correctly. Make sure that the plugs are
securely inserted (page 14).
The power is automatically turned off. This is normal and due to the Auto Power Off function. If necessary, disable the Auto Power Off
function (page 16).
The overall volume is low, or no
sound is heard.
The volume is set too low; set it to an appropriate level using the [MASTER VOLUME] control
(pages 19, 21).
The Voice is set to “---.” Select a Voice other than “---” (page 22).
Local Control is set to off. Set Local Control to on in Function F7.2 (page 51).
The acoustic piano sound can be
heard even when playing not in the
Acoustic mode.
Playing with extreme force may result in acoustic piano sound being emitted. Moderate the
strength of your playing.
The balance or volume varies
between the included headphones
and commercially available
headphones.
Headphone properties differ depending on their type, so different headphones may have
different balance or volume characteristics. Use the same type of headphones for optimum
performance.
A rattling sound from the piano body
can be heard when playing in the
Quiet mode/ TransAcoustic mode.
This is not a fault. It is the sound of the acoustic piano’s keystroke.
When playing a rapid series of notes
in the Quiet mode/TransAcoustic
mode/Layer mode, a sound louder
than expected (considering playing
strength) occurs.
This is not a fault. The structure of the TransAcoustic™ Piano or the Silent Piano™ causes
this to occur in some cases.
Rhythm does not start. The Synchro Start function is set to on. Pressing any key starts Rhythm playback. The
Synchro Start function can be turned on/off in Function F6.5 (page 51).
Metronome, MIDI Song or Rhythm
goes out of tempo slightly when you
play the keyboard.
This occurs infrequently when Grand Expression Modeling is set to “Dynamic.” If this happens,
set Grand Expression Modeling to “Static” in Function F2.7 (page 46).
No Reverb effect is applied to the
sound even when it is turned on.
The Reverb Depth may be set to minimum. Adjust the Reverb Depth in Function F1.2
(page 45).
(Only on the TA3/TC3) When the [TA] lamp is lit (when in the TransAcoustic mode or Layer
mode), the Reverb effect is automatically turned off and no effect is applied.
The sound lingers excessively. The Reverb Depth (Function F1.2) or the Damper Resonance (Function F2.2) may be set to an
excessive level. Set these parameters to an appropriate levels (pages 45, 46).
Noise is heard from the instrument. The noise may be due to interference caused by the use of a mobile phone in close proximity
to the instrument. Turn off the mobile phone, or use it further away from the instrument.
The noise may be due to interference caused by the use of a smart device phone in close
proximity to the instrument. When you connect a smart device with the instrument wirelessly,
we recommend that you set that device’s “Airplane Mode” to on and then the Wi-Fi/Bluetooth
setting to on on your smart device, in order to avoid noise caused by communication.
The pitch of this instrument is
different from that of other
instruments.
The pitch is different depending on the instrument. You can adjust the pitch of this instrument
in Function F3.4 (page 47) to match that of other instruments.
TA3 TC3 SH3 SC3 Owner’s Manual
68
The Bluetooth-equipped device (such
as smart device) cannot be
connected to the instrument.
The Bluetooth function is turned off on this instrument or on the Bluetooth-equipped device.
Make sure that the Bluetooth function is turned on both devices. The Bluetooth on/off of this
instrument can be set in Function F7.5 (page 51).
The Bluetooth-equipped device is not paired with this instrument. The device and this
instrument need to be paired to each other (page 59).
This instrument and the Bluetooth-equipped device are too far apart. Use the device in close
proximity to this instrument.
There is a device (microwave oven, wireless LAN device, etc.) that outputs signals in the
2.4 GHz frequency band nearby. Move the instrument away from any devices that might be
emitting radio-frequency signals.
Sound input via Bluetooth is
interrupted.
The output volume of the Bluetooth-equipped device connected to this instrument is too low,
resulting in the sound being cut off via the Noise Gate after it is input to this instrument.
Increase the output volume of the device. The volume level reproduced via this instrument can
be adjusted by using the [VOLUME] control.
Sound input to the [AUX IN] jacks is
interrupted.
The output volume of the external device connected to the [AUX IN] jack is too low. Increase
the output volume of the external device. The volume level reproduced via this instrument can
be adjusted by using the [VOLUME] control. The AUX IN Noise Gate function may cut off
wanted soft sounds; if this happens, set the function to off in Function F8.2 (page 52).
Problem Possible Cause and Solution
TA3 TC3 SH3 SC3 Owner’s Manual
69
Appendix
Voice List
The cells marked by “” indicate the available characteristics (explained below) for the Voice.
• Stereo Sampling: Stereo sampling is used for the Voice.
• Touch Sensitivity: The volume responds to your playing strength.
• Key-off Sampling: The key-off sound (the subtle sound that occurs when you release a key) is sampled for the Voice.
NOTE
• VRM is effective for Voices in the “Piano” category. For details about VRM, refer to page 53.
• Grand Expression Modeling is effective for the Voices of “CFX Grand” and “Bösendorfer.” For details about Grand Expression Modeling,
refer to page 53.
Voice Number
Voice Name Description
Touch
Sensi-
tivity
Stereo
Sam-
pling
Key-off
Sam-
pling
TA3/SH3 TC3/SC3
Piano
pf1 pf1
CFX Grand Yamaha’s CFX concert grand piano sound with a wide
dynamic range for maximum expressive control.
Suitable for playing in any music genre and style. This
is available when the Binaural setting is turned off
(page 49).
Binaural CFX
Grand
Yamaha’s CFX concert grand piano sound sampled by
Binaural Sampling, the method optimized for
headphone use. Listening to this through headphones
gives the impression of being immersed in the sound,
as if it was actually emanating from the piano. This is
available when the Binaural setting is turned on
(page 49).
pf2 pf2
Bösendorfer The famed sound of the Vienna-made Bösendorfer
Imperial concert grand piano. Its warm, spacious
sound evokes the size of the instrument, and is ideal
for expressing tenderness in compositions. This is
available when the Binaural setting is turned off
(page 49).
Binaural
Bösendorfer
The famed sound of the Vienna-made Bösendorfer
Imperial concert grand piano sampled by Binaural
Sampling, the method optimized for headphone use.
Listening to this through headphones gives the
impression of being immersed in the sound, as if it was
actually emanating from the piano. This is available
when the Binaural setting is turned on (page 49).
pf3
— Pop Grand A slightly brighter piano sound. Good for popular
styles.
pf4
— Ballad Grand Grand piano sound with a soft and warm tone. Good for
playing ballads.
pf5 pf3
Upright Piano The sound sampled from an upright piano, the Yamaha
SU7. Enjoy the unique tonal character and a lighter,
more casual feel.
—
TA3 TC3 SH3 SC3 Owner’s Manual
70
Fortepiano
fp1
— Scarlatti Piano The sound of a piano made by a musical instrument
maker in Florence in the early 18th century. The maker
is famous for inventing the piano. It is believed that
Scarlatti used the piano made by the maker. The sound
is bright and brilliant.
fp2
— Mozart Piano The sound of a piano made by a musical instrument
maker in Vienna in the late 18th century. Mozart and
Beethoven played and highly appreciated the pianos
made by this manufacturer. Its sound is clear and light.
—
fp3
—Beethoven
Piano
The sound of a piano made by a piano manufacturer in
London in the early 19th century. Haydn and
Beethoven composed many masterpieces inspired by
the pianos of this manufacturer. It features a rich bass,
sparkling highs and energetic fortissimo.
fp4
— Chopin Piano The sound of a piano made by a piano manufacturer in
Paris in the 19th century. Chopin deeply loved the
pianos of this manufacturer, which responded well to
his sensitive touch. It has a sound like a singing voice,
sometimes luscious, sometimes mournful.
—
E.Piano
ep1 ep1
Stage E.Piano The sound of an electric piano using hammer-struck
metallic “tines.” Soft tone when played lightly, and an
aggressive tone when played hard.
—
ep2 ep2
DX E.Piano An electronic piano sound produced by an FM
synthesizer. The tone changes as you vary your
playing touch. Ideal for popular music.
——
ep3 ep3
Vintage EP The sound of an electric piano using hammer-struck
metal reeds. Widely used in rock and popular music.
—
Harpsichord
hs1 hs1
Harpsichord 8' The sound of the harpsichord frequently used in
baroque music. Variations in playing touch will not
affect the volume, and a characteristic sound will be
heard when you release the key.
—
hs2
— Harpsi. 8'+4' A harpsichord with an added upper octave. Produces a
more brilliant sound.
—
hs3
— Vibraphone A Vibraphone sound with spacious and clear tone.
Pressing the left pedal switches Vibrato on and off.
—
hs4 hs2
Celesta The sound of a celesta (a percussion instrument in
which hammers strike metallic bars to produce sound).
This instrument is well-known for its use in “Dance of
the Sugar-plum Fairies” from Tchaikovsky’s
“Nutcracker Suite.”
—
Voice Number
Voice Name Description
Touch
Sensi-
tivity
Stereo
Sam-
pling
Key-off
Sam-
pling
TA3/SH3 TC3/SC3
TA3 TC3 SH3 SC3 Owner’s Manual
71
Appendix
Organ
0r1 0r1
Organ Principal This Voice features the combination of pipes (8'+4'+2')
of a principal (brass instrument) organ. It is suitable for
Baroque church music.
— —
0r2
— Organ Tutti This Voice features a full coupler of a pipe organ,
famous for the sound used in “Toccata and Fugue” by
Bach.
— —
0r3 0r2
Jazz Organ The sound of an electric organ often heard in jazz and
rock idioms. Pressing the left pedal switches the speed
of Rotary Speaker effect between slow and fast.
———
Pad
pd1 pd1
Strings The sound of large-scale strings ensemble, with a slow
attack.
—
pd2
— Choir A big, spacious choir Voice. Perfect for creating rich
harmonies in slow pieces.
—
pd3 pd2
Synth Pad A warm, mellow, and spacious synth sound. ——
Layer
ly1
— Piano + Strings Combination of piano and strings ensemble Voices,
giving you a richly textured sound as if you were
playing the piano with orchestral accompaniment.
ly2
— Piano + Pad Combination of piano and Synth Pad Voices.
ly3
— Piano +
DX E.Piano
Combination of piano and DX E. Piano Voices.
Voice Number
Voice Name Description
Touch
Sensi-
tivity
Stereo
Sam-
pling
Key-off
Sam-
pling
TA3/SH3 TC3/SC3
TA3 TC3 SH3 SC3 Owner’s Manual
72
Song List
Voice Demo Songs
Song No.
Voice Name Song Name Composer
TA3/SH3 TC3/SC3
D01 D01
CFX Grand
(Binaural CFX Grand)
24 Preludes Vivace C-Dur A. Scriabin
D02 D02
Bösendorfer
(Binaural Bösendorfer)
Widmung, S. 566, R. 253 F. Liszt
D03
— Pop Grand Original —
D04
— Ballad Grand Original —
D05 D03
Upright Piano Italienisches Konzert, BWV.971-1 1st mov. J. S. Bach
D06
— Scarlatti Piano Sonata G dur K.14 L.387 D. Scarlatti
D07
— Mozart Piano Sontata No.15 C dur K.545 1st mov. W. A. Mozart
D08
— Beethoven Piano Für Elise a moll L. v. Beethoven
D09
— Chopin Piano Nocturne op.27-2 Des dur F. F. Chopin
D10 D04
Stage E.Piano Original —
D11 D05
DX E.Piano Original —
D12 D06
Vintage EP Original —
D13 D07
Harpsichord 8' Concerto a cembalo obbligato, 2 violini, viola e
continuo No.7 g moll BWV 1058 1st mov.
J. S. Bach
D14
— Harpsi. 8'+4' Gigue, French Suite No. 5, BWV 816 J. S. Bach
D15
— Vibraphone Original —
D16 D08
Celesta Dance of the Sugar Plum Fairy P. I. Tchaikovsky
D17 D09
Organ Principal Herr Christ, der ein'ge Gottes-Sohn, BWV 601 J. S. Bach
D18
— Organ Tutti Original —
D19 D10
Jazz Organ Original —
D20 D11
Strings Original —
D21
— Choir Original —
D22 D12
Synth Pad Original —
D23
— Piano + Strings Original —
TA3 TC3 SH3 SC3 Owner’s Manual
73
Appendix
The Demo Songs excluding original Songs are short rearranged excerpts from the original compositions. The “Original”
Demo Songs are Yamaha originals (© Yamaha Corporation).
Preset Songs
D24
— Piano + Pad Original —
D25
— Piano + DX E.Piano Original —
Song No.
Voice Name Song Name Composer
TA3/SH3 TC3/SC3
Song No.
Song Name Composer
Arrangements
P01
Canon D dur J. Pachelbel
P02
Air On the G String J. S. Bach
P03
Jesus, Joy of Man’s
Desiring
J. S. Bach
P04
Twinkle, Twinkle, Little
Star
Traditional
P05
Piano Sonate op.31-2
“Tempest” 3rd mov.
L. v. Beethoven
P06
Ode to Joy L. v. Beethoven
P07
Wiegenlied op.98-2 F. P. Schubert
P08
Grande Valse Brillante F. F. Chopin
P09
Polonaise op.53
“Héroïque”
F. F. C h o p i n
P10
La Campanella F. Liszt
P11
Salut d'amour op.12 E. Elgar
P12
From the New World A. Dvořák
P13
Sicilienne G. U. Fauré
P14
Clair de lune C. A. Debussy
P15
Jupiter (The Planets) G. Holst
Song No.
Song Name Composer
Duets
P16
Menuett (Eine kleine
Nachtmusik K.525)
W. A. Mozar t
P17
Menuett G dur L. v. Beethoven
P18
Marcia alla Turca L. v. Beethoven
P19
Piano Concerto No.1
op.11 2nd mov.
F. F. Chopin
P20
The Nutcracker Medley P. I. Tchaikovsky
Original Compositions
P21
Prelude (Wohltemperierte
Klavier I No.1)
J. S. Bach
P22
Menuett G dur BWV
Anh.114
J. S. Bach
P23
Piano Sonate No.15
K.545 1st mov.
W. A. Mozar t
P24
Turkish March W. A. Mozart
P25
Piano Sonate op.13
“Pathétique” 2nd mov.
L. v. Beethoven
P26
Für Elise L. v. Beethoven
P27
Piano Sonate op.27-2
“Mondschein” 1st mov.
L. v. Beethoven
P28
Impromptu op.90-2 F. P. Schubert
TA3 TC3 SH3 SC3 Owner’s Manual
74
P29
Frühlingslied op.62-6 J. L. F.
Mendelssohn
P30
Fantaisie-Impromptu F. F. Chopin
P31
Etude op.10-3 “Chanson
de l'adieu”
F. F. C h o p i n
P32
Etude op.10-12
“Revolutionary”
F. F. C h o p i n
P33
Valse op.64-1 “Petit
chien”
F. F. C h o p i n
P34
Nocturne op.9-2 F. F. Chopin
P35
Nocturne KK4a-16/BI 49
[Posth.]
F. F. C h o p i n
P36
Träumerei R. Schumann
P37
Barcarolle P. I. Tchaikovsky
P38
La prière d'une Vierge T. Badarzewska
P39
Liebesträume No.3 F. Liszt
Song No.
Song Name Composer
P40
Blumenlied G. Lange
P41
Humoresque A. Dvořák
P42
Arietta E. H. Grieg
P43
Tango (España) I. Albéniz
P44
The Entertainer S. Joplin
P45
Maple Leaf Rag S. Joplin
P46
La Fille aux Cheveux de
Lin
C. A. Debussy
P47
Arabesque No.1 C. A. Debussy
P48
Cakewalk C. A. Debussy
P49
Je te veux E. Satie
P50
Gymnopédies No.1 E. Satie
Song No.
Song Name Composer
TA3 TC3 SH3 SC3 Owner’s Manual
75
Appendix
Specifications
(*) The items with asterisks are for models equipped with a sostenuto pedal.
TA3 TC3 SH3 SC3
Product Name
TransAcoustic™ Piano SILENT Piano™
Silencing
System
Mechanism
Hammer shank stopper
(Grand pianos: operated by motor drive or silencing lever,
Upright pianos: operated by silencing lever* or silencing pedal)
Action (only for grand pianos)
Quick Escape
mechanism
— Quick Escape mechanism
Soundboard
Drive System
Mechanism
TransAcoustic™ technology —
Transducer
Exclusively for
TA 3
Exclusively for
TC3
—
Control
Interface
Keyboard Touch Response
Soft, Soft/Medium, Medium, Medium/Hard, Hard, Fixed
Pedal
Damper, Sostenuto*/Silencing, Soft
Display Type
7-Segment LED
Panel Language
English
Sensor
System
Key Sensors System
Articulation sensor system
Key Sensors
Non-contact continuous detection electromagnetic inductive type
Hammer Sensors (only
for grand pianos)
Non-contact
2-point optical
fiber type
— Non-contact
2-point optical
fiber type
—
Pedal
Sensors
Damper Pedal
Continuous detection sensor
Sostenuto Pedal*
On/Off detection
sensor
— On/Off detection
sensor
—
Soft Pedal
On/Off detection sensor
Voices Tone
Generation
Piano Sound
Yamaha CFX, Bösendorfer Imperial
Binaural Sampling
Yes (“CFX Grand” and “Bösendorfer” only)
Piano Effects VRM (Virtual
Resonance Modeling)
Ye s
Grand Expression
Modeling
Ye s
Key-off Samples
Ye s
Smooth Release
Ye s
Polyphony (max.)
256
Preset Number of Voices
25 (Piano 5
+ Fortepiano 4
+ Others 16)
12 (Piano 3
+ Others 9)
25 (Piano 5
+ Fortepiano 4
+ Others 16)
12 (Piano 3
+ Others 9)
Voices for Song Playback
480 XG Voices
+ 12 Drum/SFX
Kits
— 480 XG Voices
+ 12 Drum/SFX
Kits
—
Effects Types Reverb
6 types
Brilliance
5 types
Intelligent Acoustic
Control (IAC)
Ye s
Stereophonic
Optimizer
Yes (piano Voices other than “CFX Grand” and “Bösendorfer”)
Songs
(MIDI)
Preset Number of Preset
Songs
25 Voice Demo
Songs,
50 Classics
12 Voice Demo
Songs,
50 Classics
25 Voice Demo
Songs,
50 Classics
12 Voice Demo
Songs,
50 Classics

TA3 TC3 SH3 SC3 Owner’s Manual
76
The contents of this manual apply to the latest specifications as of the publishing date. To obtain the latest manual, access the Yamaha
website then download the manual file. Since specifications, equipment or separately sold accessories may not be the same in every
locale, please check with your Yamaha dealer.
Songs
(MIDI)
Recording Number of Songs
10
Data Capacity
approx. 500 KB / Song
Format Playback
SMF (Format 0, Format 1)
Recording
SMF (Format 0)
Songs
(Audio)
Recording Time (max.)
80 minutes / Song
Format Playback
WAV (44.1 kHz, 16 bit, stereo)
Recording
WAV (44.1 kHz, 16 bit, stereo)
Functions Rhythms Number of Rhythms
20
Overall
Controls
Metronome
Ye s
Tempo Range
5–500
Transpose
−12–0–+12
Tuning
414.8–440.0–466.8 Hz (approx. 0.2 Hz increments)
USB audio interface
44.1 kHz, 24 bit, stereo
Bluetooth
(May not have
this functionality
depending on
the country in
which you
purchased the
product.)
Audio
Supported profile: A2DP, Compatible codec: SBC
MIDI
Comply with Bluetooth Low Energy MIDI Specification
Bluetooth version
5.0
Wireless output
Bluetooth class 2
Maximum communication distance
Approx.10 m
Radio Frequency
2,401–2,481 MHz
Maximum output power (EIRP)
4 dBm
Type of modulation
FHSS
Storage and
Connectivity
Storage Internal Memory
Approx.1.3 MB
External Drives
USB flash drive
Connectivity DC IN
24 V 16 V
Headphones
Stereo mini jack (× 2)
MIDI
[IN], [OUT] — [IN], [OUT] —
AUX IN
Stereo mini jack
AUX OUT
[L/L+R], [R]
(Standard
phone jack)
— [L/L+R], [R]
(Standard
phone jack)
—
USB TO DEVICE
Ye s
USB TO HOST
Ye s
Power
Supply
AC Adaptor
PA-500 PA-300C
Output
DC 24 V, 2.5 A DC 16 V, 2.4 A
Polarity
Power Consumption
26 W (When
using PA-500
AC adaptor)
17W (When
using PA-500
AC adaptor)
8 W (When using PA-300C AC
adaptor)
Auto Power Off
Ye s
Standby Power Consumption
0.3 W
Included Accessories
Owner’s Manual, “50 Classical Music Masterpieces” music book (TA3/
SH3 only), headphones, headphone hanger, attachment screws for
headphone hanger, AC adaptor*, power cord*
*May not be included depending on your area. Check with your Yamaha dealer.
Separately Sold Accessories
(May not be available depending on your area.)
USB wireless LAN adaptor (UD-WL01),
AC adaptor (TA3/TC3: PA-500, SH3/SC3: PA-300C)
TA3 TC3 SH3 SC3

TA3 TC3 SH3 SC3 Owner’s Manual
77
Appendix
Index
A
Access Point mode .......................................................................62
Accessories ....................................................................................11
Acoustic mode ..............................................................................17
App .................................................................................................61
Audio EQ .......................................................................................49
Audio Loopback .................................................................... 52, 64
Audio recording ............................................................................29
Audio Song ....................................................................................24
Auto Power Off ...................................................................... 16, 52
[AUX IN] jack ...............................................................................58
AUX IN Noise Gate ......................................................................52
AUX OUT jacks ............................................................................57
B
Backup ............................................................................................51
Backup data ...................................................................................54
Bass .................................................................................................51
Beat .................................................................................................39
Binaural Sampling ................................................................. 19, 49
Bluetooth ............................................................................ 8, 51, 61
Bluetooth Audio ...........................................................................59
Body Resonance ............................................................................46
Brilliance ........................................................................................49
C
Character code ..............................................................................37
Computer .......................................................................................63
Computer-related Operations ....................................................11
Control unit ...................................................................................12
Copy (User Song) .........................................................................34
D
Damper Noise ........................................................................ 46, 53
Damper Resonance ......................................................................46
Delete (User Song) .......................................................................35
Demo Song ............................................................................. 24, 72
Duplex Scale ..................................................................................53
Duplex Scale Resonance ..............................................................46
E
Ending ............................................................................................50
External Song ................................................................................24
F
Format (USB flash drive) .............................................................56
Function .........................................................................................44
Function List .................................................................................45
G
Glossary .........................................................................................53
Grand Expression Modeling .................................................46, 53
H
Half Pedal Point ............................................................................47
Headphone hanger .......................................................................19
Headphones ...................................................................................18
I
IAC .................................................................................................49
Infrastructure mode .....................................................................62
Initializing .....................................................................................54
Intro ................................................................................................50
L
Language ........................................................................................37
Layer mode ....................................................................................21
Local Control ................................................................................51
M
Master Tune ..................................................................................47
Message ..........................................................................................65
Metronome ..............................................................................38, 50
MIDI recording ............................................................................29
MIDI Reference ............................................................................11
MIDI Song .....................................................................................24
MIDI terminals .............................................................................64
MIDI transmit channel ................................................................51
P
Pairing ......................................................................................52, 59
Pan ..................................................................................................46
Part ...........................................................................................28, 31
Playback (Rhythm) .......................................................................41
Playback (Song) ......................................................................24, 27
Power ..............................................................................................14
Preset Song ..............................................................................24, 73
Q
Quiet mode ....................................................................................18
R
Recording ......................................................................................29
Reverb ............................................................................................45
Rhythm ....................................................................................41, 50
Rhythm List ...................................................................................42

TA3 TC3 SH3 SC3 Owner’s Manual
78
S
Smart device ..................................................................................61
Smart Pianist .................................................................................61
Smart Pianist User Guide ............................................................11
Song ................................................................................................24
Song List .........................................................................................72
Specifications .................................................................................75
Stereophonic Optimizer ....................................................... 19, 49
String Resonance ..........................................................................46
Synchro Start .................................................................................51
T
Temperament ................................................................................48
Tempo ..................................................................................... 27, 39
Time signature ..............................................................................39
Touch Sensitivity ..........................................................................47
TransAcoustic mode ....................................................................20
TransAcoustic setting ..................................................................49
Transpose (keyboard) ..................................................................47
Transpose (Song) ..........................................................................50
Troubleshooting ...........................................................................67
Tuning ............................................................................................47
U
USB Audio Interface ....................................................................63
USB device .....................................................................................55
USB flash drive ..............................................................................55
[USB TO DEVICE] terminal ......................................................55
User Song ................................................................................ 24, 34
UTILITY ........................................................................................38
V
Version ...........................................................................................52
Voice ...............................................................................................22
Voice Demo Song .................................................................. 24, 72
Voice List ................................................................................ 23, 69
Volume (Audio Song) ..................................................................50
Volume (Metronome/Rhythm) ..................................... 40, 43, 50
Volume (overall) .................................................................... 18, 20
Volume balance ............................................................................50
VRM ........................................................................................ 46, 53
W
Wi-Fi ..............................................................................................62
Wireless LAN ................................................................................62
WPS ................................................................................................62

TA3 TC3 SH3 SC3 Owner’s Manual
79
Modified BSD license
COPYRIGHT © 2016 STMicroelectronics
Redistribution and use in source and binary forms, with or without modification, are permitted provided that the following
conditions are met:
1. Redistributions of source code must retain the above copyright notice, this list of conditions and the following
disclaimer.
2. Redistributions in binary form must reproduce the above copyright notice, this list of conditions and the following
disclaimer in the documentation and/or other materials provided with the distribution.
3. Neither the name of STMicroelectronics nor the names of its contributors may be used to endorse or promote products
derived from this software without specific prior written permission.
THIS SOFTWARE IS PROVIDED BY THE COPYRIGHT HOLDERS AND CONTRIBUTORS “AS IS” AND ANY EXPRESS
OR IMPLIED WARRANTIES, INCLUDING, BUT NOT LIMITED TO, THE IMPLIED WARRANTIES OF
MERCHANTABILITY AND FITNESS FOR A PARTICULAR PURPOSE ARE DISCLAIMED. IN NO EVENT SHALL THE
COPYRIGHT HOLDER OR CONTRIBUTORS BE LIABLE FOR ANY DIRECT, INDIRECT, INCIDENTAL, SPECIAL,
EXEMPLARY, OR CONSEQUENTIAL DAMAGES (INCLUDING, BUT NOT LIMITED TO, PROCUREMENT OF
SUBSTITUTE GOODS OR SERVICES; LOSS OF USE, DATA, OR PROFITS; OR BUSINESS INTERRUPTION)
HOWEVER CAUSED AND ON ANY THEORY OF LIABILITY, WHETHER IN CONTRACT, STRICT LIABILITY, OR TORT
(INCLUDING NEGLIGENCE OR OTHERWISE) ARISING IN ANY WAY OUT OF THE USE OF THIS SOFTWARE, EVEN
IF ADVISED OF THE POSSIBILITY OF SUCH DAMAGE.
Apache License 2.0
Copyright (c) 2009-2018 Arm Limited. All rights reserved.
SPDX-License-Identifier: Apache-2.0
Licensed under the Apache License, Version 2.0 (the License); you may not use this file except in compliance with the
License.
You may obtain a copy of the License at
www.apache.org/licenses/LICENSE-2.0
Unless required by applicable law or agreed to in writing, software distributed under the License is distributed on an AS IS
BASIS, WITHOUT WARRANTIES OR CONDITIONS OF ANY KIND, either express or implied.
See the License for the specific language governing permissions and limitations under the License.
TA3 TC3 SH3 SC3 Owner’s Manual
80
For U.S.A.
(554-M01 FCC transmitter 01)
(554-M03 FCC mobile SAR 01)
For Canada
(555-M04 ISED mobile SAR 01)
(555-M13 ISED RSS 01)
For Mexico
(556-M02 MX operating condition 01)
For United Kingdom
This transmitter must not be co-located or operated in conjunction with any other antenna or transmitter.
This equipment complies with FCC radiation exposure limits set forth for an uncontrolled environment and meets the FCC radio
frequency (RF) Exposure Guidelines. This equipment should be installed and operated keeping the radiator at least 20cm or more
away from personʼs body.
This equipment complies with ISED radiation exposure limits set forth for an uncontrolled environment and meets RSS-102 of the
ISED radio frequency (RF) Exposure rules. This equipment should be installed and operated keeping the radiator at least 20cm or
more away from personʼs body.
Cet équipement est conforme aux limites dʼexposition aux rayonnements énoncées pour un environnement non contrôlé et
respecte les règles dʼexposition aux fréquences radioélectriques (RF) CNR-102 de lʼISDE. Cet équipement doit être installé et
utilisé en gardant une distance de 20 cm ou plus entre le radiateur et le corps humain.
This device contains licence-exempt transmitter(s)/receiver(s) that comply with Innovation, Science and Economic Development
Canadaʼs licence-exempt RSS(s). Operation is subject to the following two conditions:
1. This device may not cause interference.
2. This device must accept any interference, including interference that may cause undesired operation of the device.
Lʼémetteur/récepteur exempt de licence contenu dans le présent appareil est conforme aux CNR d ʼ Innovation, Sciences et
Développement économique Canada applicables aux appareils radio exempts de licence. Lʼexploitation est autorisée aux deux
conditions suivantes :
1. Lʼappareil ne doit pas produire de brouillage;
2. Lʼappareil doit accepter tout brouillage radioélectrique subi, même si le brouillage est susceptible dʼen compromettre le
fonctionnement.
La operación de este equipo está sujeta a las siguientes dos condiciones: (1) es posible que este equipo o dispositivo no cause
interferencia perjudicial y (2) este equipo o dispositivo debe aceptar cualquier interferencia, incluyendo la que pueda causar su
operación no deseada.
SIMPLIFIED UK DECLARATION OF CONFORMITY
Hereby, Yamaha Corporation declares that this model is in compliance with the Product Security and Telecommunications
Infrastructure Regulations. The full text of the UK declaration of conformity is available at the following internet address:
https://europe.yamaha.com/en/support/compliance/doc.html
TA3 TC3 SH3 SC3 Owner’s Manual
81
For European Union and United Kingdom
EN
SIMPLIFIED EU DECLARATION OF CONFORMITY / SIMPLIFIED UK DECLARATION OF CONFORMITY
Hereby, Yamaha Music Europe GmbH declares that the radio equipment type [TA3, TC3, SH3, SC3] is in compliance with Directive
2014/53/EU and the radio equipment regulations of UK. The full texts of the EU declaration of conformity and the UK declaration of
conformity are available at the following internet address:
https://europe.yamaha.com/en/support/compliance/doc.html
FR
DECLARATION UE DE CONFORMITE SIMPLIFIEE
Le soussigné, Yamaha Music Europe GmbH, déclare que l'équipement radioélectrique du type [TA3, TC3, SH3, SC3] est conforme à
la directive 2014/53/UE. Le texte complet de la déclaration UE de conformité est disponible à l'adresse internet suivante :
https://europe.yamaha.com/en/support/compliance/doc.html
DE
VEREINFACHTE EU-KONFORMITÄTSERKLÄRUNG
Hiermit erklärt Yamaha Music Europe GmbH, dass der Funkanlagentyp [TA3, TC3, SH3, SC3] der Richtlinie 2014/53/EU entspricht.
Der vollständige Text der EU-Konformitätserklärung ist unter der folgenden Internetadresse verfügbar:
https://europe.yamaha.com/en/support/compliance/doc.html
SV
FÖRENKLAD EU-FÖRSÄKRAN OM ÖVERENSSTÄMMELSE
Härmed försäkrar Yamaha Music Europe GmbH att denna typ av radioutrustning [TA3, TC3, SH3, SC3] överensstämmer med direktiv
2014/53/EU. Den fullständiga texten till EU-försäkran om överensstämmelse finns på följande webbadress:
https://europe.yamaha.com/en/support/compliance/doc.html
IT
DICHIARAZIONE DI CONFORMITÀ UE SEMPLIFICATA
Il fabbricante, Yamaha Music Europe GmbH, dichiara che il tipo di apparecchiatura radio [TA3, TC3, SH3, SC3] è conforme alla
direttiva 2014/53/UE. Il testo completo della dichiarazione di conformità UE è disponibile al seguente indirizzo Internet:
https://europe.yamaha.com/en/support/compliance/doc.html
ES
DECLARACIÓN UE DE CONFORMIDAD SIMPLIFICADA
Por la presente, Yamaha Music Europe GmbH declara que el tipo de equipo radioeléctrico [TA3, TC3, SH3, SC3] es conforme con la
Directiva 2014/53/UE. El texto completo de la declaración UE de conformidad está disponible en la dirección Internet siguiente:
https://europe.yamaha.com/en/support/compliance/doc.html
PT
DECLARAÇÃO UE DE CONFORMIDADE SIMPLIFICADA
O(a) abaixo assinado(a) Yamaha Music Europe GmbH declara que o presente tipo de equipamento de rádio [TA3, TC3, SH3, SC3] está em
conformidade com a Diretiva 2014/53/UE. O texto integral da declaração de conformidade está disponível no seguinte endereço de Internet:
https://europe.yamaha.com/en/support/compliance/doc.html
NL
VEREENVOUDIGDE EU-CONFORMITEITSVERKLARING
Hierbij verklaar ik, Yamaha Music Europe GmbH, dat het type radioapparatuur [TA3, TC3, SH3, SC3] conform is met Richtlijn 2014/
53/EU. De volledige tekst van de EU-conformiteitsverklaring kan worden geraadpleegd op het volgende internetadres:
https://europe.yamaha.com/en/support/compliance/doc.html
BG
ОПРОСТЕНА ЕС ДЕКЛАРАЦИЯ ЗА СЪОТВЕТСТВИЕ
С настоящото Yamaha Music Europe GmbH декларира, че този тип радиосъоръжение [TA3, TC3, SH3, SC3] е в съответствие с
Директива 2014/53/ЕС. Цялостният текст на ЕС декларацията за съответствие може да се намери на следния интернет адрес:
https://europe.yamaha.com/en/support/compliance/doc.html
CS
ZJEDNODUŠENÉ EU PROHLÁŠENÍ O SHODĚ
Tímto Yamaha Music Europe GmbH prohlašuje, že typ rádiového zařízení [TA3, TC3, SH3, SC3] je v souladu se směrnicí 2014/53/
EU. Úplné znění EU prohlášení o shodě je k dispozici na této internetové adrese:
https://europe.yamaha.com/en/support/compliance/doc.html
DA
FORENKLET EU-OVERENSSTEMMELSESERKLÆRING
Hermed erklærer Yamaha Music Europe GmbH, at radioudstyrstypen [TA3, TC3, SH3, SC3] er i overensstemmelse med direktiv
2014/53/EU. EU-overensstemmelseserklæringens fulde tekst kan findes på følgende internetadresse:
https://europe.yamaha.com/en/support/compliance/doc.html
ET
LIHTSUSTATUD ELI VASTAVUSDEKLARATSIOON
Käesolevaga deklareerib Yamaha Music Europe GmbH, et käesolev raadioseadme tüüp [TA3, TC3, SH3, SC3] vastab direktiivi 2014/
53/EL nõuetele. ELi vastavusdeklaratsiooni täielik tekst on kättesaadav järgmisel internetiaadressil:
https://europe.yamaha.com/en/support/compliance/doc.html
TA3 TC3 SH3 SC3 Owner’s Manual
82
(559-M01 RED DoC URL 02)
EL
ΑΠΛΟΥΣΤΕΥΜΕΝΗ ΔΗΛΩΣΗ ΣΥΜΜΟΡΦΩΣΗΣ ΕΕ
Με την παρούσα ο/η Yamaha Music Europe GmbH, δηλώνει ότι ο ραδιοεξοπλισμός [TA3, TC3, SH3, SC3] πληροί την οδηγία 2014/
53/ΕΕ. Το πλήρες κείμενο της δήλωσης συμμόρφωσης ΕΕ διατίθεται στην ακόλουθη ιστοσελίδα στο διαδίκτυο:
https://europe.yamaha.com/en/support/compliance/doc.html
HR
POJEDNOSTAVLJENA EU IZJAVA O SUKLADNOSTI
Yamaha Music Europe GmbH ovime izjavljuje da je radijska oprema tipa [TA3, TC3, SH3, SC3] u skladu s Direktivom 2014/53/EU.
Cjeloviti tekst EU izjave o sukladnosti dostupan je na sljedećoj internetskoj adresi:
https://europe.yamaha.com/en/support/compliance/doc.html
LV
VIENKĀRŠOTA ES ATBILSTĪBAS DEKLARĀCIJA
Ar šo Yamaha Music Europe GmbH deklarē, ka radioiekārta [TA3, TC3, SH3, SC3] atbilst Direktīvai 2014/53/ES. Pilns ES atbilstības
deklarācijas teksts ir pieejams šādā interneta vietnē:
https://europe.yamaha.com/en/support/compliance/doc.html
LT
SUPAPRASTINTA ES ATITIKTIES DEKLARACIJA
Aš, Yamaha Music Europe GmbH, patvirtinu, kad radijo įrenginių tipas [TA3, TC3, SH3, SC3] atitinka Direktyvą 2014/53/ES. Visas ES
atitikties deklaracijos tekstas prieinamas šiuo interneto adresu:
https://europe.yamaha.com/en/support/compliance/doc.html
HU
EGYSZERŰSÍTETT EU-MEGFELELŐSÉGI NYILATKOZAT
Yamaha Music Europe GmbH igazolja, hogy a [TA3, TC3, SH3, SC3] típusú rádióberendezés megfelel a 2014/53/EU irányelvnek. Az
EU-megfelelőségi nyilatkozat teljes szövege elérhető a következő internetes címen:
https://europe.yamaha.com/en/support/compliance/doc.html
PL
UPROSZCZONA DEKLARACJA ZGODNOŚCI UE
Yamaha Music Europe GmbH niniejszym oświadcza, że typ urządzenia radiowego [TA3, TC3, SH3, SC3] jest zgodny z dyrektywą
2014/53/UE. Pełny tekst deklaracji zgodności UE jest dostępny pod następującym adresem internetowym:
https://europe.yamaha.com/en/support/compliance/doc.html
RO
DECLARAȚIA UE DE CONFORMITATE SIMPLIFICATĂ
Prin prezenta, Yamaha Music Europe GmbH declară că tipul de echipamente radio [TA3, TC3, SH3, SC3] este în conformitate cu
Directiva 2014/53/UE. Textul integral al declarației UE de conformitate este disponibil la următoarea adresă internet:
https://europe.yamaha.com/en/support/compliance/doc.html
SK
ZJEDNODUŠENÉ EÚ VYHLÁSENIE O ZHODE
Yamaha Music Europe GmbH týmto vyhlasuje, že rádiové zariadenie typu [TA3, TC3, SH3, SC3] je v súlade so smernicou 2014/53/
EÚ. Úplné EÚ vyhlásenie o zhode je k dispozícii na tejto internetovej adrese:
https://europe.yamaha.com/en/support/compliance/doc.html
SL
POENOSTAVLJENA IZJAVA EU O SKLADNOSTI
Yamaha Music Europe GmbH potrjuje, da je tip radijske opreme [TA3, TC3, SH3, SC3] skladen z Direktivo 2014/53/EU. Celotno
besedilo izjave EU o skladnosti je na voljo na naslednjem spletnem naslovu:
https://europe.yamaha.com/en/support/compliance/doc.html
FI
YKSINKERTAISTETTU EU-VAATIMUSTENMUKAISUUSVAKUUTUS
Yamaha Music Europe GmbH vakuuttaa, että radiolaitetyyppi [TA3, TC3, SH3, SC3] on direktiivin 2014/53/EU mukainen. EU-
vaatimustenmukaisuusvakuutuksen täysimittainen teksti on saatavilla seuraavassa internetosoitteessa:
https://europe.yamaha.com/en/support/compliance/doc.html
TR
BASİTLEŞTİRİLMİŞ AVRUPA BİRLİĞİ UYGUNLUK BİLDİRİMİ
İşbu belge ile, Yamaha Music Europe GmbH, radyo cihaz tipinin [TA3, TC3, SH3, SC3], Direktif 2014/53/ AB'ye uygunluğunu beyan
eder. AB uyumu beyanının tam metni aşağıdaki internet adresinden edinilebilir:
https://europe.yamaha.com/en/support/compliance/doc.html
TA3 TC3 SH3 SC3 Owner’s Manual
83
(58-M02 WEEE en 01)
Information for users on collection and disposal of old equipment:
This symbol on the products, packaging, and/or accompanying documents means that used electrical and electronic
products should not be mixed with general household waste.
For proper treatment, recovery and recycling of old products, please take them to applicable collection points, in
accordance with your national legislation.
By disposing of these products correctly, you will help to save valuable resources and prevent any potential negative
effects on human health and the environment which could otherwise arise from inappropriate waste handling.
For more information about collection and recycling of old products, please contact your local municipality, your
waste disposal service or the point of sale where you purchased the items.
For business users in the European Union:
If you wish to discard electrical and electronic equipment, please contact your dealer or supplier for further
information.
Information on Disposal in other Countries outside the European Union:
This symbol is only valid in the European Union. If you wish to discard these items, please contact your local
authorities or dealer and ask for the correct method of disposal.
(58-M02 WEEE es 01)
Información para usuarios sobre la recogida y eliminación de los equipos antiguos
Este símbolo en los productos, embalajes y documentos anexos significa que los productos eléctricos y
electrónicos no deben mezclarse con los desperdicios domésticos normales.
Para el tratamiento, recuperación y reciclaje apropiados de los productos antiguos, llévelos a puntos de reciclaje
correspondientes, de acuerdo con la legislación nacional.
Al deshacerse de estos productos de forma correcta, ayudará a ahorrar recursos valiosos y a impedir los posibles
efectos desfavorables en la salud humana y en el entorno que de otro modo se producirían si se trataran los
desperdicios de modo inapropiado.
Para obtener más información acerca de la recogida y el reciclaje de los productos antiguos, póngase en contacto
con las autoridades locales, con el servicio de eliminación de basuras o con el punto de venta donde adquirió los
artículos.
Para los usuarios empresariales de la Unión Europea:
Si desea desechar equipos eléctricos y electrónicos, póngase en contacto con su vendedor o proveedor para
obtener más información.
Información sobre la eliminación en otros países fuera de la Unión Europea:
Este símbolo solo es válido en la Unión Europea. Si desea desechar estos artículos, póngase en contacto con las
autoridades locales o con el vendedor y pregúnteles el método correcto.
(58-M02 WEEE fr 01)
Informations concernant la collecte et le traitement des déchets d’équipements
électriques et électroniques
Le symbole sur les produits, l'emballage et/ou les documents joints signifie que les produits électriques ou
électroniques usagés ne doivent pas être mélangés avec les déchets domestiques habituels.
Pour un traitement, une récupération et un recyclage appropriés des déchets d’équipements électriques et
électroniques, veuillez les déposer aux points de collecte prévus à cet effet, conformément à la réglementation
nationale.
En vous débarrassant correctement des déchets d’équipements électriques et électroniques, vous contribuerez à la
sauvegarde de précieuses ressources et à la prévention de potentiels effets négatifs sur la santé humaine qui
pourraient advenir lors d'un traitement inapproprié des déchets.
Pour plus d'informations à propos de la collecte et du recyclage des déchets d’équipements électriques et
électroniques, veuillez contacter votre municipalité, votre service de traitement des déchets ou le point de vente où
vous avez acheté les produits.
Pour les professionnels dans l'Union européenne :
Si vous souhaitez vous débarrasser des déchets d’équipements électriques et électroniques, veuillez contacter
votre vendeur ou fournisseur pour plus d'informations.
Informations sur la mise au rebut dans d'autres pays en dehors de l'Union européenne :
Ce symbole est seulement valable dans l'Union européenne. Si vous souhaitez vous débarrasser de déchets
d’équipements électriques et électroniques, veuillez contacter les autorités locales ou votre fournisseur et demander
la méthode de traitement appropriée.
TA3 TC3 SH3 SC3 Owner’s Manual
84
(58-M02 WEEE de 03)
Informationen zur Rückgabe von Elektro -und Elektronikgeräten, Lampen und Batterien,
gültig für Deutschland
Elektro- und Elektronische Altgeräte beinhalten eine Vielzahl von wertvollen und wiederverwendbaren Rohstoffen und gehören im Falle einer
Entsorgung nicht in die Restmülltonne, sondern Altgeräte sind getrennt zu sammeln und zu entsorgen. Besitzer von Altgeräten tragen damit zur
sicheren Entsorgung bei und helfen, mögliche umwelt- oder gesundheitsschädlichen Folgen zu vermeiden.
Zerstörungsfrei entnehmbare Altbatterien und Altakkumulatoren sowie Lampen, sind vor der Entsorgung zu entfernen und getrennt zu behandeln. Alte
oder defekte Batterien und Akkus können überall dort, wo Batterien verkauft werden, kostenfrei zurückgegeben werden. Ebenso die kommunalen
Wertstoffhöfe nehmen alte Batterien und Akkus zurück. Das Symbol mit der durchgestrichenen Mülltonne weist darauf hin, dass Batterien und/oder
Akkus getrennt vom Hausmüll gesammelt und entsorgt werden müssen.
Wenn die Batterie oder der Akku mehr als die in der europäischen Batterie-Richtlinie spezifizierten Werte für Blei (Pb), Quecksilber (Hg) und/oder
Kadmium (Cd) enthält, werden die chemischen Symbole für Blei (Pb), Quecksilber (Hg) und/oder Kadmium (Cd) unter dem Symbol mit der
durchgestrichenen Mülltonne angezeigt.
Indem Sie Batterien separat sammeln, tragen Sie zur sicheren Entsorgung von Produkten und Batterien bei und helfen damit, mögliche umwelt- oder
gesundheitsschädliche Folgen zu vermeiden. Bringen Sie dazu alle Batterien und/oder Akkus zu Ihrem örtlichen Wertstoffhof oder einem Geschäft
bzw. einer Einrichtung, wo diese Geräte zur umweltfreundlichen Entsorgung gesammelt werden.
Batterien und Akkus können bei unsachgemäßer Handhabung Risiken für Mensch und Umwelt bedeuten. Insbesondere bei Lithium handelt es sich um
ein sehr reaktionsfreudiges und brennbares Metall, dass in Batterien oder Akkus bei unsachgemäßem Umgang Sicherheitsrisiken birgt, wie z. B.
Kurzschlussgefahr, Hitzeentwicklung, Brand oder Austritt von umweltgefährdenden Stoffen. Lithium-Akkus müssen aus Sicherheitsgründen vor der
Entsorgung gesichert werden. Kleben Sie die Anschlüsse mit Isolierband ab.
Hinweis zur Verpflichtung von Vertreibern zur unentgeltlichen Rücknahme von Altgeräten in Bezug auf Elektrogesetz §17 Absatz 1
und 2:
Rücknahmepflicht größerer Elektrofachmärkte (also Elektro-Fachgeschäfte, mit einer Verkaufsfläche für Elektro- und
Elektronikgeräte von mindestens 400 m2),
Rücknahmepflicht für Lebensmittelläden mit einer Gesamtverkaufsfläche von mindestens 800 m2, die mehrmals pro Jahr oder
dauerhaft Elektro- und Elektronikgeräte anbieten und auf dem Markt bereitstellen.
Diese Händler müssen bei der Abgabe eines neuen Elektrogeräts an einen Endnutzer ein Altgerät der gleichen Art kostenfrei
zurücknehmen (1:1-Rücknahme); dies gilt auch für Lieferungen an private Haushalte.
Diese Händler sind verpflichtet von Endnutzern bis zu drei kleine Altgeräte (keine äußere Abmessung größer als 25 cm) kostenfrei im
Einzelhandelsgeschäft oder in unmittelbarer Nähe zu diesem zurücknehmen, ohne dass dies an einen Neukauf geknüpft werden darf (0:1-
Rücknahme).
Diese Rücknahmepflichten gelten auch für den Versandhandel, wobei die Pflicht zur 1:1-Rücknahme im privaten Haushalt nur für Wärmeüberträger
(Kühl-/Gefriergeräte, Klimageräte u.a.), Bildschirmgeräte und Großgeräte gilt; für die die 1:1-Rücknahme von Lampen, Kleingeräten und kleinen ITK-
Geräten durch Endnutzer sowie die 0:1-Rücknahme müssen Versandhändler Rückgabemöglichkeiten in zumutbarer Entfernung zum Endverbraucher
bereitstellen.
Als Hersteller informieren wir darüber, dass Altgeräte privater Haushalte (B2C Geräte) an einer dafür vorgesehenen Sammelstelle zurückgegeben
werden können. Für Details wenden Sie sich an Ihre örtliche Behörden. Weiterführende Informationen finden Sie hier: https://www.stiftung-ear.de/
de/startseite oder hier: https://e-schrott-entsorgen.org/.
Achtung: Die Verantwortung für das Löschen von personenbezogenen Daten, die sich auf dem zu entsorgenden Gerät befinden,
liegt beim Endnutzer!
Das Symbol mit der durchgestrichenen Mülltonne weist darauf hin, dass Produkte, deren Batterien/Akkumulatoren und/oder
Verpackungen getrennt vom Hausmüll gesammelt und entsorgt werden müssen. Der schwarze Balken zeigt an, dass das Produkt
nach dem 13. August 2005 auf den Markt gebracht wurde.
Die Sammel- und Recyclingquoten der Bundesrepublik Deutschland können auf der Seite des Bundesumweltministeriums
eingesehen werden: https://www.bmuv.de/themen/wasser-ressourcen-abfall/kreislaufwirtschaft/statistiken/elektro-und-
elektronikaltgeraete.
(58-M02 WEEE it 01)
Informazioni per gli utenti sulla raccolta e lo smaltimento di vecchia attrezzatura
Questi simboli sui prodotti, sull'imballaggio e/o sui documenti che li accompagnano, indicano che i prodotti elettrici
ed elettronici non devono essere mischiati con i rifiuti generici.
Per il trattamento, il recupero e il riciclaggio appropriato di vecchi prodotti, si prega di portarli ai punti di raccolta
designati, in accordo con la legislazione locale.
Smaltendo correttamente questi prodotti si potranno recuperare risorse preziose, oltre a prevenire potenziali effetti
negativi sulla salute e l'ambiente che potrebbero sorgere a causa del trattamento improprio dei rifiuti.
Per ulteriori informazioni sulla raccolta e il riciclaggio di vecchi prodotti, si prega di contattare l’amministrazione
comunale locale, il servizio di smaltimento dei rifiuti o il punto vendita dove sono stati acquistati gli articoli.
Per utenti imprenditori dell'Unione europea:
Se si desidera scartare attrezzatura elettrica ed elettronica, si prega di contattare il proprio rivenditore o il proprio
fornitore per ulteriori informazioni.
Informazioni sullo smaltimento negli altri Paesi al di fuori dell'Unione europea:
Questi simboli sono validi solamente nell'Unione Europea; se si desidera scartare questi articoli, si prega di
contattare le autorità locali o il rivenditore e richiedere informazioni sulla corretta modalità di smaltimento.
Deutsch
Français
Nederlands
Español
Italiano
Português
ǼȜȜȘȞȚțȐ
Svenska
Norsk
Dansk
Suomi
Polski
ýHãWLQD
Magyar
Eesti
/DWYLHãX
/LHWXYLǐ
6ORYHQþLQD
6ORYHQãþLQD
Ȼɴɥɝɚɪɫɤɢ
5RPkQă
English
Hrvatski
Türkçe
Important Notice: Power management information for customers in European Economic Area (EEA),
Switzerland and Turkey
Remarque importante : Informations sur la gestion de l'alimentation pour les clients de l'Espace
économique européen (EEE), de Suisse et de Turquie
Yamaha-Produkte sind mit einer Power-Management-Funktion ausgestattet. Bei einigen Produkten können Sie diese Funktion ausschalten oder
die Zeitdauer, die verstreicht, bis das Instrument ausgeschaltet oder in Bereitschaft versetzt wird, verlängern. In diesen Fällen erhöht sich der
Energieverbrauch.
Les produits Yamaha sont équipés d’une fonction de gestion de l’alimentation. Certains produits vous permettent de désactiver cette fonction ou
d'allonger le délai avant la mise hors tension ou la mise en veille. Dans ces cas, la consommation d’énergie augmente.
Yamaha-producten zijn uitgerust met een energiebeheerfunctie. Bij sommige producten kunt u die functie uitschakelen of de tijd verlengen die
verstrijkt voordat de stroom wordt uitgeschakeld of in stand-by wordt gezet. In deze gevallen zal het energieverbruik toenemen.
Los productos Yamaha están equipados con una función de administración de energía. Algunos productos permiten desactivar esa función o
ampliar el tiempo que transcurre antes de apagar la alimentación o poner el producto en modo de espera. En estos casos, el consumo de energía
aumentará.
I prodotti Yamaha sono dotati di una funzione di gestione dell'alimentazione. Alcuni prodotti consentono di disattivare tale funzione o di
estendere il periodo di tempo che trascorre prima che l'alimentazione venga spenta o impostata in standby. In questi casi, il consumo energetico
aumenterà.
Yamaha products are equipped with a power management function. Some products allow you to disable that function, or to extend the amount of
time that elapses before the power is turned off or set to standby. In these cases, energy consumption will increase.
Os produtos Yamaha são equipados com uma função de gerenciamento de energia. Alguns produtos permitem desativar essa função ou
estender o tempo decorrido antes de se desligar ou entrar em standby. Nesses casos, o consumo de energia aumentará.
ȉĮʌȡȠȧȩȞIJĮIJȘȢ<DPDKDİȓȞĮȚİȟȠʌȜȚıȝȑȞĮȝİȝȚĮȜİȚIJȠȣȡȖȓĮįȚĮȤİȓȡȚıȘȢȚıȤȪȠȢȅȡȚıȝȑȞĮʌȡȠȧȩȞIJĮıȐȢįȓȞȠȣȞIJȘįȣȞĮIJȩIJȘIJĮȞĮ
ĮʌİȞİȡȖȠʌȠȚİȓIJİĮȣIJȒIJȘȜİȚIJȠȣȡȖȓĮȒȞĮİʌİțIJİȓȞİIJİIJȠȤȡȠȞȚțȩįȚȐıIJȘȝĮȝȑȤȡȚIJȘȞĮʌİȞİȡȖȠʌȠȓȘıȘȒIJȘșȑıȘıİțĮIJȐıIJĮıȘĮȞĮȝȠȞȒȢȈİ
ĮȣIJȑȢIJȚȢʌİȡȚʌIJȫıİȚȢȘțĮIJĮȞȐȜȦıȘİȞȑȡȖİȚĮȢșĮĮȣȟȘșİȓ
Yamaha-produkterna är utrustade med en energihanteringsfunktion. För vissa produkter kan du inaktivera den funktionen eller för att förlänga
tiden som förflutit innan strömmen stängs av eller ställs i vänteläge. I dessa fall ökar energiförbrukningen.
Yamahas produkter har en strømstyringsfunktion. På nogle produkter er det muligt at deaktivere denne funktion eller at forlænge den tid, der går,
før der slukkes for strømmen, eller sættes på standby. I disse tilfælde vil strømforbruget stige.
Yamaha-tuotteet on varustettu virranhallintatoiminnolla. Joissakin tuotteissa voit poistaa toiminnon käytöstä tai pidentää aikaa, joka kuluu ennen
virran katkaisemista tai valmiustilaan asettamista. Näissä tapauksissa energiankulutus kasvaa.
3URGXNW\<DPDKDVąZ\SRVDĪRQHZIXQNFMĊ]DU]ąG]DQLDHQHUJLą1LHNWyUHSURGXNW\XPRĪOLZLDMąZ\áąF]HQLHWHMIXQNFMLOXEZ\GáXĪHQLHF]DVX
MDNLXSá\ZDGRZ\áąF]HQLD]DVLODQLDOXESU]HMĞFLDZWU\EJRWRZRĞFL:WDNLFKSU]\SDGNDFK]XĪ\FLHHQHUJLLZ]URĞQLH
3URGXNW\<DPDKDMVRXY\EDYHQ\IXQNFtVSUiY\QDSiMHQt1ČNWHUpSURGXNW\XPRåĖXMtWXWRIXQNFL]DNi]DWQHERSURGORXåLWGREXNWHUiPi
XEČKQRXWSĜHGY\SQXWtPQDSiMHQtQHERSRKRWRYRVWQtPUHåLPHP9WČFKWRSĜtSDGHFKVH]YêãtVSRWĜHEDHOHNWĜLQ\
$<DPDKDWHUPpNHNHQHUJLDPHQHG]VPHQWIXQNFLyYDOYDQQDNHOOiWYD(J\HVWHUPpNHNOHKHWĘYpWHV]LNKRJ\OHWLOWVDH]WDIXQNFLyWYDJ\
PHJKRVV]DEEtWVDDNLNDSFVROiVYDJ\NpV]HQOpWLiOODSRWEDKHO\H]pVHOĘWWHOWHOWLGĘW(]HNEHQD]HVHWHNEHQD]HQHUJLDIRJ\DV]WiVQ|YHNHGQLIRJ
Yamaha tooted on varustatud toitehalduse funktsiooniga. Mõned tooted võimaldavad teil selle funktsiooni keelata või pikendada aega, mis
P||GXEHQQHWRLWHYlOMDOOLWDPLVWY}LRRWHUHåLLPLVHDGPLVW6HOOLVWHOMXKWXGHOVXXUHQHEHQHUJLDWWDUELPLQH
<DPDKDL]VWUƗGƗMXPLLUDSUƯNRWLDUEDURãDQDVSƗUYDOGƯEDVIXQNFLMX'DåLHPL]VWUƗGƗMXPLHPãRIXQNFLMXYDUDWVSƝMRWYDLSDLOG]LQƗWODLNXNDP
MƗSDLHWSLUPVEDURãDQDVDWVOƝJãDQDVYDLSƗULHãDQDVJDLGVWƗYHVUHåƯPƗâƗGƗJDGƯMXPƗSDOLHOLQƗVLHVHQHUƧLMDVSDWƝULƼã
Ä<DPDKD³JDPLQLXRVH\UDHQHUJLMRVVąQDXGǐYDOG\PRIXQNFLMD.DLNXULHJDPLQLDLOHLGåLDLãMXQJWLãLąIXQNFLMąDUEDSUDWĊVWLODLNąSUDơMXVƳSULHã
LãMXQJLDQWPDLWLQLPąDUEDƳMXQJLDQWEXGơMLPRUHåLPą7RNLDLVDWYHMDLVHQHUJLMRVVXYDUWRMLPDVSDGLGơV
3URGXNW\VSRORþQRVWL<DPDKDV~Y\EDYHQpIXQNFLRXVSUiY\QDSiMDQLD1LHNWRUpSURGXNW\YiPXPRåĖXM~W~WRIXQNFLXY\SQ~ĢDOHERSUHGĎåLĢþDV
SRXSO\QXWtNWRUêFKVDQDSiMDQLHY\SQHDOHERQDVWDYtGRSRKRWRYRVWQpKRUHåLPX9WDNêFKWRSUtSDGRFKVD]YêãLVSRWUHEDHQHUJLH
<DPDKLQLL]GHONLLPDMRIXQNFLMRXSUDYOMDQMD]QDSDMDQMHP1HNDWHULL]GHONLYDPRPRJRþDMRGDRQHPRJRþLWHWRIXQNFLMRDOLSRGDOMãDWHþDVNLPRUD
SUHWHþLSUHGHQVHQDSDMDQMHL]NORSLDOLQDVWDYLYVWDQMHSULSUDYOMHQRVWL9WHKSULPHULKVHERSRUDEDHQHUJLMHSRYHþDOD
ɉɪɨɞɭɤɬɢɬɟɧɚ<DPDKDɫɚɫɧɚɛɞɟɧɢɫɮɭɧɤɰɢɹɡɚɭɩɪɚɜɥɟɧɢɟɧɚɡɚɯɪɚɧɜɚɧɟɬɨɇɹɤɨɢɩɪɨɞɭɤɬɢɜɢɩɨɡɜɨɥɹɜɚɬɞɚɡɚɛɪɚɧɢɬɟɬɚɡɢ
ɮɭɧɤɰɢɹɢɥɢɞɚɭɞɴɥɠɢɬɟɜɪɟɦɟɬɨɤɨɟɬɨɳɟɢɡɬɟɱɟɩɪɟɞɢɡɚɯɪɚɧɜɚɧɟɬɨɞɚɫɟɢɡɤɥɸɱɢɢɥɢɞɚɫɟɧɚɫɬɪɨɢɜɪɟɠɢɦɧɚɝɨɬɨɜɧɨɫɬ
ȼɬɟɡɢɫɥɭɱɚɢɤɨɧɫɭɦɚɰɢɹɬɚɧɚɟɧɟɪɝɢɹɳɟɫɟɭɜɟɥɢɱɢ
3URGXVHOH<DPDKDVXQWHFKLSDWHFXRIXQF܊LHGHJHVWLRQDUHDHQHUJLHL8QHOHSURGXVHYăSHUPLWVăGH]DFWLYD܊LDFHDVWăIXQF܊LHVDXVăSUHOXQJL܊L
SHULRDGDGHWLPSFDUHWUHFHvQDLQWHFDDOLPHQWDUHDVăILHRSULWăVDXVHWDWăvQVWDQGE\ÌQDFHVWHFD]XULFRQVXPXOGHHQHUJLHYDFUH܈WH
<DPDKDSURL]YRGLRSUHPOMHQLVXIXQNFLMRPXSUDYOMDQMDSRWURãQMRPHQHUJLMH1HNLYDPSURL]YRGLRPRJXüXMXRQHPRJXüDYDQMHWHIXQNFLMHLOL
SURGXOMHQMHYUHPHQDNRMHSURWHNQHSULMHLVNOMXþLYDQMDQDSDMDQMD
LOLSRVWDYOMDQMDXVWDQMHSULSUDYQRVWL8WLPüHVHVOXþDMHYLPDSRY
HüDWLSRWURãQMD
energije.
<DPDKDUQOHULQGHJo\|QHWLPLLúOHYLYDUGÕU%D]ÕUQOHUEXLúOHYLGHYUHGÕúÕEÕUDNPDQÕ]DYH\DJoNDSDWÕOPDGDQ\DGDEHNOHPHPRGXQD
DOÕQPDGDQ|QFHJHoHQVUH\LX]DWPDQÕ]DRODQDNWDQÕU%XJLELGXUXPODUGDHQHUMLWNHWLPLDUWDFDNWÕU
(574-M06EUerp01)

© 2022 Yamaha Corporation
Published 10/2025
MWTO-E1
YN734E0
10-1 Nakazawa-cho, Chuo-ku, Hamamatsu 430-8650, Japan