
Technical Support and E-Warranty Certificate www.vevor.com/support
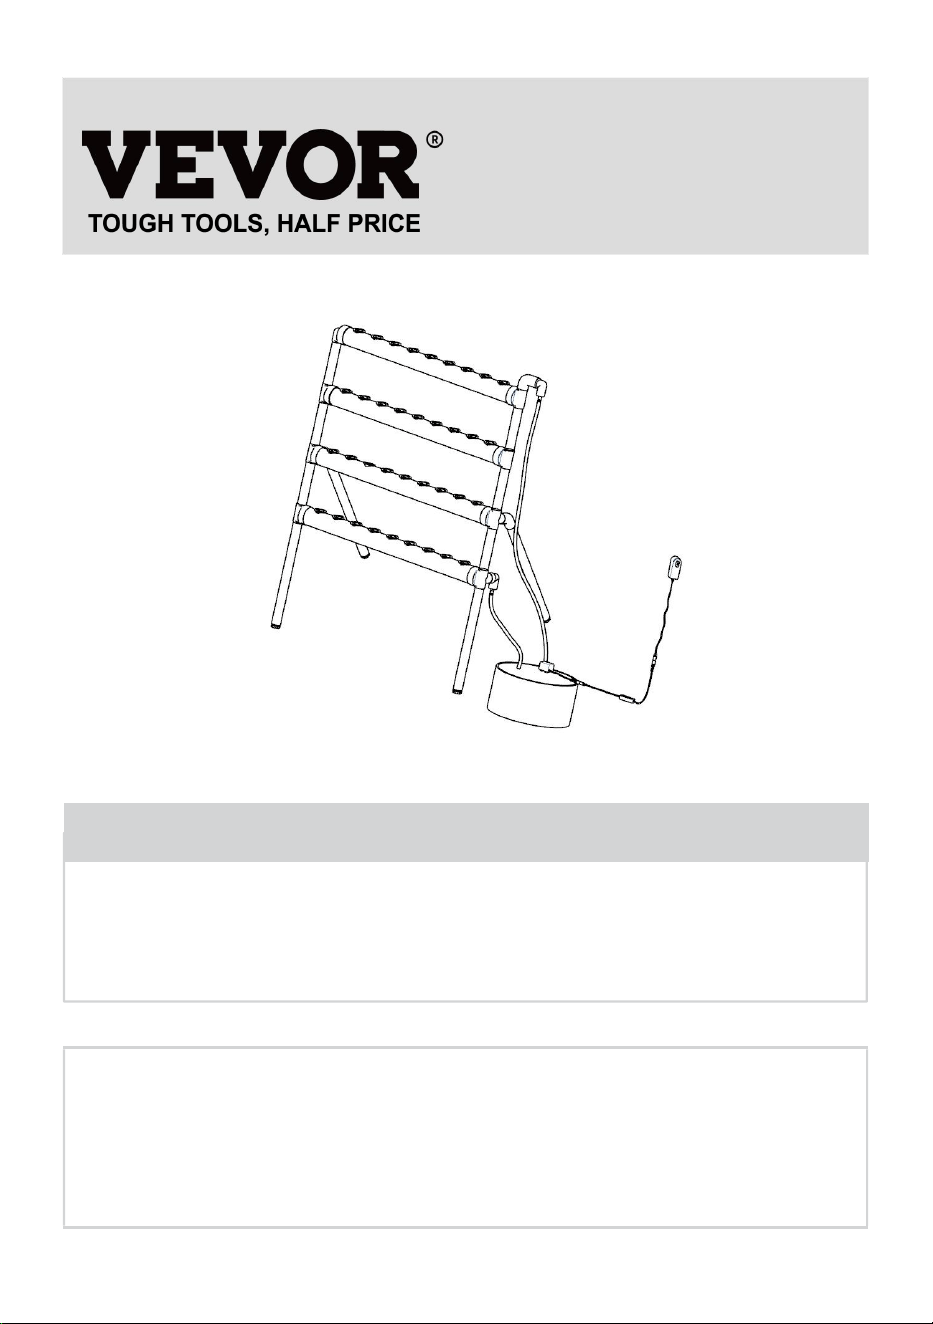
PIPES HYDROPONICS GROWING SYSTEM
USER MANUAL
We continue to be committed to provide you tools with competitive price.
"Save Half", "Half Price" or any other similar expressions used by us only represents an
estimate of savings you might benefit from buying certain tools with us compared to the major
top brands and doses not necessarily mean to cover all categories of tools offered by us. You
are kindly reminded to verify carefully when you are placing an order with us if you are
actually saving half in comparison with the top major brands.

1
Model: VVGrey4-36
Have product questions? Need technical support? Please feel free to
contact us:
Technical Support and E-Warranty Certificate
www.vevor.com/support
NEED HELP? CONTACT US!
This is the original instruction, please read all manual instructions
carefully before operating. VEVOR reserves a clear interpretation of our
user manual. The appearance of the product shall be subject to the
product you received. Please forgive us that we won't inform you again if
there are any technology or software updates on our product.
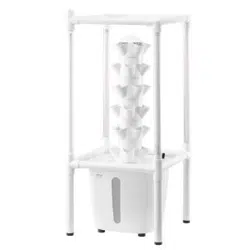
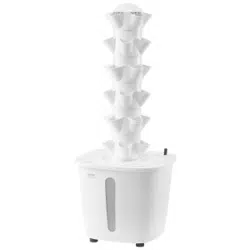
PIPES HYDROPONICS GROWING
SYSTEM

2
SPECIFICATIONS
Model
VVGrey4-36
Product Size
870*560*990mm
Input Voltage
North America: 120V 60Hz
European Union: 220~240V 50Hz
Australia: 220~240V 50Hz
Before using the product, please read the instructions carefully and keep
them properly.
Note:
Please ensure that children are always supervised by an adult when using
this product. After adding water, make sure your hands are dry before
plugging the adapter into a power source.
3
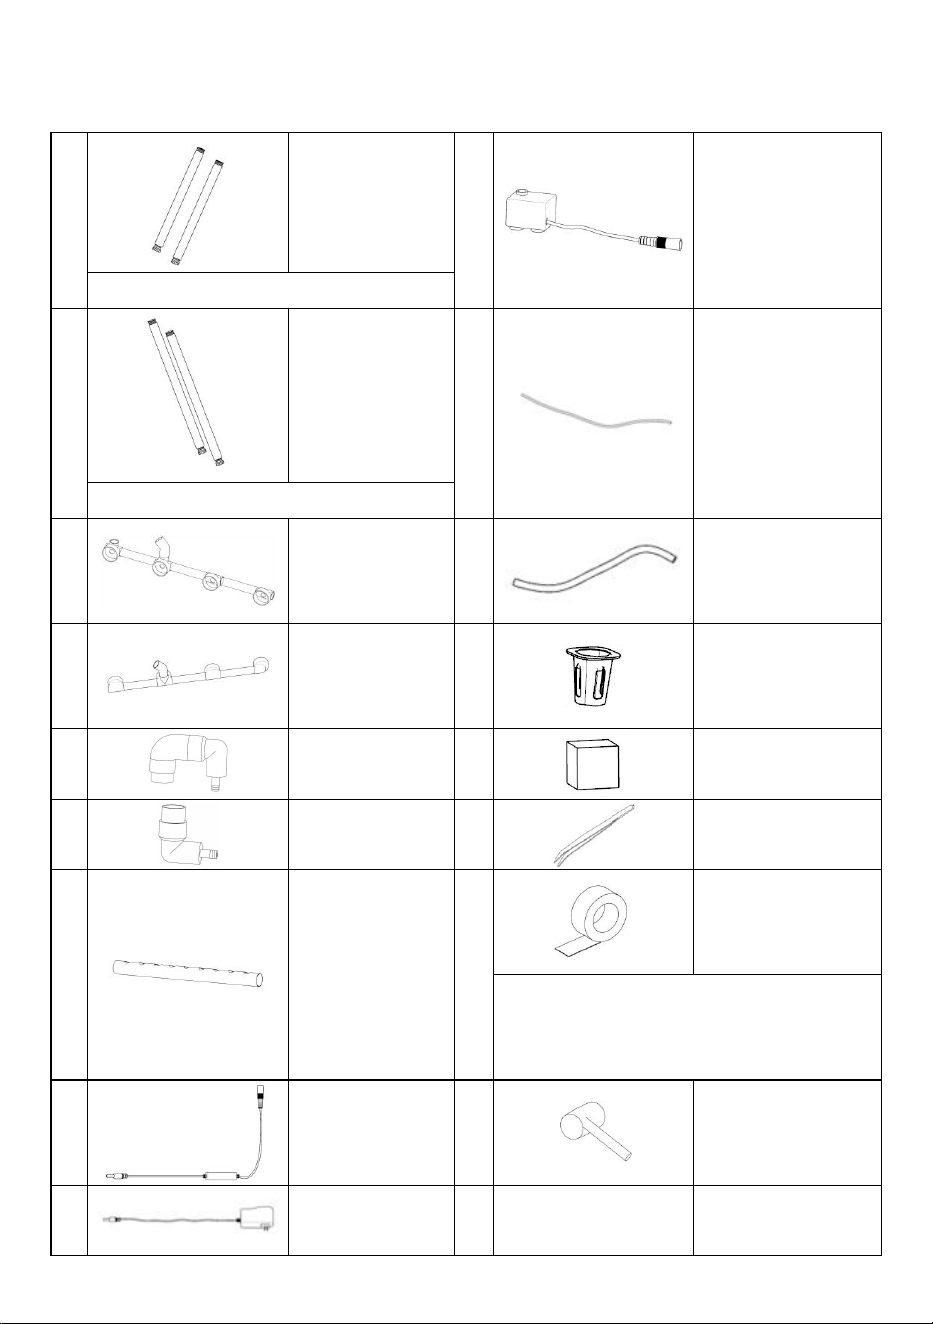
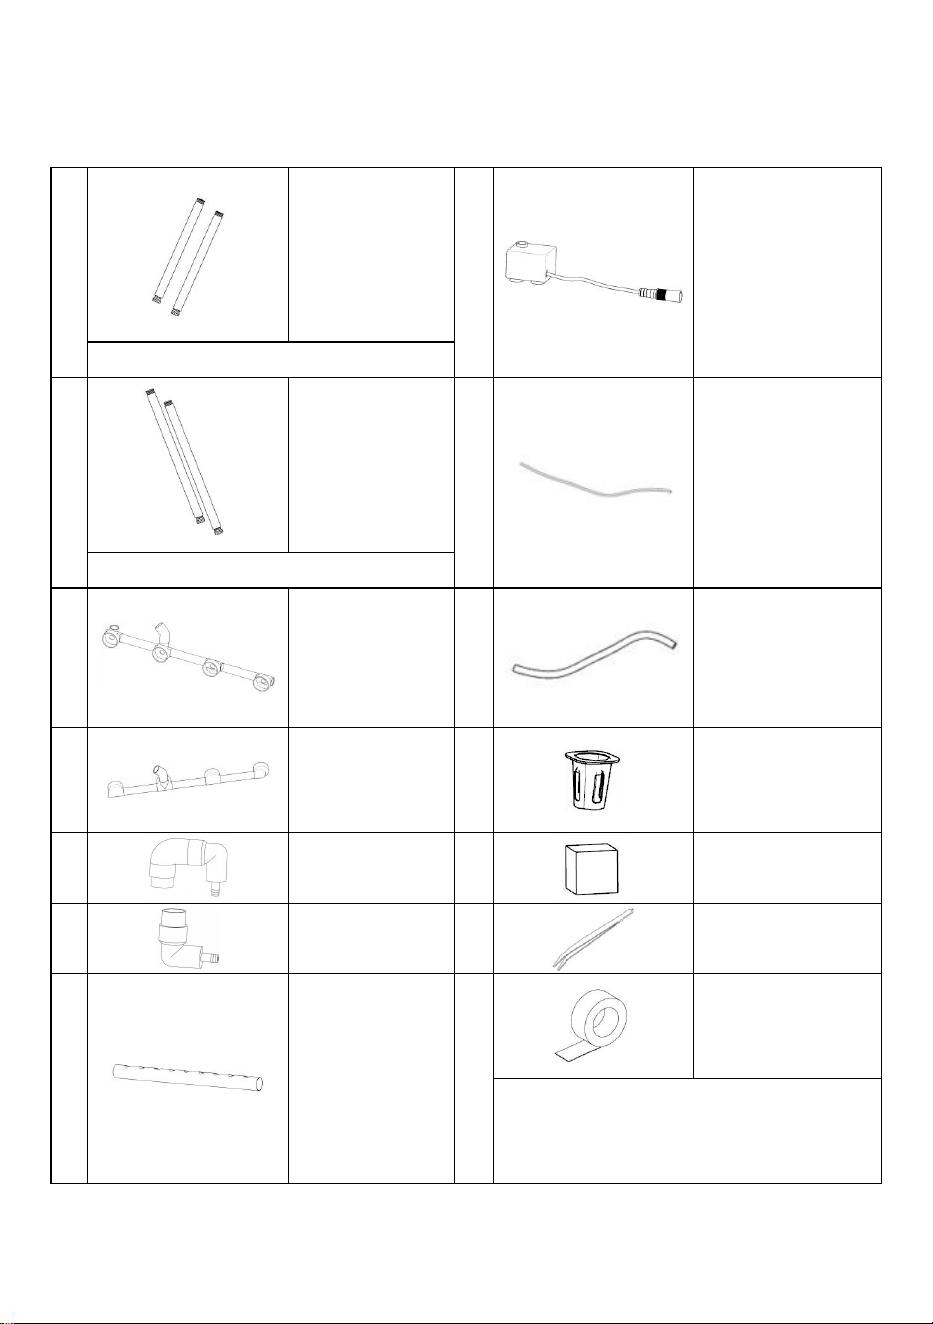
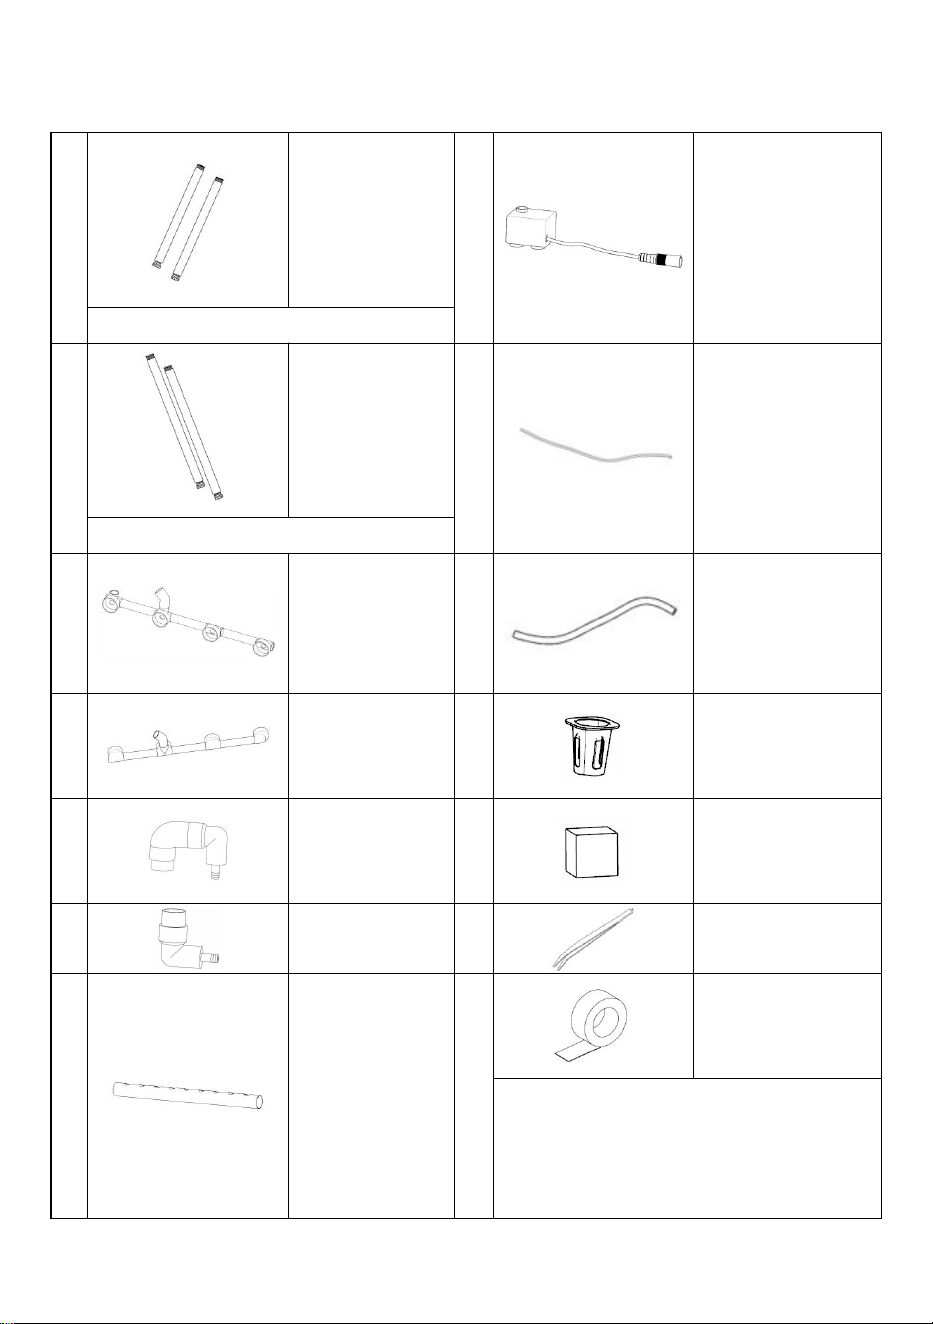
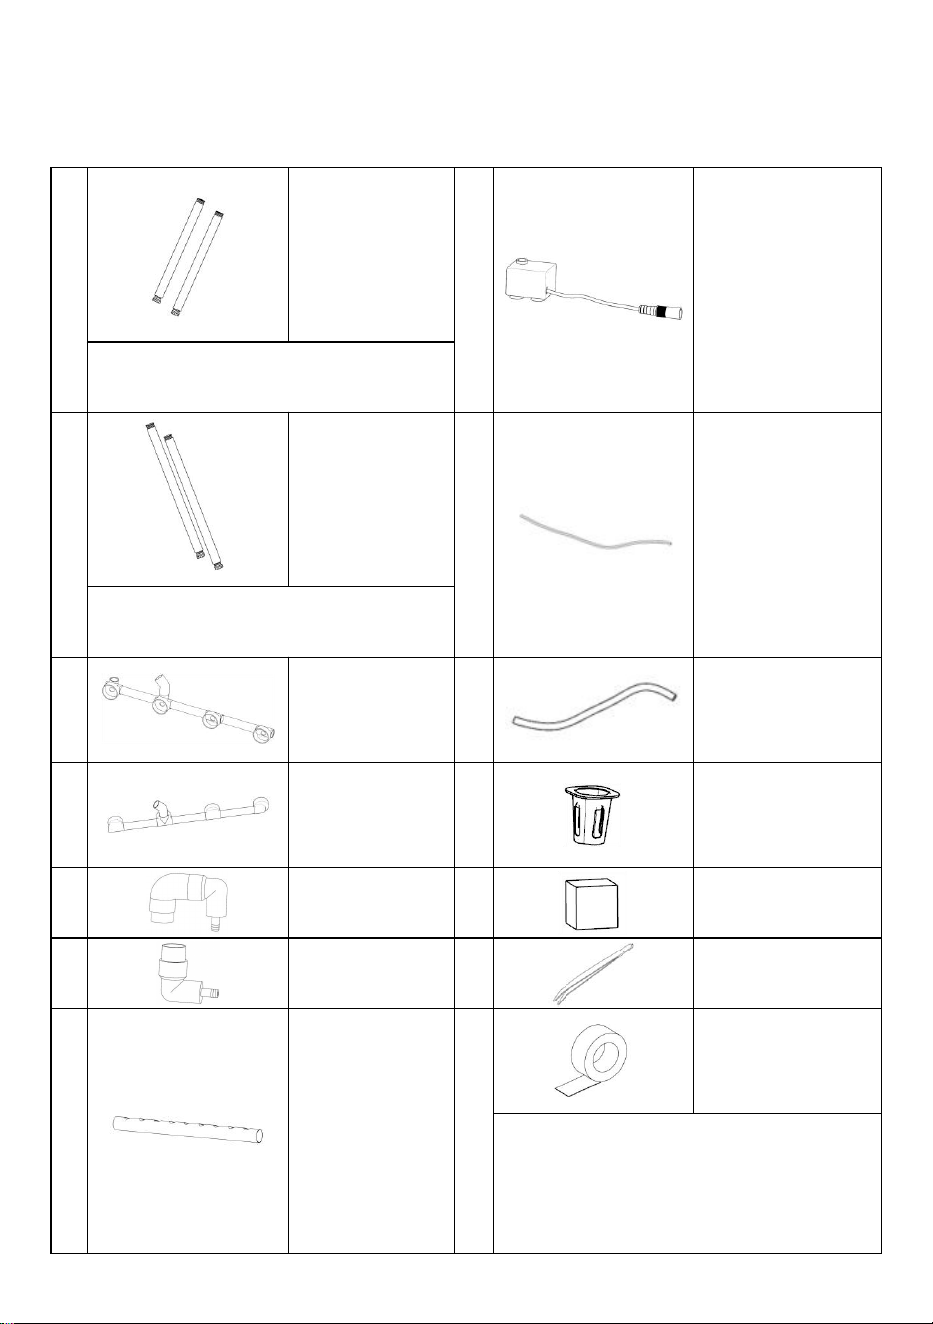
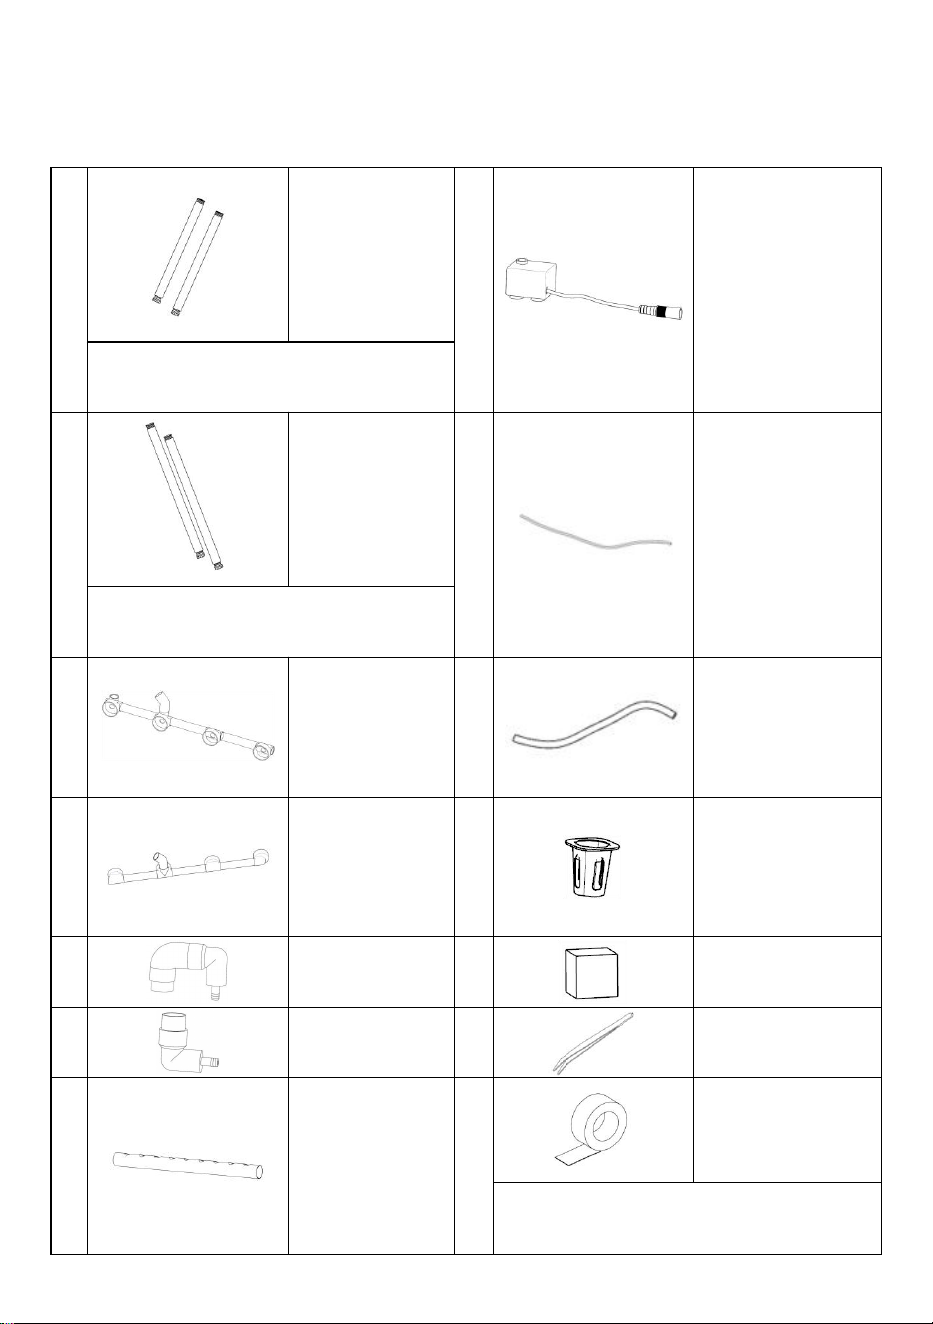
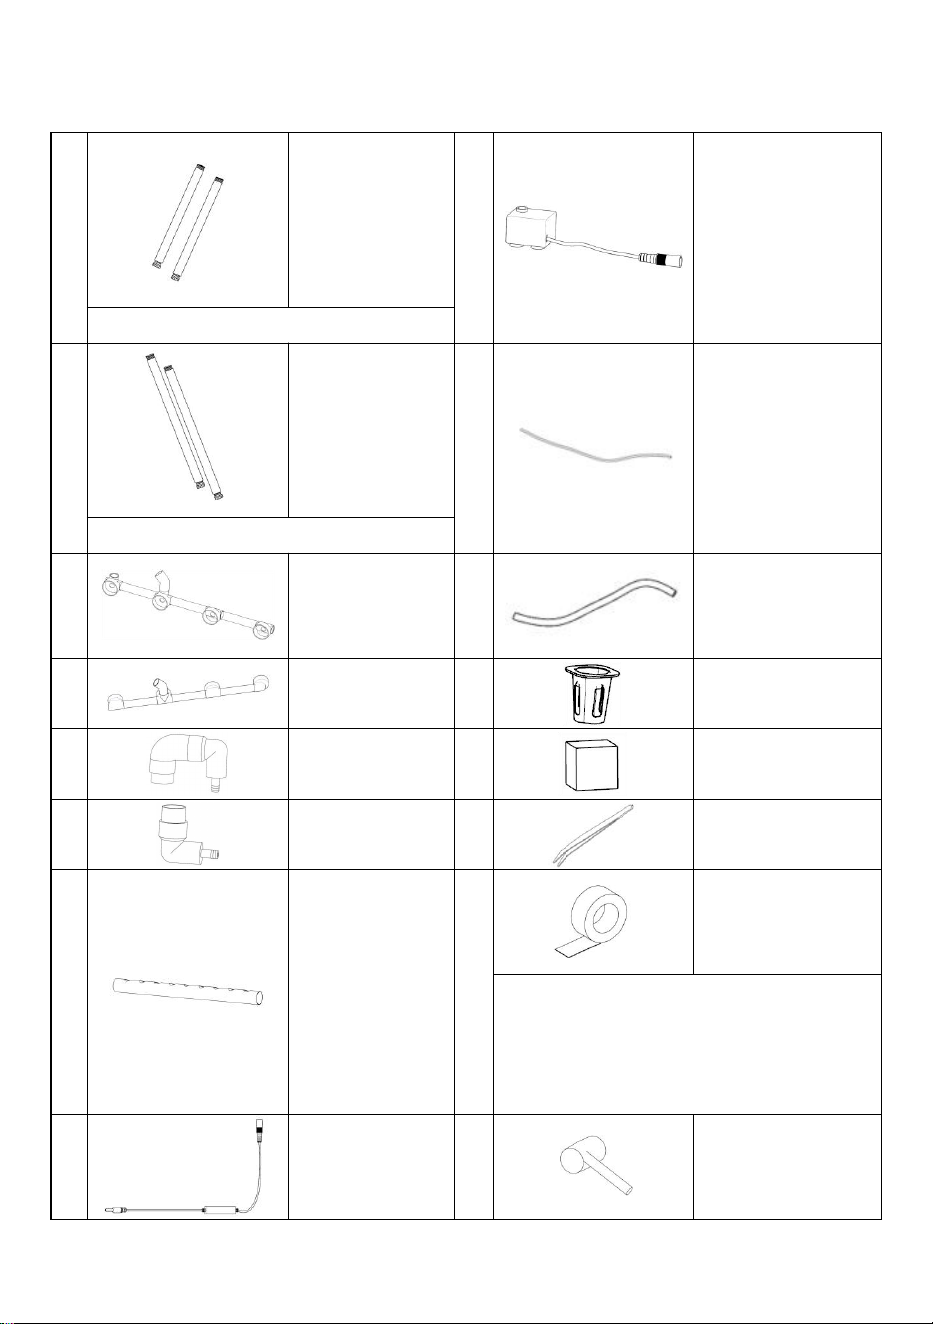
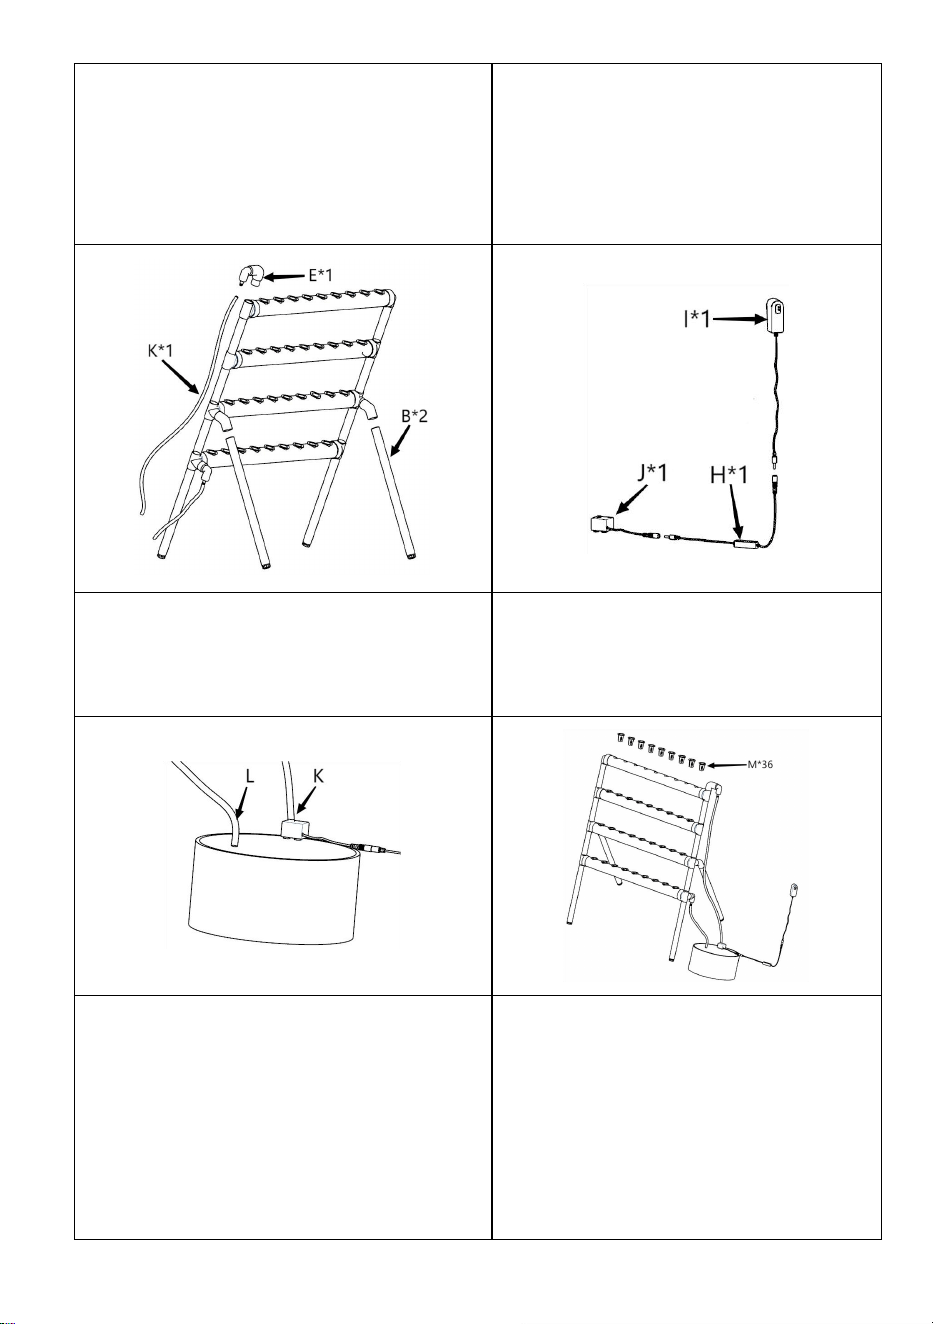
Parts list
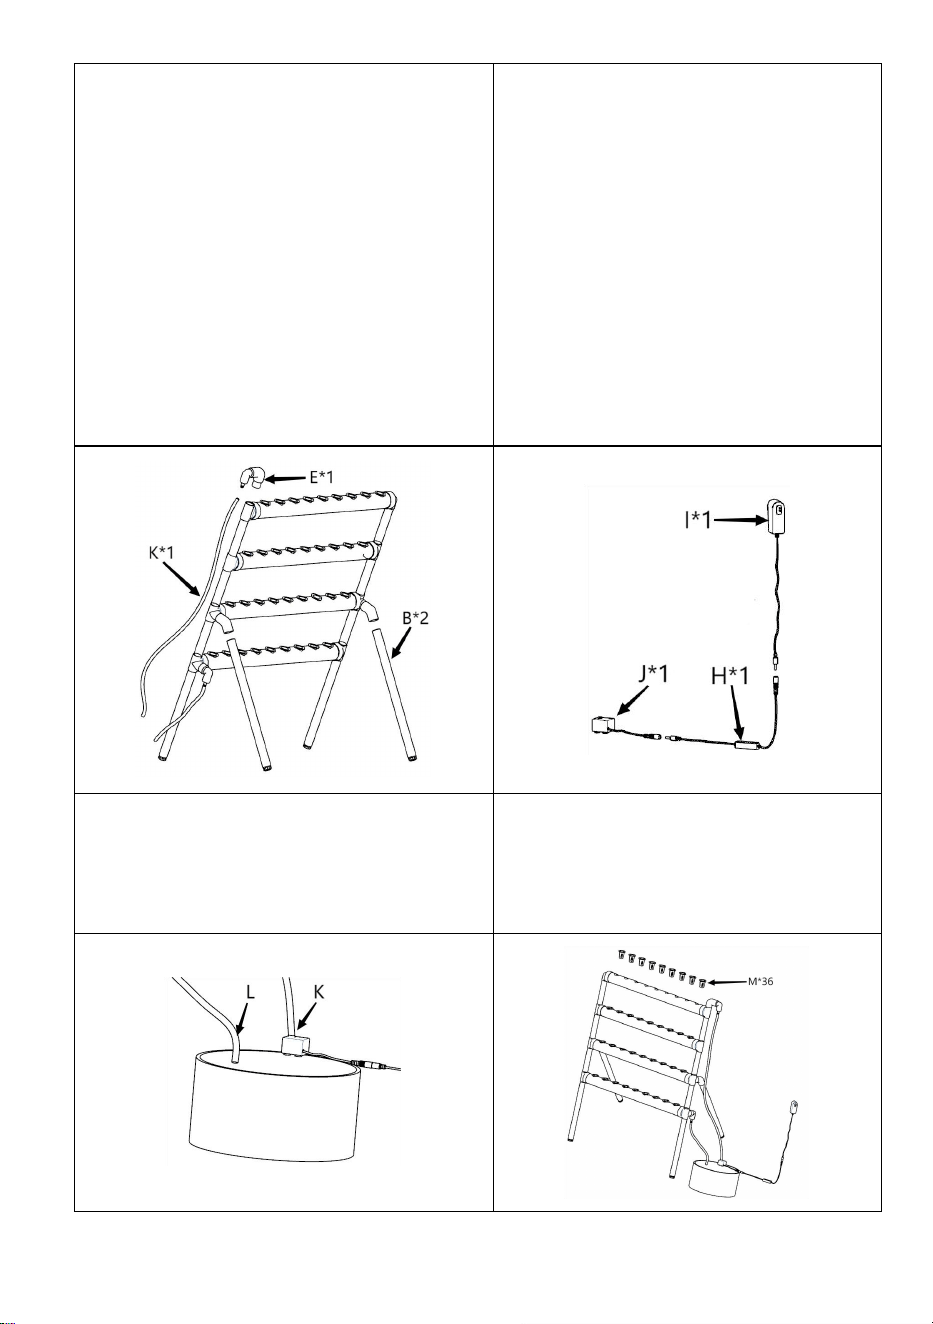
A
Foot tube ×2
(400mm)
J
Water pump ×1
With water plug and footpad
B
Foot tube ×2
(520mm)
K
Water outlet
hose 1.5m ×1
With water plug and footpad
C
Water outlet
composite
tube ×1
L
Water outlet
hose 1m ×1
D
Connector
composite
tube ×1
M
Planting basket
×36
E
Inlet tap ×1
N
Planting sponge
×36
F
Outlet tap ×1
1
Tweezers ×1
G
Planting
pipeline ×4
2
Aluminum tape
×1
Used to seal unplanted pipelines to
prevent UV rays and flying insects
from entering
H
Controller ×1
3
Rubber hammer
×1
I
Adapter ×1
4
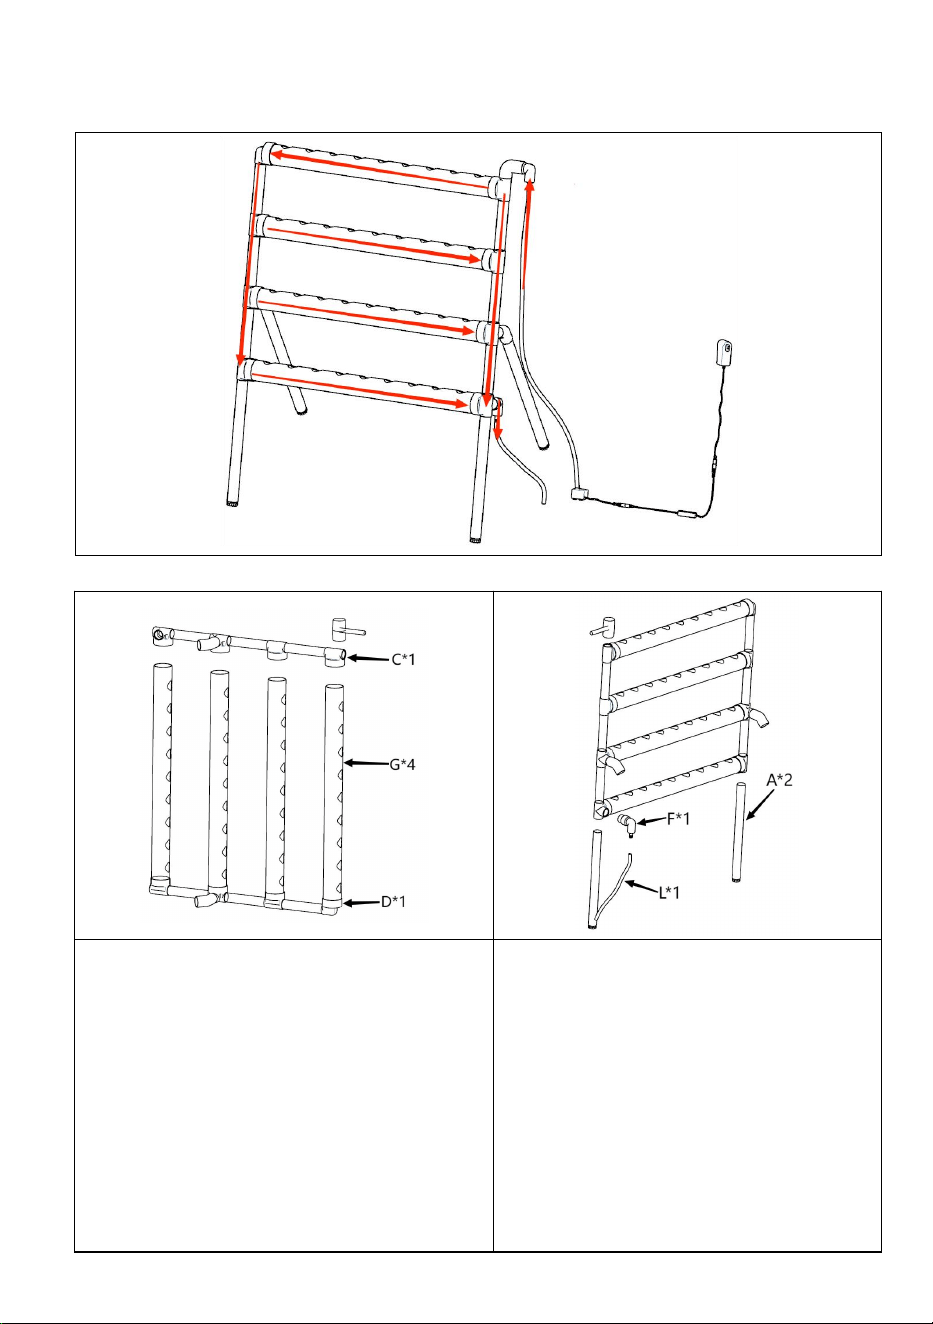
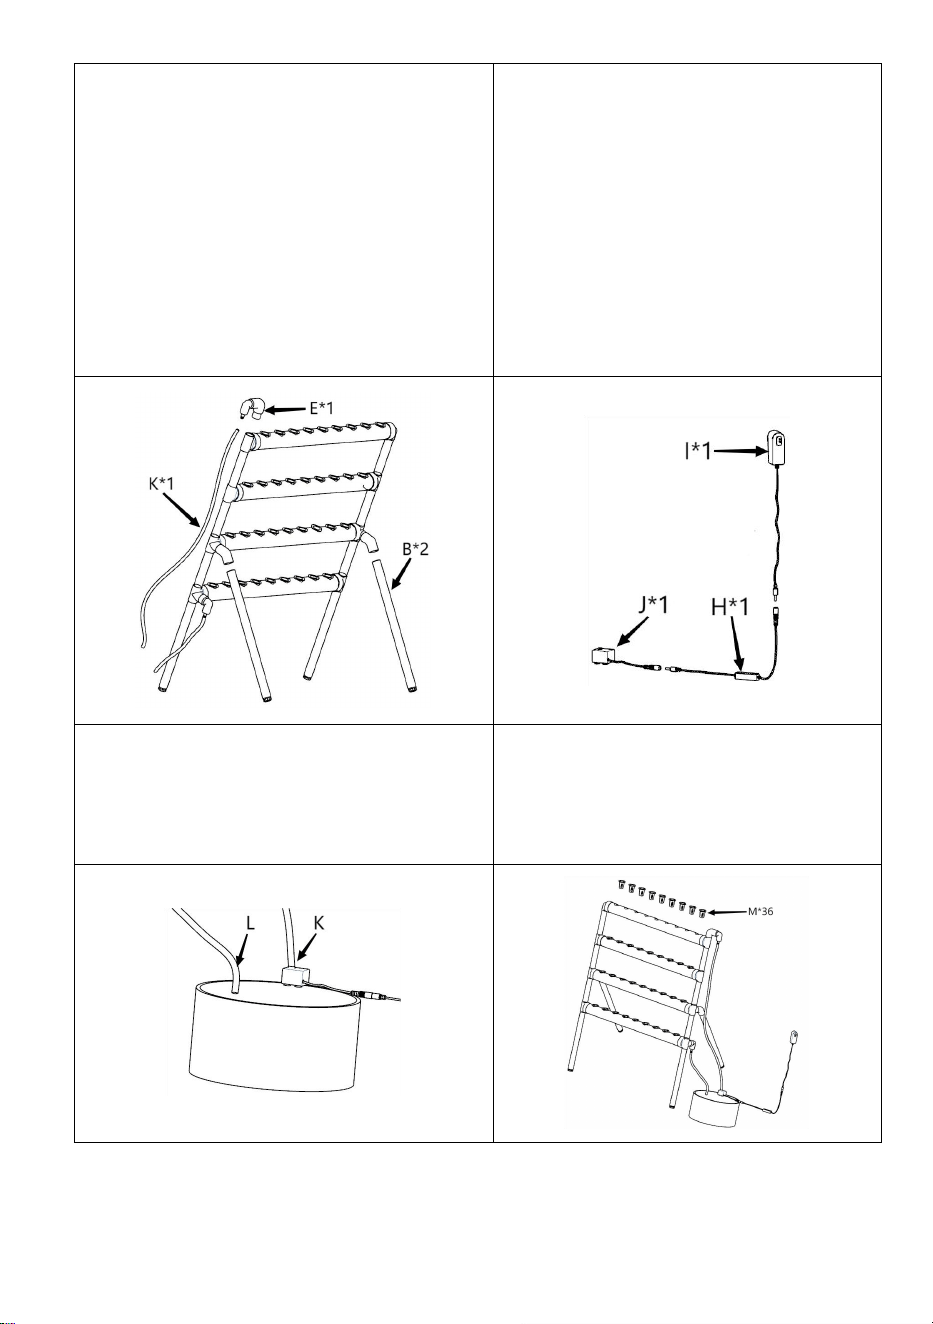
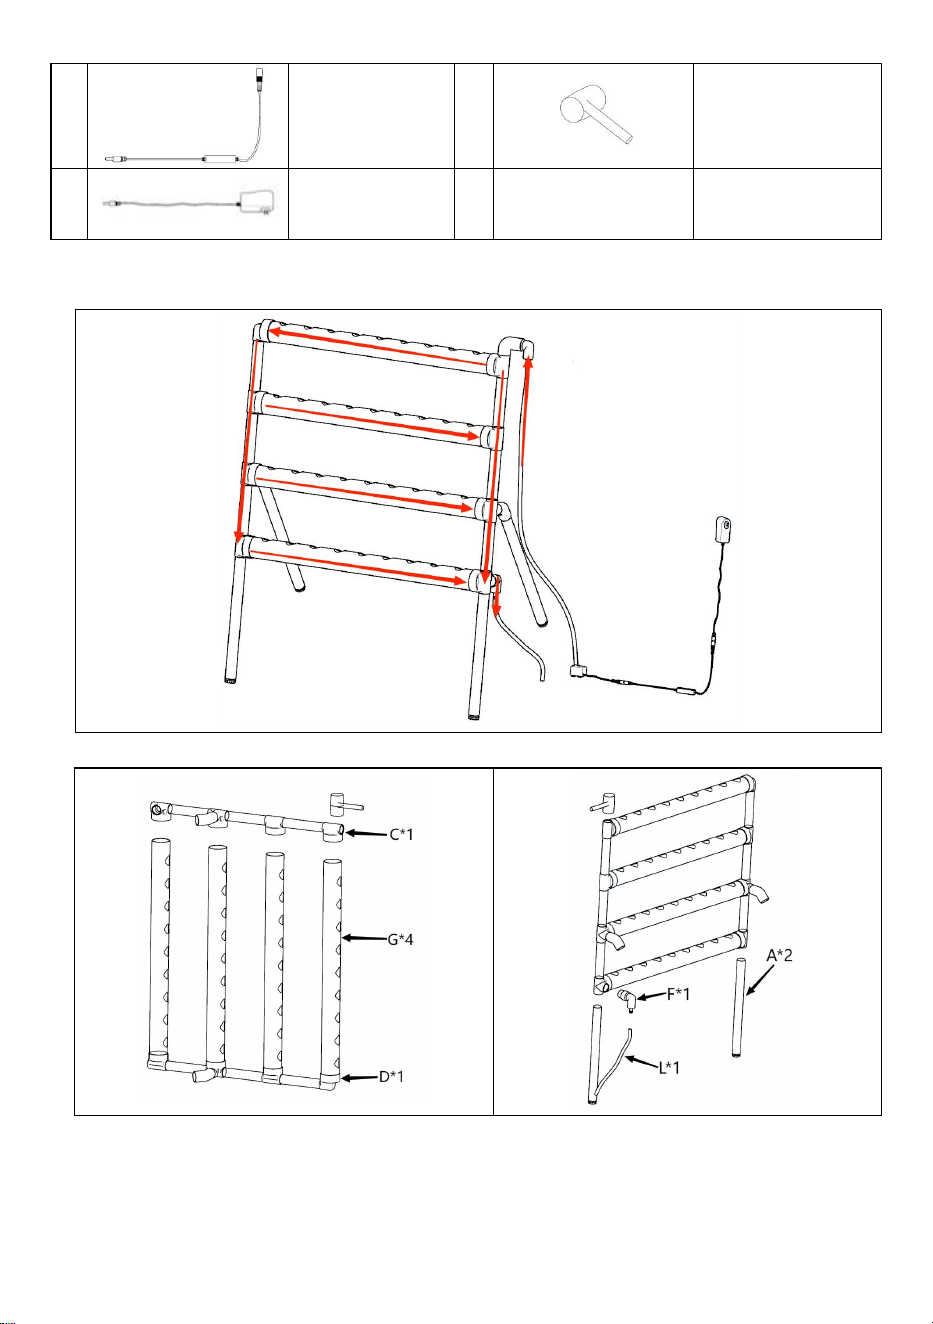
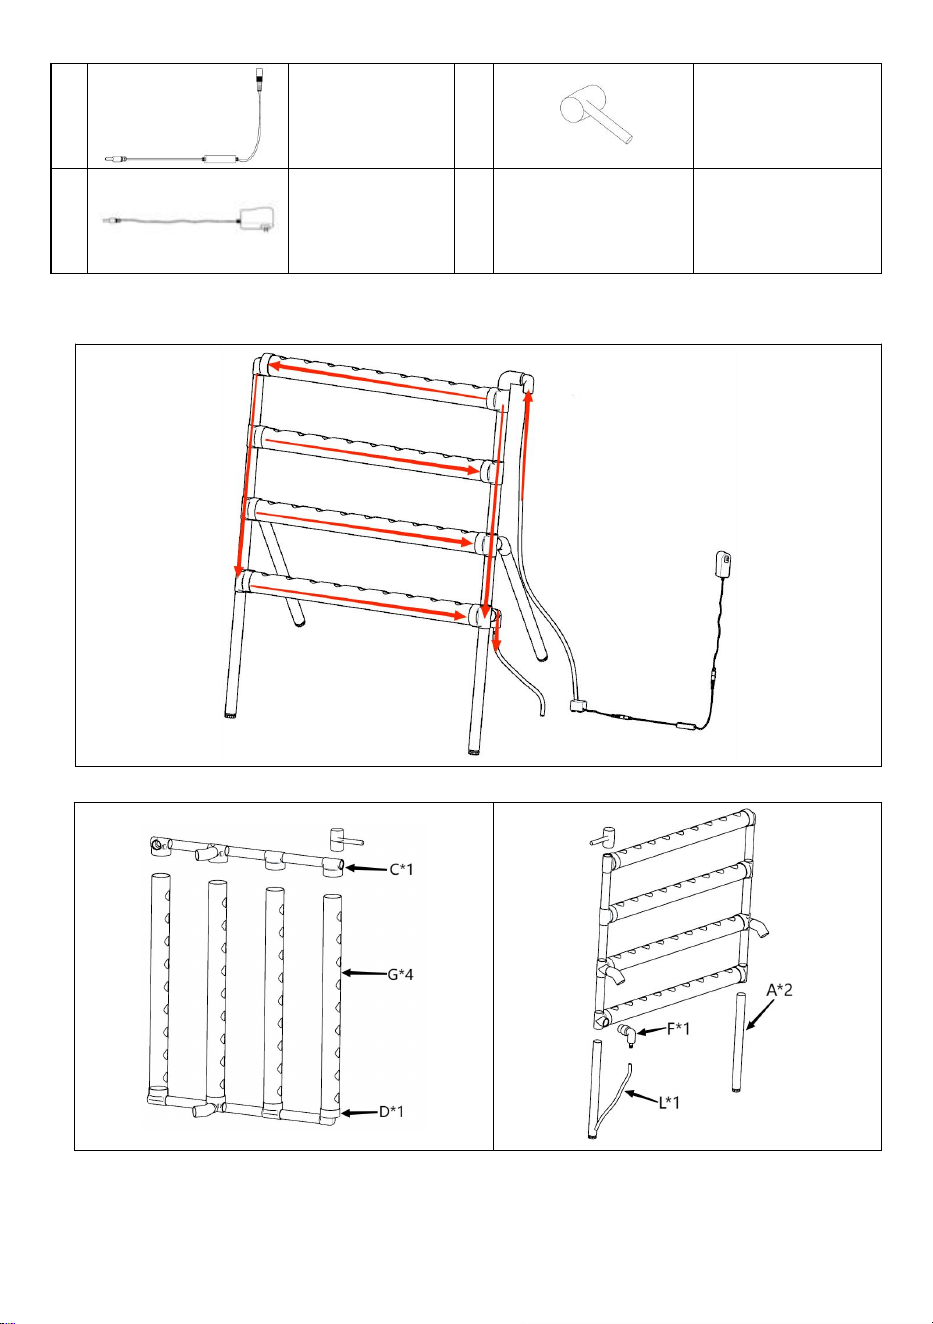
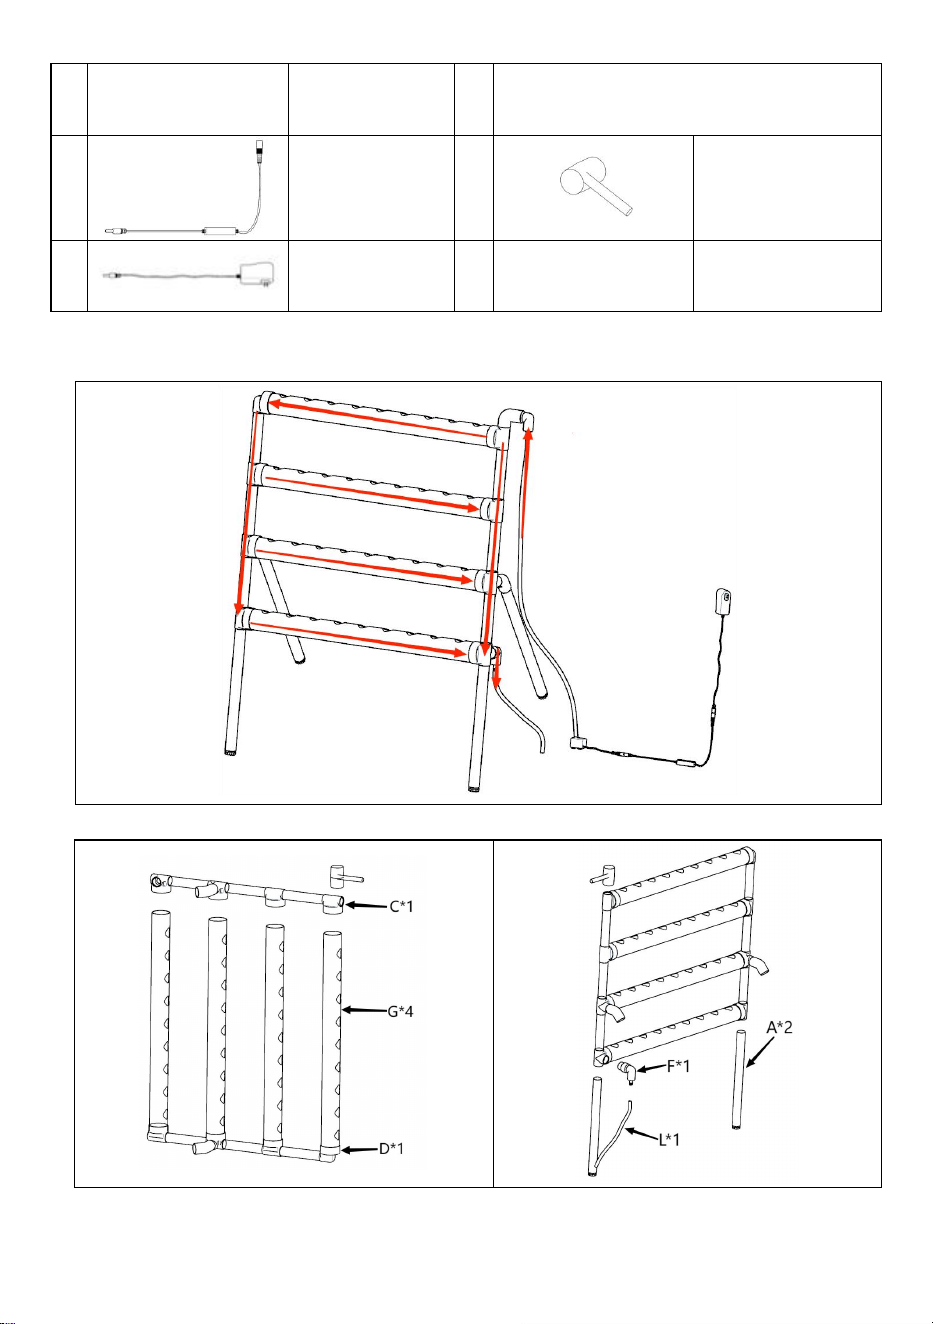
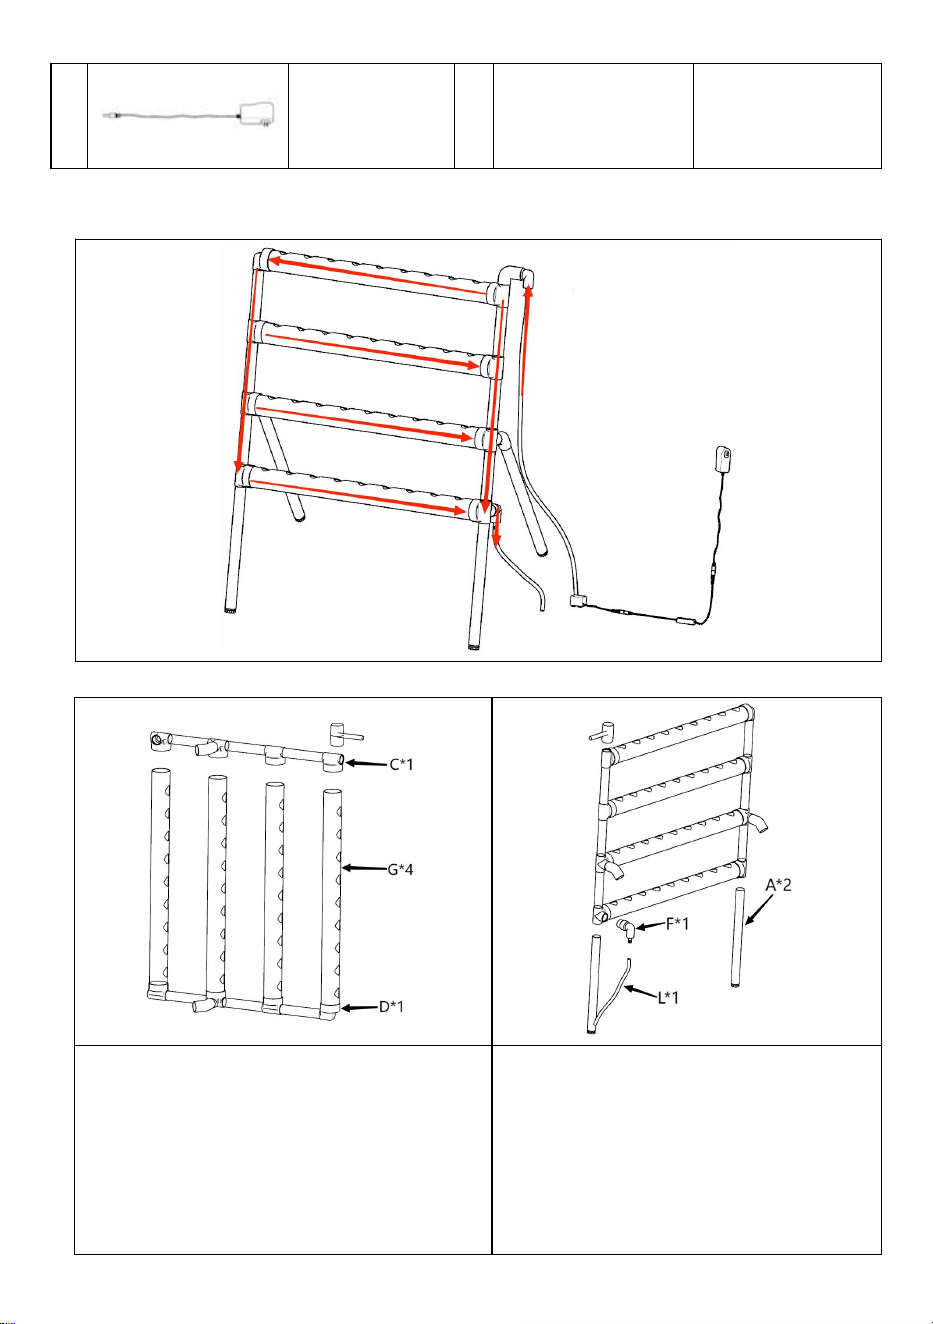
Installation
Figure 1: Connect a set of connector
composite tubes, a set of water outlet
composite tubes, and four planting
pipelines together according to the
diagram, with the planting pipelines
facing upwards. Reinforce them with a
rubber hammer (strike each connection
with the rubber hammer until they fit
tightly)
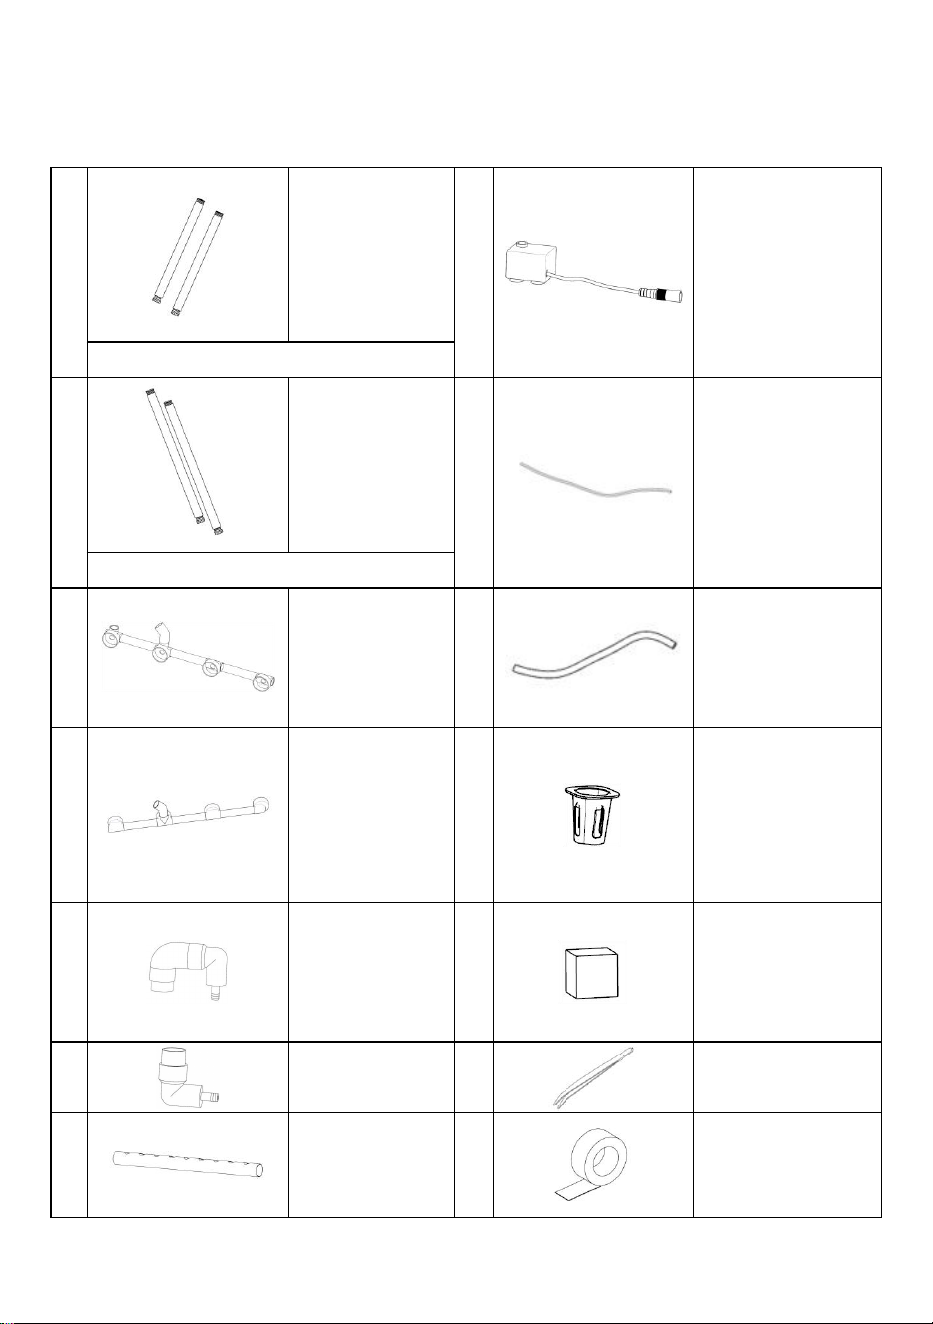
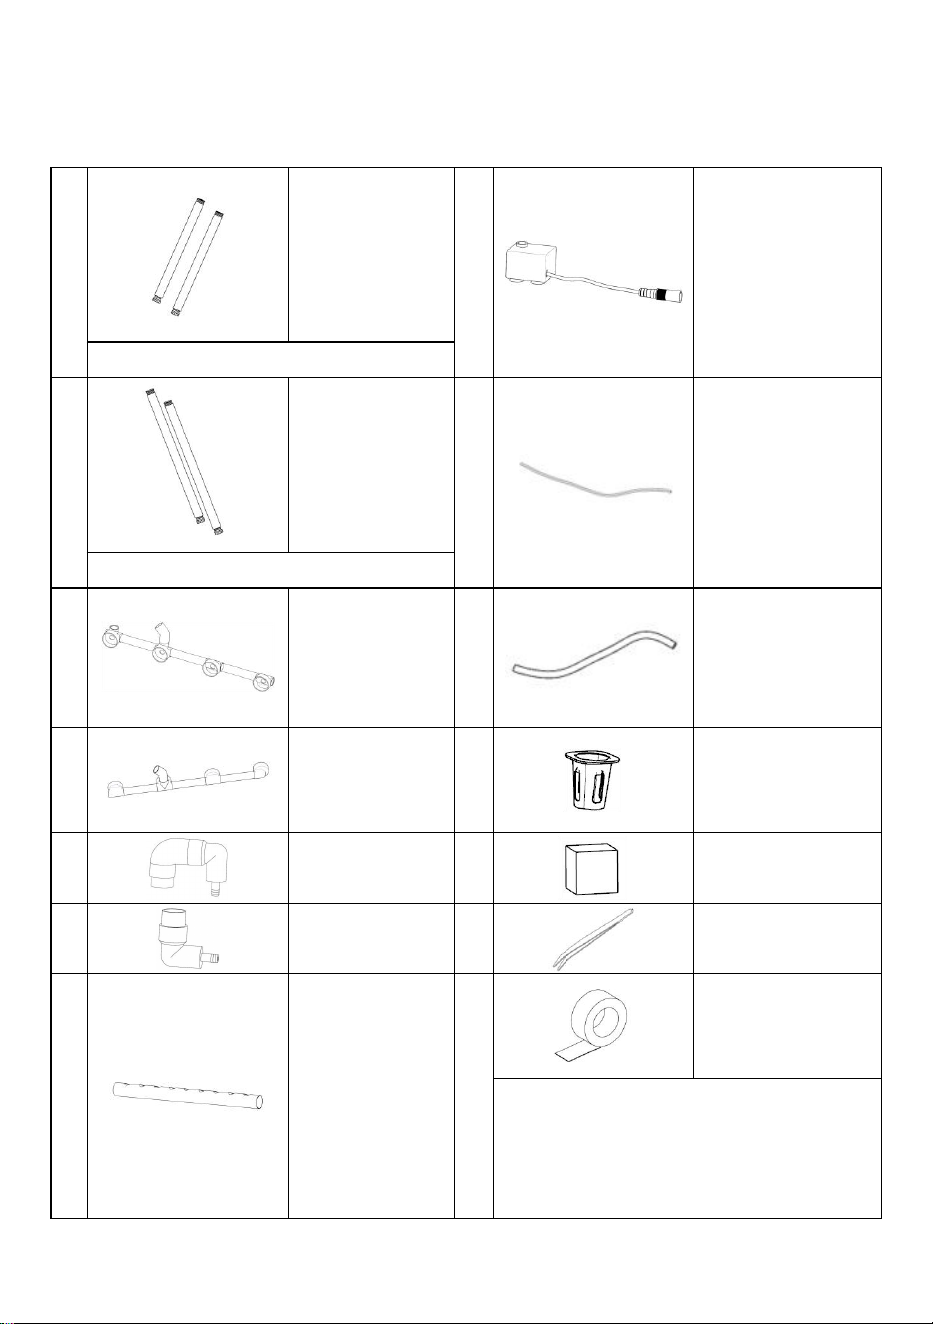
Figure 2: Connect two 400mm foot
tubes, a 1m hose and an outlet tap
with the assembly of Figure 1
according to the diagram. (Reinforce
the two angles with a rubber hammer
to adjust the level)
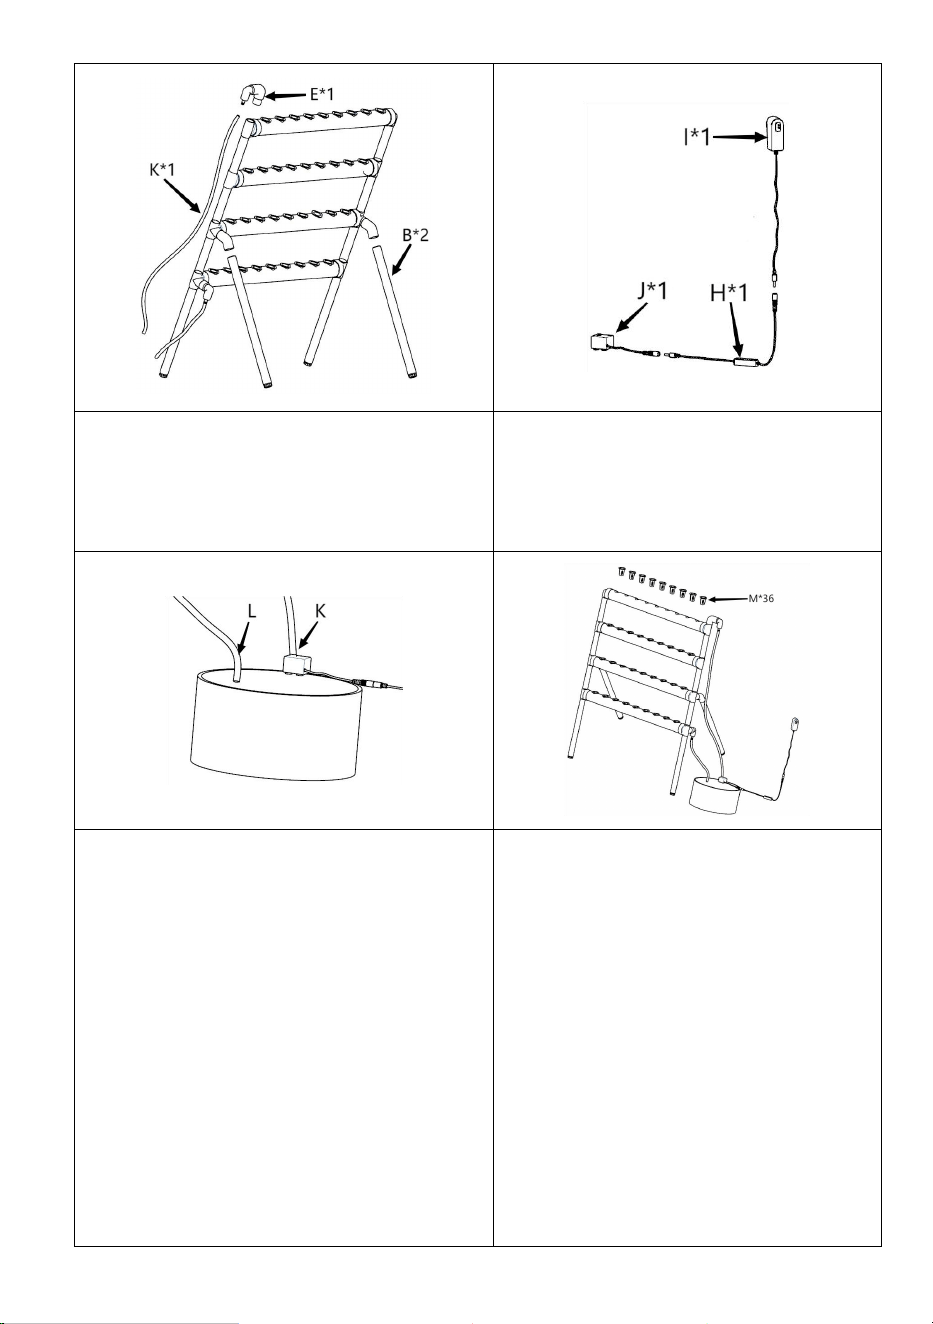
5
Figure 3: Connect two 520mm foot
tubes, a 1.5m hose, and an inlet tap with
the assembly of Figure 2 according to
the diagram.
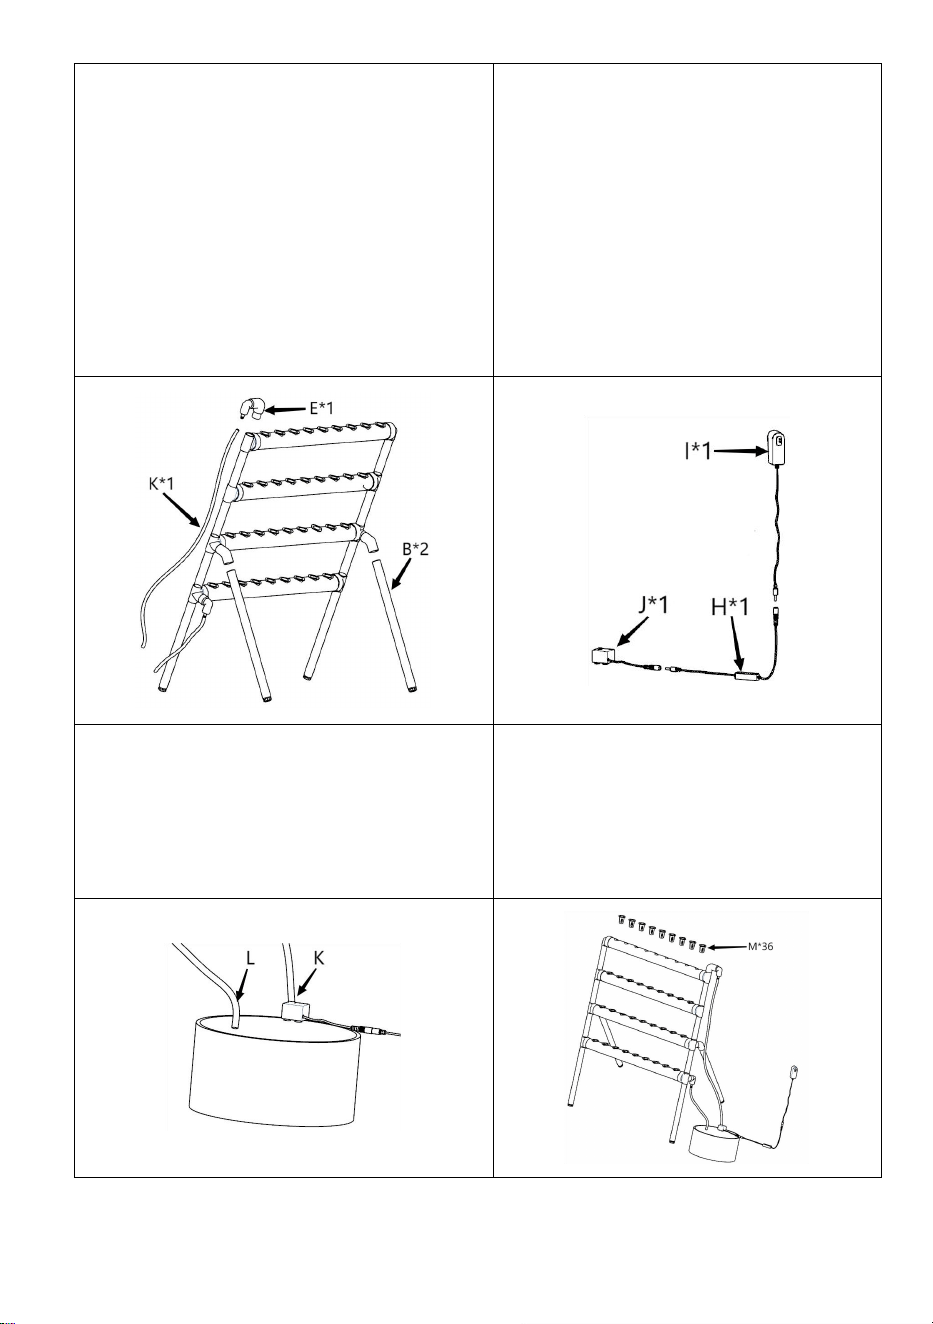
Figure 4: Connect an adapter, a
controller, and a water pump
together according to the diagram.
Figure 5: Firstly, prepare a water tank
and fill it with water. (It is recommended
to use a water tank that has capacity of
more than 20L, which does not include
20L). Connect the other end of the 1.5m
hose to the water pump, and attach the
water pump to the bottom of the water
tank. Also place the other end of the 1m
hose into the water tank. The water level
must submerge the water pump,
otherwise it will damage the pump or
stop working.
Figure 6: Put 36 planting baskets into
the planting pipelines, and insert the
adapter into the power supply. When
the water pump works, it will form a
water flow cycle. Finally, adjust the
balance of the feet so that there is
nutrient solution flowing through
each pipe.

6
Vegetable planting method:
1. Put the sponge into the water, press it with your hands, and suck in enough
water.
2. Place the seeds at the opening of the sponge, and pay attention not to place
them too deep.
3. Pour water into a basin about 2 centimeters deep.
4. Put the sponge into the basin.
5. Wait for the seeds to sprout, then place them in the sunlight. (Note that direct
sunlight instead of mere light is required)
Precautions for vegetable planting:
1. The roots of seedlings must be soaked in nutrient solution together with the
sponge.
2. The vegetable needs to be planted in a sunny area. (Except for
shade-enduring flowers and plants)
Planting:
1. The seedlings can be transplanted onto a shelf after they grow up. After being
separated, they can be filled into the planting basket together with the sponge.
Please be aware that the sponge should be filled at the bottom of the basket and
be able to touch the nutrient solution.
2. Connect the pump to the power supply and start the pump. The water in the
water tank will decrease. Turn off the pump within 10 minutes. When the water
returns to the water tank, fill the tank with water to make it full. Attention: do not
inject water into the water tank after the pump is started, otherwise when the pump
stops running, the water will overflow when it returns to the water tank.
3. It is suggested that users should purchase their own water tank with a capacity
of 20L or more.
4. Purchase seeds and nutrient solutions according to your own needs.

7
Manufacturer: Shanghaimuxinmuyeyouxiangongsi
Address:Baoshanqu Shuangchenglu 803long 11hao 1602A-1609shi
Shanghai
Imported to AUS: SIHAO PTY LTD, 1 ROKEVA STREETEASTWOOD
NSW 2122 Australia
Imported to USA: Sanven Technology Ltd., Suite 250, 9166 Anaheim
Place, Rancho Cucamonga, CA 91730
Made In China


Técnico Soporte y certificado de garantía electrónica www.vevor.com/support
SISTEMA DE CULTIVO HIDROPÓNICO DE TUBERÍAS
MANUAL DE USUARIO
We continue to be committed to provide you tools with competitive price.
"Save Half", "Half Price" or any other similar expressions used by us only represents an
estimate of savings you might benefit from buying certain tools with us compared to the major
top brands and doses not necessarily mean to cover all categories of tools offered by us. You
are kindly reminded to verify carefully when you are placing an order with us if you are
actually saving half in comparison with the top major brands.


1
Modelo: VVGrey4-36
Have product questions? Need technical support? Please feel free to
contact us:
Technical Support and E-Warranty Certificate
www.vevor.com/support
NEED HELP? CONTACT US!
This is the original instruction, please read all manual instructions
carefully before operating. VEVOR reserves a clear interpretation of our
user manual. The appearance of the product shall be subject to the
product you received. Please forgive us that we won't inform you again if
there are any technology or software updates on our product.
PIPES HYDROPONICS GROWING
SYSTEM

2
ESPECIFICACIONES
Modelo
VVGris4-36
Tamaño del producto
870*560*990mm
Voltaje de entrada
América del Norte: 120 V 60 Hz
Unión Europea: 220~240V 50Hz
Australia: 220~240V 50Hz
Antes de utilizar el producto, lea atentamente las instrucciones y
consérvelas correctamente.
Nota:
Asegúrese de que los niños estén siempre supervisados por un adulto
cuando utilicen este producto. Después de agregar agua, asegúrese de
tener las manos secas antes de enchufar el adaptador a una fuente de
alimentación.
3
Lista de partes
A
Tubo de pie ×
2 (400 mm)
j
Bomba de agua
× 1
Con tapón de agua y reposapiés.
B
Tubo de pie ×
2 (520 mm)
k
Manguera de
salida de agua
1,5 m × 1
Con tapón de agua y reposapiés.
C
Tubo
compuesto de
salida de
agua × 1
l
Manguera de
salida de agua
1m × 1
D
Conector de
tubo
compuesto ×
1
M
E
T
R
O
Cesta de
plantación × 36
m
i
Grifo de
entrada × 1
n
o
rt
e
Esponja de
plantación × 36
F
Grifo de
salida × 1
1
Pinzas × 1
G
R
A
Tubería de
plantación × 4
2
Cinta de
aluminio × 1
4
M
O
Se utiliza para sellar tuberías no
plantadas para evitar la entrada de
rayos UV e insectos voladores.
h
Controlador ×
1
3
Martillo de goma
× 1
I
Adaptador × 1
Instalación

5
Figura 1: Conecte un conjunto de tubos
compuestos conectores , un conjunto
de tubos compuestos de salida de agua
y cuatro tuberías de plantación entre sí
según el diagrama, con las tuberías de
plantación hacia arriba. Refuérzalos con
un martillo de goma (golpea cada
conexión con el martillo de goma hasta
que encajen bien)
Figura 2: Conecte dos tubos de pie
de 400 mm, una manguera de 1 m y
un grifo de salida con el conjunto de
la Figura 1 según el diagrama.
(Refuerza los dos ángulos con un
martillo de goma para ajustar el
nivel)
Figura 3: Conecte dos tubos de pie de
520 mm, una manguera de 1,5 m y un
grifo de entrada con el conjunto de la
Figura 2 según el diagrama.
Figura 4: Conecte un adaptador, un
controlador y una bomba de agua
según el diagrama.

6
Figura 5: En primer lugar, prepare un
tanque de agua y llénelo con agua. (Se
recomienda utilizar un tanque de agua
que tenga una capacidad superior a 20
L, que no incluye 20 L). Conecte el otro
extremo de la manguera de 1,5 m a la
bomba de agua y conecte la bomba de
agua al fondo del tanque de agua.
Coloque también el otro extremo de la
manguera de 1 m en el tanque de agua.
El nivel del agua debe sumergir la
bomba de agua, de lo contrario dañará
la bomba o dejará de funcionar.
Figura 6: Coloque 36 cestas de
siembra en las tuberías de siembra e
inserte el adaptador en la fuente de
alimentación. Cuando la bomba de
agua funcione, formará un ciclo de
flujo de agua. Finalmente, ajuste el
equilibrio de los pies para que fluya
solución nutritiva por cada tubo.
Método de plantación de hortalizas:
6. Coloque la esponja en el agua, presiónela con las manos y succione suficiente
agua.
7. Coloca las semillas en la abertura del bizcocho, teniendo cuidado de no
colocarlas demasiado profundas.
8. Vierta agua en un recipiente de unos 2 centímetros de profundidad.
9. Pon la esponja en el recipiente.
10. Espere a que broten las semillas y luego colóquelas a la luz del sol. (Tenga en
cuenta que se requiere luz solar directa en lugar de mera luz)
Precauciones para la siembra de hortalizas:
3. Las raíces de las plántulas se deben remojar en una solución nutritiva junto
con una esponja.
4. La verdura debe plantarse en un lugar soleado. (Excepto flores y plantas que
resisten la sombra)
Plantación:
5. Las plántulas se pueden trasplantar a un estante una vez que crezcan.
Después de separarlos, se pueden introducir en la cesta de plantación junto con la
esponja. Tenga en cuenta que la esponja debe llenarse en el fondo de la cesta y
poder tocar la solución nutritiva.

7
6. Conecte la bomba a la fuente de alimentación y enciéndala. El agua en el
tanque de agua disminuirá. Apague la bomba dentro de 10 minutos. Cuando el
agua regrese al tanque de agua, llénelo con agua para llenarlo. Atención: no
inyecte agua en el tanque de agua después de arrancar la bomba, de lo contrario,
cuando la bomba deje de funcionar, el agua se desbordará cuando regrese al
tanque de agua.
7. Se sugiere que los usuarios compren su propio tanque de agua con una
capacidad de 20 litros o más.
8. Compra semillas y soluciones nutritivas según tus propias necesidades.
Fabricante: Shanghaimuxinmuyeyouxiangongsi
Dirección: Baoshanqu Shuangchenglu 803long 11hao 1602A-1609shi
Shanghai
Importado a AUS: SIHAO PTY LTD, 1 ROKEVA STREETEASTWOOD
NSW 2122 Australia
Importado a EE. UU.: Sanven Technology Ltd., Suite 250, 9166 Anaheim
Place, Rancho Cucamonga, CA 91730
Hecho en china


Tecnico Supporto e certificato di garanzia elettronica www.vevor.com/support
SISTEMA DI COLTIVAZIONE IDROPONICA DI TUBI
MANUALE D'USO
We continue to be committed to provide you tools with competitive price.
"Save Half", "Half Price" or any other similar expressions used by us only represents an
estimate of savings you might benefit from buying certain tools with us compared to the major
top brands and doses not necessarily mean to cover all categories of tools offered by us. You
are kindly reminded to verify carefully when you are placing an order with us if you are
actually saving half in comparison with the top major brands.


1
Modello: VVGrey4-36
Have product questions? Need technical support? Please feel free to
contact us:
Technical Support and E-Warranty Certificate
www.vevor.com/support
NEED HELP? CONTACT US!
This is the original instruction, please read all manual instructions
carefully before operating. VEVOR reserves a clear interpretation of our
user manual. The appearance of the product shall be subject to the
product you received. Please forgive us that we won't inform you again if
there are any technology or software updates on our product.
PIPES HYDROPONICS GROWING
SYSTEM

2
SPECIFICHE
Modello
VVGrey4-36
Taglia del prodotto
870*560*990 millimetri
Tensione di ingresso
Nord America: 120 V 60 Hz
Unione Europea: 220~240 V 50 Hz
Australia: 220~240 V 50 Hz
Prima di utilizzare il prodotto, leggere attentamente le istruzioni e
conservarle correttamente.
Nota:
Assicurati che i bambini siano sempre supervisionati da un adulto quando
utilizzano questo prodotto. Dopo aver aggiunto l'acqua, assicurati che le
tue mani siano asciutte prima di collegare l'adattatore a una fonte di
alimentazione.
3
Elenco delle parti
U
N
Tubo del
piede × 2 (400
mm)
J
Pompa
dell'acqua × 1
Con presa acqua e poggiapiedi
B
Tubo del
piede × 2 (520
mm)
K
Tubo di uscita
dell'acqua 1,5 m
× 1
Con presa acqua e poggiapiedi
C
Tubo
composito di
uscita
dell'acqua × 1
l
Tubo di uscita
dell'acqua 1m ×
1
D
Tubo
composito
connettore × 1
M
Cesto per
piantare × 36
E
Rubinetto di
ingresso × 1
N
Spugna per
piantare × 36
F
Rubinetto di
uscita × 1
1
Pinzetta × 1
G
Piantagione di
condotte × 4
2
Nastro di
alluminio × 1
Utilizzato per sigillare tubazioni non
piantumate per impedire l'ingresso di
raggi UV e insetti volanti

4
H
Controllore ×
1
3
Martello di
gomma × 1
I
O
Adattatore × 1
Installazione
5
Figura 1: Collegare insieme un set di
tubi compositi di collegamento , un set
di tubi compositi per l'uscita dell'acqua e
quattro tubazioni per la semina insieme
secondo lo schema, con le tubazioni per
la semina rivolte verso l'alto. Rinforzarli
con un martello di gomma (colpire ogni
connessione con il martello di gomma
finché non si adatta perfettamente)
Figura 2: Collegare due tubi da 400
mm, un tubo da 1 me un rubinetto di
uscita con il gruppo della Figura 1
secondo lo schema. (Rinforzare i
due angoli con un martello di gomma
per regolare il livello)
Figura 3: Collegare due tubi da 520 mm,
un tubo da 1,5 me un rubinetto di
ingresso con il gruppo della Figura 2
secondo lo schema.
Figura 4: collegare insieme un
adattatore, un controller e una
pompa dell'acqua secondo lo
schema.

6
Figura 5: Innanzitutto, preparare un
serbatoio dell'acqua e riempirlo d'acqua.
(Si consiglia di utilizzare un serbatoio
dell'acqua con capacità superiore a 20
litri, che non include 20 litri). Collega
l'altra estremità del tubo da 1,5 m alla
pompa dell'acqua e collega la pompa
dell'acqua al fondo del serbatoio
dell'acqua. Posizionare anche l'altra
estremità del tubo da 1 metro nel
serbatoio dell'acqua. Il livello dell'acqua
deve sommergere la pompa dell'acqua,
altrimenti danneggerà la pompa o
smetterà di funzionare.
Figura 6: Metti 36 cestini per piantare
nelle tubazioni per piantare e
inserisci l'adattatore
nell'alimentatore. Quando la pompa
dell'acqua funziona, formerà un ciclo
di flusso dell'acqua. Infine, regola
l'equilibrio dei piedi in modo che la
soluzione nutritiva scorra attraverso
ciascun tubo.
Metodo di semina delle verdure:
11. Metti la spugna nell'acqua, premila con le mani e aspira abbastanza acqua.
12. Disporre i semi all'apertura del pan di spagna, facendo attenzione a non
inserirli troppo in profondità.
13. Versare l'acqua in una bacinella profonda circa 2 centimetri.
14. Metti la spugna nella bacinella.
15. Aspetta che i semi germoglino, poi mettili alla luce del sole. (Si noti che è
necessaria la luce solare diretta invece della semplice luce)
Precauzioni per la semina degli ortaggi:
5. Le radici delle piantine devono essere immerse nella soluzione nutritiva
insieme alla spugna.
6. L'ortaggio deve essere piantato in una zona soleggiata. (Ad eccezione di fiori e
piante che resistono all'ombra)
Piantagione:
9. Le piantine possono essere trapiantate su uno scaffale dopo che sono
cresciute. Dopo essere stati separati, possono essere riempiti nel cestino per la
semina insieme alla spugna. Tieni presente che la spugna deve essere riempita
sul fondo del cestello e deve poter toccare la soluzione nutritiva.

7
10. Collegare la pompa all'alimentazione e avviare la pompa. L'acqua nel
serbatoio diminuirà. Spegnere la pompa entro 10 minuti. Quando l'acqua ritorna
nel serbatoio, riempire il serbatoio con acqua per renderlo pieno. Attenzione: non
iniettare acqua nel serbatoio dell'acqua dopo l'avvio della pompa, altrimenti
quando la pompa smette di funzionare, l'acqua traboccherà quando ritorna nel
serbatoio dell'acqua.
11. Si suggerisce agli utenti di acquistare un proprio serbatoio dell'acqua con una
capacità di 20 litri o più.
12. Acquista semi e soluzioni nutritive in base alle tue esigenze.
Produttore: Shanghaimuxinmuyeyouxiangongsi
Indirizzo: Baoshanqu Shuangchenglu 803long 11hao 1602A-1609shi
Shanghai
Importato in AUS: SIHAO PTY LTD, 1 ROKEVA STREETEASTWOOD
NSW 2122 Australia
Importato negli Stati Uniti: Sanven Technology Ltd., Suite 250, 9166
Anaheim Place, Rancho Cucamonga, CA 91730
Made in China


Techniczny Certyfikat wsparcia i e-gwarancji www.vevor.com/support
SYSTEM UPRAWY HYDROPONICZNEJ RUR
INSTRUKCJA OBSŁUGI
We continue to be committed to provide you tools with competitive price.
"Save Half", "Half Price" or any other similar expressions used by us only represents an
estimate of savings you might benefit from buying certain tools with us compared to the major
top brands and doses not necessarily mean to cover all categories of tools offered by us. You
are kindly reminded to verify carefully when you are placing an order with us if you are
actually saving half in comparison with the top major brands.


1
Model: VVSzary4-36
Have product questions? Need technical support? Please feel free to
contact us:
Technical Support and E-Warranty Certificate
www.vevor.com/support
NEED HELP? CONTACT US!
This is the original instruction, please read all manual instructions
carefully before operating. VEVOR reserves a clear interpretation of our
user manual. The appearance of the product shall be subject to the
product you received. Please forgive us that we won't inform you again if
there are any technology or software updates on our product.
PIPES HYDROPONICS GROWING
SYSTEM

2
SPECYFIKACJE
Model
VVSzary4-36
Rozmiar produktu
870*560*990mm
Napięcie wejściowe
Ameryka Północna: 120 V 60 Hz
Unia Europejska: 220 ~ 240 V 50 Hz
Australia: 220 ~ 240 V 50 Hz
Przed użyciem produktu prosimy o dokładne zapoznanie się z instrukcją i
odpowiednie jej przechowywanie.
Notatka:
Upewnij się, że dzieci podczas korzystania z tego produktu są zawsze pod
nadzorem osoby dorosłej. Po dodaniu wody upewnij się, że ręce są suche,
zanim podłączysz zasilacz do źródła zasilania.
3
Lista części
A
Rura
podnóżka × 2
(400 mm)
J
Pompa wodna ×
1
Z korkiem wodnym i podnóżkiem
B
Rura
podnóżka × 2
(520 mm)
K
Wąż
odprowadzający
wodę 1,5 m × 1
Z korkiem wodnym i podnóżkiem
C
Rura
kompozytowa
wylotu wody ×
1
L
Wąż
odprowadzający
wodę 1m × 1
D
Złącze rurki
kompozytowej
× 1
M
Kosz do
sadzenia × 36
m
i
Kran
dopływowy ×
1
N
Gąbka do
sadzenia × 36
F
Kran
wylotowy × 1
1
Pęsety × 1
G
Rurociąg do
sadzenia × 4
2
Taśma
aluminiowa × 1
Służy do uszczelniania
nieobsadzonych rurociągów, aby
zapobiec przedostawaniu się
promieni UV i owadów latających
4
H
Kontroler × 1
3
Młotek gumowy
× 1
I
Adapter × 1
Instalacja

5
Rysunek 1: Połącz zestaw
kompozytowych rur łączących , zestaw
rur kompozytowych wylotu wody i cztery
rurociągi do sadzenia razem zgodnie ze
schematem, z rurociągami do sadzenia
skierowanymi do góry. Wzmocnij je
gumowym młotkiem (uderz każde
połączenie gumowym młotkiem, aż
będą dobrze przylegały)
Rysunek 2: Połącz dwie stopy 400
mm, wąż o długości 1 m i kran
wylotowy z zespołem z rysunku 1
zgodnie ze schematem. (Wzmocnij
oba kąty gumowym młotkiem, aby
wyregulować poziom)
Rysunek 3: Połącz dwie stopy rurowe o
średnicy 520 mm, wąż o długości 1,5 m i
kran dopływowy z zespołem z rysunku 2
zgodnie ze schematem.
Rysunek 4: Połącz adapter,
sterownik i pompę wodną zgodnie ze
schematem.

6
Rysunek 5: Najpierw przygotuj zbiornik
na wodę i napełnij go wodą. (Zaleca się
stosowanie zbiornika na wodę o
pojemności większej niż 20L, co nie
obejmuje 20L). Podłącz drugi koniec
węża o długości 1,5 m do pompy
wodnej i przymocuj pompę wodną do
dna zbiornika na wodę. Umieść także
drugi koniec węża o długości 1 m w
zbiorniku na wodę. Poziom wody musi
zanurzać pompę wodną, w przeciwnym
razie spowoduje to uszkodzenie pompy
lub przestanie działać.
Rysunek 6: Umieść 36 koszy do
sadzenia w rurociągach do sadzenia
i podłącz adapter do źródła zasilania.
Gdy pompa wodna zacznie działać,
utworzy cykl przepływu wody. Na
koniec wyreguluj równowagę stóp
tak, aby przez każdą rurkę
przepływał roztwór składników
odżywczych.
Metoda sadzenia warzyw:
16. Włóż gąbkę do wody, naciśnij ją dłońmi i zasysaj odpowiednią ilość wody.
17. Umieść nasiona w otworze gąbki, uważając, aby nie umieścić ich zbyt głęboko.
18. Wlej wodę do miski na głębokość około 2 centymetrów.
19. Włóż gąbkę do miski.
20. Poczekaj, aż nasiona wykiełkują, a następnie umieść je na słońcu. (Pamiętaj,
że wymagane jest bezpośrednie światło słoneczne, a nie zwykłe światło)
Środki ostrożności przy sadzeniu warzyw:
7. Korzenie sadzonek należy namoczyć w pożywce razem z gąbką.
8. Warzywa należy sadzić w słonecznym miejscu. (Z wyjątkiem kwiatów i roślin
odpornych na cień)
Sadzenie:
13. Po dorośnięciu sadzonki można przesadzić na półkę. Po rozdzieleniu można je
wraz z gąbką napełnić koszyczek do sadzenia. Należy pamiętać, aby gąbka była
wypełniona na dnie koszyka i mogła dotykać odżywki.
14. Podłącz pompę do źródła zasilania i uruchom pompę. Ilość wody w zbiorniku
spadnie. Wyłączyć pompę w ciągu 10 minut. Kiedy woda powróci do zbiornika na
wodę, napełnij zbiornik wodą do pełna. Uwaga: nie wlewaj wody do zbiornika na
wodę po uruchomieniu pompy, w przeciwnym razie, gdy pompa przestanie działać,

7
woda będzie się przelewać, gdy wróci do zbiornika na wodę.
15. Sugeruje się, aby użytkownicy zakupili własny zbiornik na wodę o pojemności
20L lub większej.
16. Kupuj nasiona i pożywki według własnych potrzeb.
Producent: Shanghaimuxinmuyeyouxiangongsi
Adres: Baoshanqu Shuangchenglu 803long 11hao 1602A-1609shi
Szanghaj
Import do AUS: SIHAO PTY LTD, 1 ROKEVA STREETEASTWOOD NSW
2122 Australia
Import do USA: Sanven Technology Ltd., Suite 250, 9166 Anaheim Place,
Rancho Cucamonga, CA 91730
Wyprodukowano w Chinach


Technisch Support- und E-Garantie-Zertifikat www.vevor.com/support
ROHRE HYDROKULTUR-ANBAUSYSTEM
BENUTZERHANDBUCH
We continue to be committed to provide you tools with competitive price.
"Save Half", "Half Price" or any other similar expressions used by us only represents an
estimate of savings you might benefit from buying certain tools with us compared to the major
top brands and doses not necessarily mean to cover all categories of tools offered by us. You
are kindly reminded to verify carefully when you are placing an order with us if you are
actually saving half in comparison with the top major brands.


1
Modell: VVGrey4-36
Have product questions? Need technical support? Please feel free to
contact us:
Technical Support and E-Warranty Certificate
www.vevor.com/support
NEED HELP? CONTACT US!
This is the original instruction, please read all manual instructions
carefully before operating. VEVOR reserves a clear interpretation of our
user manual. The appearance of the product shall be subject to the
product you received. Please forgive us that we won't inform you again if
there are any technology or software updates on our product.
PIPES HYDROPONICS GROWING
SYSTEM

2
SPEZIFIKATIONEN
Modell
VVGrau4-36
Produktgröße
870*560*990mm
Eingangsspannung
Nordamerika: 120 V 60 Hz
Europäische Union: 220~240V 50Hz
Australien: 220~240V 50Hz
Bevor Sie das Produkt verwenden, lesen Sie bitte die
Gebrauchsanweisung sorgfältig durch und bewahren Sie sie
ordnungsgemäß auf.
Notiz:
Bitte stellen Sie sicher, dass Kinder bei der Verwendung dieses Produkts
immer von einem Erwachsenen beaufsichtigt werden. Stellen Sie nach
dem Hinzufügen von Wasser sicher, dass Ihre Hände trocken sind, bevor
Sie den Adapter an eine Stromquelle anschließen.
3
Liste der Einzelteile
A
Fußrohr × 2
(400 mm)
J
Wasserpumpe ×
1
Mit Wasseranschluss und
Fußpolster
B
Fußrohr × 2
(520 mm)
K
Wasserauslasss
chlauch 1,5 m ×
1
Mit Wasseranschluss und
Fußpolster
C
Wasserauslas
s-Verbundrohr
× 1
L
Wasserauslasss
chlauch 1 m × 1
D
Verbindungsst
ück-Verbundr
ohr × 1
M
Pflanzkorb × 36
E
Einlasshahn ×
1
N
Pflanzschwamm
× 36
F
Auslaufhahn
× 1
1
Pinzette × 1
G
Pflanzrohr × 4
2
Aluminiumband
× 1
Wird zum Abdichten unbepflanzter
Rohrleitungen verwendet, um das
Eindringen von UV-Strahlen und
fliegenden Insekten zu verhindern
4
H
Controller × 1
3
Gummihammer
× 1
I
C
H
Adapter × 1
Installation
5
Abbildung 1: Verbinden Sie einen Satz
Verbindungs-Verbundrohre , einen Satz
Wasserauslass-Verbundrohre und vier
Pflanzrohre gemäß der Abbildung
miteinander, wobei die Pflanzrohre nach
oben zeigen. Verstärken Sie sie mit
einem Gummihammer (schlagen Sie mit
dem Gummihammer auf jede
Verbindung, bis sie fest sitzt).
Abbildung 2: Verbinden Sie zwei
400-mm-Fußrohre, einen 1 m langen
Schlauch und einen Auslasshahn mit
der Baugruppe aus Abbildung 1
gemäß der Abbildung. (Verstärken
Sie die beiden Winkel mit einem
Gummihammer, um die Höhe
anzupassen.)
Abbildung 3: Verbinden Sie zwei
520-mm-Fußrohre, einen 1,5 m langen
Schlauch und einen Einlasshahn mit der
Baugruppe aus Abbildung 2 gemäß der
Abbildung.
Abbildung 4: Verbinden Sie einen
Adapter, einen Controller und eine
Wasserpumpe gemäß dem
Diagramm miteinander.

6
Abbildung 5: Bereiten Sie zunächst
einen Wassertank vor und füllen Sie ihn
mit Wasser. (Es wird empfohlen, einen
Wassertank mit einem
Fassungsvermögen von mehr als 20 l
zu verwenden, wobei 20 l nicht
eingerechnet sind.) Verbinden Sie das
andere Ende des 1,5 m langen
Schlauchs mit der Wasserpumpe und
befestigen Sie die Wasserpumpe am
Boden des Wassertanks. Stecken Sie
auch das andere Ende des 1 m langen
Schlauchs in den Wassertank. Der
Wasserstand muss die Wasserpumpe
überfluten, sonst wird die Pumpe
beschädigt oder funktioniert nicht mehr.
Abbildung 6: Setzen Sie 36
Pflanzkörbe in die Pflanzleitungen
ein und stecken Sie den Adapter in
die Stromversorgung. Wenn die
Wasserpumpe arbeitet, bildet sie
einen Wasserflusskreislauf. Passen
Sie abschließend die Balance der
Füße an, sodass durch jedes Rohr
Nährlösung fließt.
Pflanzmethode für Gemüse:
21. Legen Sie den Schwamm ins Wasser, drücken Sie ihn mit den Händen an und
saugen Sie ausreichend Wasser auf.
22. Platzieren Sie die Samen an der Öffnung des Schwamms und achten Sie
darauf, sie nicht zu tief zu platzieren.
23. Gießen Sie Wasser in ein etwa 2 Zentimeter tiefes Becken.
24. Legen Sie den Schwamm in die Schüssel.
25. Warten Sie, bis die Samen keimen, und legen Sie sie dann ins Sonnenlicht.
(Beachten Sie, dass direktes Sonnenlicht anstelle von bloßem Licht erforderlich
ist.)
Vorsichtsmaßnahmen beim Gemüseanbau:
9. Die Wurzeln der Sämlinge müssen zusammen mit dem Schwamm in
Nährlösung eingeweicht werden.
10. Das Gemüse muss an einem sonnigen Ort gepflanzt werden. (Außer
schattentolerante Blumen und Pflanzen)
Bepflanzung:

7
17. Die Sämlinge können nach dem Erwachsenwerden in ein Regal umgepflanzt
werden. Nach dem Vereinzeln können sie zusammen mit dem Schwamm in den
Pflanzkorb gefüllt werden. Bitte beachten Sie, dass der Schwamm am Boden des
Korbs gefüllt sein und die Nährlösung berühren sollte.
18. Schließen Sie die Pumpe an die Stromversorgung an und starten Sie die
Pumpe. Der Wasserstand im Wassertank nimmt ab. Schalten Sie die Pumpe
innerhalb von 10 Minuten aus. Wenn das Wasser in den Wassertank zurückfließt,
füllen Sie den Tank mit Wasser, bis er voll ist. Achtung: Spritzen Sie kein Wasser in
den Wassertank, nachdem die Pumpe gestartet wurde. Andernfalls läuft das
Wasser beim Zurücklaufen in den Wassertank über, wenn die Pumpe nicht mehr
läuft.
19. Es wird empfohlen, dass Benutzer einen eigenen Wassertank mit einem
Fassungsvermögen von 20 l oder mehr kaufen.
20. Kaufen Sie Samen und Nährlösungen entsprechend Ihrem Bedarf.
Hersteller: Shanghaimuxinmuyeyouxiangongsi
Adresse: Baoshanqu Shuangchenglu 803long 11hao 1602A-1609shi
Shanghai
Importiert nach AUS: SIHAO PTY LTD, 1 ROKEVA STREETEASTWOOD
NSW 2122 Australien
In die USA importiert: Sanven Technology Ltd., Suite 250, 9166 Anaheim
Place, Rancho Cucamonga, CA 91730

8
In China hergestellt


We continue to be committed to provide you tools with competitive price.
"Save Half", "Half Price" or any other similar expressions used by us only represents an
estimate of savings you might benefit from buying certain tools with us compared to the major
top brands and doses not necessarily mean to cover all categories of tools offered by us. You
are kindly reminded to verify carefully when you are placing an order with us if you are
actually saving half in comparison with the top major brands.


1
Modèle : VVGrey4-36
Have product questions? Need technical support? Please feel free to
contact us:
Technical Support and E-Warranty Certificate
www.vevor.com/support
NEED HELP? CONTACT US!
This is the original instruction, please read all manual instructions
carefully before operating. VEVOR reserves a clear interpretation of our
user manual. The appearance of the product shall be subject to the
product you received. Please forgive us that we won't inform you again if
there are any technology or software updates on our product.
PIPES HYDROPONICS GROWING
SYSTEM

2
CARACTÉRISTIQUES
Modèle
VVGris4-36
Taille du produit
870*560*990mm
Tension d'entrée
Amérique du Nord : 120 V 60 Hz
Union européenne : 220 ~ 240 V 50 Hz
Australie : 220~240 V 50 Hz
Avant d'utiliser le produit, veuillez lire attentivement les instructions et les
conserver correctement.
Note:
Veuillez vous assurer que les enfants sont toujours surveillés par un adulte
lorsqu'ils utilisent ce produit. Après avoir ajouté de l'eau, assurez-vous que
vos mains sont sèches avant de brancher l'adaptateur sur une source
d'alimentation.
3
Liste des pieces
U
N
Tube de pied
× 2 (400 mm)
J
.
Pompe à eau ×
1
Avec bouchon d'eau et
repose-pieds
B
Tube de pied
× 2 (520 mm)
K
Tuyau de sortie
d'eau 1,5 m × 1
Avec bouchon d'eau et
repose-pieds
C
Tube
composite de
sortie d'eau ×
1
L
Tuyau de sortie
d'eau 1m × 1
D
Tube
composite de
connecteur ×
1
M
Panier de
plantation × 36
E
Robinet
d'entrée × 1
N
Éponge de
plantation × 36
F
Robinet de
sortie × 1
1
Pincettes × 1
g
Pipeline de
plantation × 4
2
Ruban en
aluminium × 1
Utilisé pour sceller les pipelines non
plantés afin d'empêcher les rayons
4
UV et les insectes volants d'entrer
H
Contrôleur × 1
3
Marteau en
caoutchouc × 1
j
e
Adaptateur ×
1
Installation
5
Figure 1 : Connectez un ensemble de
tubes composites de connecteur , un
ensemble de tubes composites de sortie
d'eau et quatre canalisations de
plantation ensemble selon le schéma,
avec les canalisations de plantation
tournées vers le haut. Renforcez-les
avec un marteau en caoutchouc
(frappez chaque connexion avec le
marteau en caoutchouc jusqu'à ce
qu'elles soient bien ajustées)
Figure 2 : Connectez deux tubes de
pied de 400 mm, un tuyau de 1 m et
un robinet de sortie avec
l'assemblage de la figure 1 selon le
schéma. (Renforcez les deux angles
avec un marteau en caoutchouc
pour ajuster le niveau)
Figure 3 : Connectez deux tubes de
pied de 520 mm, un tuyau de 1,5 m et
un robinet d'arrivée à l'assemblage de la
figure 2 selon le schéma.
Figure 4 : Connectez un adaptateur,
un contrôleur et une pompe à eau
ensemble selon le schéma.

6
Figure 5 : Tout d’abord, préparez un
réservoir d’eau et remplissez-le d’eau.
(Il est recommandé d'utiliser un
réservoir d'eau d'une capacité
supérieure à 20 L, qui n'inclut pas 20 L).
Connectez l'autre extrémité du tuyau de
1,5 m à la pompe à eau et fixez la
pompe à eau au fond du réservoir d'eau.
Placez également l'autre extrémité du
tuyau de 1 m dans le réservoir d'eau. Le
niveau d'eau doit submerger la pompe à
eau, sinon cela endommagera la pompe
ou cessera de fonctionner.
Figure 6 : placez 36 paniers de
plantation dans les pipelines de
plantation et insérez l'adaptateur
dans l'alimentation électrique.
Lorsque la pompe à eau fonctionne,
elle formera un cycle d'écoulement
d'eau. Enfin, ajustez l’équilibre des
pieds pour qu’il y ait de la solution
nutritive qui coule dans chaque
tuyau.
Méthode de plantation de légumes :
26. Mettez l'éponge dans l'eau, appuyez dessus avec vos mains et aspirez
suffisamment d'eau.
27. Placez les graines à l'ouverture de l'éponge, et faites attention à ne pas les
enfoncer trop profondément.
28. Versez de l'eau dans une bassine d'environ 2 centimètres de profondeur.
29. Mettez l'éponge dans le bassin.
30. Attendez que les graines germent, puis placez-les au soleil. (Notez que la
lumière directe du soleil au lieu d’une simple lumière est requise)
Précautions pour la plantation de légumes :
11. Les racines des plants doivent être trempées dans une solution nutritive avec
l'éponge.
12. Le légume doit être planté dans un endroit ensoleillé. (Sauf les fleurs et plantes
ombragées)
Plantation:
21. Les plants peuvent être transplantés sur une étagère après avoir grandi. Après
avoir été séparés, ils peuvent être remplis dans le panier de plantation avec
l'éponge. Attention, l'éponge doit être remplie au fond du panier et pouvoir toucher
la solution nutritive.

7
22. Connectez la pompe à l'alimentation électrique et démarrez la pompe. L'eau
dans le réservoir d'eau diminuera. Éteignez la pompe dans les 10 minutes.
Lorsque l'eau retourne dans le réservoir d'eau, remplissez le réservoir d'eau pour
le remplir. Attention : n'injectez pas d'eau dans le réservoir d'eau après le
démarrage de la pompe, sinon lorsque la pompe s'arrête de fonctionner, l'eau
débordera lorsqu'elle retournera dans le réservoir d'eau.
23. Il est suggéré aux utilisateurs d'acheter leur propre réservoir d'eau d'une
capacité de 20 L ou plus.
24. Achetez des graines et des solutions nutritives selon vos propres besoins.
Fabricant : Shanghaimuxinmuyeyouxiangongsi
Adresse : Baoshanqu Shuangchenglu 803long 11hao 1602A-1609shi
Shanghai
Importé en Australie : SIHAO PTY LTD, 1 ROKEVA STREETASTWOOD
NSW 2122 Australie
Importé aux États-Unis : Sanven Technology Ltd., Suite 250, 9166
Anaheim Place, Rancho Cucamonga, CA 91730
Fabriqué en Chine


Technisch Ondersteuning en e-garantiecertificaat www.vevor.com/support
PIJPEN HYDROCULTUUR GROEISYSTEEM
HANDLEIDING
We continue to be committed to provide you tools with competitive price.
"Save Half", "Half Price" or any other similar expressions used by us only represents an
estimate of savings you might benefit from buying certain tools with us compared to the major
top brands and doses not necessarily mean to cover all categories of tools offered by us. You
are kindly reminded to verify carefully when you are placing an order with us if you are
actually saving half in comparison with the top major brands.


1
Model: VVGrey4-36
Have product questions? Need technical support? Please feel free to
contact us:
Technical Support and E-Warranty Certificate
www.vevor.com/support
NEED HELP? CONTACT US!
This is the original instruction, please read all manual instructions
carefully before operating. VEVOR reserves a clear interpretation of our
user manual. The appearance of the product shall be subject to the
product you received. Please forgive us that we won't inform you again if
there are any technology or software updates on our product.
PIPES HYDROPONICS GROWING
SYSTEM

2
SPECIFICATIES
Model
VVGrijs4-36
Product grootte
870*560*990mm
Ingangsspanning
Noord-Amerika: 120V 60Hz
Europese Unie: 220~240V 50Hz
Australië: 220~240V 50Hz
Voordat u het product gebruikt, dient u de instructies aandachtig te lezen
en deze goed te bewaren.
Opmerking:
Zorg ervoor dat kinderen altijd onder toezicht staan van een volwassene
wanneer ze dit product gebruiken. Zorg ervoor dat uw handen droog zijn
nadat u water hebt toegevoegd voordat u de adapter op een stopcontact
aansluit.
3
Onderdelen lijst
A
Voetbuis × 2
(400 mm)
J
Waterpomp × 1
Met waterplug en voetpad
B
Voetbuis × 2
(520 mm)
K
Waterafvoerslan
g 1,5 m × 1
Met waterplug en voetpad
C
Samengestel
de buis voor
wateruitlaat ×
1
L
Waterafvoerslan
g 1m × 1
D
Connector
composietbui
s × 1
M
Plantmand × 36
E
Inlaatkraan ×
1
N
Plantspons × 36
F
Uitlaatkraan ×
1
1
Pincet × 1
G
Pijpleiding
planten × 4
2
Aluminiumtape
× 1
Wordt gebruikt om ongeplante
pijpleidingen af te dichten om te
voorkomen dat UV-stralen en
vliegende insecten binnendringen

4
H
Regelaar × 1
3
Rubberen
hamer × 1
I
Adapter × 1
Installatie

5
Figuur 1: Sluit een set samengestelde
connectorbuizen , een set
samengestelde waterafvoerbuizen en
vier plantpijpleidingen met elkaar aan
volgens het diagram, met de
plantpijpleidingen naar boven gericht.
Versterk ze met een rubberen hamer
(sla op elke verbinding met de rubberen
hamer totdat ze goed vastzitten)
Figuur 2: Sluit twee voetbuizen van
400 mm, een slang van 1 meter en
een uitlaatkraan aan met de
montage van Figuur 1 volgens het
diagram. (Versterk de twee hoeken
met een rubberen hamer om het
niveau aan te passen)
Figuur 3: Sluit twee voetbuizen van 520
mm, een slang van 1,5 m en een
inlaatkraan aan met de montage van
Figuur 2 volgens het diagram.
Figuur 4: Sluit een adapter, een
controller en een waterpomp op
elkaar aan volgens het diagram.

6
Figuur 5: Maak eerst een watertank
klaar en vul deze met water. (Het wordt
aanbevolen om een watertank te
gebruiken met een capaciteit van meer
dan 20 liter, exclusief 20 liter). Sluit het
andere uiteinde van de slang van 1,5 m
aan op de waterpomp en bevestig de
waterpomp aan de bodem van de
watertank. Plaats ook het andere
uiteinde van de slang van 1 meter in de
watertank. Het waterniveau moet de
waterpomp onderdompelen, anders zal
deze de pomp beschadigen of niet meer
werken.
Figuur 6: Plaats 36 plantmanden in
de plantleidingen en steek de
adapter in de voeding. Wanneer de
waterpomp werkt, vormt deze een
waterstroomcyclus. Pas ten slotte de
balans van de voeten aan, zodat er
een voedingsoplossing door elke
leiding stroomt.
Plantmethode voor groenten:
31. Doe de spons in het water, druk er met je handen op en zuig voldoende water
op.
32. Plaats de zaadjes bij de opening van de spons en zorg ervoor dat je ze niet te
diep plaatst.
33. Giet water in een bakje van ongeveer 2 centimeter diep.
34. Plaats de spons in het bassin.
35. Wacht tot de zaden ontkiemen en plaats ze dan in het zonlicht. (Houd er
rekening mee dat direct zonlicht in plaats van alleen licht nodig is)
Voorzorgsmaatregelen bij het planten van groenten:
13. De wortels van zaailingen moeten samen met de spons in een
voedingsoplossing worden gedrenkt.
14. De groente moet op een zonnige plek worden geplant. (Behalve
schaduwbestendige bloemen en planten)
Planten:
25. De zaailingen kunnen na het opgroeien op een plank worden getransplanteerd.
Na het scheiden kunnen ze samen met de spons in de plantmand worden gevuld.
Houd er rekening mee dat de spons op de bodem van de mand gevuld moet zijn

7
en de voedingsoplossing moet kunnen aanraken.
26. Sluit de pomp aan op de voeding en start de pomp. Het water in het
waterreservoir zal afnemen. Schakel de pomp binnen 10 minuten uit. Wanneer het
water terugkeert naar het waterreservoir, vult u het reservoir met water om het vol
te maken. Let op: injecteer geen water in de watertank nadat de pomp is gestart,
anders zal het water overstromen wanneer het terugkeert naar de watertank
wanneer de pomp stopt met draaien.
27. Er wordt gesuggereerd dat gebruikers hun eigen watertank moeten
aanschaffen met een capaciteit van 20 liter of meer.
28. Koop zaden en voedingsoplossingen volgens uw eigen behoeften.
Fabrikant: Shanghaimuxinmuyeyouxiangongsi
Adres: Baoshanqu Shuangchenglu 803long 11hao 1602A-1609shi
Shanghai
Geïmporteerd naar AUS: SIHAO PTY LTD, 1 ROKEVA
STREETEASTWOOD NSW 2122 Australië
Geïmporteerd naar de VS: Sanven Technology Ltd., Suite 250, 9166
Anaheim Place, Rancho Cucamonga, CA 91730
Gemaakt in China


Teknisk Support och e-garanticertifikat www.vevor.com/support
PIPES HYDROPONICS ODLINGSSYSTEM
ANVÄNDARMANUAL
We continue to be committed to provide you tools with competitive price.
"Save Half", "Half Price" or any other similar expressions used by us only represents an
estimate of savings you might benefit from buying certain tools with us compared to the major
top brands and doses not necessarily mean to cover all categories of tools offered by us. You
are kindly reminded to verify carefully when you are placing an order with us if you are
actually saving half in comparison with the top major brands.


1
Modell: VVGrey4-36
Have product questions? Need technical support? Please feel free to
contact us:
Technical Support and E-Warranty Certificate
www.vevor.com/support
NEED HELP? CONTACT US!
This is the original instruction, please read all manual instructions
carefully before operating. VEVOR reserves a clear interpretation of our
user manual. The appearance of the product shall be subject to the
product you received. Please forgive us that we won't inform you again if
there are any technology or software updates on our product.
PIPES HYDROPONICS GROWING
SYSTEM

2
SPECIFIKATIONER
Modell
VVGrå4-36
Produktstorlek
870*560*990mm
Inspänning
Nordamerika: 120V 60Hz
Europeiska unionen: 220~240V 50Hz
Australien: 220~240V 50Hz
Innan du använder produkten, läs instruktionerna noggrant och förvara
dem ordentligt.
Notera:
Se till att barn alltid övervakas av en vuxen när de använder denna produkt.
Efter att ha tillsatt vatten, se till att dina händer är torra innan du ansluter
adaptern till en strömkälla.
3
Lista över delar
A
Fotrör × 2
(400 mm)
J
Vattenpump × 1
Med vattenplugg och fotplatta
B
Fotrör × 2
(520 mm)
K
Vattenutloppssla
ng 1,5m × 1
Med vattenplugg och fotplatta
C
Vattenutlopp
kompositrör ×
1
L
Vattenutloppssla
ng 1m × 1
D
Anslutningsko
mpositrör × 1
M
Planteringskorg
× 36
E
Inloppskran ×
1
N
Planteringssva
mp × 36
F
Utloppskran ×
1
1
Pincett × 1
G
Planteringsrör
ledning × 4
2
Aluminiumtejp ×
1
Används för att täta oplanterade
rörledningar för att förhindra
UV-strålar och flygande insekter från
att komma in
H
Styrenhet × 1
3
Gummihammar
e × 1
4
j
a
g
Adapter × 1
Installation
Figur 1: Anslut en uppsättning
kompositrör för kopplingar , en
uppsättning kompositrör för
vattenutlopp och fyra
planteringsrörledningar tillsammans
enligt diagrammet, med
Figur 2: Anslut två 400 mm fotrör, en
1 m slang och en utloppskran med
enheten i figur 1 enligt diagrammet.
(Förstärk de två vinklarna med en
gummihammare för att justera nivån)
5
planteringsrörledningarna vända uppåt.
Förstärk dem med en gummihammare
(slå på varje anslutning med
gummihammaren tills de sitter tätt)
Figur 3: Anslut två 520 mm fotrör, en 1,5
m slang och en inloppskran med
enheten i figur 2 enligt diagrammet.
Bild 4: Anslut en adapter, en
styrenhet och en vattenpump
tillsammans enligt diagrammet.
Bild 5: Förbered först en vattentank och
fyll den med vatten. (Det
rekommenderas att använda en
vattentank som har en kapacitet på mer
än 20L, vilket inte inkluderar 20L).
Anslut den andra änden av 1,5 m
slangen till vattenpumpen och fäst
Bild 6: Sätt 36 planteringskorgar i
planteringsrörledningarna och sätt in
adaptern i strömförsörjningen. När
vattenpumpen fungerar kommer den
att bilda en vattenflödescykel.
Justera slutligen balansen på
fötterna så att det rinner

6
vattenpumpen i botten av vattentanken.
Placera även den andra änden av 1 m
slangen i vattentanken. Vattennivån
måste sänka vattenpumpen, annars
skadar den pumpen eller slutar fungera.
näringslösning genom varje rör.
Metod för att plantera grönsaker:
36. Lägg svampen i vattnet, tryck på den med händerna och sug i tillräckligt med
vatten.
37. Placera fröna vid öppningen av svampen, och var uppmärksam på att inte
placera dem för djupt.
38. Häll vatten i en ca 2 centimeter djup bassäng.
39. Lägg svampen i bassängen.
40. Vänta tills fröna spirar och placera dem sedan i solljus. (Observera att direkt
solljus istället för bara ljus krävs)
Försiktighetsåtgärder för plantering av grönsaker:
15. Rötterna på plantor måste blötläggas i näringslösning tillsammans med
svampen.
16. Grönsaken måste planteras i ett soligt område. (Förutom för skuggbeständiga
blommor och växter)
Plantering:
29. Plantorna kan transplanteras på en hylla efter att de har vuxit upp. Efter att ha
separerats kan de fyllas i planteringskorgen tillsammans med svampen. Tänk på
att svampen ska fyllas i botten av korgen och kunna röra vid näringslösningen.
30. Anslut pumpen till strömförsörjningen och starta pumpen. Vattnet i
vattentanken kommer att minska. Stäng av pumpen inom 10 minuter. När vattnet
kommer tillbaka till vattentanken, fyll tanken med vatten så att den blir full. OBS:
injicera inte vatten i vattentanken efter att pumpen har startat, annars kommer
vattnet att svämma över när pumpen slutar gå när det återgår till vattentanken.
31. Det föreslås att användare ska köpa sin egen vattentank med en kapacitet på
20L eller mer.
32. Köp frön och näringslösningar efter dina egna behov.

7
Tillverkare: Shanghaimuxinmuyeyouxiangongsi
Adress: Baoshanqu Shuangchenglu 803long 11hao 1602A-1609shi
Shanghai
Importerad till AUS: SIHAO PTY LTD, 1 ROKEVA STREETEASTWOOD
NSW 2122 Australien
Importerad till USA: Sanven Technology Ltd., Suite 250, 9166 Anaheim
Place, Rancho Cucamonga, CA 91730
Tillverkad i Kina