
Technical Support and E-Warranty Certificate www.vevor.com/support
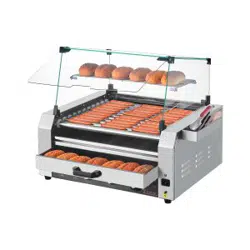
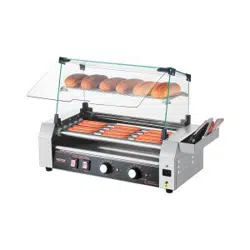
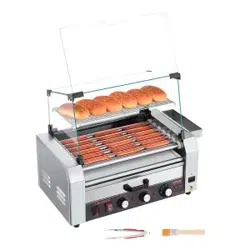
ROLLING HOT-DOG GRILL
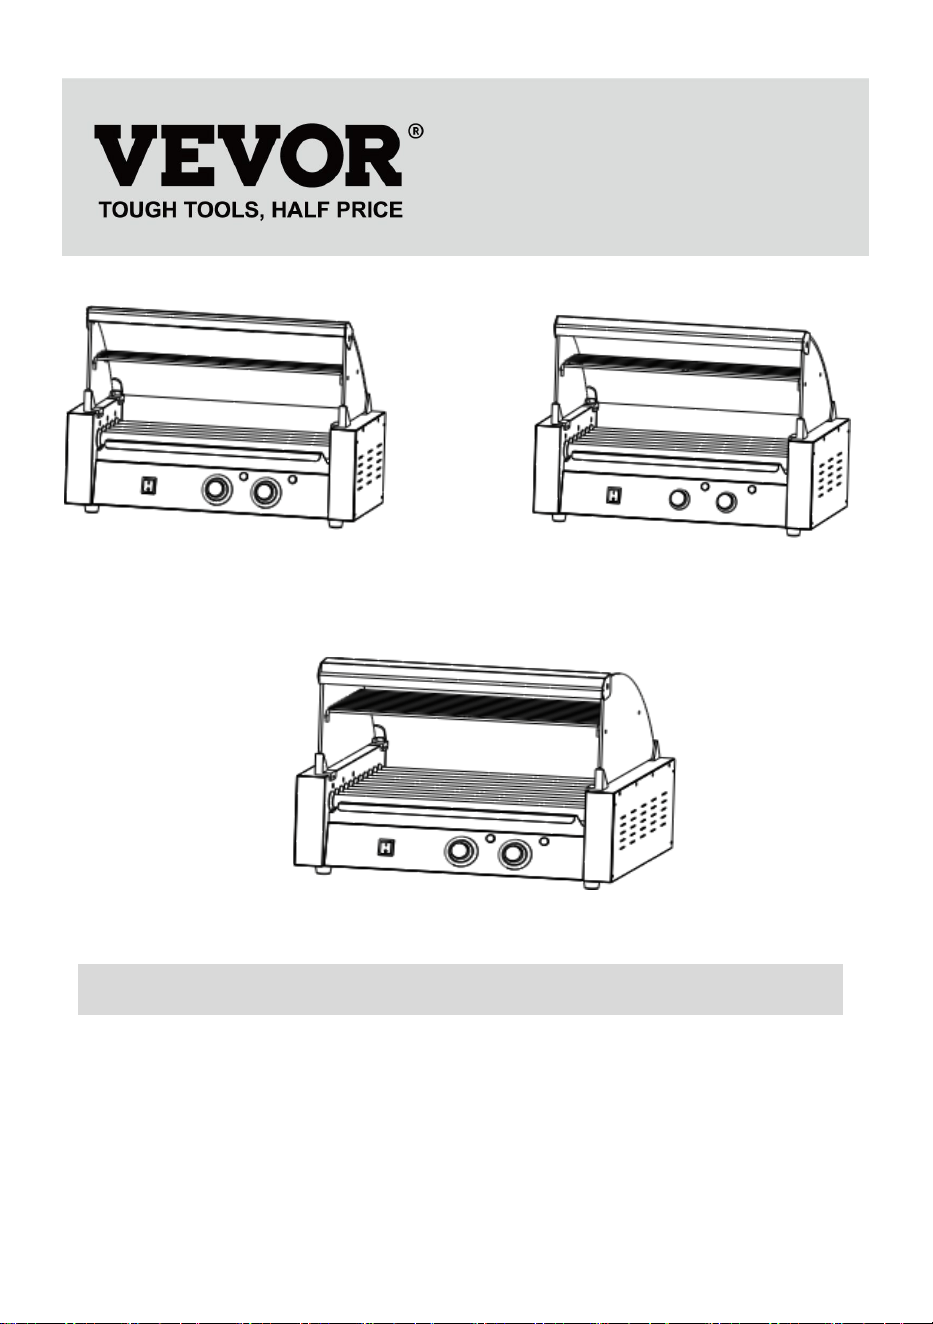
MODEL: SC-5XD / SC-7XD / SC-11XD
We continue to be committed to provide you tools with competitive price.
"Save Half", "Half Price" or any other similar expressions used by us only
represents an estimate of savings you might benefit from buying certain tools
with us compared to the major top brands and does not necessarily mean to cover
all categories of tools offered by us. You are kindly reminded to verify carefully
when you are placing an order with us if you are actually Saving
Half in comparison with the top major brands.

- 1 -
MODEL: SC-5XD MODEL: SC-7XD
MODEL: SC-11XD
NEED HELP? CONTACT US!
Have product questions? Need technical support? Please feel free to
contact us:
Technical Support and E-Warranty Certificate
www.vevor.com/support
This is the original instruction, please read all manual instructions
carefully before operating. VEVOR reserves a clear interpretation of our
user manual. The appearance of the product shall be subject to the
ROLLING HOT-DOG GRILL
- 2 -
product you received. Please forgive us that we won't inform you again if
there are any technology or software updates on our product.
Warning-To reduce the risk of injury, user must read instructions
manual carefully.
Indoor use only.
Pay attention to high temperatures to prevent burns.
CORRECT DISPOSAL
This product is subject to the provision of European Directive
2012/19/EC. The symbol showing a wheelie bin crossed through
indicates that the product requires separate refuse collection in the
European Union. This applies to the product and all accessories
marked with this symbol. Products marked as such may not be
discarded with normal domestic waste, but must be taken to a
collection point for recycling electrical and electronic devices
Compliance is a North America security certification.
Compliance is a EC & UK security certification.

- 3 -
WARM PROMPT:
A white protective film is attached to the surface of the fuselage to
protect the fuselage from scratches.Please tear it off before use.
SAFETY WARNINGS AND PRECAUTIONS
Thank you for using this product. In order to make sure that you can operate the
machine correctly, read this instruction carefully before operation and keep it
properly for future reference. Please read the precautions and safety rules on this
page to ensure your safe use. This manual will outline safety warnings and
precautions, operating, maintenance and cleaning. The warnings and instructions
reviewed in this manual cannot cover all possible conditions and situations that
may occur. Caution and common sense are not built into this product, since we
believe that the uses will comply with these codes. Before starting a training
program or engaging in strenuous endurance activity on the device, please consult
a doctor.
Please read ALL the instructions before using your machine.
1. Make sure the voltage in your outlet is the same as the voltage indicated on the
appliance's rating label.
2. Do not let children and minors and pet get close to or touch the machine.
3. Do not touch the hot surface directly with your hands. Always use the handle or
knob for operation.
4. To prevent electrical shock, do not immerse the cord or plug into water or other
liquids.
5. Do not immerse the appliance in water or any other liquid.
6. Unplug the machine from the outlet when not in use and before cleaning. Cool
the appliance before installing or removing parts and before cleaning.
7. Cool down the HOT parts before operation and cleaning.
8. Do not operate the device with damaged cord or plug, malfunction or with any
mechanical damage. Send it to your nearest authorized service centre for
examination and repair (ONLY technicians should open up the unit).
9. Using any accessories or attachments that are not provided or recommended
by the manufacturer may cause injury.
10. If the machine is not to be used for a long period of time, unplug it, clean and
cover it and store it in a dry and safe place.
11. Do not leave the power cord hanging over the edge of table or counter or let it

- 4 -
come into contact with any hot surfaces.
12. Do not place the unit on or near hot air, electric burners or heaters.
13. Always switch off the power to the socket before plugging in or unplugging.
Hold the plug instead of pulling on the cord.
14. Do not apply this unit to any other purposes than the indicated usage.
15. KEEP IT OUT OF CHILDREN'S REACH. Never leave it unattended while in
use.
16. DO NOT CLEAN IT WITH ANY ABRASIVE MATERIAL.
17. Always check that this machine is plugged into a grounded outlet with the
appropriate electrical supply. Ensure that the wall outlet being used is properly
grounded. If not, you must install a grounded outlet. Have the work performed only
by a certified electrician who is properly qualified to meet local safety and electrical
codes.
18. Ensure that the power outlet, plug and cord being used are in good working
condition. Damaged components should be repaired by a certified electrician who
is qualified to meet local safety and electrical codes. Even if your power cord is
functioning properly, keep it away from water and avoid letting it run over carpets
or heating devices.
19. Avoid using it in the presence of flammable liquids, gases, dust or other
explosive situations.
20. Do not move the machine before cooling and during heating
21. Do not operate the machine in an appliance garage or under a wall cabinet.
Always unplug the unit from the electrical outlet when storing in an appliance
garage. Otherwise, it would cause a risk of fire, especially if the machine touches
the garage wall or the door touches it as it closes.
22. Type Y attachment: If the supply cord is damaged, it must be replaced by the
manufacturer, its service agent or similarly qualified persons in order to avoid a
hazard.
23. Children shall not play with the appliance. Cleaning and user maintenance
shall not be made by children without supervision.
24. Inspect before every use.
25. DO NOT CLEAN IT WITH ANY ABRASIVE MATERIAL.
26. Never leave it unattended while in use. Never leave the child unattended.
27. Pet urine and feces can damage the product, please keep away.
WARNING: This appliance is not intended for use by young or infirm
persons unless supervised by a responsible person to ensure that they can
use the appliance safely. Young children should be supervised to ensure
that they do not play with the product. Pets should stay away from the
product.

- 5 -
PRODUCT PARAMETERS
MODEL
Region
Voltage
Power
Plug Type
Fuse
SC-5XD
North
America
AC110V
60Hz
750W
American PLUG
10A
Europe
AC220-240V
50Hz
1000W
European PLUG
SC-7XD
North
America
AC110V
60Hz
1050W
American PLUG
15A
Europe
AC220-240V
50Hz
1400W
European PLUG
SC-11XD
North
America
AC110V
60Hz
1650W
American PLUG
20A
Europe
AC220-240V
50Hz
2200W
European PLUG
Attention:
1. The voltage used for this device must be the same as the power supply voltage.
2. Users need to install it near the power switch and fuse.
3. If the machine is not powered, remove the plug from the electrical outlet
and check whether the fuse is blown.
4. It is recommended that products use separate lines and sockets to avoid circuit
breaker or time delay fuse overload.
WARM PROMPT:
A white protective film is attached to the surface of the fuselage to
protect the fuselage from scratches.Please tear it off before use.

- 6 -
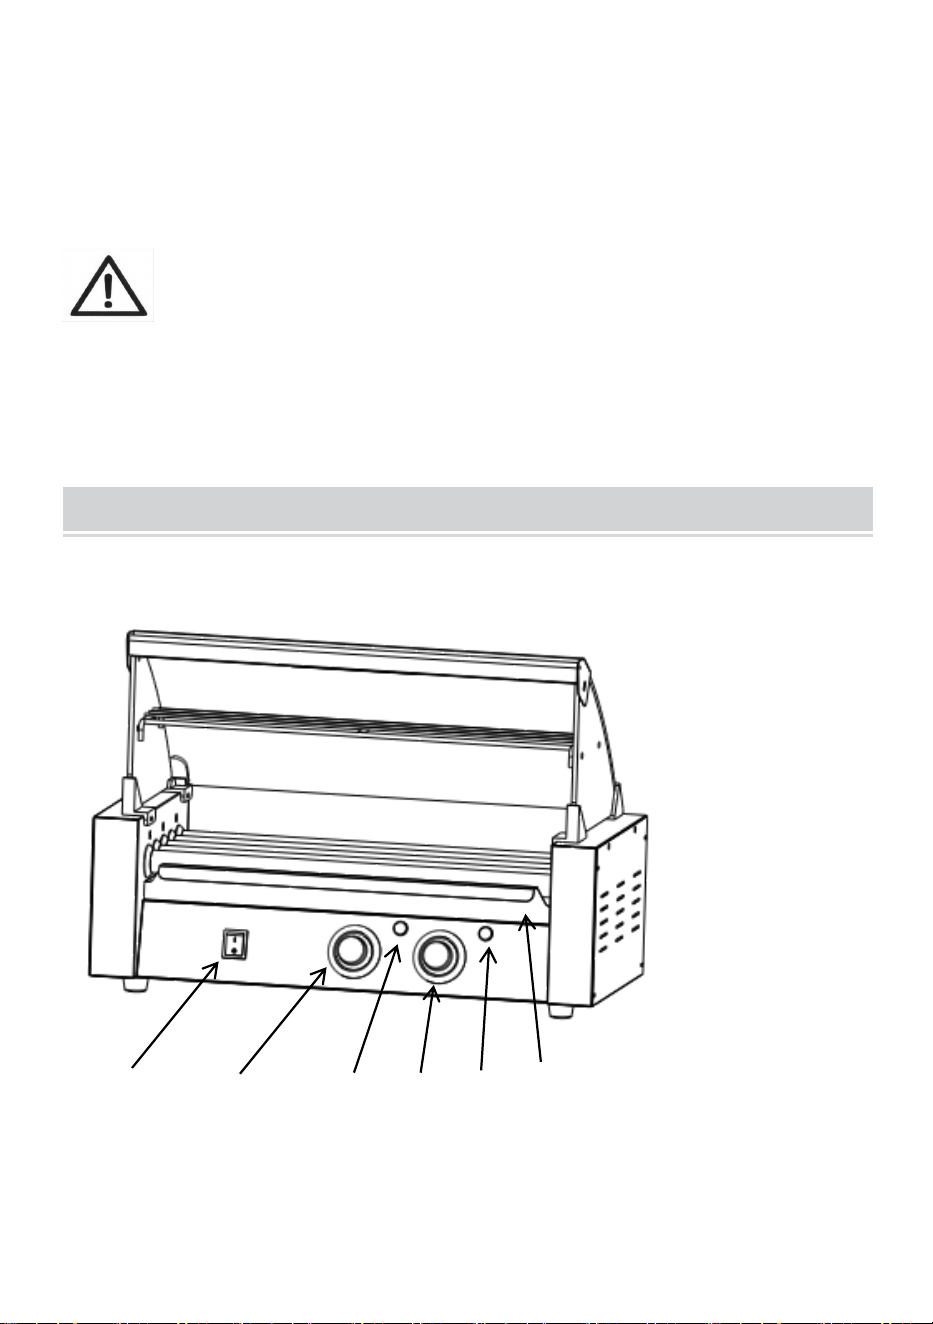
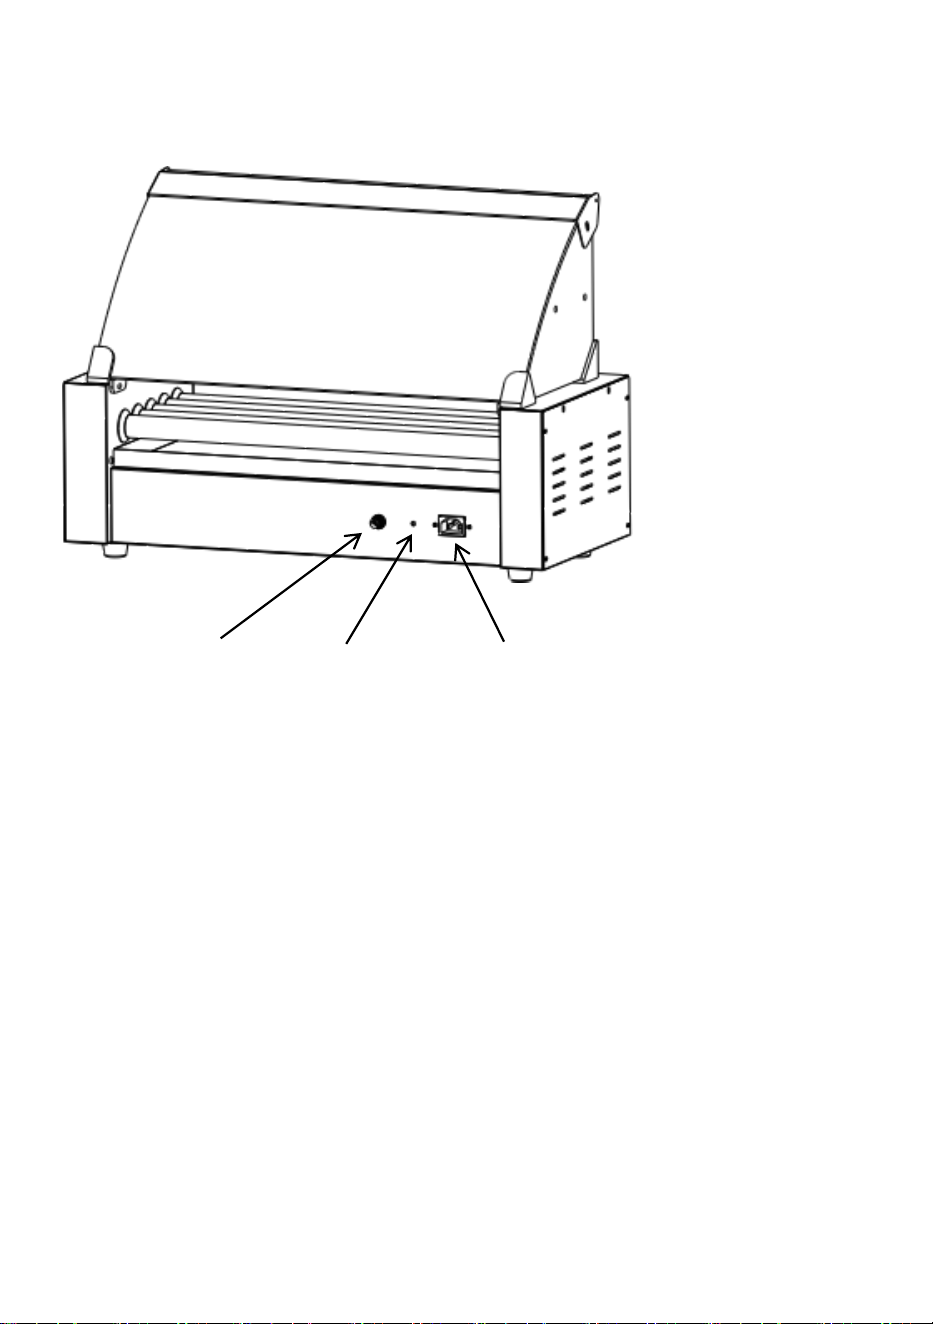
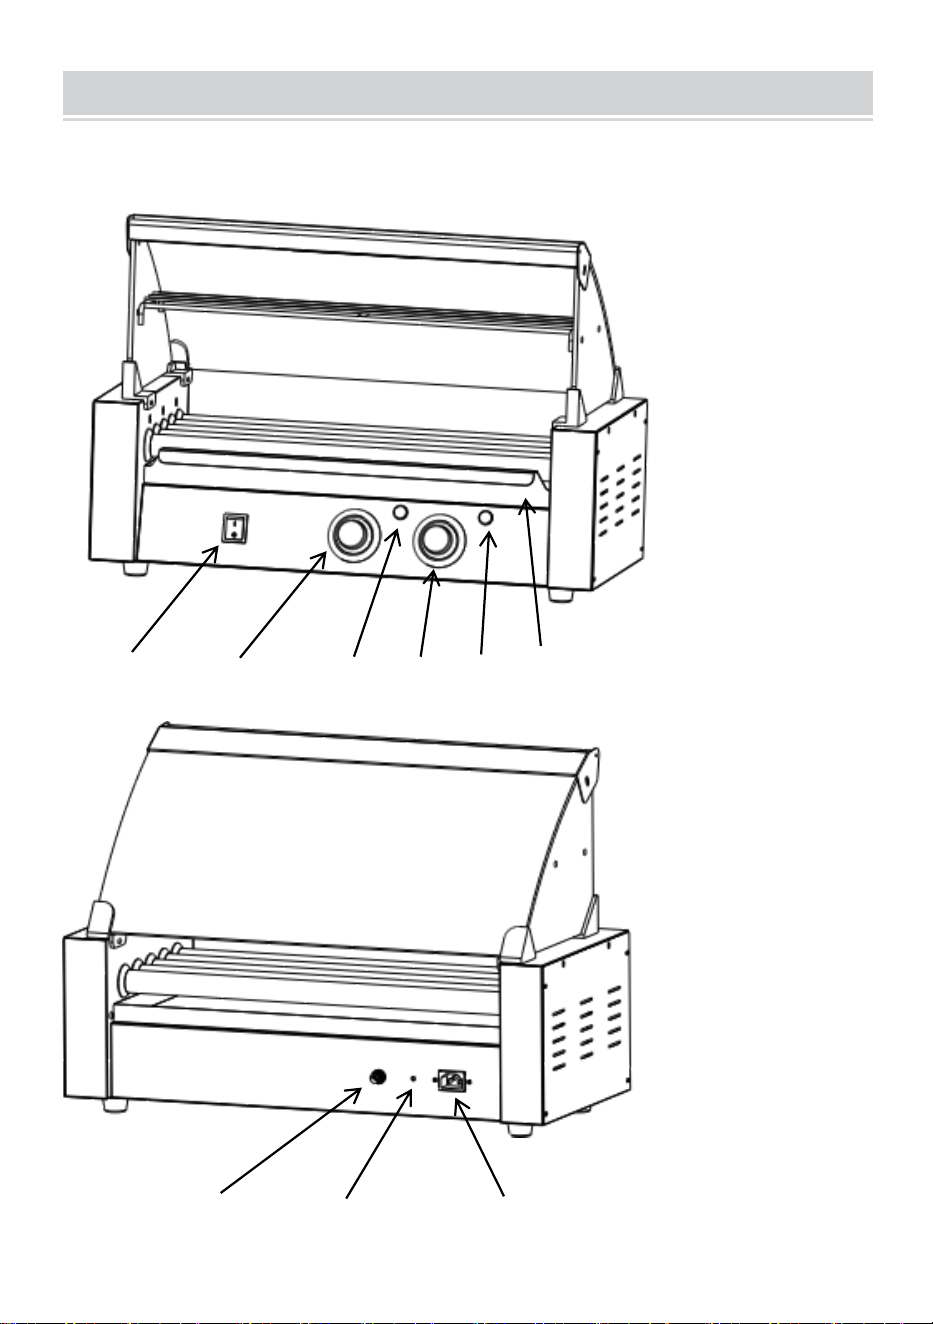
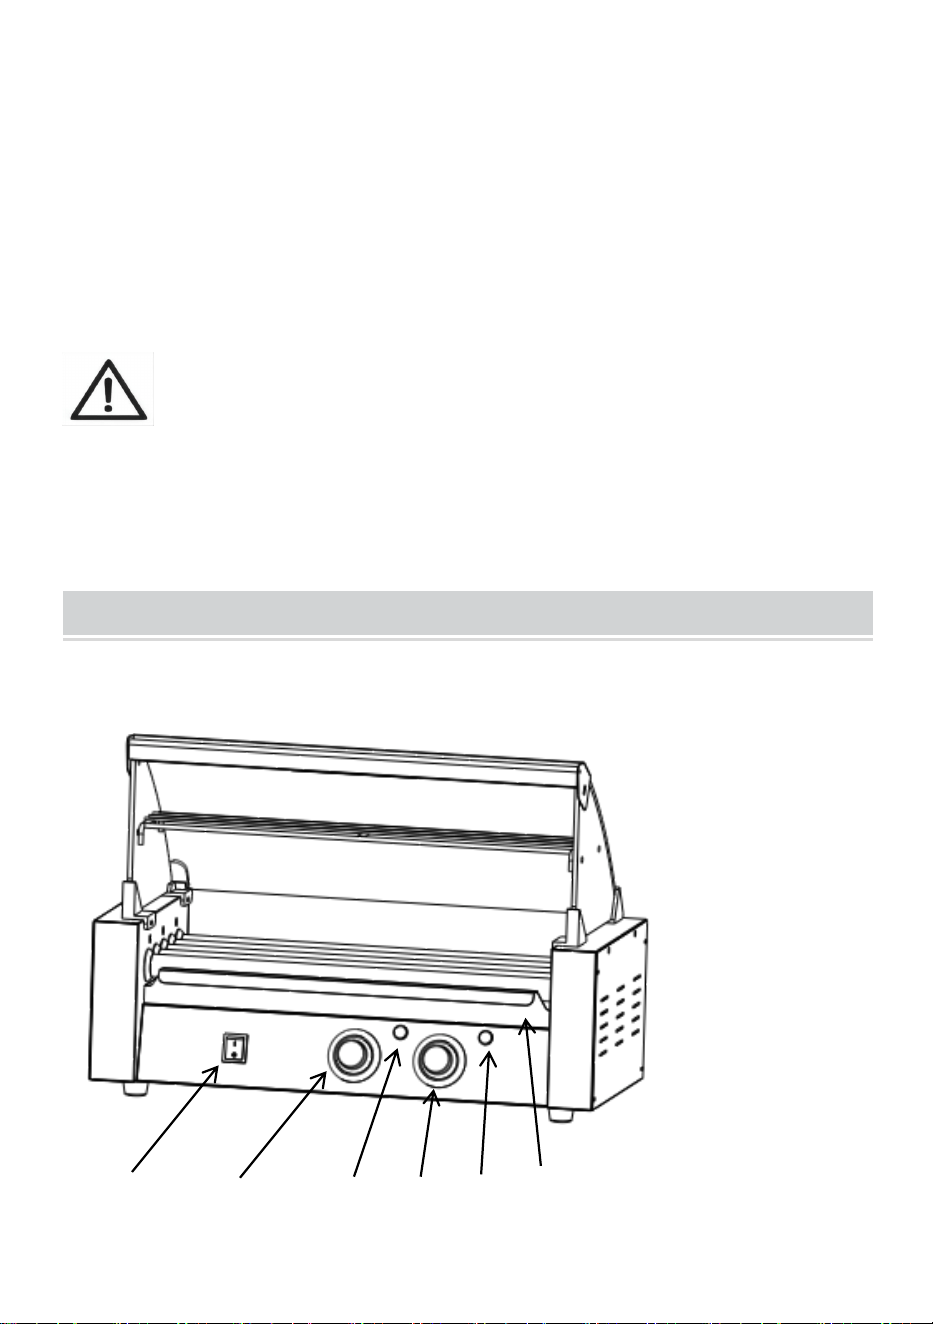
PRODUCT COMPONENTS
Note: The location of the core components of these three machines is the
same!
⑨
⑧
⑦
1. Power Switch
2.Temperature Knob
(Front)
3. Heat Light (Front)
4.Temperature Knob
(Back)
5. Heat Light (Back)
6. Pan
7. Fuse
8. Protective Earthing
9. Power Socket
④
③
②
①
⑤
⑥
- 7 -
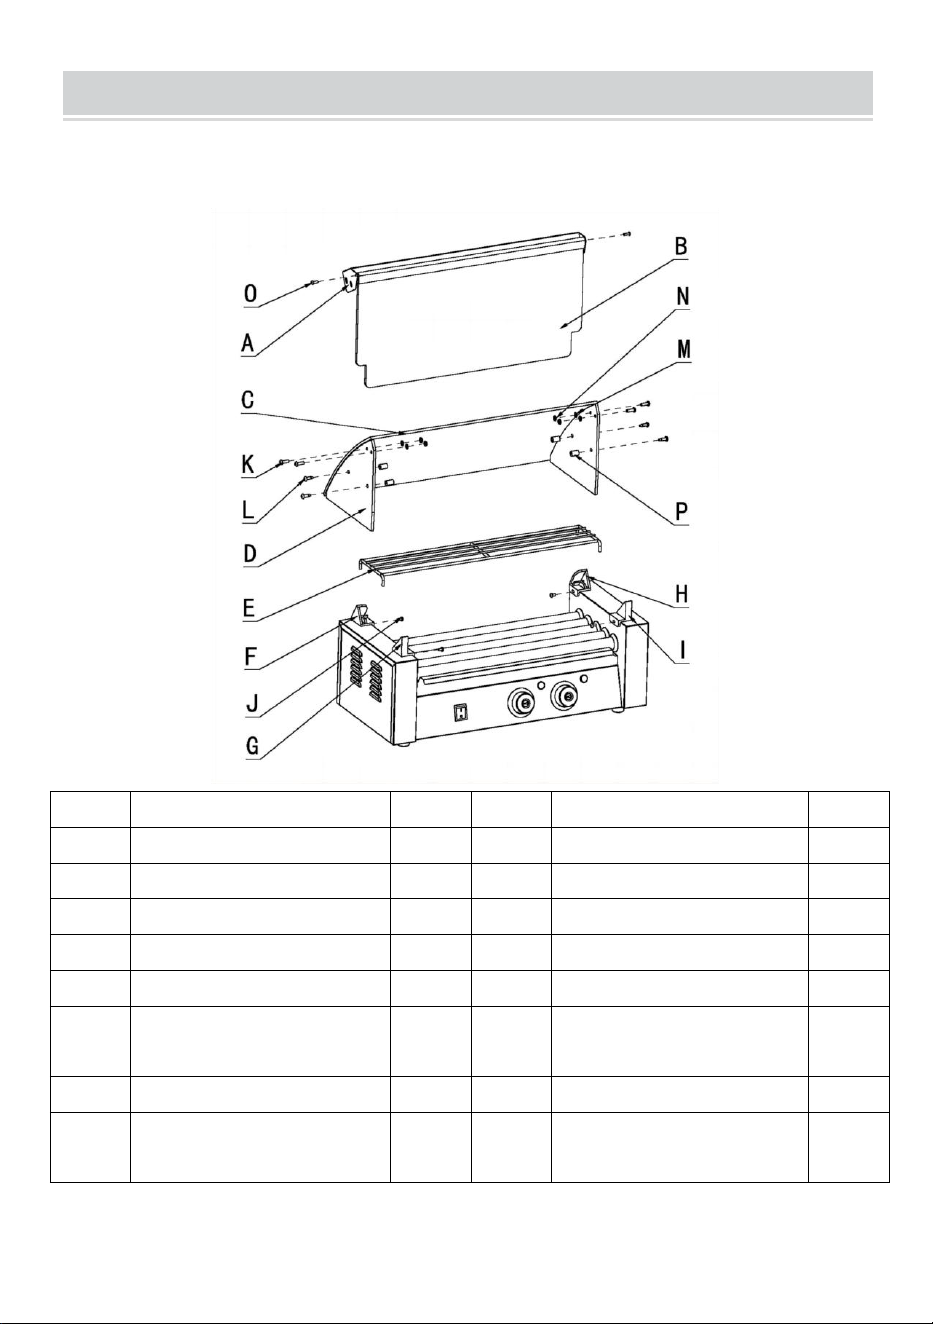
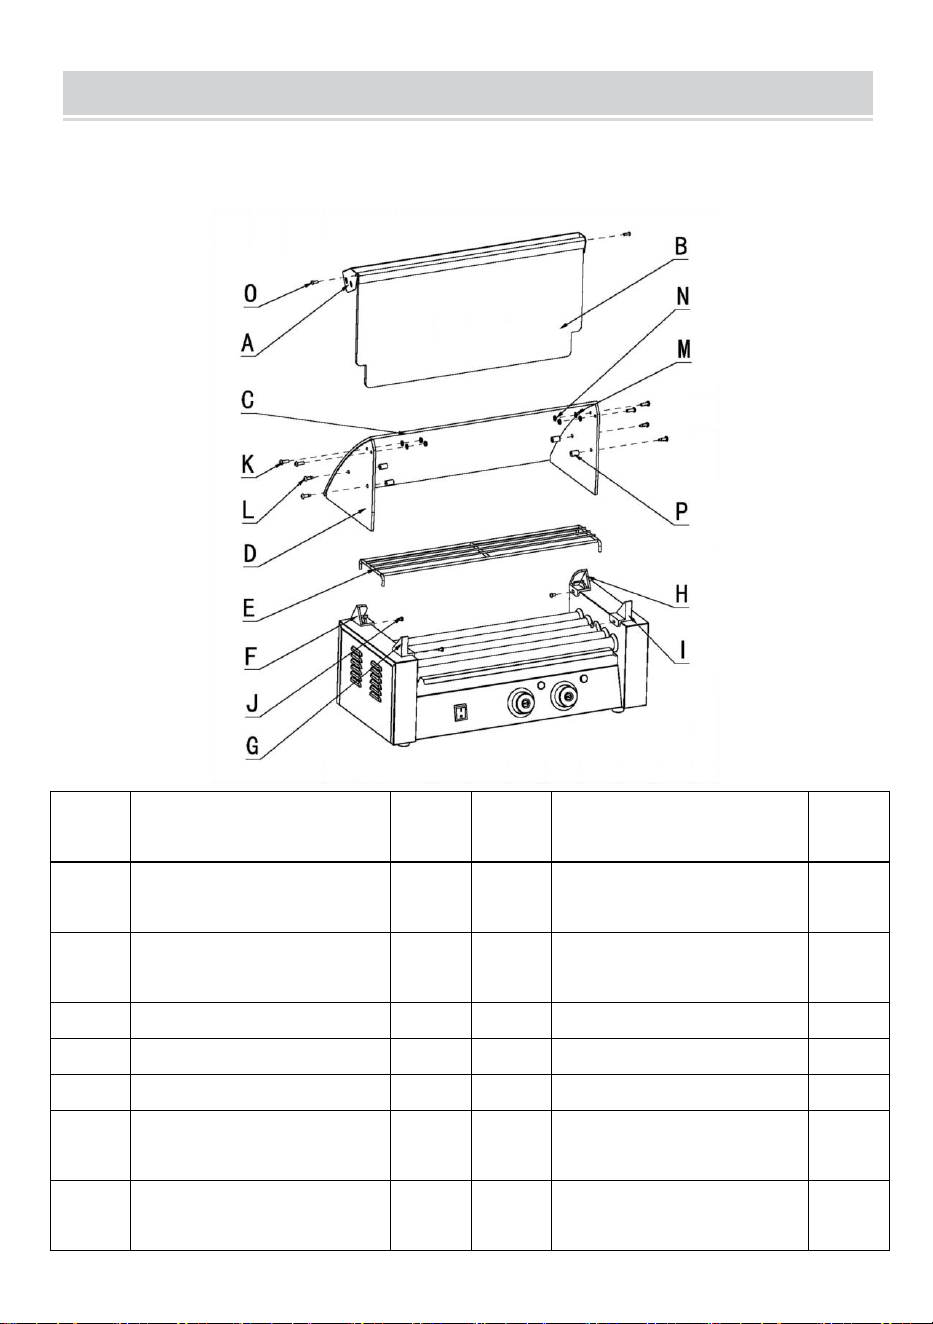
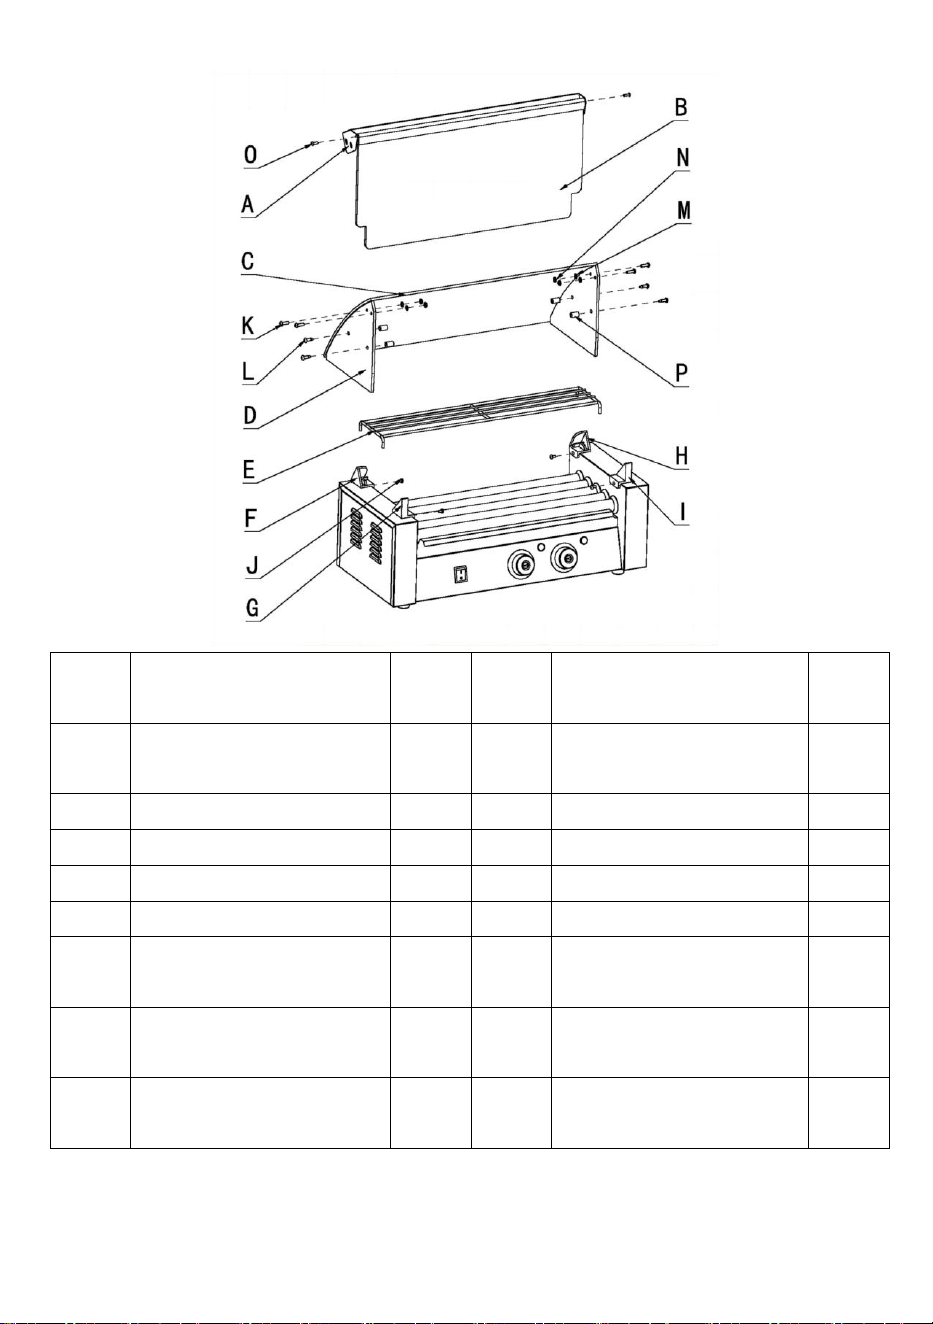
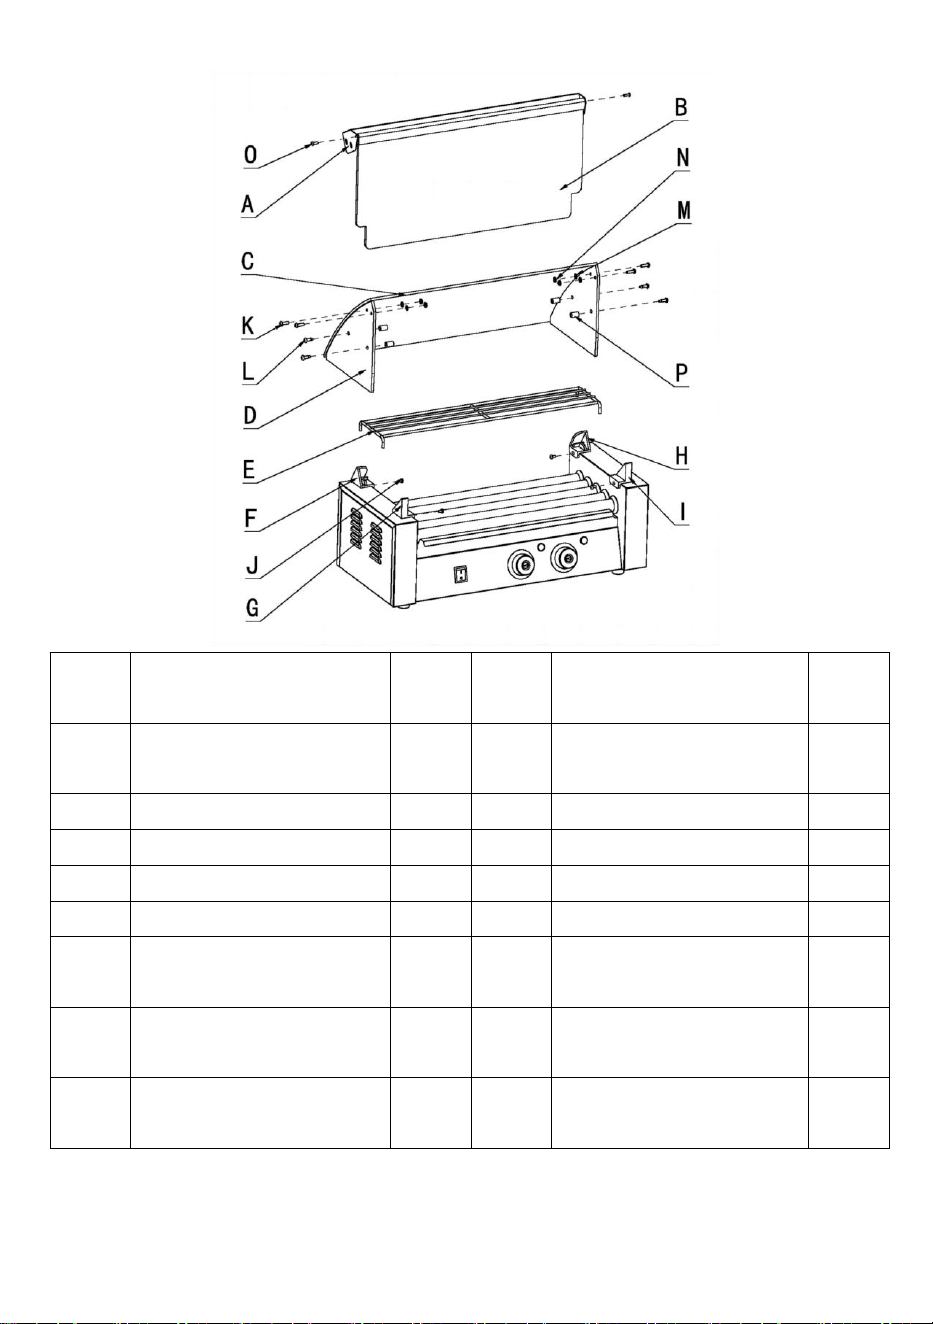
EXPLODED VIEW
Note: The location of the core components of these three machines is the
same!
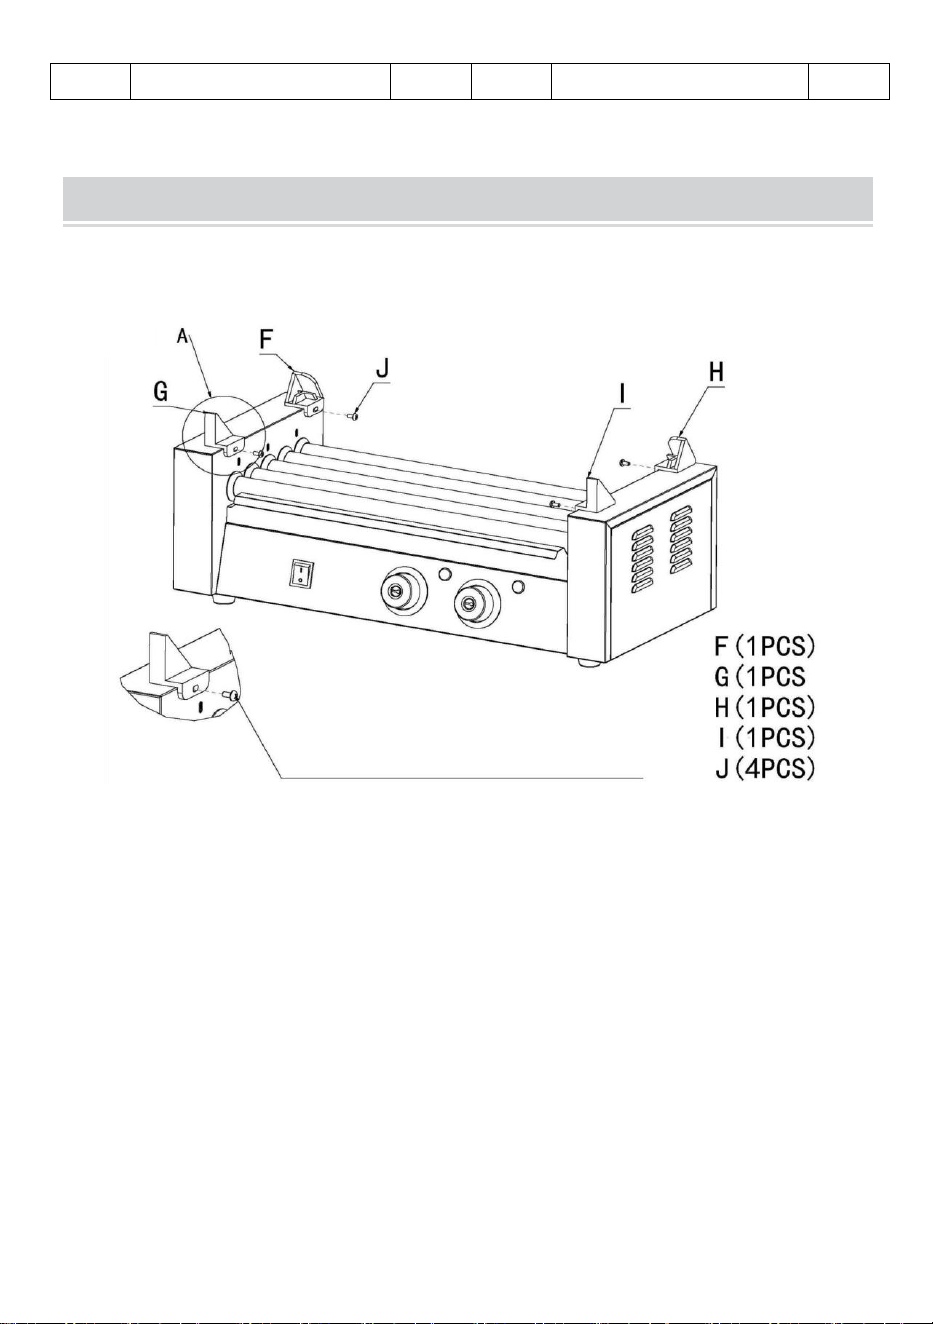
NO.
Name
QTY
NO.
Name
QTY
A
Glass front fixed beam
1
I
Glass stand front (right)
1
B
Glass front door
1
J
Screws M4x8
4
C
Curved glass
1
K
Screws M5x14
4
D
Side glass
2
L
Screws M6x14
4
E
Shelves
1
M
Nut M5
4
F
Behind the glass stand
(left)
1
N
Mica gasket
4
G
Glass stand front (left)
1
O
Screws M4x12
2
H
Behind the glass stand
(right)
1
P
Nylon sleeve
4
Note: the quantity of parts shown in the manual is the actual usage and the
unused parts are spare parts.

- 8 -
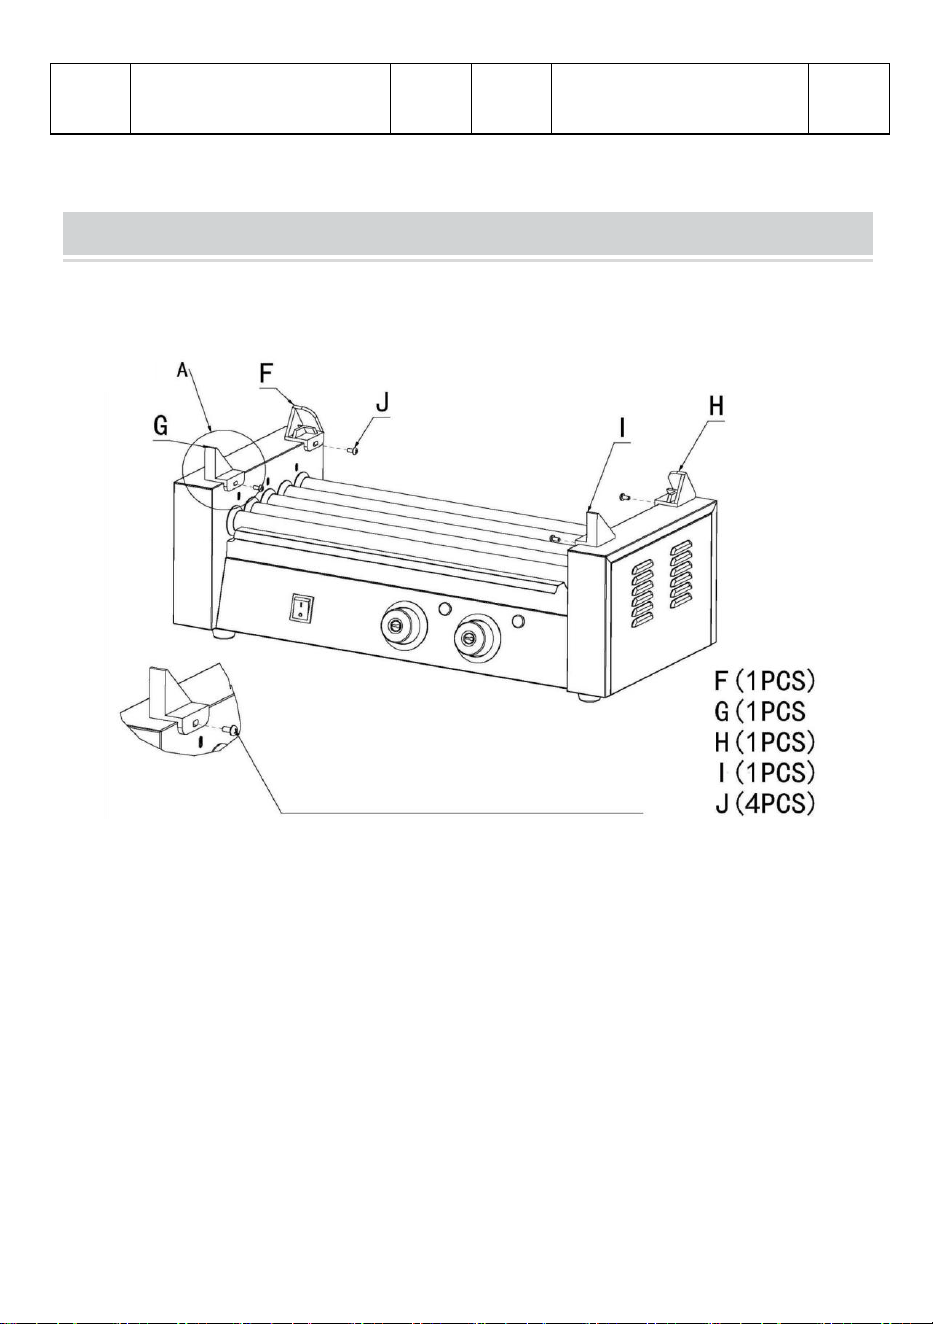
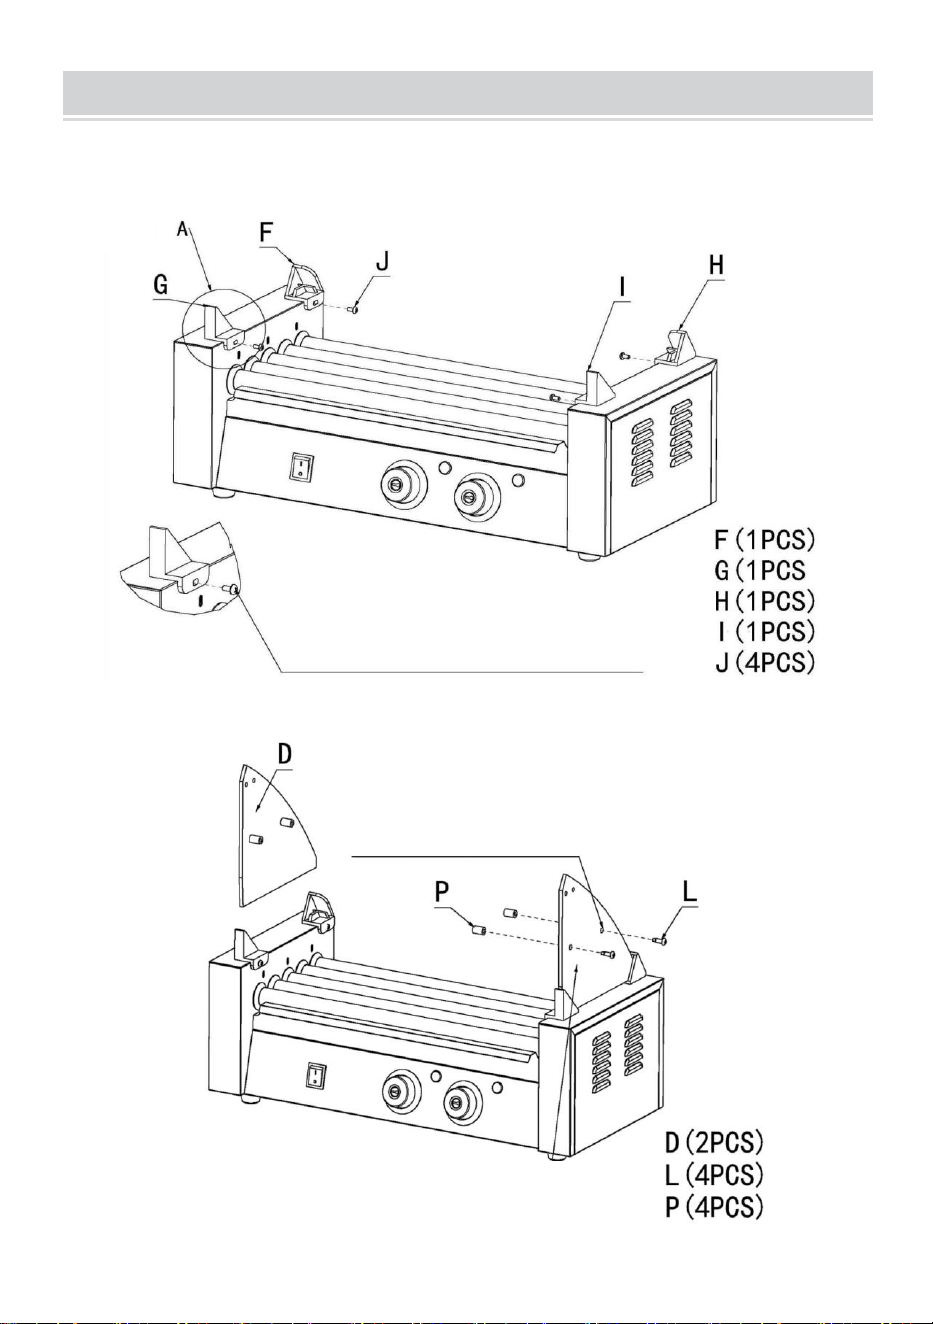
ASSEMBLY DRAWING
Note: The location of the core components of these three machines is the
same!
Note: Do not tighten the screws completely yet.
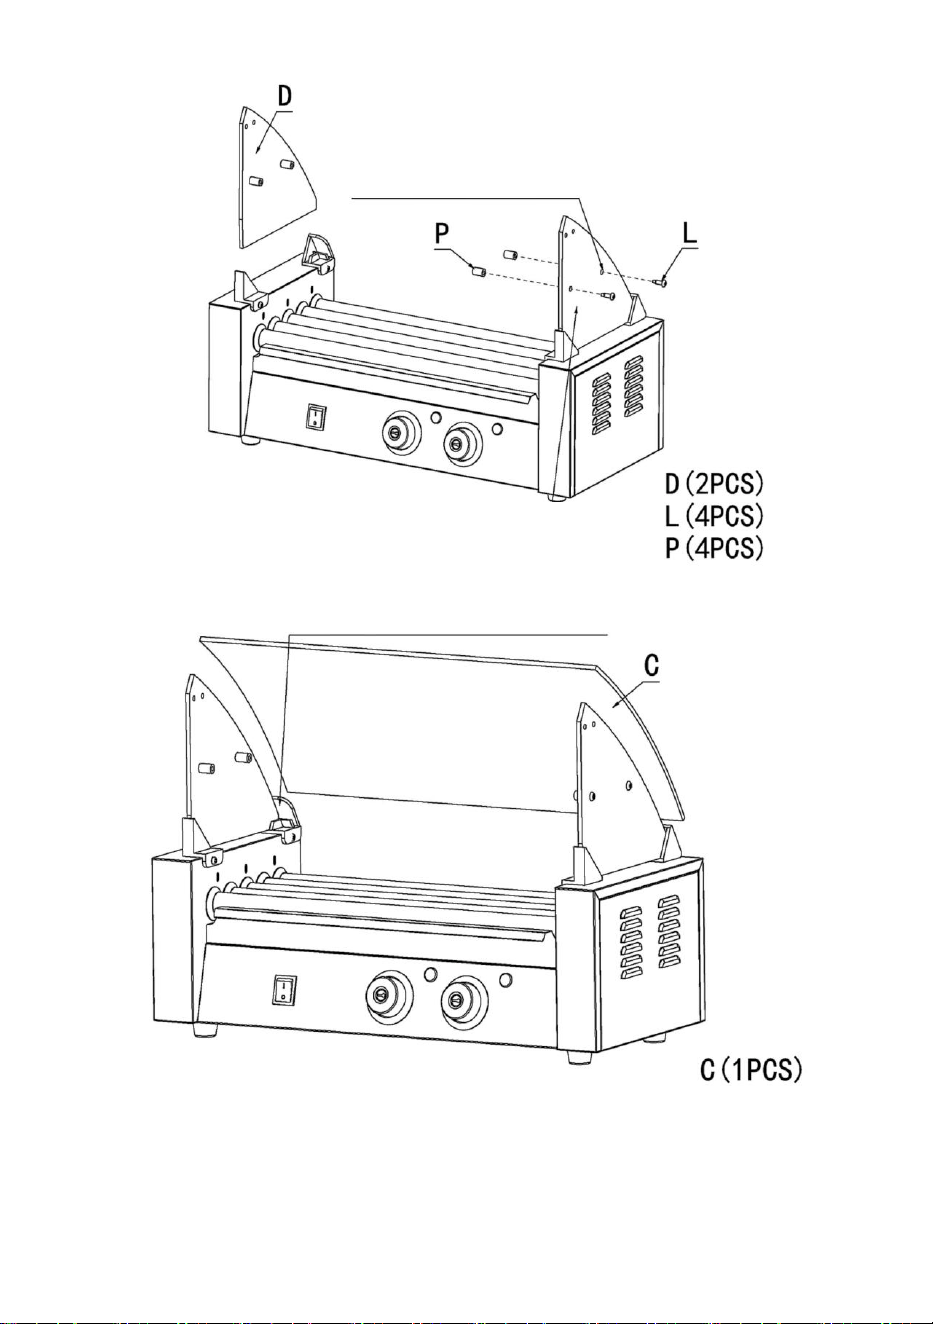
2.2 First put the left and right glass into the glass
fasteners in sequence, and then tighten the four
fixing screws.
1. First use screws (J) to fix the (F-G-H-I)
accessories to the rack in sequence.
Step1
2.1 Use screws (L) to fix the left and right
accessories (P) to the reserved fixing holes in
the glass in sequence.
Step2

- 9 -
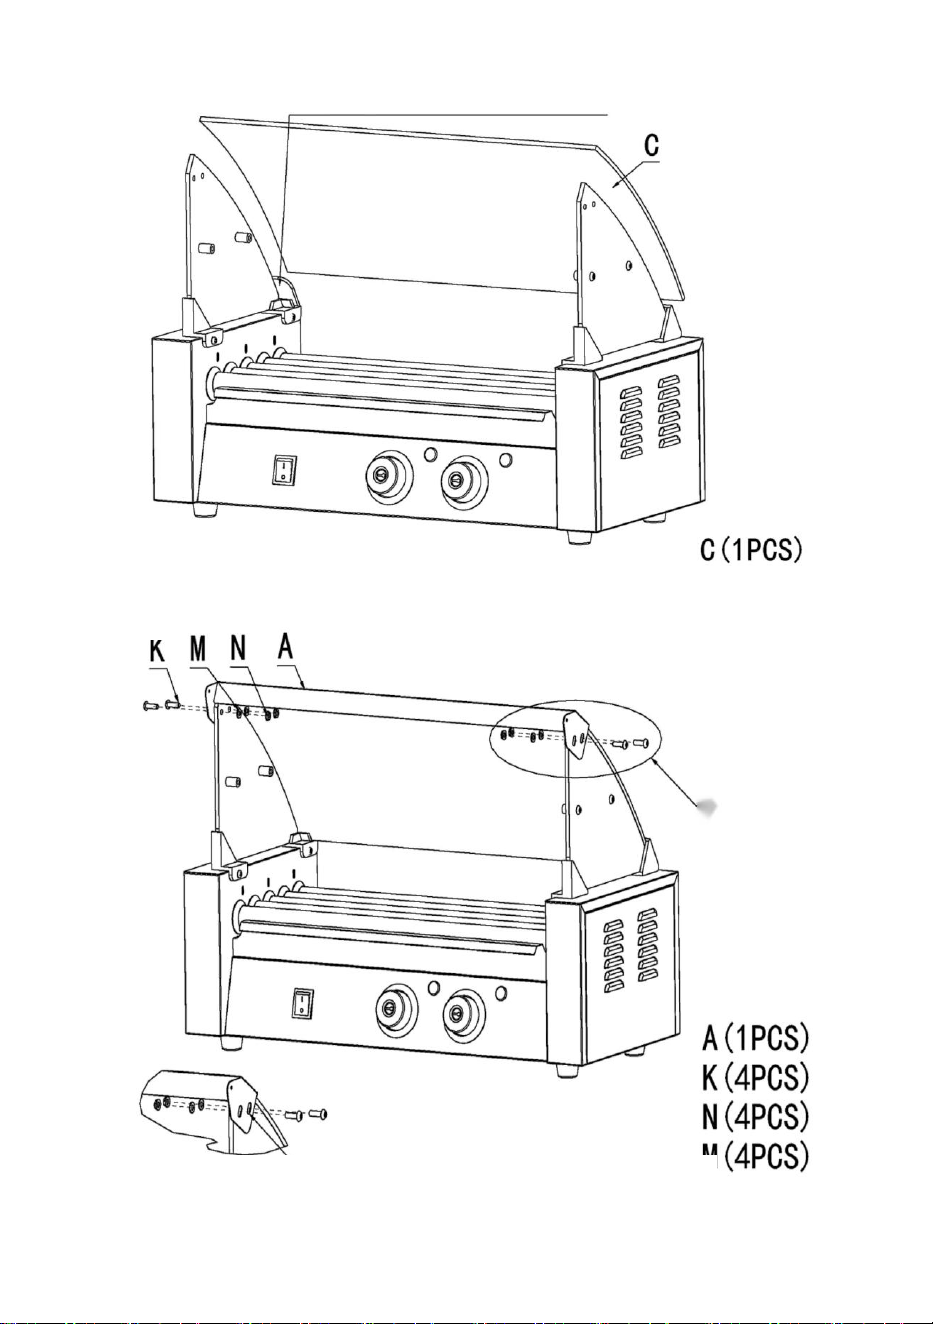
Step3
3.1 Place the accessory (C) into the slot of the glass fixture.
Step4
4 Use fasteners (K; N; M) to fix accessories
(A) to the reserved openings in the glass in
order and tighten them.

- 10 -
Step5
5 Place the accessory (E) onto the installed
accessory (P) from top to bottom.
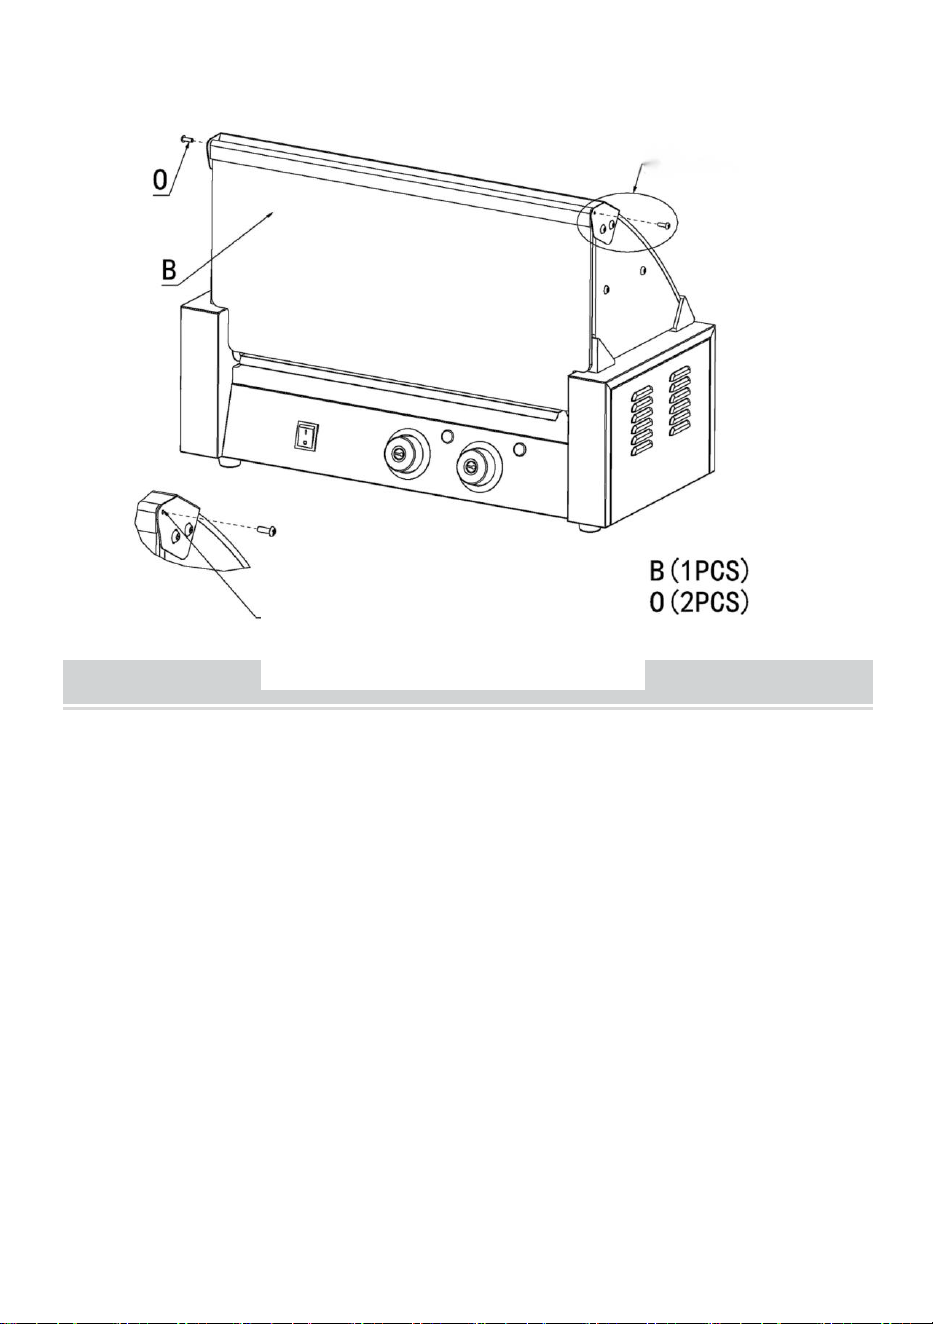
Step6
6 Use screws (O) to secure
accessory (B) to the installed
glass front fixed beam; complete
installation.

- 11 -
OPERATING INSTRUCTIONS
Before using the appliance for the first time, peel off any promotional materials and
packaging materials, and check that the product are clean and free of dust. If
necessary, wipe them over with a damp cloth. Spread over with an absorbent
kitchen towel and wipe off any excess oil. When your appliance is heated for the
first time, it may emit slight smoke or odor, which is normal for many heating
appliances, and will not affect the safety of your appliance.
1. Place the machine on a clean, dry, level surface near a plug base outlet.
2. Plug the cord into the machine power socket.
3. Plug the cord into the wall outlet.
4. How to test your machine: Turn on the power switch, the indicator light is on;
turn on the motor switch, the rollers rotate. Turn the thermostat knob clockwise to
align the knob on the temperature scale with the red triangle on the
panel, the heating indicator light is on, and the rollers start to heat. When the
temperature reaches the set value, turn the knob clockwise to about 302°F (150°C).
At this time, the heating indicator light will go off, which means the it has reached
the set temperature.
5. Place the pre-prepared sausages parallelly in the middle of the two rollers, then
the sausages will rotate in
opposite directions. Please do not place the sausages too close together, leaving
about 0.4 inch (10 mm) at the end of each roller.
Note:
1. Every time you turn on the machine for the first time, you must first turn on the
heating switch to preheat, and then turn on the rotary switch to prevent the motor
oil from solidification.
2. Opening of the bottom pan or both sides is not permitted, in case that you are
eligible to do so. 3. Usually the baking temperature should be appropriate 248°
F-320°F(120-160°C).
4. When heating, your hands are not allowed to touch the steel roller to prevent
scalding.

- 12 -
5.When connecting or unplugging the plug, it should be disconnected from the
total external power supply.
6. Keep your hands dry when plugging the cord.
TIPS
1. To save electricity and reduce the heating time, you can naturally defrost the
sausages or heat it by microwave oven before.
2.Apply food oil to the left and right sides of the roller before use to increase the
smooth rolling of the roller.
Note: The pan under the rollers is used to catch drops of oil, it can also be used to
preheat the sausage, but it’s not appropriate to put the grilled sausages into it.
CLEANING AND MAINTENANCE
1. Once you have finished baking, remove the plug from the electrical outlet.
Leave the machine to cool down completely before cleaning.
2. The rollers should be cleaned every 4-5 hours of grilling.
3. For the exterior, wipe with a soft, dry cloth. Never use an abrasive cleanser or
harsh pad. 3. Any other servicing should be provided by an Authorized Service
Representative.
Warning: Do not use liquid to rinse the product directly to avoid water
damage to internal components.
STORAGE
1. Always unplug the machine before storage.
2. Always make sure the machine is cleaning cool and dry before string.
3. Apply vegetable oil to the surface of the product to prevent rust.

Manufacturer: Shanghaimuxinmuyeyouxiangongsi
Address: Shuangchenglu 803nong11hao1602A-1609shi, baoshanqu,
shanghai 200000 CN.
Imported to AUS: SIHAO PTY LTD. 1 ROKEVA STREETEASTWOOD
NSW 2122 Australia
Imported to USA: Sanven Technology Ltd. Suite 250, 9166 Anaheim
Place, Rancho Cucamonga, CA 91730
REP
UK
YH CONSULTING LIMITED.
C/O YH Consulting Limited Office 147,
Centurion House, London Road,
Staines-upon-Thames, Surrey, TW18 4AX
REP
EC
E-CrossStu GmbH
Mainzer Landstr.69,
60329 Frankfurt am Main.
Technical Support and E-Warranty Certificate
www.vevor.com/support

Techniczny Certyfikat wsparcia i e-gwarancji www.vevor.com/support
ROLLING HOT-DOGA GRILL
MODEL: SC-5XD / SC-7XD / SC-11XD
Nadal dokładamy wszelkich starań, aby zapewnić Państwu narzędzia w konkurencyjnej
cenie.
„Zaoszczędź pół ceny”, „Zaoszczędź połowę ceny” lub inne podobne wyrażenia używane
wyłącznie przez nas
reprezentuje szacunkową oszczędność, jaką możesz zyskać kupując określone narzędzia
z nami w porównaniu z głównymi, najlepszymi markami i niekoniecznie to oznacza okładka
wszystkie kategorie oferowanych przez nas narzędzi. Przypominamy o weryfikacji ostrożnie
kiedy składasz u nas zamówienie, jeśli faktycznie tak jest Oszczędność
Połowa w porównaniu z czołowymi markami.

- 1 -
MODEL: SC-5XD MODEL: SC-7XD
MODEL: SC-11XD
POTRZEBUJĘ POMOCY? SKONTAKTUJ SIĘ Z NAMI!
Masz pytania dotyczące produktu? Potrzebujesz wsparcia
technicznego? Śmiało możesz się z nami skontaktować:
Wsparcie techniczne i certyfikat e-gwarancji
www.vevor.com/support
To jest oryginalna instrukcja. Przed przystąpieniem do obsługi prosimy o
dokładne zapoznanie się ze wszystkimi instrukcjami. VEVOR zastrzega
sobie jasną interpretację naszej instrukcji obsługi. Wygląd produktu
ROLLING HOT-DOG GRILL

- 2 -
zależy od produktu, który otrzymałeś. Proszę wybaczyć nam, że nie
będziemy ponownie informować Państwa, jeśli pojawią się jakieś
aktualizacje technologii lub oprogramowania naszego produktu.
Ostrzeżenie — aby zmniejszyć ryzyko obrażeń, użytkownik musi
uważnie przeczytać instrukcję obsługi.
Do użytku wewnątrz.
Uważaj na wysokie temperatury, aby zapobiec poparzeniom.
PRAWIDŁOWA UTYLIZACJA
Ten produkt podlega przepisom Dyrektywy Europejskiej
2012/19/WE. Symbol przekreślonego kosza na śmieci oznacza, że
produkt wymaga selektywnej zbiórki śmieci na terenie Unii
Europejskiej. Dotyczy to produktu i wszystkich akcesoriów
oznaczonych tym symbolem. Produktów oznaczonych jako takie nie
można wyrzucać razem ze zwykłymi odpadami domowymi, lecz
należy je oddać do punktu zbiórki w celu recyklingu urządzeń
elektrycznych i elektronicznych
Zgodność to certyfikat bezpieczeństwa obowiązujący w
Ameryce Północnej.
Zgodność to certyfikat bezpieczeństwa WE i Wielkiej Brytanii.

- 3 -
CIEPŁA PODPOWIEDŹ:
Na powierzchnię naklejona jest biała folia ochronna Kadłub, aby
chronić kadłub przed zadrapaniami. Przed użyciem należy go
oderwać.
SAFETY WARNINGS AND PRECAUTIONS
Dziękujemy za korzystanie z tego produktu . Aby mieć pewność, że będziesz mógł
prawidłowo obsługiwać maszynę, przeczytaj uważnie niniejszą instrukcję przed
rozpoczęciem użytkowania i zachowaj ją odpowiednio do wykorzystania w
przyszłości . Aby zapewnić bezpieczne użytkowanie, prosimy o zapoznanie się ze
środkami ostrożności i zasadami bezpieczeństwa zamieszczonymi na tej stronie.
Niniejsza instrukcja zawiera ostrzeżenia i środki ostrożności dotyczące
bezpieczeństwa, obsługi, konserwacji i czyszczenia . Ostrzeżenia i instrukcje
omówione w tej instrukcji nie obejmują wszystkich możliwych warunków i sytuacji,
które mogą wystąpić . Ostrożność i zdrowy rozsądek nie są podstawą tego
produktu, ponieważ wierzymy, że jego zastosowanie będzie zgodne z tymi
kodami . Przed rozpoczęciem programu treningowego lub podjęciem wytężonej
aktywności wytrzymałościowej na urządzeniu należy skonsultować się z lekarzem.
Przed użyciem urządzenia przeczytaj WSZYSTKIE instrukcje .
1. Upewnij się, że napięcie w gniazdku jest takie samo, jak napięcie wskazane na
tabliczce znamionowej urządzenia.
2. Nie pozwalaj dzieciom, osobom niepełnoletnim ani zwierzętom zbliżać się ani
dotykać maszyny.
3. Nie dotykaj bezpośrednio rękami gorącej powierzchni. Do obsługi zawsze
używaj uchwytu lub pokrętła.
4. Aby zapobiec porażeniu prądem, nie zanurzaj przewodu ani wtyczki w wodzie
lub innych płynach.
5. Nie zanurzać urządzenia w wodzie lub innym płynie.
6. Odłącz urządzenie od gniazdka, gdy nie jest używane i przed czyszczeniem.
Schłodzić urządzenie przed montażem lub demontażem części oraz przed
czyszczeniem.
7. Ochłodzić GORĄCE części przed rozpoczęciem pracy i czyszczeniem .
8. Nie używaj urządzenia z uszkodzonym przewodem lub wtyczką, wadliwym

- 4 -
działaniem lub jakimkolwiek uszkodzeniem mechanicznym. Wyślij go do
najbliższego autoryzowanego centrum serwisowego w celu sprawdzenia i
naprawy (urządzenie powinni otwierać WYŁĄCZNIE technicy).
9. Korzystanie z akcesoriów lub przystawek, które nie są dostarczone lub
zalecane przez producenta, może spowodować obrażenia.
10. Jeżeli maszyna nie będzie używana przez dłuższy czas, należy ją odłączyć od
prądu, wyczyścić, przykryć i przechowywać w suchym i bezpiecznym miejscu.
11. Nie zostawiaj przewodu zasilającego wiszącego nad krawędzią stołu lub blatu
ani nie dopuszczaj do jego kontaktu z gorącymi powierzchniami.
12. Nie umieszczaj urządzenia na lub w pobliżu gorącego powietrza, palników
elektrycznych lub grzejników.
13. Zawsze wyłączaj zasilanie z gniazdka przed podłączeniem lub odłączenie.
Przytrzymaj wtyczkę, zamiast ciągnąć za przewód.
1 4 . Nie używaj tego urządzenia do celów innych niż wskazane.
1 5 . TRZYMAJ GO W miejscu niedostępnym dla dzieci. Nigdy nie pozostawiaj
go bez nadzoru podczas użytkowania.
1 6 . NIE CZYŚCIĆ GO ŻADNYMI MATERIAŁAMI ŚCIERNYMI.
1 7 . Zawsze sprawdzaj, czy urządzenie jest podłączone do uziemionego gniazdka
elektrycznego o odpowiednim napięciu. Upewnij się, że używane gniazdko
ścienne jest prawidłowo uziemione. Jeżeli nie, należy zainstalować uziemione
gniazdko. Mieć prace wykonywane wyłącznie przez certyfikowanego elektryka,
posiadającego odpowiednie kwalifikacje, aby spełniać lokalne przepisy
bezpieczeństwa i przepisy elektryczne.
18 . Upewnij się, że gniazdko elektryczne, wtyczka i używany przewód są sprawne
warunki pracy. Uszkodzone elementy powinny być naprawiane przez
certyfikowanego elektryka posiadającego kwalifikacje spełniające lokalne przepisy
bezpieczeństwa i elektryczne. Nawet jeśli przewód zasilający działa prawidłowo,
należy trzymać go z dala od wody i unikaj spływania po dywanach lub
urządzeniach grzewczych.
1 9 . Unikaj używania go w obecności łatwopalnych cieczy, gazów, pyłów lub w
innych sytuacjach wybuchowych.
20 . Nie należy przenosić urządzenia przed schłodzeniem i podczas nagrzewania
2 1 . Nie używaj maszyny w garażu ze sprzętem ani pod ścianą gabinet. Zawsze
odłączaj urządzenie od gniazdka elektrycznego podczas przechowywania w
garażu. W przeciwnym razie może to spowodować ryzyko pożaru, zwłaszcza jeśli
maszyna dotknie ściany garażu lub brama dotknie jej podczas zamykania.
2 2 . Mocowanie typu Y: Jeśli przewód zasilający jest uszkodzony, musi go
wymienić producent, jego agent serwisowy lub podobnie wykwalifikowana osoba
w aby uniknąć zagrożenia.
2 3 . Dzieciom nie wolno bawić się urządzeniem. Czyszczenie i konserwacja nie
mogą być wykonywane przez dzieci bez nadzoru.
24 . Sprawdź przed każdym użyciem.
25 . NIE CZYŚCIĆ GO ŻADNYMI MATERIAŁAMI ŚCIERNYMI .

- 5 -
26 . Nigdy nie pozostawiaj go bez nadzoru podczas użytkowania . Nigdy nie
zostawiaj dziecka bez opieki.
27. Mocz i odchody zwierząt domowych mogą uszkodzić produkt. Trzymaj je z
daleka .
OSTRZEŻENIE: To urządzenie nie jest przeznaczone do użytku przez
osoby młode lub niedołężne, chyba że będzie nadzorowane przez osobę
odpowiedzialną, która zapewni im bezpieczne korzystanie z urządzenia. Małe
dzieci należy nadzorować, aby mieć pewność, że nie bawią się produktem .
Zwierzęta powinny trzymać się z daleka od produktu.
PRODUCT PARAMETERS
MODEL
Region
Napięcie
Moc
Typ wtyczki
Bezpie
cznik
SC-5XD
Ameryka
północna
AC110V6 0
Hz
750 W
Amerykanin
WTYCZKA
10A
Europa
AC 220-240
V 50 Hz
1000 W
Europejczyk
WTYCZKA
SC-7XD
Ameryka
północna
AC110V6 0
Hz
1050 W
Amerykanin
WTYCZKA
15A
Europa
AC 220-240
V 50 Hz
1400 W
Europejczyk
WTYCZKA
SC- 11 XD
Ameryka
północna
AC110V6 0
Hz
1650 W
Amerykanin
WTYCZKA
20A
Europa
AC 220-240
V 50 Hz
2200 W
Europejczyk
WTYCZKA
Uwaga :
1. Napięcie stosowane w tym urządzeniu musi być takie samo jak napięcie
zasilania.
2. Użytkownicy muszą zainstalować go w pobliżu wyłącznika zasilania i
bezpiecznika.
- 6 -
3. Jeżeli maszyna nie jest zasilana, wyjmij wtyczkę z gniazdka elektrycznego
i sprawdź, czy nie przepalił się bezpiecznik.
4. Zaleca się, aby produkty korzystały z oddzielnych linii i gniazd, aby uniknąć
przeciążenia wyłącznika automatycznego lub bezpiecznika zwłocznego.
CIEPŁA PODPOWIEDŹ:
Na powierzchnię naklejona jest biała folia ochronna Kadłub, aby
chronić kadłub przed zadrapaniami. Przed użyciem należy go
oderwać.
PRODUCT COMPONENTS
Uwaga: lokalizacja głównych komponentów tych trzech maszyn jest taka
sama!
1. Power Switch
2.Temperature Knob
(Front)
3. Heat Light (Front)
4.Temperature Knob
(Back)
5. Heat Light (Back)
6. Pan
7. Fuse
8. Protective Earthing
9. Power Socket
④
③
②
①
⑤
⑥
- 7 -
⑨
⑧
⑦
- 8 -
EXPLODED VIEW
Uwaga: lokalizacja głównych komponentów tych trzech maszyn jest taka
sama!
NIE.
Nazwa
ILOŚ
Ć
NIE.
Nazwa
ILOŚ
Ć
A
Stała belka szklana
przednia
1
I
Przednia podstawka
szklana (prawa)
1
B
Szklane drzwi
wejściowe
1
J
Śruby M4x8
4
C
Zakrzywione szkło
1
K
Śruby M5x14
4
D
Szkło boczne
2
L
Śruby M6x14
4
mi
Półki
1
M
Nakrętka M5
4
F
Za szklanym stojakiem
(po lewej)
1
N
Uszczelka mikowa
4
G
Przód szklanej
podstawki (lewy)
1
O
Śruby M4x12
2
- 9 -
H
Za szklanym stojakiem
(po prawej)
1
P
Nylonowy rękaw
4
Uwaga: ilość części podana w instrukcji oznacza faktyczne zużycie, a części
nieużywane stanowią części zamienne.
ASSEMBLY DRAWING
Uwaga: lokalizacja głównych komponentów tych trzech maszyn jest taka
sama!
Uwaga: Nie dokręcaj jeszcze śrub całkowicie.
1. First use screws (J) to fix the (F-G-H-I)
accessories to the rack in sequence.
Step1
- 10 -
2.2 First put the left and right glass into the glass
fasteners in sequence, and then tighten the four
fixing screws.
2.1 Use screws (L) to fix the left and right
accessories (P) to the reserved fixing holes in
the glass in sequence.
Step2
Step3
3.1 Place the accessory (C) into the slot of the glass fixture.
Step4

- 11 -
4 Use fasteners (K; N; M) to fix accessories
(A) to the reserved openings in the glass in
order and tighten them.
Step5
5 Place the accessory (E) onto the installed
accessory (P) from top to bottom.
- 12 -
OPERATING INSTRUCTIONS
Przed pierwszym użyciem urządzenia należy odkleić wszelkie elementy
promocyjne materiałów i materiałów opakowaniowych oraz sprawdzić, czy produkt
jest czysty i wolny od kurzu. W razie potrzeby przetrzyj je wilgotną szmatką.
Rozłóż na chłonnym ręczniku kuchennym i zetrzyj nadmiar oleju. Kiedy
urządzenie jest podgrzewane po raz pierwszy, może wydzielać się lekki dym
lub zapach, co jest zjawiskiem normalnym w przypadku wielu urządzeń
grzewczych i nie ma wpływu na bezpieczeństwo urządzenia.
1. Umieść maszynę na czystej, suchej i poziomej powierzchni w pobliżu gniazdka
elektrycznego.
2. Podłącz przewód do gniazdka elektrycznego maszyny.
3. Podłącz przewód do gniazdka ściennego.
4. Jak przetestować urządzenie: Włącz wyłącznik zasilania, lampka kontrolna
zaświeci się; włącz wyłącznik silnika, rolki się obracają. Obróć pokrętło termostatu
w kierunku zgodnym z ruchem wskazówek zegara, aby dopasować pokrętło na
skali temperatury do czerwonego trójkąta na
Step6
6 Use screws (O) to secure
accessory (B) to the installed
glass front fixed beam; complete
installation.

- 13 -
panelu, kontrolka ogrzewania świeci się, a rolki zaczynają się nagrzewać. Gdy
temperatura osiągnie ustawioną wartość, obróć pokrętło w kierunku zgodnym z
ruchem wskazówek zegara do około 302°F (150°C). W tym momencie kontrolka
nagrzewania zgaśnie, co oznacza, że osiągnął on ustawioną temperaturę.
5. Ułożyć przygotowane kiełbaski równolegle na środku dwóch wałków, kiełbaski
będą się obracać
przeciwne kierunki. Nie umieszczaj kiełbasek zbyt blisko siebie, pozostawiając
około 10 mm (0,4 cala) na końcu każdego wałka.
Notatka:
1. Za każdym razem, gdy włączasz maszynę po raz pierwszy, musisz najpierw
włączyć przełącznik ogrzewania, aby rozgrzać, a następnie włączyć przełącznik
obrotowy, aby zapobiec zestaleniu oleju silnikowego.
2. Niedozwolone jest otwieranie dolnej miski lub obu stron, jeśli masz do tego
uprawnienia. 3. Zwykle temperatura pieczenia powinna wynosić od 248°F do 320°
F (120-160°C).
4. Podczas podgrzewania nie wolno dotykać stalowego wałka rękami, aby uniknąć
poparzenia.
5.Podłączając lub odłączając wtyczkę należy ją odłączyć od całego zewnętrznego
źródła zasilania.
6. Podczas podłączania przewodu trzymaj suche
ręce.
TIPS
1. Aby zaoszczędzić energię elektryczną i skrócić czas nagrzewania, kiełbaski
można w naturalny sposób rozmrozić lub podgrzać wcześniej w kuchence
mikrofalowej.
2. Przed użyciem nałóż olej spożywczy na lewą i prawą stronę wałka, aby
zwiększyć płynność toczenia wałka.
Notatka: Patelnia pod wałkami służy do zbierania kropel oleju, można na niej
także podgrzać kiełbasę, ale nie należy wkładać do niej kiełbasek z grilla.

- 14 -
CLEANING AND MAINTENANCE
1. Po zakończeniu pieczenia wyjmij wtyczkę z gniazdka elektrycznego. Przed
czyszczeniem pozostaw maszynę do całkowitego ostygnięcia.
2. Wałki należy czyścić co 4-5 godzin grillowania.
3. Zewnętrzną część wytrzeć miękką, suchą szmatką. Nigdy nie używaj ściernych
środków czyszczących ani szorstkich podkładek. 3. Wszelkie inne czynności
serwisowe powinny być świadczone przez Autoryzowanego Przedstawiciela
Serwisu.
Ostrzeżenie: Nie używaj płynu do bezpośredniego płukania produktu, aby
uniknąć uszkodzenia elementów wewnętrznych przez wodę.
STORAGE
1. Zawsze odłączaj maszynę od prądu przed przechowywaniem.
2. Przed rozpoczęciem sznurowania zawsze upewnij się, że maszyna czyści w
chłodnym i suchym stanie.
3. Nałóż olej roślinny na powierzchnię produktu, aby zapobiec rdzy.

- 15 -
Producent: Shanghaimuxinmuyeyouxiangongsi
Adres: Shuangchenglu 803nong11hao1602A-1609shi, baoshanqu,
szanghaj 200000 CN.
Import do AUS: SIHAO PTY LTD. 1 ROKEVA STREETEASTWOOD NSW
2122 Australia
Import do USA: Sanven Technology Ltd. Suite 250, 9166 Anaheim Place,
Rancho Cucamonga, CA 91730
REP
UK
YH CONSULTING LIMITED.
C/O YH Consulting Limited Office 147,
Centurion House, London Road,
Staines-upon-Thames, Surrey, TW18 4AX
REP
EC
E-CrossStu GmbH
Mainzer Landstr.69,
60329 Frankfurt am Main.


Technisch Support und E-Garantie-Zertifikat www.vevor.com/support
ROLLENDER HOT-DOG-GRILL
MODELL: SC-5XD / SC-7XD / SC-11XD
Wir sind weiterhin bestrebt, Ihnen Werkzeuge zu wettbewerbsfähigen Preisen anzubieten.
"Sparen Sie die Hälfte", "Halber Preis" oder andere ähnliche Ausdrücke, die wir nur
verwenden
stellt eine Schätzung der Einsparungen dar, die Sie durch den Kauf bestimmter Werkzeuge
erzielen können
mit uns im Vergleich zu den großen Top-Marken und bedeutet nicht unbedingt, Abdeckung
alle von uns angebotenen Werkzeugkategorien. Wir möchten Sie bitten, zu überprüfen
sorgfältig
wenn Sie bei uns eine Bestellung aufgeben, wenn Sie tatsächlich Speichern
Halb im Vergleich mit den Top-Großmarken.

- 1 -
MODELL: SC-5XD MODELL: SC-7XD
MODELL: SC-11XD
Brauchen Sie Hilfe? Kontaktieren Sie uns!
Sie haben Fragen zu unseren Produkten? Sie benötigen technischen
Support? Dann kontaktieren Sie uns gerne:
Technischer Support und E-Garantie-Zertifikat
www.vevor.com/support
Dies ist die Originalanleitung. Bitte lesen Sie alle Anweisungen sorgfältig
durch, bevor Sie das Gerät in Betrieb nehmen. VEVOR behält sich eine
klare Auslegung unserer Bedienungsanleitung vor. Das Erscheinungsbild
ROLLING HOT-DOG GRILL

- 2 -
des Produkts richtet sich nach dem Produkt, das Sie erhalten haben. Bitte
verzeihen Sie uns, dass wir Sie nicht erneut informieren, wenn es
Technologie- oder Software-Updates für unser Produkt gibt .
Warnung: Um das Verletzungsrisiko zu verringern, muss der
Benutzer die Bedienungsanleitung sorgfältig lesen.
Nur Innen benutzen.
Achten Sie auf hohe Temperaturen, um Verbrennungen zu
vermeiden.
KORREKTE ENTSORGUNG
Dieses Produkt unterliegt den Bestimmungen der europäischen
Richtlinie 2012/19/EU. Das Symbol einer durchgestrichenen
Mülltonne weist darauf hin, dass das Produkt in der Europäischen
Union einer getrennten Müllentsorgung unterliegt. Dies gilt für das
Produkt und alle mit diesem Symbol gekennzeichneten Zubehörteile.
So gekennzeichnete Produkte dürfen nicht im normalen Hausmüll
entsorgt werden, sondern müssen an einer Sammelstelle für das
Recycling von elektrischen und elektronischen Geräten abgegeben
werden.
Compliance ist eine nordamerikanische
Sicherheitszertifizierung.
Compliance ist eine Sicherheitszertifizierung der EG und des
Vereinigten Königreichs.

- 3 -
WARMER HINWEIS:
Eine weiße Schutzfolie ist auf der Oberfläche angebracht der Rumpf,
um den Rumpf vor Kratzern zu schützen. Bitte reißen Sie es vor der
Verwendung ab.
SAFETY WARNINGS AND PRECAUTIONS
Vielen Dank, dass Sie dieses Produkt verwenden . Um sicherzustellen, dass Sie
das Gerät richtig bedienen können, lesen Sie diese Anleitung vor der
Inbetriebnahme sorgfältig durch und bewahren Sie sie für spätere Verwendung
auf . Bitte lesen Sie die Vorsichtsmaßnahmen und Sicherheitshinweise auf dieser
Seite, um eine sichere Verwendung zu gewährleisten. In diesem Handbuch
werden Sicherheitswarnungen und Vorsichtsmaßnahmen sowie Bedienung,
Wartung und Reinigung beschrieben . Die in diesem Handbuch beschriebenen
Warnungen und Anweisungen können nicht alle möglichen Bedingungen und
Situationen abdecken, die auftreten können . Vorsicht und gesunder
Menschenverstand sind bei diesem Produkt nicht angebracht, da wir davon
ausgehen, dass die Verwendung diesen Vorschriften entspricht . Bevor Sie ein
Trainingsprogramm beginnen oder anstrengende Ausdaueraktivitäten auf dem
Gerät durchführen, konsultieren Sie bitte einen Arzt.
Bitte lesen Sie ALLE Anweisungen, bevor Sie Ihre Maschine verwenden .
1. Stellen Sie sicher, dass die Spannung in Ihrer Steckdose mit der Spannung auf
dem Typenschild des Geräts übereinstimmt.
2. Lassen Sie Kinder, Jugendliche und Haustiere nicht in die Nähe der Maschine
kommen oder diese berühren.
3. Berühren Sie die heiße Oberfläche nicht direkt mit den Händen. Benutzen Sie
zur Bedienung immer den Griff oder Drehknopf.
4. Um einen Stromschlag zu vermeiden, tauchen Sie das Kabel oder den Stecker
nicht in Wasser oder andere Flüssigkeiten.
5. Tauchen Sie das Gerät nicht in Wasser oder andere Flüssigkeiten.
6. Ziehen Sie den Stecker aus der Steckdose, wenn Sie das Gerät nicht benutzen
und bevor Sie es reinigen. Lassen Sie das Gerät abkühlen, bevor Sie Teile
einbauen oder entfernen und bevor Sie es reinigen.

- 4 -
7. Kühlen Sie die heißen Teile vor dem Betrieb und der Reinigung ab .
8. Betreiben Sie das Gerät nicht mit beschädigtem Kabel oder Stecker,
Fehlfunktionen oder mechanischen Schäden. Senden Sie es zur Überprüfung und
Reparatur an Ihr nächstgelegenes autorisiertes Servicecenter (NUR Techniker
sollten das Gerät öffnen).
9. Die Verwendung von Zubehör oder Zusatzgeräten, die nicht vom Hersteller
bereitgestellt oder empfohlen werden, kann zu Verletzungen führen.
10. Wenn die Maschine längere Zeit nicht benutzt wird, ziehen Sie den Stecker,
reinigen Sie sie, decken Sie sie ab und lagern Sie sie an einem trockenen und
sicheren Ort.
11. Lassen Sie das Netzkabel nicht über die Tisch- oder Thekenkante hängen und
vermeiden Sie, dass es mit heißen Oberflächen in Berührung kommt.
12. Stellen Sie das Gerät nicht auf oder in die Nähe von heißer Luft, elektrischen
Brennern oder Heizgeräten.
13. Schalten Sie die Steckdose immer aus, bevor Sie ein Netzkabel einstecken
oder Ziehen Sie den Stecker. Halten Sie den Stecker fest, anstatt am Kabel zu
ziehen.
1 4 . Verwenden Sie das Gerät ausschließlich für den angegebenen Zweck.
15 . Außerhalb der Reichweite von Kindern aufbewahren. Lassen Sie es
während des Gebrauchs niemals unbeaufsichtigt.
1 6 . REINIGEN SIE ES NICHT MIT SCHLEIFENDEN MATERIALIEN.
1 7 . Überprüfen Sie immer, ob dieses Gerät an eine geerdete Steckdose mit der
entsprechenden Stromversorgung angeschlossen ist. Stellen Sie sicher, dass die
verwendete Steckdose ordnungsgemäß geerdet ist. Wenn nicht, müssen Sie eine
geerdete Steckdose installieren. Lassen Sie die Die Arbeiten dürfen nur von einem
zertifizierten Elektriker durchgeführt werden, der über die erforderliche
Qualifikation verfügt, um die örtlichen Sicherheits- und Elektrovorschriften
einzuhalten.
18 . Stellen Sie sicher, dass die verwendete Steckdose, der Stecker und das Kabel
in gutem Zustand sind betriebsbereiten Zustand. Beschädigte Komponenten
sollten von einem zertifizierten Elektriker repariert werden, der die örtlichen
Sicherheits- und Elektrovorschriften erfüllt. Selbst Wenn Ihr Netzkabel
ordnungsgemäß funktioniert, halten Sie es von Wasser fern und Vermeiden Sie,
dass es über Teppiche oder Heizgeräte läuft.
1 9 . Vermeiden Sie die Verwendung in der Nähe von brennbaren Flüssigkeiten,
Gasen, Staub oder anderen explosiven Situationen.
20 . Bewegen Sie die Maschine nicht vor dem Abkühlen und während des
Aufheizens
2 1 . Betreiben Sie die Maschine nicht in einer Gerätegarage oder unter einer
Wand. Schrank. Ziehen Sie bei der Lagerung in einer Garage mit Elektrogeräten
immer den Stecker aus der Steckdose. Andernfalls besteht Brandgefahr,
insbesondere wenn die Maschine die Garagenwand berührt oder die Tür beim
Schließen die Garagenwand berührt.
2 2 . Typ Y-Anschluss: Wenn das Netzkabel beschädigt ist, muss es vom
Hersteller, seinem Kundendienst oder ähnlich qualifizierten Personen in um eine
Gefahr zu vermeiden.

- 5 -
2 3 . Kinder dürfen nicht mit dem Gerät spielen. Reinigung und Benutzerwartung
dürfen nicht von Kindern ohne Aufsicht durchgeführt werden.
24. Vor jedem Gebrauch überprüfen .
25. REINIGEN SIE ES NICHT MIT SCHLEIFENDEN MATERIALIEN .
26. Lassen Sie das Gerät während der Benutzung niemals unbeaufsichtigt .
Lassen Sie das Kind niemals unbeaufsichtigt.
27. Urin und Kot von Haustieren können das Produkt beschädigen. Bitte halten
Sie es fern .
WARNUNG: Dieses Gerät ist nicht für die Benutzung durch junge oder
gebrechliche Personen bestimmt, es sei denn, sie werden von einer
verantwortlichen Person beaufsichtigt, um sicherzustellen, dass sie das
Gerät sicher verwenden können. Kleine Kinder sollten beaufsichtigt werden,
um sicherzustellen, dass sie nicht mit dem Produkt spielen . Haustiere
sollten sich vom Produkt fernhalten.
PRODUCT PARAMETERS
MODELL
Region
Stromspann
ung
Leistun
g
Steckertyp
Sicher
ung
SC-5XD
Nordame
rika
Wechselstrom
110 V, 6,0Hz
750 W
EinAmerikaner
STECKER
10A
Europa
Wechselstro
m 220–240 V,
50 Hz
1000 W
Europäisch
STECKER
SC-7XD
Nordame
rika
Wechselstrom
110 V, 6,0Hz
1050 W
EinAmerikaner
STECKER
15A
Europa
Wechselstro
m 220–240 V,
50 Hz
1400 W
Europäisch
STECKER

- 6 -
SC- 11 XD
Nordame
rika
Wechselstrom
110 V, 6,0Hz
1650 W
EinAmerikaner
STECKER
20A
Europa
Wechselstro
m 220–240 V,
50 Hz
2200 W
Europäisch
STECKER
Aufmerksamkeit :
1. Die für dieses Gerät verwendete Spannung muss mit der
Versorgungsspannung übereinstimmen.
2. Benutzer müssen es in der Nähe des Netzschalters und der Sicherung
installieren.
3. Wenn die Maschine keinen Strom hat, ziehen Sie den Stecker aus der
Steckdose und prüfen Sie, ob die Sicherung durchgebrannt ist.
4. Es wird empfohlen, für die Produkte separate Leitungen und Steckdosen zu
verwenden, um eine Überlastung des Leistungsschalters oder der
Zeitverzögerungssicherung zu vermeiden.
WARMER HINWEIS:
Eine weiße Schutzfolie ist auf der Oberfläche angebracht der Rumpf,
um den Rumpf vor Kratzern zu schützen. Bitte reißen Sie es vor der
Verwendung ab.
- 7 -
PRODUCT COMPONENTS
Hinweis: Die Position der Kernkomponenten dieser drei Maschinen ist
gleich!
⑨
⑧
⑦
1. Power Switch
2.Temperature Knob
(Front)
3. Heat Light (Front)
4.Temperature Knob
(Back)
5. Heat Light (Back)
6. Pan
7. Fuse
8. Protective Earthing
9. Power Socket
④
③
②
①
⑤
⑥

- 8 -
EXPLODED VIEW
Hinweis: Die Position der Kernkomponenten dieser drei Maschinen ist
gleich!
NEI
N.
Name
Men
ge
NEI
N.
Name
Men
ge
A
Fester Balken vorne
aus Glas
1
ICH
Glasständer vorne
(rechts)
1
B
Glasfronttür
1
J
Schrauben M4x8
4
C
Gebogenes Glas
1
K
Schrauben M5x14
4
D
Seitenscheibe
2
M
Schrauben M6x14
4
E
Regale
1
M
Mutter M5
4
F
Hinter dem Glasständer
(links)
1
N
Glimmerdichtung
4
G
Glasständer vorne
(links)
1
Ö
Schrauben M4x12
2
H
Hinter dem Glasständer
1
P
Nylonhülle
4
- 9 -
(rechts)
Hinweis: Die in der Anleitung angegebene Teilemenge entspricht der
tatsächlichen Nutzung und die nicht verwendeten Teile sind Ersatzteile.
ASSEMBLY DRAWING
Hinweis: Die Position der Kernkomponenten dieser drei Maschinen ist
gleich!
Hinweis: Die Schrauben noch nicht ganz festziehen.
1. First use screws (J) to fix the (F-G-H-I)
accessories to the rack in sequence.
Step1

- 10 -
2.2 First put the left and right glass into the glass
fasteners in sequence, and then tighten the four
fixing screws.
2.1 Use screws (L) to fix the left and right
accessories (P) to the reserved fixing holes in
the glass in sequence.
Step2
Step3
3.1 Place the accessory (C) into the slot of the glass fixture.
Step4

- 11 -
4 Use fasteners (K; N; M) to fix accessories
(A) to the reserved openings in the glass in
order and tighten them.
Step5
5 Place the accessory (E) onto the installed
accessory (P) from top to bottom.

- 12 -
OPERATING INSTRUCTIONS
Vor der ersten Inbetriebnahme des Gerätes alle Werbeaufkleber abziehen
Materialien und Verpackungsmaterial und prüfen Sie, ob das Produkt sauber und
staubfrei ist. Wischen Sie es bei Bedarf mit einem feuchten Tuch ab. Mit einem
saugfähigen Küchentuch verteilen und überschüssiges Öl abwischen. Beim
ersten Aufheizen Ihres Geräts kann es zu leichter Rauch- oder
Geruchsentwicklung kommen. Dies ist bei vielen Heizgeräten normal und
hat keine Auswirkungen auf die Sicherheit Ihres Geräts.
1. Stellen Sie die Maschine auf eine saubere, trockene und ebene Fläche in der
Nähe einer Steckdose.
2. Stecken Sie das Kabel in die Steckdose der Maschine.
3. Stecken Sie das Kabel in die Steckdose.
4. So testen Sie Ihre Maschine: Schalten Sie den Netzschalter ein, die
Kontrollleuchte leuchtet; schalten Sie den Motorschalter ein, die Walzen drehen
sich. Drehen Sie den Thermostatknopf im Uhrzeigersinn, um den Knopf auf der
Temperaturskala mit dem roten Dreieck auf der
Step6
6 Use screws (O) to secure
accessory (B) to the installed
glass front fixed beam; complete
installation.

- 13 -
Bedienfeld, die Heizanzeige leuchtet und die Walzen beginnen zu heizen. Wenn
die Temperatur den eingestellten Wert erreicht hat, drehen Sie den Knopf im
Uhrzeigersinn auf etwa 150 °C (302 °F). Zu diesem Zeitpunkt erlischt die
Heizanzeige, was bedeutet, dass die eingestellte Temperatur erreicht ist.
5. Legen Sie die vorbereiteten Würste parallel in die Mitte der beiden Walzen,
dann drehen sich die Würste in
entgegengesetzte Richtungen. Bitte legen Sie die Würste nicht zu dicht
aneinander, sondern lassen Sie am Ende jeder Rolle etwa 10 mm Platz.
Notiz:
1. Bei jedem ersten Einschalten der Maschine müssen Sie zuerst den Heizschalter
zum Vorheizen und dann den Drehschalter einschalten, um ein Aushärten des
Motoröls zu verhindern.
2. Das Öffnen der Bodenform oder beider Seiten ist nicht gestattet, sofern Sie
dazu berechtigt sind. 3. Normalerweise sollte die Backtemperatur angemessen
sein und zwischen 120 und 160 °C (248–320 °F) liegen.
4. Beim Erhitzen dürfen Ihre Hände die Stahlwalze nicht berühren, um
Verbrühungen zu vermeiden.
5. Beim Anschließen oder Abziehen des Steckers muss dieser von der gesamten
externen Stromversorgung getrennt werden.
6. Halten Sie Ihre Hände trocken, wenn Sie das Kabel
einstecken.
TIPS
1. Um Strom zu sparen und die Aufwärmzeit zu verkürzen, können Sie die
Würstchen vorher natürlich auftauen oder in der Mikrowelle erhitzen.
2. Tragen Sie vor dem Gebrauch Speiseöl auf die linke und rechte Seite der Walze
auf, um das sanfte Rollen der Walze zu verbessern.
Notiz: Die Pfanne unter den Walzen dient zum Auffangen von Öltropfen und kann
auch zum Vorwärmen der Würste verwendet werden. Zum Einlegen von
Grillwürsten ist sie jedoch nicht geeignet.

- 14 -
CLEANING AND MAINTENANCE
1. Wenn Sie mit dem Backen fertig sind, ziehen Sie den Stecker aus der
Steckdose. Lassen Sie die Maschine vor der Reinigung vollständig abkühlen.
2. Die Walzen sollten nach jeweils 4-5 Grillstunden gereinigt werden.
3. Wischen Sie die Außenseite mit einem weichen, trockenen Tuch ab. Verwenden
Sie niemals Scheuermittel oder raue Pads. 3. Alle anderen Wartungsarbeiten
sollten von einem autorisierten Kundendienstmitarbeiter durchgeführt werden.
Warnung: Spülen Sie das Produkt nicht direkt mit Flüssigkeit ab, um
Wasserschäden an internen Komponenten zu vermeiden.
STORAGE
1. Ziehen Sie vor der Lagerung immer den Stecker aus der Maschine.
2. Stellen Sie vor dem Reinigen immer sicher, dass die Maschine kühl und trocken
ist.
3. Tragen Sie Pflanzenöl auf die Oberfläche des Produkts auf, um Rost zu
verhindern.

- 15 -
Hersteller: Shanghaimuxinmuyeyouxiangongsi
Adresse: Shuangchenglu 803nong11hao1602A-1609shi, baoshanqu,
Shanghai 200000 CN.
Nach AUS importiert: SIHAO PTY LTD. 1 ROKEVA
STREETEASTWOOD NSW 2122 Australien
Importiert in die USA: Sanven Technology Ltd. Suite 250, 9166 Anaheim
Place, Rancho Cucamonga, CA 91730
REP
UK
YH CONSULTING LIMITED.
C/O YH Consulting Limited Office 147,
Centurion House, London Road,
Staines-upon-Thames, Surrey, TW18 4AX
REP
EC
E-CrossStu GmbH
Mainzer Landstr.69,
60329 Frankfurt am Main.


Technique Assistance et certificat de garantie électronique
www.vevor.com/support
GRILL À HOT-DOG ROULANT
MODÈLE : SC-5XD/SC-7XD/SC-11XD
Nous continuons à nous engager à vous fournir des outils à des prix compétitifs.
"Économisez la moitié", "Moitié prix" ou toute autre expression similaire utilisée uniquement
par nous
représente une estimation des économies dont vous pourriez bénéficier en achetant
certains outils
avec nous par rapport aux grandes marques et ne signifie pas nécessairement couverture
toutes les catégories d'outils que nous proposons. Nous vous rappelons de bien vouloir
vérifier soigneusement
lorsque vous passez une commande chez nous si vous êtes réellement Économie
Moitié en comparaison avec les plus grandes marques.
- 1 -
MODÈLE : SC-5XD MODÈLE : SC-7XD
MODÈLE : SC-11XD
BESOIN D'AIDE? CONTACTEZ-NOUS!
Vous avez des questions sur les produits ? Besoin d'une assistance
technique ? N'hésitez pas à nous contacter:
Assistance technique et certificat de garantie électronique
www.vevor.com/support
Il s'agit des instructions originales, veuillez lire attentivement toutes les
instructions du manuel avant de l'utiliser. VEVOR se réserve une
interprétation claire de notre manuel d'utilisation. L'apparence du produit
ROLLING HOT-DOG GRILL
- 2 -
dépend du produit que vous avez reçu. Veuillez nous pardonner que nous
ne vous informerons plus s'il y a des mises à jour technologiques ou
logicielles sur notre produit.
Avertissement : Pour réduire le risque de blessure, l'utilisateur doit
lire attentivement le manuel d'instructions.
Utilisation en intérieur uniquement.
Faites attention aux températures élevées pour éviter les brûlures.
ÉLIMINATION CORRECTE
Ce produit est soumis aux dispositions de la directive européenne
2012/19/CE. Le symbole représentant une poubelle barrée indique
que le produit nécessite une collecte sélective des déchets dans
l'Union européenne. Ceci s'applique au produit et à tous les
accessoires marqués de ce symbole. Les produits marqués comme
tels ne peuvent pas être jetés avec les ordures ménagères normales,
mais doivent être déposés dans un point de collecte pour le
recyclage des appareils électriques et électroniques.
La conformité est une certification de sécurité
nord-américaine.
La conformité est une certification de sécurité CE et
Royaume-Uni.

- 3 -
INDICATION CHALEUREUSE:
Un film protecteur blanc est fixé à la surface de Le fuselage pour
protéger le fuselage des rayures. Veuillez le déchirer avant utilisation.
SAFETY WARNINGS AND PRECAUTIONS
Merci d'avoir utilisé ce produit . Afin de vous assurer que vous pouvez utiliser la
machine correctement, lisez attentivement ces instructions avant de l'utiliser et
conservez-les correctement pour référence future . Veuillez lire les précautions et
les règles de sécurité sur cette page pour garantir votre utilisation en toute sécurité.
Ce manuel décrit les avertissements et les précautions de sécurité, le
fonctionnement, l'entretien et le nettoyage . Les avertissements et instructions
examinés dans ce manuel ne peuvent pas couvrir toutes les conditions et
situations possibles qui peuvent survenir . La prudence et le bon sens ne sont pas
intégrés à ce produit, car nous pensons que les utilisations seront conformes à ces
codes . Avant de commencer un programme d'entraînement ou de vous lancer
dans une activité d'endurance intense avec l'appareil, veuillez consulter un
médecin.
Veuillez lire TOUTES les instructions avant d'utiliser votre machine .
1. Assurez-vous que la tension de votre prise est la même que la tension indiquée
sur l'étiquette signalétique de l'appareil.
2. Ne laissez pas les enfants, les mineurs et les animaux domestiques s'approcher
ou toucher la machine.
3. Ne touchez pas la surface chaude directement avec vos mains. Utilisez toujours
la poignée ou le bouton pour le fonctionnement.
4. Pour éviter les chocs électriques, ne plongez pas le cordon ou la fiche dans
l'eau ou d'autres liquides.
5. Ne plongez pas l’appareil dans l’eau ou tout autre liquide.
6. Débranchez la machine de la prise lorsqu'elle n'est pas utilisée et avant de la
nettoyer. Refroidissez l'appareil avant d'installer ou de retirer des pièces et avant
de le nettoyer.
7. Refroidissez les pièces CHAUDES avant l'utilisation et le nettoyage .
8. N'utilisez pas l'appareil avec un cordon ou une fiche endommagée, un
dysfonctionnement ou un dommage mécanique. Envoyez-le à votre centre de
service agréé le plus proche pour examen et réparation (SEULS les techniciens

- 4 -
doivent ouvrir l'appareil).
9. L'utilisation d'accessoires ou d'accessoires non fournis ou recommandés par le
fabricant peut provoquer des blessures.
dix. Si la machine ne doit pas être utilisée pendant une longue période,
débranchez-la, nettoyez-la, couvrez-la et rangez-la dans un endroit sec et sûr.
11. Ne laissez pas le cordon d'alimentation pendre au-dessus du bord d'une table
ou d'un comptoir et ne le laissez pas entrer en contact avec des surfaces chaudes.
12. Ne placez pas l'appareil sur ou à proximité de brûleurs à air chaud, électriques
ou de radiateurs.
13. Coupez toujours l'alimentation de la prise avant de brancher ou
débranchement. Tenez la fiche au lieu de tirer sur le cordon.
1 4 . N'utilisez pas cet appareil à d'autres fins que l'utilisation indiquée.
1 5 . GARDEZ-LE HORS DE LA PORTÉE DES ENFANTS. Ne le laissez jamais
sans surveillance pendant son utilisation.
1 6 . NE LE NETTOYEZ PAS AVEC UN MATÉRIAU ABRASIF.
1 7 . Vérifiez toujours que cette machine est branchée sur une prise mise à la terre
avec l'alimentation électrique appropriée. Assurez-vous que la prise murale
utilisée est correctement mise à la terre. Sinon, vous devez installer une prise
mise à la terre. Avoir la travail effectué uniquement par un électricien certifié et
dûment qualifié pour respecter les codes locaux de sécurité et d'électricité.
18 . Assurez-vous que la prise de courant, la fiche et le cordon utilisés sont en bon
état. condition de travail. Les composants endommagés doivent être réparés par
un électricien certifié et qualifié pour respecter les codes locaux de sécurité et
d'électricité. Même si votre cordon d'alimentation fonctionne correctement,
gardez-le à l'écart de l'eau et évitez de le laisser couler sur des tapis ou des
appareils de chauffage.
1 9 . Évitez de l'utiliser en présence de liquides, de gaz, de poussières ou d'autres
situations explosives inflammables.
20 . Ne déplacez pas la machine avant le refroidissement et pendant le chauffage
2 1 . N'utilisez pas la machine dans un garage électroménager ou sous un mur
armoire. Débranchez toujours l'appareil de la prise électrique lorsque vous le
rangez dans un garage pour appareils électroménagers. Dans le cas contraire,
cela entraînerait un risque d'incendie, notamment si la machine touche le mur du
garage ou si la porte le touche en se fermant.
2 2 . Fixation de type Y : Si le cordon d'alimentation est endommagé, il doit être
remplacé par le fabricant, son agent de service ou des personnes de qualification
similaire en afin d'éviter un danger.
2 3 . Les enfants ne doivent pas jouer avec l'appareil. Le nettoyage et l'entretien
par l'utilisateur ne doivent pas être effectués par des enfants sans surveillance.
24 . Inspectez avant chaque utilisation.
25 . NE LE NETTOYEZ PAS AVEC UN MATÉRIAU ABRASIF .
26 . Ne le laissez jamais sans surveillance pendant son utilisation . Ne laissez
jamais l'enfant sans surveillance.

- 5 -
27. L'urine et les excréments d'animaux peuvent endommager le produit, veuillez
le tenir à l'écart .
AVERTISSEMENT: Cet appareil n'est pas destiné à être utilisé par des
personnes jeunes ou infirmes, à moins d'être supervisées par une personne
responsable pour garantir qu'elles peuvent utiliser l'appareil en toute
sécurité. Les jeunes enfants doivent être surveillés pour s'assurer qu'ils ne
jouent pas avec le produit . Les animaux domestiques doivent rester à l'écart
du produit.
PRODUCT PARAMETERS
MODÈLE
Région
Tension
Pouvoir
Type de
connecteur
Fusibl
e
SC-5XD
Amérique
du Nord
CA110V6 0
Hz
750W
Américain
PRISE
10A
L'Europe
AC220-240V
50Hz
1000W
européen
PRISE
SC-7XD
Amérique
du Nord
CA110V6 0
Hz
1050W
Américain
PRISE
15A
L'Europe
AC220-240V
50Hz
1400W
européen
PRISE
SC- 11 XD
Amérique
du Nord
CA110V6 0
Hz
1650W
Américain
PRISE
20A
L'Europe
AC220-240V
50Hz
2200W
européen
PRISE
Attention :
1. La tension utilisée pour cet appareil doit être la même que la tension
d'alimentation.
2. Les utilisateurs doivent l'installer près de l'interrupteur d'alimentation et du
fusible.

- 6 -
3. Si la machine n'est pas alimentée, retirez la fiche de la prise électrique et
vérifiez si le fusible est grillé.
4. Il est recommandé que les produits utilisent des lignes et des prises séparées
pour éviter une surcharge du disjoncteur ou du fusible temporisé.
INDICATION CHALEUREUSE:
Un film protecteur blanc est fixé à la surface de Le fuselage pour
protéger le fuselage des rayures. Veuillez le déchirer avant utilisation.
PRODUCT COMPONENTS
Remarque : L'emplacement des composants principaux de ces trois
machines est le même !
1. Power Switch
2.Temperature Knob
(Front)
3. Heat Light (Front)
4.Temperature Knob
(Back)
5. Heat Light (Back)
6. Pan
7. Fuse
8. Protective Earthing
9. Power Socket
④
③
②
①
⑤
⑥

- 7 -
EXPLODED VIEW
Remarque : L'emplacement des composants principaux de ces trois
machines est le même !
⑨
⑧
⑦
- 8 -
NON
.
Nom
QTÉ
NON
.
Nom
QTÉ
UN
Poutre fixe à façade en
verre
1
je
Support en verre avant
(droite)
1
B
Porte d'entrée en verre
1
J.
Vis M4x8
4
C
Verre courbé
1
K
Vis M5x14
4
D
Verre latéral
2
L
Vis M6x14
4
E
Étagères
1
M
Écrou M5
4
F
Derrière le support en
verre (à gauche)
1
N
Joint en mica
4
g
Support en verre avant
(gauche)
1
Ô
Vis M4x12
2
H
Derrière le support en
verre (à droite)
1
P.
Manchon en nylon
4
Remarque : la quantité de pièces indiquée dans le manuel correspond à
l'utilisation réelle et les pièces inutilisées sont des pièces de rechange.

- 9 -
ASSEMBLY DRAWING
Remarque : L'emplacement des composants principaux de ces trois
machines est le même !
Remarque : Ne serrez pas encore complètement les vis.
2.2 First put the left and right glass into the glass
fasteners in sequence, and then tighten the four
fixing screws.
1. First use screws (J) to fix the (F-G-H-I)
accessories to the rack in sequence.
Step1
2.1 Use screws (L) to fix the left and right
accessories (P) to the reserved fixing holes in
the glass in sequence.
Step2
- 10 -
Step3
3.1 Place the accessory (C) into the slot of the glass fixture.
Step4
4 Use fasteners (K; N; M) to fix accessories
(A) to the reserved openings in the glass in
order and tighten them.

- 11 -
Step5
5 Place the accessory (E) onto the installed
accessory (P) from top to bottom.
Step6
6 Use screws (O) to secure
accessory (B) to the installed
glass front fixed beam; complete
installation.

- 12 -
OPERATING INSTRUCTIONS
Avant d'utiliser l'appareil pour la première fois, décollez toute étiquette
promotionnelle matériaux et matériaux d'emballage, et vérifiez que le produit est
propre et exempt de poussière. Si nécessaire, essuyez-les avec un chiffon humide.
Étalez-la avec un torchon absorbant et essuyez tout excès d’huile. Lorsque votre
appareil est chauffé pour la première fois, il peut émettre une légère fumée
ou odeur, ce qui est normal pour de nombreux appareils de chauffage et
n'affectera pas la sécurité de votre appareil.
1. Placez la machine sur une surface propre, sèche et plane à proximité d'une
prise de courant.
2. Branchez le cordon dans la prise de courant de la machine.
3. Branchez le cordon dans la prise murale.
4. Comment tester votre machine : allumez l'interrupteur d'alimentation, le voyant
est allumé ; Allumez l'interrupteur du moteur, les rouleaux tournent. Tournez le
bouton du thermostat dans le sens des aiguilles d'une montre pour aligner le
bouton de l'échelle de température avec le triangle rouge sur le
panneau, le voyant de chauffage est allumé et les rouleaux commencent à
chauffer. Lorsque la température atteint la valeur réglée, tournez le bouton dans le
sens des aiguilles d'une montre jusqu'à environ 302°F (150°C). À ce moment-là, le
voyant de chauffage s'éteindra, ce qui signifie que la température réglée a été
atteinte.
5. Placez les saucisses pré-préparées parallèlement au milieu des deux rouleaux,
puis les saucisses tourneront dans
directions opposées. Veuillez ne pas placer les saucisses trop près les unes des
autres, en laissant environ 0,4 pouce (10 mm) à l'extrémité de chaque rouleau.
Note:
1. Chaque fois que vous allumez la machine pour la première fois, vous devez
d'abord allumer l'interrupteur de chauffage pour préchauffer, puis allumer
l'interrupteur rotatif pour empêcher l'huile moteur de se solidifier.
2. L'ouverture du bac inférieur ou des deux côtés n'est pas autorisée, dans le cas
où vous y êtes éligible. 3. Habituellement, la température de cuisson doit être

- 13 -
appropriée entre 248°F et 320°F (120-160°C).
4. Lors du chauffage, vos mains ne sont pas autorisées à toucher le rouleau en
acier pour éviter les brûlures.
5.Lorsque vous connectez ou débranchez la fiche, elle doit être déconnectée de
l'alimentation externe totale.
6. Gardez vos mains au sec lorsque vous branchez le
cordon.
TIPS
1. Pour économiser de l'électricité et réduire le temps de chauffage, vous pouvez
décongeler naturellement les saucisses ou les réchauffer au four à micro-ondes
avant.
2. Appliquez de l'huile alimentaire sur les côtés gauche et droit du rouleau avant
utilisation pour augmenter le roulement en douceur du rouleau.
Note: La poêle sous les rouleaux sert à récupérer les gouttes d'huile, elle peut
également être utilisée pour préchauffer la saucisse, mais il n'est pas approprié d'y
mettre les saucisses grillées.
CLEANING AND MAINTENANCE
1. Une fois la cuisson terminée, retirez la fiche de la prise électrique. Laissez la
machine refroidir complètement avant de la nettoyer.
2. Les rouleaux doivent être nettoyés toutes les 4 à 5 heures de cuisson.
3. Pour l'extérieur, essuyez avec un chiffon doux et sec. N'utilisez jamais de
nettoyant abrasif ou de tampon agressif. 3. Tout autre entretien doit être effectué
par un représentant de service agréé.
Avertissement : N'utilisez pas de liquide pour rincer le produit directement
afin d'éviter d'endommager les composants internes par l'eau.
STORAGE
1. Débranchez toujours la machine avant de la ranger.
2. Assurez-vous toujours que la machine nettoie au frais et au sec avant de

- 14 -
l'enfiler.
3. Appliquez de l'huile végétale sur la surface du produit pour éviter la rouille.
Fabricant : Shanghaimuxinmuyeyouxiangongsi
Adresse : Shuangchenglu 803nong11hao1602A-1609shi, baoshanqu,
Shanghai 200000 CN.
Importé en Australie : SIHAO PTY LTD. 1 ROKEVA STREETASTWOOD
NSW 2122 Australie
Importé aux États-Unis : Sanven Technology Ltd. Suite 250, 9166
Anaheim Place, Rancho Cucamonga, CA 91730
REP
UK
YH CONSULTING LIMITED.
C/O YH Consulting Limited Office 147,
Centurion House, London Road,
Staines-upon-Thames, Surrey, TW18 4AX
REP
EC
E-CrossStu GmbH
Mainzer Landstr.69,
60329 Frankfurt am Main.


Technisch Ondersteuning en e-garantiecertificaat www.vevor.com/support
ROLLENDE HOTDOGGRILL
MODELLEN: SC-5XD / SC-7XD / SC-11XD
Wij blijven ons inzetten om u gereedschap te bieden tegen een concurrerende prijs.
"Bespaar de helft", "Halve prijs" of andere soortgelijke uitdrukkingen die alleen door ons
worden gebruikt
vertegenwoordigt een schatting van de besparingen die u zou kunnen opleveren als u
bepaalde hulpmiddelen koopt
bij ons vergeleken met de grote topmerken en dat hoeft niet per se zo te zijn omslag
alle categorieën tools die door ons worden aangeboden. U wordt er vriendelijk aan
herinnerd om dit te verifiëren voorzichtig
wanneer u bij ons een bestelling plaatst, als u dat daadwerkelijk doet Besparing
Half in vergelijking met de belangrijkste grote merken.

- 1 -
MODEL: SC-5XD MODEL: SC-7XD
MODEL: SC-11XD
HULP NODIG? NEEM CONTACT MET ONS OP!
Heeft u productvragen? Technische ondersteuning nodig? Neem dan
gerust contact met ons op:
Technische ondersteuning en e-garantiecertificaat
www.vevor.com/support
Dit is de originele instructie. Lees alle instructies in de handleiding
zorgvuldig door voordat u ermee aan de slag gaat. VEVOR behoudt zich
een duidelijke interpretatie van onze gebruikershandleiding voor. Het
ROLLING HOT-DOG GRILL
- 2 -
uiterlijk van het product is afhankelijk van het product dat u heeft
ontvangen. Vergeef ons alstublieft dat we u niet opnieuw zullen
informeren als er technologie- of software-updates zijn voor ons product.
Waarschuwing-Om het risico op letsel te verminderen, moet de
gebruiker de handleiding zorgvuldig lezen.
Alleen binnenshuis te gebruiken.
Let op hoge temperaturen om brandwonden te voorkomen.
CORRECTE VERWIJDERING
Dit product valt onder de bepalingen van de Europese richtlijn
2012/19/EG. Het symbool met een doorgestreepte afvalcontainer
geeft aan dat het product in de Europese Unie een aparte
afvalinzameling vereist. Dit geldt voor het product en alle
accessoires die met dit symbool zijn gemarkeerd. Producten die als
zodanig gemarkeerd zijn, mogen niet met het normale huisvuil
worden weggegooid, maar moeten naar een inzamelpunt voor
recycling van elektrische en elektronische apparaten worden
gebracht
Compliance is een Noord-Amerikaanse
beveiligingscertificering.
Compliance is een EG- en VK-veiligheidscertificering.

- 3 -
WARME PROMPT:
Op het oppervlak is een witte beschermfolie aangebracht de romp om
de romp tegen krassen te beschermen. Scheur deze voor gebruik af.
SAFETY WARNINGS AND PRECAUTIONS
Bedankt voor het gebruik van dit product . Om er zeker van te zijn dat u de
machine correct kunt bedienen, dient u deze instructie vóór gebruik zorgvuldig
door te lezen en goed te bewaren voor toekomstig gebruik . Lees de
voorzorgsmaatregelen en veiligheidsregels op deze pagina om een veilig gebruik
te garanderen. Deze handleiding beschrijft veiligheidswaarschuwingen en
voorzorgsmaatregelen, bediening, onderhoud en reiniging . De waarschuwingen
en instructies die in deze handleiding worden besproken, kunnen niet alle
mogelijke omstandigheden en situaties dekken die zich kunnen voordoen .
Voorzichtigheid en gezond verstand zijn niet ingebouwd in dit product, omdat wij
van mening zijn dat het gebruik aan deze codes zal voldoen . Voordat u met een
trainingsprogramma begint of zware duuractiviteiten op het apparaat uitvoert, dient
u een arts te raadplegen.
Lees ALLE instructies voordat u uw machine gebruikt .
1. Zorg ervoor dat de spanning in uw stopcontact hetzelfde is als de spanning
aangegeven op het typeplaatje van het apparaat.
2. Zorg ervoor dat kinderen, minderjarigen en huisdieren niet in de buurt van de
machine komen of deze aanraken.
3. Raak het hete oppervlak niet rechtstreeks met uw handen aan. Gebruik altijd de
hendel of knop voor bediening.
4. Om elektrische schokken te voorkomen, mag u het snoer niet onderdompelen
en niet in water of andere vloeistoffen steken.
5. Dompel het apparaat niet onder in water of een andere vloeistof.
6. Haal de stekker van de machine uit het stopcontact wanneer deze niet in
gebruik is en voordat u deze schoonmaakt. Laat het apparaat afkoelen voordat u
onderdelen installeert of verwijdert en voordat u het schoonmaakt.
7. Laat de HETE onderdelen afkoelen voordat u ze in gebruik neemt en reinigt .
8. Gebruik het apparaat niet als het snoer of de stekker beschadigd is, als het niet
goed werkt of als er mechanische schade is. Stuur het naar het dichtstbijzijnde

- 4 -
erkende servicecentrum voor onderzoek en reparatie (ALLEEN technici mogen
het apparaat openen).
9. Het gebruik van accessoires of hulpstukken die niet door de fabrikant zijn
geleverd of aanbevolen, kan letsel veroorzaken.
10. Als de machine langere tijd niet wordt gebruikt, haal dan de stekker uit het
stopcontact, maak hem schoon, dek hem af en bewaar hem op een droge en
veilige plaats.
11. Laat het netsnoer niet over de rand van een tafel of aanrecht hangen en laat
het niet in contact komen met hete oppervlakken.
12. Plaats het apparaat niet op of in de buurt van hete lucht, elektrische branders
of verwarmingstoestellen.
13. Schakel altijd de stroom naar het stopcontact uit voordat u de stekker in het
stopcontact steekt loskoppelen. Houd de stekker vast in plaats van aan het snoer
te trekken.
1 4 . Gebruik dit apparaat niet voor andere doeleinden dan het aangegeven
gebruik.
1 5 . HOUD HET BUITEN HET BEREIK VAN KINDEREN. Laat het nooit
onbeheerd achter terwijl het in gebruik is.
1 6 . REINIG HET NIET MET SCHUREND MATERIAAL.
1 7 . Controleer altijd of deze machine is aangesloten op een geaard stopcontact
met de juiste elektrische voeding. Zorg ervoor dat het gebruikte stopcontact goed
geaard is. Als dit niet het geval is, moet u een geaard stopcontact installeren. Heb
de werkzaamheden mogen alleen worden uitgevoerd door een gecertificeerde
elektricien die voldoende gekwalificeerd is om te voldoen aan de plaatselijke
veiligheids- en elektriciteitsvoorschriften.
18 . Zorg ervoor dat het stopcontact, de stekker en het snoer dat u gebruikt in
goede staat zijn werk omstandigheden. Beschadigde onderdelen moeten worden
gerepareerd door een gecertificeerde elektricien die gekwalificeerd is om te
voldoen aan de plaatselijke veiligheids- en elektriciteitsvoorschriften. Zelfs Als uw
netsnoer goed functioneert, houd het dan uit de buurt van water en laat het
apparaat niet over tapijten of verwarmingstoestellen lopen.
1 9 . Vermijd gebruik in de aanwezigheid van ontvlambare vloeistoffen, gassen,
stof of andere explosieve situaties.
20 . Verplaats de machine niet vóór het afkoelen en tijdens het verwarmen
2 1 . Gebruik de machine niet in een garage voor apparaten of onder een muur
kastje. Haal altijd de stekker van het apparaat uit het stopcontact als u het in een
garage voor apparaten opbergt. Anders bestaat er brandgevaar, vooral als de
machine de garagemuur raakt of als de deur deze raakt terwijl deze sluit.
2 2 . Type Y-bevestiging: Als het netsnoer beschadigd is, moet het worden
vervangen door de fabrikant, zijn serviceagent of vergelijkbaar gekwalificeerde
personen in om een gevaar te vermijden.
2 3 . Kinderen mogen niet met het apparaat spelen. Reiniging en
gebruikersonderhoud mogen niet door kinderen zonder toezicht worden
uitgevoerd.
24 . Inspecteer vóór elk gebruik.

- 5 -
25 . REINIG HET NIET MET SCHUREND MATERIAAL .
26 . Laat het nooit onbeheerd achter terwijl het in gebruik is . Laat het kind nooit
zonder toezicht achter.
27. Urine en uitwerpselen van huisdieren kunnen het product beschadigen, houd
het uit de buurt .
WAARSCHUWING: Dit apparaat is niet bedoeld voor gebruik door jonge
of zwakke personen, tenzij onder toezicht van een persoon die
verantwoordelijk is om ervoor te zorgen dat zij het apparaat veilig kunnen
gebruiken. Op jonge kinderen moet toezicht worden gehouden om ervoor te
zorgen dat ze niet met het product spelen . Huisdieren moeten uit de buurt
van het product blijven.
PRODUCT PARAMETERS
MODEL
Regio
Spanning
Stroom
Stekkertype
Samen
smelte
n
SC-5XD
Noord
Amerika
Wisselstroom
110 V 6 0 Hz
750W
Eenmericaan
PLUG
10 A
Europa
AC220-240V
50Hz
1000W
Europees
PLUG
SC-7XD
Noord
Amerika
Wisselstroom
110 V 6 0 Hz
1050W
Eenmericaan
PLUG
15A
Europa
AC220-240V
50Hz
1400W
Europees
PLUG
SC -11 XD
Noord
Amerika
Wisselstroom
110 V 6 0 Hz
1650W
Eenmericaan
PLUG
20A
Europa
AC220-240V
50Hz
2200W
Europees
PLUG
Aandacht :
1. De spanning die voor dit apparaat wordt gebruikt, moet hetzelfde zijn als de
voedingsspanning.
- 6 -
2. Gebruikers moeten het in de buurt van de aan / uit-schakelaar en zekering
installeren.
3. Als de machine geen stroom heeft, haal dan de stekker uit het stopcontact
en controleer of de zekering is doorgebrand.
4. Het wordt aanbevolen dat producten afzonderlijke leidingen en stopcontacten
gebruiken om overbelasting van de stroomonderbreker of de
tijdvertragingszekering te voorkomen.
WARME PROMPT:
Op het oppervlak is een witte beschermfolie aangebracht de romp om
de romp tegen krassen te beschermen. Scheur deze voor gebruik af.
PRODUCT COMPONENTS
Let op: De locatie van de kerncomponenten van deze drie machines is
hetzelfde!
1. Power Switch
2.Temperature Knob
(Front)
3. Heat Light (Front)
4.Temperature Knob
(Back)
5. Heat Light (Back)
6. Pan
7. Fuse
8. Protective Earthing
9. Power Socket
④
③
②
①
⑤
⑥

- 7 -
EXPLODED VIEW
Let op: De locatie van de kerncomponenten van deze drie machines is
hetzelfde!
⑨
⑧
⑦
- 8 -
NEE
.
Naam
AAN
TAL
NEE
.
Naam
AAN
TAL
A
Vaste balk aan de
voorzijde van glas
1
I
Glasstandaard
voorzijde (rechts)
1
B
Glazen voordeur
1
J
Schroeven M4x8
4
C
Gebogen glas
1
K
Schroeven M5x14
4
D
Zijglas
2
L
Schroeven M6x14
4
E
Planken
1
M
Moer M5
4
F
Achter de glazen
standaard (links)
1
N
Mica-pakking
4
G
Glasstandaard
voorzijde (links)
1
O
Schroeven M4x12
2
H
Achter de glazen
standaard (rechts)
1
P
Nylon mouw
4
Let op: het aantal onderdelen dat in de handleiding wordt weergegeven, is
het daadwerkelijke gebruik en de ongebruikte onderdelen zijn
reserveonderdelen.
- 9 -
ASSEMBLY DRAWING
Let op: De locatie van de kerncomponenten van deze drie machines is
hetzelfde!
Let op: Draai de schroeven nog niet helemaal vast.
2.2 First put the left and right glass into the glass
fasteners in sequence, and then tighten the four
fixing screws.
1. First use screws (J) to fix the (F-G-H-I)
accessories to the rack in sequence.
Step1
2.1 Use screws (L) to fix the left and right
accessories (P) to the reserved fixing holes in
the glass in sequence.
Step2

- 10 -
Step3
3.1 Place the accessory (C) into the slot of the glass fixture.
Step4
4 Use fasteners (K; N; M) to fix accessories
(A) to the reserved openings in the glass in
order and tighten them.

- 11 -
Step5
5 Place the accessory (E) onto the installed
accessory (P) from top to bottom.
Step6
6 Use screws (O) to secure
accessory (B) to the installed
glass front fixed beam; complete
installation.

- 12 -
OPERATING INSTRUCTIONS
Voordat u het apparaat voor de eerste keer gebruikt, dient u al het
reclamemateriaal te verwijderen materialen en verpakkingsmaterialen, en
controleer of het product schoon en stofvrij is. Veeg ze indien nodig af met een
vochtige doek. Verspreid met een absorberende keukendoek en veeg overtollige
olie weg. Wanneer uw apparaat voor de eerste keer wordt verwarmd, kan er
een lichte rook of geur vrijkomen, wat normaal is voor veel
verwarmingsapparaten, en dit heeft geen invloed op de veiligheid van uw
apparaat.
1. Plaats de machine op een schoon, droog en horizontaal oppervlak in de buurt
van een stopcontact.
2. Sluit het snoer aan op het stopcontact van de machine.
3. Sluit het snoer aan op het stopcontact.
4. Hoe u uw machine kunt testen: Zet de aan/uit-schakelaar aan, het
indicatielampje brandt; zet de motorschakelaar aan, de rollen draaien. Draai de
thermostaatknop met de klok mee om de knop op de temperatuurschaal uit te
lijnen met de rode driehoek op de
paneel, het verwarmingsindicatielampje brandt en de rollen beginnen te
verwarmen. Wanneer de temperatuur de ingestelde waarde bereikt, draait u de
knop met de klok mee naar ongeveer 150°C (302°F). Op dit moment gaat het
verwarmingsindicatielampje uit, wat betekent dat de ingestelde temperatuur is
bereikt.
5. Plaats de kant-en-klare worsten parallel in het midden van de twee rollen, dan
draaien de worsten naar binnen
tegengestelde richtingen. Plaats de worsten niet te dicht bij elkaar, maar laat
ongeveer 10 mm (0,4 inch) vrij aan het uiteinde van elke rol.
Opmerking:
1. Elke keer dat u de machine voor de eerste keer inschakelt, moet u eerst de
verwarmingsschakelaar inschakelen om voor te verwarmen en vervolgens de
draaischakelaar inschakelen om te voorkomen dat de motorolie stolt.
2. Het openen van de onderpan of beide zijkanten is niet toegestaan, indien u
daartoe in aanmerking komt. 3. Gewoonlijk moet de baktemperatuur geschikt zijn

- 13 -
voor 120-160°C (248°F-320°F).
4. Bij het verwarmen mogen uw handen de stalen rol niet aanraken om
verbranding te voorkomen.
5. Wanneer u de stekker aansluit of loskoppelt, moet deze worden losgekoppeld
van de totale externe voeding.
6. Houd uw handen droog wanneer u het snoer
aansluit.
TIPS
1. Om elektriciteit te besparen en de opwarmtijd te verkorten, kunt u de worsten
natuurlijk ontdooien of vooraf opwarmen in de magnetron.
2. Breng vóór gebruik voedselolie aan op de linker- en rechterkant van de rol om
het soepel rollen van de rol te vergroten.
Opmerking: De pan onder de rollen wordt gebruikt om druppels olie op te
vangen, deze kan ook gebruikt worden om de worst voor te verwarmen, maar het
is niet gepast om de gegrilde worstjes daarin te doen.
CLEANING AND MAINTENANCE
1. Als u klaar bent met bakken, haalt u de stekker uit het stopcontact. Laat de
machine volledig afkoelen voordat u deze reinigt.
2. De rollen moeten elke 4-5 uur grillen worden schoongemaakt.
3. Veeg de buitenkant af met een zachte, droge doek. Gebruik nooit een schurend
reinigingsmiddel of een schuursponsje. 3. Elk ander onderhoud moet worden
uitgevoerd door een erkende servicevertegenwoordiger.
Waarschuwing: Gebruik geen vloeistof om het product rechtstreeks af te
spoelen om waterschade aan interne componenten te voorkomen.
STORAGE
1. Haal altijd de stekker uit het stopcontact voordat u de machine opbergt.
2. Zorg er altijd voor dat de machine koel en droog reinigt voordat u gaat rijgen.
3. Breng plantaardige olie aan op het oppervlak van het product om roest te

- 14 -
voorkomen.
Fabrikant: Shanghaimuxinmuyeyouxiangongsi
Adres: Shuangchenglu 803nong11hao1602A-1609shi, baoshanqu,
shanghai 200000 CN.
Geïmporteerd naar AUS: SIHAO PTY LTD. 1 ROKEVA
STREETEASTWOOD NSW 2122 Australië
Geïmporteerd naar de VS: Sanven Technology Ltd. Suite 250, 9166
Anaheim Place, Rancho Cucamonga, CA 91730
REP
UK
YH CONSULTING LIMITED.
C/O YH Consulting Limited Office 147,
Centurion House, London Road,
Staines-upon-Thames, Surrey, TW18 4AX
REP
EC
E-CrossStu GmbH
Mainzer Landstr.69,
60329 Frankfurt am Main.


Teknisk Support och e-garanticertifikat www.vevor.com/support
RULLANDE HOT-DOG GRILL
MODELL: SC-5XD / SC-7XD / SC-11XD
Vi fortsätter att vara engagerade i att ge dig verktyg till konkurrenskraftiga priser.
"Spara hälften", "Halva priset" eller andra liknande uttryck som endast används av oss
representerar en uppskattning av besparingar du kan dra nytta av att köpa vissa verktyg
med oss jämfört med de stora toppmärkena och betyder inte nödvändigtvis att omslag
alla kategorier av verktyg som erbjuds av oss. Du påminns vänligen om att verifiera
försiktigt
när du gör en beställning hos oss om du faktiskt gör det Sparande
Halv i jämförelse med de främsta varumärkena.
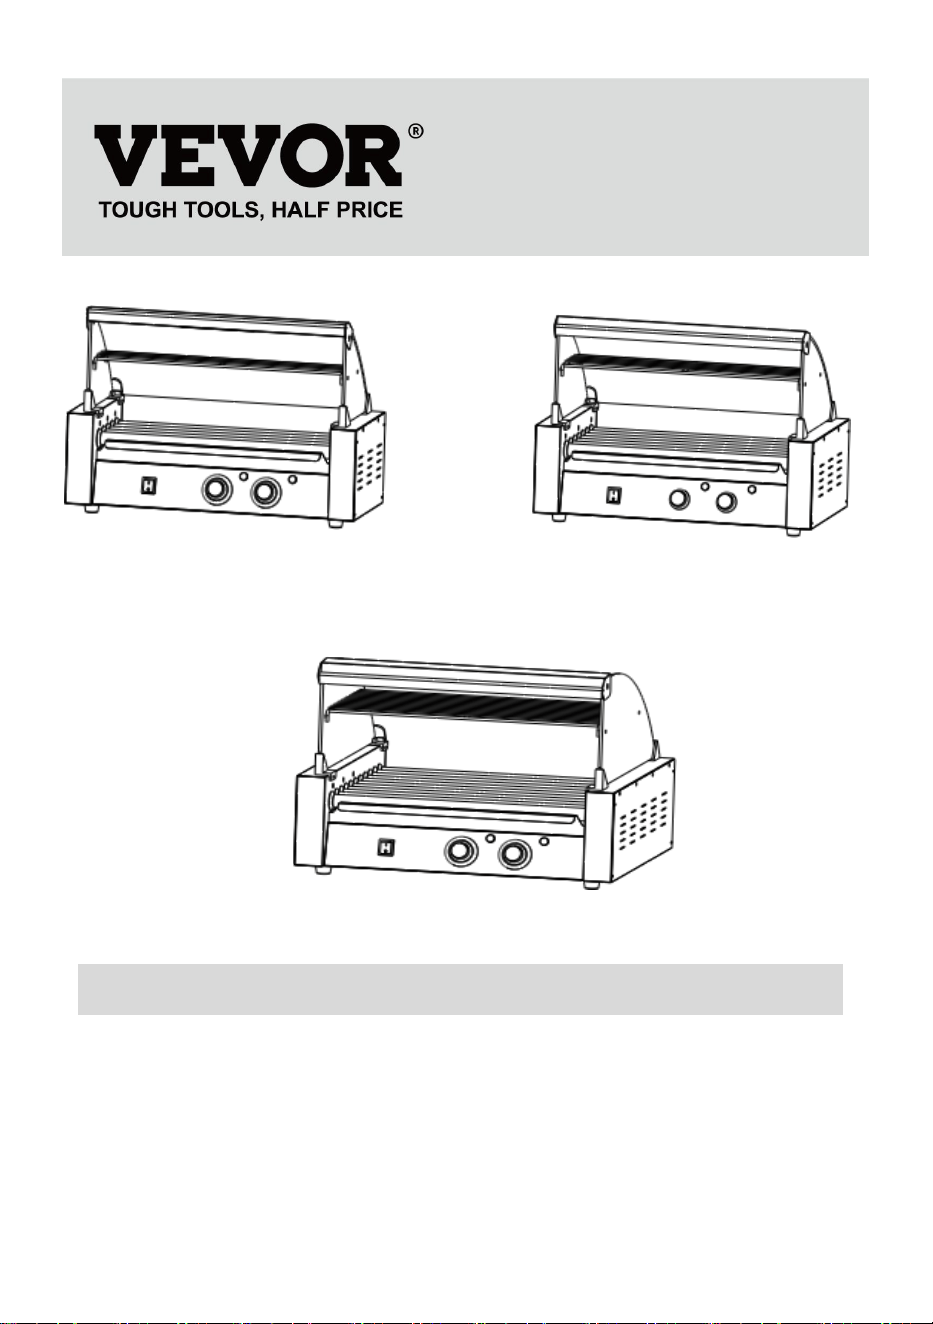
- 1 -
MODELL: SC-5XD MODELL: SC-7XD
MODELL: SC-11XD
BEHÖVS HJÄLP? KONTAKTA OSS!
Har du produktfrågor? Behöver du teknisk support? Kontakta oss
gärna:
Teknisk support och e-garanticertifikat
www.vevor.com/support
Detta är den ursprungliga instruktionen, läs alla instruktioner noggrant
innan du använder den. VEVOR reserverar sig för en tydlig tolkning av vår
användarmanual. Utseendet på produkten är beroende av den produkt du
ROLLING HOT-DOG GRILL
- 2 -
fått. Ursäkta oss att vi inte kommer att informera dig igen om det finns
någon teknik eller mjukvaruuppdateringar på vår produkt.
Varning - För att minska risken för skada måste användaren läsa
instruktionerna noggrant.
Endast inomhusbruk.
Var uppmärksam på höga temperaturer för att förhindra brännskador.
KORREKT AVFALLSHANTERING
Denna produkt omfattas av bestämmelserna i det europeiska
direktivet 2012/19/EC. Symbolen som visar en soptunna korsad
anger att produkten kräver separat sophämtning i EU. Detta gäller för
produkten och alla tillbehör märkta med denna symbol. Produkter
märkta som sådana får inte slängas tillsammans med vanligt
hushållsavfall, utan måste lämnas till en insamlingsplats för
återvinning av elektriska och elektroniska apparater
Compliance är en säkerhetscertifiering i Nordamerika.
Compliance är en säkerhetscertifiering från EG och
Storbritannien.

- 3 -
VARMT PROMPT:
En vit skyddsfilm är fäst på ytan av flygkroppen för att skydda
flygkroppen från repor. Riv av den före användning.
SAFETY WARNINGS AND PRECAUTIONS
Tack för att du använder den här produkten . För att försäkra dig om att du kan
använda maskinen korrekt, läs denna instruktion noggrant före användning och
förvara den på rätt sätt för framtida referens . Vänligen läs försiktighetsåtgärderna
och säkerhetsreglerna på denna sida för att säkerställa din säker användning.
Denna handbok kommer att beskriva säkerhetsvarningar och försiktighetsåtgärder,
drift, underhåll och rengöring . Varningarna och instruktionerna som granskas i
denna handbok kan inte täcka alla möjliga tillstånd och situationer som kan
uppstå . Försiktighet och sunt förnuft är inte inbyggt i denna produkt, eftersom vi
tror att användningen kommer att följa dessa koder . Innan du startar ett
träningsprogram eller deltar i ansträngande uthållighetsaktiviteter på enheten,
kontakta en läkare.
Läs ALLA instruktionerna innan du använder din maskin .
1. Se till att spänningen i ditt uttag är densamma som den spänning som anges på
apparatens märketikett.
2. Låt inte barn och minderåriga och husdjur komma nära eller röra vid maskinen.
3. Rör inte den heta ytan direkt med händerna. Använd alltid handtaget eller vredet
för manövrering.
4. För att förhindra elektriska stötar, doppa inte ner sladden eller kontakten i vatten
eller andra vätskor.
5. Sänk inte ner apparaten i vatten eller annan vätska.
6. Koppla bort maskinen från vägguttaget när den inte används och före rengöring.
Kyl apparaten innan du installerar eller tar bort delar och före rengöring.
7. Kyl ner de VARMA delarna före användning och rengöring .
8. Använd inte enheten med skadad sladd eller kontakt, felfunktion eller med
någon mekanisk skada. Skicka den till ditt närmaste auktoriserade servicecenter
för undersökning och reparation (ENDAST tekniker bör öppna upp enheten).
9. Användning av tillbehör eller tillbehör som inte tillhandahålls eller
rekommenderas av tillverkaren kan orsaka skada.
10. Om maskinen inte ska användas under en längre tid, koppla ur den, rengör
och täck över den och förvara den på en torr och säker plats.

- 4 -
11. Låt inte nätsladden hänga över kanten på bordet eller bänken och låt den inte
komma i kontakt med heta ytor.
12. Placera inte enheten på eller nära varmluft, elektriska brännare eller
värmeelement.
13. Stäng alltid av strömmen till uttaget innan du ansluter eller koppla ur. Håll i
kontakten istället för att dra i sladden.
1 4 . Använd inte denna enhet för andra ändamål än den angivna användningen.
1 5 . FÖRVARA DEN UTOM BARN. Lämna den aldrig utan uppsikt när den
används.
1 6 . RENGÖRA DEN INTE MED NÅGOT SLIPPANDE MATERIAL.
1 7 . Kontrollera alltid att denna maskin är ansluten till ett jordat uttag med rätt
strömförsörjning. Se till att vägguttaget som används är ordentligt jordat. Om inte
måste du installera ett jordat uttag. Ha arbete endast utfört av en certifierad
elektriker som är korrekt kvalificerad att uppfylla lokala säkerhets- och
elföreskrifter.
18 . Se till att eluttaget, kontakten och sladden som används är i bra fungerande
skick. Skadade komponenter bör repareras av en certifierad elektriker som är
kvalificerad att uppfylla lokala säkerhets- och elföreskrifter. Även om din nätsladd
fungerar korrekt, håll den borta från vatten och undvik att låta den rinna över
mattor eller värmeanordningar.
1 9 . Undvik att använda den i närvaro av brandfarliga vätskor, gaser, damm eller
andra explosiva situationer.
20 . Flytta inte maskinen före kylning och under uppvärmning
2 1 . Använd inte maskinen i ett apparatgarage eller under en vägg skåp. Koppla
alltid ur enheten från eluttaget när den förvaras i ett apparatgarage. Annars skulle
det orsaka brandrisk, speciellt om maskinen nuddar garageväggen eller dörren
vidrör den när den stängs.
2 2 . Typ Y-tillsats: Om nätsladden är skadad måste den bytas ut av tillverkaren,
dess servicerepresentant eller liknande kvalificerade personer i för att undvika
fara.
2 3 . Barn får inte leka med apparaten. Rengöring och användarunderhåll får inte
utföras av barn utan tillsyn.
24 . Inspektera före varje användning.
25 . RENGÖRA DEN INTE MED NÅGOT SLIPPANDE MATERIAL .
26 . Lämna den aldrig utan uppsikt när den används . Lämna aldrig barnet utan
tillsyn.
27. Urin och avföring från husdjur kan skada produkten, håll undan .
VARNING: Denna apparat är inte avsedd att användas av unga eller
handikappade personer om den inte övervakas av en ansvarig person för att
säkerställa att de kan använda apparaten på ett säkert sätt. Små barn bör
övervakas för att säkerställa att de inte leker med produkten . Husdjur bör
hålla sig borta från produkten.

- 5 -
PRODUCT PARAMETERS
MODELL
Område
Spänning
Kraft
Pluggtyp
Säkrin
g
SC-5XD
Nordame
rika
AC110V6
0Hz
750W
En merikan
PLUGG
10A
Europa
AC220-240V
50Hz
1000W
europeiska
PLUGG
SC-7XD
Nordame
rika
AC110V6
0Hz
1050W
En merikan
PLUGG
15A
Europa
AC220-240V
50Hz
1400W
europeiska
PLUGG
SC- 11 XD
Nordame
rika
AC110V6
0Hz
1650W
En merikan
PLUGG
20A
Europa
AC220-240V
50Hz
2200W
europeiska
PLUGG
Observera :
1. Spänningen som används för denna enhet måste vara densamma som
nätspänningen.
2. Användare måste installera den nära strömbrytaren och säkringen.
3. Om maskinen inte är strömförsörjd, dra ut kontakten ur eluttaget och
kontrollera om säkringen har gått.
4. Det rekommenderas att produkter använder separata ledningar och uttag för att
undvika överbelastning av strömbrytare eller tidsfördröjd säkring.
VARMT PROMPT:
En vit skyddsfilm är fäst på ytan av flygkroppen för att skydda
flygkroppen från repor. Riv av den före användning.
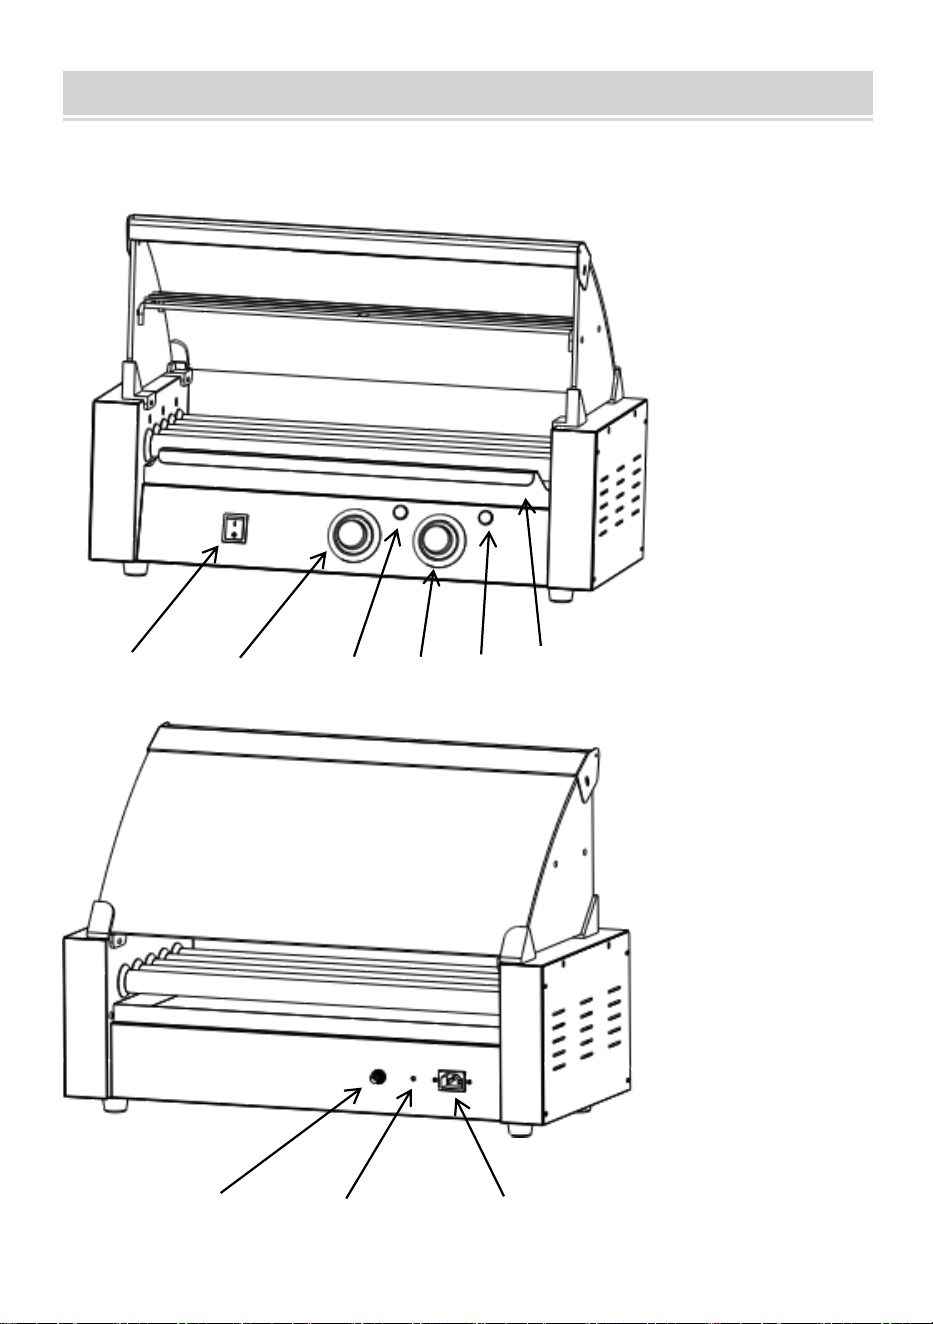
- 6 -
PRODUCT COMPONENTS
Obs: Placeringen av kärnkomponenterna i dessa tre maskiner är
densamma!
⑨
⑧
⑦
1. Power Switch
2.Temperature Knob
(Front)
3. Heat Light (Front)
4.Temperature Knob
(Back)
5. Heat Light (Back)
6. Pan
7. Fuse
8. Protective Earthing
9. Power Socket
④
③
②
①
⑤
⑥
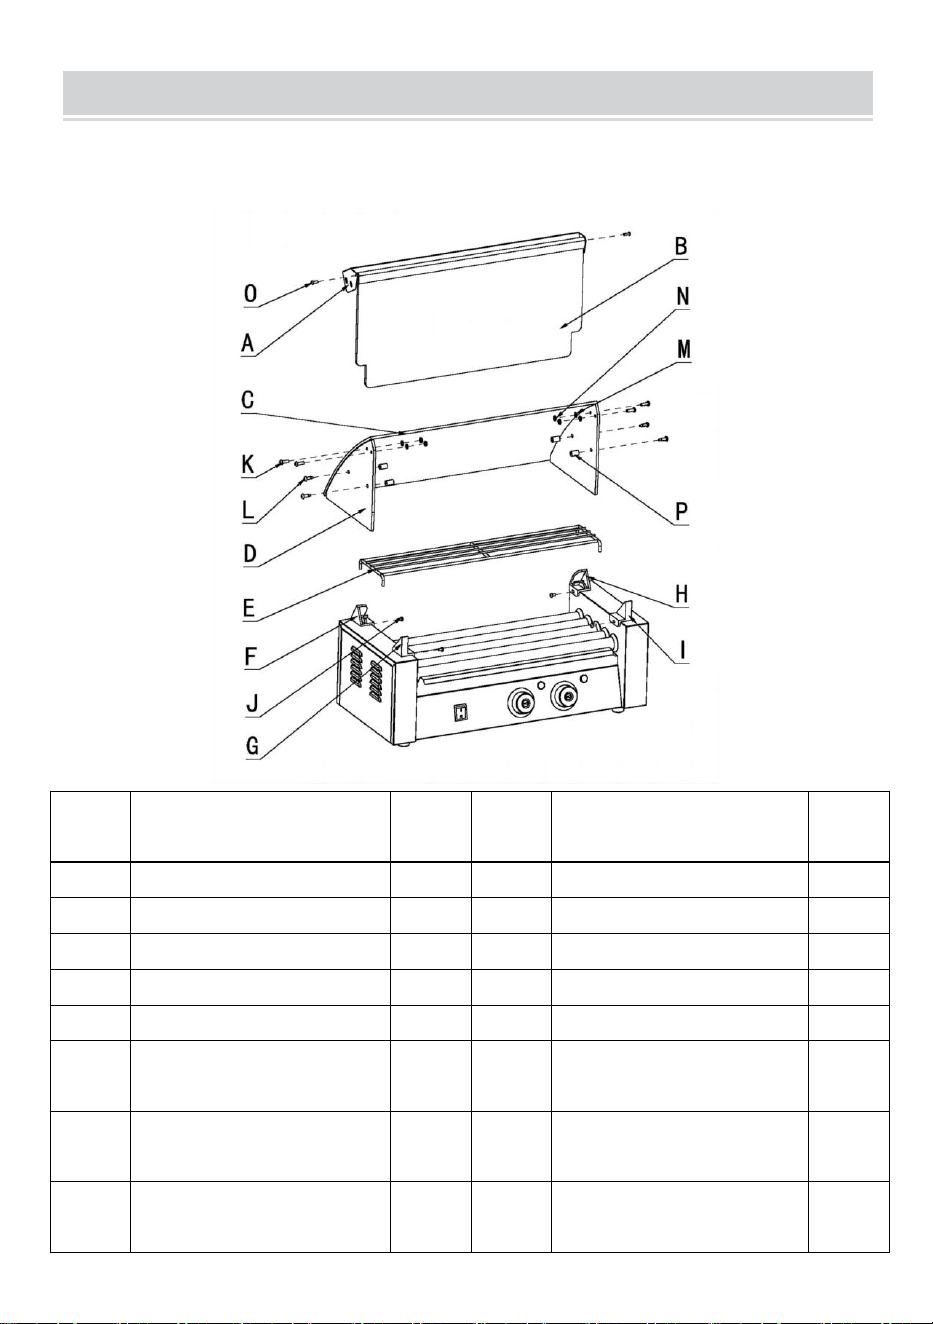
- 7 -
EXPLODED VIEW
Obs: Placeringen av kärnkomponenterna i dessa tre maskiner är
densamma!
NEJ.
namn
ANT
AL
NEJ.
namn
ANT
AL
A
Fast balk i glas fram
1
jag
Glasstativ fram (höger)
1
B
G lass ytterdörr
1
J
Skruvar M4x8
4
C
C urvat glas
1
K
Skruvar M5x14
4
D
S ide glas
2
L
Skruvar M6x14
4
E
Hyllor
1
M
Mutter M5
4
F
Bakom glasstativet
(vänster)
1
N
Glimmer packning
4
G
Glasstativ fram
(vänster)
1
O
Skruvar M4x12
2
H
Bakom glasstativet
(höger)
1
P
Nylonhylsa
4
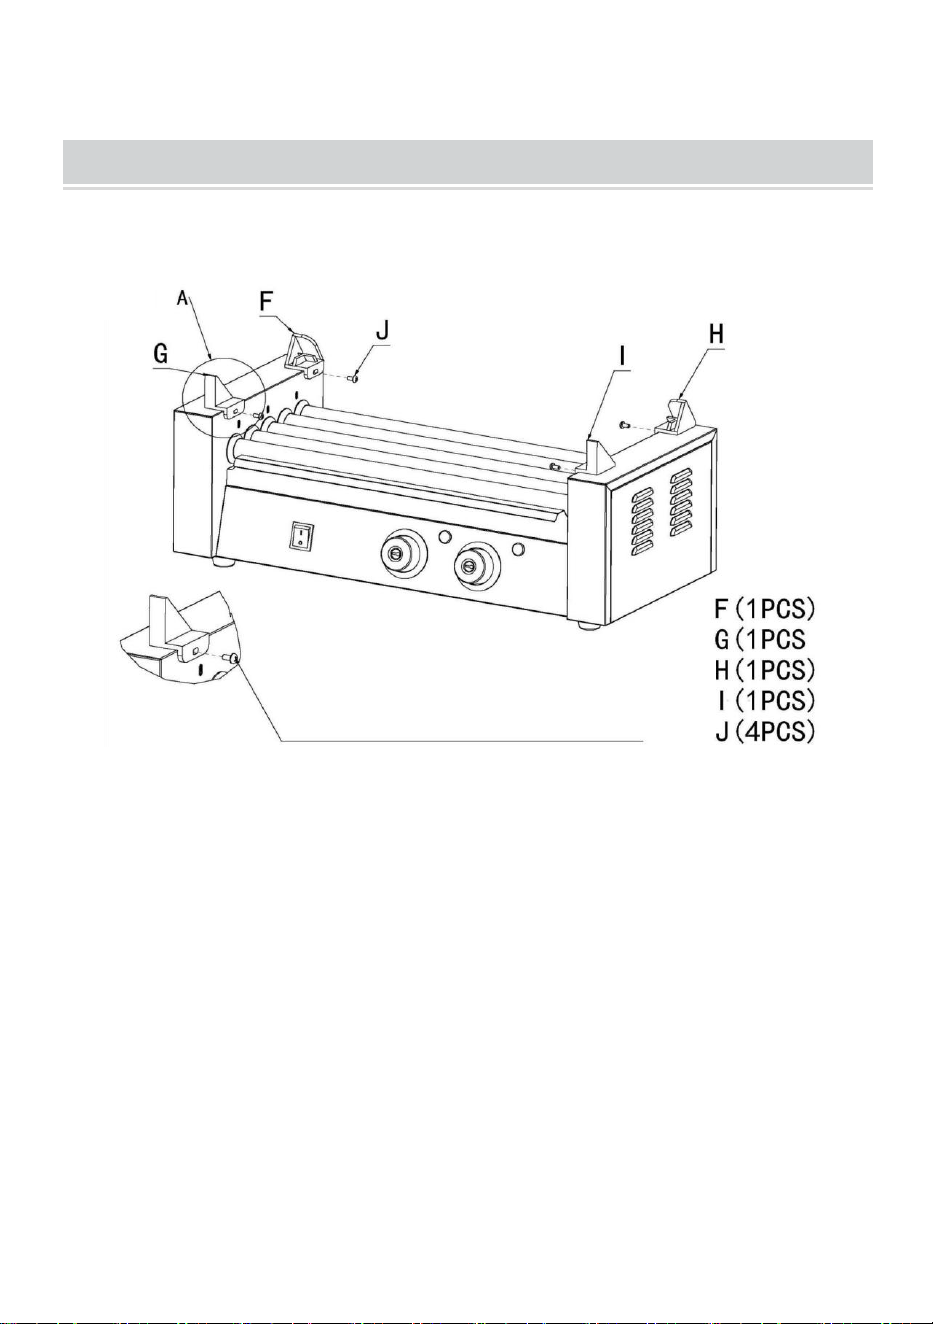
- 8 -
Obs: mängden delar som visas i manualen är den faktiska användningen
och de oanvända delarna är reservdelar.
ASSEMBLY DRAWING
Obs: Placeringen av kärnkomponenterna i dessa tre maskiner är
densamma!
Obs: Dra inte åt skruvarna helt ännu.
1. First use screws (J) to fix the (F-G-H-I)
accessories to the rack in sequence.
Step1

- 9 -
2.2 First put the left and right glass into the glass
fasteners in sequence, and then tighten the four
fixing screws.
2.1 Use screws (L) to fix the left and right
accessories (P) to the reserved fixing holes in
the glass in sequence.
Step2
Step3
3.1 Place the accessory (C) into the slot of the glass fixture.
Step4

- 10 -
4 Use fasteners (K; N; M) to fix accessories
(A) to the reserved openings in the glass in
order and tighten them.
Step5
5 Place the accessory (E) onto the installed
accessory (P) from top to bottom.

- 11 -
OPERATING INSTRUCTIONS
Innan du använder apparaten för första gången, dra bort eventuella erbjudanden
material och förpackningsmaterial, och kontrollera att produkten är ren och fri från
damm. Vid behov, torka av dem med en fuktig trasa. Bred över med en
absorberande kökshandduk och torka bort överflödig olja. När din apparat värms
upp för första gången kan den avge lätt rök eller lukt, vilket är normalt för
många värmeapparater, och kommer inte att påverka din apparats säkerhet.
1. Placera maskinen på en ren, torr, jämn yta nära ett eluttag.
2. Anslut sladden till maskinens eluttag.
3. Anslut sladden till vägguttaget.
4. Så här testar du din maskin: Slå på strömbrytaren, indikatorlampan lyser; slå på
motoromkopplaren, rullarna roterar. Vrid termostatratten medurs för att rikta in
vredet på temperaturskalan med den röda triangeln på
panelen lyser värmeindikatorlampan och rullarna börjar värmas. När temperaturen
når det inställda värdet, vrid ratten medurs till cirka 302°F (150°C). Vid denna
Step6
6 Use screws (O) to secure
accessory (B) to the installed
glass front fixed beam; complete
installation.

- 12 -
tidpunkt slocknar värmeindikatorn, vilket betyder att den har nått den inställda
temperaturen.
5. Placera de förberedda korvarna parallellt i mitten av de två valsarna, då roterar
korvarna in
motsatta riktningar. Placera inte korvarna för nära varandra, lämna cirka 0,4 tum
(10 mm) i slutet av varje rulle.
Notera:
1. Varje gång du sätter på maskinen för första gången måste du först slå på
värmebrytaren för att förvärma, och sedan slå på vridomkopplaren för att förhindra
att motoroljan stelnar.
2. Det är inte tillåtet att öppna bottenpannan eller båda sidor om du är berättigad
att göra det. 3. Vanligtvis bör bakningstemperaturen vara lämplig 248°F-320°F
(120-160°C).
4. Vid uppvärmning får dina händer inte röra stålvalsen för att förhindra skållning.
5.När du ansluter eller drar ur kontakten ska den kopplas bort från den totala
externa strömförsörjningen.
6. Håll händerna torra när du ansluter
sladden.
TIPS
1. För att spara el och minska uppvärmningstiden kan du naturligtvis tina korvarna
eller värma dem i mikrovågsugn innan.
2. Applicera matolja på valsens vänstra och högra sida före användning för att öka
rullens mjuka rullning.
Notera: Pannan under valsarna används för att fånga upp droppar olja, den kan
även användas för att förvärma korven, men det är inte lämpligt att lägga de
grillade korvarna i den.
CLEANING AND MAINTENANCE
1. När du har bakat klart, dra ut kontakten ur eluttaget. Låt maskinen svalna helt
innan rengöring.

- 13 -
2. Rullarna ska rengöras var 4-5 timmes grillning.
3. För utsidan, torka av med en mjuk, torr trasa. Använd aldrig ett slipande
rengöringsmedel eller en hård pad. 3. All annan service ska utföras av en
auktoriserad servicerepresentant.
Varning: Använd inte vätska för att skölja produkten direkt för att undvika
vattenskador på interna komponenter.
STORAGE
1. Koppla alltid ur maskinen innan förvaring.
2. Se alltid till att maskinen rengörs svalt och torrt innan strängning.
3. Applicera vegetabilisk olja på produktens yta för att förhindra rost.
Tillverkare: Shanghaimuxinmuyeyouxiangongsi
Adress: Shuangchenglu 803nong11hao1602A-1609shi, baoshanqu,
shanghai 200000 CN.
Importerad till AUS: SIHAO PTY LTD. 1 ROKEVA STREETEASTWOOD
NSW 2122 Australien
Importerad till USA: Sanven Technology Ltd. Suite 250, 9166 Anaheim
Place, Rancho Cucamonga, CA 91730

- 14 -
REP
UK
YH CONSULTING LIMITED.
C/O YH Consulting Limited Office 147,
Centurion House, London Road,
Staines-upon-Thames, Surrey, TW18 4AX
REP
EC
E-CrossStu GmbH
Mainzer Landstr.69,
60329 Frankfurt am Main.


Técnico Soporte y certificado de garantía electrónica www.vevor.com/support
PARRILLA RODANTE PARA PERRITOS
CALIENTES
MODELO: SC-5XD / SC-7XD / SC-11XD
Seguimos comprometidos a proporcionarle herramientas a precios competitivos.
"Ahorre a mitad de precio", "A mitad de precio" o cualquier otra expresión similar utilizada
únicamente por nosotros
representa una estimación de los ahorros que podría beneficiarse al comprar ciertas
herramientas
con nosotros en comparación con las principales marcas principales y no necesariamente
significa cubrir
todas las categorías de herramientas que ofrecemos. Se le recuerda amablemente verificar
con cuidado
cuando realiza un pedido con nosotros si realmente está Ahorro
Medio en comparación con las principales marcas.

- 1 -
MODELO: SC-5XD MODELO: SC-7XD
MODELO: SC-11XD
¿NECESITAS AYUDA? ¡CONTÁCTENOS!
¿Tiene preguntas sobre el producto? ¿Necesita soporte técnico?
Siéntete libre de contactarnos:
Soporte técnico y certificado de garantía electrónica
www.vevor.com/support
Estas son las instrucciones originales; lea atentamente todas las
instrucciones del manual antes de operar. VEVOR se reserva una
interpretación clara de nuestro manual de usuario. La apariencia del
ROLLING HOT-DOG GRILL

- 2 -
producto estará sujeta al producto que recibió. Perdone que no le
informaremos nuevamente si hay actualizaciones de tecnología o
software en nuestro producto.
Advertencia: para reducir el riesgo de lesiones, el usuario debe leer
atentamente el manual de instrucciones.
Solamente para uso en interiores.
Preste atención a las altas temperaturas para evitar quemaduras.
ELIMINACIÓN CORRECTA
Este producto está sujeto a las disposiciones de la Directiva Europea
2012/19/CE. El símbolo que muestra un contenedor con ruedas
tachado indica que el producto requiere recogida selectiva de basura
en la Unión Europea. Esto se aplica al producto y a todos los
accesorios marcados con este símbolo. Los productos marcados
como tales no podrán desecharse con la basura doméstica normal,
sino que deberán llevarse a un punto de recogida para el reciclaje de
aparatos eléctricos y electrónicos.
El cumplimiento es una certificación de seguridad de América
del Norte.
El cumplimiento es una certificación de seguridad de la CE y
el Reino Unido.

- 3 -
Aviso cálido:
Una película protectora blanca está adherida a la superficie de El
fuselaje para protegerlo de arañazos. Quítelo antes de usarlo.
SAFETY WARNINGS AND PRECAUTIONS
Gracias por usar este producto . Para asegurarse de que puede operar la
máquina correctamente, lea atentamente estas instrucciones antes de utilizarla y
consérvelas adecuadamente para consultarlas en el futuro . Lea las precauciones
y reglas de seguridad en esta página para garantizar su uso seguro. Este manual
describirá las advertencias y precauciones de seguridad, operación,
mantenimiento y limpieza . Las advertencias e instrucciones revisadas en este
manual no pueden cubrir todas las condiciones y situaciones posibles que puedan
ocurrir . Este producto no incluye precaución ni sentido común, ya que creemos
que los usos cumplirán con estos códigos . Antes de iniciar un programa de
entrenamiento o realizar una actividad de resistencia extenuante en el dispositivo,
consulte a un médico.
Lea TODAS las instrucciones antes de utilizar su máquina .
1. Asegúrese de que el voltaje en su toma de corriente sea el mismo que el voltaje
indicado en la etiqueta de clasificación del aparato.
2. No permita que los niños, menores y mascotas se acerquen o toquen la
máquina.
3. No toque la superficie caliente directamente con las manos. Utilice siempre la
manija o perilla para operar.
4. Para evitar descargas eléctricas, no sumerja el cable ni el enchufe en agua u
otros líquidos.
5. No sumerja el aparato en agua ni en ningún otro líquido.
6. Desenchufe la máquina del tomacorriente cuando no esté en uso y antes de
limpiarla. Enfríe el aparato antes de instalar o quitar piezas y antes de limpiarlo.
7. Enfríe las piezas CALIENTES antes de operarlas y limpiarlas .
8. No opere el dispositivo con un cable o enchufe dañado, mal funcionamiento o
con cualquier daño mecánico. Envíelo a su centro de servicio autorizado más
cercano para su examen y reparación (SÓLO los técnicos deben abrir la unidad).
9. El uso de accesorios o accesorios que no sean proporcionados o
recomendados por el fabricante puede causar lesiones.
10. Si la máquina no va a utilizarse durante un largo período de tiempo,

- 4 -
desenchúfela, límpiela, cúbrala y guárdela en un lugar seco y seguro.
11. No deje el cable de alimentación colgando sobre el borde de la mesa o
mostrador ni permita que entre en contacto con superficies calientes.
12. No coloque la unidad sobre o cerca de aire caliente, quemadores eléctricos o
calentadores.
13. Apague siempre la alimentación del tomacorriente antes de enchufarlo o
desenchufar. Sostenga el enchufe en lugar de tirar del cable.
1 4 . No utilice esta unidad para ningún otro propósito que no sea el uso indicado.
15 . MANTÉNGALO FUERA DEL ALCANCE DE LOS NIÑOS. Nunca lo dejes
desatendido mientras esté en uso.
dieciséis . NO LIMPIARLO CON NINGÚN MATERIAL ABRASIVO.
1 7 . Siempre verifique que esta máquina esté enchufada a un tomacorriente con
conexión a tierra con el suministro eléctrico adecuado. Asegúrese de que el
tomacorriente de pared que se utiliza esté correctamente conectado a tierra. De lo
contrario, deberá instalar un tomacorriente con conexión a tierra. Tener el trabajo
realizado únicamente por un electricista certificado que esté debidamente
calificado para cumplir con los códigos eléctricos y de seguridad locales.
18 . Asegúrese de que el tomacorriente, el enchufe y el cable utilizados estén en
buenas condiciones. condiciones de trabajo. Los componentes dañados deben
ser reparados por un electricista certificado que esté calificado para cumplir con
los códigos eléctricos y de seguridad locales. Incluso Si su cable de alimentación
funciona correctamente, manténgalo alejado del agua y Evite dejarlo pasar sobre
alfombras o aparatos de calefacción.
1 9 . Evite usarlo en presencia de líquidos inflamables, gases, polvo u otras
situaciones explosivas.
20 . No mueva la máquina antes de enfriar y durante el calentamiento.
2 1 . No opere la máquina en un garaje de electrodomésticos o debajo de una
pared. gabinete. Desenchufe siempre la unidad del tomacorriente cuando la
guarde en un garaje para electrodomésticos. De lo contrario, se produciría riesgo
de incendio, especialmente si la máquina toca la pared del garaje o la puerta al
cerrar.
2 2 . Accesorio tipo Y: Si el cable de alimentación está dañado, debe ser
reemplazado por el fabricante, su agente de servicio o personas igualmente
calificadas en fin de evitar un peligro.
2 3 . Los niños no deben jugar con el aparato. La limpieza y el mantenimiento del
usuario no deben ser realizados por niños sin supervisión.
24 . Inspeccione antes de cada uso.
25 . NO LIMPIARLO CON NINGÚN MATERIAL ABRASIVO .
26 . Nunca lo deje desatendido mientras esté en uso . Nunca dejes al niño
desatendido.
27. La orina y las heces de las mascotas pueden dañar el producto; manténgalo
alejado .

- 5 -
ADVERTENCIA: Este aparato no está diseñado para que lo utilicen
personas jóvenes o enfermas a menos que esté supervisado por una
persona responsable para garantizar que puedan utilizar el aparato de forma
segura. Se debe supervisar a los niños pequeños para asegurarse de que no
jueguen con el producto . Las mascotas deben mantenerse alejadas del
producto.
PRODUCT PARAMETERS
MODELO
Región
Voltaje
Fuerza
Tipo de
enchufe
Fusibl
e
SC-5XD
América
del norte
CA110V6 0
Hz
750W
Americano
ENCHUFAR
10A
Europa
CA220-240
V 50 Hz.
1000W
europeo
ENCHUFAR
SC-7XD
América
del norte
CA110V6 0
Hz
1050W
Americano
ENCHUFAR
15A
Europa
CA220-240
V 50 Hz.
1400W
europeo
ENCHUFAR
SC- 11 XD
América
del norte
CA110V6 0
Hz
1650W
Americano
ENCHUFAR
20A
Europa
CA220-240
V 50 Hz.
2200W
europeo
ENCHUFAR
Atención :
1. El voltaje utilizado para este dispositivo debe ser el mismo que el voltaje de la
fuente de alimentación.
2. Los usuarios deben instalarlo cerca del interruptor de alimentación y del fusible.
3. Si la máquina no está encendida, retire el enchufe del tomacorriente y
verifique si el fusible está fundido.
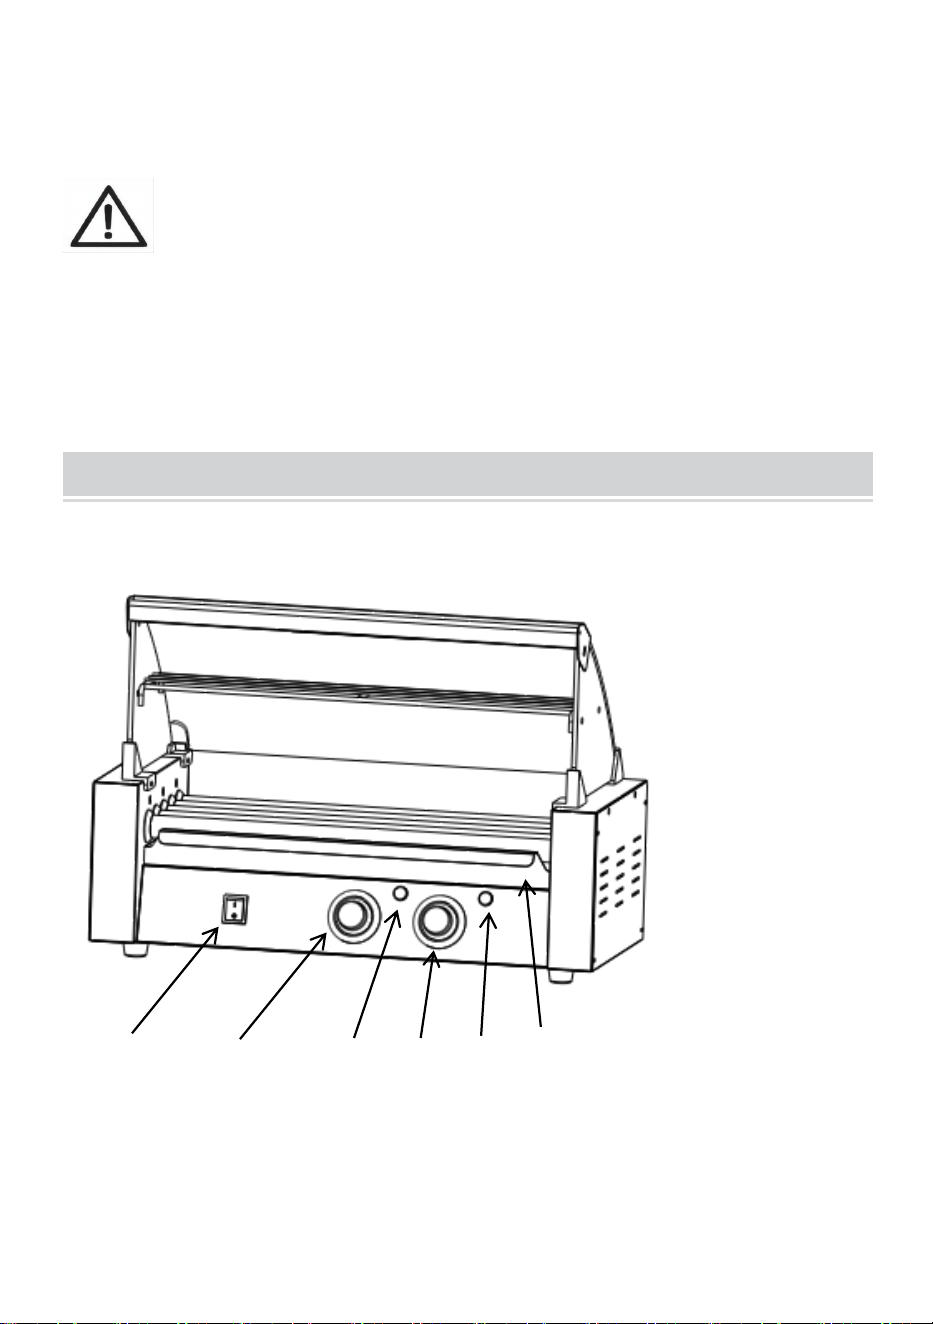
- 6 -
4. Se recomienda que los productos utilicen líneas y enchufes separados para
evitar la sobrecarga del disyuntor o del fusible de retardo.
Aviso cálido:
Una película protectora blanca está adherida a la superficie de El
fuselaje para protegerlo de arañazos. Quítelo antes de usarlo.
PRODUCT COMPONENTS
Nota: ¡ La ubicación de los componentes principales de estas tres
máquinas es la misma!
1. Power Switch
2.Temperature Knob
(Front)
3. Heat Light (Front)
4.Temperature Knob
(Back)
5. Heat Light (Back)
6. Pan
7. Fuse
8. Protective Earthing
9. Power Socket
④
③
②
①
⑤
⑥

- 7 -
EXPLODED VIEW
Nota: ¡ La ubicación de los componentes principales de estas tres
máquinas es la misma!
⑨
⑧
⑦
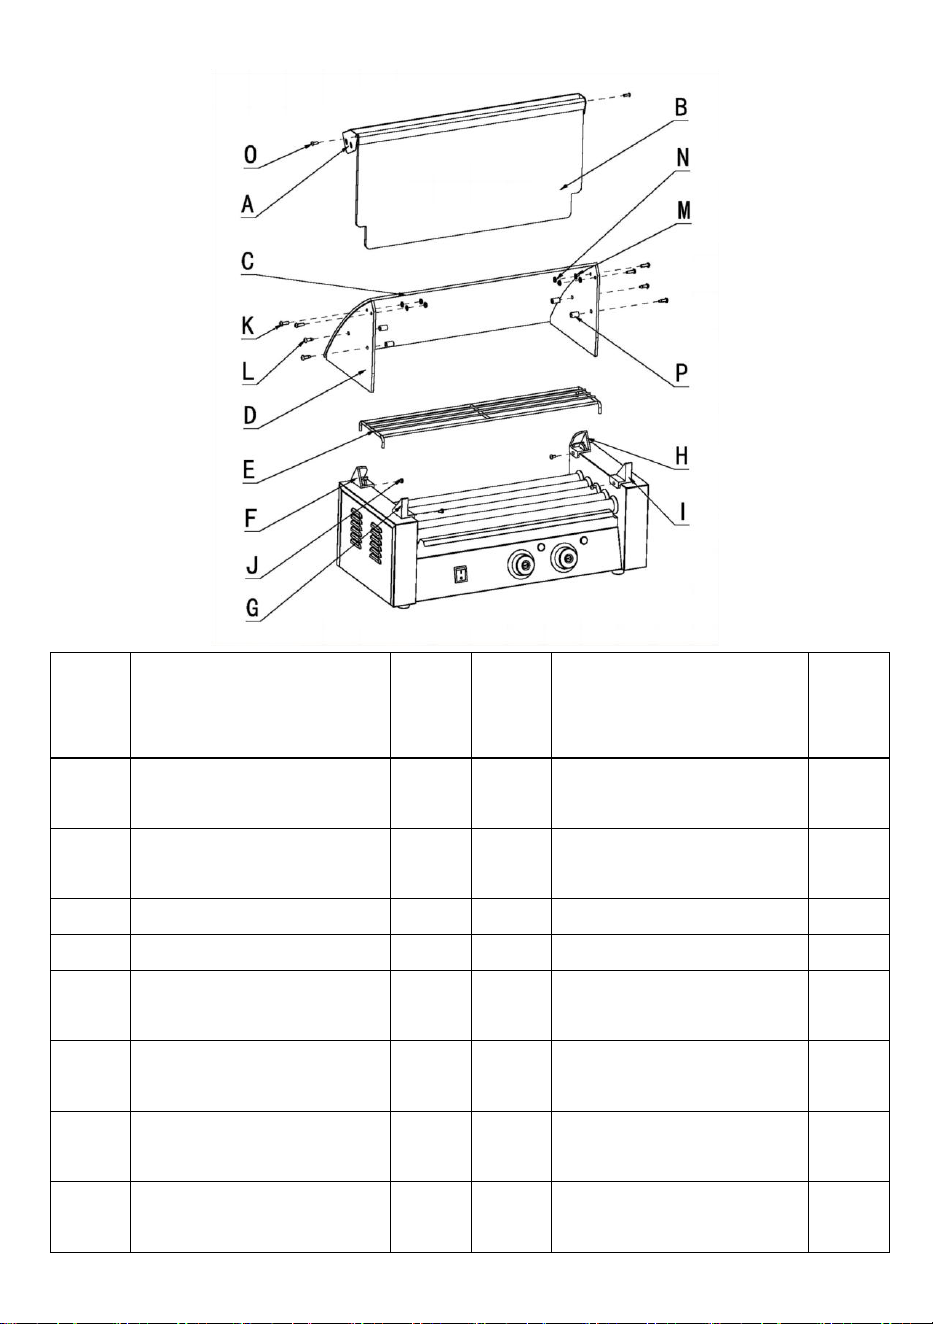
- 8 -
NO.
Nombre
CAN
TIDA
D
NO.
Nombre
CAN
TIDA
D
A
Viga fija frontal de
cristal
1
I
Frente del soporte de
vidrio (derecha)
1
B
Puerta de entrada de
cristal
1
j
Tornillos M4x8
4
C
Vidrio curvado
1
k
Tornillos M5x14
4
D
Vidrio lateral
2
l
Tornillos M6x14
4
mi
Estantes
1
MET
RO
Tuerca M5
4
F
Detrás del soporte de
cristal (izquierda)
1
norte
junta de mica
4
GRA
MO
Frente del soporte de
vidrio (izquierda)
1
oh
Tornillos M4x12
2
h
Detrás del soporte de
cristal (derecha)
1
PAG
Manga de nailon
4

- 9 -
Nota: la cantidad de piezas que se muestra en el manual es el uso real y las
piezas no utilizadas son repuestos.
ASSEMBLY DRAWING
Nota: ¡ La ubicación de los componentes principales de estas tres
máquinas es la misma!
Nota: No apriete los tornillos completamente todavía.
1. First use screws (J) to fix the (F-G-H-I)
accessories to the rack in sequence.
Step1

- 10 -
2.2 First put the left and right glass into the glass
fasteners in sequence, and then tighten the four
fixing screws.
2.1 Use screws (L) to fix the left and right
accessories (P) to the reserved fixing holes in
the glass in sequence.
Step2
Step3
3.1 Place the accessory (C) into the slot of the glass fixture.
Step4

- 11 -
4 Use fasteners (K; N; M) to fix accessories
(A) to the reserved openings in the glass in
order and tighten them.
Step5
5 Place the accessory (E) onto the installed
accessory (P) from top to bottom.
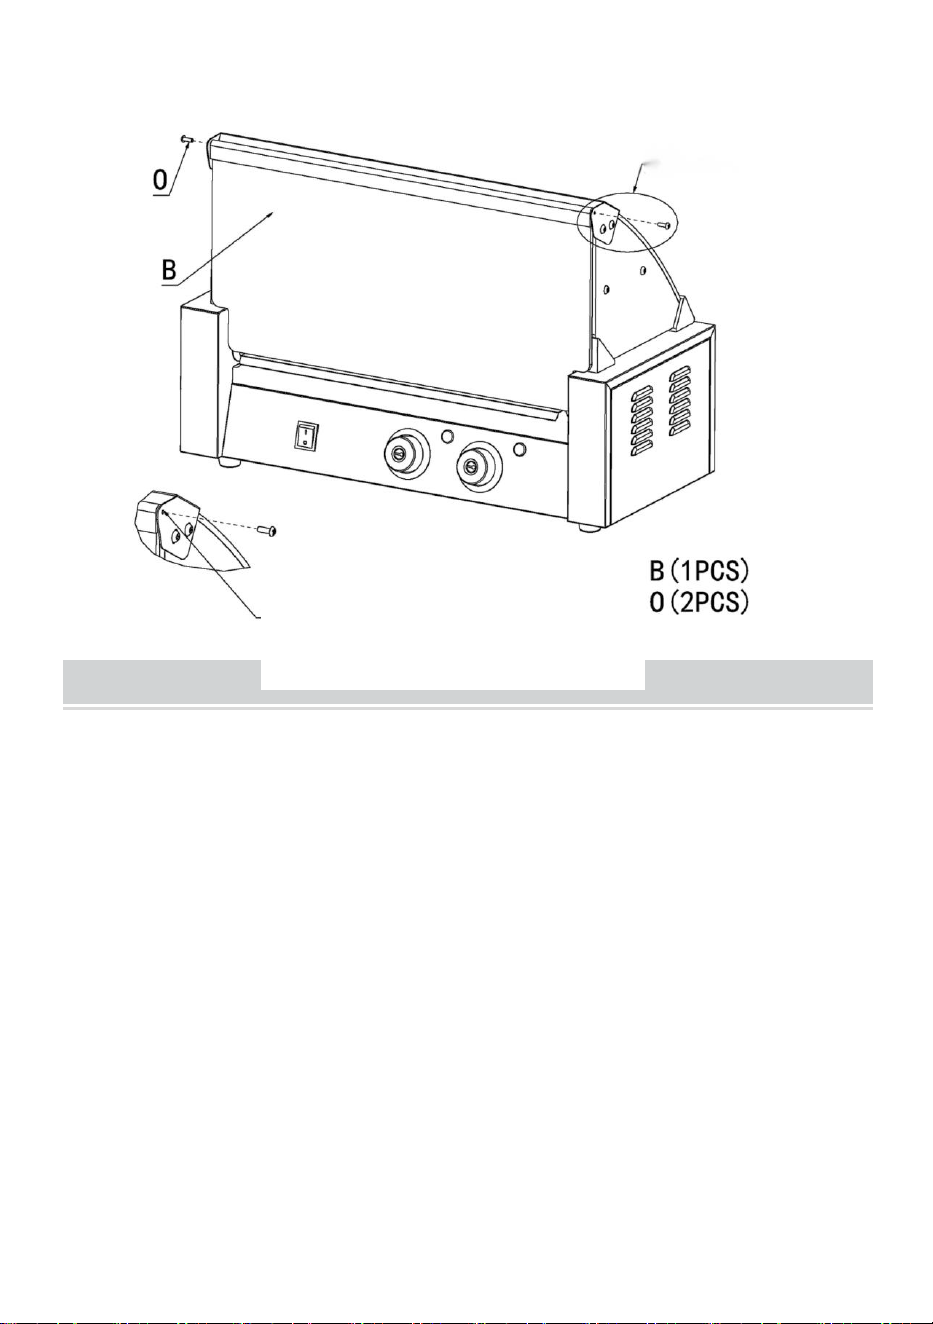
- 12 -
OPERATING INSTRUCTIONS
Antes de utilizar el aparato por primera vez, retire cualquier material promocional.
materiales y materiales de embalaje, y comprobar que el producto esté limpio y
libre de polvo. Si es necesario, límpielos con un paño húmedo. Extender con un
paño de cocina absorbente y limpiar el exceso de aceite. Cuando su aparato se
calienta por primera vez, puede emitir un ligero humo u olor, lo cual es
normal en muchos aparatos de calefacción y no afectará la seguridad de su
aparato.
1. Coloque la máquina sobre una superficie limpia, seca y nivelada cerca de un
tomacorriente con base de enchufe.
2. Conecte el cable a la toma de corriente de la máquina.
3. Conecte el cable al tomacorriente de pared.
4. Cómo probar su máquina: Encienda el interruptor de encendido, la luz
indicadora está encendida; Encienda el interruptor del motor, los rodillos giran.
Gire la perilla del termostato en el sentido de las agujas del reloj para alinear la
perilla en la escala de temperatura con el triángulo rojo en la
Step6
6 Use screws (O) to secure
accessory (B) to the installed
glass front fixed beam; complete
installation.

- 13 -
panel, la luz indicadora de calentamiento se enciende y los rodillos comienzan a
calentarse. Cuando la temperatura alcance el valor establecido, gire la perilla en
el sentido de las agujas del reloj hasta aproximadamente 302 °F (150 °C). En
este momento, la luz indicadora de calefacción se apagará, lo que significa que ha
alcanzado la temperatura establecida.
5. Coloque las salchichas preparadas paralelamente en el medio de los dos
rodillos, luego las salchichas girarán hacia adentro.
direcciones opuestas. No coloque las salchichas demasiado juntas, dejando
aproximadamente 10 mm (0,4 pulgadas) al final de cada rodillo.
Nota:
1. Cada vez que encienda la máquina por primera vez, primero debe encender el
interruptor de calefacción para precalentar y luego encender el interruptor giratorio
para evitar que el aceite del motor se solidifique.
2. No se permite la apertura del recipiente inferior o de ambos lados, en caso de
que sea elegible para hacerlo. 3. Por lo general, la temperatura de horneado debe
ser adecuada: 248 °F-320 °F (120-160 °C).
4. Al calentar, no permita que sus manos toquen el rodillo de acero para evitar
quemaduras.
5. Al conectar o desconectar el enchufe, debe desconectarse de la fuente de
alimentación externa total.
6. Mantenga las manos secas al enchufar el
cable.
TIPS
1. Para ahorrar electricidad y reducir el tiempo de calentamiento, puede
descongelar naturalmente las salchichas o calentarlas en el horno microondas
antes.
2.Aplique aceite alimentario en los lados izquierdo y derecho del rodillo antes de
usarlo para aumentar el rodamiento suave del rodillo.
Nota: La sartén debajo de los rodillos se usa para recoger las gotas de aceite,
también se puede usar para precalentar la salchicha, pero no es apropiado poner
en ella las salchichas asadas.

- 14 -
CLEANING AND MAINTENANCE
1. Una vez que haya terminado de hornear, retire el enchufe del tomacorriente.
Deje que la máquina se enfríe completamente antes de limpiarla.
2. Los rodillos deben limpiarse cada 4-5 horas de asado.
3. Para el exterior, limpie con un paño suave y seco. Nunca utilice un limpiador
abrasivo o una almohadilla áspera. 3. Cualquier otro servicio debe ser
proporcionado por un representante de servicio autorizado.
Advertencia: No utilice líquido para enjuagar el producto directamente para
evitar daños por agua a los componentes internos.
STORAGE
1. Desenchufe siempre la máquina antes de guardarla.
2. Asegúrese siempre de que la máquina esté limpiando en frío y en seco antes de
enhebrar.
3. Aplique aceite vegetal a la superficie del producto para evitar la oxidación.
Fabricante: Shanghaimuxinmuyeyouxiangongsi
Dirección: Shuangchenglu 803nong11hao1602A-1609shi, baoshanqu,
shanghai 200000 CN.
Importado a AUS: SIHAO PTY LTD. 1 ROKEVA STREETASTWOOD
NSW 2122 Australia
Importado a EE. UU.: Sanven Technology Ltd. Suite 250, 9166 Anaheim
Place, Rancho Cucamonga, CA 91730

- 15 -
REP
UK
YH CONSULTING LIMITED.
C/O YH Consulting Limited Office 147,
Centurion House, London Road,
Staines-upon-Thames, Surrey, TW18 4AX
REP
EC
E-CrossStu GmbH
Mainzer Landstr.69,
60329 Frankfurt am Main.


Tecnico Supporto e certificato di garanzia elettronica www.vevor.com/support
GRIGLIA PER HOT DOG ROTOLANTE
MODELLO: SC-5XD / SC-7XD / SC-11XD
Continuiamo a impegnarci per fornirvi strumenti a prezzi competitivi.
"Risparmia la metà", "Metà prezzo" o qualsiasi altra espressione simile utilizzata solo da noi
rappresenta una stima del risparmio che potresti trarre dall'acquisto di determinati strumenti
con noi rispetto ai principali marchi più importanti e non significa necessariamente farlo
copertina
tutte le categorie di strumenti da noi offerti. Si ricorda gentilmente di verificare
accuratamente
quando effettui un ordine con noi, se lo sei effettivamente Salvataggio
Metà rispetto ai principali marchi.

- 1 -
MODELLO: SC-5XD MODELLO: SC-7XD
MODELLO: SC-11XD
HO BISOGNO DI AIUTO? CONTATTACI!
Hai domande sul prodotto? Hai bisogno di supporto tecnico? Non
esitate a contattarci:
Supporto tecnico e certificato di garanzia elettronica
www.vevor.com/support
Queste sono le istruzioni originali, leggere attentamente tutte le istruzioni
del manuale prima dell'uso. VEVOR si riserva una chiara interpretazione
del nostro manuale d'uso. L'aspetto del prodotto sarà soggetto al prodotto
ROLLING HOT-DOG GRILL

- 2 -
ricevuto. Ti preghiamo di perdonarci se non ti informeremo più se sono
presenti aggiornamenti tecnologici o software sul nostro prodotto.
Avvertenza: per ridurre il rischio di lesioni, l'utente deve leggere
attentamente il manuale di istruzioni.
Solo per uso interno.
Fare attenzione alle alte temperature per evitare ustioni.
CORRETTO SMALTIMENTO
Questo prodotto è soggetto alle disposizioni della Direttiva Europea
2012/19/CE. Il simbolo del bidone della spazzatura barrato indica
che nell'Unione Europea il prodotto richiede la raccolta differenziata
dei rifiuti. Ciò vale per il prodotto e tutti gli accessori contrassegnati
da questo simbolo. I prodotti contrassegnati come tali non possono
essere smaltiti con i normali rifiuti domestici, ma devono essere
portati in un punto di raccolta per il riciclaggio di dispositivi elettrici ed
elettronici
La conformità è una certificazione di sicurezza del Nord
America.
La conformità è una certificazione di sicurezza CE e Regno
Unito.

- 3 -
RICHIESTA CALDA:
Sulla superficie è fissata una pellicola protettiva bianca la fusoliera
per proteggere la fusoliera dai graffi. Si prega di strapparla prima
dell'uso.
SAFETY WARNINGS AND PRECAUTIONS
Grazie per aver utilizzato questo prodotto . Per essere sicuri di poter utilizzare
correttamente la macchina, leggere attentamente queste istruzioni prima dell'uso
e conservarle adeguatamente per riferimento futuro . Si prega di leggere le
precauzioni e le regole di sicurezza in questa pagina per garantire un utilizzo
sicuro. Questo manuale descrive le avvertenze e le precauzioni di sicurezza, il
funzionamento, la manutenzione e la pulizia . Le avvertenze e le istruzioni
contenute nel presente manuale non possono coprire tutte le possibili condizioni e
situazioni che potrebbero verificarsi . La cautela e il buon senso non sono
incorporati in questo prodotto, poiché riteniamo che gli usi saranno conformi a
questi codici . Prima di iniziare un programma di allenamento o intraprendere
un'attività di resistenza faticosa sul dispositivo, consultare un medico.
Si prega di leggere TUTTE le istruzioni prima di utilizzare la macchina .
1. Assicuratevi che il voltaggio della presa corrisponda a quello indicato sulla
targhetta identificativa dell'apparecchio.
2. Non lasciare che bambini, minorenni e animali domestici si avvicinino o tocchino
la macchina.
3. Non toccare la superficie calda direttamente con le mani. Utilizzare sempre la
maniglia o la manopola per il funzionamento.
4. Per evitare scosse elettriche, non immergere il cavo o la spina in acqua o altri
liquidi.
5. Non immergere l'apparecchio in acqua o in qualsiasi altro liquido.
6. Scollegare la macchina dalla presa quando non viene utilizzata e prima di pulirla.
Raffreddare l'apparecchio prima di installare o rimuovere parti e prima di pulirlo.
7. Raffreddare le parti CALDE prima del funzionamento e della pulizia .
8. Non utilizzare il dispositivo con cavo o spina danneggiati, malfunzionamenti o
con qualsiasi danno meccanico. Inviarlo al centro di assistenza autorizzato più
vicino per l'esame e la riparazione (SOLO i tecnici dovrebbero aprire l'unità).
9. L'utilizzo di accessori o accessori non forniti o consigliati dal produttore può

- 4 -
causare lesioni.
10. Se si prevede di non utilizzare la macchina per un lungo periodo, scollegarla,
pulirla, coprirla e conservarla in un luogo asciutto e sicuro.
11. Non lasciare il cavo di alimentazione sospeso oltre il bordo del tavolo o del
bancone e non lasciarlo entrare in contatto con superfici calde.
12. Non posizionare l'unità sopra o vicino ad aria calda, fornelli elettrici o stufe.
13. Spegnere sempre la presa prima di collegare o staccando la spina. Tenere la
spina invece di tirare il cavo.
1 4 . Non utilizzare questa unità per scopi diversi dall'uso indicato.
1 5 . TENERE FUORI DALLA PORTATA DEI BAMBINI. Non lasciarlo mai
incustodito durante l'uso.
1 6 . NON PULIRLO CON NESSUN MATERIALE ABRASICO.
17 . Controllare sempre che questa macchina sia collegata a una presa con
messa a terra con l'alimentazione elettrica appropriata. Assicurarsi che la presa a
muro utilizzata sia adeguatamente collegata a terra. In caso contrario, è
necessario installare una presa con messa a terra. Avere il lavoro eseguito solo da
un elettricista certificato adeguatamente qualificato per soddisfare le norme
elettriche e di sicurezza locali.
18 . Assicurarsi che la presa di corrente, la spina e il cavo utilizzati siano in buone
condizioni condizioni di lavoro. I componenti danneggiati devono essere riparati da
un elettricista certificato e qualificato per soddisfare le normative elettriche e di
sicurezza locali. Anche se il cavo di alimentazione funziona correttamente, tenerlo
lontano dall'acqua e evitare di farlo scorrere su tappeti o apparecchi riscaldanti.
1 9 . Evitare di utilizzarlo in presenza di liquidi infiammabili, gas, polvere o altre
situazioni esplosive.
20 . Non spostare la macchina prima del raffreddamento e durante il
riscaldamento
2 1 . Non utilizzare la macchina in un garage per elettrodomestici o sotto un muro
mobiletto. Scollegare sempre l'unità dalla presa elettrica quando si ripone in un
garage per elettrodomestici. In caso contrario, potrebbe verificarsi un rischio di
incendio, soprattutto se la macchina tocca la parete del garage o la porta la tocca
mentre si chiude.
2 2 . Attacco di tipo Y: se il cavo di alimentazione è danneggiato, deve essere
sostituito dal produttore, dal suo agente di assistenza o da personale similmente
qualificato in per evitare un pericolo.
2 3 . I bambini non devono giocare con l'apparecchio. La pulizia e la manutenzione
da parte dell'utente non devono essere effettuate da bambini senza supervisione.
24 . Ispezionare prima di ogni utilizzo.
25 . NON PULIRLO CON NESSUN MATERIALE ABRASICO .
26 . Non lasciarlo mai incustodito durante l'uso . Non lasciare mai il bambino
incustodito.
27. L'urina e le feci degli animali domestici possono danneggiare il prodotto, tenerli
lontani .

- 5 -
AVVERTIMENTO: Questo apparecchio non è destinato all'uso da parte di
persone giovani o inferme a meno che non siano supervisionate da una
persona responsabile per garantire che possano utilizzare l'apparecchio in
sicurezza. I bambini piccoli devono essere sorvegliati per assicurarsi che
non giochino con il prodotto . Gli animali domestici devono stare lontani dal
prodotto.
PRODUCT PARAMETERS
MODELL
O
Regione
Voltaggio
Energia
Tipo di spina
Fusibil
e
SC-5XD
Nord
America
CA110V6 0
Hz
750W
Un americano
TAPPO
10A
Europa
CA220-240
V 50 Hz
1000W
europeo
TAPPO
SC-7XD
Nord
America
CA110V6 0
Hz
1050 W
Un americano
TAPPO
15A
Europa
CA220-240
V 50 Hz
1400 W
europeo
TAPPO
SC- 11 XD
Nord
America
CA110V6 0
Hz
1650W
Un americano
TAPPO
20A
Europa
CA220-240
V 50 Hz
2200W
europeo
TAPPO
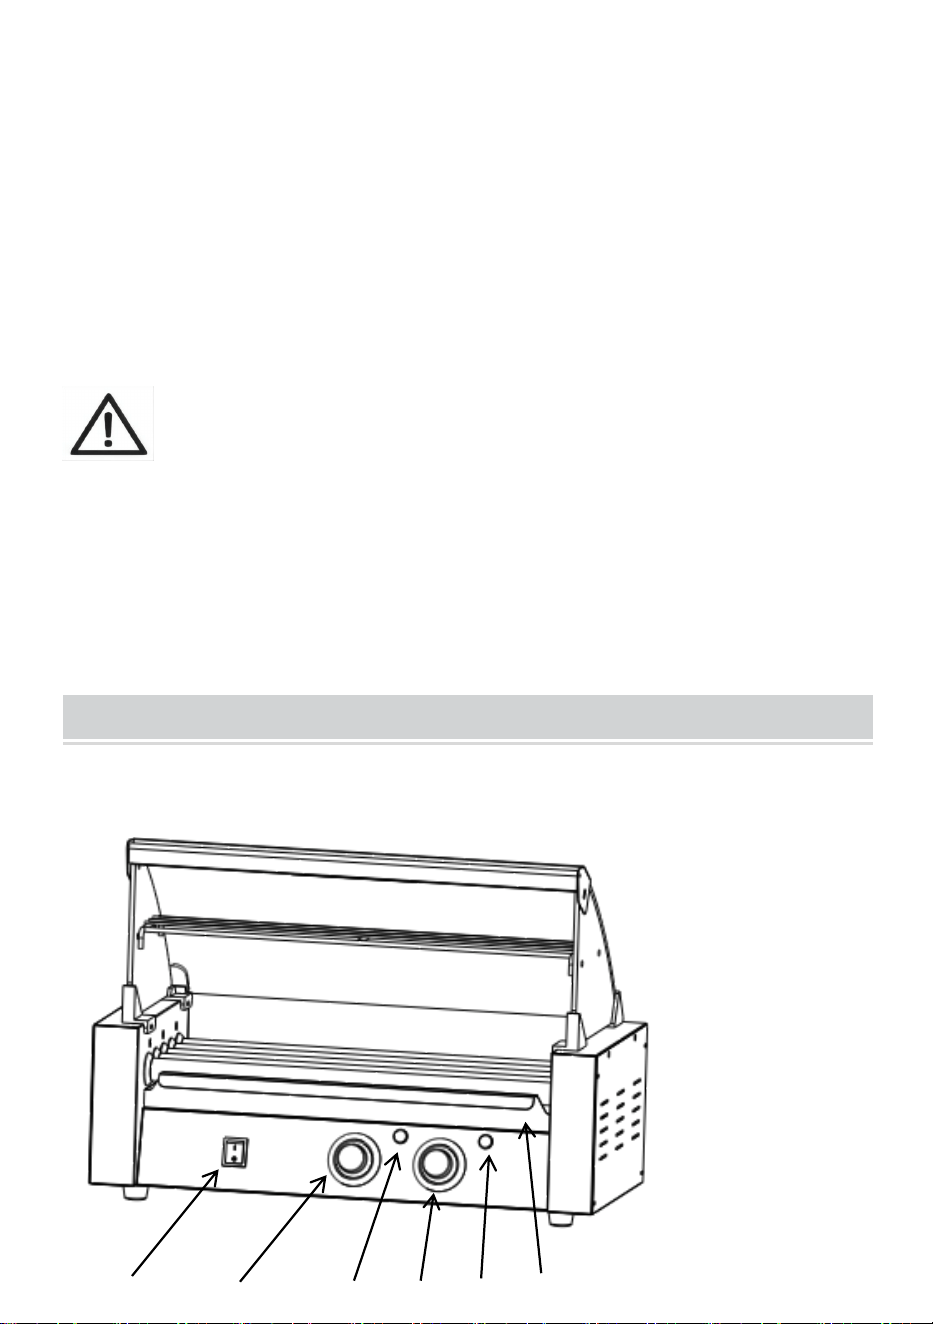
- 6 -
Attenzione :
1. La tensione utilizzata per questo dispositivo deve essere uguale alla tensione di
alimentazione.
2. Gli utenti devono installarlo vicino all'interruttore di alimentazione e al fusibile.
3. Se la macchina non è alimentata, staccare la spina dalla presa elettrica e
verificare se il fusibile è bruciato.
4. Si consiglia di utilizzare linee e prese separate per evitare il sovraccarico
dell'interruttore automatico o del fusibile ritardato.
RICHIESTA CALDA:
Sulla superficie è fissata una pellicola protettiva bianca la fusoliera
per proteggere la fusoliera dai graffi. Si prega di strapparla prima
dell'uso.
PRODUCT COMPONENTS
Nota: la posizione dei componenti principali di queste tre macchine è la
stessa!
1. Power Switch
2.Temperature Knob
(Front)
3. Heat Light (Front)
4.Temperature Knob
(Back)
5. Heat Light (Back)
6. Pan
7. Fuse
8. Protective Earthing
9. Power Socket
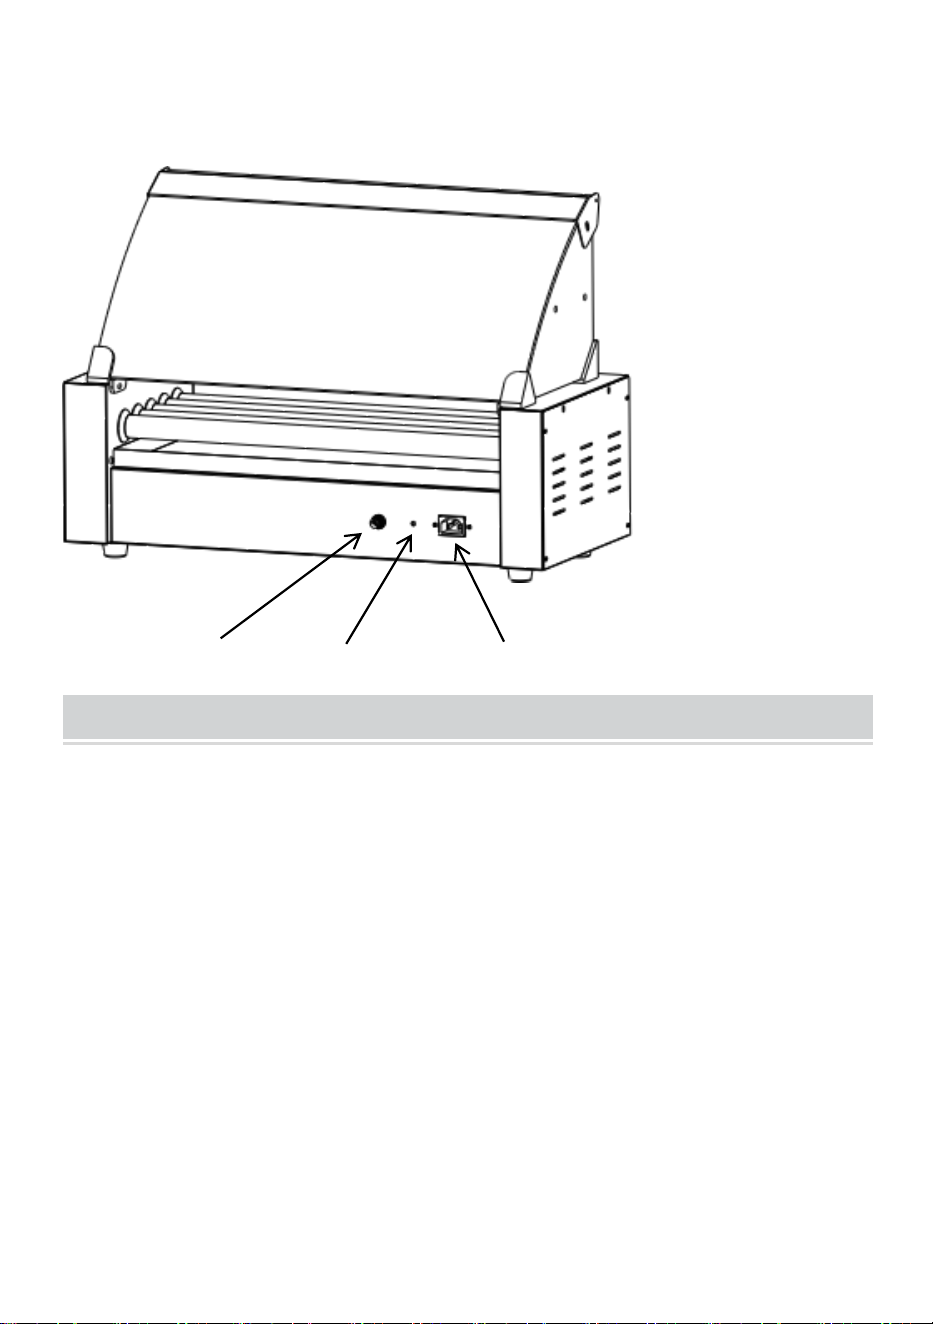
- 7 -
EXPLODED VIEW
Nota: la posizione dei componenti principali di queste tre macchine è la
stessa!
⑨
⑧
⑦
④
③
②
①
⑤
⑥
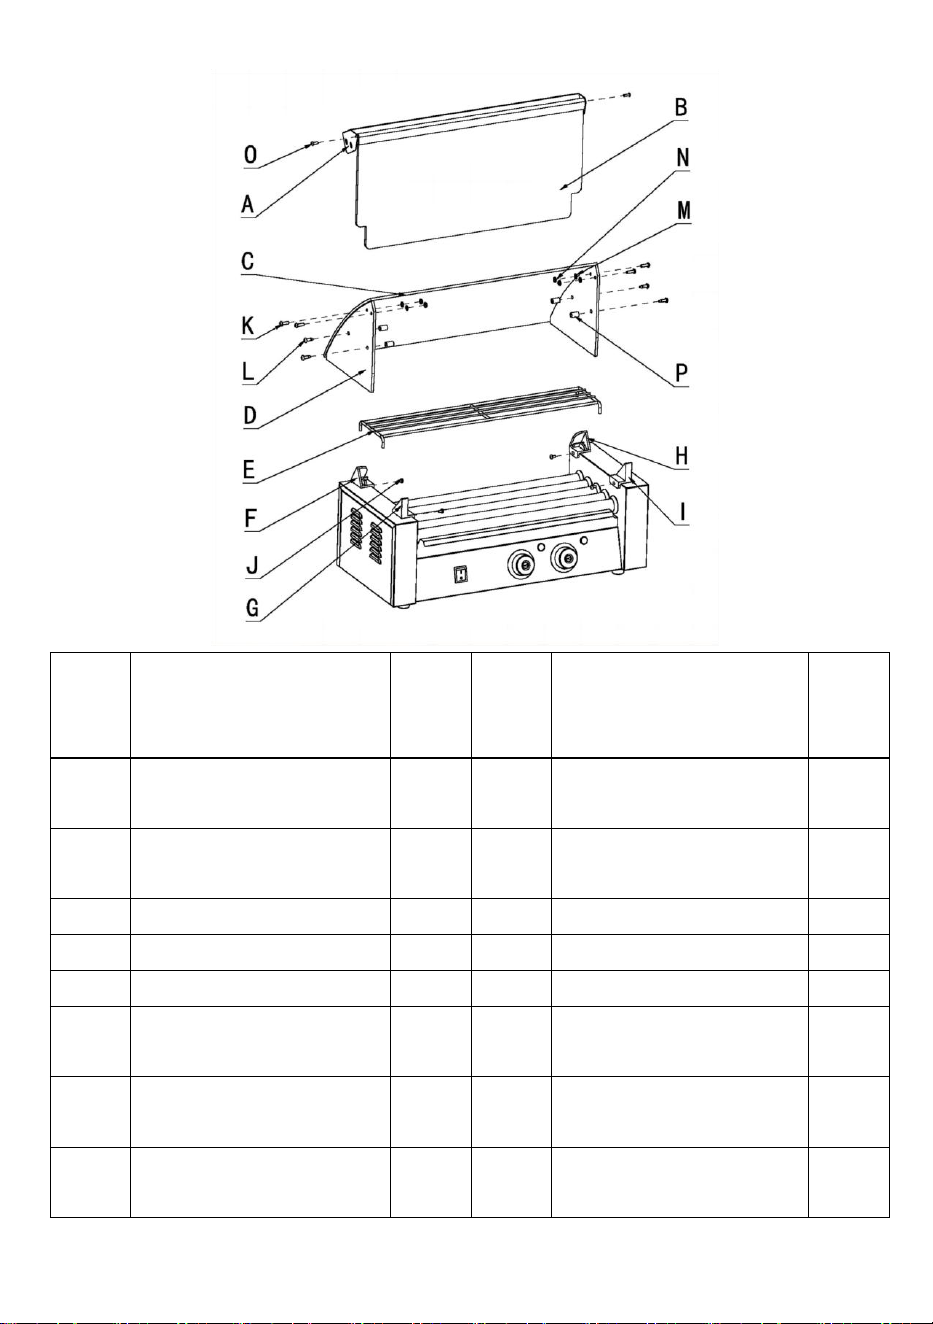
- 8 -
NO.
Nome
QUA
NTIT
À
NO.
Nome
QUA
NTIT
À
UN
Trave fissa frontale in
vetro
1
IO
Supporto in vetro
anteriore (destra)
1
B
Porta d'ingresso in
vetro
1
J
Viti M4x8
4
C
Vetro curvo
1
K
Viti M5x14
4
D
Vetro laterale
2
l
Viti M6x14
4
E
Scaffali
1
M
Dado M5
4
F
Dietro il supporto in
vetro (a sinistra)
1
N
Guarnizione in mica
4
G
Supporto in vetro
anteriore (sinistra)
1
O
Viti M4x12
2
H
Dietro il supporto in
vetro (a destra)
1
P
Manica in nylon
4
Nota: la quantità di parti indicata nel manuale corrisponde all'utilizzo
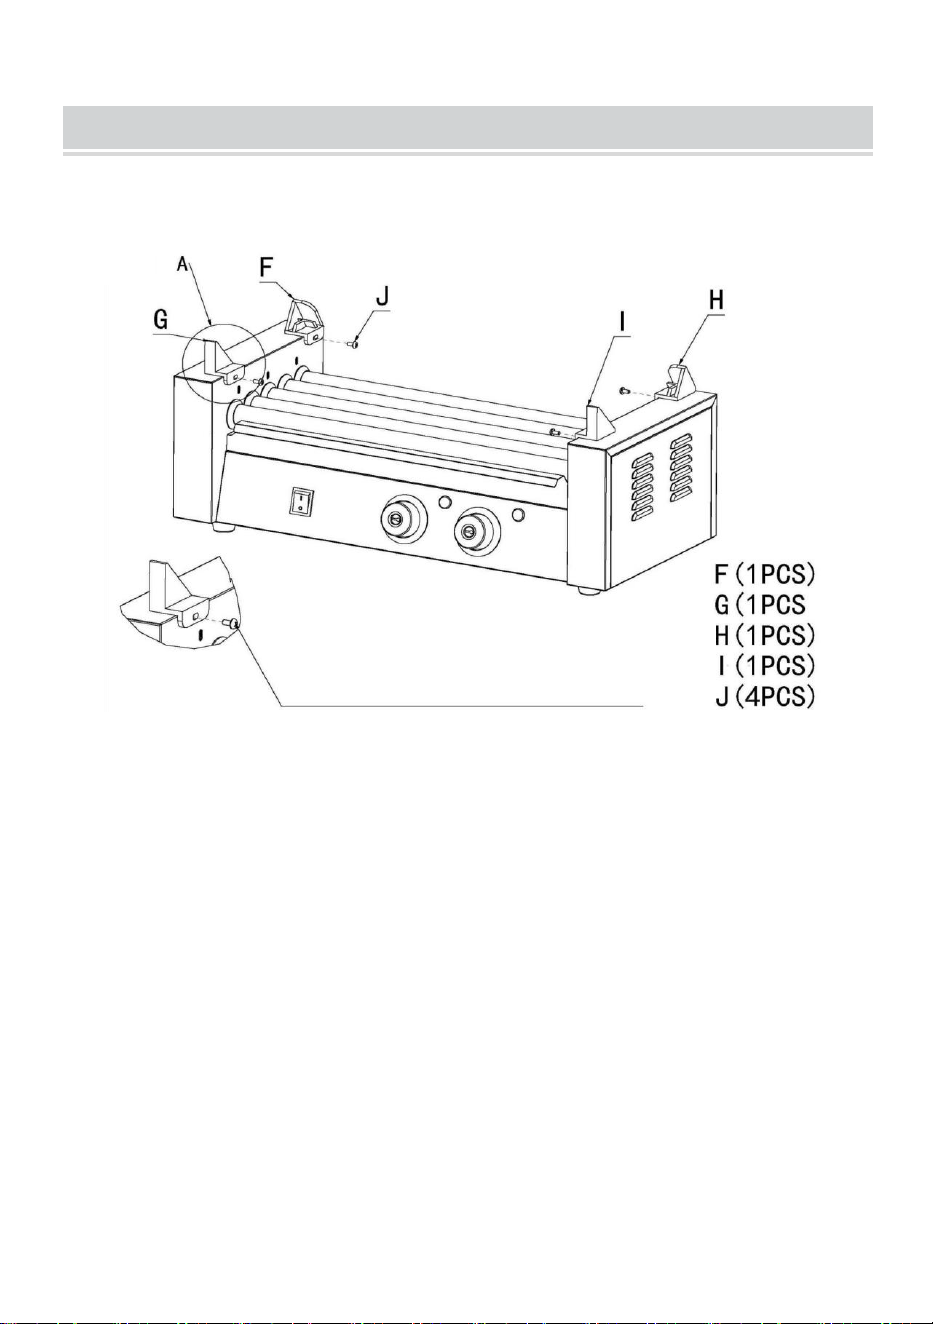
- 9 -
effettivo e le parti non utilizzate sono pezzi di ricambio.
ASSEMBLY DRAWING
Nota: la posizione dei componenti principali di queste tre macchine è la
stessa!
Nota: non serrare ancora completamente le viti.
1. First use screws (J) to fix the (F-G-H-I)
accessories to the rack in sequence.
Step1

- 10 -
2.2 First put the left and right glass into the glass
fasteners in sequence, and then tighten the four
fixing screws.
2.1 Use screws (L) to fix the left and right
accessories (P) to the reserved fixing holes in
the glass in sequence.
Step2
Step3
3.1 Place the accessory (C) into the slot of the glass fixture.
Step4

- 11 -
4 Use fasteners (K; N; M) to fix accessories
(A) to the reserved openings in the glass in
order and tighten them.
Step5
5 Place the accessory (E) onto the installed
accessory (P) from top to bottom.
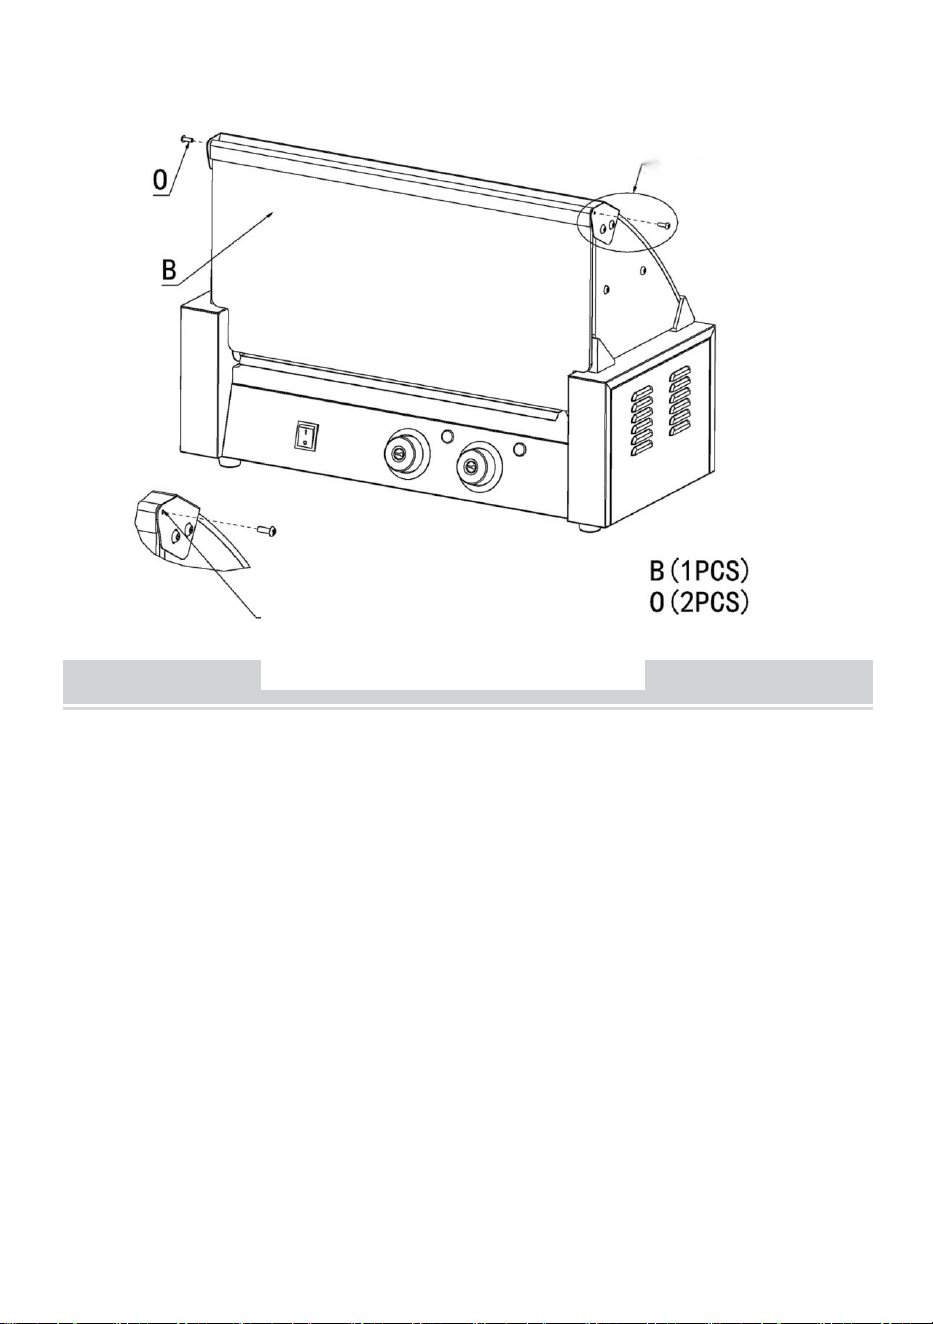
- 12 -
OPERATING INSTRUCTIONS
Prima di utilizzare l'apparecchio per la prima volta, rimuovere eventuali promozioni
materiali e materiali di imballaggio e verificare che il prodotto sia pulito e privo di
polvere. Se necessario, pulirli con un panno umido. Stendetela con un canovaccio
da cucina assorbente e asciugate l'eventuale olio in eccesso. Quando
l'apparecchio viene riscaldato per la prima volta, potrebbe emettere un
leggero fumo o odore, che è normale per molti apparecchi di riscaldamento
e non influirà sulla sicurezza dell'apparecchio.
1. Posizionare la macchina su una superficie pulita, asciutta e piana vicino a una
presa con base.
2. Collegare il cavo alla presa di corrente della macchina.
3. Collegare il cavo alla presa a muro.
4. Come testare la macchina: accendere l'interruttore di alimentazione, la spia è
accesa; accendere l'interruttore del motore, i rulli ruotano. Ruotare la manopola
del termostato in senso orario per allineare la manopola sulla scala della
temperatura con il triangolo rosso sulla
Step6
6 Use screws (O) to secure
accessory (B) to the installed
glass front fixed beam; complete
installation.

- 13 -
pannello, la spia di riscaldamento si accende e i rulli iniziano a riscaldarsi. Quando
la temperatura raggiunge il valore impostato, ruotare la manopola in senso orario
fino a circa 302°F (150°C). A questo punto, la spia del riscaldamento si spegnerà, il
che significa che ha raggiunto la temperatura impostata.
5. Posizionare le salsicce già preparate parallelamente al centro dei due rulli, poi
le salsicce ruoteranno all'interno
direzioni opposte. Si prega di non posizionare le salsicce troppo vicine tra loro,
lasciando circa 10 mm (0,4 pollici) all'estremità di ciascun rullo.
Nota:
1. Ogni volta che si accende la macchina per la prima volta, è necessario prima
accendere l'interruttore di riscaldamento per preriscaldare, quindi accendere
l'interruttore rotante per evitare che l'olio motore si solidifichi.
2. Non è consentita l'apertura del piatto inferiore o di entrambi i lati, nel caso in cui
si sia autorizzati a farlo. 3. Di solito la temperatura di cottura dovrebbe essere
appropriata 248°F-320°F(120-160°C).
4. Durante il riscaldamento, le mani non devono toccare il rullo d'acciaio per
evitare scottature.
5.Quando si collega o si scollega la spina, è necessario scollegarla
dall'alimentazione esterna totale.
6. Tenere le mani asciutte quando si collega il
cavo.
TIPS
1. Per risparmiare elettricità e ridurre il tempo di riscaldamento, è possibile
scongelare le salsicce in modo naturale o riscaldarle prima nel forno a microonde.
2. Applicare olio alimentare sui lati sinistro e destro del rullo prima dell'uso per
aumentare la scorrevolezza del rullo.
Nota: La padella sotto i rulli serve per raccogliere le gocce d'olio, può essere
usata anche per preriscaldare la salsiccia, ma non è adatta per mettervi le salsicce
grigliate.

- 14 -
CLEANING AND MAINTENANCE
1. Una volta terminata la cottura, staccare la spina dalla presa elettrica. Lasciare
raffreddare completamente la macchina prima di pulirla.
2. I rulli devono essere puliti ogni 4-5 ore di grigliatura.
3. Per l'esterno, pulire con un panno morbido e asciutto. Non utilizzare mai un
detergente abrasivo o una spugnetta dura. 3. Qualsiasi altro intervento di
manutenzione deve essere fornito da un rappresentante dell'assistenza
autorizzato.
Avvertenza: non utilizzare liquidi per sciacquare direttamente il prodotto per
evitare danni causati dall'acqua ai componenti interni.
STORAGE
1. Scollegare sempre la macchina prima di riporla.
2. Assicurarsi sempre che la macchina sia fresca e asciutta prima di infilarla.
3. Applicare olio vegetale sulla superficie del prodotto per prevenire la ruggine.
Produttore: Shanghaimuxinmuyeyouxiangongsi
Indirizzo: Shuangchenglu 803nong11hao1602A-1609shi, baoshanqu,
shanghai 200000 CN.
Importato in AUS: SIHAO PTY LTD. 1 ROKEVA STREETEASTWOOD
NSW 2122 Australia
Importato negli Stati Uniti: Sanven Technology Ltd. Suite 250, 9166
Anaheim Place, Rancho Cucamonga, CA 91730

- 15 -
REP
UK
YH CONSULTING LIMITED.
C/O YH Consulting Limited Office 147,
Centurion House, London Road,
Staines-upon-Thames, Surrey, TW18 4AX
REP
EC
E-CrossStu GmbH
Mainzer Landstr.69,
60329 Frankfurt am Main.