
NKV914B
NKV914T
CV1100B
CV1100T
EN Instructions | Vacuum Drawer 2
FR Mode d’emploi | Tiroir sous vide 15
DE Gebrauchsanweisung | Vakuumierschublade 27
IT Istruzioni per l’uso | Cassetto per sottovuoto 39
- 5 -
8 4 4
4 5
25
90 8
Language codes are dened based on ISO 639 standard - read more
Appendix 2. Other cover’s versions are placed in Appendix 5.
Maximum 36 languages are allowed. In multilingual documents page
numbers on the cover refer to the rst page of new language section.
For single language page number is not added. A each language starts
with a new row. Document Type and Appliance Type are separated by
Vertical bar “|”.
Maximum 26 Model Denomination are allowed. They are put from top
to down in one column. Maximum 14 charatkter may be used.
The list of pictograms and usage rules is placed in Appendix 4.
FRONT COVER
BG
Ръководство за употреба | Аспиратор
2
CS Návod k použití | Odsavač par 6
DA Brugsanvisning | Emhætte 10
DE Benutzerinformation | Herd-Abzugshaube 14
EL Οδηγίες Χρήσης | Απορροφητή ρας 18
EN User Manual | Cooker Hood 22
ES Manual de instrucciones | Campana extractora 26
ET Kasutusjuhend | Õhupuhasti 30
FI Käyttöohje | Liesituuletin 34
FR Notice d’utilisation | Hotte 38
HR Upute za uporabu | Kuhinjska napa 42
HU Használati útmutató | Konyhai szagelszívó 46
IT Istruzioni per l’uso | Cappa da cucina 50
KK
Қолдану туралы нұсқаулары | Пештің сорғыш қондырғысы
54
LT Naudojimo instrukcija | Garų rinktuvas 58
LV Lietošanas instrukcija | Tvaika nosūcējs 62
MK Упатство за ракување | Аспиратор 66
NL Gebruiksaanwijzing | Afzuigkap 70
NO Bruksanvisning | Kjøkkenventilator 74
PL Instrukcja obsługi | Okap kuchenny 78
PT Manual de instruções | Exaustor 82
RO Manual de utilizare | Hotă pentru aragaz 86
RU Инструкция по эксплуатации | Вытяжка 90
SK Návod na používanie | Odsávač pár 94
SL Navodila za uporabo | Kuhinjska napa 98
SQ Udhëzimet për përdorim | Aspirator 102
SR Упутство за употребу | Аспиратор штедњака 106
SV Bruksanvisning | Spisfl äkt 110
TR Kullanma Kılavuzu | Davlumbaz 114
UK Інструкція | Витяжка 118
AR
|
124
D2PX0001M
DBB2PX002M
DBB2PX0003M
DBB2PX004M
DBBB2PX00005M
DBX0006M
DBPX0007M
DBBX0008M
DBB2PX0008M
aeg.com/register
34
28,3
FRONT COVER
- LAYOUT
Background
Pictogram:
H: max 25 mm,
W: max 25 mm,
Central, top.
1
2
3
5
4
Element Font style Paragraph style
1 Language code Arial Unicode Bold, 8 pt align: left, 100% Black
2 Document Type Arial Unicode Regular, 8 pt align: left, 100% Black
3 Appliance Type Arial Unicode Bold, 8 pt align: left, 100% Black
4 Page number Arial Unicode Regular, 8 pt align: right, 100% Black
5 Model Denomination Arial Unicode Bold, 10/16 pt align: center, 100% Black
FRONT COVER
- TYPOGRAPHY
4,7

2 ENGLISH
CONTENTS
FOR PERFECT RESULTS
CUSTOMER SERVICE AND MAINTENANCE
1. SAFETY INFORMATION ................................................................................3
2. SAFETY INSTRUCTIONS ..............................................................................4
3. PRODUCT DESCRIPTION ...........................................................................6
4. CONTROL PANEL ........................................................................................7
5. BEFORE FIRST USE ....................................................................................7
6. DAILY USE ....................................................................................................8
7. CLEANING AND MAINTENANCE ...............................................................10
8. TROUBLESHOOTING .................................................................................11
9. ENERGY EFFICIENCY ...............................................................................12
10. ENVIRONMENTAL CONCERNS ..............................................................13
11. WARRANTY ..............................................................................................14
Thank you for choosing this AEG product. We have created it to give you
impeccable performance for many years, with innovative technologies that help
make life simpler – features you might not nd on ordinary appliances. Please
spend a few minutes reading to get the very best from it.
We recommend always using original spare parts.
Always have the following information at hand when you contact the authorised
Assistance Centre: Model, PNC and serial number.
You can nd the information on the rating plate.
Warning/Attention - Important safety information.
Information and general recommendations.
Environmental information.
Subject to change without notice.
Visit our website to:
Receive advice, download our brochures, solve any anomaly and nd
information on technical support:
www.aeg.com
Register your product and receive a better service:
www.aeg.com/productregistration
Purchase accessories, consumables and original spare parts for your
appliance:
www.aeg.com/shop

3ENGLISH
1. SAFETY INFORMATION
Carefully read the instructions before installing and using
the appliance. The manufacturer is not liable for improper
installation and use of the appliance that may cause injuries
and damage. Always keep the instructions available for future
reference.
1.1 Safety of children and vulnerable adults
• This appliance can be used by children aged 8 years and
above and persons with reduced physical, sensory or
mental capabilities or lack of experience and knowledge
only if they are given supervision or trained on how to use
the appliance in a safe way and understand the hazards
involved.
• Children should not play with the appliance.
• Keep packaging materials away from children.
• Keep children and pets away from the appliance during
operation.
• Cleaning and maintenance should not be done by children
without supervision.
• Children under the age of 3 years must be kept away
unless constantly supervised.
1.2 Warnings on general safety
• Only qualied personnel can install the appliance and
replace the cables.
• Disconnect the appliance from the power supply before
carrying out any maintenance operation.
• Do not use steam cleaners to clean the appliance.
• Do not use abrasive detergents or metal scrapers to clean
the appliance.
• If the power cord is damaged it must be replaced by the
manufacturer, by an authorised technician or by a qualied
person to prevent hazardous situations.
4 ENGLISH
1.3 Environments of use
This appliance is intended to be used in household and
similar applications such as:
• Sta kitchen areas in shops, oces and other working
environments.
• Farm houses.
• By clients in hotels, motels and other residential type
environments.
• Bed and breakfast type environments.
2. SAFETY INSTRUCTIONS
2.1 Installation
CAUTION!
The appliance must be installed by
qualied personnel only.
• Remove the packaging material.
• Do not install or use the appliance if
damaged.
• Comply with the instructions supplied with
the appliance.
• Always pay attention when moving the
appliance.
• Always wear safety gloves.
• Do not turn the appliance upside down or
tilt it! This may cause oil to leak from the
pump and damage the equipment.
• Respect the minimum distance from other
appliances.
• Make sure the appliance is installed and
secured to a xed structure.
• The sides of the appliance must be
adjacent to other equipment or units
having the same height.
2.2 Electrical connection
CAUTION!
Risk of re and electric shock.
• All the electrical connections must be
made by a qualied electrician.
• The appliance must be earthed.
• Make sure that all the electrical data
shown on the data plate correspond to
those of the system. Otherwise, contact an
electrician.
• Always use an electrical outlet with a
correctly installed protective contact.
• Do not use multi-plug adapters or
extension cables.
• Make sure not to damage the mains plug
and the mains cable. If the power cable
must be replaced, this should be carried
out by our Assistance Centre.
• Shock protection devices must be
fastened in such a way that they cannot be
removed without tools.
• Connect the mains plug to the mains
socket only once installation has been
completed.
• Do not connect the mains plug if the mains
socket is loose.
• Do not pull the mains cable to disconnect
the appliance. Pull only the mains plug.
• Use only suitable isolation devices: circuit
breakers, fuses (screw type fuses must be
removed from the fuse holder), earth fault
current releases and relays.
• The electric system must be equipped
with an isolation device that allows you to
disconnect the appliance from the mains at
every pole. The isolation device must have
a contact opening width of a minimum 3
mm.
• This appliance complies with the EEC
directives.
5ENGLISH
2.3 Use
CAUTION!
Risk of injury, burns, electric shock or
explosion.
• Do not touch the sealing bar after use.
Residual heat can cause burns.
• Use this appliance only in a household
environment.
• Do not modify the specications of this
appliance.
• Do not leave the appliance unattended
during operation.
• Turn the appliance o after use.
• Do not use the appliance with wet hands
or when it could come into contact with
water.
• Do not apply pressure on the drawer.
• Do not use the appliance as a work
surface or as a support surface.
• Avoid the presence of sparks or open
ames near the appliance when you open
the drawer.
• Do not place or keep ammable liquids,
materials or objects on the appliance, or
inside or close to it.
CAUTION!
You may damage the appliance.
• Pay attention when you remove or insert
the accessories.
• Do not force the lid open during the work
cycle.
• Do not force the lid open during the work
cycle in the case of a power cut.
• Do not place any weight on the lid.
• Prevent any object from falling on the lid!
This can compromise the integrity, causing
cracks or damage.
• Close the drawer gently, without slamming
or forcing it unnecessarily.
2.4 Cleaning and maintenance
CAUTION!
There is a risk of injury, re or damage.
• Before carrying out any maintenance
operation, turn the appliance o and
disconnect the plug from the mains socket.
• Check that the appliance is cold.
2.5 Disposing of the appliance
CAUTION!
Risk of injury and choking.
• Disconnect the plug from the power
supply.
• Remove the mains cable and dispose of it.
2.6 Technical Assistance
• Contact the authorised Assistance Centre
to repair the appliance.
• Only use original spare parts.
6 ENGLISH
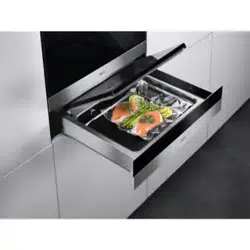
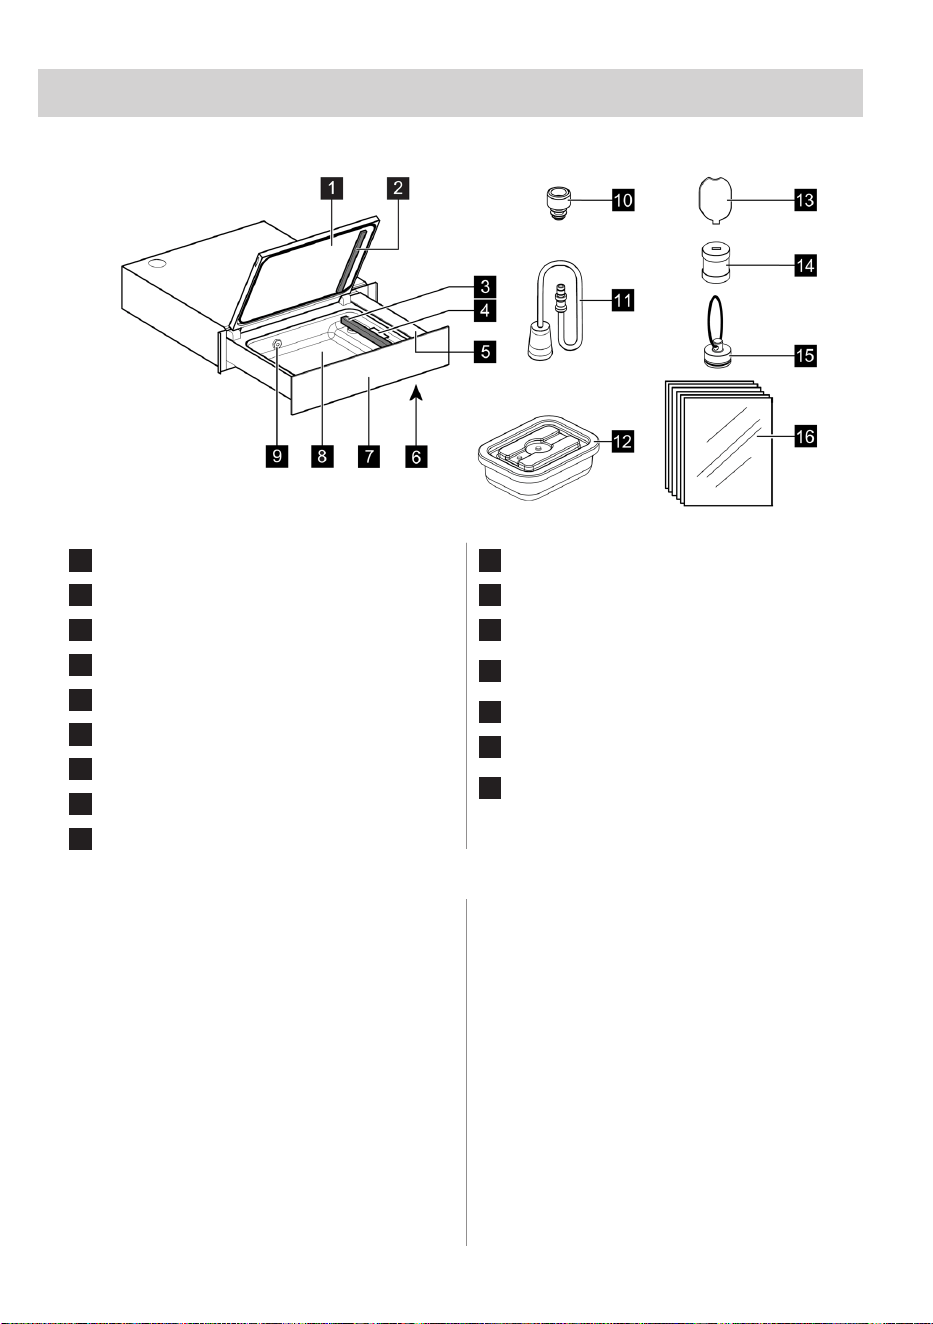
3. PRODUCT DESCRIPTION
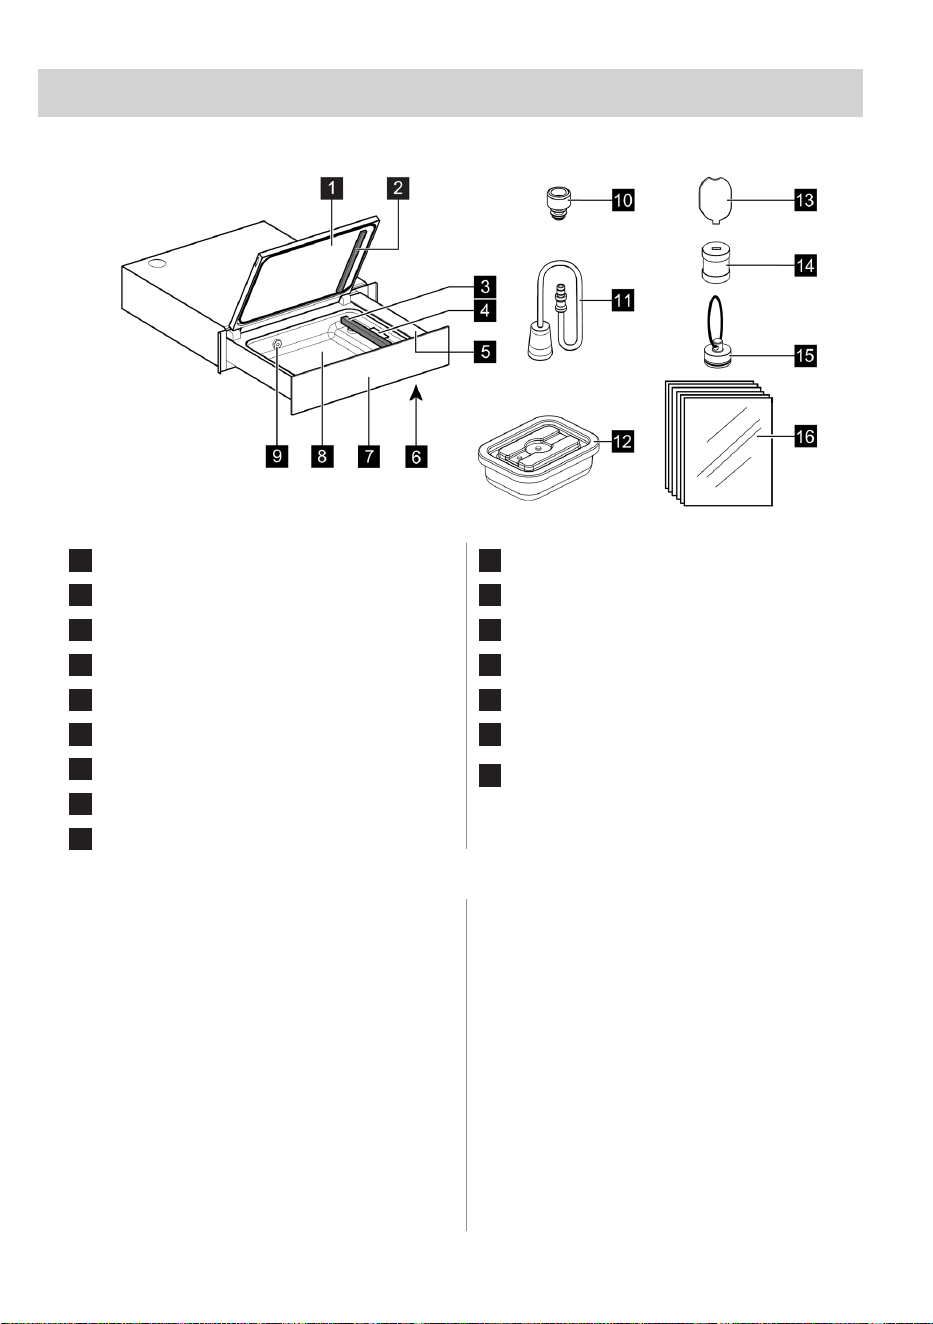
1
Lid
2
Sealing cushion
3
Sealing bar
4
Bag holding clip
5
Control panel
6
Thermal switch
7
Front panel
8
Chamber
9
Suction nozzle
10
Vacuum cork *
11
External vacuum accessory
12
Glass vacuum container *
13
Key to unscrew lter
14
Oil lter
15
Cap
16
Vacuum bags for storage and SousVide
cooking
(*) Available on selected models
3.1 Product Introduction
This product uses the so-called “bell” vacuum
technology capable of reaching up to 99.9%
vacuum, a much higher value than that of
traditional vacuum machines.
The more air that is extracted inside the bag
or container, the less oxidation the food will
undergo.
The almost total extraction (up to 99.9%) of
the air will therefore be able to guarantee the
preservation of the food for a longer period
than traditional vacuum machines and to
prepare the food for vacuum cooking in an
optimal way.
This technology also makes it easy to
preserve liquid foods such as soups,
marinated foods, in bags or containers.
You will nd on this product additional
innovative functions that are not feasible
with traditional vacuum sealers, such as fast
marinating that will allow you to save a lot
of time, fast preparation of pickles, vacuum
packing in containers useful for reducing food
waste, the cold extraction technique for the
preparation of infusions and many others.
7ENGLISH
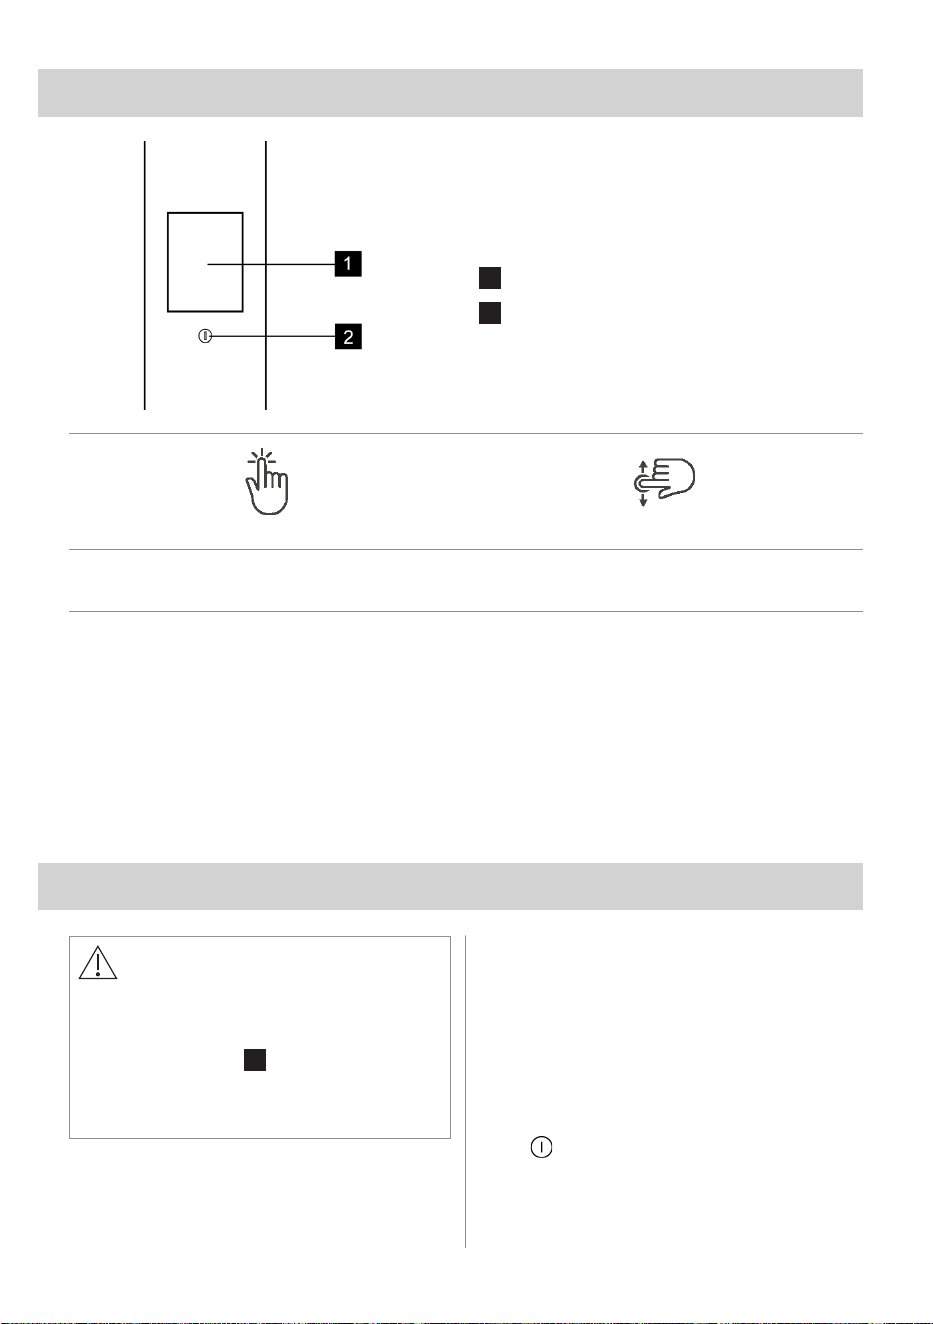
4. CONTROL PANEL
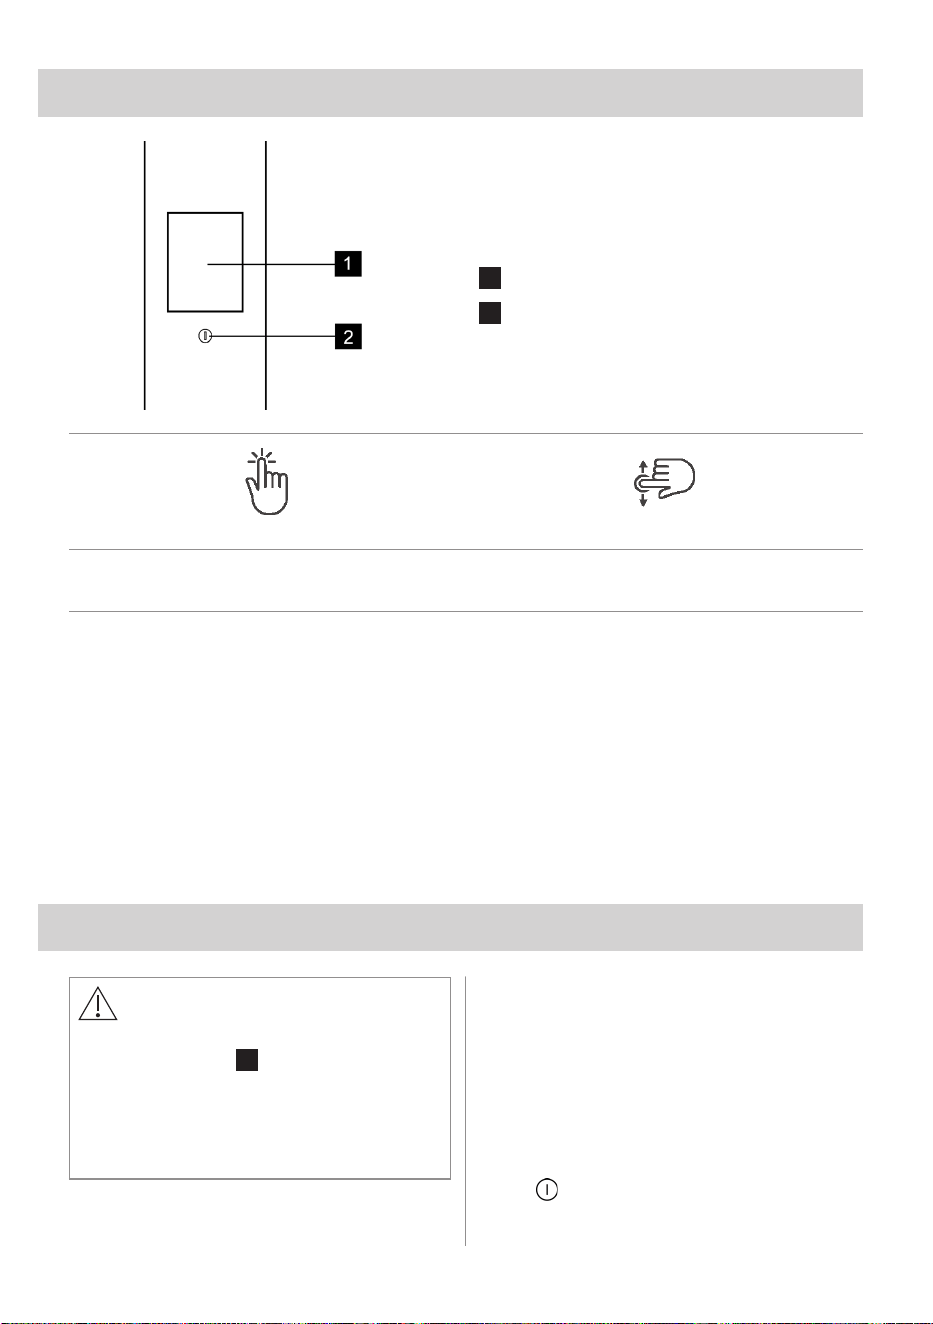
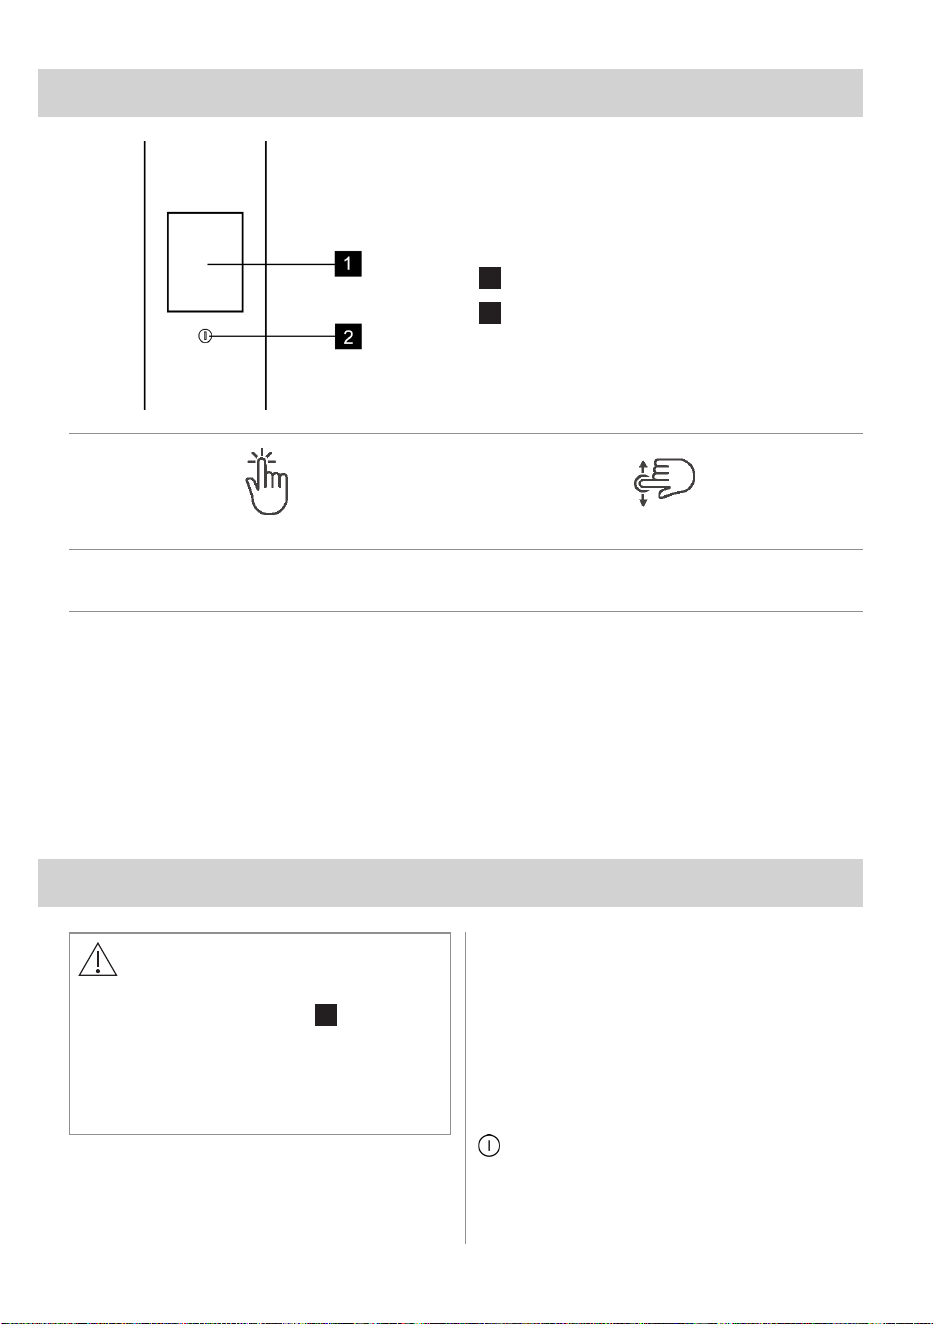
1
Display
2
ON / OFF button
Press Move
Touch the surface
with ngertip
Slide ngertip
over the surface
5. BEFORE FIRST USE
CAUTION!
• Refer to the chapters on safety.
• The plastic cap
15
removed during
installation must be kept for future
assistance.
• Comply with the instructions supplied
with the appliance.
5.1 Cleaning for the rst time
• Refer to the “CLEANING AND
MAINTENANCE” chapter.
• Wipe all parts with a damp cloth before the
rst use.
5.2 First use
Turn the appliance on by holding down the
button until the display turns on.
The appliance performs a rst setup cycle to
ensure good product performances.
8 ENGLISH
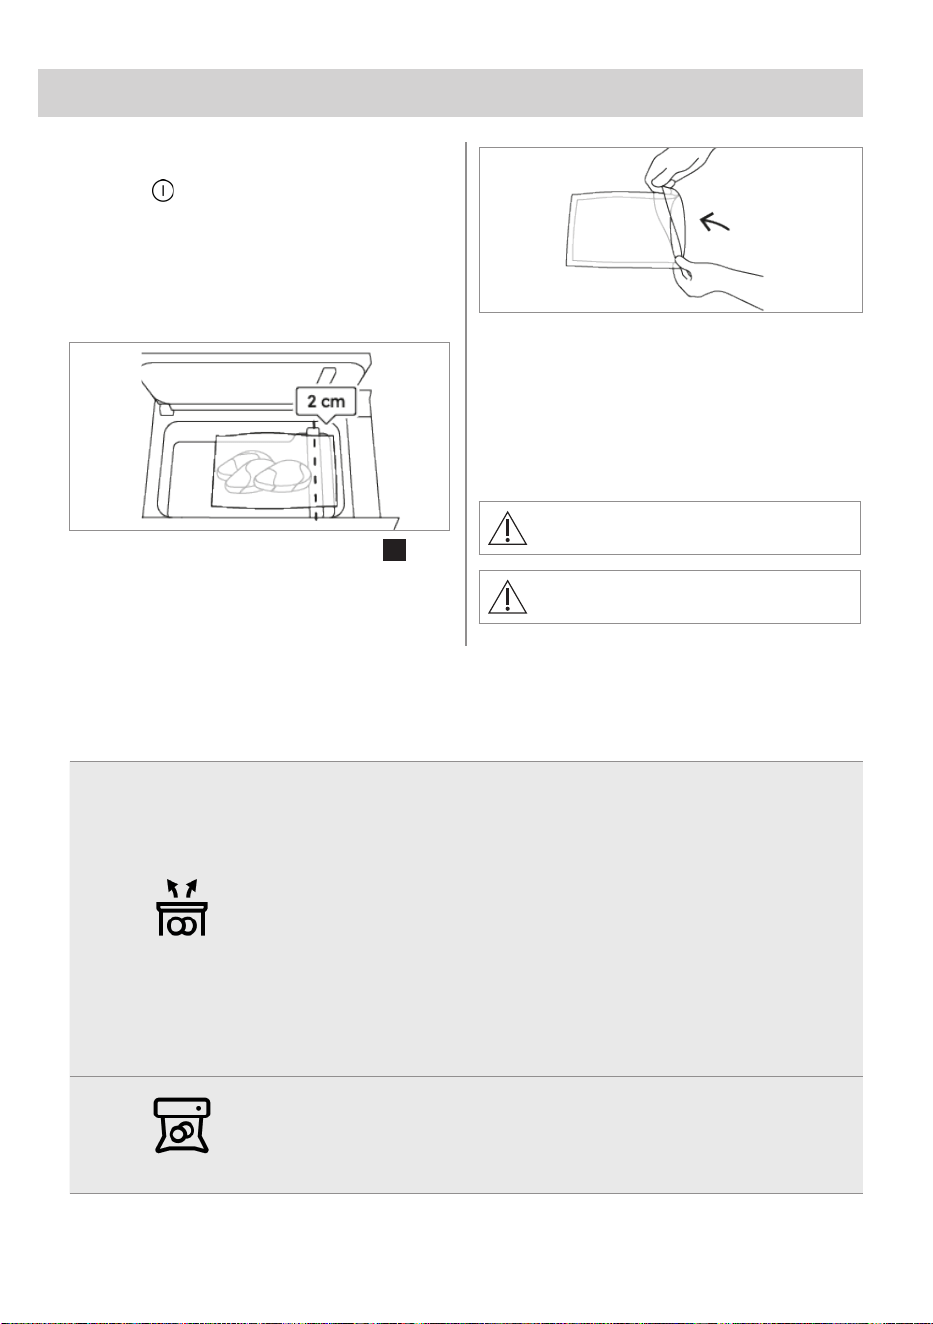
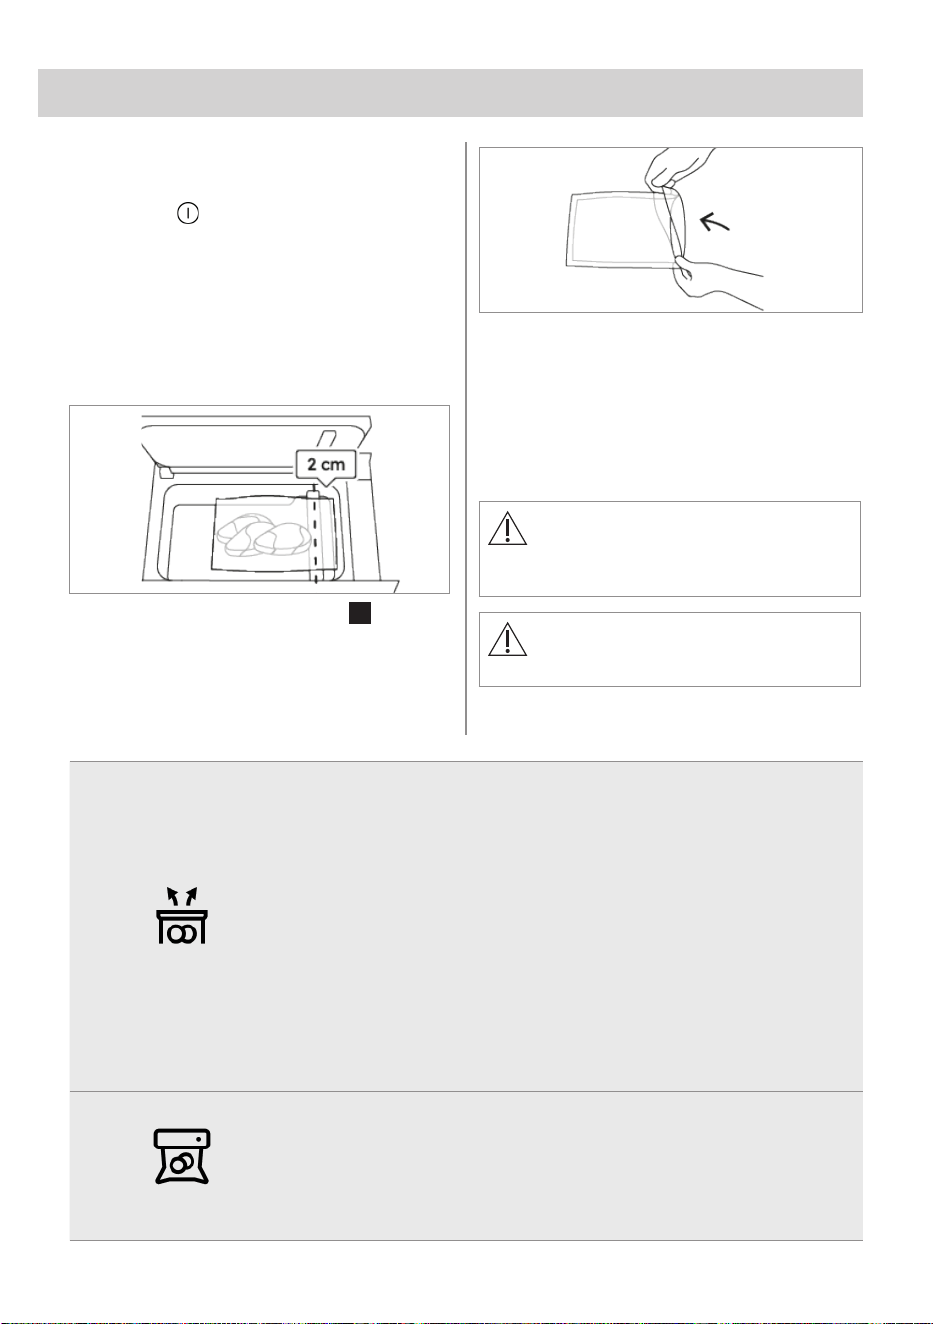
6. DAILY USE
• Push the front panel to open the drawer.
• Turn the appliance on by holding down the
button until the display turns on.
• Press Functions and select the desired
program (see table below).
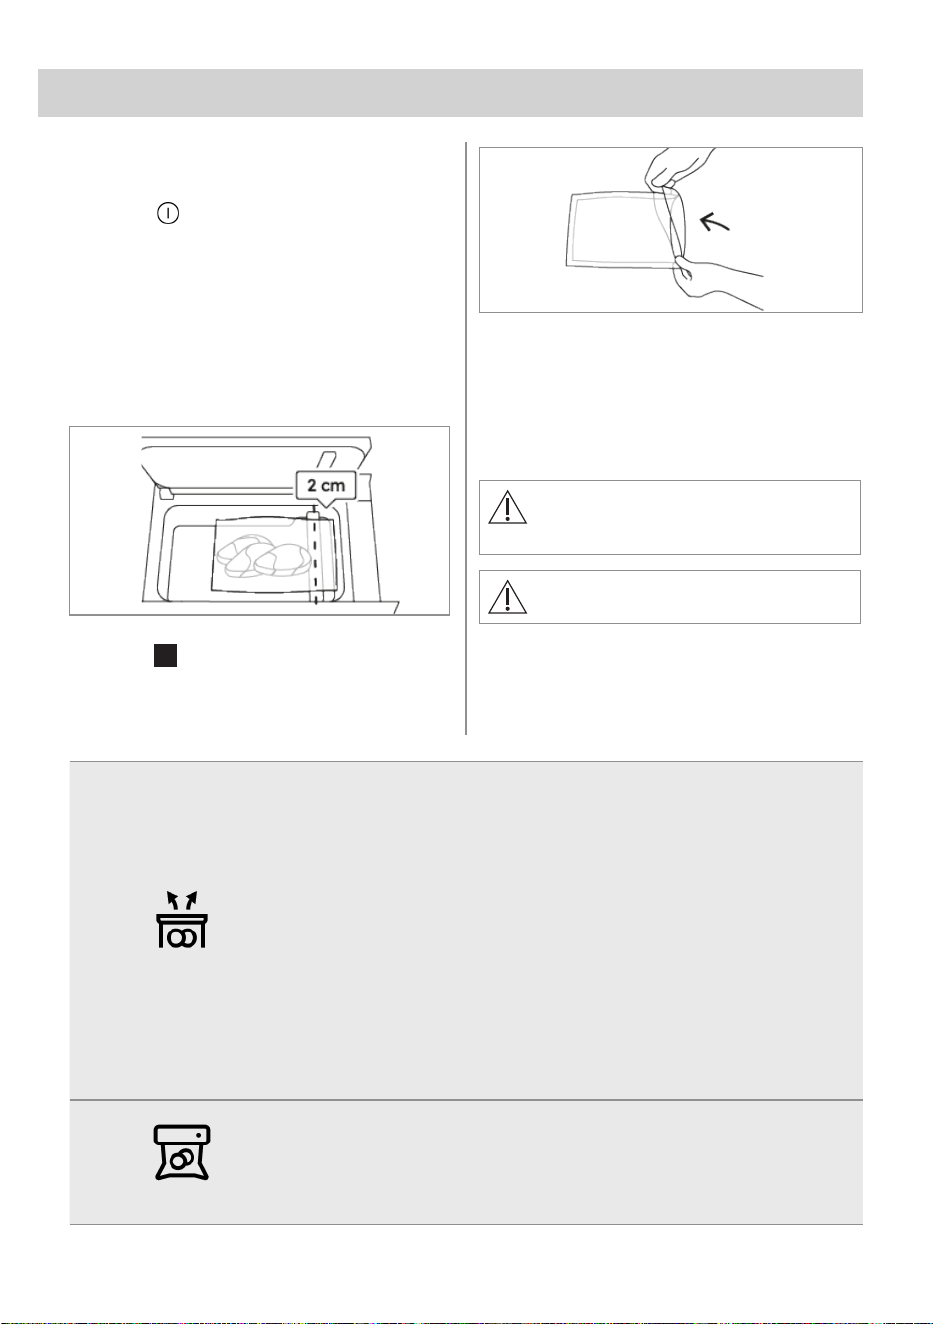
• Open the lid and place the bag or
container inside the chamber. For
packaging with bags, leave at least 2 cm
beyond the sealing bar.
Use if needed the bag holding clip
4
.
Fold down the edge of the bag outwards
by 4-5 cm to ensure a clean and dry
sealing area.
Once the food is inside the bag, fold back
the edge of the bag again in its initial
condition.
• Close the lid.
• Touch the START button. The packaging
cycle will then begin.
• At the end of the cycle, open the lid and
remove the bag/container.
Do not touch the sealing bar after
use. Residual heat can cause burns.
If the appliance is not used for 20
minutes it switches o automatically.
Vacuum seal
For keeping food fresh longer or prepare it for SousVide cooking.
Preserving food in vacuum bags extends the time the food is kept fresh in
storage. SousVide is a cooking technique where the food is cooked slowly
at low temperature.
The benets with SousVide cooking are many:
• Flavour and texture remain unaltered.
• Nutrients and moist is kept in the food.
• No need for oils or fats for cooking.
Set Food type and Bag type depending on the food that you intend to
vacuum seal and the bag used.
In case of Liquids (such as soups, etc) ll the bag with Max 1/3 of the
bag’s volume.
Risk of liquid spillage from the bag.
Do not use hot liquids.
Seal
For sealing or resealing bags to keep food fresh longer.
Suitable for foods that may deform easily such as crisps, biscuits, fresh
salad etc. This method does not involve vacuum.
Set Bag type based on the thickness of the bag used.
9ENGLISH
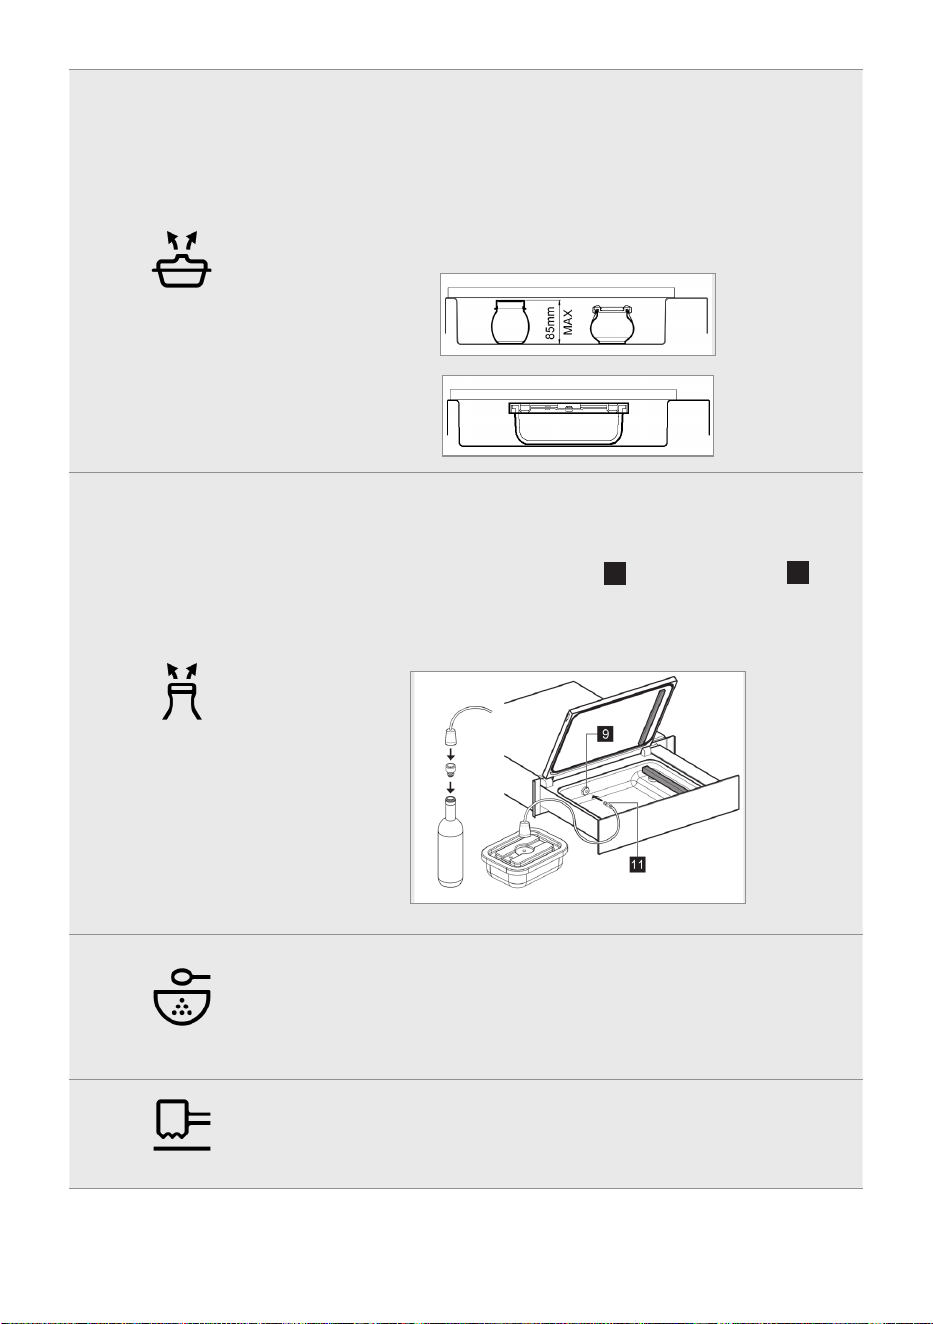
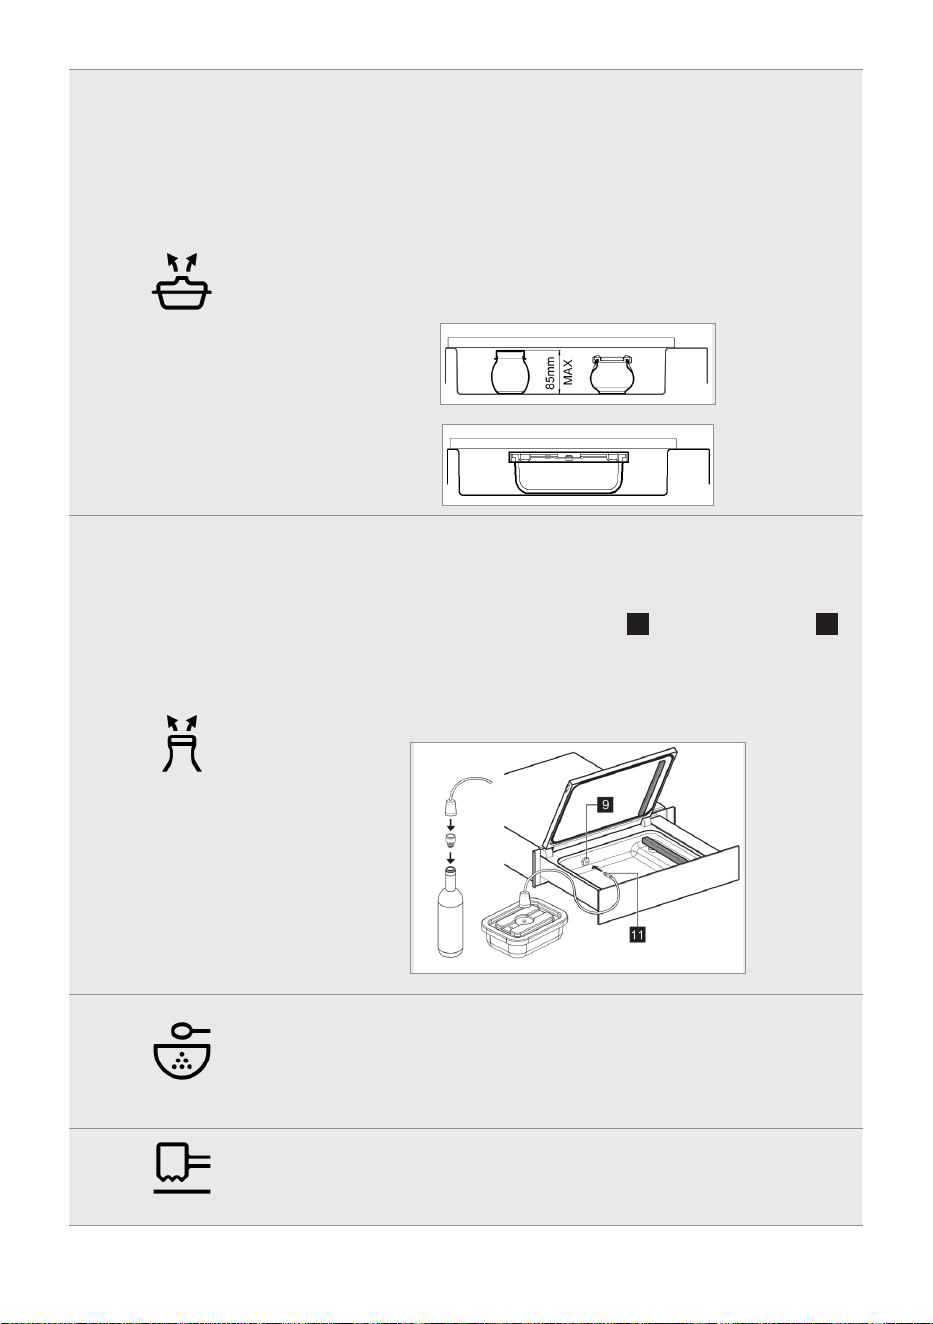
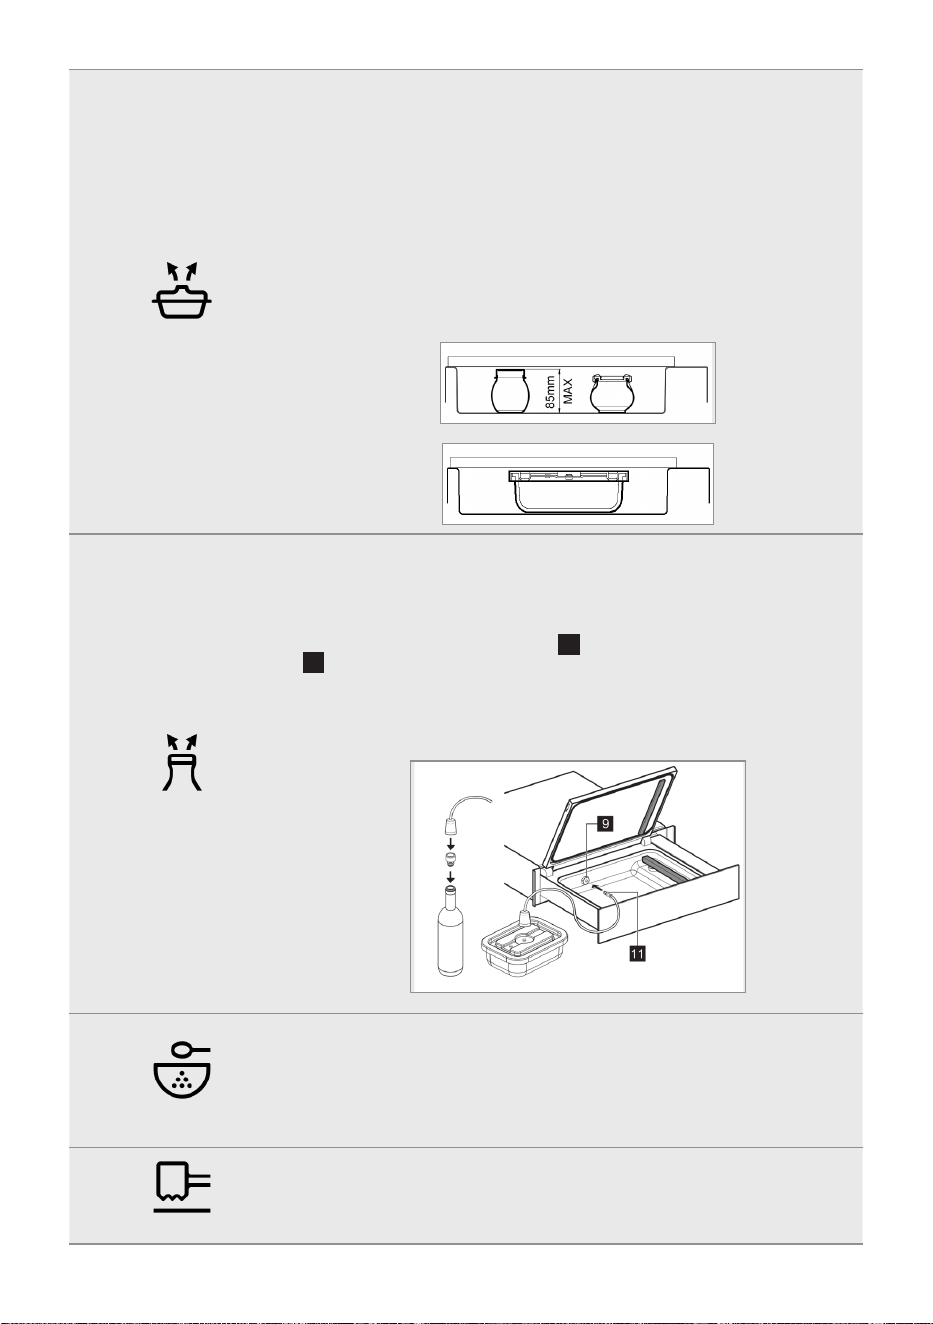
Containers
For keeping food fresh in airtight containers or jars.
This function works for a variety of dierent types of containers and jars.
Re-sealing jars with twist-o lid: Put the lid in place, but make sure the lid
is NOT turned tightly before the function is started, for the vacuum to be
created properly.
To ensure a perfect air-tight seal, use new twist-o lid every time.
Note: when vacuuming Liquids, ll max 1/2 of the container’s volume. Do
not use hot liquids.
External vacuum
For vacuum sealing bigger containers or bottles that do not t inside
the chamber.
Make sure the container or bottle cork has a vacuum valve. Set Container
type depending on container material or bottle.
Connect the external vacuum accessory
11
to the suction nozzle
9
inside the chamber. Make sure it is fully inserted.
With the drawer lid open, press START to start the function.
Note: do not use hot liquids.
Marinate
For quick marination of food for the best taste.
This technique allows the seasoning to penetrate the surface of the food
in less time.
Set Intensity and Bag type based on desired avour intensity and the use
of either an open container or a bag of varying thickness.
Tenderise
For eortlessly making meat more tender before cooking.
Set Bag type depending on the use of either an open container or a bag
with varying thickness.
10 ENGLISH
Infuse
For extracting the best avours by soaking ingredients in liquid.
Good for oils, vinegars, and cold brew coee.
Place liquid and ingredients to provide the avours in an open container or
a bag.
Set Intensity and Bag type based on desired avour intensity and the use
of either an open container or a bag of varying thickness.
Pickle
For preserving food in pickle brine.
Good for vegetables and fruits.
Set Container/Bag type depending on the use of a container (either closed
with lid, or open without lid), or a bag of varying thickness.
Dehydrate
For quick drying after baking to create a crispier crust.
Good for bread and pastry.
Place the food openly in the chamber.
Clean shells
For cleaning mussels and clams to prepare them for cooking.
Place shellsh in an open container and cover it with a solution of water
and salt using the following proportions:
- max 500 grams shellsh
- 0.5 litres of water
- 1 tablespoon of salt
Note: The water will bubble during the process. After the function nishes,
dry the chamber carefully in case of any water spillage.
NOTE: During the program the drawer can be closed.
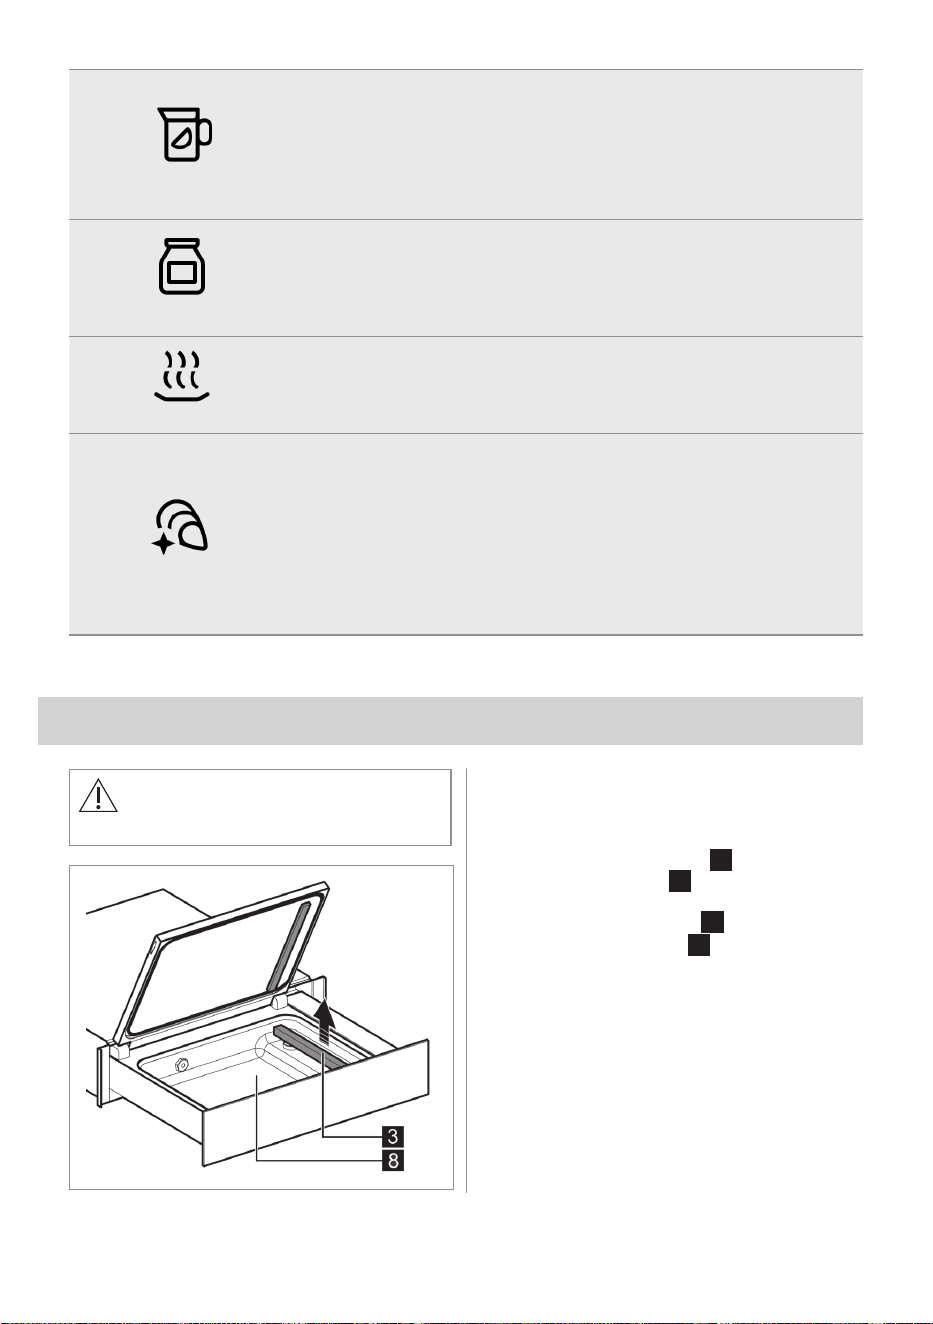
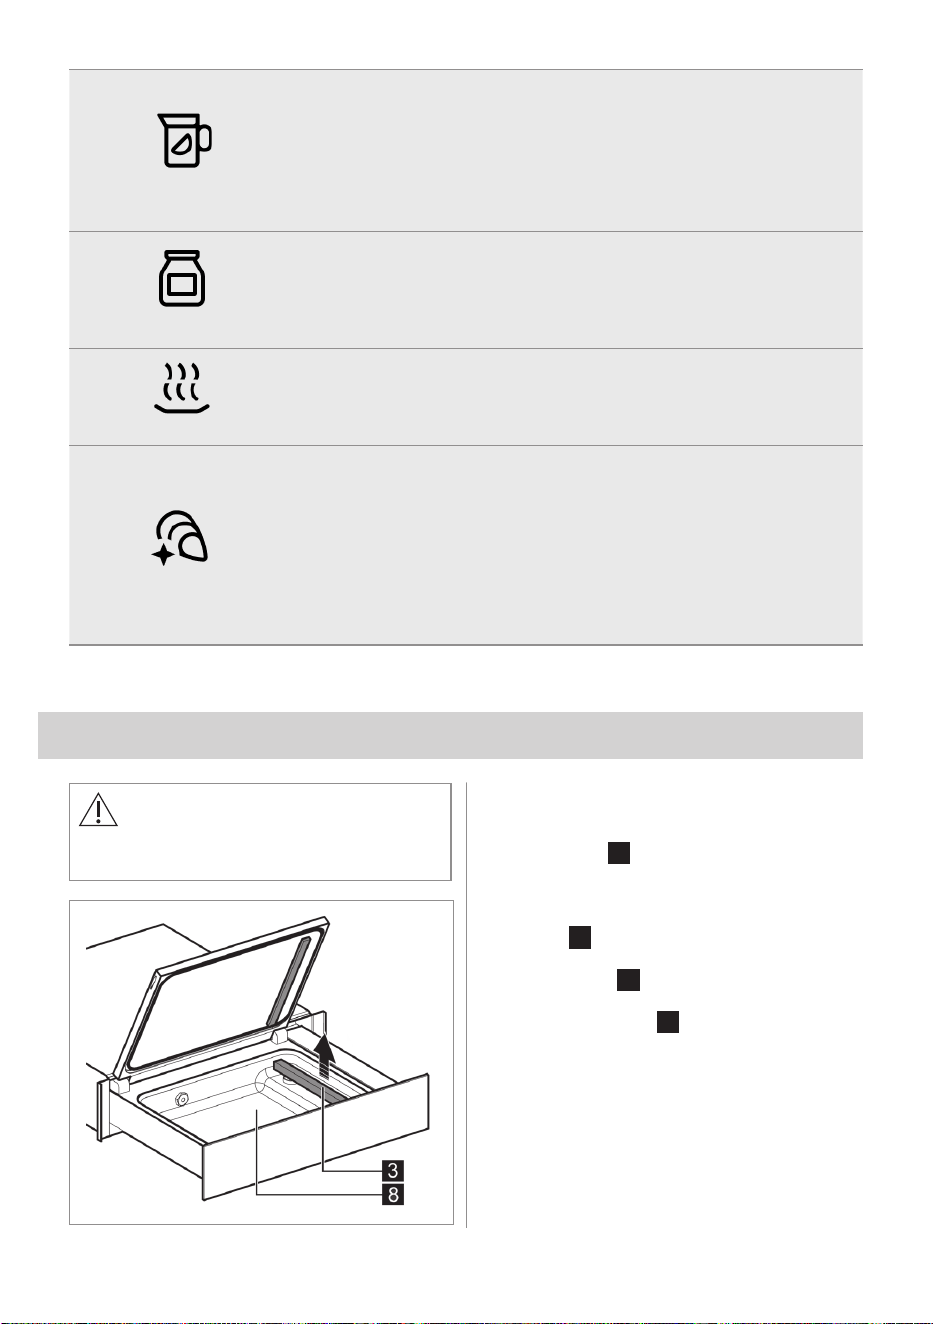
7. CLEANING AND MAINTENANCE
CAUTION!
Refer to the chapters on safety.
• Clean the appliance after each use with a
damp and soft cloth.
• Follow the safety instructions indicated
on the packaging when using products to
clean the steel chamber
8
.
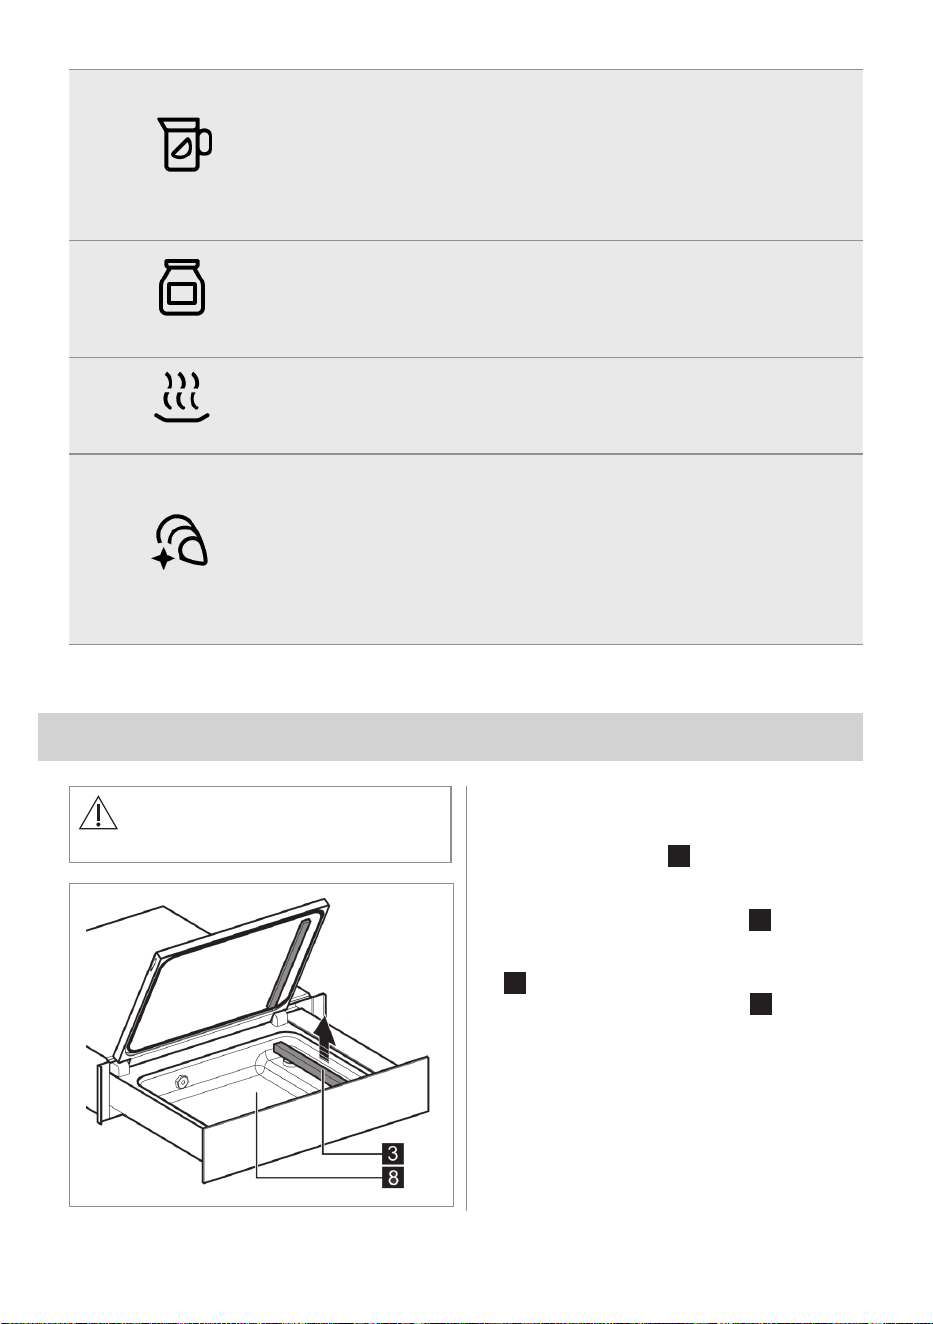
• Clean the chamber
8
, especially in the
case of residue liquid, it is advisable to
remove the sealing bar
3
upward.
• Clean the sealing bar
3
with a dry cloth.
Remove any residue that deposits on the
bar.
• Clean the metal surfaces using mild
detergents suitable for stainless steel.
• Keep the control panel clean and dry.
11ENGLISH
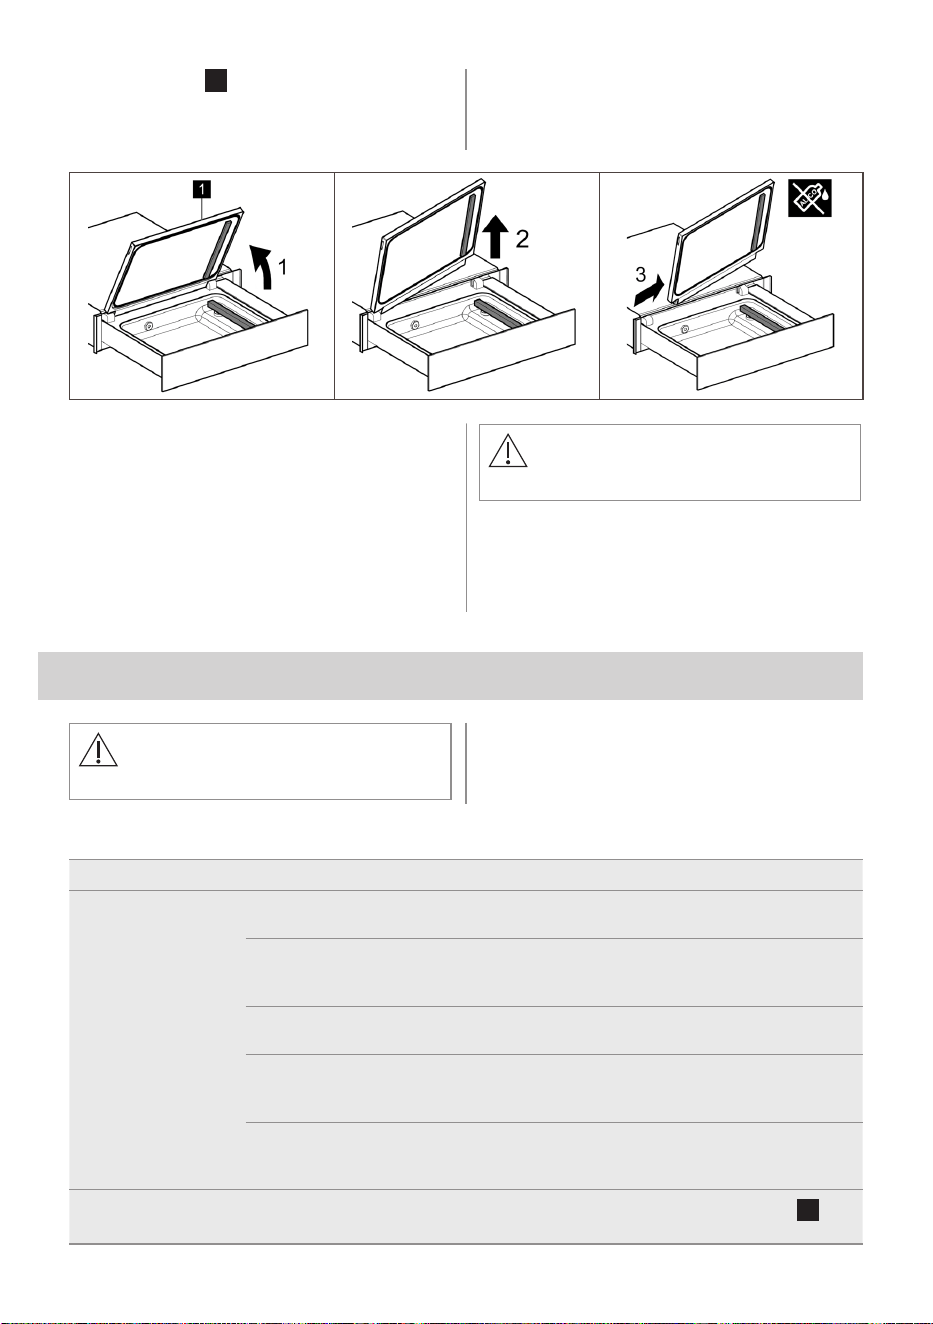
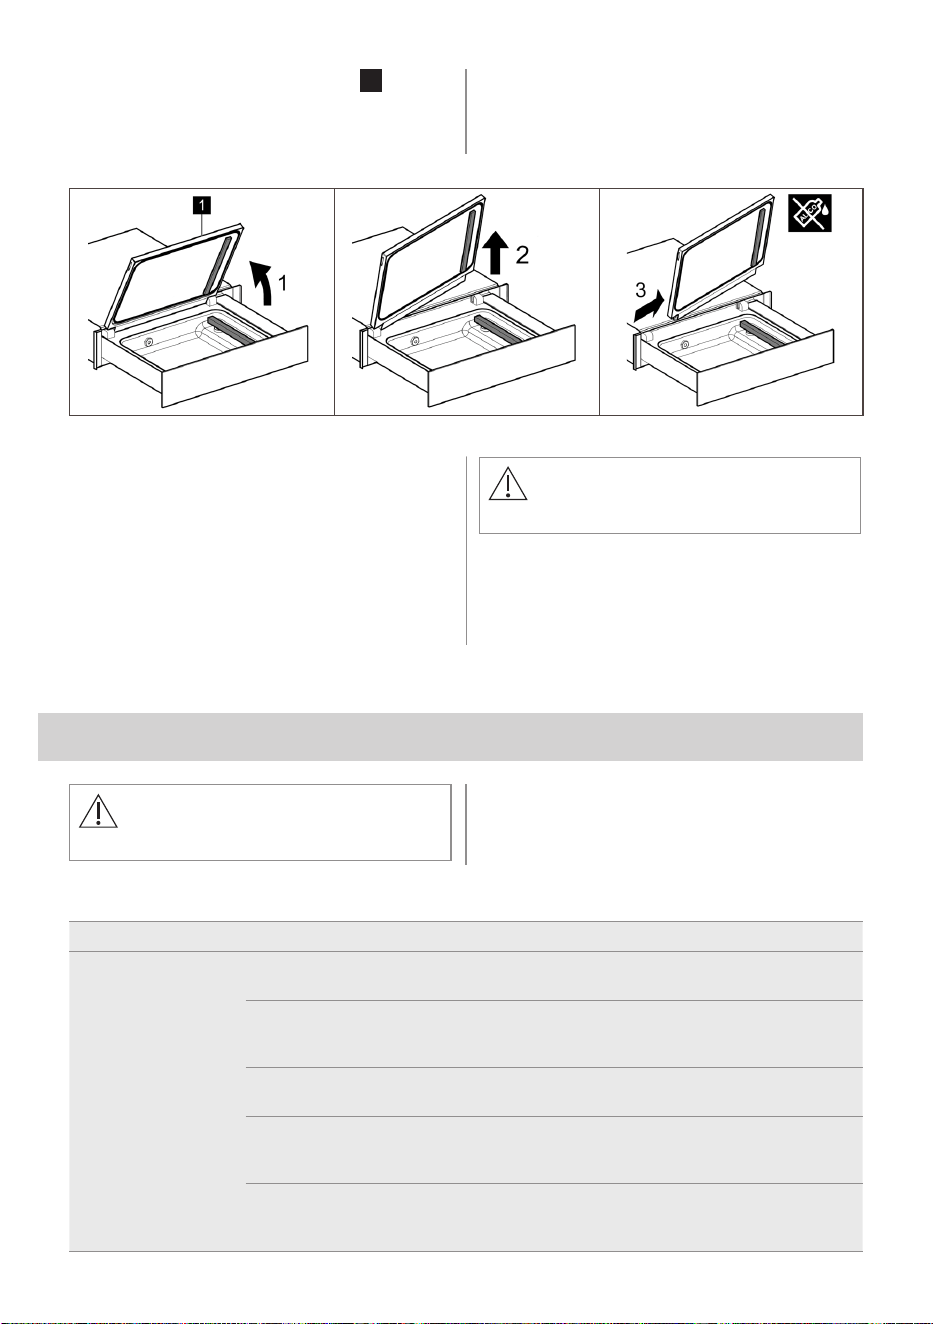
• Clean the lid
1
inside and out using only
neutral detergents (water and soap).
• Do not use abrasive products, alcohol-
based detergents, abrasive sponges,
solvents or metal objects.
7.1 Oil Maintenance
The oil maintenance is an automatic program
that checks and cleans the oil pump used to
create vacuum. The program can be found
under “Maintenance” when turning on the
machine.
CAUTION!
The chamber must be empty.
The machine will notify when oil maintenance
is necessary:
- During rst use (5.2)
- Every 200 cycles
8. TROUBLESHOOTING
CAUTION!
Refer to the chapters on safety.
8.1 What to do if…
Problem Possible cause Solution
The bag is not
sealed correctly.
The bag type thickness selected is not
correct.
Change the bag type thickness.
The lid gasket is dirty or worn. Clean or replace the lid gasket (contact
the Technical Assistance Service for a
replacement).
The bag is not placed correctly on the
sealing bar.
Position the bag correctly.
The sealing bar is worn (the Teon
coating is burnt).
Replace the sealing bar (contact the
Technical Assistance Service for a
replacement).
The blade placed under the Teon of
the sealing bar is broken.
Replace the sealing bar (contact the
Technical Assistance Service for a
replacement).
The bag is not
sealed.
Thermal safety intervention.
Press the thermal switch button
6
on
the bottom, front right corner.

12 ENGLISH
Problem Possible cause Solution
Final vacuum is poor. The lid gasket is dirty or worn. Clean or replace the lid gasket (contact
the Technical Assistance Service for a
replacement).
The lid is not closed correctly. Close the lid correctly.
Make sure that objects or dirt are not
found between the lid and chamber.
The lid does not
open.
No power supply. Wait until the power supply is restored.
The lid is cracked or
broken.
Damaged lid. Replace the lid (contact the Technical
Assistance Service for a replacement).
Alarm messages
Alarm Possible cause Solution
Press lid to create
vacuum
The lid is not closed correctly. Close the lid correctly.
Oil change needed The pump oil needs to be changed. Contact the Technical Assistance
Service.
Oil maintenance
needed
A pump oil maintenance cycle is
required.
Perform an oil maintenance cycle.
Error occurred An error occurred. Contact the Technical Assistance
Service.
8.2 Assistance Data
If it is not possible to nd a solution to the
problem, contact the authorised Assistance
Centre.
The information required for the Assistance
Centre is found on the data plate on the left
side of the appliance. Do not remove the data
plate.
9. ENERGY EFFICIENCY
9.1 Product Information for power consumption and maximum time to
reach applicable low power mode
Power consumption in o mode 0,3 W
Maximum time needed for the equipment to automatically reach the
applicable low power mode
20 min

13ENGLISH
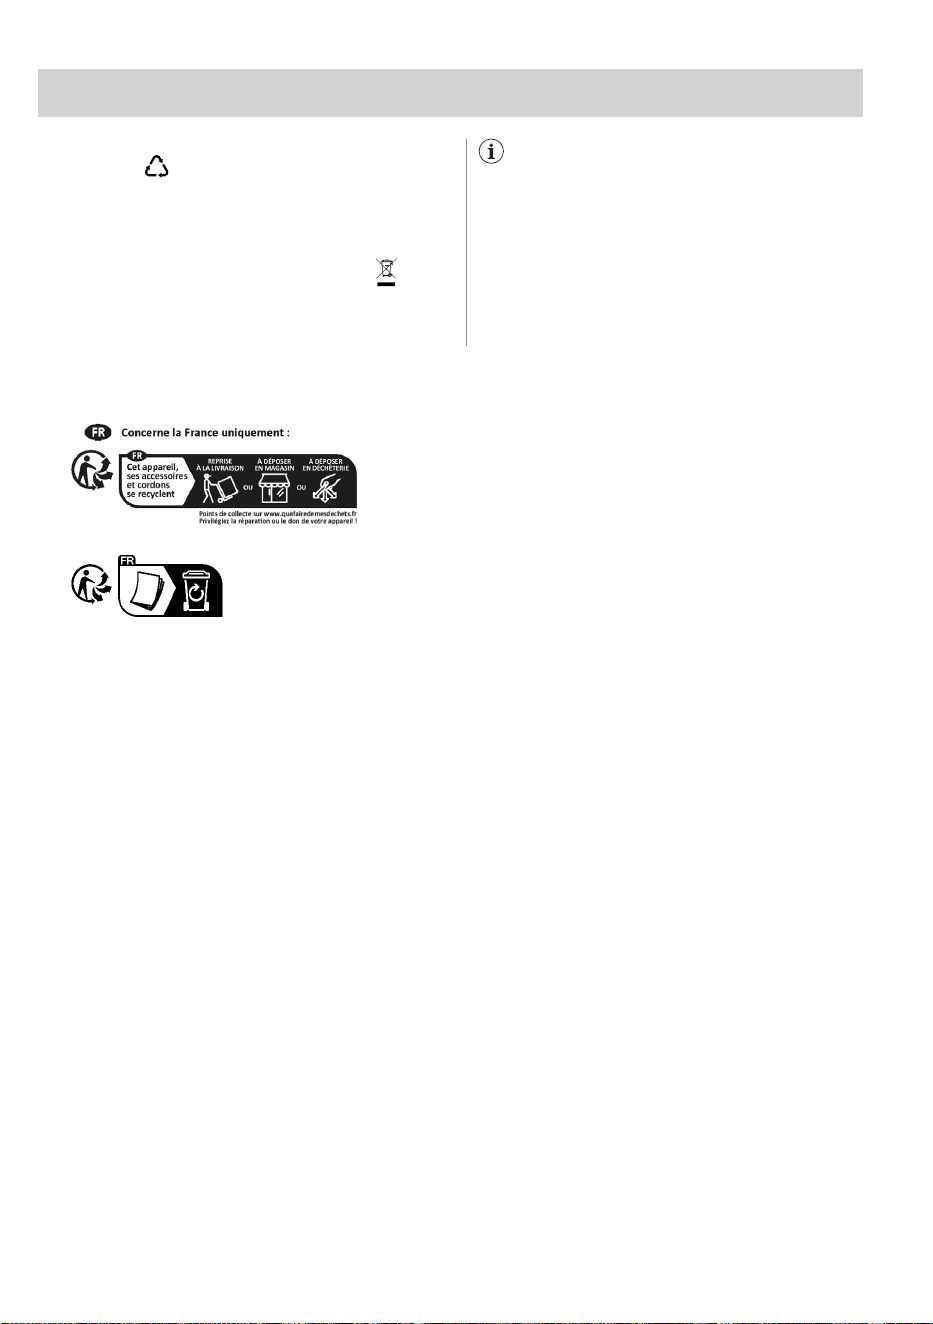
10. ENVIRONMENTAL CONCERNS
Recycle materials with the symbol
.
Put the packaging in relevant containers to
recycle it.
Help protect the environment and human
health by recycling waste of electrical and
electronic appliances.
Do not dispose appliances marked with
the symbol with the household waste.
Return the product to your local recycling
facility or contact your municipal oce.
For Switzerland:
Where should you take your old equipment?
Anywhere that sells new equipment or hand it
in to ocial SENS collection points or ocial
SENS recycling rms.
The list of ocial SENS collection points can
be found at www.erecycling.ch

14 ENGLISH
11. WARRANTY
Important Notice
Before calling for service, please ensure that the steps listed in clause 8 above have been followed.
FOR SERVICE
or to nd the address of your nearest
authorised service centre in Australia
PLEASE CALL 1300 363 664
OR EMAIL [email protected]
For the cost of a local call (Australia only)
SERVICE AUSTRALIA
aeg.com/au
FOR SPARE PARTS
or to nd the address of your nearest
spare parts centre in Australia
PLEASE CALL 13 13 50
OR EMAIL [email protected]
For the cost of a local call (Australia only)
FOR SERVICE
or to nd the address of your nearest
authorised service centre in New Zealand
PLEASE CALL 0800 234 234
OR EMAIL [email protected]
(New Zealand only)
SERVICE NEW ZEALAND
aegnewzealand.co.nz
FOR SPARE PARTS
or to nd the address of your nearest
spare parts centre in New Zealand
PLEASE CALL 0800 10 66 20
OR EMAIL [email protected]
(New Zealand only)
FOR SALES IN AUSTRALIA AND NEW ZEALAND
ALL AEG BRANDED APPLIANCES
This document sets out the terms and conditions of the product
warranties for AEG Appliances. It is an important document. Please
keep it with your proof of purchase documents in a safe place for
future reference should there be a manufacturing defect in your
Appliance. This warranty is in addition to other rights you may have
under the Australian Consumer Law.
1. In this warranty:
a) ‘ACL’ or ‘Australian Consumer Law’ means Schedule 2 to the
Competition and Consumer Act 2010;
b) ‘Appliance’ means any Electrolux product purchased by you and
accompanied by this document;
c) ‘ASC’ means Electrolux’s authorised serviced centres;
d) ‘AEG’ is the brand controlled by Electrolux Home Products Pty
Ltd of 163 O’Riordan Street, Mascot NSW 2020, ABN 51 004
762 341 in respect of Appliances purchased in Australia and
Electrolux (NZ) Limited (collectively “Electrolux”) of 3-5 Niall
Burgess Road, Mount Wellington, in respect of Appliances
purchased in New Zealand;
e) ‘Warranty Period’ means the period specied in clause 3 of this
warranty;
f) ‘you’ means the purchaser of the Appliance not having purchased
the Appliance for re-sale, and ‘your’ has a corresponding
meaning.
2. Application: This warranty only applies to new Appliances, purchased
and used in Australia or New Zealand and is in addition to (and does
not exclude, restrict, or modify in any way) other rights and remedies
under a law to which the Appliances or services relate, including any
non-excludable statutory guarantees in Australia and New Zealand.
3. Warranty Period: Subject to these terms and conditions, this
warranty continues for in Australia for a period of 60 months and in
New Zealand for a period of 60 months, following the date of original
purchase of the Appliance.
4. Repair or replace warranty: During the Warranty Period, Electrolux
or its ASC will, at no extra charge if your Appliance is readily accessible
for service, without special equipment and subject to these terms and
conditions, repair or replace any parts which it considers to be defective.
Electrolux may, in its absolute discretion, choose whether the remedy
oered for a valid warranty claim is repair or replacement. Electrolux
or its ASC may use refurbished parts to repair your Appliance. You
agree that any replaced Appliances or parts become the property of
Electrolux.
5. Travel and transportation costs: Subject to clause 7, Electrolux will
bear the reasonable cost of transportation, travel and delivery of the
Appliance to and from Electrolux or its ASC. Travel and transportation
will be arranged by Electrolux as part of any valid warranty claim.
6. Proof of purchase is required before you can make a claim under
this warranty.
7. Exclusions: You may not make a claim under this warranty unless
the defect claimed is due to faulty or defective parts or workmanship.
This warranty does not cover:
a) light globes, batteries, lters or similar perishable parts;
b) parts and Appliances not supplied by Electrolux;
c) cosmetic damage which does not aect the operation of the
Appliance;
d) damage to the Appliance caused by:
i. negligence or accident;
ii. misuse or abuse, including failure to properly maintain or
service;
iii. improper, negligent or faulty servicing or repair works done
by anyone other than an Electrolux authorised repairer or
ASC;
iv. normal wear and tear;
v. power surges, electrical storm damage or incorrect power
supply;
vi. incomplete or improper installation;
vii. incorrect, improper or inappropriate operation;
viii. insect or vermin infestation;
ix. failure to comply with any additional instructions supplied
with the Appliance;
In addition, Electrolux is not liable under this warranty if:
a) the Appliance has been, or Electrolux reasonably believes that
the Appliance has been, used for purposes other than those for
which the Appliance was intended, including where the Appliance
has been used for any non-domestic purpose;
b) the Appliance is modied without authority from Electrolux in
writing;
c) the Appliance’s serial number or warranty seal has been
removed or defaced.
8. How to claim under this warranty: To enquire about claiming under
this warranty, please follow these steps:
a) carefully check the operating instructions, user manual and the
terms of this warranty;
b) have the model and serial number of the Appliance available;
c) have the proof of purchase (e.g. an invoice) available;
d) telephone the numbers shown below.
9. Australia: For Appliances and services provided by Electrolux in
Australia: Electrolux goods come with guarantees that cannot be
excluded under the Australian Consumer Law. You are entitled to a
replacement or refund for a major failure and for compensation for any
other reasonably foreseeable loss or damage. You are also entitled to
have the Appliance repaired or replaced if the Appliance fails to be of
acceptable quality and the failure does not amount to a major failure.
‘Acceptable quality’ and ‘major failure’ have the same meaning as
referred to in the ACL.
10. New Zealand: For Appliances and services provided by Electrolux in
New Zealand, the Appliances come with a guarantee by Electrolux
pursuant to the provisions of the Consumer Guarantees Act, the Sale
of Goods Act and the Fair Trading Act. Where the Appliance was
purchased in New Zealand for commercial purposes the Consumer
Guarantee Act does not apply.
11. Condentiality: You accept that if you make a warranty claim,
Electrolux and its agents including ASC may exchange information
in relation to you to enable Electrolux to meet its obligations under
this warranty.
AEG_Warr_May17

15FRANÇAIS
TABLE DES MATIÈRES
POUR DES RÉSULTATS PARFAITS
SERVICE CLIENTS ET ENTRETIEN
1. CONSIGNES FONDAMENTALES DE SÉCURITÉ ......................................16
2. INSTRUCTIONS POUR LA SÉCURITÉ .......................................................17
3. DESCRIPTION DU PRODUIT .....................................................................19
4. PANNEAU DE COMMANDE .......................................................................20
5. AVANT LA PREMIÈRE UTILISATION ........................................................20
6. UTILISATION QUOTIDIENNE .....................................................................21
7. NETTOYAGE ET ENTRETIEN ....................................................................23
8. RÉSOLUTION DES PROBLÈMES ..............................................................24
9. EFFICACITÉ ÉNERGÉTIQUE .....................................................................25
10. EN MATIÈRE DE PROTECTION DE L’ENVIRONNEMENT .....................26
Merci d’avoir choisi ce produit AEG. Nous l’avons créé pour vous orir des
performances irréprochables pour longtemps, avec des technologies innovantes
qui vous simplient la vie - autant de caractéristiques que vous ne trouverez pas
forcément sur les appareils ordinaires. Veuillez prendre quelques instants pour
lire cette notice an d’utiliser au mieux votre appareil électroménager.
Nous vous conseillons d’utiliser des pièces de rechange d’origine.
Lorsqu'on contacte le Centre d’Assistance agréé, s'assurer de disposer des
données suivantes : Modèle, PNC, numéro de série. Les informations se
trouvent sur la plaque des données.
Mise en garde/Attention - Informations importantes en matière de sécurité.
Informations et conseils généraux.
Informations sur l'environnement.
Sous réserve de modications.
Visitez notre site Internet pour:
Recevoir des conseils, télécharger nos brochures, éliminer
d'éventuelles anomalies, obtenir des informations sur l'assistance :
www.aeg.com
Enregistrer vos produit et recevoir un meilleur service :
www.aeg.com/productregistration
Acheter des accessoires, matériels de consommation et pièces de
rechange originales pour votre appareil :
www.aeg.com/shop

16 FRANÇAIS
1. CONSIGNES FONDAMENTALES DE SÉCURITÉ
Lire attentivement les instructions fournies avant d'installer
et d’utiliser l'appareil. Le fabricant n'est pas responsable si
une installation et une utilisation non correcte de l'appareil
provoquent des lésions et des dommages. Garder toujours
les instructions à portée de main comme référence future.
1.1 Sécurité des enfants et des personnes
vulnérables
• Cet appareil peut être utilisé par des enfants de plus de
8 ans et par des adultes ayant des capacités physiques,
sensorielles ou mentales limitées ou ayant une expérience
ou connaissance insusante sur l'utilisation de l'appareil,
seulement s’ils sont surveillés ou instruits relativement
à l'utilisation de l'appareil et s'ils ont compris les risques
impliqués.
• Ne pas permettre aux enfants de jouer avec l'appareil.
• Garder les matériaux d'emballage hors de portée des
enfants.
• Tenir les enfants et les animaux domestiques éloignés de
l'appareil pendant le fonctionnement.
• Le nettoyage et les interventions d'entretien ne doivent pas
être eectués par des enfants sans supervision.
• Tenir les enfants de moins de 3 ans éloignés s’ils ne sont
pas constamment surveillés.
1.2 Mises en garde de sécurité générales
• L'installation de l'appareil et le remplacement des câbles
doivent être eectués uniquement par du personnel
qualié.
• Avant d'eectuer toute intervention d’entretien, déconnecter
l'appareil du réseau électrique.
• Ne pas utiliser de nettoyeur vapeur pour nettoyer l'appareil.
• Ne pas utiliser de détergents abrasifs ni de raclette en
métal pour nettoyer l'appareil.
17FRANÇAIS
• Si le câble d'alimentation est endommagé, il doit être
remplacé par le fabricant, un technicien autorisé ou une
personne qualiée, pour éviter des situations de danger.
1.3 Environnements d’utilisation
Cet appareil est destiné à être utilisé dans des applications
domestiques et similaires, telles que :
• Les zones de rafraîchissement pour le personnel dans les
magasins, bureaux et autres environnements de travail.
• Les agritourismes.
• Les hôtels, les motels et autres environnements
résidentiels.
• Chambres d’hôtes.
2. INSTRUCTIONS POUR LA SÉCURITÉ
2.1 Installation
ATTENTION !
L'installation de l'appareillage doit être
eectuée par du personnel qualié.
• Ôter tous les matériaux d'emballage.
• Ne pas installer ni utiliser l'appareil s’il est
endommagé.
• Se conformer aux instructions fournies
avec l'appareil.
• Faire toujours attention en phase de
déplacement de l'appareil.
• Toujours porter des gants de sécurité.
• Ne pas retourner ni incliner l'appareil !
Cela fera sortir l’huile de la pompe, ce qui
pourrait endommager l'appareil.
• Il est nécessaire de respecter la distance
minimum des autres appareils.
• S'assurer que l'appareil soit installé et
adéquatement ancré à une structure xe.
• Les côtés de l'appareil doivent rester
adjacents à des appareils ou unités ayant
la même hauteur.
2.2 Raccordement électrique
ATTENTION !
Risque d'incendie et de décharge
électrique.
• Tous les raccordements électriques
doivent être réalisés par un électricien
qualié.
• L'appareil doit disposer d'une mise à la
terre.
• S’assurer que les données électriques
reportées sur la plaque des données
correspondent à celles de l'installation.
Dans le cas contraire, contacter un
électricien.
• Utiliser toujours une prise électrique
avec contact de protection correctement
installée.
• Ne pas utiliser de prises multiples ni de
rallonges.
• S’assurer de ne pas endommager la prise
ni le câble. Si le câble électrique doit
être remplacé, l'intervention devra être
eectuée par notre Centre d'Assistance.
18 FRANÇAIS
• Les dispositifs de protection contre les
décharges électriques doivent être xés
de telle à ne pas pouvoir être désactivés
sans outils.
• Insérer la che d'alimentation dans la prise
seulement à la n de l'installation.
• Si la che de courant est desserrée, ne
pas la relier à la prise.
• Ne pas tirer sur le câble d'alimentation
pour débrancher l'appareil. Tirer
seulement la che.
• Se servir uniquement de dispositifs
d'isolation adéquats : interrupteurs
automatiques, fusibles (ceux à bouchon
doivent être ôtés du porte-fusible),
déclencheurs pour courants de panne à la
terre et relais.
• Le circuit électrique doit être doté d'un
dispositif d'isolation permettant de
déconnecter l'appareil de la prise de
courant à tous les pôles. Le dispositif
d'isolation doit avoir une largeur de
l'ouverture de contact non inférieur à 3
mm.
• Cet appareil est conforme aux directives
CEE.
2.3 Utilisation
ATTENTION !
Risque de lésions, brûlures, décharges
électriques ou explosions.
• Ne pas toucher la barre de soudure après
l'utilisation. La chaleur résiduelle peut
causer des brûlures.
• Utiliser l'appareil exclusivement dans un
environnement domestique.
• Ne pas apporter de modications aux
spécications de cet appareil.
• Ne jamais laisser l'appareil sans
surveillance pendant le fonctionnement.
• Éteindre l'appareil après chaque utilisation.
• Ne pas mettre en marche l'appareil avec
les mains humides ou s’il y a un contact
avec de l'eau.
• Ne pas exercer de pression sur le tiroir.
• Ne pas utiliser l'appareil comme surface
de travail ou comme plan d'appui.
• Éviter la présence d'étincelles ou de
ammes ouvertes près de l'appareil
lorsqu’on ouvre le tiroir.
• Ne pas poser ni laisser de liquides ou
matériaux inammables, ni d’objets
facilement inammables sur l'appareil, à
l’intérieur ou à proximité.
ATTENTION !
Il y a le risque d'endommager l'appareil.
• Faire attention lorsqu'on enlève ou insère
les accessoires.
• Ne pas forcer l'ouverture du couvercle
pendant le cycle de travail.
• Ne pas forcer l'ouverture du couvercle
pendant le cycle de travail en l’absence
d'énergie électrique.
• N’appuyer aucun poids sur le couvercle.
• Éviter de faire tomber un objet sur le
couvercle ! Cela pourrait altérer son
intégrité, en causant des ssures ou une
rupture.
• Accompagner doucement la fermeture du
tiroir, en évitant les chocs et les poussées
inappropriées.
2.4 Nettoyage et entretien
ATTENTION !
Il y a le risque de lésions, d’incendie ou de
dommages à l'appareil.
• Avant d'eectuer toute intervention
d'entretien, éteindre l'appareil et extraire la
che de la prise.
• Contrôler que l'appareillage soit froid.
2.5 Élimination
ATTENTION !
Risque de lésions ou étouement.
• Détacher la che de l'alimentation
électrique.
• Couper le câble de réseau et l'éliminer.
2.6 Assistance technique
• Pour réparer l'appareil, contacter le Centre
d'Assistance autorisé.
• Utiliser exclusivement des pièces de
rechange originales.

19FRANÇAIS
3. DESCRIPTION DU PRODUIT
1
Couvercle
2
Coussin d'étanchéité
3
Barre de soudure
4
Clip de xation du sachet
5
Panneau de commande
6
Interrupteur thermique
7
Panneau avant
8
Cuve
9
Buse d'aspiration
10
Bouchon pour sous vide *
11
Accessoire pour sous vide externe
12
Récipient sous vide en verre *
13
Clé pour dévisser le ltre
14
Filtre à huile
15
Bouchon
16
Sachets sous vide pour la conservation
et la cuisson sous vide
(*) Disponible pour certains modèles
3.1 Présentation du produit
Ce produit utilise la technologie du sous vide
appelée « à cloche » capable d’atteindre
jusqu’à 99,9 % de vide, une valeur bien
supérieure à celle des machines sous vide
traditionnelles.
Plus l’air est extrait à l’intérieur du sachet
ou du récipient, moins les aliments subiront
d’oxydation.
L’extraction quasi totale (jusqu’à 99,9 %) de
l’air pourra donc garantir la conservation des
aliments plus longtemps que les machines
sous vide traditionnelles et préparer les
aliments pour la cuisson sous vide de
manière optimale.
Cette technologie permet également de
conserver facilement les aliments liquides tels
que les soupes, les aliments marinés, dans
des sachets ou des récipients.
Vous trouverez sur ce produit des fonctions
innovantes supplémentaires qui ne sont pas
réalisables avec les machines sous vide
traditionnelles, telles que la marinade rapide
qui vous permettra de gagner beaucoup de
temps, la préparation rapide des conserves
au vinaigre, l’emballage sous vide dans des
récipients utiles pour réduire le gaspillage
alimentaire, la technique d’extraction à froid
pour la préparation des infusions et bien
d’autres.
20 FRANÇAIS
4. PANNEAU DE COMMANDE
1
Acheur
2
Bouton ALLUMAGE/ARRÊT
Appuyer Déplacer
Toucher la surface
du bout du doigt
Faire glisser le bout du doigt
sur la surface
5. AVANT LA PREMIÈRE UTILISATION
ATTENTION !
• Se référer aux chapitres sur la sécurité.
• Le bouchon en plastique
15
retiré lors
de l’installation doit être conservé pour
un entretien futur.
• Se conformer aux instructions fournies
avec l'appareil.
5.1 Premier nettoyage
• Se référer au chapitre « NETTOYAGE ET
ENTRETIEN ».
• Nettoyer avec un chion humide toutes les
parties avant la première utilisation.
5.2 Première utilisation
Allumer l’appareil en appuyant sur le bouton
et en le maintenant enfoncé jusqu’à ce
que l’écran s’allume.
L’appareil eectue un premier cycle de
conguration pour assurer les bonnes
performances du produit.
21FRANÇAIS
6. UTILISATION QUOTIDIENNE
• Pousser le panneau avant pour ouvrir le
tiroir.
• Allumer l’appareil en appuyant sur le
bouton et en le maintenant enfoncé
jusqu’à ce que l’écran s’allume.
• Appuyer sur Fonctions et sélectionner
le programme souhaité (voir tableau ci-
dessous).
• Ouvrir le couvercle et placer le sachet ou
le récipient à l’intérieur de la cuve. Pour
le conditionnement en sachet, laisser
au moins 2 cm au-delà de la barre de
soudure.
Si nécessaire, utiliser le clip de xation du
sachet
4
.
Plier le bord du sachet vers l’extérieur
de 4 à 5 cm pour assurer une zone de
scellement propre et sèche.
L'aliment inséré, replier le sachet dans la
condition initiale.
• Fermer le couvercle.
• Toucher le bouton START. À ce stade, le
cycle de conditionnement commence.
• Le cycle achevé, ouvrir le couvercle et
enlever le sachet/récipient.
Ne pas toucher la barre de soudure
après l'utilisation. La chaleur
résiduelle peut causer des brûlures.
Si l'appareil reste inutilisé pendant 20
minutes, il s'éteint automatiquement.
Scellement sous vide
Pour conserver les aliments frais plus longtemps ou les préparer
pour la cuisson sous vide.
La conservation des aliments dans des sachets sous vide prolonge la
durée de conservation des aliments frais. Le sous vide est une technique
de cuisson dans laquelle les aliments sont cuits lentement à basse
température.
Les avantages de la cuisson sous vide sont nombreux :
• La saveur et la consistance restent inchangées.
• Les nutriments et l’humidité des aliments sont maintenus.
• Aucune huile ou graisse n’est nécessaire pour la cuisson.
Congurer le type d’aliment et de sachet en fonction de l’aliment que l’on a
l’intention de sceller sous vide et du sachet utilisé.
En cas de liquides (tels que des soupes, etc.), remplir le sachet à un
maximum de 1/3 du volume.
Sinon, il y a un risque de fuite de liquide du sachet.
Ne pas utiliser de liquides chauds.
Scellement
Pour sceller ou refermer les sachets et garder les aliments frais plus
longtemps.
Convient aux aliments qui peuvent se déformer facilement comme les
chips, les biscuits, la salade fraîche, etc. Cette méthode n’implique pas
l’utilisation du vide.
Congurer le type de sachet en fonction de l'épaisseur du sachet utilisé.
22 FRANÇAIS
Récipients
Pour conserver la fraîcheur des aliments dans des récipients ou des
bocaux hermétiques.
Cette fonction peut être utilisée avec diérents types de récipients et de
bocaux.
Refermer les bocaux avec le couvercle à visser : Placer le couvercle, mais
s’assurer qu’il ne soit PAS complètement fermé avant de démarrer la
fonction, pour que le vide soit créé correctement.
Pour assurer une parfaite étanchéité à l’air, utiliser toujours un nouveau
couvercle à visser.
Remarque : pour aspirer des liquides, ne pas remplir le sachet plus de 1/2
de son volume. Ne pas utiliser de liquides chauds.
Vide externe
Pour l’emballage sous vide de grands récipients ou de bouteilles qui
ne rentrent pas dans la cuve.
S’assurer que le récipient ou le bouchon de la bouteille soient munis
d’une soupape pour le vide. Congurer le type de récipient en fonction du
matériau du récipient ou de la bouteille.
Connecter l’accessoire pour le vide externe
11
à la buse d’aspiration
9
à
l’intérieur de la cuve. S’assurer qu’il soit complètement inséré.
Avec le couvercle du tiroir ouvert, appuyer sur START pour démarrer la
fonction.
Remarque : ne pas utiliser de liquides chauds.
Mariner
Pour une marinade rapide des aliments et un maximum de goût.
Cette technique permet à l’assaisonnement de pénétrer la surface des
aliments en moins de temps.
Congurer l’intensité et le type de sachet en fonction de l’intensité de
saveur souhaitée et de l’utilisation d’un récipient ouvert ou d’un sachet
d’épaisseur variable.
Attendrir
Pour rendre la viande plus tendre avant la cuisson.
Congurer le type de sachet selon l’utilisation d’un récipient ouvert ou d’un
sachet à épaisseur variable.
23FRANÇAIS
Infusion
Pour extraire les meilleures saveurs en immergeant les ingrédients
dans un liquide.
Parfait pour les huiles, les vinaigres et le café glacé.
Placer le liquide et les ingrédients à aromatiser dans un récipient ouvert ou
un sachet.
Congurer l’intensité et le type de sachet en fonction de l’intensité de
saveur souhaitée et de l’utilisation d’un récipient ouvert ou d’un sachet
d’épaisseur variable.
Saumure
Pour conserver les aliments marinés.
Parfait pour les fruits et légumes.
Congurer le type de récipient/sachet selon que l’on utilise un récipient
(fermé avec un couvercle ou ouvert sans couvercle) ou un sachet
d’épaisseur variable.
Déshydratation
Pour un séchage rapide après la cuisson pour obtenir une croûte
plus croustillante.
Parfait pour le pain et les pâtisseries.
Placer l’aliment à l’intérieur de la cuve.
Coquilles propres
Nettoyer les moules et les palourdes pour les préparer à la cuisson.
Mettre les coquillages dans un récipient ouvert et les couvrir d’une solution
d’eau et de sel dans les proportions suivantes :
- max 500 grammes de coquillages
- 0,5 litre d’eau
- 1 cuillère à soupe de sel
Remarque : Pendant le processus, l’eau bouillira. À la n de la fonction,
sécher soigneusement la cuve en cas de déversement d’eau.
REMARQUE : Pendant le programme, le tiroir peut être fermé.
7. NETTOYAGE ET ENTRETIEN
ATTENTION !
Se référer aux chapitres sur la sécurité.
• Nettoyer l'appareil après chaque utilisation
avec un chion humidié et doux.
• Si on utilise des produits pour le nettoyage
de la cuve en acier
8
, se conformer aux
instructions de sécurité indiquées sur
l’emballage.
• Pour le nettoyage de la cuve
8
, surtout
en cas de résidus liquides, il est conseillé
d'extraire vers le haut la barre de soudure
3
.
• Nettoyer la barre de soudure
3
avec un
chion sec. Ôter d’éventuels résidus qui
se déposent sur la barre.
• Nettoyer les surfaces métalliques avec des
détergents délicats adaptés pour l'acier
inox.
• Maintenir le panneau de commande
propre et sec.
24 FRANÇAIS
• Pour le nettoyage du couvercle
1
nettoyer aussi bien l’extérieur que
l'intérieur, exclusivement avec des
détergents neutres (eau et savon).
• Ne pas utiliser de produits abrasifs, de
détergents à base d'alcool, de petites
éponges abrasives, de solvants ni d’objets
métalliques.
7.1 Entretien de l’huile
L’entretien de l’huile est un programme
automatique qui vérie et nettoie l’huile
de la pompe utilisée pour créer le vide. Le
programme est disponible sous la rubrique
« Entretien » lorsque la machine est allumée.
ATTENTION !
La cuve doit être vide.
La machine signale quand un entretien de
l’huile est nécessaire :
- À la première utilisation (5.2)
- Tous les 200 cycles
8. RÉSOLUTION DES PROBLÈMES
ATTENTION !
Se référer aux chapitres sur la sécurité.
8.1 Que faire, si...
Problème Cause possible Solution
Le sachet n'est pas
correctement soudé.
L’épaisseur du sachet sélectionné est
incorrecte.
Modier l’épaisseur du sachet.
Le joint du couvercle est sale ou usé. Nettoyer ou remplacer le joint du
couvercle (pour le remplacement,
s'adresser à l'Assistance Technique).
Le sachet n'est pas correctement
placé sur la barre de soudure.
Placer le sachet correctement.
La barre de soudure est usée (le
revêtement en téon est brûlé).
Remplacer la barre de soudure
(pour le remplacement, s'adresser à
l'Assistance Technique).
La lame située sous le téon de la
barre de soudure est cassée.
Remplacer la barre de soudure
(pour le remplacement, s'adresser à
l'Assistance Technique).

25FRANÇAIS
Problème Cause possible Solution
Le sachet n'est pas
soudé.
Intervention de la sécurité thermique. Appuyer sur le bouton de l’interrupteur
thermique
6
en bas, dans le coin
avant droit.
Sous vide nal
insusant.
Le joint du couvercle est sale ou usé. Nettoyer ou remplacer le joint du
couvercle (pour le remplacement,
s'adresser à l'Assistance Technique).
Le couvercle n'est pas correctement
fermé.
Fermer correctement le couvercle.
S’assurer qu'il n'y ait pas d'objets ni de
saleté entre le couvercle et la cuve.
Le couvercle n'ouvre
pas.
Absence d'électricité. Attendre le rétablissement de
l'électricité.
Le couvercle
présente des ssures
ou ruptures.
Couvercle endommagé. Remplacer la lame (pour le
remplacement, s'adresser à
l'Assistance Technique).
Messages d'alarme
Alarme Cause possible Solution
Appuyer sur le
couvercle pour créer
le vide
Le couvercle n'est pas correctement
fermé.
Fermer correctement le couvercle.
Vidange d’huile
requise
L’huile de la pompe doit être
remplacée.
Contacter l’assistance technique.
Entretien de l’huile
requis
Un cycle d’entretien de l’huile de la
pompe est nécessaire.
Eectuer un cycle d’entretien de l’huile.
Une erreur s’est
produite
Une erreur s’est produite. Contacter l’assistance technique.
8.2 Données de l’Assistance
S’il n’est pas possible de trouver une
solution au problème, contacter le Centre
d'Assistance Technique autorisé.
Les informations nécessaires pour le Centre
d'Assistance Technique se trouvent sur
la plaque des données, située sur le côté
gauche de l'appareil. Ne pas ôter la plaque
des données.
9. EFFICACITÉ ÉNERGÉTIQUE
9.1 Informations sur le produit concernant la consommation d’énergie et
le temps maximum pour atteindre le mode basse consommation applicable
Consommation électrique en mode o 0,3 W
Temps maximum nécessaire pour que l’appareil atteigne
automatiquement le mode basse consommation applicable
20 min
26 FRANÇAIS
10. EN MATIÈRE DE PROTECTION DE L’ENVIRONNEMENT
Recyclez les matériaux portant le
symbole
. Déposez les emballages dans
les conteneurs prévus à cet eet.
Contribuez à la protection de l’environnement
et à votre sécurité, recyclez vos produits
électriques et électroniques. Ne jetez
pas les appareils portant le symbole avec
les ordures ménagères. Emmenez un tel
produit dans votre centre local de recyclage
ou contactez vos services municipaux.
Pour la Suisse:
Où aller avec les appareils usagés ?
Partout où des appareils neufs sont vendus,
mais aussi dans un centre de collecte ou une
entreprise de récupération ociels SENS.
La liste des centres de collecte ociels SENS
est disponible sous www.erecycling.ch

27DEUTSCH
INHALTSVERZEICHNIS
FÜR PERFEKTE ERGEBNISSE
KUNDENSERVICE UND WARTUNG
1. SICHERHEITSHINWEISE ............................................................................ 28
2. SICHERHEITSANWEISUNGEN ..................................................................29
3. BESCHREIBUNG DES PRODUKTS ...........................................................31
4. BEDIENFELD ..............................................................................................32
5. VOR DEM ERSTEN GEBRAUCH ...............................................................32
6. TÄGLICHE VERWENDUNG .......................................................................33
7. REINIGUNG UND PFLEGE ........................................................................35
8. PROBLEMLÖSUNG ....................................................................................36
9. ENERGIEEFFIZIENZ ..................................................................................37
10. INFORMATIONEN ZUR ENTSORGUNG .................................................38
Danke, dass Sie sich für dieses AEG Produkt entschieden haben. Wir haben es
geschaen, damit Sie viele Jahre von seiner ausgezeichneten Leistung und den
innovativen Technologien, die Ihnen das Leben erleichtern, protieren können.
Es ist mit Funktionen ausgestattet, die in gewöhnlichen Elektrogeräten nicht
vorhanden sind. Nehmen Sie sich ein paar Minuten Zeit zum Lesen, um seine
Vorzüge kennen zu lernen.
Wir empfehlen immer die Verwendung von Original-Ersatzteilen.
Wenn Sie das autorisierte Kundendienstzentrum kontaktieren, sollten Sie die
folgenden Daten bereithalten. Modell, PNC, Seriennummer. Die Informationen
nden Sie auf dem Schild mit den Daten.
Warnung/Achtung - Wichtige Informationen für die Sicherheit.
Informationen und allgemeine Ratschläge.
Umweltschutzinformationen
Änderungen vorbehalten
Besuchen Sie unsere Homepage, um:
Tipps zu erhalten, unsere Dokumentation herunterzuladen, eventuelle
Störungen zu beheben, Informationen in Bezug auf den Kundendienst
zu erhalten:
www.aeg.com
Registrieren Sie Ihr Produkt, um immer den besten Service zu erhalten:
www.aeg.com/productregistration
Für den Kauf von Zubehörteilen, Verbrauchsmaterial und Original-
Ersatzteilen für Ihr Gerät:
www.aeg.com/shop

28 DEUTSCH
1. SICHERHEITSHINWEISE
Vor der Installation und der Verwendung des Geräts muss
die Bedienungsanleitung aufmerksam gelesen werden. Der
Hersteller übernimmt keine Haftung, wenn es durch eine
unsachgemäße Installation und Verwendung des Geräts zu
Verletzungen kommt. Die Bedienungsanleitung immer für
zukünftiges Nachschlagen gribereit aufbewahren.
1.1 Sicherheit von Kindern und schutzbedürftigen
Personen
• Dieses Gerät kann von Kindern ab 8 Jahren sowie von
Personen mit beeinträchtigten, körperlichen oder geistigen
Fähigkeiten bzw. eingeschränkter Wahrnehmung oder
ohne Erfahrung und Kenntnissen benutzt werden, wenn
sie beaufsichtigt werden oder in die sichere Benutzung des
Geräts eingewiesen wurden und wenn sie die sich daraus
ergebenden Gefahren verstehen.
• Kinder dürfen nicht mit dem Gerät spielen.
• Die Verpackungsmaterialien immer außerhalb der
Reichweite von Kindern halten.
• Kinder und Haustiere dürfen sich während des Betriebs
nicht in der Nähe des Geräts aufhalten.
• Die Reinigungs- und Wartungstätigkeiten dürfen nicht von
Kindern ohne Aufsicht ausgeführt werden.
• Kinder, die jünger als 3 Jahre sind, vom Gerät fernhalten,
wenn sie nicht laufend überwacht werden.
1.2 Allgemeine Sicherheitshinweise
• Die Installation des Geräts und der Austausch der Kabel
dürfen ausschließlich von Fachpersonal durchgeführt
werden.
• Vor der Durchführung von Wartungstätigkeiten muss das
Gerät immer vom Stromnetz getrennt werden.
• Für die Reinigung des Geräts keine Dampfreiniger
verwenden.
29DEUTSCH
• Keine scheuernden Reinigungsmittel oder Metallschaber
für die Reinigung des Geräts verwenden.
• Wenn das Versorgungskabel beschädigt ist, muss es
vom Hersteller, einem autorisierten Techniker oder
einer qualizierten Person ausgetauscht werden, um
Gefahrensituationen zu vermeiden.
1.3 Nutzungsumgebungen
Dieses Gerät ist für den Einsatz im Haushalt und ähnlichen
Anwendungen vorgesehen, wie zum Beispiel:
• Erfrischungsbereiche für Mitarbeiter in Geschäften, Büros
und anderen Arbeitsumgebungen.
• Agrartourismus.
• Hotels, Motels und andere Wohnumgebungen.
• Bed and breakfast.
2. SICHERHEITSANWEISUNGEN
2.1 Installation
ACHTUNG!
Die Installation des Geräts muss von
qualiziertem Personal durchgeführt werden.
• Sämtliche Verpackungsmaterialien
entfernen.
• Das Gerät nicht installieren oder
verwenden, wenn es beschädigt ist.
• Die mit dem Gerät gelieferten Anleitungen
beachten.
• Beim Umstellen des Geräts immer
besondere Vorsicht walten lassen.
• Immer Sicherheitshandschuhe tragen.
• Das Gerät nicht umdrehen oder kippen!
Dadurch tritt das Öl aus der Pumpe aus,
wodurch das Gerät beschädigt werden
könnte.
• Der Mindestabstand zu den anderen
Geräten muss eingehalten werden.
• Sicherstellen, dass das Gerät korrekt
installiert und entsprechend an einer xen
Konstruktion verankert ist.
• Die Seiten des Geräts müssen an Geräten
oder Einheiten mit derselben Höhe
angrenzen.
2.2 Stromanschluss
ACHTUNG!
Brand- und Stromschlaggefahr.
• Sämtlichen elektrischen Anschlüsse
müssen von einem qualizierten Elektriker
hergestellt werden.
• Das Gerät muss geerdet werden.
• Sicherstellen, dass die auf dem
Typenschild angeführten elektrischen
Daten jenen der Anlage entsprechen.
Andernfalls einen Elektriker zu Rate
ziehen.
• Immer eine korrekt installierte Steckdose
mit Schutzkontakt verwenden.
• Keine Mehrfachsteckdosen und
Verlängerungskabel verwenden.
• Sicherstellen, dass der Stecker und das
Kabel nicht beschädigt werden. Wenn das
Stromkabel ausgetauscht werden muss,
so ist dies von unserem Kundendienst
vorzunehmen.
• Die Schutzvorrichtungen gegen
Stromschläge müssen so angebracht
werden, dass sie nicht ohne Hilfe von
Werkzeug entfernt werden können.
30 DEUTSCH
• Den Versorgungsstecker nur nach
Abschluss der Installation in die Steckdose
einstecken.
• Sollte der Stecker gelockert sein, darf er
nicht in die Steckdose eingesteckt werden.
• Zum Trennen des Geräts von
der Stromversorgung niemals am
Versorgungskabel ziehen. Ausschließlich
am Stecker ziehen.
• Es dürfen ausschließlich angemessene
Isoliervorrichtungen verwendet werden:
Leitungsschutzschalter, Sicherungen
(Stöpselsicherungen müssen aus der
Sicherungshalterung entfernt werden),
Erdschlussstrom-Auslöser und Relais.
• Die Elektroanlage muss über eine
Isoliervorrichtung verfügen, mit der
das Gerät mit allen Polen von der
Steckdose getrennt werden kann.
Die Isoliervorrichtung muss über
eine Önungsweite des Kontakts von
mindestens 3 mm verfügen.
• Dieses Gerät ist mit den EWG-Normen
konform.
2.3 Gebrauch
ACHTUNG!
Gefahr von Verletzungen, Verbrennungen,
Stromschlägen oder Explosionen.
• Den Siegelbalken nach der Verwendung
nicht berühren. Die Restwärme kann
Verbrennungen verursachen.
• Das Gerät ausschließlich im Haushalt
verwenden.
• Keine Änderungen an den Spezikationen
dieses Geräts vornehmen.
• Das Gerät während des Betriebs niemals
unbeaufsichtigt lassen.
• Das Gerät nach jeder Verwendung
ausschalten.
• Das Gerät niemals mit feuchten Händen
oder wenn ein Kontakt mit Wasser vorliegt
in Betrieb nehmen.
• Keinen Druck auf die Lade ausüben.
• Das Gerät nicht als Arbeits- oder
Ablageäche verwenden.
• Funkenbildung und oene Flammen in der
Nähe des Geräts vermeiden, wenn die
Lade geönet wird.
• Keine entammbaren Flüssigkeiten oder
Materialien bzw. leicht entzündliche
Gegenstände auf dem Gerät, in dem Gerät
oder in unmittelbarer Nähe ablegen oder
aufbewahren.
ACHTUNG!
Das Gerät könnte dadurch beschädigt
werden.
• Bei der Anbringung und Entfernung von
Zubehörteilen besondere Vorsicht walten
lassen.
• Während des Arbeitszyklus den Deckel
nicht gewaltsam önen.
• Bei einem Stromausfall den Deckel
während des Arbeitszyklus nicht
gewaltsam önen.
• Kein Gewicht auf dem Deckel abstellen.
• Vermeiden, dass Gegenstände auf
den Deckel fallen! Das könnte zu
Beschädigungen führen und Risse oder
den Bruch hervorrufen.
• Die Schließung des Fachs sanft begleiten
und Stöße und ruckartiges Schieben
vermeiden.
2.4 Reinigung und Pege
ACHTUNG!
Es besteht die Gefahr von Verletzungen,
Brand oder Schäden am Gerät.
• Vor der Durchführung von
Wartungstätigkeiten muss das Gerät
immer ausgeschaltet und der Stecker
gezogen werden.
• Sicherstellen, dass das Gerät abgekühlt ist.
2.5 Entsorgung
ACHTUNG!
Gefahr von Verletzungen oder Ersticken.
• Den Stecker der Stromversorgung ziehen.
• Das Netzkabel abschneiden und
entsorgen.
2.6 Technischer Kundendienst
• Für die Reparatur des Geräts eine
autorisierte Kundendienststelle
kontaktieren.
• Ausschließlich Originalersatzteile
verwenden.
31DEUTSCH
3. BESCHREIBUNG DES PRODUKTS
1
Deckel
2
Siegelkissen
3
Siegelbalken
4
Beutel-Befestigungsclip
5
Bedienfeld
6
Thermoschalter
7
Frontpaneel
8
Wanne
9
Absaugdüse
10
Vakuum-Kappe *
11
Zubehör für externes Vakuum
12
Vakuumbehälter aus Glas *
13
Schraubenschlüssel zum Abschrauben
des Filters
14
Öllter
15
Verschluss
16
Vakuumbeutel zum Aufbewahren und
Kochen SousVide
(*) Verfügbar für ausgewählte Modelle
3.1 Produkteinführung
Dieses Produkt verwendet die sogenannte
"Glocken"-Vakuumtechnologie, die ein
Vakuum von bis zu 99,9 % erreichen kann,
ein viel höherer Wert als bei herkömmlichen
Vakuummaschinen.
Je mehr Luft im Inneren des Beutels oder
Behälters abgesaugt wird, desto weniger
Oxidation erfahren die Lebensmittel.
Die fast vollständige Absaugung (bis zu 99,9
%) der Luft kann daher die Konservierung der
Lebensmittel über einen längeren Zeitraum
als herkömmliche Vakuummaschinen
gewährleisten und die Lebensmittel optimal
für das Vakuumgaren vorbereiten.
Diese Technologie erleichtert auch die
Konservierung von üssigen Lebensmitteln
wie Suppen, marinierten Lebensmitteln in
Beuteln oder Behältern.
Dieses Produkt besitzt zurusätzliche
innovative Funktionen, die mit herkömmlichen
Vakuumgeräten nicht realisierbar sind, wie
z. B. schnelles Marinieren, mit dem Sie viel
Zeit sparen können, schnelle Zubereitung von
Gurken, Vakuumverpackung in Behältern, die
zur Reduzierung von Lebensmittelabfällen
nützlich sind, die Kaltextraktionstechnik für
die Zubereitung von Kalt-Aufgüssen und viele
andere.
32 DEUTSCH
4. BEDIENFELD
1
Display
2
Taste EIN/AUS
Drücken Bewegen
Oberäche
mit der Fingerspitze berühren
Mit der Fingerspitze über die
Oberäche streichen
5. VOR DEM ERSTEN GEBRAUCH
ACHTUNG!
• Die Kapitel in Bezug auf die Sicherheit
berücksichtigen.
• Die bei der Installation entfernte
Kunststokappe
15
muss für zukünftige
Wartungsarbeiten aufbewahrt werden.
• Die mit dem Gerät gelieferten
Anleitungen beachten.
5.1 Erste Reinigung
• Das Kapitel „REINIGUNG UND PFLEGE“
berücksichtigen.
• Vor der ersten Verwendung alle Teile mit
einem feuchten Tuch reinigen.
5.2 Erste Verwendung
Schalten Sie das Gerät ein, indem Sie die
Taste gedrückt halten, bis sich das Display
einschaltet.
Das Gerät führt einen ersten
Einrichtungszyklus durch, um die gute
Leistung des Produkts sicherzustellen.
33DEUTSCH
6. TÄGLICHE VERWENDUNG
• Drücken Sie auf das Frontpaneel, um die
Schublade zu önen.
• Schalten Sie das Gerät ein, indem Sie
die Taste gedrückt halten, bis sich das
Display einschaltet.
• Drücken Sie Funktionen und wählen Sie
das gewünschte Programm aus (siehe
Tabelle unten).
• Önen Sie den Deckel und stellen Sie den
Beutel oder Behälter in die Wanne. Lassen
Sie bei Beutelverpackungen mindestens 2
cm über die Schweißschiene hinausragen.
Verwenden Sie bei Bedarf die
4
Umschlaghalteklammer.
Falten Sie den Rand des Beutels um
4-5 cm nach außen, um einen sauberen
und trockenen Versiegelbereich zu
gewährleisten.
Nachdem die Lebensmittel in den Beutel
gegeben wurden, diesen wieder in den
Anfangszustand bringen.
• Den Deckel schließen.
• Die Taste START drücken. An diesem
Punkt beginnt der Verpackungszyklus.
• Am Ende des Zyklus den Deckel önen
und den Beutel / Behälter entnehmen.
Den Siegelbalken nach der
Verwendung nicht berühren. Die
Restwärme kann Verbrennungen
verursachen.
Wenn das Gerät 20 Minuten lang
nicht verwendet wird, schaltet es sich
automatisch aus.
Vakuum
Um Lebensmittel länger frisch zu halten oder für das SousVide-
Garen vorzubereiten.
Die Konservierung von Lebensmitteln in Vakuumbeuteln verlängert die
Lagerzeit frischer Lebensmittel. SousVide ist eine Gartechnik, bei der
Lebensmittel langsam bei niedriger Temperatur gegart werden.
Die Vorteile des SousVide-Garens sind vielfältig:
• Geschmack und Textur bleiben unverändert.
• Die Nährstoe und die Feuchtigkeit der Lebensmittel bleiben erhalten.
• Zum Kochen werden keine Öle oder Fette benötigt.
Stellen Sie die Art des Lebensmittels und des Beutels je nach zu
versiegelndem Lebensmittel und dem zu verwendenden Beutel ein.
Bei Flüssigkeiten (z. B. Suppen usw.) den Beutel bis zu maximal 1/3 des
Volumens füllen.
Andernfalls besteht die Gefahr, dass Flüssigkeit aus dem Beutel austritt.
Verwenden Sie keine heißen Flüssigkeiten.
Versiegeln
Zum Verschließen oder Wiederverschließen von Beuteln und zum
längeren Frischhalten von Lebensmitteln.
Geeignet für Lebensmittel, die sich leicht verformen können, wie Pommes,
Kekse, frischer Salat usw. Bei dieser Methode wird kein Vakuum
verwendet.
Stellen Sie den Beuteltyp entsprechend der Dicke des verwendeten
Beutels ein.
34 DEUTSCH
Behälter
Um Lebensmittel in luftdichten Behältern oder Gläsern frisch zu
halten.
Diese Funktion kann mit verschiedenen Arten von Behältern und Gläsern
verwendet werden.
Verschließen Sie die Gläser wieder mit dem Twist-O-Deckel: Setzen
Sie den Deckel auf, aber stellen Sie sicher, dass er NICHT vollständig
geschlossen ist, bevor Sie die Funktion starten, damit das Vakuum richtig
erzeugt wird.
Um eine perfekte Luftdichtheit zu gewährleisten, verwenden Sie immer
einen neuen Twist-O-Deckel.
Hinweis: Füllen Sie den Beutel zum Absaugen von Flüssigkeiten nicht
mehr als 1/2 seines Volumens. Verwenden Sie keine heißen Flüssigkeiten.
Externes Vakuum
Zum Vakuumverpacken größerer Behälter oder Flaschen, die nicht in
die Wanne passen.
Stellen Sie sicher, dass der Behälter oder Flaschenverschluss über ein
Vakuumventil verfügt. Stellen Sie die Art des Behälters in Abhängigkeit
vom Material des Behälters oder der Flasche ein.
Schließen Sie den Aufsatz für das
11
externe Vakuum an die Absaugdüse
9
der Wanne an. Stellen Sie sicher, dass er vollständig eingesetzt ist.
Drücken Sie bei geönetem Schubladendeckel START, um die Funktion
zu starten.
Hinweis: Verwenden Sie keine heißen Flüssigkeiten.
Marinieren
Für schnelles Marinieren von Speisen und maximalen Geschmack.
Diese Technik ermöglicht es dem Gewürz, in kürzerer Zeit in die
Oberäche der Lebensmittel einzudringen.
Stellen Sie die Stärke und Art des Beutels entsprechend der gewünschten
Geschmacksintensität und der Verwendung eines oenen Behälters oder
eines Beutels unterschiedlicher Dicke ein.
Zartmachen
Um das Fleisch vor dem Kochen zarter zu machen.
Stellen Sie die Art des Beutels danach ein, ob ein oener Behälter oder
ein Beutel mit variabler Dicke verwendet wird.
35DEUTSCH
Kalt Aufgiessen
Um die besten Aromen zu extrahieren, indem die Zutaten in einer
Flüssigkeit eingeweicht werden.
Ideal für Öle, Essige und Eiskaee.
Geben Sie die Flüssigkeit und die zu aromatisierenden Zutaten in einen
oenen Behälter oder Beutel.
Stellen Sie die Stärke und Art des Beutels entsprechend der gewünschten
Geschmacksintensität und der Verwendung eines oenen Behälters oder
eines Beutels unterschiedlicher Dicke ein.
Einlegen
Zur Konservierung von eingelegten Lebensmitteln.
Ideal für Obst und Gemüse.
Stellen Sie die Art des Behälters/Beutels ein, je nachdem, ob Sie einen
Behälter (geschlossen mit Deckel oder oen ohne Deckel) oder einen
Beutel unterschiedlicher Dicke verwenden.
Dehydrieren
Zum schnellen Trocknen nach dem Backen, um eine knusprigere
Kruste zu erzielen.
Ideal für Brot und Gebäck.
Das Lebensmittel in die Wanne stellen.
Reinigung von Muscheln
Um Muscheln und Venusmuscheln zu reinigen, um sie zum Garen
vorzubereiten.
Die Weichtiere in ein oenes Gefäß geben und mit einer Lösung aus
Wasser und Salz in folgenden Anteilen bedecken:
- max. 500 Gramm Schalentiere
- 0,5 Liter Wasser
- 1 Esslöel Salz
Anmerkung: Während des Vorgangs kocht das Wasser. Trocknen Sie die
Wanne am Ende der Funktion gründlich ab, falls Wasser verschüttet wird.
ANMERKUNG: Während des Programms kann die Schublade geschlossen werden.
7. REINIGUNG UND PFLEGE
ACHTUNG!
Die Kapitel in Bezug auf die Sicherheit
berücksichtigen.
• Das Gerät nach jeder Verwendung mit
einem feuchten, weichen Tuch reinigen.
• Wenn Produkte zur Reinigung der
Stahlwanne
8
verwendet werden,
müssen die Sicherheitshinweise auf der
Verpackung eingehalten werden.
• Es wird empfohlen, für die Reinigung der
Wanne
8
, vor allem bei Vorhandensein
von Flüssigkeitsrückständen, den
Siegelbalken
3
nach oben heraus zu
ziehen.
• Den Siegelbalken
3
mit einem trockenen
Tuch reinigen. Eventuelle Ablagerungen
von Rückständen vom Schweißbalken
entfernen.
• Die metallischen Oberächen mit nicht
aggressiven Reinigungsmitteln für
Edelstahl reinigen.
• Das Bedienpanel muss sauber und
trocken gehalten werden.
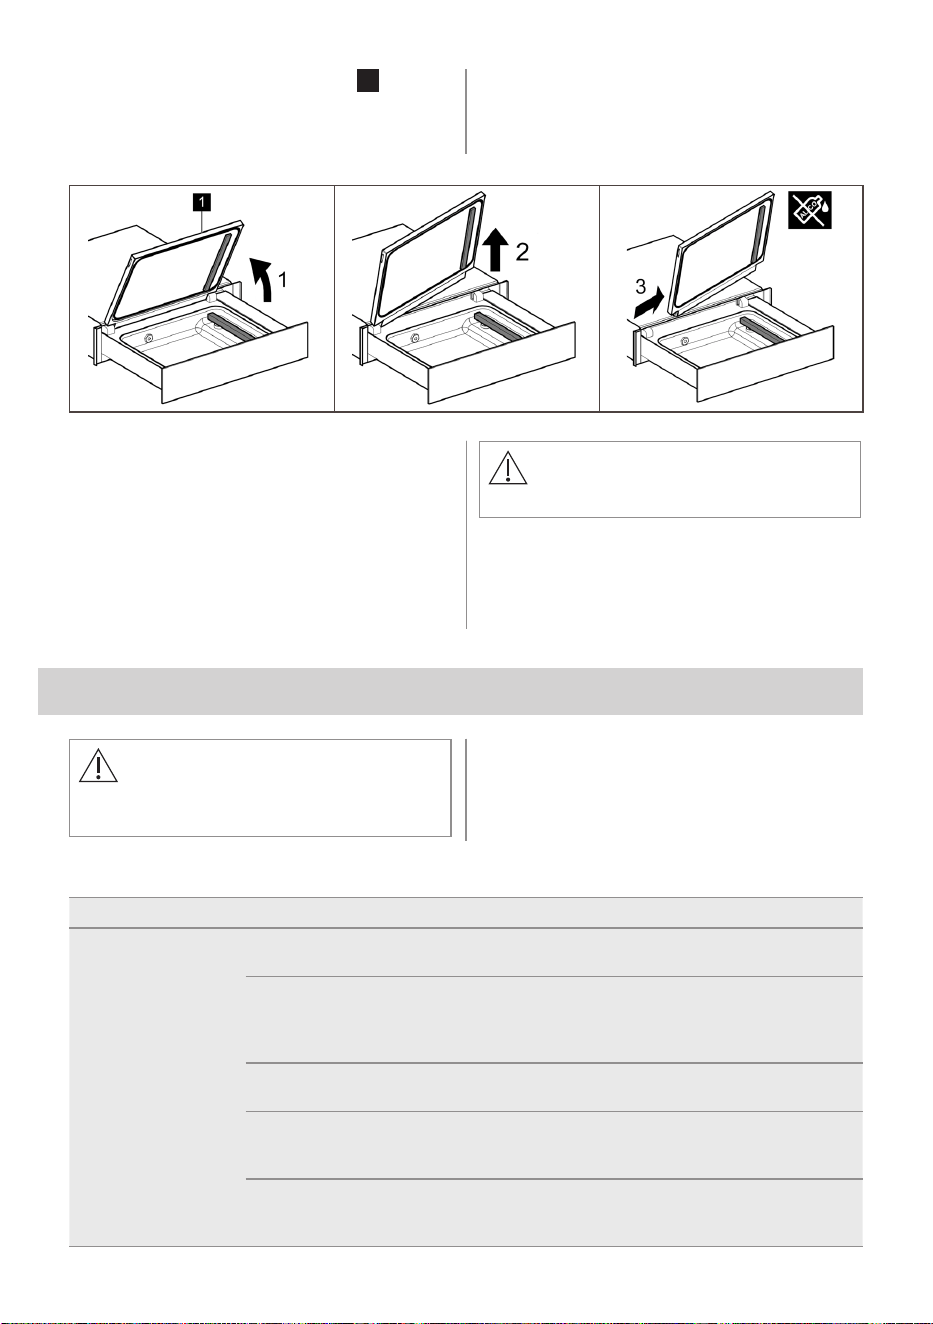
36 DEUTSCH
• Für die Reinigung des Deckels
1
sowohl
die Außen- als auch die Innenseite
ausschließlich mit neutralen Mitteln
reinigen (Wasser und Seife).
• Keine scheuernden Produkte, Produkte
auf Alkoholbasis, Scheuerschwämme,
Lösungsmittel oder metallische
Gegenstände verwenden.
7.1 Ölwartung
Die Ölwartung ist ein automatisches
Programm, das das Pumpenöl überprüft und
reinigt, das zur Erzeugung des Vakuums
verwendet wird. Das Programm ist unter
"Wartung" verfügbar, wenn die Maschine
eingeschaltet ist.
ACHTUNG!
Die Wanne muss leer sein.
Die Maschine meldet, wenn eine Ölwartung
erforderlich ist:
- Bei der Erstverwendung (5.2)
- Alle 200 Zyklen
8. PROBLEMLÖSUNG
ACHTUNG!
Die Kapitel in Bezug auf die Sicherheit
berücksichtigen.
8.1 Was tun wenn....
Problem Mögliche Ursache Lösung
Die Versiegelung des
Beutels wurde nicht
korrekt ausgeführt.
Die ausgewählte Beuteldicke ist
falsch.
Ändern Sie die Dicke des Beutels.
Die Dichtung des Deckels ist
schmutzig oder abgenutzt.
Die Dichtung des Deckels reinigen
oder austauschen (für den Austausch
den Technischen Kundendienst
kontaktieren).
Der Beutel wurde nicht korrekt am
Siegelbalken positioniert.
Den Beutel korrekt positionieren.
Der Siegelbalken ist abgenutzt (die
Teonverkleidung ist verbrannt).
Den Siegelbalken austauschen (für
den Austausch den Technischen
Kundendienst kontaktieren).
Die Klinge unter dem Teon des
Siegelbalkens ist beschädigt.
Den Siegelbalken austauschen (für
den Austausch den Technischen
Kundendienst kontaktieren).

37DEUTSCH
Problem Mögliche Ursache Lösung
Die Versiegelung des
Beutels wurde nicht
ausgeführt.
Auslösung des Thermoschalters zur
Sicherheit.
Drücken Sie den Thermoschalter
6
unten in der vorderen rechten Ecke.
Das endgültige
Vakuum ist
unzureichend.
Die Dichtung des Deckels ist
schmutzig oder abgenutzt.
Die Dichtung des Deckels reinigen
oder austauschen (für den Austausch
den Technischen Kundendienst
kontaktieren).
Der Deckel ist nicht korrekt
geschlossen.
Den Deckel korrekt verschließen.
Sicherstellen, dass sich zwischen
dem Deckel und der Wanne keine
Gegenstände oder Schmutz benden.
Der Deckel önet
nicht.
Keine Stromversorgung. Abwarten, bis die Stromversorgung
wiederhergestellt ist.
Der Deckel
weist Risse oder
Bruchstellen auf.
Der Deckel ist beschädigt. Den Deckel austauschen (für
den Austausch den Technischen
Kundendienst kontaktieren).
Alarmmeldungen
Alarm Mögliche Ursache Lösung
Deckel drücken,
um ein Vakuum zu
erzeugen
Der Deckel ist nicht korrekt
geschlossen.
Den Deckel korrekt verschließen.
Ölwechsel
erforderlich
Das Pumpenöl muss ausgetauscht
werden.
Technischen Kundendienst
kontaktieren.
Ölwartung
erforderlich
Ein Wartungszyklus für das Pumpenöl
ist erforderlich.
Führen Sie einen Ölwartungszyklus
durch.
Ein Fehler ist
aufgetreten
Es ist ein Fehler aufgetreten. Technischen Kundendienst
kontaktieren.
8.2 Kundendienstdaten
Sollte es nicht möglich sein, eine Lösung für
das Problem zu nden, muss eine autorisierte
Technische Kundendienststelle kontaktiert
werden.
Infos zum Technischen Kundendienst
nden sich auf dem Kennschild, das auf der
linken Seite des Geräts angebracht ist. Das
Kennschild darf niemals entfernt werden.
9. ENERGIEEFFIZIENZ
9.1 Produktinformationen zum Stromverbrauch und zur maximalen Zeit
bis zum Erreichen des jeweiligen Energiesparmodus
Stromverbrauch im Aus-Zustand 0,3 W
Maximale Zeit, die das Gerät benötigt, um automatisch den
entsprechenden Energiesparmodus zu erreichen
20 Min.

38 DEUTSCH
10. INFORMATIONEN ZUR ENTSORGUNG
Ihre Pichen als Endnutzer
Dieses Elektro- bzw. Elektronikgerät ist mit einer
durchgestrichenen Abfalltonne auf Rädern gekennzeichnet.
Das Gerät darf deshalb nur getrennt vom unsortierten
Siedlungsabfall gesammelt und zurückgenommen
werden, es darf also nicht in den Hausmüll gegeben
werden. Das Gerät kann z. B. bei einer kommunalen
Sammelstelle oder ggf. bei einem Vertreiber (siehe zu
deren Rücknahmepichten unten) abgegeben werden.
Das gilt auch für alle Bauteile, Unterbaugruppen und
Verbrauchsmaterialien des zu entsorgenden Altgeräts.
Bevor das Altgerät entsorgt werden darf, müssen alle
Altbatterien und Altakkumulatoren vom Altgerät getrennt
werden, die nicht vom Altgerät umschlossen sind. Das
gleiche gilt für Lampen, die zerstörungsfrei aus dem
Altgerät entnommen werden können. Der Endnutzer ist
zudem selbst dafür verantwortlich, personenbezogene
Daten auf dem Altgerätzu löschen.
Hinweise zum Recycling
Helfen Sie mit, alle Materialien zu recyceln, die mit diesem
Symbol gekennzeichnet sind. Entsorgen Sie solche
Materialien, insbesondere Verpackungen, nicht im Hausmüll
sondern über die bereitgestellten Recyclingbehälter oder
die entsprechenden örtlichen Sammelsysteme. Recyceln
Sie zum Umwelt- und Gesundheitsschutz auch elektrische
und elektronische Geräte.
Rücknahmepichten der Vertreiber in Deutschland
Wer auf mindestens 400 m² Verkaufsäche Elektro-
und Elektronikgeräte vertreibt oder sonst geschäftlich
an Endnutzer abgibt, ist verpichtet, bei Abgabe eines
neuen Geräts ein Altgerät des Endnutzers der gleichen
Geräteart, das im Wesentlichen die gleichen Funktionen
wie das neue Gerät erfüllt, am Ort der Abgabe oder in
unmittelbarer Nähe hierzu unentgeltlich zurückzunehmen.
Das gilt auch für Vertreiber von Lebensmitteln mit einer
Gesamtverkaufsäche von mindestens 800 m², die
mehrmals im Kalenderjahr oder dauerhaft Elektro- und
Elektronikgeräte anbieten und auf dem Markt bereitstellen.
Solche Vertreiber müssen zudem auf Verlangen des
Endnutzers Altgeräte, die in keiner äußeren Abmessung
größer als 25 cm sind (kleine Elektrogeräte), im
Einzelhandelsgeschäft oder in unmittelbarer Nähe hierzu
unentgeltlich zurückzunehmen; die Rücknahme darf
in diesem Fall nicht an den Kauf eines Elektro- oder
Elektronikgerätes geknüpft, kann aber auf drei Altgeräte pro
Geräteart beschränkt werden.
Ort der Abgabe ist auch der private Haushalt,wenn das
neue Elektro- oder Elektronikgerät dorthin geliefert wird;
in diesem Fall ist die Abholung des Altgerätes für den
Endnutzer kostenlos.
Die vorstehenden Pichten gelten auch für den Vertrieb
unter Verwendung von Fernkommunikationsmitteln, wenn
die Vertreiber Lager- und Versandächen für Elektro- und
Elektronikgeräte bzw. Gesamtlager- und -versandächen
für Lebensmittel vorhalten, die den oben genannten
Verkaufsächen entsprechen. Die unentgeltliche Abholung
von Elektro- und Elektronikgeräten ist dann aber auf
Wärmeüberträger (z. B. Kühlschrank), Bildschirme,
Monitore und Geräte, die Bildschirme mit einer Oberäche
von mehr als 100 cm² enthalten, und Geräte beschränkt,
bei denen mindestens eine der äußeren Abmessungen
mehr als 50 cm beträgt. Für alle übrigen Elektro- und
Elektronikgeräte muss der Vertreiber geeignete
Rückgabemöglichkeiten in zumutbarer Entfernung zum
jeweiligen Endnutzer gewährleisten; das gilt auch für kleine
Elektrogeräte (s.o.), die der Endnutzer zurückgeben will,
ohne ein neues Gerät zu kaufen.
Rücknahmepichten von Vertreibern und andere
Möglichkeiten der Entsorgung von Elektro- und
Elektronikgeräten in der Region Wallonien
Vertreiber, die Elektro- und Elektronikgeräte verkaufen,
sind verpichtet, bei der Lieferung von Neugeräten
Altgeräte desselben Typs, die im Wesentlichen die gleichen
Funktionen wie die Neugeräte erfüllen, kostenlos vom
Endverbraucher zurückzunehmen. Dies gilt auch bei der
Lieferung von neuen Elektround Elektronikgeräten oder
beim Fernabsatz.
Darüber hinaus ist jeder, der Elektro- und Elektronikgeräte
auf einer Verkaufsäche von mindestens 400 m²
verkauft, verpichtet, Altgeräte, die in keiner äußeren
Abmessung größer als 25 cm sind (Elektrokleingeräte),
im Ladengeschäft oder in unmittelbarer Nähe kostenlos
zurückzunehmen; die Rücknahme darf in diesem Fall nicht
vom Kauf eines Elektro- oder Elektronikgerätes abhängig
gemacht werden.
Die Rücknahme von Elektro- und Elektronikgeräten
kann auch auf Containerplätzen oder zugelassenen
Recyclinghöfen erfolgen. Für weitere Informationen wenden
Sie sich bitte an Ihre Gemeindeverwaltung.
DE-CH UMWELTTIPPS
Recyceln Sie Materialien mit dem Symbol .
Entsorgen Sie die Verpackung in den entsprechenden
Recyclingbehältern. Recyceln Sie zum Umwelt- und
Gesundheitsschutz elektrische und elektronische Geräte.
Entsorgen Sie Geräte mit diesem Symbol nicht mit
dem Hausmüll. Bringen Sie das Gerät zu Ihrer örtlichen
Sammelstelle oder wenden Sie sich an Ihr Gemeindeamt.
Für die Schweiz:
Wohin mit den Altgeräten?
Überall dort wo neue Geräte verkauft werden oder Abgabe
bei den oziellen SENS-Sammelstellen oder oziellen
SENS-Recyclern.
Die Liste der oziellen SENSSammelstellen ndet sich
unter www.erecycling.ch

39ITALIANO
INDICE
PER RISULTATI PERFETTI
SERVIZIO CLIENTI E MANUTENZIONE
1. INFORMAZIONI PER LA SICUREZZA ........................................................40
2. ISTRUZIONI PER LA SICUREZZA ..............................................................41
3. DESCRIZIONE DEL PRODOTTO ...............................................................43
4. PANNELLO COMANDI ................................................................................44
5. PRIMA DEL PRIMO UTILIZZO ....................................................................44
6. UTILIZZO QUOTIDIANO .............................................................................45
7. PULIZIA E CURA .........................................................................................47
8. RISOLUZIONE DEI PROBLEMI ..................................................................48
9. EFFICIENZA ENERGETICA .......................................................................49
10. CONSIDERAZIONI SULL’AMBIENTE .......................................................50
Grazie per aver scelto di acquistare questo prodotto AEG. Lo abbiamo creato
per fornirvi prestazioni impeccabili per molti anni, grazie a tecnologie innovative
che vi semplicheranno la vita - funzioni che non troverete sulle normali
apparecchiature. Vi invitiamo a dedicare qualche minuto alla lettura per sapere
come trarre il massimo dal vostro elettrodomestico.
Consigliamo sempre l’impiego di ricambi originali.
Quando si contatta il Centro di Assistenza autorizzato, accertarsi di disporre dei
seguenti dati: Modello, PNC, numero di serie. Le informazioni si trovano sulla
targhetta dei dati.
Avvertenza/Attenzione - Importanti Informazioni per la sicurezza.
Informazioni e consigli generali.
Informazioni sull’ambiente.
Con riserva di modiche.
Visitate il nostro sito web per:
Ricevere consigli, scaricare i nostri opuscoli, eliminare eventuali
anomalie, ottenere informazioni sull’assistenza:
www.aeg.com
Registrare il vostro prodotto e ricevere un servizio migliore:
www.aeg.com/productregistration
Acquistare accessori, materiali di consumo e ricambi originali per la
vostra apparecchiatura:
www.aeg.com/shop

40 ITALIANO
1. INFORMAZIONI PER LA SICUREZZA
Leggere attentamente le istruzioni fornite prima di installare e
utilizzare l’apparecchiatura. Il produttore non è responsabile
se un’installazione ed un uso non corretto dell’apparecchiatura
provocano lesioni e danni. Tenere sempre le istruzioni a
portata di mano come riferimento futuro.
1.1 Sicurezza dei bambini e delle persone vulnerabili
• Questa apparecchiatura può essere usata da bambini a
partire dagli 8 anni e da adulti con limitate capacità siche,
sensoriali o mentali o con scarsa esperienza o conoscenza
sull’uso dell’apparecchiatura, solamente se sorvegliati o
se istruiti relativamente all’uso dell’apparecchiatura e se
hanno capito i rischi coinvolti.
• Non consentire ai bambini di giocare con l’apparecchiatura.
• Tenere i materiali di imballaggio al di fuori della portata dei
bambini.
• Tenere i bambini e gli animali domestici lontano
dall’apparecchiatura durante il funzionamento.
• La pulizia e gli interventi di manutenzione non devono
essere eseguiti dai bambini senza supervisione.
• Tenere lontani i bambini al di sotto dei 3 anni se non
costantemente supervisionati.
1.2 Avvertenze di sicurezza generali
• L’installazione dell’apparecchiatura e la sostituzione
dei cavi deve essere svolta unicamente da personale
qualicato.
• Prima di eseguire qualsiasi intervento di manutenzione,
scollegare l’apparecchiatura dalla rete elettrica.
• Non usare una pulitrice a vapore per pulire
l’apparecchiatura.
• Non utilizzare detergenti abrasivi o raschietti di metallo per
pulire l’apparecchiatura.
41ITALIANO
• Se il cavo di alimentazione è danneggiato, deve essere
sostituito dal produttore, da un tecnico autorizzato o da una
persona qualicata per evitare situazioni di pericolo.
1.3 Ambienti di utilizzo
Questo apparecchio è destinato ad essere utilizzato in
applicazioni domestiche e simili, quali:
• Aree ristoro per il personale di negozi, uci e altri ambienti
di lavoro.
• Agriturismi.
• Alberghi, motel e altri ambienti di tipo residenziale.
• Bed and breakfast.
2. ISTRUZIONI PER LA SICUREZZA
2.1 Installazione
ATTENZIONE!
L’installazione dell’apparecchiatura deve
essere eseguita da personale qualicato.
• Rimuovere tutti i materiali di imballaggio.
• Non installare o utilizzare l’apparecchiatura
se danneggiata.
• Attenersi alle istruzioni fornite insieme
all’apparecchiatura.
• Prestare sempre attenzione in fase di
spostamento dell’apparecchiatura.
• Indossare sempre guanti di sicurezza.
• Non capovolgere o inclinare
l’apparecchiatura! Questo dà luogo alla
fuoriuscita dell’olio dalla pompa che
potrebbe danneggiare l’apparecchiatura
stessa.
• È necessario rispettare la distanza minima
dalle altre apparecchiature.
• Assicurarsi che l’apparecchiatura sia
installata e adeguatamente ancorata a una
struttura ssa.
• I lati dell’apparecchiatura devono restare
adiacenti ad apparecchiature o unità con
la stessa altezza.
2.2 Collegamento elettrico
ATTENZIONE!
Rischio di incendio e scossa elettrica.
• Tutti i collegamenti elettrici devono essere
realizzati da un elettricista qualicato.
• L’apparecchiatura deve disporre di una
messa a terra.
• Vericare che i dati elettrici riportati sulla
targhetta dei dati corrispondano a quelli
dell’impianto. In caso contrario, contattare
un elettricista.
• Utilizzare sempre una presa elettrica
con contatto di protezione correttamente
installata.
• Non utilizzare prese multiple e prolunghe.
• Accertarsi di non danneggiare la spina
e il cavo. Qualora il cavo elettrico debba
essere sostituito, l’intervento dovrà essere
eettuato dal nostro Centro di Assistenza.
• I dispositivi di protezione da scosse
elettriche devono essere ssati in modo
tale da non poter essere disattivati senza
l’uso di attrezzi.
• Inserire la spina di alimentazione nella
presa solo al termine dell’installazione.
42 ITALIANO
• Nel caso in cui la spina di corrente sia
allentata, non collegarla alla presa.
• Non tirare il cavo di alimentazione per
scollegare l’apparecchiatura. Tirare solo
la spina.
• Servirsi unicamente di dispositivi
di isolamento adeguati: interruttori
automatici, fusibili (quelli a tappo
devono essere rimossi dal portafusibile),
sganciatori per correnti di guasto a terra
e relè.
• L’impianto elettrico deve essere dotato di
un dispositivo di isolamento che consenta
di scollegare l’apparecchiatura dalla presa
di corrente a tutti i poli. Il dispositivo di
isolamento deve avere una larghezza
dell’apertura di contatto non inferiore ai 3
mm.
• Questa apparecchiatura è conforme alle
direttive CEE.
2.3 Utilizzo
ATTENZIONE!
Rischio di lesioni, ustioni, scosse elettriche
o esplosioni.
• Non toccare la barra saldante dopo l’uso. Il
calore residuo può causare scottature.
• Utilizzare l’apparecchiatura
esclusivamente in un ambiente domestico.
• Non apportare modiche alle speciche di
questa apparecchiatura.
• Non lasciare mai l’apparecchiatura
incustodita durante il funzionamento.
• Spegnere l’apparecchiatura dopo ogni
utilizzo.
• Non mettere in funzione l’apparecchiatura
con le mani umide o quando c’è un
contatto con l’acqua.
• Non esercitare pressione sul cassetto.
• Non utilizzare l’apparecchiatura come
supercie di lavoro o come piano di
appoggio.
• Evitare la presenza di scintille o amme
aperte vicino all’apparecchiatura quando si
apre il cassetto.
• Non appoggiare o tenere liquidi o materiali
inammabili, né oggetti facilmente
incendiabili sull’apparecchiatura, al suo
interno o nelle immediate vicinanze.
ATTENZIONE!
Vi è il rischio di danneggiare
l’apparecchiatura.
• Prestare attenzione quando si tolgono o
inseriscono gli accessori.
• Non forzare l’apertura del coperchio
durante il ciclo di lavoro.
• Non forzare l’apertura del coperchio
durante il ciclo di lavoro in mancanza di
energia elettrica.
• Non appoggiare nessun peso sul
coperchio.
• Evitare di fare cadere qualunque oggetto
sul coperchio! Questo potrebbe alterarne
l’integrità, causando cricche o rottura.
• Accompagnare la chiusura del cassetto
in modo dolce, evitando urti e spinte
improprie.
2.4 Pulizia e cura
ATTENZIONE!
Vi è il rischio di lesioni, incendio o danni
all’apparecchiatura.
• Prima di eseguire qualunque intervento di
manutenzione, spegnere l’apparecchiatura
ed estrarre la spina dalla presa.
• Controllare che l’apparecchiatura sia
fredda.
2.5 Smaltimento
ATTENZIONE!
Rischio di lesioni o soocamento.
• Staccare la spina dall’alimentazione
elettrica.
• Tagliare il cavo di rete e smaltirlo.
2.6 Assistenza Tecnica
• Per riparare l’apparecchiatura contattare il
Centro di Assistenza autorizzato.
• Utilizzare esclusivamente ricambi originali.

43ITALIANO
3. DESCRIZIONE DEL PRODOTTO
1
Coperchio
2
Cuscino sigillante
3
Barra saldante
4
Clip di ssaggio della busta
5
Pannello comandi
6
Interruttore termico
7
Pannello frontale
8
Vasca
9
Ugello di aspirazione
10
Tappo per sottovuoto *
11
Accessorio per sottovuoto esterno
12
Contenitore sottovuoto in vetro *
13
Chiave per svitare il ltro
14
Filtro olio
15
Tappo
16
Buste sottovuoto per la conservazione e
la cottura SousVide
(*) Disponibile per modelli selezionati
3.1 Introduzione al prodotto
Questo prodotto utilizza la tecnologia del
sottovuoto cosiddetta “a campana” in grado di
raggiungere no al 99,9% di vuoto, un valore
nettamente più alto rispetto a quello delle
macchine sottovuoto tradizionali.
Maggiore aria sarà estratta all’interno
della busta o del contenitore, minore sarà
l’ossidazione che subirà l’alimento.
L’estrazione quasi totale (no al 99,9%)
dell’aria riuscirà quindi a garantire la
conservazione del cibo per un periodo più
lungo rispetto alle macchine sottovuoto
tradizionali e a preparare il cibo per la cottura
Sottovuoto in maniera ottimale.
Tale tecnologia permette inoltre di preservare
alimenti liquidi quali zuppe, alimenti con
marinate, nelle buste o contenitori con grande
facilità.
Troverete su questo prodotto funzioni
addizionali innovative non praticabili
con le macchine sottovuoto tradizionali,
quali la marinatura veloce che consentirà
di risparmiare notevolmente tempo, la
preparazione veloce di sottaceti, il sottovuoto
nei contenitori utile a ridurre gli sprechi
alimentari, la tecnica dell’estrazione a freddo
per la preparazione di infusi e molte altre.
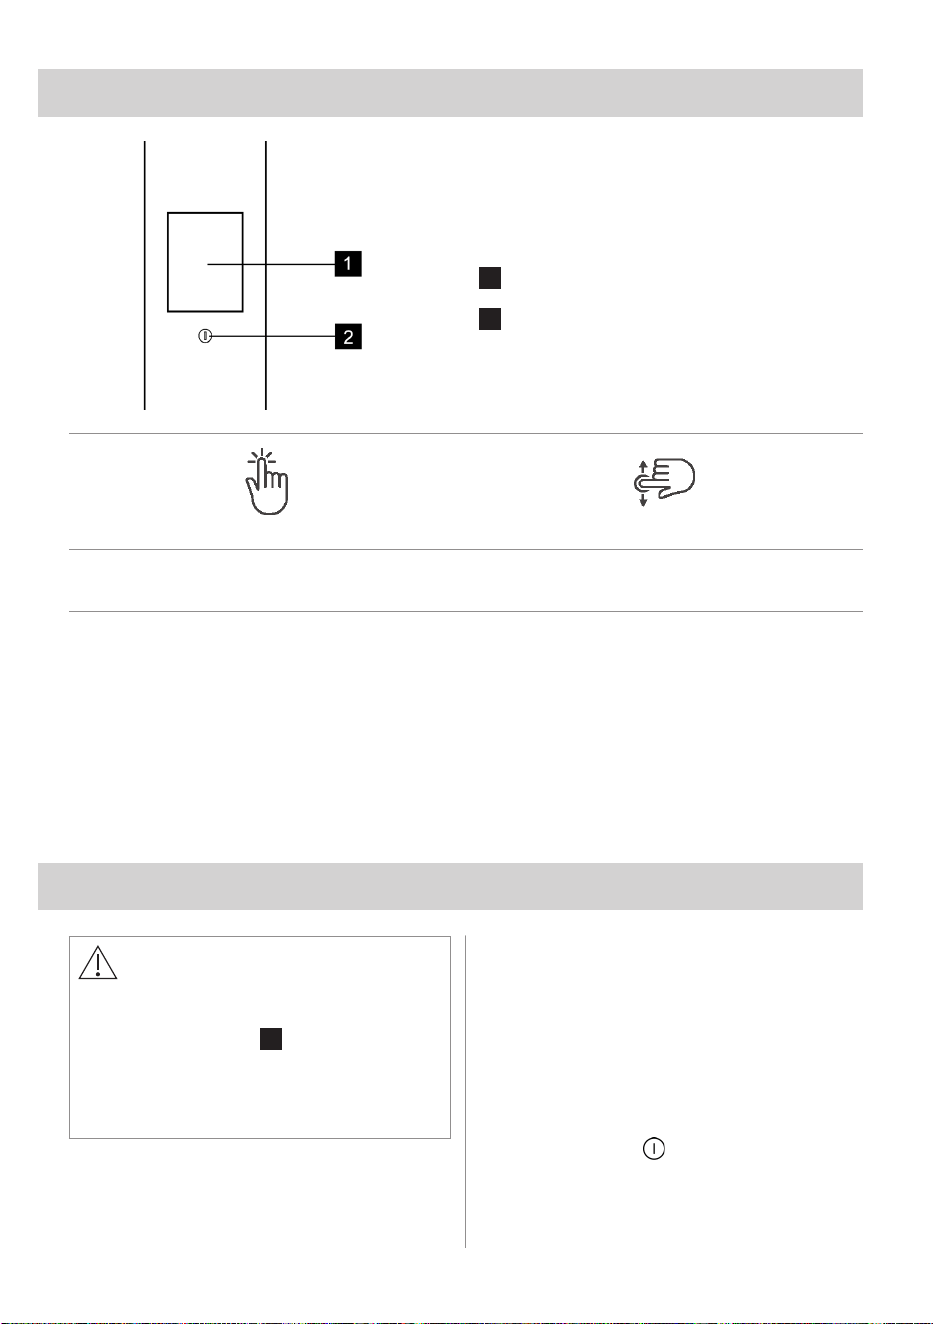
44 ITALIANO
4. PANNELLO COMANDI
1
Display
2
Pulsante ACCENSIONE/
SPEGNIMENTO
Premere Spostare
Toccare la supercie
con la punta del dito
Far scorrere la punta del dito
sulla supercie
5. PRIMA DEL PRIMO UTILIZZO
ATTENZIONE!
• Fare riferimento ai capitoli sulla
sicurezza.
• Il tappo in plastica
15
estratto in fase
di installazione va conservato per futuri
interventi di assistenza.
• Attenersi alle istruzioni fornite insieme
all’apparecchiatura.
5.1 Prima pulizia
• Fare riferimento al capitolo “PULIZIA E
CURA”.
• Pulire con un panno umido tutte le parti
prima del primo utilizzo.
5.2 Primo utilizzo
Accendere l’apparecchiatura tenendo
premuto il pulsante no all’accensione del
display.
L’apparecchiatura esegue un primo ciclo di
setup per garantire le buone prestazioni del
prodotto.
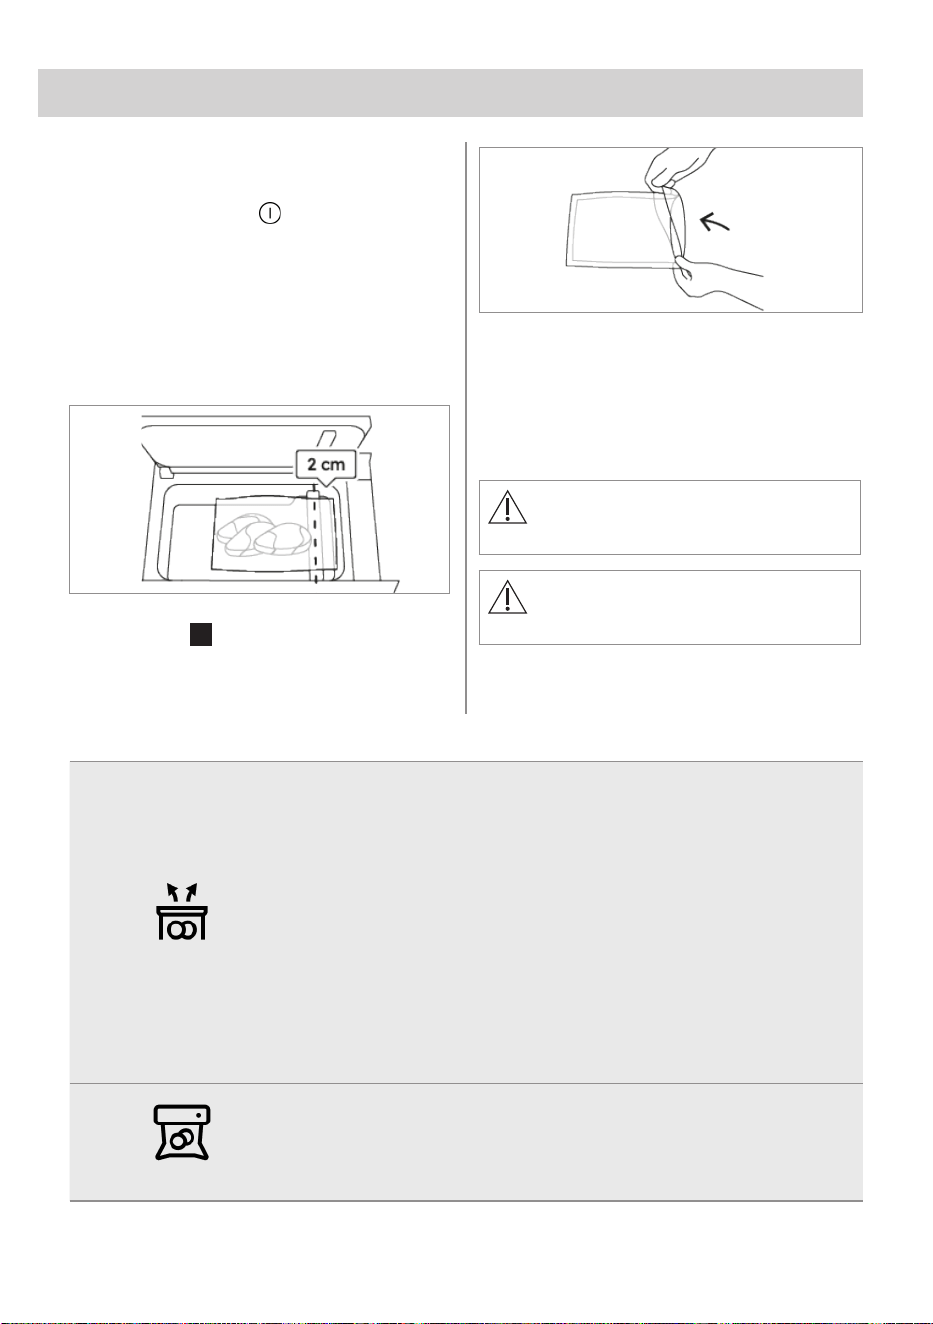
45ITALIANO
6. UTILIZZO QUOTIDIANO
• Spingere il pannello frontale per aprire il
cassetto.
• Accendere l’apparecchiatura tenendo
premuto il pulsante no all’accensione
del display.
• Premere Funzioni e selezionare il
programma desiderato (vedere la tabella
seguente).
• Aprire il coperchio e posizionare la busta
o il contenitore all’interno della vasca. Per
il confezionamento con buste, lasciare
almeno 2 cm oltre la barra saldante.
Se necessario, utilizzare la clip di ssaggio
della busta
4
.
Piegare il bordo della busta verso
l’esterno di 4-5 cm per garantire un’area di
sigillatura pulita e asciutta.
Una volta inserito l’alimento ripiegare la
busta nella condizione iniziale.
• Chiudere il coperchio.
• Premere il pulsante START. A questo
punto inizia il ciclo di confezionamento.
• Al termine del ciclo, aprire il coperchio e
rimuovere la busta/contenitore.
Non toccare la barra saldante dopo
l’uso. Il calore residuo può causare
scottature.
Se l’apparecchiatura rimane
inutilizzata per 20 minuti si spegne
automaticamente.
Sottovuoto
Per mantenere gli alimenti freschi più a lungo o prepararli per la
cottura SousVide.
La conservazione degli alimenti in buste sottovuoto prolunga il tempo di
conservazione degli alimenti freschi. Il SousVide è una tecnica di cottura in
cui il cibo viene cotto lentamente a bassa temperatura.
I vantaggi della cottura SousVide sono molteplici:
• Sapore e consistenza rimangono inalterati.
• I nutrienti e l’umidità degli alimenti vengono mantenuti.
• Non sono necessari oli o grassi per cucinare.
Impostare il tipo di alimento e di busta a seconda dell’alimento che si
intende sigillare sottovuoto e della busta utilizzata.
In caso di liquidi (come zuppe, ecc.) riempire la busta al massimo no a
1/3 del volume.
In caso contrario, vi è il rischio di fuoriuscita di liquidi dalla busta.
Non utilizzare liquidi caldi.
Sigillatura
Per sigillare o richiudere le buste e mantenere gli alimenti freschi più
a lungo.
Adatta per alimenti che possono deformarsi facilmente come patatine,
biscotti, insalata fresca, ecc. Questo metodo non prevede l’uso del vuoto.
Impostare il tipo di busta in base allo spessore della busta utilizzata.
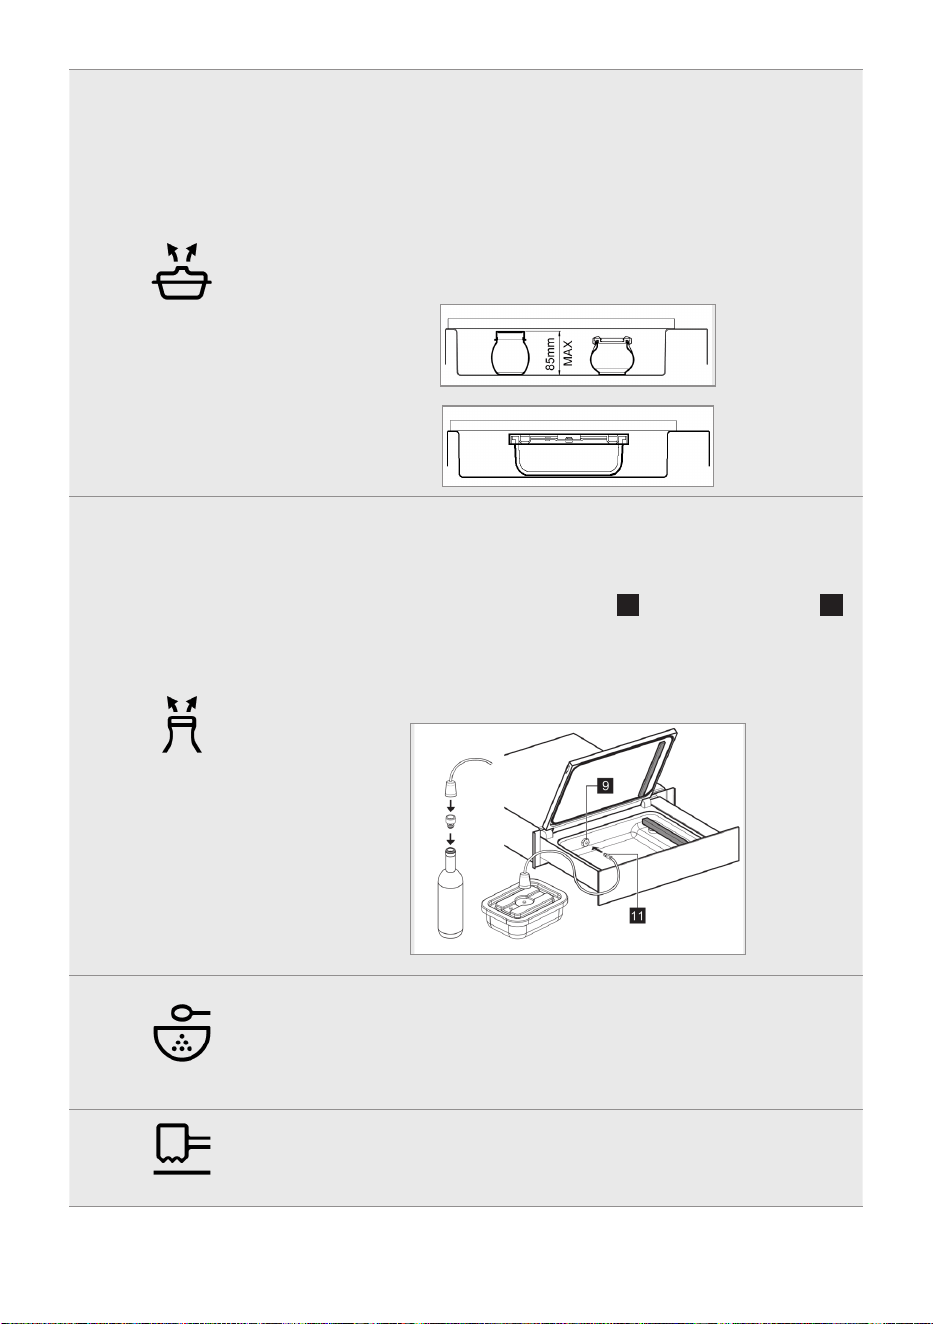
46 ITALIANO
Contenitori
Per mantenere freschi gli alimenti in contenitori o barattoli ermetici.
Questa funzione può essere utilizzata con diversi tipi di contenitori e
barattoli.
Richiudere i barattoli con il coperchio twist-o: Posizionare il coperchio,
ma assicurarsi che NON sia chiuso completamente prima di avviare la
funzione, anché il vuoto si crei correttamente.
Per garantire una perfetta ermeticità, utilizzare sempre un coperchio twist-
o nuovo.
Nota: per l’aspirazione di liquidi, riempire la busta non oltre 1/2 del suo
volume. Non utilizzare liquidi caldi.
Vuoto esterno
Per confezionare sottovuoto contenitori o bottiglie più grandi che
non entrano nella vasca.
Assicurarsi che il contenitore o il tappo della bottiglia abbiano una valvola
per il vuoto. Impostare il tipo di contenitore a seconda del materiale del
contenitore o della bottiglia.
Collegare l’accessorio per il vuoto esterno
11
all’ugello di aspirazione
9
all’interno della vasca. Assicurarsi che sia completamente inserito.
Con il coperchio del cassetto aperto, premere START per avviare la
funzione.
Nota: non utilizzare liquidi caldi.
Marinatura
Per una marinatura rapida degli alimenti e il massimo del gusto.
Questa tecnica consente al condimento di penetrare nella supercie
dell’alimento in meno tempo.
Impostare l’intensità e il tipo di busta in base all’intensità di sapore
desiderata e all’uso di un contenitore aperto o di una busta di spessore
variabile.
Intenerimento
Per rendere più tenera la carne prima della cottura.
Impostare il tipo di busta in base all’utilizzo di un contenitore aperto o di
una busta con spessore variabile.

47ITALIANO
Infusione
Per estrarre i migliori sapori immergendo gli ingredienti in un liquido.
Ideale per oli, aceti e caè freddo.
Collocare il liquido e gli ingredienti da aromatizzare in un contenitore
aperto o in una busta.
Impostare l’intensità e il tipo di busta in base all’intensità di sapore
desiderata e all’uso di un contenitore aperto o di una busta di spessore
variabile.
Sottaceto
Per conservare gli alimenti in salamoia.
Ottimo per frutta e verdura.
Impostare il tipo di contenitore/busta a seconda dell’uso di un contenitore
(chiuso con coperchio o aperto senza coperchio) o di una busta di
spessore variabile.
Disidratazione
Per un’asciugatura rapida dopo la cottura per ottenere una crosta più
croccante.
Ottimo per pane e prodotti di pasticceria.
Posizionare l’alimento all’interno della vasca.
Pulizia molluschi
Per pulire cozze e vongole per prepararle alla cottura.
Mettere i molluschi in un contenitore aperto e coprirli con una soluzione di
acqua e sale secondo le seguenti proporzioni:
- max 500 grammi di molluschi
- 0,5 litri di acqua
- 1 cucchiaio di sale
Nota: Durante il processo l’acqua bollirà. Al termine della funzione,
asciugare accuratamente la vasca in caso di fuoriuscita di acqua.
NOTA: Durante il programma il cassetto può essere chiuso.
7. PULIZIA E CURA
ATTENZIONE!
Fare riferimento ai capitoli sulla sicurezza.
• Pulire l’apparecchiatura dopo ogni utilizzo
con un panno inumidito e morbido.
• Nel caso in cui si usino prodotti per la
pulizia della vasca in acciaio
8
, attenersi
alle istruzioni di sicurezza indicate sulla
confezione.
• Per la pulizia della vasca
8
, soprattutto
in caso di residui liquidi, si consiglia di
estrarre verso l’alto la barra saldante
3
.
• Pulire la barra saldante
3
con un panno
asciutto. Rimuovere eventuali residui che
si depositano sulla barra.
• Pulire le superci metalliche con detergenti
delicati adatti per l’acciaio inox.
• Mantenere pulito e asciutto il pannello
comandi.
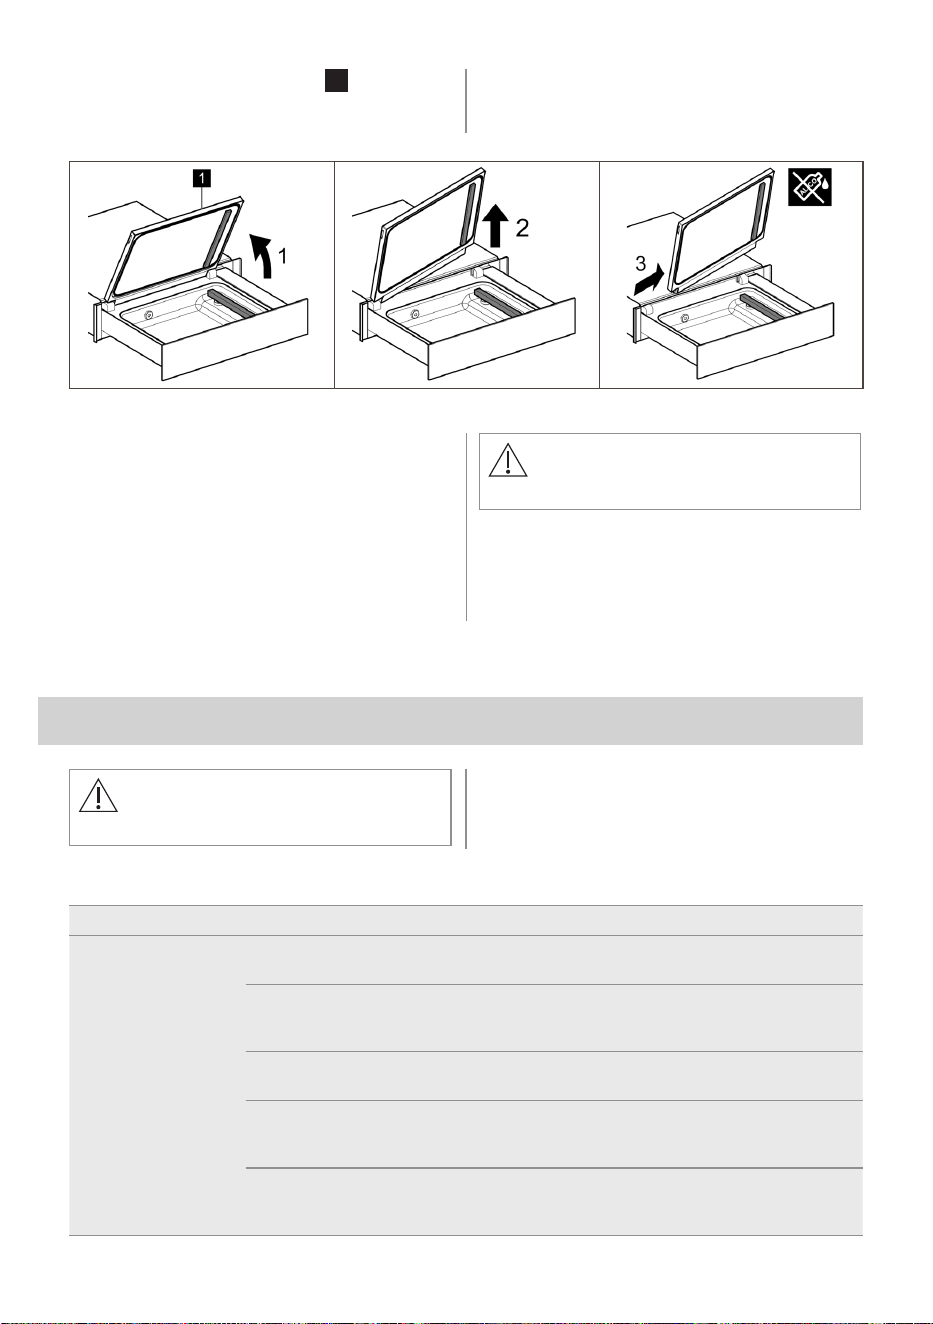
48 ITALIANO
• Per la pulizia del coperchio
1
pulire sia
l’esterno che l’interno esclusivamente con
detergenti neutri (acqua e sapone).
• Non usare prodotti abrasivi, detergenti
a base di alcool, spugnette abrasive,
solventi od oggetti metallici.
7.1 Manutenzione olio
La manutenzione dell’olio è un programma
automatico che controlla e pulisce l’olio
della pompa utilizzato per creare il vuoto.
Il programma è disponibile alla voce
“Manutenzione” all’accensione della
macchina.
ATTENZIONE!
La vasca deve essere vuota.
La macchina segnala quando è necessaria la
manutenzione dell’olio:
- Al primo utilizzo (5.2)
- Ogni 200 cicli
8. RISOLUZIONE DEI PROBLEMI
ATTENZIONE!
Fare riferimento ai capitoli sulla sicurezza.
8.1 Cosa fare se…
Problema Possibile causa Soluzione
La saldatura della
busta non è eseguita
correttamente.
Lo spessore della busta selezionata
non è corretto.
Modicare lo spessore della busta.
La guarnizione del coperchio è sporca
o usurata.
Pulire o sostituire la guarnizione
del coperchio (per la sostituzione
contattare l’Assistenza Tecnica).
La busta non è posizionata
correttamente sulla barra saldante.
Posizionare correttamente la busta.
La barra saldante è usurata (il
rivestimento in teon è bruciato).
Sostituire la barra saldante (per la
sostituzione contattare l’Assistenza
Tecnica).
La lama posizionata sotto il teon della
barra saldante è rotta.
Sostituire la barra saldante (per la
sostituzione contattare l’Assistenza
Tecnica).

49ITALIANO
Problema Possibile causa Soluzione
La saldatura
della busta non è
eseguita.
Intervento della sicurezza termica. Premere il pulsante dell’interruttore
termico
6
sul fondo, nell’angolo
anteriore destro.
Sottovuoto nale
insuciente.
La guarnizione del coperchio è sporca
o usurata.
Pulire o sostituire la guarnizione
del coperchio (per la sostituzione
contattare l’Assistenza Tecnica).
Il coperchio non è chiuso
correttamente.
Chiudere correttamente il coperchio.
Vericare che tra coperchio e vasca
non ci siano oggetti o sporcizia.
Il coperchio non si
apre.
Mancanza dell’energia elettrica. Attendere il ripristino dell’energia
elettrica.
Il coperchio presenta
cricche o rotture.
Coperchio danneggiato. Sostituire il coperchio (per la
sostituzione contattare l’Assistenza
Tecnica).
Messaggi di allarme
Allarme Possibile causa Soluzione
Premere il coperchio
per creare il vuoto
Il coperchio non è chiuso
correttamente.
Chiudere correttamente il coperchio.
Cambio olio
necessario
L'olio della pompa deve essere
sostituito.
Contattare l’assistenza tecnica.
Manutenzione olio
necessaria
È necessario un ciclo di manutenzione
dell'olio della pompa.
Eseguire un ciclo di manutenzione
dell'olio.
Si è vericato un
errore
Si è vericato un errore. Contattare l’assistenza tecnica.
8.2 Dati Assistenza
Qualora non sia possibile trovare una
soluzione al problema, contattare il Centro di
Assistenza Tecnica autorizzato.
Le informazioni necessarie per il Centro
di Assistenza Tecnica si trovano sulla
targhetta dei dati posta sul lato sinistro
dell’apparecchiatura. Non rimuovere la
targhetta dei dati.
9. EFFICIENZA ENERGETICA
9.1 Informazioni sul prodotto relative al consumo energetico e al tempo
massimo per raggiungere la modalità di basso consumo applicabile
Consumo di energia in modalità o 0,3 W
Tempo massimo necessario anché l’apparecchiatura raggiunga
automaticamente la modalità di basso consumo applicabile
20 min

50 ITALIANO
10. CONSIDERAZIONI SULL’AMBIENTE
Riciclare i materiali con il simbolo
.
Buttare l’imballaggio negli appositi contenitori
per il riciclaggio. Aiutare a proteggere
l’ambiente e la salute umana e a riciclare
riuti derivanti da apparecchiature elettriche
ed elettroniche.
Non smaltire le apparecchiature che
riportano il simbolo insieme ai normali
riuti domestici. Portare il prodotto al punto di
riciclaggio più vicino o contattare il comune di
residenza.
Per la Svizzera:
Dove portare gli apparecchi fuori uso?
In qualsiasi negozio che vende apparecchi
nuovi oppure si restituiscono ai centri di
raccolta uciali della SENS oppure ai
riciclatori uciali della SENS.
La lista dei centri di raccolta uciali della
SENS è visibile nel sito
www.erecycling.ch

51
NOTES - REMARQUES - ANMERKUNGEN - NOTE

FM111291A_09/2024
- 6 - - 7 -
XXXX
000000000-R-WWYYY
ANC:
Arial Unicode,
Regular,
size: 10pt,
100% Black,
Left.
www
CE symbol:
size 8x6 mm,
100% Black.
UKCA symbol:
6x6 mm
100% Black
EAC symbol:
size: 6x6 mm,
100% Black.
GCT
BAR CODE
ANC number is placed in the following format:
Number-Revision-WeekYear
Example: 111222333-C-322016
CE symbol is mandatory.
UKCA symbol is placed only for devices produced for United Kingdom
market.
EAC symbol is placed only for devices produced for Russian market.
Bar code or QR code may be placed only, if applicable.
GCT symbol:
REAR COVER
Arial Unicode,
5 pt,
central,
100% Black.
size:
height: 16,7mm,
width: proporcional.
XXXX
1,5 mm
1,5 mm
19 mm
37 mm
1,5 mm
1,5 mm
QR cod:
size: 9 x 19 mm.
Frame:
stroke: 0,25 pt,
100% Black.
10 106 101210
14
180
16
8