
1
Table of Contents
Get To Know Your Gear 2
How It Works 4
Auto Restart 5
Chaining 6
Frequently Asked Questions 7
Technical Specifications 8
Français 9
Español
Deutsch
日本語

3
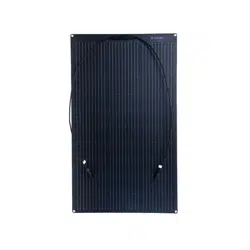
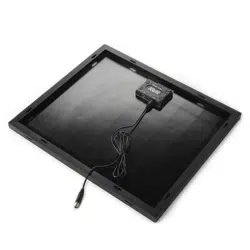
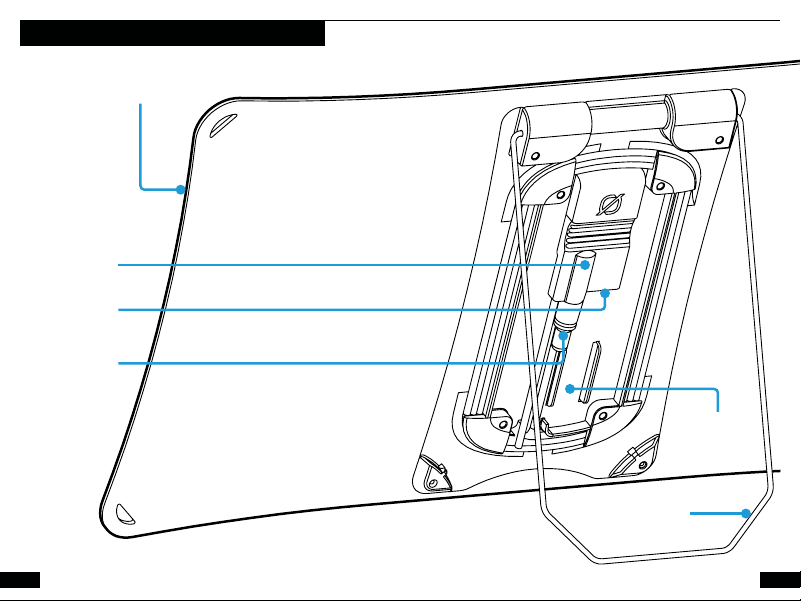
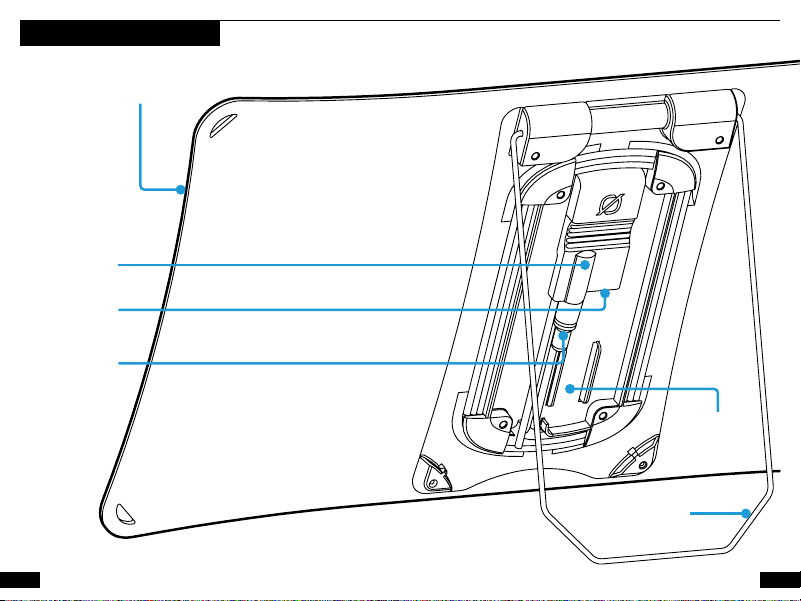
GET TO KNOW YOUR GEAR
2
Adjustable
Kickstand
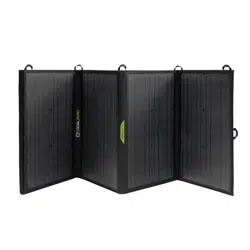
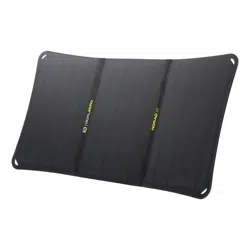
20 Watt Solar Panel
Flip Charging
Dock
8mm Output
USB
Output Port
8mm
Chaining Port
4 5
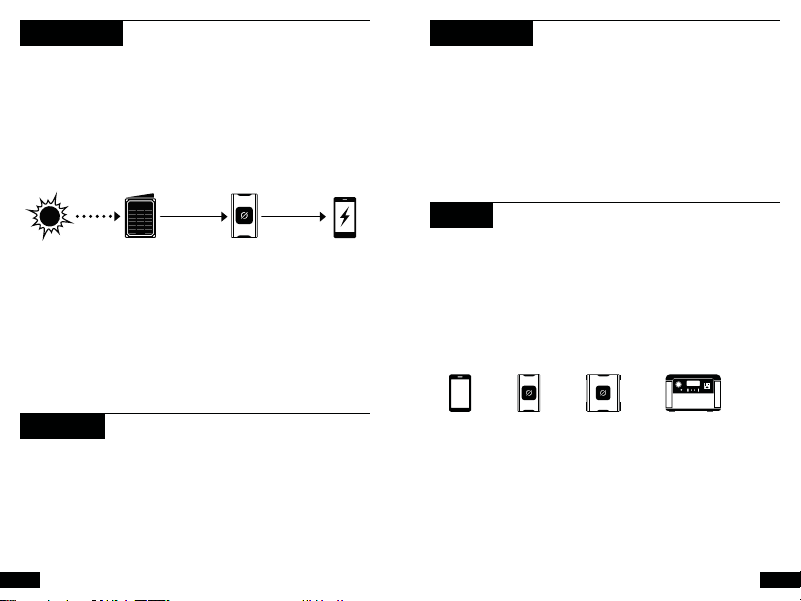
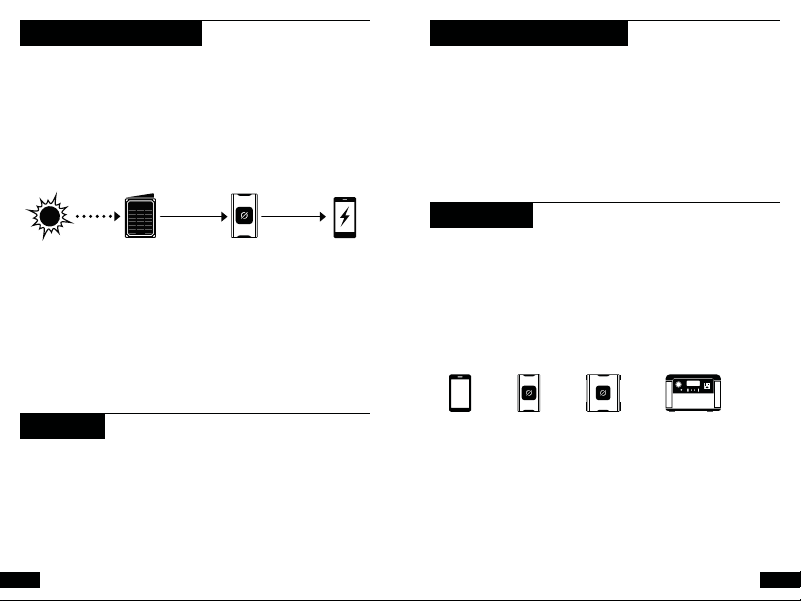
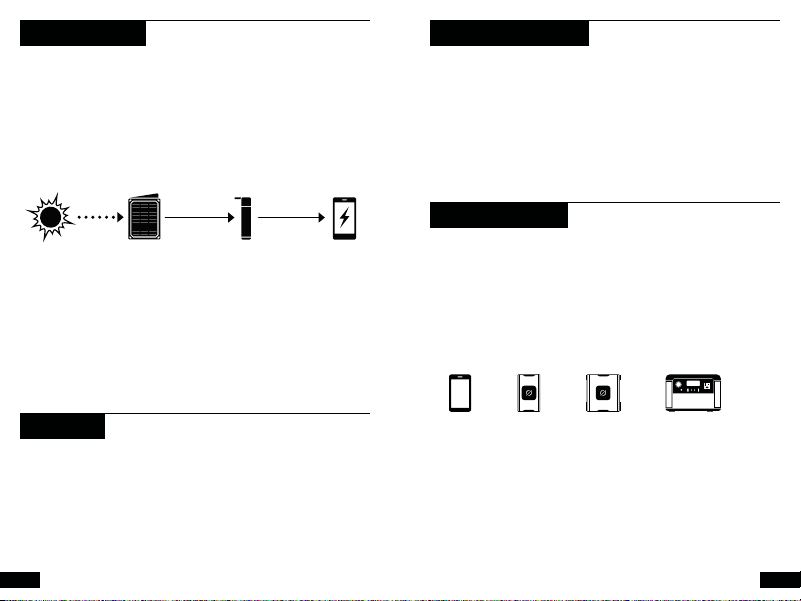
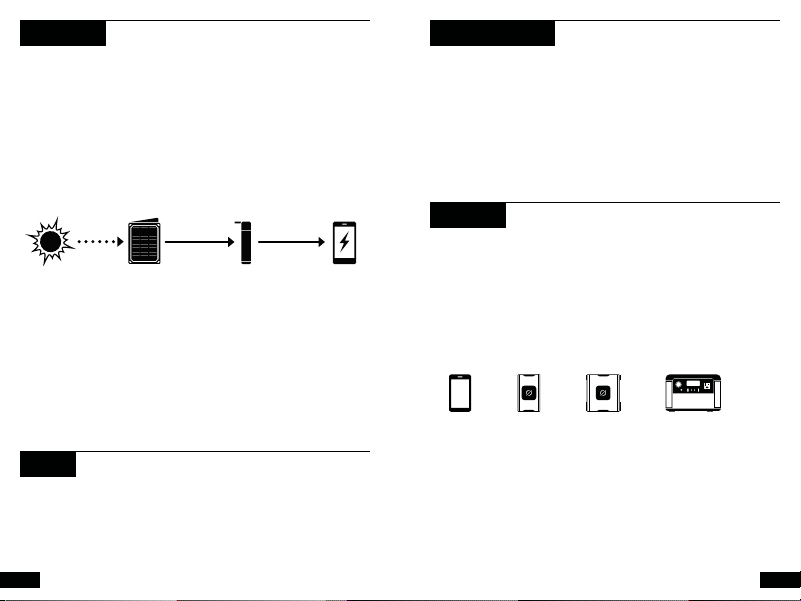
HOW IT WORKS
Charging phones, power banks and other USB-powered devices
from the Nomad 20 is as easy as plugging in.
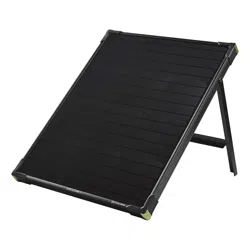
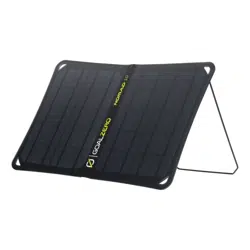
1. Open your Nomad 20 and unfold the panels.
2. Use the built-in kickstand to position the panel toward the
sun.
3. Plug your phone or device into the USB port located on the
back side of the panel and charge up.
Charge a Sherpa Power Bank or small Goal Zero Yeti Power
Station from the sun using the integrated 8mm solar charging
cable.
1. Open your Nomad 20 and unfold the panels.
2. Plug the 8mm cable into the 8mm port located on your power
bank or power station and charge up.
NOTE
A Goal Zero Flip power bank (sold separately) will fit securely
into the Flip charging dock to collect and store power while on
the move.
USB Charging
8mm Charging
STORE
Plug a Goal Zero Power Bank
or phone into the panel.
COLLECT
Gather the sun’s energy
with the solar panel.
POWER
Charge gear
anywhere.
WHAT IT POWERS
Phone
Sherpa 100AC
Goal Zero
Yeti 200X Lithium
+ Other
USB Devices
Sherpa 100PD
AUTO RESTART
PRO TIP
In low light conditions (i.e. lack of sunlight, shadow, dusk,
etc.), some devices, including smartphones, will automatically
stop charging from a solar panel due to a low current input.
The Nomad 20 features auto restart technology that knows
the difference between a device that has reached a fully
charged state and one that disconnects due to environmental
causes. When the latter is detected, the Nomad 20 will
automatically resume charging to start charging the device
again. No extra work on your part is needed.
When operating in low light conditions, we recommend
pairing your solar panel with a portable power bank for the
best charging experience possible. A Goal Zero Flip power
bank (sold separately) will fit securely into the Nomad 20’s
integrated Flip charging dock and allow you to collect and
store a continuous stream of power to charge your device.

6 7
Q: Is the Nomad 20 waterproof?
A: The best answer: it’s weatherproof. We’ve gone to great
lengths to ruggedize the Nomad 20; including beefing up the
manufacturing process with advanced lamination techniques so
it’ll slough off rain and snow.
Q: Does the Nomad 20 have a built-in battery?
A: No. In order to make the Nomad 20 as lightweight as possible,
we chose to sell batteries as an optional accessory. You can
either plug your phone or device into the Nomad 20 to charge
up directly from the sun, or pair the panel with one of our power
banks to collect and store power for later. The Nomad 20 works
seamlessly with our line of ultra-portable Flip Power Banks,
versatile Sherpa Power Banks, or small Yeti Power Stations.
Q: Is this chainable with other Nomad panels?
A: Yes, but only on some Goal Zero Nomad Solar Panels. You can
plug the Charge Cable into the chaining ports on Nomad 20
Solar Panels and larger.
FREQUENTLY ASKED QUESTIONS
CHAINING
Chaining panels is a great way to collect more power from
the sun and recharge devices quicker. You can chain up to
150W of solar panels together. We recommend no more than
four in a chain (see the NOTE below).
1. Plug the 8mm Charge Cable into another Nomad Solar
Panel’s 8mm input.
2. Using the 8mm Charge Cable of the final panel, plug
into a Sherpa Power Bank or Goal Zero Yeti Portable
Power Station. You could also plug into the USB port on
the last panel to charge USB powered devices.
NOTE
After four solar panels are chained together, you might notice
something called line loss, which has to do with the loss of
voltages over long distances. The farther the power has to
travel through cables, from panel to panel, the more power you
will lose.
8
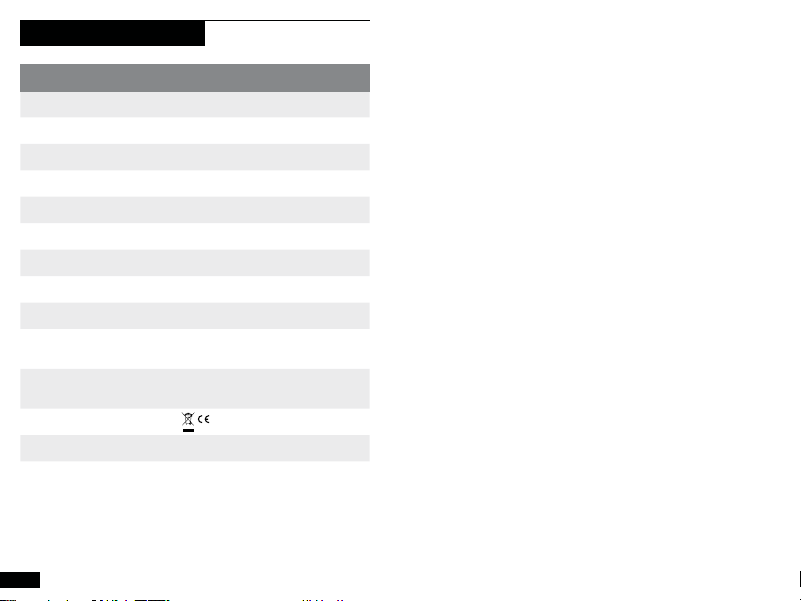
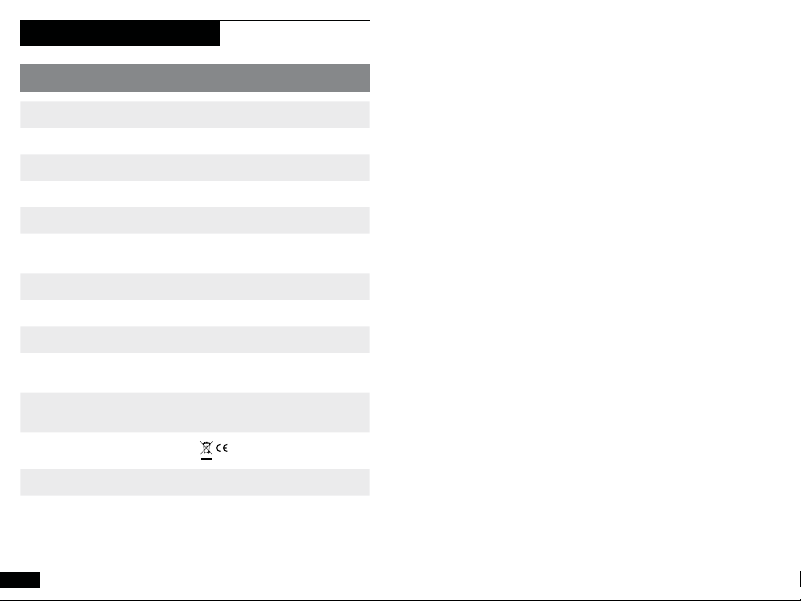
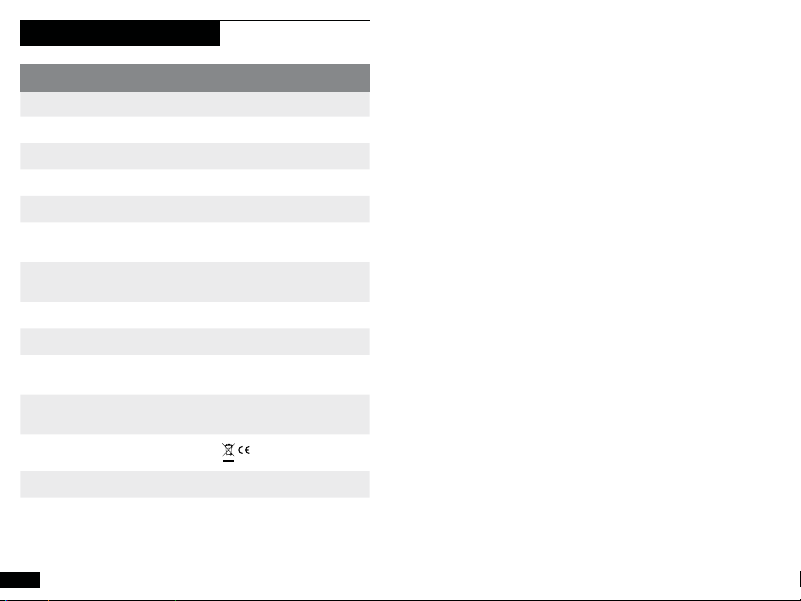
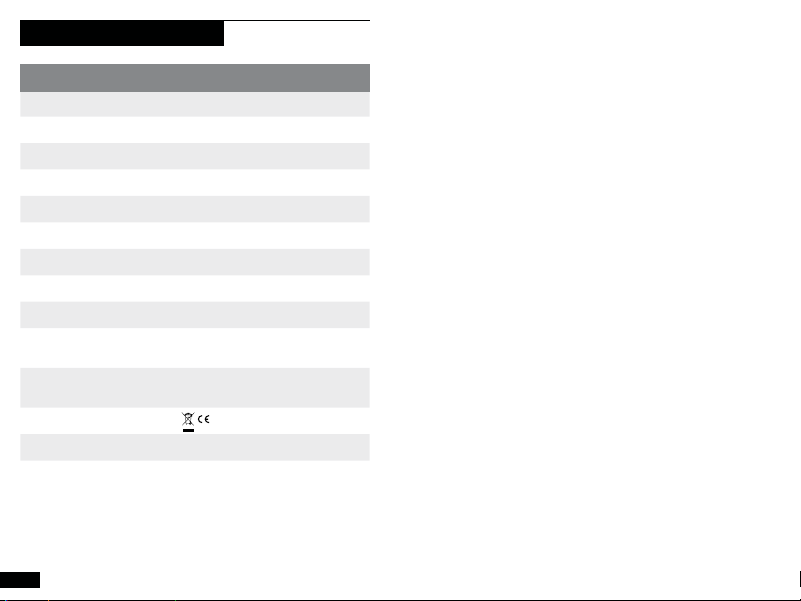
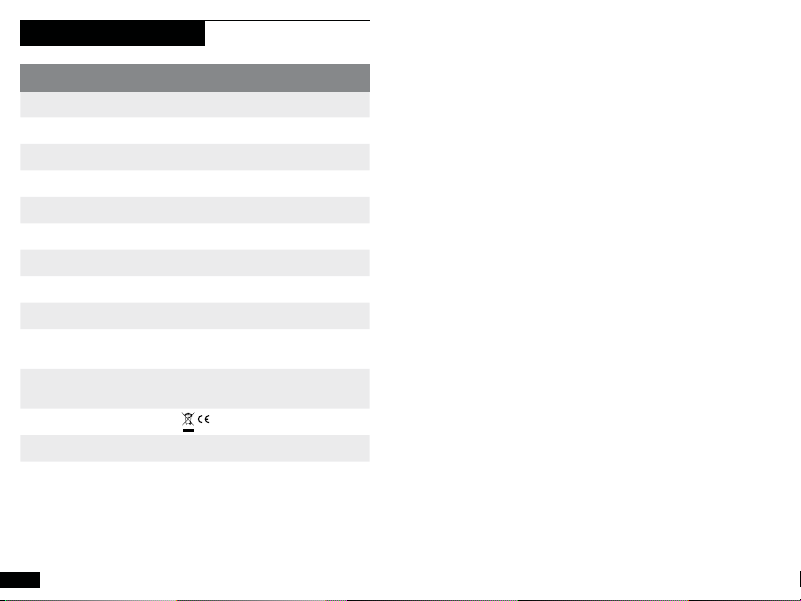
TECHNICAL SPECIFICATIONS
Solar Panel:
Rated Power 20W
Open Circuit Voltage Voc 18-22V
Cell Type Monocrystalline
Ports:
8mm Port 14-22V, up to 1.3A (20W max)
USB Port 5V, up to 2.1A (10.5W max)
General:
Weight 2.28 lbs (1.03 kg)
Dimensions
(unfolded)
11.5 x 21.75 x 0.75 in
(29.2 x 55.3 x 1.9 cm)
Dimensions
(folded)
11.5 x 7.4 x 1.25 in
(29.2 x 19 x 3.2 cm)
Certs
Warranty 12 Months
Be sure to activate your warranty at goalzero.com/warranty
Nomad 20 Solar Panel
10 11
APPRENDRE À CONNAÎTRE VOTRE ÉQUIPEMENT
10
Réglable
Béquille
Panneau Solaire de 20 Watts
Embout de
recharge
Socle
Sortie de 8 mm
USB
Port sortie
8 mm
Port de raccord
12 13
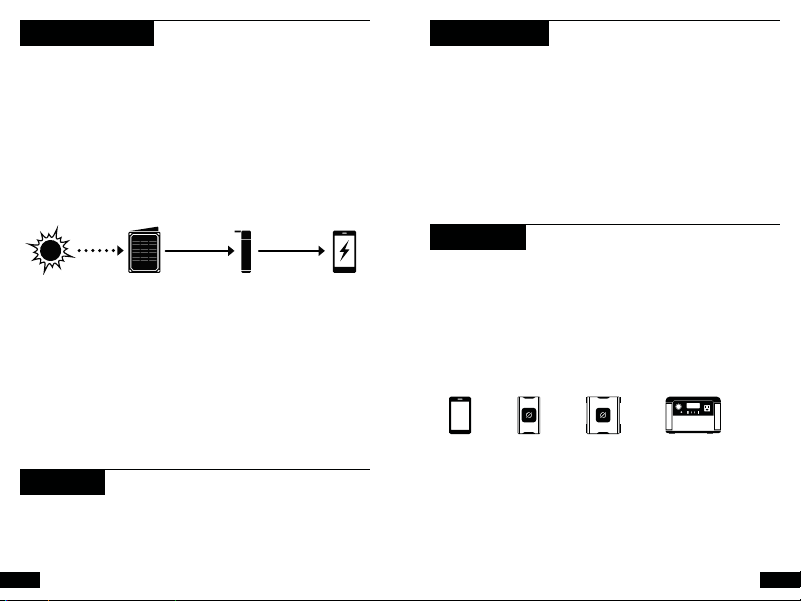
COMMENT ÇA FONCTIONNE
Charger les téléphones, les batteries de secours et autres
périphériques USB du Nomad 20 est très simple.
1. Ouvrez votre Nomad 20 et dépliez les panneaux.
2. Utilisez la béquille intégrée pour positionner le panneau vers
le soleil.
3. Branchez votre téléphone ou autre appareil sur le port USB
situé à l'arrière du panneau et chargez-le.
Rechargez une batterie de secours Sherpa ou une petite station
de recharge Goal Zero Yeti avec le soleil en utilisant le câble de
charge intégré de 8 mm.
1. Ouvrez votre Nomad 20 et dépliez les panneaux.
2. Branchez le câble de 8 mm dans le port de 8 mm situé sur votre
batterie de secours ou station de recharge et rechargez.
REMARQUE
Une batterie de secours Goal Zero Flip (vendue séparément)
s'intégrera de manière sécurisée dans le socle de charge Flip
pour collecter et stocker de l'énergie lors de vos déplacements.
Recharge USB
Charge de 8 mm
STOCKER
Branchez un chargeur
Goal Zero ou téléphone
dans le panneau.
CAPTER
Recueillez les rayons
du soleil grâce au
panneau solaire.
RECHARGER
Rechargez votre
équipement
n’importe où.
CE QUE ÇA ALIMENTE
Téléphone
portable
Sherpa 100AC
Goal Zero
Yeti 200X Lithium
+ Autre
Périphériques
USB
Sherpa 100PD
REDÉMARRAGE AUTOMATIQUE
CONSEIL PRO
Dans des conditions de faible luminosité (manque de lumière du
soleil, ombre, crépuscule, etc.), certains appareils, y compris les
smartphones, arrêtent automatiquement de se recharger à un
panneau solaire en raison d’une faible alimentation électrique. Le
Nomad 20 est doté d'une technologie de redémarrage automatique
qui permet de distinguer un périphérique qui a atteint l'état de pleine
charge, d'un qui se déconnecte pour des raisons environnementales.
Dans cette seconde situation, le Nomad 20 rebranche
automatiquement le chargeur pour continuer la recharge. Aucun
travail supplémentaire de votre part n'est donc nécessaire.
Lorsque vous travaillez dans des conditions de faible luminosité,
nous vous recommandons d’associer votre panneau solaire à une
batterie de secours portable pour une expérience de recharge
optimale. Une batterie de secours Goal Zero Flip (vendue
séparément) s’intégrera parfaitement dans le socle de charge Flip
intégrée du Nomad 20 et vous permettra de collecter et de stocker
un flux continu d’alimentation pour charger votre appareil.

14 15
Q : Le Nomad 20 est-il étanche ?
R : La réponse la plus simple : Oui, il est étanche. Nous avons fait
de grands efforts pour améliorer le Nomad 20 ; y compris en
améliorant le processus de fabrication avec des techniques de
laminage avancées afin que la pluie et la neige coulent sur lui.
Q : Le Nomad 20 possède-t-il une batterie intégrée ?
R : Non. Afin de rendre le Nomad 20 aussi léger que possible, nous
avons choisi de vendre les batteries en tant qu'accessoire en
option. Vous pouvez soit brancher votre téléphone ou votre
autre appareil électronique sur le Nomad 20 pour recharger
directement depuis le soleil, soit coupler le panneau avec
l'une de nos batteries de secours pour collecter et stocker de
l'énergie pour plus tard. Le Nomad 20 fonctionne sans problème
avec notre gamme de batteries de secours Flip ultra-portables,
les batteries de secours polyvalentes Sherpa, ou les petites
stations de recharge Yeti.
Q : Est-ce ça peut être enchaîné avec d'autres panneaux Nomad ?
R : Oui, mais seulement avec certains panneaux solaires Goal Zero
Nomad. Vous pouvez brancher le câble de Charge dans les
ports de raccord des panneaux solaires Nomad 20 ou plus.
FOIRE AUX QUESTIONS
RACCORD
Raccorder des panneaux est un excellent moyen de collecter
plus d'énergie solaire et de recharger les appareils plus
rapidement. Vous pouvez raccorder jusqu'à 150 W de panneaux
solaires ensemble. Nous n'en recommandons pas plus de quatre
par raccord (voir la REMARQUE ci-dessous).
1. Branchez le câble de charge de 8 mm dans l'entrée de 8
mm du panneau Solar Nomad.
2. À l'aide du Câble de Charge de 8 mm du panneau final,
branchez votre installation sur une batterie de secours Sherpa
ou une station de charge portative Goal Zero Yeti. Vous pouvez
également brancher dans le port USB du dernier panneau
solaire pour recharger les périphériques alimentés par USB.
REMARQUE
Si vous essayez de raccorder ensemble plus de quatre panneaux
solaires, vous pourriez remarquer quelque chose appelé une
perte de ligne, qui a à voir avec la perte de tensions sur de
longues distances. Plus la tension doit traverser de câbles, d'un
panneau à l'autre, plus vous perdrez d'énergie.
16
SPÉCIFICATIONS TECHNIQUES
Panneau solaire:
Puissance nominale 20 W
Tension en Circuit Ouvert Vco 18-22V
Type de batterie Monocristalline
Ports:
Port de 8 mm 14-22 V, jusqu'à
1,3 A (20 W max)
Port USB 5 V, jusqu'à 2,1 A (10,5 W max)
Général:
Poids 2.28 livres (1,03 kg)
Dimensions
(déplié)
11,5 x 21,75 x 0,75 pouces
(29,2 x 55,3 x 1,9 cm)
Dimensions
(plié)
11,5 x 7,4 x 1,25 pouces
(29,2 x 19 x 3,2 cm)
Certifications
Garantie 12 mois
N'oubliez pas d'activer votre garantie en ligne sur goalzero.
com/warranty
Panneau solaire Nomad 20
18 19
CONOZCA SUS DISPOSITIVOS
18
Ajustable
Soporte
Panel solar de 20 vatios
Puerto de
carga Flip
Puerto
Salida 8mm
USB
Puerto de salida
8 mm
Puerto de
conexión en serie
20 21
CÓMO FUNCIONA
Cargar teléfonos, baterías y otros dispositivos con conexión
USB con el Nomad 20 es tan sencillo como conectarlos.
1. Abra su Nomad 20 y despliegue los paneles.
2. Use el soporte integrado para orientar el panel hacia el sol.
3. Conecte su teléfono o dispositivo al puerto USB ubicado en
la parte trasera del panel para comenzar la carga.
Cargue un Sherpa Power Pack o una estación portátil Goal Zero
Yeti desde el sol utilizando el cable de carga solar integrado de
8 mm.
1. Abra su Nomad 20 y despliegue los paneles.
2. Conecte el cable de 8 mm al puerto de 8 mm situado en su
batería o central eléctrica y cárguela.
NOTA
La batería externa Goal Zero Flip (de venta por separado) encaja
de forma segura en el puerto de carga de Flip para acumular y
almacenar la energía sobre la marcha.
Carga USB
Carga de 8 mm
ALMACENAR
Conecte un teléfono o
cargador Goal Zero al panel.
ACUMULAR
Acumule la energía del
sol con el panel solar.
ALIMENTAR
Cargue su equipo
en cualquier lugar.
A QUÉ SUMINISTRA ELECTRICIDAD
Teléfono
Sherpa 100 CA
Goal Zero
Yeti 200X Lithium
+ otros
dispositivos
USB
Sherpa 100PD
REINICIO AUTOMÁTICO
CONSEJO EXPERTO
En condiciones de poca luz (p. ej., falta de luz solar, sombras,
atardecer, etc.) algunos dispositivos, incluidos los smartphones,
se desconectarán automáticamente del panel solar por la baja
entrada de corriente. El Nomad 20 cuenta con tecnología de
reinicio automático, que distingue entre dispositivos que se han
cargado por completo y dispositivos que se han desconectado
por causas ambientales. Cuando se detecta este último, el
Nomad 20 reconectará de manera automática el dispositivo de
carga. No necesita hacer nada más.
Cuando se encuentre en condiciones de poca luz,
recomendamos emparejar su panel solar con una batería portátil
para obtener la mejor experiencia de carga posible. La batería
externa Goal Zero Flip (de venta por separado) encaja de forma
segura en el puerto de carga Flip integrado del Nomad 20, y le
permite acumular y almacenar energía de forma constante para
cargar su dispositivo.

22 23
P: ¿El Nomad 20 es resistente al agua?
R: En pocas palabras, es resistente a la intemperie. Hemos
trabajado mucho para lograr una gran resistencia en el Nomad
20, incluyendo la mejora del proceso de fabricación con
técnicas avanzadas de laminación, por lo que resistirá la lluvia
y la nieve.
P: ¿El Nomad 20 tiene batería integrada?
R: No. Hemos fabricado el Nomad 20 para que sea lo más ligero
posible, y hemos optado por vender las baterías como un
accesorio opcional. Puede conectar su teléfono o dispositivo
al Nomad 20 para cargarlo directamente con energía solar,
o emparejar el panel con una de nuestras baterías externas
para acumular y almacenar la energía. El Nomad 20 funciona
a la perfección con nuestra línea de baterías ultraportátiles
Flip, versátiles banterías portátiles Sherpa, o unidades de
alimentación Yeti
P: ¿Puede conectarse en serie con otros paneles Nomad?
R: Sí, pero solo con algunos paneles solares Goal Zero Nomad.
Puede conectar el cable de carga a los puertos de conexión en
serie de paneles solares Nomad 20 y más grandes.
PREGUNTAS FRECUENTES
CONEXIÓN EN SERIE
Conectar los paneles en serie es una excelente forma de
captar más energía del sol y recargar los dispositivos con
mayor rapidez. Puede conectar en serie hasta un total de
150 W de paneles solares conjuntamente. No recomendamos
conectar en serie más de cuatro (vea la NOTA a continuación).
1. Conecte el cable de carga de 8 mm a otra entrada al
panel solar Nomad de 8 mm.
2. Usando el cable de carga de 8 mm del panel final,
conéctelo a un Sherpa Power Pack o estación portátil
Goal Zero Yeti. Puede también volver a conectar una
caja de conexiones al último panel solar en la serie para
recargar los dispositivos con conexión USB.
NOTA
Después de conectar en serie cuatro paneles solares, es
posible que detecte lo que se conoce como pérdida de línea,
que está relacionado con la pérdida de tensión a lo largo de
grandes distancias. Cuanto más lejos tiene que transportarse la
electricidad a través de los cables, de panel a panel, más energía
se perderá.
24
ESPECIFICACIONES TÉCNICAS
Panel solar:
Potencia nominal 20 W
VoC, voltaje en circuito abierto 18-22 V
Tipo de célula Monocristalina
Puertos:
Puerto de 8 mm 14-22 V, hasta
1,3 A (máx. de 28 W)
Puerto USB 5 V hasta 2,1 A (10,5
W máx.)
Datos generales:
Peso 2,28 lbs (1,03 kg)
Dimensiones
(desplegado)
11,5 x 21,75 x 0,75 pulg
(29,2 x 55,3 x 1,9 cm)
Dimensiones
(plegado)
11,5 x 21,75 x 0,75 pulg
(29,2 x 19 x 3,2 cm)
Certificados
Garantía 12 meses
No olvide validar su garantía en goalzero.com/warranty
Panel solar Nomad 20

26 27
LERNEN SIE IHR GERÄT KENNEN
Einstellbarer
STÄNDER
20-Watt-Solarmodul
Flip Lade-station
8 mm Ausgang
USB-Ausgang
8 mm
Verbindungsanschluss
26
28 29
SO FUNKTIONIERT'S
Die Aufladung von Handys, Powerbanks und anderen USB-
betriebenen Geräten mit dem Nomad 20 ist genauso einfach wie
das Einstecken.
1. Öffnen Sie Ihren Nomad 20 und klappen Sie die Solarmodule
auf.
2. Verwenden Sie den eingebauten Ständer, um das Solarmodul
auf die Sonne auszurichten.
3. Schließen Sie Ihr Handy oder ein anderes Gerät an den USB-
Anschluss auf der Rückseite des Solarmoduls an und laden
Sie es auf.
Laden Sie eine Sherpa Powerbank oder eine kleine Goal Zero
Yeti Ladestation mit dem integrierten 8-mm-Solarladekabel über
die Sonne auf.
1. Öffnen Sie Ihren Nomad 20 und klappen Sie die Solarmodule
auf.
2. Stecken Sie das 8-mm-Kabel in den 8-mm-Anschluss an
Ihrer Powerbank oder Ladestation und beginnen Sie mit dem
Ladevorgang.
HINWEIS
Eine Goal Zero Flip Powerbank (separat erhältlich) passt sicher
in die Flip Ladestation, um unterwegs Strom zu sammeln und
zu speichern.
Aufladung über den USB-Anschluss
Aufladung über den 8-mm-Anschluss
SPEICHERN
Schließen Sie eine Goal Zero
Powerbank oder ein Handy
an das Solarmodul an.
SAMMELN
Sammeln Sie die
Sonnenenergie
mit dem Solarmodul.
STROM
Laden Sie
Geräte
überall auf.
WAS ES ANTREIBT
Telefon
Sherpa 100AC
Goal Zero
Yeti 200X Lithium
+ Andere
USB-Geräte
Sherpa 100PD
AUTO-NEUSTART
EXPERTENTIP
Bei schlechten Lichtverhältnissen (z.B. Mangel an Sonnenlicht,
Schatten, Dämmerung usw.) stellen einige Geräte, einschließlich
Smartphones, den Ladevorgang über das Solarmodul aufgrund
einer geringen Stromaufnahme automatisch ein. Der Nomad
20 verfügt über eine automatische Neustarttechnologie, die
den Unterschied erkennt zwischen einem Gerät, das einen
vollständig geladenen Zustand erreicht hat, und einem Gerät,
das sich aufgrund der Umgebungsbedingungen trennt. Wenn
letzteres erkannt wird, setzt der Nomad 20 den Ladevorgang
automatisch fort, um das Gerät weiter aufzuladen. Sie müssen
nichts weiter tun.
Bei Betrieb unter schlechten Lichtverhältnissen empfehlen
wir, Ihr Solarmodul mit einem tragbaren Netzteil zu
kombinieren, um ein optimales Ladeergebnis zu erzielen.
Eine Goal Zero Flip Powerbank (separat erhältlich) passt
sicher in die integrierte Flip Ladestation des Nomad 20 und
ermöglicht es Ihnen, kontinuierlich Strom zum Laden Ihres
Geräts zu sammeln und zu speichern.

30 31
F: Ist der Nomad 20 wasserdicht?
A: Die beste Antwort: Er ist wetterfest. Wir haben einen großen
Aufwand betrieben, um den Nomad 20 robust zu gestalten;
dazu gehört die Verbesserung des Produktionsprozesses durch
moderne Beschichtungstechnik, damit er Regen und Schnee
abweist.
F: Hat der Nomad 20 eine eingebaute Batterie?
A: Nein. Um das Gewicht des Nomad 20 so gering wie möglich
zu halten, haben wir uns dafür entschieden, Batterien als
optionales Zubehör anzubieten. Sie können entweder Ihr
Handy oder Gerät an den Nomad 20 anschließen, um direkt
von der Sonne aufzuladen, oder das Modul mit einer unserer
Powerbanks verbinden, um Strom für später zu sammeln und
zu speichern. Der Nomad 20 funktioniert nahtlos mit unserer
Serie von ultramobilen Goal Zero Flip Powerbanken, vielseitigen
Sherpa Powerbanken oder kleinen Yeti Ladestationen.
F: Kann man es mit anderen Nomad-Modulen verketten?
A: Ja, aber nur mit einigen Goal Zero Nomad Solarmodulen. Sie
können das Ladekabel in die Verbindungsanschlüsse der Nomad
20 Solarmodule und größerer Module einstecken.
HÄUFIG GESTELLTE FRAGEN
VERKETTUNG
Die Verkettung von Modulen ist eine tolle Methode, um mehr
Strom von der Sonne zu beziehen und Geräte schneller
aufzuladen. Sie können Solarmodule bis zu 150 W miteinander
verketten. Wir empfehlen jedoch nicht mehr als vier in einer
Kette (siehe nachstehende ANMERKUNG).
1. Stecken Sie das 8-mm-Ladekabel in die 8-mm-Buchse
eines anderen Nomad Solarmoduls.
2. Verwenden Sie das 8-mm-Ladekabel des letzten Moduls
und schließen Sie dies an eine Sherpa Powerbank oder
eine Goal Zero Yeti Tragbare Ladestation an. Sie können
auch den USB-Anschluss am letzten Modul verwenden, um
USB-betriebene Geräte aufzuladen.
HINWEIS
Wenn vier Solarmodule miteinander verkettet sind, werden Sie
eventuell ein Phänomen namens Leitungsverlust beobachten,
was mit dem Spannungsverlust über eine lange Distanz
zusammenhängt. Je weiter der Strom von Modul zu Modul durch
die Kabel fließen muss, umso mehr Strom geht verloren.
32
TECHNISCHE SPEZIFIKATIONEN
Solarmodul:
Nennleistung 20 W
Leerlaufspannung (Voc) 18 - 22 V
Akkutyp Monokristallin
Anschlüsse:
8-mm-Anschluss 14 - 22 V, bis zu 1,3 A (max. 20 W)
USB-Anschluss 5 V, bis zu 2,1 A (max. 10,5 W)
Allgemein:
Gewicht 1.03 kg
Abmessungen
(auseinandergeklappt)
11,5 x 21,75 x 0,75 in
(29,2 x 55,3 x 1,9 cm)
Abmessungen
(zusammengeklappt)
11,5 x 7,4 x 1,25 in
(29,2 x 19 x 3,2 cm)
Zertifikate
Garantie 12 Monate
Achten Sie darauf, Ihre Garantie zu aktivieren:
goalzero.com/warranty
Nomad 20 Solarmodul

34 35
あなたの道具を知りましょう
調整可能
キックスタンド
20 ワット ソーラーパネル
Flip充電
ドック
8mm出力
USB 出力ポート
8mm
チェイニングポート
34
36 37
使用方法
Nomad 20からの電話、充電器、およびその他のUSB電源デバイスの充
電は、接続するのと同じくらい簡単です。
1. Nomad 20を開き、パネルを展開します。
2. 事前に備えつけられたキックスタンドを使い、パネルを太陽に向けて
ください。
3. 電話またはデバイスをパネルの裏側にあるUSBポートに差し込み、
充電してください。
統合された8mmソーラー充電ケーブルを使用して、Sherpa 充電器また
は小さなGoal Zero Yeti 発電所を太陽から充電します。
1. Nomad 20を開き、パネルを展開します。
2. 8mmケーブルを充電器または発電所にある8mmポートに差し込
み 、充 電 し ま す 。
注 意:
Goal Zero Flip充電器(別売り)は、Flip充電ドックに安全に保管でき移動
中も電力徴収や貯蔵が可能にします。
USB充電
8mm 充電
保存
Goal Zero 充電器 また
は電話をパネルに差し
込みます。
収集する
太陽光熱を収
集する
ソーラーパネルで。
電源
ギアを使い
たい時に充
電しよう。
電源供給可能な機器
携帯電話
Sherpa
100AC
ゴールゼロ
Yeti 200X リチウム
+ その他
USBデバイス
Sherpa
100PD
自 動 再 スタート
PRO TIP
日照不足、影、夕暮れ、その他の低光条件の時は、ソーラーパネルか
らの電力入力が落ちるため、スマートフォンを含む一部のデバイス
の充電を自動的に停止してしまう場合もあります。 Nomad 20の特徴
の一つ、再起動のテクノロジーは、デバイスが完全に充電した状態と
環境的な理由で接続を断たないといけない状態の違いを感知しま
す。 後者が検出されると、Nomad 20は自動的に充電を再開し、デバ
イスの充電を再開します。 無駄な操作は、必要とされません。
低光条件で操作する場合は、ソーラーパネルを携帯型充電器と使用
することで良質の充電が可能になります。 Nomad 20に統合された
Flip充電ドックにGoal Zero Flip充電器(別売り)を置くことで、デバイ
スの連続した電力徴収や貯蔵が可能になります。

38 39
質: Nomad 20は防水ですか?
答: 最も適してる解答: 耐候性である。 Nomad 20の耐久性を高めるべく、
高度な積層技術を用いて製造過程を強化するなど、さまざまな努力を
行ってきました。結果、雪や雨に強い機器ができました。
質: Nomad 20にバッテリーは内臓されていますか?
答: いいえ Nomad 20をなるべく軽量にするため、バッテリーは付属品と
して販売することにしました。 携帯電話やその他デバイスをNomad
20につなぎ直接太陽光熱で充電するか、自社の充電器とパネルを組
み合わせて電力収集や貯蔵が可能です。 Nomad 20は、超携帯型Flip
充電器、汎用性の高いSherpa充電器、または小型のYeti 発電所とシー
ムレスに連携します。
質: 他の Nomad パネルとチェーン接続できますか?
答: はい。しかし、特定の Goal Zero Nomad ソーラーパネルにのみ繋げる
ことができます。 充電ケーブルは、Nomad 20以上のソーラーパネル
のチェイニングポートに差し込むことができます。
よくあ るご 質 問
チェイニング 接 続
太陽光を効率的に集め、機器の充電をすばやく行うにはパネルの接
続が最適です。 最大150Wのソーラーパネルを連結できます。 チェー
ン内で4つ以下にすることをお勧めします(下記の注を参照)。
1. 8mm充電ケーブルを別のNomad ソーラーパネルの8mm入
力に差し込みます。
2. 最後のパネルの8mm充電ケーブルを使用して、Sherpa 充電
器またはGoal Zero Yeti 携帯型発電所に接続します。 最後の
パネルのUSBポートに差し込んで、USB給電デバイスを充電す
ることもできます。
注 意:
4枚のパネルを繋ぐと、ラインロスと呼ばれる長距離による電圧の低下
に関連する現象が起こることがあります。 電力を通すケーブルがパネル
からパネルへと延長されるほど、多くの電力が失われます。
40
技術仕様
ソーラーパネル:
定格出力 20W
開回路電圧 Voc 18 ~ 22V
セル種類 単結晶
ポ ー ト:
8mm ポート 14-22V、1.Aまで (最大20W)
USB ポート 5V、2.1Aまで(最大 10.5W)
全 般:
重量 2.28 lbs (1.03 kg)
寸法
(使用時)
11.5 x 21.75 x 0.75 in
(29.2 x 55.3 x 1.9 cm)
寸法
(収納時)
11.5 x 7.4 x 1.25 in
(29.2 x 19 x 3.2 cm)
安全規格
保証 12カ月
goalzero.com/warranty で保証を有効にしてください。
Nomad 20 ソーラーパネル

42
GOAL ZERO HEADQUARTERS
675 West 14600 South
Bluffdale, UT 84065
1-888-794-6250
Designed in the U.S.A.
Made in China
Nomad is a trademark of Goal Zero.
JG112619V1
This equipment has been tested and found to comply with the limits for a Class
B digital device, pursuant to part 15 of the FCC Rules. These limits are designed
to provide reasonable protection against harmful interference in a residential
installation. This equipment generates, uses and can radiate radio frequency
energy and, if not installed and used in accordance with the instructions, may
cause harmful interference to radio communications. However, there is no
guarantee that interference will not occur in a particular installation. If this
equipment does cause harmful interference to radio or television reception,
which can be determined by turning the equipment off and on, the user is
encouraged to try to correct the interference by one or more of the following
measures:
—Reorient or relocate the receiving antenna.
—Increase the separation between the equipment and receiver.
—Connect the equipment into an outlet on a circuit different from that to which
the receiver is connected.
—Consult the dealer or an experienced radio/TV technician for help.
This device complies with part 15 of the FCC Rules. Operation is subject to the
following two conditions: (1) This device may not cause harmful interference, and
(2) this device must accept any interference received, including interference that
may cause undesired operation.