FRENCH DOOR REFRIGERATOR/FREEZER
INSTRUCTION MANUAL
MODEL NUMBER CCRF1890K
Page 2
SAFETY INFORMATION
IMPORTANT SAFETY INSTRUCTIONS
1. Use this appliance only for its intended purpose as described in this use and care
guide.
2. This refrigerator must be properly installed in accordance with the installation
instructions before it is used. See grounding instructions in the installation section.
3. Never unplug your refrigerator by pulling on the power cord. Always grasp the
plug firmly and pull straight out from the outlet.
4. Do not operate any appliance with a damaged cord or plug. Return appliance to
the nearest authorized service facility for examination, repair or adjustment.
5. Unplug your refrigerator before cleaning or before making any repairs.
NOTE: If for any reason this product requires service, we strongly recommend
that a certified technician performs the service. Component parts shall be
replaced with like components and servicing shall be done by factory authorized
service personnel, so as to minimize the risk of possible ignition due to incorrect
parts or improper service.
6. Do not use any electrical device or any sharp instrument in defrosting your
refrigerator.
7. After your refrigerator is in operation, do not touch the cold surfaces in the freezer
compartment, particularly when hands are damp or wet. Skin may adhere to
these extremely cold surfaces.
8. Do not refreeze foods that have been thawed completely. The United States
Department of Agriculture in Home and Garden Bulletin No.69 reads: “…You may
safely refreeze frozen foods that have thawed if they still contain ice crystals or if
they are still cold-below 40˚F.
“…Thawed ground meats, poultry, or fish that have any o-odor or o-color
should not be refrozen and should not be eaten. Thawed ice cream should be
discarded. If the odor or color of any food is poor or questionable, discard it. The
food may be dangerous to eat… Even partial thawing and re-freezing reduce the
eating quality of foods, particularly fruits, vegetables, and prepared foods. The
eating quality of red meats is aected less than that of many other foods. Use
refrozen foods as soon as possible, to save as much of its eating quality as you
can.”
9. This refrigerator should not be recessed or built-in in an enclosed cabinet. It is
designed for freestanding installation only.
DANGER
DANGER - Immediate hazards
which WILL result in severe
personal injury or death
WARNING
WARNING - Hazards or unsafe
practices which COULD result in
severe personal injury or death
CAUTION
CAUTION - Hazards or unsafe
practices which COULD result in
minor personal injury
WARNING
When using electrical appliances, basic safety precautions should always be
followed to reduce the risk of re, electric shock and personal injury
:
READ ALL INSTRUCTIONS BEFORE USING THE PRODUCT
Page 3
SAFETY INFORMATION
10. Do not operate your refrigerator in the presence of explosive fumes.
11. Keep ventilation openings, in the appliance or enclosure or in the built-in structure,
clear of obstruction.
12. Do not use mechanical devices or other means to accelerate the defrosting
process, other than those recommended by the manufacturer.
13. Do not use electrical appliances inside the food storage compartments unless
they are recommended by the manufacturer.
SAVE THESE INSTRUCTIONS
HOUSEHOLD USE ONLY
DANGER
Risk of child entrapment. Before you throw away your old
refrigerator or freezer, take off the doors. Leave the shelves in place
so that children may not easily climb inside.
REFRIGERANT GAS WARNINGS
DANGER - Risk of fire or explosion. Flammable refrigerant used. DO NOT
use mechanical devices to defrost refrigerator. DO NOT puncture
refrigerant tubing.
DANGER - Risk of fire or explosion. Flammable refrigerant used. To be repaired
only by trained service personnel. DO NOT puncture refrigerant tubing.
CAUTION - Risk of fire or explosion. Flammable refrigerant used. Consult repair
manual/owner’s guide before attempting to service this product. All
safety precautions must be followed.
CAUTION - Risk of fire or explosion. Dispose of properly in accordance with
federal or local regulations. Flammable refrigerant used.
CAUTION - Risk of fire or explosion due to puncture of refrigerant tubing; Follow
handling instructions carefully. Flammable refrigerant used.

Page 4
SAFETY INFORMATION
GROUNDING INSTRUCTIONS
ELECTRICAL REQUIREMENTS
The electrical requirements are a 115 volt 60 Hz, AC only, 15 amp. It is recommended
that a separate circuit serving only the product be provided. The product is equipped
with a 3-wire cord having a 3-prong grounding plug. It must be plugged into a wall
receptacle that is properly installed and grounded.
This appliance must be grounded. In the event of an electrical short circuit, grounding
reduces risk of electric shock by providing an escape wire for the electric current. The
cord provided with this appliance is equipped with a grounding wire and a grounding
plug. The plug must be plugged into an outlet that is properly installed and grounded.
Avoid the use of three prong adapters or cutting o the third grounding prong in
order to accommodate a two prong outlet. This is a dangerous practice since it
provides no eective grounding for the refrigerator and may result in shock hazard.
Consult a qualified electrician or serviceman if:
WARNING
Improper use of the grounding plug can result in a risk of electric shock.
1) The grounding instructions are not completely understood.
2) You are unsure that the appliance is properly grounded.
3) You have any questions about the grounding or electrical instructions.
POWER SUPPLY CORD
Avoid the use of an extension cord because of potential safety hazards under certain
conditions. Have a qualified electrician or serviceman install an outlet near the
appliance.
If it is absolutely necessary to use longer cord sets or an extension cord, extreme care
must be exercised.
Page 5
SAFETY INFORMATION
USE OF EXTENSION CORDS WITH
REFRIGERATORS
Only use a grounded extension cord that is rated at least 15 amps and has a third-wire
ground. When a long extension cord is used to connect the refrigerator, a voltage
drop occurs. The longer the cord, the greater the voltage drop. This results in less
voltage being supplied to the refrigerator and increases the amount of current (amp)
draw or reduces performance. A heavier cord with a larger wire size will reduce the
voltage drop. Be sure to choose a cord that will supply enough voltage to operate the
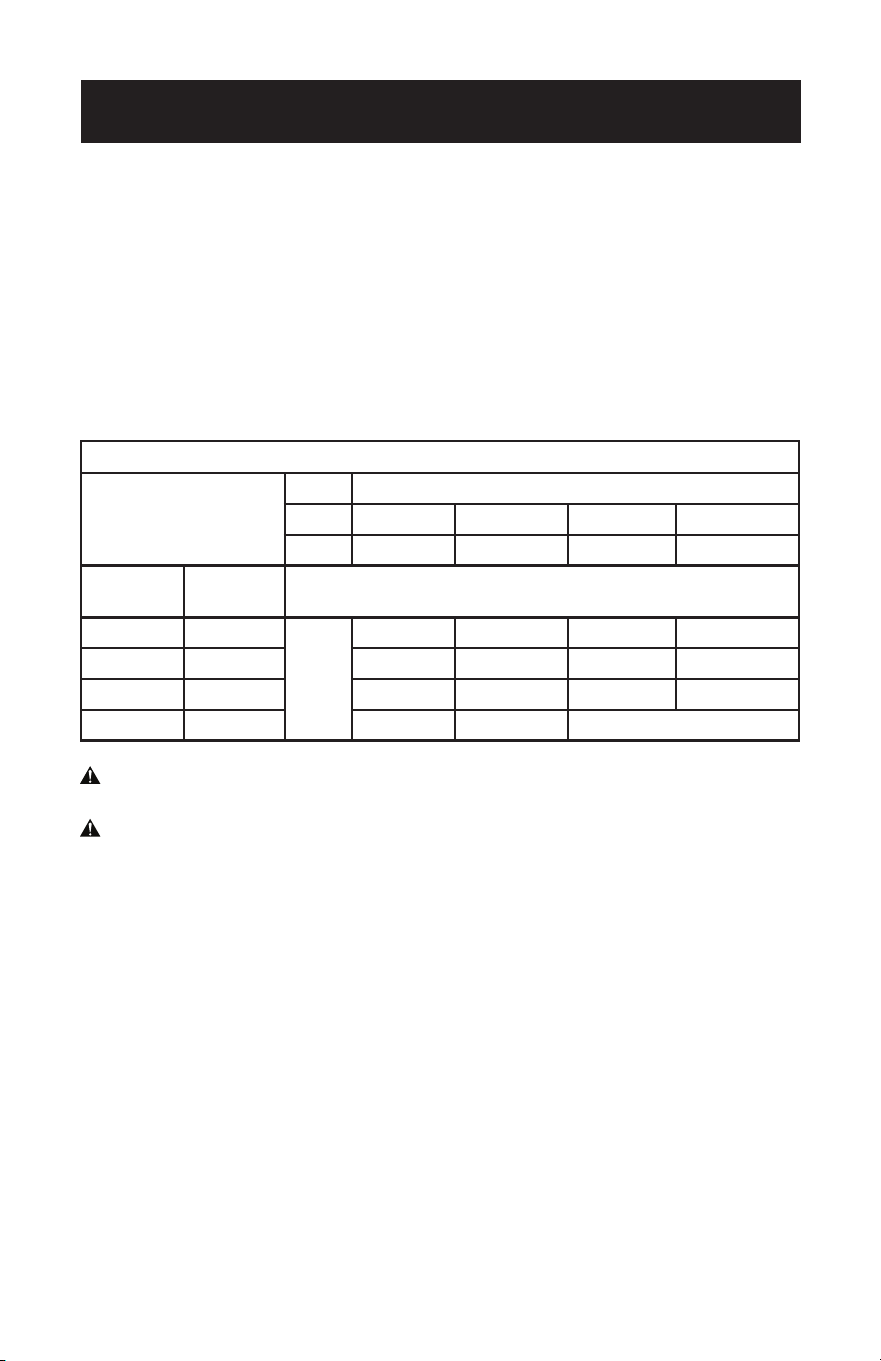
refrigerator. The table below indicates appropriate gauge for extension cords.
Minimum Gauge for Cord Sets
Ampere Rating
Volts Total Length of Cord in Feet (meters)
120V 25(7.6) 50(15.2) 100(30.5) 150(45.7)
240V 50(15.2) 100(30.5) 200(61.0) 300(91.4)
More
Than
Not More
Than
AWG
0 6 18 16 16 14
6 10 18 16 14 12
10 12 16 16 14 12
12 16 14 12 Not Recommended
WARNING: Keep electrical cords in good condition. Do not use worn, bare, or
frayed cords because they can cause electrical shock.
WARNING: Operating equipment at low voltage can cause it to overheat. Using an
excessively long extension cord can cause the cord to overheat.
NOTE: Neither BLACK+DECKER nor the dealer can accept any liability for damage to
the product or personal injury resulting from failure to observe the electrical
connection procedures.
Page 6
SET UP & USE
INSTALLATION
NOTE: All dimensions in these chapters are given in millimeters.
The minimum distances required for proper ventilation can be found in
chapter VENTILATION.
UNPACKING AND POSITIONING
WARNING: While unpacking, the packaging materials (polythene bags,
polystyrene pieces, etc.) should be kept away from children and pets. CHOKING
HAZARD! RISK OF INJURY!
1. Unpack the appliance carefully. Dispose of the packaging as described in chapter
waste management.
2. Remove all packaging materials.
3. The accessories of your appliance can be protected from damage due to
transportation (adhesive tapes etc.). Remove such tapes very carefully. Remove
remains of such tapes with a damp cloth using lukewarm water and mild
detergent (see also chapter CLEANING AND MAINTENANCE). Never remove any
components of the back of the appliance.
4. Install the appliance in a suitable position with an adequate distance from sources
of heat and cold.
5. If installation near a heat source is unavoidable, use a suitable insulation plate or
keep the following minimum distances to the heat source:
6. Check that the appliance and the power cord are not damaged.
7. Install the appliance in a dry and well-ventilated place.
8. Protect the appliance from direct sunlight.
9. The door(s) must open completely and without hindrance.
10. Install the appliance on a level, dry and solid floor. Check the correct installation
with a bubble level.
11. Connect the appliance to the mains properly.
12. The rating plate is inside the appliance or at the back.
To electric cookers At least 30mm
To radiators or ovens At least 300mm
To another refrigerators At least 20mm
Page 7
SET UP & USE
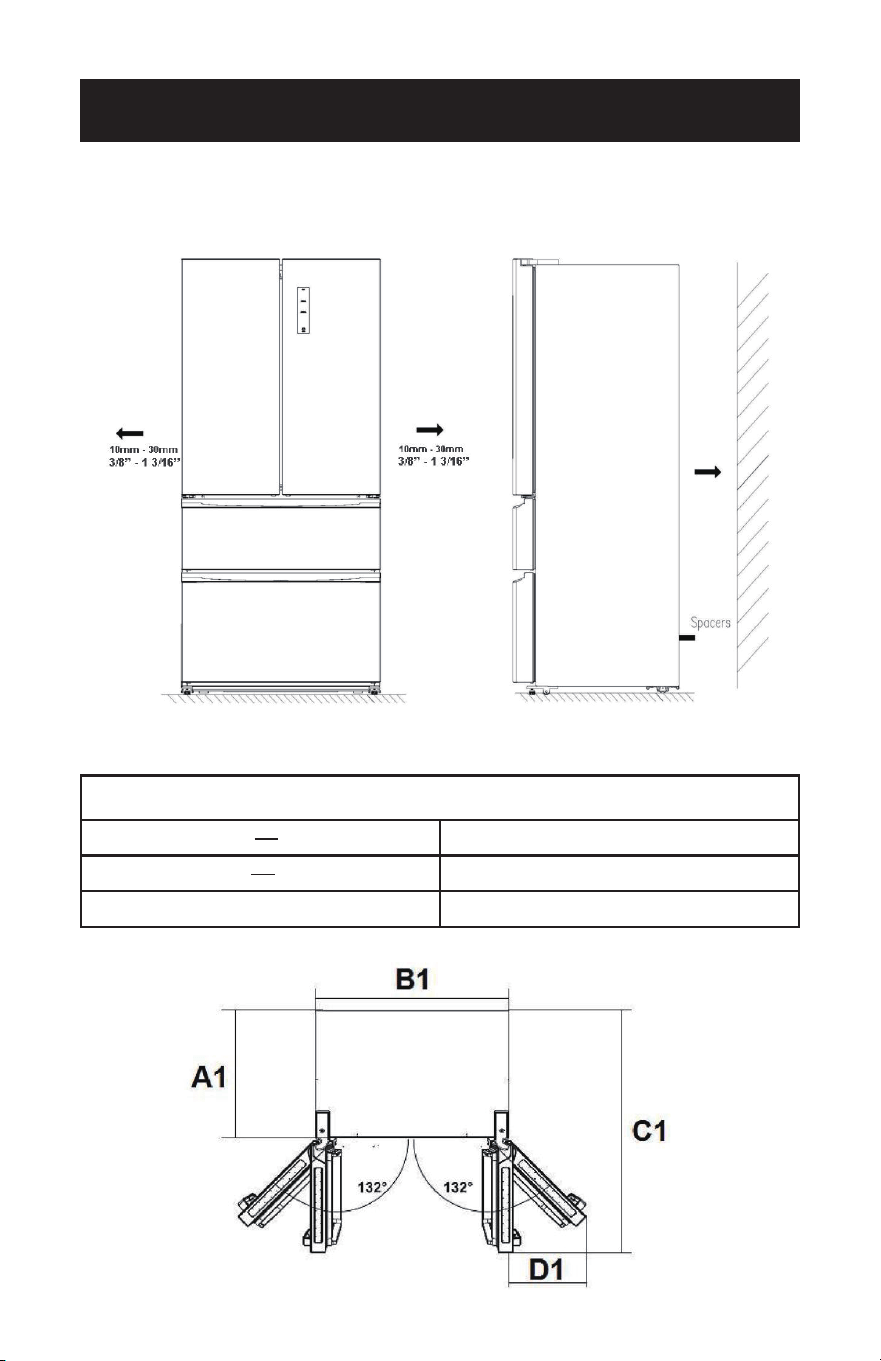
SPACE AND VENTILATION REQUIREMENTS
NOTE: Observe the required minimum distances for proper ventilation
SPACE REQUIREMENT INCL, MINIMUM DISTANCES FOR PROPER VENTILATION:
Minimum distances
MINIMUM DISTANCES REQUIRED FOR PROPER VENTILATION:
Back <> Wall Min. 50mm (2”)
Side <> Wall Min. 30cm (11.8”)
Door opening angle Min. 132°
Page 8
SET UP & USE
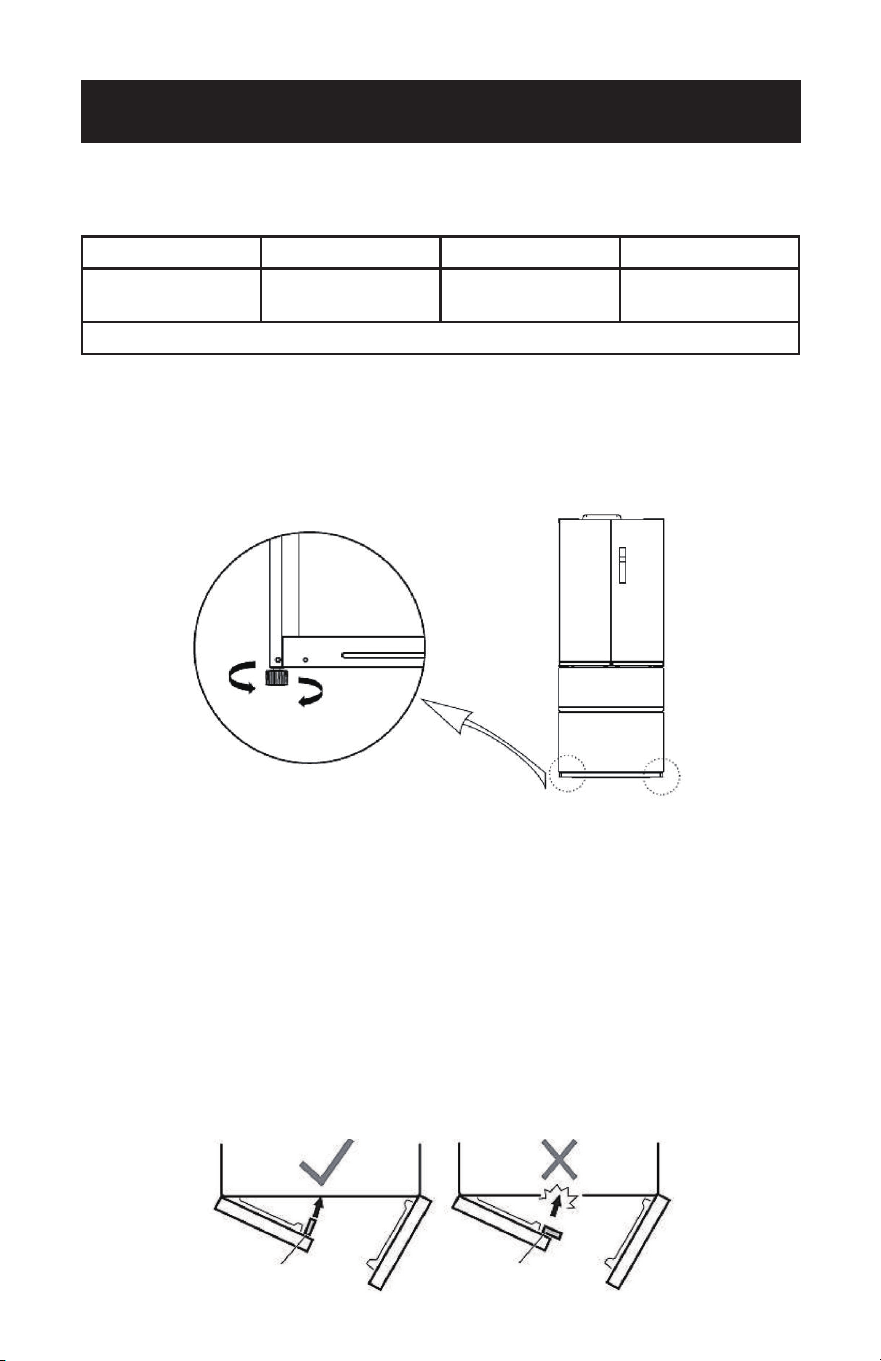
LEVELING
1. Use the adjustable supporting feet for proper leveling and for proper air
circulation in the lower sectors of the appliance. Adjust the supporting feet / foot
using a suitable spanner.
FLIPPER CLAPBOARD
1. Ensure that the flipper clapboard (depending on model) is in proper position;
otherwise the door cannot be closed properly.
2. lt is normal that the clapboard becomes hot as it is equipped with an integrated
heating element for dewing protection.
The figure above is an example only. Modifications are possible.
NOTE: These minimum distances may be less, but to do so can increase the power
consumption of the appliance.
A1 = Depth/B1 = Width/C1 = Depth (when the doors are open)/D1 = Space
requirement of the doors
A1 B1 C1 D1
Min. 620mm
(24.4”)
Min. 870mm
(34.2”)
Min. 1038mm
(40.9”)
Min. 300mm
(11.8”)
Door opening angle: Min.132°
2. You can adjust an inclination of 0.5° to allow the doors to close by themselves.
3. If you have to move the appliance, set the adjustable feet to minimum position so
the appliance can be moved on its rollers (depending on model) easily. Re-adjust
the appliance when transport has been completed.
NOTE: The rollers are no castors and intended to move the appliance forward and
backwards only. Lateral movements can damage your floor and the rollers.
Correct Incorrect
Page 9
SET UP & USE
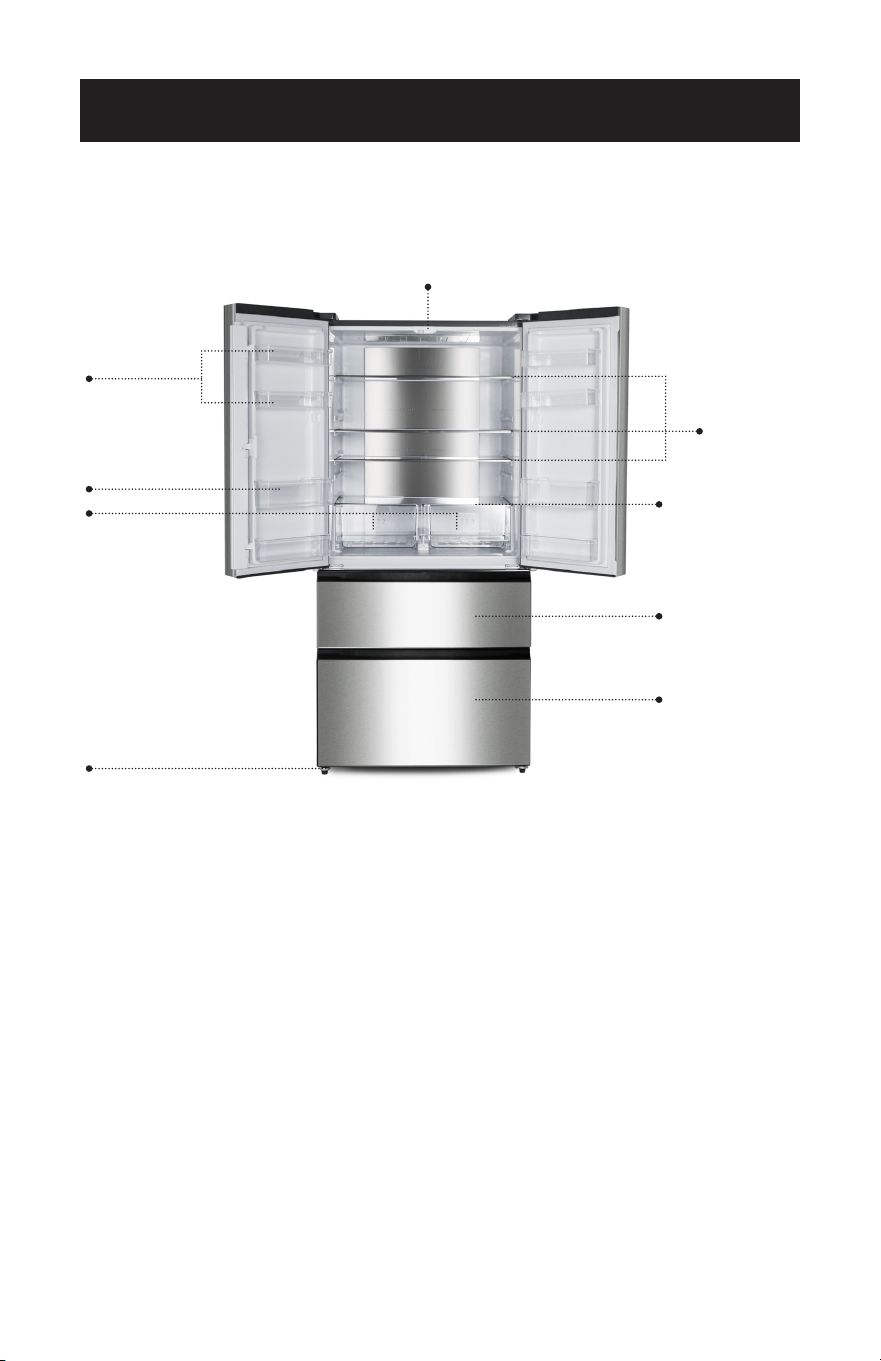
PARTS AND FEATURES
NOTE: After installation wait 4-6 hours before you connect the unit to the mains.
The glass shelves and the crisper can be removed and inserted for cleaning and
storing of food.
The appliance you have purchased may be an enhanced version of the unit this
manual was printed for. Nevertheless, the functions and operating conditions are
identical. This manual is therefore still valid.
Internal light of the fridge (LED)
Door trays
Glass shelves
Glass Crisper
Covers
Upper freezer
drawer/freezer
compartment
Lower freezer
drawer/freezer
compartment
Bottle shelf
Crispers
Adjustable feet

Page 10
SET UP & USE
OPERATION
WARNING: To disconnect the appliance from the mains, you must unplug the
appliance or use a cut-o device.
BEFORE INITIAL OPERATION
WARNING: While unpacking, the packaging materials (polythene bags,
polystyrene pieces, etc.) should be kept away from children and pets.
CHOKING HAZARD! RISK OF INJURY!
NOTE: Leave the appliance in an upright position for at least 4-6 hours before
you connect it to the mains to ensure, that the oil has flowed back into the
compressor.
NOTE: If you use the appliance for the first time or the appliance has been
disconnected from the mains for a longer period of time, allow the appliance
to cool down for 3 until 4 hours on medium temperature setting (see chapter
SETTING OF THE TEMPERATURE) before you place any fresh or frozen food
in the appliance. If you place food in the appliance before it has reached its
normal operating temperature, this food can thaw and/or spoil.
1. Remove all packaging materials.
2. Adjust the feet and clean the appliance (see chapter CLEANING AND
MAINTENANCE).
3. Do not start the appliance immediately after installation. Wait at least 4-6 hours to
ensure proper operation.
4. The settings of the temperature of the fridge can be adjusted manually. To do
this, turn the thermostat for the temperature to the desired setting. (see chapter
SETTING OF THE TEMPERATURE).
5. If operation was interrupted, wait at least 5 minutes before restart.
6. The appliance needs some time to balance temperatures when you have changed
the settings before or when you have stored additional food in the appliance. The
duration of this period of time depends on the range of the change, the ambient
temperature, the amount of food and the frequency of door-openings. When you
set the temperature of both the fridge and freezer, these aspects should be taken
into account.
7. Operate the appliance according to the instructions described in the following
chapters
Page 11
OPERATING BUTTONS AND DISPLAY
WARNING: To disconnect the appliance from the mains, you must unplug the
appliance or use a cut-o device.
• Operate the appliance according to the instructions about the control of the
functions and modes described in the following paragraphs.
• When you operate the appliance for the first time, the default temperatures are:
SET UP & USE
Fridge +5°C (41°F)
Freezer -18°C (-0.4°F)
• The settings of the temperature of both the fridge and freezer can be adjusted
manually, if required (see chapter SETTING OF THE TEMPERATURE).
Page 12
SET UP & USE
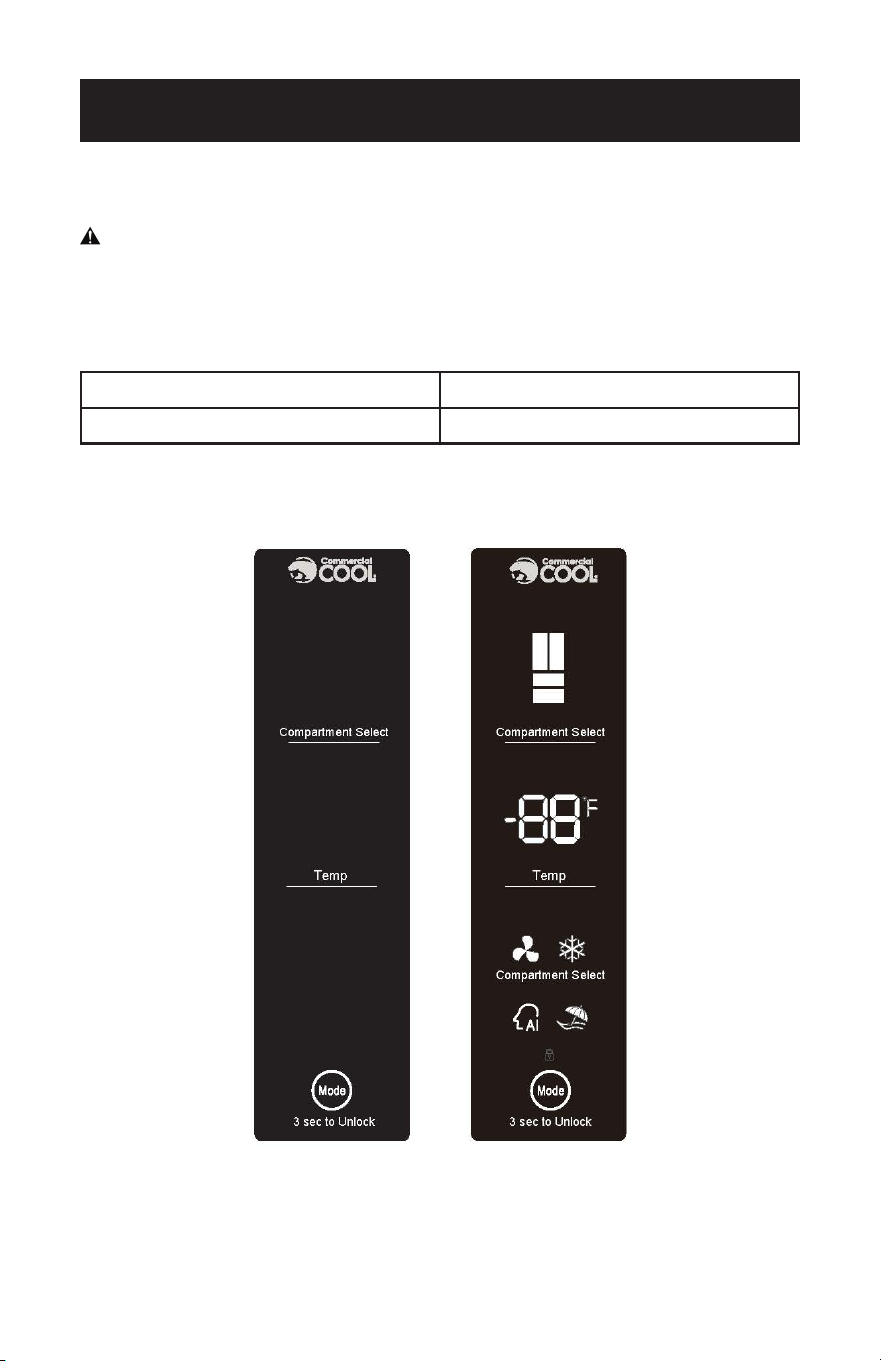
INDICATORS OF THE DISPLAY
1 Indicator of the FRIDGE
2 Indicator of the FREEZER
3
Indicator of the set TEMPERATURE of the fridge or
freezer
4 Indicator of the FAST COOLING MODE
5 Indicator of the FAST FREEZING MODE
6 Indicator of the ARTIFICIAL INTELLIGENCE MODE
7 Indicator of the VACATION MODE
8 Indicator of the KEY LOCK/CHILD PROTECTION
OPERATING BUTTONS OF THE DISPLAY
A
COMPARTMENT SELECT: Selection of the fridge or
freezer for setting temperature. Press for 5 seconds to
switch from Celsius to Fahrenheit
B
Button TEMP: SETTING OF THE TEMPERATURE in the
fridge or freezer.
C
Button MODE: selection of the dierent MODES AND
FUNCTIONS and to lock and/or unlock the KEY LOCK/
CHILD PROTECTION
DISPLAY
If you connect the appliance to the mains, the backlight of the
display goes on.
If you do not press any operating button and the doors are
closed, the backlight of the display goes o.
During normal operation the display indicates the set
temperature of the fridge or freezer.
Page 13
SET UP & USE
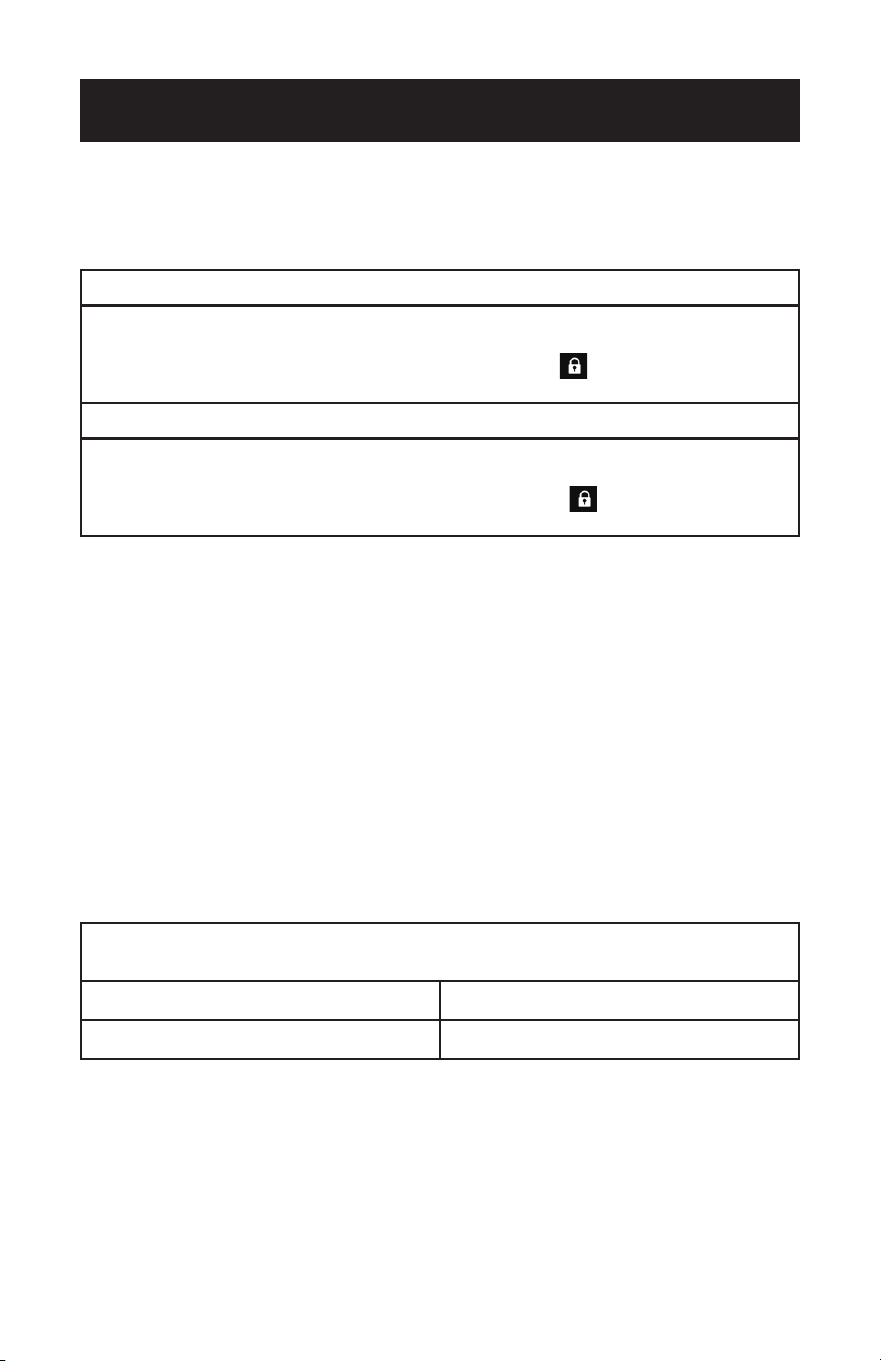
KEY LOCK/CHILD PROTECTION
The appliance is equipped with a KEY LOCK/ CHILD PROTECTION.
ACTIVATION OF THE KEY LOCK /CHILD PROTECTION:
Press the button MODE (C) for 3 seconds to turn the KEY LOCK / CHILD
PROTECTION on.
The indicator of the KEY LOCK/CHILD PROTECTION (8) goes on.
All keys of the display are locked.
DEACTIVATION OF THE KEY LOCK /CHILD PROTECTION:
Press the button MODE (C) for 3 seconds to turn the KEY LOCK / CHILD
PROTECTION o.
The indicator of the KEY LOCK/CHILD PROTECTION (8) goes o.
All keys of the display are released again.
If the KEY LOCK/CHILD PROTECTION is activated, none of the following settings
below can be carried out.
SETTING OF THE TEMPERATURE
The settings of the temperature of both the fridge and freezer can be adjusted
manually by pressing the relevant buttons (COMPARTMENT SELECT (A) for
the selection of the compartment fridge or freezer / button TEMP (B) for the
all keys of the display are locked setting of the temperature in the respective
compartments) until the desired values will be indicated (see chapter
OPERATING BUTTONS AND DISPLAY).
When you set a temperature, you set an average temperature for the whole
refrigerator Temperatures inside each area may vary from the temperature values
indicated on the display depending on how much food you store and where you
place them. Ambient temperature may also aect the actual temperature inside
the appliance. When you set the temperature of both the fridge and freezer these
aspects should be taken into account.
The ARTIFICIAL INTELLIGENCE MODE (Fridge: +5°C (41°F)/Freezer: -18°C (-0.4°F))
is the default mode of the appliance (see chapter 4.6 SELECTION OF THE MODES).
These settings can be changed as needed.
To perform the following settings the display must be unlocked.
WHEN YOU OPERATE THE APPLIANCE FOR THE FIRST TIME, THE
DEFAULT TEMPERATURES ARE (ARTIFICIAL INTELLIGENCE MODE):
Fridge +5°C (41°F)
Freezer -18°C (-0.4°F)
Page 14
SET UP & USE
Selection of the modes
You can select the modes by pressing the MODE BUTTON (C) repeatedly.
• Press the MODE BUTTON (C) repeatedly until the corresponding
indicator of the desired mode is selected.
• For doing so the keys have to be unlocked.
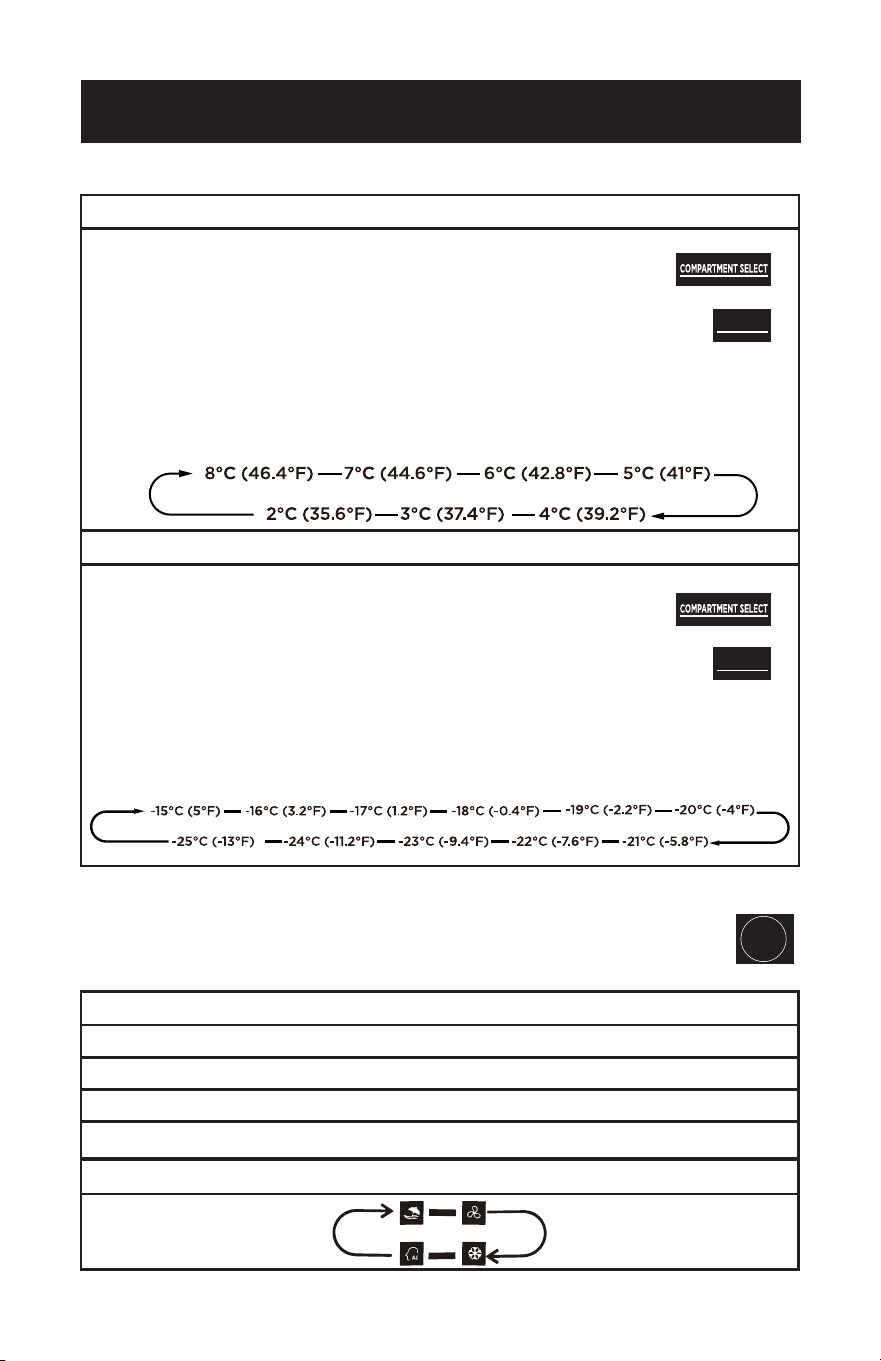
REFRIGERATOR:
You can set the temperature from +8 °C(46.4°F) to +2 °C (35.6°F).
• Press the button COMPARTMENT SELECT (A) repeatedly until
the indicator of the fridge (1) goes on.
• Press the button TEMP (B) for the setting of the temperature
repeatedly until the desired temperature is displayed (3).
• After a few seconds without using any operation buttons, the
set temperature will be activated.
• The temperature changes by 1°C (33.8°F) each time you press the Button TEMP
(B).
• The sequence of the temperature setting is:
THE FOLLOWING MODES CAN BE SET:
• ARTIFICIAL INTELLIGENCE (AI)
• VACATION MODE
• FAST FREEZING
• FAST COOLING
THE SEQUENCE OF THE MODES IS:
FREEZER:
You can set the temperature from -15°C (5°F) to -25°C (-13°F).
• Press the button COMPARTMENT SELECT (A) repeatedly until
the indicator of the freezer (2) goes on.
• Press the button TEMP (B) for the setting of the temperature
repeatedly until the desired temperature is displayed (3).
• After a few seconds without using any operation buttons, the
set temperature will be activated.
• The temperature changes by 1°C (33.8°F) each time you press the Button TEMP
(B).
• The sequence of the temperature setting is:
Temp
Temp
Mode
Page 15
SET UP & USE
ARTIFICIAL INTELLIGENCE (AI):
The ARTIFICIAL INTELLIGENCE MODE is the default mode of the appliance.
• The temperature of the fridge will be set to +5°C (41°F)automatically.
• The temperature of the freezer will be set to -18°C (-0.4°F)automatically.
• If you have not configured individual temperature settings for the
fridge and/or the freezer, the appliance will be reset to the ARTIFICIAL
INTELLIGENCE MODE automatically after deactivation of one of the other
modes ( VACATION MODE/FAST FREEZING or FAST COOLING).
• If you have configured individual temperature settings for the fridge and/or
freezer, the temperature(s) will be reset to the previous setting.
• If the ARTIFICIAL INTELLIGENCE MODE is activated, the appliance
operates with the highest eciency regarding food preservation and food
storage.
You can also set the artificial intelligence mode manually at any time:
• Press the MODE BUTTON (C) repeatedly until the indicator of the
ARTIFICIAL INTELLIGENCE MODE (6) goes on.
• After a few seconds without using any operation buttons, the ARTIFICIAL
INTELLIGENCE MODE will be activated.
VACATION MODE:
• Press the MODE BUTTON (C) repeatedly until the indicator of the VACATION
MODE (7) goes on.
• After a few seconds without using any operation buttons, the VACATION
MODE will be activated.
• The VACATION MODE can be ended at any time by pressing the button TEMP
(B). The temperature of the fridge will be reset to the previous setting.
• During the VACATION MODE, the temperature of the fridge will be set to +15°C
(59°F)automatically to minimize the energy consumption.
• During the VACATION MODE, the temperature of the fridge cannot be
changed. You must quit the VACATION MODE previously (see above).
• Select this mode when you are not at home for a longer period of time (7-21
days).
NOTE: In VACATION MODE the fridge will be set to +15°C (59°F) automatically. Do
not leave any food in the fridge while the VACATION MODE is activated.
Page 16
SET UP & USE
FAST FREEZING:
• Press the MODE BUTTON (C) repeatedly until the indicator of the FAST
FREEZING MODE (5) goes on.
• After a few seconds without using any operation buttons, the FAST FREEZING
MODE will be activated.
• The FAST FREEZING MODE can be quitted at any time by pressing the button
TEMP (B).
The temperature of the freezer will be reset to the previous setting.
• The temperature of the freezer will be set to -25°C (-13°F) automatically.
• After 26 hours the FAST FREEZING MODE switches o automatically and the
temperature of the freezer will be reset to the previous setting.
• During the FAST FREEZING MODE, the temperature of the fridge cannot be
changed. You must quit the FAST FREEZING MODE previously (see above).
• When the FAST FREEZING MODE is activated, the temperature of the
refrigerator does not change.
• This function decreases the freezing temperature rapidly and makes sure that
the food will be frozen faster than usual. Thereby this function helps to preserve
vitamins and nutrients of fresh food for a longer period of time.
• Select this mode when you like to freeze fresh meat or fish for long term
storage.
CAUTION: Do not put any bottled or canned beverages (neither still nor
carbonated) into the freezer compartment of the appliance as
their containers could explode.
FAST COOLING:
• Press the MODE BUTTON (C) repeatedly until the indicator of the FAST
COOLING MODE (4) goes on.
• After a few seconds without using any operation buttons, the FAST COOLING
MODE will be activated.
• The FAST COOLING MODE can be ended at any time by pressing the button
TEMP (B). The temperature of the fridge will be reset to the previous setting.
• The temperature of the fridge will be set to +2°C (35.6°F)automatically.
• During the FAST COOLING MODE, the temperature of the fridge cannot be
changed. You must quit the FAST COOLING MODE previously (see above).
• After 3 hours the FAST COOLING MODE switches o automatically and the
temperature of the fridge will be reset to the previous setting.
• This function decreases the refrigeration temperature rapidly and makes sure
that the food will be cooled faster than usual. Thereby this function helps to
keep the stored food fresh for a longer period of time.
Page 17
SET UP & USE
THE REFRIGERATOR
Door trays
1. Depending on model the medium door trays can be removed.
2. Remove all stored food of the relevant door trays before.
3. Lift the door tray vertically.
4. Insert the door tray by proceeding vice versa.
NOTE: The door trays can be removed and inserted for cleaning
as shown above (depending on model)
Glass shelves
1. The glass shelves can be inserted into dierent
positions 15 if required.
2. Pull the glass shelf on the guide rails forward carefully
and lift it slightly until you can remove it.
3. To reinsert the glass shelf, push it back in position on
the guide rails carefully.
4. Ensure that the area is free and has no obstacles.
NOTE: The glass shelves can be removed and inserted for
cleaning as shown above (depending on model).
DOOR ALARM
The appliance is equipped with an automatic alarm which indicates that one
of the doors of the appliance are opened for a longer period of time.
1. If one of the doors is opened for more than 2 minutes, an acoustic warning
signals sound.
2. If the door is opened for a prolonged period of time, the acoustic warning signal
will sound three times every minute.
3. After 10 minutes the acoustic warning signal will automatically.
NOTE: The door alarm also can be silenced by closing by closing the corresponding
door.
In order to save energy a prolonged opening of the doors should be avoided.
Page 18
DANGER: Never touch the power plug, the power switch or other electrical
components with wet or damp hands. RISK OF ELECTRIC SHOCK!
WARNING: Disconnect the appliance from the mains before you clean or maintain
it. RISK OF ELECTRIC SHOCK!
WARNING: To disconnect the appliance from the mains, you must unplug the
appliance or use a cut-o device.
WARNING: Remove possible dust accumulation at the power plug, at the safety
power socket and at all plug connectors regularly. RISK OF FIRE!
NOTE: Clean the appliance at least once a month.
1. Always keep the appliance clean so that unpleasant odors do not occur.
2. Dust deposits on the condenser will increase the energy consumption. Clean the
condenser twice a year with a vacuum cleaner or a soft brush.
3. Take o all rings and bracelets before cleaning or maintaining the appliance;
otherwise you will damage the surface of the appliance.
DETERGENT:
• Do not use any harsh, abrasive or aggressive detergents.
• Do not use any solvents.
• Do not use any abrasive detergents!
• Do not use any organic detergents! (Detergents such as vinegar, citric acid etc).
• Do not use essential oils!
• These instructions are valid for all surfaces of your appliance.
EXTERNAL CLEANING:
1. Use a moist cloth and a mild, non-acidic detergent. Use a suitable detergent for
stubborn stains.
2. Use clear water to rinse.
3. Dry the cleaned surfaces with a cloth.
INTERNAL CLEANING:
1. Clean the shelves and the inside with warm water and a mild detergent.
2. Use clear water to rinse.
3. Dry the cleaned surfaces with a cloth.
4. Check the water drain and clean it if needed.
DOOR SEALS:
Clean with warm water and a mild, non-acidic detergent. Do not restart the appliance
until the door seals have dried completely.
DRAIN HOLE (depending on model):
Clean the drain hole at the back of the cooling compartment
periodically; otherwise defrost water can get into the cooling
compartment. Use a suitable device such as a pipe cleaner.
NOTE: Empty and clean the drip tray regularly.
CLEANING AND CARE

Page 19
CLEANING AND CARE
DEFROSTING
REFRIGERATOR COMPARTMENT
The refrigerator compartment is defrosted automatically.
FREEZER COMPARTMENT
The freezer is defrosted automatically.
FREEZER Optional procedure if encrusted ice should occur:
WARNING: Switch o the appliance by turning the thermostat (depending on
model) to position 0 / AUS / OFF and disconnect it from the mains.
WARNING: To disconnect the appliance from the mains, you must unplug the
appliance or use a cut-o device.
WARNING: Never use any mechanical items, knives or other sharp-edged objects
to remove the encrusted ice. Never use a steam cleaner. RISK OF
ELECTRICAL SHOCK!
WARNING: Do not use hair dryers, electrical heaters or other technical devices to
accelerate the defrosting process. RISK OF ELECTRICAL SHOCK!
1. Remove the contents from the fridge and put them into a cooler.
2. Switch o the appliance by disconnecting it from the mains or use a cut-o
device.
3. Place a container in front of the appliance to catch the water.
4. When the encrusted ice melts put some dry cloths into the freezer compartment
to hold the water back.
5. Do not use hot water to accelerate the defrosting operation.
6. Remove the big pieces of ice first.
7. Afterwards remove the small pieces of ice.
8. Wipe and dry the appliance and door seals with dry and soft cloths.
9. After cleaning leave the door open for some time to ventilate the appliance.
REPLACING OF THE ILLUMINATE
WARNING: The LED-illuminate must be replaced by a competent person only. If
the LED-illuminate is damaged, please contact a qualified professional.
REPLACING OF THE POWER CORD
DANGER: The power cord must be replaced by a qualified and authorized
professional only.

Page 20
TROUBLESHOOTING & WARRANTY
BEFORE YOU CALL FOR SERVICE
IF THE UNIT FAILS TO OPERATE:
A) Check to make sure that the unit is plugged in securely. If it is not, remove the plug
from the outlet, wait 10 seconds and plug it in again securely.
B) Check for a blown circuit fuse or a tripped main circuit breaker. If these seem to be
operating properly, test the outlet with another appliance.
IF NONE OF THE ABOVE SOLVES THE PROBLEM, CONTACT A QUALIFIED
TECHNICIAN. DO NOT TRY TO ADJUST OR REPAIR THE PRODUCT YOURSELF.
IMPORTANT
DO NOT RETURN THIS PRODUCT TO THE STORE
If you have a problem with this product, please contact the
W Appliance Co. Customer Satisfaction Center at
855-855-0294 or [email protected].
DATED PROOF OF PURCHASE, MODEL # AND SERIAL #
REQUIRED FOR WARRANTY SERVICE

Page 21
TROUBLESHOOTING & WARRANTY
TROUBLE POSSIBLE CAUSE POSSIBLE REMEDY
Refrigerator does
not work.
A. The plug of the appliance is
not connected to the socket.
B. The plug has become loose.
C. The socket is not supplied
with energy.
D. The fuse is switched o.
E. The voltage is too low.
A. Connect the appliance to the mains properly.
B. Check the plug.
C. Check the corresponding socket by
connecting it with another appliance.
D. Check the fuse box.
E. Compare the data on the model, plate with
the data of your energy supplier.
The compressor
does not work
at all.
A. Incorrect energy supply A. Check the energy supply.
The compressor
operates for too
long.
A. The appliance has been
switched o for a while.
B. Too much or too hot food in
the appliance.
C. Doors opened too often or
too long.
A. The appliance needs some time to reach the
preset temperature.
B. Remove any hot food.
C. Do not open the door too often/too long.
Formation of
encrusted ice.
A. The air outlets may be
blocked by food.
B. The door is not properly
closed.
C. The door seal is damaged or
soiled.
A. Store the food in another place.
B. Close the door properly.
C. Clean and / or replace the door seal.
The door makes
a strange sound
when opened.
A. The door seals are soiled. A. Clean the door seals.
Uncommon noise. A. The appliance is not installed
on a flat and level ground. The
appliance touches a wall or
another object.
B. Frozen food is stored
improperly.
C. Items have dropped behind
the appliance.
A. Remove the items.
Water drips on the
floor
A. The water pan (located at the
rear bottom of the cabinet)
may not be properly leveled,
or the draining spout (located
underneath the top of the
compressor depot) may not
be properly positioned to
direct water into this pan, or
the water spout is blocked.
A. You may need to pull the refrigerator away
from the wall to check the pan and spout.
The light is not
working.
A. The LED light may be
damaged.
B. The control system has
disabled the lights due to the
door being kept open too
long.
A. Replace LED lights.
B. Close and reopen the door to reactivate the
lights.
If the appliance shows a malfunction not the same as the list above or if you
have checked all items on the above schedule but the problem still exists, please
contact the shop you purchased the appliance at.
TROUBLESHOOTING
Troubleshoot your problem by using the chart below. If the refrigerator still does
not work properly, contact W Appliance Co. customer service center or the nearest
authorized service center. Customers must never troubleshoot internal components.
Page 22
TROUBLESHOOTING & WARRANTY
THE OPERATING CONDITIONS DESCRIBED BELOW ARE NORMAL AND DO
NOT INDICATE A MALFUNCTION.
• The refrigerant generates a sound similar to flowing water.
• Sometimes you may hear a sound which is generated by the injection
process of the cooling circuit.
• The sides of the appliance may get warm while the appliance is running.
DISTINCT NOISE
When you operate the appliance for the first time or the temperature falls
below a certain level, the appliance will operate with high power to reach the
preset temperature.
CONDENSED WATER IN / ON THE APPLIANCE
It may be generated inside or outside the appliance by high humidity or very
warm ambient temperatures.
CLICKING
You will hear the compressor click if it is activated or deactivated.
HUM
It is caused by the compressor while running.
KNOCKING / SNAPPING
It may be generated by sequential expansion and shrinkage of the components
of the cooling system. It is caused by variation of temperature before and after
the compressor is activated or deactivated.
DECOMMISSIONING
DECOMMISSIONING, TEMPORARILY:
IF THE APPLIANCE IS NOT USED FOR A LONGER PERIOD OF TIME:
1. Disconnect the appliance from the mains. To disconnect the appliance from the
mains, you must unplug the appliance or use a cut-o device.
2. Remove all food stored in the appliance.
3. Dry the inside of the appliance with a cloth and leave the door open for a few
days.
WHILE AWAY ON AN AVERAGE VACATION / HOLIDAY (14-21 DAYS):
1. Do the same as described above, or
2. Let the appliance operate.
a. remove all perishable food from the cooling compartment.
b. clean the cooling compartment.
c. freeze all food which is suitable to be frozen.
IF YOU WANT TO MOVE THE APPLIANCE:
1. Secure all removable parts and the contents of the appliance. Pack them
separately if necessary.
2. Transport the appliance in an upright position only. All other positions can cause
damage to the compressor.
3. Do not damage the feet of the appliance.

Page 23
TROUBLESHOOTING & WARRANTY
DECOMMISSIONING, ULTIMATE:
1. Disconnect the appliance from the mains. To disconnect the appliance from the
mains, you must unplug the appliance or use a cut-o device.
2. Cut o the power cord at the appliance.
3. Completely remove every door of the appliance.
4. Leave the shelves in their position so that children are not able to get into the
appliance.
5. Follow the advice of your local municipality for the disposal of the appliance.

Page 24
TROUBLESHOOTING & WARRANTY
LIMITED WARRANTY
Commercial Cool brand is used under license.
Any repair, replacement, or warranty service,
and all questions about this appliance should
be directed to W Appliance Co. at 1 (855)
855-0294 from the USA or Puerto Rico.
W Appliance Co. warrants to the original purchaser
that the appliance will be free from defects in material,
parts and workmanship for the period designated for
this appliance. The warranty commences the day the
appliance is purchased and covers up to a period of
1 year (12 months) for labor/1 year (12 months) for
parts (manufacturing defects only)/carry in service.
W Appliance Co. agrees that it will, at its option,
replace the defective appliance with either a new or
remanufactured appliance equivalent to your original
purchase during the warranty period.
Exclusions: This warranty does not apply to the
below:
1. If the appearance or exterior of the
appliance has been damaged or
defaced, altered or modied in design or
construction.
2. If the appliance original serial number
has been altered or removed or cannot
be readily determined.
3. If there is damage due to power line
surge, user damage to the AC power
cord or connection to improper voltage
source.
4. If damage is due to general misuse,
accidents or acts of God.
5. If repair attempts are done by
unauthorized service agents, use of
parts other than genuine parts or parts
obtained from persons other than
authorized service companies.
6. On units that have been transferred
from the original owner.
7. On appliances that have been purchased
as refurbished, like new, second-hand, in
a “As-Is” or “Final Sale” terms.
8. To appliances used in a commercial or
rental setting.
9. To appliances used in settings other
than ordinary household use or used
other than in accordance with the
provided instructions.
10. To damages for service calls for
improper installations.
11. To glass parts and other accessory items
that are included with the unit.
12. Transportation and shipping costs
associated with the replacement of
the unit.
13. Service calls to repair or replace the
house fuse, reset the circuit breaker or
correct the wiring in the house.
REPAIR OR REPLACEMENT AS PROVIDED UNDER
THIS WARRANTY IS THE EXCLUSIVE REMEDY OF
THE CUSTOMER; W Appliance Co. SHALL NOT BE
LIABLE FOR ANY INCIDENTAL OR CONSEQUENTIAL
DAMAGES FOR BREACH OF ANY EXPRESS OR
IMPLIED WARRANTY ON THIS Appliance, EXCEPT
TO THE EXTENT PROHIBITED BY APPLICABLE LAW.
ANY IMPLIED WARRANTY OF MERCHANTABILITY
OF FITNESS FOR A PARTICULAR PURPOSE ON THIS
Appliance IS LIMITED TO THE DURATION OF THE
WARRANTY.
Some states do not allow the exclusion or limitations
of incidental or consequential damages, or limitations
on how long the warranty lasts. In these cases the
above exclusions or limitations may not apply to you.
This warranty gives you specic legal rights and you
may also have other rights which vary from state to
state.
Obtaining Service: To obtain service, appliance
literature, supplies or accessories please call
1 (855) 855-0294 to create a ticket for exchange/
repair. Please make sure to provide the date of
purchase, model number and a brief description of
the problem. Our customer service representative will
contact you or send detailed return instructions.
W Appliance Co. does not warrant that the appliance will work
properly in all environmental conditions, and makes no warranty
and representation, either implied or expressed, with respect
to the quality, performance, merchantability, or tness for a
particular purpose other than the purpose identied within this
user’s manual. W Appliance Co. has made every effort to ensure
that this user’s manual is accurate and disclaims liability for any
inaccuracies or omissions that may have occurred. Information
in this user’s manual is subject to change without notice and
does not represent a commitment on the part of W Appliance
Co.. W Appliance Co. reserves the right to make improvements
to this user’s manual and/or to the appliances described in this
user’s manual at any time without notice. If you nd information
in this manual that is incorrect, misleading, or incomplete, please
contact us at 1- 855-855-0294.
W Appliance Co.,
1356 Broadway
New York, NY 10018

© 2024 Commercial Cool is a W Appliance Company.
All Rights Reserved.