SAFETY INSTRUCTIONS
IMPORTANT TO BE READ AND OBSERVED
EN
These instructions are valid if the country symbol
appears on the appliance. If the symbol doesn’t appear on
the appliance, it is necessary to refer to the technical
instructions which will provide the necessary instructions
concerning modification of the appliance to the conditions
of use of the country.
CAUTION: The use of the gas cooking appliance results
in the production of heat, moisture and products of
combustion in the room in which it is installed. Ensure that
the kitchen is well ventilated especially when the appliance
is in use: keep natural ventilation holes open or install a
mechanical ventilation device (mechanical extractor
hood). Prolonged intensive use of the appliance may call
for additional ventilation, such as opening a window, or
more effective ventilation, for example increasing the level
of mechanical ventilation (if possible).
Failure to follow the information in this manual exactly
may cause a fire or explosion, resulting in property damage
or personal injury.
Before using the appliance, read these safety instructions.
Keep them nearby for future reference.
These instructions and the appliance itself provide
important safety warnings, to be observed at all times. The
manufacturer declines any liability for failure to observe
these safety instructions, for inappropriate use of the
appliance or incorrect setting of controls.
WARNING: If the hob surface is cracked, don’t use the
appliance – risk of electrical shock.
WARNING: Danger of fire: Do not store items on the
cooking surfaces.
CAUTION: The cooking process has to be supervised. A
short cooking process has to be supervised continuously.
WARNING: Unattended cooking on a hob with fat or oil
can be dangerous – risk of fire. NEVER try to extinguish a
fire with water, but switch off the appliance and then cover
flame e.g. with a lid or a fire blanket.
Do not use the hob as a work surface or support. Keep
clothes or other flammable materials away from the
appliance, until all the components have cooled down
completely – risk of fire.
Very young children (0-3 years) should be kept away
from the appliance. Young children (3-8 years) should be
kept away from the appliance unless continuously
supervised. Children from 8 years old and above and
persons with reduced physical, sensory or mental
capabilities or lack of experience and knowledge can use
this appliance only if they are supervised or have been
given instructions on safe use and understand the hazards
involved. Children must not play with the appliance.
Cleaning and user maintenance must not be carried out
by children without supervision.
CAUTION: In case of hotplate glass breakage: shut
immediately off all burners and any electrical heating
element and isolate the appliance from the power supply;
do not touch the appliance surface; do not use the
appliance.
The glass lid can break in if it is heated up. Turn off all the
burners and the electric plates before closing the lid. Do
not shout down lid when burner alight.
WARNING: The appliance and its accessible parts
become hot during use. Care should be taken to avoid
touching heating elements. Children less than 8 years of
age must be kept away unless continuously supervised.
The food must not be left in or on the product for more
than one hour before or after cooking.
PERMITTED USE
CAUTION: the appliance is not intended to be operated
by means of an external switching device, such as a timer,
or separate remote controlled system.
This appliance is intended to be used in household and
similar applications such as: staff kitchen areas in shops,
offices and other working environments; farm houses; by
clients in hotels, motels, bed & breakfast and other
residential environments.
No other use is permitted (e.g. heating rooms).
This appliance is not for professional use. Do not use
the appliance outdoors.
Use pots and pans with bottoms the same width as
that of the burners or slightly larger (see specific table).
Make sure pots on the grates do not protrude beyond the
edge of the hob.
Improper use of the grids can result in damage to the
hob: do not position the grids upside down or slide them
across the hob.
Do not let the burner flame extend beyond the edge of the pan.
If the hob surface is in glass material, do not use the cast iron griddles, ollar stones,
terracotta pots and pans.
Do not use: heat diffusers such as metal mesh, or any other types; two burners
simultaneously for one receptacle (e.g. Fish kettle).
Should particular local conditions of the delivered gas make the ignition of burner
difficult, it is advisable to repeat the operation with the knob turned to small flame
setting.
In case of installation of a hood above the cooktop, please refer to the hood
instructions for the correct distance.
The protective rubber feet on the grids represent a choking hazard for young
children. After removing the grids, please ensure that all the feet are correctly fitted.
INSTALLATION
The appliance must be handled and installed by two or
more persons - risk of injury. Use protective gloves to
unpack and install - risk of cuts.
The electrical and gas connections must comply with
local regulation.
Installation, including water supply (if any) and electrical
connections, and repairs must be carried out by a qualified
technician. Do not repair or replace any part of the
appliance unless specifically stated in the user manual.
Keep children away from the installation site. After
unpacking the appliance, make sure that it has not been
damaged during transport. In the event of problems,
contact the dealer or your nearest After-sales Service.
Once installed, packaging waste (plastic, styrofoam parts
etc.) must be stored out of reach of children - risk of
suffocation. The appliance must be disconnected from
the power supply before any installation operation - risk of
electrical shock. During installation, make sure the
appliance does not damage the power cable - risk of fire or
electrical shock. Only activate the appliance when the
installation has been completed.
WARNING: Modification of the appliance and its
method of installation are essential in order to use the
appliance safely and correctly in all the additional countries.
Use pressure regulators suitable for the gas pressure
indicated in the instruction.
The room must be equipped with an air extraction
system that expels any combustion fumes.
The room must also allow proper air circulation, as air is
needed for combustion to occur normally. The flow of air
must not be less than 2 m
3
/h per kW of installed power.
The air circulation system may take air directly from the
outside by means of a pipe with an inner cross section of
at least 100 cm
2
; the opening must not be vulnerable to
any type of blockages.
The system can also provide the air needed for
combustion indirectly, i.e. from adjacent rooms fitted with
air circulation tubes as described above. However, these
rooms must not be communal rooms, bedrooms or
rooms that may present a fire hazard.
Liquid petroleum gas sinks to the floor as it is heavier
than air. Therefore, rooms containing LPG cylinders must
also be equipped with vents to allow gas to escape in the
event of a leak. As a result LPG cylinders, whether partially
or completely full, must not be installed or stored in rooms
or storage areas that are below ground level (cellars, etc.).
It is advisable to keep only the cylinder being used in the
room, positioned so that it is not subject to heat produced
by external sources (ovens, fireplaces, stoves, etc. ) which
could raise the temperature of the cylinder above 50°C.
Should you experience difficulty in turning the burners knobs, please contact After
Sales Service for replacement of the burner tap if found to be faulty.
The openings used for the ventilation and dispersion of heat must never be covered.
Carry out all cabinet cutting works before fitting the
appliance in the furniture and remove all wood chips and
sawdust.
If the appliance is not installed above an oven, a
separator panel (not included) must be installed in the
compartment under the appliance.
GAS CONNECTION
WARNING: Prior to installation, ensure that the local
distribution conditions (type of gas and gas pressure) and
the adjustment of the appliance are compatible.
Check that the pressure of the gas supply is consistent
with the values indicated in “Burner and nozzle
specifications” table.
WARNING: The configuration conditions for this
appliance are stated on the label (or data plate).
WARNING: This appliance is not connected to a
combustion products evacuation device. It must be
installed and connected in accordance with current
installation regulations. Particular attention must be paid
to the relevant requirements regarding ventilation.
If the appliances is connected to liquid gas, the
regulation screw must be fasted as tightly as possible.
IMPORTANT: When the gas cylinder or gas container is
installed, it must be properly settled (vertical orientation).
WARNING: This operation must be performed by a
qualified technician.
Use only flexible or rigid metal hose for gas connection.
Connection with a rigid pipe (copper or steel)
Connection to the gas system must be carried out in such
a way as not to place any strain of any kind on the appliance.
There is an adjustable L-shaped pipe fitting on the
appliance supply ramp and this is fitted with a seal in order
to prevent leaks. The seal must always be replaced after
rotating the pipe fitting (the seal is provided with the
appliance). The gas supply pipe fitting is a threaded 1/2
gas cylindrical male attachment.
Connecting a flexible jointless stainless steel pipe to a
threaded attachment. The gas supply pipe fitting is a
threaded 1/2 gas cylindrical male attachment. These pipes
must be installed so that they are never longer than 2000
mm when fully extended. Once connection has been
carried out, make sure that the flexible metal pipe does
not touch any moving parts and is not compressed. Only
use pipes and seals that comply with current National
regulations.
IMPORTANT: If a stainless steel hose is used, it must be
installed so as not touch any mobile part of the furniture
(e.g. drawer). It must pass through an area where there are
no obstructions and where it is possible to inspect it on all
its length.
The appliance should be connected to the main gas
supply or to gas cylinder in compliance with the current
national regulations. Before making the connection, make
sure that the appliance is compatible with the gas supply
you wish to use. If this is not the case, follow the instructions
indicated in the paragraph “Adapting to different types of
gas”.
After connection to the gas supply, check for leaks with
soapy water. Light up the burners and turn the knobs
from maximum position 1* to minimum position 2* to
check flame stability.
ADAPTING TO DIFFERENT TYPES OF GAS
(This operation needs to be carried out by a qualified
technician).
In order to adapt the appliance to a type of gas other
than the type for which it was manufactured (indicated on
the rating label), follow the dedicated steps provided after
installation drawings.
ELECTRICAL WARNINGS
IMPORTANT: Information about current and voltage
consumption is provided on the rating plate.
It must be possible to disconnect the appliance from
the power supply by unplugging it if plug is accessible, or
by a multi-pole switch installed upstream of the socket in
accordance with the wiring rules and the appliance must
be earthed in conformity with national electrical safety
standards.
The power cable must be long enough to connect the
appliance, once fitted in its housing, to the main power
supply. Do not pull the power supply cable.
Do not use extension leads, multiple sockets or
adapters. The electrical components must not be
accessible to the user after installation. Do not use the
appliance when you are wet or barefoot. Do not operate
this appliance if it has a damaged power cable or plug, if it
is not working properly, or if it has been damaged or
dropped.
If the supply cord is damaged, it must be replaced with
an identical one by the manufacturer, its service agent or
similarly qualified persons in order to avoid a hazard - risk
of electrical shock.
CLEANING AND MAINTENANCE
WARNING: Ensure that the appliance is switched off
and disconnected from the power supply before
performing any maintenance operation; never use steam
cleaning equipment - risk of electric shock.
Do not use abrasive or corrosive products, chlorine-
based cleaners or pan scourers.
To avoid damaging the electric ignition device, do not
use it when the burners are not in their housing.
DISPOSAL OF PACKAGING MATERIALS
The packaging material is 100% recyclable and is marked with the recycle symbol
.
The various parts of the packaging must therefore be disposed of responsibly and in
full compliance with local authority regulations governing waste disposal.
DISPOSAL OF HOUSEHOLD APPLIANCES
This appliance is manufactured with recyclable or reusable materials. Dispose of it
in accordance with local waste disposal regulations. For further information on the
treatment, recovery and recycling of household electrical appliances, contact your
local authority, the collection service for household waste or the store where you
purchased the appliance. This appliance is marked in compliance with European
Directive 2012/19/EU, Waste Electrical and Electronic Equipment (WEEE) and with
the Waste Electrical and Electronic Equipment regulations 2013 (as amended).
By ensuring this product is disposed of correctly, you will help prevent negative
consequences for the environment and human health.
The symbol
on the product or on the accompanying documentation indicates
that it should not be treated as domestic waste but must be taken to an appropriate
collection center for the recycling of electrical and electronic equipment.
ENERGY SAVING TIPS
Use pots and pans with bottom width equal to that of the cooking zone.
Only use flat-bottomed pots and pans.
When possible, keep pot lids on during cooking.
Use a pressure cooker to save even more energy and time.
DECLARATION OF CONFORMITY
This appliance meets Ecodesign requirements of European Regulation 66/2014 and
The Ecodesign for Energy-Related Products and Energy Information (Amendment)
(EU Exit) Regulations 2019 in compliance with the European standard EN 30-2-1.
The information related to low power mode of the appliance in accordance
with Regulation (EU) 2023/826 can be found in the following link: https://docs.
emeaappliance-docs.eu.
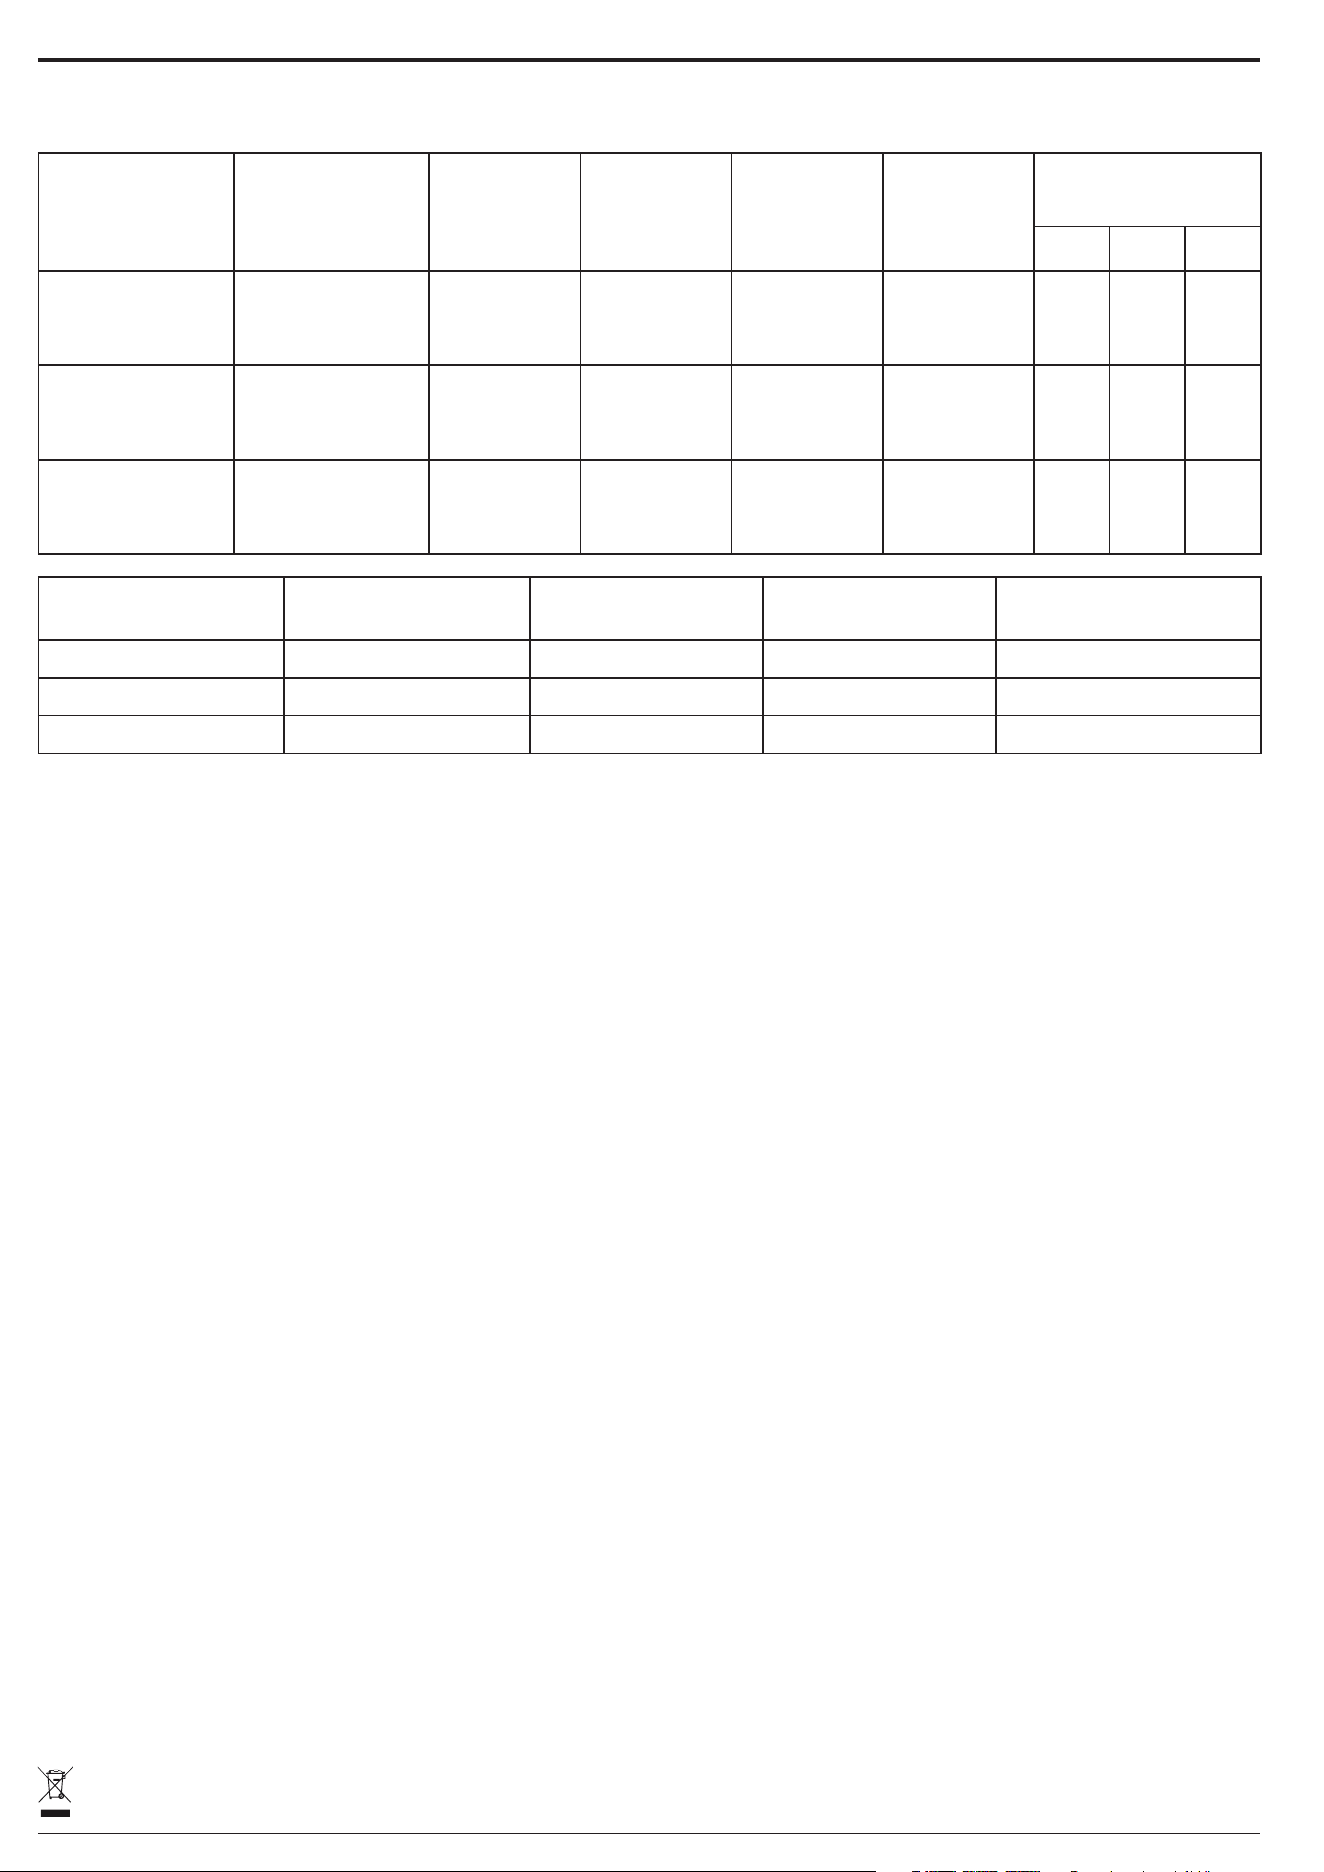
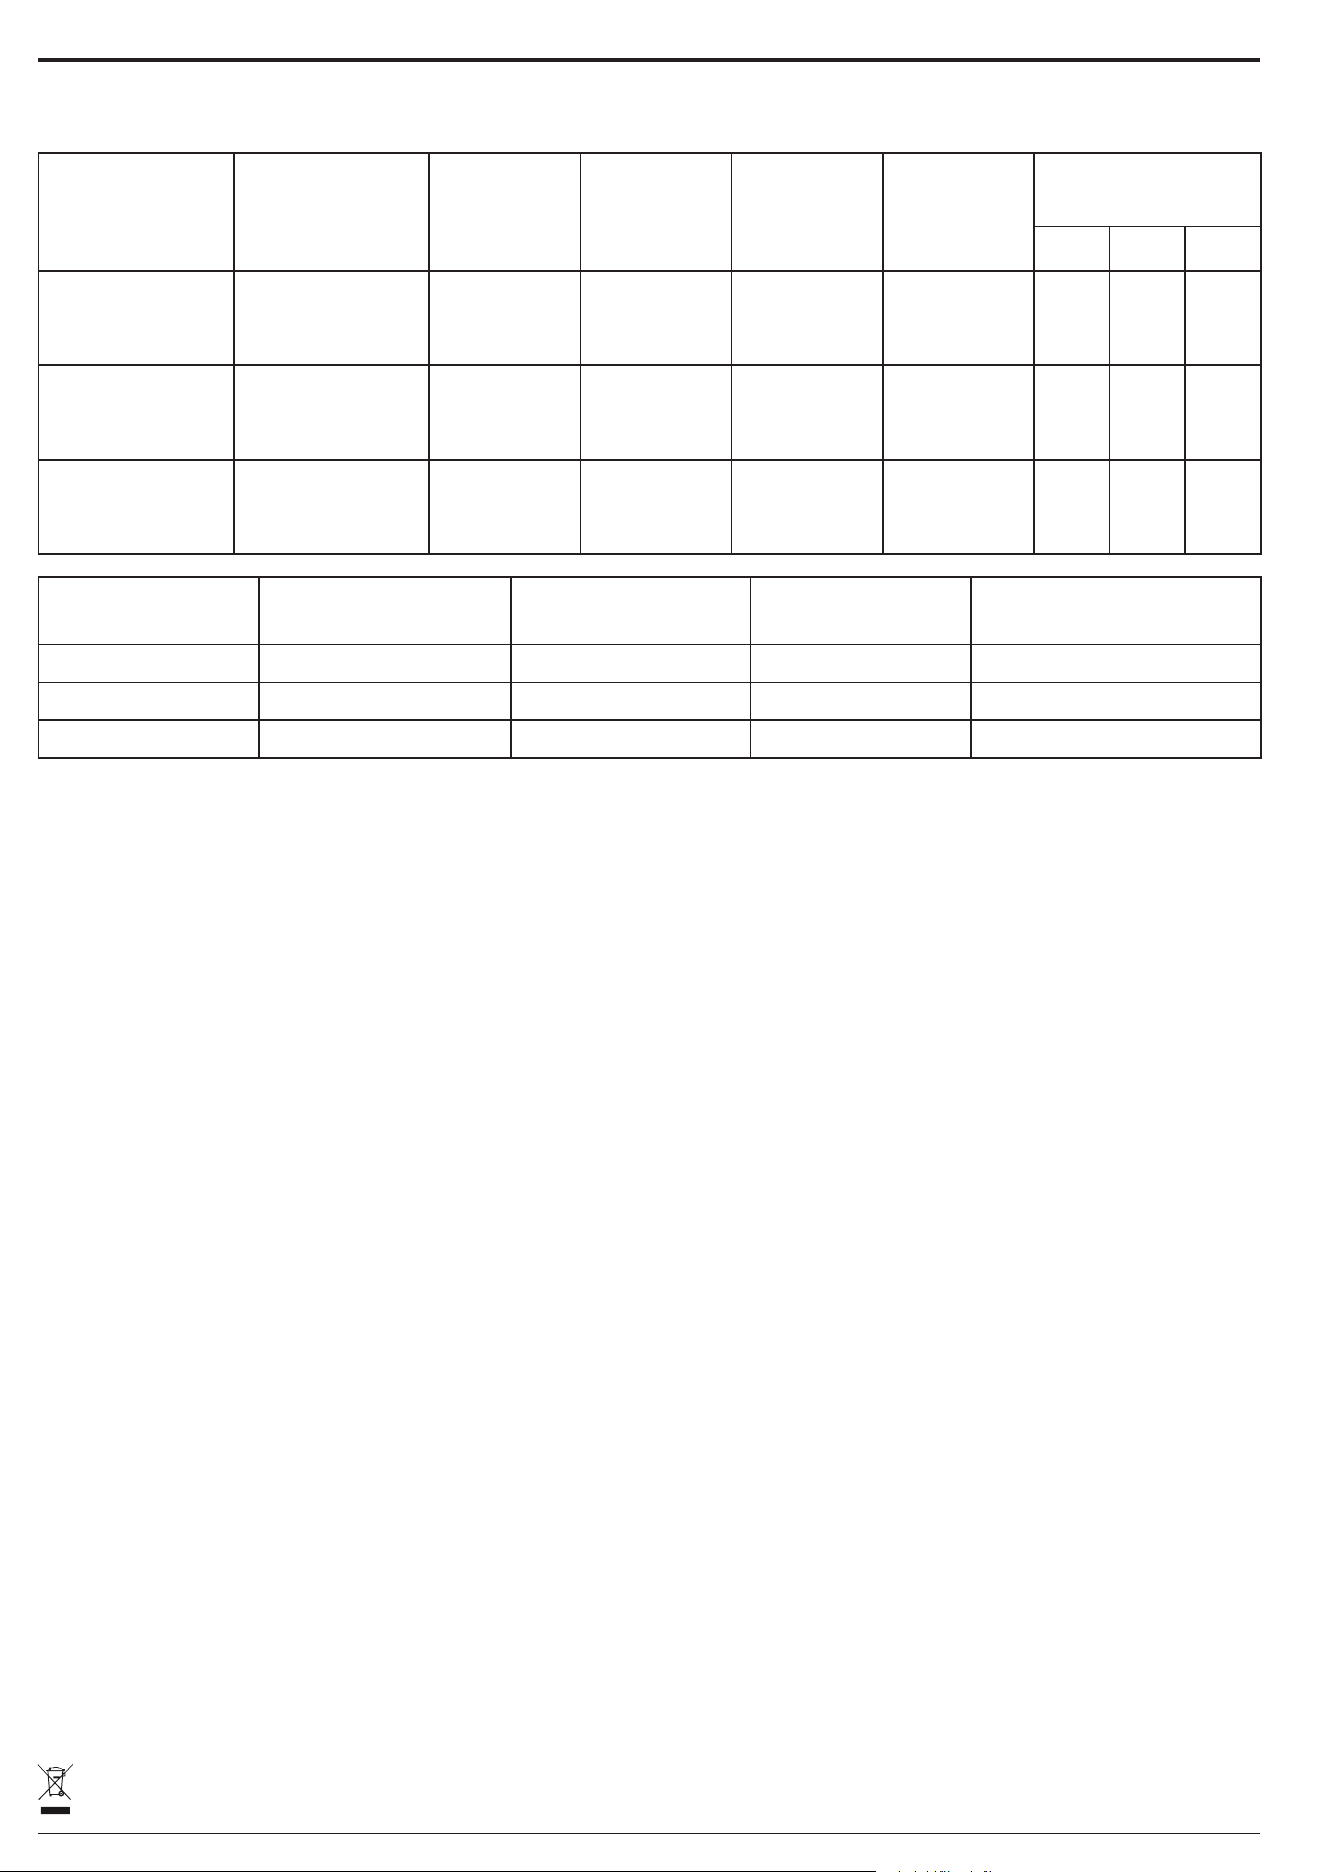
BURNER AND NOZZLE SPECIFICATIONS
CATEGORY II2H3+
Type of gas used Type of burner Injector marking Rated thermal
ow rate
kW
Rated
consumption
Reduced heat
capacity
kW
Gas pressure
mbar
min. rat. max.
NATURAL GAS
(Methane) G20
Semi-rapid (SR)
Auxiliary (AUX)
Mini Wok (MW)
95 Z
72 X
138 A
1,65
1,00
3,30
157 l/h
95 l/h
314 l/h
0,40
0,40
1,65
17 20 25
LIQUEFIED
PETROLEUM GAS
(Butane) G30
Semi-rapid (SR)
Auxiliary (AUX)
Mini Wok (MW)
63
50
91
1,65
1,00
3,30
120 g/h
73 g/h
240 g/h
0,40
0,40
1,65
20 28-30 35
LIQUEFIED
PETROLEUM GAS
(Propane) G31
Semi-rapid (SR)
Auxiliary (AUX)
Mini Wok (MW)
63
50
91
1,65
1,00
3,30
118 g/h
71 g/h
236 g/h
0,40
0,40
1,65
25 37 45
Type of gas used Model conguration
4 BURNERS
Rated thermal owrate
(kW)
Total rated consumption Air required (m
3
) for burning
1m
3
of gas
G20 20 mbar 2SR - 1AUX - 1MW 7,80 743 l/h 9,52
G30 28-30 mbar 2SR - 1AUX - 1MW 7,80 567 g/h 30,94
G31 37 mbar 2SR - 1AUX - 1MW 7,80 557 g/h 23,80
ELECTRIC SUPPLY: 220-240 V ~ 50-60 Hz - 0,6W
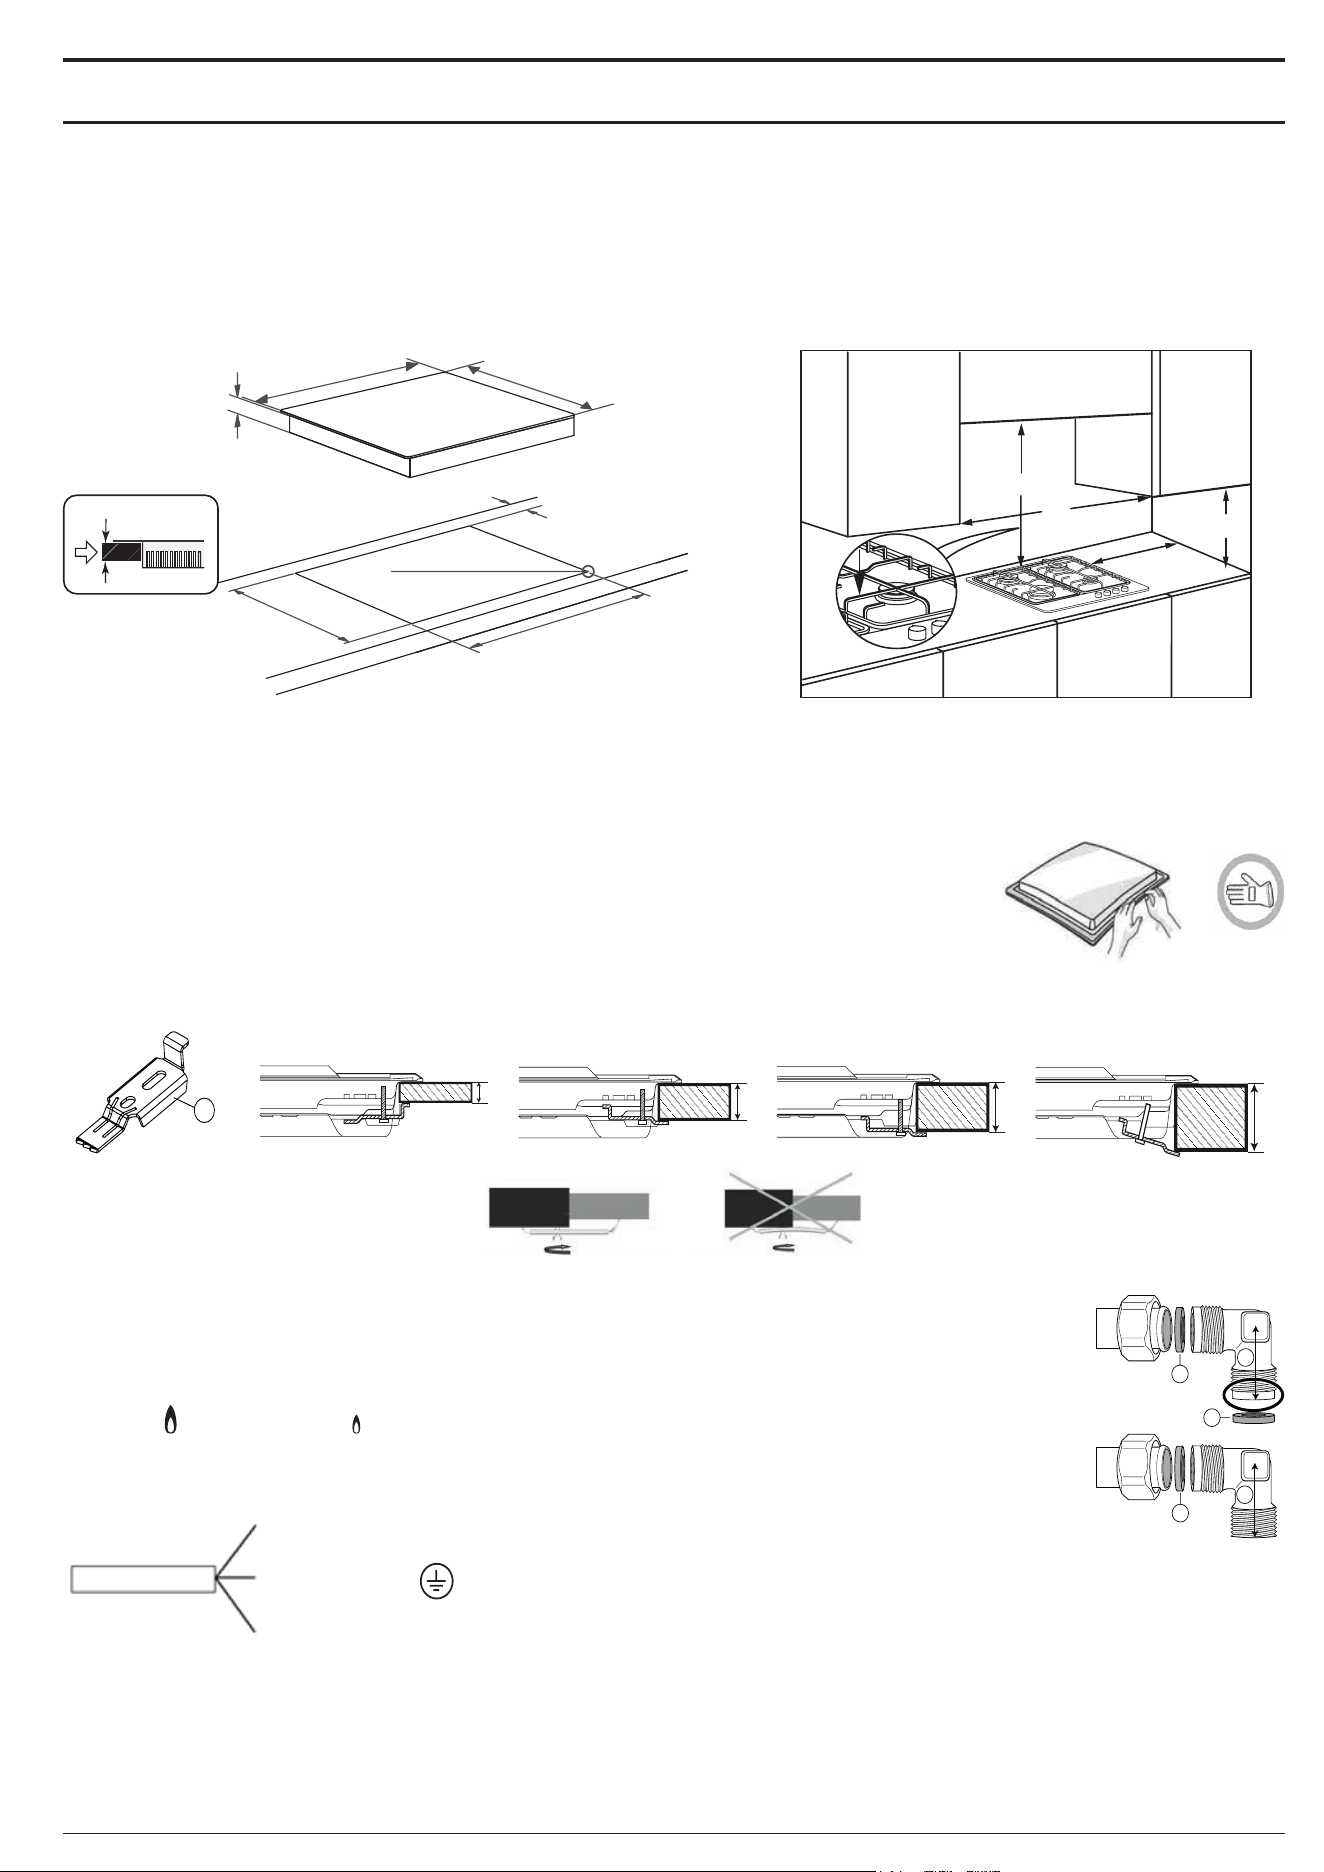
INSTALLATION (CLASS 3)
TECHNICAL INFORMATION FOR THE INSTALLER
• Use protective gloves for handling, preparing and installing the product.
• This product can be embedded in a worktop 20 ÷ 60 mm thick.
• If there is no oven beneath the hob, insert a separator panel that has a surface at least equal to the opening in the work surface. This panel must be positioned
at a maximum distance of 150 mm below the upper surface of the work surface but, in no case less than 20 mm from the bottom of the hob. In the case that
you intend to install an oven beneath the hob, make sure that it is equipped with a cooling system.
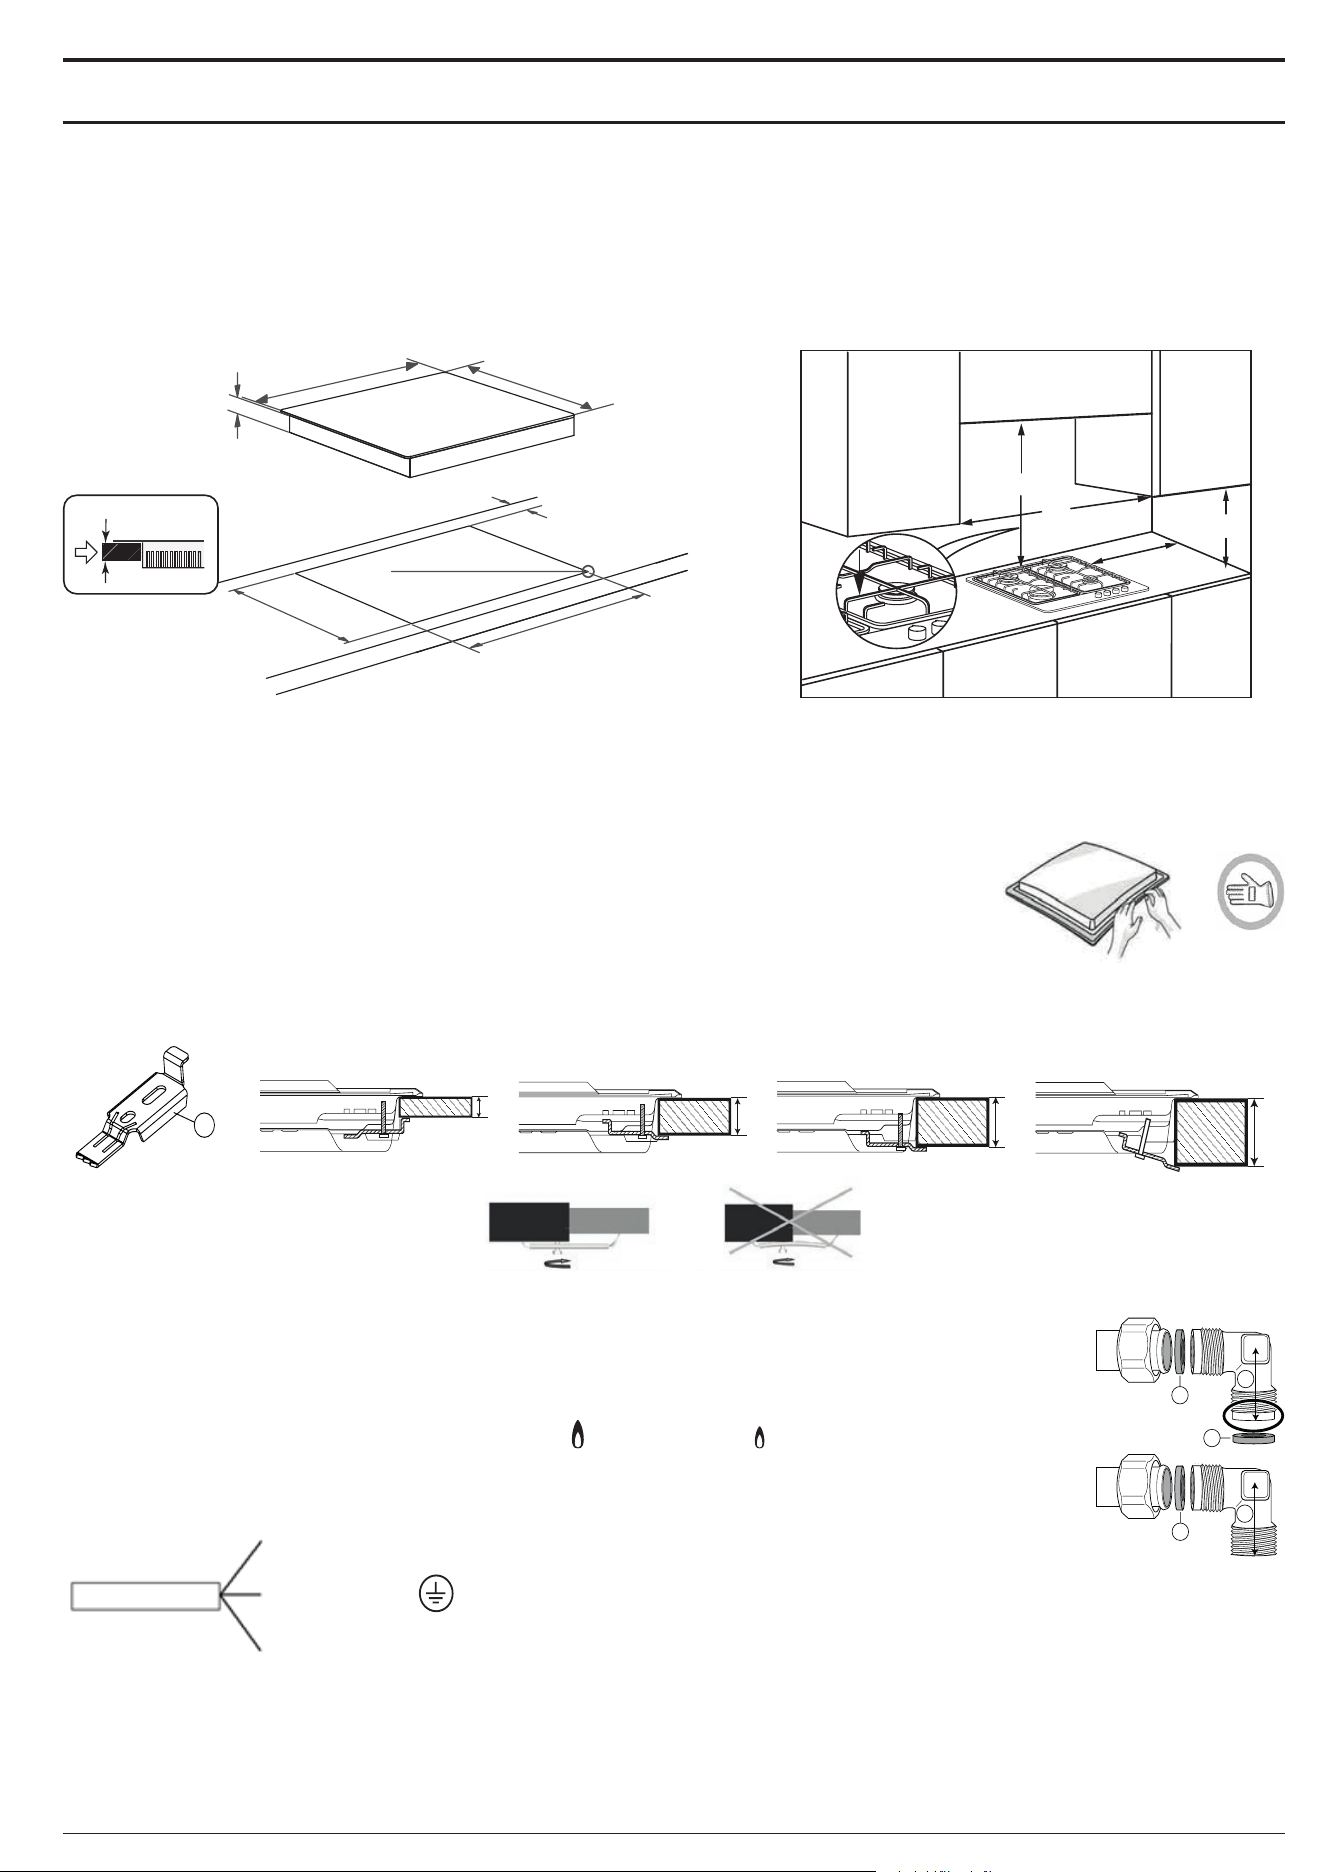
DIMENSIONS AND DISTANCES TO BE MAINTAINED
min. 6,5 mm
max. 8 mm
480 - 482 mm
560 - 562 mm
min. 55 mm
20-60 mm
38 mm
510 mm
580 mm
Min. 100 mm
B
Min. 750 mm
A
NOTE: If distance “A” between the kitchen cabinets is between 600 mm and 730 mm, height “B” must be at least 530 mm.
If distance “A” between the kitchen cabinets is greater than the width of the hob, height “B” must be at least 400 mm.
If a hood is installed above the hob, refer to the assembly instructions for the hood to see the necessary distance.
ASSEMBLY
After having cleaned the perimeter surface, apply the supplied gasket to the hob as shown in the gure.
Position the hob in the worktop opening made respecting the dimensions indicated in the Instruction.
NOTE: the power supply cable must be long enough to permit its upward extraction.
To secure the hob, use the brackets (A) provided with it. Fit the brackets into the relevant bores shown by the arrow and
fasten them by means of their screws in accordance with the thickness of the worktop (see the following gures).
20
30
60
40
20 mm
40 mm
30 mm
60 mm
A
GAS CONNECTION
• Connect elbow (A)* or (B)* supplied with to the hob inlet main pipe and interpose the washer (C) supplied, in compliance with
EN 549.
* Use elbow (A) for France and elbow (B) for all other destinations.
• After connection to the gas supply, check for leaks with soapy water. Light up the burners and turn the knobs from maximum
position
to minimum position to check ame stability.
ELECTRICAL CONNECTION
L
Ground cable
(yellow / green)
N
C
B
C
C
A
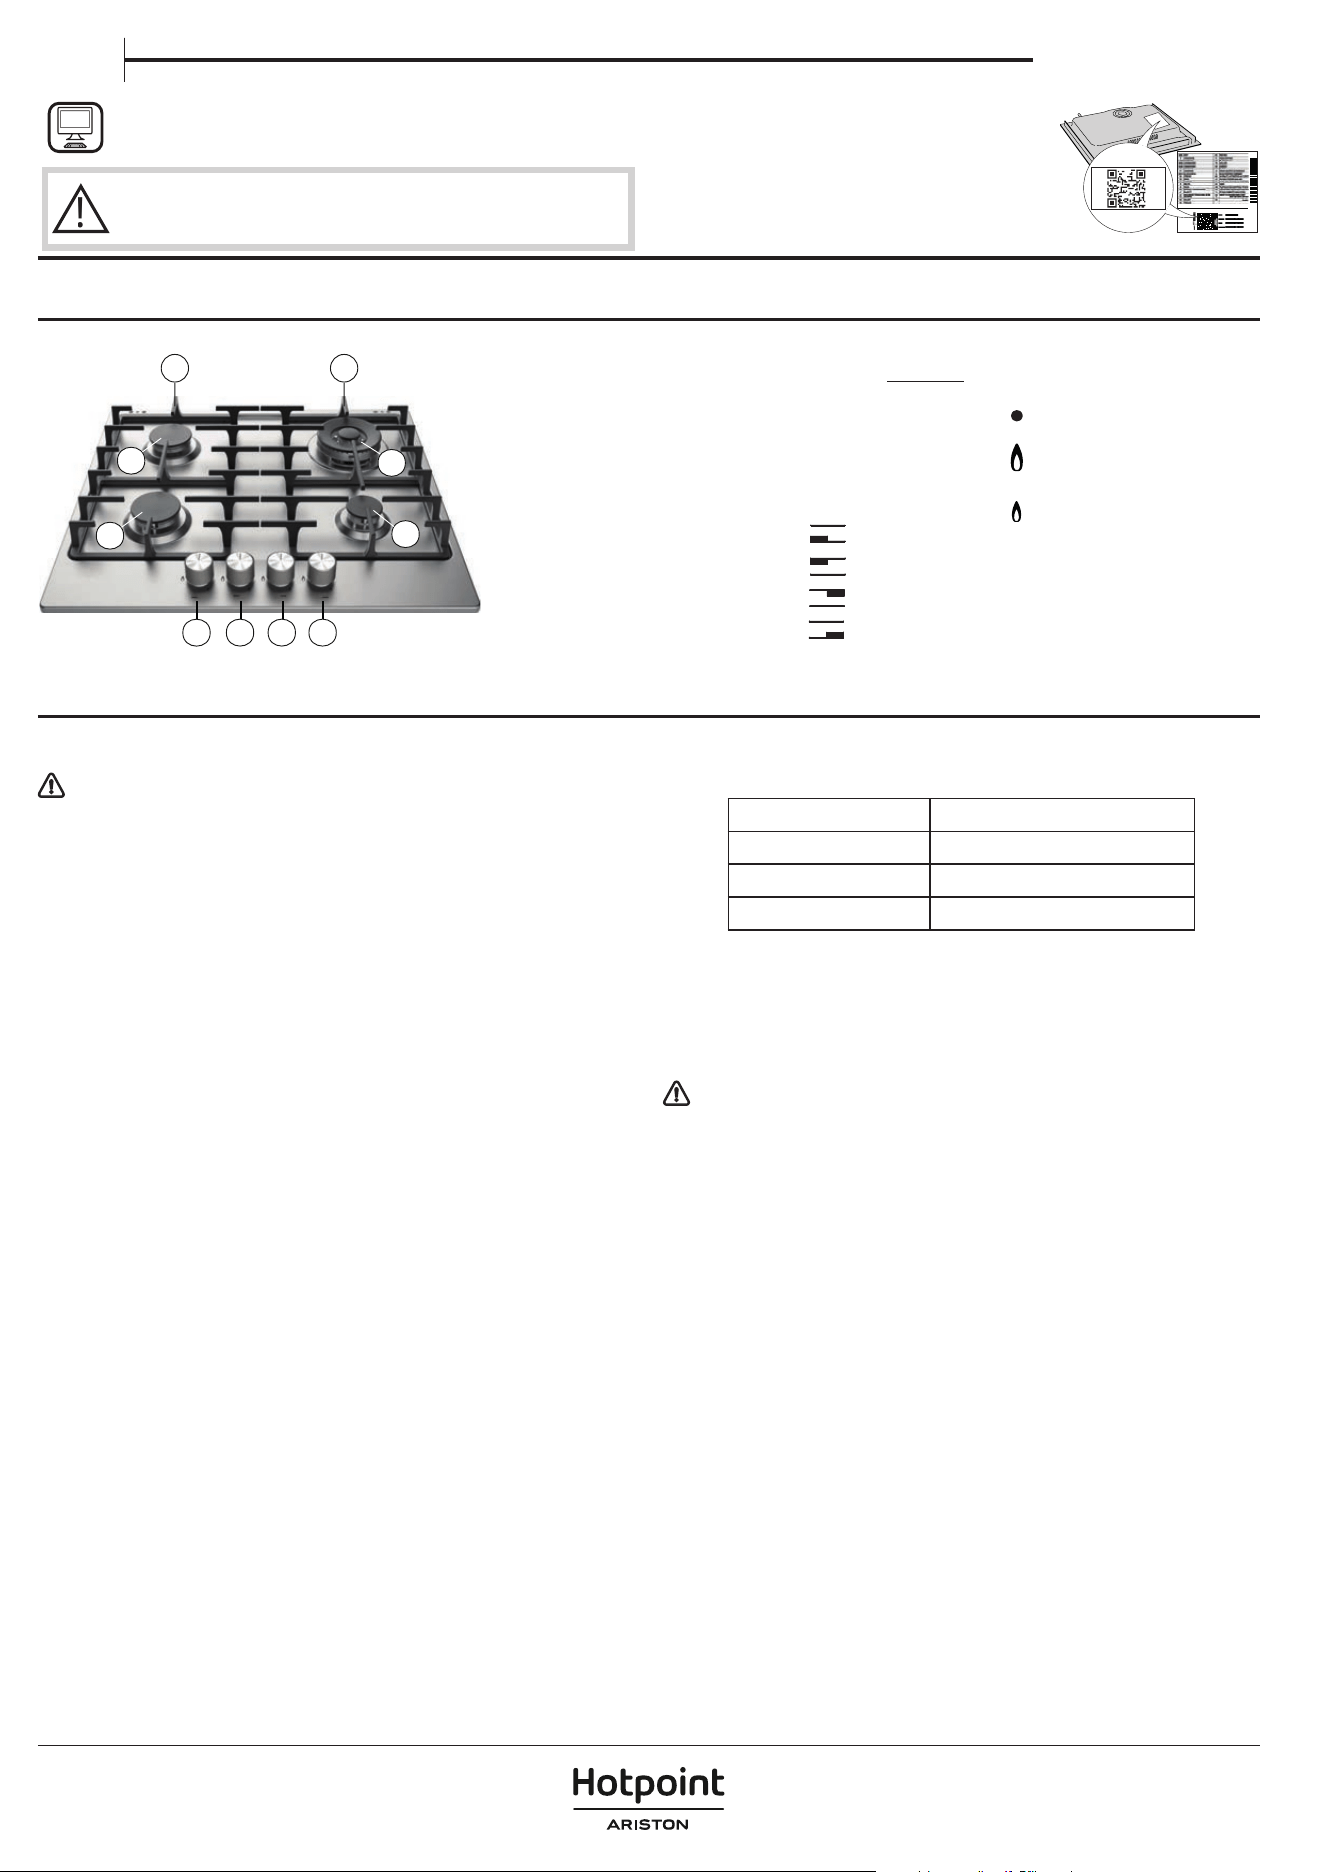
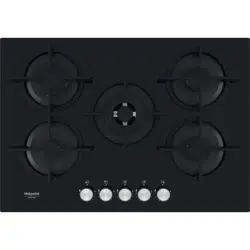
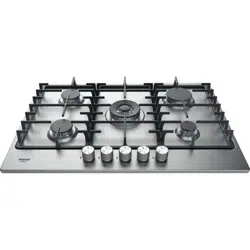
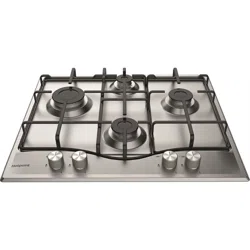
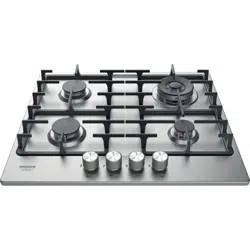
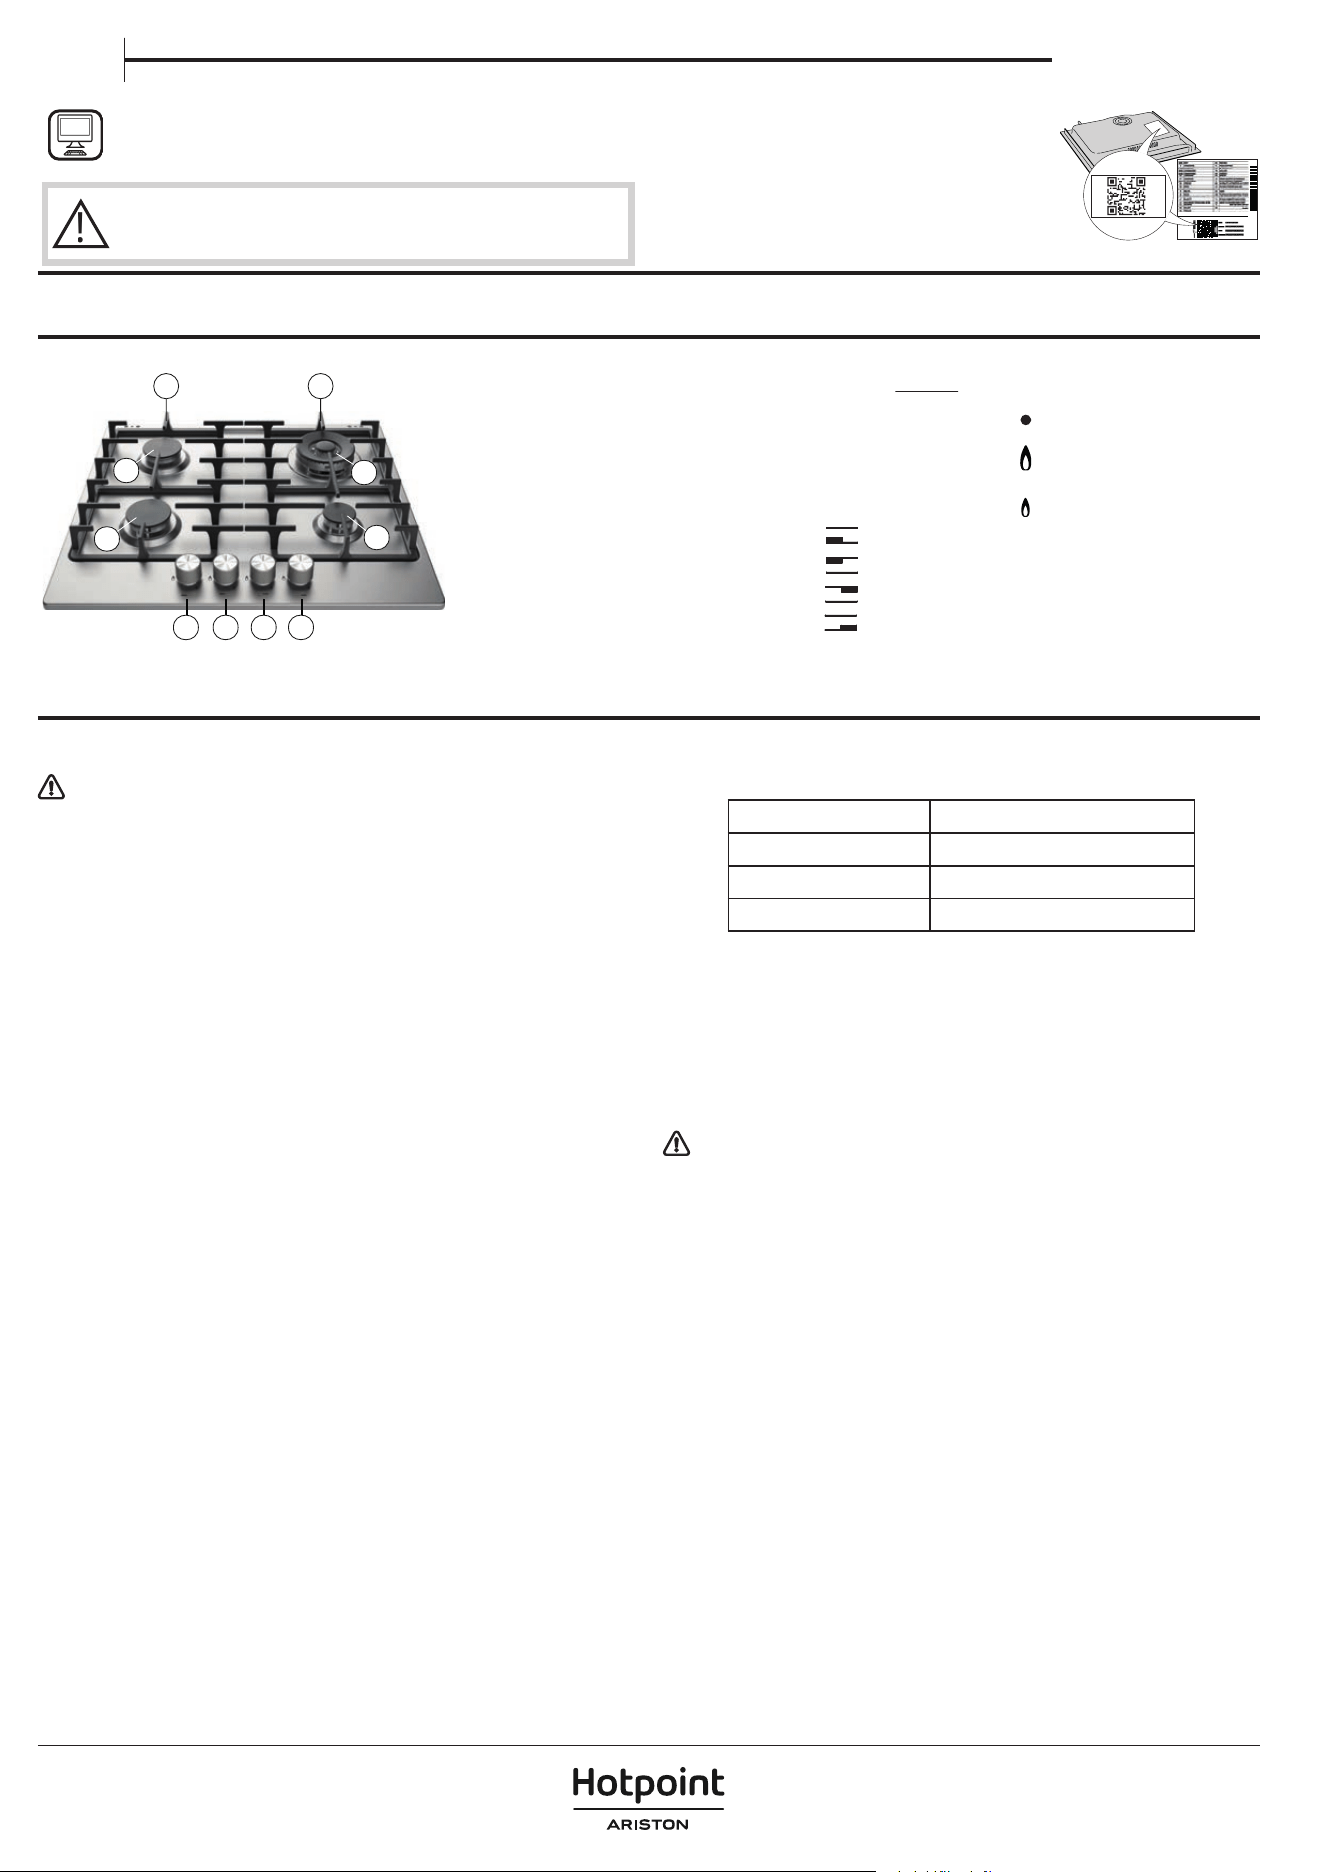
PRODUCT DESCRIPTION
HOW TO USE THE HOB
Do not let the burner ame extend beyond the edge of the pan.
IMPORTANT: when the hob is in use, the entire hob area may become hot.
• To ignite one of the burners, turn the relative knob anti-clockwise to the
maximum ame setting.
• Press the knob against the control panel to ignite the burner.
• After the burner has ignited, keep the knob pressed for about 5-10 seconds
to allow proper device operation.
• This burner safety device shuts o the gas supply to the burner if the ame
goes out accidentally (because of sudden draught, an interruption in the
gas delivery, boiling over liquids, etc.).
• The knob must not be pressed for more than 15 sec. If, after that time
has elapsed, the burner does not remain lit, wait at least one minute
before trying to light it again.
NOTE: should particular local conditions of the delivered gas make the
ignition of burner dicult, it is advisable to repeat the operation with the
knob turned to the small ame setting.
The burner might go out when the knob is released. This means that the
safety device has not warmed up enough. In this case, repeat the operations
described above.
If the burner ame is accidentally extinguished, switch o the burner control
and do not try to ignite for at least 1 minute.
PRACTICAL ADVICE FOR USING THE BURNERS
This hob has burners of dierent diameters. For better burner performance,
please stick to the following rules:
• use pots and pans with bottoms the same width as that of the burners or
slightly larger (see table on the right);
• only use at-bottomed pots and pans;
• use the correct amount of water for cooking foods and keep the pot covered;
• make sure pots on the grates do not protrude beyond the edge of the hob;
• In the case of pans with convex bottoms (WOK), use the support grille
(not provided), which should be positioned only on the multi-ring burner;
• avoid accidentally knocking the hob with pans, racks or other kitchen
utensils;
• do not leave empty steak grills over the lit burner for longer than 5 minutes.
IMPORTANT: improper use of the grids can damage the hob: do not
position the grids upside down or slide them across the hob.
BURNER POT Ø
Mini Wok From 24 to 26 cm
Semi-rapid From 16 to 20 cm
Auxiliary From 8 to 14 cm
Do not use:
• cast iron griddles, ollar stones, terracotta pots and pans;
• heat diusers such as metal mesh, or any other types;
• two burners simultaneously for one receptacle (e.g. sh kettle).
ADAPTING TO DIFFERENT TYPES OF GAS
This operation must be performed by a qualied technician.
If the appliance is intended to operate with a dierent gas from the gas type
stated on the rating plate and information label on the top of the hob, change
the injectors.
Remove the information label and keep it with the instructions booklet.
Use pressure regulators suitable for the gas pressure indicated in the
Instruction:
• the gas injector must be changed by After Sales Service or a qualied
technician;
• injector not supplied with the appliance must be ordered from After Sales
Service;
• adjust the minimum setting of the taps.
NOTE: when liquid petroleum gas is used (G30/G31), the minimum gas
setting screw must be tightened as far as it will go.
IMPORTANT: should you experience diculty in turning the burners
knobs, please contact the After Sales Service for the replacement of the
burner tap if found to be faulty.
IMPORTANT: when gas cylinder is adopted, the gas cylinder or gas
container must be properly settled (vertical orientation).
DAILY USE
THANK YOU FOR BUYING A HOTPOINT/ARISTON PRODUCT
In order to receive a more complete assistance, please
register your product on www.re
gister10.eu.
PLEASE SCAN THE QR CODE ON
YOUR APPLIANCE IN ORDER TO
REACH MORE INFORMATION
!
Before using the appliance carefully read the Safety
Instruction.
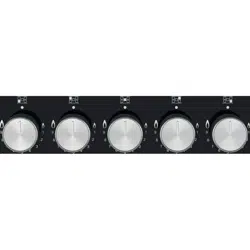
Symbols
Shaded circle
Large ame
Small ame
Tap closed
Maximum opening/delivery
and electric ignition
Minimum opening
or reduced delivery
1. Removable panstand grids
2. Semi-rapid burner
3. Semi-rapid burner
4. Mini Wok burner
5. Auxiliary burner
6. Semi-rapid burner control knob
7. Semi-rapid burner control knob
8. Mini Wok burner control knob
9. Auxiliary burner control knob
6
7 8 9
2
3
4
5
1 1
Owner's manual
EN
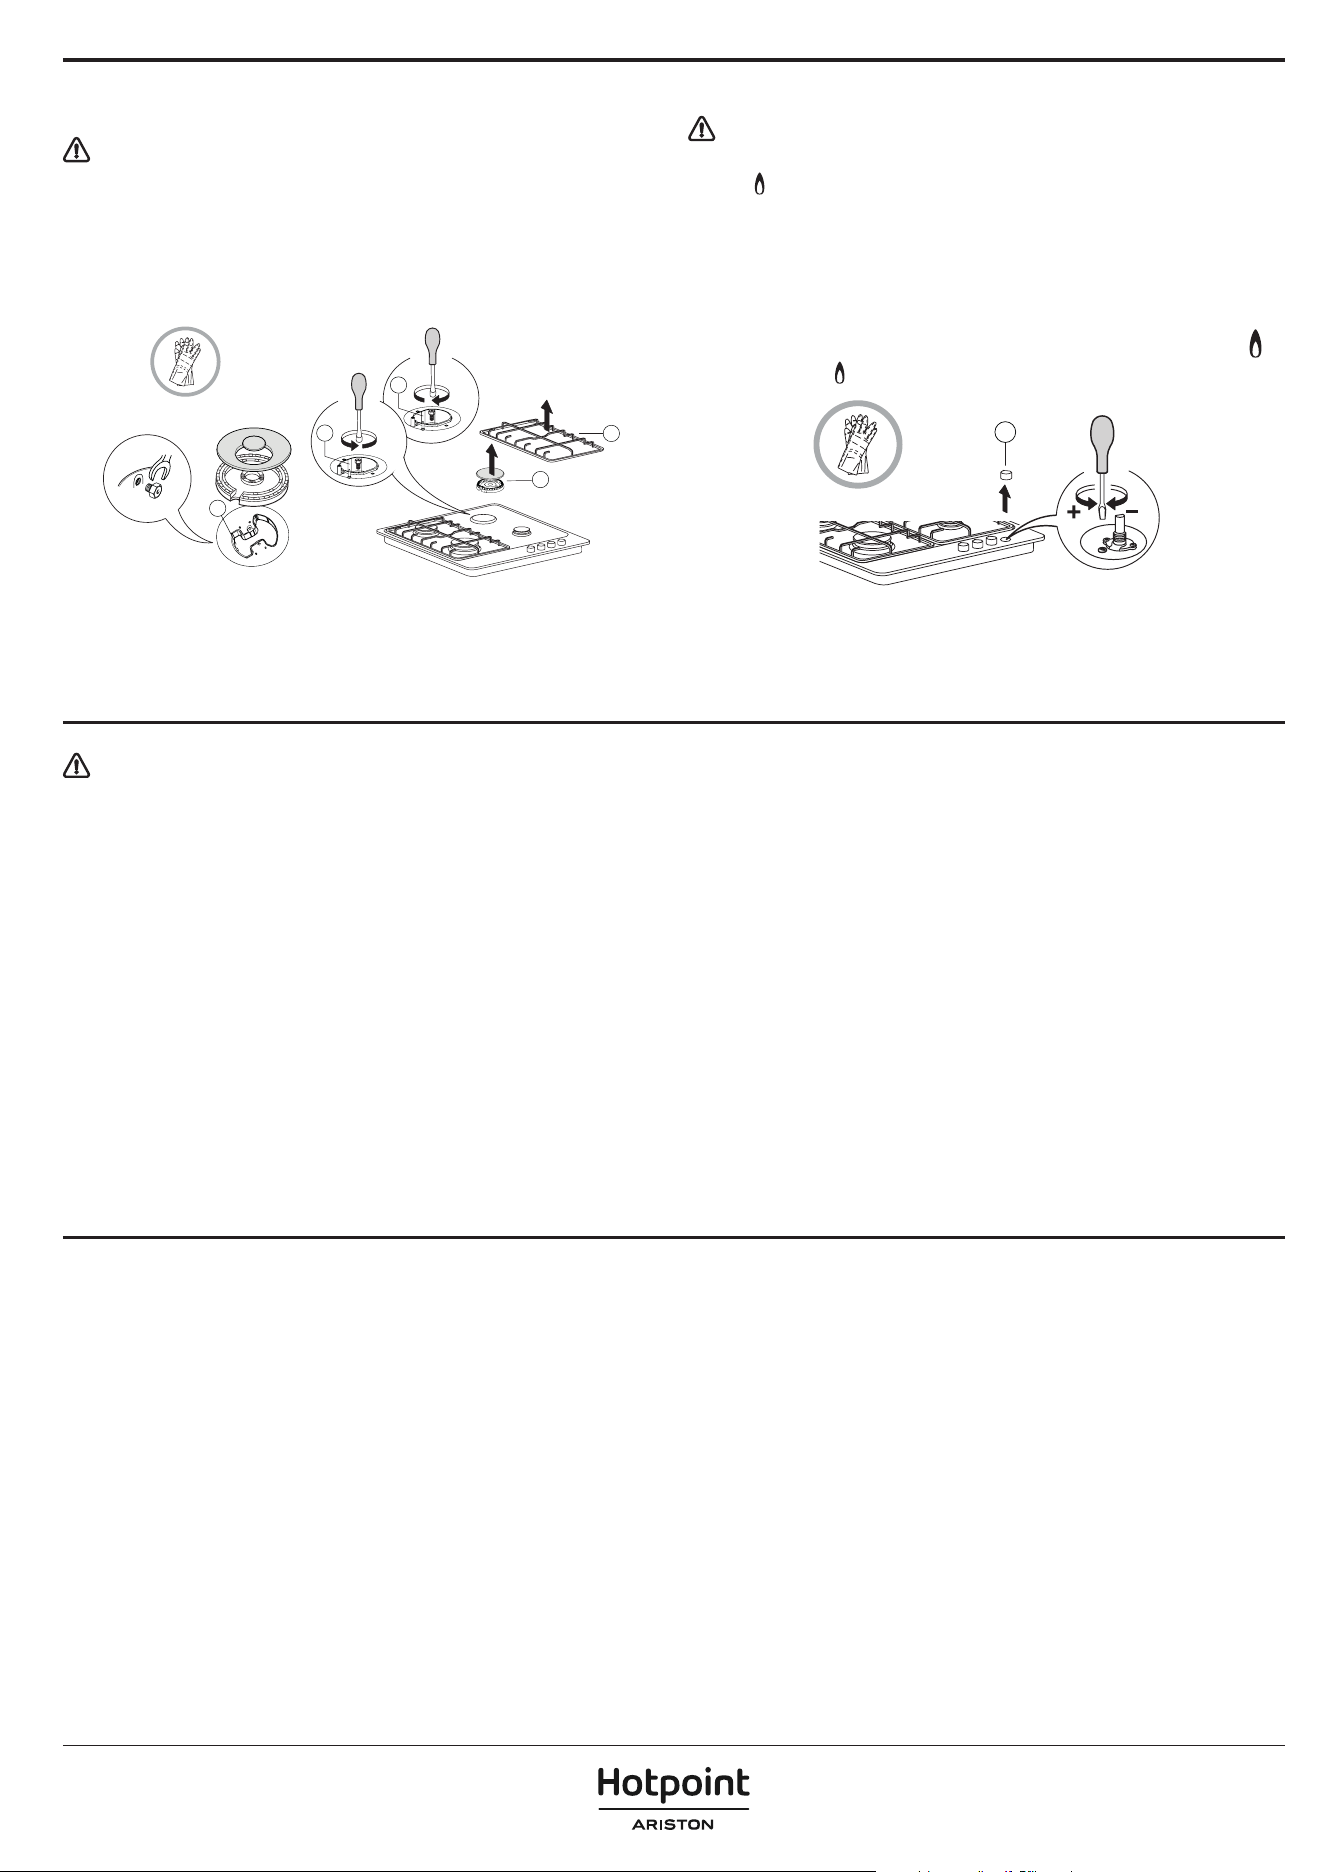
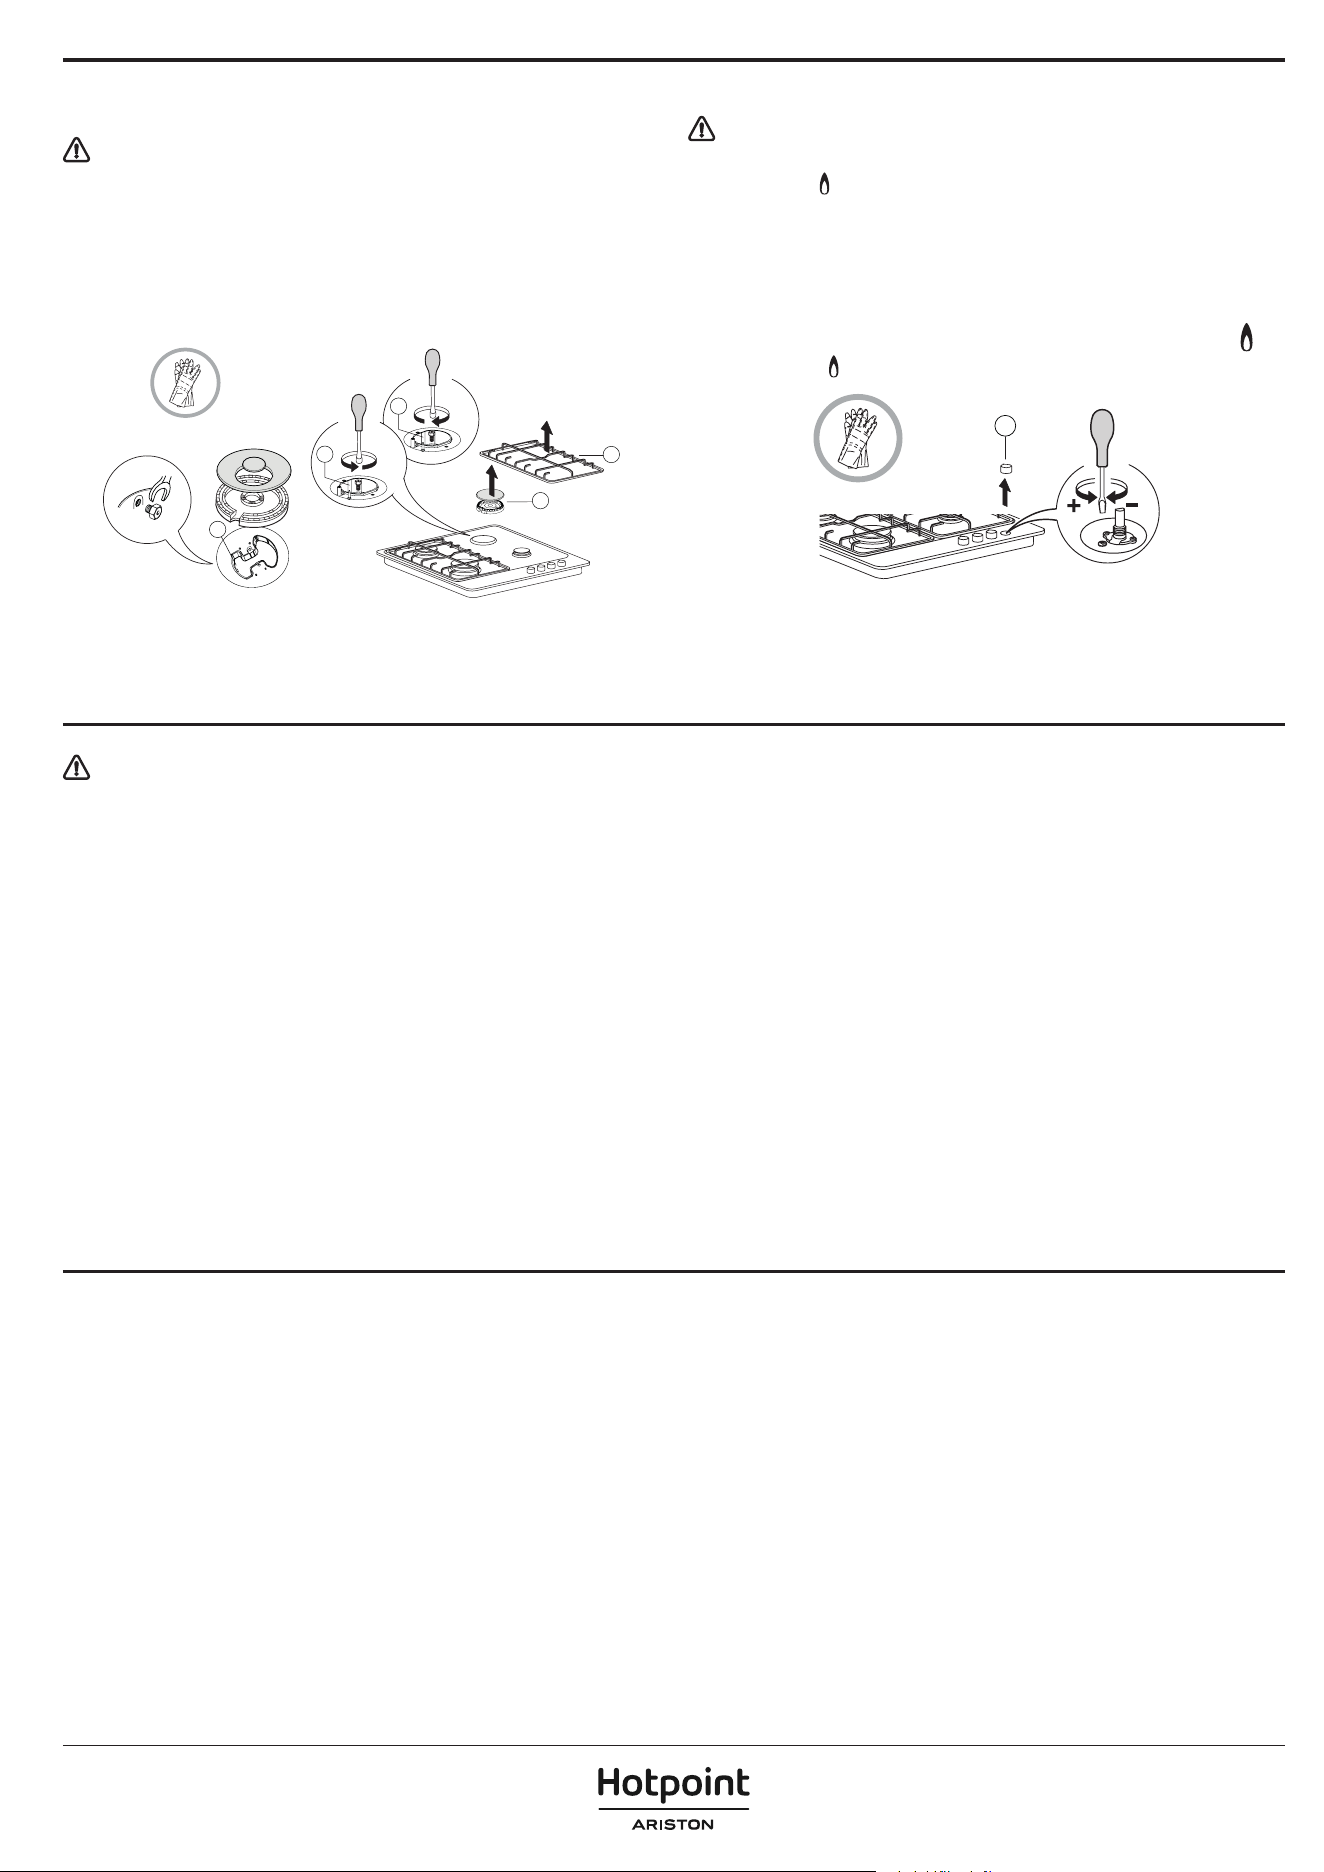
REPLACING THE INJECTORS (see the injector table in the Safety
instructions)
This operation must be performed by a qualied technician.
• Remove grids (A).
• Extract burners (B).
• Using a socket spanner of the appropriate size unscrew the injector (C), to
be replaced.
• Replace it with the injector suitable for the new type of gas.
• Re-assemble the injector in (D).
• If you have a multiple crown burner, use a side spanner to replace the injector (E).
A
B
D
C
E
Before installing the hob, remember to ax the gas calibration plate supplied
with the injectors in such a way that it covers the existing information relating
to gas calibration.
ADJUSTING MINIMUM GAS SETTING OF TAPS
This operation must be performed by a qualied technician.
The adjustment must be performed with the tap in a minimum gas setting
position
(small ame).
The primary air of the burners does not need to be adjusted.
To ensure that the minimum setting is correctly adjusted, remove the knob (F)
and proceed as follows:
• tighten the screw to reduce the ame height (−);
• loosen the screw to increase the ame height (+).
At this stage, light up the burners and turn the knobs from max. position
to
minimum position
to check ame stability.
F
Upon completion of adjustment, reseal using sealing wax or an equivalent
material.
CLEANING AND MAINTENANCE
Disconnect the appliance from the power supply.
CLEANING THE HOB SURFACE
• All the enamelled and glass parts should be cleaned with warm water and
a neutral solution.
• Stainless steel surfaces may be stained by calcareous water or aggressive
detergents if left in contact for too long. Any food spills (water, sauce,
coee, etc.) should be wiped away before they dry.
• Clean with warm water and neutral detergent, and then dry with a soft
cloth or chamois. Remove baked-on dirt with specic cleaners for stainless
steel surfaces.
NOTE: clean stainless steel only with soft cloth or sponge.
• Do not use abrasive or corrosive products, chlorine-based cleaners or pan
scourers.
• Do not use steam cleaning appliances.
• Do not use ammable products.
• Do not leave acid or alkaline substances, such as vinegar, mustard, salt,
sugar or lemon juice on the hob.
CLEANING THE HOB PARTS
• Clean glass and enamelled parts only with soft cloth or sponge.
• Grids, burner caps and burners can be removed to be cleaned.
• Clean them by hand with warm water and non-abrasive detergent,
removing any food residues and checking that none of the burner
openings is clogged.
• Rinse and dry.
• The cast-iron grates may be cleaned in the dishwasher.
Remove any burnt-on food before placing the grates in the lowest
rack in the dishwasher.
• Ret burners and burner caps correctly in the respective housings.
• When replacing the grids, make sure that the panstand area is aligned
with the burner.
• Models equipped with electrical ignition plugs and safety device
require thorough cleaning of the plug end in order to ensure correct
operation. Check these items frequently, and if necessary, clean them
with a damp cloth. Any baked-on food should be removed with a
toothpick or needle.
NOTE: to avoid damaging the electric ignition device, do not use it when
the burners are not in their housing.
TROUBLESHOOTING
If the hob does not operate correctly, before calling the After-Sales Service,
refer to the Troubleshooting Guide to determine the problem
1. The burner fails to ignite, or the ame is not even
Check that:
• the gas or electrical supplies are not shut o and especially that the gas
supply tap is open;
• the gas cylinder (liquid gas) is not empty;
• the burner openings are not clogged;
• the plug end is not dirty;
• all the burner parts have been positioned correctly;
• there are no draughts near the hob.
2. The burner does not stay lit
Check that:
• when lighting the burner, the knob has been pressed for enough time
to activate the protection device;
• the burner openings are not clogged near the thermocouple;
• the end of the safety device is not dirty;
• the minimum gas setting is correct (see relevant paragraph).
3. The containers are not stable
Check that:
• the bottom of the container is perfectly at;
• the container is centred on the burner;
• the grids have not been exchanged or positioned incorrectly.
If after the above checks the fault still occurs, get in touch with the nearest After
Sales Service.

400020004282-B
Policies, standard documentation and additional product information can be found by:
• Using QR code in your appliance;
• Visiting our website docs.hotpoint.eu;
• Alternatively, contact our After-sales Service (See phone number in the warranty booklet). When contacting our
After-sales Service, please state the codes provided on your product’s identication plate.
AFTER-SALES SERVICE
BEFORE CALLING THE AFTER-SALES SERVICE:
1. See if you can solve the problem by yourself with the help of the
TROUBLESHOOTING suggestions.
2. Switch the appliance o and back on again to see if the fault persists.
IF AFTER THE ABOVE CHECKS THE FAULT STILL OCCURS, GET IN
TOUCH WITH THE NEAREST AFTER-SALES SERVICE.
When contacting our Client After-sales service, always specify:
• a brief description of the fault;
• the type and exact model of the appliance;
XXXXXXXXXXXXXXX
XXXXXXXXXXXXXXXXXXXXXX
Made in X
Type: XXXMod.: XXX
01
XXXX XXX XXXXXXX XXXX XXXXX
XXXXXXXXXXXXXXXXXXXX
XXXXXXXXXXXXXXXXXXXXXXXXXXXXXXXXXXXXXXXXXXXXXXXXXXXXXXXXXXXXXXXXXXXXXXXXX
• the serial number (number after the word SN on the rating plate
located under the appliance). The serial number is also indicated in the
documentation;
Mod.
Ind.C.
SN:
Prod.N.
xxxx xxxx xxxx
xxxx xxxx xxxx
xxxx xxxx xxxx
xxx xxx
PRODUCT
INFORMATION
• your full address;
• your telephone number.
If any repairs are required, please contact an authorized after-sales service
(to guarantee that original spare parts will be used and repairs carried out
correctly).
Owner's manual
EN
NORME DI SICUREZZA
IMPORTANTE: DA LEGGERE E OSSERVARE
IT
Queste istruzioni sono valide se sull’apparecchio è riportato
il simbolo del paese. Se il simbolo del paese non è presente
sull’apparecchio occorre fare riferimento alle istruzioni tecniche,
che contengono le istruzioni necessarie per la modifica
dell’apparecchio secondo le condizioni d’uso del paese.
ATTENZIONE: l’uso di apparecchi di cottura a gas causa la
produzione di calore, umidità e prodotti di combustione nel
locale di installazione. La cucina deve essere ben ventilata,
soprattutto durante l’uso dell’apparecchio: tenere aperti i canali
di ventilazione naturali o installare un dispositivo di ventilazione
meccanica (una cappa di estrazione meccanica). Un uso
intensivo e prolungato dell’apparecchio può richiedere una
ventilazione supplementare o più efficace, ad esempio
l’apertura di una finestra o, se possibile, l’attivazione a una
maggiore velocità di un dispositivo di ventilazione meccanica.
La mancata osservanza delle informazioni contenute in
questo manuale può causare rischi di incendio o esplosione,
con conseguenti danni materiali o lesioni personali.
Prima di utilizzare l’apparecchio, leggere le seguenti norme di
sicurezza. Conservarle per eventuali consultazioni successive.
Questo manuale e l’apparecchio sono corredati da importanti
avvertenze di sicurezza, da leggere e rispettare sempre. Il
fabbricante declina qualsiasi responsabilità che derivi dalla
mancata osservanza delle presenti istruzioni di sicurezza, da usi
impropri dell’apparecchio o da errate impostazioni dei
comandi.
AVVERTENZA: Se la superficie del piano cottura è incrinata,
non utilizzare l’apparecchio per evitare il rischio di folgorazione.
AVVERTENZA: Pericolo di incendio: non appoggiare oggetti
sulle superfici di cottura.
ATTENZIONE: Il processo di cottura deve essere sorvegliato.
I processi di cottura brevi richiedono una supervisione continua.
AVVERTENZA: La cottura non sorvegliata su un piano di
cottura con grasso e olio può essere pericolosa e generare
incendi. Non tentare MAI di spegnere le fiamme con acqua. Al
contrario, spegnere l’apparecchio e soffocare le fiamme, ad
esempio con un coperchio o una coperta antincendio.
Non utilizzare il piano di cottura come superficie di lavoro o
appoggio. Non avvicinare all’apparecchio stoffe o altri materiali
infiammabili fino a che tutti i componenti non si siano
completamente raffreddati per evitare il rischio di incendi.
Tenere l’apparecchio fuori dalla portata dei bambini di età
inferiore a 3 anni. Senza la sorveglianza costante di un adulto,
tenere l’apparecchio fuori dalla portata dei bambini di età
inferiore a 8 anni. I bambini di età superiore agli 8 anni, le
persone con ridotte capacità fisiche, sensoriali o mentali e le
persone che non abbiano esperienza o conoscenza
dell’apparecchio potranno utilizzarlo solo sotto sorveglianza, o
quando siano state istruite sull’utilizzo sicuro dell’apparecchio e
siano consapevoli dei rischi del suo utilizzo. Vietare ai bambini
di giocare con l’apparecchio. La pulizia e la manutenzione
ordinaria non devono essere effettuate da bambini senza la
supervisione di un adulto.
ATTENZIONE: in caso di rottura del vetro del piano di cottura:
spegnere immediatamente tutti i bruciatori e le resistenze
elettriche e scollegare l’apparecchio dall’alimentazione, non
toccare la superficie dell’apparecchio; non utilizzare
l’apparecchio.
Il coperchio di vetro può rompersi se viene riscaldato. Prima di
chiudere il coperchio, spegnere tutti i bruciatori e le piastre
elettriche. Non chiudere il coperchio se i bruciatori sono accesi.
AVVERTENZA: L’apparecchio e i suoi componenti accessibili
possono diventare molto caldi durante l’uso. Fare attenzione a
non toccare gli elementi riscaldanti. Tenere lontani i bambini di
età inferiore agli 8 anni, a meno che non siano costantemente
sorvegliati.
L’alimento non deve essere lasciato nel o sul prodotto per
più di un’ora prima o dopo la cottura.
USO CONSENTITO
ATTENZIONE: l’apparecchio non è destinato ad essere
messo in funzione mediante un dispositivo di commutazione
esterno, ad esempio un temporizzatore, o attraverso un sistema
di comando a distanza separato.
L’apparecchio è destinato all’uso domestico e ad applicazioni
analoghe, quali: aree di cucina per il personale di negozi, uffici e
altri contesti lavorativi; agriturismi; camere di hotel, motel, bed
& breakfast e altri ambienti residenziali.
Non sono consentiti altri usi (ad esempio, il riscaldamento di
locali).
Questo apparecchio non è destinato all’uso professionale.
Non utilizzare l’apparecchio all’aperto.
Utilizzare pentole e tegami di diametro pari o leggermente
superiore al diametro dei bruciatori (vedere la tabella). Evitare
che le pentole, posizionate sulle griglie, fuoriescano dal
perimetro del piano di cottura.
L’uso improprio delle griglie potrebbe danneggiare il piano:
evitare di appoggiare le griglie capovolte o di trascinarle sul
piano.
Non lasciare che la fiamma del bruciatore si estenda oltre il bordo della pentola.
Se la superficie del piano è in vetro, non utilizzare le bistecchiere in ghisa, le pietre di collare,
le pentole e le padelle in terracotta.
Non utilizzare: dissipatori di rete metallica o di altro tipo; due bruciatori simultaneamente
per la cottura con un solo recipiente (ad esempio una pesciera).
Qualora particolari condizioni del gas erogato localmente rendessero difficoltosa
l’accensione del bruciatore, si consiglia di ripetere l’operazione con la manopola ruotata
sulla posizione della fiamma piccola.
In caso di installazione di una cappa sul piano di cottura, fare riferimento alle relative
istruzioni per la distanza corretta.
I piedini di protezione in gomma sotto le griglie potrebbero essere ingeriti dai bambini
piccoli rappresentando il rischio di soffocamento. Dopo avere rimosso le griglie, controllare
che tutti i piedini siano montati correttamente..
INSTALLAZIONE
Per evitare il rischio di lesioni personali, le operazioni di
movimentazione e installazione dell’apparecchio devono
essere eseguite da almeno due persone. Per evitare rischi di
taglio, durante le operazioni di disimballaggio e installazione
utilizzare i guanti protettivi.
I collegamenti di gas ed elettricità devono essere conformi
alle norme locali.
L’installazione, comprendente anche eventuali raccordi per
l’alimentazione idrica e i collegamenti elettrici, e gli interventi di
riparazione devono essere eseguiti da personale qualificato.
Non riparare o sostituire qualsiasi parte dell’apparecchio se non
espressamente richiesto nel manuale d’uso. Tenere i bambini a
distanza dal luogo dell’installazione. Dopo aver disimballato
l’apparecchio, assicurarsi che non sia stato danneggiato
durante il trasporto. In caso di problemi, contattare il rivenditore
o il Servizio Assistenza. A installazione completata, conservare il
materiale di imballaggio (parti in plastica, polistirolo, ecc.) fuori
della portata dei bambini per evitare potenziali rischi di
soffocamento. Prima di procedere all’installazione, scollegare
l’apparecchio dalla rete elettrica per non correre il rischio di
scosse elettriche. Per evitare il rischio di incendio o di
folgorazione, durante l’installazione assicurarsi che
l’apparecchio non danneggi il cavo di alimentazione. Attivare
l’apparecchio solo dopo avere completato la procedura di
installazione.
AVVERTENZA: la modifica dell’apparecchio e del metodo di
installazione sono essenziali per il suo utilizzo sicuro e corretto
in ogni paese.
Utilizzare regolatori di pressione idonei alla pressione del
gas indicata nelle istruzioni.
Il locale deve essere provvisto di un sistema di estrazione
dell’aria in grado di espellere i fumi prodotti dalla combustione.
Il locale deve inoltre consentire un’adeguata circolazione
dell’aria, in quanto l’aria è necessaria per la normale combustione.
Il flusso d’aria non deve essere inferiore a 2 m
3
/h per ogni kW di
potenza installata.
Il sistema di circolazione può aspirare l’aria direttamente
dall’esterno mediante una tubazione con sezione interna non
inferiore a 100 cm
2
; l’apertura non deve essere soggetta ad
alcun tipo di ostruzione.
Il sistema può fornire l’aria necessaria per la combustione
anche in modo indiretto, ad esempio da locali adiacenti
provvisti di tubazioni di circolazione dell’aria del tipo sopra
descritto. Tali locali, tuttavia, non devono essere spazi comuni,
camere da letto o stanze che possano presentare rischi
d’incendio.
Il gas di petrolio liquido (GPL) si sposta verso terra perché è
più pesante dell’aria. Per questa ragione, i locali che contengano
bombole di GPL devono essere provvisti di sfiati che consentano
al gas di fuoriuscire in caso di perdite. Le bombole di GPL, anche
solo parzialmente piene, non devono essere installate o
conservate in locali o aree di deposito situate sotto il piano
terreno (cantine, ecc.). È consigliabile tenere nel locale solo la
bombola in uso, posizionandola in modo che non sia esposta a
fonti di calore esterne (forni, camini, stufe, ecc. ) che possano
innalzare la temperatura della bombola oltre 50°C.
Se la rotazione delle manopole dei bruciatori dovesse risultare difficoltosa, contattare il
Servizio Assistenza, che in caso di rubinetto difettoso provvederà a sostituirlo.
Le aperture utilizzate per la ventilazione e la dispersione del calore non devono mai essere
coperte.
Eseguire tutte le operazioni di taglio del mobile prima di
inserire il forno, avendo cura di rimuovere trucioli o residui di
segatura.
Se l’apparecchio non è installato sopra un forno, è necessario
installare un pannello divisorio (non in dotazione) nel vano
sottostante.
COLLEGAMENTO DEL GAS
AVVERTENZA: Prima dell’installazione, controllare che le
condizioni di distribuzione del locale (tipo e pressione del gas)
siano compatibili con la configurazione dell’apparecchio.
Controllare che la pressione del gas dell’impianto sia in linea
con i valori riportati nella Tabella “Specifiche di bruciatori e
ugelli”.
AVVERTENZA: le condizioni di configurazione
dell’apparecchio sono riportate sull’etichetta (o sulla targhetta
matricola).
AVVERTENZA: questo apparecchio non è collegato a un
dispositivo di evacuazione dei prodotti di combustione.
l’installazione e l’allacciamento devono essere eseguiti in
conformità alle norme vigenti. Prestare particolare attenzione
ai requisiti in materia di ventilazione.
Se l’apparecchio è collegato a un impianto a gas liquido, la
vite di regolazione deve essere serrata con la massima forza
possibile.
IMPORTANTE: se si utilizza una bombola di gas o è installato
un serbatoio di gas, questi devono essere posizionati
correttamente (orientamento verticale).
AVVERTENZA: questa operazione deve essere eseguita da
un tecnico qualificato.
Per l’allacciamento del gas, utilizzare solo un tubo di metallo
flessibile o rigido.
Collegamento con tubo rigido (rame o acciaio)
Il collegamento all’impianto del gas deve essere eseguito in
modo da evitare qualsiasi forma di compressione o di trazione
sull’apparecchio. Sulla rampa di alimentazione dell’apparecchio
si trova un raccordo a L regolabile, provvisto di una guarnizione
di tenuta contro le perdite. La guarnizione deve essere
riapplicata dopo ogni rotazione del raccordo (la guarnizione è
in dotazione con l’apparecchio). Il raccordo per il tubo di
mandata del gas è un attacco maschio cilindrico 1/2 filettato.
Collegamento di un tubo in acciaio inox flessibile senza
saldature a un attacco filettato Il raccordo per il tubo di mandata
del gas è un attacco maschio cilindrico 1/2 filettato. Questi tubi
devono essere installati in modo che la loro estensione completa
non superi i 2000 mm di lunghezza. Una volta eseguito il
collegamento, controllare che il tubo in metallo flessibile non
entri a contatto con parti mobili e non sia compresso. Usare solo
tubi e guarnizioni conformi alle norme nazionali vigenti.
IMPORTANTE: nel caso si utilizzi un tubo in acciaio inox,
questo dovrà essere installato in modo da non entrare in
contatto con parti mobili (es. cassetti). Il tubo deve passare in
un’area libera da ingombri e deve essere ispezionabile su tutta
la lunghezza.
L’apparecchio deve essere collegato all’impianto del gas o
alla bombola del gas in conformità alle norme nazionali vigenti.
Prima di procedere al collegamento, verificare che l’apparecchio
sia compatibile con l’impianto di alimentazione del gas che si
intende utilizzare. In caso contrario, seguire le istruzioni del
paragrafo “Adattamento dell’apparecchio al tipo di gas”.
Dopo il collegamento all’alimentazione del gas, verificare
con una soluzione di acqua saponata che non vi siano perdite.
Con i bruciatori accesi, ruotare le manopole dalla posizione
massima 1* alla posizione minima 2* per verificare la stabilità
della fiamma.
ADATTAMENTO DELL’APPARECCHIO AL TIPO DI GAS
(Questa operazione deve essere eseguita da un tecnico
qualificato).
Per adattare l’apparecchio a un tipo di gas diverso da quello
per il quale è stato prodotto (indicato sull’etichetta), seguire la
procedura riportata dopo i disegni di installazione.
AVVERTENZE ELETTRICHE
IMPORTANTE: Le informazioni sui consumi di corrente e
tensione sono riportate sulla targhetta matricola.
Il cavo di alimentazione deve essere sufficientemente lungo
da consentire il collegamento dell’apparecchio, una volta
posizionato nell’ubicazione definitiva, alla presa di corrente.
Non tirare il cavo di alimentazione.
Deve essere possibile scollegare l’apparecchio dalla rete
elettrica disinserendo la spina, se questa è accessibile, o tramite
un interruttore multipolare installato a monte della presa nel
rispetto dei regolamenti elettrici vigenti; inoltre, l’apparecchio
deve essere messo a terra in conformità alle norme di sicurezza
elettrica nazionali.
Non utilizzare cavi di prolunga, prese multiple o adattatori.
Una volta terminata l’installazione, i componenti elettrici non
devono più essere accessibili. Non utilizzare l’apparecchio
quando si è bagnati oppure a piedi nudi. Non accendere
l’apparecchio se il cavo di alimentazione o la spina sono
danneggiati, se si osservano anomalie di funzionamento o se
l’apparecchio è caduto o è stato danneggiato.
Se il cavo di alimentazione è danneggiato, deve essere
sostituito con uno dello stesso tipo dal produttore, da un centro
di assistenza autorizzato o da un tecnico qualificato per evitare
situazioni di pericolo o rischi di scosse elettriche.
PULIZIA E MANUTENZIONE
AVVERTENZA: Per evitare rischi di folgorazione, prima di
qualsiasi intervento di manutenzione accertarsi che
l’apparecchio sia spento e scollegato dall’alimentazione
elettrica; non usare in nessun caso pulitrici a getto di vapore.
Non utilizzare prodotti abrasivi o corrosivi, prodotti a base di
cloro o pagliette.
Per evitare danni all’accensione elettrica, non utilizzarla
quando i bruciatori non sono nella loro sede.
SMALTIMENTO DEL MATERIALE DI IMBALLAGGIO
Il materiale di imballaggio è riciclabile al 100% ed è contrassegnato dal simbolo del
riciclaggio
.
Le varie parti dell’imballaggio devono pertanto essere smaltite responsabilmente e in
stretta osservanza delle norme stabilite dalle autorità locali.
SMALTIMENTO DEGLI ELETTRODOMESTICI
Questo prodotto è fabbricato con materiale riciclabile o riutilizzabile. Smaltire il prodotto
rispettando le normative locali in materia. Per ulteriori informazioni sul trattamento, il
recupero e il riciclaggio degli elettrodomestici, contattare l’ufficio locale competente,
il servizio di raccolta dei rifiuti domestici o il negozio presso il quale il prodotto è stato
acquistato. Questo apparecchio è contrassegnato in conformità alla direttiva europea
2012/19/UE, Rifiuti di apparecchiature elettriche ed elettroniche (RAEE) e alle norme sui
rifiuti di apparecchiature elettriche ed elettroniche 2013 (e successive modifiche).
Assicurandosi che questo prodotto sia smaltito in modo corretto, l’utente contribuisce a
prevenire le conseguenze negative per l’ambiente e la salute.
Il simbolo
sul prodotto o sulla documentazione di accompagnamento indica che questo
apparecchio non deve essere smaltito come rifiuto domestico, bensì conferito presso un
centro di raccolta preposto al ritiro delle apparecchiature elettriche ed elettroniche.
CONSIGLI PER IL RISPARMIO ENERGETICO
Utilizzare pentole e tegami con diametro del fondo corrispondente al diametro della zona
di cottura.
Utilizzare solo pentole e padelle con fondo piatto.
Se possibile, tenere il coperchio sulle pentole durante la cottura.
Utilizzare la pentola a pressione per ridurre il consumo di energia e il tempo di cottura.
DICHIARAZIONE DI CONFORMITÀ
Questo apparecchio soddisfa i requisiti di Ecodesign del regolamento europeo 66/2014 e
l’Ecodesign per i prodotti connessi all’energia e le informazioni sull’energia (emendamento)
(Uscita UE) Regolamenti 2019 in conformità con la norma europea EN 30-2-1.
Le informazioni relative alla modalità a basso consumo dell’apparecchio in conformità con il
Regolamento (UE) 2023/826 sono disponibili al seguente link: https://docs.emeaappliance-
docs.eu.
SPECIFICHE DI BRUCIATORI E UGELLI
IT
CATEGORIA II2H3+
Tipo di gas utilizzato Tipo di bruciatore Iniettore Portata termica
nominale
kW
Consumo
nominale
Potenza termica
ridotta
kW
Pressione del gas
mbar
min. nom. max.
GAS NATURALE
(Metano) G20
Semirapido (SR)
Ausiliario (AUX)
Mini Wok (MW)
95 Z
72 X
138 A
1,65
1,00
3,30
157 l/h
95 l/h
314 l/h
0,40
0,40
1,65
17 20 25
GAS PETROLIO
LIQUIDO
(Butano) G30
Semirapido (SR)
Ausiliario (AUX)
Mini Wok (MW)
63
50
91
1,65
1,00
3,30
120 g/h
73 g/h
240 g/h
0,40
0,40
1,65
20 28-30 35
GAS PETROLIO
LIQUIDO
(Propano) G31
Semirapido (SR)
Ausiliario (AUX)
Mini Wok (MW)
63
50
91
1,65
1,00
3,30
118 g/h
71 g/h
236 g/h
0,40
0,40
1,65
25 37 45
Tipo di gas utilizzato Congurazione modello
4 BRUCIATORI
Potenza termica nominale
(kW)
Consumo totale
nominale
Aria necessaria (m3) per la
combustione di 1 m3 di gas
G20 20 mbar 2SR - 1AUX - 1MW 7,80 743 l/h 9,52
G30 28-30 mbar 2SR - 1AUX - 1MW 7,80 567 g/h 30,94
G31 37 mbar 2SR - 1AUX - 1MW 7,80 557 g/h 23,80
ALIMENTAZIONE ELETTRICA: 220-240 V ~ 50-60 Hz - 0,6W
INSTALLAZIONE (CLASSE 3)
INFORMAZIONI TECNICHE PER L’INSTALLATORE
• Utilizzare guanti protettivi per maneggiare, preparare e installare il prodotto.
• Questo prodotto può essere incassato in un top (piano di lavoro) dello spessore di 20 ÷ 60 mm.
• Se sotto il piano di cottura non è previsto un forno, inserire un pannello separatore che abbia una supercie pari almeno all’apertura nel piano di lavoro. Tale
pannello deve essere posizionato a una distanza massima di 150 mm dalla supercie superiore del piano di lavoro e in nessun caso inferiore a 20 mm dal
fondo del piano di cottura. In caso si intenda installare un forno sotto il piano di cottura, assicurarsi che il forno sia dotato di un sistema di rareddamento.
DIMENSIONI E DISTANZE DA RISPETTARE
min. 6,5 mm
max. 8 mm
480 - 482 mm
560 - 562 mm
min. 55 mm
20-60 mm
38 mm
510 mm
580 mm
Min. 100 mm
B
Min. 750 mm
A
NOTA: se la distanza “A” tra i pensili è compresa tra 600 mm e 730 mm, l’altezza “B” deve essere minimo 530 mm.
Se la distanza “A” tra i pensili è maggiore della larghezza del piano di cottura, l’altezza “B” deve essere minimo 400 mm.
Qualora venga installata una cappa sopra il piano di cottura, fare riferimento alle istruzioni di montaggio della cappa per la distanza da rispettare.
MONTAGGIO
Dopo aver pulito la superficie perimetrale, applicare al piano di cottura la guarnizione in dotazione come mostrato in
figura.
Posizionare il piano all’interno dell’apertura praticata secondo le dimensioni indicate nelle istruzioni.
NOTA: il cavo di alimentazione deve essere sucientemente lungo da permetterne l’estrazione dall’alto.
Per bloccare il piano di cottura, utilizzare le stae (A) in dotazione. Posizionare le stae in corrispondenza dei fori evidenziati dalla freccia e ssarle con le apposite
viti in modo da adattarle allo spessore del top (vedere le gure seguenti).
20
30
60
40
20 mm
40 mm
30 mm
60 mm
A
COLLEGAMENTO GAS
• Collegare il raccordo a gomito (A)* o (B)* fornito insieme al tubo di alimentazione principale del piano di cottura e interporre
la guarnizione (C) in dotazione, a norma EN 549.
* Utilizzare il raccordo a gomito (A) per la Francia e il raccordo a gomito (B) per tutti gli altri paesi.
• Dopo il collegamento all’alimentazione del gas, vericare con una soluzione di acqua saponata che non vi siano perdite. Con i
bruciatori accesi, ruotare le manopole dalla posizione massima
alla posizione minima per vericare la stabilità della amma.
CONNESSIONE ELETTRICA
L
Cavo di terra
(giallo / verde)
N
C
B
C
C
A
UTILIZZO DEL PIANO DI COTTURA
Non lasciare che la amma del bruciatore si estenda oltre il bordo della
pentola.
IMPORTANTE: quando è in funzione, tutta la supercie del piano di
cottura potrebbe riscaldarsi.
• Per accendere uno dei bruciatori, ruotare la manopola corrispondente
in senso antiorario no a far coincidere l’indice con il simbolo di amma
massima.
• Premere la manopola contro la mascherina dei comandi per accendere il
bruciatore.
• Una volta acceso il bruciatore, è necessario continuare a tenere premuta la
manopola per circa 5–10 secondi per consentire il corretto funzionamento
del dispositivo.
• Si tratta di un dispositivo di sicurezza che interrompe la fuoriuscita di gas
in caso di spegnimento accidentale della amma (dovuto a correnti d’aria,
interruzione momentanea dell’alimentazione del gas, traboccamenti di
liquidi, ecc.).
• La manopola non deve essere tenuta premuta per più di 15 secondi.
Se, trascorso tale tempo, il bruciatore non rimane acceso, attendere
almeno un minuto prima di tentare un’ulteriore accensione.
NOTA: qualora particolari condizioni del gas erogato localmente rendessero
difficoltosa l’accensione del bruciatore, si consiglia di ripetere l’operazione
con la manopola ruotata sulla posizione della fiamma piccola.
Può accadere che il bruciatore si spenga al momento del rilascio della
manopola. Ciò indica che il dispositivo di sicurezza non si è scaldato a
sucienza. In questo caso, ripetere le operazioni sopra descritte.
Nel caso di una estinzione accidentale delle amme del bruciatore, chiudere
la manopola di comando e non tentare di accenderlo per almeno 1 minuto.
CONSIGLI PRATICI PER L’USO DEI BRUCIATORI
Questo piano di cottura è dotato di bruciatori con diametri diversi. Al ne di
ottenere il massimo rendimento, è utile attenersi alle seguenti regole:
• utilizzare pentole e tegami di diametro pari o leggermente superiore al
diametro dei bruciatori (vedere la tabella a destra);
• utilizzare soltanto pentole e tegami con fondi piatti;
• utilizzare la giusta quantità d’acqua per la cottura dei cibi e usare il
coperchio;
• evitare che le pentole, posizionate sulle griglie, fuoriescano dal perimetro
del piano di cottura;
• nel caso di recipienti con fondo convesso (WOK), utilizzare la griglia di
supporto che deve essere posizionata solo sul bruciatore multicorona;
• evitare urti accidentali con pentole,griglie o altri utensili da cucina;
• non lasciare bistecchiere vuote sul fornello acceso per più di 5 minuti.
IMPORTANTE: l’uso improprio delle griglie potrebbe danneggiare il
piano; evitare di appoggiare le griglie capovolte o di trascinarle sul piano.
BRUCIATORE Ø RECIPIENTI
Mini Wok da 24 a 26 cm
Semirapido da 16 a 22 cm
Ausiliario da 8 a 14 cm
Non utilizzare:
• bistecchiere in ghisa, supporti in pietra naturale, tegami o pentole in
terracotta;
• dissipatori di rete metallica o di altro tipo;
• due bruciatori simultaneamente per la cottura con un solo recipiente (ad
esempio una pesciera).
ADATTAMENTO AI DIVERSI TIPI DI GAS
Questa operazione deve essere eseguita da un tecnico qualicato.
In caso di utilizzo con un gas diverso da quello indicato sulla targhetta matricola
e sull’etichetta informativa posta sulla parte superiore del piano di cottura, è
necessario sostituire gli iniettori.
L’etichetta informativa va rimossa e conservata insieme al libretto istruzioni.
Utilizzare regolatori di pressione idonei alla pressione del gas indicata
nelle istruzioni:
• per la sostituzione degli iniettori del gas, rivolgersi al servizio assistenza o a
un tecnico qualicato;
• gli iniettori non forniti in dotazione devono essere richiesti al servizio
assistenza;
• regolare il minimo dei rubinetti.
NOTA: se si utilizza gas di petrolio liquefatto (G30/G31), la vite di regolazione
del minimo deve essere avvitata a fondo.
IMPORTANTE: se la rotazione delle manopole dei bruciatori dovesse
risultare dicoltosa, contattare il Servizio di assistenza tecnica
autorizzato che provvederà alla sostituzione del rubinetto, se difettoso.
IMPORTANTE: se si utilizza la bombola del gas, questa deve essere
posizionata correttamente (orientamento verticale).
USO QUOTIDIANO
DESCRIZIONE DEL PRODOTTO
GRAZIE PER AVERE ACQUISTATO UN PRODOTTO HOTPOINT/
ARISTON
Per ricevere un’assistenza più completa, registrare il
prodotto su www.register10.eu.
SI PREGA DI SCANSIONARE
IL CODICE QR SUL PROPRIO
APPARECCHIO PER OTTENERE
MAGGIORI INFORMAZIONI
!
Prima di utilizzare l'apparecchio leggere attentamente
le istruzioni di sicurezza.
6
7 8 9
2
3
4
5
1 1
1. Griglie amovibili
2. Bruciatore Semirapido
3. Bruciatore Semirapido
4. Bruciatore Mini Wok
5. Bruciatore Ausiliario
6. Manopola comando bruciatore Semirapido
7. Manopola comando bruciatore Semirapido
8. Manopola comando bruciatore Mini Wok
9. Manopola comando bruciatore Ausiliario
Simboli
Pallino pieno
Fiamma grande
Fiamma piccola
Rubinetto chiuso
Massima apertura/erogazione
e accensione elettrica
Minima apertura
o erogazione ridotta
Manuale d’uso
IT
SOSTITUZIONE DEGLI INIETTORI (per il tipo vedere tabella ugelli
nelle Norme di Sicurezza)
Questa operazione deve essere eseguita da un tecnico qualicato.
• Rimuovere le griglie (A).
• Estrarre i bruciatori (B).
• Con una chiave a tubo della dimensione appropriata, svitare l’iniettore da
sostituire (C).
• Sostituirlo con l’iniettore previsto per il nuovo tipo di gas.
• Rimontare l’iniettore in (D).
• Se si dispone di un bruciatore a corona multipla, utilizzare una chiave
laterale per sostituire l’iniettore (E).
A
B
D
C
E
Prima di installare il piano di cottura, ricordarsi di applicare la targhetta di taratura gas
fornita con gli iniettori di ricambio, in modo che copra le informazioni già presenti.
REGOLAZIONE DEL MINIMO DEI BRUCIATORI
Questa operazione deve essere eseguita da un tecnico qualicato.
La regolazione deve essere eseguita con il rubinetto nella posizione di minimo
(amma piccola)
.
Non occorre regolare l’aria primaria dei bruciatori.
Per garantire una corretta regolazione del minimo, rimuovere la manopola (F)
e procedere nel modo seguente:
• avvitare la vite per ridurre l’altezza della amma (−);
• allentare la vite per aumentare l’altezza della amma (+);
Con i bruciatori accesi, ruotare le manopole dalla posizione massima
alla
posizione minima
per vericare la stabilità della amma.
F
Terminata la regolazione, ripristinare i sigilli con ceralacca o materiale equivalente.
PULIZIA E CURA
Scollegare l’alimentazione prima di eseguire la manutenzione.
PULIZIA DEL PIANO COTTURA
• Le parti smaltate e in vetro vanno lavate con acqua calda e detergente
neutro.
• L’acqua calcarea o detergenti aggressivi potrebbero lasciare macchie sulle
superci in acciaio inox, se rimangono a contatto troppo a lungo. Eliminare
prontamente eventuali residui di cibo (acqua, sugo, caè, ecc.) prima che
si secchino.
• Pulire con acqua calda e detergente neutro, quindi asciugare con un
panno morbido o una pelle di daino. In caso di sporco dicile, usare
esclusivamente detergenti indicati per le superci in acciaio inox.
NOTA: pulire le superci in acciaio inox solo con un panno morbido o una
spugna.
• Non utilizzare prodotti abrasivi o corrosivi, prodotti a base di cloro o
pagliette.
• Non utilizzare pulitrici a getto di vapore.
• Non utilizzare prodotti inammabili.
• Evitare di lasciare sul piano sostanze acide o alcaline come aceto, mostarda,
sale, zucchero o succo di limone.
PULIZIA DEI COMPONENTI DEL PIANO
• Le griglie, i cappellotti e i bruciatori sono rimovibili per facilitarne la pulizia.
• Lavarli a mano con acqua calda e detersivo non aggressivo avendo cura
di eliminare eventuali incrostazioni e controllando che nessuna delle
aperture del bruciatore sia otturata.
• Sciacquare e asciugare.
• Le griglie in ghisa possono essere pulite in lavastoviglie.
Rimuovere eventuali residui di cibo bruciato prima di riporre le griglie
nel cestello più basso della lavastoviglie.
• Rimontare correttamente bruciatori e cappellotti nelle rispettive sedi.
• Nel riposizionare le griglie, assicurarsi che la zona di appoggio delle
pentole sia allineata con il bruciatore.
• Nei modelli dotati di candeline di accensione elettrica e di termocoppie
di sicurezza, occorre procedere a un’accurata pulizia della parte terminale
della candelina per assicurarne il buon funzionamento. Controllare questi
componenti frequentemente e, se necessario, pulirli con un panno umido.
Eventuali residui di cibo secchi vanno rimossi con uno stuzzicadenti o un
ago.
NOTA: per evitare danni all’accensione elettrica, non utilizzarla quando i
bruciatori non sono nella loro sede.
RISOLUZIONE DEI PROBLEMI
Se il piano cottura non funziona correttamente, prima di chiamare l’assistenza
esaminare questa guida rapida per individuare il problema.
1. Il bruciatore non si accende o la amma non è uniforme
Controllare che:
• non ci siano interruzioni nella rete di alimentazione del gas ed elettrica
e, in particolare, che il rubinetto del gas sia aperto;
• la bombola del gas liquido non si sia esaurita;
• le aperture del bruciatore non siano ostruite;
• la parte terminale della candelina non sia sporca;
• tutte le parti che compongono il bruciatore siano posizionate
correttamente;
• non ci siano correnti d’aria in prossimità del piano.
2. La amma non rimane accesa
Controllare che:
• la manopola sia stata premuta a fondo durante l’accensione del bruciatore
per il tempo suciente ad attivare il dispositivo di sicurezza;
• le aperture del bruciatore non siano ostruite in corrispondenza della
termocoppia;
• la parte terminale del dispositivo di sicurezza non sia sporca;
• la regolazione del minimo sia corretta (vedere il paragrafo corrispondente).
3. I recipienti sono instabili
Controllare che:
• il fondo del recipiente sia perfettamente piano;
• il recipiente sia centrato sul bruciatore;
• le griglie non siano state invertite o posizionate in modo errato.
Se dopo le suddette veriche il problema persiste, contattare il Servizio
Assistenza più vicino.
SERVIZIO ASSISTENZA
PRIMA DI CHIAMARE IL SERVIZIO ASSISTENZA:
1. Vericare se non sia possibile eliminare da soli i guasti. Vedere “RISOLUZIONE
DEI PROBLEMI”.
2. Spegnere e riaccendere l’apparecchio per assicurarsi che l’inconveniente sia
stato eliminato.
SE DOPO I SUDDETTI CONTROLLI IL PROBLEMA PERSISTE,
CONTATTARE IL SERVIZIO ASSISTENZA PIÙ VICINO.
Quando si contatta il nostro servizio assistenza,indicare sempre:
• una breve descrizione del guasto;
• il tipo e il modello esatti del prodotto;
XXXXXXXXXXXXXXX
XXXXXXXXXXXXXXXXXXXXXX
Made in X
Type: XXXMod.: XXX
01
XXXX XXX XXXXXXX XXXX XXXXX
XXXXXXXXXXXXXXXXXXXX
XXXXXXXXXXXXXXXXXXXXXXXXXXXXXXXXXXXXXXXXXXXXXXXXXXXXXXXXXXXXXXXXXXXXXXXXX
• il numero di serie (è il numero che si trova dopo la parola SN sulla targhetta
matricola posta sotto l’apparecchio). Il numero di serie è indicato anche
nella documentazione;
Mod.
Ind.C.
SN:
Prod.N.
xxxx xxxx xxxx
xxxx xxxx xxxx
xxxx xxxx xxxx
xxx xxx
PRODUCT
INFORMATION
• il proprio indirizzo completo;
• il proprio numero di telefono.
Qualora si renda necessaria una riparazione, rivolgersi ad un centro del Servizio
Assistenza (a garanzia dell’utilizzo di pezzi di ricambio originali e di una corretta
riparazione).
Per le linee guida, la documentazione standard e altre informazioni sui prodotti:
• Utilizzando il codice QR nel proprio apparecchio;
• Visitando il nostro sito web docs.hotpoint.eu;
• Oppure, contattare il Servizio Assistenza Tecnica (al numero di telefono riportato sul libretto di garanzia). Prima di
contattare il Servizio Assistenza Clienti, prepararsi a fornire i codici riportati sulla targhetta matricola del prodotto.
Manuale d’uso
IT
400020004282-B
Beko Europe Management Srl
Via Varesina 204,
20156 Milano, ITALY