
SLOW JUICER
Instruction Manual
Model No.:AMR520
Brand:AOBOSI

Contents
Section I. P r ec a u t i o n s f or S a f et y U s e ................................ 3
Section II. Parts and Functions .................................................. 5
Section III. Method of Operation ......................................... 7
Section IV. How to assemble........................................................... 7
Section V.
Tips for Ingredients Selection .................................. 10
Section
VI. Maintenance
.
.......................................................12
Section
VII.
Safety Index.............................................................................13
Section VIII. Trouble Shooting........................................................14
Warranty.......................................................................................... 15
Section I. Précautions d'utilisation en toute sécurité
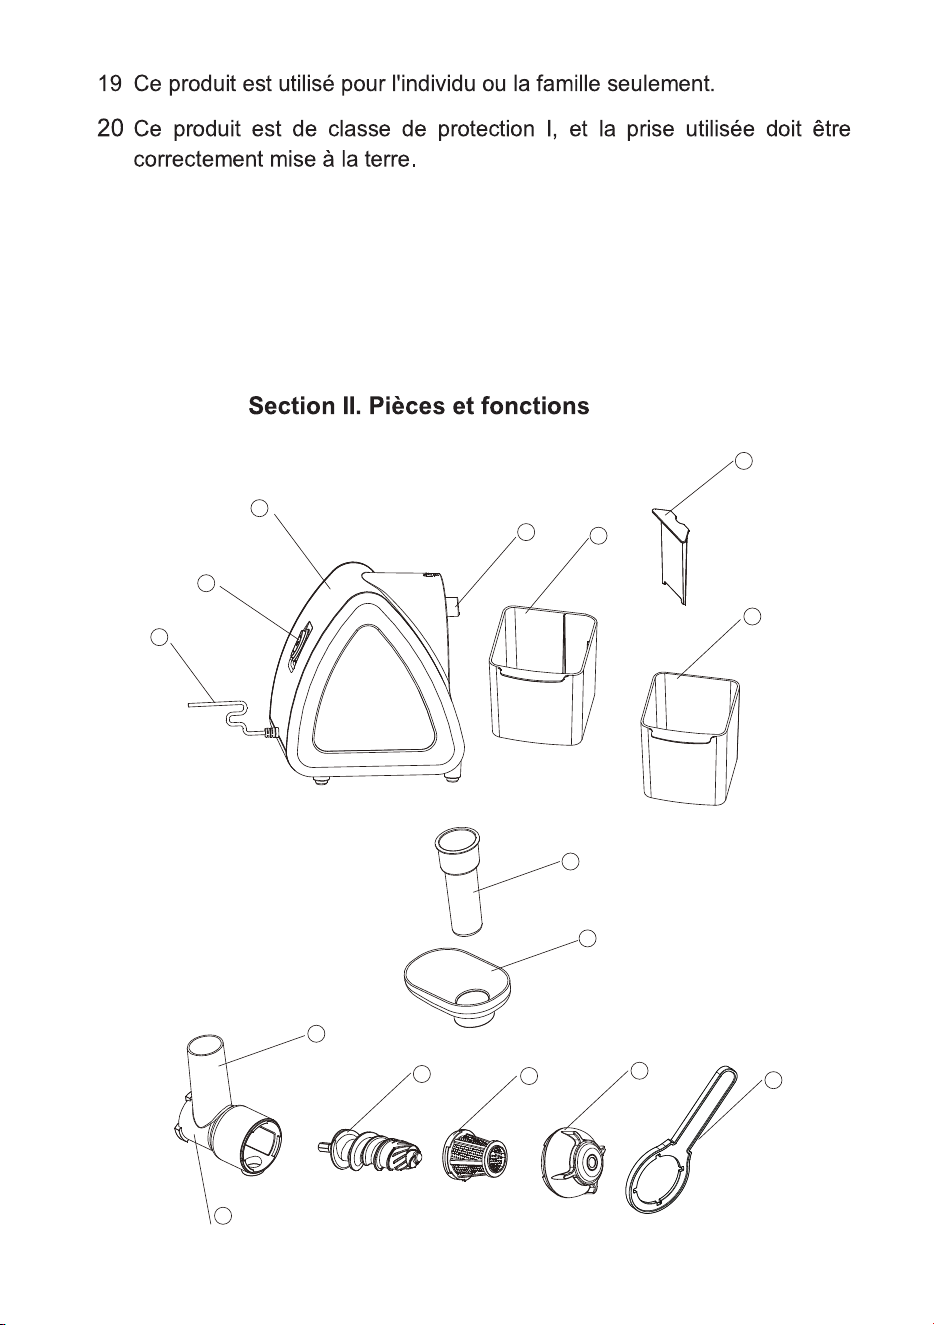
Section II. Pièces et fonctions
Section III. Mode opératoire
Section IV. Assemblage
Section V. Conseils pour la sélection des ingrédients
Section VI. Entretien
Section VII. Indice de sécurité
Section VIII. Dépannage
Garantie
14
16
18
19
23
25
27
27
29

Section I. Pr ec a u tion s fo r S afe t y U se
When using electrical appliances, basic safety precautions should always be
followed, including the following:
1.
Power of 120V~60Hz shall be supplied to this product. Please confirm
your power supply before use.
2.
Be sure to disconnect the power supply before dis-assembly/re-
assembly
or adjustment to this product.
3.
In case of any damage to the flexible wire, to avoid any hazard,
contact our customer service or send it to our authorized service
center for
replacement, and do not try to disassemble it without our
authorization.
4.
Prior to use, please check the power cable, plug, juice filter,
Auger
, chopper body, meat grinder and other parts, and in case of any
damage, stop using this product and contact our customer service
immediately without unauthorized dis-assembly or repair to avoid any
potential hazard.
5.
For need of any repair during use,return appliance to our authorized
service facility for examination, repair or electrical adjustment.
6.
Before connecting with power supply,
make sure that any such
removable parts
as extractor body, auger, juice filter and extractor
cover have been mounted inplace.
7.
DO NOT put your fingers or other objects into the juicer opening
while it is in operation. If food becomes lodged in the opening, use
the plunger or another piece of fruit to push it down. When this
method is not possible, turn the motor off and disassemble juicer
to remove the remaining food.
8.
The food material needs to be cut into proper pieces so as to pass
th
r
ou
g
h
th
e
inl
e
t
to
ex
tr
a
c
to
r
/
c
ho
pp
e
r/
g
ri
n
d
.
A
n
y
frui
t
/
v
e
g
e
t
a
b
le
s
h
a
ll
haveanyhardcore,seed,skinor shell removed before processing.
9.
Proper amount of force shall be used to push the food material in, not
excessive but sufficient to have it cut off exactly.
10.
The juice filter, extractor cover, or auger may be dyed by the
juice
during operation, which is a normal phenomenon and has no effect
on
1

edibility and does no harm to health.
11.
This product is equipped with intelligent protection chips, making it stop
automatically for every 20 minutes' operation. And in such case, rest it for
20-30 minutes before restarting it, so as to cool the motor down and
prolong product servicelife.
12.
This product is designed to limit the flow rate. During processing of
any
hard material, the motor will be locked and the current will rise up.
When
the current goes higher than 1.3A, the equipment will beep
and the motor will stop operation for over-current protection and
extension of life span.
13.
In case that current limit protection is triggered or the motor is locked
and stops automatically, disconnect the power supply and keep the
switch in position "0", and press Rotate Backwards button on the power
switch, and then discharge the food material and then press Rotate
Forwards to restart the machine. If the problem continues, it is
recommended to remove any food material inside
auger
before
restart
so as to protect the motor.
14.
After the completion of operation, remove any removable part
only after the motor/auger/shredder/slicer/grinder screw has
stopped rotating and the power has been disconnected.
15.
Any part in contact with food material is clean, safe and reliable in
compliance with related food hygiene codes.
16.
To protect against risk of electrical shock, do not put the motor base in
water or other liquid.
17.
Do not use any steel wool, abrasive cleaning agent or corrosive
liquid such as gasoline or acetone to clean this product.
18.
This product should be stored in a place that children can’t reach. Not
allow persons with unsound extremities and sensation or mental
disorders and persons who are short of related experience and
knowledge( including children ) to use or play with this product.
19.
This product is used for individual or family only.
20.
This product is of Class-I protection grade, and the socket used for it
must be grounded properly.
2
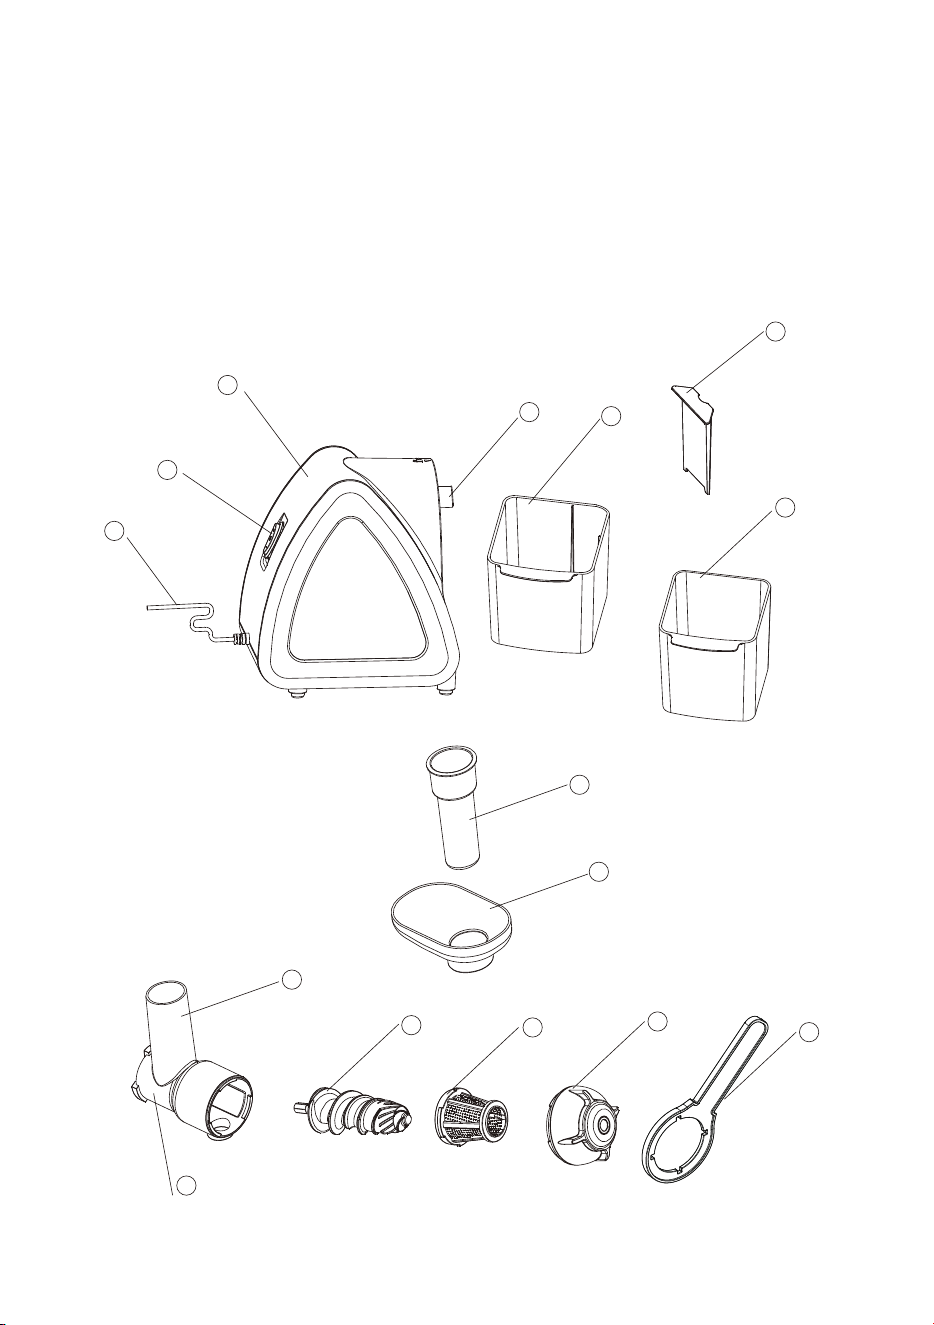
Section II. Parts and Functions
2
4
5
6
7
8
9
10
11
12
13
14
15
3
1
21 Hazards or unsafe practices could result in minor personal injury or
appliance damage. Care shall be taken when handling the sharp cutting
blades, emptying the bowl and during cleaning. Always disconnect the
appliance from the supply if it is left unattended and before assembling,
disassembling or cleaning.
3

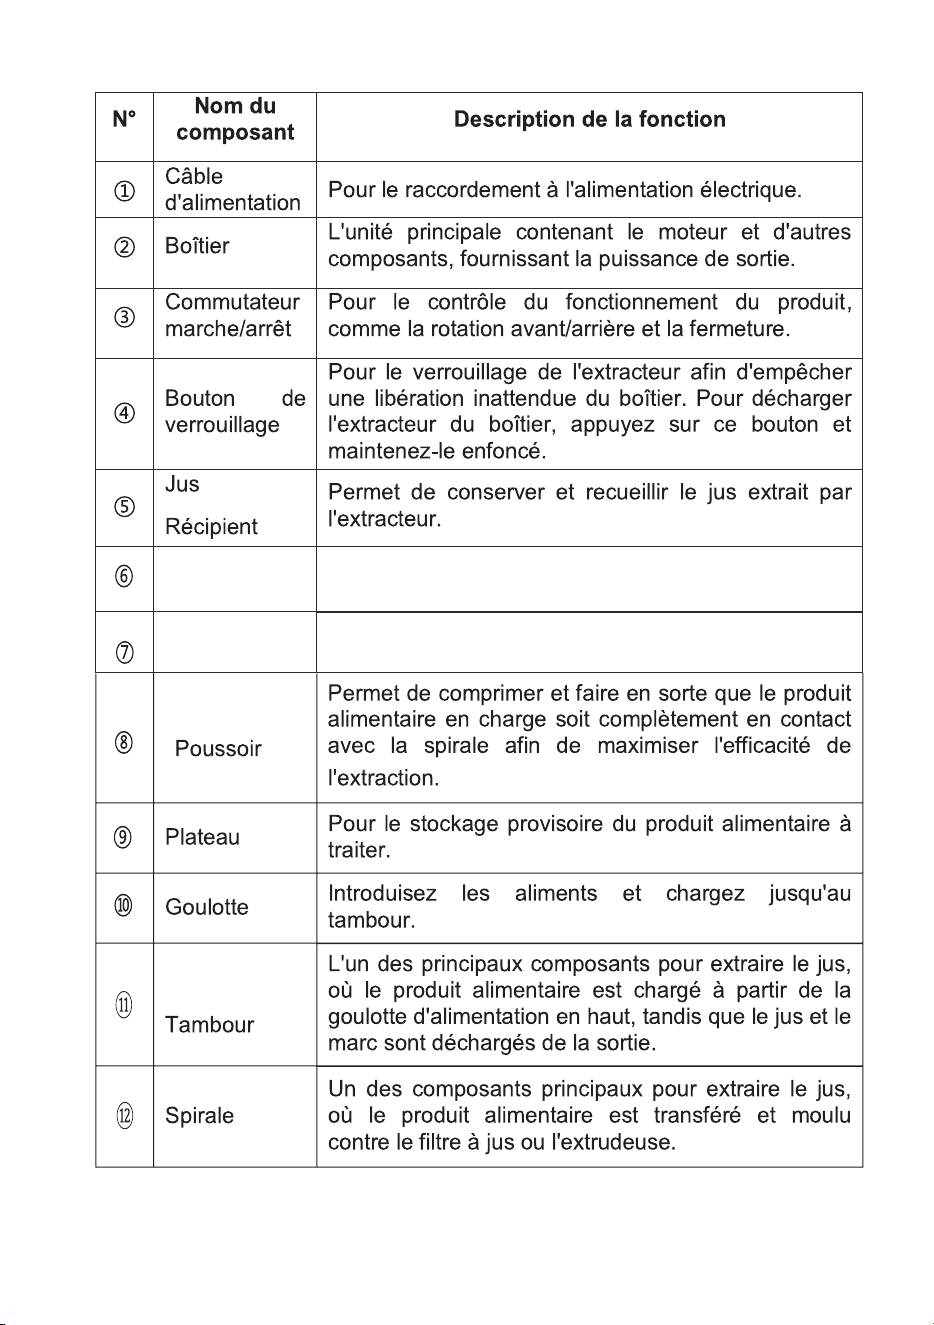
No.
Component
Name
Function Description
Power Cable
For connection to power supply.
Housing
The main unit containing motor and other
components, providing power output.
On-Off
Switch
For control of product operation,such as
forward/backwardrotationandclose-down.
Locking
Button
For locking of extractor to prevent unexpected release
out of the housing. To unload the extractor off the
housing,
press down and hold this button.
Juice
Container
To hold and collect the juice extracted by the
extractor.
Container
Baffle
To separate foam from the juice in the container.
Pomace
Container
To hold and collect any Pomaces separated by the
ex
t
r
a
c
t
o
r
.
Plunger
To squeeze and maketheload food material
contact
completely with the
auger
so as to maximize
extracting efficiency.
Tray
For interim storage of food material to process.
Feed chute
Feeding food and load down to Drum
Drum
One of the main components to extract juice,where
the food material is loaded from theFeed chute at
the top, while the juice and Pomaces are
discharged from the outlet.
Auger
Oneof the maincomponentsto extract juice, where
thefood material is transferred and ground against
juice filter or extruder.
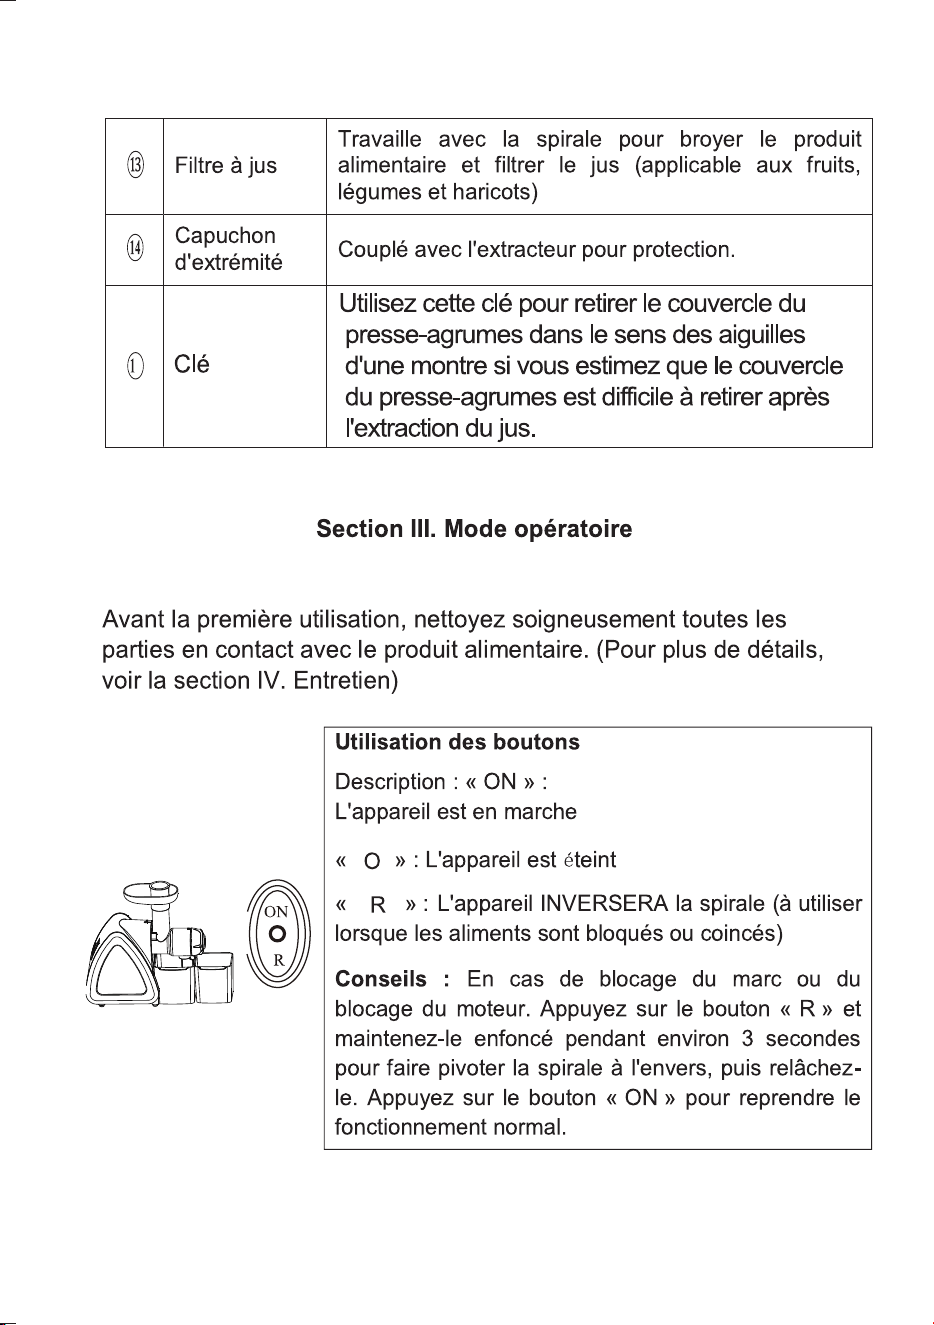
Juicing
screen
Work with
Auger
to grind food material and filter the
juice. (applicable to fruits, vegetables and
beams)
End cap
Coupled with extractor to provide protection.
Wrench
Please use this wrench to remove the juicer cover
in clockwise direction if you find the juicer cover is
difficult to remove after juicing.
4
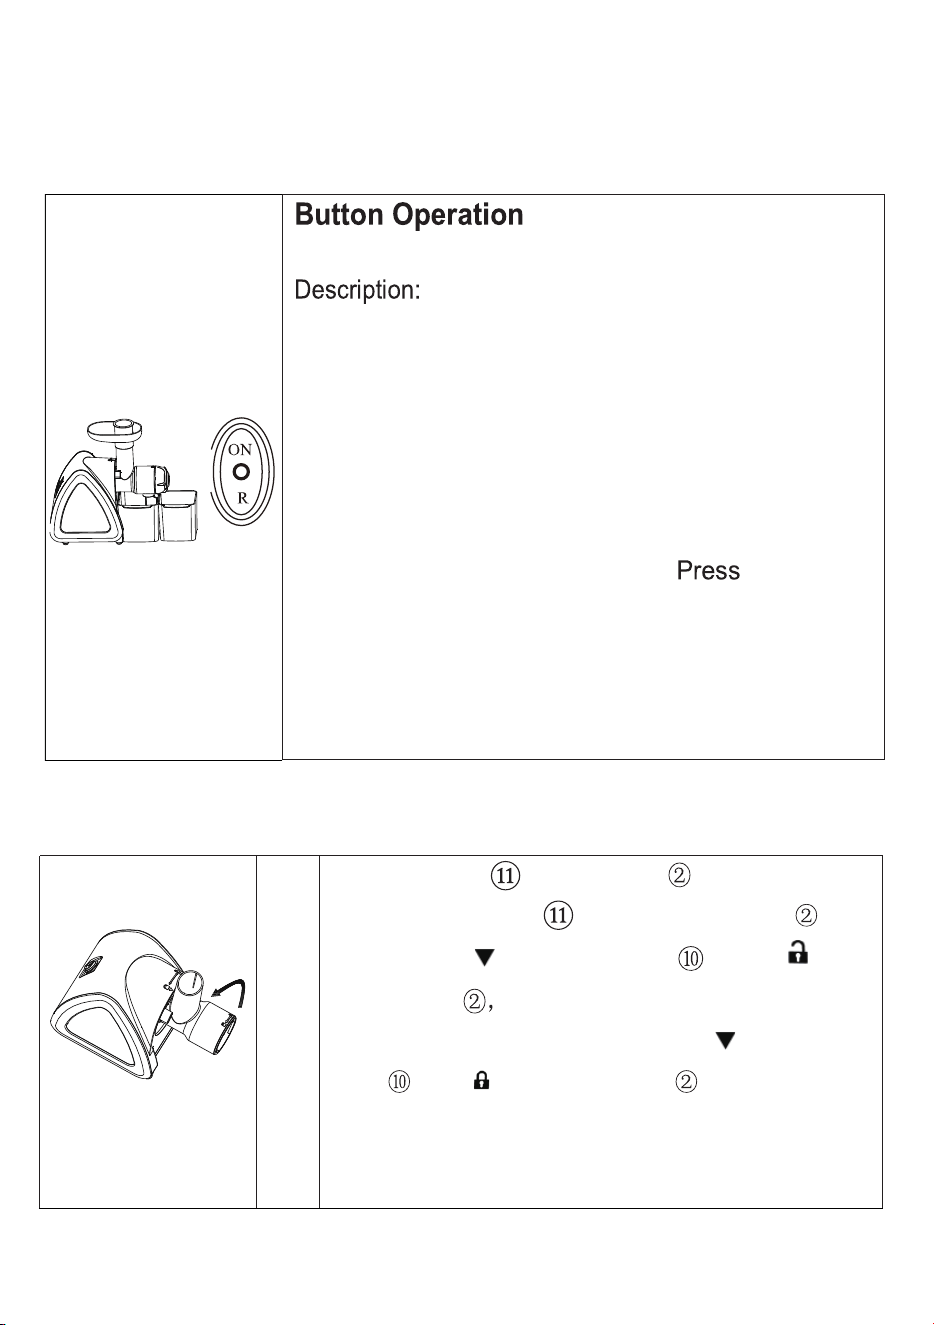
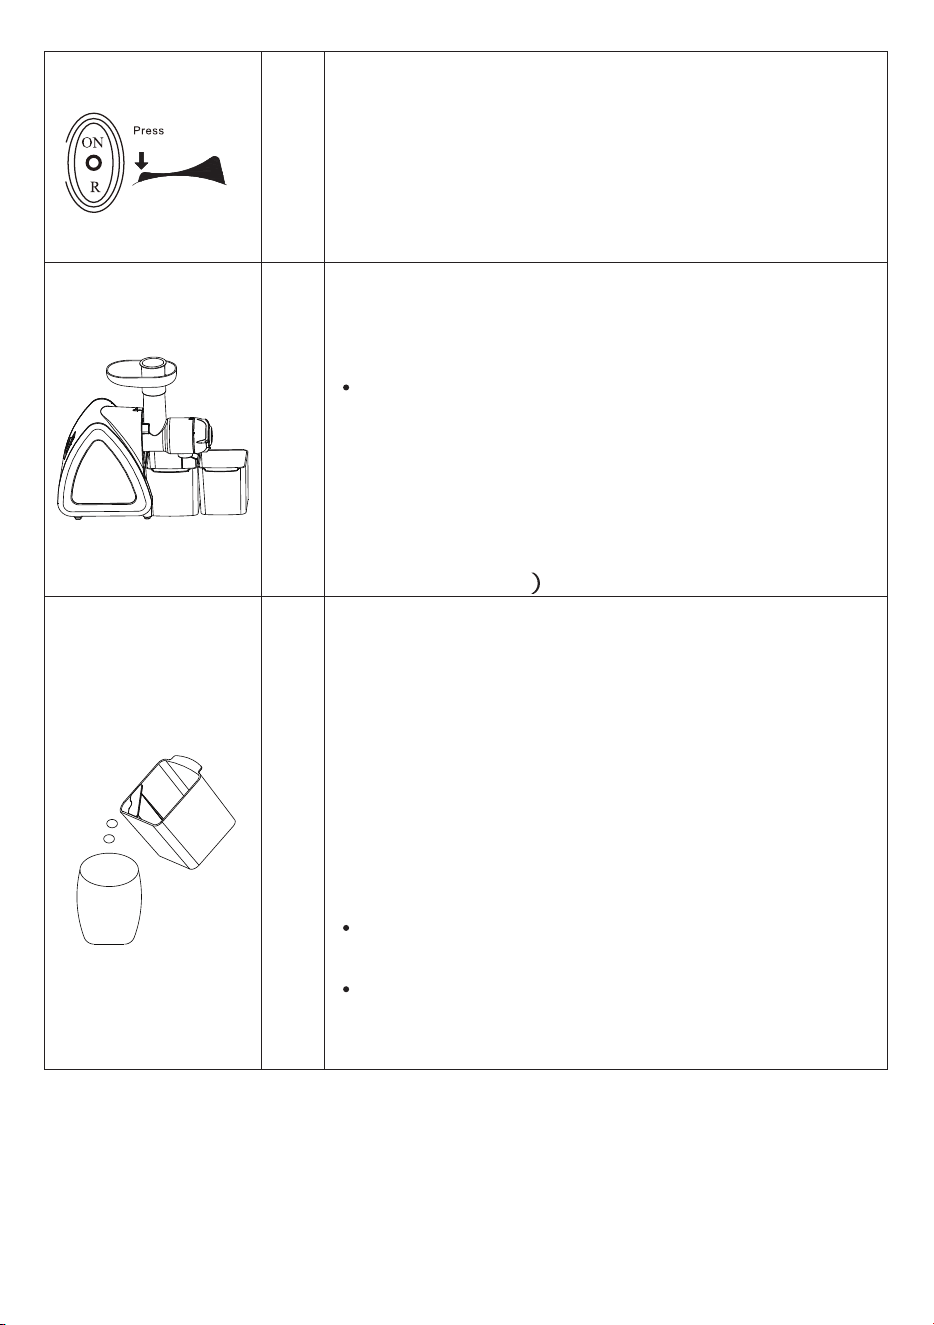
“ON” :
Appliance is ON state
“O” : Appliance is OFF state
“R” : Appliance will REVERSE auger.(use when
food is blocking or stuck)
Tips: In case of Pomace blockage or motor
locking. Press and hold“R” button for
approximately 3 seconds to rotate the auger
reversely and then release it..
“ON”button
to resume normal operation.
Note: After Press”ON”, the appliance need to
pause for 1s before starting working.
Section III. Method of Operation
Prior to first use,Please thoroughly clean any parts in contact with food
material. (See Section IV. Maintenance for more details)
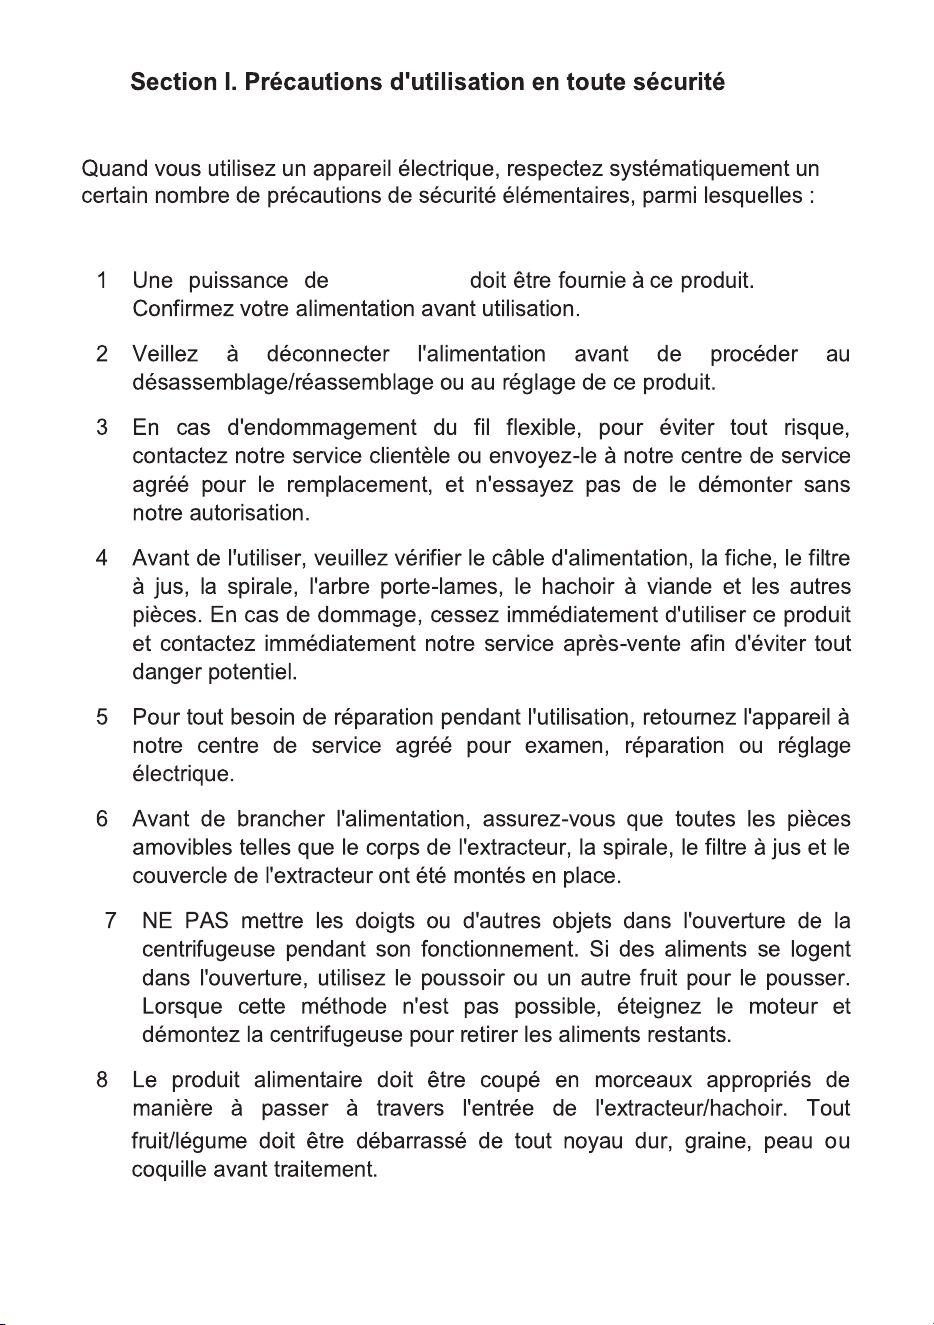
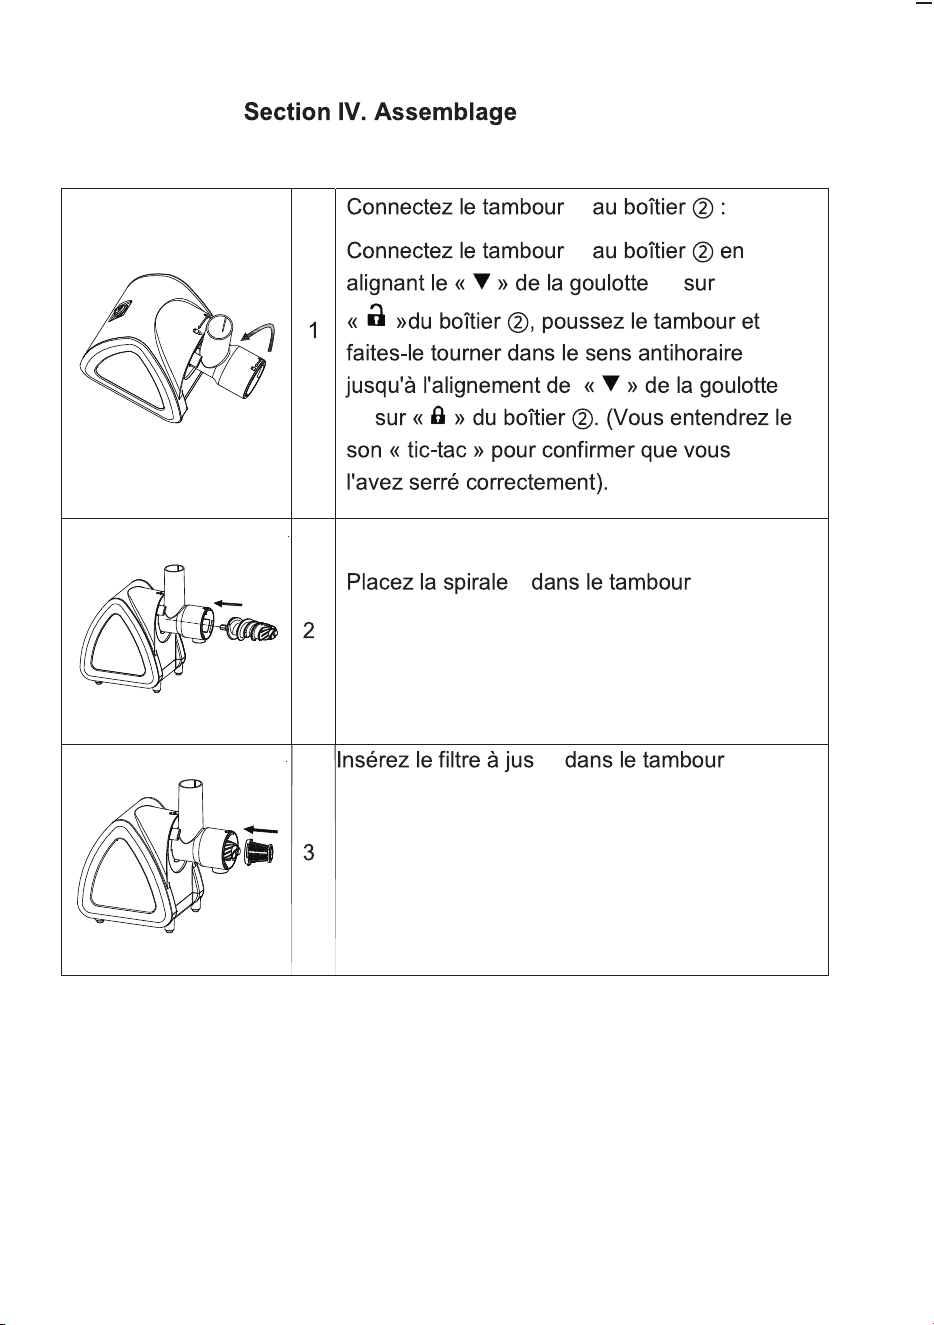
Section IV. How to assemble
1
Connect Drum with Housing :
Connect the Drum with the Housing by
aligning the
“ ”
on Feed chute with
“ ”
on
the Housing
push the Drum hard and rotate the
Drum anticlockwise until aligning
“ ”
on Feed
chute
with “ ” on the Housing .
(You will hear
“Tick”
sound to confirm
fasten it tightly and
correctly
).
5
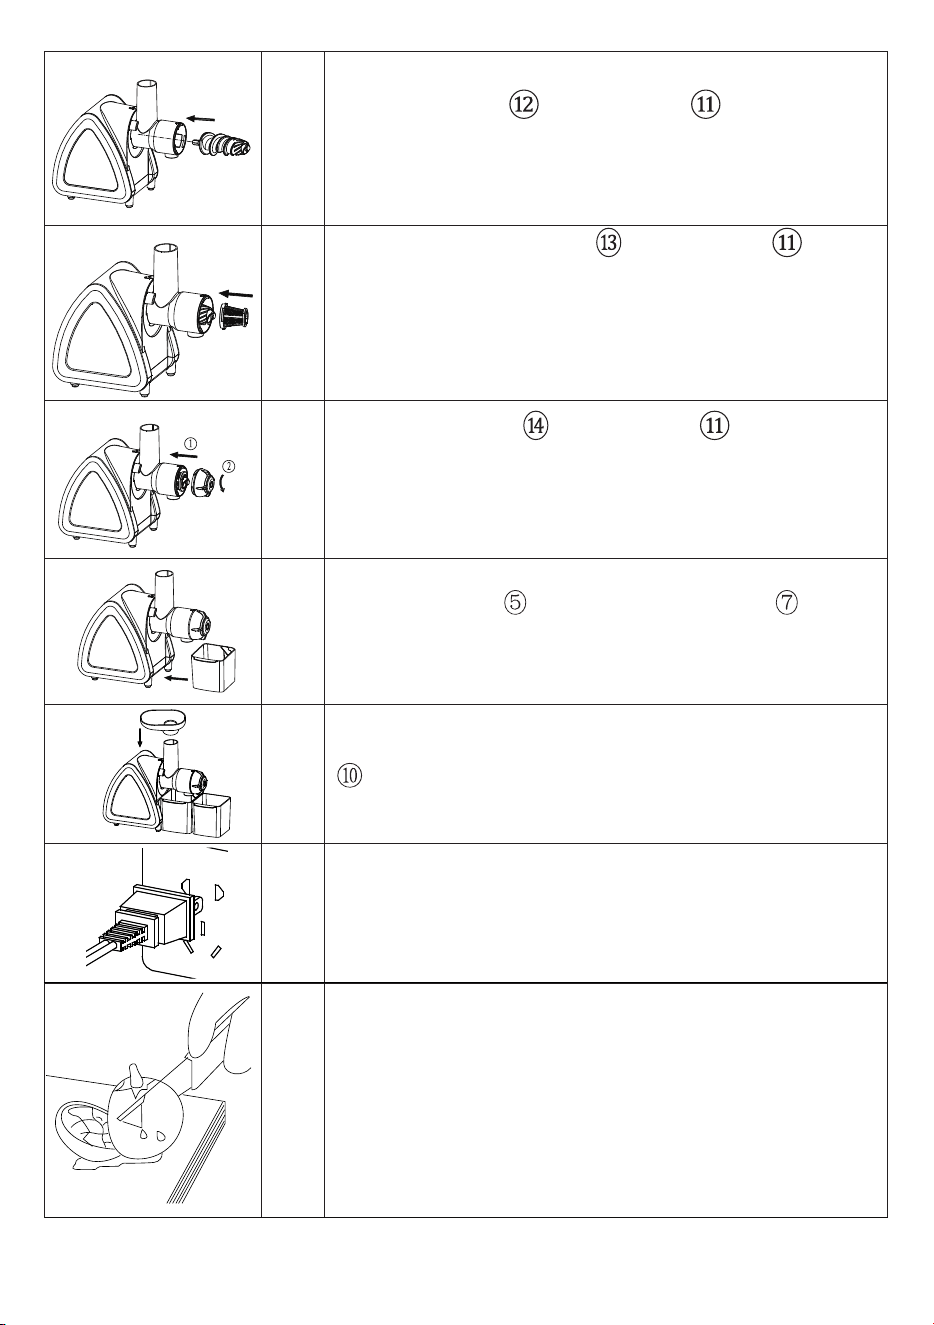
2
Place the auger into the drum .
3
Insert the juicing screen into the drum .
4
Place the end cap onto the drum end and
rotate the cap counter- clockwise.
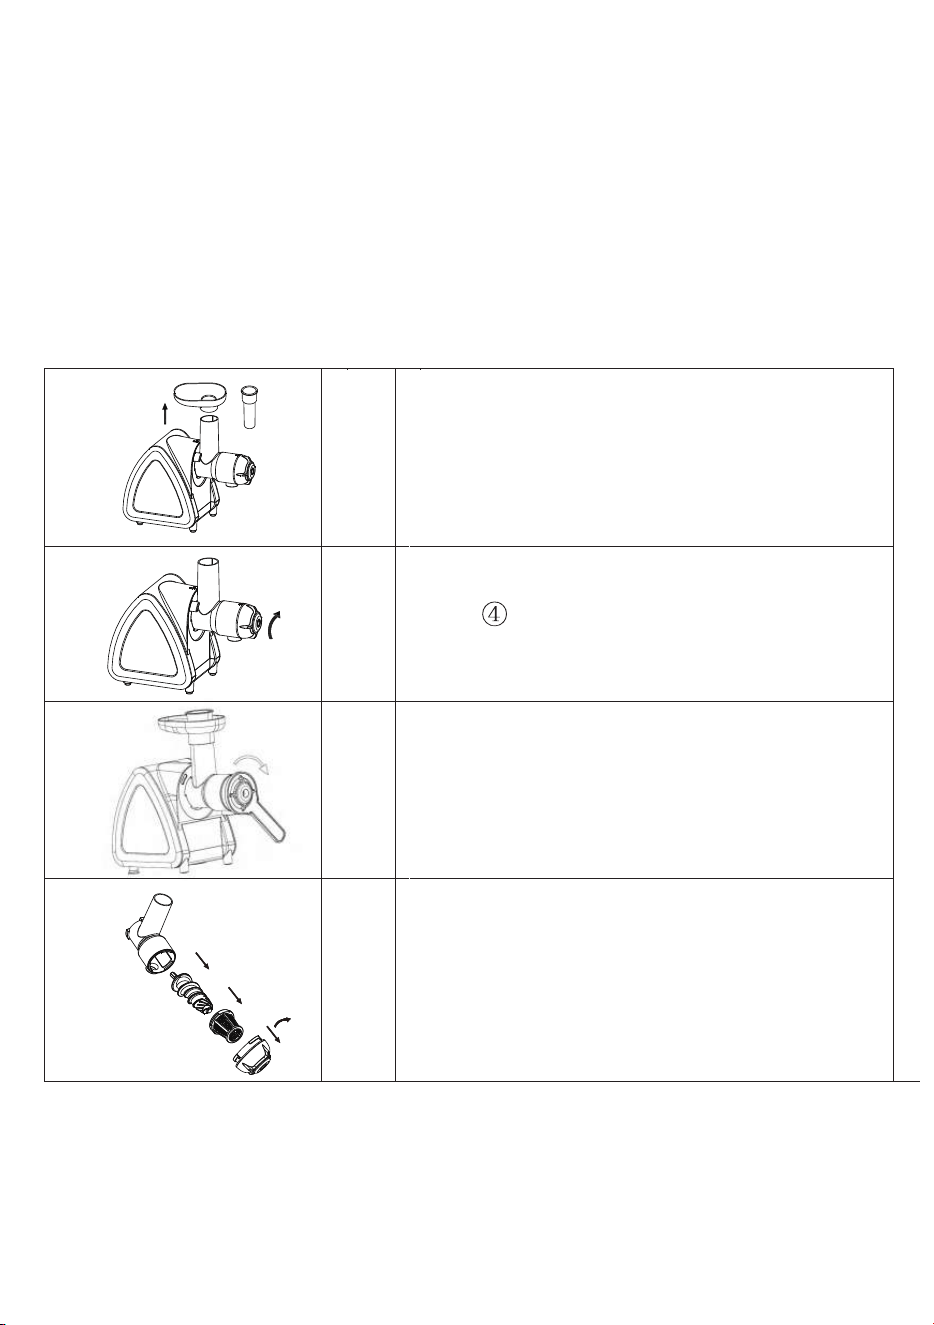
5
Place Juice Cup and Pomace Container under
the drum set
.
6
Mount tray onto the upper end of Feed chute
.
7
Connect to power supply and get ready for start
up.
(Beforepower-on,make surethe switch is
in Off position.)
8
Clean the material and cut it into pieces small
sufficiently which can pass through the Feed chute,
and place them
onto the tray.
Note: Any hard core, seed, skin or shell from
fruits and vegetables shall be removed in
advance.
6
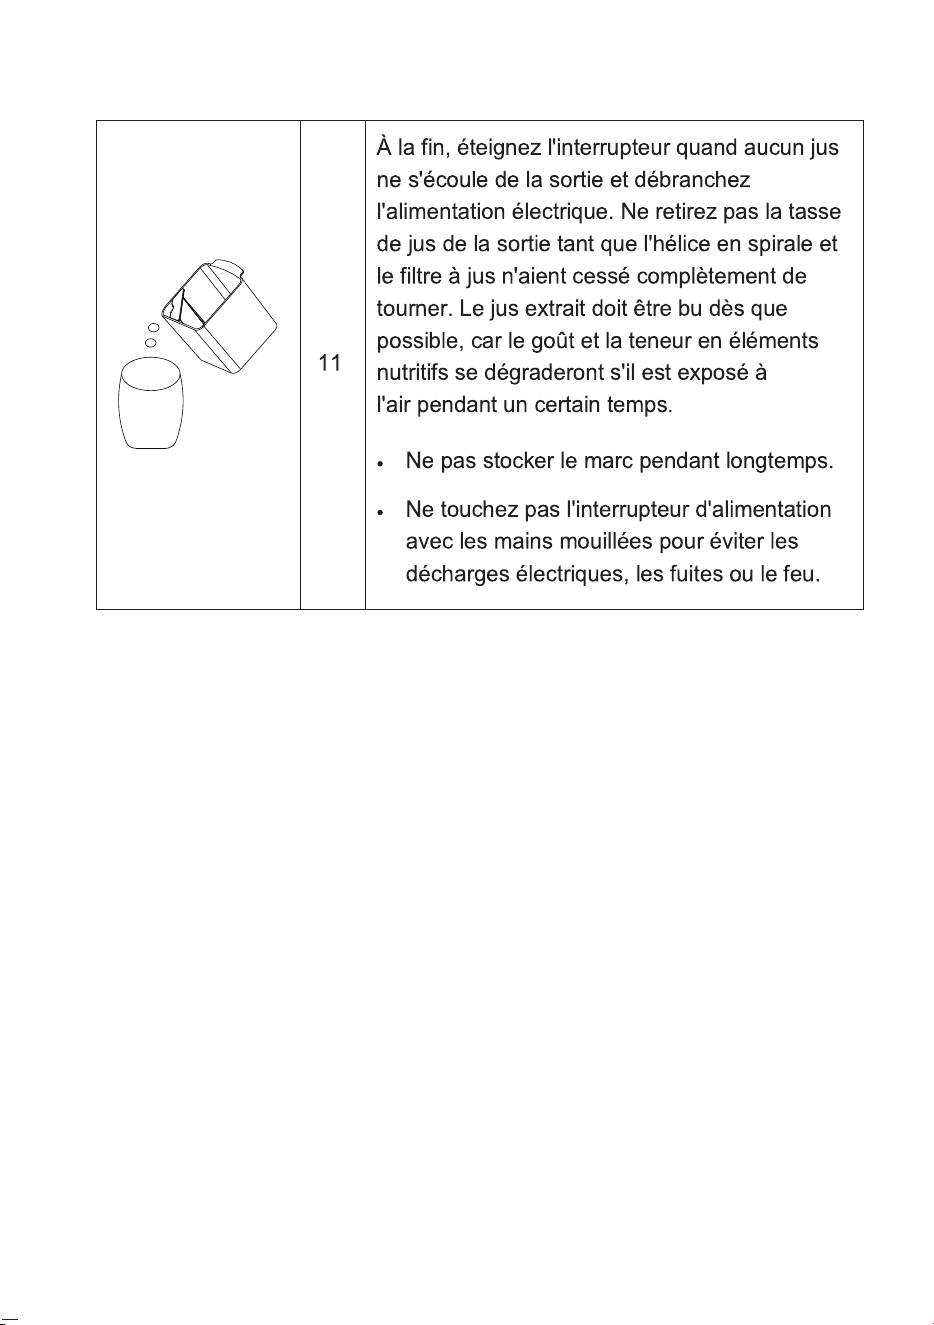
10
Place the few pieces of cut fruit or vegetables
into the Feed chute, push them down the drum
gently with plunger.
Properamountofforceshallbeusedtopushthe
food material in, not excessive but sufficient to
have
it cut off exactly.
(Donot put your finger or anyotherobjectinto
the Feed chute! If the Pomace/Juice Cup is
full,
disconnect the power supply and clear it up
before
restart.
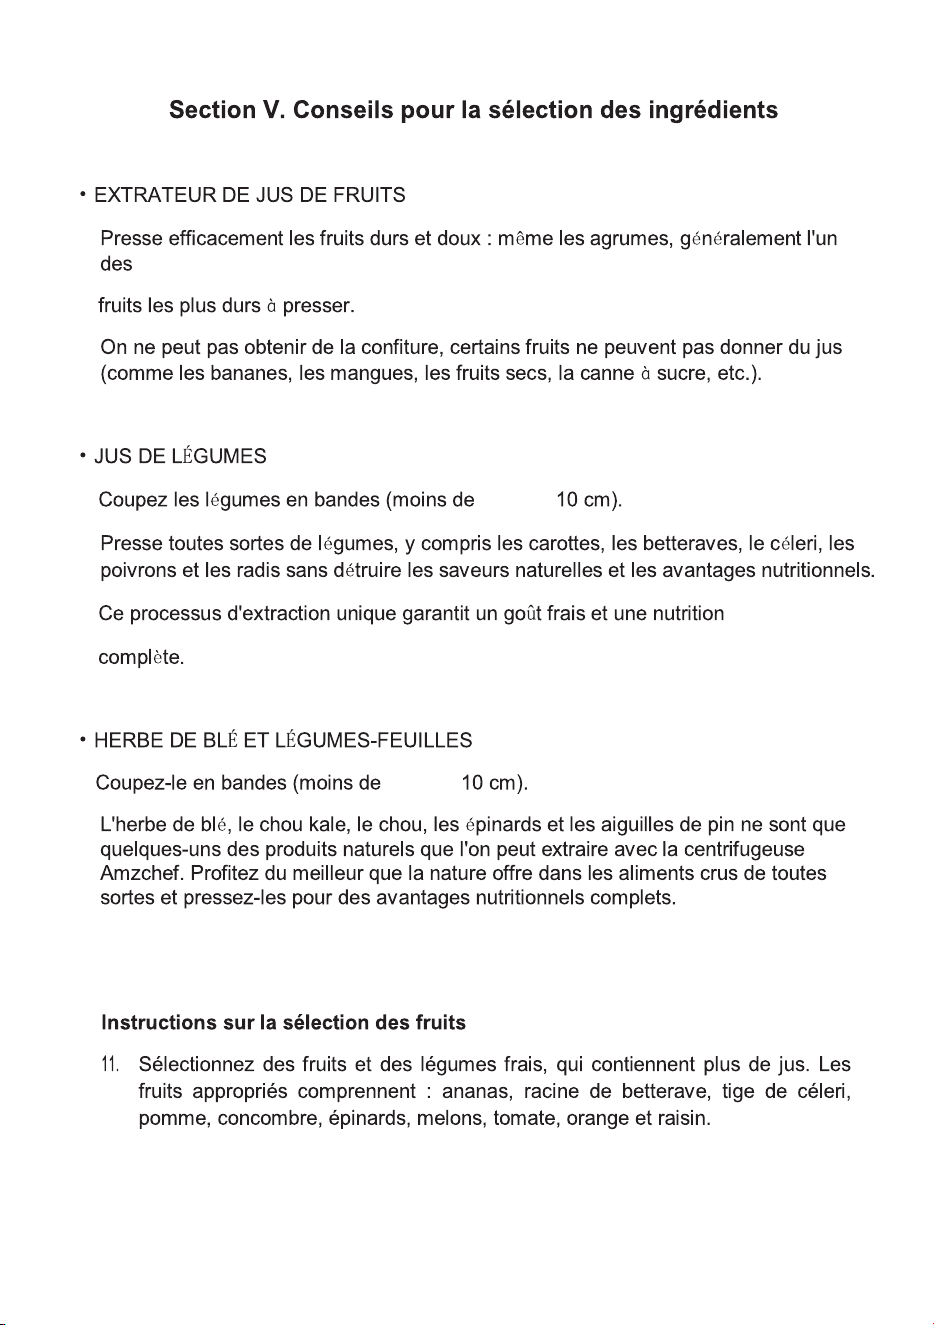
11
Upon completion, shut down the switch when no
juice
flows out of the outlet and disconnect the
power supply. Do not remove the Juice Cup off
the outlet until the spiral propeller and juice filter
have stopped rotating completely. The extracted
juice shouldbedrunkassoonas possible as itwill
have degraded taste and nutrientcontent if
exposed in the
air for a time.
The Pomaces shall not be stored fora long
time.
Do not touch the powerswitch with wet
hand to avoid electric shock, leakage or
fire.
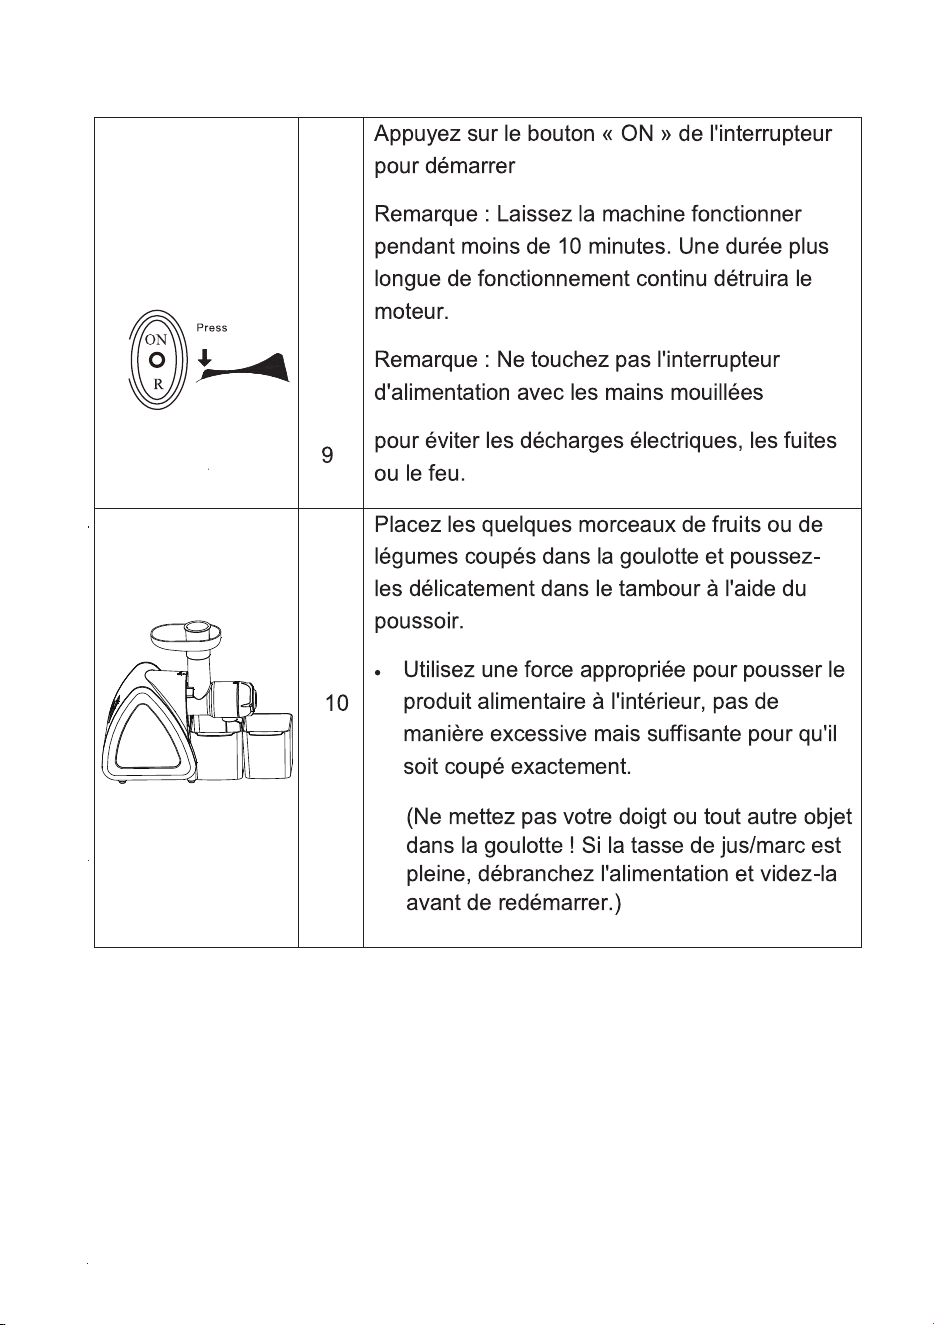
9
Press down
“
ON
”
button on the switch to start
Note: Keep the machine operating for less than 10
minutes. Long time work will destroy the
motor.
Note: Do not touch the power switch with wet hand to
avoid electric shock, leakage or fire.
7

Section V. Tips for Ingredients Selection
FRUIT JUICE EXTACTOR
Efficiently juices hard and soft fruits: even citrus fruits, usually one of the
hardest fruits to juice.
Jam can not be achieved, some fruit can not squeeze juice (such as bananas,
mangoes, dried fruit, sugar cane, etc.).
VEGETABLE JUICE
Cut vegetables to strips(less than 3.9inch/10cm).
Juices all kinds of vegetables including carrots, beets, celery, peppers,
and radishes without destroying the natural flavor and nutrition benefits.
Fresh taste and full nutrition are guaranteed with this unique extraction
process.
WHEATGRASS AND LEAFY GREENS
Cut it to strips(less than 3.9inch/10cm).
Wheat grass, kale, cabbage, spinach and pine tree needles are just some of
the natural products that can be juiced with the Aobosi juicer. Enjoy the best
that nature offers in raw foods of all kinds and juice them for full nutritional
benefits.
Instructions on Selection of Fruits
1.
Select fresh fruits and vegetables, which contain more juice. The proper
fruits include: pineapple, beet root, celery stalk, apple, cucumber, spinach,
melons, tomato, orange and grape.
2.
Thick skin on fruits such as orange, pineapple and raw beet root instead
of thin skinon fruit/vegetable needs to be removed. Seeds in oranges
should be removed as well, which may make the juice taste a little bitter.
3.
Concentration of juice extracted from apple depends on what type of
apple is selected. Juice extracted from juicier apple is less thick, so select
the proper type of apple depending on your desired juice concentration.
4.
Just extracted apple juice will turn brown very soon, and this process can
be slowed by adding drops of lemon juice into it.
5.
Leaves and stems (such as those of lettuce) can be put into theextractor
to extract juice.
8

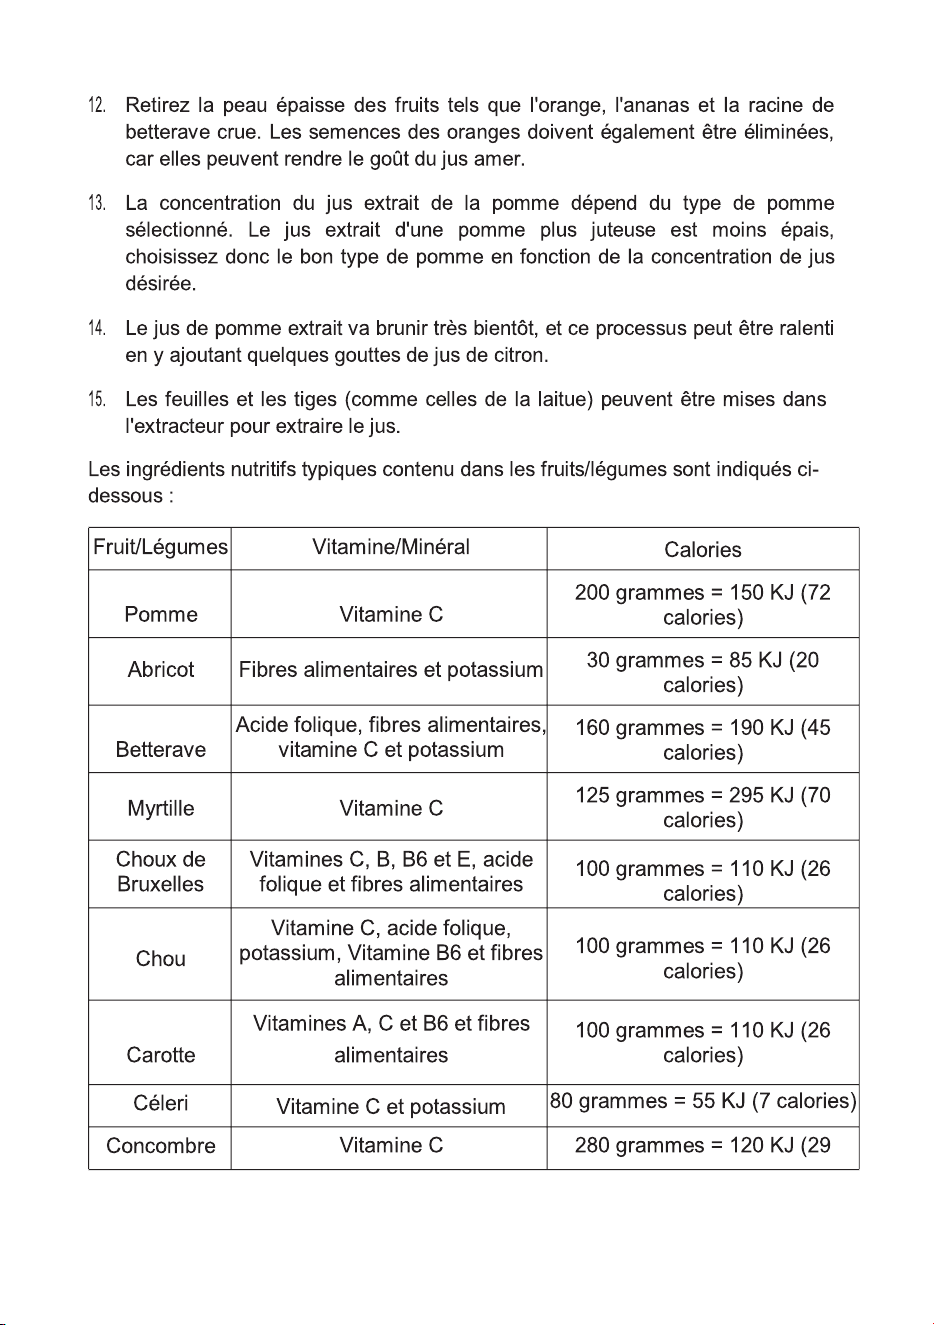
The typical nutrient ingredient contained in fruits/vegetables are shown
below:
Fruit/Vegetable
Vitamin/Mineral
Calorie
Apple
Vitamin C
Apricot
Dietary fiber and potassium
Beet
Folic acid, dietary fiber, Vitamin C
and potassium
Blueberry
Vitamin C
Brussels Sprouts
Vitamins C, B, B6 and E, folic acid
and dietary fiber
Cabbage
Vitamin C, folic acid, potassium,
Vitamin B6 and dietary fiber
Carrot
Vitamins A, C and B6, and dietary
fiber
Celery Vitamin C and potassium
Cucumber
Vitamin C
Fennel
Vitamin C and dietary fiber
Grape
Vitamins C and B6, and potassium
Yangtao
Vitamin C and potassium
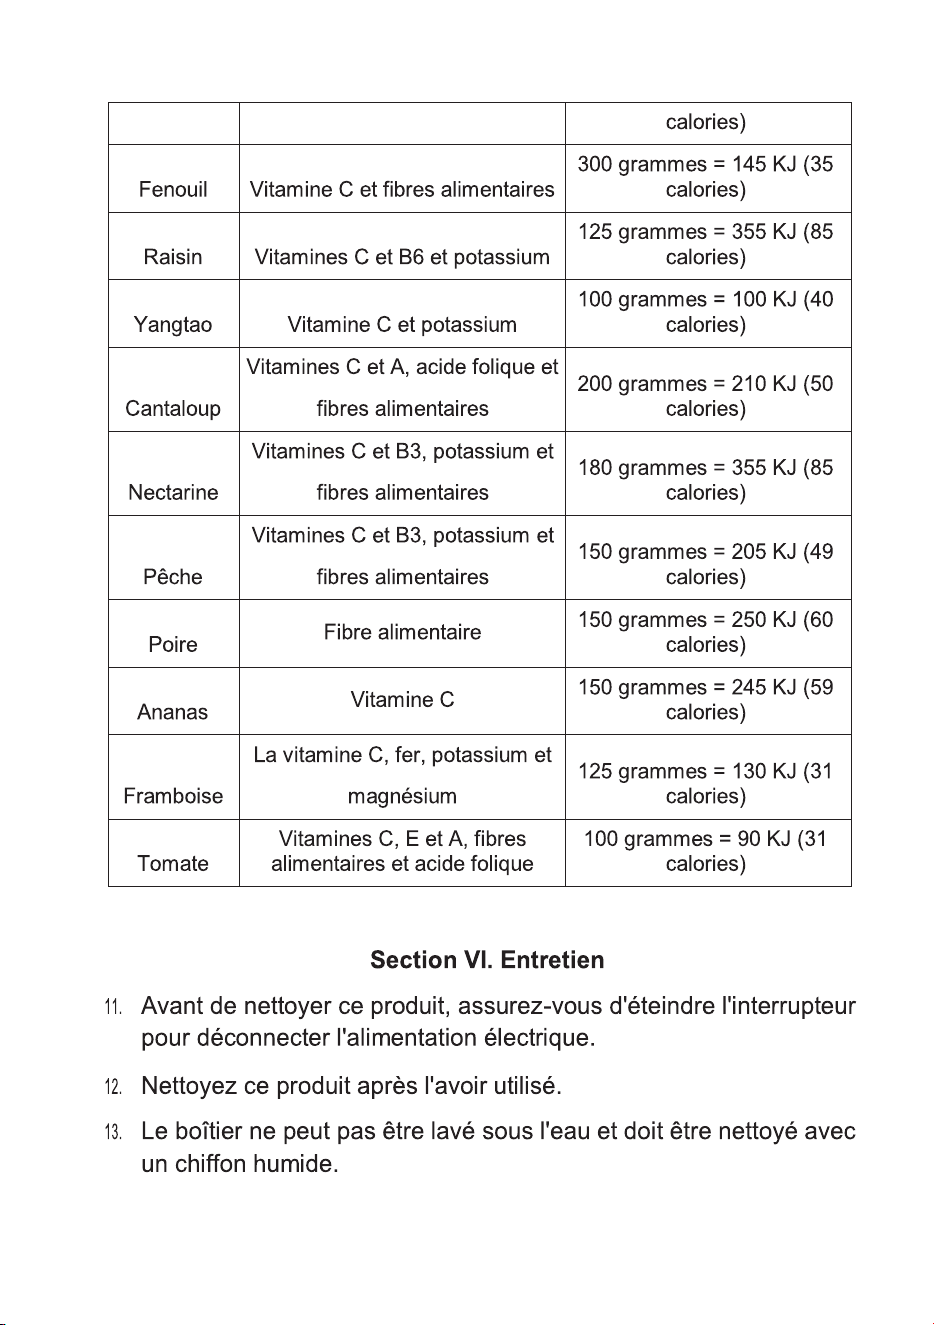
Muskmelon
Vitamins C and A, folic acid and
dietary fiber
Nectarine
Vitamins C and B3, potassium and
dietary fiber
Peach
Vitamins C and B3, potassium and
dietary fiber
Pear
Dietary fiber
Pineapple
Vitamin C
Raspberry
Vitamin C, iron, potassium and
magnesium
Tomato
Vitamins C, E and A, dietary fiber
and folic acid
0.44LB(200g)=300KJ(72 Calorie)
0.07LB(30g)=85KJ(20 Calorie)
0.35LB(160g)=190KJ(45 Calorie)
0.28LB(125g)=295KJ(70 Calorie)
0.22LB(100g)=110KJ(26 Calorie)
0.22LB(100g)=110KJ(26 Calorie)
0.22LB(100g)=110KJ(26 Calorie)
0.18LB(80g)=55KJ(13 Calorie)
0.62LB(280g)=120KJ(29 Calorie)
0.66LB(300g)=145KJ(35 Calorie)
0.28LB(125g)=355KJ(85 Calorie)
0.22LB(100g)=100KJ(40 Calorie)
0.44LB(200g)=210KJ(50 Calorie)
0.4LB(180g)=355KJ(85 Calorie)
0.33LB(150g)=205KJ(49 Calorie)
0.33LB(150g)=250KJ(60 Calorie)
0.33LB(150g)=245KJ(59 Calorie)
0.28LB(125g)=130KJ(31 Calorie)
0.22LB(100g)=90KJ(22 Calorie)
9
Section
VI
. Maintenance
1.
Before cleaning this product, be sure to shut down the switch to
disconnect the power supply.
2.
Clean this product after using it.
3.
The Housing cannot be washed under water, and must be cleaned
with twisted wet clothinstead.
4.
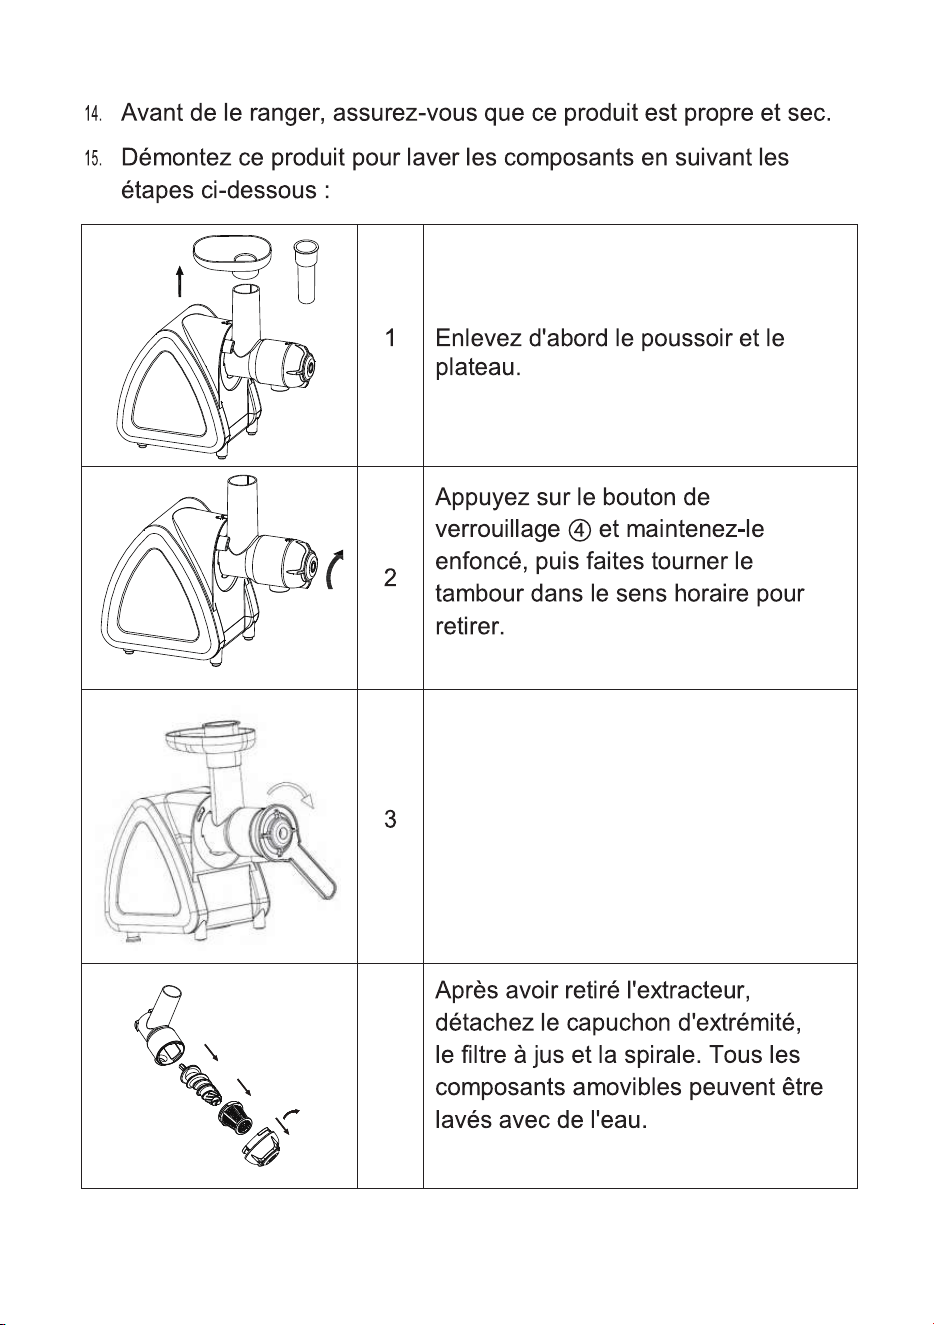
Before storing it, make sure this product is clean and dry.
5.
Disassemble this product to wash the components by the following
steps:
1
Firstremovethe plunger andtray.
2
Press
Please use this wrench to remove the
juicer cover in clockwise direction if you
find the juicer cover is difficult to remove
after juicing.
down and hold the locking
button ,and rotate the drum
clockwise to remove it.
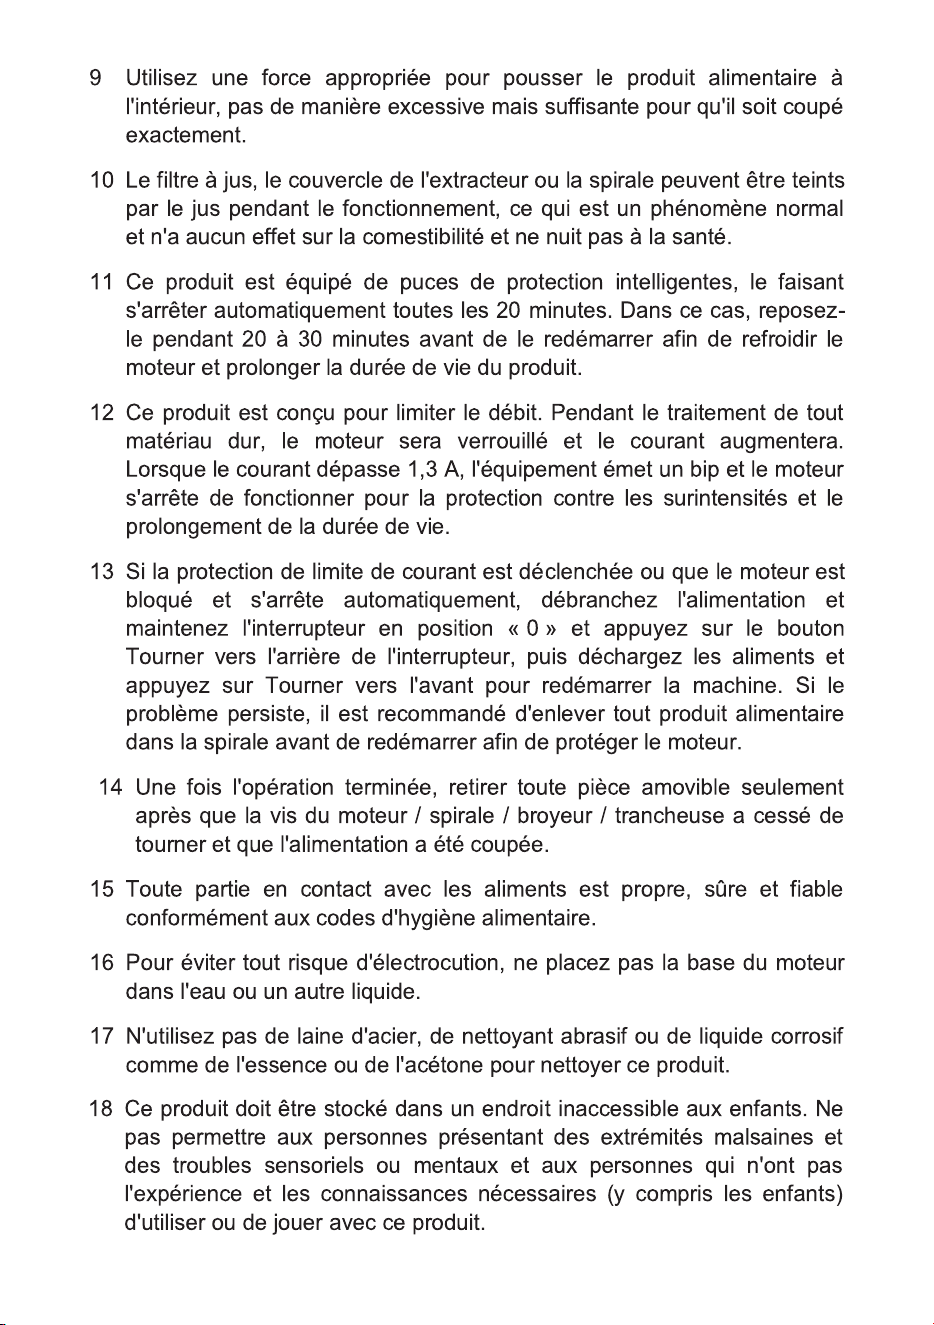
4
3
Afterremovingextractor,detachthe
end cap
,juice screen and auger in turn, all
removable components can be
washed
withwater.
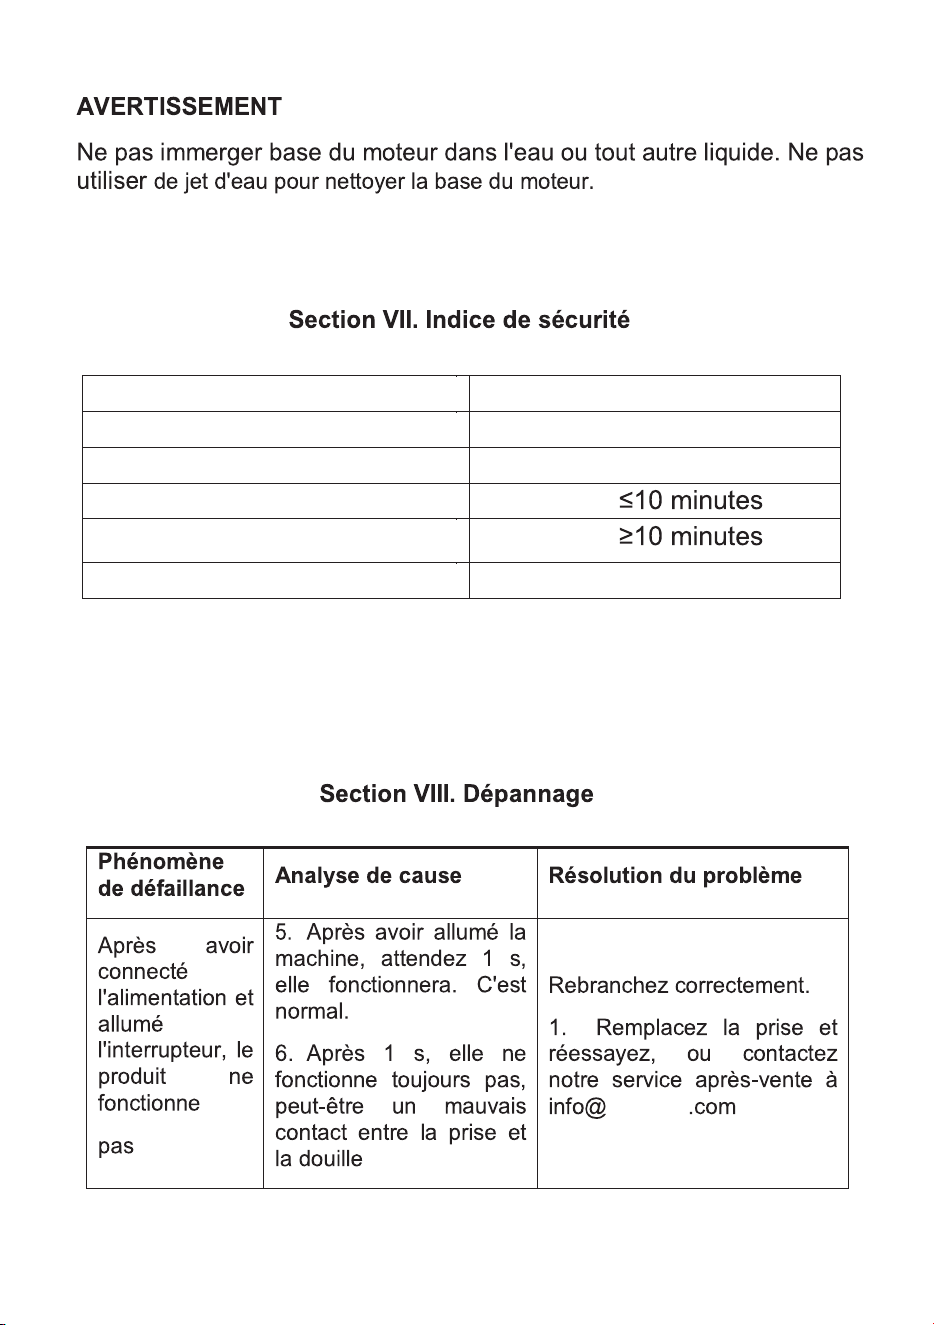
WARNING
Do not immerse the motor base in
water or any other liquid. Do not use
water jet to clean the motor base.
10

Section VII. Safety Index
Rated Voltage
120V ~
Rated Power
150W
Rated Frequency
60Hz
Continuous Operating Time
Interval Time
Juice Container 950ml
Pomace Container 800ml
Manufacturer:Zhongshan Anmir Electrical Appliance Co., Ltd.
ADD.: 83 Hetai Industry Zone, Dongfeng, Zhongshan, Guangdong, China
11

Section VIII. TroubleShooting
Fault
Phenomenon
Analysis of cause Fault resolution
After connecting
power supply
and turning on
the switch, the
product fails to
work
1.After turn on the
machine, wait for 1s,
it will work. It is
normal.
2.
After 1s, it still no
work, maybe poor
contact between
plug
and socket
Re-plug it properly
1.
Replacethesocketandtry
again, or contact a
fter
Sales Support Email:
info@iaobosi.com
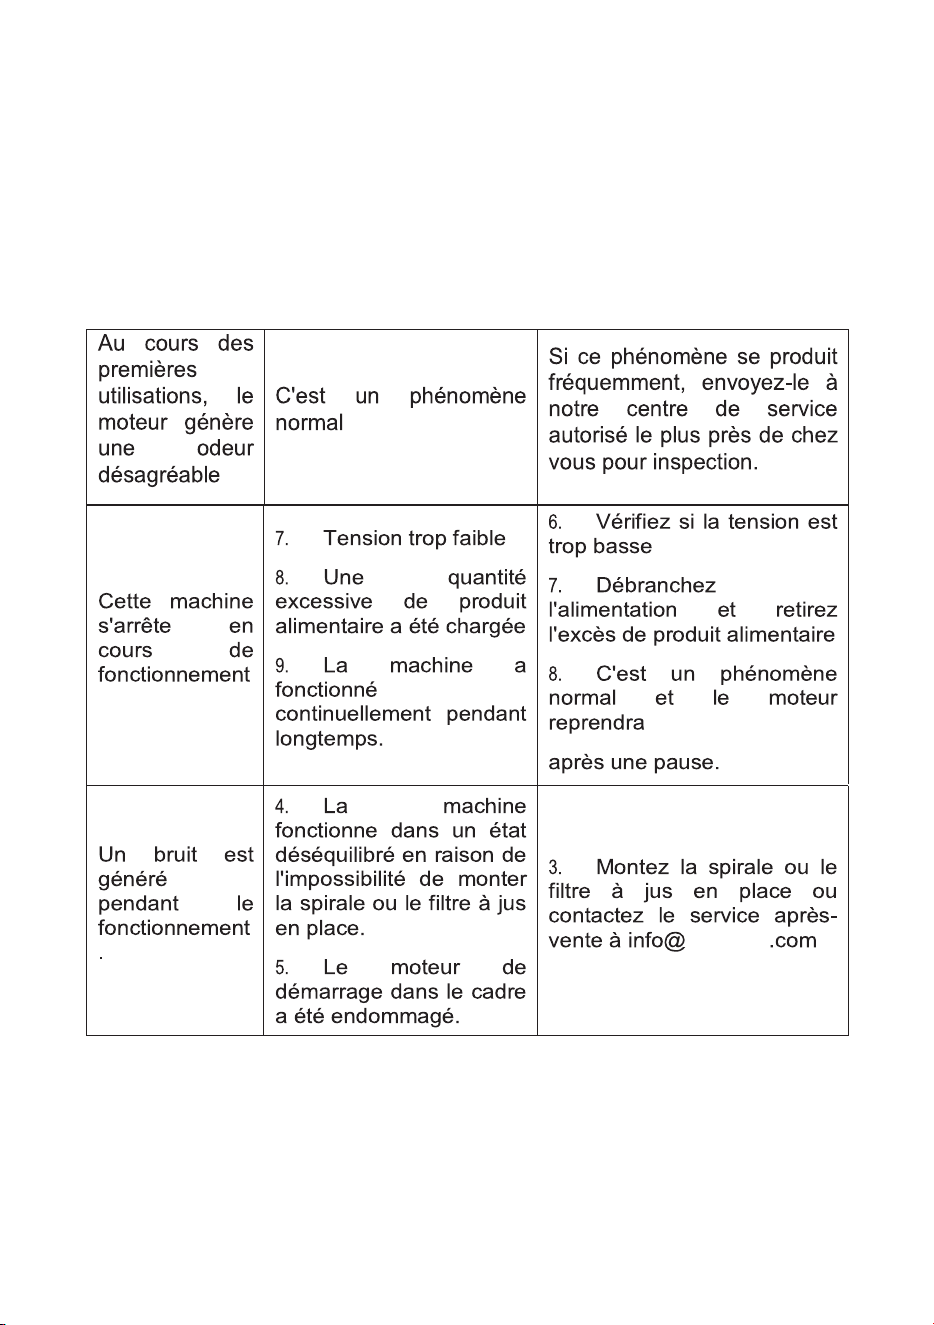
During the early
uses, the motor
generates
unpleasant smell
It is a normal
phenomenon
If this phenomena occurs
frequently, send it to our
authorized service
center
nearesttoyouforinspection.
This machine
stop during
operation
1.
Too lowvoltage
2.
Excessiveamountof
foodmaterial hasbeen
loaded
3.
The machine has
operated continuously
for long time.
1.
Check whetherthevoltage
is too low
2.
Disconnect the power
supply and remove
excessive foodmaterial
3.
It is a normal phenomenon
andthemotorwillresume
after a breaktime.
Noise is
generated
during
operation.
1.
The machine operates
inanunbalancedstate
due to failure to
mount
auger orjuice
filterinplace.
2.
The starting motor in
theframe hasbeen
damaged.
1.
Mount
auger
or
juice
filter in place or
Contact a
fter Sales
Support Email:
info@iaobosi.com
12

WARRANTY
Thank you for choosing AOBOSI product. We sincerely hope that you are satisfied
with it.
The manufacturer's warranty covers the product for a period of 12 months from the
date of purchase against manufacturing faults. All warranties are automatically kept
track of in our system, so there is no need to register your product.
Agent/Distributor is welcome to contact us. Email:[email protected].
Any help or questions during use, please contact us via website www.iaobosi.com,
send email to [email protected], we will service you within 24 hours. We suggest to
provide a warranty card, a photo or a video if there’s broken spare part or not
working machine so that we can be much more clear about your problems and offer
you the best solution.
Item name:
Model:
Serial No.:
Store name:
Purchase date:
Buyer’s name:
Email:
Address:
Tel.:
Please fill in the table and email it within 10 days from the date of purchase.
13
120V~60Hz
14
15
21 Les dangers ou les pratiques dangereuses peuvent entraîner des
blessures légères ou des dommages aux appareils. La manipulation des
lames tranchantes, le vidage de la cuve et le nettoyage doivent faire l’objet
de précautions. Débranchez toujours l’appareil de l’alimentation s’il est
laissé sans surveillance et avant le montage, le démontage ou le nettoyage.
2
4
5
6
7
8
9
10
11
12
13
14
15
3
1
16
Déflecteur de
conteneur
Séparer la mousse du jus dans le récipient.
Pomace
Container
To hold and collect any Pomaces separated by the
extractor.
17
5
18
⑪
⑪
⑩
⑩
⑪.
⑫
⑪.
⑬
19

⑪
⑭
⑦
⑩
20
21
22
3.9inch/
3.9inch/
23
24
25
Veuillez utiliser cette clé pour
enlever le couvercle du pres-
se-agrumes dans le sens des
aiguilles d’une montre si vous
trouvez que le couvercle du
presse-agrumes est difficile à
enlever après le jus.
4
26
Tension évaluée
120V ~
Puissance nominale 150W
Fréquence évaluée
60Hz
Temps de fonctionnement continu
Temps d’intervalle
Récipient à jus 950ml Conteneur de pompon 800ml
iaobosi
27
iaobosi
28

GARANTIE
Merci d'avoir choisi le produit AOBOSI. Nous espérons sincèrement que vous en
êtes satisfait.
La garantie du fabricant couvre le produit pour une période de 12 mois à compter
de la date d'achat contre les défauts de fabrication. Toutes les garanties sont
automatiquement enregistrées dans notre système, il n'est donc pas nécessaire
d'enregistrer votre produit.
L'agent/distributeur est invité à nous contacter. Courriel : [email protected].
Pour toute aide ou question pendant l'utilisation, veuillez nous contacter via le site
Web www.iaobosi.com, envoyer un e-mail à [email protected], nous vous répon-
drons dans les 24 heures. Nous vous suggérons de fournir une carte de garantie,
une photo ou une vidéo s'il y a une pièce de rechange cassée ou une machine qui
ne fonctionne pas afin que nous puissions être beaucoup plus clairs sur vos
problèmes et vous proposer la meilleure solution.
Veuillez remplir le tableau et l'envoyer par e-mail dans les 10 jours suivant la date
d'achat
29