
2

3
CONTENTS
SAFETY INFORMATION 4
WHAT’S INCLUDED 6
PRODUCT DIAGRAM 6
QUICK START GUIDE 6
STAND ASSEMBLY 7
STAND REMOVAL 7
ADJUSTING THE STAND 8
CONNECTIONS AVAILABLE ON THE MONITOR 8
GETTING STARTED 9
INITIAL SETUP 9
OSD MENU 10
Bri/Contrast 10
Picture Settings 11
Colour Settings 12
OSD Settings 12
Reset 13
Other Settings 14
SPECIFICATION 15
TROUBLESHOOTING 16
SUPPORT 16

4
SAFETY INFORMATION
•
Read these instructions - All the safety and operating instructions should
be read before this product is operated.
•
Keep these instructions - The safety and operating instructions should be
retained for future reference.
•
Heed all warnings - All warnings on the appliance and in the operating
instructions should be adhered to.
•
Follow all instructions - All operating and usage instructions should be
followed.
•
Do not use this equipment near water or in humid environments - The
appliance should not be used near water or moisture, e.g. in a wet
basement or near a swimming pool.
•
Clean only with a dry cloth. Do not use solvents or petroleum-based
fluids.
•
Do not block any ventilation openings.
•
Do not install near any heat sources such as radiators, stoves or other
apparatus (including amplifiers) that produce heat.
•
Do not tamper with the supplied plug. This plug is a BS1363 standard
plug.
•
Protect the power cord from being walked on or trapped, particularly at the
plug and at the point where it exits from the appliance.
•
Only use attachments/accessories specified by the manufacturer.
•
Use only with a cart, stand, tripod, bracket or table specified by the
manufacturer or sold with the apparatus. When a cart or stand is used,
use caution when moving it to avoid any injuries or damage from it tipping
over.
•
Unplug the apparatus during lightning storms or when unused for long
periods of time.
•
Refer all servicing to qualified personnel. Servicing is required when the
apparatus has been damaged in any way, such as if the power supply
cord or plug is damaged, liquid has been spilt, objects have fallen into the
apparatus, or it has been exposed to rain or moisture; it does not operate
normally or has been dropped.
•
Please keep the unit in a well-ventilated environment.
•
The monitor should only be connected to a mains power supply as rated
on the back of the equipment.
•
To prevent overload, do not share the same power supply socket with too
many other electronic components.
•
Do not place any connecting wires where they may be stepped on or
tripped over.
•
Do not place heavy items on the cable, as this may cause damage.
•
When removing from a socket, hold by the plug, not the wires.
5
•
Disconnect the power immediately and seek professional help if the plug
or cable is damaged, if liquid has spilt onto the unit if accidentally exposed
to water or moisture, if anything accidentally penetrates the ventilation
slots, or if the unit does not work normally.
•
Do not remove the safety covers. There are no user-serviceable parts
inside. Trying to service the unit yourself is dangerous and may invalidate
the product's warranty. Only qualified personnel should service this
apparatus.
•
Do not block ventilation slots on the back cover. The monitor can be
placed in a cabinet, but ensure at least 5cm (2") clearance all around. Do
not tap or shake the screen; this may damage internal components.
•
Due to our continuous product development, the operation and or
features of the product received may vary slightly from the information
provided within the manual.
•
WARNING: To reduce the risk of fire or electric shock, do not expose this
apparatus to rain or moisture. The apparatus shall not be exposed to
dripping or splashing, and objects filled with liquids, such as vases, shall
not be placed on the apparatus.
•
WARNING: The wall plug socket is used as a disconnection device and
should remain readily accessible.
• Although every effort is made to maintain the accuracy of the manual, due to
continuous product development, some variation from the manual is possible.
• The availability of features and settings may vary depending on the input
source, method of connection as well as the quality and specification of the
cables used.
AT FULL VOLUME, PROLONGED LISTENING MAY
DAMAGE THE USER’S HEARING.
CAUTION: To reduce the risk of
electric shock, DO NOT remove
the cover (or back). No user-
serviceable parts inside. Refer
servicing to qualified service
personnel.
This warning sign is to
This warning sign is to
warn of dangerous
alert you of important
voltage inside the
instructions accompanying
product.
the product.
6
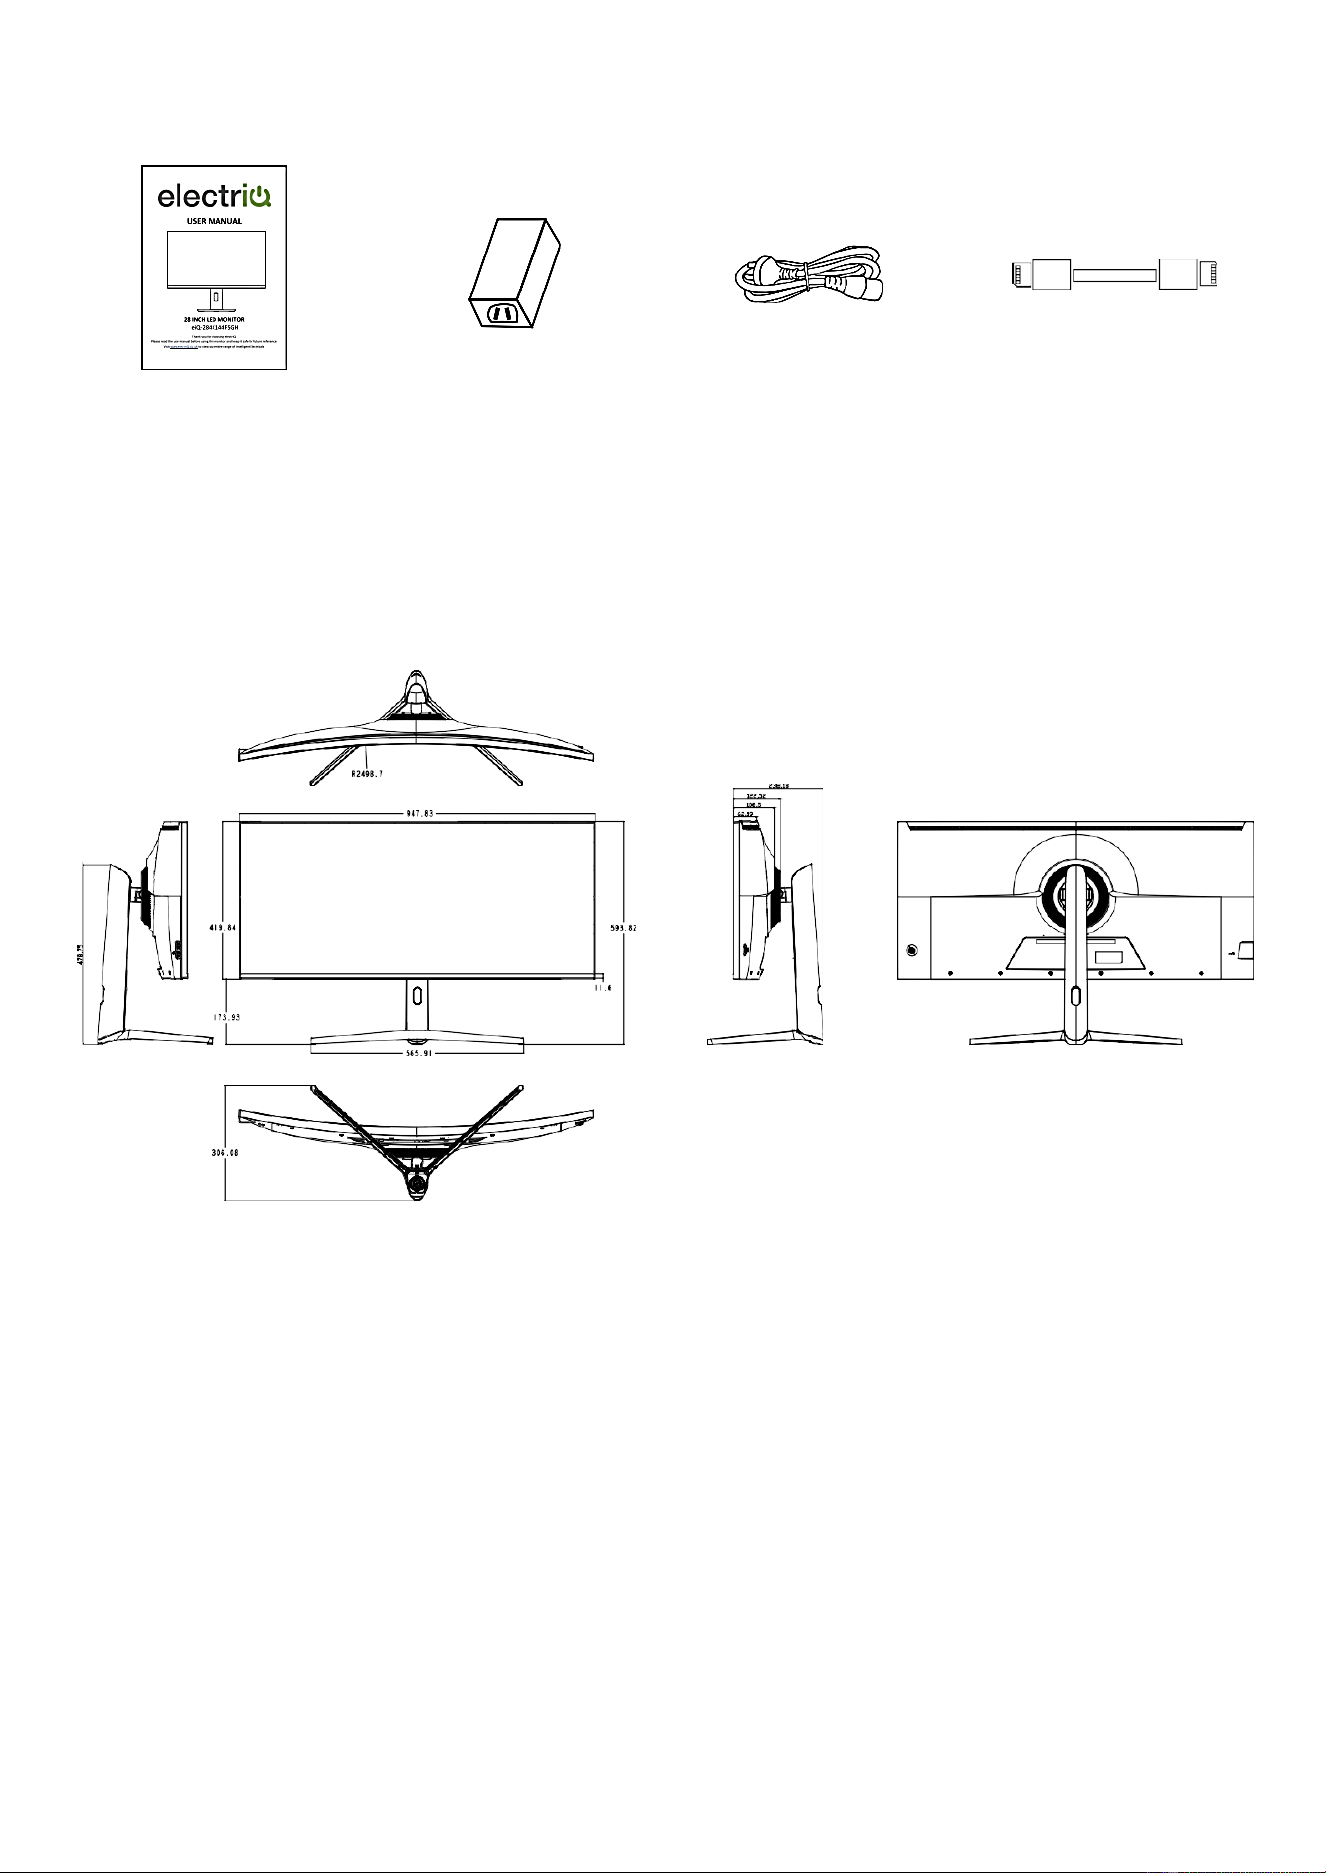
WHAT’S INCLUDED
User Manual Power Supply Power Cable DP 1.4
PRODUCT DIAGRAM
QUICK START GUIDE
●
Due to the heavyweight and dimensions of the of the monitor and it's fragile nature, we
recommend that they be unpacked and assembled by 2 people.
●
electriQ and its distributors and dealers are not liable or responsible for damage or injury
caused by improper installation, improper use or failure to observe these safety
instructions. In such cases, any guarantee will expire. The stand can be removed from the
rear of the monitor by pressing the quick-release button on the rear of the monitor.
7
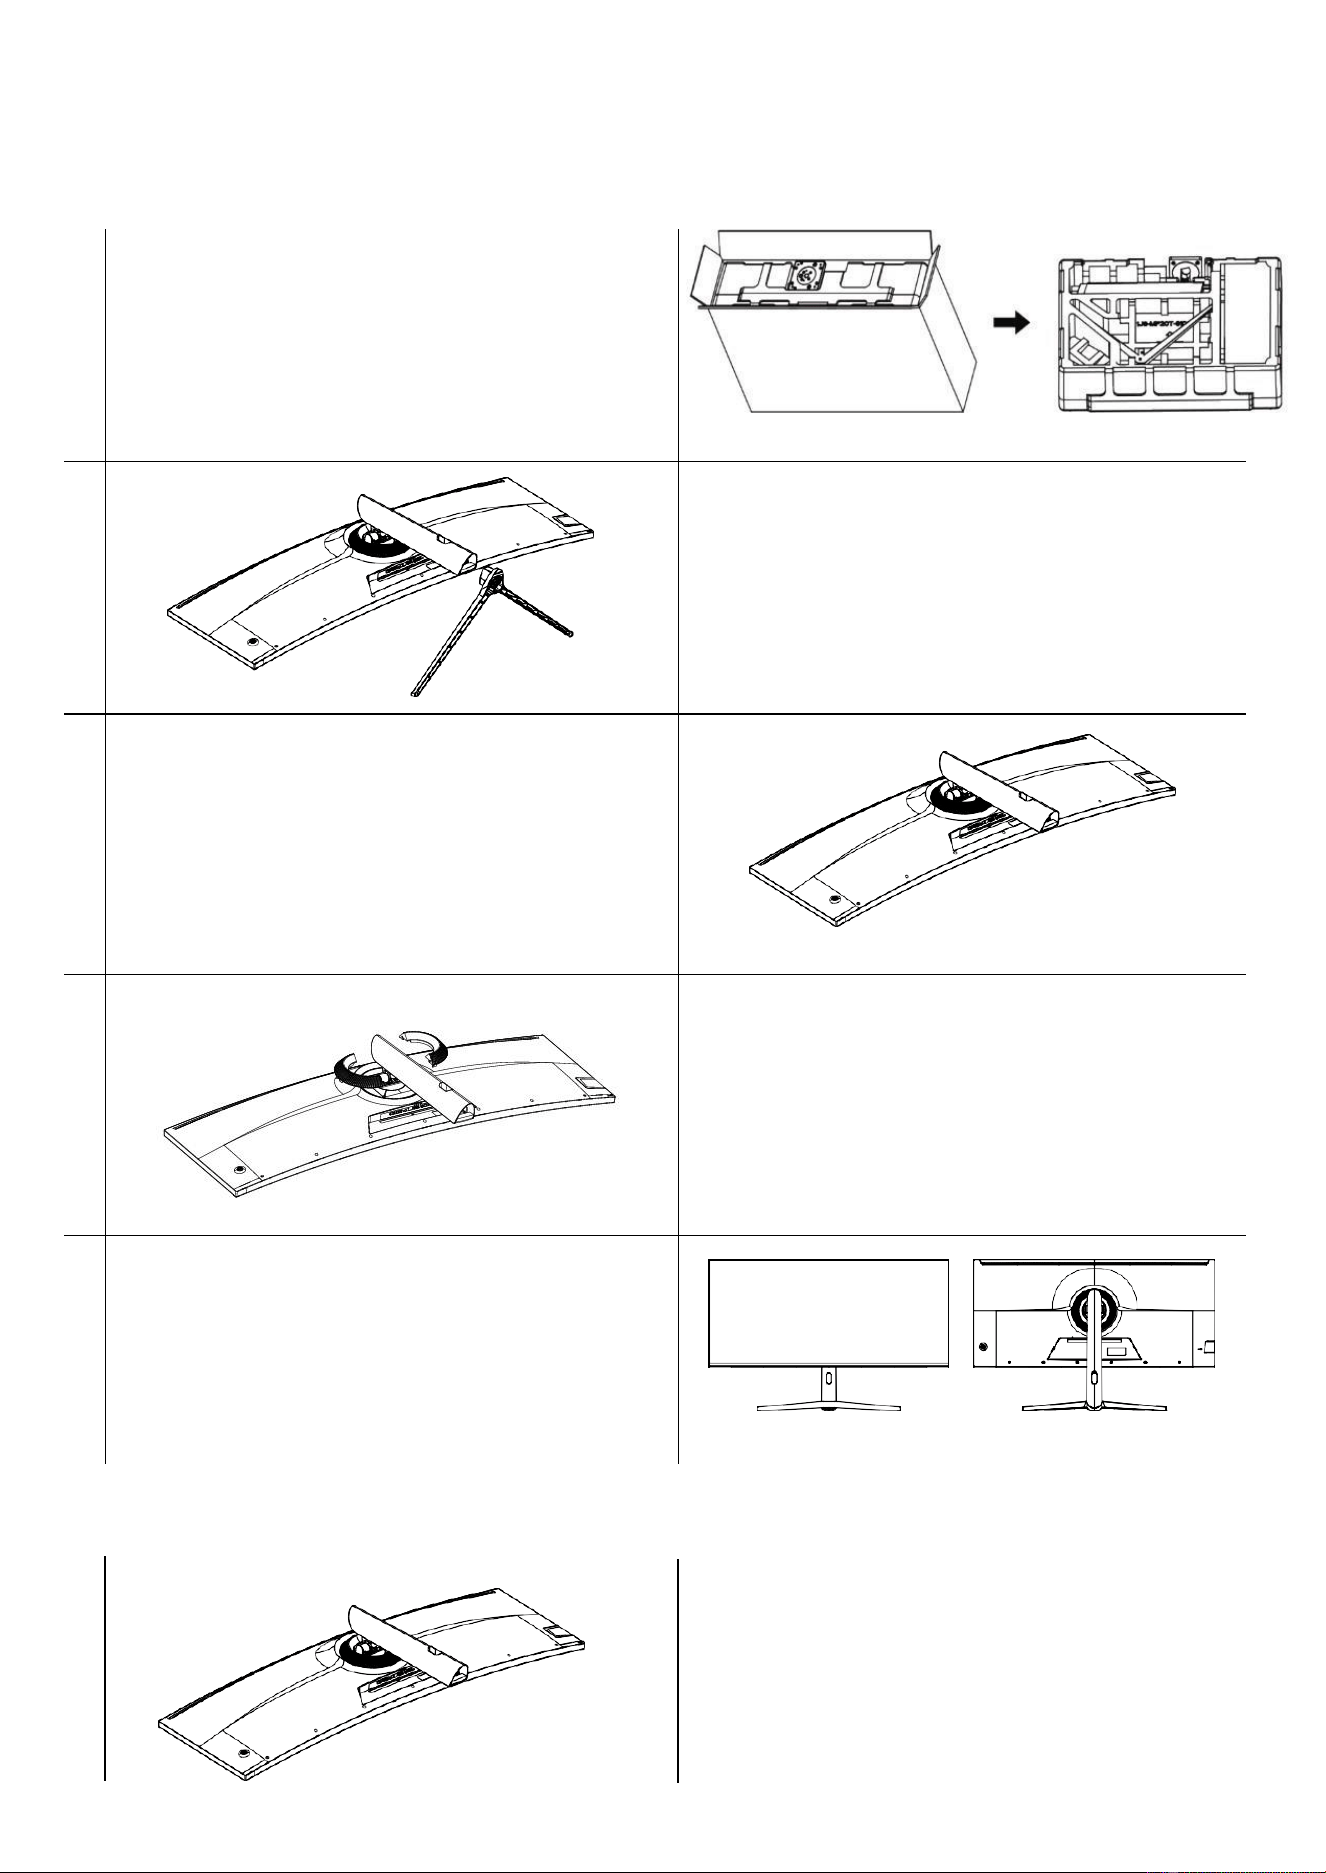
STAND ASSEMBLY
1
Open the package and remove the
Styrofoam. Place it flat on a table. Remove
the upper foam, remove the film bag from
the monitor, and place the display on the
lower foam.
2
Insert the base and screw securely into
place.
3
Fix the bracket on the back shell of the
machine, and then fasten four M4x6mm
screws.
4
Fix the decorative ring to the position of the
column and the back shell.
5
Carefully hold the stand while lifting the
monitor to an upright position (NOTE:
During the process of standing up the
monitor, please do not pinch or press on the
screen directly with your hand to prevent
the screen from breaking).
STAND REMOVAL
Repeat the assembly instructions in reverse.
1
8
ADJUSTING THE STAND
The stand allows full adjustment of the
screen position. The monitor's height can be
adjusted by holding the sides of the casing
and sliding the screen up and down on the
stand.
The screen can also be tilted and twisted.
When adjusting the monitor, be careful not
to put pressure on the screen, which may cause damage.
NOTE: The monitor is heavy; only install it using 2 people who understand the instructions.
You can opt to wall mount this monitor. Please only use a VESA wall mount when doing so. The
size you will need is 75x75mm.
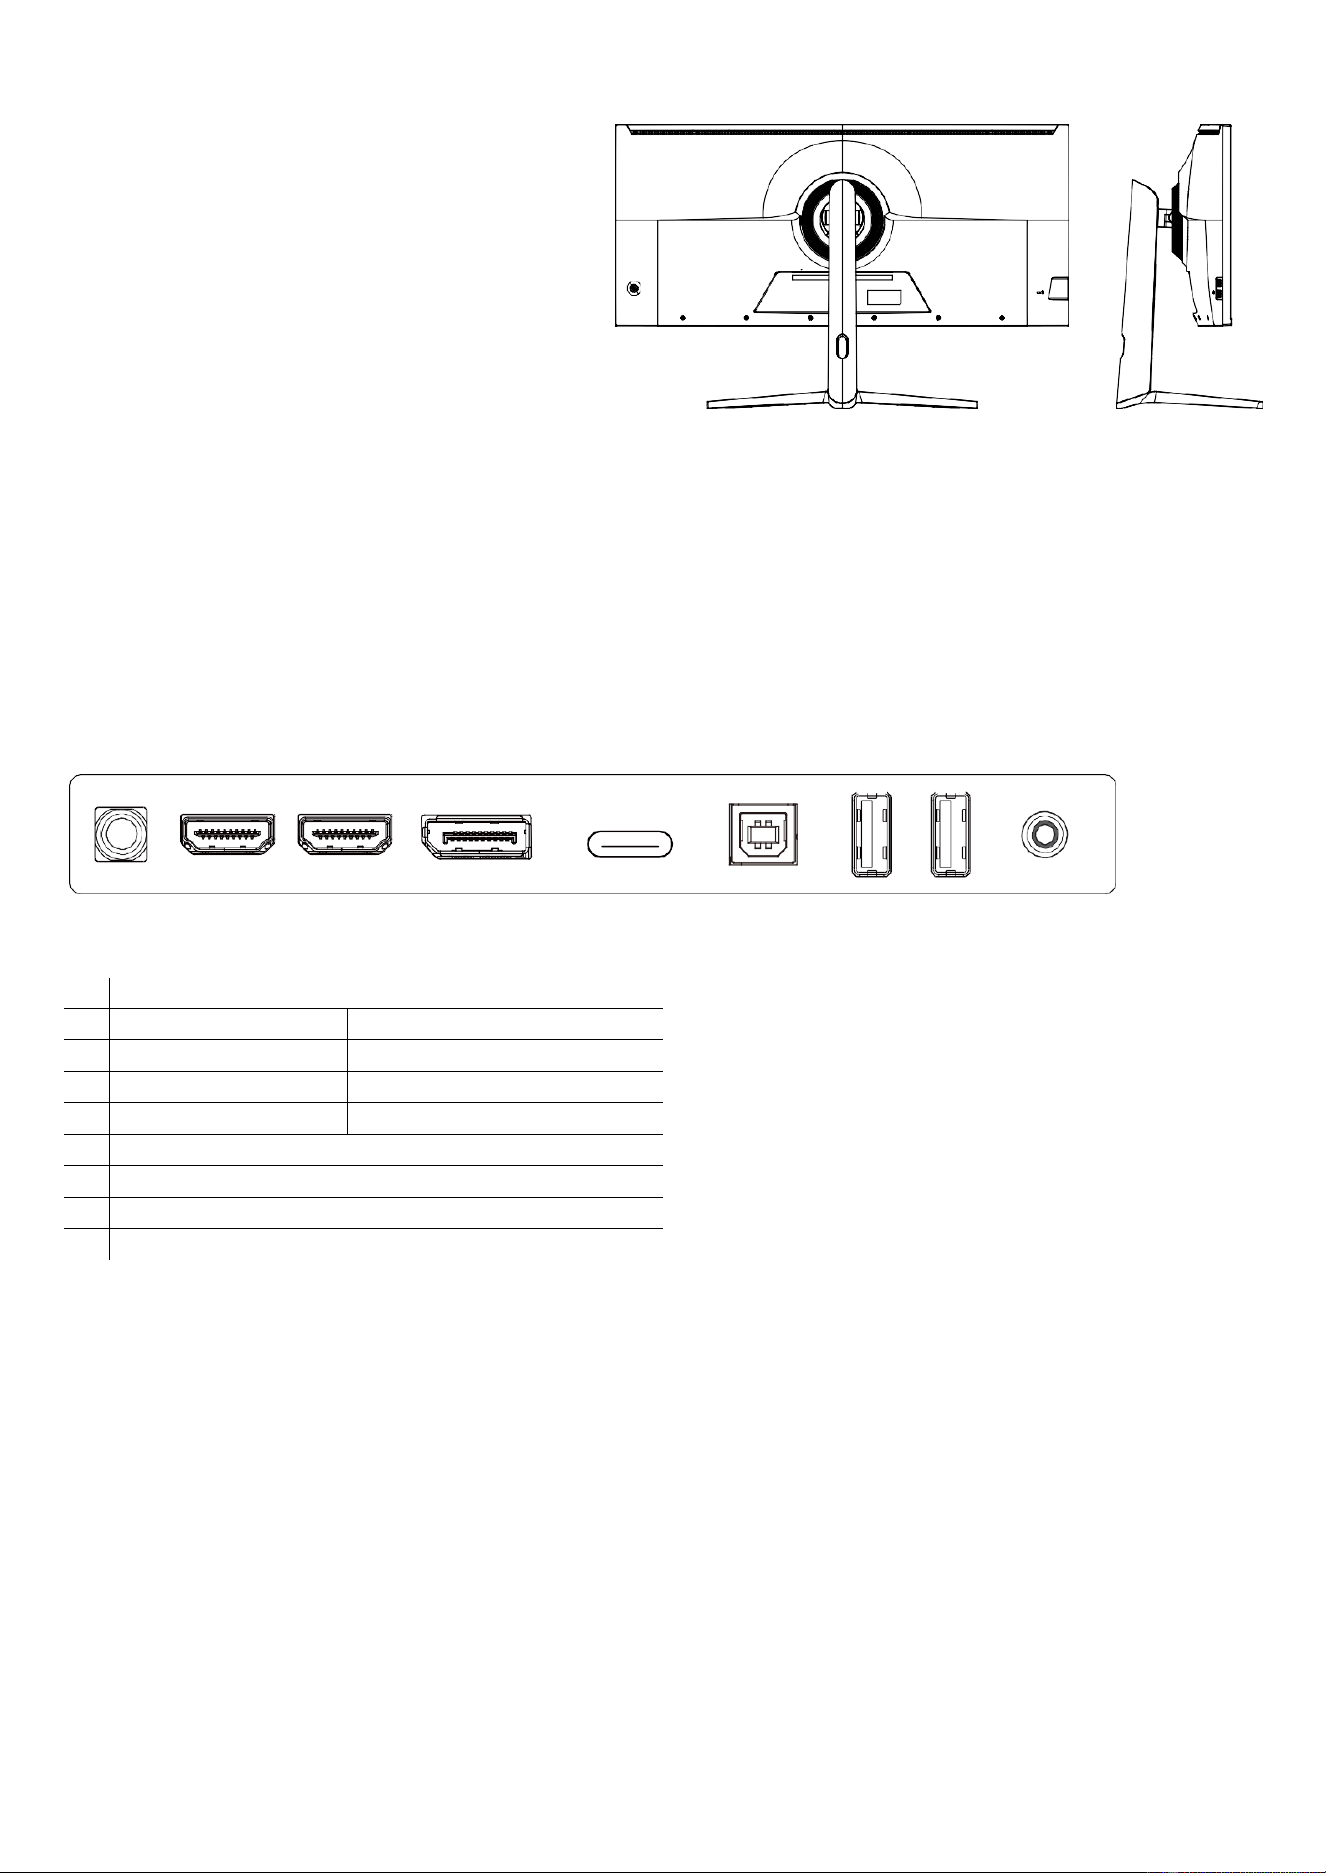
CONNECTIONS AVAILABLE ON THE MONITOR
DC 24V HDMI2 HDMI1 DP USB-C USB-B USB-A USB-A AUDIO OUT
IMPORTANT: All maximum resolutions and
refresh rates depend on the maximum
capabilities of the cables and connected
equipment. You must ensure the
connecting equipment can support this.
NOTE: Both USB–A Ports can be used to connect devices such as a mouse or a keyboard to your
computer and do not require any further cables when connected to a USB-C source. When using the
HDMI or DP inputs, the USB-B cable must be attached between the computer and monitor to allow
their use.
1
DC 24 v
2
HDMI 2 (2.1)
Max 5K @ 144Hz
3
HDMI 1 (2.1)
Max 5K @ 144Hz
4
DP (1.4)
Max 5K @ 144Hz
5
USB-C
Max 5K @ 144Hz
6
USB – B
7
USB – A
8
USB – A
9
Audio out
9
GETTING STARTED
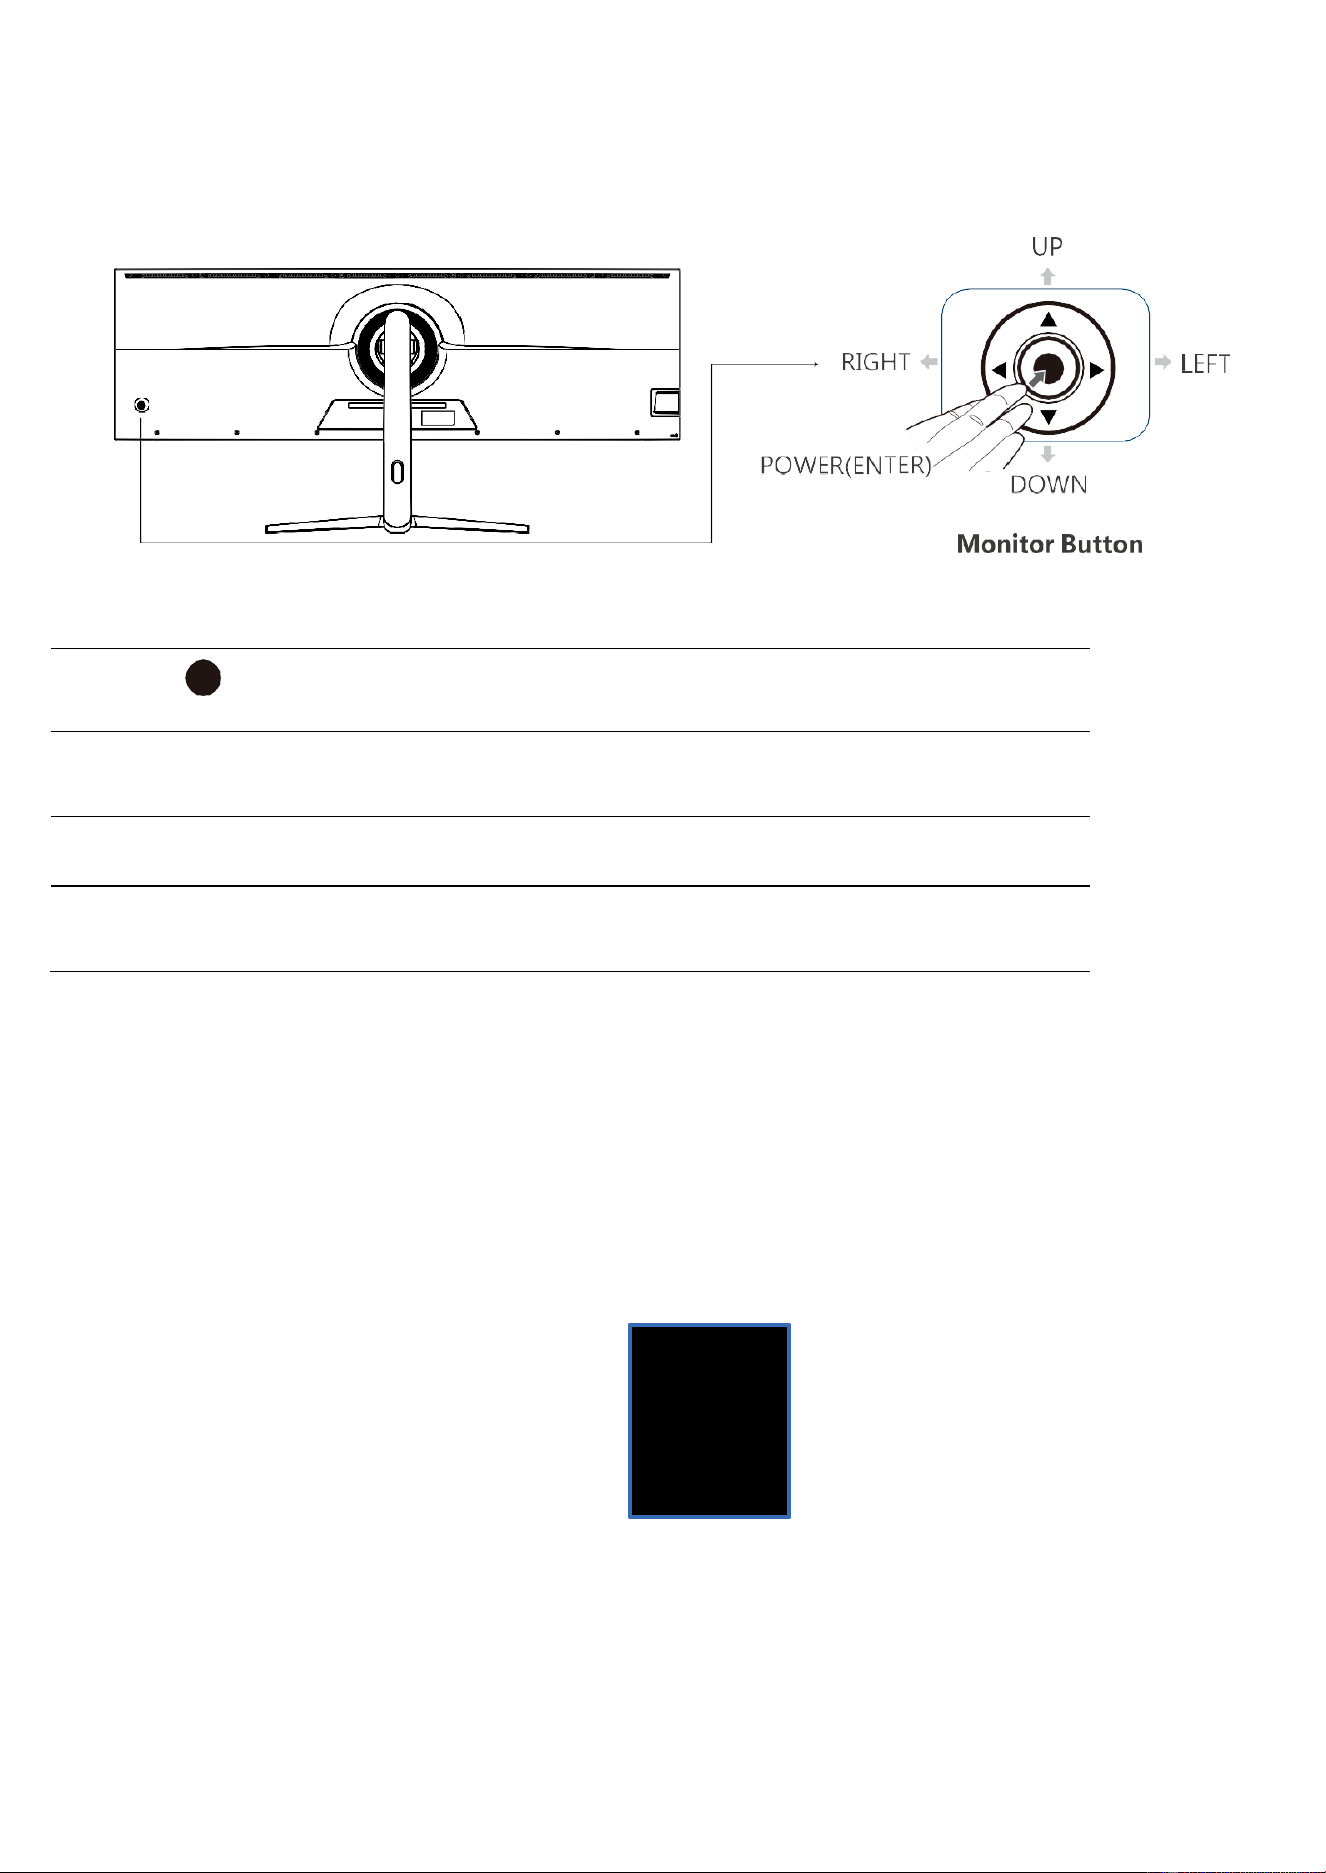
MONITOR CONTROLS
Monitor Button
Action
POWER/ENTER
Press the Button to access the menu
◄►
LEFT / RIGHT
Press the Left button to open the signal source options.
Press the right button to open the volume settings.
▲
UP
Aspect Ration zoom shortcut button
▼
DOWN
Cross Aiming Shortcut Button (During Gaming)
INITIAL SETUP
1. Connect the monitor to a power outlet using the supplied adaptor.
2. Press the monitor's power button to turn it on (The indicator will be blue).
3. Connect the relevant cable to the corresponding input on the monitor. The source will
be automatically detected.
4. To change between inputs, press the button to enter the menu. Use the ▲ and ▼
buttons to choose the input source between Auto Select, TYPEC, DP, HDMI1, and
HDMI2.
Input Signal
Type-C
DP
HDMI1
HDMI2
10
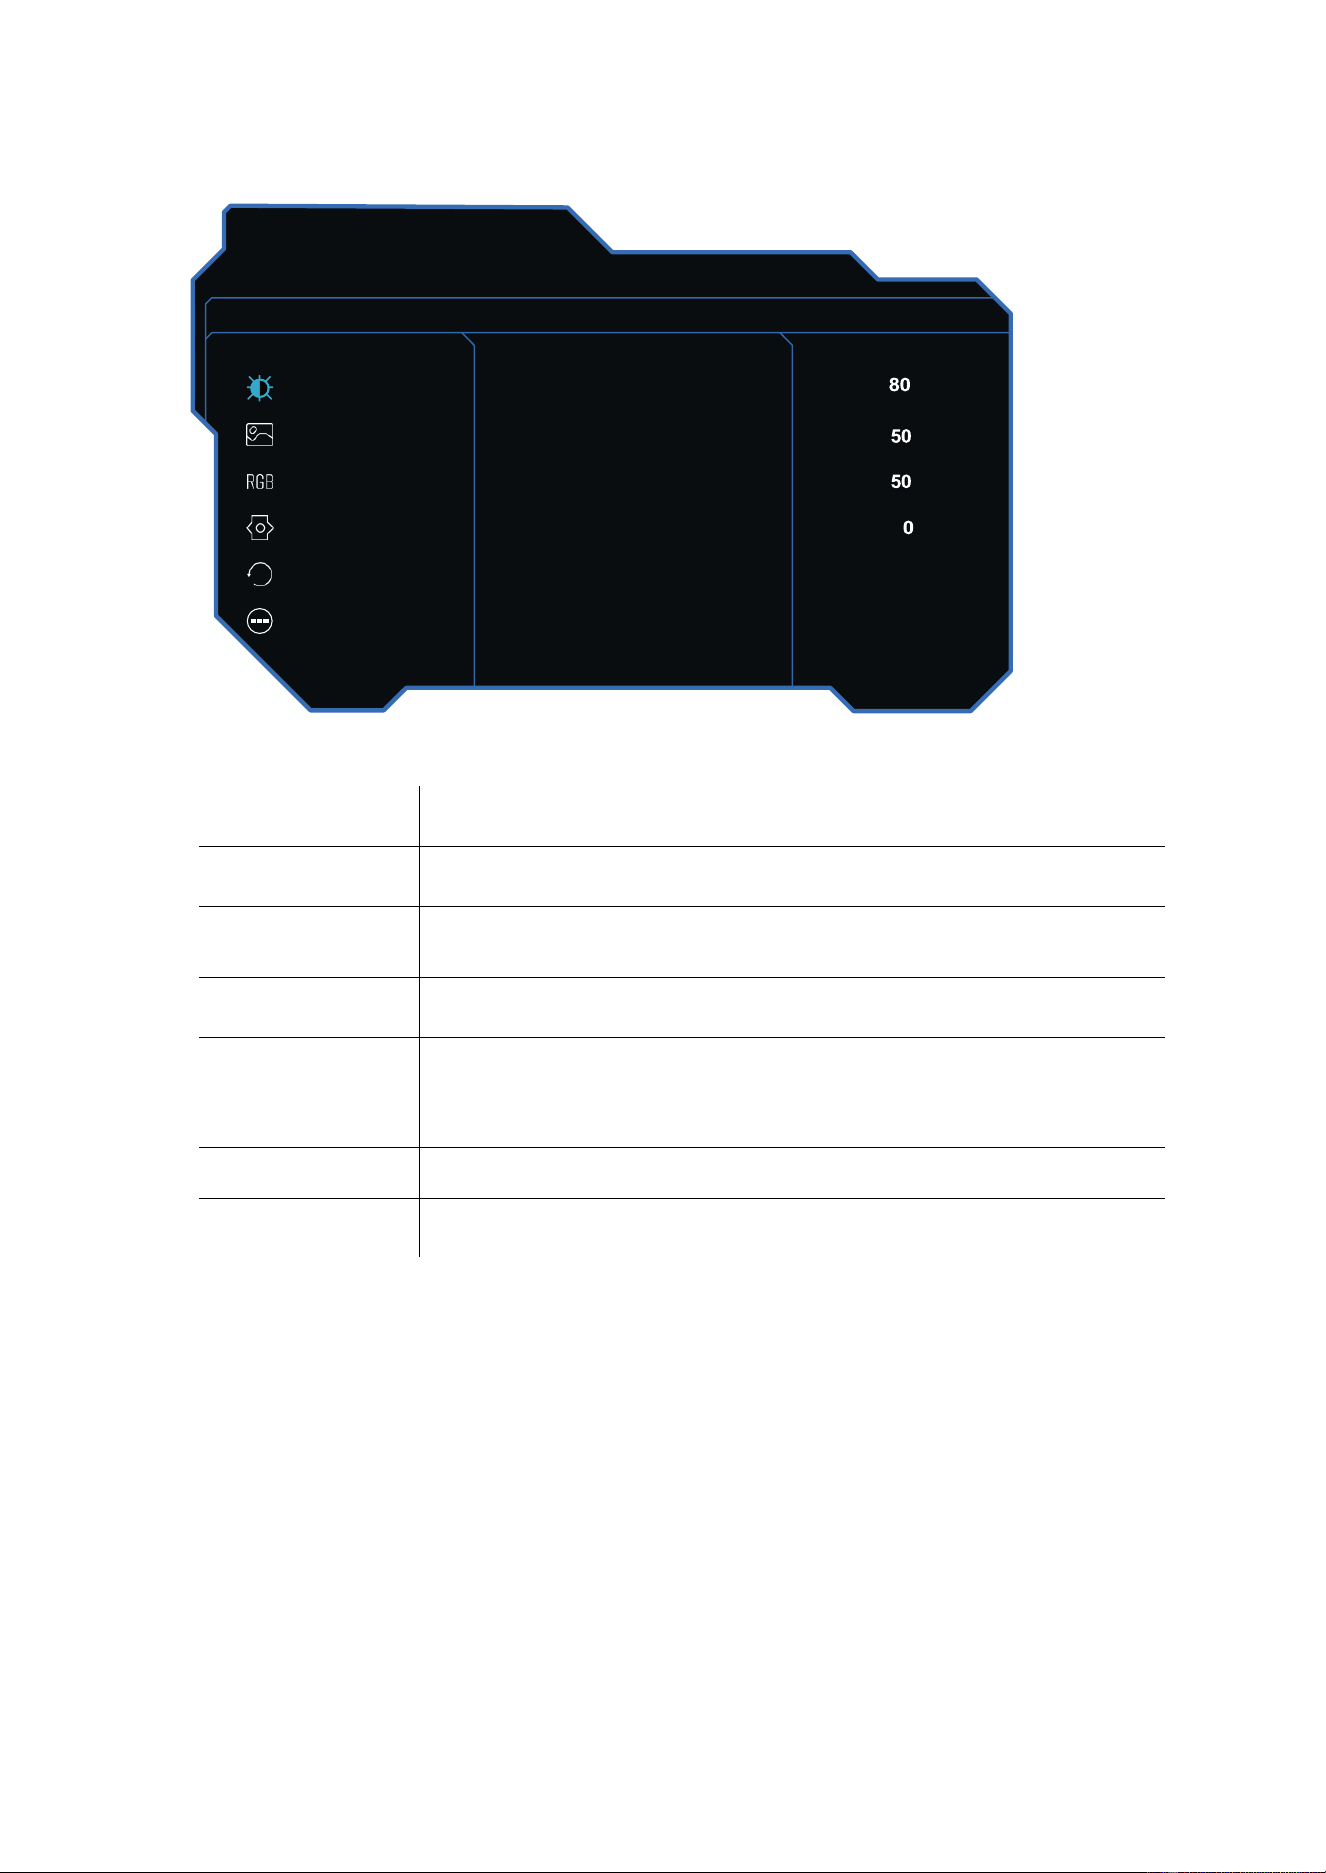
OSD MENU
Bri/Contrast
,
,
Brightness
Change the display Brightness value from 0 to 100.
Contrast
Change the display Contrast value from 0 to 100.
Dynamic
Brightness
Change the display Dynamic Brightness value from 0 to 100.
Shadow
Balance
Change the display Shadow Balance value from 0 to 100.
Contextual
Model
Change the Contextual Model to: Standard Mode, Movie Mode
Reading Mode, Night Mode, Care Eyes Mode, RTS/RPG Mode
FPS Arena Mode, MOBA Arena Mode.
HDR
Turn HDR On or Off.
DCR
Turn DCR On or Off.
5120x1440@144Hz
E-sport Monitor
Bri/Contrast
Brightness
Picture Settings
Contrast
Color Settings
Dynamic Brightness
OSD Settings
Shadow Balance
Reset
Contextual Model
Standard Mode
Other Settings
HDR
Off
11
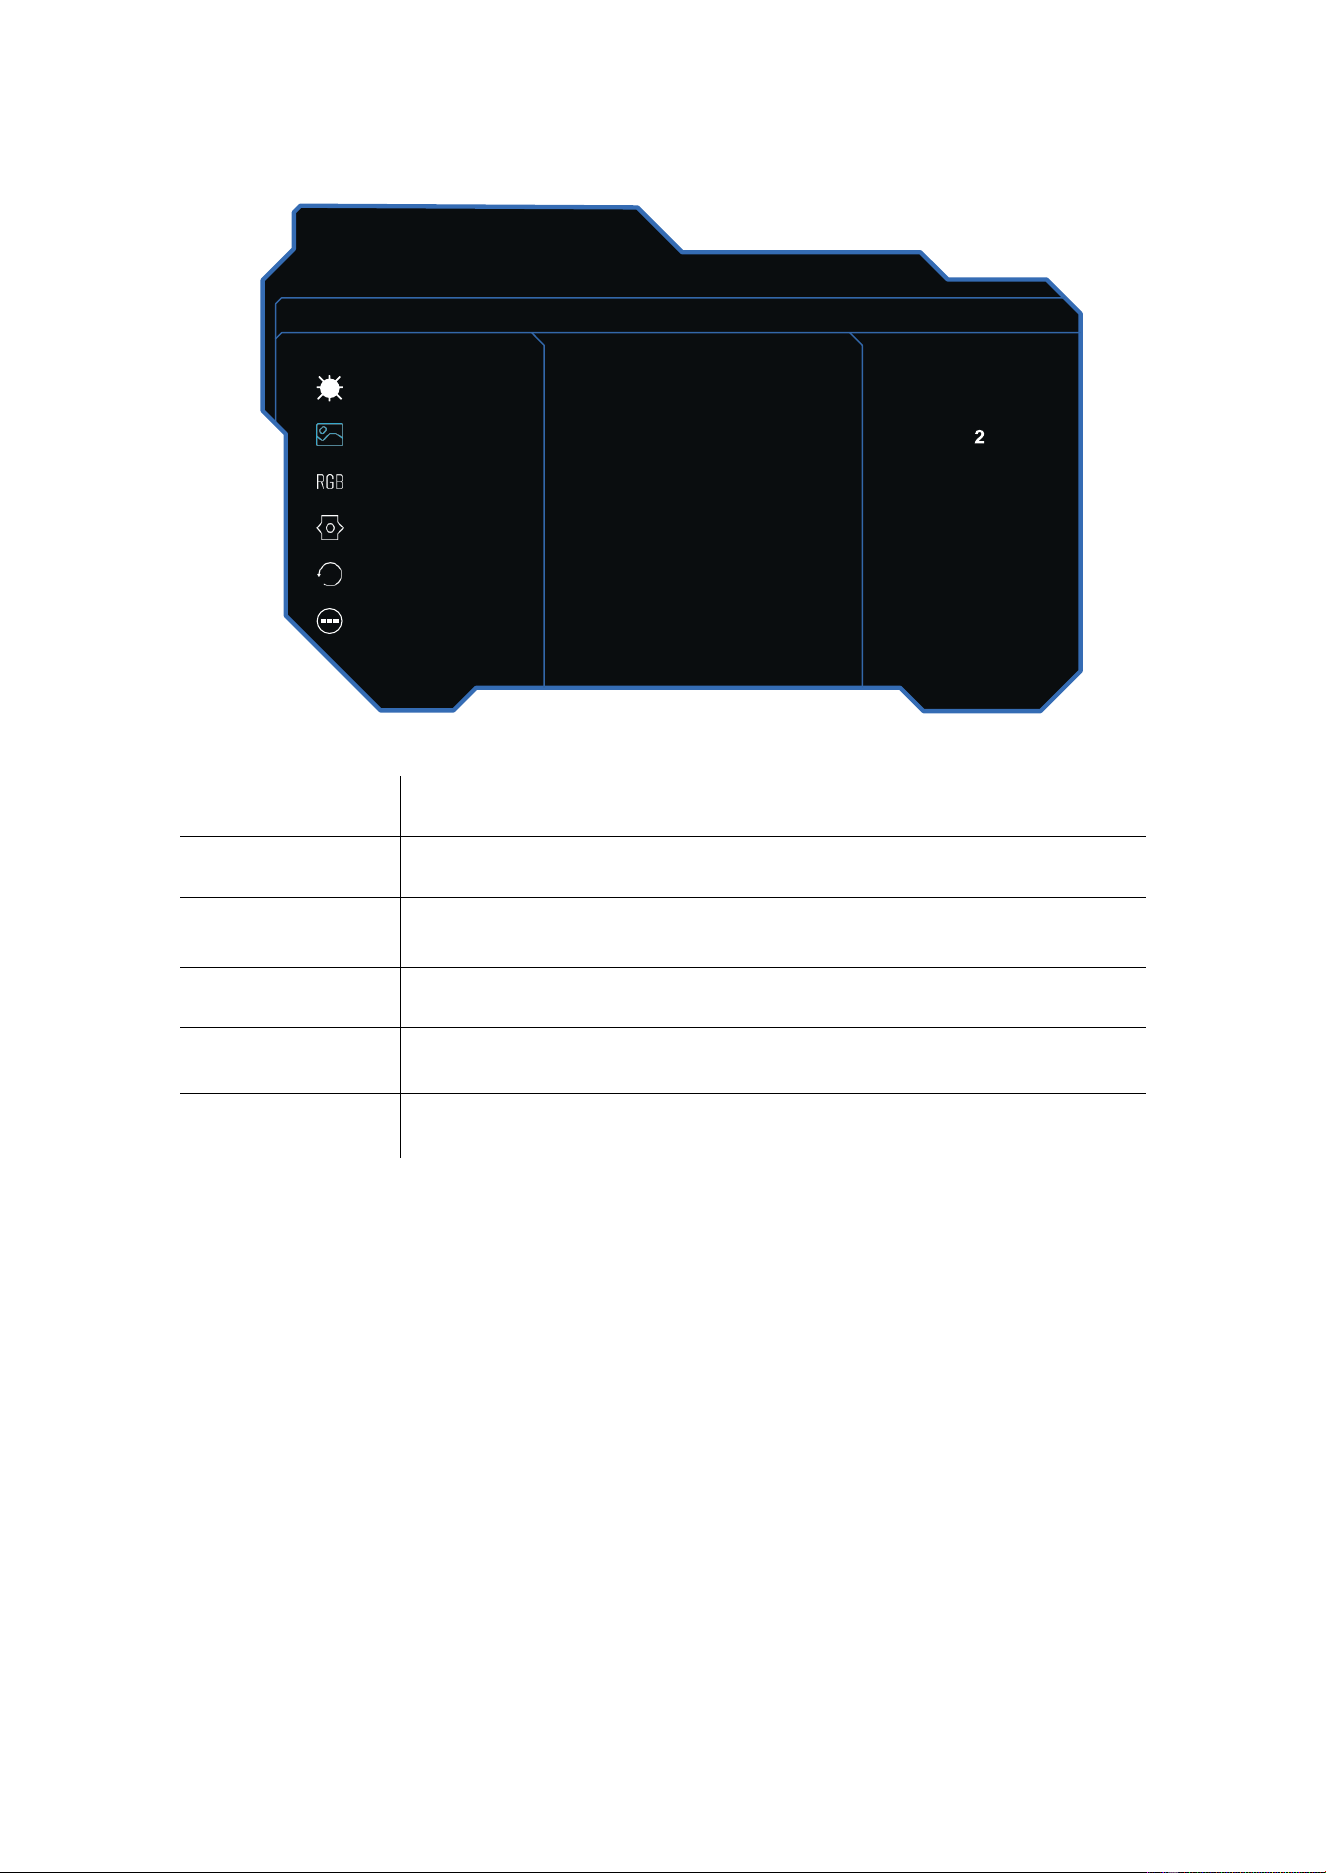
Picture Settings
MPRT
Turn MPRT On or Off.
Sharpness
Change the display Sharpness value from 0 to 5.
Aspect Ratio
Change the Aspect Ratio to: Wide Screen, 4:3, 1:1, Auto.
Gamma
Change the Gamma to: Off, 1.8, 2.0, 2.2, 2.4, 2.6.
Response Time
Change the Response Time to: Off, Normal, Fast, Ultrafast.
FreeSync
Turn FreeSync On or Off.
5120x1440@144Hz
E-sport Monitor
Bri/Contrast
MPRT
Off
Picture Settings
Sharpness
Color Settings
Aspect Ratio
Wide Screen
OSD Settings
Gamma
2.2
Reset
Response Time
Off
Other Settings
FreeSync
Off
12
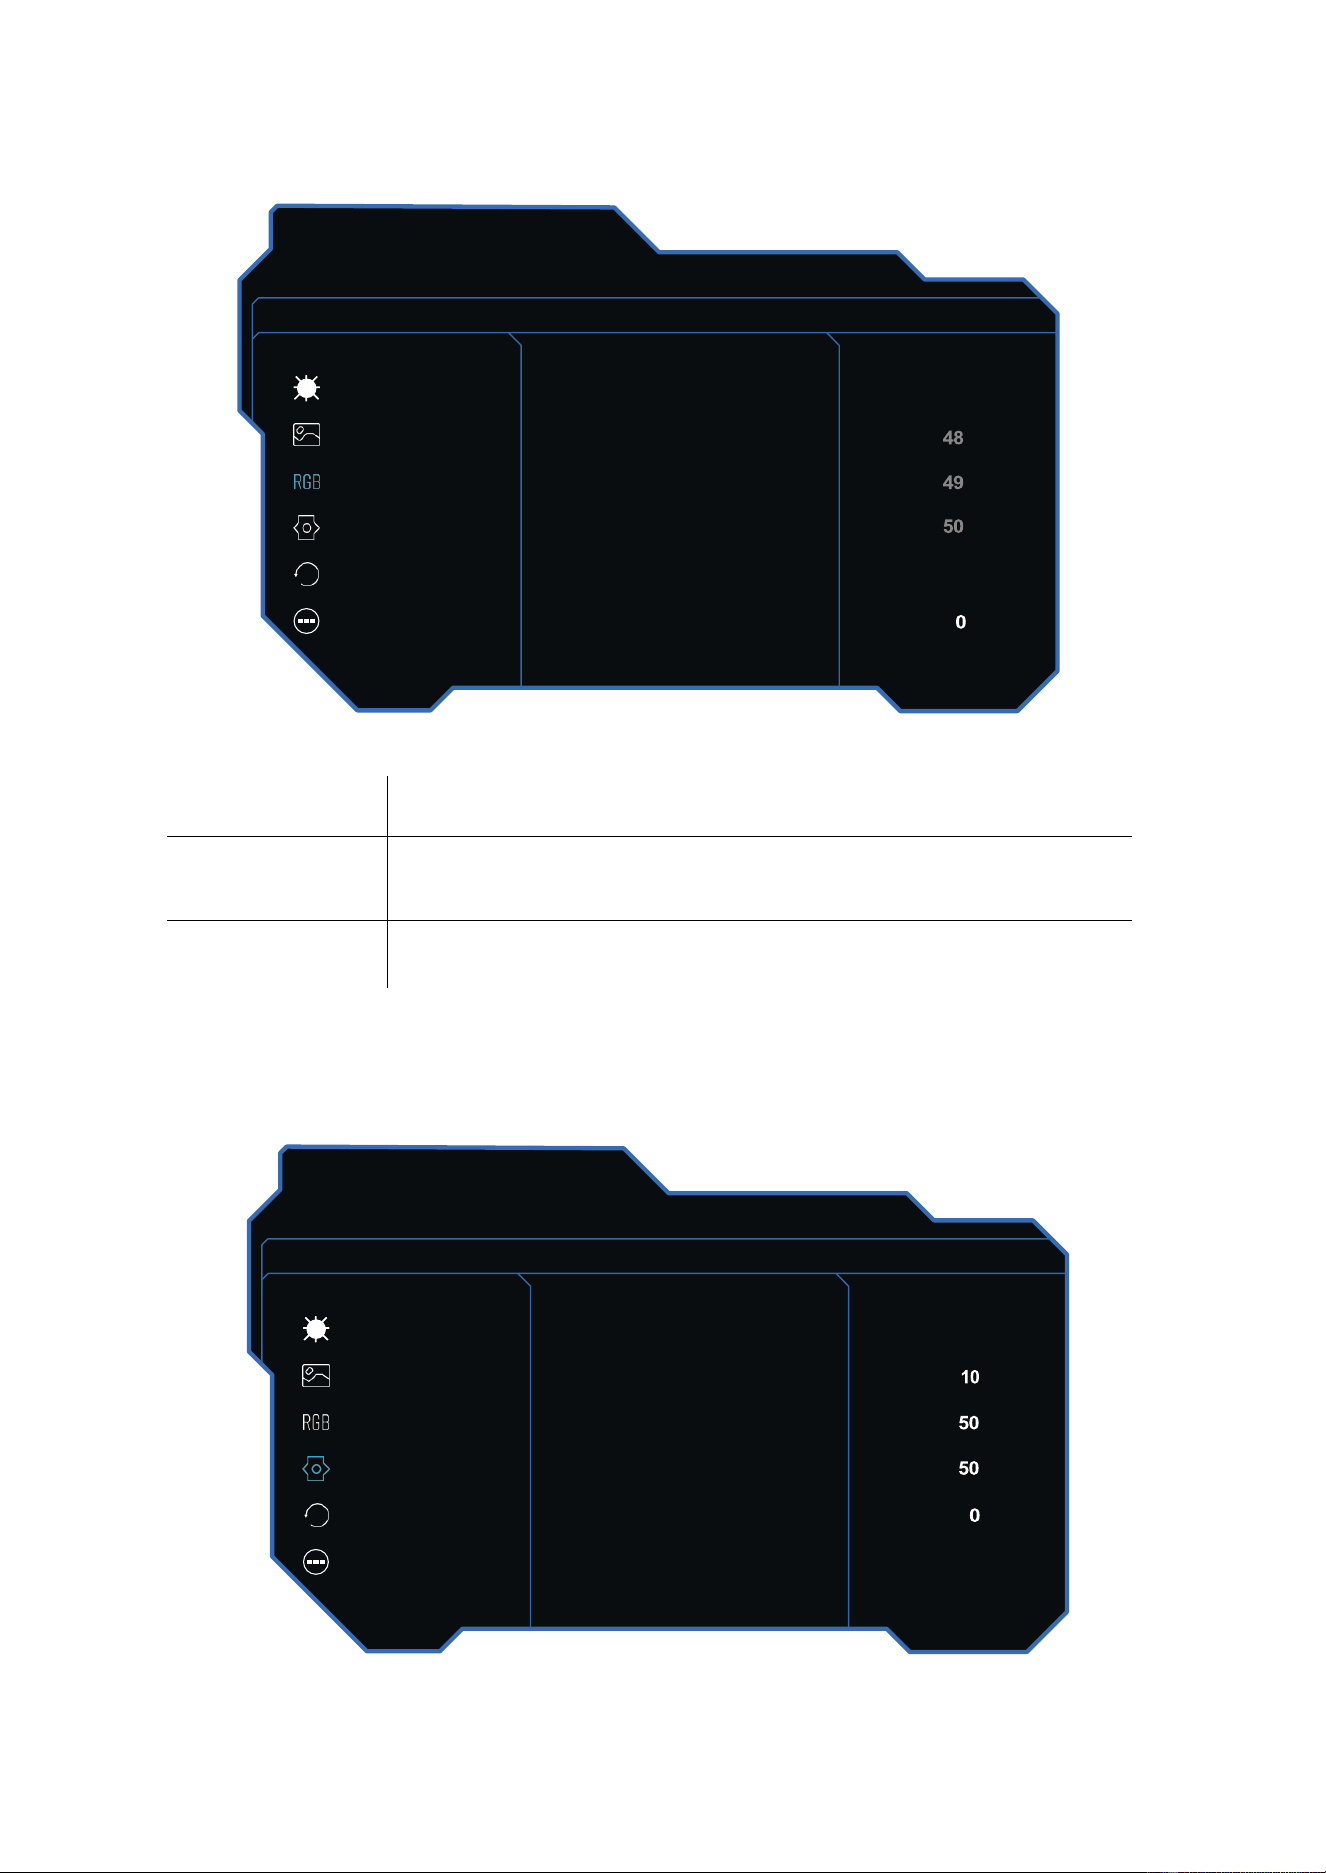
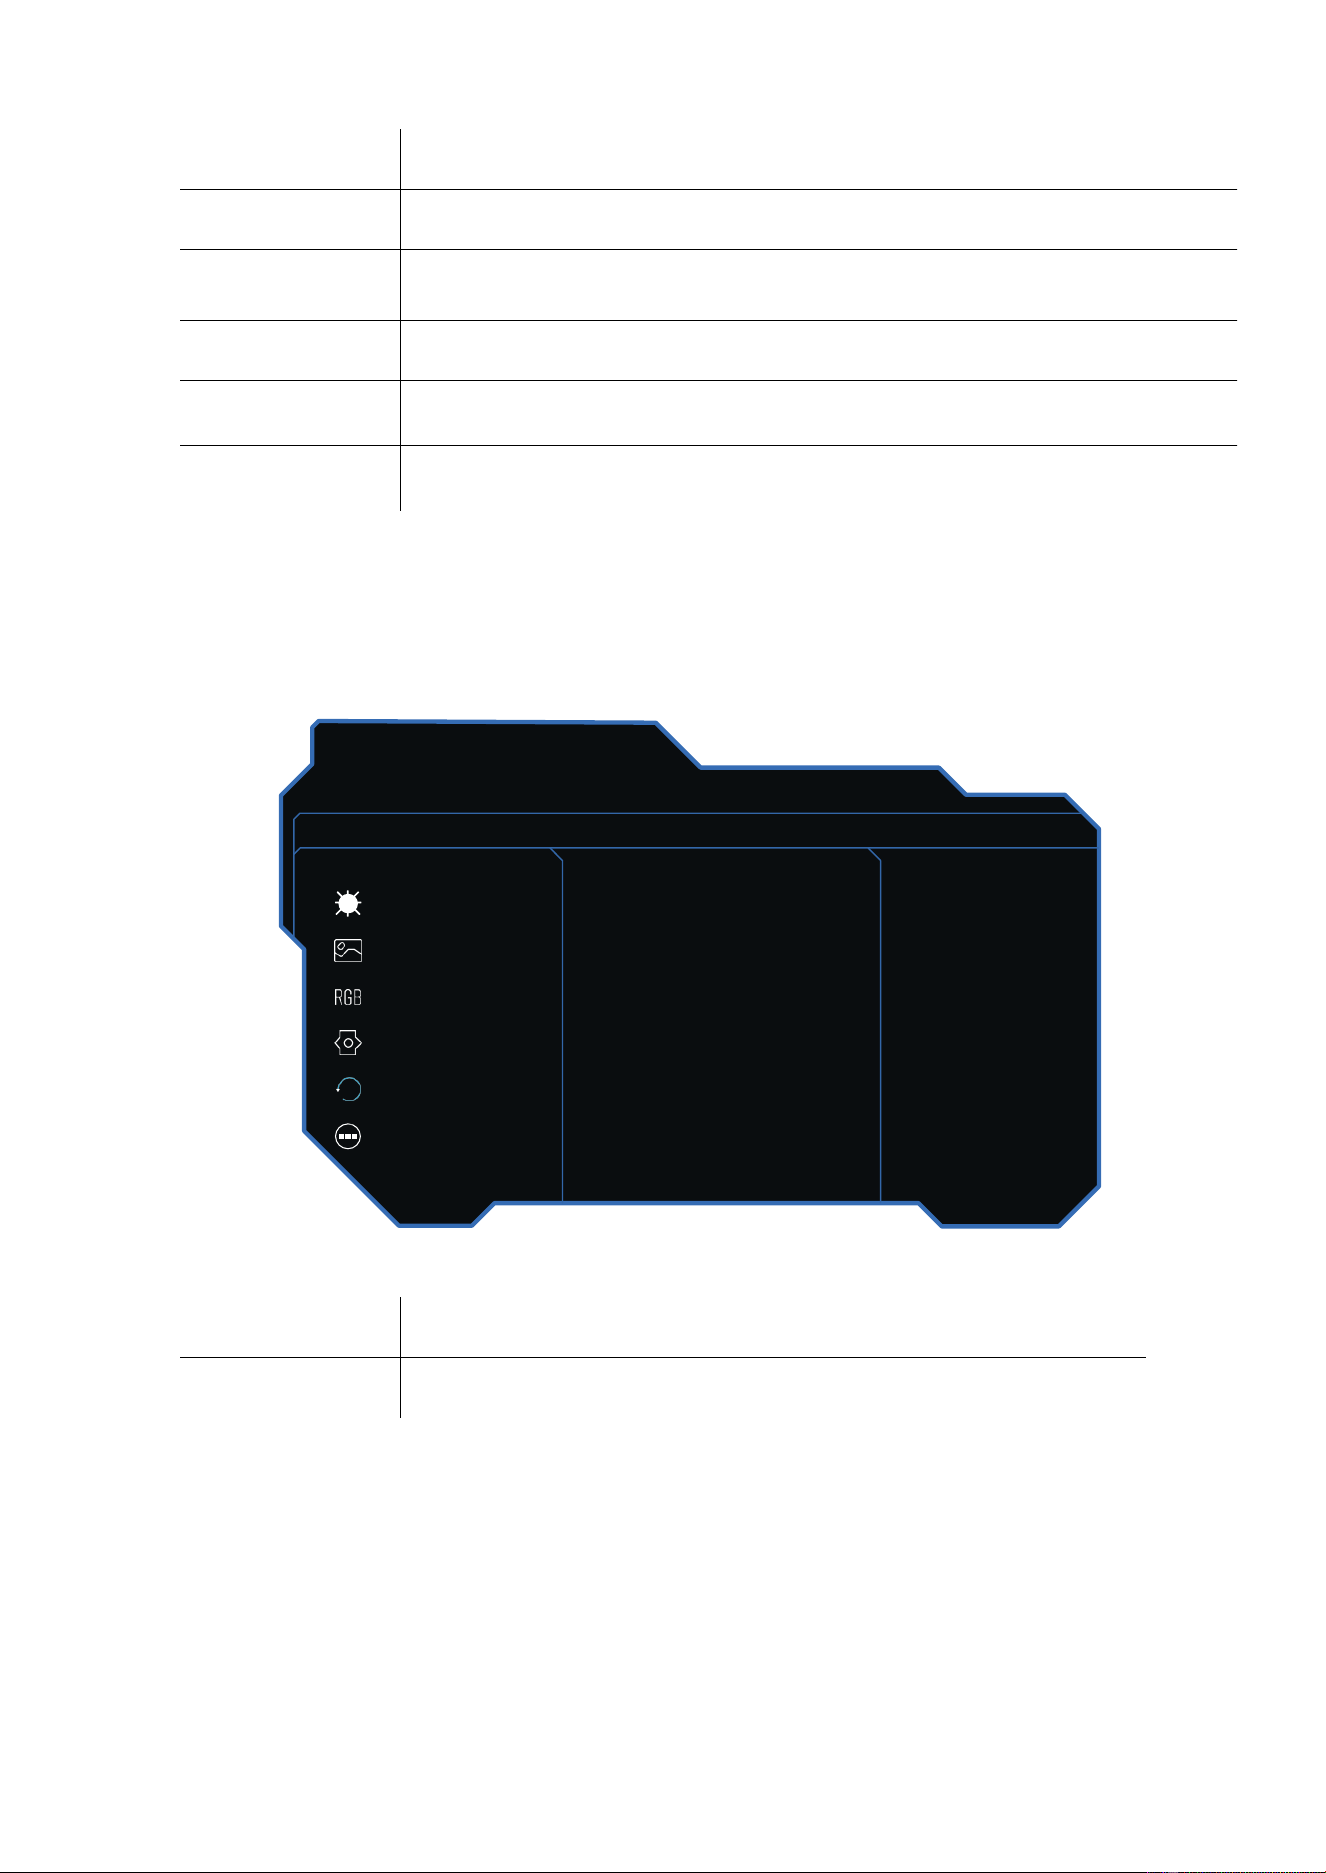
Colour Settings
Colour Temp
Change the Colour Temp to: Cool, Natural, Warm, user.
Colour Gamut
Change the Colour Gamut to: Off, sRGB Mode, DCI-P3 Mode,
Adobe Mode.
LowBlueLight
Change the display LowBlueLight value from 0 to 100.
OSD Settings
5120x1440@144Hz
E-sport Monitor
Bri/Contrast
Color Temp
Warm
Picture Settings
Red
Color Settings
Green
OSD Settings
Blue
Reset
Color Gamut
Off
Other Settings
LowBlueLight
5120x1440@144Hz
E-sport Monitor
Bri/Contrast
Language
English
Picture Settings
OSD Time Out
Color Settings
OSD H-Position
OSD Settings
OSD V-Position
Reset
OSD Transparency
Other
Flicker Free
On
13
Reset
.
Reset
Press this function to restore the original settings.
PIP/PBP Mode
Turn PIP/PBP Mode On or Off.
5120x1440@144Hz
E-sport Monitor
Bri/Contrast
Reser
No
Picture Settings
PIP/PBP Mode
Off
Color Settings
Audio Source
Type-C
OSD Settings
PIP Position
Top Right
Reset
PIP Size
Medium
Other Settings
Sub-Signal Source
DP
Language
Change the OSD Menu display language.
OSD Timer Out
Change how long the OSD Menu is on before it automatically exits.
OSD H-Position
Change the horizontal position of the OSD Menu.
OSD V-Position
Change the vertical position of the OSD Menu.
OSD Transparency
Change the transparency value of the OSD Menu from 0 to 100
Flicker Free
Turn Flicker Free On or Off.
14
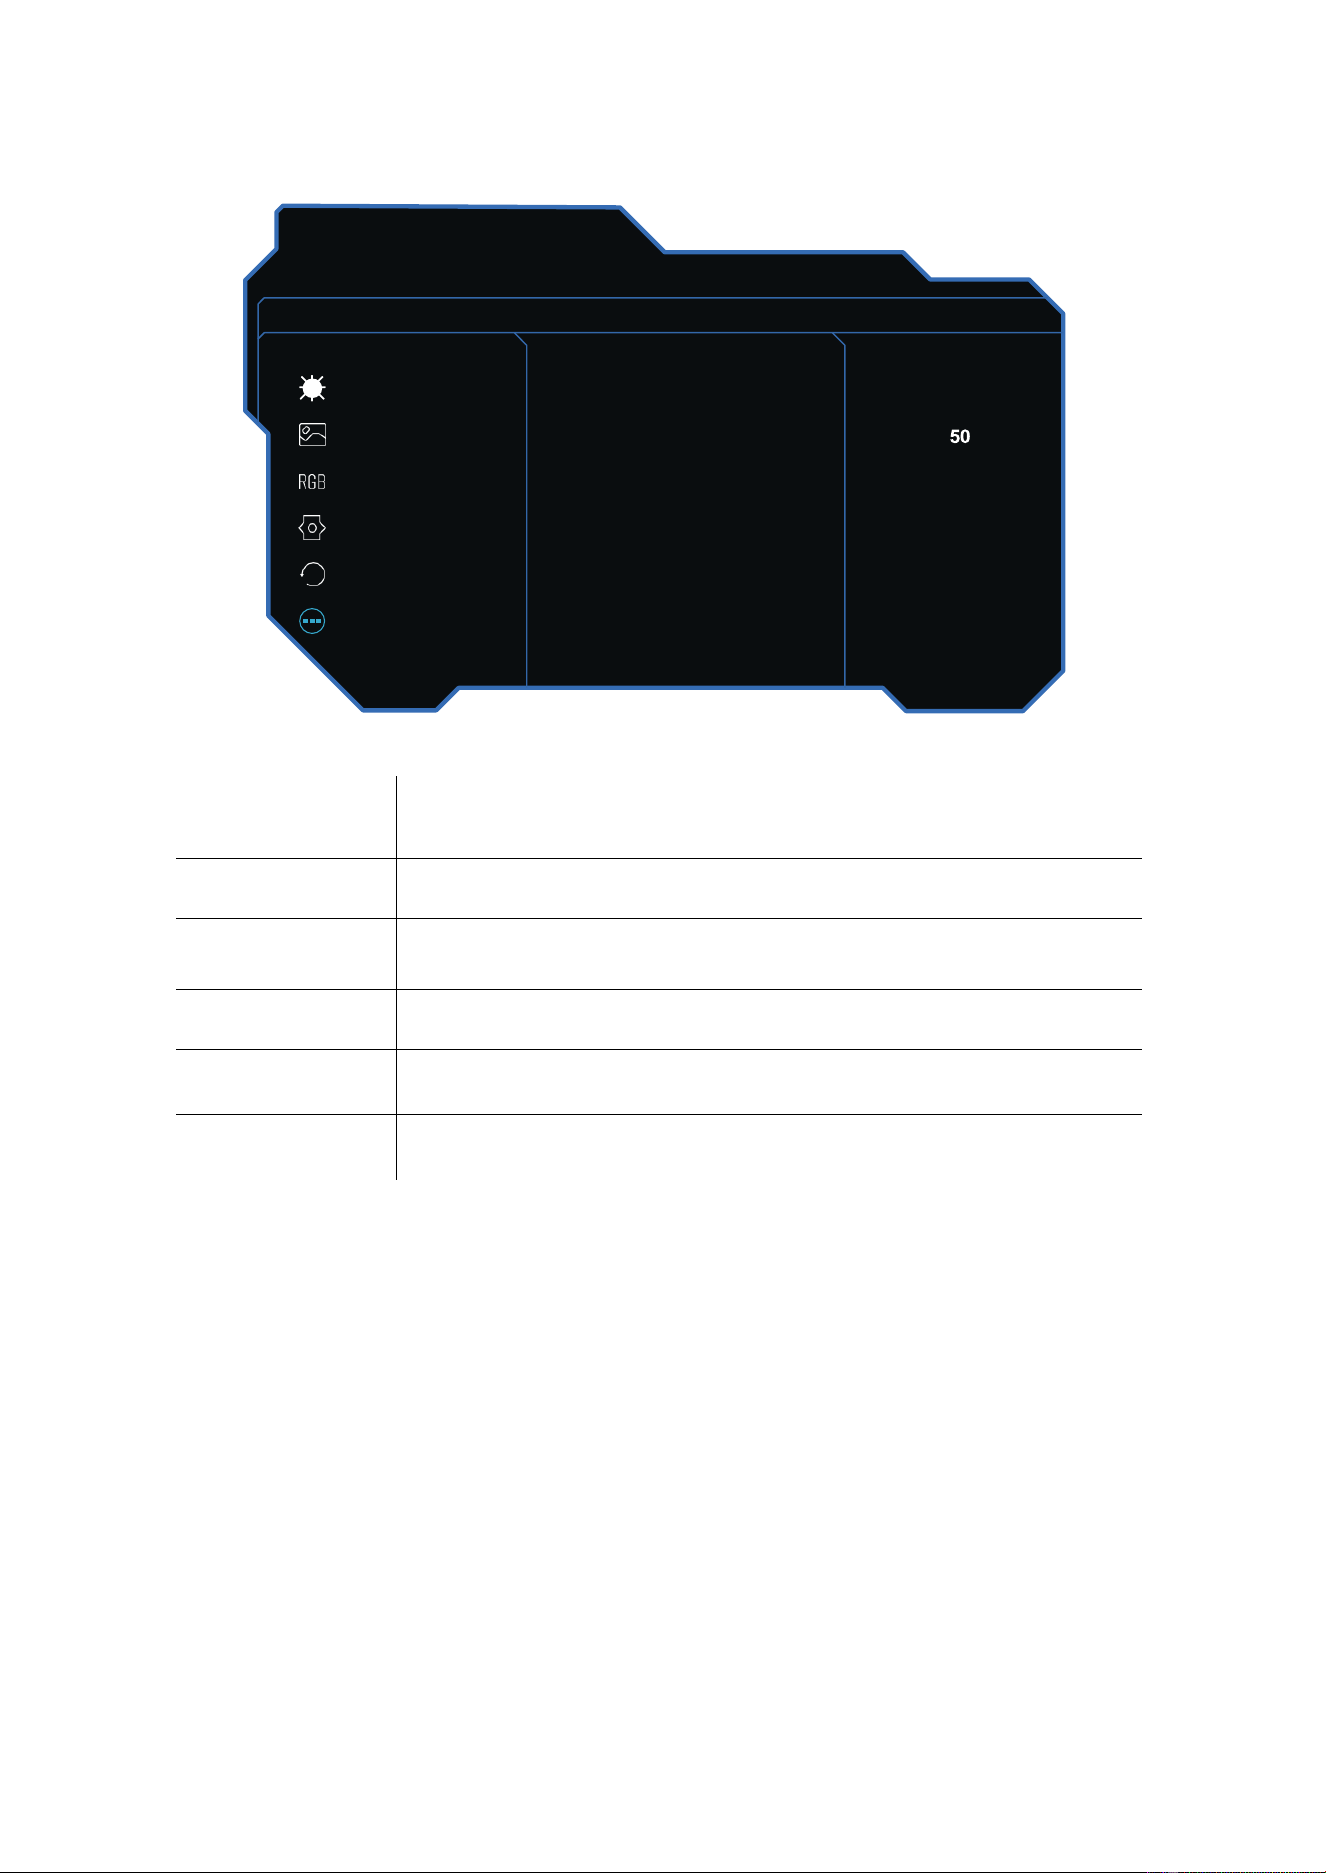
Other Settings
Input Signal
Change the input signal to auto, type-C, DP, HDMI1, and
HDMI2.
Volume
Change the audio source Volume from 0 to 100.
Mute
Turn Mute On or Off.
Enter Sleep Mode
Turn Enter Sleep Mode On or Off.
USB-SWITCH
Change the USB-SWITCH to: Auto, Type-C, PC.
DSC
Turn DSC On or Off.
5120x1440@144Hz
E-sport Monitor
Bri/Contrast
Input Signal
Auto
Picture Settings
Volume
Color Settings
Mute
Off
OSD Settings
Enter Sleep Mode
Off
Reset
USB-SWITCH
Auto
Other Settings
DSC
On
15
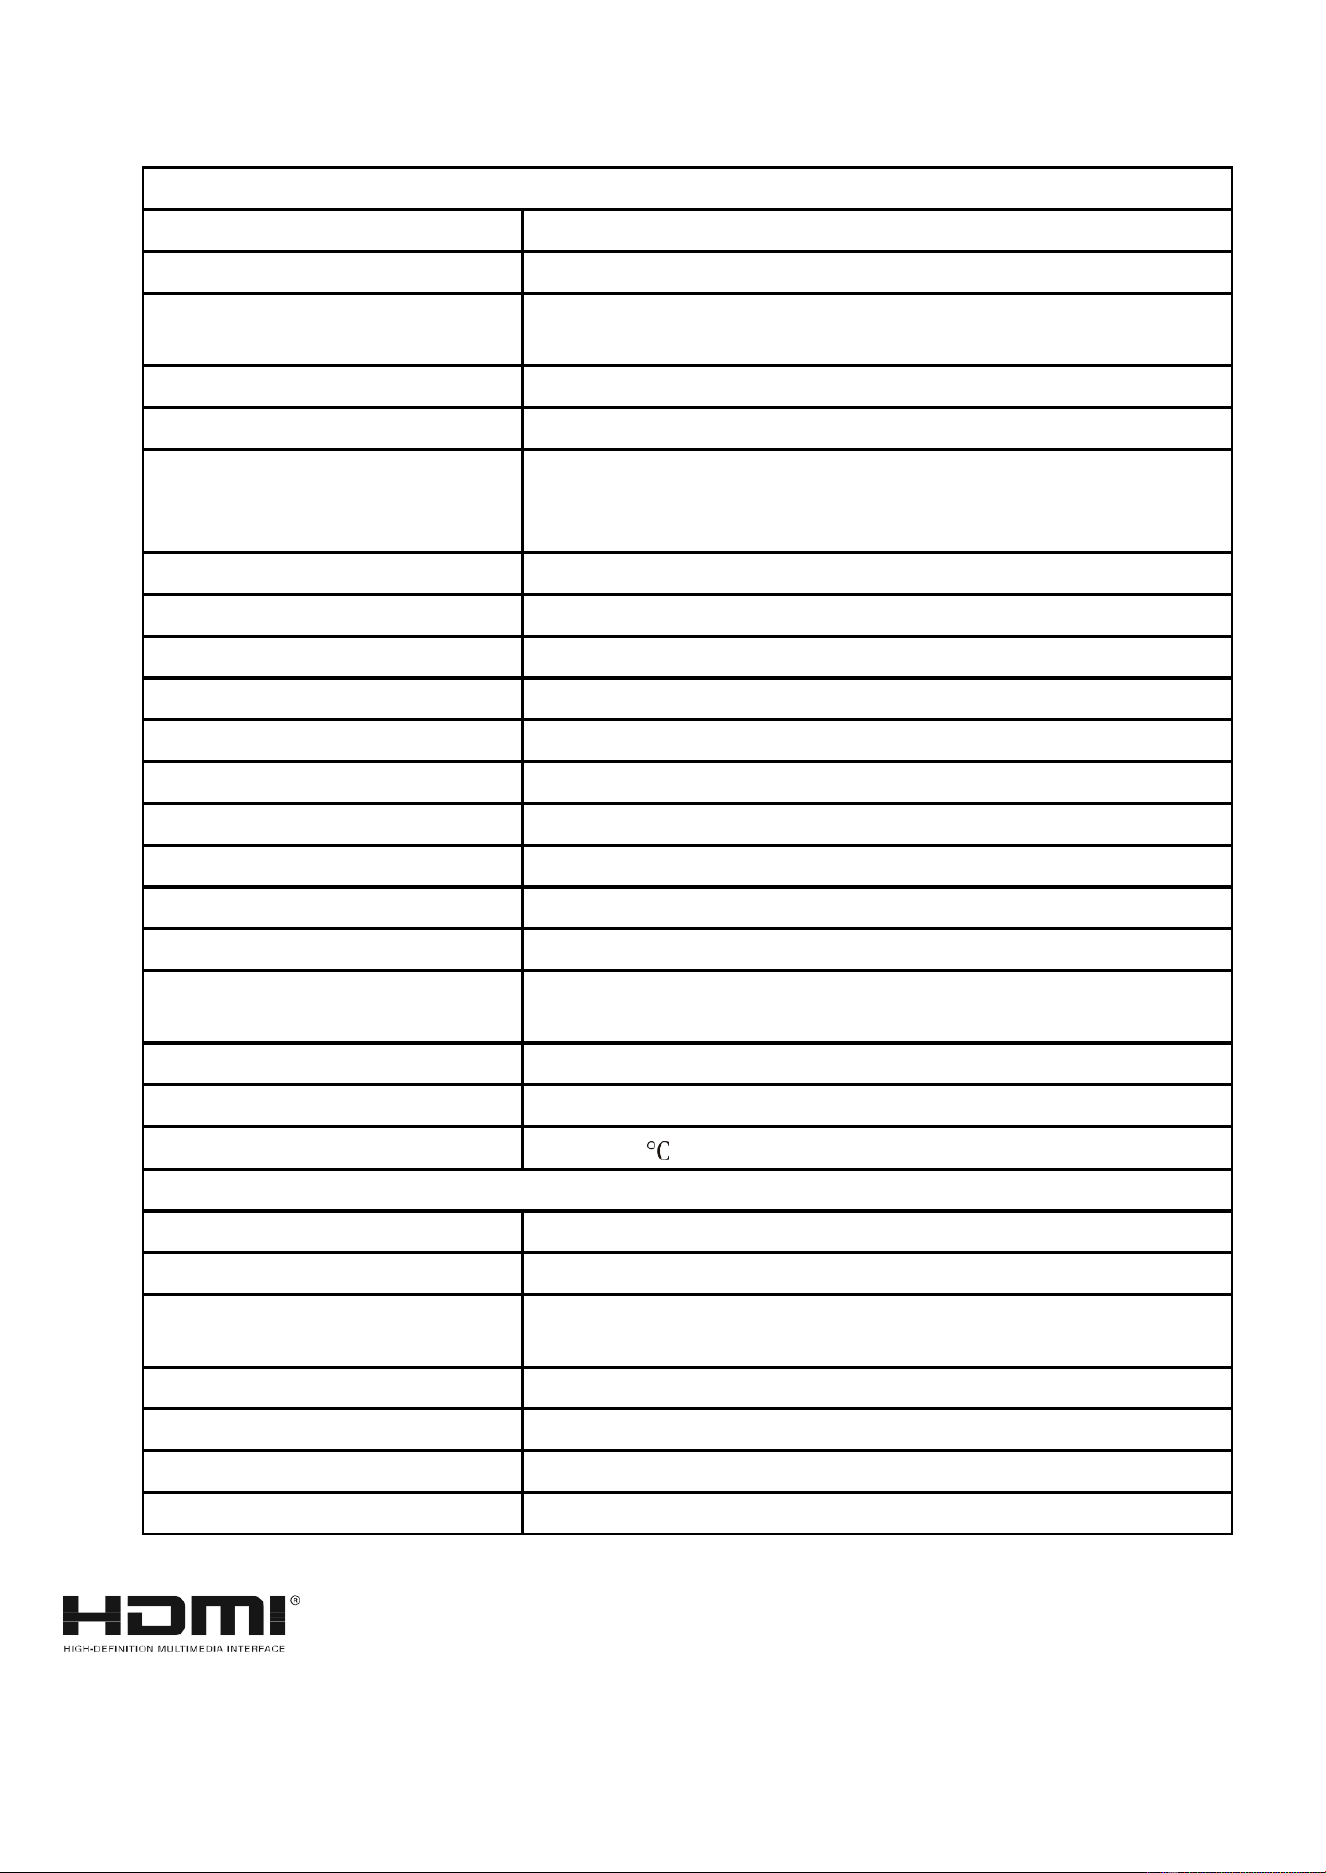
SPECIFICATION
eiq-495KCSUW144IPS
Panel Type
49” (32:9) LED Backlit Monitor
Panel Dimensions
1209.9mm Diagonal
Monitor Dimensions
1215.2x567.1x305mm (With Stand)
1215.2x365.8x115.9mm (w/o Stand)
Wall Mountable
Yes – VESA 100 x 100
Case Type
Matte Black
Max Resolution
5120(H)x1440(V)@144Hz
HDMI2.1 supports 5K @ 144Hz.
DP1.4 supports 5K @ 144Hz.
Active Display Area
1198.08(H)x336.96 (V)
Pixel Pitch
0.234(H)x0.234(V)
Contrast Ratio
1000:1 Typical
Brightness
400 cd/m²
HDR
Yes – HDR400
Response Time
7Ms GTG and 1ms MPRT
Viewing Angle
178°/178° CR≥10
Display Colours
1.06B (10 bit)
Video Compatibility
Multi-Standard for NTSC / PAL
Aspect Ratio
32:9
Speaker Multimedia
Speakers
2x4Ω3W
Sound Demodulation
Stereo. Audio
Operating Humidity
20%-70%
Operating Temperature
-10 to 40
IN/OUT INTERFACE
Video Interface
HDMI (2.1) x2, DP (1.4) x1, USB-Cx1
Audio Interface
Audio out x1
KVM Connections
1 x USB-B (To computer),
2 x USB-A (To devices)
Stand Type
Desktop
Button Position
Right Hand Side
Power Input
DC 24V 6.25A
Power Consumption
Typcal 84W
The terms HDMI, HDMI High-Definition Multimedia Interface, HDMI Trade dress and the HDMI Logos are trademarks or
registered trademarks of HDMI Licensing Administrator, Inc.
16
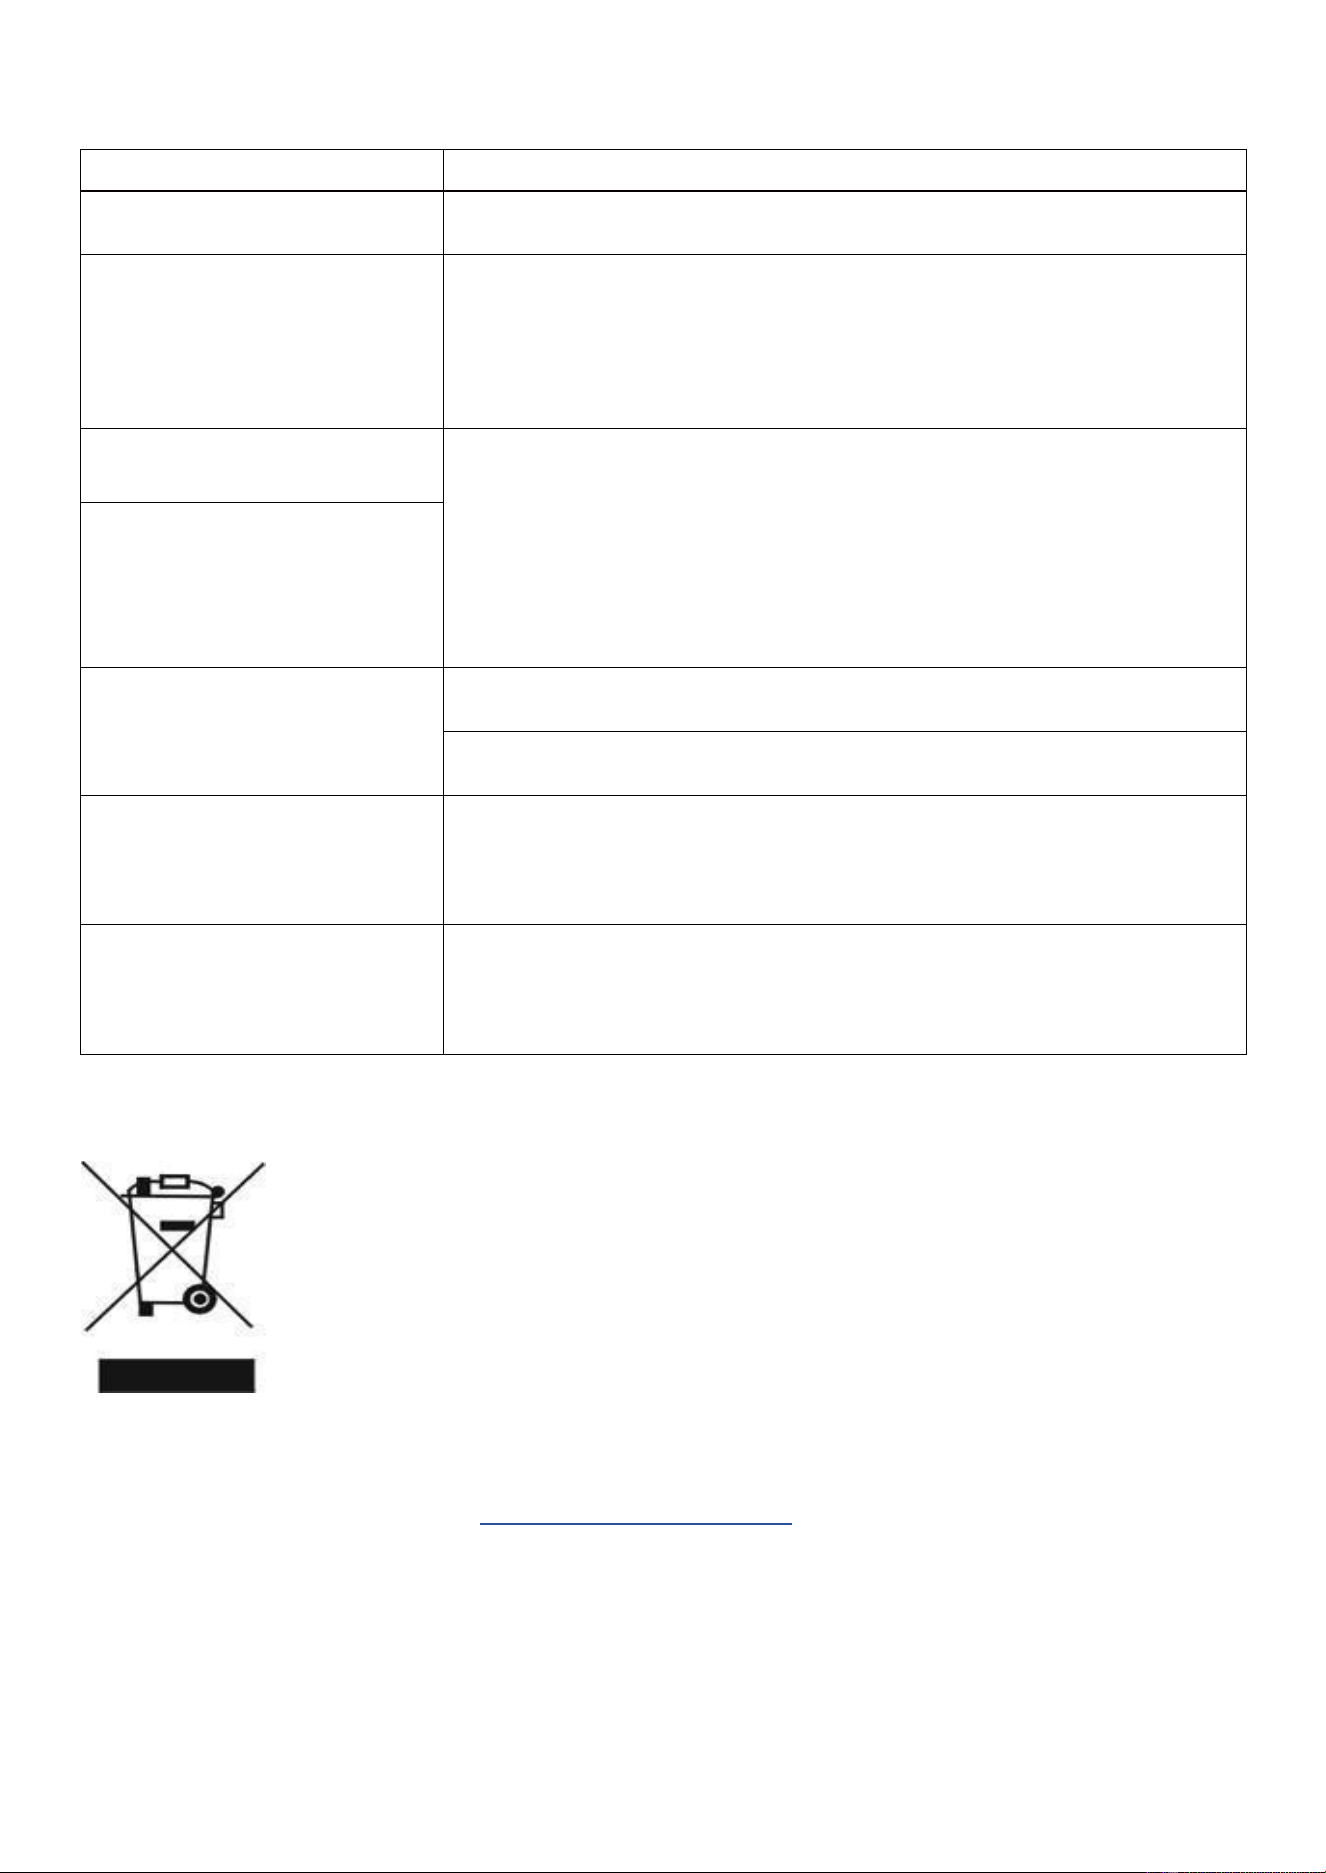
TROUBLESHOOTING
Problem
Solution
No power
Insert the plug securely into the power outlet.
Glitching Screen
Check your resolution settings and the refresh rate settings on
the monitor and the device connected. Ensure you are using a
compatible cable to both the monitor and the device. Turn on V-
Sync or VRR if the device connected to the monitor will support
this.
Not reaching the maximum
resolution.
Check that the device the monitor is connected to can reach the
maximum resolution/refresh rate of the monitor. If this is ok,
check and ensure you are using the HDMI 2.1 provided for
connection. If you wish to use a DP or USB cable for this
connection, you may need a cable with a higher specification. If
you are connecting via the USB-C, ensure the cable and
connecting device have an alternate DisplayPort function.
Not reaching maximum
refresh rate.
No picture
Ensure that the equipment is connected properly.
Ensure the correct input is selected.
The buttons on the monitor
don’t do anything.
Please disconnect the power plug and then reconnect it. (The unit
may not operate properly due to lightning, static, or other factors.)
Noise or other interference
Electronic equipment near the unit may be causing interference.
Relocate the unit or move the equipment.
ENVIRONMENTAL PROTECTION
Recycling facilities are now available for all customers at which you can deposit
your old electrical products. Customers will be able to take any old electrical
equipment to participating civic amenity sites run by their local councils. Please
remember that this equipment will be further handled during the recycling process,
so please be considerate when depositing your equipment. Please contact the
local council for details of your local household waste recycling centres.
electriQ UK SUPPORT
www.electriQ.co.uk/support
If the unit fails to operate, call 0330 390 3061 or complete the online form.
Office hours: 9 AM- 5 PM, Monday to Friday
www.electriQ.co.uk
Unit 2A, Trident Business Park,
Neptune Way, Leeds Road,
Huddersfield, HD2 1UA
V20240822SKL