
USER MANUAL
49” LED MONITOR
eiq-495KCSUW240VA
Thank you for choosing electriQ.
Please read the user manual before using this monitor and keep it safe for future
reference.
Visit our page www.electriQ.co.uk to view our entire range of Intelligent Electricals.


3
CONTENTS
SAFETY
4
WHAT IS SUPPLIED
6
PREPARING FOR USE
6
ATTACHING THE STAND
7
WALL MOUNTING
8
GETTING STARTED
9
CONNECTIONS AVAILABLE
9
MONITOR CONTROLS
9
INITIAL SET UP
10
NAVIGATING THE OSD
10
OSD MENU
11
GAME SETTINGS
12
PICTURE SETTING
13
COLOUR SETTINGS
14
PIP (PICTURE IN PICTURE)
PBP (PICTURE BY PICTURE)
15
OSD SETTINGS
16
OTHER SETTINGS
17
SPECIFICATION
18
TROUBLESHOOTING
19
PRODUCT DISPOSAL
20
SUPPORT
20

4
SAFETY INFORMATION
Read these instructions – All the safety and operating instructions should
be read before this product is installed or operated.
Keep these instructions – The safety and operating instructions should
be retained for future reference.
Heed all warnings – All warnings on the appliance and in the operating
instructions should be adhered to.
Follow all instructions – All operating and usage instructions should be
followed.
Do not use this equipment near water – The appliance should not be
used near water or moisture e.g. in a wet basement or near a swimming
pool.
This monitor is designed for indoor use only.
Clean only with a dry cloth. Do not use solvents or petroleum-based fluids.
Do not block any ventilation openings.
Do not install near any heat sources such as radiators, stoves or other
apparatus (including amplifiers) that produce heat.
Do not tamper with the supplied plug. This plug is a BS1363 standard plug.
Protect the power cord from being walked on or pinched, particularly at the
plug and at the point where it exits from the appliance.
Only use attachments/accessories specified by the manufacturer.
Unplug the apparatus during lightning storms or when unused for long
periods of time.
Refer all servicing to qualified personnel. Servicing is required when the
apparatus has been damaged in any way, such as:
The power supply cord or plug has been damaged.
Liquid has been spilled or the monitor has been exposed to rain or
moisture.
Objects have fallen into the apparatus.
It does not operate normally or has been dropped.
Please keep the unit in a well-ventilated environment.
The monitor should only be connected to a mains power supply with AC
100-240V~ 50/60Hz
To prevent overload, do not share the same power supply socket with too
many other electronic components.
Do not place any connecting wires where they may be stepped on or
tripped over.
Do not place heavy items on the cable as this may cause damage.
When removing from a socket grip the plug, not the cable.
Disconnect the plug immediately and seek professional help if the plug or
cable is damaged, liquid has spilt onto the monitor, if accidentally exposed
5
to water or moisture, if anything accidentally penetrates the ventilation slots
or if the set does not work normally.
Do not remove the safety covers. There are no user serviceable parts
inside.
Do not block ventilation slots on the back cover. The monitor can be placed
in a cabinet but ensure the guidance on clearances (see next page) are
followed.
Do not tap or shake the screen, this may damage internal components.
Diagrams within the manual are for illustrative purposes only, and as such
there may be differences to the actual product received.
This is a CLASS I product and as such requires an earth connection.
WARNINGS
Never place a monitor in an unstable location. A monitor may fall, causing
serious personal injury or death. Many injuries, particularly to children, can
be avoided by taking simple precautions such as:
Use cabinets or stands recommended by the manufacturer of the
monitor.
Only use furniture that can safely support the monitor.
Ensure the monitor is not overhanging the edge of the supporting
furniture.
Do not place the monitor on tall furniture (for example, cupboards or
bookcases) without anchoring both the furniture and the monitor to a
suitable support.
Do not place the monitor on cloth or other materials that may be located
between the monitor and the supporting furniture.
Educate children about the dangers of climbing on furniture to reach the
monitor or its controls.
If your existing monitor is being retained and relocated, the same
con
siderations as above should be applied.
AT FULL VOLUME, PROLONGED LISTENING MAY DAMAGE THE
USER’S HEARING.
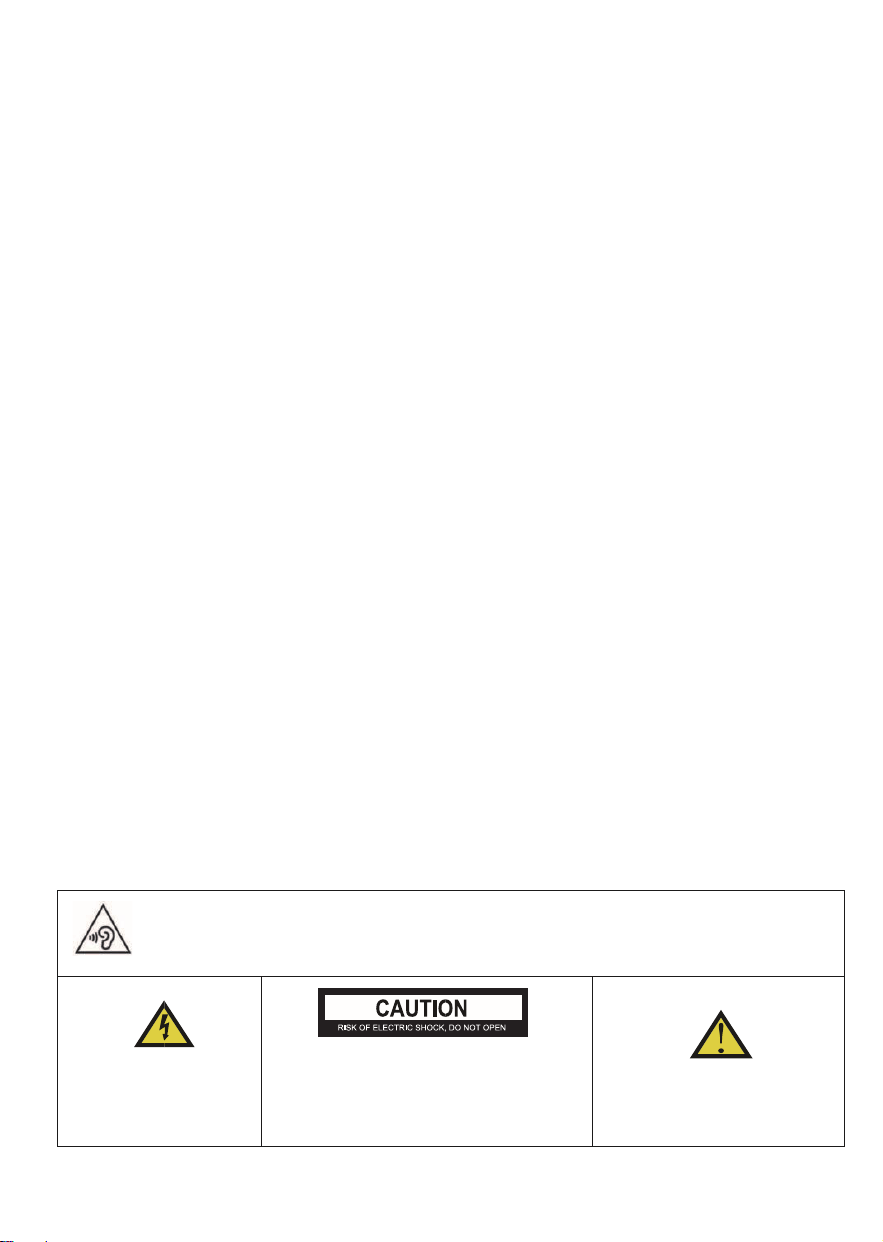
This warning sign is to
warn of dangerous
voltage inside the
product.
CAUTION: To reduce the risk of
electric shock, DO NOT remove the
cover (or back). No user serviceable
parts inside. Refer servicing to
qualified service personnel.
This warning sign is to alert
you of important instructions
accompanying the product.
6
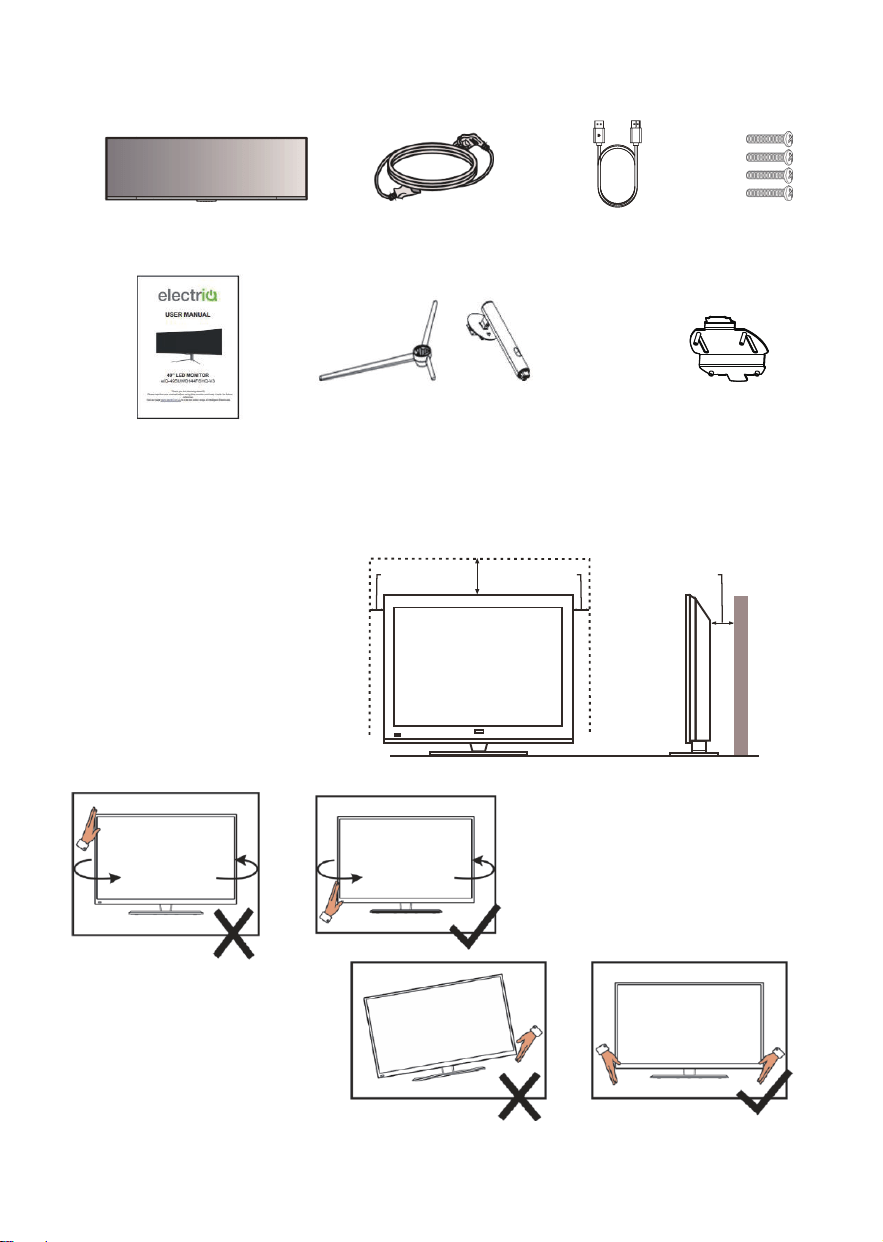
WHAT IS SUPPLIED
Monitor Power Cable DP Cable Bolts
User Manual Stand Mount Adapter
PREPARING THE MONITOR FOR USE
Place the monitor on a firm and flat
s
urface, leaving a space of at least
10
cm around the unit and 30cm from
t
he top of the unit to the ceiling or
c
abinet. Ensure the monitor is
po
sitioned close to the wall to avoid it
f
alling when pushed.
When twisting the monitor, do
no
t hold by the top, you should
t
wist from the base.
When lifting the monitor, do not
u
se one hand to handle it, you
s
hould lift the monitor using two
hand
s, ensuring pressure is not
pu
t on the screen itself.
10cm
30cm
10cm
10cm
7
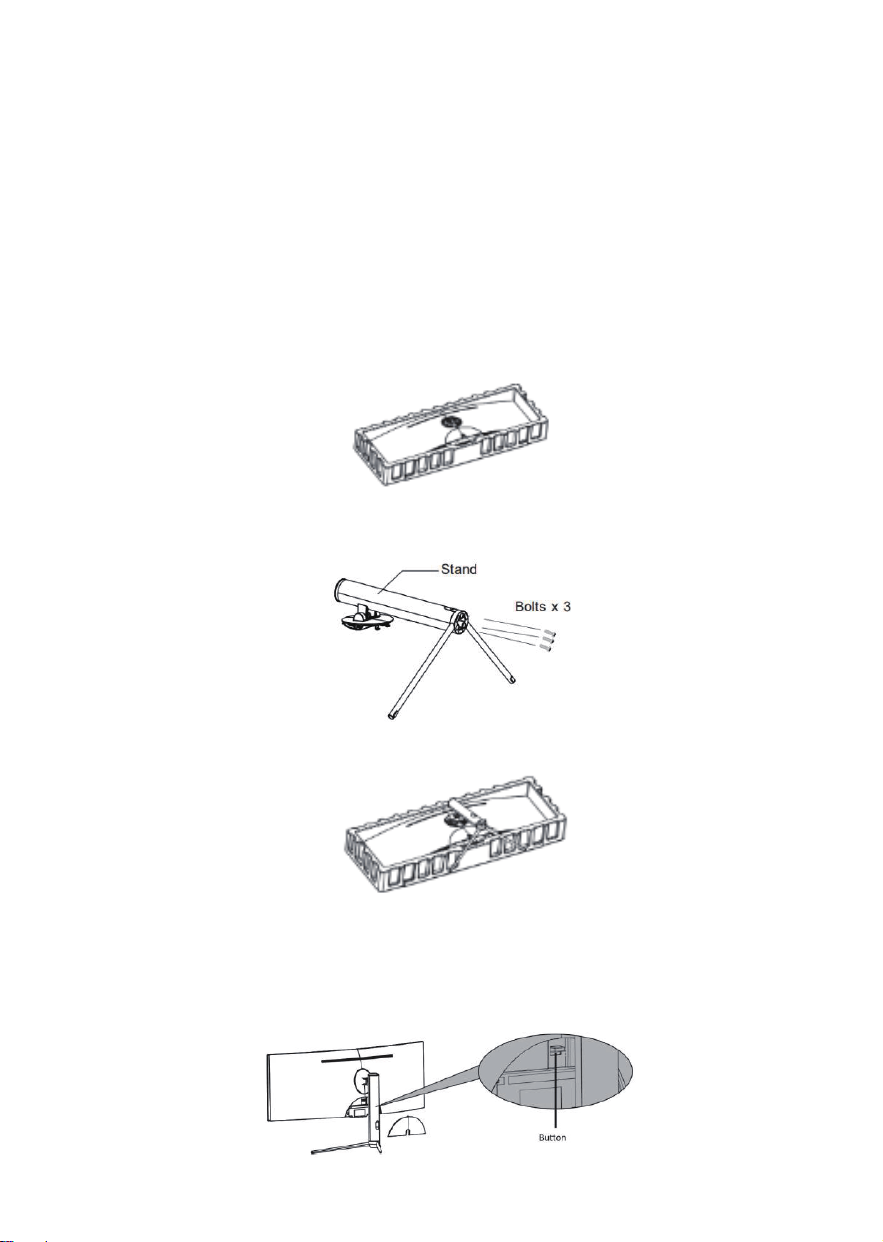
ATTACHING THE STAND
Due to the heavy weight and dimensions of the screens and their fragile nature, we recommend
that they are unpacked and assembled by 2 people.
electriQ and its distributors and dealers are not liable or responsible for damage or injury
caused by improper installation, improper use or failure to observe these safety instructions. In
such cases any guarantee will be void.
The stand can be removed from the rear of the monitor by pressing the quick release button on
the rear of the monitor.
Keep the foam underneath the monitor before attaching the stand.
To avoid damage, do not touch the screen when moving the monitor.
1. Open the packaging, take out the monitor with foam still attached and gently place it on a
desk or table.
2. Take out the two main parts of the stand. Then use a screwdriver (not included) and bolts to
fasten base to the stem.
3. Align the stand stem bracket with the opening on the back of the monitor and carefully insert
the bracket. The pieces should click into place.
HOW TO REMOVE THE STAND
Before removing the stand, remove the port cover from the rear of monitor. Press the switch down
to release the monitor from the bracket. We would advise to lay the monitor in the polystyrene
packaging to protect the screen when removing the stand.
8
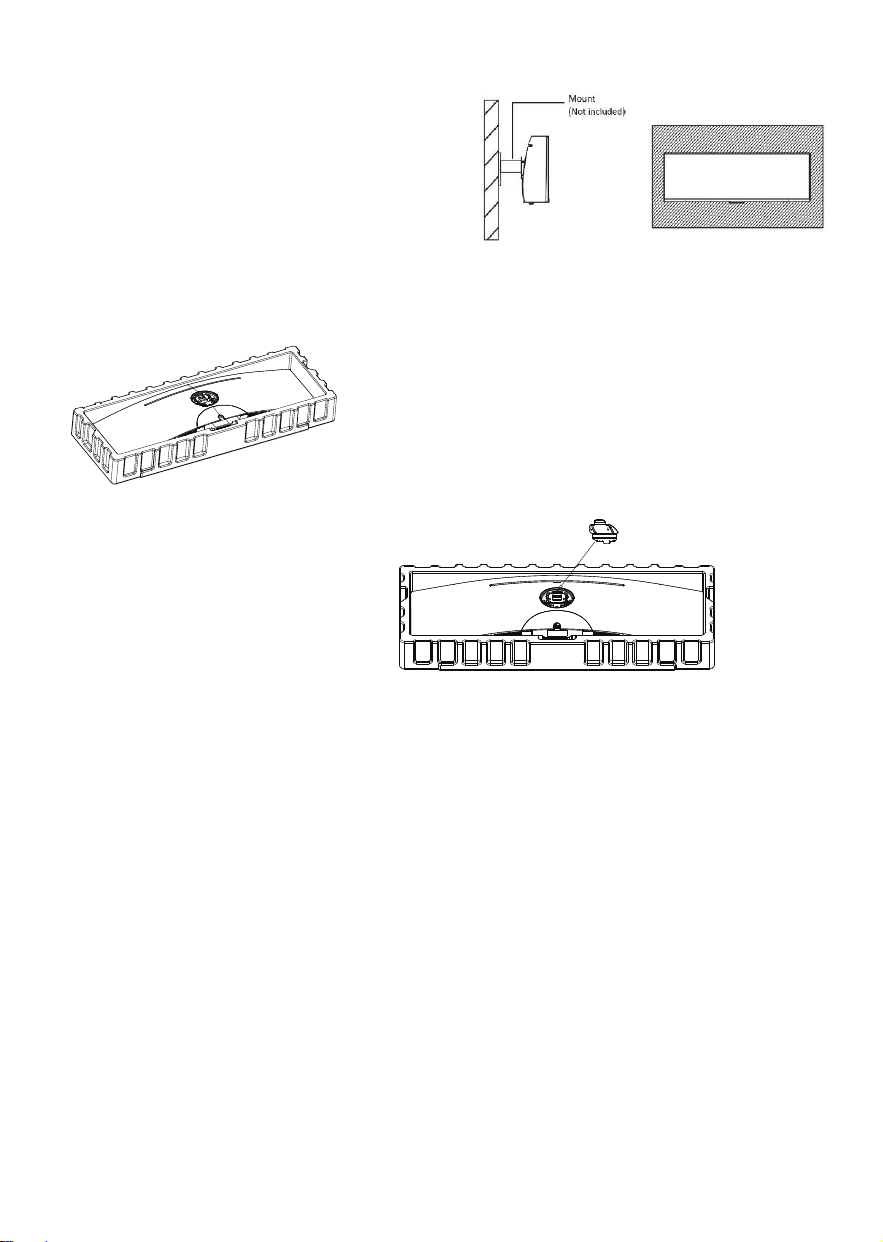
WALL MOUNTING
The monitor is provided with mounting holes for
a VESA approved wall mounting bracket (not
supplied).
The VESA mounting pattern is: 75x75mm and
the size of the screws is 4 x M6 x 10 (not
supplied)
Do not use screws longer than specified or
damage will occur to the internal components.
NOTE: As the monitor is considered heavy, please consult with a professional wall mount installer to
perform the installation.
1. Open the package, take out the product with foam
still attached, and gently place it on a desktop or table.
Remove the extra parts and the foam covering the monitor.
If the monitor was already attached to the stand, remove
the stand.
2. Remove the wall mount
adapter from the accessory
pouch and snap it onto the
backshell.
Follow the directions received
with your mount, stand, or
accessory and install the
monitor on the wall or fixture
as desired.
NOTES:
Do not pinch the screen directly with your hand when hanging the product to prevent the
screen from breaking.
Due to the heavy weight and dimensions of LCD screens and their fragile nature, we
recommend that they are unpacked and assembled by 2 people and professional installers are
used to wall mount them (wall mounting is optional).
If you do not understand the instructions, or are unsure how to install this product, please
contact a professional for assembly advice and assistance.
Careful consideration should be made regarding the location the monitor is to be wall mounted
as some walls are not suitable for installation. If the monitor is to be mounted on drywall, the
mount must be anchored into a wooden stud, concrete block or brick behind the drywall.
Installing on drywall alone may not support the weight of the display.
When drilling holes, it is particularly important to take care of electrical cables, water or gas
pipes in the wall. Please follow the in
structions provided by the wall bracket manufacturer and
ensure that all fixing bolts supplied are used.
electriQ and its distributors and dealers are not liable or responsible for damage or injury
caused by improper installation, improper use or failure to observe these safety instructions. In
such cases any guarantee will expire.
mount adapter
9
GETTING STARTED
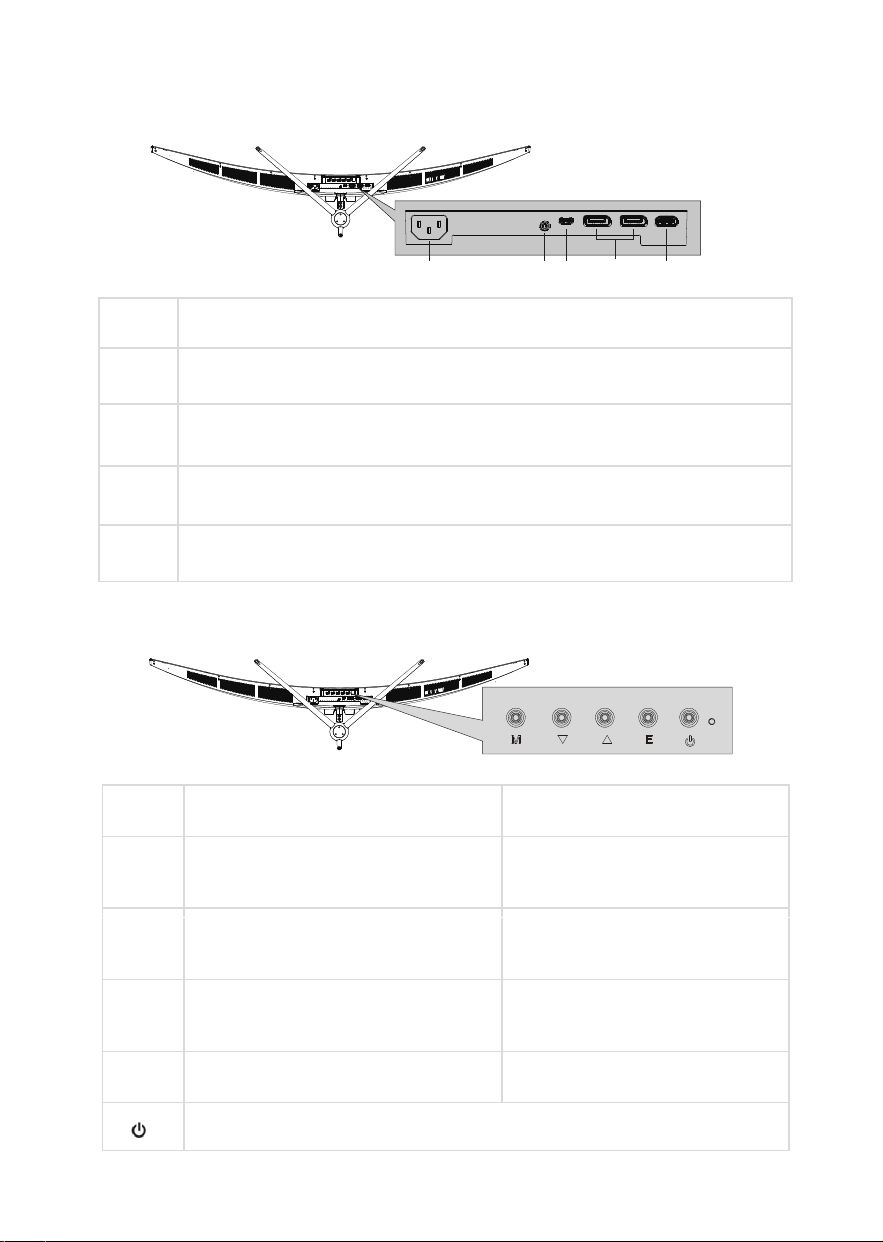
CONNECTIONS AVAILABLE ON THE MONITOR
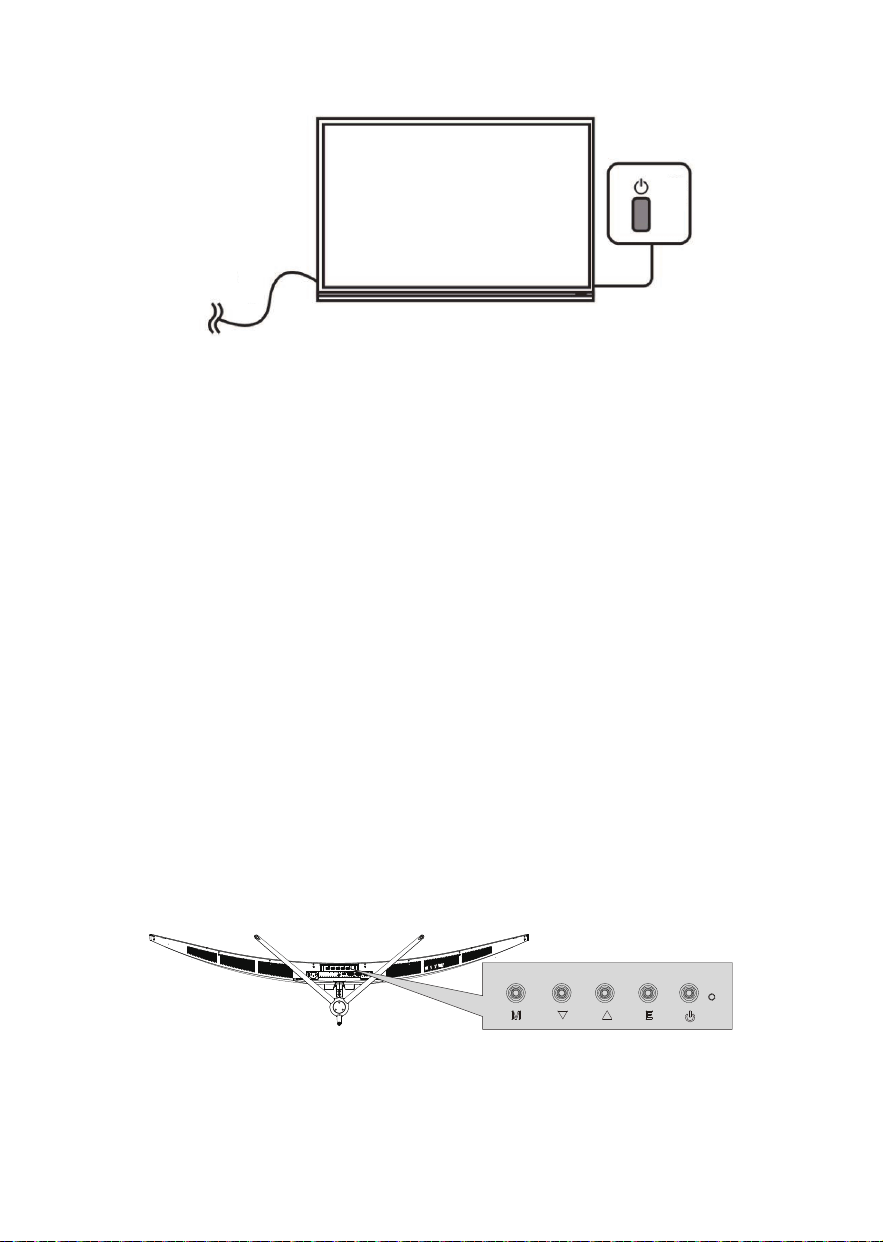
MONITOR CONTROLS
WHILE OSD (ON SCREEN
DISPLAY) IS NOT DISPLAYED
WHILE OSD (ON SCREEN
DISPLAY) IS DISPLAYED
M Press to display the OSD.
Enter the sub-menus within the
OSD or confirm the selected
function.
▼
HOTKEY 1 – See OSD Settings for
setting it’s function
Go down within the OSD or
decrease the value of a selected
setting.
▲
HOTKEY 2 – See OSD Settings for
setting it’s function
Go up within the OSD or
increase the value of a selected
setting.
E
HOTKEY 3 – See OSD Settings for
setting it’s function
Press to exit the OSD.
Press to turn the monitor On or Off.
1 2 543
1
2
Power Connector: Insert the power cable
Audio Output: Insert an Audio cable into the monitor to output sound to a
device, such as headphones or speakers.
3
4
5
Type-C Connector: Insert one end of the Type-C cable into the computer's
Type-C output and connect the other end to the monitor's Type-c port.
DP (Display Port) 1.4 (x2): Insert one end of the DP cable into the
computer's DP output and connect the other end to the monitor's DP port.
HDMl Port 2.1: Insert one end of the HDMl cable into a suitable
HDMl output and connect the other end to the monitor's HDMl port.
10
INITIAL SETUP
1. Attach the stand or wall mount the product following the guidance on the
previous pages.
2. Connect the source device (such as PC) using the correct cable.
3. Connect the power cable to the monitor and plug into a suitable socket.
4. Press the POWER button on the monitor or to turn it on.
NAVIGATING THE OSD
(ON SCREEN DISPLAY)
The menu for the monitor can be accessed by pressing the menu button on the control panel. This
menu is separated into the follow
ing sub menus: Game Settings, Picture Settings, Colour Settings.
PIP/PBP, OSD Settings and Oher Settings. Details of each menu can be found in the following
sections.
The OSD can be navigated using the buttons on the base of the monitor (See monitor controls on
the previous page).
11
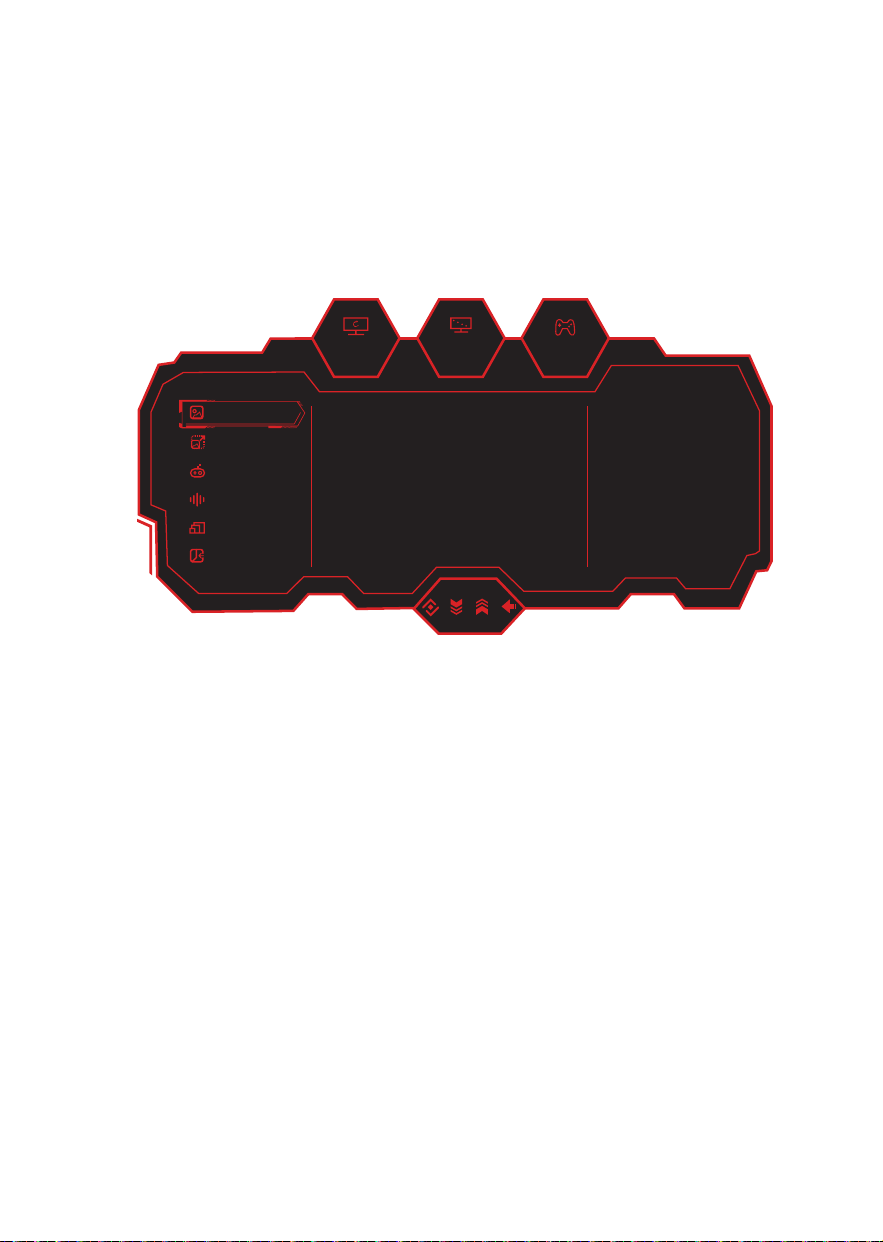
OSD MENU
NOTE: Due to continuous product development, the OSD menu shown may differ slightly
from the product.
The screen display (OSD) menu can be used to adjust the settings of the monitor and is
shown on the screen after the monitor is powered on and the M button is pressed.
1. Press the M button to enter the OSD menu.
2. Use the Up and down arrows on the base of the screen to scroll through the
desired functions.
Select your desired function, then press M to enter its sub menu.
Use the arrows to scroll through the various options in the sub menu.
Press M to confirm the setting and exit from the current sub menu.
3. Press E on the base of the monitor to exit from the menu screen.
180hz
1920
x
1080
OFF
Picture Mode
I/O Settings
PIP/PBP
Game +
Audio Settings
Picture Settings
Standard Mode On
Off
Off
Off
Off
Off
RTS/RPG Mode
FPS Mode
MOBA Mode
Movie Mode
Reading Mode
12
180hz
1920
x
1080
OFF
Picture Mode
I/O Settings
PIP/PBP
Game +
Audio Settings
Picture Settings
Standard Mode On
Off
Off
Off
Off
Off
RTS/RPG Mode
FPS Mode
MOBA Mode
Movie Mode
Reading Mode
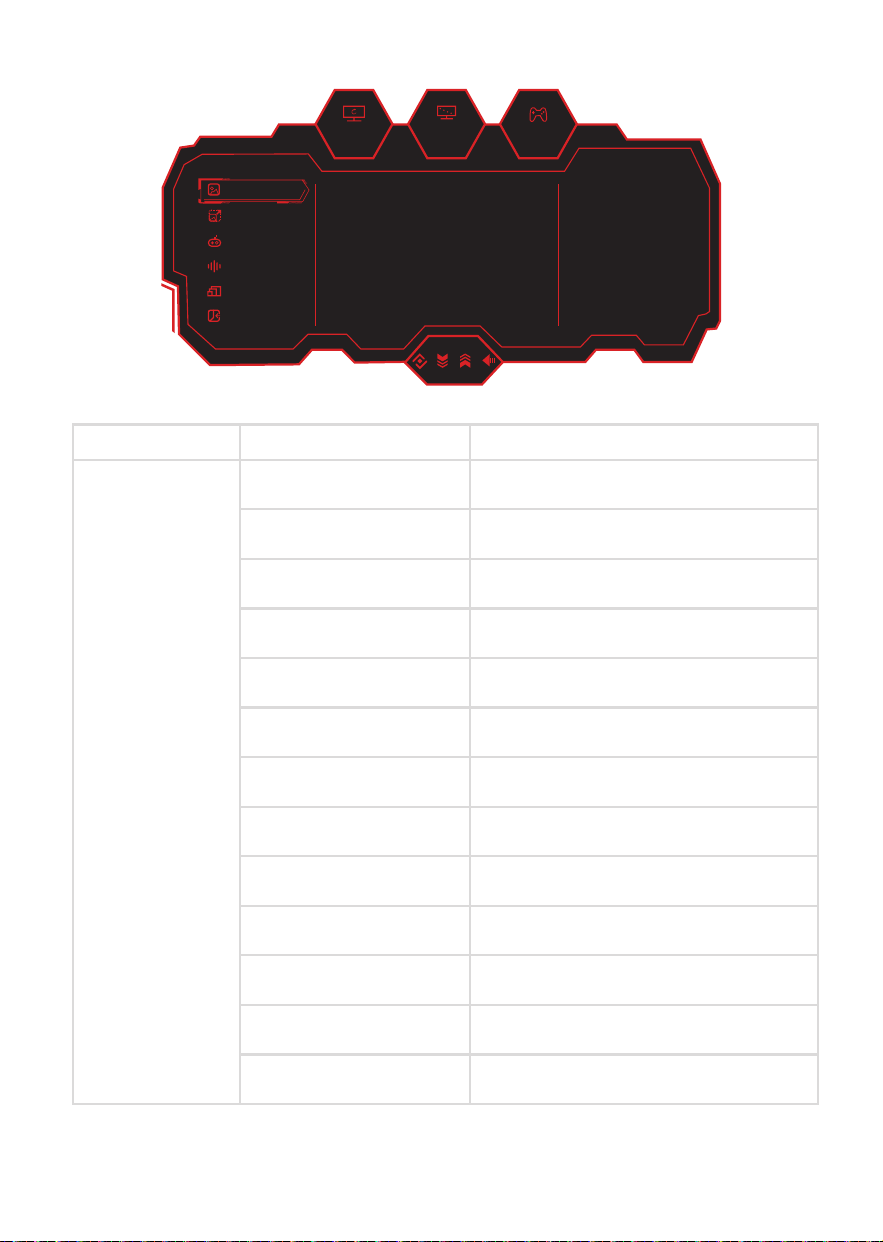
Sub Menu Options
Standard Mode
Off/On(Custom)
RTS/RPG Mode
Off/On(Custom)
FPS Mode
Off/On(Custom)
MOBA Mode
Off/On(Custom)
Movie Mode
Off/On(Custom)
Reading Mode
Off/On(Custom)
Night Mode
Off/On(Custom)
Eye Care Mode
Off/On(Custom)
Mac View Mode
Off/On(Custom)
E-Book Mode
Off/On(Custom)
sRGB Mode
Off/On(Custom)
AdobeRGB Mode
Off/On(Custom)
DCI-P3 Mode
Off/On(Custom)
PICTURE MODE
Main Menu
Picture Mode
13
180hz
1920
x
1080
OFF
Picture Mode
I/O Settings
PIP/PBP
Game +
Audio Settings
Picture Settings
Brightness 50
50
Off
0
0
22
Contrast
DCR
Low Blue Light
Sharpness
Gamma
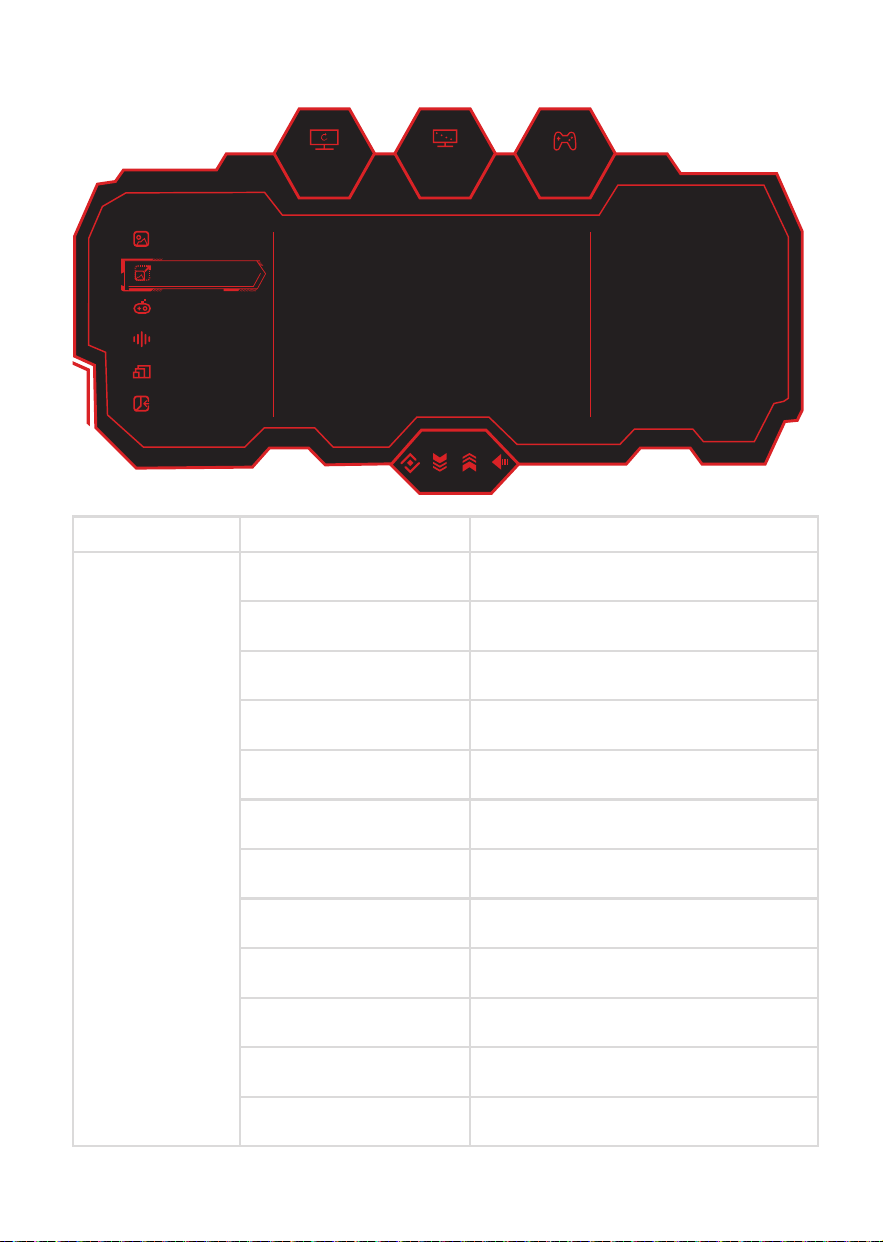
Sub Menu Options
Brightness
0-100
Contrast
0-100
DCR
Off/On
Low Blue Light
0-100
Sharpness
0-5
Gamma
1.8/2.0/2.2/2.4/2.6/S.curve
Aspect Ratio
Wide Screen/4:3/1:1/Auto
Color Temperature
Warm/Natural/Cool/User1/User2/User3
Hue
0-100(R/G/B/C/M/Y)
Saturation
0-100(R/G/B/C/M/Y)
Eyeshield Remind
Off/On
Reset Picture Settings
Off/On
Main Menu
Picture Settings
PICTURE SETTINGS
14
180hz
1920
x
1080
OFF
Picture Mode
I/O Settings
PIP/PBP
Game +
Audio Settings
Picture Settings
HDR Off
OffAdaptive-Sync
Picture Enhancement
Game Aid
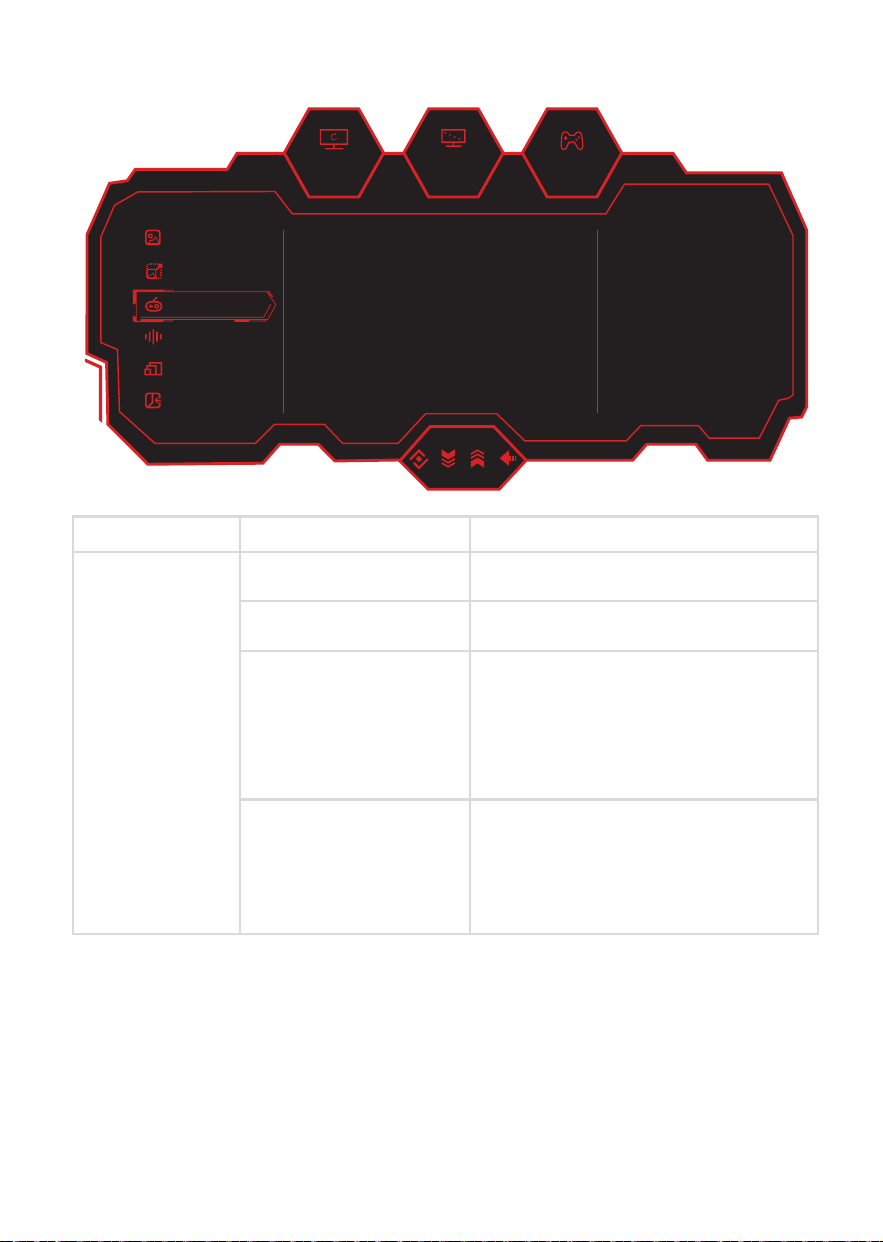
Sub Menu Options
HDR
Off/Auto/HDR Game/HDR Movie
Adaptive-Sync
Off/On
Picture Enhancement
Color Enhancement/CR Enhancement/
Shadow Balance/Night Vision Mode/
Game Rush Mode/Super Resolution/
Dynamic OD/Reset Picture Enhancement
Game Aid
Refresh Rate/Game Crosshair/
Crosshair Color/Stop Watch/Game Time/
Magnifier Mode/Dual Game Mode/
Alignment Aid/Reset Game Aid
Main Menu
Game +
GAME +
15
180hz
1920
x
1080
OFF
Picture Mode
I/O Settings
PIP/PBP
Game +
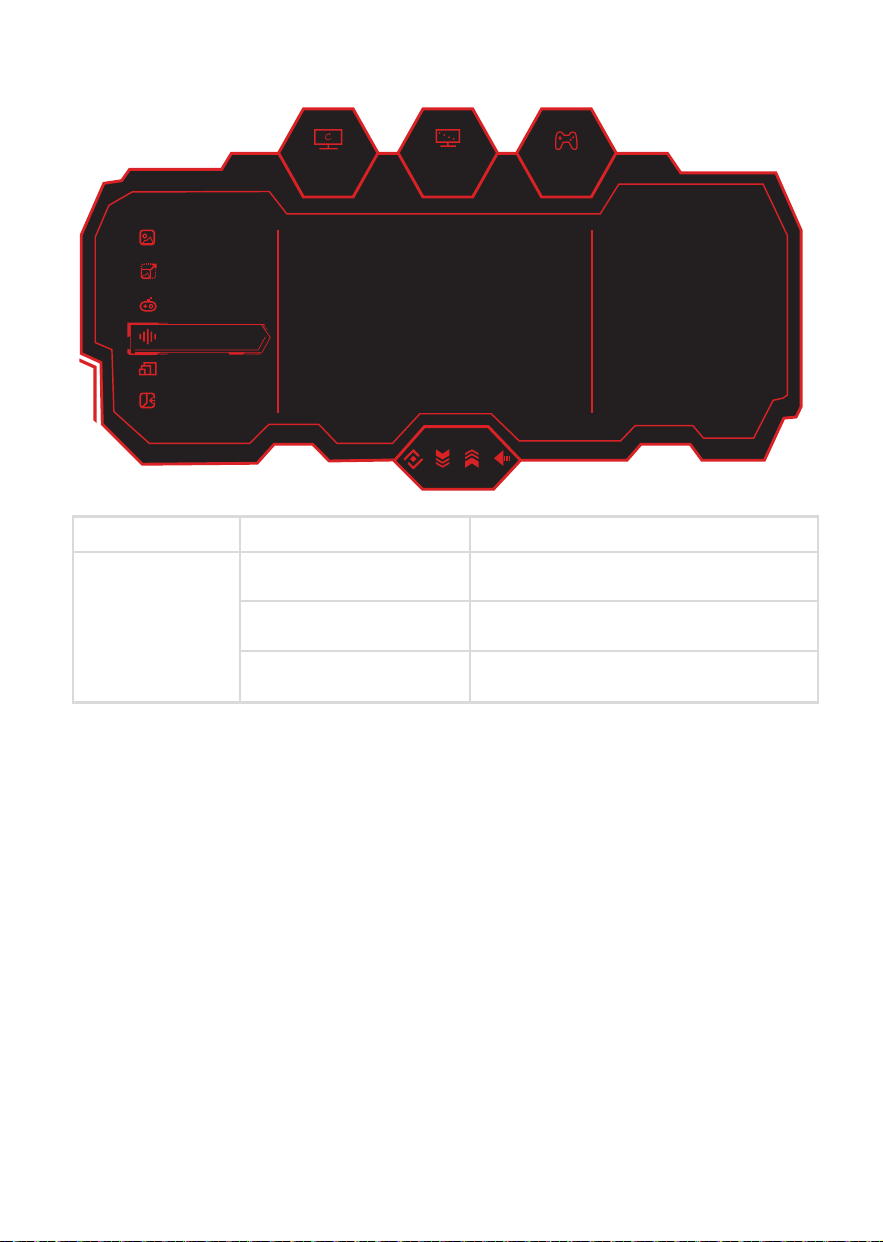
Audio Settings
Picture Settings
Volume 50
Off
Off
Audio Mute
Reset Audio Settings
Sub Menu Options
Volume
0-100
Audio Mute
Off/On
Reset Audio Settings
Off/On
Main Menu
Audio Settings
AUDIO SETTINGS
16
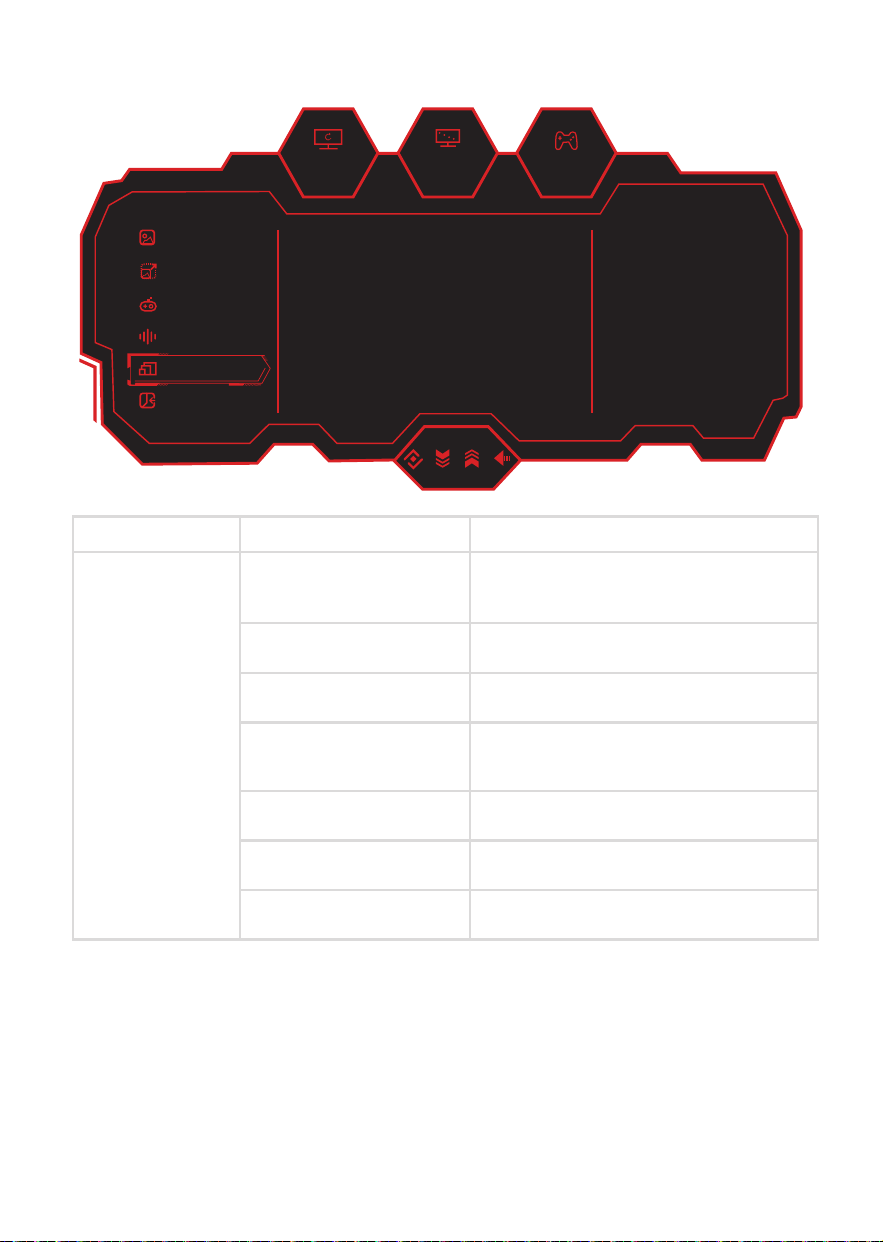
PIP (Picture in Picture) / PBP (Picture by Picture)
180hz
1920
x
1080
OFF
Picture Mode
I/O Settings
PIP/PBP
Game +
Audio Settings
Picture Settings
PIP/PBP Mode Off
DP1
Auto
Top Right
Medium
Off
Sub-Signal Source
Audio Source
PIP Position
PIP Size
Window Swap
Sub Menu Options
PIP/PBP Mode
Off/PIP Mode/PBP 2Win 1:1/
PBP 2Win 2:1/PBP 2Win 1:2
Sub-Signal Source
Type-C/DP 1/DP 2/HDMI
Audio Source
Auto/Type-C/DP 1/DP 2/HDMI
PIP Position
Top Right/Top Left/
Bottom Right/Bottom Left
PIP Size
Small/Medium/Large
Window Swap
Off/On
Reset PIP/PBP
Off/On
Main Menu
PIP/PBP
180hz
1920
x
1080
OFF
Picture Mode
I/O Settings
PIP/PBP
Game +
Audio Settings
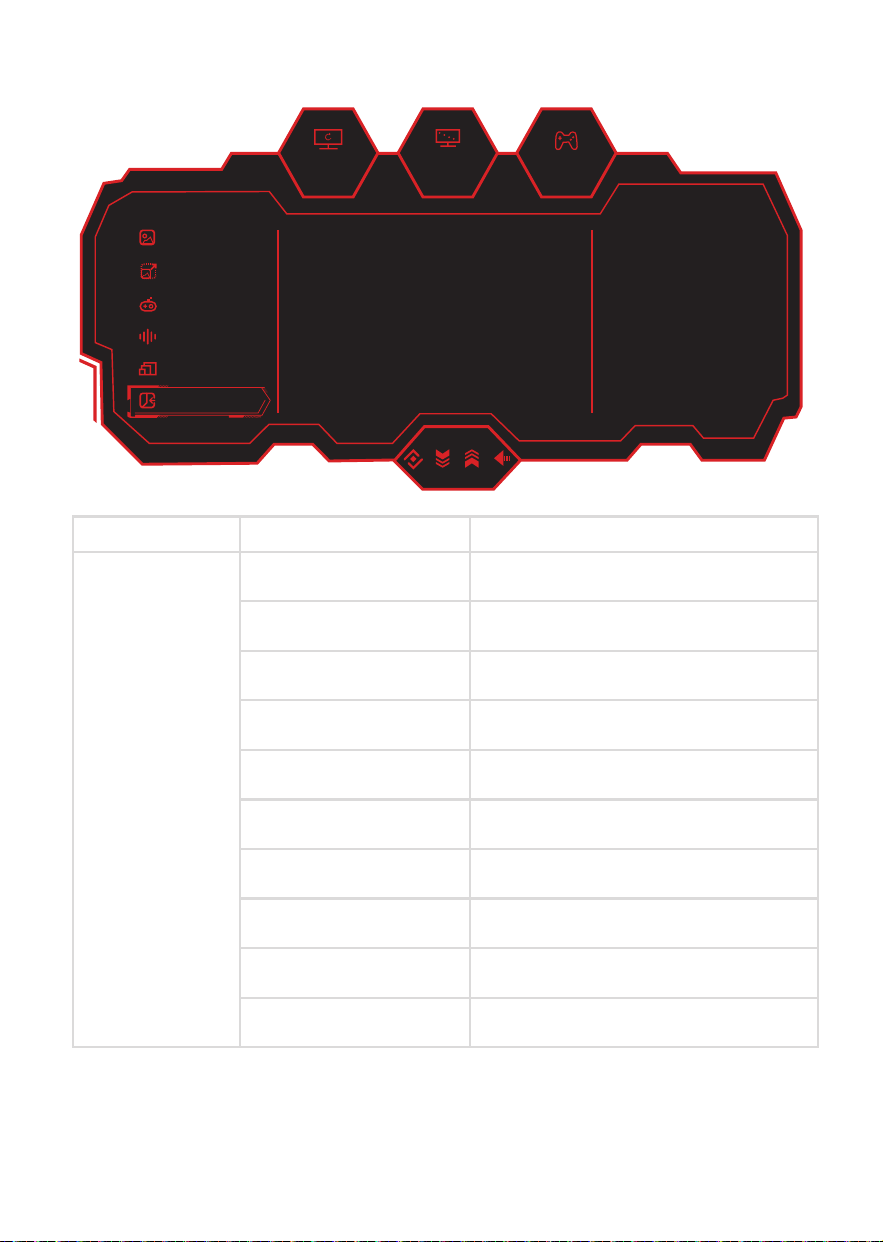
Picture Settings
Input Signal Auto
DP1
DP 5K
On
On
Type-B
HDMI EDID Mode
DP EDID Mode
Quick Boot
Type-C DSC
USB-Switch
Sub Menu Options
Input Signal
Auto/Type-C/DP 1/DP 2/HDMI
HDMI EDID Mode
HDMI 2.1/HDMI 2.0
DP EDID Mode
4K/5K
Quick Boot
Off/On
Type-C DSC
Off/On
USB-Switch
Type-B/Type-C
DDC/CI
Off/On
Quantization Range
RGB Limit(16~235)/RGB Full(0~255)/Auto
USB Power(Sleep)
Off/On
Reset I/O Settings
Off/On
Main Menu
I/O Settings
I/O SETTINGS
17
180hz
1920
x
1080
OFF
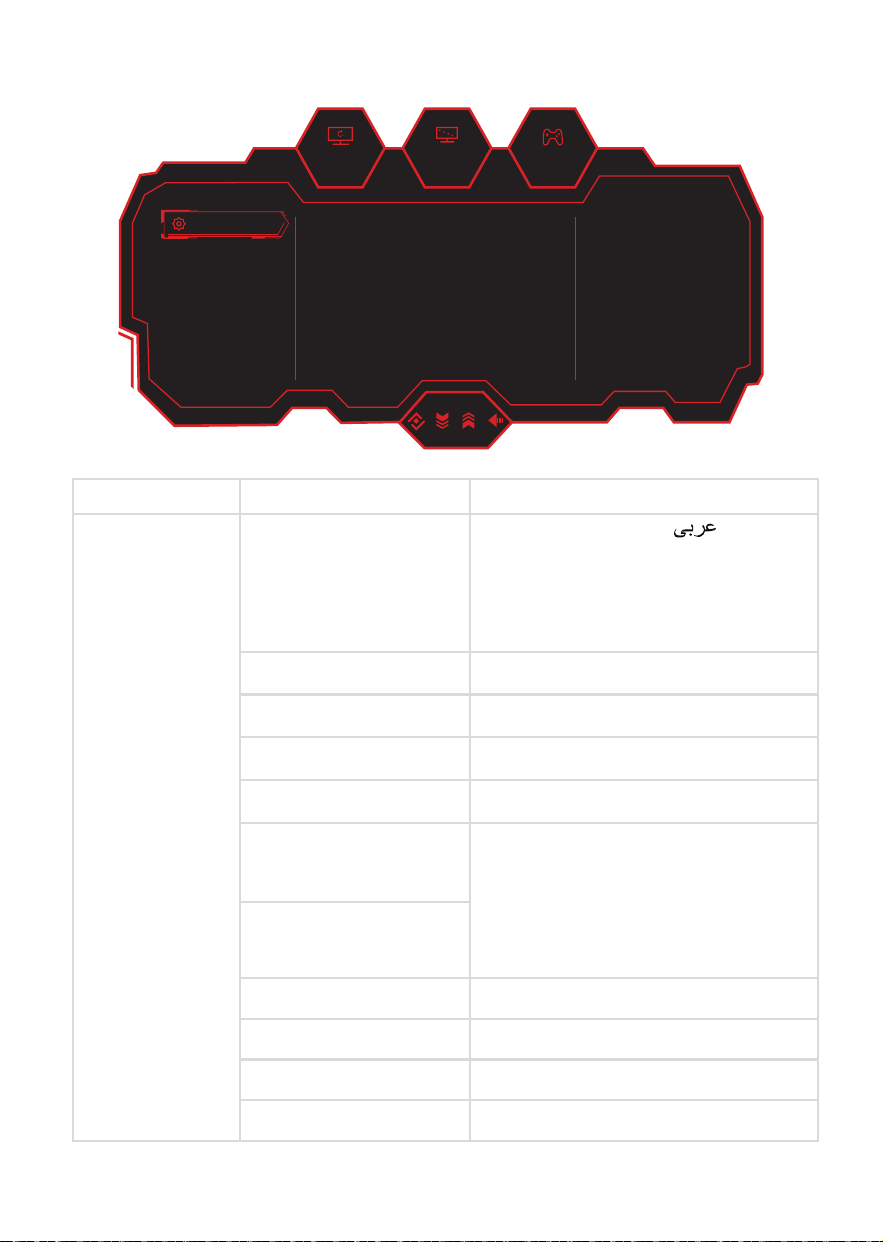
System Settings
Language English
60
50
50
0
Brightness
OSD Time Out
OSD H-Position
OSD V-Position
OSD Transparency
Hotkey1 Setting
SYSTEM SETTINGS
Sub Menu Options
Language
OSD Time Out
0-60
OSD H-Position
0-100
OSD V-Position
0-100
OSD Transparency
0-5
Hotkey1 Setting
Brightness/Contrast/Volume/Audio Mute/
Shadow Balance/Game Crosshair/
Magnifier Mode /Refresh Rate/Game Time/
Color Enhancement/Night Vision Mode/
Super Resolution/Adaptive-Sync/
Picture Mode/HDR/Dynamic OD/
Input Signal/ PIP/PBP/USB-Switch
Hotkey2 Setting
OSD Lock
Off/On
Energy Saving
Power Saving
Software Upgrade
Information/USB Upgrade
Restore Factory Settings
Yes/No
Main Menu
System Settings
简体中文/English/한국어 / /
Portugues do Brasilazil/ Deutsch/Nederland/
Suomi/Français/Eλληvικά/Indonesia/Italiano/
日本語/Malaysia/Polskie/Português/Русский/
Español/ไทย/Українська/Tiếng Việt/
繁体中文/Türkçe
18

19
SPECIFICATION
Product Model
eiq-495KCSUW240VA
Screen Size
49” (Diagonal)
Panel Type
VA Panel
Aspect Ratio
32:9
Radius of Curve
R1800
Power Supply
100-240V~ 50/60Hz 3.0A
Power Consumption
Typ. : 80W
Dimensions
1198.5 x 288.8 x 565.9 mm
Net / Gross Weight
11.5kg / 15.6kg
VESA Wall Mount
Dimensions (not included)
75 x 75 mm
Maximum Resolution
5120 x 1440 DQHD
Brightness
350 cd/m2
Response Time
6ms
Refresh Rate (Max)
240Hz
Static Contrast
3000:1
Viewing Angle (H/V)
178° / 178°
HDMI Input HDMI 2.1 x 1
Display Port Input DP 1.4 x 2
Ttpe-C Input Type-C x 1
Audio Output x 1 (Headphone Socket)
Working Temperature
0°C - 40°C
Working Humidity
10% - 85% Non-condensing
Speaker Specifications
4 Ω / 5 W x 2
Notes:
Due to continued product development the specification shown above may change
without notice.
Maciumum resolution and refresh rate achievable is dependant on the input source
and the quality / specification of cables used.
The terms HDMI and HDMI High-Definition Multimedia Interface, and the
HDMI Logo are trademarks or registered trademarks of HDMI Licensing
Administrator, Inc. in the United States and other countries.
Connection
s
20
TROUBLESHOOTING
If the display fails or the performance changes dramatically, check the display in accordance
with the following instructions. Remember to check the peripherals to pinpoint the source of
the failure.
Symptom
Solution
Power cannot be turned
on. (Power indicator does
not illuminate.)
Check that both ends of the power cable are plugged
into the socket correctly and the wall socket is
operational.
No Input Signal message
appears.
Check that the input cable is connected properly.
Check that the power of the relevant peripherals is
turned on. Check that the selected source matches the
input.
Factory reset the monitor, using the RESET option within
the main menu.
Flashing spots or stripes
appear on the screen.
Check that there is no emission (car, HV cable or neon
lamp) or other possible interference sources.
Image colour or quality
deteriorates.
Check that all the video settings are adjusted
appropriately, such as brightness, contrast, colour etc.
For more information about video settings, refer to OSD
Functions.
Screen position and size
are incorrect.
Check that the screen position and size is adjusted
appropriately.
Image or colour is
incorrect.
Check that the signal line is connected properly.
When connecting to a PC, you can change the resolution
of the PC to acquire the correct image. Discrepancies in
the PC output signal may affect the display of the image.
Display warning
message.
Check that the input signal line is properly fixed.
Select the correct input source.
For more information, refer to Supported Signal Modes.

21
PRODUCT DISPOSAL
Do not dispose this product as unsorted municipal waste. Collection of such waste must be handled
separately as special treatment is necessary.
Recycling facilities are now available for all customers at which you can deposit your
old electrical products. Customers will be able to take any old electrical equipment
to participating civic amenity sites run by their local councils. Please remember that
this equipment will be further handled during the recycling
process, so please be
considerate when depositing your equipment. Please contact the local council for
details of your local household waste recycling centres.
electriQ UK SUPPORT
Complete the online support form on www.electriQ.co.uk/support
Service Line: 0330 390 3061
Office hours: 9AM - 5PM Monday to Friday
www.electriQ.co.uk
Unit 2A, Trident Business Park,
Neptune Way, Leeds Road,
Huddersfield, HD2 1UA
V20240718
108.007.xxxxx
49C1S
ElectriQ
eiq-495KCSUW240VA
2024-7-20
140*197mm
封面封底120G铜版纸过光膜,内页80G铜版纸 彩色印刷,骑马订
V01
唐喜阳
备注:不够 页数在封面封底 的内页加空白页