
VERSION: 1.0
USER MANUAL
ICE MAKER
HIM-D5

Contents
Introduction
Precautions
Parts
Packing List
Technical Specifications
Installation Instructions
Functions
How to Use
Cleaning
Faults & Troubleshooting
Recycling
Warranty Period
Contact Us
03
04
06
08
08
09
09
11
15
16
16
17
18

Introduction
The HiCOZY Bullet Ice Maker is designed to conveniently produce
large quantities of bullet ice for cooling and retaining freshness
of food and drinks. It fits right in at any kitchen, living room, bar,
banquet, etc.
Please read and follow all the instructions in this manual before
operating the ice maker. Keep this manual for future reference.
Thank you again for choosing HiCOZY.
If you have any questions or concerns regarding your product, please
contact us at 1-866-444-2699 or support@hicozy.com.
Please read and understand the manual thoroughly before using the
ice maker and keep it for reference.
Warning:Risk of fire/flammable materials.
EN > 03

Precautions
Add cold water between 32°F and 68°F (0°C and 20°C) to the water
tank upon startup to produce higher-quality ice faster.
To maintain the ice's fresh taste, please use it shortly after it is
produced. Otherwise, it will melt.
During the ice making process, the ice will be submerged in water,
resulting in surface moisture.
Please only add safe drinking water in the ice maker. Using unsafe
or non-treated water is hazardous for your health.
Do not use hot water above 86°F (30℃) in the ice maker.
Before use, ensure your home power outlet’s voltage matches the
value on the product nameplate. Power supply voltage misalign-
ment can cause serious damage to the ice maker.
Please ground the ice maker correctly. Use an extension socket
with a grounding plug, and make sure the rated power of socket
is higher than 1,000W.
Reserve 4″ (10.2cm) of clearance around the ice maker to ensure
good cooling.
Do not dismantle, modify or replace any part of the ice maker.
When using the ice maker for the first time, please keep it still for
at least 4 hours prior to operation; this ensures the compressor is
safe to use. After the ice maker is relocated, keep it still for another
4 hours.
EN > 04

Before use, clean the new ice maker by referring to the "Cleaning"
section.
Do not put the ice maker upside down; doing so may damage the
compressor and refrigeration system.
Do not immerse any part of the ice maker in water, or plug/unplug
the power socket with wet hands.
Do not touch the ice-making parts while the ice maker is running,
touching it may result in frostbite.
Please avoid turning it on and off too frequently, as this can lead
to excessive wear on the compressor, reducing its lifespan.
Do not use the ice maker outdoors, or in hot or corrosive places.
The ice maker must be placed on a flat, dry, and bump-proof area.
Do not tilt the ice maker more than 45° during transportation or
operation.
The ice maker should not be used by children or people without
the requisite knowledge to operate it unless properly supervised
by a qualified individual.
When the ice maker is unused for a long time, drain the residual
water in the water tank and wipe the ice maker out with a clean
towel. Then, place it in a dry and ventilated place.
EN > 05
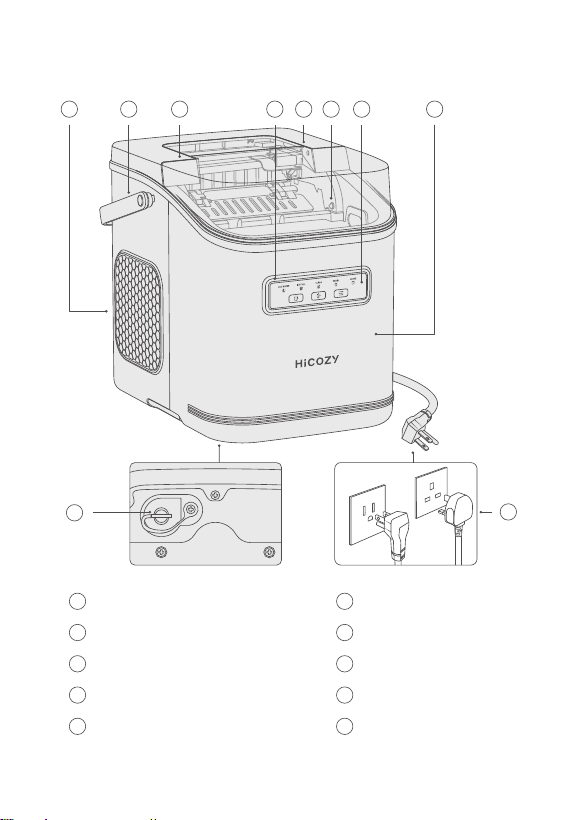
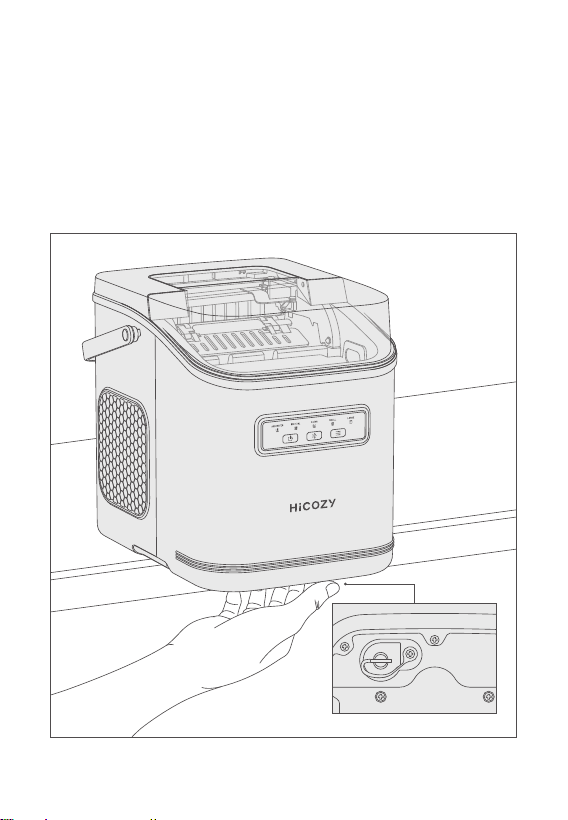
Parts
1
2
3
4
5
6
7
8
9
10
Air Inlet
Handle
Upper Cover
Panel Aperture
Ambient Light
Infrared Sensor
Control Panel
Water Tank
Water Drain Plug
Power Cord
or
9
10
1 2 3 4 5 76 8
EN > 06
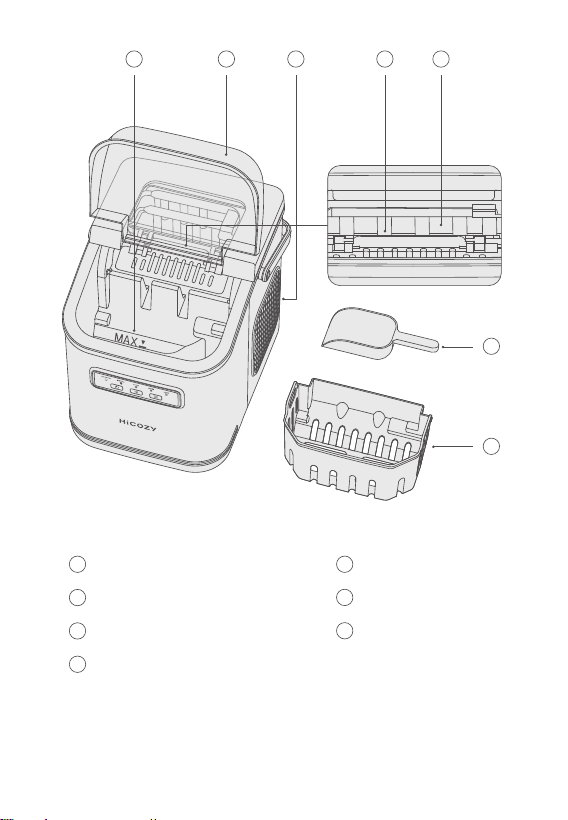
1 5
6
7
2
3
4
MAX Water Level
Transparent Top Lid
Dissipation Hole
Ice Making Device
Ice Making Box
Ice Scraper
Ice Basket
6
7
1 32 4 5
EN > 07

Ice-Making Time
Ice Basket Capacity
Water Tank Capacity
Working Voltage
Power Consumption
Weight
Dimensions
Refrigerant/Refrigerant Amount
6-10 Minutes
1.3lbs (600g)
47.3oz (1,400ml)
AC 115V/60Hz/1.5A (US/CA/MX)
AC 220-240V/50Hz/0.8A (UK/AE)
110W
13lbs (5.9kg) ± 5%
8.7L x 11.4W x 11.2H in
(22 × 29 × 28.5cm)
R600a/0.6oz (17g) (US/CA/MX)
R600a/0.5oz (15g) (UK/AE)
Technical Specifications
Packing List
Ice Maker
Ice Scraper
× 1
× 1
Manual
After-Sales Card
× 1
× 1
EN > 08
Installation Instructions
Remove the package and take out all of the accessories.
Put the ice maker vertically on a flat table.
Wipe the water tank, ice basket and ice scraper with a clean towel.
When using the ice maker for the very first time, keep it still for
4h before turning it on.
1.
2.
3.
4.
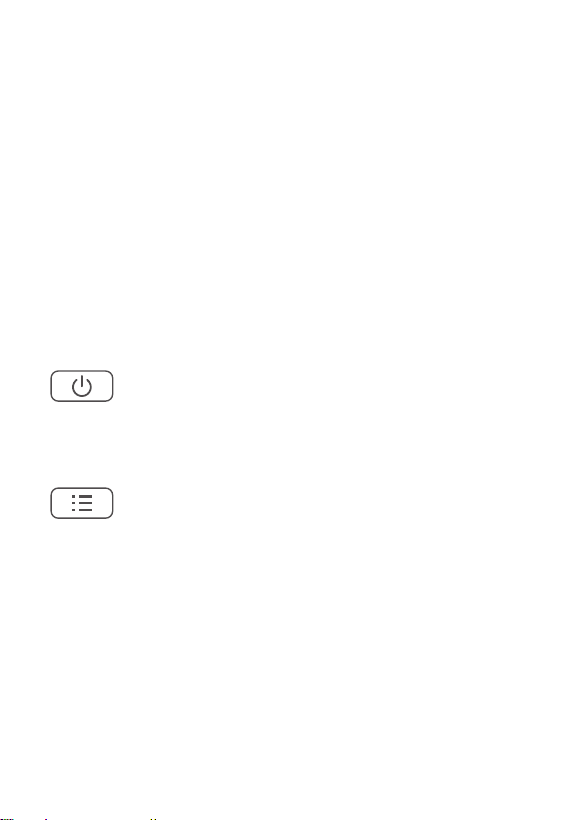
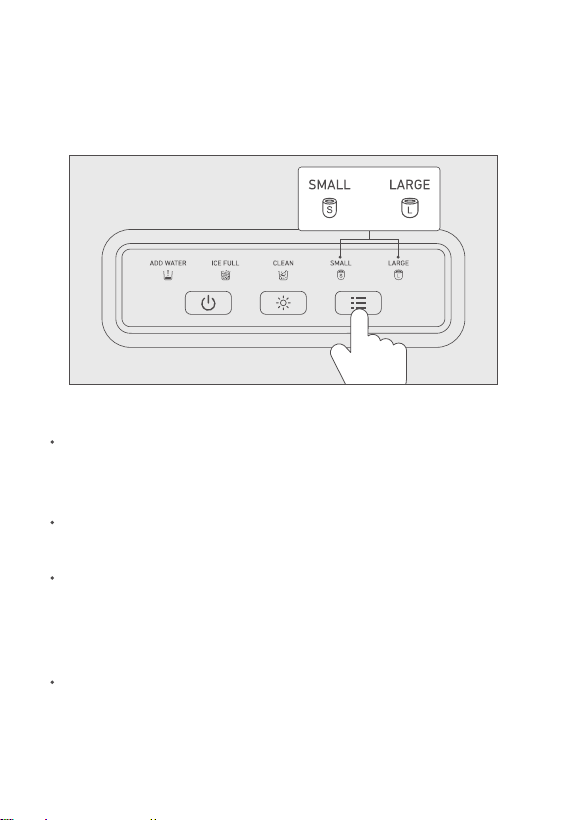
Functions
Buttons & Indicators
Press the Start Button to make ice, press the button again to stop
making ice.
Power Button
Mode Button
Mode function:
Click it to switch between the big ice and small ice making modes.
Clean function:
While in standby status, press and hold the button for 3s to start
cleaning; press the mode button to cancel cleaning.
Note: The ice maker cannot enter the self-cleaning mode while it
is producing ice. Pause it first to start the cleaning mode.
EN > 09
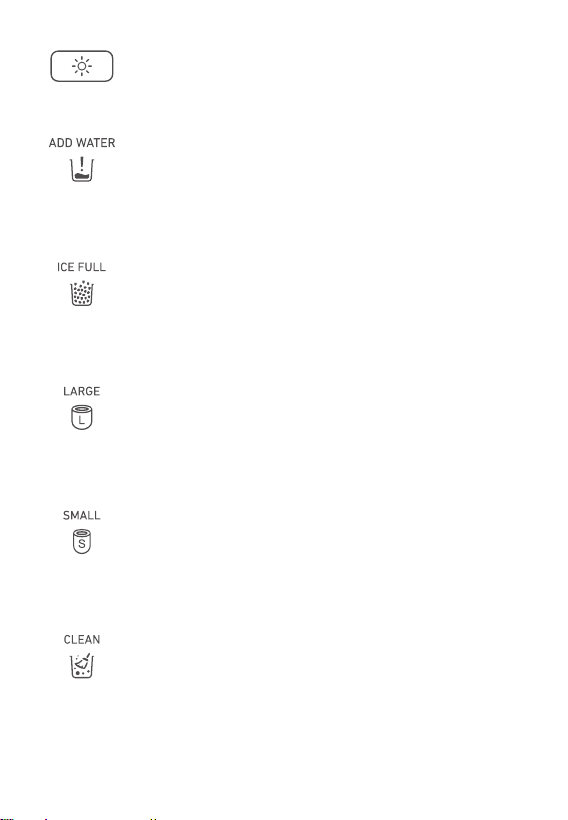
Press to turn the ambient lighting and panel aperture on or off.
Light Button
Water Shortage
When the tank’s water level is too low, the water shortage indicator
will flicker; the aperture’s blue indicator will also flicker.
Full Ice
When the ice basket is full, the full ice indicator and the white
aperture indicator will illuminate.
When clean mode is selected, this indicator will illuminate while the
white aperture flickers.
When the small ice mode is selected, this indicator and the blue
aperture indicator will illuminate.
When the big ice mode is selected, this indicator and the blue
aperture indicator will illuminate.
Big Ice Mode
Small Ice Mode
Clean Mode
EN > 10
How to Use
Water Filling
Keep the ice maker still for over 4h before using it for the very first
time.
Block the water drain hole with a water drain plug.
1.
2.
EN > 11
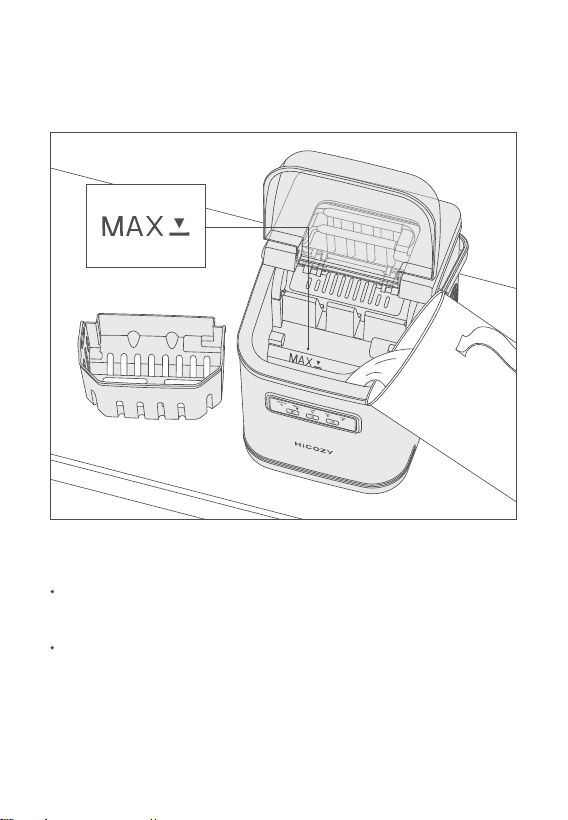
Take out the ice basket and slowly pour 47.3oz of (1,400mL) clean
drinking water into the water tank (do not exceed the MAX water
level).
3.
Check whether the voltage for household use matches that on
the product nameplate.
After connecting to the power supply, all indicator lights will flash
for 1 second and then go out.
Power-On
Note: Do not turn on the power supply using wet hands. Always
keep the plug dry.
EN > 12
Press the Power Button to start ice making.
Press the Mode Button to select big ice or small ice as required.
1.
2.
Start Ice Making
When using the ice maker for the first time, or when using it for
the first time in a long time, clean the ice maker per the “Cleaning”
section.
The ice making cycle is about 6-10 minutes, which may vary based
on the ice cube size, ambient temperature, and water temperature.
The ice may be smaller than usual for the first few cycles of ice
making; this is because the machine’s internals have not yet
completely cooled down. This is a normal phenomenon across
all ice makers.
The ice maker will stop running when the ice basket is full. The
ice maker will make more ice when the level has fallen below the
maximum level.
Note:
or
EN > 13
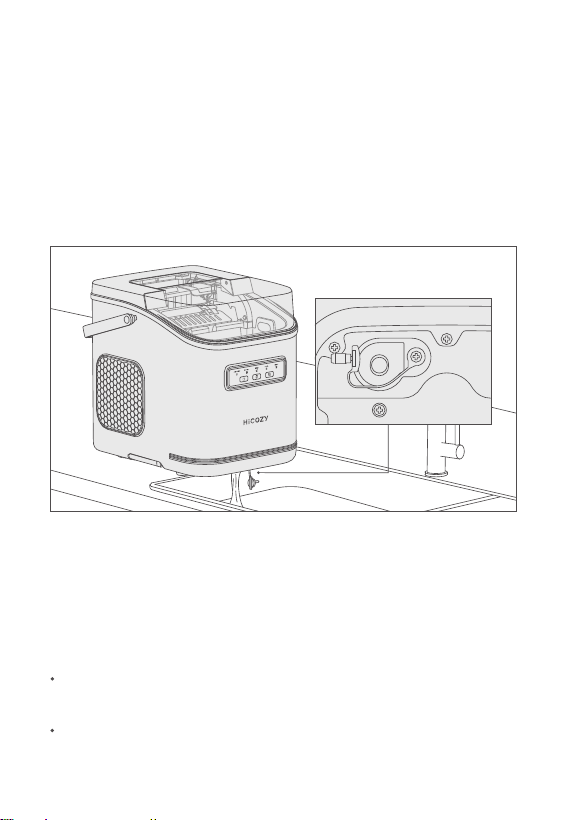
Unplug the ice maker before attempting water drainage.
Move the ice maker to a place where a water receiving device
(such as water slot) is installed below the ice maker (note: The
ice maker should be placed in a stable position to avoid falling).
Remove the water drain plug to drain the residual water out of
the water tank into the desired recepticle.
1.
After the water tank is drained, insert the water drain plug, and
clean the residual water with a clean towel.
Put the ice maker back.
4.
5.
2.
3.
Always use fresh drinking water for ice making. Any residual water
left after making ice should be promptly drained.
When the ice maker is idle for long period.
It is suggested to drain water from the ice maker under the following
conditions:
Drainage
EN > 14
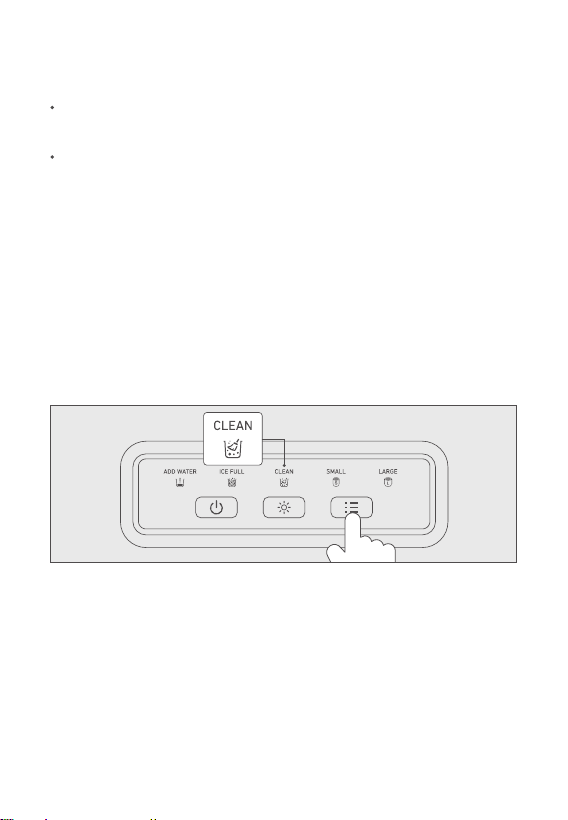
Press and hold the Mode Button for 3 seconds while in standby mode.
After 3 seconds, the cleaning indicator will illuminate and the ice maker
will enter cleaning mode. Then, it will stop automatically in approximately
5 min (you can press the Mode Button during operation to stop the
ice maker manually).
1.
After the ice maker is stopped, remove the water drain plug to drain
the wastewater. Then, insert the water drain plug.
Fill with clean drinking water again. Then,enter cleaning mode and
repeat the cleaning process 2~4 more times. This is to ensure there's
no residual detergent.
2.
3.
Cleaning
It is advised to clean the ice maker at least once a week, this keeps
the ice cubes fresh and the ice maker hygienic.
Take out the ice basket, and add an appropriate mixtureof water and
citric acid in the water tank. Please refer to the citric acid instructions
for specific measurements. This ice maker does not include citric acid.
Note: The ice maker's interior should have no contact with water to
avoid hazards. Do not use solvents or chemicals to clean the plastic parts.
Note: Do not use organic solvents, boiled water, strong acids, or strong
alkalis to clean the ice maker.
EN > 15

Faults & Troubleshooting
Check whether the ice maker is powered on correctly.
Ensure the water tank has enough water.
Ensure the compressor is working.
Ice making failure.
Do not exceed the MAX water level when filling water.
Ensure the water drain plug is on tight.
Water leakage.
Check whether the water tank filter is blocked.
Check whether the compressor is working.
Water tank has water, but ice is not being made.
The sensor above the ice basket may be blocked; clean the surrounding
area promptly.
Recycling
This ice maker contains refrigerant, which must be removed prior
to scrapping according to the federal laws. Please dispose of this
ice maker in accordance with all local laws and regulations.
The ice basket is not full, but the panel shows "full ice".
EN > 16

Warranty Period
The warranty service shall not cover the following items:
Door-to-door service.
Improper maintenance.
Replace household fuse or reset circuit breaker.
Accidental or indirect damages due to the ice maker's defects.
Labor expense for installing and dismantling the ice maker and
other expenses.
The ice maker does not have a defect of material or process. The
warranty does not cover the damages due to neglecting, misuse,
pollution, alternation, accident, abnormal operation or processing.
The warranty applies to the original purchaser only and shall not be
transferred.
HiCOZY hopes to offer good products and after-sales services for
our clients.
For any question or query, please contact us via [email protected]
and we are glad to help you!
This ice maker enjoys a 1-year warranty from HiCOZY.
Where the ice maker has a fault due to its material or processing
defect, HiCOZY will offer a new product to exchange for yours, or
make full refund.
EN > 17

Thank You for Your Purchase!
HiCOZY is always looking forward to providing our
customers with excellent products and
customer services.
For any questions or concerns, please contact us.
We are glad to help you!
Get in Touch
Visit Our Website at hicozy.com
Call us: 1-866-444-2699
Mon to Fri, 9:00am to 5:00pm, PT
Email: [email protected]
Online
EN > 18