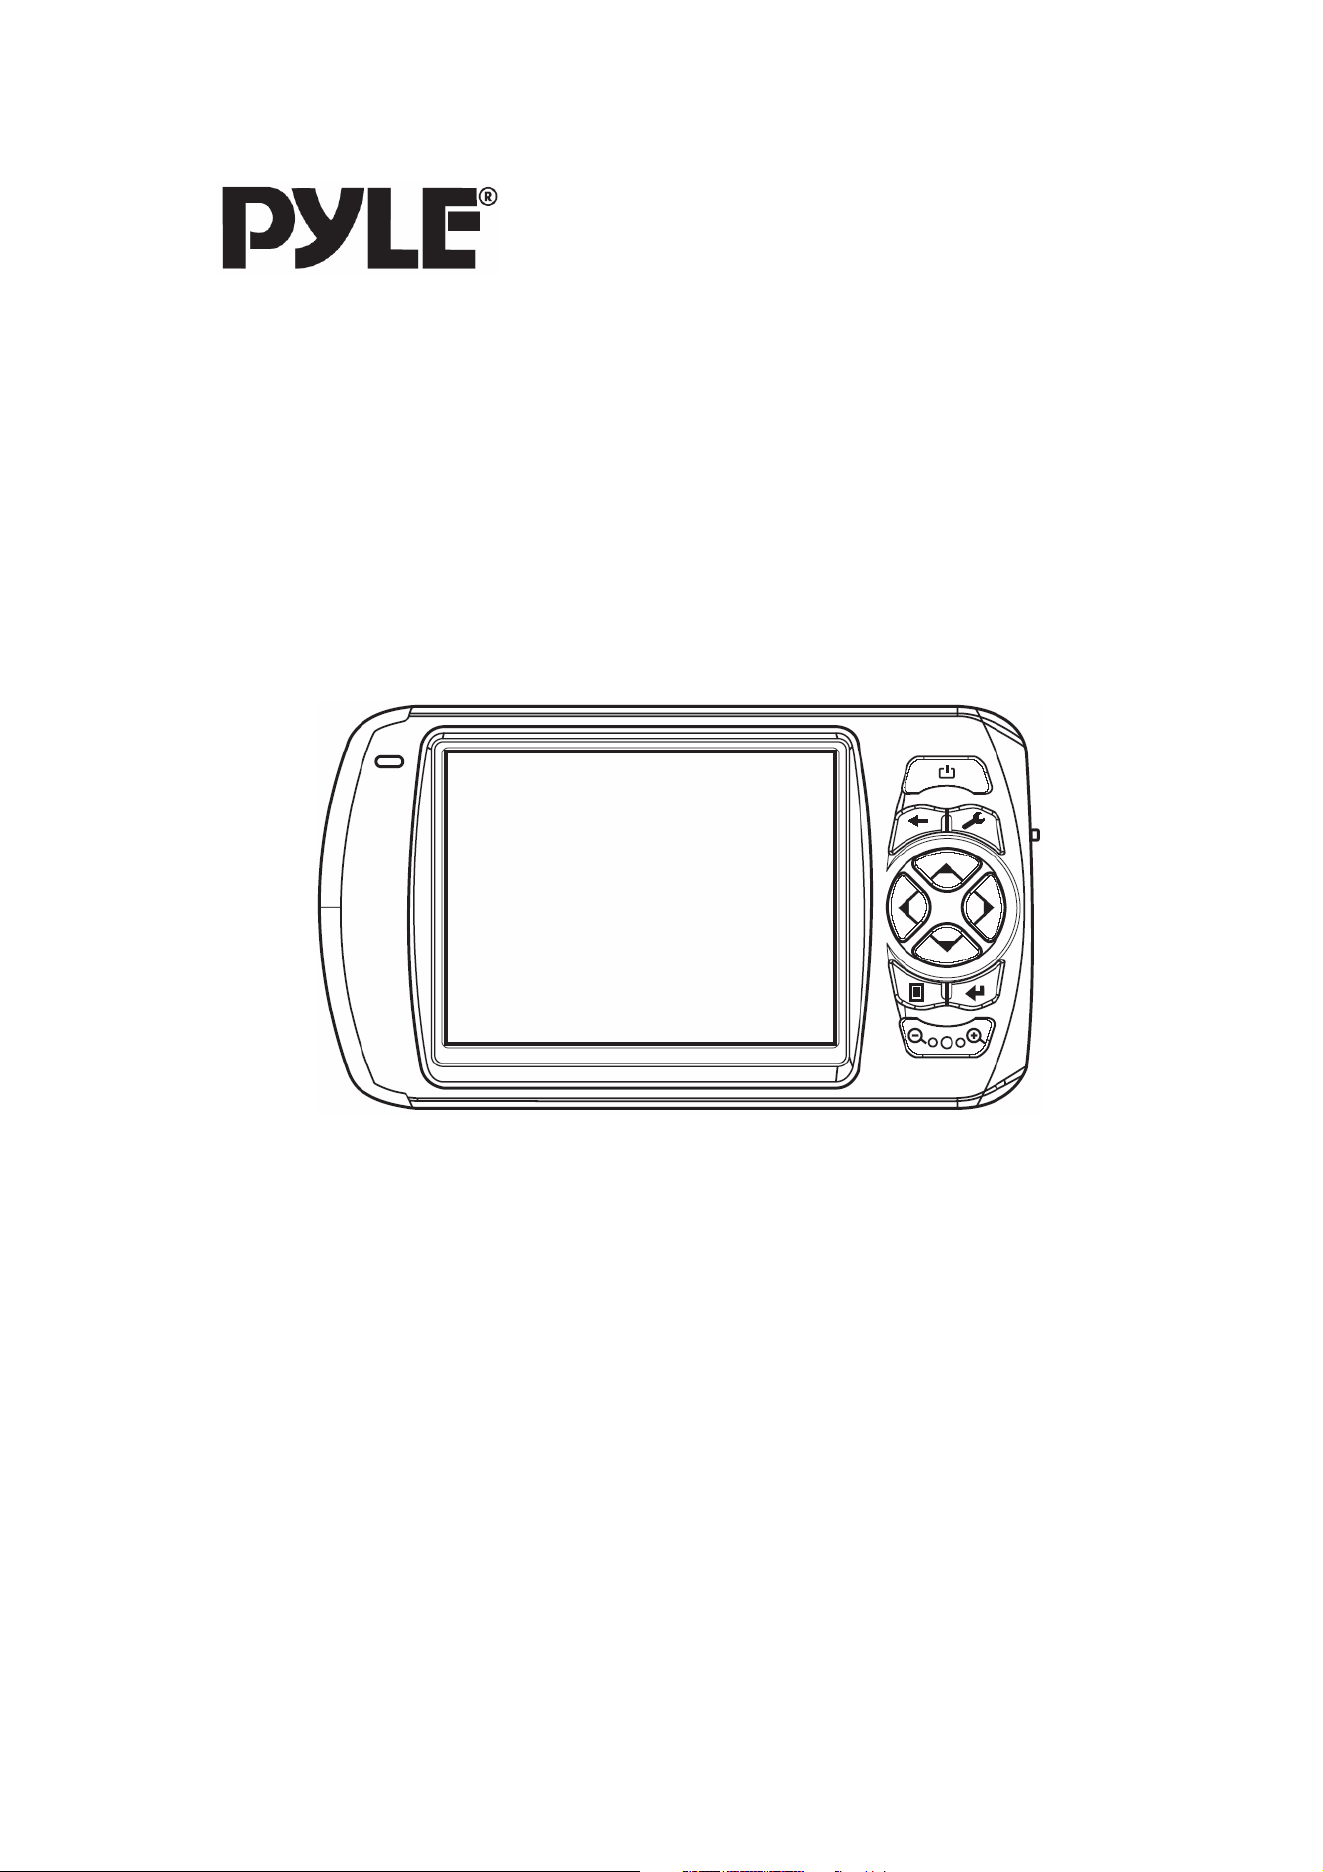
PLND 35
SOFTWARE MANUAL
www.pyleaudio.com

User's Guide
Dest inator

1. Lim ited Product Warrant y Dest inator Technologies, warrant s t o t he Client t hat t he Product s shall
substantially conform to Destinat or Technologies’ specificat ion for a period of one (1) year from t he
dat e of the original purchase by t he end user ( the " Warrant y Period" ) . As Dest inat or Technologies' sole
obligat ion and Client 's exclusive rem edy for any breach of warranty, Destinat or Technologies agrees, at
its sole opt ion, t o ( i) use reasonable efforts to repair t he Product with new or refurbished replacem ent
part s; ( ii) replace t he Product wit h a new or refurbished unit ; or ( iii) refund the purchase price,
provided Client ret urns the defect ive Product s t o Dest inator Technologies wit h proof of purchase and
Dest inator Technologies’ authorization.
Dest inat or Technologies’ warrant y hereunder does not apply in case of any dam age caused by accident ,
abuse, m isuse, m isapplicat ion, or alt erat ion of any kind perform ed by anyone other t han Dest inator
Technologies. The Product s are not designed or licensed for use in m ission-crit ical applications, or in
hazardous environments, requiring fail- safe controls, including without lim it ation operation of nuclear
facilit ies, aircraft navigat ion or com m unicat ion syst em s, air t r affic cont rol, or life support or weapons
syst em s. Without lim it ing the generality of the foregoing, Dest inator Technologies specifically disclaim s
any express or im plied warrant y or condit ion of fit ness for such purposes. Destinat or Technologies’
warranty does not, in any event, apply t o physical dam age t o t he surface of the Product or
replacem ent . Dest inator Technologies shall have no obligat ion wit h respect t o any data stored in the
Product.
Except as expressly stat ed in this sect ion, Dest inator Technologies m akes no warranties or includes any
condit ions with respect to the products, express or im plied, including, but not lim it ed t o, the im plied
warrant ies or condit ions of m erchantabilit y, fit ness for a particular purpose and no infringem ent.
2. Liabilit y Lim it ation. I n no event shall Destinat or Technologies, be liable to Client , (and Client hereby
waives any indir ect , special, incident al, or consequent ial dam ages in connect ion wit h) the transact ions
contem plat ed by t his agreem ent , whether or not such dam ages were foreseen, or t heir likelihood
disclosed. Destinat or Technologies shall not be liable to Client or any third part y claim ing through
Client , for any dam ages of any kind in excess of the am ount s paid by Client under t he term s of this
agreem ent wit h r espect t o the products giving rise t o such dam ages. Som e jurisdictions do not allow
the exclusion of or lim it at ion on im plied condit ions, warranties or dam ages, t hus som e of the foregoing
m ay not apply t o Client.
3. I ntellectual Propert y Rights. Hardware and Soft ware are propriet ary to Dest inat or Technologies or its
suppliers and are subject to copyright and ot her int ellect ual property laws. Client 's only right s wit h
respect to any Dest inat or Technologies soft ware included wit h t he Product s shall be pr ovided, under t he
term s of Destinator Technologies’ soft ware license. The tit le to all Destinat or Technologies Software
rem ains wit h Dest inator Technologies. Client agrees t hat Destinat or Technologies retains ownership of
all right s, title and int erest in all intellect ual propert y, works of aut horship, trade secret s and like’s in all
aspect s of t he Product ( s) . Client and it s affiliat es and subcont ract ors agree not to reverse engineer any
aspect of t he Soft w are and/ or Product s supplied under this agreem ent and fur t her agree t o pay
assessed dam ages should such act ion take place.
4. Copyright and Copies. The Soft ware ( including any copy t hereof) is owned by Dest inat or
Technologies or it s suppliers and is pr ot ect ed by Unit ed St at es, Canada, European, Brazilian and
Aust ralian copyright and pat ent laws and internat ional treaty provisions. The Soft ware copy is licensed
to you t he client , not sold to you, and you (the client) are not an owner of any copy t hereof. You m ay
m ake one copy of the soft w are for backup or archival purposes. You m ay not ot herwise copy the
soft ware, except as aut horised by applicable law, nor t he writ t en m at erials accom panying the Soft war e.
Dest inator Technologies hereby reserves all right s not explicitly granted in t his license agreem ent .
Copyright © 2006, Dest inat or Technologies
Part Num ber : 11nl60_UK

Use r 's Gu ide De st in a t or i
Contents
1 - Introduction 2
Destinator Features .......................................................................................................................................2
Destinator Guided Tour ................................................................................................................................2
2 - Getting Started 3
Menus ...........................................................................................................................................................3
Main Map......................................................................................................................................................6
GPS Not Found.............................................................................................................................................7
Map Views....................................................................................................................................................8
Point on the Map...........................................................................................................................................8
Screen Buttons ..............................................................................................................................................9
Cycling Through Screens..............................................................................................................................9
3 - Search for a Location 10
Enter Address..............................................................................................................................................10
Recent Locations.........................................................................................................................................14
My Favourites.............................................................................................................................................15
POI (Points of Interest) ...............................................................................................................................18
My Contacts (Optional) ..............................................................................................................................20
Traffic Information (Optional)....................................................................................................................21
Route Manager............................................................................................................................................25
Map Manager..............................................................................................................................................28
Extras ..........................................................................................................................................................30
4 - Settings 35
Prompts.......................................................................................................................................................35
Language Settings.......................................................................................................................................35
Look & Feel Settings ..................................................................................................................................35
GPS Settings ...............................................................................................................................................36
5 - Installation Requirements 37
PC Requirements ........................................................................................................................................37
Installing the Console .................................................................................................................................37
Console Toolbar..........................................................................................................................................38
Maps ...........................................................................................................................................................39
Import Favourite Location ..........................................................................................................................39
Exporting a Favourite Location from the Device........................................................................................40
Quick Activation.........................................................................................................................................41
6 - Maps 42
Map Screen Interface ..................................................................................................................................42
Installing a Map ..........................................................................................................................................42
Map Cutter Screen Interface .......................................................................................................................42
Focus the Map.............................................................................................................................................44
Cut Map ......................................................................................................................................................45
Load Map....................................................................................................................................................45
Remove Map...............................................................................................................................................45
7 - System Settings 46
Volume Settings..........................................................................................................................................47
Power Settings ............................................................................................................................................47
Backlight Settings.......................................................................................................................................47
Date-Time Settings .....................................................................................................................................48
Language Settings.......................................................................................................................................48
System Information.....................................................................................................................................48
Index 49
1 - Introduction
Welcom e t o the world of m obile navigation! Wit h Dest ina tor , you can st eer into a new era of m obile
navigat ion. Sim ple operat ion, clear m aps in 2 D or 3 D m ode as well as num erous innovat ive feat ures and
funct ions have m ade Dest inator t he essent ial guide for every t raveller – whether in t he car, on foot or by
bike.
Destinator Features
Dest ina tor provides the following features for easy navigation:
Route calculat ion wit hin seconds
High qualit y 2D/ 3D m aps w it h display of st reet nam es·
QuickNav butt on for travel t o a predet erm ined address
Address input via a full- size keyboard opt im ized for finger input
St oring of any locat ion one click away
Cross border navigat ion wit hout swit ching m aps
Address ret rieval from Hist ory, Favourit es, Points of I nt erest ( POI ) or Microsoft® Out look® contact s
Planning and opt im ising of m ult i- st op trips·
Car navigation with fast est or shortest route
Pedest r ian navigat ion in parks and town centres
Fast inst allat ion, no act ivat ion
Short t ut orial for an easy st art·
Day and night views or t urn- by- t urn inform at ion
Real t im e, high accuracy t raffic data
Destinator Guided Tour
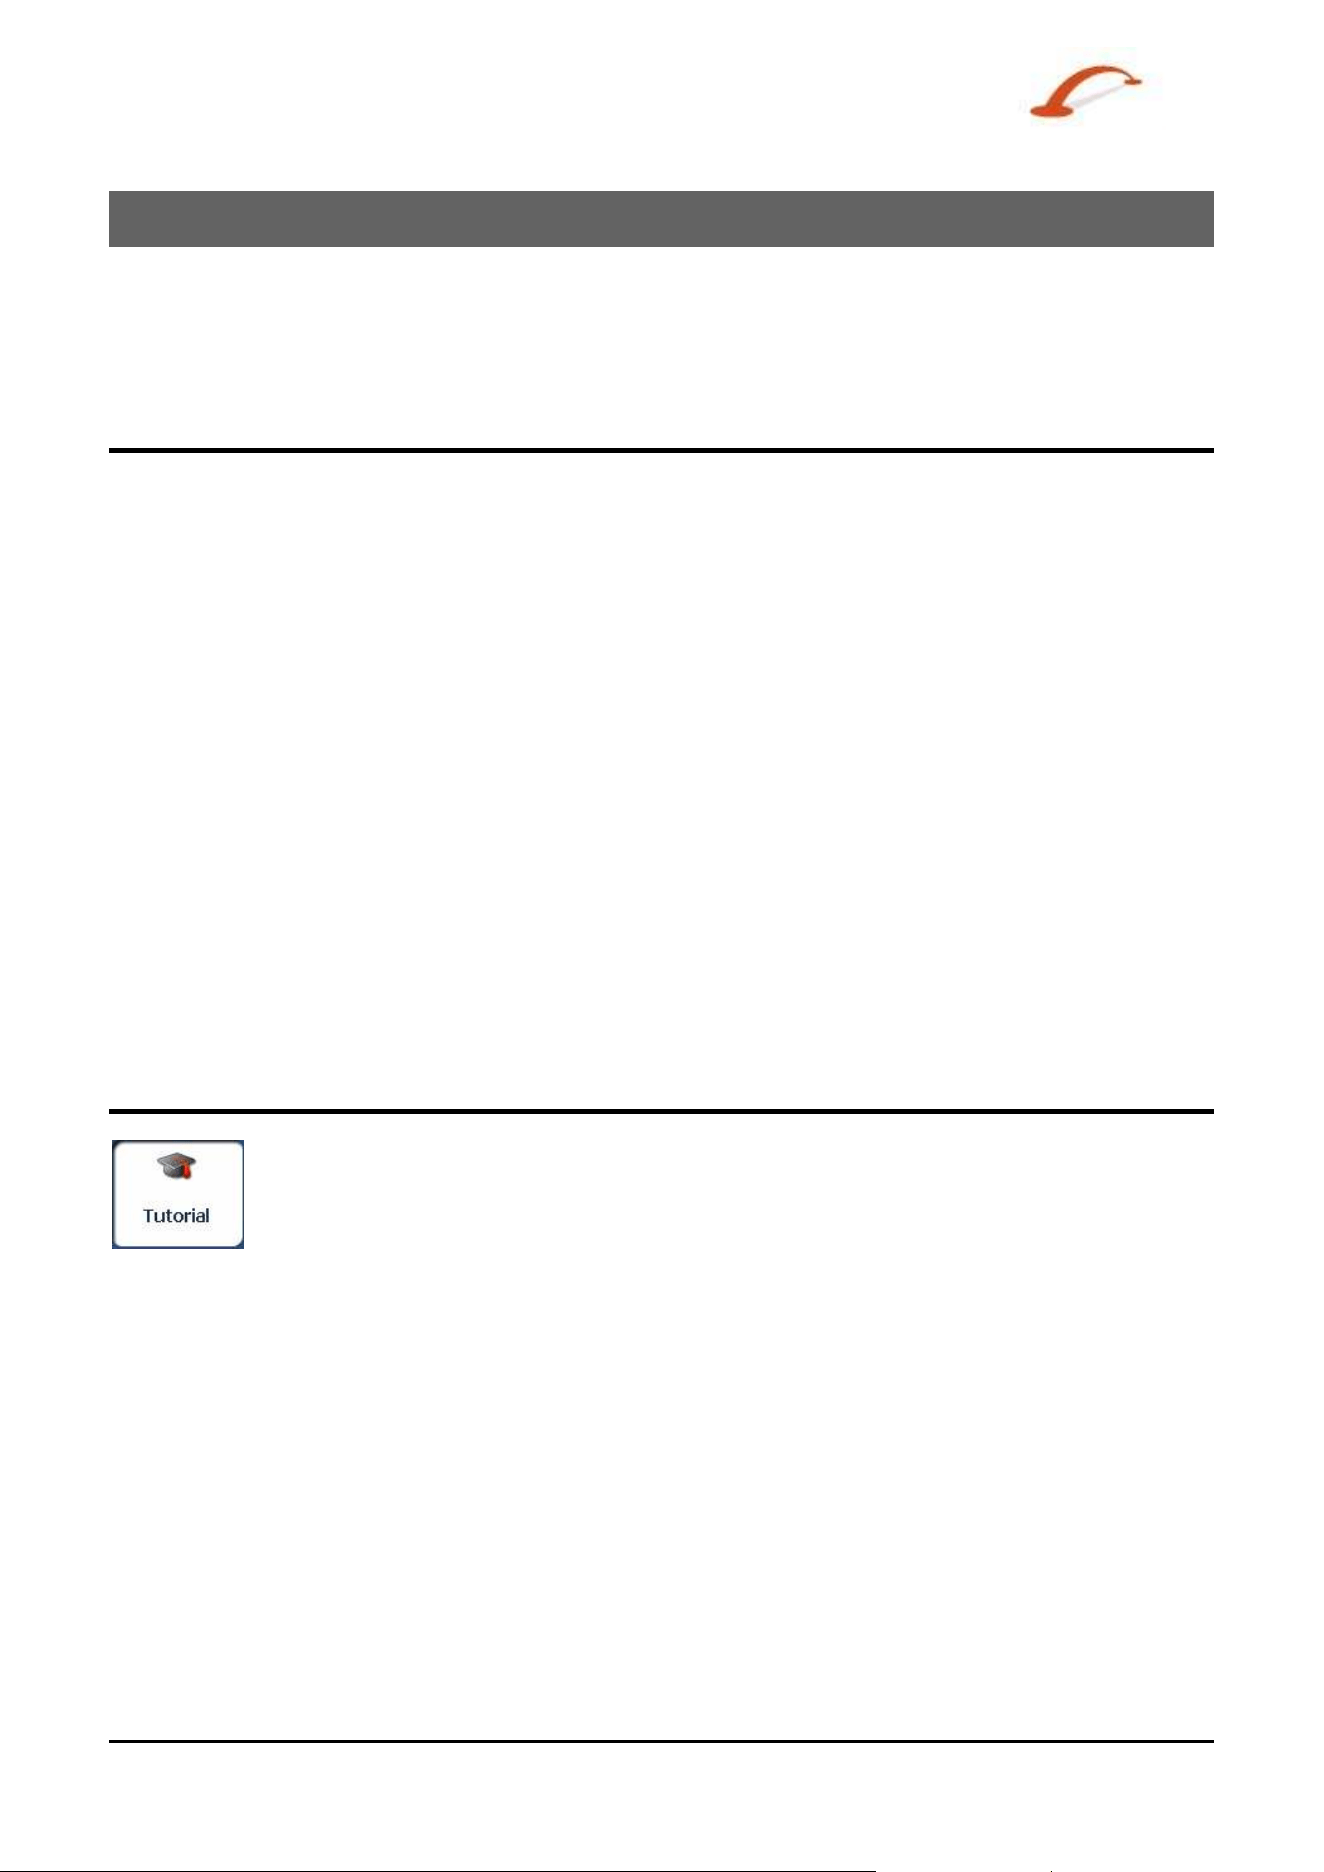
When you first st art t he Dest inat or navigat ion syst em , a m essage box appears prom pt ing
you to open the Dest in a t or Gu ided Tour program . The Guided Tour is an excellent way of
becom ing fam iliar wit h t he different navigation feat ures available. You can also st art t he
Dest inator Gu ided Tour
any t im e, by t apping t he Tutor ia l but t on from the Ex t ras m enu.
Use r 's Gu ide De st in a t or 2
2 - Getting Started
Menus
Dest inations – ( see "Dest inat ions Menu" on page 3) m enu - Provides the central navigat ion feat ures, such
as Addresses, Recent Locations, My Favorites, POI (Points of I nterest ), and My Contact s.
Option s ( see " Options Menu" on page4) m enu - Pr ovides 2D/ 3D and Day/ Night m ap view opt ions, Traffic
I nfo.
funct ionalit y and the following subm enus:
o Rout e M anage r (see "Rout e Manager Menu" on page 4) - Displays feat ures relat ing to route
inform at ion, avoiding roads, and set ting up a QuickNav route.
o Map Manager ( see " Map Manager Menu" on page 5) - Displays features relat ing to select ing m aps
and specifying m ap set tings.
o Ex t ras (on page 5) - Displays Dest inat or’s add- on feat ures
Se t tings ( see " Set tings Menu" on page 6) m enu - Provides set t ing opt ions t o configure t he navigat ion
syst em .
You can press t he
button from t he M ain Map screen to display t he Dest inat ions m enu, as shown
below.
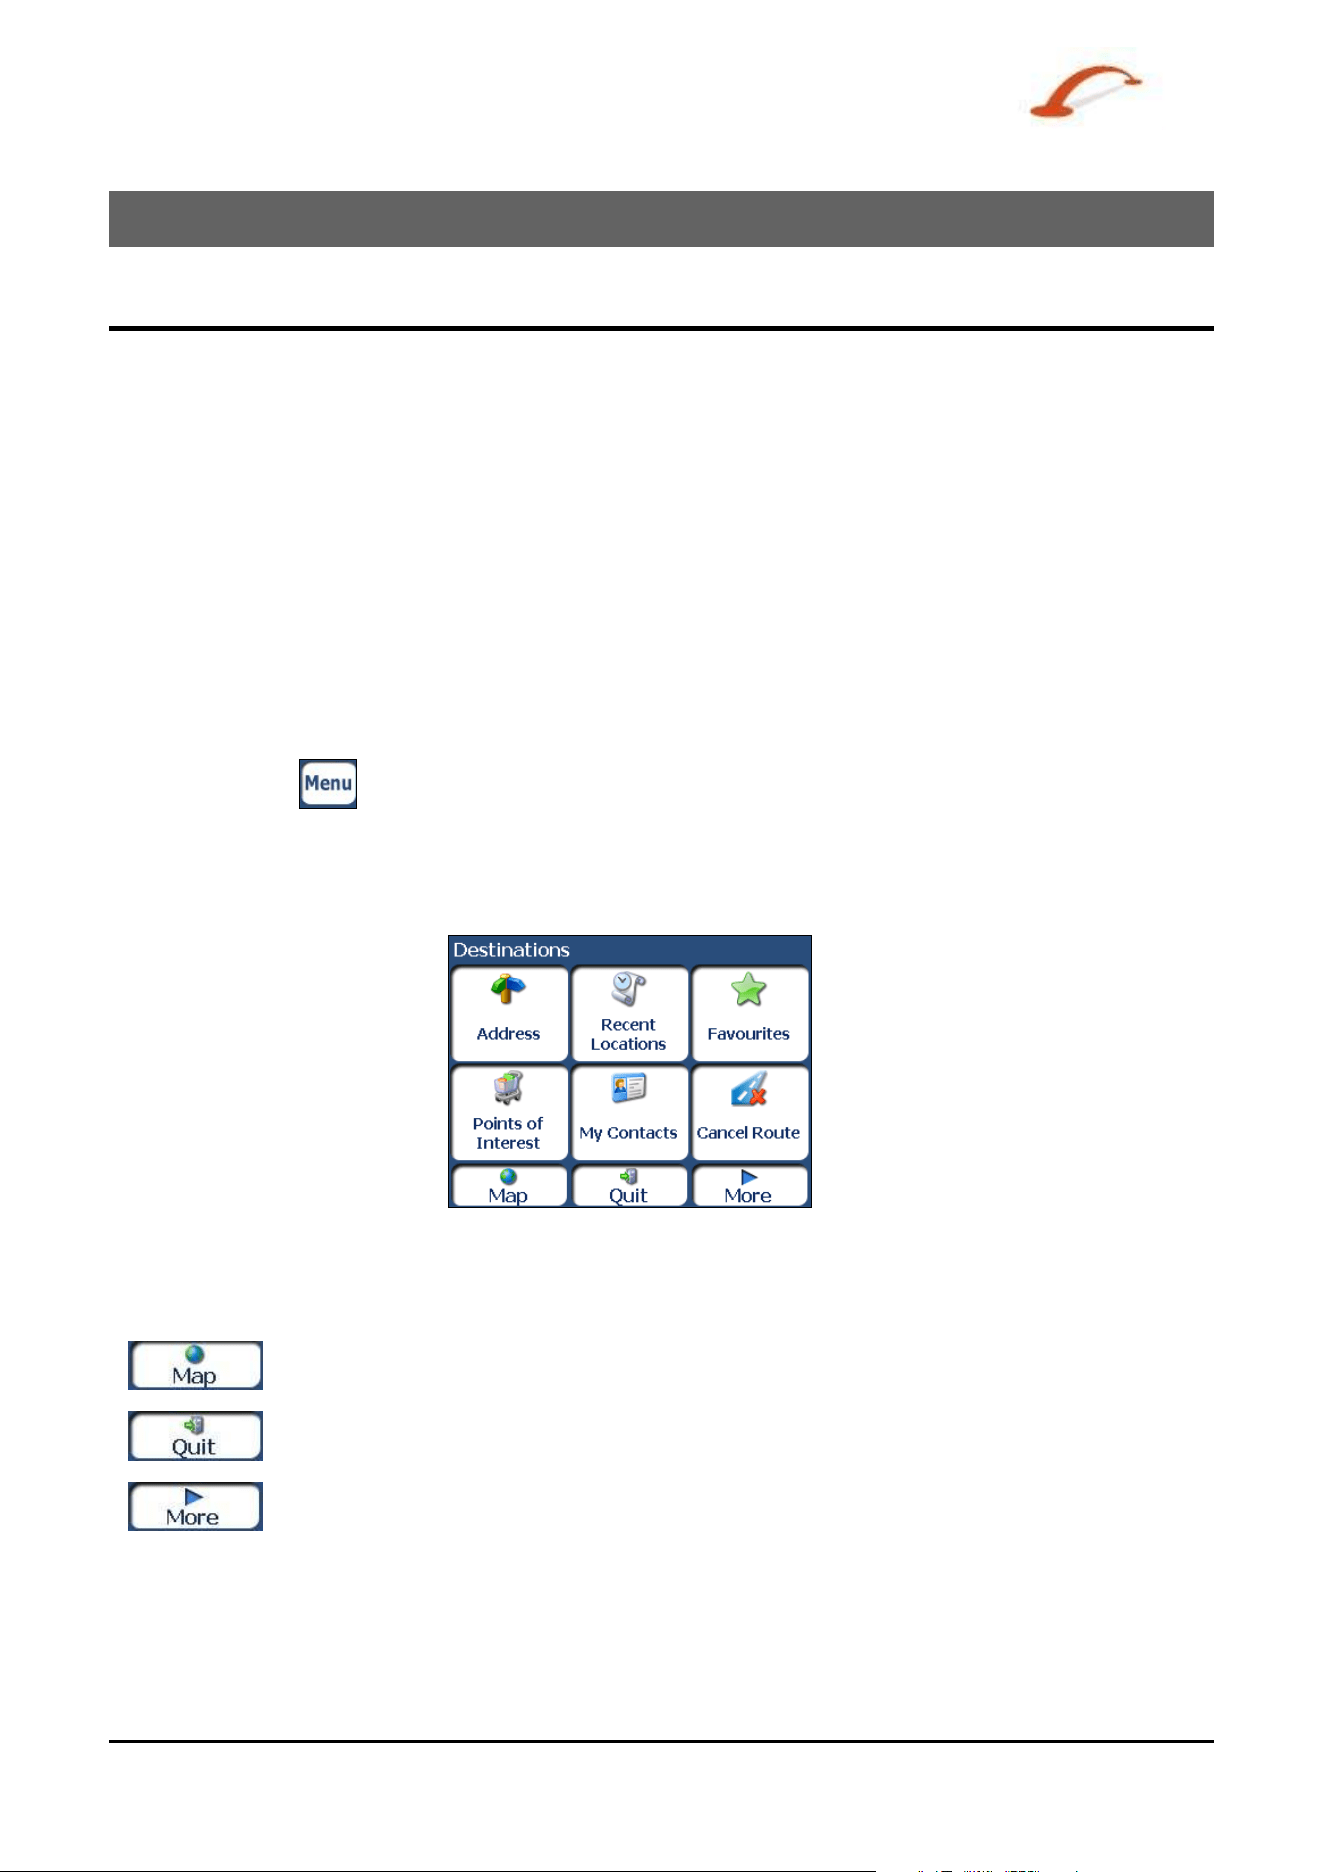
Destinations Menu
The Addr ess butt on lets you
navigat e t o an address, as
described in "
Ent e r
Address"
( see on page 10) .
The Re ce nt Loca t ion s
but ton let s you navigat e t o a
previously visit ed dest ination,
as described in "
Recent
Loca tion s ( on page 14) ".
The M y Fa vourit es butt on
let s you navigat e t o a
favourit e locat ion, as
described in "My Fa vourit e s
( on page
15)".
Figure 2 - D e st inat ions Menu
The Points of I nt e r e st button lets
you navigat e to thousands of
int erest ing places. For m ore
inform ation, see "
POI ( Poin t s of
I nterest ) ( on page 17) ".
The M y Con t act s butt on lets you
navigat e t o an address saved in your
Cont a ct s folder, as described in "M y
Cont a ct s (on page 19) " .
The Ca nce l Route butt on st ops t he
curr ent navigat ion.
The M ap but ton let s you ret urn to the M ain Ma p screen.
The Quit button let s you close t he De st inat or Navigat ion Syst em .
The M ore butt on lets you m ove between t he De st inat ions and Option s m enus.
Use r 's Gu ide De st in a t or 3
Use r 's Gu ide De st in a t or
4
Getting St a r t ed
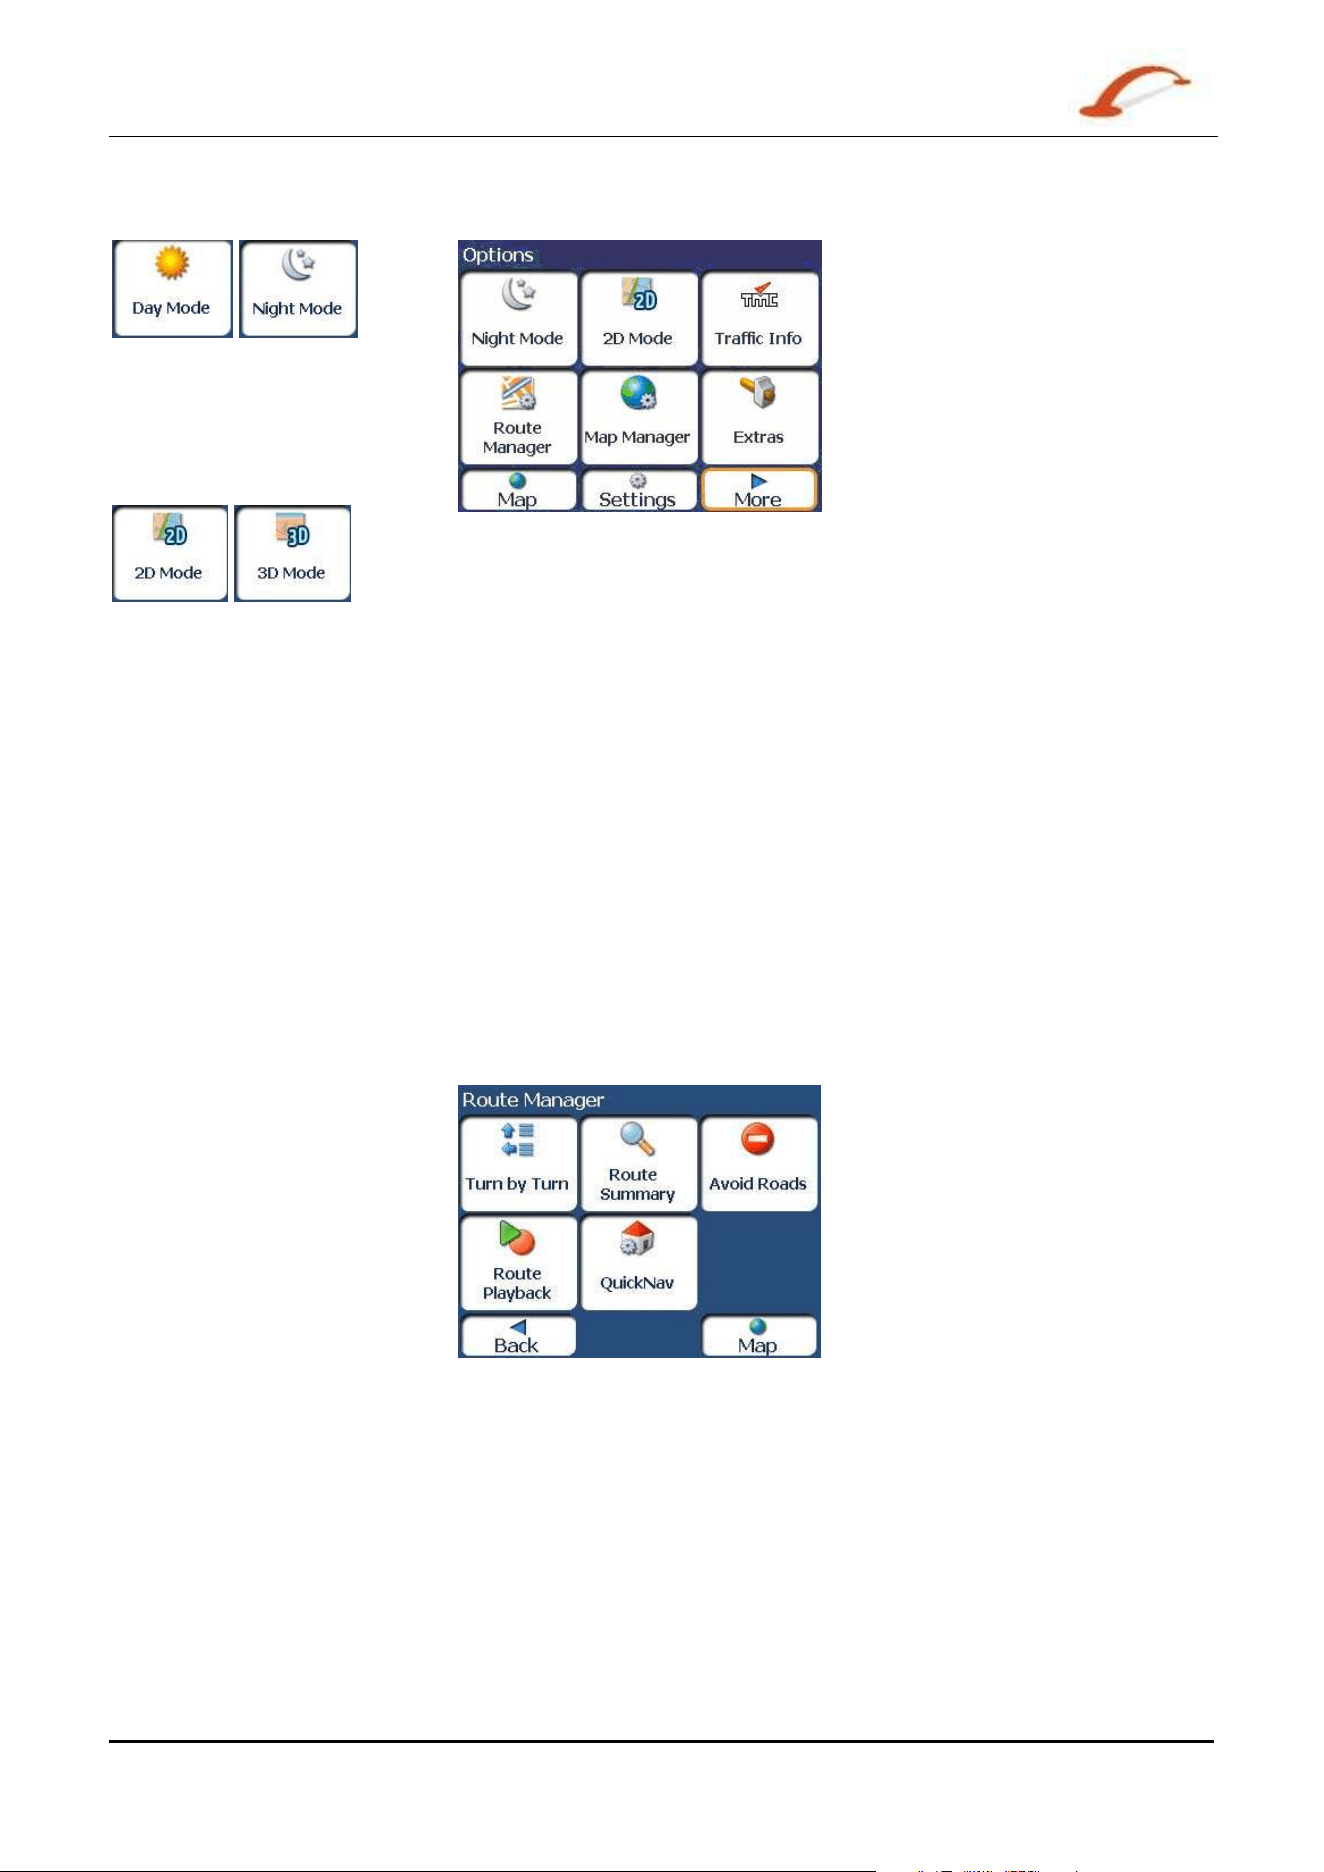
Options Menu
The
Day/ N ight M ode toggle
but ton let s you display the m ap
view for eit her day or night
driv ing. For a display of day and
night m aps, see "
Ma p View s
( on page
8) ".
The
2 D/ 3 D M ode t oggle butt on
let s you display t he m ap view in
2 dim ensional or 3-dim ensional
view s for eit her day or night
driv ing. For a display of 2D and
3D m aps, see "
Ma p Vie w s ( on
page
8) ".
The Route M a n a ger butt on
displays a m enu t hat let s you
select from t he following route
but tons: Show Route, Tur n-by-
Turn, Route Playback, Avoid
Road, and QuickNav. For m ore
inform ation, see “ Rout e
Ma nager ( on page
25) ” .
Figure 3 - Opt ions M e n u
Tr a ffic infor m at ion from FM radio
transm issions is r eceived by the
TM C- enabled GPS receiver and
m onit ored by your navigat ion
soft ware. For m ore inform at ion,
see "
Tr a ffic I nform a t ion ( on
page
21)".
The M ap M anager but ton displays
a m enu that let s you select from
the follow ing m ap buttons: Select
Map, Pedest r ian Mode, Free Map
Browsing , Unit s of Measure, and
Map Sett ings. For m ore
inform ation, see “
Ma p Ma na ger
( on page
28)” .
The Ex t ras button displays a m enu
that lets you select addit ional
Dest ina tor feat ures. For m ore
inform ation, see “ Ex tra s (on page
30)” .
Route Manager Menu
The Turn- by- Turn button let s
you display the com plet e, st ep-
by-step directions to your
dest inat ion. For m ore
inform ation, see "
Turn- by- Tu r n
List
( on page 25) " .
The Route Sum m ary button
let s you display your com plete
rout e on the M a p screen. This
but ton is disabled when no rout e
exist s.
The Route Pla yback but t on let s
you record your rout e and play
it back lat er. For m ore
inform ation, see " Route
Pla yback ( on page
28) ".
Figure 4 – Rou t e Manager Menu
The Avoid Roa ds but t on let s you
avoid a road t ype, such as toll
roads or select ed st reet s, as
described in "
Avoid Roads (on
page 26)".
The Quick Nav Se t tings but ton
let s you specify an address or place
to which you can navigate wit h a
single t ap on the QuickNav but ton.
For m ore inform at ion, see
"Quick Nav ( on page
28) ".
Use r 's Gu ide De st in a t or
5
Getting St a r t ed
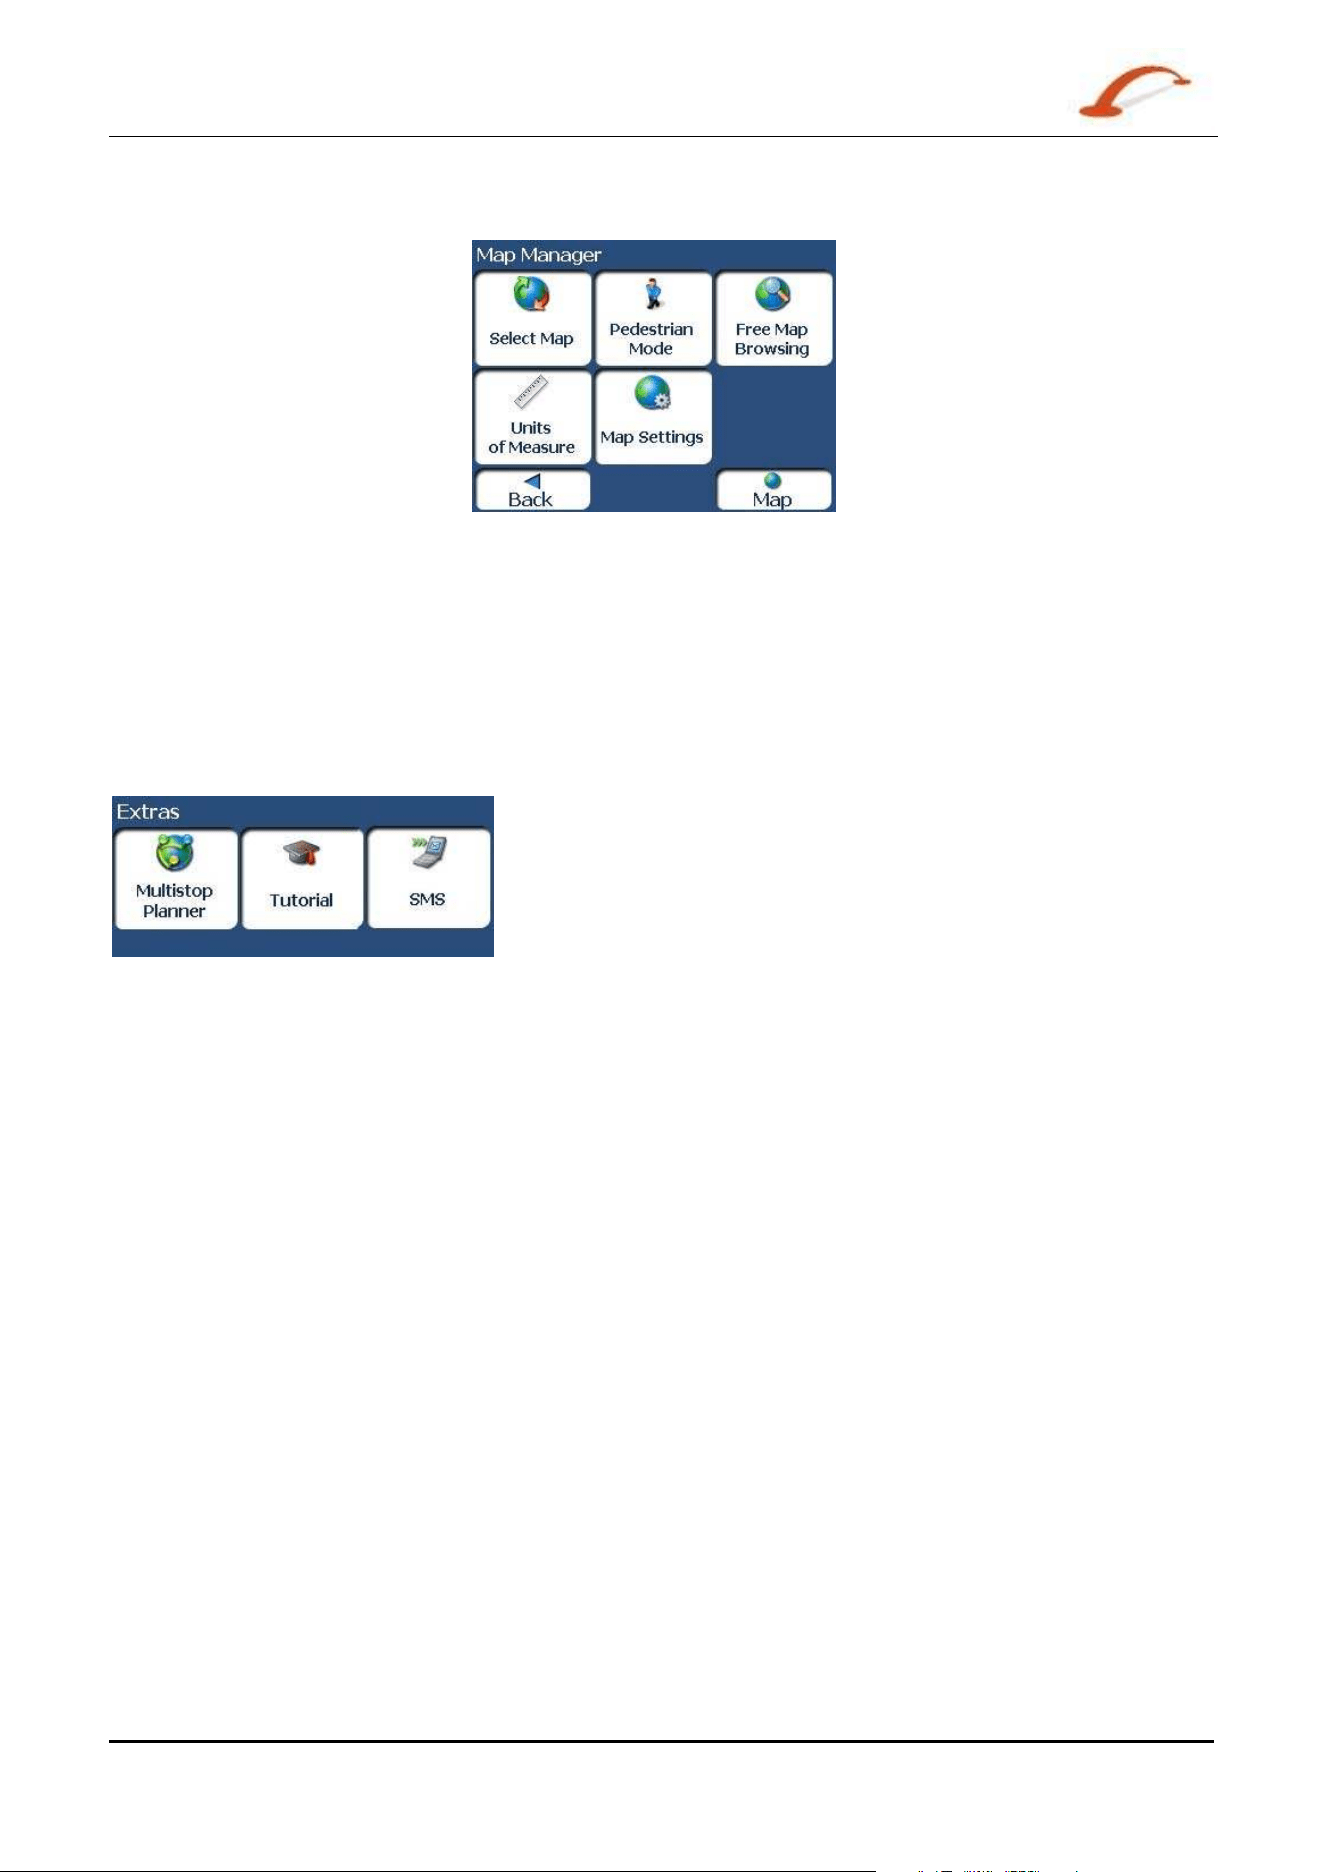
Map Manager Menu
The Se le ct Ma p button let s you
choose am ong different m aps on
your m em ory card. For m ore
inform ation, see "
Se le ct Ma p ( on
page
29)".
The Unit s of M e a sure button
let s you specify the syst em
m easurem ent unit s. For m ore
inform ation, see "
Units of
Mea su r e (on page 30) " .
The M ap Se t tings but ton let s
you specify m ap orientat ion, font ,
and zoom feat ures. For m ore
inform ation, see " M ap Se t tings
( on page
30)".
Figure 5 – M a p M a n a ger M e n u
The Pedest rian M ode/ D r iving
Mode
button let s you toggle
bet ween travelling as a pedest rian
or in a vehicle. When in Pedest r ian
Mode, you are not lim it ed by
vehicle const raints, such as one
way st reets. Note that you can
only generat e a route up t o ten
kilom et res and Voice prom pts are
not available.
The Free M a p Brow sing butt on
let s you browse the m ap
unconnect ed to the current
locat ion. I n t his m ode, t he GPS
syst em is not used. Your current
posit ion is not det ect ed and
Dest ina tor does not keep track of
your driving progress.
Extras
Figure 6 - Ex t ras M enu
The M ult i- St op Pla n ner butt on let s you designat e several st ops on a
rout e, as described in "
Mult ist op Pla nne r (on page 30)".
The Tutor ia l but ton opens the Dest in a t or Guide Tour program . The
Guided Tour is an excellent way of becom ing fam iliar wit h the
different navigation feat ures available.
The SM S I nbox button let s you set a route by an address received
thr ough an SM S m essage, as described in "Navigatin g t o a n SM S
Address ( on page
32)". Not e: This feature is available in Phone-
Enabled devices only.
Use r 's Gu ide De st in a t or
6
Getting St a r t ed
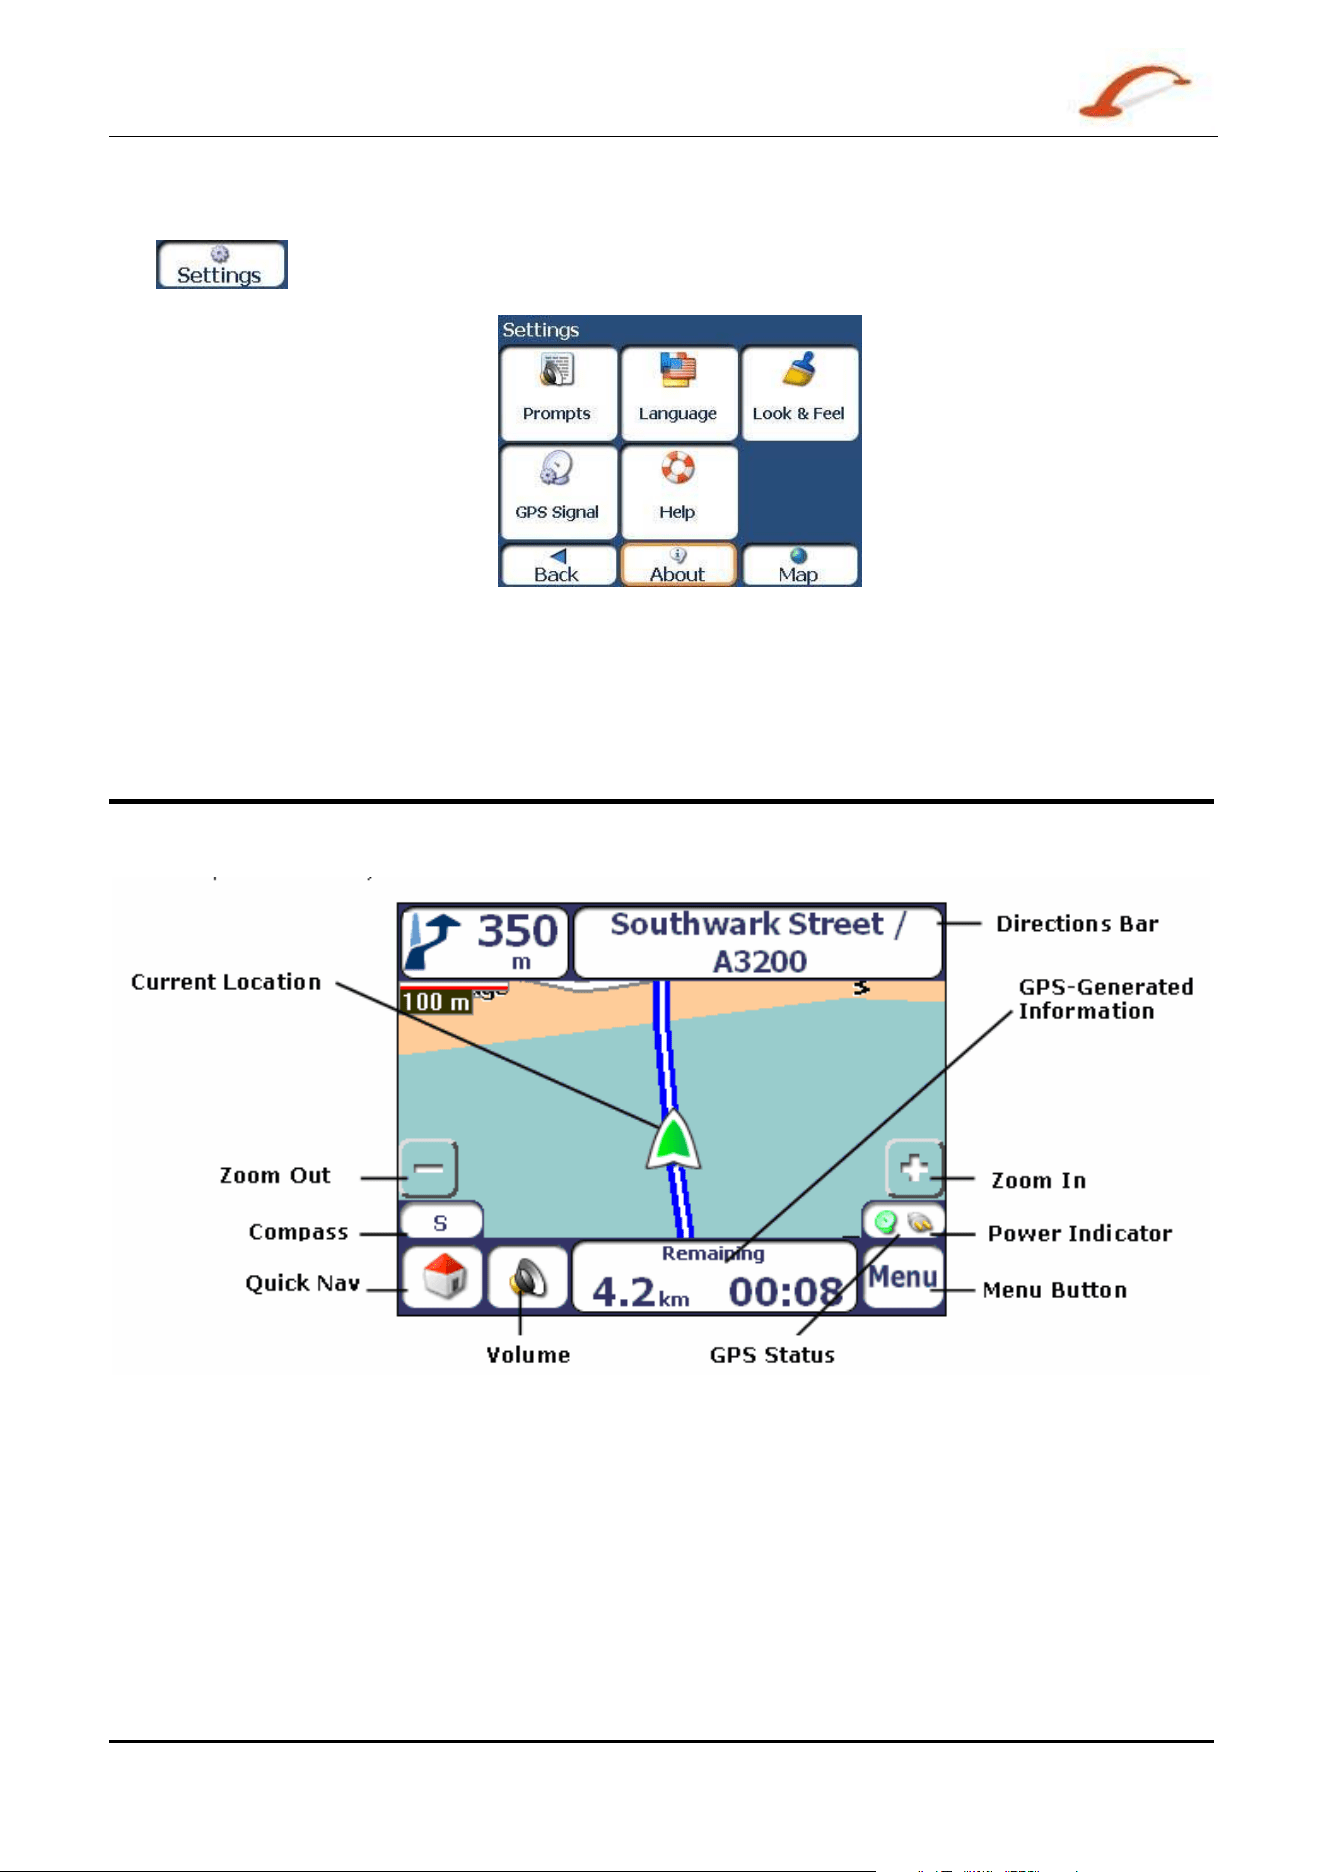
Settings Menu
The button, at t he bot tom of the Opt ions m enu, let s you configure your set tings opt ions.
The Prom pt s but t on let s you
specify the types of voice or visual
prom pt s that you want t o use. For
m ore inform ation, see "
Prom pts
( on page
35)".
The La n guage but t on let s you
select t he language for announcing
travel prom pt s, st reet nam es, and
driv ing direct ions. For m ore
inform ation, see “
La nguage
Se t t ings ( on page 35) ”.
The Look & Fe e l but ton let s you
select a different skin. For m ore
inform ation, see “ Look & Feel
Se t t ings ( on page
35)” .
Figure 7 - Se t tings Menu
The GPS butt on let s you
configure t he GPS set tings. For
m ore inform ation, see "
GPS
Se t t ings
( on page 36) " .
The H elp butt on opens the
Dest ina tor help file.
The About but t on opens an
inform ation box, providing
version and copyright
inform ation.
Main Map
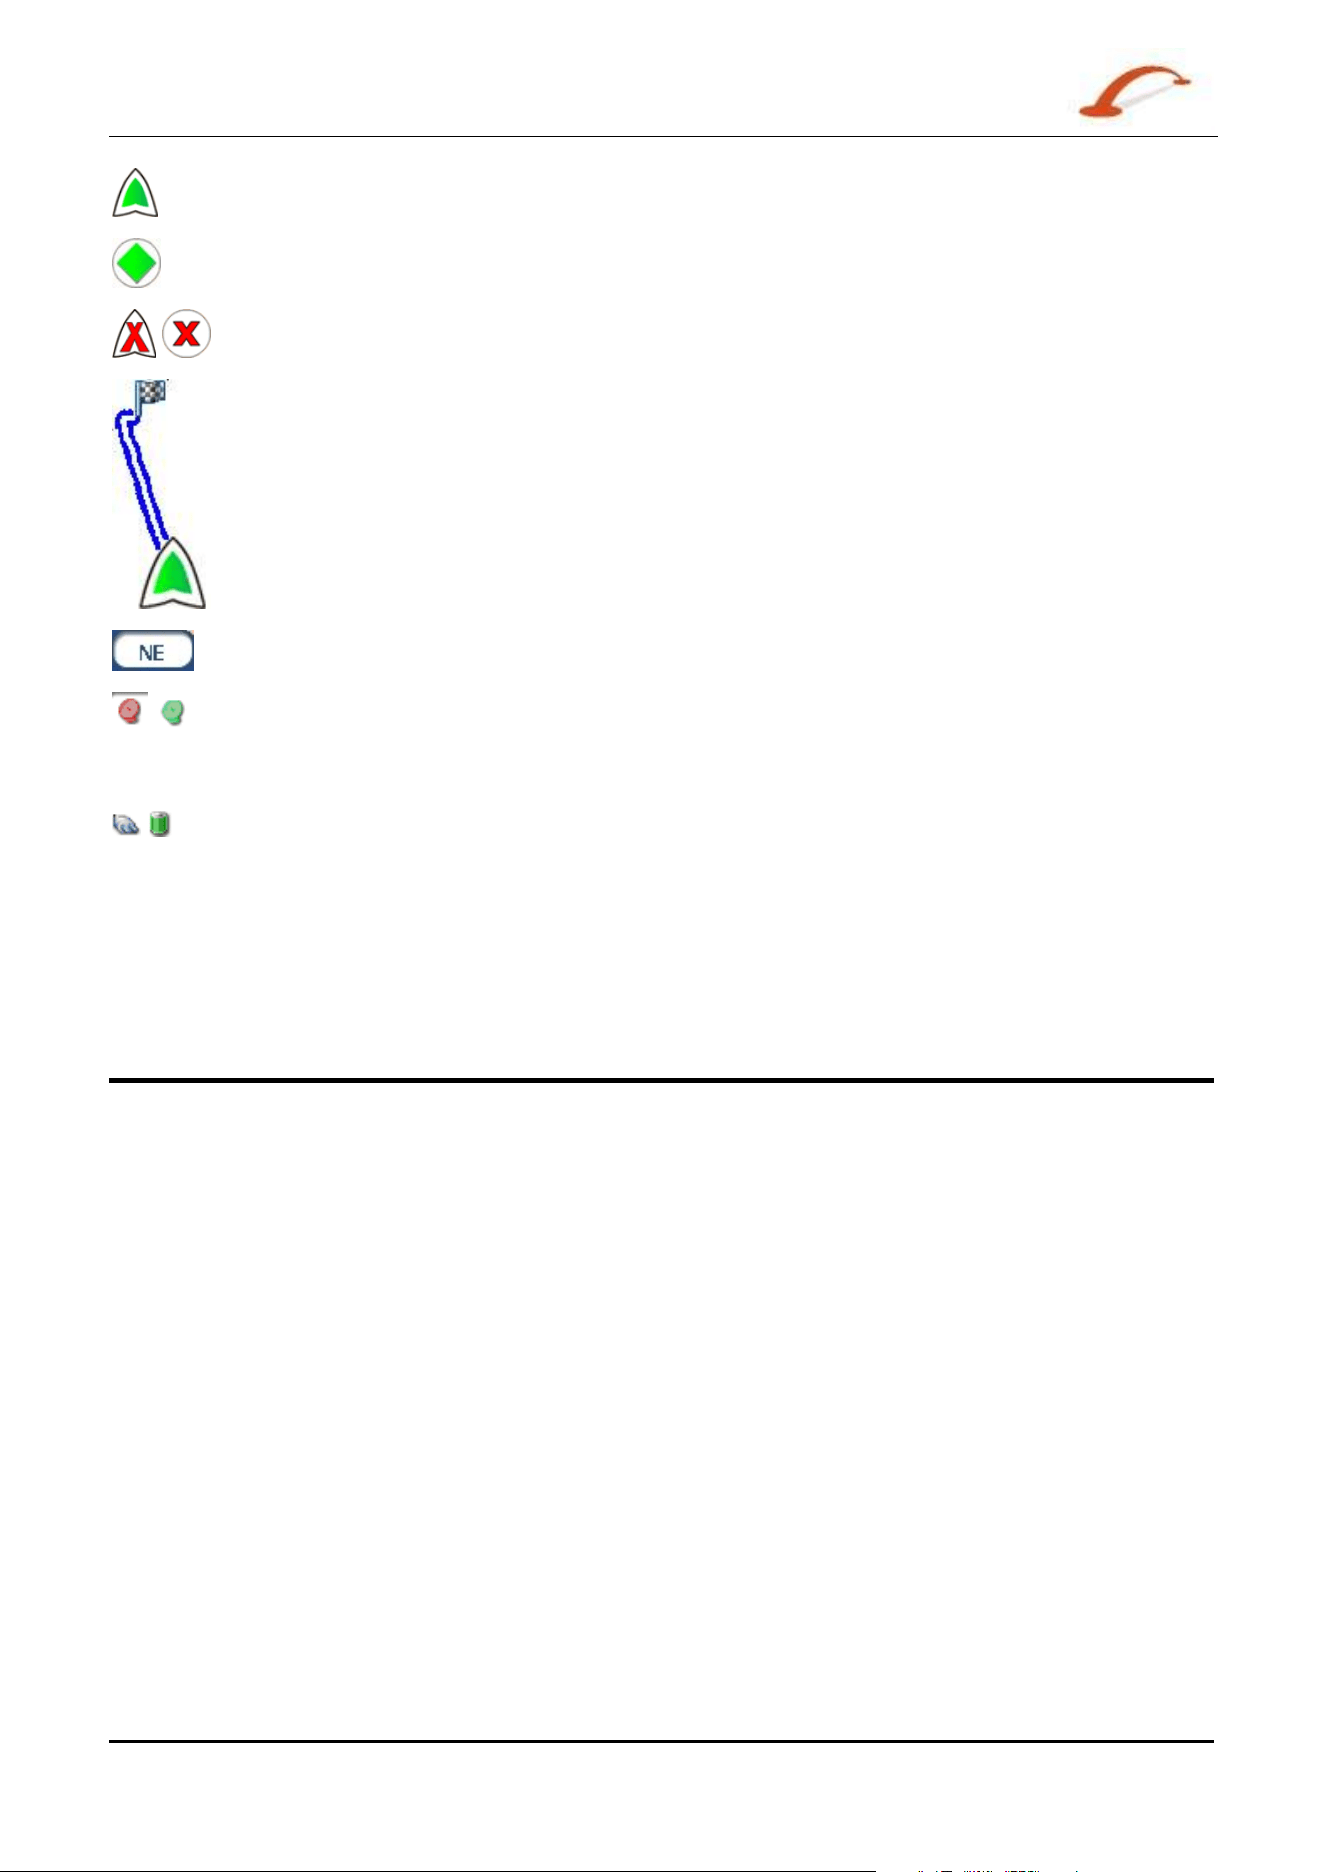
You can use the icons displayed on t his screen to plan and view your rout e.
Figure 8 - Ma p Scr e e n
Use r 's Gu ide De st in a t or
7
Getting St a r t ed
Current locat ion in V e hicle Mode.
Current locat ion in Pe dest r ian Mode.
Last known locat ion when GPS signal is unreliable.
Generat ed rout e
Travel direction
The r e d GPS receiver m eans that a reliable GPS signal is not yet locat ed.
The green GPS receiver m eans that a reliable GPS signal is locat ed and that you are
ready t o navigat e.
These icons display your power source, elect ricit y or bat t ery. The bat t ery appears as
green, yellow, or red depending on w het her t he bat t ery is recharged or weak.
The GPS bar is a t oggle butt on that displays t he rem aining t ravel dist ance and t ravel tim e, est im ated tim e
of arrival, st reet nam e and address num ber, and speed and altit ude.
When you have calculat ed a route, the Direct ions bar displays inform ation about your next turn. Click this
bar for a com plet e list of turn- by-turn directions.
GPS Not Found
When you first st art your navigat ion device, you will hear t he m essage "Signal t oo low". This m essage
m eans t hat your navigat ion device hasn’t yet locat ed a reliable GPS signal. Check t hat your device is
connect ed to t he cigarett e lighter and has a clear view of t he sky.
The “ GPS not found” m essage m eans t hat ther e is no GPS antenna or t he ant enna is not properly inst alled.
For m ore inform at ion about GPS, see GPS Set tings ( on page 36.
Please check t hat :
The GPS ant enna is extended or flipped up.
The GPS ant enna has a clear view of the sky for uninterrupt ed GPS recept ion. D e st inat or cannot
calculat e t he rout e if t here is no
GPS r ecept ion (for exam ple, in a tunnel) .
The navigat ion device is charged or connect ed t o the cigaret te lighter.
Use r 's Gu ide De st in a t or
8
Getting St a r t ed
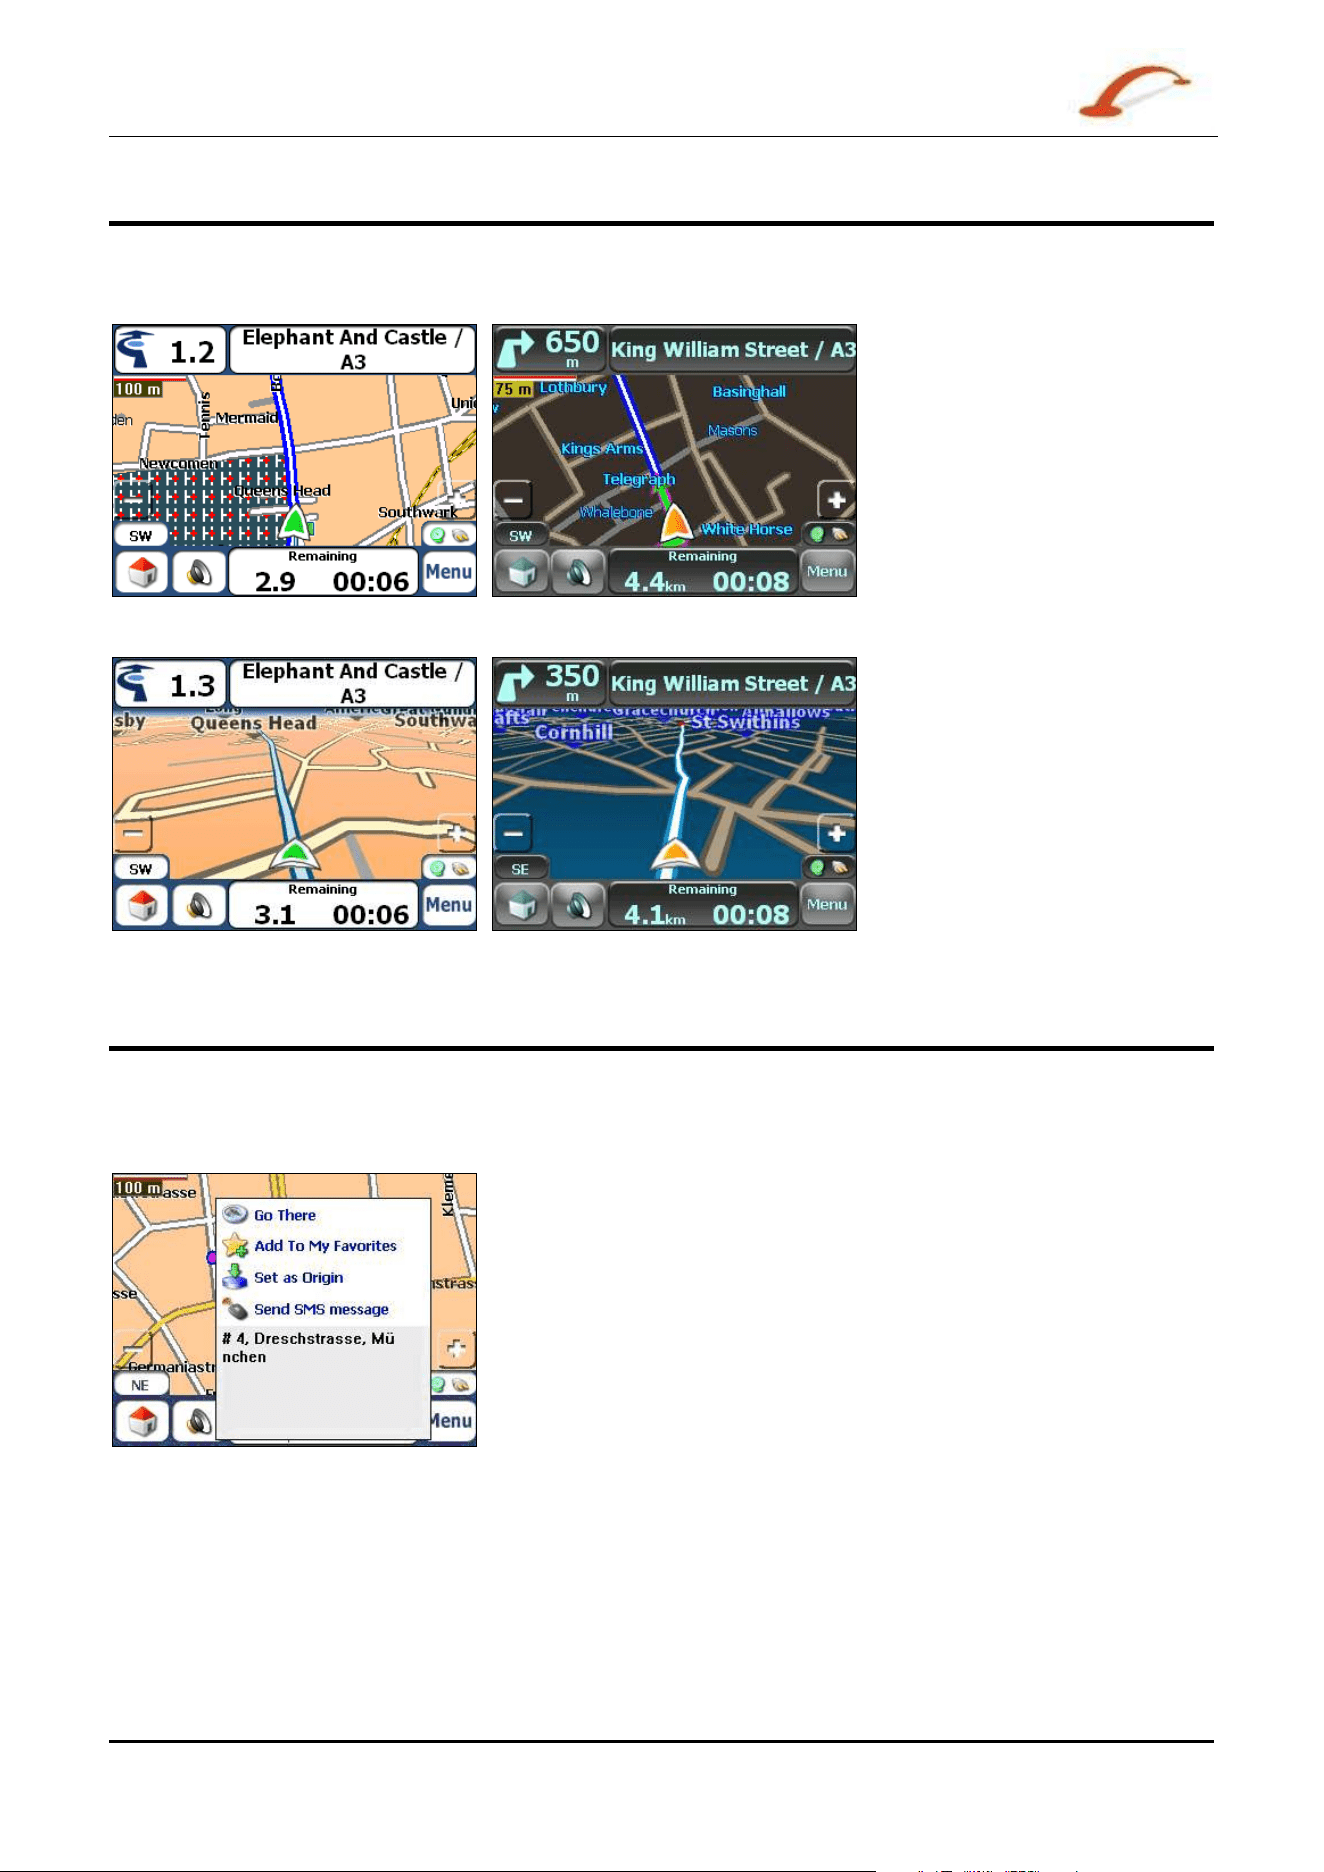
Map Views
From the Opt ions m enu, you can det erm ine whet her you want to see a t wo- dim ensional or t hree-
dim ensional m ap in daylight or night -tim e conditions.
Figure 9 - 2 D D a y M ap Vie w
Figure 1 0 - 2 D Night M a p View
Figure 1 1 - 3 D D ay Map V ie w
Figure 1 2 - 3 D N ight M a p View
Point on the Map
You can navigat e t o any point by t apping it s locat ion direct ly on t he M a in Map screen in both 2D and 3D
m ap view . This feat ure is especially handy when you w ant to navigate to a specific point on t he m ap, but
you don’t have the st reet address. When you t ap on the m ap, the cont ext m enu appears.
Go There – This butt on let s you calculate a rout e from t he m ap point .
Add t o M y Fa vour it es – This button let s you save a point on the m ap
as a favourit e dest inat ion. This is helpful if you see a locat ion that you
want t o ret urn you lat er.
Se t a s Or igin –This butt on let s you designat e t he select ed point as
the starting point and not the designation. This is helpful when you
want t o calculate a route from a point other t han your current location.
Tap t he
Free M a p Brow sing but ton t o disconnect from t he GPS
receiver .
Se nd SMS Message – I f you are using a phone- enhanced navigation
device, you can send your current locat ion in an SM S m essage. For
m ore inform at ion, go to "
Se ndin g an SM S Addr e ss ( on page 33)" .
Figure 1 3 - Point on t he Ma p Opt ions
Use r 's Gu ide De st in a t or
9
Getting St a r t ed
Screen Buttons
The following but t ons appear on m any of the navigation D e st ina t or screens.
When you t ap t he Next but ton for a select ed addr ess, gr oup, or place, Dest inator
autom at ically opens the next screen in the sequence.
When you t ap t he Ba ck but t on, D e st in a t or r et urns you to the previous screen.
When you t ap t he GO but ton, D e st in a t or calculates the route t o your selected
dest ination.
The Act ion s but t on provides a list of com m and options available for t he select ed
address or place.
The Save, OK, or Don e buttons confirm your value preferences and ret urns you t o t he
m enu or m ap.
Cycling Through Screens
Every navigat ion funct ion in t he syst em , such as Addr ess, POI , or My Favourit es consist s of a sequence of
screens. You can cycle through t he screen sequences by eit her:
Selecting an it em from t he list and tapping it .
Selecting an it em form t he list and tapping the N ext but t on.
The sequence ends wit h t he Show on Map screen, where the dest inat ion is displayed and the GO but ton is
available for you to calculat e a rout e.
Not e: You m ust fir st select an it em for Act ions, N ext and Back but t ons t o be enabled.
3 - Search for a Location
Enter Address
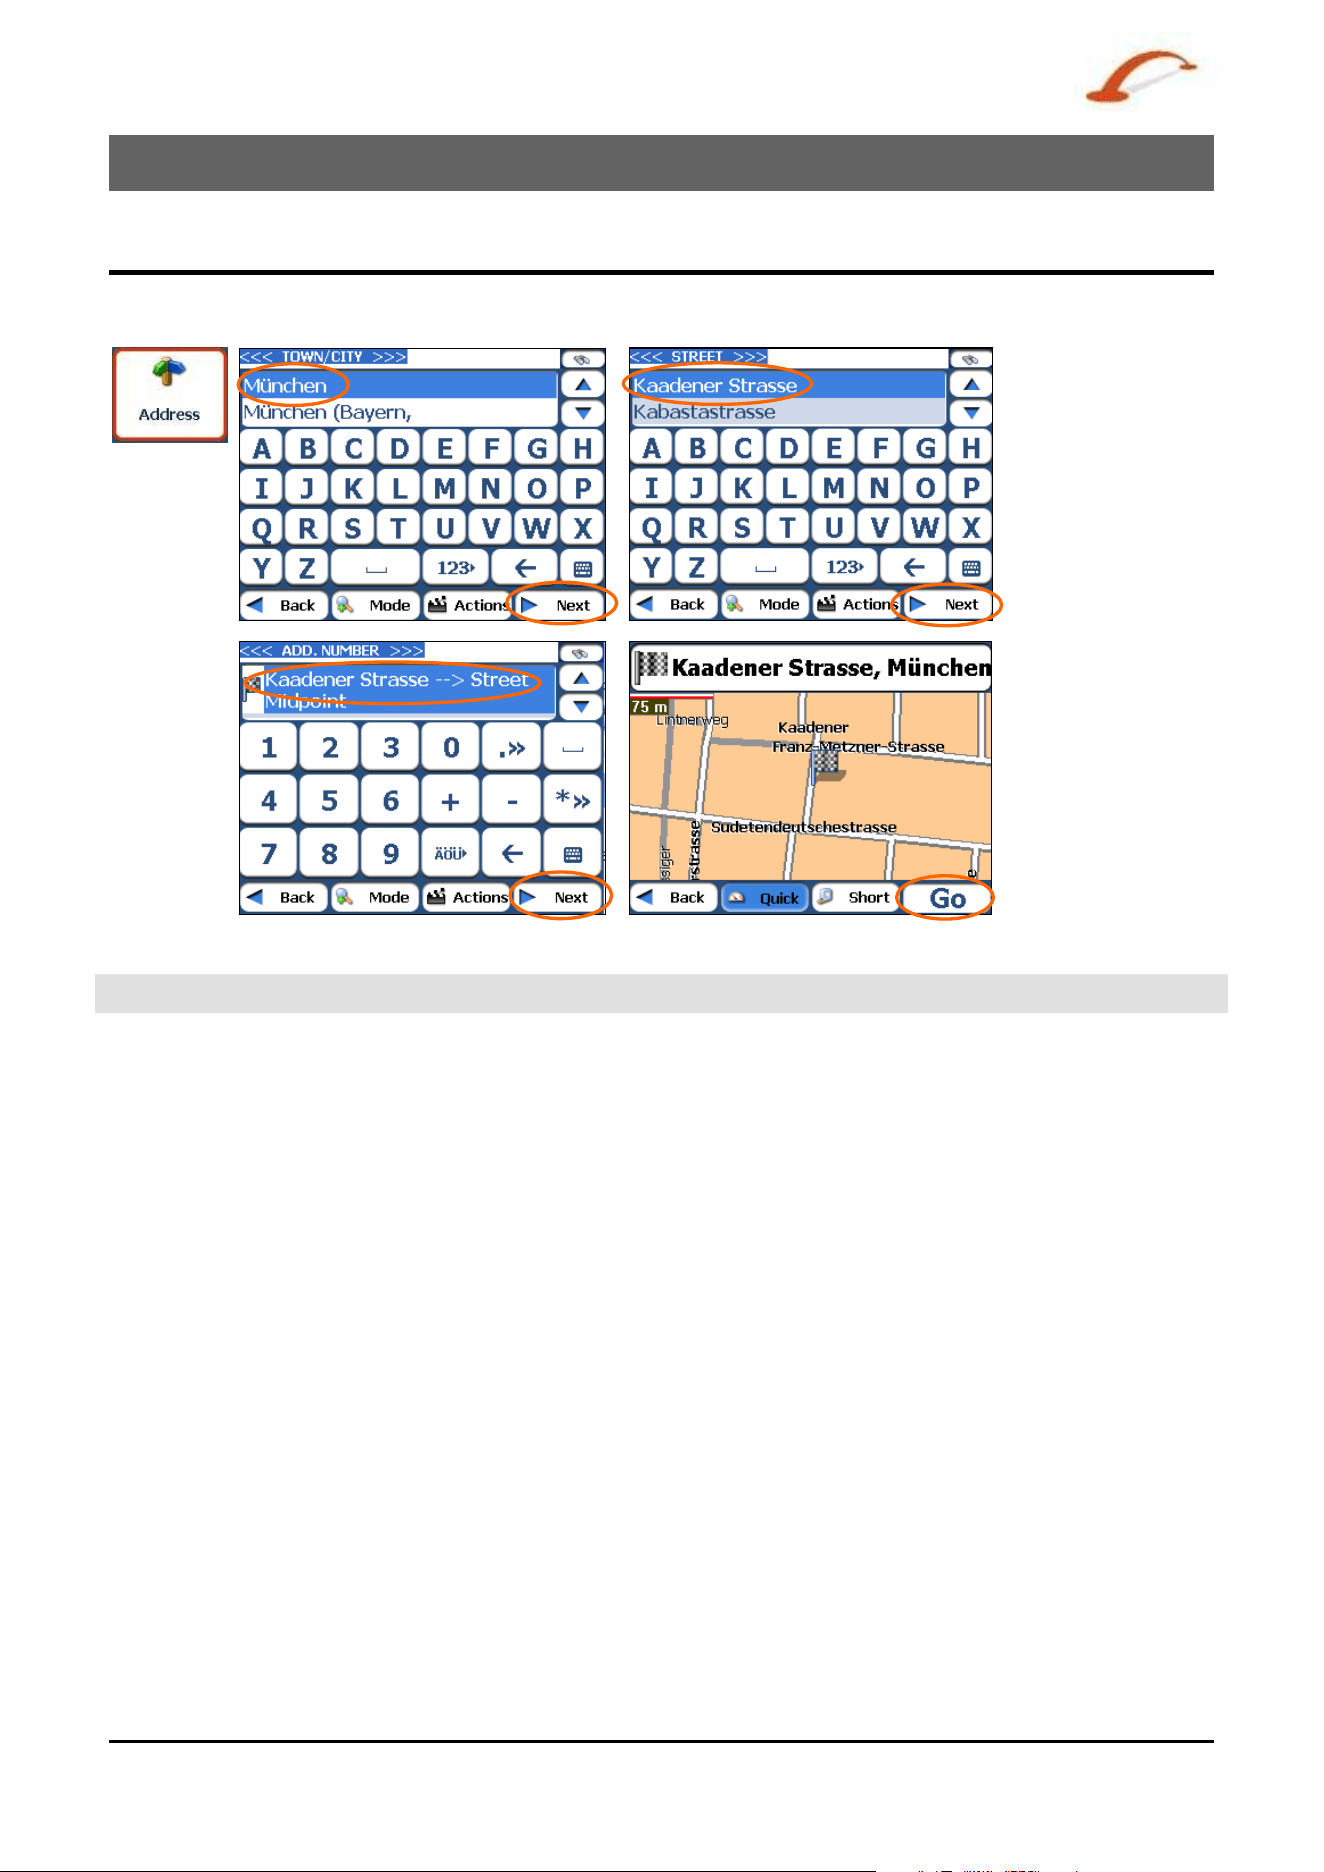
When you click the Addr e ss button, t he Addr e ss screen appears as shown below.
Figure 1 4 - D isplay the Addr ess Scr e e n
N ote: For Unit ed St at es m aps, an addit ional St a tes Addr e ss screen appears.
Use r 's Gu ide De st in a t or 1 0
Use r 's Gu ide De st in a t or
1 1
Se arch for a Loca t ion
You can use the keyboard to ent er t he charact ers of the address nam e. The charact er s appear in t he
Address field. D est inat or autom atically searches the Addr e ss list for t he first occurrence of the entered
characters. After you have select ed a cit y,
Dest ina tor displays the next address field, such as st reet and
address num ber.
You can also t ap t he Nex t button to m ove t hrough t he sequence of address screens.
The following com m and keys are available t o enhance your search process:
I f t he aut om at ic search feat ure does not find your specified nam e, use t he Find button t o
conduct a sub- search, particularly useful when the address nam e consist s of two or m ore
words.
The Scroll butt ons let you m ove up or down the list of address it em s, such as t own or street
nam es.
The H ide/ Displa y Keyboard toggle but t on let s you ext end or short en t he address list by
hiding or displaying t he keyboard.
N ote: The keyboard is aut om at ically hidden, displaying t he address list only, when the
num ber of address search result s fit s on a single screen. I f the search result s do not display
the desire address, display t he keyboard and ent er addit ional search characters.
The Select key let s you display lowercase, num eric, and special charact ers This but ton also
displays different alphabet charact ers ( for exam ple, Greek) . The operat ing syst em inst alled
on t he device m ust be able t o support these char act ers.
The Er a se key let s you delet e t he last charact er in an address field.
You can change your addr ess search m ethod by tapping the M ode button t o select from a variet y of address
form at s, as described in "
Address M ode s" (on page 11) .
N ote: I f the ent ered characters are not found at the beginning of the nam e in t he Address list , the Sm art
Search System autom at ically searches for the entered charact ers throughout t he entire list, for exam ple, in
the m iddle or t he end of the nam e.
Dest ina tor let s you search for cit y and st reet nam es w it hout having special charact ers, such as um lauts or
accent m arks, which are used in m any European languages.
Address Modes
You can define t he inform at ion used to locat e an address by tapping the button. Dest in a t or
provides a variet y of options for entering an address.
St at e- City
For Unit ed St at es m aps only. This sequence provides t he following
address screens: St a te , Cit y, St ree t, Address N um ber
Tow n - St re et
This sequence provides the following address screens: Tow n, St reet , Address
N um be r
For every cit y, you also have t he opt ion of select ing the Cit y Cent r e.
I f you don't know address num ber , you can select the Str e e t M idpoint .
Tow n-St r eet is the default form at .

Use r 's Gu ide De st in a t or 1 2
Se arch for a Loca t ion
St re et - Tow n
This sequence provides the following address screens: Tow n, St reet , Address
N um be r
This m ode lets you enter a st reet nam e wit hout having to first designat e a t own.
Useful when you're looking for an address in a m etropolit an area where t here ar e
m any cit ies and t owns.
Side St re ets
This sequence provides the following address screens: Tow n, St reet 1 , St reet 2
You can locate a road junct ion by ent ering t he nam es of two intersect ing st reets.
Post Code
This sequence provides the following address screens: Post Code , St reet,
Address N um be r
You can locate a st reet address by entering the post code, wit hout entering a t own
nam e. Useful when you have no inform at ion about the t own.
I n Othe r Ma ps
You can select anot her m ap of a country that you can travel t o by vehicle.
This feat ure is available only when you have the following m aps inst alled:
Map of t he country where you are currently locat ed.
Map of t he country where you wish t o t ravel.
The m ap of t he m aj or roads for t hat continent that connect one m ap t o
anot her ( for exam ple, the m aj or roads of Europe)
For exam ple, if you are in Par is and you want t o t ravel t o Munich, select the m ap
of Germ any and designat e Munich Tow n Centre as your destinat ion. Dest in a t or
autom at ically displays t he m ap of France when travelling on local roads of t hat
country, a m ap of Maj or Roads of Europe when travelling on a European
m ot orway, and t he m ap of Germ any when travelling on local roads of that
country.
Address Actions
When you have specified an address, t ap the Act ions but t on to select from t he following Address
com m ands:
Set as Origin
Let s you designat e t he select ed location as the route origin. You w ould use this com m and when calculat ing a
rout e from a point other t han your current locat ion. Tap t he Free M a p Br ow sin g button to disconnect from
the GPS receiver.
Show on Map
Let s you see t he select ed address on t he m ap.
Use r 's Gu ide De st in a t or
1 3
Se arch for a Loca t ion
Add to My Favourites
Lets you add an address to your list of favourit e locat ions, as shown in the figure below. For m ore
inform ation, see "My Favourites".
Figure 1 5 - Add Address t o M y Fa vourit es
I f you are using a phone- enabled navigat ion device, you can send your current locat ion in an SM S m essage.
For m ore inform at ion, see "Sending an SM S Address" ( on page 33) .
Go to your Destination
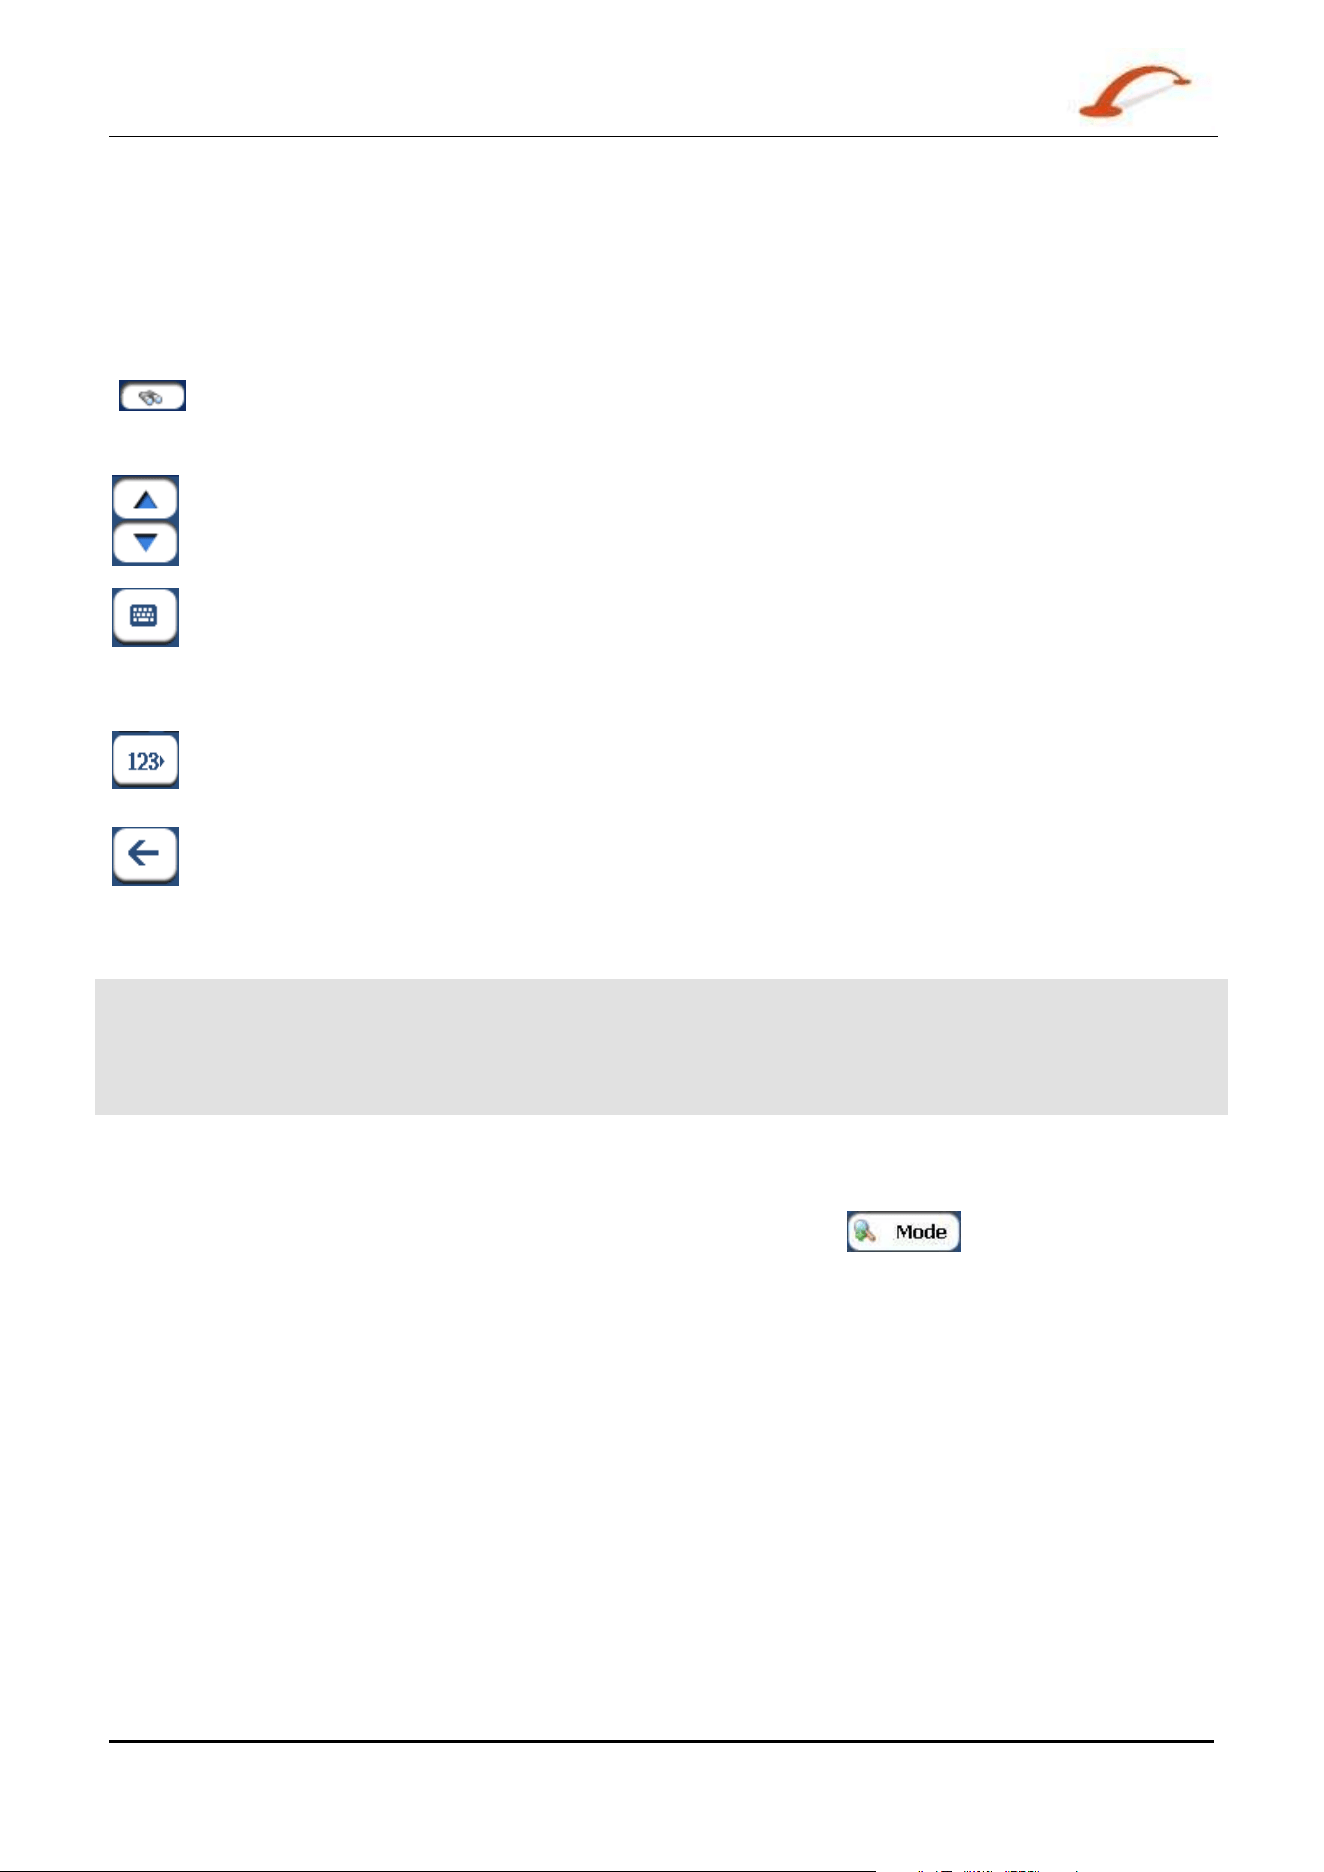
After you have specified the address, tap the N ext button. Dest in a t or shows your dest inat ion on t he M ap
screen before calculating a rout e. Check t hat t he dest inat ion address is correct at the top of the screen. I f
you want t o change the destinat ion, t ap t he
Ba ck button and change your address ent ries.
Figure 1 6 - Ca lcula t e your Dest ination
When you have specified t he address, you can inst ruct D e st inat or how t o calculat e your route by tapping
eit her t he Quick or Sh ort button.
This opt ion select s t he route t hat takes the least am ount of t im e. Quick is t he default
value.
This opt ion select s t he route t hat is the short er dist ance. Rem em ber, the short er r out e m ay
not always be the quickest , as you are able to t ravel fast er on som e roads than on ot hers.
When you are ready, t ap t he
button to creat e a route to your select ed dest inat ion.
N ote: Route generat ion excludes any det our s, st ops or delays along t he route.
Use r 's Gu ide De st in a t or
1 4
Se arch for a Loca t ion
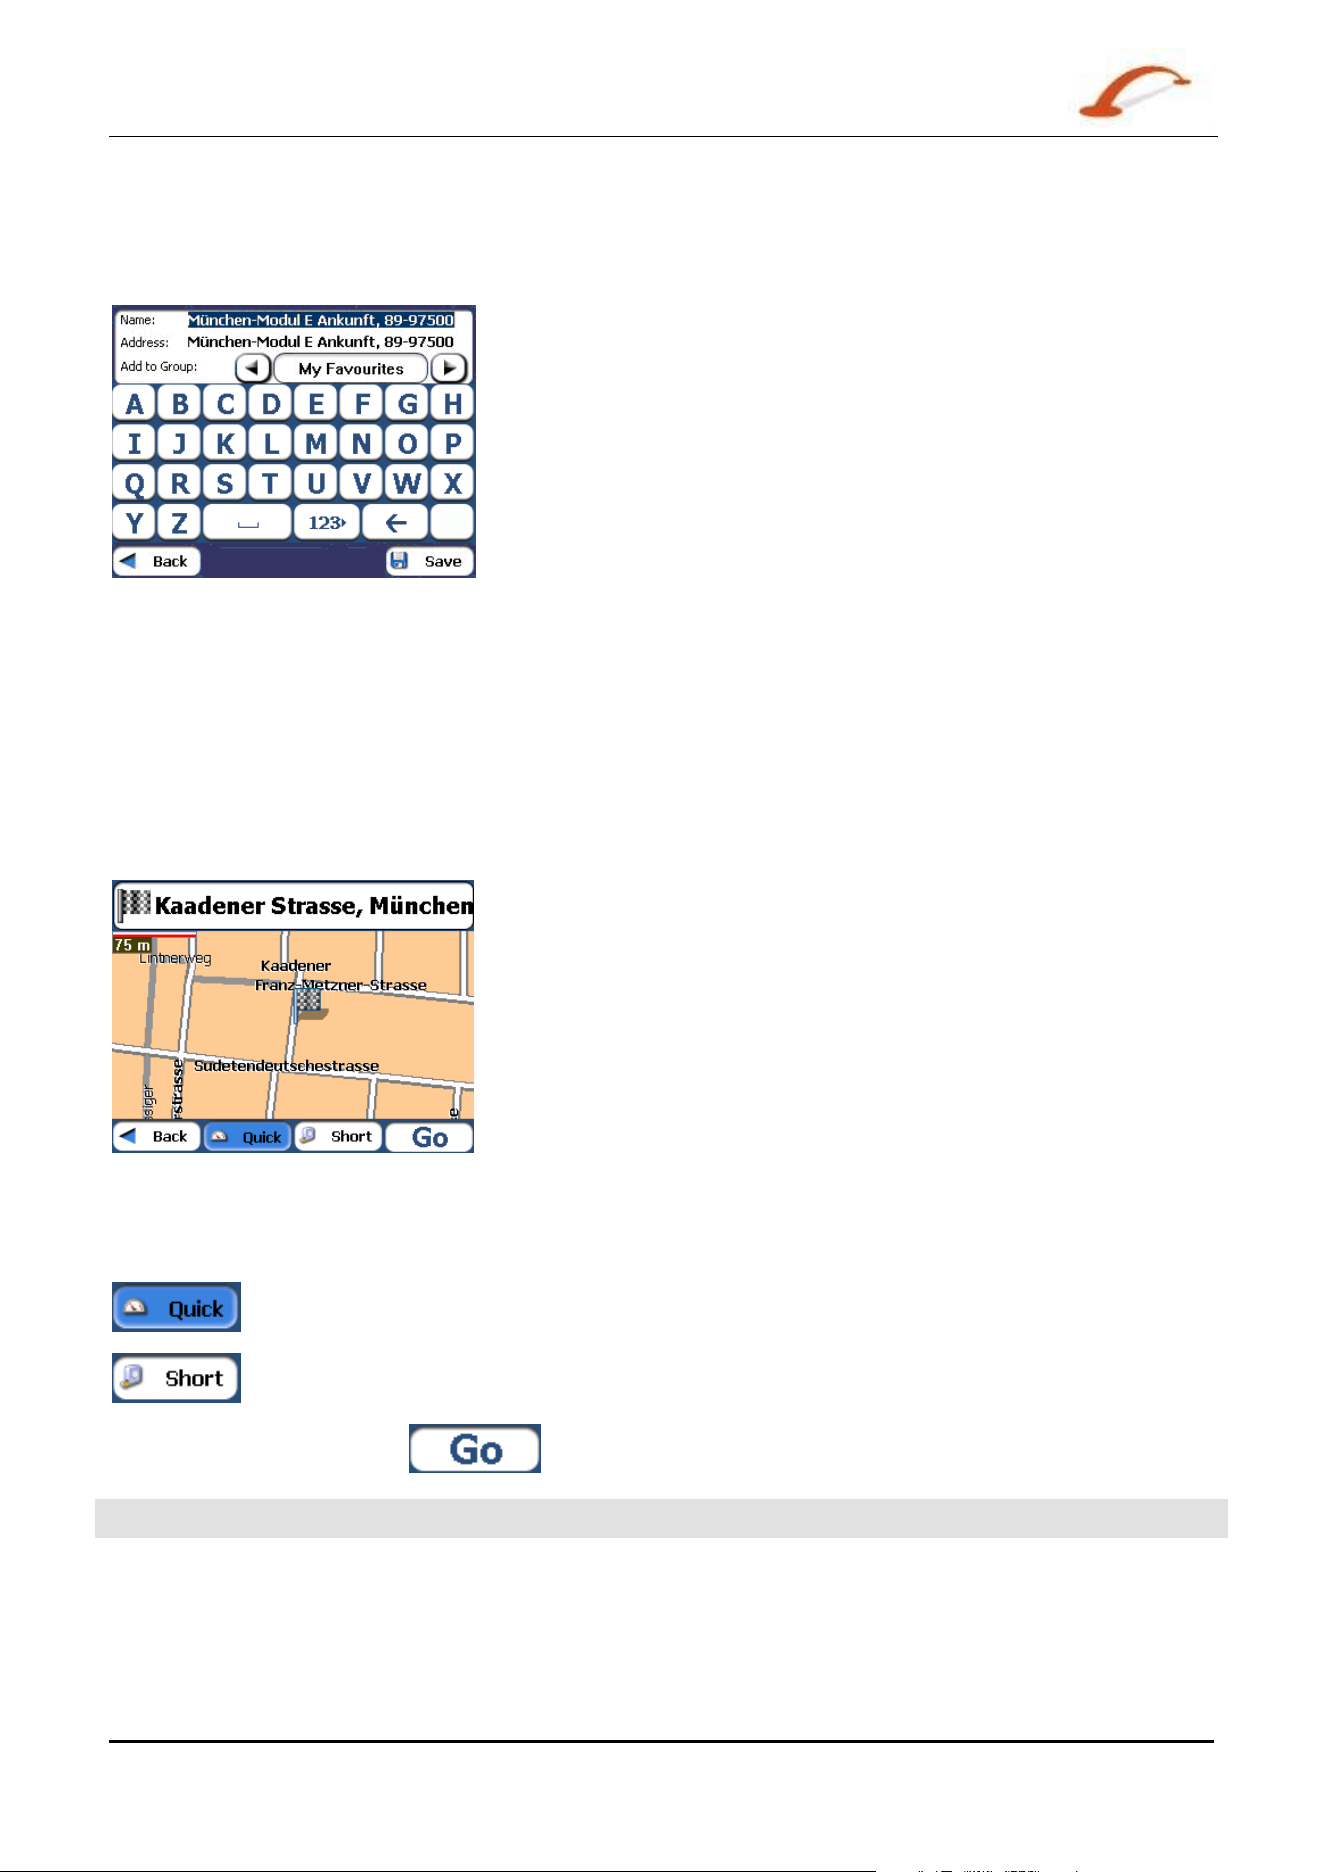
Recent Locations
The Re ce nt Locat ions screen let s you select an exist ing destinat ion from a list of
dest inat ions t hat you have previously t ravelled to. Dest in a t or aut om at ically st ores t he
last 64 dest inations in m em ory. As each new rout e is added to the top of the list, t he
older dest inat ions at t he bot tom are erased.
To navigat e to a recent dest inat ion, t ap t he Re ce n t Locat ions but ton. From t he Re ce nt
Loca tions screen, select a locat ion and tap the Show or N ext button. A m ap appears
show ing the specified locat ion. Tap the GO but ton to calculat e t he rout e.
Figure 1 7 - Tr a ve llin g t o a Rece nt Loca t ion
Use r 's Gu ide De st in a t or
1 5
Se arch for a Loca t ion
From this screen, you can tap the Act ions butt on to select from t he following com m and options.
Se t as Origin
Let s you designat e t he select ed locat ion as t he rout e origin. You would use
this com m and when calculating a rout e from a point other t han your current
location. Tap t he
Free M a p Brow sing butt on to disconnect from t he GPS
receiver .
Delet e I t em
Let s you delet e a recent locat ion.
Cle a r List
Lets you clear all locat ions in t he Re ce n t Loca tion s screen.
Se nd SMS
I f you are using a phone- enabled navigat ion device, you can send your
current locat ion in an SMS m essage. For m ore inform at ion, see "Se ndin g an
SM S Addre ss
( on page 33) " .
I nform a tion
This button displays t he location’s address inform ation.
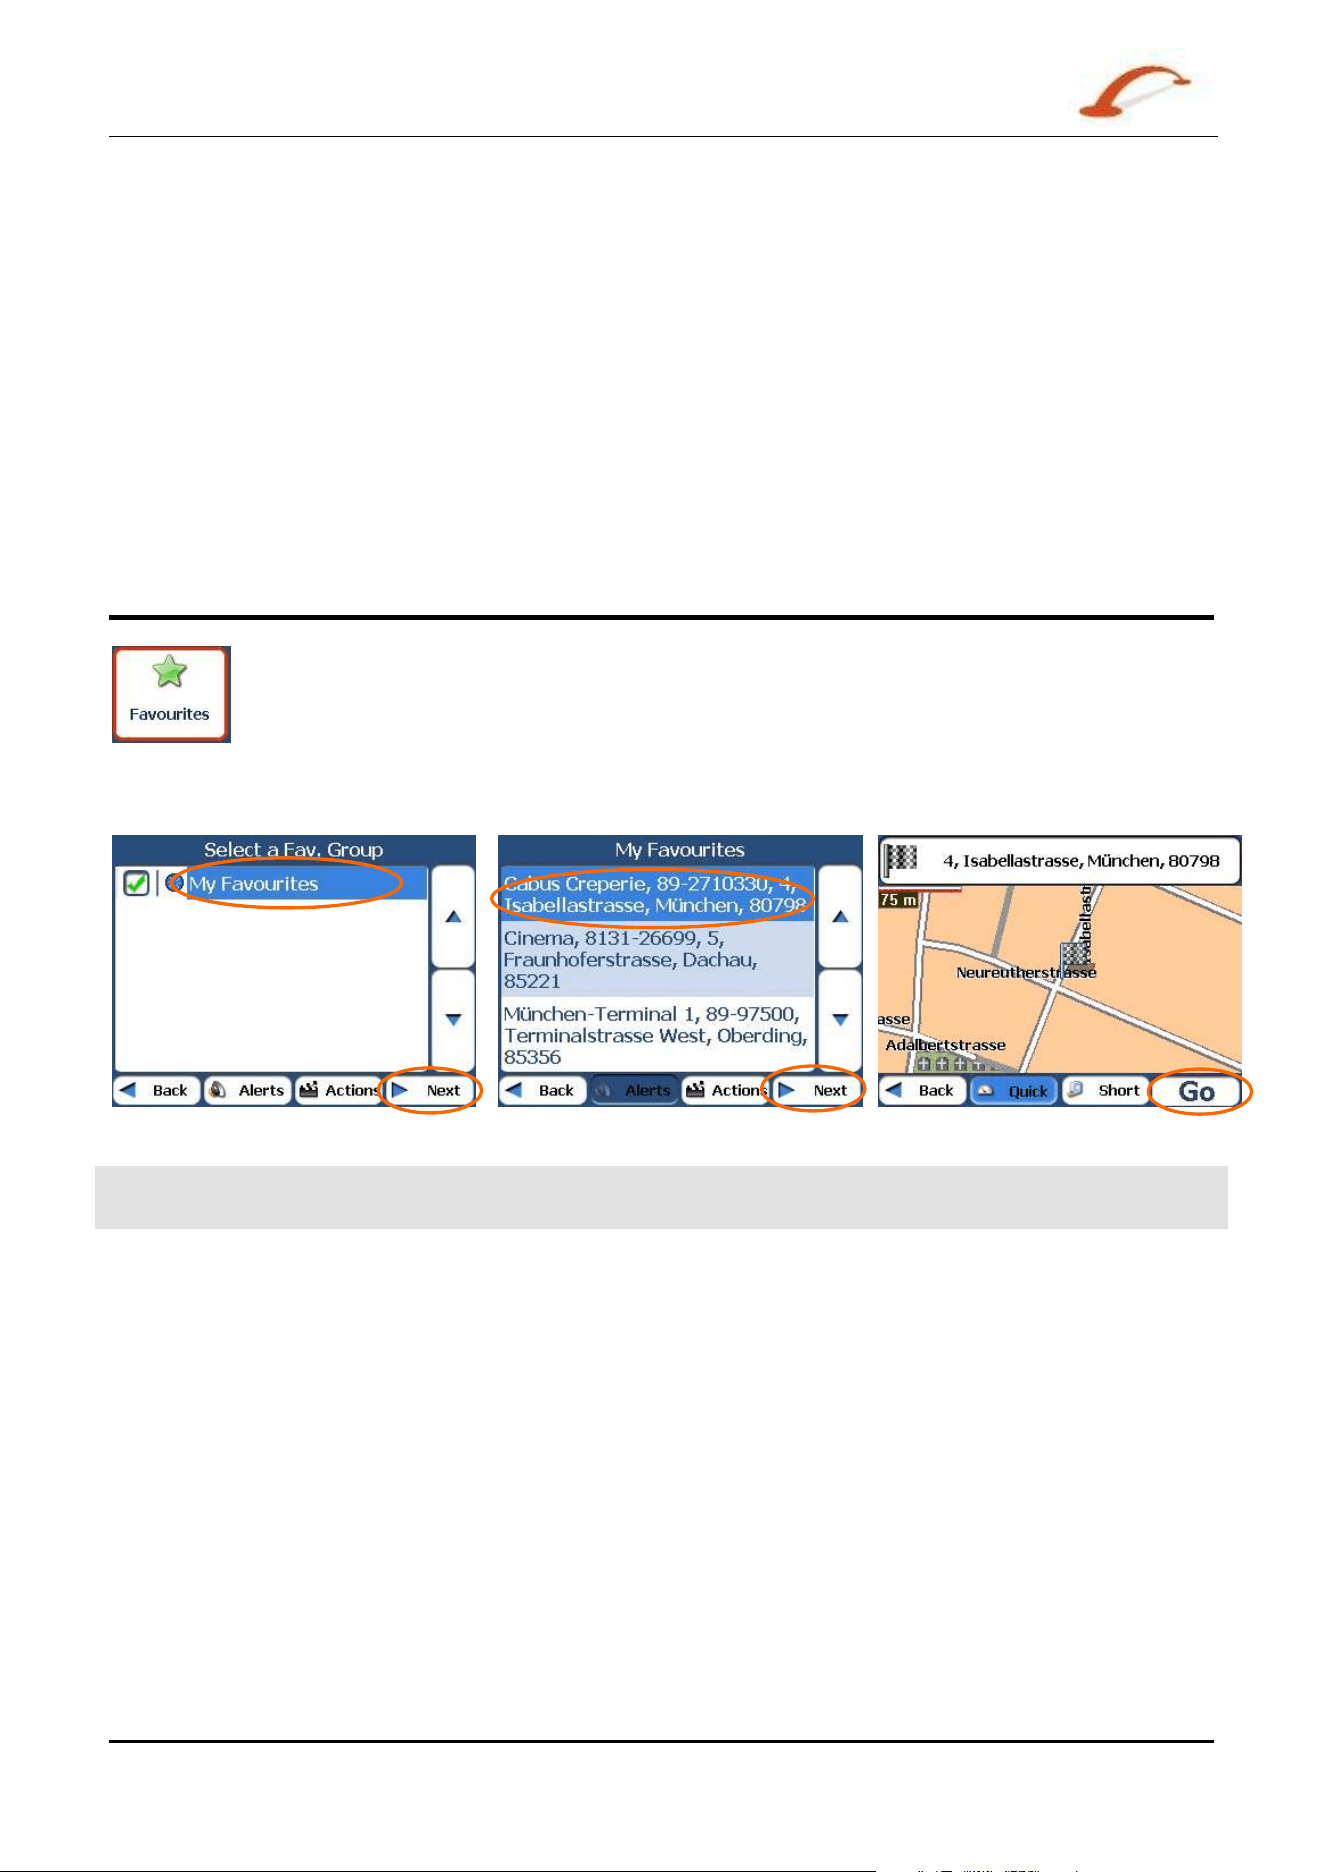
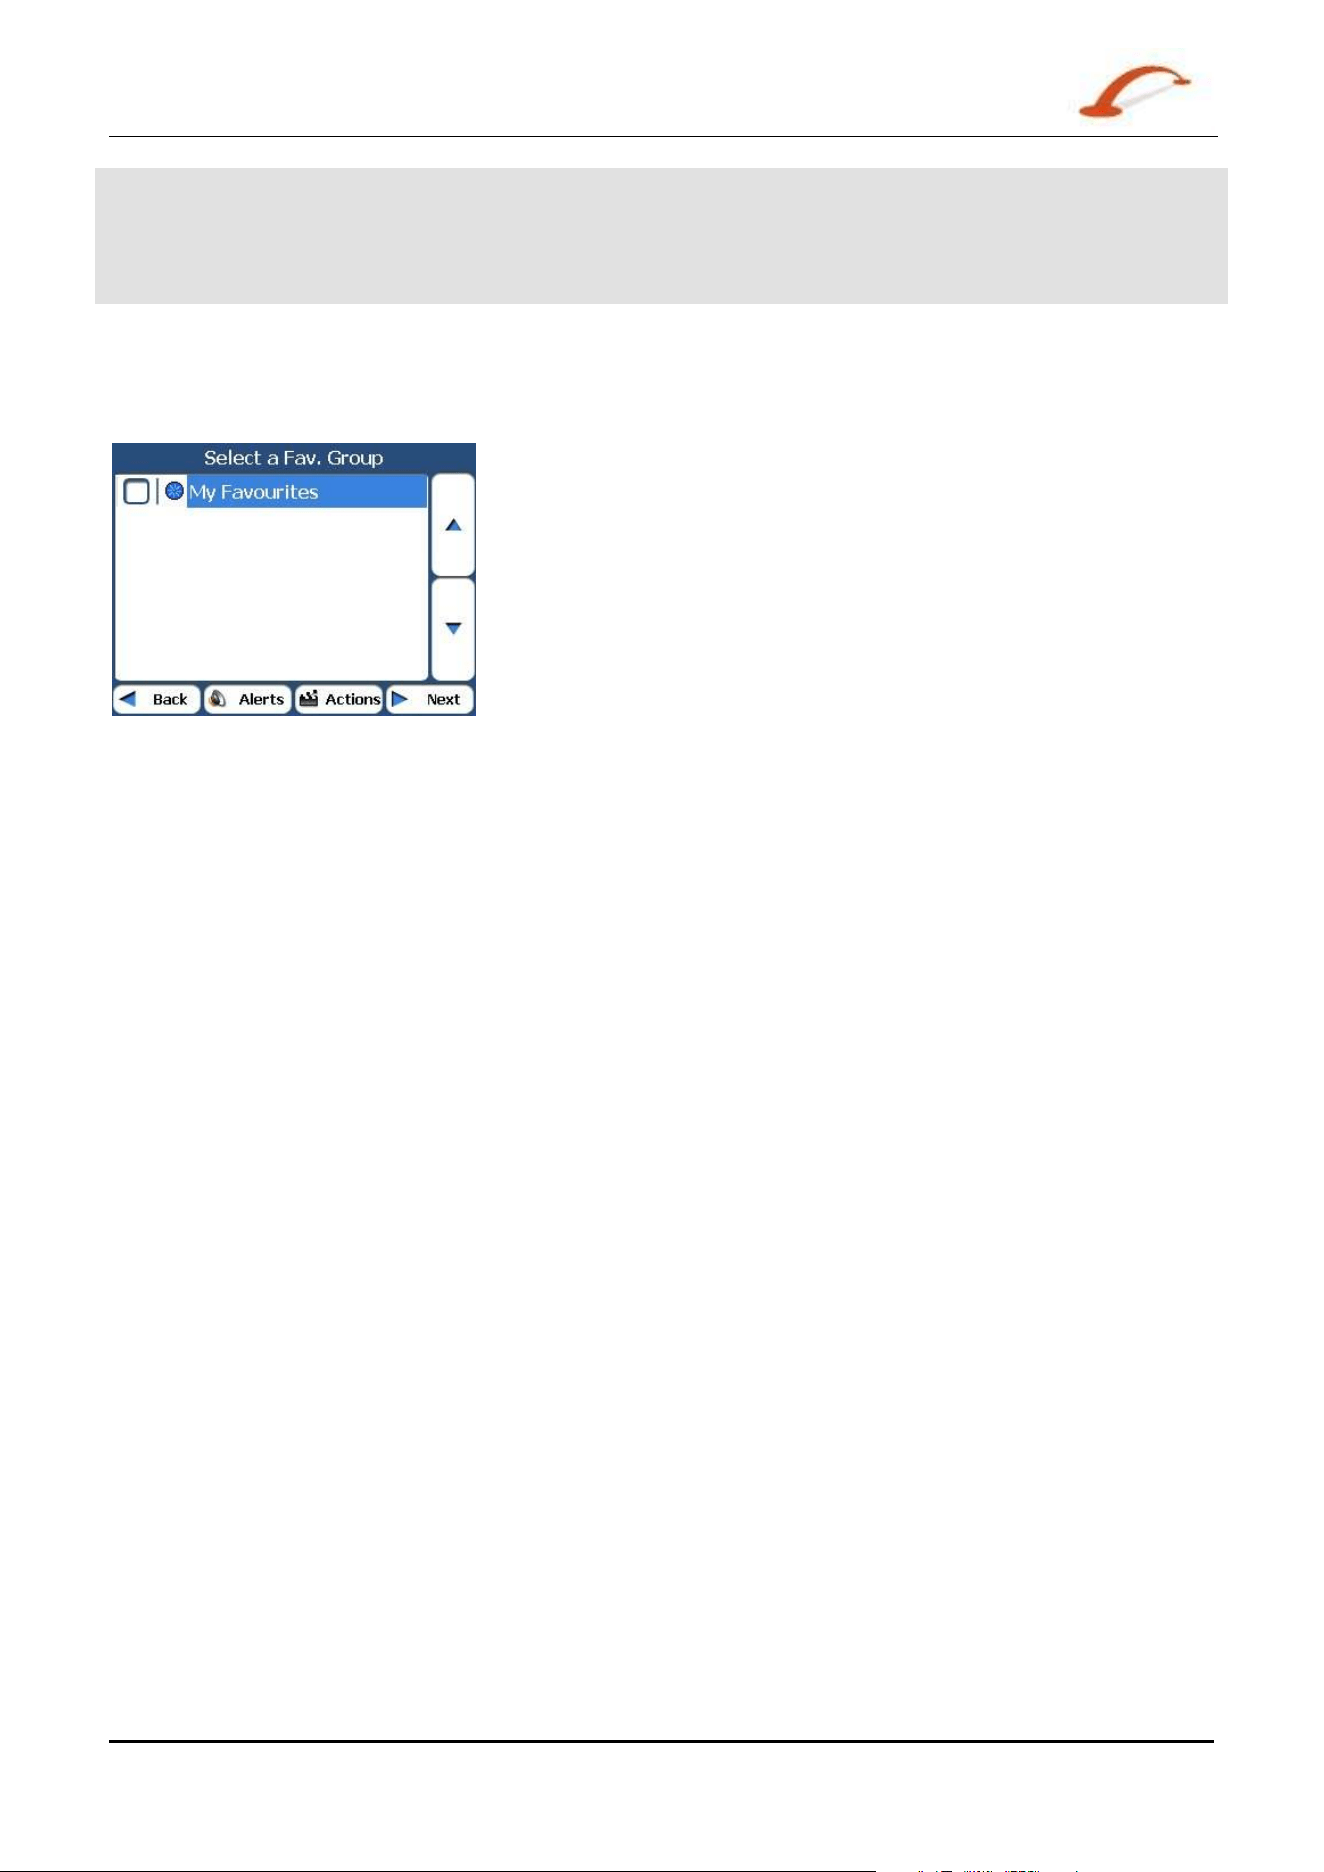
My Favourites
A Favourit e is a dest inat ion that you have stored for easy ret rieval.
To access a favour it e dest inat ion, open t he Dest in a t ion s m enu and t ap the My
Fa vourit es but t on. The M y Fa vourit es screen displays your favourit es groups. When you
tap on a select ed group,
Dest in a t or autom at ically displays it s stored locations. Tap the
selected location to show your destinat ion on a m ap. Tap the
GO but t on to calculat e your
rout e.
Figure 1 8 - Trave l to a Fa vourit e Loca tion
Not e: The My Favourites folder is the default folder where all favourites are st ored if not assigned t o a
group.
The Show M ap screen also lets you set your rout e t ype, Quick or Shor t . For m ore inform at ion, see "Go to
your Dest in a t ion " (on page 13).

Use r 's Gu ide De st in a t or
1 6
Se arch for a Loca t ion
Favourite Groups
You can tap t he Act ions butt on from t he M y Fa vourit es screen t o add, edit , or delet e groups, as described
below.
Add Gr oup
When you t ap t his but ton, the Fa vour ites Gr oup screen appears. Enter t he group
nam e and select an icon to ident ify t he group, as shown below.
Figure 1 9 - Cr e a t e Fa vourit e s Gr oup
The icon identifies all dest inations locat ed in that group, as displayed on the m ap.
Edit Group
When you t ap t his but ton, the Fa vour ites Gr oup screen appears wit h t he nam e
and select ed im age of t he highlighted group. You can change the nam e and icon.
Delet e Gr oup
When you t ap t his but ton, the select ed group and its associat ed entries are
rem oved. The
My Fa vou r it es gr oup cannot be delet ed.
Favourite Alerts
Aler t s let you know t hat you are wit hin a certain dist ance of a favourit e locat ion.
You can tap t he Ale r t s butt on to set the dist ances for t he 1st and 2nd Alert s. When you travel closer than
the designat ed dist ance, t he alert will sound, as shown below.
Figure 2 0 - Sett ing Your Fa vou r it e Ale r ts
Use r 's Gu ide De st in a t or
1 7
Se arch for a Loca t ion
Not es:
Favourit e Alert set tings affect all Favourites Groups.
The 2nd Alert m ust be set t o go off at closer distance than the 1st Alert.
Aler t s can be set for a group but not for individual locat ions. Of course, you can always creat e a group t hat
has just one locat ion.
You can disable t he alerts for all groups by select ing t he 1st Alert sett ing to Off.
You can disable t he alerts for a particular group by rem oving the t ick next t o the select ed group. Act ivat e
that disabled alert by adding a tick next to the select ed group.
Figure 2 1 - D isable d Fa vou r it e Ale r t s
Add Favourite Locations
Tap MY FAVOURI TES or any select ed gr oup that you have created to display its locat ions. You can save a
locat ion to your favourites groups from t he Addr e ss, Re ce n t Loca tions, or POI screens. For m or e
inform ation, see "
Add t o M y Fa vourit es (on page 13) ".
Favourites Actions
From this screen, you can tap the Act ions butt on to display t he following com m ands.
Se t as Origin
Let s you designat e t he select ed locat ion as t he rout e origin. You
would use t his com m and when calculat ing a route from a point
ot her t han your cur rent location. Tap t he
Free M a p Brow sing
but ton t o disconnect from t he GPS receiver.
Show Map
Let s you see t he select ed address on t he m ap.
Edit Favourit e Loca t ion
Let s you change the nam e, com m ent , or group locat ion for the
selected location.
Delet e Favourit e Loca tion
Tap t he but t on t o rem ove t he select ed locat ion.
Se nd SMS
I f you are using a phone- enabled navigat ion device, you can send
your current locat ion in an SMS m essage. For m ore inform at ion,
see
Se ndin g an SM S Addr e ss ( on page 33) .
I nform a tion
This button displays addit ional address inform at ion, such as
address det ails, phone num ber, and ot her com m ent s about your
favour it e location that you have ent er ed.
Use r 's Gu ide De st in a t or
1 8
Se arch for a Loca t ion
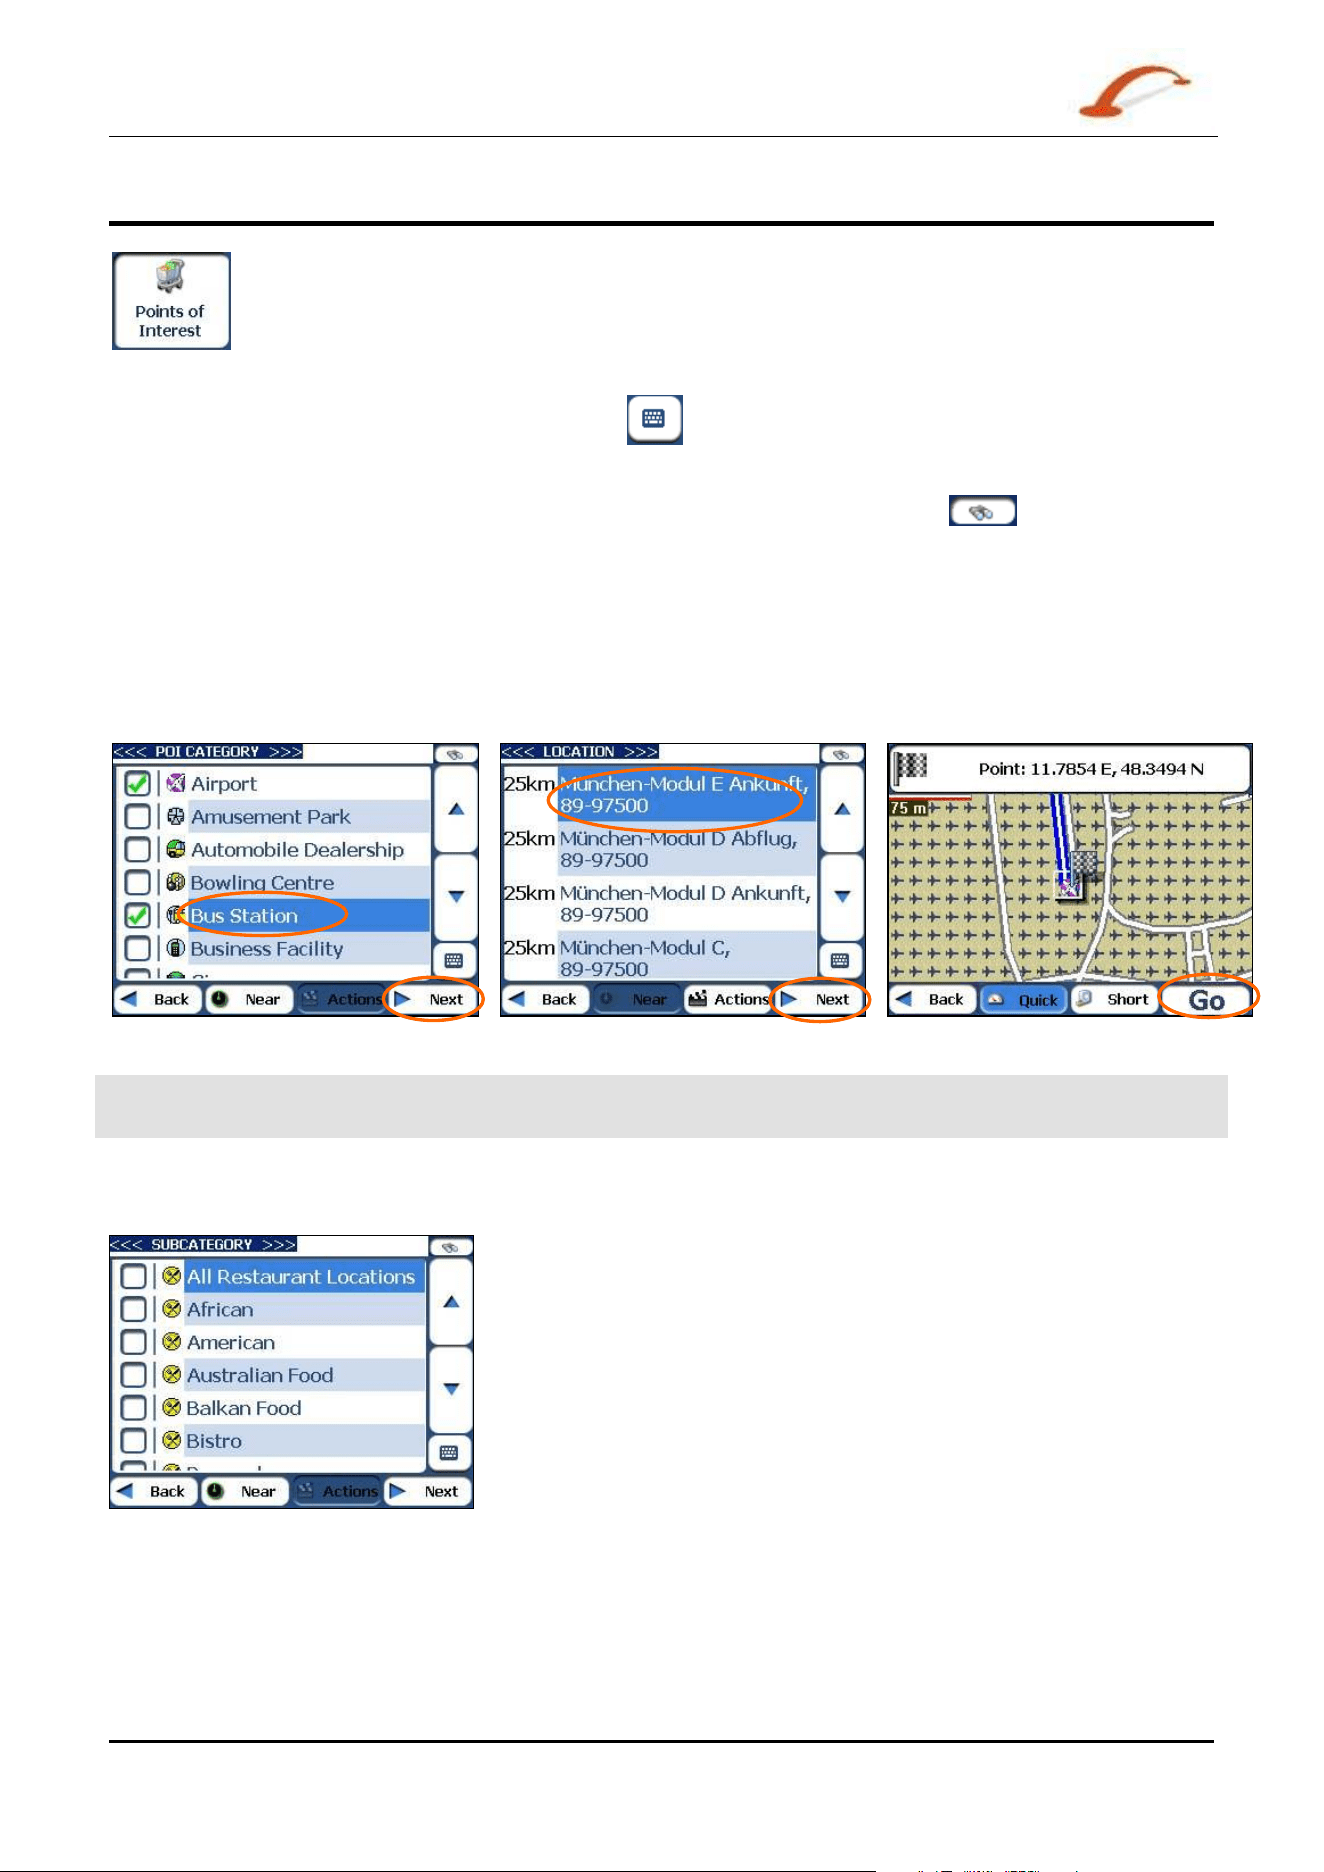
POI (Points of Interest)
The POI list is a collect ion of hundreds of int erest ing or useful places organised by easy- t o-
find cat egories. For exam ple, you can use D e st inat or t o guide you to a shopping centre,
hot el, r est aurant, or pet rol st at ion.
From the Dest inat ions m enu, t ap t he Points of I nt erest but t on. The POI screen appears. You can find a
cat egory by t apping t he H ide/ D isplay Keyboard
button and ent ering t ext in the POI Cat egory field.
The Sm art Search System autom at ically displays t he POI categories that m atch the charact ers ent ered.
I f you didn’t find t he category through the init ial search you can also use the Fin d
button to do a
sub- search, particularly useful when the cat egory nam e consists of two or m ore words. You can always
browse t he POI Category list by using the Scroll but tons.
When select ing a category, Dest inat or autom at ically displays t he cat egory entries and the dist ance each
entry is from your current posit ion. Select your ent ry and tap or click t he N ext button to display your
selected dest inat ion on the m ap and then tap the
GO button to calculat e your route. From the Show on Map
screen, you can designat e a route type, Quick or Short. For m ore inform at ion about calculating a rout e, see
"
Go t o you r D e st in a t ion (on page 13) " on page 13.
Figure 2 2 – Points of I n t erest
N ote: From t he Act ions screen, click t he Sor t by ABC butt on to display t he cat egory ent ries in alphabetical
order.
Subcategories
Many cat egories have subcategories t o provide for an even great er list
of choices. For exam ple, “ Pet rol St ation” m ay have m any
subcat egories each representing a par t icular brand nam e. The sam e is
also t rue for Hot els. Rest aurants have subcategories that represent
different t ypes of food, such as I ndian, I t alian, and French, as shown
below.
Figure 2 3 - POI Subca tegories

Use r 's Gu ide De st in a t or 1 9
Se arch for a Loca t ion
Search Near a Location
You can tap t he Near butt on to det erm ine the locat ion area, where you want t o search for a specific place,
such as a pet rol st at ion, hot el, or rest aurant.
The available opt ions are list ed below.
Curr ent Loca t ion
Let s you search near your cur rent locat ion. This is t he default value.
Dest inat ion
Let s you search near a specified dest ination. For exam ple, you know your
general dest ination, but not very m uch about int eresting locat ions in t he area.
You can use Dest inat or to locat e t he tourist at t r act ions close to your
dest inat ion. Note that this button is enabled only when a dest ination is
entered.
Ot he r Address
Let s you search near anot her address. For exam ple, you have set a
dest inat ion, but on the way you want t o st op at anot her locat ion. You can use
this feat ure t o search near that locat ion for rest aurants, lodging, historical
sit es, or other locations.
Sea rch Radiu s
Enter t he locat ion dist ance to search for a designat ed place. For exam ple, if
you ent er 5 km , Dest inat or only searches within a five kilom et re radius.
When you select a large search radius, you risk t he chance of finding too
m any locat ions, which m akes it harder t o find the place t hat you are searching
for. I t is best t o st art wit h a sm all search radius size, and t hen increase t he
radius size if necessary.
Not e: if you don’t specify a search radius, D e st in a t or searches the whole
m ap and displays the locat ions according to the dist ance fr om you.
Show or Hide Symbol on Map
You can add or rem ove t he ticks next to a POI entry to show or hide t he POI sym bol on the Map.
POI Actions
When you have select ed a POI locat ion, t ap the Act ions butt on to display t he com m ands list ed below.
Se t as Origin
Let s you designat e the select ed locat ion as t he route origin. You would use t his
com m and when calculating a rout e from a point other than your current locat ion.
Tap t he
Free M a p Brow sing but ton t o disconnect from t he GPS receiver.
Show on Map
Let s you see t he select ed address on t he m ap.
Add t o My Favourite s
Lets you add an address to your list of favourite locat ions, as shown in the figure
below. For m ore inform ation, see " My Favourit es" .
Sort By ABC or
Dist ance
Let s you sort t he entries of the select ed cat egory alphabetically or by dist ance from
your current locat ion.
N ote: D est inat or initially displays the ent ries by dist ance.
Se nd SMS
I f you are using a phone- enabled navigat ion device, you can send your current
locat ion in an SMS m essage. For m ore inform at ion, see "Sendin g an SM S
Address
( on page 33) " .
I nform a tion
This button displays t he location’s address inform ation.
Use r 's Gu ide De st in a t or
2 0
Se arch for a Loca t ion
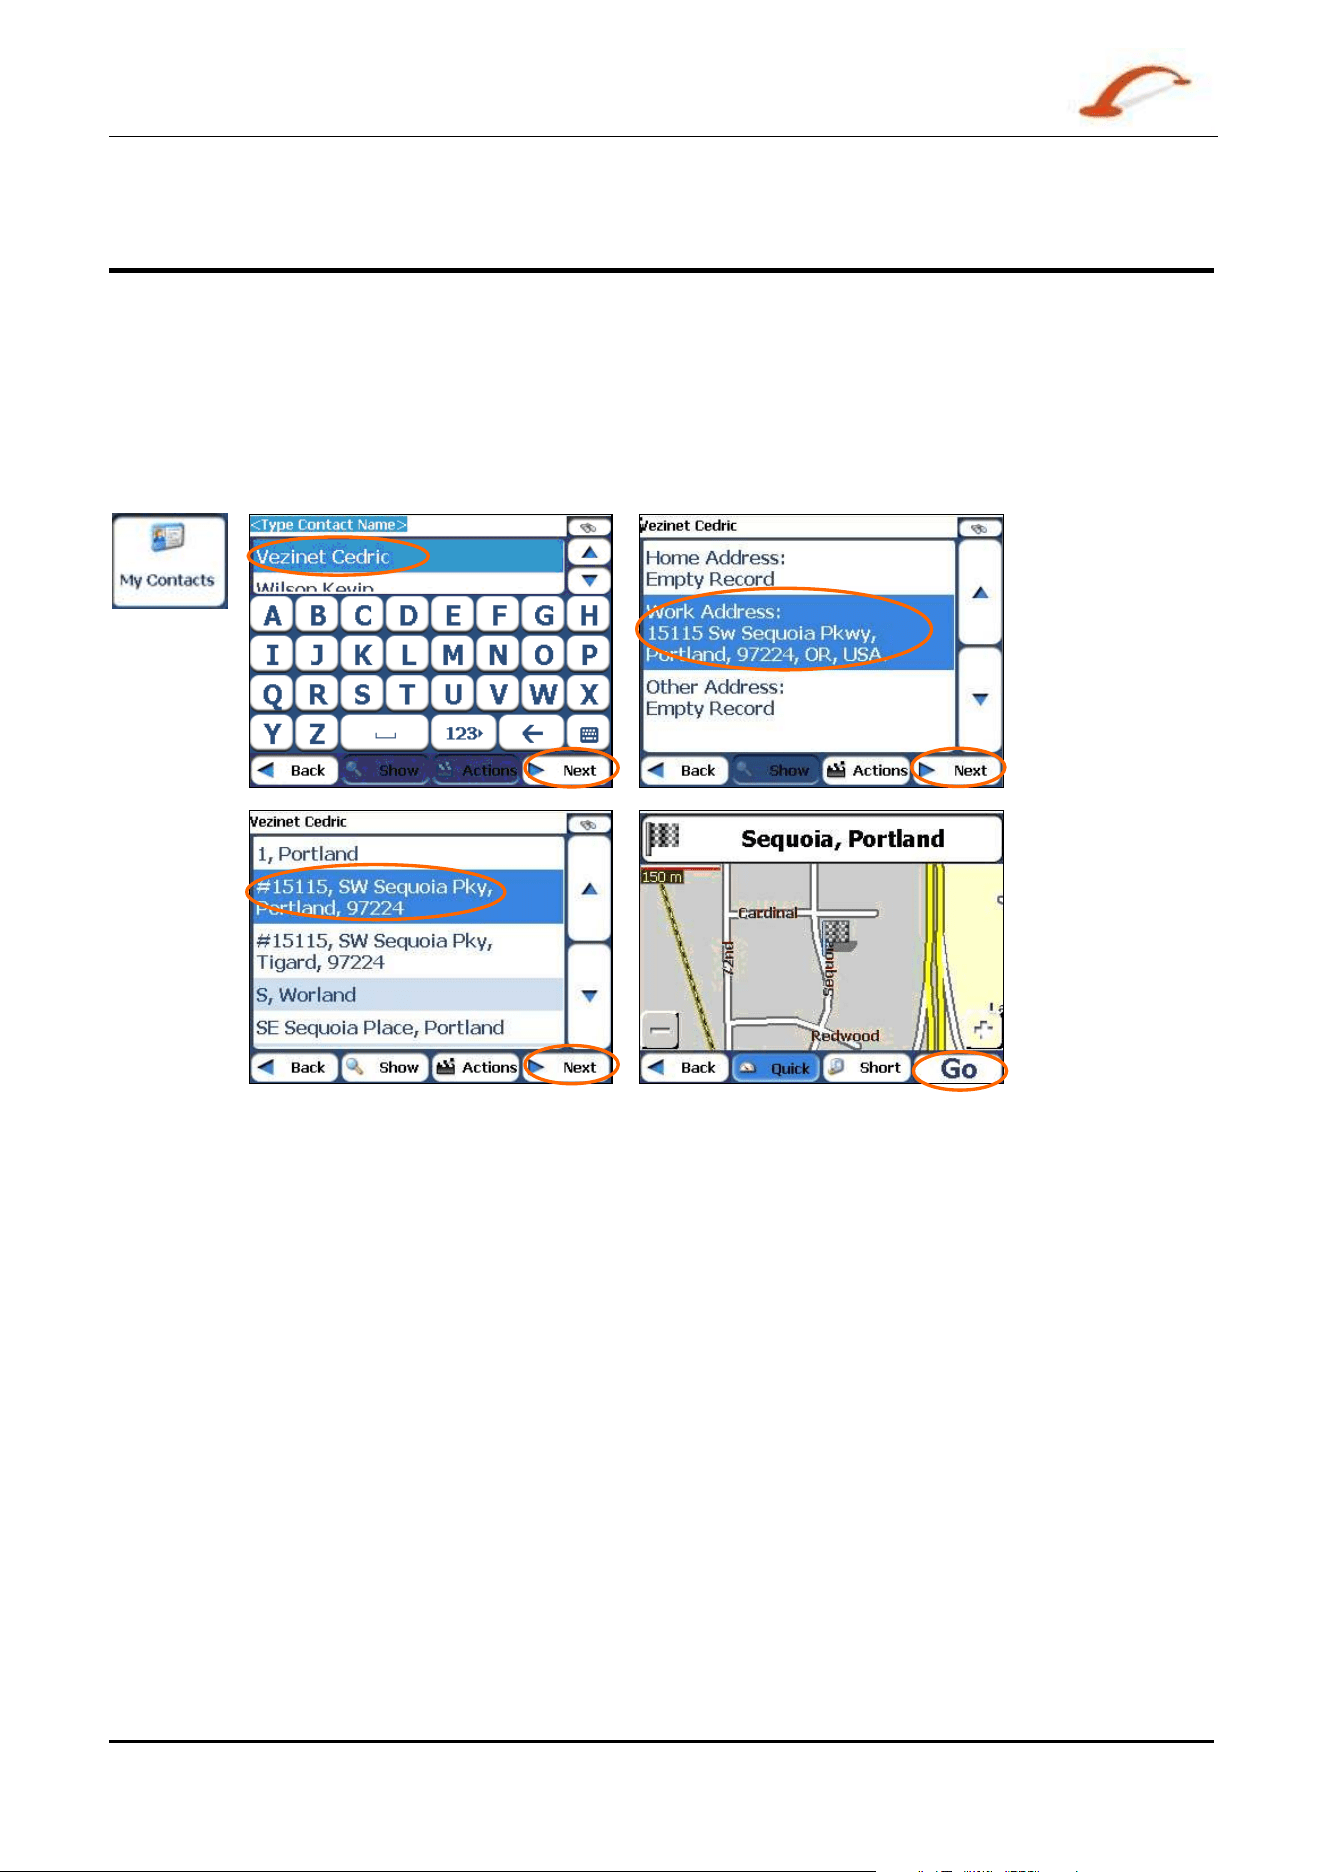
My Contacts (Optional)
You can specify a cont act address as a dest inat ion, by select ing a cont act from your PC folder , found under
the St a r t m enu.
From the Dest inat ions m enu, tap the My Contact s but t on to display your list of contact s. Select a contact
and click Next t o display t he addresses ent er ed for t he cont act. From t he Contact Addr e ss screen, tap
Next t o display the sim ilar addresses that ar e recognised by D e st in a t or . Select a Dest inat or address and
click Next t o show t he locat ion on t he m ap. Tap the GO but t on to inst ruct D e st in a t or to navigat e t o the
selected address.
Figure 2 4 - Loca t ing a Cont act 's Addr e ss
When you t ab t he Act ions but ton, you can choose from t he following opt ions:
Add t o My Favourite s
Lets you add an address to your list of favourit e locat ions,
as shown in the figure below. For m ore inform at ion, see
"My Favourit es" .
Se t as Origin
Let s you designat e t he select ed locat ion as t he rout e
origin. You would use this com m and when calculating a
rout e from a point other t han your current locat ion. Tap
the
Free M a p Brow sing butt on to disconnect from t he
GPS receiver.
Se nd as SM S
I f you are using a phone- enabled navigat ion device, you
can send your current locat ion in an SMS m essage. For
m ore inform ation, see "
Sendin g an SM S Address (on
page
33)".

Use r 's Gu ide De st in a t or 2 1
Se arch for a Loca t ion
Traffic Information (Optional)
What is the Traffic Message Channel?
The Traffic Message Channel (TMC) is a specific applicat ion of the FM Radio Dat a System ( RDS) used for
broadcast ing real- tim e t raffic and weat her inform ation. Dat a m essages are received silently, decoded, and
delivered to a TM C-enabled navigat ion syst em t hat can offer dynam ic route guidance – alerting the driver t o
a problem on the planned route and calculat ing an alternat ive route t o avoid the incident .
Coverage of the Service
TM C Services cover nearly all of West ern Europe. Each service is transm itt ed by a national, regional, or
local broadcast er. TM C Service provides traffic inform ation for m onit ored roads only, m otorways and m ain
roads. TM C radio t ransm issions recept ion can change from area to area, depending on w eat her condit ions,
st atic electricit y, power lines, and other natural or m an-m ade condit ions.
Disclaimer
Dest in a t or Tech nologie s is not responsible for any dam age caused by an accident due to unreliable TMC
radio t r ansm issions by nat ional, regional, or local broadcast ers caused by TMC service rest rictions, or by
natural and m an-m ade condit ions that prevent real- t im e traffic and weat her inform ation from being
delivered to the TM C- enabled navigat ion syst em . D e st inat or Tech nologie s is not responsible for t he
qualit y or accuracy of t he events br oadcast and the m et hod by which they are displayed.
TMC Antenna Installation
I nst alling t he TMC Ant enna:
1. Place the wired antennas horizontally in t he car using the rubber st ickers provided. I t is
recom m ended that the antenna be at t ached to the windscreen. Please not e t hat som e car m odels
( especially French) use coat ed windscreen glass and placing t he radio antenna on ot her windows is
therefore r ecom m ended on t hese cars.
2. The TMC syst em autom at ically locat es the frequency of t he closest radio st at ion and r ecom m ends
an alt ernate route when traffic event s ( such as congest ion or an accident) are det ect ed. For m ore
inform ation, please refer to the user m anual.
3. Ot her traffic event s – such as General I nform at ion, Roadworks and Weat her – are also m onit ored to
let the user avoid these event s m anually.
Destinator Traffic Service
Dest ina tor provides the following traffic service:
1. The Dest inat or Traffic Engine m onit ors the events relevant t o your rout e only.
2. Dest ina tor aut om at ically calculat es the best alt ernative rout e.
3. Every 5 m inut es, D e st inat or re- evaluat es the t raffic conditions and rout e accordingly.
4. No addit ional registrat ion or act ivat ion is required. Sim ply use your device in the way you are used
to.
Use r 's Gu ide De st in a t or
2 2
Se arch for a Loca t ion
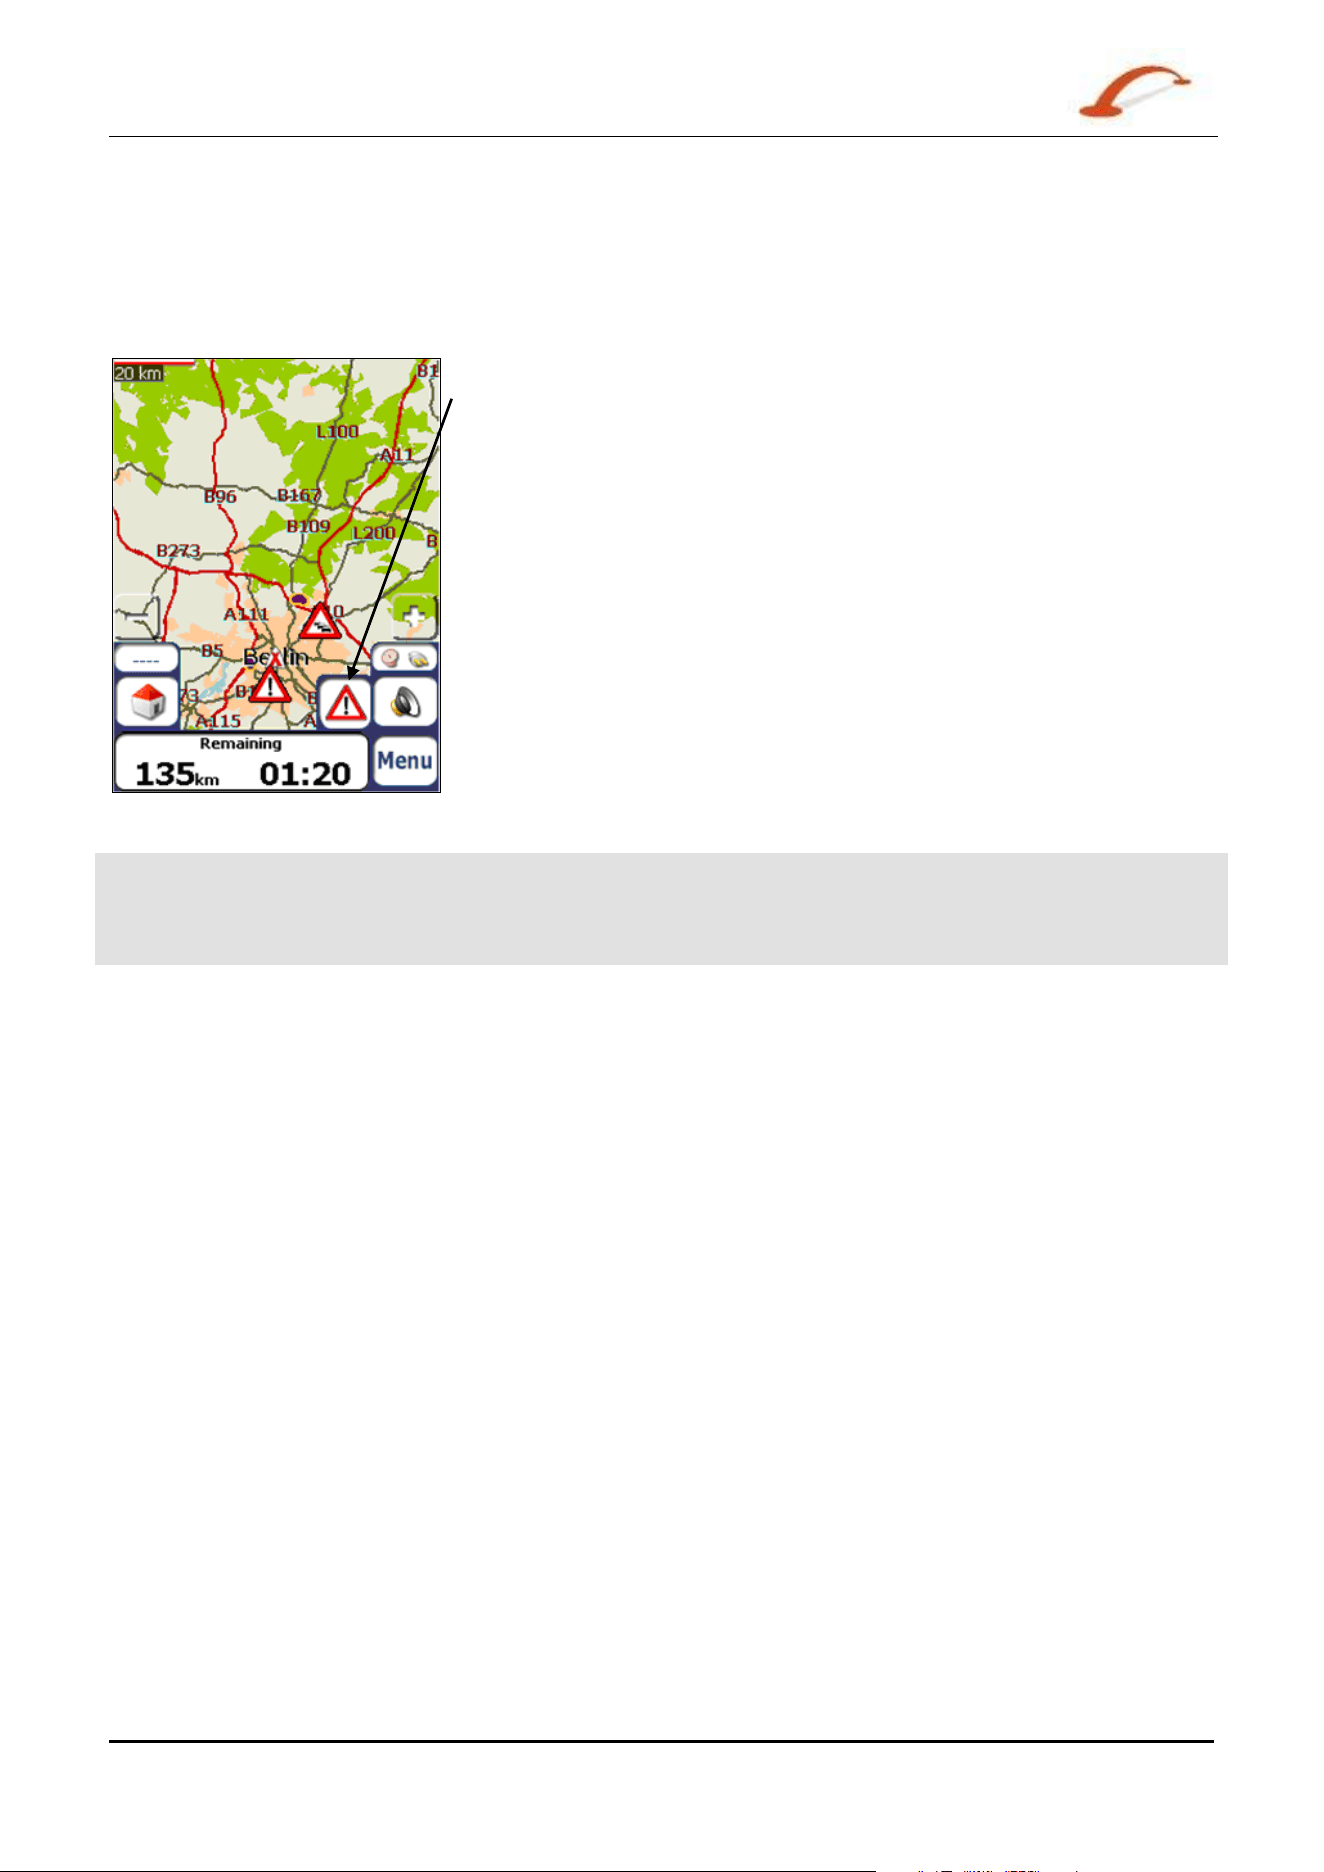
Traffic Info Alert
Traffic ( TMC) m essages are nat ional and regional FM radio broadcast s t hat are used to inform drivers of
traffic, weather, and ot her driving condit ions, as shown below .
The Traffic Alert icon appears each t im e a t raffic event is encountered. The
alert descript ion is displayed in the
TMC I nbox screen, which can be
opened by t apping on the Traffic Alert icon.
Figure 2 5 - Tr affic I nfo Ale r t
N ote: Som e car m odels (especially French) use coat ed windscreen glass, and placing t he radio ant enna on
ot her windows is t herefore recom m ended on t hese cars. An alternat ive solut ion is to inst all an Ant enna
Split t er t hat lets you use your usual radio antenna. For m ore inform at ion about t he Ant enna Split t er, please
go t o htt p: / / www.gns- gm bh.com
TM C inform ation is received by your TMC- enabled GPS receiver and m onit ored by your soft ware.
Dest ina tor can autom at ically reroute your travel t o avoid areas t hat TM C indicates are t roublesom e t o
drivers. For inst ance, if t here is a st orm or accident in your vicinit y, your rout e would be r ecalculat ed t o
avoid the problem .
Use r 's Gu ide De st in a t or
2 3
Se arch for a Loca t ion
N ote: Please go t o http: / / www.tm cforum .com for inform at ion about European count ries t hat provide TM C
service. A TMC receiver is required to receive TM C br oadcast s.
From the Opt ions m enu, select the Tr a ffic I nfo but t on, which opens t he TMC inbox, and displays traffic
reports. You can select a traffic report and click Next to show a m ap of t he affect ed road. I f you click t he
Avoid button, D e st in a t or recalculates your rout e. Not e t hat if the event was avoided, t he Show M a p
screen displays t he Allow button to recalculate to that previously avoided rout e sect ion.
Figure 2 6 - Tr affic I nfo Events
All TM C m essages are delivered t o the TMC I nbox, but only m essages relat ing t he direct rout e and a 200
m etre radius are displayed. The radius is set t o 160 kilom et res when no route has been select ed.
N ote: I t is st rongly r ecom m ended t hat you let Dest ina t or aut om at ically scan and lock ont o the TM C
st at ions and do not m anually search for a TM C st ation.
You can use the following butt ons to go t o a different radio frequency:
Let s you search for a t raffic channel at a lower frequency. When a st at ion is locat ed,
Dest ina tor checks for TM C dat a. I f t here is no TMC data for this st ation, De st in a t or
continues to scan until a radio st at ion wit h TM C dat a is locat ed.
Lets you m ake m inim al ( 0.1) st eps t oward a lower frequency t o bring in the channel.
Let s you m ake m inim al (0.1) st eps t oward a higher frequency t o bring in t he channel.
Let s you scan for a t raffic channel wit h TMC dat a at a higher frequency.
Use r 's Gu ide De st in a t or
2 4
Se arch for a Loca t ion
TMC Options
You can tap t he Opt ions butt on The Tra ffic I nfor m at ion Opt ion s dialogue box is displayed, as shown
below.
Figure 2 7 - D e fining Traffic I nform a t ion Set t in gs
You m ust configure t he Traffic M essa ge Channel ( TM C) be defining the follow ing set tings:
W he n an
even t occu rs:
You can select eit her:
Au t om atica lly - Dest in a t or autom at ically recalculat es the route to avoid a road wit h
adverse t raffic condit ions – traffic j am or accident only.
Manual - You can m anually select the TMC event from t he inbox and tap t he Avoid
but ton from t he Sh ow Map scr een.
Sea rch for
TM C St at ion s:
Au t om atica lly - Dest in a t or autom at ically scans the FM r adio fr equencies unt il a
TM C st at ion is found. Should you lose t he st ation frequency, D e st in a t or will
autom at ically scan for a new
TM C st at ion.
Manual - You can use t he frequency keys to scan for a TM C st ation [ Not advised] .
Te st TM C
When you t ap t his but ton, D e st in a t or expands the search radius for t o the "Whole
Map" for one m inute, sw it ches autom at ically t o t he TM C I nbox screen and displays a
test m essage called " Test ing TM C Service". After one m inute,
Dest ina tor reverts to
the rout e and the 200 m etre radius.”
I f you do not receive a m essage aft er tapping this button, please check in the
following sequence:
The TMC receiver is locked on to a TMC st at ion. I f not , reconnect your TM C receiver
I f you see t he t uner scanning but not locking on to a TM C st ation, try to change your
posit ion and check t hat your ant enna is vertical.
Depending on your locat ion, you m ight not have TM C coverage.
Check t hat you are using the m ap of the country that you are current ly t ravelling in.
Use r 's Gu ide De st in a t or
2 5
Se arch for a Loca t ion
Traffic Info Map Icons
You can display Traffic I nfo. icons on the m ain m ap by select ing the Traffic I nfo. r adio button in the GPS
Connect ion Set t ings
screen.
This icon appears only when you have act ivat ed the TM C from t he GPS Conn e ct ion Set t ings screen.
You can tap t he TM C icon to display t he TM C I nbox screen.
The Route Aler t icon appears in place of the TM C icon, not ifying you t hat there are relevant TMC
m essages in your inbox
Route Manager
From the Opt ions m enu, tap the Route Ma na ger button t o display D est inat or’s r out e navigat ion
features, as described in the sections below.
Turn-by-Turn List
When you display the Tu r n - by- Turn screen by tapping t he Direct ions Bar on the m ain m ap, t he Turn- by-
Turn list changes as you navigat e the route.
After you have entered a dest inat ion and calculat ed a rout e, t he D ir e ctions bar appears on the M ain Ma p
screen, displaying the follow ing inform at ion:
The next t urn direct ion
The dist ance to the next turn
The st reet nam e of the next turn
When you t ap t he Direct ions bar, D est in a t or displays a com plet e set of turn- by- t urn direct ions from your
curr ent point t o your select ed dest inat ion. You can also tap the Turn- by - Tu r n butt on to display t he
direct ion list .
Use the Scroll but t ons t o m ove up or down the direct ions list.
Figure 2 8 - Tu r n - by- Turn D ispla y
The follow ing opt ions are available:
The Rout e Sum m ary button displays your entire rout e on the M a p screen, plus the travel
distance and the Estim at ed Travel Tim e Rem aining ( ETR) .
The Show Turn but t on displays t he next t urn on the M ap screen, including t he st reet
nam e, the distance t o it , and t he turn direct ion.
The Avoid butt on lets you avoid the select ed turn in t he direct ions list . D e st in a t or
recalculat es the rout e aut om at ically. Note that when you exclude a t urn, the recalculat ed
rout e m ay take longer.
Use r 's Gu ide De st in a t or
2 6
Se arch for a Loca t ion
Route Summary or Cancel Route
The Route Sum m ary button let s you display an overview of your com plet e route on the M ap
Manager screen, t he t ot al driving dist ance to your destinat ion, t he est im ated t ravel tim e,
and the com plet e dest inat ion address.
The Ca nce l Route butt on, in the Dest inations m enu, st ops t he current navigat ion and clears
the rout e. This feature is act ive only aft er a dest ination has been set .
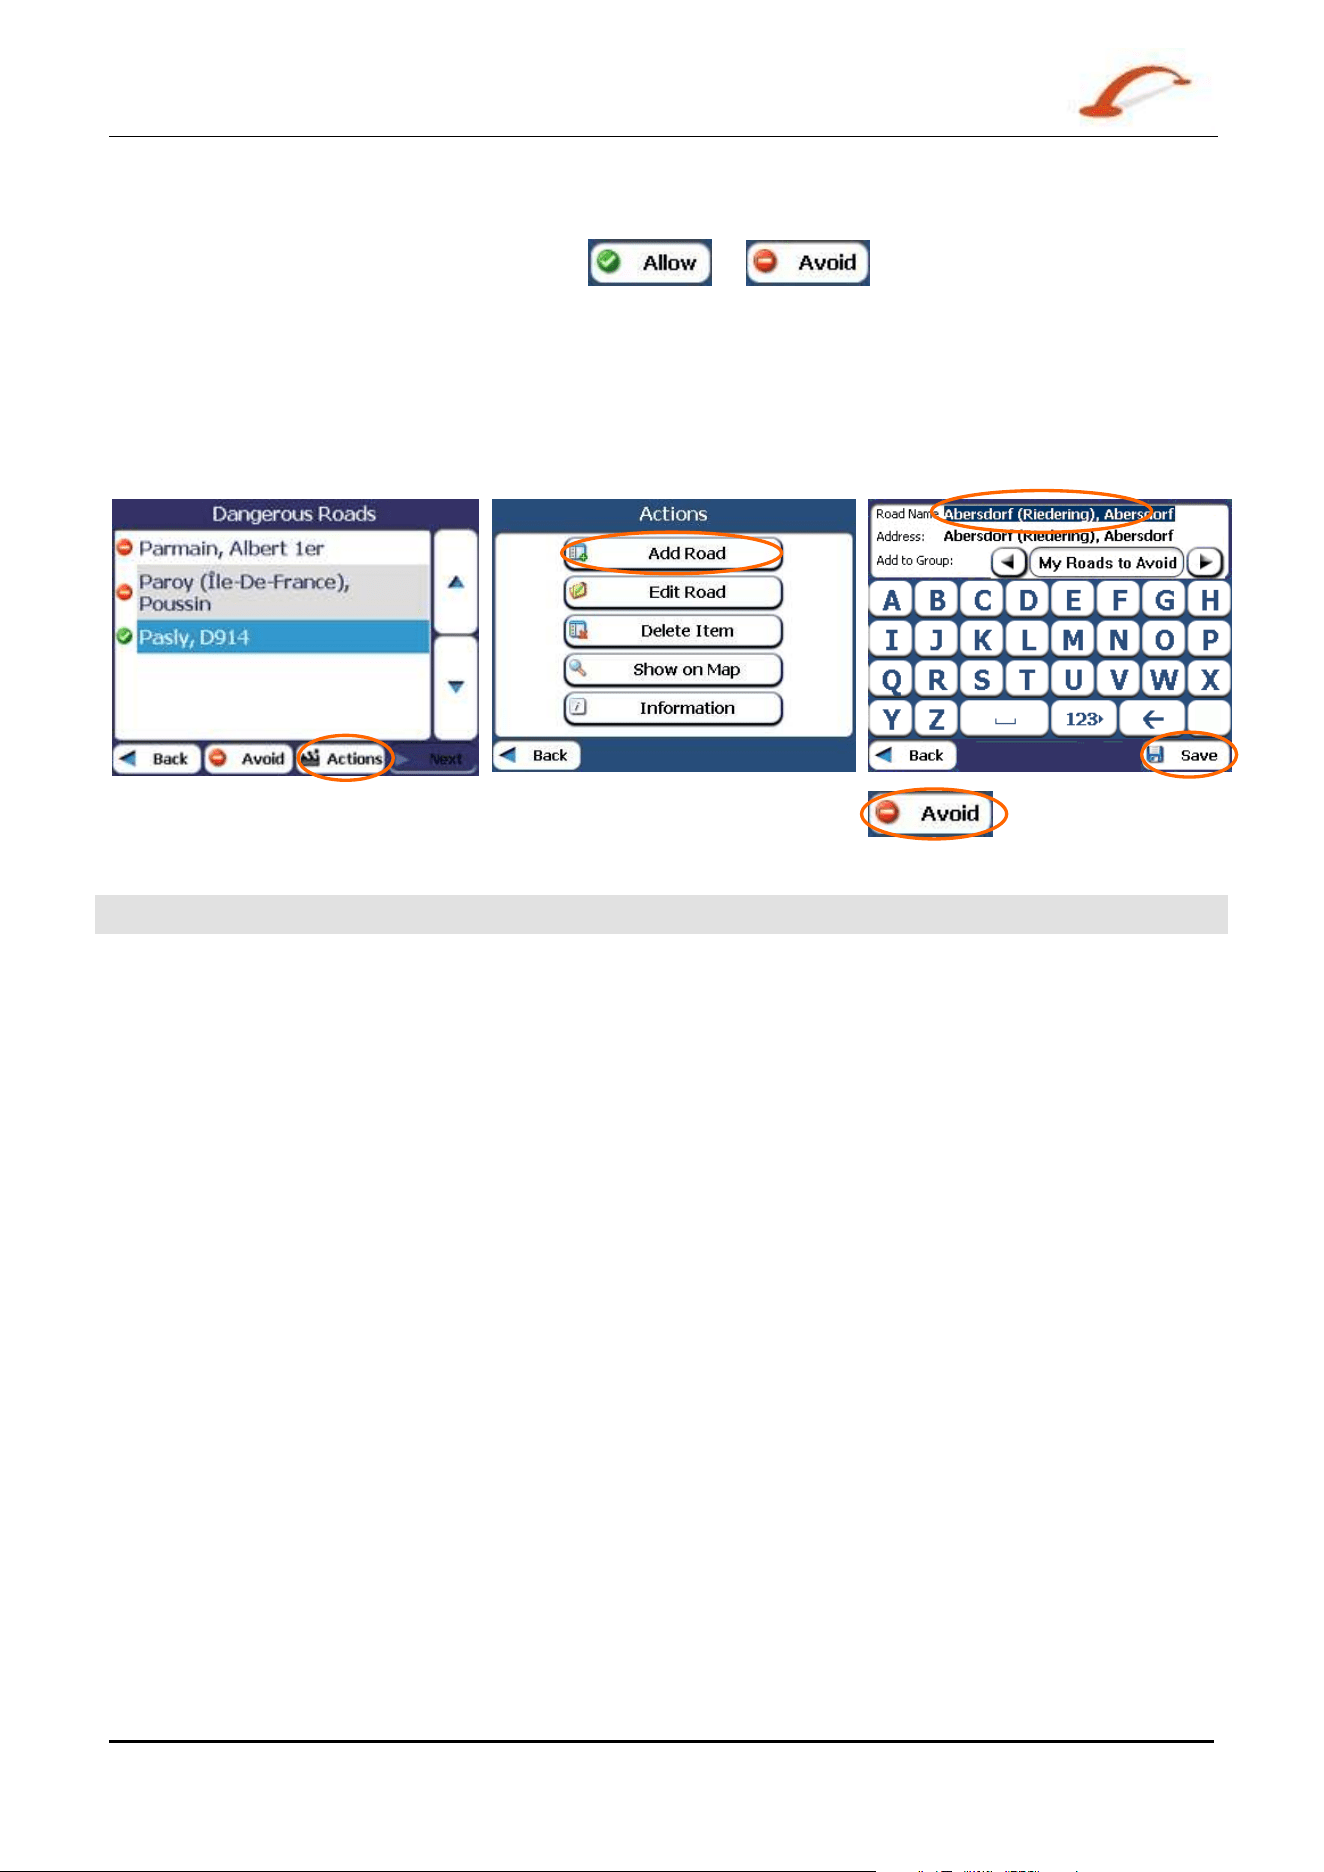
Avoid Roads
You can specify that certain roads be perm anently excluded from your rout e calculations. Use this feat ure
when you w ant t o avoid congest ed roads, t oll roads, or unsafe street s.
From the Rout e Manager m enu, tap the Avoid Roa ds but ton. The Avoid Roa ds screen appear s, displaying
the Toll Roads and Avoid Road groups.
Figure 2 9 – Cr e a t ing Avoid Roa d Gr oups
Avoid Road Groups
From the Avoid Roads screen, tap the Act ions but t on. The Act ion s scr een lets you select from t he
following com m ands:
Add Gr oup
Creat e a new a group of r oads t o avoid. For exam ple, you can creat e a group called
“ Count ry Roads” , where you designat e t he roads in t hat area t o be avoided.
When you t ap t he Add Gr oup but t on, t he Avoid Roa ds Gr oup screen appears. Enter
the group nam e and tap Save.
Edit Group
Select a group and tap this button to change t he group nam e. When you tap the Edit
Grou p button, the Avoid Roads Gr oup screen appears displaying the group nam e.
Change t he group nam e and tap Save. The new nam e is displayed on t he Av oid
Roa ds screen.
Use r 's Gu ide De st in a t or
2 7
Se arch for a Loca t ion
Delet e Gr oup
Select a group and tap this button to rem ove t he group from t he Avoid Roads screen.
The road ent ries in this group are also rem oved.
When select ing a group rout e, you can tap the or butt ons t o include or exclude all
roads locat ed in t he group.
Avoid Road Locations
When you t ap Default or an Av oid Roads group, D e st in a t or displays t he gr oup screen, which lets you select
roads t o avoid. From t his screen, you can use the Allow or Avoid buttons to include or exclude a select ed
road when calculating a rout e.
Figure 3 0 - Addin g a Road t o Avoid
Not e: You cannot specify a particular toll road.
You can tap t he Act ions butt on from t his screen to select from the following com m ands:
Add Road
Let s you select a road. An address screen appears for you t o specify a t own and
st reet . When you have com pleted updating your road inform ation, tap Save.
Edit Road
Let s you renam e t he road and select a different group. When you have m ade your
changes, t ap Save.
Delet e Road
Select a road and tap this button to rem ove t he road from your group. Dest inat or
no longer avoids t he rem oved road.
Show on Map
Let s you show t he m ap wit h t he displayed dest inat ion for you t o review before
creat ing a rout e.
I nform a tion
This button displays t he location’s address inform ation.
Use r 's Gu ide De st in a t or
2 8
Se arch for a Loca t ion
Route Playback
This feat ure let s you record your rout e as you’re driving and then t o play it back on the M ain
Map screen. From t he Route Manager m enu, tap the Rout e Pla yba ck button.
To record a rout e, tap the Record button in t he Rout e Pla yback screen. Dest inat or shows the M a in M ap
screen and navigat es you to your select ed dest inat ion. To st op recording, ret urn t o the Rou t e Pla yback
screen and t ap the St op but t on.
To playback your recording, select the dat a file, and tap the Pla y but t on. D e st inat or shows the M a p
screen t o play the recorded route. To st op the playback, ret urn to the Rout e Pla yback screen and t ap the
St op but t on.
Route Playback Actions
You can tap t he Act ions butt on to display t he following com m ands:
De le t e Recordin g
This button let s you rem ove a selected r ecording.
Cle a r All Recordings
This button rem oves all recordings.
Pla yback Spee d
Use the arrow keys to adj ust t he playback speed. The range is fr om 100% to
300% .
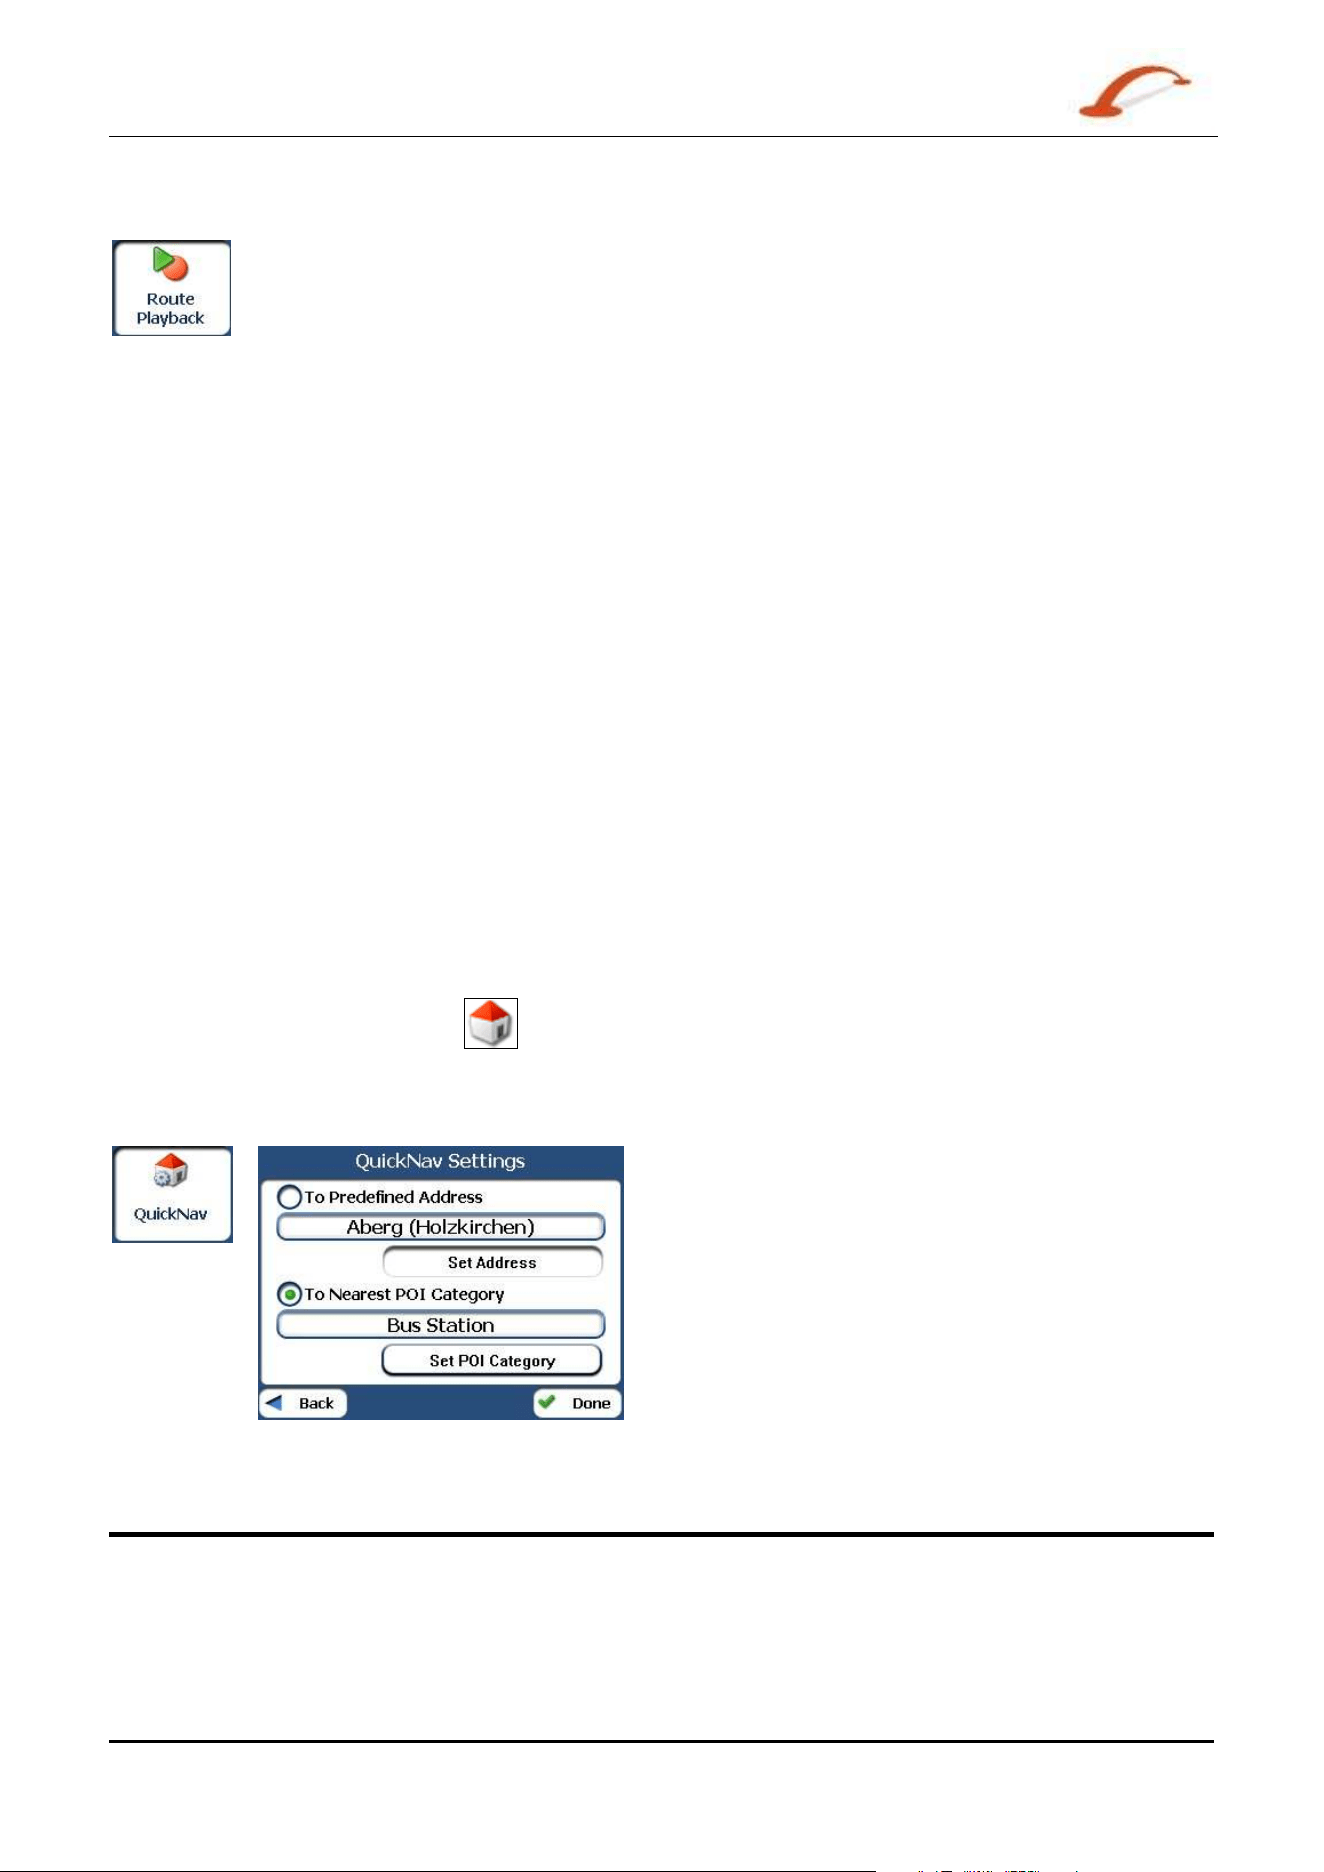
Quick Navigation
You can define t he QuickNav location by select ing either t he To Predefined Address or To Nearest POI
Cat egory in t he Quick N av Se t tings screen. When the locat ion is select ed, you can navigate to your
address by t apping t he Quick N av
butt on displayed on the Main M a p screen.
For exam ple, if you have select ed "Gas St ations" as the QuickNav destination, when you click t he QuickNav
from the Main Ma p screen, D e st inat or autom atically creat es a route t o the closest gas st at ion.
Figure 3 1 - Se t ting t he Quick N av Loca tion
Map Manager
From the Opt ions m enu, tap the M a p M anage r but ton t o display De st inat or’s m ap navigation features, as
described in the sect ions below.
Use r 's Gu ide De st in a t or
2 9
Se arch for a Loca t ion
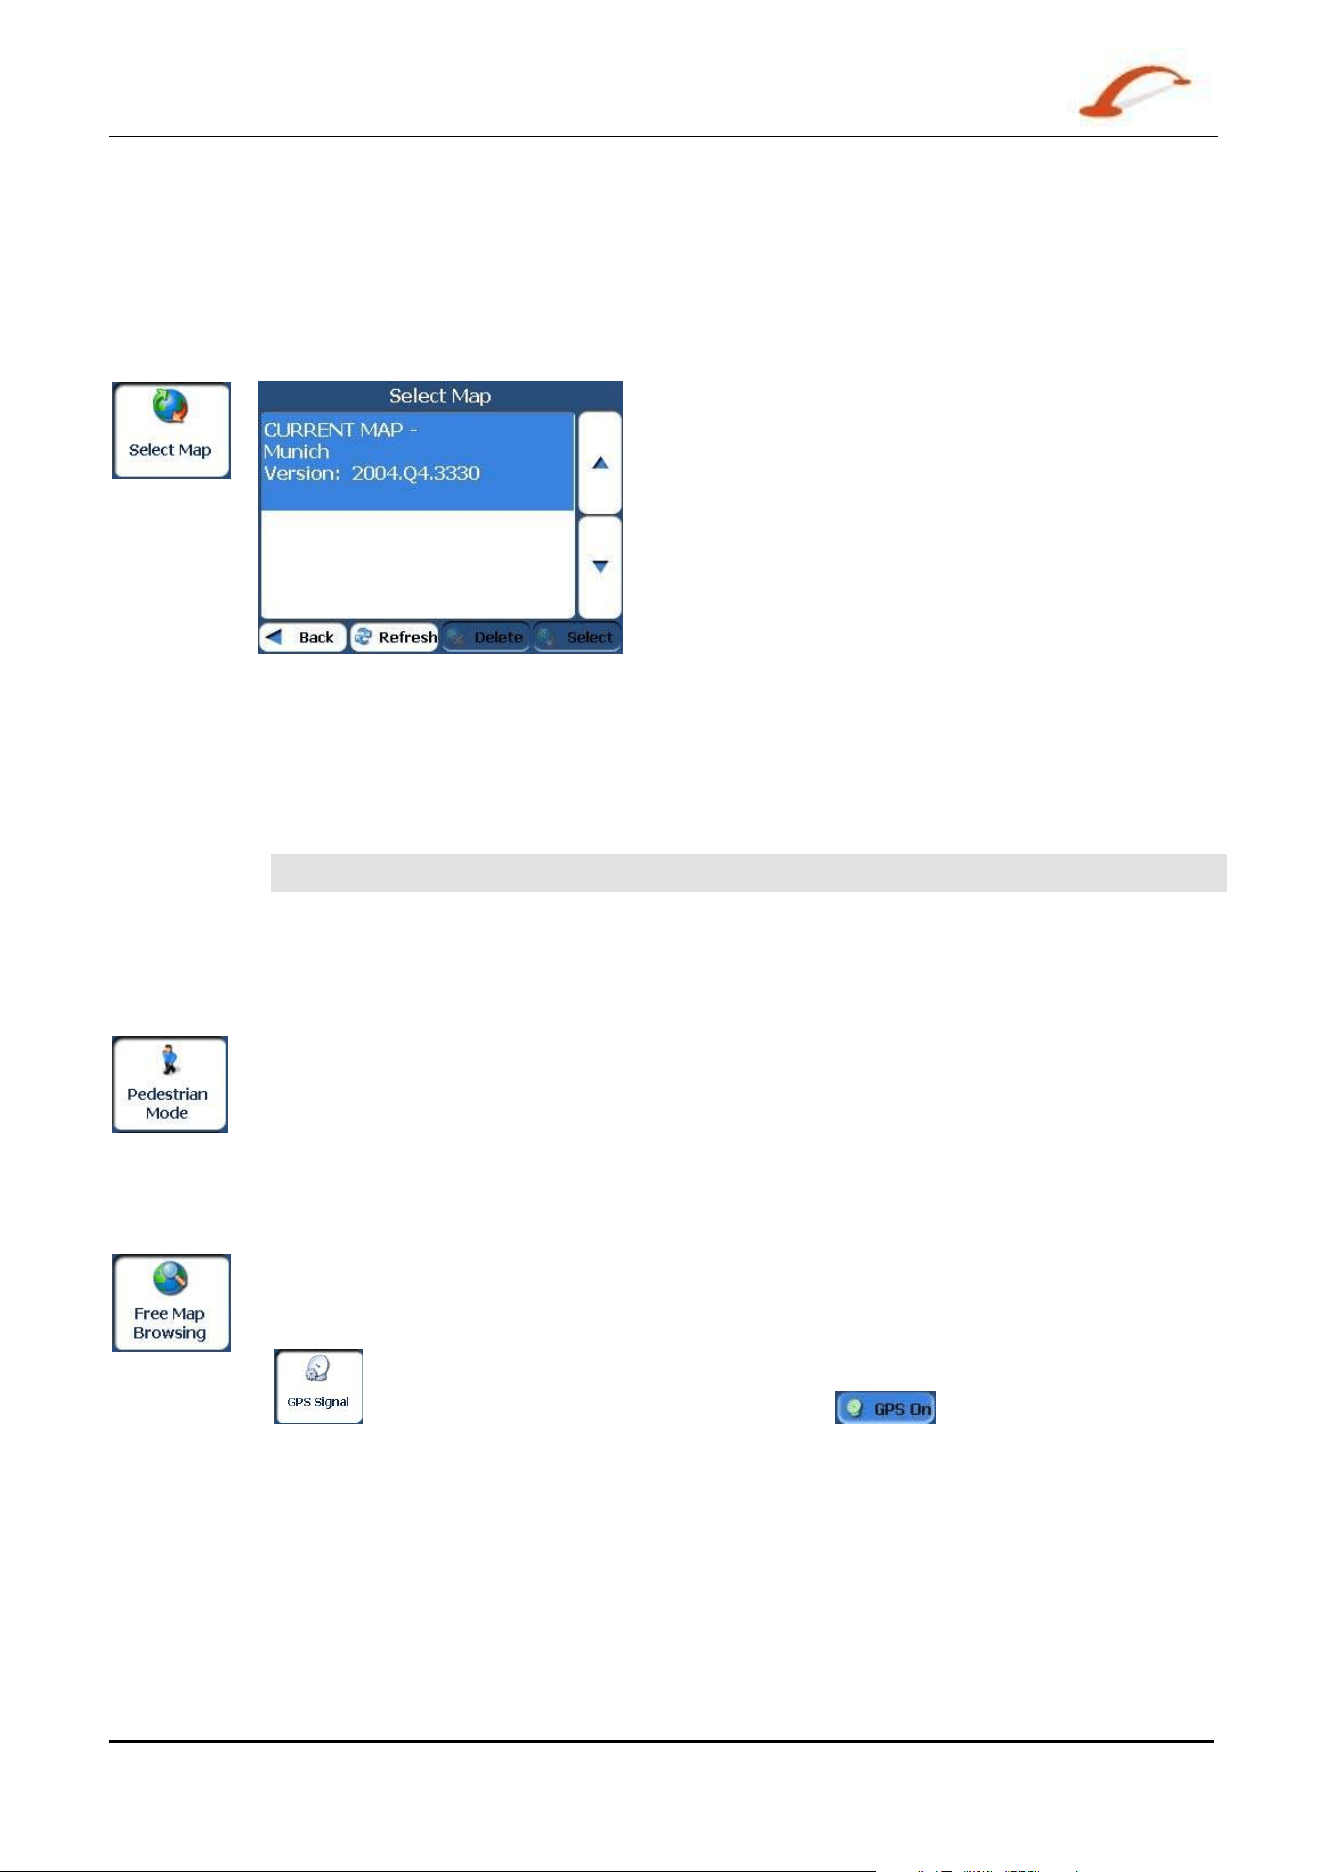
Select Map
This feat ure let s you change t he currently select ed m ap t o anot her m ap saved on your SD m em ory card. I f
you want t o st ore addit ional m aps on your m em ory card, see “Maps” on page 1.
You can tap t he Se lect M ap but t on to display t he m aps saved on your SD m em ory card. The Sele ct M ap
screen displays m ap det ails and version num bers. The m ap currently used appears at the top of the list .
Figure 3 2 - Select a M ap
You can choose from t he following Select Map com m ands:
Refre sh
Let s you refresh the screen when a new m em ory card is inserted int o the device.
Delete
Let s you perm anently r em ove a select ed m ap.
Not e: You cannot delet e t he current m ap.
Se lect
Let s you designat e a selected m ap as the cur rent m ap.
Pedestrian Mode
The Pedest rian Mode button let s you toggle bet ween travelling as a pedest rian or in a
vehicle. When in Pedest rian Mode, you can generat e a rout e up to ten kilom et res and you
are not lim it ed by vehicle constraints, such as one way street s. When creating a pedest r ian
rout e, Dest in a t or avoids m otorways or ot her roads where pedest rians would not travel.
Voice prom pts are deact ivat ed in t his m ode.
Free Map Browsing
This feat ure let s you browse t he m ap wit hout t he GPS receiver ret urning you to your
curr ent locat ion. Tap the Fr e e Map Br ow sing button t o disconnect from t he GPS receiver.
When you are ready t o reconnect to t he GPS receiver , go t o t he Se t tings m enu and t ap t he
button. From t he GPS Signal screen, tap the butt on.
Use r 's Gu ide De st in a t or
3 0
Se arch for a Loca t ion
Units of Measure
You can tap t he Unit s of M easure button to specify the m easurem ent syst em you would
like to use.
You can select :
o Miles/ Yards
o Miles, 10
th
of a Mile
o Kilom et res, Metres
Map Settings
You can tap t he Map Se tt in gs butt on to cust om ize your m ap display, as show n in t he
figure below.
The following m ap set t ings are:
Ma p Or ient at ion
Forward is up – This opt ion orient s t he m ap so t hat your forward direct ion
is always at t he t op.
Nort h is up – This opt ion orient s the m ap so t hat Nor t h is always at the
top.
Use Aut om a t ic Zoom
When t his opt ion is select ed, t he zoom is speed dependent. The m ap
zoom s out at higher speeds, displaying a larger m ap area, and zoom s in
at slower speeds, displaying a sm aller m ap area. I f you m anually change
the zoom , the Aut om at ic Zoom ret urns t o a syst em defined zoom level
after several seconds of inact ivit y.
Use Lar ger Print
This opt ion increases the size of st reet nam es t o m ake t he m ap easier t o
read.
Extras
From the Opt ions m enu, tap the Ex t ras button, t o display t he Dest in a t or add- ons as described in the
sect ions below .
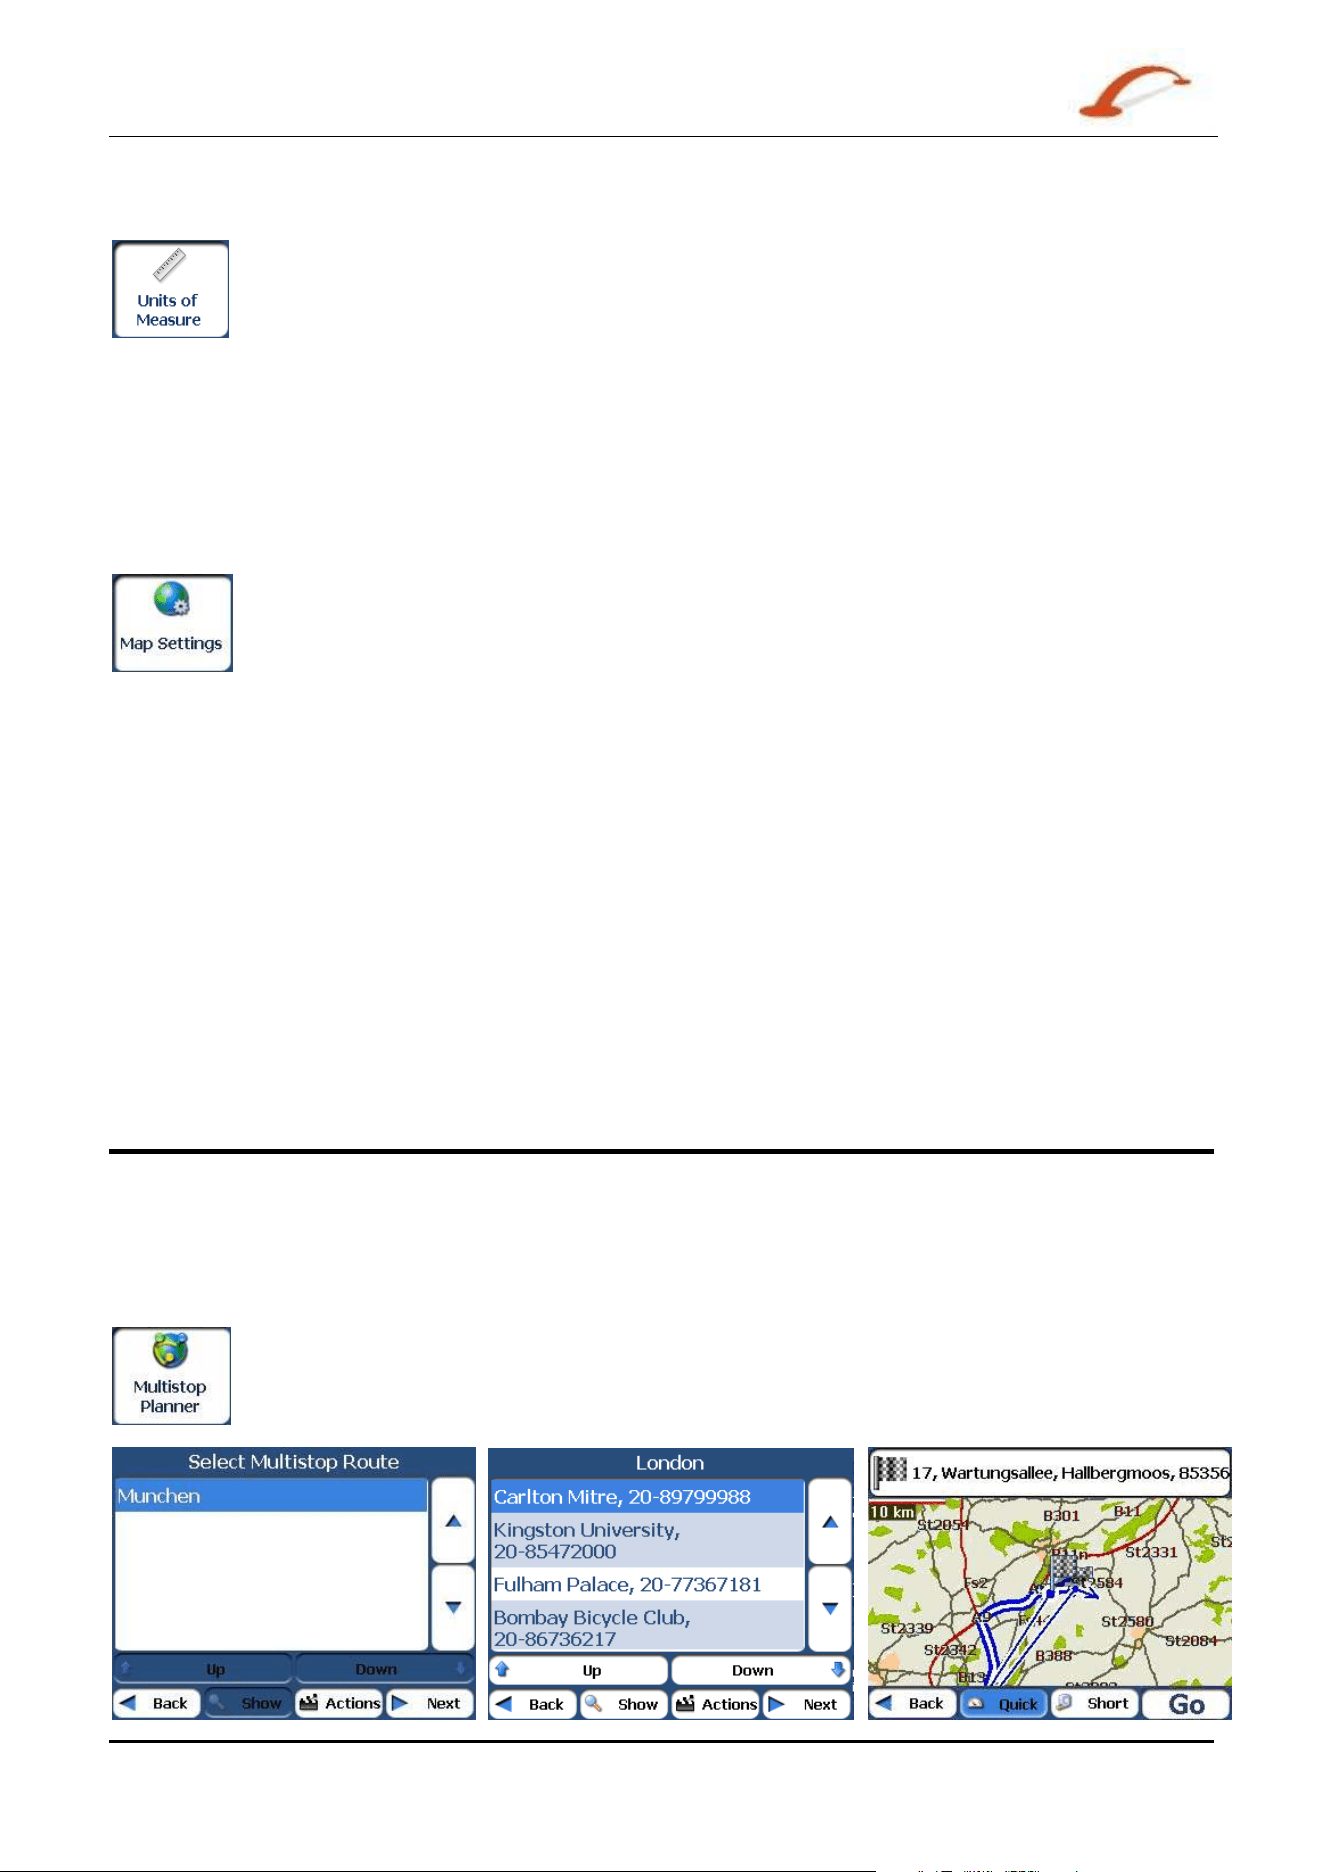
Multistop Planner
The Mult ist op Planner let s you plan a route wit h up t o t welve st ops.
When you t ap t he GO but t on, t he route is calculat ed in stages, fr om t he departure point t o t he
first st op. When you reach t he first st op, t he route recalculat es to t he second st op, and so on.
Use r 's Gu ide De st in a t or 3 1
Se arch for a Loca t ion
Figure 3 3 - Trave l t o M u lt iple Rout es
The Show M ap screen provides you wit h t he following r out e t ypes: Quick and Short. You can select Short
( t he default value) to calculat e a route w it h t he shorter physical dist ance bet ween your current locat ion and
the select ed designat ion. When you tap the GO but t on, D e st in a t or aut om at ically calculates t he fast er
rout e.
Defining Route Groups
A Rout e Group represent s a group of st ops.
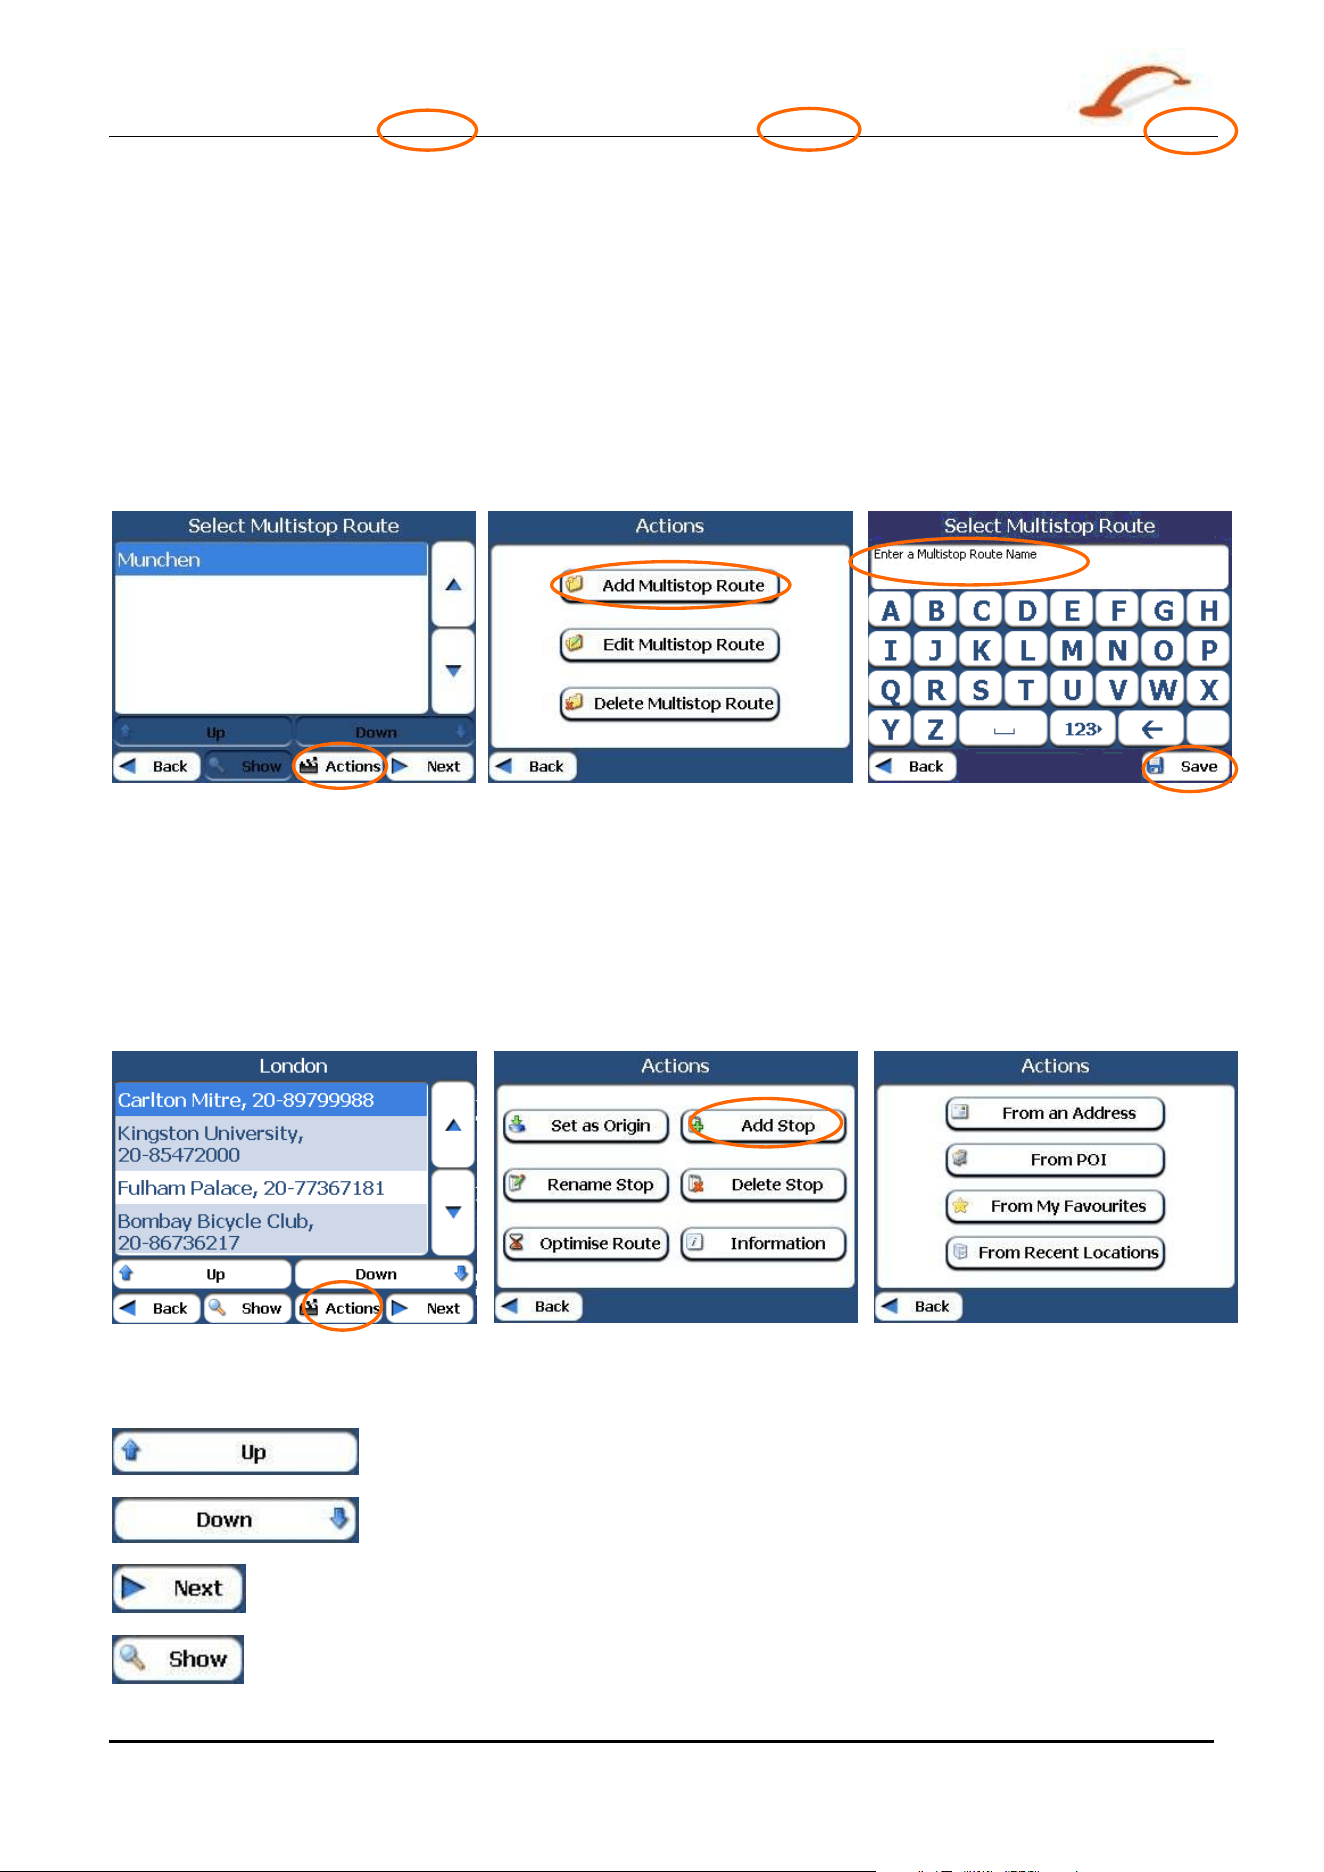
From the Mult ist op Pla nner screen, select the Act ions button and tap Add Group. From t he Add Gr oup
screen, ent er t he Group nam e and save. The Act ions scr een also lets you edit or delete a select ed group.
Figure 3 4 - D e fining the Rout e Gr ou p
Setting Stops Along the Route
You can set up st ops by selecting the Rout e Group and tapping the N e x t butt on. From t he St ops screen,
tap the Act ions butt on t o add, renam e, or delete a destinat ion.
Add a st op by Address, POI , My Favourit es, or Recent Locat ions. Select one of these opt ions, and specify a
location. The select ed locat ion appears in the St ops screen.
Figure 3 5 - Specifyin g a St op
When in t he St ops screen, you can use the following com m ands:
Use the Up or Dow n butt ons t o change t he order of your it inerary.
Shows the st op dest inat ion on the m ap and let s you select a rout e t ype, Quick or
Short. Tap GO t o calculate the st op dest inat ion.
Select the Show button to view the select ed stop destinat ion on the m ap.
Use r 's Gu ide De st in a t or
3 2
Se arch for a Loca t ion
Stops Actions
You can tap t he Act ions butt on for the following com m and opt ions:
Se t as Origin
Let s you designat e t he select ed address as the route origin. You w ould use this
com m and when calculating a rout e from a point other than your current locat ion.
Tap t he
Free M a p Brow sing but ton t o disconnect from t he GPS receiver.
Add St op
Let s you add a locat ion by specifying an address from recent locations, favourit e
locations, or pre- defined POI s, such as fuel, food, or lodging.
Rena m e St op
Let s you change the st op inform ation, such as nam e, com m ents, or route group.
Delete Stop
Let s you rem ove a select ed st op.
Opt im ize Rout e
Your t rip it inerary is creat ed by the sequence of st ops entered. This m ay not be
the m ost efficient route. When you click Opt im ize St ops, D e stinat or changes the
order of st ops to creat e t he m ost efficient route.
I nform a tion
This button displays t he location’s address inform ation.
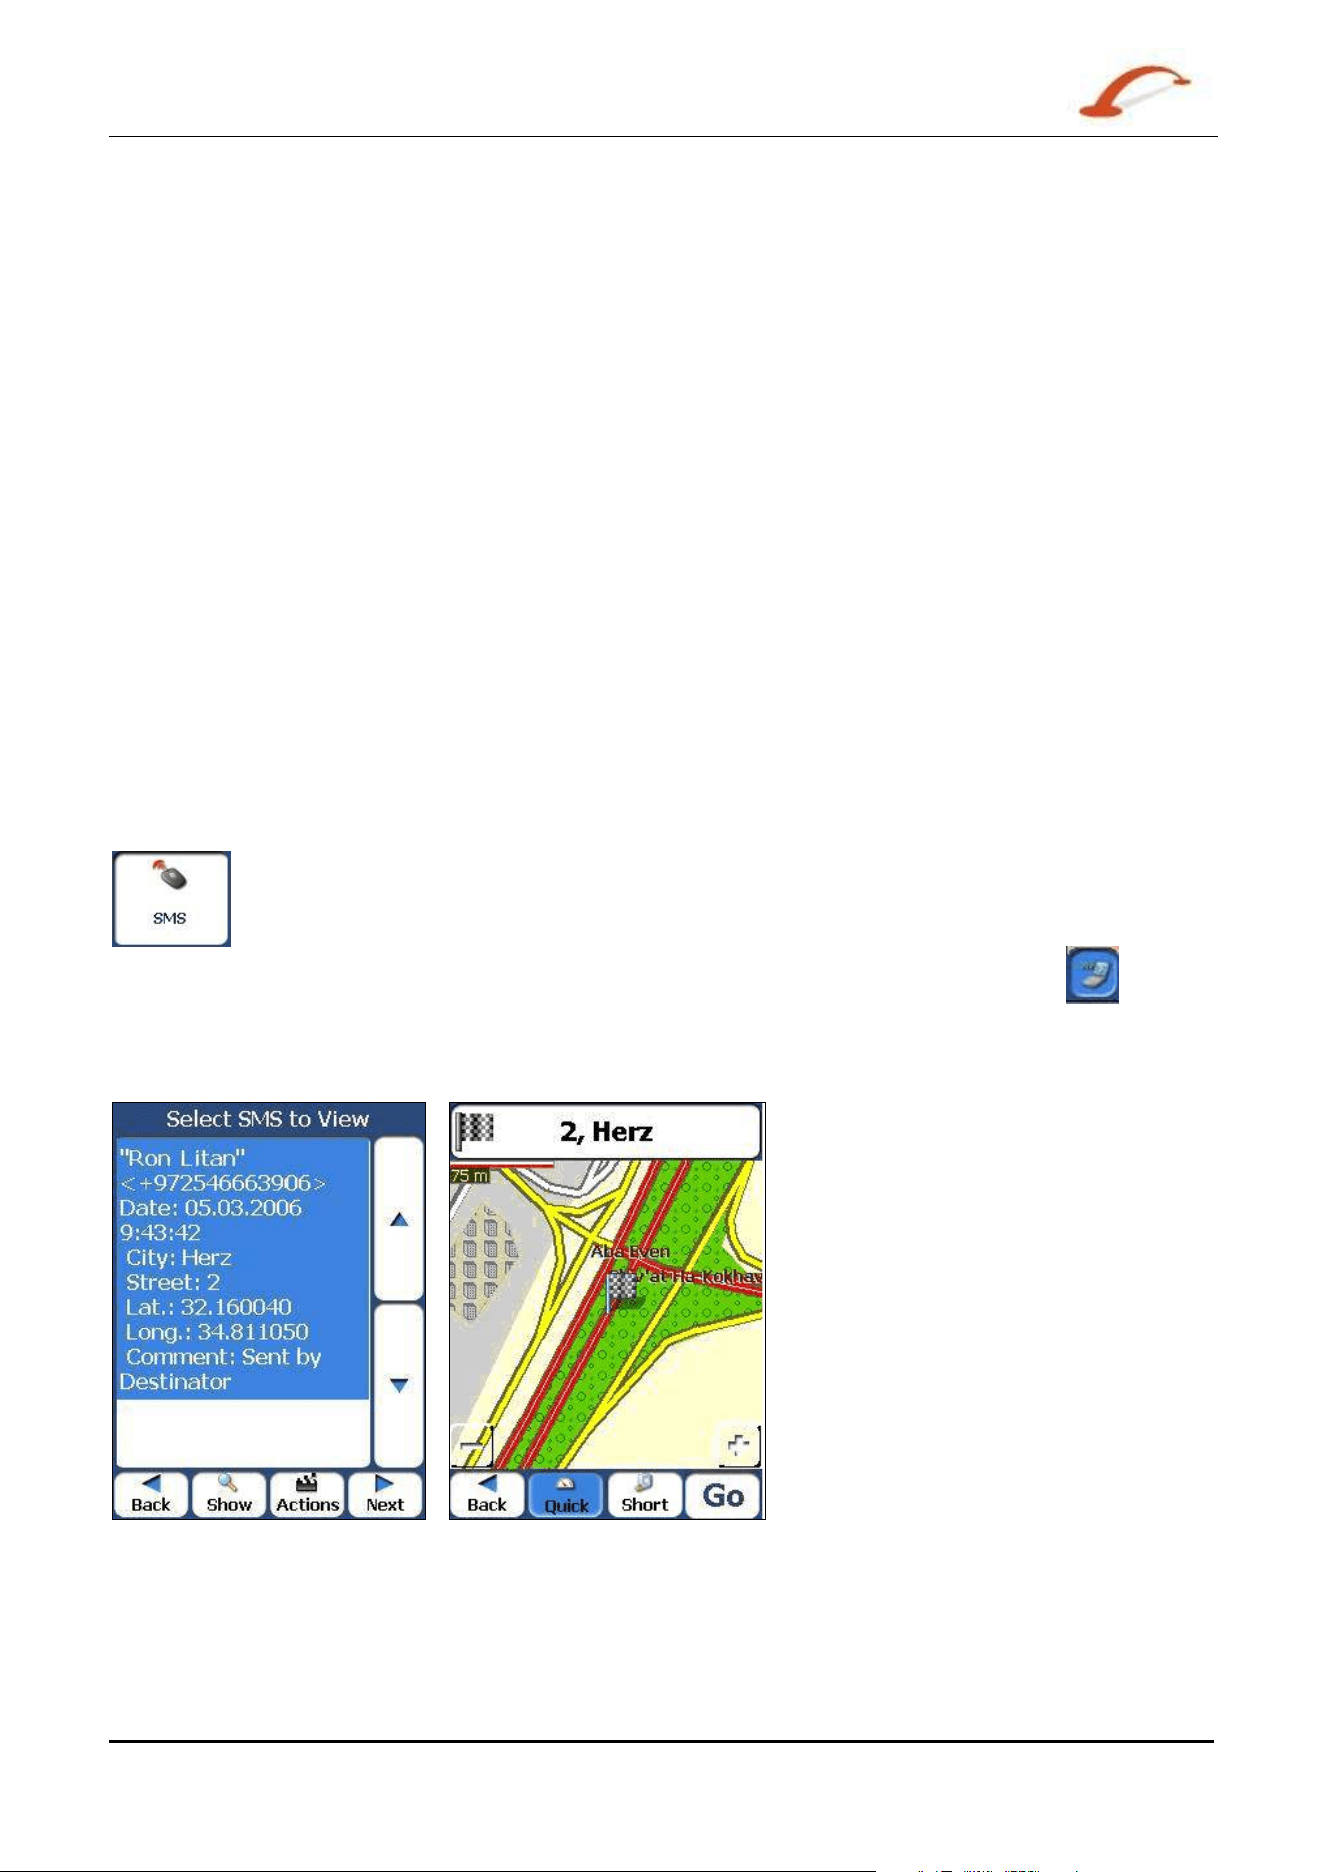
Navigating to an SMS Address
You can navigat e t o an addr ess received from an SMS m essage. This feat ure is available only
when both the sender and receiver have phone- enabled navigat ion devices that run
Dest ina tor .
When an SM S m essage is sent t o a phone- enabled navigat ion device, an Alert
icon
appears on the Main Ma p screen. Tap t his icon t o open the SMS inbox and select t he SMS
m essage. Tap Next to display t he locat ion on the Show M a p screen. Tap the GO but ton t o
calculat e t he rout e to the address in t he SMS m essage.
Figure 3 6 – Re ce ivin g an Address by SM S Me ssa ge

Use r 's Gu ide De st in a t or 3 3
Se arch for a Loca t ion
SMS Address Actions
Tap t he Act ions butt on to select from t he following com m ands.
Se t as Origin
Let s you designat e t he select ed locat ion as t he rout e origin. You would use t his
com m and when calculating a rout e from a point other than your current locat ion.
Tap t he
Free M a p Brow sing but ton t o disconnect from t he GPS receiver.
Delet e M essage
Let s you delet e t he select ed SMS m essage.
Cle a r List
Let s you clear all SMS m essages.
Add t o My Favourite s
Lets you add an address to your list of favourite locat ions, as shown in the figure
below. For m ore inform ation, see "
My Fa vour it es ( on page 15)" on page 1.

Use r 's Gu ide De st in a t or 3 4
Se arch for a Loca t ion
Sending an SMS Address
I f you are using a phone- enhanced navigat ion device, you can send your current location in an SMS
m essage to som eone in your Contact s list. From t he Act ions m enu, click Send Locat ion. The SMS m essage
autom at ically includes your current address, which can be used by t he recipient t o calculat e t he rout e.
To send an address through an SMS m essage:
1. From the Actions m enu, select Send Locat ion. Your Cont act s list appears. You can also choose a
point on the m ap and select Send SMS from t he cont ext m enu.
2. Select t he cont act and pr ess Send. The SM S I nbox screen appear s.
3. The m obile num ber of your contact is aut om at ically entered into the Mobile # field. You can add a
m essage of up to 20 characters in the Com m ent box. The Address field displays t he locat ion of t he
dest inat ion you have selected.
4. Press Send. A confirm at ion m essage confirm s that t he SMS m essage was sent .
Not e: I f you want t o send an SMS m essage t o som eone who is not list ed in your Cont act s folder, select Your
Num ber when t he Contact s list is displayed. Press Send. The SMS Cont e n t s screen appear s. Enter any valid
m obile num ber int o t he Mobile # field.
4 - Settings
Prompts
You can select the types of voice and visual not ificat ions that you w ould like t o use while
navigat ing. From t he Set t ings m enu, tap the Pr om pts butt on. The Pr om pts screen appears.
Voice Prompts
Spee d W arning
Warns you when your car exceeds t he speed lim it. This prom pt is not active by
default .
Route Reca lcula tion
Act ivat ed when Dest ina tor recalculat es a new route. This prom pt is not act ive
by default .
Unrelia ble GPS Signa l
Warns t hat the GPS signal is too low and unreliable for navigat ion. This prom pt
is aut om at ically act ive by default .
GPS N ot Found
Alerts you if the GPS signal is lost , or if t he power is rem oved from t he GPS
receiver .
Drive Ca refully
Rem inder at the st art of each journey. This prom pt is autom at ically act ive by
default .
Visual Prompts
Te xt
Direct ions are displayed as text.
Sym bols
Direct ions are displayed as sym bols.
N one
Direct ions are not displayed.
Language Settings
Lets you select t he language for text and voice travel m essages and driving direct ions.
Look & Feel Settings
Let s you select from ot her preinst alled skins. A skin det erm ines how screens and butt ons are
displayed.
Use r 's Gu ide De st in a t or 3 5

Use r 's Gu ide De st in a t or
3 6
Settin gs
GPS Settings
Dest ina tor uses the GPS receiver t o pinpoint your locat ion. GPS signals are aut om at ically
acquired and your vehicle's locat ion and posit ion are const ant ly updat ed unless you are
working in the Free Browse Map m ode or you tap t he GPS Off button. The GPS r eceiver
m ay take a few m inutes to find it s init ial location. For best result s, ensure that the GPS
receiver has a clear view of the sky.
The following GPS inform ation is displayed:
Longitude - The angular dist ance east or west on t he eart h's surface.
Lat it ude - The locat ion of a place nort h or south of the eart h's surface.
Speed - The rat e of m ovem ent, as expressed by kilom etres or m iles per hour.
Altitude - The height above sea level.
The
and butt ons let you connect or disconnect from t he GPS receiver. I f you are
working in Free Browse Map m ode, D e st in a t or aut om at ically disconnect s from t he GPS r eceiver.
Tap the GPS Set butt on to display t he following Connect ion fields:
COM Port
This field let s you specify the Com m unications port.
Not e: Most Bluet ooth receivers use COM 6 or COM 8. Most serial receiv ers use
COM 1.
Ba ud Rat e
This field lets you specify t he transm ission rat e of dat a.
Pr ot ocol
This field displays the GPS pr ot ocol. The default value is NMEA.
Not e: Most receivers use NMEA 4800.
Tr affic I nfo.
Select the ON radio button to act ivat e the TMC service. This service let s you
enjoy live t raffic updates from local broadcast er s, including prem ium toll
services in England, France, and Germ any.
Conn ect t o GPS
This button let s you locat e the GPS receiver by t he values you have entered
in the COM, Baud, and Prot ocol fields.

Use r 's Gu ide De st in a t or 3 7
5 - Installation Requirements
PC Requirements
Minim um Syst em Requir em ent s for PC:
o CPU: AMD/ c 3.8 and higher. I nt el® Processor ( 300 MHz or fast er )
o Operating Syst em : Windows® 2000/ XP
o Mem ory: 128 MB RAM (or m ore)
o Free space on hard drive for inst allat ion: at least 500 MB
o CD- ROM: 4x drive ( or m ore)
o Support Act iveSyn
Installing the Console
To install t he D e st in a t or Console :
1. I nsert t he Dest inat or Disk int o t he PC's CD- ROM drive. The Dest ina t or Console I nst alla t ion
W iz a r d prom pt s you to select the language used for the inst allat ion process. When you have
selected a language, click OK.
2. Please read t he Welcom e m essage and click Next.
3. Click Next .
4. The I nst allat ion Stat us box displays the progress of the inst allat ion process.
5. When t he installation is com plet e, click t he Finish but t on to close the wizard.
N ote: You can uninst all the D e stinat or Console by opening t he Microsoft Windows Program s m enu,
select ing Dest inat orApps> Uninst all Console.

Use r 's Gu ide De st in a t or 3 8
Installation Requirements
Console Toolbar
The follow ing opt ions are available from t he Console Toolbar:
Figure 3 7 – Console Toolbar
I nst all/ Rem ove M aps
lets you inst all or rem ove a m ap. For m ore inform ation, see "I nst alling a
Ma p ( on page 42)".
Cut Ma p
Lets you cust om ize an installed m ap. For m ore inform ation, see “Ma p Cut t er
Scr e e n I nt erface
( on page 42) ” .
Fa vor ite s I m port er
Let s you dow nload a list of your favourit e locat ions from your PC t o the
select ed My Favourit es group on your device. For m ore inform at ion, see
"
I m port Fa vour ite Loca t ion ( on page 39)".
Fa vor ite s Export er
Let s you download a category of favourit e locat ions from your device t o a
select ed folder on your PC. For m ore inform at ion, see "
Ex por t ing a
Fa vourit e Loca tion from t h e D evice " on page 40.
Quick Act iva tion
( Opt ional)
Let s you activat e your Navigat ion Syst em t hrough an autom ated process ( on
page Er r or! Book m ark not defin e d.) .
Use r 's Gu ide De st in a t or 3 9
Installation Requirements
Maps
After you have inst alled the D e st in a t or Console to your proprietary device, you m ust select at least one
m ap. For inform at ion about installing maps, see "I nst alling a M a p ( on page 42)".
Import Favourite Location
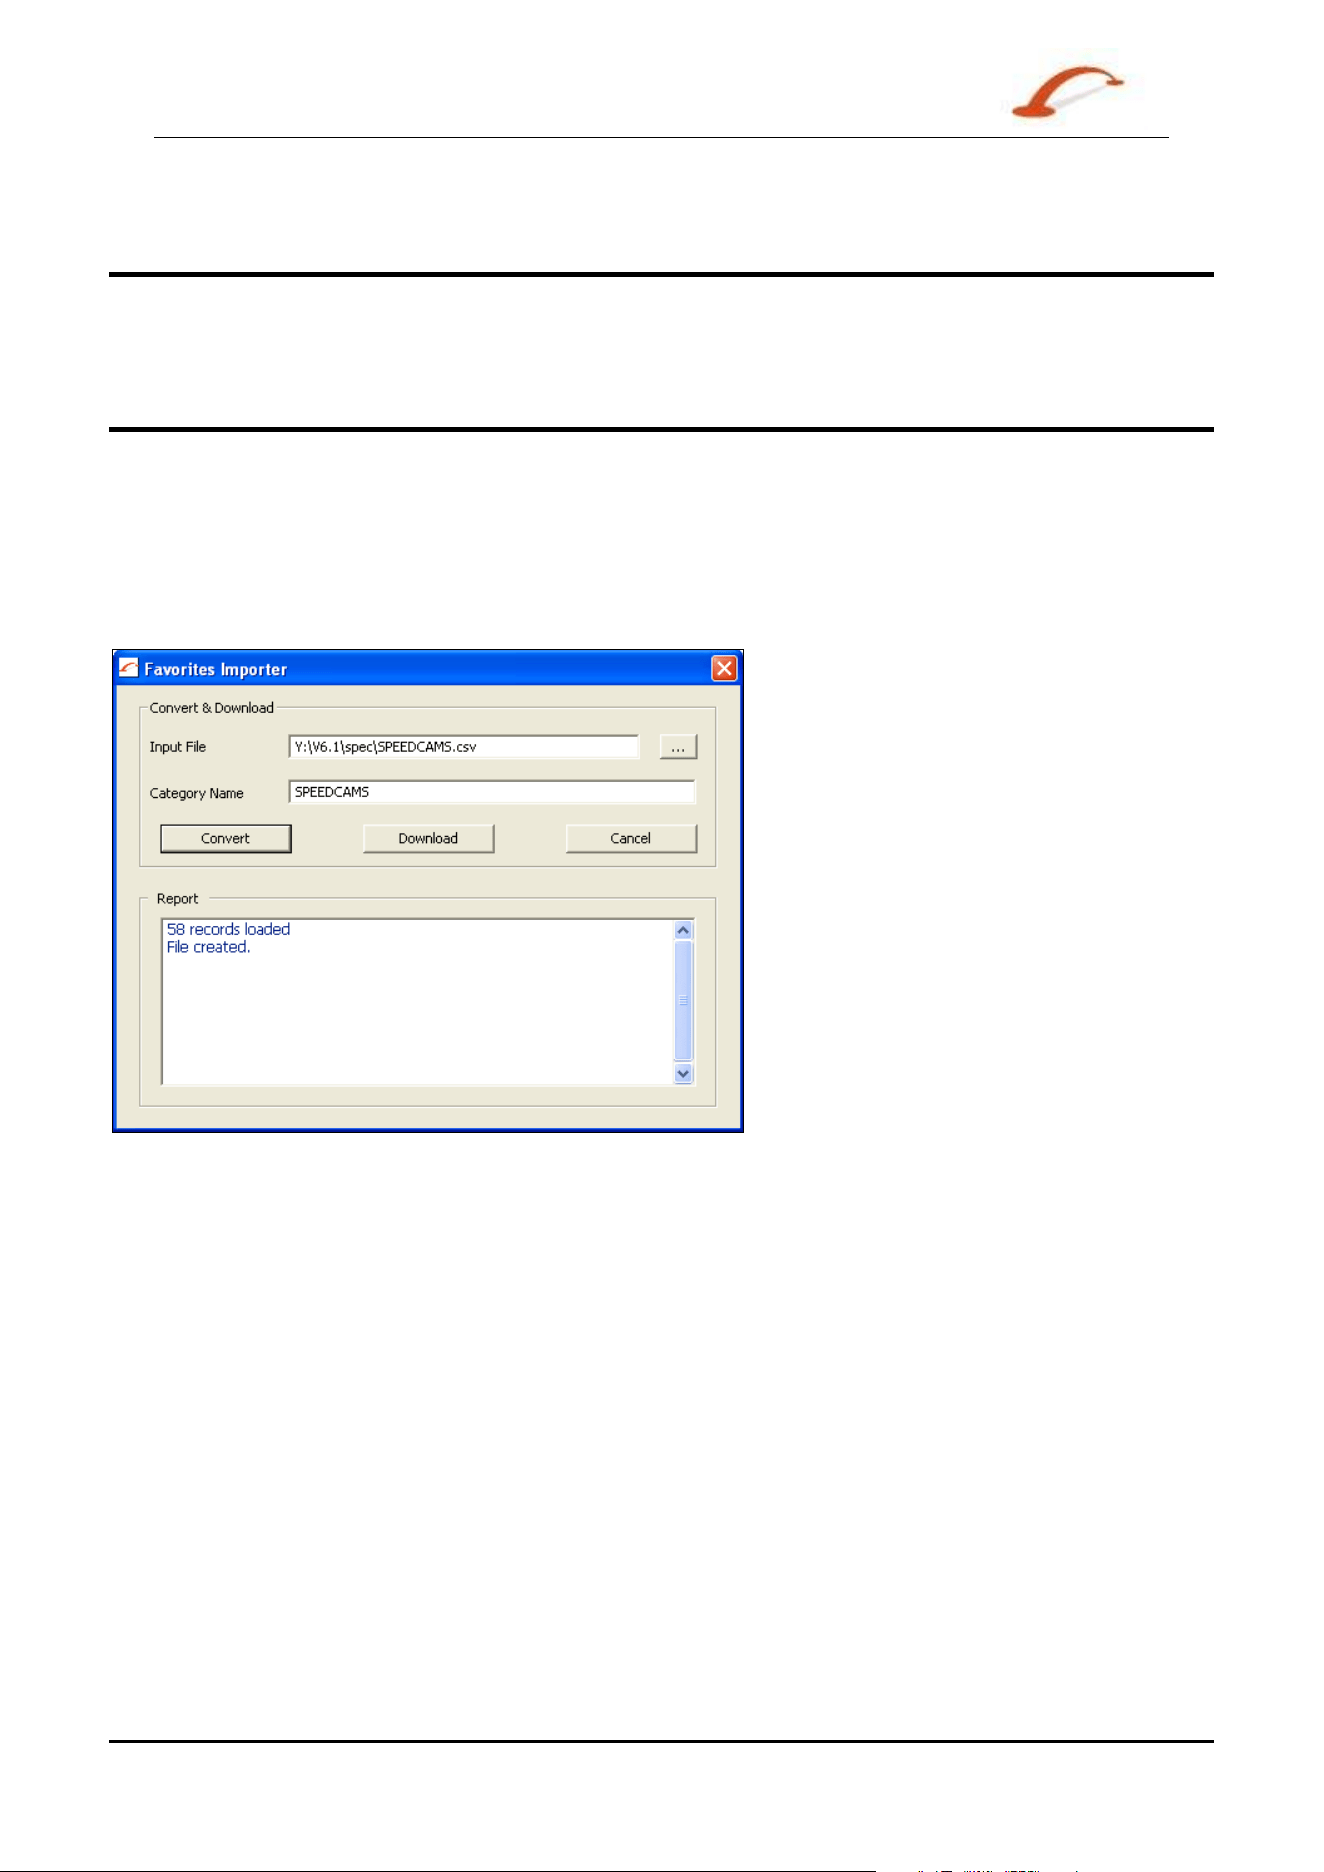
The Favourit es I m porter lets you im port content creat ed and provided externally as a new Favourit es
cat egory on t he device.
You can download a list of favourit e locat ions from your PC t o your device. The list m ust be cont ained in
Com m a- Separated Values (.csv) files. As part of the download procedure, you convert the .csv files to .dat
form at for stor age on your device by using the Dest in a t or Conversion Utilit y . The Favourit es I m porting
file st ruct ure m ust be in .csv form at .
Figure 3 8 – Dest inat or Conve r sion Utilit y
The file contains t he following fields:
Fav. Place 1 Com m ent 1 39.21370 38.78903 8033 Munich 173
Fav. Place 2 Com m ent 2 24.79360 37.08604 75010 Paris 3013
Fav. Place e Com m ent 3 44.97889 23.82718 8044 Zurich 123
The Longit ude and Lat it ude are num erical values. All t he ot her s are st ring values. To im port a .csv file:
1. On the D e st inat or Con sole, click on a Standard Map. This will enable the I nstalling Map and
Favourit es I m port er feat ures.
2. Click t he Fa vourit es I m port e r but ton. The Conver t er dialogue is displayed.
3. Select the .csv file, specify a cat egory nam e, and click the Con vert but t on. The Report Area displays
a m essage st at ing that the content of the file has been conver t ed and that t he file is ready for
download.
4. Download the file t o your device by clicking the Dow n load butt on.
Use r 's Gu ide De st in a t or 4 0
Installation Requirements
Exporting a Favourite Location from the Device
You can export a list of favourit e locations from your device t o your PC. The list will be st ored in Com m a-
Separated Values ( .csv) files. As a part of the export procedure, y ou convert the .dat files to .csv form at for
st orage on your PC by using the Dest in a t or Conversion Utilit y.
Figure 3 3 – Favorit e Ex por t De st inat or Conve r sion Ut ilit y
To export a .dat file:
5. Click t he Fa vourit es Exporter button. The Convert e r dialogue is displayed.
6. Click t he Brow se
button and then select the .dat file. Specify a cat egory nam e, and click the
Convert butt on. The Repor t Ar e a displays a m essage st at ing that the cont ent of t he file has been
conver t ed and t hat the file is ready t o Upload.
7. Upload the file t o your PC by clicking the Upload but ton.

Use r 's Gu ide De st in a t or 4 1
Installation Requirements
Quick Activation
Not e: This sect ion is not relevant for m aps of West ern Europe and North Am erica.
Recommended Registration for Support
You can act ivat e D e st inat or autom at ically by using Quick Act ivat ion.
To activat e D e st inat or:
1. Check t hat your PC has an I nternet connection.
2. Check t hat t he navigation device is com m unicat ing wit h your PC through Microsoft Act iveSync.
3. Open the Dest inat or Con sole .
4. Click t he Quick Act ivat ion
button from t he D e st inat or Console toolbar.
5. The Quick Act ivat ion W e lcom e screen appears. Please review t he inform at ion and click Next to
continue.
6. The Use r I nform a tion screen appears. Com plet e t he inform ation fields. Not e t hat fields with
ast erisks (* ) require informat ion. Click Next.
7. The Lice nce Key scr een appears. Ent er the licence key and select your device type. Click Finish.
8. The Congr a tulat ions screen appears. Your D e st inat or licence key has been act ivat ed.
Use r 's Gu ide De st in a t or 4 2
6 - Maps
Map Screen Interface
On the D e st inat or Console , a collect ion of available m aps is displayed, as shown in the figure below.
St anda rd M aps
Maps available for installation.
My Maps
Maps t hat have been cust om ized from a st andard m ap.
I nst alle d M aps
St andard and cust om ised m aps that are already loaded on your
device.
Installing a Map
You can install a m ap by select ing it from t he St a n dard M aps pane in the Dest inator Console and clicking
the I nst all/ Re m ove Ma ps button. The Ta r ge t D evice dialogue box appears. Select eit her St orage Card
( on a m obile device) or
Main M e m or y ( on a PC). The am ount of m em ory available for t he selected target
device appear s on the
Ta r get D e vice M e m or y Bala nce pane. The inst alled m ap appears in t he I nst alled
Maps
pane.
Figure 3 9 – I nst alling a Ma p
Map Cutter Screen Interface
Use r 's Gu ide De st in a t or 4 3
Maps
Due t o m em ory lim it ations of your device, you m ay w ant to custom ize a st andard m ap by select ing the area
you need.
You can crop a st andard m ap from t he M ap Cutt e r screen. Select a st andard m ap and click the Cut Map
button. The M a p Cut t er scr een appear s, as shown in t he figure below.
Figure 4 0 – Cut t ing a M ap
The following tools are provided t o help you easily m ove, view, and designat e an area on the m ap:
You can use the Pa n tool t o m ove t he m ap up, dow n, left, or right.
You can use the Zoom tool to increase or decrease the m ap det ail. You can also use the
scroll bar t o zoom in or out .
You can use the Cr op t ool t o designat e an area on the m ap that you want t o cut . When
you have select ed your focus by using the focus t ools, as descr ibed below, click t he Crop
tool to designat e an area on the st andard m ap.
You can use the Cut tool t o create a cust om ized m ap from your designat ed area.
Use r 's Gu ide De st in a t or 4 4
Maps
Focus the Map
The following t ools are provided t o help you focus your m ap, so you can designat e the area that you want t o
cut.
You can click the Addr e ss t ool t o set t he origin of the m ap to a Tow n, St r e e t Addr e ss,
or Road Ju n ct ion . The Address dialog box provides the Show … and Set … butt ons t o
view and set the m ap focus.
You can click the POI tool t o set t he origin of t he m ap t o a point of int erest . The POI
dialogue box displays all cat egories in t he left pane. When you click a cat egory, t he it em s
associated w it h the category appear in t he right pane. You can click the
Show POI and
Se t POI butt ons to view and set t he m ap focus.
You can click the Select tool t o set the origin of t he m ap by a pr edefined sub- region. A
list of sub- regions is displayed in a pane to the right of the m ap. When you click a sub-
region, t hat area is highlighted.
Focus the Map by Route
Dest ina tor supports rout e cutting, which allows you to creat e a m ap com posed of points on a rout e. To
creat e the rout e, you m ust specify two or m ore point s. Aft er the rout e has been creat ed, you can cut a m ap
from your rout e specificat ions.
Click t he Route
t ool. The Route pane appears. Use the Address and POI t ools to set route points.
Click t he
Crea t e Rout e button. Your rout e is highlighted in blue. Click t he Cu t M ap tool.
The follow ing com m ands are described below:
Click t his butt on to centre t he m ap on the select ed point.
Click this button to delet e the selected point .
Click this button to delet e all select ed point s.
Click t hese buttons t o m ove a select ed point up or down.
Cor r idor You can select the am ount of surrounding area that is included along t he route's pat h, as
m easured in kilom et res or m iles.
Rout e You can select eit her t he quickest r out e, as det erm ined by speed lim it , or t he shortest
physical rout e.
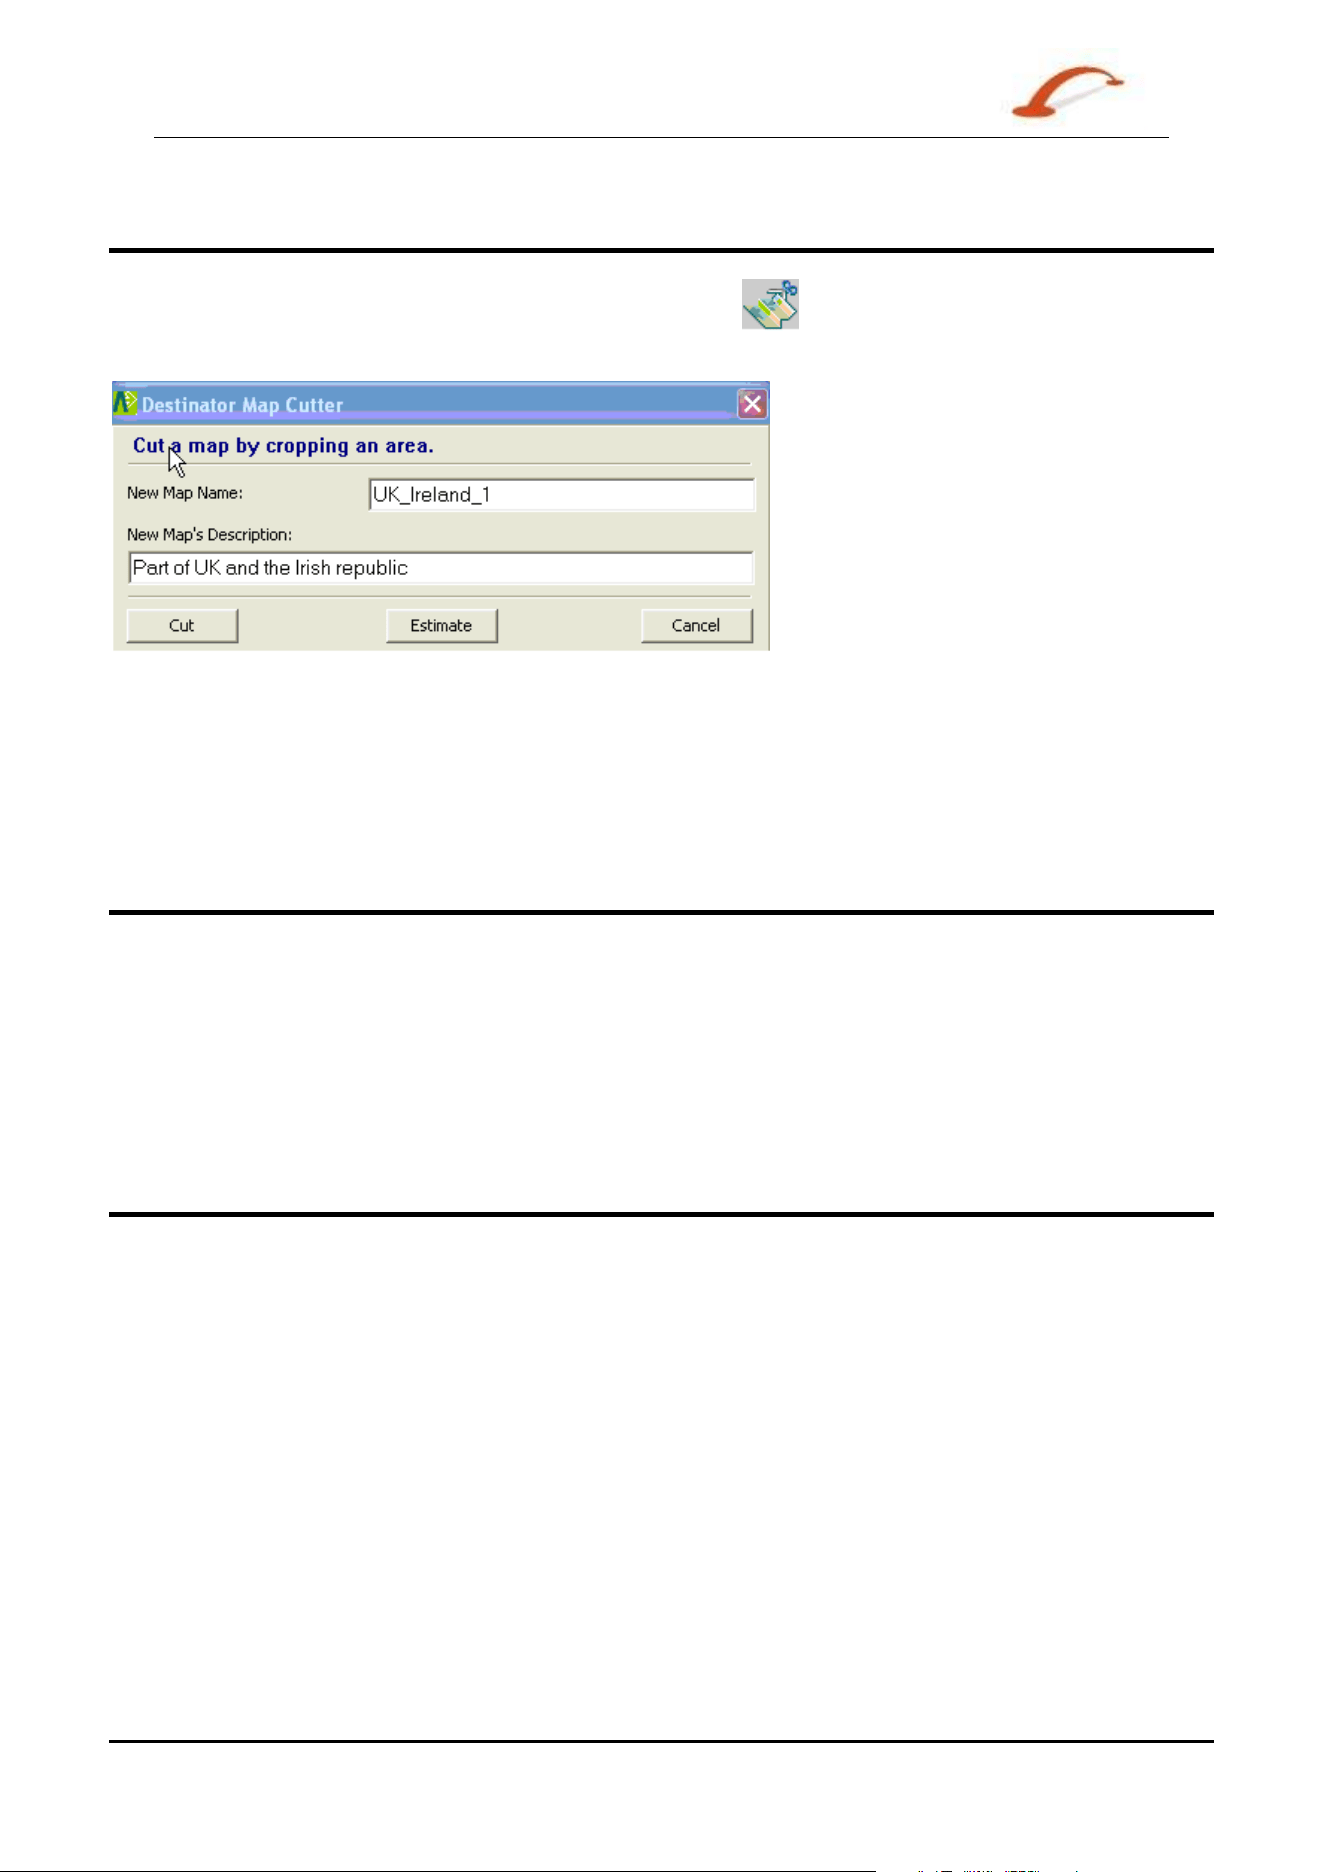
Use r 's Gu ide De st in a t or 4 5
Maps
Cut Map
When you have designat ed your m ap area, click t he Cut M a p t ool. The Cu t Map dialogue box
appears, as shown in the figur e below.
Figure 4 1 – Cut the M ap Box
You m ust enter a m ap nam e and descript ion. I f you have entered a nam e t hat already exist s,
Dest ina tor prom pts you t o ent er a different nam e.
You can click the Est im at e button t o display the m ap size. This is an im portant feature when m em ory space
is lim it ed.
Load Map
On the D e st inat or Console , you can refresh your m aps by clicking Tools> Refresh N e w M ap D ata.
Select the m ap that you wish to load by clicking on the m ap im age or select it from the list . A checkm ark
represents a select ed m ap.
From the Target Device pane, click the Change button to specify where t o inst all the m ap. You can choose
from Main Mem ory, St orage Card, or Rem ovable Disk. Aft er you have select ed your t arget device and have
confirm ed t hat there's sufficient m em ory, click t he
I nst all/ Re m ove M a ps but t on. Your select ed m aps are
inst alled and appear in t he I nst a lled M a ps pane.
Remove Map
I n t he Targe t Device pane, click t he Cha nge butt on and select the locat ion from where to rem ove the
m ap. You can choose from Main Mem ory, St orage Card, or Rem ovable Disk. This updates the I nst a lle d
Map
pane.
The I nst alle d Ma p pane displays a list of all the loaded m aps available. Select the check box by t he m ap
you want t o rem ove. Click t he
I nst all/ Re m ove M a ps button to rem ove the select ed m ap.
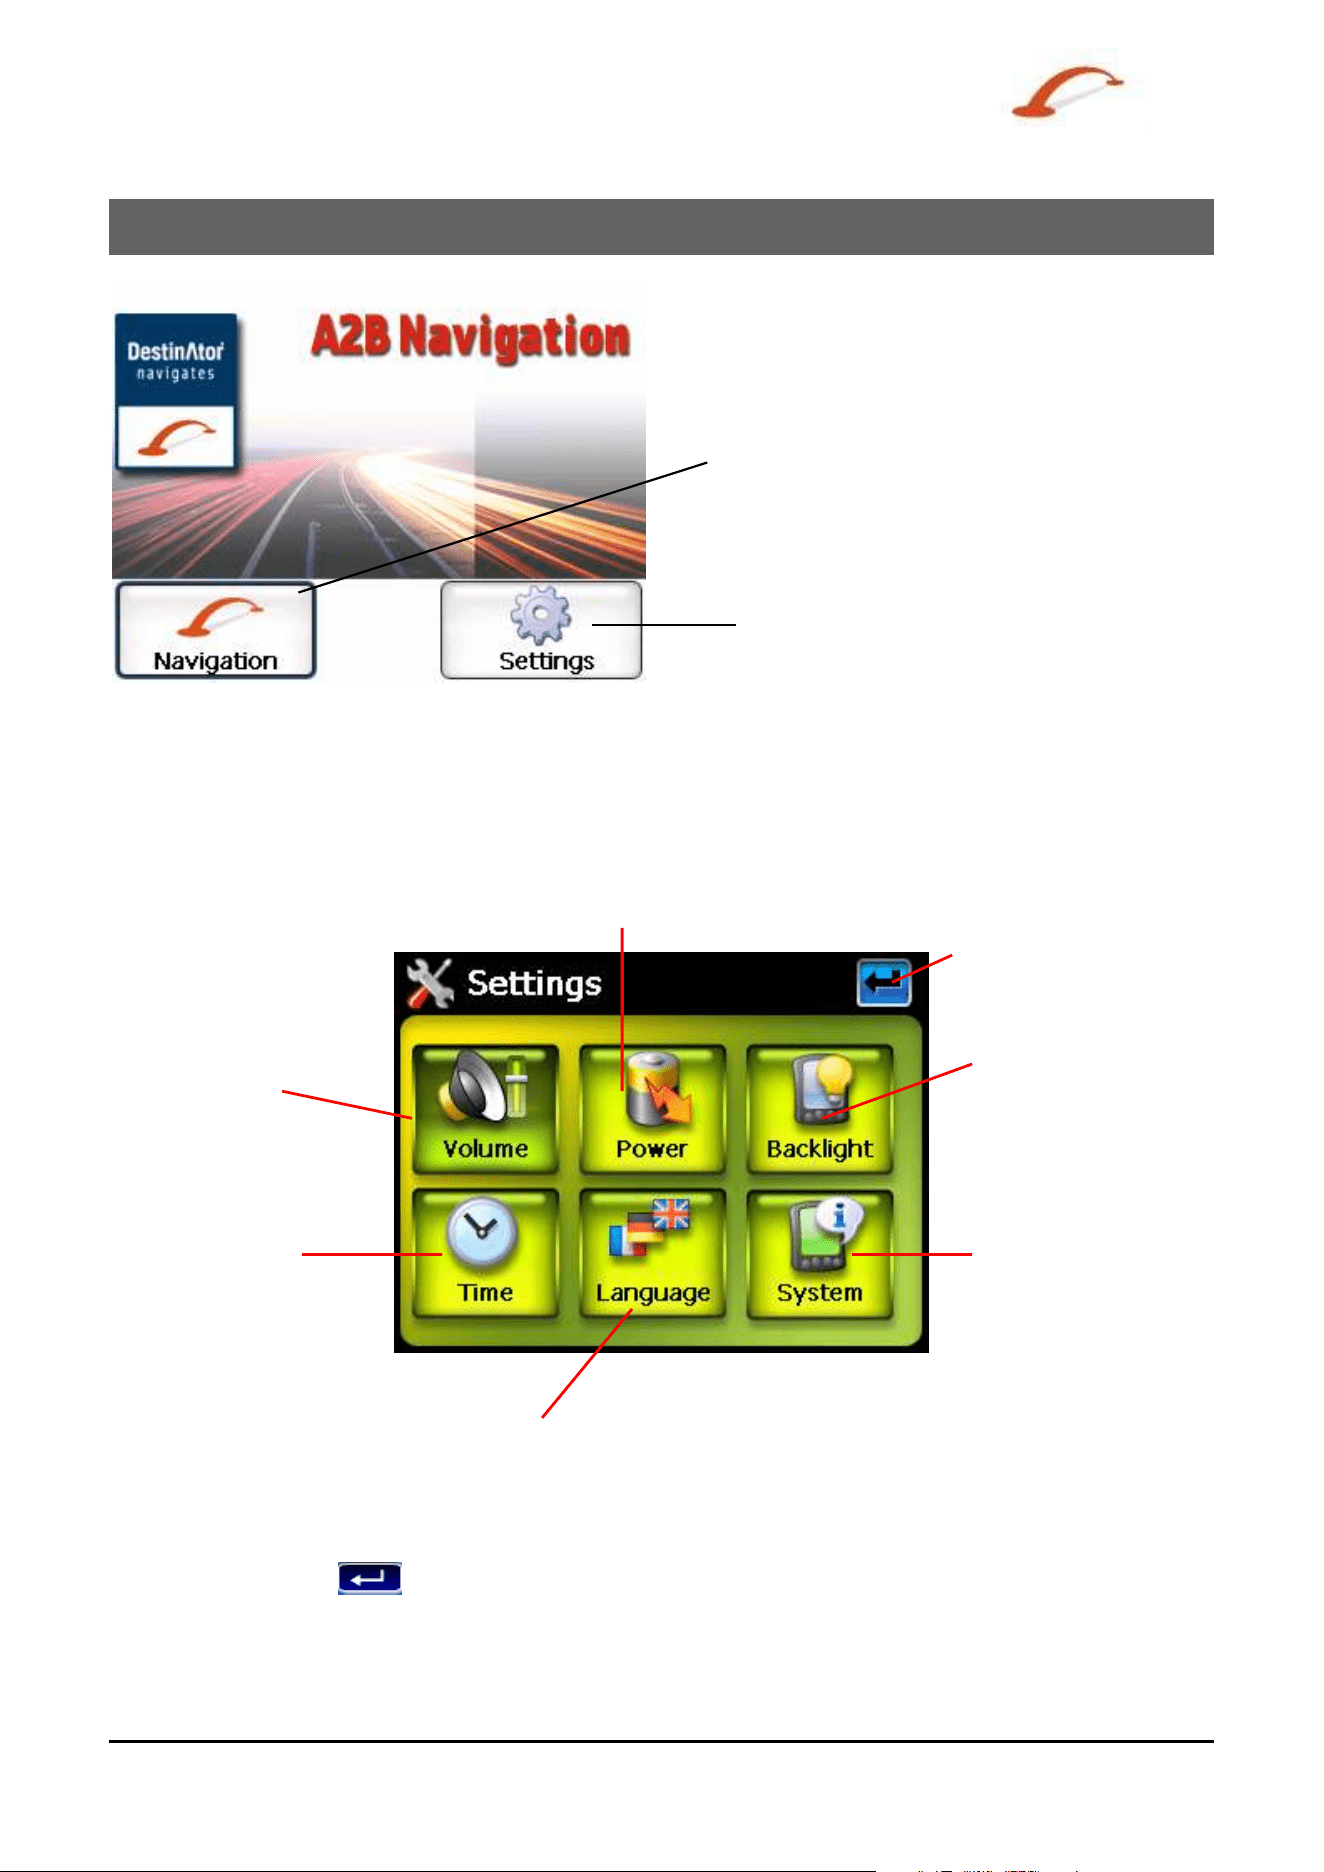
Use r 's Gu ide De st in a t or 4 6
7 - System Settings
St arts t he D e st in a t or
OP application
Opens t he device’s Syst em
Se t tings screen
Figure 1 - The Main Menu
You can change t he syst em set t ings by t apping t he Syst em butt on. The Syst em screen shows all of the
syst em set t ings that you can change, as displayed below .
Power Settings –
See Figure 4
Volume Setting –
See Figure 3
Returns you to the
Main Screen.
Time Settings – See
Figure 6
Language Settings - See
Figure 7
System Information – See
Figure 8
Backlight Settings –
See Figure 5
Figure 2 - Syst em Set t ings
You can tap t he Ba ck
button to return to a previous screen.
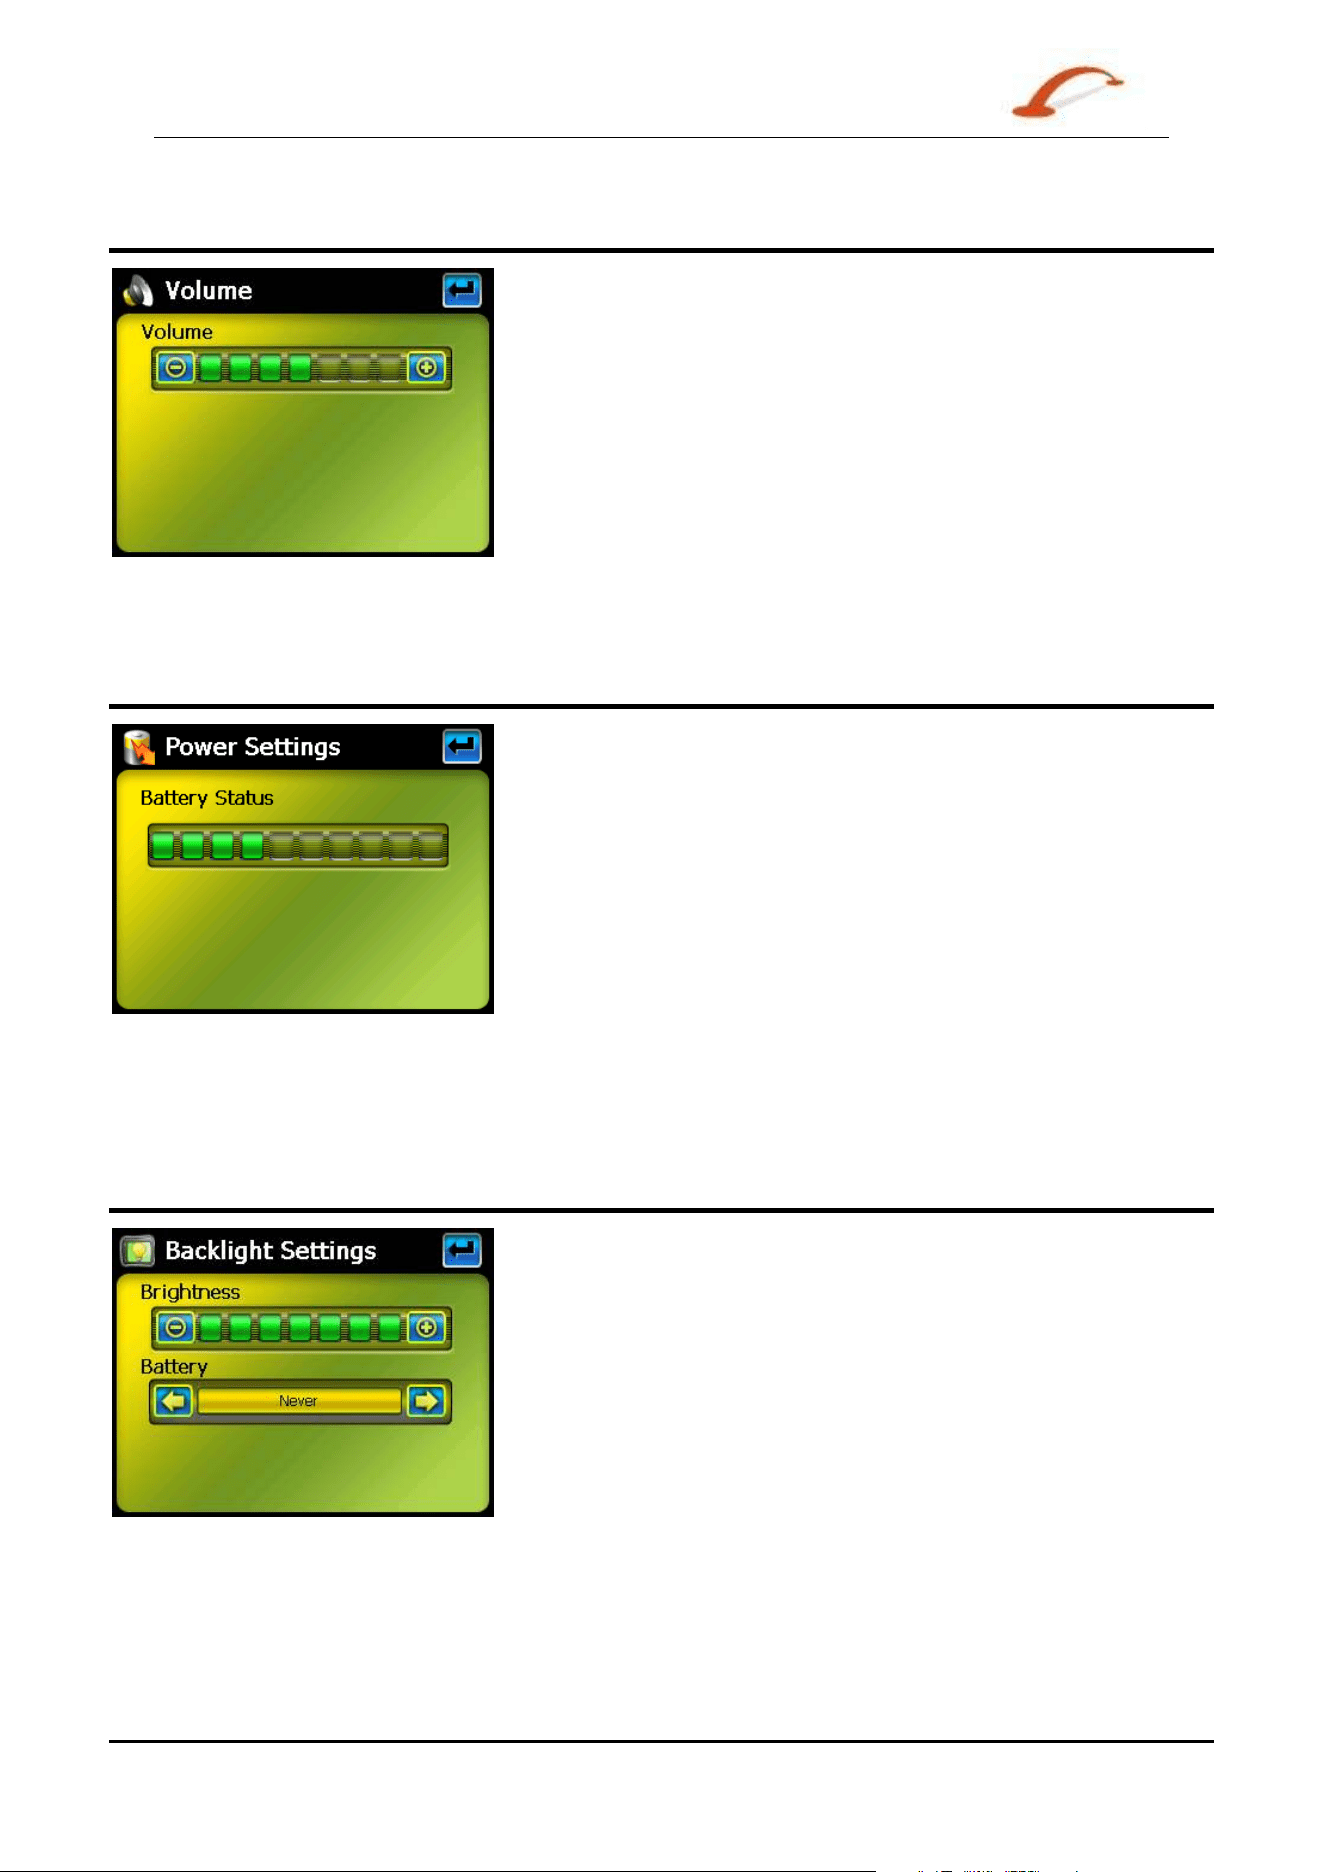
Use r 's Gu ide De st in a t or 4 7
System Settings
Volume Settings
Figure 3 - Volum e Set tings
This screen let s you change t he volum e level for voice prom pts and t ap sounds.
Power Settings
Figure 4 - Power Set t ings
This screen indicat es the bat t er y st atus of the device.
You can select the hot key checkboxes to det erm ine whet her you want t he backlight for t he device keys.
Backlight Settings
Figure 5 - Backlight Set t ings
This screen let s you det erm ine t he bright ness of the screen. You can save power by select ing how long the
backlight will st ay on before it dim s w hen running t he device either on bat tery or on AC power.
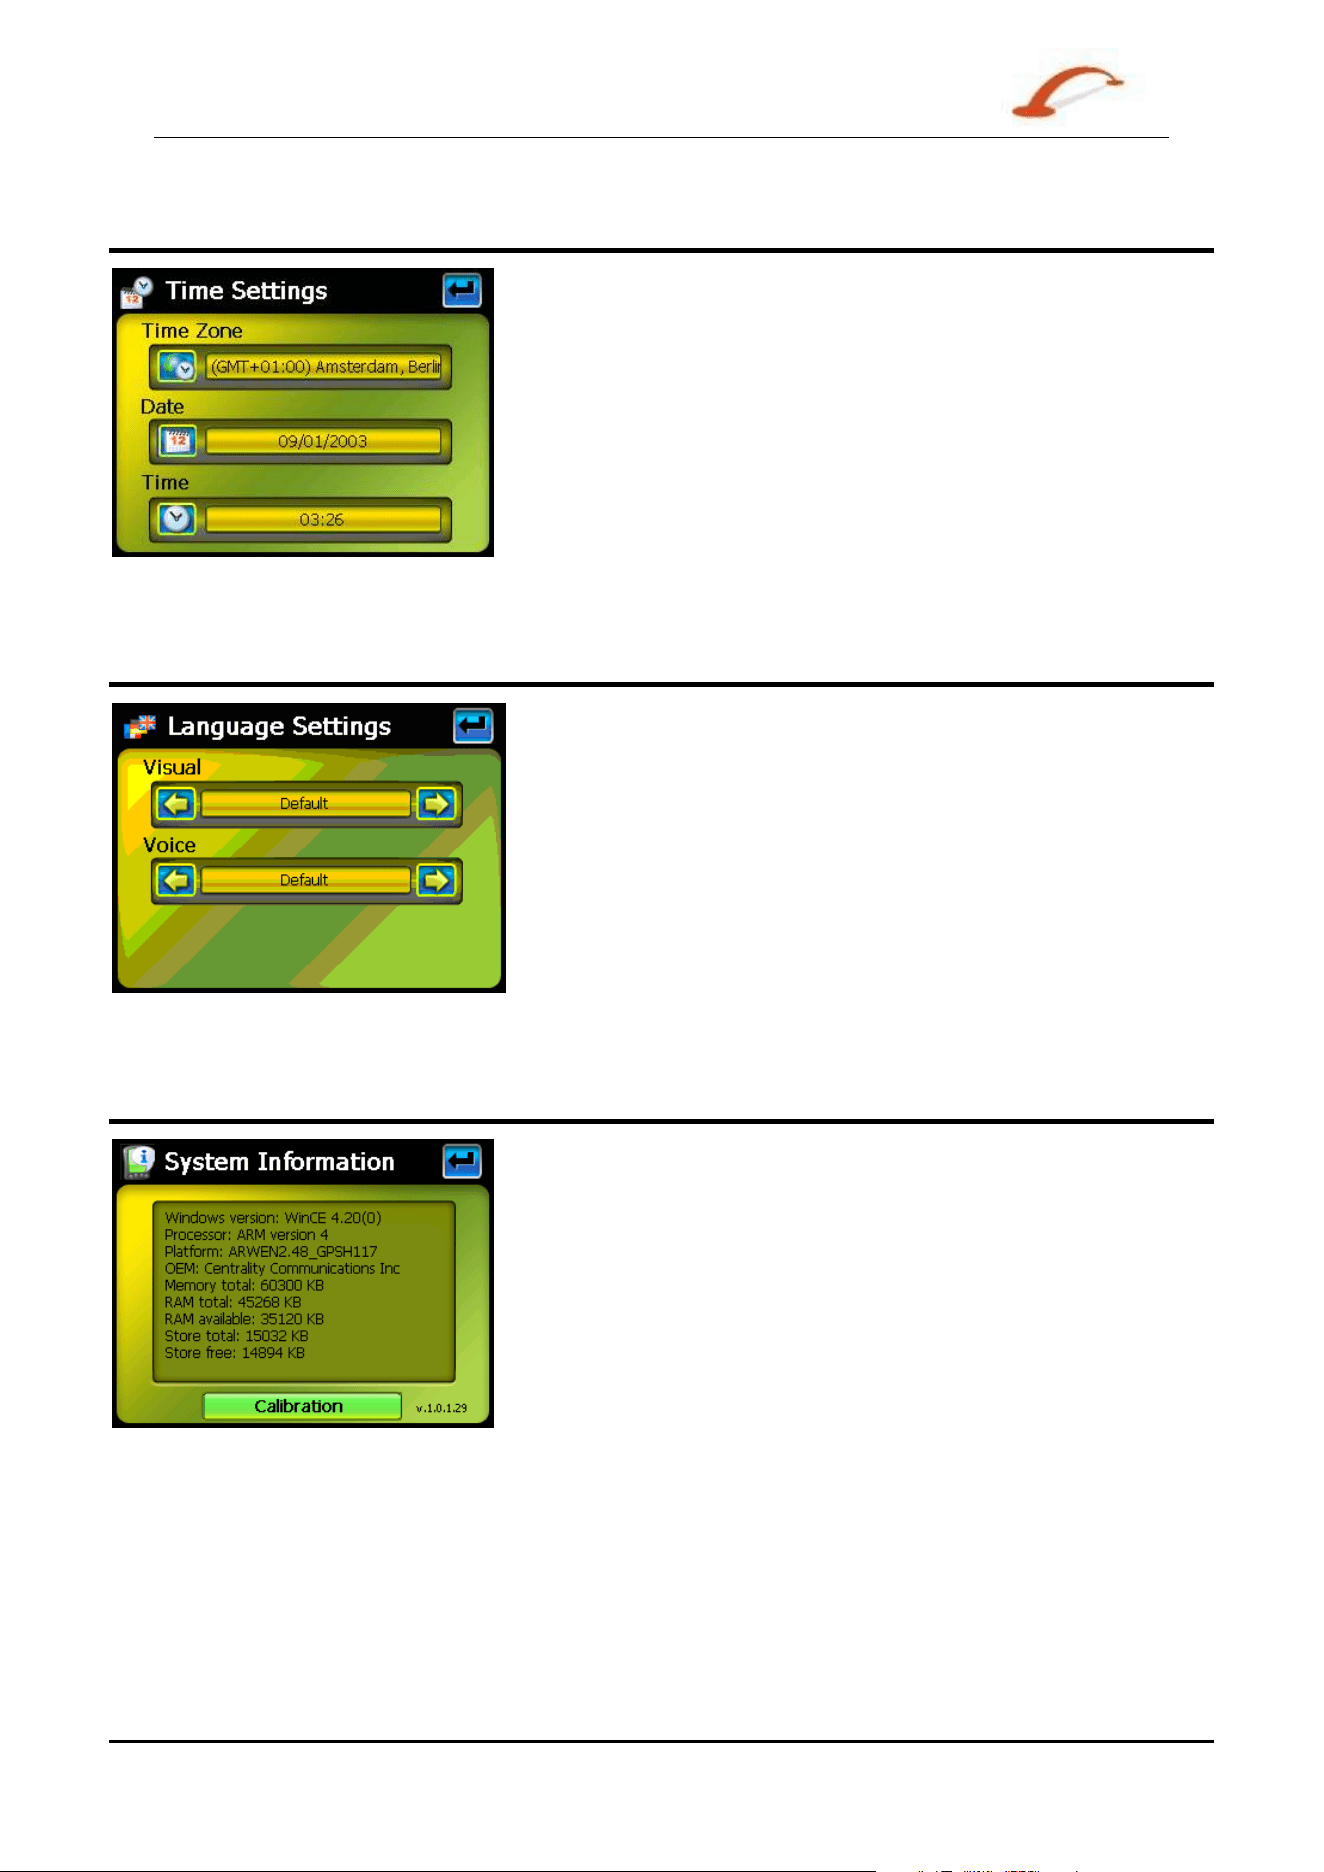
Use r 's Gu ide De st in a t or 4 8
System Settings
Date-Time Settings
Figure 6 - Dat e- Tim e Set tings
This screen let s you select your tim e zone, and to set t he dat e and tim e.
Language Settings
Figure 7 - Language Set tings
This screen let s you select the language t o be used for screen displays and voice prom pts.
System Information
Figure 8 - Syst em I nform at ion
This screen displays inform ation about the device.

Use r 's Gu ide De st in a t or 4 9
Index
Index
A
Add Favourite Locations • 17
Add to My Favourites • 13, 17
Address Actions • 12
Address Modes • 11
Avoid Road Groups • 26
Avoid Road Locations • 27
Avoid Roads • 4, 26
B
Backlight Settings • 47
C
Console Toolbar • 38
Cut Map • 45
Cycling Through Screens • 9
D
Date-Time Settings • 48
Defining Route Groups • 31
Destinations Menu • 3
Destinator Features • 2
Destinator Guided Tour • 2
E
Enter Address • 3, 10
Extras • 3, 4, 5, 30
F
Favourite Alerts • 16
Favourite Groups • 16
Favourites Actions • 17
Focus the Map • 44
Focus the Map by Route • 44
Free Map Browsing • 29
G
Getting Started • 3
Go to your Destination • 13, 15, 18
GPS Not Found • 7
GPS Settings • 6, 7, 36
I
Import Favourite Location • 38, 39
Installation Requirements • 37
Installing a Map • 38, 39, 42
Installing the Console • 37
Introduction • 2
L
Language Settings • 6, 35, 48
Load Map • 45
Look & Feel Settings • 6, 35
M
Main Map • 6
Map Cutter Screen Interface • 38, 42
Map Manager • 4, 28
Map Manager Menu • 3, 5
Map Screen Interface • 42
Map Settings • 5, 30
Map Views • 4, 8
Maps • 39, 42
Menus • 3
Multistop Planner • 5, 30
My Contacts • 3, 20
My Favourites • 3, 15, 33
N
Navigating to an SMS Address • 5, 32
O
Options Menu • 3, 4
P
PC Requirements • 37
Pedestrian Mode • 29
POI (Points of Interest) • 3, 18
POI Actions • 19
Point on the Map • 8
Power Setting • 47
Prompts • 6, 35
Q
Quick Activation • 41
Quick Navigation • 4, 28
R
Recent Locations • 3, 14
Recommended Registration for Support • 41
Remove Map • 45
Route Manager • 4, 25
Route Manager Menu • 3, 4
Route Playback • 4, 28
Route Playback Actions • 28
Route Summary or Cancel Route • 26
S
Screen Buttons • 9
Search for a Location • 10
Search Near a Location • 19
Select Map • 5, 29
Sending an SMS Address • 8, 13, 15, 17, 19, 20, 34
Set as Origin • 12
Setting Stops Along the Route • 31
Settings • 35
Settings Menu • 3, 6
Show on Map • 12
Show or Hide Symbol on Map • 19
SMS Address Actions • 33
Stops Actions • 32
Subcategories • 18
System Information • 48
System Settings • 46
T
TMC Options • 24
Traffic Information • 4, 21
Turn-by-Turn List • 4, 25

Use r 's Gu ide De st in a t or 5 0
Index
U
Units of Measure • 5, 30
V
Visual Prompts • 35
Voice Prompts • 35
Volume Settings • 47