
Technical Support and E-Warranty Certificate www.vevor.com/support
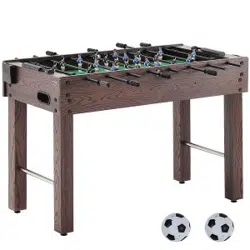
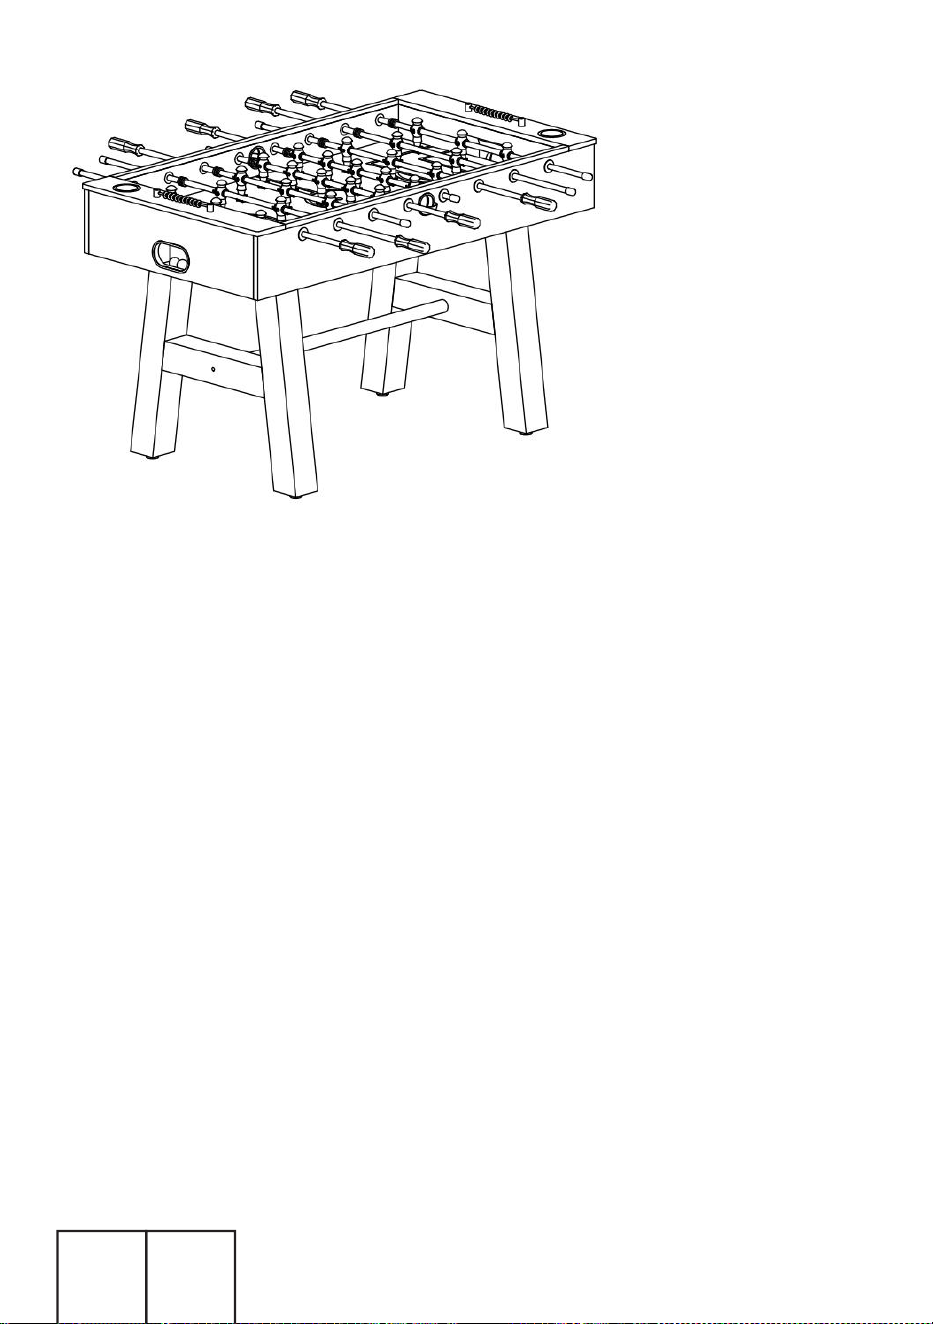
TABLE SOCCEB
MODEL:SUO-5529-A
We continue to be committed to provide you tools with competitive price.
"Save Half", "Half Price" or any other similar expressions used by us only represents an
estimate of savings you might benefit from buying certain tools with us compared to the major
top brands and does not necessarily mean to cover all categories of tools offered by us. You
are kindly reminded to verify carefully when you are placing an order with us if you are
actually saving half in comparison with the top major brands.


1
MODEL: SUO-5529-A
Have product questions? Need technical support? Please feel free to
contact us:
Technical Support and E-Warranty Certificate
www.vevor.com/support
NEED HELP? CONTACT US!
This is the original instruction, please read all manual instructions
carefully before operating. VEVOR reserves a clear interpretation of our
user manual. The appearance of the product shall be subject to the
product you received. Please forgive us that we won't inform you again if
there are any technology or software updates on our product.
TABLE SOCCEB

2
Warning-To reduce the risk of injury, user must read instructions
manual carefully.
SAFETY WARNINGS AND PRECAUTIONS
Thank you for using this product. In order to make sure that you can
operate the machine correctly, read this instruction carefully before
operation and keep it properly for future reference. Please be sure to read
the precautions and safety rules in this page to ensure your safe use. This
manual will outline safety warnings and precautions, operating,
maintenance. The warnings and instructions reviewed in this manual
cannot cover all possible conditions and situations that may occur. Caution
and common sense are not built into this product, since we believe that the
uses will comply with these codes.
Please read ALL the instructions before using your machine.
1. Assemble needs to follow these instructions. Incorrect assembly can be
a hazard.
2. Do not assemble when tired or when under the influence of alcohol,
drugs or medication.
3.Weight and elastic and other product properties are only applicable to
correctly and completely assembled products.
4. Keep the assembly area clean and well-lit.
5. Keep bystanders out of the area during assembly.
6. This is a equipment, not a toy, it needs to be used under the guidance of
a professional. Do not allow children and pets to play alone or approach
this item.
7. Use as intended only. Do not sit or stand on the product.
8. Inspect before every use. Do not use it if parts are loose or damaged.
9. Do not apply this unit to any other purposes than the indicated usage.
10. Do not use it for commercial purposes.
11. Do not clean it with any abrasive material.
12. Never leave it unattended while in use.
13. Pet urine and feces can damage the product, please keep away.
3
14. Do not place the product on or near hot air, electric burners or heaters.
15. Young children should be supervised to ensure that they do not play
with the product. Pets should stay away from the product.
Do not use outdoors in rainy and cloudy days, avoid lightning strikes and
falls. People or pets hanging on the product will cause injury or death.
WARNING:Choking Hazard--Toy contains small balls
and/or small parts.Not for children under 3 years.
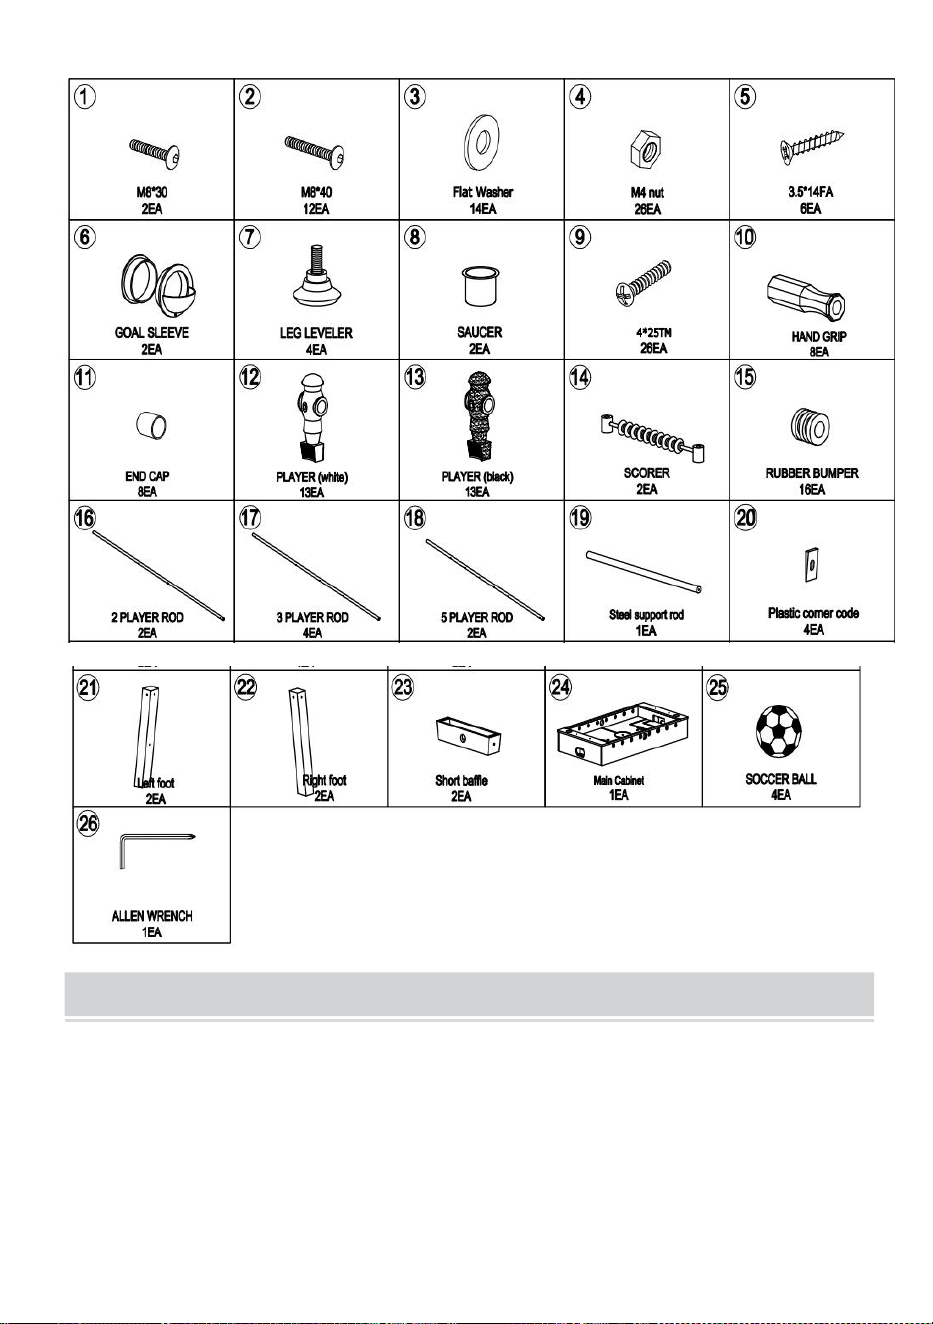
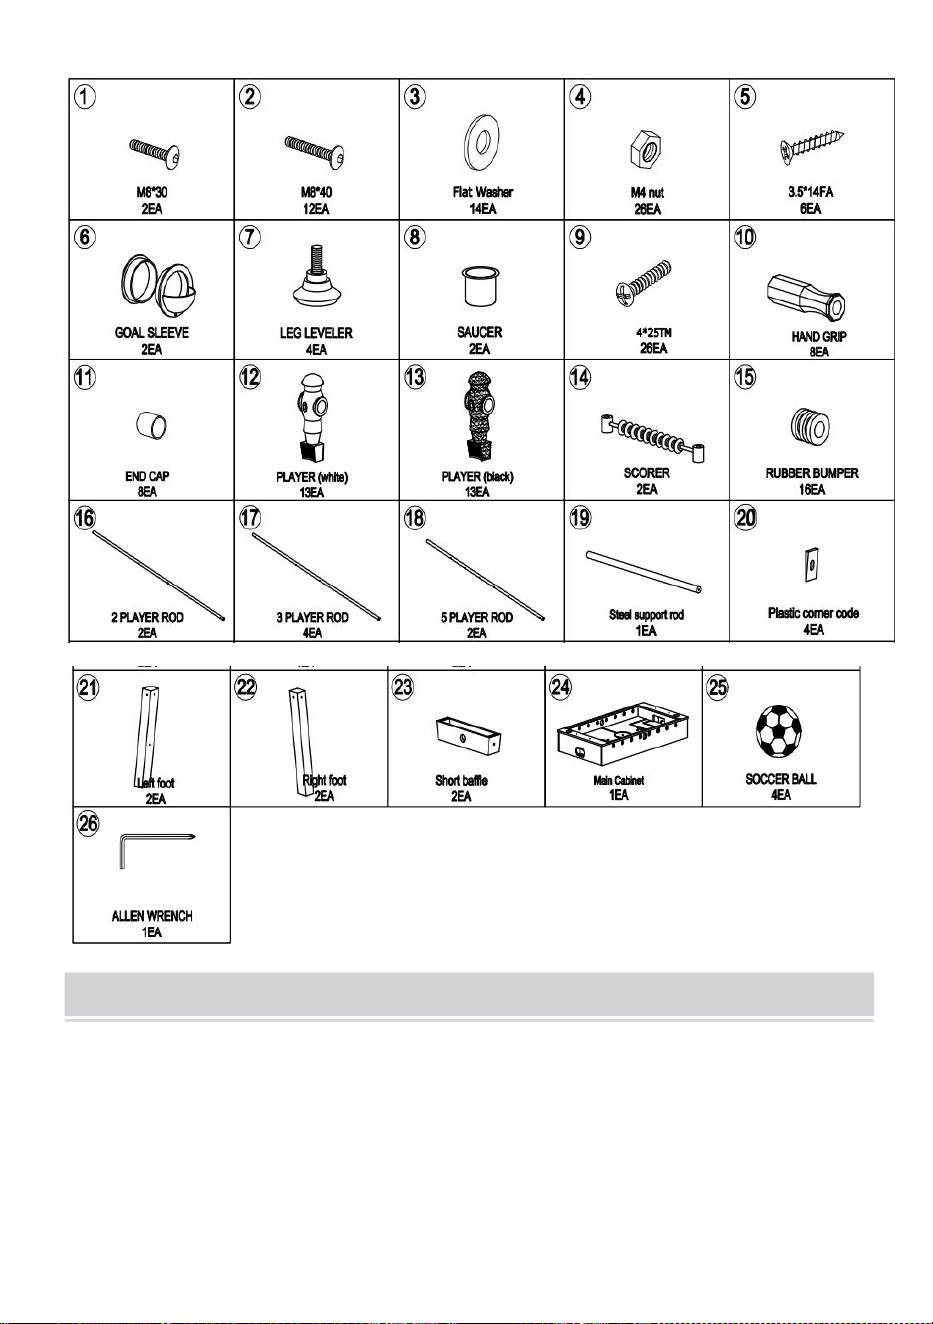
IMPORTANT!Before attempting assembly please read
through this instruction book to familiarize yourself with all
the parts and assembly steps.We recommend that two adults assemble
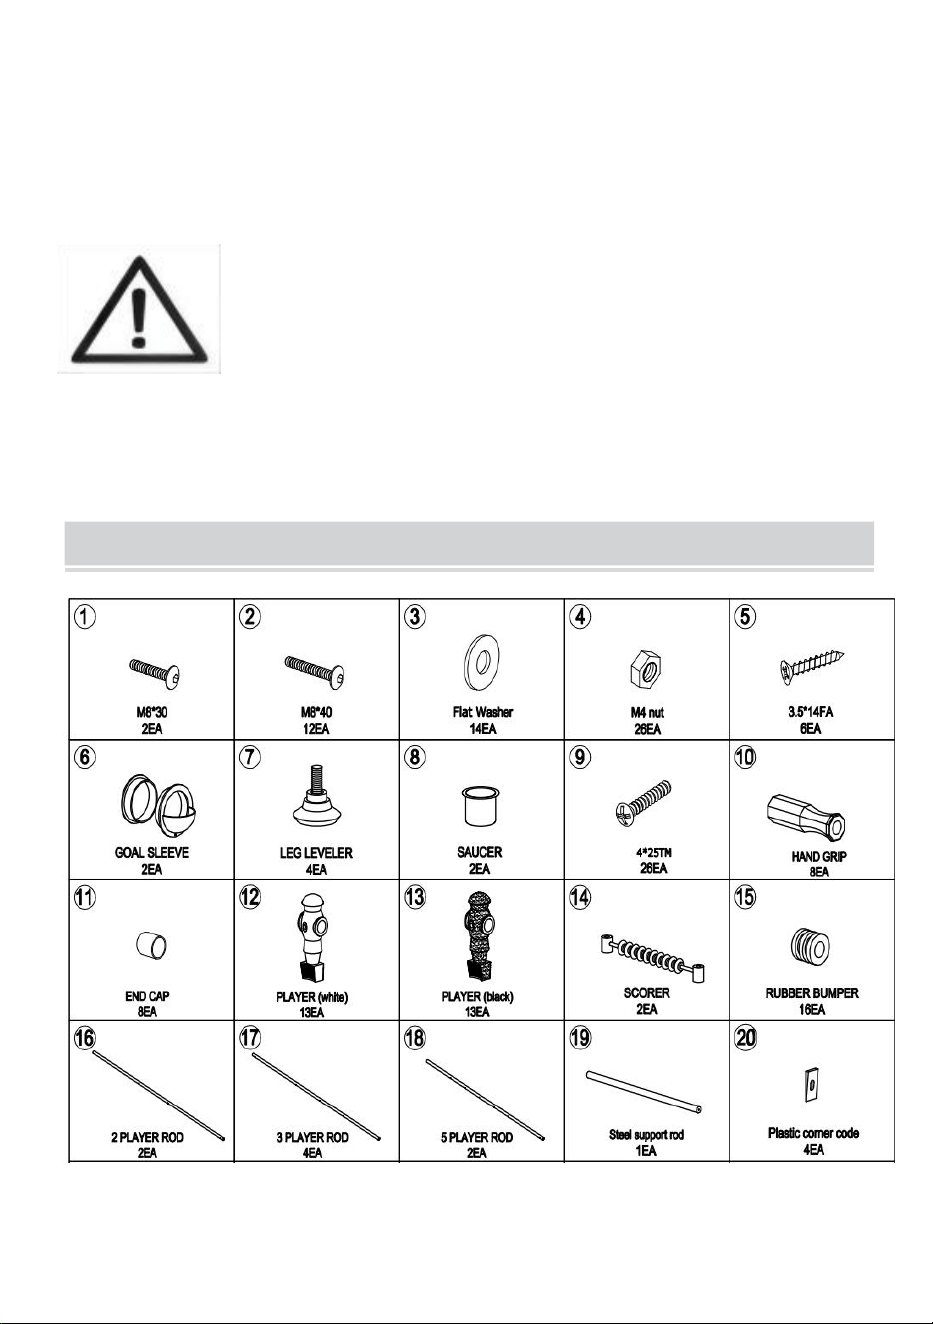
this game.Please refer to the Parts List below and be sure that all parts
have been included.
PARTS LIST
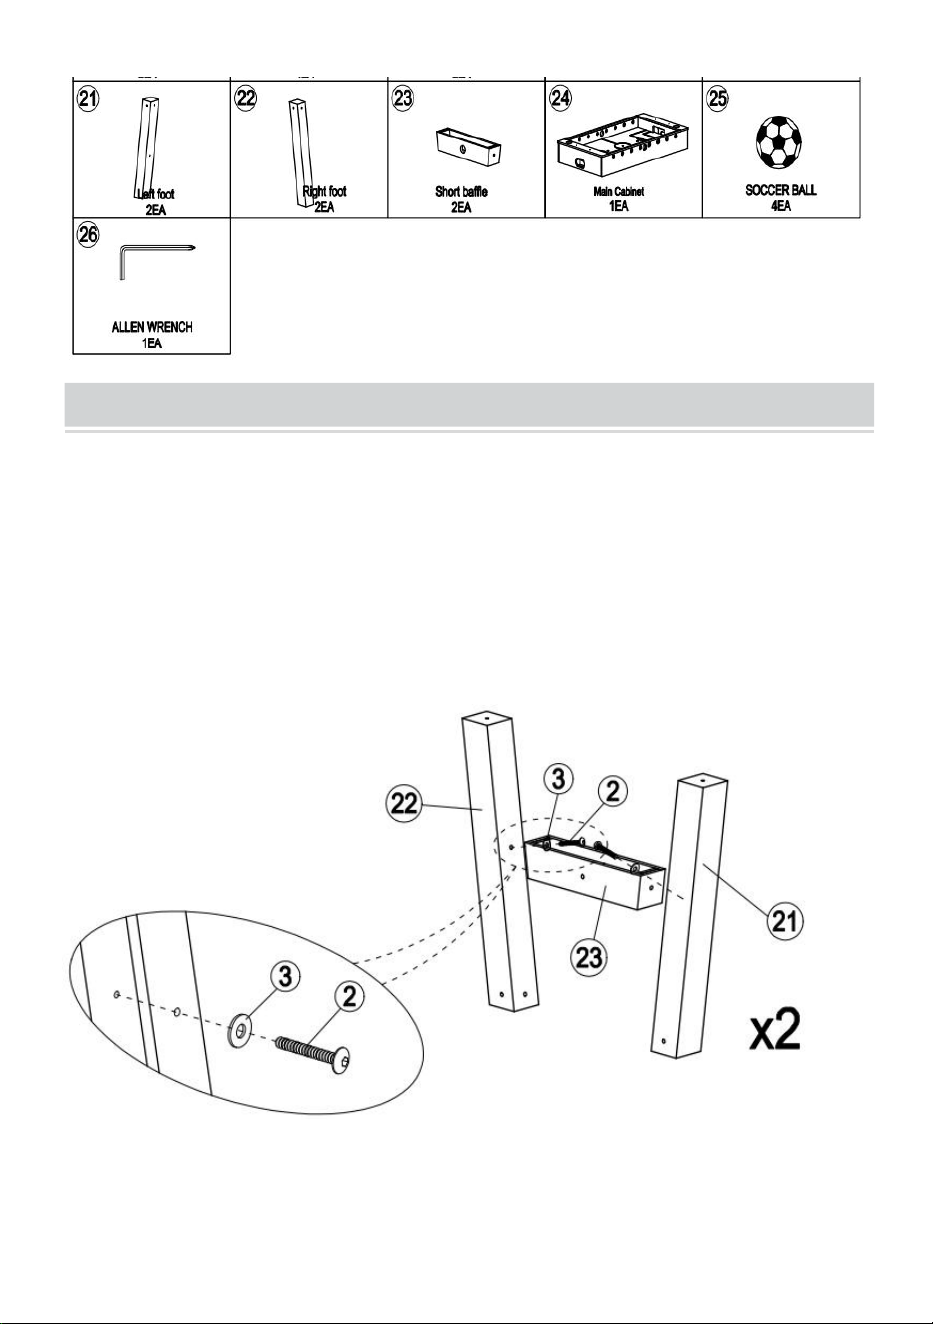
4
ASSEMBLY INSTRUCTIONS:
We recommend that two adults work together to assemble this game.
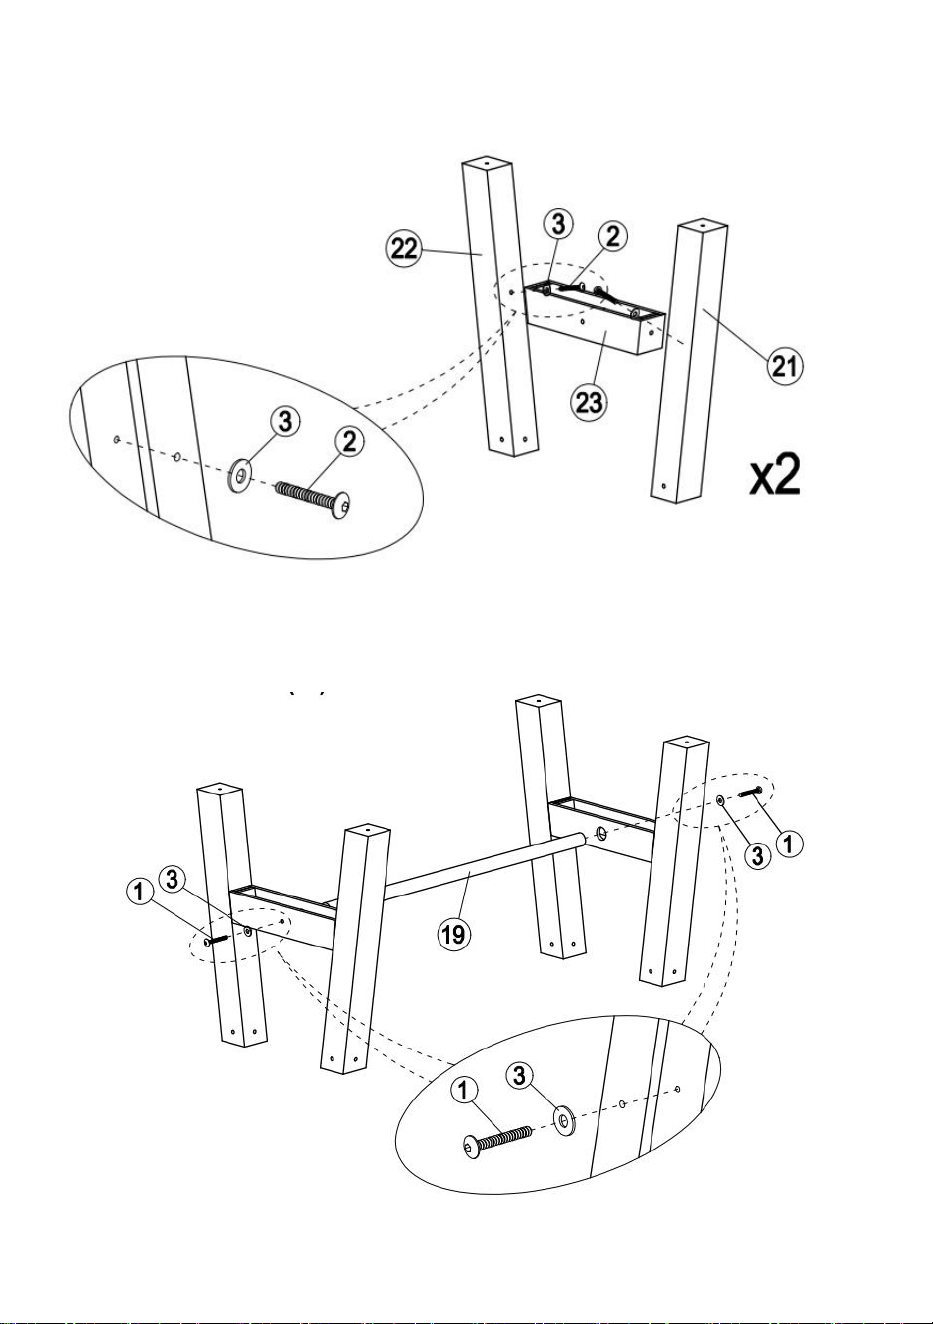
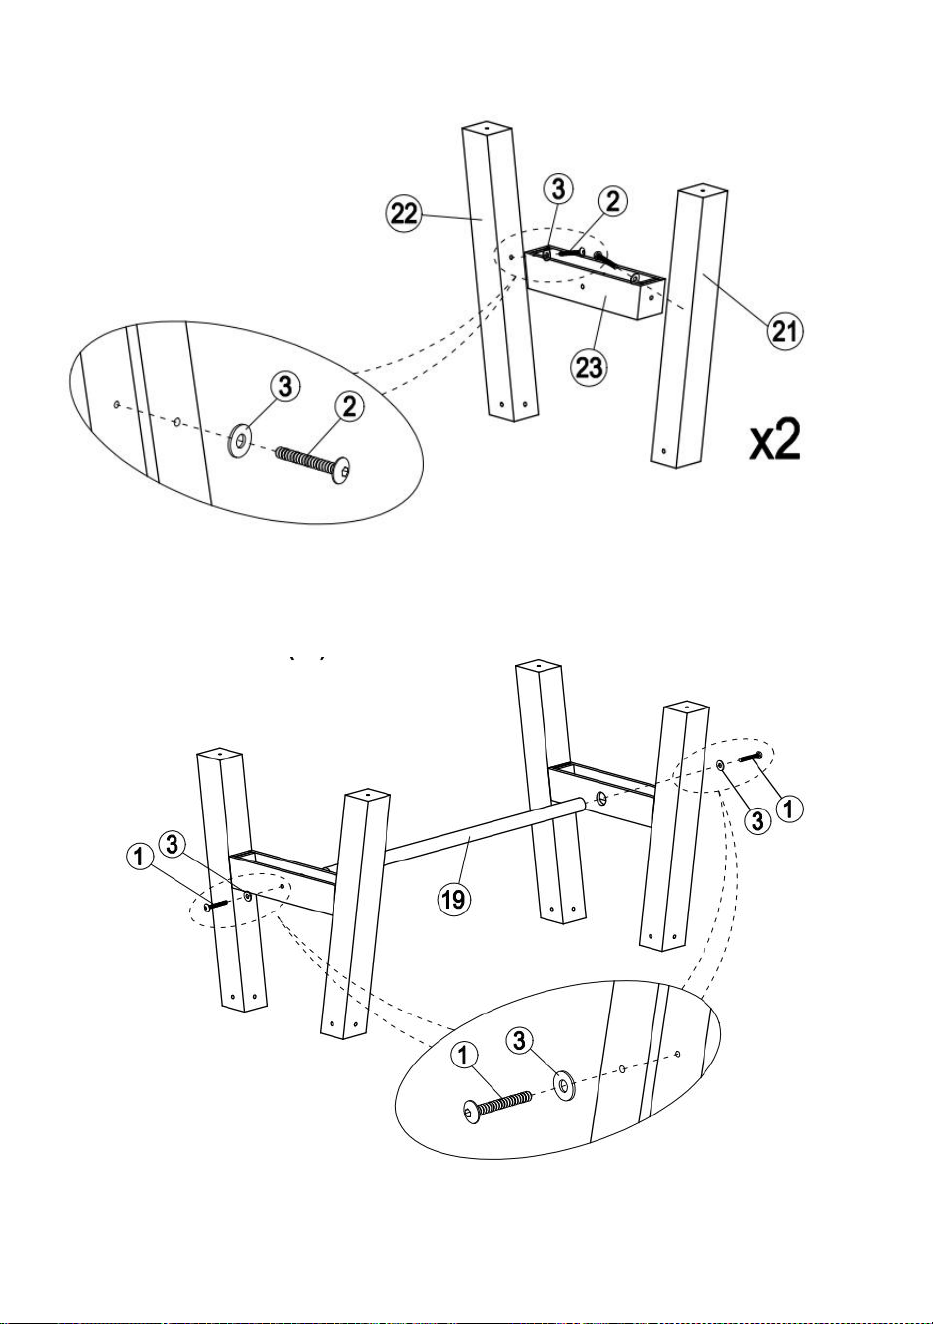
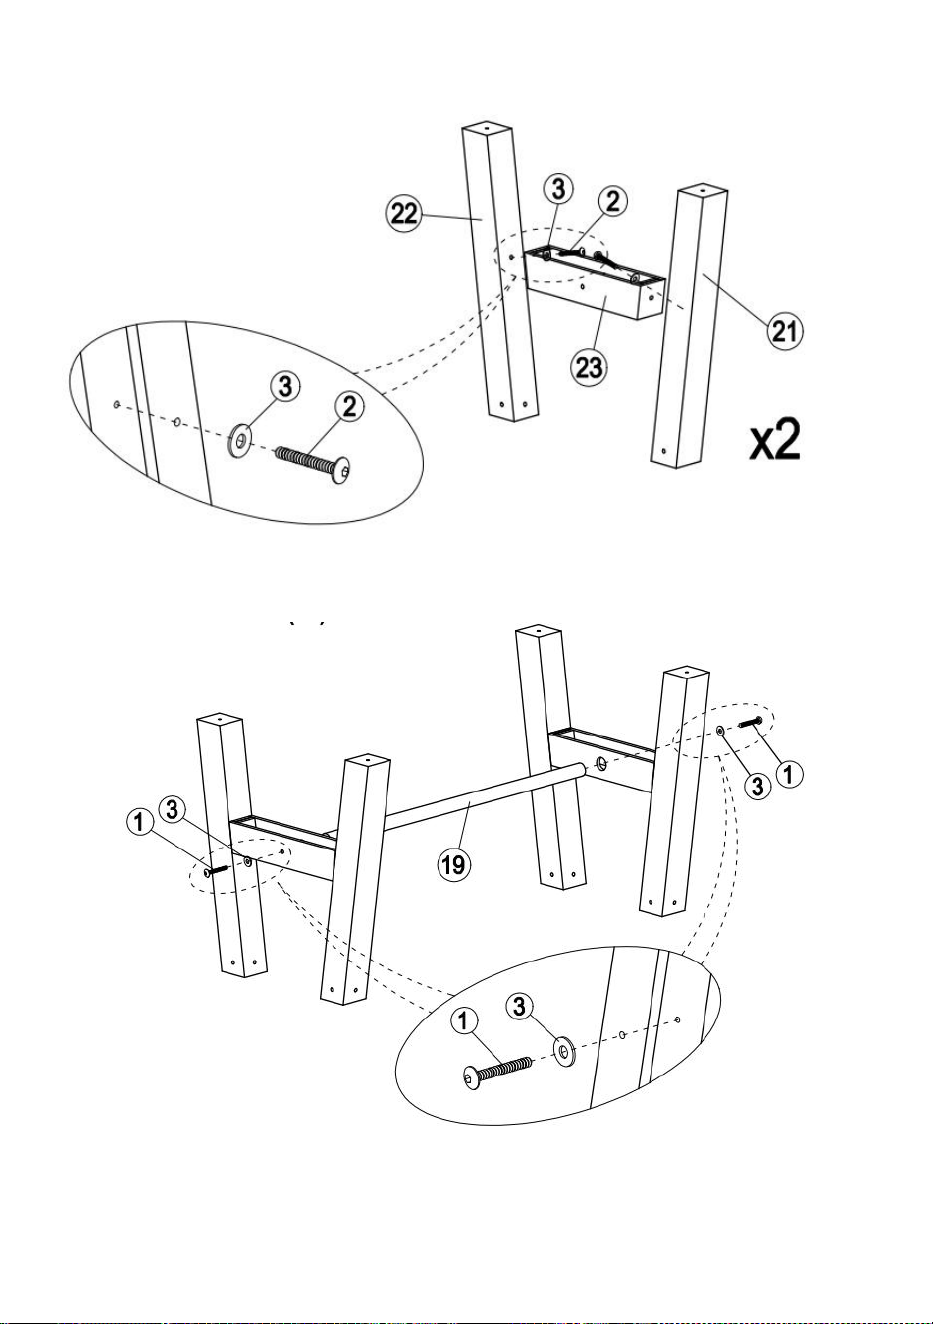
STEP 1: Connect the left foot (#21)and the right foot (#22)with the short
baffle (#23)with the Allen Head Bolt (#2)and Flat Washer (#3)as shown in
FIGURE 1.
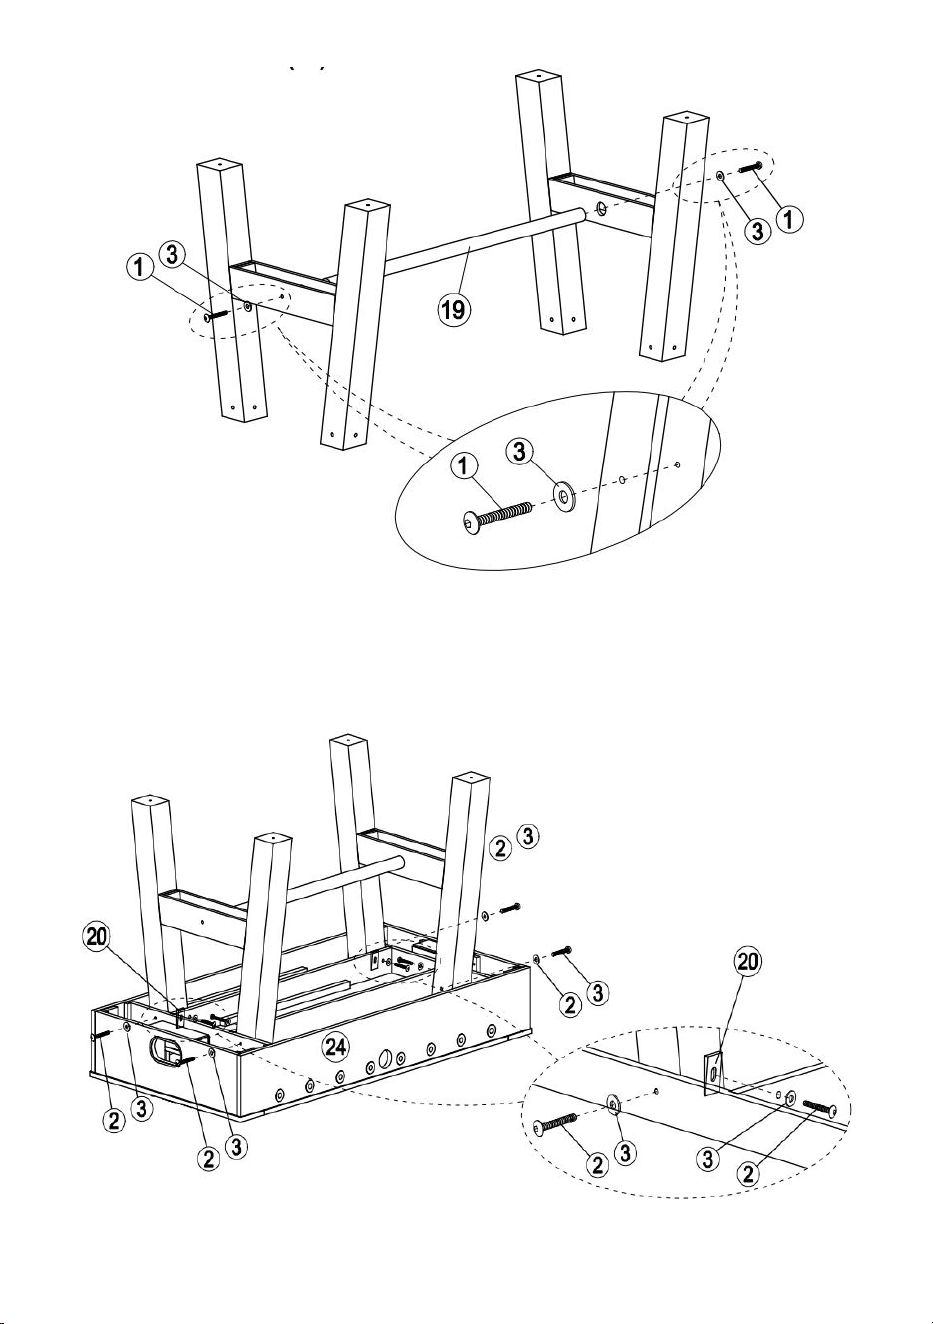
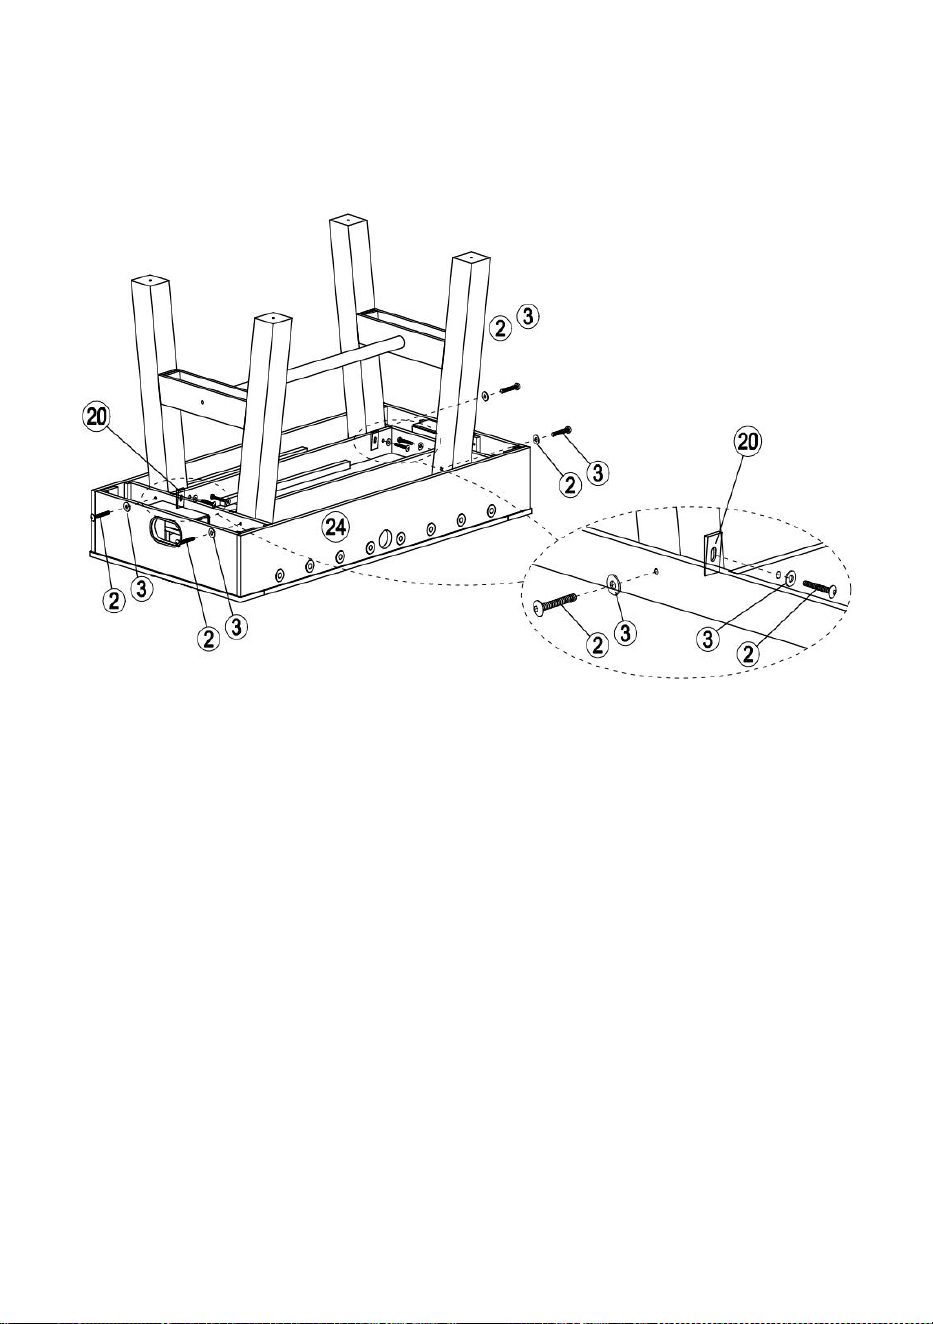
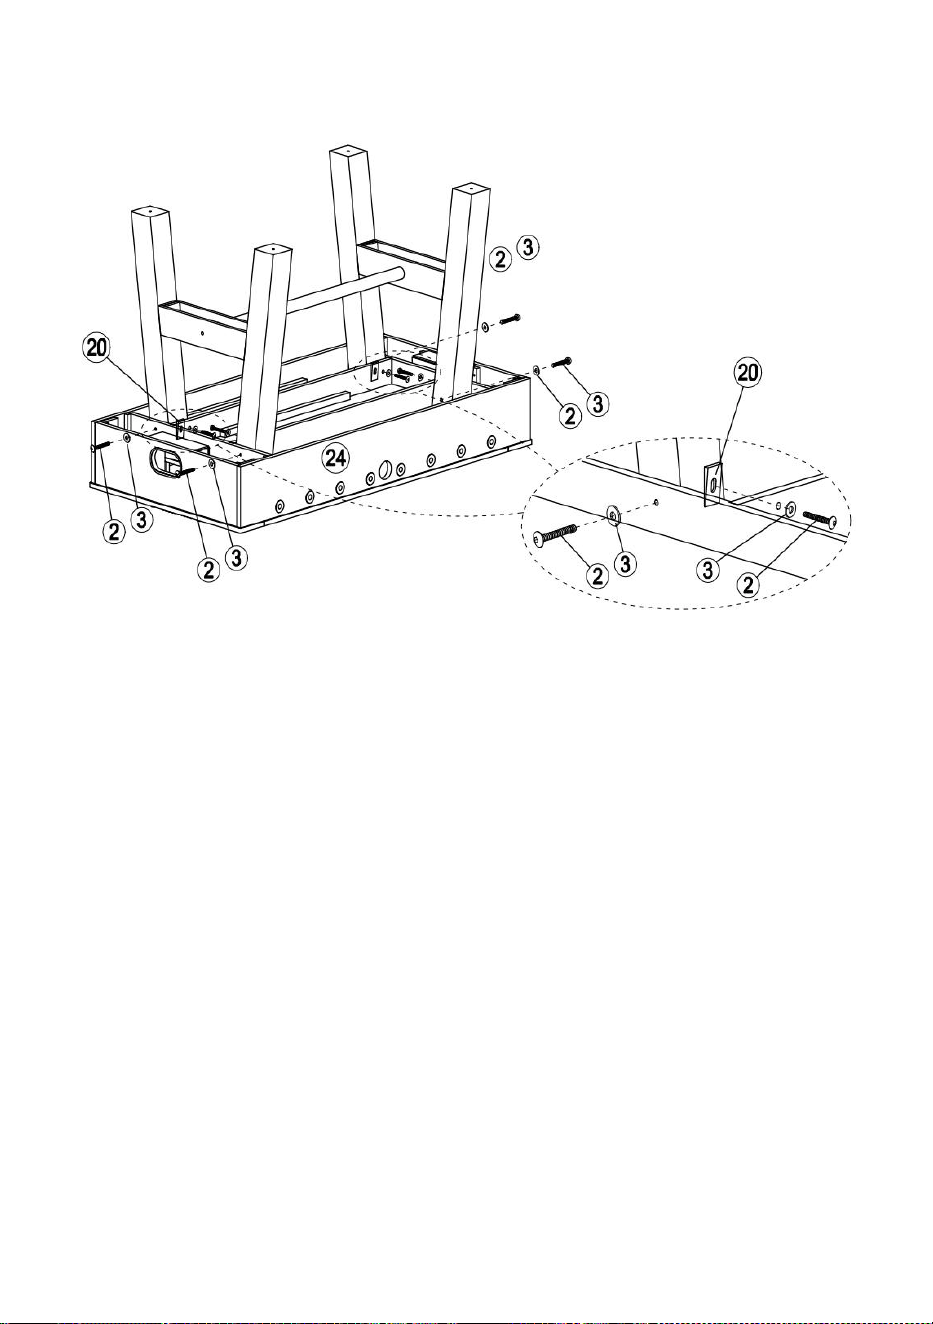
STEP 2: Plug the iron support bar (#20)into the assembled short baffle
with a Allen Head Bolt (#1)and Flat Washer (#3)as shown in FIGURE 2.
5
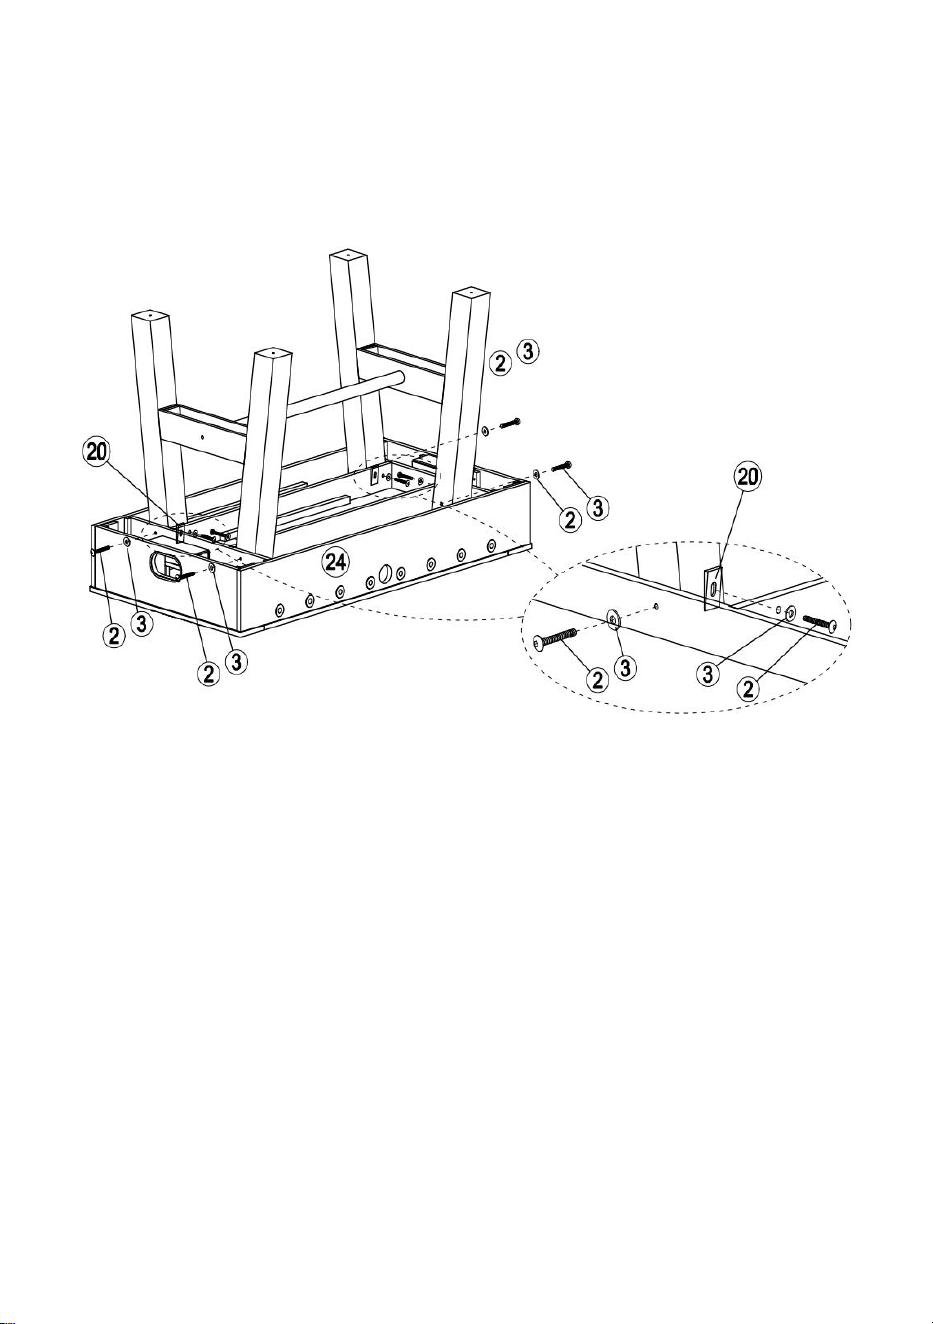
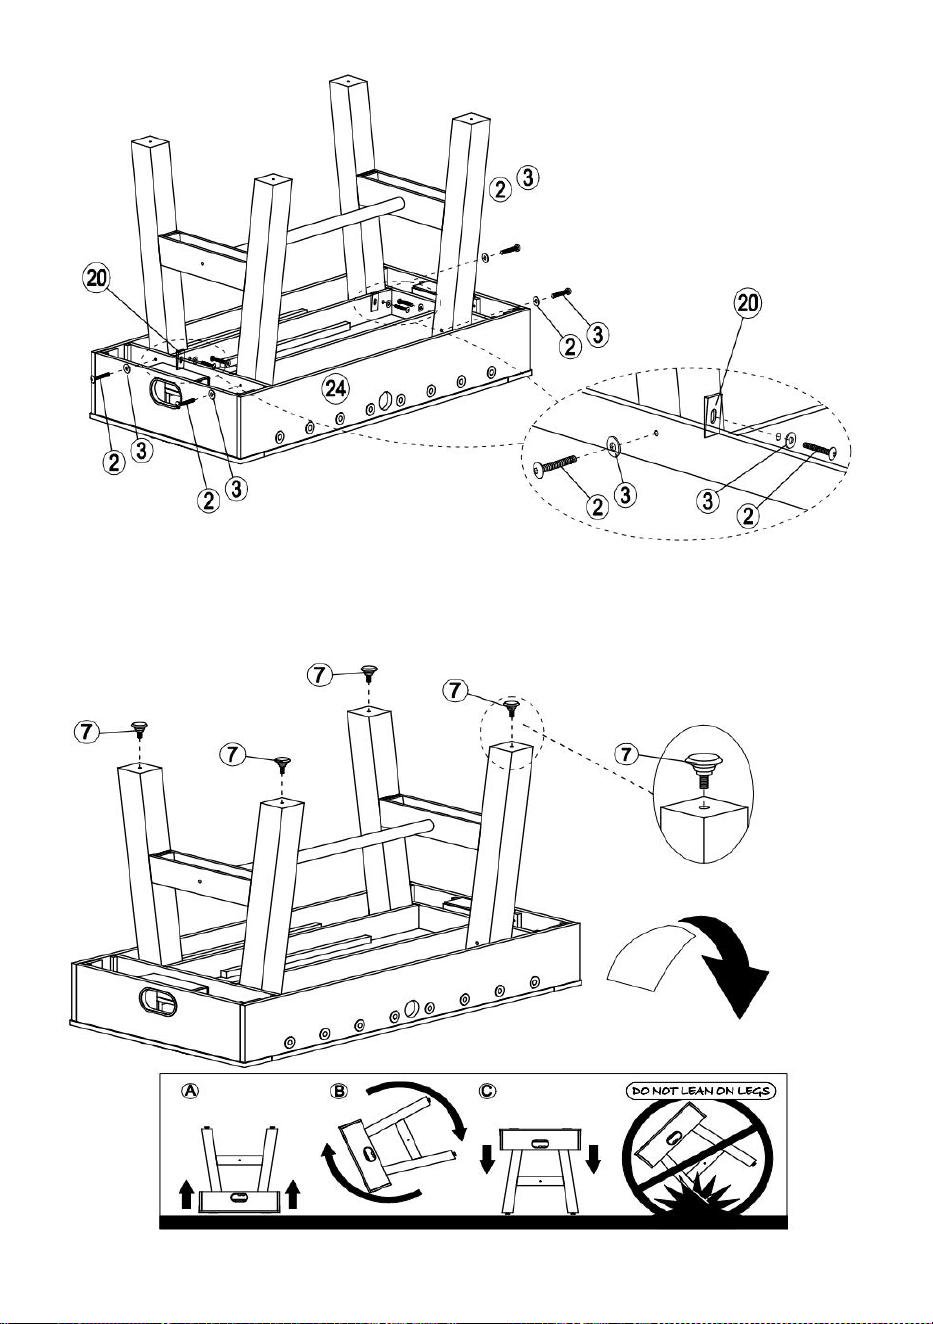
STEP 3:Place the leg assembly in step 2 on the Main Cabinet(#24),Put
the triangle plastic cushion in the gap between the foot and the derrick,and
tighten with the Allen Head Bolt (#2)and the Flat Washer (#3)as shown in
FIGURE 3.
6
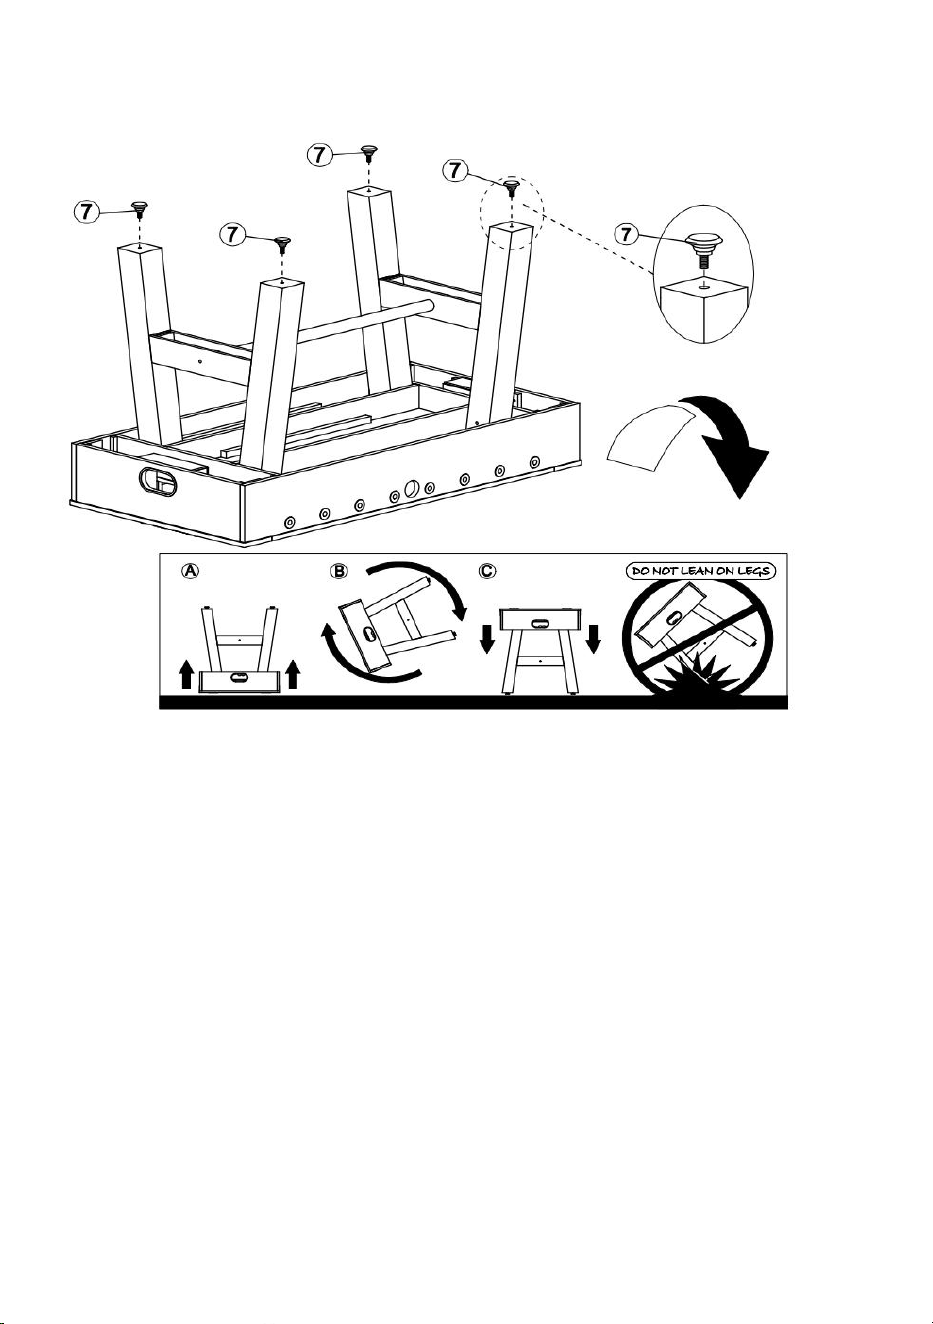
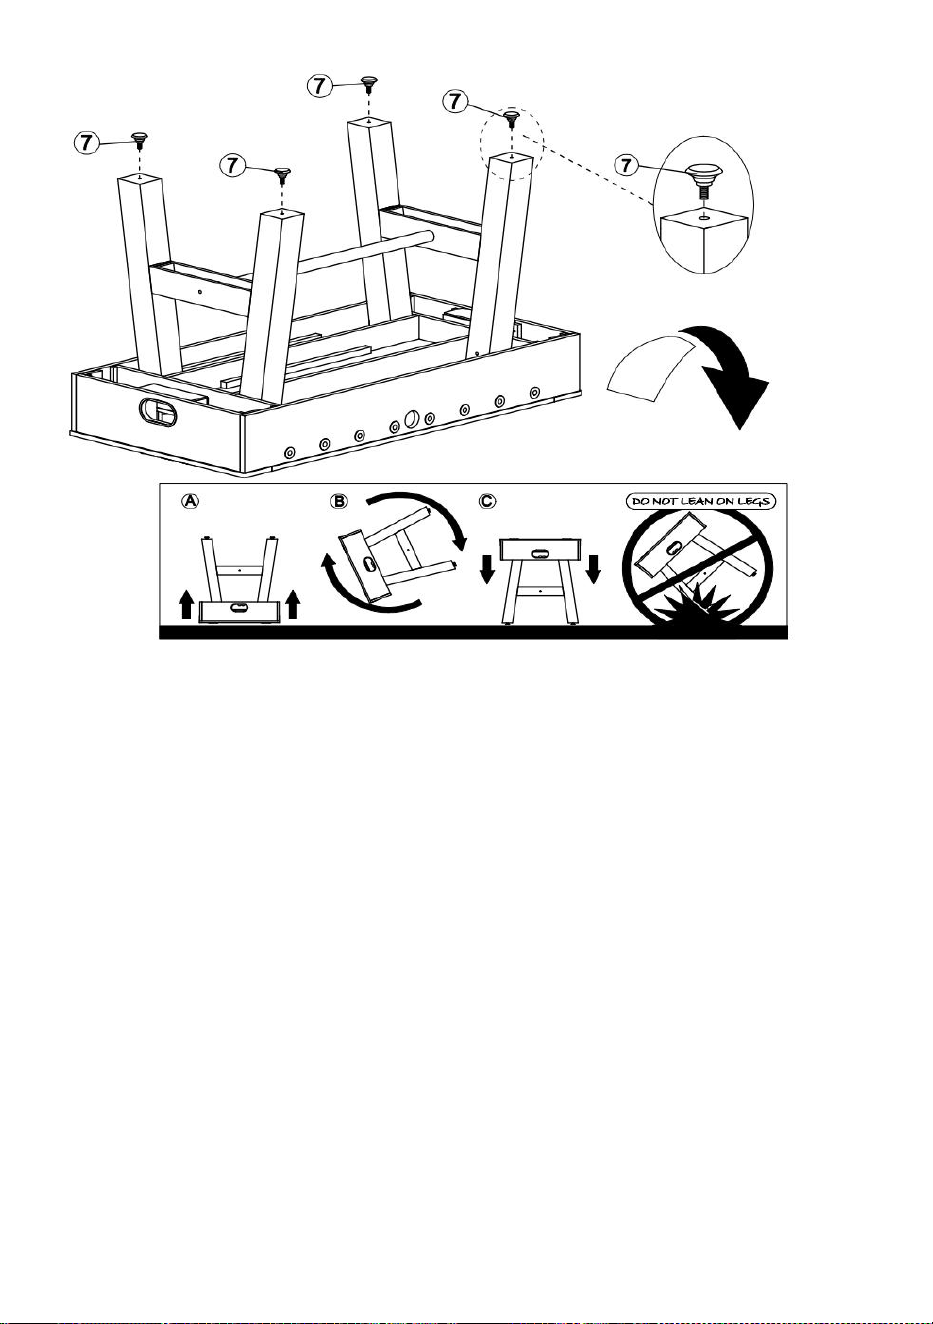
STEP 4:Thread Leg Levelers(#7)on the Legs as shown in FIGURE 4.
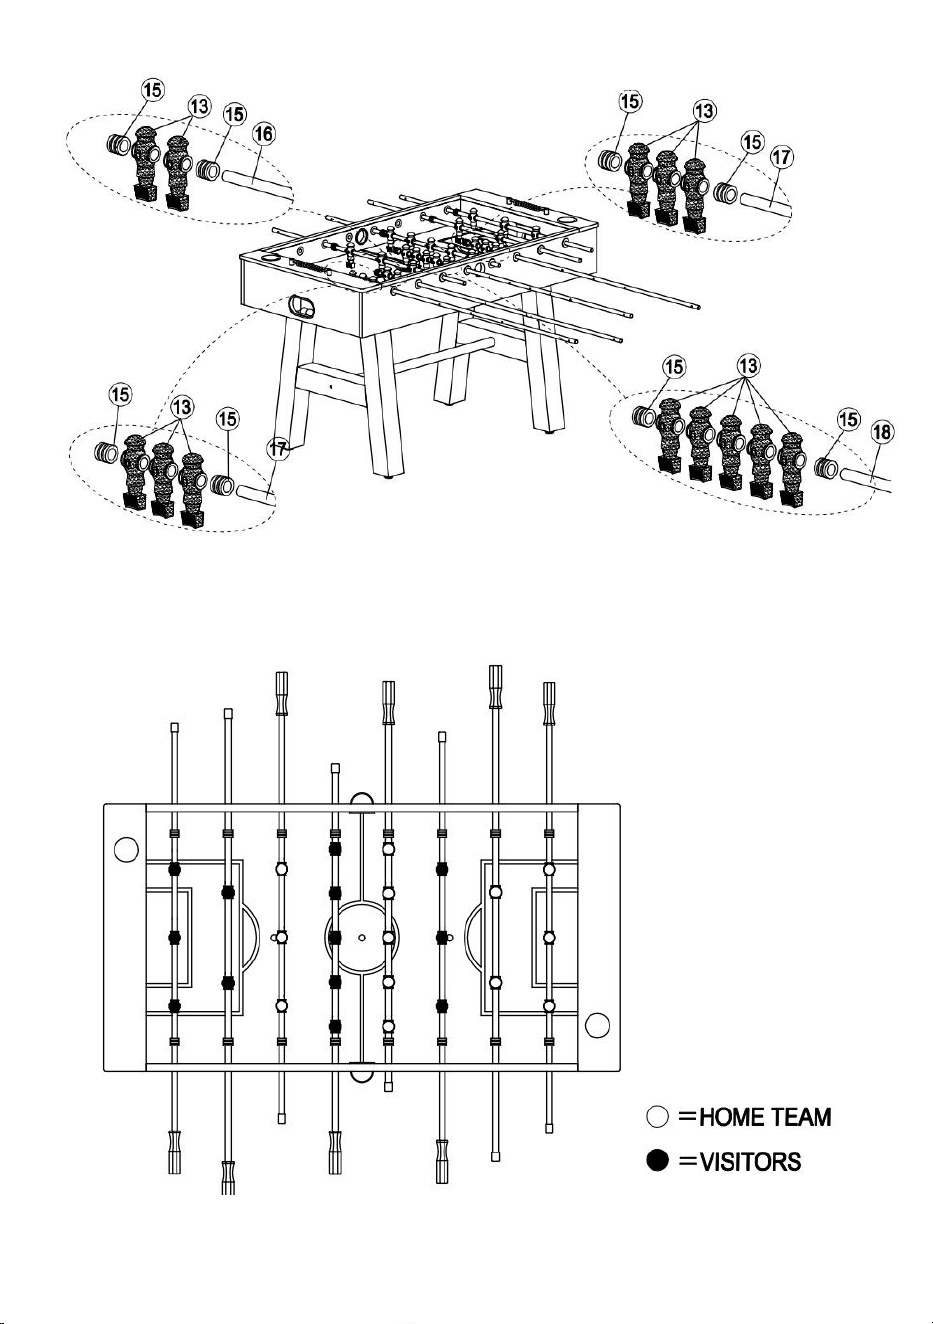
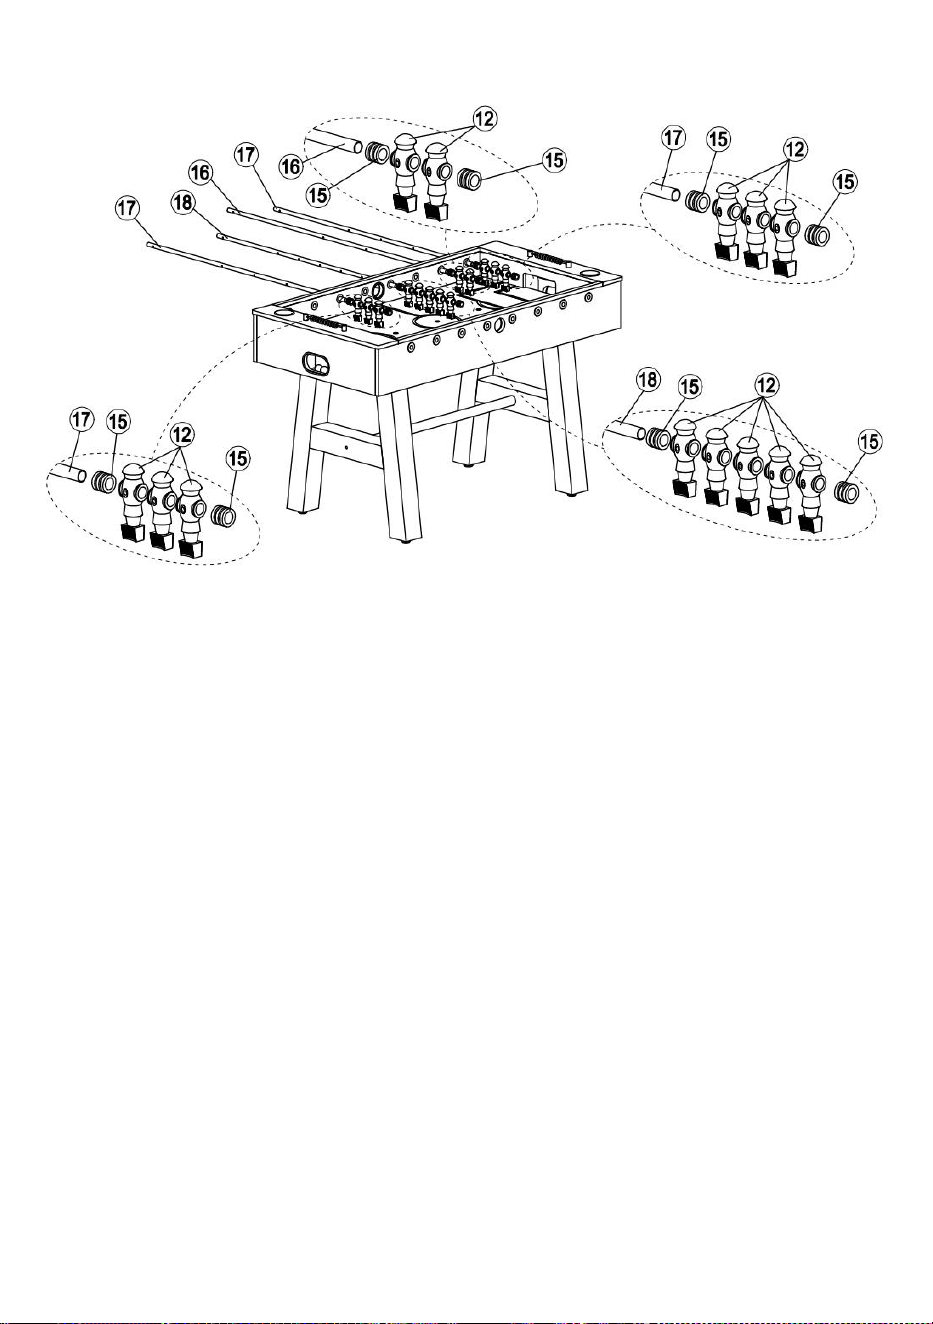
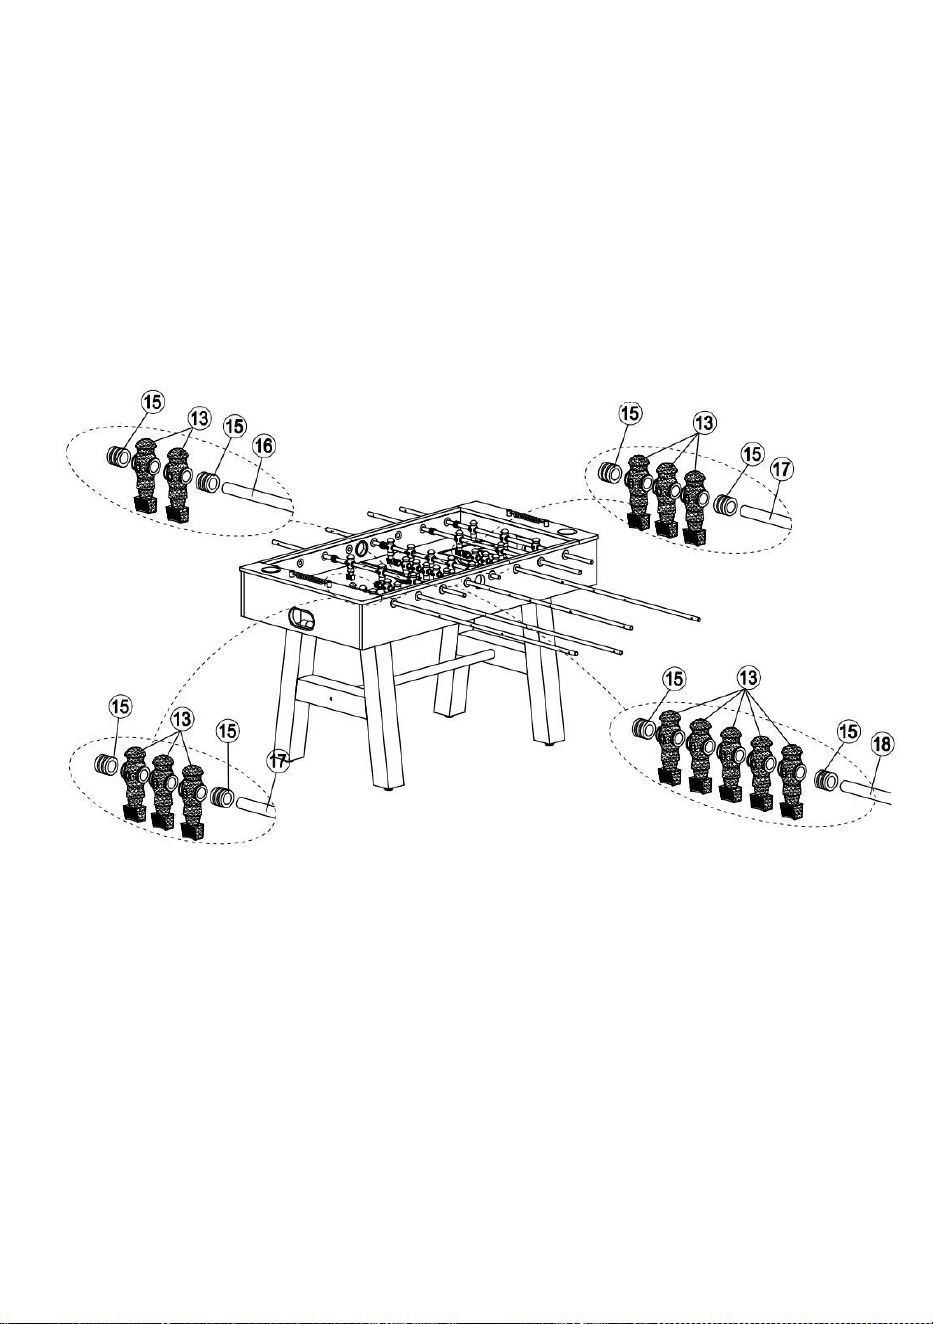
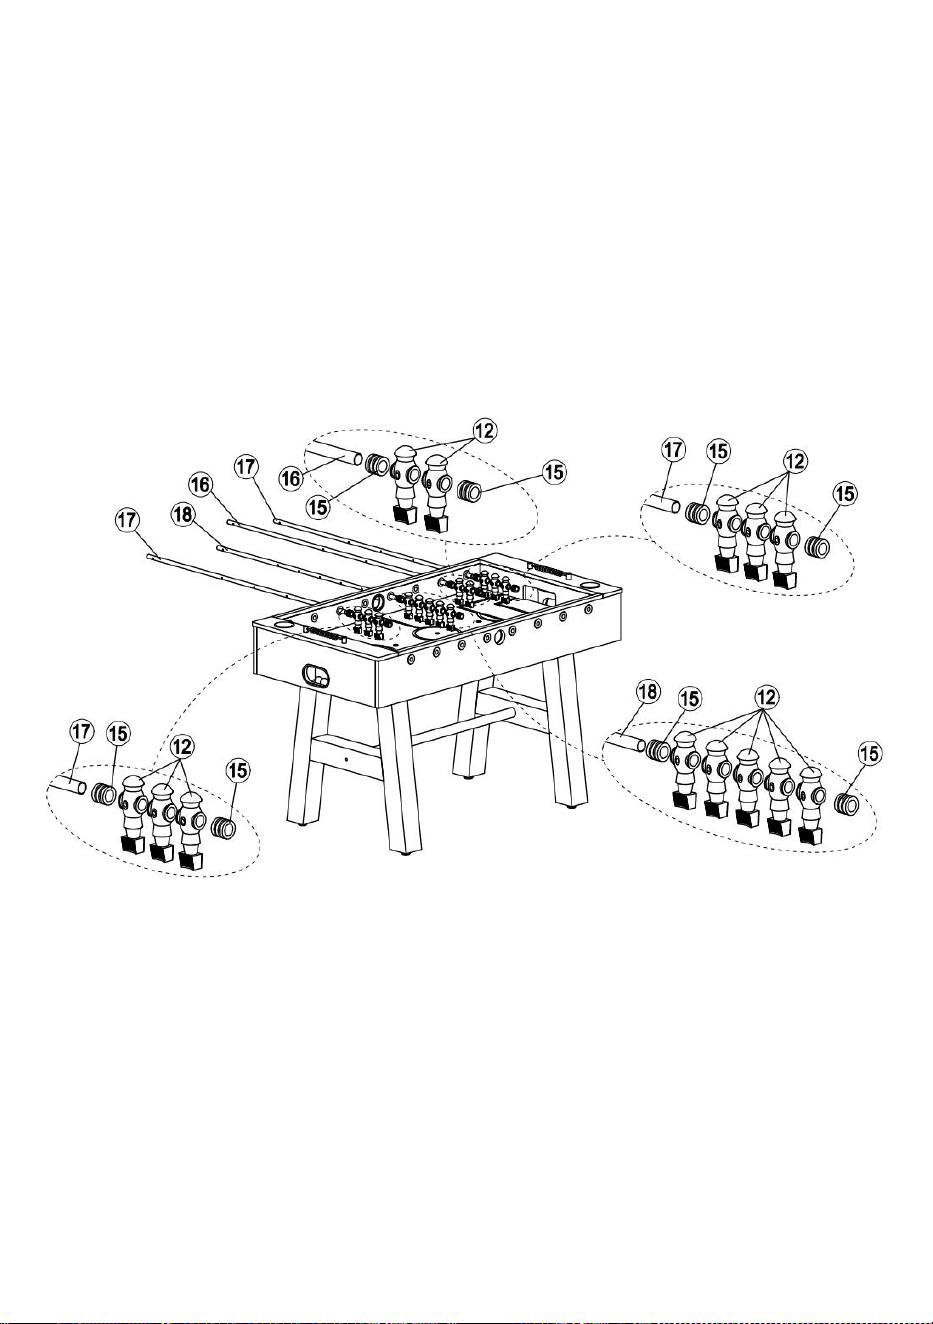
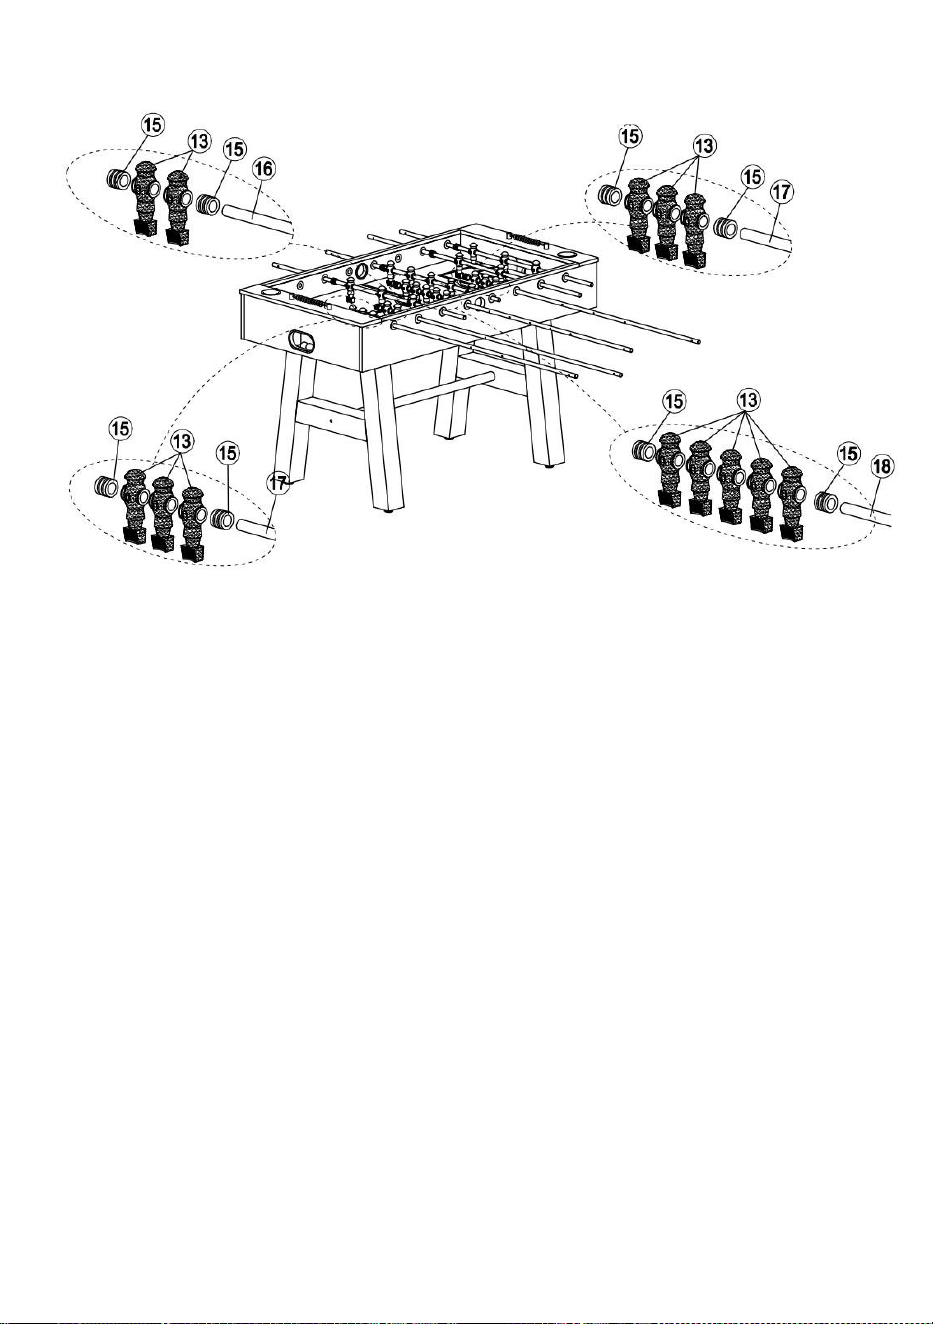
STEP 5:Insert the steel pipe (#17)into the hole on the main cabinet
(#24),then connect the rubber ring (#15),3 home team player (#12),and the
rubber ring (#15).
Insert the steel pipe (#16)into the hole on the main cabinet (#24),then
connect the rubber ring (#15),2 home team player (#12),and the rubber
ring (#15).
Insert the steel pipe (#18)into the hole on the main cabinet (#24),then
connect the rubber ring (#15),5 home team player (#12),and the rubber
ring (#15).
Insert the steel pipe (#17)into the hole on the main cabinet (#24),then
connect the rubber ring (#15),3 home team player (#12),and the rubber
ring (#15).

7
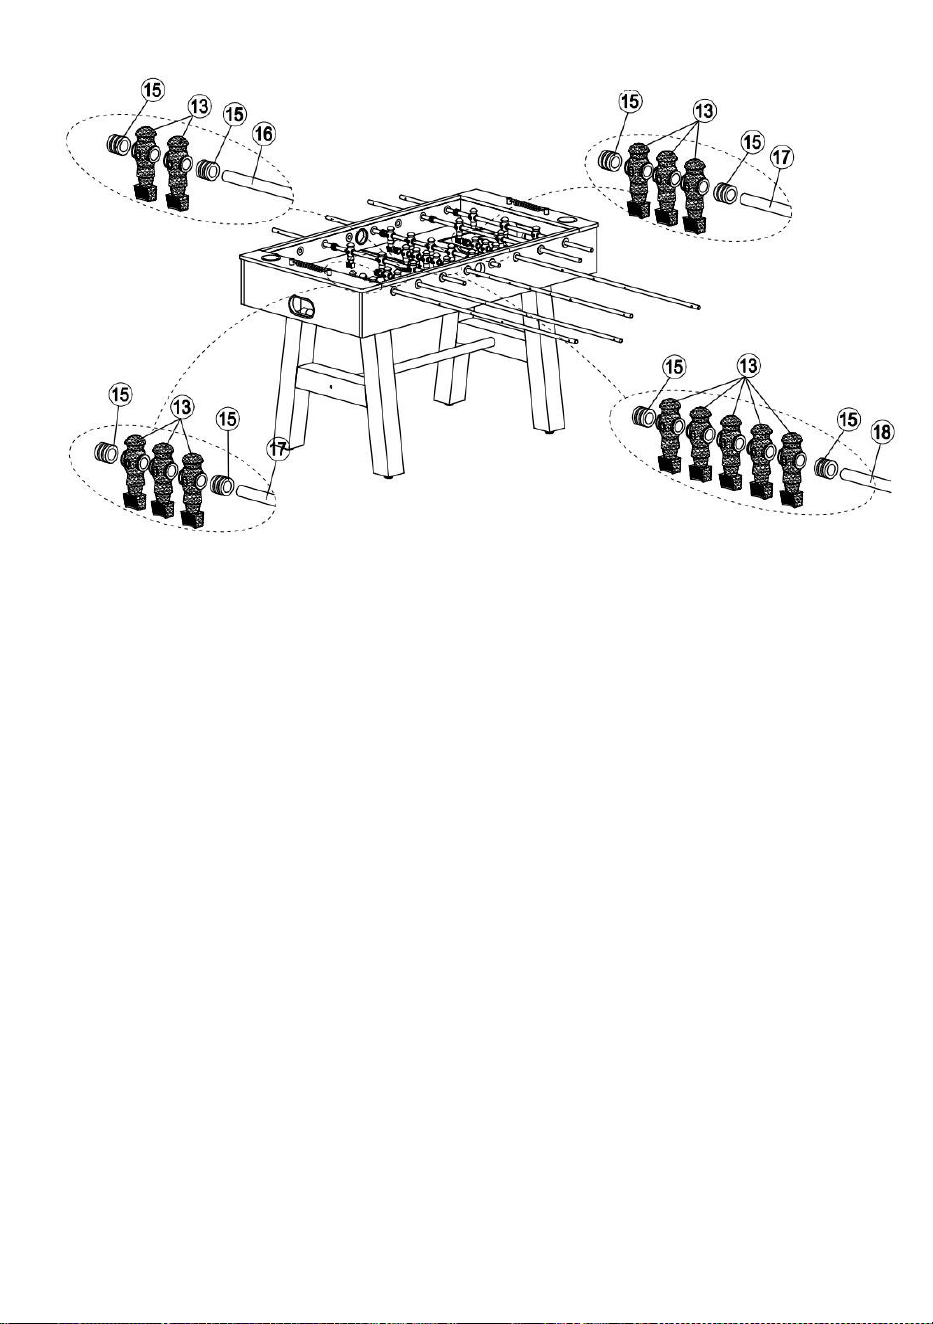
STEP 6:Insert the steel pipe (#17)into the hole on the main cabinet
(#24),then connect the rubber ring (#15),3 home team player (#13),and the
rubber ring (#15).
Insert the steel pipe (#16)into the hole on the main cabinet (#24),then
connect the rubber ring (#15),2 home team player (#13),and the rubber
ring (#15).
Insert the steel pipe (#18)into the hole on the main cabinet (#24),then
connect the rubber ring (#15),5 home team player (#13),and the rubber
ring (#15).
Insert the steel pipe (#17)into the hole on the main cabinet (#24),then
connect the rubber ring (#15),3 home team player (#13),and the rubber
ring(#15).
8
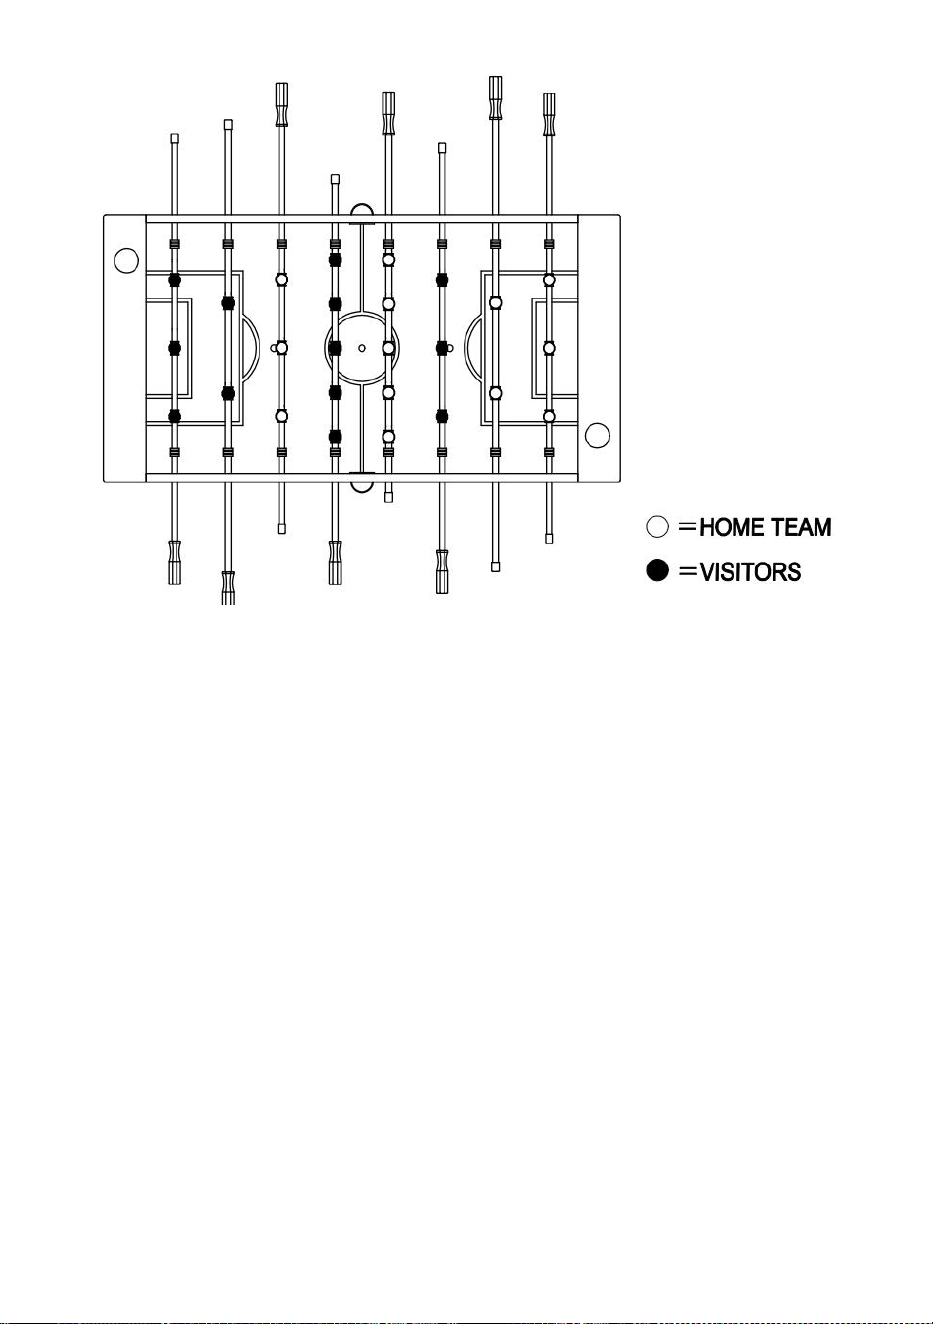
STEP 7: ORDER OF PLAYERS(Overhead View -Table upside down)
9
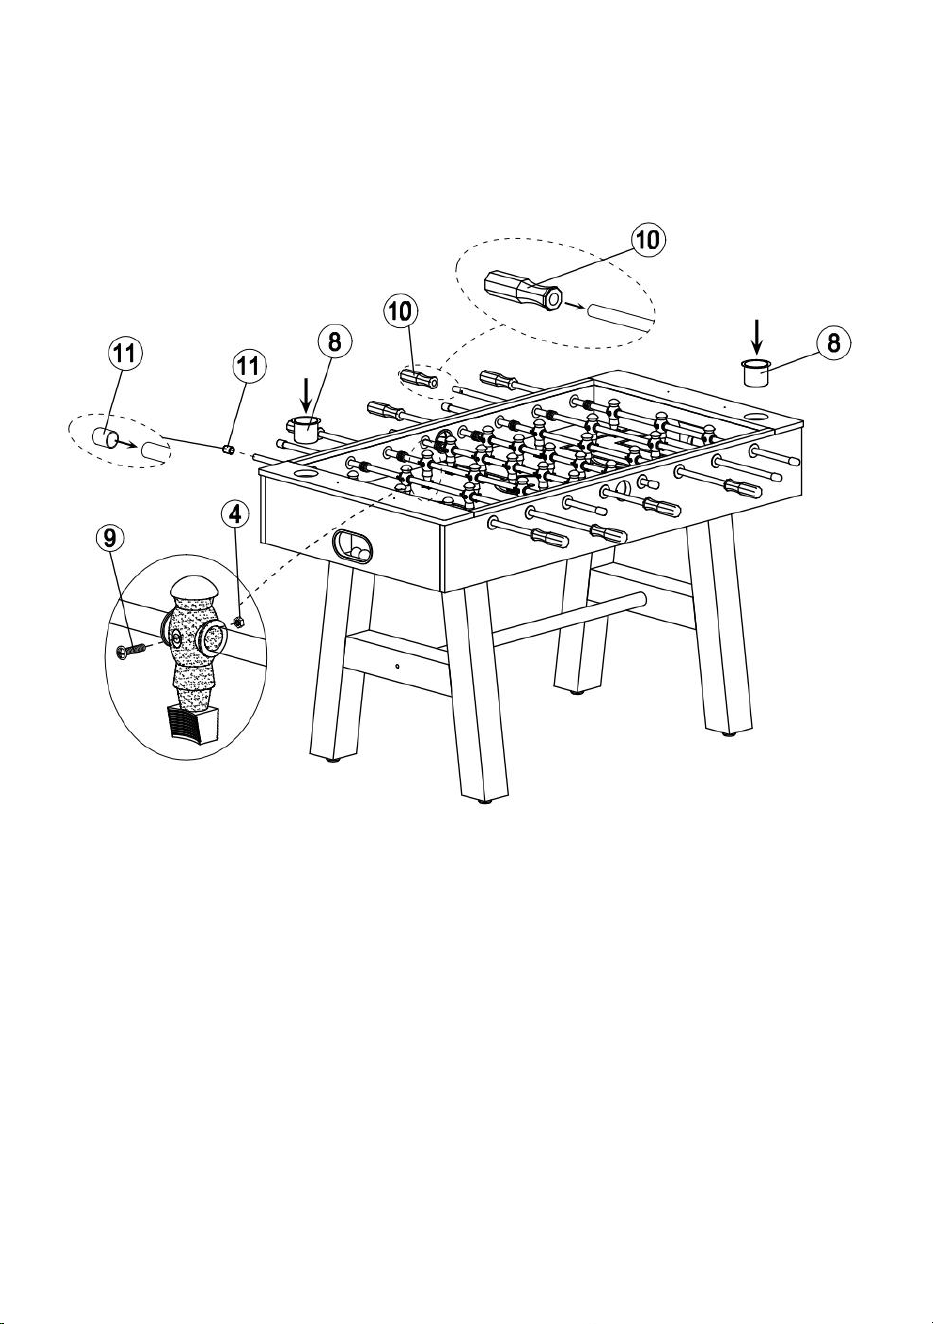
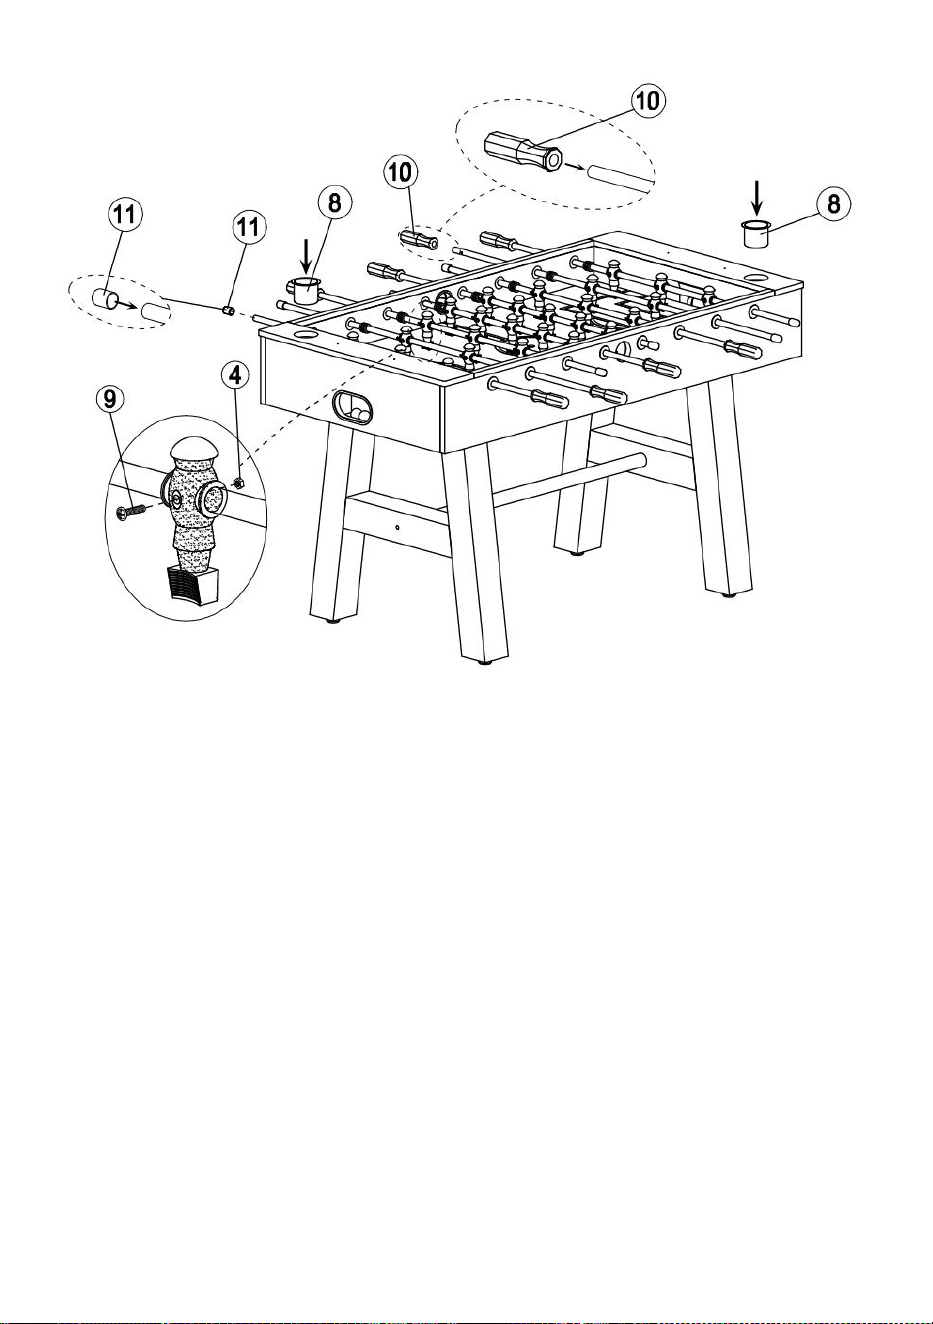
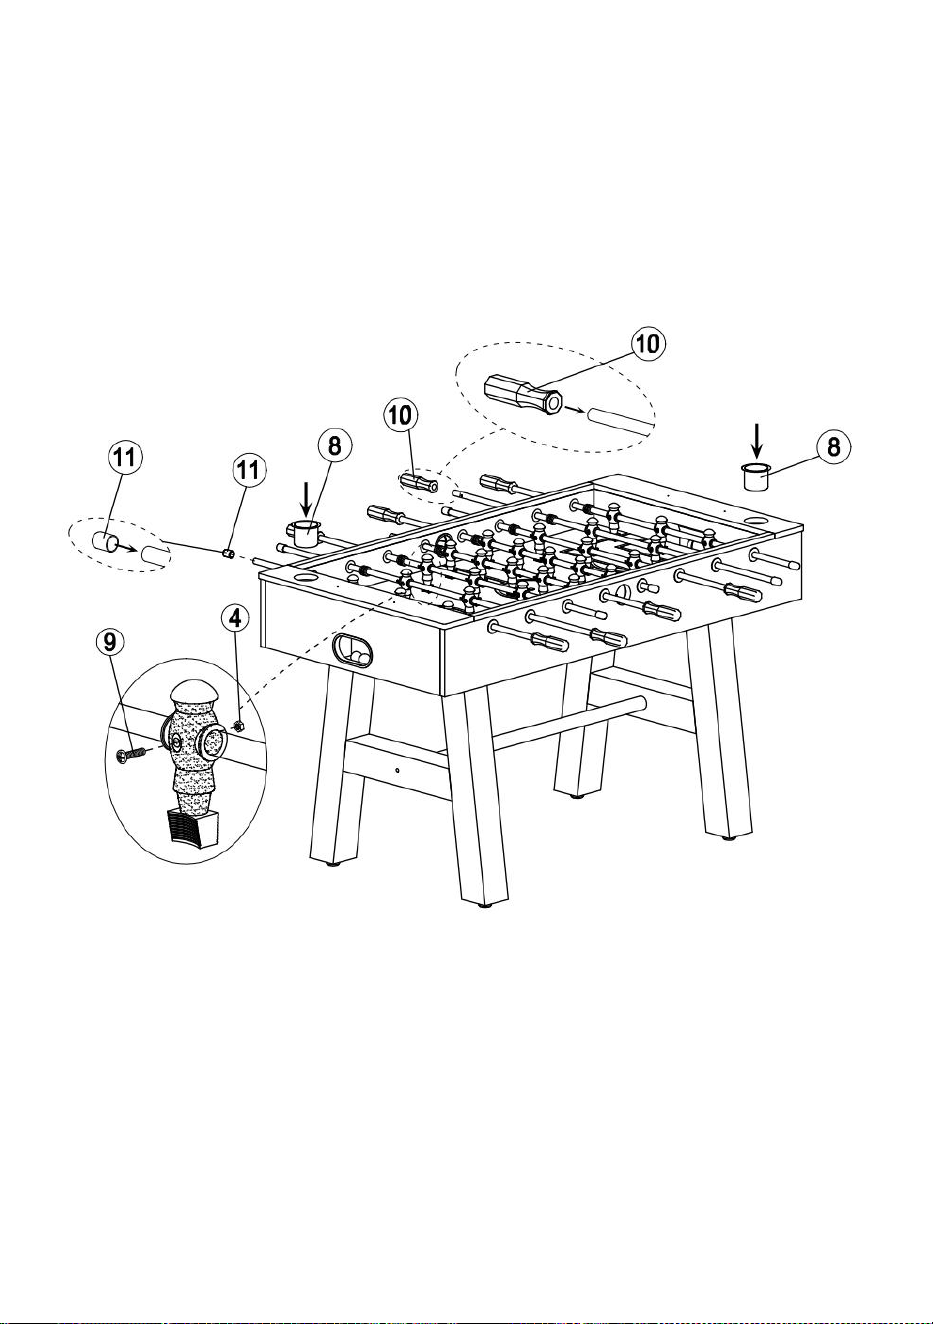
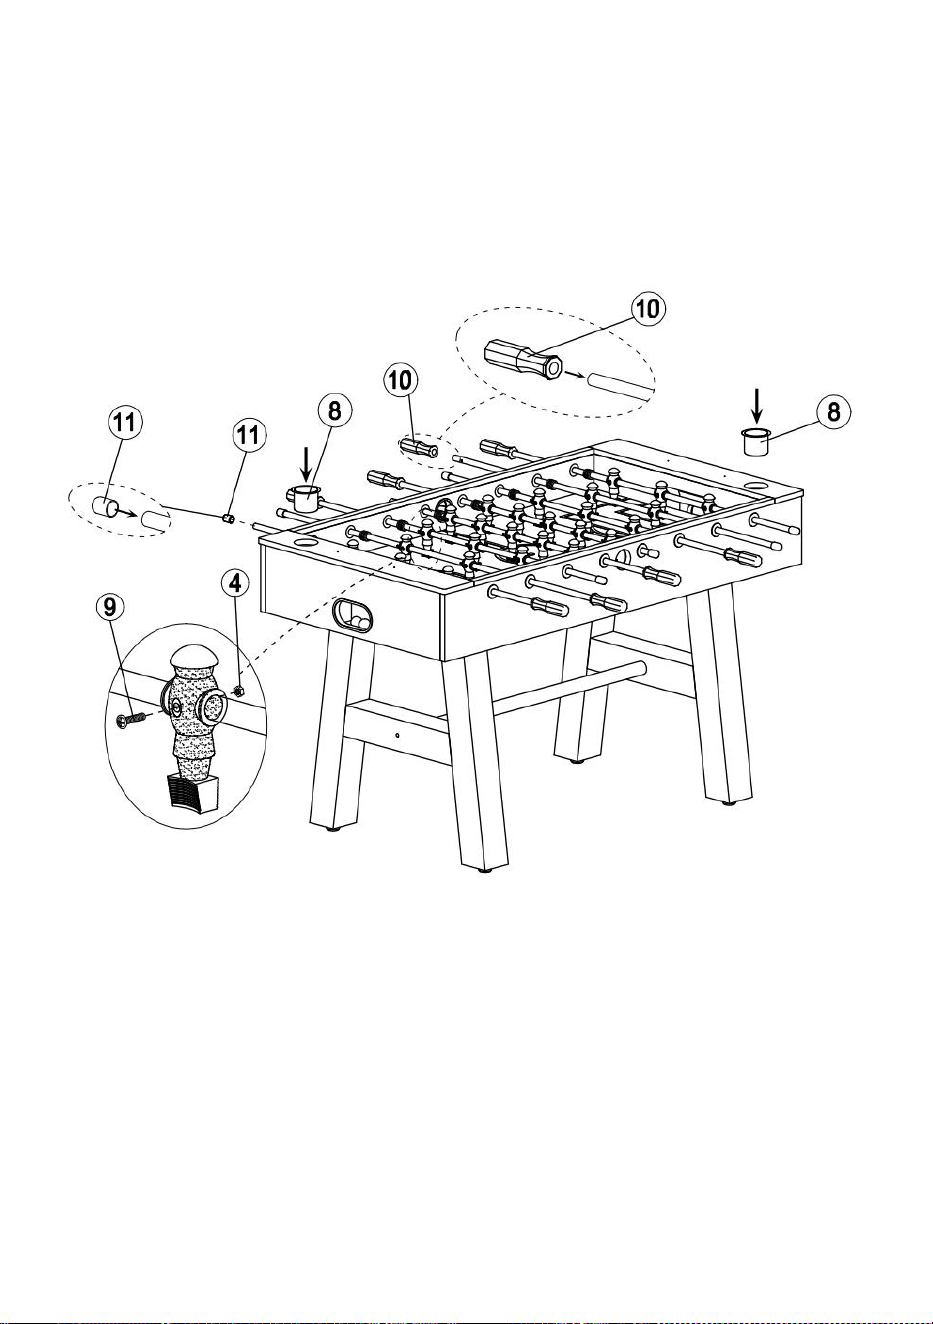
STEP 8:Lock each players (#12)(#13)through the nut (#4)with screws
(#9)to the hole position.
Insert the handle grip (#10)and the end cap (11 #)on the iron pipe.
Place the cup holder (#8)in the main cabinet hole as shown in FIGURE 8.
10
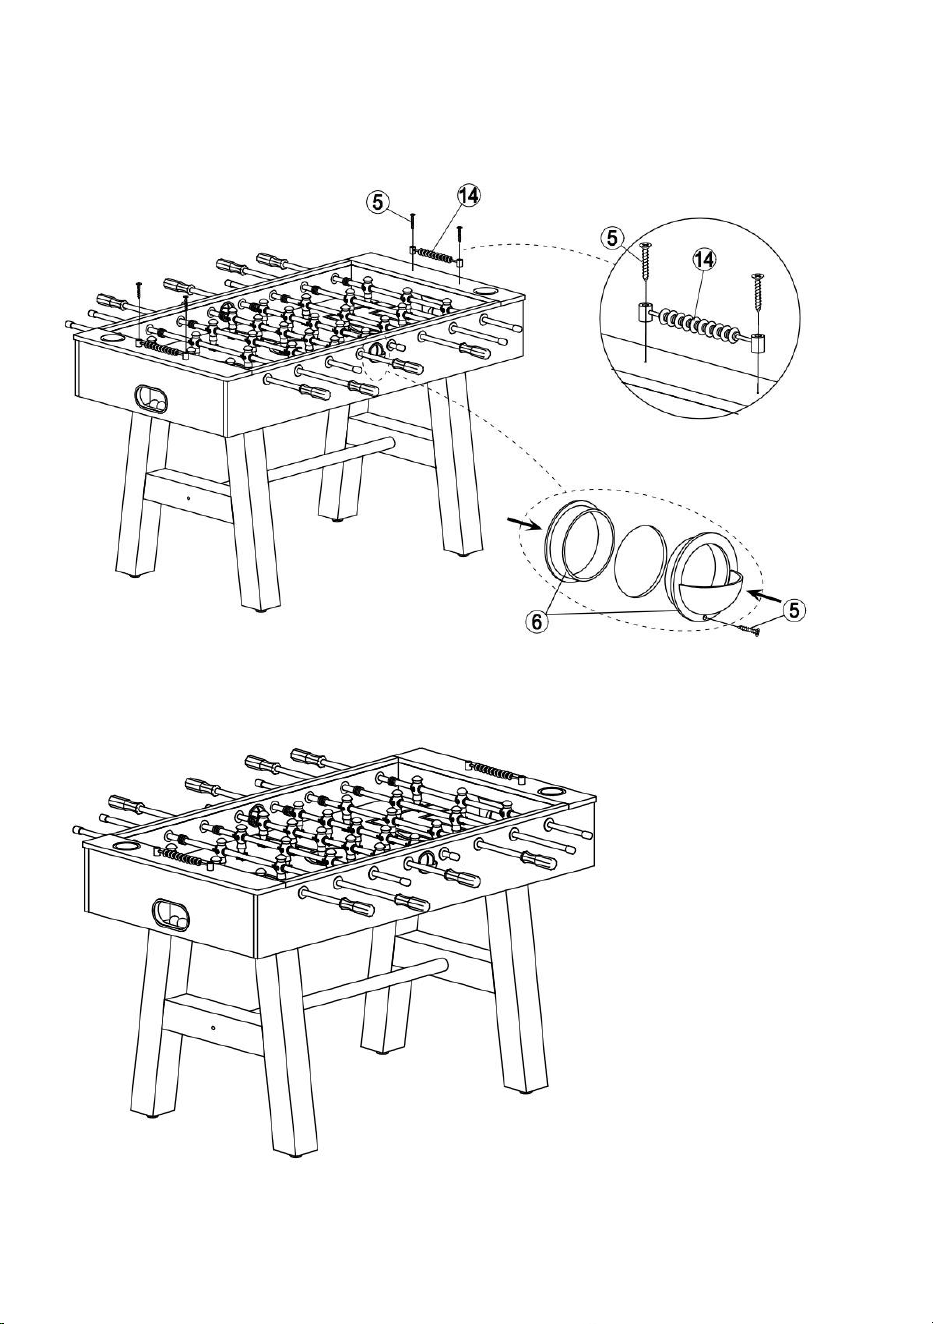
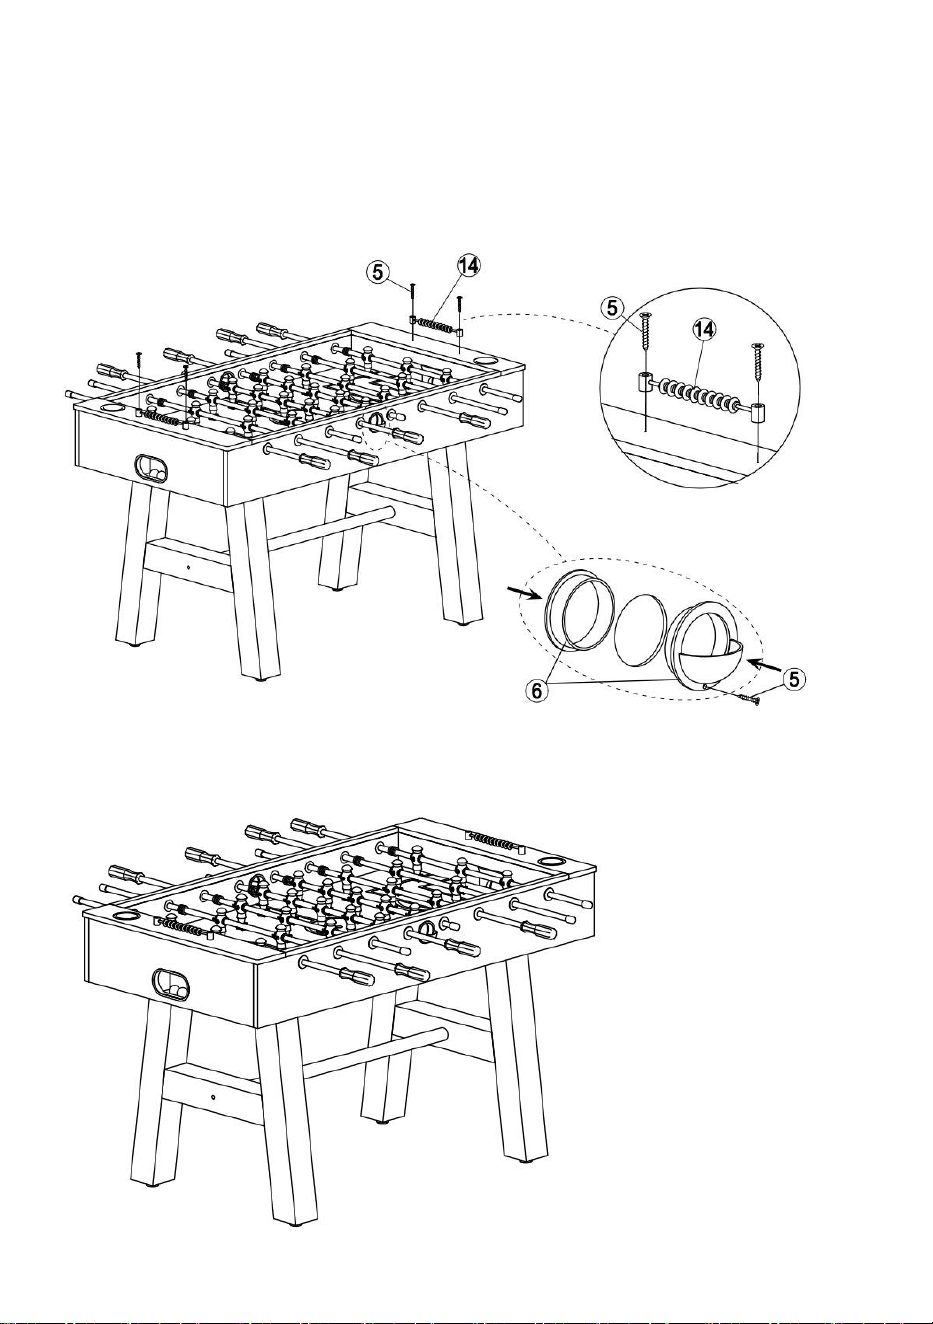
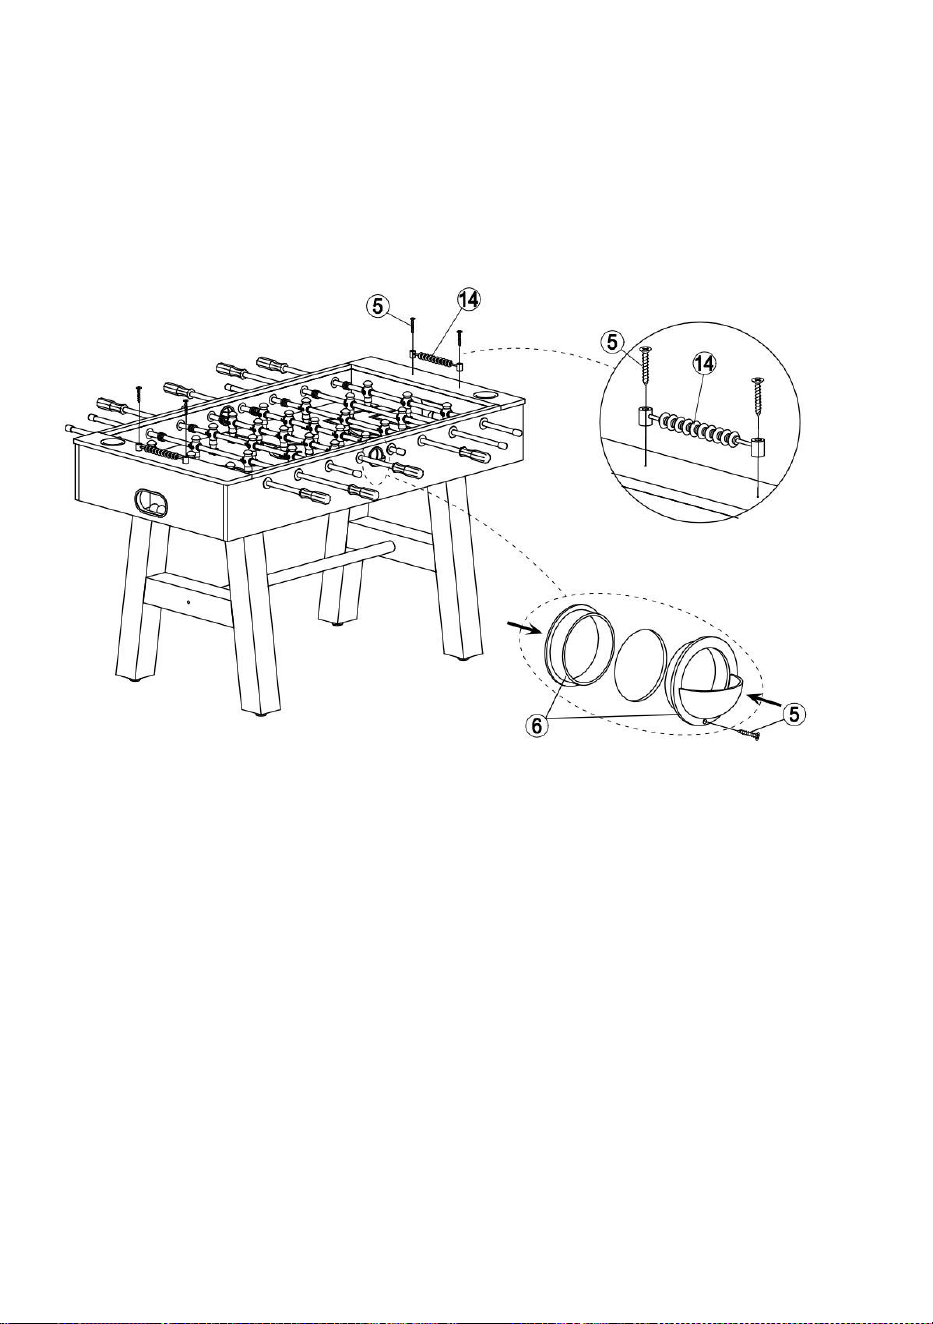
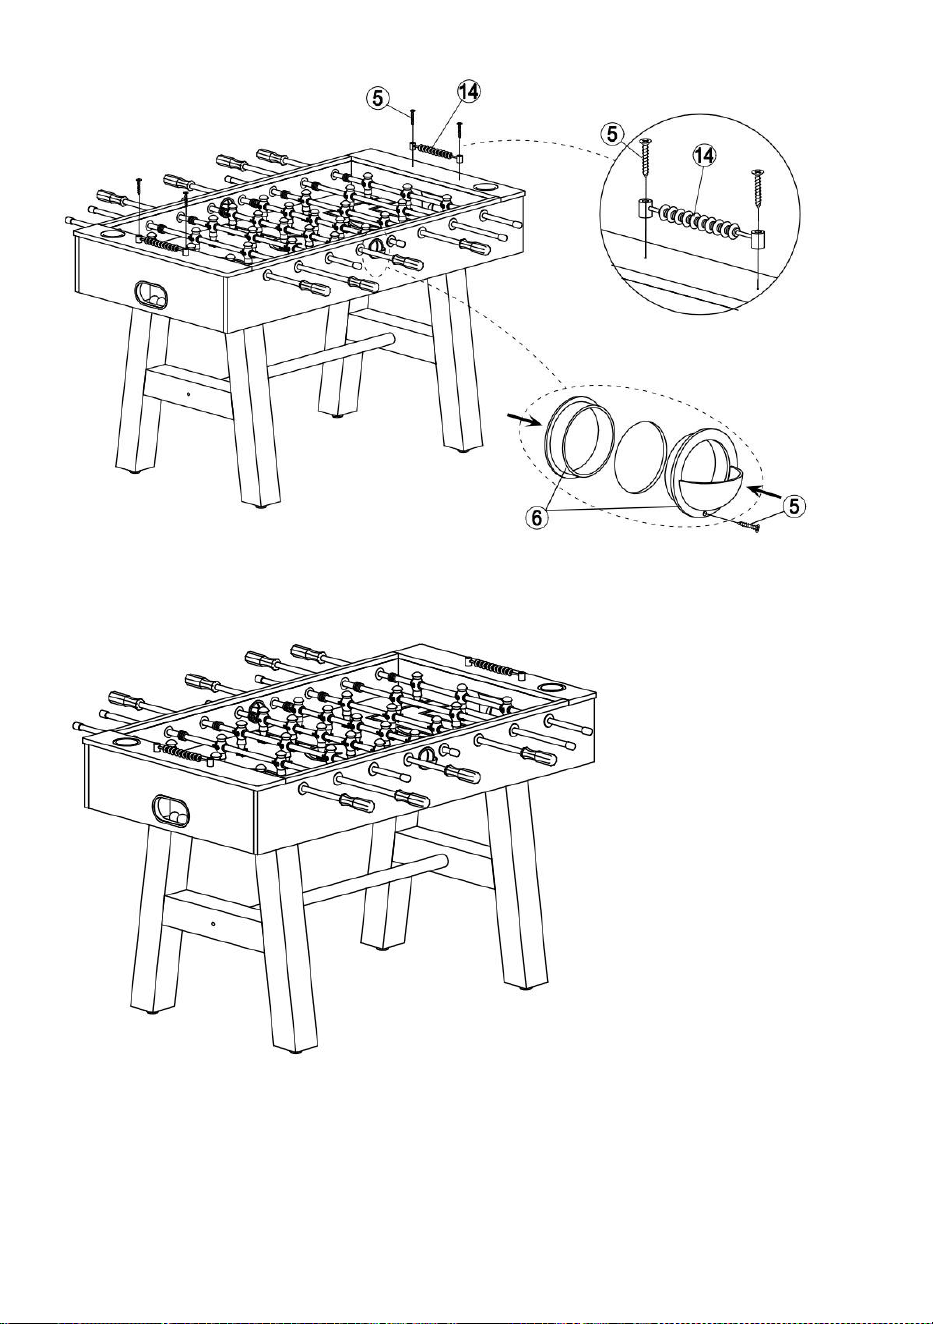
STEP 9:Install the scorer (#14)on the short side with screws (#5)
Screw the goal set (#6)on the long side and lock it with screws (#5) as
shown in FIGURE 9.
STEP10:

11
Manufacturer: Shanghaimuxinmuyeyouxiangongsi
Address: Baoshanqu Shuangchenglu 803long 11hao 1602A-1609shi
Shanghai
Imported to AUS: SIHAO PTY LTD, 1 ROKEVA STREETEASTWOOD
NSW 2122 Australia
Imported to USA: Sanven Technology Ltd.
Suite 250,9166 Anaheim Place, Rancho Cucamonga, CA 91730
Made In China
REP
EC
SHUNSHUN GmbH
Römeräcker 9 Z2021,76351
Linkenheim-Hochstetten,Germany
euvertreter@gmail.com
+49 1727041930
REP
UK
Pooledas Group Ltd
Unit 5 Albert Edward House, The
Pavilions Preston, United Kingdom
pooledas123@gmail.com
Tel: 01772418127


Technique Assistance et certificat de garantie électronique
www.vevor.com/support
TABLEAU SOCCEB
MODÈLE : SUO-5529-A
We continue to be committed to provide you tools with competitive price.
"Save Half", "Half Price" or any other similar expressions used by us only represents an
estimate of savings you might benefit from buying certain tools with us compared to the major
top brands and does not necessarily mean to cover all categories of tools offered by us. You
are kindly reminded to verify carefully when you are placing an order with us if you are
actually saving half in comparison with the top major brands.

1
MODÈLE: SUO-5529-A
Have product questions? Need technical support? Please feel free to
contact us:
Technical Support and E-Warranty Certificate
www.vevor.com/support
NEED HELP? CONTACT US!
This is the original instruction, please read all manual instructions
carefully before operating. VEVOR reserves a clear interpretation of our
user manual. The appearance of the product shall be subject to the
product you received. Please forgive us that we won't inform you again if
there are any technology or software updates on our product.
TABLE SOCCEB

2
Avertissement : Pour réduire le risque de blessure, l'utilisateur
doit lire attentivement le manuel d'instructions.
SAFETY WARNINGS AND PRECAUTIONS
Merci d'avoir utilisé ce produit . Afin de vous assurer que vous pouvez
utiliser la machine correctement, lisez attentivement ces instructions avant
de l'utiliser et conservez-les correctement pour référence future . Veuillez
vous assurer de lire les précautions et les règles de sécurité contenues
dans cette page pour garantir votre utilisation en toute sécurité . Ce
manuel décrit les avertissements et les précautions de sécurité, le
fonctionnement et la maintenance . Les avertissements et instructions
examinés dans ce manuel ne peuvent pas couvrir toutes les conditions et
situations possibles qui peuvent survenir . La prudence et le bon sens ne
sont pas intégrés à ce produit, car nous pensons que les utilisations seront
conformes à ces codes .
Veuillez lire TOUTES les instructions avant d'utiliser votre machine .
1. L'assemblage doit suivre ces instructions. Un montage incorrect peut
constituer un danger.
2. Ne vous rassemblez pas lorsque vous êtes fatigué ou sous l'influence
de l'alcool, de drogues ou de médicaments.
3. Le poids, l'élasticité et les autres propriétés du produit ne s'appliquent
qu'aux produits correctement et complètement assemblés.
4. Gardez la zone de montage propre et bien éclairée.
5. Gardez les spectateurs hors de la zone pendant l'assemblage.
6. Il s’agit d’un équipement et non d’un jouet, il doit être utilisé sous la
direction d’un professionnel. Ne laissez pas les enfants et les animaux
domestiques jouer seuls ou s'approcher de cet article.
7. Utiliser uniquement comme prévu. Ne vous asseyez pas et ne vous
tenez pas debout sur le produit.
8. Inspectez avant chaque utilisation. Ne l'utilisez pas si les pièces sont
desserrées ou endommagées.
9 . N'utilisez pas cet appareil à d'autres fins que celles indiquées .

3
dix . _ Ne l'utilisez pas à des fins commerciales .
1 1 . Ne le nettoyez pas avec un matériau abrasif .
1 2 . Ne le laissez jamais sans surveillance pendant son utilisation .
1 3 . L'urine et les excréments d'animaux peuvent endommager le produit,
veuillez le tenir à l'écart .
1 4 . Ne placez pas le produit sur ou à proximité d'air chaud, de brûleurs
électriques ou de radiateurs .
15 . Les jeunes enfants doivent être surveillés pour s'assurer qu'ils ne
jouent pas avec le produit . Les animaux domestiques doivent rester à
l'écart du produit.
Ne pas utiliser à l'extérieur par temps pluvieux et nuageux, évitez les
coups de foudre et les chutes . Les personnes ou les animaux
domestiques accrochés au produit provoqueront des blessures, voire la
mort .
AVERTISSEMENT : Risque d'étouffement - Le jouet
contient de petites balles et/ou de petites pièces. Ne
convient pas aux enfants de moins de 3 ans.
IMPORTANT! Avant de tenter l'assemblage, veuillez lire
ce manuel d'instructions pour vous familiariser avec toutes les pièces et
étapes d'assemblage. Nous recommandons que deux adultes assemblent
ce jeu. Veuillez vous référer à la liste des pièces ci-dessous et
assurez-vous que toutes les pièces ont été incluses.
PARTS LIST

4
ASSEMBLY INSTRUCTIONS:
Nous recommandons que deux adultes travaillent ensemble pour
assembler ce jeu.
ÉTAPE 1 : Connectez le pied gauche (#21) et le pied droit (#22) avec le
déflecteur court (#23) avec le Boulon à tête Allen (n° 2) et rondelle plate (n°
3), comme illustré dans la FIGURE 1.
5
ÉTAPE 2 : Branchez la barre de support en fer (#20) dans le déflecteur
court assemblé avec un boulon à tête Allen (#1) et une rondelle plate (#3),
comme indiqué dans la FIGURE 2.

6
ÉTAPE 3 : Placez l'assemblage des pieds à l'étape 2 sur l'armoire
principale (#24), placez le coussin triangulaire en plastique dans l'espace.
entre le pied et le derrick, et serrez avec le boulon à tête Allen (n° 2) et la
rondelle plate (n° 3), comme indiqué dans la FIGURE 3.
ÉTAPE 4 : Lisez les niveleurs de pieds (#7) sur les pieds, comme indiqué
dans la FIGURE 4.

7
ÉTAPE 5 : Insérez le tuyau en acier (#17) dans le trou de l'armoire
principale (#24), puis connectez l' anneau en caoutchouc (#15), le joueur
de l'équipe à domicile (#12) et l'anneau en caoutchouc (#15). ).
Insérez le tuyau en acier (#16) dans le trou de l'armoire principale (#24),
puis connectez l' anneau en caoutchouc (#15), 2 joueurs de l'équipe locale
(#12) et l'anneau en caoutchouc (#15).
Insérez le tuyau en acier (#18) dans le trou de l'armoire principale (#24),
puis connectez l' anneau en caoutchouc (#15), le joueur de l'équipe à
domicile (#12) et l'anneau en caoutchouc (#15).
Insérez le tuyau en acier (#17) dans le trou de l'armoire principale (#24),
puis connectez l' anneau en caoutchouc (#15), le joueur de l'équipe à
domicile (#12) et l'anneau en caoutchouc (#15).

8
ÉTAPE 6 : Insérez le tuyau en acier (#17) dans le trou de l'armoire
principale (#24), puis connectez l' anneau en caoutchouc (#15), le joueur
de l'équipe à domicile (#13) et l'anneau en caoutchouc (#15). ).
Insérez le tuyau en acier (#16) dans le trou de l'armoire principale (#24),
puis connectez l' anneau en caoutchouc (#15), 2 joueurs de l'équipe locale
(#13) et l'anneau en caoutchouc (#15).
Insérez le tuyau en acier (#18) dans le trou de l'armoire principale (#24),
puis connectez l' anneau en caoutchouc (#15), le joueur de l'équipe à
domicile (#13) et le caoutchouc. bague (#15).
Insérez le tuyau en acier (#17) dans le trou de l'armoire principale (#24),
puis connectez l' anneau en caoutchouc (#15), le joueur de l'équipe à
domicile (#13) et l'anneau en caoutchouc (#15).

9
ÉTAPE 7 : ORDRE DES JOUEURS (Vue du dessus - Table à
l'envers)

10
ÉTAPE 8 : Verrouillez chaque joueur (#12)(#13) à travers l'écrou (#4)
avec des vis (#9) à la position du trou.
Insérez la poignée (#10) et l'embout (11#) sur le tuyau en fer .
Placez le porte-gobelet (#8) dans le trou principal de l'armoire, comme
illustré dans la FIGURE 8.
11
ÉTAPE 9 : Installez le marqueur (#14) sur le côté court avec des vis (#5)
Vissez le jeu de buts (#6) sur le côté long et verrouillez-le avec des vis (#5).
comme le montre la FIGURE 9.
ÉTAPE10 :

12
Fabricant : Shanghaimuxinmuyeyouxiangongsi
Adresse : Baoshanqu Shuangchenglu 803long 11hao 1602A-1609shi
Shanghai
Importé en Australie : SIHAO PTY LTD, 1 ROKEVA STREETASTWOOD
NSW 2122 Australie
Importé aux États-Unis : Sanven Technology Ltd.
Suite 250 , 9166 Anaheim Place, Rancho Cucamonga, CA 91730
Fabriqué en Chine
REP
EC
SHUNSHUN GmbH
Römeräcker 9 Z2021,76351
Linkenheim-Hochstetten,Germany
euvertreter@gmail.com
+49 1727041930
REP
UK
Pooledas Group Ltd
Unit 5 Albert Edward House, The
Pavilions Preston, United Kingdom
pooledas123@gmail.com
Tel: 01772418127


Technisch Support- und E-Garantie-Zertifikat www.vevor.com/support
TABELLE SOCCEB
MODELL : SUO-5529-A
We continue to be committed to provide you tools with competitive price.
"Save Half", "Half Price" or any other similar expressions used by us only represents an
estimate of savings you might benefit from buying certain tools with us compared to the major
top brands and does not necessarily mean to cover all categories of tools offered by us. You
are kindly reminded to verify carefully when you are placing an order with us if you are
actually saving half in comparison with the top major brands.


1
MODELL: SUO-5529-A
Have product questions? Need technical support? Please feel free to
contact us:
Technical Support and E-Warranty Certificate
www.vevor.com/support
NEED HELP? CONTACT US!
This is the original instruction, please read all manual instructions
carefully before operating. VEVOR reserves a clear interpretation of our
user manual. The appearance of the product shall be subject to the
product you received. Please forgive us that we won't inform you again if
there are any technology or software updates on our product.
TABLE SOCCEB

2
Warnung: Um das Verletzungsrisiko zu verringern, muss der
Benutzer die Bedienungsanleitung sorgfältig lesen.
SAFETY WARNINGS AND PRECAUTIONS
Vielen Dank, dass Sie dieses Produkt verwenden . Um sicherzustellen,
dass Sie die Maschine ordnungsgemäß bedienen können, lesen Sie diese
Anleitung vor der Inbetriebnahme sorgfältig durch und bewahren Sie sie
zum späteren Nachschlagen sorgfältig auf . Bitte lesen Sie unbedingt die
Vorsichtsmaßnahmen und Sicherheitsregeln auf dieser Seite, um eine
sichere Verwendung zu gewährleisten . In diesem Handbuch werden
Sicherheitswarnungen und Vorsichtsmaßnahmen sowie Bedienung und
Wartung beschrieben . Die in diesem Handbuch aufgeführten Warnungen
und Anweisungen können nicht alle möglichen Bedingungen und
Situationen abdecken, die auftreten können . Vorsicht und gesunder
Menschenverstand sind in diesem Produkt nicht eingebaut, da wir davon
ausgehen, dass die Verwendung diesen Codes entspricht .
Bitte lesen Sie ALLE Anweisungen, bevor Sie Ihr Gerät verwenden .
1. Beim Zusammenbau müssen diese Anweisungen befolgt werden. Eine
falsche Montage kann eine Gefahr darstellen.
2. Montieren Sie das Gerät nicht, wenn Sie müde sind oder unter dem
Einfluss von Alkohol, Drogen oder Medikamenten stehen.
3.Gewicht, Elastizität und sonstige Produkteigenschaften gelten nur für
korrekt und vollständig montierte Produkte.
4. Halten Sie den Montagebereich sauber und gut beleuchtet.
5. Halten Sie während der Montage unbeteiligte Personen aus dem
Bereich fern.
6. Dies ist ein Gerät, kein Spielzeug, es muss unter Anleitung eines
Fachmanns verwendet werden. Erlauben Sie Kindern und Haustieren nicht,
alleine zu spielen oder sich diesem Gegenstand zu nähern.
7. Nur bestimmungsgemäß verwenden. Setzen oder stehen Sie nicht auf
dem Produkt.

3
8. Vor jedem Gebrauch prüfen. Benutzen Sie es nicht, wenn Teile lose
oder beschädigt sind.
9 . Benutzen Sie dieses Gerät nicht für andere Zwecke als den
angegebenen .
1 0 . Benutzen Sie es nicht für kommerzielle Zwecke .
1 1 . Reinigen Sie es nicht mit scheuernden Materialien .
1 2 . Lassen Sie es während des Gebrauchs niemals unbeaufsichtigt .
1 3 . Urin und Kot von Haustieren können das Produkt beschädigen, bitte
fernhalten .
1 4 . Stellen Sie das Produkt nicht auf oder in die Nähe von Heißluft-,
Elektrobrennern oder Heizgeräten .
15 . Kleine Kinder sollten beaufsichtigt werden, um sicherzustellen, dass
sie nicht mit dem Produkt spielen . Haustiere sollten vom Produkt
ferngehalten werden.
An regnerischen und bewölkten Tagen nicht im Freien verwenden,
Blitzeinschläge und Stürze vermeiden . Am Produkt hängende Personen
oder Haustiere können zu Verletzungen oder zum Tod führen .
WARNUNG: Erstickungsgefahr – Spielzeug enthält
kleine Kugeln und/oder Kleinteile. Nicht für Kinder unter 3
Jahren.
WICHTIG! Bevor Sie mit dem Zusammenbau beginnen, lesen Sie bitte
diese Anleitung durch, um sich mit allen Teilen und Montageschritten
vertraut zu machen. Wir empfehlen , dass zwei Erwachsene dieses Spiel
zusammenbauen. Bitte sehen Sie sich die Teileliste unten an und stellen
Sie sicher, dass alle Teile enthalten sind.
PARTS LIST

4
ASSEMBLY INSTRUCTIONS:
Wir empfehlen, dass zwei Erwachsene zusammenarbeiten, um dieses
Spiel zusammenzubauen.
SCHRITT 1 : Verbinden Sie den linken Fuß (#21) und den rechten Fuß
(#22) mit der kurzen Schallwand (#23). Inbusschraube (#2) und
Unterlegscheibe (#3) wie in ABBILDUNG 1 gezeigt.

5
SCHRITT 2 : Stecken Sie die Eisenstützstange (#20) mit einer
Inbusschraube (#1) und einer Unterlegscheibe (#3) in die
zusammengebaute kurze Schallwand, wie in ABBILDUNG 2 gezeigt.
6
SCHRITT 3 : Platzieren Sie die Beinbaugruppe aus Schritt 2 auf dem
Hauptschrank (Nr. 24). Setzen Sie das dreieckige Kunststoffkissen in die
Lücke zwischen Fuß und Bohrturm und ziehen Sie es mit der
Inbusschraube (#2) und der Unterlegscheibe (#3) fest, wie in ABBILDUNG
3 gezeigt.
SCHRITT 4 : Befestigen Sie die Beinnivellierer (#7) an den Beinen, wie in
ABBILDUNG 4 gezeigt.

7
SCHRITT 5 : Führen Sie das Stahlrohr (#17) in das Loch im
Hauptgehäuse (#24) ein und verbinden Sie dann den Gummiring (#15), die
drei Spieler der Heimmannschaft (#12) und den Gummiring (#15). ).
Führen Sie das Stahlrohr (#16) in das Loch im Hauptgehäuse (#24) ein
und verbinden Sie dann den Gummiring (#15), 2 Spieler der
Heimmannschaft (#12) und den Gummiring (#15).
Führen Sie das Stahlrohr (#18) in das Loch im Hauptgehäuse (#24) ein
und verbinden Sie dann den Gummiring (#15), den
Heimmannschaftsspieler (#12) und den Gummiring (#15).
Führen Sie das Stahlrohr (#17) in das Loch im Hauptgehäuse (#24) ein
und verbinden Sie dann den Gummiring (#15), den
Heimmannschaftsspieler (#12) und den Gummiring (#15).
8
SCHRITT 6 : Führen Sie das Stahlrohr (#17) in das Loch im
Hauptgehäuse (#24) ein und verbinden Sie dann den Gummiring (#15), die
drei Spieler der Heimmannschaft (#13) und den Gummiring (#15). ).
Führen Sie das Stahlrohr (#16) in das Loch im Hauptgehäuse (#24) ein
und verbinden Sie dann den Gummiring (#15), 2 Heimmannschaftsspieler
(#13) und den Gummiring (#15).
Führen Sie das Stahlrohr (#18) in das Loch im Hauptgehäuse (#24) ein
und verbinden Sie dann den Gummiring (#15), den 5.
Heimmannschaftsspieler (#13) und den Gummi Ring (#15).
Führen Sie das Stahlrohr (#17) in das Loch im Hauptgehäuse (#24) ein
und verbinden Sie dann den Gummiring (#15), den
Heimmannschaftsspieler (#13) und den Gummiring (#15).
9
SCHRITT 7 : REIHENFOLGE DER SPIELER (Ansicht von oben –
Tisch auf dem Kopf)
10
SCHRITT 8 : Befestigen Sie jeden Spieler (#12) (#13) durch die Mutter
(#4) mit Schrauben (#9) an der Lochposition.
Setzen Sie den Griff (#10) und die Endkappe (11 #) auf das Eisenrohr .
Platzieren Sie den Getränkehalter (#8) im Hauptschrankloch, wie in
ABBILDUNG 8 gezeigt.
11
SCHRITT 9 : Installieren Sie den Vorritzer (#14) mit Schrauben (#5) an
der kurzen Seite.
Schrauben Sie den Torsatz (#6) an der Längsseite fest und befestigen Sie
ihn mit den Schrauben (#5). wie in ABBILDUNG 9 dargestellt.

12
SCHRITT 10 :
13
Hersteller: Shanghaimuxinmuyeyouxiangongsi
Adresse: Baoshanqu Shuangchenglu 803long 11hao 1602A-1609shi
Shanghai
Importiert nach AUS: SIHAO PTY LTD, 1 ROKEVA STREETEASTWOOD
NSW 2122 Australien
Importiert in die USA: Sanven Technology Ltd.
Suite 250 , 9166 Anaheim Place, Rancho Cucamonga, CA 91730
In China hergestellt
REP
EC
SHUNSHUN GmbH
Römeräcker 9 Z2021,76351
Linkenheim-Hochstetten,Germany
euvertreter@gmail.com
+49 1727041930
REP
UK
Pooledas Group Ltd
Unit 5 Albert Edward House, The
Pavilions Preston, United Kingdom
pooledas123@gmail.com
Tel: 01772418127


Técnico Soporte y certificado de garantía electrónica www.vevor.com/support
FÚTBOL DE MESA
MODELO : SUO-5529-A
We continue to be committed to provide you tools with competitive price.
"Save Half", "Half Price" or any other similar expressions used by us only represents an
estimate of savings you might benefit from buying certain tools with us compared to the major
top brands and does not necessarily mean to cover all categories of tools offered by us. You
are kindly reminded to verify carefully when you are placing an order with us if you are
actually saving half in comparison with the top major brands.


1
MODELO: SUO-5529-A
Have product questions? Need technical support? Please feel free to
contact us:
Technical Support and E-Warranty Certificate
www.vevor.com/support
NEED HELP? CONTACT US!
This is the original instruction, please read all manual instructions
carefully before operating. VEVOR reserves a clear interpretation of our
user manual. The appearance of the product shall be subject to the
product you received. Please forgive us that we won't inform you again if
there are any technology or software updates on our product.
TABLE SOCCEB

2
Advertencia: para reducir el riesgo de lesiones, el usuario debe
leer atentamente el manual de instrucciones.
SAFETY WARNINGS AND PRECAUTIONS
Gracias por usar este producto . Para asegurarse de que puede operar la
máquina correctamente, lea atentamente estas instrucciones antes de
utilizarla y consérvelas adecuadamente para consultarlas en el futuro .
Asegúrese de leer las precauciones y reglas de seguridad en esta página
para garantizar su uso seguro . Este manual describirá las advertencias y
precauciones de seguridad, operación y mantenimiento . Las advertencias
e instrucciones revisadas en este manual no pueden cubrir todas las
condiciones y situaciones posibles que puedan ocurrir . Este producto no
incluye precaución ni sentido común, ya que creemos que los usos
cumplirán con estos códigos .
Lea TODAS las instrucciones antes de utilizar su máquina .
1. El montaje debe seguir estas instrucciones. El montaje incorrecto puede
ser un peligro.
2. No reunirse cuando esté cansado o bajo la influencia de alcohol, drogas
o medicamentos.
3. El peso, la elasticidad y otras propiedades del producto solo se aplican
a productos ensamblados correcta y completamente.
4. Mantenga el área de montaje limpia y bien iluminada.
5. Mantenga a las personas transeúntes fuera del área durante el montaje.
6. Este es un equipo, no un juguete, debe usarse bajo la guía de un
profesional. No permita que los niños y las mascotas jueguen solos o se
acerquen a este artículo.
7. Úselo únicamente según lo previsto. No se siente ni se pare sobre el
producto.
8. Inspeccione antes de cada uso. No lo utilice si las piezas están sueltas o
dañadas.
9 . No utilice esta unidad para ningún otro propósito que no sea el
indicado .

3
1 0 . No lo utilice con fines comerciales .
1 1 . No lo limpie con ningún material abrasivo .
1 2 . Nunca lo deje desatendido mientras esté en uso .
1 3 . La orina y las heces de las mascotas pueden dañar el producto;
manténgalo alejado .
1 4 . No coloque el producto sobre o cerca de aire caliente, quemadores o
calentadores eléctricos .
15 . Se debe supervisar a los niños pequeños para asegurarse de que no
jueguen con el producto . Las mascotas deben mantenerse alejadas del
producto.
No utilizar al aire libre en días lluviosos y nublados, evitar rayos y caídas .
Las personas o mascotas que cuelguen del producto causarán lesiones o
la muerte .
ADVERTENCIA: Peligro de asfixia: el juguete contiene
pelotas pequeñas y/o piezas pequeñas. No apto para
niños menores de 3 años.
¡IMPORTANTE! Antes de intentar el montaje, lea este
libro de instrucciones para familiarizarse con todas las piezas y los pasos
de montaje. Recomendamos que dos adultos monten este juego. Consulte
la lista de piezas a continuación y asegúrese de que se hayan incluido
todas las piezas.
PARTS LIST

4
ASSEMBLY INSTRUCTIONS:
Recomendamos que dos adultos trabajen juntos para armar este
juego.
PASO 1 : Conecte el pie izquierdo (#21) y el pie derecho (#22) con el
deflector corto (#23) con el Perno de cabeza Allen (n.° 2) y arandela plana
(n.° 3) como se muestra en la FIGURA 1.

5
PASO 2 : Conecte la barra de soporte de hierro (N.° 20) en el deflector
corto ensamblado con un perno de cabeza Allen (N.° 1) y una arandela
plana (N.° 3) como se muestra en la FIGURA 2.
6
PASO 3 : Coloque el conjunto de patas en el paso 2 en el gabinete
principal (#24). Coloque el cojín triangular de plástico en el espacio. entre
el pie y la torre de perforación y apriete con el perno de cabeza Allen (n.°
2) y la arandela plana (n.° 3) como se muestra en la FIGURA 3.
PASO 4 : Lea los niveladores de patas (#7) en las patas como se muestra
en la FIGURA 4.

7
PASO 5 : Inserte el tubo de acero (#17) en el orificio del gabinete principal
(#24), luego conecte el anillo de goma (#15), el jugador del equipo local
(#12) y el anillo de goma (#15). ).
Inserte el tubo de acero (#16) en el orificio del gabinete principal (#24),
luego conecte el anillo de goma (#15), el jugador del equipo local (#12) y el
anillo de goma (#15).
Inserte el tubo de acero (#18) en el orificio del gabinete principal (#24),
luego conecte el anillo de goma (#15), el jugador del equipo local (#12) y el
anillo de goma (#15).
Inserte el tubo de acero (#17) en el orificio del gabinete principal (#24),
luego conecte el anillo de goma (#15), el jugador del equipo local (#12) y el
anillo de goma (#15).

8
PASO 6 : Inserte el tubo de acero (#17) en el orificio del gabinete principal
(#24), luego conecte el anillo de goma (#15), el jugador del equipo local
(#13) y el anillo de goma (#15). ).
Inserte el tubo de acero (#16) en el orificio del gabinete principal (#24),
luego conecte el anillo de goma (#15), el jugador del equipo local (#13) y el
anillo de goma (#15).
Inserte el tubo de acero (#18) en el orificio del gabinete principal (#24),
luego conecte el anillo de goma (#15), el jugador del equipo local (#13) y la
goma. anillo (#15).
Inserte el tubo de acero (#17) en el orificio del gabinete principal (#24),
luego conecte el anillo de goma (#15), el jugador del equipo local (#13) y el
anillo de goma (#15).

9
PASO 7 : ORDEN DE LOS JUGADORES (Vista aérea - Mesa al
revés)

10
PASO 8 : Bloquee cada jugador (#12)(#13) a través de la tuerca (#4) con
tornillos (#9) en la posición del orificio.
Inserte la empuñadura (#10) y la tapa del extremo (11#) en el tubo de
hierro .
Coloque el portavasos (#8) en el orificio principal del gabinete como se
muestra en la FIGURA 8.
11
PASO 9 : Instale el marcador (#14) en el lado corto con tornillos (#5)
Atornille el juego de portería (#6) en el lado largo y asegúrelo con tornillos
(#5) como se muestra en la FIGURA 9.
PASO 10 :

12
Fabricante: Shanghaimuxinmuyeyouxiangongsi
Dirección: Baoshanqu Shuangchenglu 803long 11hao 1602A-1609shi
Shanghai
Importado a AUS: SIHAO PTY LTD, 1 ROKEVA STREETEASTWOOD
NSW 2122 Australia
Importado a EE. UU.: Sanven Technology Ltd.
Suite 250 , 9166 Anaheim Place, Rancho Cucamonga, CA 91730
REP
EC
SHUNSHUN GmbH
Römeräcker 9 Z2021,76351
Linkenheim-Hochstetten,Germany
euvertreter@gmail.com

13
Hecho en china
REP
UK
Pooledas Group Ltd
Unit 5 Albert Edward House, The
Pavilions Preston, United Kingdom
pooledas123@gmail.com
Tel: 01772418127


Techniczny Certyfikat wsparcia i e-gwarancji www.vevor.com/support
TABELA SOCCEB
MODEL : SUO-5529-A
We continue to be committed to provide you tools with competitive price.
"Save Half", "Half Price" or any other similar expressions used by us only represents an
estimate of savings you might benefit from buying certain tools with us compared to the major
top brands and does not necessarily mean to cover all categories of tools offered by us. You
are kindly reminded to verify carefully when you are placing an order with us if you are
actually saving half in comparison with the top major brands.


1
MODEL: SUO-5529-A
Have product questions? Need technical support? Please feel free to
contact us:
Technical Support and E-Warranty Certificate
www.vevor.com/support
NEED HELP? CONTACT US!
This is the original instruction, please read all manual instructions
carefully before operating. VEVOR reserves a clear interpretation of our
user manual. The appearance of the product shall be subject to the
product you received. Please forgive us that we won't inform you again if
there are any technology or software updates on our product.
TABLE SOCCEB

2
Ostrzeżenie — aby zmniejszyć ryzyko obrażeń, użytkownik
musi uważnie przeczytać instrukcję obsługi.
SAFETY WARNINGS AND PRECAUTIONS
Dziękujemy za korzystanie z tego produktu . Aby mieć pewność, że
będziesz mógł prawidłowo obsługiwać maszynę, przeczytaj uważnie
niniejszą instrukcję przed rozpoczęciem użytkowania i zachowaj ją
odpowiednio do wykorzystania w przyszłości . Aby zapewnić bezpieczne
użytkowanie, pamiętaj o zapoznaniu się ze środkami ostrożności i
zasadami bezpieczeństwa zawartymi na tej stronie . Niniejsza instrukcja
zawiera ostrzeżenia i środki ostrożności dotyczące bezpieczeństwa,
obsługi i konserwacji . Ostrzeżenia i instrukcje omówione w tej instrukcji
nie obejmują wszystkich możliwych warunków i sytuacji, które mogą
wystąpić . Ostrożność i zdrowy rozsądek nie są podstawą tego produktu,
ponieważ wierzymy, że jego zastosowanie będzie zgodne z tymi kodami .
Przed użyciem urządzenia przeczytaj WSZYSTKIE instrukcje .
1. Montaż musi przebiegać zgodnie z poniższymi instrukcjami.
Nieprawidłowy montaż może stanowić zagrożenie.
2. Nie montuj się będąc zmęczonym, pod wpływem alkoholu, narkotyków
lub leków.
3.Waga, elastyczność i inne właściwości produktu mają zastosowanie
wyłącznie do produktów prawidłowo i całkowicie zmontowanych.
4. Utrzymuj miejsce zbiórki w czystości i dobrze oświetlone.
5. Podczas montażu trzymaj osoby postronne z dala od obszaru.
6. To jest sprzęt, a nie zabawka, należy go używać pod okiem
profesjonalisty. Nie pozwalaj dzieciom i zwierzętom bawić się samotnie ani
nie zbliżaj się do tego przedmiotu.
7. Używaj wyłącznie zgodnie z przeznaczeniem. Nie siadaj ani nie stawaj
na produkcie.
8. Sprawdź przed każdym użyciem. Nie używaj go, jeśli części są luźne lub
uszkodzone.
9 . Nie używaj tego urządzenia do celów innych niż wskazane .

3
1 0 . Nie używaj go do celów komercyjnych .
1 1 . Nie czyść go żadnymi materiałami ściernymi .
1 2 . Nigdy nie pozostawiaj go bez nadzoru podczas użytkowania .
1 3 . Mocz i odchody zwierząt domowych mogą uszkodzić produkt, należy
je trzymać z daleka .
1 4 . Nie umieszczaj produktu na lub w pobliżu gorącego powietrza,
palników elektrycznych lub grzejników .
15 . Małe dzieci należy nadzorować, aby mieć pewność, że nie bawią się
produktem . Zwierzęta powinny trzymać się z daleka od produktu.
Nie używać na zewnątrz w deszczowe i pochmurne dni, unikać uderzeń
pioruna i upadków . Osoby lub zwierzęta wiszące na produkcie mogą
spowodować obrażenia lub śmierć .
OSTRZEŻENIE: Ryzyko zadławienia — zabawka
zawiera małe kulki i/lub małe części. Nie przeznaczona
dla dzieci poniżej 3 lat.
WAŻNY! Przed przystąpieniem do montażu przeczytaj tę instrukcję, aby
zapoznać się ze wszystkimi częściami i etapami montażu. Zalecamy, aby
grę składały dwie osoby dorosłe. Zapoznaj się z poniższą listą części i
upewnij się, że wszystkie części zostały dołączone.
PARTS LIST

4
ASSEMBLY INSTRUCTIONS:
Zalecamy, aby nad złożeniem tej gry pracowały dwie osoby dorosłe.
KROK 1 : Połącz lewą stopę (#21) i prawą (#22) z krótką przegrodą (#23)
za pomocą Śruba imbusowa (#2) i podkładka płaska (#3), jak pokazano na
RYSUNKU 1.
5
KROK 2 : Podłącz żelazny wspornik (#20) do zmontowanej krótkiej
przegrody za pomocą śruby imbusowej (#1) i płaskiej podkładki (#3), jak
pokazano na RYSUNKU 2.
KROK 3 : Umieść zespół nóg z kroku 2 na szafce głównej (nr 24), włóż
trójkątną plastikową poduszkę w szczelinę pomiędzy stopą a żurawiem i
6
dokręć śrubą z łbem sześciokątnym (#2) i płaską podkładką (#3), jak
pokazano na RYSUNKU 3.
KROK 4 : Załóż poziomice nóg (nr 7) na nogi, jak pokazano na
RYSUNKU 4.

7
KROK 5 : Włóż stalową rurkę (#17) do otworu w głównej szafce (#24),
następnie podłącz gumowy pierście ń (#15), 3 zawodnika drużyny
gospodarzy (#12) i gumowy pierścień (#15) ).
Włóż stalową rurkę (#16) do otworu w głównej szafce (#24), a następnie
podłącz gumowy pierście ń (#15), 2 odtwarzacze gospodarzy (#12) i
gumowy pierścień (#15).
Włóż stalową rurkę (#18) do otworu w głównej szafce (#24), a następnie
podłącz gumowy pierścień (#15), 5 zawodników drużyny gospodarzy (#12)
i gumowy pierścień (#15).
Włóż stalową rurkę (#17) do otworu w głównej szafce (#24), a następnie

8
podłącz gumowy pierścień (#15), 3 zawodnika drużyny gospodarzy (#12) i
gumowy pierścień (#15).
KROK 6 : Włóż stalową rurkę (#17) do otworu w głównej szafce (#24),
następnie podłącz gumowy pierście ń (#15), 3 zawodnika drużyny
gospodarzy (#13) i gumowy pierścień (#15) ).
Włóż stalową rurkę (#16) do otworu w głównej szafce (#24), a następnie
podłącz gumowy pierście ń (#15), 2 odtwarzacze gospodarzy (#13) i
gumowy pierścień (#15).
Włóż stalową rurkę (#18) do otworu w głównej szafce (#24), a następnie
9
podłącz gumowy pierścień (#15), 5 zawodników drużyny gospodarzy (#13)
i gumkę pierścień (#15).
Włóż stalową rurkę (#17) do otworu w głównej szafce (#24), a następnie
podłącz gumowy pierścień (#15), 3 zawodnika drużyny gospodarzy (#13) i
gumowy pierścień (#15).
KROK 7 : KOLEJNOŚĆ GRACZY (widok z góry – stół do góry
nogami)

10
KROK 8 : Zablokuj każdego gracza (#12) (#13) za pomocą nakrętki (#4)
za pomocą śrub (#9) do pozycji otworu.
Włóż uchwyt (#10) i zaślepkę końcową (11 #) na żelazną rurę .
Umieść uchwyt na kubek (#8) w głównym otworze szafki, jak pokazano na
RYSUNKU 8.

11
KROK 9 : Zamontuj nacięcie (#14) na krótszym boku za pomocą śrub
(#5)
Przykręć bramkę (#6) na dłuższym boku i zablokuj śrubami (#5) jak
pokazano na RYSUNKU 9.

12
KROK 10 :
13
Producent: Shanghaimuxinmuyeyouxiangongsi
Adres: Baoshanqu Shuangchenglu 803long 11hao 1602A-1609shi
Szanghaj
Import do AUS: SIHAO PTY LTD, 1 ROKEVA STREETEASTWOOD NSW
2122 Australia
Import do USA: Sanven Technology Ltd.
Apartament 250 , 9166 Anaheim Place, Rancho Cucamonga, Kalifornia
91730
Wyprodukowano w Chinach
REP
EC
SHUNSHUN GmbH
Römeräcker 9 Z2021,76351
Linkenheim-Hochstetten,Germany
euvertreter@gmail.com
+49 1727041930
REP
UK
Pooledas Group Ltd
Unit 5 Albert Edward House, The
Pavilions Preston, United Kingdom
pooledas123@gmail.com
Tel: 01772418127


Tecnico Supporto e certificato di garanzia elettronica www.vevor.com/support
CALCIO DA TAVOLO
MODELLO : SUO-5529-A
We continue to be committed to provide you tools with competitive price.
"Save Half", "Half Price" or any other similar expressions used by us only represents an
estimate of savings you might benefit from buying certain tools with us compared to the major
top brands and does not necessarily mean to cover all categories of tools offered by us. You
are kindly reminded to verify carefully when you are placing an order with us if you are
actually saving half in comparison with the top major brands.


1
MODELLO: SUO-5529-A
Have product questions? Need technical support? Please feel free to
contact us:
Technical Support and E-Warranty Certificate
www.vevor.com/support
NEED HELP? CONTACT US!
This is the original instruction, please read all manual instructions
carefully before operating. VEVOR reserves a clear interpretation of our
user manual. The appearance of the product shall be subject to the
product you received. Please forgive us that we won't inform you again if
there are any technology or software updates on our product.
TABLE SOCCEB

2
Avvertenza: per ridurre il rischio di lesioni, l'utente deve leggere
attentamente il manuale di istruzioni.
SAFETY WARNINGS AND PRECAUTIONS
Grazie per aver utilizzato questo prodotto . Per essere sicuri di poter
utilizzare correttamente la macchina, leggere attentamente queste
istruzioni prima dell'uso e conservarle adeguatamente per riferimento
futuro . Assicurati di leggere le precauzioni e le regole di sicurezza in
questa pagina per garantire un utilizzo sicuro . Questo manuale descriverà
le avvertenze e le precauzioni di sicurezza, il funzionamento e la
manutenzione . Le avvertenze e le istruzioni contenute nel presente
manuale non possono coprire tutte le possibili condizioni e situazioni che
potrebbero verificarsi . La cautela e il buon senso non sono incorporati in
questo prodotto, poiché riteniamo che gli usi saranno conformi a questi
codici .
Si prega di leggere TUTTE le istruzioni prima di utilizzare la
macchina .
1. Il montaggio deve seguire queste istruzioni. Un montaggio errato può
rappresentare un pericolo.
2. Non montare in caso di stanchezza o sotto l'effetto di alcol, droghe o
farmaci.
3.Il peso, l'elasticità e le altre proprietà del prodotto si applicano solo ai
prodotti correttamente e completamente assemblati.
4. Mantenere l'area di assemblaggio pulita e ben illuminata.
5. Tenere gli astanti lontani dall'area durante il montaggio.
6. Questa è un'attrezzatura, non un giocattolo, deve essere utilizzata sotto
la guida di un professionista. Non permettere ai bambini e agli animali
domestici di giocare da soli o di avvicinarsi a questo oggetto.
7. Utilizzare solo come previsto. Non sedersi o stare in piedi sul prodotto.
8. Ispezionare prima di ogni utilizzo. Non utilizzarlo se le parti sono
allentate o danneggiate.
9 . Non utilizzare questa unità per scopi diversi da quelli indicati .

3
1 0 . Non utilizzarlo per scopi commerciali .
1 1 . Non pulirlo con materiali abrasivi .
1 2 . Non lasciarlo mai incustodito durante l'uso .
1 3 . L'urina e le feci degli animali domestici possono danneggiare il
prodotto, tenere lontano .
1 4 . Non posizionare il prodotto sopra o vicino ad aria calda, fornelli
elettrici o stufe .
15 . I bambini piccoli devono essere sorvegliati per assicurarsi che non
giochino con il prodotto . Gli animali domestici devono stare lontani dal
prodotto.
Non utilizzare all'aperto nelle giornate piovose e nuvolose, evitare fulmini e
cadute . Persone o animali appesi al prodotto possono causare lesioni o
morte .
ATTENZIONE: pericolo di soffocamento: il giocattolo
contiene palline e/o piccole parti. Non adatto a bambini di
età inferiore a 3 anni.
IMPORTANTE! Prima di tentare l'assemblaggio, leggere
questo manuale di istruzioni per familiarizzare con tutte le parti e le fasi di
assemblaggio. Raccomandiamo che due adulti assemblino questo gioco.
Fare riferimento all'elenco delle parti di seguito e assicurarsi che tutte le
parti siano state incluse.
PARTS LIST

4
ASSEMBLY INSTRUCTIONS:
Consigliamo che due adulti lavorino insieme per assemblare questo
gioco.
PASSO 1 : Collega il piede sinistro (#21) e il piede destro (#22) con il
deflettore corto (#23) con il Bullone a brugola (n. 2) e rondella piatta (n. 3)
come mostrato nella FIGURA 1.

5
FASE 2 : Collegare la barra di supporto in ferro (n. 20) al deflettore corto
assemblato con un bullone a brugola (n. 1) e una rondella piatta (n. 3)
come mostrato nella FIGURA 2.

6
PASSO 3 : Posizionare il gruppo gambe al punto 2 sul mobiletto
principale (#24), inserire il cuscino di plastica triangolare nello spazio vuoto
tra il piede e la torre di trivellazione e serrare con il bullone a brugola (n. 2)
e la rondella piatta (n. 3) come mostrato nella FIGURA 3.
FASE 4 : Infilare i livellatori delle gambe (#7) sulle gambe come mostrato
nella FIGURA 4.

7
PASSO 5 : Inserire il tubo d'acciaio (#17) nel foro sull'armadietto
principale (#24), quindi collegare l' anello di gomma (#15), 3 giocatori della
squadra di casa (#12) e l'anello di gomma (#15 ).
Inserire il tubo d'acciaio (#16) nel foro sull'armadietto principale (#24),
quindi collegare l' anello di gomma (#15), 2 giocatori della squadra di casa
(#12) e l'anello di gomma (#15).
Inserire il tubo d'acciaio (#18) nel foro sull'armadietto principale (#24),
quindi collegare l' anello di gomma (#15), i 5 giocatori della squadra di casa
(#12) e l'anello di gomma (#15).
Inserire il tubo d'acciaio (#17) nel foro sull'armadietto principale (#24),
quindi collegare l' anello di gomma (#15), i 3 giocatori della squadra di casa
(#12) e l'anello di gomma (#15).

8
PASSO 6 : Inserire il tubo d'acciaio (#17) nel foro sull'armadietto
principale (#24), quindi collegare l' anello di gomma (#15), 3 giocatori della
squadra di casa (#13) e l'anello di gomma (#15 ).
Inserire il tubo d'acciaio (#16) nel foro sull'armadietto principale (#24),
quindi collegare l' anello di gomma (#15), 2 giocatori della squadra di casa
(#13) e l'anello di gomma (#15).
Inserire il tubo d'acciaio (#18) nel foro sull'armadietto principale (#24),
quindi collegare l' anello di gomma (#15), i 5 giocatori della squadra di casa
(#13) e la gomma anello (#15).
Inserire il tubo d'acciaio (#17) nel foro sull'armadietto principale (#24),
quindi collegare l' anello di gomma (#15), i 3 giocatori della squadra di casa
(#13) e l'anello di gomma (#15).

9
PASSO 7 : ORDINE DEI GIOCATORI (Vista dall'alto -Tavolo
capovolto)
10
PASSO 8 : Bloccare ciascun giocatore (#12)(#13) attraverso il dado (#4)
con le viti (#9) nella posizione del foro.
Inserire l'impugnatura (#10) e il cappuccio terminale (11 #) sul tubo di
ferro .
Posizionare il portabicchieri (n. 8) nel foro dell'armadietto principale come
mostrato nella FIGURA 8.

11
PASSO 9 : Installare il segnapunti (#14) sul lato corto con le viti (#5)
Avvitare il set porta (#6) sul lato lungo e bloccarlo con le viti (#5) come
mostrato nella FIGURA 9.
PASSO 10 :
12
Produttore: Shanghaimuxinmuyeyouxiangongsi
Indirizzo: Baoshanqu Shuangchenglu 803long 11hao 1602A-1609shi
Shanghai
Importato in AUS: SIHAO PTY LTD, 1 ROKEVA STREETEASTWOOD
NSW 2122 Australia
Importato negli Stati Uniti: Sanven Technology Ltd.
Suite 250 , 9166 Anaheim Place, Rancho Cucamonga, CA 91730
REP
EC
SHUNSHUN GmbH
Römeräcker 9 Z2021,76351
Linkenheim-Hochstetten,Germany
euvertreter@gmail.com

13
Made in China
REP
UK
Pooledas Group Ltd
Unit 5 Albert Edward House, The
Pavilions Preston, United Kingdom
pooledas123@gmail.com
Tel: 01772418127


Technisch Ondersteuning en e-garantiecertificaat www.vevor.com/support
TAFEL VOETBAL
MODEL : SUO-5529-A
We continue to be committed to provide you tools with competitive price.
"Save Half", "Half Price" or any other similar expressions used by us only represents an
estimate of savings you might benefit from buying certain tools with us compared to the major
top brands and does not necessarily mean to cover all categories of tools offered by us. You
are kindly reminded to verify carefully when you are placing an order with us if you are
actually saving half in comparison with the top major brands.


1
MODEL: SUO-5529-A
Have product questions? Need technical support? Please feel free to
contact us:
Technical Support and E-Warranty Certificate
www.vevor.com/support
NEED HELP? CONTACT US!
This is the original instruction, please read all manual instructions
carefully before operating. VEVOR reserves a clear interpretation of our
user manual. The appearance of the product shall be subject to the
product you received. Please forgive us that we won't inform you again if
there are any technology or software updates on our product.
TABLE SOCCEB

2
Waarschuwing-Om het risico op letsel te verminderen, moet de
gebruiker de handleiding zorgvuldig lezen.
SAFETY WARNINGS AND PRECAUTIONS
Bedankt voor het gebruik van dit product . Om er zeker van te zijn dat u de
machine correct kunt bedienen, dient u deze instructie zorgvuldig door te
lezen voordat u de machine gebruikt en deze goed te bewaren voor
toekomstig gebruik . Zorg ervoor dat u de voorzorgsmaatregelen en
veiligheidsregels op deze pagina leest om een veilig gebruik te
garanderen . Deze handleiding beschrijft veiligheidswaarschuwingen en
voorzorgsmaatregelen, bediening en onderhoud . De waarschuwingen en
instructies die in deze handleiding worden besproken, kunnen niet alle
mogelijke omstandigheden en situaties dekken die zich kunnen voordoen .
Voorzichtigheid en gezond verstand zijn niet ingebouwd in dit product,
omdat wij van mening zijn dat het gebruik aan deze codes zal voldoen .
Lees ALLE instructies voordat u uw machine gebruikt .
1. Bij het monteren moeten deze instructies worden gevolgd. Een onjuiste
montage kan een gevaar vormen.
2. Niet monteren als u moe bent of onder invloed bent van alcohol, drugs of
medicijnen.
3.Gewichts- en elastische en andere producteigenschappen zijn alleen van
toepassing op correct en compleet gemonteerde producten.
4. Houd de verzamelplaats schoon en goed verlicht.
5. Houd omstanders tijdens de montage uit de buurt.
6. Dit is een apparaat, geen speelgoed, het moet worden gebruikt onder
begeleiding van een professional. Laat kinderen en huisdieren niet alleen
spelen of in de buurt van dit artikel komen.
7. Alleen gebruiken zoals bedoeld. Ga niet op het product zitten of staan.
8. Inspecteer vóór elk gebruik. Gebruik het niet als onderdelen loszitten of
beschadigd zijn.
9 . Gebruik dit apparaat niet voor andere doeleinden dan het aangegeven
gebruik .

3
1 0 . Gebruik het niet voor commerciële doeleinden .
1 1 . Maak het niet schoon met schurend materiaal .
1 2 . Laat het nooit onbeheerd achter terwijl het in gebruik is .
1 3 . Urine en uitwerpselen van huisdieren kunnen het product
beschadigen, blijf uit de buurt .
1 4 . Plaats het product niet op of in de buurt van hete lucht, elektrische
branders of verwarmingstoestellen .
15 . Op jonge kinderen moet toezicht worden gehouden om ervoor te
zorgen dat ze niet met het product spelen . Huisdieren moeten uit de buurt
van het product blijven.
Niet buitenshuis gebruiken op regenachtige en bewolkte dagen, vermijd
blikseminslagen en vallen . Mensen of huisdieren die aan het product
hangen, kunnen letsel of de dood veroorzaken .
WAARSCHUWING: Verstikkingsgevaar – Speelgoed
bevat kleine balletjes en/of kleine onderdelen. Niet voor
kinderen jonger dan 3 jaar.
BELANGRIJK! Lees eerst dit instructieboek door voordat u met de
montage begint, zodat u vertrouwd raakt met alle onderdelen en
montagestappen. Wij raden aan dat twee volwassenen dit spel in elkaar
zetten. Raadpleeg de onderstaande onderdelenlijst en zorg ervoor dat alle
onderdelen aanwezig zijn.
PARTS LIST
4
ASSEMBLY INSTRUCTIONS:
Wij raden aan dat twee volwassenen samenwerken om dit spel in
elkaar te zetten.
STAP 1 : Verbind de linkervoet (#21) en de rechtervoet (#22) met het
korte schot (#23) met de Inbusbout (#2) en platte sluitring (#3) zoals
weergegeven in AFBEELDING 1.

5
STAP 2 : Steek de ijzeren steunstang (#20) in het gemonteerde korte
schot met een inbusbout (#1) en een platte sluitring (#3) zoals
weergegeven in AFBEELDING 2.

6
STAP 3 : Plaats de pootmontage in stap 2 op de hoofdkast (#24), plaats
het driehoekige plastic kussen in de opening tussen de voet en de
boortoren, en draai vast met de inbusbout (#2) en de platte ring (#3) zoals
getoond in FIGUUR 3.
STAP 4 : Lees de beennivelleerders(#7) op de poten, zoals weergegeven
in FIGUUR 4.
7
STAP 5 : Steek de stalen buis (#17) in het gat in de hoofdkast (#24), sluit
vervolgens de rubberen ring (#15), de 3 thuisteamspeler (#12) en de
rubberen ring (#15) aan. ).
Steek de stalen buis (#16) in het gat in de hoofdkast (#24) en sluit
vervolgens de rubberen ring (#15), de 2 thuisteamspeler (#12) en de
rubberen ring (#15) aan.
Steek de stalen buis (#18) in het gat in de hoofdkast (#24) en sluit
vervolgens de rubberen ring (#15), de thuisteamspeler (#12) en de
rubberen ring (#15) aan.
Steek de stalen buis (#17) in het gat in de hoofdkast (#24) en sluit
vervolgens de rubberen ring (#15), de 3 thuisteamspeler (#12) en de
rubberen ring (#15) aan.

8
STAP 6 : Steek de stalen buis (#17) in het gat in de hoofdkast (#24), sluit
vervolgens de rubberen ring (#15), de 3 thuisteamspeler (#13) en de
rubberen ring (#15) aan. ).
Steek de stalen buis (#16) in het gat in de hoofdkast (#24) en sluit
vervolgens de rubberen ring (#15), de 2 thuisteamspeler (#13) en de
rubberen ring (#15) aan.
Steek de stalen buis (#18) in het gat in de hoofdkast (#24) en sluit
vervolgens de rubberen ring (#15), 5 thuisteamspeler (#13) en het rubber
aan. bel (#15).
Steek de stalen buis (#17) in het gat in de hoofdkast (#24) en sluit
vervolgens de rubberen ring (#15), de 3 thuisteamspeler (#13) en de
rubberen ring (#15) aan.

9
STAP 7 : VOLGORDE VAN SPELERS (bovenaanzicht - tafel
ondersteboven)
10
STAP 8 : Vergrendel elke speler (#12)(#13) via de moer (#4) met
schroeven (#9) in de gatpositie.
Plaats de handgreep (#10) en de eindkap (11#) op de ijzeren buis .
Plaats de bekerhouder (#8) in het gat in de hoofdkast, zoals weergegeven
in AFBEELDING 8.

11
STAP 9 : Installeer de voorritser (#14) aan de korte zijde met schroeven
(#5)
Schroef de doelset (#6) aan de lange zijde en zet deze vast met schroeven
(#5) zoals getoond in FIGUUR 9.
STAP10 :

12
Fabrikant: Shanghaimuxinmuyeyouxiangongsi
Adres: Baoshanqu Shuangchenglu 803long 11hao 1602A-1609shi
Shanghai
Geïmporteerd naar AUS: SIHAO PTY LTD, 1 ROKEVA
STREETEASTWOOD NSW 2122 Australië
Geïmporteerd naar de VS: Sanven Technology Ltd.
Suite 250 , 9166 Anaheim Place, Rancho Cucamonga, CA 91730
REP
EC
SHUNSHUN GmbH
Römeräcker 9 Z2021,76351
Linkenheim-Hochstetten,Germany
euvertreter@gmail.com

13
Gemaakt in China
REP
UK
Pooledas Group Ltd
Unit 5 Albert Edward House, The
Pavilions Preston, United Kingdom
pooledas123@gmail.com
Tel: 01772418127


Teknisk Support och e-garanticertifikat www.vevor.com/support
BORDSOCCEB
MODELL : SUO-5529-A
We continue to be committed to provide you tools with competitive price.
"Save Half", "Half Price" or any other similar expressions used by us only represents an
estimate of savings you might benefit from buying certain tools with us compared to the major
top brands and does not necessarily mean to cover all categories of tools offered by us. You
are kindly reminded to verify carefully when you are placing an order with us if you are
actually saving half in comparison with the top major brands.


1
MODELL: SUO-5529-A
Have product questions? Need technical support? Please feel free to
contact us:
Technical Support and E-Warranty Certificate
www.vevor.com/support
NEED HELP? CONTACT US!
This is the original instruction, please read all manual instructions
carefully before operating. VEVOR reserves a clear interpretation of our
user manual. The appearance of the product shall be subject to the
product you received. Please forgive us that we won't inform you again if
there are any technology or software updates on our product.
TABLE SOCCEB

2
Varning - För att minska risken för skada måste användaren
läsa instruktionerna noggrant.
SAFETY WARNINGS AND PRECAUTIONS
Tack för att du använder den här produkten . För att försäkra dig om att du
kan använda maskinen korrekt, läs denna instruktion noggrant före
användning och förvara den på rätt sätt för framtida referens . Var noga
med att läsa försiktighetsåtgärderna och säkerhetsreglerna på den här
sidan för att säkerställa din säker användning . Denna handbok kommer att
beskriva säkerhetsvarningar och försiktighetsåtgärder, drift, underhåll .
Varningarna och instruktionerna som granskas i denna handbok kan inte
täcka alla möjliga tillstånd och situationer som kan uppstå . Försiktighet
och sunt förnuft är inte inbyggt i denna produkt, eftersom vi tror att
användningen kommer att följa dessa koder .
Läs ALLA instruktionerna innan du använder din maskin .
1. Montering måste följa dessa instruktioner. Felaktig montering kan vara
en fara.
2. Sätt dig inte ihop när du är trött eller påverkad av alkohol, droger eller
mediciner.
3. Vikt och elastik och andra produktegenskaper är endast tillämpliga på
korrekt och fullständigt monterade produkter.
4. Håll monteringsområdet rent och väl upplyst.
5. Håll åskådare borta från området under monteringen.
6. Detta är en utrustning, inte en leksak, den måste användas under
ledning av en professionell. Tillåt inte barn och husdjur att leka ensamma
eller närma sig detta föremål.
7. Använd endast på avsett sätt. Sitt eller stå inte på produkten.
8. Inspektera före varje användning. Använd den inte om delar är lösa eller
skadade.
9 . Använd inte denna enhet för andra ändamål än den angivna
användningen .
1 0 . Använd den inte för kommersiella ändamål .

3
1 1 . Rengör den inte med något slipande material .
1 2 . Lämna den aldrig utan uppsikt när den används .
1 3 . Urin och avföring från husdjur kan skada produkten, håll undan .
1 4 . Placera inte produkten på eller nära varmluft, elektriska brännare eller
värmare .
15 . Små barn bör övervakas för att säkerställa att de inte leker med
produkten . Husdjur bör hålla sig borta från produkten.
Använd inte utomhus under regniga och molniga dagar, undvik
blixtnedslag och fall . Människor eller husdjur som hänger på produkten
kommer att orsaka skada eller dödsfall .
VARNING: Kvävningsrisk - Leksaken innehåller små
bollar och/eller små delar. Ej för barn under 3 år.
VIKTIG! Innan du försöker montera, läs igenom denna
instruktionsbok för att bekanta dig med alla delar och
monteringssteg. Vi rekommenderar att två vuxna monterar detta spel. Se
reservdelslistan nedan och se till att alla delar har medföljt.
PARTS LIST
4
ASSEMBLY INSTRUCTIONS:
Vi rekommenderar att två vuxna arbetar tillsammans för att sätta ihop
detta spel.
STEG 1 : Anslut vänster fot (#21) och höger fot (#22) med den korta
baffeln (#23) med Insexbult (#2) och platt bricka (#3) som visas i FIGUR 1.
5
STEG 2 : Sätt i järnstödstången (#20) i den sammansatta korta baffeln
med en insexbult (#1) och platt bricka (#3) som visas i FIGUR 2.
STEG 3 : Placera benenheten i steg 2 på huvudskåpet (#24), Placera
triangelplastkudden i springan mellan foten och borrtårnet, och dra åt med
insexbulten (#2) och den platta brickan (#3) som visas i FIGUR 3.
6
STEG 4 : Läs av benen (#7) på benen som visas i FIGUR 4.
7
STEG 5 : Sätt in stålröret (#17) i hålet på huvudskåpet (#24), anslut sedan
gummiringen (#15), 3 hemmalagsspelare (#12) och gummiringen (#15) ).
Sätt in stålröret (#16) i hålet på huvudskåpet (#24), anslut sedan
gummiringen (#15), 2 hemmalagsspelare (#12) och gummiringen (#15).
Sätt in stålröret (#18) i hålet på huvudskåpet (#24), anslut sedan
gummiringen (#15), 5 hemmalagsspelare (#12) och gummiringen (#15).
Sätt in stålröret (#17) i hålet på huvudskåpet (#24), anslut sedan
gummiringen (#15), 3 hemmalagsspelare (#12) och gummiringen (#15).
STEG 6 : Sätt in stålröret (#17) i hålet på huvudskåpet (#24), anslut sedan
gummiringen (#15), 3 hemmalagsspelare (#13) och gummiringen (#15) ).
Sätt in stålröret (#16) i hålet på huvudskåpet (#24), anslut sedan
gummiringen (#15), 2 hemmalagsspelare (#13) och gummiringen (#15).
Sätt in stålröret (#18) i hålet på huvudskåpet (#24), anslut sedan
gummiringen (#15), 5 hemmalagsspelare (#13) och gummit ring (#15).
Sätt in stålröret (#17) i hålet på huvudskåpet (#24), anslut sedan
8
gummiringen (#15), 3 hemmalagsspelare (#13) och gummiringen (#15).
STEG 7 : ORDNING AV SPELARE (Overhead View - Tabell upp och
ner)

9
STEG 8 : Lås varje spelare (#12)(#13) genom muttern (#4) med skruvar
(#9) till hålpositionen.
Sätt in handtaget (#10) och ändlocket (11#) på järnröret .
Placera mugghållaren (#8) i hålet i huvudskåpet som visas i FIGUR 8.

10
STEG 9 : Montera poängskivan (#14) på kortsidan med skruvar (#5)
Skruva fast målsatsen (#6) på långsidan och lås den med skruvar (#5) som
visas i FIGUR 9.
11
STEG 10 :

12
Tillverkare: Shanghaimuxinmuyeyouxiangongsi
Adress: Baoshanqu Shuangchenglu 803long 11hao 1602A-1609shi
Shanghai
Importerad till AUS: SIHAO PTY LTD, 1 ROKEVA STREETEASTWOOD
NSW 2122 Australien
Importerad till USA: Sanven Technology Ltd.
Suite 250 , 9166 Anaheim Place, Rancho Cucamonga, CA 91730
Tillverkad i Kina
REP
EC
SHUNSHUN GmbH
Römeräcker 9 Z2021,76351
Linkenheim-Hochstetten,Germany
euvertreter@gmail.com
+49 1727041930
REP
UK
Pooledas Group Ltd
Unit 5 Albert Edward House, The
Pavilions Preston, United Kingdom
pooledas123@gmail.com
Tel: 01772418127