
Technical Support and E-Warranty Certificate
www.vevor.com/support
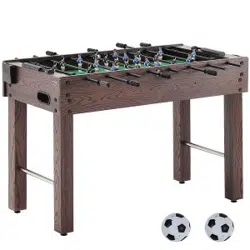
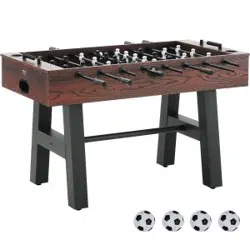
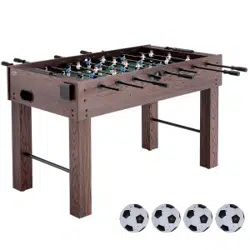
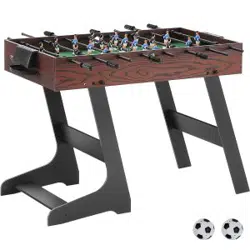
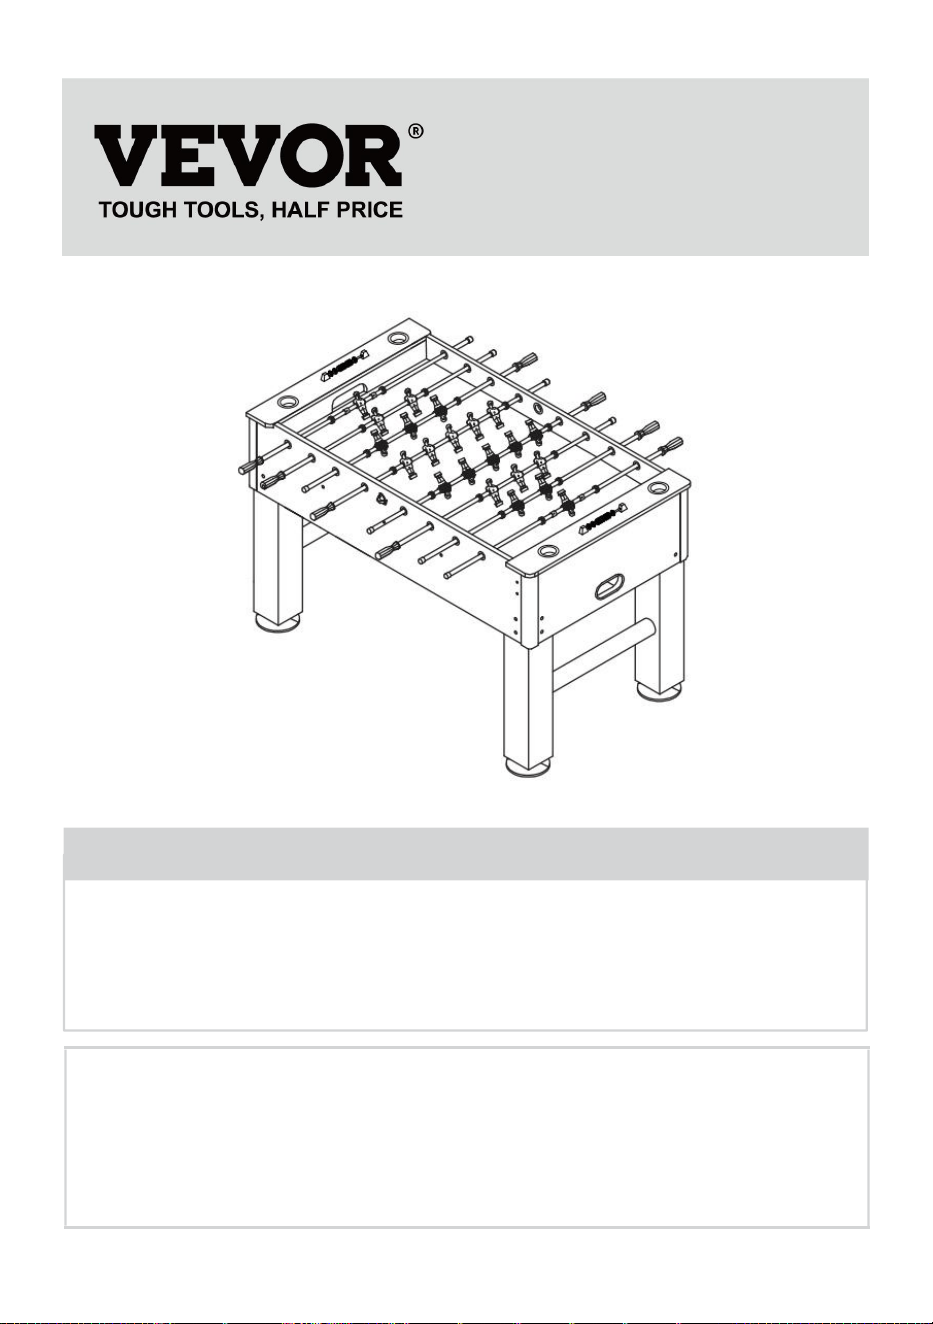
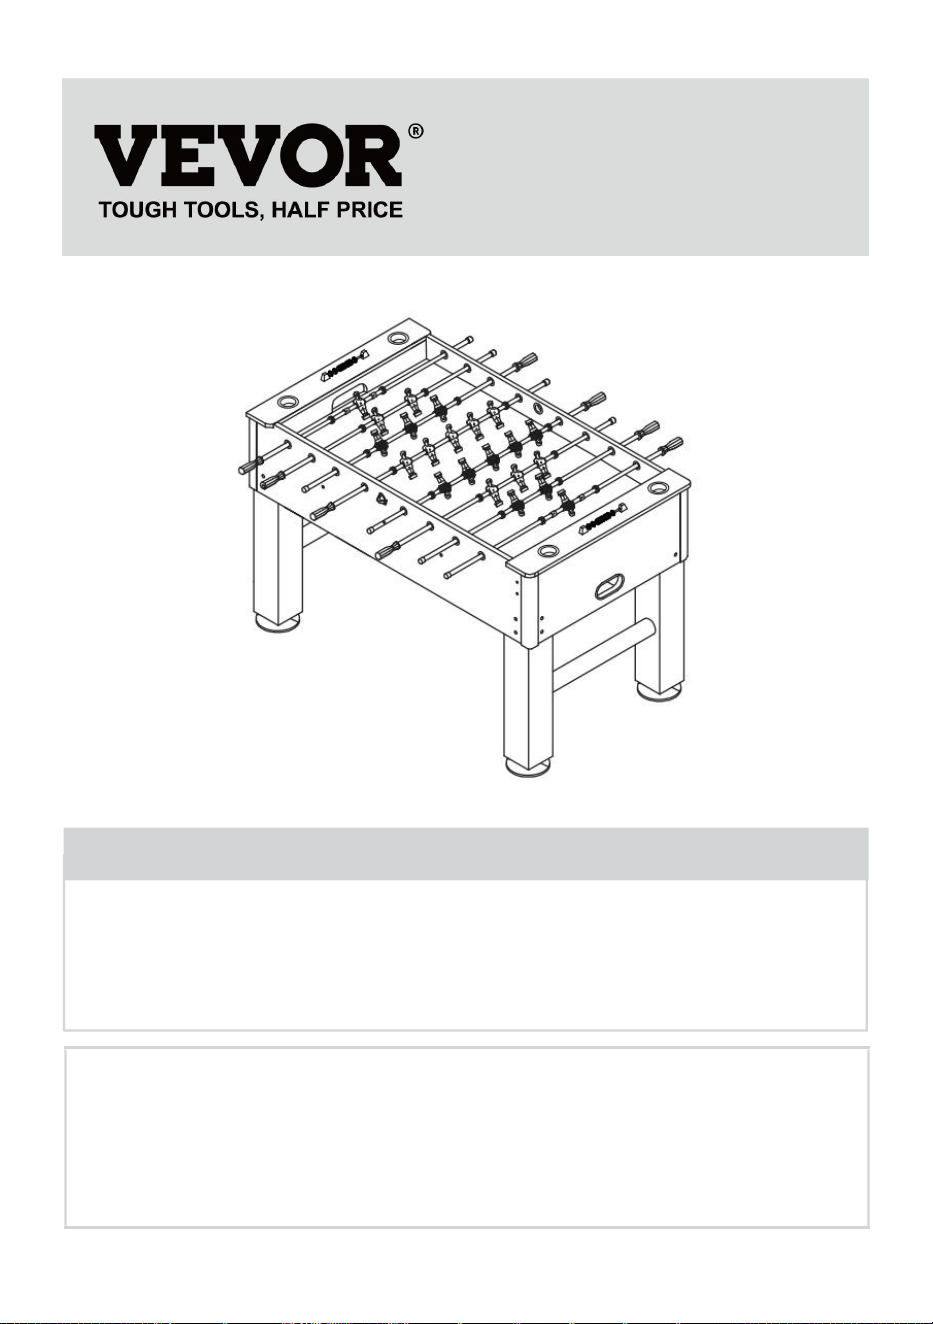
TABLE SOCCER
MODEL:SUO-5529L
We continue to be committed to provide you tools with competitive price.
"Save Half", "Half Price" or any other similar expressions used by us only represents an
estimate of savings you might benefit from buying certain tools with us compared to the major
top brands and does not necessarily mean to cover all categories of tools offered by us. You
are kindly reminded to verify carefully when you are placing an order with us if you are
actually saving half in comparison with the top major brands.


1
MODEL: SUO-5529L
Have product questions? Need technical support? Please feel free to
contact us:
Technical Support and E-Warranty Certificate
www.vevor.com/support
NEED HELP? CONTACT US!
This is the original instruction, please read all manual instructions
carefully before operating. VEVOR reserves a clear interpretation of our
user manual. The appearance of the product shall be subject to the
product you received. Please forgive us that we won't inform you again if
there are any technology or software updates on our product.
TABLE SOCCER

2
Warning-To reduce the risk of injury, user must read instructions
manual carefully.
SAFETY WARNINGS AND PRECAUTIONS
Thank you for using this product. In order to make sure that you can
operate the machine correctly, read this instruction carefully before
operation and keep it properly for future reference. Please be sure to read
the precautions and safety rules in this page to ensure your safe use. This
manual will outline safety warnings and precautions, operating,
maintenance. The warnings and instructions reviewed in this manual
cannot cover all possible conditions and situations that may occur. Caution
and common sense are not built into this product, since we believe that the
uses will comply with these codes.
Please read ALL the instructions before using your machine.
1. Assemble needs to follow these instructions. Incorrect assembly can be
a hazard.
2. Do not assemble when tired or when under the influence of alcohol,
drugs or medication.
3.Weight and elastic and other product properties are only applicable to
correctly and completely assembled products.
4. Keep the assembly area clean and well-lit.
5. Keep bystanders out of the area during assembly.
6. This is a equipment, not a toy, it needs to be used under the guidance of
a professional. Do not allow children and pets to play alone or approach
this item.
7. Use as intended only. Do not sit or stand on the product.
8. Inspect before every use. Do not use it if parts are loose or damaged.
9. Do not apply this unit to any other purposes than the indicated usage.
10. Do not use it for commercial purposes.
11. Do not clean it with any abrasive material.
12. Never leave it unattended while in use.
13. Pet urine and feces can damage the product, please keep away.
3
14. Do not place the product on or near hot air, electric burners or heaters.
15. Young children should be supervised to ensure that they do not play
with the product. Pets should stay away from the product.
Do not use outdoors in rainy and cloudy days, avoid lightning strikes and
falls. People or pets hanging on the product will cause injury or death.
WARNING:Choking Hazard--Toy contains small balls and/or
small parts.Not for children under 3 years.
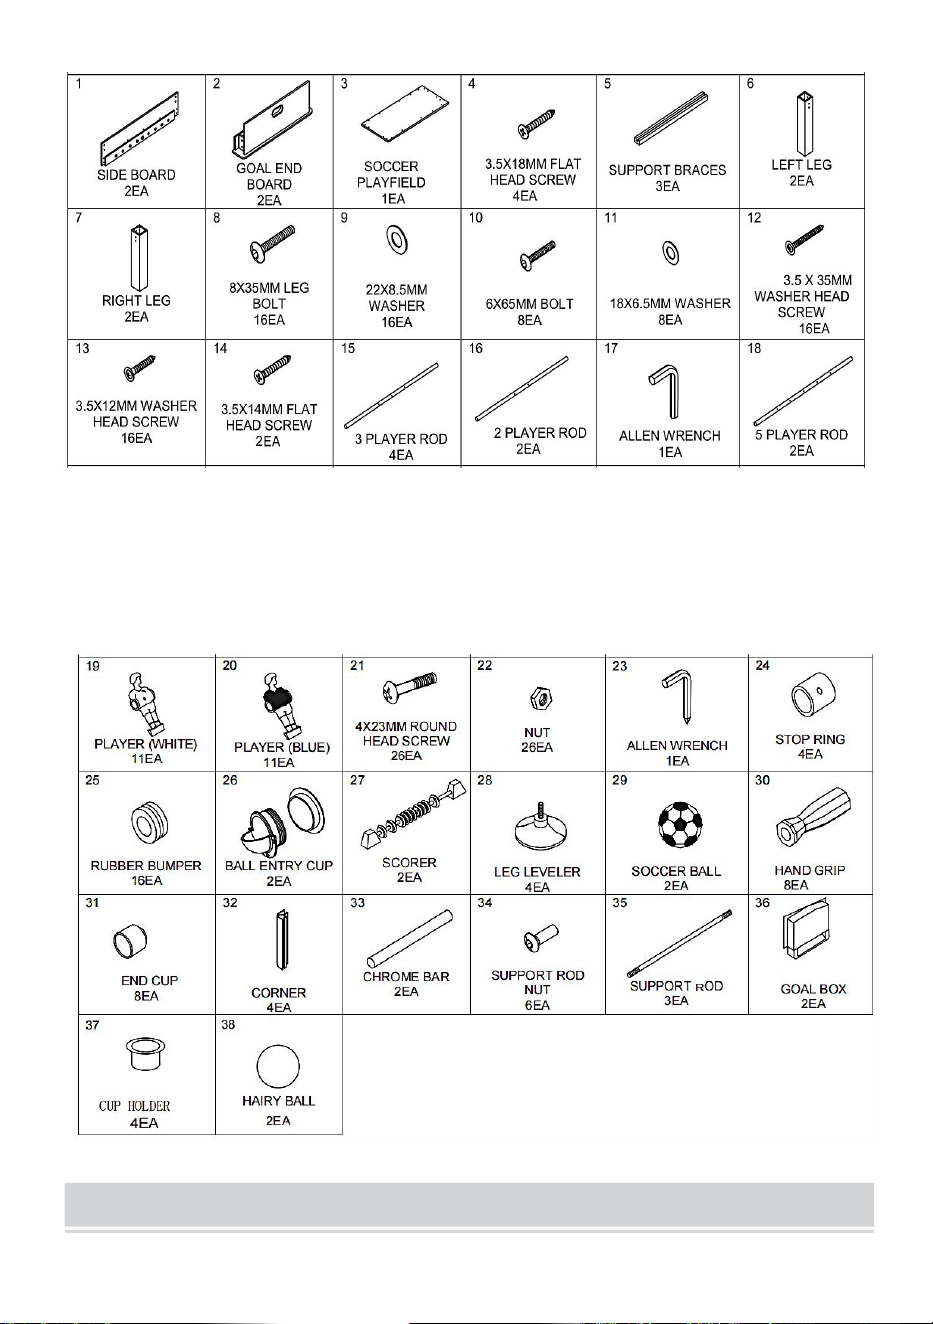
IMPORTANT!Please keep your instructions.Before attempting
assembly,please read through this instruction book to familiarize yourself
with all the parts and assembly steps.We recommend that two adults
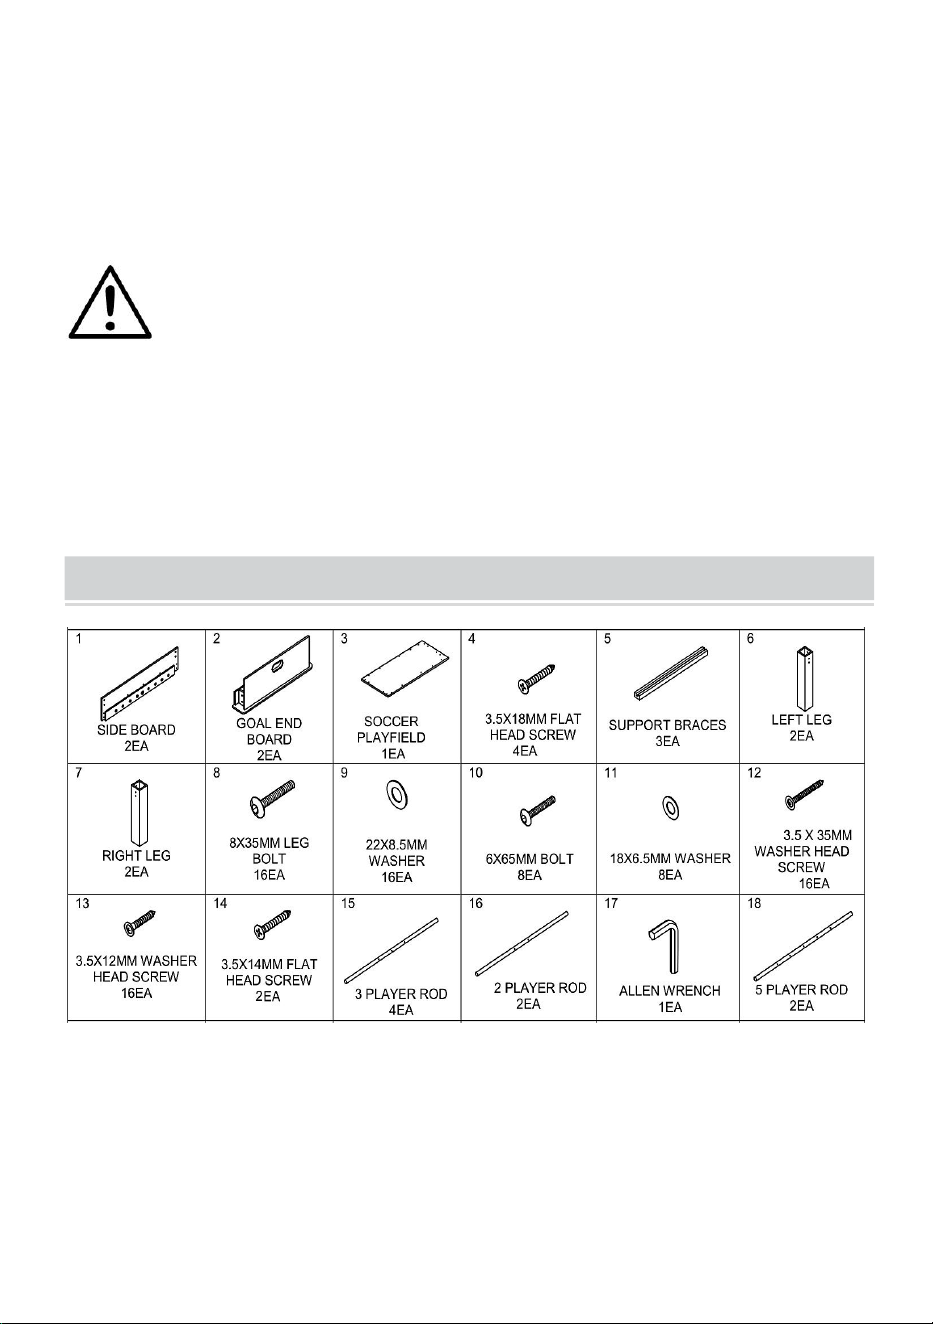
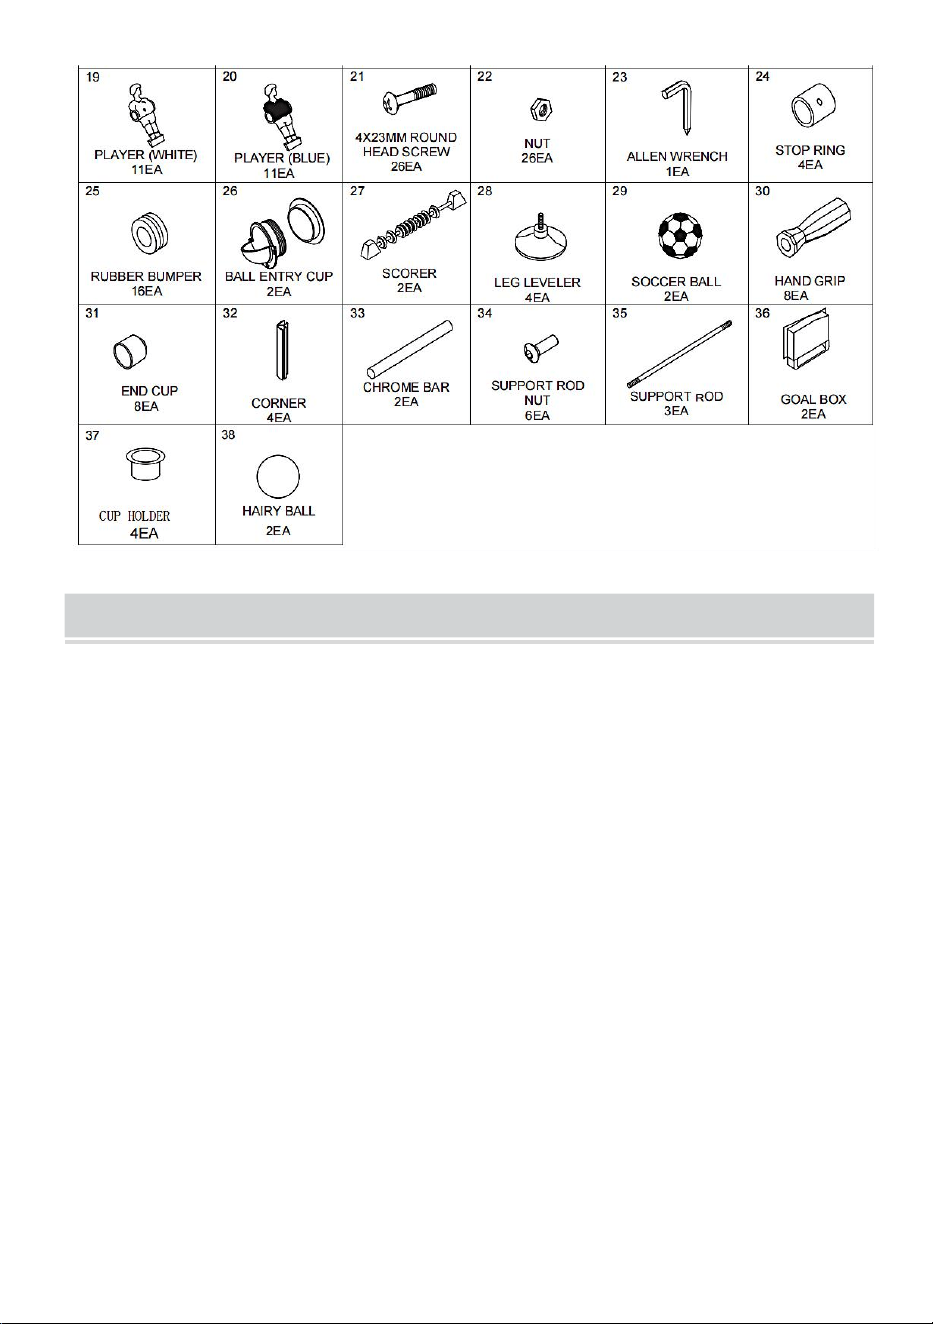
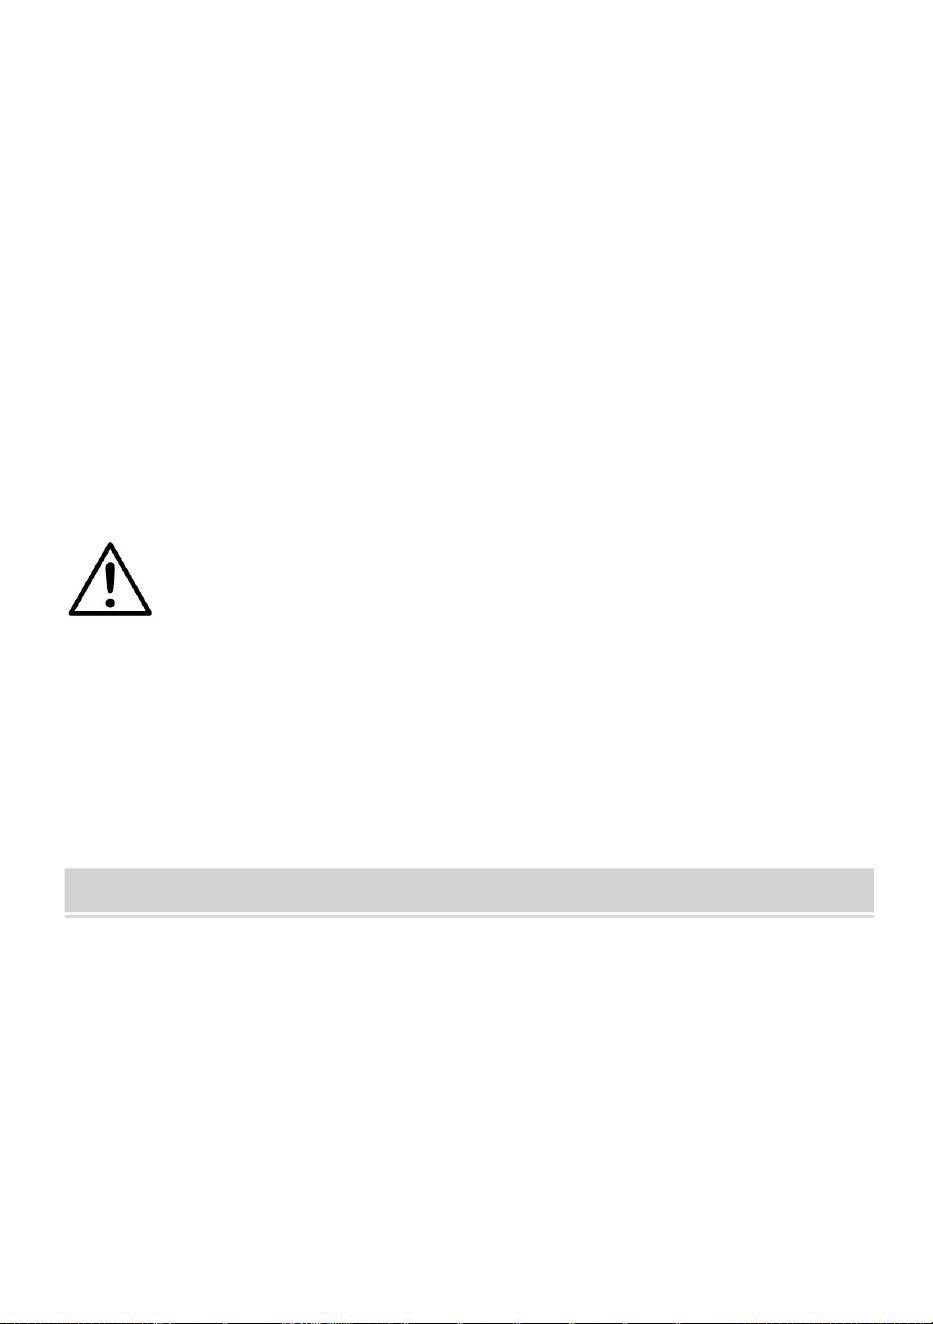
assemble the football table.Please refer to the parts list below and be sure
that all parts have been included.
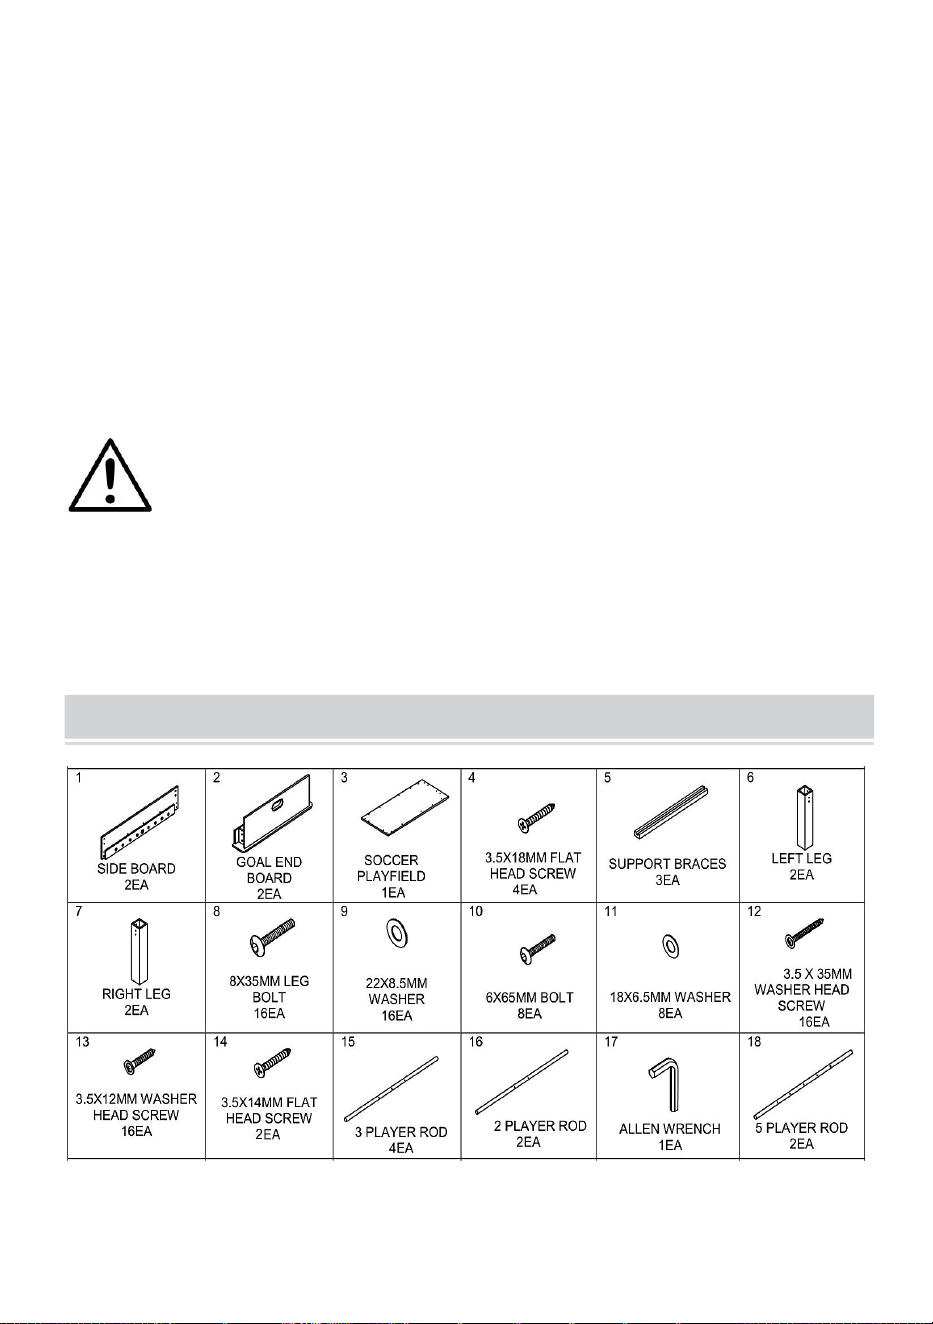
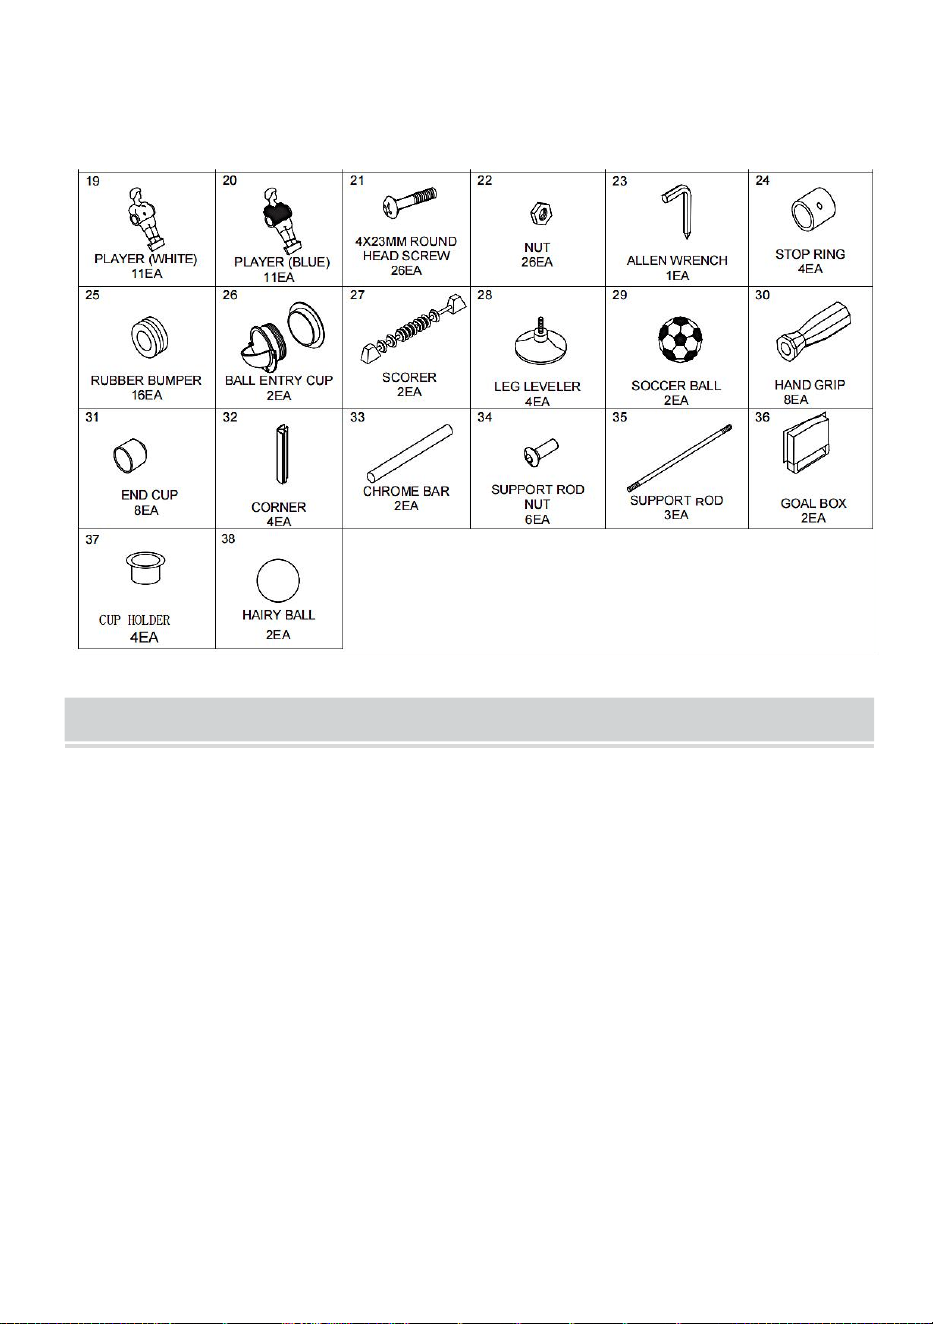
PARTS LIST
4
ASSEMBLY INSTRUCTIONS:
We recommend that two adults work together to assemble this game.
STEP1:Open the 2 cartons of your new football table close to the place
where you are actually going to use the table.
STEP2:Remove all the contents from inside the cartons and verify that
you have all the listed parts as shown on the parts list.We suggest that you
use the bottom carton as a clean flat working area to protect the
table.Carefully cut or tear the four carton corners from the largest carton so
that the bottom carton is now your work area.
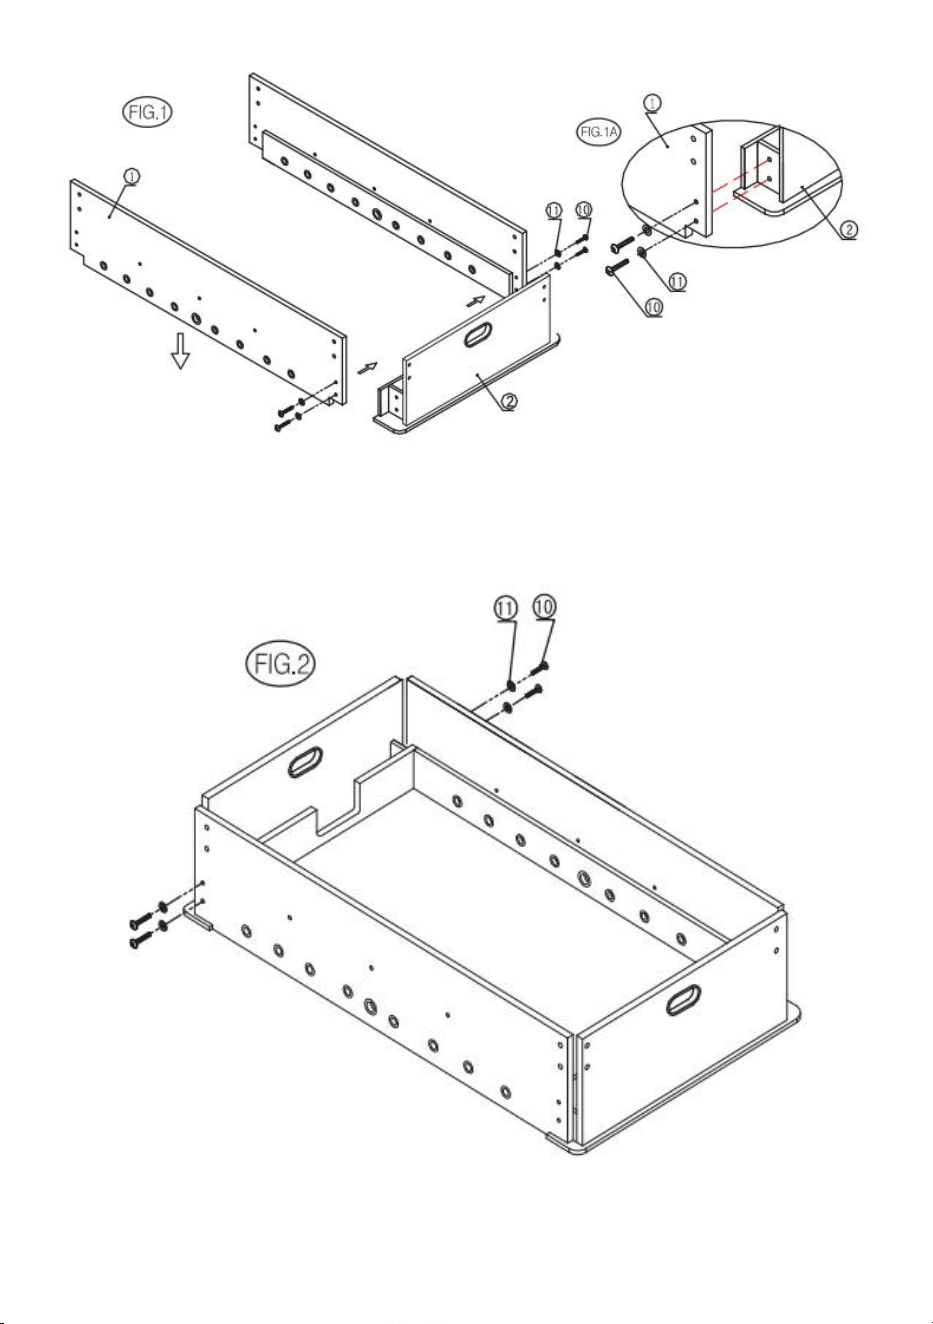
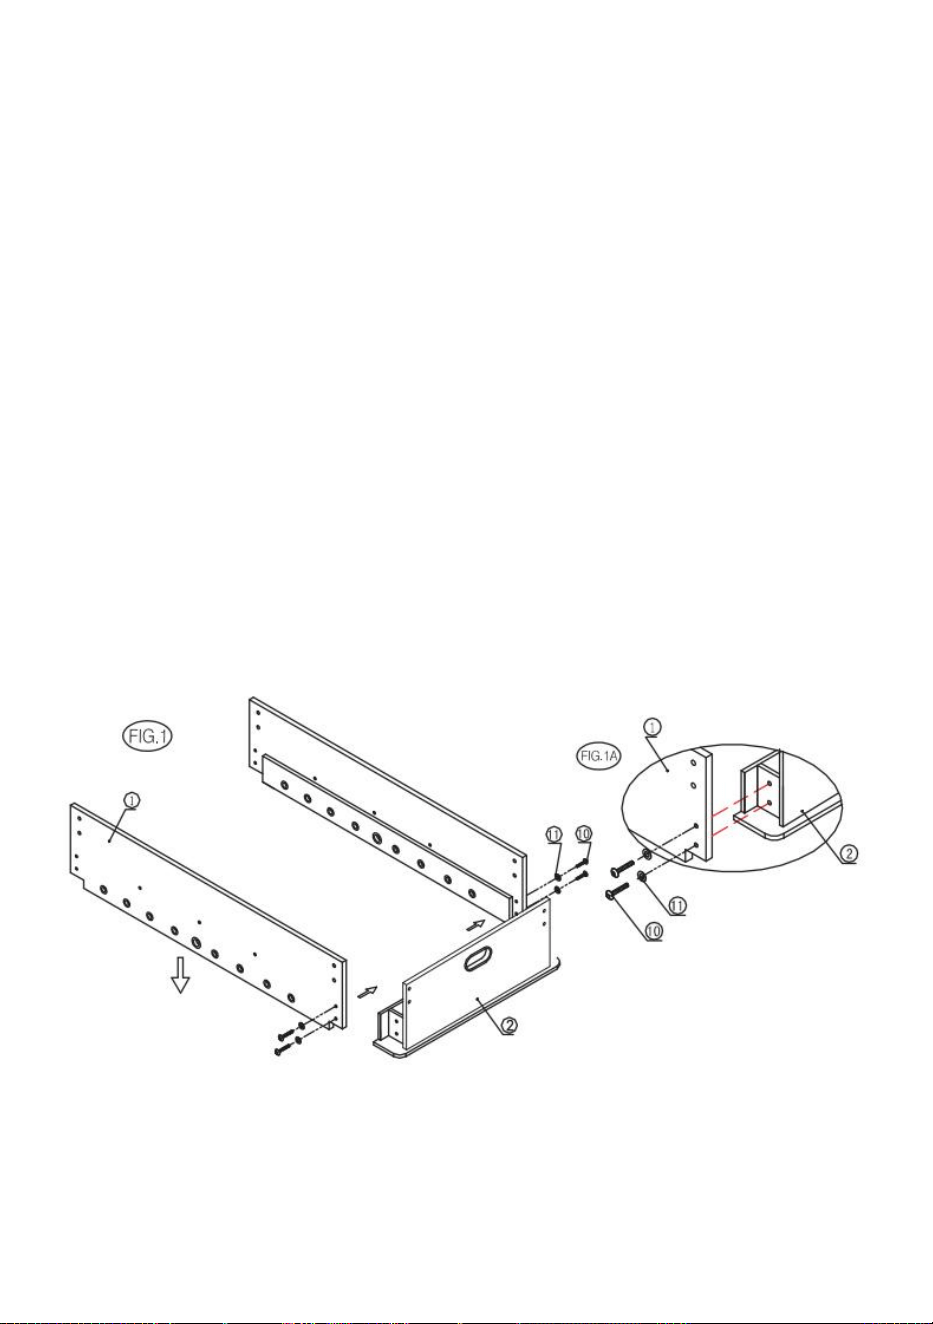
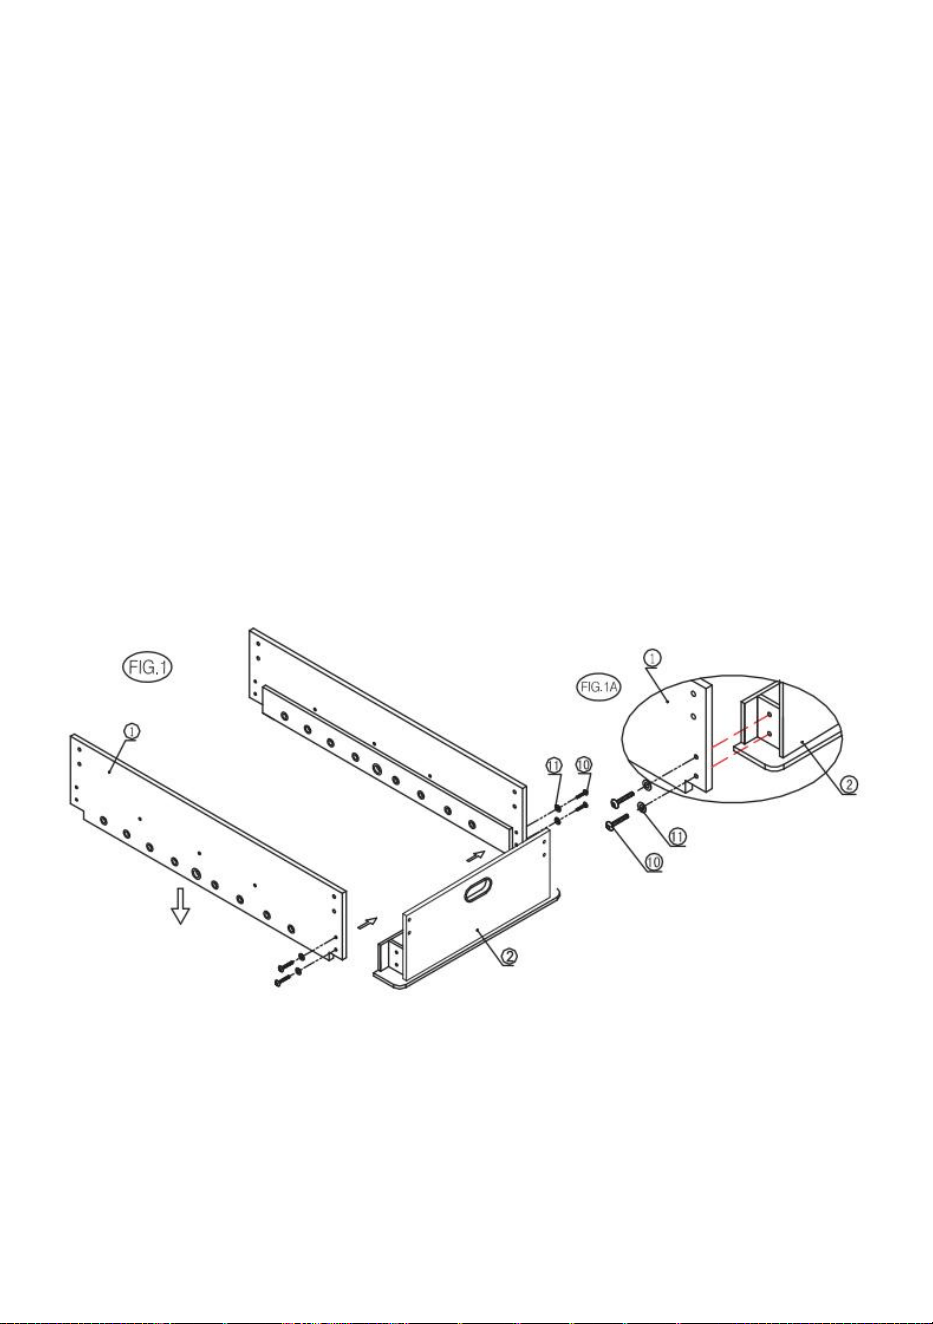
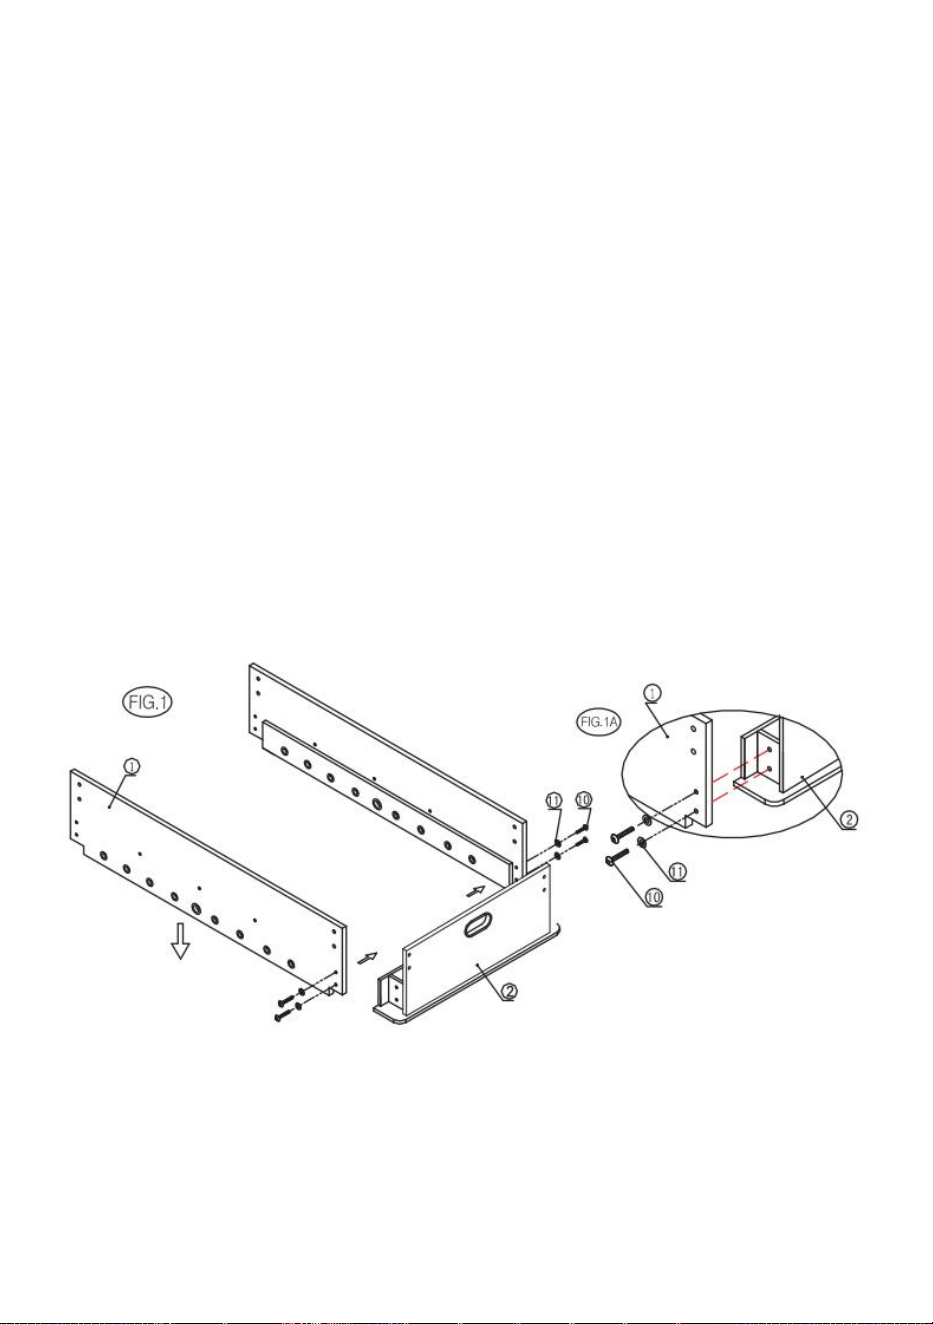
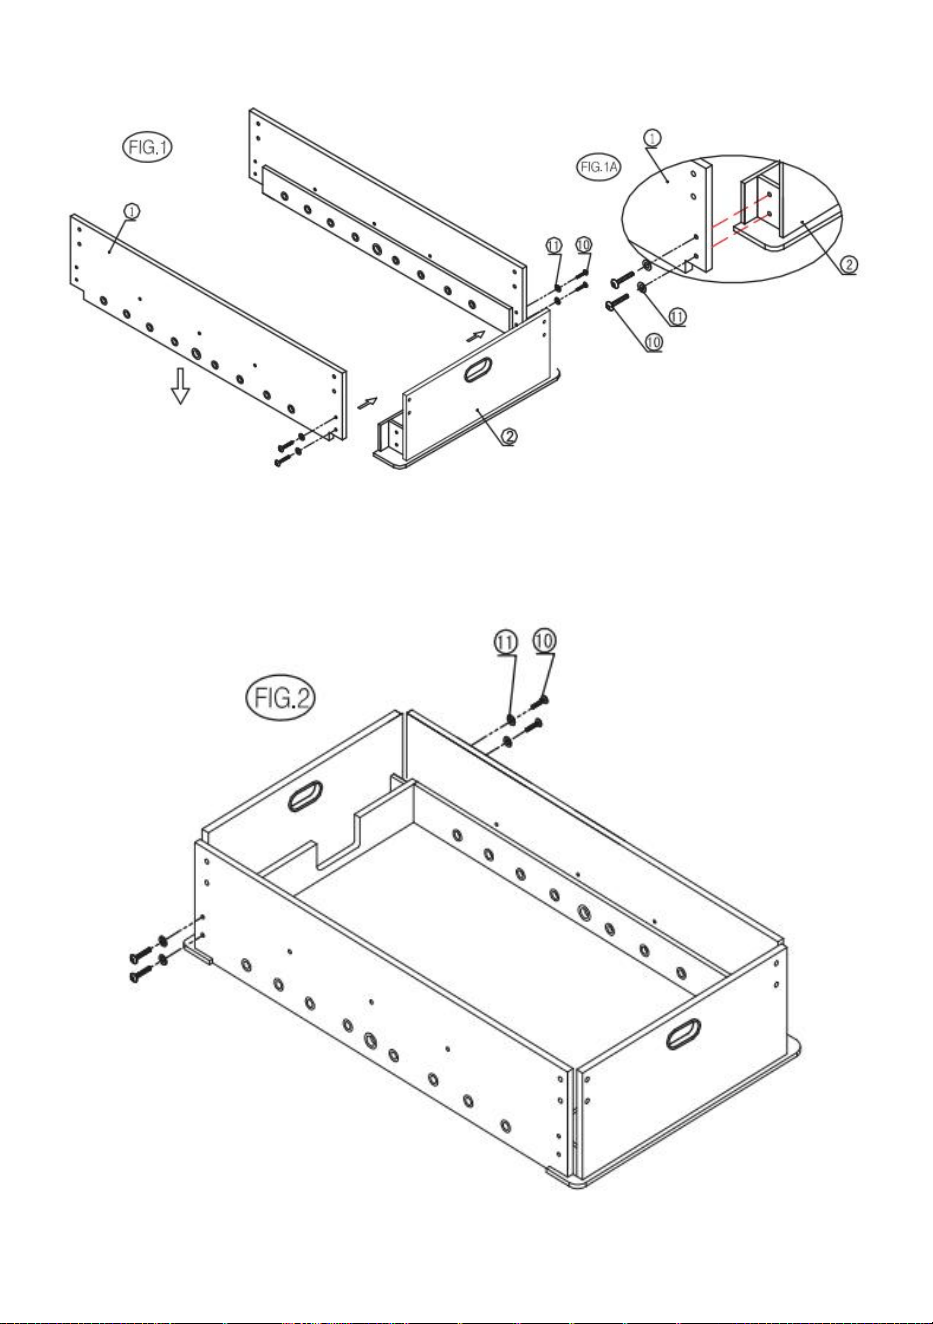
STEP3:Attach one goal end board (#2)between the side board (#1)using
two bolts (#10)and two washers (#11)per side as shown in FIG 1 and 1A.
NOTE:Do not tighten the screws too fast now,in a later step you will have
to do so.
5
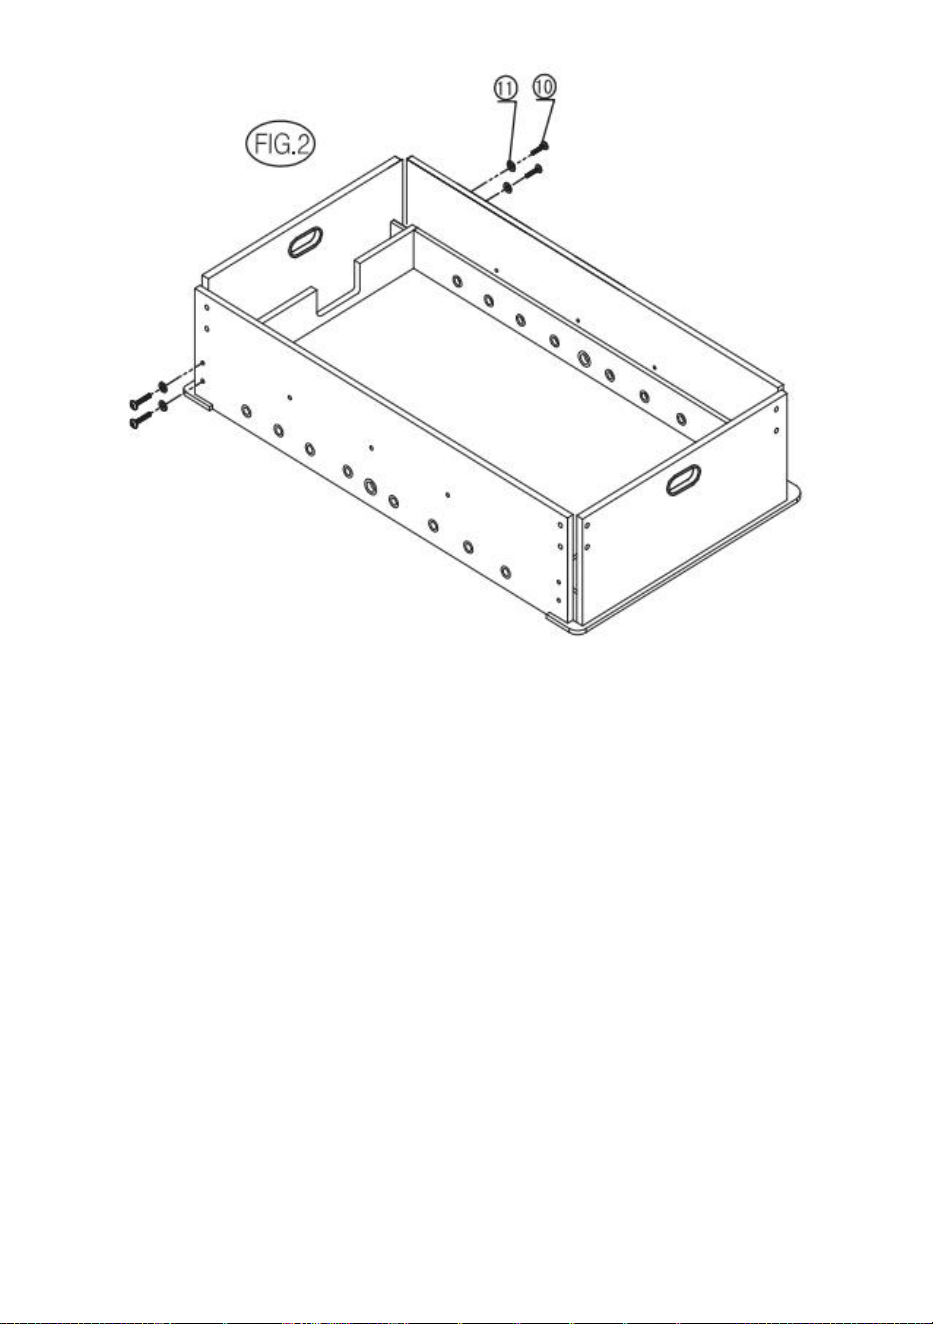
STEP4:Repeat the step to attach the other goal end board (#2)to side
board (#1),as shown in FIG 2.
NOTE:Be sure that two side boards (#1)and goal end boards (#2)are
square.Now tighten all the connections from step 3 and 4.
6
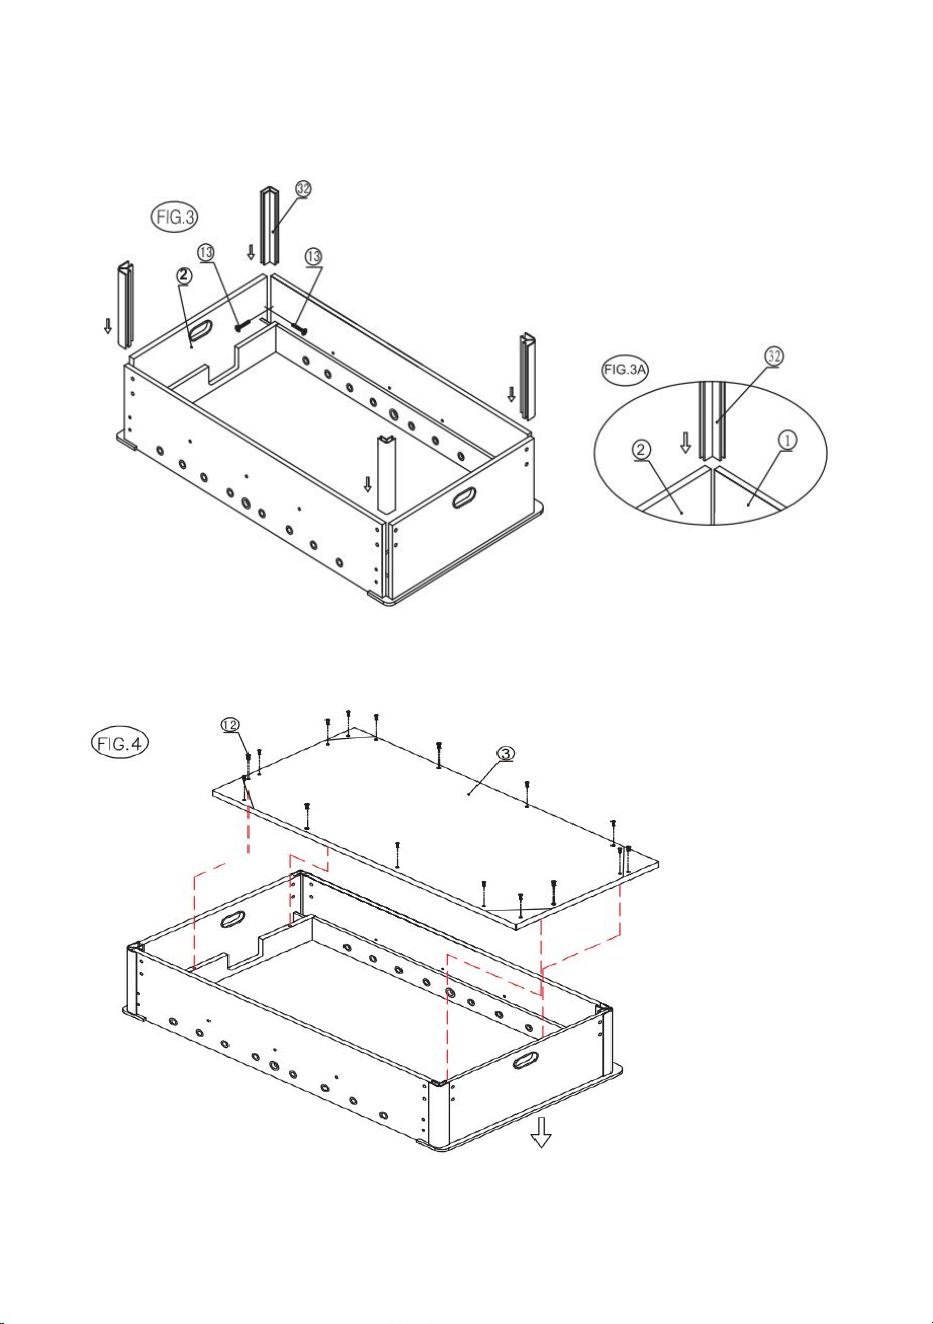
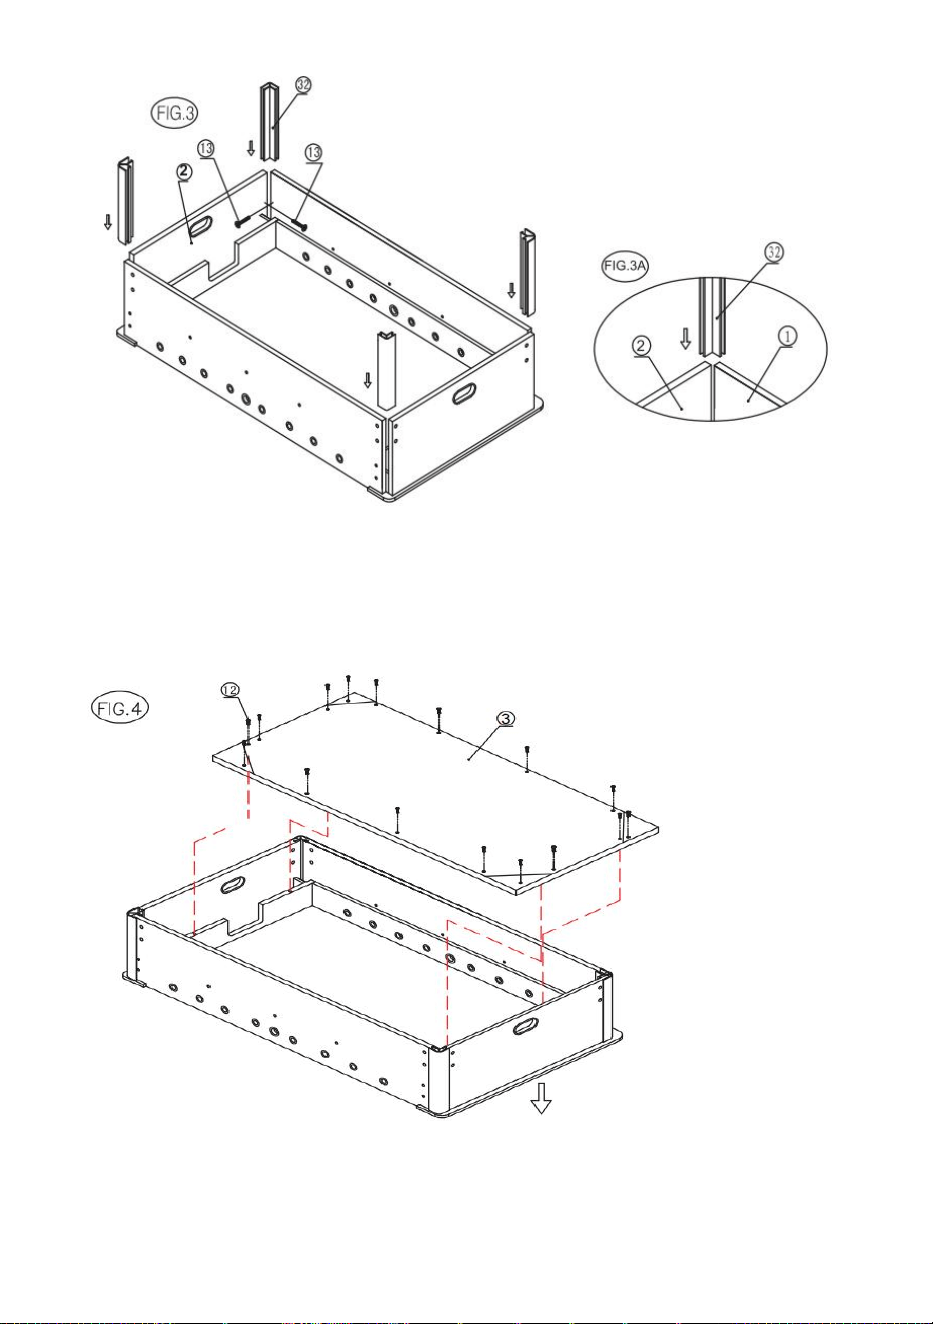
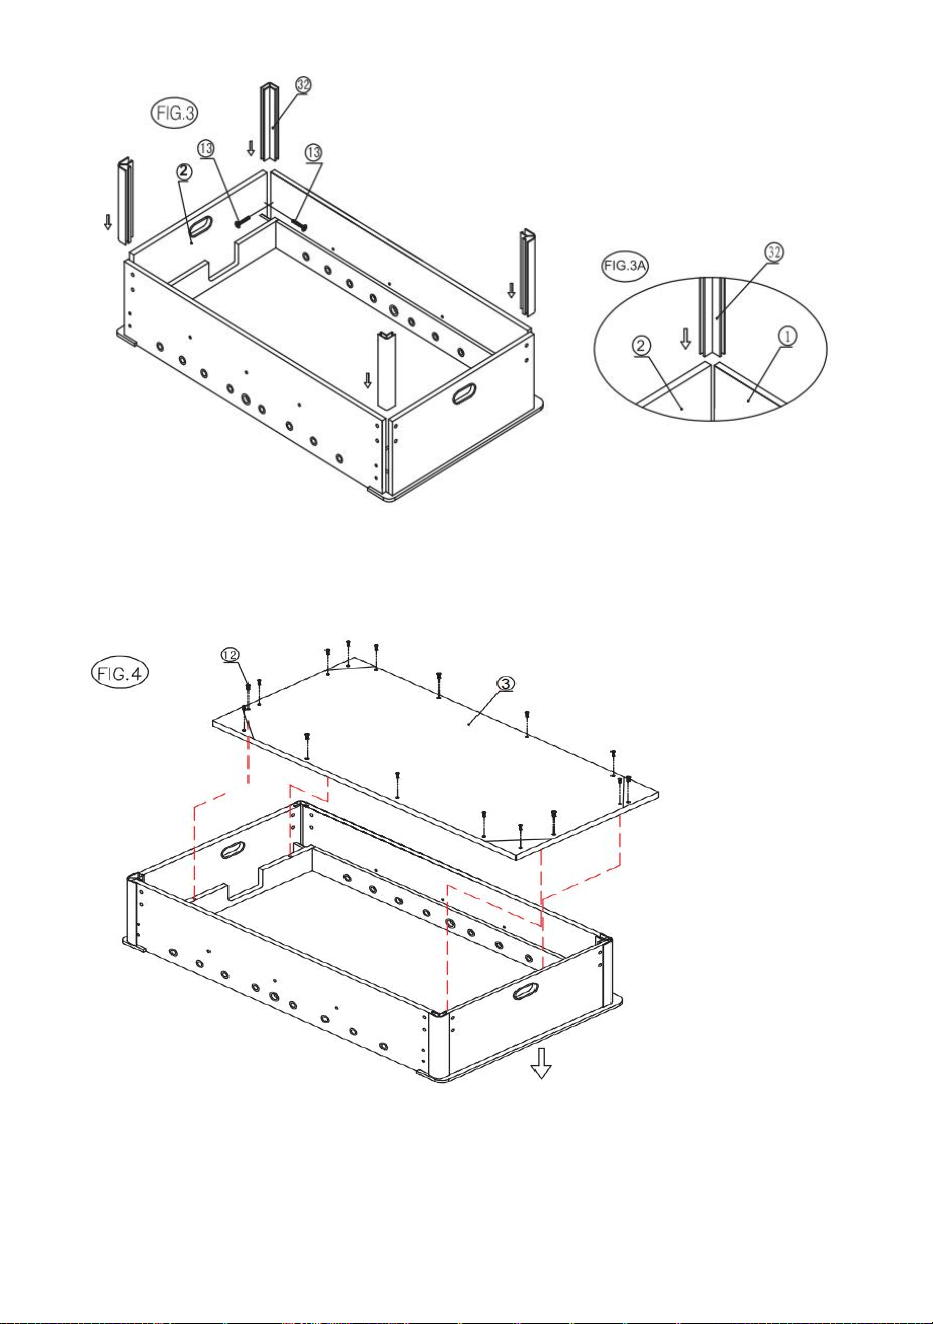
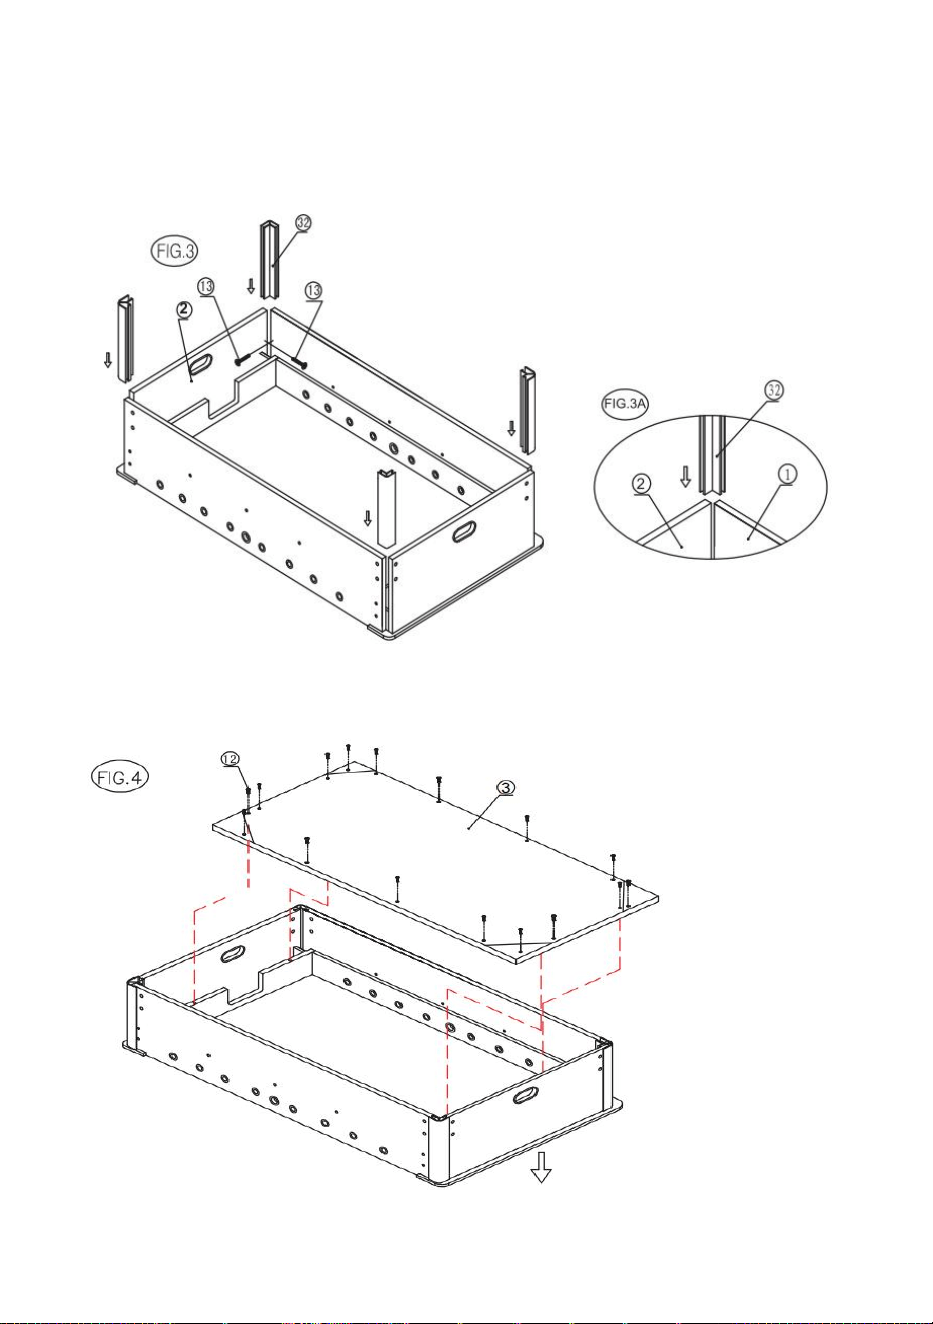
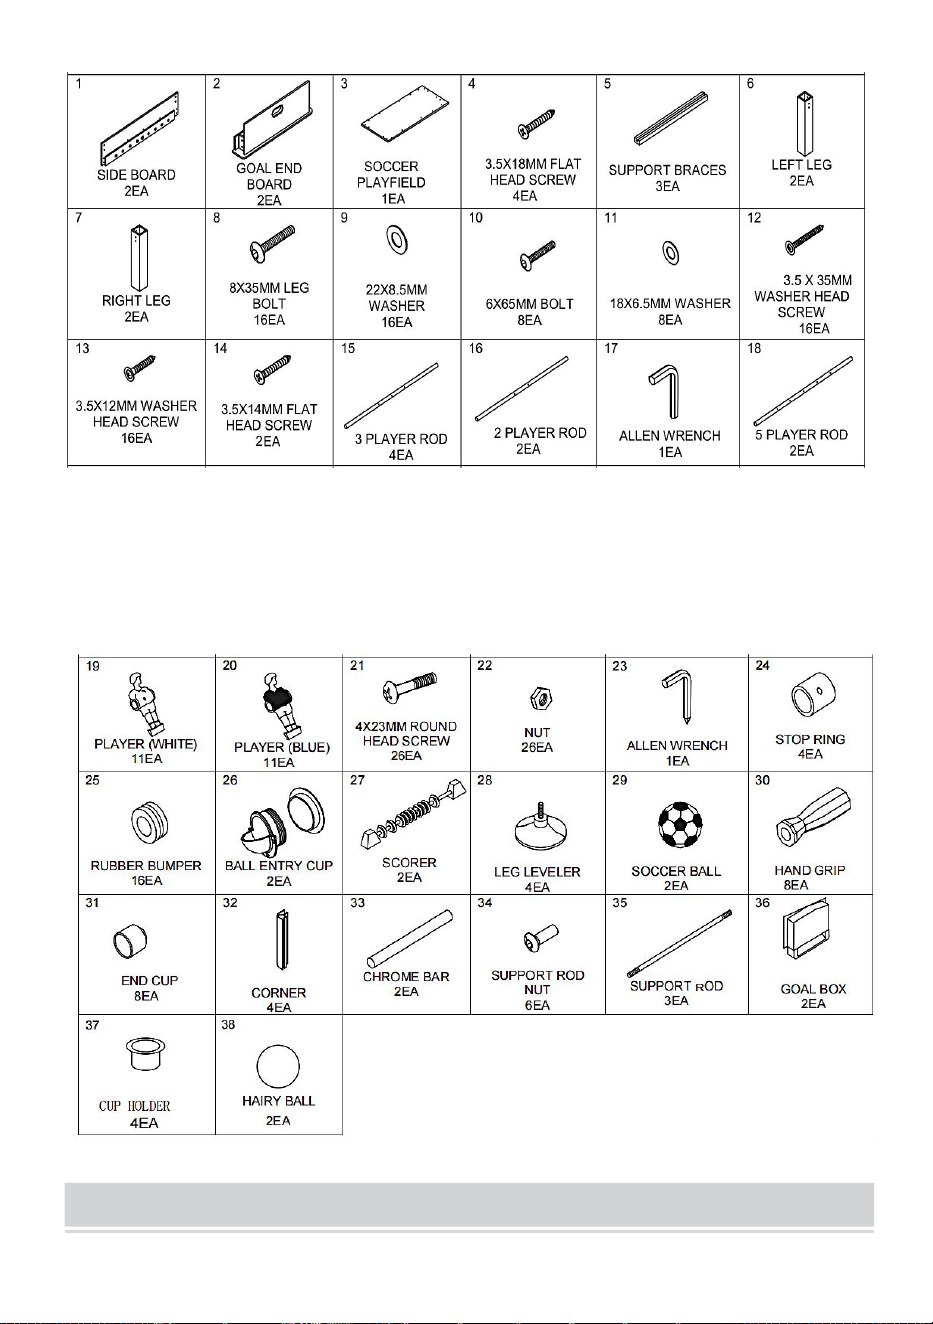
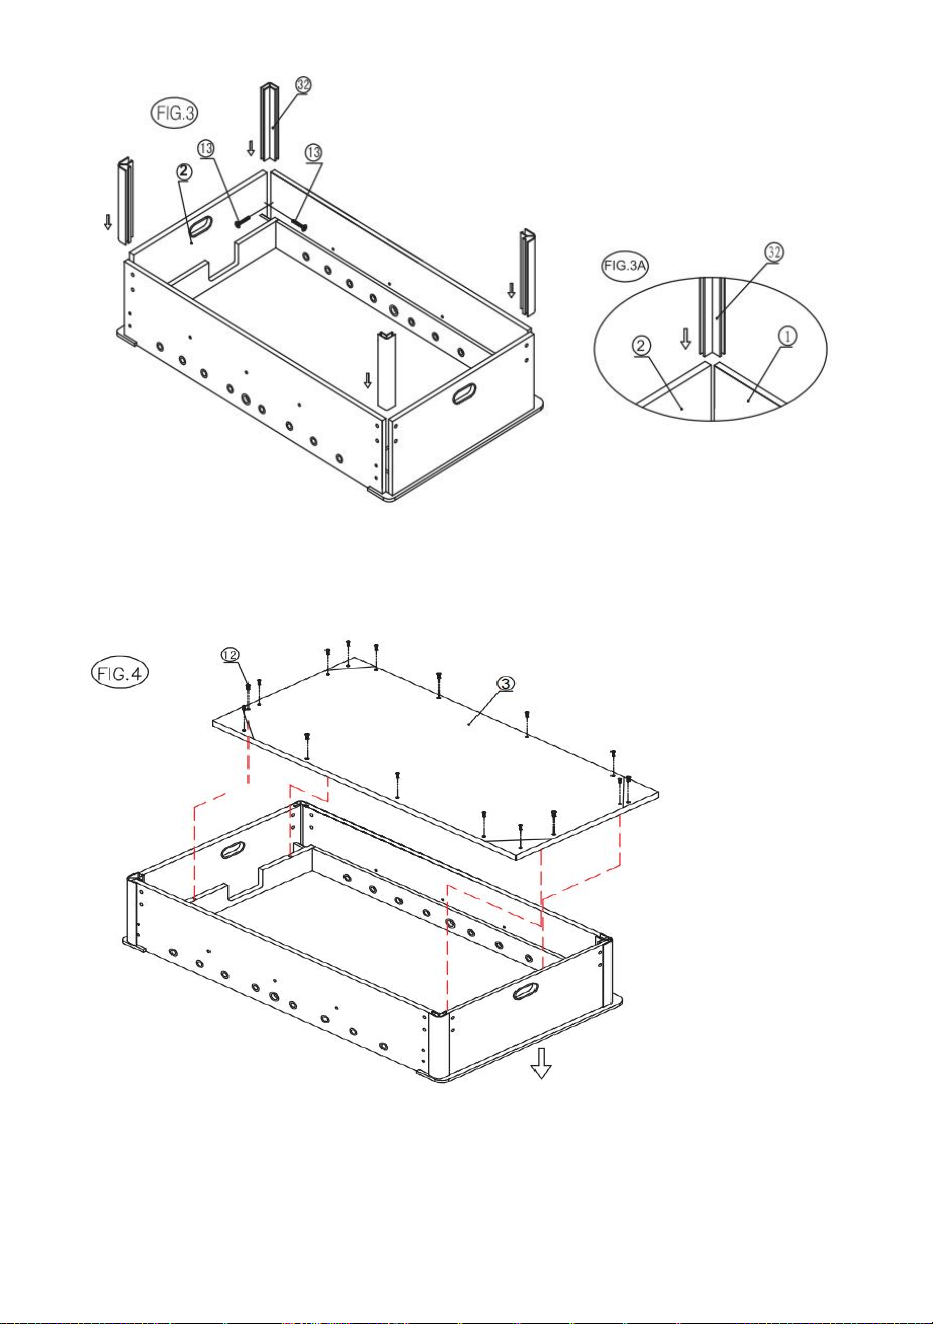
STEP5:Slide the four comers(#32)into the groove of the side
Board(#1)and end Board (#2),Fix the Corners (#32)to the Boards by using
two Screws (#13)per Corner as shown in FIG 3A.
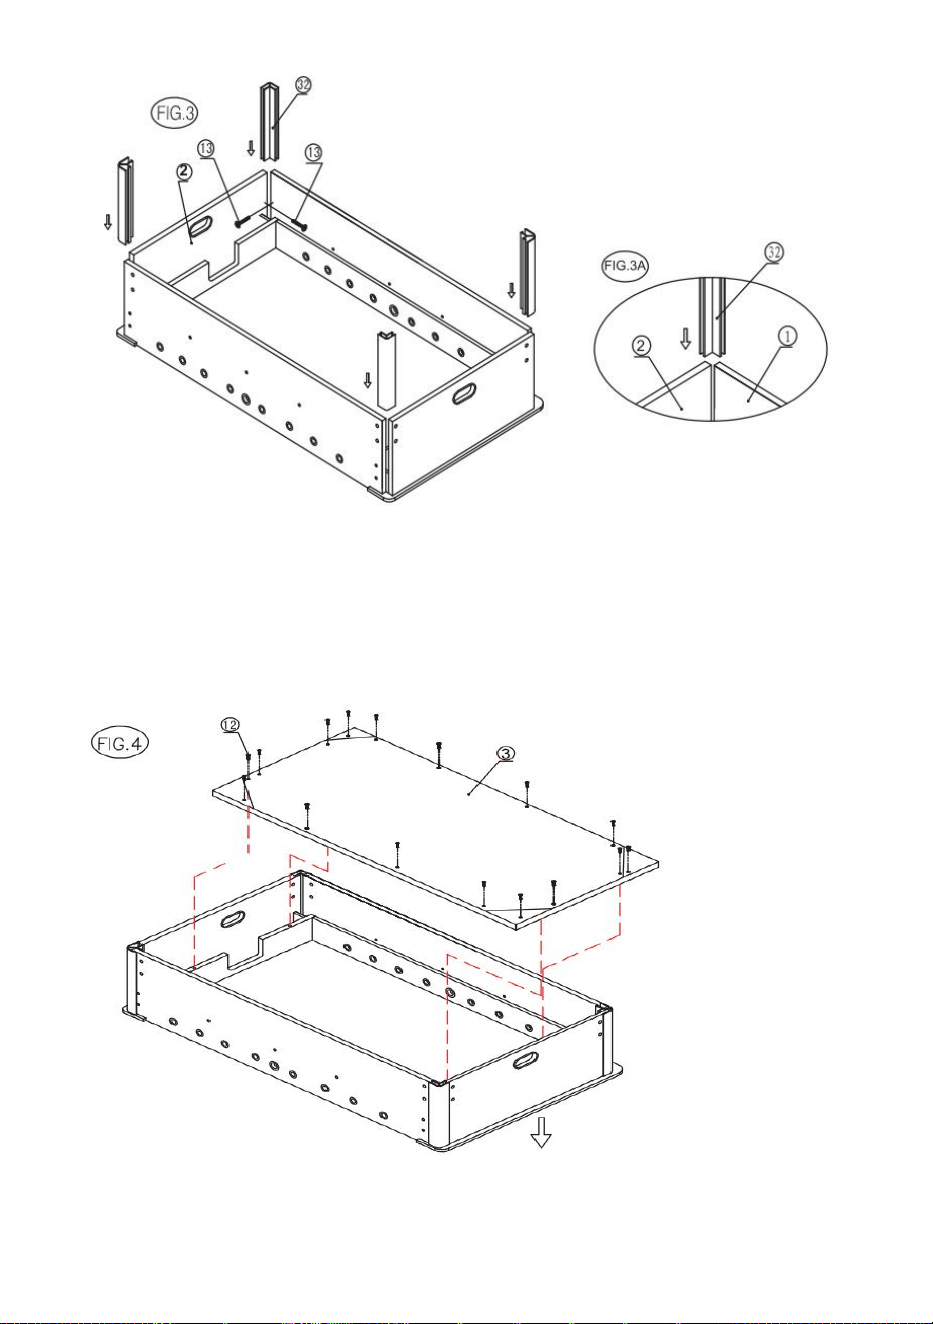
STEP6:Fix the soccer play field (#3)on the Side Board(#1)and goal end
boards (#2)using Sixteen washer head screws(#12)as shown in FIG.4.
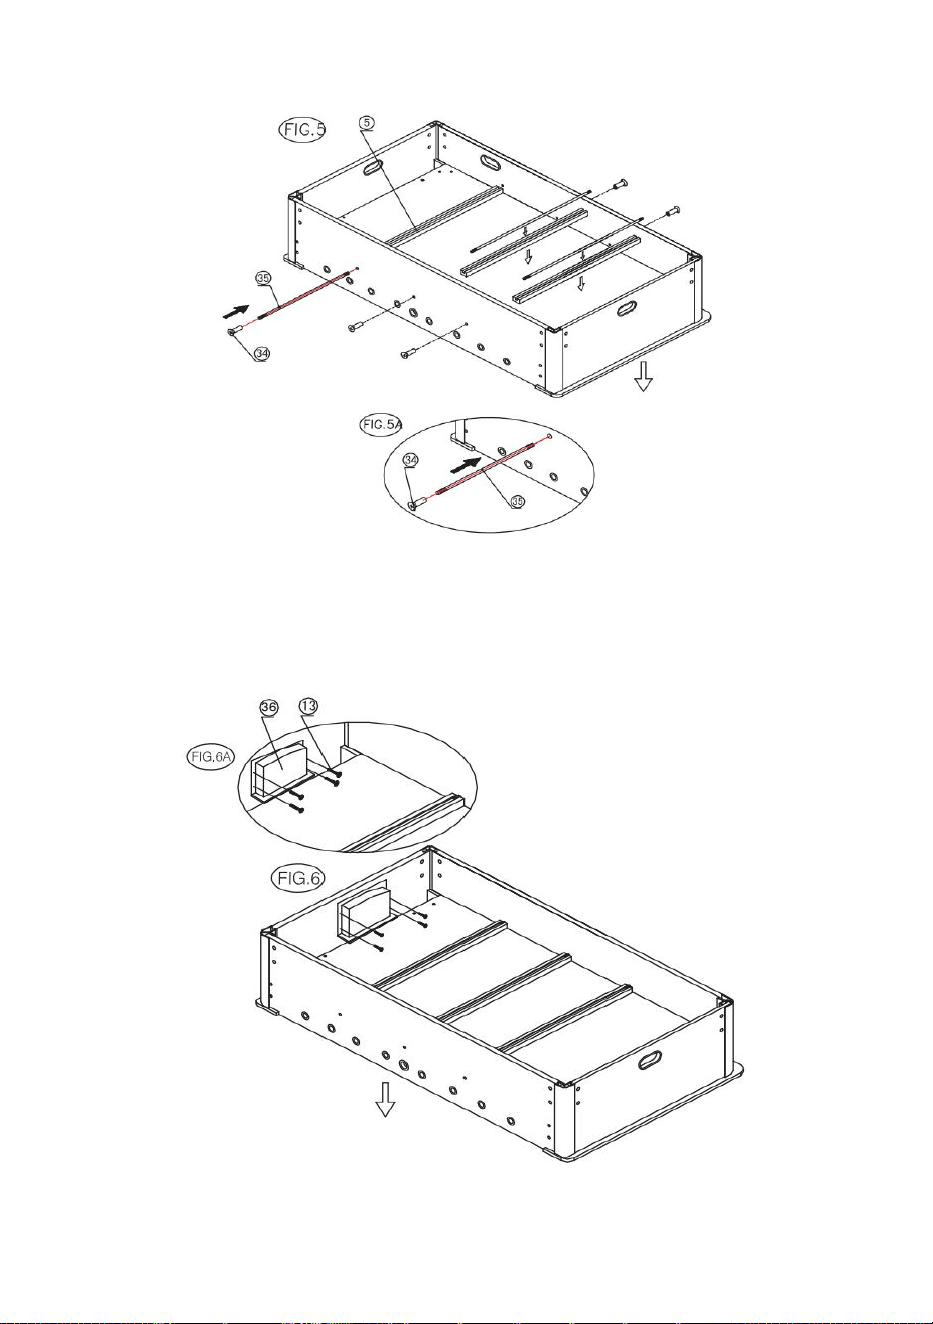
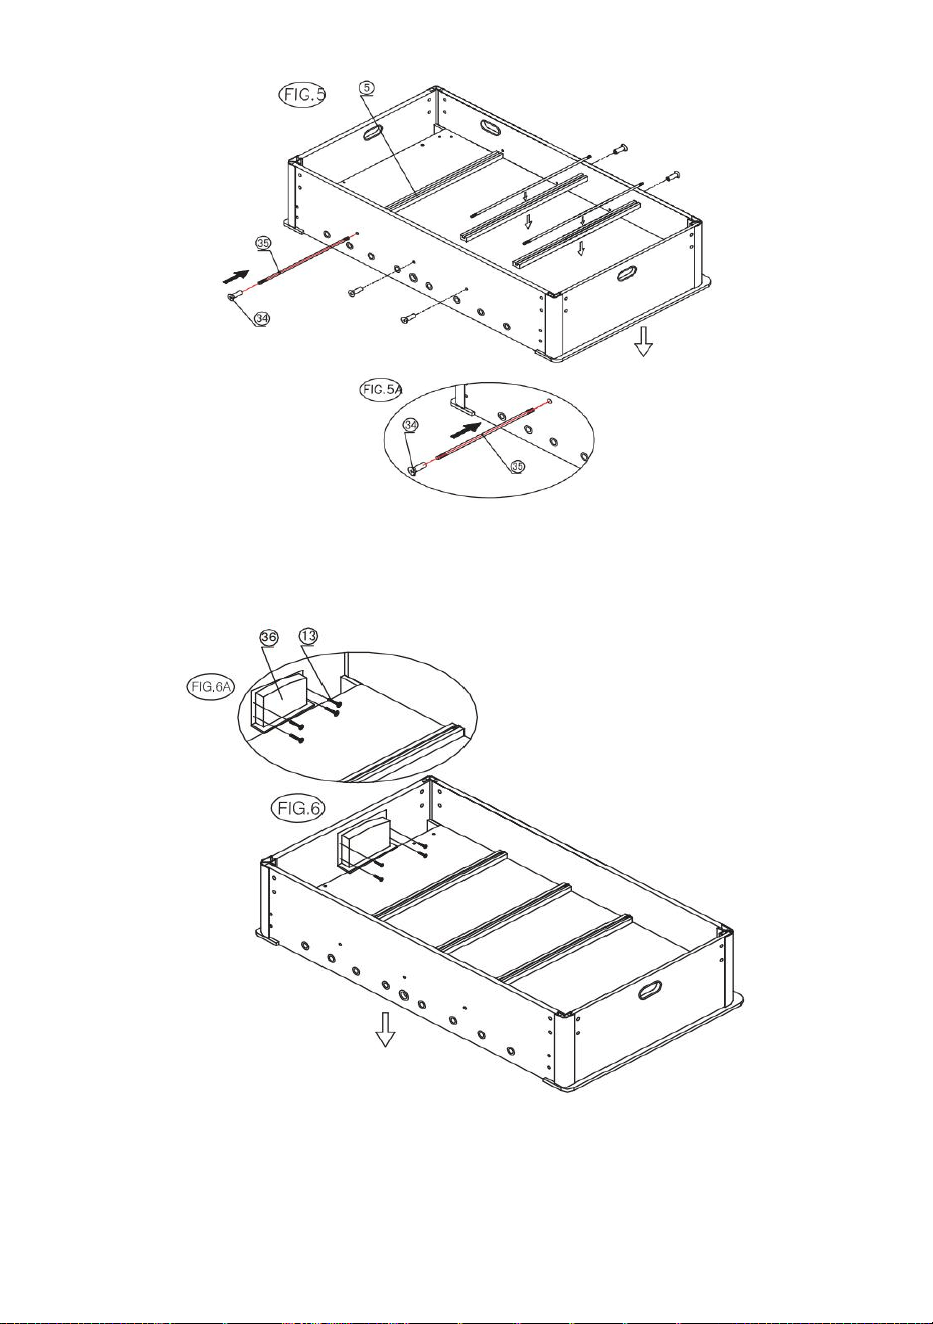
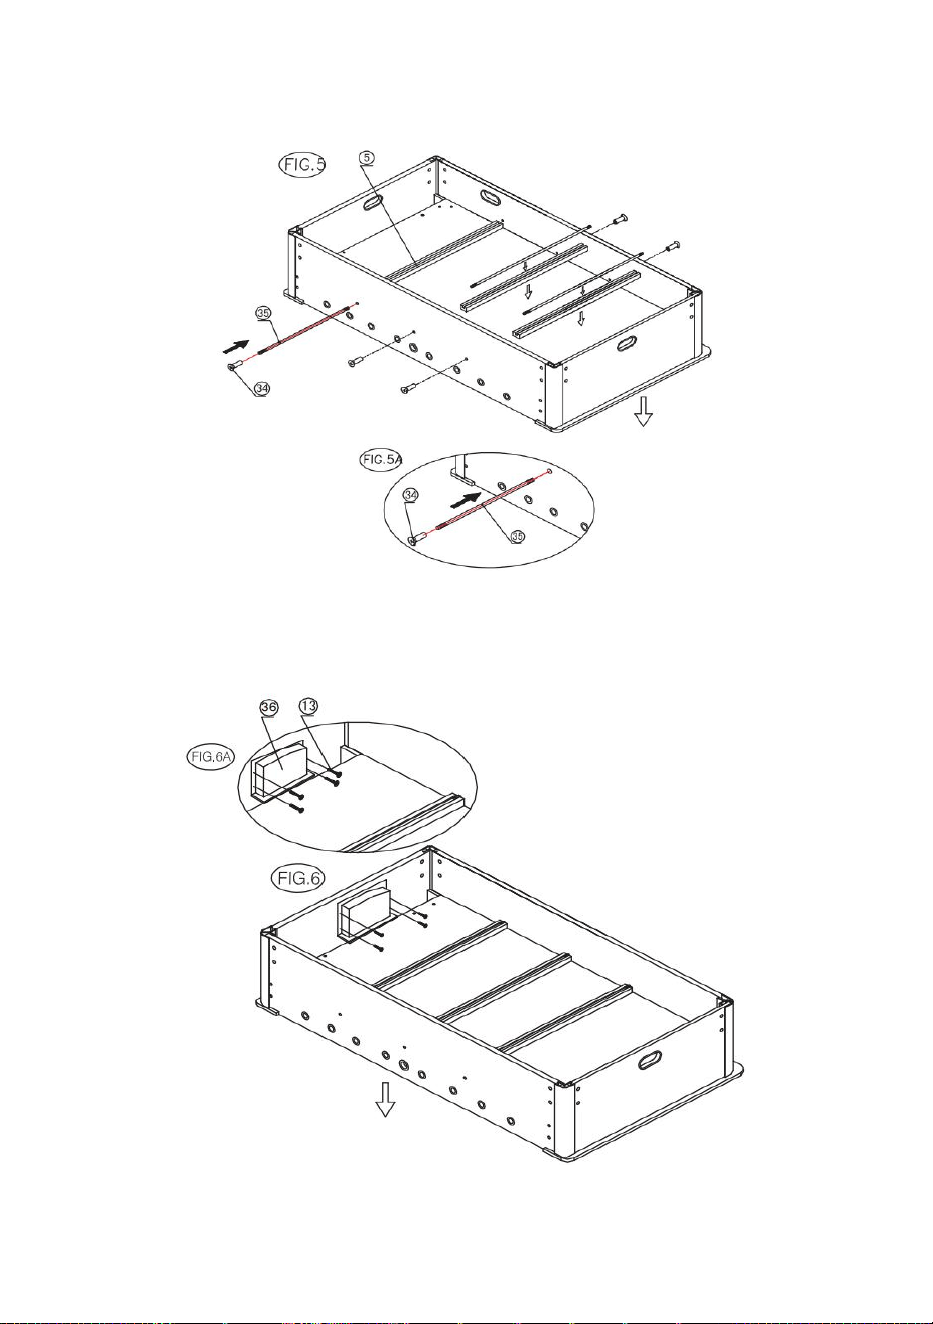
STEP7:Place the support braces (#5)on the playfield (#3)as shown in
FIG.5.Then place the support rods (#35)in the groove of the support
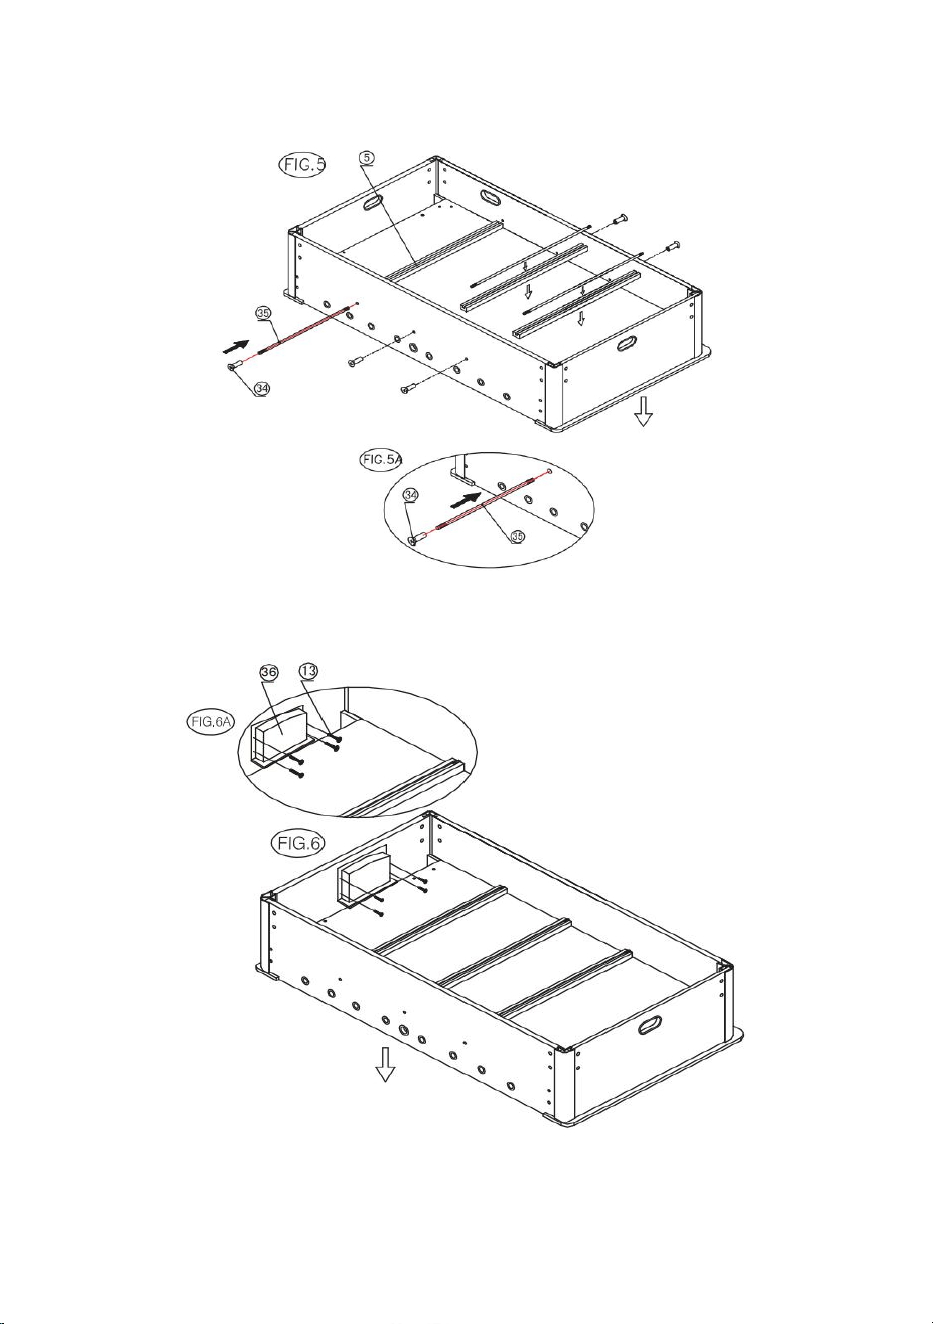
7
braces (#5),attach them using six of the support rod nuts (#34)as shown in
FIG 5 and 5A.
STEP8:Attach the two goal boxes (#36)to the End boards (#2)using four
washer head screws (#13)per goal box (#36)as shown in FIG.6A.
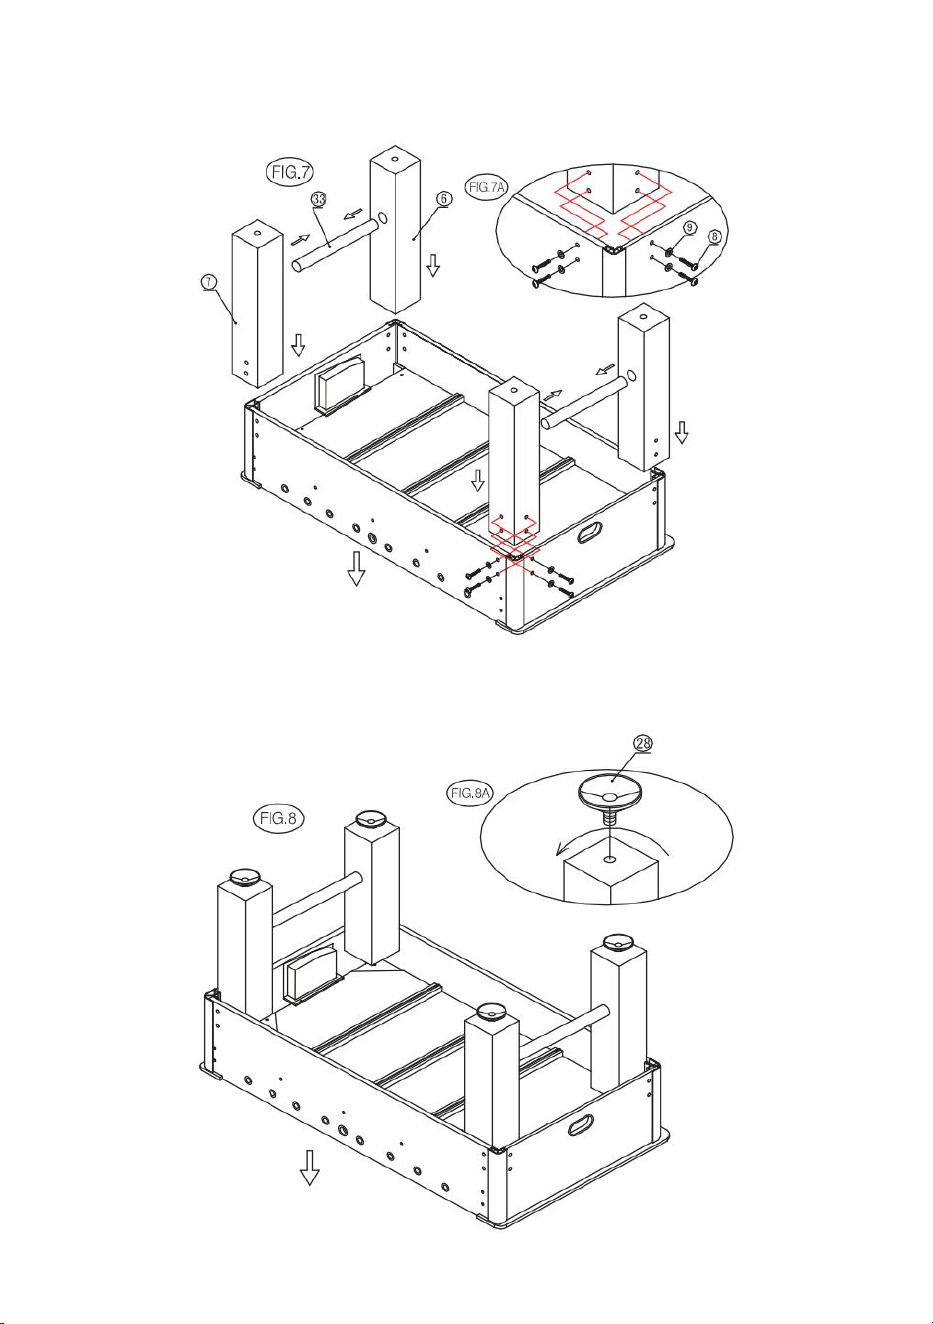
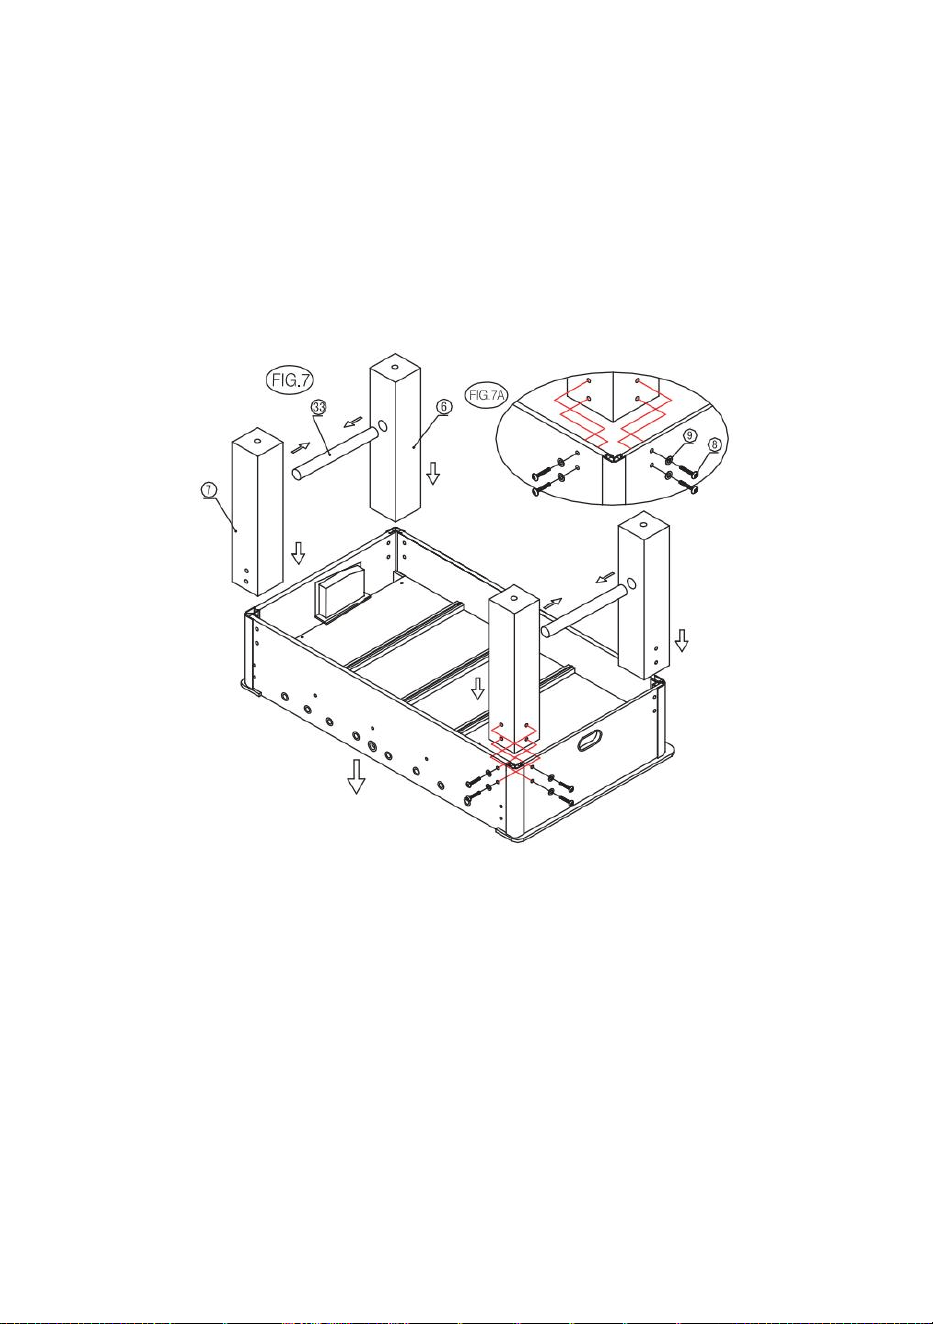
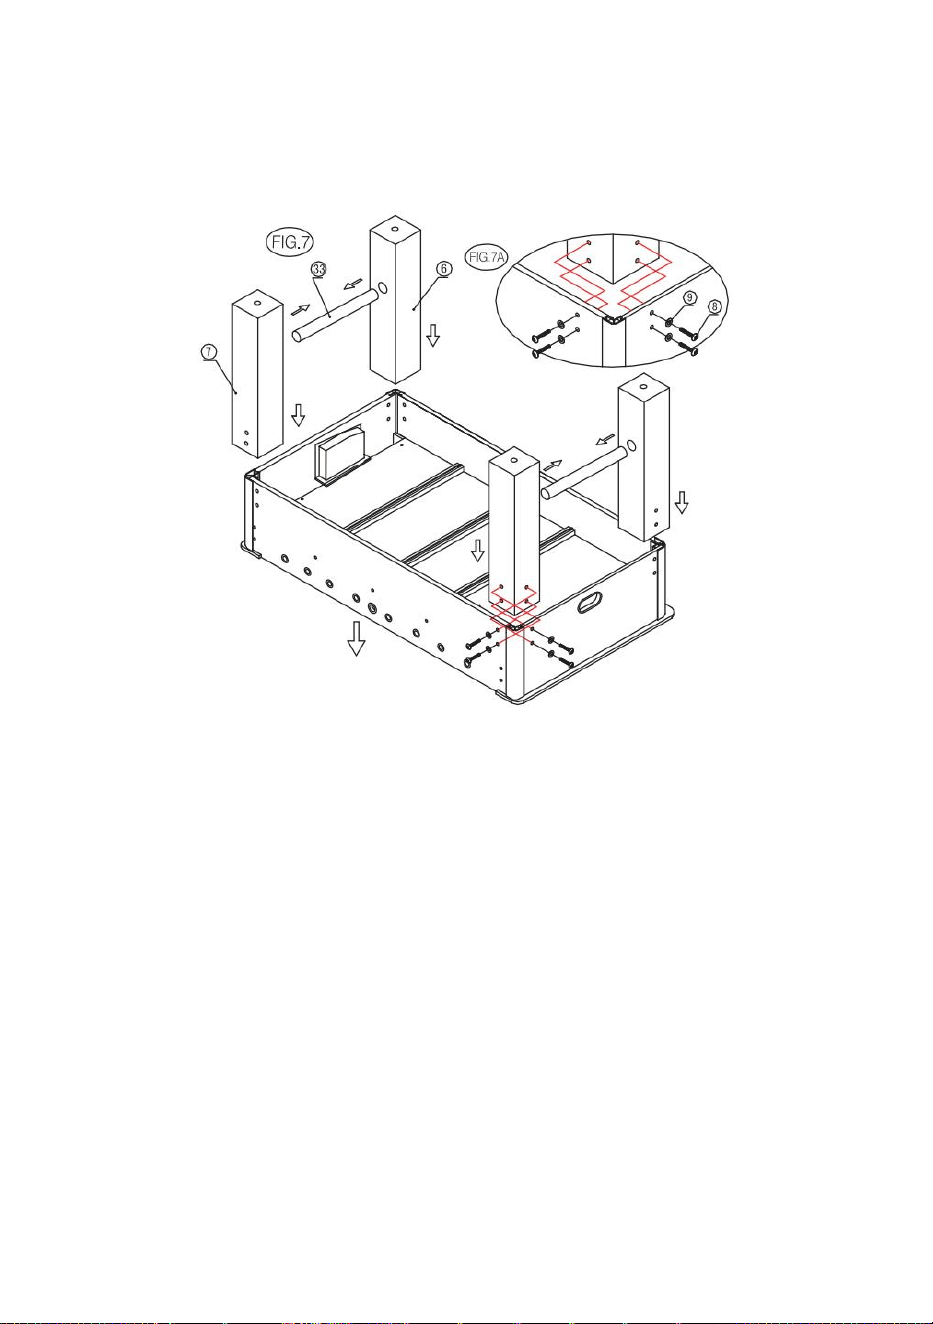
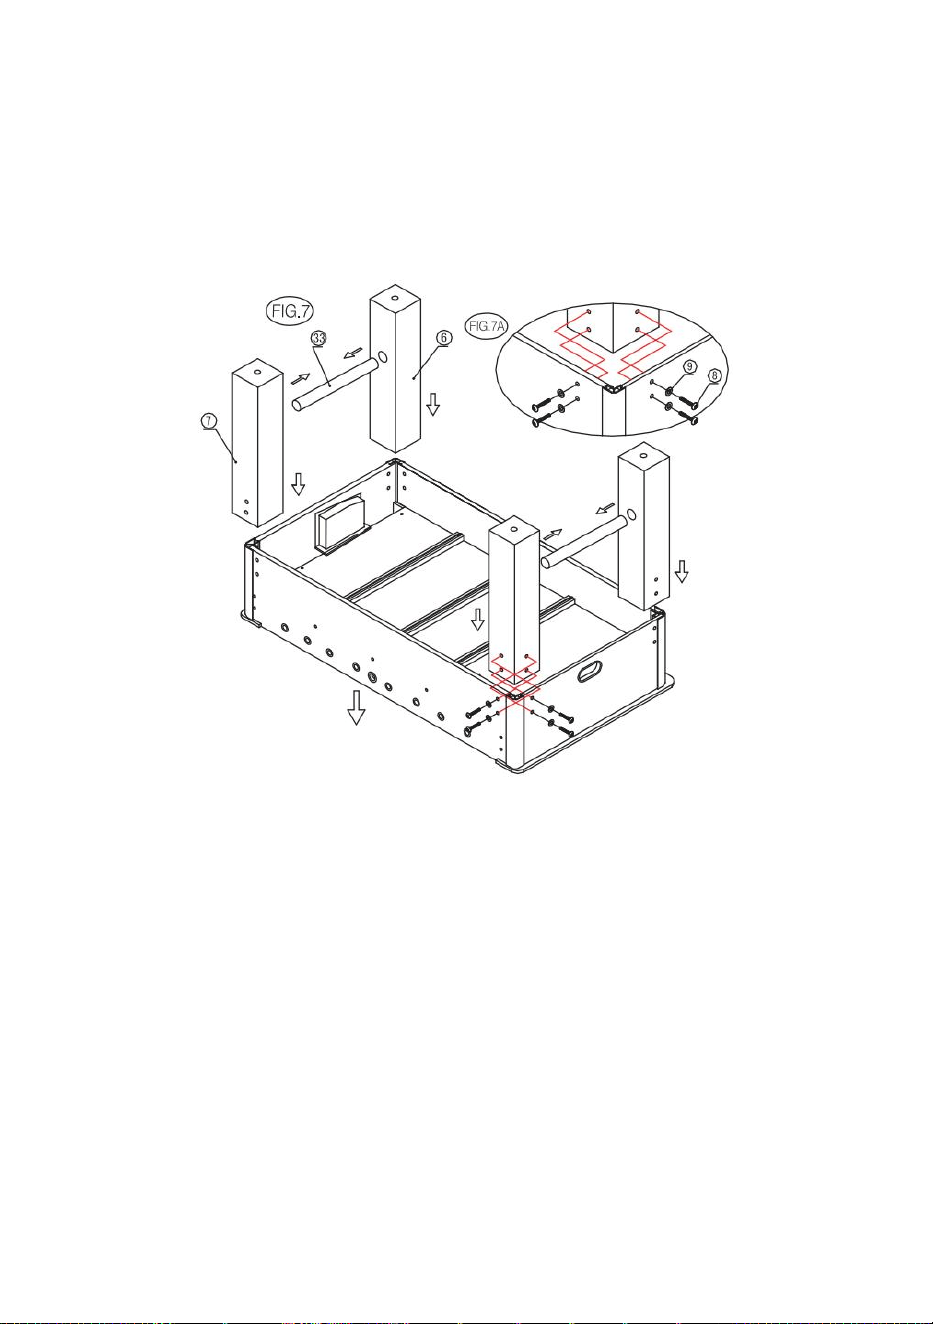
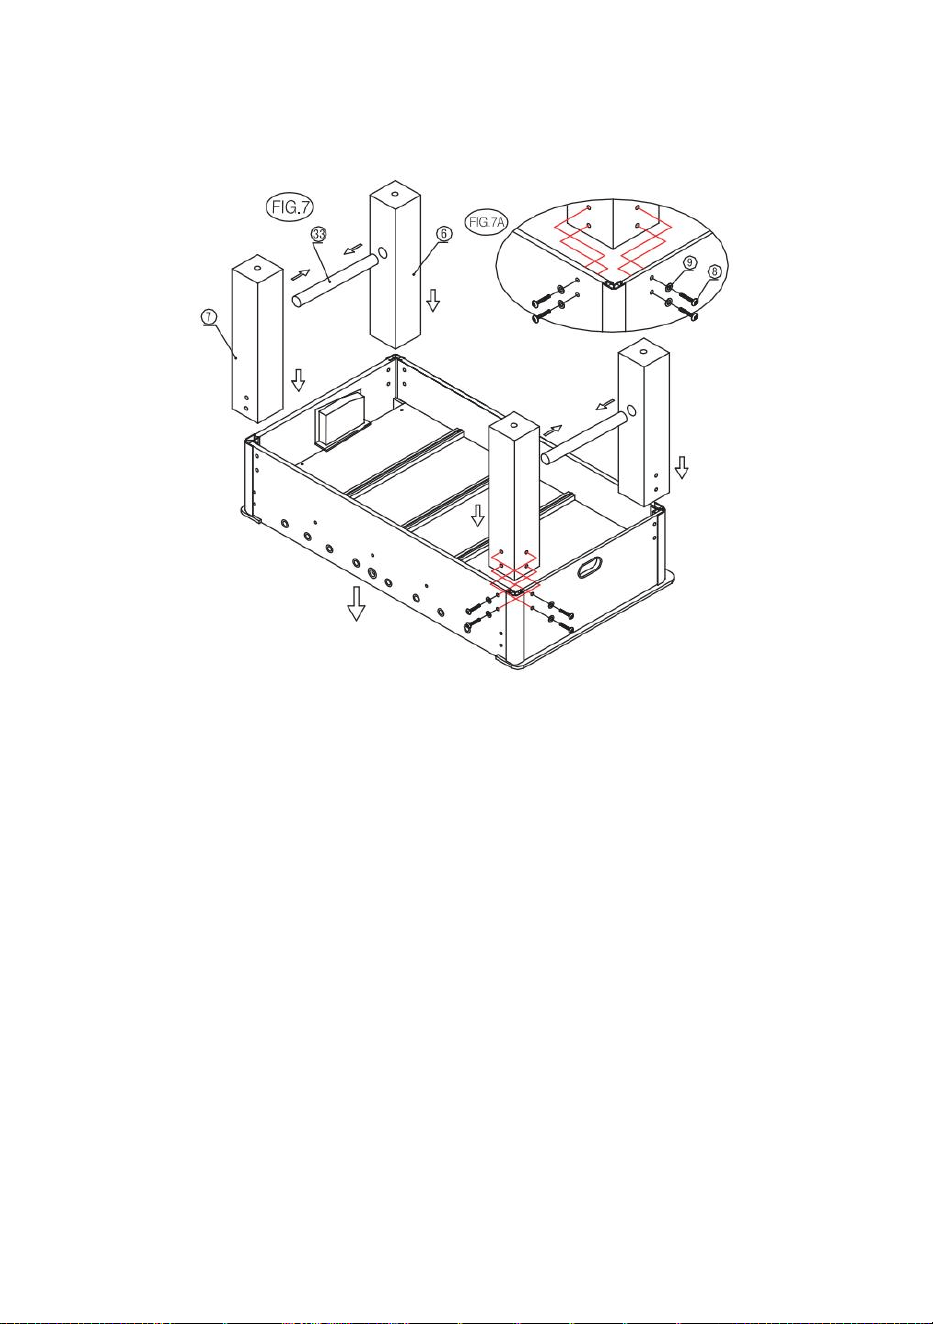
STEP9:Attach the left leg (#6)and the right leg (#7)with the chrome bar
(#33)between them to the football table using four leg bolts(#8)and four
washers (#9)per leg as shown in FIG 7and 7A.
8
NOTE:If you are having trouble inserting the leg bolts (#8),you may have to
go back to step3 and loosen the bolts (#10)a little.
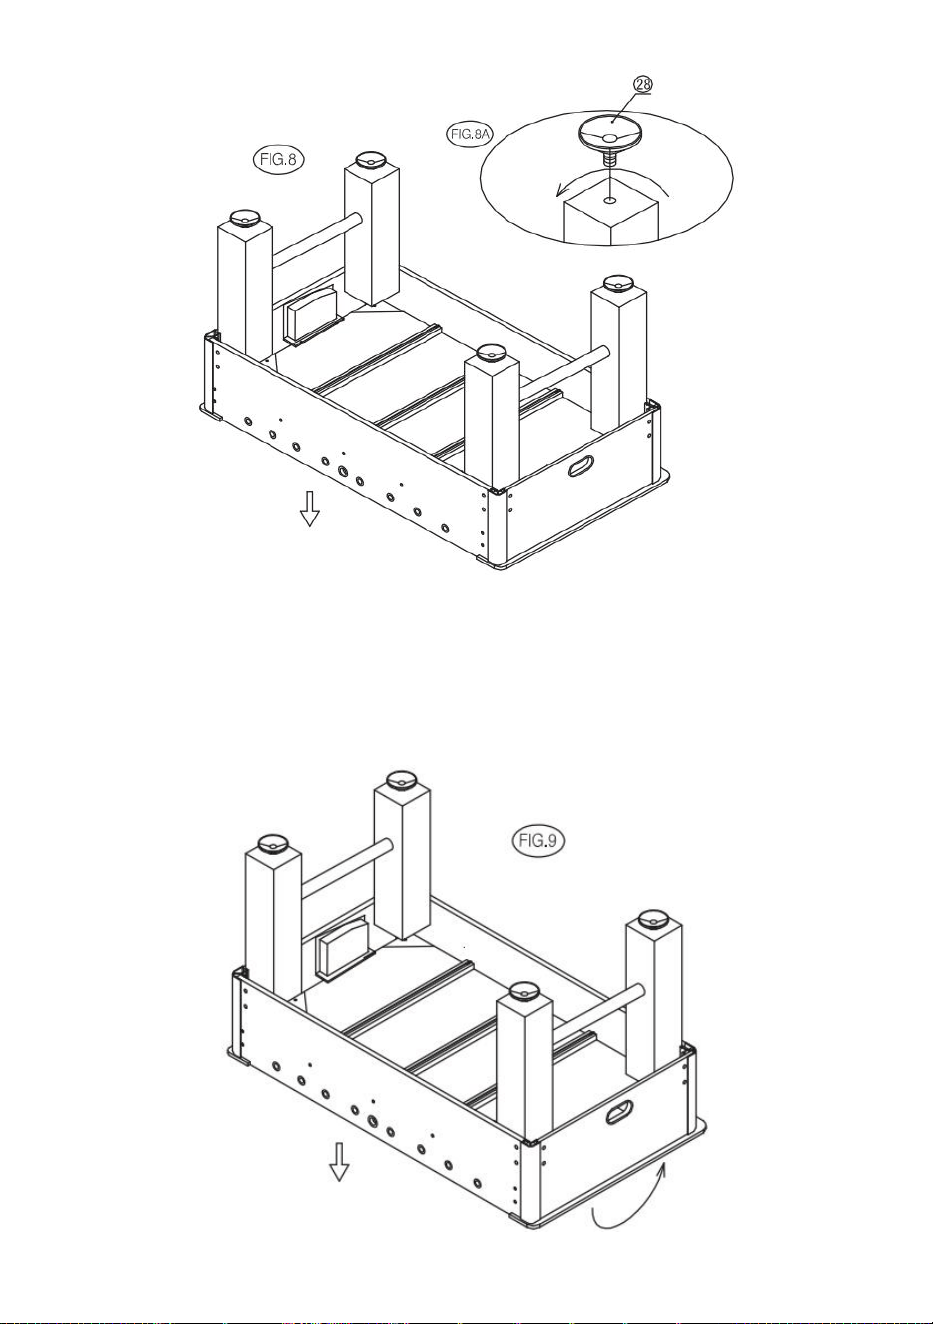
STEP10:Locate the leg levelers (#28)and screw one into each leg as
shown in FIG 8 and 8A.
9
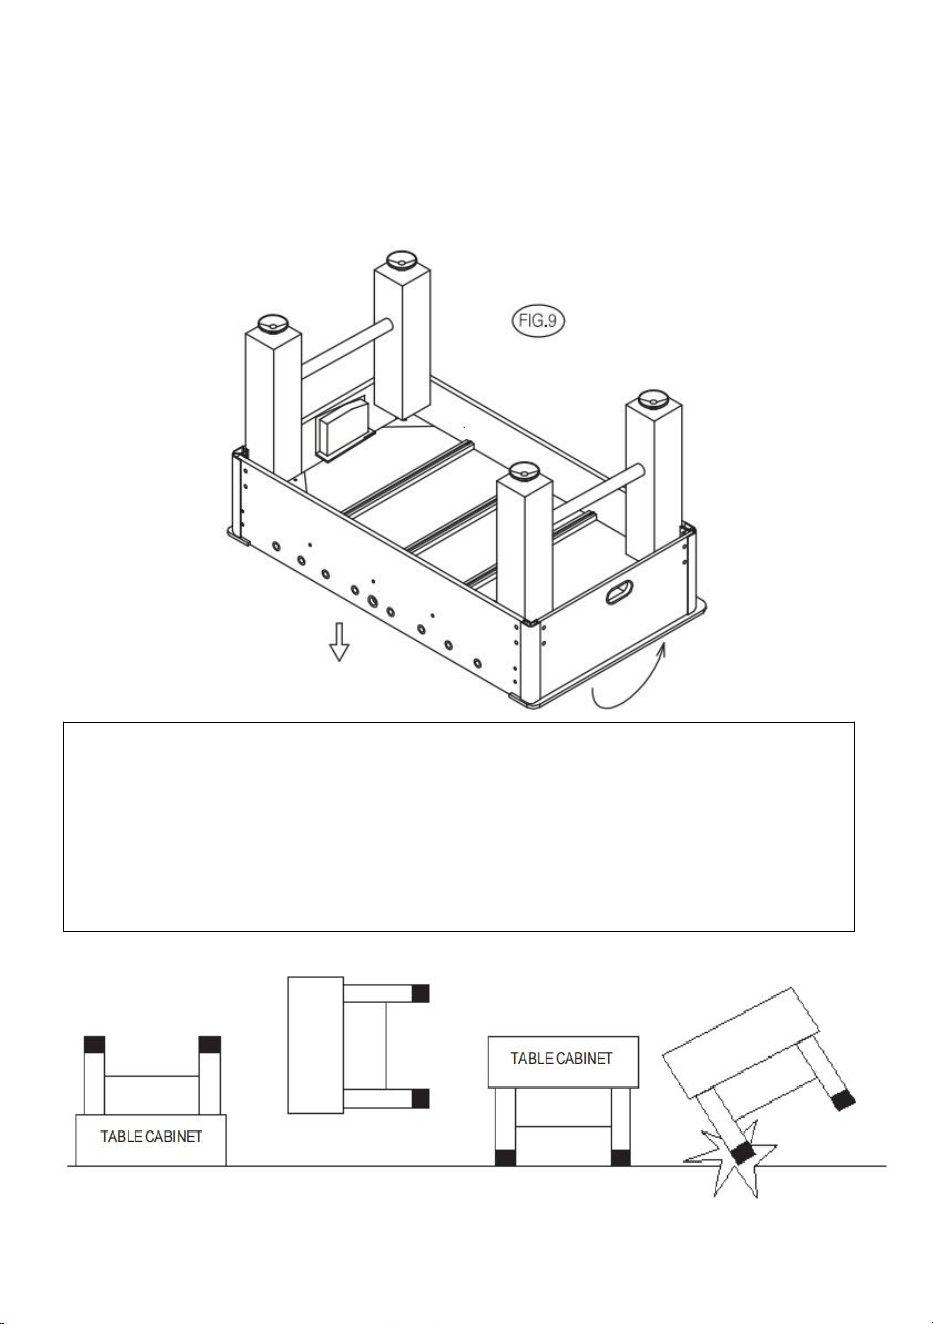
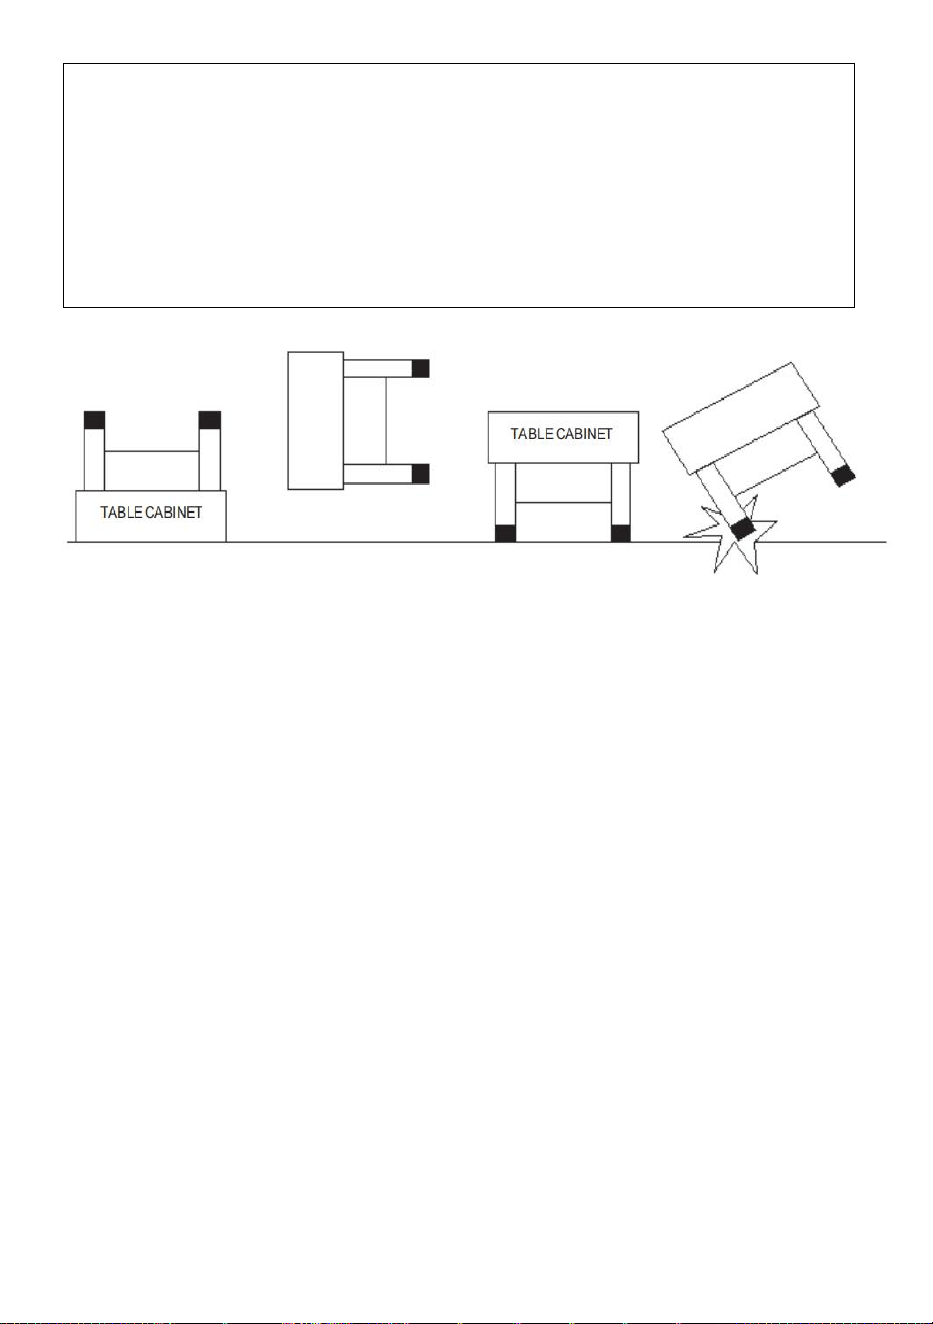
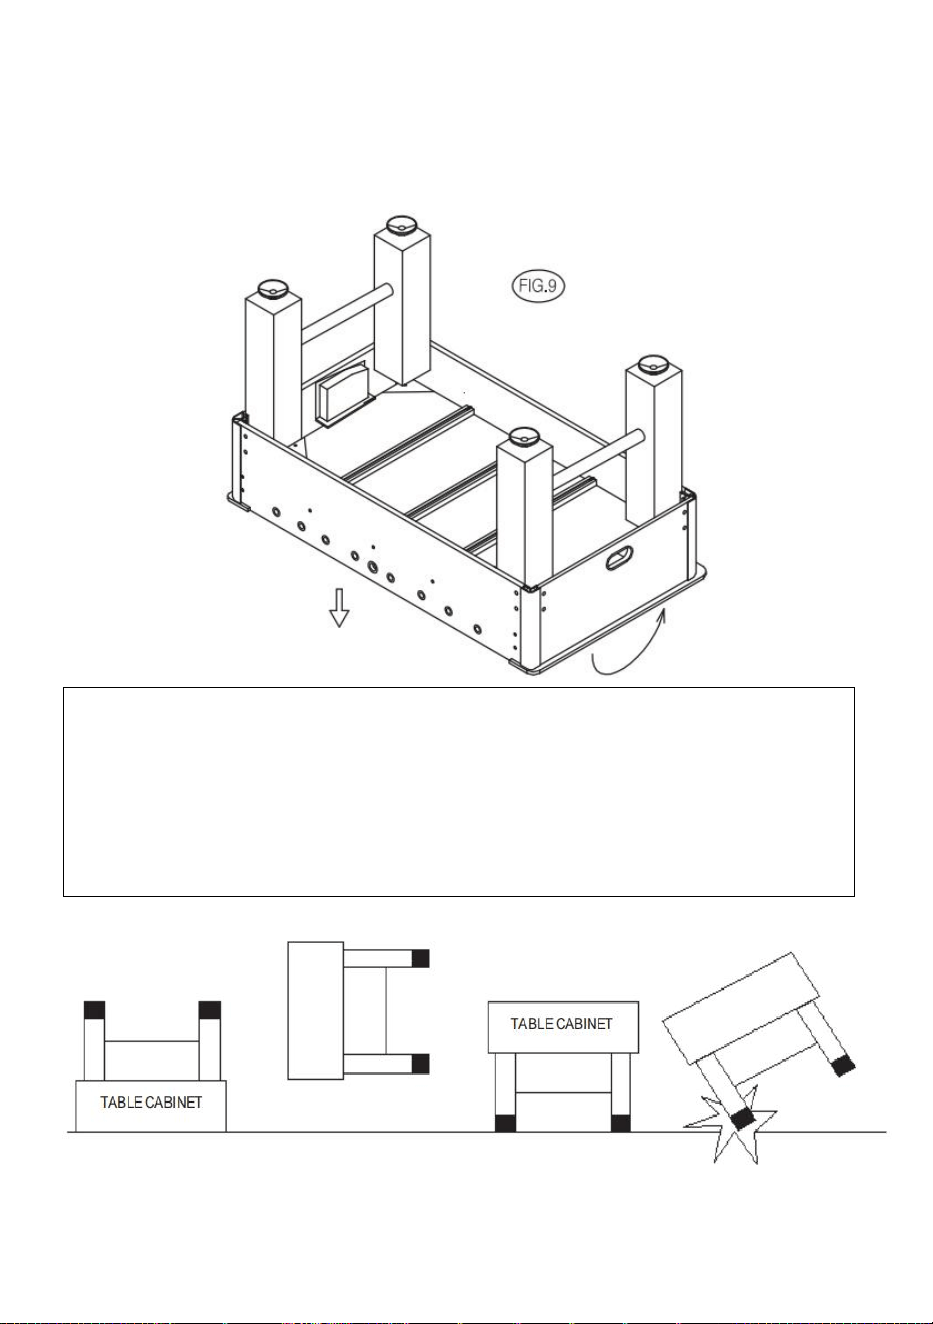
STEP11:Lift the table assembly from the floor with two strong adults,turn it
over,and set the table on its legs in the location where you will play the
game.
NOTE:Do not hold the legs! You should pick up the table at the table
cabinet ! as shown in FIG 9.
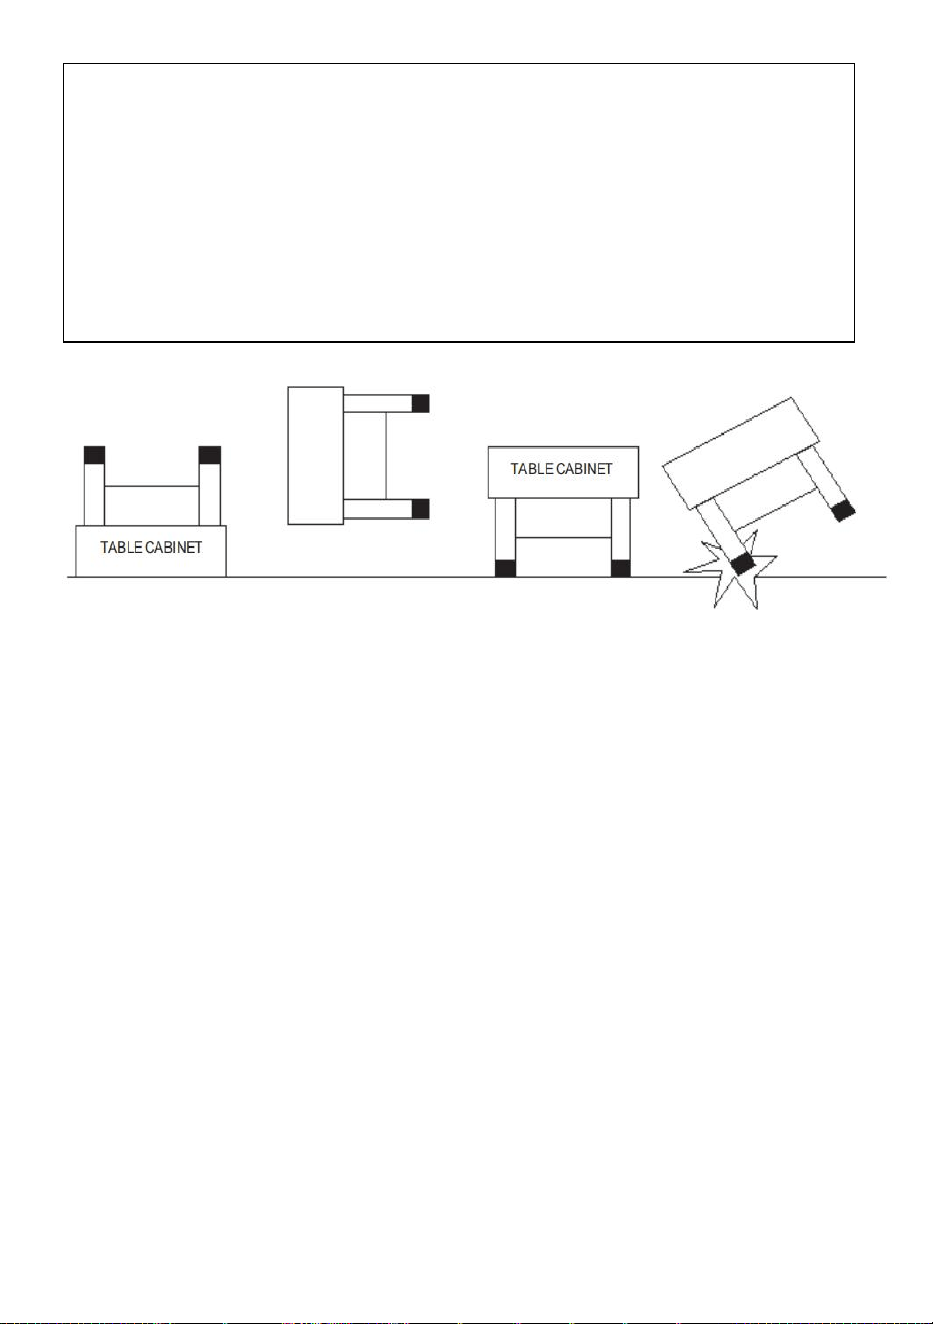
CAUTION:Two strong adults are needed to flip the table as shown.
1.Pick up the table,one adult on each end.Do not hold the legs! You
should pick up the table at the table cabinet !
2.Tum the table over.
3.Place it on all four feet at the same time on the ground.
10
STEP12:Now check if all the connections,which are made in the previous
steps,are tightened.
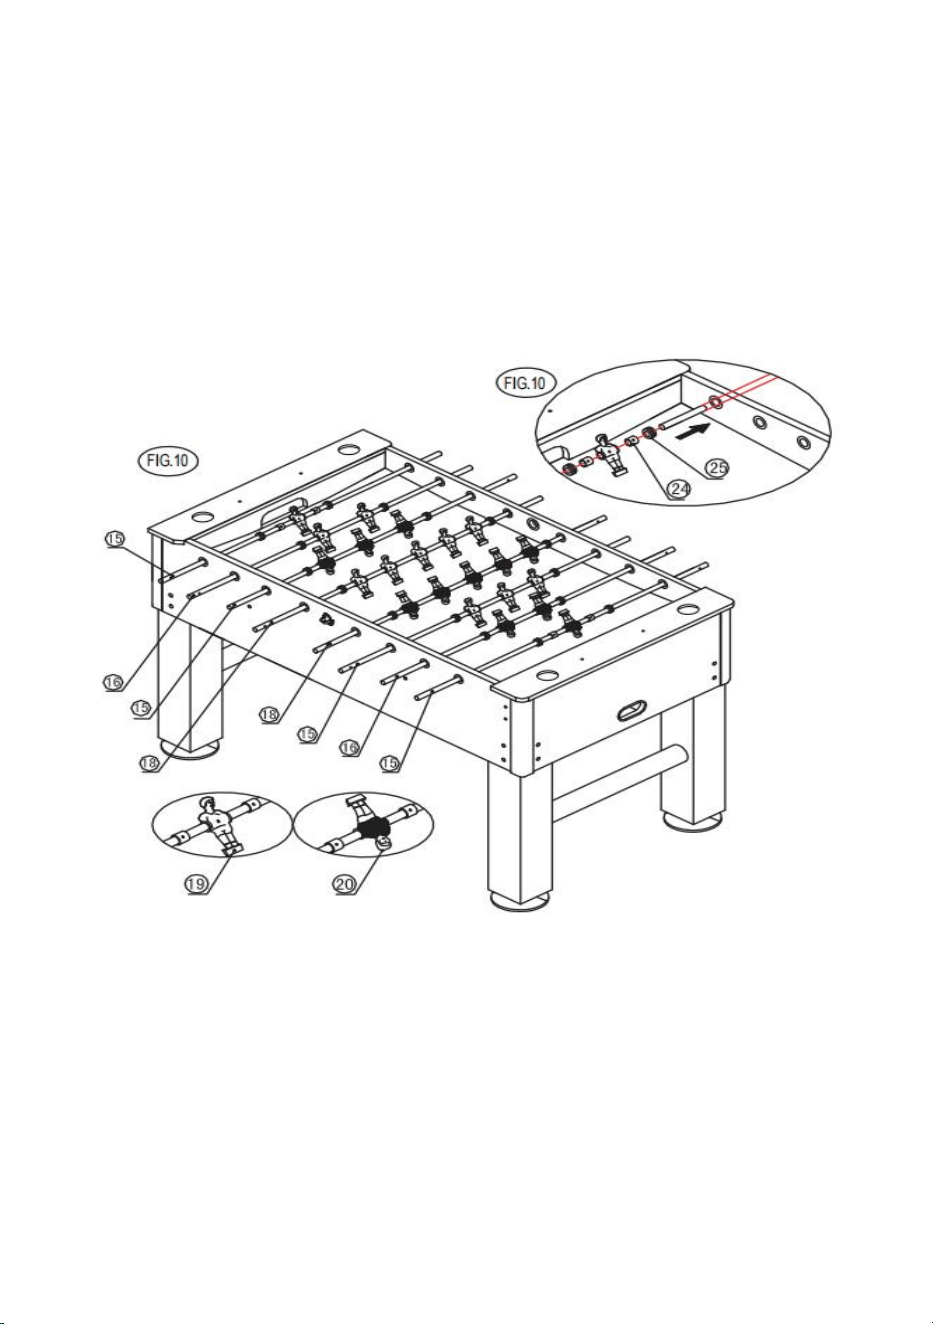
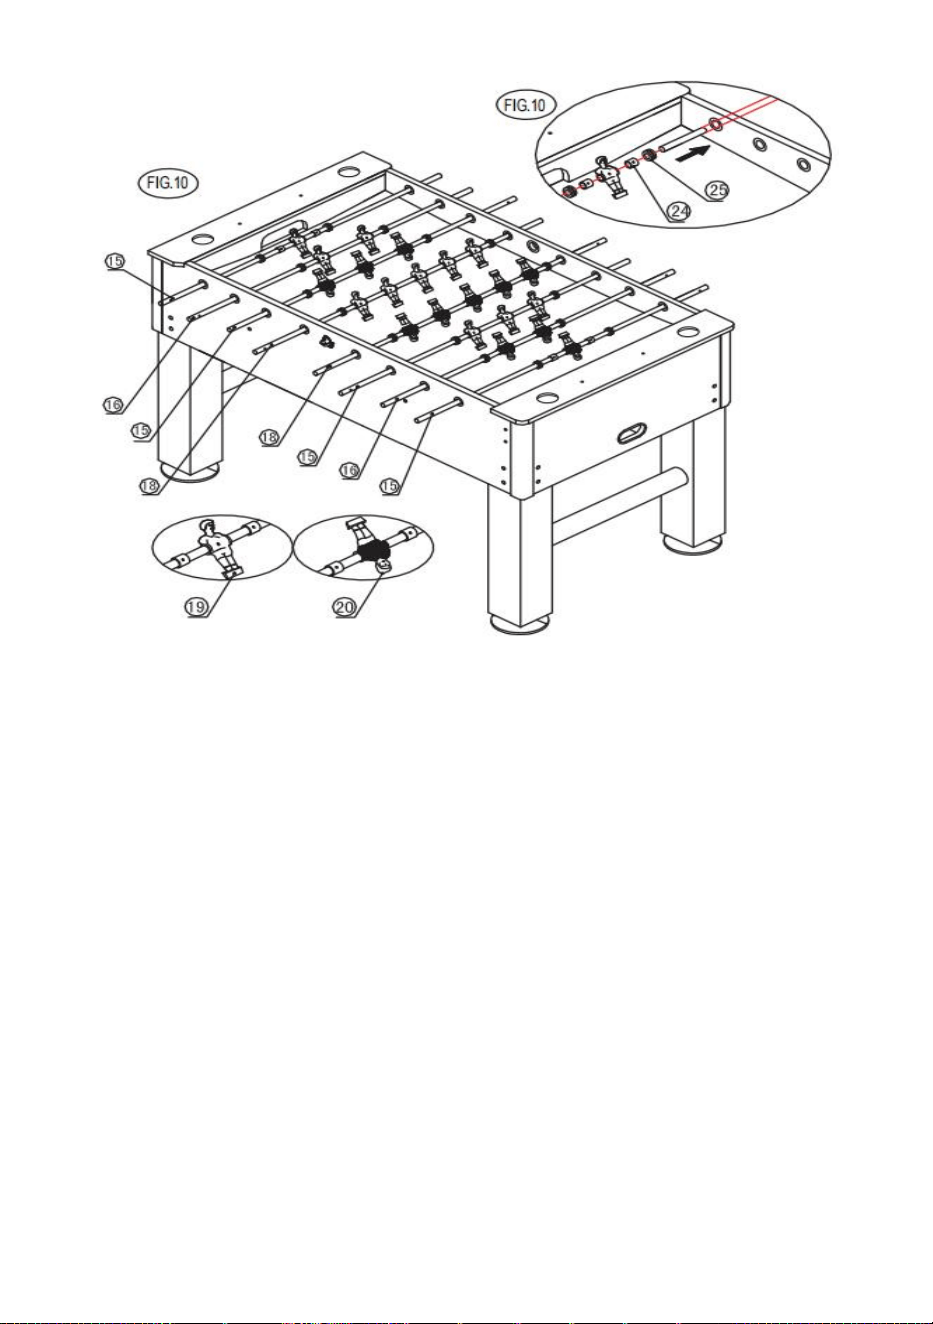
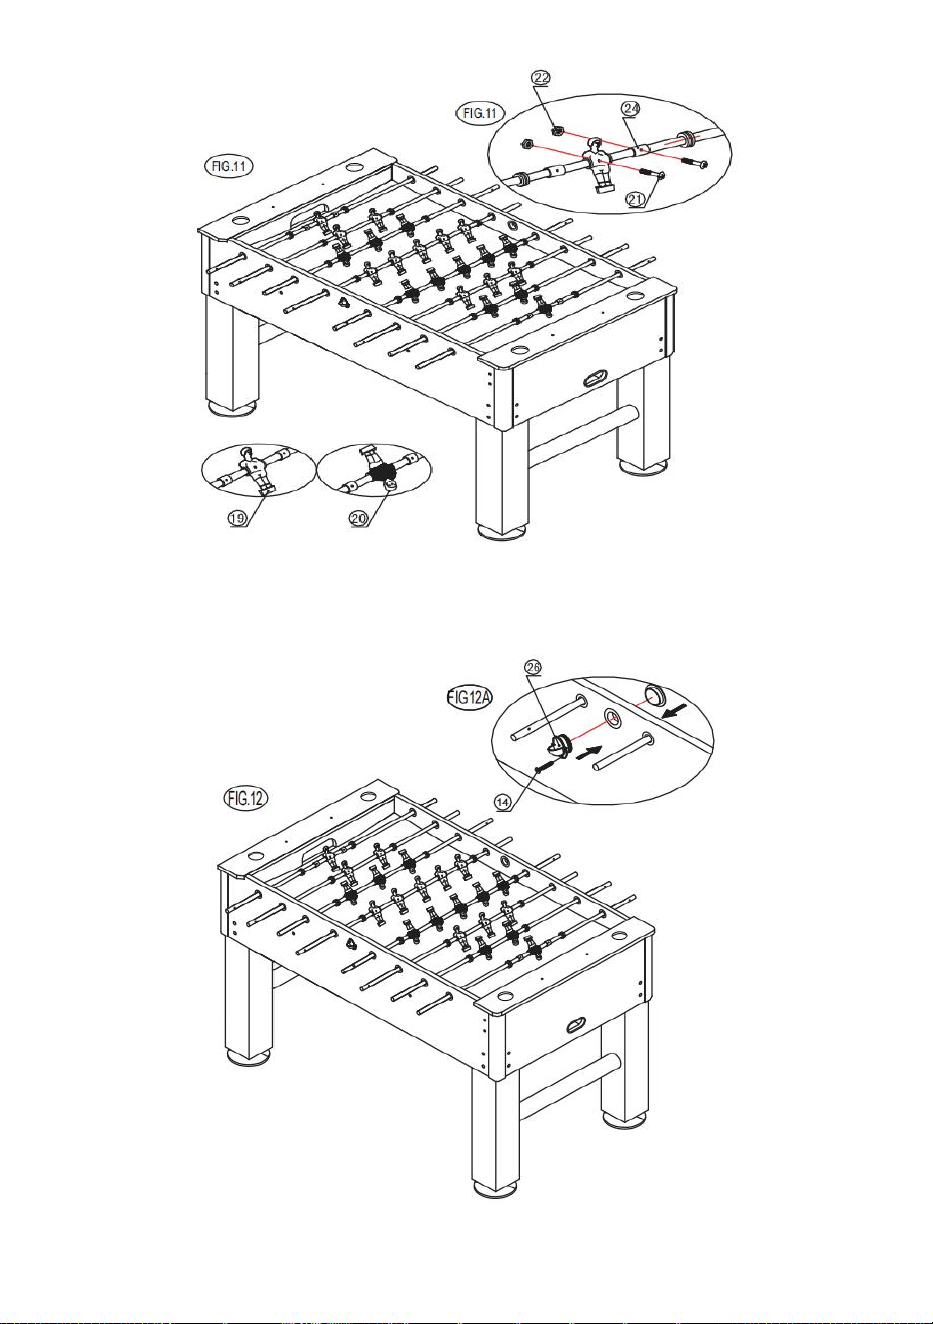
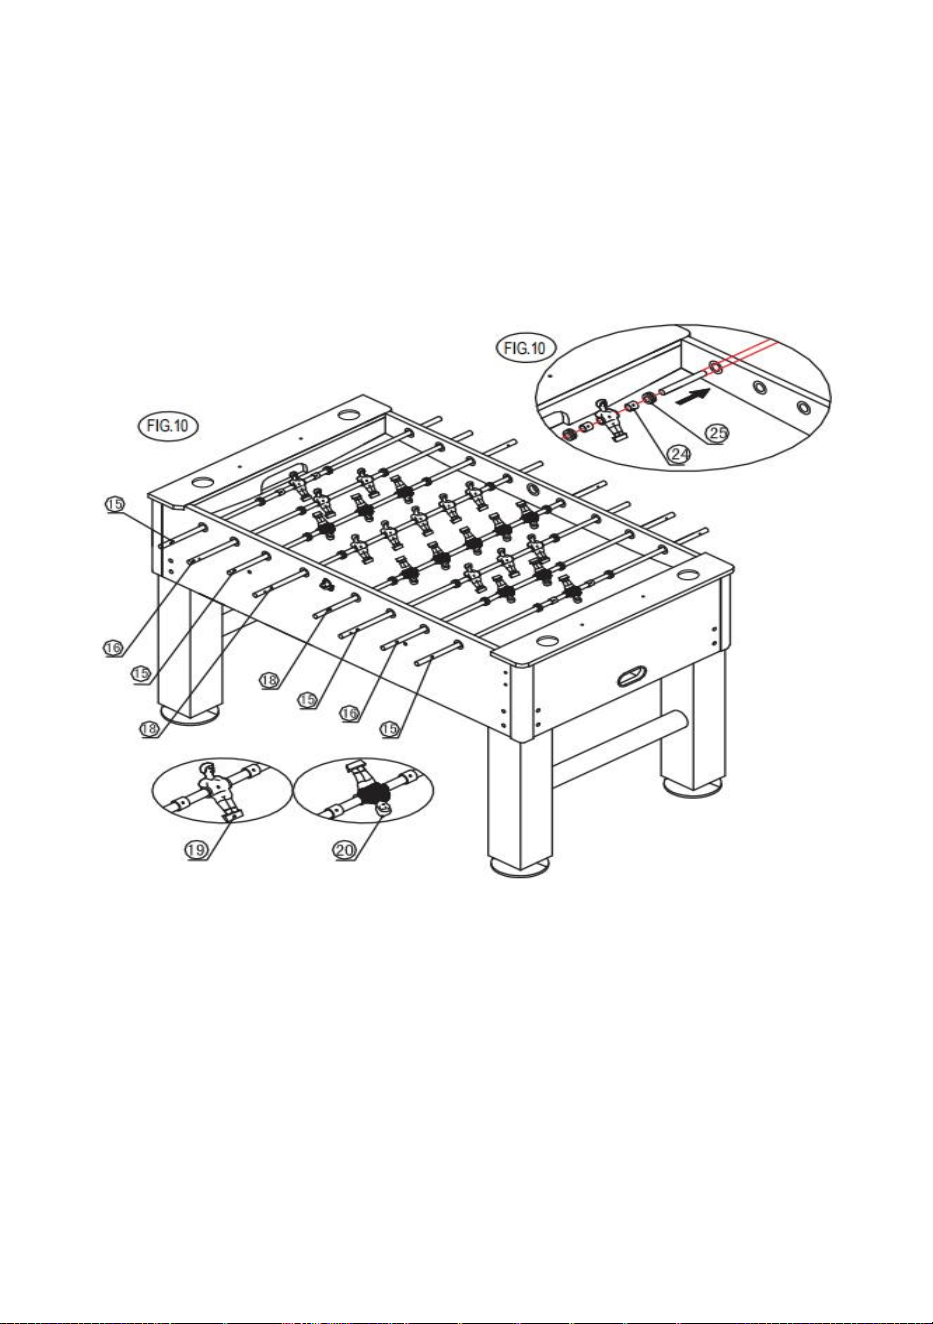
STEP13:Slide one player (#19 or #20)in the middle and one stop ring
(#24)and one rubber bumper (#25)on each side of the player onto the two
1 player rods (#15).See.FIG.10 and 10A.
Slide rubber bumper (#25)and players (#19 or #20)onto player rods
(#16,#17 and #18) See.FIG.10 and 10A.
11
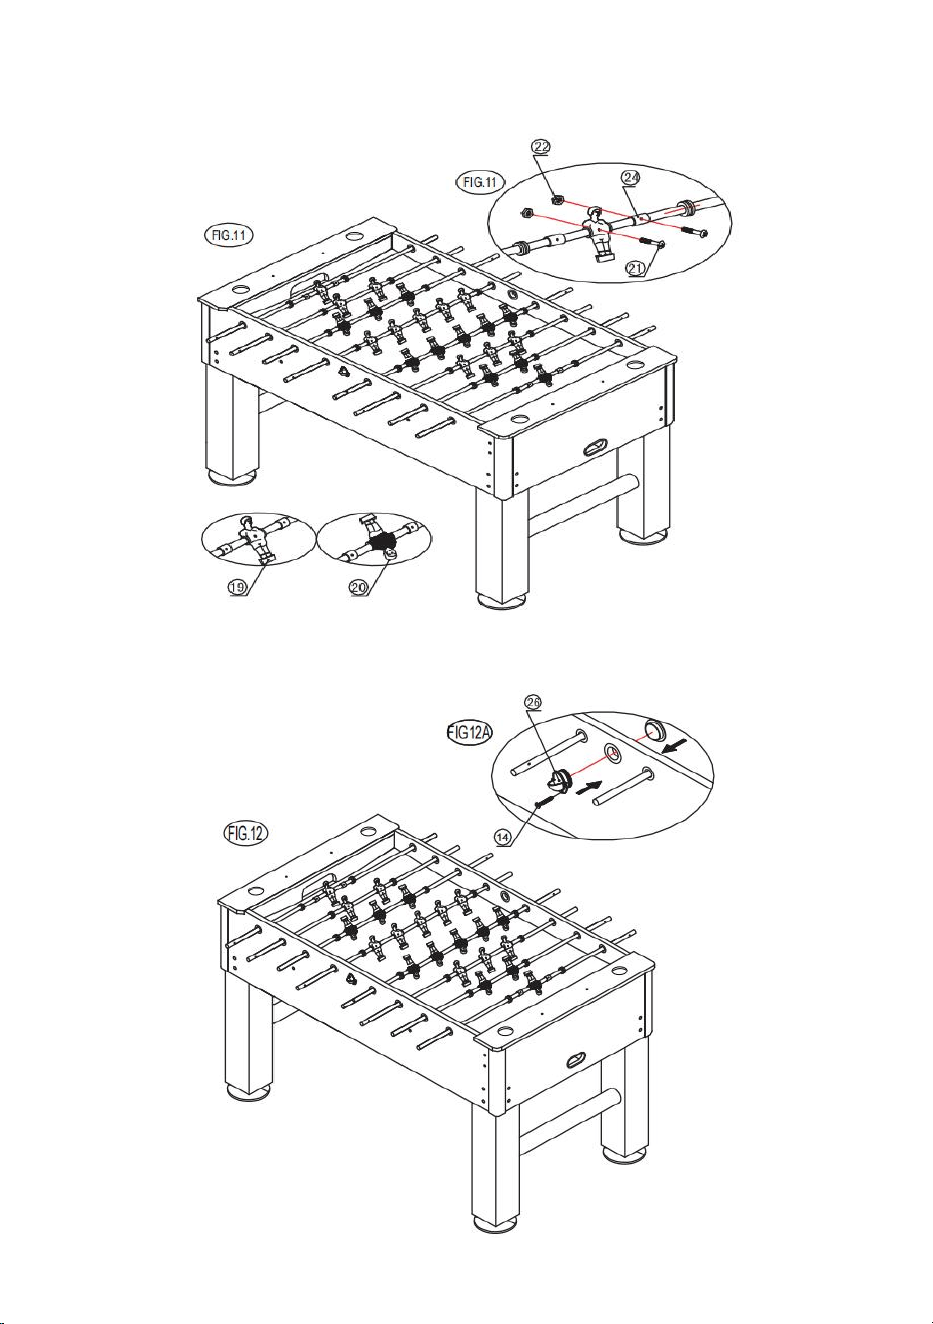
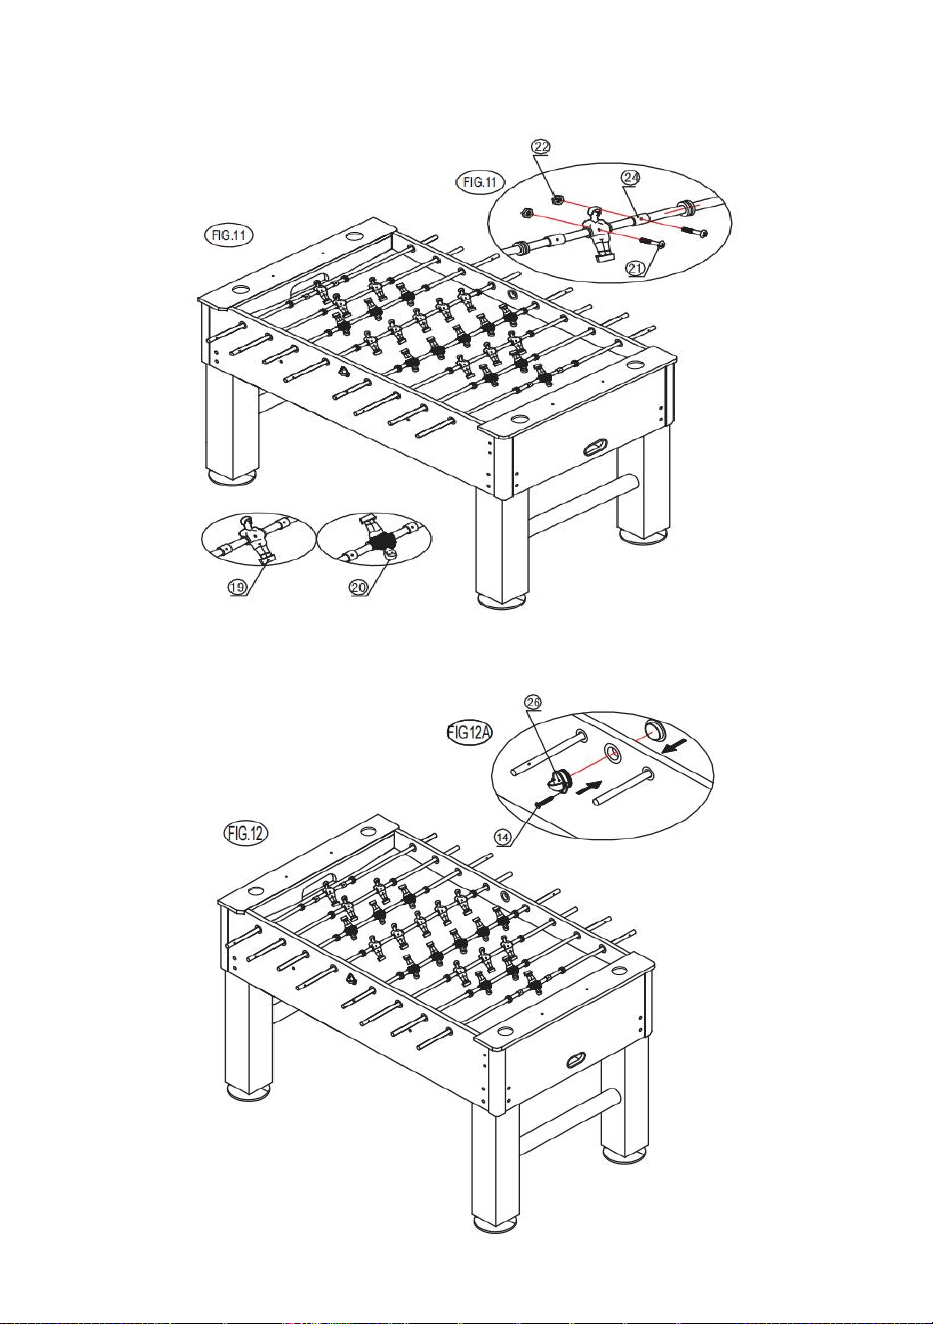
STEP14:Use one round head screw (#21)and one nut (#22) per stop ring
(#24)and player (#19 or #20) as shown in FIG 11 and 11A.
STEP15:Attach the two ball return cups (#26)to the side boards (#1)using
one flat head screw (#14)per side.See FIG.12 and 12A.
12
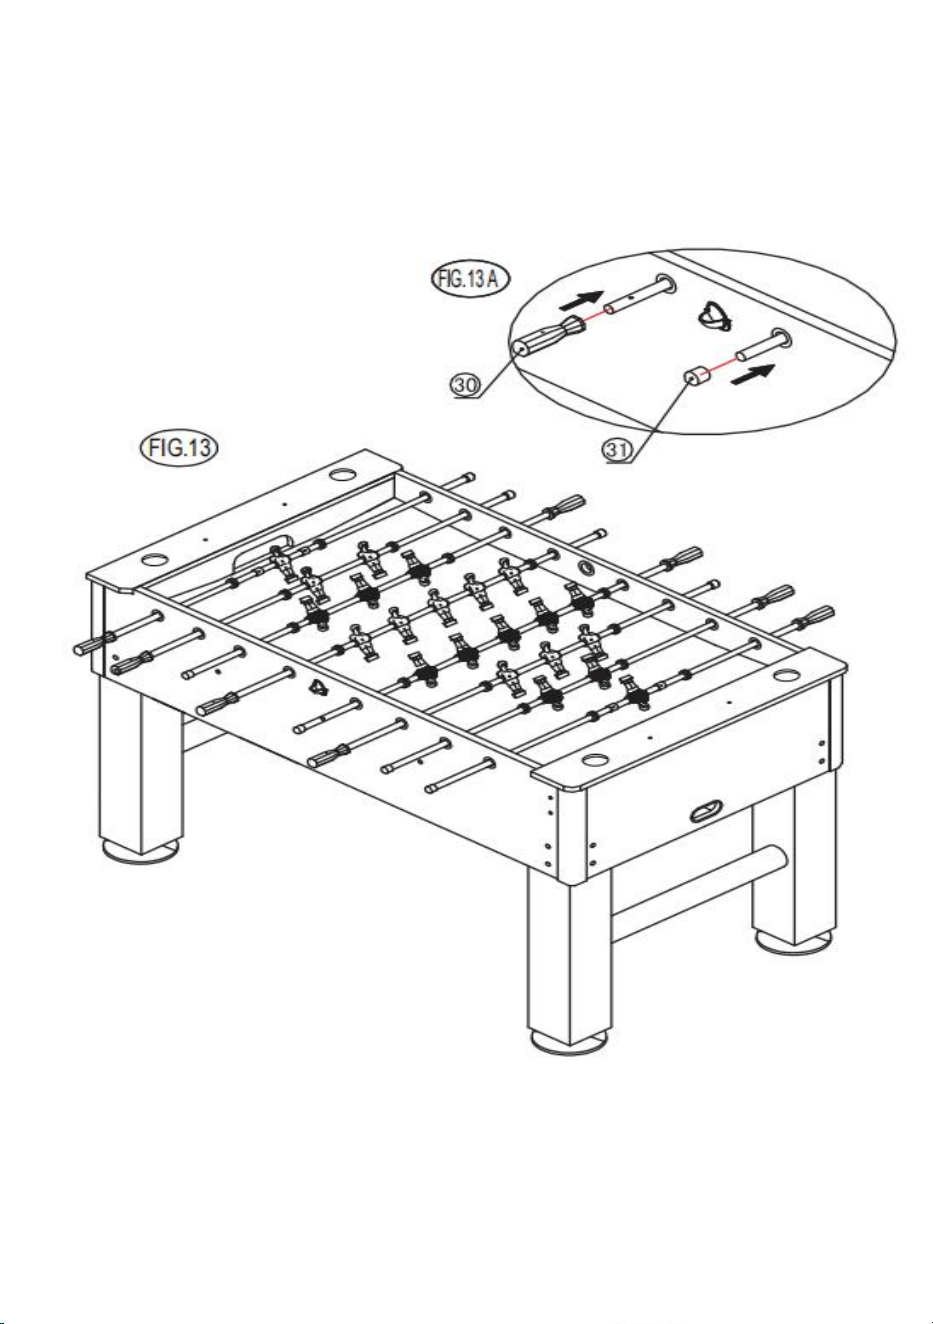
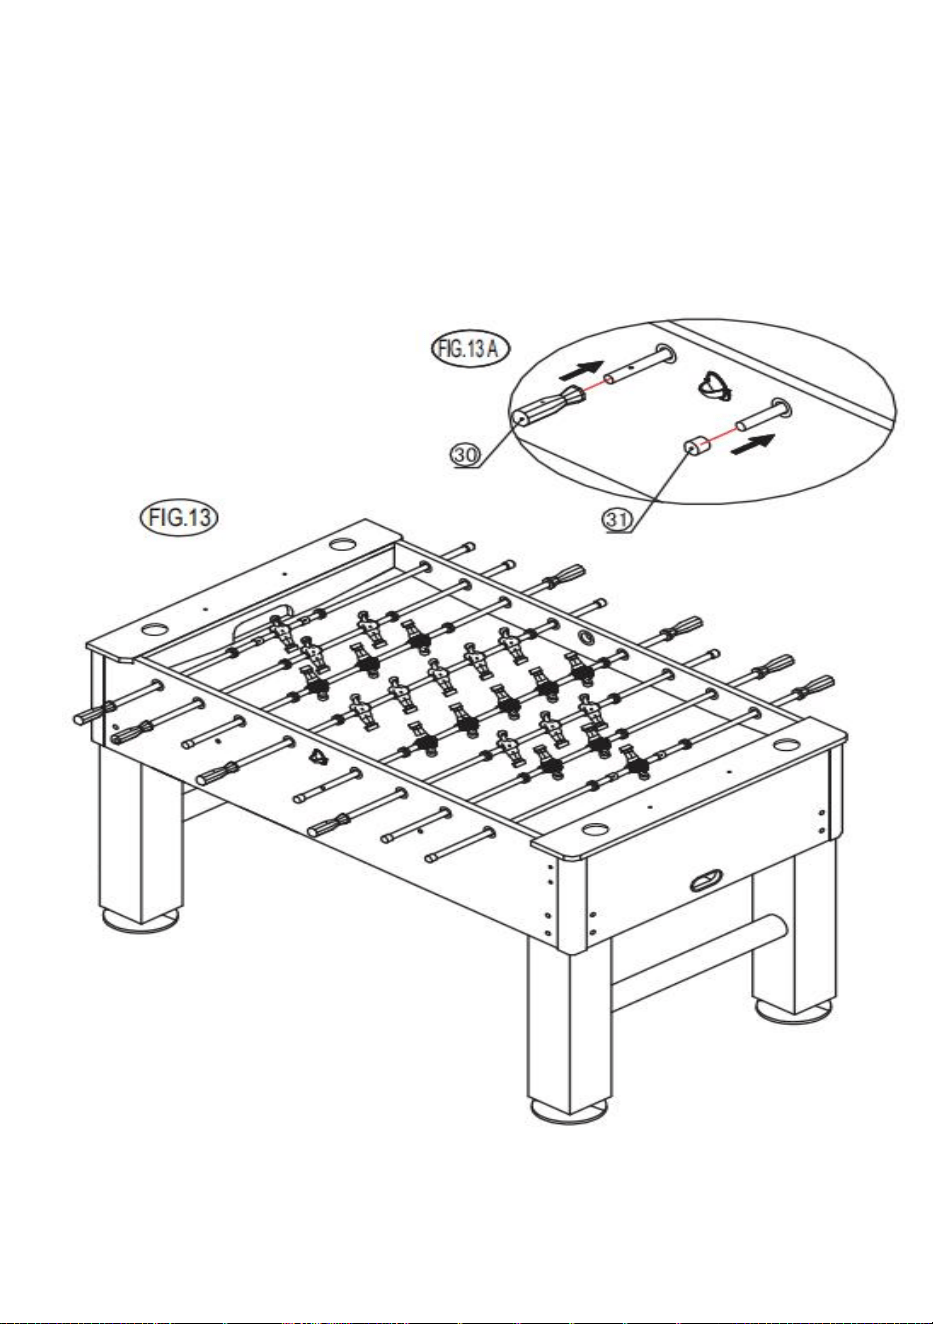
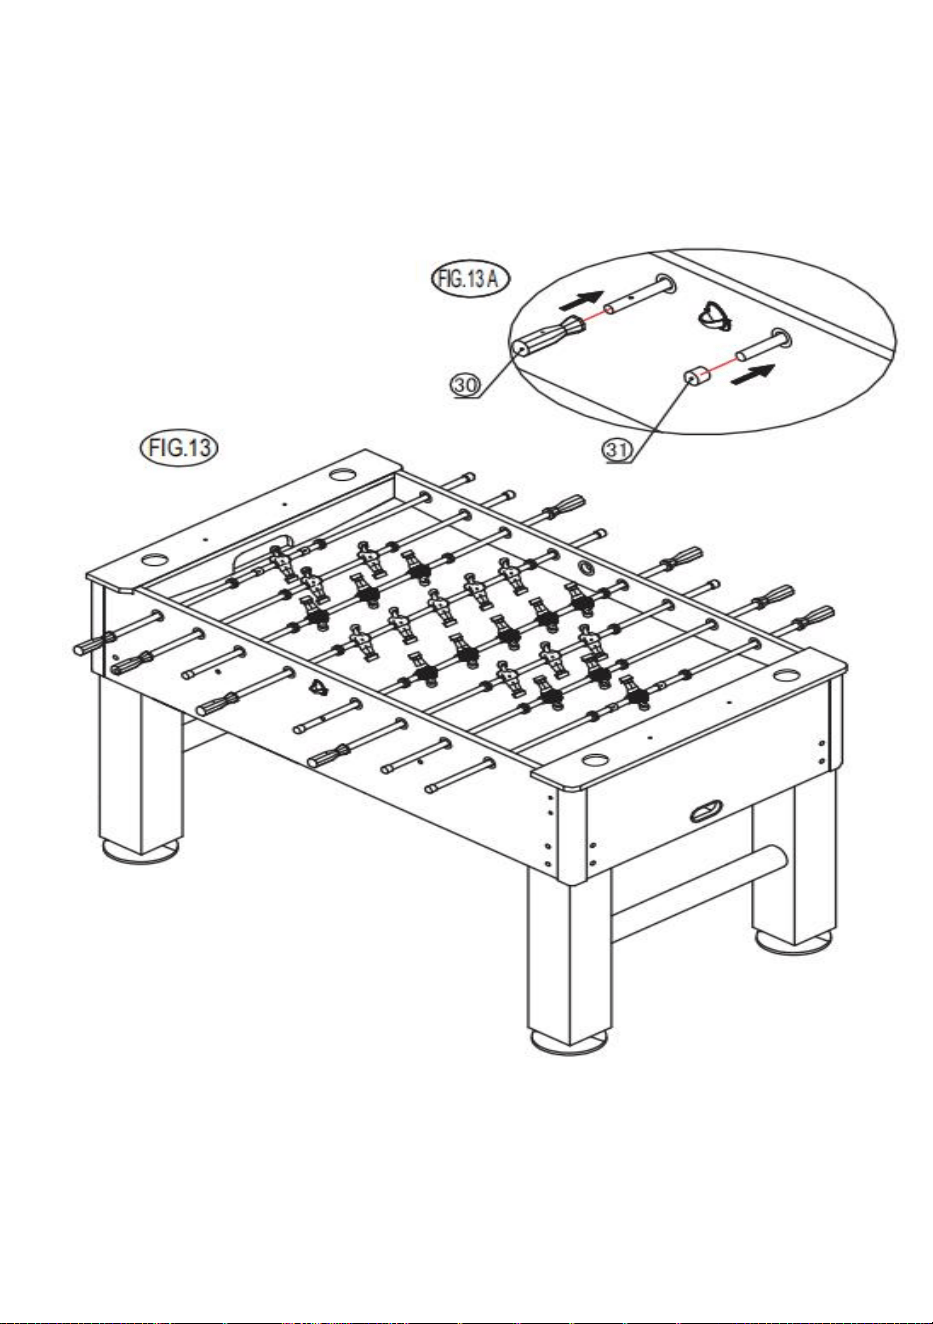
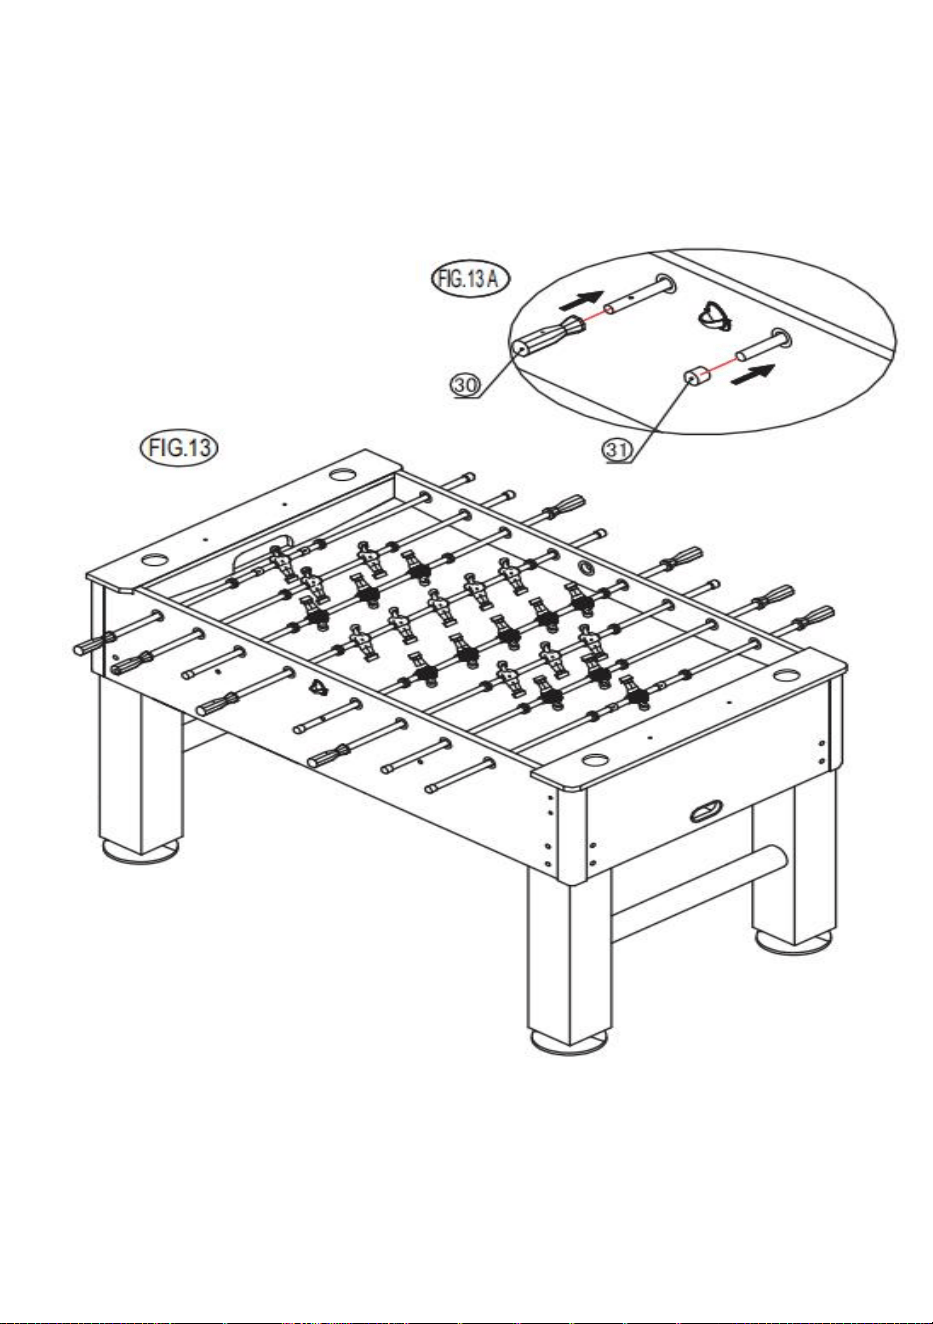
STEP16:Slide the hand grips (#30)and end caps(#31)onto the player
rods.
TIP:To make the Handles easier to attach,spray a little window cleaner on
the rod ends prior to installation and gently hammer it with a wooden
hammer onto the player rods.See FIG.13and 13A.

13
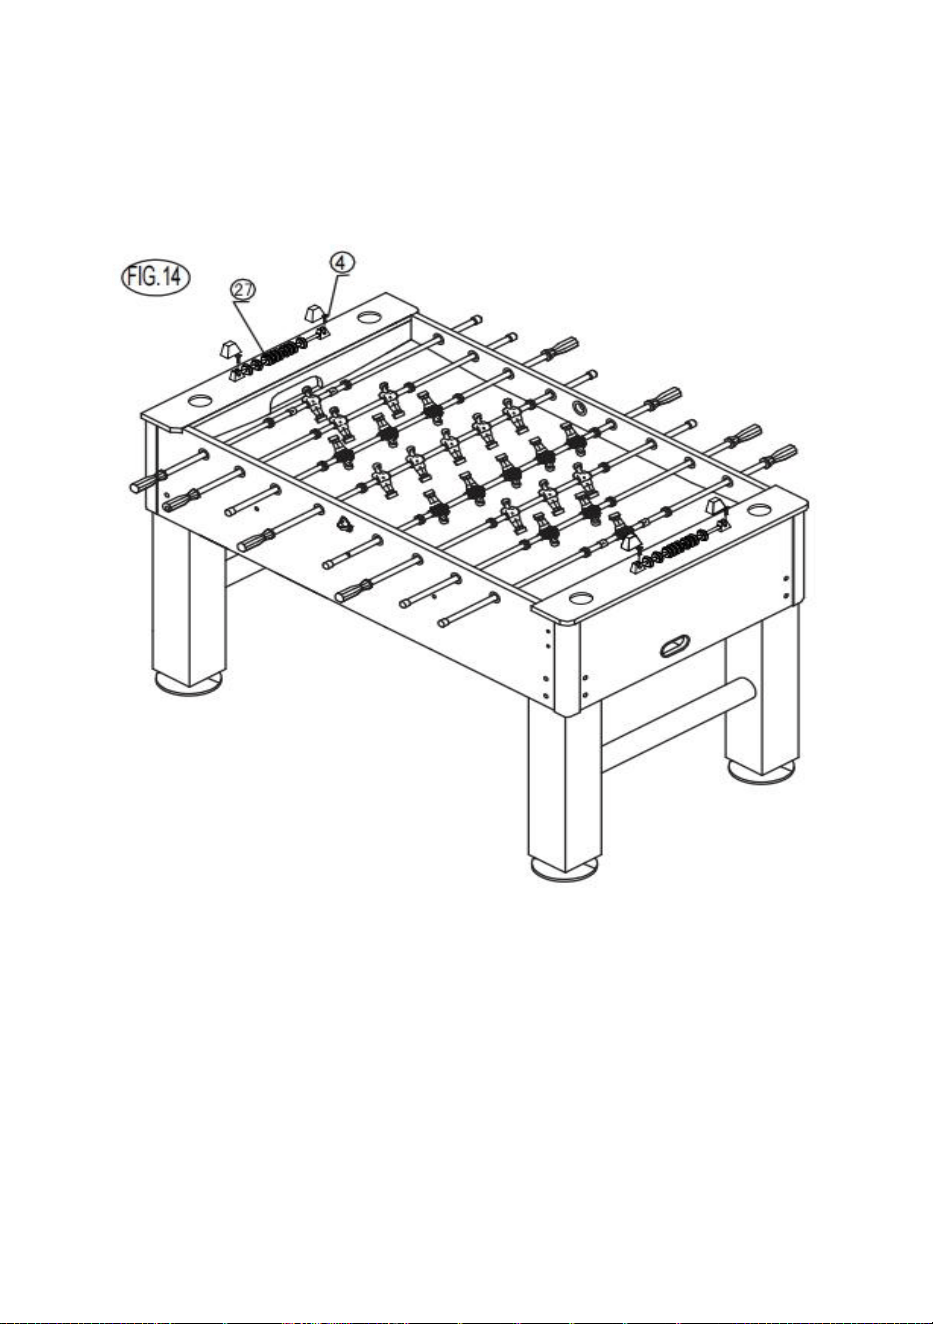
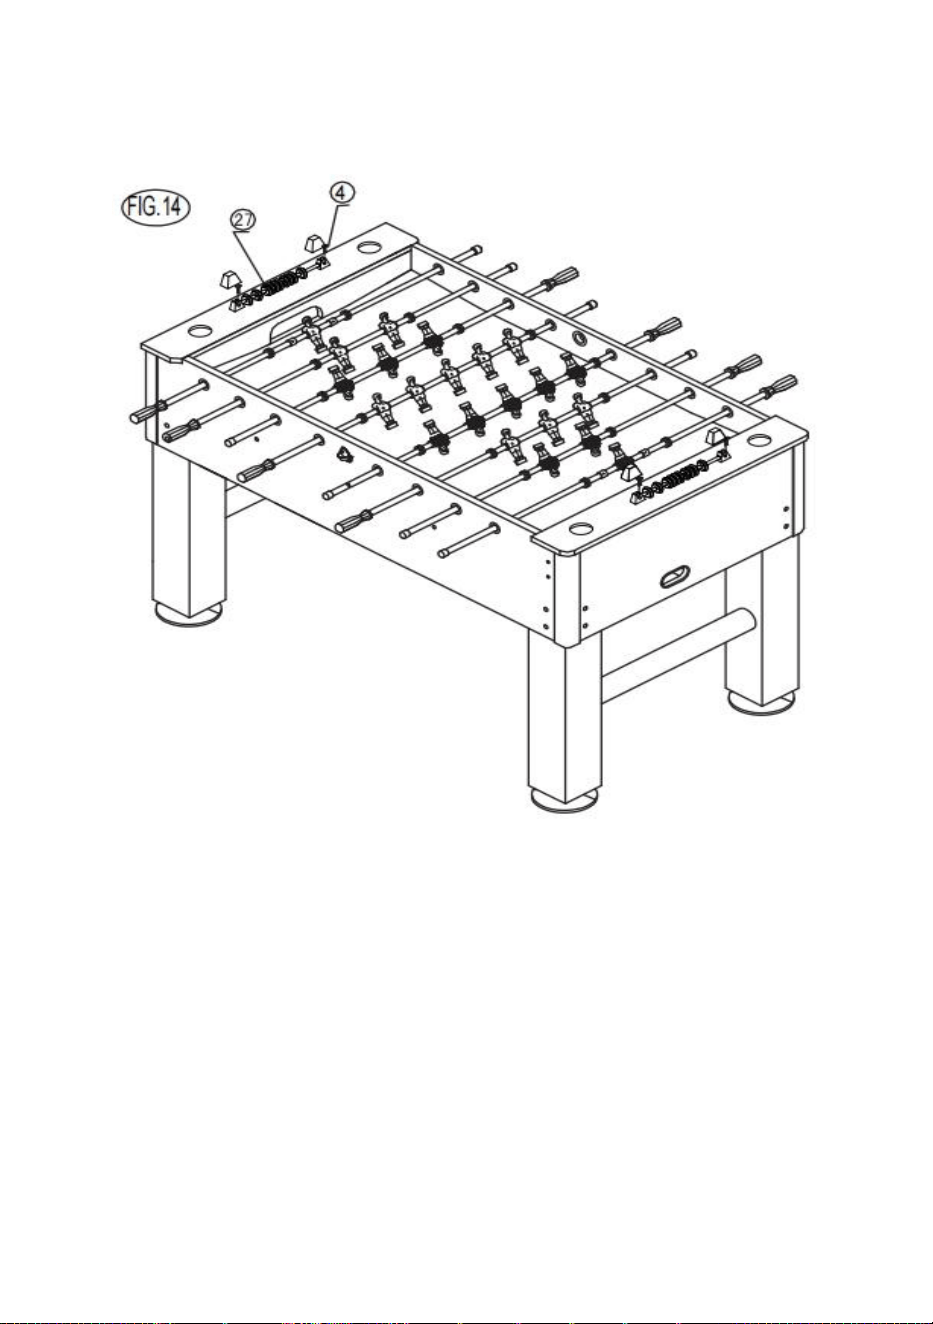
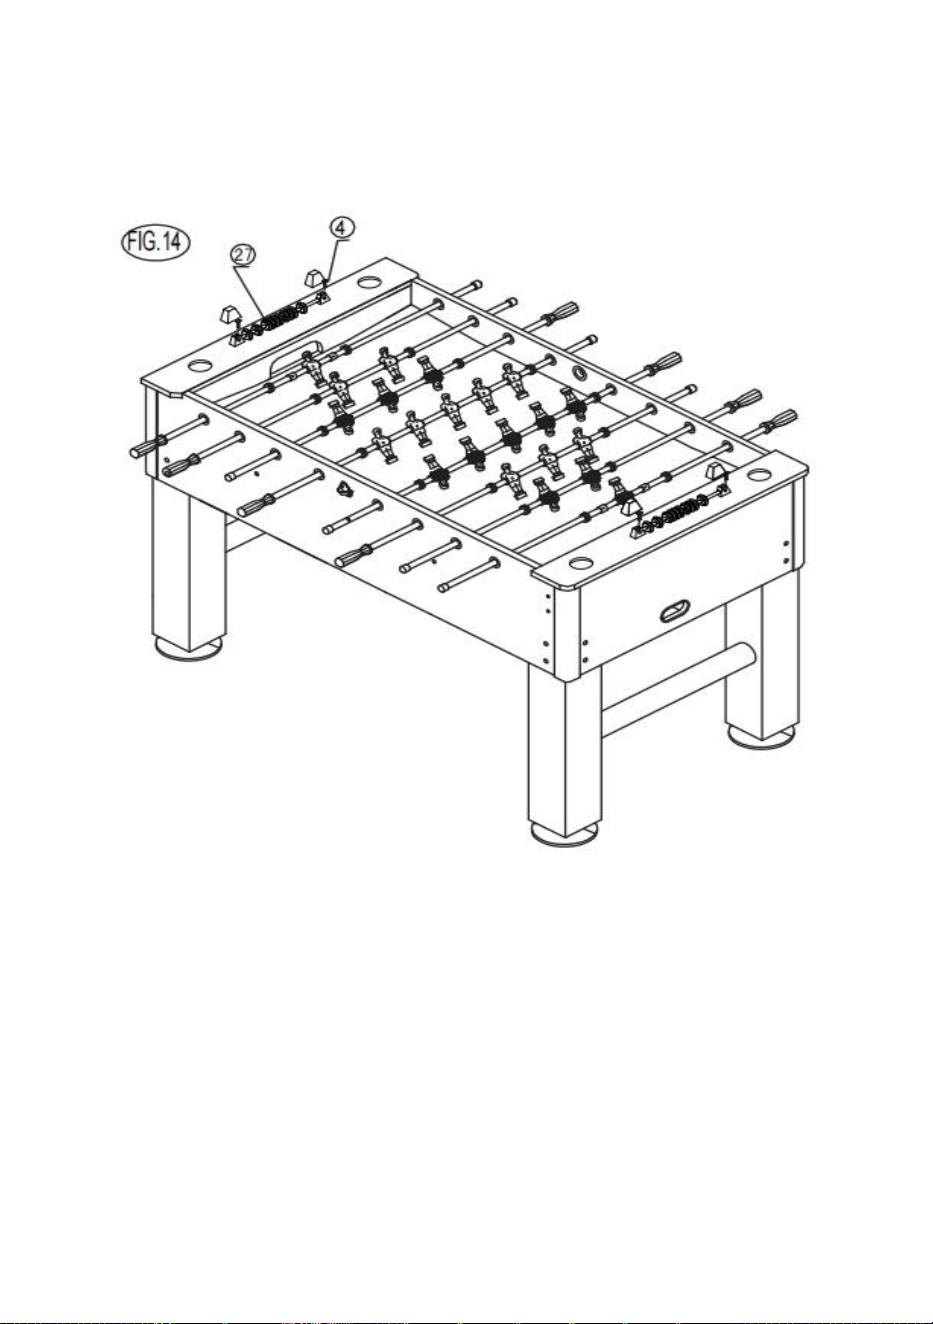
STEP17:Attach the two scorers (#27)to the end boards (#2)using two flat
head screws (#4) per scorer.See FIG.14.

14
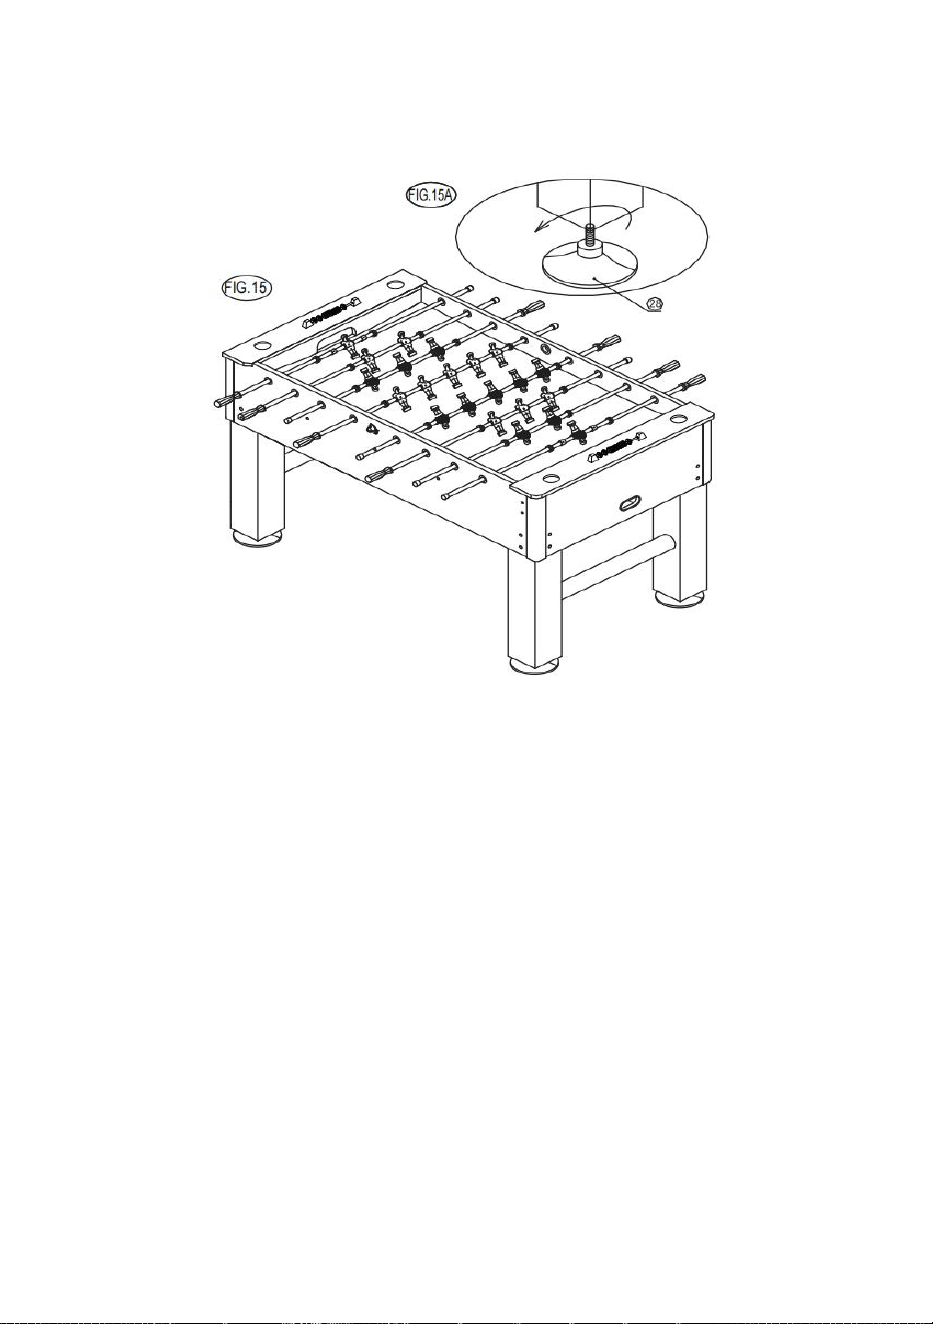
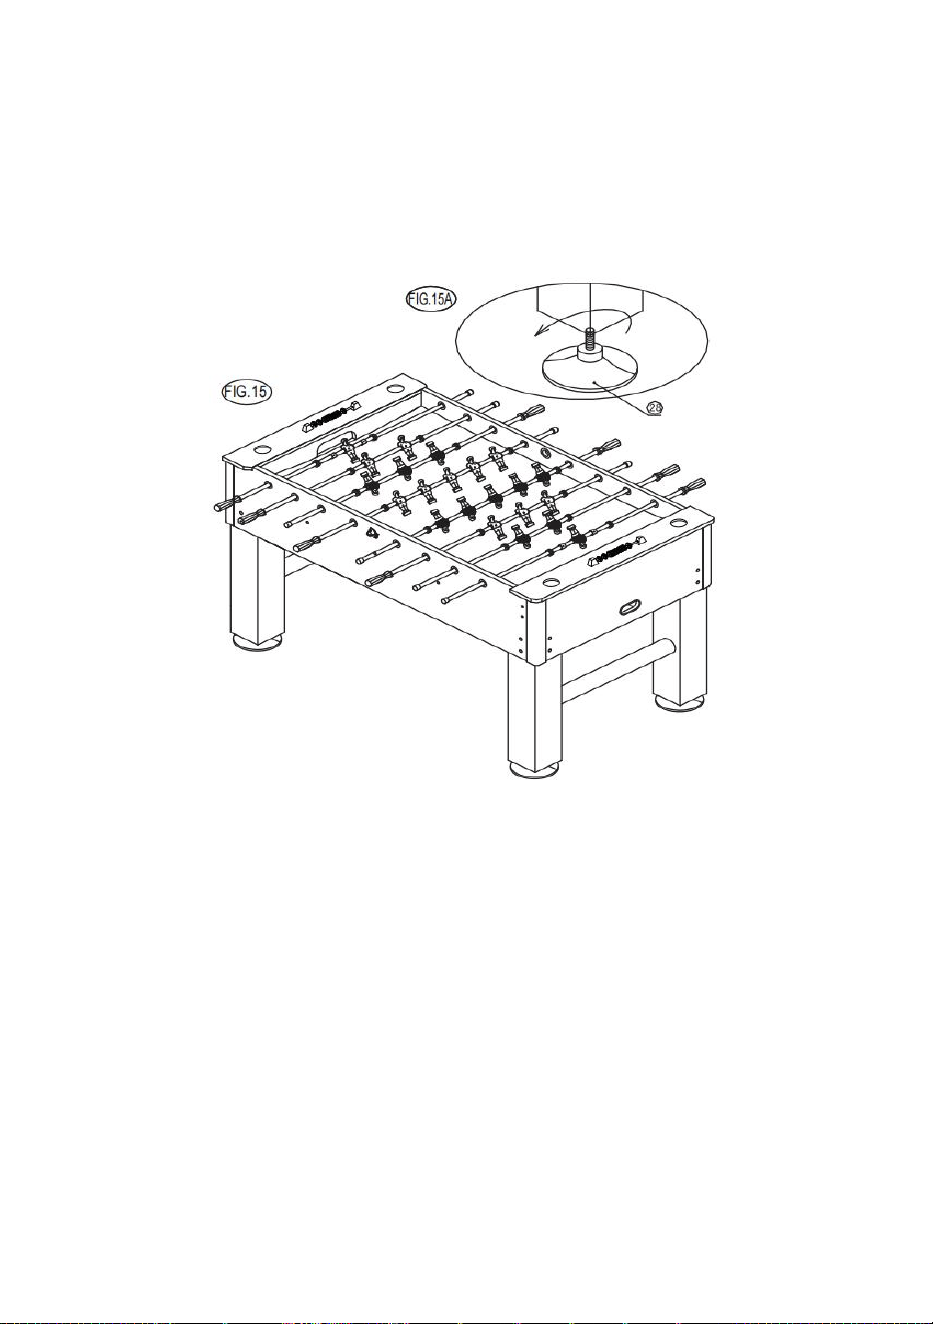
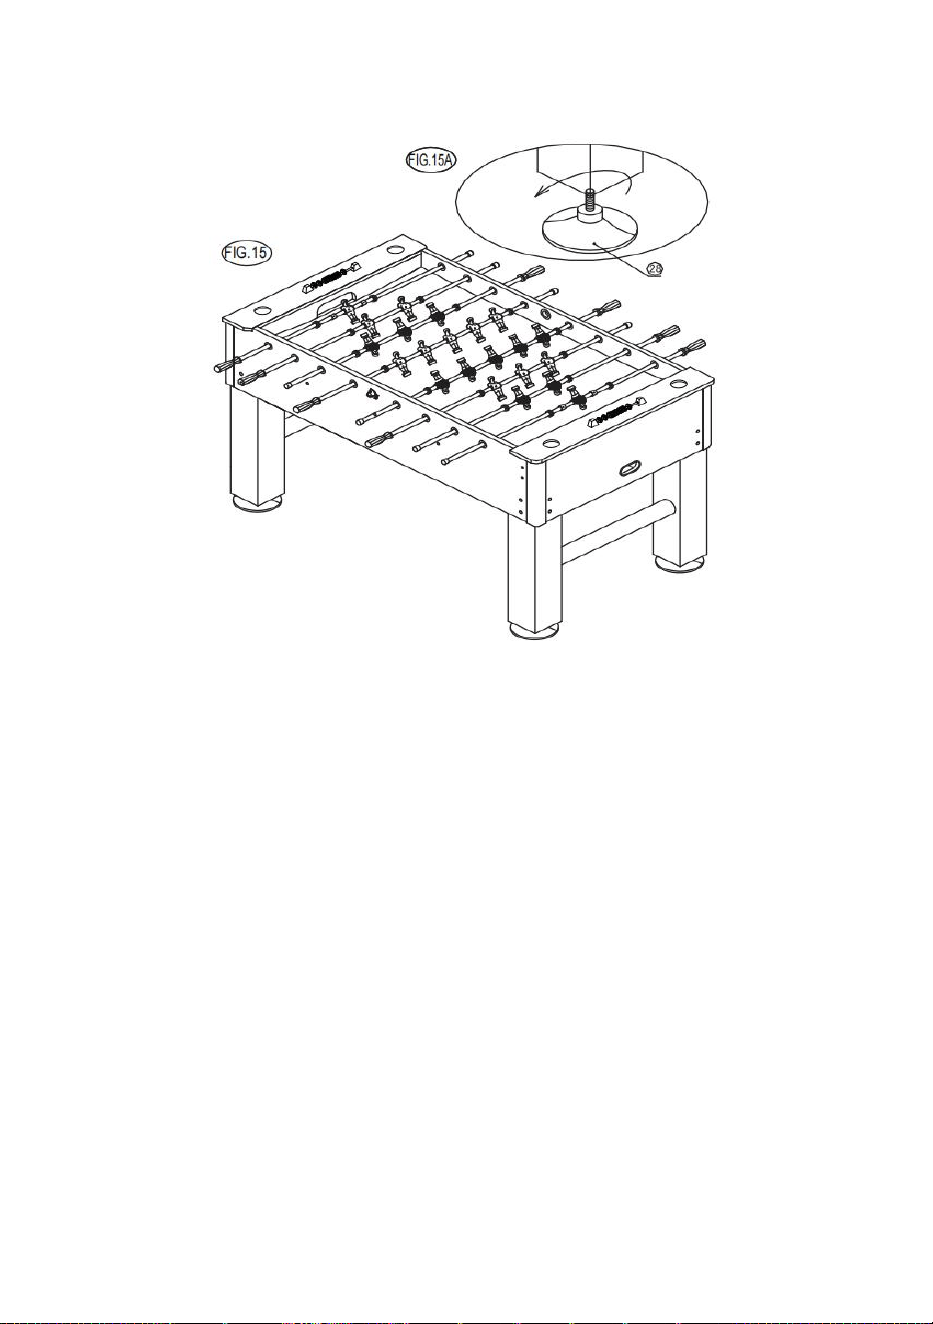
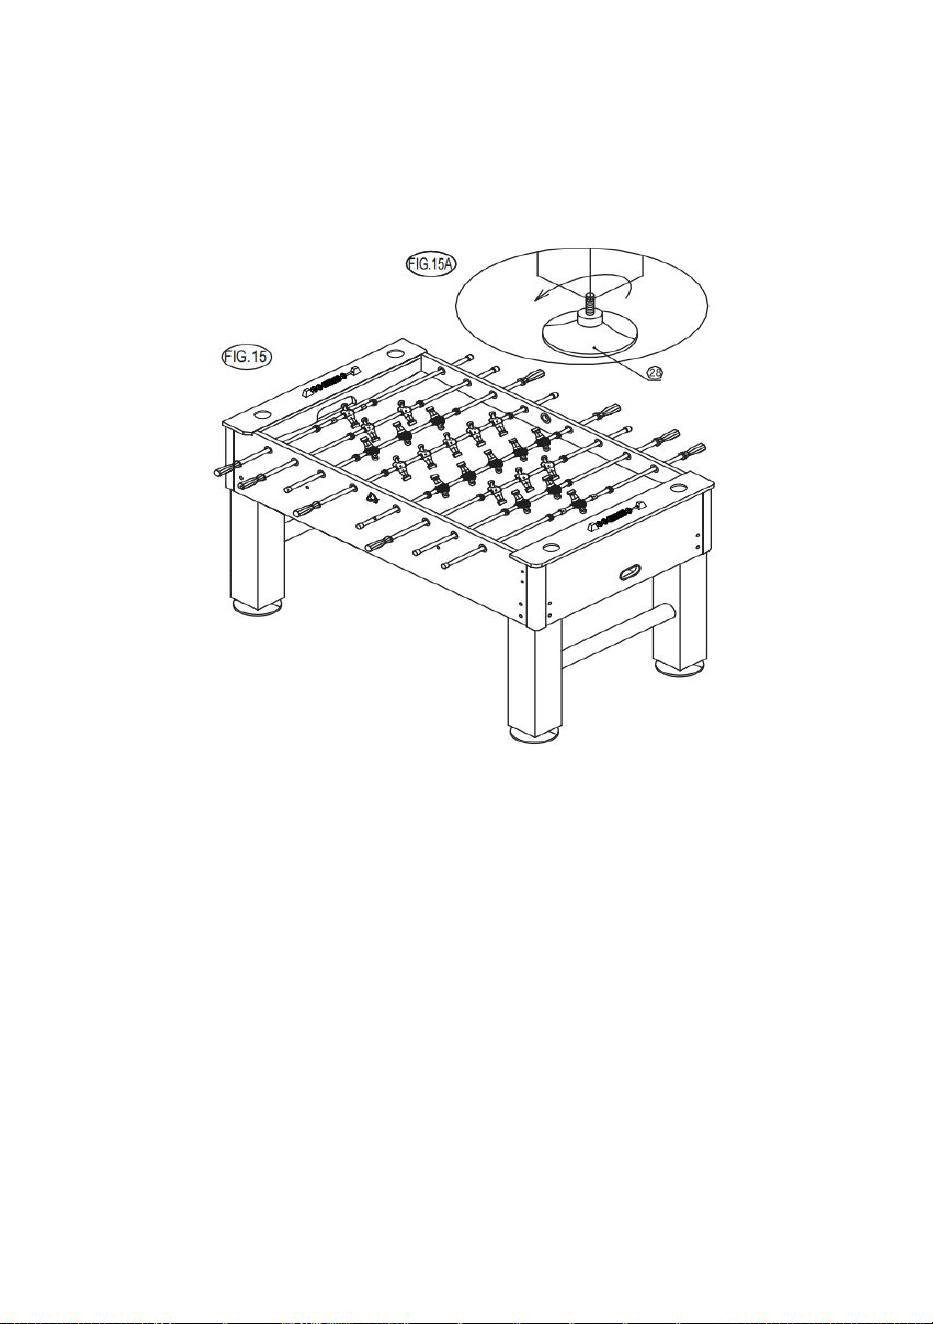
STEP18:If the table is not leveled you can adjust the leg levelers (#28)one
by one till the table is exactly level.See FIG.15 and 15A.
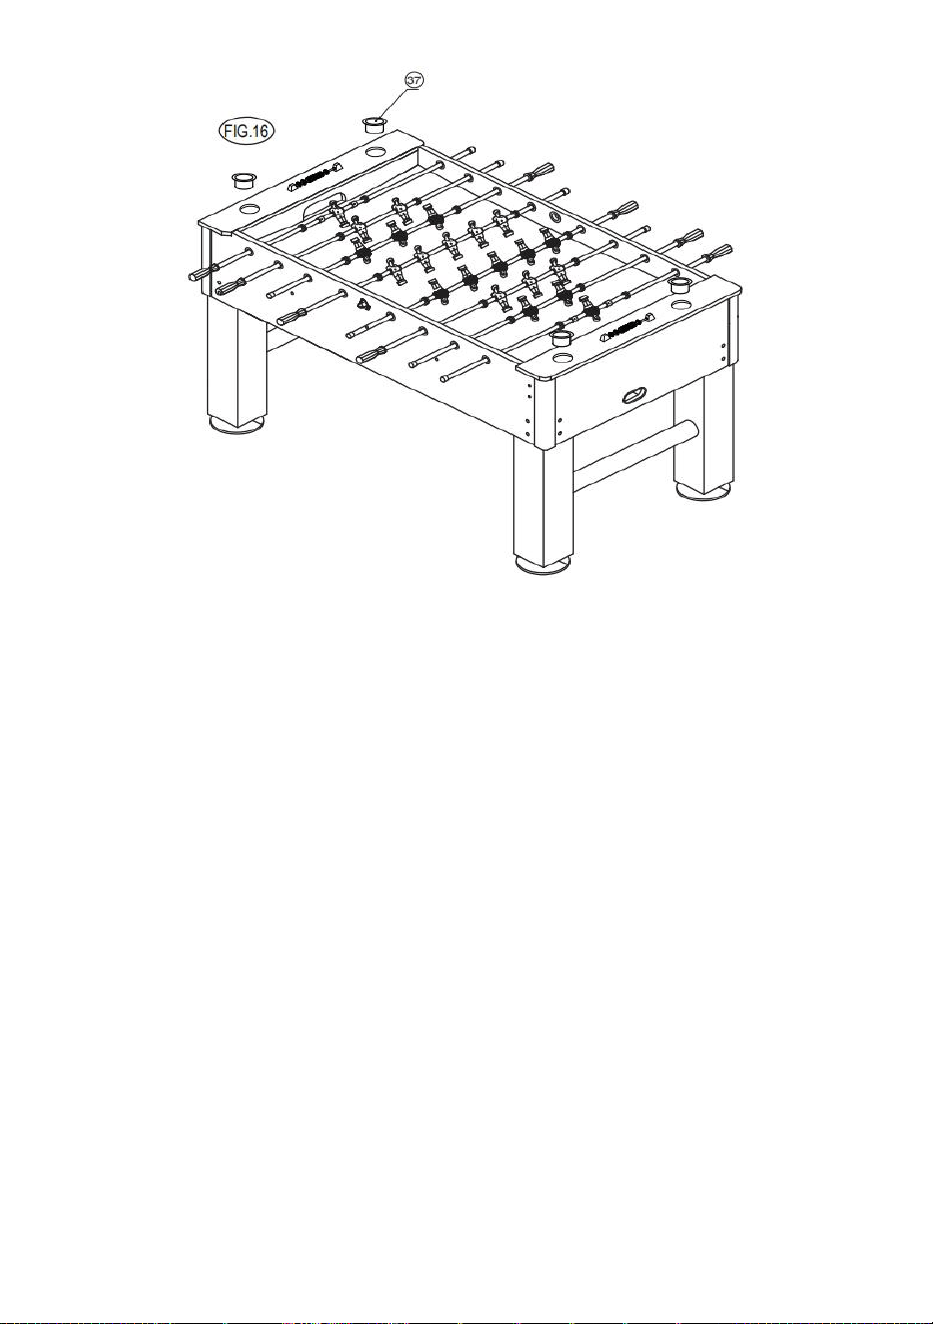
STEP19:Attach the two cup holders (#37) to place the two end boards (#2)
mouth of a cave per cup holder (#37).See FIG.16.
15
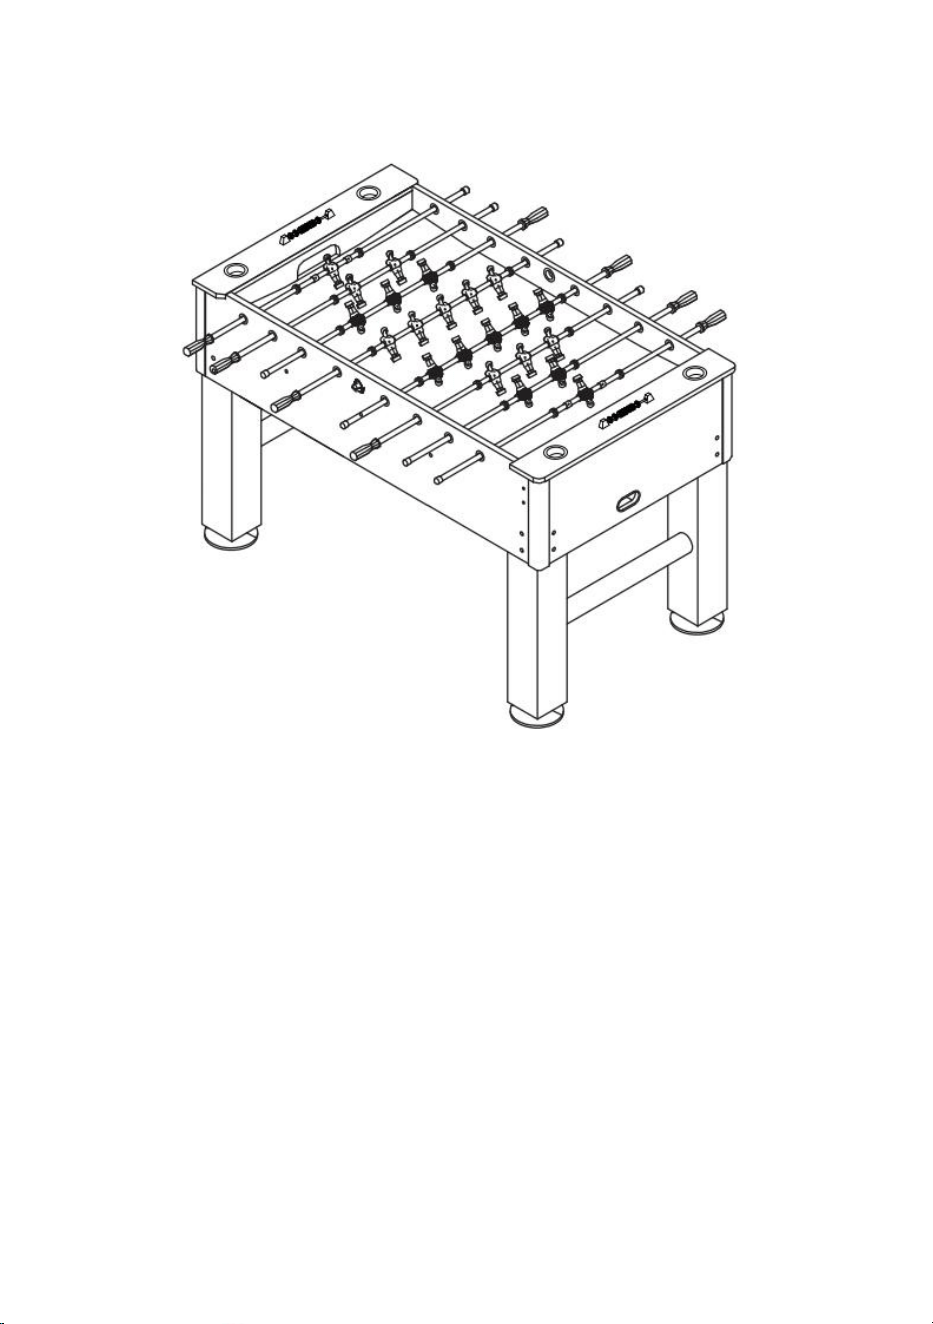
The game assembly is complete.you are now ready to play.
16
Manufacturer: Shanghaimuxinmuyeyouxiangongsi
Address: Baoshanqu Shuangchenglu 803long 11hao 1602A-1609shi
Shanghai
Imported to AUS: SIHAO PTY LTD, 1 ROKEVA STREETEASTWOOD
NSW 2122 Australia
Imported to USA: Sanven Technology Ltd.
Suite 250,9166 Anaheim Place, Rancho Cucamonga, CA 91730
Made In China
REP
EC
SHUNSHUN GmbH
Römeräcker 9 Z2021,76351
Linkenheim-Hochstetten,Germany
euvertreter@gmail.com
+49 1727041930
REP
UK
Pooledas Group Ltd
Unit 5 Albert Edward House, The
Pavilions Preston, United Kingdom
pooledas123@gmail.com
Tel: 01772418127


Technique Assistance et certificat de garantie électronique
www.vevor.com/support
FOOTBALL DE TABLE
MODÈLE : SUO-5529L
We continue to be committed to provide you tools with competitive price.
"Save Half", "Half Price" or any other similar expressions used by us only represents an
estimate of savings you might benefit from buying certain tools with us compared to the major
top brands and does not necessarily mean to cover all categories of tools offered by us. You
are kindly reminded to verify carefully when you are placing an order with us if you are
actually saving half in comparison with the top major brands.


1
MODÈLE: SUO-5529L
Have product questions? Need technical support? Please feel free to
contact us:
Technical Support and E-Warranty Certificate
www.vevor.com/support
NEED HELP? CONTACT US!
This is the original instruction, please read all manual instructions
carefully before operating. VEVOR reserves a clear interpretation of our
user manual. The appearance of the product shall be subject to the
product you received. Please forgive us that we won't inform you again if
there are any technology or software updates on our product.
TABLE SOCCER

2
Avertissement : Pour réduire le risque de blessure, l'utilisateur
doit lire attentivement le manuel d'instructions.
SAFETY WARNINGS AND PRECAUTIONS
Merci d'avoir utilisé ce produit . Afin de vous assurer que vous pouvez
utiliser la machine correctement, lisez attentivement ces instructions avant
de l'utiliser et conservez-les correctement pour référence future . Veuillez
vous assurer de lire les précautions et les règles de sécurité contenues
dans cette page pour garantir votre utilisation en toute sécurité . Ce
manuel décrit les avertissements et les précautions de sécurité, le
fonctionnement et la maintenance . Les avertissements et instructions
examinés dans ce manuel ne peuvent pas couvrir toutes les conditions et
situations possibles qui peuvent survenir . La prudence et le bon sens ne
sont pas intégrés à ce produit, car nous pensons que les utilisations seront
conformes à ces codes .
Veuillez lire TOUTES les instructions avant d'utiliser votre machine .
1. L'assemblage doit suivre ces instructions. Un montage incorrect peut
constituer un danger.
2. Ne vous rassemblez pas lorsque vous êtes fatigué ou sous l'influence
de l'alcool, de drogues ou de médicaments.
3. Le poids, l'élasticité et les autres propriétés du produit ne s'appliquent
qu'aux produits correctement et complètement assemblés.
4. Gardez la zone de montage propre et bien éclairée.
5. Gardez les spectateurs hors de la zone pendant l'assemblage.
6. Il s’agit d’un équipement et non d’un jouet, il doit être utilisé sous la
direction d’un professionnel. Ne laissez pas les enfants et les animaux
domestiques jouer seuls ou s'approcher de cet article.
7. Utiliser uniquement comme prévu. Ne vous asseyez pas et ne vous
tenez pas debout sur le produit.
8. Inspectez avant chaque utilisation. Ne l'utilisez pas si les pièces sont
desserrées ou endommagées.
9 . N'utilisez pas cet appareil à d'autres fins que celles indiquées .
3
dix . _ Ne l'utilisez pas à des fins commerciales .
1 1 . Ne le nettoyez pas avec un matériau abrasif .
1 2 . Ne le laissez jamais sans surveillance pendant son utilisation .
1 3 . L'urine et les excréments d'animaux peuvent endommager le produit,
veuillez le tenir à l'écart .
1 4 . Ne placez pas le produit sur ou à proximité d'air chaud, de brûleurs
électriques ou de radiateurs .
15 . Les jeunes enfants doivent être surveillés pour s'assurer qu'ils ne
jouent pas avec le produit . Les animaux domestiques doivent rester à
l'écart du produit.
Ne pas utiliser à l'extérieur par temps pluvieux et nuageux, évitez les
coups de foudre et les chutes . Les personnes ou les animaux
domestiques accrochés au produit provoqueront des blessures, voire la
mort .
AVERTISSEMENT : Risque d'étouffement - Le jouet contient de
petites balles et/ou de petites pièces. Ne convient pas aux
enfants de moins de 3 ans.
IMPORTANT! Veuillez conserver vos instructions. Avant de tenter
l'assemblage, veuillez lire ces instructions. livre pour vous familiariser avec
toutes les pièces et étapes d'assemblage. Nous recommandons que deux
les adultes assemblent la table de football. Veuillez vous référer à la liste
des pièces ci-dessous et assurez-vous que toutes les pièces ont été
inclus.
PARTS LIST
4
ASSEMBLY INSTRUCTIONS:
5
Nous recommandons que deux adultes travaillent ensemble pour
assembler ce jeu.
ETAPE 1 : Ouvrez les 2 cartons de votre nouveau baby-foot à proximité
de l'endroit où tu vas réellement pour utiliser le tableau.
ÉTAPE 2 : Retirez tout le contenu de l'intérieur des cartons et vérifiez que
vous disposez de toutes les pièces répertoriées. comme indiqué sur la liste
des pièces. Nous vous suggérons d'utiliser le carton inférieur comme
support de travail plat et propre. zone pour protéger la table. Coupez ou
déchirez soigneusement les quatre coins du carton du plus grand carton
de sorte que le carton du bas soit désormais votre zone de travail.
ÉTAPE 3 : Fixez une planche d'extrémité de but (#2) entre la planche
latérale (#1) à l'aide de deux boulons (#10) et de deux rondelles (n° 11) de
chaque côté, comme indiqué sur les figures 1 et 1A.
REMARQUE : Ne serrez pas les vis trop rapidement maintenant, vous
devrez le faire ultérieurement.
ÉTAPE 4 : Répétez l'étape pour fixer l'autre panneau d'extrémité du but
(n°2) au panneau latéral (n°1), comme indiqué sur la FIG. 2.
REMARQUE : Assurez-vous que les deux panneaux latéraux (n° 1) et les
panneaux d'extrémité du but (n° 2) sont carrés. Maintenant serrez toutes
les connexions des étapes 3 et 4.

6
ÉTAPE 5 : Faites glisser les quatre coins (#32) dans la rainure du
panneau latéral (#1) et du panneau d'extrémité (#2), fixez le Coins (n° 32)
aux planches en utilisant deux vis (n° 13) par coin, comme indiqué sur la
FIG 3A.

7
ÉTAPE 6 : Réparer le jeu de football terrain (#3) sur le panneau latéral
(#1) et les panneaux de but (#2) en utilisant Seize vis à tête ronde (#12),
comme indiqué sur la FIG.4.
ÉTAPE 7 : Placez les supports (#5) sur le terrain de jeu (#3) comme
indiqué sur la FIG.5. Ensuite, placez le tiges de support (#35) dans la
rainure des supports (#5), fixez-les à l'aide de six des écrous de tige de

8
support (n° 34), comme illustré sur les figures 5 et 5A.
ÉTAPE 8 : Fixez les deux boîtes de but (#36) aux planches d'extrémité
(#2) à l'aide de quatre vis à tête ronde. (#13) par boîte de but (#36) comme
indiqué sur la FIG.6A.
ÉTAPE 9 : Fixez le pied gauche (#6) et le pied droit (#7) avec la barre
chromée (#33) entre eux pour la table de baby-foot à l'aide de quatre
9
boulons de pied (n ° 8) et de quatre rondelles (n ° 9) par pied, comme
indiqué sur les figures 7 et 7A.
REMARQUE : Si vous rencontrez des difficultés pour insérer les boulons
des pieds (n° 8), vous devrez peut-être revenir à l'étape 3 et desserrer un
peu les boulons (n° 10).
ÉTAPE 10 : Localisez les niveleurs de pieds (#28) et vissez-en un dans
chaque pied, comme indiqué sur les FIGS 8 et 8A.

10
ÉTAPE 11 : Soulevez la table du sol avec deux adultes forts, retournez-la
et posez la table. ses jambes à l'endroit où vous jouerez au jeu.
REMARQUE : Ne tenez pas les jambes ! Vous devriez récupérer la table
au meuble de table ! comme le montre la figure 9 .

11
ATTENTION : Deux adultes forts sont nécessaires pour retourner la
table comme indiqué.
1. Prenez la table, un adulte à chaque extrémité. Ne tenez pas les
jambes ! Tu devrais prendre la table à table armoire !
2. Retournez la table.
3. Placez-le sur les quatre pieds en même temps sur le sol.
ÉTAPE 12 : Vérifiez maintenant si toutes les connexions effectuées lors
des étapes précédentes sont serrées.
ÉTAPE 13 : Faites glisser un joueur (#19 ou #20) au milieu et un anneau
d'arrêt (#24) et un caoutchouc pare-chocs (#25) de chaque côté du joueur
sur les deux tiges 1 joueur (#15).Voir.FIG.10 et 10A.
Faites glisser le pare-chocs en caoutchouc (#25) et les joueurs (#19 ou
#20) sur les tiges des joueurs (#16,#17 et #18). Voir FIG.10 et 10A.
12
ÉTAPE 14 : Utilisez une vis à tête ronde (#21) et un écrou (#22) par
bague d'arrêt (#24) et joueur (#19) ou #20) comme le montrent les figures
11 et 11A.

13
ÉTAPE 15 : Fixez les deux coupelles de retour de bille (#26) aux
panneaux latéraux (#1) à l'aide d'une vis à tête plate (#14) par côté. Voir
FIG.12 et 12A.
ÉTAPE 16 : Faites glisser les poignées (#30) et les embouts (#31) sur les

14
tiges du lecteur.
CONSEIL : Pour faciliter la fixation des poignées, vaporisez un peu de
nettoyant pour vitres sur les extrémités de la tige avant à l'installation et
martelez-le doucement avec un marteau en bois sur les tiges du lecteur.
Voir FIG.13 et 13A .

15
ÉTAPE 17 : Fixez les deux marqueurs (#27) aux planches d'extrémité (#2)
à l'aide de deux vis à tête plate (#4) par marqueur.Voir FIG.14.
16
ÉTAPE 18 : Si la table n'est pas de niveau, vous pouvez ajuster les
niveleurs de pieds (#28) un par un jusqu'à ce que la table soit exactement
au niveau.Voir FIG.15 et 15A.
ÉTAPE 19 : Fixez les deux porte-gobelets (#37) pour placer les deux
planches d'extrémité (#2) bouche d'une grotte par porte-gobelet (#37).Voir
FIG.16.

17
L' assemblage du jeu est terminé. Vous êtes maintenant prêt à jouer .

18

19
Fabricant : Shanghaimuxinmuyeyouxiangongsi
Adresse : Baoshanqu Shuangchenglu 803long 11hao 1602A-1609shi
Shanghai
Importé en Australie : SIHAO PTY LTD, 1 ROKEVA STREETASTWOOD
NSW 2122 Australie
Importé aux États-Unis : Sanven Technology Ltd.
Suite 250 , 9166 Anaheim Place, Rancho Cucamonga, CA 91730
Fabriqué en Chine
REP
EC
SHUNSHUN GmbH
Römeräcker 9 Z2021,76351
Linkenheim-Hochstetten,Germany
euvertreter@gmail.com
+49 1727041930
REP
UK
Pooledas Group Ltd
Unit 5 Albert Edward House, The
Pavilions Preston, United Kingdom
pooledas123@gmail.com
Tel: 01772418127


Techniczny Certyfikat wsparcia i e-gwarancji
www.vevor.com/support
PIŁKA NOŻNA
MODEL : SUO-5529L
We continue to be committed to provide you tools with competitive price.
"Save Half", "Half Price" or any other similar expressions used by us only represents an
estimate of savings you might benefit from buying certain tools with us compared to the major
top brands and does not necessarily mean to cover all categories of tools offered by us. You
are kindly reminded to verify carefully when you are placing an order with us if you are
actually saving half in comparison with the top major brands.


1
MODEL: SUO-5529L
Have product questions? Need technical support? Please feel free to
contact us:
Technical Support and E-Warranty Certificate
www.vevor.com/support
NEED HELP? CONTACT US!
This is the original instruction, please read all manual instructions
carefully before operating. VEVOR reserves a clear interpretation of our
user manual. The appearance of the product shall be subject to the
product you received. Please forgive us that we won't inform you again if
there are any technology or software updates on our product.
TABLE SOCCER

2
Ostrzeżenie — aby zmniejszyć ryzyko obrażeń, użytkownik
musi uważnie przeczytać instrukcję obsługi.
SAFETY WARNINGS AND PRECAUTIONS
Dziękujemy za korzystanie z tego produktu . Aby mieć pewność, że
będziesz mógł prawidłowo obsługiwać maszynę, przeczytaj uważnie
niniejszą instrukcję przed rozpoczęciem użytkowania i zachowaj ją
odpowiednio do wykorzystania w przyszłości . Aby zapewnić bezpieczne
użytkowanie, pamiętaj o zapoznaniu się ze środkami ostrożności i
zasadami bezpieczeństwa zawartymi na tej stronie . Niniejsza instrukcja
zawiera ostrzeżenia i środki ostrożności dotyczące bezpieczeństwa,
obsługi i konserwacji . Ostrzeżenia i instrukcje omówione w tej instrukcji
nie obejmują wszystkich możliwych warunków i sytuacji, które mogą
wystąpić . Ostrożność i zdrowy rozsądek nie są podstawą tego produktu,
ponieważ wierzymy, że jego zastosowanie będzie zgodne z tymi kodami .
Przed użyciem urządzenia przeczytaj WSZYSTKIE instrukcje .
1. Montaż musi przebiegać zgodnie z poniższymi instrukcjami.
Nieprawidłowy montaż może stanowić zagrożenie.
2. Nie montuj się będąc zmęczonym, pod wpływem alkoholu, narkotyków
lub leków.
3.Waga, elastyczność i inne właściwości produktu mają zastosowanie
wyłącznie do produktów prawidłowo i całkowicie zmontowanych.
4. Utrzymuj miejsce zbiórki w czystości i dobrze oświetlone.
5. Podczas montażu trzymaj osoby postronne z dala od obszaru.
6. To jest sprzęt, a nie zabawka, należy go używać pod okiem
profesjonalisty. Nie pozwalaj dzieciom i zwierzętom bawić się samotnie ani
nie zbliżaj się do tego przedmiotu.
7. Używaj wyłącznie zgodnie z przeznaczeniem. Nie siadaj ani nie stawaj
na produkcie.
8. Sprawdź przed każdym użyciem. Nie używaj go, jeśli części są luźne lub
uszkodzone.
9 . Nie używaj tego urządzenia do celów innych niż wskazane .
3
1 0 . Nie używaj go do celów komercyjnych .
1 1 . Nie czyść go żadnymi materiałami ściernymi .
1 2 . Nigdy nie pozostawiaj go bez nadzoru podczas użytkowania .
1 3 . Mocz i odchody zwierząt domowych mogą uszkodzić produkt, należy
je trzymać z daleka .
1 4 . Nie umieszczaj produktu na lub w pobliżu gorącego powietrza,
palników elektrycznych lub grzejników .
15 . Małe dzieci należy nadzorować, aby mieć pewność, że nie bawią się
produktem . Zwierzęta powinny trzymać się z daleka od produktu.
Nie używać na zewnątrz w deszczowe i pochmurne dni, unikać uderzeń
pioruna i upadków . Osoby lub zwierzęta wiszące na produkcie mogą
spowodować obrażenia lub śmierć .
OSTRZEŻENIE: Ryzyko zadławienia — zabawka zawiera małe
kulki i/lub małe części. Nie przeznaczona dla dzieci poniżej 3 lat.
WAŻNY! Prosimy o zachowanie instrukcji. Przed przystąpieniem do
montażu prosimy o zapoznanie się z niniejszą instrukcją książkę, aby
zapoznać się ze wszystkimi częściami i etapami montażu. Zalecamy te
dwa dorośli montują stół do gry w piłkarzyki. Zapoznaj się z poniższą listą
części i upewnij się, że wszystkie części są prawidłowe zostały
uwzględnione.
PARTS LIST

4
ASSEMBLY INSTRUCTIONS:
5
Zalecamy, aby nad złożeniem tej gry pracowały dwie osoby dorosłe.
KROK 1: Otwórz 2 kartony swojego nowego stołu do gry w piłkarzyki
blisko miejsca, w którym właściwie idziesz korzystać ze stołu.
KROK 2: Wyjmij całą zawartość kartonów i sprawdź, czy masz wszystkie
wymienione części jak pokazano na liście części. Sugerujemy użycie
dolnego kartonu jako czystej płaskiej części roboczej obszar chroniący stół.
Ostrożnie odetnij lub oderwij cztery rogi największego kartonu tak aby
dolny karton stał się teraz Twoim obszarem pracy.
KROK 3: Przymocuj jedną deskę koń cową bramki (#2) pomiędzy deską
boczną (#1) za pomocą dwóch śrub (#10) i dwóch podkładki (#11) po
każdej stronie, jak pokazano na FIG. 1 i 1A.
UWAGA: Nie dokręcaj teraz śrub zbyt szybko, będzie to konieczne w
późniejszym etapie.
KROK 4: Powtórz krok, aby przymocować drugą deskę końcową bramki
(#2) do deski bocznej (#1), jak pokazano na RYS. 2.
UWAGA: Upewnij się, że dwie deski boczne (#1) i deski końcowe bramki
(#2) są kwadratowe. Teraz dokręć wszystkie połączenia z kroku 3 i 4.
6
KROK 5: Wsuń cztery rogi (#32) w rowek deski bocznej (#1) i deski koń
cowej (#2), zamocuj Narożniki (#32) do desek za pomocą dwóch wkrętów
(#13) na każdy narożnik, jak pokazano na FIG. 3A.
7
KROK 6: Napraw grę w piłkę nożną pole (#3) na planszy bocznej (#1) i
tablicach ko ń cowych bramek (#2) za pomocą Szesnaście śrub z łbem
podkładkowym (nr 12), jak pokazano na FIG.4.
KROK 7: Umieść wsporniki (#5) na polu gry (#3), jak pokazano na FIG.5.
Następnie umieść pręty wsporcze (#35) w rowku wsporników (#5),
przymocuj je za pomocą sześciu z nich nakrętki pręta nośnego (#34), jak
8
pokazano na FIG. 5 i 5A.
KROK 8: Przymocuj dwie bramki (#36) do desek ko ń cowych (#2) za
pomocą czterech śrub z łbem podkładkowym (#13) na bramkę (#36), jak
pokazano na FIG.6A.
KROK 9: Połącz lewą nogę (#6) i prawą nogę (#7) za pomocą
chromowanej listwy (#33) pomiędzy nimi, aby stół do gry w piłkarzyki za
9
pomocą czterech śrub do nóg (#8) i czterech podkładek (#9) na każdą
nogę, jak pokazano na FIG. 7 i 7A.
UWAGA: Jeśli masz problemy z włożeniem śrub nóg (#8), być może
będziesz musiał wrócić do kroku 3 i nieco poluzować śruby (#10).
KROK 10: Znajdź podkładki poziomujące nóg (#28) i przykręć je do
każdej nogi, jak pokazano na FIG. 8 i 8A.

10
KROK 11: Podnieś stół z podłogi za pomocą dwóch silnych dorosłych
osób, odwróć go i ustaw stół nogi w miejscu, w którym będziesz grać w
grę.
UWAGA: Nie trzymaj za nogi! Powinieneś podnieść stół z szafki stołowej !
jak pokazano na FIG. 9 .

11
UWAGA: Do przewrócenia stołu w sposób pokazany na rysunku
potrzebne są dwie silne osoby dorosłe.
1. Podnieś stół, po jednej osobie dorosłej z każdego końca. Nie trzymaj
nóg! Powinieneś podnieść stół przy stole gabinet !
2. Przewróć stół.
3. Połóż go jednocześnie na wszystkich czterech nóżkach na ziemi.
KROK 12: Teraz sprawdź, czy wszystkie połączenia wykonane w
poprzednich krokach są dokręcone.
KROK 13: Wsu ń jednego zawodnika (#19 lub #20) na środek i jeden
pierście ń ograniczający (#24) i jedną gumkę zderzak (#25) po obu
stronach odtwarzacza na dwa pręty dla 1 gracza (#15). Patrz FIG. 10 i 10
A.
Nasu ń gumowy zderzak (#25) i odtwarzacze (#19 lub #20) na pręty
odtwarzacza (#16, #17 i #18) Patrz FIG. 10 i 10A.

12
KROK 14: Użyj jednej śruby z łbem okrągłym (#21) i jednej nakrętki (#22)
na pierścień zatrzymujący (nr 24) i gracza (nr 19 lub #20) jak pokazano na
FIG. 11 i 11A.

13
KROK 15: Przymocuj dwie miseczki zwrotne kulek (#26) do desek
bocznych (#1) za pomocą jednej śruby z łbem płaskim (#14) na stronę.
Patrz FIG. 12 i 12A.
14
KROK 16: Nasuń uchwyty (#30) i zaślepki (#31) na drążki odtwarzacza.
WSKAZÓWKA: Aby ułatwić montaż uchwytów, spryskaj ko ń cówki
drążków niewielką ilością środka do czyszczenia okien do montażu i
delikatnie wbij go drewnianym młotkiem w pręty odtwarzacza. Patrz FIG.
13 i 13A .
15
KROK 17: Przymocuj dwie nacięcia (#27) do desek koń cowych (#2) za
pomocą dwóch śrub z łbem płaskim (#4) na strzelca. Patrz FIG.14.
16
KROK 18: Jeśli stół nie jest wypoziomowany, możesz regulować
poziomice nóg (#28) jedna po drugiej, aż stół będzie dokładnie na
poziomie.Patrz FIG.15 i 15A.
KROK 19: Zamontuj dwa uchwyty na kubki (#37) aby umieścić dwie deski
końcowe (#2) ujście jaskini per uchwyt na kubek (#37). Patrz RYS.16.
17
Montaż gry jest zakończony. Jesteś teraz gotowy gotowy do gry .

18
19
Producent: Shanghaimuxinmuyeyouxiangongsi
Adres: Baoshanqu Shuangchenglu 803long 11hao 1602A-1609shi
Szanghaj
Import do AUS: SIHAO PTY LTD, 1 ROKEVA STREETEASTWOOD NSW
2122 Australia
Import do USA: Sanven Technology Ltd.
Apartament 250 , 9166 Anaheim Place, Rancho Cucamonga, Kalifornia
91730
Wyprodukowano w Chinach
REP
EC
SHUNSHUN GmbH
Römeräcker 9 Z2021,76351
Linkenheim-Hochstetten,Germany
euvertreter@gmail.com
+49 1727041930
REP
UK
Pooledas Group Ltd
Unit 5 Albert Edward House, The
Pavilions Preston, United Kingdom
pooledas123@gmail.com
Tel: 01772418127


Technisch Support- und E-Garantiezertifikat
www.vevor.com/support
TISCHFUSSBALL
MODELL : SUO-5529L
We continue to be committed to provide you tools with competitive price.
"Save Half", "Half Price" or any other similar expressions used by us only represents an
estimate of savings you might benefit from buying certain tools with us compared to the major
top brands and does not necessarily mean to cover all categories of tools offered by us. You
are kindly reminded to verify carefully when you are placing an order with us if you are
actually saving half in comparison with the top major brands.

1
MODELL: SUO-5529L
Have product questions? Need technical support? Please feel free to
contact us:
Technical Support and E-Warranty Certificate
www.vevor.com/support
NEED HELP? CONTACT US!
This is the original instruction, please read all manual instructions
carefully before operating. VEVOR reserves a clear interpretation of our
user manual. The appearance of the product shall be subject to the
product you received. Please forgive us that we won't inform you again if
there are any technology or software updates on our product.
TABLE SOCCER

2
Warnung: Um das Verletzungsrisiko zu verringern, muss der
Benutzer die Bedienungsanleitung sorgfältig lesen.
SAFETY WARNINGS AND PRECAUTIONS
Vielen Dank, dass Sie dieses Produkt verwenden . Um sicherzustellen,
dass Sie die Maschine ordnungsgemäß bedienen können, lesen Sie diese
Anleitung vor der Inbetriebnahme sorgfältig durch und bewahren Sie sie
zum späteren Nachschlagen sorgfältig auf . Bitte lesen Sie unbedingt die
Vorsichtsmaßnahmen und Sicherheitsregeln auf dieser Seite, um eine
sichere Verwendung zu gewährleisten . In diesem Handbuch werden
Sicherheitswarnungen und Vorsichtsmaßnahmen sowie Bedienung und
Wartung beschrieben . Die in diesem Handbuch aufgeführten Warnungen
und Anweisungen können nicht alle möglichen Bedingungen und
Situationen abdecken, die auftreten können . Vorsicht und gesunder
Menschenverstand sind in diesem Produkt nicht eingebaut, da wir davon
ausgehen, dass die Verwendung diesen Codes entspricht .
Bitte lesen Sie ALLE Anweisungen, bevor Sie Ihr Gerät verwenden .
1. Beim Zusammenbau müssen diese Anweisungen befolgt werden. Eine
falsche Montage kann eine Gefahr darstellen.
2. Montieren Sie das Gerät nicht, wenn Sie müde sind oder unter dem
Einfluss von Alkohol, Drogen oder Medikamenten stehen.
3.Gewicht, Elastizität und sonstige Produkteigenschaften gelten nur für
korrekt und vollständig montierte Produkte.
4. Halten Sie den Montagebereich sauber und gut beleuchtet.
5. Halten Sie während der Montage unbeteiligte Personen aus dem
Bereich fern.
6. Dies ist ein Gerät, kein Spielzeug, es muss unter Anleitung eines
Fachmanns verwendet werden. Erlauben Sie Kindern und Haustieren nicht,
alleine zu spielen oder sich diesem Gegenstand zu nähern.
7. Nur bestimmungsgemäß verwenden. Setzen oder stehen Sie nicht auf
dem Produkt.
3
8. Vor jedem Gebrauch prüfen. Benutzen Sie es nicht, wenn Teile lose
oder beschädigt sind.
9 . Benutzen Sie dieses Gerät nicht für andere Zwecke als den
angegebenen .
1 0 . Benutzen Sie es nicht für kommerzielle Zwecke .
1 1 . Reinigen Sie es nicht mit scheuernden Materialien .
1 2 . Lassen Sie es während des Gebrauchs niemals unbeaufsichtigt .
1 3 . Urin und Kot von Haustieren können das Produkt beschädigen, bitte
fernhalten .
1 4 . Stellen Sie das Produkt nicht auf oder in die Nähe von Heißluft-,
Elektrobrennern oder Heizgeräten .
15 . Kleine Kinder sollten beaufsichtigt werden, um sicherzustellen, dass
sie nicht mit dem Produkt spielen . Haustiere sollten vom Produkt
ferngehalten werden.
An regnerischen und bewölkten Tagen nicht im Freien verwenden,
Blitzeinschläge und Stürze vermeiden . Am Produkt hängende Personen
oder Haustiere können zu Verletzungen oder zum Tod führen .
WARNUNG: Erstickungsgefahr – Spielzeug enthält kleine
Kugeln und/oder Kleinteile. Nicht für Kinder unter 3 Jahren.
WICHTIG! Bitte bewahren Sie Ihre Anleitung auf. Bevor Sie mit der
Montage beginnen, lesen Sie bitte diese Anleitung durch Buch, um sich mit
allen Teilen und Montageschritten vertraut zu machen. Wir empfehlen zwei
Erwachsene bauen den Kickertisch zusammen. Bitte beachten Sie die
Teileliste unten und stellen Sie sicher, dass alle Teile vorhanden sind
wurden aufgenommen.
PARTS LIST

4
ASSEMBLY INSTRUCTIONS:

5
Wir empfehlen, dass zwei Erwachsene zusammenarbeiten, um dieses
Spiel zusammenzubauen.
SCHRITT 1: Öffnen Sie die beiden Kartons Ihres neuen Kickertisches in
der Nähe des Standorts Du gehst tatsächlich den Tisch zu benutzen.
SCHRITT 2: Nehmen Sie den gesamten Inhalt aus den Kartons und
vergewissern Sie sich, dass alle aufgeführten Teile vorhanden sind wie in
der Teileliste gezeigt. Wir empfehlen Ihnen, den unteren Karton als
saubere, flache Arbeitsfläche zu verwenden Platz, um den Tisch zu
schützen. Schneiden oder reißen Sie vorsichtig die vier Kartonecken vom
größten Karton ab sodass der untere Karton nun Ihr Arbeitsbereich ist.
SCHRITT 3: Befestigen Sie ein Torendbrett (#2) mit zwei Schrauben (#10)
und zwei zwischen dem Seitenbrett (#1). Unterlegscheiben (Nr. 11) pro
Seite anbringen, wie in Abb. 1 und 1A gezeigt.
HINWEIS: Ziehen Sie die Schrauben jetzt nicht zu fest an, dies muss in
einem späteren Schritt erfolgen.
SCHRITT 4: Wiederholen Sie den Schritt, um das andere Torendbrett (#2)
am Seitenbrett (#1) zu befestigen, wie in ABB. gezeigt 2.
HINWEIS: Stellen Sie sicher, dass zwei Seitenbretter (Nr. 1) und
Torendbretter (Nr. 2) quadratisch sind. Jetzt Ziehen Sie alle Verbindungen
aus Schritt 3 und 4 fest.

6
SCHRITT 5: Schieben Sie die vier Ecken (#32) in die Nut des
Seitenbretts (#1) und des Endbretts (#2) und befestigen Sie sie Befestigen
Sie die Ecken (#32) an den Brettern, indem Sie zwei Schrauben (#13) pro
Ecke verwenden, wie in Abb. 3A gezeigt.
7
SCHRITT 6: Reparieren Sie das Fußballspiel Feld (#3) auf dem
Seitenbrett (#1) und den Torendbrettern (#2) verwenden Sechzehn
Scheibenkopfschrauben (Nr. 12), wie in ABB. 4 gezeigt.
SCHRITT 7: Platzieren Sie die Stützstreben (#5) auf dem Spielfeld (#3),
wie in ABB. 5 gezeigt. Platzieren Sie dann die Stützstangen (#35) in die
Nut der Stützstreben (#5) einführen und mit sechs davon befestigen
Stützstangenmuttern (#34) wie in Abb. 5 und 5A gezeigt.

8
SCHRITT 8: Befestigen Sie die beiden Torkästen (#36) mit vier
Unterlegscheibenschrauben an den Endbrettern (#2). (#13) pro Torkasten
(#36), wie in ABB. 6A gezeigt.
SCHRITT 9: Befestigen Sie das linke Bein (#6) und das rechte Bein (#7)
mit der Chromstange (#33) dazwischen Befestigen Sie den Kickertisch mit
vier Beinschrauben (#8) und vier Unterlegscheiben (#9) pro Bein, wie in
Abb. 7 und 7A gezeigt.

9
HINWEIS: Wenn Sie Probleme beim Einsetzen der Beinschrauben (#8)
haben, müssen Sie möglicherweise zu Schritt 3 zurückkehren und die
Schrauben (#10) etwas lösen.
SCHRITT 10: Suchen Sie die Beinnivellierer (#28) und schrauben Sie
einen in jedes Bein, wie in Abb. 8 und 8A gezeigt.
10
SCHRITT 11: Heben Sie die Tischbaugruppe mit zwei kräftigen
Erwachsenen vom Boden an, drehen Sie sie um und stellen Sie den Tisch
auf seine Beine an der Stelle, an der Sie das Spiel spielen werden.
HINWEIS: Nicht an den Beinen festhalten! Sie sollten den Tisch am
Tischschrank abholen ! wie in Abb. 9 dargestellt .
11
ACHTUNG: Um den Tisch wie abgebildet umzudrehen, sind zwei
kräftige Erwachsene erforderlich.
1. Heben Sie den Tisch hoch, jeweils ein Erwachsener an jedem Ende.
Halten Sie die Beine nicht fest! Sie sollten den Tisch am Tisch abholen
Kabinett !
2. Drehen Sie den Tisch um.
3.Stellen Sie es mit allen vier Füßen gleichzeitig auf den Boden.
SCHRITT 12: Überprüfen Sie nun, ob alle Verbindungen, die in den
vorherigen Schritten hergestellt wurden, fest angezogen sind.
SCHRITT 13: Schieben Sie einen Spieler (#19 oder #20) in die Mitte und
einen Anschlagring (#24) und einen Gummi Stoßfänger (#25) auf jeder
Seite des Players auf die beiden 1-Spieler-Stangen (#15).Siehe.ABB.10
und 10 A.
Schieben Sie den Gummipuffer (Nr. 25) und die Spieler (Nr. 19 oder Nr. 20)
auf die Spielerstangen (Nr. 16, Nr. 17 und Nr. 18). Siehe Abb. 10 und 10A.

12
SCHRITT 14: Verwenden Sie eine Rundkopfschraube (#21) und eine
Mutter (#22). pro Stoppring (#24) und Spieler (#19). oder #20) wie in Abb.
11 und 11A gezeigt.

13
SCHRITT 15: Befestigen Sie die beiden Kugelrücklaufschalen (#26) mit
einer Flachkopfschraube an den Seitenbrettern (#1). (#14) pro Seite. Siehe
ABB. 12 und 12A.
SCHRITT 16: Schieben Sie die Handgriffe (#30) und Endkappen (#31)
14
auf die Spielerstangen.
TIPP: Um das Anbringen der Griffe zu erleichtern, sprühen Sie vorher
etwas Fensterreiniger auf die Stangenenden zur Installation und hämmern
Sie es vorsichtig mit einem Holzhammer auf die Spielerstangen. Siehe
ABB. 13 und 13A .
15
SCHRITT 17: Befestigen Sie die beiden Kerben (#27) mit zwei
Flachkopfschrauben (#4) an den Endbrettern (#2). pro Torschütze. Siehe
ABB.14.

16
SCHRITT 18: Wenn der Tisch nicht nivelliert ist, können Sie die
Beinnivellierer (#28) einzeln anpassen, bis der Tisch nivelliert ist genau
eben. Siehe ABB. 15 und 15A.
SCHRITT 19: Befestigen Sie die beiden Getränkehalter (#37). um die
beiden Endbretter (#2) zu platzieren Höhlenmündung pro Getränkehalter
(Nr. 37). Siehe ABB. 16.

17
Der Zusammenbau des Spiels ist abgeschlossen. Jetzt sind Sie fertig
fertig zu spielen .
18

19
Hersteller: Shanghaimuxinmuyeyouxiangongsi
Adresse: Baoshanqu Shuangchenglu 803long 11hao 1602A-1609shi
Shanghai
Importiert nach AUS: SIHAO PTY LTD, 1 ROKEVA STREETEASTWOOD
NSW 2122 Australien
Importiert in die USA: Sanven Technology Ltd.
Suite 250 , 9166 Anaheim Place, Rancho Cucamonga, CA 91730
In China hergestellt
REP
EC
SHUNSHUN GmbH
Römeräcker 9 Z2021,76351
Linkenheim-Hochstetten,Germany
euvertreter@gmail.com
+49 1727041930
REP
UK
Pooledas Group Ltd
Unit 5 Albert Edward House, The
Pavilions Preston, United Kingdom
pooledas123@gmail.com
Tel: 01772418127


Technisch Ondersteuning en e-garantiecertificaat
www.vevor.com/support
TAFELVOETBAL
MODEL : SUO-5529L
We continue to be committed to provide you tools with competitive price.
"Save Half", "Half Price" or any other similar expressions used by us only represents an
estimate of savings you might benefit from buying certain tools with us compared to the major
top brands and does not necessarily mean to cover all categories of tools offered by us. You
are kindly reminded to verify carefully when you are placing an order with us if you are
actually saving half in comparison with the top major brands.


1
MODEL: SUO-5529L
Have product questions? Need technical support? Please feel free to
contact us:
Technical Support and E-Warranty Certificate
www.vevor.com/support
NEED HELP? CONTACT US!
This is the original instruction, please read all manual instructions
carefully before operating. VEVOR reserves a clear interpretation of our
user manual. The appearance of the product shall be subject to the
product you received. Please forgive us that we won't inform you again if
there are any technology or software updates on our product.
TABLE SOCCER

2
Waarschuwing-Om het risico op letsel te verminderen, moet de
gebruiker de handleiding zorgvuldig lezen.
SAFETY WARNINGS AND PRECAUTIONS
Bedankt voor het gebruik van dit product . Om er zeker van te zijn dat u de
machine correct kunt bedienen, dient u deze instructie zorgvuldig door te
lezen voordat u de machine gebruikt en deze goed te bewaren voor
toekomstig gebruik . Zorg ervoor dat u de voorzorgsmaatregelen en
veiligheidsregels op deze pagina leest om een veilig gebruik te
garanderen . Deze handleiding beschrijft veiligheidswaarschuwingen en
voorzorgsmaatregelen, bediening en onderhoud . De waarschuwingen en
instructies die in deze handleiding worden besproken, kunnen niet alle
mogelijke omstandigheden en situaties dekken die zich kunnen voordoen .
Voorzichtigheid en gezond verstand zijn niet ingebouwd in dit product,
omdat wij van mening zijn dat het gebruik aan deze codes zal voldoen .
Lees ALLE instructies voordat u uw machine gebruikt .
1. Bij het monteren moeten deze instructies worden gevolgd. Een onjuiste
montage kan een gevaar vormen.
2. Niet monteren als u moe bent of onder invloed bent van alcohol, drugs of
medicijnen.
3.Gewichts- en elastische en andere producteigenschappen zijn alleen van
toepassing op correct en compleet gemonteerde producten.
4. Houd de verzamelplaats schoon en goed verlicht.
5. Houd omstanders tijdens de montage uit de buurt.
6. Dit is een apparaat, geen speelgoed, het moet worden gebruikt onder
begeleiding van een professional. Laat kinderen en huisdieren niet alleen
spelen of in de buurt van dit artikel komen.
7. Alleen gebruiken zoals bedoeld. Ga niet op het product zitten of staan.
8. Inspecteer vóór elk gebruik. Gebruik het niet als onderdelen loszitten of
beschadigd zijn.
9 . Gebruik dit apparaat niet voor andere doeleinden dan het aangegeven
gebruik .
3
1 0 . Gebruik het niet voor commerciële doeleinden .
1 1 . Maak het niet schoon met schurend materiaal .
1 2 . Laat het nooit onbeheerd achter terwijl het in gebruik is .
1 3 . Urine en uitwerpselen van huisdieren kunnen het product
beschadigen, blijf uit de buurt .
1 4 . Plaats het product niet op of in de buurt van hete lucht, elektrische
branders of verwarmingstoestellen .
15 . Op jonge kinderen moet toezicht worden gehouden om ervoor te
zorgen dat ze niet met het product spelen . Huisdieren moeten uit de buurt
van het product blijven.
Niet buitenshuis gebruiken op regenachtige en bewolkte dagen, vermijd
blikseminslagen en vallen . Mensen of huisdieren die aan het product
hangen, kunnen letsel of de dood veroorzaken .
WAARSCHUWING: Verstikkingsgevaar – Speelgoed bevat
kleine balletjes en/of kleine onderdelen. Niet voor kinderen
jonger dan 3 jaar.
BELANGRIJK! Bewaar de instructies. Voordat u met de montage begint,
verzoeken wij u deze instructie door te lezen boek om vertrouwd te raken
met alle onderdelen en montagestappen. Wij raden twee aan volwassenen
monteren de voetbaltafel. Raadpleeg de onderstaande onderdelenlijst en
zorg ervoor dat alle onderdelen aanwezig zijn zijn opgenomen.
PARTS LIST

4
ASSEMBLY INSTRUCTIONS:
5
Wij raden aan dat twee volwassenen samenwerken om dit spel in
elkaar te zetten.
STAP1: Open de 2 dozen van uw nieuwe voetbaltafel dichtbij de plaats
waar je gaat eigenlijk om de tafel te gebruiken.
STAP2: Haal de volledige inhoud uit de dozen en controleer of u alle
vermelde onderdelen heeft zoals weergegeven op de onderdelenlijst. Wij
raden u aan de onderste doos als schoon, plat werkstuk te gebruiken
gebied om de tafel te beschermen. Knip of scheur voorzichtig de vier
kartonnen hoeken van de grootste doos zodat de onderste doos nu uw
werkgebied is.
STAP3: Bevestig één doeleindbord (#2) tussen het zijbord (#1) met
behulp van twee bouten (#10) en twee sluitringen (#11) per zijde, zoals
weergegeven in FIG. 1 en 1A.
LET OP: Draai de schroeven nu niet te snel vast, dit zal u in een latere
stap moeten doen.
STAP4: Herhaal de stap om het andere eindbord van het doel (#2) aan
het zijbord (#1) te bevestigen, zoals weergegeven in FIG 2.
OPMERKING: Zorg ervoor dat twee zijborden (#1) en doeleindborden (#2)
vierkant zijn draai alle verbindingen uit stap 3 en 4 vast.

6
STAP5: Schuif de vier hoeken (#32) in de groef van de zijplank (#1) en
eindplank (#2), bevestig de Hoeken (#32) aan de planken vastmaken met
behulp van twee schroeven (#13) per hoek, zoals getoond in FIG 3A.

7
STAP6: Corrigeer het voetbalspel veld (#3)op het zijbord(#1) en de
eindborden van het doel (#2)met behulp van Zestien ringkopschroeven
(#12) zoals getoond in FIG.4.
STAP7: Plaats de steunbeugels (#5) op het speelveld (#3) zoals
weergegeven in FIG.5. Plaats vervolgens de steunstangen (#35) in de
groef van de steunbeugels (#5), bevestig ze met behulp van zes van de
steunstangmoeren (#34) zoals weergegeven in FIG. 5 en 5A.
8
STAP8: Bevestig de twee doelboxen (#36) aan de eindplanken (#2) met
behulp van vier ringkopschroeven (#13)per doelvak (#36) zoals getoond in
FIG.6A.
STAP9: Bevestig het linkerbeen (#6) en het rechterbeen (#7) met de
verchroomde staaf (#33) ertussen de voetbaltafel met behulp van vier
pootbouten (#8) en vier ringen (#9) per poot, zoals weergegeven in FIG. 7
en 7A.

9
OPMERKING: Als u problemen ondervindt bij het plaatsen van de
pootbouten (#8), moet u mogelijk teruggaan naar stap 3 en de bouten (#10)
een beetje losdraaien.
STAP 10: Zoek de pootnivelleerders (#28) en schroef er één in elke poot,
zoals getoond in FIG 8 en 8A.

10
STAP 11: Til het tafelsamenstel met twee sterke volwassenen van de
vloer, draai het om en zet de tafel erop zijn poten op de locatie waar je het
spel gaat spelen.
LET OP: Houd de benen niet vast! U dient de tafel op te halen bij de
tafelkast ! zoals getoond in FIG. 9 .
11
LET OP: Er zijn twee sterke volwassenen nodig om de tafel om te
draaien zoals afgebeeld.
1. Pak de tafel op, één volwassene aan elk uiteinde. Houd de benen
niet vast! U dient de tafel aan tafel op te pakken kastje !
2. Draai de tafel om.
3. Plaats hem op alle vier de poten tegelijk op de grond.
STAP12: Controleer nu of alle verbindingen,die in de voorgaande stappen
zijn gemaakt, goed zijn vastgedraaid.
STAP13: Schuif één speler (#19 of #20) in het midden en één stopring
(#24) en één rubber bumper (#25) aan elke kant van de speler op de twee
1-spelerstangen (#15). Zie.FIG.10 en 10 A.
Schuif de rubberen bumper (#25) en spelers (#19 of #20) op de
spelersstangen (#16,#17 en #18) Zie FIG. 10 en 10A.

12
STAP14: Gebruik één ronde kopschroef (#21) en één moer (#22) per
stopring (#24) en speler (#19 of #20) zoals getoond in FIG. 11 en 11A.
13
STAP15: Bevestig de twee kogelterugvoerbekers (#26) aan de zijplanken
(#1) met behulp van één platte kopschroef (#14)per zijde.Zie FIG.12 en
12A.
STAP16: Schuif de handgrepen (#30) en einddoppen (#31) op de

14
spelersstangen.
TIP: Om de handgrepen gemakkelijker te kunnen bevestigen, kunt u
vooraf een beetje ruitenreiniger op de uiteinden van de stang spuiten voor
installatie en sla het voorzichtig met een houten hamer op de
spelersstangen. Zie FIG.13 en 13A .

15
STAP17: Bevestig de twee scorers (#27) aan de eindplanken (#2) met
behulp van twee platkopschroeven (#4) per scorer. Zie FIG.14.

16
STAP18: Als de tafel niet waterpas staat, kunt u de pootnivelleerders (#28)
één voor één aanpassen totdat de tafel waterpas staat. precies waterpas.
Zie FIG.15 en 15A.
STAP19: Bevestig de twee bekerhouders (#37) om de twee eindplanken
(#2) te plaatsen monding van een grot per bekerhouder (#37). Zie FIG.16.

17
De spelmontage is voltooid. Dat ben je nu klaar om te spelen .

18

19
Fabrikant: Shanghaimuxinmuyeyouxiangongsi
Adres: Baoshanqu Shuangchenglu 803long 11hao 1602A-1609shi
Shanghai
Geïmporteerd naar AUS: SIHAO PTY LTD, 1 ROKEVA
STREETEASTWOOD NSW 2122 Australië
Geïmporteerd naar de VS: Sanven Technology Ltd.
Suite 250 , 9166 Anaheim Place, Rancho Cucamonga, CA 91730
Gemaakt in China
REP
EC
SHUNSHUN GmbH
Römeräcker 9 Z2021,76351
Linkenheim-Hochstetten,Germany
euvertreter@gmail.com
+49 1727041930
REP
UK
Pooledas Group Ltd
Unit 5 Albert Edward House, The
Pavilions Preston, United Kingdom
pooledas123@gmail.com
Tel: 01772418127


Teknisk Support och e-garanticertifikat
www.vevor.com/support
BORDSFOTBOLL
MODELL : SUO-5529L
We continue to be committed to provide you tools with competitive price.
"Save Half", "Half Price" or any other similar expressions used by us only represents an
estimate of savings you might benefit from buying certain tools with us compared to the major
top brands and does not necessarily mean to cover all categories of tools offered by us. You
are kindly reminded to verify carefully when you are placing an order with us if you are
actually saving half in comparison with the top major brands.


1
MODELL: SUO-5529L
Have product questions? Need technical support? Please feel free to
contact us:
Technical Support and E-Warranty Certificate
www.vevor.com/support
NEED HELP? CONTACT US!
This is the original instruction, please read all manual instructions
carefully before operating. VEVOR reserves a clear interpretation of our
user manual. The appearance of the product shall be subject to the
product you received. Please forgive us that we won't inform you again if
there are any technology or software updates on our product.
TABLE SOCCER

2
Varning - För att minska risken för skada måste användaren
läsa instruktionerna noggrant.
SAFETY WARNINGS AND PRECAUTIONS
Tack för att du använder den här produkten . För att försäkra dig om att du
kan använda maskinen korrekt, läs denna instruktion noggrant före
användning och förvara den på rätt sätt för framtida referens . Var noga
med att läsa försiktighetsåtgärderna och säkerhetsreglerna på den här
sidan för att säkerställa din säker användning . Denna handbok kommer att
beskriva säkerhetsvarningar och försiktighetsåtgärder, drift, underhåll .
Varningarna och instruktionerna som granskas i denna handbok kan inte
täcka alla möjliga tillstånd och situationer som kan uppstå . Försiktighet
och sunt förnuft är inte inbyggt i denna produkt, eftersom vi tror att
användningen kommer att följa dessa koder .
Läs ALLA instruktionerna innan du använder din maskin .
1. Montering måste följa dessa instruktioner. Felaktig montering kan vara
en fara.
2. Sätt dig inte ihop när du är trött eller påverkad av alkohol, droger eller
mediciner.
3. Vikt och elastik och andra produktegenskaper är endast tillämpliga på
korrekt och fullständigt monterade produkter.
4. Håll monteringsområdet rent och väl upplyst.
5. Håll åskådare borta från området under monteringen.
6. Detta är en utrustning, inte en leksak, den måste användas under
ledning av en professionell. Tillåt inte barn och husdjur att leka ensamma
eller närma sig detta föremål.
7. Använd endast på avsett sätt. Sitt eller stå inte på produkten.
8. Inspektera före varje användning. Använd den inte om delar är lösa eller
skadade.
9 . Använd inte denna enhet för andra ändamål än den angivna
användningen .
1 0 . Använd den inte för kommersiella ändamål .
3
1 1 . Rengör den inte med något slipande material .
1 2 . Lämna den aldrig utan uppsikt när den används .
1 3 . Urin och avföring från husdjur kan skada produkten, håll undan .
1 4 . Placera inte produkten på eller nära varmluft, elektriska brännare eller
värmare .
15 . Små barn bör övervakas för att säkerställa att de inte leker med
produkten . Husdjur bör hålla sig borta från produkten.
Använd inte utomhus under regniga och molniga dagar, undvik
blixtnedslag och fall . Människor eller husdjur som hänger på produkten
kommer att orsaka skada eller dödsfall .
VARNING: Kvävningsrisk - Leksaken innehåller små bollar
och/eller små delar. Ej för barn under 3 år.
VIKTIG! Behåll dina instruktioner. Innan du försöker montera, läs igenom
denna instruktion boka för att bekanta dig med alla delar och
monteringssteg. Vi rekommenderar att två vuxna monterar fotbollsbordet.
Se reservdelslistan nedan och se till att alla delar har tagits med.
PARTS LIST
4
ASSEMBLY INSTRUCTIONS:
Vi rekommenderar att två vuxna arbetar tillsammans för att sätta ihop
detta spel.
STEG1: Öppna de 2 kartongerna på ditt nya fotbollsbord nära platsen där
du går faktiskt att använda bordet.
STEG 2: Ta bort allt innehåll från kartongernas insida och kontrollera att
du har alla listade delar som visas på reservdelslistan. Vi föreslår att du
använder den nedre kartongen som en ren plan arbetsyta område för att
skydda bordet. Klipp eller riv försiktigt de fyra kartongh örnen från den
största kartongen så att den nedre kartongen nu är ditt arbetsområde.
STEG 3: Fäst en måländbräda (#2) mellan sidobrädan (#1) med två bultar
(#10) och två brickor (#11) per sida som visas i FIG 1 och 1A.
OBS: Dra inte åt skruvarna för snabbt nu, i ett senare steg måste du göra
det.
5
STEG4: Upprepa steget för att fästa den andra måländbrädan (#2) på
sidobrädan (#1), som visas i FIG. 2.
OBS: Se till att två sidobrädor (#1) och måländbrädor (#2) är fyrkantiga.
dra åt alla anslutningar från steg 3 och 4.
6
STEG 5: Skjut in de fyra hörnen (#32) i spåret på sidobrädan (#1) och
ändbrädan (#2), Fixa Hörn (#32) till brädorna genom att använda två
skruvar (#13) per hörn som visas i FIG 3A.
STEG6: Fixa fotbollsspelet fält (#3) på sidobrädan (#1) och målslutbrädor
(#2) med hjälp av Sexton brickhuvudskruvar (#12) som visas i FIG.4.
STEG7: Placera stödstag (#5) på spelplanen (#3) som visas i FIG.5.

7
Placera sedan stödstänger (#35) i spåret på stödstagen (#5), fäst dem
med sex av stödstångsmuttrar (#34) som visas i FIG 5 och 5A.
STEG 8: Fäst de två mållådorna (#36) på ändbrädorna (#2) med hjälp av
fyra brickhuvudskruvar (#13)per mållåda (#36) som visas i FIG.6A.
STEG9: Fäst det vänstra benet (#6) och det högra benet (#7) med
kromstången (#33) mellan dem fotbollsbordet med fyra benbultar (#8) och
fyra brickor (#9) per ben som visas i FIG 7 och 7A.

8
OBS: Om du har problem med att sätta in benbultarna (#8), kan du behöva
gå tillbaka till steg 3 och lossa bultarna (#10) lite.
STEG 10: Lokalisera bennivåerna (#28) och skruva fast en i varje ben
som visas i FIG 8 och 8A.
9
STEG 11: Lyft bordet från golvet med två starka vuxna, vänd på det och
ställ bordet på dess ben på den plats där du ska spela spelet.
OBS: Håll inte i benen! Du bör hämta bordet vid bordsskåpet ! såsom visas
i FIG 9 .
VARNING: Två starka vuxna behövs för att vända bordet enligt bilden.
1.Plocka upp bordet, en vuxen i varje ände. Håll inte i benen! Du bör
hämta bordet vid bordet skåp !
2. Vänd på bordet.
3. Placera den på alla fyra fötterna samtidigt på marken.
STEG12: Kontrollera nu om alla anslutningar, som gjordes i de
10
föregående stegen, är åtdragna.
STEG 13: Skjut en spelare (#19 eller #20) i mitten och en stoppring (#24)
och en gummi stötfångare (#25) på varje sida av spelaren på de två
1-spelares spöna (#15).Se.FIG.10 och 10A.
Skjut gummistötfångaren (#25) och spelare (#19 eller #20) på
spelarstavarna (#16,#17 och #18) Se FIG. 10 och 10A.
STEG 14: Använd en skruv med rund huvud (#21) och en mutter (#22)
11
per stoppring (#24) och spelare (#19 eller #20) såsom visas i FIG 11 och
11A.
STEG 15: Fäst de två kulreturkopparna (#26) på sidobrädorna (#1) med
en platt skruv (#14)per sida. Se FIG. 12 och 12A.
12
STEG 16: Skjut in handtagen (#30) och ändlocken (#31) på
spelarstavarna.
TIPS: För att göra handtagen lättare att fästa, spraya lite fönsterputs på
stångändarna innan för installation och hamra den försiktigt med en
trähammare på spelarstavarna. Se FIG.13 och 13A .

13
STEG 17: Fäst de två poängskivorna (#27) på gavelbrädorna (#2) med
två plattskruvar (#4) per målskytt. Se FIG.14.
14
STEG 18: Om bordet inte är vågrätt kan du justera bennivåerna (#28) en
efter en tills bordet är exakt i nivå. Se FIG.15 och 15A.
STEG 19: Fäst de två mugghållarna (#37) för att placera de två
gavelbrädorna (#2) mynning av en grotta per mugghållare (#37). Se
FIG.16.

15
Spelsammansättningen är klar. Du är nu redo att spela .

16

17
Tillverkare: Shanghaimuxinmuyeyouxiangongsi
Adress: Baoshanqu Shuangchenglu 803long 11hao 1602A-1609shi
Shanghai
Importerad till AUS: SIHAO PTY LTD, 1 ROKEVA STREETEASTWOOD
NSW 2122 Australien
Importerad till USA: Sanven Technology Ltd.
Suite 250 , 9166 Anaheim Place, Rancho Cucamonga, CA 91730
Tillverkad i Kina
REP
EC
SHUNSHUN GmbH
Römeräcker 9 Z2021,76351
Linkenheim-Hochstetten,Germany
euvertreter@gmail.com
+49 1727041930
REP
UK
Pooledas Group Ltd
Unit 5 Albert Edward House, The
Pavilions Preston, United Kingdom
pooledas123@gmail.com
Tel: 01772418127


Técnico Certificado de soporte y garantía electrónica
www.vevor.com/support
FUTBOLÍN
MODELO : SUO-5529L
We continue to be committed to provide you tools with competitive price.
"Save Half", "Half Price" or any other similar expressions used by us only represents an
estimate of savings you might benefit from buying certain tools with us compared to the major
top brands and does not necessarily mean to cover all categories of tools offered by us. You
are kindly reminded to verify carefully when you are placing an order with us if you are
actually saving half in comparison with the top major brands.

1
MODELO: SUO-5529L
Have product questions? Need technical support? Please feel free to
contact us:
Technical Support and E-Warranty Certificate
www.vevor.com/support
NEED HELP? CONTACT US!
This is the original instruction, please read all manual instructions
carefully before operating. VEVOR reserves a clear interpretation of our
user manual. The appearance of the product shall be subject to the
product you received. Please forgive us that we won't inform you again if
there are any technology or software updates on our product.
TABLE SOCCER

2
Advertencia: para reducir el riesgo de lesiones, el usuario debe
leer atentamente el manual de instrucciones.
SAFETY WARNINGS AND PRECAUTIONS
Gracias por usar este producto . Para asegurarse de que puede operar la
máquina correctamente, lea atentamente estas instrucciones antes de
utilizarla y consérvelas adecuadamente para consultarlas en el futuro .
Asegúrese de leer las precauciones y reglas de seguridad en esta página
para garantizar su uso seguro . Este manual describirá las advertencias y
precauciones de seguridad, operación y mantenimiento . Las advertencias
e instrucciones revisadas en este manual no pueden cubrir todas las
condiciones y situaciones posibles que puedan ocurrir . Este producto no
incluye precaución ni sentido común, ya que creemos que los usos
cumplirán con estos códigos .
Lea TODAS las instrucciones antes de utilizar su máquina .
1. El montaje debe seguir estas instrucciones. El montaje incorrecto puede
ser un peligro.
2. No reunirse cuando esté cansado o bajo la influencia de alcohol, drogas
o medicamentos.
3. El peso, la elasticidad y otras propiedades del producto solo se aplican
a productos ensamblados correcta y completamente.
4. Mantenga el área de montaje limpia y bien iluminada.
5. Mantenga a las personas transeúntes fuera del área durante el montaje.
6. Este es un equipo, no un juguete, debe usarse bajo la guía de un
profesional. No permita que los niños y las mascotas jueguen solos o se
acerquen a este artículo.
7. Úselo únicamente según lo previsto. No se siente ni se pare sobre el
producto.
8. Inspeccione antes de cada uso. No lo utilice si las piezas están sueltas o
dañadas.
9 . No utilice esta unidad para ningún otro propósito que no sea el
indicado .
3
1 0 . No lo utilice con fines comerciales .
1 1 . No lo limpie con ningún material abrasivo .
1 2 . Nunca lo deje desatendido mientras esté en uso .
1 3 . La orina y las heces de las mascotas pueden dañar el producto;
manténgalo alejado .
1 4 . No coloque el producto sobre o cerca de aire caliente, quemadores o
calentadores eléctricos .
15 . Se debe supervisar a los niños pequeños para asegurarse de que no
jueguen con el producto . Las mascotas deben mantenerse alejadas del
producto.
No utilizar al aire libre en días lluviosos y nublados, evitar rayos y caídas .
Las personas o mascotas que cuelguen del producto causarán lesiones o
la muerte .
ADVERTENCIA: Peligro de asfixia: el juguete contiene pelotas
pequeñas y/o piezas pequeñas. No apto para niños menores de
3 años.
¡ IMPORTANTE! Conserve sus instrucciones. Antes de intentar el
montaje, lea estas instrucciones. libro para familiarizarse con todas las
piezas y pasos de montaje. Recomendamos que dos Los adultos
ensamblan el futbolín. Consulte la lista de piezas a continuación y
asegúrese de que todas las piezas han sido incluidos.
PARTS LIST
4
ASSEMBLY INSTRUCTIONS:

5
Recomendamos que dos adultos trabajen juntos para armar este
juego.
PASO 1: Abra las 2 cajas de su nuevo futbolín cerca del lugar donde en
realidad vas para usar la mesa.
PASO 2: Retire todo el contenido del interior de las cajas y verifique que
tenga todas las piezas enumeradas. como se muestra en la lista de piezas.
Le sugerimos que utilice la caja inferior como un lugar de trabajo plano y
limpio. área para proteger la mesa. Corte o rasgue con cuidado las cuatro
esquinas de la caja más grande. de modo que la caja inferior sea ahora su
área de trabajo.
PASO 3: Coloque una tabla del extremo de la portería (#2) entre la tabla
lateral (#1) usando dos pernos (#10) y dos arandelas (#11) por lado como
se muestra en las FIG 1 y 1A.
NOTA: No apriete los tornillos demasiado rápido ahora; tendrá que hacerlo
en un paso posterior.
PASO 4: Repita el paso para fijar el otro tablero del extremo de la portería
(#2) al tablero lateral (#1), como se muestra en la FIG. 2.
NOTA: Asegúrese de que dos tableros laterales (#1) y los tableros de los
extremos de la portería (#2) estén cuadrados. Apriete todas las
conexiones de los pasos 3 y 4.

6
PASO 5: Deslice las cuatro esquinas (#32) en la ranura de la tabla lateral
(#1) y la tabla final (#2), fije la Esquinas (#32) a las tablas usando dos
tornillos (#13) por esquina como se muestra en la FIG 3A.
7
PASO 6: Arregla la jugada de fútbol campo (n.° 3) en el tablero lateral (n.°
1) y los tableros finales de la portería (n.° 2) usando Dieciséis tornillos con
cabeza de arandela (#12) como se muestra en la FIG.4.
PASO 7: Coloque los tirantes de soporte (#5) en el campo de juego (#3)
como se muestra en la FIG.5. Luego coloque los varillas de soporte (#35)
8
en la ranura de los tirantes de soporte (#5), fíjelas usando seis de los
tuercas de la varilla de soporte (#34) como se muestra en las FIG 5 y 5A.
PASO 8: Fije las dos cajas de portería (#36) a los tableros finales (#2)
usando cuatro tornillos con cabeza de arandela (#13) por cuadro de
portería (#36) como se muestra en la FIG.6A.
PASO 9: Conecte la pata izquierda (#6) y la pata derecha (#7) con la
barra cromada (#33) entre ellas para la mesa de futbolín usando cuatro
9
pernos de pata (#8) y cuatro arandelas (#9) por pata como se muestra en
las FIG 7 y 7A.
NOTA: Si tiene problemas para insertar los pernos de las patas (n.° 8), es
posible que deba volver al paso 3 y aflojar un poco los pernos (n.° 10).
PASO 10: Ubique los niveladores de patas (#28) y atornille uno en cada
pata como se muestra en las FIG 8 y 8A.

10
PASO 11: Levante el conjunto de la mesa del piso con dos adultos fuertes,
déle la vuelta y coloque la mesa sus patas en el lugar donde jugarás.
NOTA: ¡ No sujete las piernas! Deberías recoger la mesa en el mueble de
la mesa. ! como se muestra en la figura 9 .

11
PRECAUCIÓN: Se necesitan dos adultos fuertes para voltear la mesa
como se muestra.
1. Levante la mesa, un adulto en cada extremo. ¡No sujete las piernas!
Deberías recoger la mesa en la mesa. gabinete !
2.Dale la vuelta a la mesa.
3. Colóquelo sobre los cuatro pies al mismo tiempo en el suelo.
PASO 12: Ahora verifique si todas las conexiones realizadas en los pasos
anteriores están apretadas.
PASO 13: Deslice un jugador (#19 o #20) en el medio y un anillo de tope
(#24) y una goma parachoques (N.º 25) a cada lado del reproductor en las
dos varillas de 1 jugador (N.º 15). Consulte la FIG.10 y 10 A.
Deslice el parachoques de goma (n.° 25) y los reproductores (n.° 19 o n.°
20) sobre las varillas del reproductor (n.° 16, n.° 17 y n.° 18). Ver FIG.10 y
10A.

12
PASO 14: Use un tornillo de cabeza redonda (#21) y una tuerca (#22) por
anillo de tope (#24) y jugador (#19 o #20) como se muestra en las FIG 11 y
11A.

13
PASO 15: Fije las dos copas de retorno de bola (#26) a las tablas
laterales (#1) usando un tornillo de cabeza plana (#14) por lado. Vea
FIG.12 y 12A.
PASO 16: Deslice las empuñaduras (#30) y las tapas de los extremos

14
(#31) sobre las varillas del reproductor.
CONSEJO: Para que las manijas sean más fáciles de colocar, rocíe un
poco de limpiador de ventanas en los extremos de las varillas antes hasta
la instalación y golpéelo suavemente con un martillo de madera sobre las
varillas del reproductor. Consulte las FIG.13 y 13A .
15
PASO 17: Fije los dos puntajes (N.° 27) a las tablas de los extremos (N.°
2) usando dos tornillos de cabeza plana (N.° 4). por anotador.Ver FIG.14.
16
PASO 18: Si la mesa no está nivelada, puede ajustar los niveladores de
patas (#28) uno por uno hasta que la mesa esté exactamente nivelado.
Consulte las FIG.15 y 15A.
PASO 19: Coloque los dos portavasos (#37) para colocar las dos tablas
finales (#2) boca de una cueva por portavasos (#37). Vea la FIG.16.

17
El montaje del juego está completo. Ahora estás Listo para jugar .

18

19
Fabricante: Shanghaimuxinmuyeyouxiangongsi
Dirección: Baoshanqu Shuangchenglu 803long 11hao 1602A-1609shi
Shanghai
Importado a AUS: SIHAO PTY LTD, 1 ROKEVA STREETEASTWOOD
NSW 2122 Australia
Importado a EE. UU.: Sanven Technology Ltd.
Suite 250 , 9166 Anaheim Place, Rancho Cucamonga, CA 91730
Hecho en china
REP
EC
SHUNSHUN GmbH
Römeräcker 9 Z2021,76351
Linkenheim-Hochstetten,Germany
euvertreter@gmail.com
+49 1727041930
REP
UK
Pooledas Group Ltd
Unit 5 Albert Edward House, The
Pavilions Preston, United Kingdom
pooledas123@gmail.com
Tel: 01772418127


Tecnico Supporto e certificato di garanzia elettronica
www.vevor.com/support
CALCIO DA TAVOLO
MODELLO : SUO-5529L
We continue to be committed to provide you tools with competitive price.
"Save Half", "Half Price" or any other similar expressions used by us only represents an
estimate of savings you might benefit from buying certain tools with us compared to the major
top brands and does not necessarily mean to cover all categories of tools offered by us. You
are kindly reminded to verify carefully when you are placing an order with us if you are
actually saving half in comparison with the top major brands.


1
MODELLO: SUO-5529L
Have product questions? Need technical support? Please feel free to
contact us:
Technical Support and E-Warranty Certificate
www.vevor.com/support
NEED HELP? CONTACT US!
This is the original instruction, please read all manual instructions
carefully before operating. VEVOR reserves a clear interpretation of our
user manual. The appearance of the product shall be subject to the
product you received. Please forgive us that we won't inform you again if
there are any technology or software updates on our product.
TABLE SOCCER

2
Avvertenza: per ridurre il rischio di lesioni, l'utente deve leggere
attentamente il manuale di istruzioni.
SAFETY WARNINGS AND PRECAUTIONS
Grazie per aver utilizzato questo prodotto . Per essere sicuri di poter
utilizzare correttamente la macchina, leggere attentamente queste
istruzioni prima dell'uso e conservarle adeguatamente per riferimento
futuro . Assicurati di leggere le precauzioni e le regole di sicurezza in
questa pagina per garantire un utilizzo sicuro . Questo manuale descriverà
le avvertenze e le precauzioni di sicurezza, il funzionamento e la
manutenzione . Le avvertenze e le istruzioni contenute nel presente
manuale non possono coprire tutte le possibili condizioni e situazioni che
potrebbero verificarsi . La cautela e il buon senso non sono incorporati in
questo prodotto, poiché riteniamo che gli usi saranno conformi a questi
codici .
Si prega di leggere TUTTE le istruzioni prima di utilizzare la
macchina .
1. Il montaggio deve seguire queste istruzioni. Un montaggio errato può
rappresentare un pericolo.
2. Non montare in caso di stanchezza o sotto l'effetto di alcol, droghe o
farmaci.
3.Il peso, l'elasticità e le altre proprietà del prodotto si applicano solo ai
prodotti correttamente e completamente assemblati.
4. Mantenere l'area di assemblaggio pulita e ben illuminata.
5. Tenere gli astanti lontani dall'area durante il montaggio.
6. Questa è un'attrezzatura, non un giocattolo, deve essere utilizzata sotto
la guida di un professionista. Non permettere ai bambini e agli animali
domestici di giocare da soli o di avvicinarsi a questo oggetto.
7. Utilizzare solo come previsto. Non sedersi o stare in piedi sul prodotto.
8. Ispezionare prima di ogni utilizzo. Non utilizzarlo se le parti sono
allentate o danneggiate.
9 . Non utilizzare questa unità per scopi diversi da quelli indicati .

3
1 0 . Non utilizzarlo per scopi commerciali .
1 1 . Non pulirlo con materiali abrasivi .
1 2 . Non lasciarlo mai incustodito durante l'uso .
1 3 . L'urina e le feci degli animali domestici possono danneggiare il
prodotto, tenere lontano .
1 4 . Non posizionare il prodotto sopra o vicino ad aria calda, fornelli
elettrici o stufe .
15 . I bambini piccoli devono essere sorvegliati per assicurarsi che non
giochino con il prodotto . Gli animali domestici devono stare lontani dal
prodotto.
Non utilizzare all'aperto nelle giornate piovose e nuvolose, evitare fulmini e
cadute . Persone o animali appesi al prodotto possono causare lesioni o
morte .
ATTENZIONE: pericolo di soffocamento: il giocattolo contiene
palline e/o piccole parti. Non adatto a bambini di età inferiore a 3
anni.
IMPORTANTE! Si prega di conservare le istruzioni. Prima di tentare il
montaggio, leggere attentamente queste istruzioni prenota per
familiarizzare con tutte le parti e le fasi di assemblaggio. Ne consigliamo
due gli adulti assemblano il calcio balilla. Fare riferimento all'elenco delle
parti di seguito e assicurarsi che tutte le parti sono stati inclusi.
PARTS LIST

4
ASSEMBLY INSTRUCTIONS:

5
Consigliamo che due adulti lavorino insieme per assemblare questo
gioco.
PASSO 1: Apri i 2 cartoni del tuo nuovo calcio balilla vicino al luogo in cui
stai effettivamente andando per utilizzare la tabella.
PASSO 2: Rimuovere tutto il contenuto dall'interno dei cartoni e verificare
di avere tutte le parti elencate come mostrato nell'elenco delle parti.
Suggeriamo di utilizzare il cartone inferiore come un piano di lavoro pulito
per proteggere il tavolo. Tagliare o strappare con attenzione i quattro angoli
del cartone da quello più grande in modo che il cartone inferiore sia ora la
tua area di lavoro.
PASSO 3: Fissare un pannello terminale della porta (#2) tra il pannello
laterale (#1) utilizzando due bulloni (#10) e due rondelle (n. 11) per lato
come mostrato in FIG 1 e 1A.
NOTA: non stringere le viti troppo velocemente adesso, dovrai farlo in un
secondo momento.
PASSO 4: Ripetere il passaggio per collegare l'altra sponda della porta (n.
2) alla sponda laterale (n. 1), come mostrato in FIG. 2.
NOTA: Assicurati che le due assi laterali (#1) e le estremità della porta (#2)
siano quadrate. Ora serrare tutte le connessioni dai passaggi 3 e 4.

6
PASSO 5: far scorrere i quattro angoli (n. 32) nella scanalatura del
pannello laterale (n. 1) e del pannello terminale (n. 2), fissare il Angoli (n.
32) alle schede utilizzando due viti (n. 13) per angolo come mostrato nella
FIG 3A.
7
PASSO 6: Correggi la partita di calcio campo (#3) sul tabellone laterale
(#1) e sui tabelloni della porta (#2) utilizzando Sedici viti a rondella (n. 12)
come mostrato in FIG.4.
PASSO 7: posizionare i supporti di supporto (n. 5) sul campo di gioco (n.
3) come mostrato in FIG.5. Quindi posizionare il aste di supporto (#35)
nella scanalatura dei supporti di supporto (#5), fissarle utilizzando sei delle
dadi dell'asta di supporto (#34) come mostrato in FIG 5 e 5A.

8
PASSO 8: Fissare le due porte (#36) alle tavole terminali (#2) utilizzando
quattro viti a rondella (#13)per area della porta (#36)come mostrato in
FIG.6A.
PASSO 9: Attacca la gamba sinistra (#6) e la gamba destra (#7) con la
barra cromata (#33) tra di loro per il calcio balilla utilizzando quattro bulloni
per gamba (n. 8) e quattro rondelle (n. 9) per gamba, come mostrato in FIG
7 e 7A.
9
NOTA: se si riscontrano problemi nell'inserimento dei bulloni delle gambe
(n. 8), potrebbe essere necessario tornare al passaggio 3 e allentare
leggermente i bulloni (n. 10).
PASSO 10: Individuare i livellatori delle gambe (n. 28) e avvitarne uno su
ciascuna gamba come mostrato in FIG 8 e 8A.

10
PASSO 11: sollevare il tavolo dal pavimento con due adulti robusti,
capovolgerlo e posizionare il tavolo le sue gambe nel luogo in cui
giocherai.
NOTA: non tenere le gambe! Dovresti ritirare il tavolo presso il mobiletto
del tavolo ! come mostrato nella FIG. 9 .

11
ATTENZIONE: sono necessari due adulti robusti per ribaltare il tavolo
come mostrato.
1.Prendi il tavolo, un adulto su ciascuna estremità. Non tenere le
gambe! Dovresti prendere il tavolo al tavolo mobiletto !
2. Capovolgi il tavolo.
3.Posizionarlo contemporaneamente su tutti e quattro i piedi a terra.
PASSO 12: Ora controlla se tutte le connessioni, effettuate nei passaggi
precedenti, sono serrate.
PASSO 13: fai scorrere un giocatore (#19 o #20) al centro, un anello di
arresto (#24) e una gomma paraurti (#25) su ciascun lato del giocatore
sulle due aste da 1 giocatore (#15).Vedi FIG.10 e 10A.
Far scorrere il paraurti in gomma (#25) e i giocatori (#19 o #20) sulle aste
dei giocatori (#16, #17 e #18) Vedere.FIG.10 e 10A.

12
PASSO 14: utilizzare una vite a testa tonda (n. 21) e un dado (n. 22) per
anello di arresto (#24) e giocatore (#19 o #20) come mostrato nelle
FIGURE 11 e 11A.

13
PASSO 15: Fissare le due coppe di ritorno della sfera (#26) alle sponde
laterali (#1) utilizzando una vite a testa piatta (#14)per lato.Vedere FIG.12
e 12A.
PASSO 16: Far scorrere le impugnature (#30) e i cappucci terminali (#31)

14
sulle aste del lettore.
CONSIGLIO: Per facilitare il fissaggio delle maniglie, spruzzare prima un
po' di detergente per vetri sulle estremità dell'asta all'installazione e
martellarlo delicatamente con un martello di legno sulle aste del lettore.
Vedere FIG.13 e 13A .
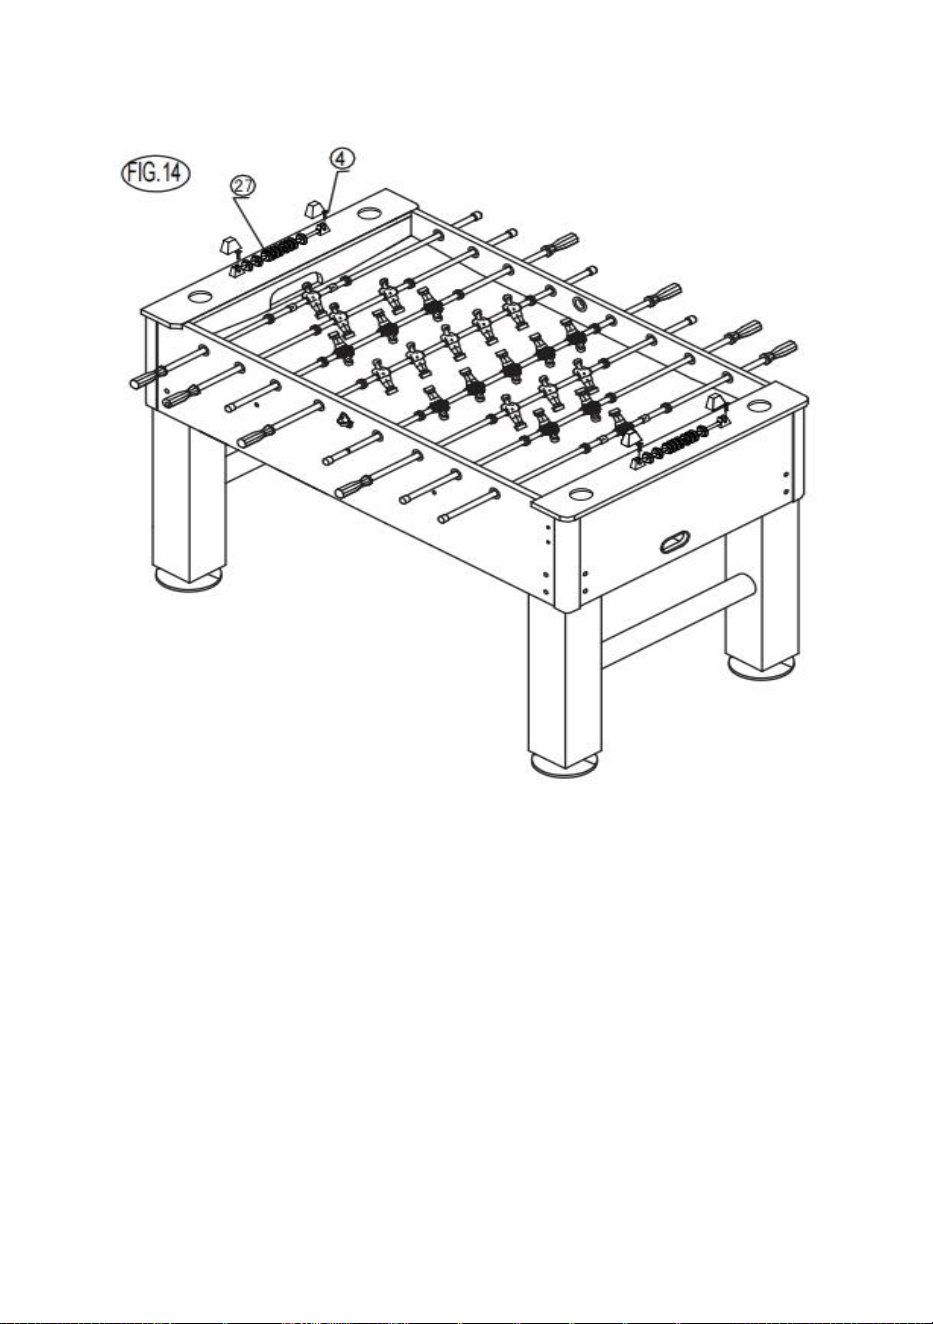
15
PASSO 17: Fissare i due marcatori (#27) alle tavole finali (#2) utilizzando
due viti a testa piatta (#4) per marcatore. Vedere FIG.14.

16
PASSO 18: Se il tavolo non è livellato è possibile regolare i livellatori delle
gambe (#28) uno per uno finché il tavolo non è livellato. esattamente a
livello. Vedere FIG.15 e 15A.
PASSO 19: Collega i due portabicchieri (#37) per posizionare le due
tavole finali (#2) bocca di una grotta per portabicchiere (#37).Vedere
FIG.16.

17
L' assemblaggio del gioco è completo. Ora sei tu pronto a giocare .

18
19
Produttore: Shanghaimuxinmuyeyouxiangongsi
Indirizzo: Baoshanqu Shuangchenglu 803long 11hao 1602A-1609shi
Shanghai
Importato in AUS: SIHAO PTY LTD, 1 ROKEVA STREETEASTWOOD
NSW 2122 Australia
Importato negli Stati Uniti: Sanven Technology Ltd.
Suite 250 , 9166 Anaheim Place, Rancho Cucamonga, CA 91730
Made in China
REP
EC
SHUNSHUN GmbH
Römeräcker 9 Z2021,76351
Linkenheim-Hochstetten,Germany
euvertreter@gmail.com
+49 1727041930
REP
UK
Pooledas Group Ltd
Unit 5 Albert Edward House, The
Pavilions Preston, United Kingdom
pooledas123@gmail.com
Tel: 01772418127