
Poly Studio E60 User Guide
SUMMARY
This guide provides end-users with task-based user information for the named product.

Legal information
Copyright and license
© 2024, HP Development Company,
L.P. The information contained herein is
subject to change without notice. The only
warranties for HP products and services are
set forth in the express warranty statements
accompanying such products and services.
Nothing herein should be construed as
constituting an additional warranty. HP shall
not be liable for technical or editorial errors
or omissions contained herein.
Trademark credits
All third-party trademarks are the property
of their respective owners.
Privacy policy
HP complies with applicable data privacy
and protection laws and regulations. HP
products and services process customer
data in a manner consistent with the HP
Privacy Policy. Please refer to
HP Privacy
Statement.
Open source software used in this product
This product contains open source
software. You may receive the open source
software from HP up to three (3) years
after the distribution date of the applicable
product or software at a charge not
greater than the cost to HP of shipping
or distributing the software to you. To
receive software information, as well as
the open source software code used in
this product, contact HP by email at

Table of contents
1About this guide.................................................................................................................................................. 1
Audience, purpose, and required skills ........................................................................................................... 1
Icons used in Poly documentation .................................................................................................................. 1
2Getting started.................................................................................................................................................... 2
Setting up Poly Studio E60 ............................................................................................................................. 2
In the box ................................................................................................................................................. 2
Set up your Poly Studio E60 camera ....................................................................................................... 2
Computer and cable requirements.................................................................................................................. 3
Poly Studio E60 overview ............................................................................................................................... 3
Poly Studio E60 hardware features ......................................................................................................... 4
Poly Studio E60 LED indicators ............................................................................................................... 5
Use the Poly Studio E60 privacy cover.................................................................................................... 5
Basic tips for great video conferences ............................................................................................................ 6
Advanced tips for great video conferences ..................................................................................................... 6
Poly Studio E60 accessibility features ............................................................................................................ 7
3Using Poly Studio E60........................................................................................................................................ 9
Using the Poly Studio E60 system web interface............................................................................................ 9
Set Poly Studio E60 as the default video device............................................................................................. 9
Tracking modes............................................................................................................................................... 9
Updating software ......................................................................................................................................... 10
Restart your device ....................................................................................................................................... 10
Using the remote control ............................................................................................................................... 10
Poly Studio E60 remote control features ............................................................................................... 10
Change the Poly Studio E60 remote control batteries ........................................................................... 11
4Getting help ...................................................................................................................................................... 13
HP Inc. addresses......................................................................................................................................... 13
Document information ................................................................................................................................... 13
iii
About this guide1
This guide describes how to use the Poly Studio E60 camera.
Audience, purpose, and required skills
This guide is intended for beginning users, as well as intermediate and advanced users, who want to
learn more about the features available with their Poly Studio E60 camera.
Icons used in Poly documentation
This section describes the icons used in Poly Documentation and what they mean.
WARNING! Indicates a hazardous situation that, if not avoided, could result in serious injury or
death.
CAUTION: Indicates a hazardous situation that, if not avoided, could result in minor or moderate
injury.
IMPORTANT: Indicates information considered important but not hazard-related (for example,
messages related to property damage). Warns the user that failure to follow a procedure exactly as
described could result in loss of data or in damage to hardware or software. Also contains essential
information to explain a concept or to complete a task.
NOTE: Contains additional information to emphasize or supplement important points of the main
text.
TIP: Provides helpful hints for completing a task.
About this guide
1

Getting started2
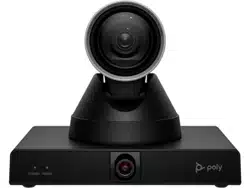
The Poly Studio E60 is a mechanical PTZ camera that brings high quality video to large meeting
rooms.
Setting up Poly Studio E60
This section provides information on how to set up your Poly Studio E60 camera.
In the box
Make sure you have the standard shipped items when you open the box.
NOTE: You can purchase optional accessories kits separately.
The Poly Studio E60 camera ships with the following items in the box as standard:
● Poly Studio E60 camera
● Privacy cover
● USB 3.0 Type-B to USB Type-A cable
● 5M CAT6 PoE network cable
● Wall mounting bracket kit
● Poly remote control
Set up your Poly Studio E60 camera
Set up your Poly Studio E60 camera and initialize it to start using it.
2
Chapter 2Getting started
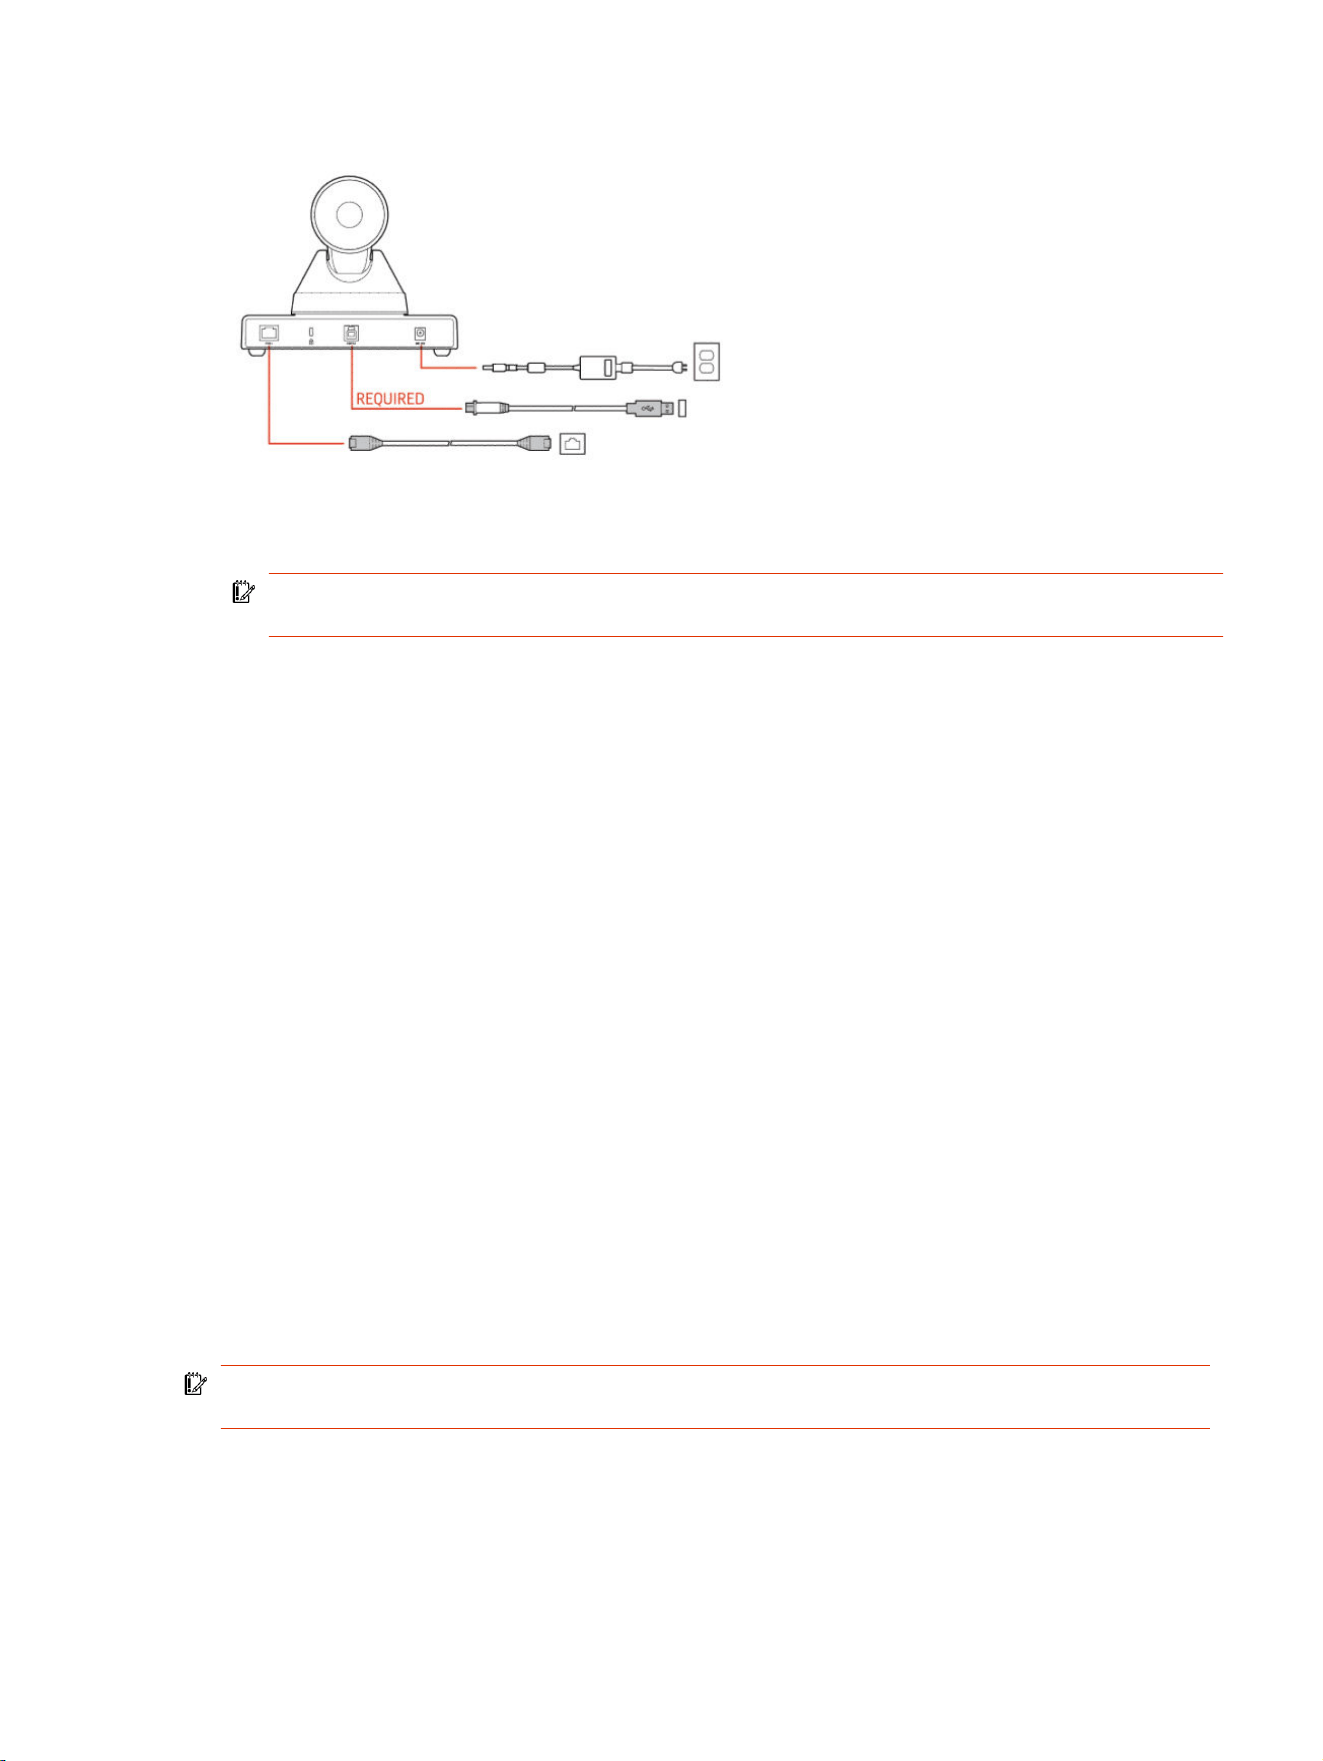
Figure 2-1 Connecting Poly Studio E60 to a video conferencing system
1. Connect your Poly Studio E60 camera to the system using the provided USB 3.0 Type-B to USB
3.0 Type-A cable.
IMPORTANT: Using a third-party USB Type-B to USB Type-A cable may affect device
performance, or your device may not work at all.
2. Supply power to the camera using one of the following options:
● Connect a network cable from the PoE+ port on the camera to an Ethernet port on your
system.
● Connect an optional power adapter from the 12 V DC power port on the rear panel of the
camera to a power source.
The Power LED on the front panel of the camera flashes white. The Standby LED glows solid
orange.
The camera initializes. The camera head rotates to face the room. The power indicator LED glows
solid white and the standby LED glows solid orange. When the camera stops moving, initialization is
complete.
Computer and cable requirements
Make sure that your system and USB cable meet the following requirements to use Poly Studio E60
as the camera accessory.
Your system must have one of the following operating systems:
● Windows 11 or Windows 10
● macOS versions 14 (Sonoma), 13 (Ventura), or 12 (Monterey)
The Poly Studio E60 camera only supports the USB cable that comes with your system.
IMPORTANT: Using a third-party USB Type-B to USB Type-A cable may affect device
performance, or your device may not work at all.
Poly Studio E60 overview
Poly Studio E60 is a new MPTZ camera with 12x optical zoom and AI-driven presenter tracking.
Computer and cable requirements
3
Poly Studio E60 includes the following features:
● 12x optical zoom and 16x digital zoom MPTZ camera and resolution up to 4K.
● Poly DirectorAI, which includes presenter tracking and group framing.
– Presenter tracking keeps presenter center-stage as they move freely around the room.
– Group framing frames the entire group on screen and removes excess wasted space.
● Connects to Poly Android and Windows-based video systems.
● Certification by multiple platforms phase by phase (see latest Data Sheet for details).
Poly Studio E60 hardware features
The following figures and tables explain the hardware features on the Poly Studio E60 camera.
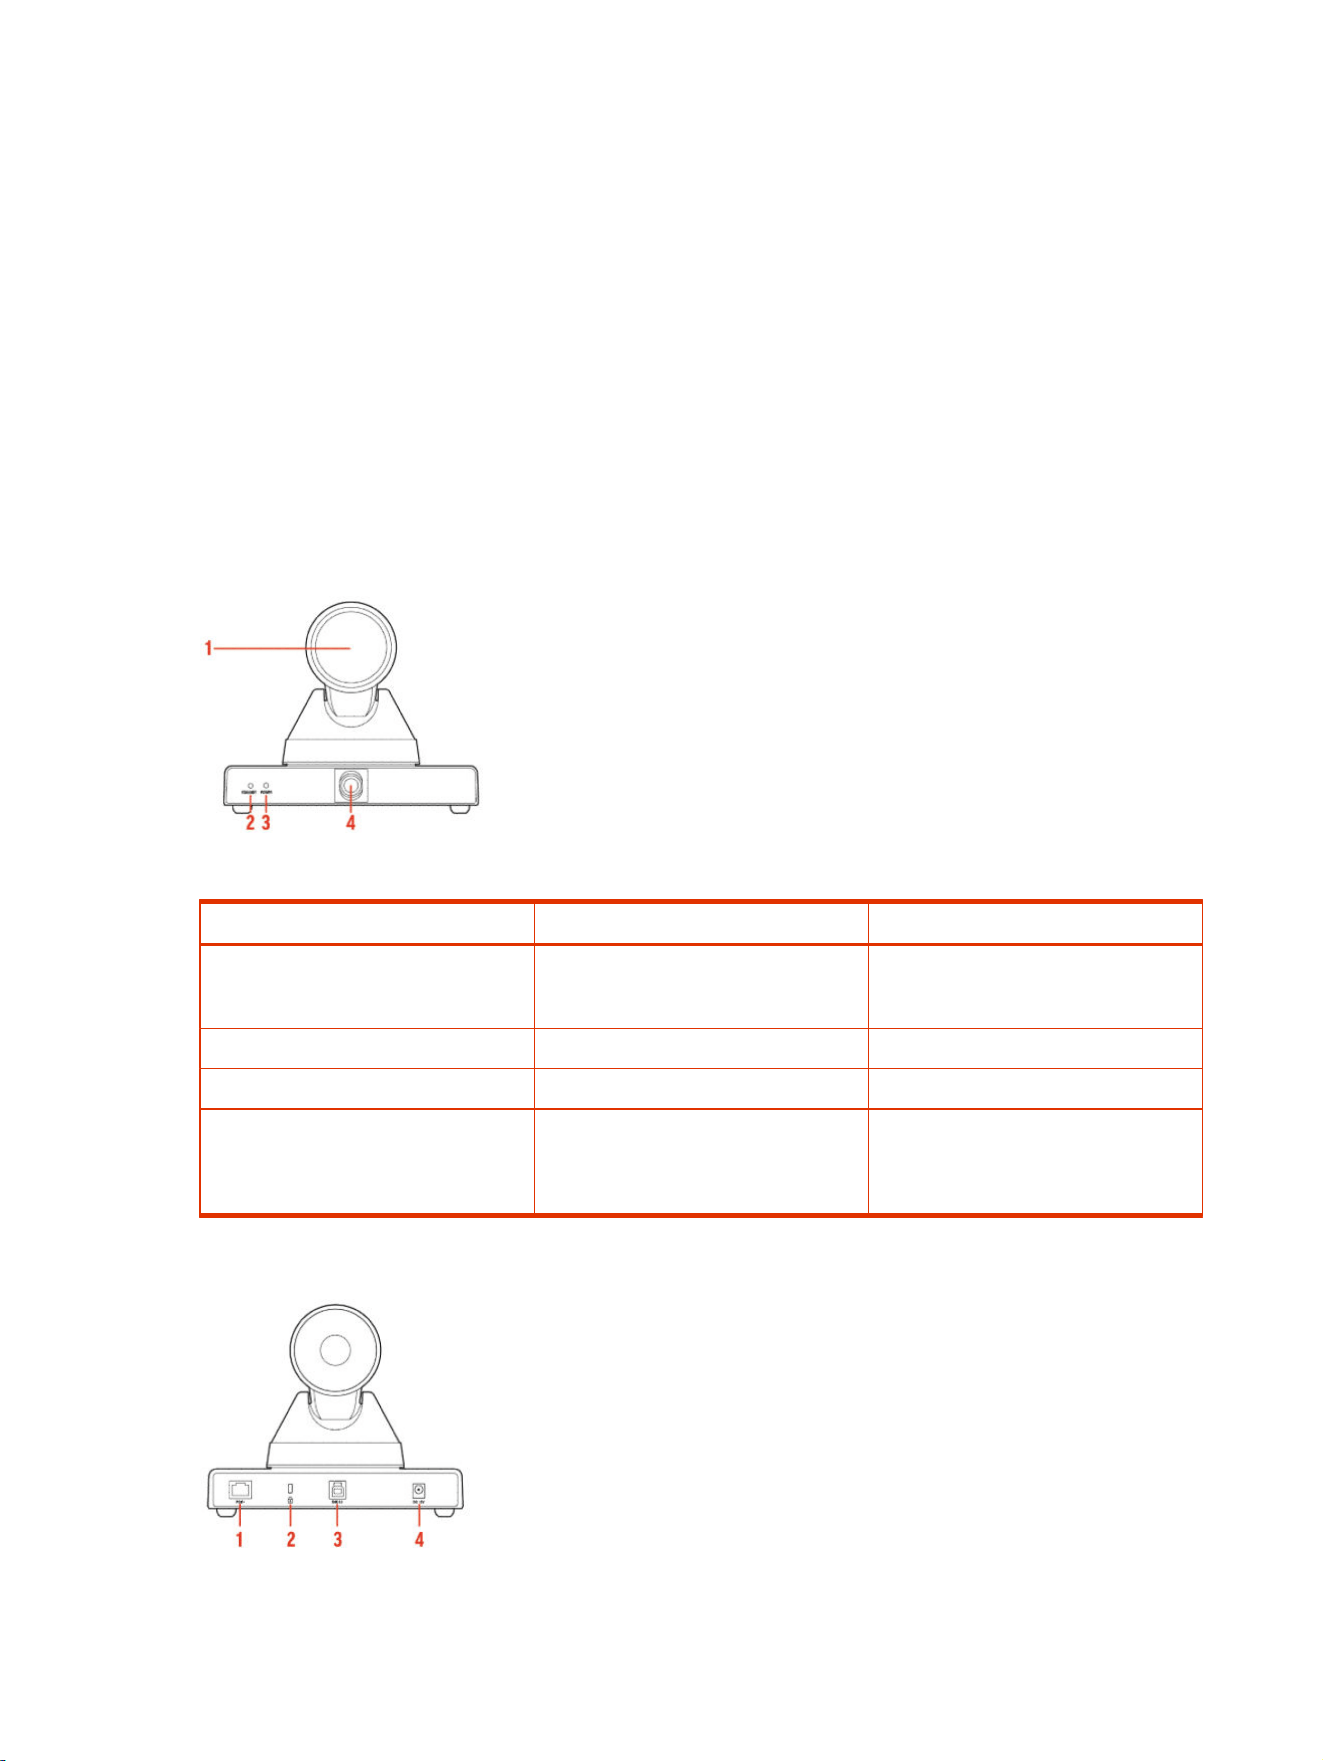
Figure 2-2 Front view of the Poly Studio E60 camera
Table 2-1
Poly Studio E60 feature descriptions (front)
Reference number Feature Feature description
1 Optical zoom lens Optical zoom lens with 12× optical and
16× digital zoom with a removable
privacy cap
2
Standby LED indicator Indicates device status
3 Power LED indicator Indicates device status
4 AI lens The fixed AI lens is used to detect
participants within its 107 degree field
of view to trigger optical zoom lens to
track people in the room.
Figure 2-3 Back view of the Poly Studio E60 camera
4
Chapter 2Getting started

Table 2-2 Poly Studio E60 feature descriptions (back)
Reference number Feature Feature description
1 Power over Ethernet+ (PoE+) port Powers your Poly Studio E60 camera
2 Kensington security slot Secures your device with a Kensington
lock (not provided)
3 USB 3.0 Type-B port Connects the camera to the video
conferencing system or PC using a
USB 3.0 Type-B to USB 3.0 Type-A
cable
4
12 V DC power port Connects the camera to a power
source using an optional power cable
(available separately)
Poly Studio E60 LED indicators
Your device provides two LED status indicators below the camera to help you understand the device's
behaviors. The Power LED is white and the Standby LED is orange.
The following table lists the LED status details.
Table 2-3
Poly Studio E60 LED behaviors
Standby LED behavior Power LED behavior Device status
No color No color Device is powered off
Camera turns to face the wall
Solid orange
Flashing white Device is starting up
Solid orange Solid white Device is powered on and awake
Camera turns to face the room
Solid orange
Solid white Device is in standby mode
Camera turns to face the wall
Flashing orange, then turning off
Solid white Video is streaming.
Flashing orange, then turning to solid Solid white The USB cable is connected but video
isn’t streaming
Solid orange, then turning off Solid white The device wakes up from standby
Video is streaming
Flashing orange, then turning to solid
Solid white The device wakes up from standby
Video is not streaming
Solid orange
Flashing white Firmware is updating
Use the Poly Studio E60 privacy cover
The Poly Studio E60 camera comes with a physical cover that blocks the camera lens to protect your
privacy.
Poly Studio E60 LED indicators
5
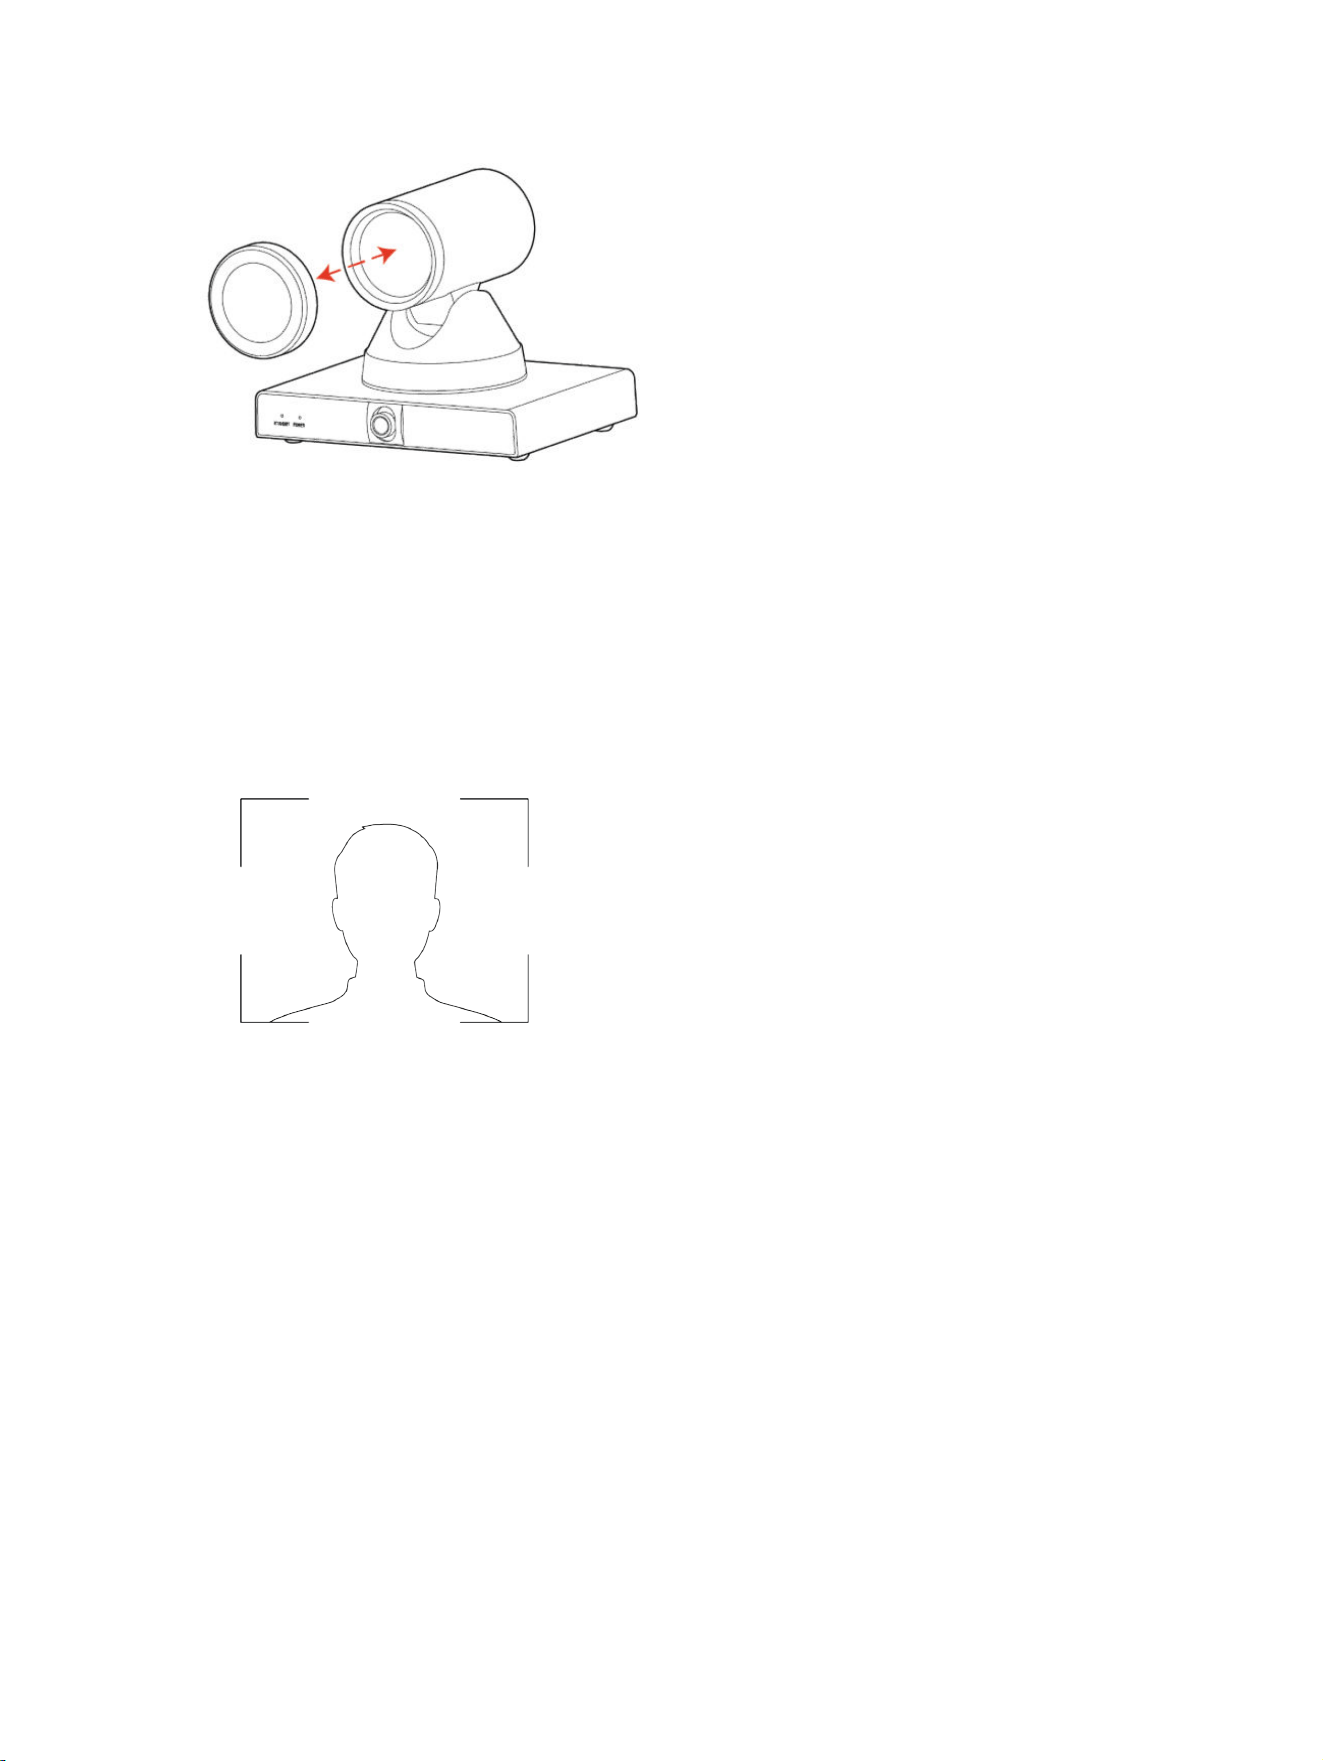
Figure 2-4 Poly Studio E60 privacy cover
1. Manually remove the privacy cover before starting your video conference to show your video.
2. Optional: Replace the privacy cover to cover the camera lens when not in use.
Basic tips for great video conferences
Use the following basic tips and guidelines to enhance or improve your experiences during video
conferences.
● Mount and position the camera so that your eyes are level with the top third of your screen and
your face appears in the middle area of the video stream.
● Avoid wearing bright colors, all-light or all-dark clothing, or very busy patterns like small checks or
narrow stripes. Light pastels and muted colors look the best on the screen.
● Preview your video stream before you join a meeting to make sure that you don’t have shadows
on your face and that your camera settings are configured correctly.
● Speak in your normal voice.
Advanced tips for great video conferences
Use the following basic tips and guidelines to enhance or improve your experiences during video
conferences.
Camera and People Positioning
● Try not to fidget too much, especially if you’re the only one on camera.
● Include all the people in the room (if possible), or introduce everyone in the room at the beginning
of a meeting.
6
Chapter 2Getting started

● Keep the view focused on people and not the background or room furnishings.
● In an office, position the monitor to an appropriate angle to avoid capturing potential distractions
in your video (for example, other people, pets, or TVs).
Clothing, Furnishings, and Backgrounds
● To avoid disruptions, exclude the following from the camera view: light sources, tables, chairs,
walls, busy decorations, and the floor.
● To avoid funny effects, wear clothes that contrast with the background instead of blending into it
and make sure nothing in the background seems to stick out of anyone’s head.
● Avoid glossy tabletops, strong colors, or bold wood grain in the room. The best table surface color
is a flat satin finish in neutral gray.
● A wall that’s painted light gray with a touch of blue works best as a background. Video
conferencing systems use a gray or blue reference image to process the video, so a background
in that color helps to enhance the video you send.
● Try to keep dry-erase whiteboards out of the camera field of view. Be aware that other people in
the meeting might see what’s written on the whiteboards.
Lighting
● Close any curtains, drapes, or blinds over your windows. Daylight is a variable light source and
can conflict with interior room lighting.
● Bright lighting increases the range of in-focus objects, but inappropriate direct lighting might make
you look harsh or somber. Poly recommends using indirect fluorescent lighting in a midrange,
neutral color temperature (3600 K to 4500 K). You can find the color temperature of your lighting
on the packaging.
Audio and Noise
● Mute your audio when you’re silent or before you move your audio device.
● Keep your windows and doors closed to minimize unwanted noises.
● Close any drapes or blinds over your windows. The glass from windowpanes can cause issues
with acoustics due to reflection.
Poly Studio E60 accessibility features
Poly Studio E60 includes a number of features to accommodate users with disabilities.
Poly Studio E60 accessibility features
7

Table 2-4 Poly Studio E60 accessibility features
Accessibility feature Description
Visual notifications LED indicators let you know when status changes and
functions work.
71-degree field of view The wide view captures your movements without
needing to adjust the camera.
Tactile buttons The mechanical buttons on the optional remote control
provide visual contrast to enable you to control the
system.
8 Chapter 2Getting started

Using Poly Studio E603
Connect the Poly Studio E60 camera to your system to begin using it.
Using the Poly Studio E60 system web interface
Configure settings for your environment in the Poly Studio E60 camera’s system web interface.
For information on using the Poly Studio E60 system web interface, refer to the Poly Studio E60
System Web Interface User Guide.
Set Poly Studio E60 as the default video device
When you use the Poly Studio E60 camera with a supported application for video calls, you may need
to set the device as the default video device of your application.
The following is a general procedure that you can use. Your application may use different terms or
categories.
1. Go to your conferencing application’s Settings.
2. Find Video Device.
3. Choose your Poly Studio E60 camera as the video device.
Tracking modes
Set the camera tracking mode which best suits your environment.
Poly Studio E60 supports the following tracking modes:
● Presenter tracking: Keeps the presenter center-stage as they move freely around the room.
● Group framing: Frames the entire group on screen and removes excess wasted space.
If you are using the Poly Studio E60 with a supported Poly video conferencing system, you can use
the system web interface of that system to access configuration settings to change or disable some of
these features for Poly Studio E60. For information on using supported Poly systems, refer to the Poly
Partner Mode Administrator Guide or Poly Video Mode Administrator Guide.
If you are using the Poly Studio E60 with a laptop, you must use the Poly Studio E60 system web
interface to manage settings. For information on using the Poly Studio E60 system web interface,
refer to the Poly Studio E60 System Web Interface User Guide.
Using Poly Studio E60
9
Updating software
Depending on your individual setup, you have a specific software update path.
If you are using the Poly Studio E60 camera with a PC, updates are pushed automatically from
Windows Update as driver updates.
When using an Android-based video system, software updates for the Poly Studio E60 camera are
handled through the connected video conferencing system. Refer to the Poly Documentation Library
to view user documentation for your relevant system.
While the software updates, the Standby LED indicator glows solid orange and the Power LED
indicator flashes white.
Restart your device
If you encounter issues with your device, you can manually restart it.
■
Unplug the PoE+ network cable or the DC power cable and plug it back in.
You may need to reselect the device as the default video device for your video conferencing
application.
Using the remote control
You can use the remote control to adjust your Poly Studio E60 camera and manage other features
when using it with a laptop.
NOTE: If you are using the Poly Studio E60 with an Android system, you should manage settings
by using a touch controller or the relevant codec's remote control.
If you are using the Poly Studio E60 with a PC-based room solution, you should manage settings by
using the native camera control options for your setup.
Poly Studio E60 remote control features
Poly Studio E60 supports a remote control.
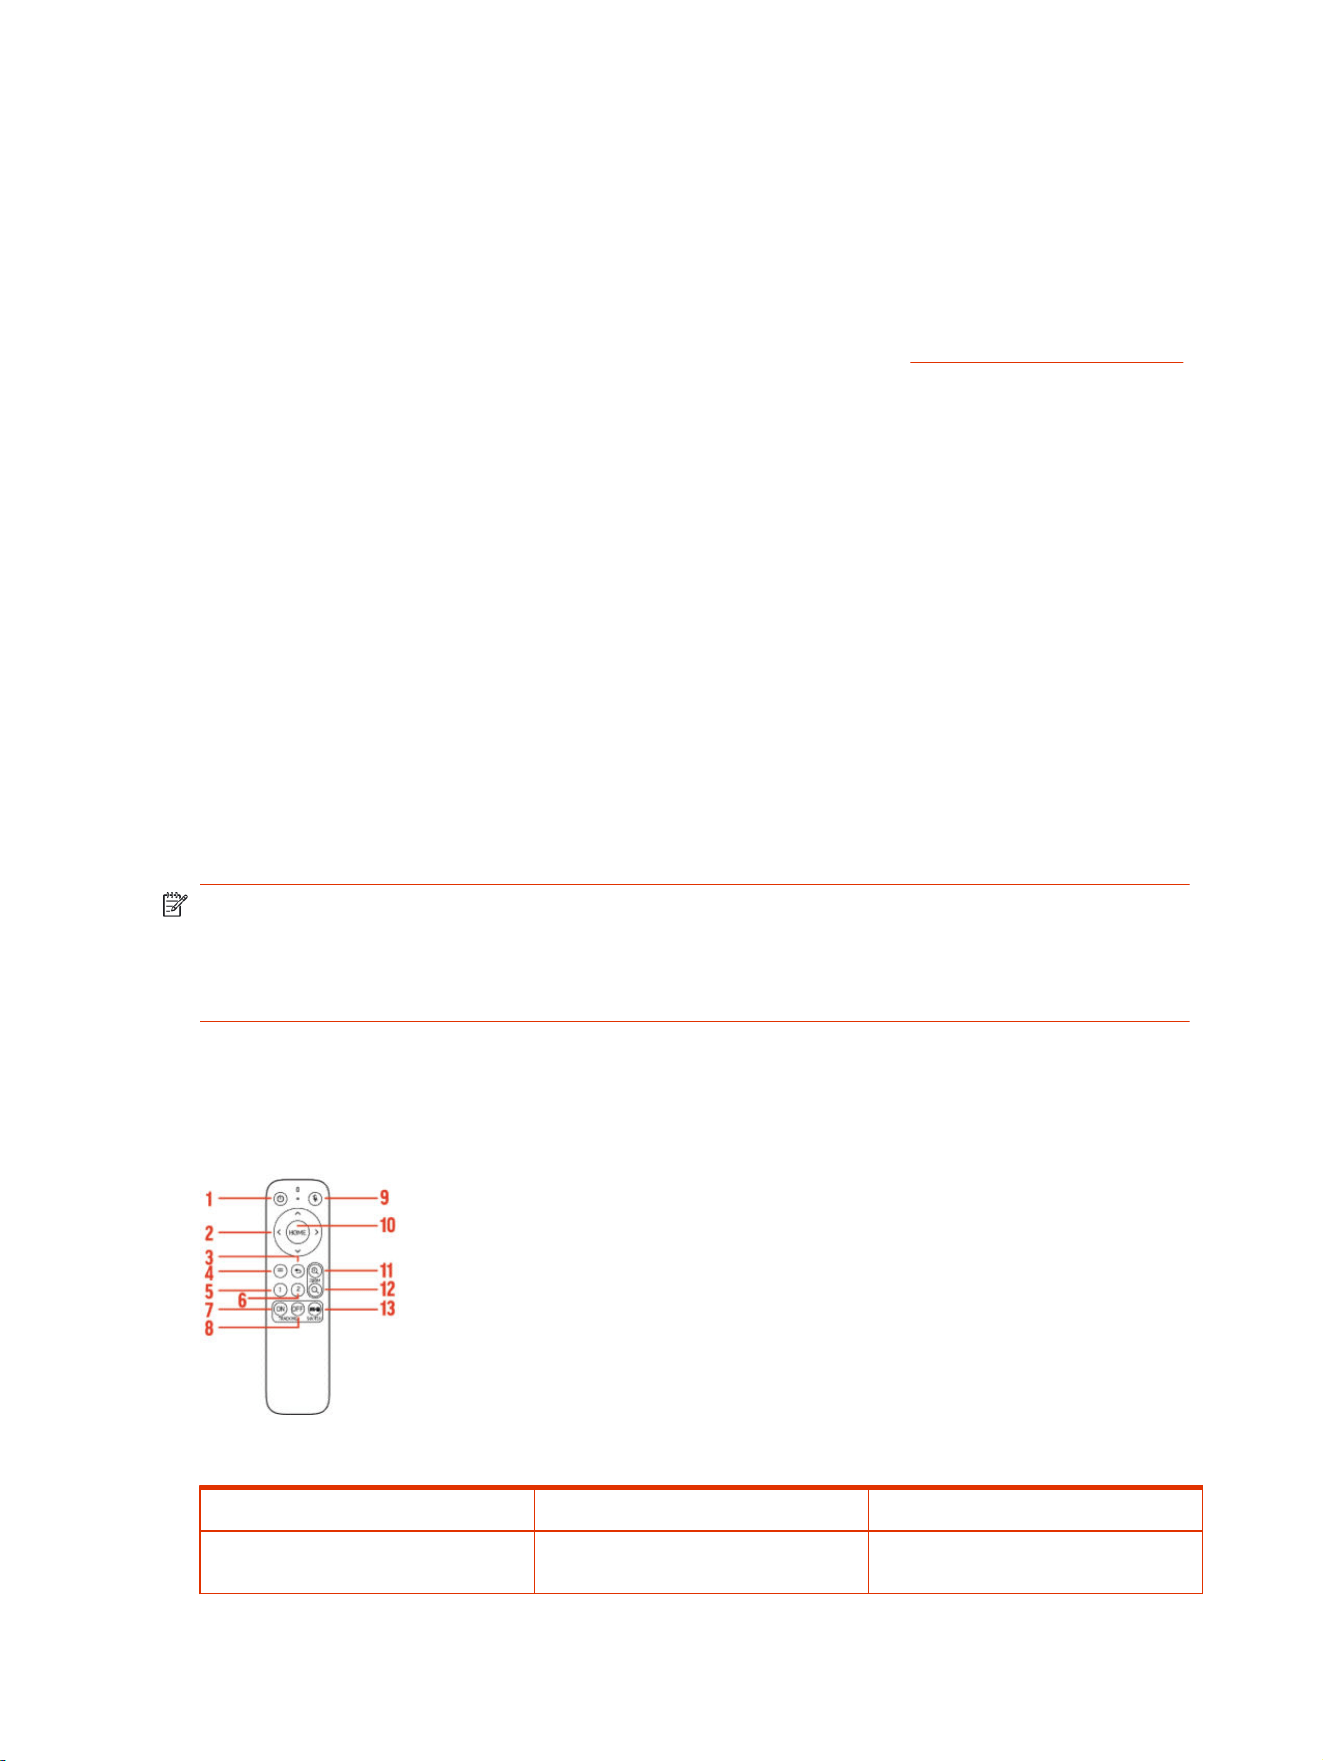
Figure 3-1 Poly Studio E60 remote control
Table 3-1
Parts of the Poly Studio E60 remote control
Reference number Button name Feature description
1 Standby Turns the device on or off or wakes it
up
10 Chapter 3Using Poly Studio E60

Table 3-1 Parts of the Poly Studio E60 remote control (continued)
Reference number Button name Feature description
2 Direction Adjusts the menu cursor and menu
parameters
3 Return Returns to the upper level of the menu
4 Menu Opens or exits the menu
5 No. 1 preset Sets a preset camera position:
● Long press for 3 seconds to set
the preset position
Short press to adjust the preset
position
6
No. 2 preset Sets a preset camera position:
● Long press for 3 seconds to set
the preset position
Short press to adjust the preset
position
7
Tracking on Turns on tracking
NOTE: Press the Switch button first.
8
Tracking off Turns off tracking
9 Mute This feature is disabled
10 Home Restores the maximum angle of view
without using the Zoom button
When menu is open, confirms menu
selections and enters the submenu
11
Zoom + Digital zoom in
NOTE: Zoom is not supported when
the tracking function or automatic frame
selection function is turned on.
12
Zoom - Digital zoom out
NOTE: Zoom is not supported when
the tracking function or automatic frame
selection function is turned on.
13
Switch Switches tracking functions
Change the Poly Studio E60 remote control batteries
Change the Poly Studio E60 remote control batteries to ensure it continues to work properly.
Change the Poly Studio E60 remote control batteries
11
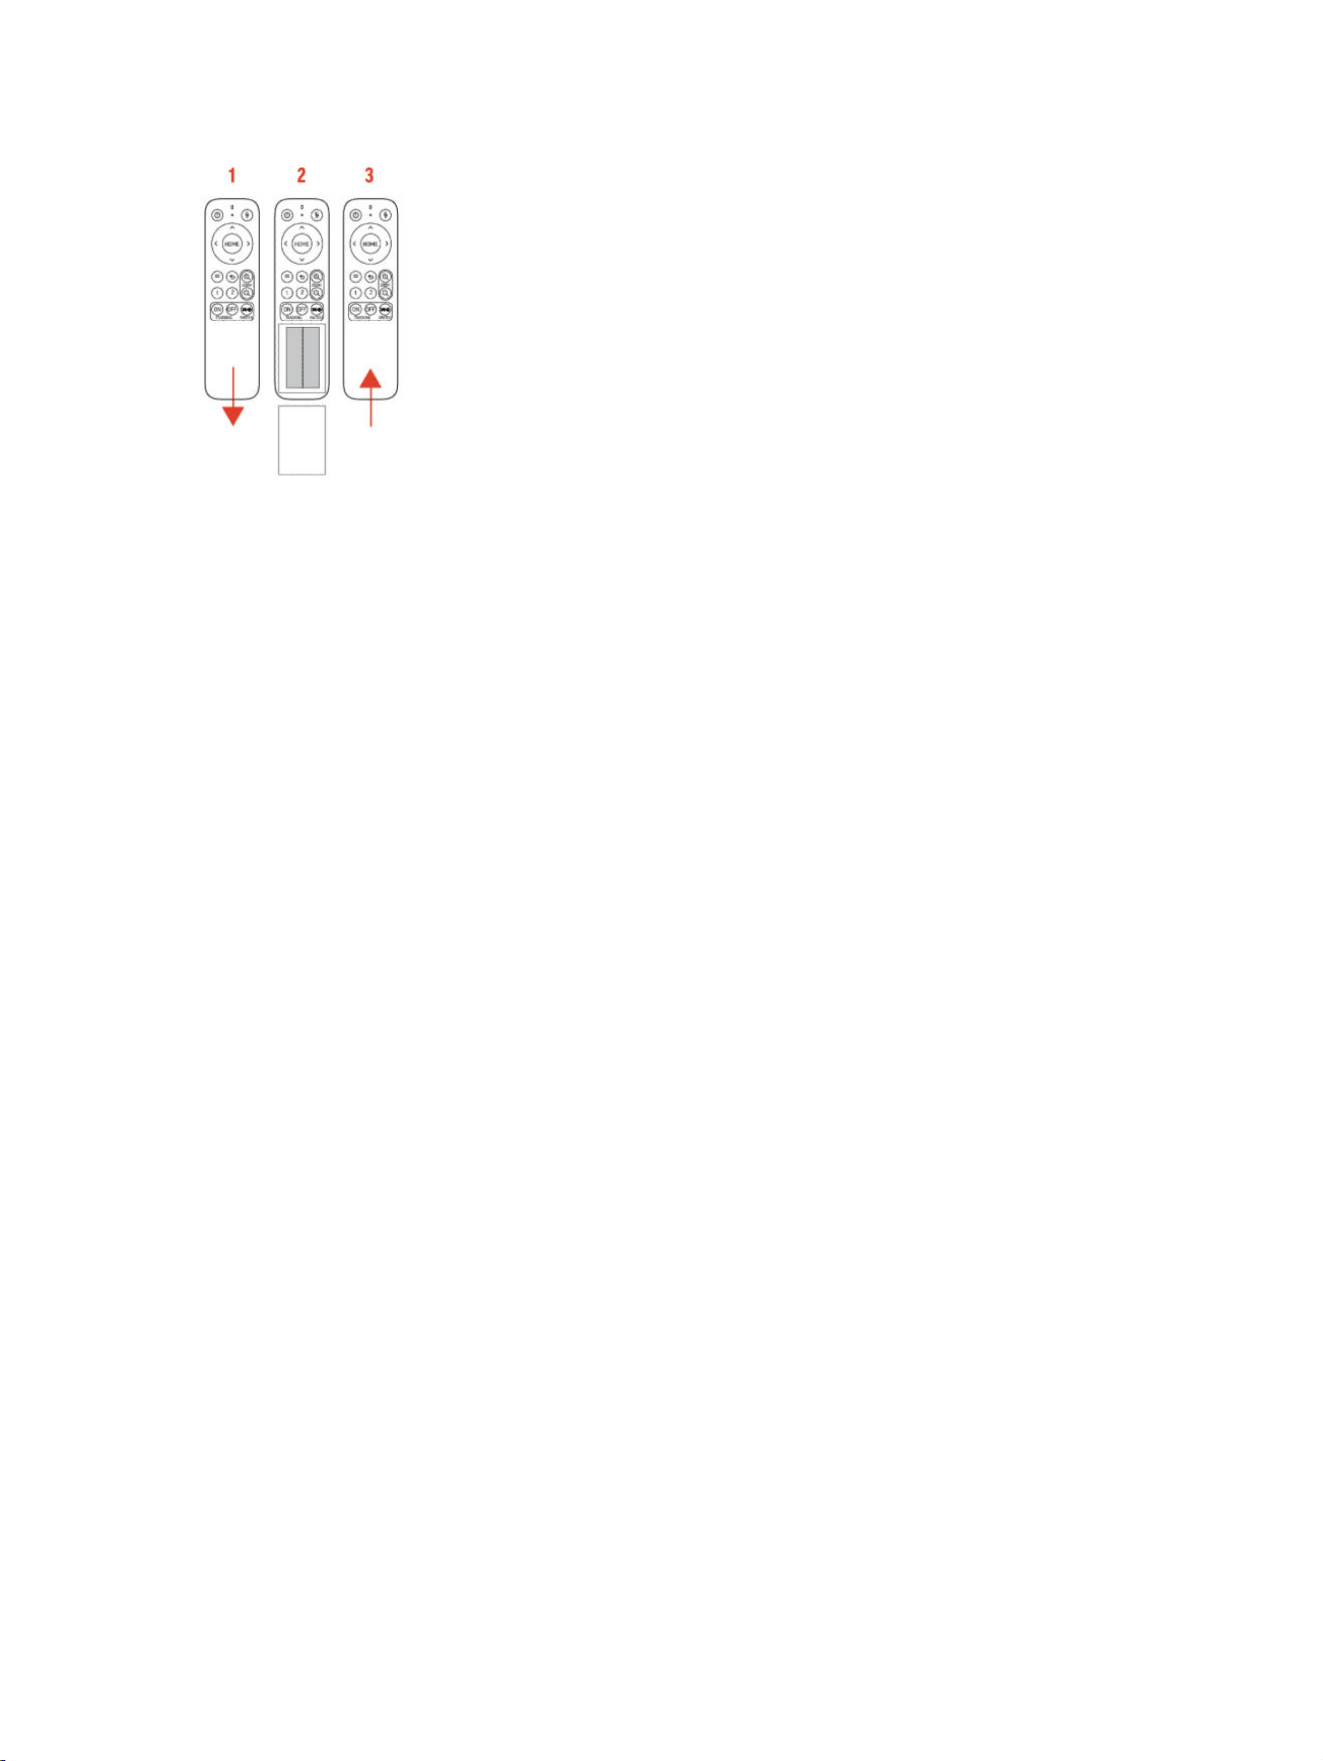
Figure 3-2 Changing the Poly remote control batteries
1. Apply pressure to the front of the remote control and slide the battery cover down.
2. Replace the AAA batteries.
3. Replace the battery cover by sliding it up and firmly into place.
12
Chapter 3Using Poly Studio E60

Getting help4
Poly is now a part of HP. The joining of Poly and HP paves the way for us to create the hybrid work
experiences of the future. Information about Poly products has transitioned from the Poly Support site
to the HP Support site.
The Poly Documentation Library is continuing to host the installation, configuration/administration, and
user guides for Poly products in HTML and PDF format. In addition, the Poly Documentation Library
provides Poly customers with information about the transition of Poly content from Poly Support to HP
Support.
The HP Community provides additional tips and solutions from other HP product users.
HP Inc. addresses
HP US
HP Inc.
1501 Page Mill Road
Palo Alto 94304, U.S.A.
650-857-1501
HP Germany
HP Deutschland GmbH
HP HQ-TRE
71025 Boeblingen, Germany
HP UK
HP Inc UK Ltd
Regulatory Enquiries, Earley West
300 Thames Valley Park Drive
Reading, RG6 1PT
United Kingdom
Document information
Model ID: Poly Studio E60 (RMN: PBJ-E60-001)
Document part number: 3725-88274-003A
Last update: July 2024
Email us at [email protected] with queries or suggestions related to this document.
Getting help
13