Save these instructions
For household use only
Power:
120V~ 60Hz 850W
Model: KST075AU
TOASTER
INSTRUCTION MANUAL

Table Of Contents
IMPORTANT SAFETY INSTRUCTIONS ---------------------- 02
LIST OF MAIN PARTS -------------------------------------- 04
TECHNICAL SPECIFICATIONS ------------------------------ 05
CONTENTS OF PACKAGING ------------------------------- 05
TOASTING TIME ------------------------------------------- 06
OPERATING INSTRUCTIONS BEFORE FIRST USE ----------- 07
COOKING USE -------------------------------------------- 07
DEFROST FUNCTION -------------------------------------- 08
REHEAT FUNCTION ---------------------------------------- 08
BAGEL FUNCTION ----------------------------------------- 08
CANCEL FUNCTION --------------------------------------- 09
CRUMB TRAY ---------------------------------------------- 09
CARE GUIDE ----------------------------------------------- 09
TO CLEAN -------------------------------------------------- 10
STORAGE -------------------------------------------------- 10
DISPOSAL INFORMATION ---------------------------------- 10
SAFETY PRECAUTION -------------------------------------- 10
01

02
Important
Safety Instructions
When using electrical appliances, especially when children are
present, basic safety precautions should always be followed,
including the following:
1.READ AND SAVE ALL INSTRUCTIONS.
2.Do not touch hot surfaces. Use handles or knobs.
3.To protect against electrical shock, do not immerse cords or plugs in water or
other liquids.
4.Close supervision is necessary when any appliance is used by or near children.
5.Unplug from outlet when not in use and before cleaning. Allow to cool before
putting on or taking off parts.
6.Do not operate any appliance with a damaged cord or plug, after the appliance
malfunctions, or after it has been damaged in any manner. Please contact the
after-sales staff to take care of it for you.
7.The use of accessory attachments is not recommended by the appliance
manufacturer and may cause injuries.
8.Do not use outdoors.
9.Do not let the cord touch hot surfaces or allow it to hang over the edge of a table
or counter.
10.Do not place on or near a heated oven or a hot gas or electric burner.
11.Extreme caution must be used when moving an appliance containing hot oil or
other hot liquids.
12.Always attach the plug to the appliance first, then plug the cord into the wall
outlet. To disconnect, turn any control to OFF, then remove the plug from the
wall outlet.
13.Do not use appliance for any use other than its intended use.
14.Oversize foods, metal foil packages, or utensils must not be inserted into the
toaster as they may involve a risk of fire or electric shock.
15.A fire may occur if toaster slots are covered or are touching flammable
material, including curtains, draperies, and walls when in operation.
16.Do not attempt to dislodge food when toaster is plugged in.
17.The appliance is exclusive for the use which has been expressed by the
manufacturer. Any other use is to be considered inappropriate and therefore
dangerous. The manufacturer cannot be held responsible for eventual damage
caused by inappropriate, improper, or irresponsible use or for repairs made to
the product by unauthorized personnel.

03
SAVE THESE INSTRUCTION
18.After having removed the appliance from the packaging, make sure that the
product is complete and in perfect condition.
19.The plastic bag in which the appliance was packaged should be kept out of
reach of children as it poses a suffocation hazard. In order to remove the dust
that may have accumulated on the appliance, simply dust it off with a soft cloth.
20.Before inserting the plug into the electrical outlet, make certain that the
voltage of the outlet corresponds to the value indicated on the information label
that is attached to the appliance.
21.The use of an extension cord is not recommended, as overheating of the
extension cord may occur during operation of the toaster
22.When the appliance is plugged into the electrical outlet or while it is turned on,
never place hands in the bread toasting slots. Do not touch the appliance with
wet or damp hands.
23.The metal sides of the toaster and the areas surrounding the bread slots
become very hot during use. Operating the appliance should be carried out using
only the plastic dials and handles.
24.Bread is a food which may catch fire. Do not use this appliance under or next to
curtains or other combustible material.
25.Never re-toast the same piece of bread at the same setting. If you wish to
re-toast the bread, set the toasting control dial to a lower setting and do not
leave the toaster unattended. Failure to do so may result in a fire hazard.
26.Do not cover the appliance while it is in use.
27.Unplug the appliance from the electrical outlet when it is not in use.
28.Do not unplug the appliance from the outlet by pulling on the cord.
29.Do not leave the appliance exposed to the elements (rain, direct sunlight, frost,
etc.).
30.Before doing any cleaning or operation, unplug the appliance from the electrical
outlet.
31.Do not immerse the appliance, the plug, or the electrical cord in water.
04
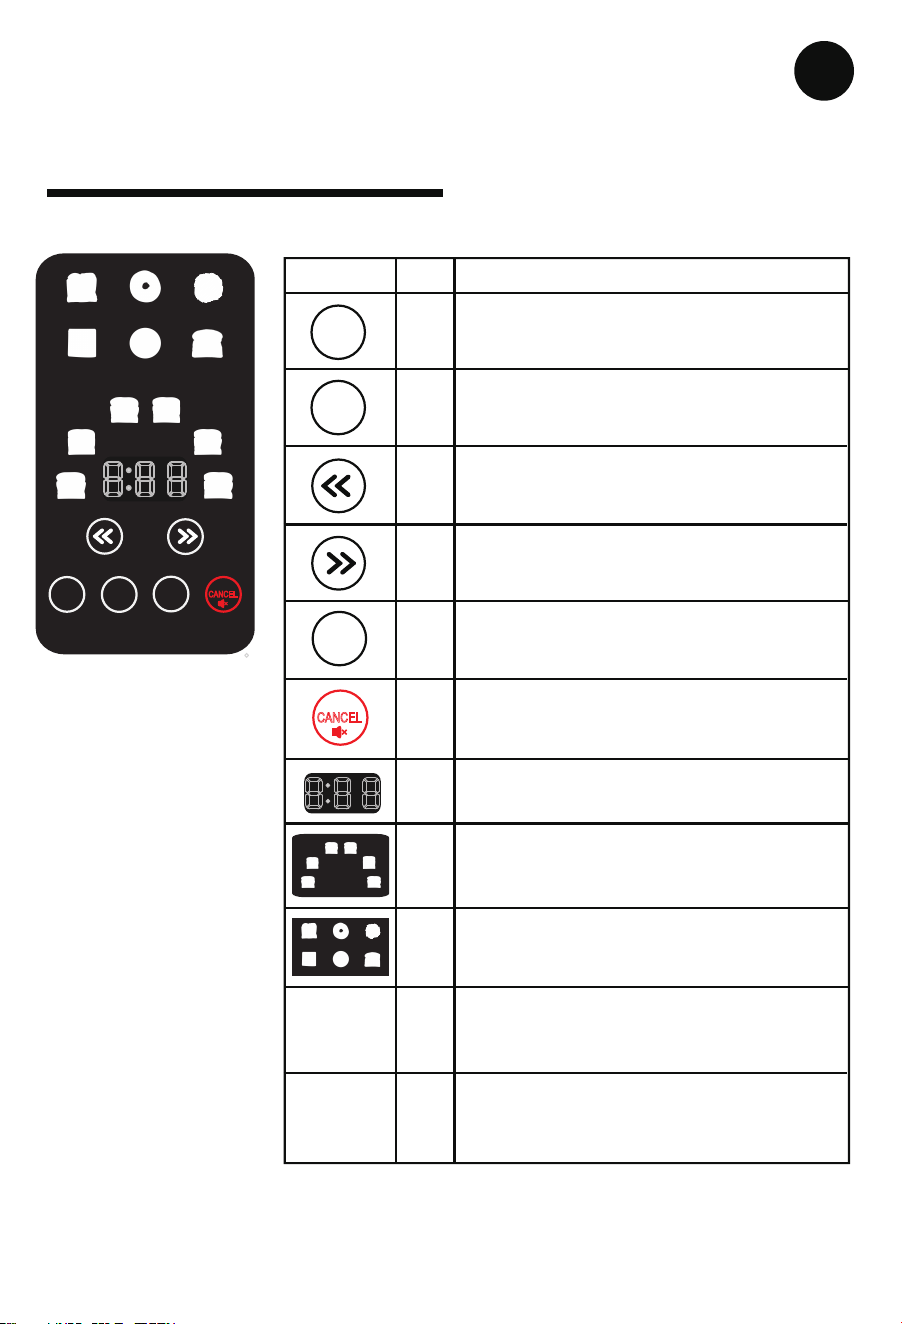
List Of Main Parts
SHADE
DEFROST
REHEAT
CANCEL
BREAD
TYPE
WAFFLE
EN MUFFIN GRAIN
BREAD
BAGEL PASTRY
1
2
3
4
5
6
7
8
9
10
11
ITEM ICON OPERATION INSTRUCTION
Bread Type Button
Defrost Button (Toast Function)
Browning Time Decrease Button
Browning Time Increase Button
Reheat Button (Toast Function)
Cancel Button / Mute Mode Button
Browning Setting & Countdown Timer
Browning Color Setting (1-6)
Menu Function Setting Area
Loading Lever
Crumb Tray
BREAD
TYPE
DEFROST
REHEAT
CANCEL
WAFFLE
EN MUFFIN GRAIN
BREAD
BAGEL PASTRY

05
1.TOASTER
2.INSTRUCTION MANUAL
Model Number KST075GU
Rating Voltage 120V~ 60Hz
Nominal power 850W
Technical Specifications
Contents Of Packaging
THIS PRODUCT IS DESIGNED TO BAKE TWO SLICES OF
BREAD AT THE SAME TIME, IF YOU ONLY BAKE A PIECE
OF BREAD, PLEASE USE FIRST LEVEL TO AVOID BURNED.
Toasting Time

06
TOAST TIME
±10S
BREAD TYPE
SETTING 1
(S)
BREAD
BREAD + DEFROST
BREAD + REHEAT
BAGEL
BAGEL + DEFROST
BAGEL + REHEAT
PASTRY
PASTRY + DEFROST
PASTRY + REHEAT
GRAIN
GRAIN + DEFROST
GRAIN + REHEAT
EN MUFFIN
EN MUFFIN +
DEFROST
EN MUFFIN +
REHEAT
WAFFLE
WAFFLE + DEFROST
WAFFLE + REHEAT
70
84
30
100
120
30
65
78
30
70
84
30
100
120
30
70
84
30
120
144
30
140
168
30
85
102
30
95
114
30
135
162
30
95
114
30
150
180
30
180
216
30
105
126
30
120
144
30
170
204
30
120
144
30
180
216
30
220
264
30
125
150
30
145
174
30
205
246
30
160
192
30
210
252
30
260
312
30
145
174
30
170
204
30
240
288
30
185
222
30
230
276
30
300
360
30
170
204
30
195
234
30
280
336
30
210
252
30
SETTING 2
(S)
SETTING 3
(S)
SETTING 4
(S)
SETTING 5
(S)
SETTING 6
(S)

1.Remove all the packaging and safely discard.
2.Insert the plug into a power outlet.
3.The LED display will light up and the appliance will enter its standby default
setting.
• NOTE: STANDBY DEFAULT SETTING WILL ILLUMINATE A FLASHING LIGHT ON
TOASTER SETTING “SHADE” AND MENU FUNCTIONS SETTING AREA.
4.Pressing the lever down fully to cure the new elements.
5.The LED display will emit a solid light on the selected Menu, setting lights
will flash repeatedly from the first till the selected one and Browning Time
functions and begin the countdown with the timer.
6.In doing so, This will burn off any lubricants from the Artisan Toasty Slice
heating elements and may omit a smell, this is normal.
7.The lever will pop up automatically once the timer has finished.
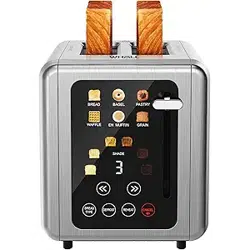
1.Press the “BREAD TYPE” button until the LED Display emits a flashing light on
your desired bread type. Bread type settings include: BREAD, BAGEL, PASTRY,
WAFFLE, EN MUFFIN (English Muffin), GRAIN.
2.Select desired Toast and Browning Time.To adjust the recommended browning
time, use the decrease or increase buttons to adjust to the desired
browning time.
3.Press the lever down fully.
4.The LED display will show your selected Function, Menu and Browning Time
settings and begin the countdown with the timer.
5.The toast will raise automatically once the timer has finished.
THE MENU FUNCTION IS DESIGNED TO TOAST, DEFROST OR REHEAT (IN
CONJUNCTION WITH THE TOAST FUNCTION SETTING SELECTION) VARIOUS
BREAD TYPES. SOME BREAD TYPES REQUIRE MORE OR LESS TOASTING TIME
DUE TO MANY FACTORS SUCH AS SUGAR CONTENT AND DENSITY. SELECT
YOUR BREAD TYPE FOR RECOMMENDED BROWNING TIME FOR ULTIMATE
RESULTS. THE SELECTED BREAD WILL FLASH DURING THE SELECTION
PROCESS AND BE LIT SOLID DURING TOASTING ON THE LED DISPLAY.
07
Operating Instructions
Before First Use
Cooking Use

1.Press the “DEFROST” button repeatedly until the LED display emits a flashing
light on 'DEFROST'.
2.Select the bread type in the “BREAD TYPE setting.
3.A recommended browning time for the frozen bread type selected in the Menu
setting will be suggested.
4.Press the lever down fully.
5.The LED display will show your selected Function, Menu and Browning Time
settings and begin the countdown with the timer.
6.The toast will raise automatically once the timer has finished.
1.Press the “REHEAT” button repeatedly until the LED display emits a flashing
light on 'REHEAT'.
2.Press the lever down fully.
3.The toast will raise automatically once the timer has finished.
THE DEFROST FUNCTION GENERATES 20% LONGER BROWNING TIME CYCLE
PERFECT FOR TOASTING FROZEN BREAD TYPES.
• NOTE: SHADE SCREEN WILL DISPLAY WORDS OF “REH” AFTER SELECTION.
IN THIS FUNCTION, THE BREAD TYPE AND BROWNING TIME SETTINGS
CANNOT BE SELECTED.
THE REHEAT FUNCTION IS DESIGNED TO REHEAT BREAD TYPES AFTER THE
TOASTING CYCLE HAS FINISHED. THE REHEAT FUNCTION GIVES 30 SECONDS
TOASTING TIME FOR A BURST OF HEAT.
THE BAGEL FUNCTION IS DESIGNED TO TOAST THE BREAD BY ONE SIDE OF
THE BREAD ONLY. ONLY THE TOASTER’S OUTER HEATING COILS ARE
ACTIVATED, THE INNER COILS REMAIN COLD.
08
DEFROST Function
BAGEL Function
REHEAT Function

1.Press the “BREAD TYPE” button until the LED Display emits a flashing light on
'BAGEL'.
2.Select desired Toast Function and Browning Time.
3.Press the lever down fully.
4.The LED display will show your selected Function, Menu and Browning Time
settings and begin the countdown with the timer.
5.The toast will raise automatically once the timer has finished.
09
THE CRUMB TRAY SHOULD BE EMPTIED REGULARLY AS A BUILD-UP OF
CRUMBS COULD BE A POTENTIAL FIRE HAZARD. AFTER TOASTING, LET THE
TOASTER COOL DOWN THOROUGHLY, THEN SLIDE OUT THE CRUMB TRAY AND
EMPTY.
Crumb Tray
• ALWAYS SWITCH OFF, UNPLUG FROM THE POWER OUTLET, AND DISMANTLE
BEFORE CLEANING.
• NEVER PUT THE APPLIANCE, PLUG OR CORD IN THE WATER OR LET THE CORD
OR PLUG GET WET.
• DO NOT WASH PARTS IN THE DISHWASHER.
• DO NOT CLEAN WITH SCOURING POWDERS, STEEL WOOL PADS OR OTHER
ABRASIVE MATERIALS.
Care Guide
TO STOP TOASTING AT ANY TIME DURING THE BROWNING PROCESS, PRESS
THE “CANCEL” BUTTON.
Cancel Function
TO ACTIVATE OR TO CANCEL THE MUTE MODE, LONG PRESS THE “CANCEL”
BUTTON FOR 2 SECONDS UNTIL TWO SOUNDS ALERT.
• NOTE: ALL THE SOUND ALERT WOULD BE CANCELED AFTER ACTIVATING
THE MUTE MODE
Mute Mode Function

10
DO NOT ALLOW THIS UNIT TO BE EXPOSED TO RAIN OR MOISTURE. THIS
APPLIANCE IS INTENDED FORHOUSEHOLD USE.USE ON ALTERNATING CURRENT
(120V~ 60Hz) ONLY.
Safety Precaution
BEFORE CLEANING, SWITCH OFF THE POWER AT THE POWER OUTLET AND
UNPLUG THE ARTISAN TOASTY SLICE AND LET THE APPLIANCE COOL DOWN.
WIPE OUTER SURFACES WITH A DAMP CLOTH AND DRY. REMOVE AND EMPTY
THE CRUMP TRAY REGULARLY AFTER USE. WIPE WITH DAMP CLOTH, DRY,
THEN REPLACE IT IN THE TOASTER.
To Clean
ONCE CLEAN, STORE THE APPLIANCE IN A DRY CUPBOARD.
Storage
ELECTRICAL WASTE PRODUCTS SHOULD NOT BE DISPOSED OF WITH
HOUSEHOLD WASTE. PLEASE RECYCLE WHERE FACILITIES EXIST.
CHECK WITH YOUR LOCAL AUTHORITY FOR RECYCLING ADVICE.
Disposal Information

11
