
25
min
Description Picture Qty
A Anchor
6
B Short Screws
6
6
C
D
Long Screws
Wall Mount Brackets
4
Cross Head ScrewdriverDrill bit
Ruler Level Hammer
Drill
SETUP
TOOLS NEEDED(NOT INCLUDED)
HARDWARE
(Wall mounting, optional)
Table 3
Figure 7
Table 2
USER GUIDE
100135495
Contents & Information
Features
• 5.1.2 Channels
• 6 Internal speakers + 2 true wireless satellite speakers + 1 wireless subwoofer
• 250W RMS output /1000W peak output (4 x RMS)
• White LED display
• Dolby Atmos®
• DTS:X® + DTS® Virtual:X™
• Roku TV Ready®
• Bluetooth®
Overview
SOUNDBAR
VOLUME UP
VOLUME DOWN
SOURCE
ON/OFF
REMOTE CONTROL
BLUETOOTH
BASS DOWN
TREBLE DOWN
SOUND MODE
(MUSIC/MOVIE/TALK)
BASS UP
TREBLE UP
NEXT TRACK
PLAY/PAUSE/OK
SOURCE
POWER
ON/OFF
VOLUME UP
VOLUME DOWN
PREVIOUS TRACK
MUTE
Model Description
1A. CENTER
1. For the best surround sound experience, position the soundbar, subwoofer,
and surround sound speakers as shown. The soundbar should be close to ear level.
2.You will get the best sound effect if your ceiling is flat and around 7.5ft to 12ft high.
First Time Setup
ON A SURFACE
DescriptionPart QtyDescription Qty
PARTS
PARTS DIAGRAM
1
2
3
4
5
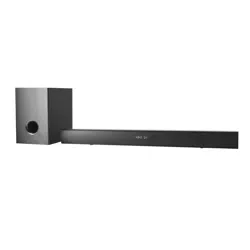
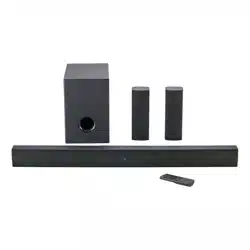
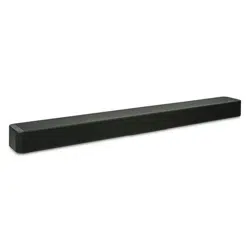
Soundbar
Wireless subwoofer
Satellite speaker
Power cable
Remote control
(requires 2 AAA batteries,
included)
2
1
1
1 1
1
1
1
3
1
4
HDMI cable
Optical cable
3.5 mm AUX cable
Quick Start Guide
Wall mounting template
Wall mounting kit
6
7
8
9
10
11
Part
42 5.1.2 Surround Soundbar System
”
SETTING
DTS® Virtual:X™
DIMMER (4 LEVELS)
(High / Medium / Low /
Off brightness)
Note: Do not block the
subwoofer port.
Speaker stands
not included.
Subwoofer
Left satellite
speaker
Right satellite
speaker
Sound bar should be
centered below the TV.
Place soundbar onto the L-shaped bracket and use the included bracket screws
to attach.
3B. HANG
To wall-mount the satellite speakers
1. Attach the wall mount screw to the back of the satellite speakers.
2. Secure the wall mount bracket to the wall.
3. Slide the speakers on to the wall brackets. Ensure the wall mount screw is secured
within the bracket grooves.
Wall-mounting the Satellite Speakers
Wall-mount Screw Holes
Bottom of Soundbar
4. CHOOSE CABLE
Connect one cable to Soundbar and TV
OPTICAL
HDMI
(eARC)
3.5MM
AUX
•To Enjoy
content, your TV must support
the HDMI-CEC and Enhanced Audio
Return Channel (eARC) function.
• Enable CEC and ARC/eARC on TV
• Settings for CEC and ARC/eARC
may differ by TV manufacturer. See
TV’s user guide for more.
• To control soundbar volume on
TV remote, enable System Audio
Control in CEC menu.
• CEC Function naming may differ
by TV Manufacture. See TV’s user
guide for more.
• Only HDMI 2.0 cables (and higher)
support eARC.
* If no Audio using Digital
Inputs see troubleshooting.
Best
Good
Better
Tip: If you have a Roku TV , setup is easy. Just use the included cable to connect your
soundbar to the HDMI (ARC/eARC) port on your TV and follow the on-screen instructions.
Cable/ Satellite Box
Blu-ray Player
OR
Operation
LED State Status
Flashing In pairing mode
Breathing Connection/Pairing Failed
Solid Connected/Pairing successful
1A. AUTOMATIC PAIRING
CONNECT SUBWOOFER & SATELLITES
5. CONNECT POWER
WARNING
Do not mix old and
new batteries.
WARNING
Do not mix alkaline, standard
(carbon-zinc) or rechargeable (ni-
cad, ni-mh, etc.) batteries.
Alk/Zinc/Ni-Mh
6. INSTALL BATTERIES
Remove battery door Replace battery door
A: Press and hold the reset hole of the subwoofer and satellite speakers for 1 second
with a pin.
B: Press " " and "-" simultaneously for 3 seconds on the soundbar or remote control.
C: When wireless connection is successful, the indicator will be solid blue.
Press & hold 3 sec
simultaneously
The indicators will
flash rapidly when pairing.
WARNING
The subwoofer and satellite speakers
are within 5m of the soundbar.
CONNECT SUBWOOFER & SATELLITES
1
2
3
4
5
6
8
10
11
7
9
1B. PLACE
Place the included wall mounting template against the wall under your TV.
Mark the two bracket holes using a pencil(Ensure enough space between
Soundbar and TV).
Then place the shorter end of the bracket on the two holes you just marked
and screw into the wall. Be sure your screws are attached to wood studs,
drywall anchors (for drywall), or concrete anchors (for brick/concrete walls).
ON A WALL
Quick Start Guide
2B. INSTALL
TROUBLESHOOTING
SUBWOOFER SATELLITE SPEAKERS
RESET
LED INDICATOR
POWER
POWER
RESET
LED
INDICATOR
WALL-MOUNT SCREW HOLES
USB
HDMI OUT (eARC)
OPTICAL AUDIO IN
AUX AUDIO IN
(STEREO 3.5MM)
POWER
BACK
HDMI IN
WALL MOUNTS
Figure 1
Figure 2
Figure 3
Figure 6
Table 4
Table 1
Table 5
Problem Cause Solution
No power
Power off
Press " " button on remote control or on Soundbar.
Ensure the power cord is securely connected.
Plug a different device into the electrical outlet
to verify that the outlet is working correctly
Press
Increase volume
Change TV output to PCM
Select different Input source
Connect directly to another device (Blu-Ray,
Game System,etc.)
Set audio output to fixed or standard, NOT
variable.
Increase volume / unmute source device
The subwoofer is out of range,please move the
subwoofer closer to the soundbar. Make sure the
subwoofer is within 5m of the soundbar.
Move the source device closer to soundbarSource too far
Bluetooth source
device
Subwoofer and
soundbar too far
Solid obstruction
Other wireless
devices
Move source device into line-of-site of soundbar
Turn off / move devices away (wireless security
cameras,wireless video baby monitors, cordless
phones, and microwave ovens
Loose power cord
Faulty outlet
Low Volume / Mute
Input source
Not All TVs have
Audio outputs listed.
TV set to variable
audio output
Some TVs do not Pass
through Digital Audio
Bluetooth
breakup or
disconnect
No audio
" "
Troubleshooting
Table 7
Figure 8
Figure 9
Figure 10
Figure 11
WALL
Figure 12
Figure 14
Figure 15
Figure 16
In remote
Figure 17
Figure 18
Figure 18
2B. SELECT SOURCE
3B. PLAY AUDIO
Button Action
Play, pause or resume play.
/
Skip to the previous or next track.
/
Increase/decrease the volume.
Select USB Mode(Remote or Soundbar
button)
1B. INSERT THE USB DEVICE
USB OPERATION
Table 6
Figure 22
ON/OFF
1A. POWER ON/OFF
Soundbar (Remote or Bar)
2A. SELECT SOURCE
To switch between audio sources
(Remote or Bar)
3A. PAIR DEVICE
Press and hold the button on
remote.
SOURCE
BLUETOOTH® OPERATION
SOURCE
WARNING
High volume levels can
damage your hearing.
Reduce the volume levels
before pressing Play.
IMPORTANT
Soundbar does not
include microphone
and cannot operate as
hands-free device.
BLUETOOTH
onn. 5.1.2 Soundbar
DEVICES
Bluetooth
ON
4A. SEARCH ON DEVICE
Select "onn. 5.1.2 Soundbar" on device
5A. PLAY AUDIO
From device
6A. VOLUME
Controlled by Device, Remote or Soundbar
ON/OFF
Press and hold
Figure 19
Figure 20
Figure 21
Figure 13
Figure 5
Figure 4
*Press "VRT:X" to enable/disable Virtual:X. When enabled (On), all inputs will produce
a virtual sound technology that simulates the effect of having overhead sound. When
disabled (Off), all sources will playback in without virtualization.
(Center Level / Surround Right
Level / Surround Left Level /
Height Level)
CONTENTS & INFORMATION
OVERVIEW ............................................................................................... 1
MODEL DESCRIPTION .......................................................................... 4
FIRST TIME SETUP ..................................................................................6
OPERATION ............................................................................................11
CLEANING & CARE ............................................................................... 16
SPECIFICATIONS .................................................................................. 16
TROUBLESHOOTING ........................................................................... 17
Power On
Power Off
HDMI (ARC)
HDMI IN
Optical
Aux in
USB
Bluetooth pairing mode
Bluetooth device connected
Volume up / down
Maximum / Minimum volume
Mute
Talk mode
Music mode
Movie mode
Bass+/-
Treble+/-
DTS Virtual:X ON
DTS Virtual:X OFF
Subwoofer and Satellite Speakers
are pairing with Soundbar
Subwoofer and Satellite Speakers are
connected with Soundbar
Function Display
CAUTION
Ensure the unit is fully unplugged from
the power supply before cleaning.
Specifications
•
• Never use abrasive pads to clean device.
• Avoid using liquids to clean device.
CLEANING
Cleaning & Care
Assembled LxWxH
Soundbar: 42 x 4.3 x 3.2 Inches
Subwoofer: 8.2 x 11.8 x 13.9 Inches
Satellite Speaker: 6.5 x 4.3 x 3.2 Inches
Specifications
•
• Never use abrasive pads to clean device.
• Avoid using liquids to clean device.
CLEANING
Cleaning & Care
POWER
Contents & Information
1-888-516-2630
SAVE THIS USER GUIDE
For product assistance &
WE CAN HELP
PLEASE READ AND KEEP
FOR FUTURE REFERENCE.
7 DAYS/WEEK 7:00am- 9:00pm CST
Find more at
1 2 3 4 5 6 7
11 12 13 15 16
17
8 9 10 14
MARK HERE MARK HERE
- SOUNDBAR
WALL MOUNTING TEMPLATE
37.80 in./960mm
Center Line
WALL
2
3
1
- SOUNDBAR
WALL MOUNTING TEMPLATE
- SATELLITE SPEAKER - SATELLITE SPEAKER
WALL MOUNTING TEMPLATE
WALL MOUNTING TEMPLATE
1B.
2.1 Soundbar
Model:100024204
Wall Mounting e
42 5.1.2 Surround Soundbar System
Model:100135495
Wall Mounting Template
MARK HERE MARK HERE
1120mm
160mm
CAUTION
•
•
Dolby, Dolby Atmos, and the double-D symbol are registered trademarks of Dolby Laboratories Licensing Corporation.
Manufactured under license from Dolby Laboratories. Confidential unpublished works. Copyright © 2012-2021 Dolby Laboratories.
All rights reserved.
•
•
• Batteries should not be exposed to excessive heat such as sunshine, fire, etc.
• Keep new and used batteries away from children.
• If the battery compartment does not close securely, stop using the product and keep it away from children.
• If you think batteries might have been swallowed or placed inside any part of the body, seek immediate medical attention.
FCC Statement :
This device complies with Part 15 of the FCC Rules. Operation is subject to the following two conditions: 1) This device may not cause
harmful interference, and 2) This device must accept any interference received, including interference that may cause undesired
operation.
Note:
This equipment has been tested and found to comply with the limits for a Class B digital device, pursuant to part 15 of the
FCC Rules. These limits are designed to provide reasonable protection against harmful interference in a residential installation.
This equipment generates,uses and can radiate radio frequency energy and, if not installed and used in accordance with the instructions,
may cause harmful interference to radio communication. However, there is no guarantee that interference will not occur in a particular
installation. If this equipment does cause harmful interference to radio or television reception, which can be determined by turning
the equipment off and on, the user is encouraged to try to correct the interference by one or more of the following measures:
• Reorient or relocate the receiving antenna.
• Increase the separation between the equipment and receiver.
• Connect the equipment into an outlet on a circuit different from that to which the receiver is connected.
• Consult the dealer or an experienced radio/TV technician for help.
FCC Caution:
• Changes or modifications not expressly approved by the party responsible for compliance could void the user’s authority to operate
the equipment.
• This equipment complies with FCC and IC radiation exposure limits set forth for an uncontrolled environment. This equipment should
be installed and operated with minimum distance 20cm between the radiator & your body.
• Shielded cables must be used with this unit to ensure compliance with the Class B FCC limits.
The Adopted Trademarks HDMI, HDMI High-Definition Multimedia Interface, HDMI trade dress and the HDMI Logos are
trademarks or registered trademarks of HDMI Licensing Administrator,Inc. in the United States and other countries.
The Bluetooth® word mark and logos are registered trademarks owned by the Bluetooth SIG, Inc. and any use of such marks by
Walmart Inc. is under license. Other trademarks and trade names are those of their respective owners.
Roku TV, Roku TV Ready, and the Roku TV Ready logo are trademarks of Roku, Inc. This product is Roku TV
Ready-supported in the United States. Countries are subject to change. For the most current list of countries in which this
product is Roku TV Ready-supported, please email [email protected].
IMPORTANT SAFETY INSTRUCTIONS
1. Read these instructions – All the safety and operating instructions should be read before this product is operated.
2. Keep these instructions – The safety and operating instructions should be retained for future reference.
3. Heed all warnings – All warnings on the appliance and in the operating instructions should be adhered to.
4. Follow all instructions – All operating and use instructions should be followed.
5. Do not use this apparatus near water – The appliance should not be used near water or moisture – for example, in a wet basement or
near a swimming pool, and the like.
6. Clean only with dry cloth.
7. Do not block any ventilation openings. Install in accordance with the manufacturer’s instructions.
8. Do not install near any heat sources such as radiators, heat registers, stoves, or other apparatus (including amplifiers) that produce heat.
9. Do not defeat the safety purpose of the polarized or grounding plug. A polarized plug has two blades with one wider than the other.
A grounding plug has two blades and a third grounding prong. The wide blade or the third prong is provided for your safety. If the
provided plug does not fit into your outlet, consult an electrician for replacement of the obsolete outlet.
10. Protect the power cord from being walked on or pinched particularly at the plugs, convenience receptacles, and at the point where
they exit from the apparatus.
11. Only use attachments/accessories specified by the manufacturer.
12. Use only with the cart, stand, tripod, bracket, or table specified by the manufacturer, or sold with
the apparatus. When a cart or rack is used, use caution when moving the cart/apparatus combination
to avoid injury from tip-over.
13. Unplug the apparatus during lightning storms or when unused for long periods of time.
14. Refer all servicing to qualified personnel. Servicing is required when the apparatus has been damaged in any way,such as power
supply cord or plug is damaged, liquid has been spilled or objects have fallen into the apparatus has been exposed to rain or moisture,
does not operate normally, or has been dropped.
IMPORTANT SAFETY INSTRUCTIONS
15. Do not install this equipment in a confined or built-in space such as a book case or similar unit, and maintain well-ventilated conditions.
The ventilation should not be impeded by covering the ventilation openings with items, such as newspaper, tablecloths, curtains, etc.
16. WARNING:To reduce the risk of fire or electric shock, do not expose this apparatus to rain or moisture. The apparatus shall not be
exposed to dripping or splashing and that objects filled with liquids, such as vases, shall not be placed on apparatus.
17. WARNING: The mains plug is used as disconnect device, the disconnect device shall remain readily operable.
18. This equipment is a Class II or double insulated electrical appliance. It has been designed in such a way that it does not require a
safety connection to electrical earth.
19.
- This lightning flash with arrowhead symbol within an equilateral triangle is intended to alert the user to the presence
of non-insulated “dangerous voltage” within the product’s enclosure that may be of suff icient magnitude to constitute
a risk of electric shock.
- Warning: To reduce the risk of electric shock, do not remove cover (or back) as there are no user-serviceable parts inside. Refer
servicing to qualified personnel.
- The exclamation point within an equilateral triangle is intended to alert the user to the presence of important operating and
maintenance instructions in the literature accompanying the appliance.
20.The equipment shall be used at maximum 35 degree C ambient temperature.
21.
WARNING: To prevent injury, this apparatus must be securely attached to the floor/wall in accordance with the installation instructions.
45mm
14.6mm
Φ10.0mm
Φ4.0mm
CAUTION
RISK OF ELECTRIC SHOCK
DO NOT OPEN
正面
背面
California Prop 65 Warning :
WARNING
This product can expose you to chemicals including Lead,
which is known to the State of California to cause cancer.
For more information go to: www.P65Warnings.ca.gov.
WARNING
Federal Communications Commission (FCC) Statement
This device complies with part 15 of the FCC Rules. Operation is subject to the following two conditions:
(1) This device may not cause harmful interference, and (2) this device must accept any interference received,
including interference that may cause undesired operation.
Note: This equipment has been tested and found to comply with the limits for a Class B digital device,
pursuant to part 15 of the FCC Rules. These limits are designed to provide reasonable protection against
harmful interference in a residential installation. This equipment generates, uses and can radiate radio
frequency energy and, if not installed and used in accordance with the instructions, may cause harmful
interference to radio communications. However, there is no guarantee that interference will not occur in a
particular installation. If this equipment does cause harmful interference to radio or television reception,
which can be determined by turning the equipment off and on, the user is encouraged to try to correct the
interference by one or more of the following measures:
●Reorient or relocate the receiving antenna.
●Increase the separation between the equipment and receiver.
●Connect the equipment into an outlet on a circuit different from that to which the receiver is connected.
●Consult the dealer or an experienced radio/TV technician for help.
Warning: Changes or modifications made to this device not expressly approved by
SHENZHEN FENDA TECHNOLOGY CO., LTD.
may void the FCC authorization to operate this device.
Note: The manufacturer is not responsible for any radio or TV interference caused by unauthorized
modifications to this equipment. Such modifications could void the user’s authority to operate the equipment.
RF exposure statement:
The transmitter must not be colocated or operated in conjunction with any other antenna or
transmitter. This equipment complies with the FCC RF radiation exposure limits set forth for
an uncontrolled environment. This equipment should be installed and operated with a Minimum distance of
20cm between the radiator and any part of your body.