Store this manual for future reference
4020-110-03
®
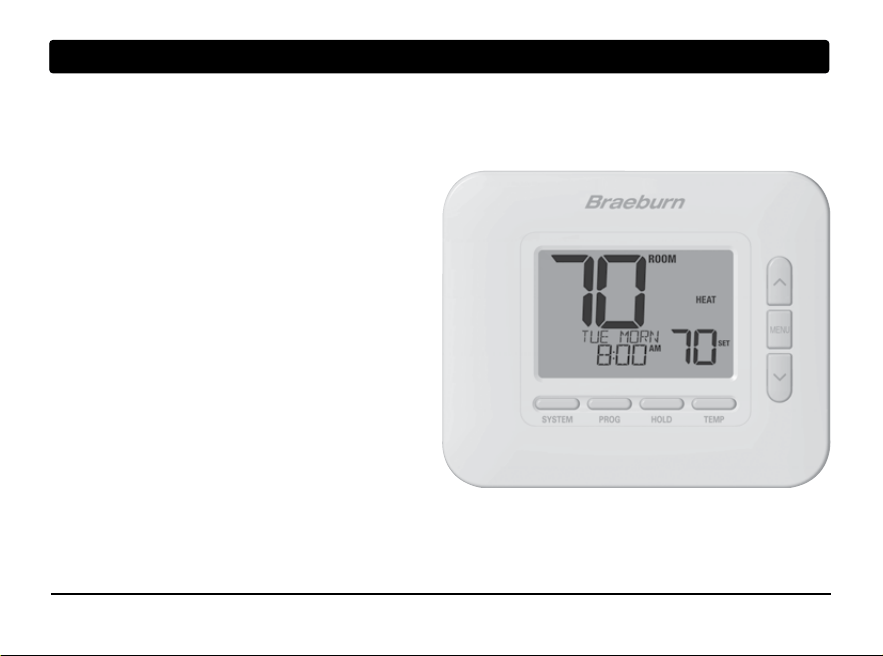
Programmable Thermostat
User Manual
Read all instructions before proceeding.
PREMIER
SERIES
4020
Heat Only Hydronic
with Freeze Protection
This manual covers the following thermostat model:

Contents
1 About Your Thermostat
Quick Reference - Thermostat and Display ............... 4
2 User Settings
Accessing User Settings ........................................... 8
Table of User Settings ...............................................9
Setting the Time and Day ..........................................9
Backlight Control .....................................................10
Temperature & Lock Code .......................................11
Resetting Thermostat ..............................................12
3 Setting Your Program Schedule
Tips Before Setting Your Program Schedule .............13
Programming a 7 Day Schedule ..............................15
Programming a 5-2 Day Schedule ...........................17
4 Operating Your Thermostat
Setting the System Control Mode ........................... 18
Temperature Adjustment ........................................ 19
Program Event Indicators ....................................... 20
System Status Indicators ........................................ 21
5 Additional Operation Features
Adaptive Recovery Mode ..................................... 24
Locking and Unlocking the Thermostat ................ 25
Remote Sensing .................................................. 26
Reviewing Sensor Temperature.............................26
6 Thermostat Maintenance
Battery Replacement ........................................... 27
Thermostat Cleaning ........................................... 27
User Manual 2

Congratulations! You are in control of one of the easiest-to-use thermostats on the market today.
This thermostat has been designed to provide you with years of reliable performance and comfort control.
Features
• Stylish new design with large display and bright blue backlight
• SpeedSet
®
programming gives you the option of programming all 7 days at once
• Convenient HOLD feature lets you override the program schedule
• Extra large display characters make viewing settings even easier
• Multi-level keypad lockout prevents unauthorized use
• Precise temperature accuracy keeps you in control of your comfort
• Minimum boiler off time adjustment
• Optional remote sensing
• Optional slab sensing for floor heat
3 User Manual
1
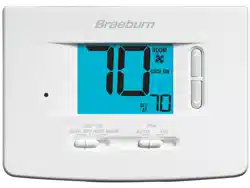
About Your Thermostat
User Manual 4
1
5
2 3 4
6
7

5 User Manual
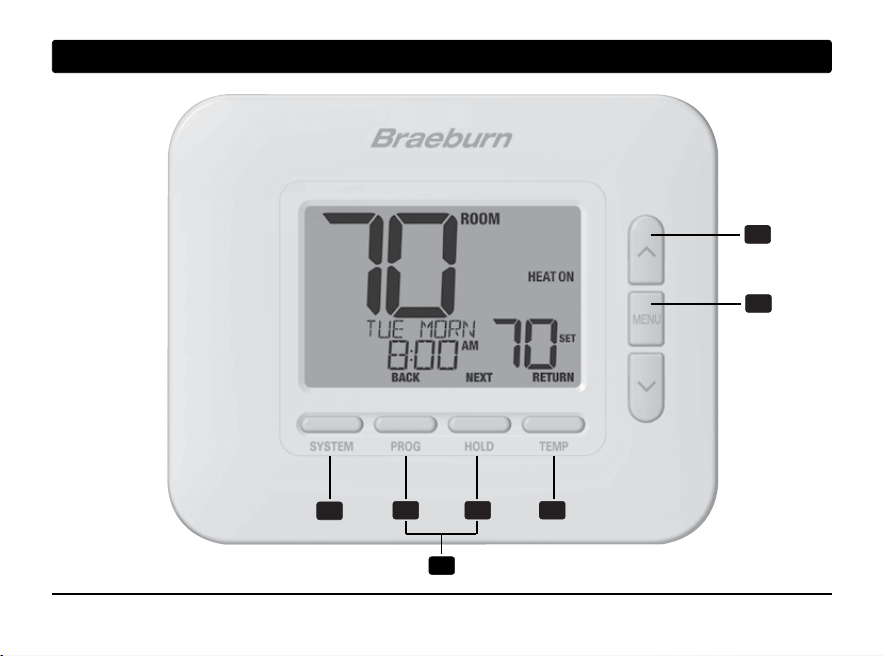
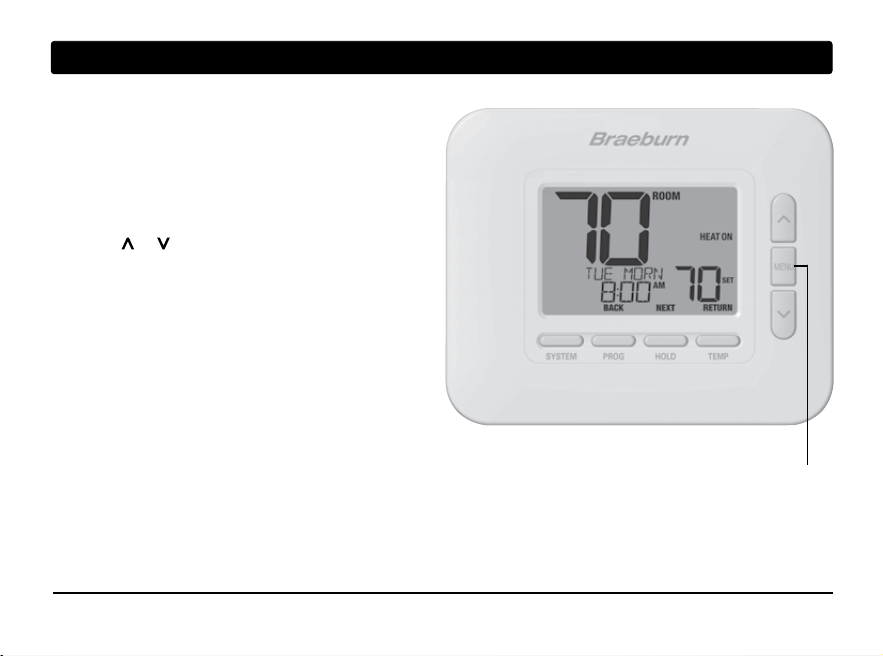
SYSTEM Button .................... Selects the system you want to control
PROG Button .........................Enters programming mode or hold for 3 seconds to enter SpeedSet
®
mode
BACK Button* ........................ Secondary function of the PROG button - Moves to previous setting
HOLD Button ......................... Enters / Exits HOLD mode (program bypass mode)
NEXT Button* ........................ Secondary function of the HOLD button - Moves to next setting
TEMP Button ......................... Press to view temperature at remote sensor
RETURN Button* .................... Secondary function of the TEMP button - Exits program or settings modes
Up / Down Arrow Buttons ..... Increases or decreases settings (time, temperature, etc.)
MENU Button ......................... Used to access user settings mode
Lock / Unlock Thermostat .... Access user Lock / Unlock screen by holding PROG and HOLD
together for 5 seconds
Battery Compartment .......... Located on the back side of thermostat
1
2
3
4
5
6
7
Thermostat
* BACK, NEXT and RETURN are secondary functions of the PROG, HOLD and TEMP buttons. When in program-
ming
or configuration modes, BACK, NEXT and RETURN appear in the display screen indicating that the PROG,
HOLD and TEMP buttons now function as BACK, NEXT and RETURN.
User Manual 6
1
About Your Thermostat
1
2
6
3
5
4
7
8
9

7 User Manual
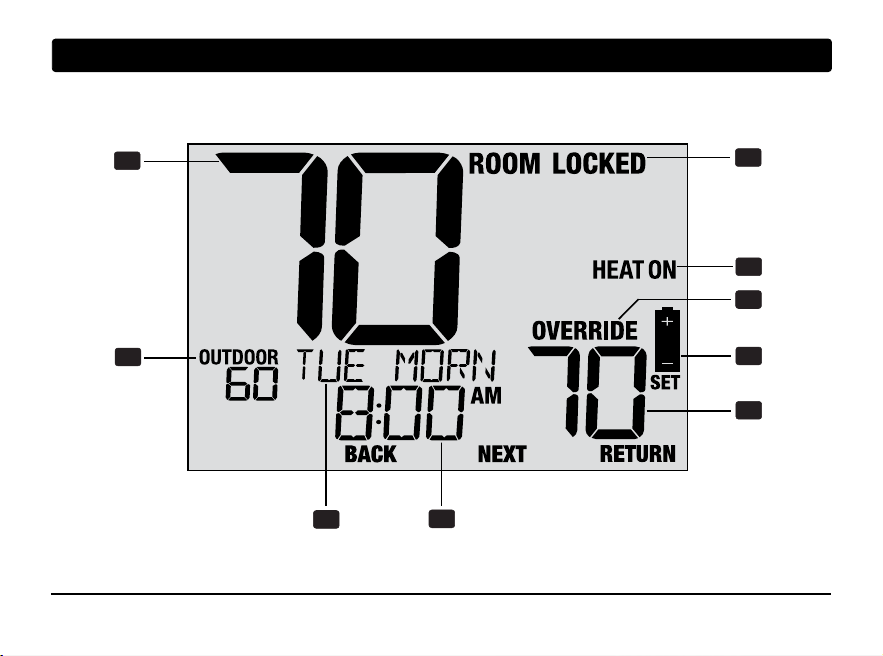
Room Temperature .............................Displays the current room temperature
Set Temperature .................................Displays the current setpoint temperature
Override Indicator .............................. Indicates that the current program schedule has
been temporarily overridden
Time of Day ........................................ Displays the current time of day
Message Center ................................. Displays various thermostat status and
maintenance information
System Mode ......................................Displays the system mode and current system status
Lock Mode Indicator .......................... Indicates if the thermostat is locked
Low Battery Indicator ........................ Indicates when the batteries need to be replaced
Outdoor Temperature .........................If a Braeburn
®
outdoor sensor is connected, the
outdoor temperature will be displayed
Thermostat Display
1
2
3
4
5
6
7
8
9
User Manual 8
2
User Settings
User Settings allow you set the current time of day as
well as customize various thermostat features.
To access the User Settings, press and release the
MENU button to display the first User Setting.
Press the or buttons to change the value for the
displayed User Setting. After your desired setting is
displayed, press NEXT (HOLD) to advance to the next
User Setting. You may also press BACK (PROG) to
move backwards through the User Settings.
When your changes are complete, press
RETURN (TEMP) to exit.
MENU
9 User Manual
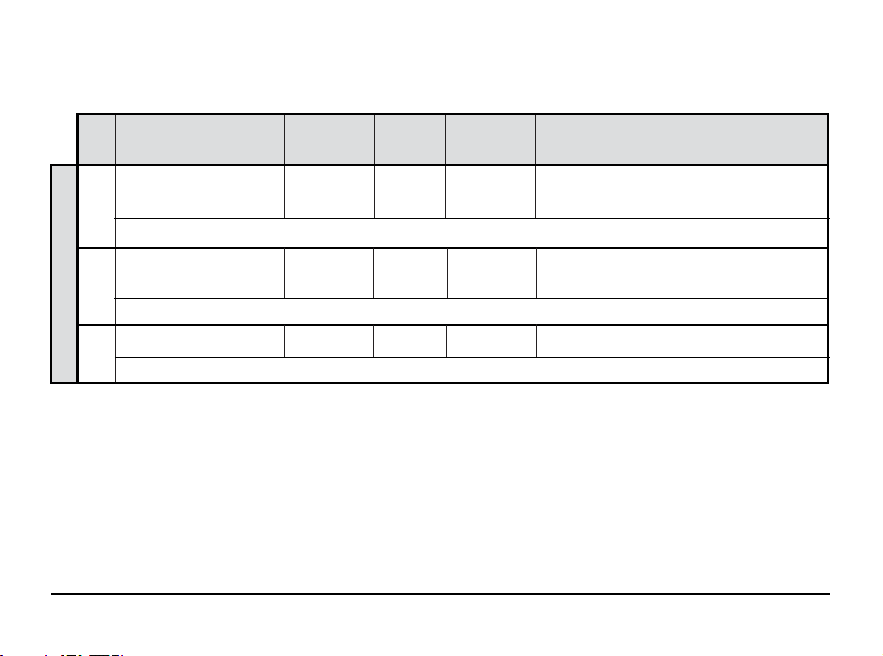
Table of User Settings
NOTE: Some user settings may not be available, depending on how the thermostat was configured during installation.
No.
User Setting
Displayed
Default
Available
Description of
Setting Settings Available Settings
1 Current Time of Day SET TIME 12:00
(Hour)
Set the current hour of the day. If thermostat was configured for a 24-hour clock, the settings 0-24 will be available.
2 Current Time of Day
SET TIME 12:00
(Minute)
Set the current minute of the hour.
3 Current Day of Week
SET DAY MON
Set the current day of the week.
1-12 Select the current hour of day
00-60 Select the current minute of the hour
MON-SUN Select the current day of the week
Time and Day
User Manual 10
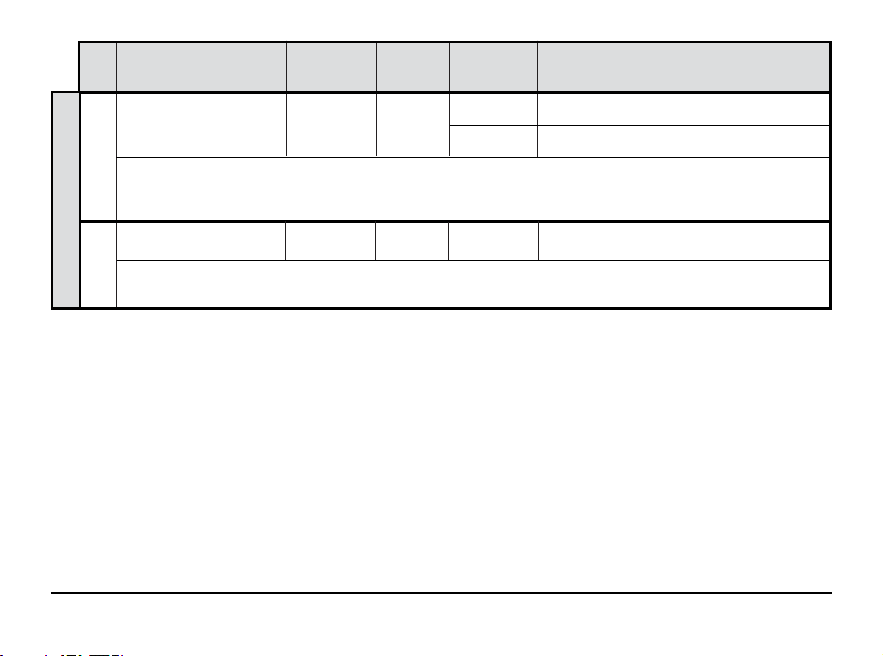
No.
User Setting
Displayed
Default
Available
Description of
Setting Settings Available Settings
4 Constant Backlight BACKLITE AUTO
[Only available if thermostat is hardwired with a 24 VAC common (C) wire] Select AUTO (default) for backlight to
turn on only with the press of a button. Backlight will turn off automatically after approximately 10 seconds. Select ON
for backlight to remain on at all times.
5 Backlight Brightness
BACKLITE 3
[Only available if thermostat is hardwired with a 24 VAC common (C) wire] Select the level of backlight brightness
with 5 being the brightest.
AUTO Backlight only turns on with button press
ON
Backlight is always on
1, 2, 3, 4, 5 Select the level of backlight brightness
Backlight
11 User Manual
No.
User Setting
Displayed
Default
Available
Description of
Setting Settings Available Settings
4 Constant Backlight BACKLITE AUTO
[Only available if thermostat is hardwired with a 24 VAC common (C) wire] Select AUTO (default) for backlight to
turn on only with the press of a button. Backlight will turn off automatically after approximately 10 seconds. Select ON
for backlight to remain on at all times.
5 Backlight Brightness
BACKLITE 3
[Only available if thermostat is hardwired with a 24 VAC common (C) wire] Select the level of backlight brightness
with 5 being the brightest.
No.
User Setting
Displayed
Default
Available
Description of
Setting Settings Available Settings
6 Temperature Hold Time
HOLD LONG
(HOLD Button)
[Only available if programming is enabled] Temperature Hold Time lets you select the time that your thermostat will
hold the temperature when the HOLD button has been pressed. When LONG is selected, the thermostat will hold your
temperature indefinitely. When 24HR is selected, the thermostat will hold your temperature for 24 hours and then return
to the current program temperature.
7 Temperature Override
ADJ LIMIT OFF
Adjustment Limit
‘ The Temporary Override Adjustment Limit will limit how much the temperature can be adjusted from the current
setpoint temperature. This setting will not allow the user to override the temperature past the selected limit amount
of 1, 2 or 3 degrees from the current setpoint.
8 Program Override
OVERRIDE 4 HR
Time Limit
[Only available if programming is enabled] The Program Override Time Limit allows you to set a maximum time limit
(in hours) that the thermostat will return to the program after a temporary temperature override has been made. You
may select 1, 2, 3 or 4 hours.
9 Thermostat Lock Code
SET LOCK 000
The Thermostat Lock Code sets a 3-digit code that you may use at any time to lock or unlock the thermostat keypad.
Setting the 3-digit code does not activate the lock feature. To lock or unlock the thermostat, see Locking/Unlocking
Thermostat, section 5. The lock code 000 cannot be used.
Temperature and Lock Code
LONG Select for long (permanent) HOLD mode
24HR
Select for 24 hour (temporary) HOLD mode
OFF Disables adjustment limit
1, 2, 3
Select adjustment limit of 1°, 2° or 3°
4 HR, 3 HR Select a program override time limit of
2 HR, 1 HR 1-4 hours
0-9
Select a 3-digit lock code of 0-9 for each digit
User Manual 12
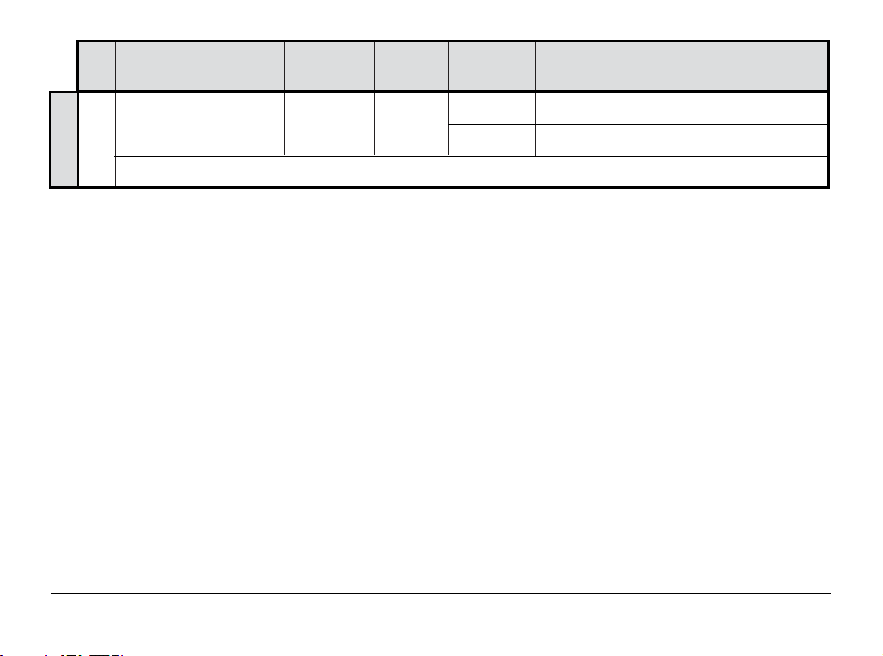
No.
User Setting
Displayed
Default
Available
Description of
Setting Settings Available Settings
10 User Reset RESET NO
Selecting YES will reset all user settings, program and current time. Thermostat lock code and Installer Settings will not be affected.
NO Reset disabled - no changes made
YES
Reset enabled - resets thermostat
RESET
13 User Manual
No.
User Setting
Displayed
Default
Available
Description of
Setting Settings Available Settings
10 User Reset RESET NO
Selecting YES will reset all user settings, program and current time. Thermostat lock code and Installer Settings will not be affected.
3
Setting Your Program Schedule
Tips Before Setting Your Program Schedule
• Make sure your current time and day of the week
are set correctly.
• Make sure the AM and PM indicators are correct.
• Various installer settings and temperature adjustment
limits may affect your programming flexibility.
• Your NITE event cannot exceed 11:50 p.m.
• BACK, NEXT and RETURN are secondary functions of the
PROG, HOLD and TEMP buttons.
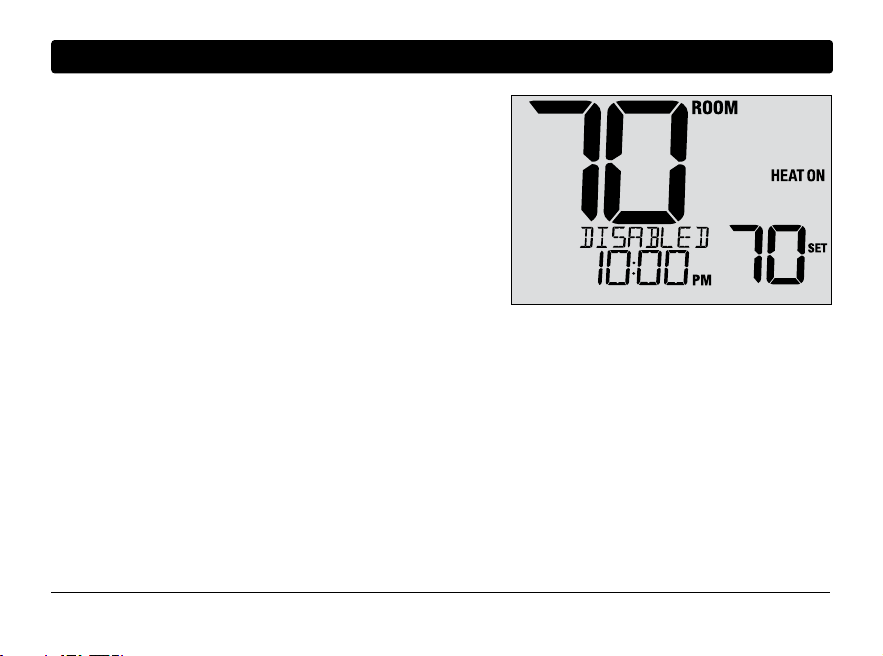
This thermostat has been configured with one of
the following programming options:
• Residential 7-day programming mode with 4 events per day
• Residential 5-2 (weekday/weekend) programming mode
with 4 events per day
• Commercial 7-day programming mode with 2 events per day
• Non-Programmable mode
NOTE: If this thermostat was configured to be
non-programmable, then you cannot set a program
schedule. If you press the PROG or HOLD buttons,
the word “DISABLED” will appear in the display.

User Manual 14
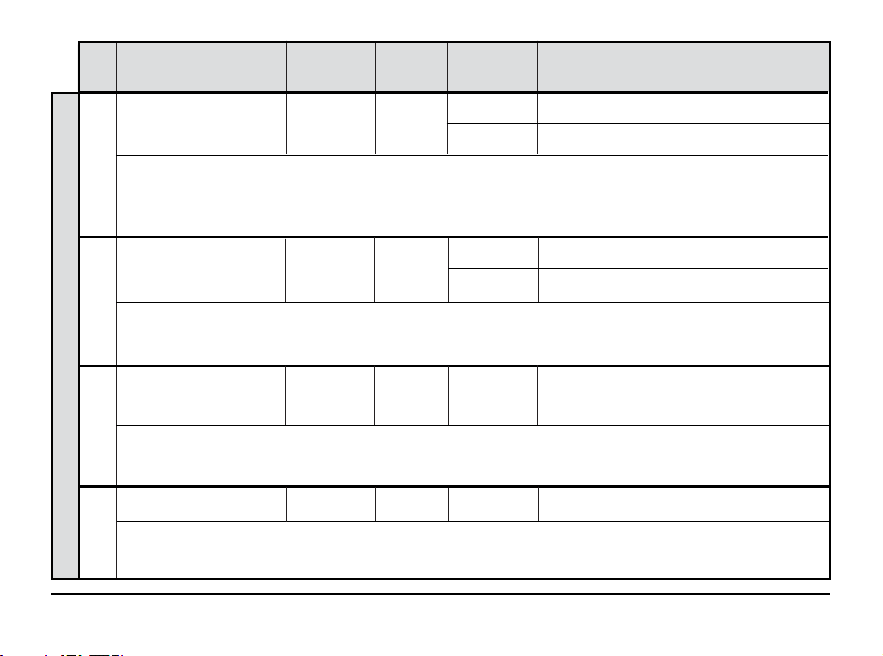
Energy Saving Programs
This thermostat comes pre-programmed with a default energy saving program. The following tables outline the
pre-programmed times and temperatures for in each of your 4 daily events. If you wish to use these settings,
then no further programming is necessary:
MORN
DAY
EVE
NITE
Time: 6:00 pm
Heat: 70˚ F (21˚ C)
Time: 8:00 am
Heat: 62˚ F (17˚ C)
Time: 6:00 am
Heat: 70˚ F (21˚ C)
Time: 10:00 pm
Heat: 62˚ F (17˚ C)
4 Event
All Days
Residential 7 Day Programming
Factory Settings
Weekday Weekend
Time: 6:00 pm
Heat: 70˚ F (21˚ C)
Time: 8:00 am
Heat: 62˚ F (17˚ C)
Time: 6:00 am
Heat: 70˚ F (21˚ C)
Time: 10:00 pm
Heat: 62˚ F (17˚ C)
Time: 6:00 pm
Heat: 70˚ F (21˚ C)
Time: 8:00 am
Heat: 62˚ F (17˚ C)
Time: 6:00 am
Heat: 70˚ F (21˚ C)
Time: 10:00 pm
Heat: 62˚ F (17˚ C)
5-2 Day Programming
Weekday/Weekend Factory Settings
15 User Manual
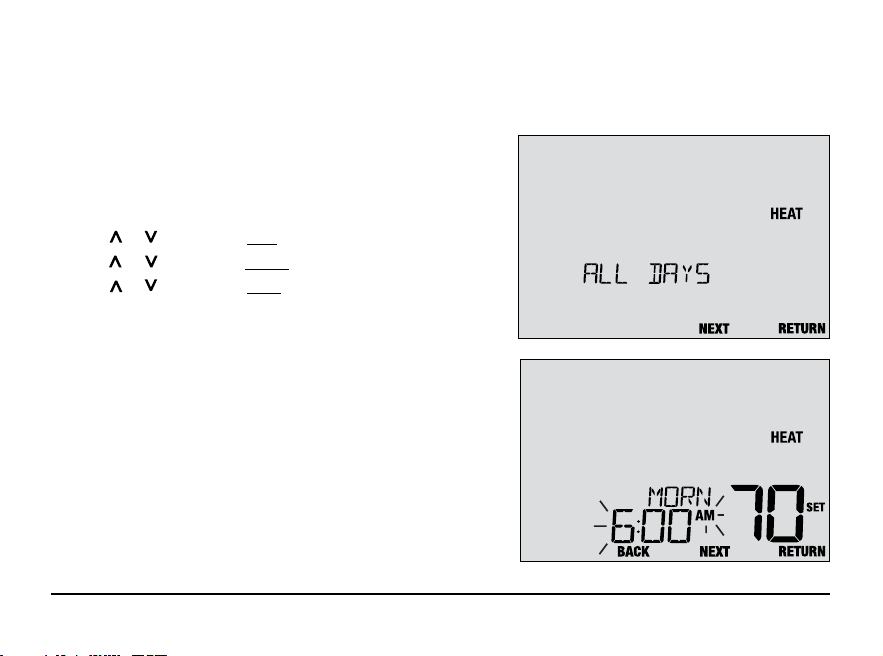
Setting a 7-Day program – All 7 Days at Once (SpeedSet
®
)
(7-day programming mode only)
NOTE: Setting all 7 days at once will copy over any previously programmed individual days.
Available Daily Events
MORN, DAY, EVE, NITE
1.
Hold the PROG button for 3 seconds until ALL DAYS appears.
2.
Press or to adjust the hour for the first event. Press NEXT.
3.
Press or to adjust the minute for the first event. Press NEXT.
4.
Press or to adjust the temp for the first event. Press NEXT.
5. Repeat steps 2-5 for the remaining daily events.
6. Press RETURN to exit.
User Manual 16
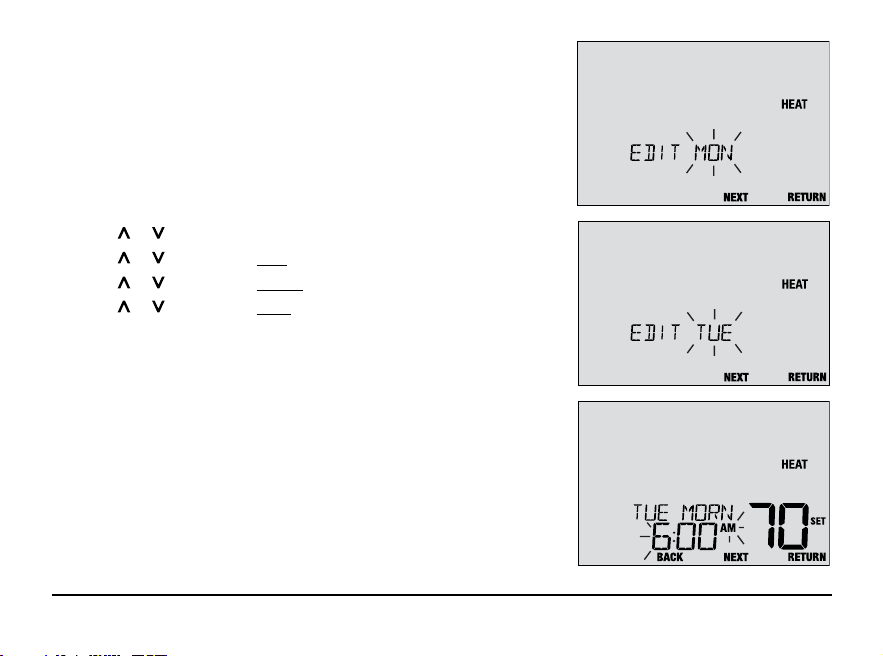
Setting a 7-Day program – Individual Days
(7-day programming mode only)
Available Daily Events
MORN, DAY, EVE, NITE
1. Press and release the PROG button.
2. Press SYSTEM to select HEAT.
3. Press or to select the day you want to program. Press NEXT.
4. Press or to adjust the hour for the first event. Press NEXT.
5. Press or to adjust the minute for the first event. Press NEXT.
6. Press or to adjust the temp for the first event. Press NEXT.
7. Repeat steps 4-6 for your remaining daily events.
8. If needed, repeat steps 3-6 to program additional days.
9. Press RETURN to exit.
17 User Manual
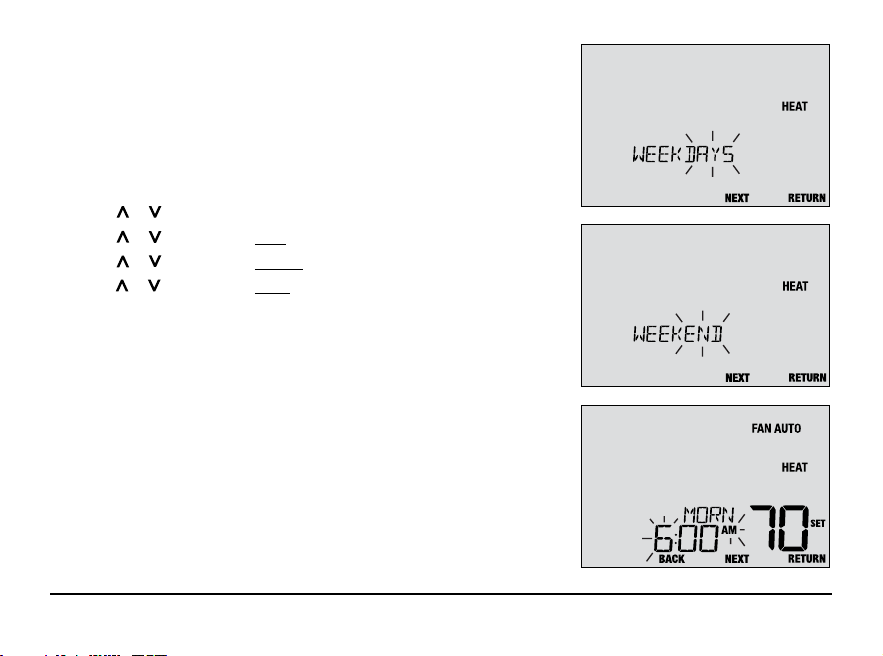
Setting a 5-2 Day Weekday/Weekend Program
(5-2 day programming mode only)
Available Daily Events: MORN, DAY, EVE, NITE
1. Press and release the PROG button.
2. Press SYSTEM to select HEAT.
3. Press or to select WEEKDAYS or WEEKEND. Press NEXT.
4. Press or to adjust the hour for the first event. Press NEXT.
5. Press or to adjust the minute for the first event. Press NEXT.
6. Press or to adjust the temp for the first event. Press NEXT.
7. Repeat steps 4-6 for your remaining daily events.
8. If needed, repeat steps 3-6 to program additional days.
9. Press RETURN to exit.
User Manual 18
4
Operating Your Thermostat
Setting the SYSTEM Control Mode
The System Control has 2 modes of operation – OFF and HEAT. The mode can be selected by pressing the
SYSTEM button to scroll through the different system modes.
OFF Heating system is off
HEAT Only your heating system will operate
NOTE: Freeze protection is still active in OFF mode.
This can cause the heating system to run in OFF
mode to prevent freezing. See the Installer Manual
for more details.
19 User Manual
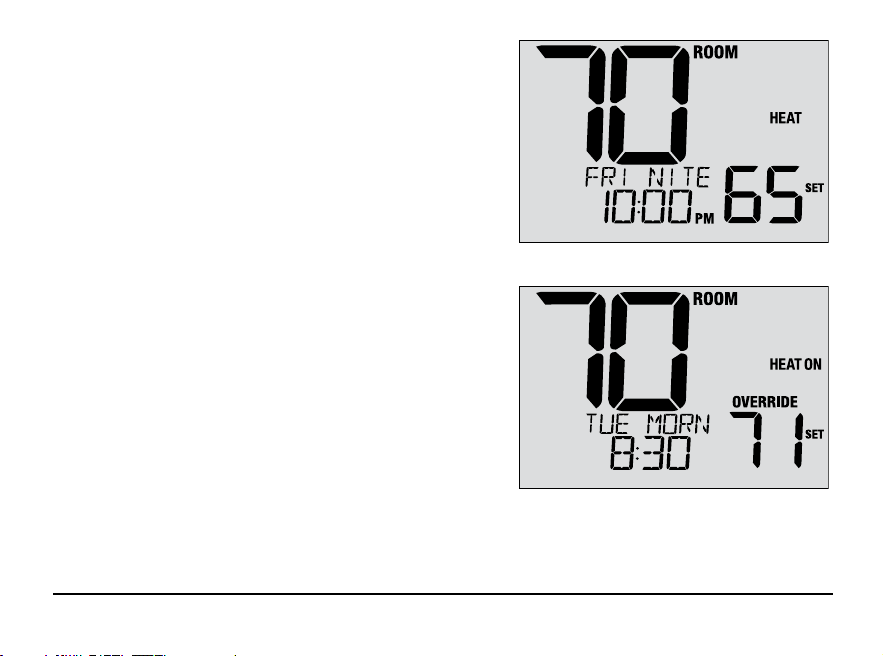
Temperature Adjustment
Temporary Adjustment (OVERRIDE) – Press or to adjust
the current set temperature. The set temperature will change
back to your programmed temperature a few hours later or
at the start of the next scheduled program event. OVERRIDE
will appear in the display during the entire override period.
Extended Adjustment (HOLD) – Press the HOLD button
to override all programming. You can continue to use
the or buttons to adjust the current set temperature.
Press HOLD again to resume the program schedule. You
can limit your hold time to 24-hours by adjusting User
Setting 6 in section 2.
NOTE: If your thermostat was configured to be
non-programmable, HOLD and OVERRIDE are
not available.
User Manual 20
Program Event Indicators
Program event indicators appear in the display to let you
know what part of your current program is active.
Events: MORN, DAY, EVE or NITE
When OVERRIDE appears, your program has been temporarily
overridden and will resume in 1-4 hours depending on the
selection for User Setting 8 in section 2. The program will also
resume at the beginning of the next scheduled program event.
NOTE: If your thermostat was configured to be
non-programmable, or is in HOLD mode, you will
not see a Program Event or OVERRIDE indicator.
AM
21 User Manual
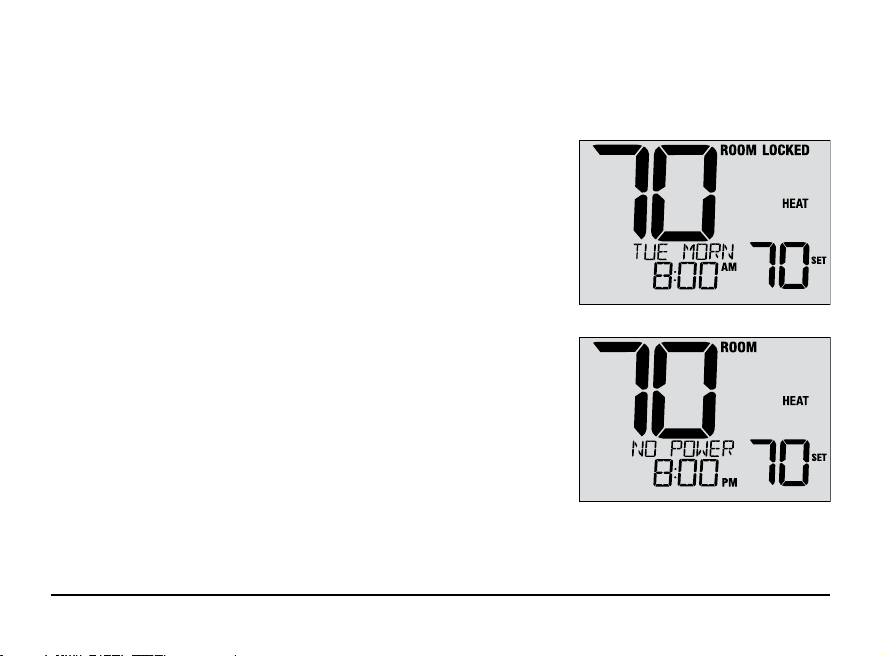
System Status and Maintenance Indicators
Status indicators are messages or symbols that appear in the display to let you know what function your system
is currently performing. They are also used to inform you of various service and maintenance functions.
HEAT ON The heating system is running.
LOCKED Thermostat has been fully or partially locked.
See Locking and Unlocking thermostat, section 5.
NO POWER AC power to thermostat has been lost. Only available
if thermostat is hardwired and thermostat is configured
for power monitoring.
User Manual 22
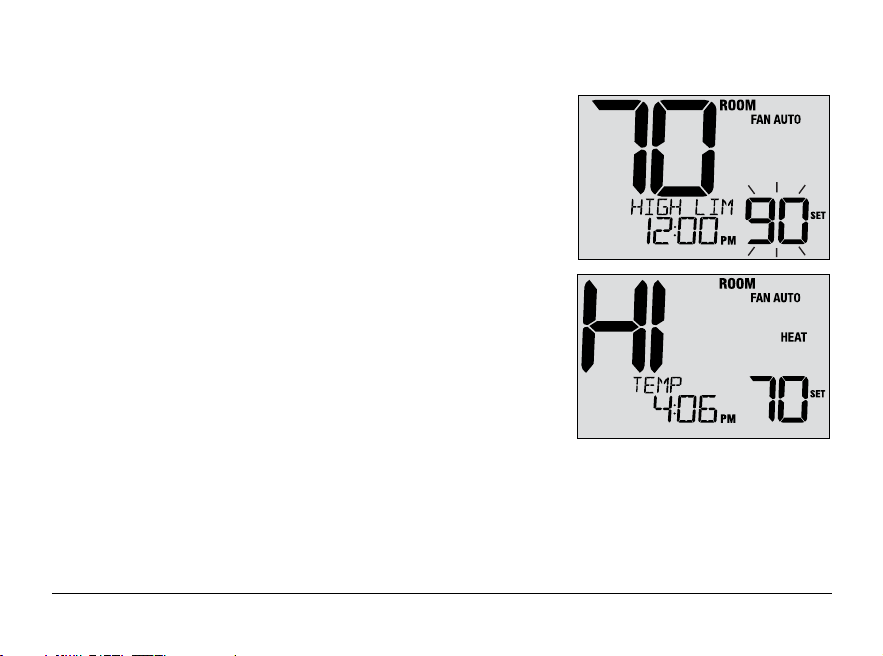
System Status and Maintenance Indicators (continued)
HIGH LIM Setpoint temperature has reached its
upper limit maximum.
LOW LIM Setpoint temperature has reached its
lower limit maximum.
HI TEMP Room temperature has risen above the
display range.
LO TEMP Room temperature has fallen below the
display range. Heat will still operate to help
raise temperature.
23 User Manual
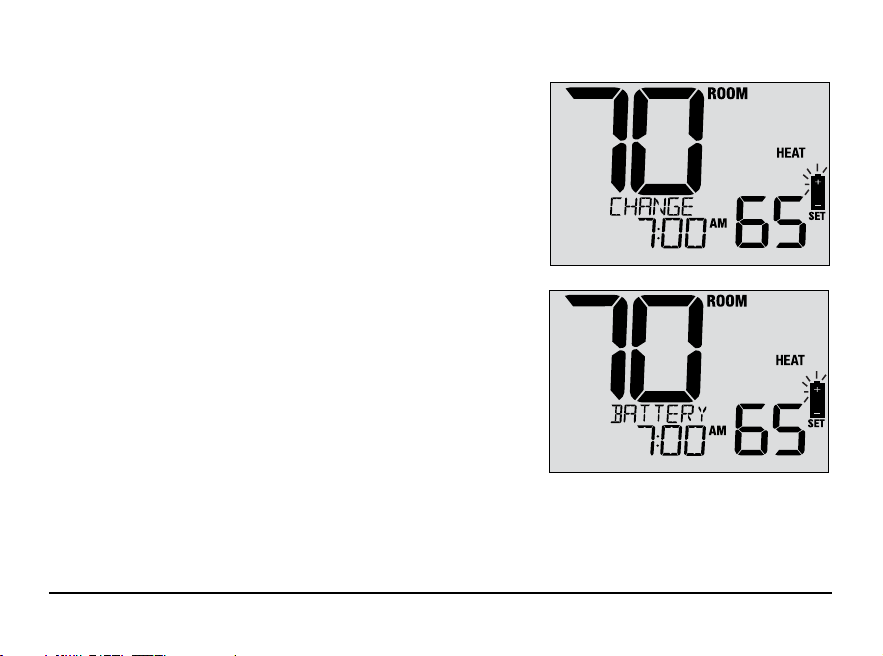
System Status and Maintenance Indicators (continued)
CHANGE If batteries are installed and they become
BATTERY low, the battery symbol appears in the display.
When the batteries become critically low, the
battery symbol will flash, and CHANGE / BATTERY
will alternate in the display (see “Changing the
Batteries” in section 7).

User Manual 24
5
Additional Operating Features
Adaptive Recovery Mode (ARM
TM
)
If enabled, Adaptive Recovery Mode attempts to achieve your desired heating temperature at the time you have
set in your current program schedule, after a setback period. For example, if you set your heat down to 62° at
night and have a set point of 70° scheduled for 7:00 AM, the thermostat may turn on your heating system early
in order achieve a temperature of 70° by 7:00 AM.
This feature does not operate when the thermostat is in HOLD mode, or if the program is temporarily overridden.
25 User Manual
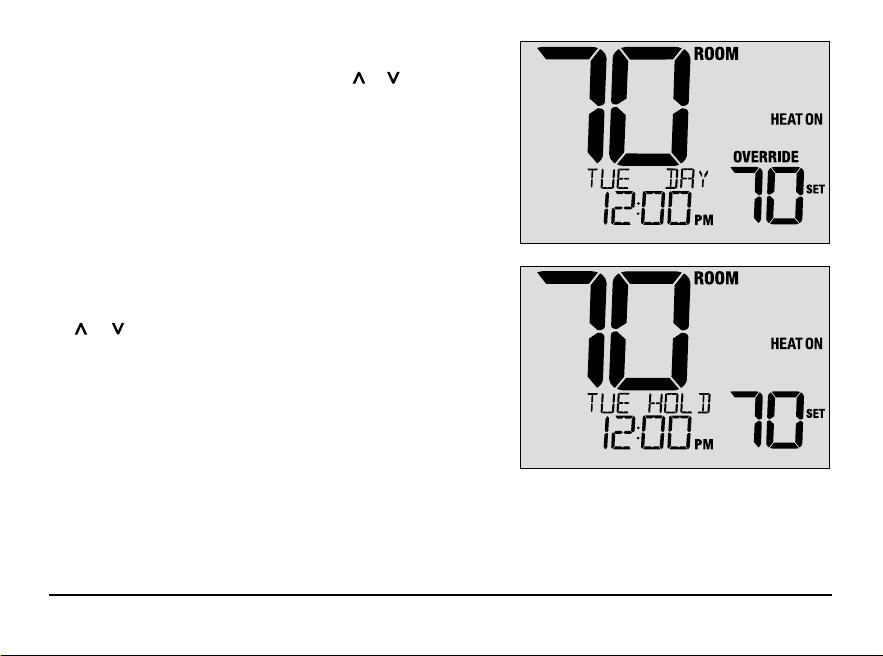
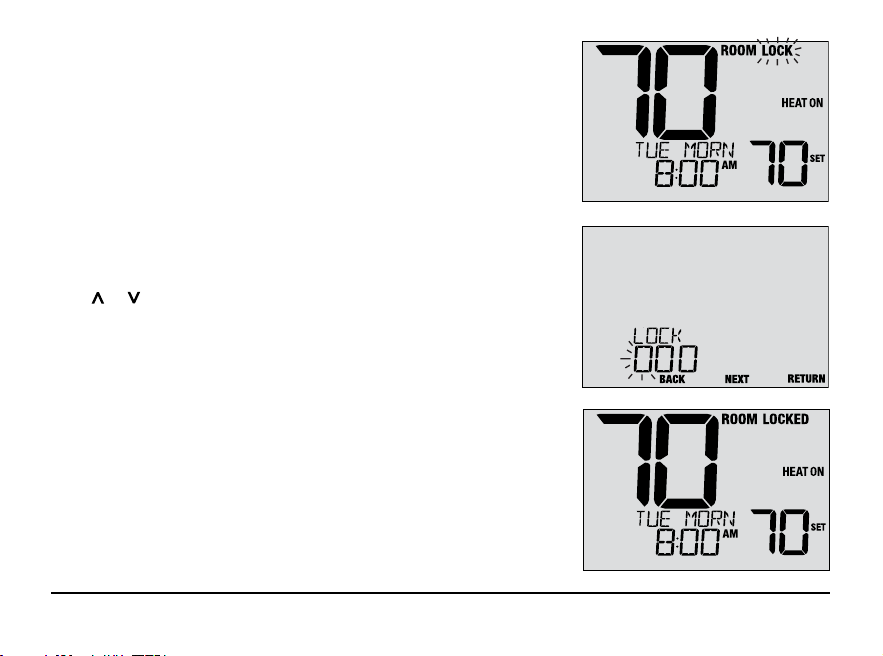
Locking and Unlocking the Thermostat
Your 3-digit Lock Code is set in the User Settings portion of this
manual (section 2). Once the code is set, the thermostat can be
locked or unlocked at any time by entering that code.
To lock or unlock the thermostat, press and hold the PROG and
HOLD buttons together for 5 seconds. While holding these buttons,
LOCK will flash in the display (Figure 1).
The screen will change displaying LOCK CODE 000 (Figure 2).
Press or to enter the first digit of your lock code and then
press the NEXT button to advance to the next digit. Repeat this
process to enter the second and third digit of your lock code.
After entering the third digit, press NEXT to advance to the next
User Setting or RETURN to exit.
If you entered a valid code, the thermostat will be locked or
unlocked (depending on its previous state). When locked, the
word LOCKED appears in the display (Figure 3). If an invalid code
is entered, WRONG CODE will briefly appear in the display.
Figure 1
Figure 2
Figure 3
User Manual 26
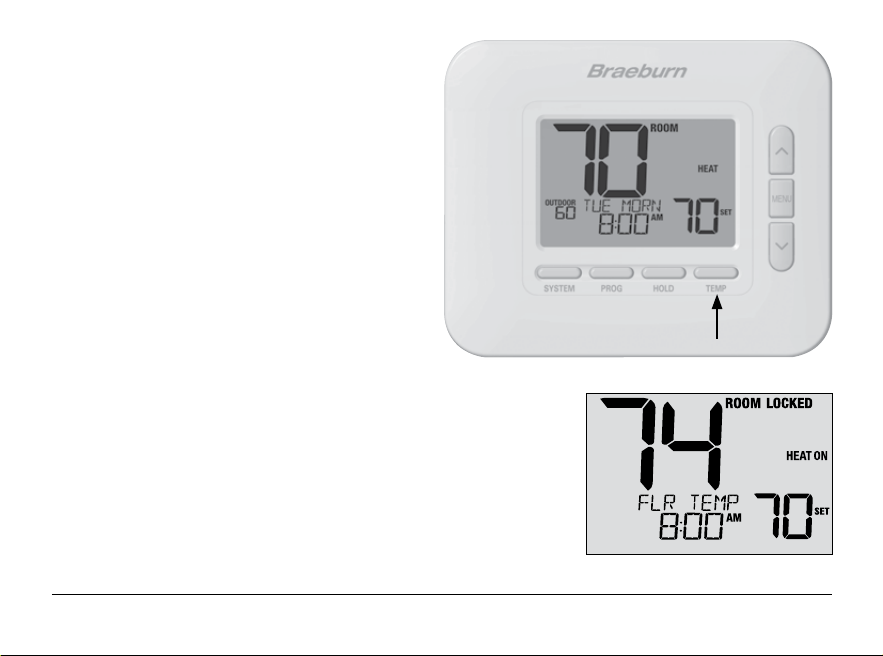
Outdoor Remote Sensing
If
a Braeburn outdoor sensor was installed, the
outdoor temperature will be displayed in the screen.
Indoor Remote Sensing
Remote sensing is achieved by installing a
Braeburn remote indoor or floor sensor.
If
a Braeburn remote sensor was installed and properly
configured, the thermostat will sense temperature at a
remote location or an average of a remote location and
the thermostat location or in the floor.
Reviewing Sensor Temperature
If
a remote sensor is connected, you can press TEMP
to review the current reading at the remote sensor.
27 User Manual
6
Thermostat Maintenance
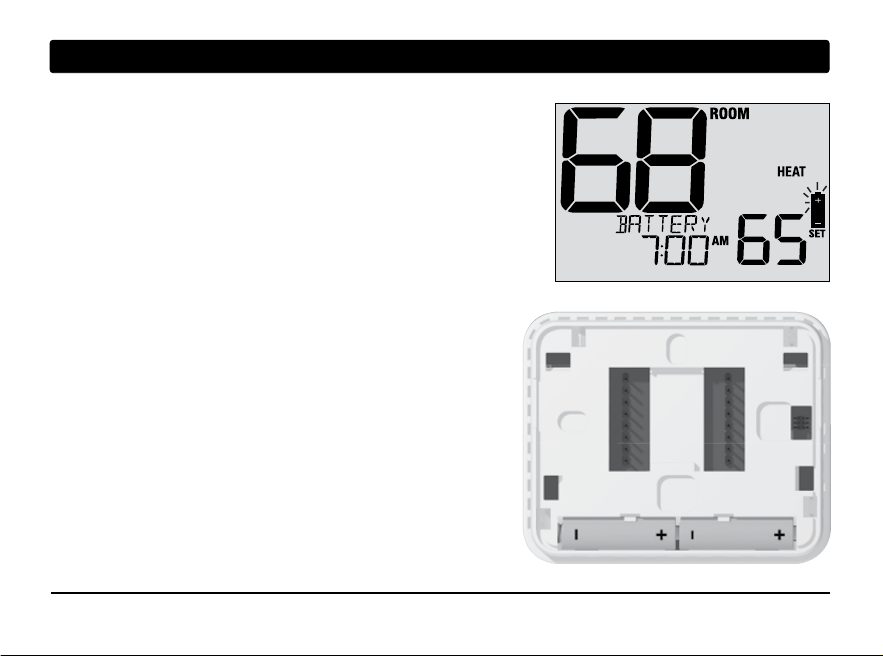
Changing the Batteries
Depending on your installation, this thermostat may be equipped with
two (2) “AA” type alkaline batteries.
If batteries are installed and they become low, the battery symbol
appears in the display. When the batteries become critically low,
the battery symbol will flash, and CHANGE / BATTERY will alternate
in the display.
To change your batteries:
1. Remove thermostat body by gently pulling it from base.
2. Remove old batteries and replace with new batteries.
3. Make sure to correctly position the (+) and (-) symbols.
4. Gently push thermostat body back onto base.
NOTE: We recommend replacing the thermostat batteries
annually or if the thermostat will be unattended for
an extended period of time.
Thermostat Cleaning
Never spray any liquid directly on the thermostat. Spray
your
cleaning liquid on a soft cloth and then proceed to
clean the screen
with the damp cloth. Only use water or
household glass cleaner. Never use any abrasive cleansers
to clean your thermostat.

For more information, visit www.braeburnonline.com
Limited Warranty
When installed by a professional contractor, this product is backed by a 5 year limited warranty. Limitations apply. For limitations, terms
and conditions, you may obtain a full copy of this warranty. Visit us online: www.braeburnonline.com/warranty, phone us: 866.268.5599
or write us: Braeburn Systems LLC, 2215 Cornell Avenue, Montgomery, IL 60538.
Braeburn Systems LLC
2215 Cornell Avenue • Montgomery, IL 60538
Technical Assistance: www.braeburnonline.com
Call us toll-free: 866-268-5599 (U.S.)
630-844-1968 (Outside the U.S.)
©2024 Braeburn Systems LLC • All Rights Reserved.
4020-110-03
55
YEAR
WARRANTY
LIMITED