Double-SiDeD ToaSTer
User Manual | 4 Slice Toaster | GDT2850 1
user Manual | GDT2680
Double-Sided Toaster

For customer service visit www.gourmia.com or call 888.552.00332
all rights reserved. No portion of this manual may be reproduced by any means whatsoever without written permission from e
Steelstone Group, except for the inclusion of quotations in a media review. although every precaution has been taken in the preparation
of this manual, e Steelstone Group assumes no responsibility for errors or omissions. Nor is any liability assumed for damages
resulting from the use of the information contained herein. although every eort has been made to ensure that the information
contained in this manual is complete and accurate, e Steelstone Group is not engaged in rendering professional advice or services to
the individual consumer; further, e Steelstone Group shall not be held responsible for any loss or damage allegedly arising from any
information or suggestions in this manual.
Model: GDT2680 © 2024 Gourmia
e Steelstone Group brooklyn, NY | Gourmia.com
TABLE OF CONTENTS
important Safeguards . . . . . . . . . . . . . . . . . . . . . . . . . .4
Know Your Toaster. . . . . . . . . . . . . . . . . . . . . . . . . . . .6
using Your Toaster. . . . . . . . . . . . . . . . . . . . . . . . . . . .7
Cleaning & Maintenance . . . . . . . . . . . . . . . . . . . . . . . .8
Troubleshooting . . . . . . . . . . . . . . . . . . . . . . . . . . . . .9
Warranty & Service . . . . . . . . . . . . . . . . . . . . . . . . . . 10

User Manual | 4 Slice Toaster | GDT2850 3
Here at Gourmia, we’re all about helping cooks make easy, healthy, and delicious meals
an everyday possibility. We know how fast-paced life is and that sometimes a home-
cooked meal doesn’t make the top of the priority list, no matter how bad you want it.
our dependable, easy-to-use appliances are here to help you change that. We’re giving
you the tools to eat better and healthier without spending hours in the kitchen prepping
and cooking.
We want you to get the most out of your toaster, which is why our team is available to
help with any questions you may have. Whether you have a question with setup or need
some guidance on which preset to use, we’re happy to walk you through it.
Welcome to the ease of cooking with Gourmia.
is manual provides instructions for all of the toaster’s functions and features along
with directions for assembling, operating, cleaning, and maintaining the appliance.
Please read all safety instructions and directions for safe usage at all times. Keep this
manual for future use.
ank you for choosing Gourmia!
We’d love to hear about the delicious dishes you’re creating!
Share your thoughts, recipes, and photos with us.
Congratulations on the purchase
of your Toaster from Gourmia!

For customer service visit www.gourmia.com or call 888.552.00334
iMPorTaNT SaFeGuarDS
IMPORTANT SAFEGUARDS
Read all instructions before using the electric appliance.
Electrical Polarized Plug
1. is appliance is not intended for use
by children or persons with reduced
physical, sensory, or mental capabilities,
or a lack of experience and knowledge,
unless they have supervision.
2. Do NoT touch hot surfaces.
use handles or knobs.
3. To prevent electric shock do not im-
merse cord, plugs, or the base in water.
4. Check if the voltage indicated on the
appliance corresponds to the local main
voltage before you connect the appliance.
5. always make sure that the plug
is inserted properly into a wall outlet.
6. Do NoT operate any appliance
with a damaged cord or plug, aer
the appliance malfunctions, or if the
appliance has been damaged in any
manner. return the appliance to the
nearest authorized service center
for repair.
7. Do NoT let the cord hang over
the edge of the table or counter.
8. NeVer connect this appliance
to an external timer switch, separate
remote-control system or extension cords.
9. To disconnect, turn o the appliance,
then remove the plug from wall outlet.
10. Do NoT place appliance on or near a
hot gas, electric burner, or in a heated oven.
11. leave at least 4 inches of free space on
the back and sides of the appliance.
12. Do NoT use the appliance for any
other purpose than described in this
manual. e use of accessory attachments
not recommended by the appliance
manufacturer may cause injuries.
13. Do NoT leave the appliance
unattended during use.
14. unplug from outlet when not in use
and before cleaning. allow to cool before
putting on or taking o parts, and before
cleaning the appliance.
15. Do NoT use outdoors.
16. is appliance is intended for
household use only.
17. Save these instructions for future use.
18. if theSuPPlY CorDis damaged, it
must be replaced by the manufacturer, its
service agent or similarly qualied persons
in order to avoid a hazard.
Power: 120V~ 60Hz 1,700W
is appliance has a polarized plug (one blade is wider
than the other). To reduce the risk of electric shock,
the plug is intended to be used by inserting it into the
electrical outlet only one way. if the plug does not t
securely into the outlet, reverse the plug and re-insert. if it still does not t,
contact a qualied electrician for assistance. Do not modify the plug in any way.
KNoW Your ToaSTer
User Manual | 4 Slice Toaster | GDT2850 5
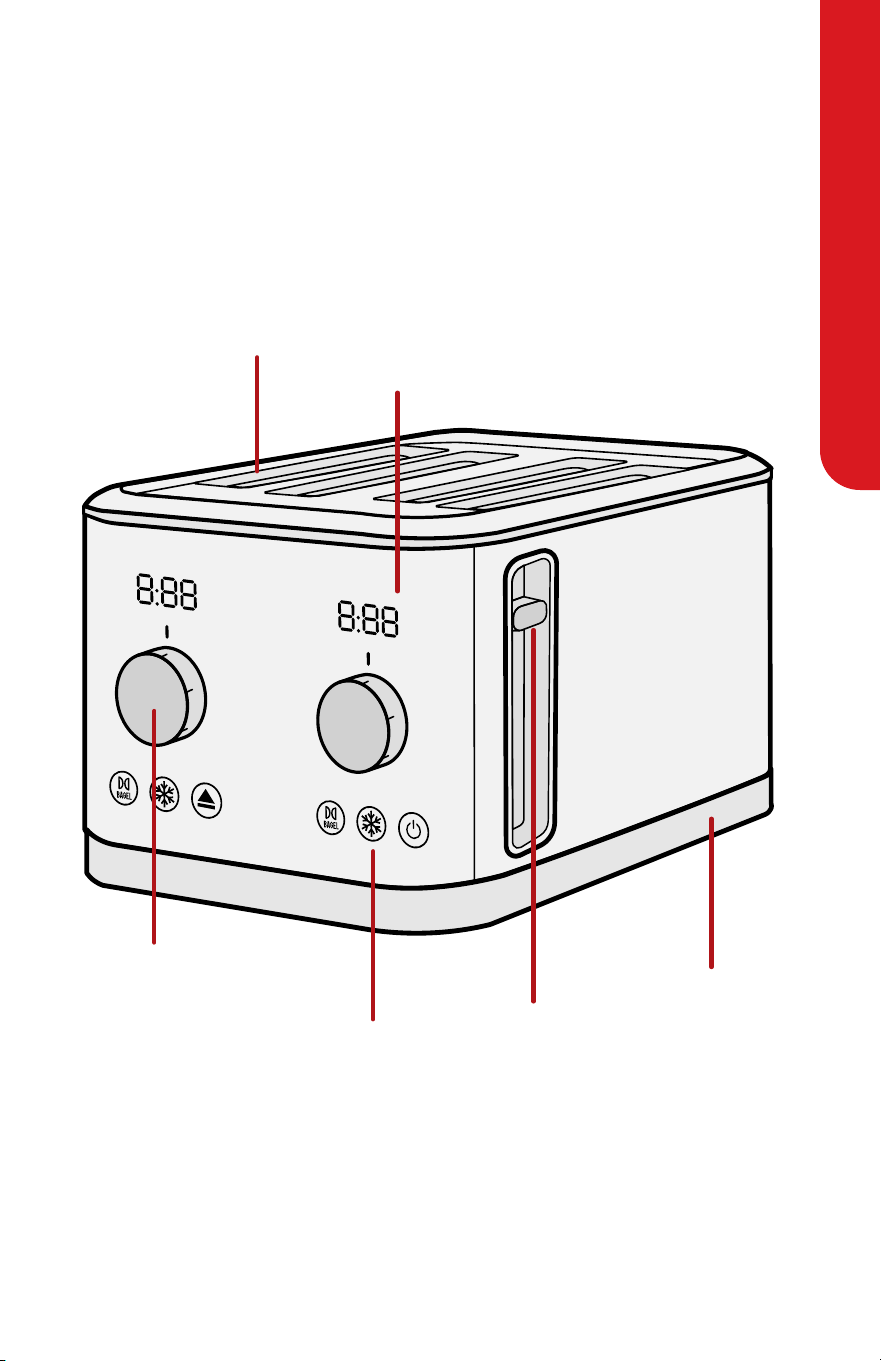
KNOW YOUR TOASTER
Display
Screen
Control
Panel
Toast
Settings
Dial
Bread
Slots
Crumb Tray
Lever
Note: ere are two levers, control panels, display screens, dials, and sets of bread slots,
one for each side (le and right) of the toaster.

KNoW Your ToaSTer
For customer service visit www.gourmia.com or call 888.552.00336
BEFORE FIRST USE
1. remove the stickers, protective foil or plastic from the appliance.
2. before using your appliance for the rst time, wipe o all removable parts with
a damp cloth. Never use abrasive products.
Setting Up and Priming the Toaster
1. Place the toaster on a hard, at, and heat-resistant surface.
2. ensure both crumb trays are pushed all the way into the back of the toaster and that
there is nothing inside the bread slots.
3. Plug the power cord into an outlet.
4. Turn both toast settings dials to level 3.
5. Push both levers down.
6. repeat steps 4–5 a second time to burn o any manufacturing residue.
Notes:
• a slight amount of smoke or odor is normal and will stop as the heating elements
continue to heat.
• To stop the toast cycle, press the Cancel/Power button.
Toasting Tips
• e toaster has two sets of bread slots. each set has it’s own individual lever, toast
settings dial, and buttons. You can adjust each side independently if you’d like to
make dierent types of toast or food. For example, you can make a bagel using one of
the le slots and two slices of bread using the right slots.
• avoid toasting foods with runny ingredients such as butter or oil.
• Don’t stu extra-thick slices of bread into the toaster.
• inner slices of bread require less toasting, use a lower setting for these foods.
• use a lower setting if you are toasting and the appliance is still hot.
• is toaster has a safety mechanism where the lever will only lock into place when
the toaster is plugged in.
• For toasting pastries, use the lightest setting.
• if food becomes jammed in the bread slot, move the lever up and down to loosen it.
• use wooden tongs to remove stuck or broken food from the bread slots.

uSiNG Your ToaSTer
user Manual | 4 Slice Toaster | GDT2850 7
Making Toast or a Bagel
1. Push both crumb trays all the way to the back of the toaster. e bread slots should
be empty before placing in your breads.
2. Plug the power cord into an outlet.
3. Put the food into the bread slot(s)
.
4. For bread: Turn the toast settings dial(s) to the desired level.
level 1 is the lowest (lightest) setting.
5. For bagel(s): Press one bagel button if you are making 1 or 2 bagels.
Press both bagel buttons if you are making 3 or 4 bagels.
6. Push one or both levers down, as required.
7. e countdown timer on the display screen shows the remaining time.
To stop the toast cycle, press the Cancel/Power button.
8. Food pops up when done toasting.
9. Carefully remove food from the toaster. li the lever higher for easy removal.
NoTe: For frozen or cold food, press the Defrost button.
Reheating Toast
1. Push both crumb trays all the way to the back of the toaster. e bread slots should
be empty before placing in your breads..
2. Plug the power cord into an outlet.
3. Put the food into the bread slot(s).
4. Turn the toast settings dial(s) to reHeaT.
5. Push one or both levers down, as required.
6. e countdown timer on the display screen shows the remaining time.
To stop the reheat cycle, press the Cancel/Power button.
7. Food pops up when done toasting.
8. Carefully remove food from the toaster. li the lever higher for easy removal.
WARNINGS:
• Toasted food is hot! Handle with care.
• Never insert your ngers, or metal or sharp-edged utensil into
the toaster. is may damage it or cause injury.
• Keep the face away from the bread slots while toasting.
• To prevent a re hazard, always place food inside the toaster.
• always turn o the appliance and unplug aer use.
USING YOUR TOASTER

CleaNiNG aND MaiNTeNaNCe
For customer service visit www.gourmia.com or call 888.552.00338
CLEANING AND MAINTENANCE
Cleaning the Toaster
1. Turn the appliance o and unplug the power cord from the outlet. Wait for the parts
to cool down before touching them.
2. Wipe the outside with a so, dry cloth.
3. Dry thoroughly before storing.
CAUTION: Do not use abrasive scouring pads or abrasive cleaners, as they may scratch
the surface and damage the appliance.
Cleaning the Crumb Trays
aer using the toaster for a while, crumbs will accumulate in the crumb trays.
Clean the crumb trays out at least once a week.
1. Turn the appliance o and unplug the power cord from the outlet. Wait for the parts
to cool down before touching them.
1. Pull out the crumb tray from the back of the toaster and empty it into the trash.
1. if crumbs are stuck, wipe them out with a damp cloth or paper towel, then dry the
tray thoroughly.
1. replace the crumb tray.
1. repeat steps 2–4 with the other crumb tray.
1. ensure both crumb trays are completely inserted before using the toaster again.
Storing the Toaster
1. Clean the toaster and crumb trays according to the instructions in the sections above.
1. Wrap the cord around inside the bottom of the toaster.
1. Store in a cool, dry place.
WARNING: Never immerse any part of the toaster in water.

TroubleSHooTiNG
User Manual | 4 Slice Toaster | GDT2850 9
TROUBLESHOOTING
Note: if you are unable to troubleshoot the appliance or you attempt the
above without resolving the problem, call Gourmia for assistance.
ISSUE SOLUTIONS
Toast is burned.
use a lower setting on the toast settings dial.
Note: 1 is the lowest setting.
Toasting again right aer using the toaster
results in darker toast. either use a lower setting
or wait for the toaster to cool down before
making more toast.
Manually stop toasting early by pressing the
Cancel/Power button before the toast burns.
e control panel buttons
do not work.
Check that the power cord is plugged in.
unplug it and then plug it back in.
e lever won’t stay down.
Check that the toaster is plugged in.
Food is stuck in the bread slot.
Move the lever up and down to loosen it.
use a wooden tongs to remove stuck or broken
food from the bread slots.
ere is a burning smell.
Manually stop toasting by pressing the Cancel/
Power button. Wait for the burned toast to cool
and remove it safely with wooden tongs.
ere may be an abundance of burned crumbs
in the crumb tray.

WarraNTY & SerViCeS
For customer service visit www.gourmia.com or call 888.552.003310
is limited Warranty is for one full year from the date of purchase
and requires proof of purchase from an authorized seller. it is applicable
to the original purchaser only and is not transferable to a third party
user. repair or replacement of defective parts is solely at Gourmia’s
discretion. in the event that repair isn’t possible, Gourmia will replace
the product/part. if product repair/replacement won’t suce, Gourmia
has the option of refunding the cash value of the product or component
returned.
Product defects not covered under the Warranty provisions include
normal wear and damage incurred from use or accidental negligence,
misuse of instruction specications or repair by unauthorized parties.
Gourmia is not liable for any incidental or consequential damages
incurred by such circumstances.
only valid within the united States.
For Customer Service, Questions, or Comments
gourmia.com • inf[email protected] • 888.552.0033
Mon-u 9:00 a.m. to 6:00 p.m. eT
Fri 9:00 a.m. to 3:00 p.m. eT
languages: english, Spanish, French
register your product at
www.gourmia.com/warranty
Warranty & Services

We’d love to hear from you!
888.552.0033
info@gourmia.com
