

PNEUMATIC HUB PULLER SET
MODEL NO: PS100
Thank you for purchasing a Sealey product. Manufactured to a high standard, this product will, if used according to these instructions,
and properly maintained, give you years of trouble free performance.
IMPORTANT: PLEASE READ THESE INSTRUCTIONS CAREFULLY. NOTE THE SAFE OPERATIONAL REQUIREMENTS, WARNINGS & CAUTIONS. USE
THE PRODUCT CORRECTLY AND WITH CARE FOR THE PURPOSE FOR WHICH IT IS INTENDED. FAILURE TO DO SO MAY CAUSE DAMAGE AND/OR
PERSONAL INJURY AND WILL INVALIDATE THE WARRANTY. KEEP THESE INSTRUCTIONS SAFE FOR FUTURE USE.
1. SAFETY
1.1. GENERAL SAFETY
WARNING! Ensure all Health and Safety, local authority, and general workshop practice regulations are strictly adhered to when using
this tool.
9 For multiple hazards, read and understand the safety instructions before installing, operating, repairing, maintaining, changing
accessories on, or working with the tool. Failure to do so can result in serious bodily injury.
9 Only qualied and trained operators should install, adjust or use the tool.
8 DO NOT modify this tool. Modications can reduce the eectiveness of safety measures and increase the risks to the operator.
8 DO NOT discard the safety instructions; give them to the operator.
8 DO NOT use the tool if it has been damaged.
9 Tools shall be inspected periodically to verify that the markings are legibly marked on the tool.
9 The user shall contact the manufacturer to obtain replacement marking labels when necessary.
1.2. HAZARDS
1.2.1. Projectile
9 Failure of the workpiece, of accessories or even the tool itself can generate high-velocity projectiles.
9 Always wear impact-resistant eye protection during the operation of the tool. The grade of protection required should be assessed for
each use.
9 Ensure that the workpiece is securely xed.
1.2.2. Entanglement
9 Entanglement hazards can result in choking, scalping and/or lacerations if loose clothing, personal jewellery, neckwear, hair or gloves
are not kept away from the tool and accessories.
8 DO NOT wear loose-tting gloves or gloves with cut or frayed ngers.
8 NEVER hold the drive, socket or drive extension.
1.2.3. Operating
9 The use of the tool can expose the operator’s hands to hazards including crushing, impacts, cuts and abrasions and heat. Wear
suitable gloves to protect hands.
9 Operators and maintenance personnel shall be physically able to handle the bulk, weight and power of the tool.
9 Hold the tool correctly; be ready to counteract normal or sudden movements and have both hands available.
9 Maintain a balanced body position and secure footing.
9 Release the start-and-stop device in the case of an interruption of the energy supply.
9 Use only lubricants recommended by the manufacturer.
8 DO NOT use in conned spaces and beware of crushing hands between tool and workpiece, especially when unscrewing.
1.2.4. Repetitive Motions
9 When using a power tool the operator can experience discomfort in the hands, arms, shoulders, neck, or other parts of the body.
9 While using the operator should adopt a comfortable posture while maintaining secure footing and avoiding awkward or o-balanced
postures. The operator should change posture during extended tasks, which can help avoid discomfort and fatigue.
9 If the operator experiences symptoms such as persistent or recurring discomfort, pain, throbbing, aching, tingling, numbness, burning
sensations or stiness, these warning signs should not be ignored. The operator should tell the employer and consult a qualied health
professional.
1.2.5. Accessories
9 Disconnect the power tool from the air supply before changing the inserted tool or accessory.
8 DO NOT touch sockets or accessories during operation, as this increases the risk of cuts, burns or vibration injuries.
9 Use only sizes and types of accessories and consumables that are recommended for the tool by the manufacturer; DO NOT use other
types or sizes of accessories and consumables.
1.2.6. Workplace
9 Slips, trips and falls are major causes of workplace injury. Be aware of slippery surfaces caused by the use of the tool and also of trip
hazards caused by the air line or hydraulic hose.
9 The power tool is not intended for use in potentially explosive atmospheres and is not insulated against coming into contact with
electric power.
1.2.7. Dust and Fumes
9 Dust and fumes generated when using power tools can cause ill health (for example cancer, birth defects, asthma and/or dermatitis);
risk assessment and implementation of appropriate controls for these hazards are essential.
Refer to
instruction
manual
Wear a face
shield
Wear protective
clothing
PS100 Issue 1 03/10/2024
Original Language Version
© Jack Sealey Limited
Wear protective
gloves
Wear ear
protection
9 Risk assessment should include dust created by the use of the tool and the potential for disturbing existing dust.
9 Where dust or fumes are created, the priority shall be to control them at the point of emission.
9 Use respiratory protection in accordance with employer’s instructions and as required by occupational health and safety regulations.
1.2.8. Noise
9 Exposure to high noise levels can cause permanent, disabling hearing loss and other problems, such as tinnitus (ringing, buzzing,
whistling or humming in the ears). Therefore a risk assessment and implementation of appropriate controls for these hazards are
essential.
9 Appropriate controls to reduce the risk may include actions such as damping materials to prevent workpieces from “ringing”.
9 Use hearing protection in accordance with employer’s instructions and as required by occupational health and safety regulations.
9 Operate and maintain the assembly power tool for threaded fasteners as recommended in the instructions handbook, to prevent an
unnecessary increase in noise levels.
9 Select, maintain and replace the consumable/inserted tool as recommended in the instructions handbook, to prevent an unnecessary
increase in noise.
1.2.9. Vibration
9 Exposure to vibration can cause disabling damage to the nerves and blood supply of the hands and arms.
9 Wear warm clothing when working in cold conditions and keep your hands warm and dry.
9 Operate and maintain the assembly power tool for threaded fasteners as recommended in the instructions handbook, to prevent an
unnecessary increase in vibration levels.
8 DO NOT use worn or ill-tting sockets or extensions, as this is likely to cause a substantial increase in vibration.
1.2.10. Pneumatic Power Tools
9 Air under pressure can cause severe injury.
9 Always shut o air supply, drain hose of air pressure and disconnect tool from air supply when not in use, before changing accessories
or when making repairs.
8 NEVER direct air at yourself or anyone else.
9 Whipping hoses can cause severe injury. Always check for damaged or loose hoses and ttings.
9 Cold air shall be directed away from the hands.
8 DO NOT exceed the maximum air pressure stated on the tool.
8 NEVER carry an air tool by the hose.”
1.3. SLIDE HAMMER SAFETY
9 DO NOT use tools if damaged or worn.
9 Maintain the tools in good and clean condition for best and safest performance.
9 Ensure all threads are clean and well lubricated.
9 Always check that puller is correctly assembled and is square with the workpiece.
9 Ensure the nuts and bolts are tight on the jaw heads.
9 If vehicle is raised, ensure it is adequately supported with axle stands, ramps, etc. as appropriate.
9
8 DO NOT heat puller jaws when heating a gear or bearing as this will aect the temper and, therefore, the strength of the material.
8 DO NOT hit workpiece with a hammer if workpiece has not moved with maximum puller force applied. Use a larger capacity puller.
9 Account for all tools and parts being used and do not leave them in or on the vehicle.
IMPORTANT: Always refer to the vehicle manufacturers service instructions, or proprietary manual, to establish the correct procedure
and data.
NOTE: This tool will exert strong forces on the object being worked on and may damage some objects depending on force required.
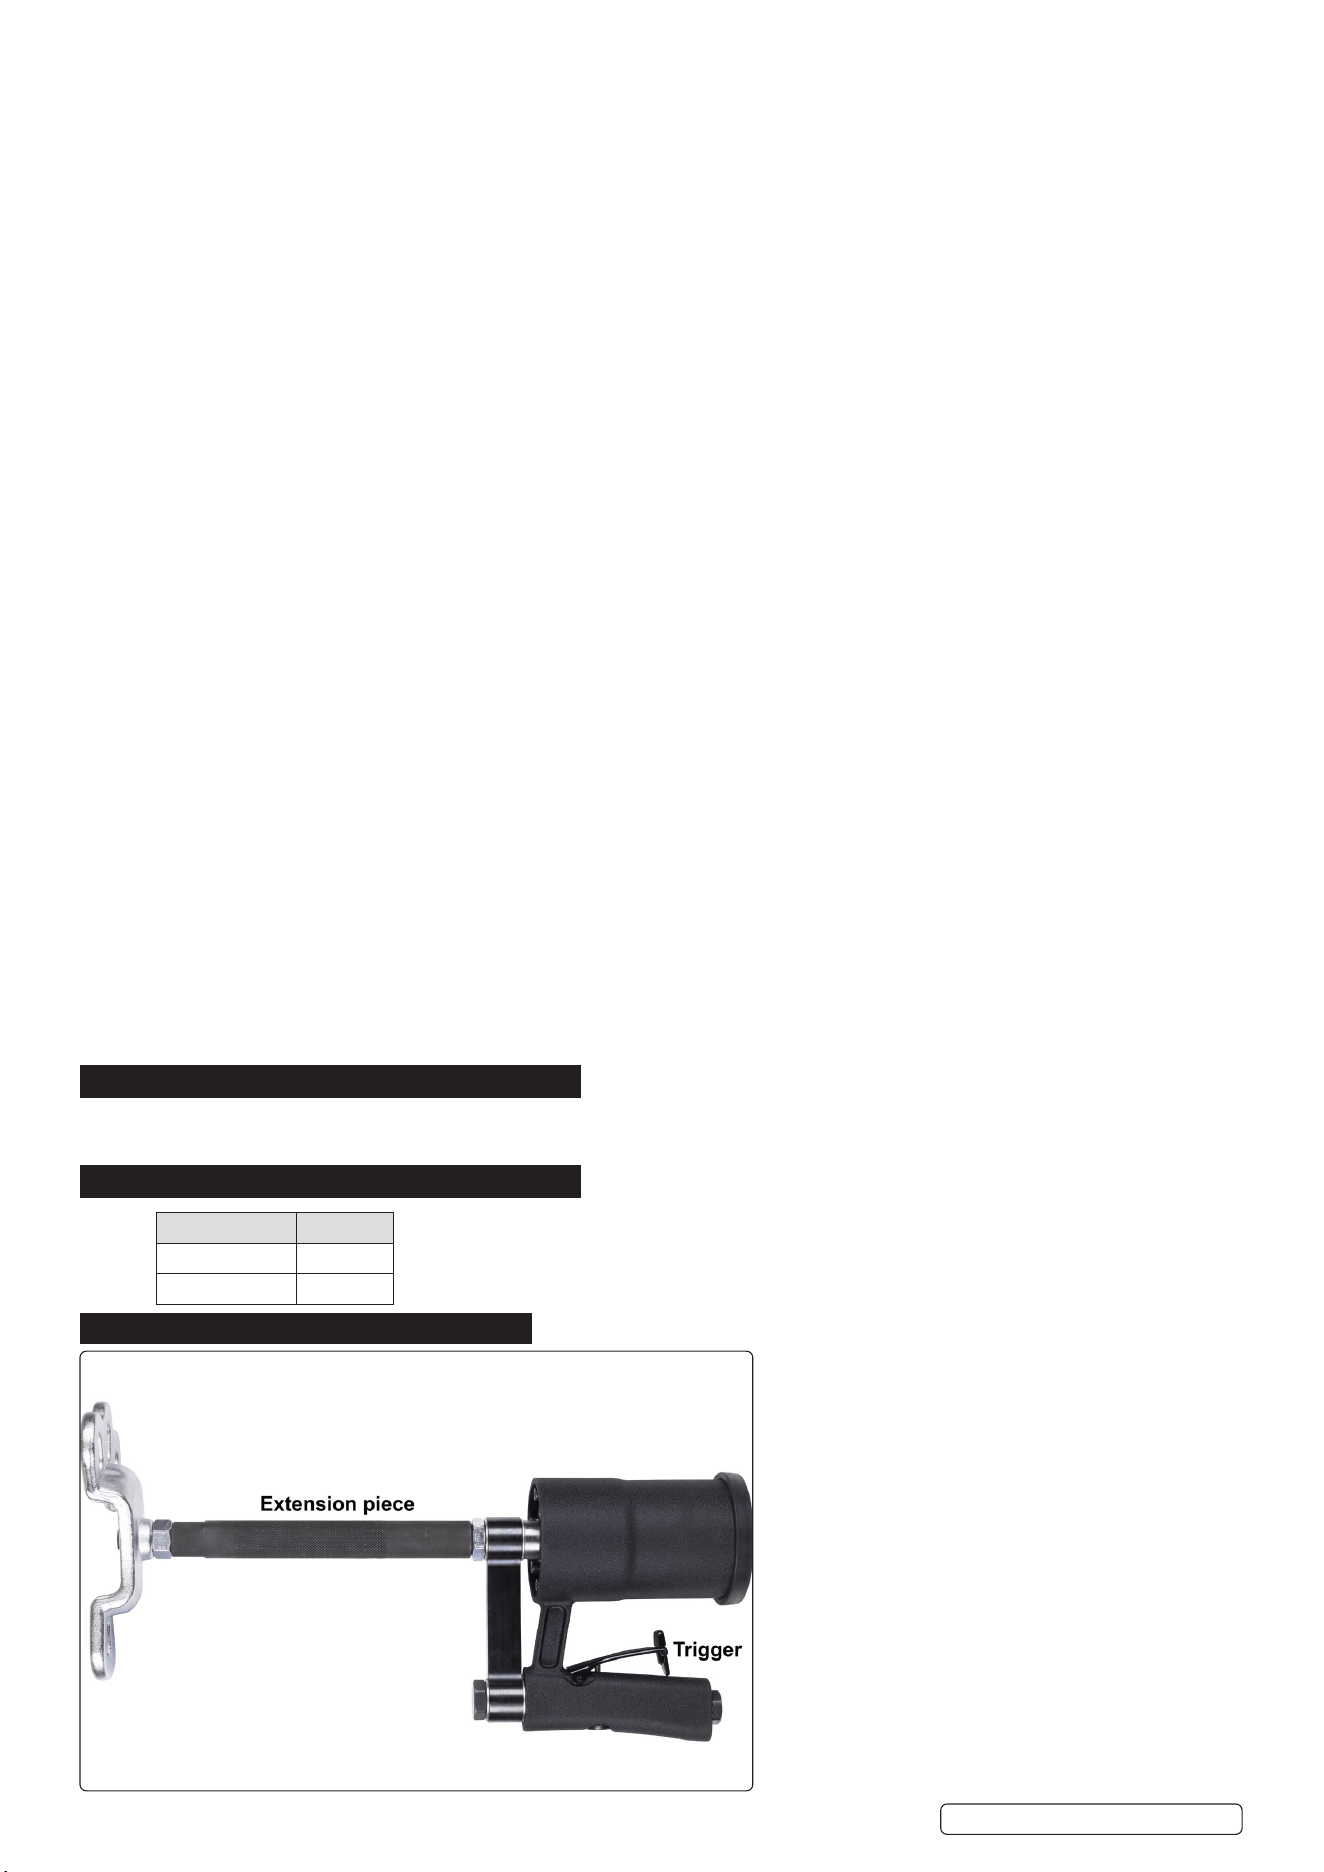
2. INTRODUCTION
Pneumatic system uses vibration to remove seized up hubs easily. Cast iron ductile body with steel force screw and tommy bar.
Suitable for four and ve stud hubs. Supplied in storage case.
3. SPECIFICATION
MODEL NO: PS100
Air Supply: 90-110psi
Nett Weight: 5.50kg
4. CONTENTS
5.
Original Language Version
© Jack Sealey Limited
PS100 Issue 3 10/12/2024
Sealey Group, Kempson Way, Suffolk Business Park, Bury St Edmunds, Suffolk. IP32 7AR
01284 757500 sales@sealey.co.uk www.sealey.co.uk
ENVIRONMENT PROTECTION
Recycle unwanted materials instead of disposing of them as waste. All tools, accessories and packaging should be sorted, taken to
a recycling centre and disposed of in a manner which is compatible with the environment. When the product becomes completely
unserviceable and requires disposal, drain any fluids (if applicable) into approved containers and dispose of the product and fluids
according to local regulations.
Note: It is our policy to continually improve products and as such we reserve the right to alter data, specifications and component parts
without prior notice.
Important: No Liability is accepted for incorrect use of this product.
Warranty: Guarantee is 12 months from purchase date, proof of which is required for any claim.
REGISTER YOUR
PURCHASE HERE
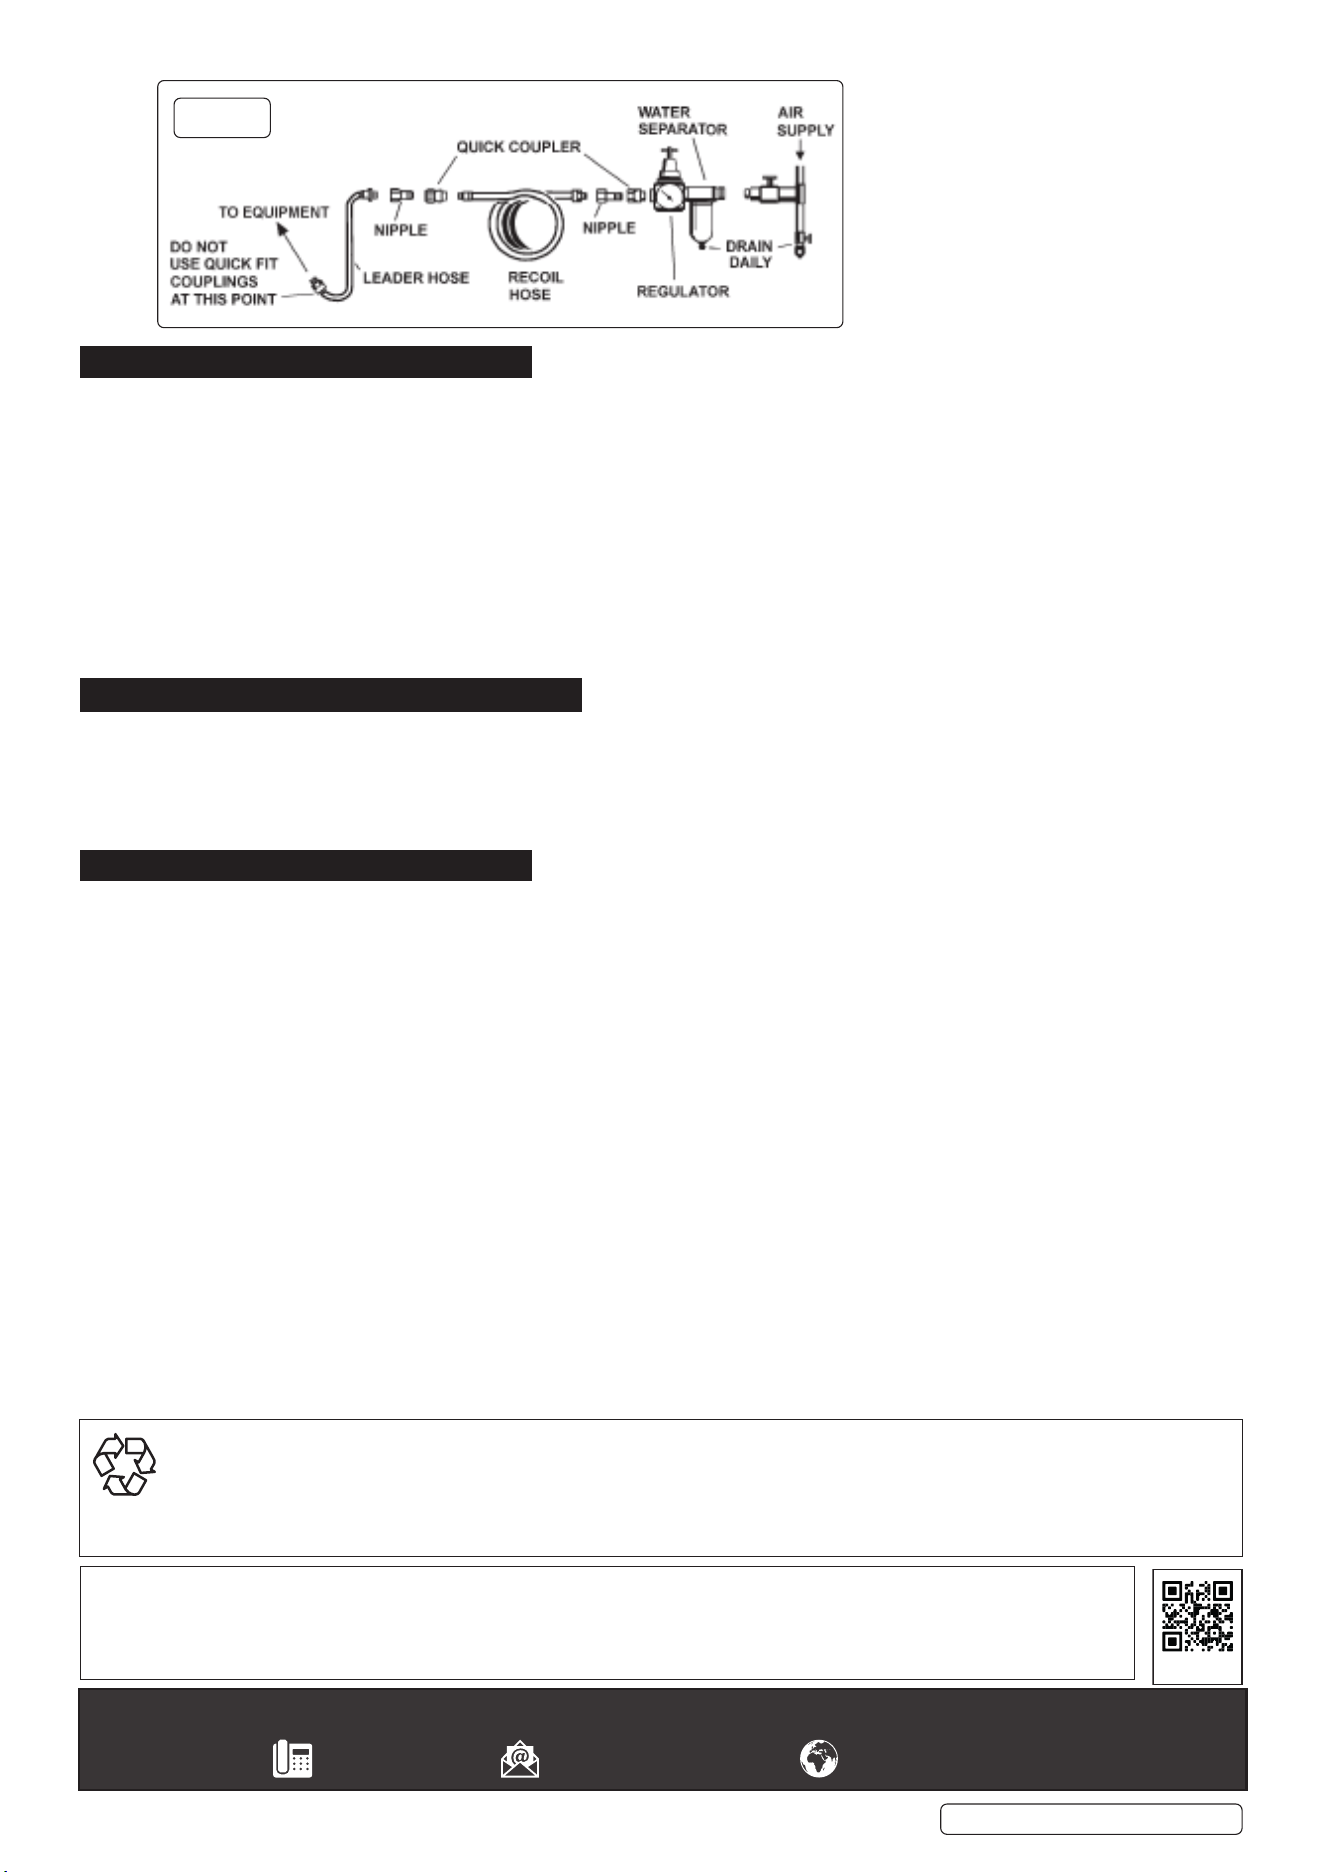
g.1
6. AIR SUPPLY
6.3.1. Ensure the trigger is in the “O” position before connecting to the air supply.
WARNING! Ensure the air supply is clean and does not exceed 90psi while operating the tool.
6.3.2. Too high an air pressure and/or unclean air will shorten the product life due to excessive wear, and may be dangerous, causing damage
and/or personal injury.
6.3.3. Drain the air tank daily. Water in the air line will damage the sander and will invalidate your warranty.
6.3.4. Clean air inlet filter weekly. Recommended hook-up procedure (fig.1).
6.3.5. Line pressure should be increased to compensate for unusually long air hoses (over 8 metres).
6.3.6. The minimum hose diameter should be 1/4” I.D. and fittings must have the same inside dimensions.
6.3.7. Keep hose away from heat, oil and sharp edges. Check hoses for wear and make certain that all connections are secure.
6.1. COUPLINGS
6.1.1. Vibration may cause failure if a quick change coupling is connected directly to the tool. To overcome this, connect a leader
hose to the tool. A quick change coupling may then be used to connect the leader hose to the air line recoil hose (g.1).
7. OPERATION
7.1. Assemble with extensions as required.
7.2. Attach to hub assembly.
7.3. Connect air supply.
7.4. Assess the amount of weight to be carried tool has released the hub assembly from the axle.
7.5. Press trigger to operate the puller.
8. MAINTENANCE
WARNING! Disconnect from air supply before changing accessories, servicing or performing maintenance. Replace or repair
damaged parts. Use genuine parts only. Unauthorised parts may be dangerous and will invalidate the warranty.
8.1. If the air system does not have an oiler then lubricate the tool daily with a few drops of Sealey air tool oil dripped into the air
inlet.
8.2. Clean the tool after use.
8.3. Loss of power or erratic action may be due to the following:
A) Excessive drain on the air line. Moisture or restriction in the air pipe. Incorrect size or type of hose connectors. To remedy, check
the air supply and follow instructions in section 5.
B) Grit or gum deposits in the tool may also reduce performance. If your model has an air strainer (located in the area of the air
inlet), remove the strainer and clean it. Flush the tool out with gum solvent oil or an equal mixture of SAE No 10 oil and paran.
Allow to dry before use.
8.4. For a full service contact your local Sealey service agent.
8.5. When not in use, disconnect from air supply, clean tool and store in a safe, dry, childproof location.
Original Language Version
© Jack Sealey Limited
PS100 Issue 3 10/12/2024