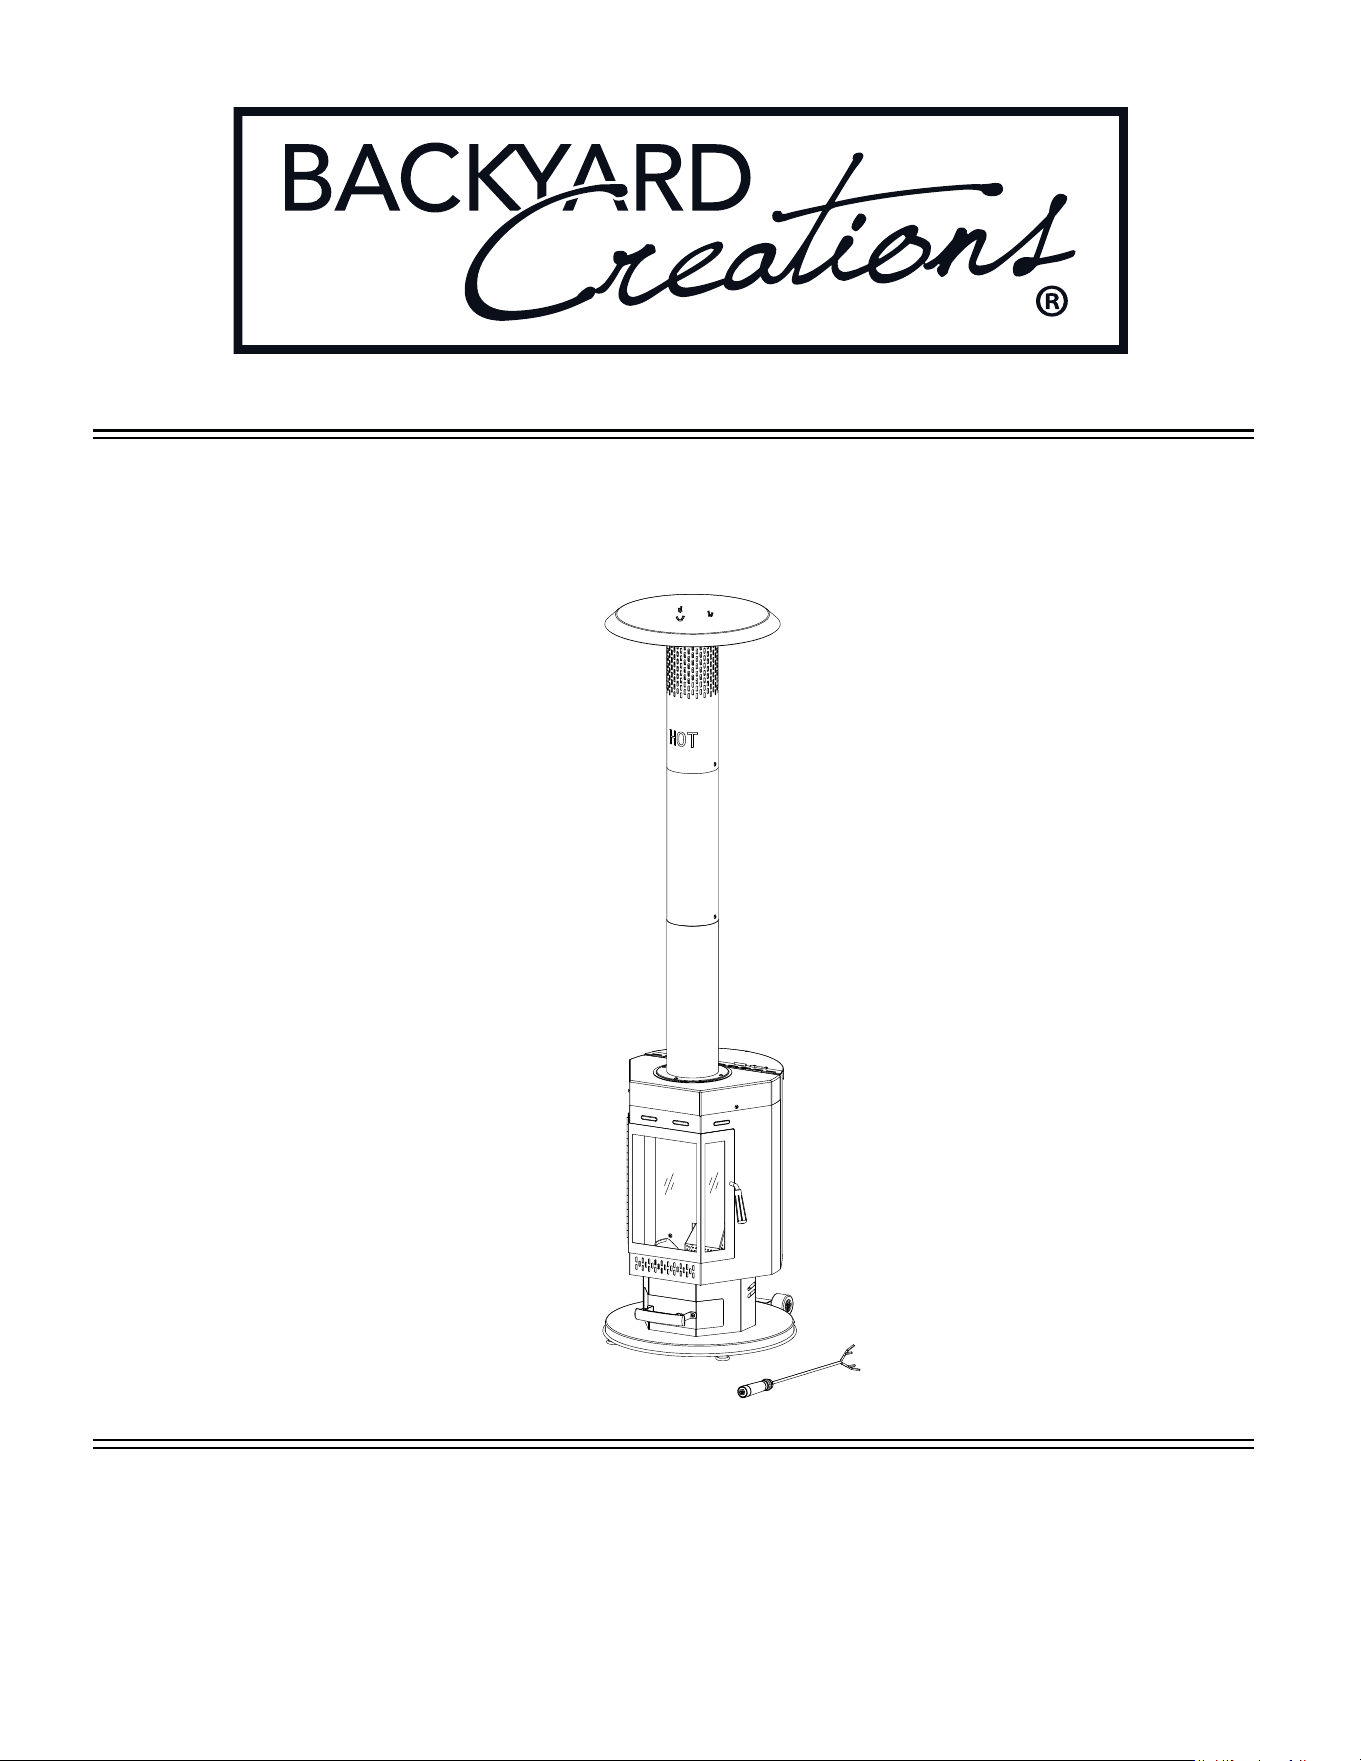
Patio Pellet Heater
Item# 13535
Questions, problems, missing parts? Before returning to your retailer,
call our customer service department at 1-877-447-4768,
8:00 a.m. - 4:30 p.m., CST, Monday-Friday or email us at
Model# 259-5282
2
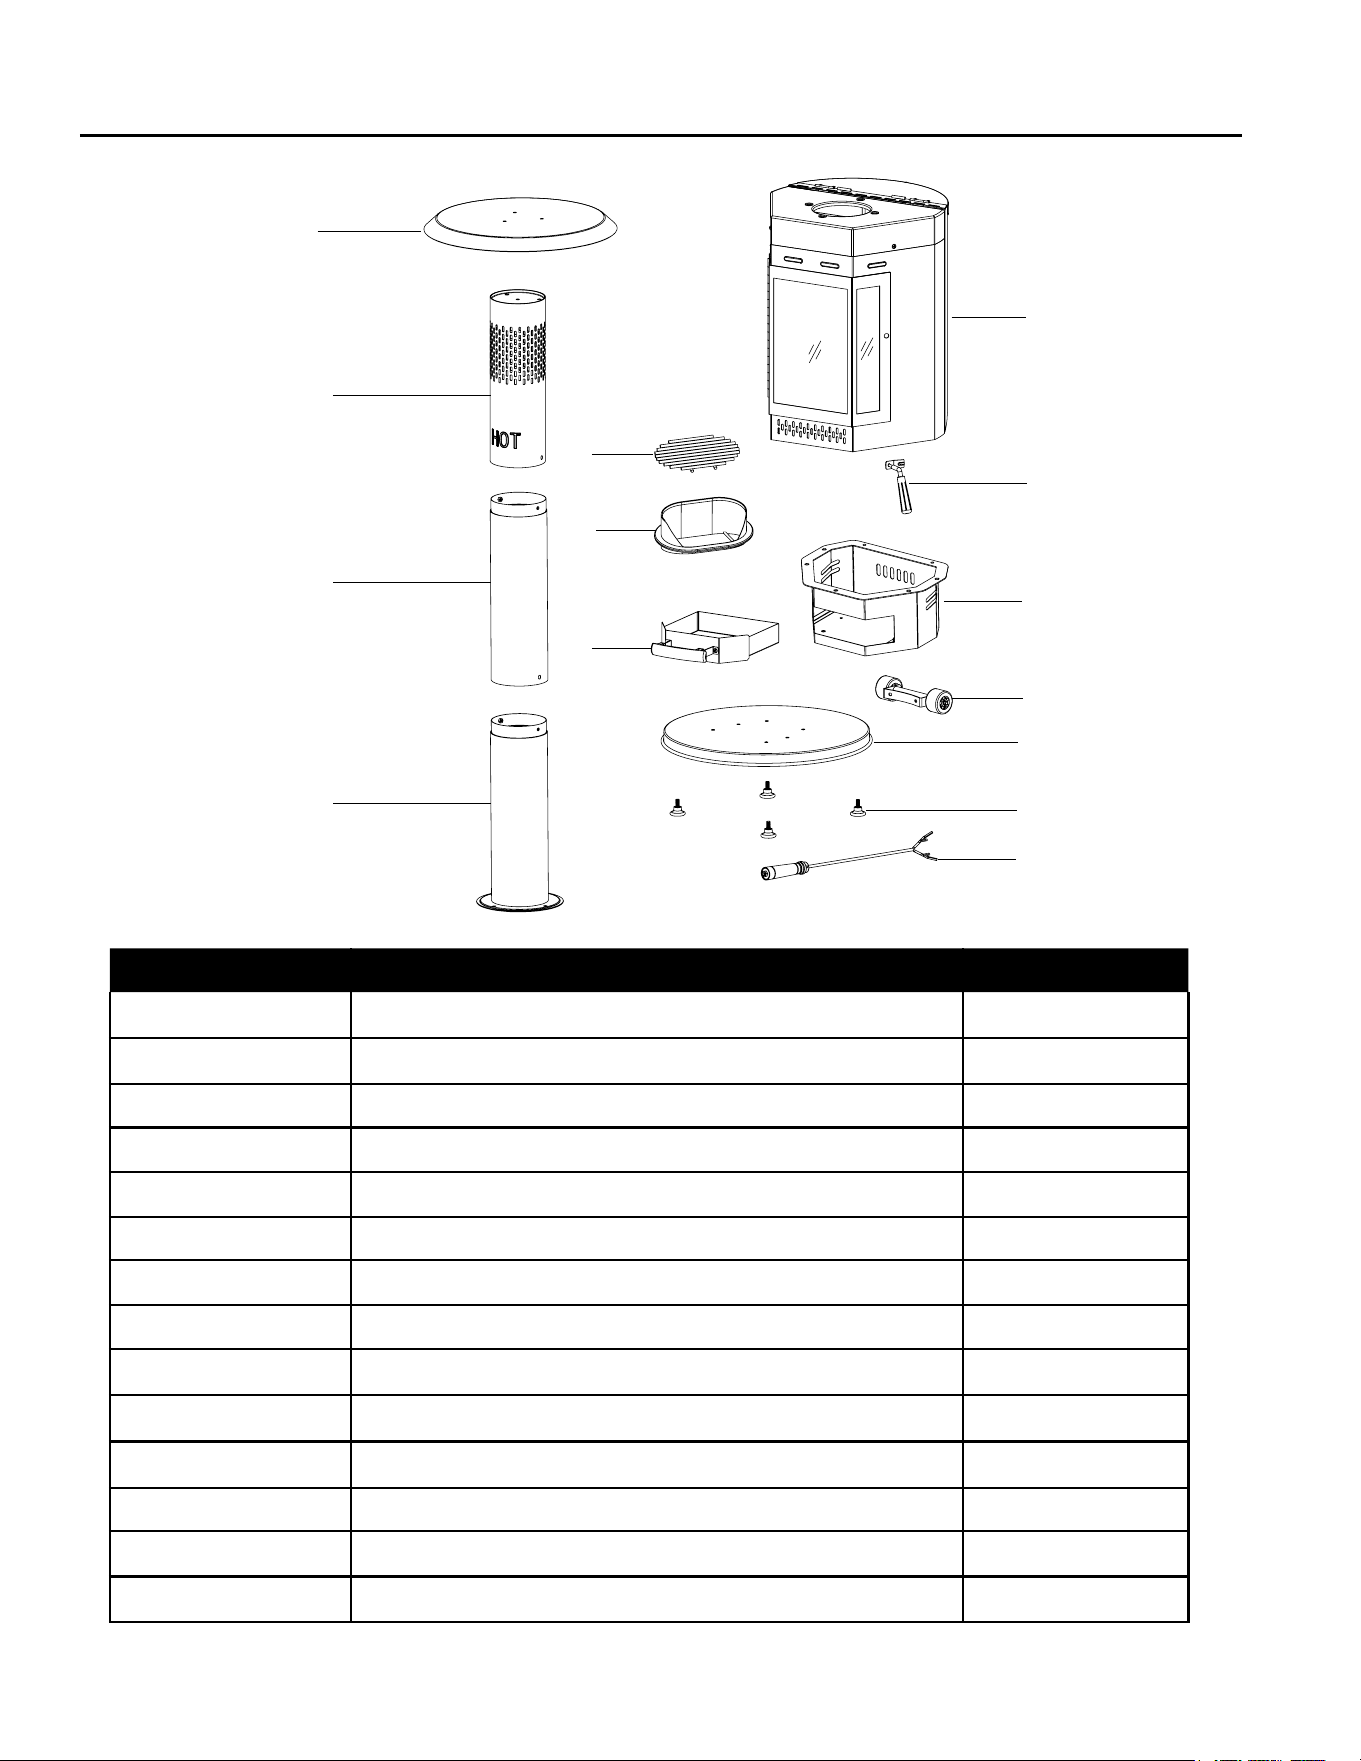
PACKAGE CONTENTS
A
B
C
D
F
G
I
N
E
H
J
K
L
M
Item Description Qty
A Reector 1
B Upper Chimney 1
C Middle Chimney 1
D Lower Chimney 1
E Heater Body Assembly 1
F Grate 1
G Firepot 1
H Heater Base 1
I Ash Tray 1
J Wheel Assembly 1
K Bottom Base 1
L Feet 4
M Fire Poker 1
N Door Handle Assembly 1
SAFETY INFORMATION
WARNING
Before you assemble or operate this unit, please carefully read this entire guide. Failure to do so
may result in a re, explosion, injury or death.
• FOR OUTDOOR USE ONLY! This pellet heater shall be used only outdoors in a well-ventilated
space and shall not be used in a building, garage, or any other enclosed area.
• DO NOT attempt to touch the heater while in use or hot. Handles may be hot due to ames.
• DO NOT add gasoline, kerosene, diesel fuel, lighter uid or alcohol to relight or enhance ame
• Excessive heat may damage the integrity of the structure. The ONLY method of relighting used
should be a match or lighter. Do not use any ammable fuels to reignite.
• Never use charcoal or any other solid fuel in the pellet heater.
• DO NOT use the unit indoors due to hazard of carbon monoxide fumes. Lack of ventilation can
cause death.
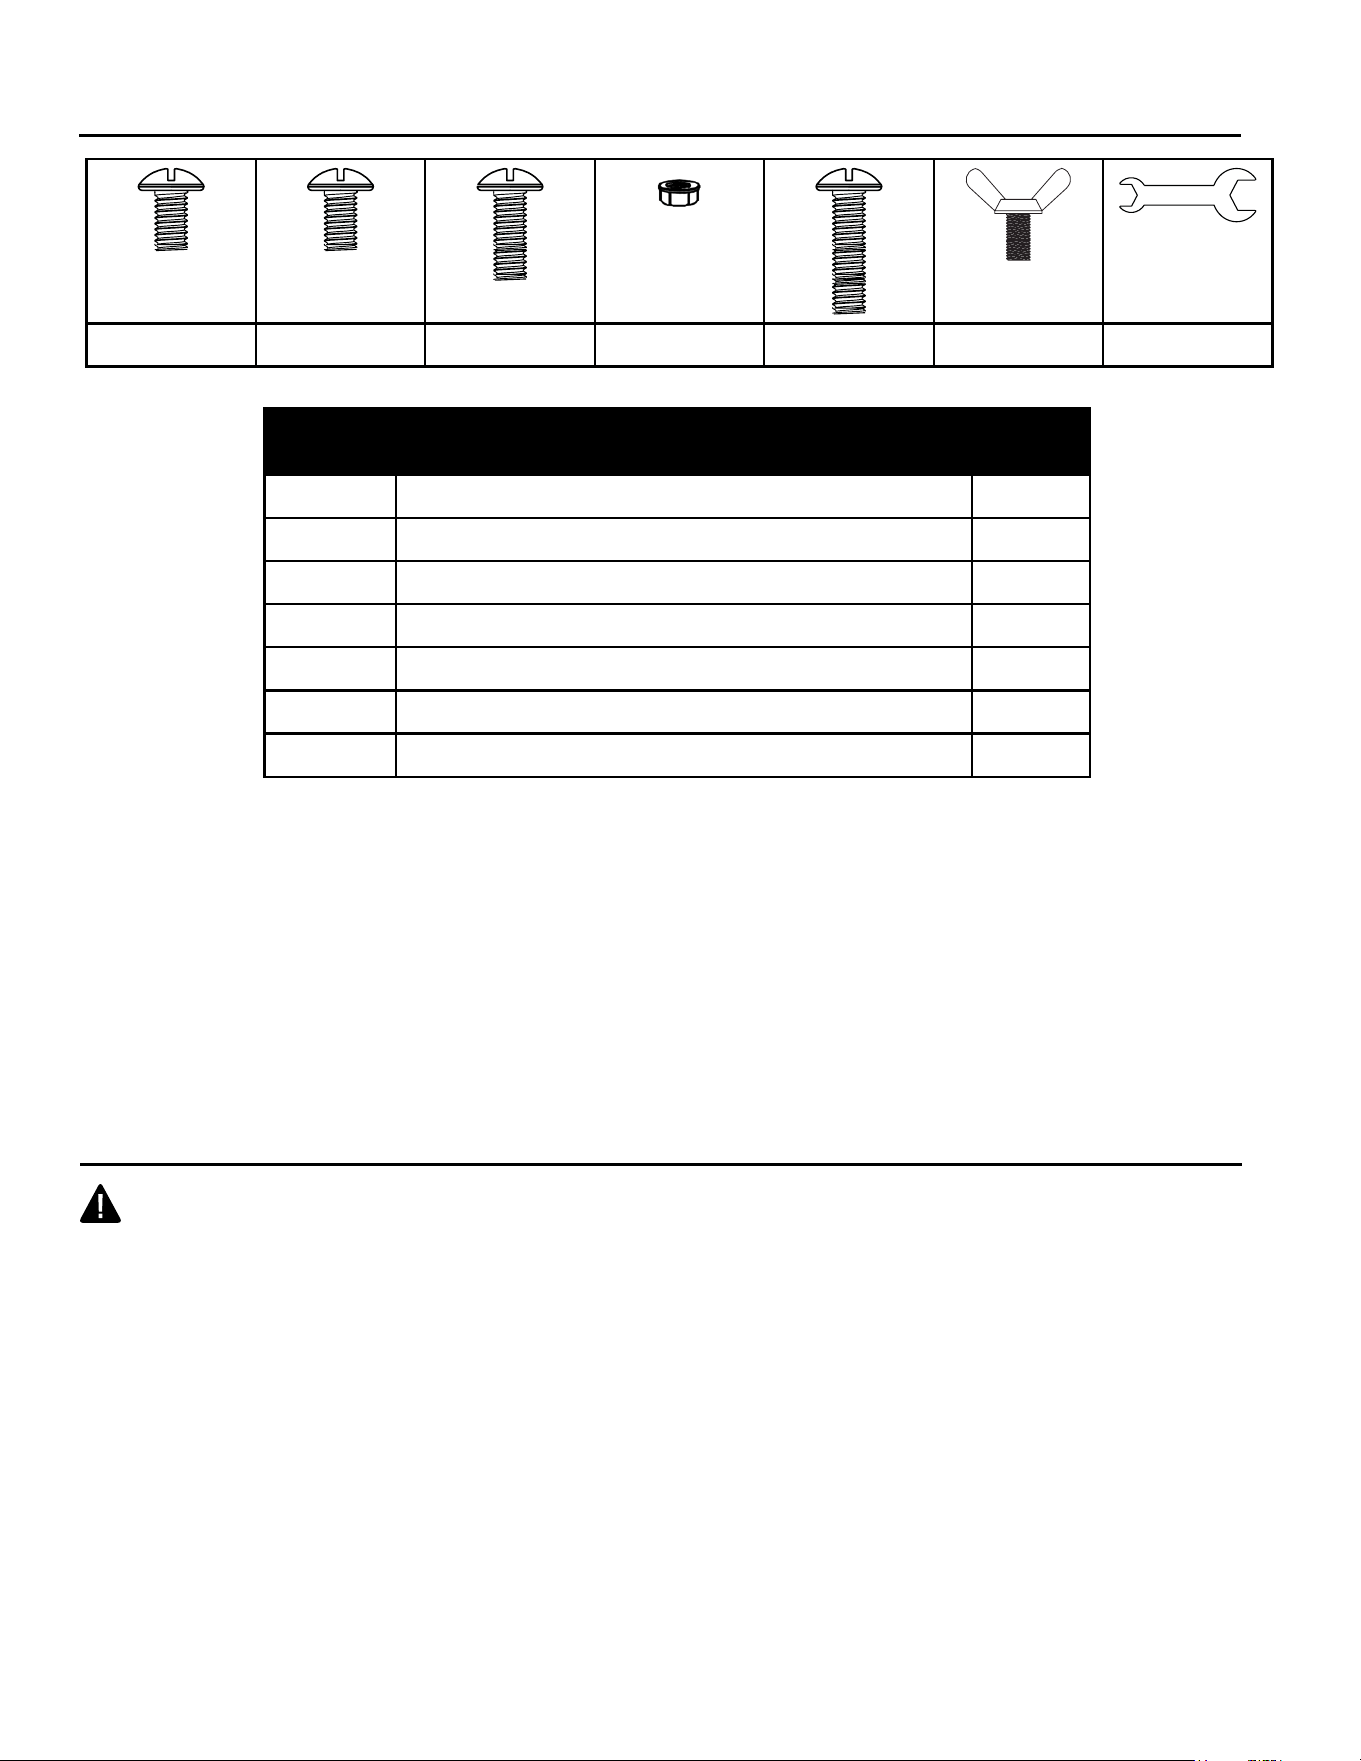
HARDWARE
AA BB CC DD EE FF GG
Item Description Qty
AA M6x12 Screw 13
BB M6x12 Screw (stainless steel) 2
CC M6x20 Screw 2
DD M6 Nut 2
EE M6x40 Screw 4
FF Wing Screw 3
GG Wrench 1
Before beginning assembly of product, make sure all parts are present. Compare parts with package
contents list and hardware contents list. If any part appears missing or damaged, don’t use this
product and call customer service immediately.
Tools Required for Assembly: Wrench (included) and Phillips Screwdriver (Not Included)
3
SAFETY INFORMATION
• This pellet heater was designed for burning wood pellets (heating or cooking grade) ONLY. Never
use charcoal, treated re logs or other materials in the unit.
• DO NOT pour water into pellet heater when it is burning; this will cause rusting.
• Check the local bylaws before using the pellet heater.
• Never leave a lighted pellet heater unattended.
• DO NOT use under any unprotected combustible structure. Keep combustible surfaces at least
48” (1.21 m) away from all sides of the pellet heater. Combustible materials should never be
within 48 (1.21 m) of top, back or sides of the heater.
• Protective gloves and long-handled tools are recommended for use with this pellet heater. Adding
pellets to the hopper by hand while the model is in use can cause serious injury. If the ame goes
out, please reload hopper once the unit has completely cooled, then resume use.
• Dispose of packing materials properly.
• DO NOT use pellet heater on wooden decks or on other combustible surface.
• This heating appliance should not be used on plastic or articial wood decks.
• Pellet heater will remain very hot for a period of time after use.
• Be sure pellet heater is cooled down completely before moving it.
• Use with extreme care and at your own risk.
• Do not operate pellet heater unless it is completely assembled and all parts are in place.
• Do not use this pellet heater for cooking.
• Clothing or other ammable material should not be placed on or near the pellet heater.
• Do not put pellet heater cover or anything ammable on, beneath or around the pellet heater until
completely cool.
• Users should be aware of the hazards of high surface temperatures and keep a safe distance to
avoid burning or clothing ignition.
• Never place hands or nger on the heater while in use or hot.
• Do not handle the pellet heater until it is completely cooled.
• Keep children away from hot pellet heater.
• Young children should be carefully supervised when they are in the same area of the pellet heater.
WARNING
Fuels used in wood burning appliances, and the products of combustion of such fuels, can
expose you to chemicals including carbon black, which is known to the state of california to
cause cancer, and carbon monoxide, which is known to the state of california to cause birth
defects or other reproductive harm. for more information go to: www.p65warnings.ca.gov
• Children should never operate this unit.
• Children and adults should be aware of the hazards of high surface temperatures and
should stay away to avoid burns or clothing ignition.
• Unit may tip over in high winds.
• Cover the unit when not in use, once completely cooled.
• CREOSOTE DEPOSITS WARNING. Burned wood pellets will naturally produce tar and other
organic vapors that form creosote. After use, residue can accumulate within the chimney and unit
body, this will need to be cleaned off and removed by a professional prior to continuing safe use.
• Any guard or other protective device removed for servicing the pellet heater shall be
replaced prior to operating the pellet heater.
• Maximum safe fuel capacity: 18-20 Ibs./ 8-9 KG
4
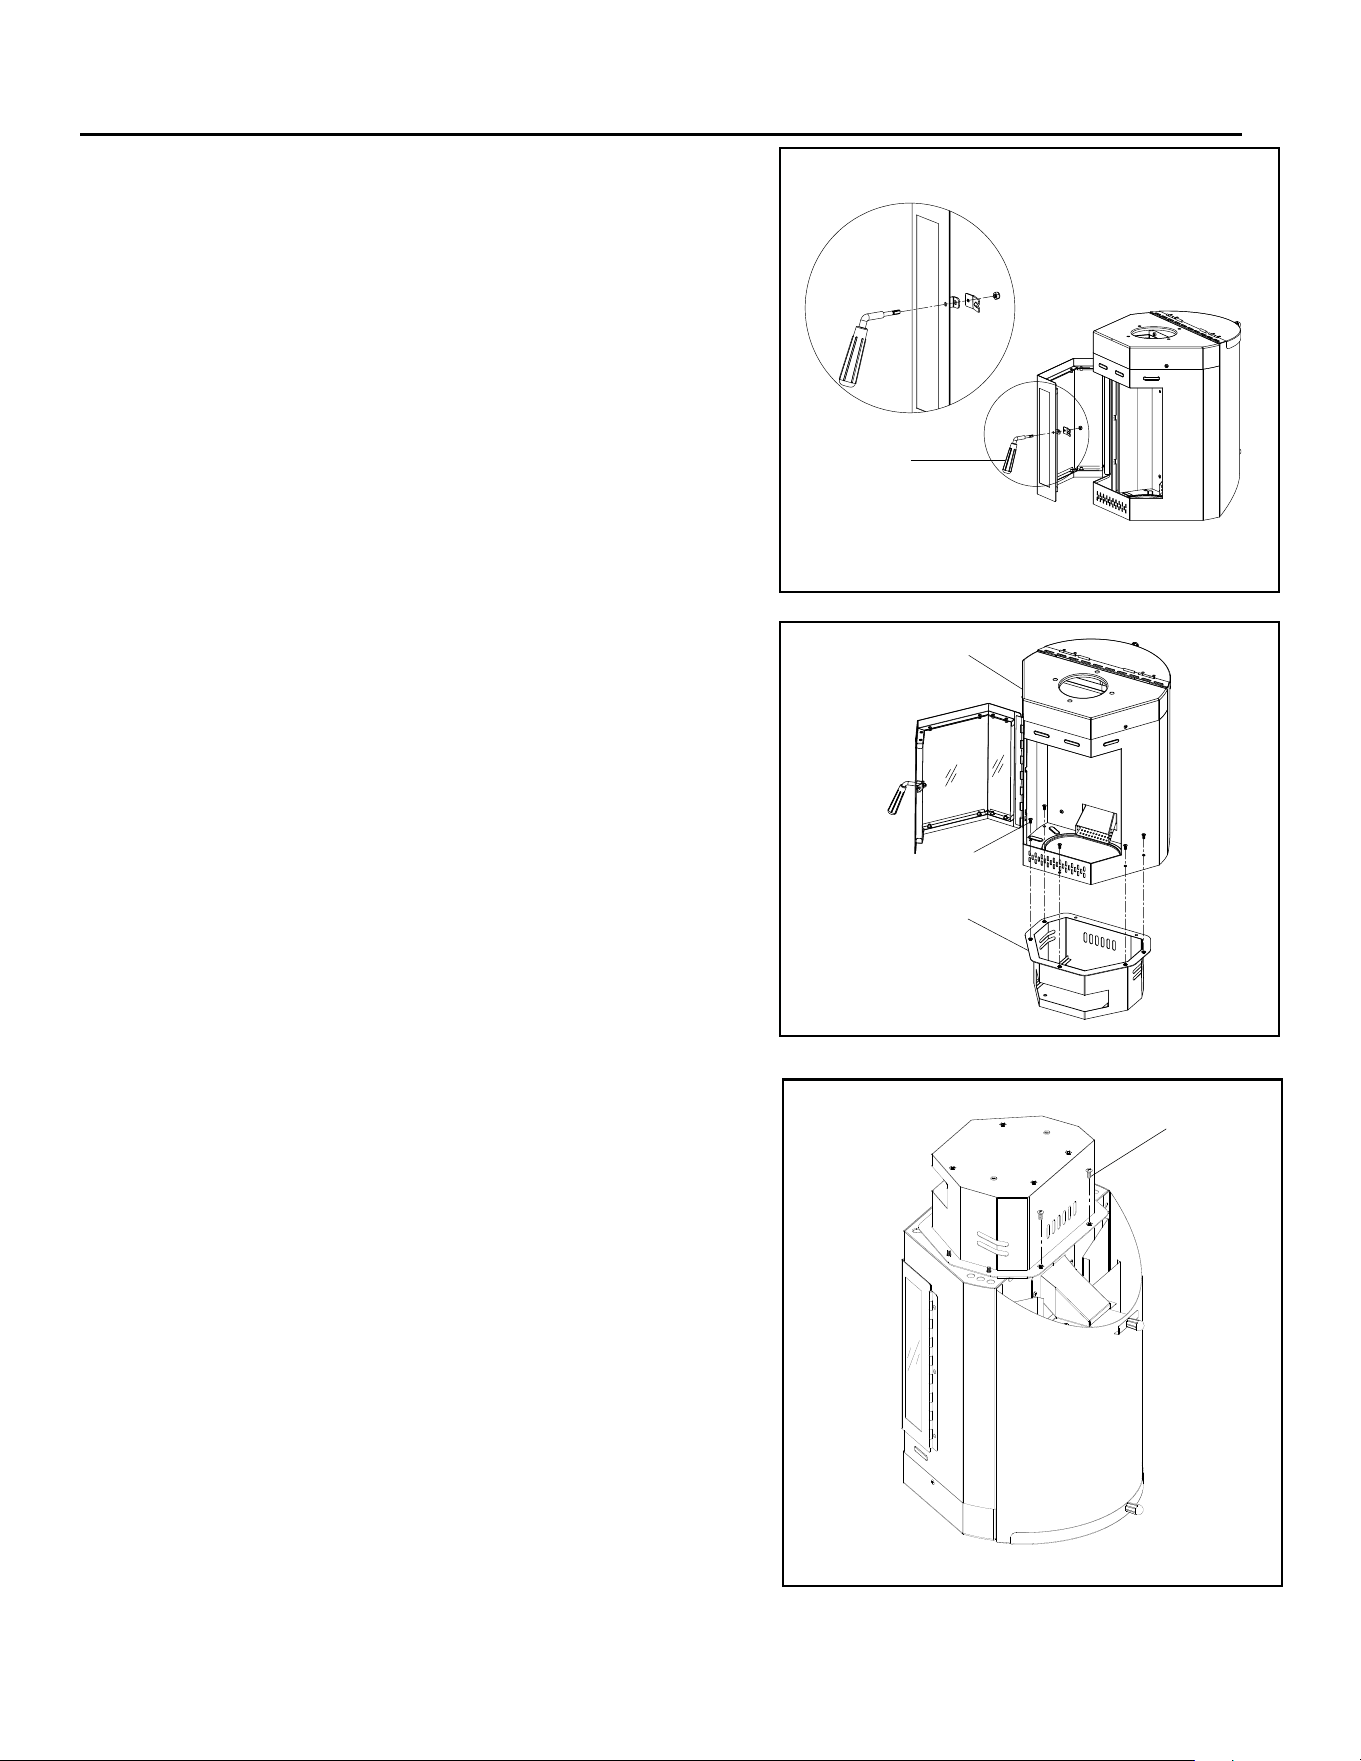
ASSEMBLY INSTRUCTIONS
1. Unscrew the lock nut and the latch from the door
handle assembly (N). Insert the door handle to the
hole on the door, then attach the latch and tighten
with lock nut.
N
AA
H
E
2. Attach the heater body assembly (E) to heater base
(H) using 7 pcs M6x12 screws (AA).
AA
5
ASSEMBLY INSTRUCTIONS
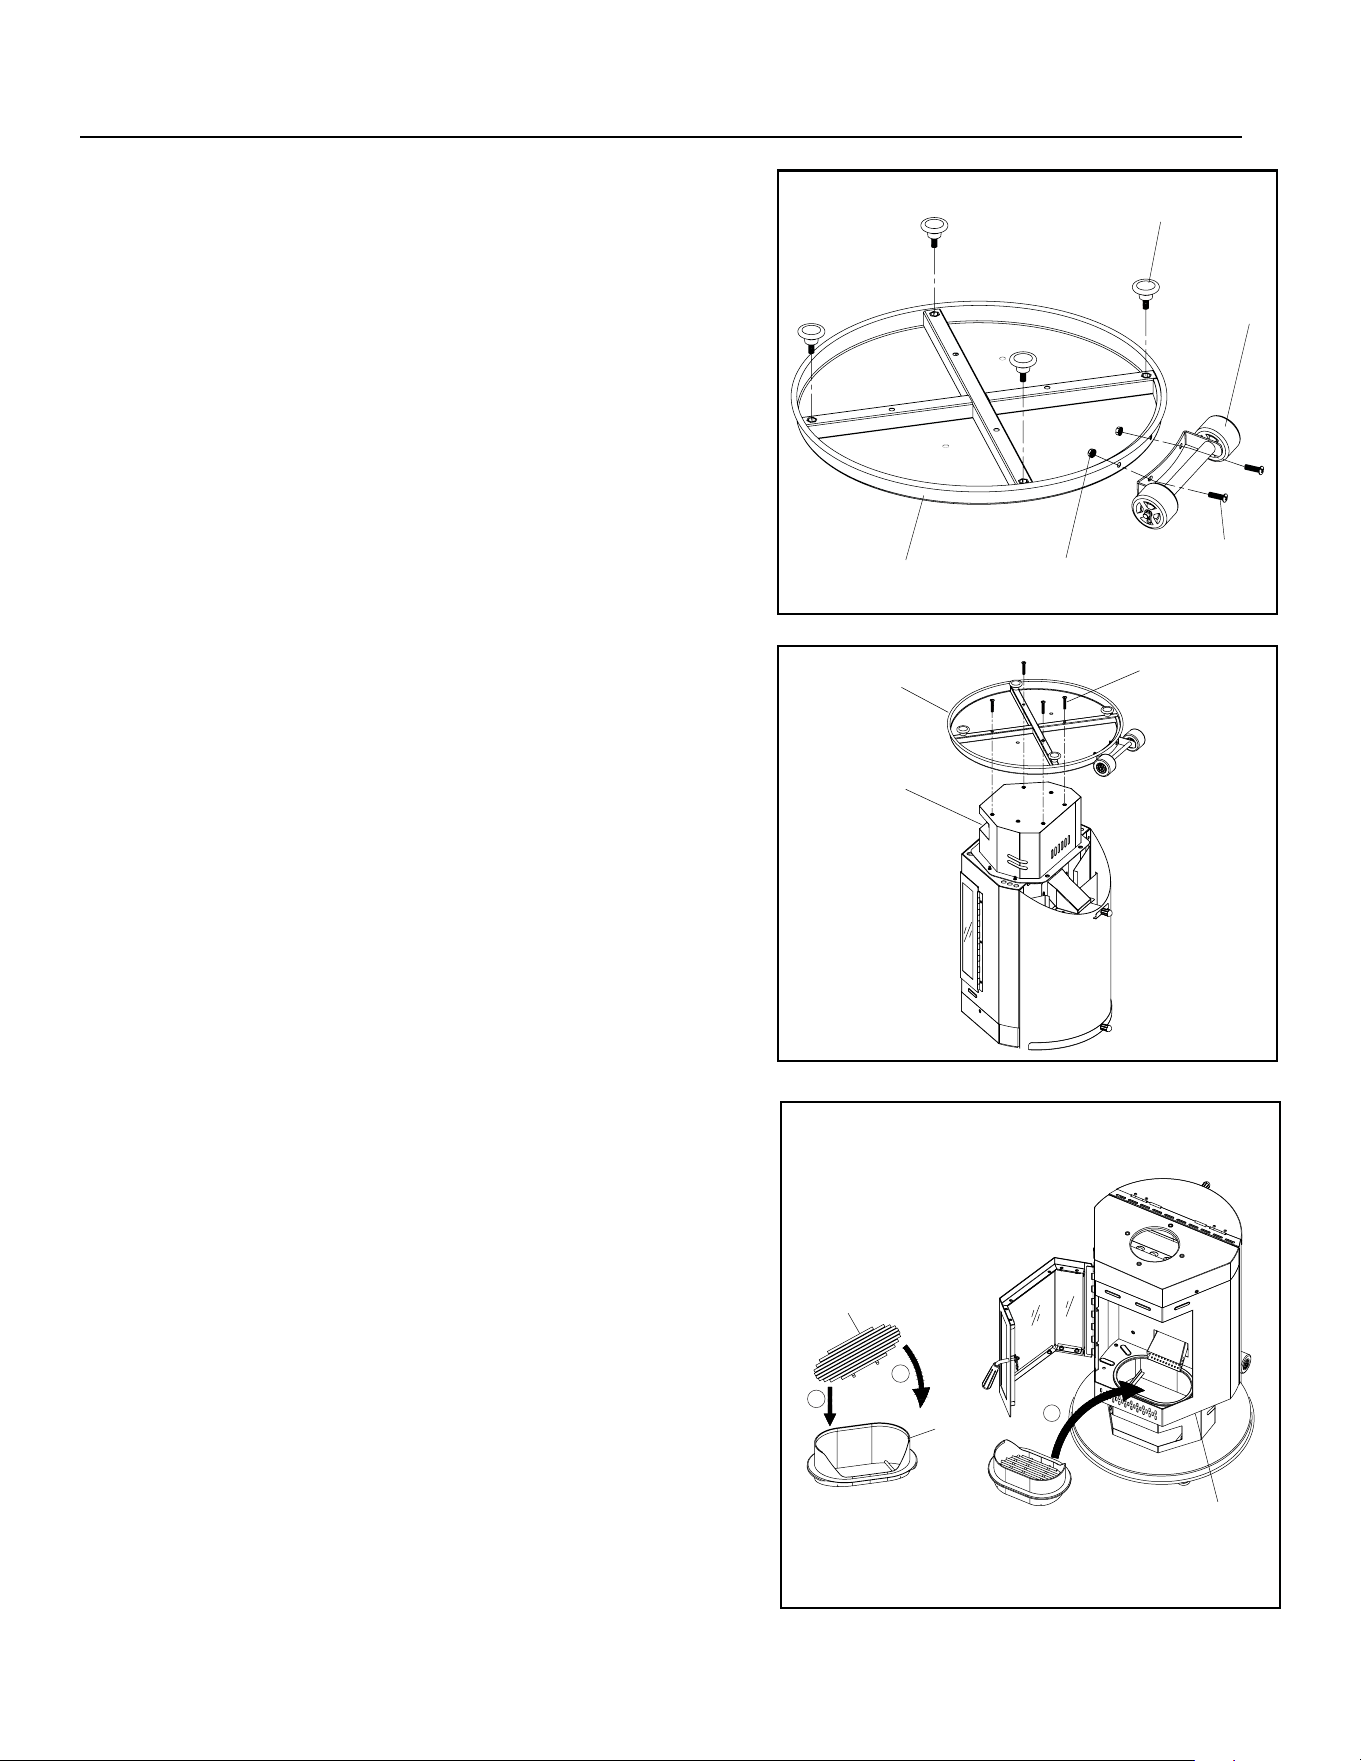
3. Screw in 4 pcs feet (L) to bottom base (K), then
attach wheel assembly (J) to bottom base (K) using
2pcs M6x 20 screws (CC) and 2 pcs M6 nuts (DD).
4. Attach bottom base (K) to heater base (H) using 4
pcs M6x 40 screws (EE).
5. Place the grate (F) into repot (G), then place repot
into heater body assembly (E).
K
DD
J
CC
L
EE
K
H
2
3
1
F
G
E
6
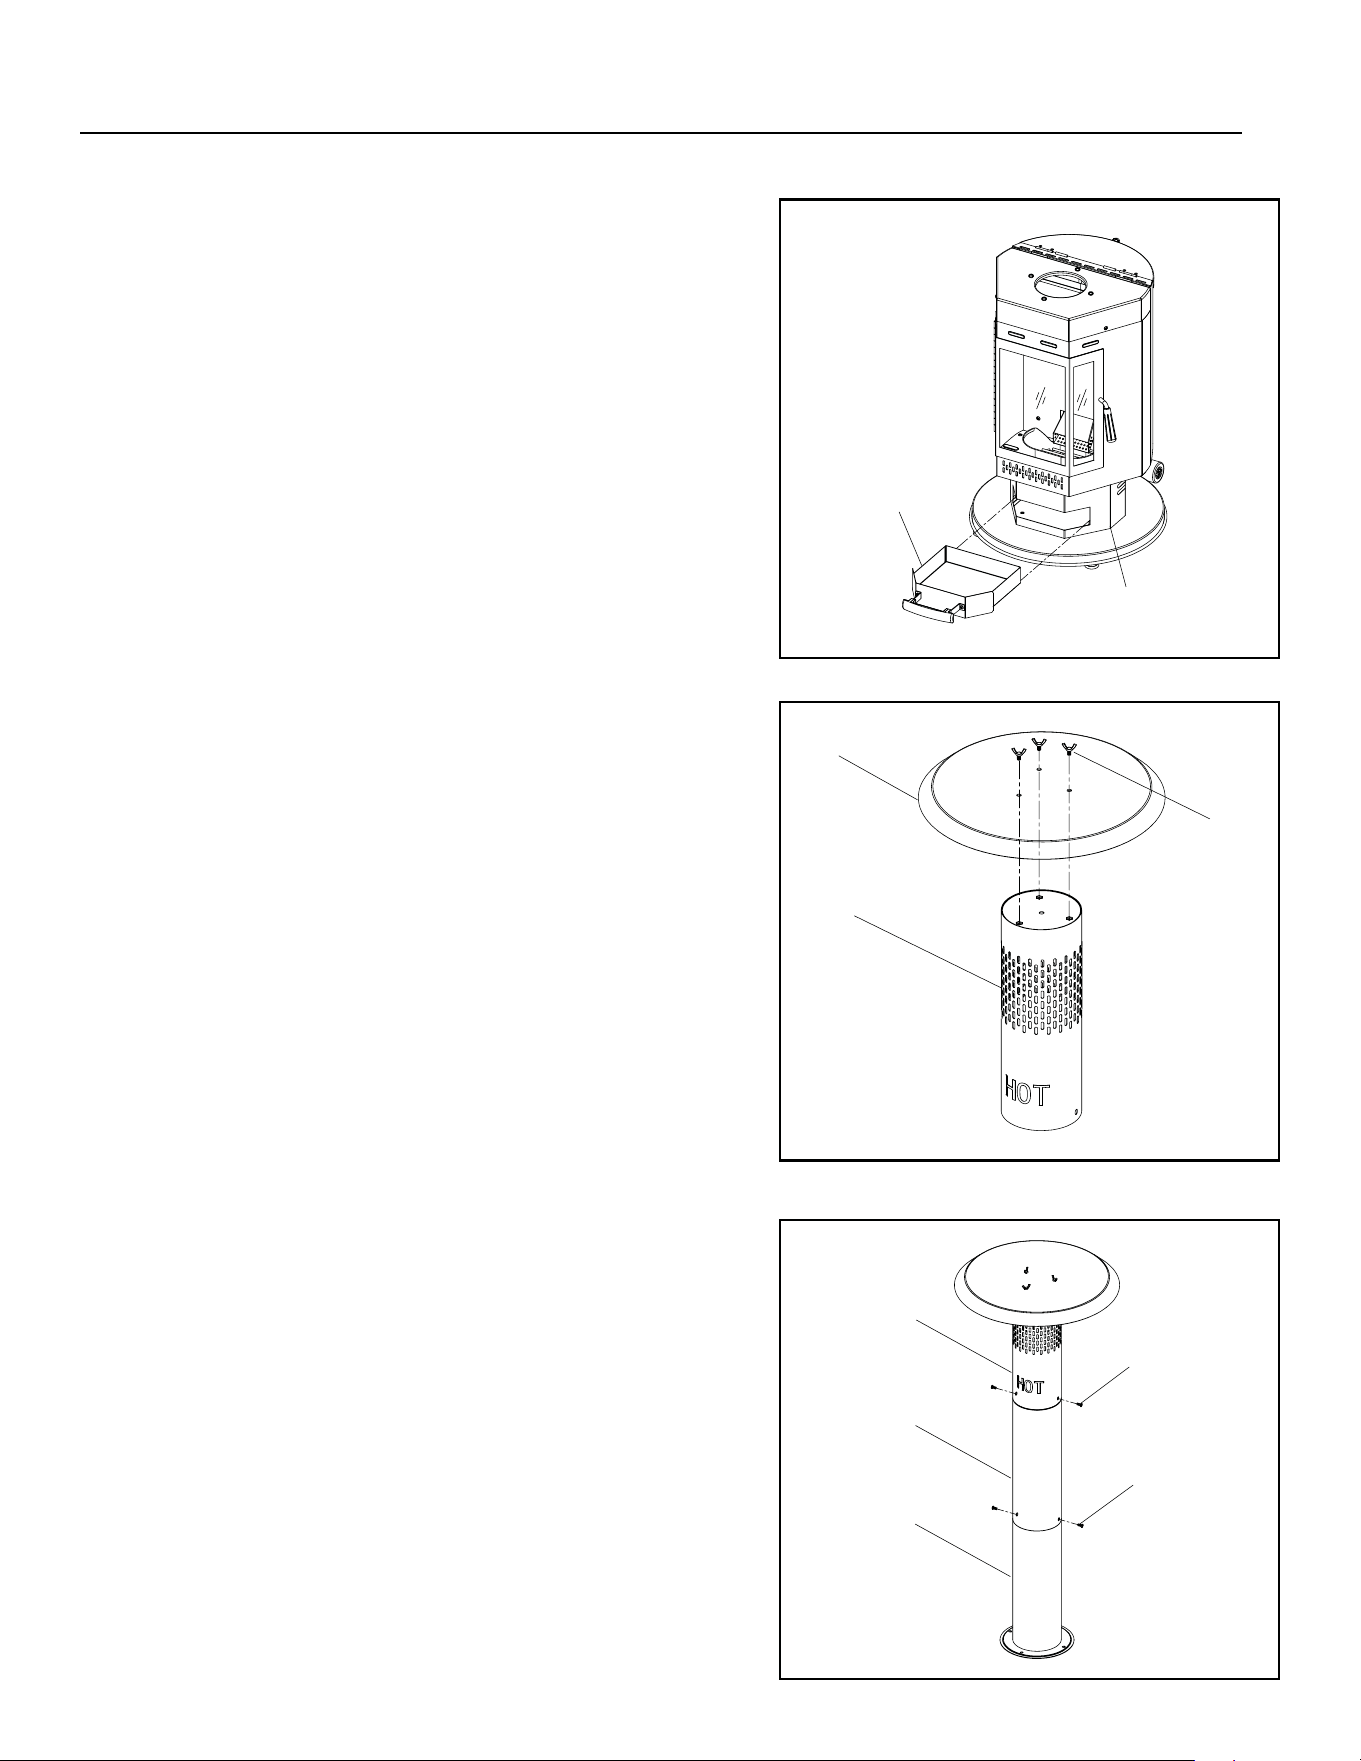
6. Insert ash tray (I) into heater base (H).
H
I
ASSEMBLY INSTRUCTIONS
7. Attach the reector (A) to upper chimney (B)
using 3 wing screws (FF).
8. Attach upper chimney (B) and middle chimney
(C) and lower chimney (D) together using 2 pcs
M6x12 screws (BB) and 2 pcs M6x12 screws
(AA).
FF
A
B
BB
AA
B
C
D
7
E
AA
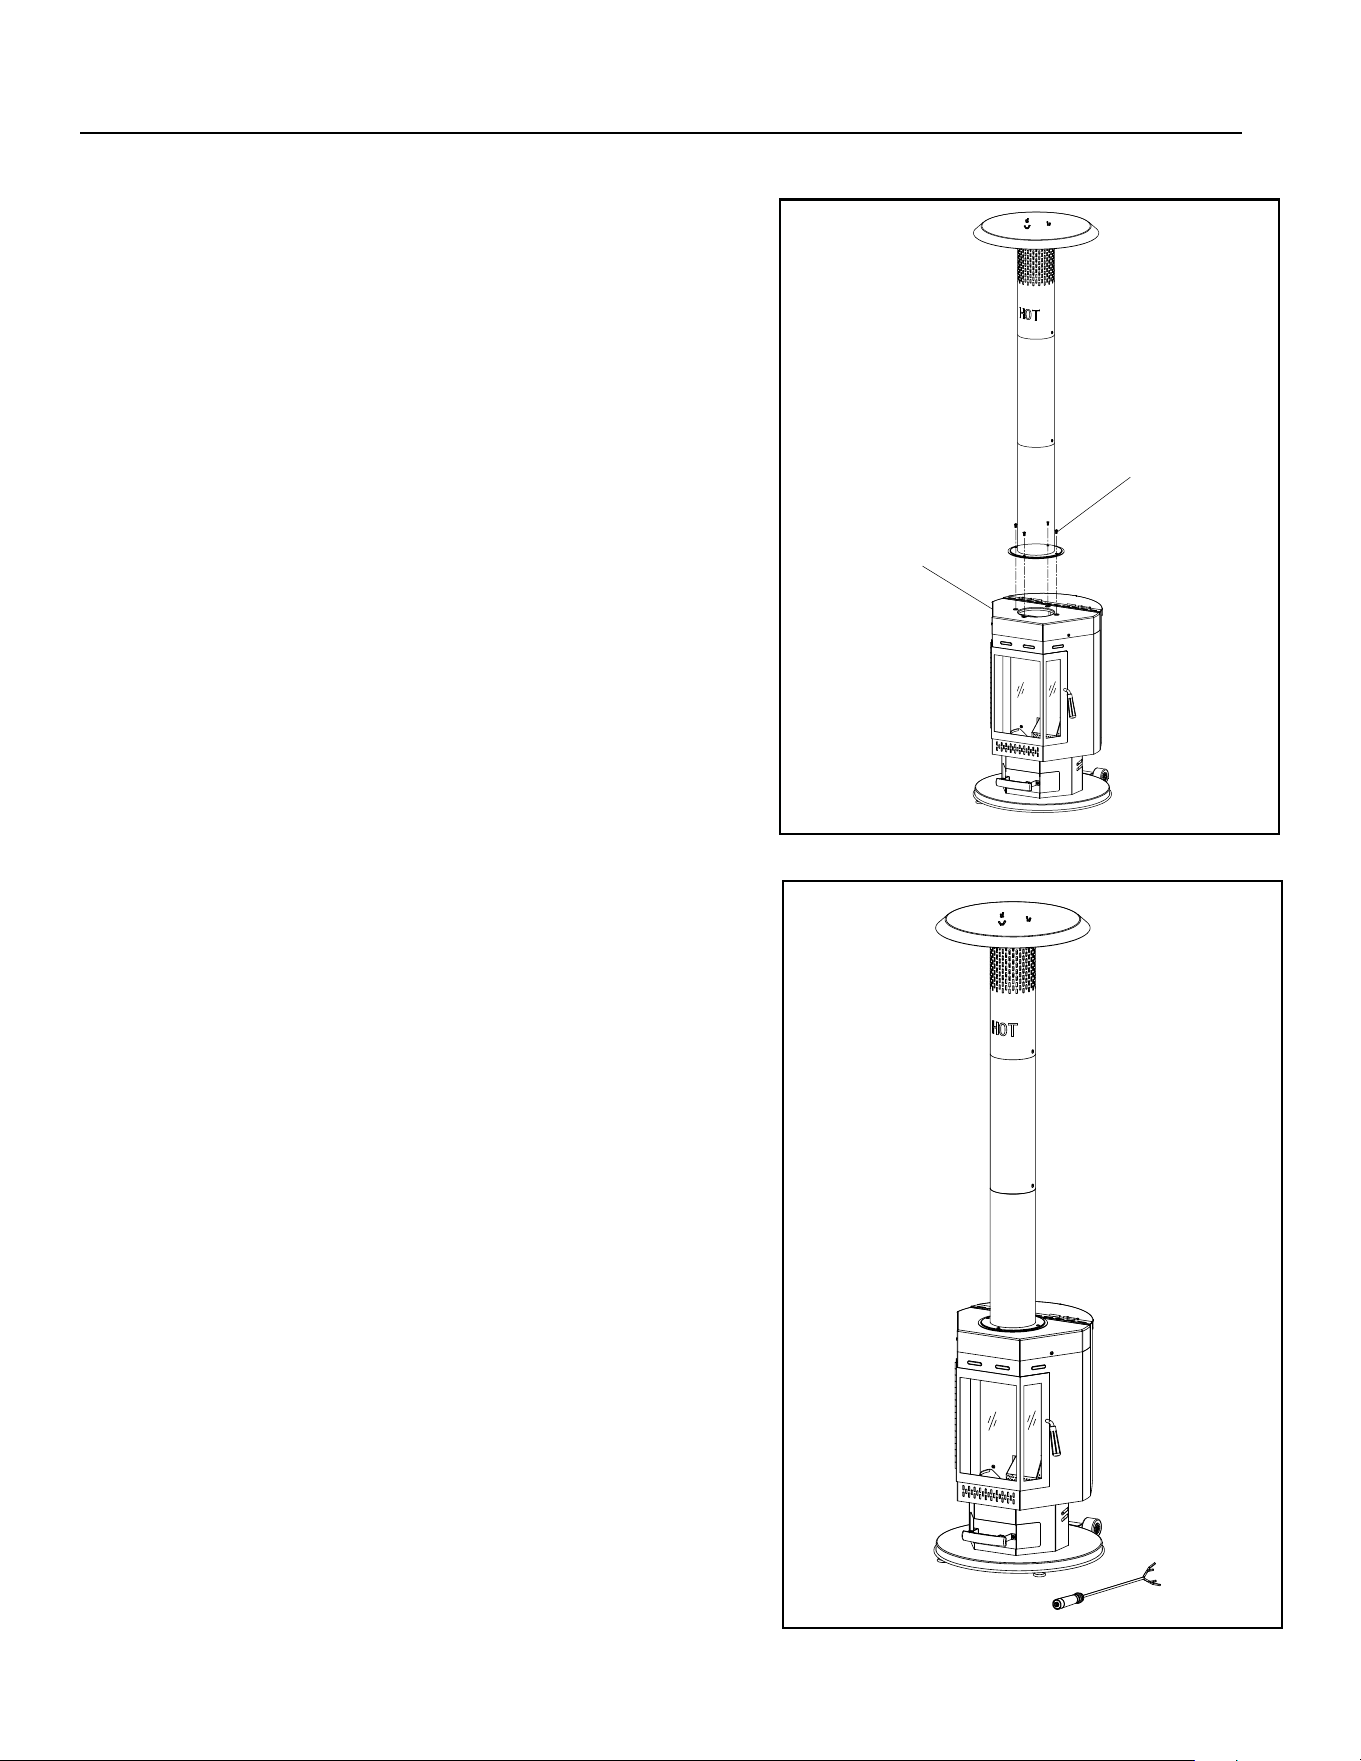
ASSEMBLY INSTRUCTIONS
9. Attach chimney assembly to heater body
assembly (E) using 4pcs M6x12 screws (AA).
10. Your pellet patio heater is now ready for use.
8
OPERATION
1. Make sure your heater has been assembled properly.
2. Push in the shut-o gate.
3. Fill hopper with pellets. The pellets will not fall into the repot at this point since the shut-o gate
is closed.
4. Open the door, pull out the shut-o gate completely. This will allow pellets to fall into repot.
5. Squirt a small amount of lighter uid or gel onto the pellets and ignite with a butane lighter or
match and close the door.
6. Keep the door closed when using the heater. If the door is open, the heater will lose its draft and
the pellets will not burn properly.
7. During the initial burn, the high temperature powder coating goes through a curing process. While
curing, it will give o smoke during the rst 15 minutes of use. This is normal and temporary.
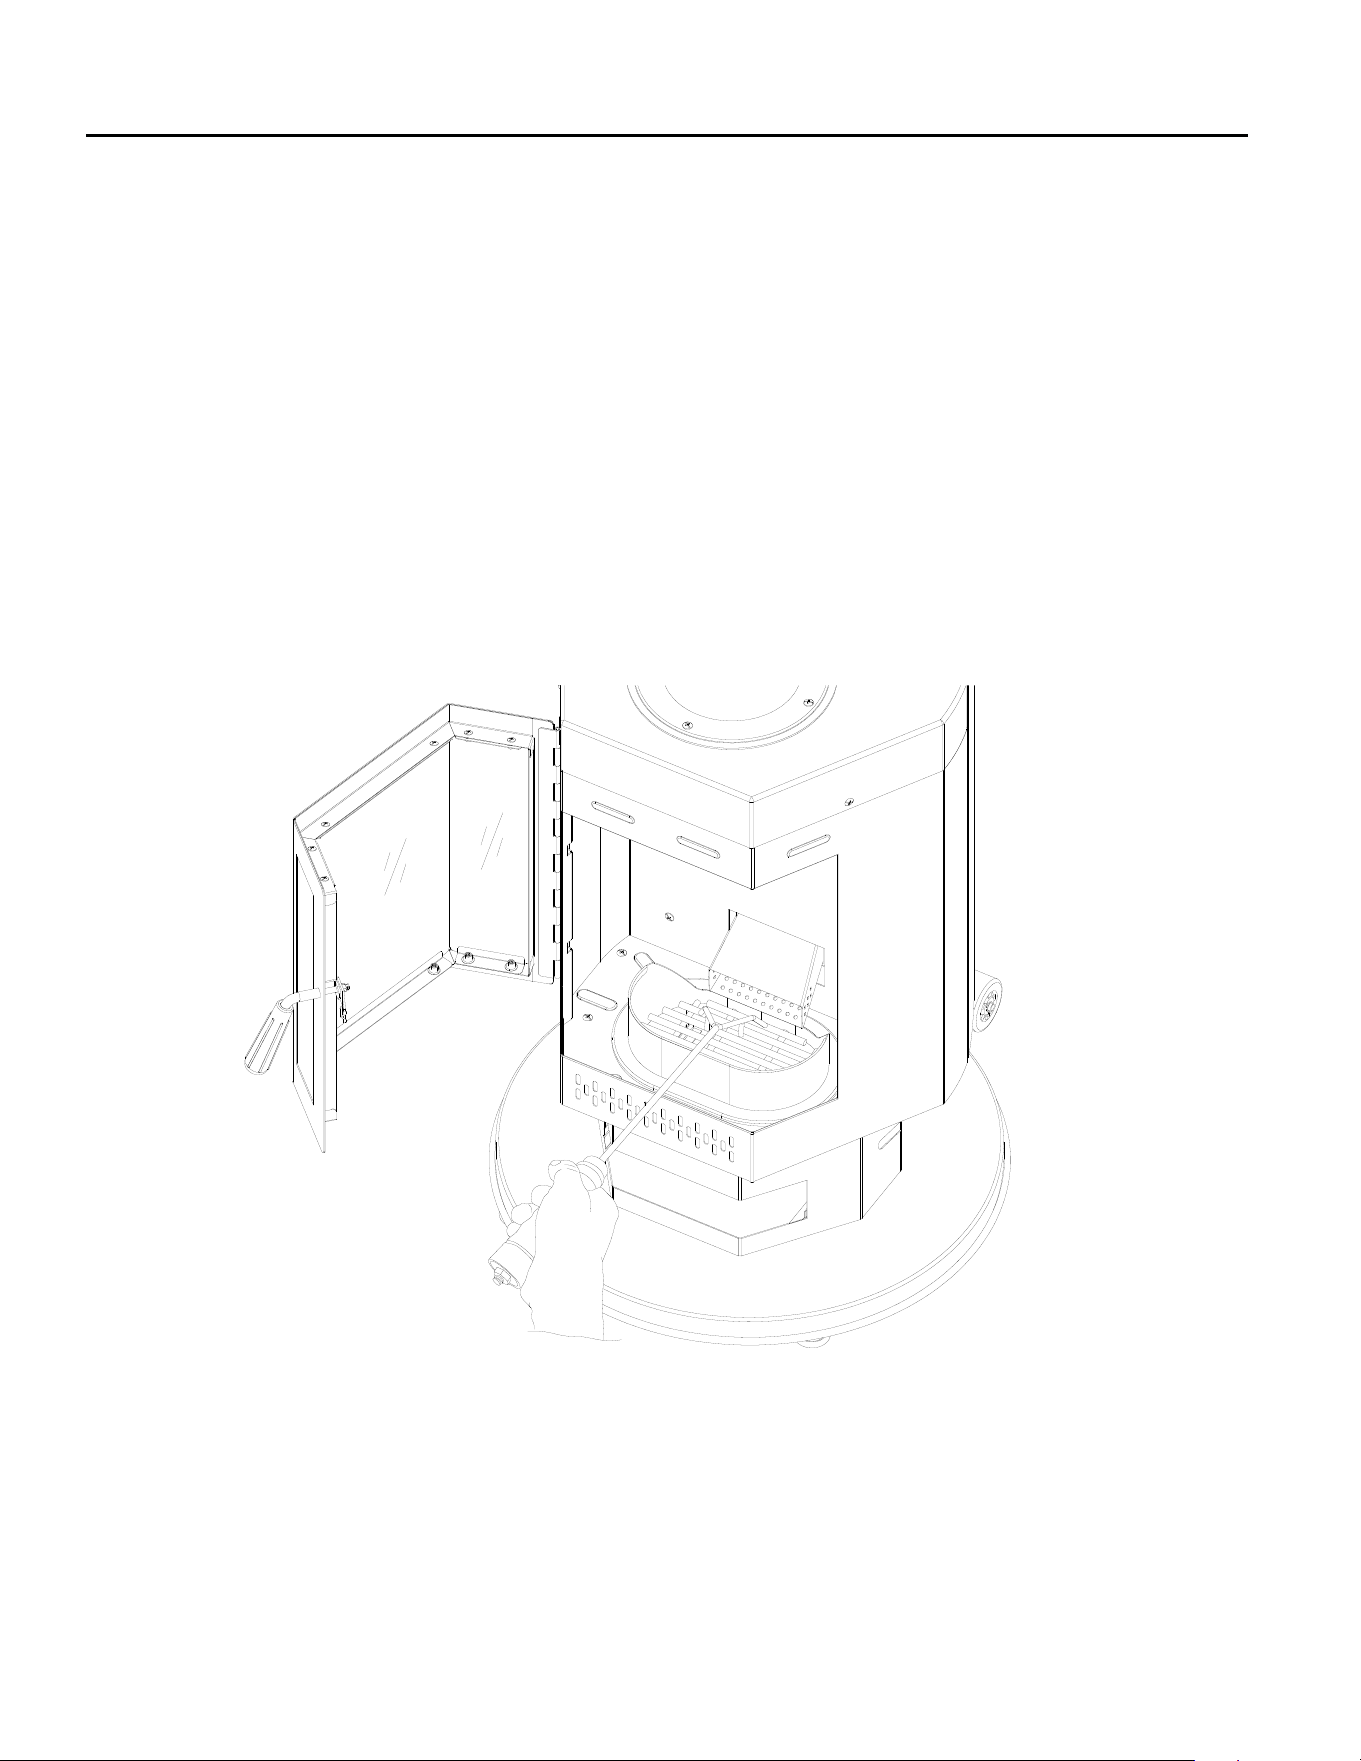
8. After several hours of use you may have excess pellets piled up at the bottom of the repot, you
will need to open the door and use the re poker to stir the pellets. This only needs to be done
after several hours of use to help ensure maximum heat output.
9

MAINTENANCE
CONTACT
If you have any questions or concerns, please contact manufacturer at the below resources:
Toll free phone 1-877-447-4768 | Monday - Friday, 8:00 am - 4: 30 pm CST
Email [email protected]
Website www.ghpgroupinc.com
•This outdoor pellet patio heater should be inspected on a regular basis to ensure product safety
and long product life.
•Check components for any signs of damage.
•Wipe exterior surfaces and unit windows with a mild soap and water. Ash tray and ash tray area
should be regularly cleaned, once ashes have completely cooled.
•Store pellet patio heater in a cool dry place, away from moisture
•When ready to store, remove left over wood pellets from the hopper to avoid a clog in the gravity
feeder.
•CREOSOTE DEPOSITS WARNING. After use, residue can accumulate within the chimney and
unit body. Please reach out to a professional prior to continuing use of the model for creosote
removal and continued safe use.
•ATTENTION! Properly dispose of any ashes left over after burning. Ashes may still be hot from
use, please ensure these are placed in a non-ammable container away from any combustible
materials until completely cooled. Once completely cooled, these can be discarded.
•Use manufacturer-approved or supplied replacement parts and accessories only. Otherwise it may
void the warranty of this product and result in a hazardous condition.
•Keep the pellet patio heater free and clear from combustible materials and debris.
WARRANTY
This product has a one-year warranty against manufacturing defects in workmanship, or materials.
The manufacturer warranty will be voided by, and manufacturer disclaims any responsibility for, the
following actions:
• Modication of the unit and/or components including the gas valve assembly.
• Use of any component part not manufactured or approved by Manufacturer.
• Use and installation other than what is listed in this manual.
Please contact the manufacturer for replacement parts.
10

REPLACEMENT PARTS LIST
PART DESCRIPTION PART #
A Reector 30-01-885 M Fire Poker 30-01-897
B Upper Chimney N
Door Handle As-
sembly
30-01-937
C Middle Chimney 30-01-887
O
Heater Body
Cover
30-01-938
D Lower Chimney 30-01-888 P
Small Glass
30-01-950
E Heater Body Assembly 30-01-934 Q
Middle Glass
30-01-951
F Grate 30-01-890 R
Inner Shield
30-01-875
G Firepot 30-01-891 S
Hopper Lid Knob
30-01-878
H Heater Base 30-01-935 T
Hopper
I Ash Tray 30-01-936 U
Shut-o Gate
30-01-880
J Wheel Assembly 30-01-894 V
Feeder
30-01-881
K Bottom Base 30-01-895 W
Ash Tray Handle 30-01-939
L Feet 30-01-896 AA-GG Hardware Pack 30-01-940
A
B
C
D
E
F
G
H
I
J
K
L
M
N
O
S
Q
P
T
U
V
W
R
11
30-02-077
30-02-078