
User Guide
SUMMARY
This guide provides technical specifications and information about monitor features, setting up the monitor, and
using the monitor.

Legal information
© Copyright 2024 HP Development
Company, L.P.
Product notice
This guide describes features that are
common to most models. Some features
may not be available on your product.
To access the latest user guide, go to
http://www.hp.com/support, and follow the
instructions to find your product. Then select
Setup & User Guides.
To help us improve this document, please
send any suggestions, comments, or errors
to
mailto:hp.doc.feedback@hp.com. Include
the document part number when submitting
your feedback.
Second Edition: December 2024
Document part number: N83024-002

Table of contents
1 About this guide.....................................................................................................................................................................................................................................1
2 Getting started...................................................................................................................................................................................................................................... 2
Important safety information............................................................................................................................................................................................... 2
More HP resources......................................................................................................................................................................................................................3
Preparing to call technical support......................................................................................................................................................................3
Getting to know your monitor............................................................................................................................................................................................... 3
Features ...................................................................................................................................................................................................................................3
Front components.............................................................................................................................................................................................................5
Rear components..............................................................................................................................................................................................................5
Locating the serial number and product number......................................................................................................................................6
Setting up the monitor ...............................................................................................................................................................................................................7
Attaching the fixed monitor stand (flat screen monitor)........................................................................................................................7
Attaching the height-adjustable monitor stand (flat screen monitor).........................................................................................8
Routing the cables for a fixed-height stand ...................................................................................................................................................9
Routing the cables for an adjustable-height stand...................................................................................................................................9
Connecting the cables ................................................................................................................................................................................................10
Adjusting the monitor ...................................................................................................................................................................................................11
Installing a security cable.......................................................................................................................................................................................... 12
Turning on the monitor................................................................................................................................................................................................. 12
HP watermark and image retention policy....................................................................................................................................................13
3 Using the monitor ............................................................................................................................................................................................................................. 14
Downloading software and utilities...............................................................................................................................................................................14
Downloading HP Display Center .....................................................................................................................................................................................14
The Information (INF) file........................................................................................................................................................................................................14
The Image Color Matching (ICM) file.............................................................................................................................................................................15
Using the OSD menu................................................................................................................................................................................................................15
Using the OSD function buttons......................................................................................................................................................................................15
Reassigning the OSD menu options.............................................................................................................................................................................16
Using Auto-Sleep Mode..........................................................................................................................................................................................................16
Using low blue light mode......................................................................................................................................................................................................17
4 Support and troubleshooting...................................................................................................................................................................................................18
Using the self-test function .................................................................................................................................................................................................18
Internal test pattern generator.........................................................................................................................................................................................19
Solving common issues........................................................................................................................................................................................................20
Button lockouts ...........................................................................................................................................................................................................................20
Using the auto-adjustment function (analog input)........................................................................................................................................... 21
iii

Optimizing image performance (analog input)..................................................................................................................................................... 21
5 Maintaining the monitor...............................................................................................................................................................................................................24
Maintenance guidelines.........................................................................................................................................................................................................24
Cleaning the monitor ....................................................................................................................................................................................................24
Shipping the monitor....................................................................................................................................................................................................25
Appendix A Technical specifications ....................................................................................................................................................................................26
80.1 cm (31.5 in) model specifications.......................................................................................................................................................................... 26
68.6 cm (27 in) model specifications............................................................................................................................................................................26
60.5 cm (23.8 in) model specifications .......................................................................................................................................................................27
Preset display resolutions...................................................................................................................................................................................................28
80.1 cm (31.5 in) model (FHD).................................................................................................................................................................................... 28
68.6 cm (27 in) model (FHD)......................................................................................................................................................................................29
60.5 cm (23.8 in) model (FHD) .................................................................................................................................................................................30
Power supply specification .................................................................................................................................................................................................31
Energy saver feature................................................................................................................................................................................................................31
Appendix B Accessibility................................................................................................................................................................................................................ 32
HP and accessibility................................................................................................................................................................................................................. 32
Finding the technology tools you need........................................................................................................................................................... 32
The HP commitment.....................................................................................................................................................................................................32
International Association of Accessibility Professionals (IAAP)..................................................................................................33
Finding the best assistive technology.............................................................................................................................................................33
Assessing your needs .....................................................................................................................................................................................33
Accessibility for HP products.....................................................................................................................................................................33
Monitor accessibility features (select products/regions only).................................................................................................................34
Built-in accessibility features.................................................................................................................................................................................34
Text to Speech (select products/regions only)..........................................................................................................................................34
What is Accessibility Mode?...................................................................................................................................................................................34
How do you turn Accessibility Mode on or off?........................................................................................................................................35
Standards and legislation ...................................................................................................................................................................................................35
Standards.............................................................................................................................................................................................................................36
Mandate 376 – EN 301 549 ............................................................................................................................................................................36
Web Content Accessibility Guidelines (WCAG).............................................................................................................................36
Legislation and regulations.....................................................................................................................................................................................36
Useful accessibility resources and links ...................................................................................................................................................................37
Organizations.....................................................................................................................................................................................................................37
Educational institutions..............................................................................................................................................................................................37
Other disability resources ........................................................................................................................................................................................37
HP links...................................................................................................................................................................................................................................38
Contacting support..................................................................................................................................................................................................................38
Index................................................................................................................................................................................................................................................................39
iv

About this guide1
This guide provides technical specifications and information about monitor features, setting up the
monitor, and using the software. Depending on the model, your monitor may not have all the features
included in this guide.
WARNING! Indicates a hazardous situation that, if not avoided, could result in serious injury or death.
CAUTION: Indicates a hazardous situation that, if not avoided, could result in minor or moderate
injury.
IMPORTANT: Indicates information considered important but not hazard-related (for example,
messages related to property damage). Warns the user that failure to follow a procedure exactly as
described could result in loss of data or in damage to hardware or software. Also contains essential
information to explain a concept or to complete a task.
NOTE: Contains additional information to emphasize or supplement important points of the main text.
TIP: Provides helpful hints for completing a task.
This product incorporates HDMI® technology.
About this guide
1

Getting started2
Read this chapter to learn about safety information and where to find additional HP resources.
Important safety information
An AC adapter and power cord might be included with the monitor. If you use another cord, use only a
power source and connection appropriate for this monitor.
For information about the correct power cord set to use with the monitor, see the
Product Notices
at HP
Regulatory, Safety, Compliance, and Warranty Information.
WARNING! To reduce the risk of electric shock or damage to the equipment:
● Plug the power cord into an AC outlet that is easily accessible at all times.
● If the power cord has a three-pin attachment plug, plug the cord into a grounded (earthed) three-
pin outlet.
● Disconnect power from the monitor by unplugging the power cord from the AC outlet. When
unplugging the power cord from the AC outlet, grasp the cord by the plug.
For your safety, do not place anything on power cords or cables. Take care to route all cords and cables
connected to the monitor so that they cannot be stepped on, pulled, grabbed, or tripped over.
To reduce the risk of serious injury, read the
Safety & Comfort Guide
provided with your user guides.
It describes proper workstation setup and proper posture, health, and work habits for computer users.
The
Safety & Comfort Guide
also provides important electrical and mechanical safety information. The
Safety & Comfort Guide
is also available on the web at http://www.hp.com/ergo.
IMPORTANT: For the protection of the monitor and the computer, connect all power cords for the
computer and its peripheral devices (such as a monitor, printer, scanner) to a surge protection device
such as a power strip or uninterruptible power supply (UPS). Not all power strips provide surge
protection; the power strip must be specifically labeled as having this capability. Use a power strip
whose manufacturer offers a damage replacement policy so that you can replace the equipment if
surge protection fails.
Use the appropriate and correctly sized furniture designed to properly support your monitor.
WARNING! Monitors that are inappropriately situated on dressers, bookcases, shelves, desks,
speakers, chests, or carts could fall over and cause personal injury.
WARNING! Stability hazard: The device might fall, causing serious personal injury or death. To prevent
injury, securely attach the monitor to the floor or wall in accordance with the installation instructions.
WARNING! This equipment is not suitable for use in locations where children are likely to be present.
NOTE: This product is suitable for entertainment purposes. Consider placing the monitor in a
controlled luminous environment to avoid interference from surrounding light and bright surfaces that
might cause disturbing reflections from the screen.
2
Chapter 2 Getting started

More HP resources
Use this table to locate resources that provide product details, how-to information, and more.
Table 2-1 Additional information
Resource Contents
Setup Instructions Overview of monitor setup and features
HP support For HP support or to resolve a hardware or software problem, perform
one of these tasks:
● Go to http://www.hp.com/support, and follow the instructions to
find your product.
● Select the Search icon in the taskbar, type support in the search
box, and then select HP Support Assistant.
● Select the question mark icon in the taskbar.
NOTE:
Contact customer support to replace the power cord, the AC adapter (select products only), or
any other cables that shipped with your monitor.
Preparing to call technical support
Use this information if you have to troubleshoot an issue.
If you cannot solve a problem using Support and troubleshooting on page 18, a call to technical
support can provide additional help. Have the following information available when you call.
● Monitor model number
● Monitor serial number
● Purchase date on invoice
● Conditions under which the problem occurred
● Error messages received
● Hardware configuration
● Name and version of the hardware and firmware that you are using
Getting to know your monitor
Your monitor has top-rated features. This section provides details about your components, where they
are located, and how they work.
Features
Depending on the model, your monitor might include the following features:
More HP resources
3

Display features
● 80.1 cm (31.5 in) diagonal viewable screen area with 1920 × 1080 FHD resolution, plus full-screen
support for lower resolutions; includes custom scaling for maximum image size while preserving
original aspect ratio
● 68.6 cm (27.0 in) diagonal viewable screen area with 1920 × 1080 FHD resolution, plus full-screen
support for lower resolutions; includes custom scaling for maximum image size while preserving
original aspect ratio
● 60.5 cm (23.8 in) diagonal viewable screen area with 1920 × 1080 FHD resolution, plus full-screen
support for lower resolutions; includes custom scaling for maximum image size while preserving
original aspect ratio
● Liquid crystal display (LCD) with active matrix and in-plane switching (IPS) and Vertical Alignment
(VA).
● Nonglare panel with an LED backlight
● Wide viewing angle to allow viewing from a sitting or standing position, or moving from side to side
● Tilt and height adjustment capabilities
● Four on-screen display (OSD) buttons, three that you can reconfigure to quickly allow selection of
the most commonly used operations
● On-screen display (OSD) adjustments in several languages for easy setup and screen optimization
● Energy saver feature to meet requirements for reduced power consumption
● Security cable slot on the rear of the monitor for an optional security cable
● Cable management feature for placement of cables and cords
Connectors
● High-Definition Multimedia Interface (HDMI) video input
● VGA port
● Plug and Play capability, if supported by your operating system
Monitor stand
● Removable fixed-height stand for flexible monitor head mounting solutions
● Removable adjustable-height stand for flexible monitor head mounting solutions
● HP Quick Release 2 device to quickly attach the monitor head to the stand with a simple click, and
then remove it with the convenient sliding tab release
NOTE: For safety and regulatory information, see the
Product Notices
provided in your
documentation kit. To access the latest user guide, go to http://www.hp.com/support, and follow the
instructions to find your product. Then select Setup & User Guides.
4
Chapter 2 Getting started
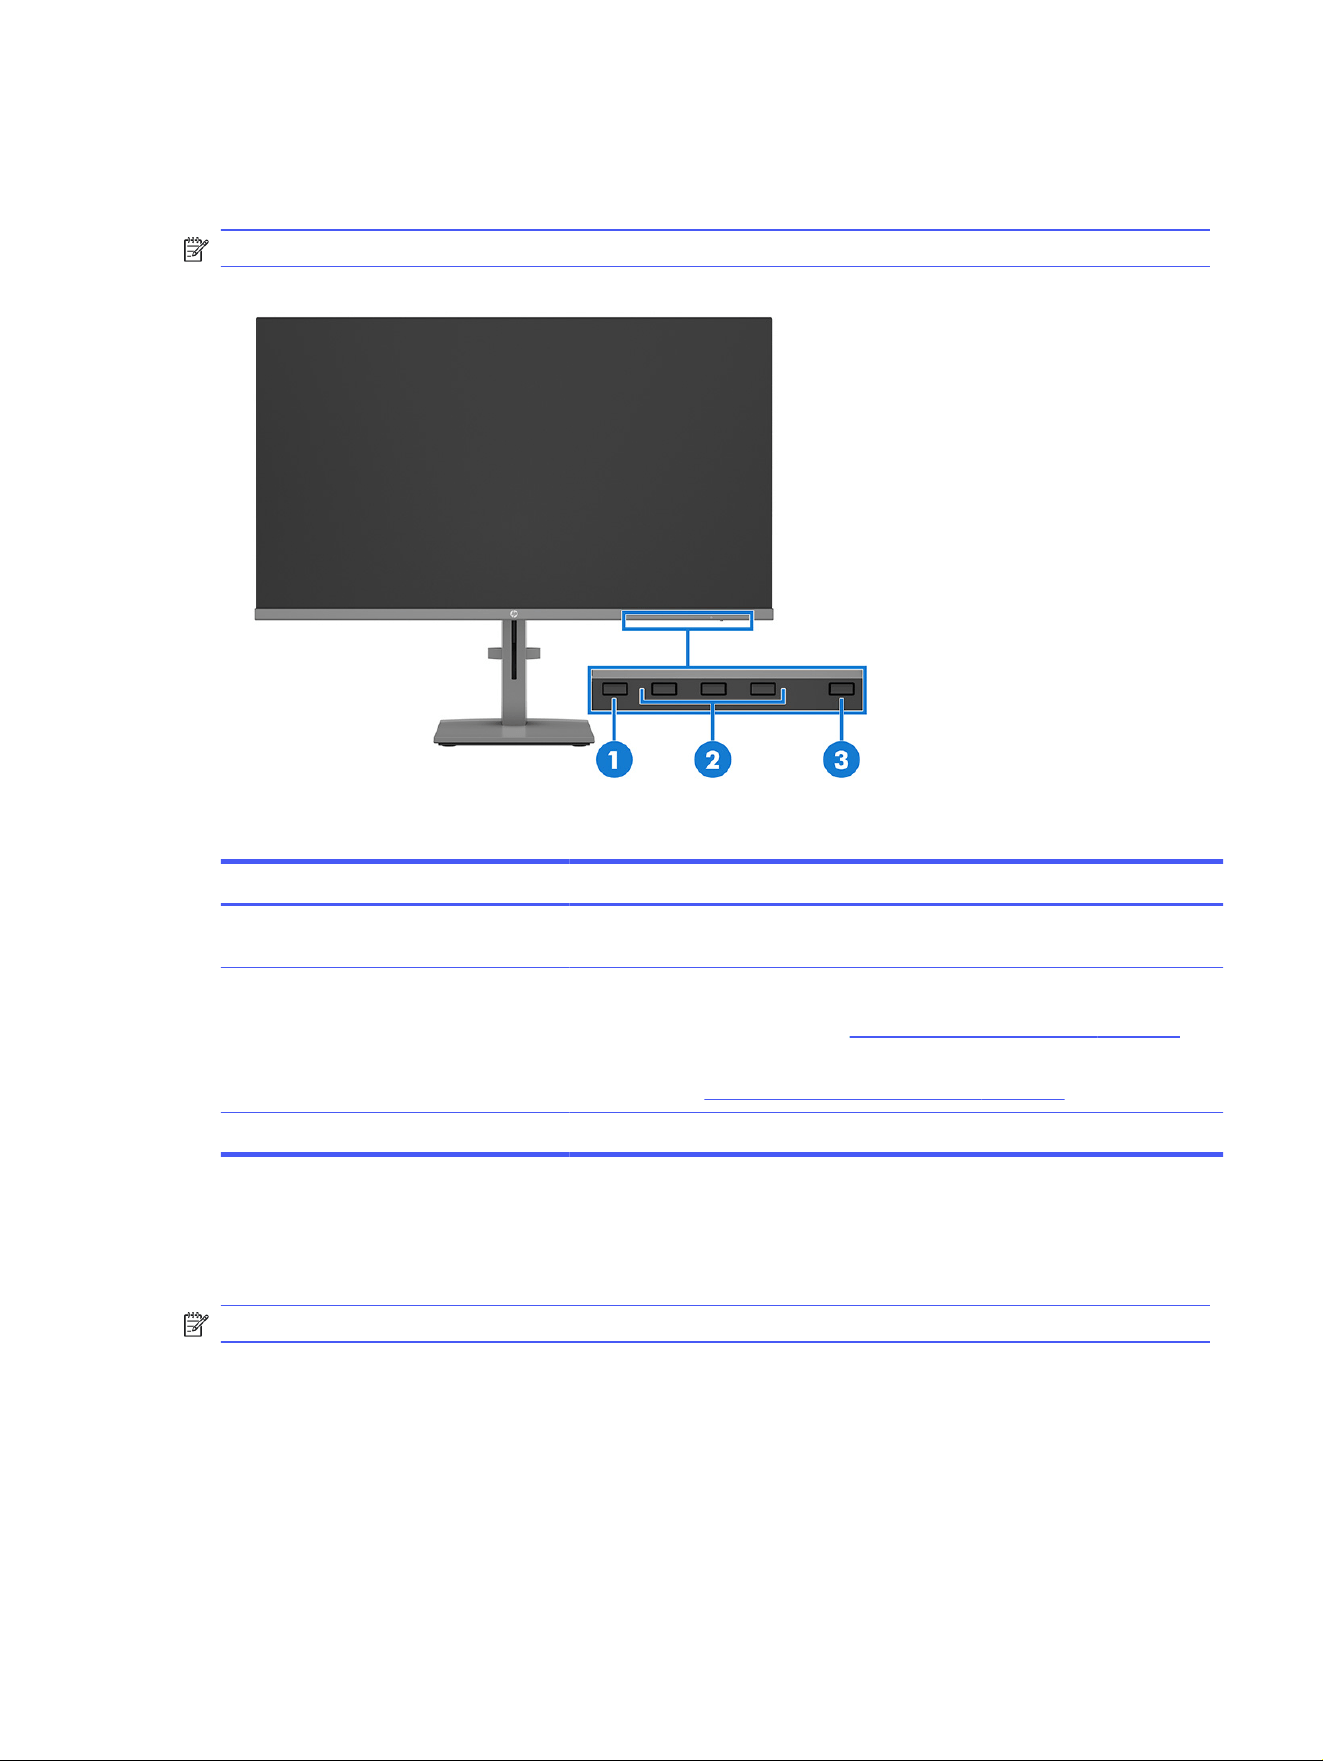
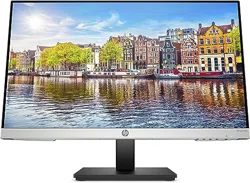
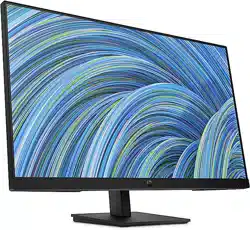
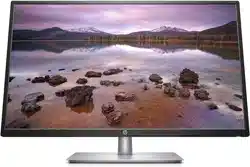
Front components
To identify the components on the front of the monitor, use these illustrations and tables.
NOTE: Refer to the illustration that best matches your monitor.
Table 2-2 Front components and their descriptions
Component Description
(1) Menu button Opens the OSD main menu, selects a menu item from the OSD, or closes the OSD
menu.
(2) On-screen display buttons
(assignable)
When the on-screen display menu is open, press the buttons to navigate through
the menu. The function light icons indicate the default button functions. For a
description of these functions, see Using the OSD function buttons on page 15.
You can reassign the function buttons to quickly select the most commonly used
operations. See Reassigning the OSD menu options on page 16.
(3) Power button Turns the monitor on or off.
Rear components
To identify the components on the rear of the monitors, use these illustrations and tables.
NOTE: Refer to the illustration that best matches your monitor.
Front components
5
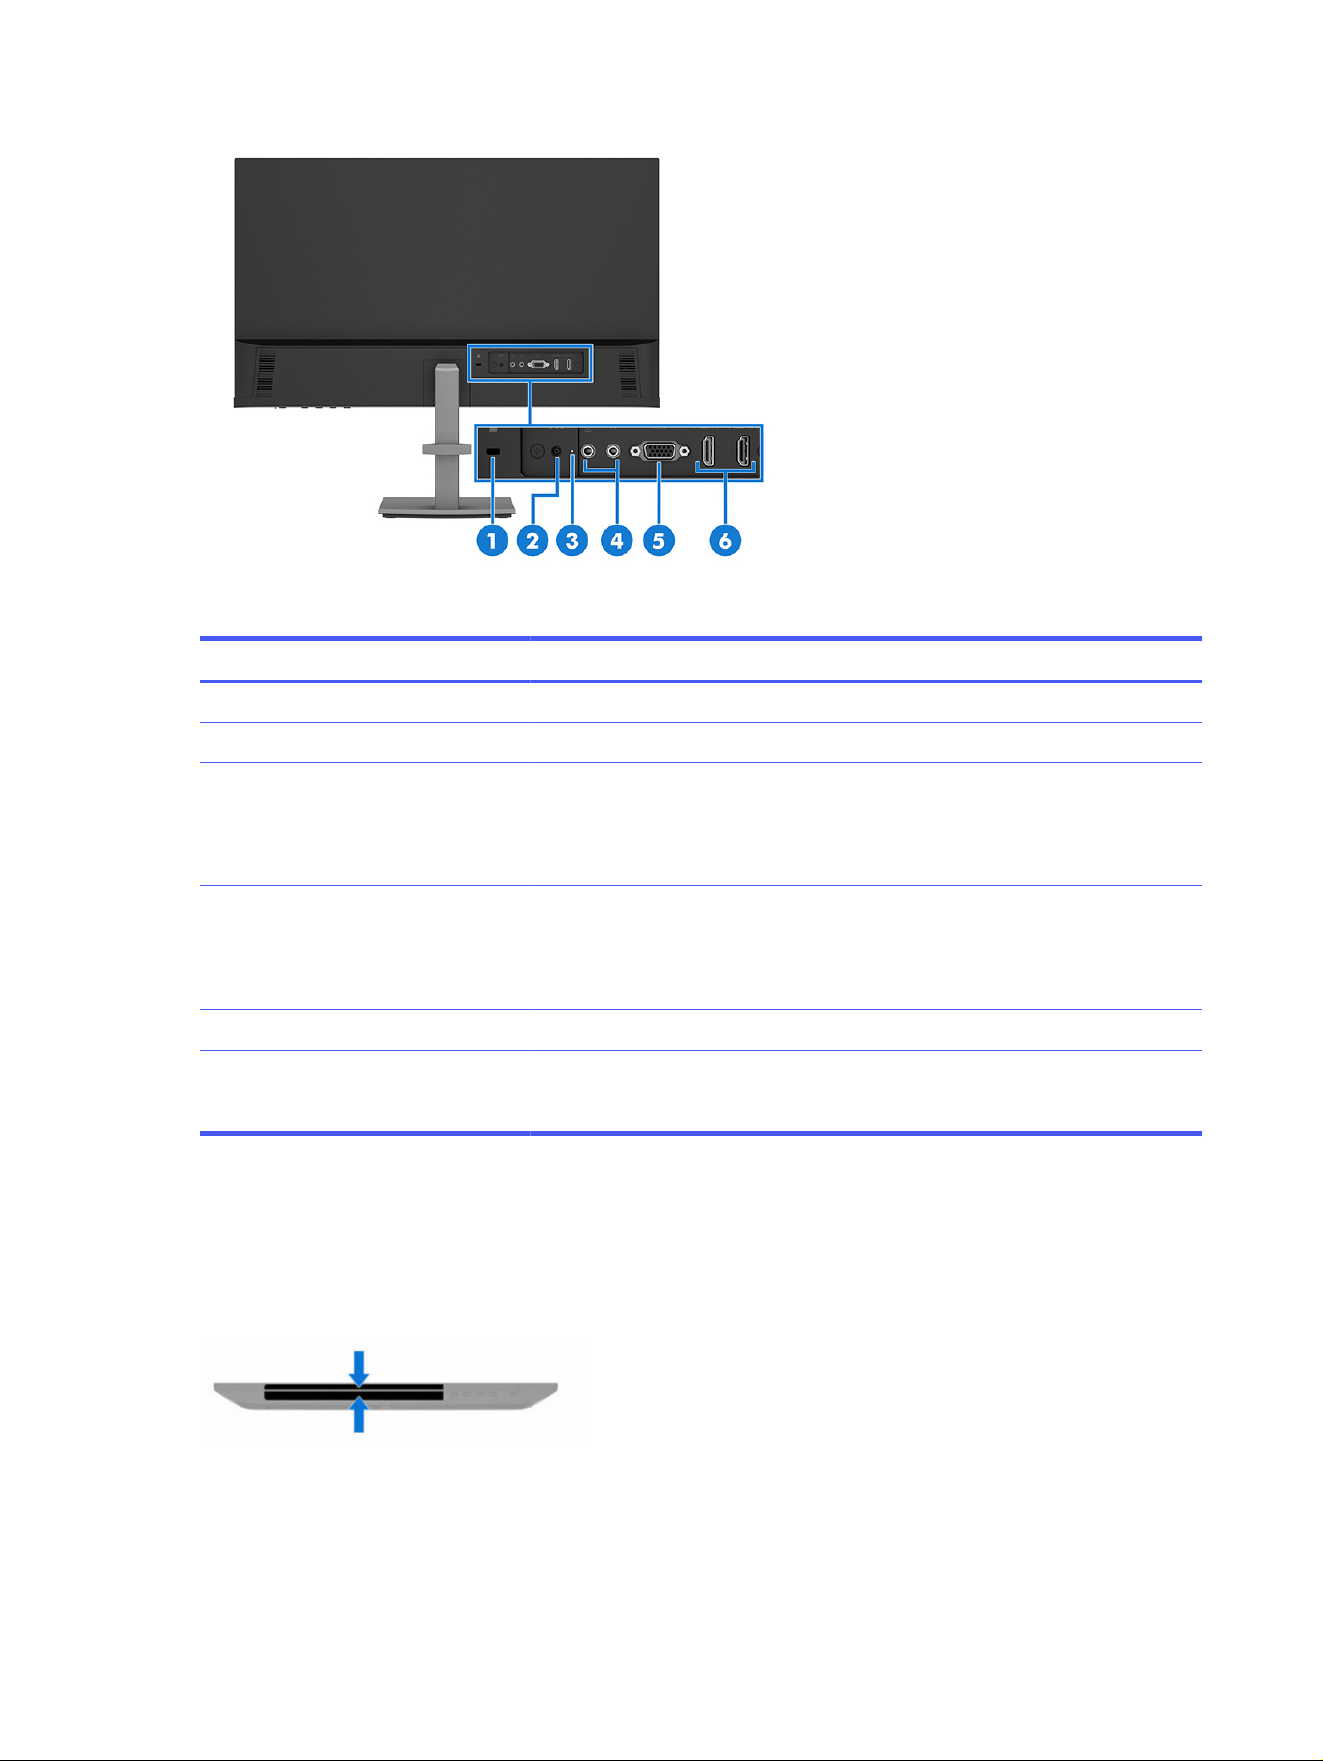
Table 2-3 Rear components and their descriptions
Component Description
(1) Security cable slot Connects an optional security cable.
(2) Power connector Connects a power cord.
(3) Power light On/White: The monitor is on.
On/Amber: The monitor is in a reduced power state because of inactivity.
Off: the monitor is off.
(4) Audio-in jack and Audio-
in (microphone)/Audio-out
(headphone) combo jack
(select products only)
The audio-in jack connects optional powered audio devices.
The combo jack connects optional powered stereo speakers, headphones, earbuds,
a headset, or a television audio cable. Also connects an optional headset
microphone. This jack does not support optional standalone microphones.
(5) VGA port Connects a VGA cable to a source device such as a computer or game console.
(6) HDMI port Connects the HDMI cable to a source device such as a computer.
NOTE: There might be 2 HDMI ports on select models.
Locating the serial number and product number
Depending on the product, the serial number and product number are located on a label on the rear of
the monitor or on a label under the front bezel of the monitor head. You might need these numbers when
you contact HP for support.
6
Chapter 2 Getting started
Setting up the monitor
This section describes attaching the monitor stand or wall mount and the options for connecting your
monitor to a PC, notebook, gaming console, or similar device.
WARNING! To reduce the risk of serious injury, read the
Safety & Comfort Guide
. It describes proper
workstation setup and proper posture, health, and work habits for computer users. The
Safety &
Comfort Guide
also provides important electrical and mechanical safety information. The
Safety &
Comfort Guide
is available on the web at http://www.hp.com/ergo.
IMPORTANT: To prevent damage to the monitor, do not touch the surface of the LCD panel. Pressure
on the panel can cause nonuniformity of color or disorientation of the liquid crystals. If this occurs, the
screen will not recover to its normal condition.
IMPORTANT: To prevent the screen from getting scratched, defaced, or broken and to prevent
damage to the control buttons, position the monitor facedown on a flat surface covered with protective
sheet foam or a nonabrasive cloth.
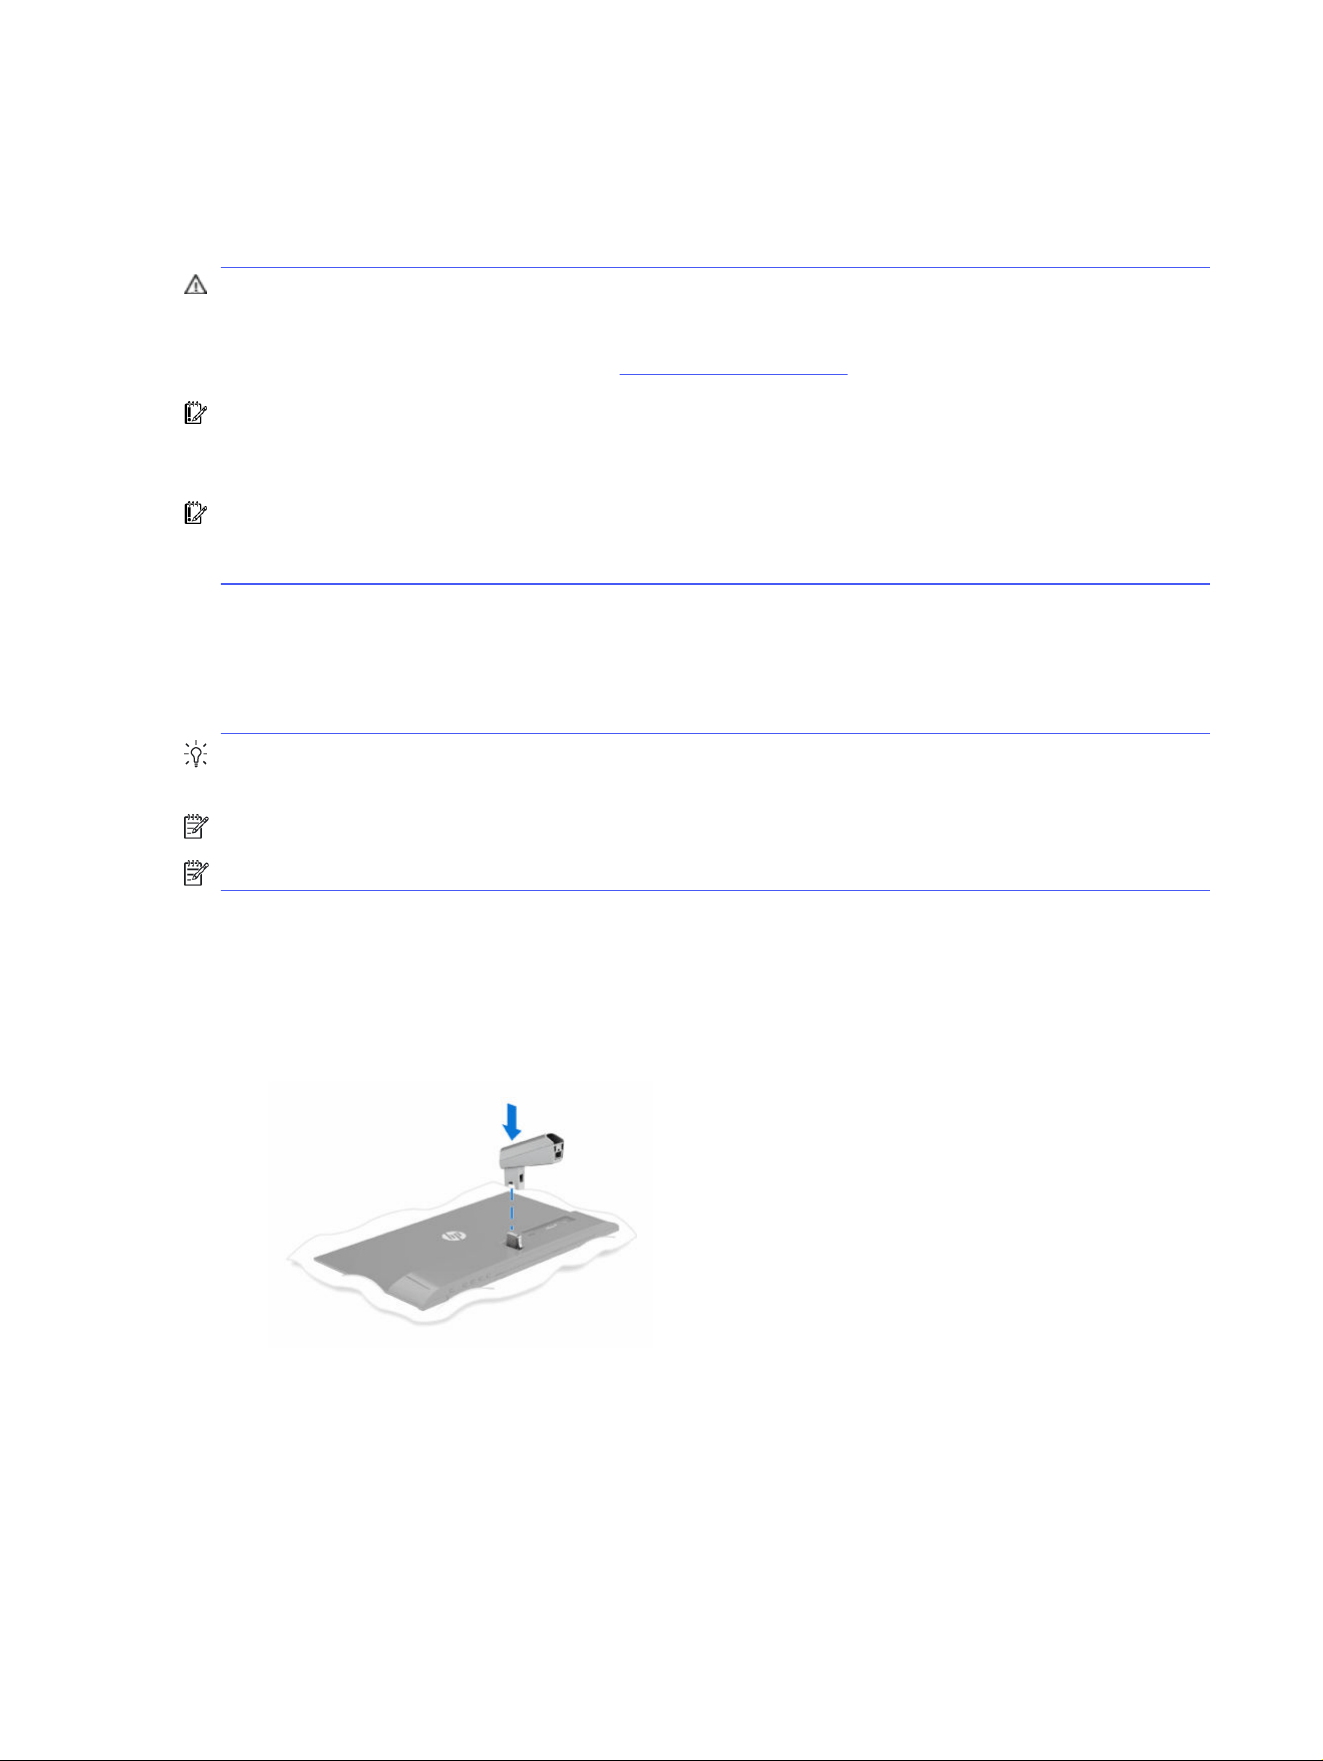
Attaching the fixed monitor stand (flat screen monitor)
Correctly attaching your monitor stand is critical for safe use. This section describes how to safely
attach a stand.
TIP: Consider the placement of the monitor, because surrounding light and bright surfaces might
cause interfering reflections.
NOTE: The procedures for attaching a monitor stand might be different on other models.
NOTE: Leave the monitor in the box to protect the screen.
1. Open the box so that the monitor head is facedown in the box.
2. Remove the protective covering from the monitor.
3. Position the monitor stand on the mounting plate on the rear of the monitor, and then snap the
monitor stand into place.
Setting up the monitor
7
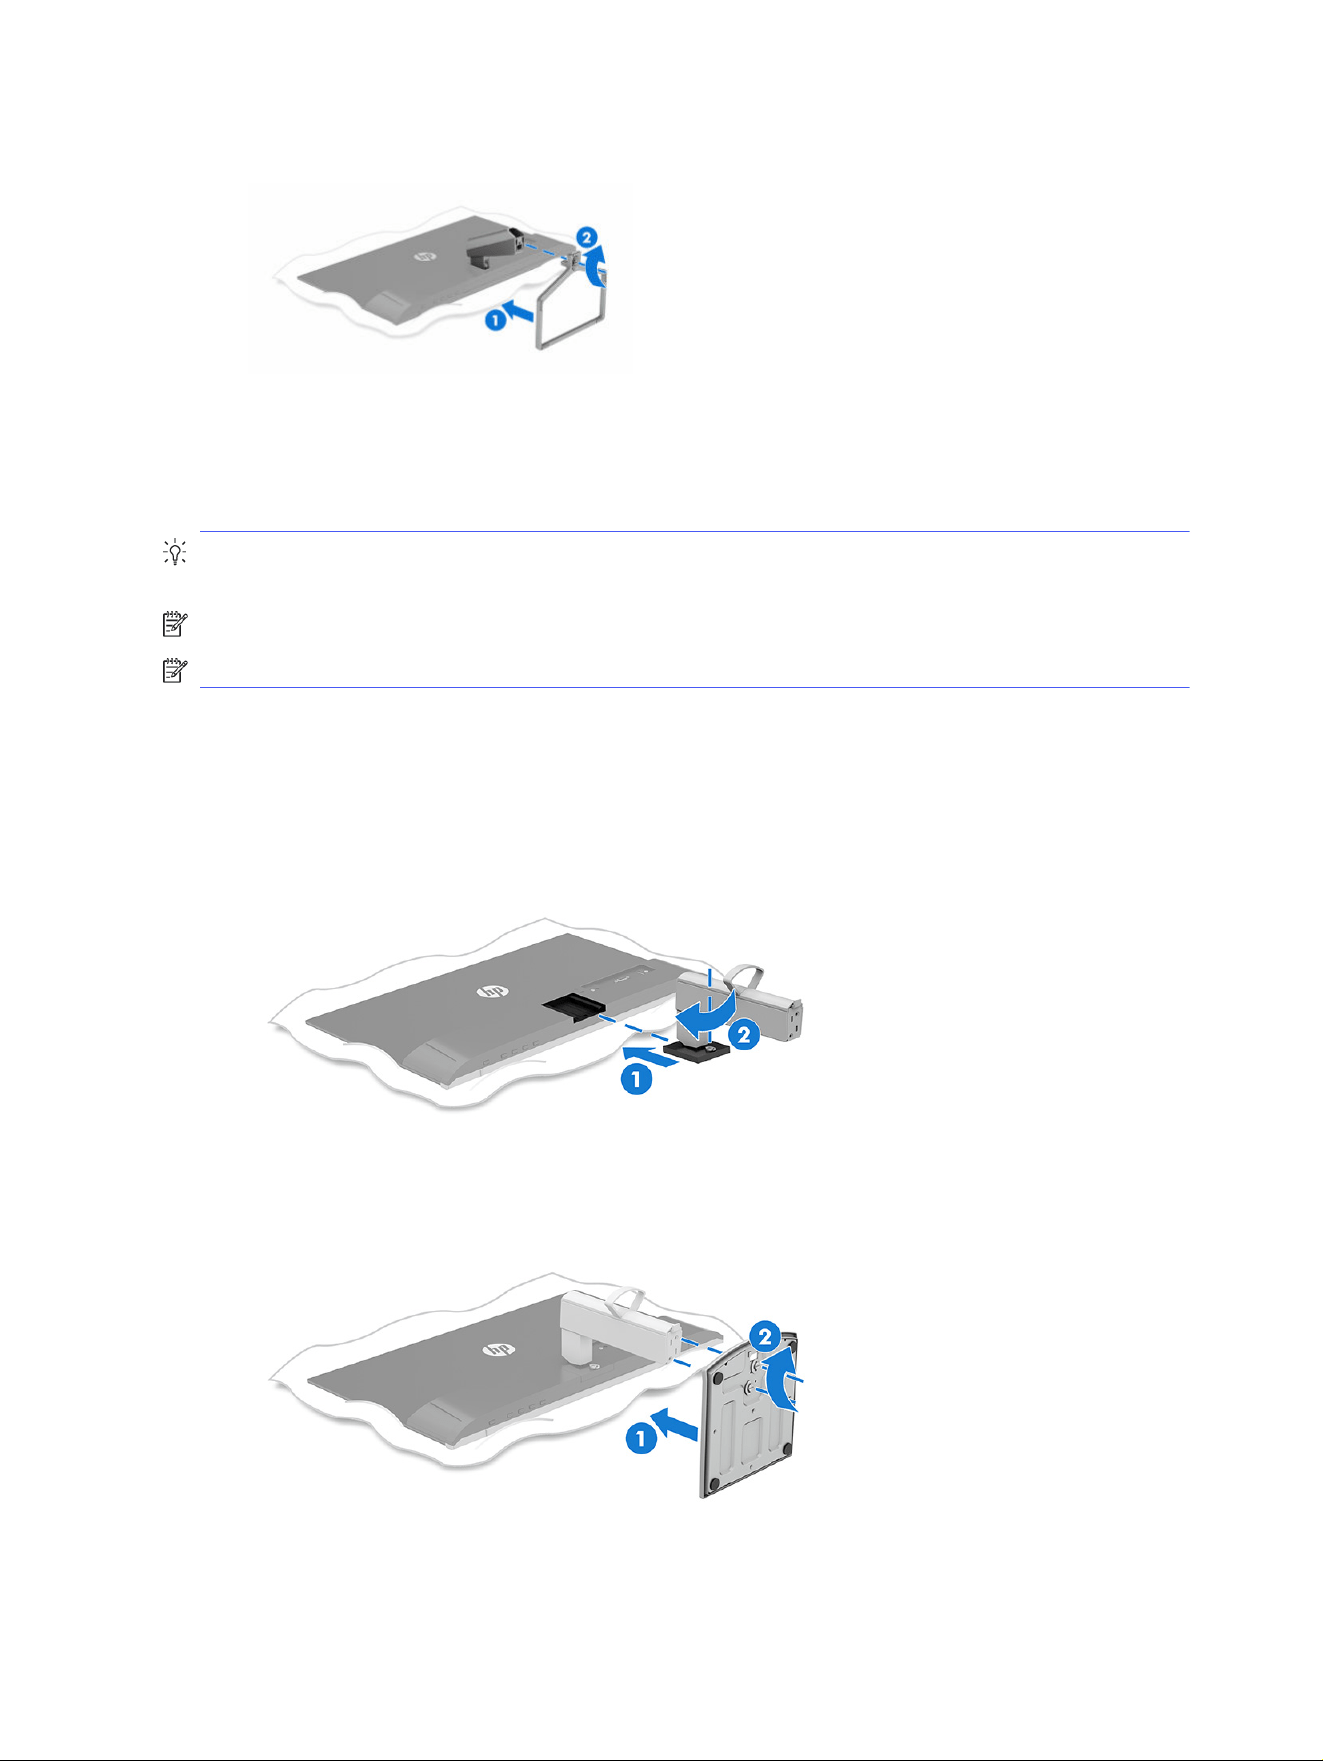
4. Attach the base to the monitor stand (1), and then tighten the screws (2).
Attaching the height-adjustable monitor stand (flat screen monitor)
Correctly attaching your monitor stand is critical for safe use. This section describes how to safely
attach a stand.
TIP: Consider the placement of the monitor, because surrounding light and bright surfaces might
cause interfering reflections.
NOTE: The procedures for attaching a monitor stand might be different on other models.
NOTE: Leave the monitor in the box to protect the screen.
1. Open the box so that the monitor head is facedown in the box.
2. Remove the protective covering from the monitor.
3. Position the monitor stand on the mounting plate on the rear of the monitor (1), snap the monitor
stand into place, and then tighten the screw (2).
4. Attach the base to the monitor stand (1), and then tighten the screws (2).
8
Chapter 2 Getting started
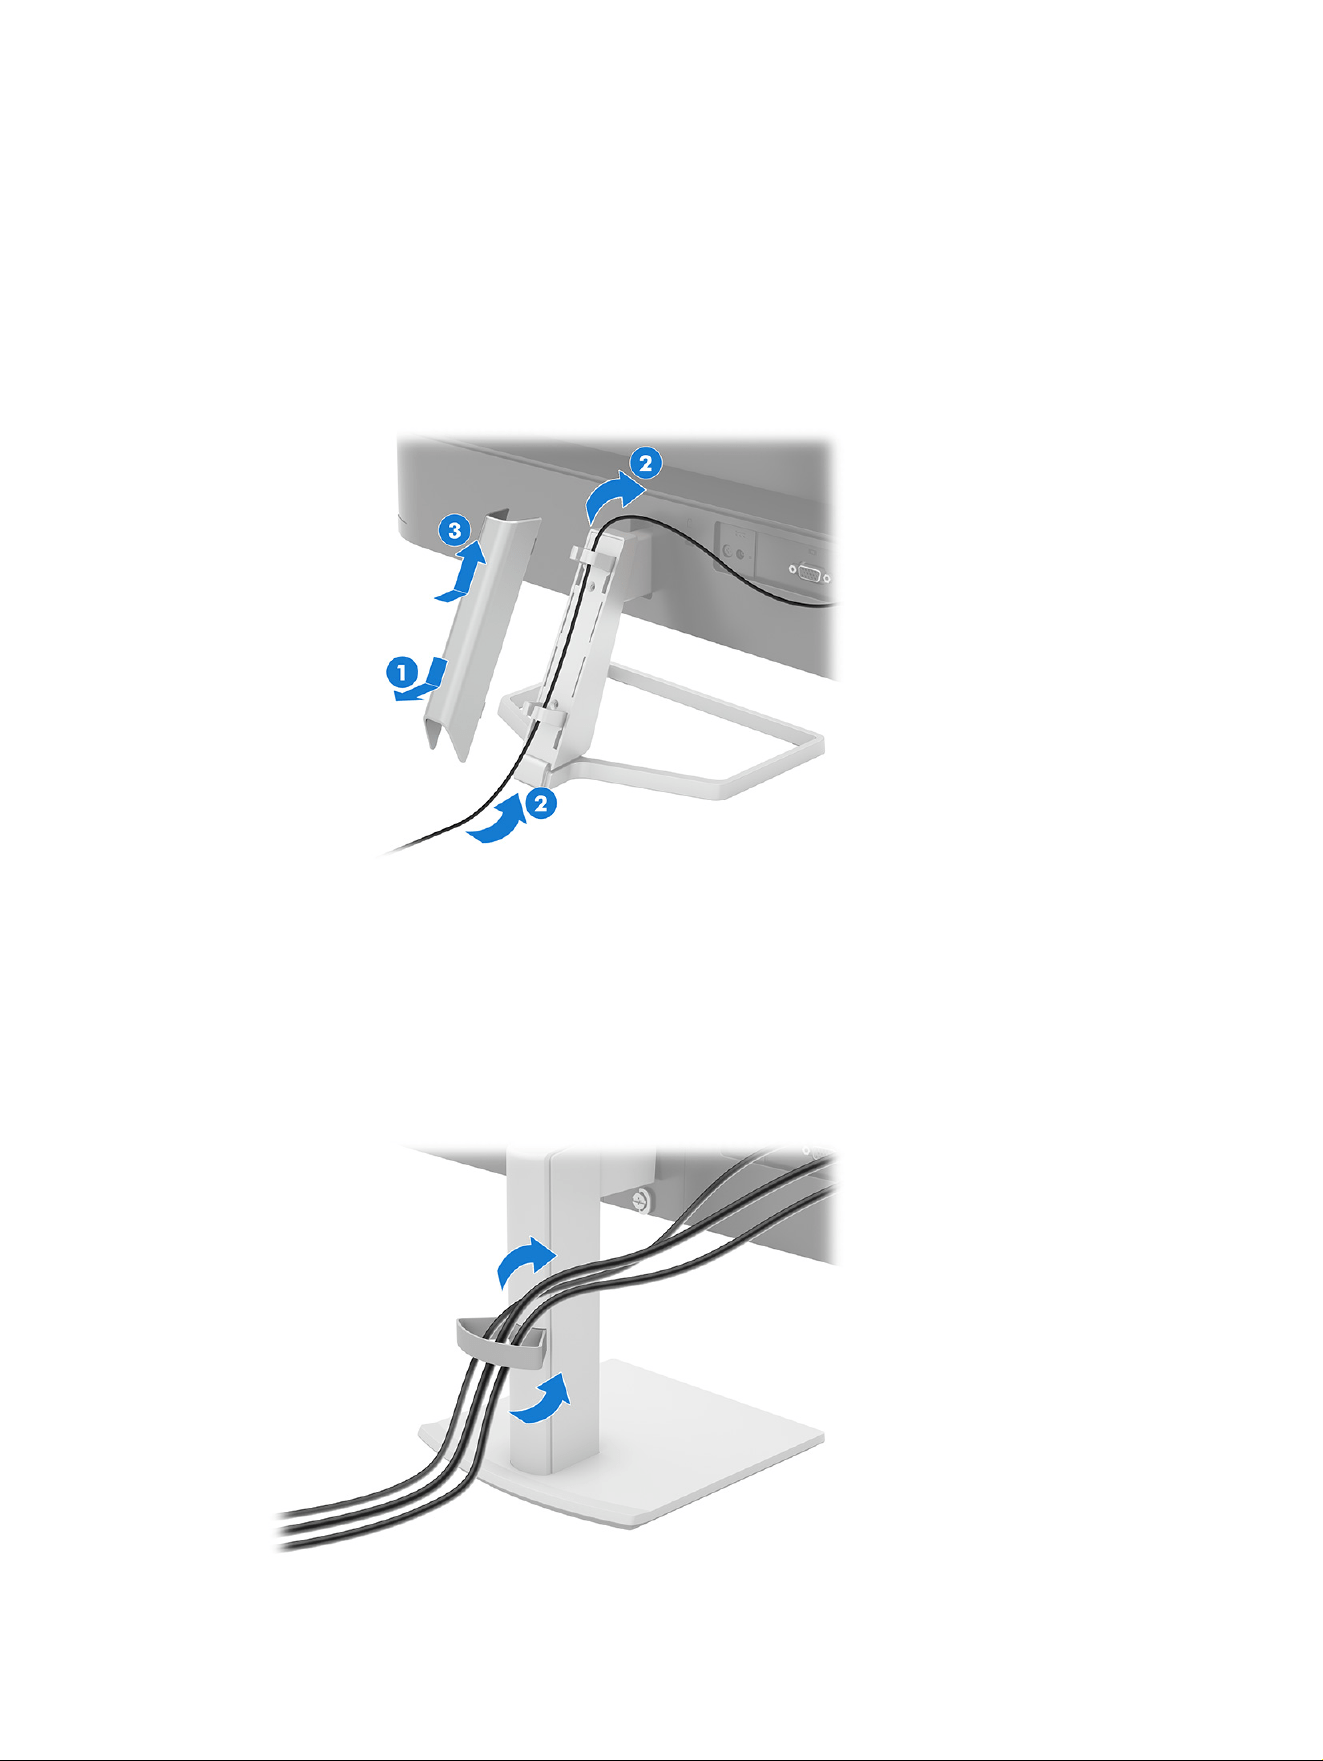
Routing the cables for a fixed-height stand
The monitor stand includes a cable management feature that you can use to organize your monitor
cables.
1. Remove the cable cover from the monitor stand (1).
2. Route any cables that you want to organize through the stand and connect them to the appropriate
connectors on the rear of the monitor (2).
3. Replace the cable cover (3).
Routing the cables for an adjustable-height stand
The monitor stand includes a cable management feature that you can use to organize your monitor
cables.
1. Place the monitor in a convenient, well-ventilated location near the computer.
2. Before connecting the cables, route the cables through the cable routing holder in the center of the
stand.
Routing the cables for a fixed-height stand
9
Connecting the cables
In addition to details about how to connect a cable, this section contains information about how your
monitor functions when you connect certain cables.
NOTE: Depending on the model, the monitor might be capable of supporting HDMI or VGA inputs. The
video mode is determined by the video cable used. The monitor automatically determines which inputs
have valid video signals. You can select the inputs through the OSD menu. The monitor ships with
select cables. Not all cables shown in this section are included with the monitor.
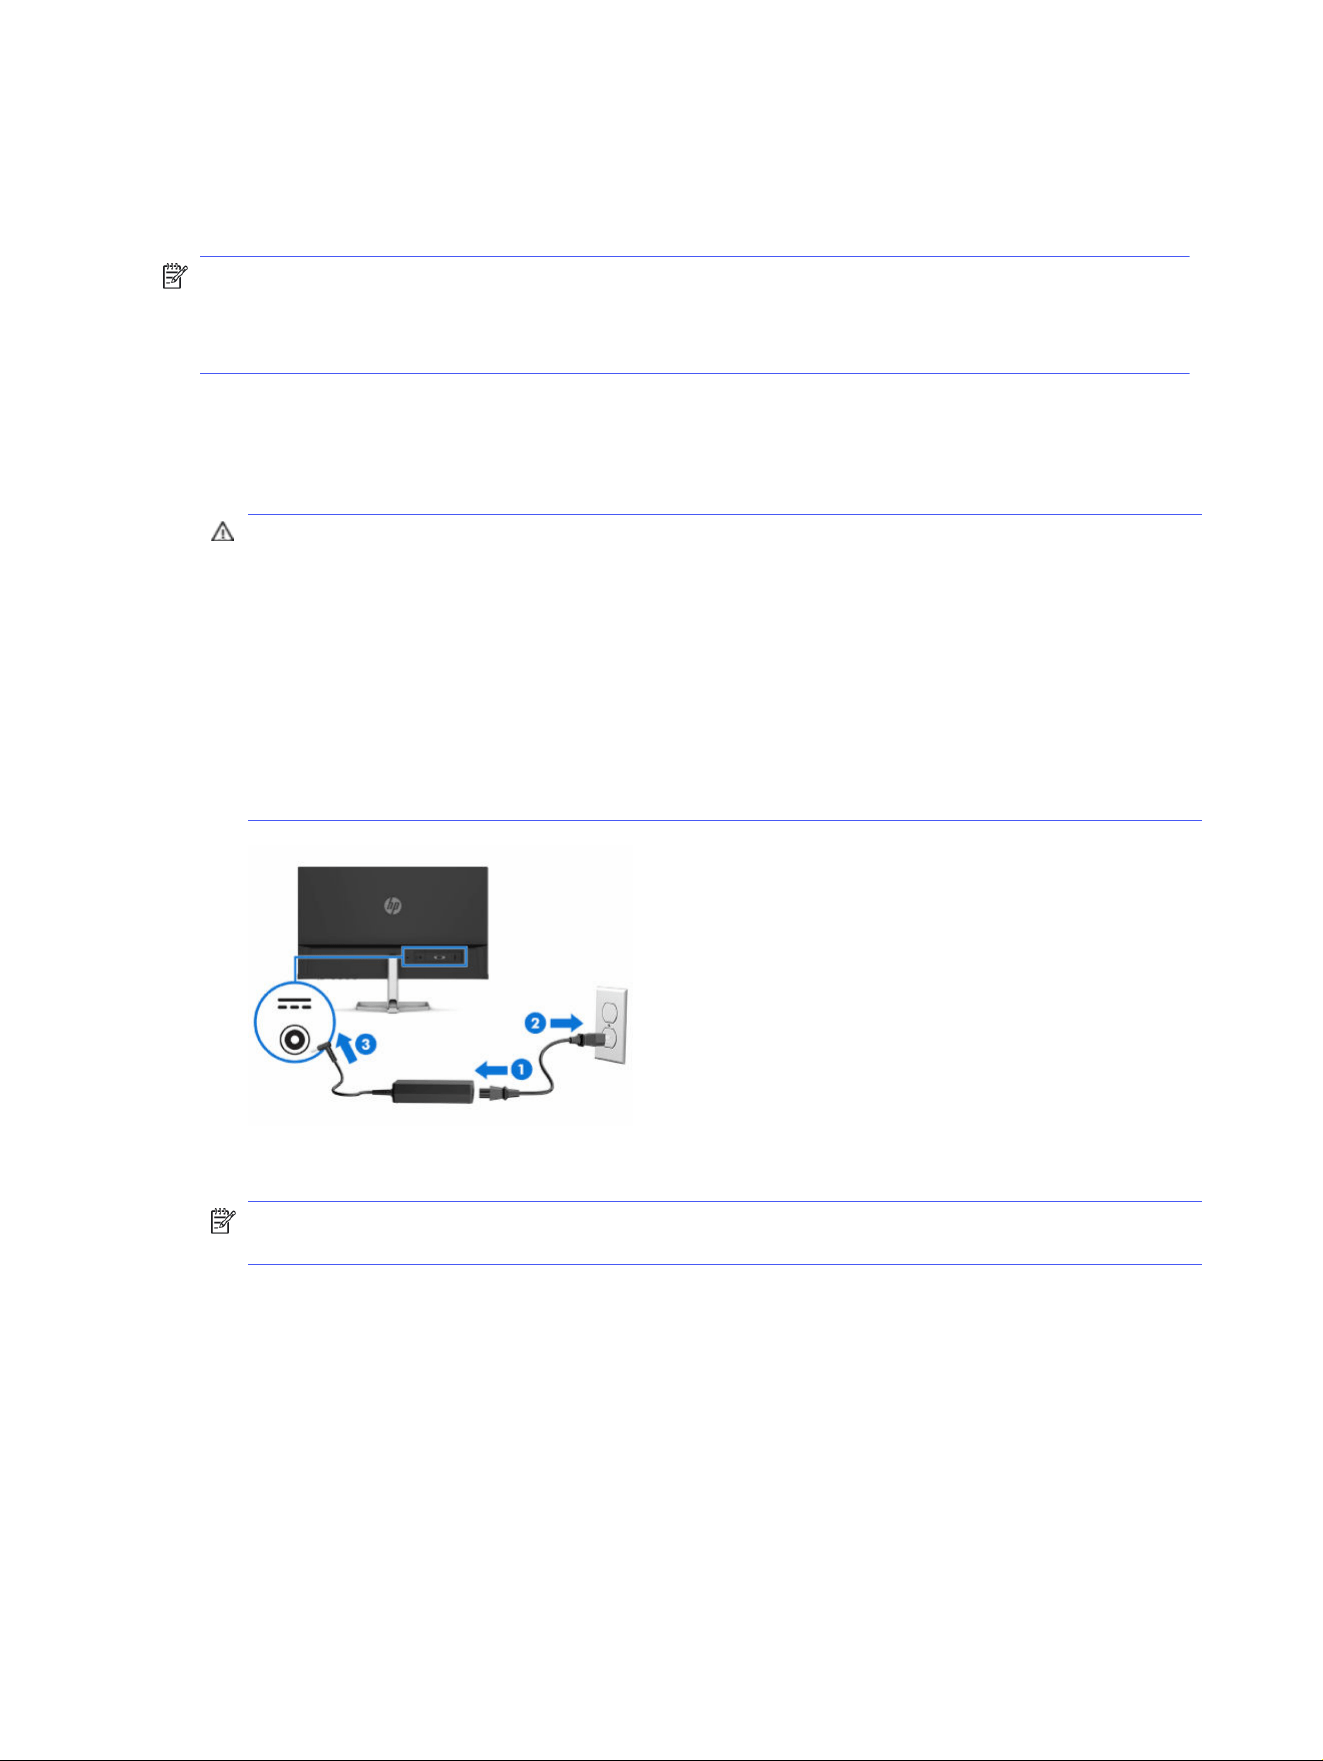
1. Place the monitor in a convenient, well-ventilated location near the computer.
2. Connect one end of the power cord to the AC adapter (1) and the other end to a grounded AC outlet
(2). Then connect the AC adapter to the power connector on the monitor (3).
WARNING! To reduce the risk of electric shock or damage to the equipment:
● Do not disable the power cord grounding plug. The grounding plug is an important safety
feature.
● Plug the power cord into a grounded (earthed) AC outlet that is easily accessible at all times.
● Disconnect power from the equipment by unplugging the power cord from the AC outlet.
For your safety, do not place anything on power cords or cables. Arrange them so that no one can
accidentally step on or trip over them. Do not pull on a cord or cable. When unplugging the power
cord from the AC outlet, grasp the cord by the plug.
3. Connect a video cable.
NOTE: The monitor automatically determines which inputs have valid video signals. To select any
input, open the OSD menu and select Input.
● Connect one end of an HDMI cable to the HDMI port on the rear of the monitor and the other
end to the HDMI port on the source device.
10
Chapter 2 Getting started
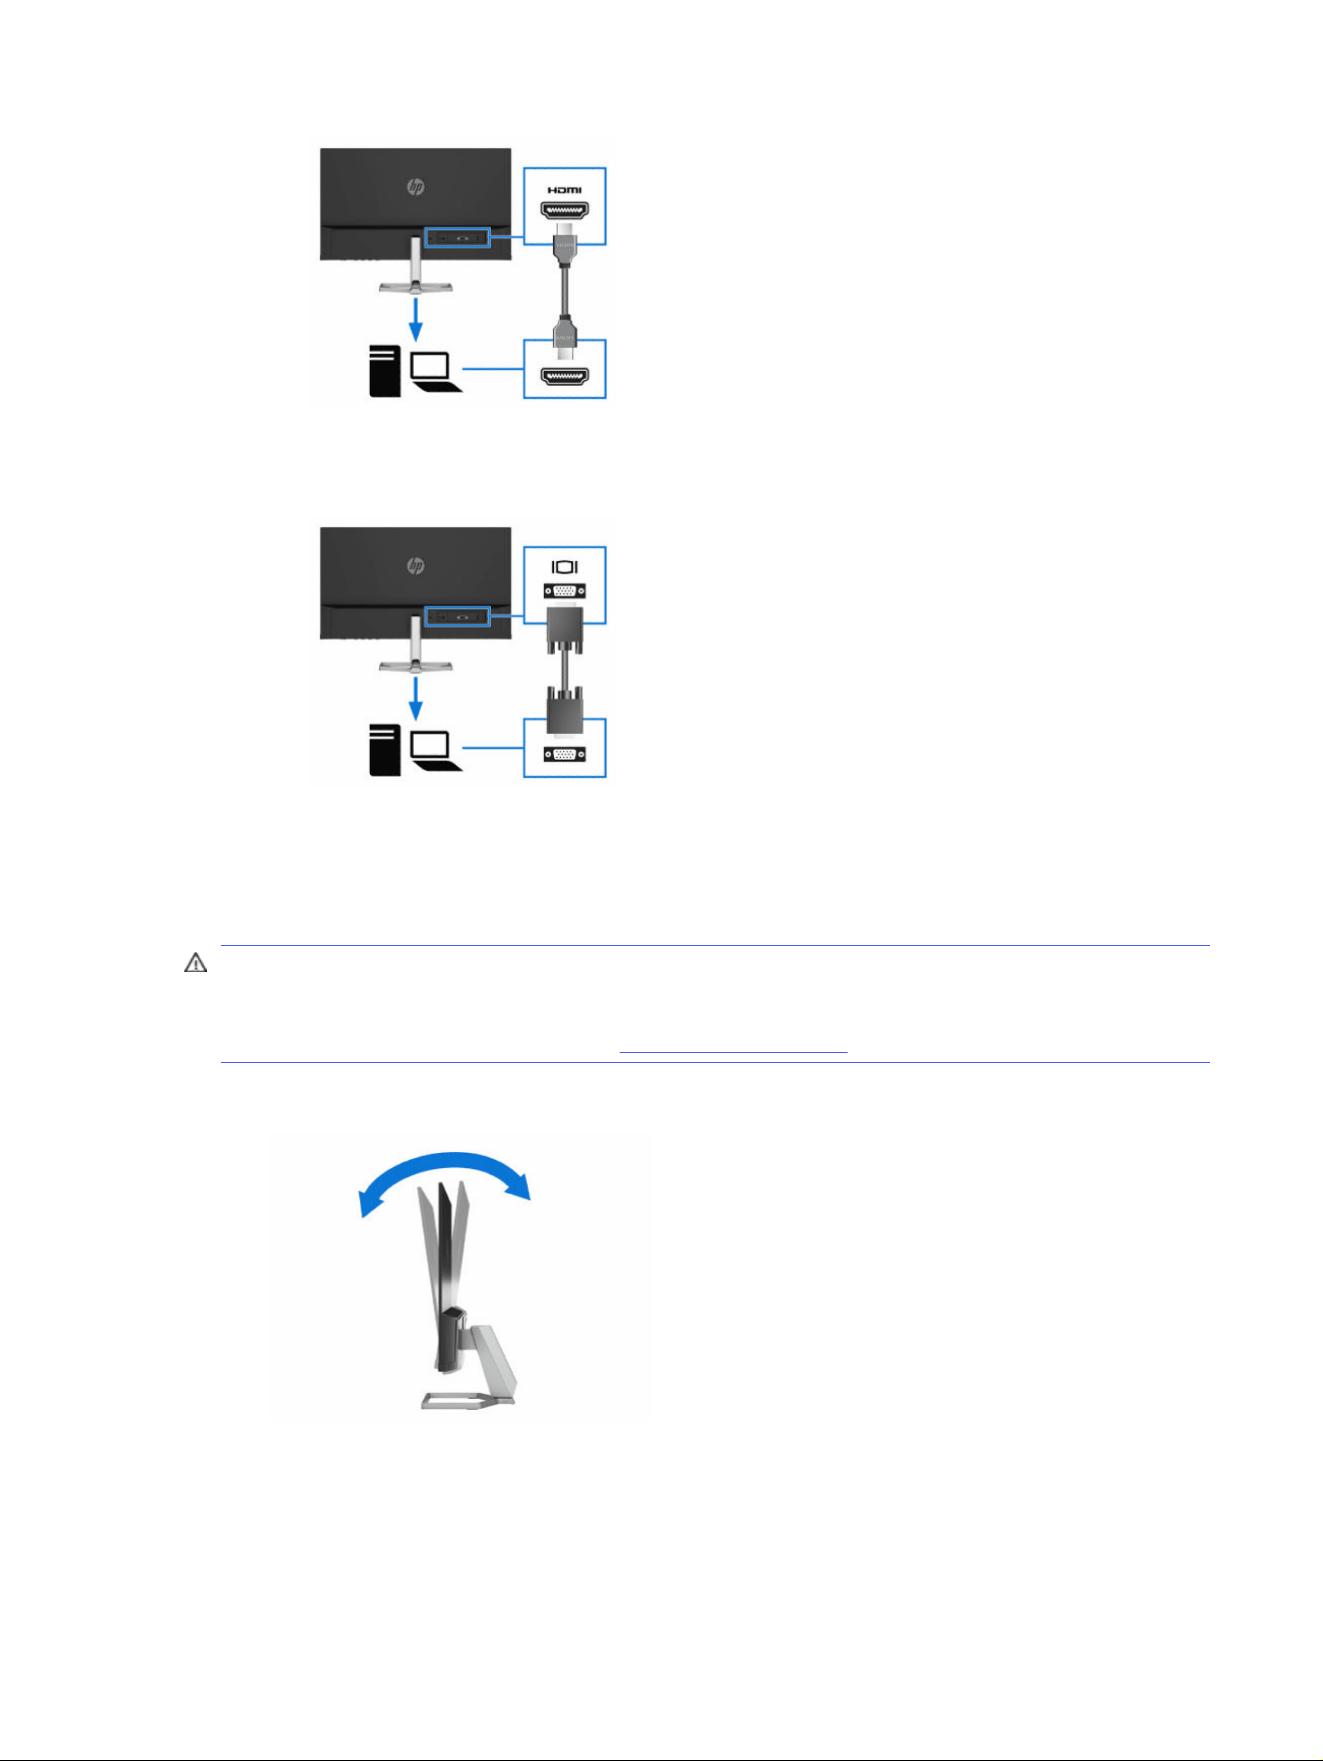
● Connect one end of a VGA cable to the VGA port on the rear of the monitor and the other end to
the VGA port on the source device.
Adjusting the monitor
To support an ergonomic work space, your monitor offers the adjustment options outlined in this
section.
WARNING! To reduce the risk of serious injury, read the
Safety & Comfort Guide
. It describes proper
workstation setup and proper posture, health, and work habits for computer users. The
Safety &
Comfort Guide
also provides important electrical and mechanical safety information. The
Safety &
Comfort Guide
is available on the web at http://www.hp.com/ergo.
1. Tilt the monitor head forward or backward to set it to a comfortable eye level.
2. Adjust the monitor’s height to a comfortable position for your individual workstation. The monitor’s
top bezel edge should not exceed a height that is parallel to your eye height. A monitor that is
Adjusting the monitor
11
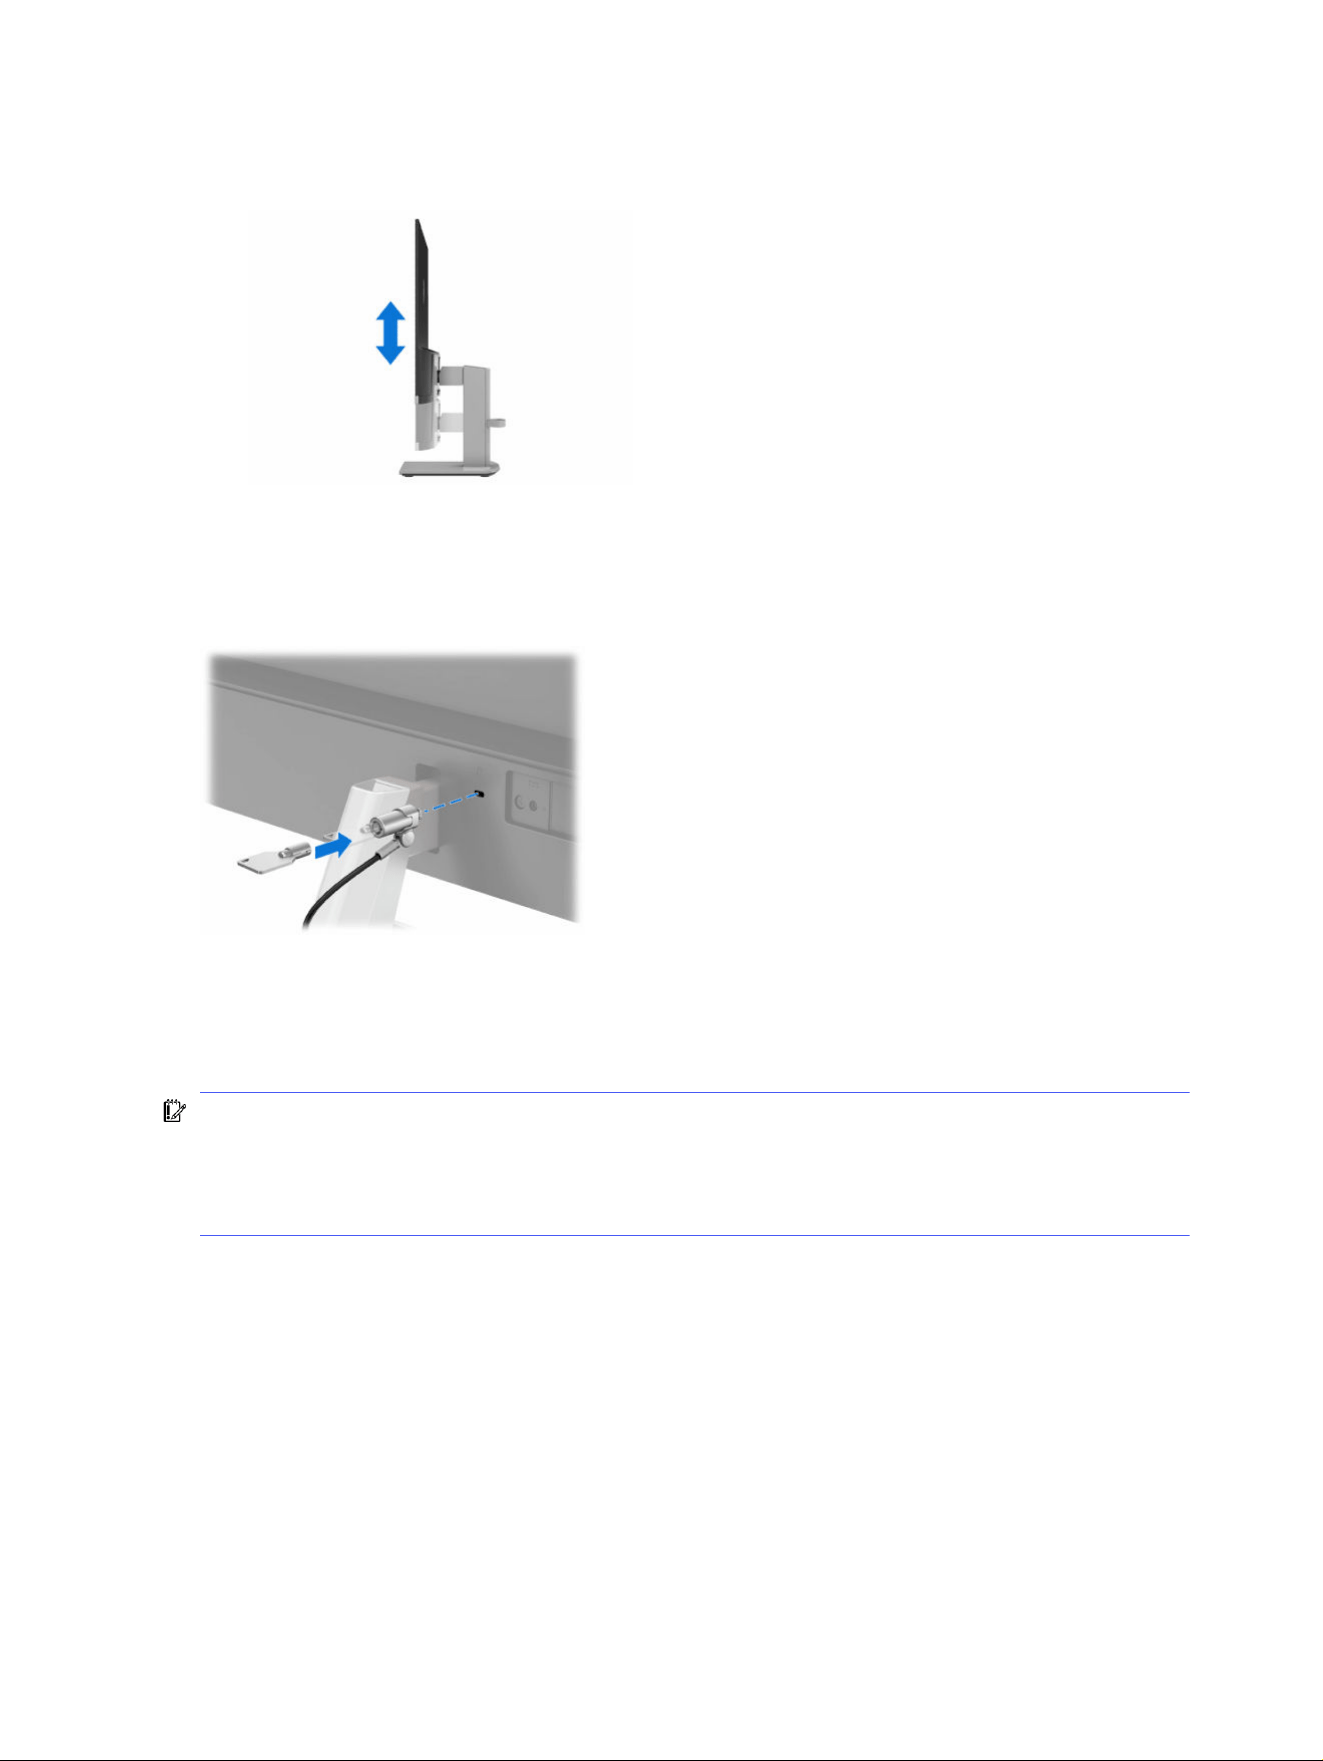
positioned low and reclined might be more comfortable for users with corrective lenses. Reposition
your monitor as you adjust your working posture throughout the work day.
Installing a security cable
As a security measure, you can secure the monitor to a fixed object with an optional security cable
available from HP. Use the key that came with the optional security cable to attach and remove the lock.
Turning on the monitor
This section provides important information about preventing damage to your monitor, startup
indicators, and troubleshooting information.
IMPORTANT: Burn-in image damage might occur on monitors that display the same static image on
the screen for 12 or more hours. To avoid burn-in image damage, you should always activate a screen
saver application or turn off the monitor when it will not be in use for a prolonged period of time. Image
retention is a condition that might occur on all LCD screens. Burn-in damage on the monitor is not
covered under the HP warranty.
Press the power button on the monitor to turn it on.
12
Chapter 2 Getting started

NOTE: When the monitor is on, if pressing the power button has no effect, the Power Button Lockout
feature might be enabled. To disable this feature, press and hold the monitor power button for
10 seconds.
When you first turn on your monitor, a monitor status message is displayed for 5 seconds. The message
shows which input is the current active signal, the status of the auto-switch source setting (On or
Off; default setting is On), the current preset display resolution, and the recommended preset display
resolution.
The monitor automatically scans the signal inputs for an active input and uses that input for the display.
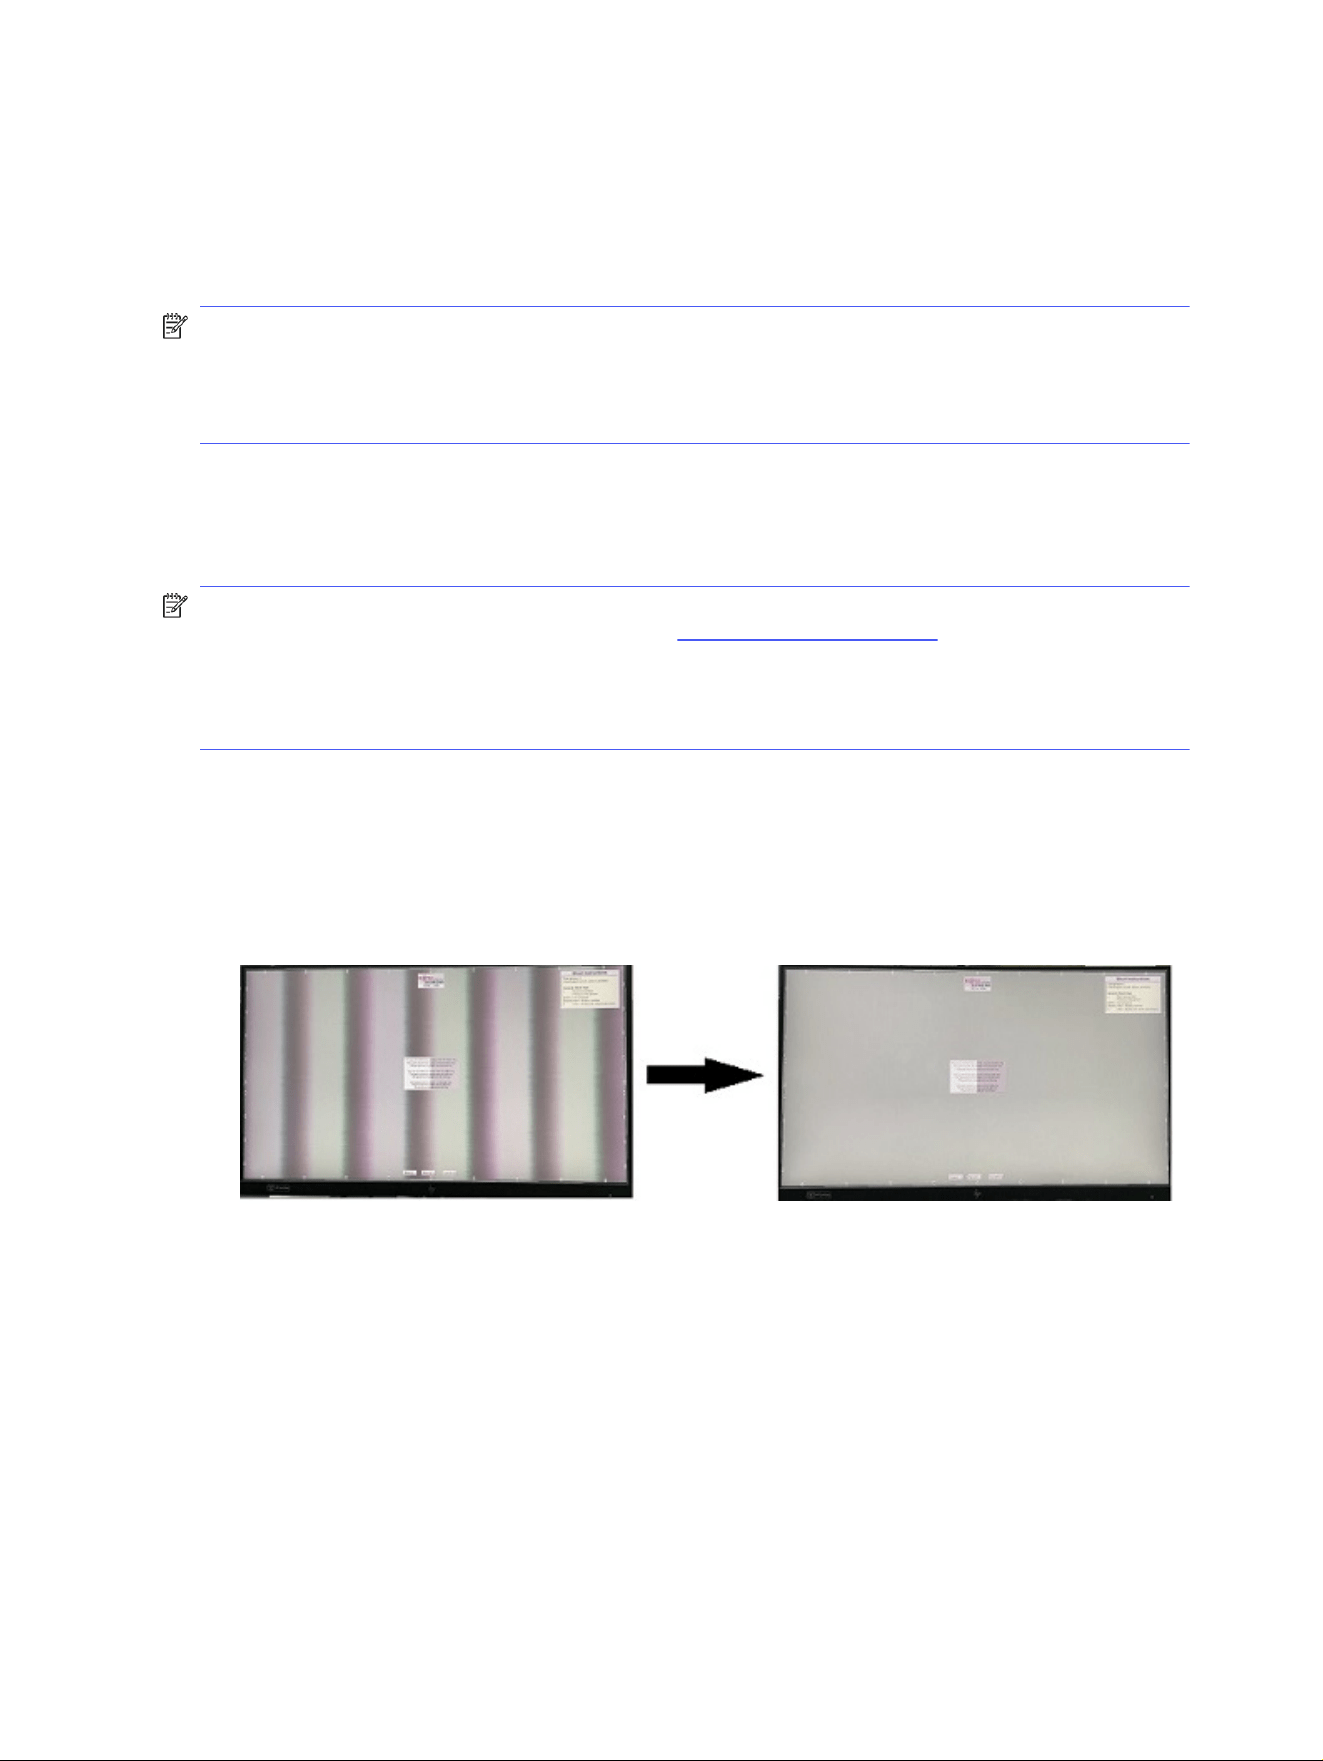
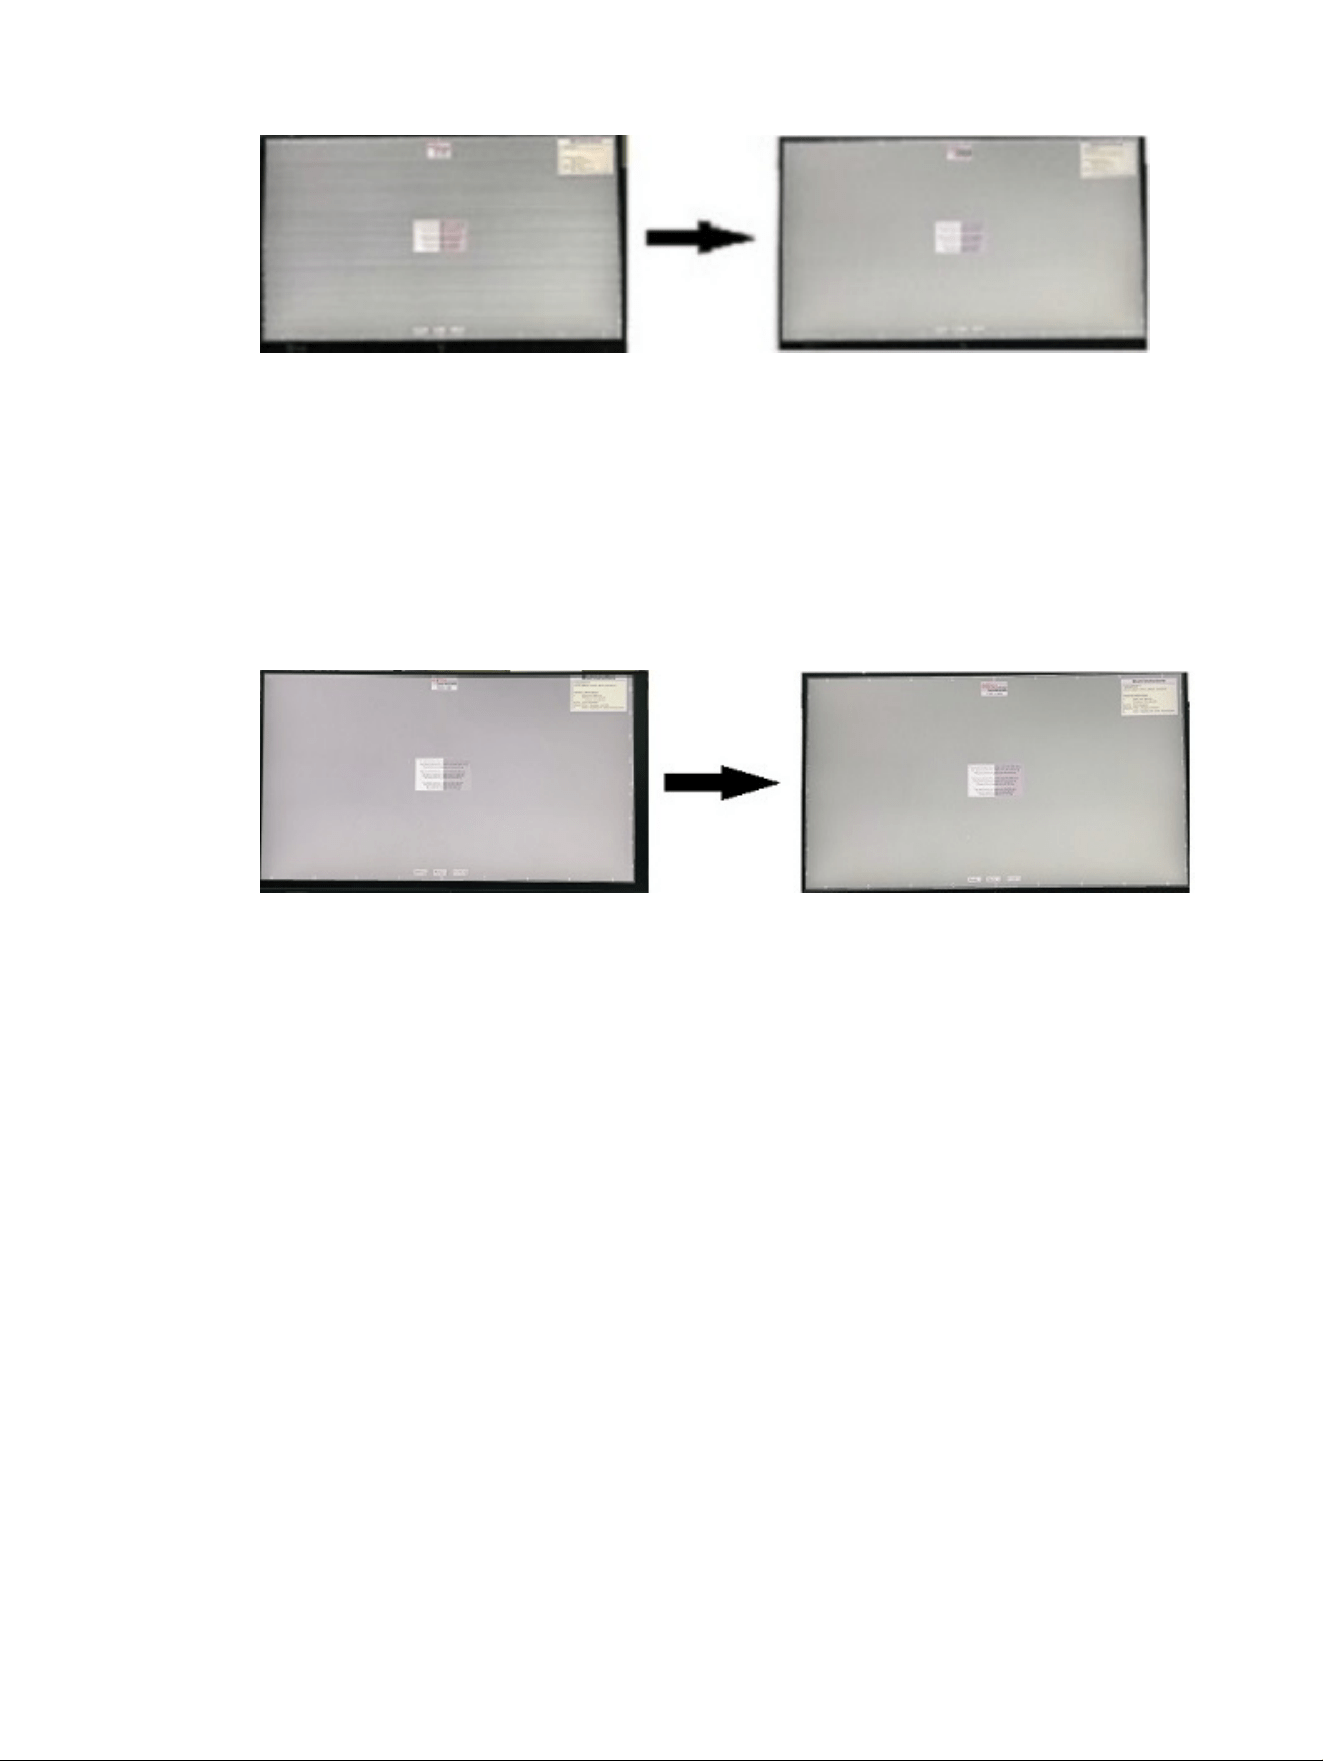
HP watermark and image retention policy
Some monitors are designed with In-Plane Switching (IPS) display technology, which provides ultrawide
viewing angles and advanced image quality. Though suitable for many applications, this panel
technology is not suitable for static, stationary, or fixed images for long periods of time, unless you
use screen savers.
Applications with static images can include camera surveillance, video games, marketing logos, and
templates. Static images can cause image retention damage that could look like stains or watermarks
on the monitor's screen.
Image retention damage on monitors that are in use 24 hours per day is not covered under the HP
warranty. To avoid image retention damage, always turn off the monitor when it is not in use, or use the
power management setting, if supported on your computer, to turn off the monitor when the computer is
idle.
HP watermark and image retention policy
13

Using the monitor3
This chapter describes how to use your monitor and its features, including software and utilities, the
OSD menu, the function buttons, power modes, and Windows Hello.
Downloading software and utilities
You can download and install these files from HP Support.
● INF (Information) file
● ICM (Image Color Matching file <model name>.icm)
To download the files:
1. Go to http://www.hp.com/support.
2. Select Software and Drivers.
3. Select your product type.
4. Enter your HP monitor model in the search field and follow the on-screen instructions. The .inf
and .icm files are included in the SoftPaq.
Downloading HP Display Center
You can download and install the HP Display Center software from the Microsoft store.
1. Select the Microsoft Store app on your desktop or type Microsoft Store in the taskbar search
box.
2. Type HP Display Center in the Microsoft Store search box.
3. Follow the on-screen instructions.
The tool downloads to the selected location.
The Information (INF) file
The INF file defines monitor resources used by Windows operating systems to ensure monitor
compatibility with the computer’s graphics adapter.
This monitor is Plug and Play compatible, and the monitor will work correctly without installing the INF
file. Monitor Plug and Play compatibility requires that the computer’s graphics card is VESA® DDC2
compliant and that the monitor connects directly to the graphics card. Plug and Play does not work
through separate BNC-type connectors or through distribution buffers, boxes, or both.
14
Chapter 3 Using the monitor

The Image Color Matching (ICM) file
The ICM files are data files that are used in conjunction with graphics programs to provide consistent
color matching from monitor screen to printer, or from scanner to monitor screen. These files are
activated from within graphics programs that support this feature.
NOTE: The ICM color profile is written in accordance with the International Color Consortium (ICC)
Profile Format specification.
Using the OSD menu
You can adjust your HP monitor to suit your preferences. Use the OSD menu to customize the viewing
features of your monitor.
To access and make adjustments in the OSD, use the buttons at the bottom of the monitor’s front bezel.
1. If the monitor is not already on, press the power button to turn on the monitor.
2. Press the Menu button.
3. Use the three function buttons to navigate, select, and adjust the menu choices. The on-screen
button labels vary, depending on which menu or submenu is active.
The following table lists possible menu selections in the OSD main menu. It includes descriptions for
each setting and its impacts on your monitor's appearance or performance.
Table 3-1
OSD menu options and descriptions for using a button
Main menu Description
Brightness + Adjusts the brightness level of the screen.
Color Selects and adjusts the screen color.
Image Adjusts the screen image.
Input Selects the video input signal (HDMI, VGA).
Power Adjusts the power settings.
Menu Adjusts the OSD menu and function button controls, and selects the language used to display the
OSD menu (the factory default is English).
Management Adjusts the DDC/CI settings, and returns all OSD menu settings to the factory default settings.
Information Opens the Information menu.
Exit Exits the OSD menu screen.
Using the OSD function buttons
The function buttons offer useful actions, and you can customize all except one of the options to make
them even more useful.
NOTE: The actions of the function buttons vary among monitor models.
For information about changing the function of the buttons, see Reassigning the OSD menu options on
page 16.
The Image Color Matching (ICM) file
15

Table 3-2 Button names and descriptions
Button Description
(1) Menu button Opens the OSD main menu, selects a menu item from the OSD, or closes the OSD
menu.
(2) Brightness button
Assignable function button
Adjusts the monitor screen brightness.
(3) Color button
Assignable function button
Opens the Viewing Modes menu where you can adjust the monitor screen to a
comfortable viewing light or select a preset view mode.
(4) Next Active Input button
Assignable function button
Selects the active input to go to the next active input.
Reassigning the OSD menu options
Except for the Menu button, you can change the action associated with an option from its default action
to a menu button you use more frequently.
To reassign the function buttons:
1. Press the Menu button to open the OSD menu.
2. Select Menu, select Assign Buttons, and then select one of the available options for the button that
you want to assign.
Using Auto-Sleep Mode
Your monitor has an energy-saving feature called Auto-Sleep Mode, which is a reduced power state. This
section describes how to activate or adjust Auto-Sleep Mode on your monitor.
When Auto-Sleep Mode is enabled, which it is by default, the monitor enters a reduced power state when
the computer signals low-power mode, which it does by the absence of either a horizontal or vertical
sync signal.
Upon entering this reduced power state (Auto-Sleep mode), the monitor screen is blanked, the backlight
turns off, and the power light turns amber. The monitor draws less than 0.5 W of power when in this
reduced power state. The monitor wakes from Auto-Sleep mode when the computer sends an active
signal to the monitor (for example, when you activate the mouse or keyboard).
To disable Auto-Sleep Mode in the OSD:
1. Press the Menu button to open the OSD.
16
Chapter 3 Using the monitor

2. In the OSD, select Power.
3. Select Auto-Sleep Mode, and then select Off.
Using low blue light mode
Decreasing the blue light emitted by the monitor reduces the blue light exposure to your eyes. This
monitor uses a low blue light panel in default setting mode.
In the default setting mode, this monitor's low blue light panel is certified by TÜV to reduce blue light
output and create a more relaxing and less stimulating image while you read content on the screen.
Using low blue light mode 17
Support and troubleshooting4
If your monitor is not working as expected, you might be able to resolve the issue by following the
instructions in this section.
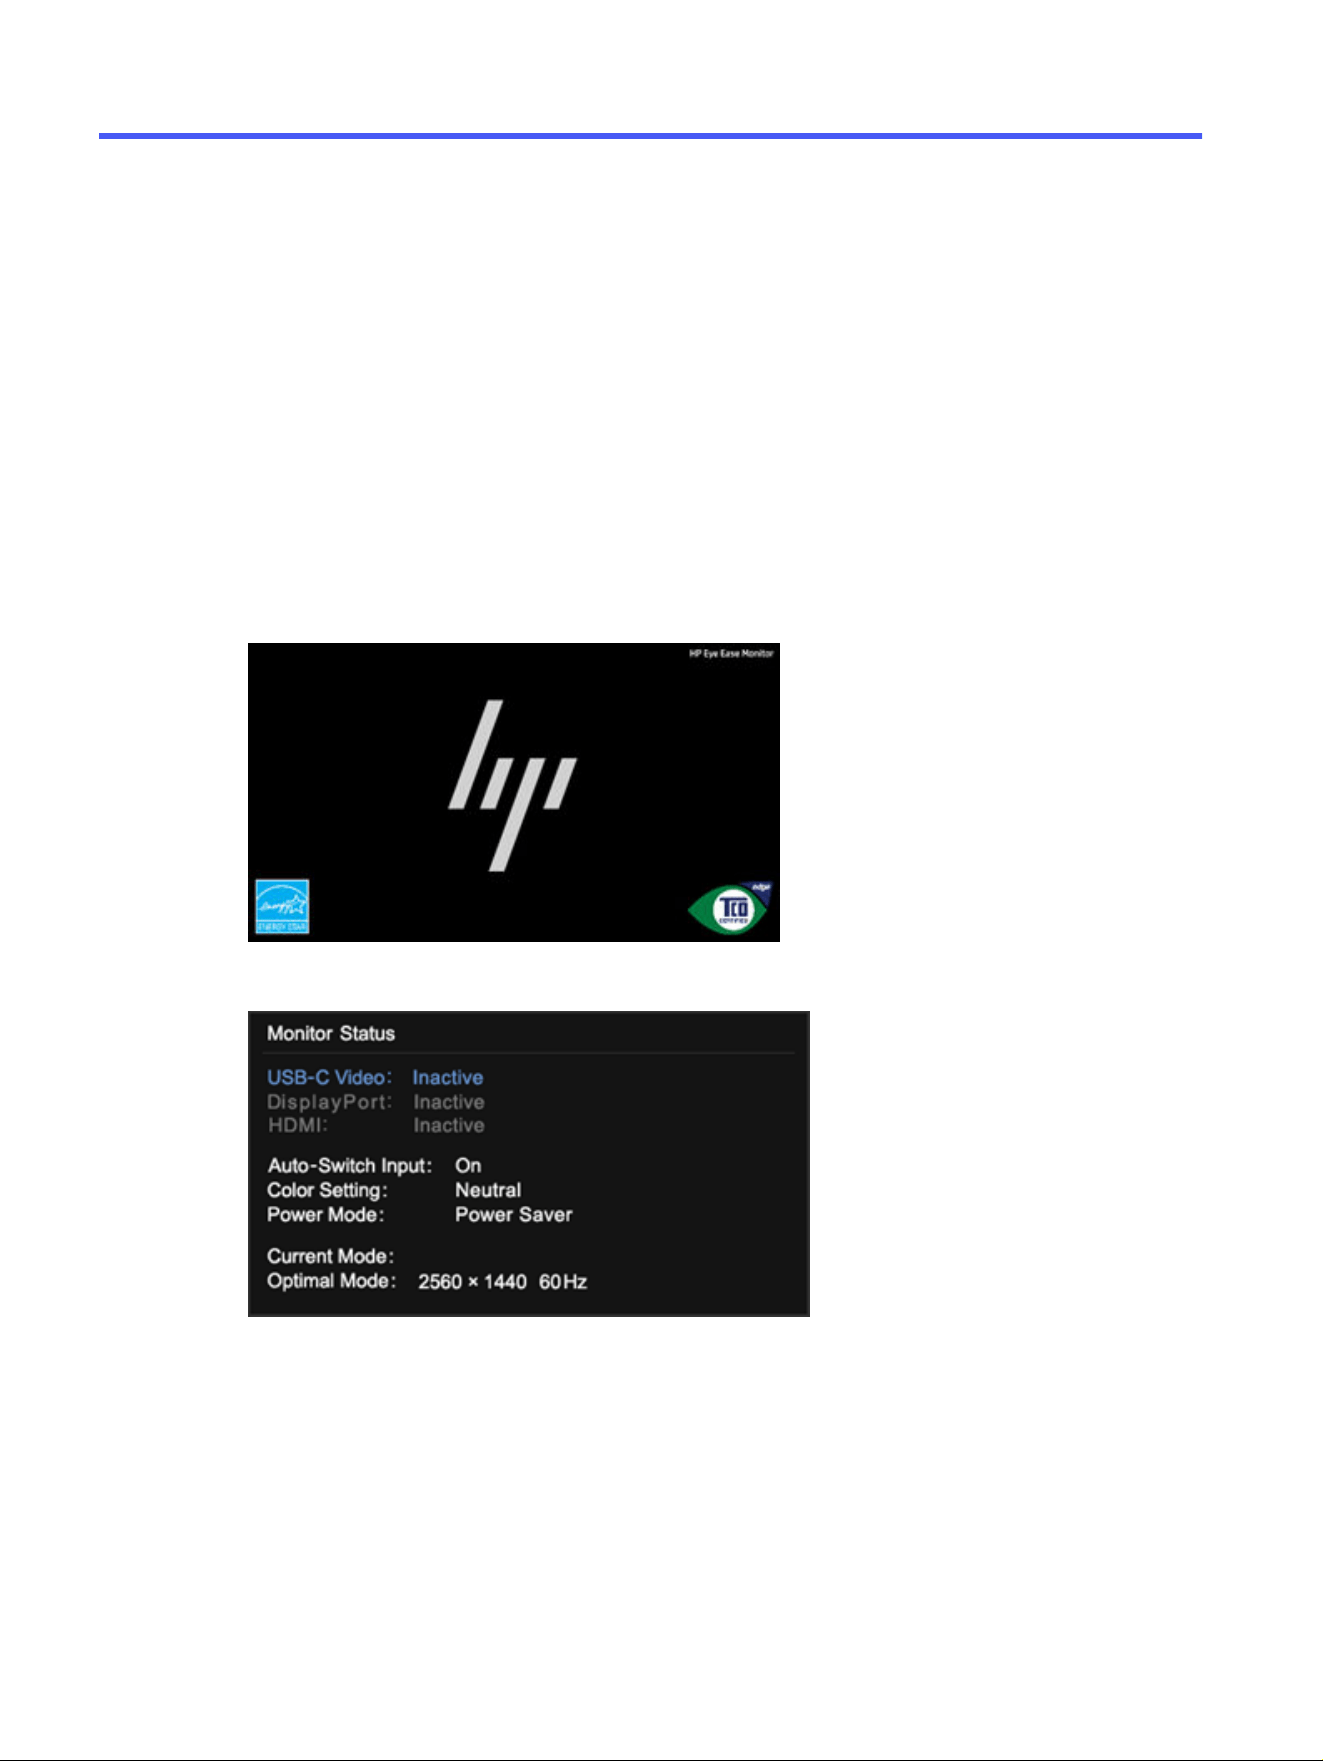
Using the self-test function
To help verify the correct operation of this monitor, a series of startup images and messages is
displayed. These images and messages function as a self-test. Use the following procedure to start the
self-test.
1. Turn off the monitor and disconnect all of the cables except the power cord.
2. Turn on the monitor. An image similar to the one shown here is displayed.
A monitor status message is displayed next.
The power-on image and monitor status message indicates that the monitor is working as expected
and is looking for a valid video signal.
3. Connect a video source to the monitor and repeat steps 1 through 2. If no external video signal is
detected, check the video connection to the host computer.
18
Chapter 4 Support and troubleshooting
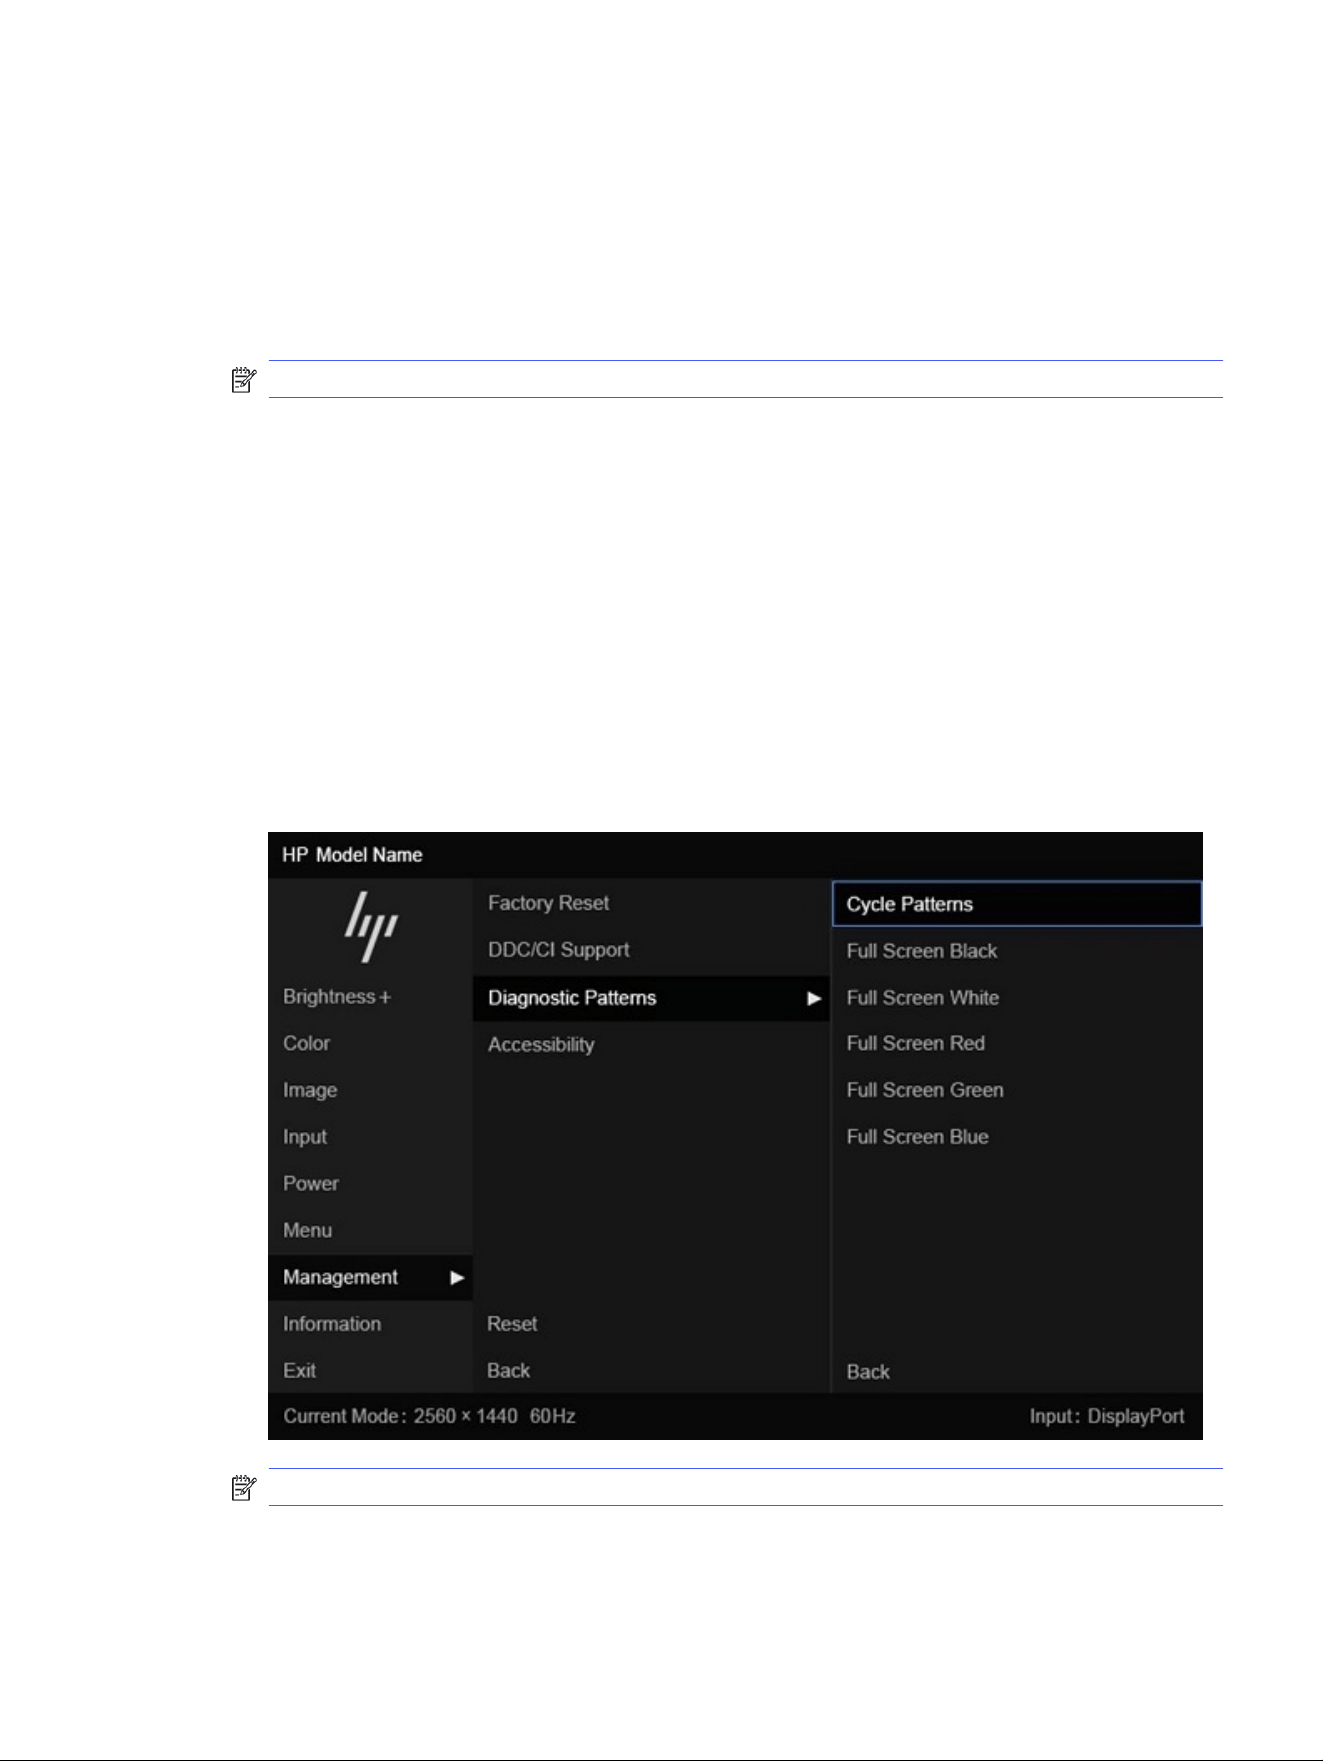
Internal test pattern generator
This monitor includes a built-in test pattern generator called Diagnostic Patterns to help with diagnosing
visual anomalies.
To open Diagnostic Patterns:
1. Turn on the monitor.
NOTE: Video inputs do not need to be connected.
2. In the left column, navigate to Management.
3. In the middle column, navigate to Diagnostic Patterns.
4. Perform one of these tasks for the options in the right column:
● Highlight an option to see a preview in the background (behind the on-screen display (OSD)
menu).
● Select an option to close the OSD menu and view the test pattern in full screen. Press any of
the menu buttons in the column to exit the full screen pattern and return to the OSD menu.
● To close the Diagnostic Patterns menu, select Back at the bottom of the right column or select
any of the other options in the middle column.
● To close the OSD menu, select Exit at the bottom of the left column.
NOTE: You can view the diagnostic patterns with or without an active external video signal.
Internal test pattern generator
19

Solving common issues
The following table lists possible issues, the possible cause of each issue, and the recommended
solutions.
NOTE: Always ensure that the BIOS, device firmware, and monitor firmware are updated to the latest
version.
Table 4-1 Common issues and solutions
Issues Possible cause Solution
Screen is blank or video is
blinking.
Power cord is disconnected. Connect the power cord.
Monitor is off. Press the monitor power button.
Video cable is improperly
connected.
Connect the video cable properly. For more information,
see Connecting the cables on page 10.
System is in Auto-Sleep Mode. Press any key on the keyboard or move the mouse to
inactivate the screen blanking utility.
Video card is incompatible. Perform one of the following actions:
● Open the OSD menu and select the Input menu. Set
Auto-Switch Input to Off, and then manually select
the input.
● Replace the video card or connect the video cable to
one of the computer’s on-board video sources.
Image appears blurred,
indistinct, or too dark.
Brightness setting is too low. Open the OSD menu, and select Brightness to adjust the
brightness scale as needed.
“Check Video Cable” is
displayed on the screen.
Monitor video cable is
disconnected.
Connect the appropriate video signal cable between the
computer and monitor. Be sure that the computer power is
off while connecting the video cable.
“Input Signal Out of Range”
is displayed on screen.
Video resolution rate, refresh rate,
or both, are set higher than the
monitor supports.
Change the settings to a supported setting. See Preset
display resolutions on page 28.
The monitor does not enter
into a low-power sleep
state.
The monitor's power saving control
is disabled.
Open the OSD menu and select Power, select Auto-Sleep
Mode, and then set auto-sleep to On.
“OSD Lockout” is displayed. The monitor's OSD Lockout
function is enabled.
Press and hold the Left button for 10 seconds to disable
the OSD Lockout function.
“Power Button Lockout” is
displayed.
The monitor's Power Button
Lockout feature is enabled.
Press and hold the Power button for 10 seconds to unlock
the power button function.
Button lockouts
The button lockout function is available only when the monitor is on, an active signal is displayed, and the
OSD menu is closed. Holding down the power button or Left button for 10 seconds disables that button.
You can enable the button again by holding it down for 10 seconds.
20
Chapter 4 Support and troubleshooting

Using the auto-adjustment function (analog input)
The auto-adjustment feature automatically engages and attempts to optimize your screen under
several conditions.
● Monitor setup
● Factory reset of the computer
● Changing monitor resolution
You can manually optimize the screen performance for the VGA (analog) input at any time from the
Auto Adjustment menu in the OSD. You can download the auto-adjustment pattern software utility from
http://www.hp.com/support.
Do not use this procedure if the monitor is using an input other than VGA. If the monitor is using a VGA
(analog) input, this procedure can correct the following image quality conditions:
● Fuzzy or unclear focus
● Ghosting, streaking, or shadowing effects
● Faint vertical bars
● Thin, horizontal scrolling lines
● An off-center picture
To use the auto-adjustment feature:
1. Turn the monitor on, and then wait for 20 minutes before adjusting.
2. Open the auto-adjustment utility. You can download this utility from http://www.hp.com/support. The
setup test pattern is displayed.
3. Press the Menu button to open the OSD menu, select Image, and then select Auto Adjustment. If
the result is not satisfactory, continue with the procedure.
4. Press the esc key or any other key on the keyboard to exit the test pattern.
Optimizing image performance (analog input)
This section describes how to customize your settings and manually optimize your monitor's image.
Using the auto-adjustment function (analog input)
21
You can adjust two controls in the on-screen display to improve image performance: Clock and Phase
(available in the OSD menu). Use these controls only when the auto-adjustment function does not
provide a satisfactory image.
If the auto-adjustment option does not correct the flicker/noise issues as noted below, you might need to
manually adjust the clock and phase controls.
NOTE: You can adjust the Clock and Phase controls only when you use an analog (VGA) input. These
controls are not adjustable for digital inputs.
The Clock must first be set correctly because the Phase settings are dependent on the main Clock
setting.
● Clock: Increases or decreases the value to minimize any vertical bars or stripes visible on the
screen background.
● Phase: Increases or decreases the value to minimize video flickering or blurring.
NOTE: When you use the controls, you get the best results by using the auto-adjustment pattern
software utility. You can download this utility from http://www.hp.com/support.
When adjusting the Clock and Phase values, if the monitor images become distorted, continue
adjusting the values until the distortion disappears. To restore the factory settings, press the Menu
button to open the OSD menu, then select Management, select Factory Reset, and select Yes.
To eliminate vertical bars (Clock):
1. Press the Menu button to open the OSD menu, select Image, and then select Clock and Phase.
2. Select Clock, and then use the OSD buttons on the monitor that display up and down arrow icons
to eliminate vertical bars. Press the buttons slowly so that you do not miss the optimum adjustment
point.
3. After adjusting the Clock, if flickering, blurring, or bars appear on the screen, proceed to adjust the
Phase.
To remove flickering or blurring (Phase):
1. Press the Menu button to open the OSD menu, select Image, and then select Clock and Phase.
2. Select Phase, and then use the OSD buttons on the monitor that display up and down arrow icons
to eliminate flickering or blurring. Flickering or blurring might not be eliminated, depending on the
computer or graphics controller card installed.
22
Chapter 4 Support and troubleshooting
To correct screen position (Horizontal Position or Vertical Position):
1. Press the Menu button to open the OSD menu, select Image, and then select Image Position.
2. Press the OSD buttons on the monitor that display up and down arrow icons to properly adjust the
position of the image in the display area of the monitor. The Horizontal Position shifts the image left
or right; the Vertical Position shifts the image up or down.
In this example, the screen on the left is positioned incorrectly, and there are gaps on the right and
the bottom of the screen between the image and the bezel. The image on the right shows the screen
after the position has been adjusted.
Optimizing image performance (analog input)
23

Maintaining the monitor5
Properly maintained, your monitor can run for many years. These instructions provide steps you can
perform to keep your monitor in the best condition.
Maintenance guidelines
Follow these instructions to enhance the performance and extend the life of the monitor.
● Do not open the monitor cabinet or attempt to service this product yourself. Adjust only those
controls that are covered in the operating instructions. If the monitor is not operating properly or
has been dropped or damaged, contact an authorized HP dealer, reseller, or service provider.
● Use only a power source and connection appropriate for this monitor, as indicated on the label or
back plate of the monitor.
● Be sure that the total ampere rating of the products connected to the outlet does not exceed the
current rating of the AC outlet and that the total ampere rating of the products connected to the
cord does not exceed the rating of the cord. Look on the power label to determine the ampere rating
(AMPS or A) for each device.
● Install the monitor near an outlet that you can easily reach. Disconnect the monitor by grasping the
plug firmly and pulling it from the outlet. Never disconnect the monitor by pulling the cord.
● Turn the monitor off when it is not in use, and use a screen saver program. Doing this can
substantially increase the life expectancy of the monitor.
NOTE: A burned-in image on the monitor is not covered under the HP warranty.
● Never block the slots and openings of the cabinet or push objects into them. These openings
provide ventilation.
● Do not drop the monitor or place it on an unstable surface.
● Do not allow anything to rest on the power cord. Do not walk on the cord.
● Keep the monitor in a well-ventilated area, away from excessive light, heat, or moisture.
Cleaning the monitor
Use these instructions to clean your monitor when necessary.
1. Turn off the monitor and unplug the power cord from the AC outlet.
2. Disconnect any external devices.
3. Dust the monitor by wiping the screen and the cabinet with a soft, clean antistatic cloth.
CAUTION: Never spray cleaner directly onto the screen. It can run behind the bezel and damage
the electronics. Water dripping into the ventilation openings or other points of entry can cause
24
Chapter 5 Maintaining the monitor

damage to the monitor. Protect your monitor by always consulting your user guide for cleaning
procedures, or go to http://www.hp.com/support and search for How to Clean Your Computer.
IMPORTANT: Do not use cleaners that contain petroleum-based materials such as benzene,
thinner, or any volatile substance to clean the monitor screen or cabinet. These chemicals might
damage the monitor.
IMPORTANT: Spray the cleaner onto a cloth and use the damp cloth to gently wipe the screen
surface. The cloth should be moist, but not wet. Allow the monitor to air-dry before use.
4. After you remove the dirt and debris, you can also clean the surfaces with a disinfectant. The World
Health Organization (WHO) recommends cleaning surfaces, followed by disinfection, as a best
practice for preventing the spread of viral respiratory illnesses and harmful bacteria. A disinfectant
that is within HP’s cleaning guidelines is an alcohol solution consisting of 70% isopropyl alcohol and
30% water. This solution is also known as rubbing alcohol and is sold in most stores.
Shipping the monitor
Keep the original packing box in a storage area. You might need it later if you ship the monitor or move.
Shipping the monitor
25

Technical specificationsA
This section contains technical specifications for the physical aspects of your monitor, such as the
weight and viewing dimensions, as well as required environmental operating conditions and power
source ranges.
All specifications represent the typical specifications provided by HP component manufacturers; actual
performance can vary either higher or lower.
NOTE: For the latest specifications or additional specifications for this product, go to
http://www.hp.com/go/quickspecs/ and search for your specific monitor model to find the model-
specific QuickSpecs.
80.1 cm (31.5 in) model specifications
This section provides specifications for your monitor.
Table A-1
Technical specifications
Specification Metric U.S.
Display, widescreen 80.1 cm 31.5 in
Type VA
Viewable image size 80.1 cm diagonal 31.5 in diagonal
Maximum weight (unpacked with stand) 5.1 kg 11.24 lbs
Dimensions (unpacked with stand)
Height 49.48 cm 19.48 in
Depth 21.66 cm 8.52 in
Width 71.03 cm 27.96 in
Tilt –5° to 25°
Environmental requirements temperature
Operating temperature 5°C to 35°C 41°F to 95°F
Storage temperature –20°C to 60°C –4°F to 140°F
Storage humidity 5% to 95% (noncondensing)
Power source 100 V AC to 240 V AC, 50 Hz to 60 Hz
Input terminal Two HDMI ports and one VGA port
68.6 cm (27 in) model specifications
This section provides specifications for your monitor.
26
Appendix A Technical specifications

Table A-2 Technical specifications
Specification Metric U.S.
Display, widescreen 68.6 cm 27.0 in
Type IPS
Viewable image size 68.6 cm diagonal 27.0 in diagonal
Fixed height stand models (unpacked with stand)
Weight 3.2 kg 7.05 lbs
Weight (fixed height stand models with audio) 3.28 kg 7.23 lbs
Height 43.73 cm 17.21 in
Depth 18.82 cm 7.40 in
Width 60.79 cm 23.93 in
Height adjustable stand models (unpacked with
stand)
Weight
4.15 kg
4.22 kg (with audio)
9.15 lbs
9.3 lbs (with audio)
Height 50.03 cm 19.70 in
Depth 21.22 cm 8.35 in
Width 60.79 cm 23.93 in
Tilt –5° to 25°
Environmental requirements temperature
Operating temperature 5°C to 35°C 41°F to 95°F
Storage temperature –20°C to 60°C –4°F to 140°F
Storage humidity 5% to 95% (noncondensing)
Power source 100 V AC to 240 V AC, 50 Hz to 60 Hz
Input terminal Two HDMI ports and one VGA port
60.5 cm (23.8 in) model specifications
This section provides specifications for your monitor.
Table A-3
Technical specifications
Specification Metric U.S.
Display, wide-screen 60.50 cm 23.80 in
Type IPS
Viewable image size 60.50 cm diagonal 23.80 in diagonal
Fixed height stand models (unpacked with stand)
Weight 2.5 kg 5.51 lbs
Weight (fixed height stand models with audio) 2.58 kg 5.69 lbs
60.5 cm (23.8 in) model specifications 27

Table A-3 Technical specifications (continued)
Specification Metric U.S.
Height
Depth
Width
39.68 cm
17.72 cm
53.58 cm
15.62 in
6.97 in
21.09 in
Height adjustable stand models (unpacked with
stand)
Weight 3.45 kg
3.52 kg (with audio)
7.61 lbs
7.76 lbs (with audio)
Height 45.98 cm 18.10 in
Depth 20.22 cm 7.96 in
Width 53.58 cm 21.09 in
Tilt –5° to 25°
Environmental requirements temperature
Operating temperature
Storage temperature
Storage humidity
5°C to 35°C
–40°C to 65°C
5% to 95% (noncondensing)
41°F to 95°F
–40°F to 149°F
Power source 100 V AC to 240 V AC, 50 Hz to 60 Hz
Video input terminal One HDMI port and one VGA port
Preset display resolutions
The following display resolutions are the most commonly used modes and are set as factory defaults.
The monitor automatically recognizes these preset modes, and they will appear properly sized and
centered on the screen.
80.1 cm (31.5 in) model (FHD)
This section provides preset display resolutions and preset timing resolutions.
Table A-4
Preset display resolutions
Preset Pixel format Horz freq (kHz) Vert freq (Hz)
1 640 × 480 31.469 59.940
2 720 × 400 31.469 70.087
3 800 × 600 37.879 60.317
4 1024 × 768 48.363 60.004
5 1280 × 720 45.000 60.000
6 1280 × 800 49.702 59.810
7 1280 × 1024 63.981 60.020
8 1440 × 900 55.935 59.887
28 Appendix A Technical specifications

Table A-4 Preset display resolutions (continued)
Preset Pixel format Horz freq (kHz) Vert freq (Hz)
9 1600 × 900 60.000 60.000
10 1680 × 1050 65.290 59.954
11 1920 × 1080 67.500 60.000
12 1920 × 1080 83.955 75.027
13 1920 × 1080 110.000 100.000
Table A-5 Preset timing resolutions
Preset Pixel format Horz freq (kHz) Vert freq (Hz)
1 640 × 480 31.469 60
2 720 × 480 31.469 60
3 720 × 576 31.250 50
4 1280 × 720 37.500 50
5 1280 × 720 45.000 60
6 1920 × 1080 56.250 50
7 1920 × 1080 67.500 60
68.6 cm (27 in) model (FHD)
This section provides preset display resolutions and preset timing resolutions.
Table A-6
Preset display resolutions
Preset Pixel format Horz freq (kHz) Vert freq (Hz)
1 640 × 480 31.469 59.940
2 720 × 400 31.469 70.087
3 800 × 600 37.879 60.317
4 1024 × 768 48.363 60.004
5 1280 × 720 45.000 60.000
6 1280 × 800 49.702 59.810
7 1280 × 1024 63.981 60.020
8 1440 × 900 55.935 59.887
9 1600 × 900 60.000 60.000
10 1680 × 1050 65.290 59.954
11 1920 × 1080 67.500 60.000
12 1920 × 1080 83.955 75.027
13 1920 × 1080 112.500 100.000
68.6 cm (27 in) model (FHD) 29

Table A-7 Preset timing resolutions
Preset Timing name Pixel format Horz freq (kHz) Vert freq (Hz)
1 480p60 640 × 480 31.469 60
2 480p60 720 × 480 31.469 60
3 576p50 720 × 576 31.250 50
4 720p50 1280 × 720 37.500 50
5 720p60 1280 × 720 45.000 60
6 1080p50 1920 × 1080 56.250 50
7 1080p60 1920 × 1080 67.500 60
60.5 cm (23.8 in) model (FHD)
This section provides preset display resolutions and preset timing resolutions.
Table A-8
Preset display resolutions
Preset Pixel format Horz freq (kHz) Vert freq (Hz)
1 640 × 480 31.469 59.940
2 720 × 400 31.469 70.087
3 800 × 600 37.879 60.317
4 1024 × 768 48.363 60.004
5 1280 × 720 45.000 60.000
6 1280 × 800 49.702 59.810
7 1280 × 1024 63.981 60.020
8 1440 × 900 55.935 59.887
9 1600 × 900 60.000 60.000
10 1680 × 1050 65.290 59.954
11 1920 × 1080 67.500 60.000
12 1920 × 1080 83.955 75.027
13 1920 × 1080 112.500 100.000
Table A-9 Preset timing resolutions
Preset Pixel format Horz freq (kHz) Vert freq (Hz)
1 640 × 480 31.469 59.940
2 720 × 480 31.469 59.940
3 720 × 576 31.250 50.000
4 1280 × 720 37.500 50.000
5 1280 × 720 45.000 60.000
30 Appendix A Technical specifications

Table A-9 Preset timing resolutions (continued)
Preset Pixel format Horz freq (kHz) Vert freq (Hz)
6 1920 × 1080 56.250 50.000
7 1920 × 1080 67.500 60.000
Power supply specification
This section provides power supply specifications.
Table A-10 Power supply specification
Manufacturer Model number Power supply rating
Delta ADP-45FE FBC 19.5 V DC to 2.31 A - 45 W
Honor ADS-45PE-19-3 19540E 19.5 V DC to 2.05 A - 40 W
Honor ADS-25PE-19-3 19525E 19.5 V DC to 1.28 A - 25 W
Energy saver feature
This monitor supports a reduced power state.
The reduced power state is initiated if the monitor detects the absence of either the horizontal sync
signal or the vertical sync signal. Upon detecting the absence of these signals, the monitor screen
is blank, the backlight is turned off, and the power light turns amber. In the reduced power state, the
monitor uses < 0.5 W of power. There is a brief warm-up period before the monitor returns to its normal
operating state.
See the computer manual for instructions on setting the energy saver mode (sometimes called “power
management feature”).
NOTE: This monitor enters the low-power state whether it is connected or not connected to any
source.
Power supply specification
31

AccessibilityB
HP's goal is to design, produce, and market products, services, and information that everyone
everywhere can use, either on a standalone basis or with appropriate third-party assistive technology
(AT) devices or applications.
HP and accessibility
Because HP works to weave diversity, inclusion, and work/life into the fabric of the company, it is
reflected in everything HP does. HP strives to create an inclusive environment focused on connecting
people to the power of technology throughout the world.
Finding the technology tools you need
Technology can unleash your human potential. Assistive technology removes barriers and helps you
create independence at home, at work, and in the community. Assistive technology helps increase,
maintain, and improve the functional capabilities of electronic and information technology.
For more information, see Finding the best assistive technology on page 33.
The HP commitment
HP is committed to providing products and services that are accessible for people with disabilities.
This commitment supports the company's diversity objectives and helps ensure that the benefits of
technology are available to all.
The HP accessibility goal is to design, produce, and market products and services that can be effectively
used by everyone, including people with disabilities, either on a standalone basis or with appropriate
assistive devices.
To achieve that goal, this Accessibility Policy establishes seven key objectives to guide HP actions. All
HP managers and employees are expected to support these objectives and their implementation in
accordance with their roles and responsibilities:
● Raise the level of awareness of accessibility issues within HP, and provide employees with the
training they need to design, produce, market, and deliver accessible products and services.
● Develop accessibility guidelines for products and services, and hold product development groups
accountable for implementing these guidelines where competitively, technically, and economically
feasible.
● Involve people with disabilities in the development of accessibility guidelines and in the design and
testing of products and services.
● Document accessibility features, and make information about HP products and services publicly
available in an accessible form.
● Establish relationships with leading assistive technology and solution providers.
● Support internal and external research and development that improves assistive technology
relevant to HP products and services.
32
Appendix B Accessibility

● Support and contribute to industry standards and guidelines for accessibility.
International Association of Accessibility Professionals (IAAP)
IAAP is a not-for-profit association focused on advancing the accessibility profession through
networking, education, and certification. The objective is to help accessibility professionals develop and
advance their careers and to better enable organizations to integrate accessibility into their products
and infrastructure.
As a founding member, HP joined to participate with other organizations to advance the field of
accessibility. This commitment supports HP’s accessibility goal of designing, producing, and marketing
products and services that people with disabilities can effectively use.
IAAP will make the profession strong by globally connecting individuals, students, and
organizations to learn from one another. If you are interested in learning more, go to
http://www.accessibilityassociation.org to join the online community, sign up for newsletters, and learn
about membership options.
Finding the best assistive technology
Everyone, including people with disabilities or age-related limitations, should be able to communicate,
express themselves, and connect with the world using technology. HP is committed to increasing
accessibility awareness within HP and with our customers and partners.
Whether it’s large fonts that are easy on the eyes, voice recognition that lets you give your hands a rest,
or any other assistive technology to help with your specific situation—a variety of assistive technologies
make HP products easier to use. How do you choose?
Assessing your needs
Technology can unleash your potential. Assistive technology removes barriers and helps you create
independence at home, at work, and in the community. Assistive technology (AT) helps increase,
maintain, and improve the functional capabilities of electronic and information technology.
You can choose from many AT products. Your AT assessment should allow you to evaluate several
products, answer your questions, and facilitate your selection of the best solution for your situation.
You will find that professionals qualified to do AT assessments come from many fields, including those
licensed or certified in physical therapy, occupational therapy, speech/language pathology, and other
areas of expertise. Others, while not certified or licensed, can also provide evaluation information.
You will want to ask about the individual's experience, expertise, and fees to determine if they are
appropriate for your needs.
Accessibility for HP products
These links provide information about accessibility features and assistive technology, if applicable and
available in your country or region, that are included in various HP products. These resources will help
you select the specific assistive technology features and products most appropriate for your situation.
● HP Aging & Accessibility: Go to http://www.hp.com, type Accessibility in the search box. Select
Office of Aging and Accessibility.
● HP computers: For Windows products, go to http://www.hp.com/support, type Windows
Accessibility Options in the Search our knowledge library search box. Select the appropriate
operating system in the results.
● HP Shopping, peripherals for HP products: Go to http://store.hp.com, select Shop, and then select
Monitors or Accessories.
International Association of Accessibility Professionals (IAAP)
33

If you need additional support with the accessibility features on your HP product, see Contacting
support on page 38.
Additional links to external partners and suppliers that may provide additional assistance:
● Microsoft Accessibility information (Windows and Microsoft Office)
● Google Products accessibility information (Android, Chrome, Google Apps)
Monitor accessibility features (select products/regions only)
HP monitors enable you to find and configure display settings directly from your monitor, without
needing to use an external device such as a computer, using multiple types of accessibility
enhancements.
Built-in accessibility features
The following accessibility features are built into the monitor.
● Physical buttons or a Joypad that are tactilely discoverable.
● Physical button or Joypad labels that are displayed on-screen.
● On-Screen Display (OSD) menu
– Menu items, text, and elements meet a 4.5:1 (or greater) contrast ratio.
– Focus indication is provided.
Text to Speech (select products/regions only)
Text to Speech converts text into spoken words. You can enable text to assist you when reading text on
the monitor.
If your monitor has built-in speakers, you can request the TTS accessibility device by calling HP Support
at (877) 656-7058, Monday through Friday, 6 a.m. to 9 p.m. Mountain Time.
NOTE: Support is in English only.
What is Accessibility Mode?
Accessibility Mode enables you to use audio navigation and to enlarge items on the screen.
When you turn on Accessibility Mode, the following adjustments are made:
● Menu timeout setting is set to the maximum duration of 60 seconds (default is 30 seconds).
● Language is set to English, which is the only language currently supported in Accessibility Mode.
When Accessibility Mode is turned off, the previous language is used.
● On FHD monitors, the OSD menu is set to a fixed position in the lower-right quadrant of the screen.
● Menu items, text, and other elements meet a 4.5:1 contrast ratio or greater.
● Text is enlarged to a 4.8 mm or larger font size.
34
Appendix B Accessibility
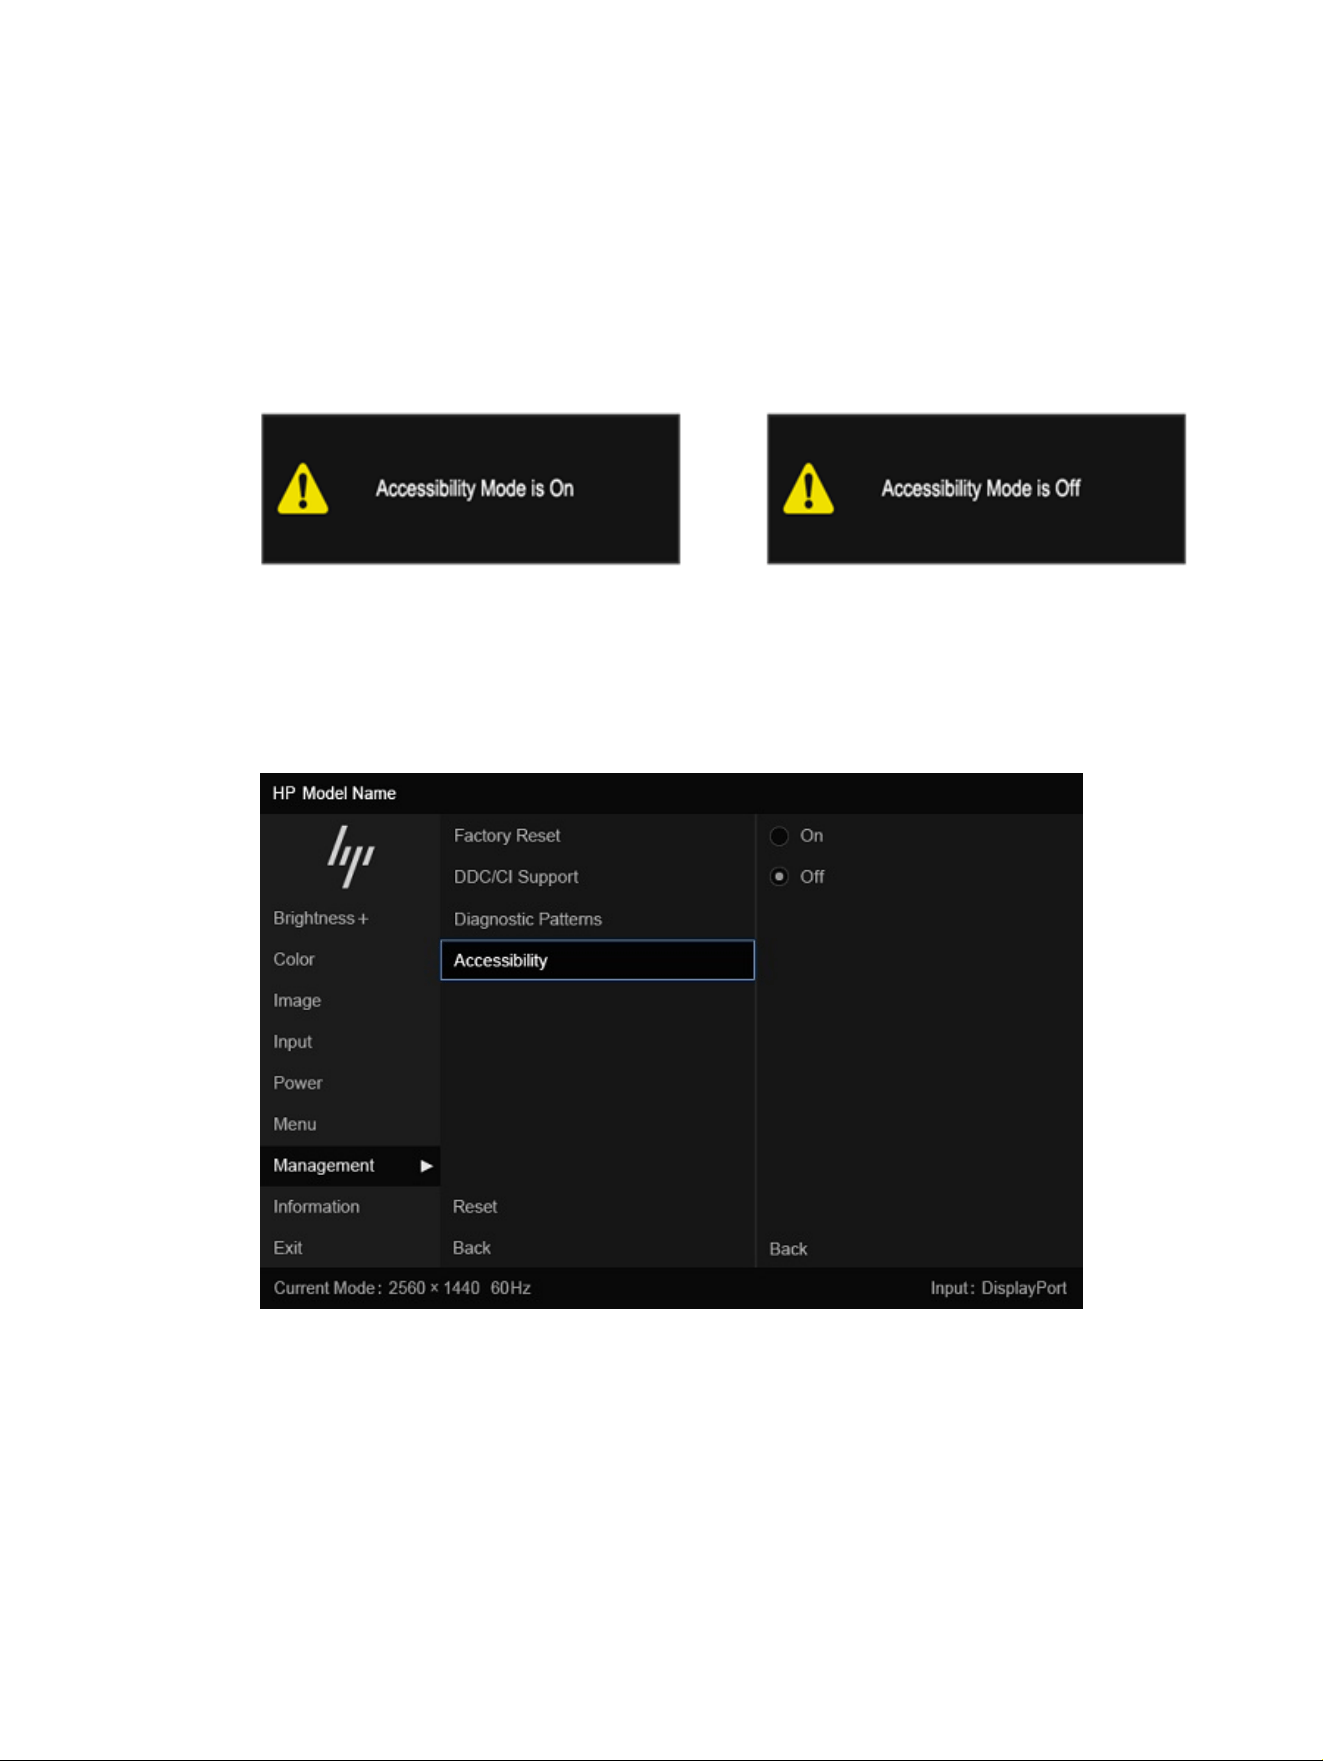
How do you turn Accessibility Mode on or off?
Turn Accessibility Mode on or off using either physical monitor controls or an OSD menu.
● On a monitor with a Joypad, press and hold the center of the Joypad for four seconds to turn
Accessibility Mode on or off.
When Accessibility Mode is turned on using a physical button, an Accessibility Mode is On message
is displayed. When Accessibility Mode is turned off using a physical button, an Accessibility Mode is
Off message is displayed.
● Using the OSD menu
– To turn on Accessibility Mode, set the language to English, and then select Management >
Accessibility > On.
– To turn off Accessibility Mode, select Management > Accessibility > Off.
Standards and legislation
Countries worldwide are enacting regulations to improve access to products and services for persons
with disabilities. These regulations are historically applicable to telecommunications products and
services, PCs and printers with certain communications and video playback features, their associated
user documentation, and their customer support.
How do you turn Accessibility Mode on or off?
35

Standards
The US Access Board created Section 508 of the Federal Acquisition Regulation (FAR) standards to
address access to information and communication technology (ICT) for people with physical, sensory, or
cognitive disabilities.
The standards contain technical criteria specific to various types of technologies, as well as
performance-based requirements which focus on functional capabilities of covered products. Specific
criteria cover software applications and operating systems, web-based information and applications,
computers, telecommunications products, video and multimedia, and self-contained closed products.
Mandate 376 – EN 301 549
The European Union created the EN 301 549 standard within Mandate 376 as an online toolkit for public
procurement of ICT products. The standard specifies the accessibility requirements applicable to ICT
products and services, with a description of the test procedures and evaluation methodology for each
requirement.
Web Content Accessibility Guidelines (WCAG)
Web Content Accessibility Guidelines (WCAG) from the W3C's Web Accessibility Initiative (WAI) helps
web designers and developers create sites that better meet the needs of people with disabilities or
age-related limitations.
WCAG advances accessibility across the full range of web content (text, images, audio, and video)
and web applications. WCAG can be precisely tested, is easy to understand and use, and allows web
developers flexibility for innovation. WCAG 2.0 has also been approved as ISO/IEC 40500:2012.
WCAG specifically addresses barriers to accessing the web experienced by people with visual, auditory,
physical, cognitive, and neurological disabilities, and by older web users with accessibility needs. WCAG
2.0 provides characteristics of accessible content:
● Perceivable (for instance, by addressing text alternatives for images, captions for audio, adaptability
of presentation, and color contrast)
● Operable (by addressing keyboard access, color contrast, timing of input, seizure avoidance, and
navigability)
● Understandable (by addressing readability, predictability, and input assistance)
● Robust (for instance, by addressing compatibility with assistive technologies)
Legislation and regulations
Accessibility of IT and information has become an area of increasing legislative importance.
The HP policy landscape website provides information about key legislation, regulations, and standards
in the following locations:
● United States
● Canada
● Europe
● Australia
36
Appendix B Accessibility

Useful accessibility resources and links
These organizations, institutions, and resources might be good sources of information about disabilities
and age-related limitations.
NOTE: This is not an exhaustive list. These organizations are provided for informational purposes
only. HP assumes no responsibility for information or contacts you encounter on the internet. Listing on
this page does not imply endorsement by HP.
Organizations
These organizations are a few of the many that provide information about disabilities and age-related
limitations.
● American Association of People with Disabilities (AAPD)
● The Association of Assistive Technology Act Programs (ATAP)
● Hearing Loss Association of America (HLAA)
● Information Technology Technical Assistance and Training Center (ITTATC)
● Lighthouse International
● National Association of the Deaf
● National Federation of the Blind
● Rehabilitation Engineering & Assistive Technology Society of North America (RESNA)
● Telecommunications for the Deaf and Hard of Hearing, Inc. (TDI)
● W3C Web Accessibility Initiative (WAI)
Educational institutions
Many educational institutions, including these examples, provide information about disabilities and
age-related limitations.
● California State University, Northridge, Center on Disabilities (CSUN)
● University of Wisconsin - Madison, Trace Center
● University of Minnesota computer accommodations program
Other disability resources
Many resources, including these examples, provide information about disabilities and age-related
limitations.
● ADA (Americans with Disabilities Act) Technical Assistance Program
● ILO Global Business and Disability network
● EnableMart
● European Disability Forum
● Job Accommodation Network
Useful accessibility resources and links
37

● Microsoft Enable
HP links
These HP-specific links provide information that relates to disabilities and age-related limitations.
HP comfort and safety guide
HP public sector sales
Contacting support
HP offers technical support and assistance with accessibility options for customers with disabilities.
NOTE: Support is in English only.
● Customers who are deaf or hard of hearing who have questions about technical support or
accessibility of HP products:
– Use TRS/VRS/WebCapTel to call (877) 656-7058 Monday through Friday, 6 a.m. to 9 p.m. Mountain
Time.
● Customers with other disabilities or age-related limitations who have questions about technical
support or accessibility of HP products:
– Call (888) 259-5707 Monday through Friday, 6 a.m. to 9 p.m. Mountain Time.
38
Appendix B Accessibility

Index
A
accessibility 32, 33, 36, 38
accessibility needs
assessment 33
assistive technology (AT)
finding 33
purpose 32
AT (assistive technology)
finding 33
purpose 32
auto-adjustment (analog
input) 21
C
calling technical support 3
components
rear 5
connectors
DisplayPort 5
mini DisplayPort 5
power 5
customer support,
accessibility 38
D
diagnostics 18
DisplayPort connector 5
G
getting started 2
getting to know your monitor 3
H
HDMI port 5
HP Assistive Policy 32
HP Display Center 14
HP resources 3
HP support 3
I
internal diagnostics 19
International Association of
Accessibility Professionals 33
L
label 6
O
optimizing image performance
(analog input) 21
P
ports
HDMI 5
USB Type-C 5
power connector 5
product label 6
product number 6
R
rear components 5
resources, accessibility 37
routing cables 9
S
safety information 2
Section 508 accessibility
standards 36
self-test 18
serial number 6
standards and legislation,
accessibility 35
support 3
T
technical support 3
Text to Speech 34
troubleshooting 18
U
USB Type-C port 5
W
warnings 2
Index
39