
Air Purifier
HP070 Series
OWNER’S GUIDE
IMPORTANT SAFETY INSTRUCTIONS
HOUSEHOLD USE ONLY
WARNING
TO REDUCE THE RISK OF FIRE, ELECTRIC SHOCK, OR INJURY:
GENERAL WARNINGS
1. This appliance has a polarized plug (one blade is wider than
the other). To reduce the risk of electric shock, this plug is
intended to fit in a polarized outlet only one way. If the plug
does not fit fully in the outlet, reverse the plug. If it still does
not fit, contact a qualified electrician. Do not attempt to defeat
this safety feature. Unplug or disconnect the appliance from
the power supply before servicing.
2. DO NOT operate any unit with a damaged cord or plug.
Discard the unit or return to an authorized service facility for
examination and/or repair.
3. DO NOT run cord under carpeting. DO NOT cover cord with
throw rugs, runners, or similar coverings. DO NOT route cord
under furniture or appliances. Keep cord away from high
traffic areas where it will not be tripped over.
4. If the power cord is damaged, it must be replaced by the
manufacturer, its service agent, or similarly qualified persons
in order to avoid a hazard.
5. This appliance should only be placed on flat and dry surfaces.
6. This appliance is not intended for use by anyone (including
children) with reduced physical, sensory or mental capabilities,
or lack of experience and knowledge, unless they have
been given supervision or instruction concerning use of the
appliance by a person responsible for their safety.
7. Children should be supervised to ensure that they DO NOT
play with the appliance.
8. Cleaning and user maintenance shall not be made by children
without supervision.
9. Prior to cleaning or other maintenance, the appliance must be
unplugged from the electrical outlet.
10. DO NOT handle plug or appliance with wet hands.
11. DO NOT use without filter in place.
12. Only use Shark® branded filters and accessories.
13. DO NOT damage the power cord:
a) DO NOT pull or carry appliance by the cord or use the cord
as a handle.
b) DO NOT unplug by pulling on cord. Grasp the plug, not
the cord.
c) DO NOT stand the appliance on the power cord, close a
door on the cord, pull the cord around sharp corners, or
leave the cord near heated surfaces.
14. DO NOT use with any opening blocked; keep free of dust, lint,
hair, and anything that may reduce airflow.
15. DO NOT use if airflow is restricted. If the air paths become
blocked, turn the appliance off and unplug from electrical
outlet. Remove all obstructions before you plug in and turn on
the unit again.
16. DO NOT use if appliance is not working as it should, or has
been dropped, damaged, left outdoors, or dropped into water.
17. DO NOT place appliance on unstable surfaces such as chairs
or tables.
18. DO NOT use in the following areas:
a) Wet or damp surfaces
b) Outdoor areas
c) Spaces that are enclosed and may contain explosive or toxic
fumes or vapors (lighter fluid, gasoline, kerosene, paint, paint
thinners, mothproofing substances, or flammable dust)
19. Turn off all controls before plugging in or unplugging
the appliance.
20. Unplug from electrical outlet when not in use and before any
maintenance or cleaning.
21. Hand wash exterior/hard plastic/non-electronic
parts with water only. Do not immerse. Cleaning
with chemicals could damage the unit.
22. Make sure filter is in place after routine maintenance.
23. Not suitable for use with solid-state speed controls.
24. The appliance is only to be used with the power supply unit
provided with the appliance.
SAVE THESE INSTRUCTIONS
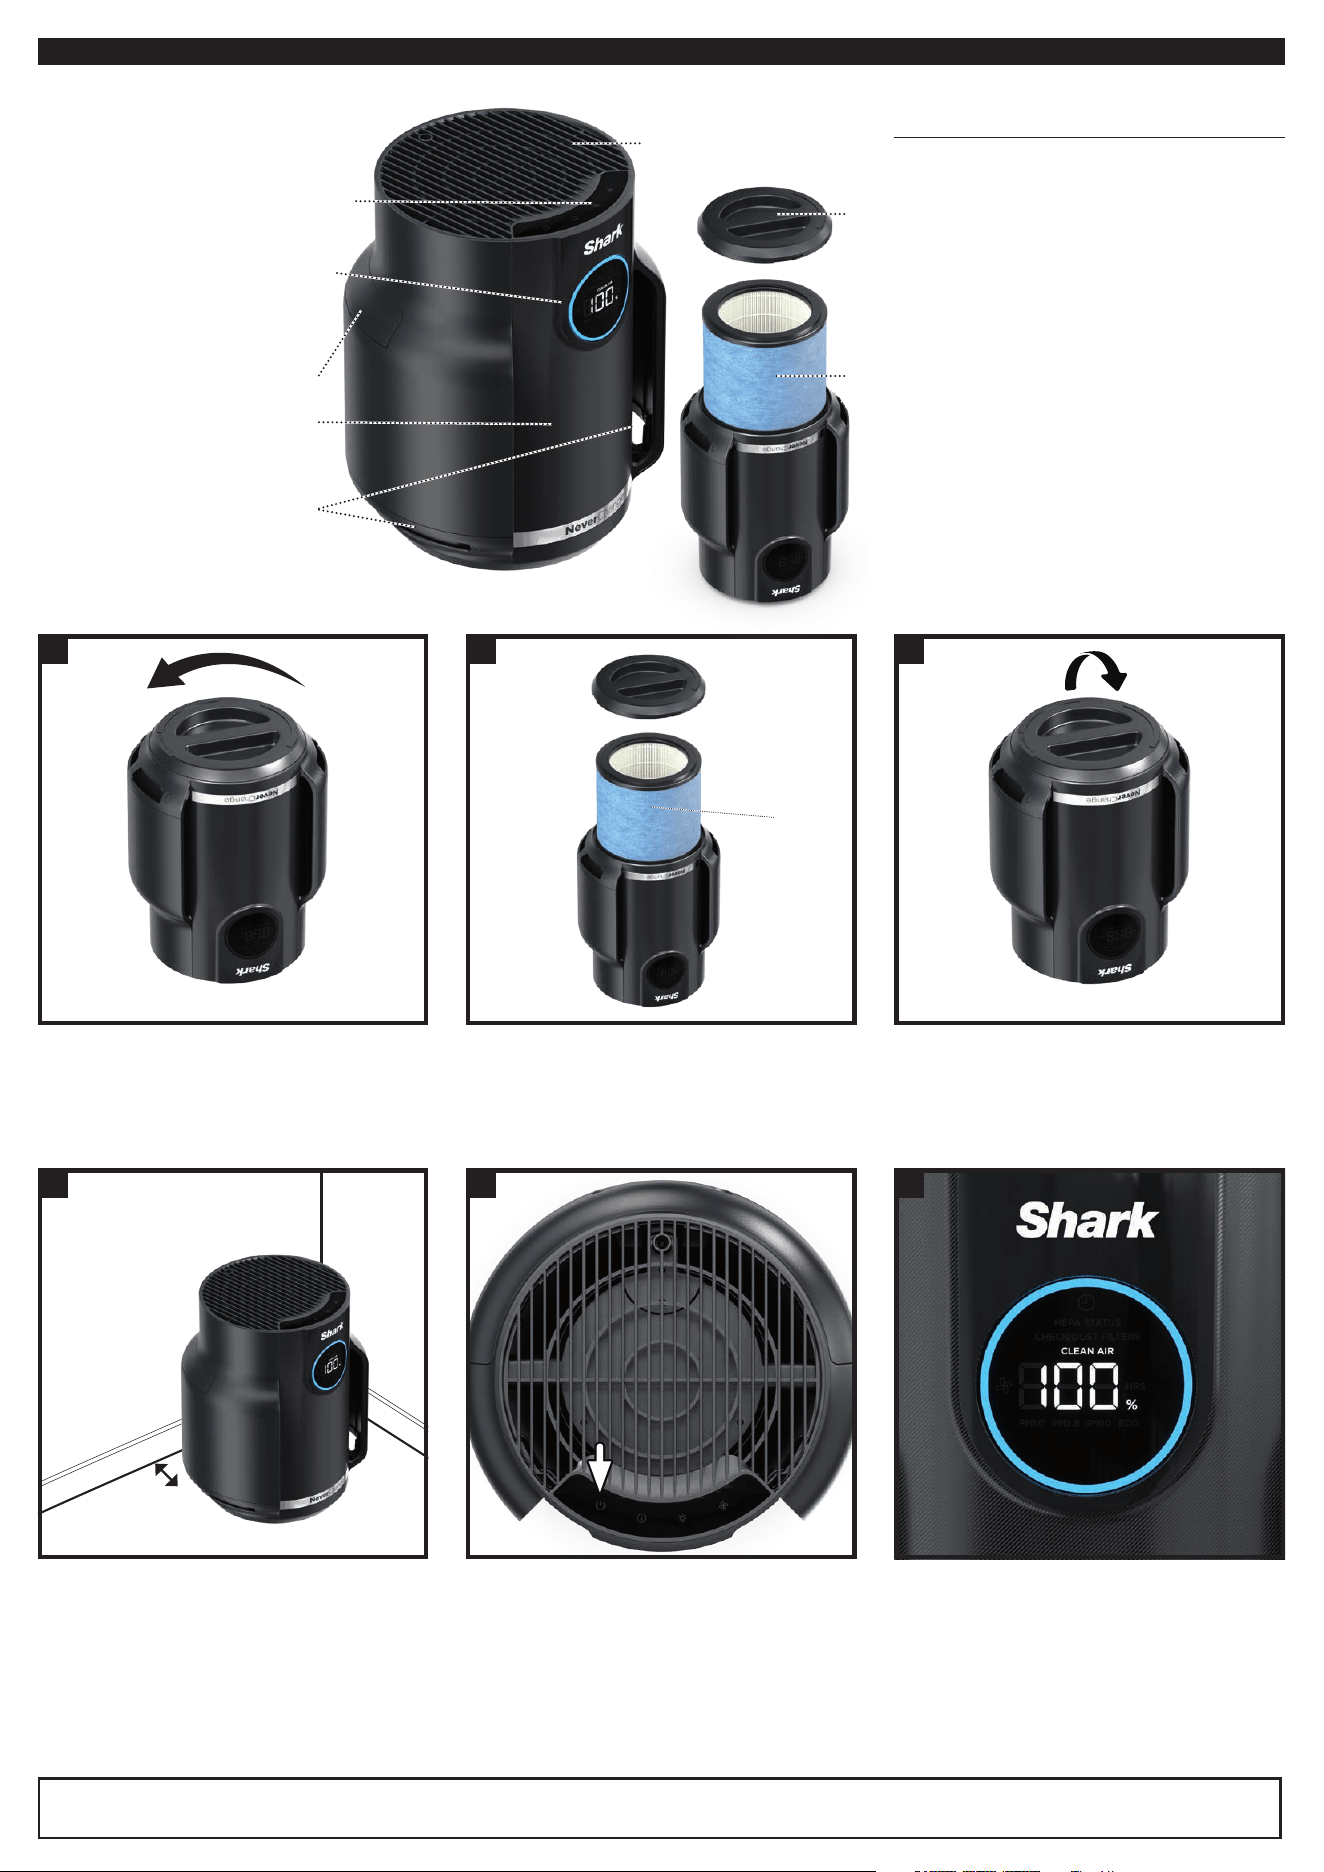
SETTING UP YOUR AIR PURIFIER
Parts:
1. Air Output Vents
2. Control Panel
3. Front Display
4. Air Purifier Body
5. Air Intake Vents
6. Mesh Dust Filter
7. HEPA Filter
8. HEPA Filter Door
1. DO NOT plug in the air purifier. First,
carefully turn the air purifier upside
down and place it on a level floor surface.
Rotate the filter door counterclockwise
to unlock it, then lift it o to access the
HEPA filter.
2. Take the HEPA filter out of its plastic
packaging. Reinstall the HEPA filter
in either orientation.
3. With the HEPA filter reinstalled, rotate
the filter door clockwise until it clicks
into place.
4. Set up the air purifier on a level
surface, at least 3 inches (8 cm) from
walls and objects.
5. Carefully remove the yellow sticker on
the front of the air purifier to access the
display panel.
Plug the air purifier into an electrical
outlet and press the power button
on the top control panel.
6. When the power is on, the air purifier will
begin to analyze the air quality, indicated
by the rotating lights.
After a few seconds, the air purifier will
display the current air quality.
If the air quality is between 96% to 100%,
the number on the display will spin every
five minutes to indicate that the machine
is actively monitoring and cleaning the air.
3-inch
minimum
4
32
Remove
HEPA filter
from plastic
packaging
5 6
1
TIPS FOR SETTING
UP YOUR AIR PURIFIER
• Make sure the front panel of the air purifier
faces away from the closest wall.
• Do not move the unit while it is running. Turn
o the power and unplug the air purifier before
moving it.
• Make sure the air intake vents are not blocked.
• Do not place anything on the air purifier.
• Do not place the air purifier near heaters
or radiators.
• Keep the air purifier out of direct sunlight and
away from water or other liquid.
• Keep all nearby doors and windows closed
when operating the air purifier.
• Avoid using in very humid environments.
Note: NeverChange HEPA Filter Technology allows up to 5 years* of use from a single HEPA filter.
*Tested to GB/T18801-2015 P.CCM, based on 50% CADR declined, 52 sq. ft. cleaning area and 12 hours daily operation on MAX fan speed.
5.
4.
6.
2.
1.
8.
7.
3.
Remove plastic
protective film,
then power on
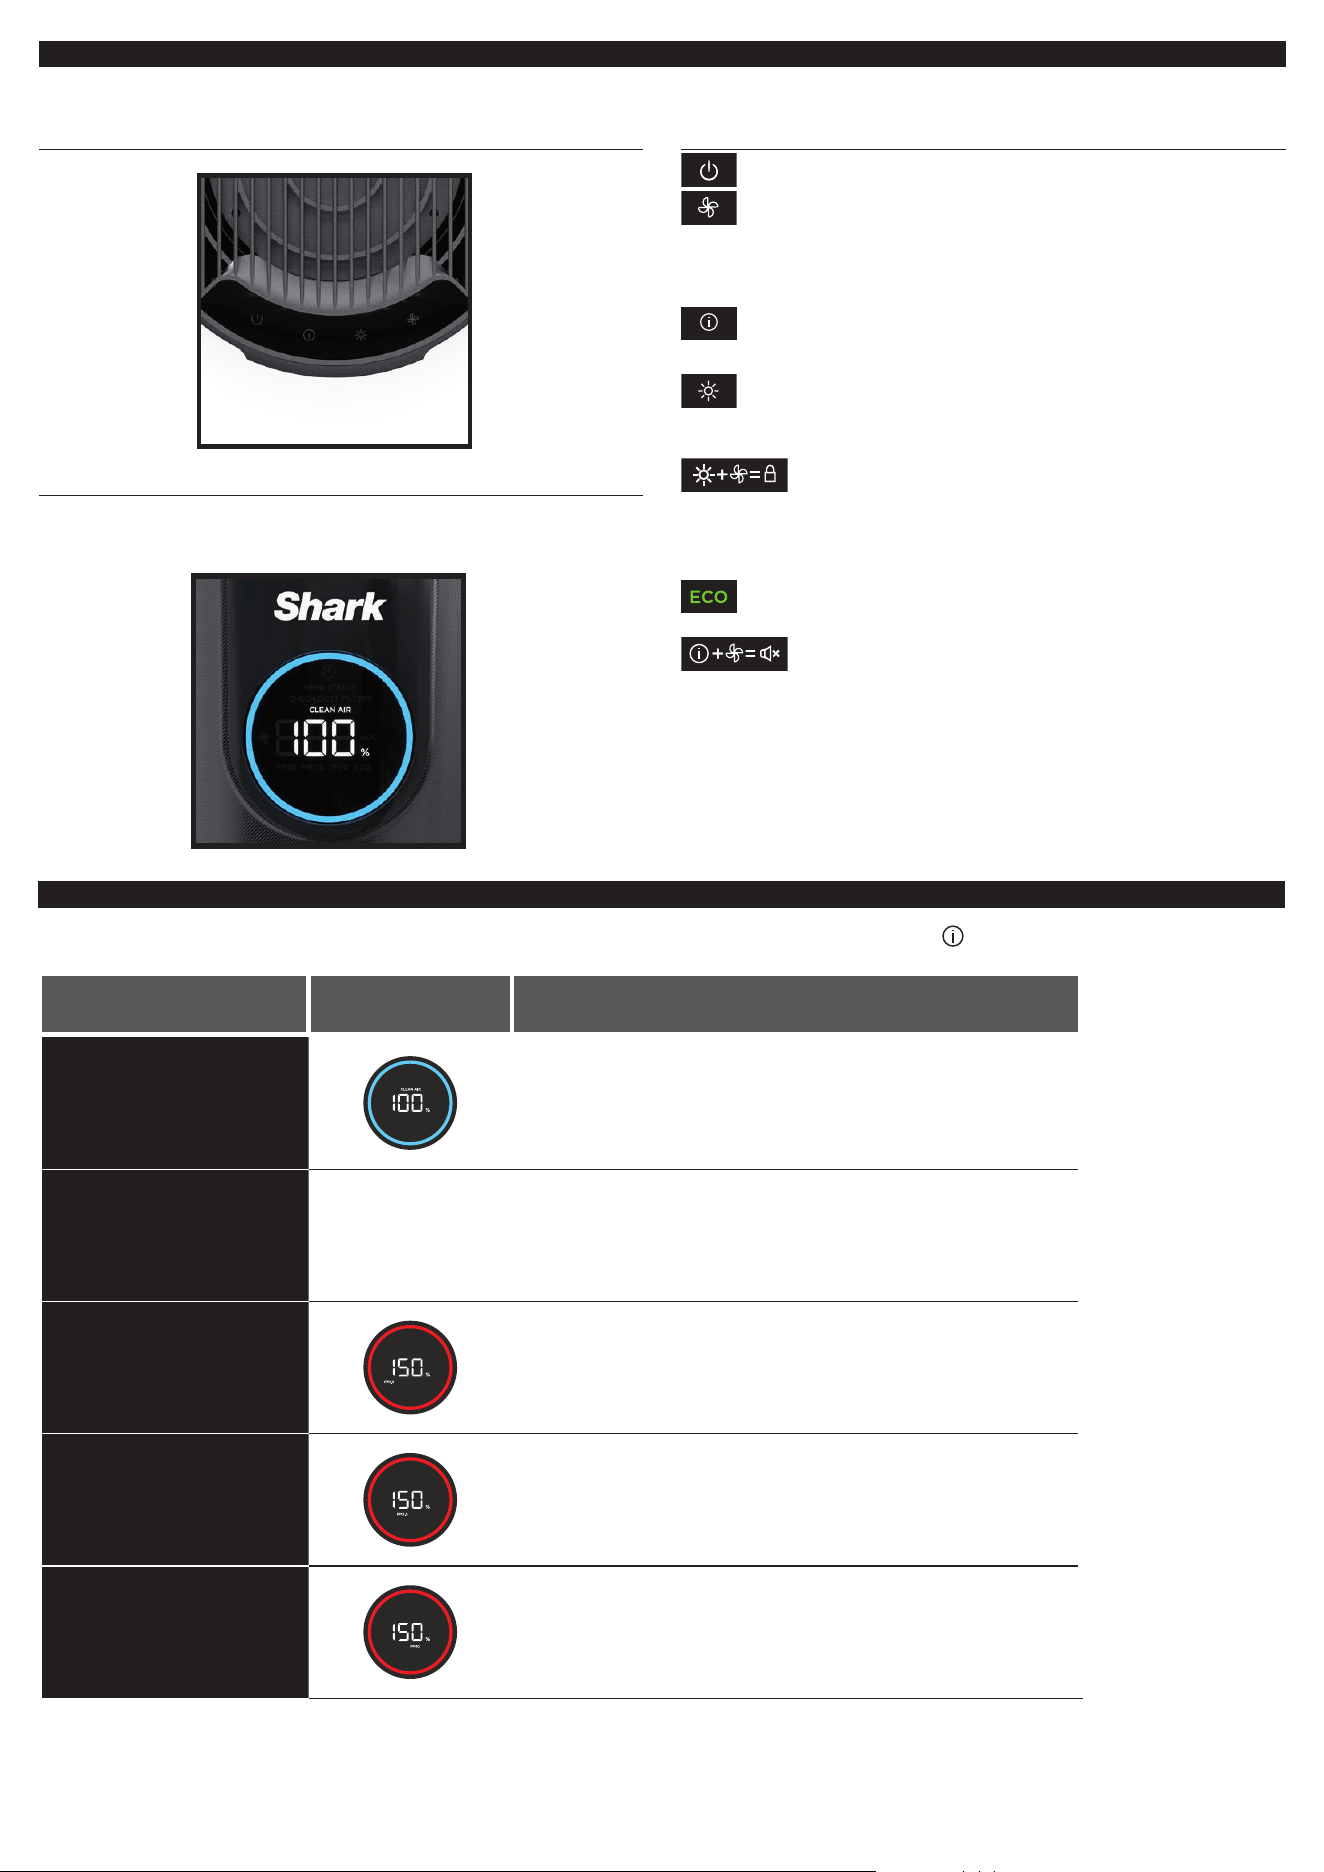
CONTROL PANEL
There is a control panel on the top of the air purifier and a display screen on the front.
TOP CONTROL PANEL
FRONT DISPLAY SCREEN
Displays the current air quality status based on the Air Info mode
selected on the top control panel.
TOP CONTROL PANEL BUTTONS
MAX
On/O: Press to turn the power on or o.
MAX
Fan Speed: Press repeatedly to cycle through the fan speed options:
1 Quiet, 2 Low, 3 Medium, 4 High, 5 Maximum, A Auto. For optimal
filter life and performance, select Auto mode by cycling through
the speed levels until the A indicator appears. In Auto mode, the
fan speed automatically adjusts: as air quality improves, fan speed
decreases. If air quality worsens, fan speed will increase. For tips and
more information, see the Optimizing Fan Speed section.
Air Info: Press to switch between air quality display options and
filter life information. See Mesh Dust Filter Maintenance section for
more information on dust filter, or Air Info Settings section for more
information on air quality.
MAX
Brightness: Adjusts the brightness of both the front display
screen and the top control panel. Switch between 3 options:
full brightness, partially dim, fully dim. In fully dim mode, the
air purifier will continue to run with the LED light o—perfect
for nighttime.
Child Lock: Press and hold the Brightness and Fan speed
buttons at the same time for two seconds to lock the top
control panel buttons.
To unlock, press and hold both buttons again for two seconds.
Tips and Tricks:
Optimize Performance in Eco Mode: After 100% clean air
status is achieved for 5 minutes in Auto Mode, your air purifier
will enter Eco Mode. Your unit’s filter life will be optimized.
Turn O Beeping: To turn o notification sounds, press and
hold the Air Info and Fan Speed buttons at the same time for
two seconds. To resume, press and hold both buttons again.
AIR INFO SETTINGS
The built-in sensor detects your air quality to give you real-time information. Use the AIR INFO button to switch between air quality
display options.
INFO
FRONT DISPLAY
SCREEN
REAL-TIME READING
% CLEAN AIR
Displays the air quality rating:
• Poor: 0%–69% • Fair: 70%–84% • Good: 85%–100%
% CLEAN AIR uses particulate matter (PM) air quality standards
as determined by the EPA to calculate the air quality rating.
PARTICLE SIZES
The PM (particulate matter) value is the amount of particulate in
your air, measured in micrograms (μg) per cubic meter. Your air
purifier measures three particle sizes, PM1, PM2.5, and PM10.
PM1
Displays the number of PM1-sized particles
in your air, including ultra-fine allergens.*
*Allergens refers to non-living matter.
PM2.5
Displays the number of PM2.5-sized particles
in your air, including smoke.
PM10
Displays the number of PM10-sized particles in
your air, including dust and pollen.
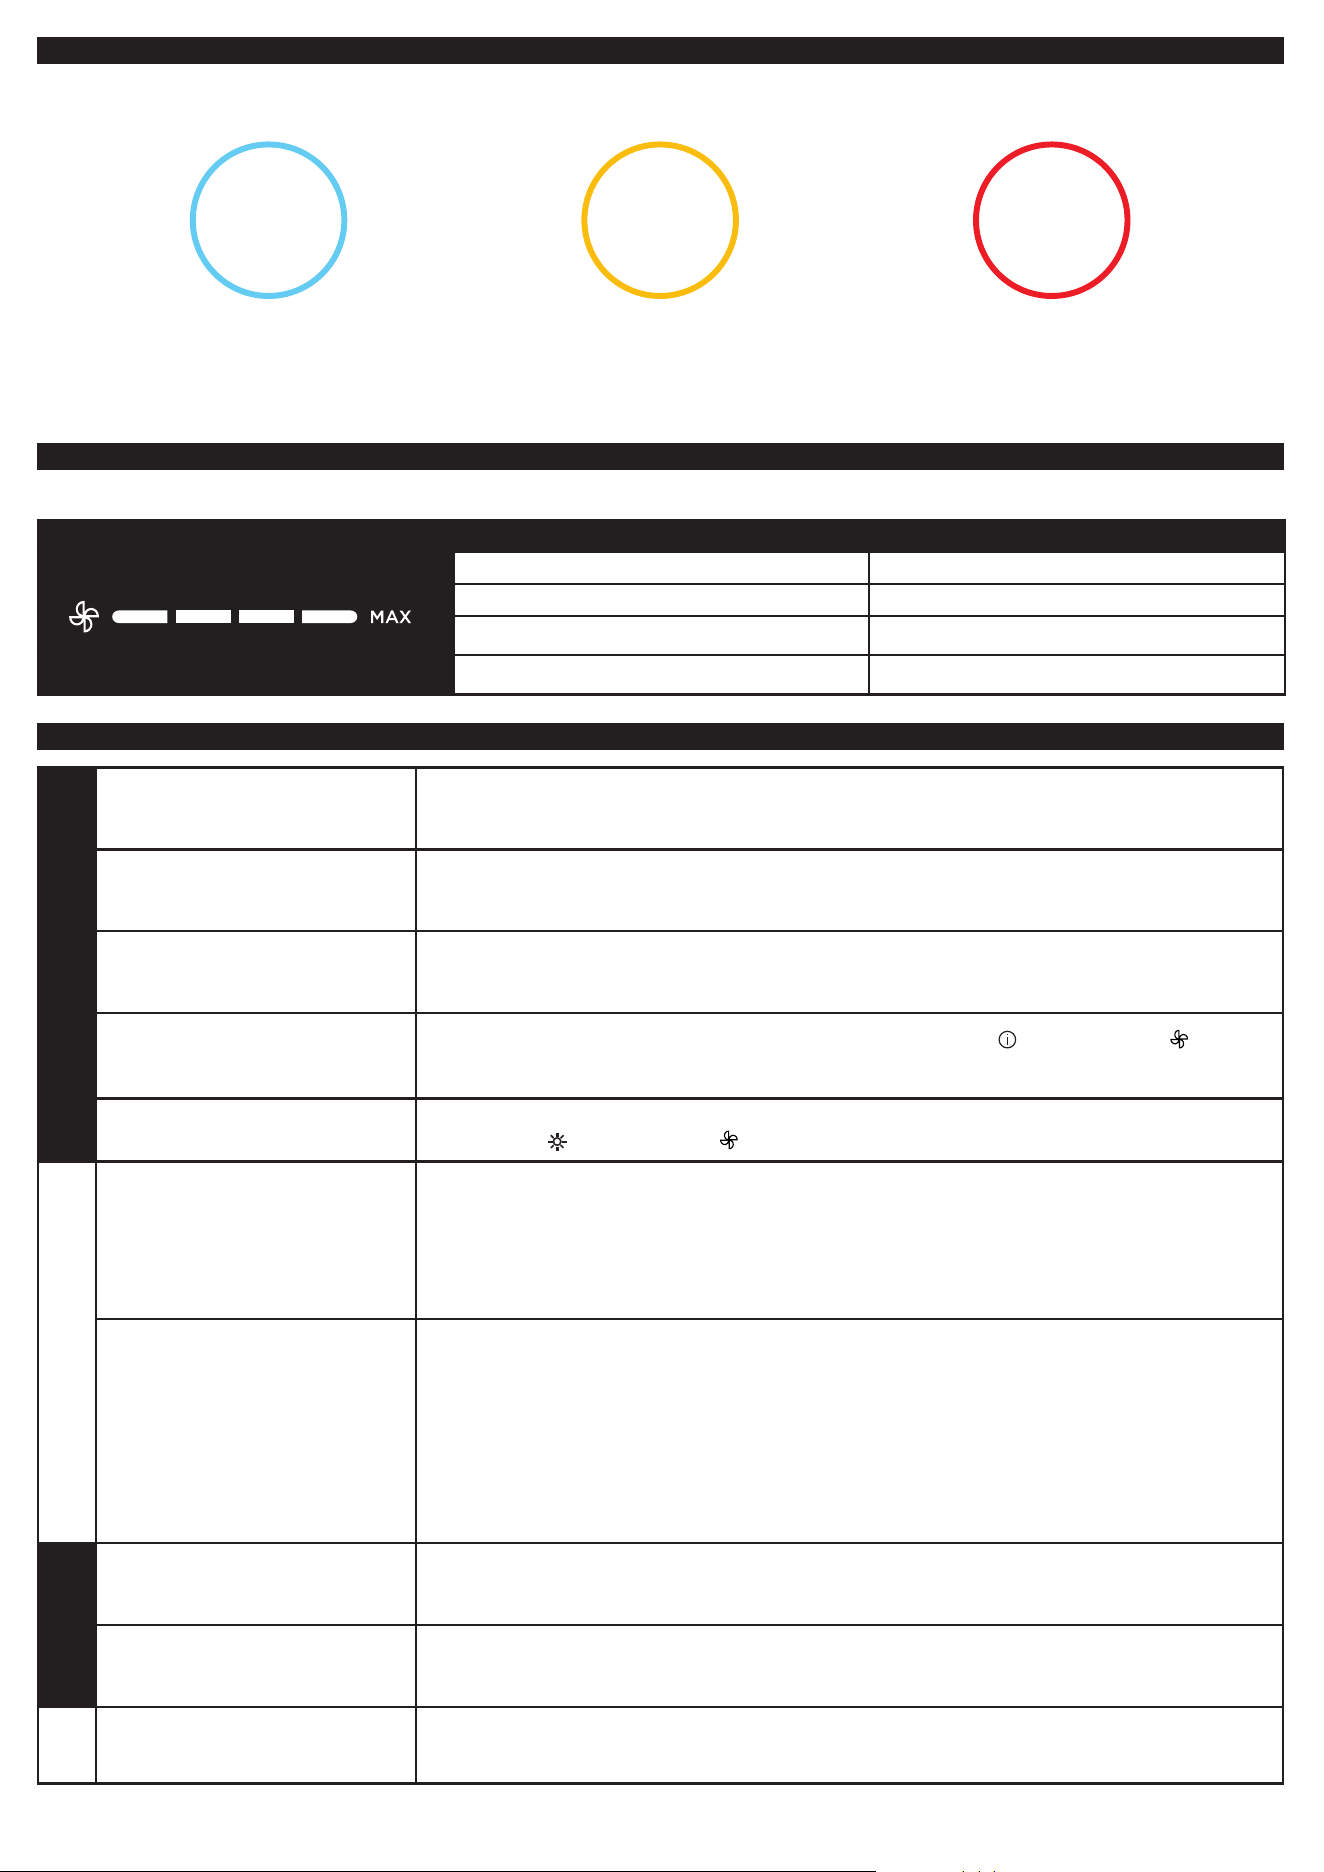
UNDERSTANDING YOUR AIR QUALITY
The rings on the front display will change color as your air quality changes,
allowing you to easily monitor your air quality even when the air purifier is across the room.
GOOD
85–100
%
0–25
particles
A blue ring means your air quality
is good, with a low level of particle
concentration.
FAIR
70–84
%
26–80
particles
An amber ring means your air quality
is fair, with a moderate level of particle
concentration. For better results, increase
fan speed or select Auto Mode.
POOR
0–69
%
81–430+
particles
A red ring means your air quality
is poor, with a high level of particle
concentration. For better results,
increase fan speed or select Auto Mode.
Note: The air quality sensor uses a cumulative particle count across all particle sizes to determine percentage of clean air.
OPTIMIZING FAN SPEED
Your air purifier has 5 speed settings plus Auto Mode. Adjust fan speed to optimize your cleaning performance.
DISPLAY SPEED BEST FOR
AUTO Optimizing HEPA filter life
1-2 Quiet operation
3-4 Reducing odors
5 (MAX) Maximum purification and debris capture
TROUBLESHOOTING AND FREQUENTLY ASKED QUESTIONS
Product
What are the
recommended settings?
We recommend using this air purifier in Auto Mode. Auto Mode leverages your air
purifier’s particle sensor, and this adjusts the fan speed automatically. Higher fan
speeds work best for reducing odors and capturing debris most effectively.
Where should I
set up my air purifier?
We recommend setting up the air purifier in the room of your home where there
is the most activity. This will help to clear the air of pollutants and odors as they
are introduced. Note: This model is recommended for smaller rooms.
What is Eco mode?
After 100% clean air is achieved for 5 minutes in Auto Mode, your air purifier will enter
Eco Mode. The fan will turn off until a significant number of particles are detected,
optimizing your HEPA filter’s life.
Can I mute the air purifier, so
it doesn’t beep when pressing
the buttons?
To turn off notification sounds, press and hold the Air Info
and Fan Speed
buttons
at the same time for two seconds. To reactivate sounds, press and hold both buttons
for 2 seconds again.
Why are the top control panel
buttons not working?
Your air purifier may have the child lock setting activated. Press and hold the
Brightness and Fan Speed button for two seconds to turn this setting on or off.
Air Quality
Why is my air quality
always at 100%?
If your air purifier displays a blue ring, your air quality is good. However, air quality will
fluctuate as you introduce pollutants into your home. Activities like smoking, cooking,
dusting, or spraying cleaning products (among other things) can add pollutants to your
air. Our Clean Sense IQ™ technology tracks this fluctuation in real time and adjusts as
it detects particles. To determine if the sensor is working correctly, spray perfume or
aerosol cleaning product near the sensor on the back of the air purifier. Please visit
sharkclean.com/support for more information.
Why is my air quality
never at 100%?
Why is my air quality
always at 0%?
If your air quality never reaches 100%, make sure that the HEPA filter is properly installed
and that its original plastic packaging has been removed. Activities like smoking, burning
candles, running a humidifier, opening windows, and cooking (among other things) can
add more pollutants to your air. Make sure to survey your environment and remove
anything that could be causing low air quality.
If the problem persists after these checks, the air quality sensor on the back of the air purifier
may be dirty, causing a false reading. First, turn off and unplug the unit. Remove the mesh
dust filter to locate the sensor on the back. Use a hand vacuum or hose attachment to
clean the area around the sensor. After cleaning, wait 30 seconds before plugging the unit
back in and turning it on. Let it run for 24 hours and monitor the air quality.
Mesh Dust
Filter
What is the mesh
dust filter for?
This easy-to-clean mesh dust filter captures large debris like hair, dust, and lint to protect
the 3-layer HEPA filter. Maintenance is required on this filter when indicated on the front
display. Refer to the Mesh Dust Filter Maintenance section for more information.
How do I know when to
clean the pre-filter?
When the mesh dust filter needs maintenance, the front display will show a
pulsing red ring along with the text “check dust filter.” Refer to the Mesh Dust Filter
Maintenance section for more information.
HEPA
Filter
Can I wash the HEPA filter?
No, the HEPA filter is not washable. Keep filter away from water and dispose of it when
it is dirty.
Customer Service
For further assistance, call 1-855-523-4061.
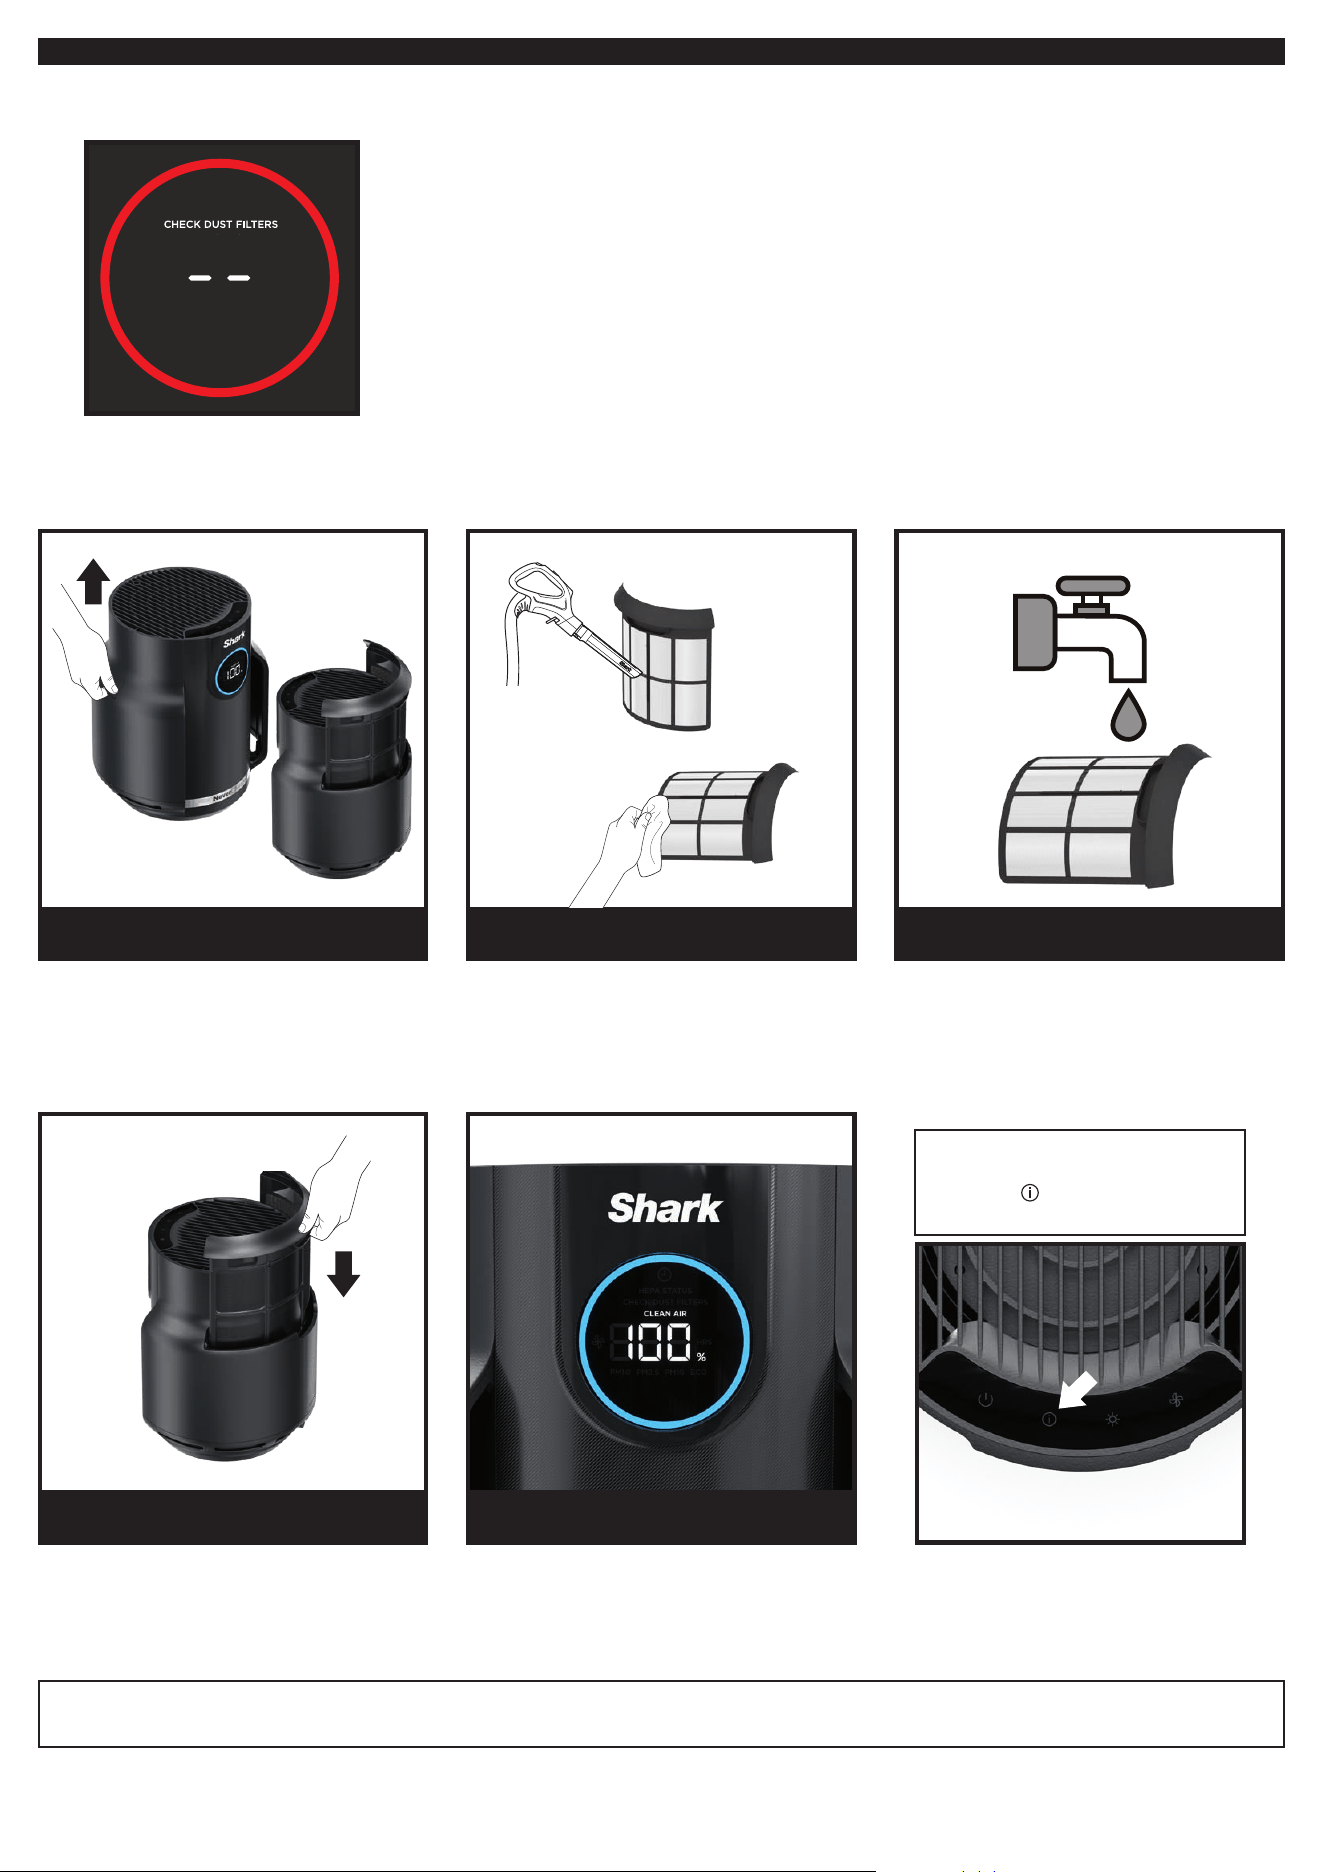
MESH DUST FILTER MAINTENANCE
Checking the Mesh Dust Filter:
When the mesh dust filter needs maintenance, the front display will show the following screen with a pulsing red ring:
Cleaning the Mesh Dust Filter:
When the Check Dust Filter message appears on the front display, remove the dust filter and inspect it for debris.
If maintenance is required, be sure to KEEP THE AIR PURIFIER PLUGGED IN and running, and complete the following steps:
Gently slide up the filter and remove it.
Check the screen for dust and
debris buildup.
Use a vacuum cleaner on low speed with
a soft brush attachment OR a cloth/towel
to remove debris from the mesh screen.
DO NOT use abrasive chemical cleaners.
If additional cleaning is required, rinse the
mesh dust filter with room temperature tap
water. Be sure to completely dry the screen
for 12 hours before reinstalling.
DO NOT USE the air purifier when mesh
filter is wet.
Gently reinsert the mesh dust filter into the
slot on the side of the air purifier. Be sure to
push the dust filter into place until it is flush
with the air purifier body.
Once the filter has been cleaned and
reinstalled, the air purifier will recalibrate
and begin to analyze air quality, indicated
by the rotating lights.
1. LOCATE AND REMOVE
MESH DUST FILTER
4. REINSTALL MESH DUST FILTER
2. CLEAN DUST FILTER
5. RECALIBRATION
3. ADDIITONAL CLEANING
(NOT REQUIRED)
Note: NeverChange HEPA Filter Technology allows up to 5 years* of use from a single HEPA filter.
*Tested to GB/T18801-2015 P.CCM, based on 50% CADR declined, 52 sq. ft. cleaning area and 12 hours daily operation on MAX fan speed.
Note: To manually reset the Check
Dust Filter indicator, press and hold
the Air Info
Button on the top
control panel for 1.5 seconds.
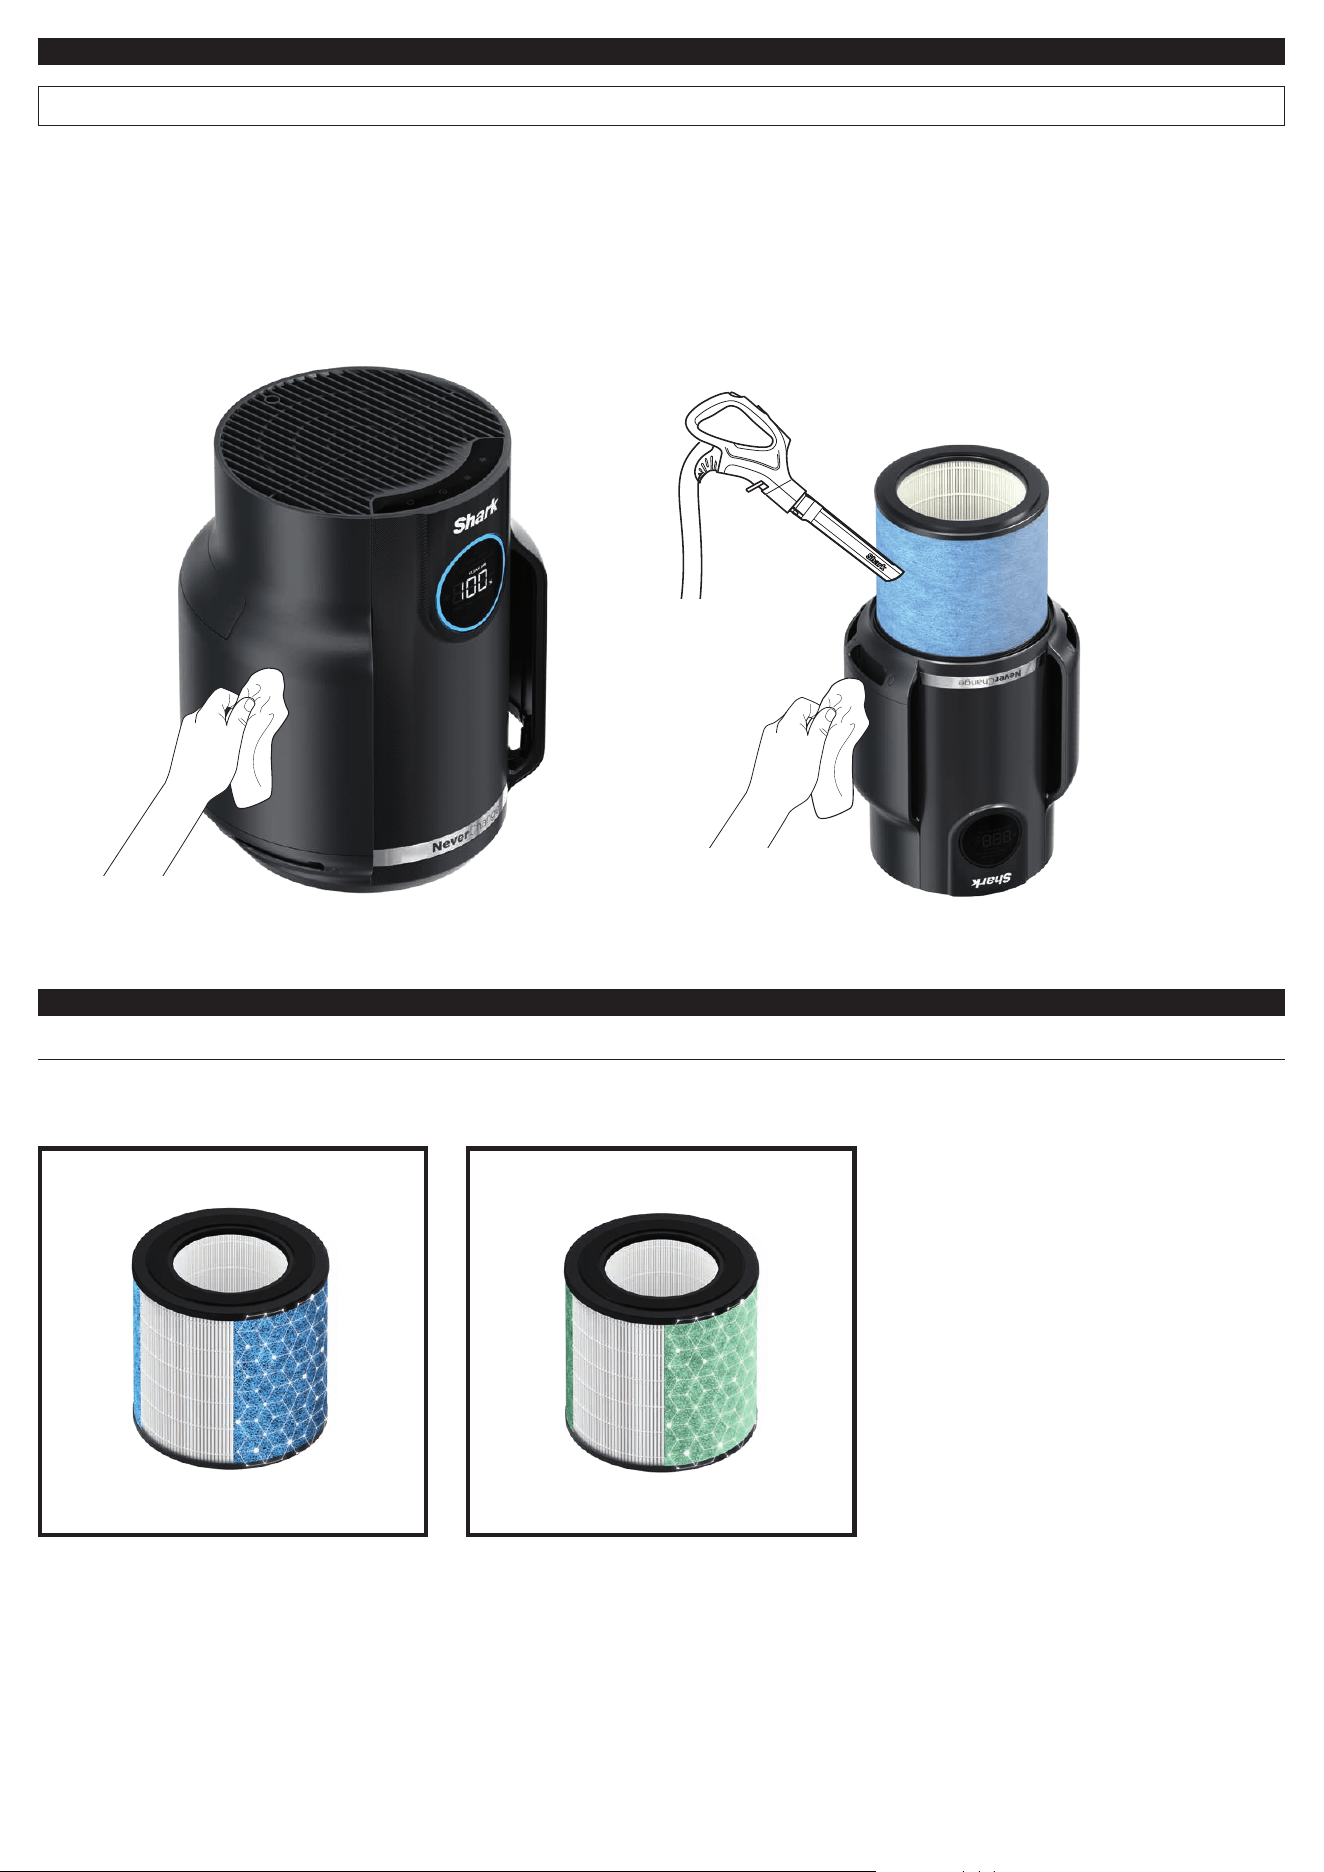
MAINTAINING YOUR AIR PURIFIER
NOTE: Unplug the air filter whenever doing any cleaning or maintenance (other than checking the mesh dust filter.)
Exterior Cleaning:
For best results, clean the exterior every two months or as needed.
Use a microfiber cloth to remove dust. To clean, wipe down the
exterior with a microfiber cloth dampened with warm, soapy
water. Avoid excess water and abrasive chemical cleaners to
prevent damage.
Interior Cleaning:
For best results, clean the interior of the air purifier every two
months or as needed. Remove the filter door, take out the HEPA
filter, and use a vacuum cleaner or a microfiber cloth to remove
dust and debris from the interior. DO NOT use abrasive chemical
cleaners or water on the inside of the air purifier.
AVAILABLE ACCESSORIES
ORDER ADDITIONAL ACCESSORIES AND REPLACEMENT FILTERS
Additional accessories and replacement filters are available on sharkaccessories.com
Shark NeverChange® Anti-Allergen
True HEPA Filter
Captures 99.98%* of large, small, and micro-
sized particles from the air and is equipped
with 240 ± 10g virgin carbon for heightened
protection against household odors.
*Based on IEST-RPCC007.3, 0.1–0.2 microns.
Shark NeverChange PetPro filter
Captures 99.98%* of large, small, and
micro-sized particles from the air and is
equipped with 90 ± 10g virgin carbon for
heightened protection against household
odors. Contains 25% more carbon for odor
absorption**.
*Based on IEST-RPCC007.3, 0.1–0.2 microns.
**Compared to the Shark NeverChange
Anti-Allergen True HEPA Filter.
TWO (2) YEAR LIMITED WARRANTY
The Two (2) Year Limited Warranty applies to purchases made from
authorized retailers of SharkNinja Operating LLC. Warranty coverage
applies to the original owner and to the original product only and is
not transferable.
SharkNinja warrants that the unit shall be free from defects in material and
workmanship for a period of two (2) years from the date of purchase when
it is used under normal household conditions and maintained according to
the requirements outlined in the Owner’s Guide, subject to the following
conditions and exclusions:
CA RESIDENTS ONLY:
The Two (2) Year Limited Warranty period begins on the original date of
delivery or pickup.
What is covered by this warranty?
1. The original unit and/or non-wearable parts deemed defective, in
SharkNinja’s sole discretion, will be repaired or replaced up to two (2)
years from the original purchase date.
2. In the event a replacement unit is issued, the warranty coverage ends
six (6) months following the receipt date of the replacement unit or
the remainder of the existing warranty, whichever is later. SharkNinja
reserves the right to replace the unit with one of equal or greater value.
What is not covered by this warranty?
1. Normal wear and tear of wearable parts (such as filters), which
require regular maintenance and/or replacement to ensure the proper
functioning of your unit, are not covered by this warranty. Replacement
parts are available for purchase at sharkaccessories.com.
2. Any unit that has been tampered with or used for commercial purposes.
3. Damage caused by misuse, abuse, negligent handling, failure to perform
required maintenance (e.g., not replacing the filters), or damage due to
mishandling in transit.
4. Consequential and incidental damages.
5. Defects caused by repair persons not authorized by SharkNinja. These
defects include damages caused in the process of shipping, altering, or
repairing the SharkNinja product (or any of its parts) when the repair is
performed by a repair person not authorized by SharkNinja.
6. Products purchased, used, or operated outside North America.
How to get service
If your appliance fails to operate properly while in use under normal
household conditions within the warranty period, visit sharkclean.com/
support for product care and maintenance self-help. Our Customer Service
Specialists are also available at 1-855-523-4061 to assist with product
support and warranty service options, including the possibility of
upgrading to our VIP warranty service options for select product categories.
So we may better assist you, please register your product online at
registeryourshark.com and have the product on hand when you call.
SharkNinja will cover the cost for the customer to send in the unit to us for
repair or replacement. A fee of $25.95 (subject to change) will be charged
when SharkNinja ships the repaired or replacement unit.
How to initiate a warranty claim
You must call 1-855-523-4061 to initiate a warranty claim. You will need
the receipt as proof of purchase. We also ask that you register your product
online at registeryourshark.com and have the product on hand when you
call, so we may better assist you. A Customer Service Specialist will provide
you with return and packing instruction information.
How state law applies
This warranty gives you specific legal rights, and you also may have other
rights that vary from state to state. Some states do not permit the exclusion
or limitation of incidental or consequential damages, so the above may not
apply to you.
IMPORTANT INFORMATION
REGISTER YOUR PURCHASE
registeryourshark.com
Scan QR code using
mobile device
RECORD THIS INFORMATION
Model Number:
�������������������������������������������������������������������������������������������������������������������������������������������������������������������������������
Serial Number:
���������������������������������������������������������������������������������������������������������������������������������������������������������������������������������
Date of Purchase:
�����������������������������������������������������������������������������������������������������������������������������������������������������������������������
(Keep receipt)
Store of Purchase:
���������������������������������������������������������������������������������������������������������������������������������������������������������������������
TECHNICAL SPECIFICATIONS
Voltage: 24V DC / 0.8A
Watts: 16W
Benefits of registering your product and creating an account:
• Get easier, faster product support and access to warranty
information
• Access troubleshooting and product care instructions
• Be among the first to know about exclusive product promotions
TIP: You can find the model and serial numbers on the QR code label
on the bottom of the unit.
FCC WARNINGS
Note: This unit has been tested and found to comply with FCC limits for Class
B digital devices. These limits are designed to provide reasonable protection
against harmful interference in a residential installation. This unit generates,
uses, and can radiate radio frequency energy, and if not installed and used in
accordance with the instructions, may cause harmful interference to
radio communications.
This device complies with part 15 of the FCC Rules. Operation is subject to the
following two conditions: (1) this device may not cause harmful interference,
and (2) this device must accept any interference received, including
interference that may cause undesired operation.
To see if this unit interferes with radio or television reception, try turning it
o and on.
To correct any interference:
■ Reorient or relocate the receiving antenna.
■ Increase the distance between the unit and the receiver.
■ Connect the unit to a dierent outlet than the receiver.
■ Consult the dealer or an experienced technician for help.
Caution: Any changes or modifications to this unit not expressly approved
by the party responsible for compliance could void the user’s authority to
operate it
PLEASE READ CAREFULLY AND KEEP FOR FUTURE REFERENCE.
This Owner’s Guide is designed to help you get a complete understanding of your new Shark® Air Purifier.
SharkNinja Operating LLC
US: Needham, MA 02494
CAN: Ville St-Laurent, QC H4S 1A7
1-800-798-7398
sharkclean.com
Illustrations may dier from actual product. We are constantly striving to improve our products; therefore the specifications contained herein
are subject to change without notice.
This product may be covered by one or more U.S. patents. See sharkninja.com/patents for more information.
© 2024 SharkNinja Operating LLC. SHARK and SHARK NEVERCHANGE are registered trademarks of SharkNinja Operating LLC.
CLEAN SENSE IQ is a trademark of SharkNinja Operating LLC.
HP070Series�IB-A4�wOut-ONT�MP�Mv14
