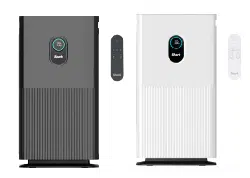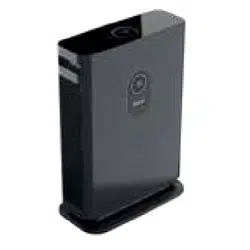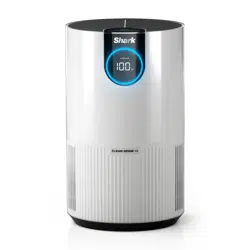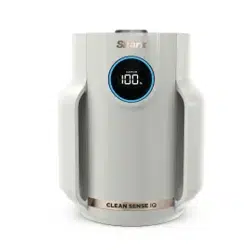
Air Purifier
HP072
OWNER’S GUIDE
IMPORTANT SAFETY INSTRUCTIONS
HOUSEHOLD USE ONLY
WARNING
TO REDUCE THE RISK OF FIRE, ELECTRIC SHOCK, OR INJURY:
GENERAL WARNINGS
1. DO NOT operate any unit with a damaged cord or
plug. Consult your local waste authority for information
regarding available recycling and/or disposal options.
2. DO NOT run cord under carpeting. DO NOT cover
cord with throw rugs, runners, or similar coverings.
DO NOT route cord under furniture or appliances.
Keep cord away from high-traffic areas where it will
not be tripped over.
3. If the power cord is damaged, it must be replaced by
the manufacturer, its service agent, or similarly qualified
persons in order to avoid a hazard.
4. This appliance should only be placed on flat and dry surfaces.
5. This appliance is not intended for use by anyone
(including children) with reduced physical, sensory or
mental capabilities, or lack of experience and knowledge,
unless they have been given supervision or instruction
concerning use of the appliance by a person responsible
for their safety.
6. Children should be supervised to ensure that they
DO NOT play with the appliance.
7. Cleaning and user maintenance shall not be made by
children without supervision.
8. Prior to cleaning or other maintenance, the appliance must
be unplugged from the electrical socket.
9. DO NOT handle plug or appliance with wet hands.
10. DO NOT use without filters in place.
11. Only use Shark® branded filters and accessories.
12. DO NOT damage the power cord:
a) DO NOT pull or carry appliance by the cord or use the
cord as a handle.
b) DO NOT unplug by pulling on cord. Grasp the plug, not
the cord.
c) DO NOT stand the appliance on the power cord, close a
door on the cord, pull the cord around sharp corners, or
leave the cord near heated surfaces.
13. DO NOT use with any opening blocked; keep free of dust,
lint, hair, and anything that may reduce airflow.
14. DO NOT use if airflow is restricted. If the air paths become
blocked, turn the appliance off and unplug from electrical
outlet. Remove all obstructions before you plug in and turn
on the unit again.
15. DO NOT use if appliance is not working as it should, or
has been dropped, damaged, left outdoors, or dropped
into water.
16. DO NOT place appliance on unstable surfaces such as
chairs or tables.
17. DO NOT use in the following areas:
a) Wet or damp surfaces
b) Outdoor areas
c) Spaces that are enclosed and may contain explosive or
toxic fumes or vapors (lighter fluid, gasoline, kerosene,
paint, paint thinners, mothproofing substances, or
flammable dust)
18. Turn off all controls before plugging in or unplugging the
appliance.
19. Unplug from electrical outlet when not in use and
before general maintenance or cleaning. For mesh dust
filter maintenance, please refer to the mesh dust filter
maintenance section.
20. Hand wash exterior/hard plastic/non-electronic parts with
a damp cloth only. Do not immerse. Cleaning
with chemicals could damage the unit.
21. Make sure filters are in place after routine maintenance.
22. Not suitable for use with solid-state speed controls.
ANTI-ODOUR TECHNOLOGY
23. Observe the following when interacting with the
Anti-Odour Technology cartridge.
a) DO NOT attempt to disassemble Anti-Odour
Technology cartridge.
b) Avoid direct contact with the fragrance pod in
the cartridge.
c) DO NOT directly inhale from the anti-odour technology
cartridge.
d) Keep away from children and pets.
e) Keep away from heat, sparks, and open flame.
f) DO NOT place in direct sunlight.
g) Avoid contact with fabrics and finished surfaces.
FRAGRANCE CARTRIDGE FIRST AID
a) Eye contact: Remove contact lenses if present.
Rinse continuously with water for several minutes
b) Skin contact: Wash hands thoroughly after handling.
If irritation or rash develops, seek medical
advice/attention.
c) Inhalation: Move person to fresh air if they are
experiencing any respiratory symptoms. If
symptoms persist, seek medical advice/attention.
d) Ingestion: DO NOT induce vomiting. Seek medical
advice/attention.
SAVE THESE INSTRUCTIONS
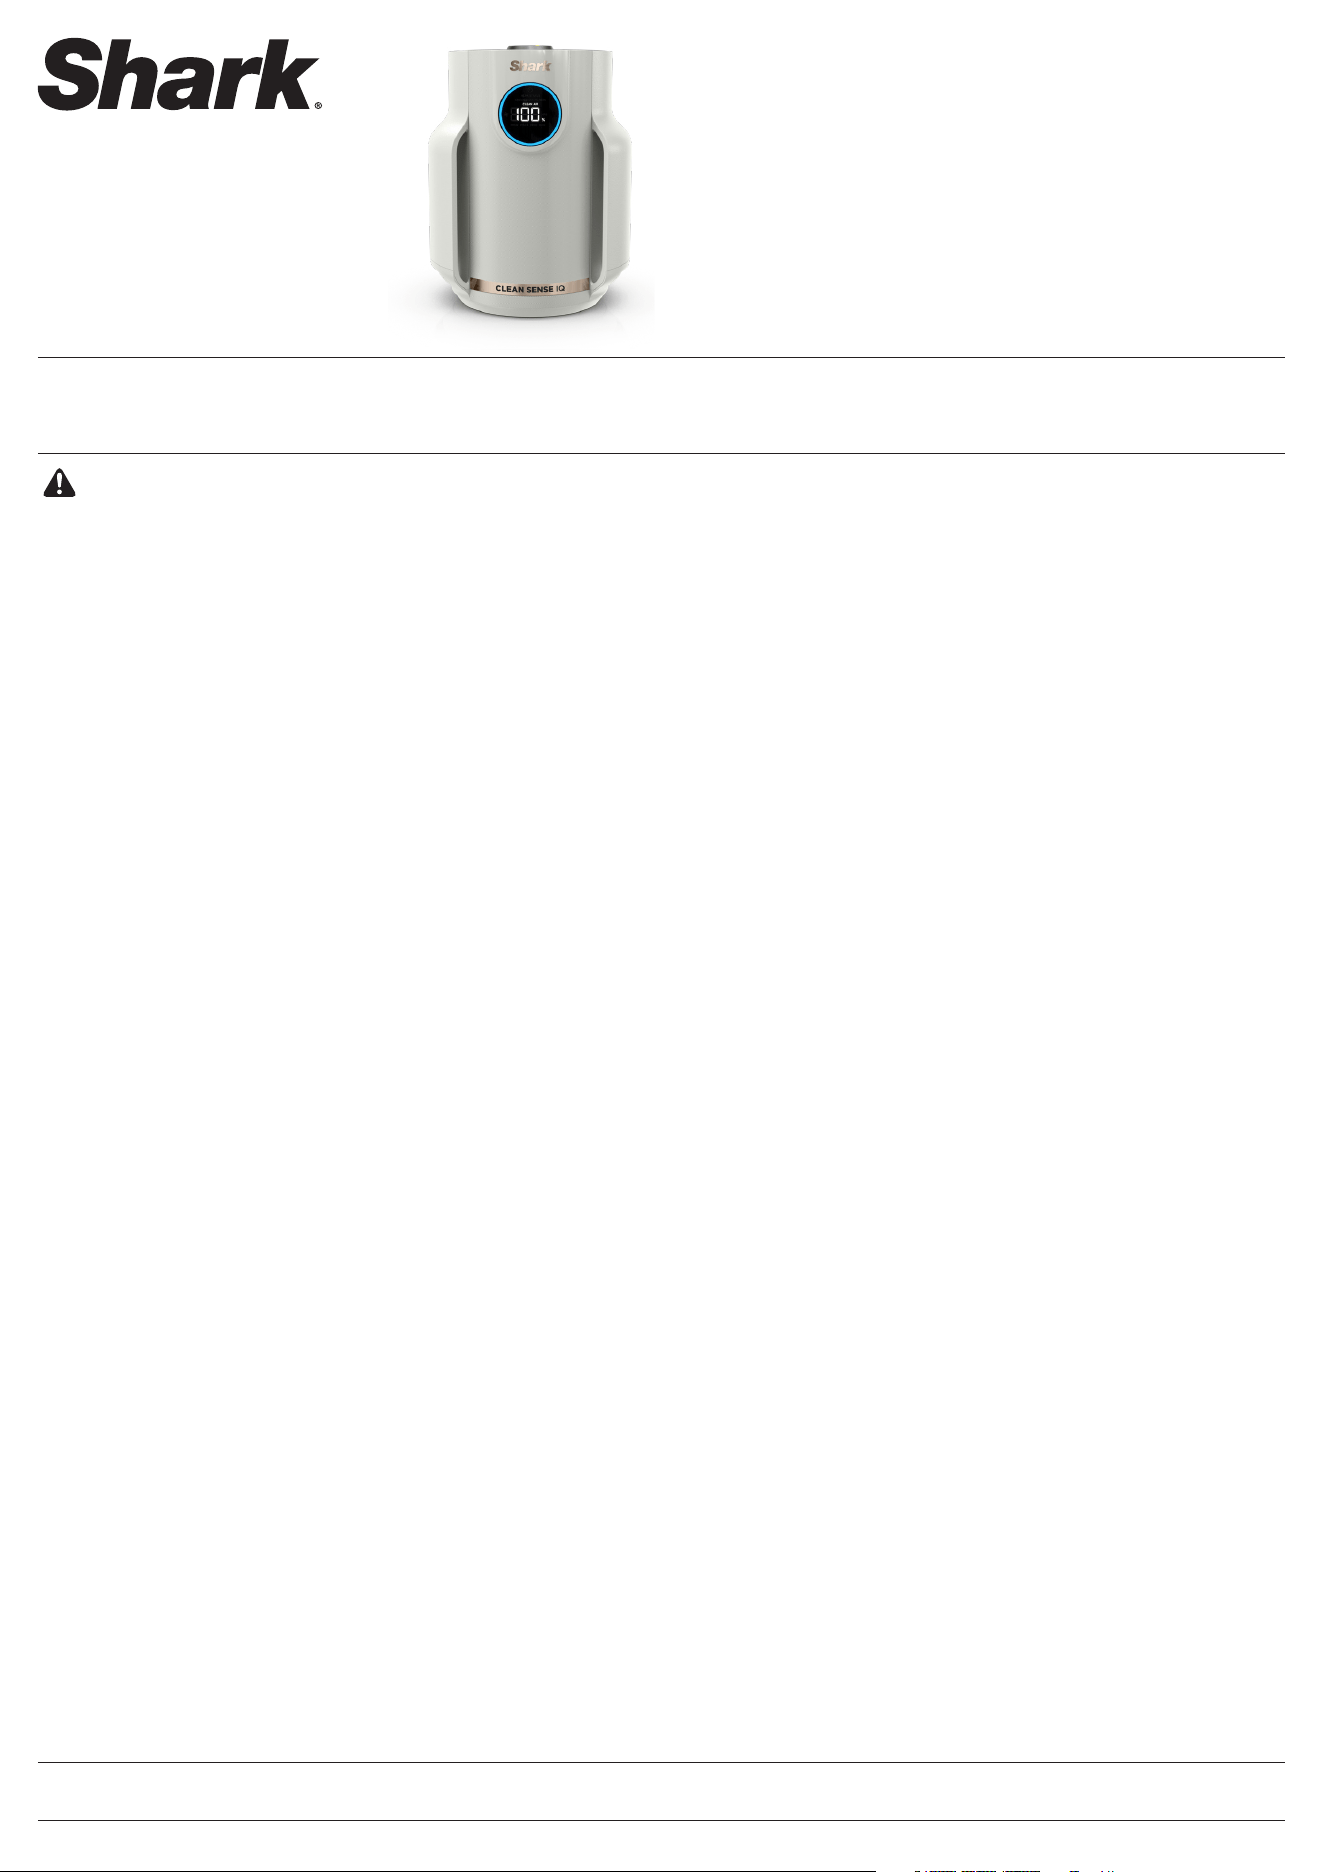
SETTING UP YOUR AIR PURIFIER
Parts:
1. Air Output Vents
2. Anti-Odour Technology Dial
3. Control Panel
4. Front Display
5. Air Purifier Body
6. Air Intake Vents
7. Mesh Dust Filters
8. HEPA Filter
9. HEPA Filter Door
1. DO NOT plug in the air purifier. First,
carefully turn the air purifier upside
down and place it on a level floor surface.
Rotate the filter door anti-clockwise to
unlock it, then lift it o to access the
HEPA filter.
2. Take the HEPA filter out of its plastic
packaging. Reinstall the HEPA filter in
either orientation.
3. With the HEPA filter reinstalled, rotate
the filter door clockwise until it clicks
into place.
4. Set up the air purifier on a level surface,
at least 3 inches (8 cm) from walls and
objects.
If Anti-Odour Technology is included
with your air purifier, find the odour
cartridge and follow the instructions to
install it.
5. Carefully remove the yellow sticker on
the front of the air purifier to access the
display panel.
Plug the air purifier into an electrical
socket and press the power button on
the top control panel.
6. When the air purifier power is on, the
air purifier will begin to analyse the air
quality, indicated by the rotating lights.
After a few seconds, the air purifier will
display the current air purification status.
TIPS FOR SETTING
UP YOUR AIR PURIFIER
• Make sure the front panel of the air purifier
faces away from the closest wall.
• Do not move the unit while it is running. Turn
o the power and unplug the air purifier before
moving it.
• Make sure the air intake vents are not blocked.
• Do not place anything on the air purifier.
• Do not place the air purifier near heaters
or radiators.
• Keep the air purifier out of direct sunlight and
away from water or other liquid.
• Keep all nearby doors and windows closed
when operating the air purifier.
• Avoid using in very humid environments.
Note: HEPA Filter Technology allows up to 5 years* of use out of a single HEPA filter.
*Tested to GB/T18801-2022 P.CCM, based on 50% CADR decline, 4 m2 cleaning area and 12 hours daily operation on MAX fan speed.
6.
5.
7.
3.
1.
9.
8.
2.
4.
321
Turn
upside
down
Turn
upside
down
Twist until
audible click
BEFORE USE:
Remove
HEPA filter
from plastic
Anti-Odour cartridge is optional.
Does not need to be inserted for the
Air Purifier to function.
8cm
minimum
4 5 6
Insert
Anti-Odour
Technology
Cartridge
Remove plastic protect film
then power on
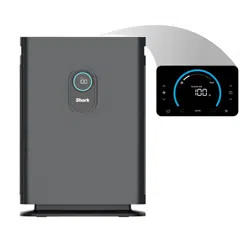
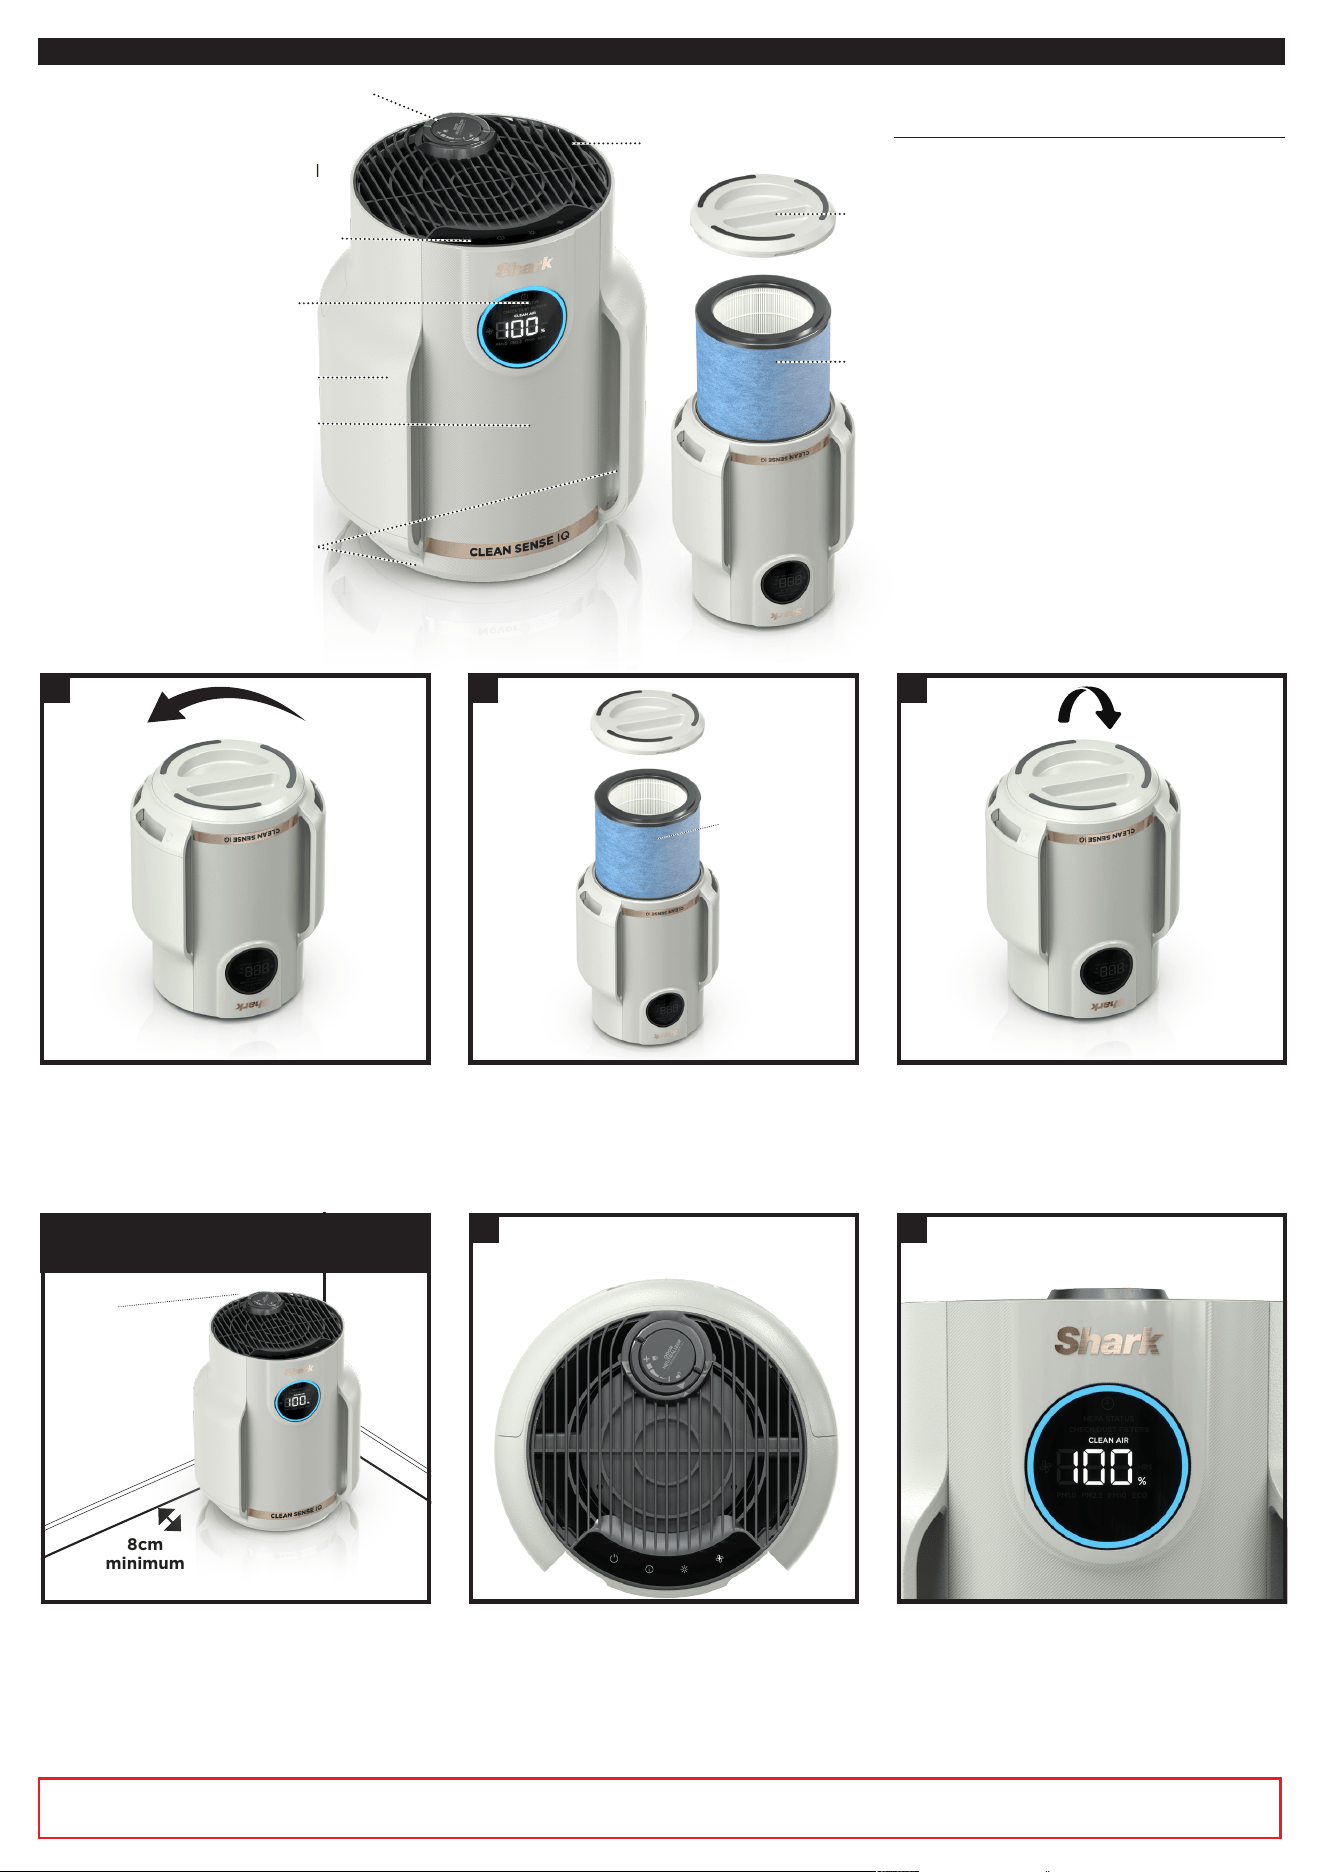
CONTROL PANEL
There is a control panel on the top of the air purifier and a display screen on the front.
TOP CONTROL PANEL
FRONT DISPLAY SCREEN
Displays the current air purification status based on the Air Info
mode selected on the top control panel.
TOP CONTROL PANEL BUTTONS
MAX
On/O: Press to turn the power on or o.
MAX
Fan Speed: Press repeatedly to cycle through the fan speed options:
A Auto, 1 Quiet, 2 Low, 3 Medium, 4 High, 5 Maximum. For optimal
filter life and performance, select Auto mode by cycling through
the speed levels until the A indicator appears. In Auto mode, the
fan speed automatically adjusts: as air quality improves, fan speed
decreases. If air quality worsens, fan speed will increase. For tips and
more information, see the Optimising Fan Speed section.
Air Info: Press to switch between air quality display options and
filter life information. See Mesh Dust Filter Maintenance section for
more information on dust filter, or Air Info Settings section for more
information on air quality.
MAX
Brightness: Adjusts the brightness of both the front display
screen and the top control panel. Switch between 3 options:
full brightness, partially dim, fully dim. In fully dim mode, the
air purifier will continue to run with the LED light o—perfect
for nighttime.
Child Lock: Press and hold the Brightness and Fan speed
buttons at the same time for two seconds to lock the top
control panel buttons. To unlock, press and hold both
buttons again for two seconds.
Tips and Tricks:
Optimise Performance in Eco Mode: After 100% clean air
status is achieved for 5 minutes in Auto Mode, your air purifier
will enter Eco Mode. Your unit’s filter life will be optimised.
Turn O Beeping: To turn o notification sounds, press and
hold the Air Info and Fan Speed buttons at the same time for
two seconds. To resume, press and hold both buttons again.
AIR INFO SETTINGS
The built-in sensor detects your air purification status to give you real-time information. Use the AIR INFO button to switch between air
status display options.
INFO
FRONT DISPLAY
SCREEN
REAL-TIME READING
% STATUS
Displays the air purification status rating:
• Poor: 0%–69% • Fair: 70%–84% • Good: 85%–100%
% STATUS uses particulate matter (PM) air purification standards as determined by the
EPA (United States Environmental Protection Agency) to calculate the status rating.
PARTICLE SIZES
The PM (particulate matter) value is the amount of particulate in
your air, measured in micrograms (μg) per cubic metre. Your air
purifier measures three particle sizes, PM1, PM2.5, and PM10.
PM1
Displays the number of PM1-sized particles
in your air, including ultra-fine allergens.
PM2.5
Displays the number of PM2.5-sized particles
in your air, including smoke.
PM10
Displays the number of PM10-sized particles in your air, including dust, and pollen.
UNDERSTANDING YOUR AIR QUALITY
The rings on the front display will change colour as your air purification status changes,
allowing you to easily monitor the purification even when the air purifier is across the room.
GOOD
85–100
%
0–25
particles
A blue ring means your air purification
status is good, with a low level of
particle concentration.
FAIR
70–84
%
26–80
particles
An amber ring means your air purification
status is fair, with a moderate level of
particle concentration. For better results,
increase fan speed or select Auto Mode.
POOR
0–69
%
81–430+
particles
A red ring means your air purification
status is poor, with a high level of particle
concentration. For better results, increase
fan speed or select Auto Mode.
Note: The air purification status sensor uses a cumulative particle count across all particle sizes to determine air purification status.
OPTIMISING FAN SPEED
Your air purifier is equipped with 5 fan speed settings. Adjust fan speed to Optimise your cleaning performance.
DISPLAY SPEED BEST FOR
AUTO Optimising HEPA filter life
1-2 Quiet operation
3-4 Reducing odours.
5 (MAX) Maximum purification and debris capture.
TROUBLESHOOTING AND FREQUENTLY ASKED QUESTIONS
Product
What are the
recommended
settings?
We recommend using this air purifier in Auto Mode. Auto Mode leverages your air purifier’s particle
sensor, and this adjusts the fan speed automatically. Higher fan speeds work best for reducing
odours and capturing debris most effectively.
Where should I
set up my air purifier?
We recommend setting up the air purifier in the room of your home where there is the most activity.
This will help to clear the air of pollutants and odours as they are introduced.
What is Eco mode?
After 100% clean air is achieved for 5 minutes in Auto Mode, your air purifier will enter Eco
Mode. The fan will turn off until a significant number of particles are detected, optimising your
HEPA filter’s life.
Can I mute the air
purifier, so it doesn’t
beep when pressing
the buttons?
To turn off notification sounds, press and hold the Air Info
and Fan Speed
buttons at the same
time for two seconds. To reactivate sounds, press and hold both buttons for 2 seconds again.
Why are the top
control panel buttons
not working?
Your air purifier may have the child lock setting activated. Press and hold the Brightness and the
Fan Speed buttons at the same time for two seconds to turn this setting on or off.
Air Quality
Why is my air
purification status
always at 100%?
If your air purifier displays a blue ring, your air purification status is good. However, air purification
status will fluctuate as you introduce pollutants into your home. Activities like smoking, cooking,
dusting, or spraying cleaning products (among other things) can add pollutants to your air. Our Clean
Sense IQ technology tracks this fluctuation in real time and adjusts as it detects particles. To determine
if the sensor is working correctly, spray a small amount of perfume or aerosol cleaning product near
the sensor on the back of the air purifier. Please visit support.sharkclean.co.uk for more information.
Why is my air
purification status
never at 100%?
Why is my air quality
always at 0%?
If your air purification status never reaches 100%, make sure that the HEPA filter is properly installed and
that its original plastic packaging has been removed. Activities like smoking, burning candles, running a
humidifier, opening windows, and cooking (among other things) can add more pollutants to your air. Make
sure to survey your environment and remove anything that could be causing low air purification status.
If the problem persists after these checks, the air quality sensor on the back of the air purifier may be dirty,
causing a false reading. First, turn off and unplug the unit. Remove the mesh dust filter to locate the sensor on
the back. Use a hand vacuum or hose attachment to clean the area around the sensor. After cleaning, wait 30
seconds before plugging the unit back in and turning it on. Let it run for 24 hours and monitor the air quality.
Mesh Dust
Filter
What is the mesh dust
filter for?
This easy-to-clean mesh dust filter captures large debris like hair, dust, and lint to protect the
3-layer HEPA filter. Maintenance is required on this filter when indicated on the front display.
Refer to the Mesh Dust Filter Maintenance section for more information.
How do I know when to
clean the pre-filter?
When the mesh dust filter needs maintenance, the front display will show a
pulsing red ring along with the text “check dust filter.” Refer to the Mesh Dust Filter Maintenance
section for more information.
HEPA
Filter
Can I wash the HEPA
filter?
No, the HEPA filter is not washable. Keep filter away from water.
Customer Service
For further assistance, call 0800 862 0453.
MAX
MAX
MAX
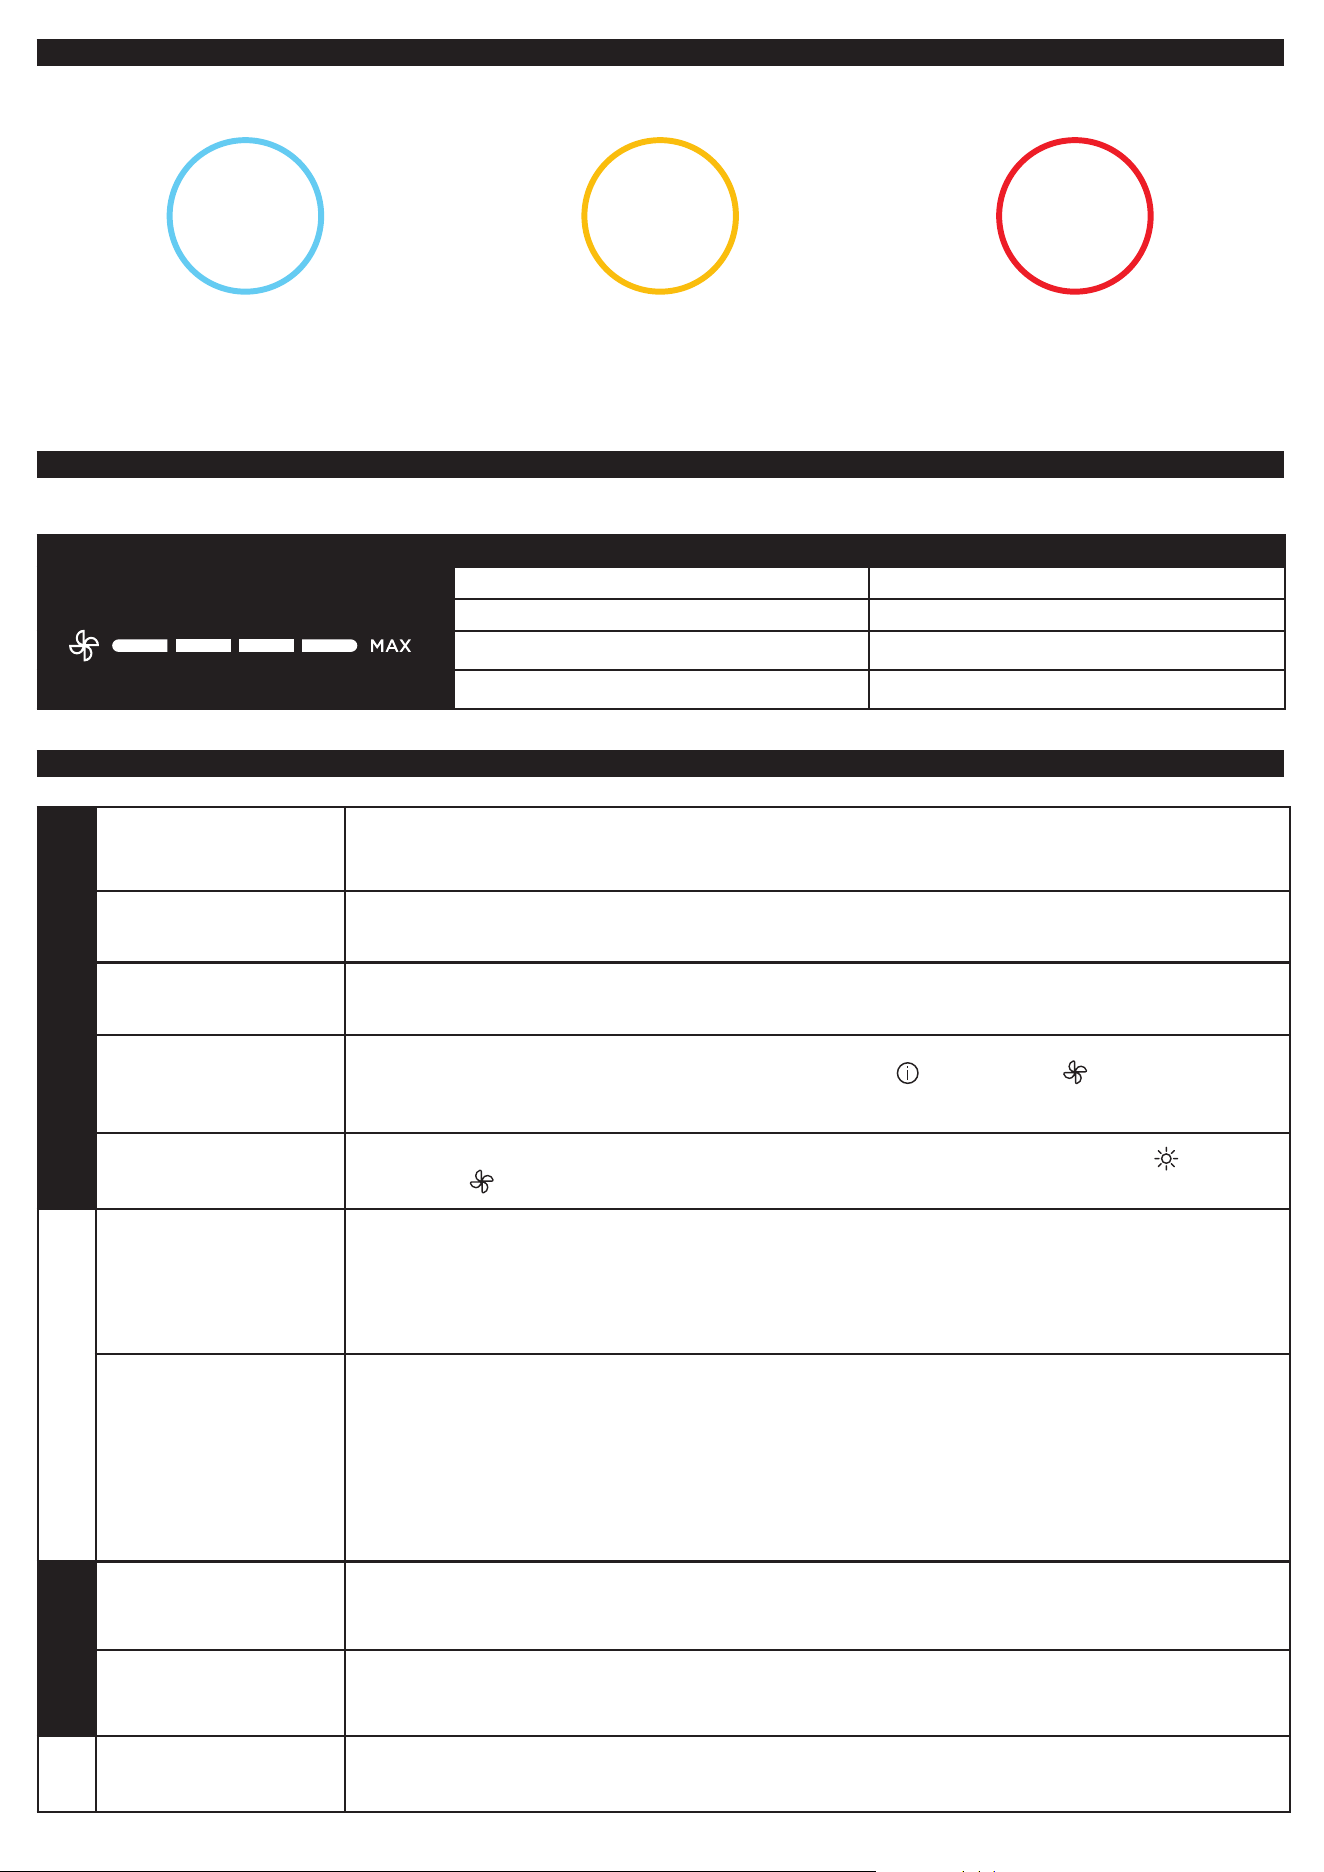
MESH DUST FILTER MAINTENANCE
Checking the Mesh Dust Filter:
When the mesh dust filter needs maintenance, the front display will show the following screen with a pulsing red ring:
Cleaning the Mesh Dust Filter:
When the Check Dust Filter message appears on the front display, remove the dust filter and inspect it for debris.
If maintenance is required, be sure to KEEP THE AIR PURIFIER PLUGGED IN and running, and complete the following steps:
Gently slide up the filters to remove
them. Check the screens for dust and
debris buildup.
Use a vacuum cleaner on low power with
a soft brush attachment OR a cloth/towel
to remove debris from the mesh screens.
DO NOT use abrasive chemical cleaners.
If additional cleaning is required, rinse the
mesh dust filter with room temperature tap
water. Be sure to completely dry the screen
for 12 hours before reinstalling.
DO NOT USE the air purifier when mesh
filter is wet.
Gently reinsert the mesh dust filter into the
slot on the side of the air purifier. Be sure to
push the dust filter into place until it is flush
with the air purifier body.
Once the filter has been cleaned and
reinstalled, the air purifier will recalibrate
and begin to analyse air quality, indicated
by the rotating lights.
1. LOCATE AND REMOVE
MESH DUST FILTER
4. REINSTALL MESH DUST FILTER
2. CLEAN DUST FILTERS
5. RECALIBRATION
3. ADDITIONAL CLEANING
(NOT REQUIRED)
Note: The HEPA Filter Technology allows up to 5 years* of use out of a single HEPA filter.
*Tested to GB/T18801-2022 P.CCM, based on 50% CADR decline, 4 m2 cleaning area and 12 hours daily operation on MAX fan speed.
Note: To manually reset the Check
Dust Filter Indicator, press and hold
the Air Info button on the top control
pane for 1.5 seconds.
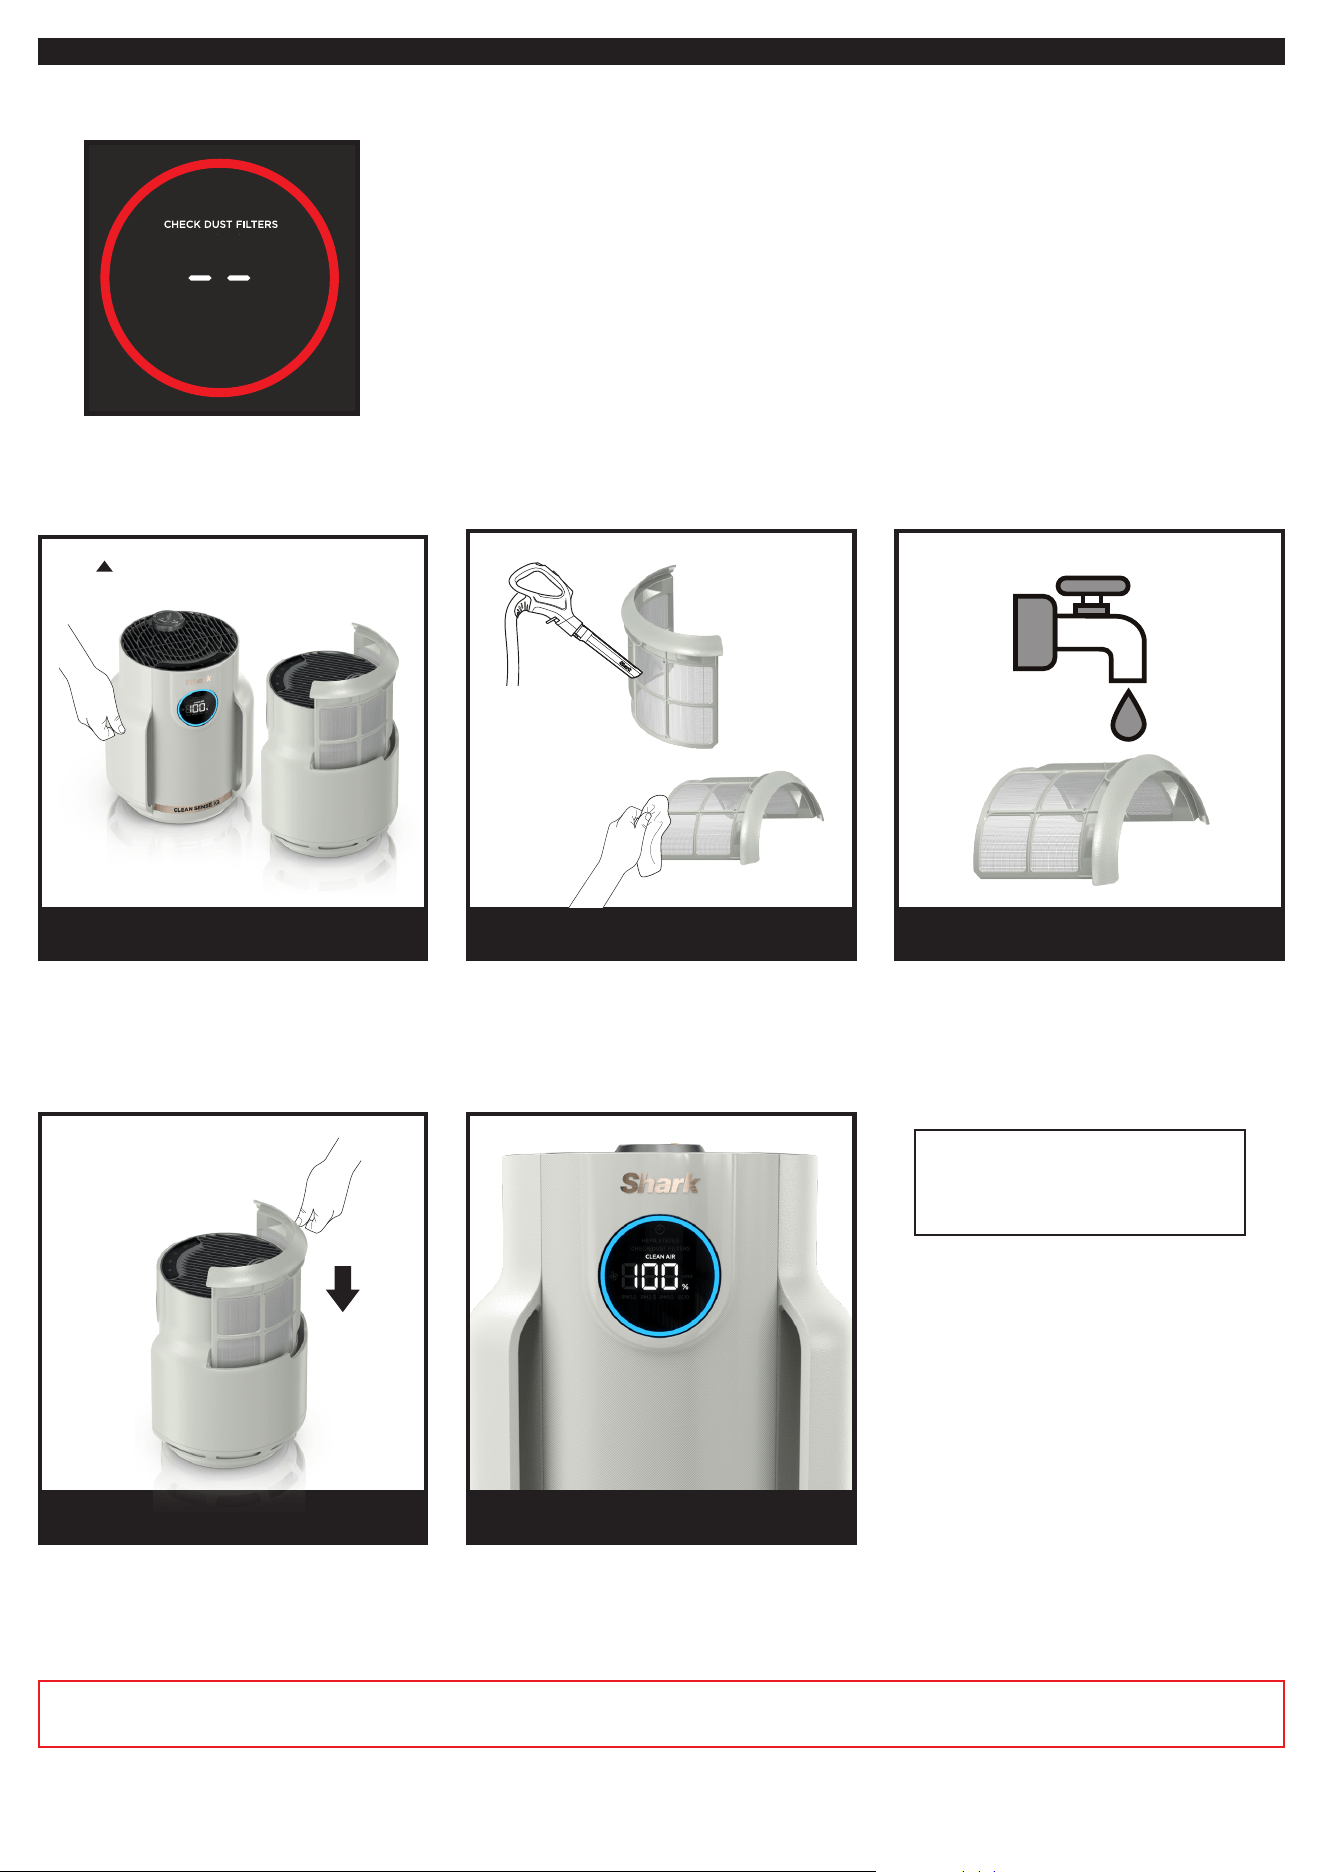
MAINTAINING YOUR AIR PURIFIER
NOTE: Unplug the air filter whenever doing any cleaning or maintenance (other than checking the mesh dust filter.)
Exterior Cleaning:
For best results, clean the exterior every two months or as needed.
Use a microfiber cloth to remove dust. To clean, wipe down the
exterior with a microfiber cloth dampened with warm, soapy
water. Avoid excess water and abrasive chemical cleaners to
prevent damage.
Interior Cleaning:
For best results, clean the interior of the air purifier every two
months or as needed. Remove the filter door, take out the HEPA
filter, and use a vacuum cleaner or a microfiber cloth to remove
dust and debris from the interior. DO NOT use abrasive chemical
cleaners or water on the inside of the air purifier.
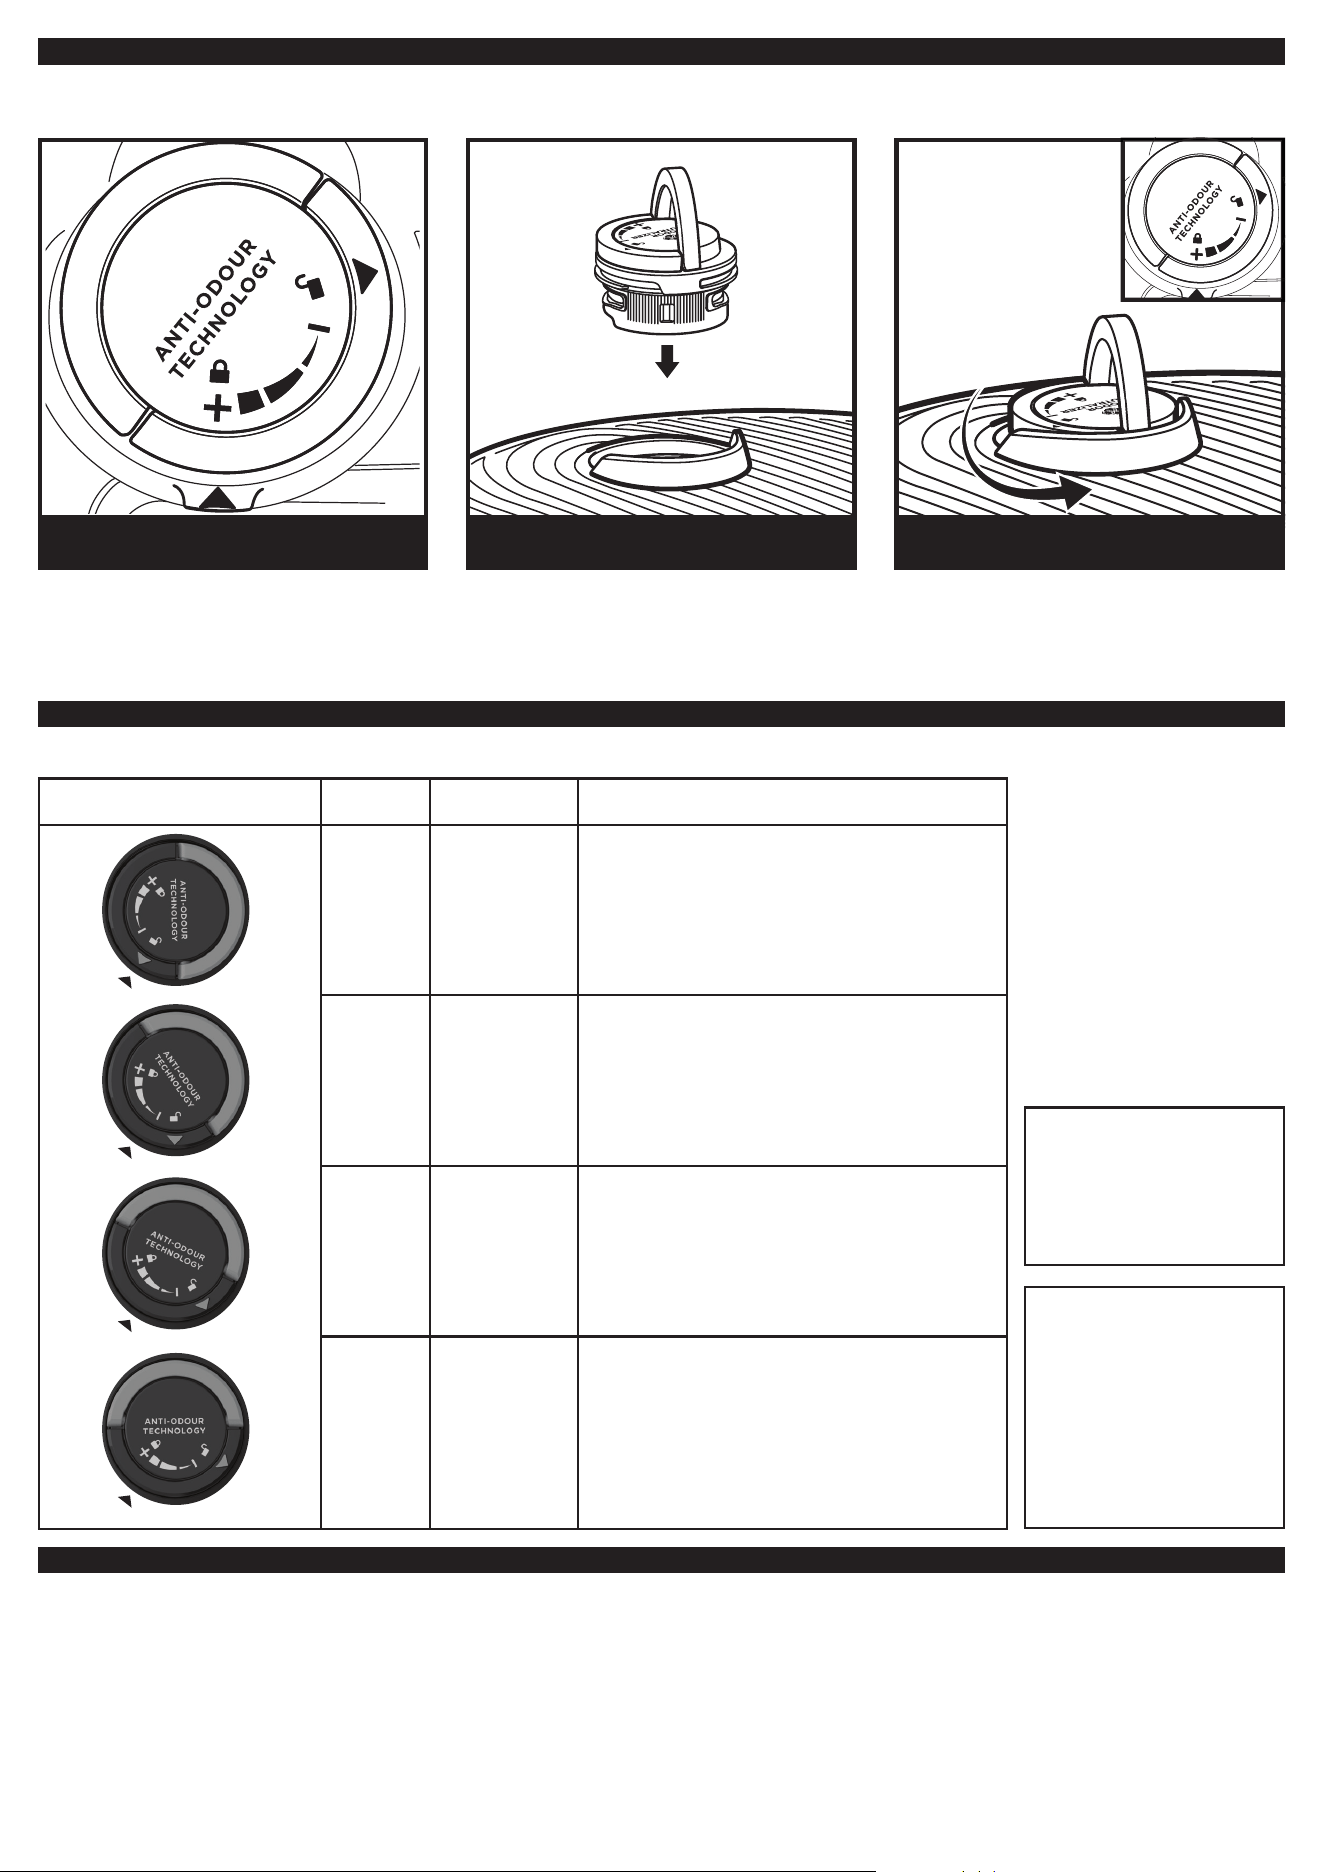
ANTI-ODOUR TECHNOLOGY
SETTINGS
Settings: The Anti-Odour Technology dial has 4 intensity settings: Low, Medium, High, and O.
TIPS
Odour Cartridge Removal
• The odour cartridge can be removed if you don’t want to use the Anti-Odour Technology.
• To remove the cartridge, first remove the odour cartridge assembly from the air purifier. Flip up the handle on the odour cartridge assembly
and rotate clockwise until the two arrows are aligned.Pull the handle up and remove from the air purifier.
• Hold the odour cartridge assembly so that the coloured base is visible and rotate the cartridge anticlockwise in the dial housing to remove.
• The dial housing can then be inserted into the air purifier.
Maintenance Required
• Replace the cartridge as recommended under Odour Cartridge Replacement.
• Visit sharkclean.co.uk/shark-parts-accessories/ to learn more and purchase replacements.
Fragrance Strength Over Time
• The intensity of the Anti-Odour Technology’s fragrance may diminish over time. It may also have no noticeable fragrance at all. This is
natural and does not indicate that the technology is not working. Follow replacement instructions to ensure continued performance.
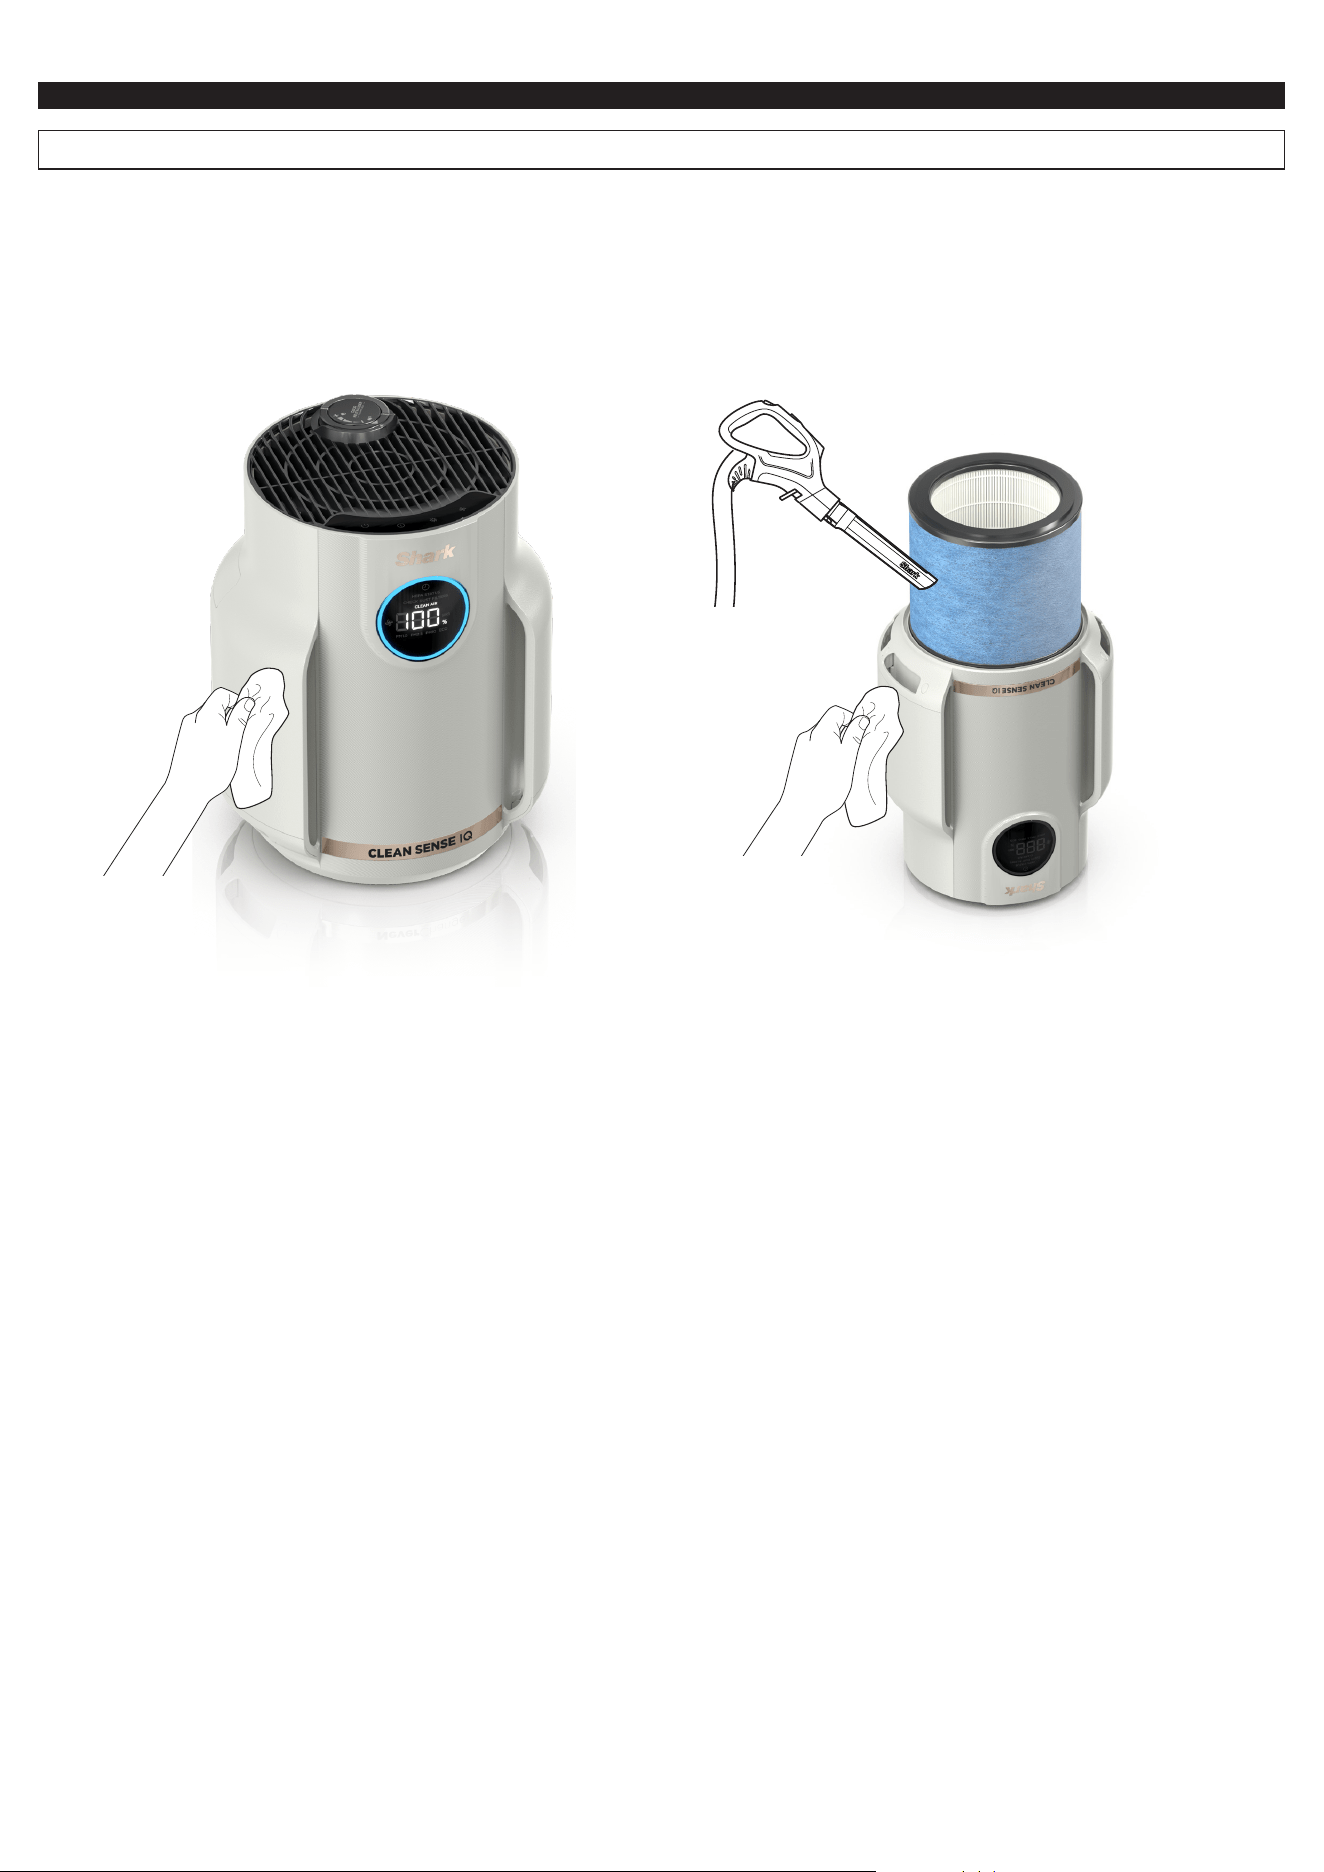
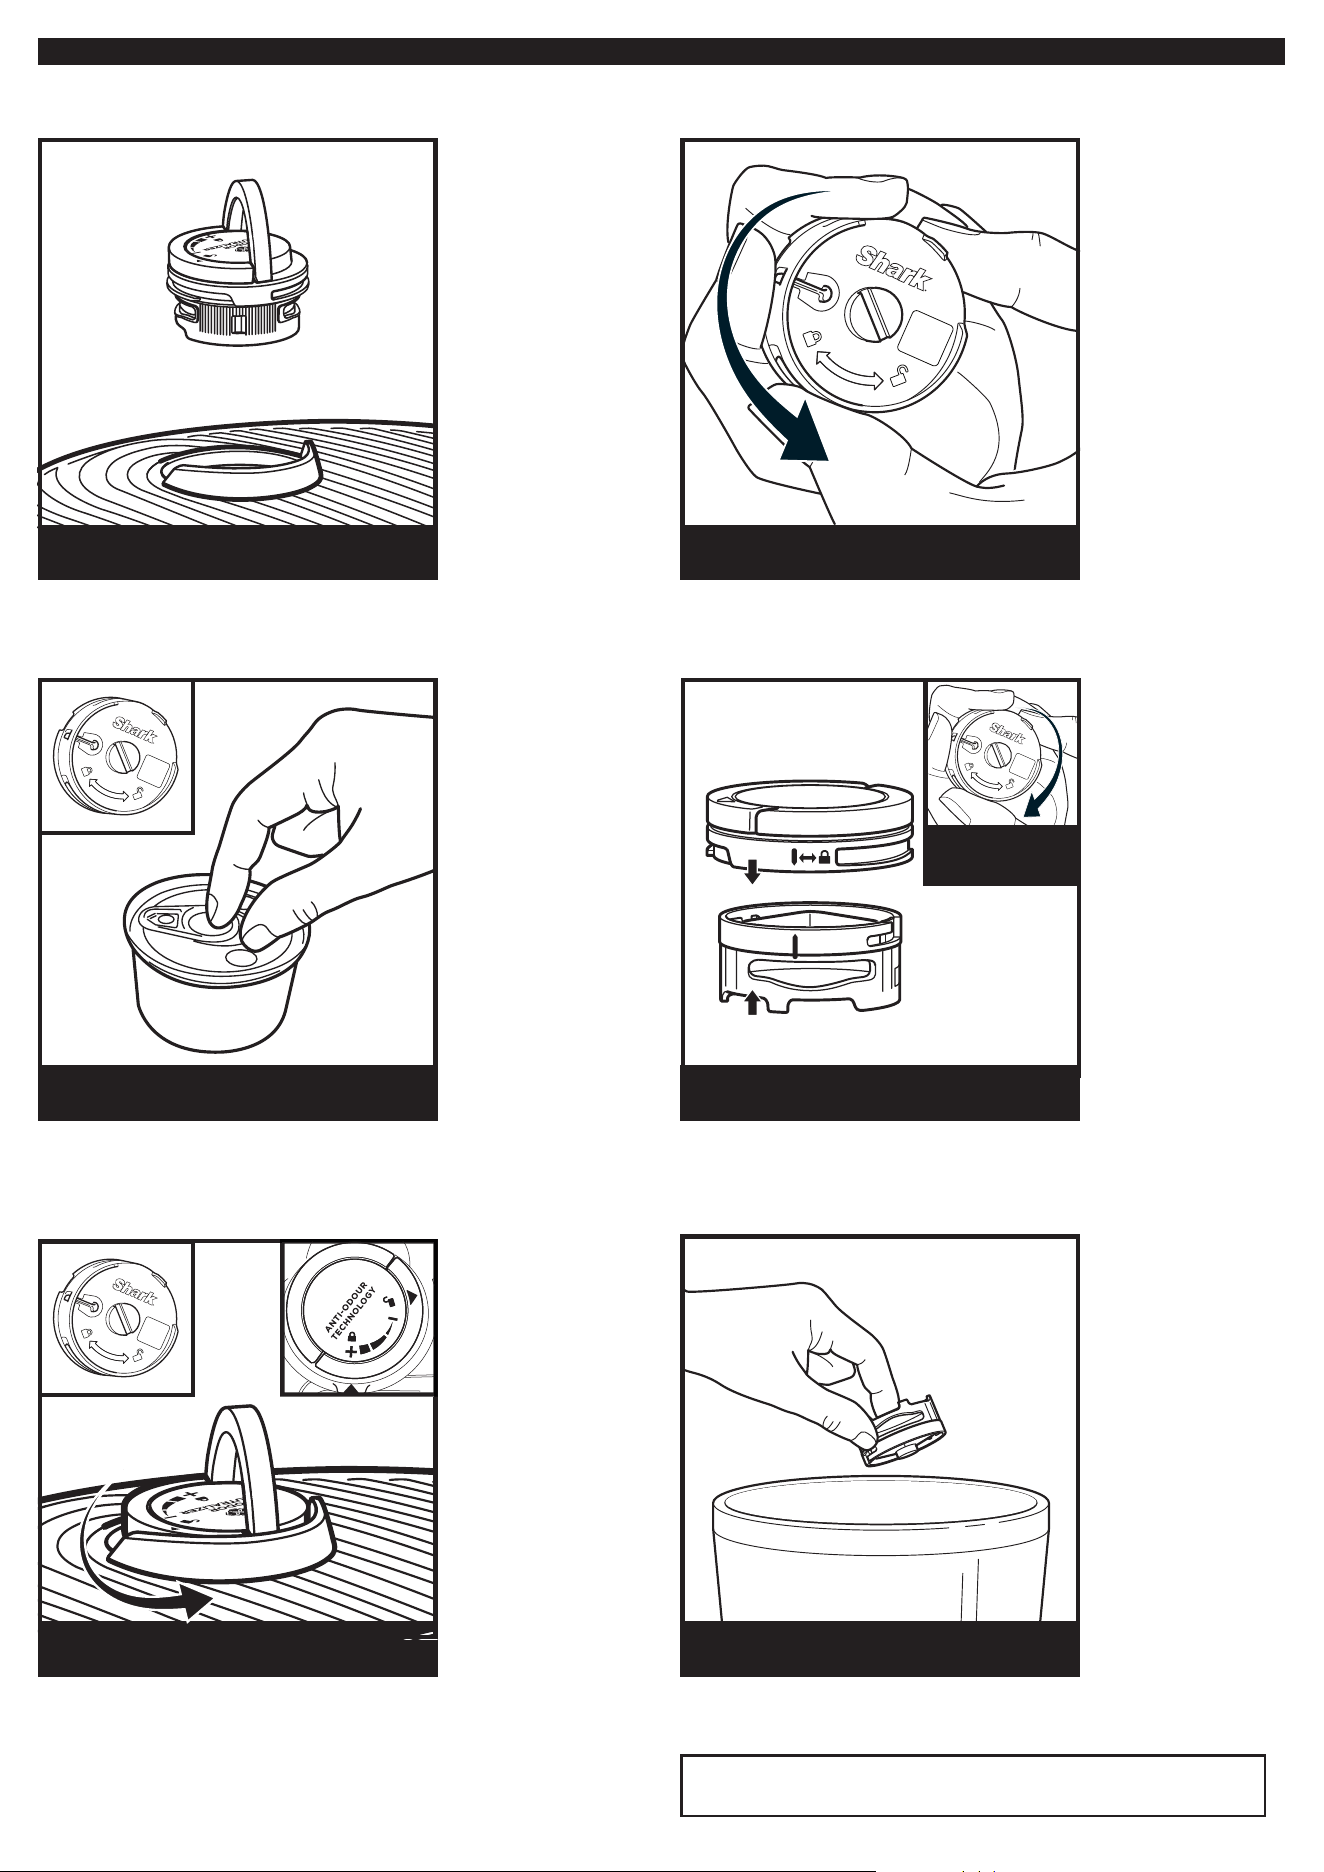
Remove the odour cartridge assembly from
the can.
Flip up the handle on the odour dial, align
the arrows, then insert the assembly into
the air purifier.
To lock and engage the odour cartridge
assembly, rotate it anti-clockwise until it
clicks at least once. Continue to rotate the
dial toward the high position to increase
the intensity.
1. OPEN THE PACKAGED ODOUR
CARTRIDGE ASSEMBLY
2. INSERT ODOUR CARTRIDGE
ASSEMBLY INTO AIR PURIFIER
3. ROTATE UNTIL CLICK
LOW
Rotate the dial to the
Low position to decrease
intensity to the lowest level
when in use.
HIGH
Rotate the dial to the High
position to increase intensity
to the highest level when
in use.
Note: Adjusting the fan
speed is another way to
control Anti-Odour
Technology intensity. See the
Optimising Fan Speed section
for more information.
ODOUR DIAL POSITION CLICKS SETTING RECOMMENDED FOR
1 OFF
• When you are not actively looking
to reduce odours. This will extend
the life of the odour cartridge.
2 LOW
• Mild odour events such as
bin smells.
• Small spaces like a bathroom
or entryway.
3 MEDIUM
• Strong odour events such as
cooking or pet smells.
• Mid-sized spaces like a bedroom
or kitchen.
4 HIGH
• Optimal odour-reducing
performance.
• Extreme odour events such as
smoke or lingering burnt smells.
• Large spaces like a living room.
ANTI-ODOUR TECHNOLOGY REPLACEMENT
Flip up the handle and rotate the dial anti-clockwise
until the two arrows are aligned. Pull the handle to
remove the dial from the air purifier.
Align the arrow on the dial cover with the arrow on the air
purifier, then reinsert the dial into the air purifier. Rotate the
dial anti-clockwise until it clicks into an intensity setting to
engage. Rotate further to change the intensity setting.
Rotate the cartridge anti-clockwise in the dial
housing and pull out the cartridge to remove it.
Align the yellow arrow on the side of the cartridge with the yellow
arrow on the side of the dial cover, then insert the cartridge
into the dial. Rotate the cartridge clockwise to lock it in place.
Remove the new odour cartridge from the sealed
packaging. To maintain the life of the cartridge,
keep it in the sealed packaging until you are
ready to install it.
Dispose of the old cartridge by dropping it
into the bin.
1. REMOVE THE ODOUR
CARTRIDGE ASSEMBLY
2. REMOVE OLD ODOUR CARTRIDGE
3.REMOVE NEW CARTRIDGE
FROM CAN
4. INSTALL NEW CARTRIDGE IN DIAL
6. USED CARTRIDGE DISPOSAL
5. INSTALL THE ODOUR DIAL ASSEMBLY
TURN
UNTIL CLICK
TO LOCK
Note: Odour cartridges should be replaced every 3 months or as
needed for optimal Anti-Odour Technology performance.
AVAILABLE ACCESSORIES
ORDER ADDITIONAL ACCESSORIES
Additional accessories and replacement filters are available
on sharkclean.co.uk/shark-parts-accessories/
Anti-Odour Technology Cartridges (2)
Two replacement cartridges that guard against bad odours for a
fresher-smelling home. We recommend replacing cartridges every
3 months or as needed in your air purifier. Anti-Odour Technology
intensity dial sold separately.
Shark NeverChange5 Anti-Allergen
HEPA Filter
Captures 99.97%* of large, small, and micro-
sized particles from the air and is equipped
with 240 ± 10g virgin carbon for heightened
protection against household odours.
* Non-living matter, based on IEST-RP-CC007.4
99.97% @ 0.1 - 0.2 microns.
sharkhomeUK
IMPORTANT INFORMATION
RECORD THIS INFORMATION
Model Number:
�������������������������������������������������������������������������������������������������������������������������������������������������������������������������������
Serial Number:
���������������������������������������������������������������������������������������������������������������������������������������������������������������������������������
Date of Purchase:
�����������������������������������������������������������������������������������������������������������������������������������������������������������������������
(Keep receipt)
Store of Purchase:
���������������������������������������������������������������������������������������������������������������������������������������������������������������������
TECHNICAL SPECIFICATIONS
Voltage: 24V DC / 0.8A
Watts: 16 W
Benefits of registering your product and creating an account:
• Get easier, faster product support and access to warranty
information
• Access troubleshooting and product care instructions
• Be among the first to know about exclusive product promotions
TIP: You can find the model and serial numbers on the QR code label
on the bottom of the unit.
MANUFACTURER’S GUARANTEE
When a consumer buys a product in the United Kingdom they get the
benefit of legal rights relating to the quality of the product (your “legal
rights”). You can enforce your legal rights against your retailer, including
Shark if you bought your Shark appliance from sharkclean.co.uk. However,
at Shark we are so confident about the quality of our products that we give
the owner an additional, free parts and labour manufacturer’s guarantee of
up to 2 years.
A household appliance like a Shark aircare appliance constitutes a sizeable
investment. Your new machine needs to work properly for as long as
possible. The guarantee it comes with is an important consideration - and
reflects how much confidence the manufacturer has in its product and
manufacturing quality.
The manufacturer’s guarantee does not aect your legal rights.
How long are new Shark machines guaranteed for?
Our manufacturer’s guarantee lasts for one year from the date of purchase
as standard, or for two years if you register your purchase with us within 28
days. There is information on how to register below.
How do I register my Shark guarantee?
If you have purchased your Shark aircare appliance directly from sharkclean.
co.uk your guarantee is registered automatically. If you bought it from
anywhere else, you can register your guarantee online within 28 days of
purchase.
• To register online, please visit www.sharkclean.co.uk/register-guarantee
• Keep a note of the date you purchased the machine.
IMPORTANT:
• Keep your receipt if you bought your Shark aircare appliance from
anywhere except sharkclean.co.uk. You will need it to claim under your
guarantee.
• The free Shark guarantee only applies in the UK.
What are the benefits of registering my free Shark guarantee?
When you register your guarantee, you will get an extra year of cover. We’ll
also have your details to hand if we ever need to get in touch. If you further
agree to receive communications from us, you can also receive tips and
advice on how to get the best out of your Shark aircare appliance and hear
the latest news about new Shark technology and launches.
What is covered by the free Shark guarantee?
Repair or replacement (at Shark’s option) of your Shark machine, including
all parts and labour.
What is not covered by the free Shark guarantee?
• Normal wear and tear.
• Accidental damage or faults caused by negligent use or care, misuse,
neglect, careless operation or handling of the Shark appliance which is
not in accordance with the Shark Operating Manual supplied with your
machine.
• Damage caused by use of the Shark appliance for anything other than
normal domestic household purposes.
• Damage caused by use of parts not assembled or installed in accordance
with the operating instructions.
• Damage caused by use of parts and accessories which are not Shark
Genuine Components
• Faulty installation (except where installed by Shark).
• Repairs or alterations carried out by parties other than Shark or its agents.
How can I claim under the free Shark guarantee?
Contact our customer service helpline on 0800 862 0453. For service hours
please visit our website under ‘Contact Us’. It’s free to call, and you’ll be put
straight through to a Shark representative. You’ll also find online support at
https://support.sharkclean.co.uk/. The Shark representative will go through
some troubleshooting with you, and if we conclude that the item has failed,
we will send you a replacement part or a returns label to send the defective
item back to us free of charge. When you have delivered the defective
product to us, we will send you a replacement.
Please remember that the item will need to be boxed when you return it
to us, which can be any suitable box;, it does not have to be the original
packaging.
Where can I buy genuine Shark spares and accessories?
Shark spares and accessories are developed by the same engineers who
developed your Shark aircare appliance. You’ll find a full range of Shark
spares, replacement parts and accessories for all Shark machines at
www.sharkclean.co.uk. Please remember that damage caused by the use of
non-Shark spares may not be covered under your guarantee.
HP072UK�IB�A4�MP�250310
PLEASE READ CAREFULLY AND KEEP FOR FUTURE REFERENCE.
This Instruction Guide is designed to help you get a complete understanding of your new Shark®
Air Purifier
.
Illustrations may dier from actual product. We are constantly striving to improve our products; therefore the specifications contained herein
are subject to change without notice.
© 2024 SharkNinja Operating LLC. SHARK is a registered trademark in the United Kingdom of SharkNinja Operating LLC.
SharkNinja Europe Limited,
1st/2nd Floor Building 3150,
Leeds, LS15 8ZB, UK
+44 (0)800 862 0453
www.sharkclean.co.uk
SharkNinja Germany GmbH,
Rotfeder-Ring 9,
60327 Frankfurt am Main,
Germany
www.sharkclean.eu
REGISTER YOUR PURCHASE
registeryourshark.com