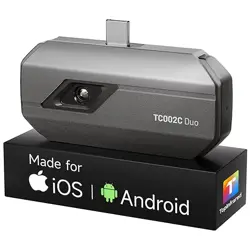
Instruction Manual
Thermal Imaging Camera
User Manual Version 1.0. August 8,2022.

1
2
2
3
5
10
11
12
15
5
9
9
8
11
13
13
14
10
11
1. Overview
2. Considerations and Safety Maintenance
3.
Read Images
4. Performance Index
5. Product Description
5.1. Instruction to Structure
5.2. Display Description
5.3. Key Description
6. Initial Operation
7. Introduction to “Image” Sub-menu
7.1. View Image
7.2. Delete Images
8. Introduction to “Color Palette” Sub-menu
8.1. Color Palette Description
8.2. Application of Color Palette
9. Introduction to “Emissivity” Sub-menu
9.1. Emissivity Description
9.2. Emissivity Setting
9.3. The Emissivity Value of Common Materials
Contents
19
16
17
18
19
19
21
23
23
23
17
10. Introduction to “Setting” Sub-menu
10.1. Temperature Range Setting
10.2. Time Setting
10.3. Enable/Disable of the Highest and Lowest Temperature Cursor
11. “Data Base” Submenu
11.1. Database Description
11.2. Database Image Viewing
11.3. Database Upgrade
12. “Image Overlapping” Submenu
12.1. Description of Image Overlapping
12.2. Application of Image Overlapping

1
2
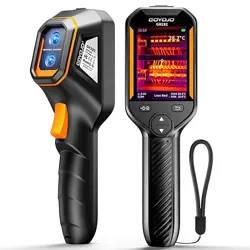
1. Overview
This product is an infrared camera that integrates surface temperature
measurement and real-time thermal image. A traditional infrared thermom-
eter needs to measure every component one by one while it is not
necessary for an infrared imaging camera, thus saving time. The potential
problems are displayed on the color display screen clearly. Moreover, the
central point measurement cursor is used to locate quickly and accurately
to measure the temperature of the target object.
In order to increase the differentiation, the product is provided with a visible
light camera. The thermal images and visible images are stored in the
device and can be read through USB or stored in a computer to generate a
report or for print.
The product can be used in fields of medical treatment, fire fighting,
archaeology, traffic, agriculture, geology, energy, smelting, electronic
manufacture, etc and is the ideal selection for electricians,maintenance
personnel and technicians to find the problem area quickly.
The following major functions increase the product’s accuracy and usability:
The radiation coefficient may be adjusted to increase the measurement
accuracy of objects with half reflection surface.
The highest temperature and lowest temperature cursor may guide the
users to the areas with highest and lowest temperature of the thermal
images.
The selectable color palette.
2. Considerations and Safety Maintenance
Please read the instructions for use carefully in order to ensure correct
measurement result:
Don’t use the device in explosive, flammable or corrosive environment.
The product belongs to precision electronic and sensitive optical
devices. Don’t impact and drop it to avoid damage.
Don’t dismantle and remodel the products.
When the product works, there is light clicking sound every several
seconds. This is normal phenomenon that the lens captures images.
Please use damp cloth or weak soap to clean the enclosure of the
device. Don’t use abradant, isopropanol or solvent to clean. Special
optical lens cleaner is used to clean the screen.
3. Read Images
Open the USB protective cover as shown in . Use USB cord to
connect the USB port and then computer to read the images or save
it into computers.
The supported operating system through verification includes: winxp,
win7, win 8, win10, Apple system.
It is suggested to use the attached USB cord or USB cord with higher
quality.
Note:
When connecting with a computer, unplug the cord after selecting
“pop out device safely” to avoid causing file system damage and
other problems. If “unable to save” and other problems occur, you
may find the hard disc in the computer and fix it.
3

3
4
4. Performance Index
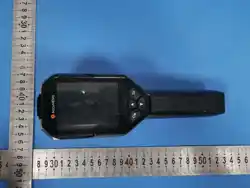
235mm x 100mm x 90mm(9.3''x3.9''x3.5'')
415g (does not contain battery)
Display pixels
Thermal resolution
Visible image resolution
Field angle/shortest focus length
Thermal senstivity
Temperature measurement range
Accuracy
Temperature correction
Emissivity
Frame rate of thermal images
Wavelength coverage
Focus mode
Color palette
320x240
Display screen
Display size
TFT display screen
3.2 inches
256x192
300000
56°x42°/0.4m
-20℃to 300℃(-4 °F to 572°F ) +/-2
℃ or
reading +/-2%
300℃to 550℃(572 °F to 1022°F ) +/-5%
Yes,Automatic shutter calibration
Adjustable from 0.01 to 1.0
≤25Hz
8-14um
Rainbow, iron oxide red, cold color,
black & white, white & black
Fixed
Low:-20℃~120℃
(-4 °F to 248°F )
32.09 °F (0.05℃ )
High:120℃~550℃
(248 °F to 1022°F )
Storage medium
File format
Interface type
Automatic power-off time
Setting command
Language
View option
The integration of thermal image with
25% step length and visible image
Built-in 3G
(More than 20 thousand pictures)
JPG
Micro USB 2.0
Power supply Built-in chargeable 18650 battery
Battery working time 2~3 hours
Selectable: 5 minutes/20 minutes/
not power off automatically
Unit、language、date、time、information
English, Chinese, Italian, German
Product size
(length × width × height)
Product weight
Work temperature 0℃to 45℃(32°F to 113°F)
Storage temperature -20℃ to 60℃(-4°F to 140°F)
Relative humidity
< 85%RH
5
6
1
2
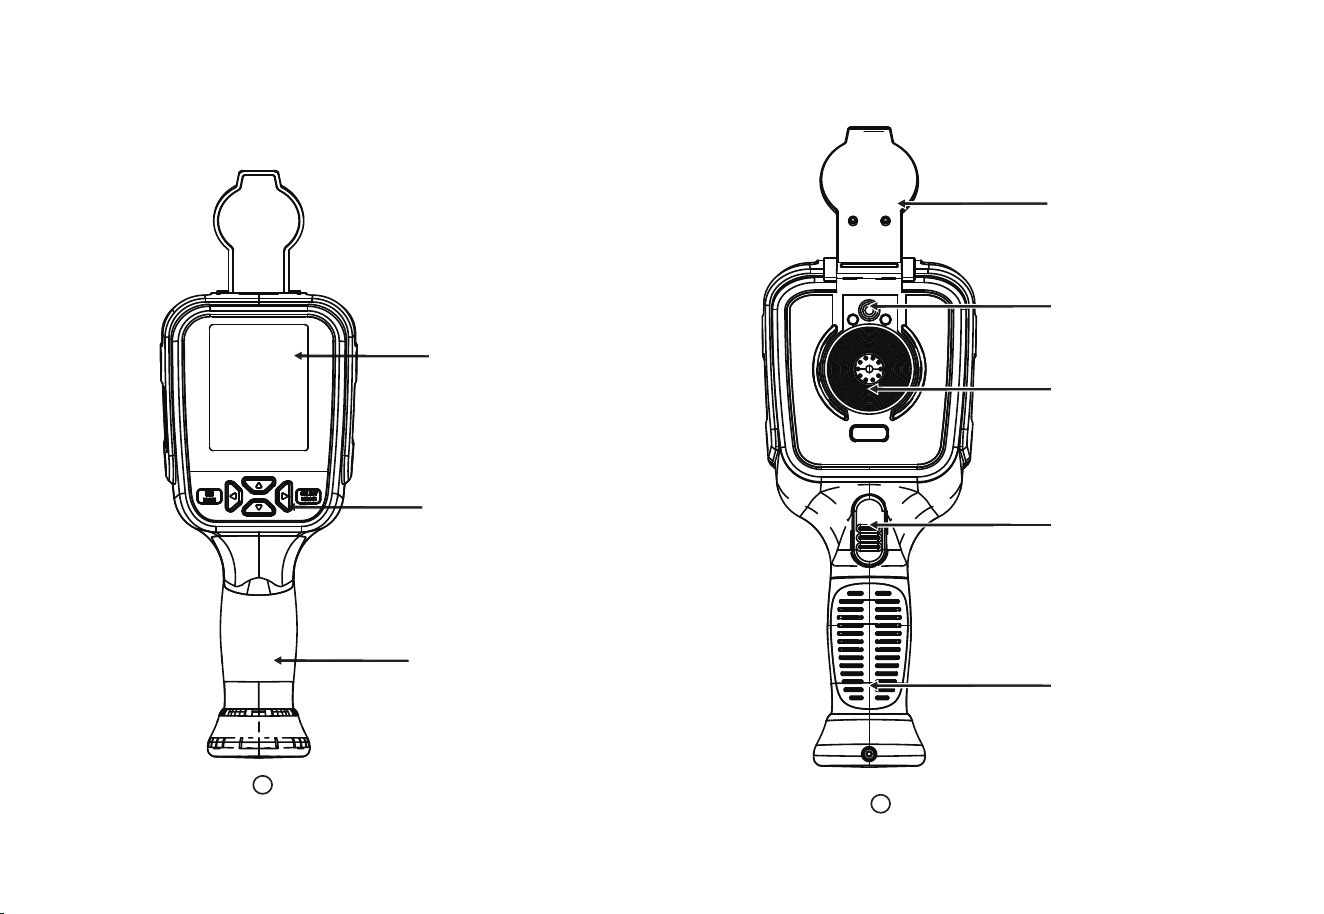
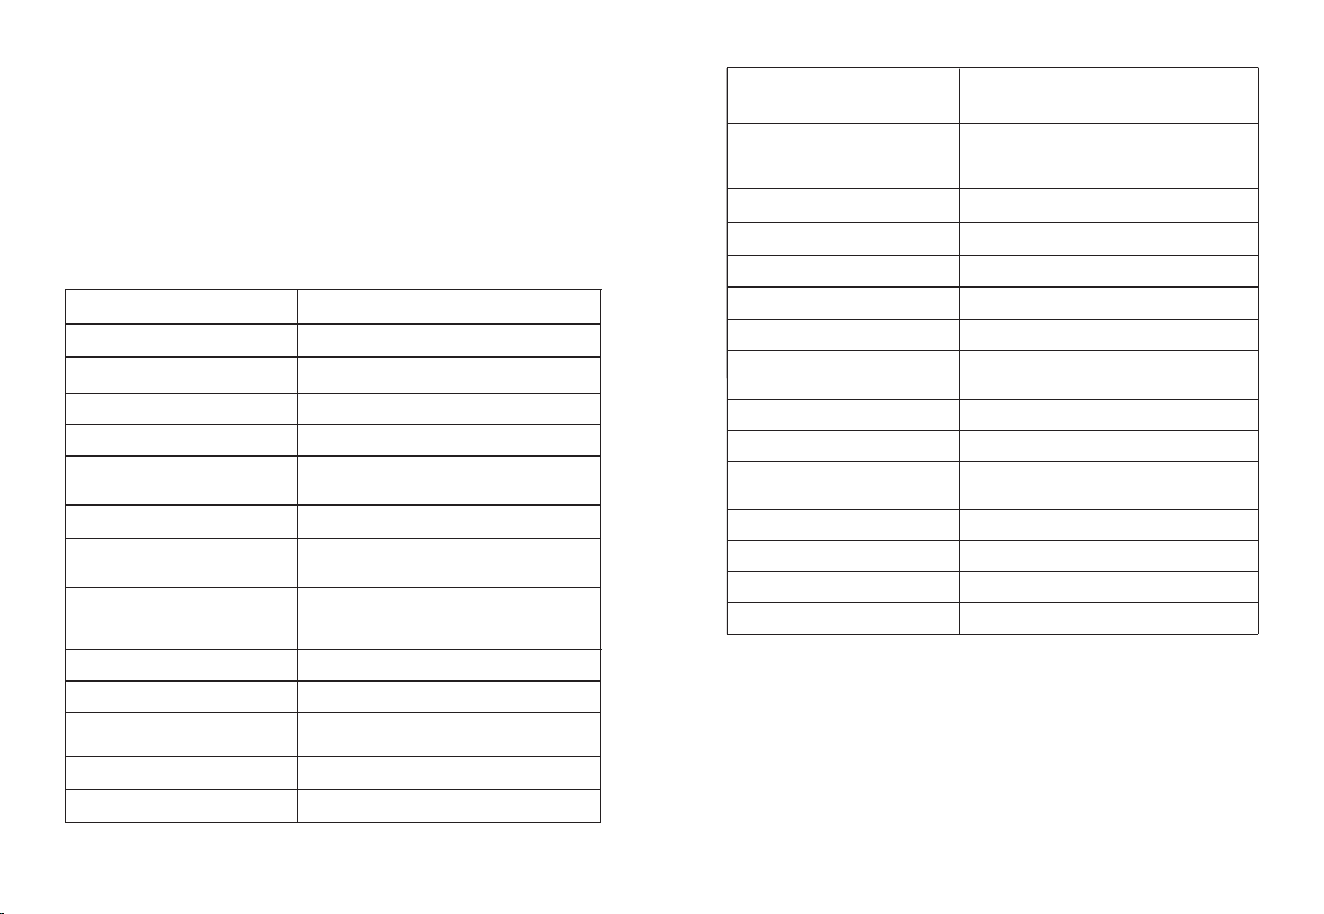
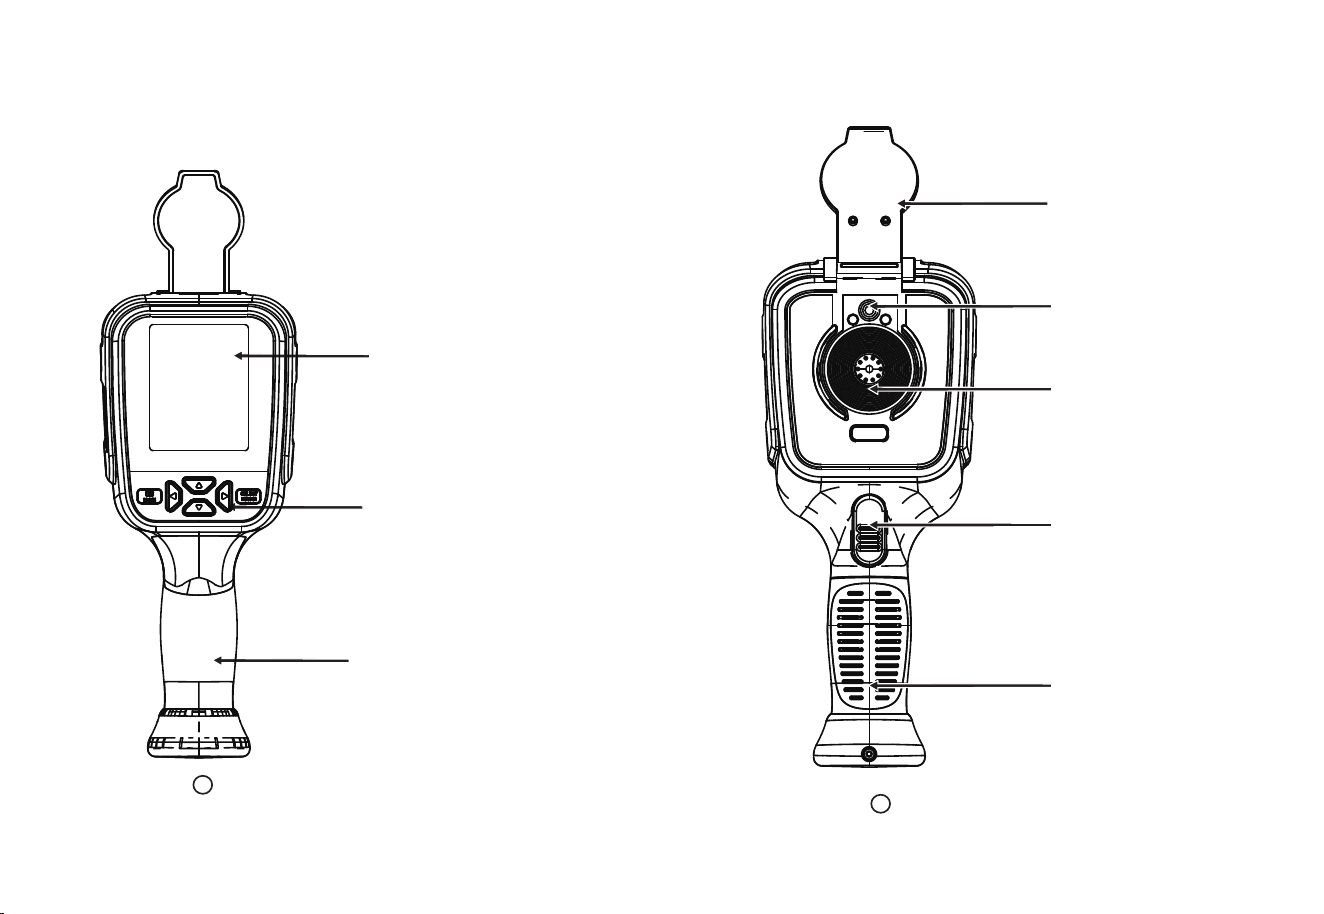
5. Product Description
Display screen
Keypad
Handle
Visible light camera
Infrared imaging sensor
Image capture key
Battery
Cap
Please open the cap in use
5.1. Instruction to structure

87
3
Micro
USB
Please open the cap in use
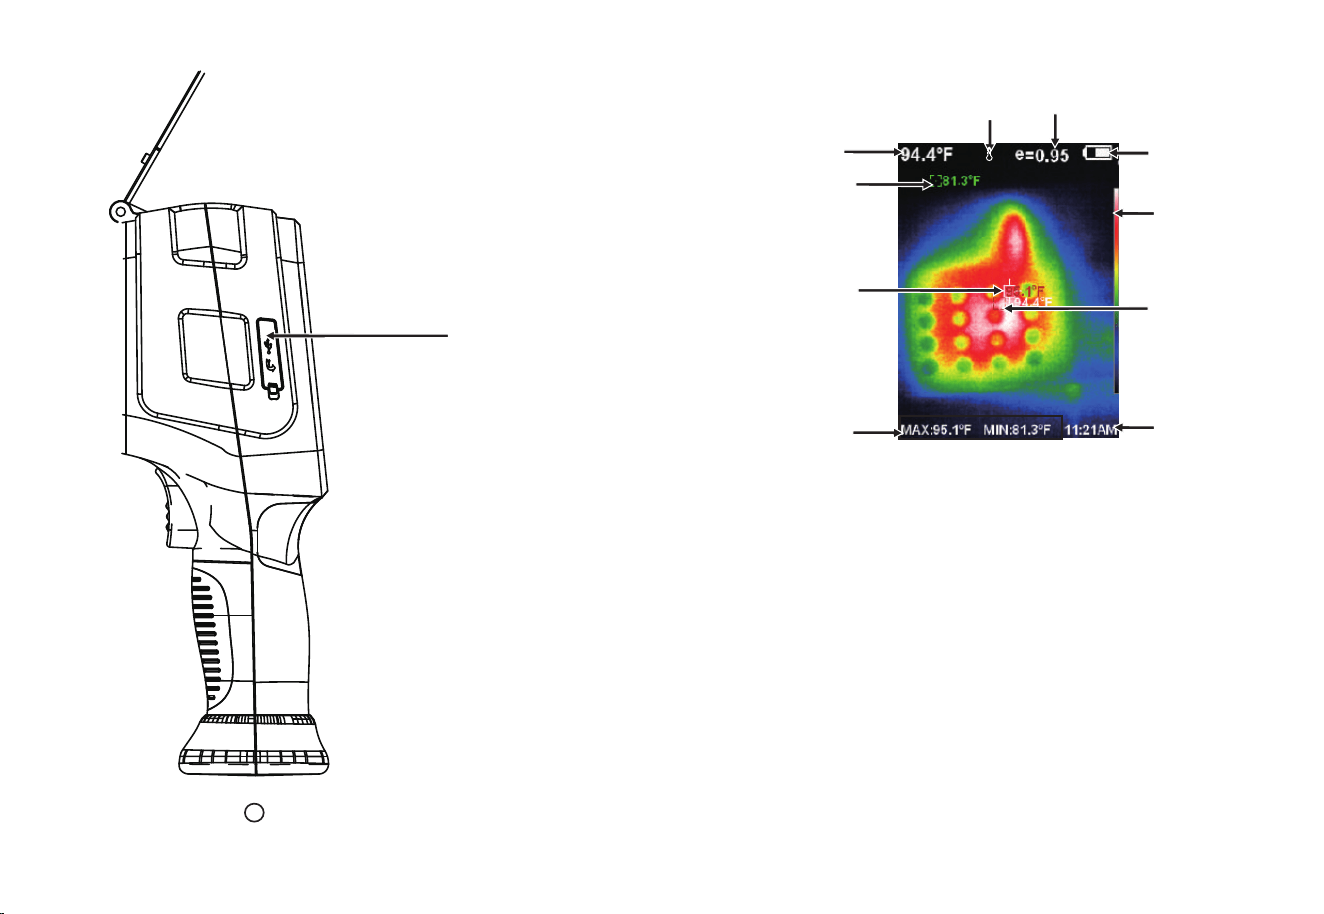
5.2. Display Description
Maximum value/
minimum value of
field temperature
Color code
Current emissivityTemperature range
Battery power
The highest
temperature
cursor
Temperature
cursor at
central point
Time
Central point
temperature
The lowest
temperature cursor
2. Color code: used to mark the color corresponding to the relative tempera-
ture from low to high in the field of version.
3. The central point temperature cursor: used to indicate the central position
in the screen area. The cursor color displays white. The temperature value is
displayed top left corner of the screen.
5. The lowest temperature cursor: used to indicate the lowest temperature
position in the screen area. It will move with the movement of the lowest
temperature. The cursor displays red. The temperature value is displayed at
the central position of the screen.
4. The highest temperature cursor: used to indicate the highest temperature
position in the screen area. It will move with the movement of the highest
temperature. The cursor displays red. The temperature value is displayed at
bottom left corner of the screen.
L
1.Temperature range: The range of temperature measurement.
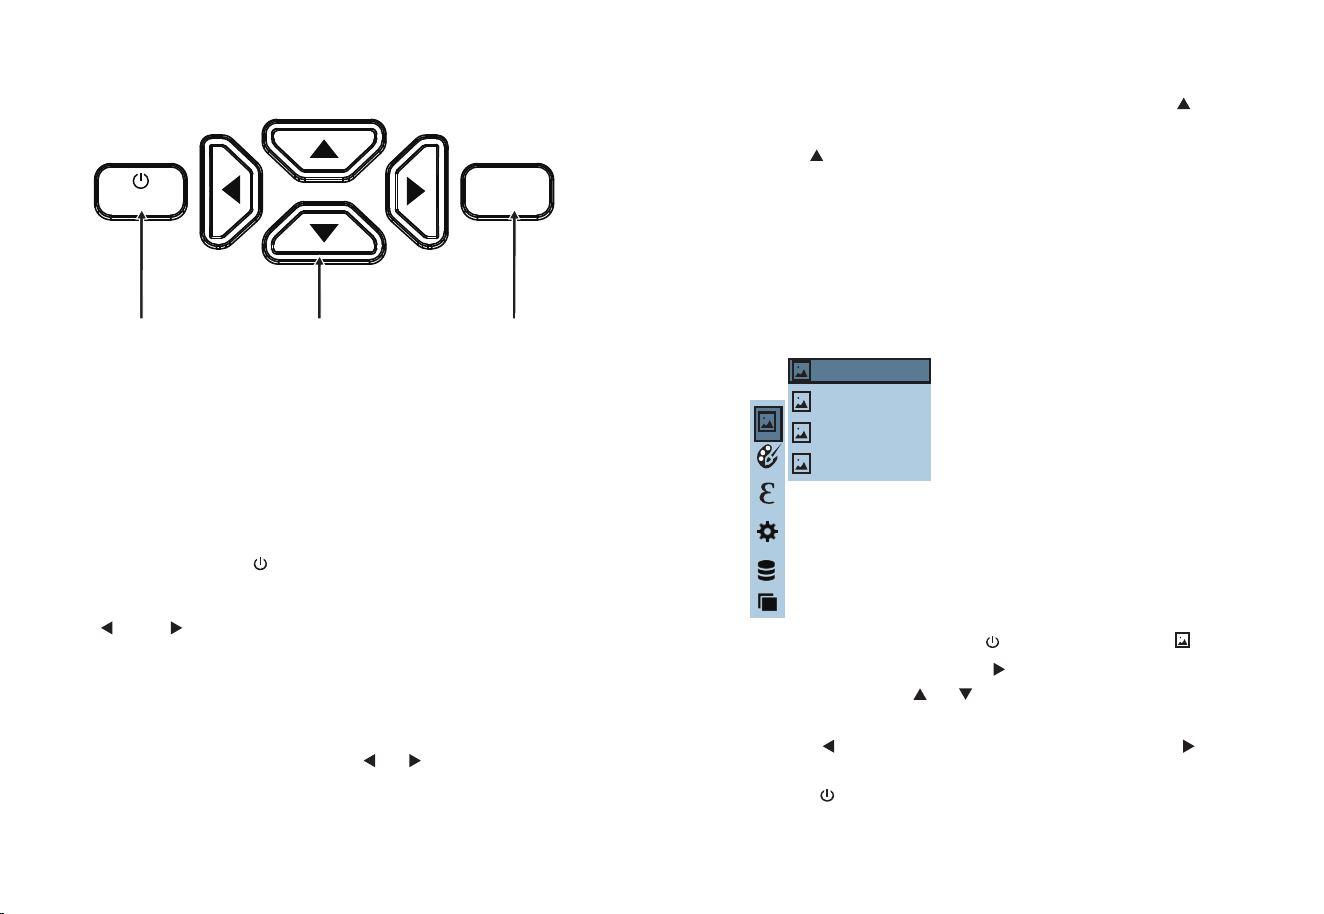
On/off key: hold down “ /MENU ” key to power on /off.
The function to hide highest/lowest temperature column at the screen
bottom: under the operation after normal start up, press
“ ”
key
and the screen bottom will display highest/lowest temperature column.
Press
“ ”
can also hide it.
Image capture: press the image capture key. When the capture is
successful, the screen will display “save photo?” prompt.
Select “Yes”
or “No” to delete the image, press the “ ”“ ” button to Switch the
selection, then press the “SELECT/ENTER” button to confirm.
Switching between infrared thermal image and visible image: press
“ ”
or
“ ”
key to switch the degree of fusion between inferred
thermal images and visible images (the degree of fusion is 0%, 25%,
50%, 75% and 100%).
As shown in the figure, press the “ /MENU” button, select “ ” (image)
item in the main menu, then press “ ” to enter the image list, press the
navigation key Use the “ ”“ ” button to select an image, then press
the “SELECT/ENTER” button to view the image. While viewing the image,
press the “ ” button to view the previous image, press the “ ” button
to view the next image, press the “SELECT/ENTER” button to return, and
press the “ /MENU” button to exit the menu.
9 10
MENU
SELECT
ENTER
171229-105030
171229-105031
171229-105032
171229-105033
On/off/menu key Selection key/
entry key
Navigation key: Up,
down, left and right
6. Initial Operation
Image output: The saved images through capture may be checked
and output by connecting with a computer through Micro USB.
Charging: the product is provided with built-in 18650 lithium battery.
When the battery power is not sufficient, please charge it with the
Micro USB cord.
5.3. Key Description
7. Introduction to “Image” Sub-menu
7.1. View image
When viewing an image, press the
“ ”
key, and the prompt “Delete
photo?” will appear on the screen. Select “Yes” or “No” to delete the image,
press the
“ ”
and
“ ”
keys to switch the selection, and then press
the “SELECT/ENTER” key to confirm. Press the “ /MENU” key to exit the
menu.
As shown in the figure, press “ /MENU” key to enter the main menu
and select “ ” (color palette)option and press “ ” key to enter
the color palette list. Press “ ” and “ ” keys in navigation to select
the color palette. Then press“SELECT/ENTER” key to select the color
palette. Press “ ” to return. Press “ /MENU” key to exit from the
menu.
12
11
7.2. Delete images
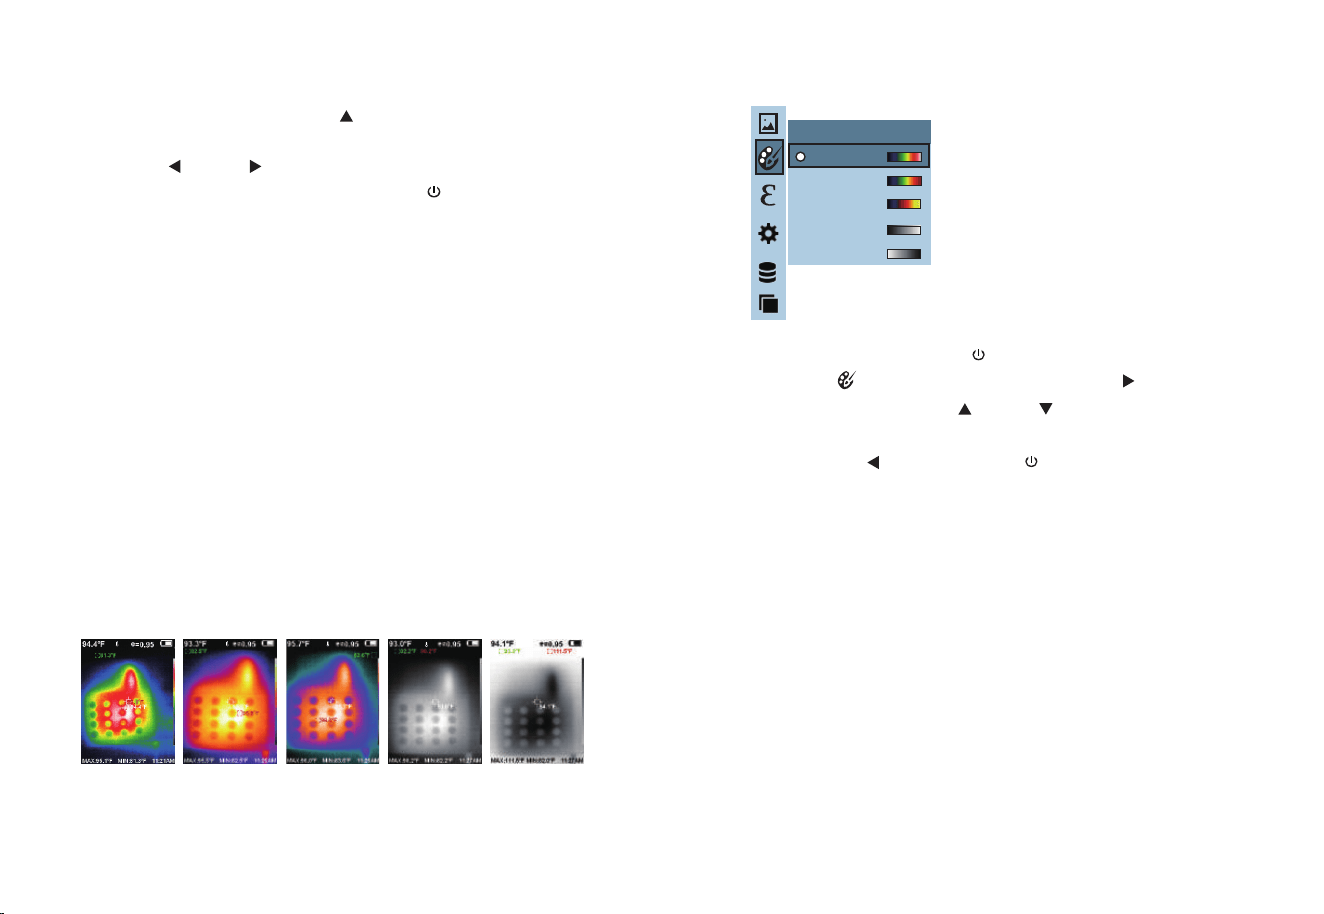
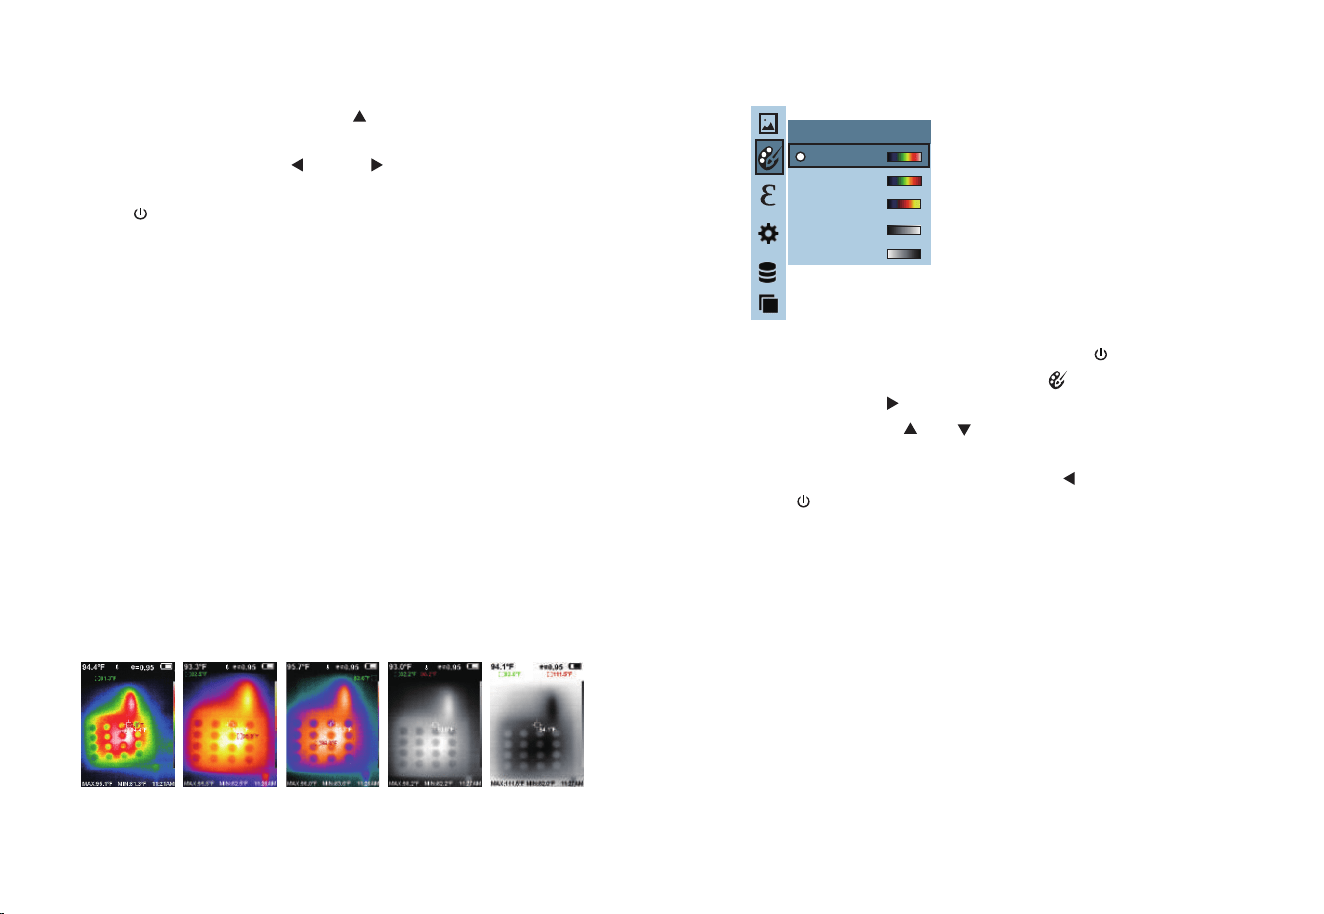
8. Introduction to “Color Palette” Sub-menu
The following is the image of the same object with selection of different
color palettes.
8.1 Color Palette Description
The menu of color palette can change the false color of infrared thermal
image. The product provides five types of color palette: rainbow, iron oxide
red, cold color, white heat and black heat.
Suitable selection of color palette displays the details of the target objective
better. Rainbow, iron oxide red and cold color palettes focus on display of
color. Such color palettes are very suitable for high heat contrast and are
used to improve the color contrast between high temperature and low
temperature. But the black & white and white & black color palettes provide
even linear color.
Iron oxide redRainbow Cold color White heat Black heat
8.2 Application of Color Palette
Spectra
Iron
Cool
White
Black
Color palette
L L L
LL
As shown in the figure, press “ /MENU” key to enter the main menu
and select “ ”(emissivity) option and press
“ ”
key to enter the
emissivity list. Press
“ ”
and
“ ”
keys in navigation key to select
the emissivity. Then press “
SELECT/ENTER
” key to determine selection
of the emissivity. Press
“ ”
key again to return.
13 14
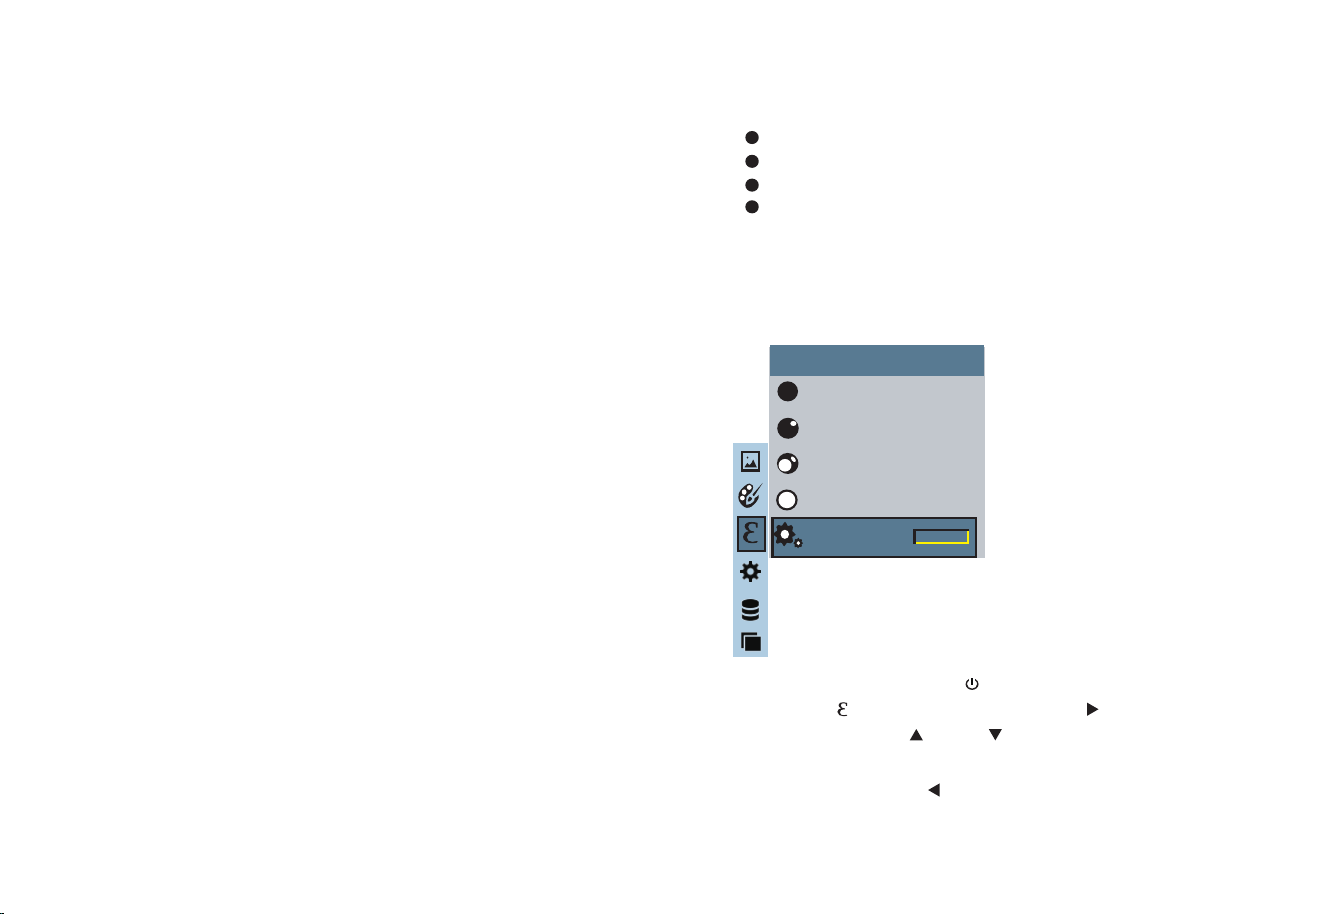
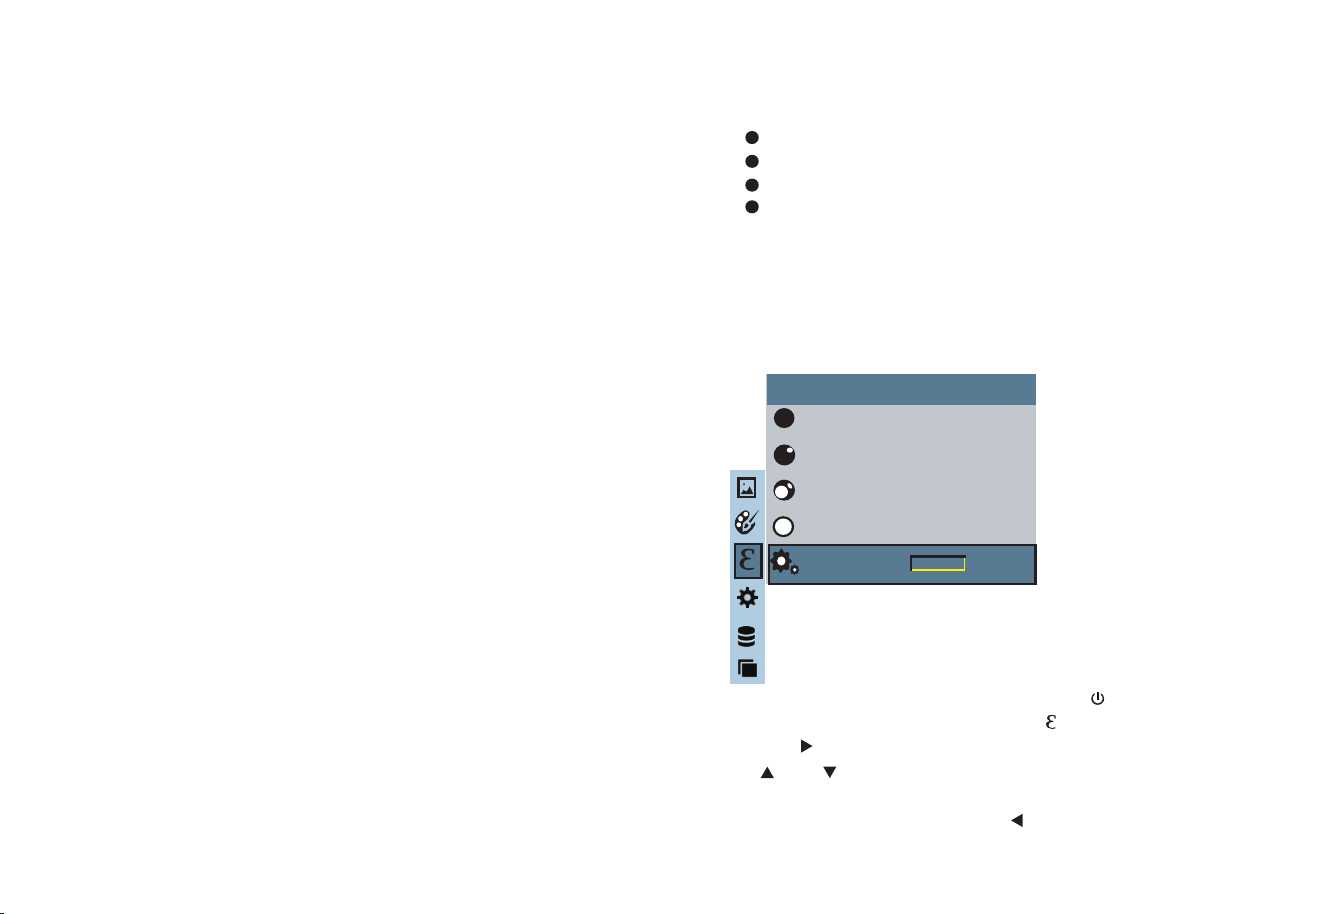
9. Introduction to “Emissivity” Sub-menu
9.1 Emissivity description
The emissivity of the product can be adjusted from 0.01 to 1.00 with the
default value of 0.95. Many common objects and materials (such as timber,
water, skin and textile fabric) can reflect the heat energy effectively. So it is
easy to obtain relatively correct measurement value. The emissivity is usually
set as 0.95 when the coarse objects that are easy to give out energy. For
semi-matte objects that give out less energy, the emissivity is usually about
0.85 and the emissivity of semi-gloss objects is 0.6. The shiny objects are
divided into materials with low radiation coefficient. The emissivity is usually
set as 0.3 at the time of measurement. Correct setting of the value of
emissivity is very important for you to carry out the most correct temperature
measurement. The surface emissivity will produce giant impact on surface
temperature measured by the product. Understanding the surface emissivity
will enable you to obtain correct temperature measurement result.
The operating step is as the following:
9.2. Emissivity setting
The product is provided with four types of object measurement modes:
Coarse object (0.95)
Semi-matte object (0.85)
Semi-shiny object (0.60)
Shiny object (0.30)
According to the characteristics of the measured objects, users may set
the emissivity value through the “self-define” option (please refer to the
table of “emissivity of common materials”).
Matte (e=0.95)
Emissivity
Semi-matte (e=0.85)
Semi-glossy (e=0.60)
Glossy (e=0.30)
Custom
0.01

Press “ /MENU” key to select the “ ”(setting) option in the main
menu. Press “ ” key again to enter the “setting” sub-menu.
If you select “Custom” emissivity, press “SELECT/ENTER” to enterTo edit
the status, press
“ ”
/
“ ”
to select the number to be modified, press
“ ”“ ”
to modify the value. After the modification is completed, press
“SELECT/ENTER” to confirm, then press
“ ”
to return. The “ /MENU”
button exits the menu.
15
16
9.3 The emissivity value of common materials
10. Introduction to “Setting” Sub-menu
Thermal radiation
Black cloth
Human skin
Foam
Charcoal dust
Paint
Matte paint
Black rubber
Plastic
Timber
Paper
Chromium
hemitrioxide
Copper oxide
Ferric oxide
Textile
Substance
Thermal radiation
Substance
Bitumen
Concrete
Cement
Sand
Earth
Water
Ice
Snow
Glass
Ceramics
Marble
Gypsum
Mortar
Brick
Settings
Auto shutdown
Auto
shutdown
Intensity
Language
Unit
Time Format
Year
Month
Day
Hour
Minute
Second
Set time
Spot
Off
On
24 hour
AM/PM
English
Chinese
Italian
German
Celsius
Fahrenheit
NO
5min
20min
Low
Medium
Hight
Intensity
Language
Unit
Temperature range
Temperature
range
Time format
Set time
Spot
2020
10
26
02
52
03
Low(-20℃~120℃)
High(120℃~550℃)
24h
L
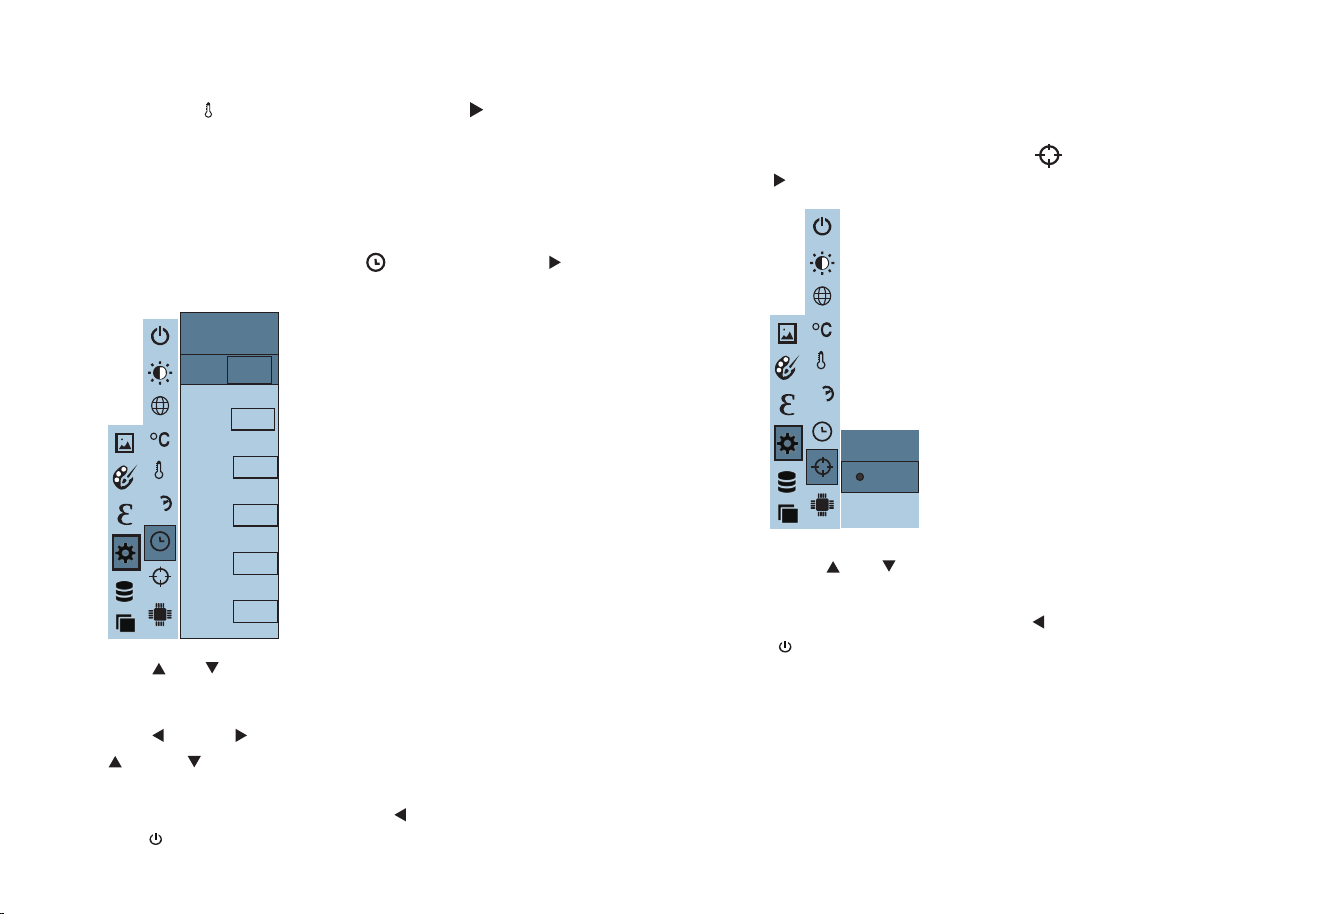
Press “ ” and “ ” keys to select the number to be modified, press
“ ” and “ ” keys to modify the value, after the modification is
completed, press “SELECT/ENTER” key to confirm;
Press “ ” /“ ” key to select “Off” or “On” the option.
As shown in the figure, after selecting “ ” (set time), press “ ”
in the navigation key to enter the setting time.
Press “ ”/ “ ” to select year/month/day/hour/minute.
As shown in the figure, after selecting “ ” (cold hotspot), press the
“ ” button in the navigation key to enter the cold hotspot setting.
After the setting is completed,press “ ” key to return. Press
“
/MENU
” key to exit from the menu.
After the time setting is completed, press “ ” key to return.
Press “
/MENU
” exit from the menu.
1817
10.2. Time setting
After selecting, press “SELECT/ENTER” key to enter the edit state.
Year
Month
Day
Hour
Minute
2016
9
9
11
33
Second
33
Set time
Spot
Off
On
10.3. Enable/disable of the highest and lowest
temperature cursor
Then press “ SELECT/ENTER ” key to determine selection.
24h
L
24h
L
After selecting
“ ”
(temperature range), press the
“ ”
key in the
navigation keys to enter the temperature range setting. Can be set to low
temperature (-20°C to 120°C) or high temperature (120°C to 550°C).
10.1. Temperature range setting
L
M
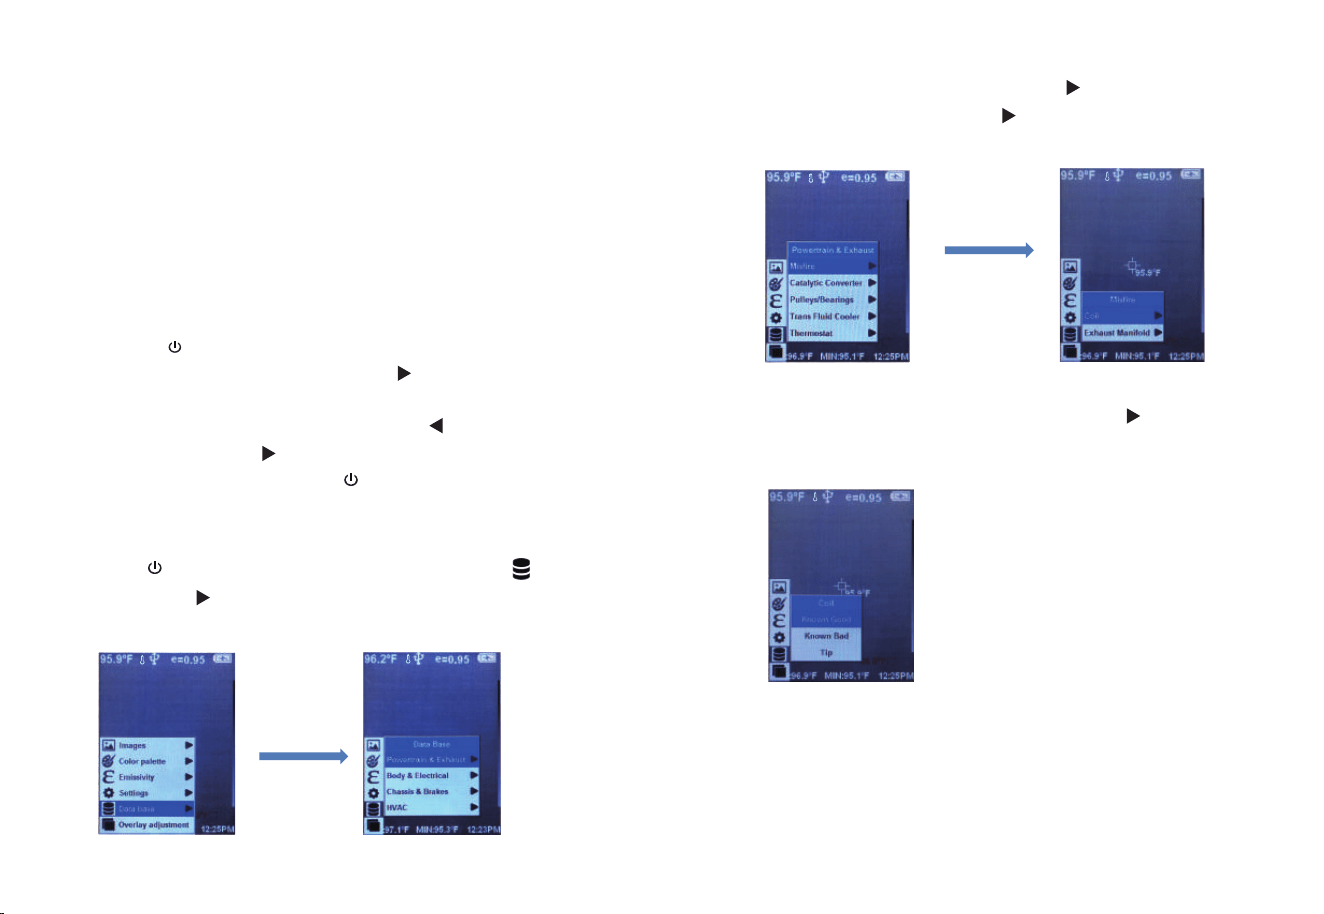
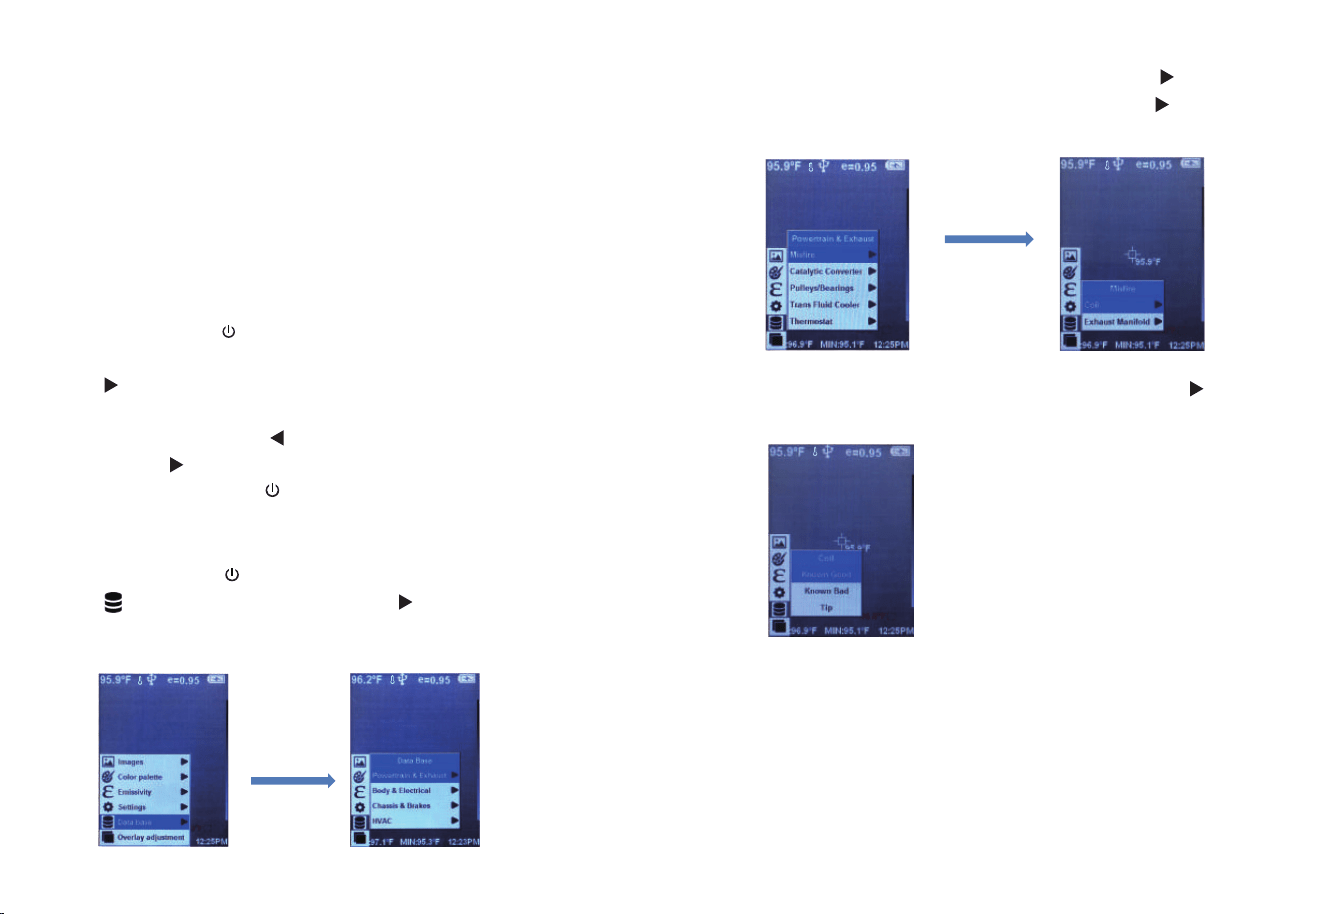
Press “ / MENU” button to enter the main menu, select “ ” (data
base), press “ ” button to enter data base and view “Data base”
sub-menu. As shown below:
After entering the “Data base” menu, press “ ” to enter the “Power-
train & Exhaust”menu, then press “ ” to view the “Misfire” submenu.
As shown below:
After entering the “Misfire” submenu, then press the “ ” button to view
the “Coil”submenu. As shown below:
Press the “ /MENU” button to enter the main menu, select “Database”
at the bottom of the main menu, press the “ ” button in the navigation
key to enter the database list, press the “SELECT/ENTER” button to view
the image, and when viewing the image, press “ ” Press to view the
previous image, press “ ” to view the next image, press
“SELECT/ENTER” to return, press “ /MENU” to exit the menu.
2019
11.“Data Base” Submenu
11.1. Database description
Through the image map stored in the database, the customer can compare
whether the captured thermographic image is normal. The database
contains normal imaging images and abnormal imaging images for
customer reference.
For example: look at the database menu "Powertrain & Exhaust" Submenu
of "Coil".
11.2. Database image viewing
L
L
L
L
L
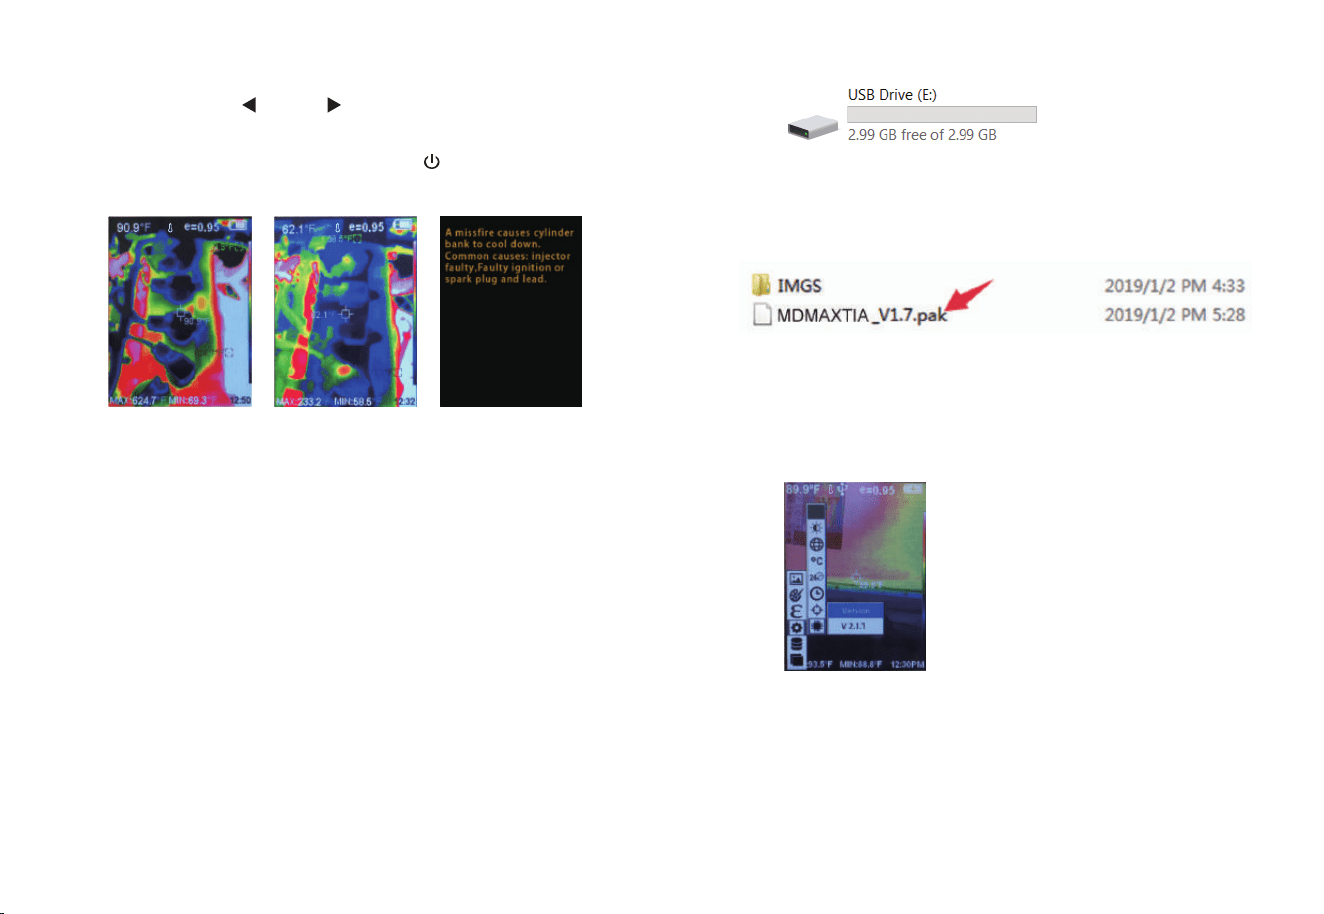
After entering the “Coil” submenu, press “SELECT/ENTER” to enter the
image view, press “ ” and “ ” to view the three images of Known
Good, Known Bad and Tip.
Press “SELECT/ENTER” to return and press “ /MENU” to exit the
menu.
2221
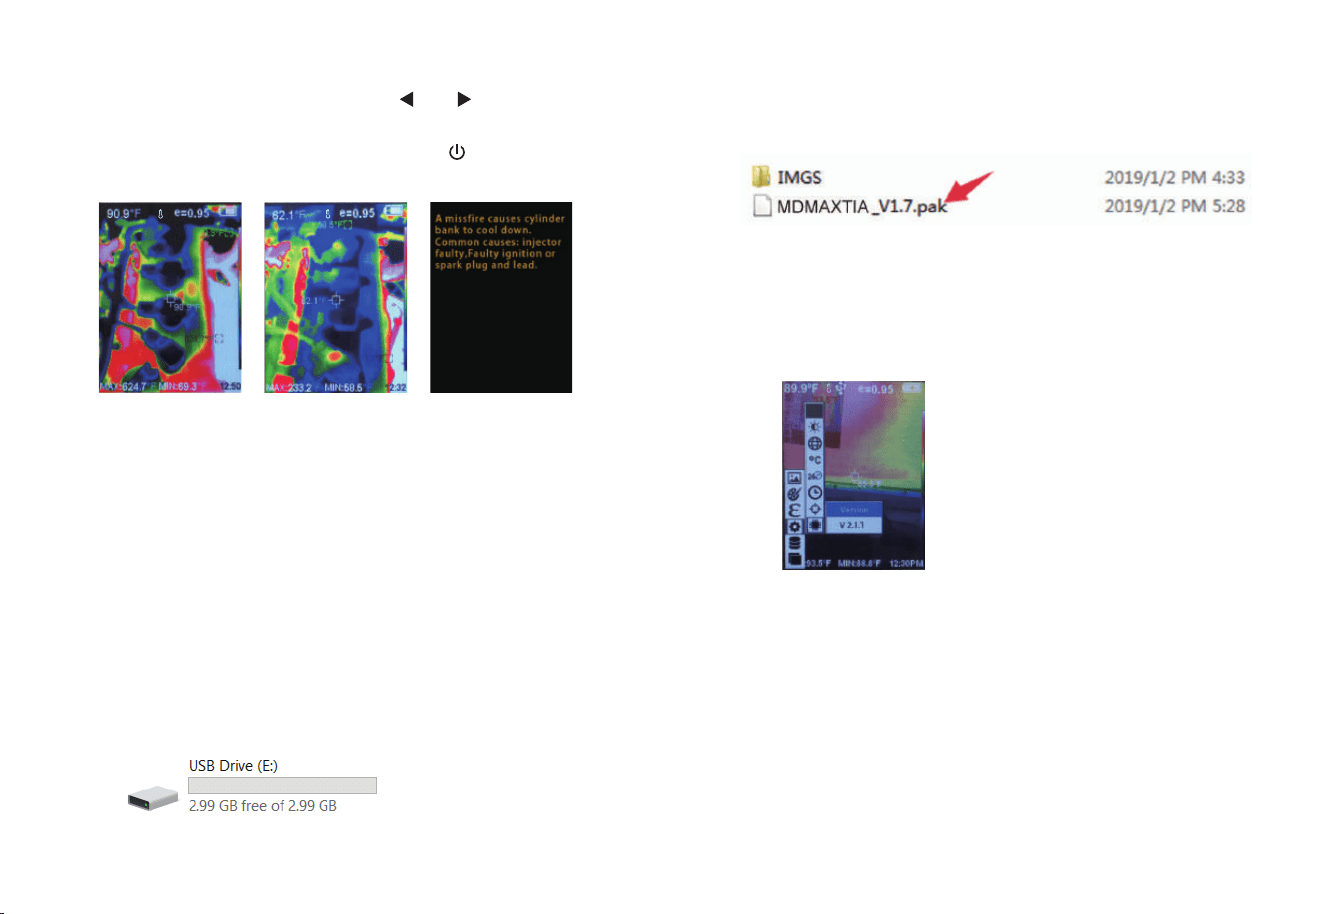
Note: This function provides a fast database and application upgrade
method without changing the entire firmware. The database and
application files are packaged by USB drive mapping and automatically
updated to the machine.
The specific steps are as follows:
Upgrade address of the database: visit https://www.matcotools.com/,
search Enter "MDMAXTIA" in the cable box and go to the product page
to download.
1、 In the case of booting, connect the USB interface of the machine to
the PC, and identify the USB flash drive.
2. Open the USB flash drive and copy the upgrade package with the pak
suffix to the root directory of the USB flash drive.
As shown below:
3、 After powering off and then rebooting, check whether the version
number has been updated. The update indicates that the upgrade is
successful. If it is not updated, the upgrade fails. Repeat the above 3 steps
for the upgrade failure.
Note: The application upgrade package must be placed in the root directory
of the USB drive. It cannot be renamed or allowed to exist in multiple
different versions.
11.3. Database upgrade
L L
L

Press the “
/MENU
” button to enter the main menu, and select “ ”
(Image registration) in the main menu.
Press the “ SELECT/ENTER ” button to enter the image overlap adjustment
mode.Press the navigation keys (up, down, left and right buttons) to
perform the visible image shift operation.
Press the “ SELECT/ENTER ” button to exit the image blending mode (Note:
If there is no operation for more than 6 seconds, the image blending mode
will be automatically exited).
12.“Image Overlapping” Submenu
12.1. Description of image overlapping
Image overlapping makes it easier for users to understand the infrared
images by using aligned visible images and infrared images. The use of
image overlapping can capture the visible image of every infrared image so
as to display the temperature distribution in the target region correctly and
share with other people more effectively.
12.2. Application of Image overlapping
23
Cámara de Imagen Térmica
Manual de Instrucciones
Manual de Usuario Versión 1.0. 16 de agosto,2022.

1
2
2
3
5
10
11
12
15
5
9
9
8
11
13
13
14
10
11
1. Visión General
2. Consideraciones y Mantenimiento de la Seguridad
3.
Leer Imágenes
4. Índice de Rendimiento
5. Descripciones de Producto
5.1. Instrucción a la Estructura
5.2. Descripción de la Pantalla
5.3. Descripción de la clave
6. Operación Inicial
7. Introducción al Submenú “Imagen”
7.1. Ver imagen
7.2. Eliminar imágenes
8. Introducción al Submenú “Paleta de Colores”
8.1. Descripción de la Paleta de Colores
8.2. Aplicación de la Paleta de Colores
9. Introducción al Submenú “Emisividad”
9.1. Descripción de la Emisividad
9.2. Ajuste de Emisividad
9.3. El Valor de Emisividad de los Materiales Comunes
Contenidos
19
16
17
18
19
19
21
23
23
23
17
10. Introducción al Submenú “Configuración”
10.1. Ajuste del Rango de Temperatura
10.2. Ajuste de Tiempo
10.3. Activar/Desactivar el Cursor de Temperatura Más Alta y Más Baja
11. Submenú “Base de Datos”
11.1. Descripción de la Base de Datos
11.2. Visualización de Imágenes de la Base de Datos
11.3. Actualización de la Base de Datos
12. Submenú “Superposición de Imágenes”
12.1. Descripción de la Superposición de Imágenes
12.2. Aplicación de Superposición de Imágenes

1
2
1. Visión general
Este producto es una cámara infrarroja que integra la medición de la
temperatura de la superficie y la imagen térmica en tiempo real. Un
termómetro inferido tradicional necesita medir cada componente uno por
uno, mientras que no es necesario para una cámara de imágenes
infrarrojas, así ahorrando tiempo. Los problemas potenciales se muestran
claramente en la pantalla a color. Además, el cursor de medición del punto
central se utiliza para localizar de forma rápida y precisa para medir la
temperatura del objeto objetivo.
Para aumentar la diferenciación, el producto está provisto de una cámara
de luz visible. Las imágenes térmicas y las imágenes visibles se
almacenan en el dispositivo y se pueden leer a través de USB o almacenar
en una computadora para generar un informe o para imprimir.
El producto se puede utilizar en campos de tratamiento médico, extinción
de incendios, arqueología, tráfico, agricultura, geología, energía, fundición,
fabricación electrónica, etc. y es la selección ideal para electricistas,
personal de mantenimiento y técnicos para encontrar el área problemática
rápidamente.
Las siguientes funciones principales aumentan la precisión y la usabilidad
del producto:
El coeficiente de radiación puede ajustarse para aumentar la precisión
de la medición de objetos con media superficie de reflexión.
El cursor de temperatura más alta y temperatura más baja puede guiar
a los usuarios a las áreas con la temperatura más alta y más baja de
las imágenes térmicas.
La paleta de colores seleccionable.
2. Consideraciones y Mantenimiento de la
Seguridad
3. Leer Imágenes
Por favor, lea atentamente las instrucciones de uso para garantizar el
resultado correcto de la medición:
No use el dispositivo en un ambiente explosivo, inflamable o corrosivo.
El producto pertenece a dispositivos electrónicos de precisión y ópticos
sensibles. No impacte y déjelo caer para evitar daños.
No desmonte ni remodele los productos.
Cuando el producto funciona, hay un ligero sonido de clic cada varios
segundos. Este es un fenómeno normal de que la lente captura
imágenes.
Utilice un paño húmedo o jabón débil para limpiar la carcasa del
dispositivo. No use abradante, isopropanol o disolvente para limpiarlo.
Se utiliza un limpiador de lentes ópticos especial para limpiar la pantalla.
Abra la cubierta protectora USB como se muestra en Use el código
USB para conecte el puerto USB y luego la computadora para leer las
imágenes o guardarlas en computadoras.
El sistema operativo soportado a través de la verificación incluye:
winxp, win7, win 8, win10, sistema Apple.
Se sugiere utilizar el código USB conectado o el código USB con mayor
calidad.
3
3
4
Nota:
Al conectarse con una computadora, desconecte el código después de
seleccionar “dispositivo emergente de forma segura” para evitar causar
daños en el sistema de archivos y otros problemas. Si “no se puede
guardar” y se producen otros problemas, puede encontrar el disco duro
en la computadora y solucionarlo.
4. Índice de Rendimiento
235mm x 100mm x 90mm(9.3''x3.9''x3.5'')
415g (no contiene batería)
Píxeles de pantalla
Resolución térmica
Resolución de imagen visible
Ángulo de campo/longitud de
enfoque más corta
Sensividad térmica
Rango de medición de
temperatura
Precisión
Corrección de temperatura
Emisividad
Velocidad de fotogramas de
imágenes térmicas
Cobertura de longitud de onda
Modo de enfoque
Paleta de colores
320x240
Pantalla de visualización
Tamaño de pantalla
Pantalla de visualización TFT
3.2 pulgadas
256x192
300000
56°x42°/0.4m
32.09°F
(0.05℃)
-20℃ a 300℃(-4°F a 572°F ) +/-2
℃ o
lectura +/-2%
300℃ a 550℃(572 °F a 1022°F ) +/-5%
Sí, calibración automática del obturador
Ajustable de 0.01 a 1.0
≤25Hz
8-14um
Arco iris, óxido de hierro rojo, color frío,
blanco y negro, blanco y negro
Fijo
Bajo: -20°C ~ 120°C (-4°F a 248°F)
Alto: 120°C ~ 550°C (248°F a 1022°F)
Medio de almacenamiento
Interface type
Tipo de interfaz
Tiempo de apagado automático
Comando de configuración
Idioma
Opción de visualización
La integración de la imagen térmica con
un 25% de longitud de paso e imagen
visible
3G incorporado (Más de 20 mil fotos)
JPG
Micro USB 2.0
Fuente de alimentación Batería 18650 recargable incorporada
Tiempo de trabajo de la batería 2~3 horas
Seleccionable: 5 minutos/20 minutos/no
se apaga automáticamente
Unidad, idioma, fecha, tiempo, información
Inglés, Chino, Italiano, Alemán
Tamaño del producto
(largo × ancho × alto)
Peso del producto
Temperatura de trabajo 0°C a 45°C (32°F a 113°F)
Temperatura de almacenamiento -20℃ a 60℃ (-4°F a 140°F)
Humedad relativa
< 85%RH
5
6
1
2
5. Descripciones de Producto
Pantalla de visualización
Teclado
Manija
Cámara de luz visible
Sensor de imagen infrarroja
Clave de captura de imagen
Batería
Gorro
Por favor, abra la tapa en uso
5.1. Instrucción a la estructura
87
3
Micro USB
Por favor, abra la tapa en uso
5.2. Descripción de la Pantalla
Valor máximo/valor
mínimo de la
temperatura del campo
Código de color
Emisividad actual
Rango de Temperatura
Energía de
batería
El cursor de
temperatura
más alta
Cursor de temperatura
en el punto central
Tiempo
Temperatura del
punto central
El cursor de
temperatura
más baja
2. Código de color: se utiliza para marcar el color correspondiente a la
temperatura relativa de bajo a alto en el campo de versión.
3. El cursor de temperatura del punto central: se utiliza para indicar la
posición central en el área de la pantalla. El color del cursor muestra blanco.
El valor de temperatura se muestra en la esquina superior izquierda de la
pantalla.
5. El cursor de temperatura más baja: se utiliza para indicar la posición de
temperatura más baja en el área de la pantalla. Se moverá con el
movimiento de la temperatura más baja. El cursor muestra rojo. El valor de
temperatura se muestra en la posición central de la pantalla.
4. El cursor de temperatura más alta: se utiliza para indicar la posición de
temperatura más alta en el área de la pantalla. Se moverá con el movimien-
to de la temperatura más alta. El cursor muestra rojo. El valor de
temperatura se muestra en la esquina inferior izquierda de la pantalla.
L
1.Rango de temperatura: El rango de medición de temperatura.
Tecla de encendido/apagado: mantenga presionada la tecla “ /MENU ”
para encender/apagar.
Captura de imagen: presione la tecla de captura de imagen. Cuando
la captura se realiza correctamente, la pantalla mostrará el mensaje
“¿guardar la foto?”. Seleccione “Sí” o “No” para eliminar la imagen,
presione el botón “ ” “ ” para cambiar la selección, luego
presione el botón “SELECT/ENTER” para confirmar.
La función para ocultar la columna de temperatura más alta/más baja en
la parte inferior de la pantalla: debajo de la operación después del
arranque normal, presione “ ” y la parte inferior de la pantalla
mostrará la columna de temperatura más alta/más baja. Presione “ ”
también puede ocultarlo.
Salida de imagen: Las imágenes guardadas a través de la captura se
pueden verificar y enviar conectándose con una computadora a través
de Micro USB.
Cambiar entre imagen térmica infrarroja e imagen visible: presione la
tecla “ ” o“ ” para cambiar el grado de fusión entre las imágenes
térmicas e imágenes visibles inferidas (el grado de fusión es 0%,
25%,50%, 75% y 100%).
Como se muestra en la figura, presione el botón “ /MENU”, seleccione el
elemento “ ” (imagen) en el menú principal, luego presione “ ” para
ingresar a la lista de imágenes, presione la tecla de navegación Use el botón
“ ”“ ” para seleccionar una imagen, luego Presione el botón
“SELECT/ENTER”para ver la imagen. Mientras se visualiza el imagen,presi-
one el botón “ ” para ver 8la imagen anterior, presione el botón “ ”
para ver la siguiente imagen, presione el botón “SELECT/ENTER” para
regresar y presione el botón “ /MENU” para salir del menú.
9 10
MENU
SELECT
ENTER
171229-105030
171229-105031
171229-105032
171229-105033
Tecla On/off/menú Clave de selección/
clave de entrada
Tecla de navegación:
Arriba, abajo, izquierda
y derecha
6. Operación inicial
Carga: el producto está provisto de una batería de litio 18650 incorpora-
da. Cuando la energía de la batería no sea suficiente, por favor,
cárguela con el cable Micro USB.
5.3. Descripción de la clave
7. Introducción al submenú “Imagen”
7.1. Ver imagen
Al ver una imagen, presione la tecla “ ” y aparecerá en la pantalla el
mensaje “Eliminar la foto?” Seleccione “Sí” o “No” para eliminar la
imagen, presione las teclas “ ” y “ ” para cambiar la selección y
luego presione la tecla “SELECT/ENTER” para confirmar. Presione la
tecla “ /MENU” para salir del menú.
Como se muestra en la figura, presione la tecla “ /MENU” para ingresar
al menú principal y seleccione la opción “ ” (paleta de color )y
presione la tecla “ ” para ingresar a la lista de paleta de colores.
Presione las teclas “ ”y “ ” en la navegación para seleccionar
la paleta de colores. Luego presione la tecla “SELECT/ENTER” para
seleccionar la paleta de colores. Presione “ ” para volver. Presione la
tecla “ /MENU” para salir del menú.
12
11
7.2. Eliminar imágenes
8. Introducción al Sub-menú “Paleta de Colores”
La siguiente es la imagen del mismo objeto con selección de diferentes
paletas de colores.
8.1 Descripción de Paleta de Colores
El menú de la paleta de colores puede cambiar el color falso de la imagen
térmica infrarroja. El producto ofrece cinco tipos de paleta de colores: arco
iris, óxido de hierro rojo, color frío, calor blanco y calor negro.
La selección adecuada de la paleta de colores muestra los detalles del
objetivo mejor. Las paletas de colores arco iris, rojo óxido de hierro y frío se
centran en la visualización del color. Tales paletas de colores son muy
adecuadas para un alto contraste de calor y se utilizan para mejorar el
contraste de color entre alta temperatura y baja temperatura. Pero las
paletas de colores blanco y blanco y negro proporcionan un color lineal
uniforme.
Óxido de
hierro rojo
Arco iris Color frío Calor blanco Calor negro
8.2 Aplicación de la paleta de colores
Spectra
Hierro
blanc
o frío
Negro
Paleta de
L L L
LL
Como se muestra en la figura, presione la tecla “ /MENU” para ingresar
al menú principal y seleccione la opción “ ” (emisividad) y presione la
tecla “ ” para ingresar a la lista de emisividad. Presione las teclas
“ ” y “ ” en la tecla de navegación para seleccionar la emisividad.
Luego presione la tecla “SELECT/ENTER” para determinar la selección
de la emisividad. Presione la tecla “ ” nuevamente para regresar.
13 14
9. Introducción al submenú "Emisividad”
9.1 Descripción de la emisividad
La emisividad del producto se puede ajustar de 0,01 a 1,00 con el valor
predeterminado de 0,95. Muchos objetos y materiales comunes (como la
madera, el agua, la piel y la tela textil) pueden reflejar la energía térmica de
manera efectiva. Por lo tanto, es fácil obtener un valor de medición
relativamente correcto. La emisividad generalmente se establece en 0.95
cuando los objetos gruesos que son fáciles de emitir energía. Para los
objetos semimate que dan menos energía, la emisividad suele ser de
0,85 y la emisividad de los objetos semibrillantes es de 0,6. Los objetos
brillantes se dividen en materiales con bajo coeficiente de radiación. La
emisividad generalmente se establece como 0.3 en el momento de la
medición. El ajuste correcto del valor de emisividad es muy importante para
que pueda realizar la medición de temperatura más correcta. La emisividad
superficial producirá un impacto gigante en la temperatura de la superficie
medida por el producto. Comprender la emisividad de la superficie le
permitirá obtener el resultado correcto de la medición de la temperatura.
The operating step is as the following:
9.2. Ajuste de emisividad
El producto está provisto de cuatro tipos de modos de medición de objetos:
Objeto grueso (0.95)
Objeto semimate (0.85)
Objeto semi-brillante (0.60)
Objeto brillante (0.30)
De acuerdo con las características de los objetos medidos, los usuarios
pueden establecer el valor de emisividad a través de la opción
“autodefinirse” (consulte la tabla de "emisividad de materiales comunes").
El paso de funcionamiento es el siguiente:
Objeto grueso
(e=0.95)
emisividad
Objeto semimate
(e=0.85)
Objeto semi-brillante
(e=0.60)
Objeto brillante
(e=0.30)
autodefinirse
0.01
Presione la tecla “ /MENU” para seleccionar la opción “ ”
(configuración) en la pantalla principal.menú. Presione la tecla “ ”
nuevamente para ingresar al submenú de “configuración”.
Si selecciona la emisividad “Personalizada” , presione “SELECT/ENTER”
para ingresar para editar el estado, presione “ ” / “ ” para
seleccionar el número a modificar, presione “ ” “ ” para modificar
el valor. Una vez completada la modificación, presione “SELECT/ENTER”
para confirmar, luego presione “ ” para regresar. El botón “ /MENU”
sale del menú.
15
16
9.3 El valor de emisividad de los materiales comunes
10. Introducción al submenú “Configuración”
Radiación térmica
Tela negra
Piel humana
Espuma
Polvo de
carbón vegetal
Pintar
Pintura mate
Caucho negro
Plástico
Madera
Papel
Hemitróxido
de cromo
Óxido de cobre
Óxido férrico
Textil
Sustancia
Radiación térmica
Sustancia
Bitumen
Concreto
Cemento
Arena
Tierra
Agua
Hielo
Nieve
Vidrio
Cerámica
Mármol
Yeso
Mortero
Ladrillo
Ajustes:
Apagado automático
Apagado
automático
Intensidad
Idioma
Unidad
Formato de
tiempo
Año
Mes
Día
Hora
Minuto
Segundo
Tiempo
establecido
Punto
Off
On
24 horas
AM/PM
Inglés
Chino
Italiano
Alemán
Celsius
Fahrenheit
NO
5min
20min
Bajo
Medio
Alto
Intensidad
Idioma
Unidad
Rango de temperatura
Temperatura
rango
Formato de tiempo
Tiempo de ajuste
Punto
2020
10
26
02
52
03
Bajo(-20℃~120℃)
Alto(120℃~550℃)
24h
L
Después de seleccionar, presione la tecla “SELECT/ENTER” para ingresar
el estado de edición.
Presione las teclas “ ” y “ ”para seleccionar el número a modificar,
presione las teclas “ ” y “ ” para modificar el valor, después de que
se complete la modificación, presione la tecla “SELECT/ENTER” para
confirmar;
Presione la tecla “ ” /“ ” para seleccionar la opción “Off” o “On”.
Como se muestra en la figura, después de seleccionar “ ” (tiempo
establecido), presione “ ” en la tecla de navegación para ingresar la
hora de configuración.
e “ ”/ “ ” para seleccionar año/mes/día/hora/minuto.
Como se muestra en la figura, después de seleccionar “ ” (punto de
acceso frío), presione el botón “ ” en la tecla de navegación para
ingresar a la configuración de punto de acceso frío.
Una vez completada la configuración, presione la tecla “ ” para
regresar.Presione la tecla “ /MENU” para salir del menú.
Una vez completada la configuración de tiempo, presione la tecla “ ” para
regresar.
resione la salida “ /MENU” en el menú.
1817
10.2. Ajuste de tiempo
Año
Mes
Día
Hora
Minuto
2016
9
9
11
33
Segundo
33
Tiempo establecido
Punto
Off
On
10.3. Activar/Desactivar el Cursor de Temperatura
Más Alta y Más Baja
Luego presione la tecla “ SELECT/ENTER ” para determinar la selección.
24h
L
24h
L
L
Después de seleccionar “ ” (rango de temperatura), presione la tecla
“ ” en las teclas de navegación para ingresar a la configuración del
rango de temperatura. Puede ajustarse a baja temperatura
(-20 °C a 120 °C) o alta temperatura (120 °C a 550 °C).
10.1. Ajuste del rango de temperatura
Presione el botón “ / MENU” para ingresar al menú principal, seleccione
“ ” (base de datos), presione el botón “ ” para ingresar a la base
de datos y vea “Base de Datos”Sub-menú. Como se muestra a continu-
ación:
Después de ingresar al menú “Base de Datos”, presione “ ” para
ingresar al menú “Tren Motriz y Escape”, luego presione “ ” para ver el
submenú “Fallo de Encendido”. Como se muestra a continuación:
Después de ingresar al submenú "Misfire", presione el botón “ ” para
ver el submenú “Bobina”. Como se muestra a continuación:
Presione el botón “ /MENU” para ingresar al menú principal, seleccione
“Base de Datos” en la parte inferior del menú principal, presione el botón
“ ” en la tecla de navegación para ingresar a la lista de la base de
datos, presione el botón “SELECT/ENTER” para ver la imagen, y cuando
vea la imagen, presione “ ”, presione para ver la siguiente imagen,
presione “ ” para ver la siguiente imagen, presione “SELECT/ENTER”
para regresar, presione “ /MENU” para salir del menú.
2019
11.Submenú “Base de Datos”
11.1. Descripción de la Base de Datos
A través del mapa de imágenes almacenado en la base de datos, el
cliente puede comparar si la imagen termográfica capturada es normal.
La base de datos contiene imágenes normales y anormales para
referencia del cliente.
Por ejemplo: mire el menú de la base de datos “Tren Motriz y Escape”
Submenú de “Bobina”.
11.2. Visualización de imágenes de base de datos
L
L
L
L
L
Después de ingresar al submenú “Bobina”, presione “SELECT/ENTER”
para ingresar a la vista de imagen, presione “ ” y “ ” para ver las tres
imágenes de Bien Conocido, Malo Conocido y Propina.
Presione “SELECT/ENTER” para volver y presione “ /MENU” para salir
del menú.
2221
Nota: Esta función proporciona un método rápido de actualización de
aplicaciones y bases de datos sin cambiar todo el firmware. La base de
datos y los archivos de aplicación se empaquetan mediante asignación de
unidades USB y se actualizan automáticamente en la máquina.
Los pasos específicos son los siguientes:
Actualizar la dirección de la base de datos: visite https://www.mat-
cotools.com/, busque Ingrese "MDMAXTIA" en el cuadro de cable y vaya a
la página del producto para descargar.
1. En el caso del arranque, conecte la interfaz USB de la máquina a la
PC e identifique la unidad flash USB.
2. Abra la unidad flash USB y copie el paquete de actualización con el
sufijo pak en el directorio raíz de la unidad flash USB.
Como se muestra a continuación:
3. Después de apagar y luego reiniciar, verifique si el número de versión
se ha actualizado. La actualización indica que la actualización se ha
realizado correctamente. Si no se actualiza, se produce un error en la
actualización. Repita los 3 pasos anteriores para la falla de actualización.
Nota: El paquete de actualización de la aplicación debe colocarse en el
directorio raíz de la unidad USB. No se puede cambiar el nombre ni
permitir que exista en varias versiones diferentes.
11.3. Actualización de la base de datos
L L
L

Presione el botón “ /MENU ” para entrar en el menú principal y seleccione
“ ” (Registro de Imagen) en el menú principal.
Presione el botón “ SELECT/ENTER ” para entrar en el modo de ajuste de
superposición de imágenes. Presione las teclas de navegación (botones
arriba, abajo, izquierda y derecha) para realizar la operación de
desplazamiento de imagen visible.
Presione el botón “ SELECT/ENTER ” para salir del modo de fusión de
imágenes (Nota: Si no hay ninguna operación durante más de 6 segundos,
se saldrá automáticamente del modo de mezcla de imágenes).
12.12. Submenú “Superposición de Imágenes”
12.1. Descripción de la superposición de imágenes
La superposición de imágenes facilita a los usuarios la comprensión de las
imágenes infrarrojas mediante el uso de imágenes visibles alineadas e
imágenes infrarrojas. El uso de la superposición de imágenes puede
capturar la imagen visible de cada imagen infrarroja para mostrar la
distribución de la temperatura en la región objetivo correctamente y
compartirla con otras personas de manera más efectiva.
12.2. Aplicación de la superposición de imágenes
23