2
SAFETY NOTICES

3
ENSURE YOU HAVE READ AND FULLY UNDERSTAND THE INSTRUCTIONS FOR THIS
DEVICE. FAILURE TO DO SO COULD CAUSE, DAMAGE OR SERIOUS HARM.
• When you start training with this product, please consider your physical condition, train properly and
regularly to ensure that you have enough physical strength to train. Wrong or excessive training will
not help your health.
• This product is not suitable for children. Children can use the product, but only under the
supervision of adults. The device is not a toy. Do not let children or pets play around the
treadmill to avoid accidents.
• Only people who have a good understanding of the product and who are in good health should use
the device.
• This product is suitable for home use, not suitable for professional training and testing, or medical
purposes. If the power line is damaged, it must be replaced by the manufacturer or a qualified service
person in order to avoid danger.
• Please check all parts before use. And make sure the screws and nuts are tightened.
• When running on a treadmill, wear comfortable tight clothes to avoid clothes being caught by the
machine.
• Place the treadmill on a smooth, clean, level surface. Make sure there are no sharp objects nearby. Do
not use it near water and heat sources.
• Please keep your hands away from all moving parts. Do not place your hands and feet in the gap
below the running belt.
• The treadmill must have only one user at a time.
• Make sure the screws and bolts are tightened after the treadmill is assembled.
• If the product is not in use, put the machine in a safe place to prevent the danger caused by children
and those who are not suitable for using the treadmill.
• When in an emergency, quickly pull down the safety switch and step on the left and right side of the
treadmill.
• The side of the left and right handrails need one foot distance from any obstacles, and the back will
need two feet. Please remove all obstacles before use and assure there is safe distance.
• Please use the accessories provided by the original manufacturer. It is strictly forbidden to change it
privately.
• The product is a HC grade product with a maximum user weight of 265 lbs (120kg).
• The running belt on this treadmill has a visible joint mark. This is completely normal and will not aect
the performance or operation of your treadmill.
SAFETY NOTICES
IMPORTANT NOTES
• WARNING: if the plug is not pulled out, it may lead to personal injury and equipment damage.
• Please check each part carefully before use.
• Place the treadmill in a place where the plug can be plugged into the socket.
• Plug the device into a socket and ensure it is not loose.
• Ensure the socket has been installed professionally.
• If the plug and socket are not compatible, please do not change the plug by yourself. Ask an
electrician to handle it.
• Please use a supply voltage of 110-120V.
• Please do not let the power cord touch the running belt roller, and do not use a damaged plug.
• Unplug the plug from the socket before cleaning and maintenance.
• Please do not use this product outdoors, in high humidity and in the sun.
• Please turn o the machine and remove the plug when you leave.
• For your safety, the power plug of the machine must be grounded.

4
SAFETY NOTICES
WARNINGS
Read, understand, and carefully follow all warnings, instructions, and procedures on treadmill and in this
instruction manual before using.
1. BEFORE starting any fitness or strength program, consult with your physician or health ocial.
This will ensure that you engage in the proper strength or fitness program for your age and physical
condition.
2. Inspect treadmill for incorrect, worn, or loose components and then correct, replace, or tighten prior
to use.
3. Do not use the appliance in close proximity to loose clothing or jewelry.
4. Keep long hair away from the appliance while in use
5. Care should be used when mounting or dismounting the treadmill.
6. Read and review all warning labels. Call Customer Service 1 (833) YES-BIKE to obtain replacements if
needed.
7. Do not exceed weight capacity 265 lbs (120kg).
8. The safety and integrity designed into the machine can only be maintained when treadmill is
regularly examined for damage and repaired. It is the sole responsibility of the user/owner or
facility operator to ensure that regular maintenance is performed. Worn or damaged components
shall be replaced immediately or the treadmill removed from service until the repair is made. Only
manufacturer-supplied or -approved components shall be used to maintain and repair the treadmill.
FEDERAL COMMUNICATION COMMISSION (FCC) STATEMENT
15.21 - You are cautioned that changes or modifications not expressly approved by the party responsible for
compliance could void the user’s authority to operate the equipment.
15.105(B) - This equipment has been tested and found to comply with the limits for a Class B digital device,
pursuant to part 15 of the FCC rules. These limits are designed to provide reasonable protection against
harmful interference in a residential installation. This equipment generates, uses and can radiate radio
frequency energy and, if not installed and used in accordance with the instructions, may cause harmful
interference to radio communications. However, there is no guarantee that interference will not occur in a
particular installation.
If this equipment does cause harmful interference to radio or television reception, which can be determined
by turning the equipment o and on, the user is encouraged to try to correct the interference by one or more
of the following measures:
• Reorient or relocate the receiving antenna.
• Increase the separation between the equipment and receiver.
• Connect the equipment into an outlet on a circuit dierent from that to which the receiver is connected.
Consult the dealer or an experienced radio/TV technician for help.
FCC RF RADIATION EXPOSURE STATEMENT:
1. This Transmitter must not be co-located or operating in conjunction with any other antenna or transmitter.
2. This equipment complies with RF radiation exposure limits set forth for an uncontrolled environment. This
equipment should be installed and operated with a minimum distance of 20 cm between the radiator and
your body.
THIS DEVICE COMPLIES WITH PART 15 OF THE FCC RULES.
OPERATION IS SUBJECT TO THE FOLLOWING TWO CONDITIONS:
1. This device may not cause harmful interference and
2. This device must accept any interference received, including interference that may cause undesired
operation.

5
IMPORTANT SAFETY INSTRUCTIONS
CAUTION: To Reduce The Risk Of Injury From Moving Parts - Unplug Before Servicing.
WARNING: To Reduce the Risk of Electric Shock – Unplug Before Cleaning or Servicing
Risk of Injury to Persons – To Avoid Injury, use extreme caution when stepping onto or
o of a moving belt. Read Instruction Manual Before Using.
WARNING: Risk of personal injury – Keep children under the age of 13 away from
machine.
When using an electrical appliance, basic precautions should always be followed,
including reading all instructions before using.
DANGER: To reduce the risk of electric shock, always unplug this appliance from the
electrical outlet immediately after using and before cleaning.
WARNING: To reduce the risk of burns, fire, electric shock, or injury to persons:
1. An appliance should never be left unattended when plugged in. Unplug from outlet
when not in use, and before putting on or taking o parts.
2. This appliance is not intended for use by persons with reduced physical, sensory
or mental capabilities, or lack of experience and knowledge, unless they have
been given supervision or instruction concerning use of the appliance by a person
responsible for their safety. Keep children under the age of 13 away from this
machine.
3. Use this appliance only for its intended use as described in this manual. Do not use
attachments not recommended by the manufacturer.
4. Never operate this appliance if it has a damaged cord or plug, if it is not working
properly, if it has been dropped or damaged, or dropped into water. Return the
appliance to a service center for examination and repair.
5. Do not carry this appliance by supply cord or use cord as a handle.
6. Keep the cord away from heated surfaces.
7. Never operate the appliance with air openings blocked. Keep air openings free of
lint, hair, etc.
8. Never drop or insert any object into any opening.
9. Do not use outdoors.
10. Do not operate where aerosol (spray) products are being used or where oxygen is
being administered.
11. To disconnect, turn all controls to the o position, then remove plug from outlet.
Connect this appliance to a properly grounded outlet only. See Grounding
Instructions.
12. Household use only
13. Connect this appliance to a properly grounded outlet only. See Grounding
Instructions.
SAVE THESE INSTRUCTIONS
6
GROUNDING INSTRUCTIONS
This product must be grounded. If it should malfunction or break down, grounding provides a path of least
resistance for electric current to reduce the risk of electric shock. This product is equipped with a cord having
an equipment-grounding conductor and a grounding plug. The plug must be plugged into an appropriate
outlet that is properly installed and grounded in accordance with all local codes and ordinances.
Two common types of outlets presently in homes are: GFCI (Ground Fault Circuit Interrupter) and AFCI (Arc
Fault Circuit Interrupter). Should hazardous wiring occur, either outlets are programmed to trip. Due to this,
treadmills and other equipment have poor interactions with the GFCI or AFCI outlets.
Oftentimes, GFCI outlets are installed in either bathrooms or kitchens. These can be identified with either
a red or white reset switch that is located on the front of the outlet. Should an excessive amount of power
go through the group port, the GFCI outlet will flip their breaker. Due to treadmills and other equipment
using the ground prong to help disperse static electricity, it is not ideal to use a GFCI outlet to power your
machine. It is recommended that equipment be plugged into a dierent type of outlet that will prevent the
machine from continually shutting down. Please note that GFCI outlets can be connected to other outlets
(even if they’re not that specific type of outlet) and it is recommended moving the equipment to a space
that is not electrically tied together. Do not plug your equipment into surge protectors or other types of
units, it is recommended that the equipment is plugged into a dedicated circuit.
Electrical arcs are detected by AFCI outlets and are designed to disrupt and cancel the flow of electricity.
Due to this, treadmills and other equipment would likely have issues of shutting down if plugged into AFCI
outlets. Newer building codes now require AFCI outlets, however, if you’re having persistent issues, here
are some recommended solutions: consult an electrician or switch to a dierent type of outlet.
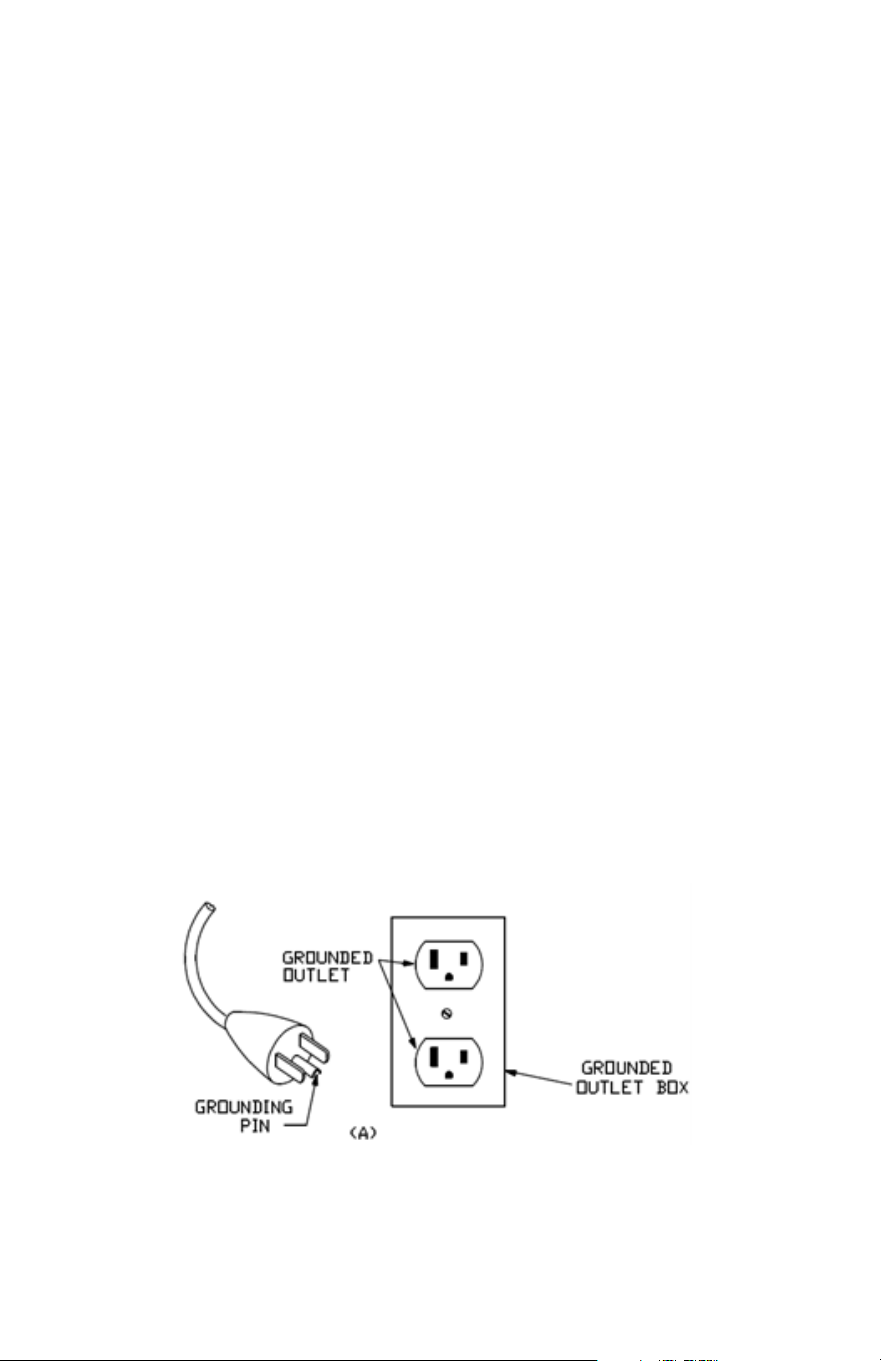
DANGER – Improper connection of the equipment-grounding conductor can result in a risk of electric
shock. Check with a qualified electrician or serviceman if you are in doubt as to whether the product is
properly grounded. Do not modify the plug provided with the product.
If it will not fit the outlet, have a proper outlet installed by a qualified electrician. This product is for use on
a nominal 120-V circuit and has a grounding plug that looks like the plug illustrated in sketch A. Make sure
that the product is connected to an outlet having the same configuration as the plug. No adapter should be
used with this product.

7
DuoTread COMPONENTS
1. DuoTread
2. Device Holder
3. Detachable
Remote Control
(packed separately)
4. Safety Key
5. L Shaped Wrench
6. (2) Screws
2
1
4
5
6
BATTERY WARNINGS
• Ensure batteries are installed according to correct polarity (+ and -).
• Do not mix old and new batteries, dierent brands, or dierent types of batteries, such as alkaline,
carbon-zinc, or rechargeable batteries.
• Remove and immediately recycle or dispose of batteries from equipment not used for an extended
period of time according to local regulations.
• Always completely secure the battery compartment. If the battery compartment does not close
securely, stop using the product, remove the batteries, and keep them away from children.
• Do not force discharge, recharge, disassemble, incinerate, or heat batteries. Doing so may result in
injury due to venting, leakage, or explosion resulting in chemical burns.
• Remove and immediately recycle or dispose of used batteries according to local regulations. KEEP
AWAY FROM CHILDREN. Do NOT dispose of batteries in household trash or incinerate.
• Even used batteries may cause severe injury or death.
• If battery is ingested, call local poison control center for treatment information.
• Non-rechargeable batteries are not to be recharged.
8
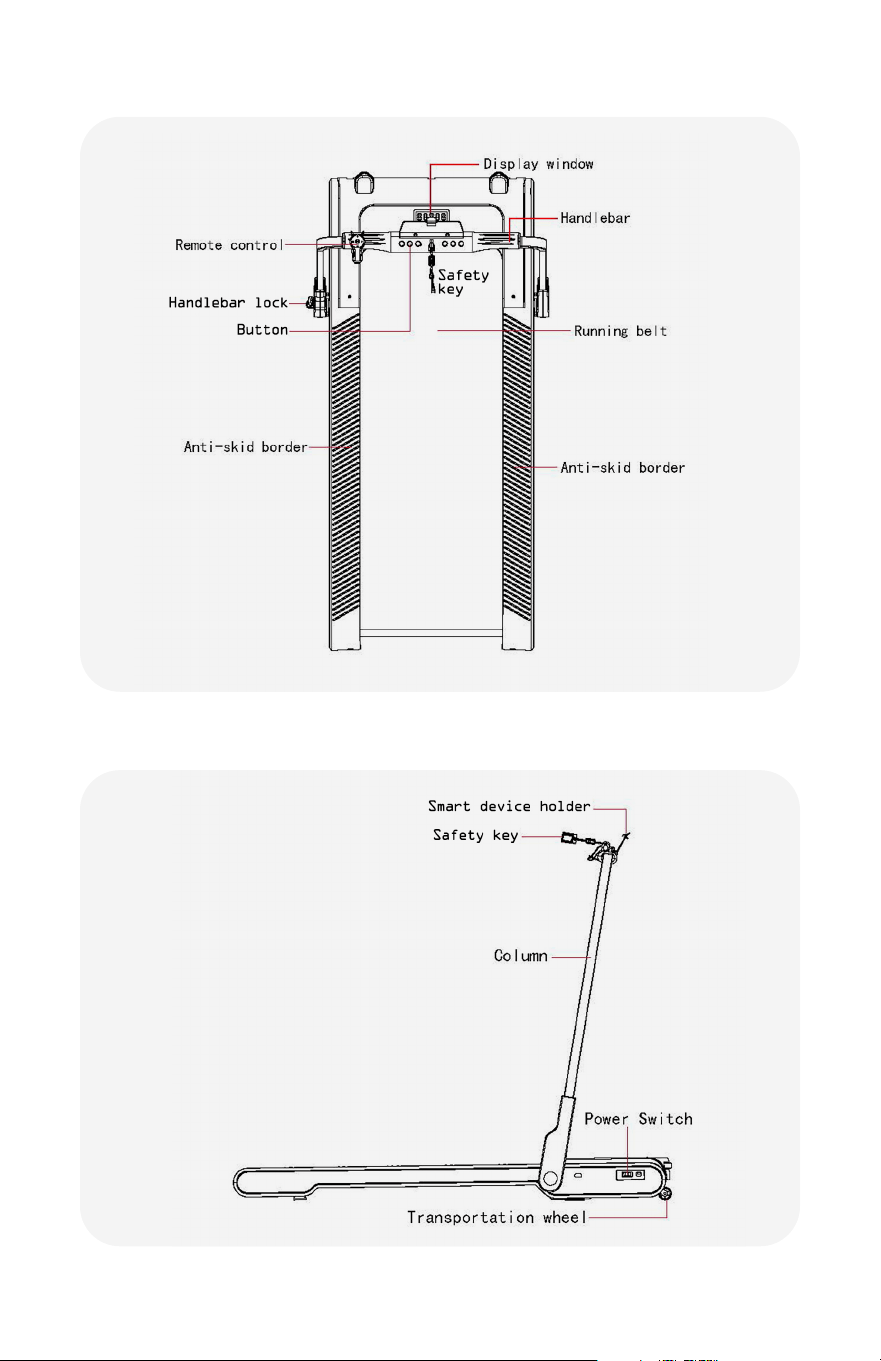
OVERVIEW
9
USAGE INSTRUCTION
The main structure of the treadmill you purchased has already been assembled in
the factory. It is ready to use once plugged in. The following operations are how to
use handrails and how to fold and unfold them.
1. Remove any packaging and remove the treadmill from the box.
2. Release the handlebar lock and gently pull the handlebar base to the side and
away from the body of the treadmill. Once loosened, rotate the handlebar into the
upright position and lock in place.
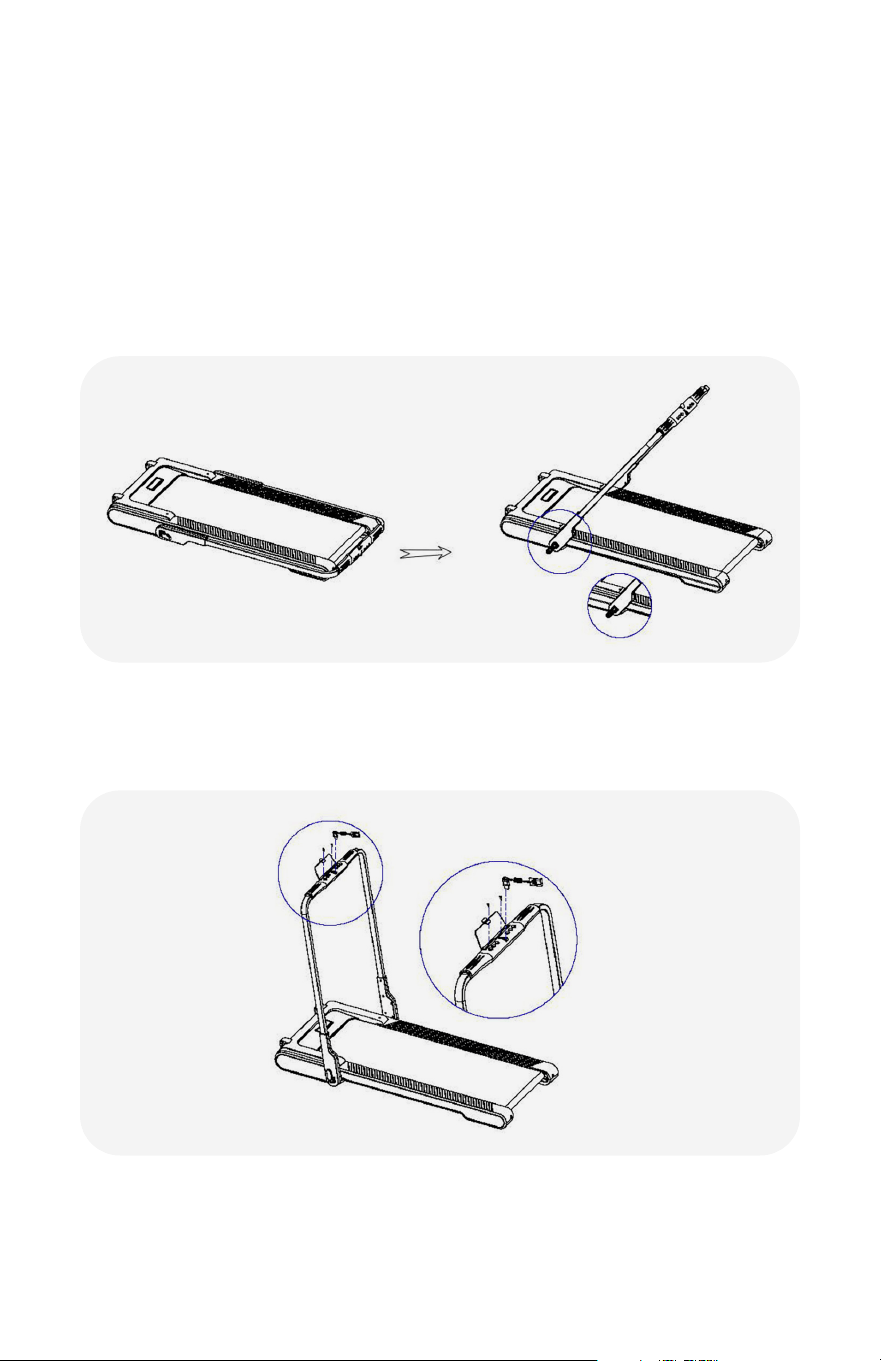
3. Attach the Smart Device Holder onto the handlebar using the included
L shape wrench and screws. Insert the security lock into the console.
Assembly is complete.
4. Plug in the treadmill and turn on the machine using the power switch located on
the right front. Step onto the tread, and press the play button to begin.
10
USAGE INSTRUCTION
Folding the Treadmill, horizontal storage.
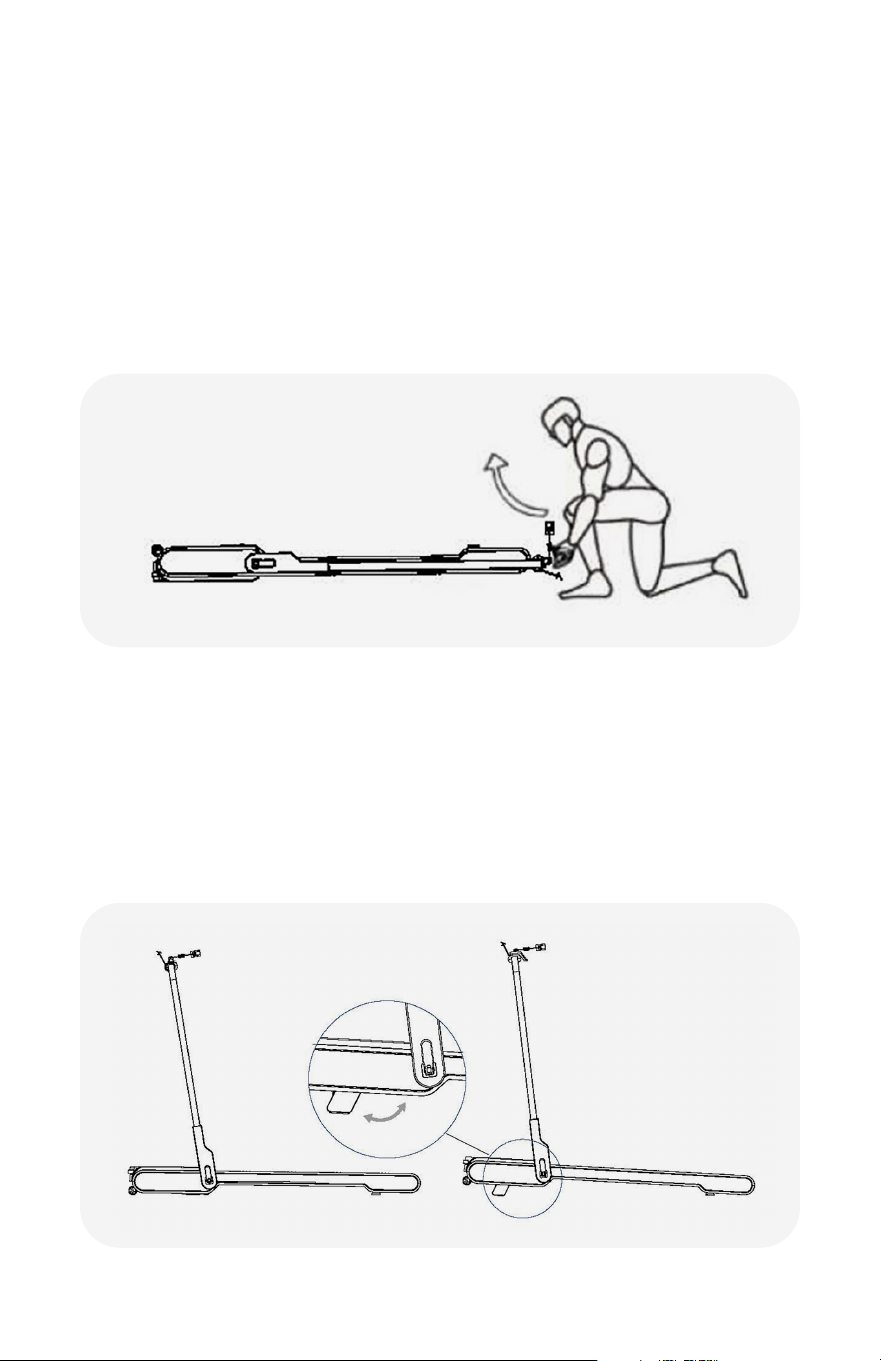
1. Turn the treadmill power button to the OFF position, and unplug the treadmill.
2. Release the handlebar lock and fold the handlebar so that it lies horizontal with
the running board.
3. Secure the handlebar lock before lifting the machine up onto it's front end wheels.
4. Make sure you use proper lifting form by lifting with your legs and not your back
as shown below.
Incline adjustment of the running platform.
1. Standing o and to the side of the treadmill, lift the front portion slightly and rotate
the adjusting block out to a stationary position. Do the same on the other side,
resulting in a 3° incline of the running platform.
2. Standing o and to the side of the treadmill, lift the front end of the machine
slightly and rotate the adjusting block in to the stationary folded position. Do the
same on the other side. This will keep the machine level with no incline.
11
1. POWER ON
When booting up the screen, the display will display the word "HELLO" and the
number "10000" as a reminder to walk 10000 steps minimum for a nominal
workout. Then the display will breifly show the software version number. The
format is Vx.x. Then the display will enter standby mode and wait for the user to
begin workout.
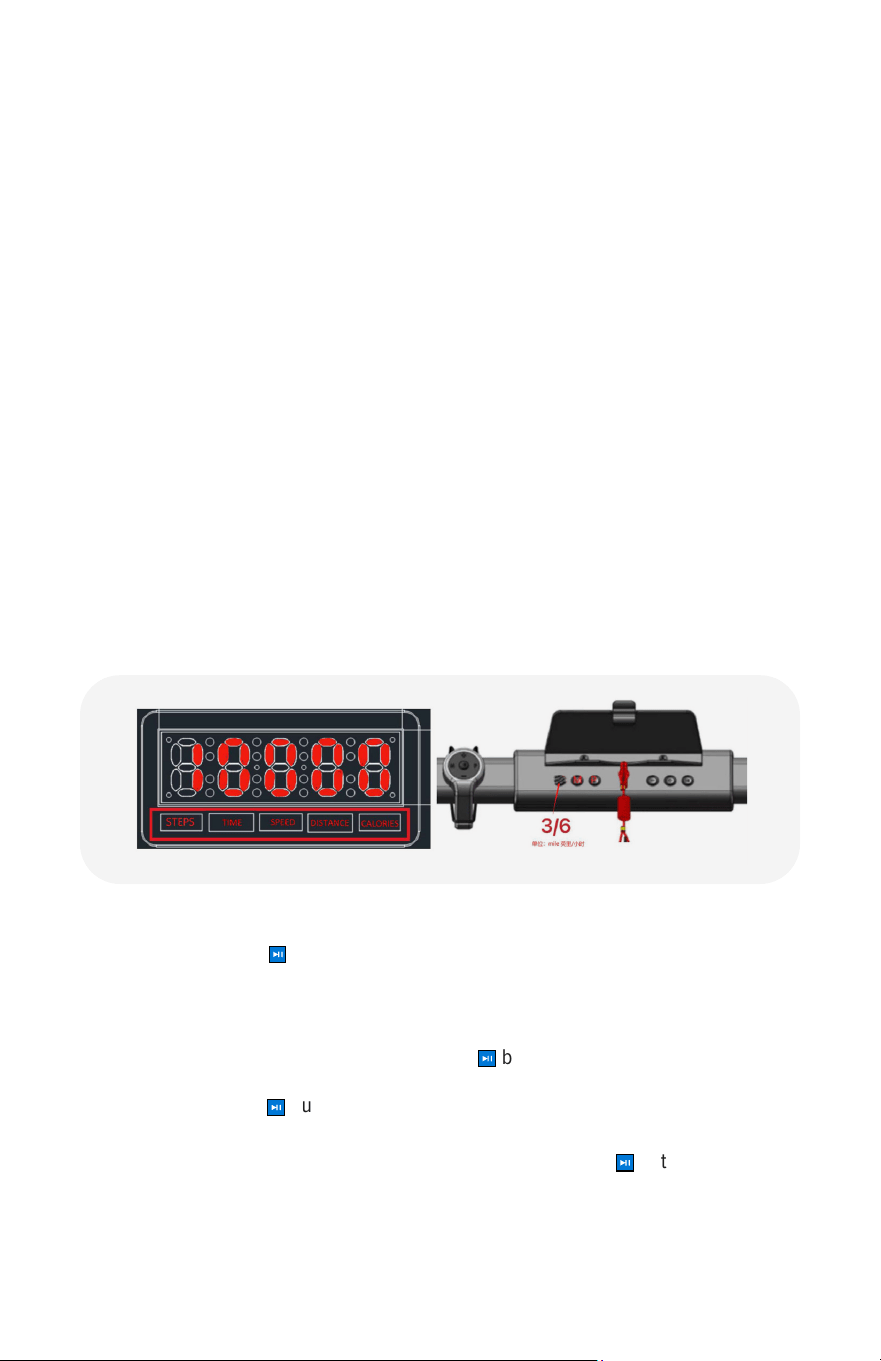
2. WINDOW DISPLAY
Five Function Window Display: STEPS will display for 10 seconds, then will
transition to the following categories every 5 seconds - TIME, SPEED, DISTANCE,
and CALORIES.
• Note: the treadmill will notify with a sound when the user has reached 5,000
and 10,000 steps.
• “TIME”: Used to display the running time or countdown time. Format: 0:00:00,
Hours: Minutes: Seconds. After 60 mins, the time display will show 1:00:00.
• “SPEED”: Displays the current speed.
• “DISTANCE”: Displays the movement distance.
• “CALORIES”: Displays the calorie consumption value. In standby mode, the
calorie value is displayed 0.
3. BUTTON FUNCTION
• Start: Press the
⏯
button to move the treadmill from standby mode into a 3
second countdown to begin the exercise. The default speed is 1.0 mph. If a fixed
program has been set, the default speed can be whatever the preset value is
and will begin there.
• Stop: When ready to stop, long press the
⏯
button for 3 seconds. The treadmill
will slow down and eventually stop, going back into standby interface. To pause,
short press the
⏯
button. The user has 30 seconds to resume workout. After 30
seconds, the data will all go back to zero.
• To resume during the 30 second paused action, press the
⏯
button to resume.
The treadmill will countdown 3 more seconds before the belt begins
to move.
OPERATION

12
OPERATION
• During pause state, if the user wishes to end exercise, simply press and hold the
⏯
button for 3 seconds and all data will go down to zero.
• "SPEED +/-" Button: to adjust the speed, press the + to increase or the - to
decrease. The value will go up 0.1 mph.
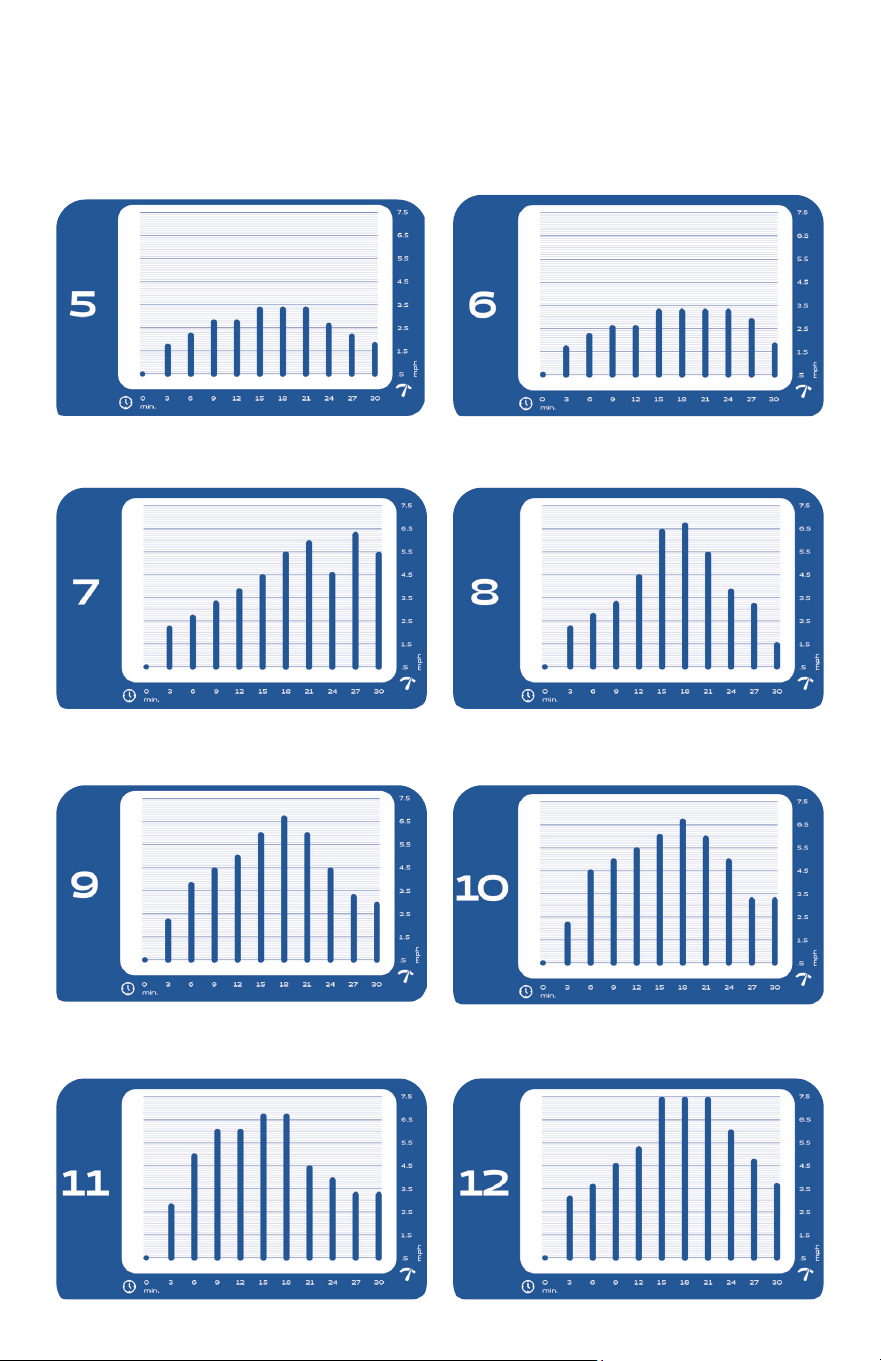
• "P" Program Button: for an extended list of programs, see page 13. While in
standby, the user may switch programs. In total, there are 12 fixed programs:
P01-P12. P01-P06 are 6 programs for walking.
• “M”Mode button: While in standby, the user may switch between 4 dierent
countdown modes.
ɧ The total number of steps being counted down on default is 5,000 steps.
ɧ Users can choose between a range of 1,000-40,000 steps by adding or
subtracting 1,000 steps at a time.
ɧ The default countdown time is 30 minutes. User may change this and
choose between the range of 5:00-9:59:00 by adding or subtracting 1
minute at a time.
ɧ The default distance countdown is set at 1.00 mile. User may change
this and choose between a range of 1.00-990.00 miles by adding or
subtracting 1.00 mile at a time.
ɧ Calorie countdown is set at the default setting of 50 kcal. The user may
change this and choose between the range of 10-990 kcal by adding or
subtracting by 1 kcal at a time.
• In program setting mode, change the time setting function under the program.
Press "Speed +" and "Speed -" to add or subtract time from the program.
• Example: Time countdown is set at 30 minutes. To start, press speed "+" once to
increase it to 31 minutes.
• "3/6" Button: two speed shortcuts are available - if the user hits this once the
speed will increase to 3 mph. If the user hits this twice the speed will increase to
6 mph. To quickly switch between the two, simply press the button.
• O/On Prompt Sound: while in standby mode, short press the speed "+" or
speed "-" on the remote control. The display will show "ON", flashes twice, then
will display "OFF" and the treadmill sounds will be turned o. To turn back on,
repeat steps above. The "OFF" will turn to "ON" on the display.
4. FUNCTION MODE INSTRUCTION
• Sport Mode: press the
⏯
button to quickly start exercising. The display will show
a 3 second countdown. The default speed is set to 0.6 mph, shortcut keys for
speed "+" and "-" will help increase or decrease speed.
• Countdown Mode (M1-M4): while in standby, press the "M" mode key to
choose dierent modes. M1: step countdown (default is 5,000 steps). Press the
speed "+" or speed "-" to add or subtract the steps 1,000 at a time. M2: time
countdown (default 30:00 minutes). Press the speed "+" or speed "-" to add or
subtract 5 minutes at a time. M3: distance countdown (default 1.00 mile). Press

13
OPERATION
the speed "+" or speed "-" to add or subtract the mileage 1 mile at a time. M4:
calorie countdown (default 50 kcal). Press the speed "+" or speed "-" to add or
subtract the calories 1 kcal at a time. To complete the process for each setting,
press the
⏯
button, treadmill will countdown according to the value set, then
automatically stops. Duplicate the original values desired for each setting. The
treadmill will display for 10 seconds, this indicates that the goals have been
achieved with the display showing "END". The user will enter standby mode after
3 seconds.
• Sleep mode: In standby mode, do not press any button for 10 minutes, enter
sleep mode, when the screen is turned o, press any button to wake up, and
enter standby mode Safety mode:
In case of emergency, pull down the safety clip, the treadmill can stop the
operation, the speed window shows E0, close the safety clip system and restart
the machine.
• Metric / Imperial Switching Function: Press
⏯
and speed "+" for 5 seconds at
the same time in order to switch the metric display. After a sound, the speed
interface will display 0.6, indicating that it has been switched to the imperial
display. If switching back, the speed interface displays 1.0, indicating that it has
been switched to the metric display. After a successful switch, the treadmill will
return to standby mode.
• What data needs to be stored by EEPROM: this treadmill uses total steps,
distance, and time. To see this data, the user must enter into Engineering
Mode. While in standby, unplug the safety key lock, press speed "+", insert the
safety lock back, press speed "+" and toggle to view the total number of steps,
distance, and time.
• Exiting Engineering Mode: unplug the safety key lock, insert it back, and reset to
normal standby mode.
• Clear Stored Workout Data: while in the standby state, press
⏯
and speed "-" at
the same time for 5 seconds. After initial sound, the interface will display "EE",
the EEPROM data is cleared, and the factory mode parameter setting is restored.
The treadmill will return to the standby state.
• Sound Switch Setting: while in standby mode, press the speed "+" to turn on the
sound, press speed "-" to turn o the sound. This setting is not saved, and each
time the treadmill is turned on, it will be restored to it's default on state.
• Running Mode: only when the handlebar is erect is the treadmill in "Running
Mode". Speed range is 0.6-7.5 mph. Both the handlebar buttons or the remote
control can be used while in this mode.
• Walking Mode: when the handrail is flat and horizontal with the running deck,
is when the treadmill is in "Walking Mode." The speed range is 0.6-3.7 mph.
Handlebar buttons cannot be used while in this mode, and only the remote
control can be used.
• Mode Switching: user may only switch from "Walking" to "Running" mode while
in standby. Modes cannot be switched while in running motion.
14
OPERATION
5. REMOTE CONTROL OPERATION INSTRUCTION
• Remote Control Buttons: speed "+", speed "-", "P", "M", "START/PAUSE/STOP".
• Remote Control Pairing Function: in standby mode, press and hold the speed
shortcut key "3/6" for 3 seconds to enter the remote control pairing mode. In this
mode, the electronic watch displays "BLUE", prompting the remote control to
pair; at this time, press the remote control speed "+" and speed "-" for 5 seconds
at the same time. The remote control will send the pairing code, if the electronic
watch interface shows "SUCCE", it means that the pairing is successful: the
pairing time is set to 60 seconds. If the time exceeds 60
seconds and the pairing is not prompted successfully,
the display "FAIL" means that the pairing failed: in the
pairing mode, press any button to exit the queue mode.
• Remote Pairing Cancel: while in standby, press speed
"+" and speed "-" at the same time for 5 seconds. The
remote control will send a request to cancel the pairing
and once successful the display will show "LOSE".
6. PROGRAMS:
• Fixed Program Mode (P01-P12): press the "P" key to select a mode (12 total
programs). Use the speed "+" or speed "-" keys to set the time desired (default
is 30:00, but can be changed to between 5:00-9:59:00). Press
⏯
to begin
the program. Treadmill will begin to move according to the preset value of the
selected program. Every interval (time/10), the speed will change. This speed
can be adjusted with your shortcut keys ("+" or "-"). NOTE: The program will
return to the default value for each new stage of the program; each program
varies by 10 stages.
15
OPERATION

16
OPERATION
Range Program Value Mode Value Setting Range
Speed(mile/h) 0.6-7.5 — — —
Time(MIN) 5:00-9:59:00 0:30:00 0:30:00 5:00-9:59:00
Distance(mile) 1-990 — 1.0 1.0-990.0
Calories (CAL) 10-990 — 50 10-990
8. ERROR
E0 Safety key disconnected
E01 Communication error
E02 Over current protection
E03 Over loaded
E08 Speed signal missing
E011 Under voltage protection
E012 Over voltage protection
E013 Motor phase loss protection
E014 Motor blocking protection
E015 Incline sensor failure
E016 Motor unable to start
E017 Motor overflow protection
E018 Over heat protection
7. NUMERICAL DISPLAY RANGE

17
OPERATION
Adjusting the Running Belt to the Middle Position
Normal deviation from the center on the treadmill belt is normal with regular use.
Typically, the belt will return to center if not in use. If it does not, please follow the
instructions below:
1. While o of the treadmill, turn on and adjust the speed to 3 mph (6 km/h).
2. Observe the running belt in motion and the distance between the right and left
side rails. Using the L-Shaped Wrench. Continue this until the belt has returned to
the center.
3. After adjusting the running belt to the middle, adjust the speed to .06 mph
(1 km/h) and observe the deviation of the running belt and check whether the
treadmill belt drifts to either side while it is running. If there is a deviation, repeat
the running step.
4. Warning! Do not over tighten the rollers! Refer to the care & maintenance
instructions for further information on proper steps for tightening and loosening the
treadmill rollers.
The left and right
tighten screw bolts are
located at the treadmill
rear cover.
Tightening the running belt
After continual use, the running belt will stretch over time, this is normal. To avoid
any damage that could occur from misalignment or stretching or if the running belt is
slippery and not smooth during use, you can improve it with the below instruction.
How to adjust the running belt?
1. Using a hexagonal wrench, adjust the screw on the left side of the running belt and
rotate the wrench clockwise for 1/4 turn. This will adjust the rear roller and tighten
the running belt.
2. Repeat step 1 to adjust the right screw. Check that the adjustment screw rotates the
same distance so that the rear roller is adjusted parallel to the frame.
3. Repeat steps 1 and 2 until the running belt does not slip.
4. Warning! Do not over tighten the rollers! refer to the care & maintenance
instructions for further information on proper steps for tightening and loosening the
treadmill rollers.

18
After each use
• Power o the treadmill and clean any high-use areas, like the handlebars and
console, with a non-acidic cleaner (NO ammonia, chlorine, or alcohol) on a soft cloth.
Do not spray cleaning solution directly on the treadmill as that could ruin any
electrical components.
• Inspect the power cord for damage. If damaged, call customer service (833-937-2453)
for immediate replacement before use.
Weekly
• Clean the running belt, console, uprights, and motor cover with non-acidic cleaners
(NO ammonia, chlorine, or alchohol) and a soft cloth. Cleaners should be applied to
the cloth and never sprayed onto the equipment directly.
• Inspect all the assembled and pre-assembled hardware and tighten or resecure
as needed.
• Dust and vacuum the treadmill and the surrounding area. To clean underneath the
treadmill, turn o the power, fold, and roll the treadmill to an alternate location. Return
the treadmill to its original location after cleaning.
• Assess the feet leveling system to make sure your treadmill is sitting level to the floor
(select models).
• Check the belt for any looseness, this will cause the treadmill to recieve improper info
when calculating metrics if it is not properly tightened. When tightening make sure
to adjust both sides of the rear roller evenly with the provided Allen Wrench, turning
clockwise to tighten. Do not tighten the belt rollers in excess of 10 full rotations,
doing so could damage components of the treadmill. If you know or think you have
overtightend the roller bolts, reverse the rotation of the bolt to the other direction.
Evenly loosening both sides till the belt maintains a 2 - 3 inch gap when lifted.
Monthly
• Unplug the treadmill, and assess the components under the motor cover monthly.
If there is an intense build up of dust or debris, contact our customer service to
schedule a technician to properly clean and restore the components before using
your treadmill again.
• Check frame folding mechanism for proper function.
Other
• Lubricating Oil Reminder Function: after every 300 miles of operation, when the
treadmill is on, the display will show "OIL" accompanied with a repeating sound 5
times. User may press any button to cancel the reminder. Lubrication oil not included.
• Remote Control Battery Type: CR2032H, 3v.
CARE & MAINTENANCE

19

MODEL: DUOTRDPATENT PENDING
Made in
CHINA
For indoor
use only
REV: 032524
Read Instructions
Before Opening
Echelon
®
1-Year Limited Warranty
For questions, assistance, or replacement parts, do not return to your retailer.
Contact Echelon customer service below.
For refunds on items not purchased from Echelon directly, please contact your retailer.
Echelon warrants this product to be free of manufacturing defects. Should any such defect develop
or become evident within one year from the date of purchase, Echelon will replace the entire product
or, at its option, repair or replace the defective part(s) without charge.
Contact Echelon customer service at 833-937-2453 or at cs@echelonfit.com to determine whether it is
necessary to return the unit. To return, securely pack the entire unit. Be sure carton clearly identifies sender
by name and address. Attach a letter or card describing defect and original sales receipt.
Mail prepaid to Echelon Fitness Returns, 2001 Riverside Drive, Building 2, Chattanooga, TN 37402
This warranty is void if damage or malfunction is due to abuse or failure to operate product in accordance
with instructions and on recommended electrical current. This warranty gives you specific legal rights and
you may also have other rights which vary from state to state. If you have any questions, or would like to
learn more about Echelon, please contact us at 833-937-2453 or at cs@echelonfit.com.
Register your product online at echelonfit.com/pages/register-warranty/
CUSTOMER SERVICE
/ Le service a la clientele / Servicio al Consumidor
833-937-2453 (+1.423.402.9010)
cs@echelonfit.com
DO NOT DISPOSE OF BATTERIES IN FIRE. ALWAYS DISPOSE OF BATTERIES
PER LOCAL & FEDERAL GUIDELINES.
© 2023 ECHELON FITNESS MULTIMEDIA, LLC. All specifications are subject
to change without notice. All rights reserved.
Echelon Fitness Multimedia, LLC
605 Chestnut St. Suite 700
Chattanooga, TN 37450
ECHELONFIT.COM

