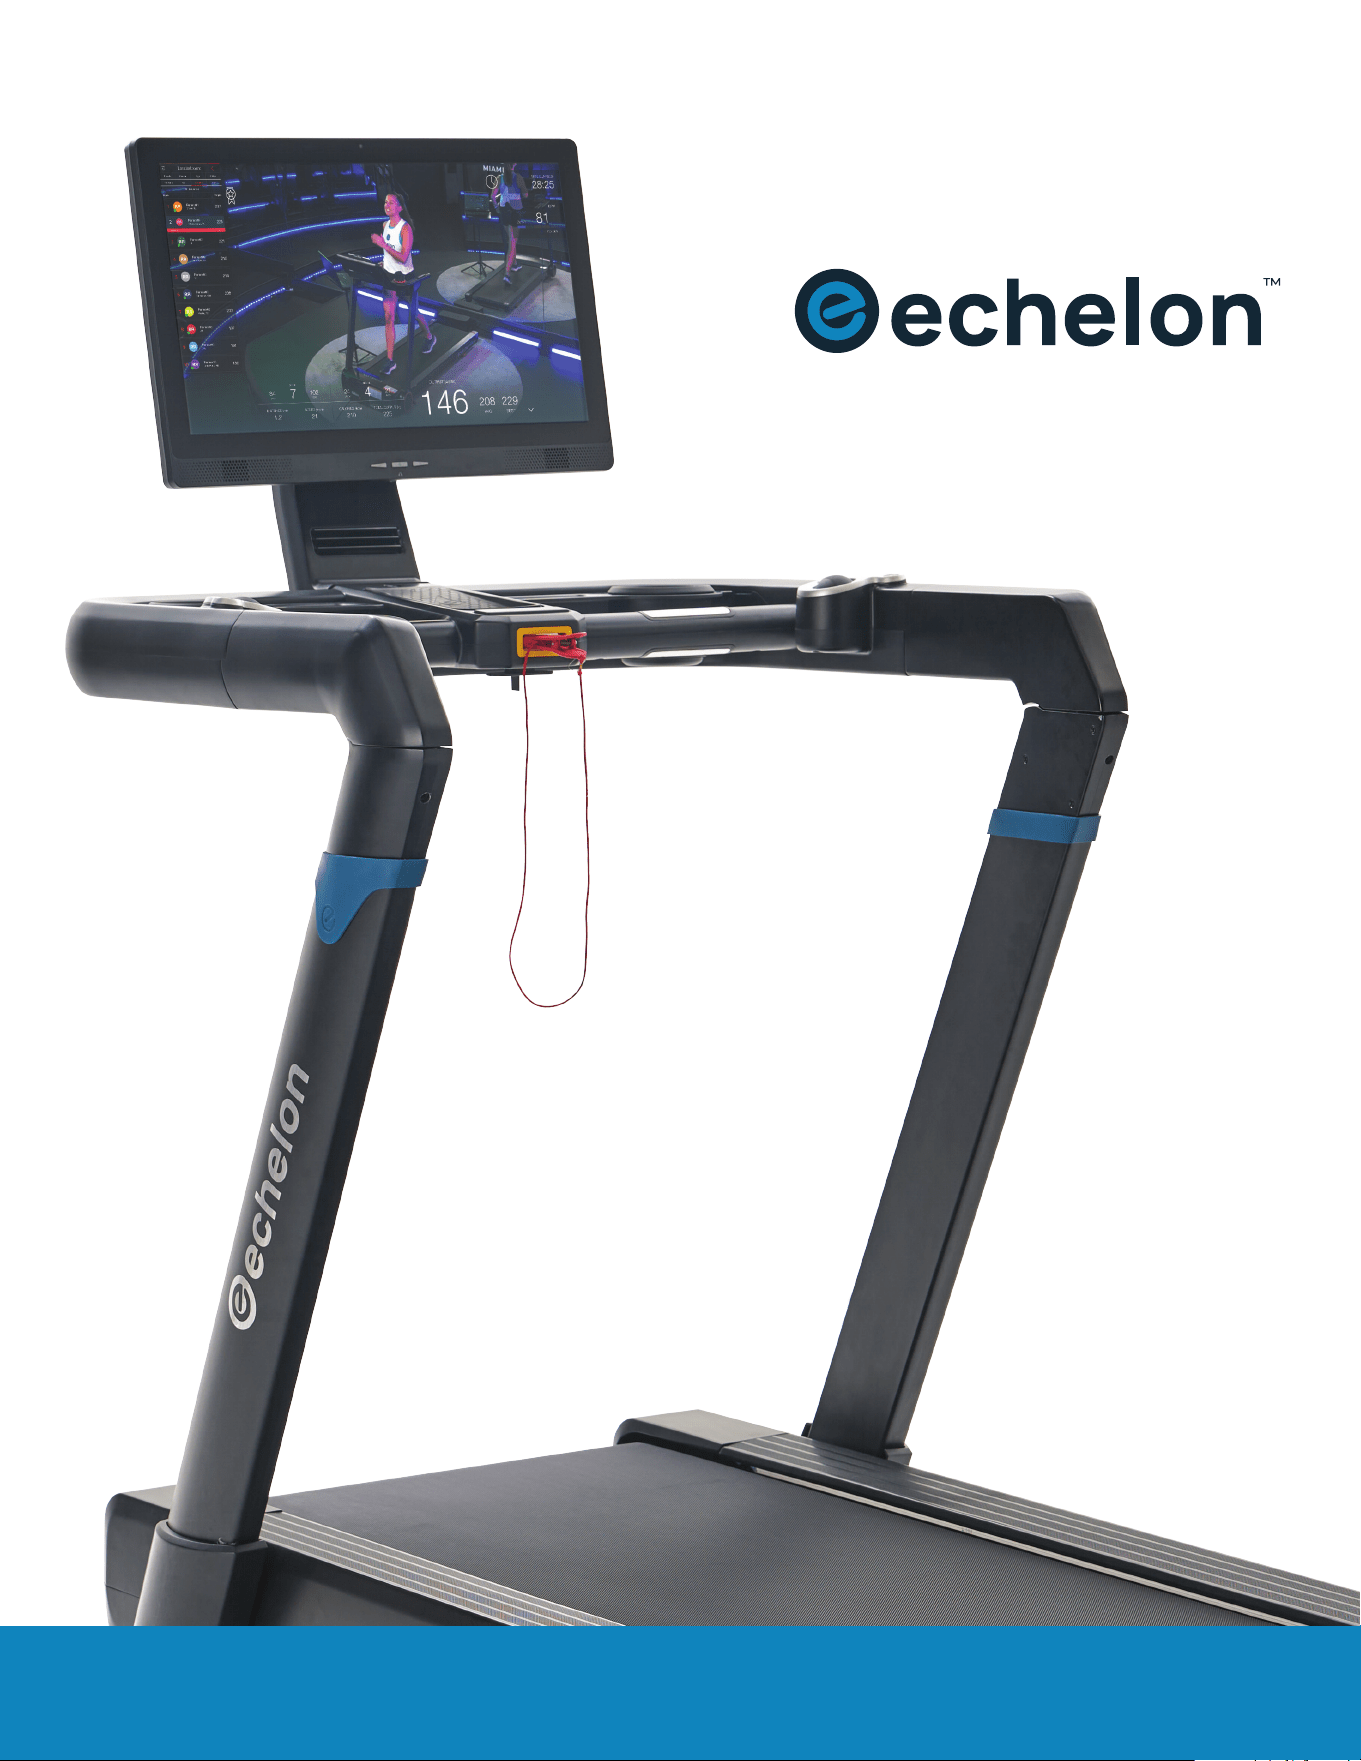
INSTRUCTION MANUAL
STRIDE-8s

WELCOME
ECHELON FITNESS | STRIDE-8SWELCOME TO ECHELON
ECHELON FITNESS // STRIDE-8s // INSTRUCTION MANUAL
I am Lou Lentine, Founder of Echelon, and I would like to welcome you
to the Echelon community. You’ve made a great decision for yourself and
your family. The Echelon Experience is an innovative combination of fitness
products integrated with our state-of-the-art Echelon Fit
®
app. This brand-
new, fitness lifestyle connects your family, friends, the Echelon community,
and Echelon instructors together to help you with your fitness goals. With
thousands of live and on-demand classes, no matter your schedule or
experience, there is always a new and exciting class for you
to join.
We embrace your decision to join our Echelon family in the pursuit of living
a healthier lifestyle. We are committed to continue engineering cutting
edge, world-class fitness products to improve quality of life through
workout experiences that make an active lifestyle more accessible
and sustainable.
Thank you again for choosing Echelon and I look forward to
seeing you in the next live class!
Best personal regards,
Lou Lentine
Founder of Echelon Fitness
Multimedia, LLC
2

INSTRUCTION MANUAL
| SAFETY INFORMATION 04
| GROUNDING INSTRUCTIONS 07
| TREADMILL SPECIFICATIONS 08
| ASSEMBLY 10
| PRODUCT USE 12
| CARE & MAINTENANCE 16
| TROUBLESHOOTING & ERROR CODES 17
| NOTES 20
3
TABLE
OF CONTENTS

SAFETY INFORMATION
FEDERAL COMMUNICATION COMMISSION (FCC) STATEMENT
WARNING LABELS
INNOVATION, SCIENCE AND ECONOMIC DEVELOPMENT CANADA (ISED)
INNOVATION, SCIENCE ET DÉVELOPPEMENT ÉCONOMIQUE CANADA (ISED)
15.21
You are cautioned that changes or modifications not expressly approved
by the party responsible for compliance could void the user’s authority to
operate the equipment.
15.105(B)
This equipment has been tested and found to comply with the limits for a
Class B digital device, pursuant to part 15 of the FCC rules. These limits are
designed to provide reasonable protection against harmful interference in
a residential installation. This equipment generates, uses and can radiate
radio frequency energy and, if not installed and used in accordance with
the instructions, may cause harmful interference to radio communications.
However, there is no guarantee that interference will not occur in a particular
installation.
If this equipment does cause harmful interference to radio or television
reception, which can be determined by turning the equipment off and on, the
user is encouraged to try to correct the interference by one or more of the
following measures:
• Reorient or relocate the receiving antenna.
• Increase the separation between the equipment and receiver.
• Connect the equipment into an outlet on a circuit different from that
to which the receiver is connected.
Consult the dealer or an experienced radio/TV technician for help.
FCC RF RADIATION EXPOSURE STATEMENT:
1. This Transmitter must not be co-located or operating in conjunction with
any other antenna or transmitter.
2. This equipment complies with RF radiation exposure limits set forth for
an uncontrolled environment. This equipment should be installed and
operated with a minimum distance of 20 cm between the radiator and
your body.
THIS DEVICE COMPLIES WITH PART 15 OF THE FCC RULES.
OPERATION IS SUBJECT TO THE FOLLOWING TWO CONDITIONS:
1. This device may not cause harmful interference and
2. This device must accept any interference received, including interference
that may cause undesired operation.
THIS CLASS B DIGITAL APPARATUS COMPLIES WITH CANADIAN ICES-003.
CET APPAREIL NUMÉRIQUE DE CLASSE B EST CONFORME À LA NORME
NMB-003.
CANADIAN NOTICE
This device complies with ISED license-exempt RSS standard(s). Operation
is subject to the following two conditions:
1. This device may not cause interference, and
2. This device must accept any interference, including interference that
may cause undesired operation of the device.
AVIS CANADIEN
Le présent appareil est conforme aux CNR d’ISED applicables aux
appareils radio exempts de licence. L’exploitation est autorisée aux deux
conditions suivantes :
1. L’appareil ne doit pas produire de brouillage, et
2. L’utilisateur de l’appareil doit accepter tout brouillage radioélectrique
subi, même si le brouillage est susceptible d’en compromettre
le fonctionnement.
CAUTION: EXPOSURE TO RADIO FREQUENCY RADIATION
1. To comply with the Canadian RF exposure compliance requirements, this
device and its antenna must not be co-located or operating in conjunction
with any other antenna or transmitter.
2. To comply with RSS 102 RF exposure compliance requirements, a
separation distance of at least 20 cm must be maintained between
the antenna of this device and all persons.
ATTENTION: EXPOSITION AU RAYONNEMENT RADIOFRÉQUENCE
1. Pour se conformer aux exigences de conformité RF canadienne
l’exposition, cet appareil et son antenne ne doivent pas être co-localisés
ou fonctionnant en conjonction avec une autre antenne ou transmetteur.
2. Pour se conformer aux exigences de conformité CNR 102 RF exposition,
une distance de séparation d’au moins 20 cm doit être maintenue entre
l’antenne de cet appareil et toutes les personnes.
4
ECHELON FITNESS | STRIDE-8S
ECHELON FITNESS // STRIDE-8s // INSTRUCTION MANUAL

INSTRUCTION MANUAL
IMPORTANT SAFETY INSTRUCTIONS
Care should be taken in mounting or dismounting the treadmill.
Before mounting or dismounting, bring the machine to a complete stop.
The manufacturer recommends placing the Echelon
®
Stride-8s treadmill in a
space where you have the following minimum clearance dimensions for safe
mounting and dismounting of the treadmill:
• The minimum clearance area behind the treadmill is 2.0 m (78.7 in) ×
the treadmill width. This area must be free of any and all obstructions.
• The minimum clearance area on each side of the treadmill is:
500 mm (19.7 in).
While cleaning your Echelon
®
Stride-8s treadmill, please use a soft rag with
mild detergent or water to wipe down the machine. Do not use corrosive
chemical liquids which may damage the cover.
When using an electrical appliance, basic precautions should always be
followed, including the following:
Read all instructions before using the Echelon
®
Stride treadmill.
FOR HOUSEHOLD USE ONLY.
SAVE THESE INSTRUCTIONS.
DANGER – TO REDUCE THE RISK
OF ELECTRIC SHOCK:
Always unplug this appliance from the electrical outlet immediately after
using and before cleaning.
WARNING – TO REDUCE THE RISK OF BURNS, FIRE,
ELECTRIC SHOCK, OR INJURY TO PERSONS:
1. An appliance should never be left unattended when plugged in. Unplug
from outlet when not in use, and before putting on or taking off parts.
2. Do not operate under blanket or pillow. Excessive heating can occur and
cause fire, electric shock, or injury to persons.
3. This appliance is not intended for use by persons with reduced physical,
sensory or mental capabilities, or lack of experience and knowledge,
unless they have been given supervision or instruction concerning use
of the appliance by a person responsible for their safety. Keep children
under the age of 13 away from this machine.
4. Use this appliance only for its intended use as described in this manual.
Do not use attachments not recommended by the manufacturer.
5. Connect this appliance to a properly grounded outlet only. See Grounding
Instructions for important information on page 7.
6. Never operate this appliance if it has a damaged cord or plug, if it is not
working properly, if it has been dropped or damaged, or dropped into
water. Return the appliance to a service center for examination and repair.
7. Do not carry this appliance by supply cord or use cord as a handle.
8. Keep the cord away from heated surfaces.
9. Never operate the appliance with the air openings blocked. Keep the air
openings free of lint, hair, and the like.
10. Never drop or insert any object into any opening.
11. Do not use outdoors.
12. Do not operate where aerosol (spray) products are being used or where
oxygen is being administered.
13. To disconnect, turn all controls to the off position, then remove plug
from outlet.
BEFORE starting any fitness or strength program, consult with your
physician or health official. This will ensure that you engage in the proper
strength or fitness program for your age and physical condition.
Before using the Echelon
®
Stride-8s treadmill, answer these questions:
• Have you been sick recently?
• Have you had prolonged dizziness recently?
• Have you been out of breath for no reason recently?
• Have you had chest pain recently?
• Do you currently have any injuries preventing you from exercise?
• Are you pregnant?
• Do you have any conditions or reasons you should NOT exercise?
• Are you over 35 years old and physically inactive?
• Have you been told by a doctor that you should NOT exercise?
If you answer “yes” to any of the above questions, you should seek
further advice from your doctor prior to using the Echelon
®
Stride-8s
treadmill.
Read the user manual fully and follow all instructions. This ensures
your safety.
• NEVER exceed the weight limit for this treadmill. The weight limit for
this treadmill is 300 lbs / 135 kg. Do not use the Echelon® Stride-8s if
your body weight is in excess of 300 lbs / 135 kg.
• ALWAYS use the Echelon® Stride-8s on solid, level ground and in a
well-lit and ventilated area. Do not place the treadmill on thick carpet
as it may interfere with ventilation.
• ALWAYS check the treadmill for wear or loose components before use.
• NEVER use the treadmill if it is not properly / completely assembled
or is damaged in any way.
• NEVER allow children or pets to play on or around the treadmill during
operation. This helps protect them from injury from moving parts.
• ALWAYS set the treadmill up properly for your specific body type.
• NEVER use the Echelon® Stride-8s when sick or fatigued.
• ALWAYS warm up / stretch before starting exercise.
• ALWAYS ensure that you have a water bottle filled with at least
12 oz. of water and a towel close by to absorb sweat from your body
and the handrails.
• NEVER start the treadmill while you are standing on the running belt.
After turning the power on and adjusting the speed control, there may
be a pause before the running belt begins to move. Always stand on
the side rails of the frame until the belt begins to move.
• ALWAYS hold the handrails when initially walking or running on the
treadmill until you are familiar with the use of the treadmill.
• Do not stand or climb on the handrails.
• ALWAYS wear proper attire and footwear that fully covers your feet. Do
not wear loose or dangling clothing while using the treadmill. Long hair
should be tied back or tucked away. Ensure that shoelaces are tucked
into your shoes.
• ALWAYS keep hands away from moving parts and ensure that hands
are safely placed on handlebars during use.
• NEVER pickup this treadmill when the deck is NOT folded up.
• NEVER hang from the handlebars, doing so could damage the unit and
injure the user.
5
PARTS & HARDWARE
6
ECHELON FITNESS | STRIDE-8S
ECHELON FITNESS // STRIDE-8s // INSTRUCTION MANUAL
GROUNDING INSTRUCTIONS
INSTRUCTION MANUAL
7
This product must be grounded. If it should malfunction or break down,
grounding provides a path of least resistance for electric current to
reduce the risk of electric shock. This product is equipped with a
cord having an equipment-grounding conductor and a grounding
plug. The plug must be plugged into an appropriate outlet that is
properly installed and grounded in accordance with all local codes
and ordinances.
Two common types of outlets presently in homes are: GFCI (Ground
Fault Circuit Interrupter) and AFCI (Arc Fault Circuit Interrupter).
Should hazardous wiring occur, either outlets are programmed
to trip. Due to this, treadmills and other equipment have poor
interactions with the GFCI or AFCI outlets.
Oftentimes, GFCI outlets are installed in either bathrooms or kitchens.
These can be identified with either a red or white reset switch that
is located on the front of the outlet. Should an excessive amount
of power go through the group port, the GFCI outlet will flip their
breaker. Due to treadmills and other equipment using the ground
prong to help disperse static electricity, it is not ideal to use a GFCI
outlet to power your machine. It is recommended that equipment be
plugged into a different type of outlet that will prevent the machine
from continually shutting down. Please note that GFCI outlets can
be connected to other outlets (even if they’re not that specific type
of outlet) and it is recommended moving the equipment to a space
that is not electrically tied together. Do not plug your equipment into
surge protectors or other types of units, it is recommended that the
equipment is plugged into a dedicated circuit.
Electrical arcs are detected by AFCI outlets and are designed to
disrupt and cancel the flow of electricity. Due to this, treadmills
and other equipment would likely have issues of shutting down
if plugged into AFCI outlets. Newer building codes now require
AFCI outlets, however, if you’re having persistent issues, here are
some recommended solutions: consult an electrician or switch to a
different type of outlet.
Grounded Outlet
Grounding Pin
DANGER:
Improper connection of the equipment-grounding conductor can result in a risk of electric shock. Check with a qualified
electrician or serviceman if you are in doubt as to whether the product is properly grounded. Do not modify the plug
provided with the product.
If it will not fit the outlet, have a proper outlet installed by a qualified electrician. This product is for use on a nominal 120-V
circuit and has a grounding plug that looks like the plug illustrated in sketch A. Make sure that the product is connected to
an outlet having the same configuration as the plug. No adapter should be used with this product
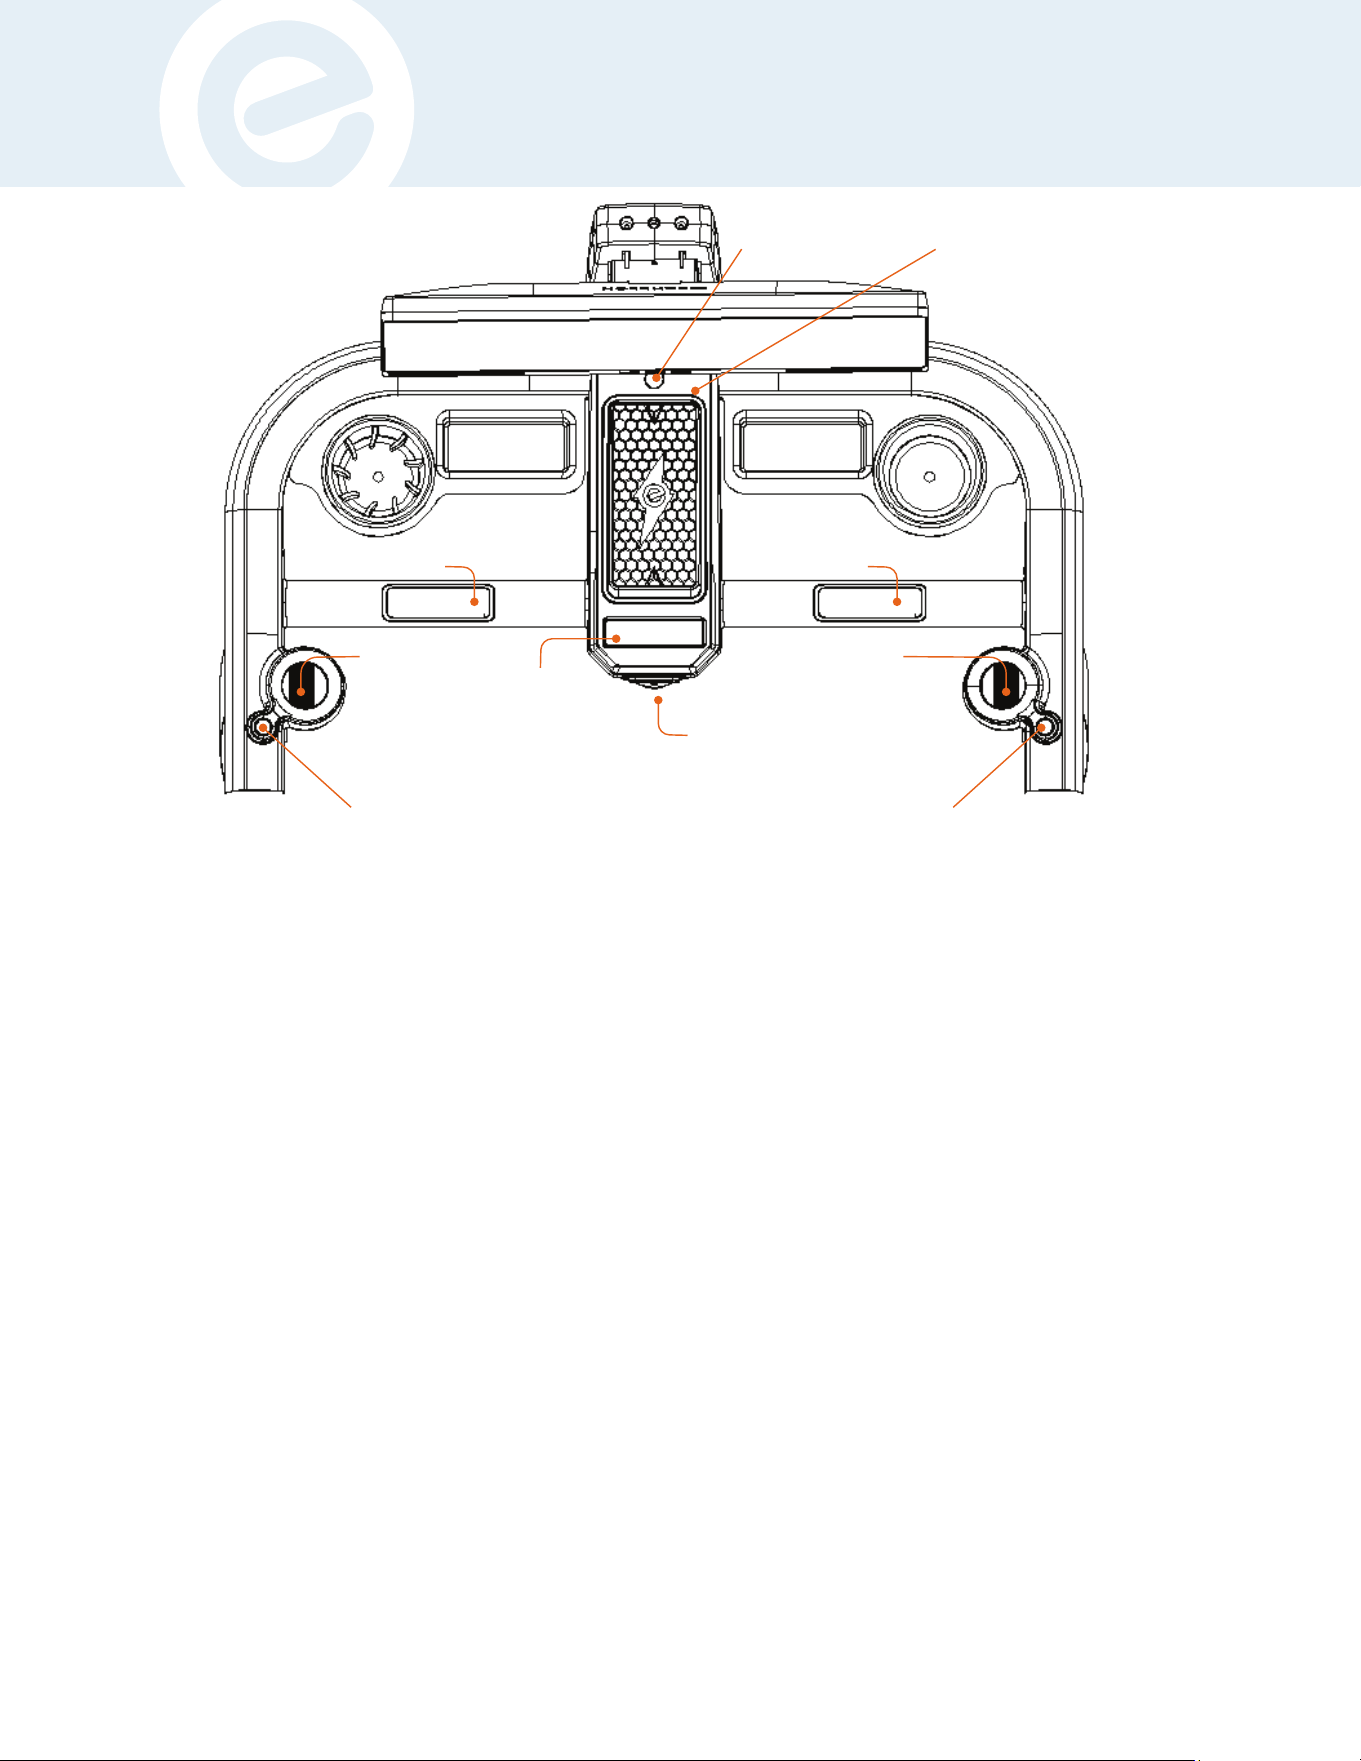
TREADMILL SPECIFICATIONS
8
ECHELON FITNESS | STRIDE-8S
ECHELON FITNESS // STRIDE-8s // INSTRUCTION MANUAL
TREADMILL SPECIFICATIONS
Power Port
Speed Tracking Ball
Incline/Volume
Tracking Ball
Safety Key
Pulse Sensor
Pulse
Sensor
Foot
Rails
Start /
Stop
Tablet
Fan
Water Bottle Holder ×2
Device Holder
Accessory Tray
Running Belt
Transport Wheels
Belt
Adjustment
Bolts
TECHNICAL INFORMATION:
Max. User Weight: 300lbs
Assembly Dimension: 66” x 32” x 63”
Running Area: 20” x 60”
Speed: 0.5-12mph // Incline: 0-12 Levels
INSTRUCTION MANUAL
9
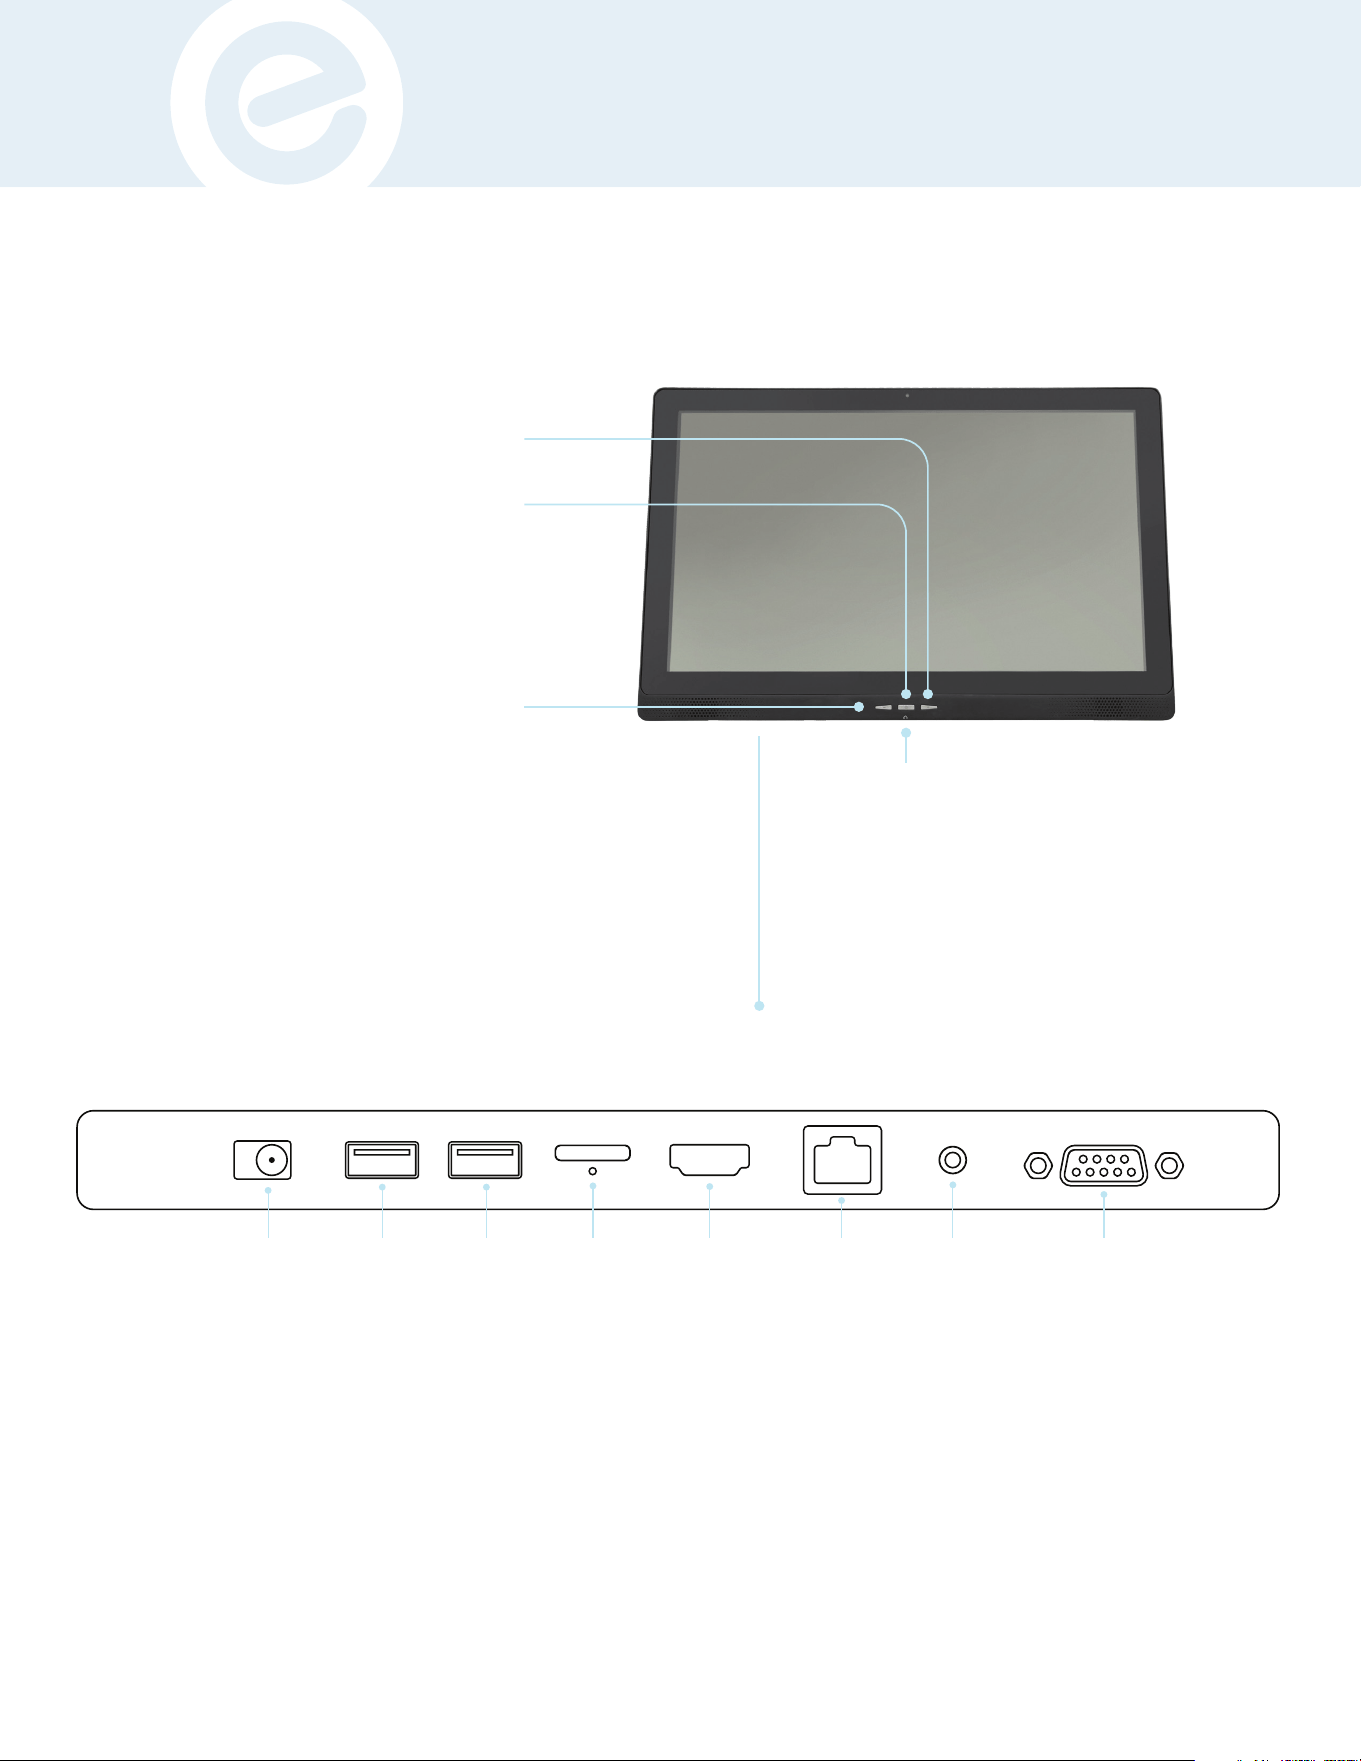
Accessory Tray
Tablet Power / Sleep
Push button once to put tablet in sleep mode.
Hold button for menu to power o tablet,
restart tablet, or take a screenshot.
Volume Down
Volume Up
AUX
For External
Wired Audio
Devices
Ports On Reverse Side
HDMI EthernetTF Card
Tablet Reset
Audio Output
DC IN
RS232/UART
For Powering
the Screen
from the
Treadmill
For
Charging
Devices
Transfers
volume
from tablet
speakers
to wired
headphones
or earbuds.
USB-A USB OTG
For Displaying
on an External
Screen
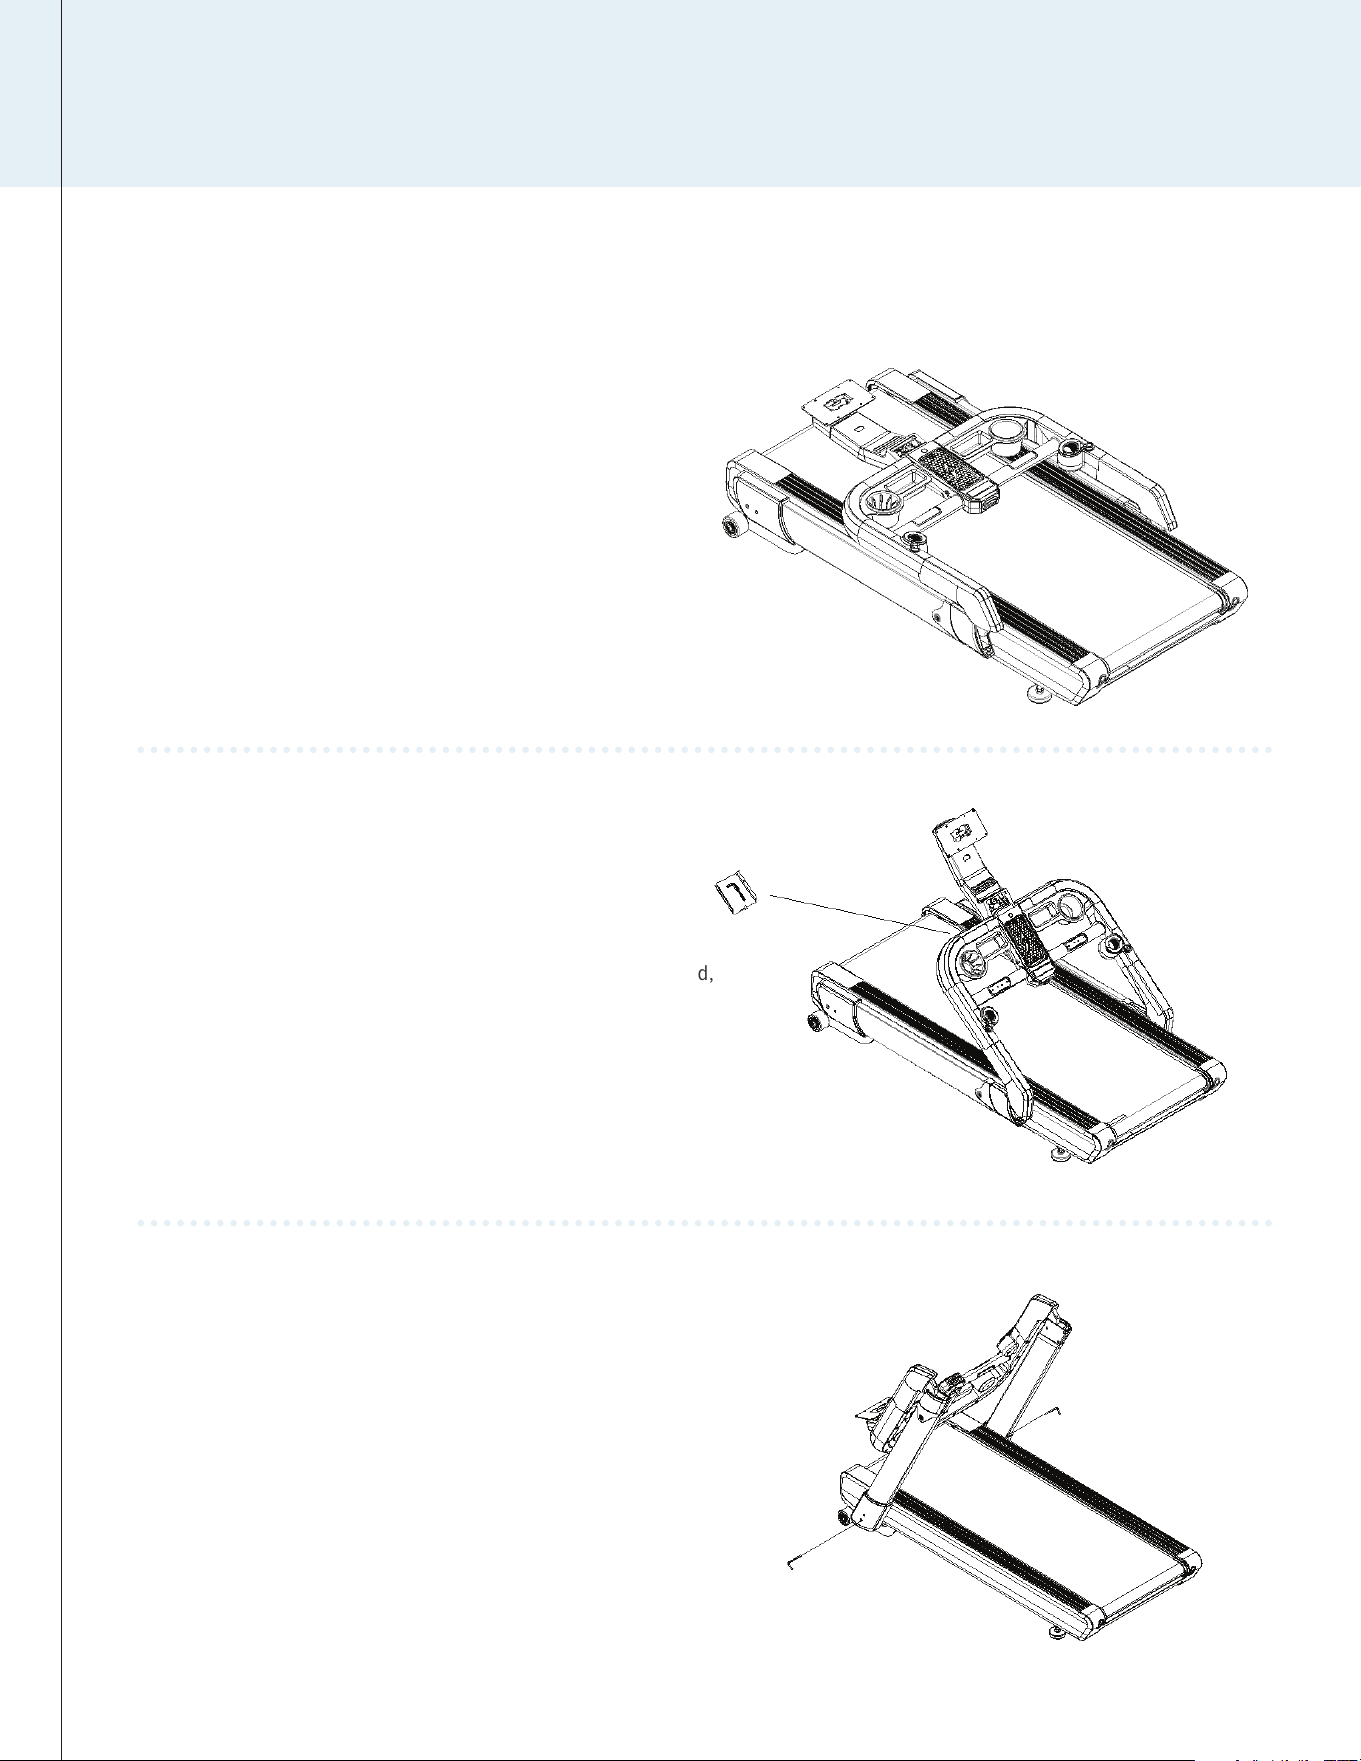
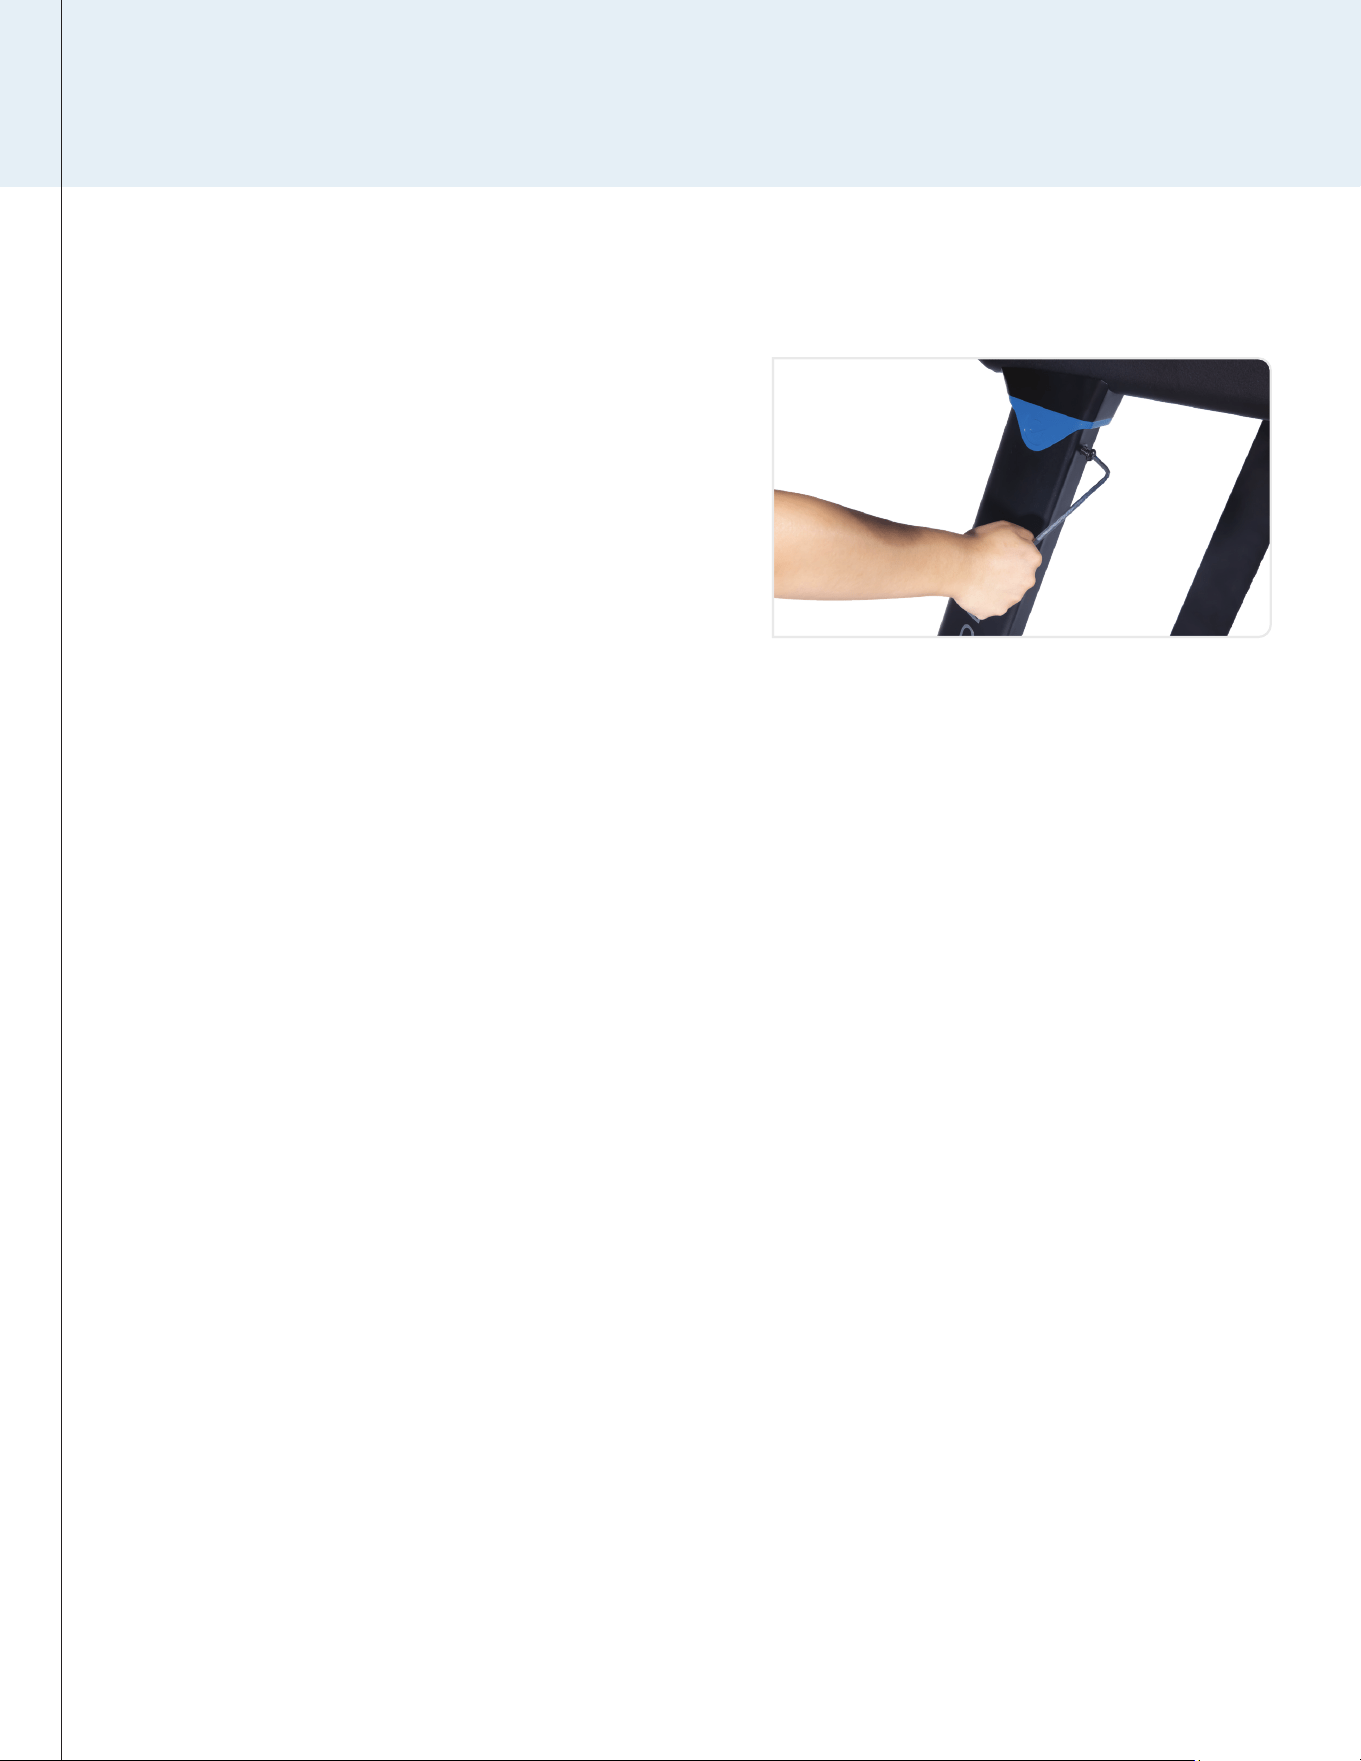
TREADMILL ASSEMBLY
TREADMILL ASSEMBLY
Lift up the console frame. Under the “Wireless Charging” pad,
remove from the box in the “Tool Holder Tray” and locate the
L-Shape Wrench.
2
STEP
Remove equipment and screen from box.
Place it flat on the floor.
Do not roll the treadmill out of the box with
the plastic wrap around the transport wheels.
Doing so may cause the plastic to bunch
up in the wheels and make it hard to move.
1
STEP
Assembly should take place on a soft
surface, such as a carpet or rug, or
with the cardboard box opened to
protect the floor.
Unfold and lift the console support uprights into position.
Attach both sides to the base by tightening the screws
inside the lower upright with the L-Shape Wrench.
3
STEP
Note: These next two steps
will require two people.
10
ECHELON FITNESS | STRIDE-8S
ECHELON FITNESS // STRIDE-8s // INSTRUCTION MANUAL
INSTRUCTION MANUAL
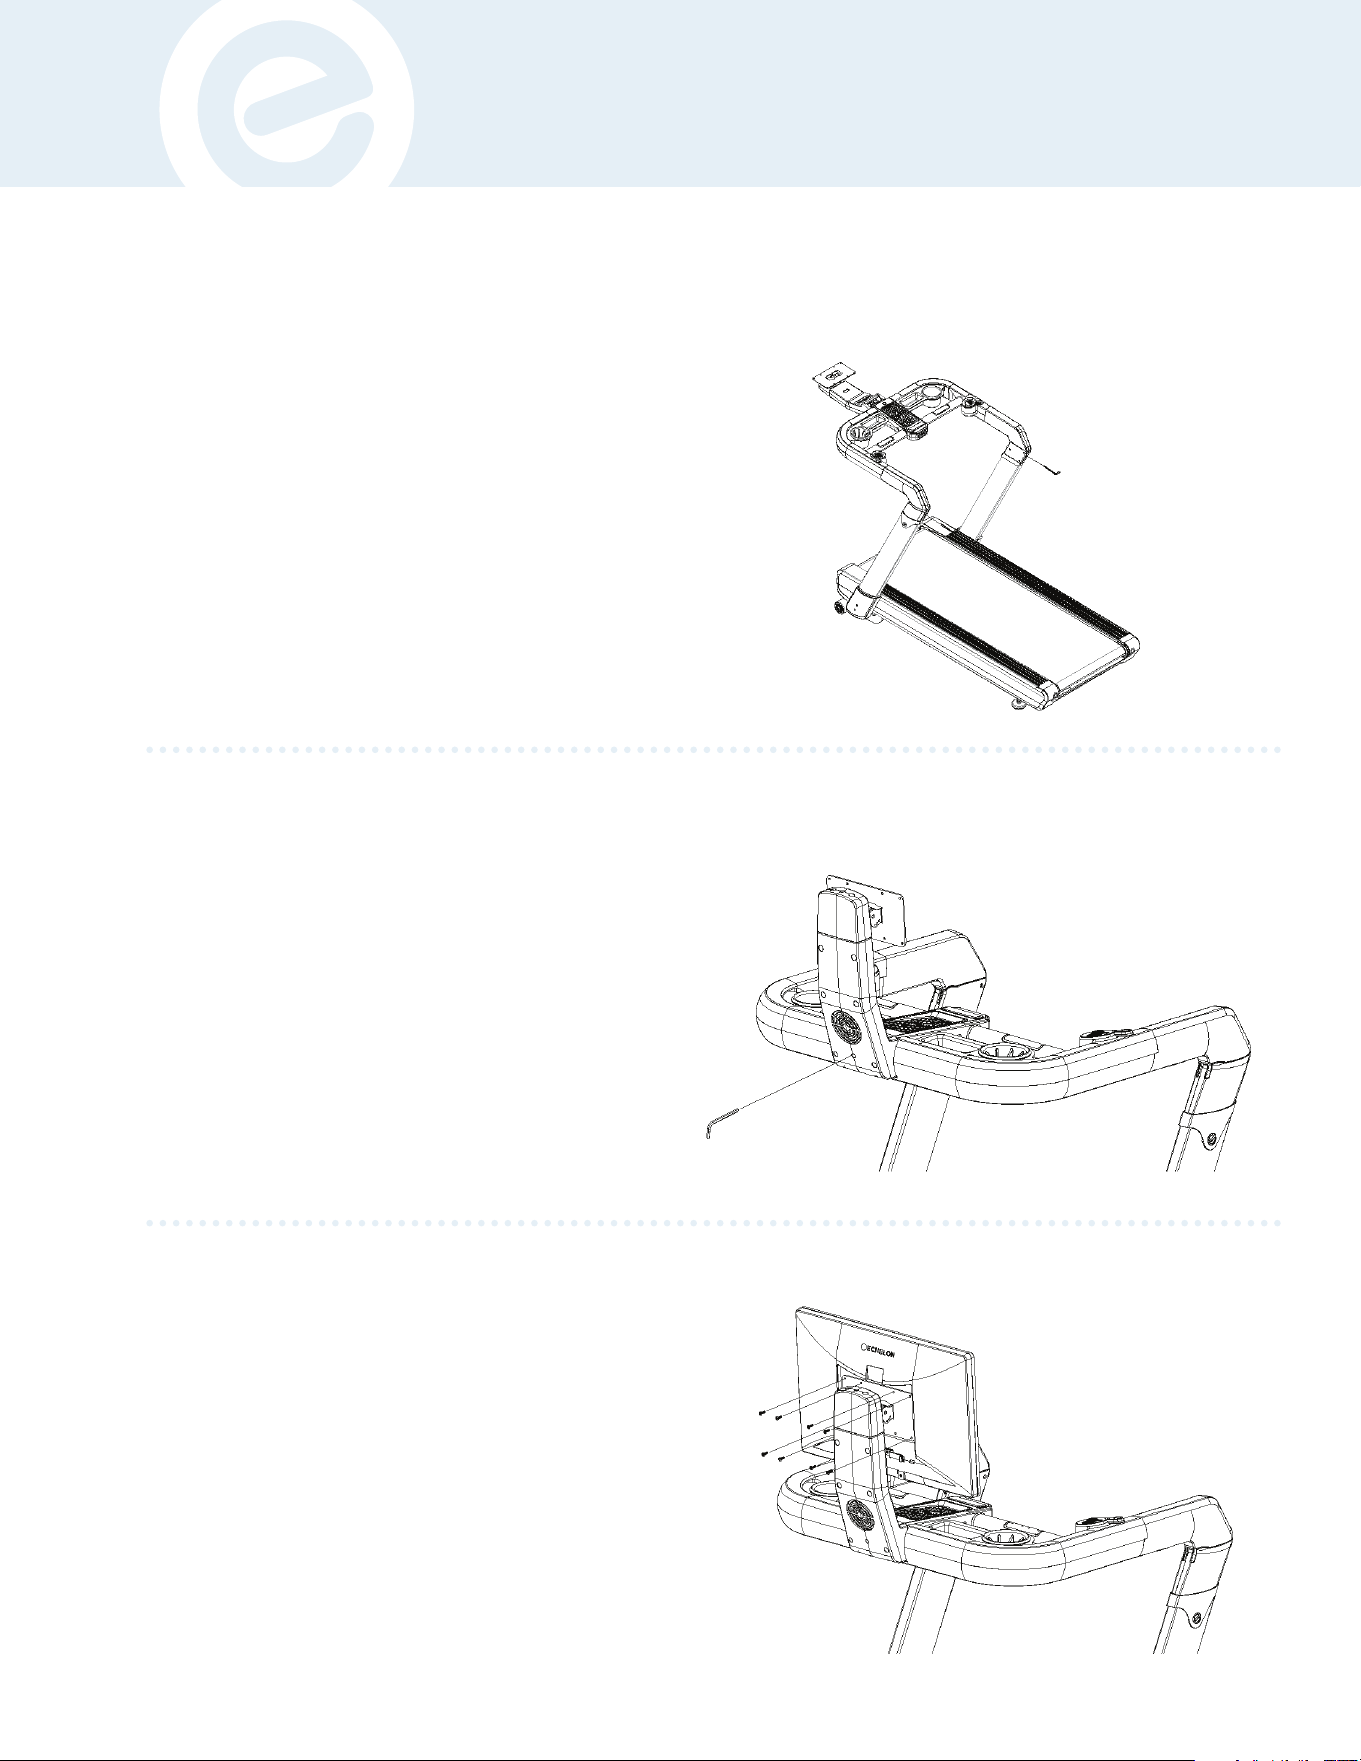
Unfold the console frame into place by attaching the frame
to the secured uprights with screws inside the upper upright
with the L-Shape Wrench. Have someone assist with this step
by having them hold the console in position to allow the bolts
to be driven into the console frame as shown.
4
STEP
Remove the screen from the packaging and remove both back plastic
covers on the tablet by first removing the bottom cover on the tablet,
then removing the top cover to expose the mounting holes. Remove
the (8) screws from the back of the screen with a Philips Head
Screwdriver. Attach the screen to the mount plate on the console neck
by tightening the previously removed (8) screws. Insert the power
cable and the 9 pin cable to the DC IN and UART ports. Make sure to
tighten the screws on the RS232/UART port evenly to ensure this
plug does not fall out. This will conclude physical setup!
6
STEP
Unfold the console neck into place by attaching the neck
with the frame and tightening the screws inside the neck
with the L-Shape Wrench. After setup, return the tool back
to the “Tool Holder Tray” and cover it for safe keeping.
5
STEP
11
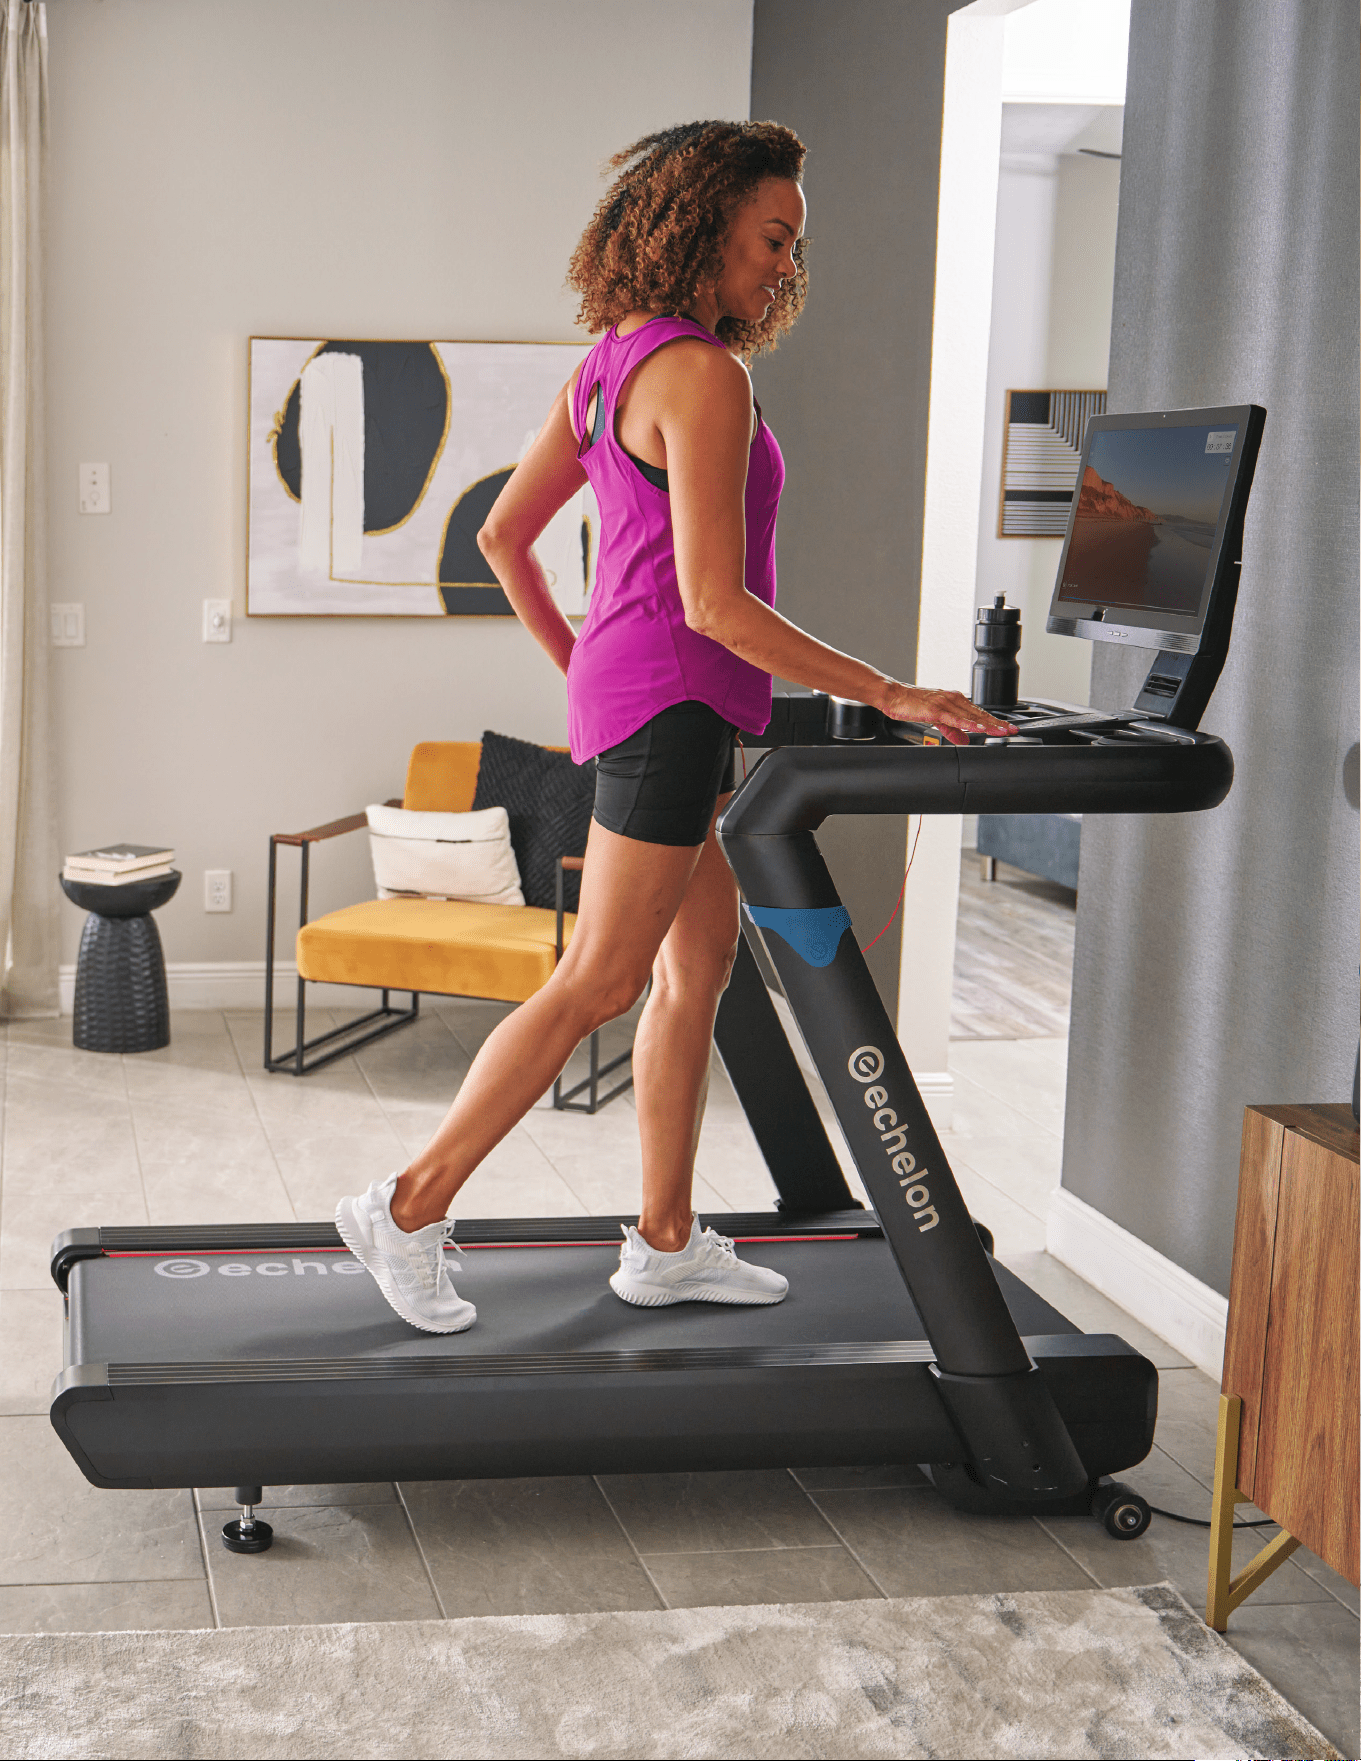
PRODUCT USE
Membership
Activation
Required
to Unlock
the Echelon
Stride-8s
Treadmill
Experience
Activate Echelon Premier Membership
to connect to classes.
You should have received an activation email after purchasing this
product.
a. Follow the link from the activation email.
b. Choose "Sign Up Now" and follow the prompts to complete
your membership enrollment.
Connecting to the Echelon Fit
®
App
1. Ensure your treadmill and tablet (screen) are both
powered on.
a. The power cord should be plugged into the wall and the
base of the treadmill.
b. The screen should be plugged into the treadmill via the DC
cable coming from the tablet mount base as well as the
USB or UART port on applicable Echelon equipment.
c. You may need to power on the screen by pushing the red
power button located on the back right side.
2. Echelon Fit® App.
a. Use the email and password used to create your
membership account.
b. Select user (there may only be one option).
3. Select a class.
a. We recommend a “Welcome Run”, but any class will work.
b. Press play.
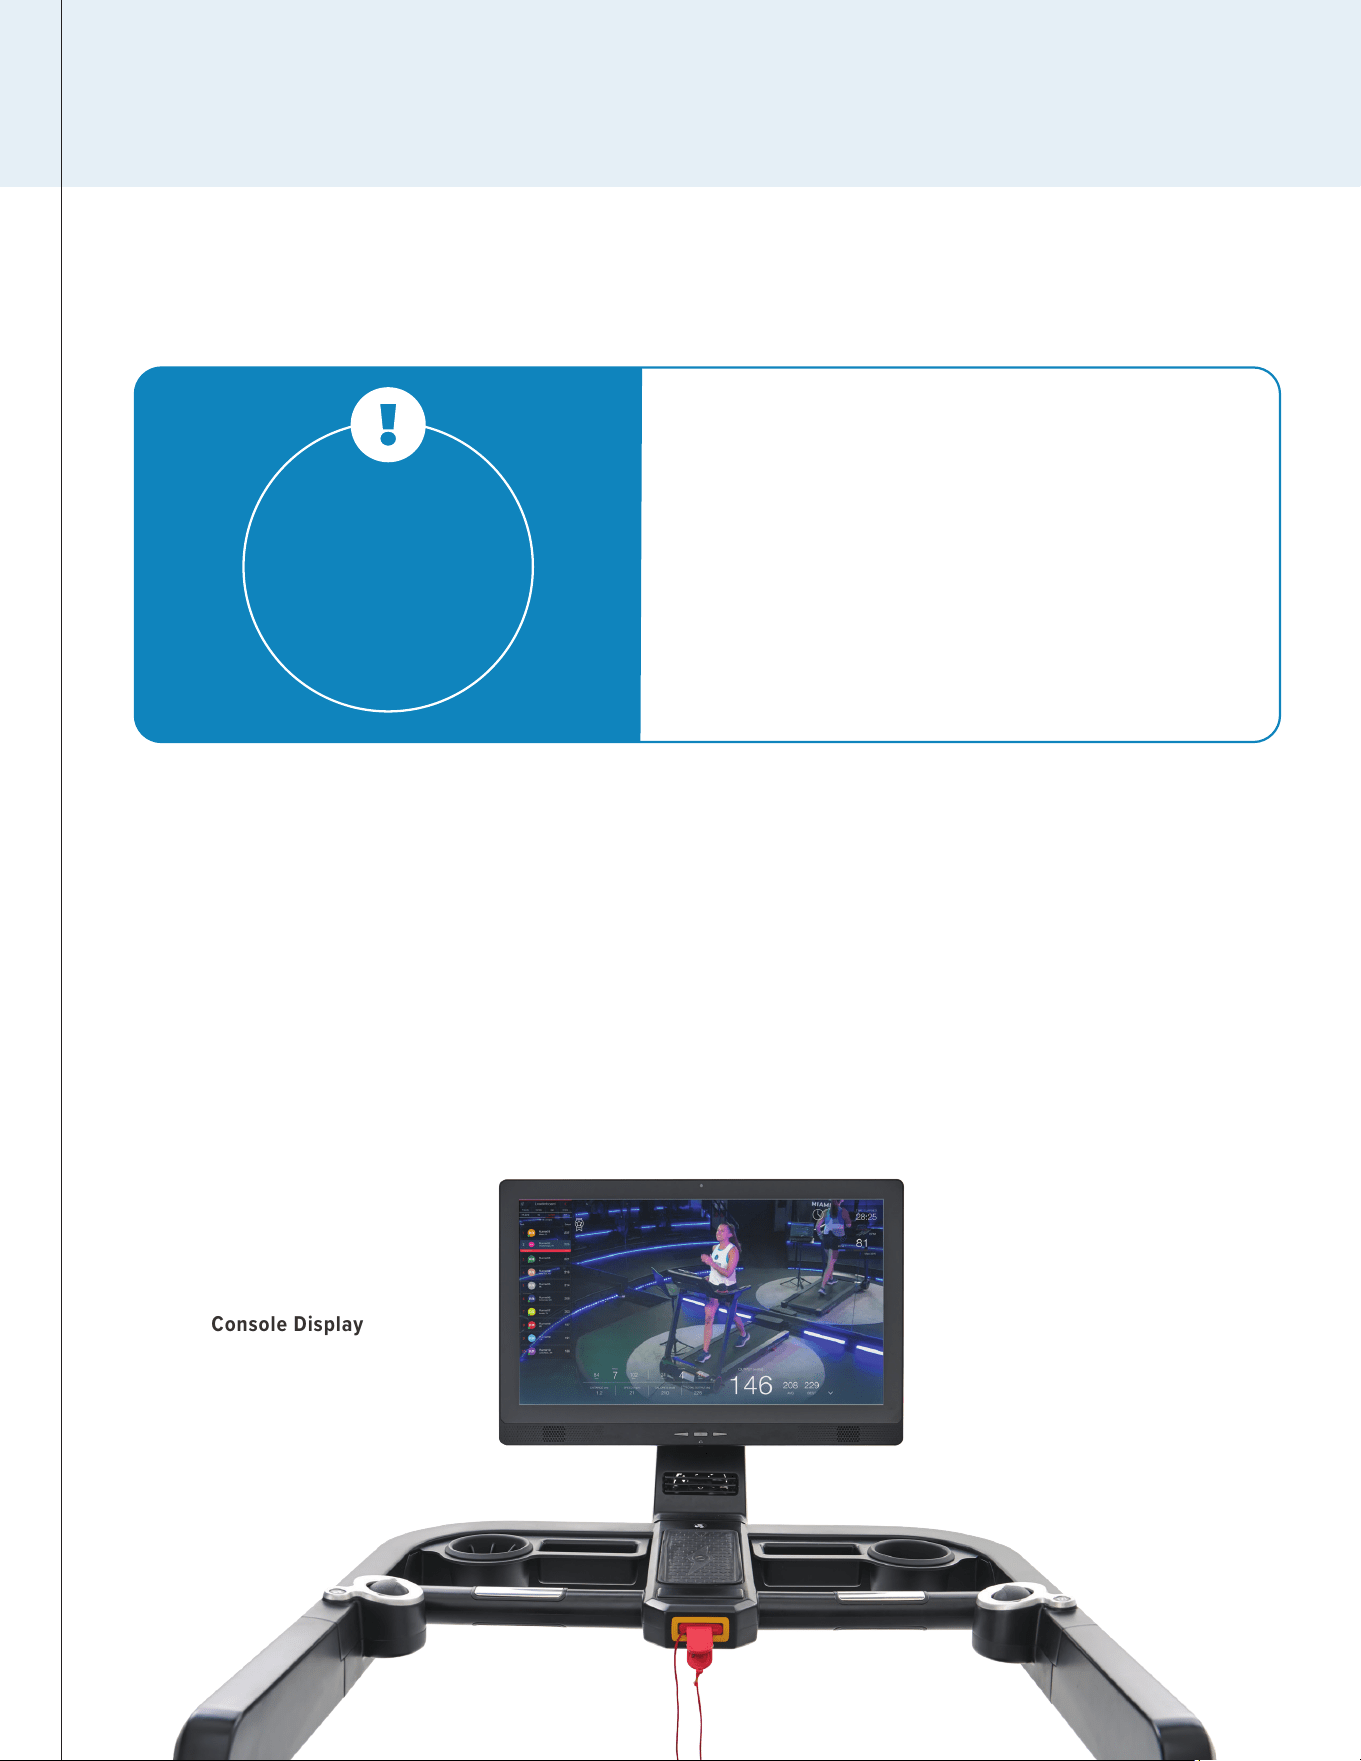
Console Display
PRODUCT USE
12
ECHELON FITNESS | STRIDE-8S
ECHELON FITNESS // STRIDE-8s // INSTRUCTION MANUAL
Fan Key
Hand PulseHand Pulse
One Key
Start / Stop
Magnetic
Safety Key
Wireless Charging
Speed
Tracking Ball
Incline
/Vol
Tracking
Ball
Fast Toggle Key
Incline / Vol
Fast Toggle Key
Speed: .01/1 mph
increment
INSTRUCTION MANUAL
13
1. One-Key Start/Stop Button: Start/Pause/Stop, the LED lights will auto change color: “Stop” red light steady on; “Start” green light steady on;
“Counts down 3-2-1” green light flashes; “Pause” red and green lights flash alternatively; “Magnet safety key pulled out” red light flashes. To get
started, power on treadmill and login to Echelon Fit® App. Select your desired class (we recommend a “Welcome” class), and click ‘Play’; after the
class ends, the Stride-8s will automatically stop.
To “Start”/”Pause”/”Stop” the treadmill, use the following touch structure: “Start”/”Stop” press (1) time, the treadmill will begin when the green
light is steadily on. “Pause” press (2) times, the treadmill will pause with red and green flashing alternately. “Stop” press the “One-Key” a second
time and the treadmill will stop with a steady red light. Pressing the “One-Key” a third time from either “Pause” or “Stop” status, and the treadmill
will start.
2. Fan Key: When the treadmill is powered on, press (1) time for Level 1; Press (2) times for Level 2; Press (3) times for fan to stop.
3. Left Tracking Ball - Incline/Sound Volume: The LED blue light indicates that tracking ball is in “Incline” status. Move the ball forward to
increase the incline. Move the ball backwards to decrease the incline. To switch to “Sound Volume”, press the “Fast Toggle Key” from incline (blue
light) to sound/volume. LED green light will indicate it’s in the “Sound Volume” status. Move the ball forward to increase the volume, move the ball
backwards to decrease the volume.
4. Right Tracking Ball - Speed: The LED blue light indicates that the incremental speed will be increased by 0.1 MPH each time. Move the tracking
ball forward to increase speed and backwards to decrease speed. Press the “Fast Toggle Key” on the right by the tracking ball to change the
incremental speed amount. When the LED green light is on, the speed will be increased by 1 MPH each time. Move the tracking ball forwards to
increase speed and backwards to decrease speed.
5. Magnet Safety Key: Pull the “Safety Key” out to immediately stop the Stride-8s Treadmill. A flashing LED red light will indicate this has been
pulled out. When the “Safety Key” is inserted back in, the LED red light will stay steady. Press the “One-Key” “Start” or “Stop” to restart the treadmill.
On the screen a “Resume Workout” button will appear, which you may also press to restart the treadmill. When using the treadmill attach the clip
end of the lanyard to the most rigid piece of fabric on your person. This will ensure your safety if you ever fall while using the treadmill.
6. Hand Pulse Sensors: While using the Stride-8s, place both hands on the “Hand Pulse” bars on the handlebars. The heart rate will be displayed
on the screen. Note: This is not specific medical data and is only for workout references. Should you feel dizzy, fatigued, etc. IMMEDIATELY stop
the treadmill and seek a medical personnel.
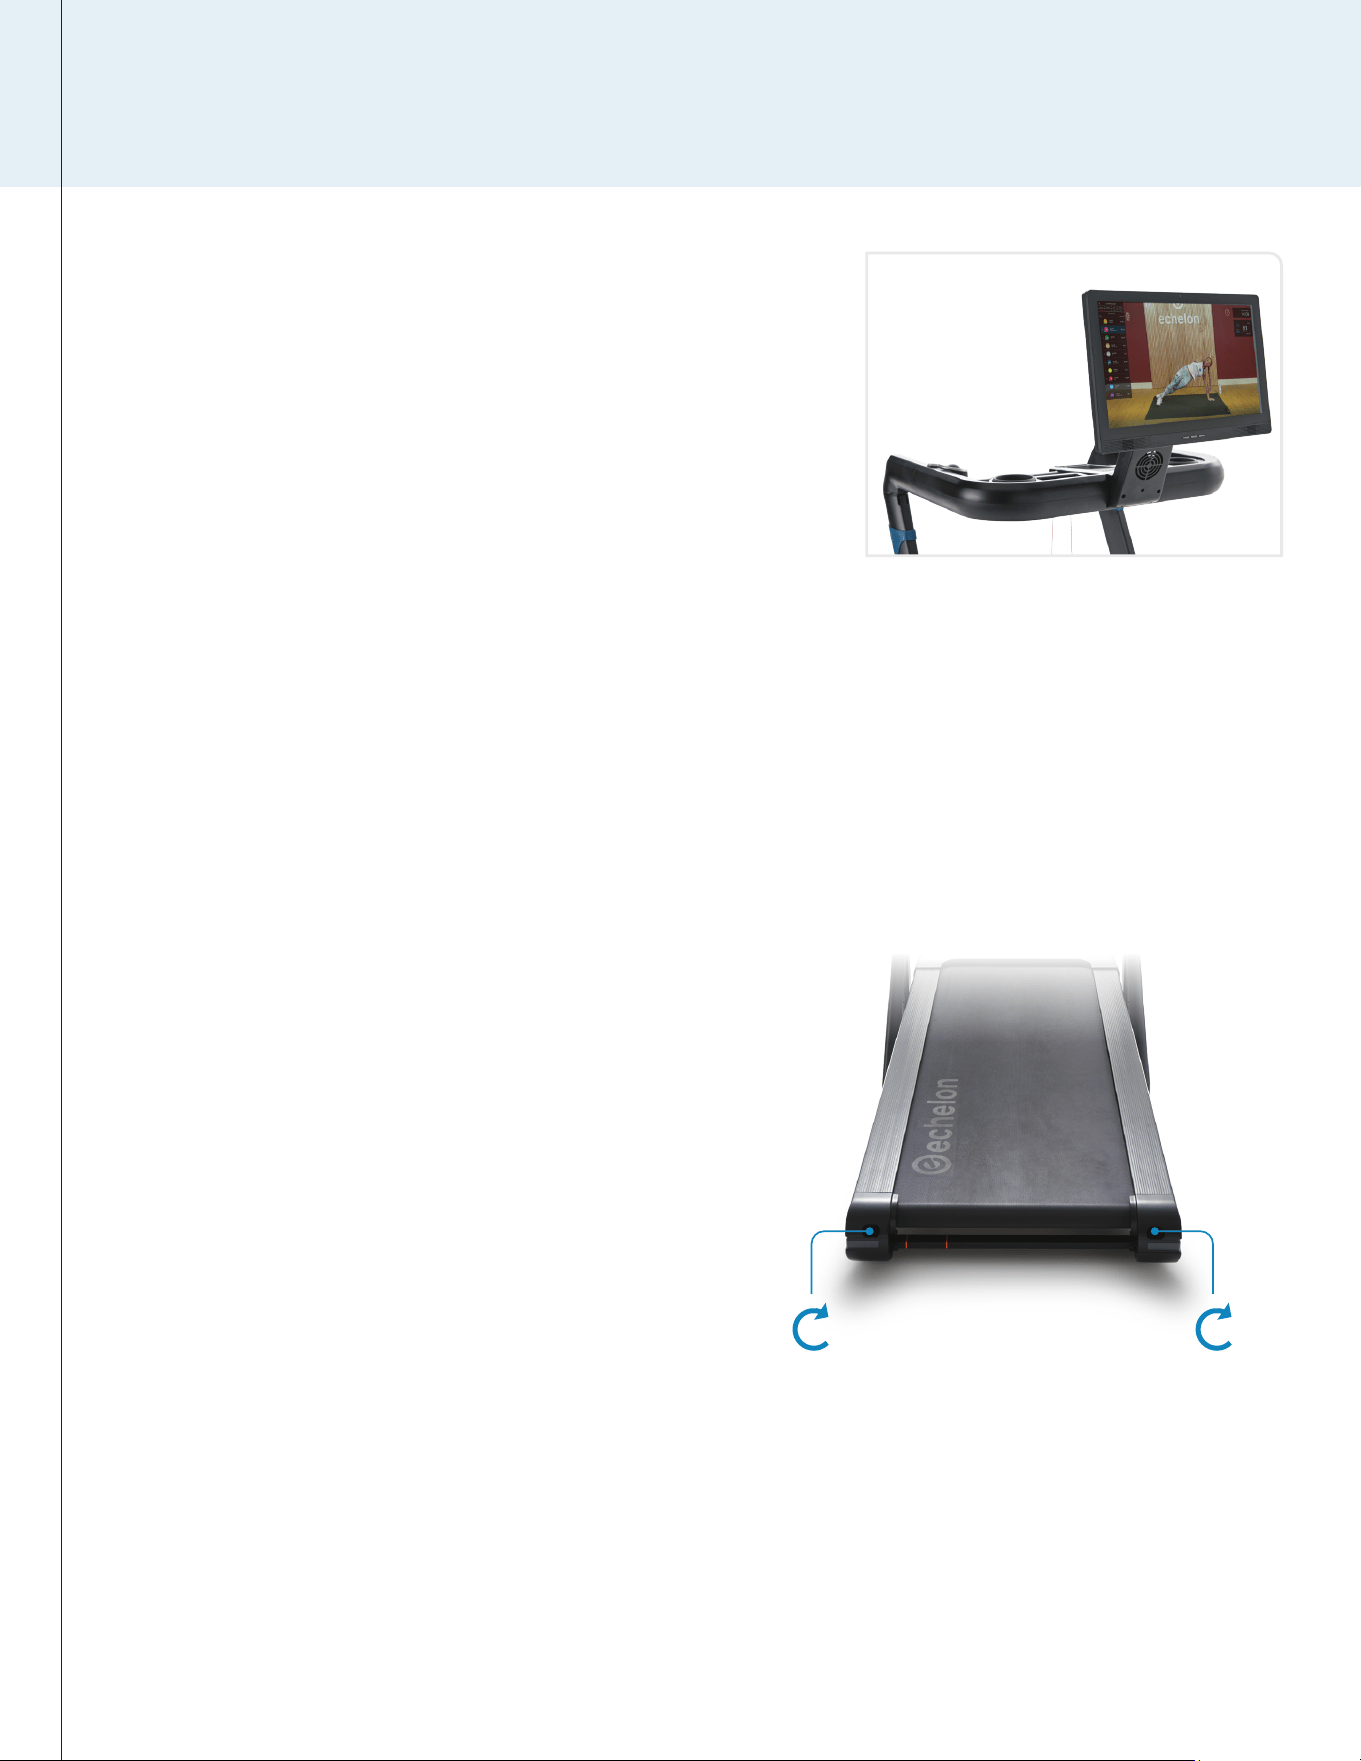
BELT ADJUSTMENT
TABLET ROTATION & TILT
1. Rotating
a. Hold both sides of the tablet.
b. Gently rotate the tablet either left or right 180°.
2. Tiliting
a. Hold both sides of the tablet.
b. Gently tilt forward or back towards the console to adjust for
different user heights. The maximum tilt angle is around 30°.
1. Swerving Right
a. Remove the safety key and turn the power OFF.
b. Turn the right adjusting bolt 1/4 clockwise. Re-insert the
safety key and turn the power ON.
c. Run the treadmill (3–4 mph/6–8 kph) and observe.
d. Repeat above steps a–c until belt is centered.
2. Swerving Left
a. Remove the safety key and turn the power OFF.
b. Turn the left adjusting bolt 1/4 clockwise. Re-insert the safety
key and turn the power ON.
c. Run the treadmill (3–4 mph/6–8 kph) and observe.
d. Repeat above steps a–c until belt is centered.
3. Tightening Belt
a. Remove the safety key and turn the power OFF.
b. Turn the left/right adjusting bolts 1/4 turn clockwise. Re-insert
the safety key and turn the power ON.
c. Run the treadmill (3–4 mph/6–8 kph) and stand on the belt to
confirm the tightness.
d. Repeat above steps a–c until the belt is moderately tight.
Left Adjusting Bolt Right Adjusting Bolt
PRODUCT USE
14
ECHELON FITNESS | STRIDE-8S
ECHELON FITNESS // STRIDE-8s // INSTRUCTION MANUAL
INSTRUCTION MANUAL
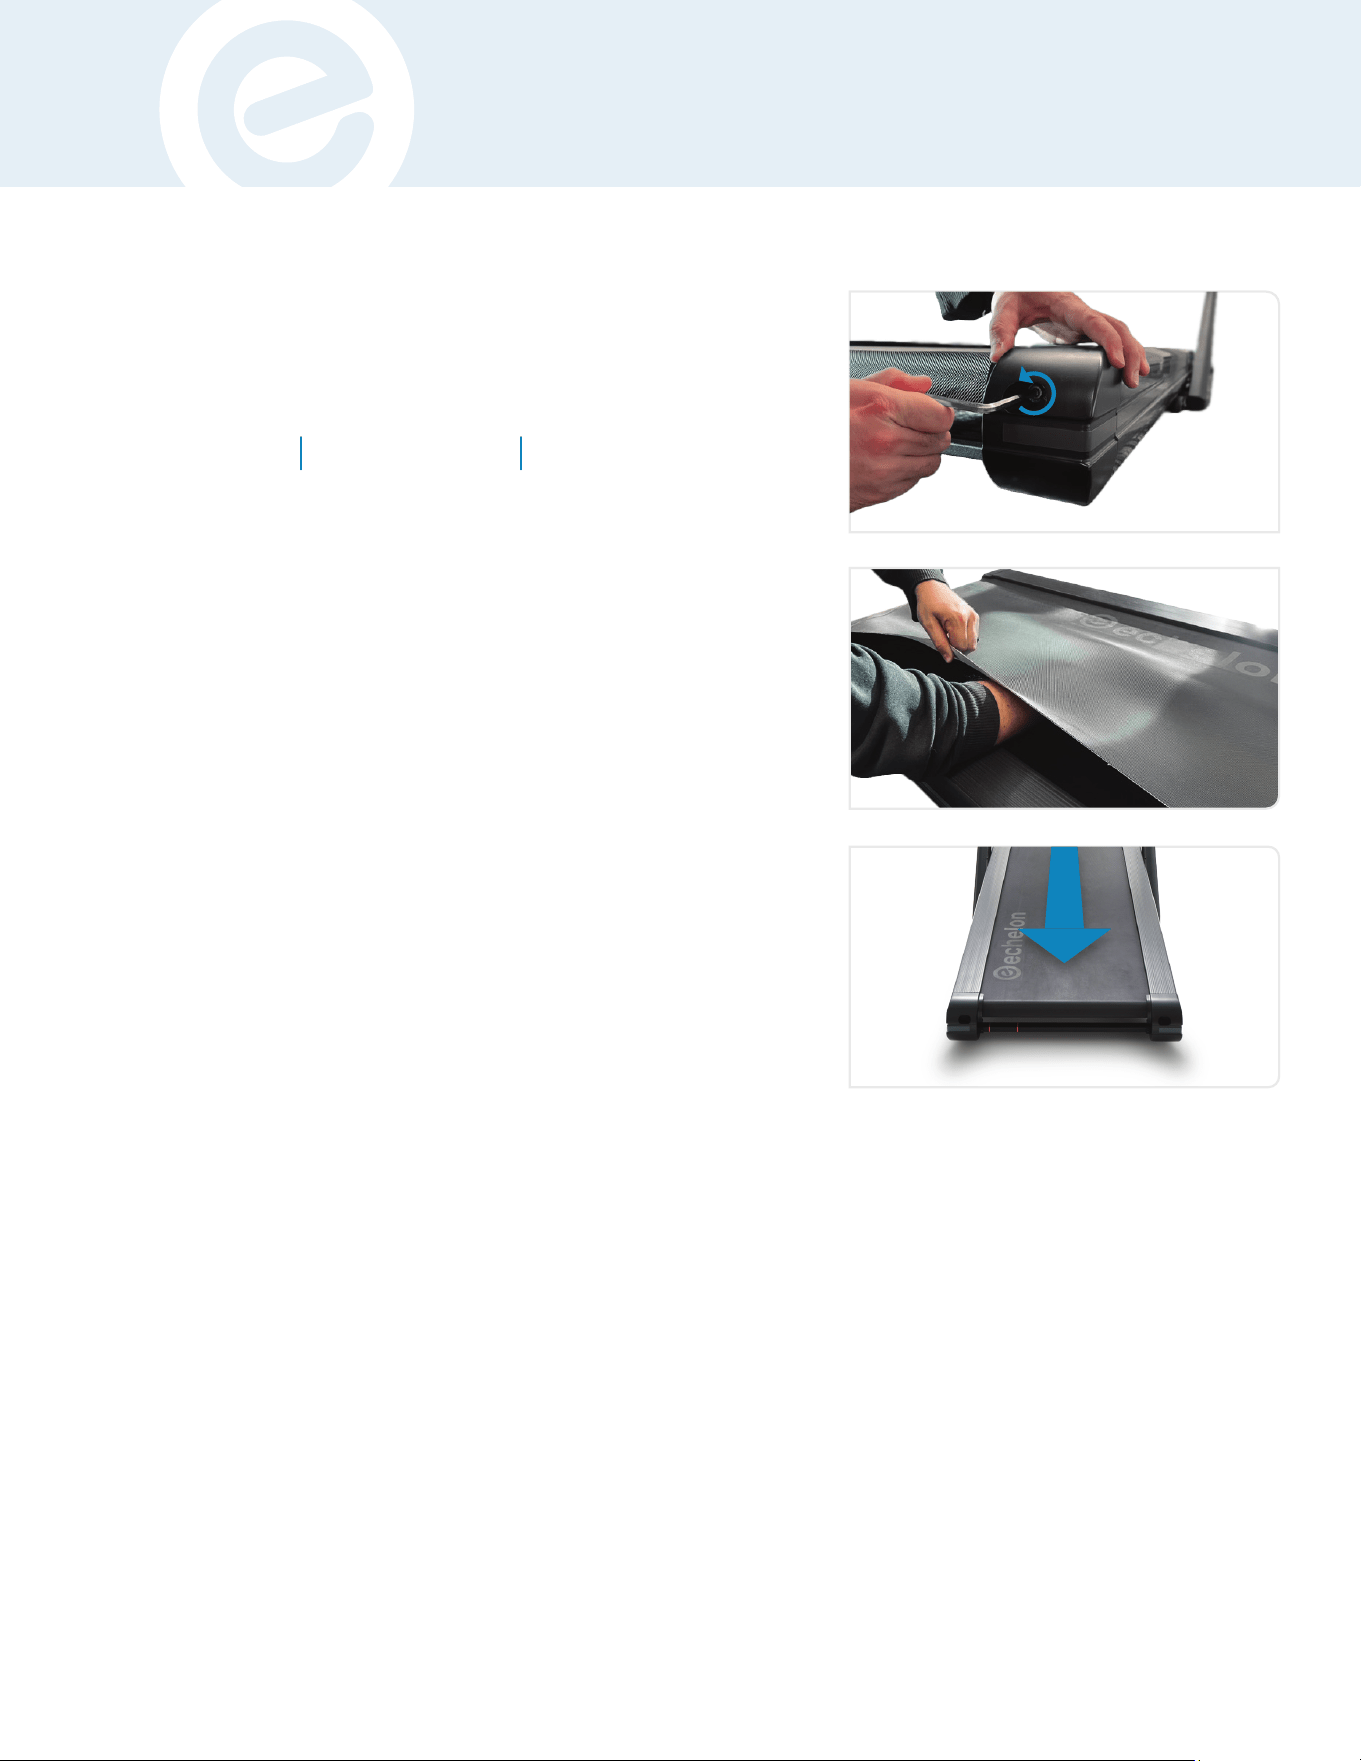
BELT LUBRICATION
1. Power off the treadmill and unplug the power cord.
2. Using Allen Wrench (B), loosen rear adjusting bolts with 5–10
counter-clockwise turns.
3. Lift the running belt and apply silicone oil in a zigzag pattern
across the entire running deck surface. Use 1/2 bottle of
silicone oil. DO NOT apply the silicone oil on top of the
running belt.
4. Lay the running belt flat and tighten the rear adjusting bolts
clockwise the same number of times loosened from step 2.
5. After the lubricant is applied, plug in the power cord, insert
the safety key, and turn power the treadmill on.
6. Stay off the treadmill and press START. Allow the belt to run
at 3 MPH for 3 minutes to spread the silicone oil.
7. Walk on the treadmill at a comfortable speed for an
additional 3 minutes to sufficiently spread the silicone oil and
check the running belt for proper tightness and alignment.
8. Once the belt is centered and properly tightened, stop
the belt. Wipe away any excess silicone oil with a damp
microfiber cloth.
Light Usage
Once Every 60
Days
Medium Usage
Once Every 45
Days
Heavy Usage
Once Every 30
Days
The Echelon Stride-8s requires lubrication as a part of routine
maintenance according to the recommended schedule below.
• Keeping the deck lubricated at the recommended intervals
above ensures the longest life possible for your treadmill.
• Failure to lubricate the deck at regular intervals may void
the warranty.
• It is recommended every other month to reach between the
belt and deck to verify there is lubrication present every
other month.
2
3
6
15
CARE & MAINTENANCE
Daily
1. Power off the treadmill and clean any high-use areas, like
the handlebars and console, with a non-acidic cleaner (NO
ammonia, chlorine, or alcohol) on a soft cloth. Do not spray
cleaning solution directly on the treadmill as that could ruin
any electrical components.
2. Inspect the power cord for damage. If damaged, replace
immediately by contacting Customer Service (833-937-2453).
Note: When the treadmill is not in use, unplug and store the
power cord in a secure, dry area and away from children.
3. The safety key and power cord should be removed after each
use so the treadmill is not accidentally powered on when not
in use.
4. Inspect for any noises that could indicate potential issues.
If a troubling noise is indicated please contact Customer
Service (833-937-2453).
Weekly
1. Clean the running belt, console, uprights, and motor cover
with non-acidic cleaners and a soft cloth. Cleaners should be
applied to the cloth and never sprayed onto the equipment
directly.
2. Inspect all the assembled and pre-assembled hardware
and tighten or re-secure as-needed. This includes but is not
limited to the following:
a. Handlebars & Uprights
b. Tablet
c. Running Belt
3. Dust and vacuum the treadmill and the surrounding area. To
clean underneath the treadmill, turn off the power, fold, and
roll the treadmill to an alternate location. Return the treadmill
to its original location after cleaning.
4. Ensure your app and equipment firmware are up-to-date with
the latest versions.
5. Check the belt for any looseness, this will cause the treadmill
to receive improper info when calculating metrics if it is not
properly tightened. When tightening make sure to adjust
both sides of the rear roller evenly with the provided Allen
Wrench, turning clockwise to tighten.
Weekly | 2-a
Monthly
Check the alignment on the treadmill running belt by
ensuring it is centered and glides smoothly over the
running deck. Utilize the instructions located in your
user manual for "re-centering" the belt to troubleshoot
and fix. Refer to page 14 for belt adjustment instructions.
1. Start the treadmill at a low speed and test for any
slippage of the belt to ensure the motor is applying
the proper torque.
2. Stop using the treadmill and contact Customer
Service (833-937-2453) if you hear rubbing noises
or if the belt is off-center and can't be recentered
using the instructions..
3. Lubricate the running deck every 1-2 months
depending on usage or 500 miles/km
(whichever comes first) per the provided steps.
CARE & MAINTENANCE
16
ECHELON FITNESS | STRIDE-8S
ECHELON FITNESS // STRIDE-8s // INSTRUCTION MANUAL
NOTE: Contact customer service (833-937-2453) if your running deck is damaged or if you are experiencing any issues.
INSTRUCTION MANUAL
TROUBLESHOOTING
1. Ensure safety key is fully inserted.
2. Ensure the AC power cord that runs
from the wall outlet to the front of the
treadmill motor cover is plugged in on both sides.
3. If screen does not turn on, make sure the
DC power plug that comes from the tablet is
properly plugged into the DC IN port.
4. Retry pairing. If treadmill will not pair, please
contact Customer Service (833-937-2453)
for further assistance.
Troubleshooting
Ensure RS232 cable is fully inserted and secured to the tablet.
Incline Calibration
From time to time it is necessary to perform an incline
calibration on the treadmill. If for any reason the incline
motor automatically locks itself to a certain level or
refuses to reset to the zero position after a hard reset,
you will need to perform the calibration.
To do this follow these instructions:
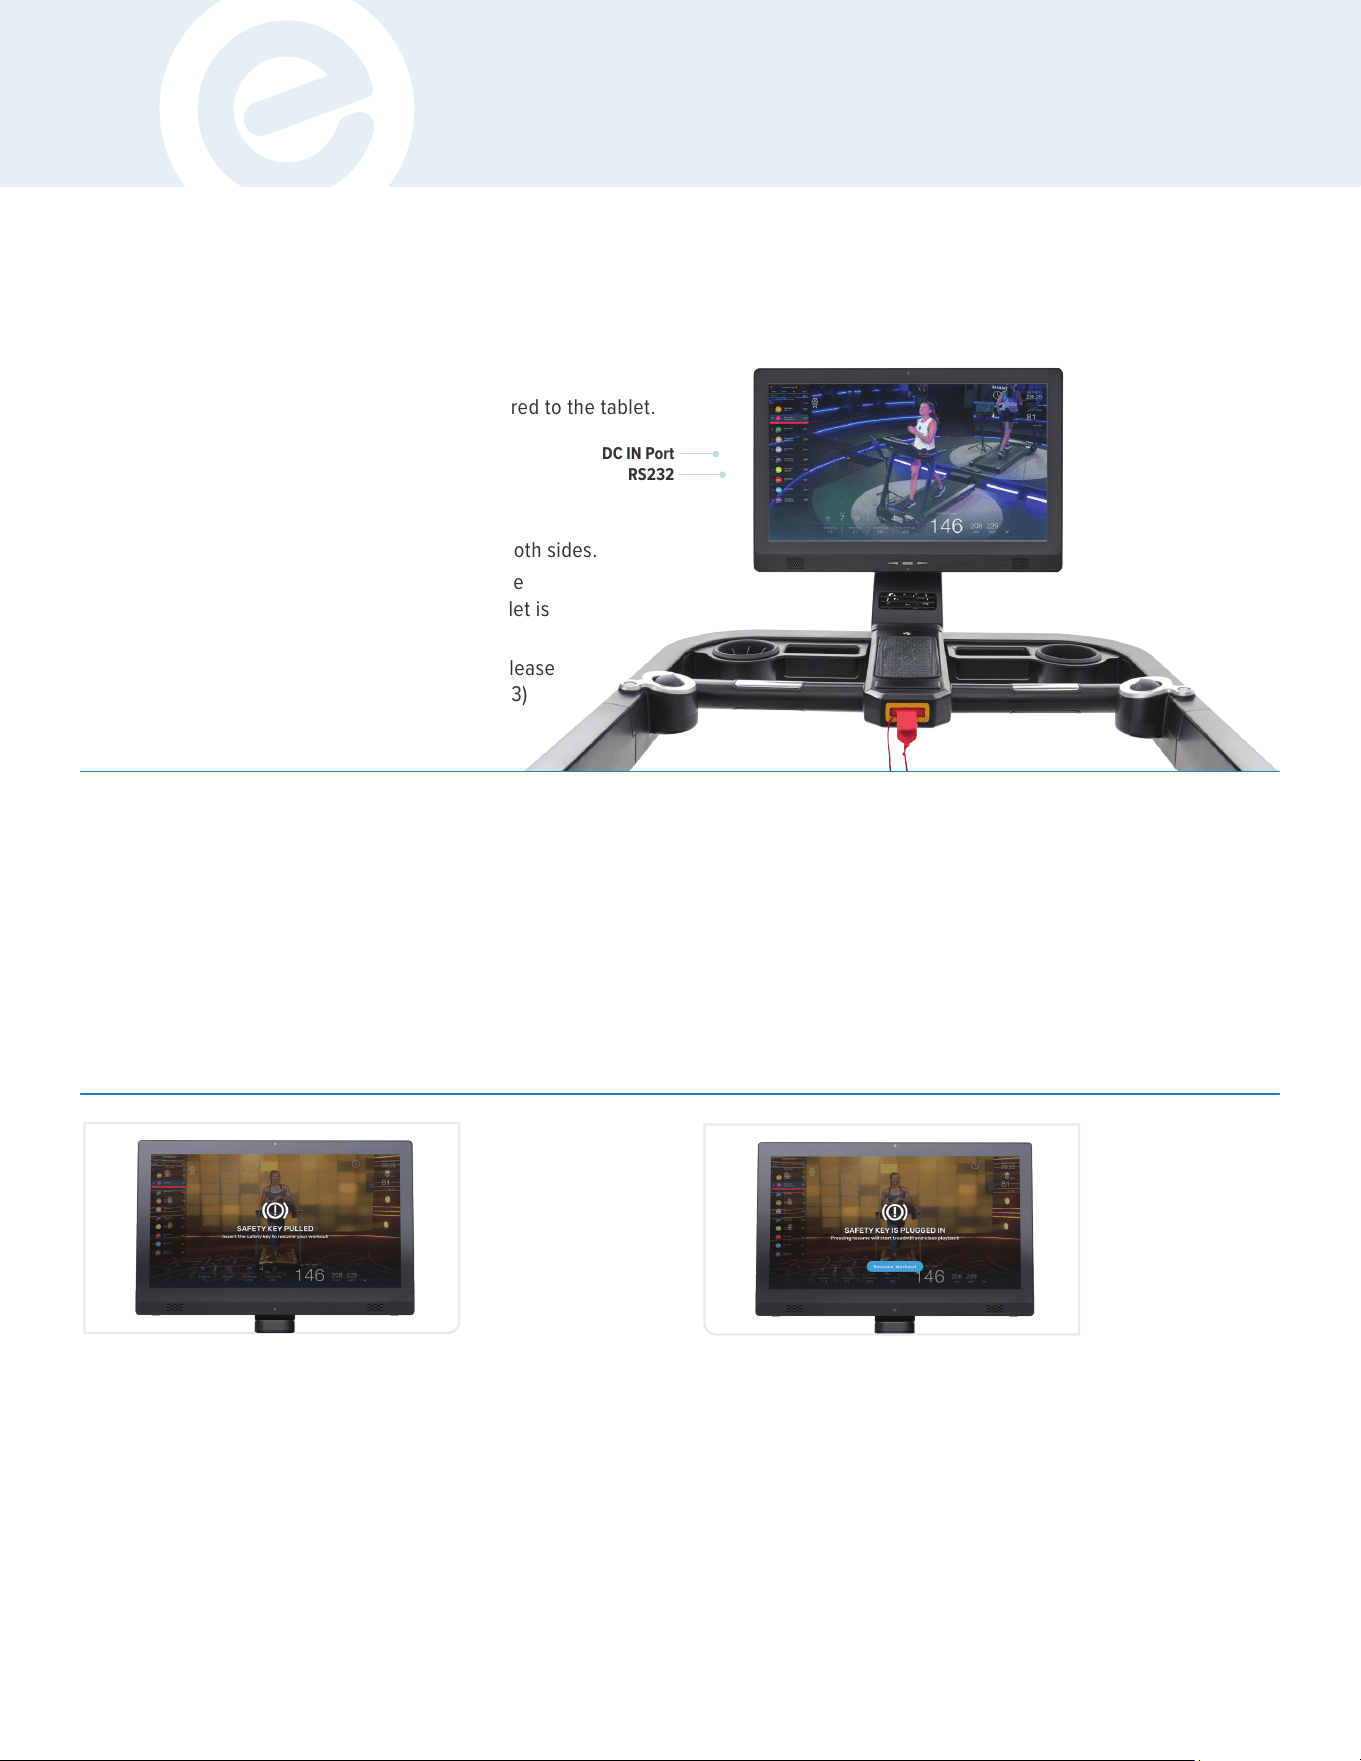
DC IN Port
RS232
a. Running belt comes to a complete stop.
b. Incline level remains in current position and will not
automatically return to level 0.
c. Any class that is currently in-progress will pause with an
on-screen prompt until the safety magnet is re-inserted
into the slot.
d. "SAFETY KEY IS PULLED. Insert the safety magnet to
resume your workout."
Safety Magnet (Removed)
The treadmill stops automatically when the safety magnet
is pulled from the slot.
a. The on-screen prompt will update and allow the current class
to resume: "SAFETY KEY IS PLUGGED IN. Pressing resume
will start treadmill and class playback."
Safety Magnet (Inserted)
The treadmill will not automatically start when the safety magnet
is inserted.
17
• Make sure you are off the treadmill.
• Remove the safety key from the inserted position.
• Hold the start/stop button for 10 seconds. The treadmill will
reprogram the incline motor to its default setting.
• Once the treadmill has gone through the incline and decline
process, re-insert the safety key and resume using.

TROUBLESHOOTING & ERROR CODES
ERROR CODES
18
ECHELON FITNESS | STRIDE-8S
ECHELON FITNESS // STRIDE-8s // INSTRUCTION MANUAL
ERROR CODE MEANING SOLUTION
E01 Lower Control Board failing to connect
to console
1. Check whether a connector is loose, or whether the wire is
damaged or matched.
2. The lower control board may be defective. Check and replace
the lower control board.
3. If the console is damaged, test whether it is damaged before
replacement.
E02 Overcurrent to Lower Control Board 1. Wait 20 seconds after power o, then turn on electricity.
2. Check whether the roller bearing is in fault, and whether the
running deck and running belt are under lubricated.
3. Replace the lower control board.
E03 Lower Control Board overheating 1. Wait 20 seconds after power o, then turn on electricity.
2. Check whether the motor compartment components are dusty
and whether the fan is faulty.
3. Replace the lower control board.
E04 Incline Motor Error 1. E4 error is automatically cleared after the incline calibration
is performed.
2. Turn o the power to the treadmill and check to see if the incline
motor is experiencing issues from dust buildup or any visible
pinched, or disconnected internal wiring.
3. Replace the lower control board.
E05 Voltage conversion
less than 220V (2 mins)
1. Wait 20 seconds after power o, then turn on electricity.
2. Check whether the power supply voltage is low.
3. Replace the lower control board.
E06 Lower Control Board output short circuit 1. Check whether the converter output connection is correct.
2. Check the motor for damage.
3. Replace the lower control board
E07 Voltage conversion
is over 390V (0.1 second)
1. Wait 20 seconds after power o, then turn on electricity.
2. Check whether the power supply voltage is high.
3. Replace the lower control board.
E08 Voltage conversion
is over 380V (10 seconds)
1. Wait 20 seconds after power o, then turn on electricity.
2. Check whether the power supply voltage is high.
3. Replace the lower control board.

INSTRUCTION MANUAL
Questions or Concerns
Our members are our priority! If you require assistance or
have concerns, please contact our customer service team.
(833) 937-2453
Submit a Request:
Warranty Information
Your Echelon Stride-8s treadmill comes with a 1-year parts
and labor warranty. Should the need arise, all you need
is a proof of purchase and our customer service team
will be happy to assist. Additional 1- or 3-year extended
warranties are available through customer service.
19

NOTES
NOTES
20
ECHELON FITNESS | STRIDE-8S
ECHELON FITNESS // STRIDE-8s // INSTRUCTION MANUAL

INSTRUCTION MANUAL
21

NOTES
22
ECHELON FITNESS | STRIDE-8S
ECHELON FITNESS // STRIDE-8s // INSTRUCTION MANUAL

INSTRUCTION MANUAL
23
MODEL: ECH-STRIDE-8S-22
ECHELON FITNESS MULTIMEDIA. LLC
605 CHESNUT STREET, SUITE 700
CHATTANOOGA, TN 37450
ECHELONFIT.COM
MADE IN
CHINA
REV: 10292023
READ INSTRUCTIONS
BEFORE OPERATING
PATENT
PENDING

