Helios J1 Jump Starter
Read all instructions and safety warnings before use.
If you have questions or comments, contact us.
User Manual
V1.0
(�)���-���-���� Mon-Fri �AM-�PM(PST)
Support@etenwolf.com
Warning! Please read all safety warnings
and all instructions to reduce the risk of
electric shock, fire and/or serious injury.
Warning!
Register at http://www.etenwolf.com to
receive a 1-year extended warranty.

��
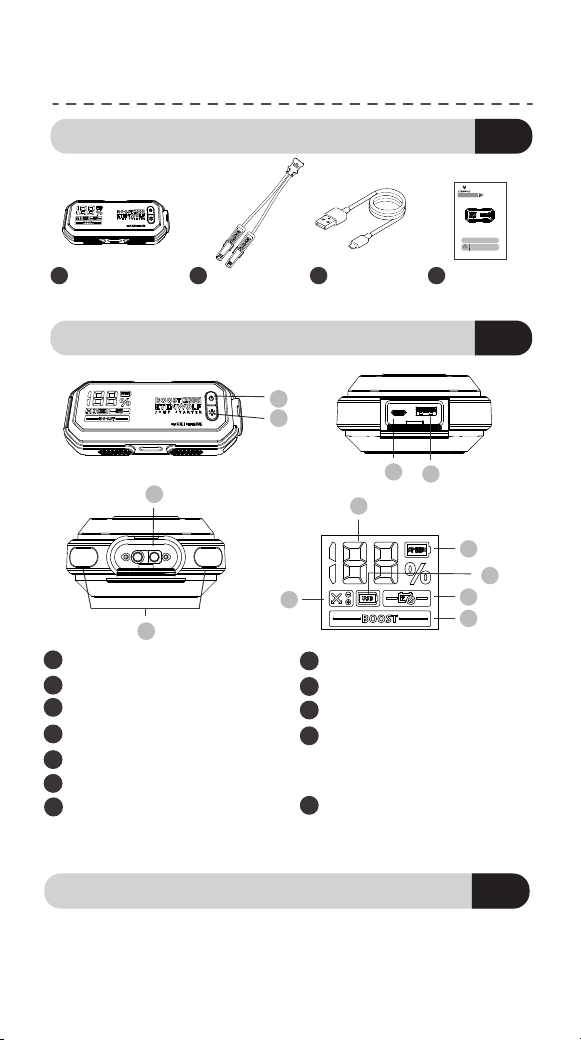
Helios J1 Jump
Starter x 1
��
Jumper Cable
x 1
��
��
USB A to C
Cable x 1
User Manual
x 1
01
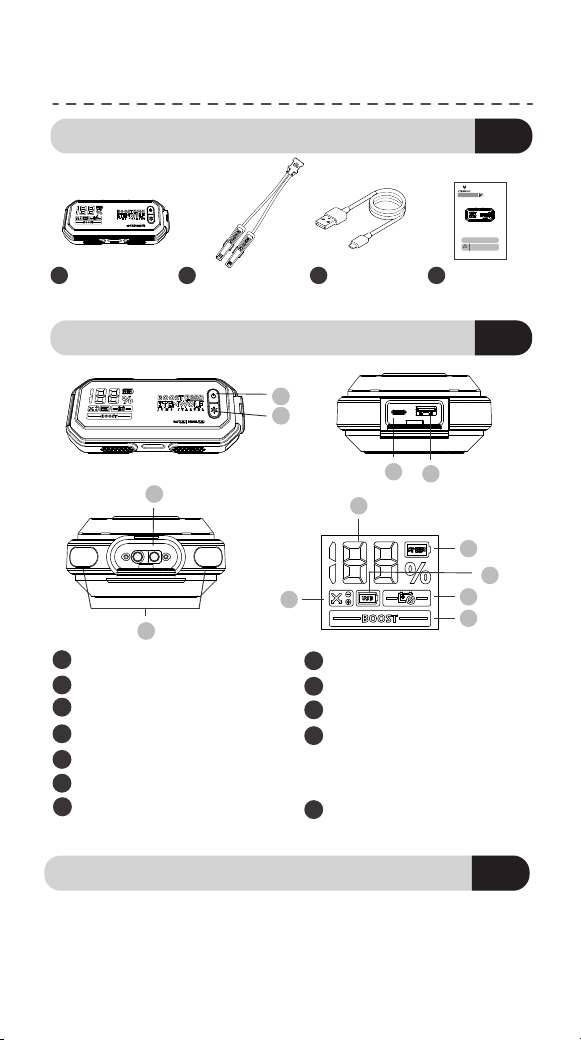
PACKAGE CONTENT
��
��
��
��
��
��
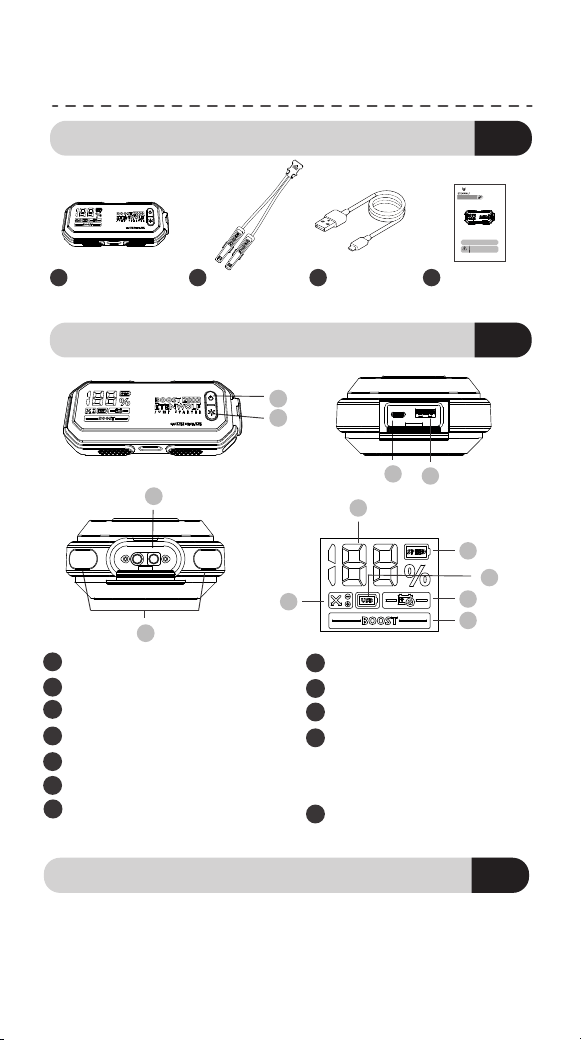
PRODUCT OVERVIEW
03
QUICK START GUIDE
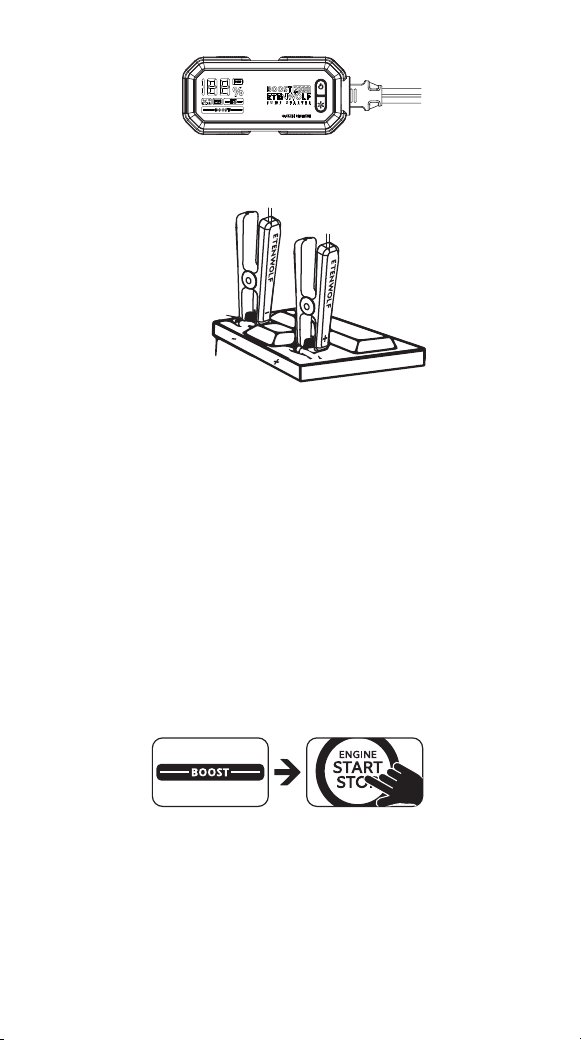
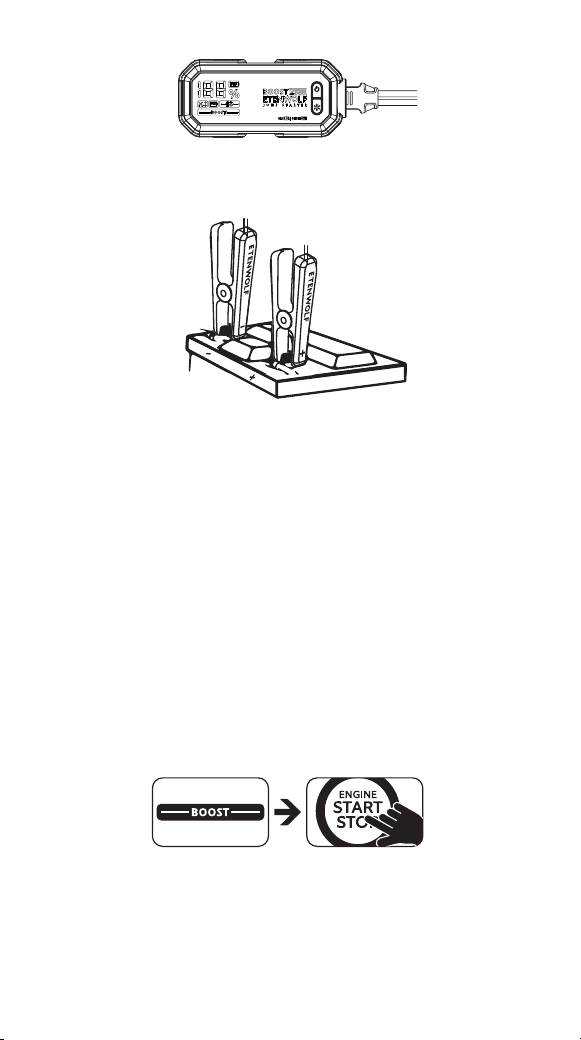
1.Connect the battery clamps to the Helios J1 by connecting to the
12V OUT port.
STEP 1
02
��
��
��
��
��
��
��
��
��
��
��
��
Start/pause power button
Light button
Jump start socket
LED work light
Type-c port(Input/Output)
USB-A port(Output)
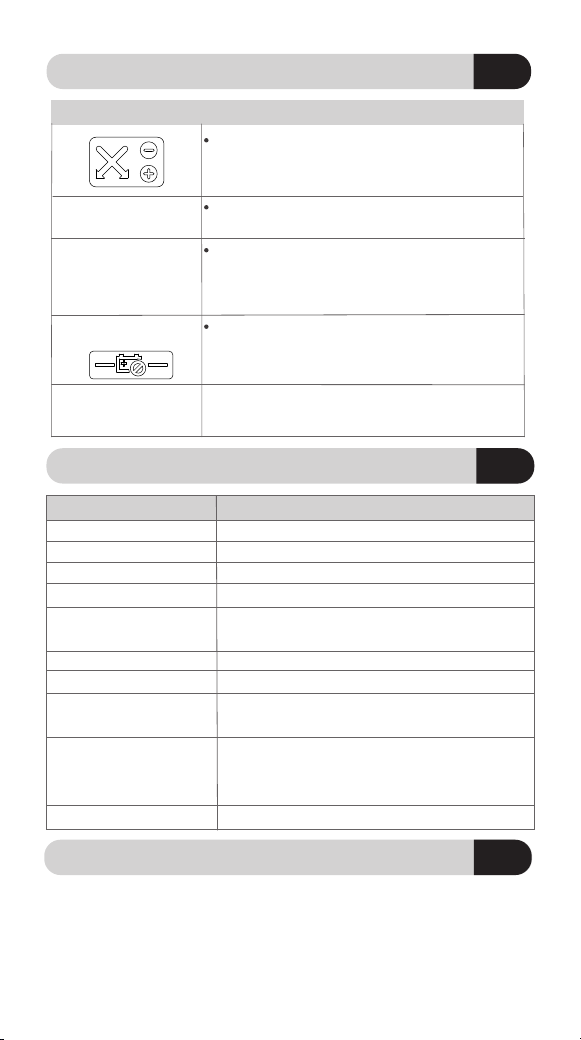
Battery precentage:remoin-
ing battery power
01
Helios J1 Jump Starter
Read all instructions and safety warnings before use.
If you have questions or comments, contact us.
User Manual
V1.0
(�)���-���-���� Mon-Fri �AM-�PM(PST)
Warning! Please read all safety warnings
and all instructions to reduce the risk of
electric shock, fire and/or serious injury.
Warning!
Register at http://www.etenwolf.com to receive a
1-year extended warranty.
��
��
��
��
��
��
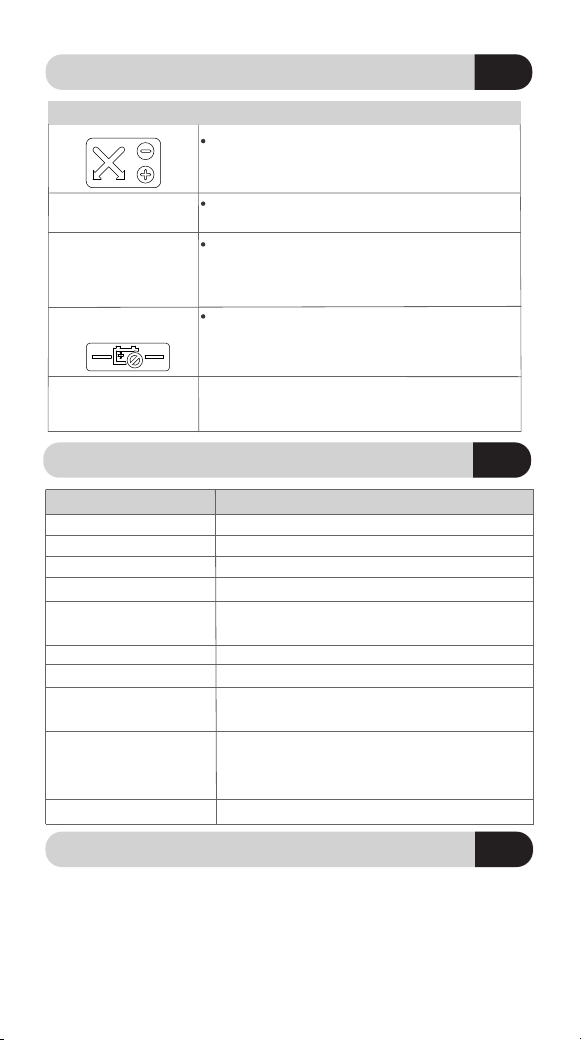
Charging
Reverse Polarity Indicator
Discharging
Open Electrode/Low Battery
Voltage Warning Light
Boost mode(Ready to start)
English---------------01
Italiano--------------16
Espaniol -------------10
Deutsch-------------21
Francais-------------19

2.Connect the positive(red)battery clamp to the positive(POS,P,+)
battery terminal.
3.Connect the negative(black) battery clamp to the negative (NEG,N,-)
battery terminal or vehicle chassis.
4.When disconnecting,disconnect in the reverse sequence,removing
the negative first(or positive first for positive ground systems)
NOTE: �.Before connecting the battery, please make sure you have a
12-volt lead-acid battery. �.Identify the correct polarity of the battery
terminals on the battery.The positive is usually marked with these
letters or symbols (POS, P,+).The negative is usually marked with these
letters or symbols (NEG.N.-). �.Do not connect anything to the
carburetor, fuel line or thin metal sheet. �.The following description is
about the far negative grounding system ( most common ).If your
vehicle has a positive ground system ( very rare), please follow the
instructions above in reverse order.
STEP 2
1. "BOOST" is displayed on the screen.Power on the vehicle using a
key or remote control Most vehicles will start immediately.
2.If the vehicle cannot start immediately, please wait for 20 to 30
seconds and try again.Don't attempt more than five consecutive
jumps within 10 minutes.Let the Helios J1 rest for ten (10) minutes
and then try to start the vehicle.
3.Once you have started your vehicle, disconnect the battery clip
and remove the Helios J1.
02

Power bank is ready to charge all your electronic devices such as
phone,tablet,laptop,drone and camera.It has Type-C PD3.0
PD30W: 5V 1A/2A/3A,9V 2A,12V 1.5A,15V 2A,20V 1.5A,and USB-A
Output 5V 3A,9V 2A,12V 1.5A
04
BUTTON OPERATION GUIDE
05
LED WORK LIGHT
For the best charging performance and stability, use ETENWOLF or
the Certified PD charger to fuel your built-in battery. Battery
charging takes approximately 3 hours to fully charge from 0% to
100%.
After 2 minutes inactivity after being fully charged, the devices will
automatically shut off. The devices cannot be used while it is
charging.
Charging with AC power supply
Note:
06
POWER BANK
ON:Long-press Start/pause power button �� for two seconds to
turn on.
OFF:When the Jump starter is turn on,long-press Start/pause
power button �� for two seconds to turn off.
Start/pause power button
03
Warning: �. This mode is only applicable to 12-volt lead-acid
batteries.Please pay close attention to the polarity of the battery
before using this mode.�.Do not allow the positive and negative
battery clips to touch or connect with each other, as the product
will produce sparks.�.This mode uses a very high current (up to 800
amperes), and if not used properly, it may cause sparks and high
temperatures.If you are not sure whether to use this mode, please
do not attempt it and seek professional help.
The LED work ligh is in the front of jump starter.To turn the light
on,pressing the LIGHT button �� for two seconds .Press the light
button briefly to switch between different lighting modes in
sequence.
Switch between four different light modes
Ultra-brightflashlight、Bright flashlight、Slow strobe light、SOS light
Note:
The light won't turn off automatically. It needs to be turned off
manually
NOTE:
To work as a power bank,the devices needs to power on.
After 2 minutes of fully charging the devices,the devices will
automatically turn off.
07
BATTERY CHARGING & INDICATOR
08
TROUBLE SHOOTING
1.This product is only applicable to 12 voltage batteries.Do not
attempt to use the product with other types of batteries.If you are
unsure of the battery's specific chemistry or voltage, do not start
the car.
2.Store the product in a dry and cool place.This product is not a toy
and should not be used by children.
09
SPECIFICATION
10
SAFETY INSTRUCTIONS
Helios J1 Jump Starter
207*94*49mm
300A/2s
800A
Model
Dimensions
Starting current
Peak current
Name
Jump Starter
Charging: 0℃-55℃/32°F-131°F
Discharging: -20°C-55°C/-4°F-131°F
16000mAh (59.2Wh)
Type-C PD3.0 PD30W: 5V 1A/2A/3A,9V
2A,12V 1.5A,15V 2A,20V 1.5A
Type-C PD3.0 PD30W: 5V 1A/2A/3A,9V
2A,12V 1.5A,15V 2A,20V 1.5A; USB-A: 5V
3A,9V 2A,12V 1.5A
Operating Tempera-
ture
Storage temperature
Battery capacity
Input
output
3 hours
Charging time
04
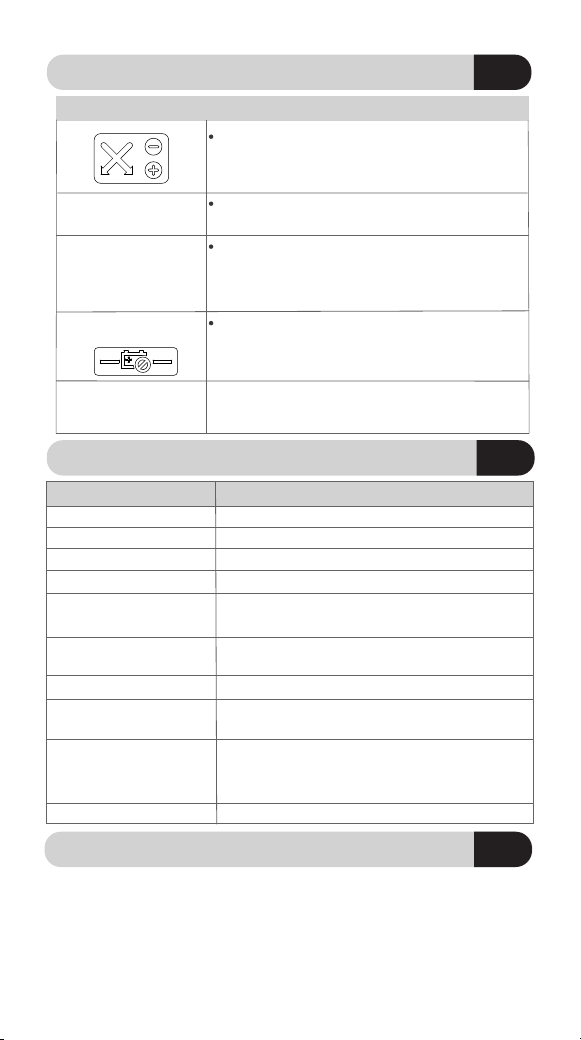
The jumper clip is incorrectly connect-
ed.Reverse them to ensure proper
connection.
Due to the extreme temperature, the starter does
not work and needs to be restored to the optimal
operating temperature range of -4°F to 122°F (-20°C
to 50°C).
Display shows the E0
error code
Display shows the E1
error code
Problem Solution
Display shows the E2
error code
The battery is low or dying.Press the power and
LED buttons at the same time for 2 seconds to
activate the forced start function.
Output's not on. Clamp voltage equals battery
voltage
After frequent short-term use, the launcher can be
locked.It will be unlocked automatically after 10
minutes.
Display shows the E3
error code
-20°C-60°C/ -4°F -140°F

Within two years of purchase, we will provide timely and effective
online after-sale service. We will repair or replace any defective
product (due to manufacturing fault) within this warranty period.
2-years coverage
WARRANTY
Manufacturer:Mozhen Technology (Shenzhen) Co., LTD
CN-503, Floor 5, Building 4, Tianan Yungu Industrial Park
Phase ll,Gangtou Community, Bantian Street, Longgang
District, Shenzhen
(1)877-838-0209 Mon-Fri 8AM-5PM(PST)
support@etenwolf.com
www.etenwolf.com
www.facebook.com/etenwolftools
Made in P.R.C
05
9.Do not place this product in high heat or fire.
10.Do not clean the product with harmful chemicals or detergents.
11.Misusedroppingorexcessive forcemay causeproduct
damage.Malfunction caused by actions not in accordance with the
above requirements is not covered by the warranty.
11
3.Please store the product within temperatures ranging
from-20°C-60°C/-4°F -140°F. Extremely hot or cold environments
may damage the battery and shorten the lifetime of the product.
Long-time storage of the product may decrease the effective-
ness of the battery.
4.Do not attempt to change, modify or repair any part of the
product.Disassembling the product may cause personal, death
or property damage.If the product is damaged, malfunctions, or
comes into contact with any liquid, discontinue use and contact
ETENWOLF.Any modification to the product will void the
warranty.
5.Charge the product at least once every three months to
maintain its performance.
6.The built-in lithium-ion battery can only be replaced by
ETENWOLF.
7. If the product battery is overheated, smelly, deformed, cut or
abnormal, please stop using it immediately and contact
ETENWOLF.
8.Staring directly at the beam or glow of a flashlight can cause
permanent eye damage.The product is equipped with a
high-output LED prefocus lamp that emits a powerful beam at
its highest setting.
��
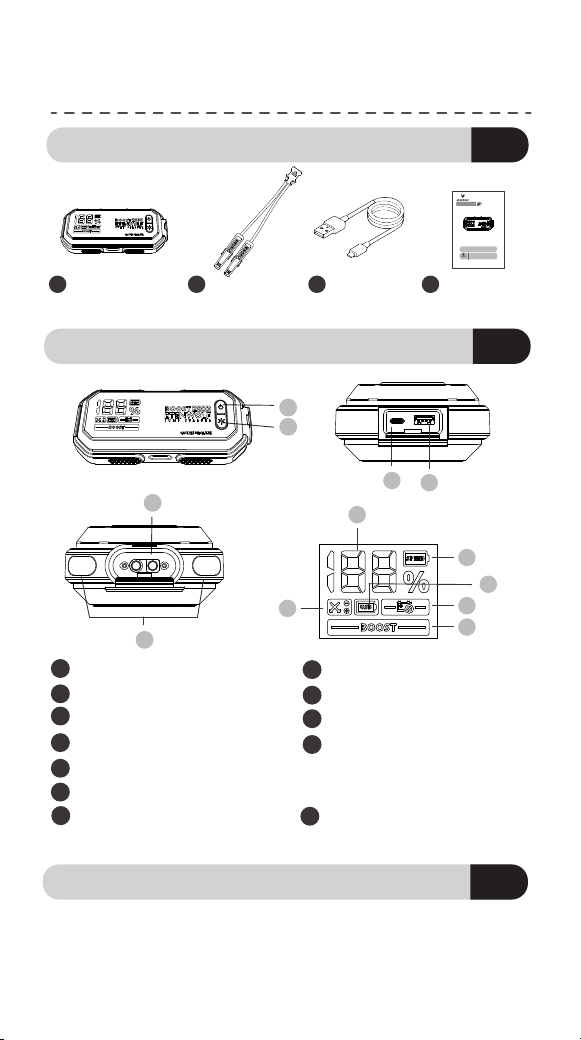
Helios J1 Jump
Starter x 1
��
Cable de puente
x 1
��
��
Cable USB
de A a C x 1
Manual del
Usuariox 1
01
PACKAGE CONTENT
��
��
��
��
��
��
PRODUCTO DESCRIPCIÓN GENERAL
03
RÁPIDO COMENZAR
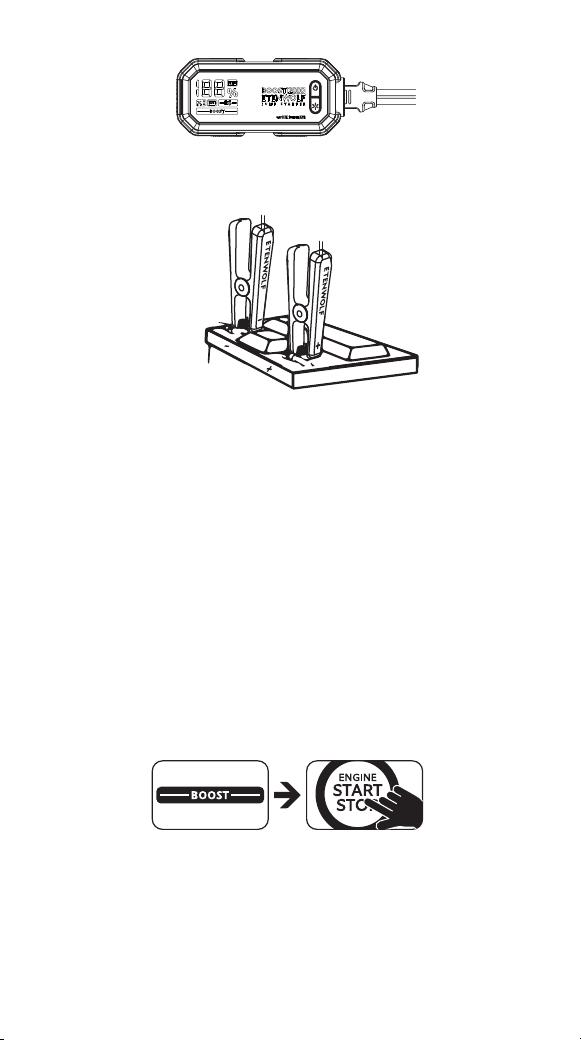
1.Conectar el batería abrazaderas a el Helios J1 por conectando a
los 12 V AFUERA puerto.
PASO 1
02
��
��
��
��
��
��
��
��
��
��
��
��
Inicio/pausa fuerza botón
Luz botón
Saltar comenzar enchufe
CONDUJO trabajar luz
Tipo-c puerto Entrada/Salida)
USB-A puerto(Salida)
Batería porcentaje: remanente
batería fuerza
06
Helios J1 Jump Starter
Read all instructions and safety warnings before use.
If you have questions or comments, contact us.
User Manual
V1.0
(�)���-���-���� Mon-Fri �AM-�PM(PST)
Warning! Please read all safety warnings
and all instructions to reduce the risk of
electric shock, fire and/or serious injury.
Warning!
Register at http://www.etenwolf.com to receive a
1-year extended warranty.
��
��
��
��
��
��
Cargando
Contrarrestar Polaridad
Indicador de descarga
Abierto Electrodo/Bajo
Voltaje de la batería
Advertencia Luz
Aumentar modo(Listo a
comenzar)
English---------------01
Italiano--------------16
Espaniol -------------10
Deutsch-------------21
Francais-------------19

2.Conectar el batería positiva (roja) abrazadera a el batería positiva
(POS,P,+) Terminal.
3.Conectar el negativo(negro) batería abrazadera a el negativo (NEG,
N,-)batería Terminal o vehículo chasis.
4.Cuando desconectando,desconectar en el contrarrestar
secuencia, eliminando el negativo primero(o positivo primero para
positivo suelo sistemas)
NOTA:1. Antes conectando el batería, por favor hacer seguro tú tener
12 voltios plomo-ácido batería.�.Identificar el correcto polaridad de
el terminales de la batería en el batería.La positivo es generalmente
marcado con estas cartas o símbolos (POS, P,+).El negativo es
generalmente marcado con estos letras o símbolos (NEG.N.-).�.Hacer
no conectar cualquier cosa a el carburador, combustible línea o
delgado metal hoja.�.La siguiente descripción Se trata de el lejos
negativo toma de tierra sistema ( mayoría común ).Si su vehículo
tiene a positivo suelo sistema ( muy extraño), por favor seguir las
instrucciones arriba en contrarrestar orden.
PASO 2
1. "BOOST" es desplegado en el pantalla.Poder en el vehículo
usando una llave o remoto control Mayoría vehículos voluntad
comenzar inmediatamente.
2.Si el vehículo no puedo comenzar inmediatamente, por favor
esperar para 20 a 30 segundos y intentar otra vez.no lo hagas
intentar más que cinco consecutivo salta dentro 10 minutos.Dejar
el Helios J1 descansar para diez (10) minutos y luego intentar a
comenzar el vehículo.
3.Una vez tú tener comenzó su vehículo, desconectar el batería
acortar y eliminar el Helios J1.
Advertencia: �.Este modo es solo aplicable a 12 voltios baterías
07
de plomo-ácido.Por favor pagar cerca atención a el polaridad de el
batería antes usando este modo.�.Hacer no permitir el positivo y
batería negativa clips a tocar o conectar con cada otro, como el El
producto lo hará producir chispas.�.Esto modo usos a muy alto
actual (arriba a 800 amperios), y si no usado adecuadamente, él
puede causa moscas y altas temperaturas.Si tú son no seguro si a
usar este modo, Por favor hazlo no intentar él y buscar profesional
ayuda.

Fuerza banco es listo a cargar todo su electrónico dispositivos
semejante como teléfono, tableta, computadora portátil, dron y
cámara.Eso tiene Tipo C PD3.0 PD30W: 5 V 1A/2A/3A,9V 2 A, 12 V
1,5 A, 15 V 2 A, 20 V 1,5 A y Salida USB-A 5 V 3 A, 9 V 2 A, 12 V 1,5 A
04
BOTÓN 04 OPERACIÓN GUÍA
05
LED TRABAJAR LUZ
Para el mejor cargando actuación y estabilidad, usar ETENWOLF o
el Certificado PD cargador a combustible su incorporado batería.
Carga de la batería acepta aproximadamente 3 horas a completa-
mente cargar de 0% al 100%.
Después 2 minutos inactividad después ser completamente
cargado, el dispositivos se hará automáticamente cerrar apagado.
El dispositivos no puedo ser usado mientras él se esta cargando
Cargando con C.A. fuerza suministrar
Nota:
06
POTENCIA BANCO
ENCENDIDO: Pulsación larga Inicio/pausa fuerza botón 01 para
dos artículos de segunda clase girar en.
APAGADO: Cuando el Saltar motor de arranque es doblar
encendido, pulsación larga Iniciar/pausar energía botón 01 para
dos artículos de segunda clase a doblar apagado.
Inicio/pausa fuerza botón
08
Advertencia: �.Este modo es solo aplicable a 12 voltios baterías
La luz de trabajo LED está en la parte frontal del arrancador
portátil. Para encenderla, mantenga presionado el botón LUZ ��
durante dos segundos. Presione brevemente el botón LUZ para
cambiar entre los modos de iluminación en secuencia.
Cambiar entre cuatro diferente luz modos
Linterna ultrabrillante , brillante linterna , lenta luz estroboscópica
luz , SOS luz
Nota:
El luz no doblar apagado automáticamente. Él necesidades a ser
transformado apagado manual
NOTA:
A trabajar como a fuerza banco,el dispositivos necesidades a
fuerza encendido. Después 2 minutos de completamente
cargando el dispositivos,los dispositivos se hará automáticamente
doblar apagado.
07
BATERÍA CARGANDO & INDICADOR
de plomo-ácido.Por favor pagar cerca atención a el polaridad de el
batería antes usando este modo.�.Hacer no permitir el positivo y
batería negativa clips a tocar o conectar con cada otro, como el El
producto lo hará producir chispas.�.Esto modo usos a muy alto
actual (arriba a 800 amperios), y si no usado adecuadamente, él
puede causa moscas y altas temperaturas.Si tú son no seguro si a
usar este modo, Por favor hazlo no intentar él y buscar profesional
ayuda.
08
PROBLEMAS TIROTEO
1.Este producto es solo aplicable a 12 Voltaje baterías.Hacer no
intentar a usar el producto con otro tipos de baterías.Si tú no
están seguros de el batería específico química o Voltaje, hacer no
iniciar el auto.
2.Almacenar el producto en a seco y Frío lugar.Este producto no es
un juguete y no debe ser utilizado por niños.
09
ESPECIFICACIÓN
10
CONSIGNES DE SÉCURITÉ
Helios J1 Saltar Motor de arranquer
207*94*49mm
300A/2s
800A
Modelo
Dimensiones
A partir de actual
Cima actual
Nombre
Saltar Motor de arranque
Cargando: 0℃-55℃/32°F-131°F
Descarga: -20°C-55°C/-4°F-131°F
16000mAh (59.2Wh)
Type-C PD3.0 PD30W: 5V 1A/2A/3A,9V
2A,12V 1.5A,15V 2A,20V 1.5A
Type-C PD3.0 PD30W: 5V 1A/2A/3A,9V
2A,12V 1.5A,15V 2A,20V 1.5A; USB-A: 5V
3A,9V 2A,12V 1.5A
Operante Tempera-
tura
Almacenamiento
temperatura
Batería capacidad
Aporte
output
3 hours
Charging time
09
El saltador acortar es incorrectamente
conectado- ed.Reverse a ellos a asegurar
Conexión adecuada .
Pendiente a el extremo temperatura, el motor de
arranque no lo hace trabajar y necesidades a ser
restaurado a el funcionamiento óptimo
temperatura rango de -4°F a 122°F (-20°C a 50°C).
Mostrar espectáculos el
Error E0 código
Mostrar espectáculos
el Error E1 código
Problema Solución
Mostrar espectáculos
el Error E2 código
El batería es bajo o muriendo.Presione el fuerza y
LED botones en el mismo tiempo para 2 artículos
de segunda clase Para activar el forzado comenzar
función.
Salida no en. Abrazadera Voltaje es igual voltaje
de la batería
Después frecuente Corto plazo usar, el lanzacohetes
poder estar bloqueado. voluntad ser desbloqueado
automáticamente después 10 minutos.
Mostrar espectáculos
el Error E3 código
-20°C-60°C/ -4°F -140°F

Dentro dos años de compra, nosotros voluntad proporcionar
oportuno y eficaz en línea posventa servicio. Nosotros voluntad
reparar o reemplazar cualquier producto defectuoso (pendiente a
fabricación falla) dentro este garantía período.
2 años cobertura
GARANTÍA
Manufacturer:Mozhen Technology (Shenzhen) Co., LTD
CN-503, Floor 5, Building 4, Tianan Yungu Industrial Park
Phase ll,Gangtou Community, Bantian Street, Longgang
District, Shenzhen
(1)877-838-0209 Mon-Fri 8AM-5PM(PST)
support@etenwolf.com
www.etenwolf.com
www.facebook.com/etenwolftools
Made in P.R.C
10
9.Hacer no lugar este producto en alto calor o fuego.
10.Hacer no limpio el producto con dañino productos químicos o
detergentes.
11.Caídas indebidas o excesivas fuerza puede Causar daños al
producto. Mal funcionamiento causado por comportamiento no en
conformidad con lo anterior requisitos es no cubierto por el garantía.
11
3.Por favor almacenar el producto dentro temperaturas que van
de -20°C a 60°C/-4°F -140°F. Extremadamente caliente o frío Los
entornos pueden daño el batería y acortar el vida de el producto.
Largo tiempo almacenamiento de el producto puede disminuir el
eficacia de el batería.
4.Hacer no intentar a cambiar, modificar o reparar cualquier parte
de el producto.Desmontaje el producto puede causa personal,
muerte o propiedad daño.Si el producto es dañado, averías, o
viene en contacto con cualquier líquido, discontinuar usar y
Contacte con ETENWOLF. Cualquier modificación a el producto
voluntad vacío la garantía.
5.Cargar el producto en el menos una vez cada tres meses Para
mantener es actuación.
6.El incorporado iones de litio batería poder solo ser reemplazado
por ETENWOLF.
7. Si el producto batería es sobrecalentado, maloliente, deforma-
do, cortar o anormal, por favor detener usando él inmediatamente
y Contacte con ETENWOLF.
8.Mirando fijamente directamente en el haz o brillo de a flash
poder causa permanente ojo daño.El producto es equipado con a
alto rendimiento CONDUJO preenfoque lámpara eso emite a
poderoso haz en su más alto configuración.
��
Helios J1 Jump
Starter x 1
��
Câble de
démarrage x 1
��
��
Câble USB
A vers C x 1
Manuel de
l’Utilisateurx 1
01
PACKAGE CONTENT
��
��
��
��
��
��
PRODUCT OVERVIEW
03
RAPIDE COMMENCER
1.Connecter le batterie pinces à le Hélios J1 par de liaison à le 12V
DEHORS port.
ÉTAPE 1
02
��
��
��
��
��
��
��
��
��
��
��
��
Démarrer/pause pouvoir bouton
Lumière bouton
Saut commencer douille
DIRIGÉ travail lumière
Type-c port Entrée/Sortie)
USB-A port (sortie)
Batterie pourcentage : restant
batterie pouvoir
11
Helios J1 Jump Starter
Read all instructions and safety warnings before use.
If you have questions or comments, contact us.
User Manual
V1.0
(�)���-���-���� Mon-Fri �AM-�PM(PST)
Warning! Please read all safety warnings
and all instructions to reduce the risk of
electric shock, fire and/or serious injury.
Warning!
Register at http://www.etenwolf.com to receive a
1-year extended warranty.
��
��
��
��
��
��
Chargement
Inverse Polarité Indicateur de
décharge
Ouvrir Électrode/Bas Tension
de la batterie Avertissement
Lumière
Booster mode (Prêt à
commencer)
English---------------01
Italiano--------------16
Espaniol -------------10
Deutsch-------------21
Francais-------------19
2.Connecter le batterie positive (rouge) serrer à le positif (POS,P,+)
batterie Terminal.
3.Connecter le négatif (noir) batterie serrer à le négatif (NEG, N,
-)batterie Terminal ou véhicule châssis.
4.Quand déconnexion, déconnecter dans le inverse séquence,
suppression le négatif premier (ou positif d'abord pour positif sol
systèmes)
REMARQUE: �. Avant de liaison le batterie, s'il te plaît faire bien sûr
toi avoir un 12 volts plomb-acide batterie.
�. Identifier le correct
polarité de le bornes de batterie sur le batterie.La positif est
généralement marqué avec ces lettres ou symboles (POS, P,+).Le
négatif est généralement marqué avec ceux-ci courrier ou symboles
(NEG.N.-).�.Faire pas connecter rien à le carburateur, carburant
doubler ou mince métal feuille.�.La suivant description il s'agit de le
loin négatif mise à la terre système ( la plupart commun ).Si votre
véhicule a un positif sol système ( très rare), s'il te plaît suivre les
instructions au-dessus de dans inverse commande.
ÉTAPE 2
1. "BOOST" est affiché sur le écran.Alimentation sur le véhicule en
utilisant une clé ou télécommande contrôle La plupart véhicules
volonté commencer immédiatement.
2.Si le véhicule ne peut pas commencer immédiatement, s'il te
plaît attendez pour 20 à 30 secondes et essayer encore une fois. Ne
tentative plus que cinq consécutif saute à l'intérieur 10
minutes.Laissez le Hélios J1 repos pour dix (10) minutes et puis
essayer à commencer le véhicule.
3.Une fois toi avoir commencé ton véhicule, déconnecter le
batterie agrafe et retirer le Hélios J1.
Avertissement: �.Ce mode est seulement en vigueur à 12 volts
12
batteries au plomb-acide. S'il vous plaît payer fermer attention à le
polarité de le batterie avant en utilisant ce mode.�.Do pas
permettre le positif et batterie négative clips à touche ou connecter
avec chaque autre, comme le le produit sera produire des
étincelles. �.Ceci mode utilisations un très haut actuel (en haut à
800 ampères), et si pas utilisé correctement, il peut cause des
étincelles et températures élevées.Si toi sont pas bien sûr si à
utiliser ce mode, s'il te plaît fais-le pas tentative il et chercher
professionnel aide.

Pouvoir banque est prêt à charge tous ton électronique appareils
tel comme téléphone, tablette, ordinateur portable, drone et
appareil photo.Il a Type C PD3.0 PD30W : 5 V 1A/2A/3A, 9V 2A, 12V
1,5 A, 15 V 2A, 20V 1,5 A et Sortie USB-A 5 V 3A, 9V 2A, 12V 1,5 A
04
BOUTON OPÉRATION GUIDE
05
LED TRAVAIL LUMIÈRE
Pour le meilleur charge performance et stabilité, utiliser
ETENWOLF ou le Agréé PD chargeur à carburant ton intégré
batterie. Chargement de la batterie prend environ 3 heures à
pleinement charge depuis 0% à 100%.
Après 2 minutes inactivité après être pleinement chargé, le
appareils sera automatiquement fermer désactivé. Le appareils ne
peut pas être utilisé alors que il est en train de charger.
Chargement avec CA pouvoir fournir
Note:
06
PUISSANCE BANQUE
ON: Appui long Démarrer/pause pouvoir bouton 01 pour deux
secondes tourner sur.
OFF: Quand le Saut démarreur est tourner allumé, appui long
Démarrer/mettre en pause l'alimentation bouton 01 pour deux
secondes à tourner désactivé.
Démarrer/pause pouvoir bouton
13
Avertissement: �.Ce mode est seulement en vigueur à 12 volts
La lampe de travail LED se trouve à l'avant du démarreur de secours.
Pour allumer la lumière, appuyez sur le bouton LUMIÈRE �� pendant
deux secondes. Appuyez brièvement sur le bouton LUMIÈRE pour
passer d’un mode d’éclairage à l’autre en séquence.
Changer entre quatre différent lumière modes
Lampe de poche ultra-lumineuse , lumineuse lampe de poche 、
Lent stroboscope lumière , SOS lumière
Note:
Le lumière ne le fera pas tourner désactivé automatiquement. Il
besoins à être tourné désactiver manuellement
NOTE:
À travail comme un pouvoir banque, la appareils besoins à
pouvoir sur. Après 2 minutes de pleinement charge le appareils, le
appareils sera automatiquement tourner désactivé.
07
BATTERIE CHARGEMENT & INDICATEUR
batteries au plomb-acide. S'il vous plaît payer fermer attention à le
polarité de le batterie avant en utilisant ce mode.�.Do pas
permettre le positif et batterie négative clips à touche ou connecter
avec chaque autre, comme le le produit sera produire des
étincelles. �.Ceci mode utilisations un très haut actuel (en haut à
800 ampères), et si pas utilisé correctement, il peut cause des
étincelles et températures élevées.Si toi sont pas bien sûr si à
utiliser ce mode, s'il te plaît fais-le pas tentative il et chercher
professionnel aide.

08
PROBLÈME TOURNAGE
1.Ce produit est seulement en vigueur à 12 tension piles.Faire ne pas
tenter à utiliser le produit avec autre types de piles.Si toi ne sont pas
sûrs de le batteries spécifique chimie ou tension, faire pas démarrer
le voiture.
2.Magasin le produit dans un sec et cool lieu.Ce produit n’est pas un
jouet et ne doit pas être utilisé par des enfants.
3.S'il te plaît magasin le produit dans températures allant de
09
SPÉCIFICATION
10
ISTRUZIONI DI SICUREZZA
Hélios J1 Saut Démarreur
207*94*49mm
300A/2s
800A
Modèle
Dimensions
Départ actuel
Culminer actuel
Nom
Saut Démarreur
Charging: 0℃-55℃/32°F-131°F
Discharging: -20°C-55°C/-4°F-131°F
16000mAh (59.2Wh)
Type-C PD3.0 PD30W: 5V 1A/2A/3A,9V
2A,12V 1.5A,15V 2A,20V 1.5A
Type C PD3.0 PD30W : 5 V 1A/2A/3A, 9V 2A,
12V 1,5 A, 15 V 2A, 20V 1,5 A; USB-A : 5 V
3A, 9V 2A, 12V 1,5 A
Fonctionnement
Température
Stockage température
Batterie capacité
Saisir
sortir
3 heures
Chargement temps
14
Le cavalier agrafe est incorrectement
connecter- éd.Reverse eux à assurer
connexion correcte .
Exigible à le extrême température, le démarreur ne
fait pas travail et besoins à être restauré à le
fonctionnement optimal température gamme de
-4°F à 122°F (-20°C à 50°C).
Afficher spectacles le
Erreur E0 code
Afficher spectacles le
Erreur E1 code
Problème Solution
Afficher spectacles le
Erreur E2 code
Le batterie est faible ou mourant.Presse le pouvoir
et LED boutons à le même temps pour 2 secondes
pour activer le forcé commencer fonction.
Sorties pas sur. Serrer tension est égal à tension
de la batterie
Après fréquent à court terme utiliser, le lanceur
peut être verrouillé.Il volonté être déverrouillé
automatiquement après 10 minutes.
Afficher spectacles le
Erreur E3 code
-20°C-60°C/ -4°F -140°F

Dans deux années de achat, nous volonté fournir opportun et
efficace en ligne après-vente service. Nous volonté réparation ou
remplacer n'importe lequel produit défectueux (exigible à
fabrication faute) dans ce garantie période.
2 ans couverture
GARANTIE
Manufacturer:Mozhen Technology (Shenzhen) Co., LTD
CN-503, Floor 5, Building 4, Tianan Yungu Industrial Park
Phase ll,Gangtou Community, Bantian Street, Longgang
District, Shenzhen
(1)877-838-0209 Mon-Fri 8AM-5PM(PST)
support@etenwolf.com
www.etenwolf.com
www.facebook.com/etenwolftools
Made in P.R.C
15
11
de -20°C à 60°C/-4°F -140°F. Extrêmement chaud ou froid les
environnements peuvent dommage le batterie et raccourcir le
durée de vie de le produit. Depuis longtemps stockage de le produit
peut diminuer le efficacité de le batterie.
4.Faire pas tentative à changement, modifier ou réparation
n'importe lequel partie de le produit.Démontage le produit peut
cause personnel, la mort ou propriété dommages.Si le produit est
endommagé, dysfonctionnements, ou vient dans contact avec
n'importe lequel liquide, cesser utiliser et Contactez ETENWOLF.Tout
modification à le produit volonté vide la garantie.
5.Charge le produit à moins une fois chaque trois mois maintenir
c'est performance.
6.Le intégré lithium-ion batterie peut seulement être remplacé par
ETENWOLF.
7. Si le produit batterie est surchauffé, malodorant, déformé, couper
ou anormal, s'il te plaît arrêt en utilisant il immédiatement et
Contactez ETENWOLF.ase stop using it immediately and contact
ETENWOLF.
8.En regardant directement à le faisceau ou briller de un lampe de
poche peut cause permanente œil dommages.Le produit est équipé
avec un
haut rendement DIRIGÉ préfocus lampe que émet un puissant
faisceau à son le plus élevé paramètre.
9.Faire pas lieu ce produit dans haut chaleur ou feu.
10.Faire pas faire le ménage le produit avec nocif produits
chimiques ou détergents.
11.Abus, abandon ou excès forcemay causer des dommages au
produit. Dysfonctionnement causé par actes pas dans conformité
avec ci -dessus exigences est pas couvert par le garantie.
��
Helios J1 Jump
Starter x 1
��
Cavo per
avviamento X 1
��
��
Cavo USB
da A a C X 1
Manuale
dell’UtenteX 1
01
PACCHETTO CONTENUTO
��
��
��
��
��
��
PRODOTTO PANORAMICA
03
VELOCE INIZIO
1.Collegare IL batteria morsetti A IL Elio J1 di collegamento A il 12V
FUORI porta.
FARE UN PASSO 1
02
��
��
��
��
��
��
��
��
��
��
��
��
Avvio/pausa energia pulsante
Leggero pulsante
Salto inizio PRESA
GUIDATO lavoro leggero
Tipo-c po r ( t Ingresso/Uscita)
USB-A porta (uscita)
Batteria percentuale:rimanen-
do- ing batteria energia
16
Helios J1 Jump Starter
Read all instructions and safety warnings before use.
If you have questions or comments, contact us.
User Manual
V1.0
(�)���-���-���� Mon-Fri �AM-�PM(PST)
Warning! Please read all safety warnings
and all instructions to reduce the risk of
electric shock, fire and/or serious injury.
Warning!
Register at http://www.etenwolf.com to receive a
1-year extended warranty.
��
��
��
��
��
��
Ricarica
Inversione Polarità Indicatore
discarica
Aprire Elettrodo/Basso
Tensione della batteria
Avvertimento Leggero
Aumento modalità (Pronto A
inizio)
English---------------01
Italiano--------------16
Espaniol -------------10
Deutsch-------------21
Francais-------------19
2.Collegare IL batteria positiva (rossa) MORSETTO A IL batteria
positiva (POS, P, +) terminale.
3.Collegare IL negativo (nero) batteria MORSETTO A IL negativo (NEG,
N,-)batteria terminale O veicolo telaio.
4.Quando disconnettersi, disconnettersi In IL inversione sequenza,
rimozione IL negativo primo (o positivo Primo per positivo terra
sistemi)
NOTA: �.prima collegamento IL batteria, Per favore Fare Sicuro
Voi Avere un 12 volt piombo-acido batteria.�.Identifica IL
corretto polarità Di IL terminali della batteria SU IL batteria.La
positivo È Generalmente segnato con queste lettere O simboli
(POS, P,+).Il negativo È Generalmente segnato con questi
lettere O simboli (NEG.N.-).�.Do non collegare nulla A il
carburatore, carburante linea O magro metallo foglio.�.Il
seguente descrizione riguarda IL lontano negativo messa a
terra sistema ( maggior parte comune ).Se il tuo veicolo ha UN
positivo terra sistema ( molto raro), Per favore seguire le
istruzioni Sopra In inversione ordine.
PASSO 2
1."BOOST" È visualizzato SU IL schermo.Potenza SU IL veicolo
usando una chiave O remoto controllare Maggior parte veicoli
Volere inizio immediatamente.
2.Se il veicolo non può inizio immediatamente, Per favore
Aspettare per 20 A 30 secondi e Tentativo di nuovo. Non tentativo
Di più di cinque consecutivo salti dentro 10 minuti. Lascia IL Elio
J1 riposo per dieci (10) minuti poi Tentativo A inizio IL veicolo.
3.Una volta Voi Avere iniziato tuo veicolo, disconnettere IL batteria
clip E rimuovere IL Elio J1.
17

Energia banca È pronto A carica Tutto tuo elettronico dispositivi
come come telefono, tablet, laptop, drone E macchina fotografica.
ha Tipo-C PD3.0 PD30W: 5V 1A/2A/3A,9V 2A, 12V 1,5 A, 15 V 2A,20V
1.5A e Uscita USB-A 5V 3A,9V 2A, 12V 1,5A
04
PULSANTE OPERAZIONE GUIDA
05
LED LAVORO LEGGERO
Per IL migliore ricarica prestazione E stabilità, utilizzo ETENWOLF o
il Certificato Dipartimento di Polizia caricabatterie A carburante
tuo incorporato batteria. Ricarica della batteria prende circa 3 ore
A completamente carica da 0% al 100%.
Dopo 2 minuti inattività Dopo essendo completamente caricato, IL
dispositivi verrà automaticamente chiuso spento. IL dispositivi
non può Essere usato Mentre Esso è in carica.
Ricarica con corrente alternata energia fornitura
Nota:
06
POTENZA BANCA
ON:pressione prolungata Avvio/pausa energia pulsante 01 per
due secondi girare SU.
SPENTO:Quando IL Salto antipasto È giro su, premere a lungo
Avvia/pausa potenza pulsante 01 per due secondi A giro spento.
Avvio/pausa energia pulsante
18
Avvertimento: �.Questo modalità È soltanto applicabile A 12 volt
batterie al piombo.Per favore paga vicino Attenzione A IL polarità Di
IL batteria prima usando Questo modalità.�.Fai non permettere IL
positivo E batteria negativa clip A tocco O collegare con ogni altro,
COME IL il prodotto sarà produrre scintille.�.Questo modalità usi
UN molto alto attuale (su A 800 ampere), E Se non usato corretta-
mente, Esso Maggio causa scintille E alte temperature.Se Voi Sono
non Sicuro se A utilizzo Questo modalità, per favore fallo non
tentativo Esso E cercare professionale aiuto.
La luce di lavoro LED si trova nella parte anteriore dell'avviatore
di emergenza. Per accendere la luce, premere il pulsante LUCE ��
per due secondi. Premere brevemente il pulsante LUCE per
passare tra le diverse modalità di illuminazione in sequenza.
Interruttore fra quattro diverso leggero modalità
Torcia ultra-luminosa , luminosa torcia elettrica , lenta strobo luce ,
SOS leggero
Nota:
IL leggero non giro spento automaticamente. Esso esigenze A
Essere girato spento manualmente
NOTA:
A lavoro COME UN energia banca, la dispositivi esigenze A energia
su. Dopo 2 minuti Di completamente ricarica IL dispositivi, il
dispositivi verrà automaticamente giro spento.
07
BATTERIA RICARICA e INDICATORE

08
PROBLEMI TIRO
1.Questo prodotto È soltanto applicabile A 12 voltaggio batterie.Fare
non tentare A utilizzo IL prodotto con altro tipi Di batterie.Se Voi non
sono sicuri Di IL batteria specifico chimica O voltaggio, Fare non
avviare il auto.
2.Negozio IL prodotto In UN Asciutto E Freddo posto.Questo prodotto
non è un giocattolo e non deve essere utilizzato da bambini.
09
SPECIFICHE
10
SICHERHEITSHINWEISE
Elio J1 Salto Antipasto
207*94*49mm
300A/2s
800A
Modello
Dimensioni
Di partenza attuale
Picco attuale
Nome
Salto Antipasto
Ricarica: 0℃-55℃/32°F-131°F
Scarico: -20°C-55°C/-4°F-131°F
16000mAh (59.2Wh)
Type-C PD3.0 PD30W: 5V 1A/2A/3A,9V
2A,12V 1.5A,15V 2A,20V 1.5A
Tipo C PD3.0 PD30W: 5V 1A/2A/3A,9V
2A,12V 1,5 A, 15 V 2A,20V 1,5A; USB-A: 5V
3A,9V 2A, 12V 1,5A
Operativo Tempera-
tura
Magazzinaggio
temperatura
Batteria capacità
Ingresso
produzione
3 ore
Ricarica tempo
19
IL maglione clip È in modo errato connect-
ed.Reverse loro A garantire collegamento
corretto .
Dovuto A IL estremo temperatura, IL antipasto non
lo fa lavoro E esigenze A Essere restaurato A IL
funzionamento ottimale temperatura allineare Di
14°F A 122°C (da -20°C a 50°C).
Display spettacoli IL
Errore E0 codice
Display spettacoli IL
Errore E1 codice
Problema Soluzione
Display spettacoli IL
Errore E2 codice
IL batteria È Basso O morendo.Premi IL energia e
LED pulsanti A IL Stesso tempo per 2 secondi
attivare IL costretto inizio funzione.
Risultati dell'output non SU. MORSETTO voltaggio
è uguale tensione della batteria
Display spettacoli IL Errore E3 codice.Dopo
frequente a breve termine utilizzo, IL lanciatore
Potere essere bloccato. Volere Essere sbloccato
automaticamente Dopo 10 minuti.
Display spettacoli IL
Errore E3 codice
-20°C-60°C/ -4°F -140°F

Entro due anni Di acquistare, Noi Volere fornire tempestivo E
efficace online post-vendita servizio. Noi Volere riparazione O
sostituire Qualunque prodotto difettoso (dovuto A produzione
colpa) entro Questo garanzia periodo.
2 anni copertura
GARANZIA
Manufacturer:Mozhen Technology (Shenzhen) Co., LTD
CN-503, Floor 5, Building 4, Tianan Yungu Industrial Park
Phase ll,Gangtou Community, Bantian Street, Longgang
District, Shenzhen
(1)877-838-0209 Mon-Fri 8AM-5PM(PST)
support@etenwolf.com
www.etenwolf.com
www.facebook.com/etenwolftools
Made in P.R.C
20
9.Fare non posto Questo prodotto In alto Calore O fuoco.
10.Fare non pulito IL prodotto con dannoso prodotti chimici O
detersivi.
11.Uso improprio, caduta o eccessiva forza maggio causare danni al
prodotto. Malfunzionamento causato di azioni non In accordo con
quanto sopra requisiti È non coperto di IL garanzia.
11
3.Per favore negozio IL prodotto entro temperature che vanno
da -20°C a 60°C/-4°F -140°F. Estremamente caldo O Freddo gli
ambienti possono danno IL batteria E accorciare IL tutta la vita Di
IL prodotto. Di lunga data magazzinaggio Di IL prodotto Maggio
diminuire IL efficacia Di IL batteria.
4.Fare non tentativo A modifica, modificare O riparazione
Qualunque parte Di il prodotto.Smontaggio IL prodotto Maggio
causa personale, morte o proprietà danni.Se IL prodotto È
danneggiato, malfunzionamenti, o viene in contatto con Qualun-
que liquido, interrompere utilizzo E contattare ETENWOLF.Qualsiasi
modifica A IL prodotto Volere vuoto la garanzia.
5.Carica IL prodotto A meno una volta ogni tre mesi mantenere suo
prestazione.
6.IL incorporato agli ioni di litio batteria Potere soltanto Essere
sostituito di ETENWOLF.
7. Se IL prodotto batteria È surriscaldato, puzzolente, deforme,
taglio o anormale, Per favore fermare usando Esso immediata-
mente E contattare ETENWOLF.
8.Stupefatto direttamente A IL trave O incandescenza Di UN torcia
elettrica Potere causa permanente occhio danno.Il prodotto È
equipaggiato con UN ad alta potenza GUIDATO pre-messa a fuoco
lampada Quello emette UN potente trave al suo più alto colloca-
mento.its highest setting.
��
Helios J1 Jump
Starter x 1
��
Starthilfekabel
X 1
��
��
USB-A-zu-C-
Kabel X 1
Benutzer-
handbuchX 1
01
PACKAGE CONTENT
��
��
��
��
��
��
PRODUCT OVERVIEW
03
SCHNELL START
1.Verbinden Die Batterie Klemmen Zu Die Helios J1 von Verbinden
Zu die 12V AUS Hafen.
SCHRITT 1
02
��
��
��
��
��
��
��
��
��
��
��
��
Start/Pause Leistung Taste
Licht Taste
Springen Start Buchse
LED arbeiten Licht
Typ-C Hafen Eingabe/Ausgabe)
USB-A Port (Ausgabe)
Batterie Prozentsatz:
verbleibend Batterie Leistung
21
Helios J1 Jump Starter
Read all instructions and safety warnings before use.
If you have questions or comments, contact us.
User Manual
V1.0
(�)���-���-���� Mon-Fri �AM-�PM(PST)
Warning! Please read all safety warnings
and all instructions to reduce the risk of
electric shock, fire and/or serious injury.
Warning!
Register at http://www.etenwolf.com to receive a
1-year extended warranty.
��
��
��
��
��
��
Laden
Umkehren Polarität Anzeige
Entladung
Offen Elektrode/Niedrig
Batteriespannung Warnung
Licht
Schub Modus (Bereit Zu Start)
English---------------01
Italiano--------------16
Espaniol -------------10
Deutsch-------------21
Francais-------------19
2.Verbinden Die positive (rote) Batterie Klemme Zu Die positive (POS,
P, +) Batterie Terminal.
3.Verbinden Die negativ (schwarz) Batterie Klemme Zu Die negativ
(NEG, N)-)Batterie Terminal oder Fahrzeug Chassis.
4.Wann trennen, trennen In Die umkehren Sequenz, Entfernen Die
Negativ zuerst (oder positiv Erste für positiv Boden Systeme)
HINWEIS:�.Vor Verbinden Die Batterie, Bitte machen Sicher
Du haben ein 12-Volt Blei-Säure Batterie.�.Identifizieren Die
richtig Polarität von Die Batterieklemmen An Die Batterie.Die
positiv Ist normalerweise markiert mit diese Briefe oder
Symbole (POS, P,+).�.Die Negativ Ist normalerweise markiert
mit diesen Briefe oder Symbole (NEG.N.-).Do nicht verbinden
irgendetwas Zu der Vergaser, Kraftstoff Linie oder dünn Metall
Blatt.�.Die folgende Beschreibung handelt von Die weit
Negativ Erdung System ( am meisten gemeinsam ).Wenn Ihr
Fahrzeug hat A positiv Boden System ( sehr selten), Bitte
folgen die Anweisungen über In umkehren Befehl.
SCHRITT 2
1."BOOST" Ist angezeigt An Die Bildschirm.Power An Die Fahrzeug
mit ein Schlüssel oder Fernbedienung Kontrolle Am meisten
Fahrzeuge Wille Start sofort.
2.Wenn das Fahrzeug kann nicht Start sofort, Bitte Warten für 20 Zu
30 Sekunden und versuchen wieder.Nicht versuchen mehr als fünf
aufeinanderfolgend Sprünge innerhalb 10 Minuten.Lassen Die
Helios J1 ausruhen für zehn (10) Minuten und dann versuchen Zu
Start Die Fahrzeug.
3.Einmal Du haben gestartet dein Fahrzeug, trennen Die Batterie
Clip Und entfernen Die Helios J1.
22

Leistung Bank Ist bereit Zu Aufladung alle dein elektronisch
Geräte solch als Telefon, Tablet, Laptop, Drohne Und Kamera.Es
hat Typ C PD3.0 PD30W: 5 V 1A/2A/3A, 9V 2A, 12V 1,5 A, 15 V 2A,
20V 1,5 A und USB-A-Ausgang 5 V 3A, 9V 2A, 12V 1,5 A
04
TASTE BETRIEB FÜHRUNG
05
LED ARBEITEN LICHT
Für Die am besten Laden Leistung Und Stabilität, verwenden
ETENWOLF oder die Zertifiziert PD Ladegerät Zu Kraftstoff dein
eingebaut Batterie. Batterieladung dauert etwa 3 Std. Zu voll
Aufladung aus 0 % auf 100 %.
Nach 2 Minuten Inaktivität nach Sein voll aufgeladen, Die Geräte
wird automatisch schließen aus. Der Geräte kann nicht Sei
gebraucht während Es wird geladen.
Laden mit Klimaanlage Leistung liefern
Notiz:
06
LEISTUNG BANK
EIN: Lange drücken Start/Pause Leistung Taste 01 für zwei
Sekunden drehen An.
AUS: Wenn Die Springen Anlasser Ist drehen an,lang drücken
Stromversorgung starten/unterbrechen Taste 01 für zwei
Sekunden Zu drehen aus.
Start/Pause Leistung Taste
23
Warnung: �.Das Modus Ist nur anwendbar Zu 12 Volt Blei-Säure-
Batterien.Bitte zahlen schließen Aufmerksamkeit Zu Die Polarität
von Die Batterie vor mit Das Modus.�.Do nicht erlauben Die positiv
Und Minuspol der Batterie Clips Zu berühren oder verbinden mit
jede andere, als Die Produkt wird produzieren Funken.�.Diese
Modus verwendet A sehr hoch aktuell (hoch Zu 800 Ampere), Und
Wenn nicht gebraucht richtig, Es Mai Ursache Funken Und hohen
Temperaturen.Wenn Du Sind nicht Sicher ob Zu verwenden Das
Modus, Bitte nicht versuchen Es Und suchen Professional helfen.
Die LED-Arbeitsleuchte befindet sich vorne am Starthilfegerät. Um
das Licht einzuschalten, drücken Sie die LICHT-Taste �� zwei
Sekunden lang. Drücken Sie die LICHT-Taste kurz, um zwischen
verschiedenen Beleuchtungsmodi in der Reihenfolge zu wechseln.
Schalten zwischen vier anders Licht Modi
Ultrahelle Taschenlampe , Hell Taschenlampe , Langsam Blitz Licht ,
SOS Licht
Notiz:
Der Licht Gewohnheit drehen aus automatisch. Es Bedürfnisse Zu
Sei gedreht manuell ausschalten
NOTIZ:
Zu arbeiten als A Leistung Bank, die Geräte Bedürfnisse Zu
Leistung an . Nach 2 Minuten von voll Laden Die Geräte,die Geräte
wird automatisch drehen aus.
07
BATTERIE LADEN und INDIKATOR
08
PROBLEME SCHIESSEN
1.Das Produkt Ist nur anwendbar Zu 12 Stromspannung Batterien.
nicht versuchen Zu verwenden Die Produkt mit andere Typen von
Batterien.Wenn Du sind unsicher von Die Batterie spezifisch
Chemie oder Stromspannung, Tun nicht starten Sie die Auto.
2.Speichern Die Produkt In A trocken Und Cool Ort.Dieses Produkt
ist kein Spielzeug und darf nicht von Kindern verwendet werden.
09
SPEZIFIKATION
10
PROBLEME SCHIESSEN
Helios J1 Springen Anlasser
207*94*49mm
300A/2s
800A
Modell
Maße
Starten aktuell
Gipfel aktuell
Name
Springen Anlasser
Aufladen: 0℃-55℃/32°F-131°F
Entladung: -20 °C-55 °C/-4 °F-131 °F
16000mAh (59.2Wh)
Type-C PD3.0 PD30W: 5V 1A/2A/3A,9V
2A,12V 1.5A,15V 2A,20V 1.5A
Type-C PD3.0 PD30W: 5V 1A/2A/3A,9V
2A,12V 1.5A,15V 2A,20V 1.5A; USB-A: 5V
3A,9V 2A,12V 1.5A
Betrieb Temperatur
Lagerung Temperatur
Batterie Kapazität
Eingang
Ausgabe
3 Std.
Laden Zeit
24
Der Jumper Clip Ist falsch verbunden.
Rückwärts ihnen Zu sicherstellen
ordnungsgemäße Verbindung.
Fällig Zu Die extrem Temperatur, Die Anlasser
nicht arbeiten Und Bedürfnisse Zu Sei restauriert
Zu Die optimale Betriebs Temperatur Reichweite
von -4°F Zu 122°F (-20°C bis 50°C).
Anzeige zeigt Die
E0-Fehler Code
Anzeige zeigt Die
E1-Fehler Code
Problem Lösung
Anzeige zeigt Die
E2-Fehler Code
Der Batterie Ist niedrig oder sterben.Presse Die
Leistung und LED Schaltflächen bei Die Dasselbe
Zeit für 2 Sekunden aktivieren Die gezwungen
Start Funktion.
Ausgaben nicht An. Klemme Stromspannung
gleich Batteriespannung
Nach häufig kurzfristig verwenden, Die
Trägerrakete dürfen verschlossen sein.Es Wille Sei
entsperrt automatisch nach 10 Minuten.
Anzeige zeigt Die E3-
Fehler Code
-20°C-60°C/ -4°F -140°F

Innerhalb zwei Jahre von kaufen, Wir Wille bieten rechtzeitig Und
effektiv online Nachverkauf Service. Wir Wille reparieren oder
ersetzen beliebig defektes Produkt (fällig Zu Herstellung Fehler)
innerhalb Das Garantie Zeitraum.
2 Jahre Abdeckung
GARANTIE
Manufacturer:Mozhen Technology (Shenzhen) Co., LTD
CN-503, Floor 5, Building 4, Tianan Yungu Industrial Park
Phase ll,Gangtou Community, Bantian Street, Longgang
District, Shenzhen
(1)877-838-0209 Mon-Fri 8AM-5PM(PST)
support@etenwolf.com
www.etenwolf.com
www.facebook.com/etenwolftools
Made in P.R.C
25
9.Tun nicht Ort Das Produkt In hoch Hitze oder Feuer.
10.Tun nicht sauber Die Produkt mit schädlich Chemikalien oder
Reinigungsmittel.
11.Missbrauch, Fallenlassen oder übermäßige forcemay
Produktschäden verursachen.Fehlfunktion verursacht von Aktionen
nicht In Übereinstimmung mit obenstehendes Anforderungen Ist
nicht bedeckt von Die Garantie.
11
3.Bitte speichern Die Produkt innerhalb Temperaturen Bereich
von -20°C bis 60°C/-4°F -140 °F. Äußerst heiß oder kalt Umgebun-
gen können Schaden Die Batterie Und verkürzen Die Lebensdauer
von Die Produkt. Langjährige Lagerung von Die Produkt Mai
verringern Die Wirksamkeit von Die Batterie.
4.Tun nicht versuchen Zu ändern, ändern oder reparieren beliebig
Teil von das Produkt.Demontage Die Produkt Mai Ursache
persönlich, Tod oder Eigentum Schaden.Wenn Die Produkt Ist
beschädigt, Fehlfunktionen, oder kommt hinein Kontakt mit
beliebig flüssig, abbrechen verwenden Und Kontakt ETENWOLF.Any
Änderung Zu Die Produkt Wille Leere der Garantie.
5.Aufladung Die Produkt bei am wenigsten einmal jeder drei
Monate pflegen es ist Leistung.
6.Der eingebaut Lithium-Ionen Batterie dürfen nur Sei ersetzt von
ETENWOLF.
7. Wenn Die Produkt Batterie Ist überhitzt, stinkend, deformiert,
schneiden oder abnormal, Bitte stoppen mit Es sofort Und
Kontaktieren Sie ETENWOLF.
8.Starren direkt bei Die Strahl oder glühen von A Taschenlampe
dürfen verursachen dauerhafte Auge Schaden.Die Produkt Ist
ausgestattet mit A hohe Leistung LED Vorfokussierung Lampe Das
emittiert A leistungsstark Strahl an seinem höchste Einstellung.