
Technical Support and E-Warranty Certificate
www.vevor.com/support
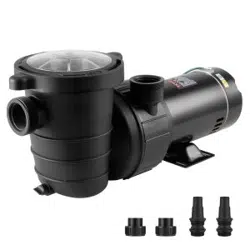
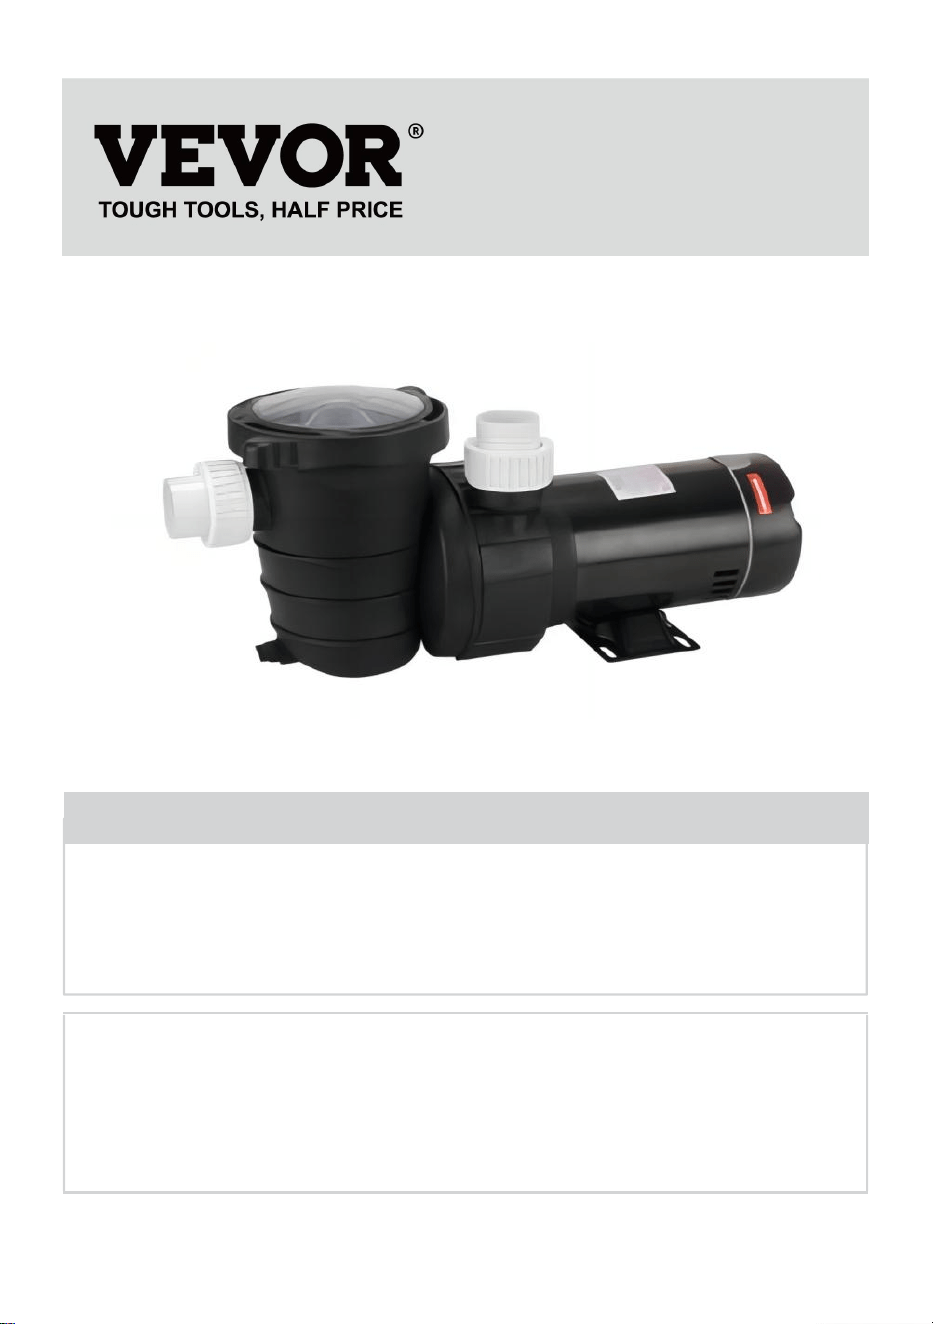
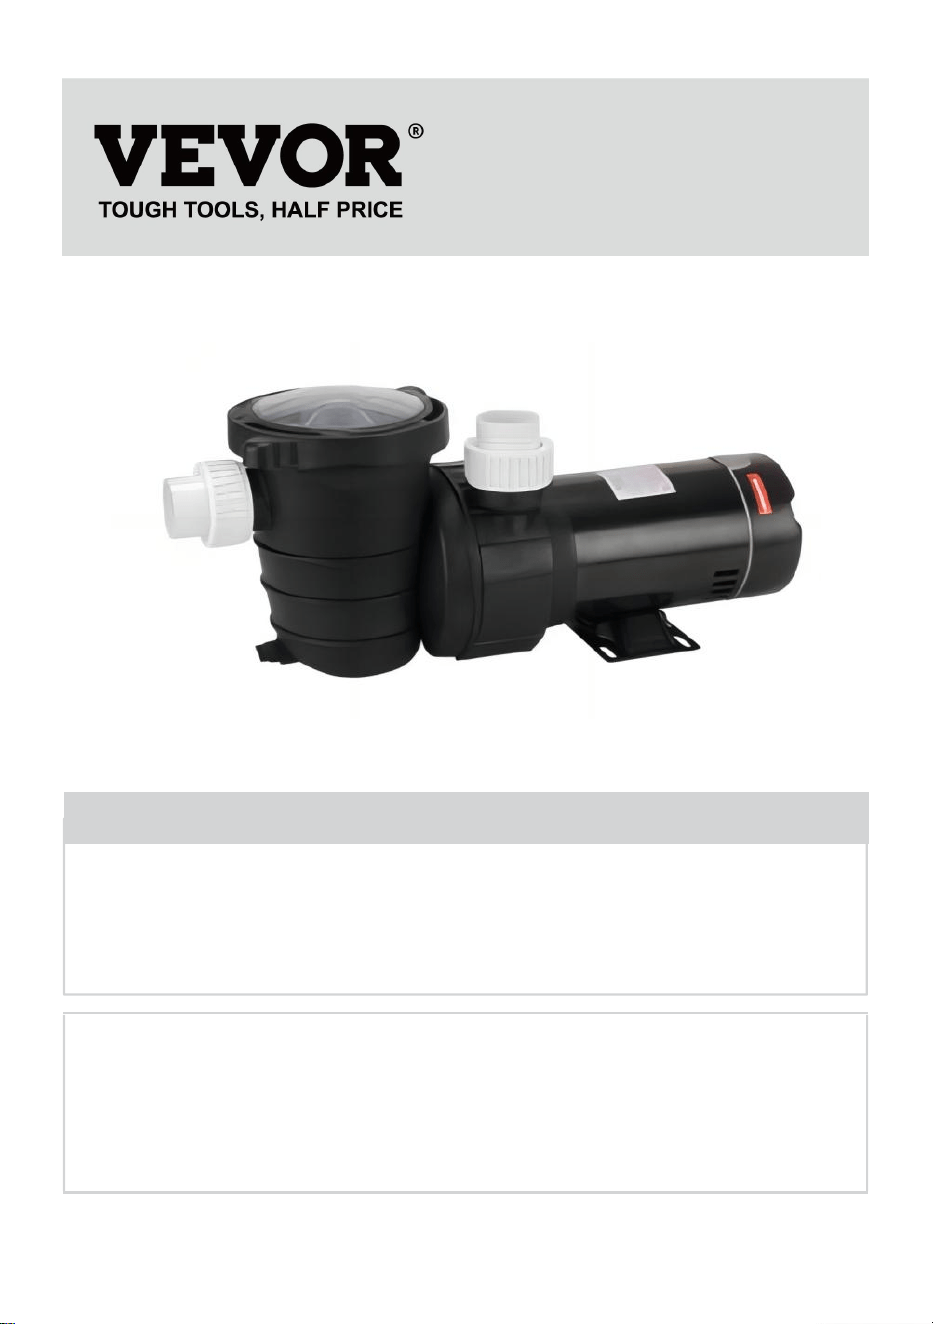
SWIMMING POOL PUMP
USER MANUAL
MODEL : HAP750
We continue to be committed to provide you tools with competitive price.
"Save Half", "Half Price" or any other similar expressions used by us only represents an
estimate of savings you might benefit from buying certain tools with us compared to the major
top brands and does not necessarily mean to cover all categories of tools offered by us. You
are kindly reminded to verify carefully when you are placing an order with us if you are
actually saving half in comparison with the top major brands.

- 1 -
MODEL: HAP750
Have product questions? Need technical support? Please feel free to
contact us:
Technical Support and E-Warranty Certificate
www.vevor.com/support
NEED HELP? CONTACT US!
This is the original instruction, please read all manual instructions
carefully before operating. VEVOR reserves a clear interpretation of our
user manual. The appearance of the product shall be subject to the
product you received. Please forgive us that we won't inform you again if
there are any technology or software updates on our product.
SWIMMING POOL PUMP

- 2 -
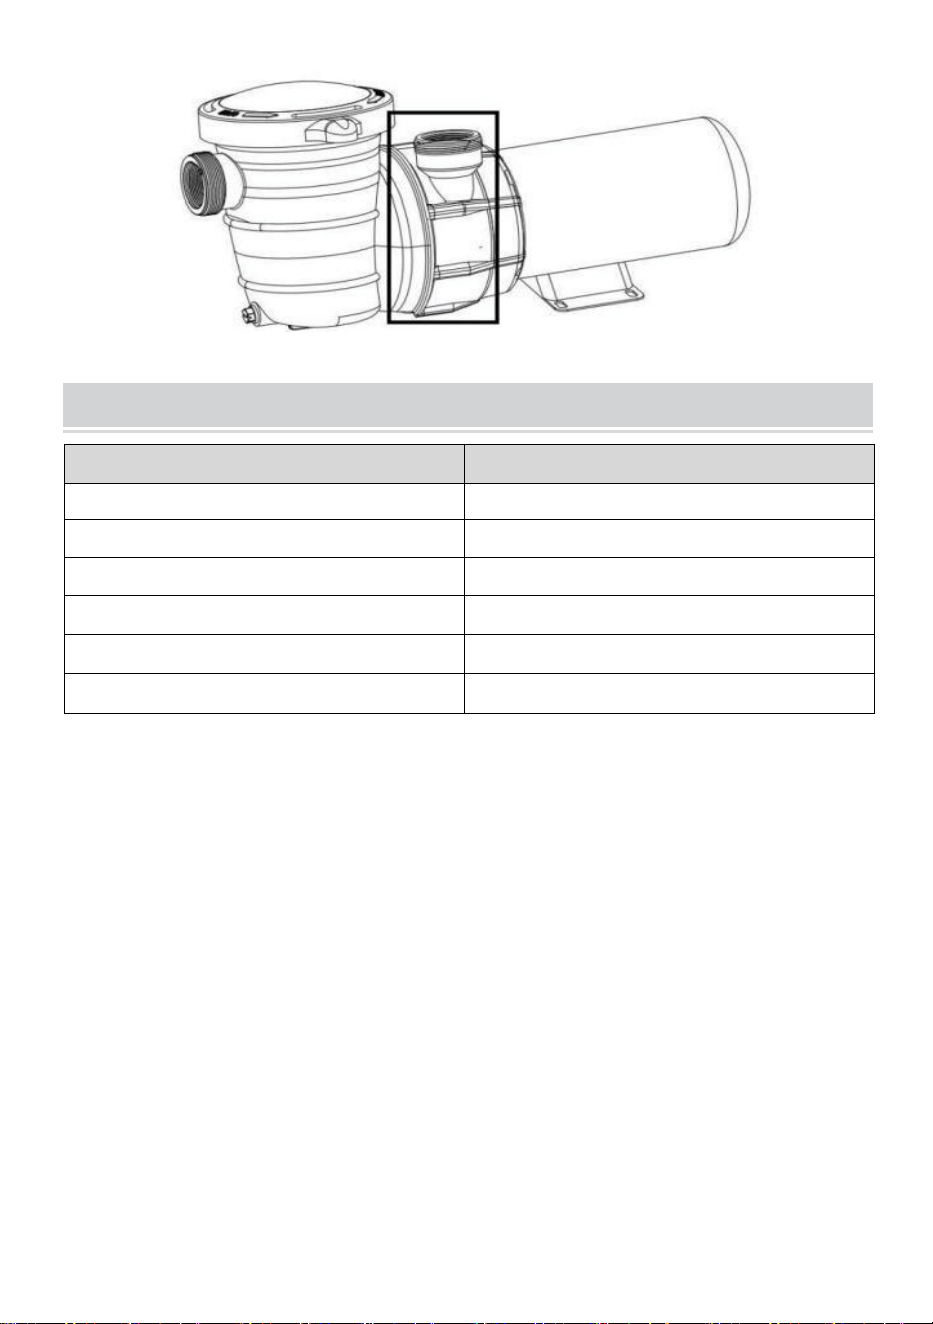
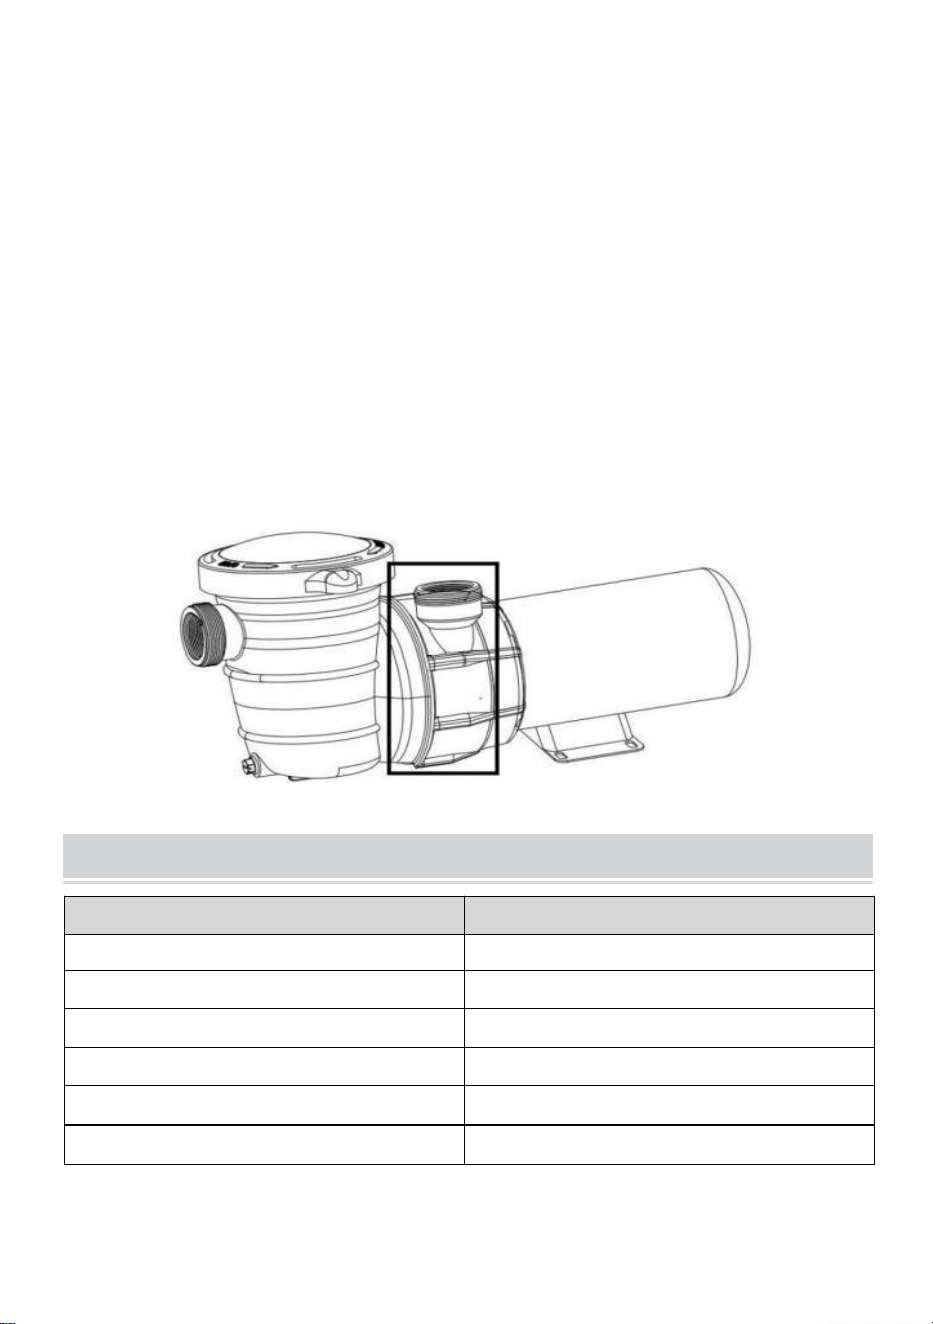
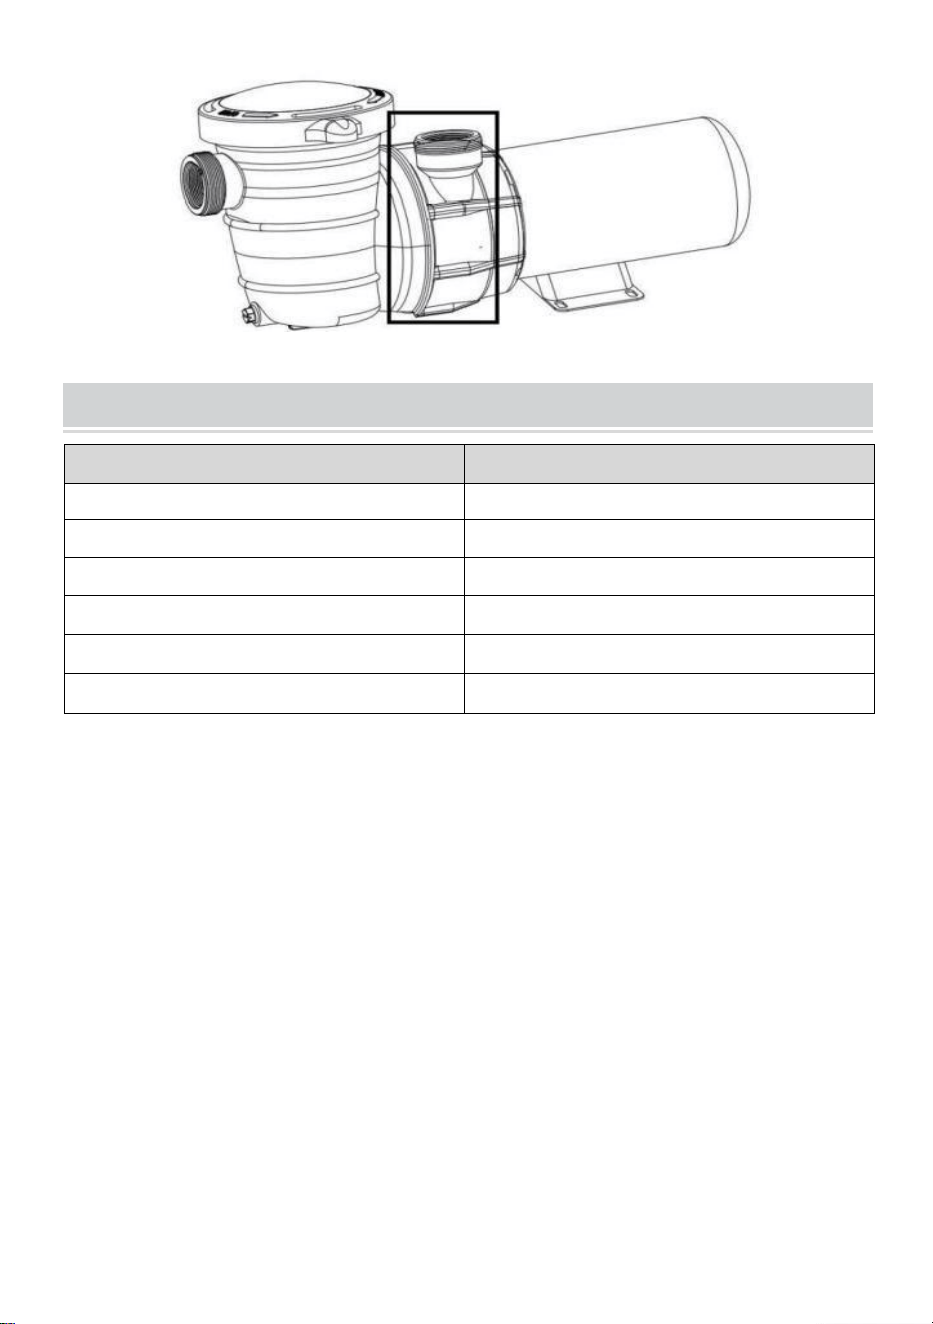
MAIN PARTS
PARTS
INSTALLATION
READ CAREFULLY AND SAVE THIS INSTRUCTION MANUAL
ATTENTION INSTALLER-THIS MANUAL CONTAINS IMPORTANT
INFORMATION ABOUT THE INSTALLATION,OPERATION, AND SAFE
USE OF THIS PUMP THAT MUST BE FURNISHED TO
THE END-USER OF THIS PRODUCT.FAILURE TO READ AND FOLLOW
ALL INSTRUCTIONS COULD RESULT IN SERIOUS INJURY.
- 3 -
SAFETY PRECAUTIONS
Read this "Safety Precautions" before operation.
The below information should not be neglected for the proper
use of this product. Your understanding can prevent harm or
danger to the user or others.
The following information is very important for safety in handling this
product. Be sure to observe it.
DANGER
Indicates an imminently hazardous situation that, if not
avoided, will result in death or serious injury.
WARNING
Indicates a potentially hazardous situation that, if not
avoided, could result in death or serious injury.
CAUTION
Indicates a potentially hazardous situation that, if not
avoided, may result in minor or moderate injury, or
property damage.
IMPORTANT
PROHIBITED ALERT
DANGER
Stay off the main drain and away from all suction outlets.
Strainer cover must be properly secured to prevent violent separation
due to pressure in the circulation system.
Before servicing, turn all the circulation system and pump controls off,
make sure the filter manual air relief valve is in the open position, and
all pressure is relieved.
It is highly recommended that this product be installed and serviced
by a qualified pool professional.
- 4 -
WARNING
Remove pressure test plugs and/or plugs used in winterization of the
pool/spa from the suction outlets. Failure to do so will result in an
increased potential for suction entrapment.
Do not permit children to play with this product.
Before starting the system pump, all system valves must be set to allow
system water to return to the pool.
Do not operate the pool and spa circulation system if a system
component is not assembled properly, damaged, or missing
Before working on any electrical equipment, turn off the power supply to
the equipment.
Connect only to a branch circuit protected by a ground-fault circuit
interrupter(GFCI).
CAUTION
All electrical wiring must be in conformance with applicable
local codes, regulations, and the National Electric Code (NEC)
It is strongly advised to protect the electrical components from direct
sunlight though this pump is designed for outdoor use.
Place this pump in a well-drained area, one that will not flood when it
rains.
If installed within an outer enclosure or beneath the skirt of a hot tub or
spa, adequate ventilation and free circulation of air must be provided to
prevent overheating.
Do not install this pump in a damp or non-ventilated location.It requires
free circulation of air for cooling.
Do not run the pump dry. Water acts as a coolant and lubricant for the
mechanical shaft seal. Running the pump dry may damage seals,
causing leakage, flooding, and voids warranty. Fill strainer housing with
water before starting the motor.

- 5 -
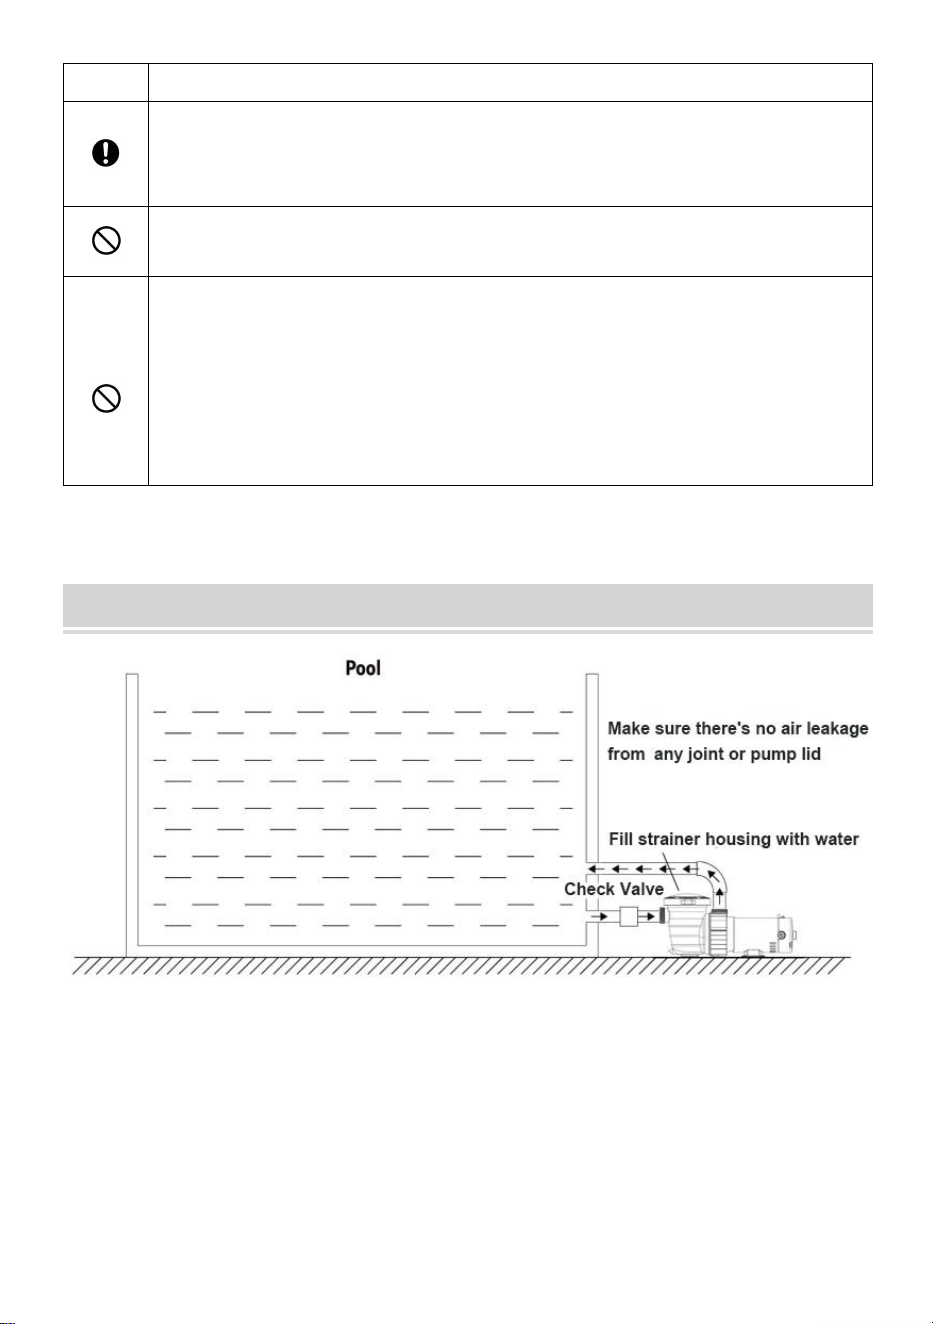
INSTALLATION
Rotate the fan blade before starting-up,check
whether the pump rotation is flexible,then
unscrew the water-filling plug,fill the pump
chamber with clean water from the water
injection hole,then tighten the plug screw after
the air has been completely discharged. Set the
valve for a smaller water flow when
starting-up,and then adjust to your required water
flow after water discharging.
Before servicing, all water circulation systems and pump controls
must be off position to release all the pressure from the system.
WARNING: This product should be installed and serviced by a qualified pool
professional.
This pump is compatible with above-ground pools and spas. Locate the
pump as close to the pool and water level as possible. Do not add too many
elbow pipes in the plumbing so as to avoid suction reduction. It is highly
recommended that the pump be placed in cool, dry places and avoid direct
sunlight. Install the pump on a firm, level base or pad to meet all local and
national codes. Fasten the pump to a base or pad with screws or bolts to
further reduce vibration and stress on pipe or hose joints. The base must be
solid, level, rigid, and vibration-free.
- 6 -
WARNING: Keep product away from Children.
Use Teflon tape on the thread before screw fittings to pump inlet and outlet
ports so as to avoid leakage. Do not over-tighten the fittings.
Accessory:
1: Manual
2: 2 pcs of NPT 1-1/2” adaptor
3: 2 pcs of 48.5mm (ID) adaptor
4: 1 roll PTFE tape.
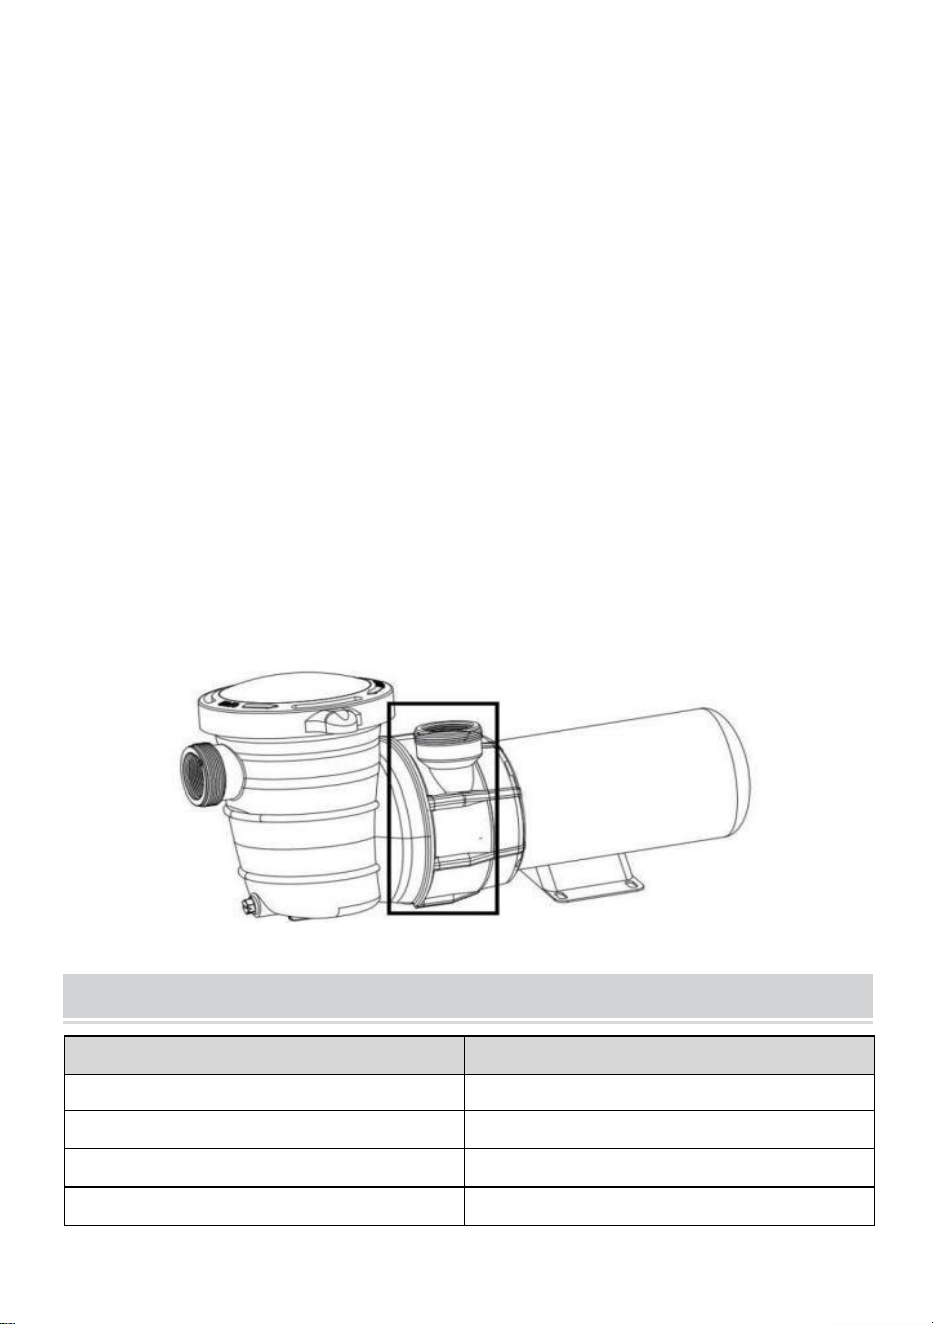
Pump discharge port can be turned horizontal:
Remove pump lid and Strainer.
Remove C-clip (part# 4 in the parts list).
Remove the pump strainer body from the pump housing.
Unscrew the bolts.
Turn the discharge port to be horizontal.
Screw back the bolts.
Re-install the pump strainer body.
Buckle up the C-clip.
Put Strainer back into the pump strainer body.
Fasten pump lid
- 7 -
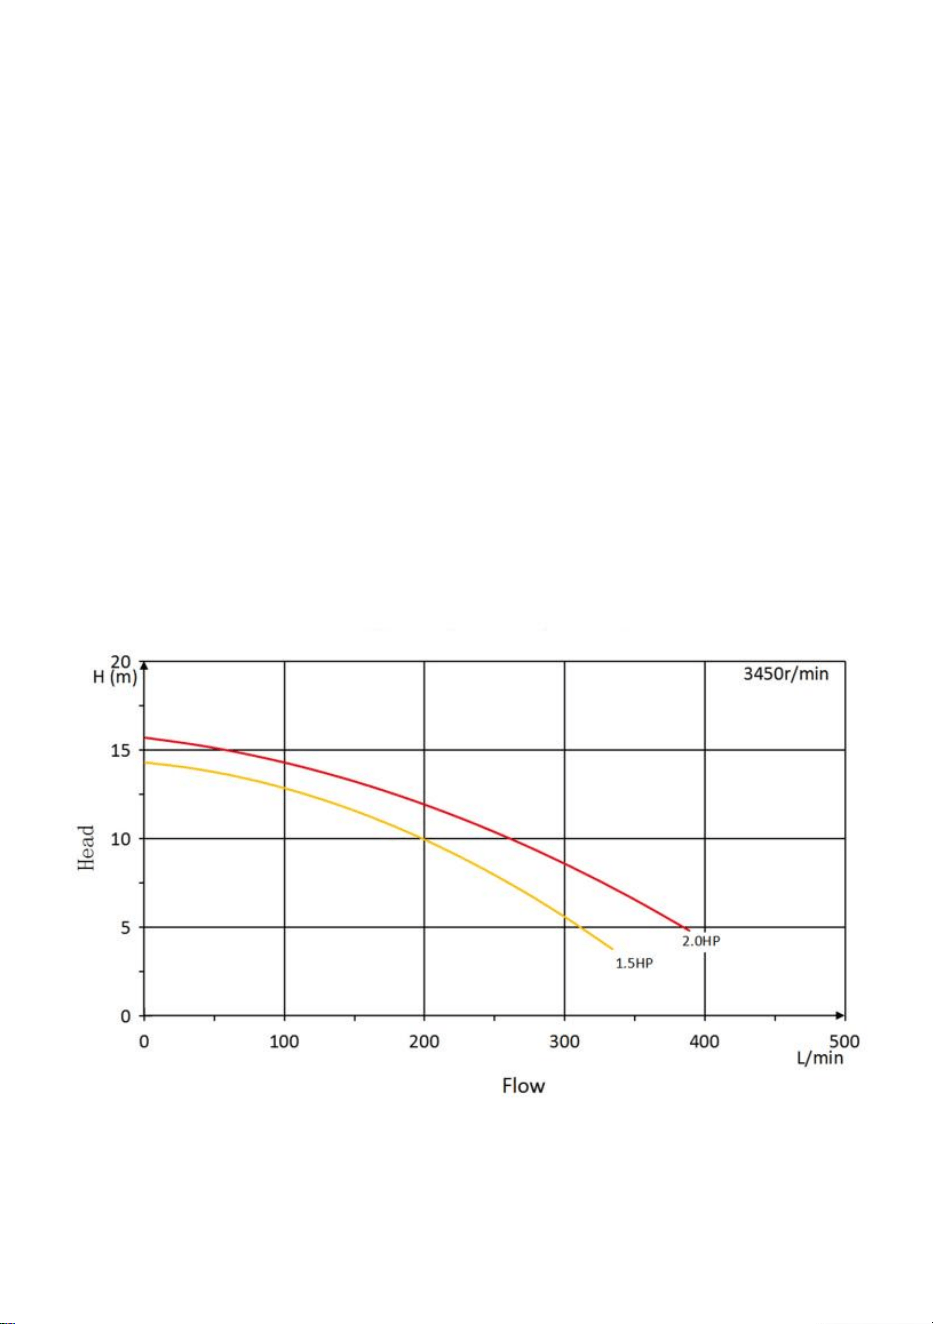
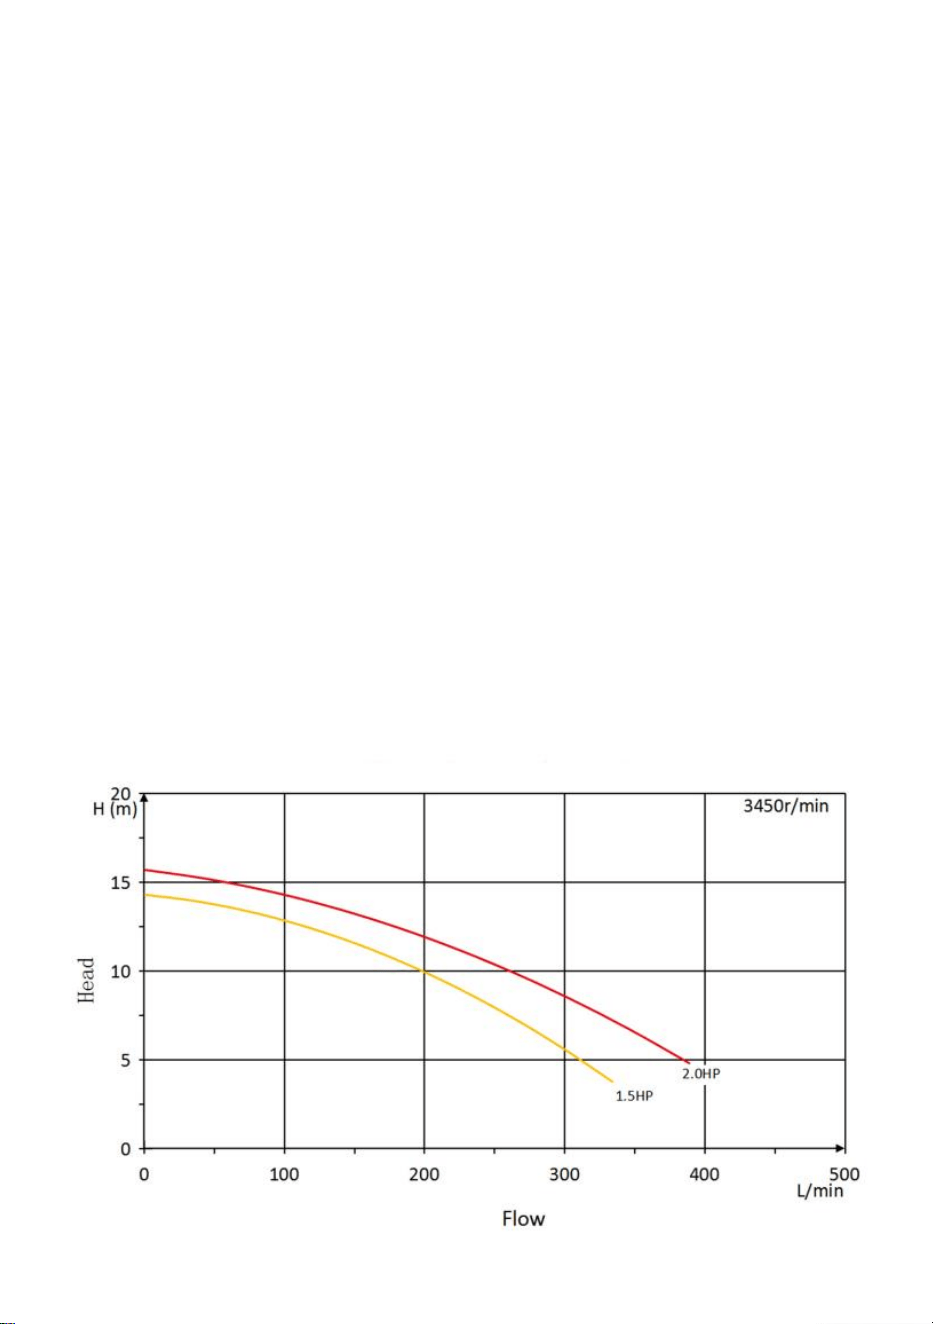
SPECIFICATIONS
Model
HAP750
Input
AC110-120V 60Hz
Power
1.0HP
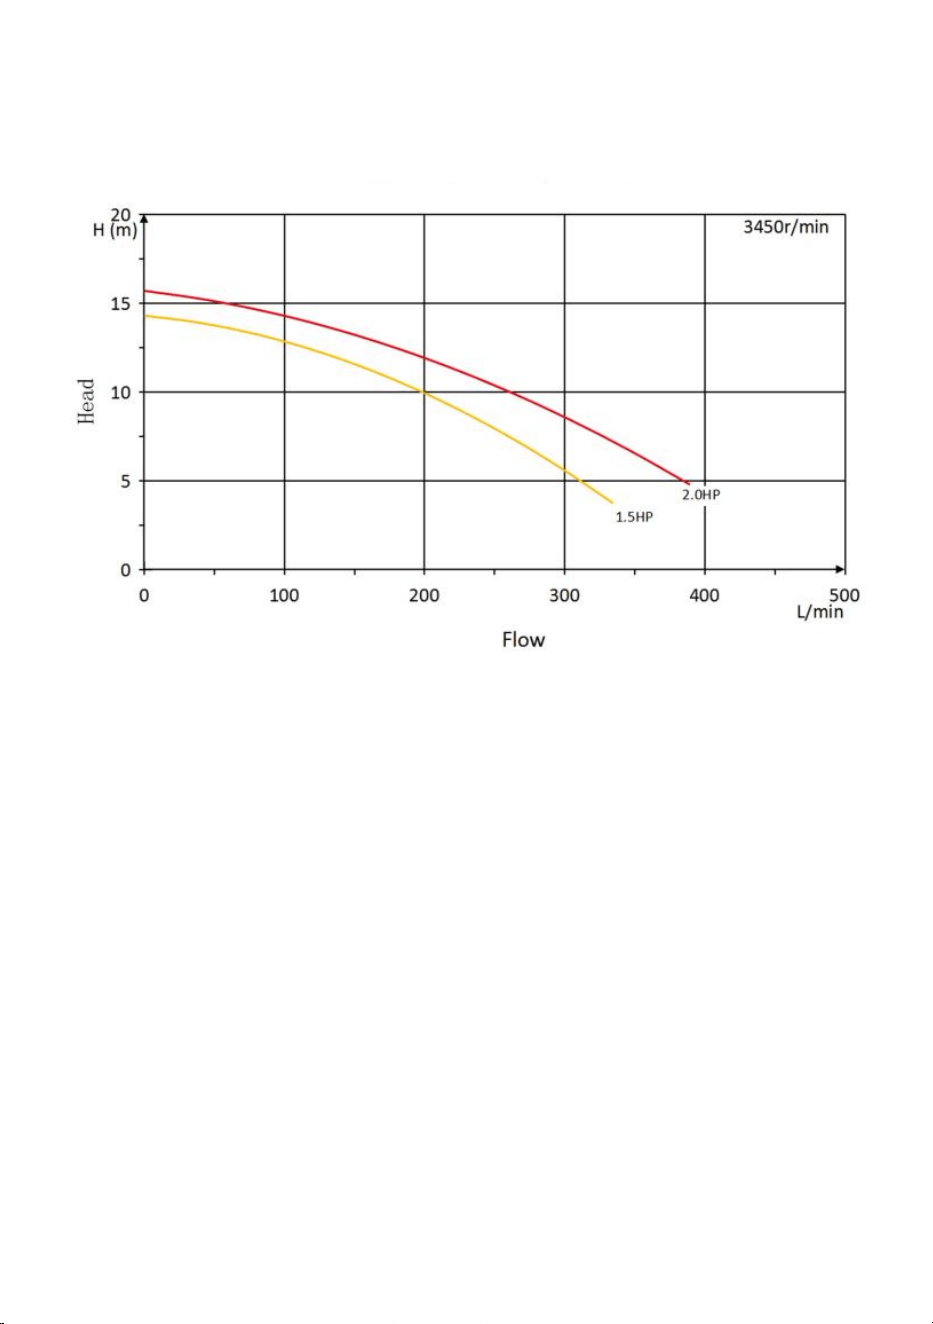
Max. head
11 m (36 ft)
Max. flow
80 GPM
Work water temperature
0-50℃(32℉-122℉)
Inlet/outlet caliber
NPT 1-1/2
Make sure that the electrical supply available is suitable for the motor's
voltage, phase, and cycle.
Voltage from the power must be in the range from 90%to 110% of the
motor nameplate rated voltage. Otherwise, the motor may overheat and
result in overload tripping and reduced component life.
Install, ground, bond,and wire motor in accordance with local or NEC
requirements.
The motor should be grounded permanently by connecting the ground
terminal to the electrical service ground.
Bond motor to pool structure.Bonding will connect all metal parts within
and around the pool with a continuous wire. Bonding reduces the risk of
current passing between bonded metal objects, which could potentially
cause electrical shock if grounded or shorted.

- 8 -
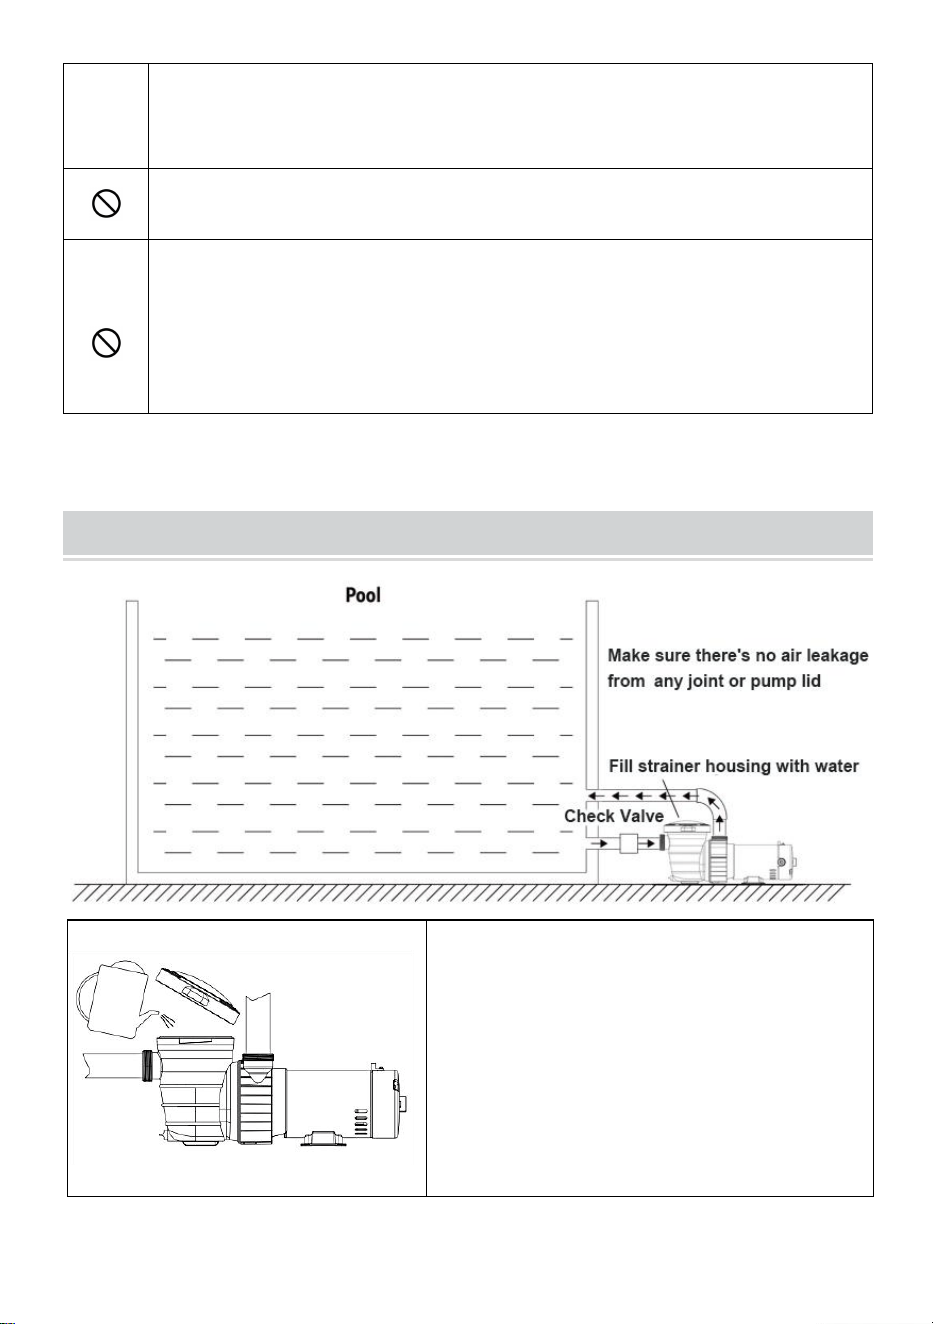
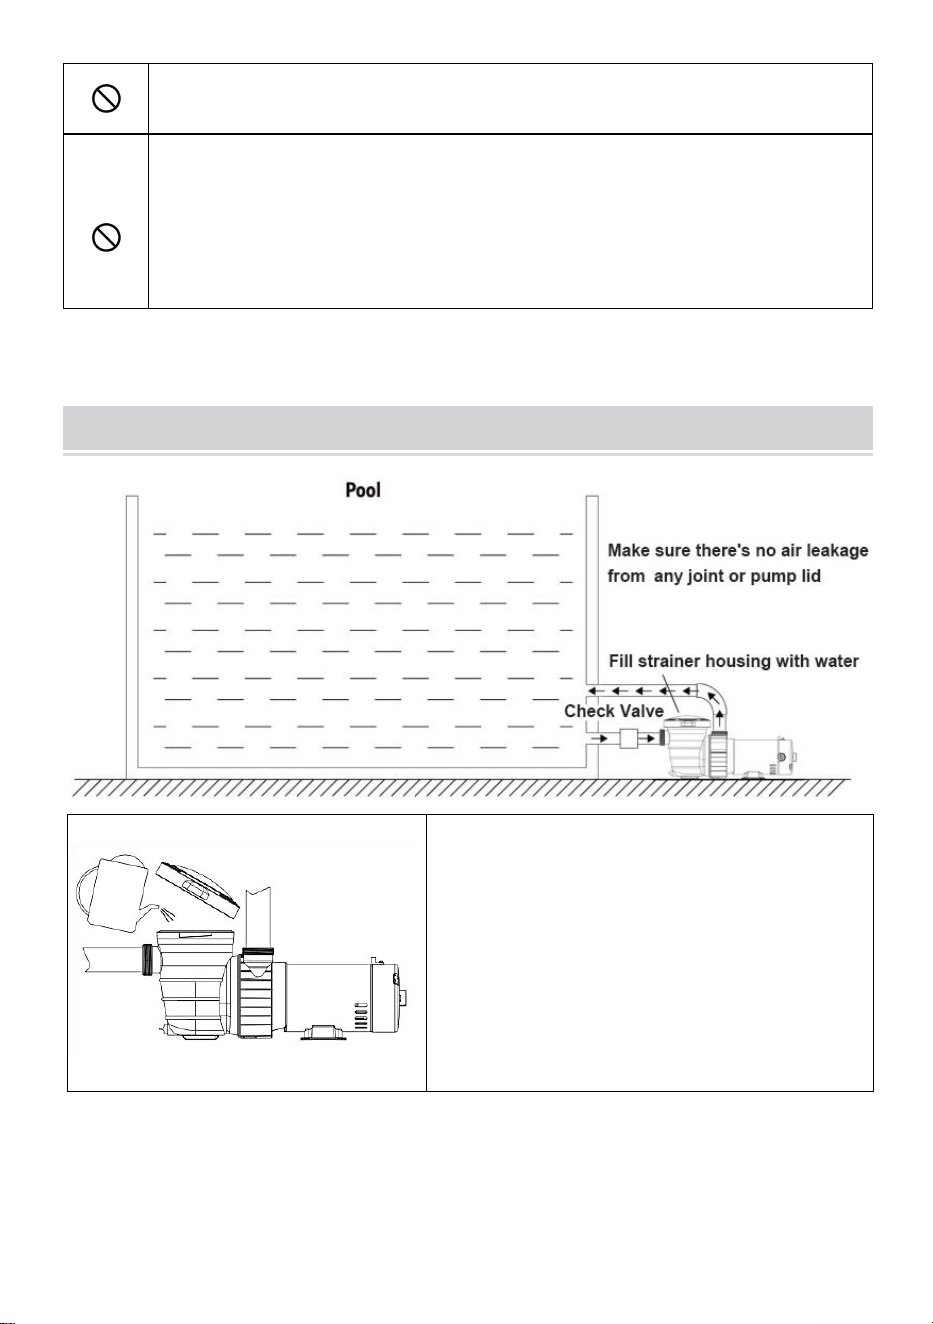
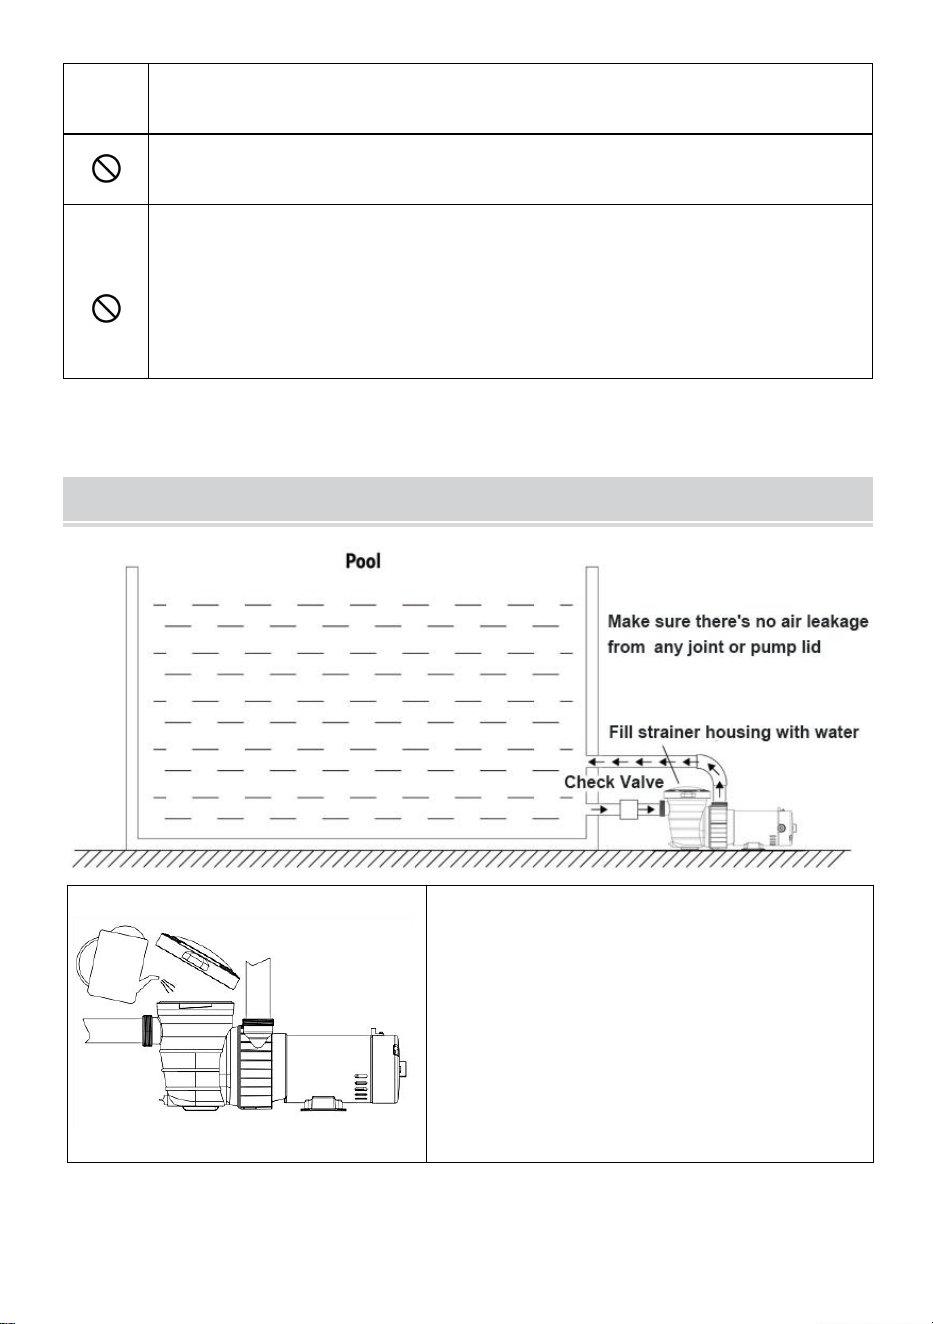
PRIMING
Fill strainer housing with water to suction pipe level. If water leakage
occurs anywhere on the pump or filter, DO NOT start the pump. If no
leakage occurs, stand at least 10 feet from the pump and/or filter and
proceed with starting the pump.
TROUBLE SHOOTING
MOTOR WILL NOT START
Improper or loose wiring connections; open switches or relays; tripped
circuit breakers, GFCl's,or blown fuses.
Manually check rotation of motor shaft for free movement and lack of
obstruction.
If you have a timer, make sure it is working properly.Bypass it if
necessary.
MOTOR SHUTS OFF
Undersized wiring;loose connections; etc.
Low voltage at motor or power drop(frequently caused by undersized
wiring or extension cord use).
MOTOR HUMS BUT DOES NOT START
Mechanical binding and electrical overload.
Centrifugal switch stuck in the OPEN position.
Binding of the motor shaft.
PUMP WON'T PRIME
Make sure pump strainer housing is filled with water and the cover
O-ring is clean;also, be sure it is properly seated in the cover O-ring
groove. Make sure the strainer cover is locked firmly in position and
lubricated with“Jack's 327” .
Make sure all suction and discharge valves are fully open and not
blocked, that the pool water level is at a proper level and that the
skimmer weir is not hung up or stuck on the skimmer wall
Block off to determine if the pump will develop a vacuum.You should
have 5”-6”of vacuum at the strainer cover. You may be able to check

- 9 -
by removing the skimmer basket and holding your hand over the
bottom port with the skimmer full and pump running. If no suction is felt,
check for line blockage.
A. If pump develops a vacuum, check for a blocked suction line or dirty
strainer basket, and an air leak in the suction piping may be the cause.
B. If the pump does not develop a vacuum and the pump has sufficient
“priming water":
i. Re-check strainer housing cover and all threaded connections for
suction leaks. Check if all hose clamps are tight.
ii. Check voltage to ensure that the motor is rotating at full RPM.
iii. Open housing cover and check clogging or obstruction in suction.
Check impeller for debris.
iv. Remove and replace shaft seal only if it is leaking.
TROUBLE SHOOTING(CONTINUED)
LOW FLOW
Clogged or restricted strainer or suction line;undersized pool piping.
Plugged or restricted discharge line or filter,valve partially closed (high
gauge reading) . How to correct:Backwash strainer as per
manufacturer's instructions;
Air leak in suction piping causing rumbling in the pump.
Cavitation due to restricted or undersized suction line or leak at any
joint, low water level in the pool, and unrestricted discharge return
lines. Correct suction condition or throttle return lines, if practical.
NOISY PUMP
Vibration due to improper mounting, etc. Put a rubber pad under metal
mounting feet.
Foreign matter in the pump housing. Loose stones/debris hitting the
impeller could be the cause;remove any above.
Motor bearings are noisy from normal wear, rust, overheating, or
concentration of chemicals causing seal damage which will allow
chlorinated water to seep into bearings wiping out the grease causing
bearing to whine. All seal leaks should be replaced at once.
Equipment base vibrating.

- 10 -
Manufacturer: Shanghaimuxinmuyeyouxiangongsi
Address: Baoshanqu Shuangchenglu 803long 11hao 1602A-1609shi
Shanghai
EC REP: SHUNSHUN GmbH.
Römeräcker 9 Z2021,76351 Linkenheim-Hochstetten, Germany
Tel: +49 1727041930 euvertreter@gmail.com
UK REP: Pooledas Group Ltd.
Unit 5 Albert Edward House, The Pavilions Preston, United Kingdom
Imported to AUS: SIHAO PTY LTD.
1 ROKEVA STREETEASTWOOD NSW 2122 Australia
Imported to USA: Sanven Technology Ltd.
Suite 250, 9166 Anaheim Place, Rancho Cucamonga, CA 91730
Made In China


- 12 -
Technique Assistance et certificat de garantie électronique
www.vevor.com/support
POMPE DE PISCINE
MANUEL DE L'UTILISATEUR
MODÈLE : HAP750
We continue to be committed to provide you tools with competitive price.
"Save Half", "Half Price" or any other similar expressions used by us only represents an
estimate of savings you might benefit from buying certain tools with us compared to the major
top brands and does not necessarily mean to cover all categories of tools offered by us. You
are kindly reminded to verify carefully when you are placing an order with us if you are
actually saving half in comparison with the top major brands.

- 1 -
MODÈLE : HAP750
Have product questions? Need technical support? Please feel free to
contact us:
Technical Support and E-Warranty Certificate
www.vevor.com/support
NEED HELP? CONTACT US!
This is the original instruction, please read all manual instructions
carefully before operating. VEVOR reserves a clear interpretation of our
user manual. The appearance of the product shall be subject to the
product you received. Please forgive us that we won't inform you again if
there are any technology or software updates on our product.
SWIMMING POOL PUMP

- 2 -
MAIN PARTS
LES PIÈCES
INSTALLATION
LIRE ATTENTIVEMENT ET CONSERVER CE MANUEL
D'INSTRUCTIONS
ATTENTION INSTALLATEUR - CE MANUEL CONTIENT DES
INFORMATIONS IMPORTANTES SUR L'INSTALLATION, LE
FONCTIONNEMENT ET L'UTILISATION SÉCURISÉE DE CETTE
POMPE QUI DOIVENT ÊTRE FOURNIES À
L'UTILISATEUR FINAL DE CE PRODUIT. LE DÉFAUT DE LIRE ET DE

- 3 -
SUIVRE TOUTES LES INSTRUCTIONS POURRAIT ENTRAÎNER EN
BLESSURE GRAVE.
SAFETY PRECAUTIONS
Lire ce "Sécurité Précautions" avant opération.
Le ci-dessous information devrait pas être négligé pour le
approprié _ utiliser de ce produit. Ton compréhension peut
prévenir nuire ou danger à le utilisateur ou autres.
Les informations suivantes sont très importantes pour la sécurité dans la
manipulation de ce produit. Assurez-vous de l'observer.
DANGER
Indique une situation dangereuse imminente qui, si elle n'est
pas évitée, entraînera la mort ou des blessures graves.
AVERTISSEM
ENT
Indique une situation potentiellement dangereuse qui,
si elle n'est pas évitée, pourrait entraîner la mort ou
des blessures graves .
PRUDENCE
Indique une situation potentiellement dangereuse qui,
si elle n'est pas évitée, peut entraîner des blessures
mineures ou modérées, ou des dommages matériels .
IMPORTANT
ALERTE INTERDITE
DANGER
Restez à l'écart du drain principal et de toutes les sorties d'aspiration.
Le couvercle du filtre doit être correctement fixé pour éviter une
séparation violente due à la pression dans le système de circulation.
Avant l'entretien, éteignez toutes les commandes du système de
circulation et de la pompe, assurez-vous que la soupape de décharge
d'air manuelle du filtre est en position ouverte et que toute la pression
- 4 -
est évacuée.
Il est fortement recommandé que ce produit soit installé et entretenu
par un professionnel de la piscine qualifié .
AVERTISSEMENT
Retirer les bouchons de test de pression et/ou les bouchons utilisés pour
l'hivernage de la piscine/spa du sorties d'aspiration. Échec cela
entraînerait un risque accru de piégeage par aspiration .
Ne laissez pas les enfants jouer avec ce produit.
Avant de démarrer la pompe du système, toutes les vannes du système
doivent être réglées pour permettre à l'eau du système de retourner dans
la piscine.
N'utilisez pas le système de circulation de piscine et de spa si un
composant du système n'est pas assemblé correctement, est
endommagé ou est manquant.
Avant de travailler sur un équipement électrique, coupez l’alimentation
électrique de l’équipement.
Connectez-vous uniquement à un circuit de dérivation protégé par un
disjoncteur de fuite à la terre (GFCI) .
PRUDENCE
Tout le câblage électrique doit être conforme aux normes applicables
codes locaux, réglementations et Code national de l'électricité (NEC)
Il est fortement conseillé de protéger les composants électriques des
rayons directs du soleil bien que cette pompe soit conçue pour une
utilisation en extérieur.
Placez cette pompe dans un endroit bien drainé, qui ne sera pas
inondé en cas de pluie.
S'il est installé dans une enceinte extérieure ou sous la jupe d'un spa
ou d'un spa, une ventilation adéquate et une libre circulation de l'air
doivent être assurées pour éviter la surchauffe .

- 5 -
N'installez pas cette pompe dans un endroit humide ou non ventilé. Elle
nécessite une libre circulation de l'air pour le refroidissement.
Ne faites pas fonctionner la pompe à sec. L'eau agit comme liquide de
refroidissement et lubrifiant pour l'arbre mécanique joint. Faire
fonctionner la pompe à sec peut endommager les joints, provoquant
des fuites, des inondations et annuler la garantie. Remplissez le boîtier
de la crépine avec de l'eau avant de démarrer le moteur.
INSTALLATION
Tourner le ventilateur lame avant
démarrage,vérifier si le pompe rotation est
flexible, alors dévisser le remplissage d'eau
boucher, remplir le pompe chambre avec faire le
ménage eau depuis le injection d' eau trou, alors
serrer le prise vis après le air a a été
complètement déchargé. Met le _ soupape pour
un plus petit eau couler quand je démarre , et
alors ajuster à ton requis eau couler après eau
déchargement .
Avant l'entretien, tous les systèmes de circulation d'eau et les
commandes de pompe doivent être éteints pour libérer toute la
pression du système.
- 6 -
AVERTISSEMENT : Ce produit devrait être installée et desservis _ par un
qualifié piscine professionnel .
Ce pompe est compatible avec au-dessus du sol piscines et les thermes.
Localiser le pompe comme fermer à le piscine et eau niveau comme
possible . Faire pas ajouter aussi beaucoup coude tuyaux dans le _
plomberie donc comme à éviter succion réduction. Il est très recommandé
que le pompe être mis dans cool, sec lieux et éviter direct lumière du soleil.
Installer le pompe sur un ferme, niveau base ou tampon à rencontrer tous
locale et national codes . Boucler le pompe à un base ou tampon avec des
vis ou boulons à réduire davantage vibrations et contraintes sur les joints de
tuyaux ou de tuyaux. La base doit être solide, plane, rigide et sans
vibrations.
AVERTISSEMENT : Garder produit loin _ depuis Enfants.
Utiliser Téflon ruban adhésif sur le fil avant vis raccords à pompe entrée et
sortie ports donc comme à éviter fuite . Faire pas plus de dix _ le raccords.
Accessoire:
1 : Manuel
2 : 2 adaptateurs NPT 1-1/2 "
3 : 2 adaptateurs 48,5 mm (ID)
- 7 -
4 : 1 rouleau de ruban PTFE.
Pompe décharge port peut être _ tourné horizontal:
Retirez le couvercle de la pompe et la crépine.
Retirez le clip en C (pièce n° 4 dans la liste des pièces).
Retirez le corps de la crépine de la pompe du boîtier de la pompe.
Dévissez les boulons.
Tournez l’orifice de décharge pour qu’il soit horizontal.
Revissez les boulons.
Réinstallez le corps de la crépine de la pompe.
Attachez le clip en C.
Remettez la crépine dans le corps de la crépine de la pompe.
Fixer le couvercle de la pompe
SPECIFICATIONS
Modèle
HAP750
Saisir
AC110-120V 60Hz
Pouvoir
1.0HP
Max. tête
11 m (36 pi)
Max. couler
80 gallons par minute
Température de l'eau de travail
0-50 ℃ (32 ℉-122 ℉)
Calibre entrée/sortie
NPT 1-1/2
Assurez-vous que l'alimentation électrique disponible est adaptée à la

- 8 -
tension, à la phase et au cycle du moteur.
La tension du secteur doit être comprise entre 90 % et 110 % de la tension
nominale indiquée sur la plaque signalétique du moteur. Sinon, le moteur
pourrait surchauffer et entraîner un déclenchement en cas de surcharge et
une durée de vie réduite des composants.
Installez, mettez à la terre, reliez et câblez le moteur conformément aux
exigences locales ou NEC.
Le moteur doit être mis à la terre en permanence en connectant la borne
de terre à la terre du service électrique.
Lier le moteur à la structure de la piscine. La liaison reliera toutes les
pièces métalliques à l'intérieur et autour de la piscine avec un fil continu.
La liaison réduit le risque de passage de courant entre des objets
métalliques liés, ce qui pourrait potentiellement provoquer un choc
électrique en cas de mise à la terre ou de court-circuit.
PRIMING
Remplissez le boîtier du filtre avec de l'eau jusqu'au niveau du tuyau
d'aspiration. Si une fuite d'eau se produit n'importe où sur la pompe ou le
filtre, NE démarrez PAS la pompe. Si aucune fuite ne se produit,
tenez-vous à au moins 10 pieds de la pompe et/ou du filtre. et procédez au
démarrage de la pompe.
TROUBLE SHOOTING
MOTEUR VOLONTÉ PAS COMMENCER
Connexions de câblage incorrectes ou desserrées ; ouvrir les
interrupteurs ou relais; Disjoncteurs déclenchés, GFCl ou fusibles
grillés.
Vérifiez manuellement la rotation de l'arbre du moteur gratuitement
mouvement et absence d’obstruction.
Si vous disposez d’une minuterie, assurez-vous qu’elle fonctionne
correctement. Contournez-la si nécessaire.
LE MOTEUR S'ÉTEINT

- 9 -
Câblage sous-dimensionné ; connexions desserrées ; etc.
Basse tension au niveau du moteur ou chute de puissance (souvent
causée par un câblage sous-dimensionné ou l'utilisation d'une
rallonge).
LE MOTEUR bourdonne mais ne démarre pas
Liaison mécanique et surcharge électrique.
Interrupteur centrifuge bloqué en position OUVERT.
Liaison de l'arbre moteur.
LA POMPE NE S'AMORCE PAS
Assurez-vous que le boîtier de la crépine de la pompe est rempli d'eau
et que le joint torique du couvercle est propre ; assurez-vous
également qu'il est correctement placé dans la rainure du joint torique
du couvercle. Assurez-vous que le couvercle de la crépine est
fermement verrouillé en position et lubrifié avec du « Jack's 327 ».
Assurez-vous que toutes les vannes d'aspiration et de refoulement
sont complètement ouvertes et non bloquées, que le niveau d'eau de
la piscine est à un niveau approprié et que le déversoir du skimmer
n'est pas accroché ou coincé sur la paroi du skimmer.
Bloquez pour déterminer si la pompe développera un vide. Vous
devriez avoir 5 à 6 pouces de vide au niveau du couvercle de la
crépine. Vous pourrez peut-être vérifier en retirant le panier de
l'écumoire et en plaçant votre main sur le port inférieur avec l'écumoire
pleine et la pompe en marche. Si aucune aspiration n’est ressentie,
vérifiez s’il y a un blocage de la conduite.
C. Si la pompe développe un vide, vérifiez si la conduite d'aspiration est
obstruée ou sale.
panier-filtre et un air une fuite dans la tuyauterie d'aspiration peut en être la
cause.
D. Si la pompe ne développe pas de vide et que la pompe a suffisant
« eau d'amorçage » :
v. Vérifiez à nouveau le couvercle du boîtier de la crépine et tous les
raccords filetés pour
fuites d'aspiration. Vérifiez si tous les colliers de serrage sont serré.
vi. Vérifiez la tension pour vous assurer que le moteur tourne à plein

- 10 -
régime.
vii. Ouvrir le couvercle du boîtier et vérifier le colmatage ou l'obstruction de
l'aspiration.
Vérifiez la turbine pour déceler des débris.
viii. Retirez et remplacez le joint d’arbre uniquement s’il fuit.
TROUBLE SHOOTING(CONTINUED)
FAIBLE DÉBIT
Crépine ou conduite d'aspiration obstruée ou restreinte ; tuyauterie de
piscine sous-dimensionnée.
Conduite ou filtre de refoulement bouché ou restreint, vanne
partiellement fermée (lecture de jauge élevée) . Comment corriger :
Crépine de lavage à contre-courant selon les instructions du fabricant ;
Fuite d'air dans la tuyauterie d'aspiration provoquant un grondement
dans la pompe.
Cavitation due à une conduite d'aspiration restreinte ou
sous-dimensionnée ou à une fuite au niveau d'un joint, faible niveau
d'eau dans la piscine, et des conduites de retour de rejet sans
restriction. Corriger les conditions d'aspiration ou les conduites de
retour du papillon, si cela est pratique.
POMPE BRUYANTE
Vibration due à un mauvais montage, etc. Placez un tampon en
caoutchouc sous les pieds de montage métalliques.
Corps étrangers dans le corps de la pompe. Des pierres/débris qui
heurtent la turbine pourraient en être la cause ; retirez ceux qui se
trouvent au-dessus.
Les roulements du moteur sont bruyants à cause de l'usure normale,
rouiller, surchauffe, ou une concentration de produits chimiques
causant des dommages aux joints, ce qui permettra à l'eau chlorée de
s'infiltrer dans les roulements, essuyant la graisse et provoquant le
gémissement du roulement. Toutes les fuites de joint doivent être
remplacées immédiatement.
Base d'équipement vibrante.

- 11 -
Fabricant : Shanghaimuxinmuyeyouxiangongsi
Adresse : Baoshanqu Shuangchenglu 803long 11hao 1602A-1609shi
Shanghai
REPRÉSENTANT CE : SHUNSHUN GmbH .
Römeräcker 9 Z2021,76351 Linkenheim-Hochstetten, Allemagne
REPRÉSENTANT DU ROYAUME-UNI : Pooledas Group Ltd.
Unité 5 Albert Edward House, The Pavilions Preston, Royaume-Uni
Importé en Australie : SIHAO PTY LTD.
1 ROKEVA STREETASTWOOD NSW 2122 Australie
Importé aux États-Unis : Sanven Technology Ltd.
Bureau 250, 9166 Anaheim Place, Rancho Cucamonga, CA 91730
Fabriqué en Chine


- 13 -
Technisch Support- und E-Garantiezertifikat
www.vevor.com/support
SCHWIMMBAD- PUMPE
BENUTZERHANDBUCH
MODELL : HAP750
We continue to be committed to provide you tools with competitive price.
"Save Half", "Half Price" or any other similar expressions used by us only represents an
estimate of savings you might benefit from buying certain tools with us compared to the major
top brands and does not necessarily mean to cover all categories of tools offered by us. You
are kindly reminded to verify carefully when you are placing an order with us if you are
actually saving half in comparison with the top major brands.
- 1 -
MODELL: HAP750
Have product questions? Need technical support? Please feel free to
contact us:
Technical Support and E-Warranty Certificate
www.vevor.com/support
NEED HELP? CONTACT US!
This is the original instruction, please read all manual instructions
carefully before operating. VEVOR reserves a clear interpretation of our
user manual. The appearance of the product shall be subject to the
product you received. Please forgive us that we won't inform you again if
there are any technology or software updates on our product.
SWIMMING POOL PUMP

- 2 -
MAIN PARTS
TEILE
INSTALLATION
LESEN SIE DIESE BEDIENUNGSANLEITUNG SORGFÄLTIG DURCH
UND BEWAHREN SIE SIE AUF
ACHTUNG INSTALLATEUR – DIESES HANDBUCH ENTHÄLT
WICHTIGE INFORMATIONEN ZUR INSTALLATION, ZUM BETRIEB UND
ZUR SICHEREN VERWENDUNG DIESER PUMPE, DIE IHNEN ZUR
VERFÜGUNG GESTELLT WERDEN MÜSSEN
DER ENDBENUTZER DIESES PRODUKTS. ES KANN ZUR FOLGE
- 3 -
GEHEN, DASS ALLE ANWEISUNGEN NICHT GELESEN UND BEFOLGT
WERDEN SCHWERE VERLETZUNG.
SAFETY PRECAUTIONS
Lesen Das "Sicherheit Vorsichtsmaßnahmen" Vor Betrieb.
Der unten Information sollen nicht Sei vernachlässigt für Die
richtig _ verwenden von Das Produkt. Dein Verständnis dürfen
verhindern Schaden oder Gefahr Zu Die Benutzer oder
Andere.
Die folgenden Informationen sind für die Sicherheit sehr wichtig im
Umgang mit diesem Produkt. Beachten Sie es unbedingt.
GEFAHR
Weist auf eine unmittelbar gefährliche Situation hin, die,
wenn sie nicht vermieden wird, zum Tod oder zu schweren
Verletzungen führt.
WARNUNG
Weist auf eine potenziell gefährliche Situation hin, die,
wenn sie nicht vermieden wird, zum Tod oder zu
schweren Verletzungen führen kann .
VORSICHT
Weist auf eine potenziell gefährliche Situation hin, die,
wenn sie nicht vermieden wird, zu leichten oder
mittelschweren Verletzungen oder Sachschäden
führen kann .
WICHTIG
VERBOTENE ALARM
GEFAHR
Halten Sie sich vom Hauptabfluss und allen Ansaugöffnungen fern.
Die Siebabdeckung muss ordnungsgemäß gesichert sein, um eine
gewaltsame Trennung aufgrund des Drucks im Zirkulationssystem zu
- 4 -
verhindern.
Schalten Sie vor Wartungsarbeiten das gesamte Zirkulationssystem
und die Pumpensteuerung aus, stellen Sie sicher, dass das manuelle
Entlüftungsventil des Filters geöffnet ist und der gesamte Druck
entlastet ist.
Schwimmbadfachmann installieren und warten zu lassen .
WARNUNG
Entfernen Sie Druckteststopfen und/oder Stopfen, die bei der
Überwinterung des Pools/Spas verwendet wurden Saugauslässe.
Versagen Andernfalls besteht ein erhöhtes Risiko für Saugeinschlüsse .
Erlauben Sie Kindern nicht, mit diesem Produkt zu spielen.
Vor dem Starten der Systempumpe müssen alle Systemventile so
eingestellt werden, dass das Systemwasser in den Pool zurückkehren
kann.
Betreiben Sie das Pool- und Spa-Zirkulationssystem nicht, wenn eine
Systemkomponente nicht ordnungsgemäß montiert ist, beschädigt ist
oder fehlt
Schalten Sie vor Arbeiten an elektrischen Geräten die Stromversorgung
des Geräts aus.
Schließen Sie das Gerät nur an einen Abzweigstromkreis an, der durch
einen Fehlerstromschutzschalter (FI-Schutzschalter) geschützt ist .
VORSICHT
Die gesamte elektrische Verkabelung muss den geltenden Vorschriften
entsprechen
örtliche Vorschriften, Vorschriften und der National Electric Code (NEC)
Es wird dringend empfohlen, die elektrischen Komponenten vor
direkter Sonneneinstrahlung zu schützen, obwohl diese Pumpe für den
Einsatz im Freien konzipiert ist.
Platzieren Sie diese Pumpe an einem gut entwässerten Ort, an dem es
- 5 -
bei Regen nicht zu Überschwemmungen kommt.
Bei der Installation in einem Außengehäuse oder unter der Schürze
eines Whirlpools oder Spas muss für ausreichende Belüftung und freie
Luftzirkulation gesorgt werden, um eine Überhitzung zu verhindern .
Installieren Sie diese Pumpe nicht an einem feuchten oder nicht
belüfteten Ort. Zur Kühlung ist eine freie Luftzirkulation erforderlich.
Lassen Sie die Pumpe nicht trocken laufen. Wasser fungiert als Kühl-
und Schmiermittel für die mechanische Welle Siegel. Wenn die Pumpe
trocken läuft, können die Dichtungen beschädigt werden, was zu
Undichtigkeiten und Überschwemmungen führt und zum Erlöschen der
Garantie führt. Füllen Sie das Siebgehäuse mit Wasser, bevor Sie den
Motor starten.
INSTALLATION

- 6 -
Drehen Die Lüfter Klinge Vor Inbetriebnahme,
prüfen ob Die Pumpe Drehung Ist also flexibel
abschrauben Die Wasser füllen Stopfen, füllen
Die Pumpe Kammer mit sauber Wasser aus Die
Wasser einspritzung _ Loch, dann spannen Die
Stecker schrauben nach Die Luft hat gewesen
vollständig entlassen. Stellen Sie es ein Ventil für
A kleiner Wasser fließen Wann Starte ich , und
Dann anpassen Zu dein erforderlich Wasser
fließen nach Wasser entladen .
Vor Wartungsarbeiten müssen alle Wasserzirkulationssysteme und
Pumpensteuerungen ausgeschaltet sein, um den gesamten Druck
aus dem System abzulassen.
WARNUNG : Das Produkt sollen Sei Eingerichtet Und bedient _ von A
qualifiziert Schwimmbad Fachmann .
Das Pumpe Ist kompatibel mit überirdisch Pools Und Spas. Lokalisieren Die
Pumpe als schließen Zu Die Schwimmbad Und Wasser Ebene als möglich .
Tun nicht hinzufügen zu viele Ellbogen Rohre In Die _ Installation Also als
Zu vermeiden Saugen die Ermäßigung. Es Ist höchst empfohlen Das Die
Pumpe Sei platziert In Cool, trocken setzt Und vermeiden Direkte
Sonnenlicht. Installieren Die Pumpe An A Firma, Ebene Base oder
Unterlage Zu treffen alle lokal Und National Codes . Befestigen Die Pumpe
Zu A Base oder Unterlage mit Schrauben oder Schrauben Zu weiter
reduzieren Vibrationen und Belastungen an Rohr- oder
Schlauchverbindungen. Der Untergrund muss fest, eben, steif und stabil
sein vibrationsfrei.
WARNUNG : Halten Produkt weg _ aus Kinder.
Verwenden Teflon Band An Die Faden Vor schrauben Beschläge Zu Pumpe
Einlass Und Auslauf Häfen Also als Zu vermeiden Leckage . Tun nicht über -
knapp zehn Die Beschläge.
- 7 -
Zubehörteil:
1: Handbuch
2: 2 Stück NPT 1-1/2 Zoll Adapter
3: 2 Stück 48,5-mm-Adapter (ID).
4: 1 Rolle PTFE-Band.
Pumpe Entladung Hafen dürfen Sei _ gedreht horizontal:
Pumpendeckel und Sieb entfernen.
Entfernen Sie den C- Clip (Teil Nr. 4 in der Teileliste).
Entfernen Sie den Pumpensiebkörper vom Pumpengehäuse.
Schrauben Sie die Schrauben ab.
Drehen Sie die Auslassöffnung so, dass sie horizontal ist.
Schrauben Sie die Schrauben wieder fest.
Bringen Sie das Pumpensiebgehäuse wieder an.
Schnallen Sie den C- Clip an.
Setzen Sie das Sieb wieder in das Siebgehäuse der Pumpe ein.
Pumpendeckel befestigen
- 8 -
SPECIFICATIONS
Modell
HAP750
Eingang
AC110-120V 60Hz
Leistung
1,0 PS
Max. Kopf
11 m (36 Fuß)
Max. fließen
80 GPM
Arbeitswassertemperatur
0-50℃(32℉-122℉)
Einlass-/Auslasskaliber
NPT 1-1/2
Stellen Sie sicher, dass die verfügbare Stromversorgung für Spannung,
Phase und Zyklus des Motors geeignet ist.
Die Spannung der Stromversorgung muss im Bereich von 90 % bis 110 %
der auf dem Typenschild des Motors angegebenen Nennspannung liegen.
Andernfalls kann es zu einer Überhitzung des Motors kommen, was zu
einer Überlastauslösung und einer verkürzten Lebensdauer der
Komponenten führen kann.
Installieren, erden, verbinden und verdrahten Sie den Motor gemäß den
örtlichen oder NEC-Anforderungen.
Der Motor sollte dauerhaft geerdet werden, indem die Erdungsklemme mit
der elektrischen Betriebserde verbunden wird .
Verbinden Sie den Motor mit der Poolstruktur. Durch die Verbindung
werden alle Metallteile innerhalb und um den Pool herum mit einem

- 9 -
durchgehenden Draht verbunden. Durch die Verbindung wird das Risiko
verringert, dass Strom zwischen verbundenen Metallobjekten fließt, was
bei Erdung oder Kurzschluss möglicherweise zu einem Stromschlag
führen kann.
PRIMING
Füllen Sie das Siebgehäuse bis zur Saugrohrhöhe mit Wasser. Wenn an
irgendeiner Stelle der Pumpe oder des Filters Wasser austritt, starten Sie
die Pumpe NICHT. Wenn keine Leckage auftritt, stellen Sie sich
mindestens 10 Fuß von der Pumpe und/oder dem Filter entfernt auf und
fahren Sie mit dem Starten der Pumpe fort.
TROUBLE SHOOTING
MOTOR WILLE NICHT START
Falsche oder lose Kabelverbindungen; offene Schalter bzw Relais;
Ausgelöste Schutzschalter, FI-Schutzschalter oder durchgebrannte
Sicherungen.
Überprüfen Sie die Drehung der Motorwelle manuell und kostenlos
Bewegung und fehlende Behinderung.
Wenn Sie über einen Timer verfügen, stellen Sie sicher, dass dieser
ordnungsgemäß funktioniert. Umgehen Sie ihn gegebenenfalls.
MOTOR SCHALTET AUS
Unterdimensionierte Verkabelung; lose Verbindungen; usw.
Niedrige Spannung am Motor oder Stromausfall (häufig verursacht
durch zu kleine Kabel oder die Verwendung von
Verlängerungskabeln).
Der Motor summt, startet aber nicht
Mechanische Blockierung und elektrische Überlastung.
Fliehkraftschalter klemmt in der OFFEN-Position.
Bindung der Motorwelle.
Die Pumpe wird nicht angesaugt
Stellen Sie sicher, dass das Pumpensiebgehäuse mit Wasser gefüllt
ist und der O-Ring der Abdeckung sauber ist. Stellen Sie außerdem

- 10 -
sicher, dass er richtig in der O-Ring-Nut der Abdeckung sitzt. Stellen
Sie sicher, dass die Siebabdeckung fest eingerastet und mit „Jack's
327“ geschmiert ist.
Stellen Sie sicher, dass alle Ansaug- und Auslassventile vollständig
geöffnet und nicht blockiert sind, dass der Wasserstand im Becken auf
einem angemessenen Niveau ist und dass das Skimmerwehr nicht an
der Skimmerwand hängt oder festsitzt
Blockieren Sie die Pumpe, um festzustellen, ob die Pumpe ein
Vakuum entwickelt. An der Siebabdeckung sollte ein Vakuum von 5 bis
6 Zoll herrschen. Möglicherweise können Sie dies überprüfen, indem
Sie den Skimmerkorb entfernen und Ihre Hand über die untere
Öffnung halten, während der Skimmer voll ist und die Pumpe läuft.
Wenn kein Sog spürbar ist, prüfen Sie, ob die Leitung verstopft ist.
E. Wenn die Pumpe ein Vakuum entwickelt, prüfen Sie, ob die Saugleitung
verstopft oder verschmutzt ist
Siebkorb und eine Luft Ein Leck in der Saugleitung kann die Ursache sein.
F. Wenn die Pumpe kein Vakuum entwickelt und die Pumpe hat
ausreichend „Ansaugwasser“:
ix. Überprüfen Sie den Siebgehäusedeckel und alle Gewindeanschlüsse
erneut auf
Ansauglecks. Überprüfen Sie, ob alle Schlauchklemmen vorhanden sind
eng.
x. Überprüfen Sie die Spannung, um sicherzustellen, dass der Motor mit
voller Drehzahl dreht.
xi. Öffnen Sie den Gehäusedeckel und prüfen Sie, ob die Ansaugöffnung
verstopft oder blockiert ist.
Überprüfen Sie das Laufrad auf Fremdkörper.
xii. Entfernen und ersetzen Sie die Wellendichtung nur, wenn diese undicht
ist.
TROUBLE SHOOTING(CONTINUED)
LOW-FLOW
Verstopftes oder verstopftes Sieb oder Saugleitung;
unterdimensionierte Poolrohre.

- 11 -
Abflussleitung oder Filter verstopft oder verstopft, Ventil teilweise
geschlossen (hohe Anzeige) . So beheben Sie: Rückspülsieb gemäß
Herstellerangaben;
Luftleck in der Saugleitung verursacht Rumpeln in der Pumpe.
Kavitation aufgrund einer verstopften oder unterdimensionierten
Saugleitung oder eines Lecks an einer Verbindungsstelle, niedriger
Wasserstand im Becken, und uneingeschränkte
Entladungsrücklaufleitungen. Saugzustand korrigieren bzw.
Rücklaufleitungen drosseln, wenn praktisch.
LÄRMENDE PUMPE
Vibrationen durch unsachgemäße Montage, usw. Legen Sie eine
Gummiunterlage unter die Metallbefestigungsfüße.
Fremdkörper im Pumpengehäuse. Die Ursache könnten lose
Steine/Trümmer sein, die auf das Laufrad treffen. Entfernen Sie alle
oben liegenden Steine.
Motorlager sind aufgrund normaler Abnutzung laut. Rost, Überhitzung,
oder die Konzentration von Chemikalien führt zu Schäden an der
Dichtung, wodurch chlorhaltiges Wasser in die Lager eindringt, das
Fett auslöscht und das Lager zum Heulen bringt. Alle Dichtungslecks
sollten sofort ersetzt werden.
Gerätebasis vibriert.
Hersteller: Shanghaimuxinmuyeyouxiangongsi
Adresse: Baoshanqu Shuangchenglu 803long 11hao 1602A-1609shi
Shanghai
EK-VERTRETER: SHUNSHUN GmbH .
Römeräcker 9 Z2021,76351 Linkenheim-Hochstetten, Deutschland
Britischer Vertreter: Pooledas Group Ltd.
Einheit 5 Albert Edward House, The Pavilions Preston, Vereinigtes
Königreich
Importiert nach AUS: SIHAO PTY LTD.

- 12 -
1 ROKEVA STREETEASTWOOD NSW 2122 Australien
Importiert in die USA: Sanven Technology Ltd.
Suite 250, 9166 Anaheim Place, Rancho Cucamonga, CA 91730
In China hergestellt


- 14 -
Tecnico Supporto e certificato di garanzia elettronica
www.vevor.com/support
POMPA PER PISCINA
MANUALE D'USO
MODELLO : HAP750
We continue to be committed to provide you tools with competitive price.
"Save Half", "Half Price" or any other similar expressions used by us only represents an
estimate of savings you might benefit from buying certain tools with us compared to the major
top brands and does not necessarily mean to cover all categories of tools offered by us. You
are kindly reminded to verify carefully when you are placing an order with us if you are
actually saving half in comparison with the top major brands.

- 1 -
MODELLO: HAP750
Have product questions? Need technical support? Please feel free to
contact us:
Technical Support and E-Warranty Certificate
www.vevor.com/support
NEED HELP? CONTACT US!
This is the original instruction, please read all manual instructions
carefully before operating. VEVOR reserves a clear interpretation of our
user manual. The appearance of the product shall be subject to the
product you received. Please forgive us that we won't inform you again if
there are any technology or software updates on our product.
SWIMMING POOL PUMP

- 2 -
MAIN PARTS
PARTI
INSTALLATION
LEGGERE ATTENTAMENTE E CONSERVARE QUESTO MANUALE DI
ISTRUZIONI
ATTENZIONE INSTALLATORE-QUESTO MANUALE CONTIENE
INFORMAZIONI IMPORTANTI SULL'INSTALLAZIONE, IL
FUNZIONAMENTO E L'USO SICURO DI QUESTA POMPA CHE DEVE
ESSERE FORNITA A
L'UTENTE FINALE DI QUESTO PRODOTTO. LA MANCATA LEGGERE E
- 3 -
SEGUIRE TUTTE LE ISTRUZIONI POTREBBE RISULTARE IN GRAVI
FERITE.
SAFETY PRECAUTIONS
Leggere Questo "Sicurezza Precauzioni" Prima operazione.
IL sotto informazione Dovrebbe non Essere trascurato per IL
corretto _ utilizzo Di Questo Prodotto. Tuo comprensione
Potere impedire danno O Pericolo A IL utente O altri.
Le seguenti informazioni sono molto importanti per la sicurezza nel
maneggiare questo prodotto. Assicurati di osservarlo.
PERICOLO
Indica una situazione di pericolo imminente che, se non
evitata, provocherà morte o lesioni gravi.
AVVERTIMEN
TO
Indica una situazione potenzialmente pericolosa che,
se non evitata, potrebbe provocare morte o lesioni
gravi .
ATTENZIONE
Indica una situazione potenzialmente pericolosa che,
se non evitata, potrebbe causare lesioni minori o
moderate o danni materiali .
IMPORTANT
E
AVVISO VIETATO
PERICOLO
Stare lontano dallo scarico principale e lontano da tutte le prese di
aspirazione.
Il coperchio del filtro deve essere adeguatamente fissato per evitare
separazioni violente dovute alla pressione nel sistema di circolazione.
Prima della manutenzione, spegnere tutti i controlli del sistema di
circolazione e della pompa, assicurarsi che la valvola di sfogo dell'aria
- 4 -
manuale del filtro sia in posizione aperta e che tutta la pressione sia
scaricata.
Si consiglia vivamente che questo prodotto venga installato e
sottoposto a manutenzione da un professionista qualificato della
piscina .
AVVERTIMENTO
Rimuovere i tappi di prova della pressione e/o i tappi utilizzati durante la
preparazione per l'inverno della piscina/spa dal bocche di aspirazione.
Fallimento ciò comporterà un aumento del rischio di intrappolamento
tramite aspirazione .
Non permettere ai bambini di giocare con questo prodotto.
Prima di avviare la pompa del sistema, tutte le valvole del sistema
devono essere impostate per consentire all'acqua del sistema di ritornare
nella piscina.
Non utilizzare il sistema di circolazione della piscina e della spa se un
componente del sistema non è assemblato correttamente, è danneggiato
o manca
Prima di intervenire su qualsiasi apparecchiatura elettrica, disattivare
l'alimentazione elettrica dell'apparecchiatura.
Collegare solo a un circuito derivato protetto da un interruttore automatico
con guasto a terra (GFCI) .
ATTENZIONE
Tutto il cablaggio elettrico deve essere conforme alle normative
applicabili
codici locali, regolamenti e Codice Elettrico Nazionale (NEC)
Si consiglia vivamente di proteggere i componenti elettrici dalla luce
solare diretta sebbene questa pompa sia progettata per uso esterno.
Posiziona la pompa in un'area ben drenata, che non si allaghi quando
piove.
Se installato all'interno di un involucro esterno o sotto il bordo di una
- 5 -
vasca idromassaggio o di una spa, è necessario garantire un'adeguata
ventilazione e una libera circolazione dell'aria per evitare il
surriscaldamento .
Non installare questa pompa in un luogo umido o non ventilato.
Richiede la libera circolazione dell'aria per il raffreddamento.
Non far funzionare la pompa a secco. L'acqua funge da refrigerante e
lubrificante per l'albero meccanico foca. Il funzionamento a secco della
pompa può danneggiare le guarnizioni, causando perdite, allagamenti
e invalidando la garanzia. Riempire l'alloggiamento del filtro con acqua
prima di avviare il motore.
INSTALLATION
Ruotare IL fan lama Prima avvio, controllo se IL
pompa rotazione È flessibile, quindi svitare IL
riempimento d'acqua tappare, riempire IL pompa
Camera con pulito acqua da IL iniezione di
acqua buco, allora stringere IL tappo vite Dopo IL
aria ha stato completamente dimesso. Impostare
il _ valvola per UN più piccola acqua fluire
Quando iniziare a lavorare e Poi regolare A tuo
necessario acqua fluire Dopo acqua scarico .
- 6 -
Prima della manutenzione, tutti i sistemi di circolazione dell'acqua e i
controlli della pompa devono essere disattivati per rilasciare tutta la
pressione dal sistema.
AVVERTIMENTO : Questo Prodotto Dovrebbe Essere installato E servito _
di UN qualificato piscina professionale .
Questo pompa È compatibile con fuori terra piscine E terme. Individuare IL
pompa COME vicino A IL piscina E acqua livello COME possibile . Fare non
aggiungere pure molti gomito tubi In IL _ idraulico COSÌ COME A Evitare
aspirazione riduzione. Esso È altamente consigliato Quello IL pompa
Essere posizionato In Freddo, Asciutto luoghi E Evitare diretto luce del sole.
Installare IL pompa SU UN ditta, livello base O tampone A Incontrare Tutto
Locale E nazionale codici . Fissare IL pompa A UN base O tampone con viti
O bulloni A ridurre ulteriormente vibrazioni e sollecitazioni sui giunti di tubi o
tubi flessibili. La base deve essere solida, piana, rigida e esente da
vibrazioni.
AVVERTIMENTO : Mantenere Prodotto lontano _ da Bambini.
Utilizzo Teflon nastro SU IL filo Prima vite raccordi A pompa ingresso E presa
porti COSÌ COME A Evitare perdita . Fare non oltre le dieci _ IL raccordi.
- 7 -
Accessorio:
1: Manuale
2: 2 pezzi di adattatore NPT 1-1/2 ” .
3: 2 adattatori da 48,5 mm (ID).
4: 1 rotolo di nastro in PTFE.
Pompa scarico porta Potere Essere _ trasformato orizzontale:
Rimuovere il coperchio della pompa e il filtro.
Rimuovere la clip a C (parte n. 4 nell'elenco delle parti).
Rimuovere il corpo del filtro della pompa dal corpo della pompa.
Svitare i bulloni.
Ruotare l'apertura di scarico in orizzontale.
Riavvitare i bulloni.
Reinstallare il corpo del filtro della pompa.
Allaccia la clip a C.
Rimettere il filtro nel corpo del filtro della pompa.
Fissare il coperchio della pompa
SPECIFICATIONS
Modello
HAP750
Ingresso
CA 110-120 V 60 Hz
Energia
1,0 CV
Massimo. Testa
11 m (36 piedi)
Massimo. fluire
80 GPM

- 8 -
Temperatura dell'acqua di lavoro
0-50℃(32℉-122℉)
Calibro ingresso/uscita
NPT 1-1/2
Assicurarsi che l'alimentazione elettrica disponibile sia adatta alla tensione,
alla fase e al ciclo del motore.
La tensione proveniente dall'alimentazione deve essere compresa tra il
90% e il 110% della tensione nominale della targa del motore. In caso
contrario, il motore potrebbe surriscaldarsi e provocare uno scatto per
sovraccarico e una durata ridotta dei componenti.
Installare, mettere a terra, collegare e cablare il motore in conformità ai
requisiti locali o NEC.
Il motore deve essere messo a terra in modo permanente collegando il
terminale di terra alla terra del servizio elettrico.
Collegare il motore alla struttura della piscina. Il collegamento collegherà
tutte le parti metalliche all'interno e attorno alla piscina con un filo continuo.
Il collegamento riduce il rischio di passaggio di corrente tra oggetti metallici
collegati, che potrebbe potenzialmente causare scosse elettriche se messi
a terra o in cortocircuito.
PRIMING
Riempire l'alloggiamento del filtro con acqua fino al livello del tubo di
aspirazione. Se si verificano perdite d'acqua in qualsiasi punto della
pompa o del filtro, NON avviare la pompa. Se non si verificano perdite,
posizionarsi ad almeno 3 metri dalla pompa e/o dal filtro e procedere con
l'avviamento della pompa.
TROUBLE SHOOTING
IL MOTORE VOLERE NON INIZIO
Collegamenti elettrici errati o allentati; interruttori aperti o relè;
interruttori automatici, GFCl o fusibili bruciati.
Controllare manualmente e gratuitamente la rotazione dell'albero

- 9 -
motore movimento e assenza di ostacoli.
Se disponi di un timer, assicurati che funzioni correttamente. Ignoralo
se necessario.
IL MOTORE SI SPEGNE
Cablaggio sottodimensionato; collegamenti allentati; eccetera.
Bassa tensione al motore o caduta di potenza (spesso causata da cavi
sottodimensionati o dall'uso di prolunghe).
IL MOTORE RUMORA MA NON PARTE
Vincolo meccanico e sovraccarico elettrico.
Interruttore centrifugo bloccato in posizione APERTA.
Legatura dell'albero motore.
LA POMPA NON SI ADESCA
Assicurarsi che l'alloggiamento del filtro della pompa sia pieno d'acqua
e che l'O-ring del coperchio sia pulito; inoltre, assicurarsi che sia
correttamente inserito nella scanalatura dell'O-ring del coperchio.
Assicurarsi che il coperchio del filtro sia bloccato saldamente in
posizione e lubrificato con “Jack's 327”.
Assicurarsi che tutte le valvole di aspirazione e scarico siano
completamente aperte e non bloccate, che il livello dell'acqua della
piscina sia ad un livello adeguato e che lo stramazzo dello skimmer
non sia appeso o bloccato sulla parete dello skimmer
Bloccare per determinare se la pompa svilupperà il vuoto. Dovresti
avere 5"-6" di vuoto sul coperchio del filtro. Potresti riuscire a
controllare rimuovendo il cestello dello skimmer e tenendo la mano
sopra la porta inferiore con lo skimmer pieno e la pompa in funzione.
Se non si avverte alcuna aspirazione, verificare l'eventuale blocco
della linea.
G. Se la pompa sviluppa vuoto, verificare la presenza di una linea di
aspirazione bloccata o sporca
cestello del filtro e un'aria la causa potrebbe essere una perdita nella
tubazione di aspirazione.
H. Se la pompa non sviluppa il vuoto e la pompa ha sufficiente “acqua di
adescamento”:
xiii. Ricontrollare il coperchio dell'alloggiamento del filtro e tutti i

- 10 -
collegamenti filettati
perdite di aspirazione. Controllare se tutte le fascette stringitubo lo sono
stretto.
xiv. Controllare la tensione per garantire che il motore ruoti al massimo
numero di giri.
xv. Aprire il coperchio dell'alloggiamento e verificare l'intasamento o
l'ostruzione dell'aspirazione.
Controllare la girante per eventuali detriti.
xvi. Rimuovere e sostituire la tenuta meccanica solo se perde.
TROUBLE SHOOTING(CONTINUED)
FLUSSO BASSO
Filtro o linea di aspirazione intasati o ostruiti; tubazioni della piscina
sottodimensionate.
Linea di scarico o filtro intasato o ostruito, valvola parzialmente chiusa
(lettura alta) . Come correggere: controlavaggio del filtro secondo le
istruzioni del produttore;
Perdita d'aria nella tubazione di aspirazione che provoca rombo nella
pompa.
Cavitazione dovuta a linea di aspirazione ristretta o sottodimensionata
o perdita in qualsiasi giunto, livello dell'acqua basso nella piscina, e
linee di ritorno dello scarico senza restrizioni. Correggere le condizioni
di aspirazione o le linee di ritorno dell'acceleratore, se pratico.
POMPA RUMOROSA
Vibrazioni dovute a montaggio improprio, eccetera. Metti un cuscinetto
di gomma sotto i piedini di montaggio in metallo.
Corpi estranei nel corpo della pompa. La causa potrebbero essere
pietre o detriti che colpiscono la girante; rimuovere quelli sopra
indicati.
I cuscinetti del motore sono rumorosi a causa della normale usura,
ruggine, surriscaldamento, o concentrazione di sostanze chimiche che
causano danni alle guarnizioni e che consentono all'acqua clorata di
penetrare nei cuscinetti, eliminando il grasso e provocando il gemito
dei cuscinetti. Tutte le perdite dalle guarnizioni devono essere

- 11 -
sostituite immediatamente.
Base dell'attrezzatura vibrante.
Produttore: Shanghaimuxinmuyeyouxiangongsi
Indirizzo: Baoshanqu Shuangchenglu 803long 11hao 1602A-1609shi
Shanghai
RAPPRESENTANTE CE: SHUNSHUN GmbH .
Römeräcker 9 Z2021,76351 Linkenheim-Hochstetten, Germania
REP. DEL REGNO UNITO: Pooledas Group Ltd.
Unità 5 Albert Edward House, The Pavilions Preston, Regno Unito
Importato in AUS: SIHAO PTY LTD.
1 ROKEVA STREETEASTWOOD NSW 2122 Australia
Importato negli Stati Uniti: Sanven Technology Ltd.
Suite 250, 9166 Anaheim Place, Rancho Cucamonga, CA 91730
Made in China


- 13 -
Técnico Certificado de soporte y garantía electrónica
www.vevor.com/support
BOMBA DE PISCINA
MANUAL DE USUARIO
MODELO : HAP750
We continue to be committed to provide you tools with competitive price.
"Save Half", "Half Price" or any other similar expressions used by us only represents an
estimate of savings you might benefit from buying certain tools with us compared to the major
top brands and does not necessarily mean to cover all categories of tools offered by us. You
are kindly reminded to verify carefully when you are placing an order with us if you are
actually saving half in comparison with the top major brands.
- 1 -
MODELO: HAP750
Have product questions? Need technical support? Please feel free to
contact us:
Technical Support and E-Warranty Certificate
www.vevor.com/support
NEED HELP? CONTACT US!
This is the original instruction, please read all manual instructions
carefully before operating. VEVOR reserves a clear interpretation of our
user manual. The appearance of the product shall be subject to the
product you received. Please forgive us that we won't inform you again if
there are any technology or software updates on our product.
SWIMMING POOL PUMP

- 2 -
MAIN PARTS
PARTES
INSTALLATION
LEA ATENTAMENTE Y GUARDE ESTE MANUAL DE INSTRUCCIONES
ATENCIÓN INSTALADOR: ESTE MANUAL CONTIENE INFORMACIÓN
IMPORTANTE SOBRE LA INSTALACIÓN, OPERACIÓN Y USO SEGURO
DE ESTA BOMBA QUE DEBE SUMINISTRARSE A
EL USUARIO FINAL DE ESTE PRODUCTO. NO LEER Y SEGUIR
TODAS LAS INSTRUCCIONES PODRÍA RESULTAR EN LESIONES
GRAVES.

- 3 -
SAFETY PRECAUTIONS
Leer este "Seguridad Precauciones" antes operación.
El abajo información debería no ser descuidado para el
adecuado _ usar de este producto. Su comprensión poder
prevenir dañar o peligro a el usuario o otros.
La siguiente información es muy importante para la seguridad. en el
manejo de este producto. Asegúrate de observarlo.
PELIGRO
Indica una situación de peligro inminente que, si no se evita,
provocará la muerte o lesiones graves.
ADVERTENC
IA
Indica una situación potencialmente peligrosa que, si
no se evita, podría provocar la muerte o lesiones
graves .
PRECAUCIÓ
N
Indica una situación potencialmente peligrosa que, si
no se evita, puede provocar lesiones leves o
moderadas o daños a la propiedad .
IMPORTANT
E
ALERTA PROHIBIDA
PELIGRO
Manténgase alejado del drenaje principal y de todas las salidas de
succión.
La cubierta del filtro debe estar asegurada adecuadamente para
evitar una separación violenta debido a la presión en el sistema de
circulación.
Antes de realizar mantenimiento, apague todos los controles del
sistema de circulación y de la bomba, asegúrese de que la válvula de
alivio de aire manual del filtro esté en la posición abierta y que se
- 4 -
alivie toda la presión.
Se recomienda encarecidamente que este producto sea instalado y
reparado por un profesional calificado en piscinas .
ADVERTENCIA
Retire los tapones de prueba de presión y/o los tapones utilizados en la
preparación para el invierno de la piscina/spa del salidas de succión.
Falla hacerlo resultará en un mayor potencial de atrapamiento por
succión .
No permita que los niños jueguen con este producto.
Antes de arrancar la bomba del sistema, se deben configurar todas las
válvulas del sistema para permitir que el agua del sistema regrese a la
piscina.
No opere el sistema de circulación de piscina y spa si un componente del
sistema no está ensamblado correctamente, está dañado o falta
Antes de trabajar en cualquier equipo eléctrico, apague el suministro de
energía al equipo.
Conéctelo únicamente a un circuito derivado protegido por un interruptor
de circuito de falla a tierra (GFCI) .
PRECAUCIÓN
Todo el cableado eléctrico debe cumplir con las normas aplicables.
códigos locales, regulaciones y el Código Eléctrico Nacional (NEC)
Se recomienda encarecidamente proteger los componentes eléctricos
de la luz solar directa, aunque esta bomba está diseñada para uso en
exteriores.
Coloque esta bomba en un área con buen drenaje, una que no se
inunde cuando llueve.
Si se instala dentro de un recinto exterior o debajo del faldón de una
bañera de hidromasaje o spa, se debe proporcionar ventilación
adecuada y libre circulación de aire para evitar el sobrecalentamiento .
- 5 -
No instale esta bomba en un lugar húmedo o sin ventilación. Requiere
libre circulación de aire para enfriarse.
No haga funcionar la bomba en seco. El agua actúa como refrigerante
y lubricante para el eje mecánico. sello. Hacer funcionar la bomba en
seco puede dañar los sellos, provocar fugas, inundaciones y anular la
garantía. Llene la carcasa del filtro con agua antes de arrancar el
motor.
INSTALLATION
Girar el admirador cuchilla antes puesta en
marcha, comprobar si el bomba rotación es
flexible, entonces destornillar el llenado de agua
enchufar, llenar el bomba cámara con limpio
agua de el inyección de agua agujero, entonces
apretar el enchufar tornillo después el aire tiene
estado completamente descargado. Selecciona
el _ válvula para a menor agua fluir cuando poner
en marcha y entonces ajustar a su requerido
agua fluir después agua descargando .
Antes de realizar mantenimiento, todos los sistemas de circulación
de agua y controles de bombas deben estar fuera de posición para
liberar toda la presión del sistema.

- 6 -
ADVERTENCIA : Este producto debería ser instalado y servido _ por a
calificado piscina profesional .
Este bomba es compatible con sobre el suelo quinielas y balnearios.
Localizar el bomba como cerca a el piscina y agua nivel como posible .
Hacer no agregar también muchos codo tubería en el _ plomería entonces
como a evitar succión reducción. Él es altamente recomendado eso el
bomba ser metido en Frío, seco lugares y evitar directo luz de sol. Instalar
el bomba en a firme, nivel base o almohadilla a encontrarse todo local y
nacional códigos . Sujetar el bomba a a base o almohadilla con tornillos o
pernos a reducir aún más vibración y tensión en las juntas de tuberías o
mangueras. La base debe ser sólida, nivelada, rígida y sin vibraciones.
ADVERTENCIA : Mantener producto lejos _ de Niños.
Usar teflón cinta en el hilo antes tornillo guarniciones a bomba entrada y
salida puertos entonces como a evitar fuga . Hacer no más de diez _ el
guarniciones.
Accesorio:
1: manuales
adaptador NPT 1-1/2 ”
3: 2 piezas de adaptador de 48,5 mm (ID)

- 7 -
4: 1 rollo de cinta de PTFE.
Bomba descargar puerto poder ser _ transformado horizontal:
Retire la tapa de la bomba y el colador.
Retire el clip C (parte n.° 4 en la lista de piezas).
Retire el cuerpo del filtro de la bomba de la carcasa de la bomba.
Desenrosque los tornillos.
Gire el puerto de descarga para que quede horizontal.
Vuelva a atornillar los pernos.
Vuelva a instalar el cuerpo del filtro de la bomba.
Abróchese el clip C.
Vuelva a colocar el colador en el cuerpo del colador de la bomba.
Fije la tapa de la bomba
SPECIFICATIONS
Modelo
HAP750
Aporte
CA 110-120 V 60 Hz.
Fuerza
1.0HP
Máx. cabeza
11 metros (36 pies)
Máx. fluir
80 galones por minuto
Temperatura del agua de trabajo
0-50 ℃ (32 ℉-122 ℉)
Calibre de entrada/salida
TNP 1-1/2
Asegúrese de que el suministro eléctrico disponible sea el adecuado para

- 8 -
la tensión, fase y ciclo del motor.
El voltaje de la fuente de alimentación debe estar en el rango del 90% al
110% del voltaje nominal de la placa del motor. De lo contrario, el motor
podría sobrecalentarse y provocar un disparo por sobrecarga y una
reducción de la vida útil de los componentes.
Instale, conecte a tierra, conecte y cablee el motor de acuerdo con los
requisitos locales o NEC.
El motor debe estar conectado a tierra permanentemente conectando el
terminal de tierra a la tierra del servicio eléctrico.
Conecte el motor a la estructura de la piscina. La unión conectará todas
las partes metálicas dentro y alrededor de la piscina con un cable continuo.
La unión reduce el riesgo de que pase corriente entre objetos metálicos
unidos, lo que podría causar una descarga eléctrica si se conecta a tierra o
se produce un cortocircuito.
PRIMING
Llene la carcasa del filtro con agua hasta el nivel del tubo de succión. Si se
produce una fuga de agua en cualquier parte de la bomba o del filtro, NO
arranque la bomba. Si no se produce ninguna fuga, párese al menos a 10
pies de la bomba y/o del filtro. y proceder con el arranque de la bomba.
TROUBLE SHOOTING
MOTOR VOLUNTAD NO COMENZAR
Conexiones de cableado flojas o inadecuadas; interruptores abiertos o
relés; Disyuntores disparados, GFCl o fusibles quemados.
Verifique manualmente la rotación del eje del motor de forma gratuita
movimiento y ausencia de obstrucciones.
Si tiene un temporizador, asegúrese de que esté funcionando
correctamente. Evítelo si es necesario.
EL MOTOR SE APAGA
Cableado de tamaño insuficiente; conexiones sueltas; etc.
Bajo voltaje en el motor o caída de energía (frecuentemente causado

- 9 -
por cableado de tamaño insuficiente o uso de cable de extensión).
EL MOTOR ZUMA PERO NO ARRANCA
Atascamiento mecánico y sobrecarga eléctrica.
Interruptor centrífugo atascado en la posición ABIERTO.
Unión del eje del motor.
LA BOMBA NO SE CEBA
Asegúrese de que la carcasa del filtro de la bomba esté llena de agua
y que la junta tórica de la cubierta esté limpia; además, asegúrese de
que esté correctamente asentada en la ranura de la junta tórica de la
cubierta. Asegúrese de que la cubierta del filtro esté firmemente
bloqueada en su posición y lubricada con “Jack's 327”.
Asegúrese de que todas las válvulas de succión y descarga estén
completamente abiertas y no bloqueadas, que el nivel del agua de la
piscina esté en el nivel adecuado y que el vertedero del skimmer no
esté colgado o atascado en la pared del skimmer.
Bloquee para determinar si la bomba desarrollará vacío. Debe tener
entre 5 y 6 pulgadas de vacío en la tapa del colador. Es posible que
pueda comprobarlo retirando la cesta del skimmer y colocando la
mano sobre el puerto inferior con el skimmer lleno y la bomba en
funcionamiento. Si no siente succión, verifique si hay una obstrucción
en la línea.
I. Si la bomba genera vacío, verifique que no haya una línea de succión
bloqueada o sucia.
cesta coladora y un filtro de aire. La causa puede ser una fuga en la
tubería de succión.
J. Si la bomba no desarrolla vacío y la bomba tiene suficiente “agua de
cebado”:
xvii. Vuelva a revisar la cubierta de la carcasa del filtro y todas las
conexiones roscadas para ver si
fugas de succión. Compruebe si todas las abrazaderas de manguera
están ajustado.
xviii. Verifique el voltaje para asegurarse de que el motor esté girando
a máximas RPM.
xix. Abra la tapa de la carcasa y revise la obstrucción u obstrucción en la

- 10 -
succión.
Revise el impulsor en busca de residuos.
xx.Retire y reemplace el sello del eje sólo si tiene fugas.
TROUBLE SHOOTING(CONTINUED)
FLUJO BAJO
Filtro o línea de succión obstruidos o restringidos; tubería de piscina
de tamaño insuficiente.
Línea o filtro de descarga obstruido o restringido, válvula parcialmente
cerrada (lectura de calibre alto) . Cómo corregir: Lave el colador según
las instrucciones del fabricante;
Fuga de aire en la tubería de succión que provoca ruidos en la bomba.
Cavitación debido a una línea de succión restringida o de tamaño
insuficiente o fuga en cualquier junta, bajo nivel de agua en la piscina,
y líneas de retorno de descarga sin restricciones. Corrija la condición
de succión o las líneas de retorno del acelerador, si es práctico.
BOMBA RUIDOSA
Vibración debido a un montaje inadecuado, etc. Coloque una
almohadilla de goma debajo de las patas de montaje de metal.
Materia extraña en la carcasa de la bomba. La causa podría ser
piedras sueltas o escombros que golpeen el impulsor; retire los que
estén arriba.
Los cojinetes del motor hacen ruido debido al desgaste normal, óxido,
calentamiento excesivo, o concentración de productos químicos que
causan daños en el sello, lo que permitirá que el agua clorada se filtre
en los rodamientos, eliminando la grasa y provocando que el
rodamiento chirrie. Todas las fugas en los sellos deben reemplazarse
de inmediato.
Base del equipo vibrando.
Fabricante: Shanghaimuxinmuyeyouxiangongsi
Dirección: Baoshanqu Shuangchenglu 803long 11hao 1602A-1609shi
Shanghai
REPRESENTANTE CE: SHUNSHUN GmbH .

- 11 -
Römeräcker 9 Z2021,76351 Linkenheim-Hochstetten, Alemania
REPRESENTANTE DEL REINO UNIDO: Pooledas Group Ltd.
Unidad 5 Albert Edward House, The Pavilions Preston, Reino Unido
Importado a AUS: SIHAO PTY LTD.
1 ROKEVA STREET ASTWOOD NSW 2122 Australia
Importado a EE. UU.: Sanven Technology Ltd.
Suite 250, 9166 Anaheim Place, Rancho Cucamonga, CA 91730
Hecho en china


- 13 -
Techniczny Certyfikat wsparcia i e-gwarancji
www.vevor.com/support
POMPA DO BASENU
INSTRUKCJA OBSŁUGI
MODEL : HAP750
We continue to be committed to provide you tools with competitive price.
"Save Half", "Half Price" or any other similar expressions used by us only represents an
estimate of savings you might benefit from buying certain tools with us compared to the major
top brands and does not necessarily mean to cover all categories of tools offered by us. You
are kindly reminded to verify carefully when you are placing an order with us if you are
actually saving half in comparison with the top major brands.

- 1 -
MODEL: HAP750
Have product questions? Need technical support? Please feel free to
contact us:
Technical Support and E-Warranty Certificate
www.vevor.com/support
NEED HELP? CONTACT US!
This is the original instruction, please read all manual instructions
carefully before operating. VEVOR reserves a clear interpretation of our
user manual. The appearance of the product shall be subject to the
product you received. Please forgive us that we won't inform you again if
there are any technology or software updates on our product.
SWIMMING POOL PUMP

- 2 -
MAIN PARTS
CZĘŚCI
INSTALLATION
PRZECZYTAJ UWAŻNIE I ZACHOWAJ NINIEJSZĄ INSTRUKCJĘ
OBSŁUGI
UWAGA INSTALATOR – NINIEJSZA INSTRUKCJA ZAWIERA WAŻNE
INFORMACJE DOTYCZĄCE INSTALACJI, OBSŁUGI I BEZPIECZNEGO
UŻYTKOWANIA TEJ POMPY, KTÓRE MUSZĄ BYĆ DOSTARCZONE
UŻYTKOWNIK KOŃCOWY TEGO PRODUKTU. NIEPRZECZYTANIE I
NIEPRZESTRZEGANIE WSZYSTKICH INSTRUKCJI MOŻE
- 3 -
SKUTKOWAĆ W POWAŻNEJ KONTUZJI.
SAFETY PRECAUTIONS
Czytać Ten "Bezpieczeństwo Środki ostrożności" zanim operacja.
The poniżej Informacja powinien nie Być zaniedbany Do the
właściwy _ używać z Ten produkt. Twój zrozumienie Móc
zapobiegać szkoda Lub niebezpieczeństwo Do the użytkownik
Lub inni.
Poniższe informacje są bardzo ważne dla bezpieczeństwa w obsłudze tego
produktu. Koniecznie to przestrzegaj.
NIEBEZPIEC
ZEŃSTWO
Wskazuje bezpośrednio niebezpieczną sytuację, która, jeśli
się jej nie uniknie, spowoduje śmierć lub poważne
obrażenia.
OSTRZEŻENI
E
Wskazuje potencjalnie niebezpieczną sytuację, która,
jeśli się jej nie uniknie, może spowodować śmierć lub
poważne obrażenia .
OSTROŻNOŚ
Ć
Wskazuje potencjalnie niebezpieczną sytuację, która,
jeśli się jej nie uniknie, może skutkować drobnymi lub
umiarkowanymi obrażeniami bądź szkodami
materialnymi .
WAŻNY
OSTRZEŻENIE ZABRONIONE
NIEBEZPIECZEŃSTWO
Trzymaj się z dala od głównego odpływu i wszelkich wylotów ssących.
Pokrywa filtra siatkowego musi być odpowiednio zabezpieczona, aby
zapobiec gwałtownemu rozdzieleniu na skutek ciśnienia w układzie
cyrkulacyjnym.

- 4 -
Przed przystąpieniem do serwisowania wyłącz cały układ cyrkulacji i
sterowanie pompą, upewnij się, że ręczny zawór odpowietrzający
filtra jest w pozycji otwartej i usunięto całe ciśnienie.
Zdecydowanie zaleca się, aby ten produkt był instalowany i
serwisowany przez wykwalifikowanego specjalistę z branży
basenowej .
OSTRZEŻENIE
Wyjmij korki do pomiaru ciśnienia i/lub korki używane podczas
przygotowania basenu/spa do zimy z wyloty ssące. Awaria spowoduje to
zwiększone ryzyko uwięzienia przez zasysanie .
Nie pozwalaj dzieciom bawić się tym produktem.
Przed uruchomieniem pompy systemowej należy ustawić wszystkie
zawory systemowe, aby umożliwić powrót wody systemowej do basenu.
Nie używaj systemu cyrkulacji basenu i spa, jeśli element systemu nie
jest prawidłowo zmontowany, jest uszkodzony lub go brakuje
Przed rozpoczęciem prac przy jakimkolwiek sprzęcie elektrycznym
należy wyłączyć zasilanie tego sprzętu.
Podłączaj tylko do obwodu odgałęzionego zabezpieczonego
wyłącznikiem różnicowo-prądowym (GFCI) .
OSTROŻNOŚĆ
Całe okablowanie elektryczne musi być zgodne z obowiązującymi
przepisami
lokalne przepisy, regulacje i Krajowy Kodeks Elektryczny (NEC)
Zdecydowanie zaleca się ochronę elementów elektrycznych przed
bezpośrednim działaniem promieni słonecznych, chociaż pompa jest
przeznaczona do użytku na zewnątrz.
Umieść pompę w dobrze osuszonym miejscu, które nie zostanie zalane
podczas deszczu.
W przypadku instalacji w zewnętrznej obudowie lub pod krawędzią
wanny z hydromasażem lub spa, należy zapewnić odpowiednią
- 5 -
wentylację i swobodną cyrkulację powietrza, aby zapobiec
przegrzaniu .
Nie instaluj tej pompy w wilgotnym lub niewentylowanym miejscu.
Wymaga swobodnej cyrkulacji powietrza do chłodzenia.
Nie uruchamiaj pompy na sucho. Woda pełni rolę chłodziwa i smaru dla
wału mechanicznego foka. Praca pompy na sucho może spowodować
uszkodzenie uszczelek, co może spowodować wycieki, zalanie i
unieważnienie gwarancji. Przed uruchomieniem silnika napełnij
obudowę filtra siatkowego wodą.
INSTALLATION
Obracać się the wentylator ostrze zanim
uruchomienie, sprawdź czy the pompa obrót Jest
elastyczny, zatem odkręcić the napełnianie
wodą podłącz, napełnij the pompa izba z czysty
woda z the Wtrysk wody _ dziura, wtedy
dokręcać the wtyczka śruba Po the powietrze ma
został całkowicie rozładowany. Ustaw _ _ zawór
Do A mniejszy woda przepływ Kiedy rozpocznij
pracę i Następnie regulować Do twój wymagany
woda przepływ Po woda rozładowywanie .
Przed przystąpieniem do serwisowania wszystkie systemy obiegu

- 6 -
wody i elementy sterujące pomp muszą być wyłączone, aby uwolnić
całe ciśnienie z układu.
OSTRZEŻENIE : Ten produkt powinien Być zainstalowany I podawać
mrożone przez A wykwalifikowany basen profesjonalny .
Ten pompa Jest zgodny z nad ziemią totalizator piłkarski I uzdrowiska.
Znajdź the pompa Jak zamknąć Do the basen I woda poziom Jak możliwy .
Do nie dodać zbyt wiele łokieć Rury W on _ instalacja wodociągowa Więc
Jak Do unikać ssanie zmniejszenie. To Jest wysoko Zalecana To the pompa
Być umieszczony W Fajny, suchy miejsca I unikać bezpośredni światło
słoneczne. zainstalować the pompa NA A solidny, poziom baza Lub
Podkładka Do poznać Wszystko lokalny I krajowy kody . Zapiąć the pompa
Do A baza Lub Podkładka z śruby Lub śruby Do dalej redukować wibracje i
naprężenia na złączach rur lub węży. Podstawa musi być solidna, równa,
sztywna i pozbawiony wibracji.
OSTRZEŻENIE : Trzymać produkt z dala z Dzieci.
Używać Teflon taśma NA the nitka zanim śruba armatura Do pompa wlot I
wylot porty Więc Jak Do unikać przeciek . Do nie ponad - około dziesiątej the
armatura.

- 7 -
Akcesorium:
1: Instrukcja
adaptera NPT 1-1/2 ” .
3: 2 sztuki adapterów 48,5 mm (ID).
4:1 rolka taśmy PTFE.
Pompa wypisać Port Móc Być _ obrócony poziomy:
Zdjąć pokrywę pompy i filtr siatkowy.
Usuń zacisk C (część nr 4 na liście części).
Wymontuj korpus filtra siatkowego pompy z obudowy pompy.
Odkręcić śruby.
Obróć króciec wylotowy tak, aby był poziomy.
Wkręć ponownie śruby.
Zamontuj ponownie korpus filtra pompy.
Zapnij klamrę C.
Włóż filtr siatkowy z powrotem do korpusu filtra pompy.
Zamocuj pokrywę pompy
SPECIFICATIONS
Model
HAP750
Wejście
AC 110-120 V 60 Hz
Moc
1,0 KM
Maks. głowa
11 m (36 stóp)
Maks. przepływ
80 GPM

- 8 -
Temperatura wody roboczej
0-50 ℃ (32 ℉ -122 ℉)
Kaliber wlotowy/wylotowy
NPT 1-1/2
Upewnij się, że dostępne zasilanie elektryczne jest odpowiednie dla
napięcia, fazy i cyklu silnika.
Napięcie z sieci musi mieścić się w zakresie od 90% do 110% napięcia
znamionowego silnika z tabliczki znamionowej. W przeciwnym razie silnik
może się przegrzać, co może skutkować wyłączeniem przeciążeniowym i
skróceniem żywotności podzespołów.
Zamontować, uziemić, połączyć i okablować silnik zgodnie z wymaganiami
lokalnymi lub NEC.
Silnik powinien być trwale uziemiony poprzez podłączenie zacisku
uziemiającego do uziemienia elektrycznego.
Połącz silnik ze strukturą basenu. Klejenie połączy wszystkie metalowe
części wewnątrz i wokół basenu za pomocą ciągłego drutu. Klejenie
zmniejsza ryzyko przepływu prądu pomiędzy łączonymi metalowymi
obiektami, co mogłoby potencjalnie spowodować porażenie prądem w
przypadku uziemienia lub zwarcia.
PRIMING
Napełnij obudowę filtra siatkowego wodą do poziomu rury ssącej. Jeżeli
nastąpi wyciek wody w dowolnym miejscu pompy lub filtra, NIE WOLNO
uruchamiać pompy. Jeżeli nie nastąpi wyciek, należy stanąć w odległości
co najmniej 3 metrów od pompy i/lub filtra i przystąpić do uruchomienia
pompy.
TROUBLE SHOOTING
SILNIK BĘDZIE NIE POCZĄTEK
Niewłaściwe lub luźne połączenia przewodów; otwarte przełączniki lub
przekaźniki; zadziałały wyłączniki automatyczne, GFC lub przepalone
bezpieczniki.

- 9 -
Ręcznie sprawdź obroty wału silnika za darmo ruch i brak przeszkód.
Jeśli masz timer, upewnij się, że działa prawidłowo. Pomiń go, jeśli to
konieczne.
SILNIK WYŁĄCZA SIĘ
Niewymiarowe okablowanie; luźne połączenia; itp.
Niskie napięcie na silniku lub spadek mocy (często spowodowany zbyt
małym okablowaniem lub użyciem przedłużacza).
SILNIK BRZMI, ALE NIE URUCHAMIA SIĘ
Wiązanie mechaniczne i przeciążenie elektryczne.
Przełącznik odśrodkowy utknął w pozycji OTWARTE.
Wiązanie wału silnika.
POMPA NIE NAPEŁNIA
Upewnij się, że obudowa filtra siatkowego pompy jest wypełniona
wodą, a uszczelka typu O-ring pokrywy jest czysta; upewnij się także,
że jest prawidłowo osadzona w rowku O-ringu pokrywy. Upewnij się,
że pokrywa filtra siatkowego jest dobrze zamocowana i nasmarowana
środkiem „Jack's 327”.
Upewnij się, że wszystkie zawory ssące i tłoczne są całkowicie otwarte
i niezatkane, że poziom wody w basenie jest na odpowiednim
poziomie oraz że jaz odpieniacza nie jest zawieszony lub przyklejony
do ścianki odpieniacza
Zablokuj, aby sprawdzić, czy w pompie będzie wytwarzana próżnia.
Na pokrywie filtra siatkowego powinieneś uzyskać podciśnienie
wynoszące 5–6 cali. Możesz to sprawdzić, wyjmując koszyk skimmera
i trzymając rękę nad dolnym portem, gdy skimmer jest pełny i pracuje
pompa. Jeśli nie czuje się ssania, sprawdź, czy przewód nie jest
zablokowany.
K. Jeśli w pompie wytworzy się podciśnienie, sprawdź, czy przewód
ssawny nie jest zablokowany lub zanieczyszczony
kosz sitkowy i dopływ powietrza przyczyną może być nieszczelność
przewodu ssawnego.
L. Jeśli pompa nie wytworzy podciśnienia i pompa ma wystarczający
„woda gruntująca”:
xxi. Ponownie sprawdź pokrywę obudowy filtra siatkowego i wszystkie

- 10 -
połączenia gwintowe
nieszczelności ssania. Sprawdź, czy wszystkie zaciski węża są obcisły.
xxii. Sprawdź napięcie, aby upewnić się, że silnik obraca się z pełną
prędkością obrotową.
xxiii. Otwórz pokrywę obudowy i sprawdź zatkanie lub niedrożność
zasysania.
Sprawdź wirnik pod kątem zanieczyszczeń.
xxiv. Zdemontuj i wymień uszczelkę wału tylko wtedy, gdy jest
nieszczelna.
TROUBLE SHOOTING(CONTINUED)
NISKI PRZEPŁYW
Zatkany lub zatkany filtr siatkowy lub przewód ssący; zbyt małe rury
basenowe.
Zatkana lub zatkana linia tłoczna lub filtr, zawór częściowo zamknięty
(odczyt wysokiego wskaźnika) . Sposób naprawy: Sitko płukania
wstecznego zgodnie z instrukcją producenta;
Wyciek powietrza w rurociągu ssącym powodujący dudnienie w
pompie.
Kawitacja spowodowana ograniczonym lub zbyt małym przewodem
ssawnym lub nieszczelnością na dowolnym złączu, niski poziom wody
w basenie, i nieograniczone linie powrotne odprowadzające. Popraw
warunki ssania lub przewody powrotne przepustnicy, jeśli jest to
praktyczne.
GŁOŚNA POMPA
Wibracje spowodowane nieprawidłowym montażem, itp. Umieść
gumową podkładkę pod metalowymi nóżkami montażowymi.
Ciała obce w obudowie pompy. Przyczyną mogą być luźne
kamienie/zanieczyszczenia uderzające w wirnik; usuń powyższe.
Łożyska silnika hałasują w wyniku normalnego zużycia, rdza,
przegrzanie, lub stężenie środków chemicznych powodujących
uszkodzenie uszczelnienia, co umożliwi przedostanie się chlorowanej
wody do łożysk i wytarcie smaru, powodując pisk łożyska. Wszystkie
nieszczelności uszczelek należy natychmiast wymieniać.

- 11 -
Wibrująca podstawa urządzenia.
Producent: Shanghaimuxinmuyeyouxiangongsi
Adres: Baoshanqu Shuangchenglu 803long 11hao 1602A-1609shi
Szanghaj
Przedstawiciel WE: SHUNSHUN GmbH .
Römeräcker 9 Z2021,76351 Linkenheim-Hochstetten, Niemcy
REPUBLIKA WIELKIEJ BRYTANII: Pooledas Group Ltd.
Jednostka 5 Albert Edward House, The Pavilions Preston, Wielka Brytania
Tel: 01772418127pooledas123@gmail.com
Import do AUS: SIHAO PTY LTD.
1 ROKEVA STREETEASTWOOD NSW 2122 Australia
Import do USA: Sanven Technology Ltd.
Apartament 250, 9166 Anaheim Place, Rancho Cucamonga, Kalifornia
91730
Wyprodukowano w Chinach


- 13 -
Technisch Ondersteuning en e-garantiecertificaat
www.vevor.com/support
ZWEMBADPOMP _
HANDLEIDING
MODEL : HAP750
We continue to be committed to provide you tools with competitive price.
"Save Half", "Half Price" or any other similar expressions used by us only represents an
estimate of savings you might benefit from buying certain tools with us compared to the major
top brands and does not necessarily mean to cover all categories of tools offered by us. You
are kindly reminded to verify carefully when you are placing an order with us if you are
actually saving half in comparison with the top major brands.
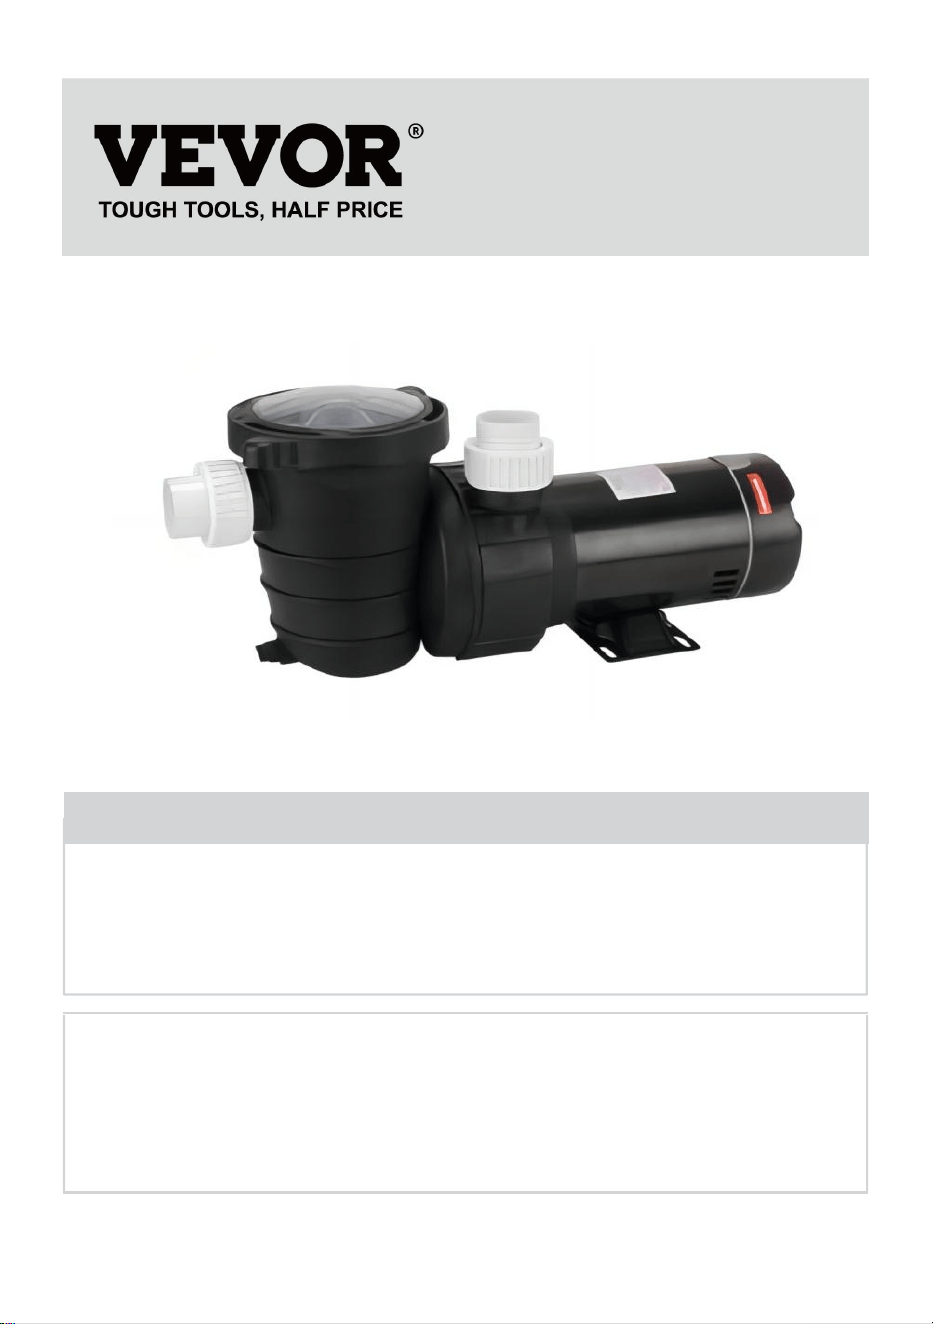
- 1 -
MODEL: HAP750
Have product questions? Need technical support? Please feel free to
contact us:
Technical Support and E-Warranty Certificate
www.vevor.com/support
NEED HELP? CONTACT US!
This is the original instruction, please read all manual instructions
carefully before operating. VEVOR reserves a clear interpretation of our
user manual. The appearance of the product shall be subject to the
product you received. Please forgive us that we won't inform you again if
there are any technology or software updates on our product.
SWIMMING POOL PUMP

- 2 -
MAIN PARTS
ONDERDELEN
INSTALLATION
LEES DEZE HANDLEIDING ZORGVULDIG DOOR EN BEWAAR DEZE
HANDLEIDING
LET OP INSTALLATEUR: DEZE HANDLEIDING BEVAT BELANGRIJKE
INFORMATIE OVER DE INSTALLATIE, BEDIENING EN VEILIG
GEBRUIK VAN DEZE POMP DIE MOET WORDEN GELEVERD
DE EINDGEBRUIKER VAN DIT PRODUCT. HET NIET LEZEN EN
VOLGEN VAN ALLE INSTRUCTIES KAN RESULTEREN BIJ ERNSTIG
- 3 -
LETSEL.
SAFETY PRECAUTIONS
Lezen dit "Veiligheid Voorzorgsmaatregelen" voor operatie.
De onderstaand informatie zou moeten niet zijn verwaarloosd
voor de juist _ gebruik van dit Product. Jouw begrip kan
voorkomen leed of Gevaar naar de gebruiker of anderen.
De volgende informatie is erg belangrijk voor de veiligheid bij het omgaan
met dit product. Zorg ervoor dat u het observeert.
GEVAAR
Geeft een onmiddellijk gevaarlijke situatie aan die, als deze
niet wordt vermeden, zal resulteren in de dood of ernstig
letsel.
WAARSCHU
WING
Geeft een potentieel gevaarlijke situatie aan die, als
deze niet wordt vermeden, kan leiden tot de dood of
ernstig letsel .
VOORZICHTI
GHEID
Geeft een mogelijk gevaarlijke situatie aan die, als
deze niet wordt vermeden, kan leiden tot licht of
middelmatig letsel of materiële schade .
BELANGRIJ
K
VERBODEN WAARSCHUWING
GEVAAR
Blijf uit de buurt van de hoofdafvoer en uit de buurt van alle
aanzuigopeningen.
Het zeefdeksel moet goed worden vastgezet om gewelddadige
scheiding als gevolg van druk in het circulatiesysteem te voorkomen.
Schakel vóór het uitvoeren van onderhoudswerkzaamheden alle
bedieningselementen van het circulatiesysteem en de pomp uit, zorg
- 4 -
ervoor dat de handmatige ontluchtingsklep van het filter in de open
stand staat en dat alle druk is ontlast.
Het wordt ten zeerste aanbevolen om dit product te laten installeren
en onderhouden door een gekwalificeerde zwembadprofessional .
WAARSCHUWING
Verwijder de druktestpluggen en/of pluggen die worden gebruikt bij het
winterklaar maken van het zwembad/spa uit de zuigopeningen.
Mislukking dit wel doen zal resulteren in een grotere kans op
zuiginsluiting .
Laat kinderen niet met dit product spelen.
Voordat u de systeempomp start, moeten alle systeemkleppen zo worden
ingesteld dat het systeemwater naar het zwembad kan terugkeren.
Gebruik het circulatiesysteem van het zwembad en de spa niet als een
systeemonderdeel niet goed is gemonteerd, beschadigd is of ontbreekt
Voordat u aan elektrische apparatuur gaat werken, moet u de
stroomtoevoer naar de apparatuur uitschakelen.
Alleen aansluiten op een vertakt circuit dat is beveiligd door een
aardlekschakelaar (GFCI) .
VOORZICHTIGHEID
Alle elektrische bedrading moet in overeenstemming zijn met de
toepasselijke normen
lokale codes, regelgeving en de National Electric Code (NEC)
Het wordt ten zeerste aanbevolen om de elektrische componenten te
beschermen tegen direct zonlicht, hoewel deze pomp is ontworpen
voor gebruik buitenshuis.
Plaats deze pomp in een goed gedraineerde ruimte, een ruimte die niet
onder water komt te staan als het regent.
Indien geïnstalleerd in een buitenruimte of onder de rand van een hot
tub of spa, moet er voor voldoende ventilatie en vrije luchtcirculatie
worden gezorgd om oververhitting te voorkomen .

- 5 -
Installeer deze pomp niet op een vochtige of niet-geventileerde locatie.
Voor koeling is vrije luchtcirculatie vereist.
Laat de pomp niet drooglopen. Water fungeert als koel- en
smeermiddel voor de mechanische as zegel. Als u de pomp droog laat
draaien, kunnen de afdichtingen beschadigd raken, waardoor lekkage
en overstroming ontstaat, en vervalt de garantie. Vul het zeefhuis met
water voordat u de motor start.
INSTALLATION
Draaien de fan blad voor opstarten, controleren
of de pomp rotatie is flexibel dus losschroeven
de watervullend stekker, vullen de pomp kamer
met schoon water van de Water injectie _ gat
dan vastdraaien de plug schroef na de lucht
heeft geweest volledig afgevoerd. Stel de _
ventiel voor A kleiner water stroom wanneer
opstarten , en Dan aanpassen naar jouw vereist
water stroom na water ontladen .
Voordat u onderhoud uitvoert, moeten alle watercirculatiesystemen
en pompbedieningen uit de stand staan om alle druk uit het systeem
te laten ontsnappen.
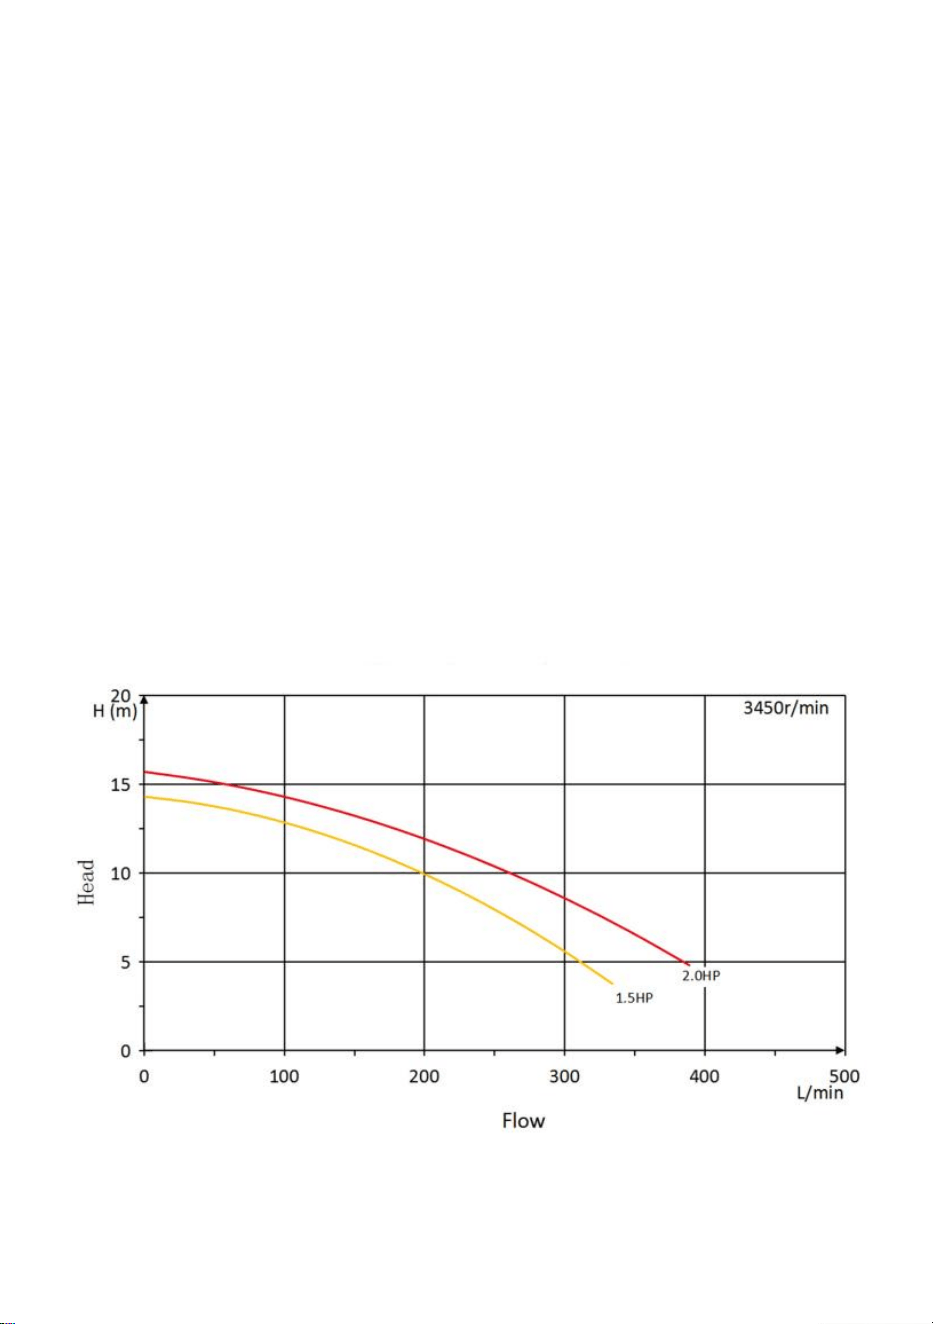
- 6 -
WAARSCHUWING : Dit Product zou moeten zijn geïnstalleerd En
geserveerd _ door A gekwalificeerd zwembad professioneel .
Dit pomp is verenigbaar met bovengronds zwembaden En kuuroorden.
bevind zich de pomp als dichtbij naar de zwembad En water niveau als
mogelijk . Doen niet toevoegen te veel elleboog pijpen in de _ loodgieter
Dus als naar voorkomen zuigkracht afname. Het is zeer aanbevolen Dat de
pomp zijn geplaatst in koel, droog plaatsen En voorkomen direct zonlicht.
Installeren de pomp op A stevig, niveau baseren of stootkussen naar
ontmoeten alle lokaal En nationaal codes . Vastmaken de pomp naar A
baseren of stootkussen met schroeven of bouten naar verder verminderen
trillingen en spanning op pijp- of slangverbindingen. De basis moet stevig,
vlak, stijf en stevig zijn trillingsvrij.
WAARSCHUWING : Houden Product ach ja van Kinderen.
Gebruik Teflon plakband op de draad voor schroef uitrusting naar pomp inlaat
En uitlaat havens Dus als naar voorkomen lekkage . Doen niet ruim tien _ _ de
uitrusting.
Accessoire:
1: Handleiding
2: 2 stuks NPT 1-1/2 ” -adapter
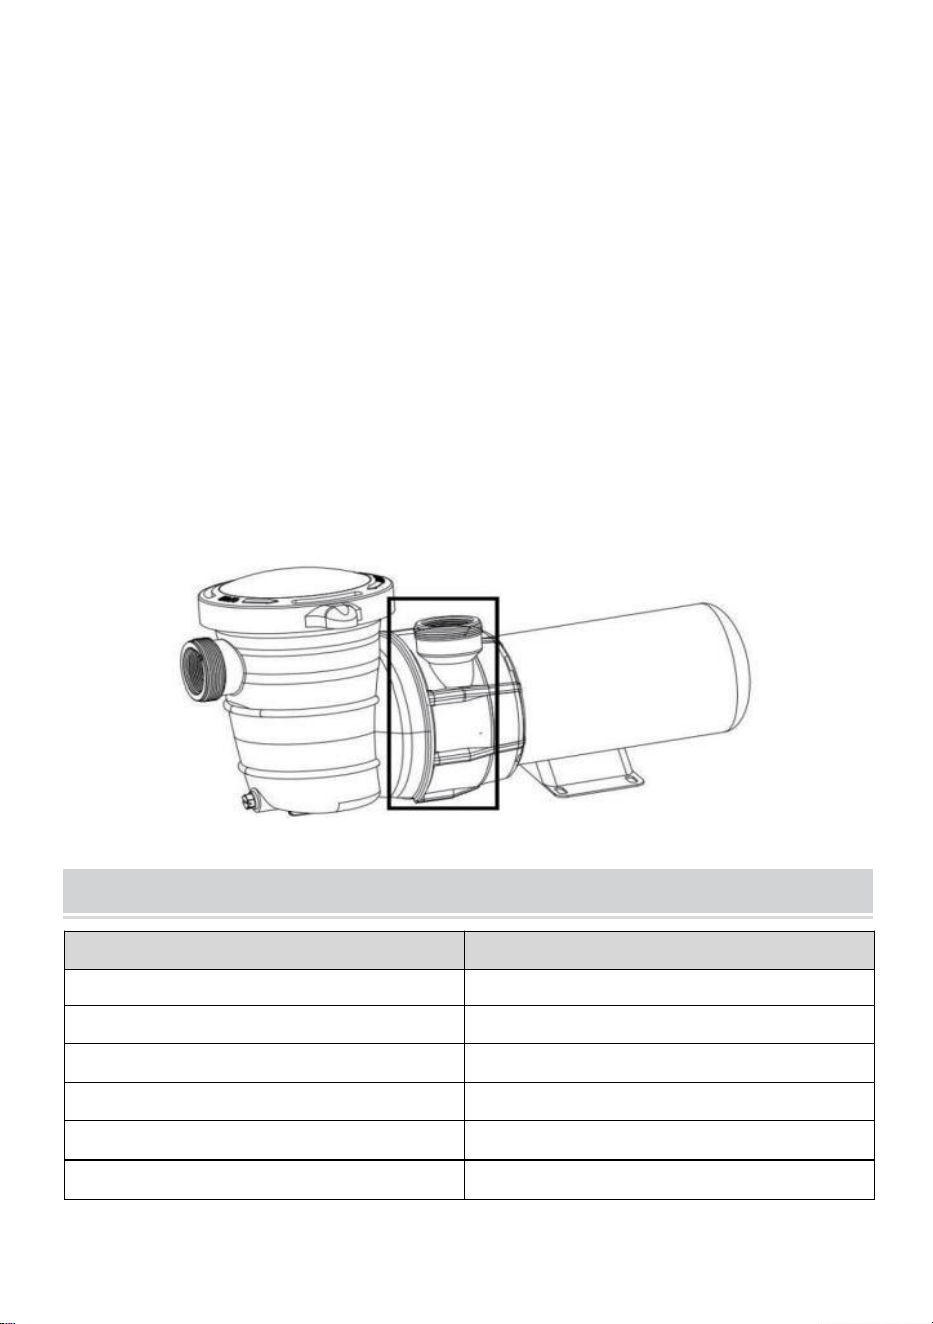
- 7 -
3: 2 stuks adapter van 48,5 mm (ID).
4: 1 rol PTFE-tape.
Pomp afvoer haven kan zijn _ draaide horizontaal:
Verwijder het pompdeksel en de zeef.
Verwijder de C- clip (onderdeelnr. 4 in de onderdelenlijst).
Verwijder het pompzeeflichaam uit het pomphuis.
Draai de bouten los.
Draai de afvoerpoort horizontaal.
Draai de bouten terug.
Installeer het pompzeefhuis opnieuw.
Maak de C- clip vast.
Plaats de zeef terug in het zeefhuis van de pomp.
Pompdeksel vastmaken
SPECIFICATIONS
Model
HAP750
Invoer
AC110-120V 60Hz
Stroom
1,0 pk
Max. hoofd
11 m (36 voet)
Max. stroom
80 GPM
Werkwatertemperatuur
0-50℃ (32℉-122℉)
Inlaat/uitlaat kaliber
NPT 1-1/2

- 8 -
Zorg ervoor dat de beschikbare elektrische voeding geschikt is voor de
spanning, fase en cyclus van de motor.
De spanning van de voeding moet binnen het bereik van 90% tot 110% van
de nominale spanning op het motortypeplaatje liggen. Anders kan de motor
oververhit raken, wat kan leiden tot uitschakeling door overbelasting en
een kortere levensduur van de componenten.
Installeer, aard, verbind en bedraad de motor in overeenstemming met de
lokale of NEC-vereisten.
De motor moet permanent worden geaard door de aardklem aan te sluiten
op de elektrische serviceaarde.
Verbind de motor met de zwembadstructuur. Bij het verlijmen worden alle
metalen onderdelen in en rond het zwembad met een doorlopende draad
verbonden. Door het verbinden wordt het risico verminderd dat er stroom
loopt tussen verbonden metalen voorwerpen, wat mogelijk een elektrische
schok kan veroorzaken als deze geaard of kortgesloten is.
PRIMING
Vul het zeefhuis met water tot aan het niveau van de zuigleiding. Als er
ergens op de pomp of het filter water lekt, start de pomp dan NIET. Als er
geen lekkage optreedt, ga dan minstens 3 meter van de pomp en/of het
filter staan en ga verder met het starten van de pomp.
TROUBLE SHOOTING
MOTOR ZULLEN NIET BEGIN
Onjuiste of losse bedradingsverbindingen; open schakelaars of relais;
gesprongen stroomonderbrekers, aardlekschakelaars of gesprongen
zekeringen.
Controleer gratis handmatig de rotatie van de motoras beweging en
gebrek aan obstructie.
Als u een timer heeft, zorg er dan voor dat deze goed werkt. Omzeil
deze indien nodig.
MOTOR WORDT UITGESCHAKELD

- 9 -
Ondermaatse bedrading; losse verbindingen; enz.
Lage spanning bij de motor of stroomuitval (vaak veroorzaakt door te
kleine bedrading of gebruik van verlengsnoeren).
MOTOR ZOMERT MAAR START NIET
Mechanische binding en elektrische overbelasting.
Centrifugaalschakelaar zit vast in de OPEN-positie.
Binding van de motoras.
POMP WIL NIET VULLEN
Zorg ervoor dat de behuizing van de pompzeef gevuld is met water en
dat de O-ring van het deksel schoon is; zorg er ook voor dat deze
goed in de O-ringgroef van het deksel zit. Zorg ervoor dat het
zeefdeksel stevig op zijn plaats zit en gesmeerd is met “Jack's 327”.
Zorg ervoor dat alle zuig- en afvoerkleppen volledig open zijn en niet
geblokkeerd zijn, dat het zwembadwaterniveau op het juiste niveau is
en dat de skimmerstuw niet aan de skimmerwand hangt of vastzit
Sluit af om te bepalen of de pomp een vacuüm zal ontwikkelen. Er
moet een vacuüm van 5 tot 15 cm zijn bij het zeefdeksel. U kunt dit
mogelijk controleren door het skimmermandje te verwijderen en uw
hand boven de onderste poort te houden terwijl de skimmer vol is en
de pomp draait. Als u geen zuigkracht voelt, controleer dan of de
leiding verstopt is.
M. Als de pomp een vacuüm ontwikkelt, controleer dan of de zuigleiding
verstopt of vuil is
zeefmand en een lucht lekkage in de aanzuigleiding kan de oorzaak zijn.
N. Als de pomp geen vacuüm ontwikkelt en de pomp heeft voldoende
“aanzuigwater”:
xxv. Controleer het zeefhuisdeksel en alle schroefdraadverbindingen
opnieuw
zuiglekken. Controleer of alle slangklemmen aanwezig zijn nauw.
xxvi. Controleer de spanning om er zeker van te zijn dat de motor op
vol toerental draait.
xxvii. Open het behuizingsdeksel en controleer verstopping of obstructie
in de aanzuiging.
Controleer de waaier op vuil.

- 10 -
xxviii. Verwijder en vervang de asafdichting alleen als deze lekt.
TROUBLE SHOOTING(CONTINUED)
LAGE STROOM
Verstopte of beperkte zeef of zuigleiding; te kleine zwembadleidingen.
Verstopte of beperkte afvoerleiding of filter, klep gedeeltelijk gesloten
(hoge meetwaarde) . Hoe te corrigeren: Terugspoelzeef volgens de
instructies van de fabrikant;
Luchtlekkage in de aanzuigleiding, waardoor gerommel in de pomp
ontstaat.
Cavitatie als gevolg van een beperkte of te kleine zuigleiding of
lekkage bij een verbinding, laag waterniveau in het zwembad, en
onbeperkte afvoerretourleidingen. Correcte aanzuigconditie of
gasretourleidingen, als het praktisch is.
Lawaaierige pomp
Trillingen door onjuiste montage, enz. Plaats een rubberen kussentje
onder de metalen montagevoeten.
Vreemd materiaal in het pomphuis. Losse stenen/puin die de waaier
raken, kunnen de oorzaak zijn; verwijder bovenstaande.
Motorlagers maken lawaai door normale slijtage, Roest, oververhitting,
of concentratie van chemicaliën die schade aan de afdichting
veroorzaken, waardoor gechloreerd water in de lagers kan sijpelen en
het vet wordt weggeveegd, waardoor de lagers gaan janken. Alle
afdichtingslekken moeten onmiddellijk worden vervangen.
Apparatuurbasis trilt.
Fabrikant: Shanghaimuxinmuyeyouxiangongsi
Adres: Baoshanqu Shuangchenglu 803long 11hao 1602A-1609shi
Shanghai
EG-REP: SHUNSHUN GmbH .
Römeräcker 9 Z2021,76351 Linkenheim-Hochstetten, Duitsland
VK REP: Pooledas Group Ltd.
Eenheid 5 Albert Edward House, The Pavilions Preston, Verenigd

- 11 -
Koninkrijk
Geïmporteerd naar AUS: SIHAO PTY LTD.
1 ROKEVA STREETEASTWOOD NSW 2122 Australië
Geïmporteerd naar de VS: Sanven Technology Ltd.
Suite 250, 9166 Anaheim Place, Rancho Cucamonga, CA 91730
Gemaakt in China


- 13 -
Teknisk Support och e-garanticertifikat
www.vevor.com/support
SIMPASSPUMPA _
ANVÄNDARMANUAL
MODELL : HAP750
We continue to be committed to provide you tools with competitive price.
"Save Half", "Half Price" or any other similar expressions used by us only represents an
estimate of savings you might benefit from buying certain tools with us compared to the major
top brands and does not necessarily mean to cover all categories of tools offered by us. You
are kindly reminded to verify carefully when you are placing an order with us if you are
actually saving half in comparison with the top major brands.

- 1 -
MODELL: HAP750
Have product questions? Need technical support? Please feel free to
contact us:
Technical Support and E-Warranty Certificate
www.vevor.com/support
NEED HELP? CONTACT US!
This is the original instruction, please read all manual instructions
carefully before operating. VEVOR reserves a clear interpretation of our
user manual. The appearance of the product shall be subject to the
product you received. Please forgive us that we won't inform you again if
there are any technology or software updates on our product.
SWIMMING POOL PUMP

- 2 -
MAIN PARTS
DELAR
INSTALLATION
LÄS NOGGRANT OCH SPARA DENNA BRUKSANVISNING
OBSERVERA INSTALLATÖR – DENNA MANUAL INNEHÅLLER VIKTIG
INFORMATION OM INSTALLATION, DRIFT OCH SÄKER ANVÄNDNING
AV DENNA PUMP SOM MÅSTE TILLHANDAHÅLLAS FÖR
SLUTANVÄNDAREN AV DENNA PRODUKT. UNDERLÄSNING ATT LÄSA
OCH FÖLJA ALLA INSTRUKTIONER KAN RESULTAT VID ALLVARLIG
SKADA.
- 3 -
SAFETY PRECAUTIONS
Läsa detta "Säkerhet Försiktighetsåtgärder" innan drift.
De Nedan information skall inte vara försummad för de pro per
använda sig av av detta produkt. Din förståelse burk förhindra
skada eller fara till de användare eller andra.
Följande information är mycket viktig för säkerheten vid hantering av
denna produkt. Var noga med att observera det.
FARA
Indikerar en överhängande farlig situation som, om den inte
undviks, kommer att resultera i dödsfall eller allvarlig skada.
VARNING
Indikerar en potentiellt farlig situation som, om den inte
undviks, kan resultera i dödsfall eller allvarlig skada .
VARNING
Indikerar en potentiellt farlig situation som, om den
inte undviks, kan resultera i mindre eller måttlig
personskada eller egendomsskada .
VIKTIG
FÖRBJUDET VARNING
FARA
Håll dig borta från huvudavloppet och borta från alla suguttag.
Silkåpan måste vara ordentligt fastsatt för att förhindra våldsam
separation på grund av tryck i cirkulationssystemet.
Före service, stäng av alla cirkulationssystem och pumpkontroller, se
till att filtrets manuella luftavlastningsventil är i öppet läge och att allt
tryck är avlastat.
Det rekommenderas starkt att denna produkt installeras och servas
av en kvalificerad poolpersonal .
- 4 -
VARNING
Ta bort trycktestpluggar och/eller pluggar som används vid vinterisering
av poolen/spaet från suguttag. Fel att göra det kommer att resultera i en
ökad potential för suginstängning .
Tillåt inte barn att leka med denna produkt.
Innan systempumpen startas måste alla systemventiler ställas in så att
systemvattnet kan återvända till poolen.
Använd inte pool- och spacirkulationssystemet om en systemkomponent
inte är korrekt monterad, skadad eller saknas
Innan du arbetar med någon elektrisk utrustning, stäng av
strömförsörjningen till utrustningen.
Anslut endast till en grenkrets som skyddas av en jordfelsbrytare (GFCI) .
VARNING
Alla elektriska ledningar måste överensstämma med gällande
lokala koder, föreskrifter och National Electric Code (NEC)
Det rekommenderas starkt att skydda de elektriska komponenterna
från direkt solljus även om denna pump är designad för utomhusbruk.
Placera denna pump i ett väldränerat område, ett som inte kommer att
svämma över när det regnar.
Om den installeras i ett yttre hölje eller under kjolen på en badtunna
eller spa, måste tillräcklig ventilation och fri luftcirkulation
tillhandahållas för att förhindra överhettning .
Installera inte denna pump på en fuktig eller icke-ventilerad plats. Den
kräver fri luftcirkulation för kylning.
Kör inte pumpen torr. Vatten fungerar som kylmedel och smörjmedel för
den mekaniska axeln täta. Att köra pumpen torr kan skada tätningar,
orsaka läckage, översvämning och ogiltigförklara garantin. Fyll silhuset
med vatten innan motorn startas.
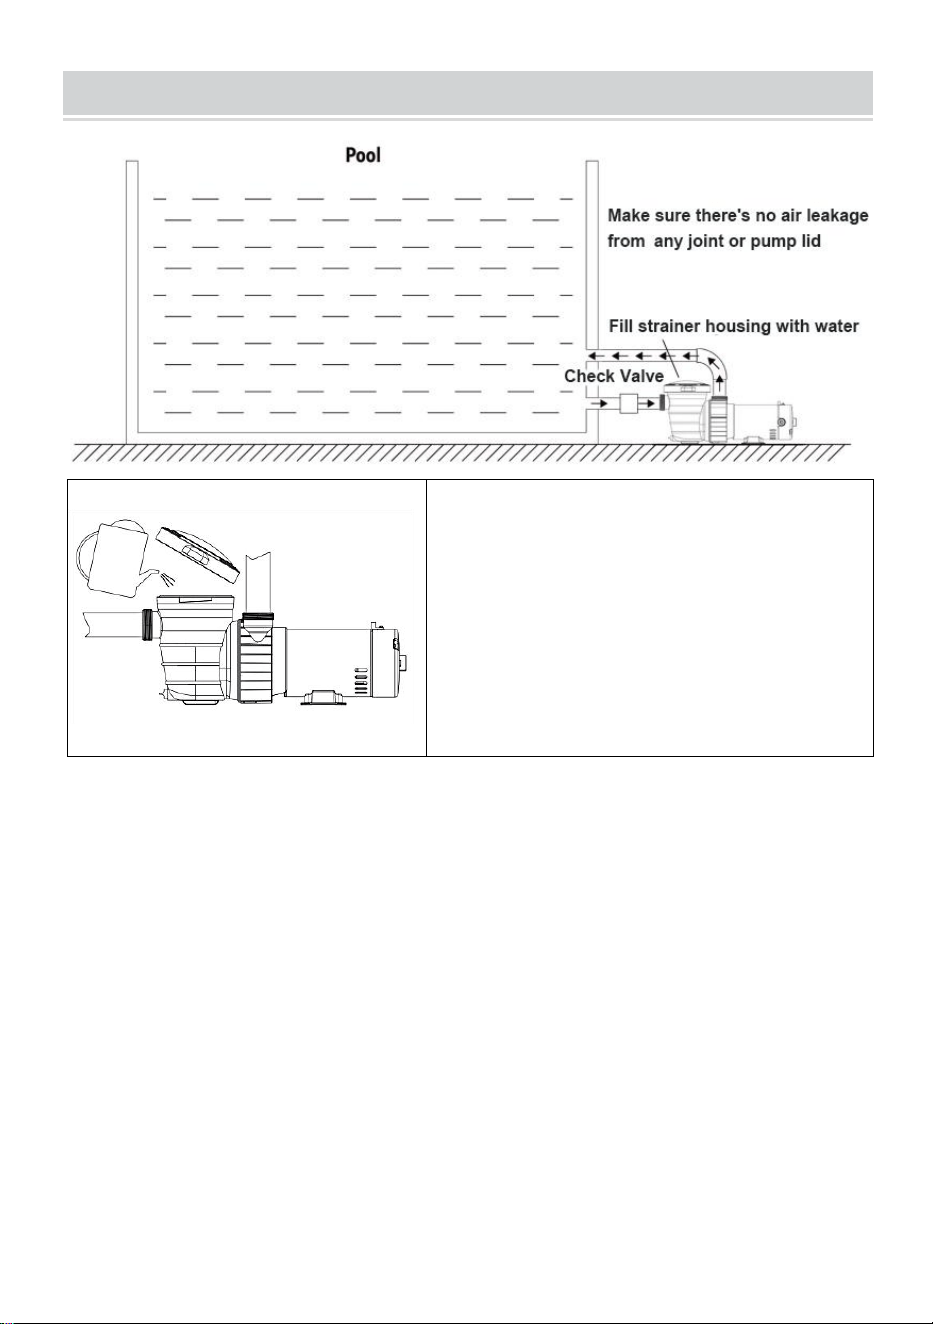
- 5 -
INSTALLATION
Rotera de fläkt blad innan uppstart, kolla
huruvida de pump rotation är flexibel alltså
skruva loss de vattenfyllning plugga, fyll på de
pump kammare med rena vatten från de vatten
i injektion hål alltså spänna de plugg skruva efter
de luft har varit fullständigt urladdat. Ställ in han
ventil för a mindre vatten flöde när starta i ng-up,
och sedan justera till din nödvändig vatten flöde
efter vatten urladdning .
Före service måste alla vattencirkulationssystem och pumpkontroller
vara avstängda för att släppa ut allt tryck från systemet.
VARNING : Detta produkt skall vara installerat och servera iskallt förbi a
kvalificerad slå samman professionella .
Detta pump är kompatibel med ovan jord pooler och spa. Lokalisera de
pump som stänga till de slå samman och vatten nivå som möjligt . Do inte
Lägg till för många armbåge rör i t han VVS så som till undvika sugning
minskning. Det är i hög grad rekommenderad den där de pump vara
placerad i Häftigt, torr platser och undvika direkt solljus. Installera de pump
på a fast, nivå bas eller vaddera till träffa Allt lokal och nationell koder .
Fästa de pump till a bas eller vaddera med skruvar eller bultar till minska
ytterligare vibrationer och påfrestningar på rör- eller slangskarvar. Basen
- 6 -
måste vara solid, jämn, styv och vibrationsfri.
VARNING : Ha kvar produkt åååå _ från Barn.
Använda sig av Teflon tejp på de tråd innan skruva beslag till pump inlopp och
utlopp hamnar så som till undvika läckage . Do inte över - tight tio de beslag.
Tillbehör:
1: Manual
2: 2 st NPT 1-1/2 ” adapter
3: 2 st 48,5 mm (ID) adapter
4: 1 rulle PTFE-tejp.
Pump ansvarsfrihet hamn burk b e vände horisontell:
Ta bort pumplocket och silen.
Ta bort C- klämman (del # 4 i reservdelslistan).
Ta bort pumpsilkroppen från pumphuset.
Skruva loss bultarna.
Vrid utloppsporten så att den är horisontell.
Skruva tillbaka bultarna.
Sätt tillbaka pumpsilkroppen.
Spänn fast C- klämman.
- 7 -
Sätt tillbaka silen i pumpsilkroppen.
Fäst pumplocket
SPECIFICATIONS
Modell
HAP750
Inmatning
AC110-120V 60Hz
Kraft
1,0 hk
Max. huvud
11 m (36 fot)
Max. flöde
80 GPM
Arbetsvattentemperatur
0-50℃(32℉-122℉)
Inlopp/utlopp kaliber
NPT 1-1/2
Se till att den tillgängliga elförsörjningen är lämplig för motorns spänning,
fas och cykel.
Spänningen från strömmen måste ligga i intervallet från 90 % till 110 % av
motorns märkspänning. Annars kan motorn överhettas och resultera i
överbelastningsutlösning och minskad komponentlivslängd.
Installera, jorda, binda och trådmotor i enlighet med lokala eller NEC-krav.
Motorn ska jordas permanent genom att ansluta jordterminalen till den
elektriska servicejorden.
Bind motorn till poolstrukturen. Bonding kommer att ansluta alla
metalldelar i och runt poolen med en kontinuerlig tråd. Limning minskar
risken för att ström passerar mellan bundna metallföremål, vilket kan

- 8 -
orsaka elektriska stötar om de jordas eller kortsluts.
PRIMING
Fyll silhuset med vatten till sugrörets nivå. Om vattenläckage uppstår
någonstans på pumpen eller filtret, starta INTE pumpen. Om inget läckage
inträffar, stå minst 10 fot från pumpen och/eller filtret och fortsätt med att
starta pumpen.
TROUBLE SHOOTING
MOTOR KOMMER INTE START
Felaktiga eller lösa ledningsanslutningar; öppna strömbrytare eller
reläer; utlösta strömbrytare, GFCl eller trasiga säkringar.
Kontrollera rotationen av motoraxeln manuellt gratis rörelse och brist
på hinder.
Om du har en timer, se till att den fungerar som den ska. Förbigå den
vid behov.
MOTORN STÄNGS AV
Underdimensionerade ledningar;lösa anslutningar; etc.
Låg spänning vid motor- eller strömfall (orsakas ofta av
underdimensionerade ledningar eller förlängningssladd).
MOTORN SNAR MEN STARTAR INTE
Mekanisk bindning och elektrisk överbelastning.
Centrifugalströmställaren har fastnat i ÖPPET läge.
Bindning av motoraxeln.
PUMP KOMMER INTE PÅ
Se till att pumpsilhuset är fyllt med vatten och att lockets O-ring är ren;
se också till att den sitter ordentligt i lockets O-ringsspår. Se till att
silkåpan är ordentligt låst på plats och smord med "Jack's 327" .
Se till att alla sug- och utloppsventiler är helt öppna och inte
blockerade, att poolvattennivån är på rätt nivå och att skummaren inte
är upphängd eller fast på skummarväggen
Blockera för att avgöra om pumpen kommer att utveckla ett vakuum.
Du bör ha 5"-6" vakuum vid silskyddet. Du kanske kan kontrollera

- 9 -
genom att ta bort skummarkorgen och hålla handen över den nedre
porten med skummaren full och pumpen igång. Om inget sug känns,
kontrollera om ledningen blockeras.
O. Om pumpen utvecklar ett vakuum, kontrollera om det finns en
blockerad sugledning eller smutsig
silkorg och en luft läckage i sugröret kan vara orsaken.
P. Om pumpen inte utvecklar ett vakuum och pumpen har tillräcklig
"primande vatten":
xxix. Kontrollera igen silhusets lock och alla gängade anslutningar för
sugläckor. Kontrollera om alla slangklämmor är tajt.
xxx.Kontrollera spänningen för att säkerställa att motorn roterar med fullt
varvtal.
xxxi. Öppna höljets lock och kontrollera igensättning eller blockering av
suget.
Kontrollera impellern för skräp.
xxxii. Ta endast bort och byt ut axeltätningen om den läcker.
TROUBLE SHOOTING(CONTINUED)
LÅGT FLÖDE
Igensatt eller förträngd sil eller sugledning; underdimensionerade
poolrör.
Tilltäppt eller begränsat utloppsledning eller filter, ventil delvis stängd
(hög mätning) . Hur man korrigerar: Backwash sil enligt tillverkarens
instruktioner;
Luftläckage i sugrör som orsakar mullrande i pumpen.
Kavitation på grund av begränsad eller underdimensionerad
sugledning eller läckage vid någon led, låg vattennivå i poolen, och
obegränsade returledningar för utlopp. Korrekt sugtillstånd eller
gasreturledningar, om praktiskt.
STÖRLIG PUMP
Vibrationer på grund av felaktig montering, etc. Sätt en gummikudde
under metallfästet.
Främmande föremål i pumphuset. Lösa stenar/skräp som träffar
pumphjulet kan vara orsaken; ta bort ovanstående.

- 10 -
Motorlager är bullriga från normalt slitage, rost, överhettning, eller
koncentration av kemikalier som orsakar tätningsskador som gör att
klorerat vatten kan sippra in i lagren och torka bort fettet och får lagret
att gnälla. Alla tätningsläckor bör bytas ut på en gång.
Utrustningsbas vibrerande.
Tillverkare: Shanghaimuxinmuyeyouxiangongsi
Adress: Baoshanqu Shuangchenglu 803long 11hao 1602A-1609shi
Shanghai
EC REP: SHUNSHUN GmbH .
Römeräcker 9 Z2021,76351 Linkenheim-Hochstetten, Tyskland
UK REP: Pooledas Group Ltd.
Enhet 5 Albert Edward House, The Pavilions Preston, Storbritannien
Importerad till AUS: SIHAO PTY LTD.
1 ROKEVA STREETEASTWOOD NSW 2122 Australien
Importerad till USA: Sanven Technology Ltd.
Suite 250, 9166 Anaheim Place, Rancho Cucamonga, CA 91730
Tillverkad i Kina