ENGLISH
t
Read these instructions carefully before using your appliance, and keep them carefully.
If you follow the instructions, your appliance will provide you with many years of good service.
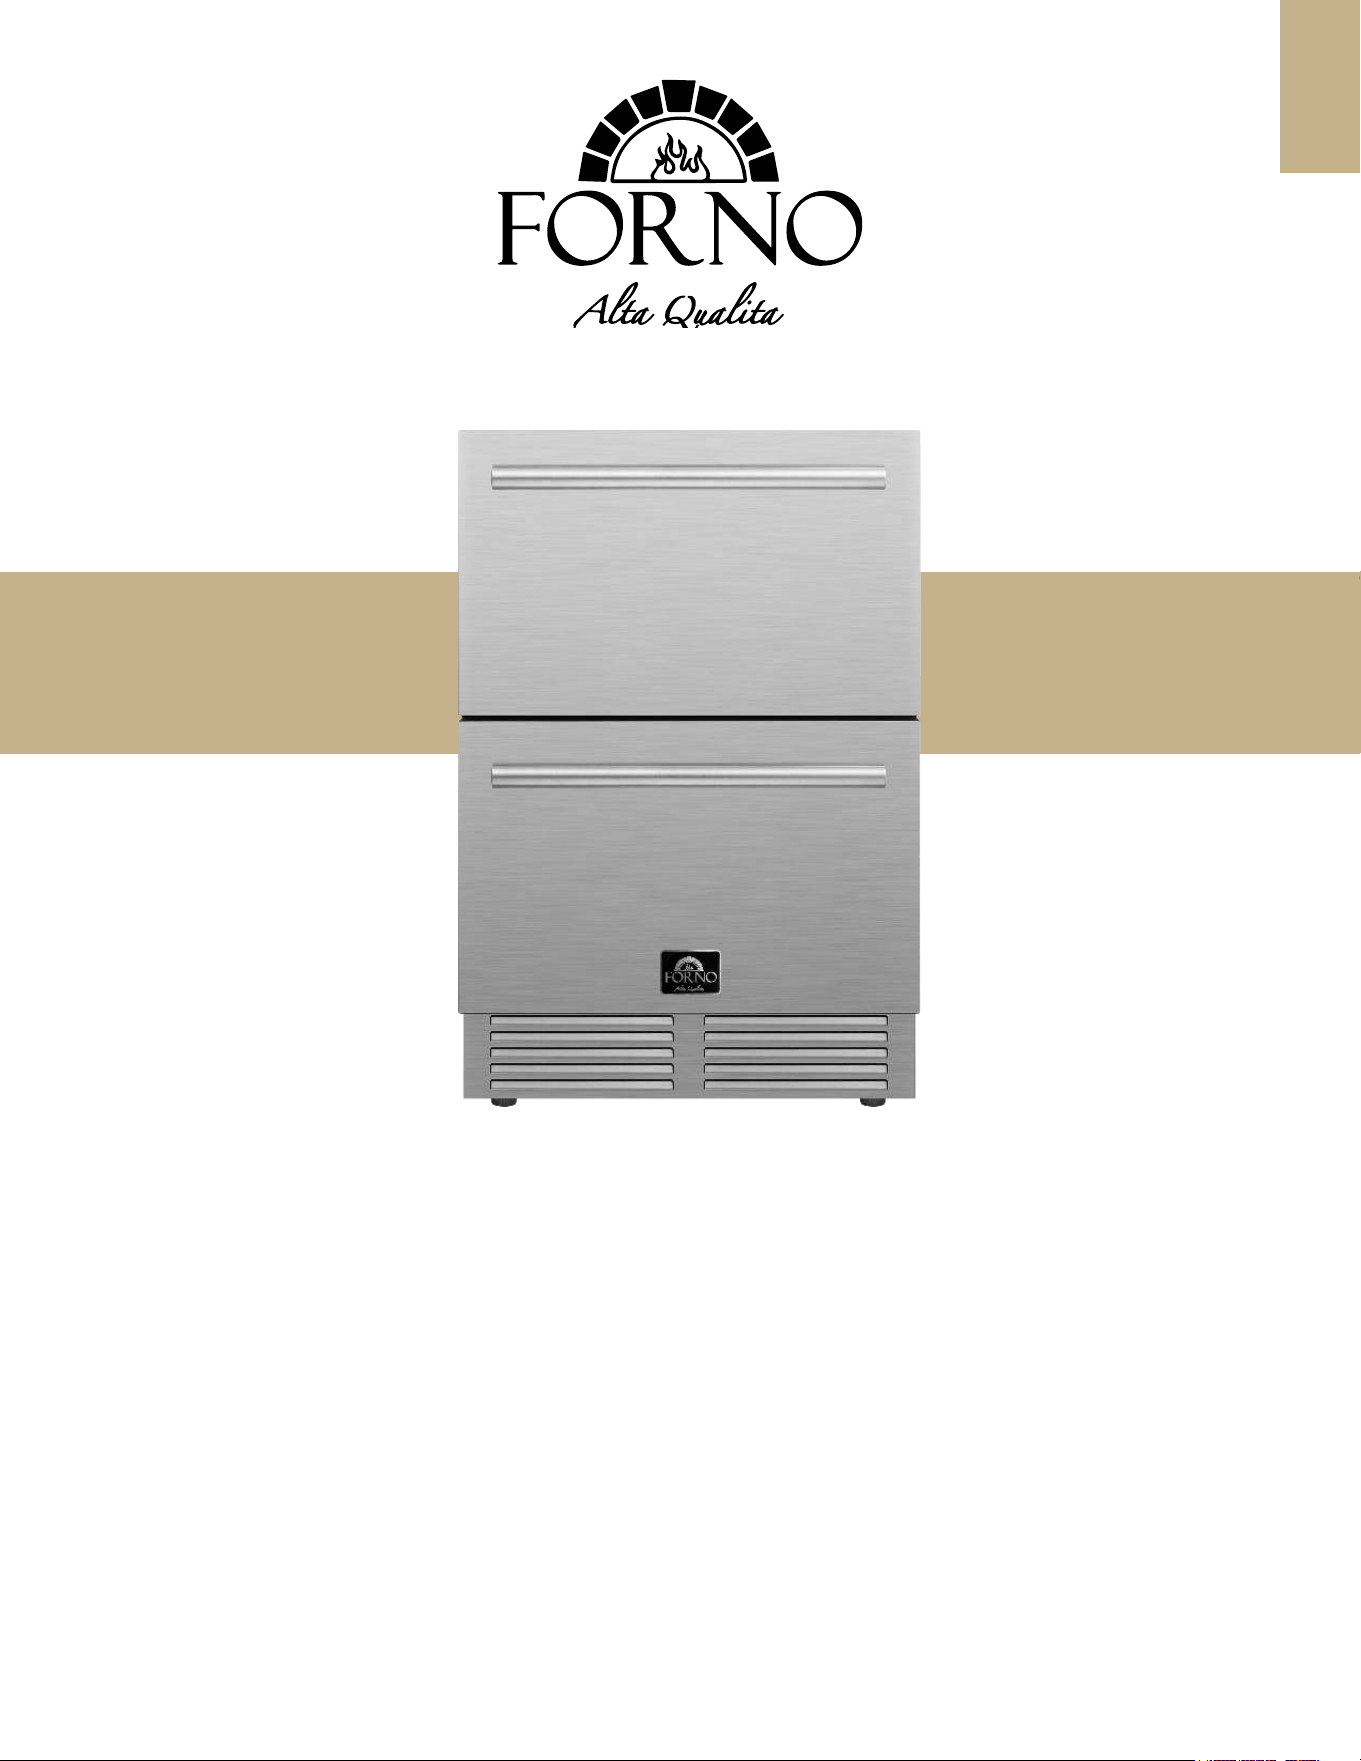
MODEL NUMBER SERIES: FDROD1611-24S
INSTRUCTION MANUAL
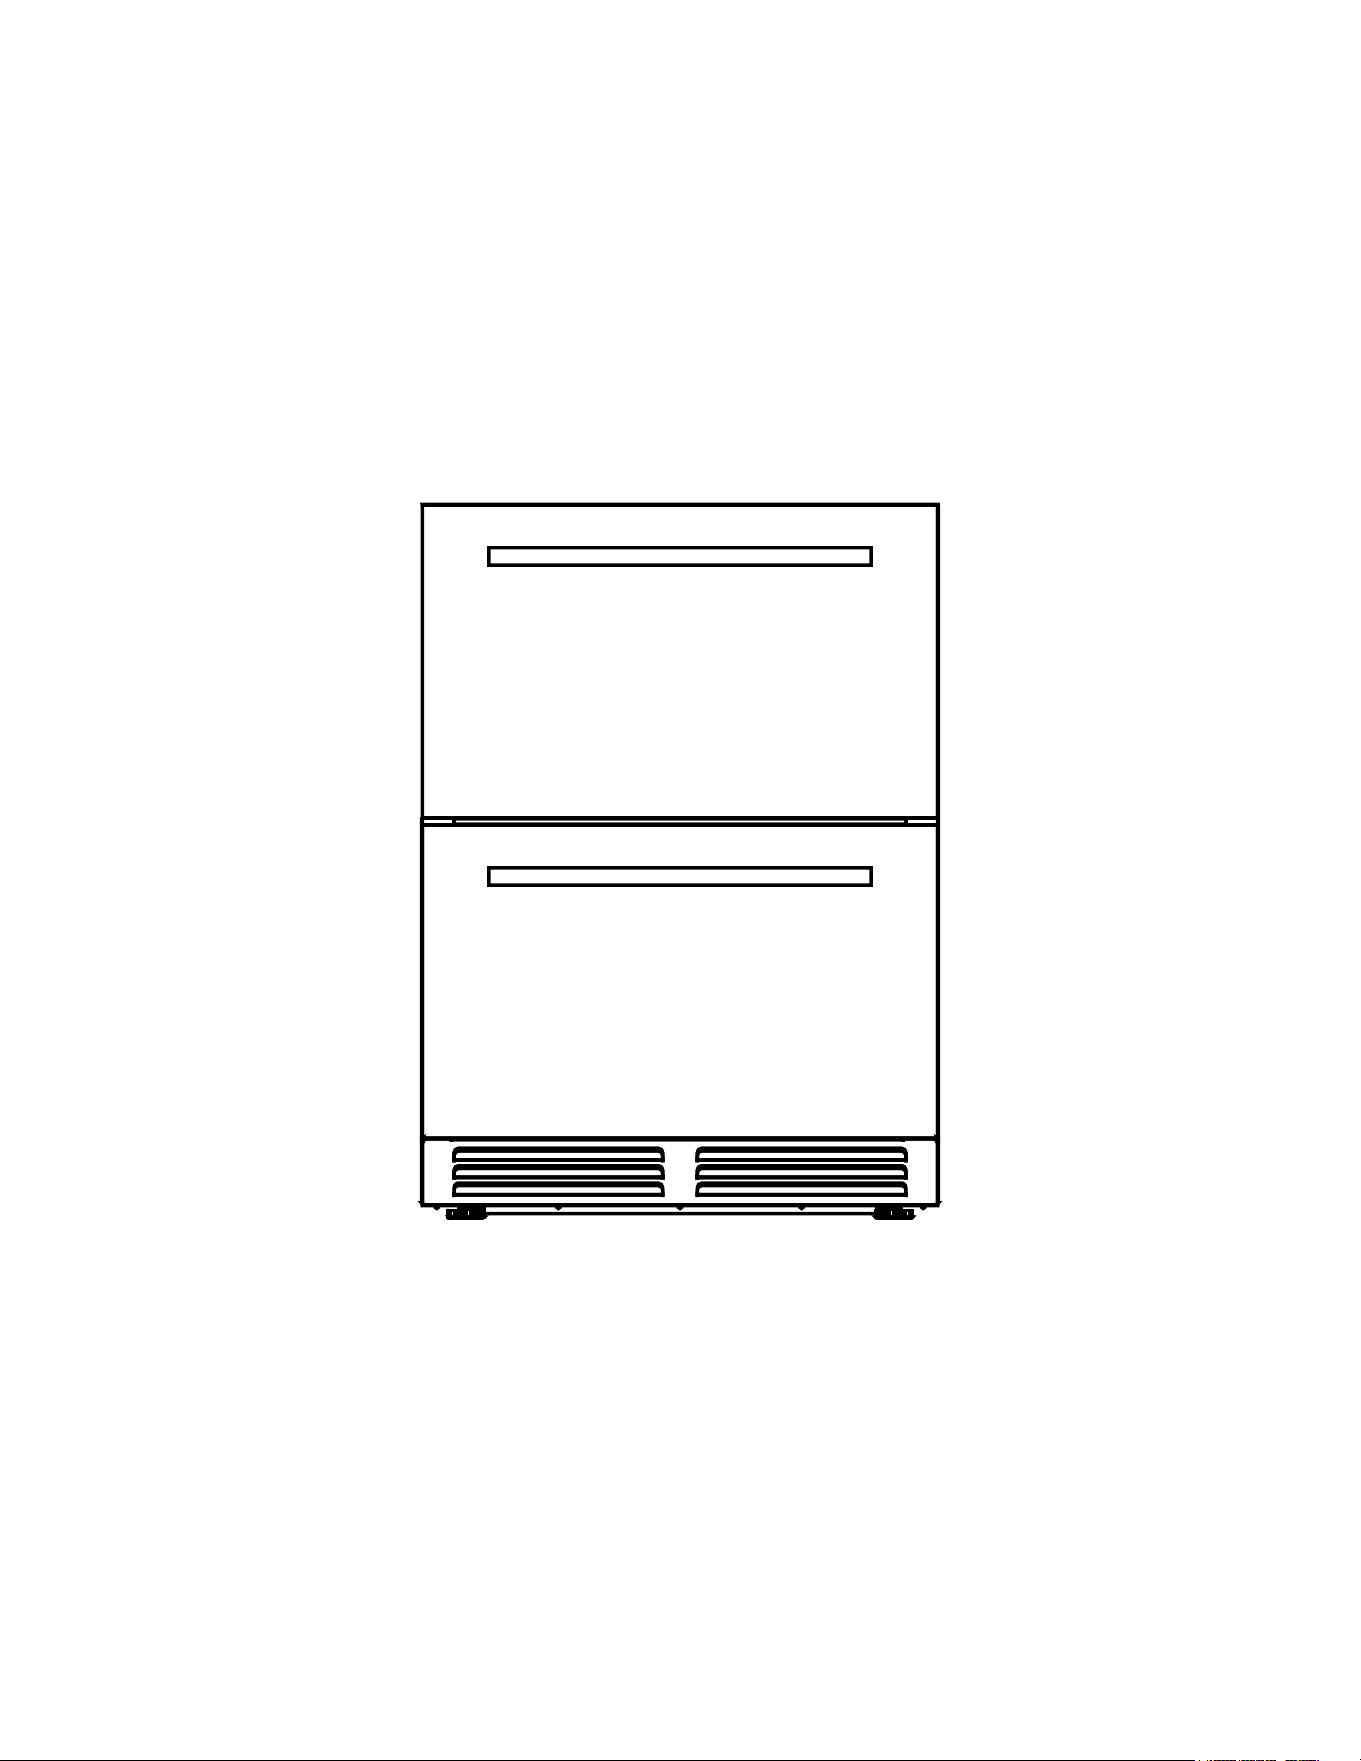
COMO 24” BUILT-IN DRAWER REFRIGERATOR
10/2023

2

3
TABLE OF CONTENTS
Customer Care 5
Safety 6
Product Contents 7
Installation
Anti-tip bracket installation
Installing the handle
8
9
Important Information 9
Operating System
Control Panel
Removing and installing the drawers:
10
11
Cutout 11
Charcoal Filter Replacement 12
Storage 12
Care and Maintenance 12
Warranty 13
4
MODEL NUMBER SERIES: FDROD1611-24S
COMO 24” BUILT-IN DRAWER REFRIGERATOR
5
Product Information Service Information
Model Number:
Use these numbers in any
correspondence or services calls
concerning your product.
If you received a damaged product,
immediately contact Forno.
Check the troubleshooting guide
before you call for service. It lists the
causes of minor operation problems
that you can correct yourself.
Serial Number:
Date of Purchase:
Purchase Address And Phone:
Thank you for purchasing a Forno product. Please read the entire instruction manual before operating your new appliance
for the rst time. Whether you are an occasional user or an expert, it will be benecial to familiarize yourself with the
safety practices, features, operation and care recommendations of your appliance.
Both the model and serial number are listed inside the product. For warranty purposes, you will also need the date of
purchase .
Record this information below for future reference.
Customer Care
Services in Canada and Untied States
Keep the instruction manual handy to answer your questions. You can also nd all the information you need on-line at
www.forno.ca.
If you don’t understand something or need more assistance, please visit our website or email: [email protected]
If there is a problem, please contact FORNO customer service. Please note that troubleshooting with a customer service
representative will be needed before being able to send a service provider. All warranty work needs to be authorized by
FORNO customer service. All our authorized service providers are carefully selected and rigorously trained by us.
6
Safety
• To prevent damaging the door gasket, make sure to have the door all the way opened when pulling shelves out of
the rail compartment.
• The appliance must be positioned so that the plug is accessible. Release the electric cord. Move your cabinet to its
nal location. Do not move your Cabinet while loaded with wine. You might distort the body. The cabinet should be
installed in a suitable place in order to avoid touching the compressor with hand.
• This appliance is not intended for use by persons (including children) with reduced physical, sensory or mental
capabilities or lack of experience and knowledge, unless they have been given supervision or instruction
concerning use of the appliance by a person responsible for their safety.
• If the supply cord is damaged, it must be replaced by manufacturer of its Service agent or a similarly qualied
person in order to avoid a hazard.
•
PLEASE DON’T TRY TO PLUG INTO OR EXTENSION THE CABLE IN ANY CASE.
WARNING
WARNING
To reduce the risk of re, electrical shock, or injury when using your appliance, follow these
basic precautions:.
• Read all instructions before using the appliance.
• DANGER or WARNING: Risk of child entrapment.
• Child entrapment and suocation are not problems of the past. Junked or abandoned appliances are still dangerous
even if they will “just sit in the garage a few days”.
• Before you throw away your old appliance: Take o the door. Leave the shelves in place so that children may not
easily climb inside.
• Never allow children to operate, play with, or crawl inside the appliance.
• Never clean appliance parts with ammable uids. The fumes can create a re hazard or explosion.
• Do not store or use gasoline or any other ammable vapors and liquids in the vicinity of this or any other appliance.
The fumes can create a re hazard or explosion. Do not store explosive substances such as aerosol cans with a am-
mable propellant in this appliance.
• WARNING: Keep ventilation openings, in the appliance enclosure or in the built-in structure, clear of obstruction;
• WARNING: Do not use mechanical devices or other means to accelerate the defrosting process, other than those
Recommended by the manufacturer;
• To avoid a hazard due to instability of the appliance, it must be xed in accordance with the instructions.
• WARNING: Do not damage the refrigerant circuit;
• WARNING: Do not use electrical appliances inside the food storage compartments of the appliance, unless they are
the type recommended by the manufacturer.
If the refrigerant of these appliances are R600a , Flammable and explosive articles should not be put in or near the cabi-
net, to avoid the re or explode caused.
-Save these instructions-
7
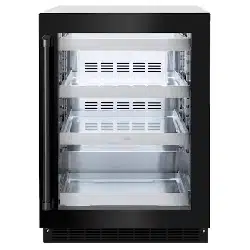
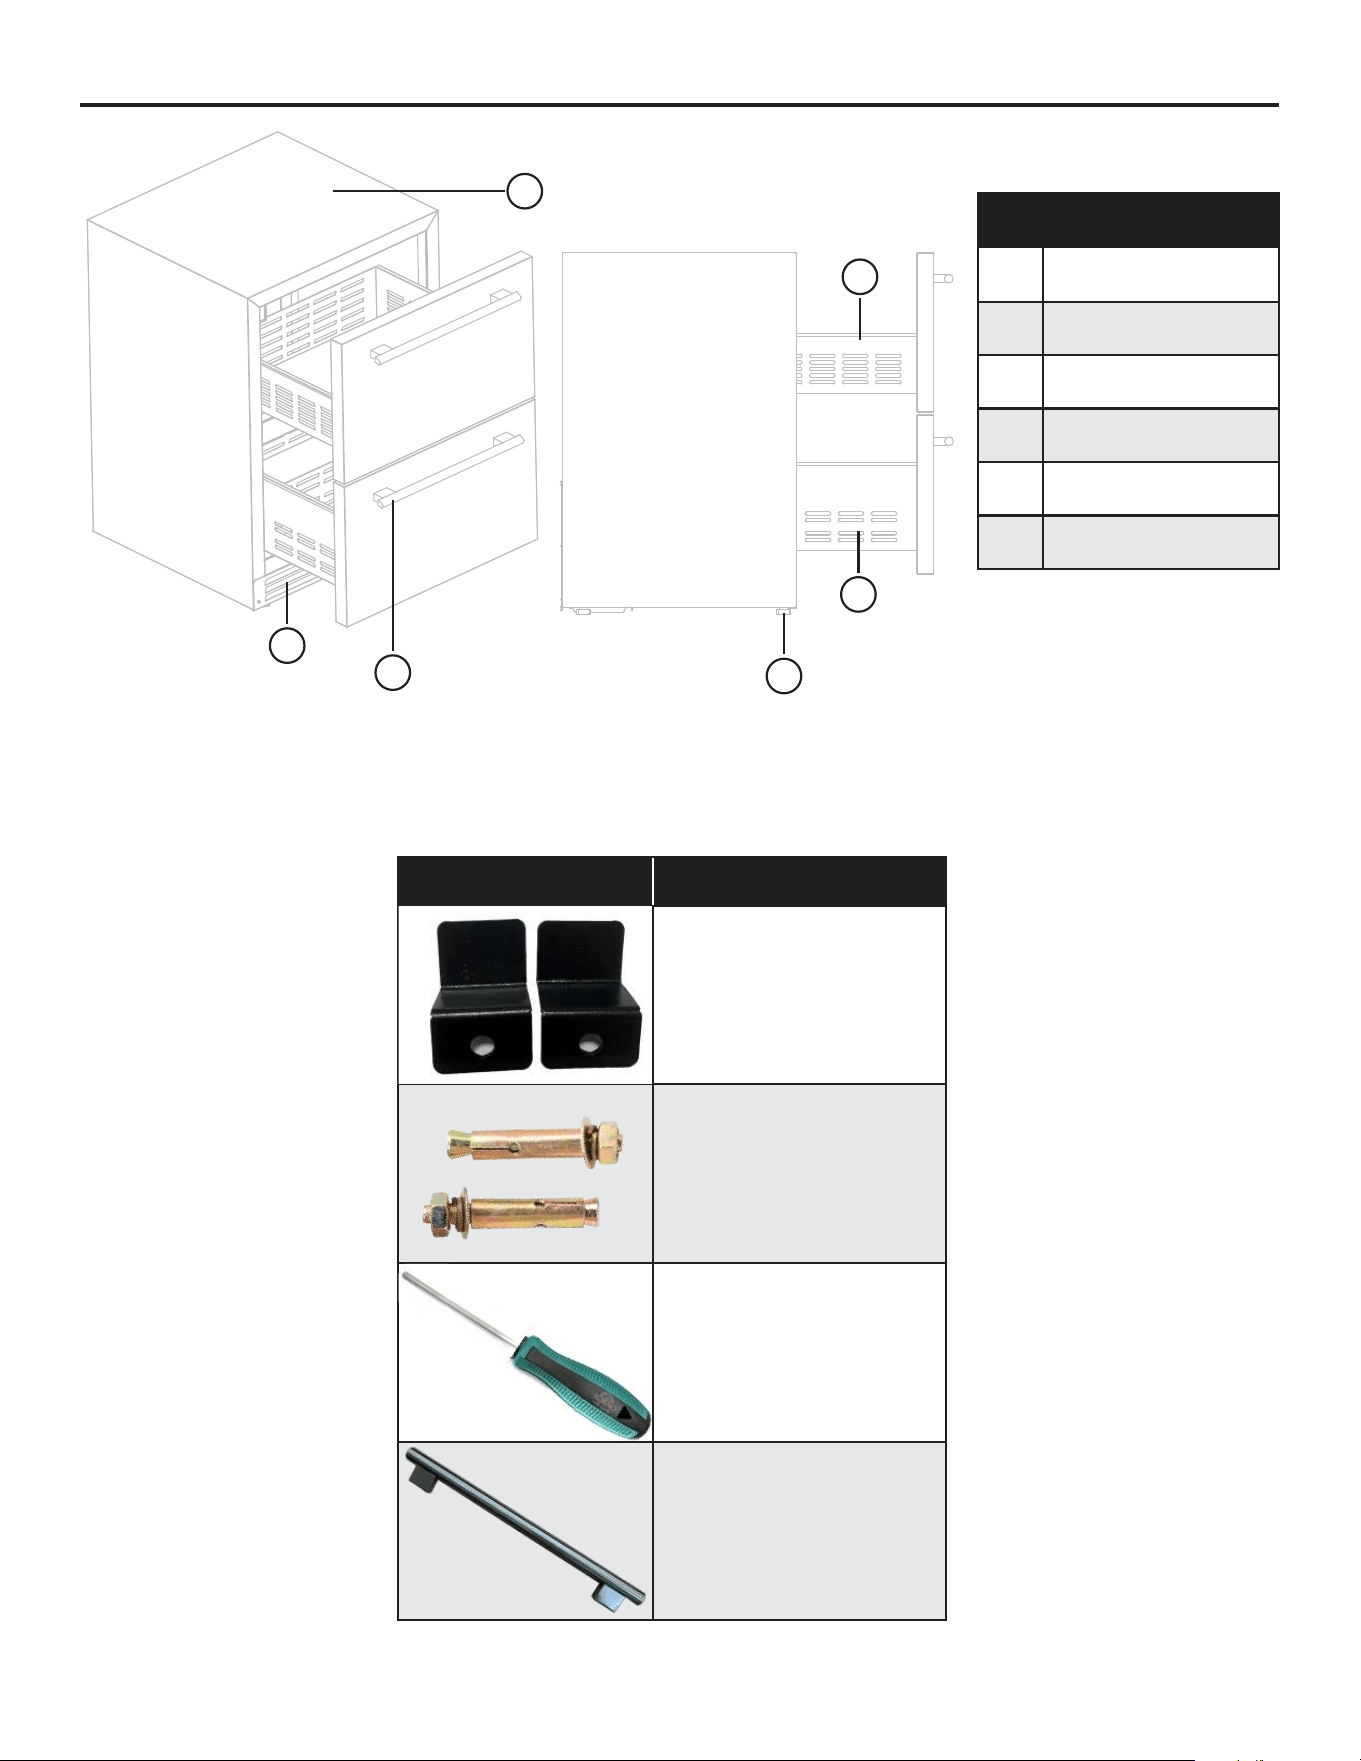
Product Contents
Names
1 Cabinet housing
2 Ventilation
3 2x Handles
4 Bottom drawer
5 Top drawer
6 Leveling legs
2
5
1
3
4
6
Parts list
(Supplied with the unit)
2x Anti-tip bracket with
hardware
2x Expansion bolt
1x Hexagon wrench
2x Handle with hardware
8
Installations
Before installing your refrigerator drawer, you must do the following:
• Remove the exterior and interior packing.
• Before connecting the refrigerator to the power source, let it stand upright for approximately 2 hours. This will reduce
the possibility of a malfunction in the cooling system from handling during transportation.
• Clean the interior surface with lukewarm water using a soft cloth.
• This appliance is intended to be used in household and similar applications such as
• Sta kitchen areas in shops, oces and other working environments;
• Farm houses and by clients in hotels, motels and other residential type environments;
• Bed and breakfast type environments;
• Catering and similar non-retail applications.
• When disposing your appliance, please choose an authorized disposal site.
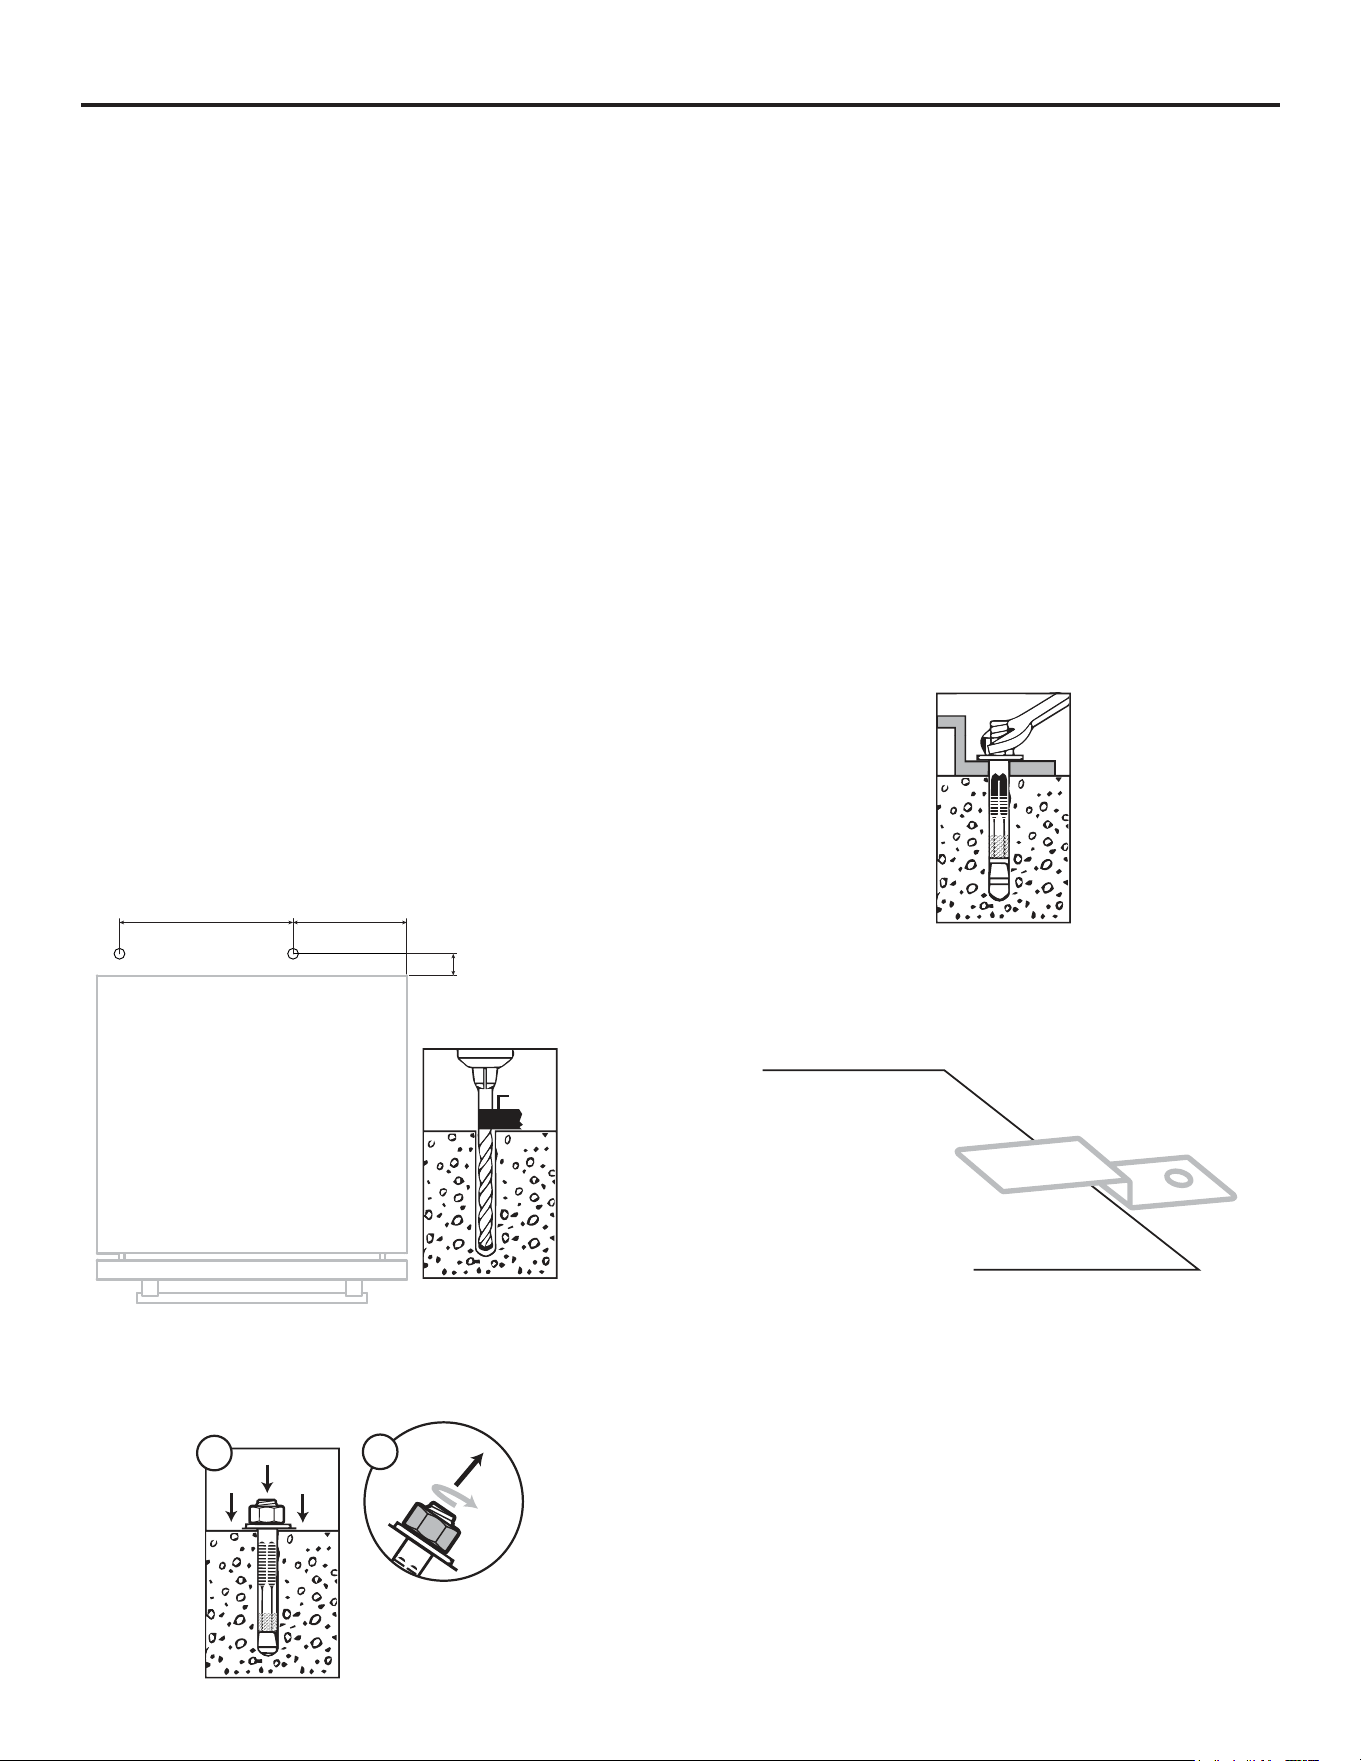
Anti-tip bracket installation
To avoid the risk of serious personal injury or damage to the appliance due to the instability of the appliance, it must be
xed to the oor with anti-tip brackets and screws(supplied). Before installing, carefully read these instructions.
3. (A) Next insert the expansion bolt into the drilled
hole. Make sure it is ush to the oor.
(B) Unscrew the nut, washer and lock ring from the
screw.
4. Next, align the bracket hole with the screw and
reattach the washer and lock ring. Finally, tighten the
nut with a wrench or socket to the maximum. As you
tighten the shield, it will bend outwards, creating an
anchor that provides extra security for your unit.
B
A
5. Push the appliance back into its place, Ensure that
the bottom of the opening slides under the bracket,
as shown in the example below.
If the unit is not stable, pull back the appliance and
repeat the previous step until the unit is stable. Note: If
the unit is relocated, the bracket must be removed and
re-installed to its new location.
1. Take the xing brackets(2pcs) and the expansion
bolts(2pcs) out of the instruction packet.
2. Drill holes into the oor according to the dimensions
shown below. This will allow you to x the brackets
to the oor. According to the size and location, the
holes on the oor should be Ø0.39” (10mm).
TIP: Use painter’s tape to judge how deep of a hole you are
drilling. First, cut a piece of painter’s tape several inches
long. Then, place the tape on your drill bit at the depth of the
expansion bolts shield to drill. Once you reach the tape, you
know when to stop drilling. Don’t drill too deep.
Min: 0.87”/22mm
Max: 1.77”/45mm
Top View
8.07” (205mm)12.52” (318mm)
Tape
9
Installations (continued)
Important Information
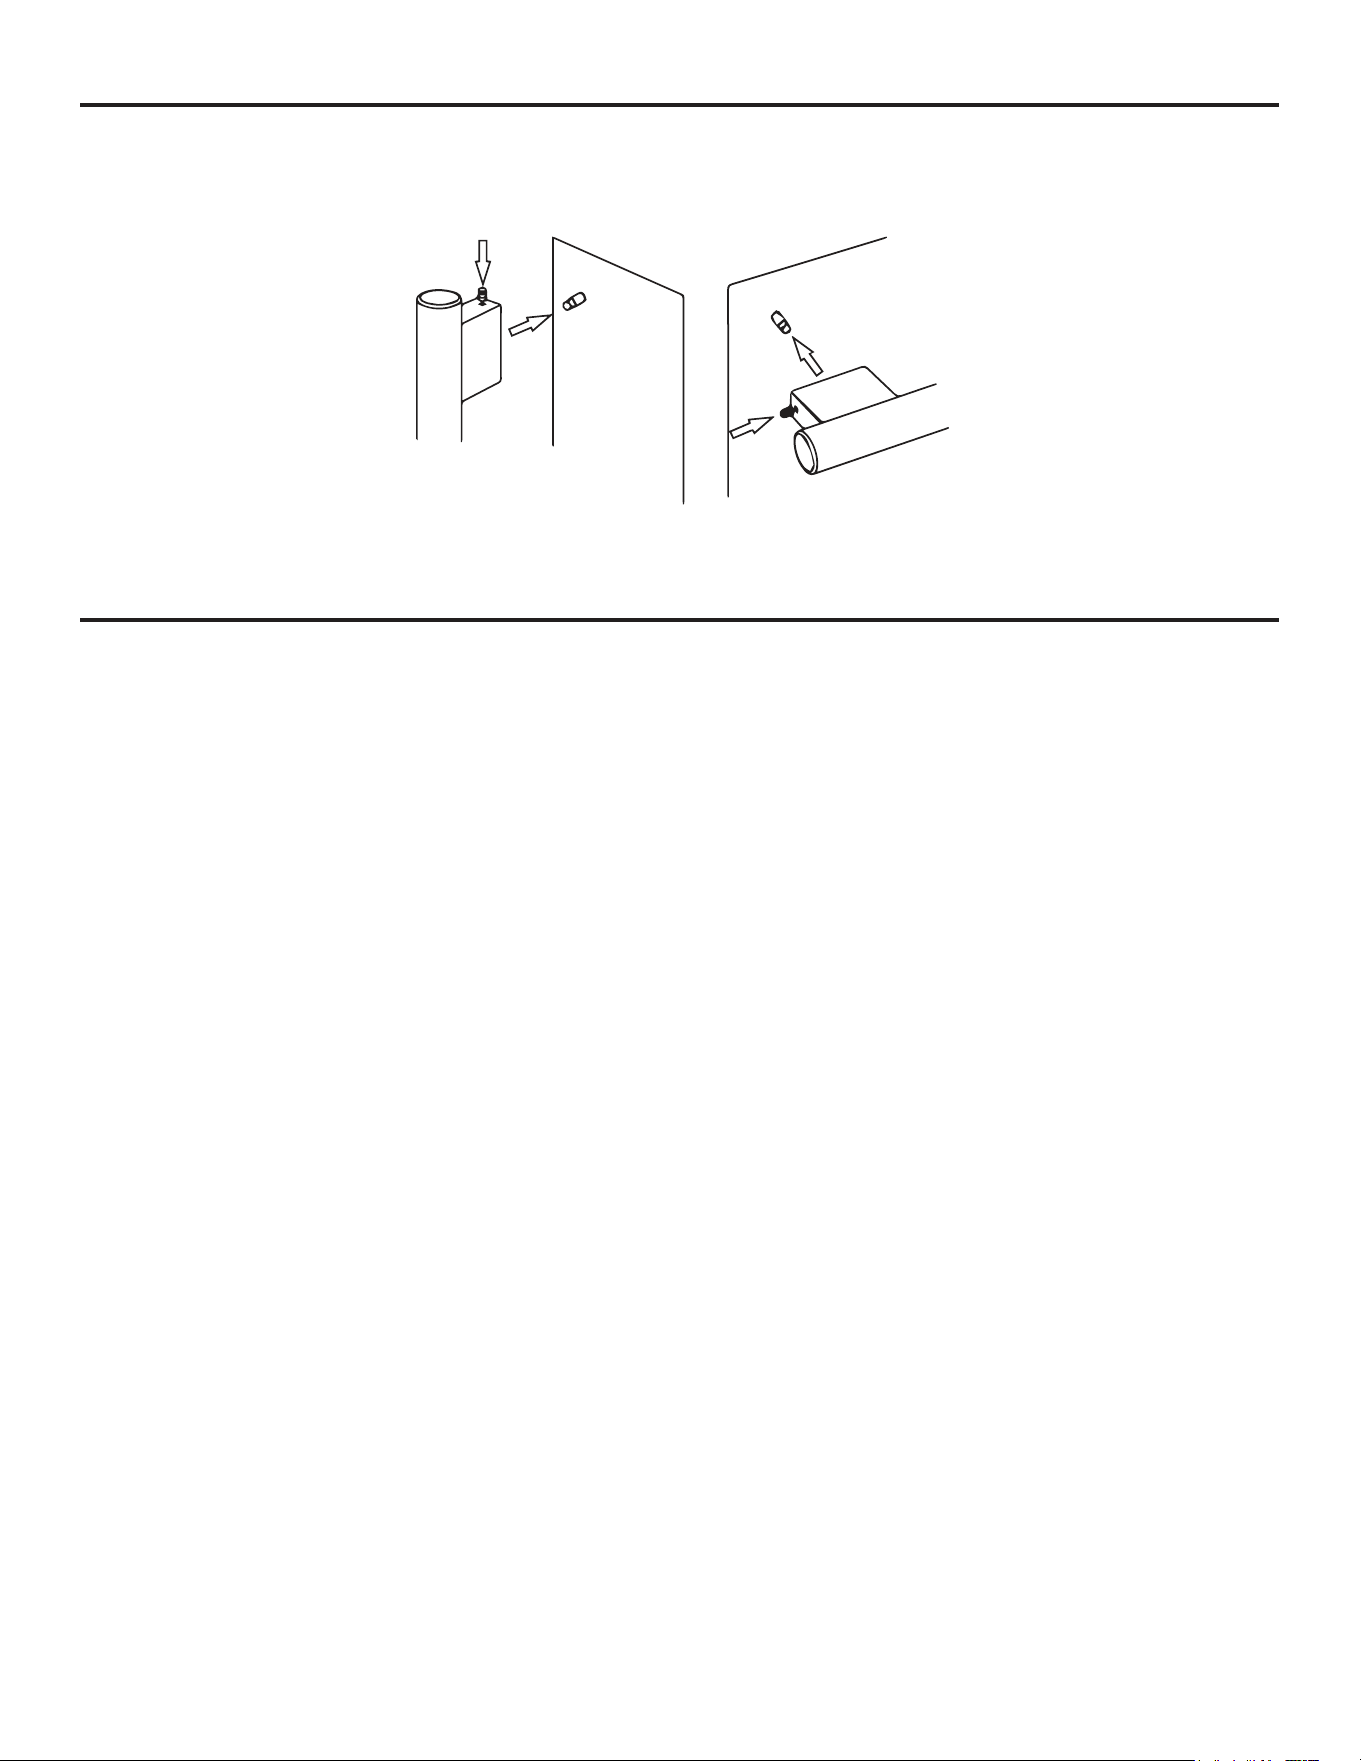
Installing The Handle
1. Locate the handle over the pins on the door panel.
2. Fix the handle by tighten the screw.
This appliance is designed to be for free-standing installation or built-in (fully recessed) (Refer to sticker location
the back of this appliance).
This appliance is designed to be for free standing installation or built-in (fully recessed) (Refer to sticker location the back
of this appliance).
This appliance is intended to be used exclusively for the storage of wine or beverages.
• Place your aplliance on a oor that is strong enough to support it when it is fully loaded. To level your appliance,
adjust the front leveling leg at the bottom of the appliance.
• This appliance is using ammability refrigerant. So never damage the cooling pipework during the transportation.
Locate the appliance away from direct sunlight and sources of heat (stove, heater, radiator, etc.). Direct sunlight may
aect the acrylic coating and heat sources may increase electrical consumption. Extreme cold ambient temperatures may
also cause the unit not to perform properly.
• Avoid locating the unit in moist areas.
• Plug the appliance into an exclusive, properly installed-grounded wall outlet. Do not under any circumstances cut
or remove the third (ground) prong from the power cord. Any questions concerning power and/or grounding should be
directed toward a certied electrician or an authorized Products service center.
Please make sure to follow these dos and don’ts when using the cabinet:
• Don’t overload the items in the cabinet.
• Don’t open the door unless necessary.
• Don’t cover shelves with aluminum foil or any other material which may prevent air circulation.
• If the appliance is stored without use for long periods, it is suggested to leave the door ajar after a careful cleaning to
allow air circulation inside the cabinet. This will help to avoid possible formations of condensation, mold, or odors.
• In case the appliance loses power or gets unplugged, it is important to wait for 3-5 minutes before starting it again.
The cause for starting the appliance immediately can add more pressure to an already high-pressure compressor
causing damage to the compressor due to an overload of pressure.
10
Class: Symbol Ambient Temperatures range(ºC / ºF)
Extended Temperate SN ﹢10ºC/ 50ºF to ﹢32ºC / 89.6ºF
Temperate N ﹢16ºC / 60.8ºF to ﹢32ºC / 89.6ºF
Subtropical ST ﹢16ºC / 60.8ºF to ﹢38ºC / 100.4ºF
Tropical T ﹢16ºC / 60.8ºF to ﹢43ºC / 109.4ºF
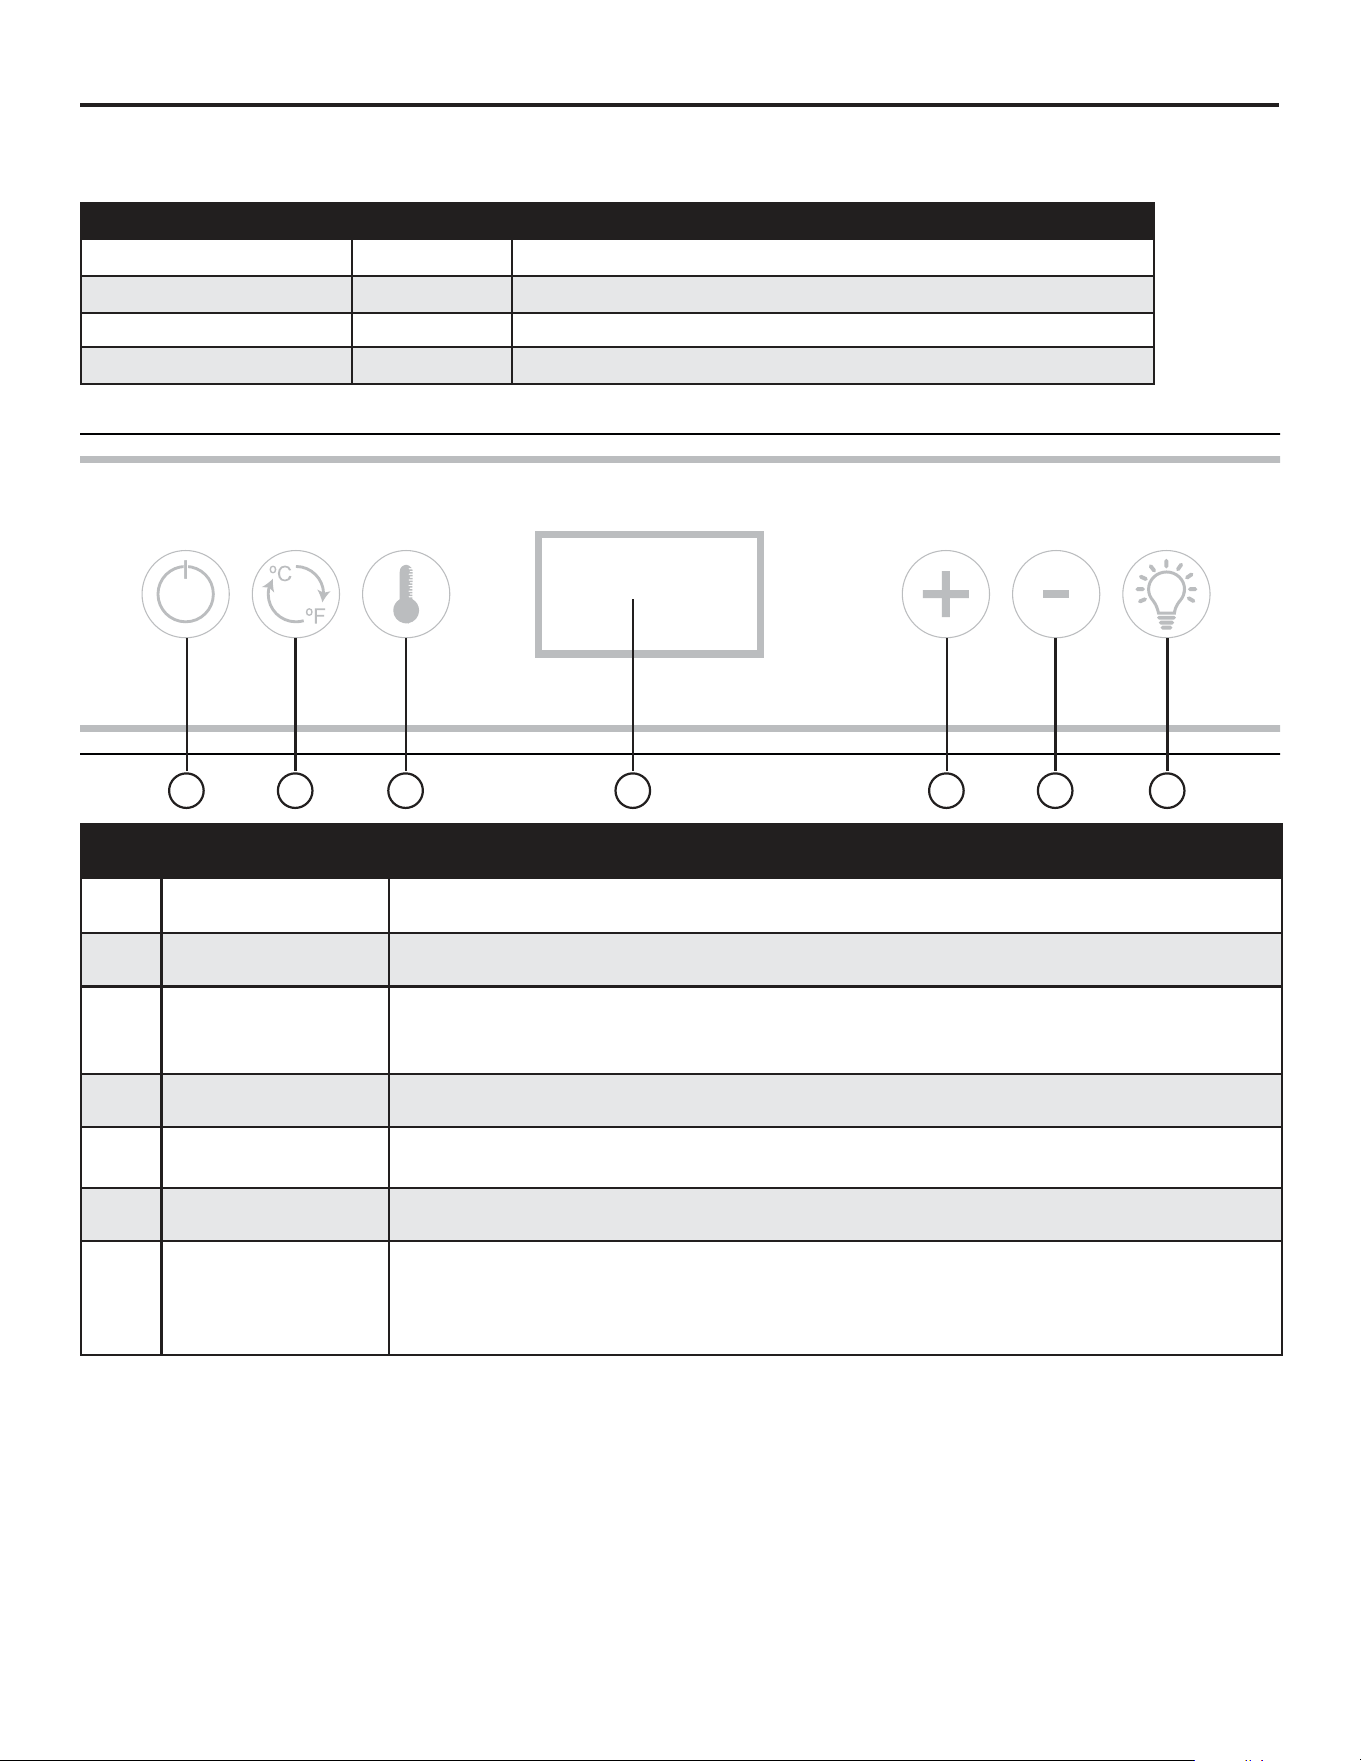
Operating System
ºC
ºF
O
O
1 2 3 4 5 6 7
Names Function
1 Power button Press and hold for 3 seconds to turn the appliance on or o.
2 Temperature button Press to switch between Celsius and Fahrenheit temperature display.
3
Temperature setting
button
Before adjusting the temperature, press the button. The display will ash and it will show
the current temperature setting. After 5 seconds, the ashing will stop and you can begin
to adjust the temperature by pressing (+) or (-).
4 LED display 2-digit LED display
5 & 6 Plus / Minus button
The “+” and “-” buttons are used to adjust the temperature. Each press of the button will
increase or decrease the temperature by 1ºF / 1ºC.
7 Light button To turn the light on or o. When door is open, the light will automatically be switched on.
8 Sabbath mode
To enter Sabbath mode, press and hold “+” button for 3 seconds to activate the feature.
The appliance will automatically exit Sabbath mode after 42 hours. Alternatively, you can
manually exit Sabbath mode. Note that in Sabbath mode, the light will not work, but the
compressor will continue to run.
Setting The Temperature Controls
• When you push the (+) or (-) buttons for the rst time, The LED display will show the temperature that is currently on.
• With in the 3 min while there is no operation, The appliance will locked automatically. To unlock, press (﹢) and (-) at
the same time for 3 seconds to unlock.
• To select the temperature, stay on the chosen temperature until the ashing stops. The temperature setting can be
adjusted from 2ºC to 10ºC.
Ambient Room Temperature Limits:
This appliance is designed to operate in temperatures specied by its temperature class on the rating plate.
Control Panel
11
Operating System (continued)
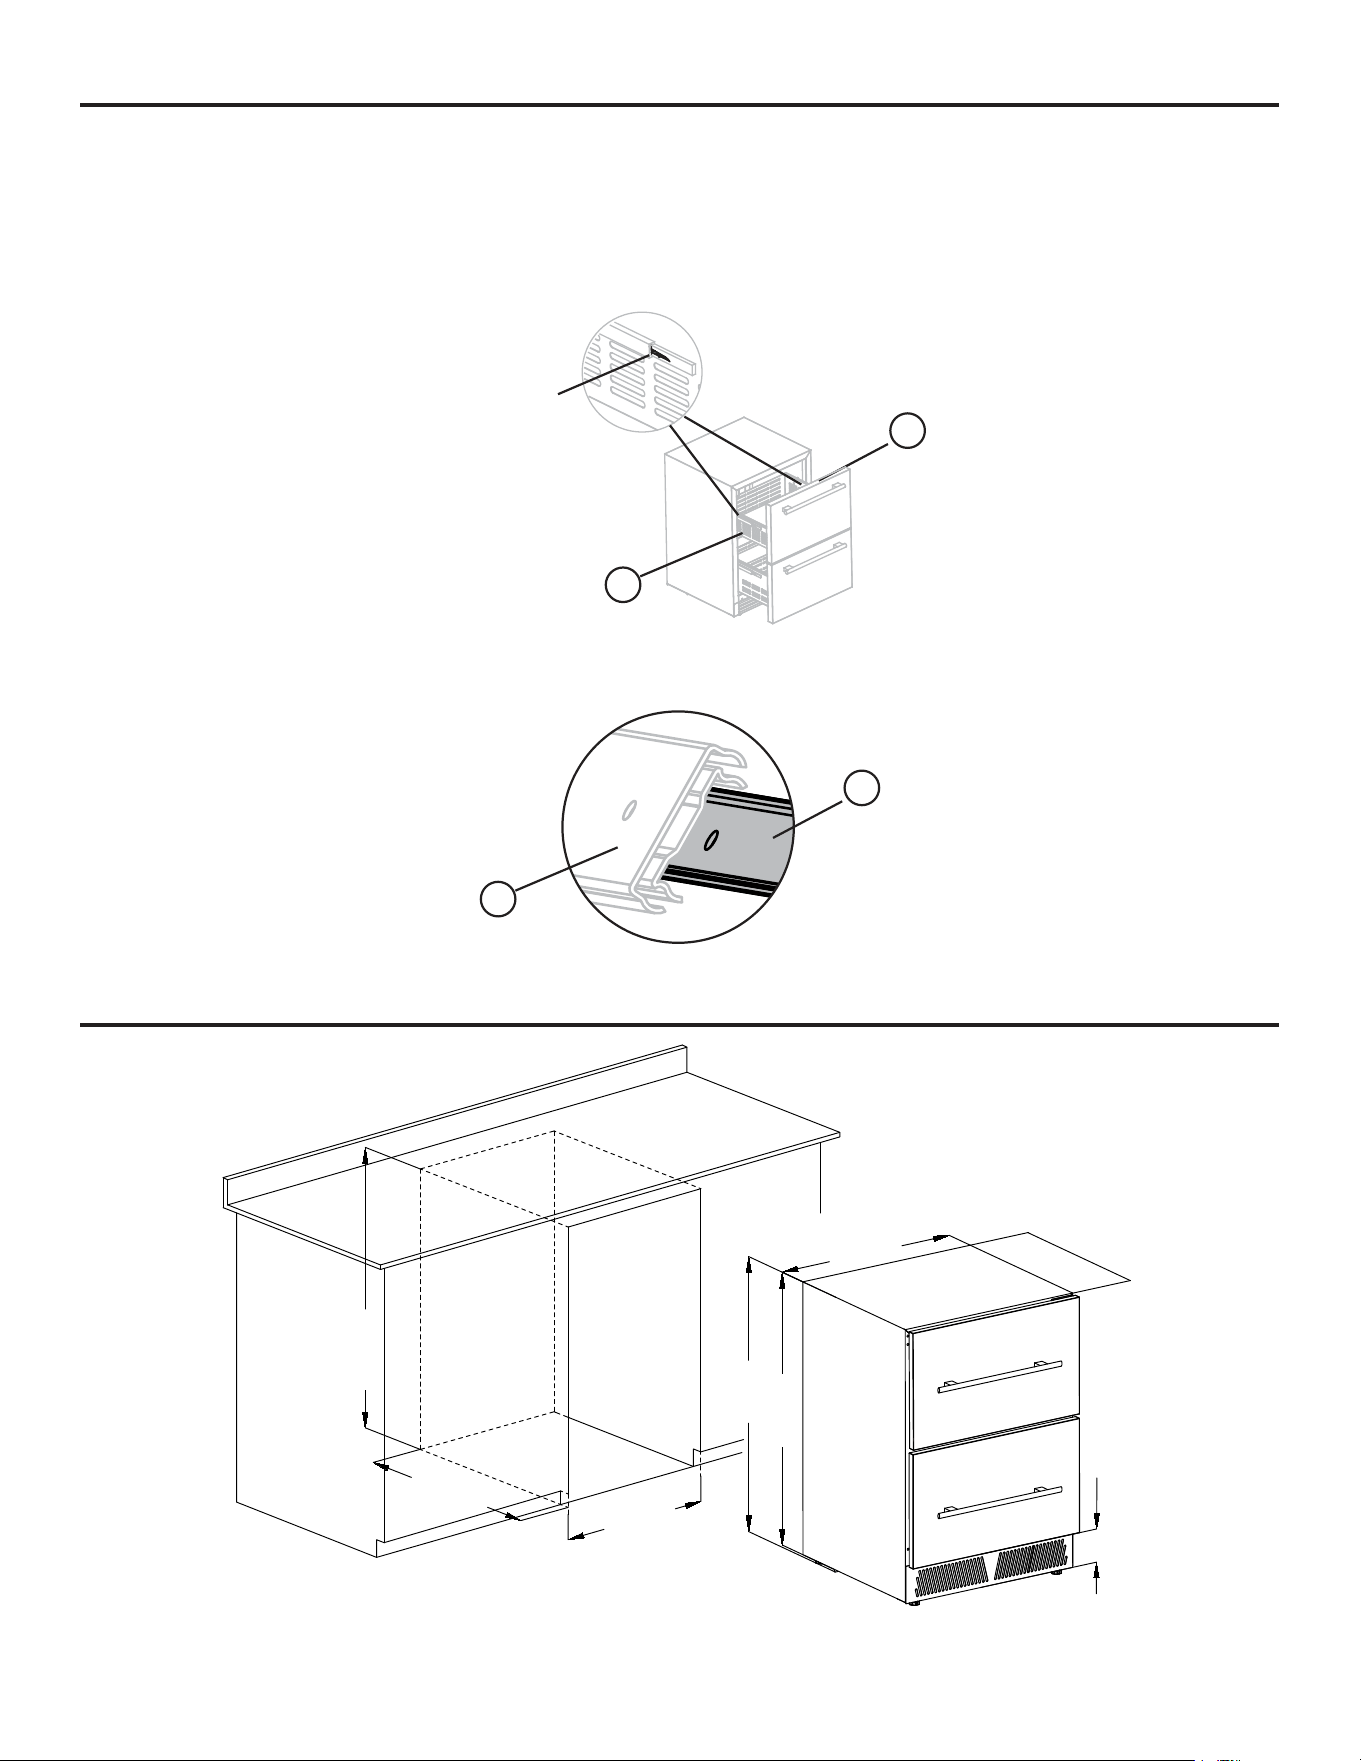
Removing and installing the drawers
To Remove the drawers.
1. Open the drawer completely all the way.
2. On the sliding track on both sides of the drawer, there is a locking bar (A & B). On the left side (A) push down the
locking bar and at the same time , on the right side (B) lift up the locking bar. While holding the locking bar in position,
gentile pull the drawer towards you. Keep pulling slowly until is fully remove from the track.
3. To re-install the drawers, place the track (C) parallel to the slot (D) and push in the drawer. Have a test run to verify if
the installation is done properly.
D
C
B
Locking Bar
A
Cutout
605<23.8">
>613<24.1">
>880<34.6">
122<4.8">
850<33.4">
865<34">
595<23.4">
533<20.9">
12
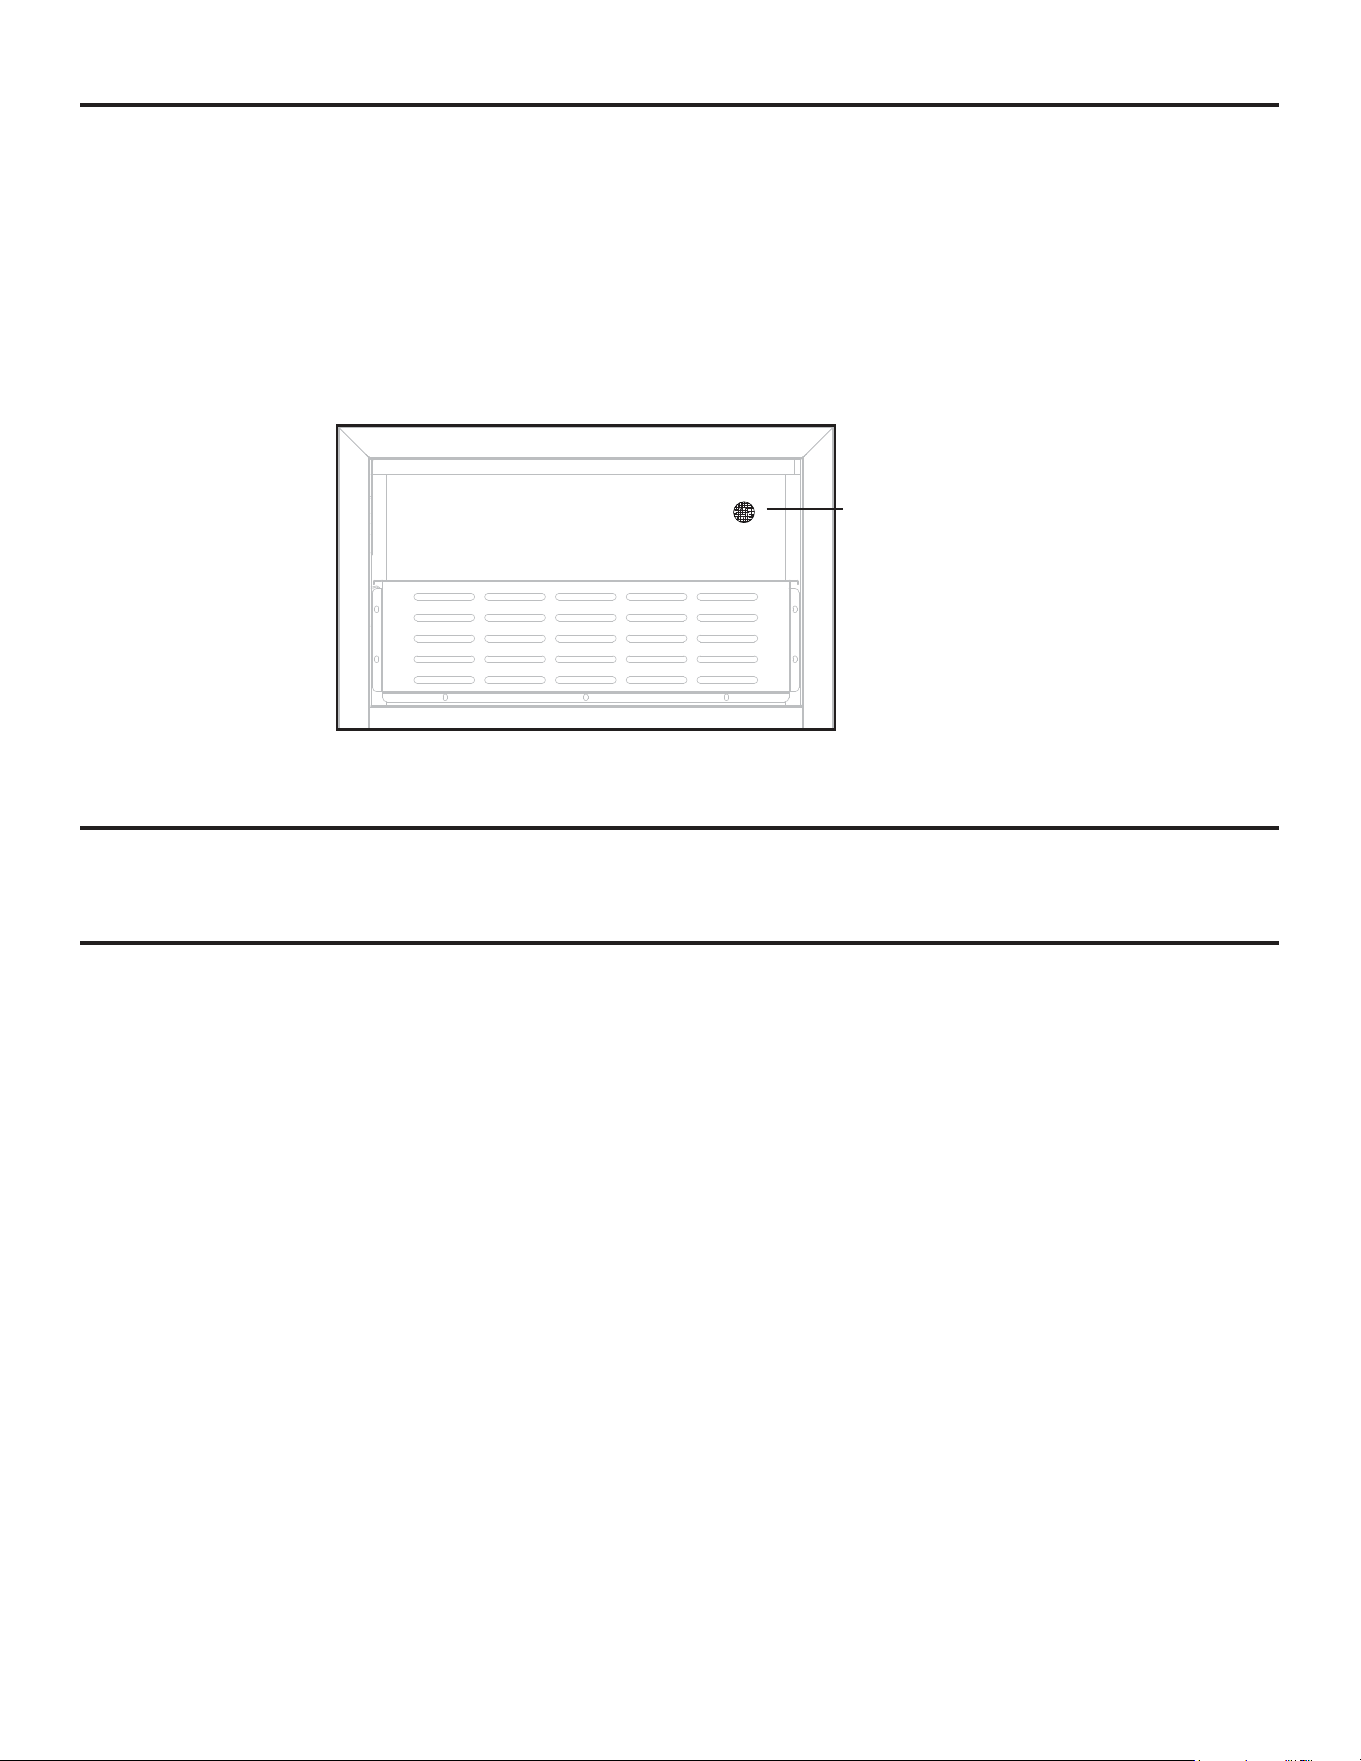
Charcoal lter replacement
Storage
Care & Maintenance
Charcoal lter replacement
In order to preserve the quality and taste of your food, they must be stored at the ideal temperature and ambient condi-
tions. Your Refrigerator is equipped with an active charcoal ltration system to ensure air purity, cooling eciency, and
to maintain an odor free cabinet for the storage of your food. The lter assembly is located at the rear panel inside your
refrigerator. Keep in mind, that this lter must be changed every 12 months.
To replace your lter:
1. Rotate the lter counter-clockwise to 45º and carefully pull out the filter.
2. Replace the filter with a new one and repeat step 1 but clockwise. Don’t over tighten it.
This appliance can store up to 149 standard cans. The actual number of bottles that can be stored may vary. The stated
capacity is based on standard-size soda drinks with a 2.6” diameter and 4.84” height.
To clean your appliance, start by turning off the power, unplugging it, and removing all items including shelves and racks.
Next, use a solution of warm water and mild liquid detergent to wash the inside surfaces and drawers. Rinse well and then
wipe dry with a clean, soft cloth. This will ensure that your appliance is clean and ready for use.
Charcoal lter
Front view

13
Warranty
What this limited warranty covers:
The Warranty coverage provided by Forno Appliances in
this statement applies exclusively to the original Forno
appliance (“Product”) sold to the consumer (“Purchaser”) by
an authorized Forno dealer/distributor/retailer, purchased
and installed in the United States or Canada, and which has
always remained within the original country of purchase (the
United States or Canada). Warranty coverage is activated on
the date of the Product’s original retail purchase and has a
duration of two (2) years.
Warranty coverage is non-transferable. In the event
of replacement of parts or of the entire product, the
replacement Product (or parts) shall assume the remaining
original Warranty activated with the original retail purchase
document. This Warranty shall not be extended with respect
to such replacement. Forno Appliances will repair or replace
any component/part which fails or proves defective due to
materials and/or workmanship within 2 years of the date of
the original retail purchase and under conditions of ordinary
residential, non-commercial use. Repair or replacement
will be free of charge, including labor at standard rates and
shipping expenses. Purchaser is responsible for making the
Product reasonably accessible for service. Repair service
must be performed by a Forno Authorized Service company
during normal working hours.
Important
Retain proof of original purchase to establish warranty
period. Forno’s liability on any claim of any kind, with respect
to the goods and/or services provided, shall in no event
exceed the value of the goods or service or part there of
which has given rise to the claim.
30-Day Cosmetic Warranty
The Purchaser must inspect the product at the time of
delivery. Forno warrants that the Product is free from
manufacturing defects in materials and workmanship for
a period of thirty (30) days from date of the original retail
purchase of the Product.
This coverage includes:
• Paint blemishes
• Chips
• Macroscopic nish defects
Cosmetic warranty does NOT cover:
• Issues resulting from incorrect transport, handling and/
or installation (e.g.: dents, broken, warped or deformed
structures or components, cracked or otherwise
damaged glass components);
• Slight color variations on painted/enameled components;
• Dierences caused by natural or articial lighting,
location or other analogous factors; > stains/corrosion/
discoloration caused by external substances and/
or environmental factors; > labor costs, display, oor,
B-stock, out- of-box,“as is” appliances and demo units.
How to receive service
To receive warranty services, the Purchaser must contact the
Forno Support department in order to determine the problem
and the required service procedures. Troubleshooting with
a customer service representative will be necessary before
moving forward with the service. Model number, serial
number and date of original retail purchase will be requested.
Warranty Exclusions: What Is Not Covered.
• Use of the Product in any non-residential, commercial
application.
• Use of the Product for anything other than its intended
purpose.
• Repair services provided by anyone other than a Forno
Authorized Service agency.
• Damages or repair services to correct services provided
by unauthorized parties or the use of unauthorized parts.
• Installation not in accordance with local/state/city/county
re codes, electrical codes, gas codes, plumbing codes,
building codes, laws or regulations.
• Defects or damage due to improper storage of the
Product.
• Defects, damage or missing parts on products sold out
of the original factory packaging or from displays. >
Service calls or repairs to correct an incorrect installation
of the Product and/or related accessories.
• Replacement of parts/service calls to connect, convert
or otherwise repair the electrical wiring and/or gas line in
order to properly use the product.
• Replacement of parts/service calls to provide
instructions and information on the use of the Product.
• Replacement of parts/service calls to correct issues
arising from the product being used in a manner other
than what is normal and customary for residential use.
• Replacement of parts/service calls due to wear and tear
of components such as seals, knobs, pan supports,
shelving, cutlery baskets, buttons, touch displays,
scratched or broken ceramic-glass tops.
• Replacement of parts/service calls for lack of/improper
maintenance, including but not limited to: build up of
residues, stains, scratches, discoloration, corrosion.
• Defects and damages arising from accidents, alteration,
misuse, abuse or improper installation.
• Defects and damages arising from Product transport,
logistics and handling. Inspection of the product must
be made at time of delivery. Following receipt and
inspection, the selling dealer/delivery company must be
notied of any issues arising from handling, transport
and logistics.
• Defects and damages arising from external forces
beyond the control of Forno Appliances, including but
not limited to wind, rain, sand, res, oods, mudslides,
freezing temperatures, excessive moisture or extended
exposure to humidity, power surges,
• Lightning, structural failures surrounding the appliance
and other acts of God.
• Products whose serial number has been altered/
damaged/tampered with. In no case shall Forno be held
liable or responsible for damage to surrounding property,
including furniture, cabinetry, ooring, panels, and other
structures surrounding the Product. Forno is neither
liable nor responsible for the Product if it is located
in a remote area or an area where certied trained
technicians are not reasonably available. Purchaser
must bear any transportation and delivery costs of the
Product to the nearest Authorized Service Center or
the additional travel expenses of a certied trained
technician

14
THERE ARE NO EXPRESS WARRANTIES OTHER THAN THOSE LISTED AND DESCRIBED ABOVE, AND NO WARRANTIES, EITHER EXPRESS OR
IMPLIED, INCLUDING, BUT NOT LIMITED TO, ANY IMPLIED WARRANTIES OF MERCHANTABILITY OR FITNESS FOR A PARTICULAR PURPOSE THAT
SHALL APPLY AFTER THE EXPRESS WARRANTY PERIODS STATED ABOVE, AND NO OTHER EXPRESS WARRANTY OR GUARANTEE GIVEN BY
ANY PERSON, FIRM OR CORPORATION WITH RESPECT TO THIS PRODUCT SHALL BE BINDING ON FORNO. FORNO SHALL NOT BE LIABLE FOR
LOSS OF REVENUE OR PROFITS, FAILURE TO REALIZE SAVINGS OR OTHER BENEFITS, TIME AWAY FROM WORK, MEALS, LOSS OF FOOD OR
BEVERAGES, TRAVELING OR HOTEL EXPENSES, EXPENSES TO RENT OR PURCHASE APPLIANCES, REMODELING/CONSTRUCTION EXPENSES
IN EXCESS OF DIRECT DAMAGES WHICH ARE UNDENIABLY CAUSED EXCLUSIVELY BY FORNO OR ANY OTHER SPECIAL, INCIDENTAL OR
CONSEQUENTIAL DAMAGES CAUSED BY THE USE, MISUSE OR INABILITY TO USE THIS PRODUCT, REGARDLESS OF THE LEGAL THEORY ON
WHICH THE CLAIM IS BASED, AND EVEN IF FORNO HAS BEEN ADVISED OF THE POSSIBILITY OF SUCH DAMAGES. NOR SHALL RECOVERY OF
ANY KIND AGAINST FORNO BE GREATER IN AMOUNT THAN THE PURCHASE PRICE OF THE PRODUCT SOLD BY FORNO AND CAUSING THE
ALLEGED DAMAGE. WITHOUT PREJUDICE TO THE FOREGOING, PURCHASER ASSUMES ALL RISK AND LIABILITY FOR LOSS, DAMAGE OR INJURY
TO PURCHASER AND PURCHASER’S PROPERTY AND TO OTHERS AND THEIR PROPERTY ARISING FROM THE USE, MISUSE, OR INABILITY TO
USE THIS PRODUCT SOLD BY FORNO THAT IS NOT A DIRECT RESULT OF NEGLIGENCE ON THE PART OF FORNO THIS LIMITED WARRANTY SHALL
NOT EXTEND TO ANYONE OTHER THAN THE ORIGINAL PURCHASER OF THIS PRODUCT, IS NON-TRANSFERABLE, AND STATES YOUR EXCLUSIVE
REMEDY.
Correct Disposal of this product:
This marking indicates that this appliance should not be disposed with
other household wastes. To prevent possible harm to the environment or
human health from uncontrolled waste disposal, recycle it responsibly to
promote the sustainable reuse of material resources.
Warranty (continued)
WARNING: This product can expose you to chemicals including [Lead & Lead Compounds], which is [are]
known to the State of California to cause cancer, birth defects and / or reproductive harm. To minimize exposure to these
substances. Always operate this unit according the Owner’s Manual, and ensure that you provide proper ventilation. For
more information go to www.P65Warnings.ca.gov

15
Customer Support: Call 1-866-231-8893 or email: [email protected]