

Technical Support and E-Warranty Certificate www. vevor. com/support
COTTON CANDY MAKERS
USER MANUAL
We continue to be committed to provide you tools with competitive price.
"Save Half", "Half Price" or any other similar expressions used by us only represents an
estimate of savings you might benefit from buying certain tools with us compared to the
major top brands and does not necessarily mean to cover all categories of tools offered by
us. You are kindly reminded to verify carefully when you are placing an order with us if you
are actually saving half in comparison with the top major brands.

- 1 -
Note:This user manual is
applicable
to the cotton candy machines.
Please read it carefully before use.
Have product questions? Need technical support? Please feel free to
contact us:
Technical Support and E-Warranty Certificate
www. vevor. com/support
NEED HELP? CONTACT US!
This is the original instruction, please read all manual instructions
carefully before operating. VEVOR reserves a clear interpretation of our
user manual. The appearance of the product shall be subject to the
product you received. Please forgive us that we won't inform you again if
there are any technology or software updates on our product.
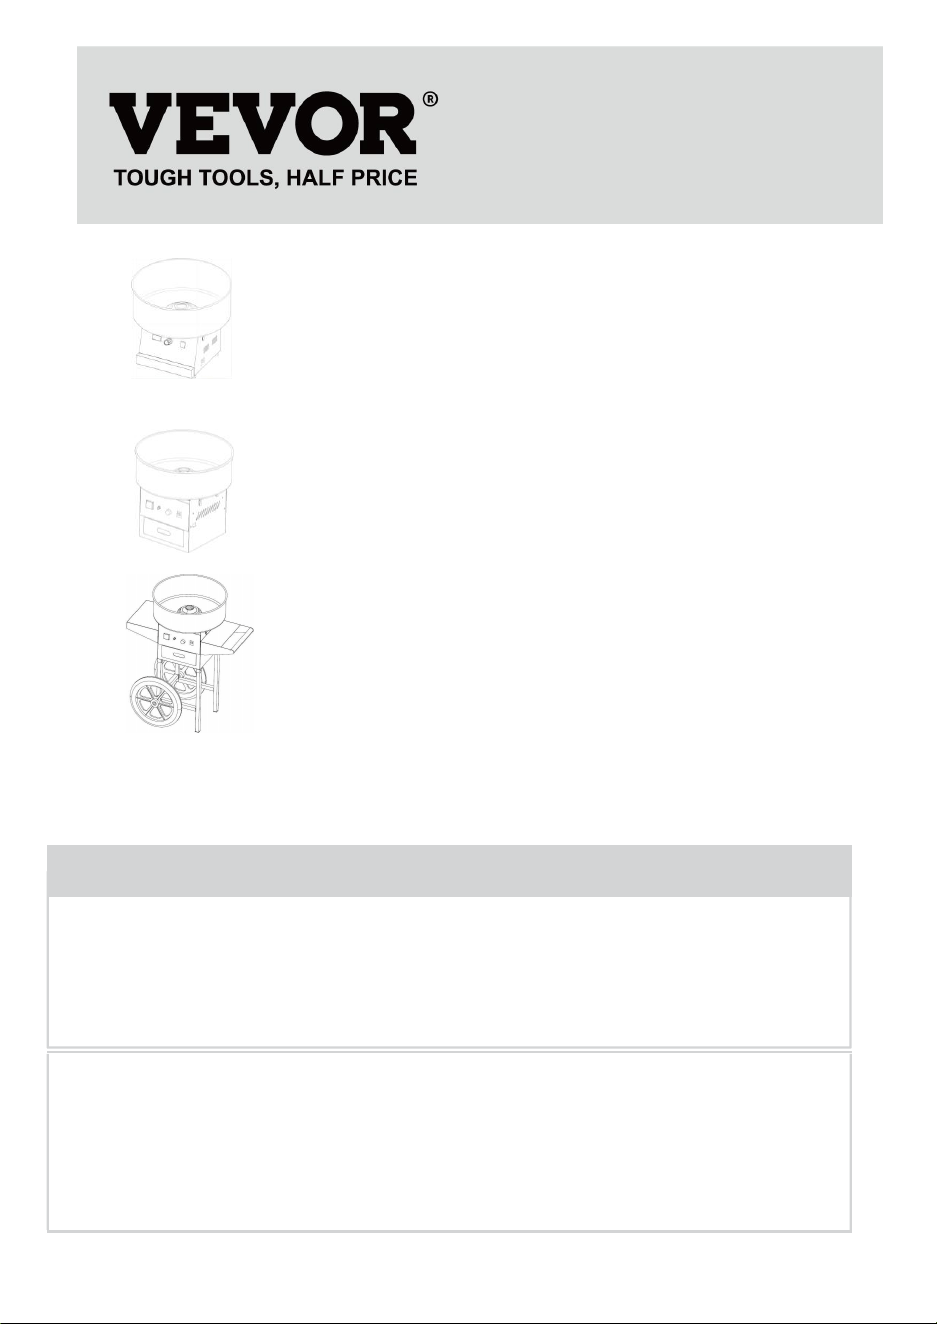
COTTON CANDY
MAKERS
MHTJXM01F MHTJXM02F MHTJXM03F
MHTJXM01H MHTJXM02H MHTJXM03H
MHTJXM01L MHTJXM02L MHTJXM03L
MHTJJPZY01 MHTJJPZY02 MHTJJPZY03
MHTJJPHC01 MHTJJPHC02 MHTJJPHC03

- 2 -
Warning-To reduce the risk of injury, user must read instructions
manual carefully.
CORRECT DISPOSAL
This product is subject to the provision of european Directive
2012/19/EU. The symbol showing a wheelie bin crossed through
indicates that the product requires separate refuse collection in the
European Union. This applies to the product and all accessories
marked with this symbol. Products marked as such may not be
discarded with normal domestic waste, but must be taken to
acollection point for recycling electrical and electronic devices.
Compliance is a EC & UK security certification.
IMPORTANT SAFEGUARDS
When using electrical appliances, basic safety precautions should always be
followed including the following:
1. Read all instructions.
2. Do not touch hot surfaces. Use handles or knobs.
3. To protect against electrical shock, do not immerse cords, plugs, or
appliances in water or other liquid.
4. Close supervision is necessary when any appliance is used by or near
children.
5. Unplug from outlet when not in use and before cleaning. Allow to cool before
putting on or taking off parts
6. Do not operate any appliance with a damaged cord or plug or after the
appliance malfunctions or has been damaged in any manner. Return appliance
to the nearest authorized service facility for examination, repair, or adjustment.
7. The use of accessory attachments not recommended by the appliance
manufacturer may cause injuries.
8. Do not use outdoors.
9. Do not let cord hang over edge of table or counter, or touch hot surfaces.
10. Do not place on or near a hot gas or electric burner, or in a heated oven.
11. Extreme caution must be used when moving an appliance containing hot oil
or other hot liquids.

- 3 -
12. Always Attach the plug to the appliance first, then the cord to the wall outlet.
To disconnect, turn any control to "off," then remove the plug from the wall outlet.
13. Do not use appliances for other than intended use.
14. Household used only.
SAVE THESE INSTRUCTIONS
Note For Cord:
A short power-supply cord is provided to reduce the risk resulting from becoming
entangled in or tripping over a longer cord.Extension cords are available and may be
used if care is exercised in their use.If an extension cord is used:
1) The marked electrical rating of the extension cord should be at least as great as the
electrical rating of the appliance;
2) The cord should be arranged so that it will not drape over the countertop or tabletop
where it can be pulled on by children or tripped over unintentionally; and
3) The extension cord should be a grounding-type 3-wire cord.
PRODUCT PARAMETERS
Model
Heating
Plate Power
Dimensions(mm)
Voltage
Frequency
MHTJXM01F
MHTJXM01H
MHTJXM01L
1000W
518*518*415
AC120V
60Hz
MHTJXM02F
MHTJXM03F
MHTJXM02H
MHTJXM03H
MHTJXM02L
MHTJXM03
AC220-240V
50/60Hz
MHTJJPZY01
518*518*485
AC120V
60Hz
MHTJJPZY02
MHTJJPZY03
AC220-240V
50/60Hz
MHTJJPHC01
518*820*1000
AC120V
60Hz
MHTJJPHC02
MHTJJPHC03
AC220-240V
50/60Hz
- 4 -
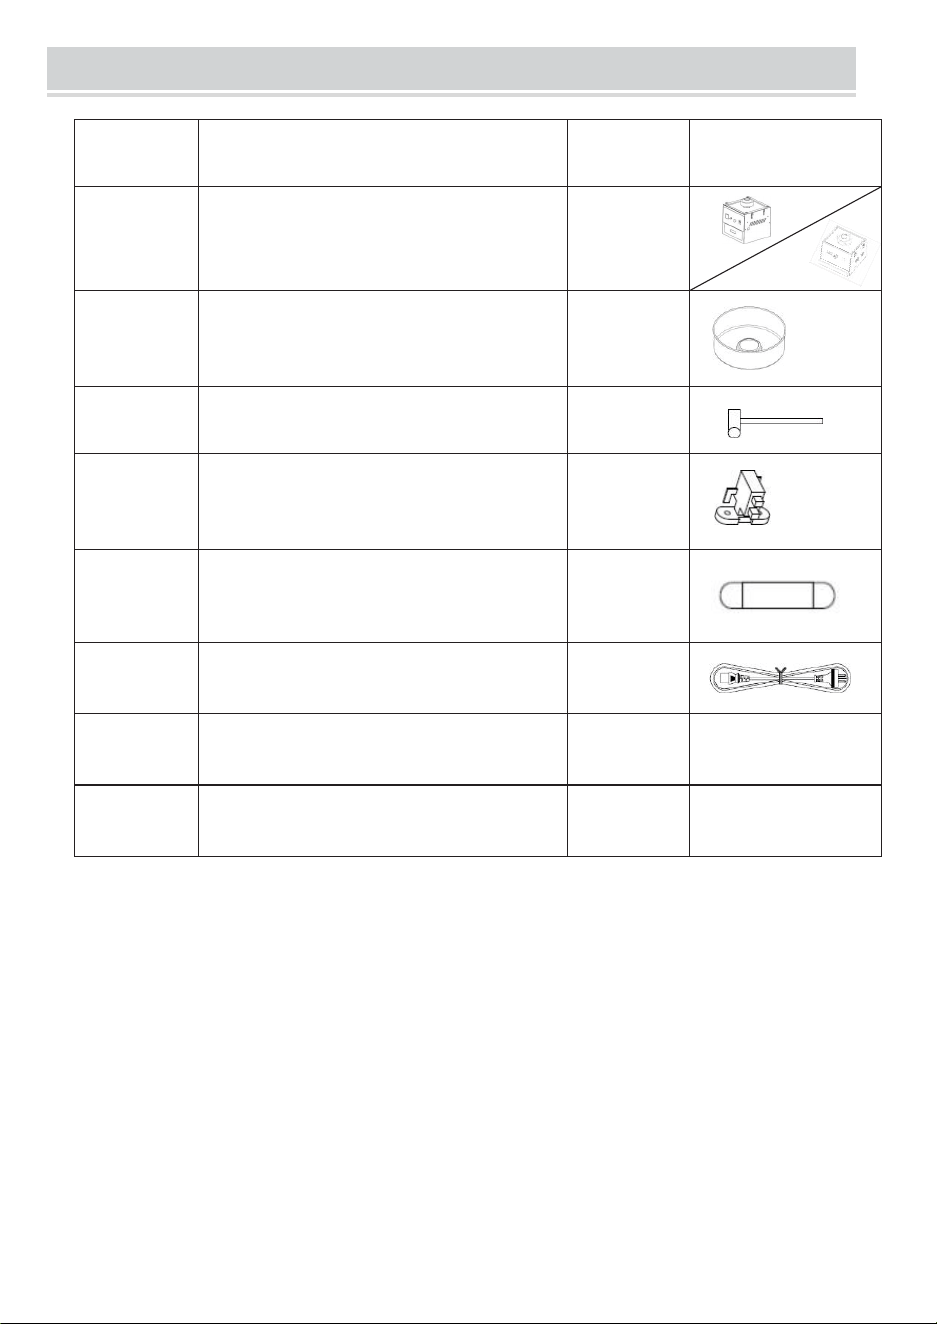
PACKING LIST
Item
Part Name
QTY
Picture
1
Cotton Candy Machine
1 PCS
2
Stainless Steel Bowl
1 PCS
3
Stainless Steel Sugar Scoop
1 PCS
4
Carbon
Brush
1 PCS
5
Fuse
1 PCS
6
Power
Cord
1 PCS
7
User
Manual
1 PCS
8
Installation Tools
Note: For t he cart-style ones only.
1 SET
- 5 -
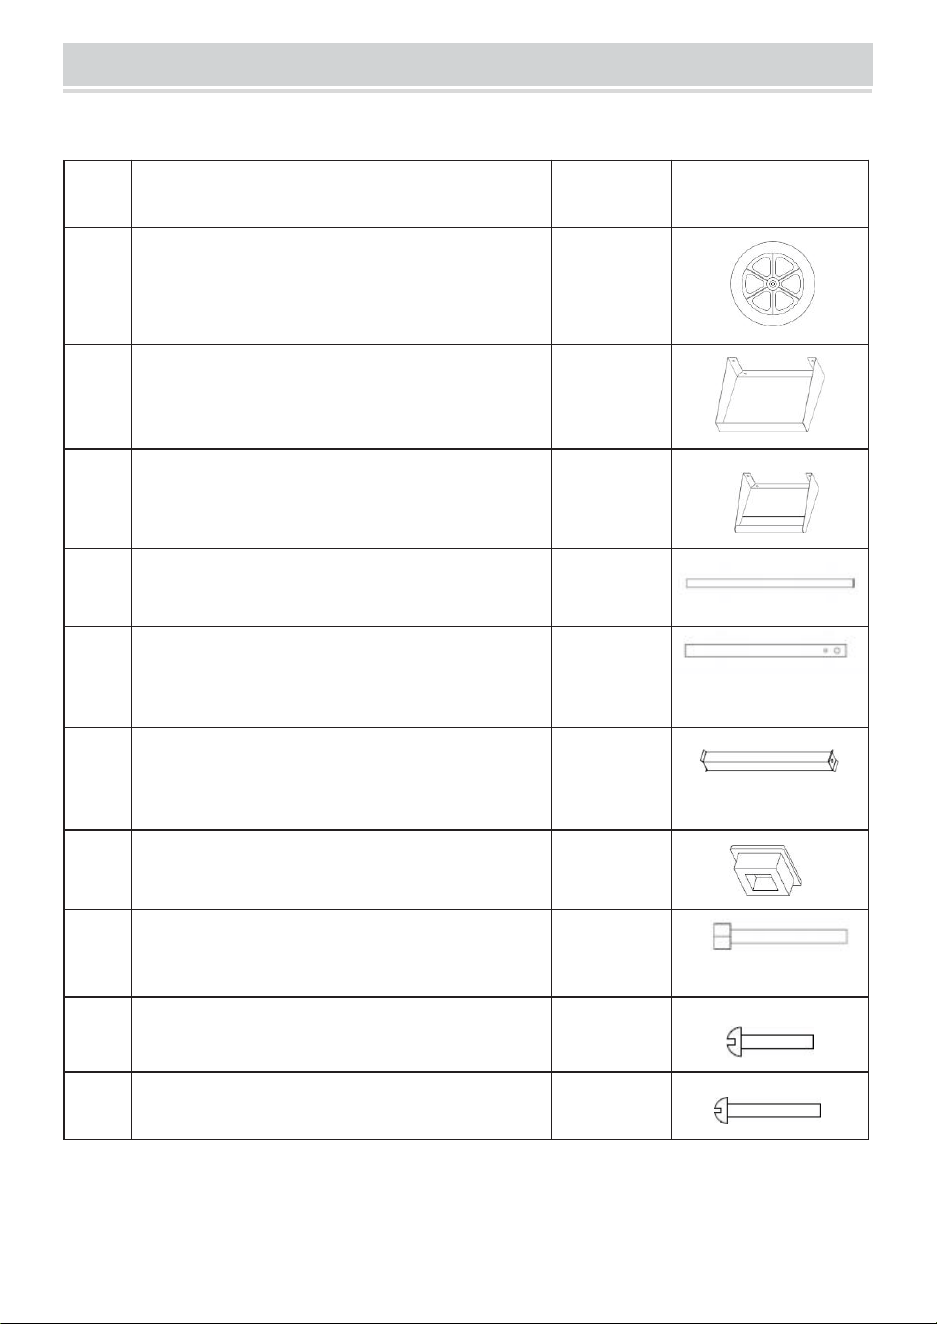
INSTALLATION KIT ACCESSORIES LIST
Note: Only the cart-style machines come with the installation kits.
Item
Part Name
QTY
Picture
1
Wheel
2 PCS
2
Table
1 PCS
3
Handle
1 PCS
4
(P1) - Long Bracket
2 PCS
5
(P2)-Short Bracket (Wheel Mounting)
2 PCS
6
(P3)-Transverse Fixing Bracket
3 PCS
7
Plastic Pad
2 PCS
8
Bolts (M8*70)
2 PCS
9
Screw
(M5*12)
16 PCS
10
Screw
(M5*35)
6 PCS
- 6 -
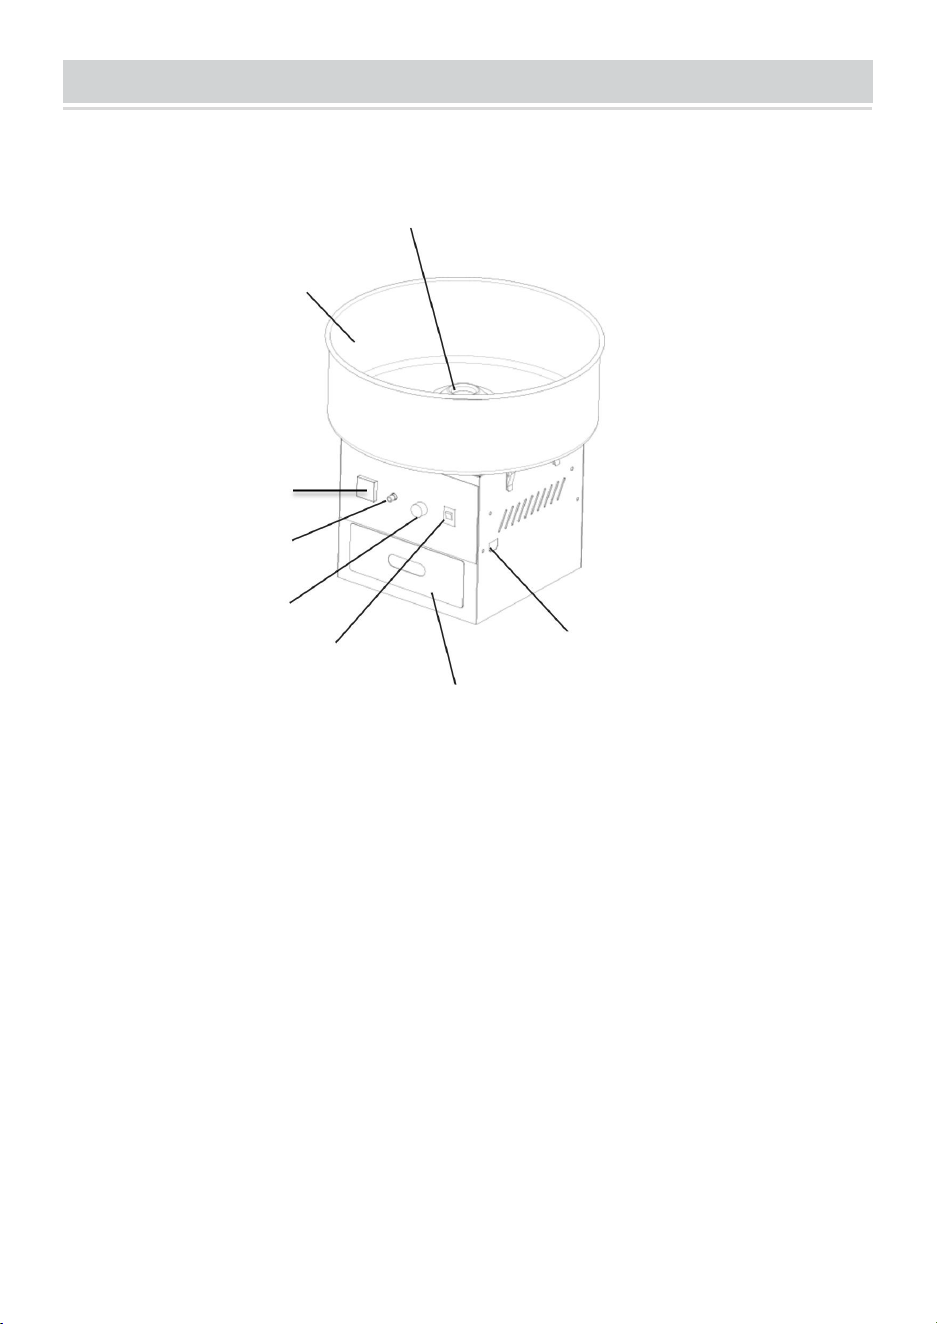
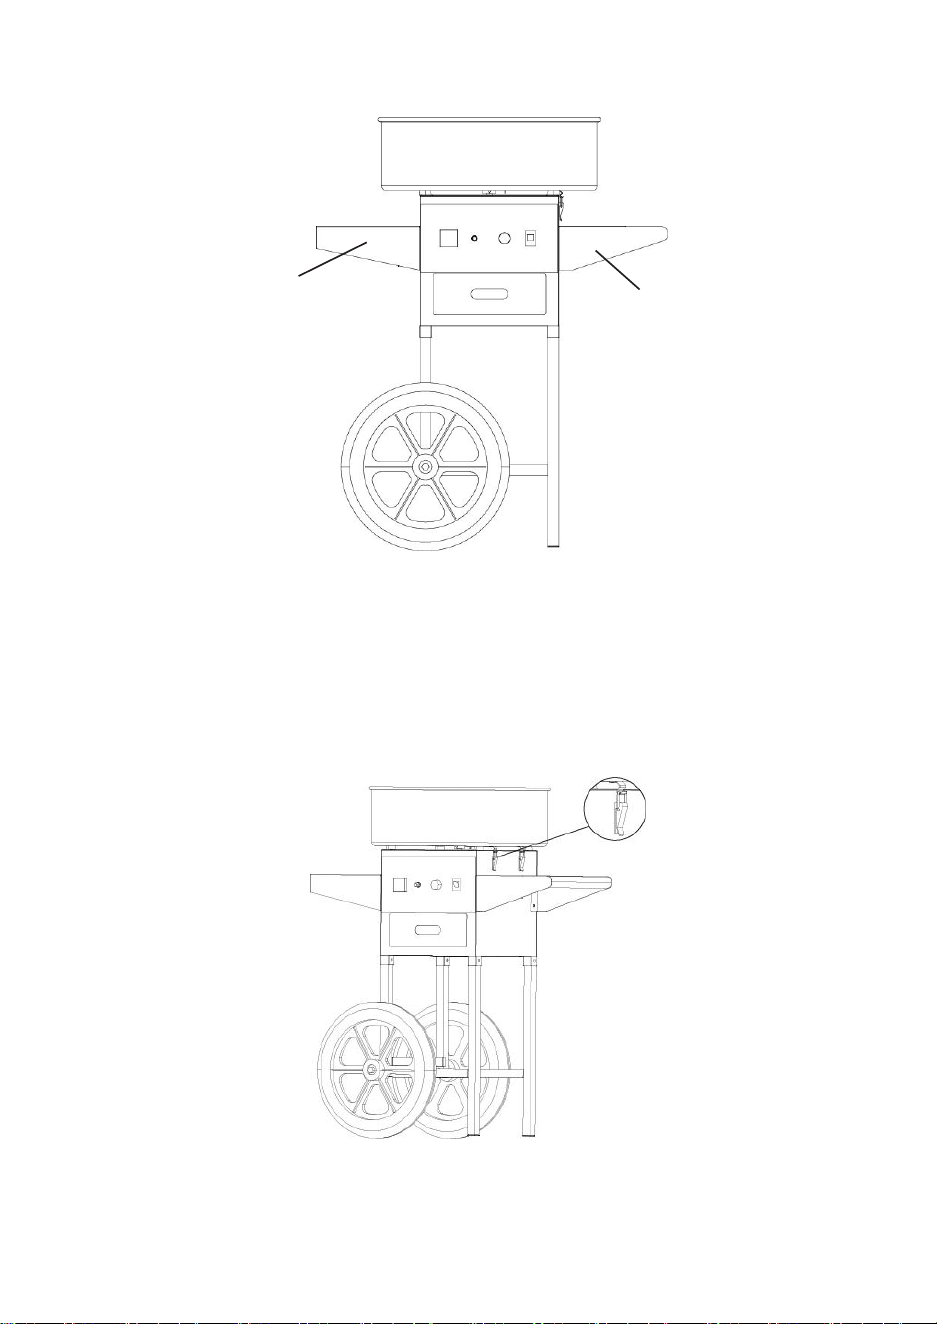
PRODUCT COMPOSITION DIAGRAM
Spinning
Head
Bowl
Voltmeter
Fuse
Heating Switch
Power Switch
Power Plug
Drawer
Cotton Candy Machine
(Countertop Type with Cabinet)

- 7 -
Spinning
Head
Bowl
Voltmeter
Heating
Switch
Power
Plug
Power
Switch
Fuse
Cotton Candy Machine
(Countertop
Type)
Cotton Candy
Machine
(Cart Type)
- 8 -
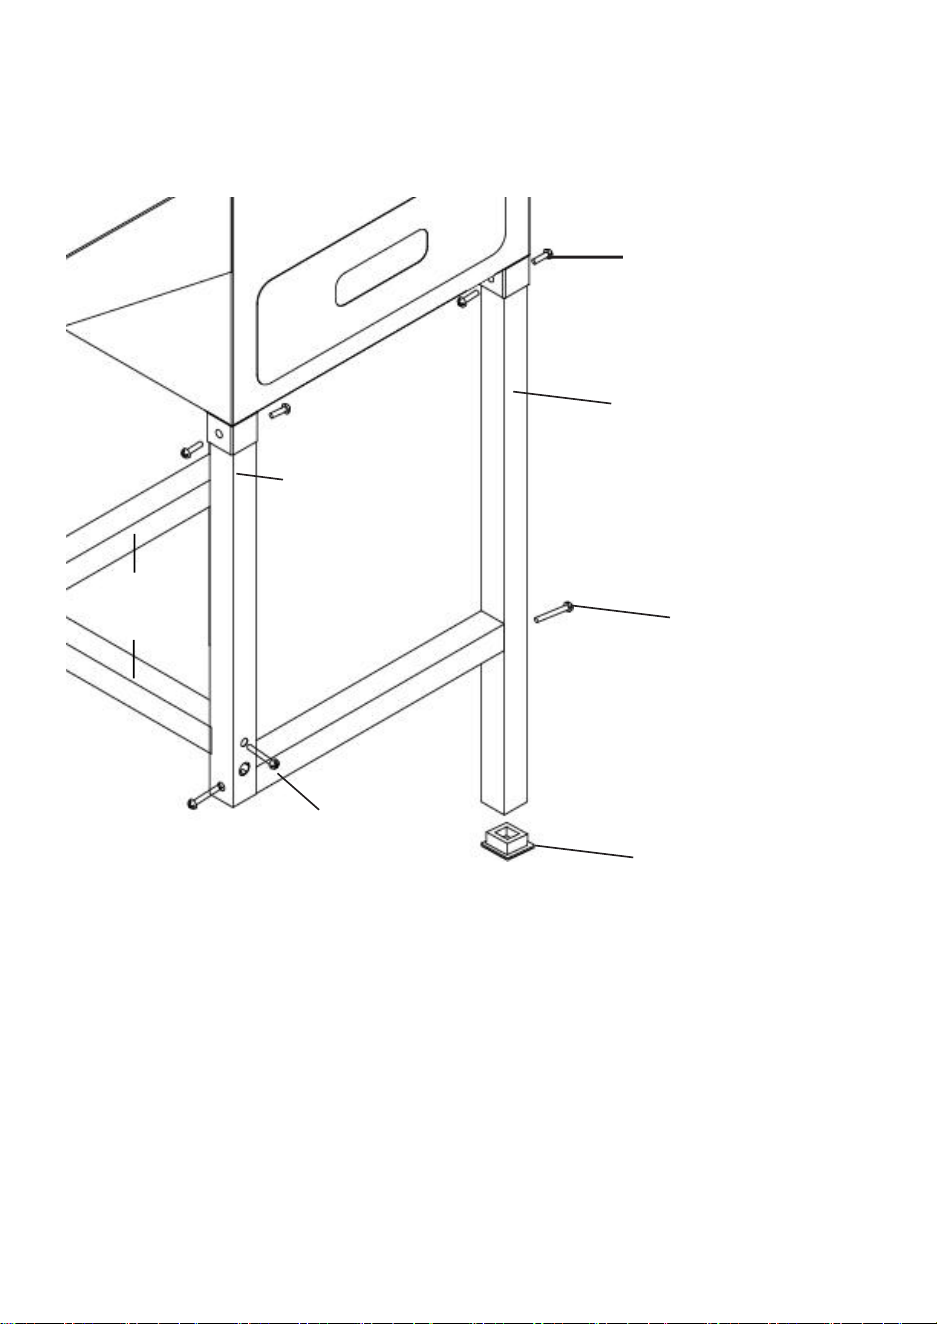
Please install the wheels for the Cart Type in the following order.
1
.
Use screws (M5*12) and screws (M5*35) to install the bracket as
shown in the figure. The installation steps on both sides are the same.
Screws
(M5*12)
(P1)- Long Bracket
(P2)-Short Bracket
(Wheel Mounting)
Screws
(M5*35)
Plastic Pad
(P3)-Transverse
Fixing Bracket
(P3)-Transverse
Fixing Bracket
- 9 -
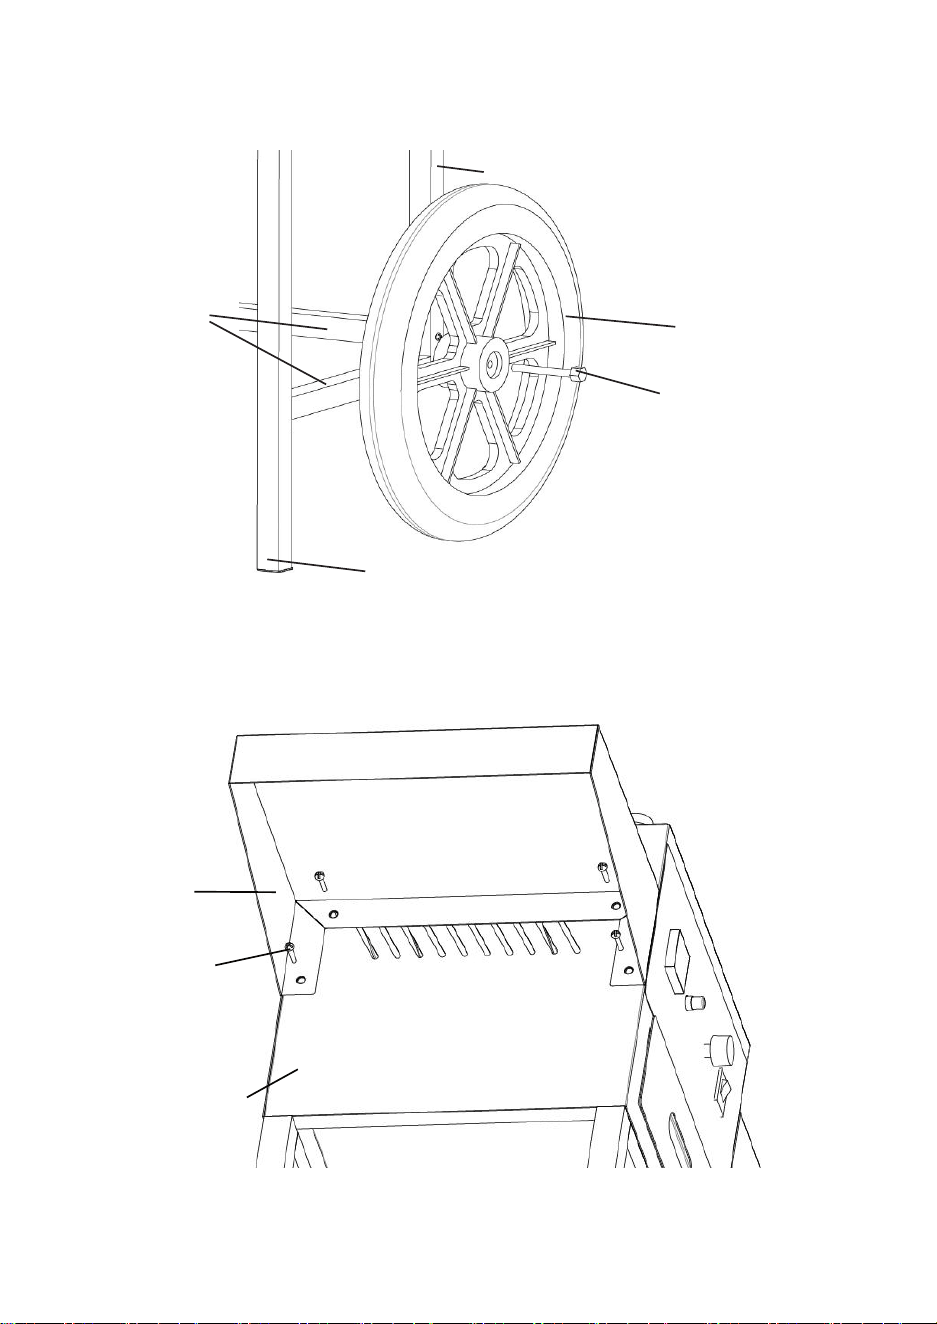
2.Install two wheels under the frame with two Bolts (M8*70).
(P2)-Short Bracket (Wheel Mounting)
(P3)-
Transverse
Fixing
Bracket
Wheel
Bolt
(P1)- Long Bracket
3.Install the table on the left side of the main body, and install the push
handle on the right side with 8 pcs Screw (M5*12)
Table
Screw
(M5*12)
Main
Body
- 10 -
Table
Push
Handle
4
.
Place the stainless steel pan on top of the box and fix it with the 4 locking clips
on both sides.

- 11 -
5.After all assembly is completed, it is ready to use. Please properly keep the
other components, which will be used during use or maintenance.
OPERATION PRECAUTIONS
1
.
Please read this manual carefully before use. In order to give full play to
its advantages and achieve satisfactory results, please understand the
structure and function of the machine, and be familiar with its main parts and
related safety operations.
2.After taking the machine out of the package, rinse the bowl and spinning
head with a small amount of clean water, and then wipe the water stains
with a soft cloth.
3.
The machine should be installed on a supported workbench, keeping a distance
from the ground.
4
.
Before starting the machine, please check whether the voltage of the
power supply used is consistent with the voltage of the machine used. Ensure
that the contact between the socket and the machine meets the safety
standards, the leakage protection switch and ground wire are installed, and
everything meets the electricity requirements.

- 12 -
OPERATING INSTRUCTIONS
1
.
Press the switch to turn on the machine and wait for 1-2 minutes. Observe
whether the machine runs smoothly when the spinning head of the machine is
rotating. If the vibration is too severe, the machine needs to be adjusted. It
must be ensured that the machine is placed stably.
2
.
Adjust the voltage knob to Max, and the voltmeter will change with the
adjustment. Warm up the machine for 2-3 minutes. After preheating, the
voltage can be adjusted according to the user's temperature requirements.
3.First, pour half a teaspoon of sugar, test the degree of heating and sugar
production. When everything is okay, then pour a spoonful of clean white
sugar in the center of the sugar head.
4
.
After about 3 seconds, the cotton candy starts to squirt out. Take a bamboo
stick and rotate it a few times along the inner wall of the bowl. Then, place the
stick horizontally and rotate it over the spinning head to form cotton candy.
Different shapes can be made by tilting the sticks.
5.After making enough cotton candy, turn off the machine.
CLEANING
1.The machine needs to be cleaned after the cotton candy is made,
otherwise the spinning head may be blocked. Keep the machine running
during the cleaning process, pour a small amount of water into the rotor, then
the rotor will shake off the water slowly. After that, turn off the machine and
clean it with a dry soft cloth.
2.If the spinning head is blocked, turn off the machine and open the spinning
head, then clean up the burnt sugar.
3
.
Do not wash the machine with detergents such as washing powder.
4
.
Do not rinse the machine directly with water.
NOTICE
1.Minors are prohibited from using this product.
2
.
Do not put the wire close to the hot surface. Do not immerse the lugs on the
machine in water or other liquids. Do not use damaged cords, sockets or
plugs.
3.The machine must be properly installed before inserting the plug into the
outlet. When not in use or before cleaning, turn off the switch, unplug the
power supply, wait for the spinning head to stop rotating, and wait for the
- 13 -
machine to cool down.
4.
Do not touch the rotating spinning head when the machine is working. Do not
reach your hands.
into the bowl until the sugar is gone. To avoid burns, do not
move the machine while it is working.
5
.
Do not touch the plug or wire when the plug or wire is wet or your hands
are wet, otherwise it may cause an electric shock.
6
.
The motor of this machine is designed to have a temporary cut-off rate of
80%, so long-term
continuous operation should be avoided. After working
continuously for one hour, you should pause
for 20 minutes before starting to
work, which will greatly extend the service life of the motor.
7
.
Whether it is cleaning, maintenance and other related work, the power
should be turned off first, and the power plug should be unplugged. The
machine is not allowed to run without load for a long time.
8.Cleaning agents are not allowed to be used during cleaning to prevent
the cleaning agents remaining on the machine from being eaten by
mistake.
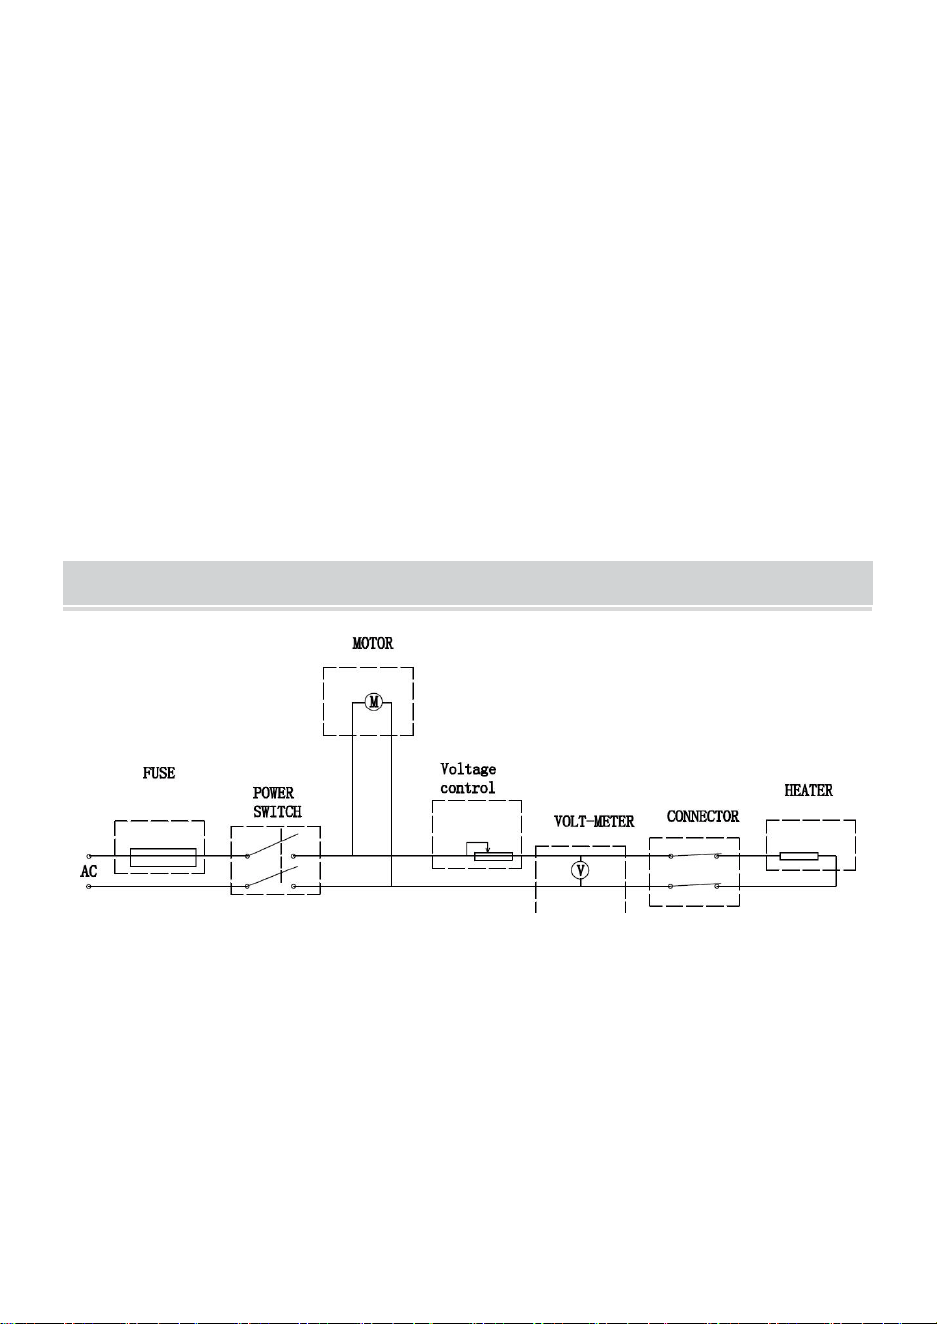
CIRCUIT DIAGRAM
- 14 -
TROUBLESHOOTING
Fault: No Sugar Filament
1.Check whether the sugar head is rotating or not, and stop the machine to sense
whether the sugar head is hot.
2.If the sugar head does not rotate, check whether the machine is powered on and the
motor is broken.
3.If the sugar head is not hot: check whether the machine is powered on, whether the
sugar head is ringing, and whether the voltage is excessive.
4.Unscrew the fuse knob on the panel or pry open the fuse cover (for Countertop
Type) in the socket, then, take the fuse out to check whether it is burnt out.
5.Remove the baffle & upper cover and take out the cover through the spinning head,
then you can see the internal condition of the machine. Check whether the carbon brush
is loose or not working, if so, replace it with a new one.
NOTICE FOR CARBON BRUSH
Please replace the carbon brush in time if the following situations occur during
routine maintenance inspection and use:
1.
The carbon brush has a relatively large spark and smoke.
2.The contact surface of the carbon brush on the slip ring is less than 70%.
3.
Carbon brush spring pressure mismatch, etc.
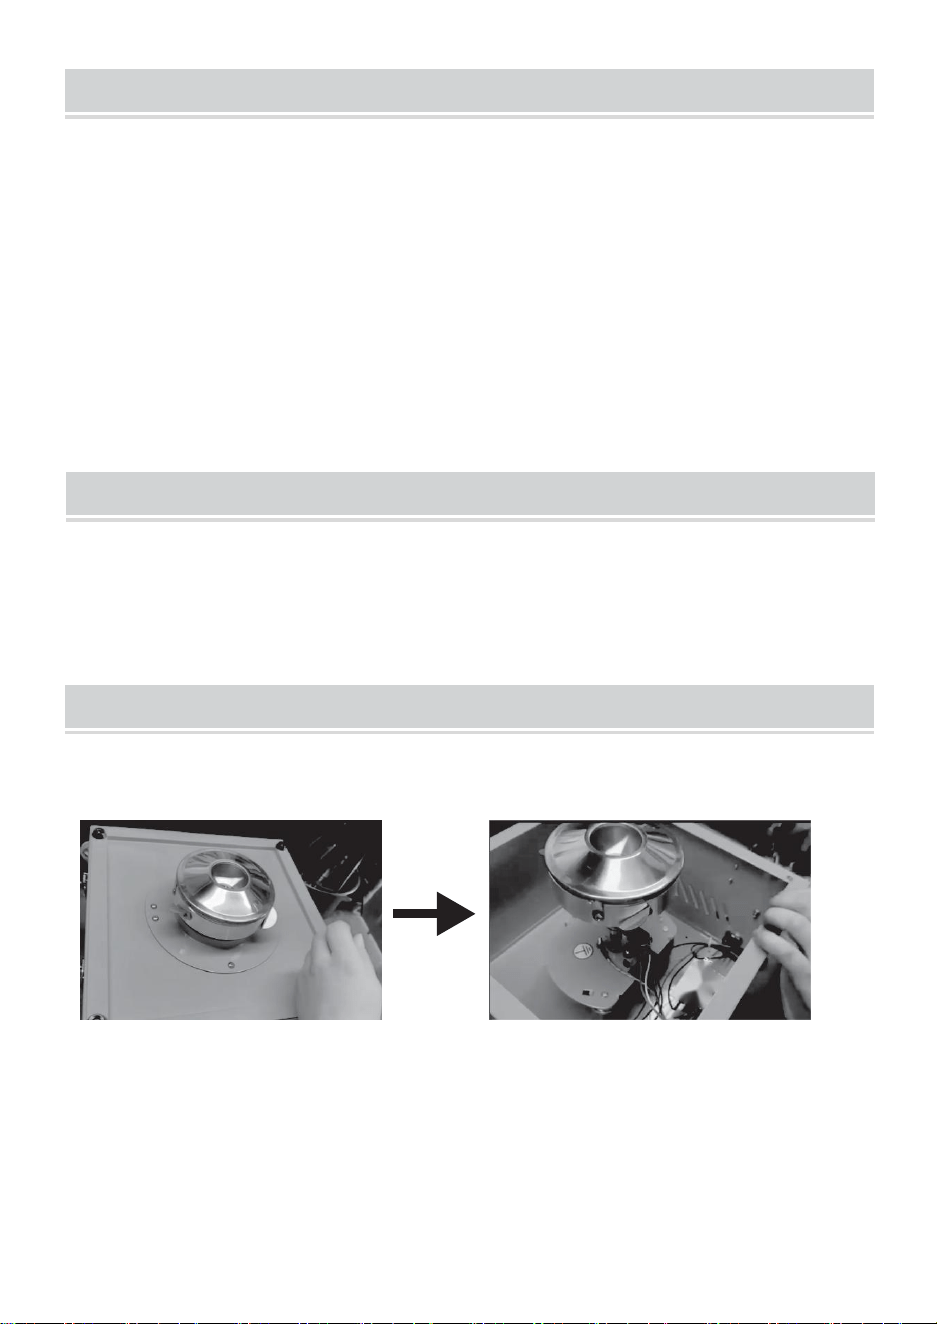
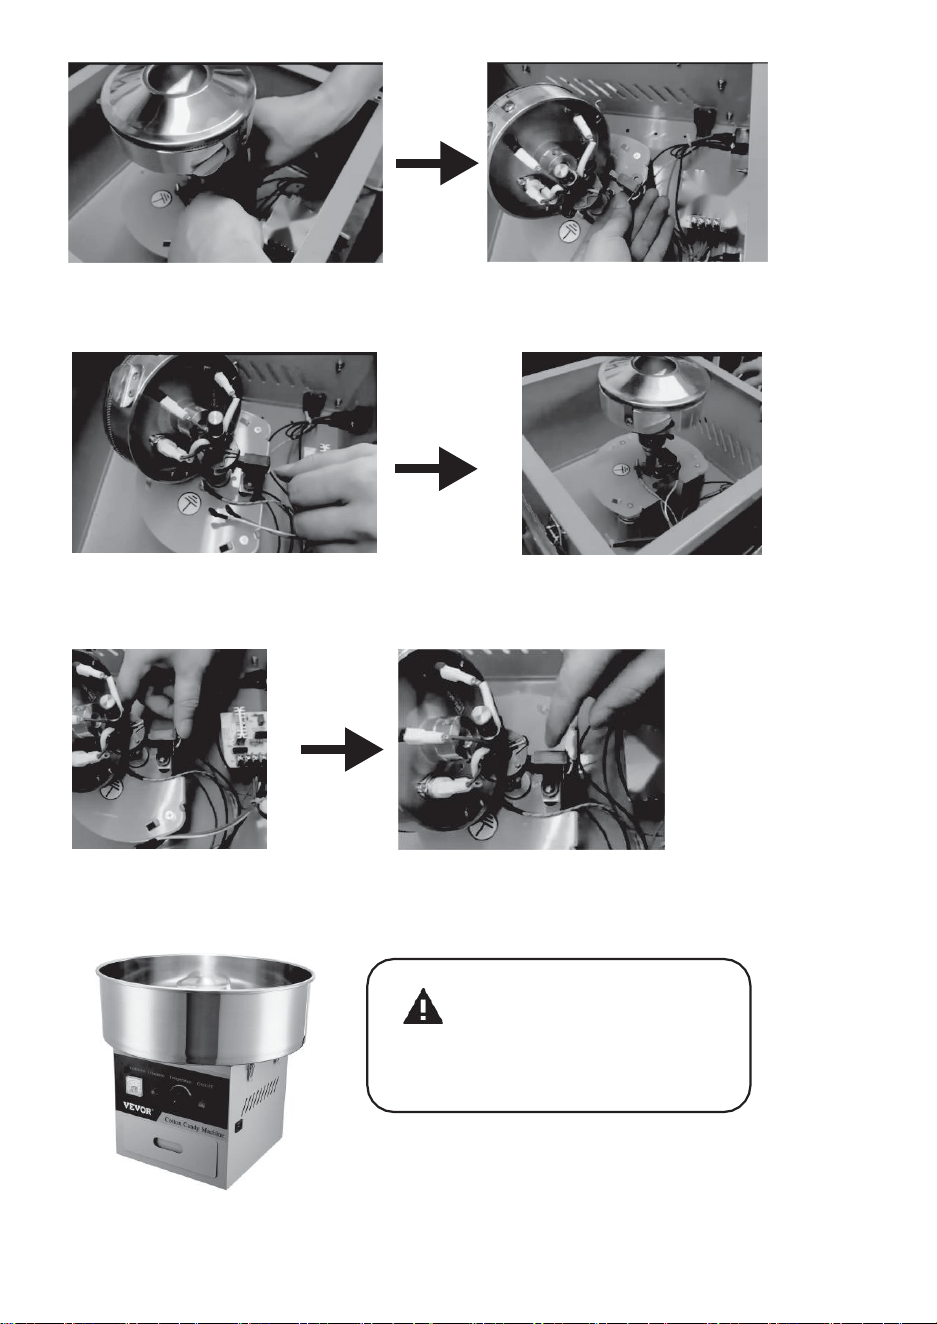
REPLACE THE CARBON BRUSH STEPS
1
.
Remove the screws fixing the baffle plate and top cover and take out the baffle
and top cover.
2
.
Remove the connecting end of the carbon brush, remove the fixing
screws, and take out the old carbon brush. (In order to facilitate the
installation and disassembly, the fixing screw of the sugar head can be
removed first to increase the operating space)
- 15 -
3.Replace the new carbon brush, place it in position and fix it with
screws, and plug in the connecting end.
4.Check the installation of the new carbon brush. (whether the spring
and the installation contact is good)
5
.
Reinstall the top cover and baffle, complete the carbon brush replacement.
Note: The carbon brush
is a
consumable and should be
replaced
after a period of use.