
Technical Support and E-Warranty Certificate www. vevor. com/support
COTTON CANDY MAKERS
USER MANUAL
We continue to be committed to provide you tools with competitive price.
"Save Half", "Half Price" or any other similar expressions used by us only represents an
estimate of savings you might benefit from buying certain tools with us compared to the
major top brands and does not necessarily mean to cover all categories of tools offered by
us. You are kindly reminded to verify carefully when you are placing an order with us if you
are actually saving half in comparison with the top major brands.


- 1 -
Note:This user manual is
applicable
to the cotton candy machines.
Please read it carefully before use.
Have product questions? Need technical support? Please feel free to
contact us:
Technical Support and E-Warranty Certificate
www. vevor. com/support
NEED HELP? CONTACT US!
This is the original instruction, please read all manual instructions
carefully before operating. VEVOR reserves a clear interpretation of our
user manual. The appearance of the product shall be subject to the
product you received. Please forgive us that we won't inform you again if
there are any technology or software updates on our product.
COTTON CANDY
MAKERS
MHTJXM01F MHTJXM02F MHTJXM03F
MHTJXM01H MHTJXM02H MHTJXM03H
MHTJXM01L MHTJXM02L MHTJXM03L
MHTJJPZY01 MHTJJPZY02 MHTJJPZY03
MHTJJPHC01 MHTJJPHC02 MHTJJPHC03
- 2 -
Warning-To reduce the risk of injury, user must read instructions
manual carefully.
CORRECT DISPOSAL
This product is subject to the provision of european Directive
2012/19/EU. The symbol showing a wheelie bin crossed through
indicates that the product requires separate refuse collection in the
European Union. This applies to the product and all accessories
marked with this symbol. Products marked as such may not be
discarded with normal domestic waste, but must be taken to
acollection point for recycling electrical and electronic devices.
Compliance is a EC & UK security certification.
IMPORTANT SAFEGUARDS
When using electrical appliances, basic safety precautions should always be
followed including the following:
1. Read all instructions.
2. Do not touch hot surfaces. Use handles or knobs.
3. To protect against electrical shock, do not immerse cords, plugs, or
appliances in water or other liquid.
4. Close supervision is necessary when any appliance is used by or near
children.
5. Unplug from outlet when not in use and before cleaning. Allow to cool before
putting on or taking off parts
6. Do not operate any appliance with a damaged cord or plug or after the
appliance malfunctions or has been damaged in any manner. Return appliance
to the nearest authorized service facility for examination, repair, or adjustment.
7. The use of accessory attachments not recommended by the appliance
manufacturer may cause injuries.
8. Do not use outdoors.
9. Do not let cord hang over edge of table or counter, or touch hot surfaces.
10. Do not place on or near a hot gas or electric burner, or in a heated oven.
11. Extreme caution must be used when moving an appliance containing hot oil
or other hot liquids.

- 3 -
12. Always Attach the plug to the appliance first, then the cord to the wall outlet.
To disconnect, turn any control to "off," then remove the plug from the wall outlet.
13. Do not use appliances for other than intended use.
14. Household used only.
SAVE THESE INSTRUCTIONS
Note For Cord:
A short power-supply cord is provided to reduce the risk resulting from becoming
entangled in or tripping over a longer cord.Extension cords are available and may be
used if care is exercised in their use.If an extension cord is used:
1) The marked electrical rating of the extension cord should be at least as great as the
electrical rating of the appliance;
2) The cord should be arranged so that it will not drape over the countertop or tabletop
where it can be pulled on by children or tripped over unintentionally; and
3) The extension cord should be a grounding-type 3-wire cord.
PRODUCT PARAMETERS
Model
Heating
Plate Power
Dimensions(mm)
Voltage
Frequency
MHTJXM01F
MHTJXM01H
MHTJXM01L
1000W
518*518*415
AC120V
60Hz
MHTJXM02F
MHTJXM03F
MHTJXM02H
MHTJXM03H
MHTJXM02L
MHTJXM03
AC220-240V
50/60Hz
MHTJJPZY01
518*518*485
AC120V
60Hz
MHTJJPZY02
MHTJJPZY03
AC220-240V
50/60Hz
MHTJJPHC01
518*820*1000
AC120V
60Hz
MHTJJPHC02
MHTJJPHC03
AC220-240V
50/60Hz
- 4 -
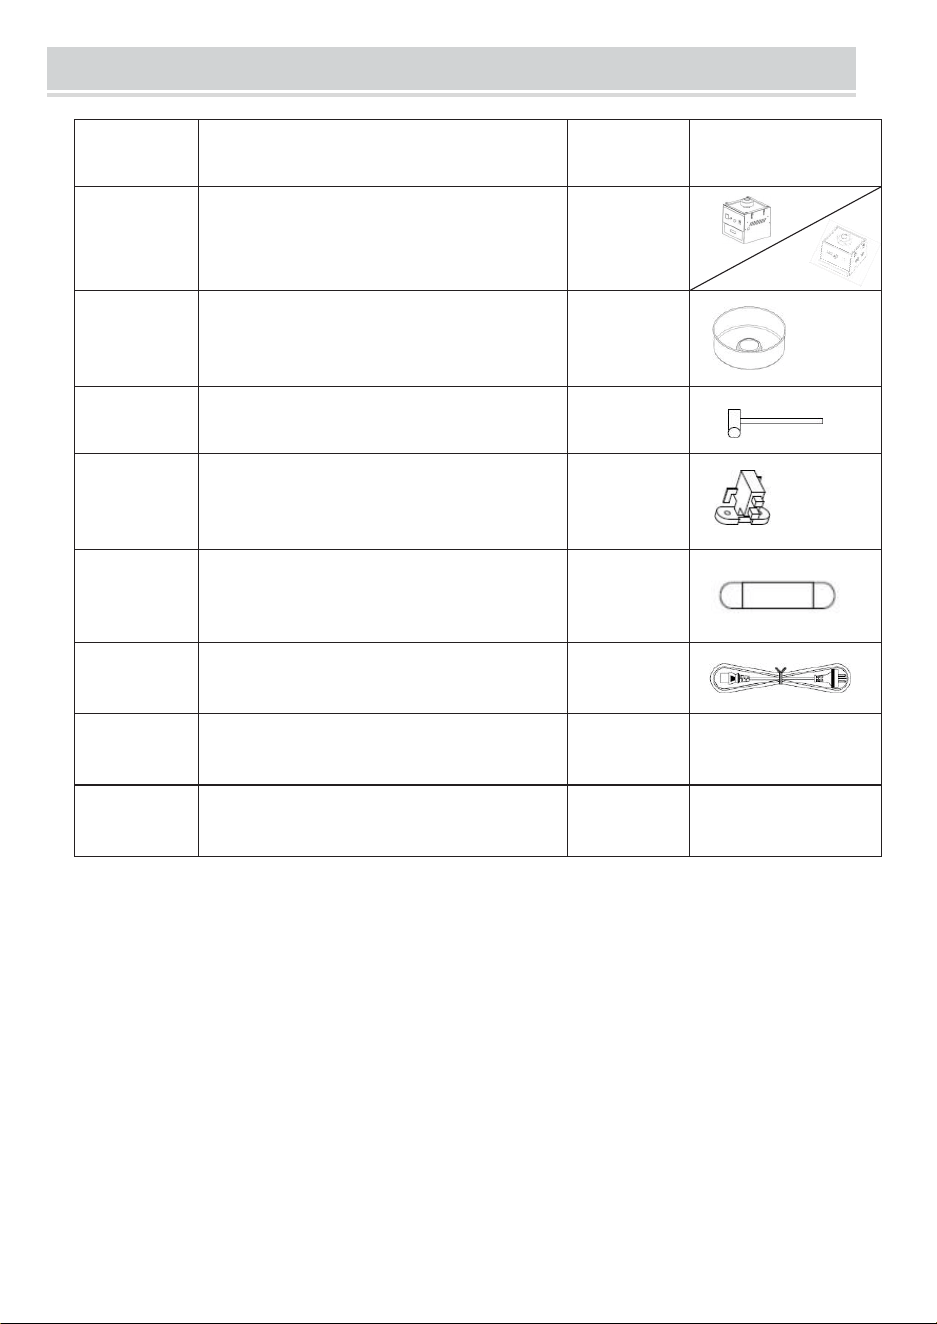
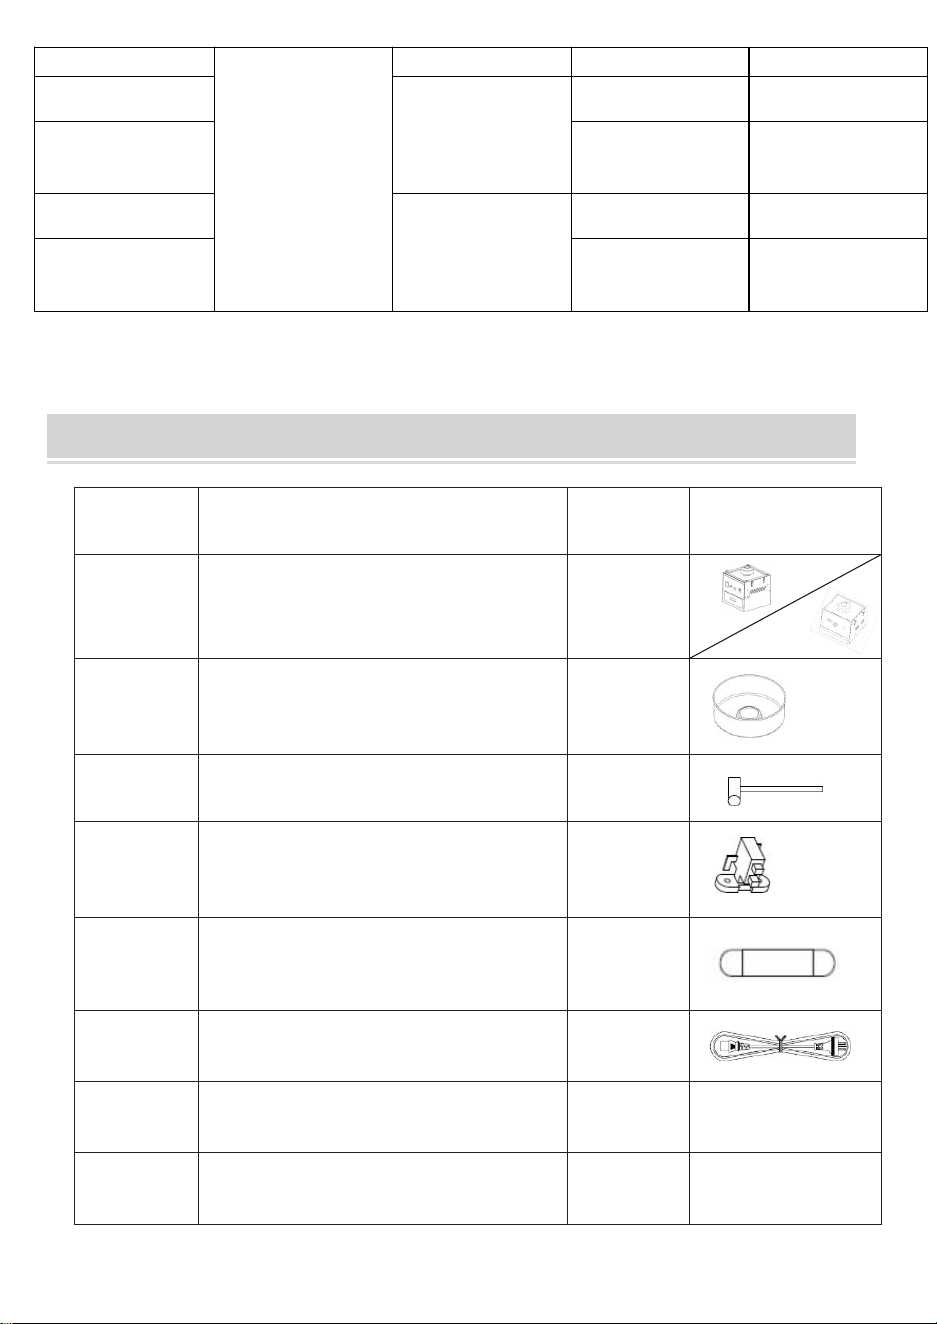
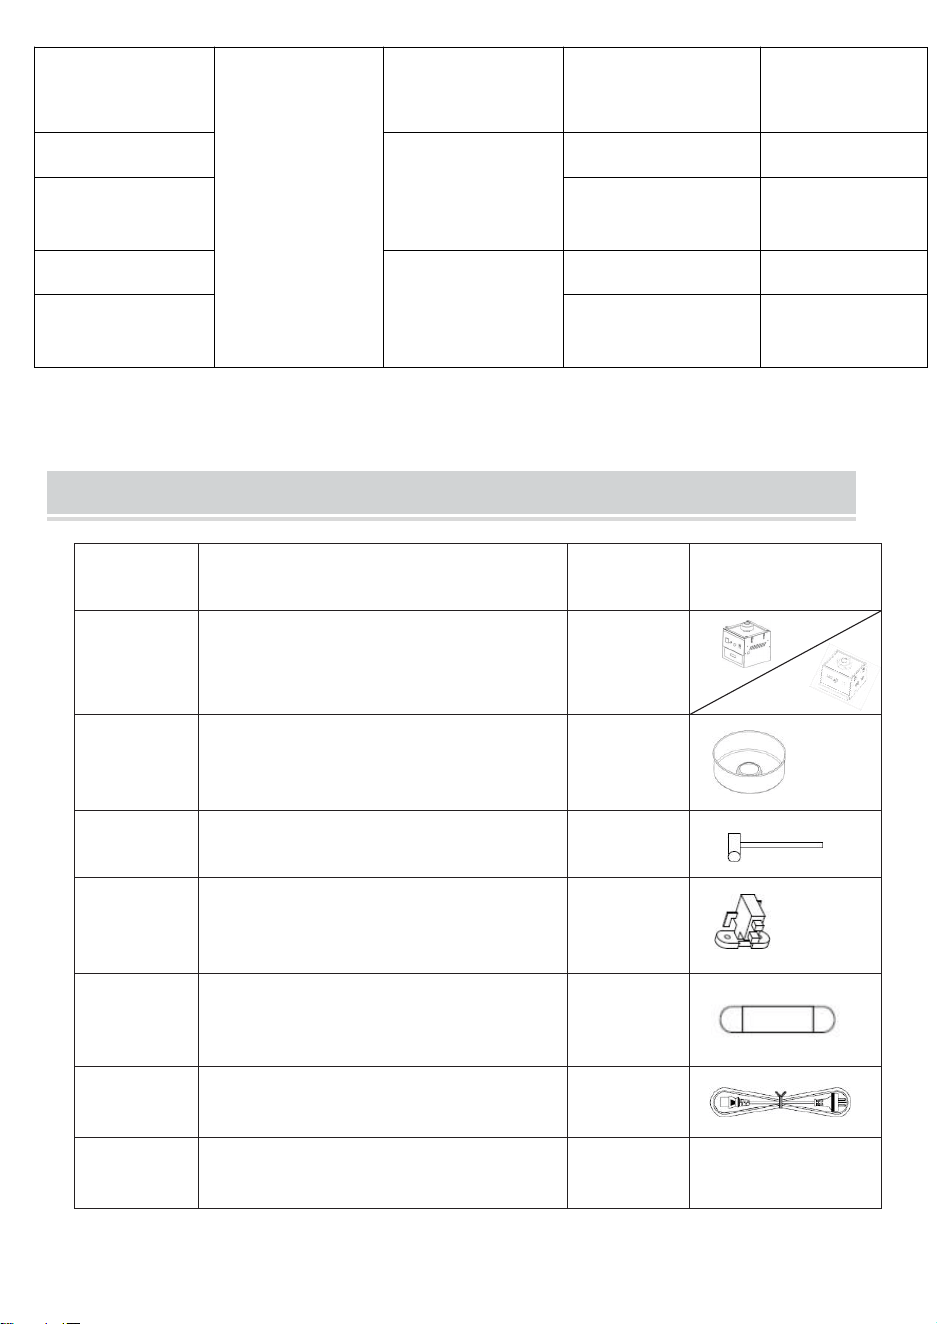
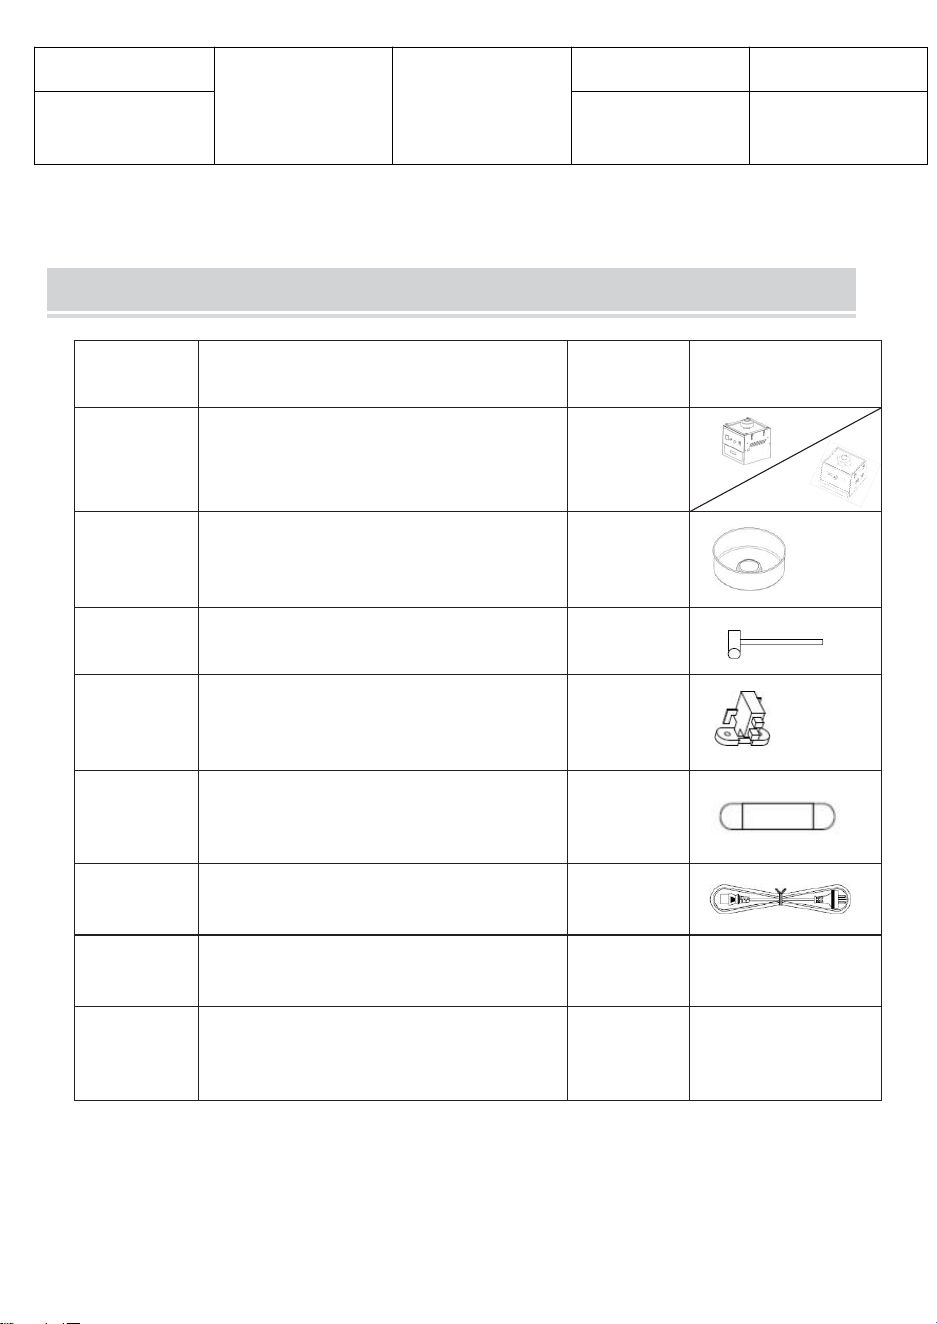
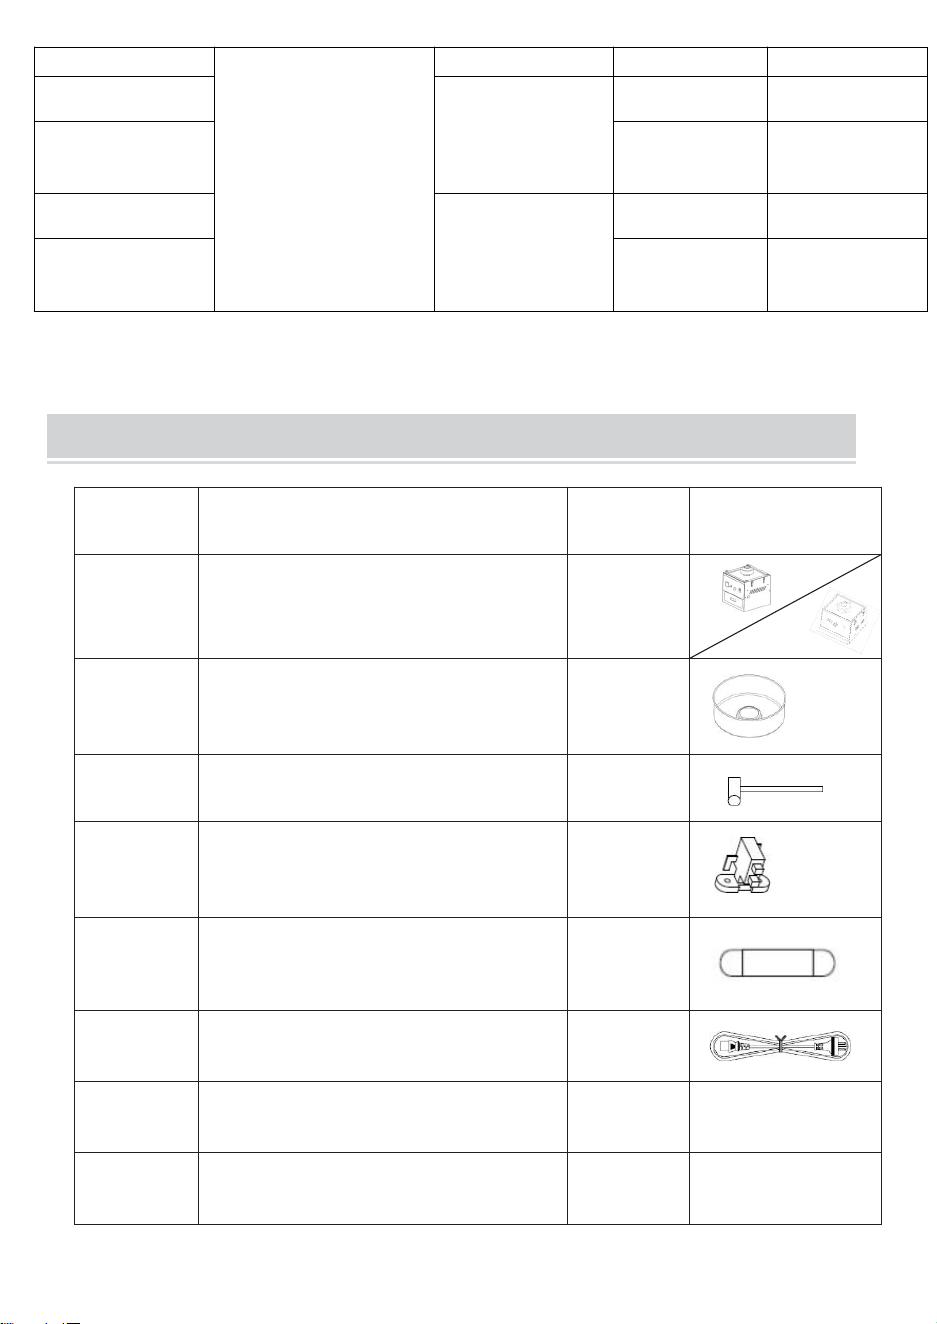
PACKING LIST
Item
Part Name
QTY
Picture
1
Cotton Candy Machine
1 PCS
2
Stainless Steel Bowl
1 PCS
3
Stainless Steel Sugar Scoop
1 PCS
4
Carbon
Brush
1 PCS
5
Fuse
1 PCS
6
Power
Cord
1 PCS
7
User
Manual
1 PCS
8
Installation Tools
Note: For t he cart-style ones only.
1 SET
- 5 -
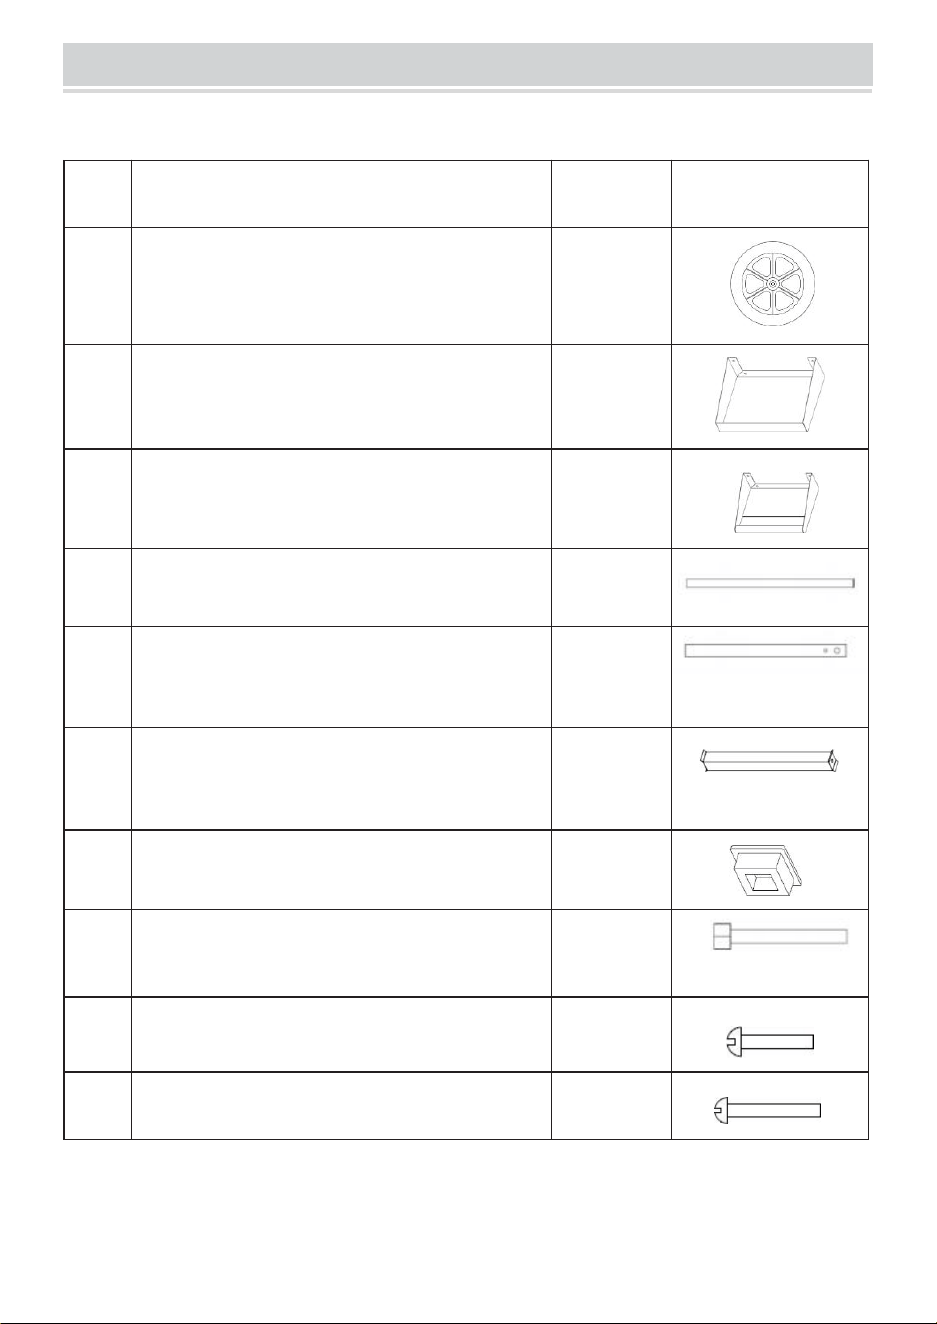
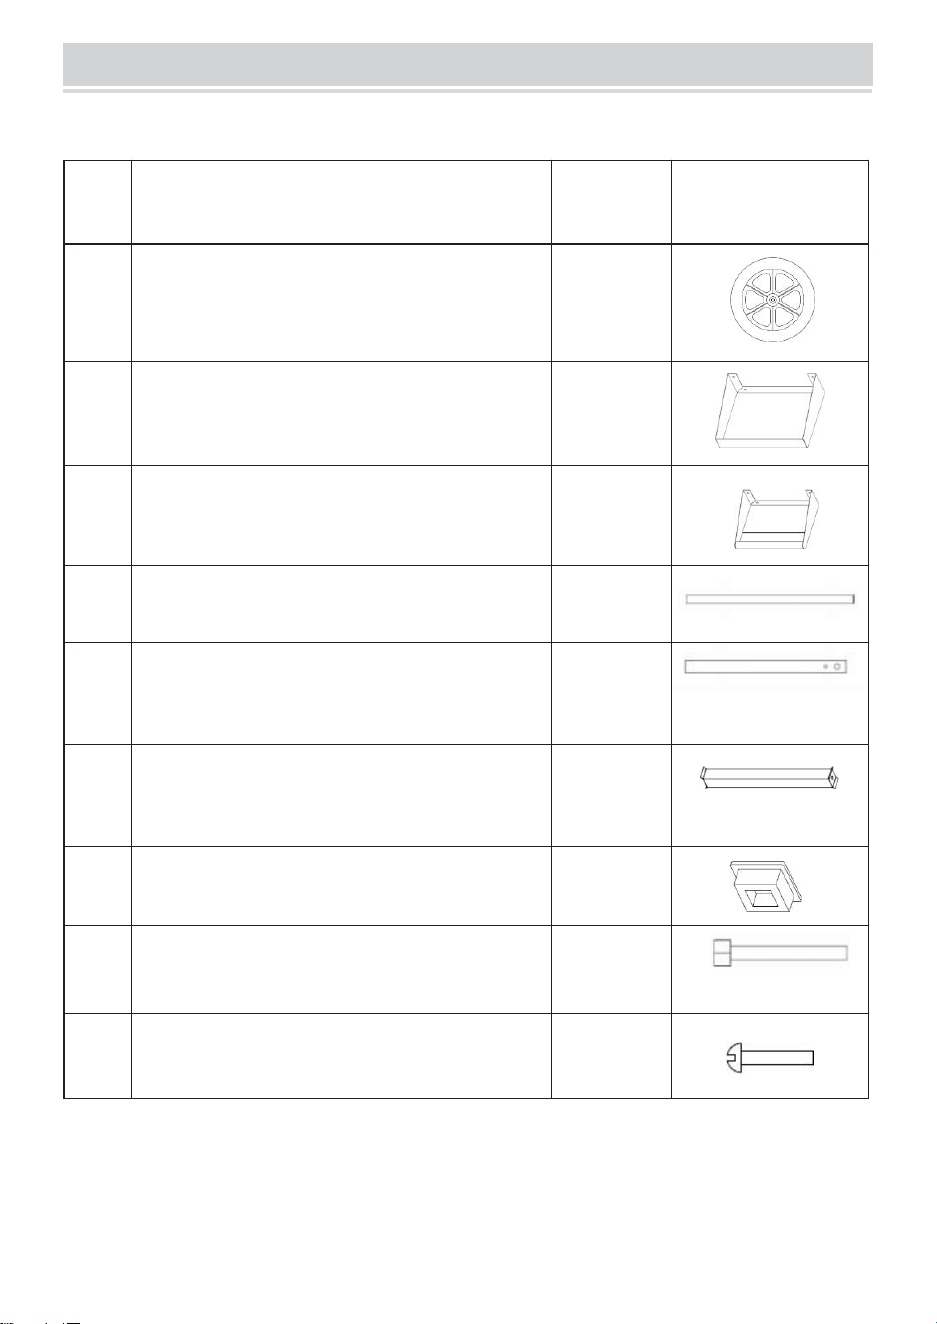
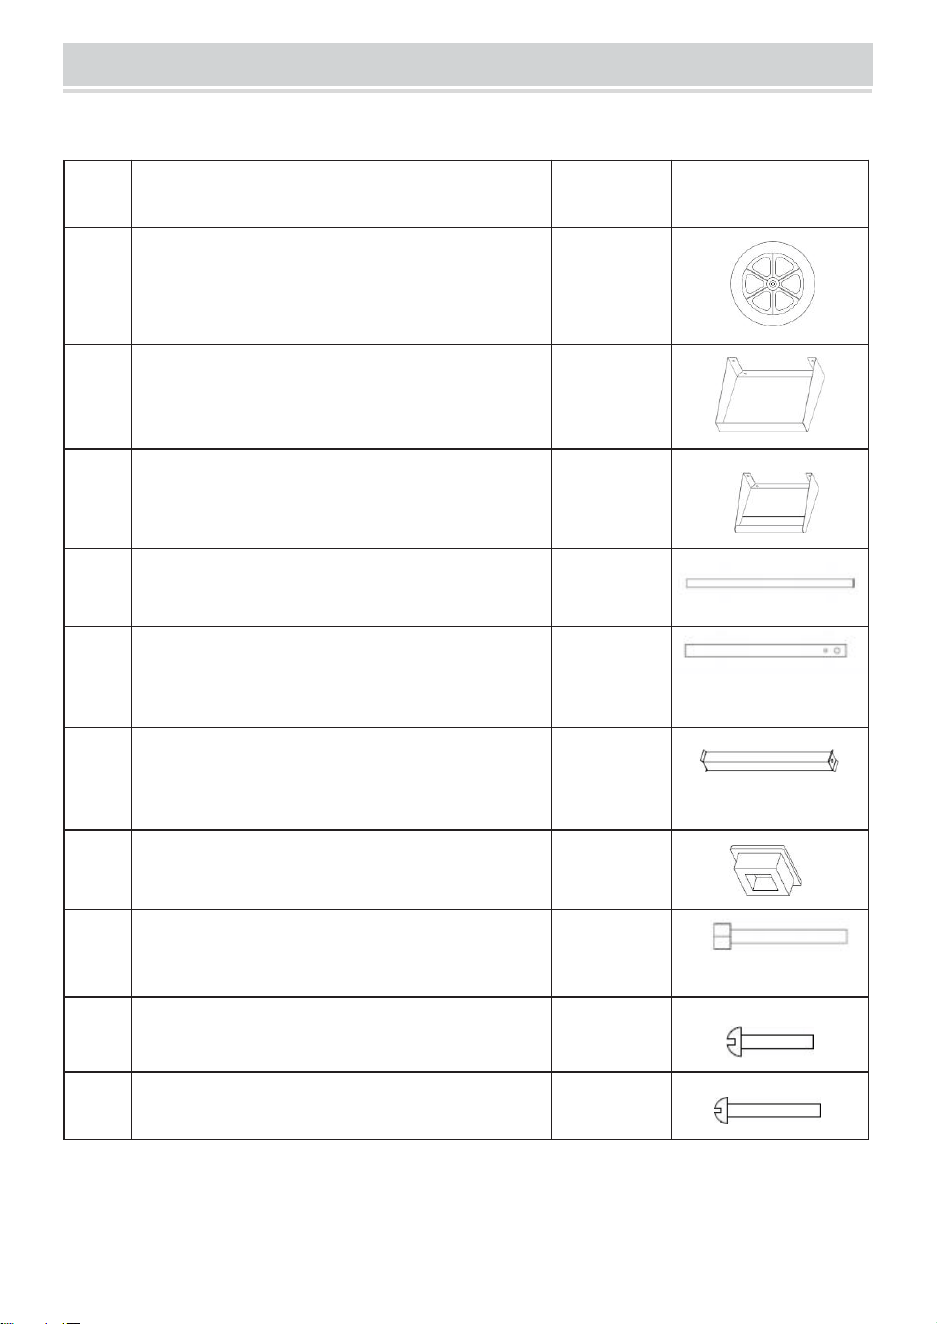
INSTALLATION KIT ACCESSORIES LIST
Note: Only the cart-style machines come with the installation kits.
Item
Part Name
QTY
Picture
1
Wheel
2 PCS
2
Table
1 PCS
3
Handle
1 PCS
4
(P1) - Long Bracket
2 PCS
5
(P2)-Short Bracket (Wheel Mounting)
2 PCS
6
(P3)-Transverse Fixing Bracket
3 PCS
7
Plastic Pad
2 PCS
8
Bolts (M8*70)
2 PCS
9
Screw
(M5*12)
16 PCS
10
Screw
(M5*35)
6 PCS

- 6 -
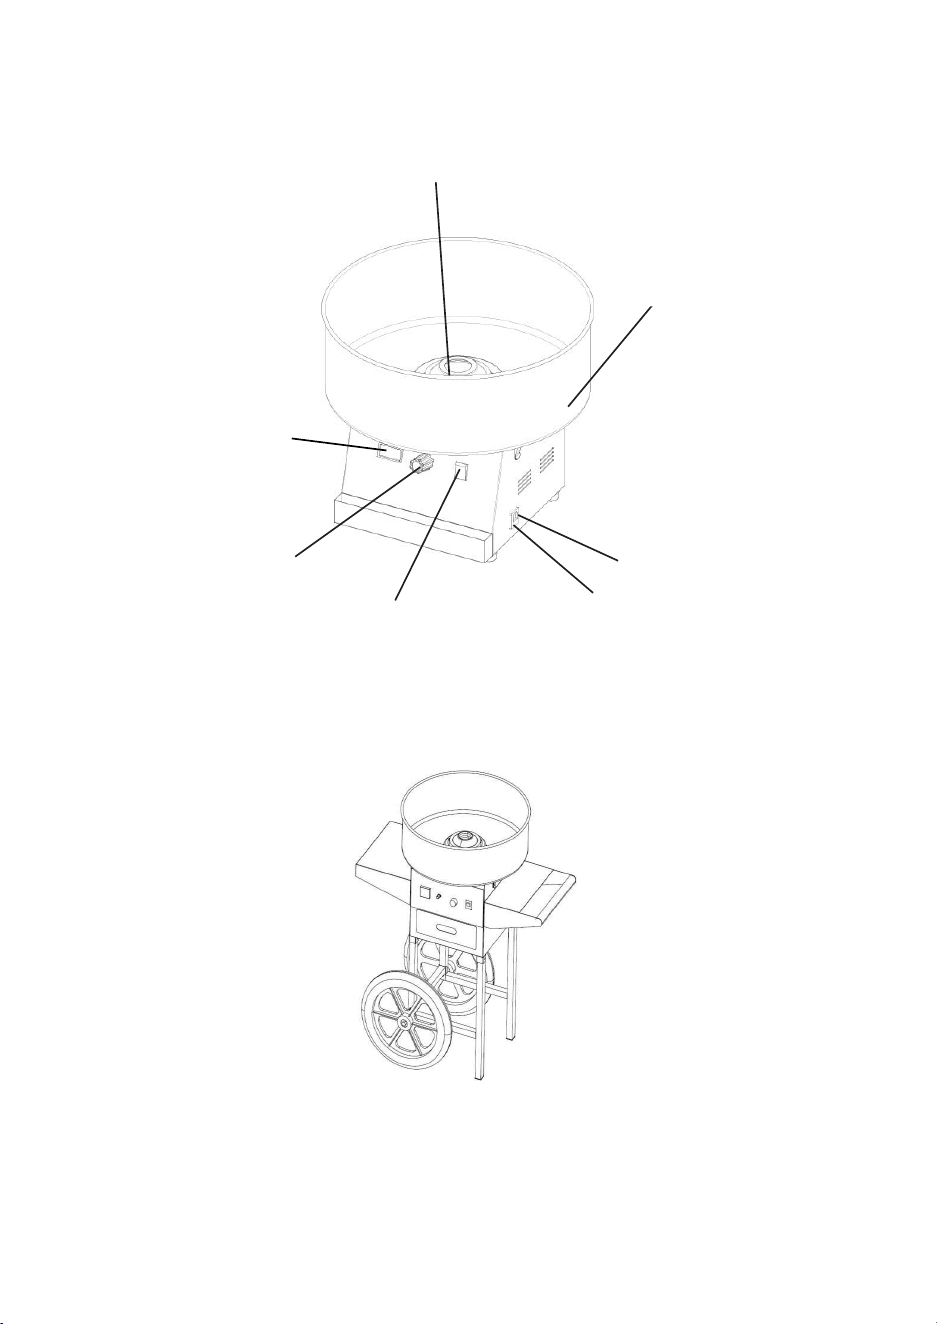
PRODUCT COMPOSITION DIAGRAM
Spinning
Head
Bowl
Voltmeter
Fuse
Heating Switch
Power Switch
Power Plug
Drawer
Cotton Candy Machine
(Countertop Type with Cabinet)
- 7 -
Spinning
Head
Bowl
Voltmeter
Heating
Switch
Power
Plug
Power
Switch
Fuse
Cotton Candy Machine
(Countertop
Type)
Cotton Candy
Machine
(Cart Type)

- 8 -
Please install the wheels for the Cart Type in the following order.
1
.
Use screws (M5*12) and screws (M5*35) to install the bracket as
shown in the figure. The installation steps on both sides are the same.
Screws
(M5*12)
(P1)- Long Bracket
(P2)-Short Bracket
(Wheel Mounting)
Screws
(M5*35)
Plastic Pad
(P3)-Transverse
Fixing Bracket
(P3)-Transverse
Fixing Bracket

- 9 -
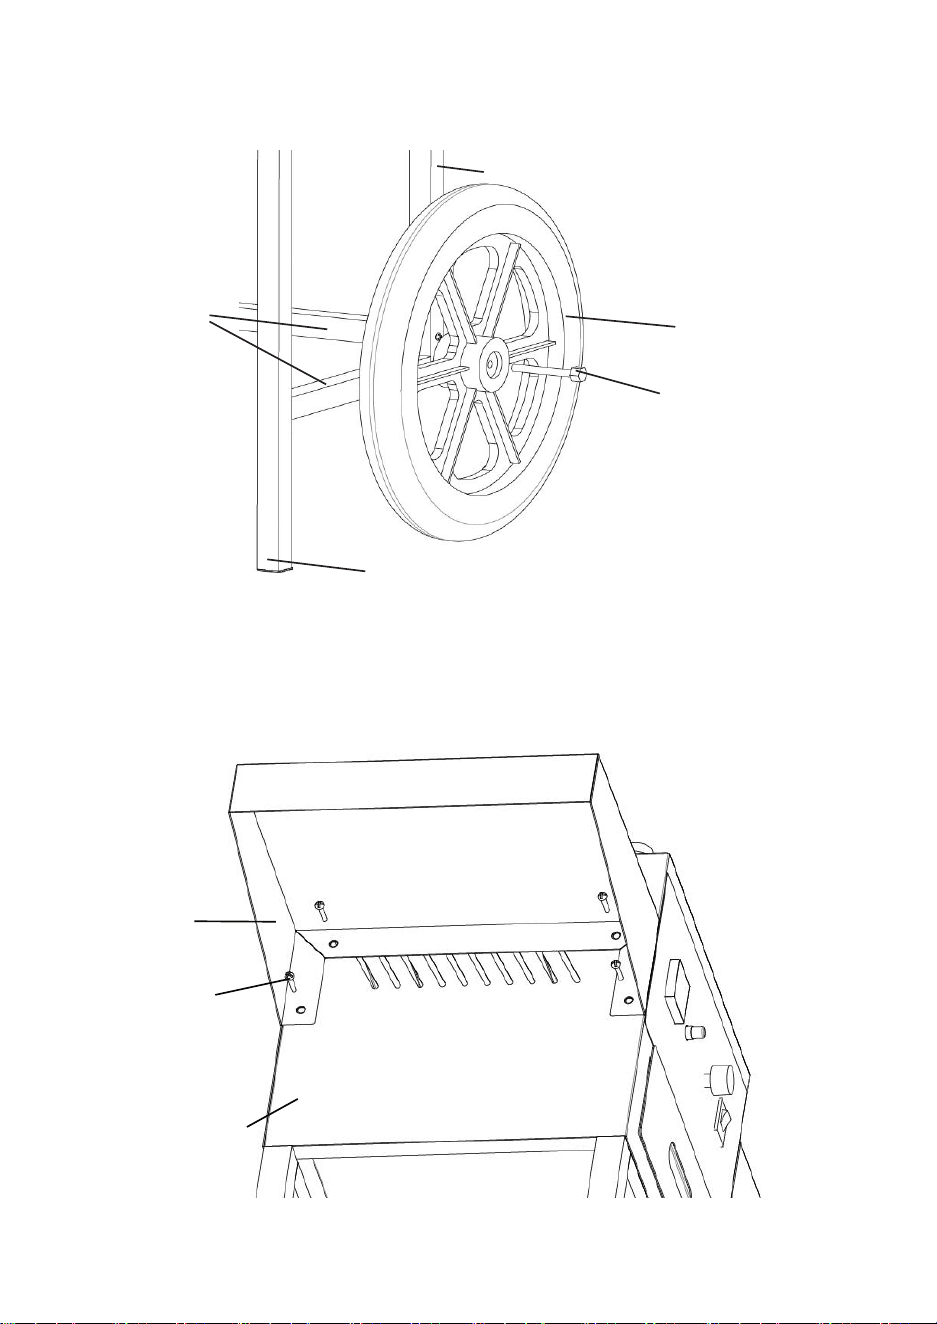
2.Install two wheels under the frame with two Bolts (M8*70).
(P2)-Short Bracket (Wheel Mounting)
(P3)-
Transverse
Fixing
Bracket
Wheel
Bolt
(P1)- Long Bracket
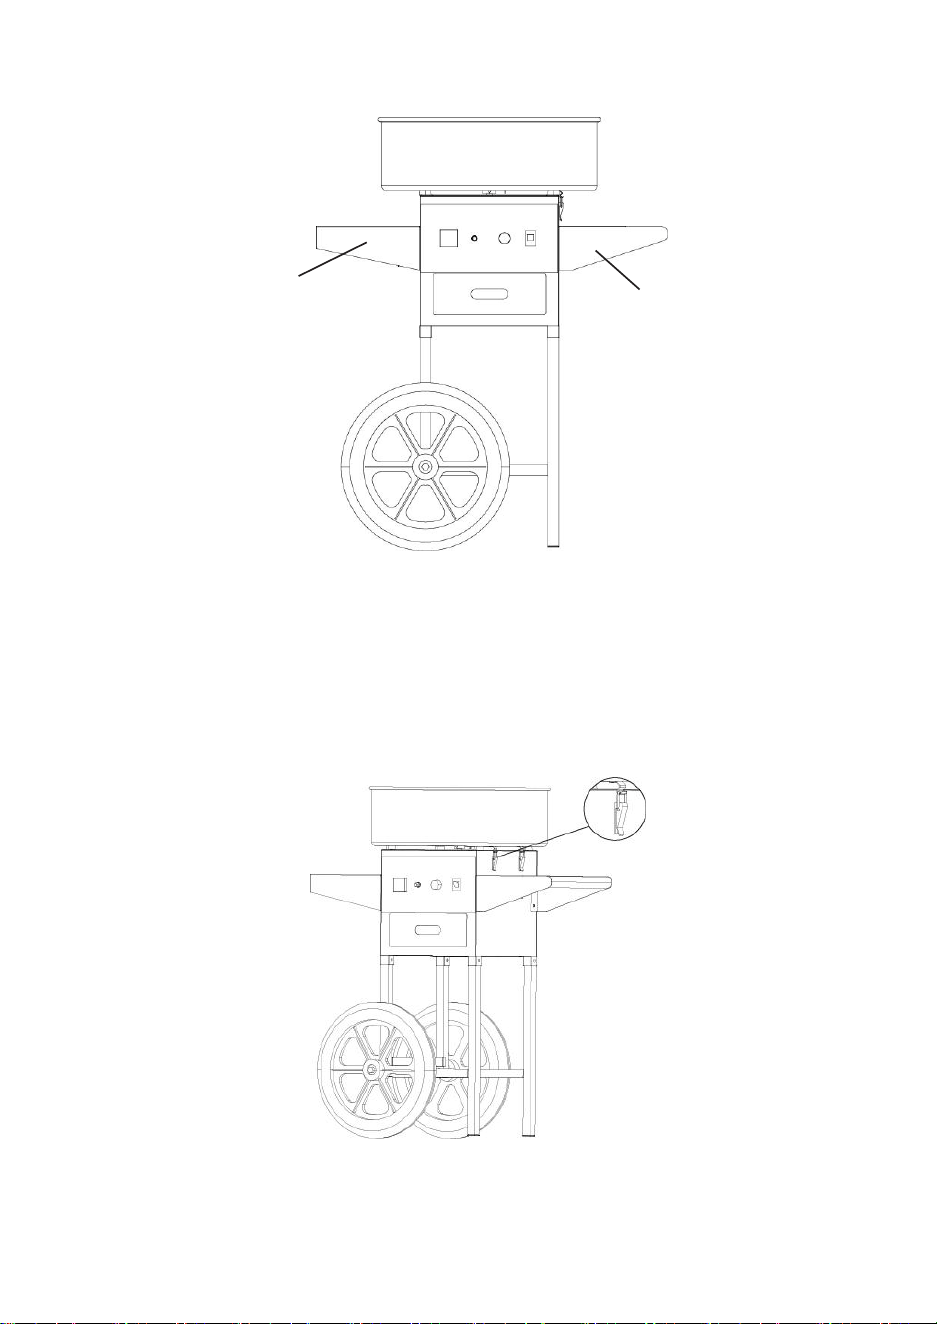
3.Install the table on the left side of the main body, and install the push
handle on the right side with 8 pcs Screw (M5*12)
Table
Screw
(M5*12)
Main
Body
- 10 -
Table
Push
Handle
4
.
Place the stainless steel pan on top of the box and fix it with the 4 locking clips
on both sides.
- 11 -
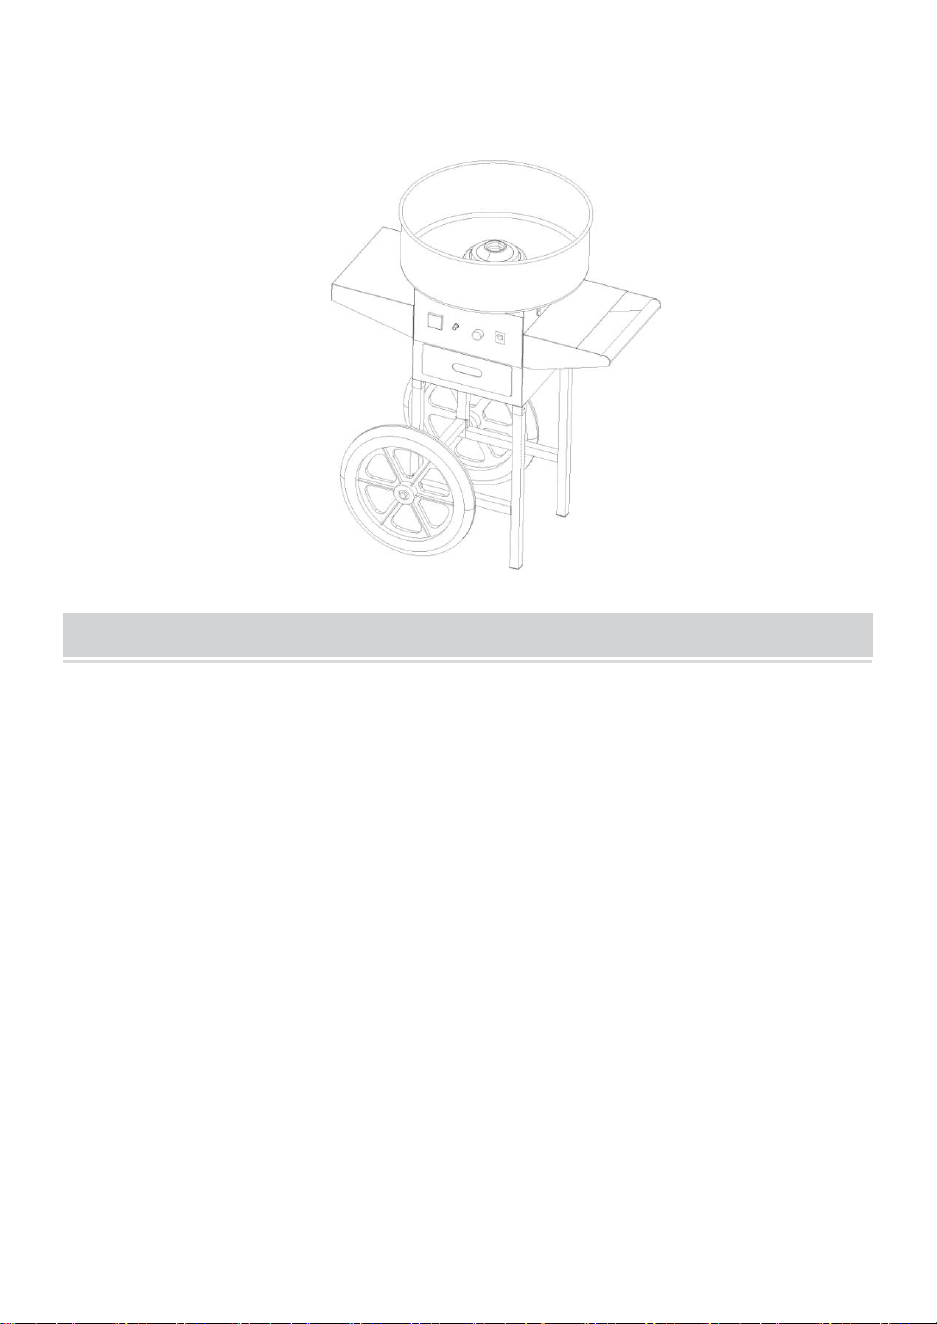
5.After all assembly is completed, it is ready to use. Please properly keep the
other components, which will be used during use or maintenance.
OPERATION PRECAUTIONS
1
.
Please read this manual carefully before use. In order to give full play to
its advantages and achieve satisfactory results, please understand the
structure and function of the machine, and be familiar with its main parts and
related safety operations.
2.After taking the machine out of the package, rinse the bowl and spinning
head with a small amount of clean water, and then wipe the water stains
with a soft cloth.
3.
The machine should be installed on a supported workbench, keeping a distance
from the ground.
4
.
Before starting the machine, please check whether the voltage of the
power supply used is consistent with the voltage of the machine used. Ensure
that the contact between the socket and the machine meets the safety
standards, the leakage protection switch and ground wire are installed, and
everything meets the electricity requirements.

- 12 -
OPERATING INSTRUCTIONS
1
.
Press the switch to turn on the machine and wait for 1-2 minutes. Observe
whether the machine runs smoothly when the spinning head of the machine is
rotating. If the vibration is too severe, the machine needs to be adjusted. It
must be ensured that the machine is placed stably.
2
.
Adjust the voltage knob to Max, and the voltmeter will change with the
adjustment. Warm up the machine for 2-3 minutes. After preheating, the
voltage can be adjusted according to the user's temperature requirements.
3.First, pour half a teaspoon of sugar, test the degree of heating and sugar
production. When everything is okay, then pour a spoonful of clean white
sugar in the center of the sugar head.
4
.
After about 3 seconds, the cotton candy starts to squirt out. Take a bamboo
stick and rotate it a few times along the inner wall of the bowl. Then, place the
stick horizontally and rotate it over the spinning head to form cotton candy.
Different shapes can be made by tilting the sticks.
5.After making enough cotton candy, turn off the machine.
CLEANING
1.The machine needs to be cleaned after the cotton candy is made,
otherwise the spinning head may be blocked. Keep the machine running
during the cleaning process, pour a small amount of water into the rotor, then
the rotor will shake off the water slowly. After that, turn off the machine and
clean it with a dry soft cloth.
2.If the spinning head is blocked, turn off the machine and open the spinning
head, then clean up the burnt sugar.
3
.
Do not wash the machine with detergents such as washing powder.
4
.
Do not rinse the machine directly with water.
NOTICE
1.Minors are prohibited from using this product.
2
.
Do not put the wire close to the hot surface. Do not immerse the lugs on the
machine in water or other liquids. Do not use damaged cords, sockets or
plugs.
3.The machine must be properly installed before inserting the plug into the
outlet. When not in use or before cleaning, turn off the switch, unplug the
power supply, wait for the spinning head to stop rotating, and wait for the
- 13 -
machine to cool down.
4.
Do not touch the rotating spinning head when the machine is working. Do not
reach your hands.
into the bowl until the sugar is gone. To avoid burns, do not
move the machine while it is working.
5
.
Do not touch the plug or wire when the plug or wire is wet or your hands
are wet, otherwise it may cause an electric shock.
6
.
The motor of this machine is designed to have a temporary cut-off rate of
80%, so long-term
continuous operation should be avoided. After working
continuously for one hour, you should pause
for 20 minutes before starting to
work, which will greatly extend the service life of the motor.
7
.
Whether it is cleaning, maintenance and other related work, the power
should be turned off first, and the power plug should be unplugged. The
machine is not allowed to run without load for a long time.
8.Cleaning agents are not allowed to be used during cleaning to prevent
the cleaning agents remaining on the machine from being eaten by
mistake.
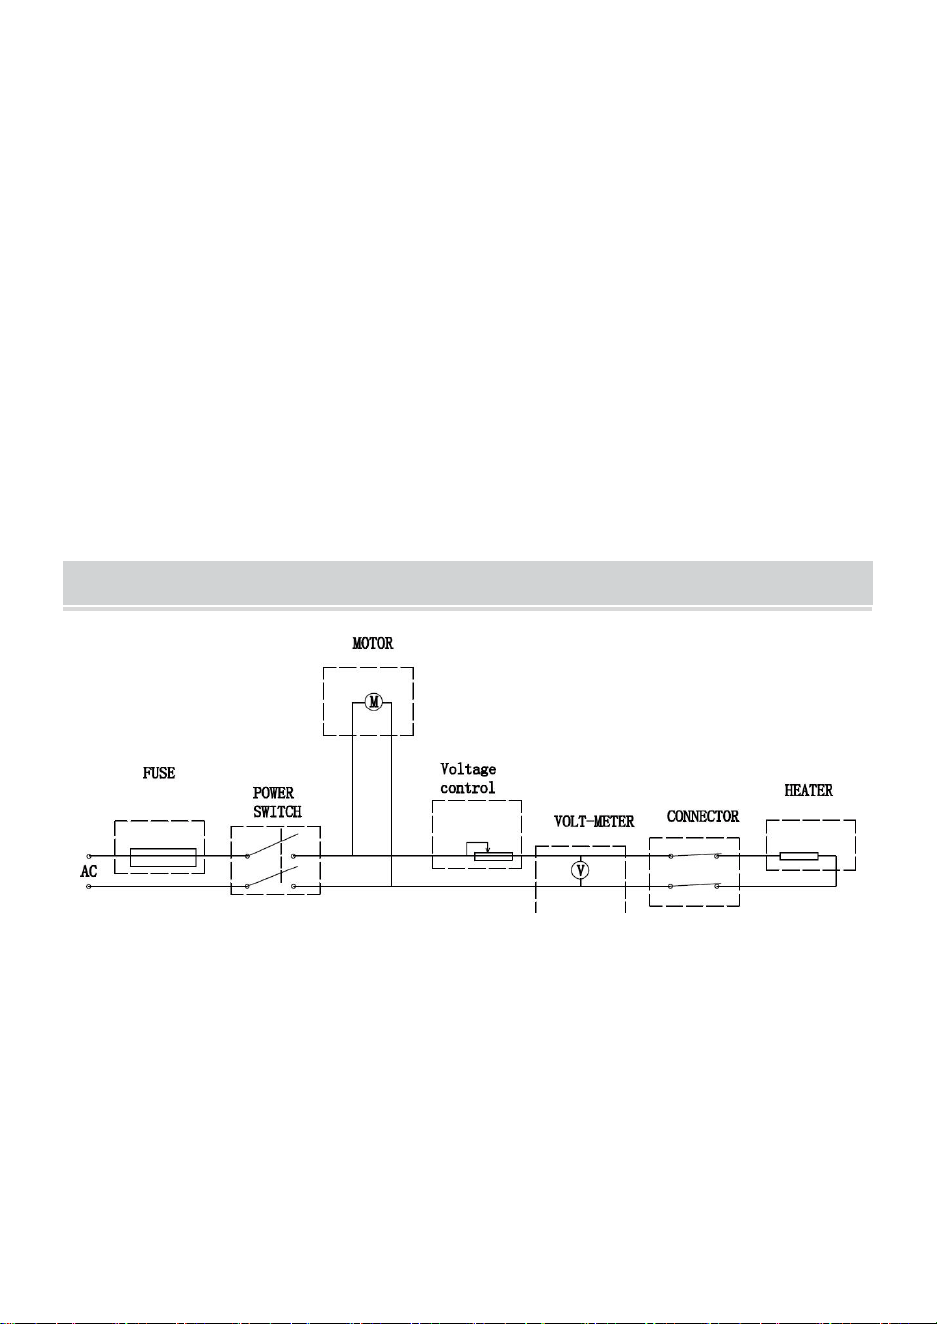
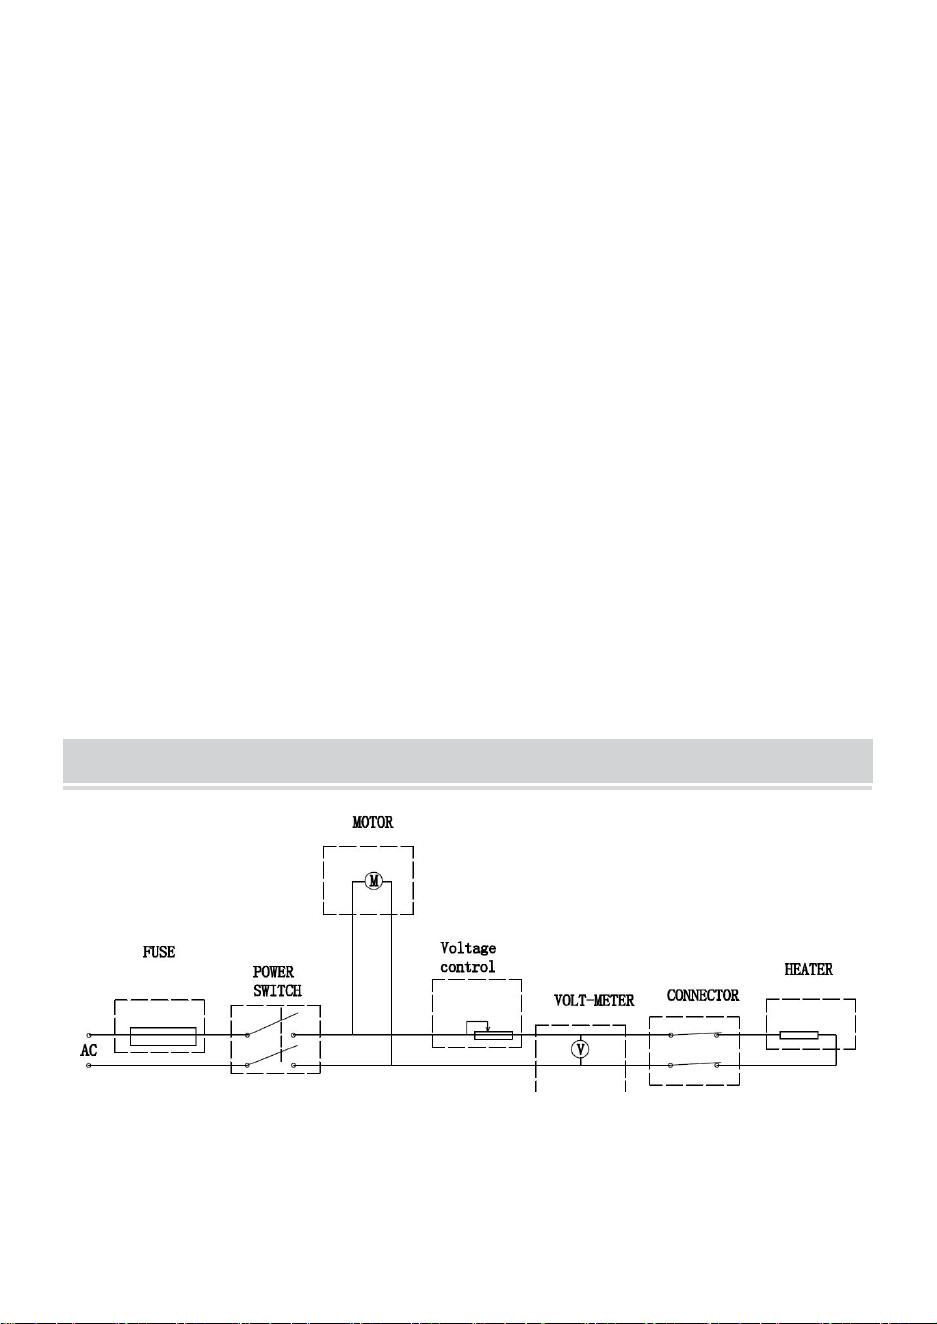
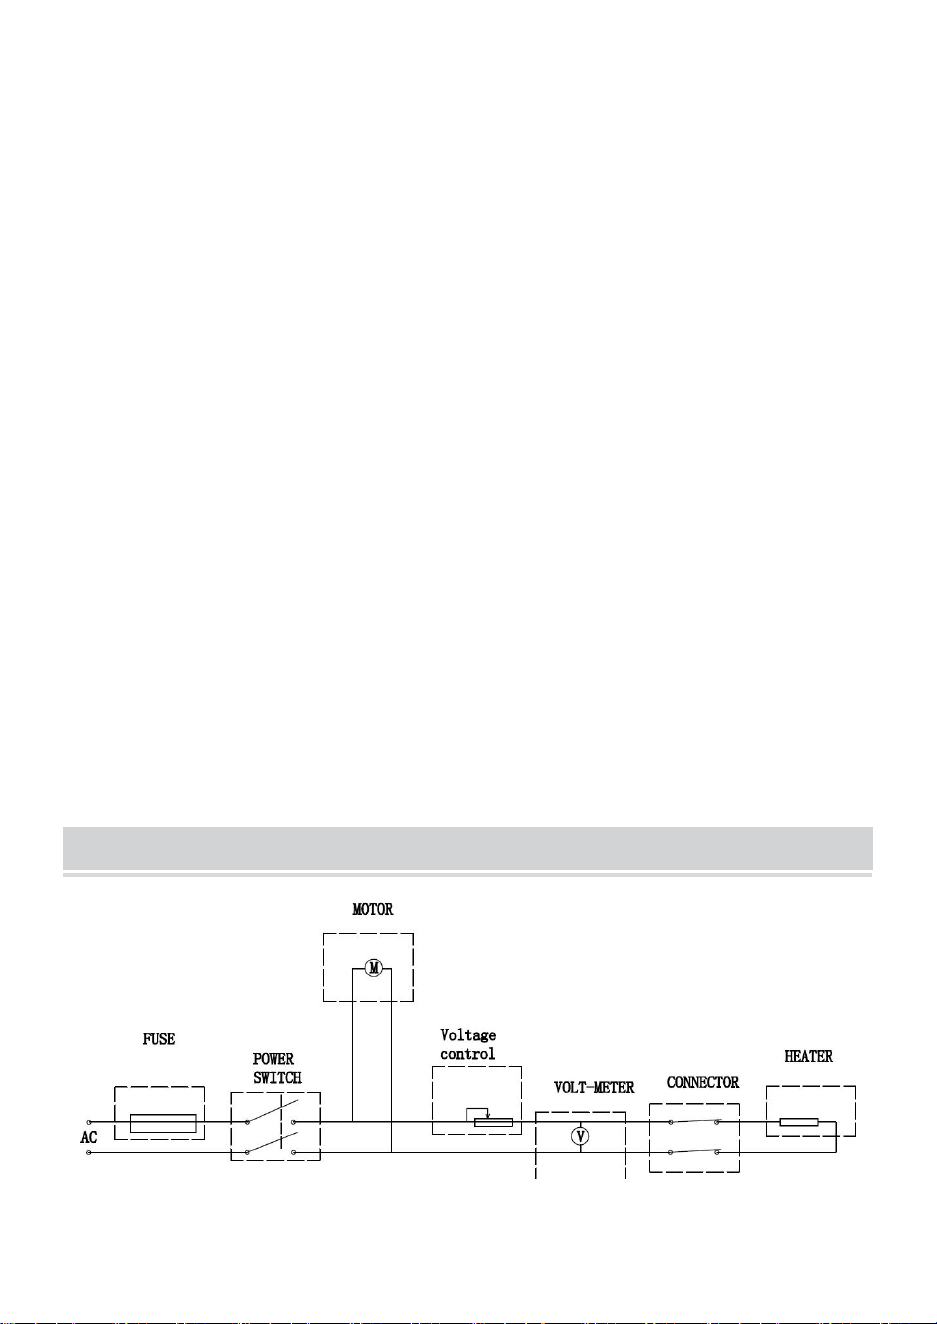
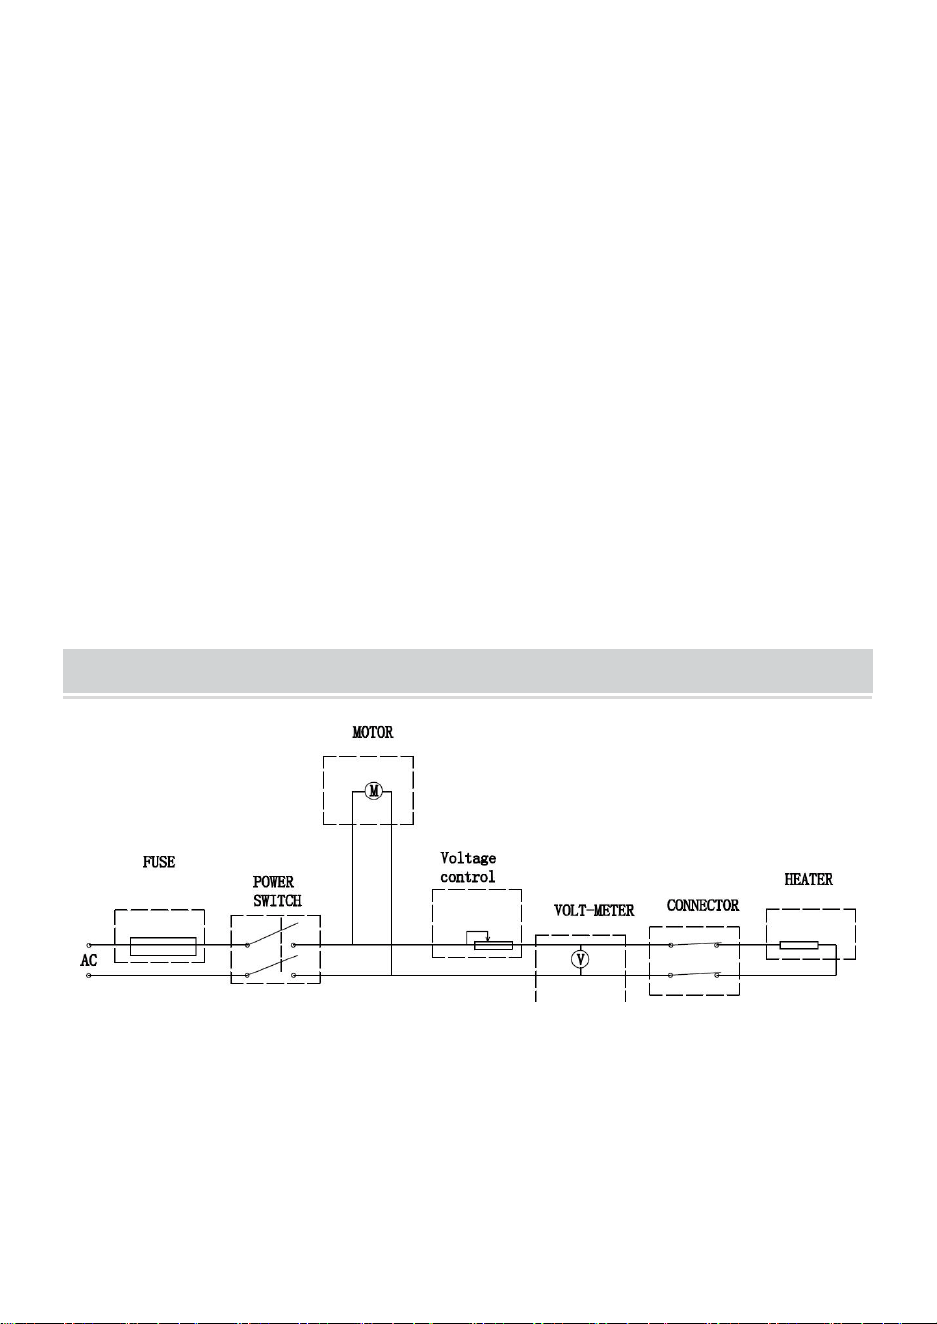
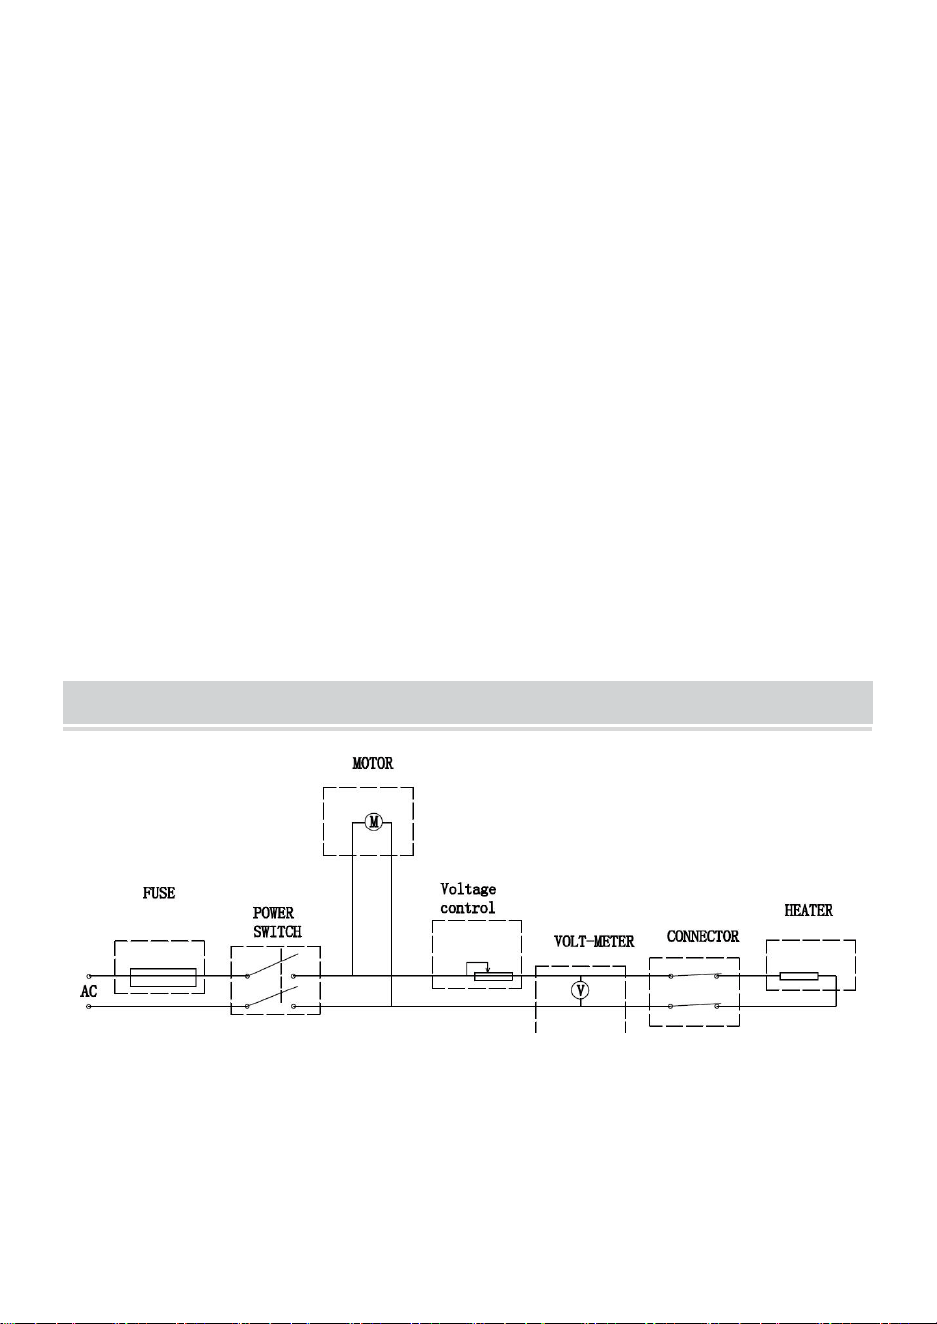
CIRCUIT DIAGRAM

- 14 -
TROUBLESHOOTING
Fault: No Sugar Filament
1.Check whether the sugar head is rotating or not, and stop the machine to sense
whether the sugar head is hot.
2.If the sugar head does not rotate, check whether the machine is powered on and the
motor is broken.
3.If the sugar head is not hot: check whether the machine is powered on, whether the
sugar head is ringing, and whether the voltage is excessive.
4.Unscrew the fuse knob on the panel or pry open the fuse cover (for Countertop
Type) in the socket, then, take the fuse out to check whether it is burnt out.
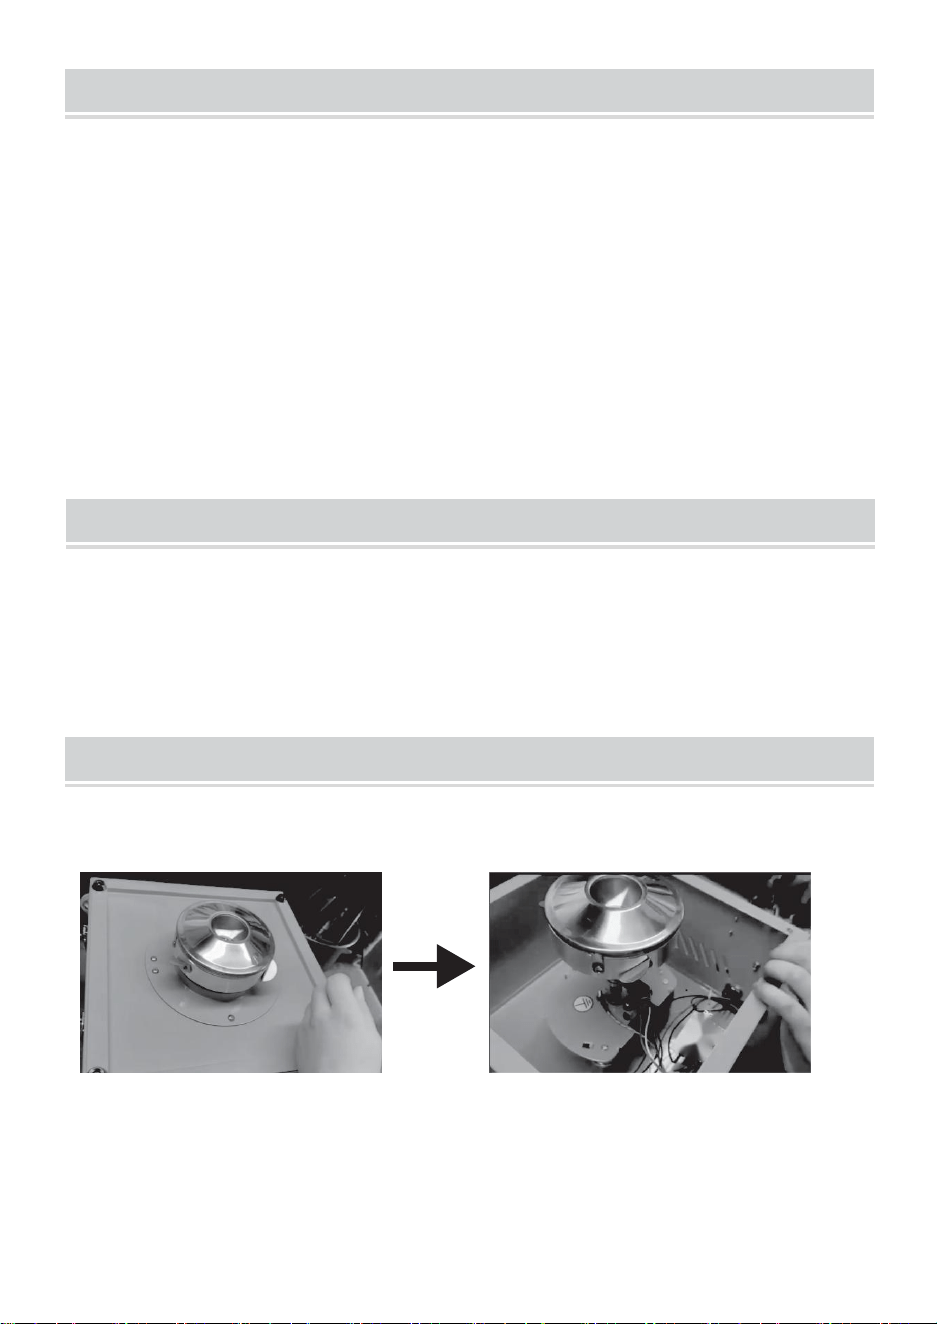
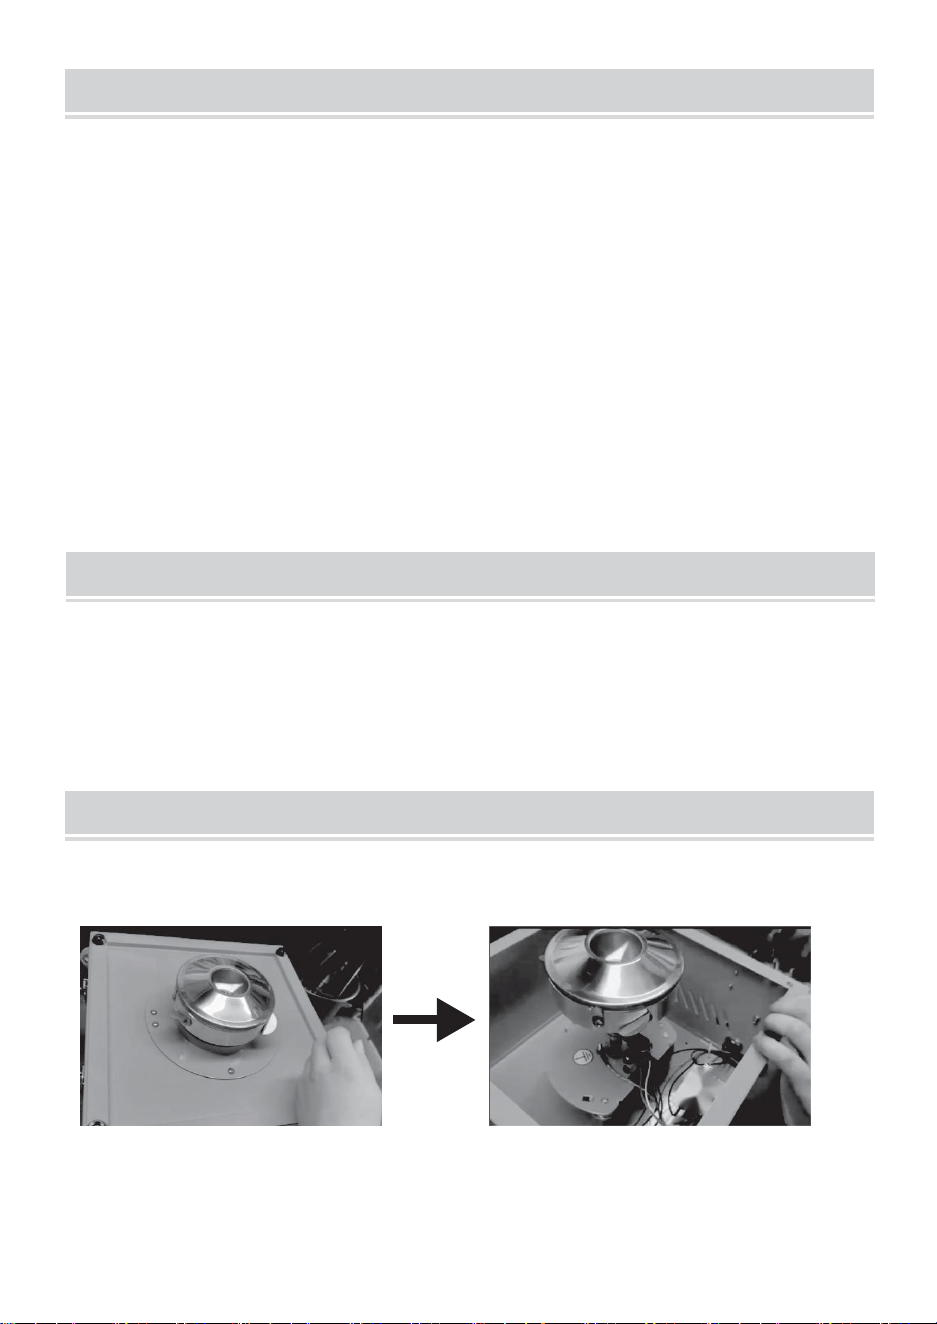
5.Remove the baffle & upper cover and take out the cover through the spinning head,
then you can see the internal condition of the machine. Check whether the carbon brush
is loose or not working, if so, replace it with a new one.
NOTICE FOR CARBON BRUSH
Please replace the carbon brush in time if the following situations occur during
routine maintenance inspection and use:
1.
The carbon brush has a relatively large spark and smoke.
2.The contact surface of the carbon brush on the slip ring is less than 70%.
3.
Carbon brush spring pressure mismatch, etc.
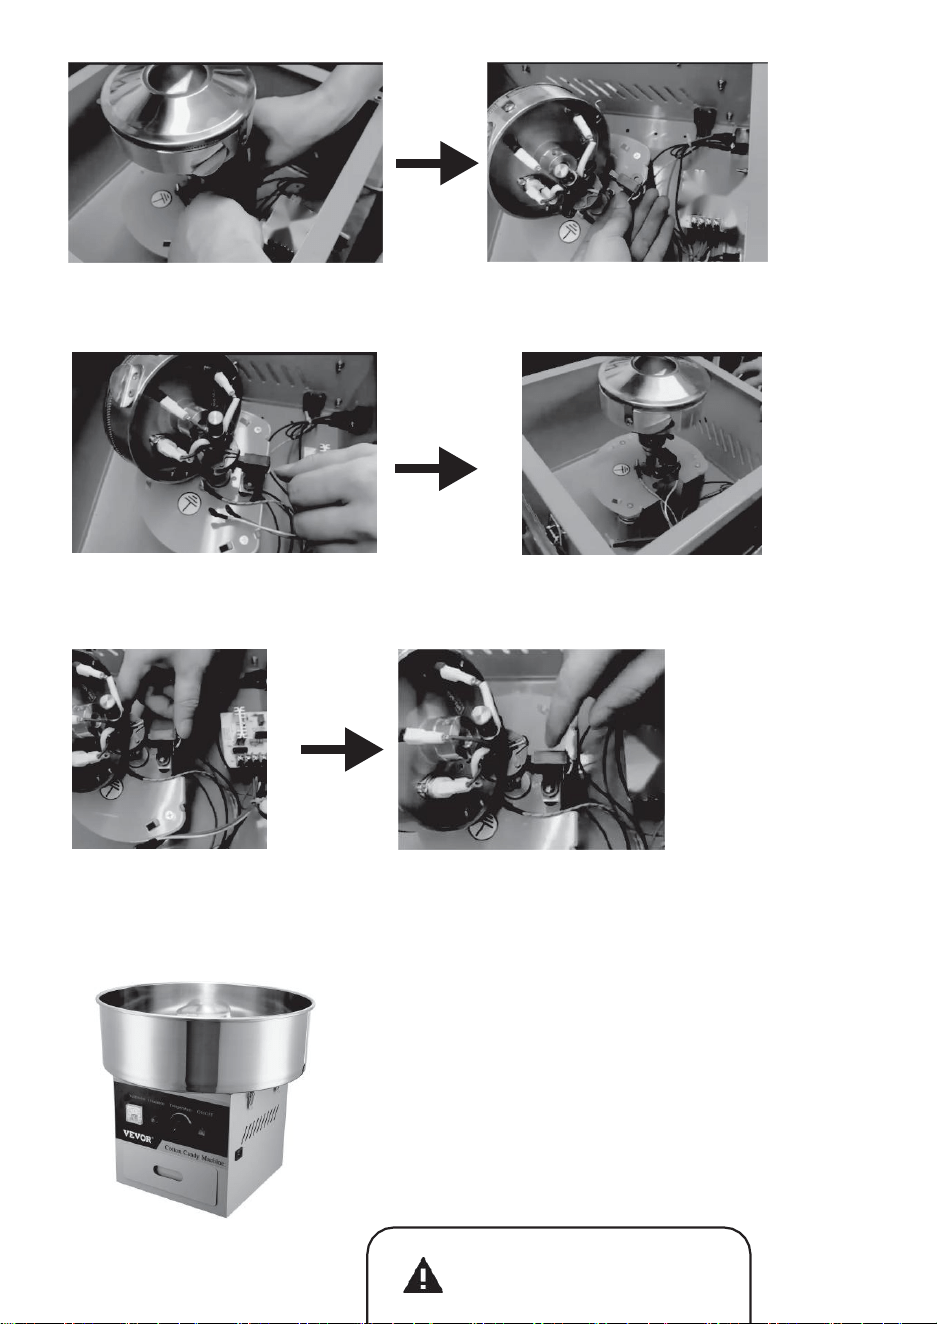
REPLACE THE CARBON BRUSH STEPS
1
.
Remove the screws fixing the baffle plate and top cover and take out the baffle
and top cover.
2
.
Remove the connecting end of the carbon brush, remove the fixing
screws, and take out the old carbon brush. (In order to facilitate the
installation and disassembly, the fixing screw of the sugar head can be
removed first to increase the operating space)

- 15 -
3.Replace the new carbon brush, place it in position and fix it with
screws, and plug in the connecting end.
4.Check the installation of the new carbon brush. (whether the spring
and the installation contact is good)
5
.
Reinstall the top cover and baffle, complete the carbon brush replacement.
Note: The carbon brush
is a
consumable and should be
replaced
after a period of use.


Techniczny Certyfikat wsparcia i e-gwarancji www . wevor . com/wsparcie
PRODUCENCI WATY CUKROWEJ
INSTRUKCJA OBSŁUGI
We continue to be committed to provide you tools with competitive price.
"Save Half", "Half Price" or any other similar expressions used by us only represents an
estimate of savings you might benefit from buying certain tools with us compared to the
major top brands and does not necessarily mean to cover all categories of tools offered by
us. You are kindly reminded to verify carefully when you are placing an order with us if you
are actually saving half in comparison with the top major brands.


- 1 -
Uwaga: to użytkownik podręcznik Jest
stosuje się
do the bawełna cukierek
maszyny.
Proszę Czytać To ostrożnie zanim używać.
Have product questions? Need technical support? Please feel free to
contact us:
Technical Support and E-Warranty Certificate
www. vevor. com/support
NEED HELP? CONTACT US!
COTTON CANDY
MAKERS
MHTJXM01F MHTJXM02F MHTJXM03F
MHTJXM01H MHTJXM02H MHTJXM03H
MHTJXM01L MHTJXM02L MHTJXM03L
MHTJJPZY01 MHTJJPZY02 MHTJJPZY03
MHTJJPHC01 MHTJJPHC02 MHTJJPHC03
- 2 -
This is the original instruction, please read all manual instructions
carefully before operating. VEVOR reserves a clear interpretation of our
user manual. The appearance of the product shall be subject to the
product you received. Please forgive us that we won't inform you again if
there are any technology or software updates on our product.
Ostrzeżenie — aby zmniejszyć ryzyko obrażeń, użytkownik musi
uważnie przeczytać instrukcję obsługi .
PRAWIDŁOWA UTYLIZACJA
Ten produkt podlega postanowieniom dyrektywy europejskiej
2012/19/UE. Symbol przekreślonego kosza na śmieci oznacza, że
produkt wymaga selektywnej zbiórki śmieci na terenie Unii
Europejskiej. Dotyczy to produktu i wszystkich akcesoriów
oznaczonych tym symbolem. Produktów oznaczonych jako takie
nie można wyrzucać razem ze zwykłymi odpadami domowymi, lecz
należy je przekazać do punktu zbiórki w celu recyklingu urządzeń
elektrycznych i elektronicznych.
Zgodność to certyfikat bezpieczeństwa WE i Wielkiej Brytanii.
IMPORTANT SAFEGUARDS
Podczas korzystania z urządzeń elektrycznych należy zawsze przestrzegać
podstawowych środków ostrożności, w tym:
1. Przeczytaj wszystkie instrukcje.
2. Nie dotykaj gorących powierzchni. Użyj uchwytów lub gałek.
3. Aby chronić się przed porażeniem prądem, nie zanurzaj przewodów, wtyczek
ani urządzeń w wodzie lub innym płynie.
4. Jeśli jakiekolwiek urządzenie jest używane przez dzieci lub w ich pobliżu,
konieczny jest ścisły nadzór.
5. Odłącz od gniazdka, gdy nie jest używany i przed czyszczeniem. Przed
założeniem lub zdjęciem części poczekaj, aż ostygnie
6. Nie używaj żadnego urządzenia z uszkodzonym przewodem lub wtyczką, lub
po awarii urządzenia lub jego uszkodzeniu w jakikolwiek sposób. Zwróć

- 3 -
urządzenie do najbliższego autoryzowanego serwisu w celu sprawdzenia,
naprawy lub regulacji.
7. Używanie akcesoriów niezalecanych przez producenta urządzenia może
spowodować obrażenia.
8. Nie używać na zewnątrz.
9. Nie pozwól, aby przewód zwisał z krawędzi stołu lub blatu ani nie dotykał
gorących powierzchni.
10. Nie umieszczaj na lub w pobliżu gorącego palnika gazowego lub
elektrycznego, ani w nagrzanym piekarniku.
11. Należy zachować szczególną ostrożność podczas przenoszenia urządzenia
zawierającego gorący olej lub inne gorące płyny.
12. Zawsze najpierw podłączaj wtyczkę do urządzenia, a następnie przewód do
gniazdka ściennego. Aby odłączyć, ustaw dowolny element sterujący w pozycji
„off”, a następnie wyjmij wtyczkę z gniazdka ściennego.
13. Nie używaj urządzeń do celów innych niż przeznaczone.
14. Używany wyłącznie w gospodarstwie domowym.
ZACHOWAJ TE INSTRUKCJE
Uwaga dotycząca przewodu:
Aby zmniejszyć ryzyko zaplątania się w dłuższy przewód lub potknięcia się o niego,
dołączony jest krótki przewód zasilający. Przedłużacze są dostępne i można ich używać,
jeśli podczas ich używania zachowa się ostrożność. W przypadku stosowania
przedłużacza:
1) Oznaczona moc elektryczna przedłużacza powinna być co najmniej równa wartości
elektrycznej urządzenia;
2) Przewód powinien być ułożony w taki sposób, aby nie zwisał z blatu lub stołu, gdzie
mogłyby zostać pociągnięte przez dzieci lub przypadkowo się o nie potknąć; I
3) Przedłużacz powinien być 3-żyłowym kablem uziemiającym.
PRODUCT PARAMETERS
Model
Moc płyty
grzewczej
Wymiary
(mm)
Napięcie
Częstotliwość
MHTJXM01F
MHTJXM01H
MHTJXM01L
1000 W
518*518*415
120 V AC
60 Hz
MHTJXM02F
MHTJXM03F
MHTJXM02H
MHTJXM03H
MHTJXM02L
AC220-240V
50/60 Hz
- 4 -
MHTJXM03
MHTJJPZY01
518*518*485
120 V AC
60 Hz
MHTJJPZY02
MHTJJPZY03
AC220-240V
50/60 Hz
MHTJJPHC01
518*820*1000
120 V AC
60 Hz
MHTJJPHC02
MHTJJPHC03
AC220-240V
50/60 Hz
PACKING LIST
Przedmiot
Część Nazwa
ILOŚĆ
Zdjęcie
1
Bawełna cukierek Maszyna
1 szt
2
Nierdzewny Stal Miska
1 szt
3
Nierdzewny Stal Cukier Szufelka
1 szt
4
Węgiel
Szczotka
1 szt
5
Bezpiecznik
1 szt
6
Moc
Sznur
1 szt
7
Instrukcja
obsługi
1 szt
8
Instalacja Narzędzia
Notatka: Dla T On w stylu wózka
1

- 5 -
te tylko.
ZESTAW

- 6 -
INSTALLATION KIT ACCESSORIES LIST
Notatka: Tylko the w stylu wózka maszyny przychodzić z the instalacja zestawy.
Przed
miot
Część Nazwa
ILOŚĆ
Zdjęcie
1
Koło
2 szt
2
Tabela
1 szt
3
Uchwyt
1 szt
4
(P1) - Długi Nawias
2 szt
5
(P2)-Krótki Nawias (Koło Montowanie)
2 szt
6
(P3)-Poprzeczny Ustalenie Nawias
3 szt
7
Plastikowy Podkładka
2 szt
8
Śruby (M8*70)
2 szt
9
Śruba
(M5*12)
16 szt

- 7 -
10
Śruba
(M5*35)
6 szt

- 8 -
PRODUCT COMPOSITION DIAGRAM
Spinning
Głowa
Miska
Woltomierz
Bezpiec
znik
Ogrzewanie
Przełącznik
Moc Przełącznik
Moc
Wtyczka
Szuflada
Maszyna do waty cukrowej
(typ blatowy z szafką)

- 9 -
Spinning
Głowa
Miska
Woltomierz
Ogrzewanie
Przełącznik
Moc
Wtyczka
Moc
Przełącz
bezpiecznik
Bawełna cukierek Maszyna
(Blat
Typ)
Bawełna cukierek
Maszyna
(wózek Typ)

- 10 -
Please install the wheels for the Cart Type in the following order.
1
.
Używać śruby (M5*12) I śruby (M5*35) Do zainstalować the nawias
Jak pokazane W the postać. Instalacja _ kroki NA Zarówno boki Czy the
To samo.
Śruby
(M5*12)
(P1)- Długi Nawias
(P2)-Krótki Wspornik
(koło Montowanie)
Śruby
(M5*35)
Plastic Pad
(P3)-Transverse
Fixing Bracket
(P3)-Transverse
Fixing Bracket

- 11 -
2.zainstalować dwa koła pod the rama z dwa Śruby (M8*70).
(P2)-Krótki Nawias (Koło Montowanie)
(P3)
-
Mocowanie
poprzeczne
Nawias
Koło
Śruba
(P1)- Długi Nawias
3.zainstalować the tabela NA the lewy strona z the główny ciało, I
zainstalować the naciskać uchwyt NA the Prawidłowy strona z 8 szt. śrub
(M5*12)
Tabela
Śruba
(M5*12)
Główny
Ciało

- 12 -
Table
Push
Handle
4
.
Miejsce the nierdzewny stal patelnia NA szczyt z the skrzynka I naprawić To z
the 4 zamykający klipy NA Zarówno boki.

- 13 -
5.Po zakończeniu całego montażu jest gotowy do użycia. Prosimy o
odpowiednie przechowywanie pozostałych elementów, tj będzie Być
używany podczas używać Lub konserwacja.
OPERATION PRECAUTIONS
1
.
Przed użyciem należy uważnie przeczytać niniejszą instrukcję. Aby w
pełni wykorzystać jego zalety i osiągnąć zadowalające wyniki, należy
zapoznać się z budową i funkcją maszyny oraz zapoznać się z nią z jego
główny Części I powiązany bezpieczeństwo operacje.
2
.
Po wyjęciu maszyny z opakowania przepłucz misę i głowicę wirującą
niewielką ilością z czysty woda, I Następnie wytrzeć the woda plamy z A
miękki płótno.
3.
The maszyna powinien Być zainstalowany NA A utrzymany stoł warsztatowy,
konserwacja A dystans z the grunt.
4
.
Przed uruchomieniem maszyny należy sprawdzić, czy napięcie
stosowanego zasilacza jest zgodne z napięciem używanej maszyny. Upewnij
się, że styk pomiędzy gniazdem a maszyną spełnia normy bezpieczeństwa,
zamontowany jest wyłącznik zabezpieczający przed upływem prądu i
przewód uziemiający , I wszystko spotyka się the Elektryczność wymagania.

- 14 -
OPERATING INSTRUCTIONS
1
.
Naciskać the przełącznik Do zakręt NA the maszyna I Czekać Do 1-2
minuty. Przestrzegać czy the maszyna działa płynnie Kiedy the spinning głowa
z the maszyna Jest obrotowy. Jeśli the wibracja Jest zbyt ciężki : silny,
maszyna _ wymagania Do Być skorygowana. To musieć Być ubezpieczony
To the maszyna Jest umieszczony stabilnie.
2.Regulować the Napięcie pokrętło Do Maks, I the woltomierz będzie zmiana
z the modyfikacja. Ciepły w górę maszyna _ Do 2-3 minuty. Po podgrzewanie,
the Napięcie Móc Być skorygowana według Do the wymagania temperaturowe
użytkownika .
3
.
Najpierw wsyp pół łyżeczki cukru, sprawdź stopień wygrzania i
produkcję cukru. Kiedy wszystko Jest Dobra, Następnie wlać A pełna łyżka
z czysty biały cukier W the Centrum z the cukier głowa.
4
.
Po o 3 sekundy, the bawełna cukierek zaczyna Do tryskać na zewnątrz.
Brać A bambus stick I obracać się To kilka _ czasy przed siebie the
wewnętrzny ściana z the miska. Następnie, miejsce the stick poziomo I
obracać się To nad wirowanie głowa Do formularz bawełna cukierek. Różny
kształty Móc Być zrobiony przez przechylanie the patyki.
5
.
Po zrobienie wystarczająco bawełna cukierek, zakręt wyłączony the maszyna.
CLEANING
1.The maszyna wymagania Do Być wyczyszczony Po the bawełna cukierek
Jest zrobiony, W przeciwnym razie the spinning głowa może Być zablokowany.
Trzymać the maszyna działanie podczas the czyszczenie proces, wlać A mały
kwota Z wody do the wirnik, Następnie the wirnik będzie potrząsnąć
wyłączony the woda powoli. Po To, zakręt wyłączony the maszynę i wyczyść
ją suchą, miękką ściereczką.
2
.
Jeśli głowica wirująca jest zablokowana, wyłącz maszynę i otwórz głowicę
wirującą, a następnie usuń przypalony cukier.
3.Nie myć maszynę z detergentami takie jak proszek do prania.
4.Do nie płukanie the maszyna bezpośrednio z woda.
NOTICE
1.Nieletni Czy zabroniony z za pomocą Ten produkt.
2.Nie umieszczaj przewodu blisko gorącej powierzchni. Nie zanurzaj
występów maszyny w wodzie lub innej wodzie płyny. Do nie używać
- 15 -
uszkodzony spodnie sztruksowe, gniazdka Lub buble.
3
.
Przed włożeniem wtyczki do gniazdka należy prawidłowo zainstalować
maszynę. Kiedy nie jest używany lub zanim czyszczenie, zakręt wyłączony
the przełącznik, wyjąć wtyczkę the moc dostarczać, Czekać Do the spinning
głowa Do przestań się obracać, I Czekać Do the maszyna Do Fajny w dół.
4
.
Do nie dotykać the obrotowy spinning głowa Kiedy the maszyna Jest pracujący.
Do nie zasięg twój ręce.
do misce, aż wyczerpie się cukier. Aby uniknąć oparzeń,
nie ruszaj się maszynę podczas jej pracy.
5.Do nie dotykać the wtyczka Lub drut Kiedy the wtyczka Lub drut Jest
mokry Lub twój ręce Czy mokry, W przeciwnym razie może _ przyczyna
jakiś elektryczny zaszokować.
6.The silnik z Ten maszyna Jest zaprojektowany Do Posiadać A
tymczasowy odciąć wskaźnik z 80%, Więc
należy unikać
długotrwałej ,
ciągłej pracy.
Po nieprzerwanej pracy przez godzinę należy zrobić
przerwę 20
minuty zanim startowy Do praca, Który będzie bardzo rozszerzyć the
praca życie z the silnik.
7.Czy To Jest czyszczenie, konserwacja I Inny powiązany praca, the moc
powinien Być obrócony wyłączony najpierw, a wtyczkę zasilającą należy
odłączyć. Maszyna nie może pracować bez obciążenia przez dłuższy czas.
8
.
Czyszczenie agenci nie są mający pozwolenie na być użytym podczas
czyszczenia aby zapobiec the pozostałości środków czyszczących NA
the maszyna z istnienie zjedzony przez błąd.
CIRCUIT DIAGRAM
- 16 -
TROUBLESHOOTING
Wada: NIE Cukier Włókno
1.Sprawdzać czy the cukier głowa Jest obrotowy Lub nie, I zatrzymywać się the
maszyna Do sens czy głowa cukru jest gorąca.
2.Jeśli głowica cukrowa się nie obraca, sprawdź, czy urządzenie jest włączone i czy
silnik nie jest uszkodzony.
3.Jeżeli głowica cukrowa nie jest gorąca: sprawdź, czy urządzenie jest włączone i czy
głowica cukrowa jest dzwonienie, I czy the Napięcie Jest nadmierny.
4.Odkręć pokrętło bezpiecznika na panelu lub podważ pokrywę bezpiecznika (dla
typu blatowego) w gnieździe , Następnie, Brać the bezpiecznik na zewnątrz Do
sprawdzać czy To Jest spalony na zewnątrz.
5.Zdejmij przegrodę i górną pokrywę, a następnie wyjmij pokrywę przez obracającą się
głowicę, wtedy będziesz mógł zobaczyć the wewnętrzny stan z the maszyna. Sprawdzać
czy the węgiel szczotka Jest luźny Lub nie działa, jeśli tak, wymień go na nowy.
NOTICE FOR CARBON BRUSH
konserwacji wystąpią następujące sytuacje, należy wymienić szczotkę węglową
kontrola I używać:
1.
The węgiel szczotka ma A stosunkowo duży iskra I palić.
2.The kontakt powierzchnia z the węgiel szczotka NA the poślizg pierścień Jest mniej niż
70%.
3.
Węgiel szczotka wiosna ciśnienie niedopasowanie, itp.
REPLACE THE CARBON BRUSH STEPS
1.Usunąć the śruby ustalenie the przegroda płyta I szczyt okładka I Brać na
zewnątrz the przegroda I szczyt okładka.
2.Usunąć the złączony koniec z the węgiel szczotka, usunąć the ustalenie
śruby, I Brać na zewnątrz starą szczotkę węglową. (W celu ułatwienia
montażu i demontażu śruba mocująca cukier głowa Móc Być REMOVED
Pierwszy Do zwiększyć the operacyjny przestrzeń)

- 17 -
3.Zastępować the nowy węgiel szczotka, miejsce To W pozycja I
naprawić To z śruby, I wtyczka W koniec łączący .
4.Sprawdzać the instalacja z the nowy węgiel szczotka. (czy the
wiosna I the kontakt instalacyjny jest dobry)
5
.
Zainstaluj ponownie the szczyt okładka I przegroda, kompletny the węgiel
szczotka wymiana.
Note: The carbon brush
is a
consumable and should be


Technisch Support- und E-Garantiezertifikat www . vevor . com/support
ZUCKERWATTEHERSTELLER
BENUTZERHANDBUCH
We continue to be committed to provide you tools with competitive price.
"Save Half", "Half Price" or any other similar expressions used by us only represents an
estimate of savings you might benefit from buying certain tools with us compared to the
major top brands and does not necessarily mean to cover all categories of tools offered by
us. You are kindly reminded to verify carefully when you are placing an order with us if you
are actually saving half in comparison with the top major brands.


- 1 -
Hinweis: Dies Benutzer Handbuch Ist
anwendbar
auf Die Baumwolle Süßigkeiten
Maschinen.
Bitte lesen Es sorgfältig Vor verwenden.
Have product questions? Need technical support? Please feel free to
contact us:
Technical Support and E-Warranty Certificate
www. vevor. com/support
NEED HELP? CONTACT US!
COTTON CANDY
MAKERS
MHTJXM01F MHTJXM02F MHTJXM03F
MHTJXM01H MHTJXM02H MHTJXM03H
MHTJXM01L MHTJXM02L MHTJXM03L
MHTJJPZY01 MHTJJPZY02 MHTJJPZY03
MHTJJPHC01 MHTJJPHC02 MHTJJPHC03

- 2 -
This is the original instruction, please read all manual instructions
carefully before operating. VEVOR reserves a clear interpretation of our
user manual. The appearance of the product shall be subject to the
product you received. Please forgive us that we won't inform you again if
there are any technology or software updates on our product.
Warnung: Um das Verletzungsrisiko zu verringern, muss der
Benutzer die Bedienungsanleitung sorgfältig lesen .
RICHTIGE ENTSORGUNG
Dieses Produkt unterliegt den Bestimmungen der europäischen
Richtlinie 2012/19/EU. Das Symbol einer durchgestrichenen
Mülltonne weist darauf hin, dass das Produkt in der Europäischen
Union einer getrennten Müllsammlung bedarf. Dies gilt für das
Produkt und alle Zubehörteile, die mit diesem Symbol
gekennzeichnet sind. Als solche gekennzeichnete Produkte dürfen
nicht über den normalen Hausmüll entsorgt werden, sondern
müssen an einer Sammelstelle für das Recycling von Elektro- und
Elektronikgeräten abgegeben werden.
Compliance ist eine EG- und UK-Sicherheitszertifizierung.
IMPORTANT SAFEGUARDS
Bei der Verwendung von Elektrogeräten sollten stets grundlegende
Sicherheitsvorkehrungen befolgt werden, darunter die folgenden:
1. Lies alle Anweisungen.
2. Berühren Sie keine heißen Oberflächen. Verwenden Sie Griffe oder Knöpfe.
3. Um Stromschläge zu vermeiden, tauchen Sie Kabel, Stecker oder Geräte
nicht in Wasser oder andere Flüssigkeiten.
4. Wenn ein Gerät von oder in der Nähe von Kindern verwendet wird, ist eine
strenge Aufsicht erforderlich.
5. Ziehen Sie bei Nichtgebrauch und vor der Reinigung den Stecker aus der
Steckdose. Vor dem Anbringen oder Abnehmen von Teilen abkühlen lassen
6. Betreiben Sie kein Gerät mit einem beschädigten Kabel oder Stecker oder

- 3 -
nachdem das Gerät eine Fehlfunktion aufweist oder in irgendeiner Weise
beschädigt wurde. Bringen Sie das Gerät zur Überprüfung, Reparatur oder
Einstellung zur nächstgelegenen autorisierten Serviceeinrichtung.
7. Die Verwendung von Zubehörteilen, die nicht vom Gerätehersteller
empfohlen werden, kann zu Verletzungen führen.
8. Nicht im Freien verwenden.
9. Lassen Sie das Kabel nicht über die Tisch- oder Thekenkante hängen und
berühren Sie keine heißen Oberflächen.
10. Nicht auf oder in der Nähe eines heißen Gas- oder Elektrobrenners oder in
einem beheizten Ofen platzieren.
11. Beim Bewegen eines Geräts, das heißes Öl oder andere heiße
Flüssigkeiten enthält, ist äußerste Vorsicht geboten.
12. immer zuerst den Stecker in das Gerät und dann das Kabel in die
Steckdose. Um die Verbindung zu trennen, schalten Sie einen beliebigen
Regler auf „Aus“ und ziehen Sie dann den Stecker aus der Steckdose.
13. Benutzen Sie die Geräte nicht für andere als den vorgesehenen Zweck.
14. Nur im Haushalt genutzt.
ANLEITUNG AUFBEWAHREN
Hinweis zum Kabel:
Ein kurzes Netzkabel wird mitgeliefert, um das Risiko zu verringern, dass man sich in
einem längeren Kabel verheddert oder darüber stolpert. Verlängerungskabel sind
erhältlich und können verwendet werden, wenn bei der Verwendung Vorsicht geboten
ist. Wenn ein Verlängerungskabel verwendet wird:
1) Die angegebene elektrische Nennleistung des Verlängerungskabels sollte
mindestens so groß sein wie die elektrische Nennleistung des Geräts;
2) Das Kabel sollte so angeordnet sein, dass es nicht über die Arbeitsplatte oder
Tischplatte hängt, wo Kinder daran ziehen oder unbeabsichtigt darüber stolpern können.
Und
3) Das Verlängerungskabel sollte ein dreiadriges Erdungskabel sein.
PRODUCT PARAMETERS
Modell
Leistung der
Heizplatte
Abmessungen
(mm)
Stromspannung
Frequenz
MHTJXM01F
MHTJXM01H
MHTJXM01L
1000W
518*518*415
AC120V
60Hz
MHTJXM02F
MHTJXM03F
MHTJXM02H
AC220-240V
50/60Hz
- 4 -
MHTJXM03H
MHTJXM02L
MHTJXM03
MHTJJPZY01
518*518*485
AC120V
60Hz
MHTJJPZY02
MHTJJPZY03
AC220-240V
50/60Hz
MHTJJPHC01
518*820*1000
AC120V
60Hz
MHTJJPHC02
MHTJJPHC03
AC220-240V
50/60Hz
PACKING LIST
Artikel
Teil Name
MENGE
Bild
1
Baumwolle Süßigkeiten Maschine
1 Stck
2
Rostfrei Stahl Schüssel
1 Stck
3
Rostfrei Stahl Zucker Scoop
1 Stck
4
Kohlenstoff
Bürste
1 Stck
5
Sicherung
1 Stck
6
Leistung
Kabel
1 Stck
7
Benutzerhandbuch
_
1 Stck

- 5 -
8
Installation Werkzeuge
Notiz: Für T Er Cart-Stil Einsen
nur.
1 Satz

- 6 -
INSTALLATION KIT ACCESSORIES LIST
Notiz: Nur Die Cart-Stil Maschinen kommen mit Die Installation Bausätze.
Artike
l
Teil Name
MENGE
Bild
1
Rad
2 STÜCK
2
Tisch
1 Stck
3
Handhaben
1 Stck
4
(P1) - Lang Halterung
2 STÜCK
5
(P2)-Kurz Halterung (Rad Montage)
2 STÜCK
6
(P3)-Quer Festsetzung Halterung
3 Stck
7
Plastik Unterlage
2 STÜCK
8
Schrauben (M8*70)
2 STÜCK
9
Schrauben
(M5*12)
16 STÜCK

- 7 -
10
Schrauben
(M5*35)
6 Stck

- 8 -
PRODUCT COMPOSITION DIAGRAM
Spinnen
Kopf
Schüssel
Voltmeter
Sicheru
ng
Heizung
Schalten
Leistung Schalten
Leistung Stecker
Schublade
Zuckerwattemaschine
(Arbeitsplattentyp mit Schrank)

- 9 -
Spinnen
Kopf
Schüssel
Voltmeter
Heizung
Schalten
Leistung
Stecker
Leistung
Sicherung
wechseln
Baumwolle Süßigkeiten Maschine
(Arbeitsplatte
Typ)
Baumwolle
Süßigkeiten Maschine
(Warenkorb Typ)

- 10 -
Please install the wheels for the Cart Type in the following order.
1
.
Verwenden Schrauben (M5*12) Und Schrauben (M5*35) Zu
Installieren Die Halterung als gezeigt In Die Figur. Die Installation
Schritte An beide Seiten Sind Die Dasselbe.
Schrauben
(M5*12)
(P1)- Lang Halterung
(P2)-Kurz Halterung
(Rad Montage)
Schrauben
(M5*35)
Plastic Pad
(P3)-Transverse
Fixing Bracket
(P3)-Transverse
Fixing Bracket
- 11 -
2.Installieren zwei Räder unter Die rahmen mit zwei Schrauben (M8*70).
(P2)-Kurz Halterung (Rad Montage)
(P3)
-
Querbefesti
gung
Halterung
Rad
Bolzen
(P1)- Lang Halterung
3.Installieren Die Tisch An Die links Seite von Die hauptsächlich Körper,
Und Installieren Die drücken handhaben An Die Rechts Seite mit 8 Stück
Schrauben (M5*12)
Tisch
Schrauben
(M5*12)
Hauptsächlich
Körper

- 12 -
Table
Push
Handle
4
.
Ort Die rostfrei Stahl Pfanne An Spitze von Die Kasten Und Fix Es mit Die 4
Verriegelung Clips An beide Seiten.

- 13 -
5.Nachdem die gesamte Montage abgeschlossen ist, ist es einsatzbereit.
Bitte bewahren Sie die anderen Komponenten ordnungsgemäß auf Wille Sei
gebraucht während verwenden oder Wartung.
OPERATION PRECAUTIONS
1
.
Bitte lesen Sie dieses Handbuch vor der Verwendung sorgfältig durch.
Um die Vorteile voll auszuschöpfen und zufriedenstellende Ergebnisse zu
erzielen, sollten Sie den Aufbau und die Funktion der Maschine verstehen und
sich damit vertraut machen mit es ist hauptsächlich Teile Und verwandt
Sicherheit Operationen.
2
.
Nachdem Sie die Maschine aus der Verpackung genommen haben,
spülen Sie die Schüssel und den Spinnkopf mit einer kleinen Menge aus
von sauber Wasser, Und Dann wischen Die Wasser Flecken mit A weich
Tuch.
3
.
Der Maschine sollen Sei Eingerichtet An A unterstützt Werkbank, behalten A
Distanz aus Die Boden.
4
.
Bitte prüfen Sie vor Inbetriebnahme der Maschine, ob die Spannung des
verwendeten Netzteils mit der Spannung der verwendeten Maschine
übereinstimmt. Stellen Sie sicher, dass der Kontakt zwischen der Steckdose
und der Maschine den Sicherheitsstandards entspricht, der
Auslaufschutzschalter und das Erdungskabel installiert sind. Und alles trifft
Die Elektrizität Anforderungen.

- 14 -
OPERATING INSTRUCTIONS
1
.
Drücken Sie Die schalten Zu drehen An Die Maschine Und Warten für 1-2
Protokoll. Beobachten ob Die Maschine läuft glatt Wann Die Spinnen Kopf von
Die Maschine Ist rotierend. Wenn Die Vibration Ist zu schwer, Die Maschine
Bedürfnisse Zu Sei angepasst. Es muss Sei sichergestellt Das Die Maschine
Ist platziert Stabil.
2.Anpassen Die Stromspannung Knopf Zu Max, Und Die Voltmeter Wille
ändern mit Die Einstellung. Warm hoch Die Maschine für 2-3 Protokoll. Nach
Vorwärmen, Die Stromspannung dürfen Sei angepasst nach Zu Die
Temperaturanforderungen des Benutzers .
3
.
Gießen Sie zunächst einen halben Teelöffel Zucker ein und testen Sie
den Erhitzungsgrad und die Zuckerproduktion. Wenn alles Ist Okay, Dann
gießen A Löffel von sauber Weiß Zucker In Die Center von Die Zucker
Kopf.
4
.
Nach um 3 Sekunden, Die Baumwolle Süßigkeiten beginnt Zu spritzen aus.
Nehmen A Bambus Stock Und drehen Es ein paar mal entlang Die innere
Wand von Die Schüssel. Dann, Ort Die Stock horizontal Und drehen Es über
das Spinnen Kopf Zu bilden Baumwolle Süßigkeiten. Anders Formen dürfen
Sei gemacht von kippen Die Stöcke.
5.Nach Herstellung genug Baumwolle Süßigkeiten, drehen aus Die Maschine.
CLEANING
1
.
Der Maschine Bedürfnisse Zu Sei gereinigt nach Die Baumwolle
Süßigkeiten Ist gemacht, ansonsten Die Spinnen Kopf evtl Sei verstopft.
Halten Die Maschine läuft während Die Reinigung Verfahren, gießen A klein
Menge aus Wasser hinein Die Rotor, Dann Die Rotor Wille Shake aus Die
Wasser langsam. Nach Das, drehen aus Die Maschine und reinigen Sie es
mit einem trockenen, weichen Tuch.
2.Wenn der Spinnkopf verstopft ist, schalten Sie die Maschine aus, öffnen Sie
den Spinnkopf und entfernen Sie den verbrannten Zucker.
3
.
Nicht waschen Maschine mit Reinigungsmitteln wie Waschpulver.
4.Tun nicht spülen Die Maschine direkt mit Wasser.
NOTICE
1.Minderjährige Sind verboten aus verwenden Das Produkt.
2.Legen Sie den Draht nicht in die Nähe der heißen Oberfläche. Tauchen Sie
- 15 -
die Laschen an der Maschine nicht in Wasser oder Ähnliches Flüssigkeiten.
Tun nicht verwenden beschädigt Schnüre, Steckdosen oder Stecker.
3
.
Bevor Sie den Stecker in die Steckdose stecken, muss die Maschine
ordnungsgemäß installiert sein. Bei Nichtgebrauch bzw Vor Reinigung,
drehen aus Die schalten, ausstecken Die Leistung liefern, Warten für Die
Spinnen Kopf Zu aufhören zu rotieren, Und Warten für Die Maschine Zu
Cool runter.
4
.
Tun nicht berühren Die rotierend Spinnen Kopf Wann Die Maschine Ist Arbeiten.
Tun nicht erreichen dein Hände.
hinein in der Schüssel, bis der Zucker
verschwunden ist. Um Verbrennungen zu vermeiden, bewegen Sie sich nicht die
Maschine während des Betriebs.
5.Tun nicht berühren Die Stecker oder Draht Wann Die Stecker oder Draht
Ist nass oder dein Hände Sind nass, ansonsten es kann Ursache ein
elektrisch Schock.
6
.
Der Motor von Das Maschine Ist entworfen Zu haben A vorübergehend
Abschneiden Rate von 80 %, Also Ein längerfristiger
Dauerbetrieb sollte
vermieden werden. Nachdem Sie eine Stunde ununterbrochen gearbeitet haben,
sollten Sie eine Pause
einlegen 20 Protokoll Vor beginnend Zu arbeiten,
welche Wille sehr verlängern Die Service Leben von Die Motor.
7
.
Ob Es Ist Reinigung, Wartung Und andere verwandt arbeiten, Die Leistung
sollen Sei gedreht aus Zuerst sollte der Netzstecker gezogen werden. Die
Maschine darf nicht längere Zeit ohne Last laufen.
8
.
Reinigung Agenten sind nicht erlaubt zu verwendet werden während
der Reinigung verhindern Die Reinigungsmittel verbleiben An Die
Maschine aus Sein gegessen von Fehler.
CIRCUIT DIAGRAM
- 16 -
TROUBLESHOOTING
Fehler: NEIN Zucker Filament
1.Überprüfen ob Die Zucker Kopf Ist rotierend oder nicht, Und stoppen Die
Maschine Zu Sinn ob Der Zuckerkopf ist heiß.
2.Wenn sich der Zuckerkopf nicht dreht, prüfen Sie, ob die Maschine eingeschaltet ist
und der Motor defekt ist.
3.Wenn der Zuckerkopf nicht heiß ist: Überprüfen Sie, ob die Maschine eingeschaltet
ist und ob der Zuckerkopf heiß ist Klingeln, Und ob Die Stromspannung Ist
übertrieben.
4.Schrauben Sie den Sicherungsknopf an der Blende ab oder hebeln Sie die
Sicherungsabdeckung (für Arbeitsplattentyp) in der Steckdose auf. Dann, nehmen
Die Sicherung aus Zu überprüfen ob Es Ist verbrannt aus.
5.Entfernen Sie das Ablenkblech und die obere Abdeckung und nehmen Sie die
Abdeckung durch den Spinnkopf heraus, dann können Sie sehen Die intern Zustand von
Die Maschine. Überprüfen ob Die Kohlenstoff Bürste Ist lose oder nicht Wenn ja ,
ersetzen Sie es durch ein neues.
NOTICE FOR CARBON BRUSH
Bitte tauschen Sie die Kohlebürste rechtzeitig aus, wenn bei der routinemäßigen
Wartung die folgenden Situationen auftreten Inspektion Und verwenden:
1.
Der Kohlenstoff Bürste hat A verhältnismäßig groß Funke Und Rauch.
2.Der Kontakt Oberfläche von Die Kohlenstoff Bürste An Die Unterhose Ring Ist weniger
als 70 %.
3.
Kohlenstoff Bürste Frühling Druck Nichtübereinstimmung, usw.
REPLACE THE CARBON BRUSH STEPS
1
.
Entfernen Die Schrauben Festsetzung Die Schallwand Platte Und Spitze
Abdeckung Und nehmen aus Die Schallwand Und Spitze Abdeckung.
2
.
Entfernen Die verbinden Ende von Die Kohlenstoff Bürste, entfernen Die
Festsetzung Schrauben, Und nehmen aus die alte Kohlebürste. (Um die
Montage und Demontage zu erleichtern, muss die Befestigungsschraube

- 17 -
des Zuckers entfernt werden Kopf dürfen Sei ENTFERNT Erste Zu
Zunahme Die Betriebs Raum)

- 18 -
3.Ersetzen Die neu Kohlenstoff Bürste, Ort Es In Position Und Fix Es
mit Schrauben, Und Stecker In das Verbindungsende.
4.Überprüfen Die Installation von Die neu Kohlenstoff Bürste. (ob Die
Frühling Und Die Installationskontakt ist gut)
5
.
Neu installieren Die Spitze Abdeckung Und Schallwand, vollständig Die
Kohlenstoff Bürste Ersatz.
Note: The carbon brush
is a
consumable and should be


Technique Assistance et certificat de garantie électronique www . vevor . com/support
FABRICANTS DE BARBE À PAPA
MANUEL DE L'UTILISATEUR
We continue to be committed to provide you tools with competitive price.
"Save Half", "Half Price" or any other similar expressions used by us only represents an
estimate of savings you might benefit from buying certain tools with us compared to the
major top brands and does not necessarily mean to cover all categories of tools offered by
us. You are kindly reminded to verify carefully when you are placing an order with us if you
are actually saving half in comparison with the top major brands.


- 1 -
Remarque : ceci utilisateur manuel est
applicable
à le coton bonbons Machines.
S'il te plaît lire il soigneusement avant utiliser.
Have product questions? Need technical support? Please feel free to
contact us:
Technical Support and E-Warranty Certificate
www. vevor. com/support
NEED HELP? CONTACT US!
This is the original instruction, please read all manual instructions
carefully before operating. VEVOR reserves a clear interpretation of our
user manual. The appearance of the product shall be subject to the
product you received. Please forgive us that we won't inform you again if
there are any technology or software updates on our product.
COTTON CANDY
MAKERS
MHTJXM01F MHTJXM02F MHTJXM03F
MHTJXM01H MHTJXM02H MHTJXM03H
MHTJXM01L MHTJXM02L MHTJXM03L
MHTJJPZY01 MHTJJPZY02 MHTJJPZY03
MHTJJPHC01 MHTJJPHC02 MHTJJPHC03

- 2 -
Avertissement : pour réduire le risque de blessure, l'utilisateur doit
lire attentivement le manuel d'instructions .
ÉLIMINATION CORRECTE
Ce produit est soumis aux dispositions de la directive européenne
2012/19/UE. Le symbole représentant une poubelle barrée indique
que le produit nécessite une collecte sélective des déchets dans
l'Union européenne. Ceci s'applique au produit et à tous les
accessoires marqués de ce symbole. Les produits marqués comme
tels ne doivent pas être jetés avec les ordures ménagères
normales, mais doivent être déposés dans un point de collecte pour
le recyclage des appareils électriques et électroniques.
La conformité est une certification de sécurité CE et Royaume-Uni.
IMPORTANT SAFEGUARDS
Lors de l’utilisation d’appareils électriques, des précautions de sécurité de base
doivent toujours être suivies, notamment les suivantes :
1. Lisez toutes les instructions.
2. Ne touchez pas les surfaces chaudes. Utilisez des poignées ou des boutons.
3. Pour vous protéger contre les chocs électriques, ne plongez pas les cordons,
les fiches ou les appareils dans l'eau ou tout autre liquide.
4. Une surveillance étroite est nécessaire lorsqu'un appareil est utilisé par ou à
proximité d'enfants.
5. Débranchez-le de la prise lorsqu'il n'est pas utilisé et avant le nettoyage.
Laisser refroidir avant de mettre ou de retirer des pièces
6. N'utilisez aucun appareil avec un cordon ou une fiche endommagé ou après
un dysfonctionnement de l'appareil ou a été endommagé de quelque manière
que ce soit. Renvoyez l'appareil au centre de service agréé le plus proche pour
examen, réparation ou réglage.
7. L'utilisation d'accessoires non recommandés par le fabricant de l'appareil
peut provoquer des blessures.
8. Ne pas utiliser à l'extérieur.
9. Ne laissez pas le cordon pendre du bord de la table ou du comptoir, ni
toucher des surfaces chaudes.

- 3 -
10. Ne pas placer sur ou à proximité d’un brûleur à gaz ou électrique chaud, ni
dans un four chauffé.
11. Une extrême prudence doit être utilisée lors du déplacement d’un appareil
contenant de l’huile chaude ou d’autres liquides chauds.
12. toujours d'abord la fiche sur l'appareil, puis le cordon sur la prise murale.
Pour déconnecter, éteignez n'importe quelle commande, puis retirez la fiche de
la prise murale.
13. N'utilisez pas d'appareils pour un usage autre que celui prévu.
14. Usage domestique uniquement.
CONSERVEZ CES INSTRUCTIONS
Remarque concernant le cordon :
Un cordon d'alimentation court est fourni pour réduire le risque de s'emmêler ou de
trébucher sur un cordon plus long. Des rallonges sont disponibles et peuvent être
utilisées si des précautions sont prises lors de leur utilisation. Si une rallonge est
utilisée :
1) La puissance électrique indiquée sur la rallonge doit être au moins aussi élevée que
la puissance électrique de l'appareil ;
2) Le cordon doit être disposé de manière à ce qu'il ne pende pas sur le comptoir ou la
table où il pourrait être tiré par des enfants ou trébucher involontairement ; et
3) La rallonge doit être un cordon à 3 fils avec mise à la terre.
PRODUCT PARAMETERS
Modèle
Puissance de
la plaque
chauffante
Dimensions
(mm)
Tension
Fréquence
MHTJXM01F
MHTJXM01H
MHTJXM01L
1000W
518*518*415
AC120V
60Hz
MHTJXM02F
MHTJXM03F
MHTJXM02H
MHTJXM03H
MHTJXM02L
MHTJXM03
AC220-240V
50/60 Hz
MHTJJPZY01
518*518*485
AC120V
60Hz
MHTJJPZY02
MHTJJPZY03
AC220-240V
50/60 Hz
- 4 -
MHTJJPHC01
518*820*1000
AC120V
60Hz
MHTJJPHC02
MHTJJPHC03
AC220-240V
50/60 Hz
PACKING LIST
Article
Partie Nom
QTÉ
Image
1
Coton Bonbons Machine
1 PC
2
Inoxydable Acier Bol
1 PC
3
Inoxydable Acier Sucre Scoop
1 PC
4
Carbone
Brosse
1 PC
5
Fusible
1 PC
6
Pouvoir
Corde
1 PC
7
Manuel
de l'Utilisateur
1 PC
8
Installation Outils
Note: Pour t il style chariot ceux
seulement.
1 JEU
- 5 -
INSTALLATION KIT ACCESSORIES LIST
Note: Seulement le style chariot Machines viens avec le installation trousses.
Articl
e
Partie Nom
QTÉ
Image
1
Roue
2 pièces
2
Tableau
1 PC
3
Poignée
1 PC
4
(P1) - Long Support
2 pièces
5
(P2)-Court Support (Roue Montage)
2 pièces
6
(P3)-Transversale Fixation Support
3 PC
7
Plastique Tampon
2 pièces
8
Boulons (M8*70)
2 pièces
9
Vis
(M5*12)
16
PIÈCES

- 6 -
dix
Vis
(M5*35)
6 PC

- 7 -
PRODUCT COMPOSITION DIAGRAM
Filage
Tête
Bol
Voltmètre
Fusible
Chauffage
Changer
Pouvoir Changer
Pouvoir
Prise
Tiroir
Machine à barbe à papa
(type de comptoir avec armoire)

- 8 -
Filage
Tête
Bol
Voltmètre
Chauffage
Changer
Pouvoir
Prise
Pouvoir
Fusible
de commutation
Coton Bonbons Machine
(Comptoir
Taper)
Coton Bonbons
Machine
(Chariot
Taper)

- 9 -
Please install the wheels for the Cart Type in the following order.
1
.
Utiliser des vis (M5*12) et des vis (M5*35) à installer le support comme
montré dans le chiffre. L' installation pas sur les deux côtés sont le
même.
Des vis
(M5*12)
(P1)- Long Support
(P2)-Court Support
(Roue Montage)
Des vis
(M5*35)
Plastic Pad
(P3)-Transverse
Fixing Bracket
(P3)-Transverse
Fixing Bracket

- 10 -
2.Installer deux roues sous le cadre avec deux Boulons (M8*70).
(P2)-Court Support (Roue Montage)
(P3)
-
Fixation
transversale
Support
Roue
Boulon
(P1)- Long Support
3.Installer le tableau sur le gauche côté de le principal corps, et installer le
pousser poignée sur le droite côté avec 8 vis (M5*12)
Tableau
Vis
(M5*12)
Principal
Corps

- 11 -
Table
Push
Handle
4
.
Lieu le inoxydable acier poêle sur haut de le boîte et réparer il avec le 4
verrouillage extraits sur les deux côtés.

- 12 -
5.Une fois l’assemblage terminé, il est prêt à l’emploi. Veuillez conserver
correctement les autres composants, qui volonté être utilisé pendant utiliser
ou entretien.
OPERATION PRECAUTIONS
1
.
Veuillez lire attentivement ce manuel avant utilisation. Afin de tirer
pleinement parti de ses avantages et d'obtenir des résultats satisfaisants,
veuillez comprendre la structure et la fonction de la machine et vous
familiariser avec c'est principal les pièces et en rapport sécurité opérations.
2
.
Après avoir sorti la machine de l'emballage, rincez le bol et la tête
d'essorage avec une petite quantité de faire le ménage eau, et alors
essuyer le eau taches avec un doux tissu.
3.
Le machine devrait être installée sur un prise en charge Table de travail, en
gardant un distance depuis le sol.
4
.
Avant de démarrer la machine, veuillez vérifier si la tension de
l'alimentation utilisée est cohérente avec la tension de la machine utilisée.
Assurez-vous que le contact entre la prise et la machine répond aux normes
de sécurité, que l'interrupteur de protection contre les fuites et le fil de terre
sont installés, et tout se rencontre le électricité exigences.

- 13 -
OPERATING INSTRUCTIONS
1
.
Presse le changer à tourner sur le machine et attendez pour 1-2 minutes.
Observer si le la machine tourne doucement quand le filage tête de le machine
est tournant. Si le vibration est aussi grave, la machine besoins à être ajusté. Il
doit être assuré que le machine est mis de manière stable.
2
.
Ajuster le tension bouton à Max, et le voltmètre volonté changement avec le
ajustement. Chaud en haut la machine pour 2-3 minutes. Après préchauffage,
le tension peut être ajusté selon à le exigences de température de l'utilisateur .
3.Tout d’abord, versez une demi-cuillère à café de sucre, testez le degré
de chauffage et la production de sucre. Quand tout est d'accord, alors
verser un cuillerée de faire le ménage blanc sucre dans le centre de le
sucre tête.
4.Après à propos 3 secondes, le coton bonbons départs à jet dehors.
Prendre un bambou bâton et tourner il quelques _ fois le long de le intérieur
mur de le bol. Alors, lieu le bâton horizontalement et tourner il sur la filature
tête à formulaire coton bonbons. Différent formes peut être fait par inclinaison
le des bâtons.
5
.
Après fabrication assez coton bonbons, tourner désactivé le machine.
CLEANING
1
.
Le machine besoins à être nettoyé après le coton bonbons est fait, sinon le
filage la tête peut être bloqué. Garder le machine en cours d'exécution pendant
le nettoyage processus, verser un petit montant de l'eau dans le rotor, alors le
rotor volonté secouer désactivé le eau lentement. Après que, tourner
désactivé le machine et nettoyez-la avec un chiffon doux et sec.
2.Si la tête d'essorage est bloquée, éteignez la machine et ouvrez la tête
d'essorage, puis nettoyez le sucre brûlé.
3
.
Ne lavez pas le machine avec des détergents comme la lessive.
4.Faire pas rincer le machine directement avec eau.
NOTICE
1.Mineurs sont interdit depuis en utilisant ce produit.
2
.
Ne placez pas le fil près de la surface chaude. Ne plongez pas les cosses de
la machine dans l'eau ou autre liquides. Faire pas utiliser endommagé des
cordons, prises ou bouchons.
3.La machine doit être correctement installée avant d'insérer la fiche dans la
- 14 -
prise. Lorsqu'il n'est pas utilisé ou avant nettoyage, tourner désactivé le
changer, débrancher le pouvoir fournir, attendez pour le filage tête à arrêtez
de tourner, et attendez pour le machine à cool vers le bas.
4
.
Faire pas touche le tournant filage tête quand le machine est fonctionnement.
Faire pas atteindre ton mains.
dans le bol jusqu'à ce qu'il n'y ait plus de sucre.
Pour éviter les brûlures, ne bougez pas la machine pendant qu'elle fonctionne.
5.Faire pas touche le prise ou fil quand le prise ou fil est mouillé ou ton
mains sont mouillé, sinon cela pourrait cause un électrique choc.
6.Le moteur de ce machine est conçu à avoir un temporaire couper taux de
80%, donc un fonctionnement continu à long terme
doit être évité. Après avoir
travaillé continuellement pendant une heure, vous devez faire une pause
pendant 20 minutes avant départ à travail, lequel volonté très étendre le
service vie de le moteur.
7
.
Si il est nettoyage, entretien et autre en rapport travail, le pouvoir devrait
être tourné désactivé d'abord, et la fiche d'alimentation doit être débranchée.
La machine ne doit pas fonctionner sans charge pendant une longue période.
8.Nettoyage agents ne sont pas autorisé à être utilisé pendant le
nettoyage pour prévenir le produits de nettoyage restants sur le machine
depuis être mangé par erreur.
CIRCUIT DIAGRAM

- 15 -
TROUBLESHOOTING
Faute: Non Sucre Filament
1.Vérifier si le sucre tête est tournant ou pas, et arrêt le machine à sens si la tête
de sucre est chaude.
2.Si la tête sucrière ne tourne pas, vérifiez si la machine est sous tension et si le
moteur est cassé.
3.Si la tête sucrière n'est pas chaude : vérifiez si la machine est allumée, si la tête
sucre est sonnerie, et si le tension est excessif.
4.Dévissez le bouton du fusible sur le panneau ou ouvrez le couvercle du fusible
(pour le type de comptoir) dans la prise, alors, prendre le fusible dehors à vérifier
si il est brûlé dehors.
5.Retirez le déflecteur et le couvercle supérieur et retirez le couvercle à travers la tête
rotative, vous pourrez alors voir le interne condition de le machine. Vérifier si le carbone
brosse est lâche ou pas fonctionne, si c'est le cas, remplacez-le par un neuf.
NOTICE FOR CARBON BRUSH
Veuillez remplacer le balai de charbon à temps si les situations suivantes se
produisent lors de l'entretien de routine inspection et utiliser:
1.
Le carbone brosse a un relativement grand étincelle et fumée.
2.Le contact surface de le carbone brosse sur le glisser anneau est moins que 70%.
3.
Carbone brosse printemps pression décalage, etc.
REPLACE THE CARBON BRUSH STEPS
1.Retirer le des vis fixation le baffle plaque et haut couverture et prendre dehors
le baffle et haut couverture.
2
.
Retirer le de liaison fin de le carbone brosse, retirer le fixation des vis, et
prendre dehors le vieux balai de charbon. (Afin de faciliter le montage et le
démontage, la vis de fixation du sucre tête peut être supprimé d'abord à
augmenter le en fonctionnement espace)
- 16 -
3.Remplacer le nouveau carbone brosse, lieu il dans position et
réparer il avec des vis, et prise dans l' extrémité de connexion.
4.Vérifier le installation de le nouveau carbone brosse. (si le printemps
et le le contact d'installation est bon)
5
.
Réinstaller le haut couverture et baffle, complet le carbone brosse
remplacement.
Note: The carbon brush
is a
consumable and should be


Technisch Ondersteuning en e-garantiecertificaat www . kracht . com/ondersteuning
SUIKERSPINMAKERS
HANDLEIDING
We continue to be committed to provide you tools with competitive price.
"Save Half", "Half Price" or any other similar expressions used by us only represents an
estimate of savings you might benefit from buying certain tools with us compared to the
major top brands and does not necessarily mean to cover all categories of tools offered by
us. You are kindly reminded to verify carefully when you are placing an order with us if you
are actually saving half in comparison with the top major brands.


- 1 -
Opmerking: dit gebruiker handmatig is
toepasbaar
op de katoen snoep
machines.
Alsjeblieft lezen Het voorzichtig voor gebruik.
Have product questions? Need technical support? Please feel free to
contact us:
Technical Support and E-Warranty Certificate
www. vevor. com/support
NEED HELP? CONTACT US!
COTTON CANDY
MAKERS
MHTJXM01F MHTJXM02F MHTJXM03F
MHTJXM01H MHTJXM02H MHTJXM03H
MHTJXM01L MHTJXM02L MHTJXM03L
MHTJJPZY01 MHTJJPZY02 MHTJJPZY03
MHTJJPHC01 MHTJJPHC02 MHTJJPHC03
- 2 -
This is the original instruction, please read all manual instructions
carefully before operating. VEVOR reserves a clear interpretation of our
user manual. The appearance of the product shall be subject to the
product you received. Please forgive us that we won't inform you again if
there are any technology or software updates on our product.
Waarschuwing-Om het risico op letsel te verminderen, moet de
gebruiker de handleiding zorgvuldig lezen .
CORRECTE VERWIJDERING
Dit product valt onder de bepalingen van de Europese Richtlijn
2012/19/EU. Het symbool met een doorgestreepte afvalcontainer
geeft aan dat het product in de Europese Unie een aparte
afvalinzameling vereist. Dit geldt voor het product en alle
accessoires die met dit symbool zijn gemarkeerd. Producten die als
zodanig zijn gemarkeerd, mogen niet bij het normale huisvuil
worden weggegooid, maar moeten worden ingeleverd bij een
inzamelpunt voor recycling van elektrische en elektronische
apparaten.
Compliance is een EG- en VK-veiligheidscertificering.
IMPORTANT SAFEGUARDS
Bij het gebruik van elektrische apparaten moeten altijd de
basisveiligheidsmaatregelen in acht worden genomen, waaronder de volgende:
1. Lees alle instructies.
2. Raak hete oppervlakken niet aan. Gebruik handgrepen of knoppen.
3. Ter bescherming tegen elektrische schokken mag u snoeren, stekkers of
apparaten niet onderdompelen in water of een andere vloeistof.
4. Strikt toezicht is noodzakelijk wanneer een apparaat door of in de buurt van
kinderen wordt gebruikt.
5. Haal de stekker uit het stopcontact wanneer deze niet in gebruik is en vóór
het schoonmaken. Laat afkoelen voordat u onderdelen aanbrengt of verwijdert
6. Gebruik geen apparaat met een beschadigd snoer of beschadigde stekker, of

- 3 -
nadat het apparaat defect is of op enige wijze beschadigd is. Breng het
apparaat terug naar het dichtstbijzijnde erkende servicecentrum voor onderzoek,
reparatie of aanpassing.
7. Het gebruik van accessoires die niet door de fabrikant van het apparaat
worden aanbevolen, kan letsel veroorzaken.
8. Niet buitenshuis gebruiken.
9. Laat het snoer niet over de rand van een tafel of aanrecht hangen, en laat het
snoer niet in aanraking komen met hete oppervlakken.
10. Niet op of in de buurt van een hete gas- of elektrische brander, of in een
verwarmde oven plaatsen.
11. Uiterste voorzichtigheid is geboden bij het verplaatsen van een apparaat dat
hete olie of andere hete vloeistoffen bevat.
12. altijd eerst de stekker aan op het apparaat en vervolgens het snoer op het
stopcontact. Om de verbinding te verbreken, zet u een willekeurige knop op 'uit'
en haalt u vervolgens de stekker uit het stopcontact.
13. Gebruik apparaten niet voor ander dan het beoogde gebruik.
14. Alleen huishoudelijk gebruikt.
BEWAAR DEZE INSTRUCTIES
Opmerking voor snoer:
Er wordt een kort netsnoer meegeleverd om het risico te verkleinen dat u verstrikt raakt
in of struikelt over een langer snoer. Verlengsnoeren zijn verkrijgbaar en kunnen worden
gebruikt als u er zorgvuldig mee omgaat. Als u een verlengsnoer gebruikt:
1) Het aangegeven elektrische vermogen van het verlengsnoer moet minstens even
groot zijn als het elektrische vermogen van het apparaat;
2) Het snoer moet zo worden geplaatst dat het niet over het aanrecht of tafelblad hangt,
waar kinderen eraan kunnen trekken of er onbedoeld over kunnen struikelen; En
3) Het verlengsnoer moet een geaard 3-draads snoer zijn.
PRODUCT PARAMETERS
Model
Verwarmingsplaat
Vermogen
Afmetingen
(mm)
Spanning
Frequentie
MHTJXM01F
MHTJXM01H
MHTJXM01L
1000W
518*518*415
AC120V
60 Hz
MHTJXM02F
MHTJXM03F
MHTJXM02H
MHTJXM03H
MHTJXM02L
AC220-
240V
50/60 Hz
- 4 -
MHTJXM03
MHTJJPZY01
518*518*485
AC120V
60 Hz
MHTJJPZY02
MHTJJPZY03
AC220-
240V
50/60 Hz
MHTJJPHC01
518*820*1000
AC120V
60 Hz
MHTJJPHC02
MHTJJPHC03
AC220-
240V
50/60 Hz
PACKING LIST
Item
Deel Naam
AANTAL
Afbeelding
1
Katoen Snoep Machine
1 STUKS
2
Roestvrij Staal Schaal
1 STUKS
3
Roestvrij Staal Suiker Lepel
1 STUKS
4
Koolstof
Borstel
1 STUKS
5
Samensmelten
1 STUKS
6
Stroom
Koord
1 STUKS
7
Handleiding
_
1 STUKS
8
Installatie Hulpmiddelen
Opmerking: Voor T Hij kar-stijl
1

- 5 -
degenen alleen.
INSTELLE
N
- 6 -
INSTALLATION KIT ACCESSORIES LIST
Opmerking: Alleen de kar-stijl machines komen met de installatie uitrustingen.
Item
Deel Naam
AANTAL
Afbeelding
1
Wiel
2 STUKS
2
Tafel
1 STUKS
3
Hendel
1 STUKS
4
(P1) - Lang Haakje
2 STUKS
5
(P2)-Kort Haakje (Wiel Montage)
2 STUKS
6
(P3)-Dwars Bevestiging Haakje
3 STUKS
7
Plastic Pad
2 STUKS
8
Bouten (M8*70)
2 STUKS
9
Schroef
(M5*12)
16 STUKS
10
Schroef
(M5*35)
6 STUKS

- 7 -
PRODUCT COMPOSITION DIAGRAM
Spinnen
Hoofd
Schaal
Voltmeter
Samens
melten
Verwarming
Schakelaar
Stroom Schakelaar
Stroom Plug
Lade
Suikerspinmachine
(aanrechttype met kast)

- 8 -
Spinnen
Hoofd
Schaal
Voltmeter
Verwarming
Schakelaar
Stroom
Plug
Stroom
Zekering
schakelen
Katoen Snoep Machine
(Aanrecht
Type)
Katoen Snoep
Machine
(kar Type)

- 9 -
Please install the wheels for the Cart Type in the following order.
1
.
Gebruik schroeven (M5*12) En schroeven (M5*35) naar installeren de
haakje als getoond in de figuur. De installatie stappen op beide
zijkanten Zijn de dezelfde.
Schroeven
(M5*12)
(P1)- Lang Haakje
(P2)-Kort Beugel
(wiel Montage)
Schroeven
(M5*35)
Plastic Pad
(P3)-Transverse
Fixing Bracket
(P3)-Transverse
Fixing Bracket

- 10 -
2.Installeren twee wielen onder de kader met twee Bouten (M8*70).
(P2)-Kort Haakje (Wiel Montage)
(P3)
-
Dwarsbeve
stiging
Haakje
Wiel
Bout
(P1)- Lang Haakje
3.Installeren de tafel op de links kant van de voornaamst lichaam, En
installeren de duw hendel op de rechts kant met 8 stks Schroef (M5*12)
Tafel
Schroef
(M5*12)
Voornaamst
Lichaam

- 11 -
Table
Push
Handle
4
.
Plaats de roestvrij staal pan op bovenkant van de doos En repareren Het met
de 4 vergrendelen clips op beide zijkanten.

- 12 -
5.Nadat alle montage is voltooid, is het klaar voor gebruik. Bewaar de
overige onderdelen zorgvuldig zullen zijn gebruikt tijdens gebruik of
onderhoud.
OPERATION PRECAUTIONS
1
.
Lees deze handleiding zorgvuldig door voor gebruik. Om de voordelen
ervan ten volle te kunnen benutten en bevredigende resultaten te bereiken,
dient u de structuur en functie van de machine te begrijpen en er vertrouwd
mee te zijn met zijn voornaamst onderdelen En verwant veiligheid
activiteiten.
2
.
Nadat u de machine uit de verpakking heeft gehaald, spoelt u de kom
en de draaikop met een kleine hoeveelheid van schoon water, En Dan
veeg de water vlekken met A zacht lap.
3
.
De machine zou moeten zijn geïnstalleerd op A ondersteund werkbank, houden A
afstand van de grond.
4.Controleer voordat u de machine start of de spanning van de gebruikte
voeding overeenkomt met de spanning van de gebruikte machine. Zorg
ervoor dat het contact tussen het stopcontact en de machine voldoet aan de
veiligheidsnormen, dat de lekbeschermingsschakelaar en de aarddraad zijn
geïnstalleerd, En alles voldoet aan de elektriciteit vereisten.

- 13 -
OPERATING INSTRUCTIONS
1
.
druk op de schakelaar naar draai op de machine En wachten voor 1-2
minuten. Observeer of de machine loopt soepel wanneer de draaien hoofd van
de machine is roterend. Als de trillingen is te streng, de machine behoeften
naar zijn bijgestelde. Het moeten zijn verzekerd Dat de machine is geplaatst
stabiel.
2.Aanpassen de Spanning knop naar Maximaal, En de voltmeter zullen
wijziging met de aanpassing. Warm omhoog de machine voor 2-3 minuten. Na
voorverwarmen, de Spanning kan zijn bijgestelde volgens naar de
temperatuurvereisten van de gebruiker .
3
.
Giet eerst een halve theelepel suiker, test de mate van verwarming en
suikerproductie. Wanneer alles is Oké, Dan giet A lepel van schoon wit
suiker in de centrum van de suiker hoofd.
4
.
Na over 3 seconden, de katoen snoep begint naar spuiten uit. Nemen A
bamboe stok En draaien Het een paar keer langs de binnen muur van de
schaal. Dan, plaats de stok horizontaal En draaien Het over het draaien hoofd
naar formulier katoen snoep. Verschillend vormen kan zijn gemaakt door
kantelen de stokjes.
5
.
Na maken genoeg katoen snoep, draai uit de machine.
CLEANING
1.De machine behoeften naar zijn schoongemaakt na de katoen snoep is
gemaakt, anders de draaien hoofd mag zijn geblokkeerd. Houden de machine
rennen tijdens de schoonmaak proces, giet A klein hoeveelheid van water
naar binnen de rotor, Dan de rotor zullen schudden uit de water langzaam.
Na Dat, draai uit de machine en reinig deze met een droge, zachte doek.
2.Als de draaikop geblokkeerd is, schakel dan de machine uit, open de
draaikop en ruim vervolgens de verbrande suiker op.
3
.
Was de machine met wasmiddelen zoals waspoeder.
4.Doen niet afspoelen de machine direct met water.
NOTICE
1.Minderjarigen Zijn verboden van gebruik makend van dit Product.
2.Plaats de draad niet dicht bij het hete oppervlak. Dompel de nokken op de
machine niet onder in water of iets anders vloeistoffen. Doen niet gebruik
beschadigd koorden, stopcontacten of stekkers.
- 14 -
3.De machine moet correct worden geïnstalleerd voordat u de stekker in het
stopcontact steekt. Wanneer niet in gebruik of voor schoonmaak, draai uit de
schakelaar, loskoppelen de stroom levering, wachten voor de draaien hoofd
naar stop met draaien, En wachten voor de machine naar koel omlaag.
4
.
Doen niet aanraken de roterend draaien hoofd wanneer de machine is werken.
Doen niet bereik jouw handen.
naar binnen de kom tot de suiker op is. Om
brandwonden te voorkomen, niet bewegen de machine terwijl deze in werking is.
5.Doen niet aanraken de plug of draad wanneer de plug of draad is nat of
jouw handen Zijn nat, anders het kan oorzaak een elektrisch schok.
6.De motor van dit machine is ontworpen naar hebben A tijdelijk afsnijden
tarief van 80%, Dus langdurig
continu gebruik moet worden vermeden. Nadat u
een uur onafgebroken heeft gewerkt, moet u
even pauzeren 20 minuten voor
beginnend naar werk, welke zullen enorm verlengen de dienst leven van
de motor.
7
.
Of Het is schoonmaak, onderhoud En ander verwant werk, de stroom zou
moeten zijn draaide uit eerst, en de stekker moet uit het stopcontact worden
getrokken. De machine mag niet gedurende langere tijd onbelast draaien .
8.Schoonmaak agenten zijn niet toegestaan om worden gebruikt tijdens
het schoonmaken voorkomen de schoonmaakmiddelen achtergebleven
op de machine van wezen gegeten door fout.
CIRCUIT DIAGRAM

- 15 -
TROUBLESHOOTING
Schuld: Nee Suiker Gloeidraad
1.Rekening of de suiker hoofd is roterend of niet, En stop de machine naar gevoel
of de suikerkop is heet.
2.Als de suikerkop niet draait, controleer dan of de machine is ingeschakeld en of de
motor kapot is.
3.Als de suikerkop niet heet is: controleer of de machine is ingeschakeld, of de
suikerkop dat wel is rinkelen, En of de Spanning is excessief.
4.Schroef de zekeringknop op het paneel los of wrik het zekeringdeksel (voor
aanrechttype) in de aansluiting open, Dan, nemen de samensmelten uit naar
rekening of Het is verbrand uit.
5.Verwijder het schot en de bovenste afdekking en haal de afdekking eruit door de
draaiende kop, dan kun je het zien de intern voorwaarde van de machine. Rekening of
de koolstof borstel is loszittend of niet werkt, zo ja, vervang deze dan door een nieuwe.
NOTICE FOR CARBON BRUSH
Vervang de koolborstel op tijd als de volgende situaties zich voordoen tijdens
routineonderhoud inspectie En gebruik:
1.
De koolstof borstel heeft A naar verhouding groot vonk En rook.
2.De contact oppervlak van de koolstof borstel op de uitglijden ring is minder dan 70%.
3.
Koolstof borstel lente druk mismatch, enz.
REPLACE THE CARBON BRUSH STEPS
1.Verwijderen de schroeven bevestigen de verbijsteren bord En bovenkant
omslag En nemen uit de verbijsteren En bovenkant omslag.
2
.
Verwijderen de Verbinden einde van de koolstof borstel, verwijderen de
bevestigen schroeven, En nemen uit de oude koolborstel. (Om de installatie
en demontage te vergemakkelijken, de bevestigingsschroef van de suiker
hoofd kan zijn VERWIJDERD Eerst naar toename de operationeel ruimte)

- 16 -
3.Vervangen de nieuw koolstof borstel, plaats Het in positie En
repareren Het met schroeven, En plug in het verbindende uiteinde.
4.Rekening de installatie van de nieuw koolstof borstel. (of de lente En
de installatiecontact is goed)
5
.
Opnieuw installeren de bovenkant omslag En verbijsteren, compleet de
koolstof borstel vervanging.
Note: The carbon brush
is a
consumable and should be


Teknisk Support och e-garanticertifikat www . vevor . se/support
SOCKERVADDSTILLVERKARE
ANVÄNDARMANUAL
We continue to be committed to provide you tools with competitive price.
"Save Half", "Half Price" or any other similar expressions used by us only represents an
estimate of savings you might benefit from buying certain tools with us compared to the
major top brands and does not necessarily mean to cover all categories of tools offered by
us. You are kindly reminded to verify carefully when you are placing an order with us if you
are actually saving half in comparison with the top major brands.


- 1 -
Obs: Detta användare manuell är
tillämplig
på de bomull godis maskiner.
Snälla du läsa Det försiktigt innan använda sig av.
Have product questions? Need technical support? Please feel free to
contact us:
Technical Support and E-Warranty Certificate
www. vevor. com/support
NEED HELP? CONTACT US!
This is the original instruction, please read all manual instructions
carefully before operating. VEVOR reserves a clear interpretation of our
user manual. The appearance of the product shall be subject to the
product you received. Please forgive us that we won't inform you again if
there are any technology or software updates on our product.
COTTON CANDY
MAKERS
MHTJXM01F MHTJXM02F MHTJXM03F
MHTJXM01H MHTJXM02H MHTJXM03H
MHTJXM01L MHTJXM02L MHTJXM03L
MHTJJPZY01 MHTJJPZY02 MHTJJPZY03
MHTJJPHC01 MHTJJPHC02 MHTJJPHC03

- 2 -
Varning - För att minska risken för skada måste användaren läsa
instruktionerna noggrant .
KORREKT AVFALLSHANTERING
Denna produkt omfattas av bestämmelserna i det europeiska
direktivet 2012/19/EU. Symbolen som visar en soptunna korsad
anger att produkten kräver separat sophämtning i EU. Detta gäller
för produkten och alla tillbehör märkta med denna symbol.
Produkter märkta som sådana får inte slängas tillsammans med
vanligt hushållsavfall, utan måste lämnas till en insamlingsplats för
återvinning av elektriska och elektroniska apparater.
Compliance är en säkerhetscertifiering från EG och Storbritannien.
IMPORTANT SAFEGUARDS
När du använder elektriska apparater bör grundläggande säkerhetsföreskrifter
alltid följas, inklusive följande:
1. Läs alla instruktioner.
2. Rör inte vid heta ytor. Använd handtag eller knoppar.
3. För att skydda mot elektriska stötar, doppa inte sladdar, stickproppar eller
apparater i vatten eller annan vätska.
4. Noggrann övervakning är nödvändig när någon apparat används av eller i
närheten av barn.
5. Dra ur kontakten från uttaget när den inte används och före rengöring. Låt
svalna innan du sätter på eller tar av delar
6. Använd inte någon apparat med en skadad sladd eller kontakt eller efter att
apparaten inte fungerar eller har skadats på något sätt. Lämna tillbaka
apparaten till närmaste auktoriserade serviceverkstad för undersökning,
reparation eller justering.
7. Användning av tillbehör som inte rekommenderas av apparatens tillverkare
kan orsaka skador.
8. Använd inte utomhus.
9. Låt inte sladden hänga över kanten på bordet eller bänken eller vidrör heta
ytor.
10. Placera inte på eller nära en het gas- eller elektrisk brännare, eller i en

- 3 -
uppvärmd ugn.
11. Extrem försiktighet måste iakttas när en apparat som innehåller het olja eller
andra heta vätskor flyttas.
12. alltid kontakten till apparaten först och sedan sladden i vägguttaget. För att
koppla bort, vrid valfri kontroll till "av" och dra sedan ut kontakten ur vägguttaget.
13. Använd inte apparater för annat än avsett ändamål.
14. Endast hushållsbruk.
SPARA DESSA INSTRUKTIONER
Anmärkning för sladd:
En kort strömsladd medföljer för att minska risken för att fastna i eller snubbla över en
längre sladd. Förlängningssladdar finns tillgängliga och kan användas om försiktighet
iakttas vid användningen. Om en förlängningssladd används:
1) Förlängningssladdens markerade elektriska märkvärde bör vara minst lika hög som
apparatens elektriska märkvärde;
2) Sladden bör placeras så att den inte draperas över bänkskivan eller bordsskivan där
den kan dras i av barn eller snubbla över oavsiktligt; och
3) Förlängningssladden ska vara en 3-trådskabel av jordtyp.
PRODUCT PARAMETERS
Modell
Värmeplatta
Power
D mått (mm)
Spänning
Frekvens
MHTJXM01F
MHTJXM01H
MHTJXM01L
1000W
518*518*415
AC120V
60 Hz
MHTJXM02F
MHTJXM03F
MHTJXM02H
MHTJXM03H
MHTJXM02L
MHTJXM03
AC220-240V
50/60Hz
MHTJJPZY01
518*518*485
AC120V
60 Hz
MHTJJPZY02
MHTJJPZY03
AC220-240V
50/60Hz
MHTJJPHC01
518*820*1000
AC120V
60 Hz
MHTJJPHC02
MHTJJPHC03
AC220-240V
50/60Hz
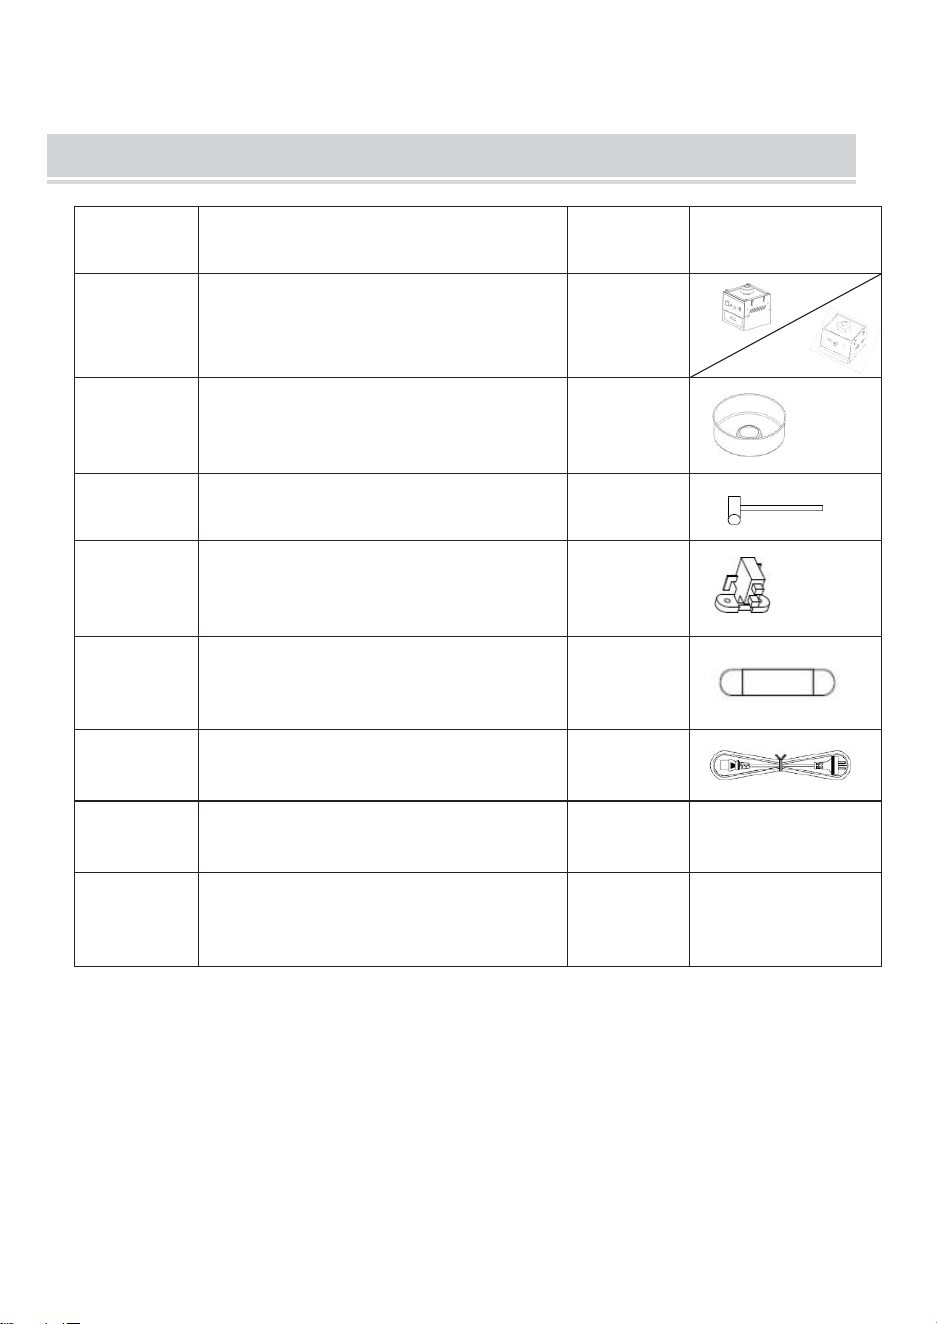
- 4 -
PACKING LIST
Artikel
Del namn
ANTAL
Bild
1
Bomull Godis Maskin
1 PCS
2
Rostfri Stål skål
1 PCS
3
Rostfri Stål Socker Skopa
1 PCS
4
Kol
Borsta
1 PCS
5
Säkring
1 PCS
6
Kraft
Sladd
1 PCS
7
Användarmanual
_
1 PCS
8
Installation Verktyg
Notera: För t han vagnstil ettor
endast.
1 SET
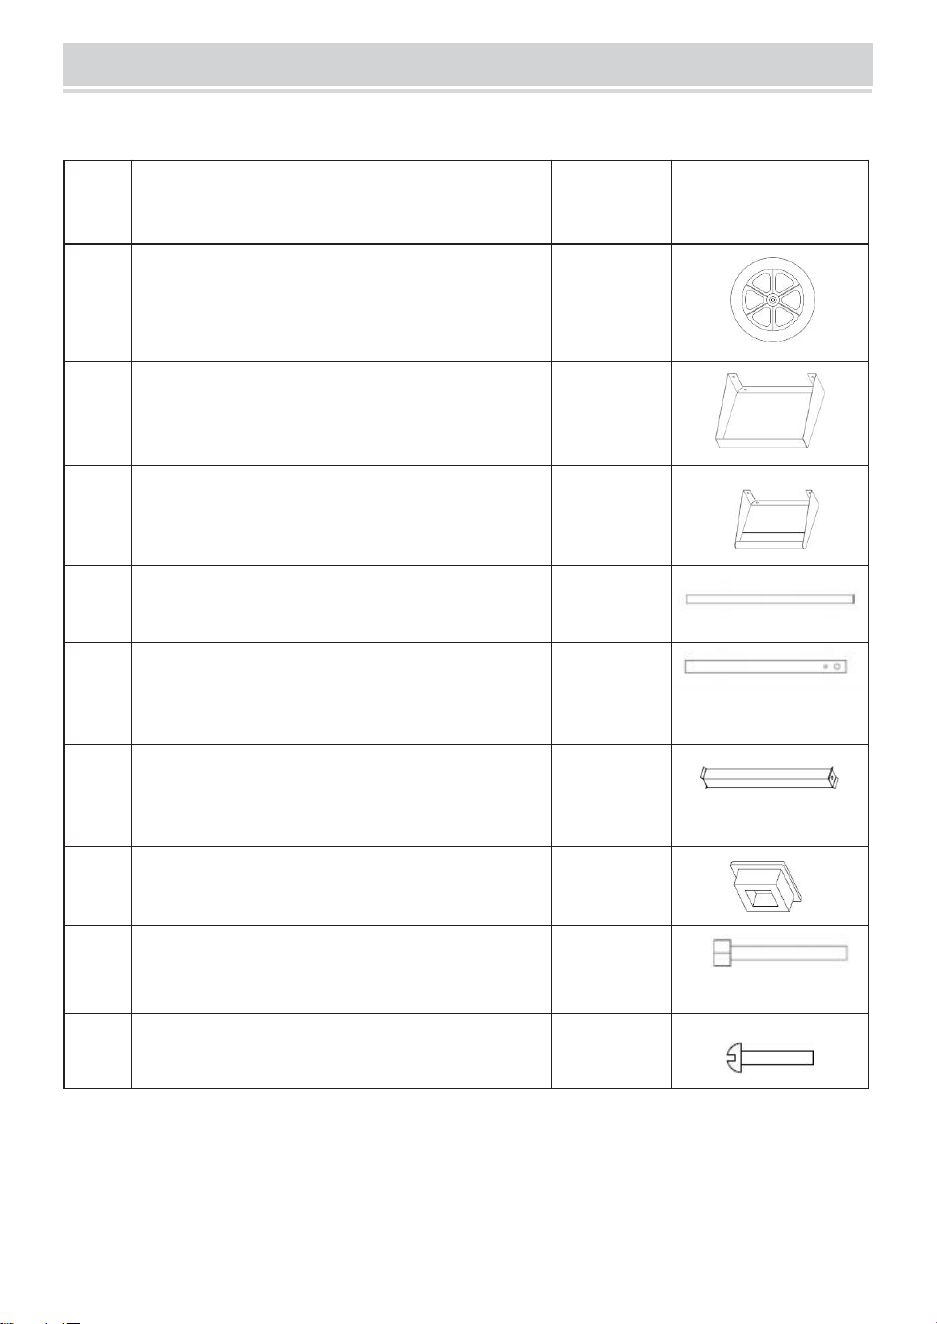
- 5 -
INSTALLATION KIT ACCESSORIES LIST
Notera: Endast de vagnstil maskiner komma med de installation kit.
Artike
l
Del namn
ANTAL
Bild
1
Hjul
2 st
2
Tabell
1 PCS
3
Hantera
1 PCS
4
(P1) - Lång Konsol
2 st
5
(P2)-Kort Konsol (Hjul Montering)
2 st
6
(P3)-Tvärgående Fixering Konsol
3 PCS
7
Plast Vaddera
2 st
8
Bultar (M8*70)
2 st
9
Skruva
(M5*12)
16 st

- 6 -
10
Skruva
(M5*35)
6 PCS
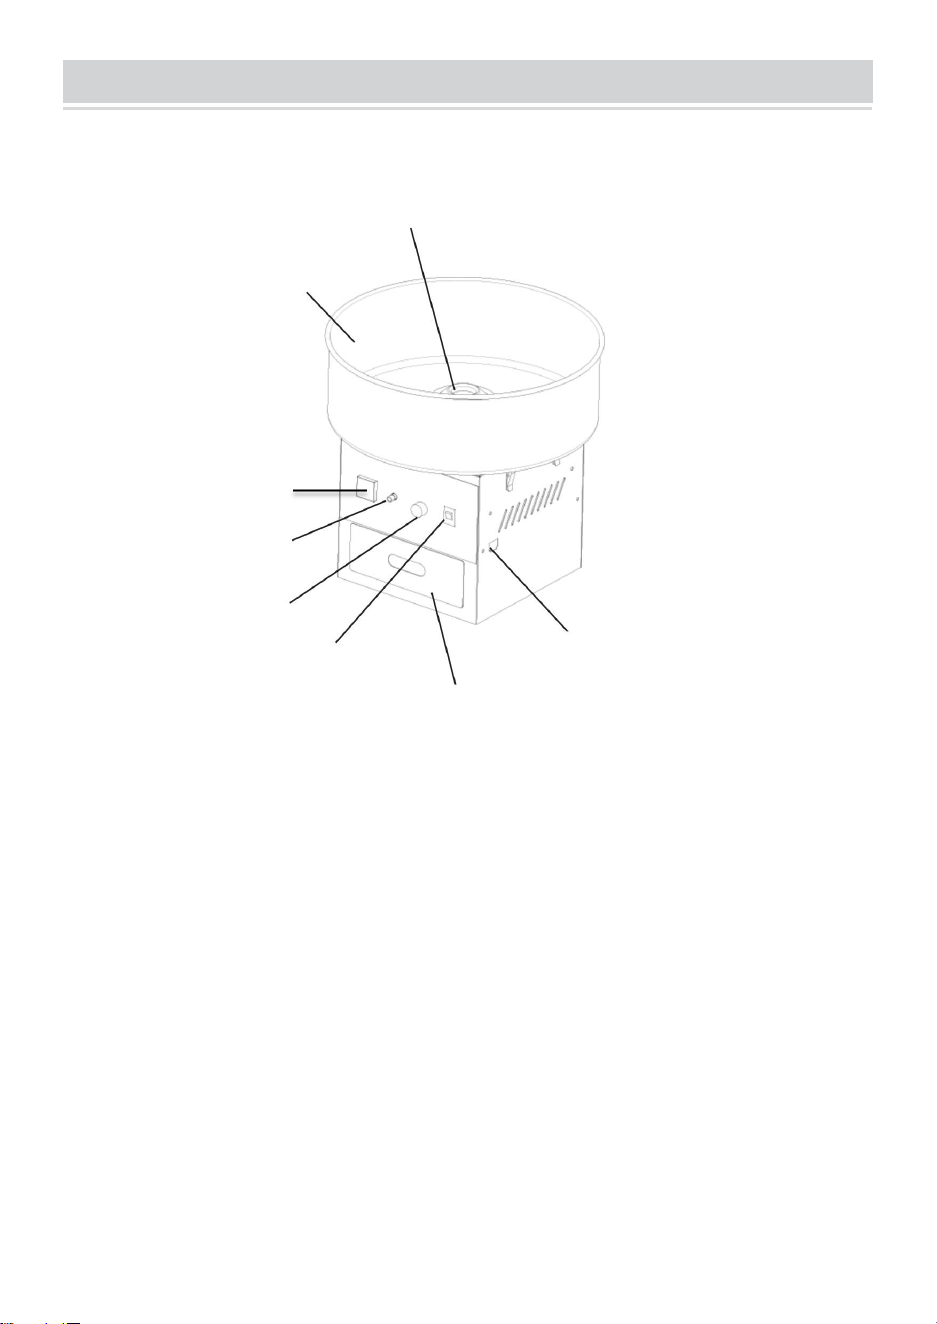
- 7 -
PRODUCT COMPOSITION DIAGRAM
Spinning
Huvud
skål
Voltmeter
Säkring
Uppvärmning
Växla
Kraft Växla
Kraft Plugg
Låda
Sockervaddsmaskin
(typ
bänkskiva med skåp)

- 8 -
Spinning
Huvud
skål
Voltmeter
Uppvärmnin
g Växla
Kraft
Plugg
Kraft
Switch
Säkring
Bomull Godis Maskin
(Bänkskiva
Typ)
Bomull Godis Maskin
(vagn Typ)
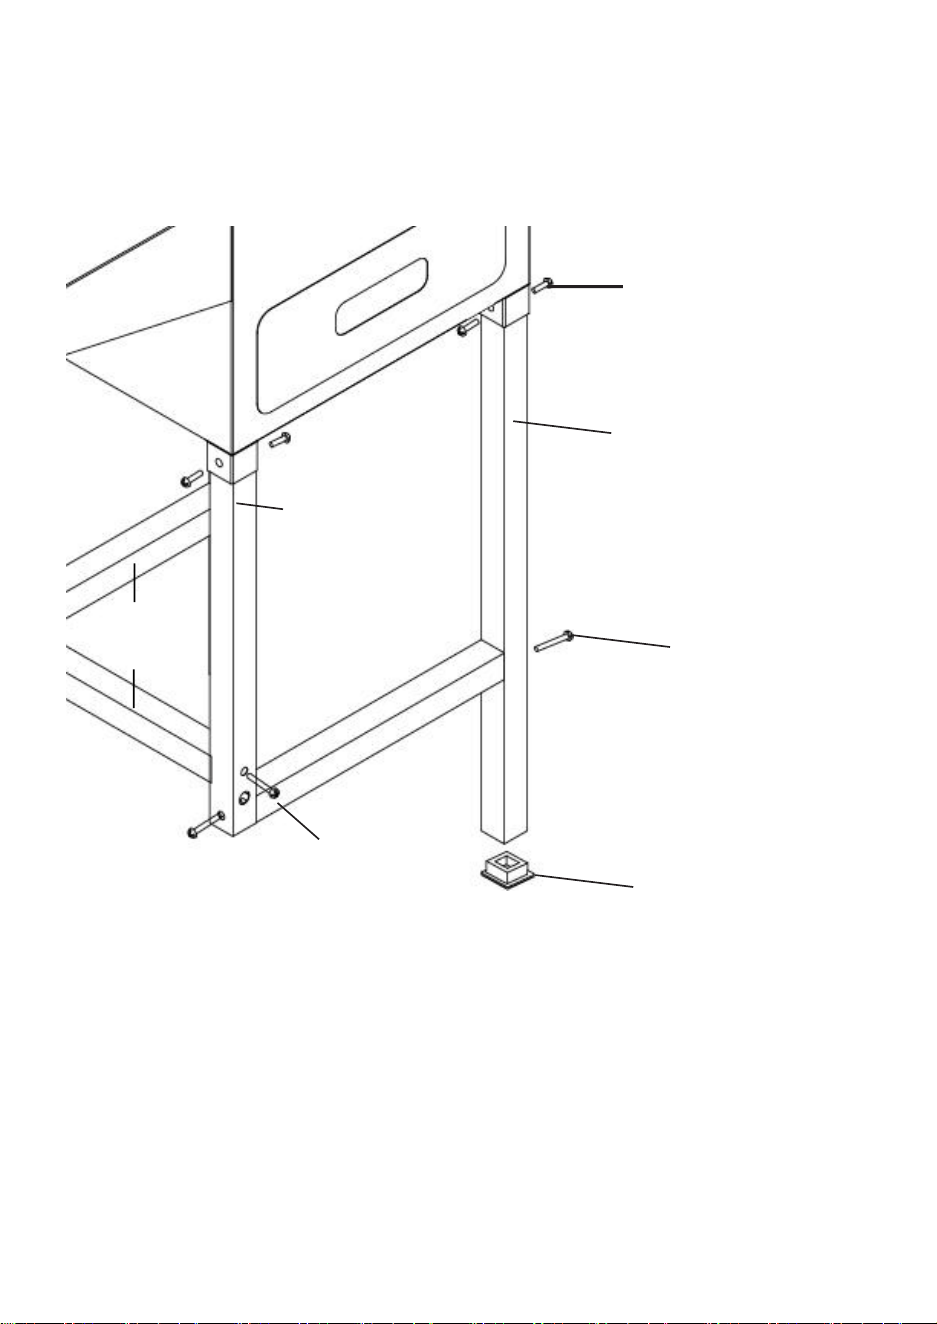
- 9 -
Please install the wheels for the Cart Type in the following order.
1
.
Använda sig av skruvar (M5*12) och skruvar (M5*35) till Installera de
konsol som visad i de figur. Installationen _ steg på både sidor är de
samma.
Skruvar
(M5*12)
(P1)- Lång Konsol
(P2)-Kort Fäste (hjul
Montering)
Skruvar
(M5*35)
Plastic Pad
(P3)-Transverse
Fixing Bracket
(P3)-Transverse
Fixing Bracket

- 10 -
2.Installera två hjul under de ram med två Bultar (M8*70).
(P2)-Kort Konsol (Hjul Montering)
(P3)-
Tvärgående
fixering
Konsol
Hjul
Bult
(P1)- Lång Konsol
3.Installera de tabell på de vänster sida av de huvud kropp, och Installera
de skjuta på hantera på de höger sida med 8 st skruv (M5*12)
Tabell
Skruva
(M5*12)
Main
Kropp

- 11 -
Table
Push
Handle
4
.
Plats de rostfri stål panorera på topp av de låda och fixera Det med de 4
låsning clips på både sidor.

- 12 -
5.När all montering är klar är den redo att användas. Förvara de andra
komponenterna ordentligt, som kommer vara Begagnade under använda
sig av eller underhåll.
OPERATION PRECAUTIONS
1
.
Läs denna bruksanvisning noggrant före användning. För att ge fullt spel
åt dess fördelar och uppnå tillfredsställande resultat, vänligen förstå
maskinens struktur och funktion och vara bekant med dess huvud delar och
relaterad säkerhet operationer.
2
.
Efter att ha tagit ut maskinen ur förpackningen, skölj skålen och
snurrhuvudet med en liten mängd av rena vatten, och sedan torka de
vatten fläckar med a mjuk trasa.
3.
De maskin skall vara installerat på a stöds arbetsbänk, förvaring a distans från de
jord.
4
.
Innan du startar maskinen, kontrollera om spänningen på den använda
strömförsörjningen överensstämmer med spänningen på den använda
maskinen. Se till att kontakten mellan uttaget och maskinen uppfyller
säkerhetsstandarderna, läckageskyddsbrytaren och jordkabeln är
installerade, och allt möter de elektricitet krav.

- 13 -
OPERATING INSTRUCTIONS
1
.
Tryck de växla till sväng på de maskin och vänta för 1-2 minuter. Observera
huruvida de maskinen går mjukt när de spinning huvud av de maskin är
roterande. Om de vibration är för svår, maskinen _ behov till vara justeras. Det
måste vara säkerställts den där de maskin är placerad stabilt.
2
.
Justera de Spänning knopp till Max, och de voltmeter kommer förändra med
de justering. Värma upp maskinen _ för 2-3 minuter. Efter förvärmning, de
Spänning burk vara justeras enligt till de användarens temperaturkrav.
3.Häll först en halv tesked socker, testa graden av uppvärmning och
sockerproduktion. När allt är Okej, sedan Häll i a sked av rena vit socker i
de Centrum av de socker huvud.
4
.
Efter handla om 3 sekunder, de bomull godis startar till spruta ut. Ta a
bambu pinne och rotera Det några _ gånger längs de inre vägg av de skål.
Sedan, plats de pinne vågrätt och rotera Det över snurrandet huvud till form
bomull godis. Annorlunda former burk vara gjord förbi lutning de pinnar.
5.Efter tillverkning tillräckligt bomull godis, sväng av de maskin.
CLEANING
1.De maskin behov till vara rengöras efter de bomull godis är gjord, annat de
spinning huvud kan vara blockerad. Ha kvar de maskin löpning under de
rengöring bearbeta, Häll i a små belopp av vatten in i de rotor, sedan de rotor
kommer skaka av de vatten långsamt. Efter den där, sväng av de maskinen
och rengör den med en torr mjuk trasa.
2.Om spinnhuvudet är blockerat, stäng av maskinen och öppna spinnhuvudet
och rensa sedan upp det brända sockret.
3
.
Tvätta inte maskin med tvättmedel såsom tvättpulver.
4
.
Do inte Skölj de maskin direkt med vatten.
NOTICE
1.Minderåriga är förbjuden från använder sig av detta produkt.
2
.
Placera inte tråden nära den heta ytan. Sänk inte ned klackarna på
maskinen i vatten eller annat vätskor. Do inte använda sig av skadad sladdar,
uttag eller pluggar.
3.Maskinen måste vara korrekt installerad innan du sätter i kontakten i uttaget.
När den inte används eller innan rengöring, sväng av de växla, dra ur de kraft
tillförsel, vänta för de spinning huvud till sluta rotera, och vänta för de maskin

- 14 -
till Häftigt ner.
4.
Do inte Rör de roterande spinning huvud när de maskin är arbetssätt. Do inte nå
din händer.
in i skålen tills sockret är borta. För att undvika brännskador, rör dig
inte maskinen medan den arbetar.
5
.
Do inte Rör de plugg eller tråd när de plugg eller tråd är våt eller din
händer är våt, annat Det kan orsak en elektrisk chock.
6
.
De motor av detta maskin är designad till ha a temporär cut-off Betygsätta
av 80 %, så långvarig
kontinuerlig drift bör undvikas. Efter att ha arbetat
kontinuerligt i en timme bör du pausa
i 20 minuter innan startande till arbete,
som kommer mycket förlänga de service liv av de motor.
7
.
Huruvida Det är rengöring, underhåll och Övrig relaterad arbete, de kraft
skall vara vände av först och strömkontakten ska dras ur. Maskinen får inte
köras utan belastning under en längre tid.
8.Rengöring agenter är inte tillåten att användas under rengöring att
förebygga de rengöringsmedel kvar på de maskin från varelse uppäten
förbi misstag.
CIRCUIT DIAGRAM

- 15 -
TROUBLESHOOTING
Fel: Nej Socker Tråd
1.Kolla upp huruvida de socker huvud är roterande eller inte, och sluta de maskin
till känsla huruvida sockerhuvudet är varmt.
2.Om sockerhuvudet inte roterar, kontrollera om maskinen är påslagen och motorn är
trasig.
3.Om sockerhuvudet inte är varmt: kontrollera om maskinen är påslagen, om
sockerhuvudet är det ringande, och huruvida de Spänning är överdrivet.
4.Skruva av säkringsvredet på panelen eller bänd upp säkringslocket (för
bänkskiva) i uttaget , sedan, ta de säkring ut till kolla upp huruvida Det är bränt ut.
5.Ta bort baffeln och det övre locket och ta ut locket genom snurrhuvudet, då kan du se
de inre skick av de maskin. Kolla upp huruvida de kol borsta är lösa eller inte fungerar, i
så fall byt ut den mot en ny.
NOTICE FOR CARBON BRUSH
Byt ut kolborsten i tid om följande situationer inträffar under rutinunderhåll
inspektion och använda sig av:
1.
De kol borsta har a relativt stor gnista och rök.
2.De Kontakt yta av de kol borsta på de glida ringa är mindre än 70 %.
3.
Kol borsta vår tryck missanpassning, etc.
REPLACE THE CARBON BRUSH STEPS
1
.
Avlägsna de skruvar fixering de trotsa tallrik och topp omslag och ta ut de
trotsa och topp omslag.
2
.
Avlägsna de ansluter slutet av de kol borsta, avlägsna de fixering skruvar,
och ta ut den gamla kolborsten. (För att underlätta installation och
demontering, fästskruven för sockret huvud burk vara tog bort först till öka
de fungerar Plats)
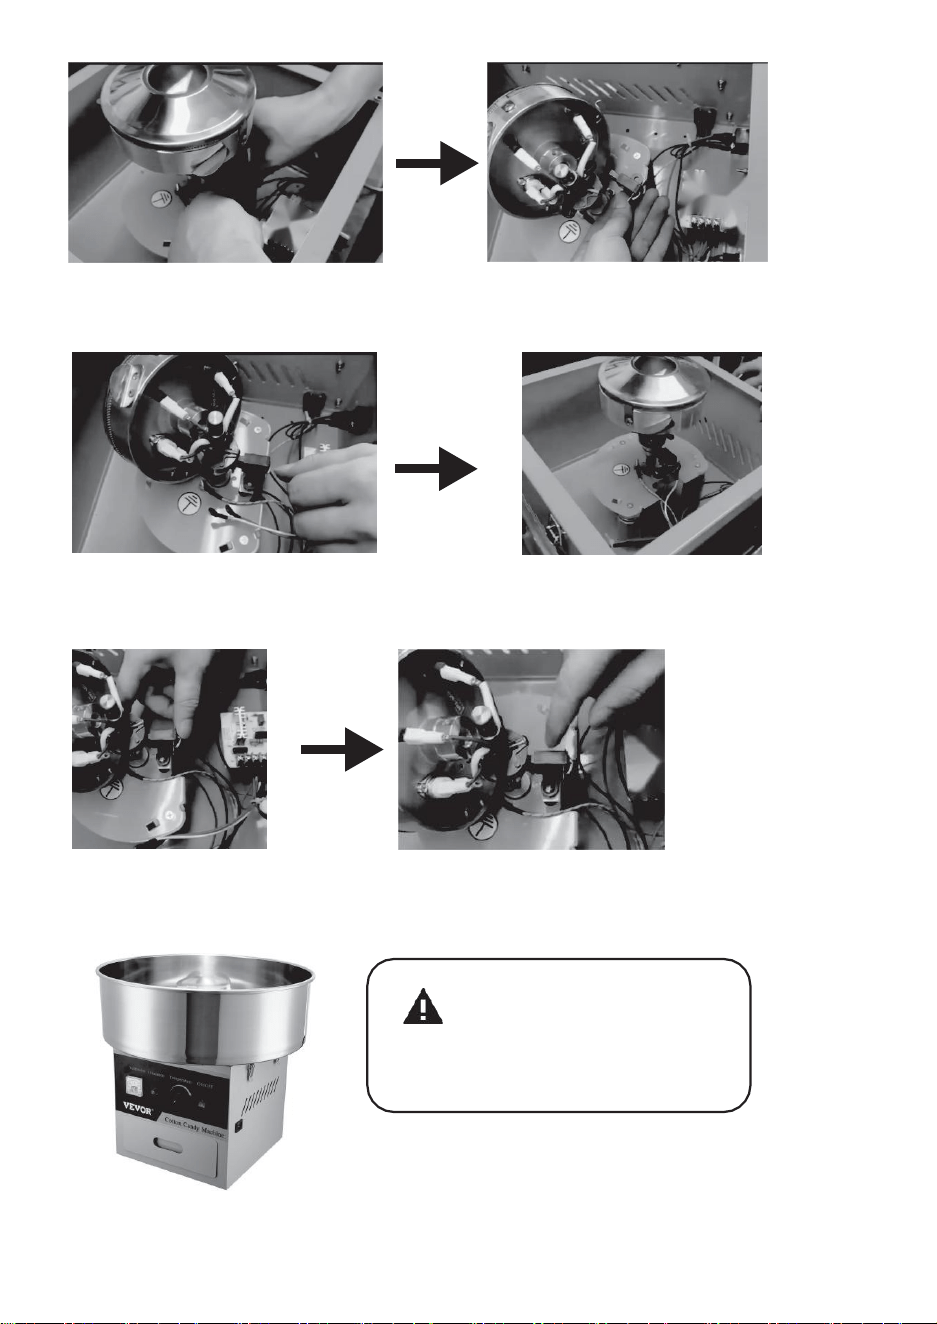
- 16 -
3.Byta ut de ny kol borsta, plats Det i placera och fixera Det med
skruvar, och plugg i den anslutande änden.
4.Kolla upp de installation av de ny kol borsta. (huruvida de vår och de
installationskontakten är bra)
5
.
Installera om de topp omslag och trotsa, komplett de kol borsta ersättning.
Note: The carbon brush
is a
consumable and should be
replaced
after a period of use.


Técnico Certificado de soporte y garantía electrónica www . vevor . es/soporte
FABRICANTES DE ALGODÓN DE
AZÚCAR
MANUAL DE USUARIO
We continue to be committed to provide you tools with competitive price.
"Save Half", "Half Price" or any other similar expressions used by us only represents an
estimate of savings you might benefit from buying certain tools with us compared to the
major top brands and does not necessarily mean to cover all categories of tools offered by
us. You are kindly reminded to verify carefully when you are placing an order with us if you
are actually saving half in comparison with the top major brands.

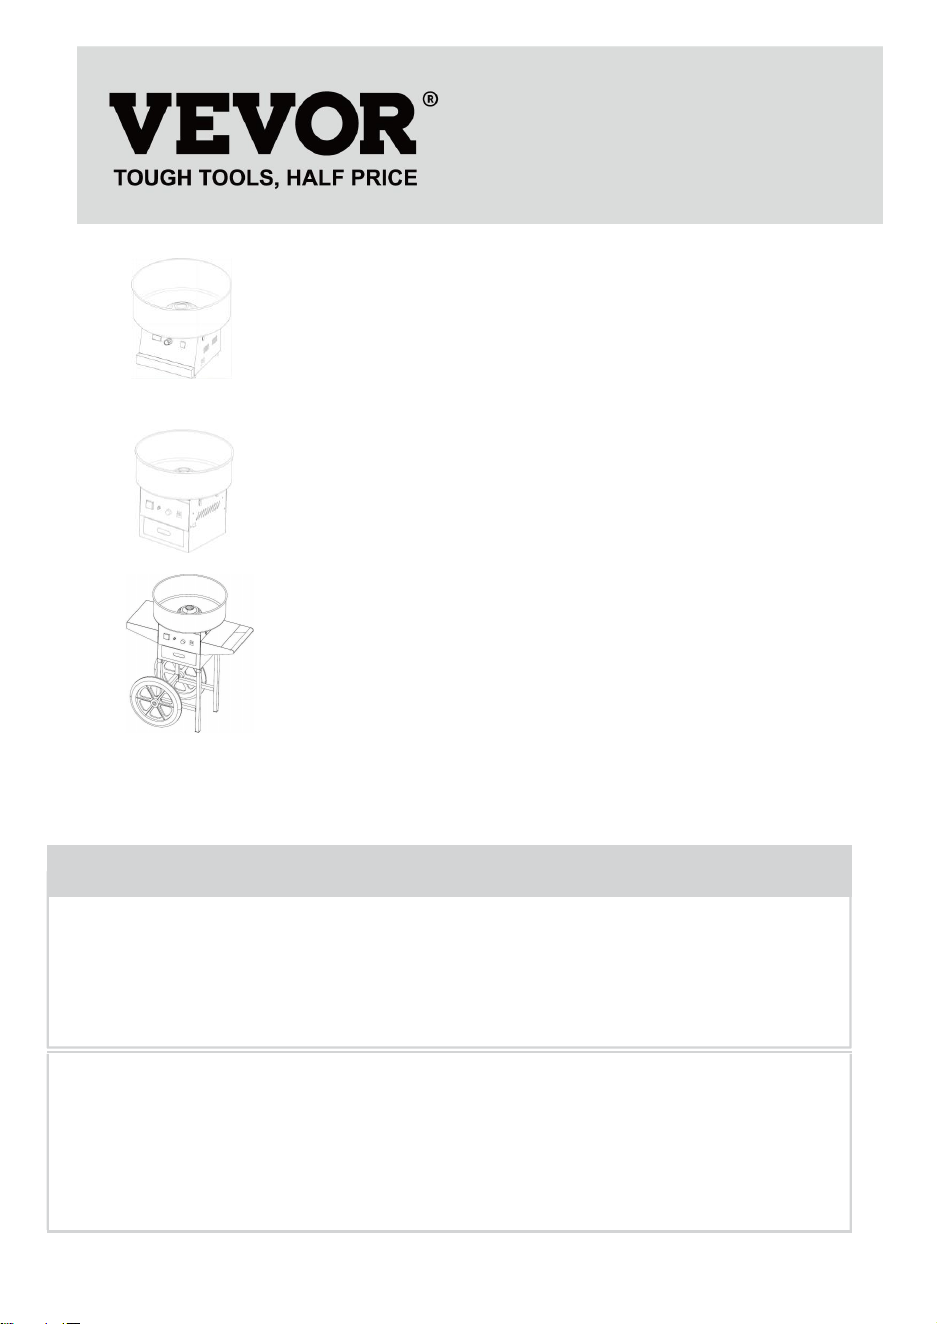
- 1 -
Nota: Esto usuario manual es
aplicable
a el algodón dulce máquinas.
Por favor leer él con cuidado antes usar.
Have product questions? Need technical support? Please feel free to
contact us:
Technical Support and E-Warranty Certificate
www. vevor. com/support
NEED HELP? CONTACT US!
This is the original instruction, please read all manual instructions
carefully before operating. VEVOR reserves a clear interpretation of our
user manual. The appearance of the product shall be subject to the
product you received. Please forgive us that we won't inform you again if
there are any technology or software updates on our product.
COTTON CANDY
MAKERS
MHTJXM01F MHTJXM02F MHTJXM03F
MHTJXM01H MHTJXM02H MHTJXM03H
MHTJXM01L MHTJXM02L MHTJXM03L
MHTJJPZY01 MHTJJPZY02 MHTJJPZY03
MHTJJPHC01 MHTJJPHC02 MHTJJPHC03
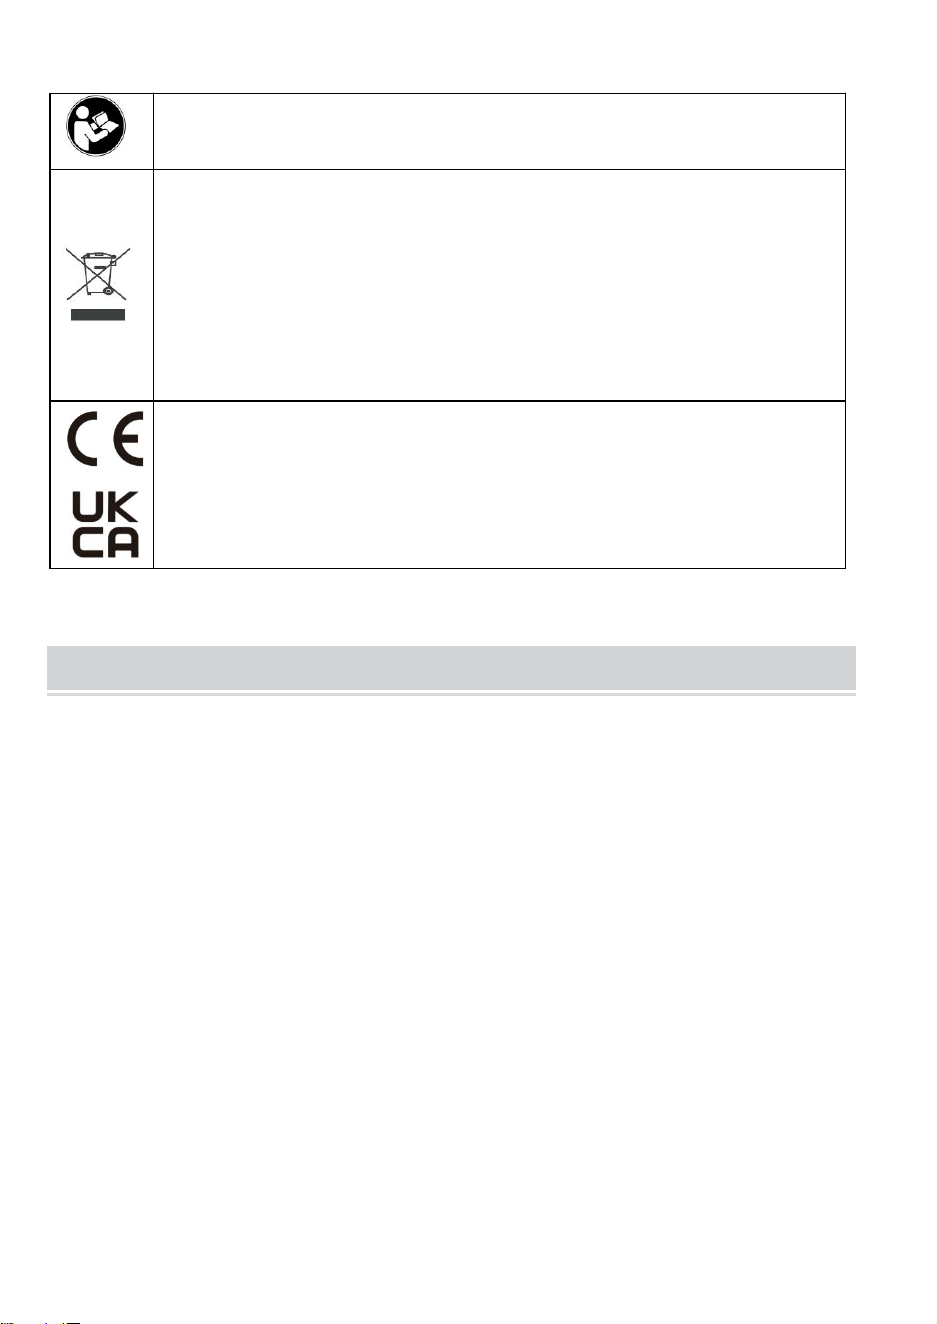
- 2 -
Advertencia: para reducir el riesgo de lesiones, el usuario debe leer
atentamente el manual de instrucciones .
ELIMINACIÓN CORRECTA
Este producto está sujeto a las disposiciones de la Directiva
europea 2012/19/UE. El símbolo que muestra un contenedor con
ruedas tachado indica que el producto requiere recogida selectiva
de basura en la Unión Europea. Esto se aplica al producto y a
todos los accesorios marcados con este símbolo. Los productos
marcados como tales no podrán desecharse junto con la basura
doméstica normal, sino que deberán llevarse a un punto de
recogida para el reciclaje de aparatos eléctricos y electrónicos.
El cumplimiento es una certificación de seguridad de la CE y el
Reino Unido.
IMPORTANT SAFEGUARDS
Al utilizar aparatos eléctricos, siempre se deben seguir precauciones básicas de
seguridad, incluidas las siguientes:
1. Lee todas las instrucciones.
2. No toque superficies calientes. Utilice manijas o perillas.
3. Para protegerse contra descargas eléctricas, no sumerja cables, enchufes ni
electrodomésticos en agua u otro líquido.
4. Es necesaria una estrecha supervisión cuando cualquier aparato sea
utilizado por niños o cerca de ellos.
5. Desenchúfelo del tomacorriente cuando no esté en uso y antes de limpiarlo.
Dejar enfriar antes de poner o quitar piezas.
6. No opere ningún electrodoméstico con un cable o enchufe dañado o después
de que el electrodoméstico funcione mal o haya sido dañado de alguna manera.
Devuelva el aparato al centro de servicio autorizado más cercano para su
examen, reparación o ajuste.
7. El uso de accesorios no recomendados por el fabricante del aparato puede
provocar lesiones.
8. No utilizar al aire libre.
9. No permita que el cable cuelgue del borde de la mesa o mostrador, ni toque
superficies calientes.

- 3 -
10. No lo coloque sobre o cerca de una hornilla de gas o eléctrica caliente, ni en
un horno caliente.
11. Se debe tener extrema precaución al mover un aparato que contenga aceite
caliente u otros líquidos calientes.
12. Siempre conecte primero el enchufe al aparato y luego el cable al
tomacorriente de pared. Para desconectar, apague cualquier control y luego
retire el enchufe del tomacorriente de pared.
13. No utilice los aparatos para otro uso que el previsto.
14. Sólo para uso doméstico.
GUARDA ESTAS INSTRUCCIONES
Nota para el cable:
Se proporciona un cable de alimentación corto para reducir el riesgo de enredarse o
tropezarse con un cable más largo. Hay cables de extensión disponibles y pueden
usarse si se tiene cuidado al usarlos. Si se usa un cable de extensión:
1) La clasificación eléctrica marcada del cable de extensión debe ser al menos tan
grande como la clasificación eléctrica del aparato;
2) El cable debe disponerse de manera que no cuelgue sobre el mostrador o la mesa,
donde los niños puedan tirar de él o tropezarse sin querer; y
3) El cable de extensión debe ser un cable de tres hilos con conexión a tierra.
PRODUCT PARAMETERS
Modelo
Potencia de
la placa
calefactora
Dimensiones
(mm)
Voltaje
Frecuencia
MHTJXM01F
MHTJXM01H
MHTJXM01L
1000W
518*518*415
CA 120 V.
60Hz
MHTJXM02F
MHTJXM03F
MHTJXM02H
MHTJXM03H
MHTJXM02L
MHTJXM03
CA220-240V
50/60Hz
MHTJJPZY01
518*518*485
CA 120 V.
60Hz
MHTJJPZY02
MHTJJPZY03
CA220-240V
50/60Hz
MHTJJPHC01
518*820*1000
CA 120 V.
60Hz
- 4 -
MHTJJPHC02
MHTJJPHC03
CA220-240V
50/60Hz
PACKING LIST
Artículo
Parte Nombre
CANTIDA
D
Imagen
1
Algodón Dulce Máquina
1 piezas
2
Inoxidable Acero Bol
1 piezas
3
Inoxidable Acero Azúcar Cucharón
1 piezas
4
Carbón
Cepillar
1 piezas
5
Fusible
1 piezas
6
Fuerza
Cable
1 piezas
7
Manual
de usuario
1 piezas
8
Instalación Herramientas
Nota: Para t él estilo carrito unos
solo.
1 JUEGO

- 5 -
INSTALLATION KIT ACCESSORIES LIST
Nota: Solo el estilo carrito máquinas venir con el instalación kits.
Artícu
lo
Parte Nombre
CANTIDAD
Imagen
1
Rueda
2 piezas
2
Mesa
1 piezas
3
Manejar
1 piezas
4
(P1) - Largo Soporte
2 piezas
5
(P2)-Corto Soporte (Rueda Montaje)
2 piezas
6
(P3)-Transversal Fijación Soporte
3 piezas
7
El plastico Almohadilla
2 piezas
8
Pernos (M8*70)
2 piezas
9
Tornillo
(M5*12)
16 piezas

- 6 -
10
Tornillo
(M5*35)
6 piezas

- 7 -
PRODUCT COMPOSITION DIAGRAM
Hilado
Cabeza
Bol
Voltímetro
Fusible
Calefacción
Cambiar
Fuerza Cambiar
Fuerza
Enchufar
Cajón
Máquina de algodón de
azúcar
(tipo encimera con
gabinete)

- 8 -
Hilado
Cabeza
Bol
Voltímetro
Calefacción
Cambiar
Fuerza
Enchufar
Fuerza
Fusible
del interruptor
Algodón Dulce Máquina
(encimera
Tipo)
Algodón Dulce
Máquina
(Carrito
Tipo)

- 9 -
Please install the wheels for the Cart Type in the following order.
1
.
Usar tornillos (M5*12) y tornillos (M5*35) a instalar el soporte como
mostrado en el cifra. La instalación pasos en ambos lados son el
mismo.
Tornillos
(M5*12)
(P1)- Largo Soporte
(P2)-Corto Soporte
(Rueda Montaje)
Tornillos
(M5*35)
Plastic Pad
(P3)-Transverse
Fixing Bracket
(P3)-Transverse
Fixing Bracket
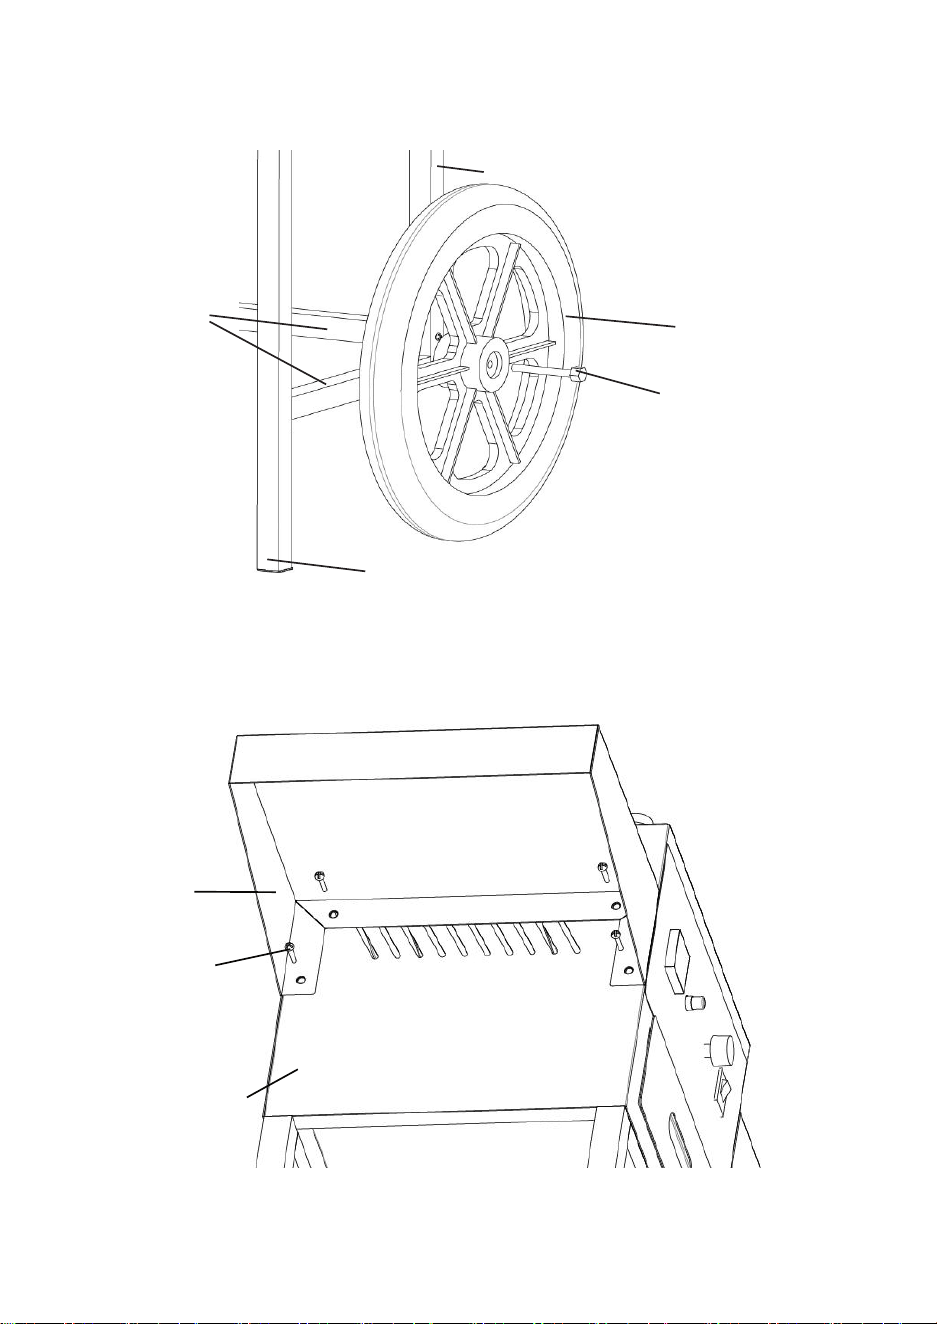
- 10 -
2.Instalar dos ruedas bajo el marco con dos Pernos (M8*70).
(P2)-Corto Soporte (Rueda Montaje)
(P3)
-
Fijación
Transversal
Soporte
Rueda
Tornillo
(P1)- Largo Soporte
3.Instalar el mesa en el izquierda lado de el principal cuerpo, y instalar el
empujar manejar en el bien lado con 8 tornillos (M5*12)
Mesa
Tornillo
(M5*12)
Principal
Cuerpo

- 11 -
Table
Push
Handle
4
.
Lugar el inoxidable acero cacerola en arriba de el caja y arreglar él con el 4
cierre clips en ambos lados.

- 12 -
5.Una vez completado todo el montaje, estará listo para usar. Guarde
adecuadamente los demás componentes, que voluntad ser usado durante
usar o mantenimiento.
OPERATION PRECAUTIONS
1
.
Lea atentamente este manual antes de usarlo. Para aprovechar al
máximo sus ventajas y lograr resultados satisfactorios, comprenda la
estructura y función de la máquina y esté familiarizado. con es principal
partes y relacionado seguridad operaciones.
2
.
Después de sacar la máquina del paquete, enjuague el recipiente y el
cabezal giratorio con una pequeña cantidad. de limpio agua, y entonces
limpiar el agua manchas con a suave paño.
3.
El máquina debería ser instalado en a soportado banco de trabajo, acuerdo a
distancia de el suelo.
4
.
Antes de encender la máquina, verifique si el voltaje de la fuente de
alimentación utilizada es consistente con el voltaje de la máquina utilizada.
Asegúrese de que el contacto entre el enchufe y la máquina cumpla con los
estándares de seguridad, que el interruptor de protección contra fugas y el
cable de tierra estén instalados. y todo Satisface el electricidad requisitos.

- 13 -
OPERATING INSTRUCTIONS
1
.
Prensa el cambiar a doblar en el máquina y esperar para 1-2 minutos.
Observar si el la máquina funciona suavemente cuando el hilado cabeza de el
máquina es giratorio. Si el vibración es también severo, la máquina
necesidades a ser equilibrado. Él debe ser asegurado eso el máquina es
metido establemente.
2.Ajustar el Voltaje mando a máximo, y el voltímetro voluntad cambiar con el
ajustamiento. Cálido arriba la máquina para 2-3 minutos. Después
precalentamiento, el Voltaje poder ser equilibrado de acuerdo a a el requisitos
de temperatura del usuario .
3
.
Primero, vierta media cucharadita de azúcar, pruebe el grado de
calentamiento y producción de azúcar. cuando todo es bueno, entonces
verter a cucharada de limpio blanco azúcar en el centro de el azúcar
cabeza.
4
.
Después acerca de 3 segundos, el algodón dulce empieza a chorro afuera.
Llevar a bambú palo y girar él algunos _ veces a lo largo de el interno muro de
el bol. Entonces, lugar el palo horizontalmente y girar él encima el giro cabeza
a forma algodón dulce. Diferente formas poder ser hecho por inclinación el
palos.
5.Después haciendo suficiente algodón dulce, doblar apagado el máquina.
CLEANING
1
.
El máquina necesidades a ser limpiado después el algodón dulce es hecho,
de lo contrario el hilado la cabeza puede ser obstruido. Mantener el máquina
correr durante el limpieza proceso, verter a pequeño cantidad de agua en el
rotor, entonces el rotor voluntad agitar apagado el agua despacio. Después
eso, doblar apagado el máquina y límpiela con un paño suave y seco.
2
.
Si el cabezal giratorio está bloqueado, apague la máquina y abra el cabezal
giratorio, luego limpie el azúcar quemado.
3.No lave el maquina con detergentes como detergente en polvo.
4.Hacer no enjuagar el máquina directamente con agua.
NOTICE
1.Menores son prohibido de usando este producto.
2.No coloque el cable cerca de la superficie caliente. No sumerja las orejetas
de la máquina en agua u otros líquidos. Hacer no usar dañado cuerdas,
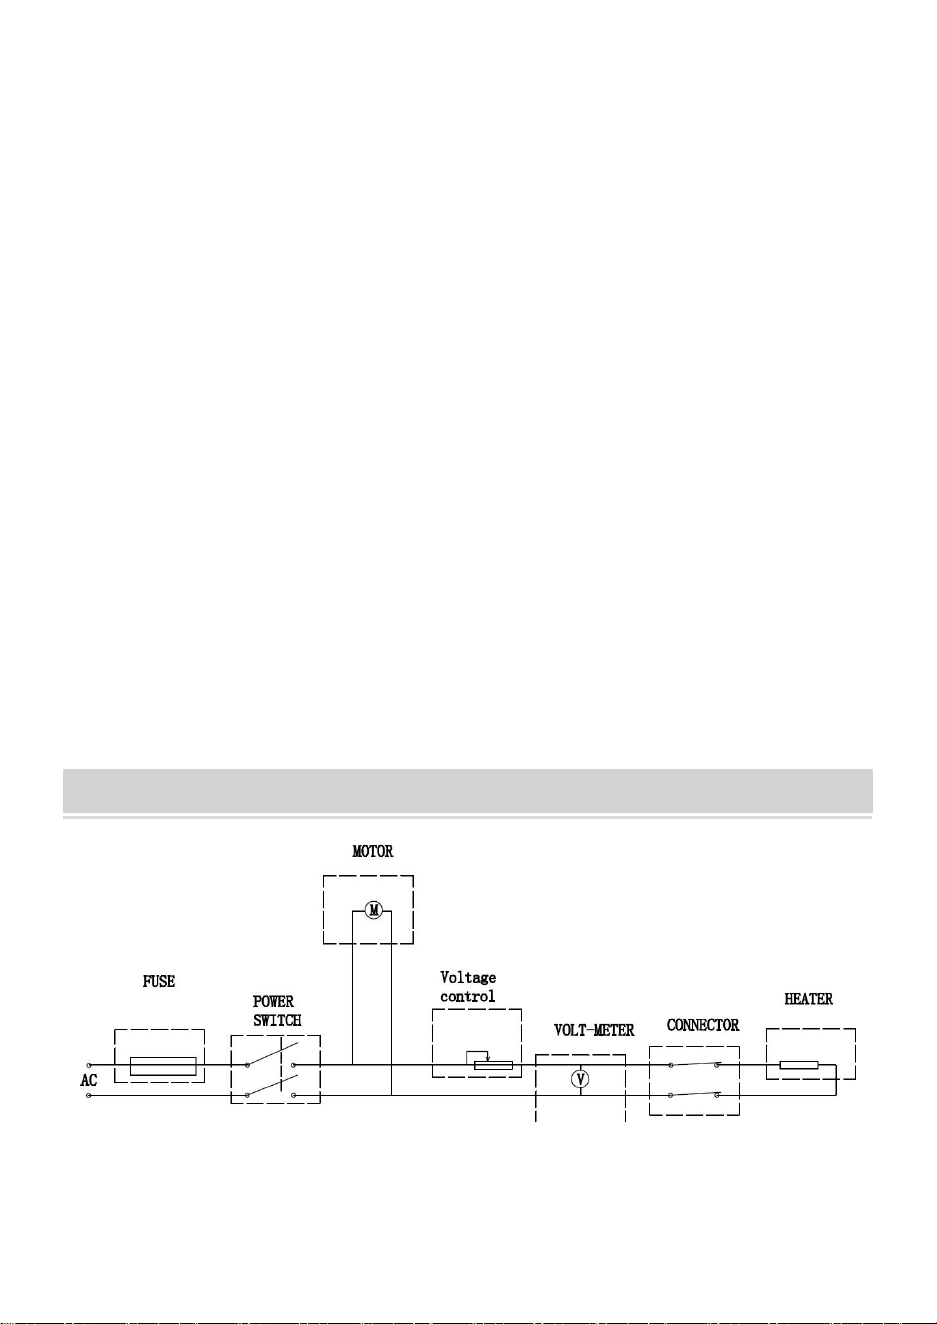
- 14 -
enchufes o enchufes.
3
.
La máquina debe instalarse correctamente antes de insertar el enchufe en el
tomacorriente. Cuando no esté en uso o antes limpieza, doblar apagado el
cambiar, desenchufar el fuerza suministrar, esperar para el hilado cabeza a
dejar de girar, y esperar para el máquina a Frío abajo.
4
.
Hacer no tocar el giratorio hilado cabeza cuando el máquina es laboral. Hacer no
alcanzar su manos.
en el bol hasta que se acabe el azúcar. Para evitar
quemaduras, no se mueva. la máquina mientras está funcionando.
5.Hacer no tocar el enchufar o cable cuando el enchufar o cable es
húmedo o su manos son húmedo, de lo contrario puede _ causa un
eléctrico choque.
6.El motor de este máquina es diseñado a tener a temporario cortar tasa de
80%, entonces
Se debe evitar el funcionamiento continuo
a largo plazo .
Después de trabajar continuamente durante una hora, debe hacer una pausa
durante 20 minutos antes a partir de a trabajar, cual voluntad muy
extender el servicio vida de el motor.
7.Si él es limpieza, mantenimiento y otro relacionado trabajar, el fuerza
debería ser transformado apagado primero, y el enchufe debe estar
desenchufado. No se permite que la máquina funcione sin carga durante
mucho tiempo.
8.Limpieza agentes no son permitido ser usado durante la limpieza para
prevenir el agentes de limpieza restantes en el máquina de ser comido
por error.
CIRCUIT DIAGRAM

- 15 -
TROUBLESHOOTING
Falla: No Azúcar Filamento
1.Controlar si el azúcar cabeza es giratorio o no, y detener el máquina a sentido si
la cabeza de azúcar está caliente.
2.Si el cabezal del azúcar no gira, verifique si la máquina está encendida y si el motor
está roto.
3.Si el cabezal de azúcar no está caliente: verifique si la máquina está encendida, si el
cabezal de azúcar está El sonar, y si el Voltaje es excesivo.
4.Desenrosque la perilla del fusible en el panel o abra la tapa del fusible (para el
tipo de encimera) en el zócalo, entonces, llevar el fusible afuera a controlar si él
es quemado afuera.
5.Retire el deflector y la cubierta superior y saque la cubierta a través del cabezal
giratorio, luego podrá ver el interno condición de el máquina. Controlar si el carbón
cepillar es perder o no funcionando, si es así reemplácelo por uno nuevo.
NOTICE FOR CARBON BRUSH
Reemplace la escobilla de carbón a tiempo si ocurren las siguientes situaciones
durante el mantenimiento de rutina inspección y usar:
1.
El carbón cepillar tiene a relativamente grande Chispa - chispear y fumar.
2.El contacto superficie de el carbón cepillar en el deslizar anillo es menos que 70%.
3.
Carbón cepillar primavera presión discordancia, etc.
REPLACE THE CARBON BRUSH STEPS
1.Eliminar el tornillos fijación el deflector lámina y arriba cubrir y llevar afuera el
deflector y arriba cubrir.
2
.
Eliminar el conectando fin de el carbón cepillar, eliminar el fijación
tornillos, y llevar afuera la vieja escobilla de carbón. (Para facilitar la
instalación y desmontaje, el tornillo de fijación del azúcar cabeza poder ser
remoto primero a aumentar el operando espacio)

- 16 -
3.Reemplazar el nuevo carbón cepillar, lugar él en posición y arreglar
él con tornillos, y enchufar en el extremo de conexión.
4.Controlar el instalación de el nuevo carbón cepillar. (si el primavera y
el el contacto de instalación es bueno)
5
.
Reinstalar el arriba cubrir y deflector, completo el carbón cepillar reemplazo.
Note: The carbon brush
is a
consumable and should be
replaced
after a period of use.


Tecnico Supporto e certificato di garanzia elettronica www . vevor . com/supporto
PRODUTTORI DI ZUCCHERO FILATO
MANUALE D'USO
We continue to be committed to provide you tools with competitive price.
"Save Half", "Half Price" or any other similar expressions used by us only represents an
estimate of savings you might benefit from buying certain tools with us compared to the
major top brands and does not necessarily mean to cover all categories of tools offered by
us. You are kindly reminded to verify carefully when you are placing an order with us if you
are actually saving half in comparison with the top major brands.


- 1 -
Nota: questo utente Manuale È
applicabile
a IL cotone caramella macchine.
Per favore Leggere Esso accuratamente Prima utilizzo.
Have product questions? Need technical support? Please feel free to
contact us:
Technical Support and E-Warranty Certificate
www. vevor. com/support
NEED HELP? CONTACT US!
This is the original instruction, please read all manual instructions
carefully before operating. VEVOR reserves a clear interpretation of our
user manual. The appearance of the product shall be subject to the
product you received. Please forgive us that we won't inform you again if
there are any technology or software updates on our product.
COTTON CANDY
MAKERS
MHTJXM01F MHTJXM02F MHTJXM03F
MHTJXM01H MHTJXM02H MHTJXM03H
MHTJXM01L MHTJXM02L MHTJXM03L
MHTJJPZY01 MHTJJPZY02 MHTJJPZY03
MHTJJPHC01 MHTJJPHC02 MHTJJPHC03

- 2 -
Avvertenza: per ridurre il rischio di lesioni, l'utente deve leggere
attentamente il manuale di istruzioni .
CORRETTO SMALTIMENTO
Questo prodotto è soggetto alle disposizioni della Direttiva europea
2012/19/UE. Il simbolo del bidone della spazzatura barrato indica
che nell'Unione Europea il prodotto richiede la raccolta differenziata
dei rifiuti. Ciò vale per il prodotto e tutti gli accessori contrassegnati
da questo simbolo. I prodotti contrassegnati come tali non possono
essere smaltiti con i normali rifiuti domestici, ma devono essere
portati in un punto di raccolta per il riciclaggio di dispositivi elettrici
ed elettronici.
La conformità è una certificazione di sicurezza CE e Regno Unito.
IMPORTANT SAFEGUARDS
Quando si utilizzano apparecchi elettrici, è necessario seguire sempre le
precauzioni di sicurezza di base, tra cui:
1. Leggi tutte le istruzioni.
2. Non toccare le superfici calde. Utilizzare maniglie o pomelli.
3. Per proteggersi dalle scosse elettriche, non immergere cavi, spine o
apparecchi in acqua o altri liquidi.
4. È necessaria un'attenta supervisione quando un apparecchio viene utilizzato
da o vicino a bambini.
5. Scollegare dalla presa quando non in uso e prima della pulizia. Lasciare
raffreddare prima di montare o togliere le parti
6. Non utilizzare l'apparecchio con un cavo o una spina danneggiati o dopo che
l'apparecchio non funziona correttamente o è stato danneggiato in qualsiasi
modo. Restituire l'apparecchio al centro di assistenza autorizzato più vicino per
l'esame, la riparazione o la regolazione.
7. L'uso di accessori non consigliati dal produttore dell'apparecchio può causare
lesioni.
8. Non utilizzare all'aperto.
9. Non lasciare che il cavo penda dal bordo del tavolo o del bancone o tocchi
superfici calde.

- 3 -
10. Non posizionare sopra o vicino a un fornello a gas o elettrico caldo o in un
forno riscaldato.
11. È necessario prestare la massima attenzione quando si sposta un
apparecchio contenente olio caldo o altri liquidi caldi.
12. sempre prima la spina all'apparecchio, quindi il cavo alla presa a muro. Per
disconnettersi, ruotare qualsiasi controllo su "off", quindi rimuovere la spina
dalla presa a muro.
13. Non utilizzare gli apparecchi per usi diversi da quelli previsti.
14. Solo uso domestico.
CONSERVA QUESTE ISTRUZIONI
Nota per il cavo:
Viene fornito un cavo di alimentazione corto per ridurre il rischio derivante dall'impigliarsi
o dall'inciampare in un cavo più lungo. Sono disponibili prolunghe che possono essere
utilizzate se si presta attenzione al loro utilizzo. Se si utilizza una prolunga:
1) La potenza elettrica indicata sulla prolunga deve essere almeno pari alla potenza
elettrica dell'apparecchio;
2) Il cavo deve essere disposto in modo tale che non penda dal piano di lavoro o dal
tavolo dove possa essere tirato dai bambini o inciampare involontariamente; E
3) La prolunga deve essere un cavo a 3 fili con messa a terra.
PRODUCT PARAMETERS
Modello
Potenza della
piastra
riscaldante
Dimensioni
(mm)
Voltaggio
Frequenza
MHTJXM01F
MHTJXM01H
MHTJXM01L
1000W
518*518*415
CA 120 V
60Hz
MHTJXM02F
MHTJXM03F
MHTJXM02H
MHTJXM03H
MHTJXM02L
MHTJXM03
CA 220-240 V
50/60Hz
MHTJJPZY01
518*518*485
CA 120 V
60Hz
MHTJJPZY02
MHTJJPZY03
CA 220-240 V
50/60Hz
MHTJJPHC01
518*820*1000
CA 120 V
60Hz
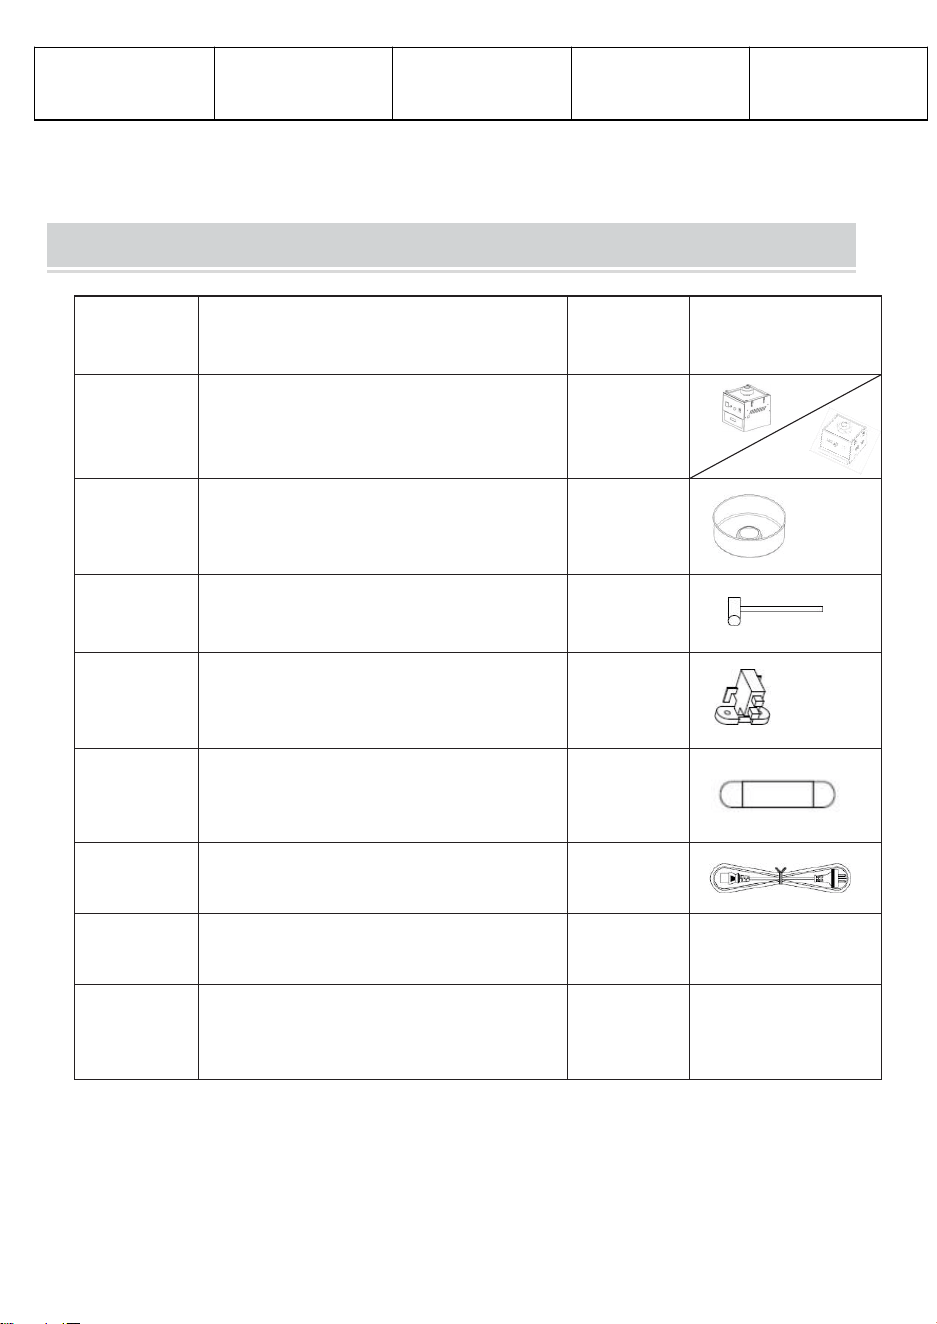
- 4 -
MHTJJPHC02
MHTJJPHC03
CA 220-240 V
50/60Hz
PACKING LIST
Articolo
Parte Nome
QUANTIT
À
Immagine
1
cotone Caramella Macchina
1 PZ
2
Inossidabile Acciaio Ciotola
1 PZ
3
Inossidabile Acciaio Zucchero
Notizia in anticipo
1 PZ
4
Carbonio
Spazzola
1 PZ
5
Fusibile
1 PZ
6
Energia
Cavo
1 PZ
7
Manuale
d'uso
1 PZ
8
Installazione Utensili
Nota: Per T Lui stile carrello quelli
soltanto.
1 SET

- 5 -
INSTALLATION KIT ACCESSORIES LIST
Nota: Soltanto IL stile carrello macchine Venire con IL installazione kit.
Artico
lo
Parte Nome
QUANTITÀ
Immagine
1
Ruota
2 PZ
2
Tavolo
1 PZ
3
Maniglia
1 PZ
4
(P1) - Lungo Staffa
2 PZ
5
(P2)-Corto Staffa (Ruota Montaggio)
2 PZ
6
(P3)-Trasversale Fissaggio Staffa
3 PZ
7
Plastica Pad
2 PZ
8
Bulloni (M8*70)
2 PZ
9
Vite
(M5*12)
16 PZ

- 6 -
10
Vite
(M5*35)
6 PZ

- 7 -
PRODUCT COMPOSITION DIAGRAM
Filatura
Testa
Ciotola
Voltmetro
Fusibile
Riscaldamento
Interruttore
Energia Interruttore
Energia Tappo
Cassetto
Macchina per lo zucchero
filato
(tipo da banco con
mobiletto)
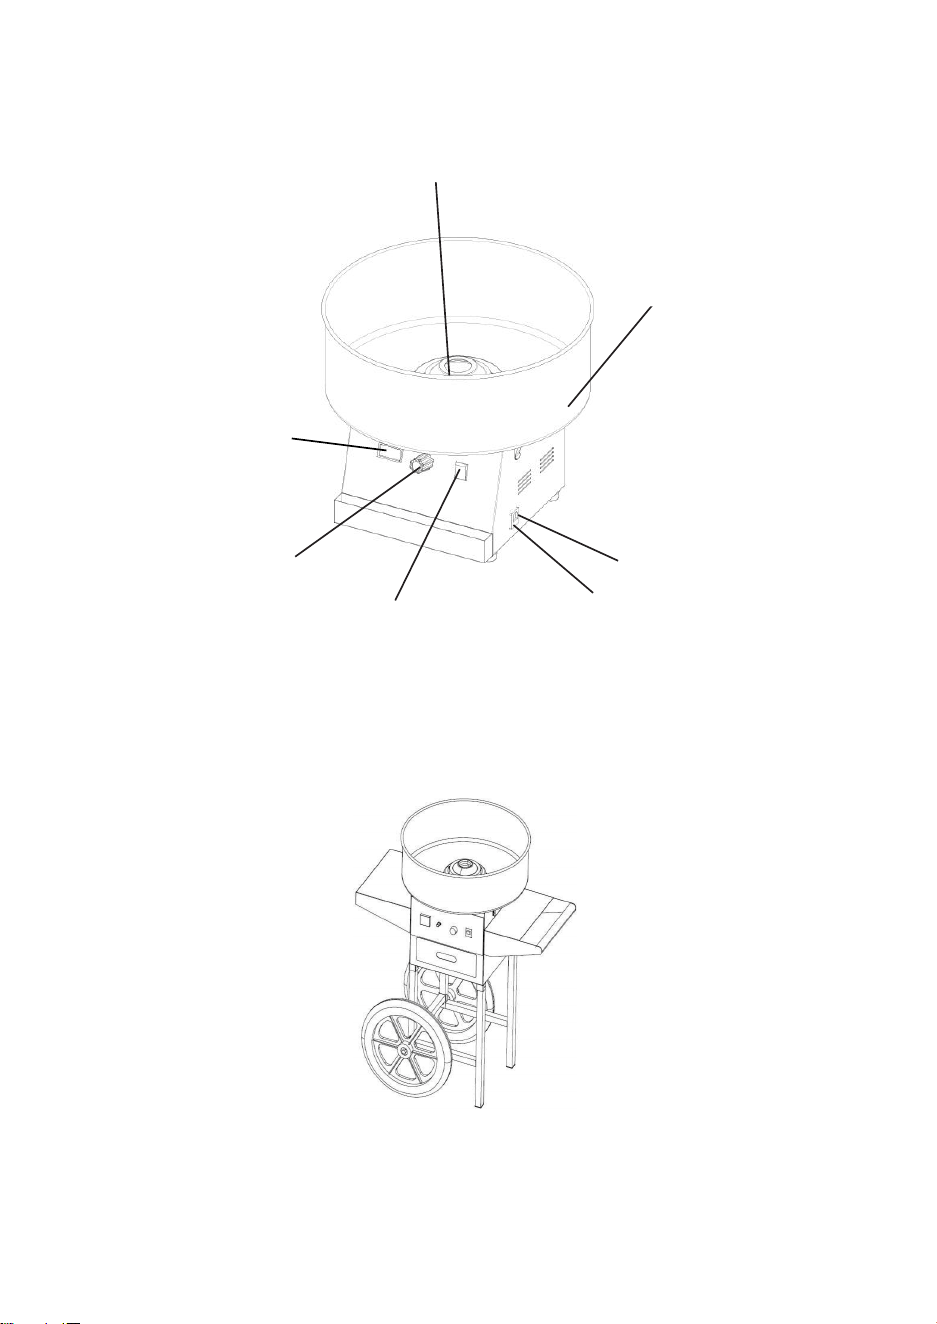
- 8 -
Filatura
Testa
Ciotola
Voltmetro
Riscaldame
nto
Interruttore
Energia
Tappo
Energia
Interruttore
fusibile
cotone Caramella Macchina
(Controsoffitto
Tipo)
cotone Caramella
Macchina
(cart Tipo)
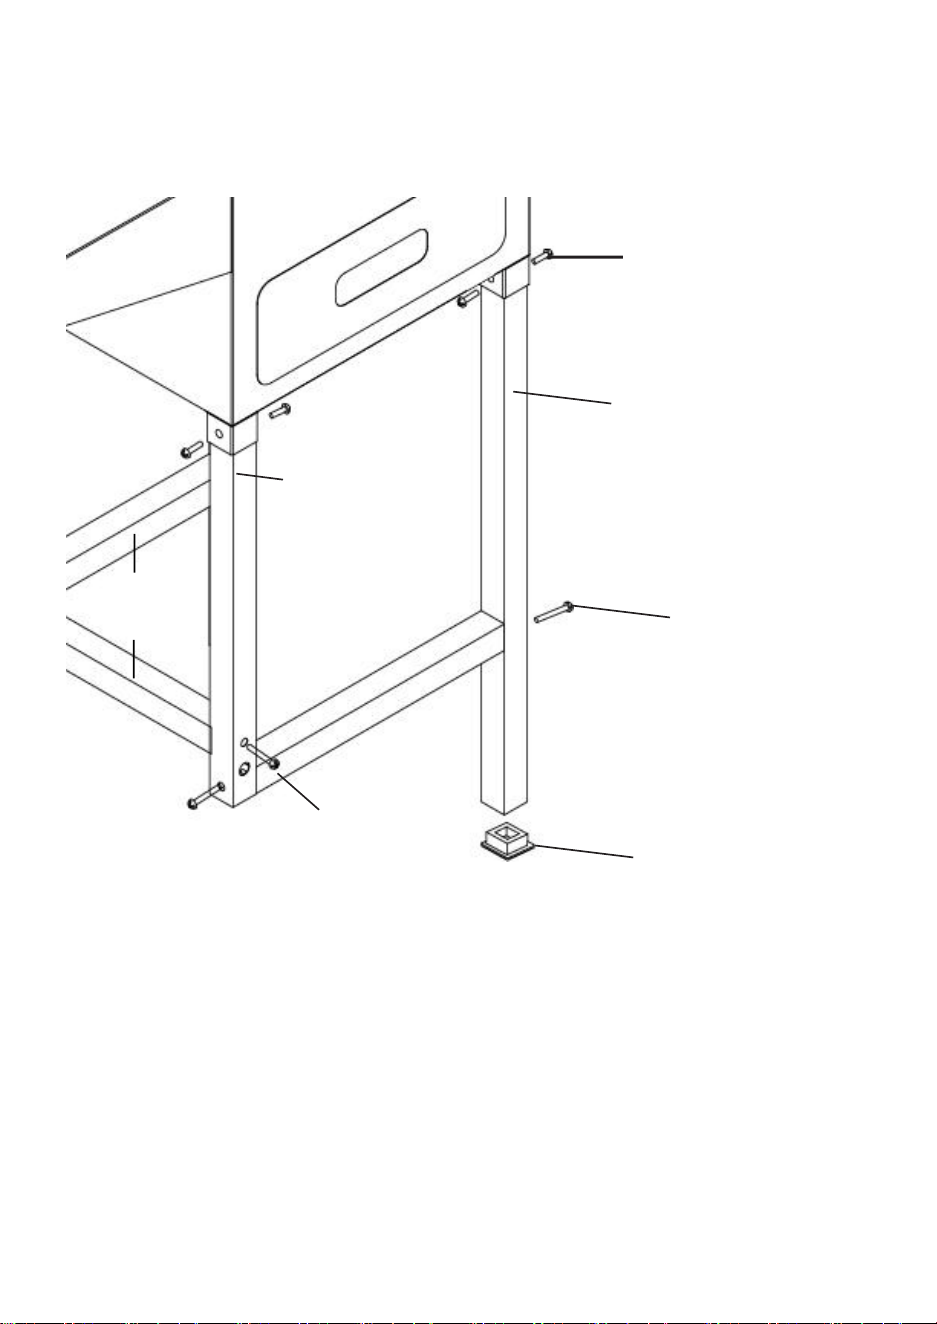
- 9 -
Please install the wheels for the Cart Type in the following order.
1
.
Utilizzo viti (M5*12) E viti (M5*35) A installare IL staffa COME mostrato
In IL figura. L' installazione passi SU Entrambi lati Sono IL Stesso.
Viti
(M5*12)
(P1)- Lungo Staffa
(P2)-Corto Staffa
(ruota Montaggio)
Viti
(M5*35)
Plastic Pad
(P3)-Transverse
Fixing Bracket
(P3)-Transverse
Fixing Bracket

- 10 -
2.Installare due ruote Sotto IL telaio con due Bulloni (M8*70).
(P2)-Corto Staffa (Ruota Montaggio)
(P3)
-
Fissaggio
trasversale
Staffa
Ruota
Bullone
(P1)- Lungo Staffa
3.Installare IL tavolo SU IL Sinistra lato Di IL principale corpo, E installare
IL spingere maniglia SU IL Giusto lato con 8 viti (M5*12)
Tavolo
Vite
(M5*12)
Principale
Corpo

- 11 -
Table
Push
Handle
4
.
Posto IL inossidabile acciaio padella SU superiore Di IL scatola E aggiustare
Esso con IL 4 bloccaggio clip SU Entrambi lati.

- 12 -
5.Una volta completato l'assemblaggio, è pronto per l'uso. Si prega di
conservare adeguatamente gli altri componenti, che Volere Essere usato
durante utilizzo O manutenzione.
OPERATION PRECAUTIONS
1
.
Si prega di leggere attentamente questo manuale prima dell'uso. Per
sfruttare appieno i suoi vantaggi e ottenere risultati soddisfacenti,
comprendere la struttura e il funzionamento della macchina e acquisirne
familiarità con suo principale parti E imparentato sicurezza operazioni.
2
.
Dopo aver tolto la macchina dalla confezione, sciacquare la vasca e la
testa rotante con una piccola quantità Di pulito acqua, E Poi pulire IL
acqua macchie con UN morbido stoffa.
3.
IL macchina Dovrebbe Essere installato SU UN supportato banco di lavoro,
mantenendo UN distanza da IL terra.
4
.
Prima di avviare la macchina, verificare se la tensione dell'alimentatore
utilizzato è compatibile con la tensione della macchina utilizzata. Assicurarsi
che il contatto tra la presa e la macchina soddisfi gli standard di sicurezza,
che l'interruttore di protezione contro le perdite e il filo di terra siano installati,
E qualunque cosa incontra IL elettricità requisiti.

- 13 -
OPERATING INSTRUCTIONS
1
.
Premere IL interruttore A giro SU IL macchina E Aspettare per 1-2 minuti.
Osservare se IL la macchina funziona senza intoppi Quando IL Filatura Testa
Di IL macchina È rotante. Se IL vibrazione È pure acuto, la macchina esigenze
A Essere aggiustato. Esso dovere Essere assicurato Quello IL macchina È
posizionato stabilmente.
2.Regolare IL voltaggio pomello A massimo, E IL voltmetro Volere modifica
con IL regolazione. Caldo su la macchina per 2-3 minuti. Dopo
preriscaldamento, IL voltaggio Potere Essere aggiustato secondo A IL requisiti
di temperatura dell'utente .
3
.
Per prima cosa versare mezzo cucchiaino di zucchero, testare il grado di
riscaldamento e la produzione di zucchero. Quando tutto È Va bene, Poi
versare UN cucchiaio Di pulito bianco zucchero In IL centro Di IL zucchero
Testa.
4
.
Dopo Di 3 secondi, IL cotone caramella inizia A schizzare fuori. Prendere
UN bambù bastone E ruotare Esso alcuni _ volte lungo IL interno parete Di IL
ciotola. Poi, posto IL bastone orizzontalmente E ruotare Esso Sopra la filatura
Testa A modulo cotone caramella. Diverso forme Potere Essere fatto di
basculante IL bastoni.
5.Dopo fabbricazione Abbastanza cotone caramella, giro spento IL macchina.
CLEANING
1
.
IL macchina esigenze A Essere puliti Dopo IL cotone caramella È fatto,
Altrimenti IL Filatura la testa può Essere bloccato. Mantenere IL macchina
corsa durante IL pulizia processi, versare UN piccolo quantità d' acqua in IL
rotore, Poi IL rotore Volere scuotere spento IL acqua lentamente. Dopo
Quello, giro spento IL macchina e pulirla con un panno morbido e asciutto.
2
.
Se la testa rotante è bloccata, spegnere la macchina e aprire la testa
rotante, quindi pulire lo zucchero bruciato.
3.Non lavare il macchina con detersivi come il detersivo in polvere.
4.Fare non risciacquo IL macchina direttamente con acqua.
NOTICE
1.Minori Sono proibito da utilizzando Questo Prodotto.
2.Non avvicinare il filo alla superficie calda. Non immergere le alette della
macchina in acqua o altro liquidi. Fare non utilizzo danneggiato corde, prese

- 14 -
O tappi.
3
.
La macchina deve essere installata correttamente prima di inserire la spina
nella presa. Quando non in uso o Prima pulizia, giro spento IL interruttore,
scollegare IL energia fornitura, Aspettare per IL Filatura Testa A smetti di
girare, E Aspettare per IL macchina A Freddo giù.
4
.
Fare non tocco IL rotante Filatura Testa Quando IL macchina È lavorando. Fare
non portata tuo mani.
in la ciotola finché lo zucchero non sarà scomparso. Per
evitare ustioni, non muoversi la macchina mentre è in funzione.
5.Fare non tocco IL tappo O filo Quando IL tappo O filo È Bagnato O tuo
mani Sono Bagnato, Altrimenti esso può causa UN elettrico shock.
6
.
IL il motore Di Questo macchina È progettato A Avere UN temporaneo
tagliare valutare Di 80%, COSÌ Il funzionamento continuo a lungo termine
dovrebbe essere evitato. Dopo aver lavorato ininterrottamente per un'ora,
dovresti
fare una pausa 20 minuti Prima di partenza A lavoro, Quale Volere
notevolmente estendere IL servizio vita Di IL il motore.
7.Se Esso È pulizia, manutenzione E altro imparentato lavoro, IL energia
Dovrebbe Essere trasformato spento per prima cosa e la spina di
alimentazione deve essere scollegata. La macchina non deve funzionare a
lungo senza carico .
8
.
Pulizia agenti non sono permesso essere usato durante la pulizia
impedire IL detergenti rimanenti SU IL macchina da essendo mangiato
di errore.
CIRCUIT DIAGRAM
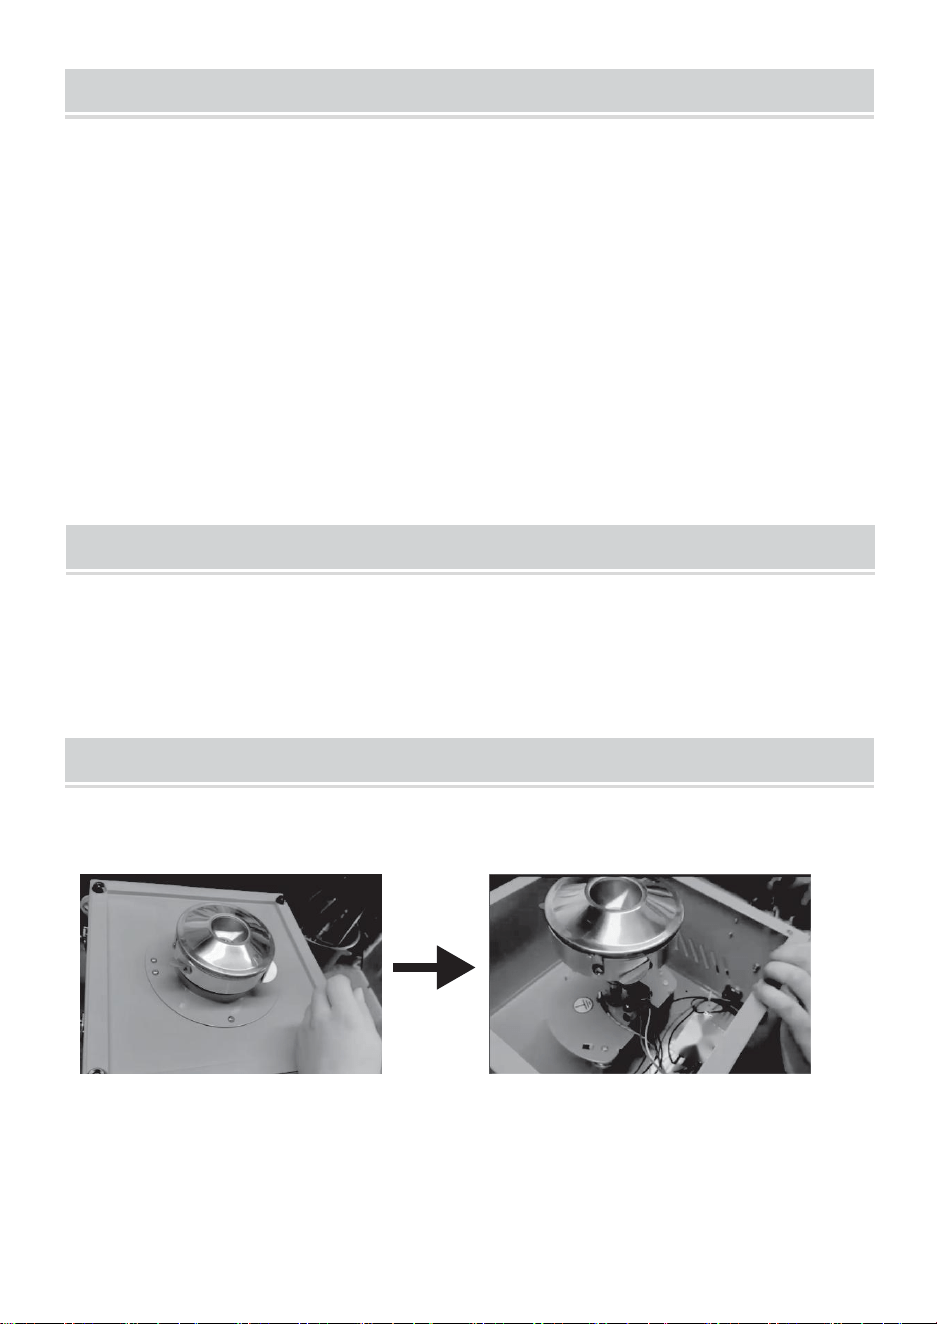
- 15 -
TROUBLESHOOTING
Colpa: NO Zucchero Filamento
1.Controllo se IL zucchero Testa È rotante O non, E fermare IL macchina A senso
se la testa di zucchero è calda.
2.Se la testa dello zucchero non gira, controllare se la macchina è accesa e il motore è
rotto.
3.Se la testa di zucchero non è calda: controlla se la macchina è accesa, se la testa di
zucchero lo è squillo, E se IL voltaggio È eccessivo.
4.Svitare la manopola del fusibile sul pannello o fare leva per aprire il coperchio del
fusibile (per il tipo da banco) nella presa, Poi, Prendere IL fusibile fuori A controllo
se Esso È bruciato fuori.
5.Rimuovere il deflettore e il coperchio superiore ed estrarre il coperchio attraverso la
testa rotante, quindi sarà possibile vedere IL interno condizione Di IL macchina. Controllo
se IL carbonio spazzola È sciolto O non funzionante, nel caso sostituirlo con uno
nuovo.
NOTICE FOR CARBON BRUSH
Si prega di sostituire la spazzola di carbone in tempo se si verificano le seguenti
situazioni durante la manutenzione ordinaria ispezione E utilizzo:
1.
IL carbonio spazzola ha UN relativamente grande scintilla E Fumo.
2.IL contatto superficie Di IL carbonio spazzola SU IL scontrino squillo È meno di 70%.
3.
Carbonio spazzola primavera pressione mancata corrispondenza, eccetera.
REPLACE THE CARBON BRUSH STEPS
1
.
Rimuovere IL viti fissaggio IL deflettore piatto E superiore copertina E Prendere
fuori IL deflettore E superiore copertina.
2.Rimuovere IL collegamento FINE Di IL carbonio spazzola, rimuovere IL
fissaggio viti, E Prendere fuori la vecchia spazzola di carbone. (Per facilitare
l'installazione e lo smontaggio, la vite di fissaggio dello zucchero Testa
Potere Essere RIMOSSO Primo A aumento IL operativo spazio)
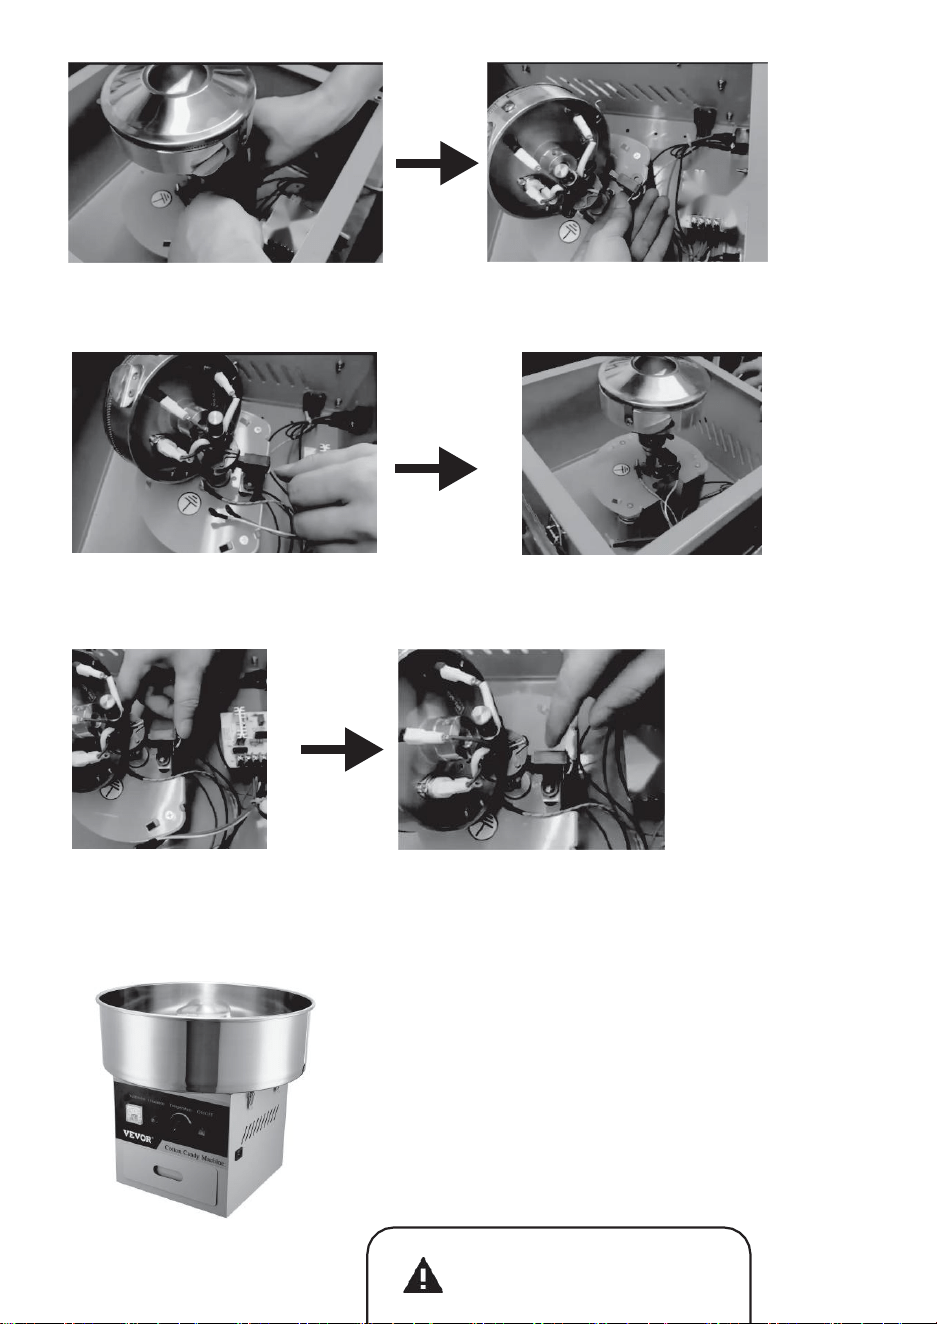
- 16 -
3.Sostituire IL nuovo carbonio spazzola, posto Esso In posizione E
aggiustare Esso con viti, E tappo In l' estremità di collegamento.
4.Controllo IL installazione Di IL nuovo carbonio spazzola. (se IL
primavera E IL il contatto per l'installazione è buono)
5
.
Reinstallare IL superiore copertina E deflettore, completare IL carbonio
spazzola sostituzione.
Note: The carbon brush
is a
consumable and should be