
USER MANUAL
00MD-KH1001USH3.indb100MD-KH1001USH3.indb1 2013/11/0815:18:342013/11/0815:18:34

2
English
Safety Information
Before use, be sure to carefully read this manual for safety issues and to ensure that you use •
this product correctly. Be sure to follow information printed in this manual when using this
product.
WARNING
In order to avoid any electrical shock, short-circuit, burns, or possibly
cause a fire:
Do not disassemble. This product may only be disassembled by qualified repair technicians. To •
request repair, see Warranty Page at the back of this manual.
Do not use if the power cord or plug is damaged, or if the plug is not fully inserted into the •
outlet.
Do not scratch, damage, modify, forcibly bend, pull, twist, bind/clamp, or place heavy objects on •
the power cord.
Do not insert metal objects, such as pins, wires, or other foreign materials into any gaps of the •
product.
Do not allow children to use this product by themselves, and keep product and power cords out •
of the reach of small children.
Use only with the designated power supply 110 – 120 V.•
CAUTION
When cleaning the product, be sure to unplug the power cord from
the outlet.
Do not use in area with high humidity (85% or higher).
Do not use in area where the mist directly contacts furniture, bedding,
walls, curtains, ceiling, or other objects.
Do not place on slanted surfaces, high locations such as bookshelves,
or on unstable surfaces.
00MD-KH1001USH3.indb200MD-KH1001USH3.indb2 2013/11/0815:18:342013/11/0815:18:34

3
English
Do not place the humidifier directly onto a carpet or other object with
soft fibers or a thick pile. These could block the vent hole from
performing properly and can cause the unit to malfunction or leak.
Do not block the mist outlet.
Fill the reservoir tank using only clean cool tap water.
Do not use hot water. Use of hot water that is 104°F or higher can
cause the product to deform and malfunction.
Never put aroma oil or other fragrances into the water reservoir tank
as this can damage the humidifier.
Do not wipe product with turpentine/benzene, thinner or other
chemicals, since this can ruin the sheen.
When unplugging the power cord, always unplug by grasping the
power plug, not by pulling on the power cord. If the supply cord is
damaged, it must be replaced by the manufacturer, or its service
agent.
Spill out the water when not using the humidifier or when moving
the appliance.
Replace the water in the reservoir tank with fresh water every day.
Regularly maintaining the inside will ensure that the product is always
clean and ready for use.
Use without attaching the cover could result in water spillage. Do not
remove the cover unless cleaning the hybrid humidifier
Do not place cell phones, computers, or other electronic devices near
the humidifier. The area around the humidifier can become very
humid while the humidifier is operating and these items are sensitive
to humidity. Product should be placed at least 6 feet away from these
objects.
Take care that the product does not freeze. If the product is placed in
a area subject to freezing temperatures, spill out all the water inside.
00MD-KH1001USH3.indb300MD-KH1001USH3.indb3 2013/11/0815:18:342013/11/0815:18:34
4
English
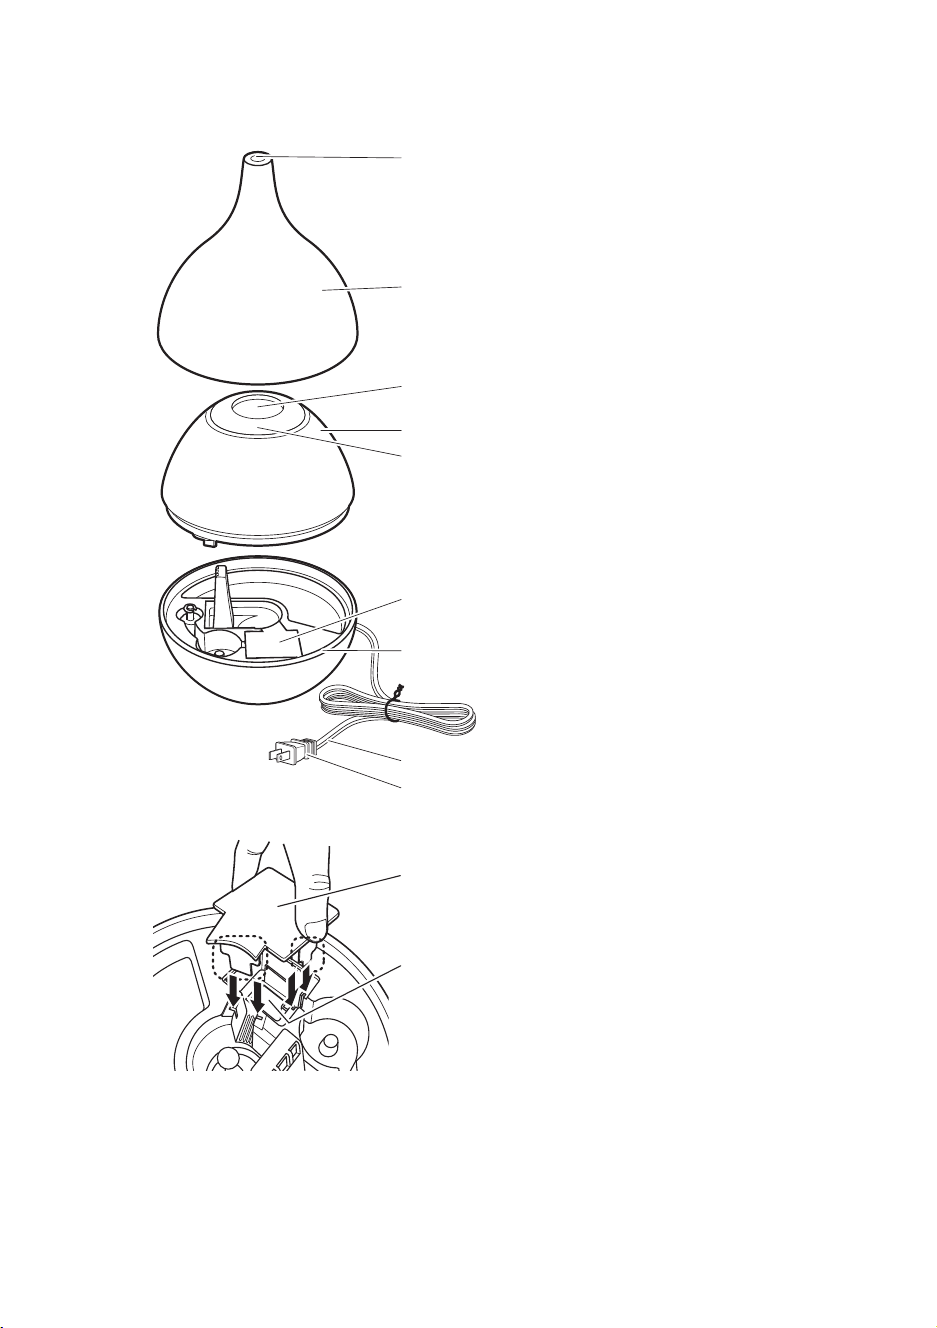
Parts and Their Functions
Mist outlet
Mist cone
Mist hole
Water tank
Water tank handle
Use when carrying the water tank as well as inserting a
fi nger into the mist hole, and hold from the inside.
Water passage cover
Hybrid humidifi er body
Power cord
Power plug
Water passage cover
Heater
If the water passage cover is not attached correctly, hot
water can overfl ow from the hybrid humidifi er body. Insert
the legs at the bottom of the water passage cover (dotted
line section) all the way into the grooves of the water
passage in the hybrid humidifi er body (location shown by the
arrows).
00MD-KH1001USH3.indb400MD-KH1001USH3.indb4 2013/11/0815:18:342013/11/0815:18:34
5
English
* Overfl ow sensor
An overflow occurs when the water level is excessively high. The overflow sensor
will be activated and the heater operation will stop. This is to prevent water
from overflowing into the electrical part of the unit. If water has collected in the
overflow pool, drain it. When the water level in the water passage returns to
normal, restart operation.
** Fan outlet
Take care not to get water into the fan outlet or overflow drain when filling with
water, draining out water or cleaning.
*Overfl ow sensor
Overfl ow pool
**Fan outlet
Water tub
Water level sensor
Ultrasonic vibration plate
Water drain direction arrow indicator
Water tank cap
Mist hole
Bottom of Water tank
Inside body
00MD-KH1001USH3.indb500MD-KH1001USH3.indb5 2013/11/0815:18:352013/11/0815:18:35
6
English
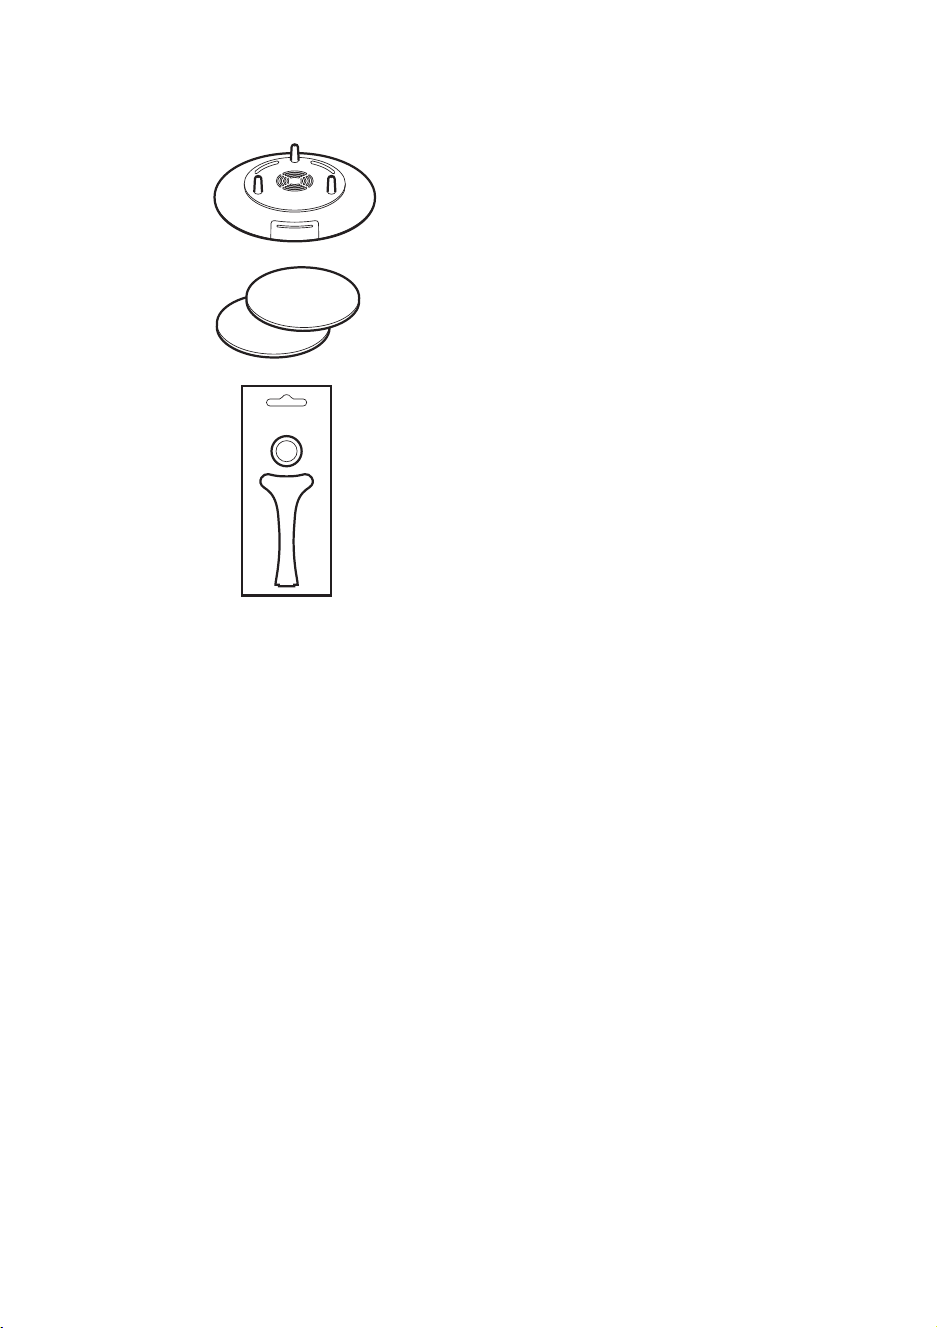
Accessories:
Ceramicdiscset
IMM-DISC001
Ceramic
disc
Special
tool
Replacement ceramic disc set
IMM-DISC001
Replacement felt × 2
Aroma base
00MD-KH1001USH3.indb600MD-KH1001USH3.indb6 2013/11/0815:18:352013/11/0815:18:35
7
English
Operating Instructions for Hybrid Humidifier
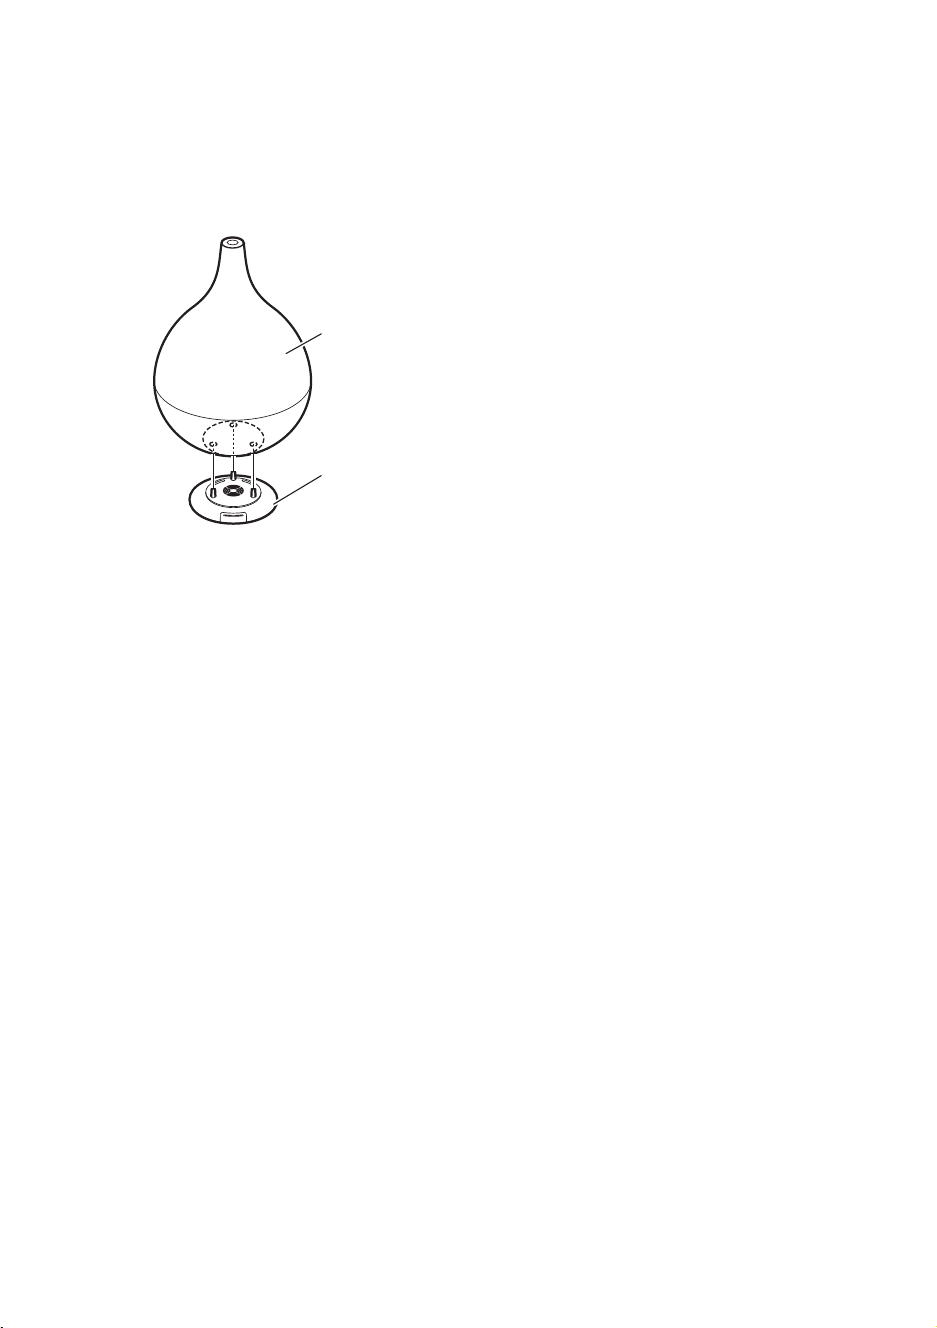
Place the hybrid humidifier on the aroma base.1.
Insert the brackets on the aroma base all the way into the corresponding holes on
the bottom of the hybrid humidifi er.
Mist Cone
Hybrid humidifi er body
Aroma base
Place the hybrid humidifier with the connected aroma base on a flat sturdy 2.
surface.
Turn the mist cone at the top of the hybrid humidifier to remove it.3.
Take out the water reservoir tank from the hybrid humidifier, remove the 4.
water cap and fill with room temperature, clean tap water.
Firmly tighten the water tank cap, wipe up any spilled water, and turn it 5.
over to check that no water is leaking.
*Be careful when removing the water tank since there might be some water
remaining there and can possibly will spill out. Prepare towels beforehand
so that the hybrid humidifier and the floor do not get wet.
Place the water tank into the hybrid humidifier so that it fits securely. Firmly 6.
cover the mist cone onto the hybrid humidifier.
Plug the power cord plug firmly into the outlet.7.
WARNING
If you are going outside or will be away from the hybrid humidifier for an extended period of
time, unplug the power cord from the outlet. Otherwise, you could forget to turn it off and
cause a fire.
00MD-KH1001USH3.indb700MD-KH1001USH3.indb7 2013/11/0815:18:352013/11/0815:18:35
8
English
When going to bed during the winter, if your heat is turned off and the
room temperature drops below 59°F, continued misting operation can
result in condensation. This can cause the hybrid humidifier body and the
floor to get wet.
If using in environments where the room temperature is expected to drop
below 59°F or the humidity is expected to be above 60% when going to
bed, either set misting operation to M (Medium) or L (Low), or stop the
misting operation altogether.
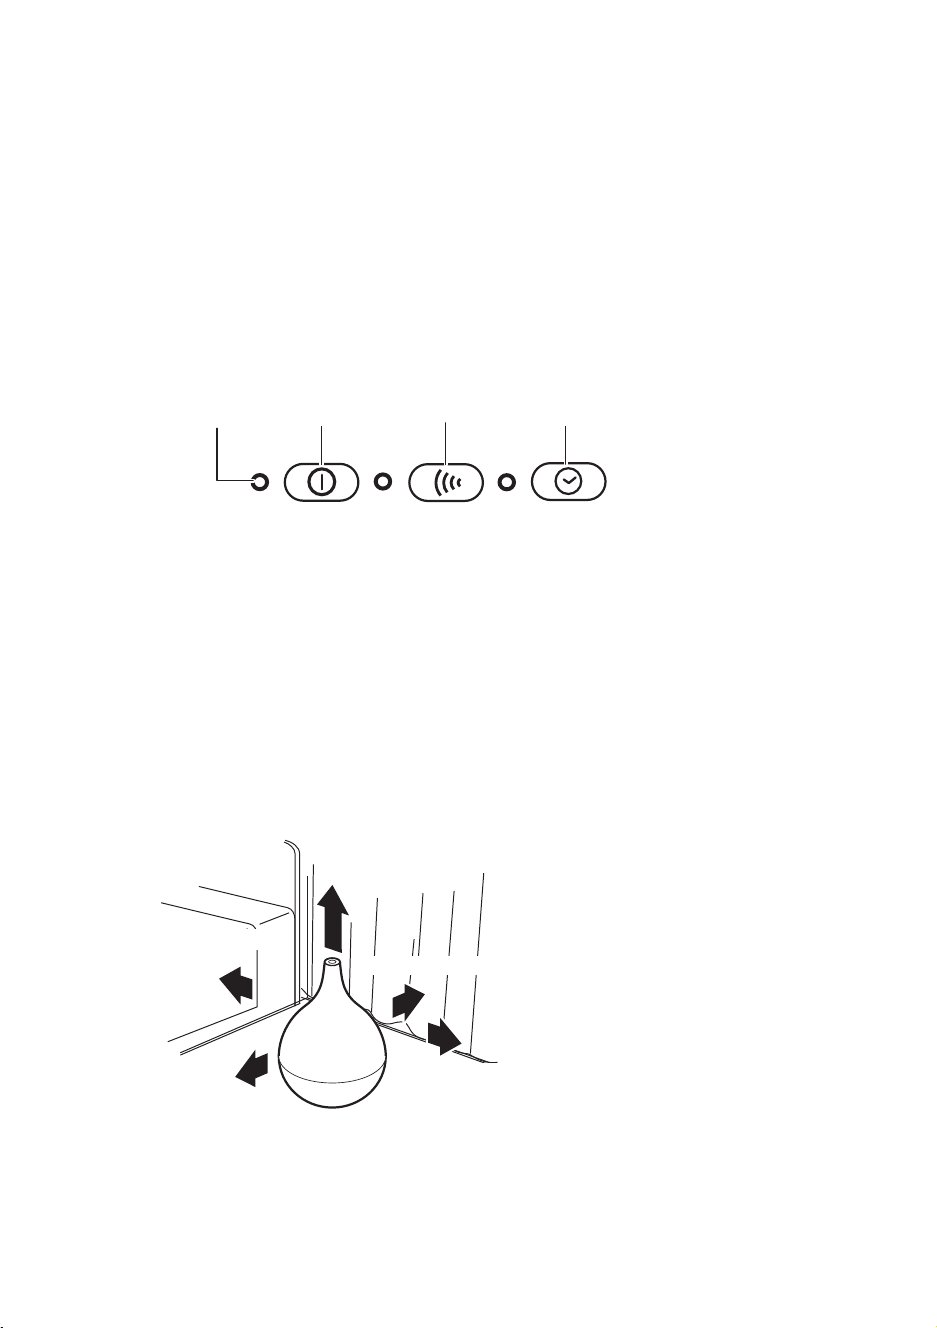
Power button operations:
Mist Setting
button
ON/OFF H/M/L 2H/4H
Timer Setting button
Power/Water
indicator Power button
When the Power button is pressed, the Power/Water indicator (ON/OFF) is 1.
lit GREEN, the misting operation starts after about two minutes. The delay is
due to the water temperature heating up to at least 140°F for sterilization
before starting the misting operation.
To stop - Press the Power button again. After misting operation is stopped, 2.
the fan will run for about one minute before the hybrid humidifier comes to
a complete stop.
Use the humidifier in a location that is at least 20 inches away from walls, bedding, curtains, •
furniture, and other objects.
At least 40 inches above the
humidifi er
At least 20 inches in front
At least 20 inches behind
At least 20 inches
to the left
At least 20 inches to the right
00MD-KH1001USH3.indb800MD-KH1001USH3.indb8 2013/11/0815:18:352013/11/0815:18:35

9
English
Setting the Mist and Timer Operations:
Press the Mist Setting button. Each time this button is pressed, the setting 1.
cycles and color of light change as per chart below:
H (High) → M (Medium) → L (Low)
Mist setting Indicator color
H (High) BLUE
M (Medium) YELLOW
L (Low) Flashes YELLOW
Press the Timer Setting button. Each time the button is pressed, the setting 2.
cycles change. 2 Hours (off after 2 hrs.) → 4 Hours (off after 4 hrs.) →
Continuous operation. The setting cycles and color of light change as per
chart below:
Continuous operation → 2H (off after 2 hrs.) → 4H (off after 4 hrs.)
Timer setting Indicator color
2 H (off after 2 hrs.) YELLOW
4 H (off after 4 hrs.) Flashes YELLOW
Continuous operation OFF
The Power/Water indicator (ON/OFF):
When the Power/Water indicator (ON/OFF) is lit RED, this means that the water level
in the water tank is low and the alarm will beep fi ve times.
After draining any water remaining in the water passage, refi ll the water tank with new clean 1
tap water.
When water reaches the hybrid humidifi er from the water tank, the Power/Water indicator (ON/2
OFF) will automatically turn off.
Press the Power button to start operation.3
00MD-KH1001USH3.indb900MD-KH1001USH3.indb9 2013/11/0815:18:362013/11/0815:18:36

10
English
Using the Aroma Fragrance Feature
Pull out the felt case from the aroma base stand holding the hybrid 1.
humidifier.
Felt case
Insert the felt circle so that it fits under the clips in the felt case. *
Clip
Felt
Trickle 2-4 drops of aroma oil or essential oil onto the felt circle located in 2.
the case. (These oils are available commercially). Take care that oil does not
spill outside the case – if some oil spills on the base simply wipe it up before
proceeding. Make sure that the felt circle is fully inserted into the indented
area of the case. Then insert the plastic case all the way inside the hybrid
humidifier.
Tab
Aroma oil or essential oil
Take care that the felt circle is not protruding outside the indented
area of the plastic case. Otherwise it might obstruct the plastic
case from opening and closing properly.
CAUTION
Do not use any other material in the aroma base only the special felt specifically designed •
for this product – otherwise you can damage the aroma base or cause it to malfunction.
To start operation, follow the instructions on page 8.3.
If aroma oil is not added, your hybrid humidifier functions as a regular
humidifier.
00MD-KH1001USH3.indb1000MD-KH1001USH3.indb10 2013/11/0815:18:362013/11/0815:18:36

11
English
Cleaning
Replace the felt circle whenever it becomes dirty, or when using a different type of
aroma oil or essential oil.
Please note: In addition to the felt already included with the aroma base at
purchase, two additional pieces are also included. The felt cannot be washed or
re-used.
Wash the case with a soft cleanser, and carefully wipe up any moisture before *
inserting plastic case it into the aroma base.
The Replacement Felt AF-04 is sold separately. *
Handling of aroma oils and essential oils
Do not expose the oils to an open flame. *
Store in a location that is out of the reach of children. *
If oils are spilled on clothes or other objects, rinse with a lot of water and allow to *
air dry. Do not use a blow dryer as this could cause a fire.
If any oil gets on your hands, wash them immediately. *
For further details about the handling of aroma oils and essential oils, refer to the *
manufacturer’s manual.
Press the Stop Button and unplug the power cord. Allow the unit to cool (takes about 10 •
minutes).
Do not touch any of the metal parts inside the hybrid humidifier – which can become quite •
HOT.
Fully drain the water left inside the hybrid humidifi er in the direction of the arrow
shown on the humidifi er body and fully dry.
Attach the water passage
cover to avoid leakage
(follow illustration on next
page).
00MD-KH1001USH3.indb1100MD-KH1001USH3.indb11 2013/11/0815:18:362013/11/0815:18:36

12
English
Water passage cover
Heater
Clean the air inlet filter at the bottom of the hybrid humidifier. *
Use a vacuum cleaner or soft brush to clean the dust off the filter.
Fill the water tank with cool clean tap water, close the cap, thoroughly
shake the water tank, and then drain. (Repeat this two or three times.)
Clean the outside with a soft cloth – do not use any chemicals that will discolor or
scratch the glossy fi nish.
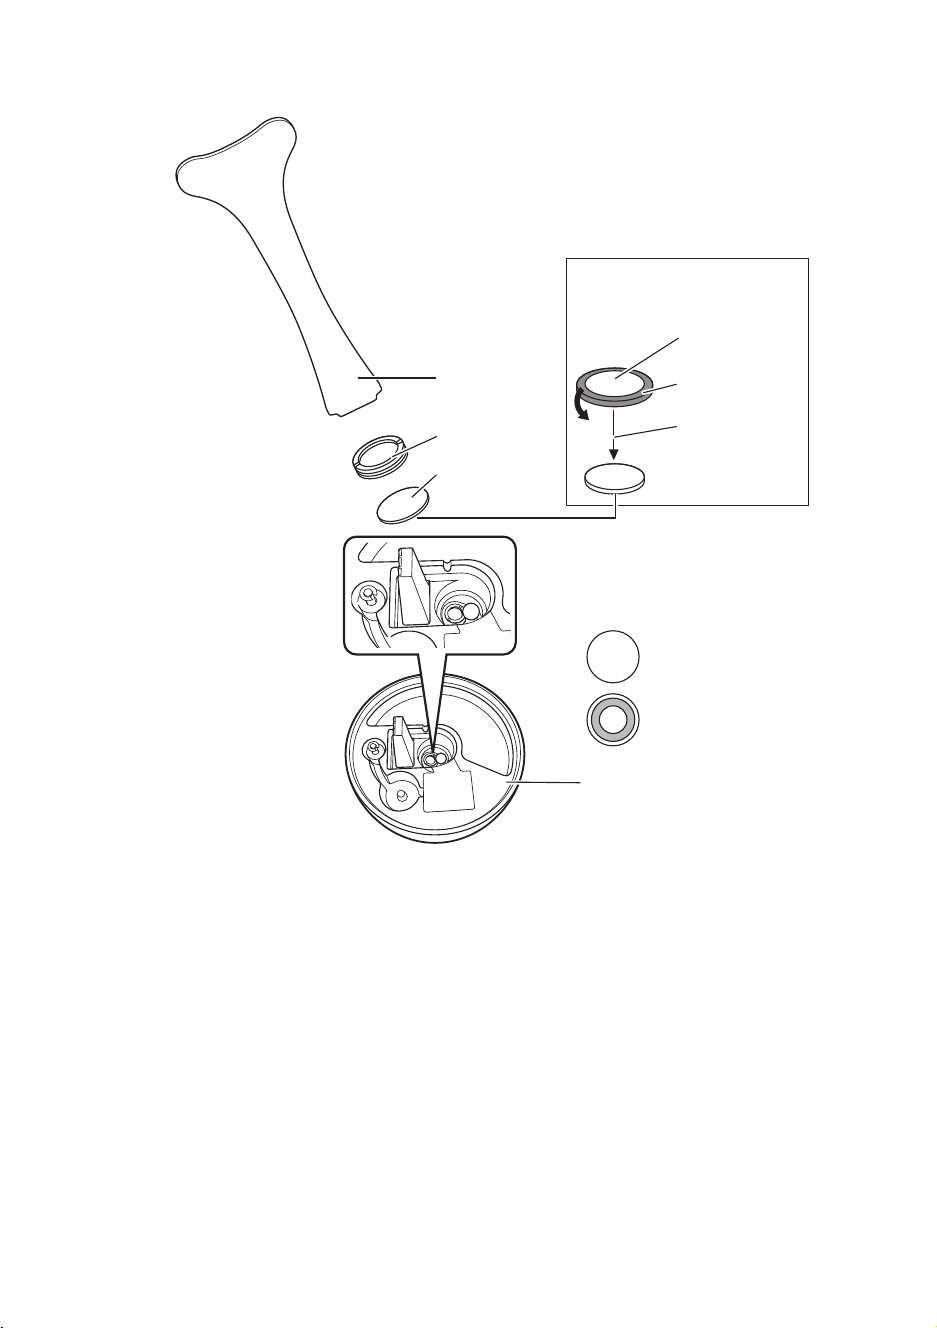
Replacing Ceramic Disc (part sold separately)
The ceramic disc should last for about 3,000 hours. If the ceramic disc is used
longer than that, the amount of mist generated will diminish or stop completely.
Turn off the power, unplug the power cord, drain the water and dry completely.a)
Use the special tool to turn the ring holder counter-clockwise, and then remove b)
the ring holder and ceramic disc from the hybrid humidifi er body.
To attach the replacement part, perform the removal procedure in reverse to c)
attach to the ultrasound vibration plate, and use the special tool to tighten the
ring holder.
Note: 1. The replacement ceramic disc is protected by a rubber ring to prevent
breakage. When attaching, remove the rubber ring while being careful
not to damage the ceramic disc.
2. The ceramic disc has a front side and back side. When attaching it, do
so with the front side visible.
See illustration instruction on next page.
00MD-KH1001USH3.indb1200MD-KH1001USH3.indb12 2013/11/0815:18:362013/11/0815:18:36
13
English
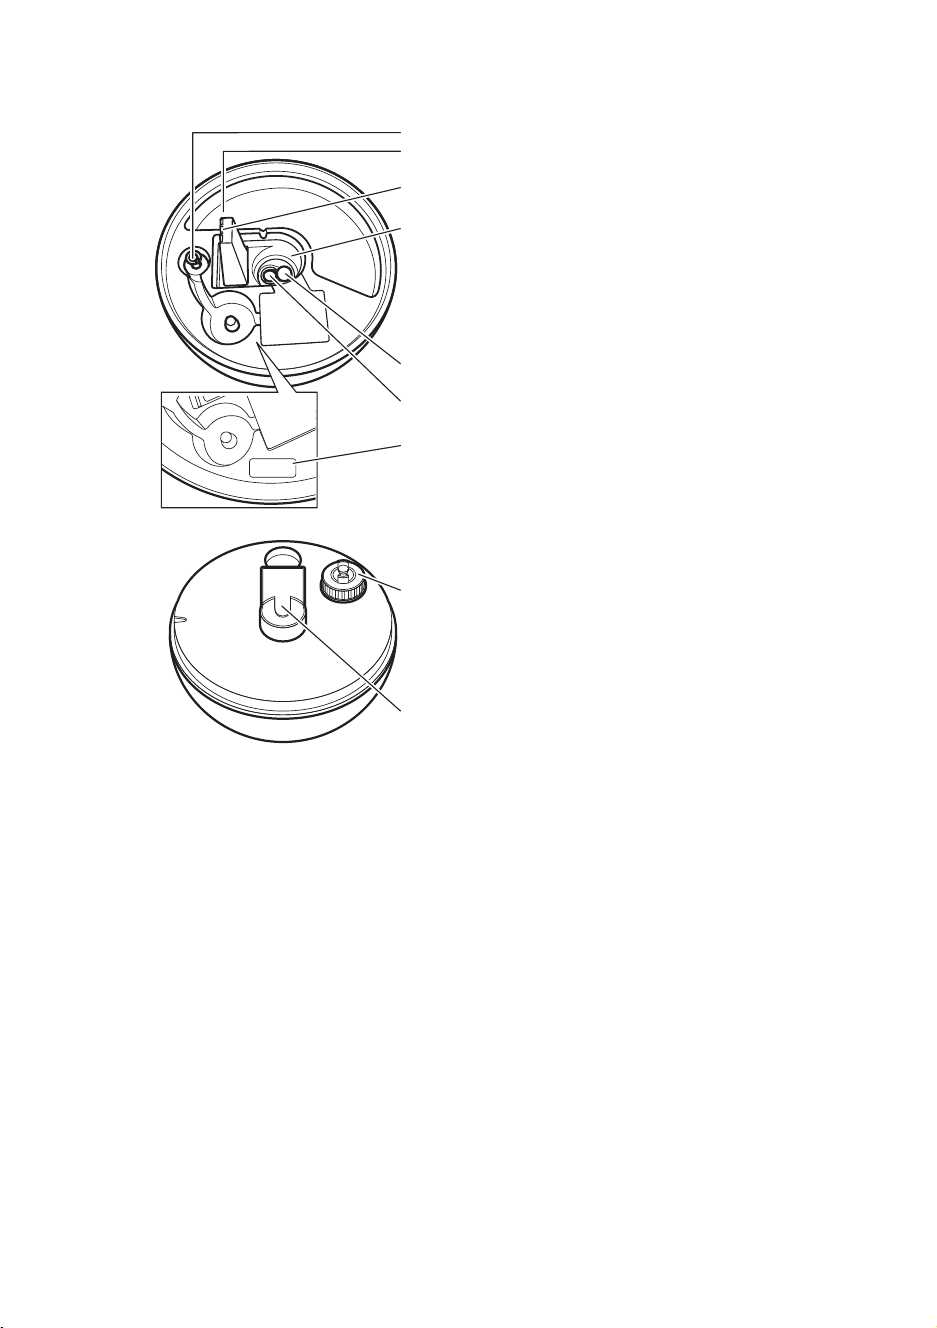
Special tool
Ring holder
Ceramic disc
Ceramic disc
Rubber ring
Remove the
rubber ring
Hybrid humidifi er body
Front
Back
Ceramic disc set
IMM-DISC001
Ceramic disc has a front + back side.
• Mount with the front side facing
upward.
00MD-KH1001USH3.indb1300MD-KH1001USH3.indb13 2013/11/0815:18:362013/11/0815:18:36

14
English
Storage
Wipe up any moisture inside the hybrid humidifi er body, allow it to dry completely,
pack it back in the original box along with the User’s Manual, and store it in dry
cool place.
Check the following before Requesting Repair or Service
Problem Primary cause Solution
The power does not
turn on.
Is the power cord •
plugged into the outlet?
Plug the power cord into the
outlet.
No mist is generated, or
the amount of mist is
minimal.
Is the Power/Water level •
low (ON/OFF) lit RED?
Is it time to replace the •
ceramic disc (after 3,000
hours of operation).
Fill with water.•
Press the Power button - the •
hybrid humidifier will not
produce mist for about two
minutes – allowing the water
temperature to heat up to
140°F for sterilization.
Replace the ceramic disc (See •
page 12).
Is the Power/Water
indicator (ON/OFF) light
RED even though water
was fi lled.
Is the water tank •
inserted securely in the
hybrid humidifier?
Take out and re-insert the water
tank securely into the humidifi er.
A smell is emitted.
Are you using water •
other than clean tap
water?
Drain the water left in the water
tank, clean product by following
the procedure in the "Cleaning"
section.
The mist nearly stops
once every minute.
This is not a malfunction. •
To prevent water from
collecting at the mist
outlet, the fan motor
stops about once every
minute, and the fan
stops for about two
seconds.
This is a normal operation
function.
00MD-KH1001USH3.indb1400MD-KH1001USH3.indb14 2013/11/0815:18:372013/11/0815:18:37
15
English
Specifications
Product name
H3 Hybrid Humidifi er
Model
HM-27
Power supply
110 – 120 V, 50/60 Hz
Power consumption
53 W
Humidifi cation
Per hour H (High): Approx. 6 oz, M (Medium): Approx. 3 oz,
L (Low): Approx. 1.3 oz
Continuous
humidifying time
Approx. 10 hrs (in High mode (H))
Approx. 19 hrs (in Medium mode (M))
Tank capacity
Approx. 0.47 gal
Power cord length
Approx. 70 inches
Size
Diameter 8 inches × Height 12 inches
Weight
Approx. 2.2 lbs (body only)
Accessories
User’s Manual / Warranty × 1, Aroma base (1 felt sheet
provided in base), Replacement felt × 2, Ceramic disc set × 1
Due to a continuous process of product improvement, the specifications and other information *
are subject to change without notice.
00MD-KH1001USH3.indb1500MD-KH1001USH3.indb15 2013/11/0815:18:372013/11/0815:18:37

English
LIMITED WARRANTY POLICY
Thank you for selecting our Products.
Please carefully read the User’s Manual furnished with this product. We believe that you will be very
satisfi ed with your purchase. We will provide the following LIMITED WARRANTY to you as the original
purchaser.
Should service be necessary for any reason due to manufacturing defect or malfunction during the
90 days period, OBJECTO will provide carry-in repair service at our FACTORY SERVICE CENTER at no
charge, and for the duration of the extended 9 months parts warranty period will replace the defective
part only, not including labor, provided the defect or malfunction is verifi ed along with the date of
purchase. In the event service is necessary, you may return the unit to our FACTORY SERVICE CENTER
listed below.
Pack the unit in a well padded heavy corrugated box. Be certain that the unit is well protected.a)
Enclose your check or money order payable to OBJECTO REPAIR CORP, in the amount of $40.00.b)
Enclose copy of proof of purchase.c)
Ship the unit prepaid via UPS or parcel post insured.d)
NOTE: This warranty does not cover.
OBJECTO products which have been damaged by negligence, misuse or accident or which have a)
been modifi ed or repaired by anyone other than our FACTORY SERVICE CENTER.
Damage to OBJECTO equipment that has been improperly connected to the equipment of other b)
manufacturers
Costs incurred in the shipping of OBJECTO products to our FACTORY SERVICE CENTER.c)
This warranty is valid only to the original purchaser and does not extend to owners of the product
subsequent to the original purchaser. Any applicable implied warranties, including the warranty of
merchantability, are limited in duration to a period of 90 days from the date of original purchase at
retail and no warranties, whether expressed or implied, shall apply to this product thereafter. Under
no circumstances shall OBJECTO be liable for any loss or damage, direct or consequential, arising
out of the use of, or inability to use this product. (Some states do not allow limitation or implied
warranties or exclusion of consequential damage, therefore these restrictions may not apply to you.)
This warranty gives you specifi c legal rights and you may also have other rights which may vary from
state to state.
The Limited Warranty Registry Card must be completely fi lled out and mailed immediately, in order a)
to validate the Limited Warranty.
You must include copy of your purchase slip when you are returning the unit.b)
Register your new product online at WWW.OBJECTO.com
SERVICE INFORMATION:
OBJECTO
935 BROADWAY, 6TH FL.
NEW YORK, NY 10010
TELEPHONE: 855-996-9099
FAX: 800-433-9099
INTERNET WEBSITE ADDRESS: WWW.OBJECTO.COM
YA13A
00MD-KH1001USH3.indb1600MD-KH1001USH3.indb16 2013/11/0815:18:372013/11/0815:18:37