OWNER’S MANUAL
MODEL AE1012-E
IMPORTANT
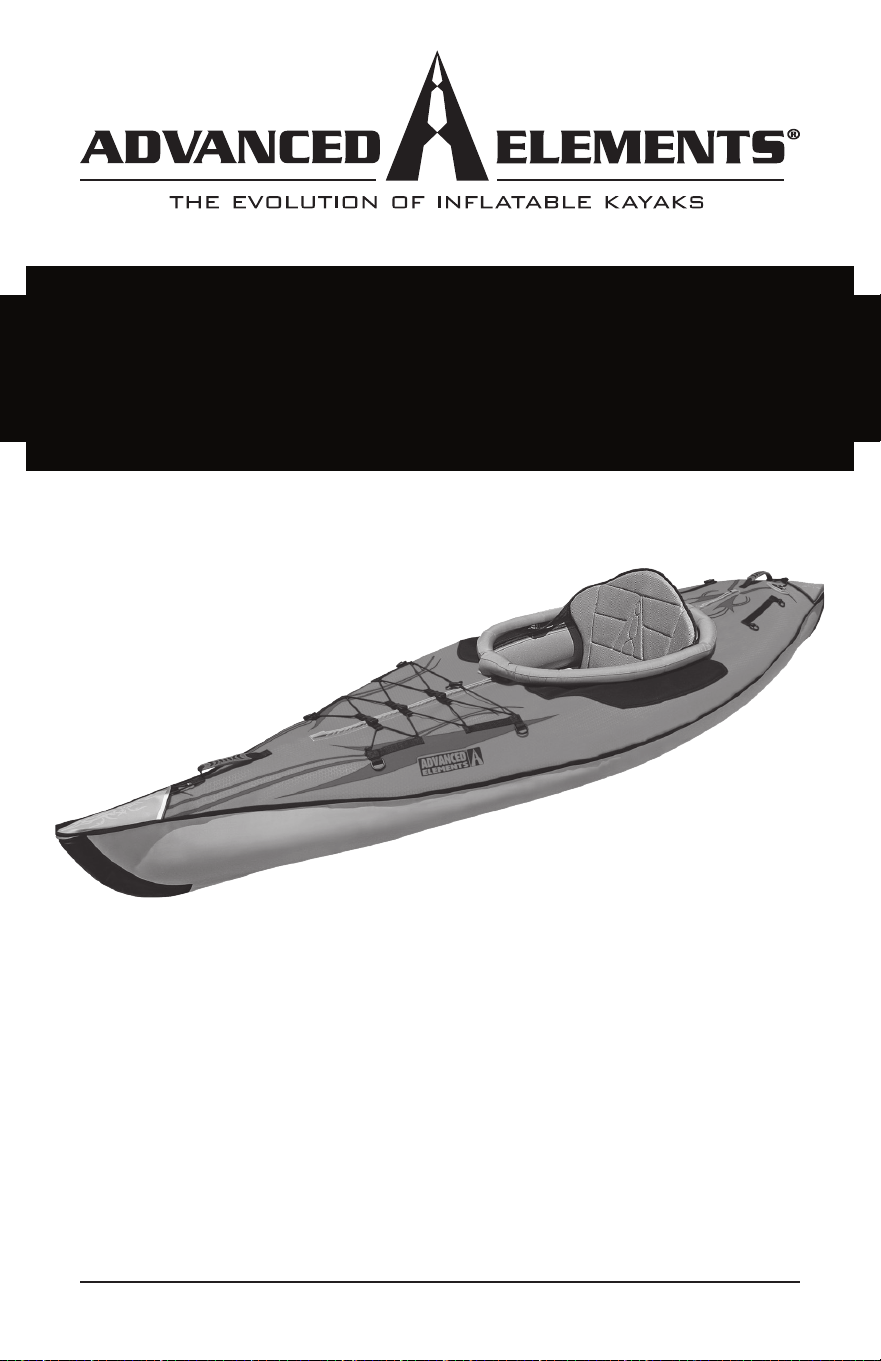
ADVANCEDFRAME ELITE
INFLATABLE KAYAK
®
IMPORTANT! PLEASE READ THIS MANUAL CAREFULLY BEFORE PROCEEDING.
AFTER READING THIS MANUAL, SAVE THESE INSTRUCTIONS FOR FUTURE REFERENCE.
ADVANCED ELEMENTS, INC 2022 REV 10-2022
1 PERSON KAYAK


AdvancedFrame® Inatable Kayak Owner’s Manual
3
TABLE OF CONTENT
1. Caution – Safety Warning ........................................................4
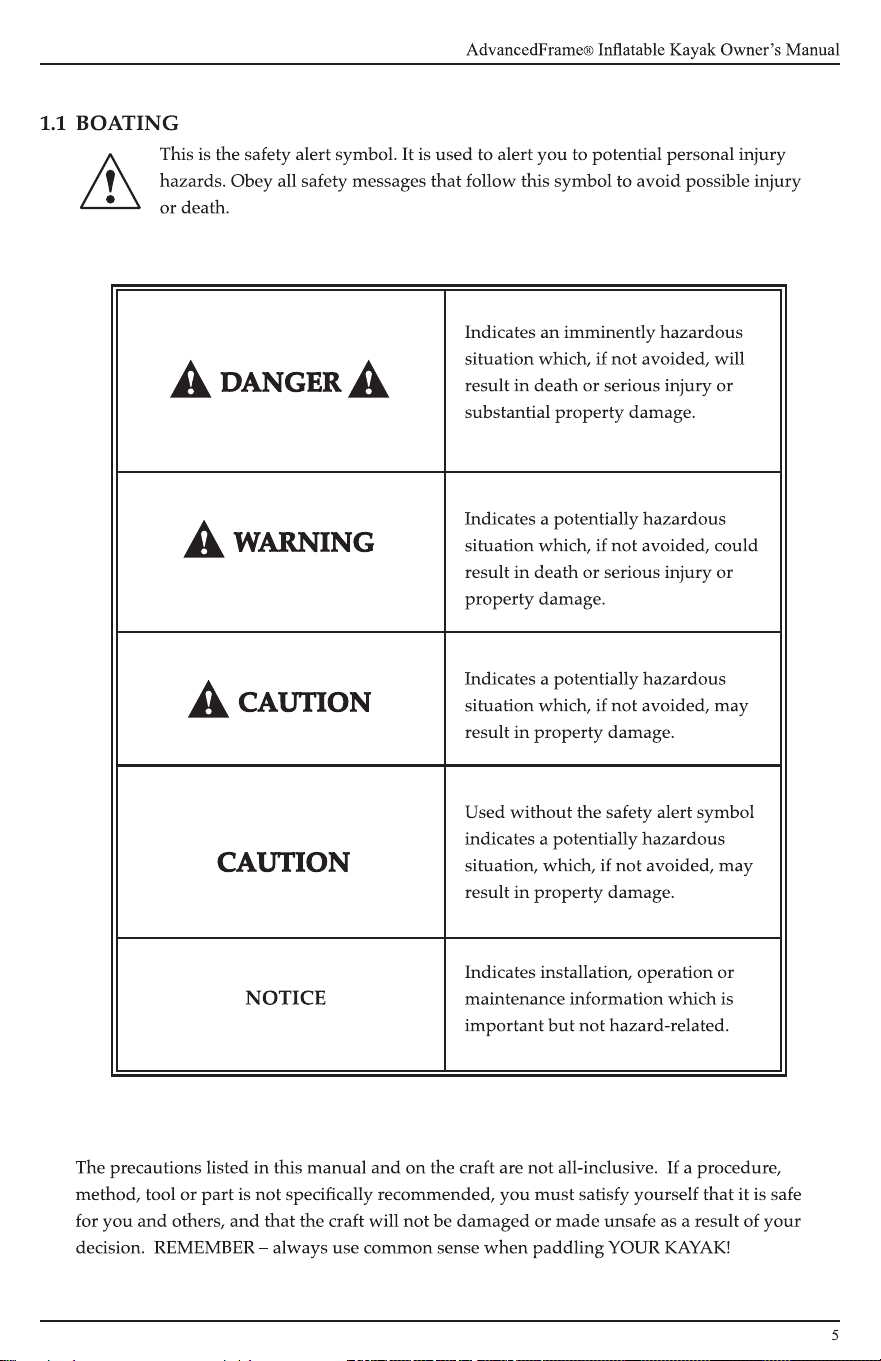
1.1 Boating Safety ...................................................................5
2. Specifications .............................................................................6
2.1 Capacity .............................................................................6
2.2 Features..............................................................................6
3. Assembly/Inflating/Deflation Instruction .............................7
3.1 Assembly ...........................................................................7
3.2 Understanding Your Valves ...........................................8
3.3 Inflation And Setup In 3 Simple Stages ......................10
3.4 Over Inflation And Temperature Regulation............11
3.5 Deflation ..........................................................................12
3.6 Folding .............................................................................12
4. Guidelines For Usage .............................................................12
5. Proper Care And Storage .......................................................13
6. Repairs ......................................................................................14
6.1 Repairing Small Punctures And Cuts Using The
Peel-And-Stick Patch .....................................................14
6.2 Repairing Pinholes .........................................................14
7. Troubleshooting ......................................................................14
Manufacturer’s Statement Of Origin (MSO) ...........................17
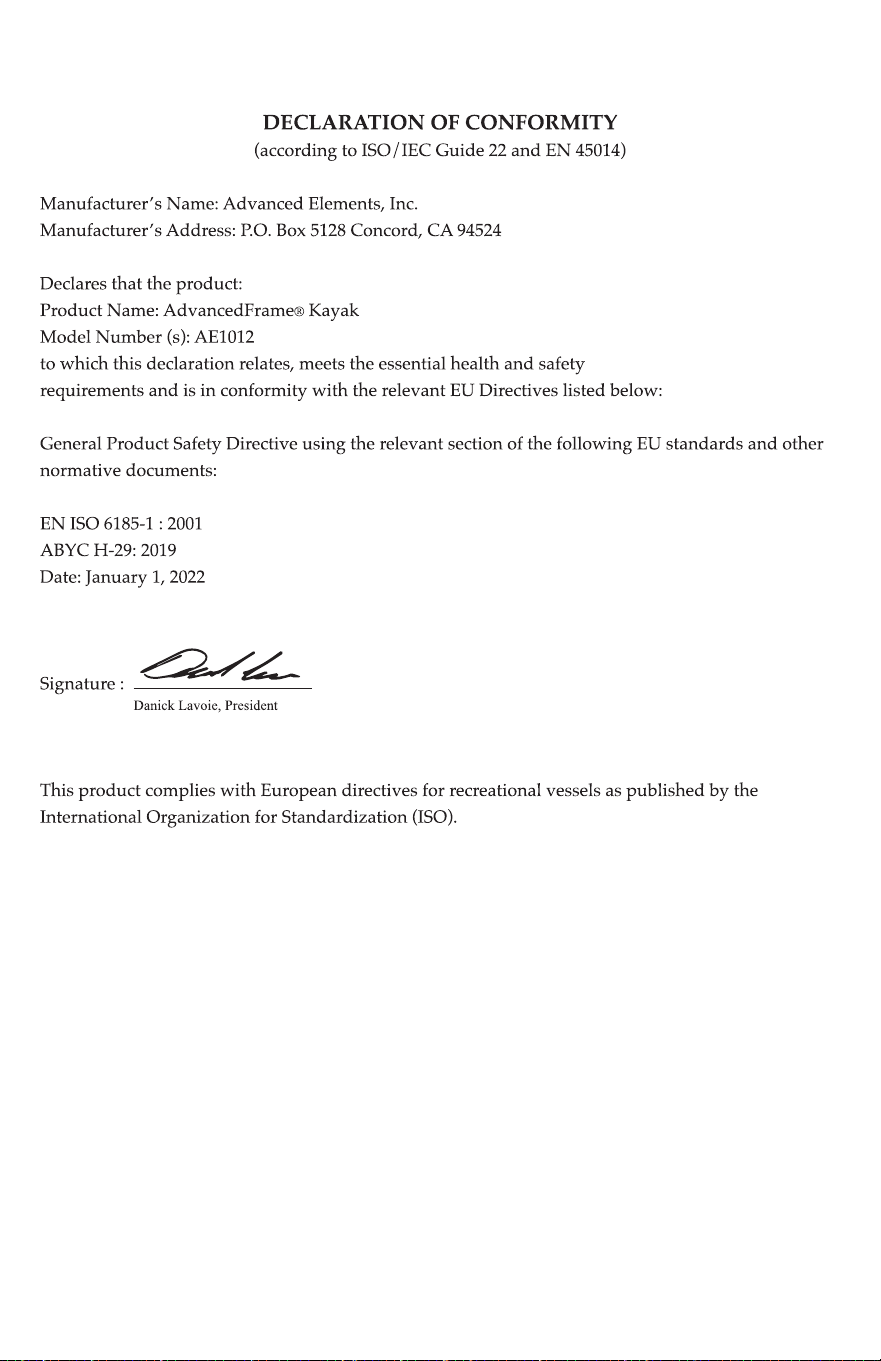
Declaration Of Conformity ........................................................18
Limited Warranty ........................................................................19
Section 2 : Français
6
2. SPECIFICATIONS
Dimensions:
Length: 10’5” (317 cm)
Width: 32” (81 cm)
Weight: 36 lbs (16 kg)
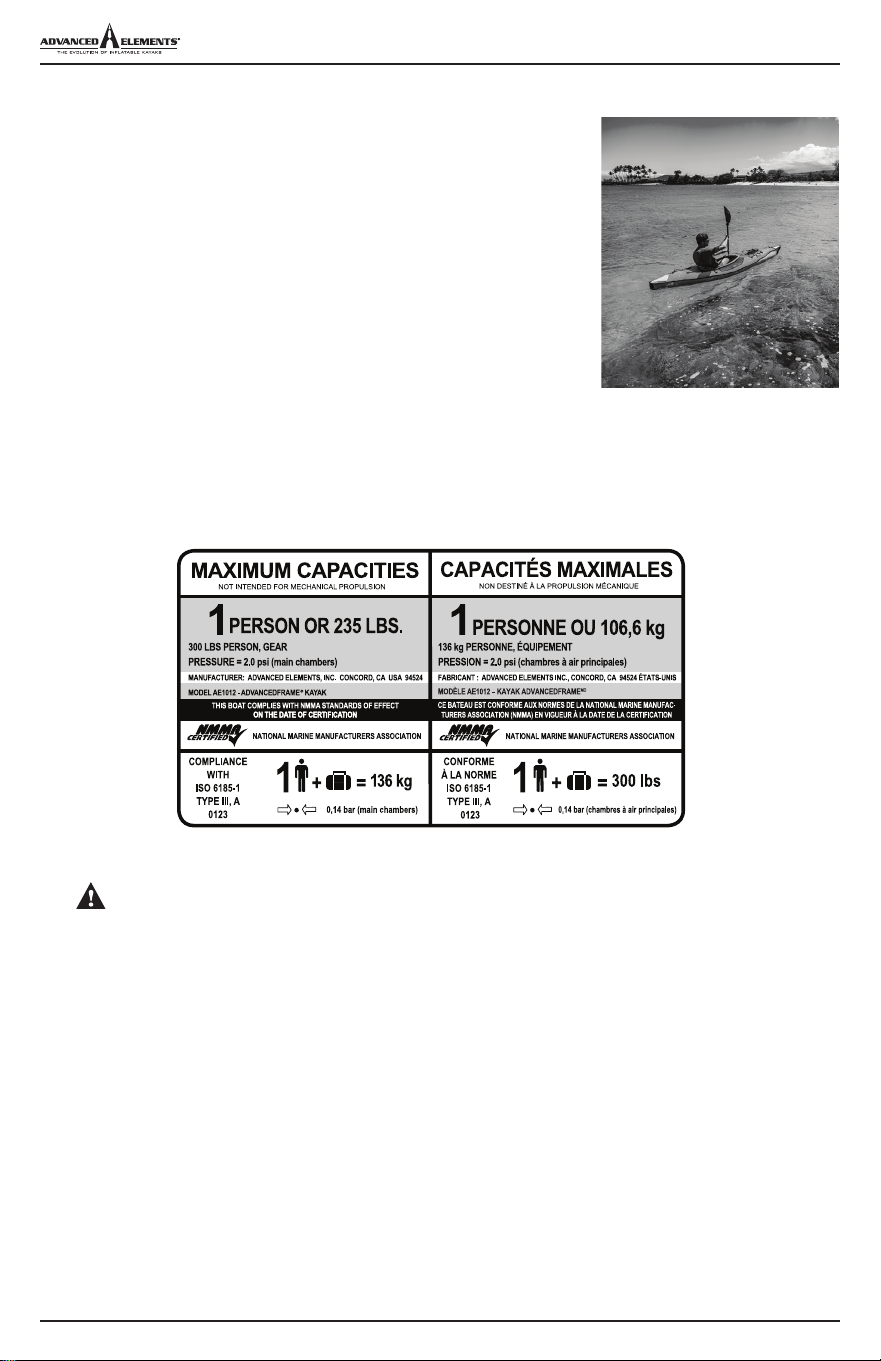
Max. Person Capacity: 235 lbs (107 kg)
Max. Persons & Gear Capacity: 300 lbs (136 kg)
Recommended Pressure:
Main chambers: 2.0 psi (0.14 bar)
Floor chambers: 6.0 psi (0.41 bar)
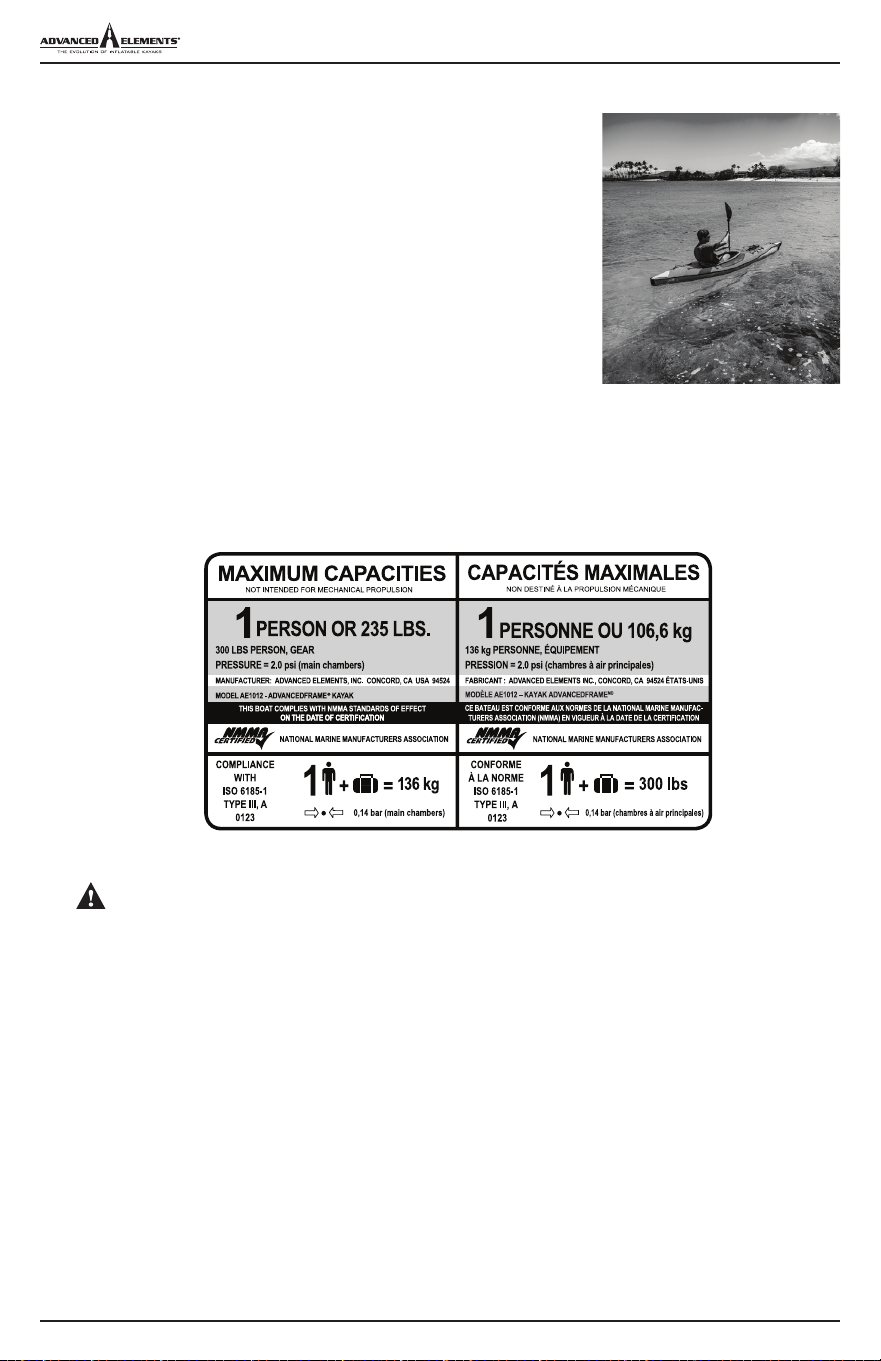
2.1 CAPACITY
The person/load capacity is determined by the availability of proper seating on the kayak.
Acceptable seating determines the number of passengers, not the overall load capacity.
WARNING: Do not exceed the certied maximum capacities under any circumstances.
Overloading will reduce freeboard and increase the likelihood of swamping, especially in heavy
seas. Overloading causes handling to become sluggish, making it dicult to react quickly.
2.2 FEATURES
Hull Design: Built-in Aluminum ribs dene the bow and stern and improve tracking.
Durable: 3 Layers of material for extreme puncture resistance.
Easy to Set Up: Pre-assembled at the factory. Simply unfold, inate and aach the seat.
Comfortable: High support, adjustable padded seat provides comfort for hours of paddling.
Style : Looks and paddles similar to a rigid hard shell kayak with the portability of an inatable.
AdvancedFrame® Inatable Kayak Owner’s Manual
7
3. ASSEMBLY/INFLATING/DEFLATION INSTRUCTION
The AdvancedFrame Kayak has a rigid frame in the bow and stern that enhances its
performance.
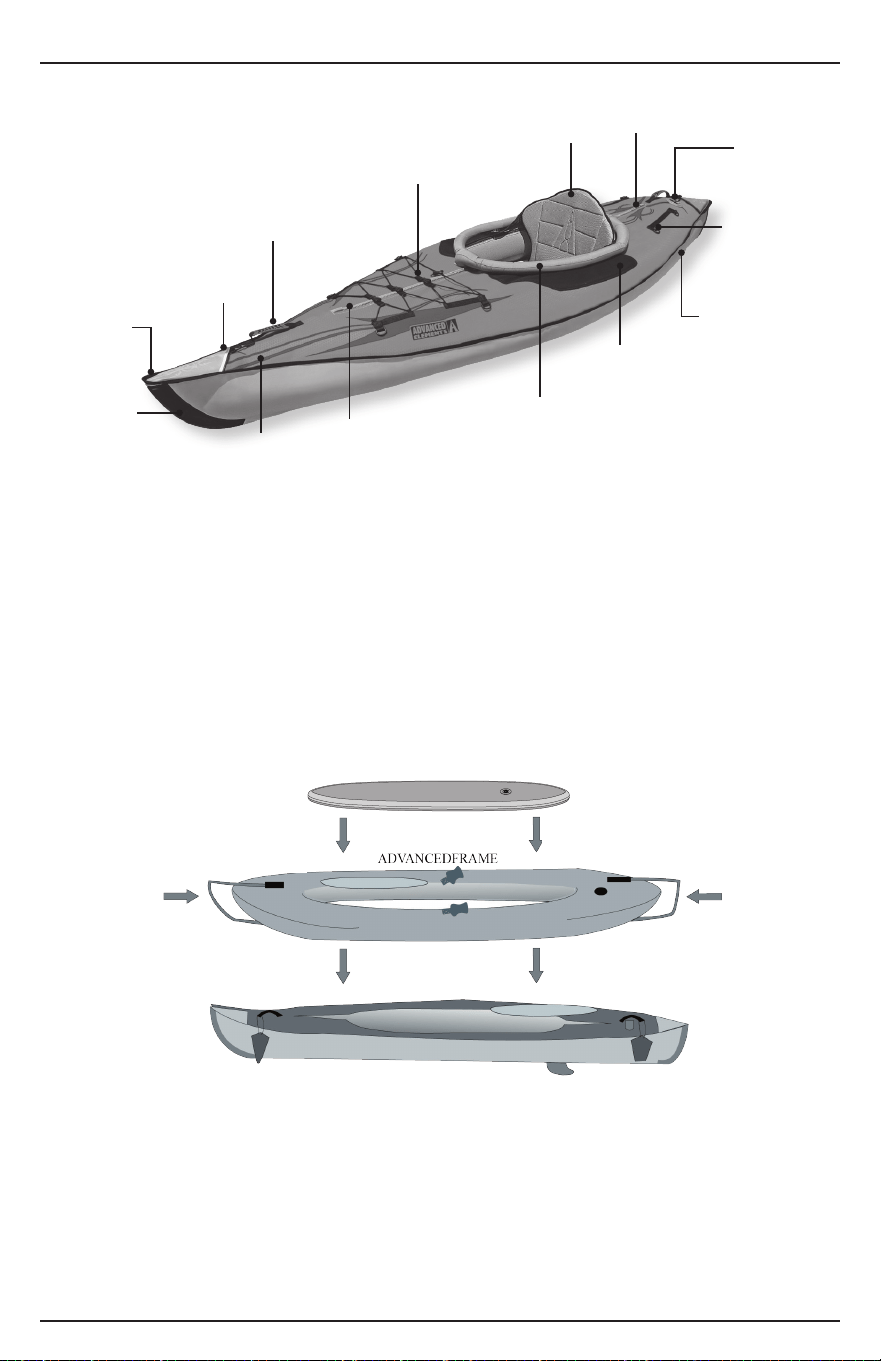
3.1 ASSEMBLY
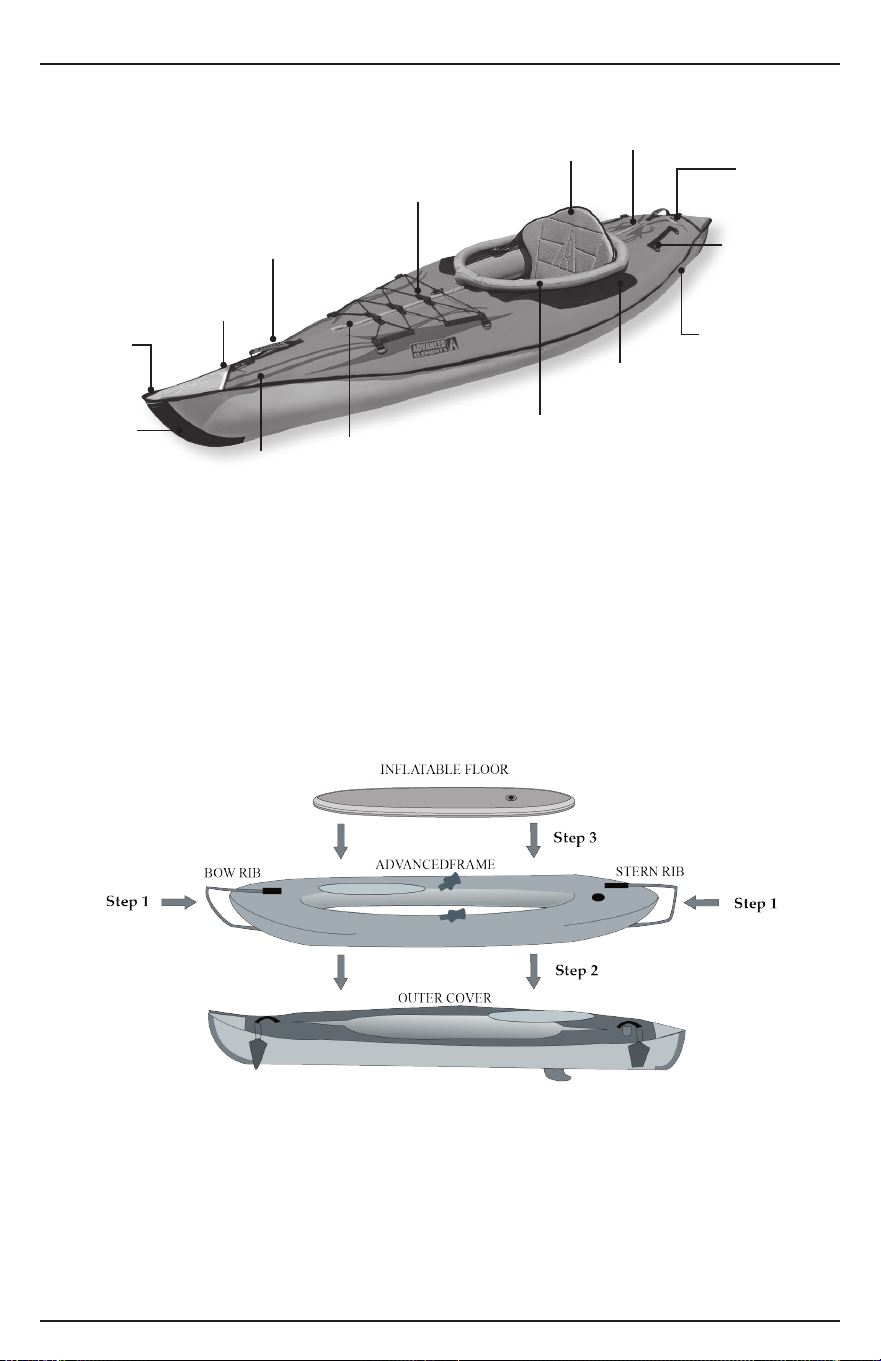
The illustration below shows the general assembly of the kayak. Your kayak comes from the
factory pre-assembled. The only assembly your should need to do is aach the adjustable seat.
1. Your AdvancedFrame kayak comes from the factory pre-assembled however should you take
it apart you will need to insert the aluminum Bow rib and the Stern Rib into the webbing slots
on the cover of the AdvancedFrame tube (while deated).
2. Place the AdvancedFrame (with Ribs installed), into the Outer Skin, making sure that the air
valve is upright and at the back of the boat, and lined up with the opening on the outer cover
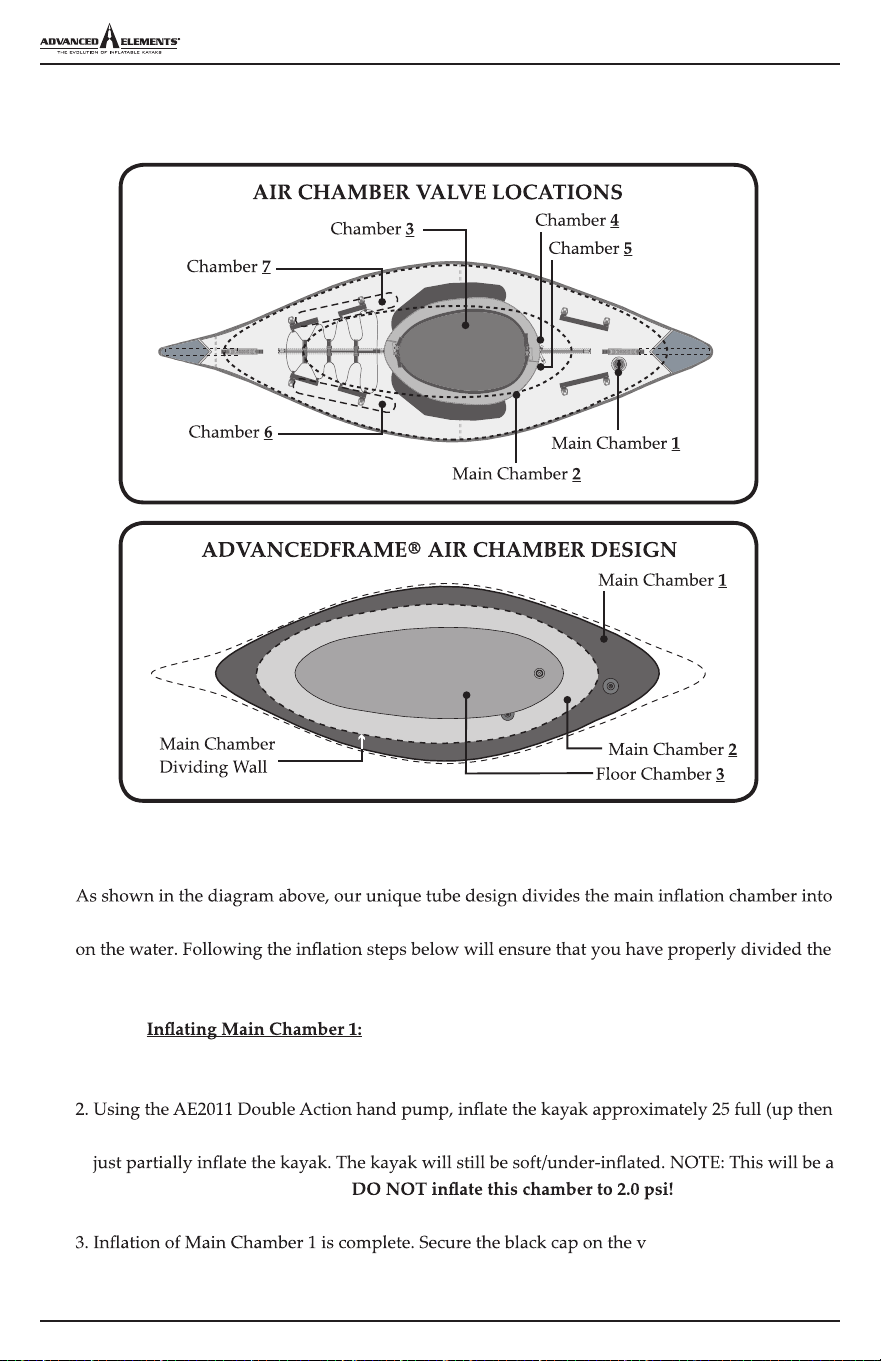
Chamber 1 and 2 are separate chambers but equalize in pressure because they are inside a
Bungee Deck
Lacing
Adjustable High-
Back Seat
Storage
Compartment
Molded Rubber
Carry Handle
Welded
Seams
Reinforced
Bow Seam
Hard Edge
Bow & Stern
Durable Double
Coated Fabric
Zipper Lips
Inatable Coaming
for Spray Skirt
Aachment
Neoprene Paddle
Guard
Skeg/
Tracking Fin
D-ring
Tie-Downs
Advanced
Elements
Spring
Valve
®
3.3 INFLATION AND SETUP IN 3 SIMPLE STAGES
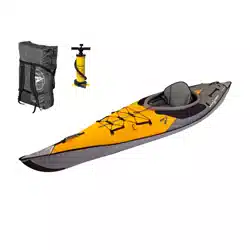
For the best setup experience, we recommend using the Advanced Elements Double Action
Hand Pump with Gauge (AE2011) which provides 4,000 cc’s per full cycle stroke.
two separate air chambers that encircle the entire kayak. This provides optimum safety when out
air into the two main chambers, not only for proper performance, but for safety as well.
STEP 1 :
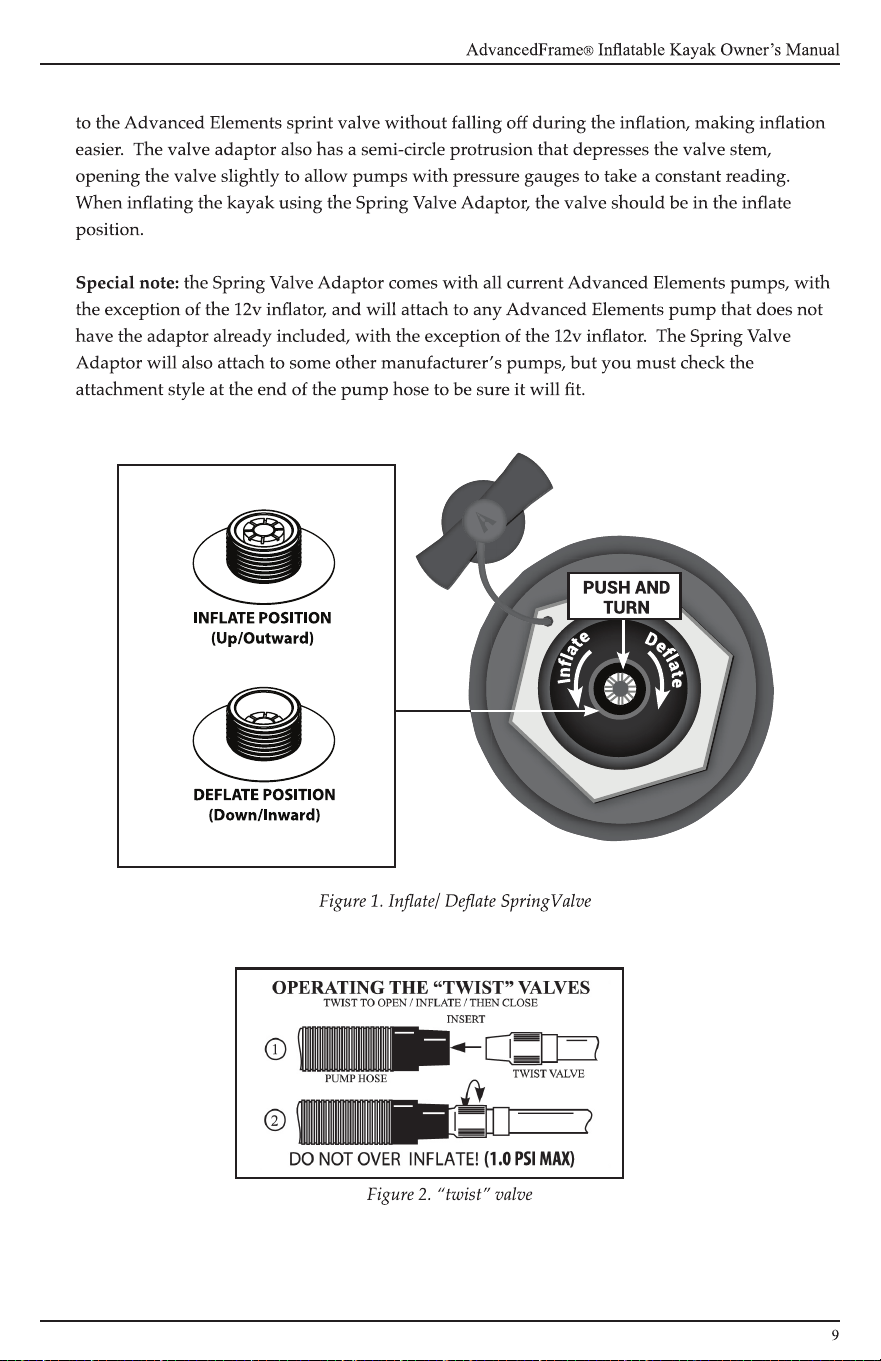
1. Starting with Main Chamber 1, check to be sure that the valve plunger is UP or in the
INFLATE position (See Figure 1 on previous page).
down) strokes until the kayak begins to take shape. If using another pump, the key here is to
minimal amount of air pressure.
DO NOT PUT ALL OF THE AIR PRESSURE IN THIS CHAMBER.
alve and proceed to
Main Chamber 2.
10
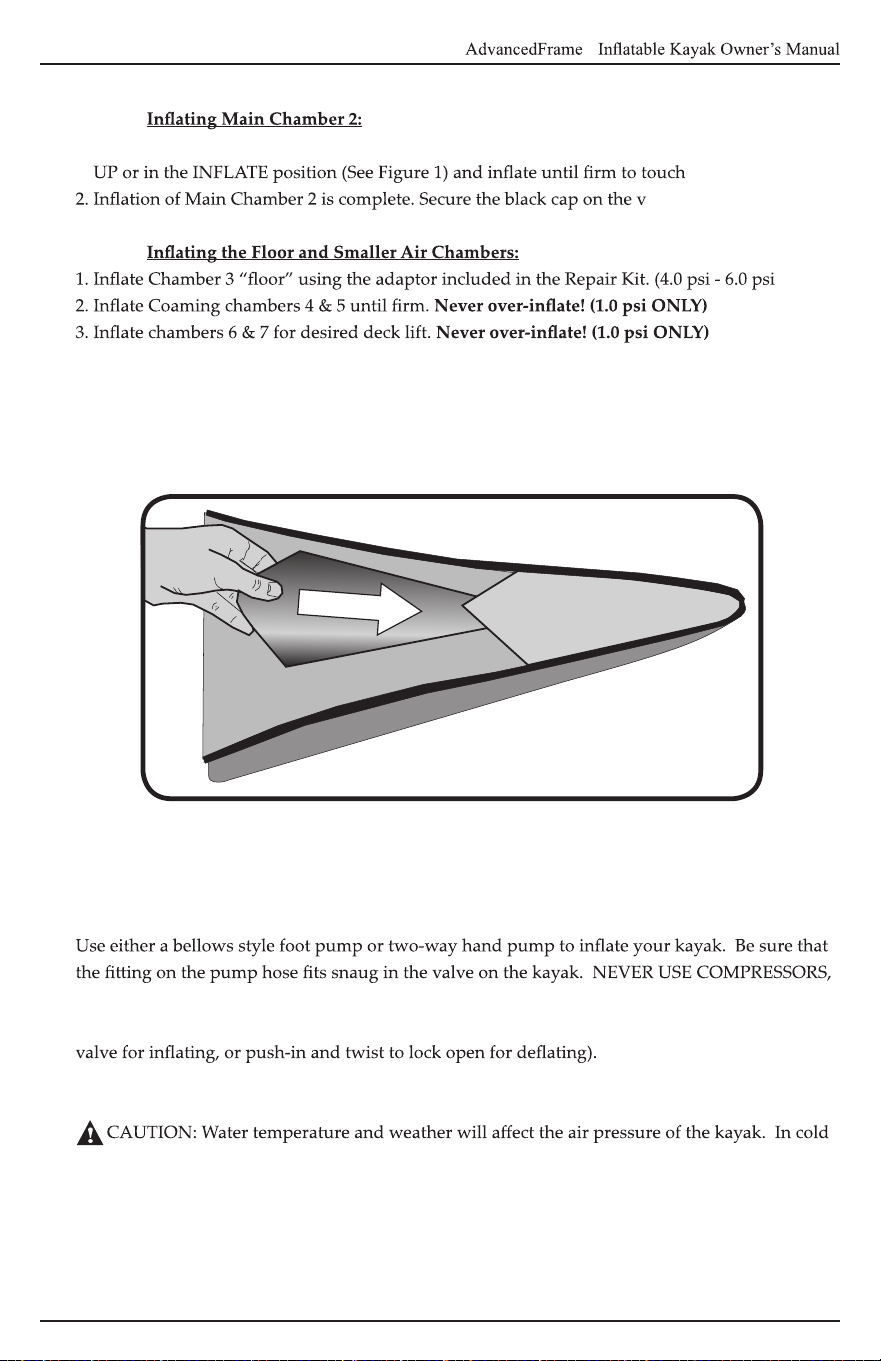
STEP 2 :
1. Moving to Main Chamber 2 on the inside of kayak, check to be sure that the valve plunger is
(2.0 psi ONLY).
alve.
STEP 3 :
MAX)
4. Make sure all valves are closed tightly and properly.
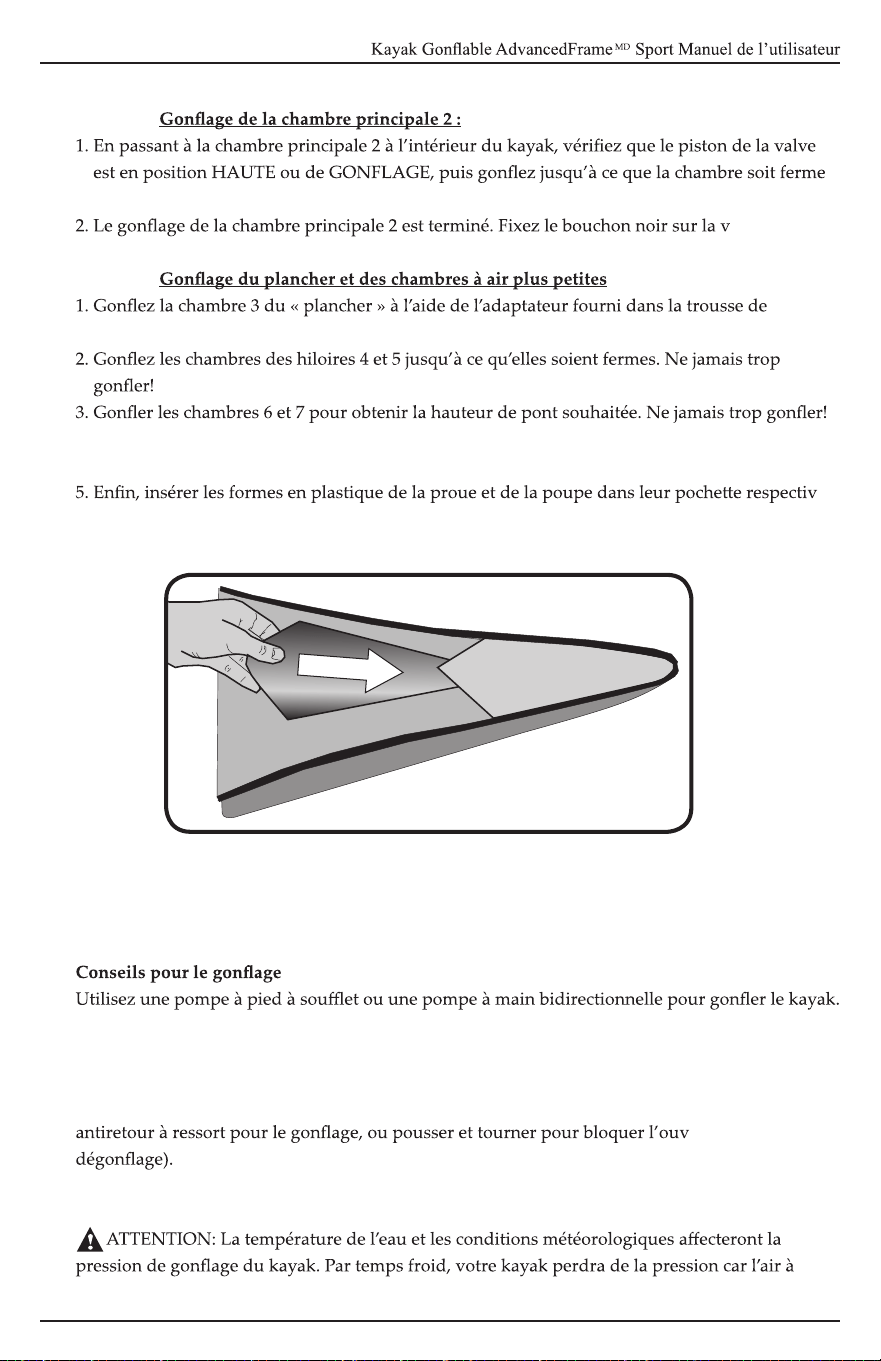
5. Finally, insert plastic Bow and Stern Forms into the grey pockets on the bow and stern of the
kayak. (See Figure 3).
INFLATION TIPS
CO2, OR COMPRESSED AIR AS THEY MAY DAMAGE YOUR KAYAK. The main chambers use
high-end military style, plunger valves (Push in and twist to activate the spring-loaded check
3.4 OVER INFLATION AND TEMPERATURE REGULATION
weather and water your kayak will lose some pressure. If this occurs, you may want to add a
bit more air to the kayak to improve performance. In hot weather or prolonged sunlight, the air
inside the kayak will expand. You must let some air out of the appropriate chambers to prevent
the kayak from failing due to overpressure. You should avoid exposing your kayak to extreme
temperatures (hot or cold).
Figure 3. Plastic Bow and Stern Insert
11
®
3.5 DEFLATION
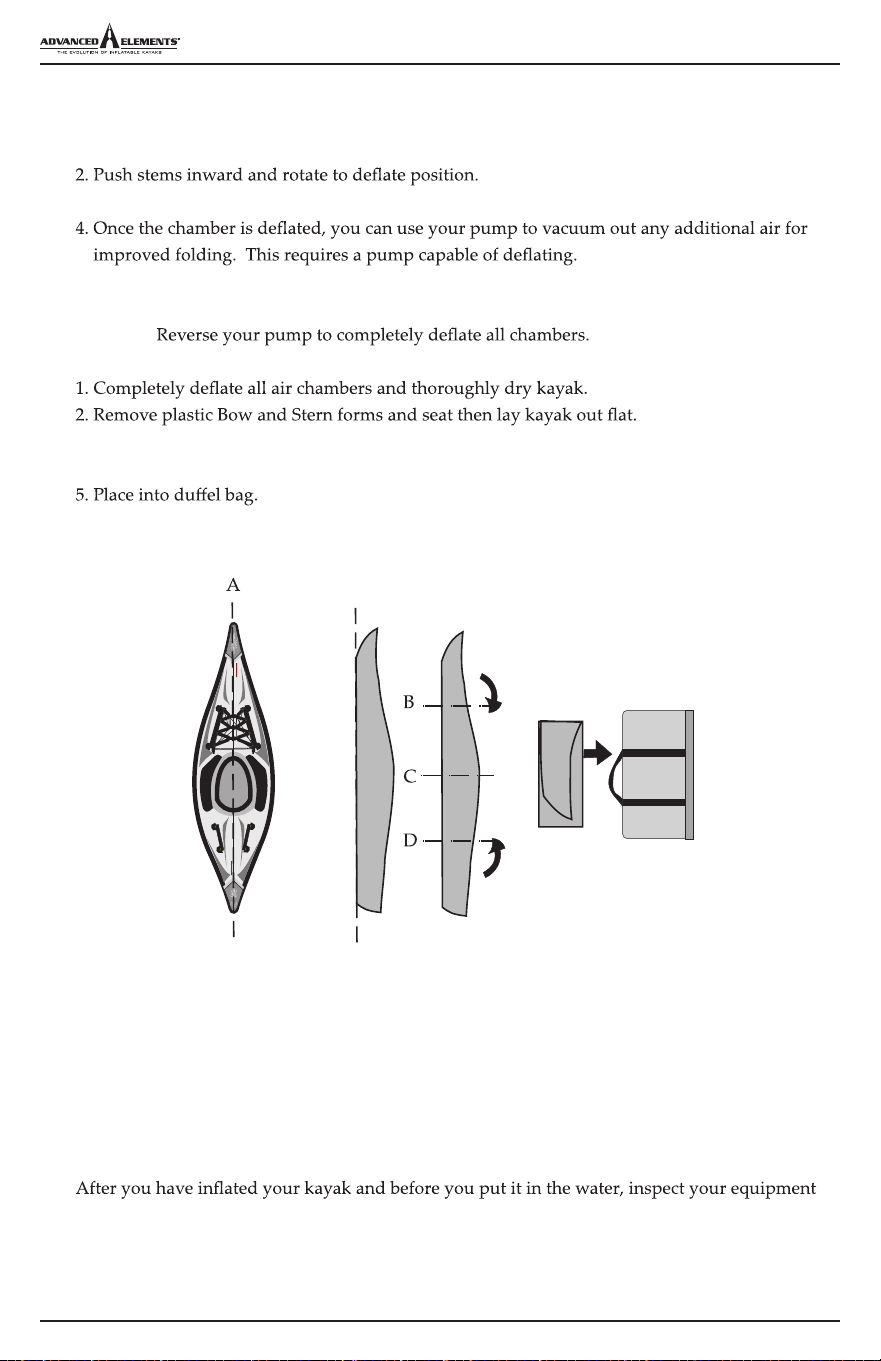
1. Remove the caps from chamber 1, 2 & 3.
3. Open twist valves on chambers 4 through 7.
3.6 FOLDING
NOTICE:
3. Fold in half, down the center (right to left)(A).
4. Fold into 4 equal sections.
4. GUIDELINES FOR USAGE
Paddlesports can be very dangerous and physically demanding. The user of this product should
understand that participation in paddlesports may involve serious injury or death. Observe the
following safety standards whenever using this product. The user of this product acknowledges
both an understanding and an assumption of the risk involved in paddlesports.
for obvious signs of wear or failure. Review local rules and regulations and read again the
“CAUTION” statement.
FOLDFOLD
FOLD
FOLD
12
13
®
14
15
®

16

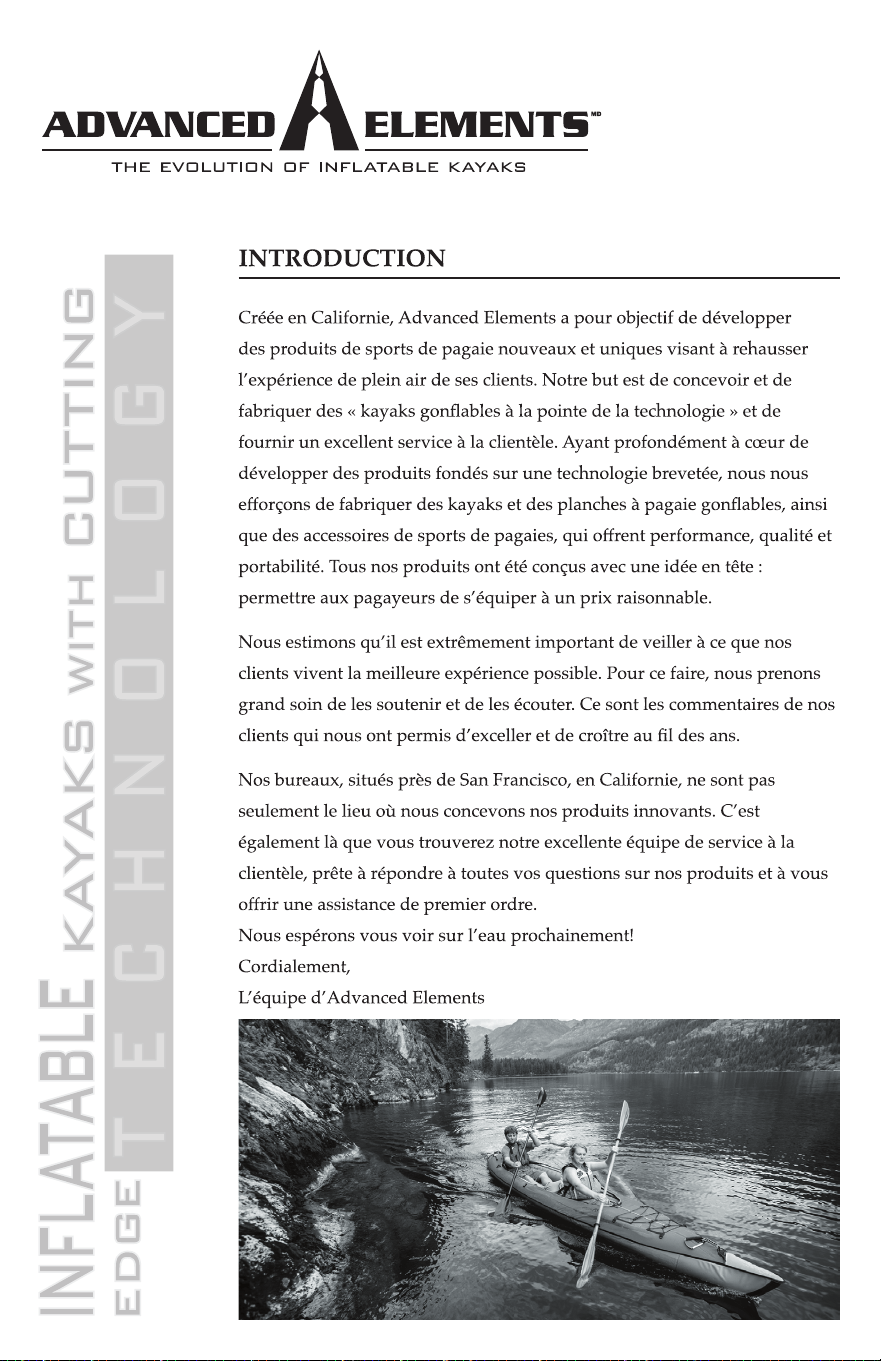
MANUEL DE L’UTILISATEUR
MODÈLE AE1012-E
IMPORTANT
KAYAK GONFLABLE
ADVANCEDFRAME ELITE
MD
IMPORTANT! VEUILLEZ LIRE ATTENTIVEMENT LE PRÉSENT MANUEL AVANT D’UTILISER LE PRODUIT
ET LE CONSERVER POUR RÉFÉRENCE FUTURE.
ADVANCED ELEMENTS, INC 2022 REV 10-2022
KAYAK POUR 1 PERSONNE

Kayak Gonable AdvancedFrame Sport Manuel de l’utilisateur
3
MD
TABLE DES MATIÈRES
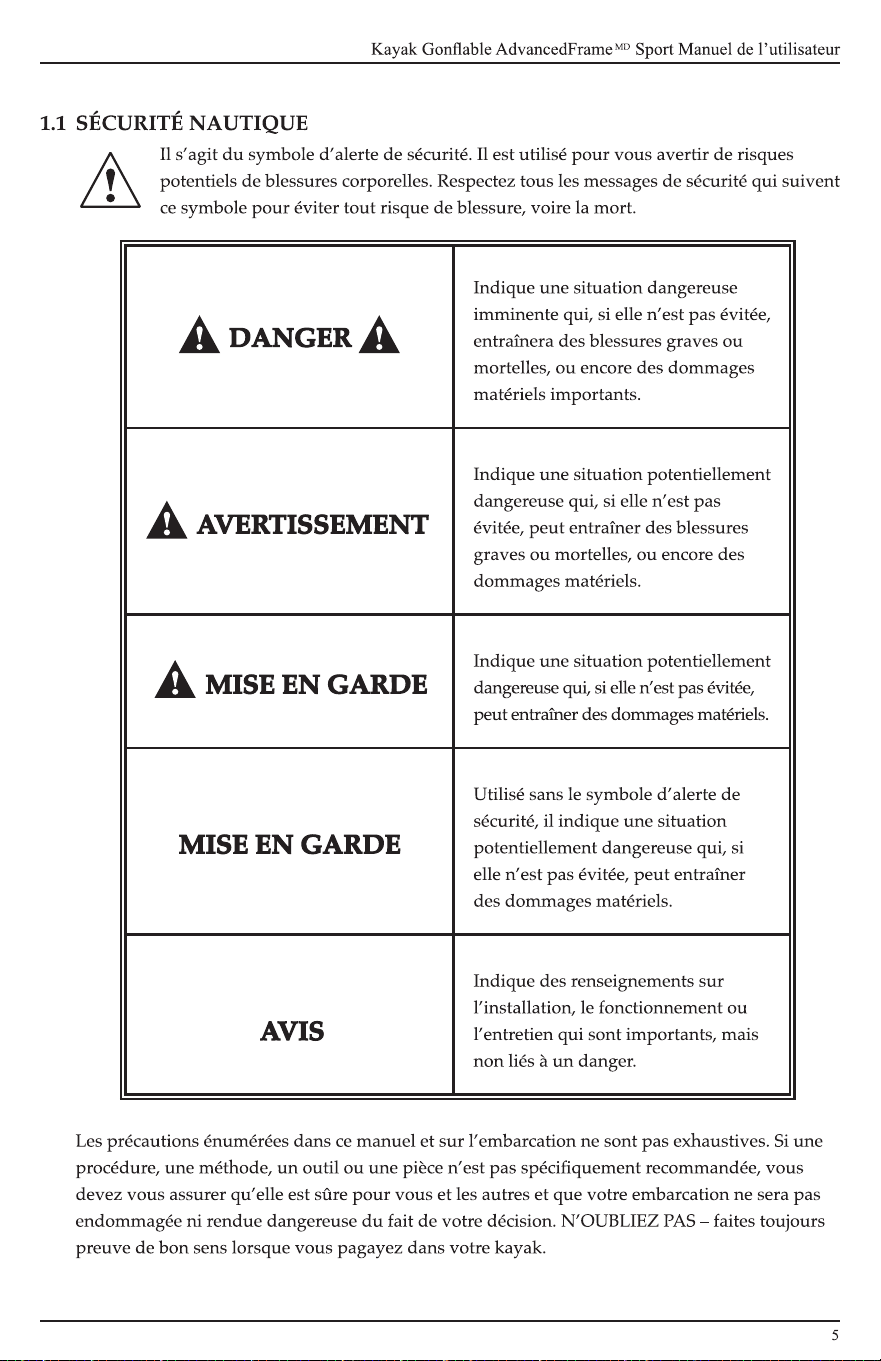
1. Mise en garde et sécurité ..........................................................4
1.1 Sécurité Nautique .............................................................5
2. Spécifications .............................................................................6
2.1 Capacité .............................................................................6
2.2 Caractéristiques ................................................................6
3. Instructions d’assemblage, de gonflage et de dégonflage ..7
3.1 Assemblage .......................................................................7
3.2 Comprendre vos valves ..................................................8
3.3 Gonflage et installation en trois étapes simples ........10
3.4 Surgonflage ......................................................................11
3.5 Dégonflage ......................................................................12
3.6 Pliage ................................................................................12
4. Lignes directrices pour l’utilisation ......................................12
5. Entretient adéquat et rangement ..........................................13
6. Réparations ..............................................................................14
6.1 Réparer les petites perforations et coupures à l’aide
de la rustine autocollante ..............................................14
6.2 Réparer les trous d’épingle ...........................................14
7. Dépannage ...............................................................................15
Déclaration d’origine du Fabricant ..........................................18
Déclaration de conformité .........................................................19
Garantie limitée ...........................................................................20
6
2. SPÉCIFICATIONS
Dimensions:
Longueur: 10’5” (317 cm)
Largeur: 32” (81 cm)
Poids: 36 lbs (16 kg)
Capacité maximale (personnes): 235 lbs (107 kg)
Capacité maximale (personnes et équipement): 300 lbs (136 kg)
Pression recommandée:
Chambres à air principales: 2.0 psi (0.14 bar)
Chambre à air de plancher: 6.0 psi (0.41 bar)
2.1 CAPACITÉ
La capacité (personne / charge) est déterminée par la disponibilité de sièges appropriés sur le
kayak. Les places assises acceptables déterminent le nombre de passagers et non la capacité de
charge globale.
ATTENTION: Ne dépassez en aucun cas les capacités maximales certiées. La surcharge
réduira le franc-bord et augmentera les risques d’inondation, en particulier par forte mer. La
surcharge entraîne un ralentissement de la manipulation, rendant dicile une réaction rapide.
2.2 CARACTÉRISTIQUES
Conception de la coque : Des membrures en aluminium intégrées façonnent la proue et la poupe et
facilitent la manœuvre.
Durable : Trois couches de matériaux orent une résistance extrême aux perforations.
Facile à installer : préassemblé en usine. Il sut de le déplier, de le goner et de xer le siège.
Confortable : des heures à naviguer en tout confort grâce au siège rembourré réglable orant un
excellent soutien.
Style : L’apparence et le pagayage sont semblables à celui d’un kayak à coque dure, mais la
portabilité est celle d’un kayak gonable.
Kayak Gonable AdvancedFrame Sport Manuel de l’utilisateur
7
MD
3. INSTRUCTIONS D’ASSEMBLAGE, DE GONFLAGE ET DE DÉ-
GONFLAGE
La proue et la poupe du kayak AdvancedFrame sont dotées d’un cadre rigide qui améliore sa
performance.
3.1 ASSEMBLAGE
L’illustration ci-dessous montre l’assemblage général du kayak. Votre kayak a été préassemblé en
usine. Vous n’avez qu’à xer le siège réglable.
1. Votre kayak AdvancedFrame a été préassemblé en usine. Toutefois, si vous le démontez, vous
devrez insérer les membrures en aluminium de proue et de poupe dans les fentes des sangles
de l’enveloppe du tube AdvancedFrame (lorsque le kayak est dégoné).
2. Placez l’AdvancedFrame (avec les membrures installées) dans le revêtement extérieur, en vous
assurant que la valve à air est à la verticale et à l’arrière de l’embarcation, et qu’elle est alignée
sur l’ouverture de l’enveloppe extérieure. Les chambres 1 et 2 sont des chambres distinctes,
Cordage élastique
pour gréement du pont
Siège à dossier
haut réglable
Compartiment
de rangement
Poignée de transport
en caoutchouc moulé
Coutures
soudées
Coutures
renforcé à
la proue
Proue et
poupe à bord
dur
Confection
multicouche
durable
Fermeture
à glissière
Hiloire gonable
pour xation de la
jupee
Protège-pagaie
en néoprène
Aileron de
direction
Anneaux
d’arrimage
en D
Valves
à ressort
Advanced
Elements
ÉTAPE 3
ÉTAPE 2
ÉTAPE 1ÉTAPE 1
PLANCHER GONFLABLE
MD
MEMBRURE DE PROUE
REVÊTEMENT EXTÉRIEUR
MEMBRURE DE POUPE
3.3 GONFLAGE ET INSTALLATION EN TROIS ÉTAPES SIMPLES
Pour une mise en place optimale, nous vous recommandons d’utiliser la pompe à main à double
action Advanced Elements avec jauge (AE2011), qui fournit 4 000 cm3 par cycle complet.
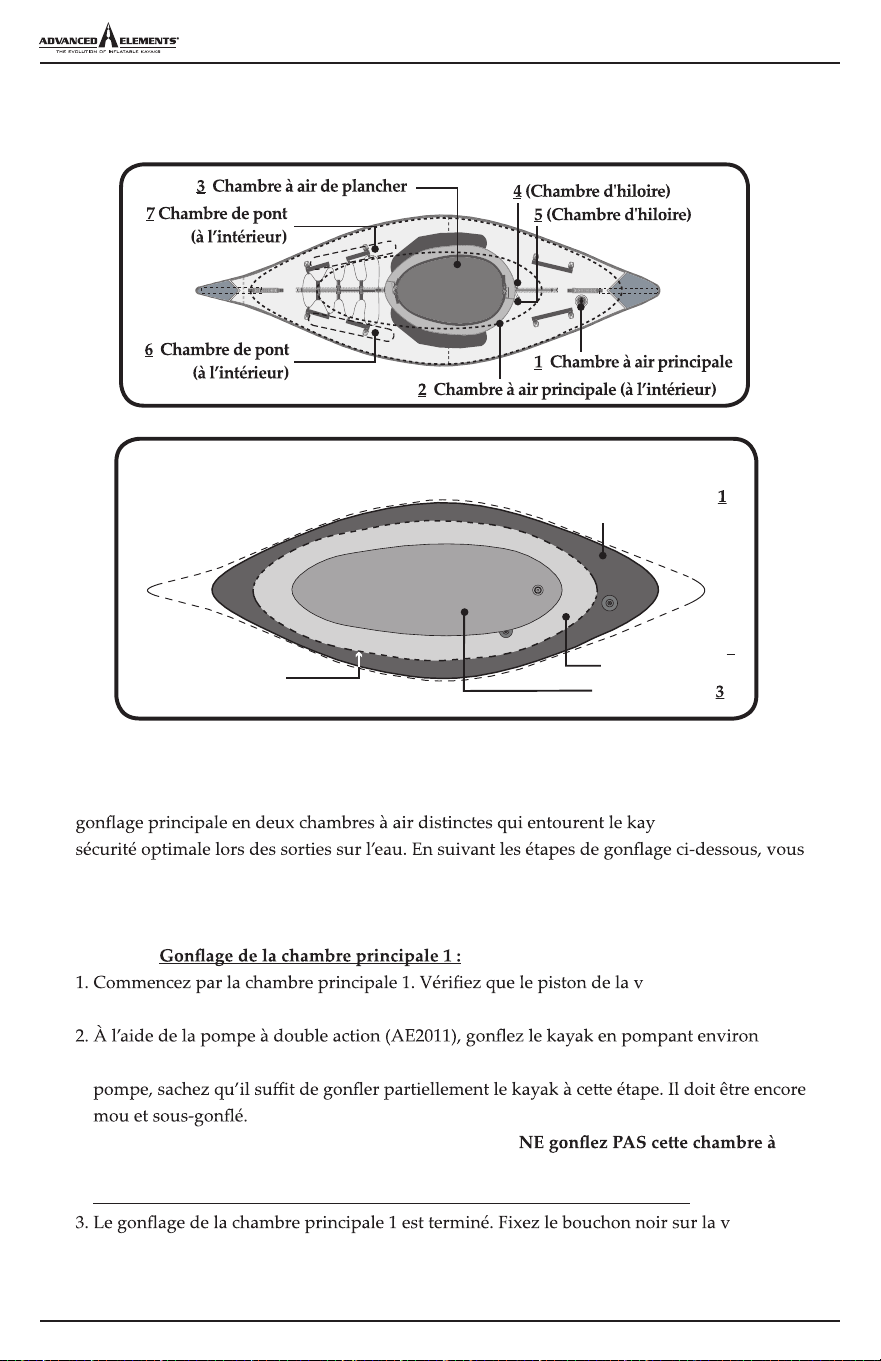
Comme le montre le diagramme ci-dessus, notre conception de tube unique divise la chambre de
ak. Cela assure une
vous assurerez d’avoir correctement réparti l’air dans les deux chambres principales, non
seulement pour des performances adéquates, mais aussi pour la sécurité.
ÉTAPE 1 :
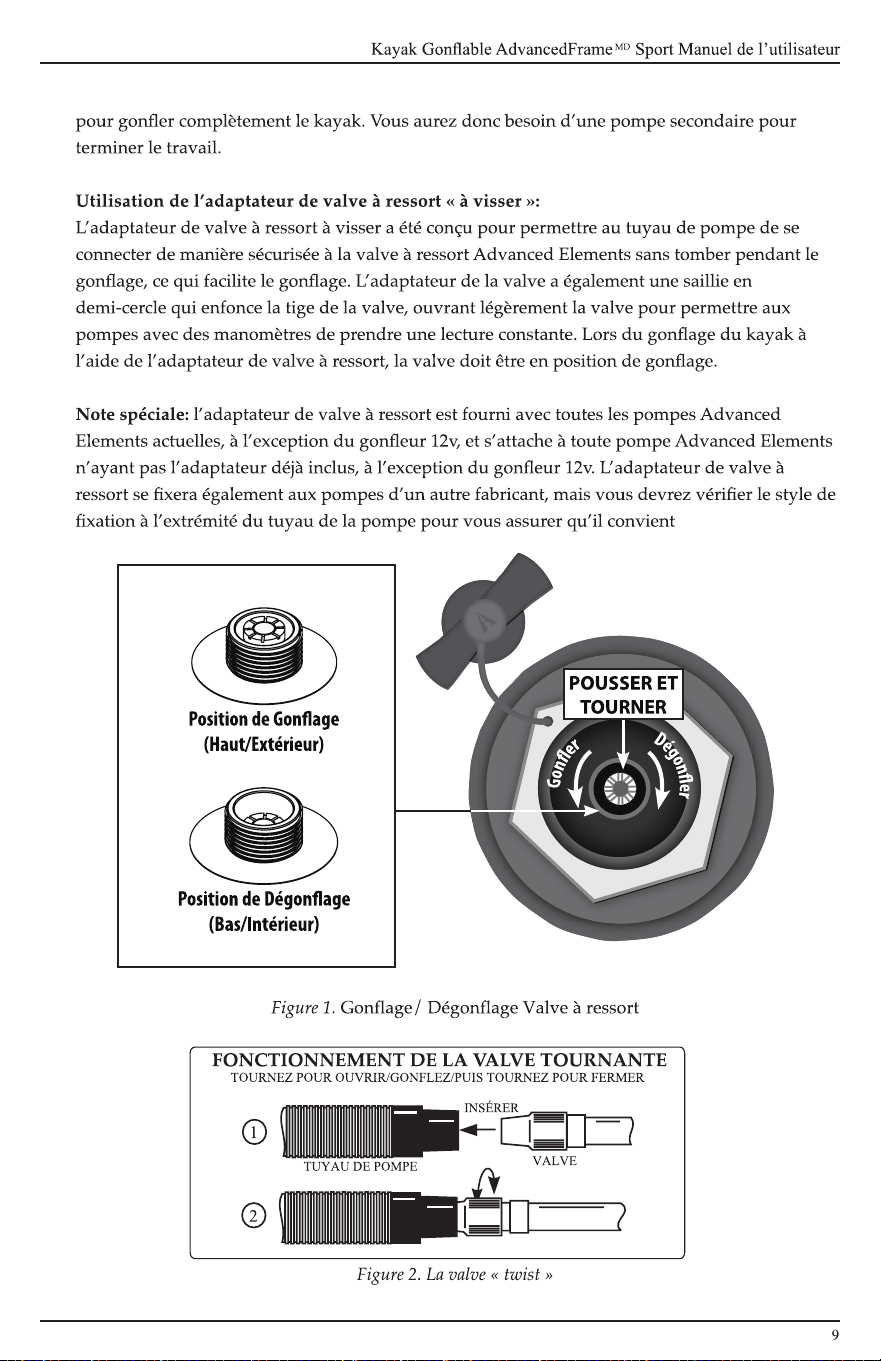
alve est en position
HAUTE ou de GONFLAGE.
25 fois
(montée et descente) jusqu’à ce qu’il commence à prendre forme. Si vous utilisez une autre
REMARQUE : Il s’agit d’une pression d’air minimale.
0,14 bar (2,0 psi)!
NE METTEZ PAS TOUTE LA PRESSION D’AIR DANS CETTE CHAMBRE.
alve et passez
à la chambre principale 2.
3
Structure des chambres à air de l’AdvancedFrame
Chambre à air
principale
Chambre à air
principale
Chambre à air
de plancher
Mur de séparation
de la chambre
principale
MD
2
10
11
ÉTAPE 2 :
au toucher (0,14 bar [2,0 psi] SEULEMENT).
alve.
ÉTAPE 3 :
réparation (0,27 à 0,41 bar [4,0 psi à 6,0 psi] MAX)
(0,07 bar [1,0 psi] SEULEMENT).
(0,07 bar [1,0 psi] SEULEMENT).
4. Assurez-vous que toutes les valves sont correctement fermées.
e.
Assurez-vous que le tuyau de la pompe se raccorde bien à la valve du kayak. N’UTILISEZ
JAMAIS DE COMPRESSEURS, DE DIOXYDE DE CARBONE OU D’AIR COMPRIMÉ, CAR ILS
POURRAIENT ENDOMMAGER VOTRE KAYAK. Les chambres principales sont dotées
de valves à piston de type militaire haut de gamme (pousser et tourner pour activer le clapet
erture pour le
3.4 SURGONFLAGE
Figure 3. formes en plastique de la proue et de la poupe
l’intérieur se contracte. Si cela se produit, vous pouvez ajouter un peu d’air pour améliorer les
performances de votre kayak. Cependant, par temps chaud ou en plein soleil prolongé, l’air à
l’intérieur va se dilater. Dans ce cas, vous devez laisser de l’air sortir des chambres appropriées
pour éviter que le kayak ne soit endommagé par une surpression. Vous devez éviter d’exposer
votre kayak à des températures extrêmes (chaudes ou froides).
3.5 DÉGONFLAGE
1. Enlevez le bouchon des chambres 1, 2 et 3.
3. Ouvrez les valves twist des chambres 4 à 7.
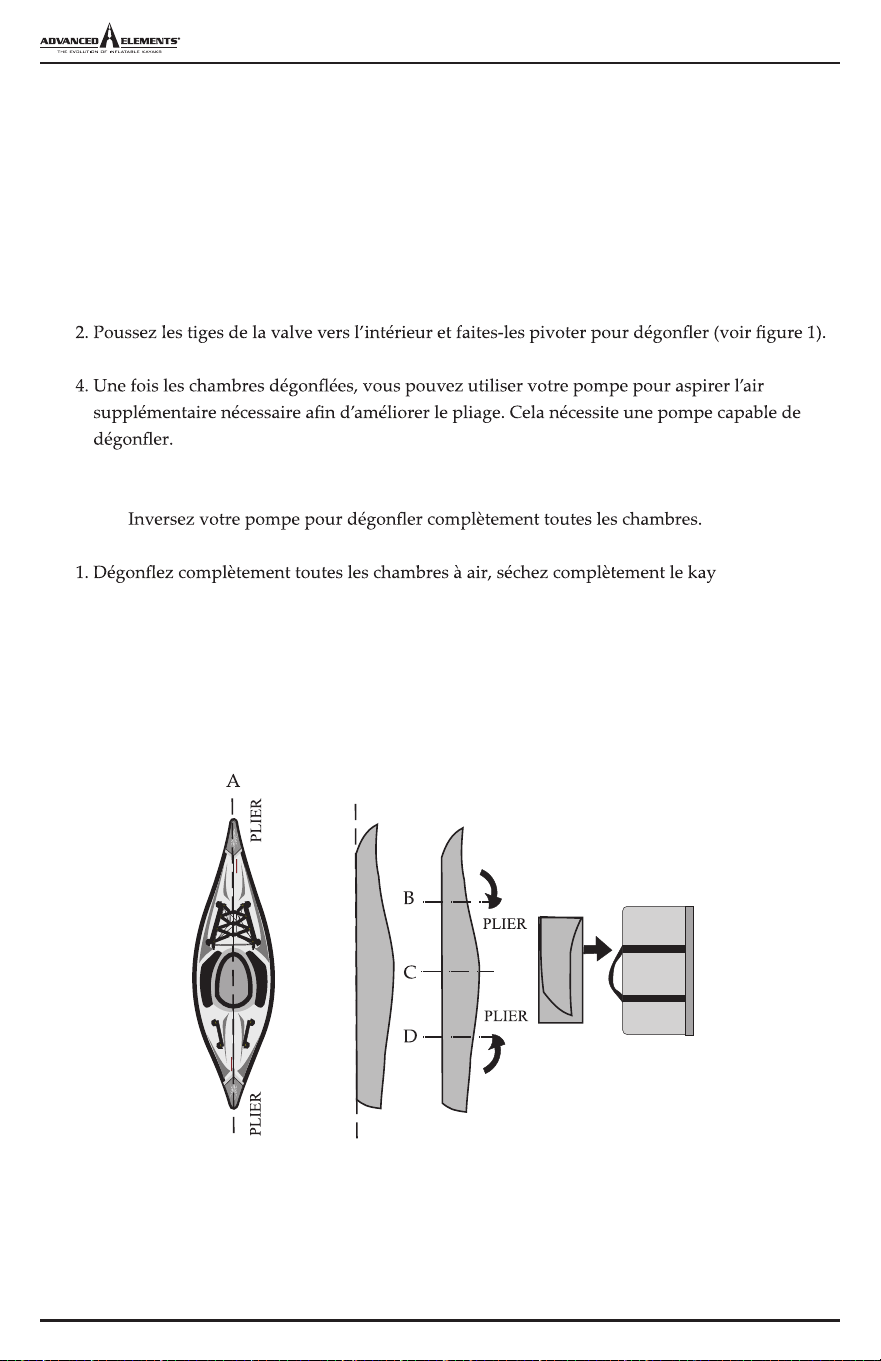
3.6 PLIAGE
AVIS:
ak et retirez
le siège.
2. Enlevez les formes d’arc et de poupe en plastique.
3. Étendez le kayak à plat et pliez-le en deux au centre (de droite à gauche) comme indiqué
en “A”.
4. Pliez en 4 sections égales (B, C, D)
5. Placez dans un sac de sport.
4. LIGNES DIRECTRICES POUR L’UTILISATION
Les sports de rame peuvent être très dangereux et physiquement exigeants. L’utilisateur de ce
produit doit comprendre que la pratique de sports de rame peut entraîner des blessures graves,
voire mortelles. Observez les normes de sécurité suivantes lors de l’utilisation de ce produit.
12
13
14
15

16

17