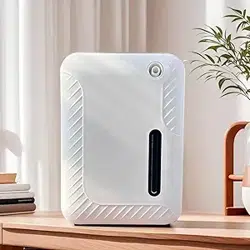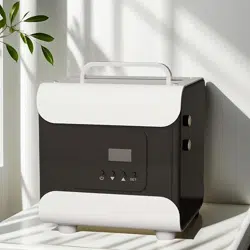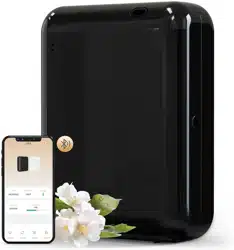
Waterless Diffuser
LCD-DF200A
User Manual
Thank you for your purchase. We offer a one-year
warranty. In the event of any quality issues, we are
happy to provide a replacement or refund.
For assistance, please don't hesitate to contact us
via email at:

Precautions
Thank you for purchasing our Waterless Diffuser LCD-DF200A
Please read this manual carefully before using
and keep it for future reference.
All pictures shown are for illustration purposes only.
Actual products may vary due to product enhancement.
For more installation information,
please visit the official website link or scan the QR code:
https://lacidoll.com/pages/user-manual

Contens
Precautions
Specifications
Installation
Control Panel
APP Operating
Maintenance
Troubleshooting
Warranty Policy
1
2
3-4
5-7
8-10
11
12
13

Precautions
Please read this manual carefully before using and keep
it for future reference.
To prolong the lifespan of the device, it is recommended
to clean the atomizing head oil bottle with alcohol appro-
ximately every two months.
When changing the type of essential oil, please clean the
atomizing head oil bottle with alcohol first.
Keep the device out of reach of children and pets.
Non-technical personnel are prohibited from modifying,
disassembling, or repairing the machine.
This diffuser is uniquely designed for fragrance oil with-
out adding water
Do not block the sprayer by hand or other obstructions
while the device is working.
1
Do not spill water or any conductive or corrosive liquid
on the device surface or inside the device.
Do not operate the device continuously without stopping.
The suggested average daily usage time should not
exceed 14 hours.
Cut off the power to the machine in the event of an
extreme weather event.
1

Specifications
Model: LCD-DF200A
Product Size: 6.50*4.76*2.36in
Voltage: DC 6V/1A
Power: 1.6W
Coverage: 800Sq.ft
Capacity: 170ml
Product weight: 0.75lb
Hanging board Screw Power adapter Key User Manual
2
Hanging holea.
e.
b.
f.
c. d.
g.
Lock catch Indicator light Power socket
Atomizing port Essential oil bottle
h. Atomizing head i. Battery slot
Button
a
b
d
c
e
f
i
h
g
2
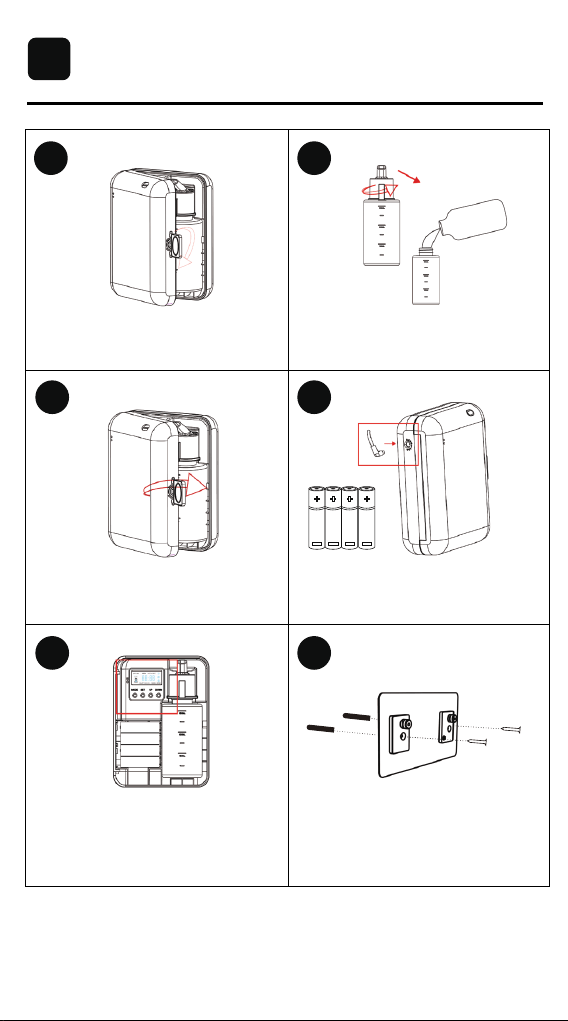
Installation
Open the device: Open the front cover
by a key.
Close the device: Put the bottle with
oil inside the device, cover the front
panel.
Set the working time: Press the button
or connect mobile app via Bluetooth to
set the working time of the device, and
close the cover.
Install the hanging board: Insert the
matching screws into the correspo-
nding holes.
Use the included DC6V adapter or
install four AA batteries.
Fill essential oil: Take out the bottle,
remove the atomizer head, fill the
essential oil.
3
1 2
4
65
3
3

1. The device is equipped with an anti-oil leakage design; however, for
safety reasons, we recommend keeping the device in a vertical position.
2. If you are not a technician, shall not modify, disassemble or repair the
device. If the device is faulty, please contact technical staff in time.
4
Wall installation: Align the device
with the mounting holes and secure
it to the board.
Anti-theft installation: Remove the
bottle, insert the anti-theft screw
through the designated hole, and
fasten it to the mounting board.
Installation
3
7 8
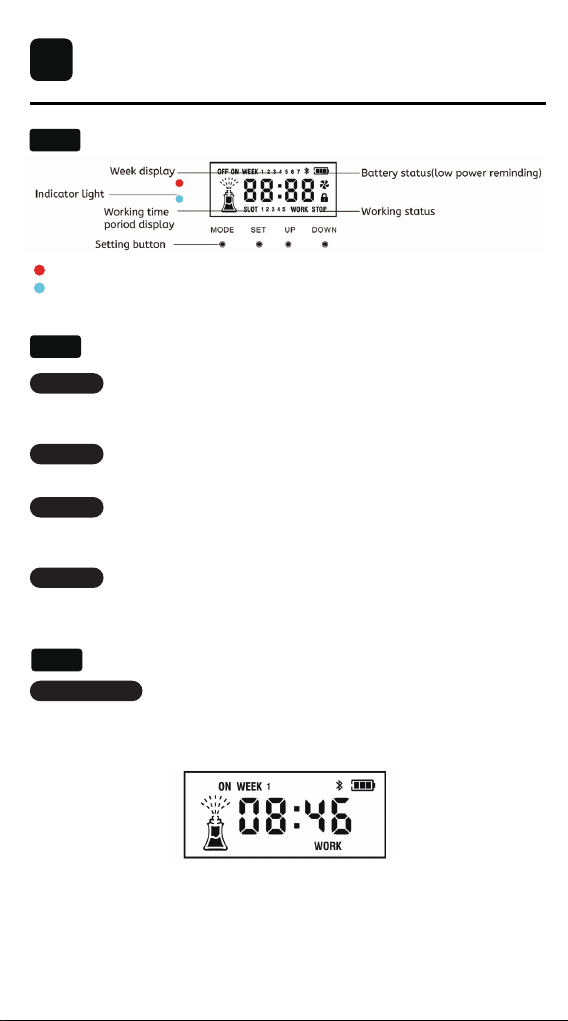
Control Panel
Main Menu Display:
4
4.1
Button Function
4.2
Red Flashing Light: Indicates that the device is in operation.
Solid Blue Light: Indicates that Bluetooth is connected, and the device
can be controlled via the app.
MODE:
1. Power on:
SET:
UP:
DOWN:
Long press: Factory reset;
Short press: Working time setting;
Short press: Toggle settings options;
Long press: Testing device, the air pump will run for 15 seconds;
Short press: Increase “+”;
Plug in the adapter with DC6V voltage or install four AA batteries. When the
indicator light is on, the device is ready to work. The screen displays the
time, working status, and working mode.
Note: When the device is connected to Bluetooth, the screen will remain on.
If the device is not connected to Bluetooth and there is no operation for 10
seconds, the screen will turn off automatically. In this case, press any button
to wake up the screen, then press the button to adjust the settings.
Long press: Lock/unlock the device;
Short press: Decrease “-”;
Default device screen
Button Setting:
4.3
5
Control Panel
4
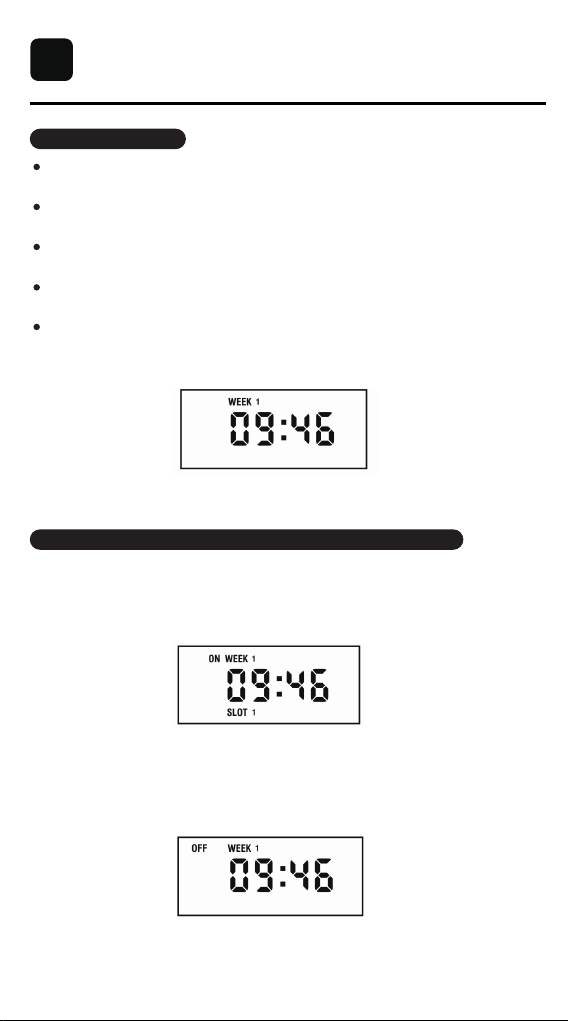
2.Set local time:
3.Set the working period and fragrance frequency of the device:
- On the default screen, press [SET]firstly to enter the hour setting mode
(the hour digits will begin flashing).
- Press [SET]secondly to switch to the minute setting mode (the minute
digits will begin flashing).
- Press [SET]thirdly to switch to the week setting mode (the week number
will begin flashing).
- Use the [UP] or [DOWN] buttons to adjust the values for the hour, minute,
and day of the week as needed.
- Once all values are correctly adjusted, press [SET]fourthly to confirm and
return to the home screen.
The local time will now be successfully set.
(1)Press the [MODE] firstly, the screen displays [SLOT 1 ON], indicating
the start time of the first working period. Press [SET] to switch the hour,
minute, and date settings (the digits will flash for adjustment), and press
[UP]and[DOWN] to adjust.
(2)Press [MODE] secondly, the screen displays [SLOT 1 OFF], indicating
the stop time of the first working period; press [SET] enter to set its hour,
minute, adjust by [UP/DOWN].
Stop working time setting page
Start working time setting page
Local time setting screen
6
Control Panel
4
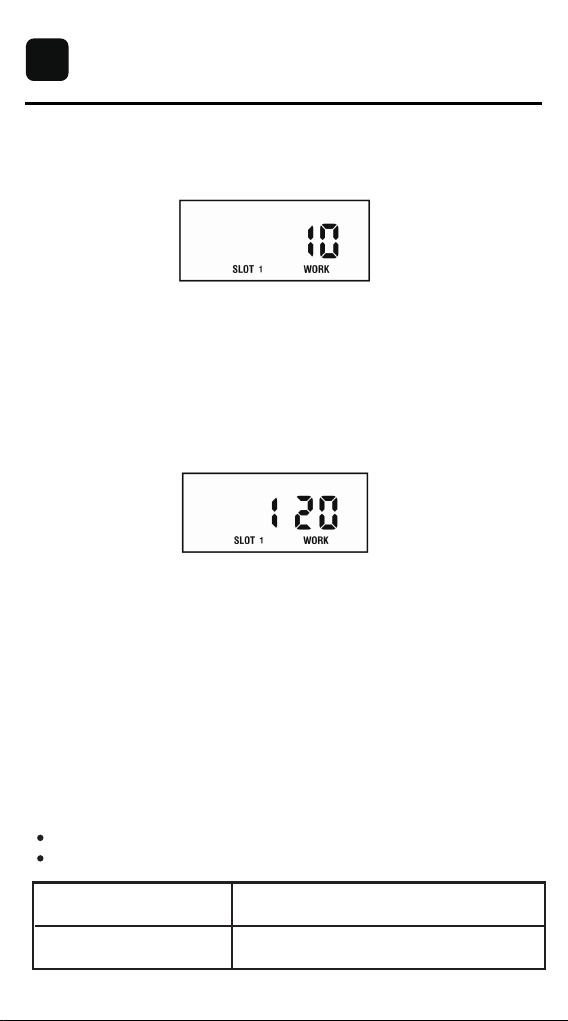
(3)Press [MODE] thirdly, the screen displays [SLOT 1 WORK], indicating
each spray time setting, from 2s - 10s to choose, press [UP/DOWN]
to adjust.
(4)Press [MODE] fourthly, the screen displays [SLOT 1 STOP], indicating
each pause time setting, from 120s to 900s to choose, press [UP/DOWN]
to adjust.
The first working period is set. Press [MODE] five times continuously or
pause for 8 seconds and the device will automatically return to the main
menu interface.
Notice:
1.When setting its working time period, the shutdown time can not be earlier
than the startup time;
2. If the working period crosses midnight (00:00), it must be divided into two
separate periods. For example, if the working time is from 21:00 to 9:00, you
should set:
SLOT 1: 21:00 - 23:59
SLOT 2: 00:01 - 9:00
If you want to set the second working period, press [MODE] fifthly, the screen
displays [SLOT ON 2], press [SET] to enter the adjustment state, same setting
as SLOT1, the process is as shown above. 5 working periods can be set
according to the demand.
Each spray time setting page
Each pause time setting page
Each spray time(S)
Each pause time(S)
2s-10s to choose
120s-900s to choose
7
APP Operating
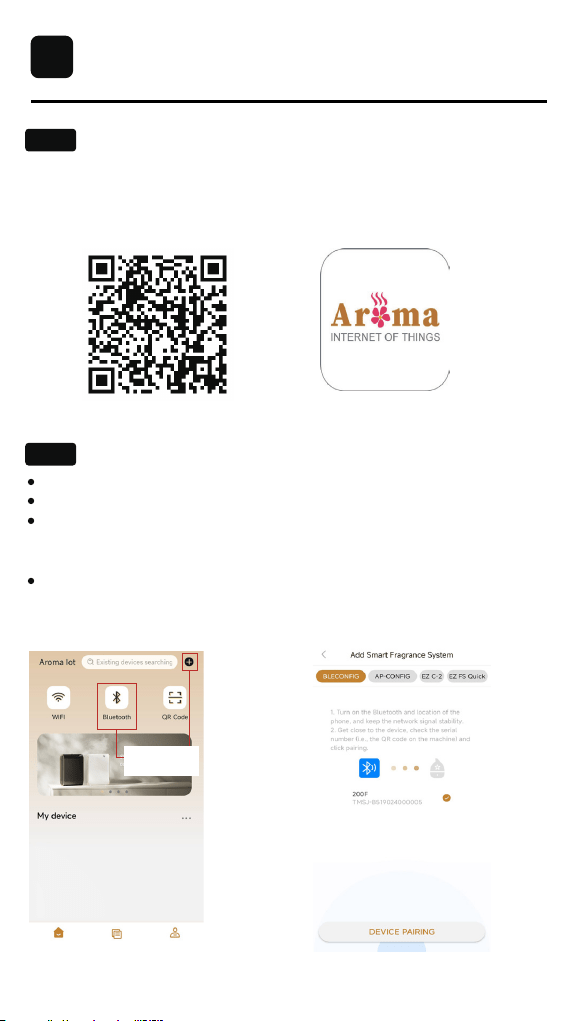
APP Download and Pairing:
1. Scan the QR code to download the Aroma IOT app.
2. Open the Aroma IOT app and log into your account.APP download
Note: First-time users must register for an account.
3. Select the appropriate network pairing mode.
Enable Bluetooth and location services on your phone.
Tap the "+" or Bluetooth icon to enter the pairing page.
Open the front panel of the device, locate and select the serial number
beneath the QR code sticker on the panel. Press DEVICE PAIRING to
proceed to the settings page.
Alternatively, use the app’s QR code scanner on the homepage to scan
the QR code on the back of the front panel to connect.
APP download
Bluetooth connection:
APP icon
5
5.1
5.2
(1) Enter pairing mode. (2) Perform Bluetooth pairing.
Tap the "+" or Bluetooth
icon to enter the pairing
page.
8
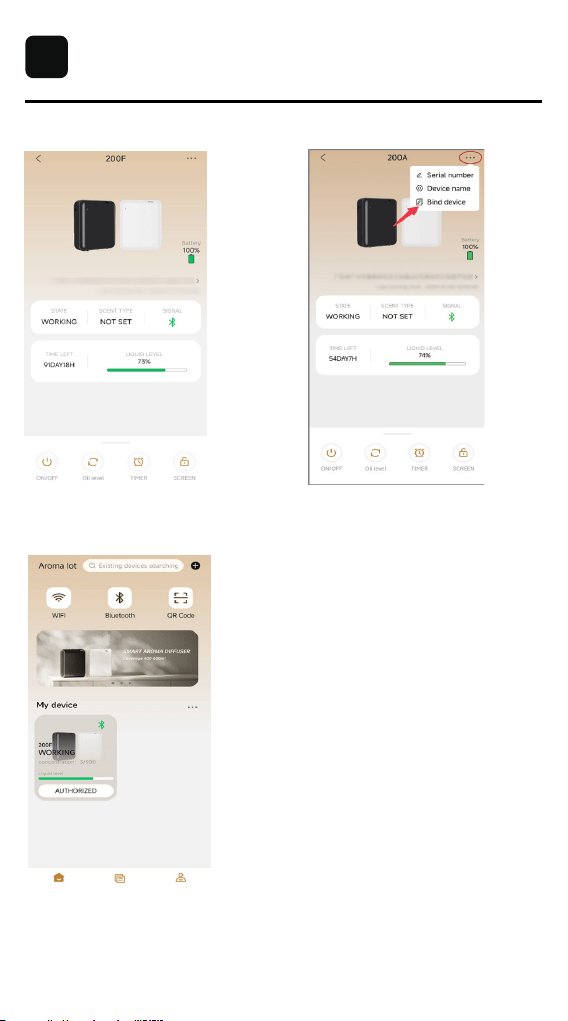
Remark: After the device is successfully paired, the user needs to bind the
device. Authorization is required for others to connect and use it.
APP Operating
5
(4) Bind the device.(3) Device pairing is successful.
(5) Return to the home page, where the
device information will be displayed.
9
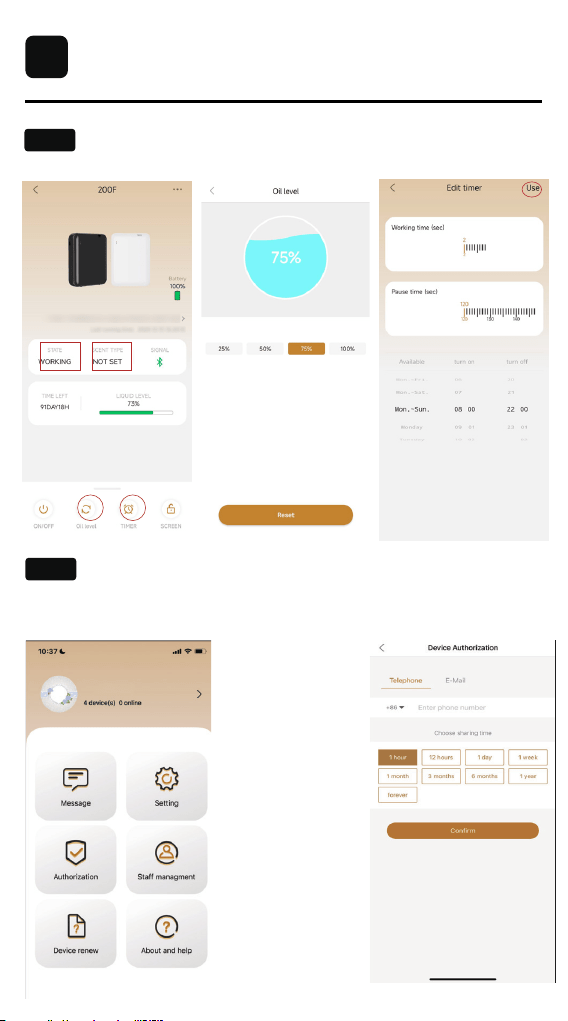
Device Setup Method:
Authorization and group setting methods:
APP Operating
5
5.3
5.4
device page oil level page
timer page
1.Click on Staff Management.
2.Select Add Employee Authorization to grant access.
10

Maintenance
The device requires cleaning in the follow-
ing circumstances:
1. When switching to a different fragrance oil.
2. When the atomization output becomes progressively weaker.
1. Remove the atomizing head and unscrew the oil bottle.
2. Fill the oil bottle with a small amount of alcohol, reinstall it, and run the
device 5
to 10 times to prevent cross-odor.
3. Remove the atomizing head and oil bottle, then allow them to air dry.
How to Clean the Product's Surface:
1. Turn off and disconnect the power.
2. Wipe the surface of the product with a soft cloth.Note: Avoid wiping the
power connections.
3. Do not use abrasive materials like steel wool, scrapers, or other hard
objects to clean the product.
6
6.1
6.2
How to Change Essential Oil:
6.3
1. Remove the atomizing head and unscrew the oil bottle.
2. Fill the oil bottle with a small amount of alcohol, reinstall it, and run the
device 1-2 times.
3. Remove the atomizing head and oil bottle, then allow them to air dry.
How to Clean Atomizing Head:
6.4
11
Troubleshooting
Problem Possible Solution
Not Turning On
No Diffusion
Small Diffusion
Oil leakage
1. Ensure the power cord is securely plugged in and
check the power outlet.
2. Ensure the battery is installed correctly with the
correct polarity.
1. Check if the device is in "OFF" mode. If so, it may
be outside the set operating time or turned off via the
app. Reset by holding the "Mode" button or change
the status to "ON" in the app.
2. Check if the air outlet seal O-ring is damaged.
3. Inspect whether the air pump is functioning and if
the atomizing head is blocked.
4. Check if the air pipe connected to the air pump is
sealed or damaged.
1. Ensuring the oil bottle is tightly sealed and posi-
tioned upright.
2. Inspecting the atomizer head for any damage.
3. Checking the gasket for signs of damage and re-
placing if necessary.
4. Verifying that the essential oil bottle and atomizer
head are aligned and securely fastened.
1. Check if the air outlet sealing ring is damaged.
2. Inspect whether the atomizer head is blocked.
3. Ensure the atomizer head is securely tightened.
7
12
WARRANTY SERVICE
Our company provides a one-year warranty
starting from the date of purchase.
The following conditions are not covered by the warranty:
- Damage that occurs after the warranty period has expired.
- Damage caused by natural disasters or other force majeure events.
- Any damage caused by use that does not follow the requirements outlined
in the User Manual.
- Failure or damage caused by the forced use of the product.
- The user disassembles or repairs the product without authorization.
In order to receive warranty service, please follow these steps:
Thank you for choosing our product, and we hope you enjoy using it.
If you have any questions or concerns, please don't hesitate to contact us.
- Provide the warranty card and the order number.
- Describe the problems you are experiencing in detail and provide pictures
or videos if possible.
- Send an email to
Non-Warranty Policy
Warranty Requirements
Model Number
Order Number
Warranty Period
Purchase date
Customer
Within 1 year from the date of purchase.
Name:
Email:
Phone Number:
Address:
8
8.1
8.2
13