User Guide
Mini Smart Wi-Fi Plug, Matter
Tapo P125M
©2023 TP-Link 1910013355 REV1.0.0

Contents
About This Guide ·································································································································1
Introduction ············································································································································2
Appearance ············································································································································3
Set Up Your Smart Plug ···················································································································· 4
Set Up Your Device via Matter ······································································································5
Add to Alexa via Matter ·····················································································································6
Add to Google via Matter ·············································································································13
Add to Apple via Matter ·················································································································20
Failed to Set Up via Matter ···········································································································25
Basic Device Control ······················································································································26
Congure Your Smart Plug ··········································································································27
Smart Actions ·····································································································································28
Share Your Smart Plug ··················································································································· 31
Voice Control ······································································································································32
Authentication ···································································································································33

1
About This Guide
This guide provides a brief introduction to the Mini Smart Wi-Fi Plug, Matter and regulatory information.
Please note that features available in Tapo may vary by model and software version. Tapo availability may also vary by region. All images, steps, and
descriptions in this guide are only examples and may not reect your actual Tapo experience.
Conventions
In this guide, the following convention is used:
Convention Description
Blue
Key information appears in blue, including management page text such as menus, items, buttons and so on.
Underline
Hyperlinks are in teal and underlined. You can click to redirect to a website.
Note:
Ignoring this type of note might result in a malfunction or damage to the device.
More Info
• Specications can be found on the product page at https://www.tapo.com.
• Our Technical Support and troubleshooting information can be found at https://www.tapo.com/support/.
• The setup video can be found at https://www.tp-link.com/support/setup-video/.

2
Introduction
Tapo P125M Mini Smart Wi-Fi Plug, Matter is a compact home device that turns your typical electrical wall outlet into a controllable, customizable and
multi-functional outlet, enabling you to easily control your lights and household electronic devices via the Tapo app, no matter where you nd yourself.
• Matter-Certied - Integrate Tapo products into your preferred ecosystems to work seamlessly with other certied products and create a unied
smart home.
• Voice Control - Use simple voice commands with Alexa, Siri®, or Google Assistant to conveniently control connected devices without leaving your
spot.
• Remote Control - Control your connected devices from anywhere via the Tapo app.
• Schedule - Preset a schedule to automatically manage devices.
• Auto-O Timer - Cut o power to connected heaters after a set time, saving energy and reducing re risks.
• Away Mode - Automatically turns devices on and o at dierent times to give the appearance that someone is home.
• Compact Design - Mini-sized to avoid blocking adjacent sockets, (even smaller than P100).
3
Appearance
Smart Socket:
Plug in your device and control it from Tapo app on your phone/tablet.
Power Button:
• Press once:
Turn on or o the smart plug.
• Press and hold for 5 seconds:
Keep the existing settings except Wi-Fi.
• Press and hold for 10 seconds:
Restore your smart plug to factory default settings.
System LED
• Blinking orange and blue:
Ready for setup
• Blinking orange:
Connecting to a Wi-Fi network
• Solid orange:
Connected to Wi-Fi or disconnected from the Wi-Fi; oine
• Solid blue:
Connected to server and working properly
• Blinking blue:
Being reset; being upgraded

4
Set Up Your Smart Plug
Follow the steps below to get started with your new smart plug, or you can follow the setup video at https://www.tp-link.com/support/setup-video/.
Step 1. Download Tapo App
Get the Tapo app from the App Store or
Google Play, or by scanning the QR code
below.
Step 2. Log In
Open the app, and log in with your TP-Link ID.
If you don't have an account, create one rst.
Step 3. Add Your Plug
Tap the button in the Tapo app, choose
Plugs, and select your model. Follow the
instructions in the Tapo app to complete the
setup.
OR

5
Set Up Your Device via Matter
This is a Matter-certied device. You can integrate it into any Matter ecosystem you prefer for easy control. As IoT manufacturers are working to
optimize the user experience of Matter setup, the setup process and user experience should improve over time. Take Alexa, Google, and Apple
ecosystems for example and the following shows you how to set up via Matter:
• Add to Alexa via Matter
• Add to Google via Matter
• Add to Apple via Matter
• Failed to Set Up via Matter?
Note:
1. The Matter setup code can only be used to add the device to the rst ecosystem. For the second commissioning, you will need to open the app of the rst
ecosystem to generate a new setup code.
2. A Matter hub (i.e., controller) and smart home app of the same ecosystem are required.
More Information of Matter
• For matter setup guides for Alexa, Google and Apple, please refer to https://www.tp-link.com/hk/support/faq/3564/
• For Matter setup troubleshooting, please refer to https://www.tp-link.com/en/support/faq/3574/
• For general questions and troubleshooting about Matter, please refer to https://www.tp-link.com/support/faq/3520/
• For the third-party setup video and Matter multi-admin setup and demo video, please visit https://www.tp-link.com/support/download/tapo-p125m/

6
Add to Alexa via Matter
Before you start:
Since Alexa's setup is temporarily limited, make sure Alexa is the rst matter ecosystem when adding your matter-certied devices to Alexa. If you are
unsure, please factory reset your device before setup.
1. Check Compatibility (Click here for more information)
• Alexa app version: 2.2.491118.0 or later
Note: By now, only the Android version of Alexa app supports Matter.
• Matter-supported Echo devices:
Device Version
Echo/Echo Dot 5th Gen: Echo Dot, Echo Dot (Gen 5 with Clock)
4th Gen: Echo, Echo Dot, Echo Dot (Gen 4 with Clock)
3rd Gen: Echo, Echo Dot, Echo Dot (Gen 3 with Clock)
Echo Show 3rd Gen: Echo Show 10, Echo Show 15
2nd Gen: Echo Show 8, Echo Show 5
1st Gen: Echo Show, Echo Show 8
Note: Please update the software of your Echo devices to a compatible version, such as v8289070468.
7
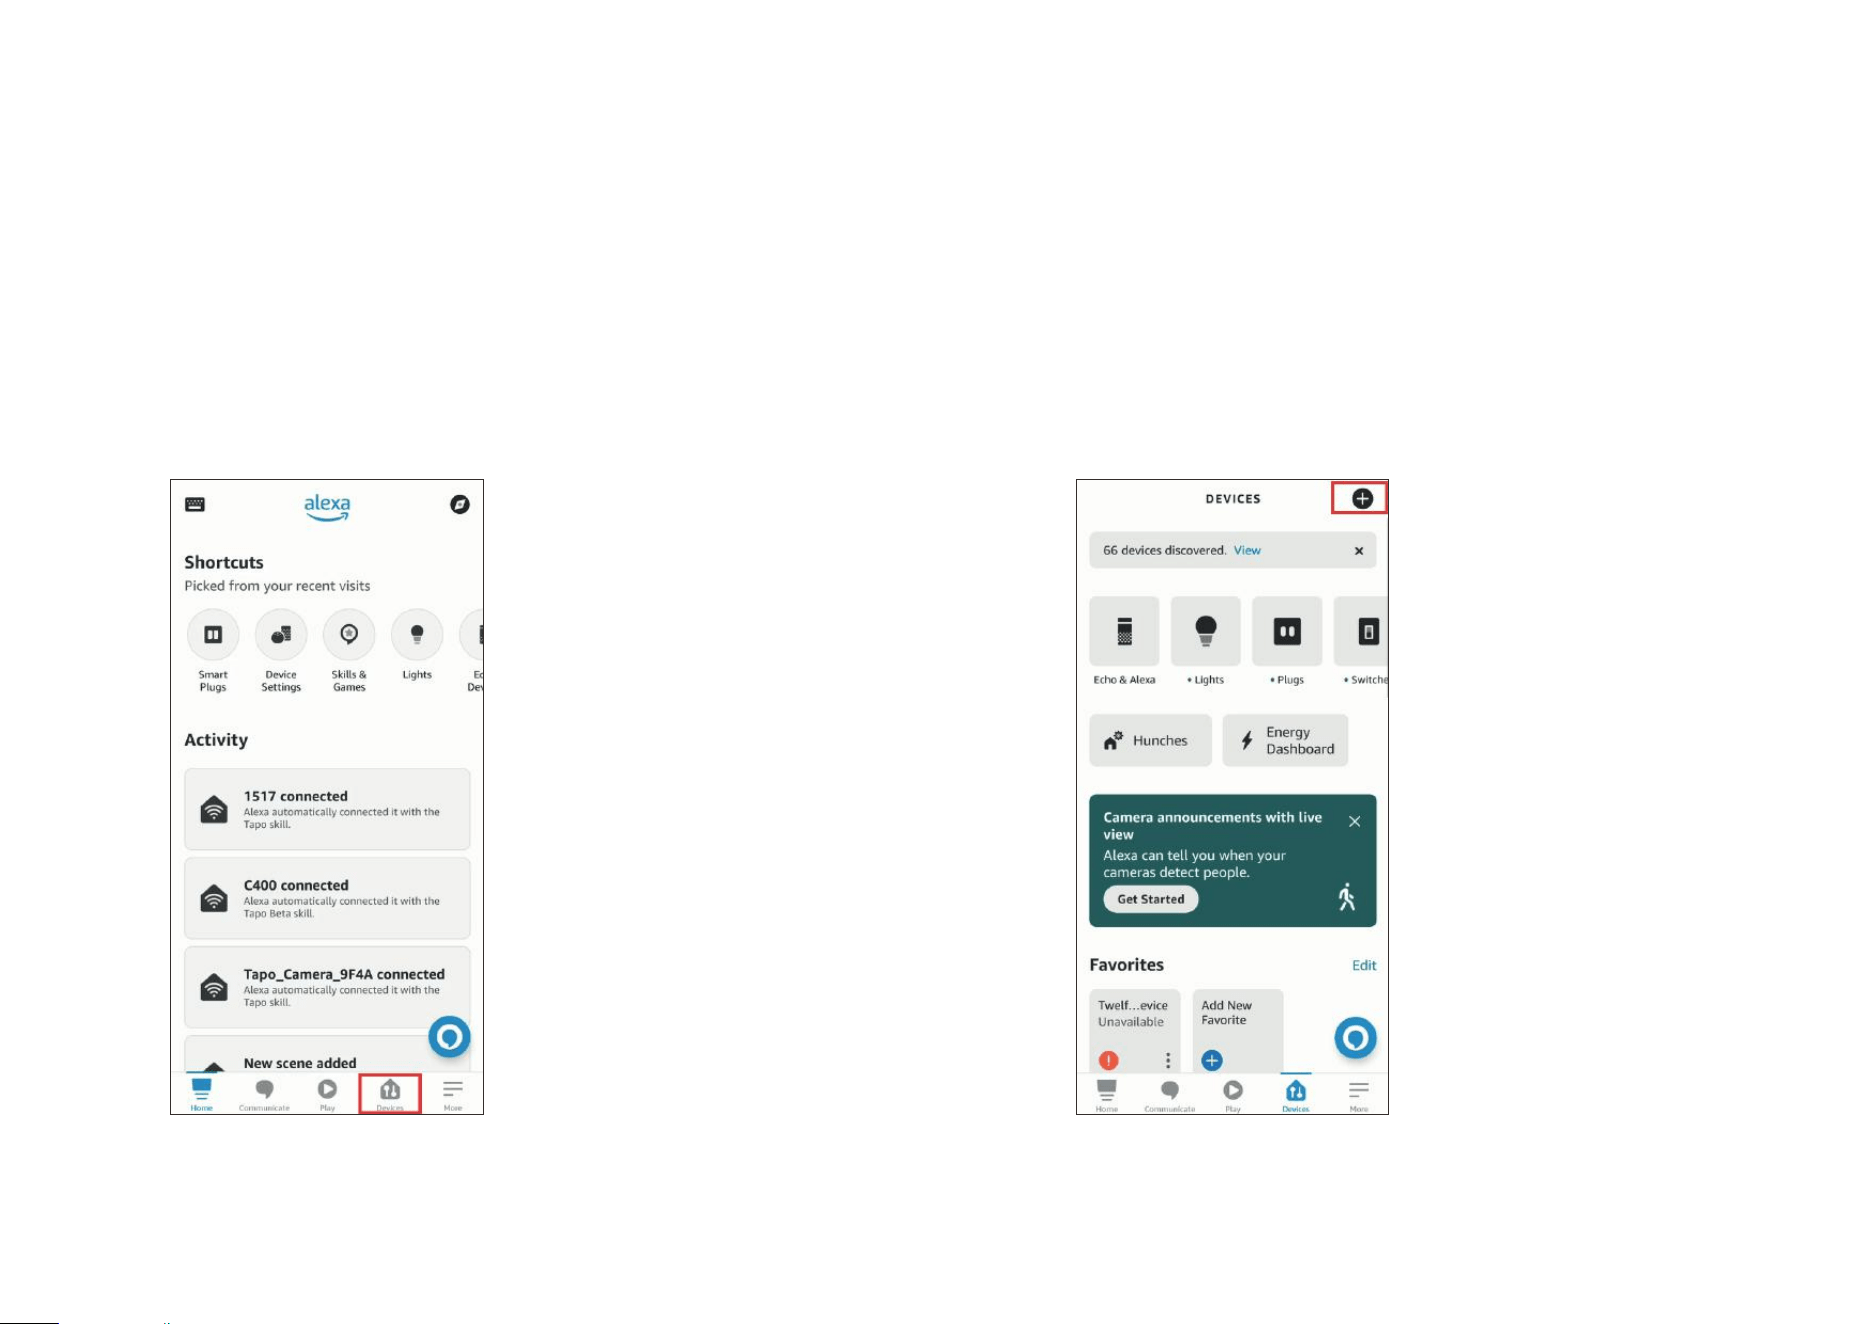
a. Launch the Alexa app and go to the Devices page.
b. Tap + and then tap Add Device to add a new device.
2. How to Set Up Your Matter Device
8
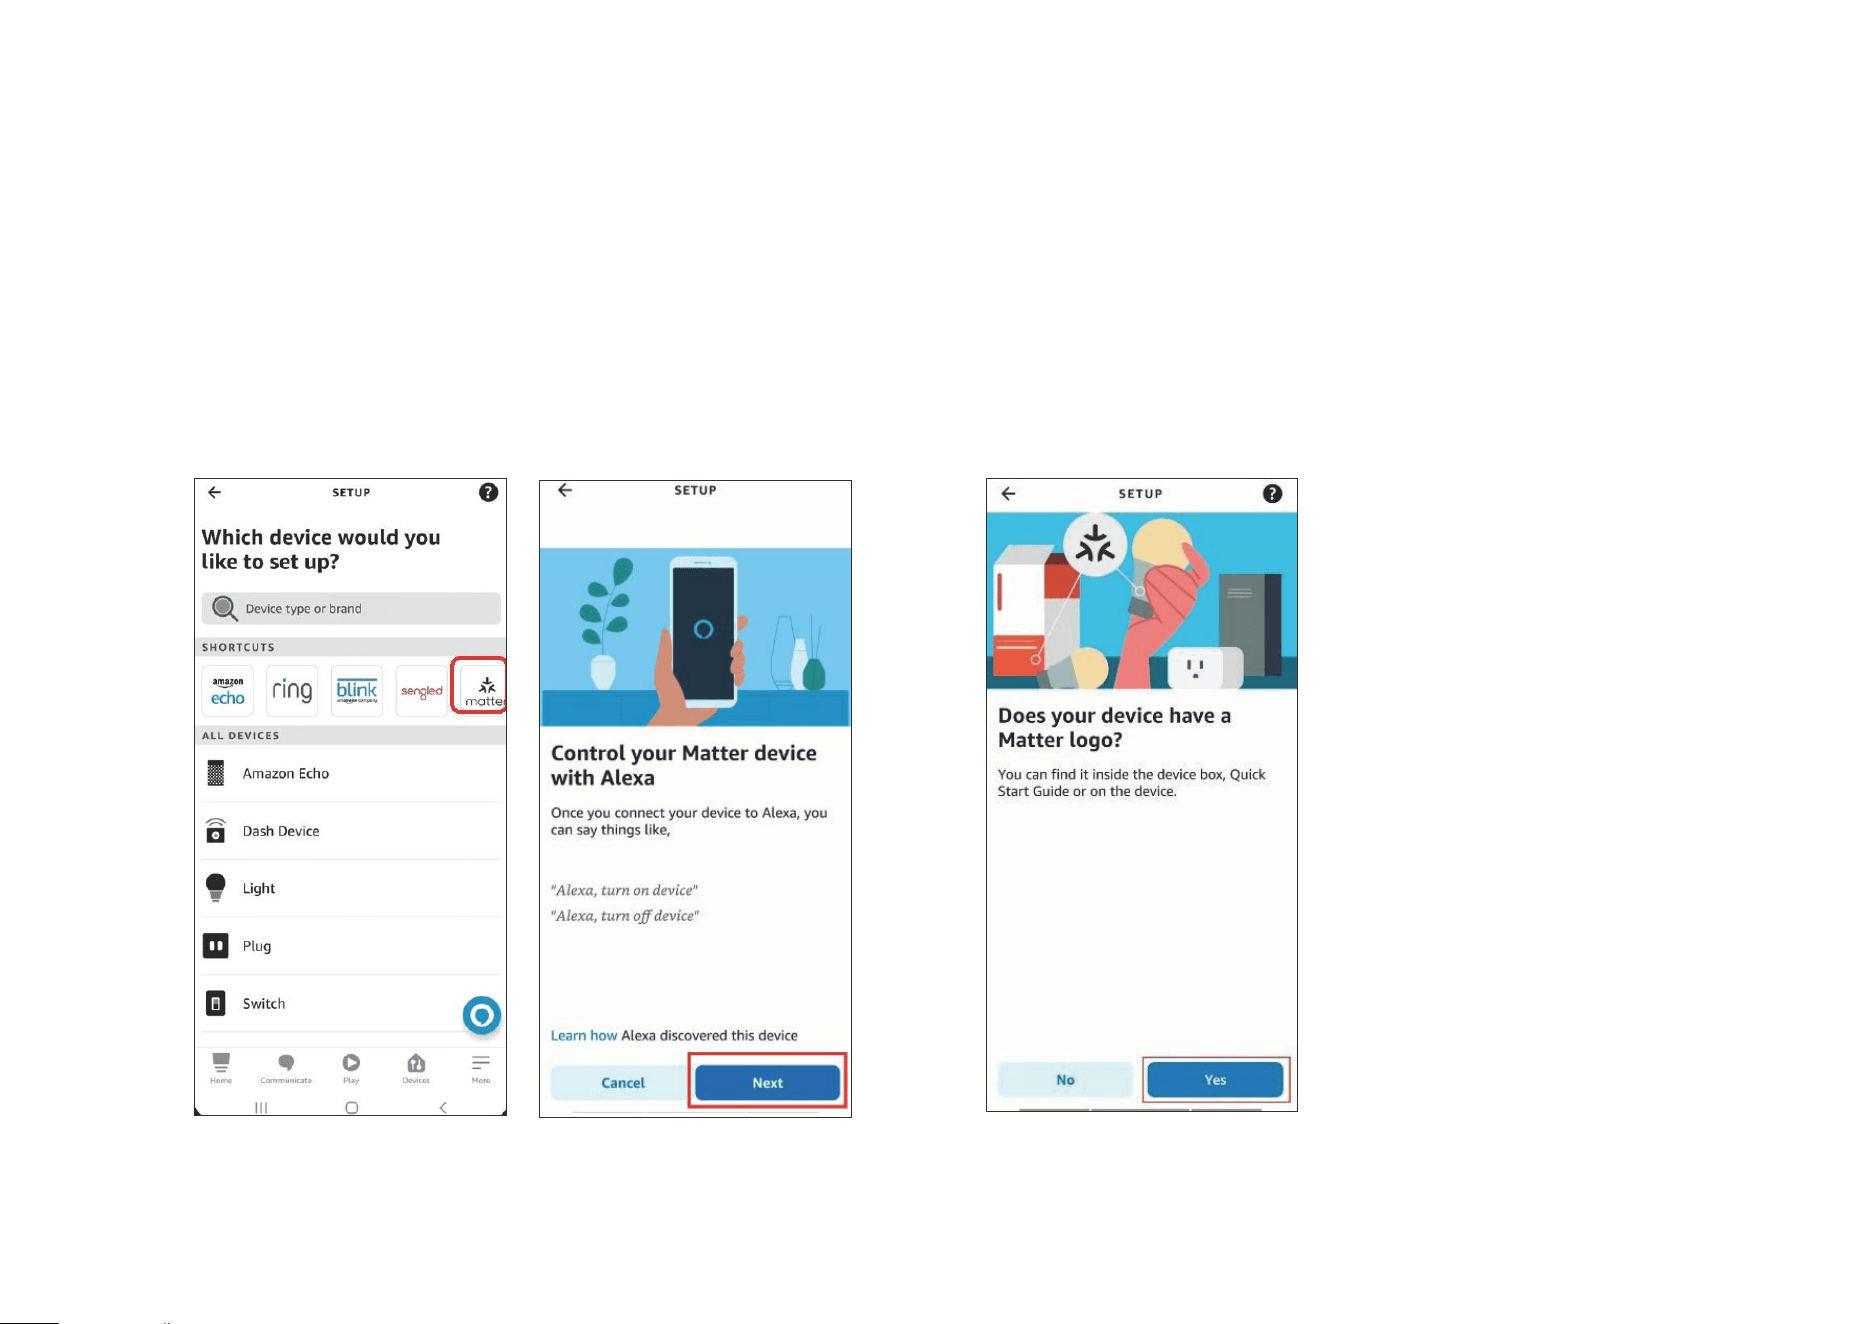
c. Choose Matter and then tap Next on the following pages. d. Tap Ye s on the conrming page.
9
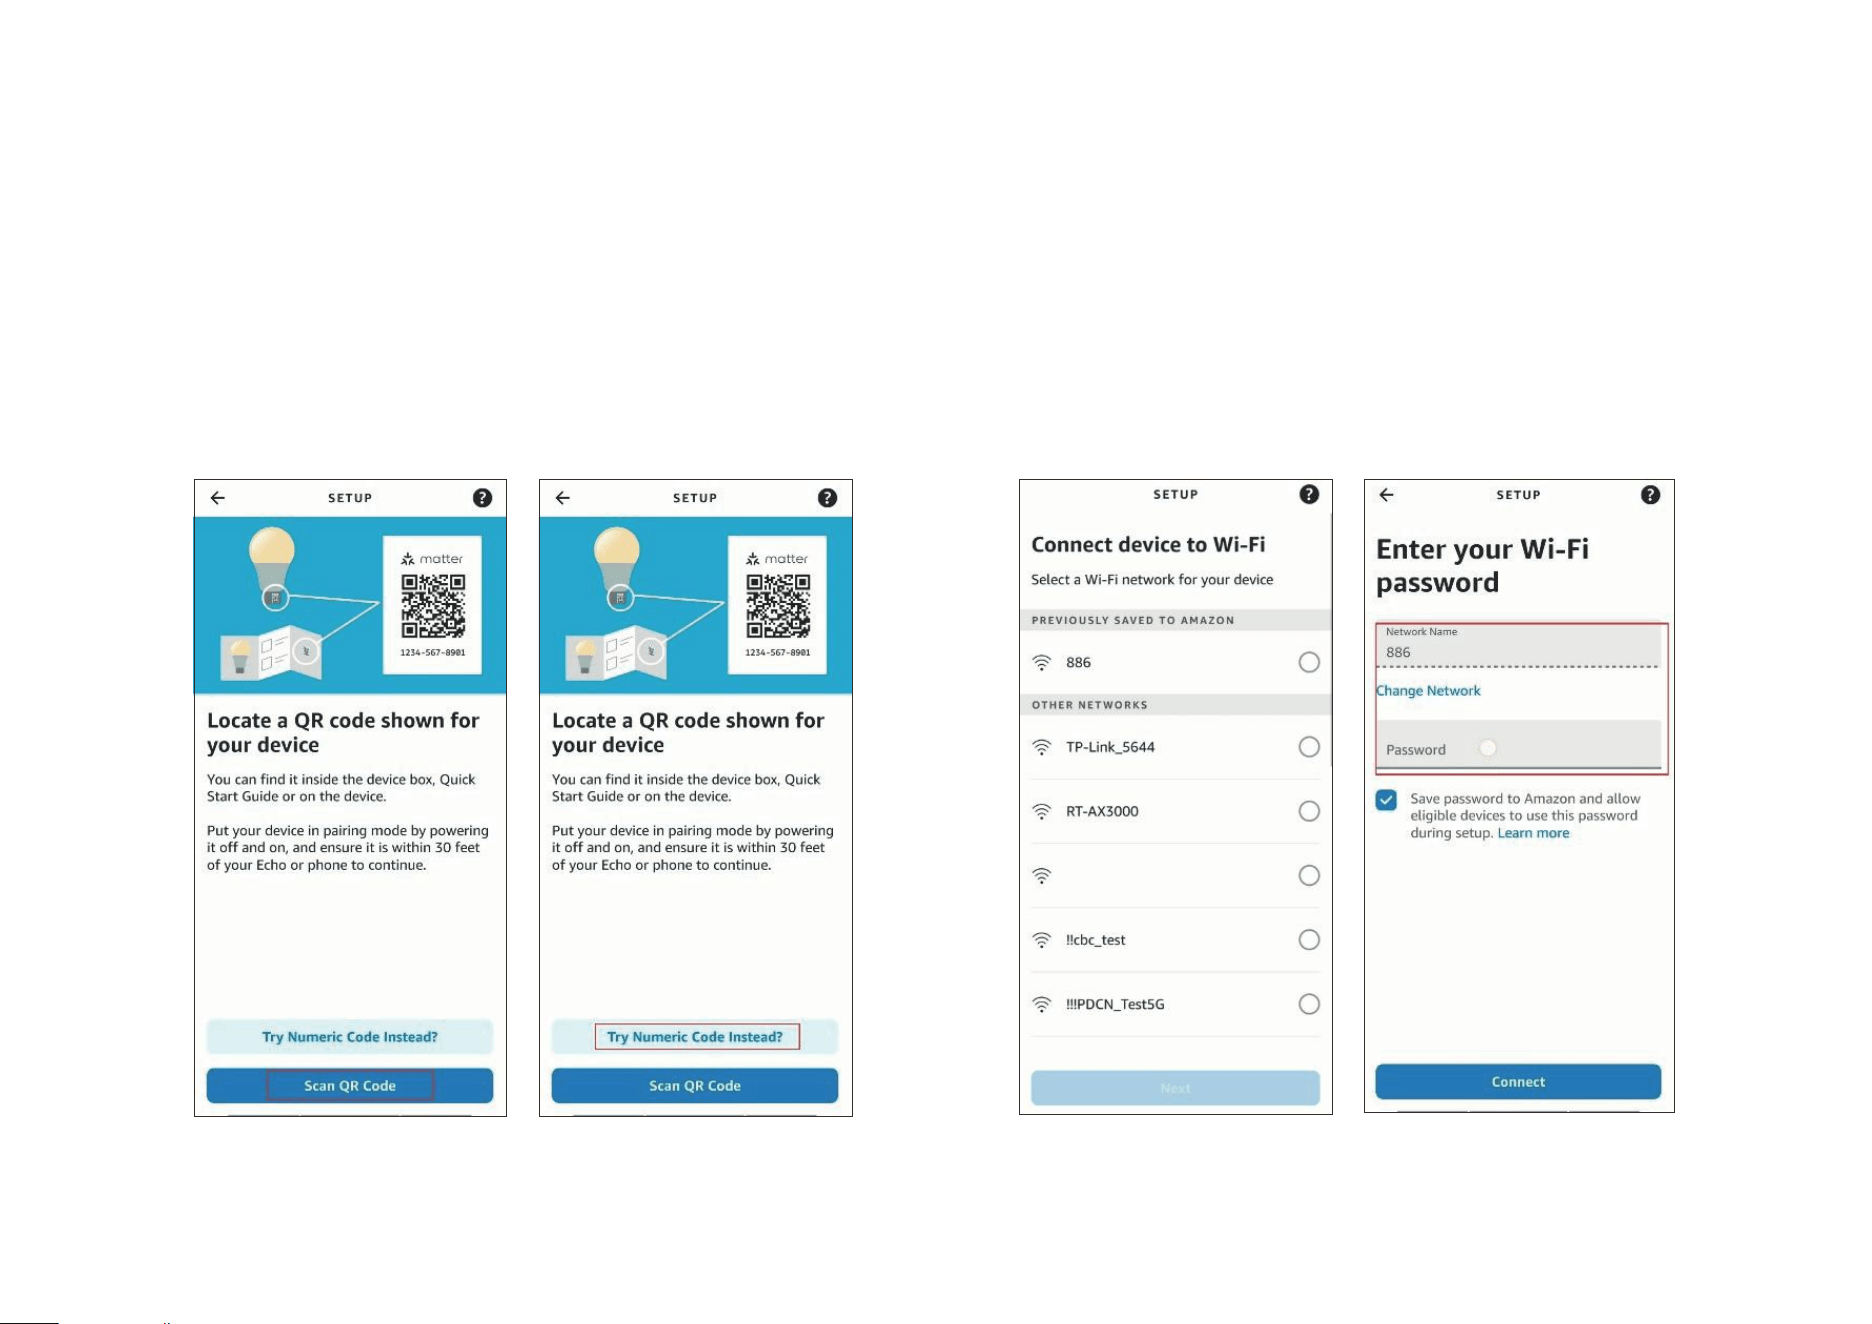
e. Tap Scan QR Code and scan the QR Code.
Alternatively, you can tap Try Numeric Code Instead? to enter the numeric
setup code that comes along with your device.
f. Wait for your device to set up, then choose the Wi-Fi you want your
device to connect to and enter the corresponding Wi-Fi password.
10
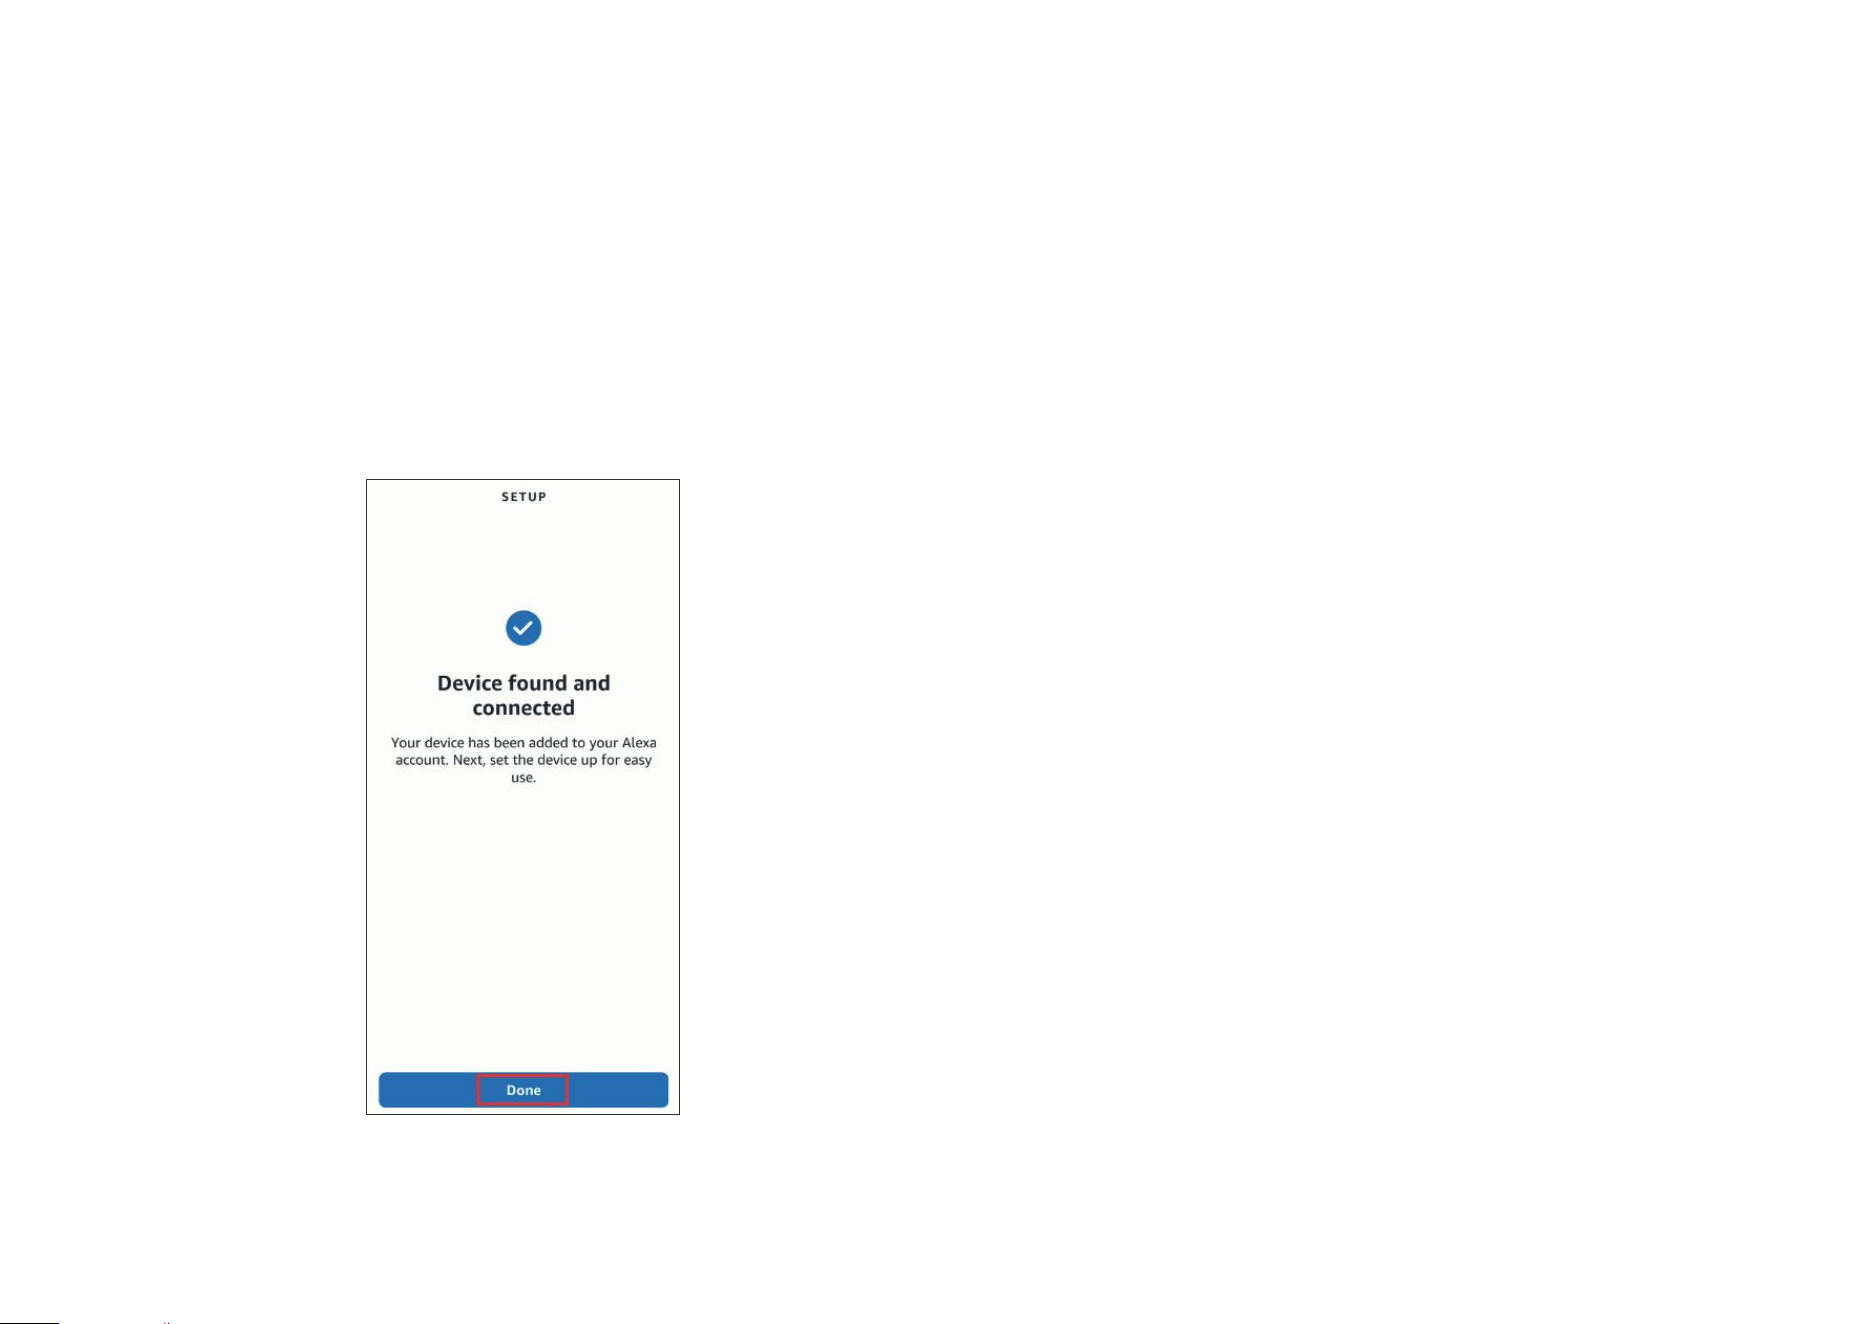
g. Tap Done. Now you can nd your device on the Device list and use your
voice to control your device.
11
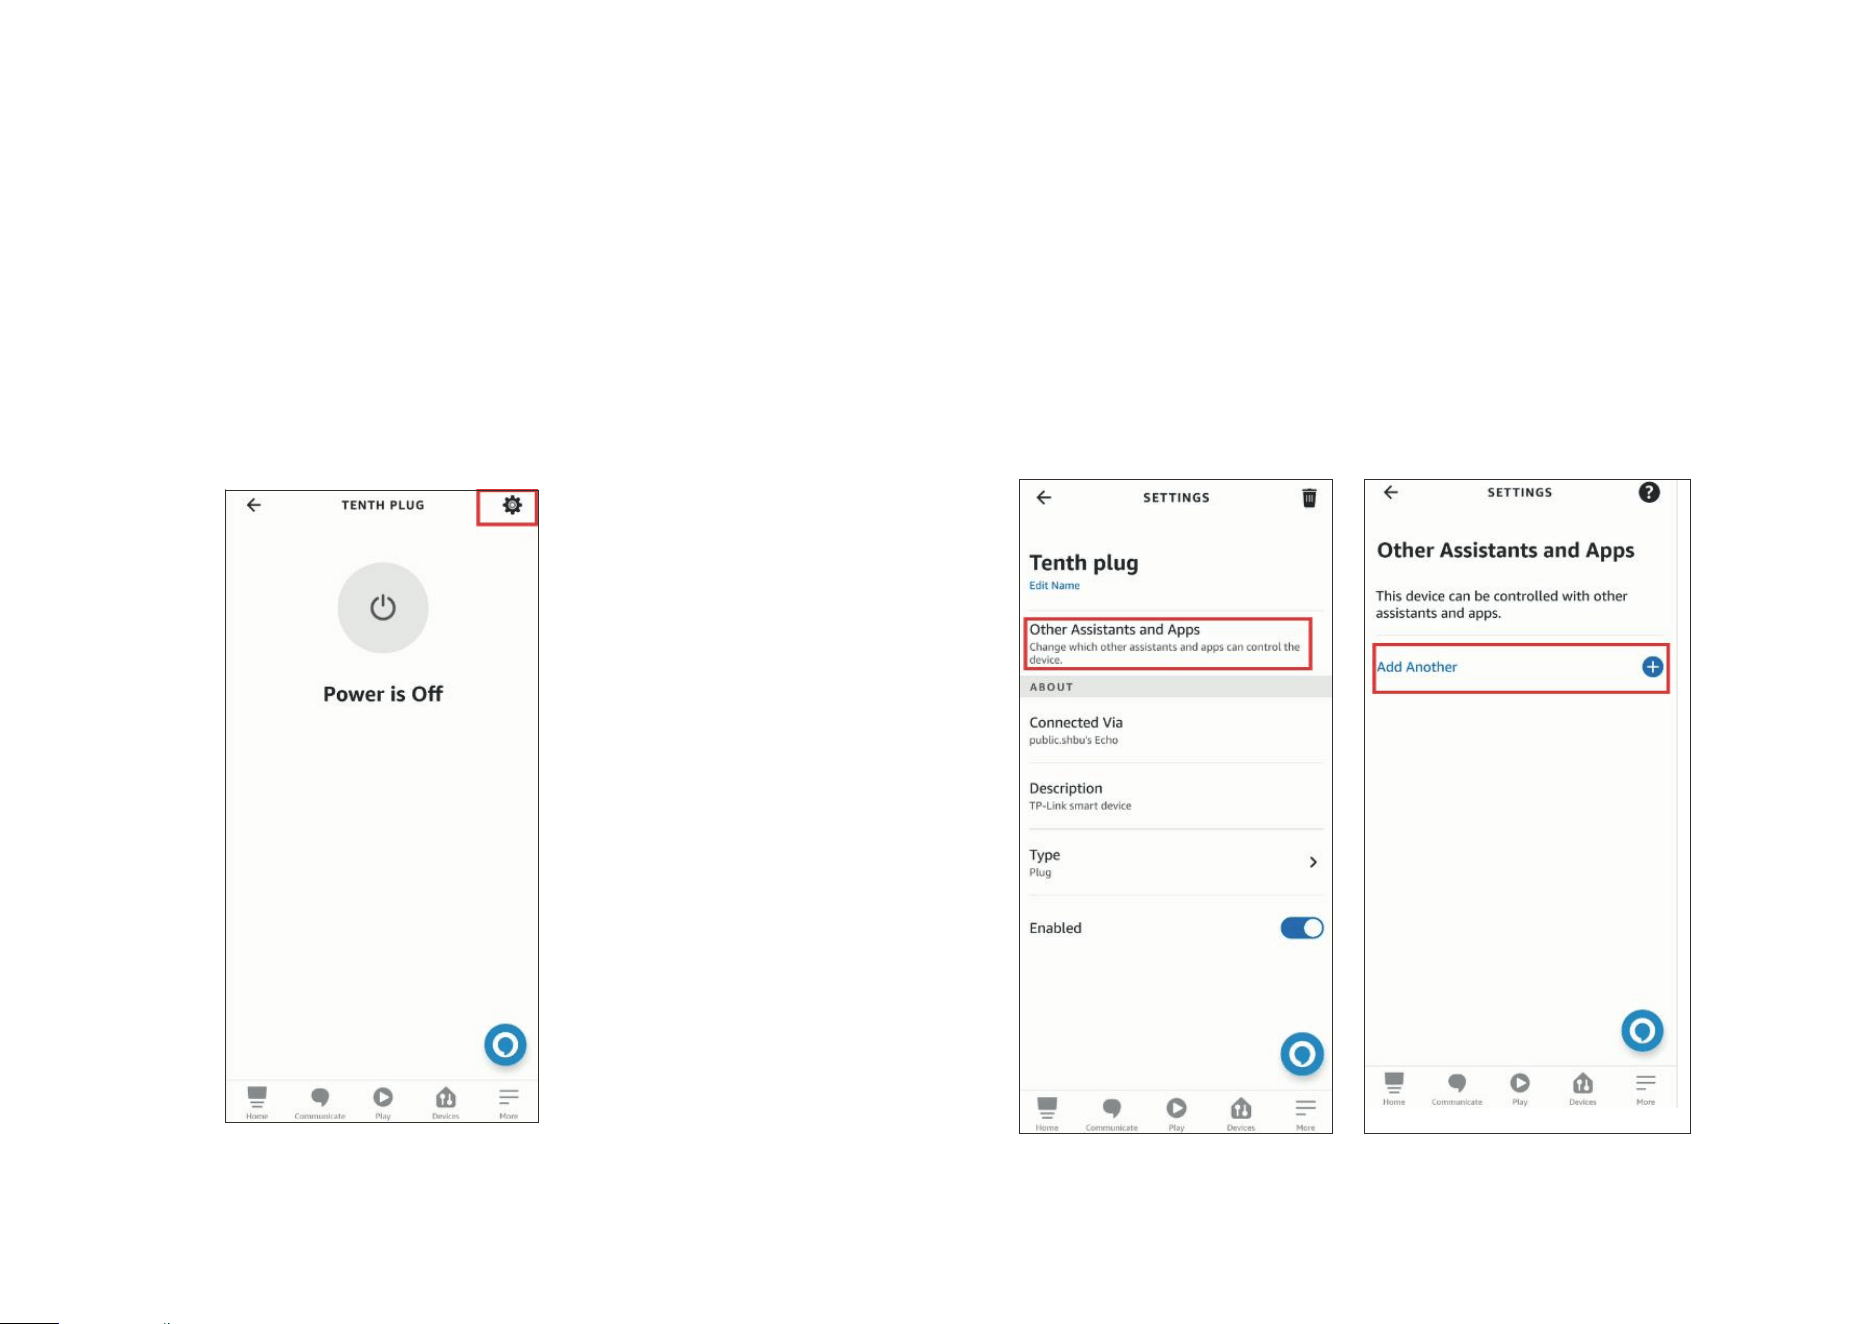
a. Launch your Alexa and go to the device Settings page.
b. Tap Other Assistants and Apps and then tap Add Another to create an
11-digit setup code.
3. How to Integrate Your Device into Another Ecosystem
As the setup code can only be used to add the device to the rst ecosystem, for the second commissioning, you need to open the app of the rst
ecosystem to generate a new setup code.
12
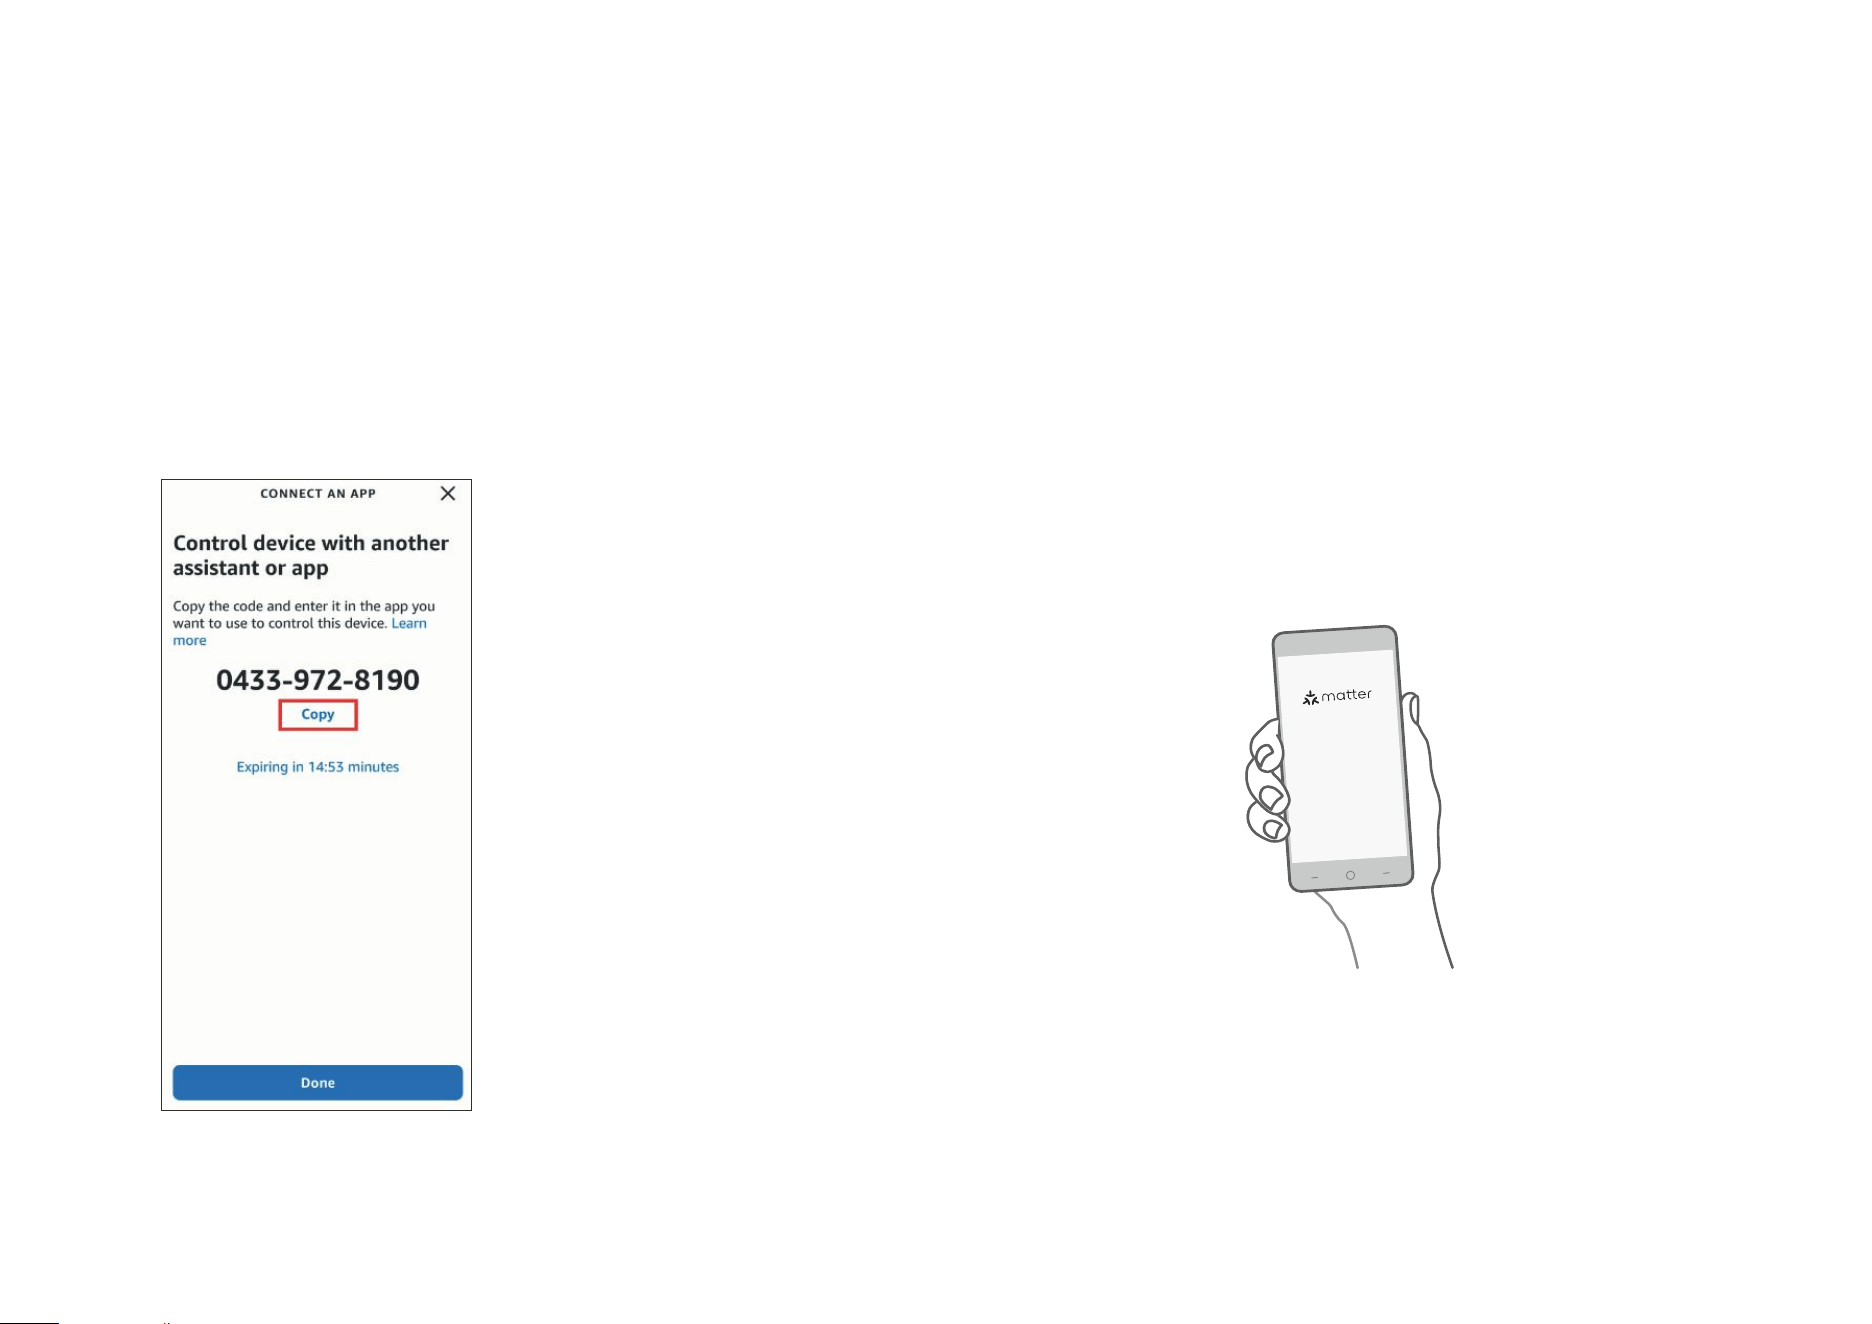
d. Launch the app of the second ecosystem. Follow the setup instruction
to enter the setup code and follow the app instructions to complete the
setup.
c. Copy the setup code.
13
Add to Google via Matter
1. Check Compatibility (Click here for more information)
• Google Home App: 2.62.1.15 or later
Note: By now, only the Android version of Google Home app supports Matter.
• Matter-supported Controller:
Device Version
Wi-Fi Routers Nest Wi-Fi Pro (Wi-Fi 6E)
Speakers Google Home, Google Home Mini, Nest Mini, Nest Audio
Displays Nest Hub (1st gen), Nest Hub (2nd gen), Nest Hub Max
Note: Please update the software/rmware of your controller devices to a compatible version, such as v1.56.324896 for Google Nest Hub (2nd gen).
14
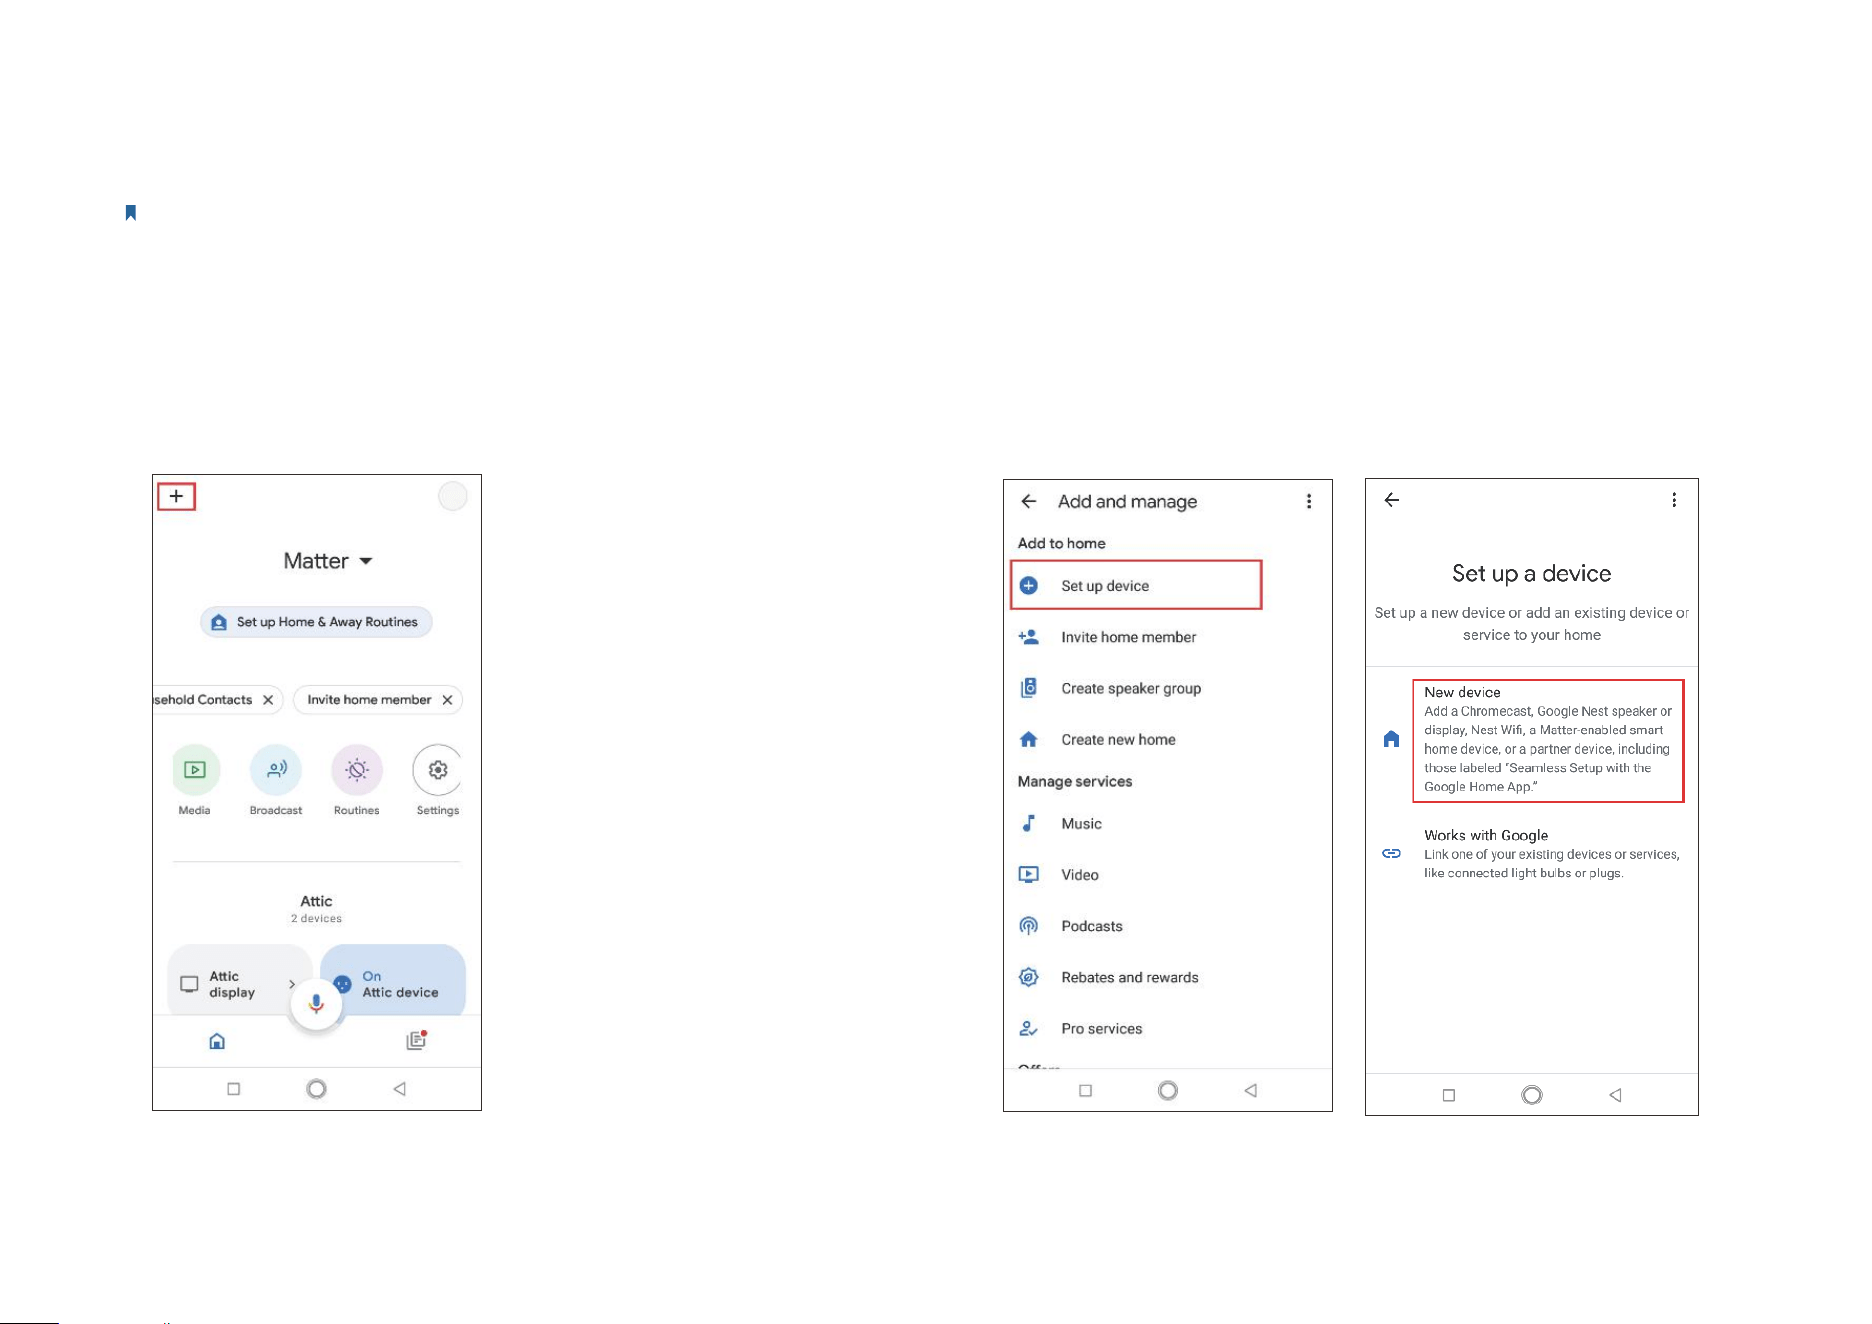
b. Choose Set up device and tap New Device to add a new device.a. Launch your Google Home App and tap +.
2. How to Set Up Your Matter Device
Note: The pairing mode of your Matter-certified device will automatically turn off in 15 minutes. You can turn the pairing mode back on by restarting your device, such as
unplugging your plug.
15
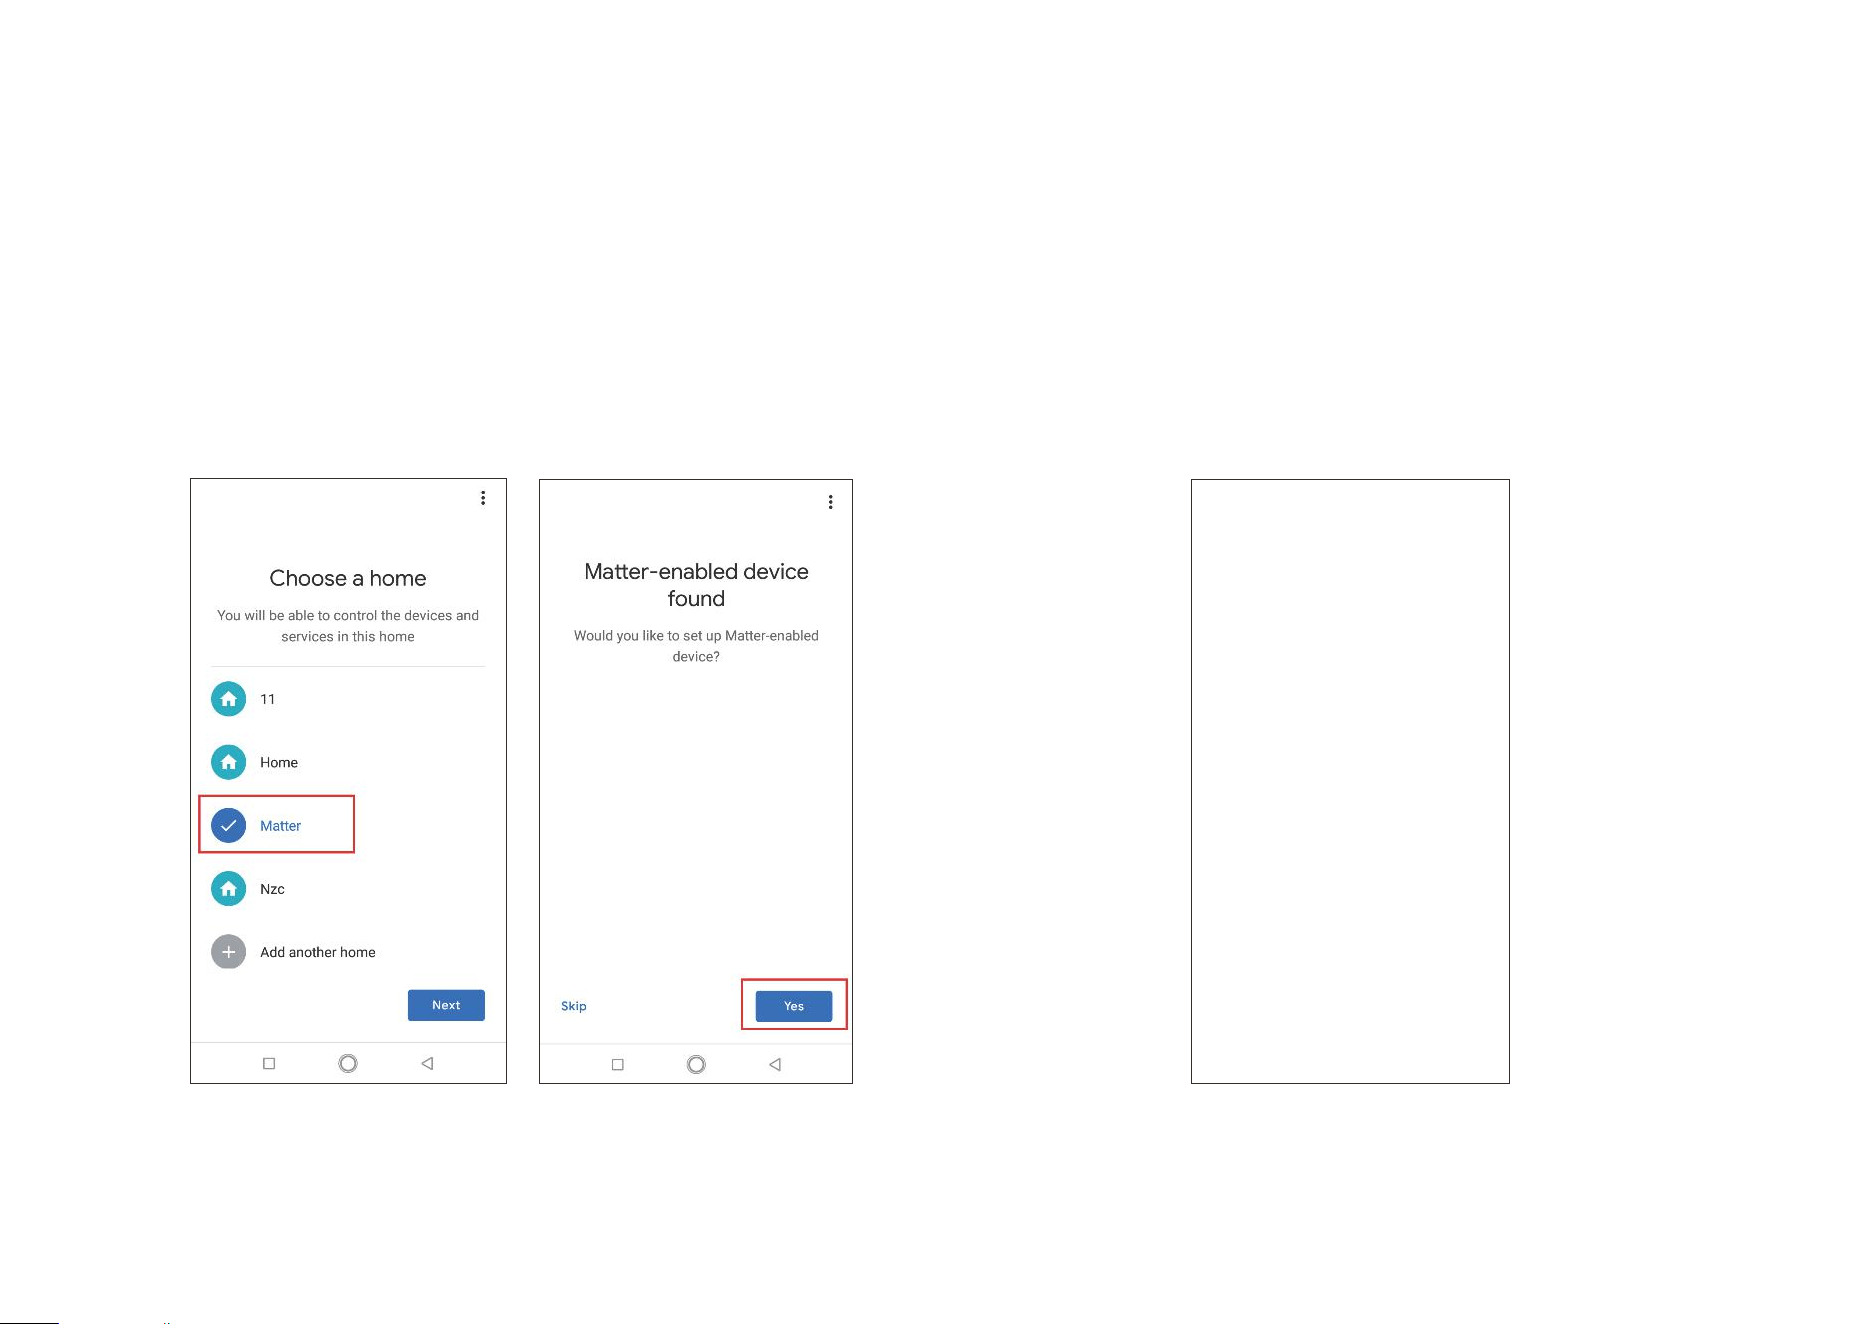
c. Choose Matter and tap Yes on the conforming page. d. Scan the setup QR code on your device. If your device comes without
a QR code but a numeric code, you can tap Set up without QR code and
enter the numeric code.
16
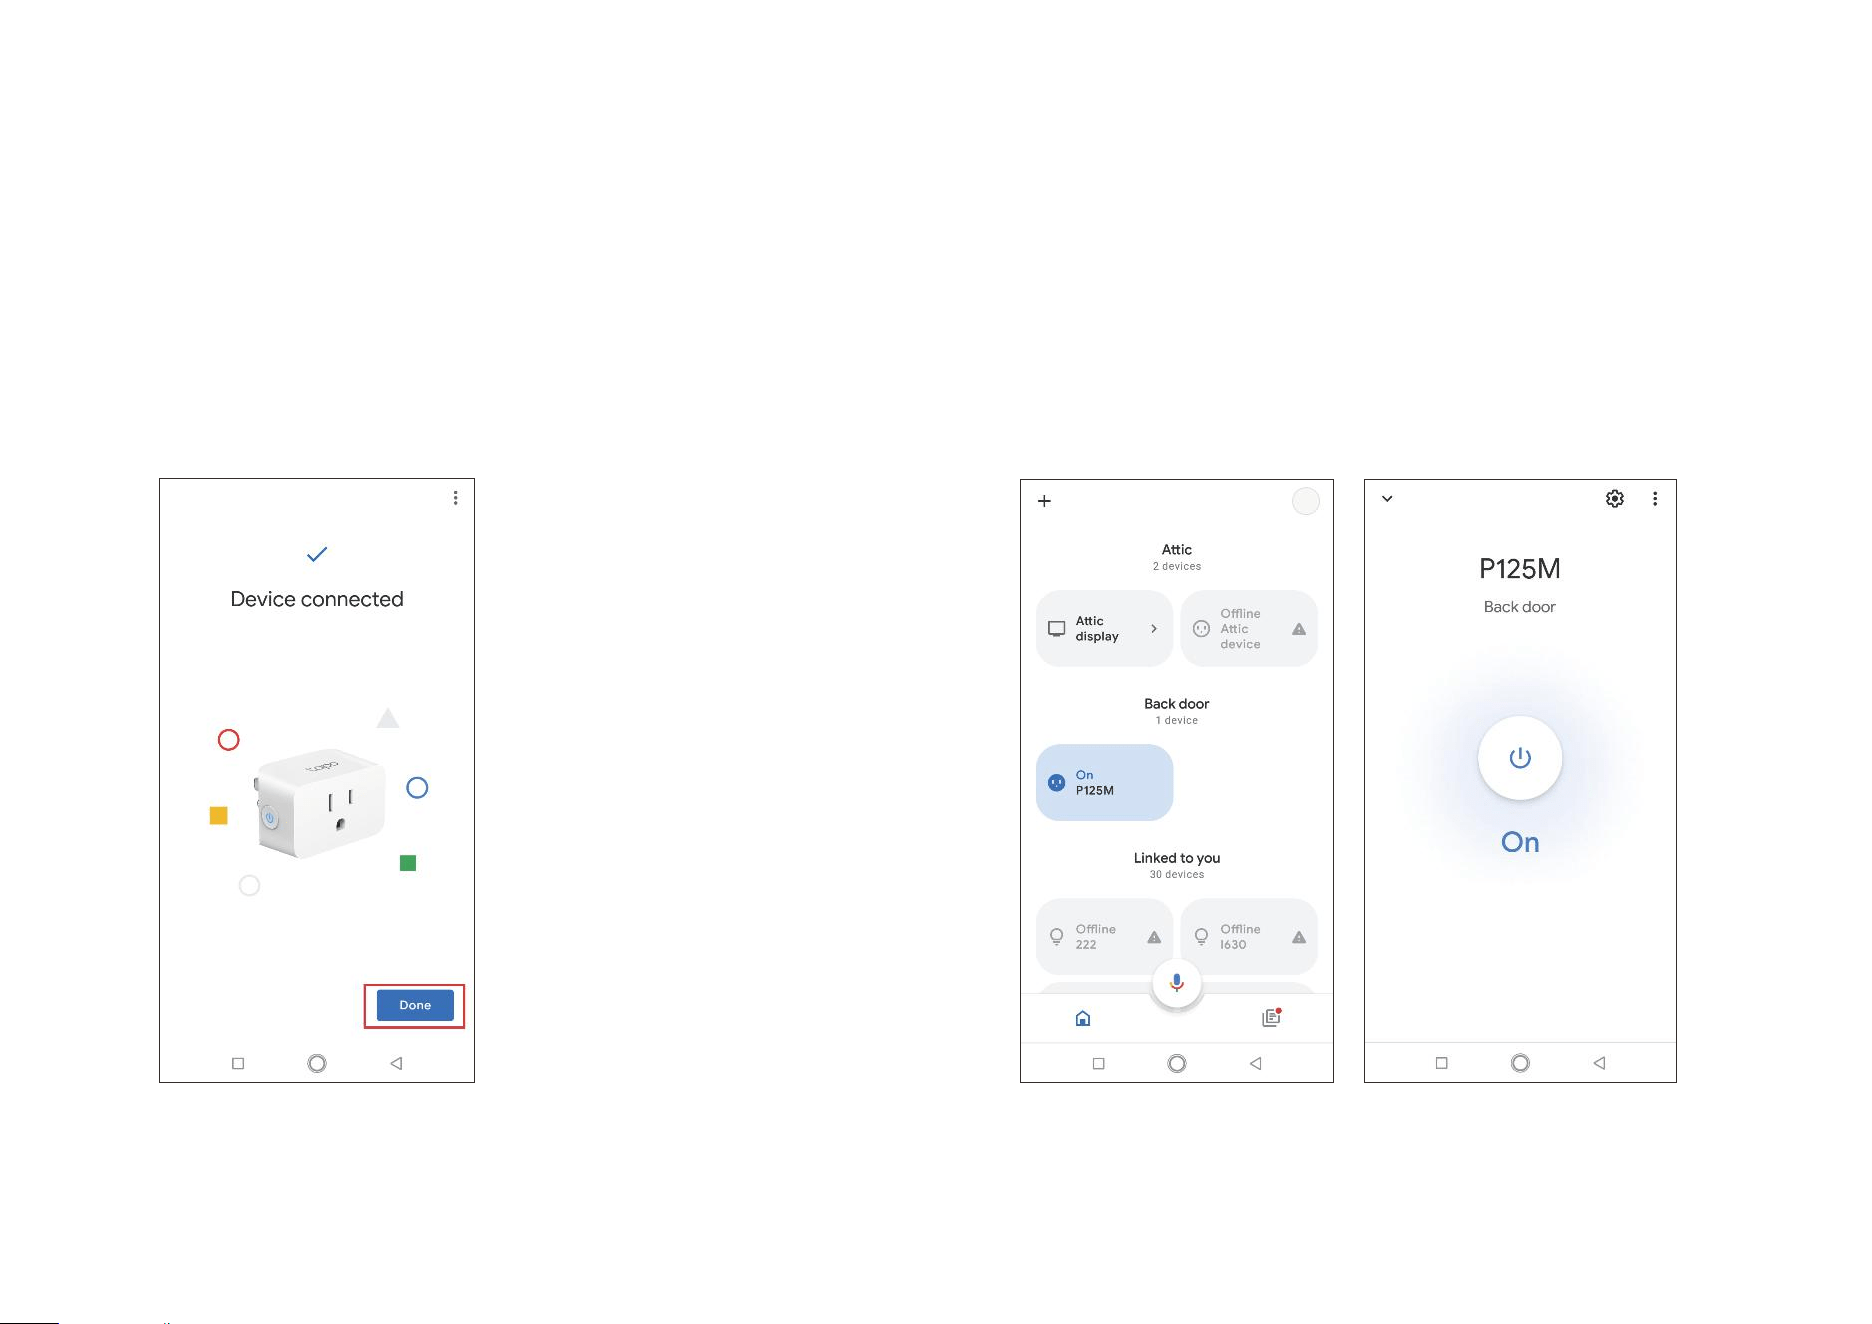
f. Choose a location for your device and give it a name. Then you can nd
your device on the Device list and turn on/o your device on the Google
Home app or with Google assistants.
e. Tap Done when the device is connected.
17
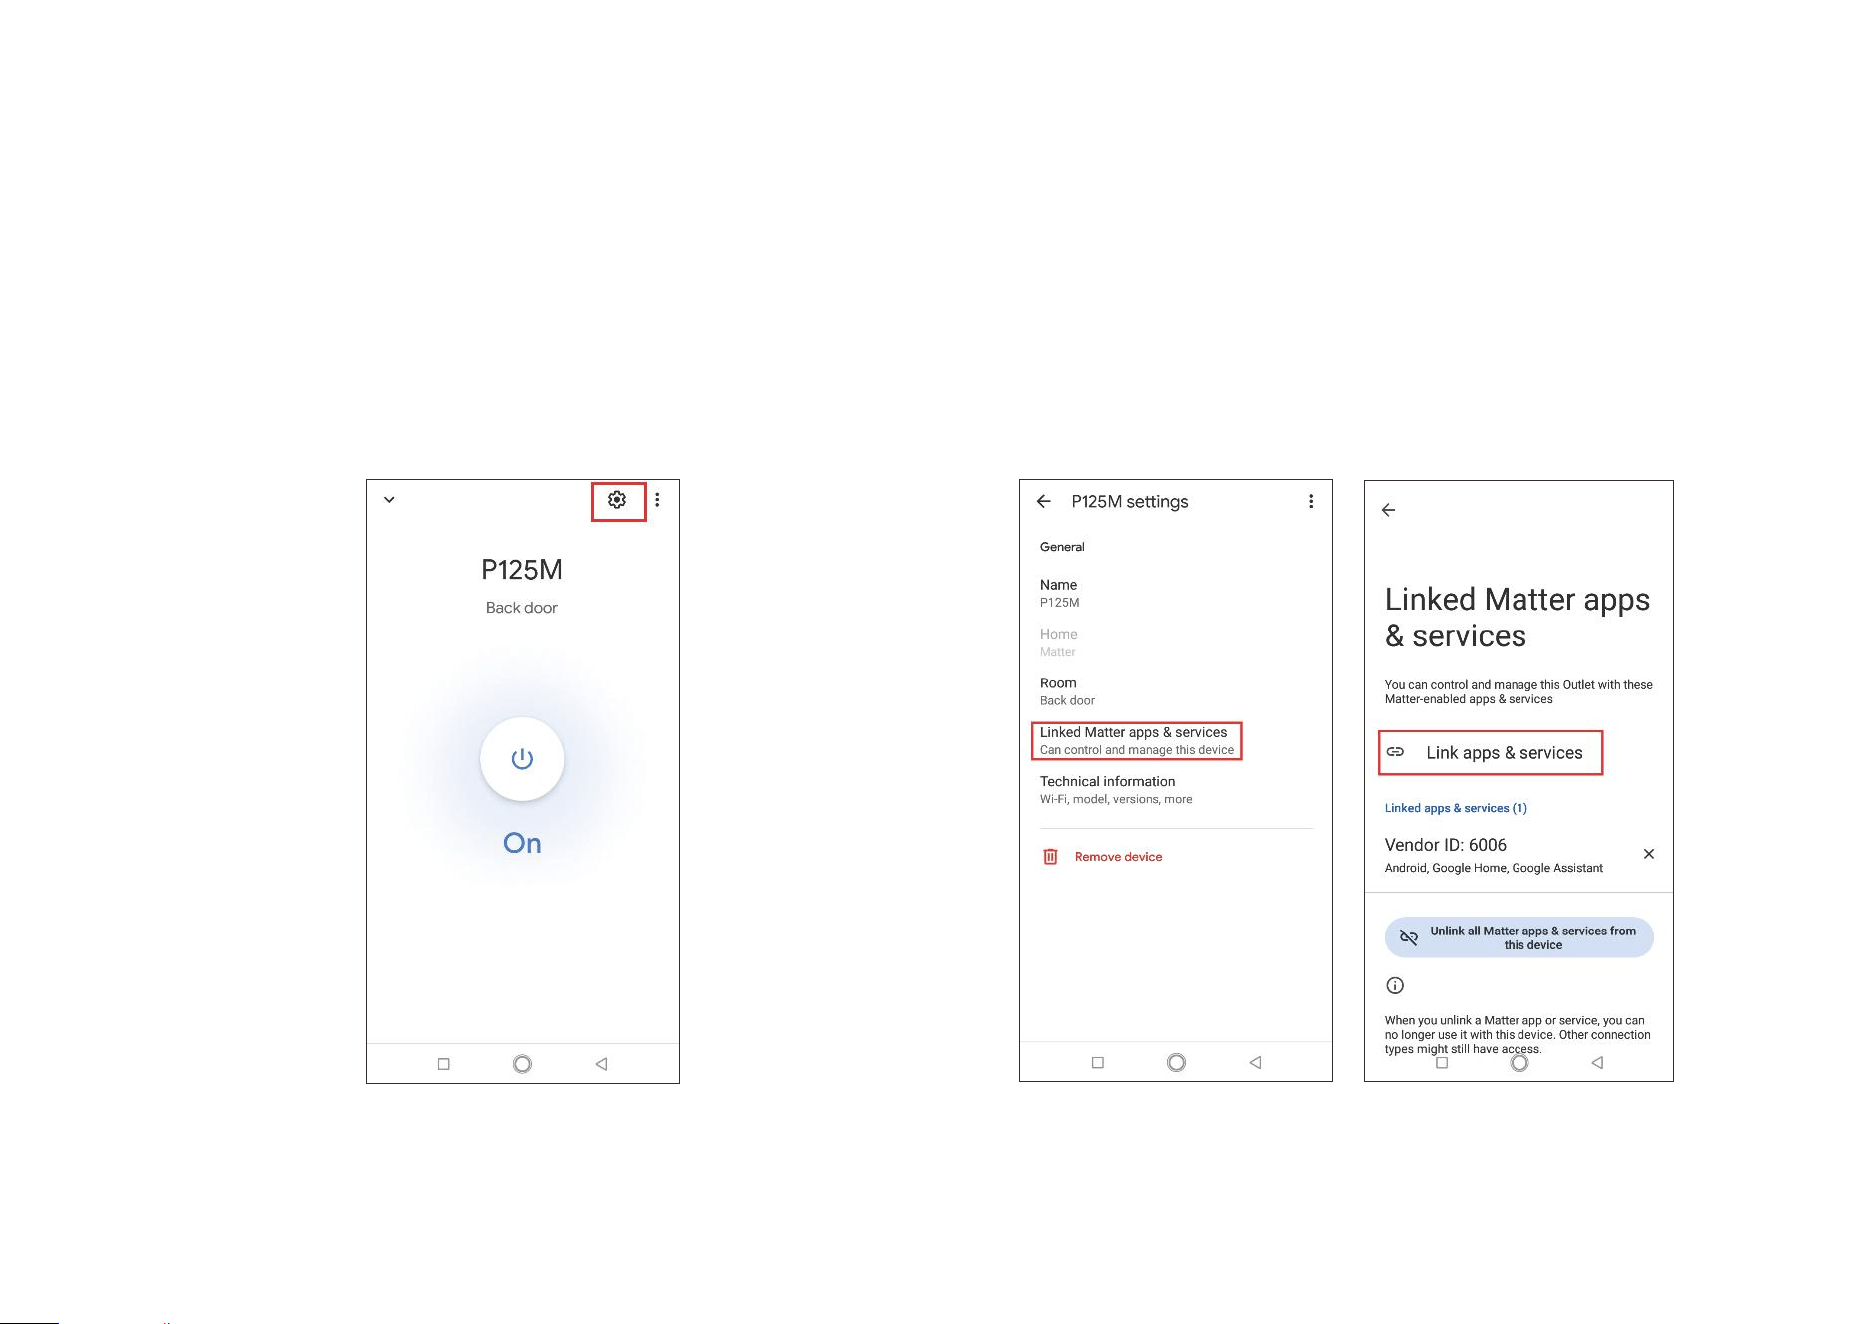
a. Launch your Google Home app. Tap the gear button to go to the device
settings page.
b. Tap Linked Matter apps & services and then tap Link apps & services
to create an 11-digit setup code.
3. How to Integrate Your Device into Another Ecosystem
As the setup code can only be used to add the device to the rst ecosystem, for the second commissioning, you need to go to the app of the rst
ecosystem to generate a new setup code.
18
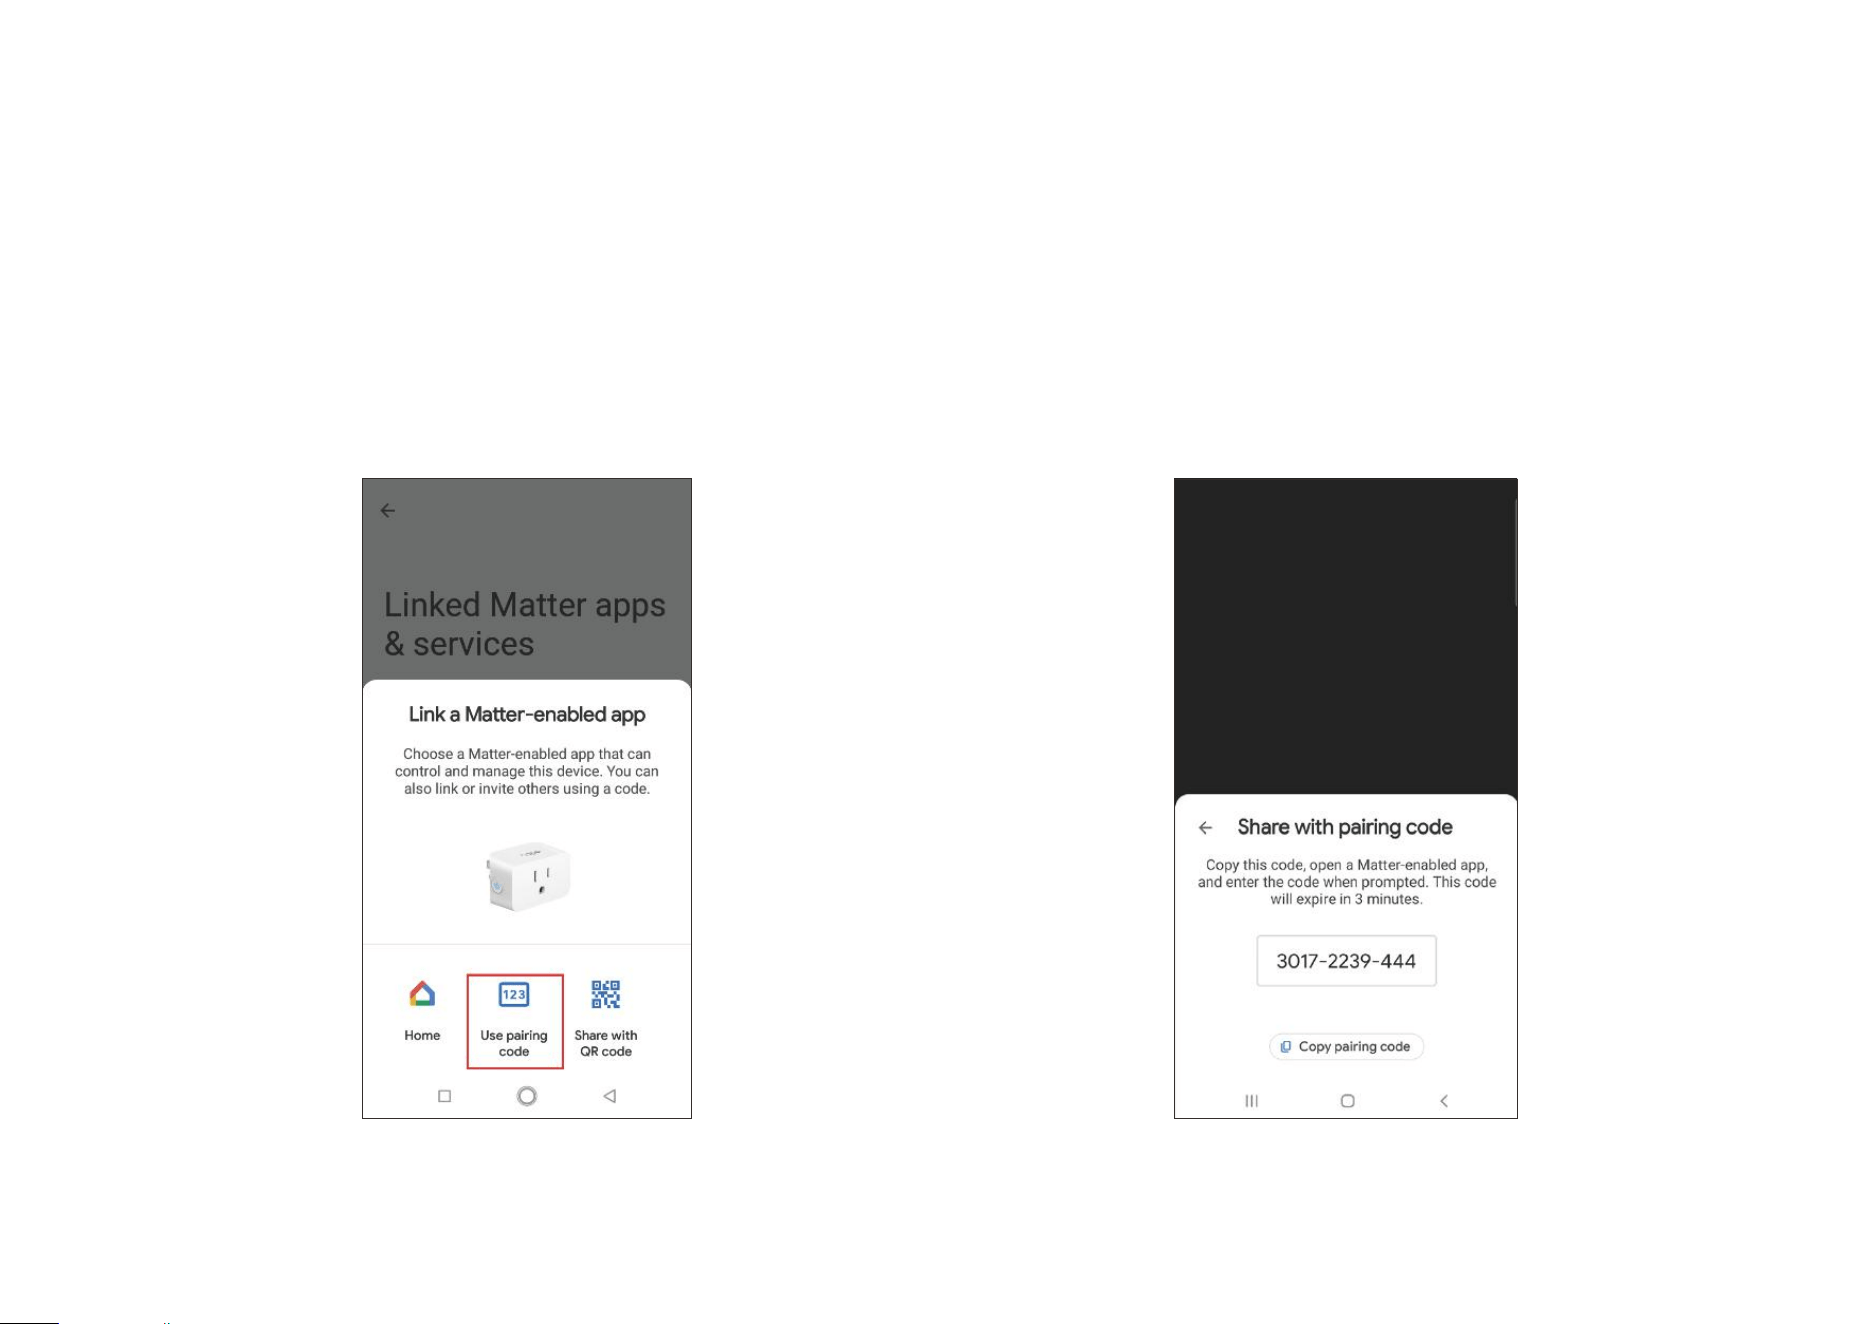
c. Tap Use pairing code.
If conditions permit, you can alternatively tap Share with QR code and you
should use the other mobile device to scan the newly-created pairing QR
code.
d. Tap Copy pairing code to copy the new code.

19
d. Launch the app of the second ecosystem. Follow the setup instruction
to enter the setup code and follow the app instructions to complete the
setup.

20
Add to Apple via Matter
1. Check Compatibility (Click here for more information)
• iOS system: Version 16.2 or later.
• Matter-supported Controller: Home Pod, Home Pod mini, or Apple TV.
Note: Please update your iOS devices to iOS 16.2 or a later version. It is recommended to update your iOS to the latest version for better experience.
21
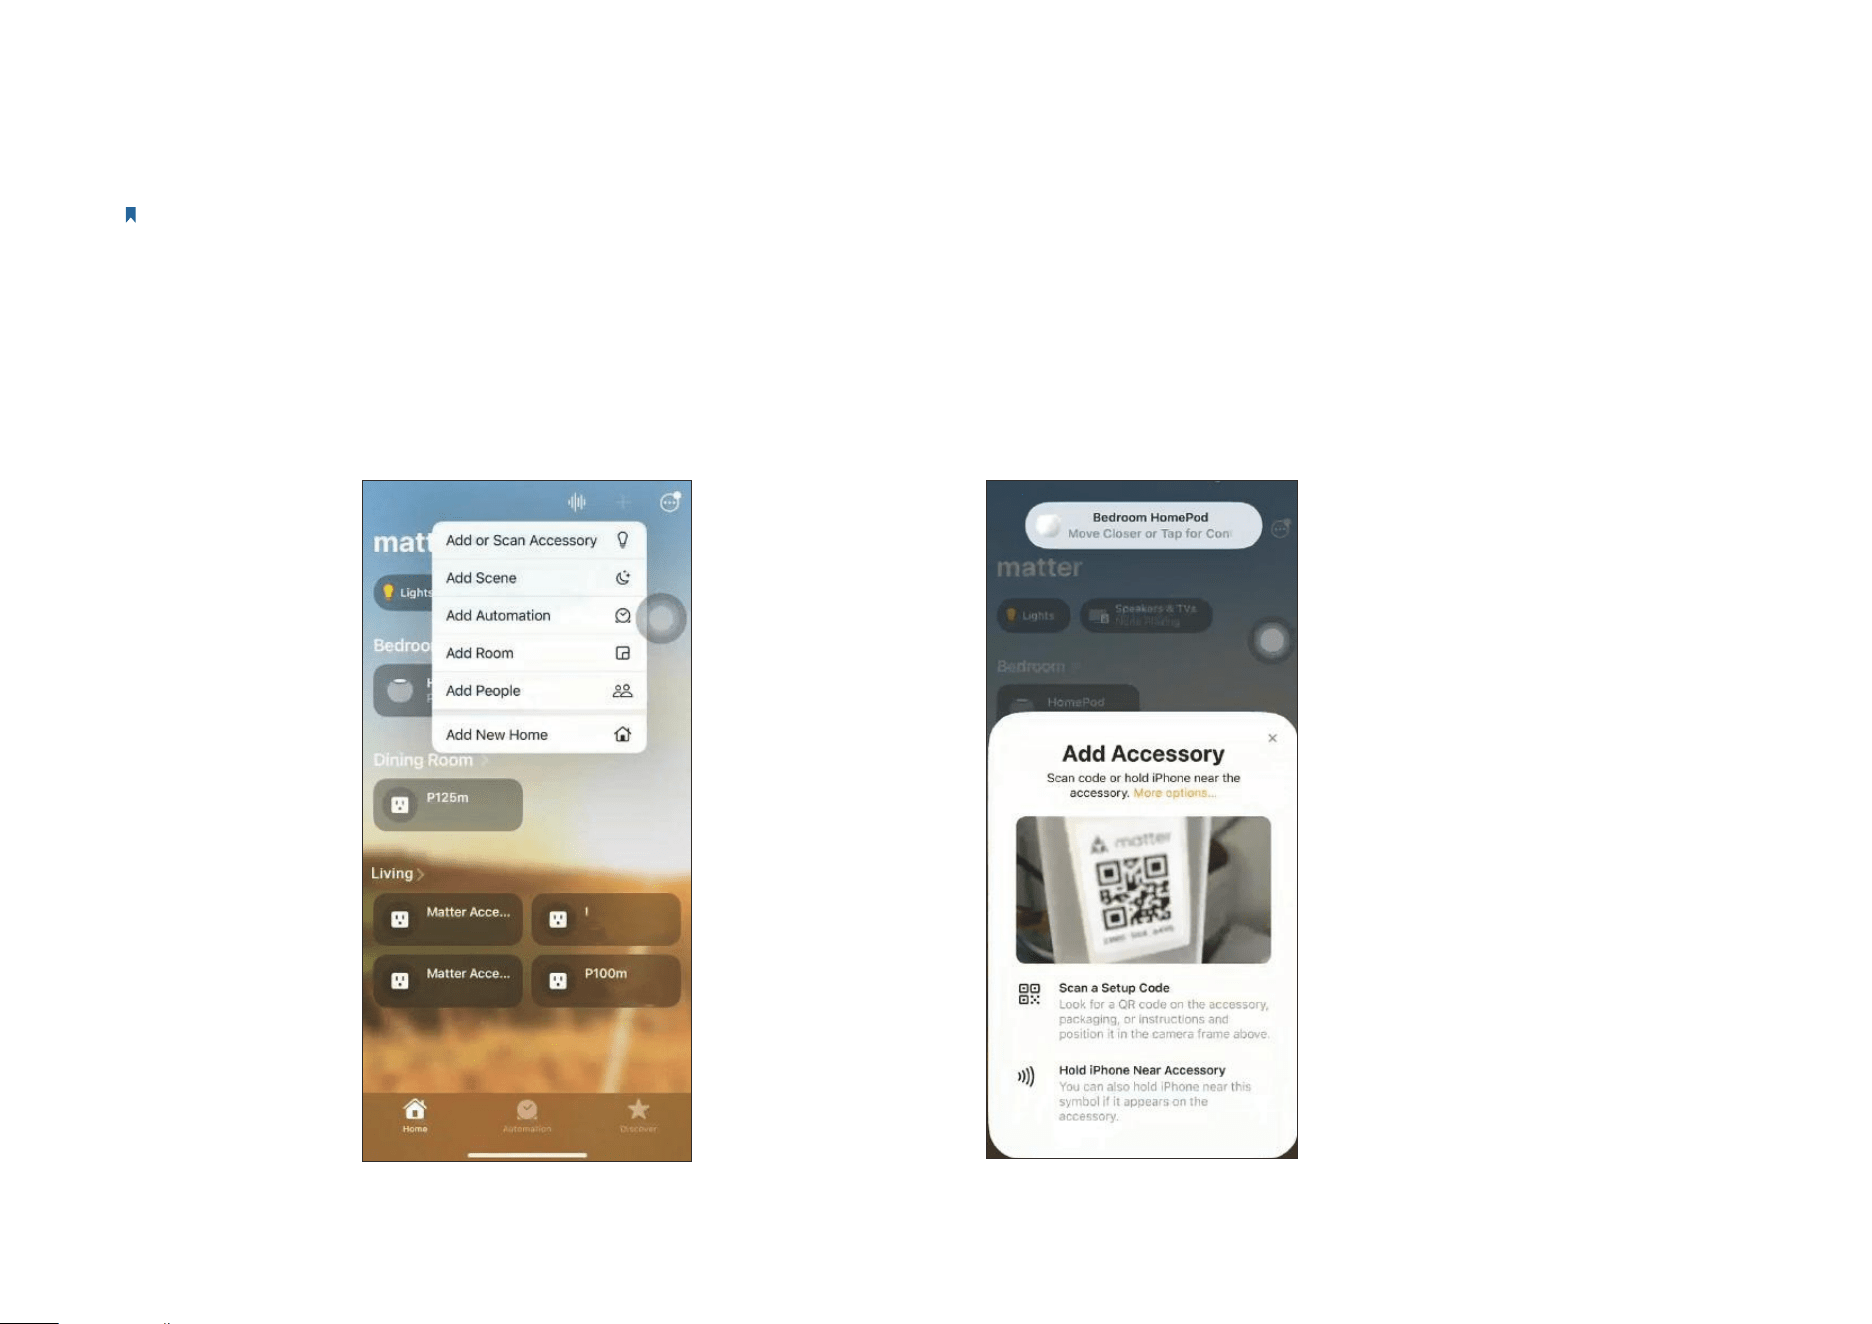
b. Scan the setup QR code on your device.a. Launch your Home App. Tap + and then tap Add or Scan Accessory to
add a new device.
2. How to Set Up Your Matter Device
Note: The pairing mode of your Matter-certified device will automatically turn off in 15 minutes. You can turn the pairing mode back on by restarting your device, such as
unplugging your plug.
22
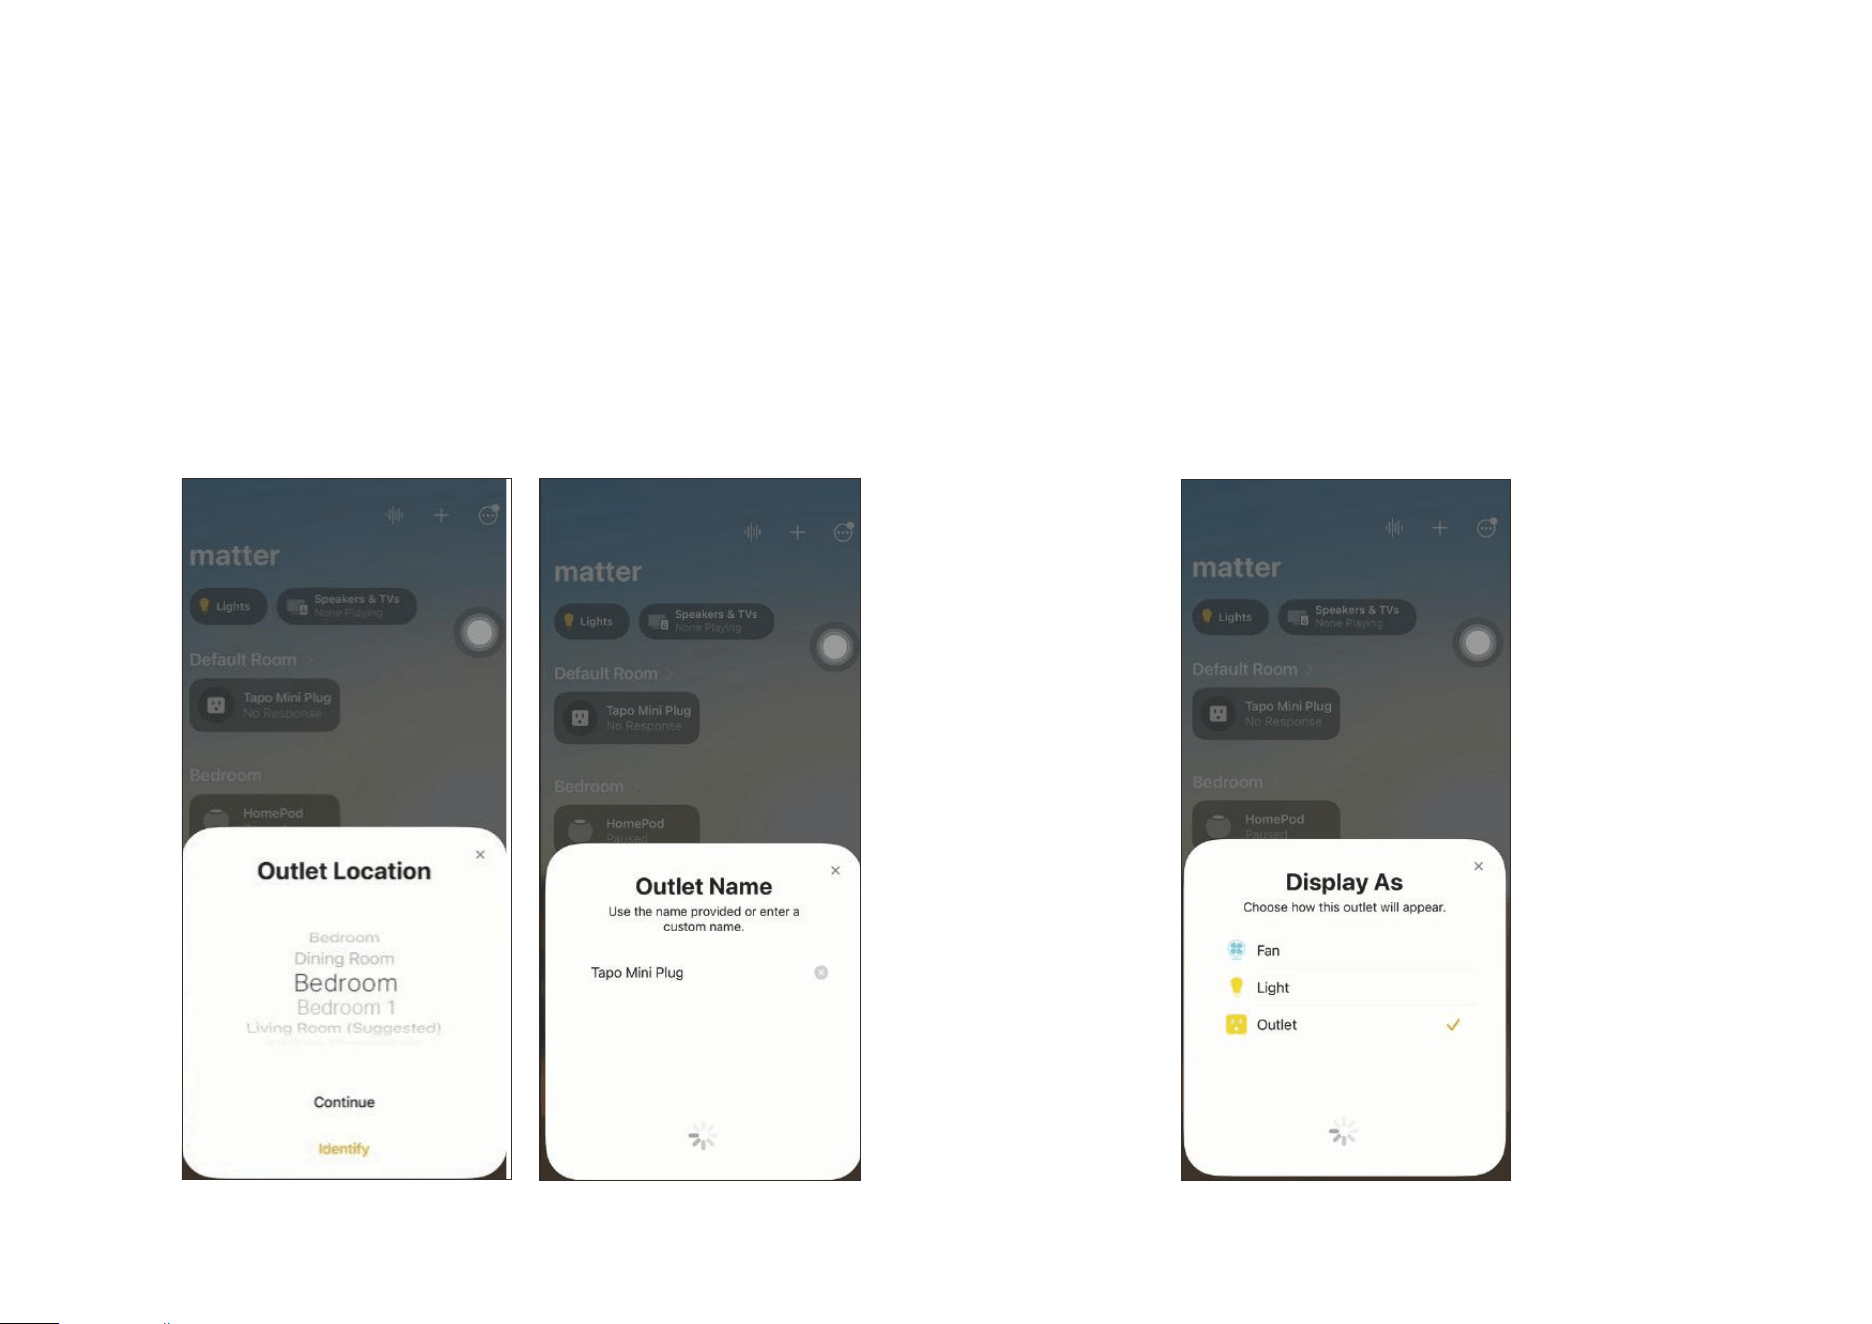
d. Choose how your device will appear. Now you can check your device on
the Device list and turn on/o your device on the Home app.
c. Choose a location for your device and give it a name.
23
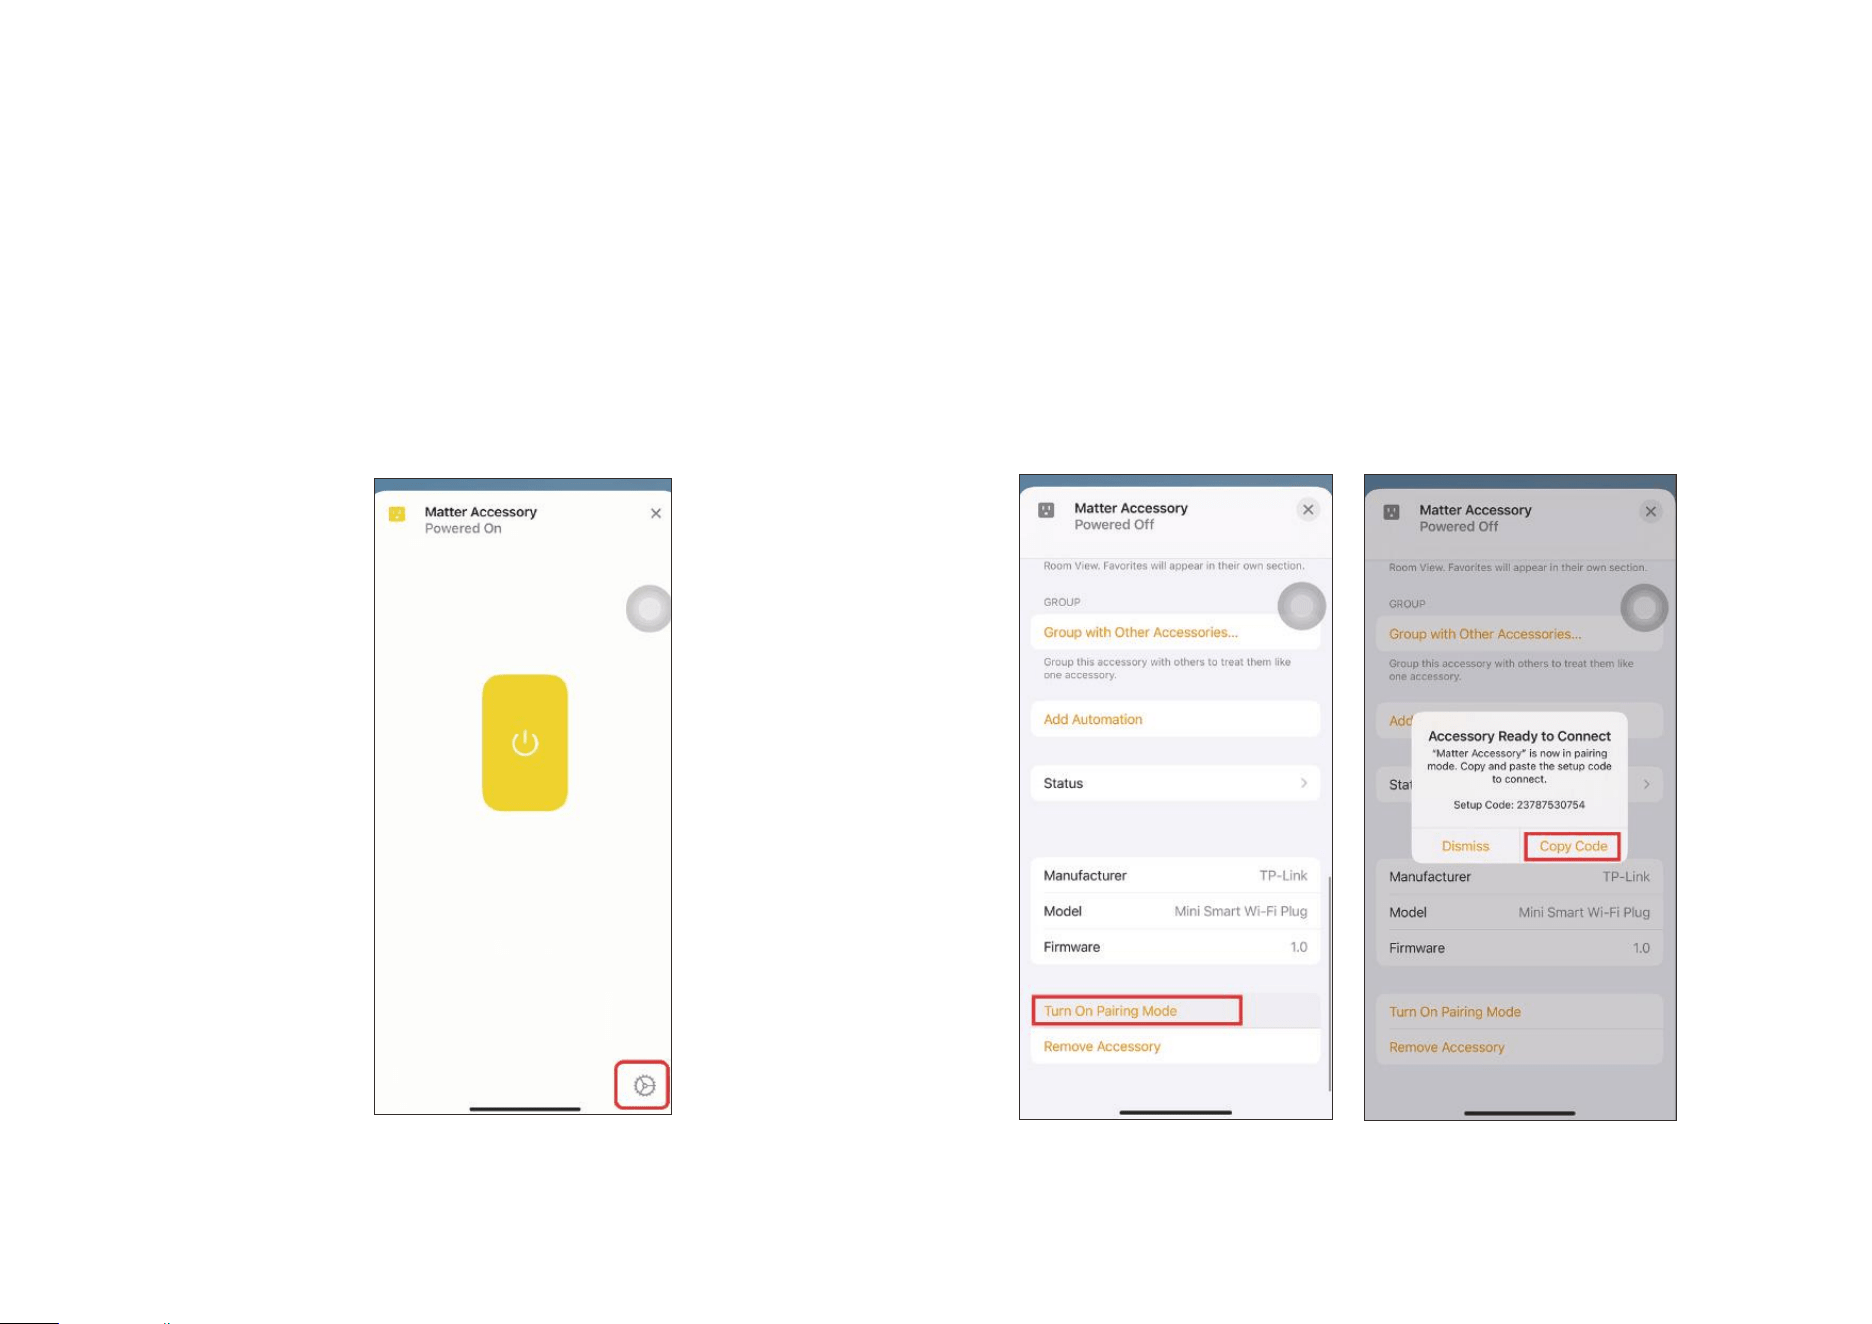
a. Launch your Home app and go to the Device Settings page. b. Scroll down, tap Turn On Pairing Mode and then Copy Code.
3. How to Integrate Your Device into Another Ecosystem
As the setup code can only be used to add the device to the rst ecosystem, for the second commissioning, you need to go to the app of the rst
ecosystem to generate a new setup code.
24
c. Launch the app of the second ecosystem. Follow the setup instruction
to enter the setup code and follow the app instructions to complete the
setup.

25
Failed to Set Up via Matter?
Refer to the following and you can resolve most setup issues.
1. Make sure the rmware of your Matter hub and Smart Home app is updated to support Matter.
2. Ensure your phone and Matter hub are both connected to a stable 2.4 GHz Wi-Fi network, and that it has internet access during the
setup process.
3. Power cycle the Matter-enabled device.
4. If the Matter-enabled device has already been added to another ecosystem, you will need to get a new setup code for pairing according
to FAQ how to integrate your device into another ecosystem.
5. In the rst commissioning, Matter setup mode is active for 15 minutes after the device is powered on. For the second commissioning
the active time of setup mode varies between ecosystems. If this time period has expired, you will need to power cycle the matter-enabled
device to restart the clock.
6. Restart your smartphone and clear the cache of the Smart Home app.
If the above steps did not help solve your problem, it’s recommended that you try to factory reset the Matter-enabled device or use
another smartphone to congure it. For more information, please refer to https://www.tp-link.com/support/faq/3574/.
26
Basic Device Control
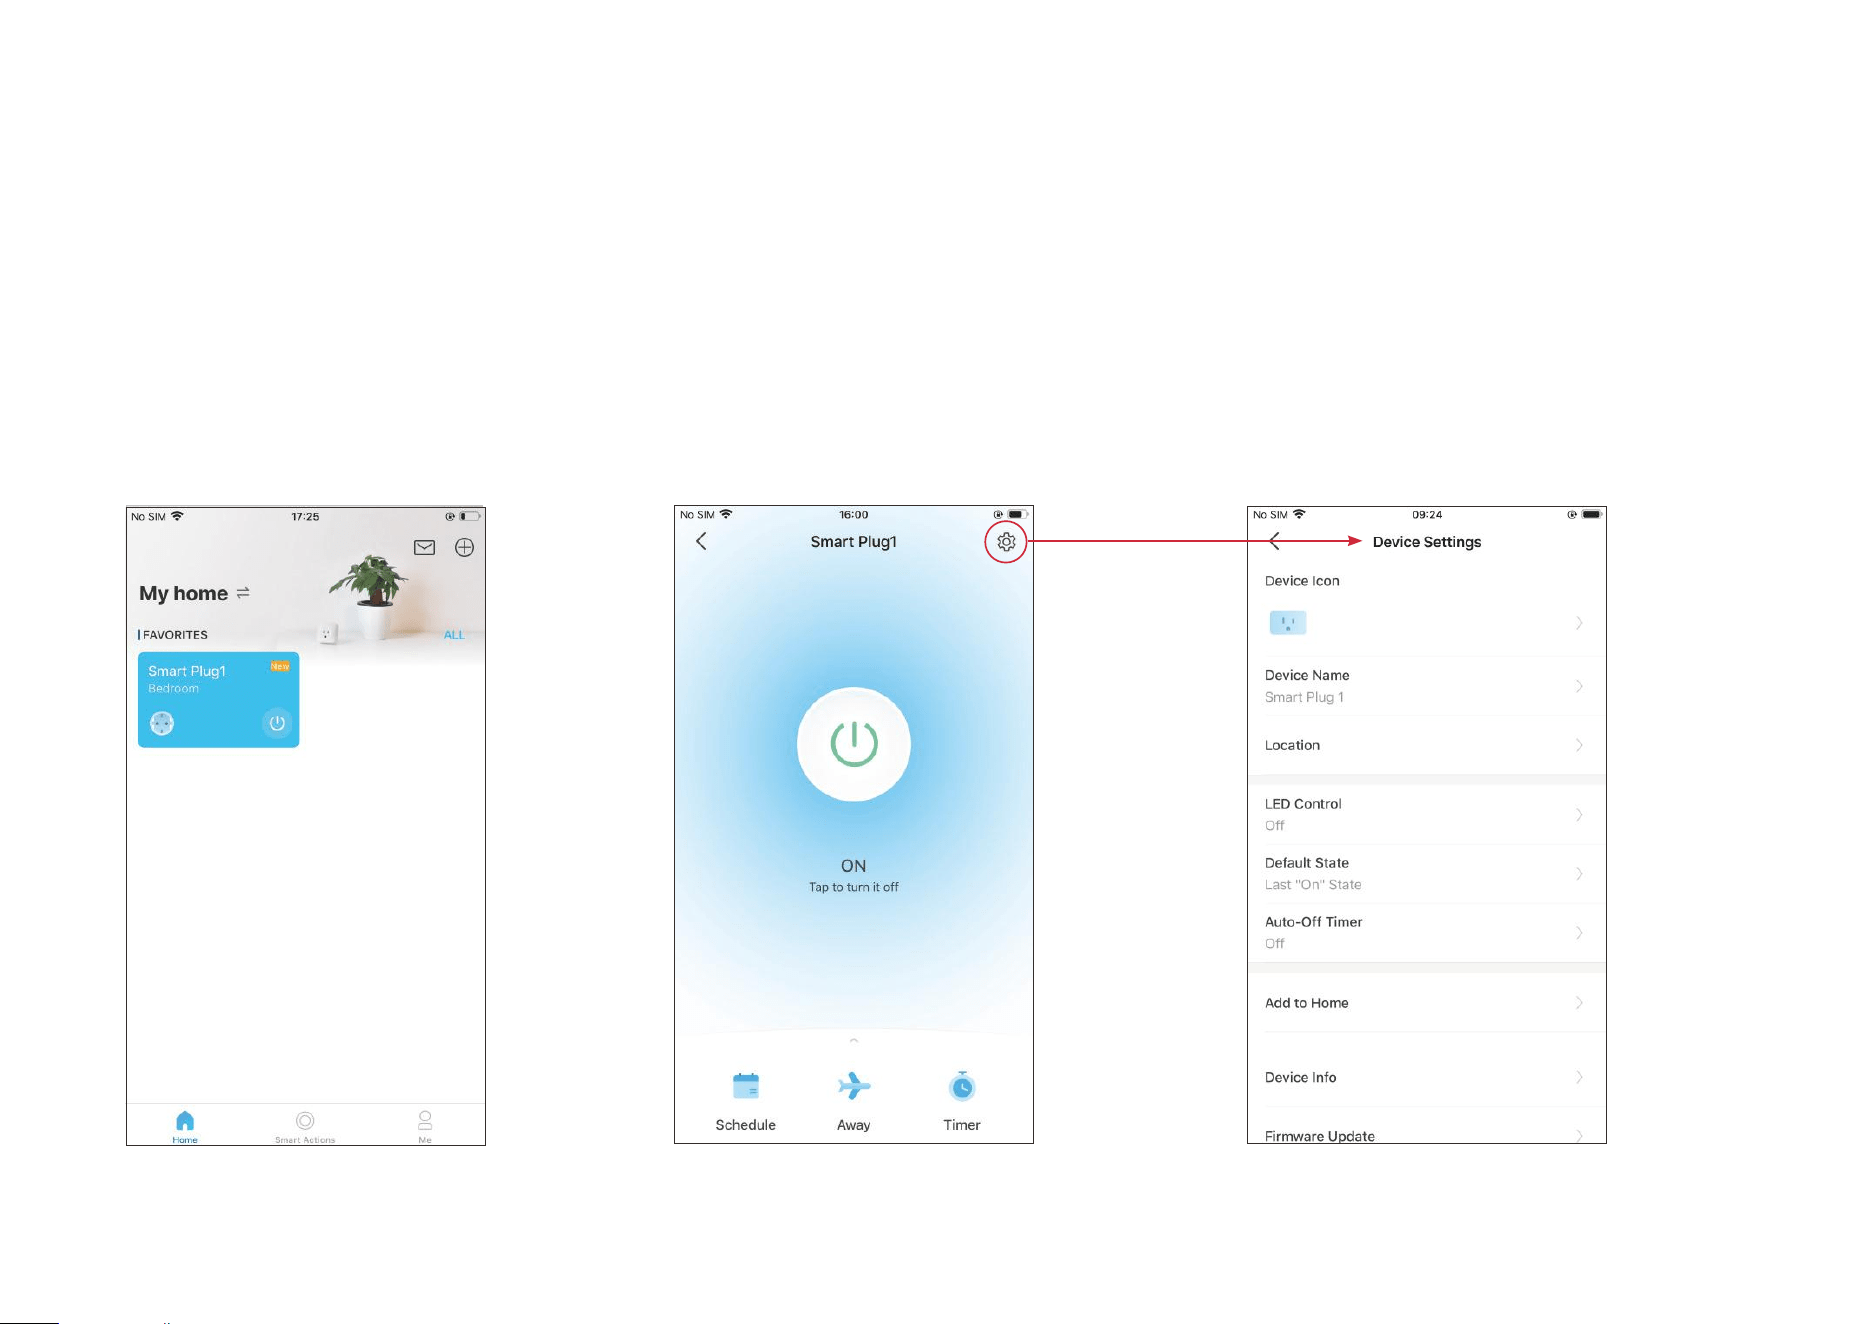
After successfully set up your smart plug, you will see the home page of the Tapo app. Here you can view the status of all devices that you've added
and manage them. You can tap on the device to control and manage it on the Tapo app.
Home Page
You can turn on/o your plug any time
anywhere and tap the plug card to enter the
status page.
Device Status Page
You can turn on/o your plug with one tap,
customize Schedule, enable Away Mode, set a
timer, and more.
Device Settings Page
Tap to view the Device Settings page. You
can edit the basic information, control the
LED, update rmware and more.
27
Congure Your Smart Plug
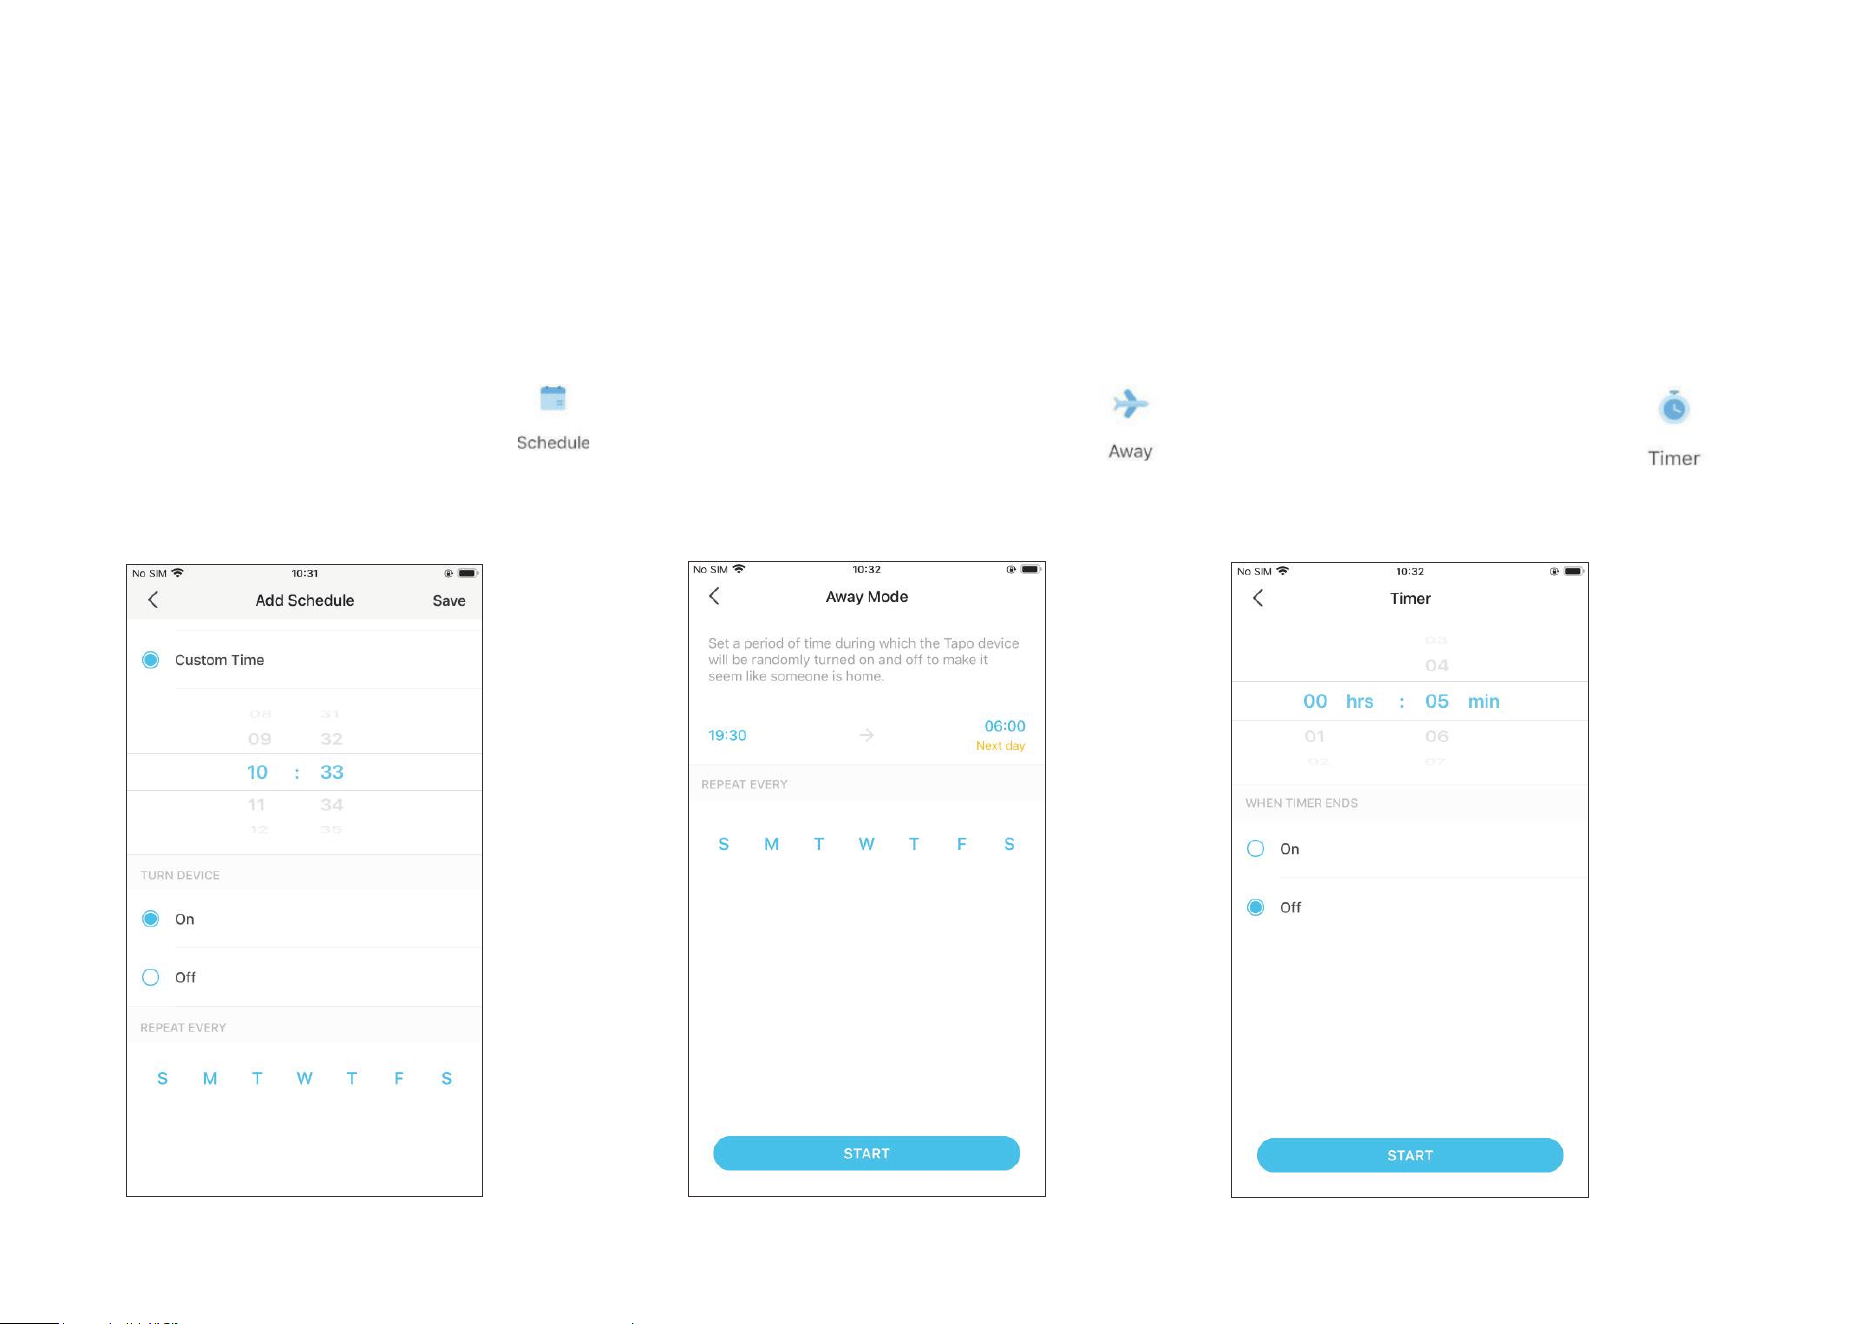
You can congure your smart plug by setting Schedule, Timer, Away Mode and more.
Set Schedule
Scroll down the status page and tap to
set schedules for your plug to automatically
turn on/o to simplify your daily routine.
Set Away Mode
Scroll down the status page and tap to
preset the Away Mode, set the start and end
time, then your plug will be randomly turned on/
o during this period.
Set Timer
Scroll down the status page and tap to
set the timer, then your plug will automatically
turn on/o after the timer ends.

28
Option 1: Edit Routine Actions on the featured shortcuts
1. Go to the Smart Actions page and you will see the Featured
Actions (Shortcuts or Automation).
Smart Actions
Smart Actions automate repetitive tasks, allowing you to blaze through tedium with utmost ease. Set everything up once and never have to worry about
it again. With Smart Actions, giving your home that level of intelligence is a snap. Shortcut lets you perform an action with a simple tap. Automation
allows you to automate tasks to be performed at a set time. e.g. The lamp plugged into your smart plug will light on at 7 PM.
2. Tap on a featured action. Tap EDIT to change the settings as needed and tap APPLY
to save changes.

29
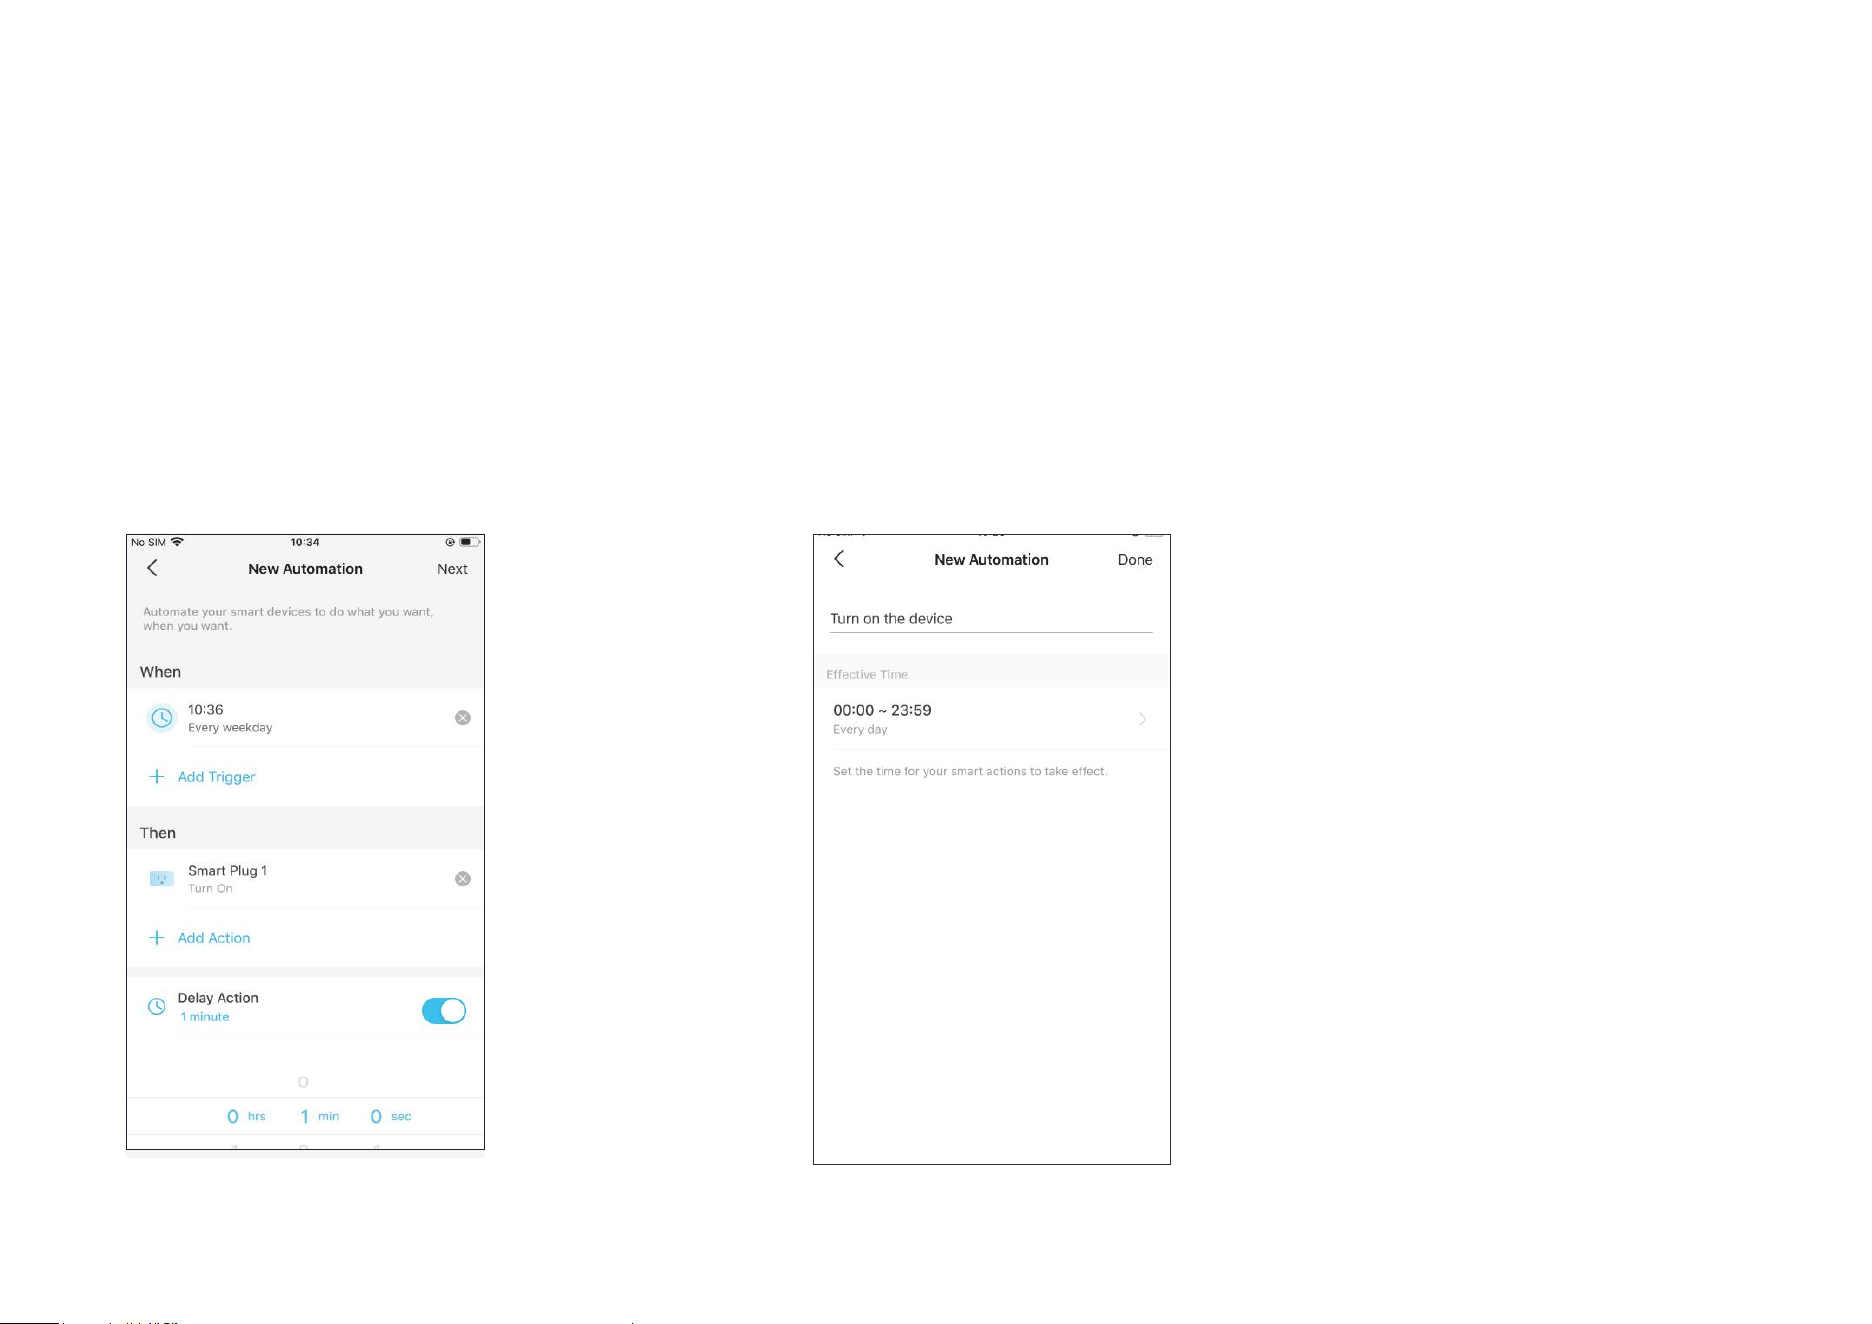
Option 2: Create your own actions
1. Tap + and then choose Automation to add a simple and
smart action.
2. Add conditions (When) like the trigger time, and tap + to add tasks (Then) like turning
on the smart plug.
30
3. When the action is created, you can also delay the action
for a specic time. Tap Done to save all the settings.
4. Give your new automation a name and then you can decide when to perform the
action by setting the Eective Time.
31
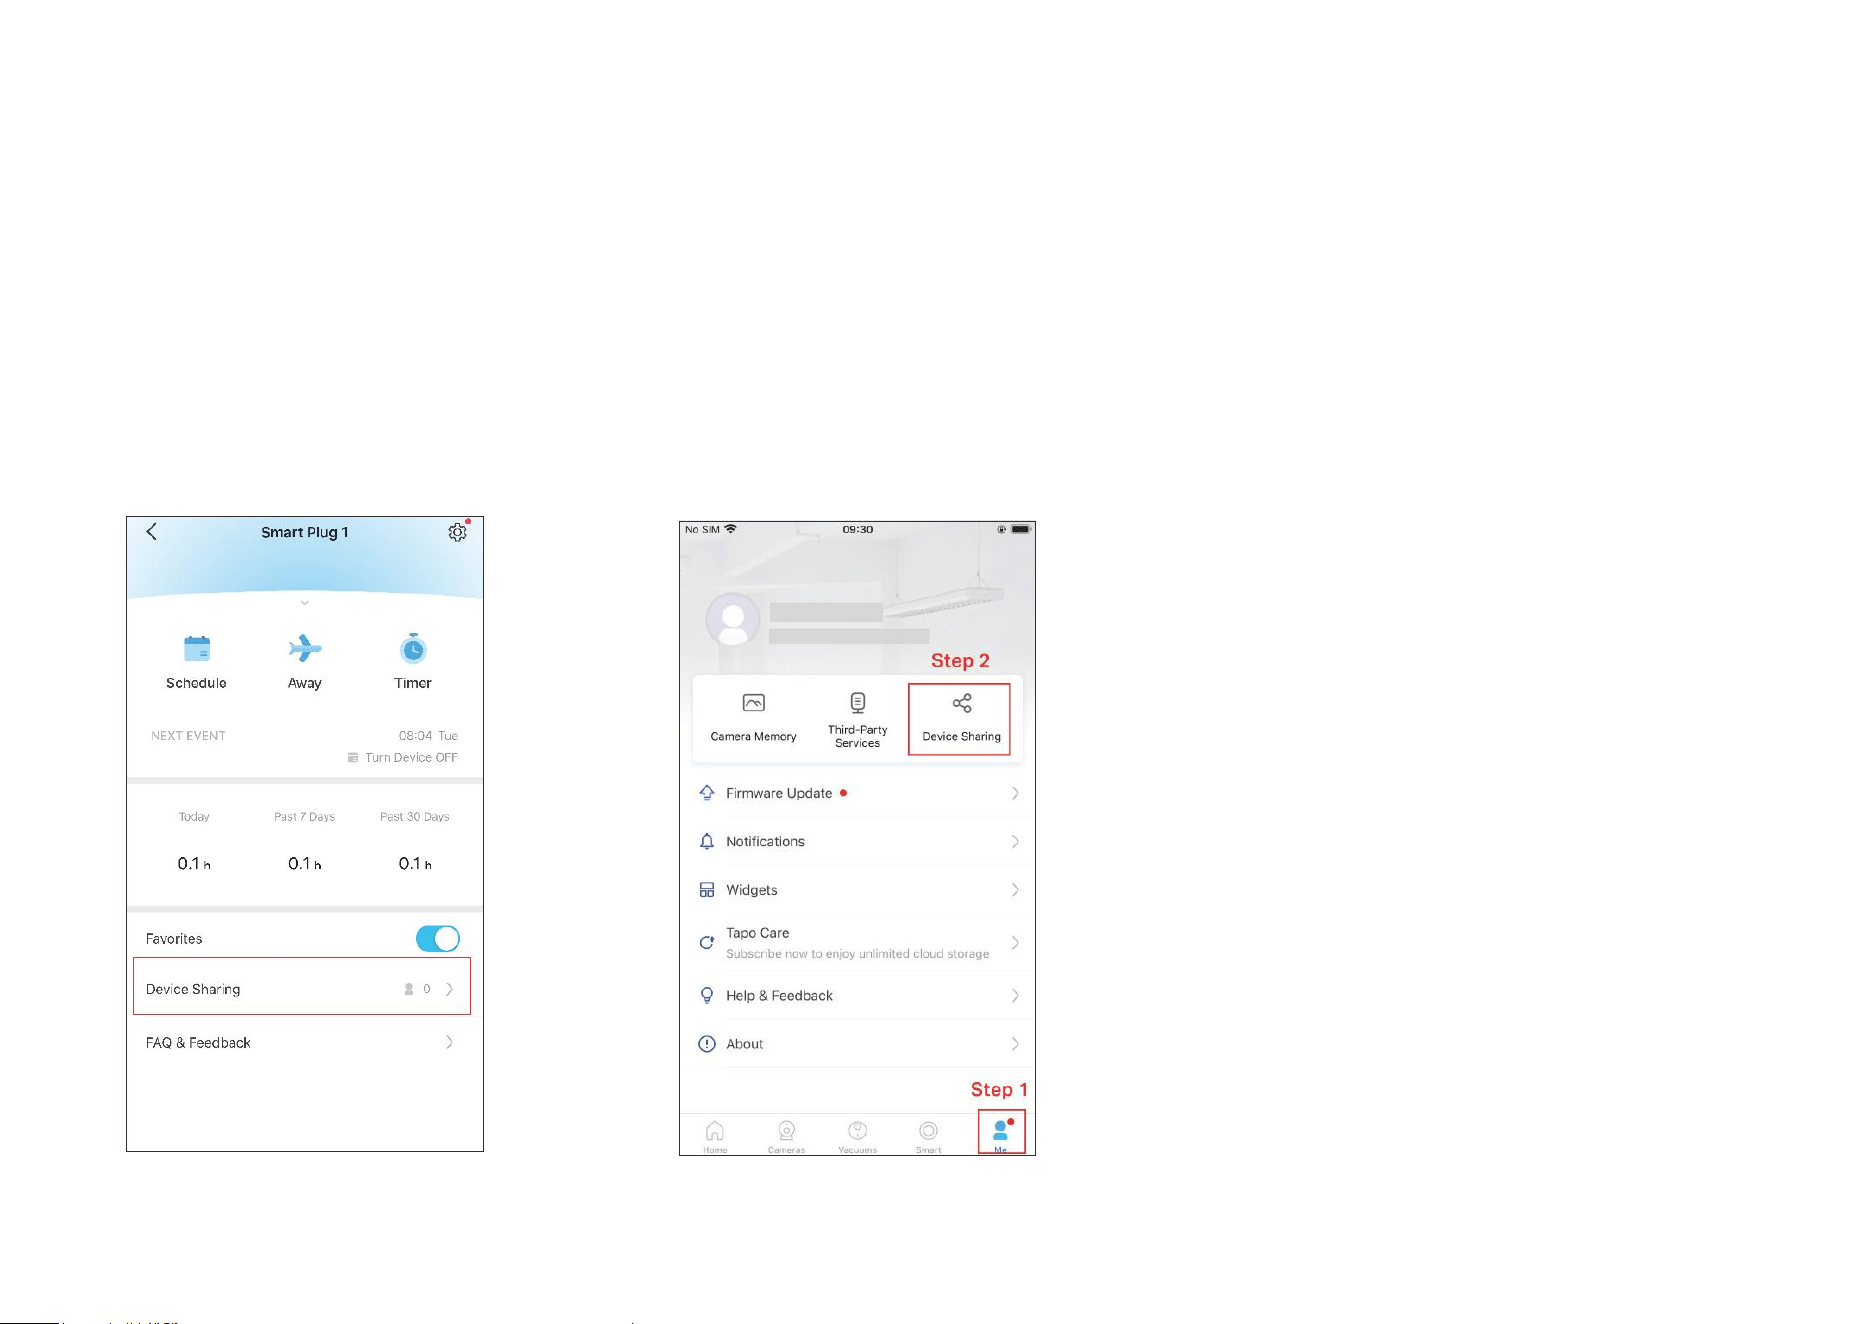
Method 1
Go to Device Status page, slide up and tap
Device Sharing.
Method 2
Go to Me page and tap Device Sharing to view
your shared devices and devices shared from
others.
Share Your Smart Plug
You can invite your family members to manage your Tapo devices together by entering the TP-Link ID (email) you want to share the devices with.
32
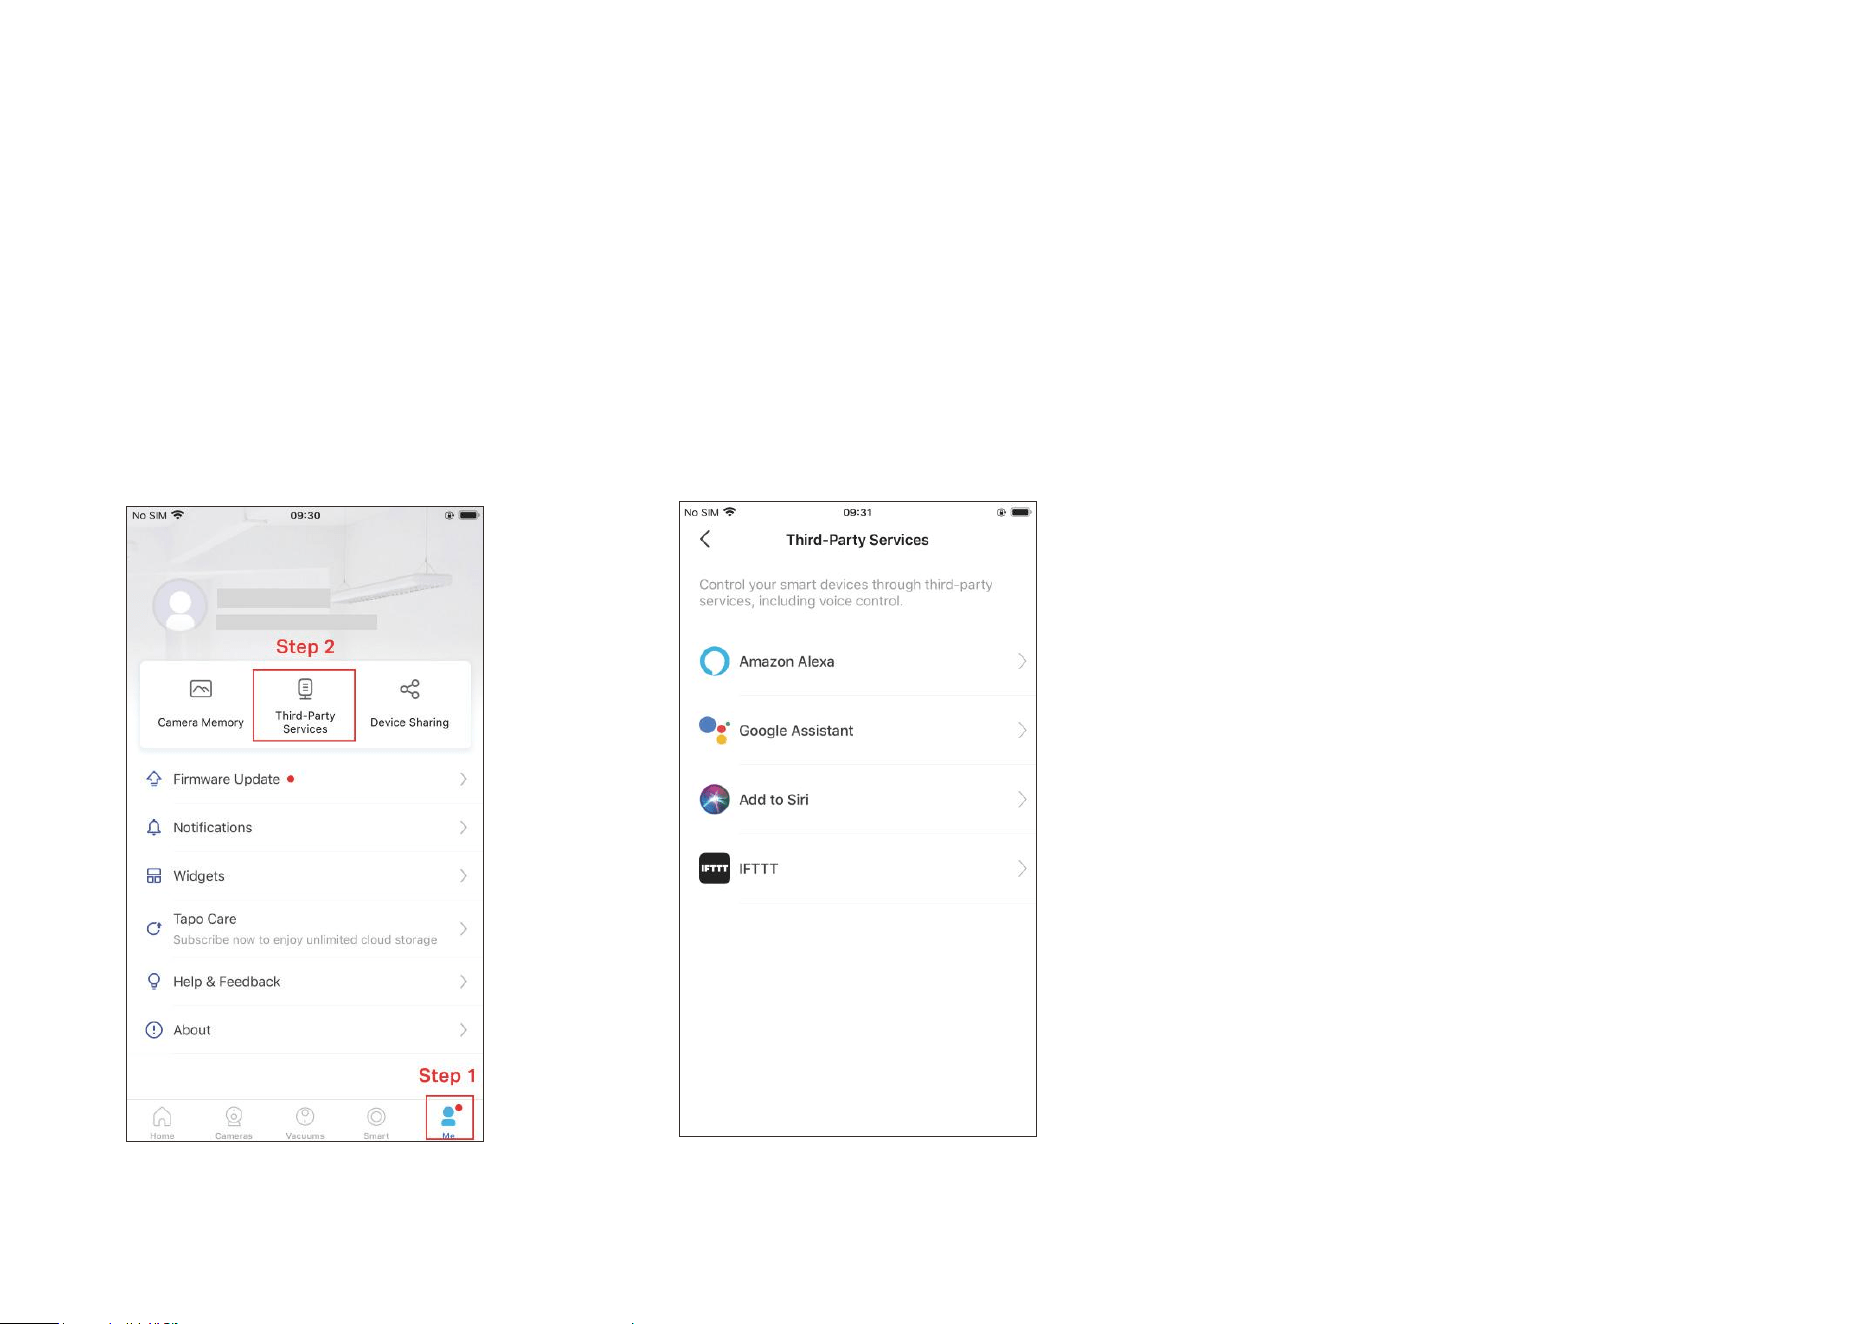
1. Go to Me page and tap Third-Party Services
to connect to Amazon Alexa or Google
Assistant.
2. Select a voice assistant and follow the
instructions to control your device via voice.
Voice Control
Free up your hands with simple voice commands to control your devices via Amazon Alexa, Google Assistant, Siri and IFTTT.

33
Authentication
FCC Compliance Information Statement
Product Name: Mini Smart Wi-Fi Plug, Matter
Model Number: Tapo P125M
Responsible Party:
TP-Link USA Corporation
Address: 10 Mauchly, Irvine, CA 92618
Website: http://www.tp-link.com/us/
Tel: +1 626 333 0234
Fax: +1 909 527 6804
E-mail: [email protected]om
This equipment has been tested and found to comply with the limits for a Class B digital device, pursuant to part 15 of the FCC Rules. These limits are
designed to provide reasonable protection against harmful interference in a residential installation. This equipment generates, uses and can radiate
radio frequency energy and, if not installed and used in accordance with the instructions, may cause harmful interference to radio communications.
However, there is no guarantee that interference will not occur in a particular installation. If this equipment does cause harmful interference to radio
or television reception, which can be determined by turning the equipment off and on, the user is encouraged to try to correct the interference by
one or more of the following measures:
• Reorient or relocate the receiving antenna.
• Increase the separation between the equipment and receiver.
• Connect the equipment into an outlet on a circuit different from that to which the receiver is connected.
• Consult the dealer or an experienced radio/ TV technician for help.
This device complies with part 15 of the FCC Rules. Operation is subject to the following two conditions:
1. This device may not cause harmful interference.

34
2. This device must accept any interference received, including interference that may cause undesired operation.
Any changes or modifications not expressly approved by the party responsible for compliance could void the user’s authority to operate the
equipment.
Note: The manufacturer is not responsible for any radio or TV interference caused by unauthorized modifications to this equipment. Such modifications
could void the user’s authority to operate the equipment.
FCC RF Radiation Exposure Statement
This equipment complies with FCC RF radiation exposure limits set forth for an uncontrolled environment. This device and its antenna must not be
co-located or operating in conjunction with any other antenna or transmitter.
“To comply with FCC RF exposure compliance requirements, this grant is applicable to only Mobile Configurations. The antennas used for this
transmitter must be installed to provide a separation distance of at least 20 cm from all persons and must not be co-located or operating in conjunction
with any other antenna or transmitter.”
We, TP-Link USA Corporation, has determined that the equipment shown as above has been shown to comply with the applicable technical standards,
FCC part 15. There is no unauthorized change is made in the equipment and the equipment is properly maintained and operated.
Issue Date: 2023-01-11

35
Canadian Compliance Statement
This device complies with Industry Canada license-exempt RSSs. Operation is subject to the following two conditions:
1 ) This device may not cause interference, and
2 ) This device must accept any interference, including interference that may cause undesired operation of the device.
Le présent appareil est conforme aux CNR d’Industrie Canada applicables aux appareils radio exempts de licence. L’exploitation est autorisée aux
deux conditions suivantes :
1 ) l’appareil ne doit pas produire de brouillage;
2 ) l’utilisateur de l’appareil doit accepter tout brouillage radioélectrique subi, meme si le brouillage est susceptible d’en compromettre le
fonctionnement.
Radiation Exposure Statement:
This equipment complies with IC radiation exposure limits set forth for an uncontrolled environment. This equipment should be installed and operated
with minimum distance 20cm between the radiator & your body.
Déclaration d’exposition aux radiations:
Cet équipement est conforme aux limites d’exposition aux rayonnements IC établies pour un environnement non contrôlé. Cet équipement doit être
installé et utilisé avec un minimum de 20 cm de distance entre la source de rayonnement et votre corps.
Industry Canada Statement
CAN ICES-3 (B)/NMB-3(B)
NCC Notice
注意!
取得審驗證明之低功率射頻器材,非經核准,公司、商號或使用者均不得擅自變更頻率、加大功率或變更原設計之特性及功能。
低功率射頻器材之使用不得影響飛航安全及干擾合法通信;經發現有干擾現象時,應立即停用,並改善至無干擾時方得繼續使用。
前述合法通信,指依電信管理法規定作業之無線電通信。
低功率射頻器材須忍受合法通信或工業、科學及醫療用電波輻射性電機設備之干擾。

36
BSMI Notice
安全諮詢及注意事項
• 清潔本產品之前請先切斷電源。請勿使用液體、噴霧清潔劑或濕布進行清潔。
• 注意防潮,請勿將水或其他液體潑灑到本產品上。
• 請勿將本產品置放於靠近熱源的地方。除非有正常的通風,否則不可放在密閉位置中。
• 不要私自拆開機殼或自行維修,如產品有故障請與原廠或代理商聯繫。
37
限用物質含有情況標示聲明書
設備名稱:Mini Smart Wi-Fi Plug, Matter
Equipment name
型號(型式):Tapo P125M
Type designation (Type)
單元
Unit
限用物質及其化學符號
Restricted substances and its chemical symbols
鉛
Lead
(Pb)
汞
Mercury
(Hg)
鎘
Cadmium
(Cd)
六價鉻Hexavalent
chromium
(Cr
+6
)
多溴聯苯
Polybrominated
biphenyls
(PBB)
多溴二苯醚Polybrominated
diphenyl ethers (PBDE)
PCB ○ ○ ○ ○ ○ ○
外殼 ○ ○ ○ ○ ○ ○
電源供應板 − ○ ○ ○ ○ ○
其他及其配件 − ○ ○ ○ ○ ○
備考1.〝超出0.1 wt %〞及〝超出0.01 wt %〞係指限用物質之百分比含量超出百分比含量基準值
Note 1:“Exceeding 0.1 wt %” and “exceeding 0.01 wt %” indicate that the percentage content of the restricted substance exceeds
the reference percentage value of presence condition.
備考2.〝○〞係指該項限用物質之百分比含量未超出百分比含量基準值。
Note 2:“○” indicates that the percentage content of the restricted substance does not exceed the percentage of reference value of
presence.
備考3.〝−〞係指該項限用物質為排除項目。
Note 3:The “−” indicates that the restricted substance corresponds to the exemption.
Safety Information
• Keep the device away from water, fire, humidity or hot environments.
• Do not attempt to disassemble, repair, or modify the device.
• Do not use the device where wireless devices are not allowed.
• The socket-outlet shall be installed near the equipment and shall be easily accessible.

38
• The devices are not intended for use in locations where the temperature may be less than actual room conditions, such as unheated warehouses
or garages.
• For indoor use only.
• Do not overload power outlets. This can result in the risk of fire or electric shock.
• Completely insert the product into the power outlet. Failure to do so may cause electric shock and / or excessive heat resulting in fire.
• Regularly remove dust etc from the product by pulling it out from the power outlet and wiping with a DRY cloth. Accumulated dust may cause an
insulation defect resulting in fire.
• Unplug from the power outlet if it emits smoke, has an abnormal smell or makes an unusual noise.
• Do not use the product if the casing has been broken. Danger of electric shock.
• Never touch the product with wet hands.
• Do not place near automatically controlled devices such as fire alarms. Radio waves emitted from this product may cause such devices to
malfunction resulting in an accident.
• Do not use this product at a refuelling point.
• Observe restrictions on using wireless products in fuel depots, chemical plants or when blasting operations are in progress.
• Do not use liquid to clean the product. Only use a dry cloth.
• Never put metal objects inside the product. If a metal object enters the product turn off the circuit breaker and contact an authorised electrician.
• Be careful to connect the following- cooking appliances, irons, other devices that generate a large amount of heat. There is a risk of fire, burns or
injury. – power tools, electric machinery, or other devices that could cause injury and therefore must be used under direct careful observation. –
heating or cooling devices or any type of device which could cause health risks particularly to the elderly or children.
• This product is not intended to be used when providing medical care. Consult the manufacturer of any personal medical devices, such as pacemakers
or hearing aids to determine if they are adequality shielded from external RF (radio frequency) energy.
• Do not use this product in health care facilities. Hospitals or health care facilities may be using equipment that could be sensitive to external RF
energy.
• Do not use this product near water for example near a bath tub, wash bowl, kitchen sink or laundry tub, in a wet basement or near a swimming pool.
• The product should be kept free from excessive smoke, dust or high temperature and vibration.
• This product should not be exposed to direct sunlight.
• Do not place heavy objects on top of the product.
39
• When you leave the product unused for a long time unplug the product from the power outlet.
• Product should be kept away from heat sources such as radiators, cookers etc.- it should not be placed in rooms where the temperature is less than
0 degrees or greater than 40 degrees. Damp basements should also be avoided.
• This product may interfere with other electronic products such as TV, radios, personal computers, phones or other wireless devices.
• Operating Humidity: 10%-90%RH, Non-condensing
• Storage Humidity: 5%-90%RH, Non-condensing
• Function switch of MICRO-DISCONNECTION is used. Power is completely off only when the plug has been withdrawn from Tapo smart socket.
Automatic action type of the integrated switch: MICRO-DISCONNECTION (Type 1.B).
• This is a portable direct plug-in device. Plug the device into a suitable outlet.
CAUTION
Electronic switch integrated in this product
is only intended for functional purpose.
Unplug the appliance before servicing.
Please read and follow the above safety information when operating the device. We cannot guarantee that no accidents or damage will occur due to
improper use of the device. Please use this product with care and operate at your own risk.
40
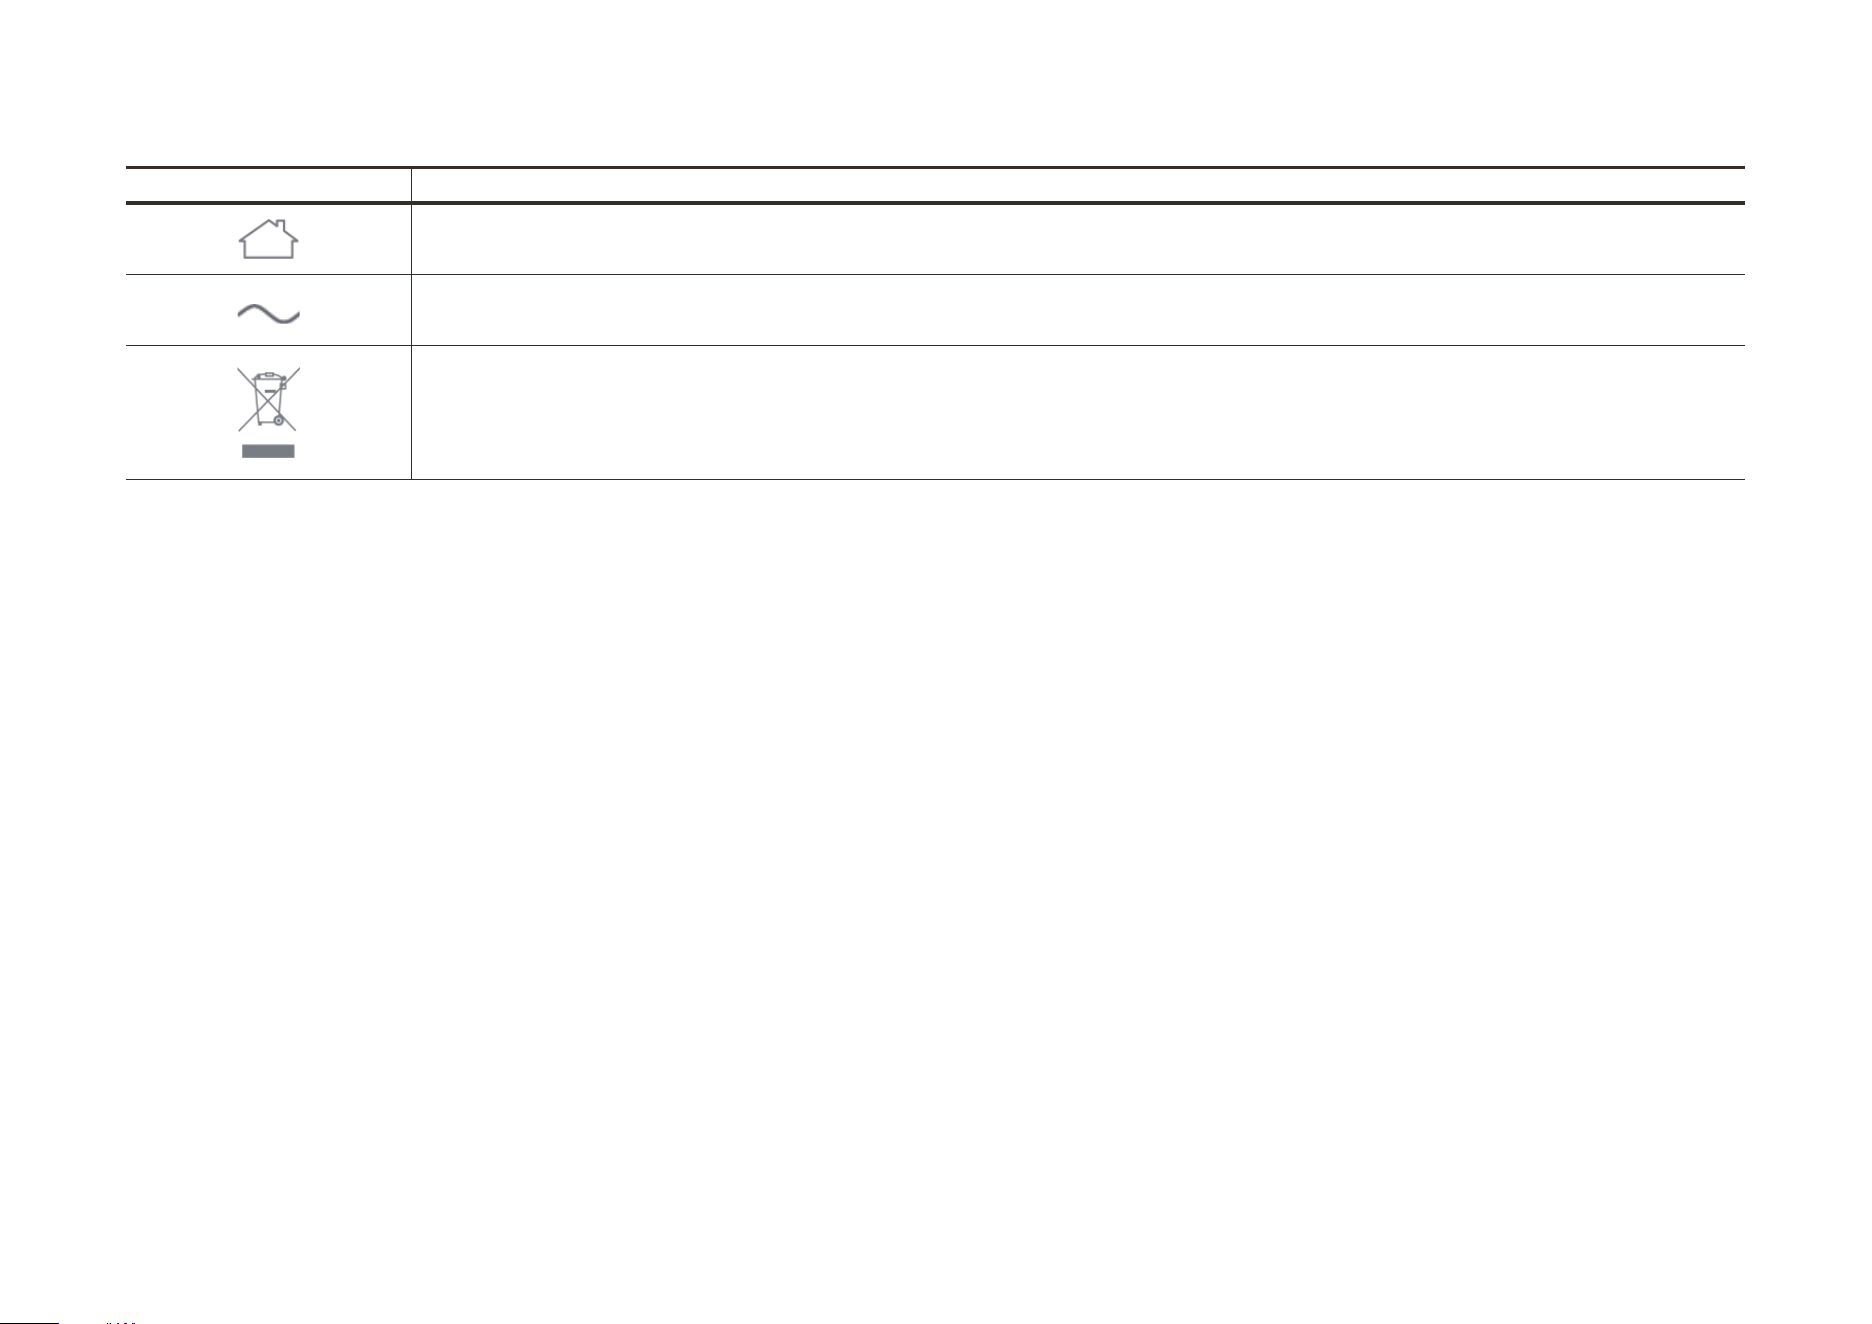
Explanation of the symbols on the product label
Symbol Explanation
Indoor use only
AC voltage
RECYCLING
This product bears the selective sorting symbol for Waste electrical and electronic equipment (WEEE). This means that this product must be handled pursuant to
European directive 2012/19/EU in order to be recycled or dismantled to minimize its impact on the environment.
User has the choice to give his product to a competent recycling organization or to the retailer when he buys a new electrical or electronic equipment.