User’s Manual
RE270K / RE370K
1910012130 REV 1.1.0
AC750 / AC1200
Wi-Fi Range Extender
with Smart Plug

Copyright & Trademarks
Specications are subject to change without notice. TP-Link is a registered trademark of TP-Link Technologies Co., Ltd. Other
brands and product names are trademarks or registered trademarks of their respective holders.
No part of the specications may be reproduced in any form or by any means or used to make any derivative such as translation,
transformation, or adaptation without permission from TP-Link Technologies Co., Ltd.
App Store is a trademark of Apple Inc.
Google Play is a trademark of Google Inc.
© 2017 TP-Link. All rights reserved.
www.tp-link.com

Contents
1 About This Guide
1 Conventions
1 More Info
2 Introduction
2 Product Overview
2 Features
2 Product Requirements
3 Wi-Fi Extender+
5 Important Safety Information
6 Connect Wi-Fi Extender+ to the Internet
6 Setting Up Wi-Fi Extender+ via Kasa
7 Setting Up Wi-Fi Extender+ via Computer
9 Using Kasa with Wi-Fi Extender+
9 Kasa Account
9 Kasa Settings
10 Location Assistant
10 Home Automation with Integrated Smart Plug
10 Scheduling
10 Creating Scenes
11 ConguringWi-FiExtender+viaaWebBrowser
11 Dashboard
12 Extending Another Wi-Fi Network
14 Extended Network Settings
15 Wi-Fi Access Control
17 Changing the IP address
18 Wireless Adapter
19 OtherAdministrativeTools
19 Time Settings
19 LED Control
20 System Log
21 Cloud Setting
22 Maintaining the Wi-Fi Extender+
22 Firmware Upgrade
23 Backup and Restore
26 Troubleshooting
26 Frequently Asked Questions
27 Usage Tips
27 Support
www.tp-link.com
User’s Manual Wi-Fi Extender+
1
About This Guide
This guide is a complement to Quick Start Guide. The Quick Start Guide provides instructions for quick
setup, while this guide contains details of each function and demonstrates how to congure them in
typical scenarios.
When using this guide, please notice that features of the router may vary slightly depending on the
model and software version you have, and on your location, language, and internet service provider. All
images, parameters and descriptions documented in this guide are used for demonstration only.
Conventions
In this guide, the following conventions are used:
Convention
Description
Underline
Hyperlinks are in teal and underlined. You can click to redirect to a website
or a specic section.
Teal
Key information appears in teal, including management page text such as
menus, items, buttons and so on.
>
The menu structures to show the path to load the corresponding page. For
example, Wireless > Connect to Network means Connect to Network page
is under the Wireless menu.
Ignoring this type of note might result in a malfunction or damage to the
device.
More Info
• The latest rmware and management app are available from Download Center at http://www.tp-link.
com/support.
• The Quick Start Guide can be found where you nd this guide or inside the product package.
• Specications can be found on the product page at http://www.tp-link.com.
• A Technical Support Forum is provided for you to discuss our products at http://forum.tp-link.com.
• Our Technical Support contact information can be found at the Contact Technical Support page at
http://www.tp-link.com/support.
• To learn more about the Limited Warranty for TP-Link products, please visit http://www.tp-link.us/
support/rma.

www.tp-link.com
User’s Manual Wi-Fi Extender+
2
Introduction
ProductOverview
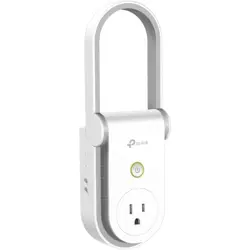
TP-Link AC750/AC1200 Wi-Fi Range Extender with Smart Plug, also called “Wi-Fi Extender+” is a
compact home device that expands and boots the Wi-Fi signal of your existing router to those
hard-to-reach areas throughout your home or ofce.
Powered by the latest wireless AC technology, the RE270K delivers ultra-fast Wi-Fi speed up to 750Mbps
and the RE370K delivers ultra-fast Wi-Fi speed up to 1200Mbps, providing reliable connections for
bandwidth-intensive needs such as HD/4K video streaming and online gaming.
The Wi-Fi Extender+ is also integrated with an intelligent Wi-Fi socket, also known as a “Smart Plug”,
that gives you the ability to customize, automate, and remotely control the plugged-in devices, such as
lights and other household electronics, via TP-Link’s Kasa mobile app on your iOS or Android devices,
no matter where you nd yourself.
Features
• Complies with IEEE 802.11ac
• Provide multiple encryption security types, including 64-bit, 128-bit WEP, and WPA-PSK/WPA2-PSK
• Support built-in DHCP server
• Support app-based and web-based managements.
• Control the Smart Plug whenever you are connected to the Internet using the Kasa app on your
smartphones and tablets.
• Automate your lights and small household appliances with Schedule and Timer.
• Compatible with Amazon Echo (sold separately) that lets you interact with the devices plugged into
the Smart Plug using your voice.
Product Requirements
• A smartphone or tablet running iOS 9 or higher; Android 4.1x or higher.
• A Wi-Fi connection (supports 802.11n standard).
www.tp-link.com
User’s Manual Wi-Fi Extender+
3
Wi-Fi Extender+
1
2
3
4
5
7
6
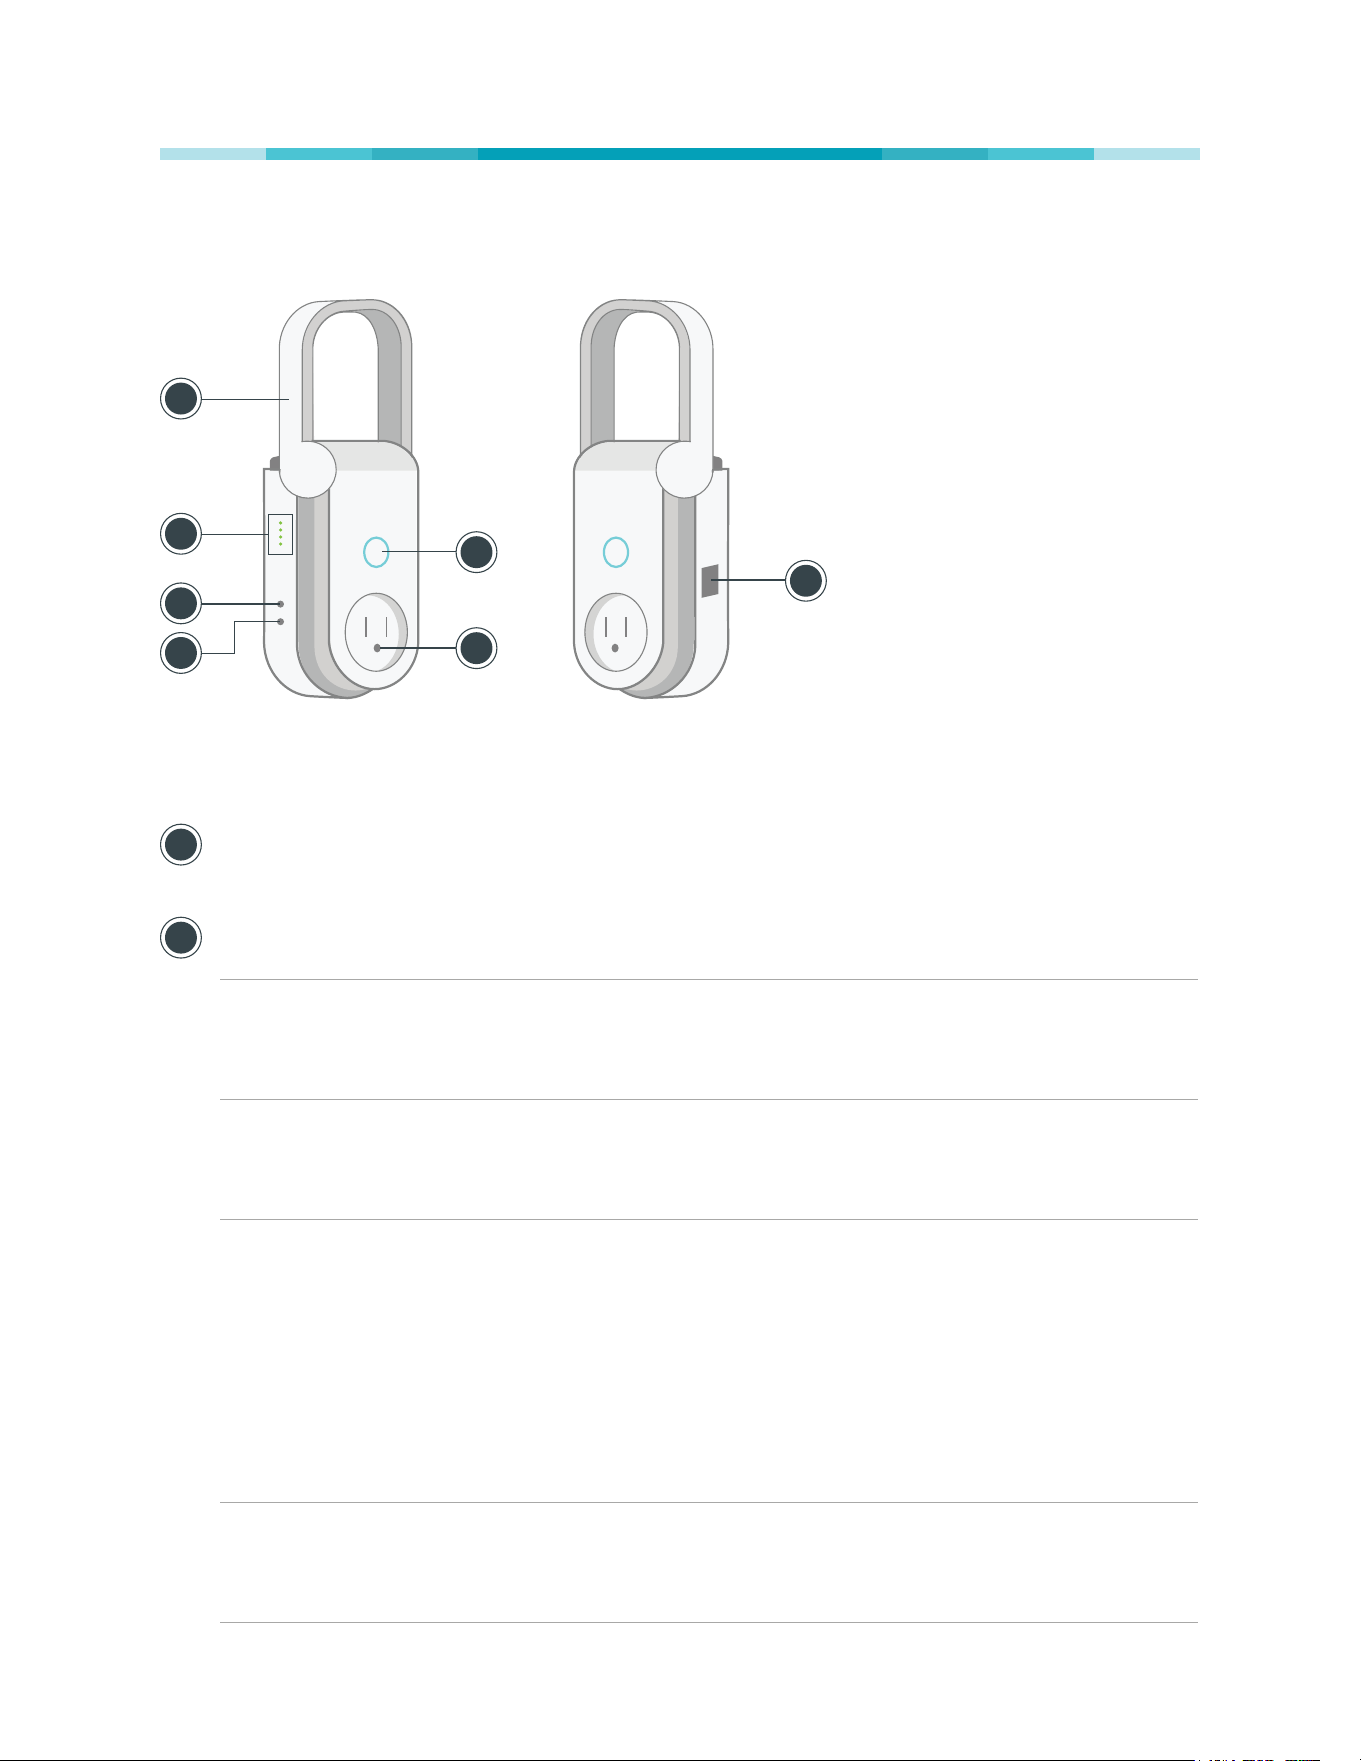
Note: Image may differ from actual product due to different regional power specications. We use the
U.S. version as an example.
1
Antenna
Position the antenna vertically for optimal performance.
2
LED Indicators
2.4G
Green: The 2.4GHz network is extended.
Flashing green: The extender is in SoftAP mode.
OFF: No 2.4GHz connection.
5G
Green: The 5GHz network is extended.
Flashing green: The extender is in SoftAP mode.
OFF: No 5GHz connection.
Status
Green: The extender is connected and in a good signal location.
Red: The extender is connected, but in a poor signal location.
Flashing green rapidly: SoftAP connection is in progress.
Flashing amber and green: When pressing the Reset button for 5~10 seconds to
trigger a Soft Reset.
Flashing amber rapidly: When pressing the Reset button for 10 seconds to factory
reset the device.
OFF: No active connection.
Power
Green: The extender is plugged into an active power outlet.
Flashing green: Initializing.
Flashing green rapidly: Upgrading rmware.
www.tp-link.com
User’s Manual Wi-Fi Extender+
4
3
LEDON/OFFButton
Press to turn the LED Indicators ON or OFF.
4
ResetButton
Press and hold for about 5 seconds or until the Status LED starts to flash amber and green
alternately to only reset the network settings without losing the current settings and initiate the
SoftAP mode.
Press and hold for about 10 seconds or until the Status LED starts to flash amber rapidly to reset
the extender to factory defaults.
5
SocketON/OFFButton
Press to turn the Smart Plug and its LED indicator ON or OFF.
6
Smart Plug
Plug in your electronic devices and small appliances, and control them from the Kasa app
Note: The input voltage should be consistent with the output voltage of the power outlet.
7
Gigabit Ethernet Port
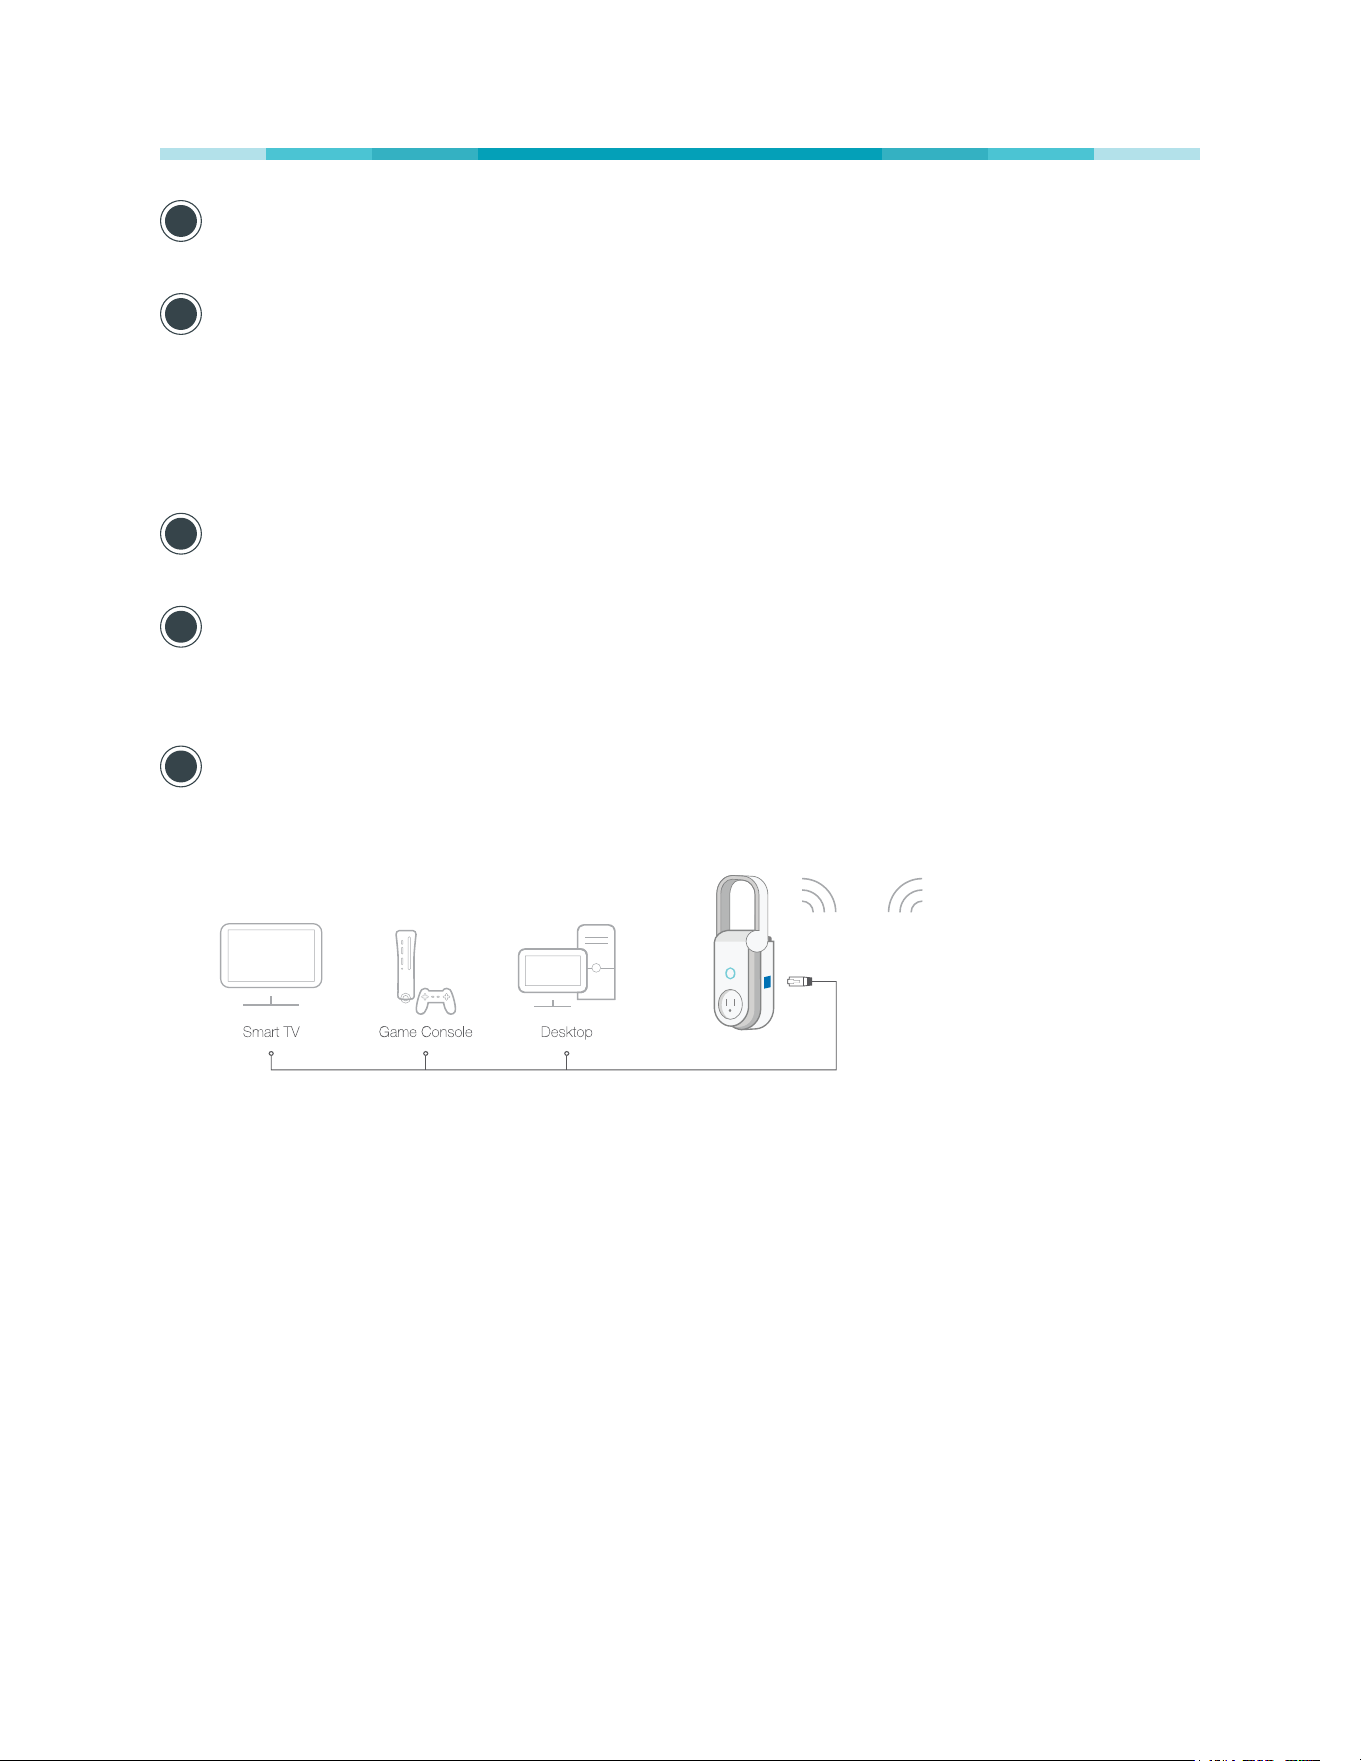
Connect Ethernet-only (wired) devices such as Smart TVs, game consoles, and Blu-ray players to
your wireless network with Ethernet cables.

www.tp-link.com
User’s Manual Wi-Fi Extender+
5
Important Safety Information
Before installing and using the Wi-Fi Range Extender with Smart Plug, read and follow all safety
precautions including the following:
• WARNING: RISK OF ELECTRIC SHOCK OR FIRE.
• For indoor use only.
• The Wi-Fi Extender+ must only be installed and operated in an upright vertical position with the
antenna pointing upwards.
• Do NOT leave the Wi-Fi Extender+ in an excessive hot or humid environment.
• The Wi-Fi Extender+ is not intended for use in locations where the temperature may be less than
actual room conditions, such as unheated basements or garages.
• Do NOT touch the integrated pass-through power outlet with wet hands or when standing on wet or
damp surfaces.
www.tp-link.com
User’s Manual Wi-Fi Extender+
6
Connect Wi-Fi Extender+ to the Internet
There are two easy-to-setup methods to extend your Wi-Fi network.
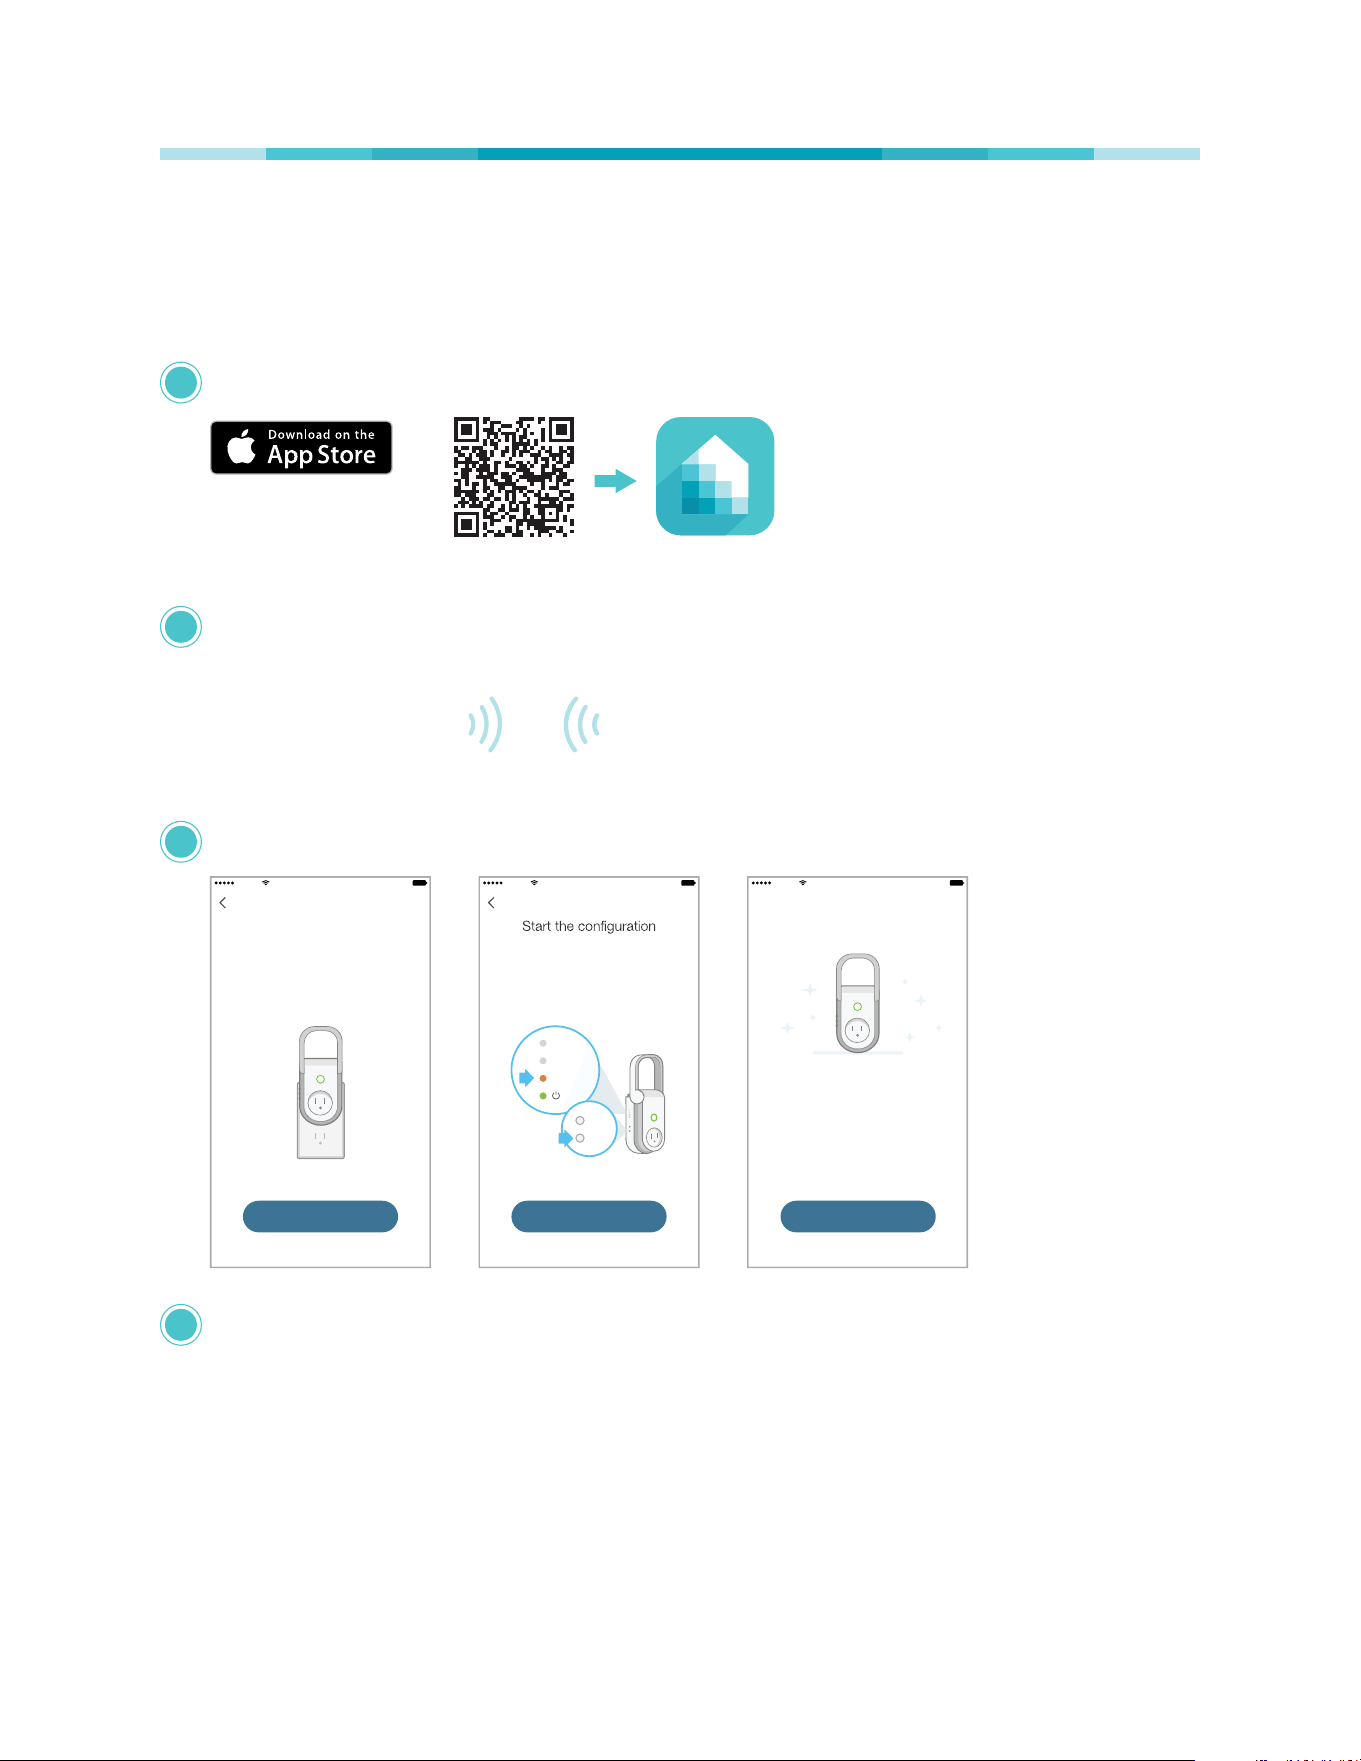
SettingUpWi-FiExtender+viaKasa
Download Kasa for Mobile from the App Store or Google Play.
KasaScan QR code
OR
Connect your mobile device to your Wi-Fi network.
Launch Kasa and follow the in-app instructions to expand your Wi-Fi network.
Sketch 9:41 AM 100%
Press and hold the Reset button for 5
seconds until the Status light is
blinking green and amber.
NEXT
2.4G
5G
Status
Reset
Sketch 9:41 AM 100%
Power up
NEXT
Pull up the antenna on your
Wi-Fi Extender+. Then, plug in your
extender to power it up.
Sketch 9:41 AM 100%
DONE
Great!
Your extended dual-band
networks are
MyHome_1_EXT
MyHome_2_EXT
The network passwords have been
inherited from your home network’s.
Connect your Wi-Fi devices to the new extended network using the same password as the main
network.
The extended network names are your main network names (SSIDs) with _EXT or _2GEXT or
_5GEXT as a sufx, depending on whether the extender is connecting to the single-band or dual-
band router. For example:
1
2
3
4
www.tp-link.com
User’s Manual Wi-Fi Extender+
7
Main Router Main Router’s SSIDs Extended SSIDs
2.4GHz Single-Band MyHome
2.4GHz: MyHome_EXT
5GHz: MyHome_5GEXT
5GHz Single-Band MyHome
2.4GHz: MyHome_2GEXT
5GHz: MyHome_EXT
Dual-Band
MyHome_1
MyHome_2
2.4GHz: MyHome_1_EXT
5GHz: MyHome_2_EXT
SettingUpWi-FiExtender+viaComputer
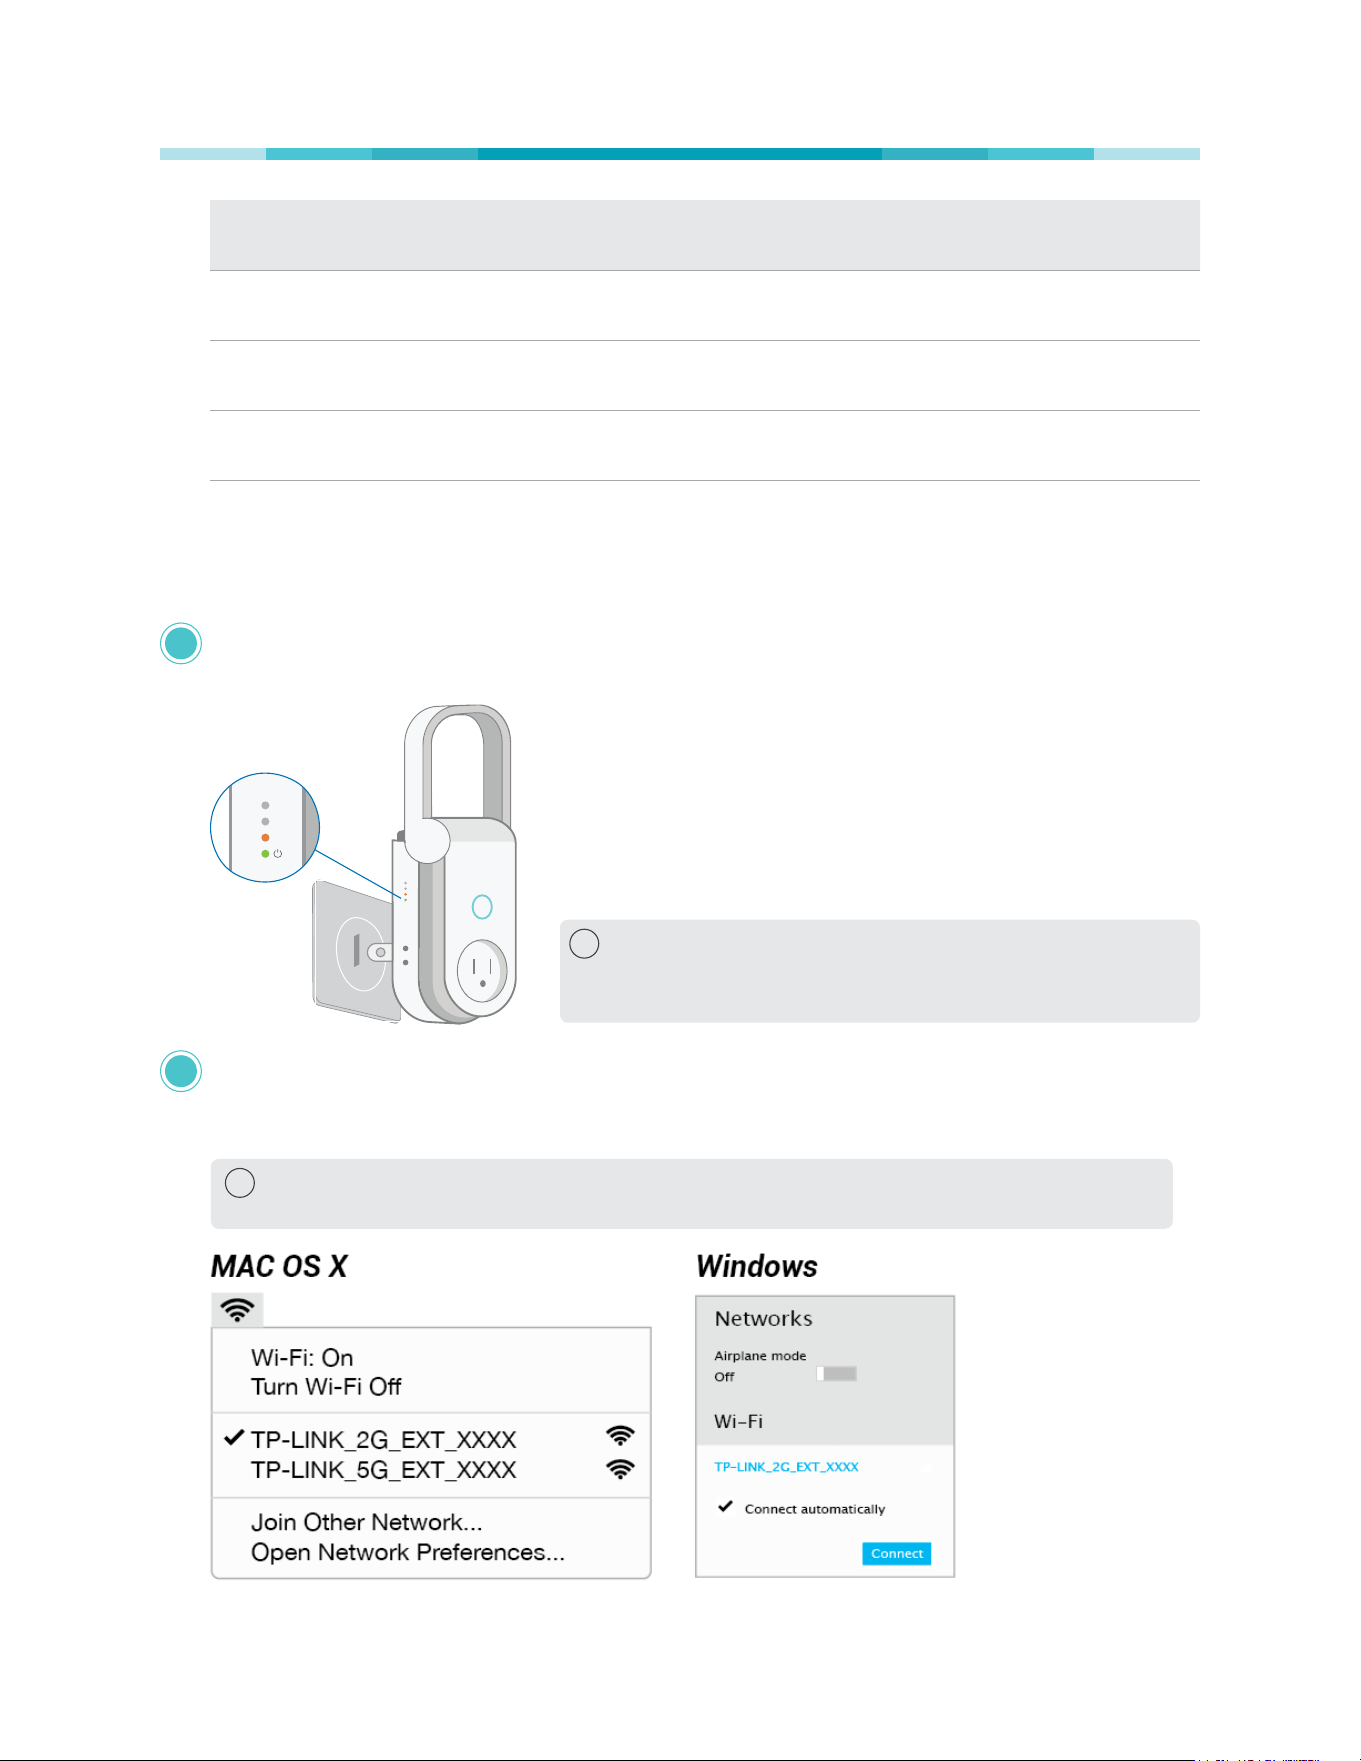
Position antenna vertically and plug in the extender near your router. Then, wait until the Power LED
is lit solid green.
2.4G
5G
Status
! The Wi-Fi Extender+ must only be installed and operated
in an upright vertical position with the antenna pointing
upwards.
Disconnect the Ethernet connection from your computer (if any). Click the Wi-Fi icon on the taskbar
and select the extender’s default network name (SSID): TP-LINK_2G_EXT_XXXX or TP-LINK_5G_
EXT_XXXX. No password is needed to connect.
! XXXX is the last 4 digits of the device’s MAC address, printed on the label on the back of
your Wi-Fi Extender+.
1
2
www.tp-link.com
User’s Manual Wi-Fi Extender+
8
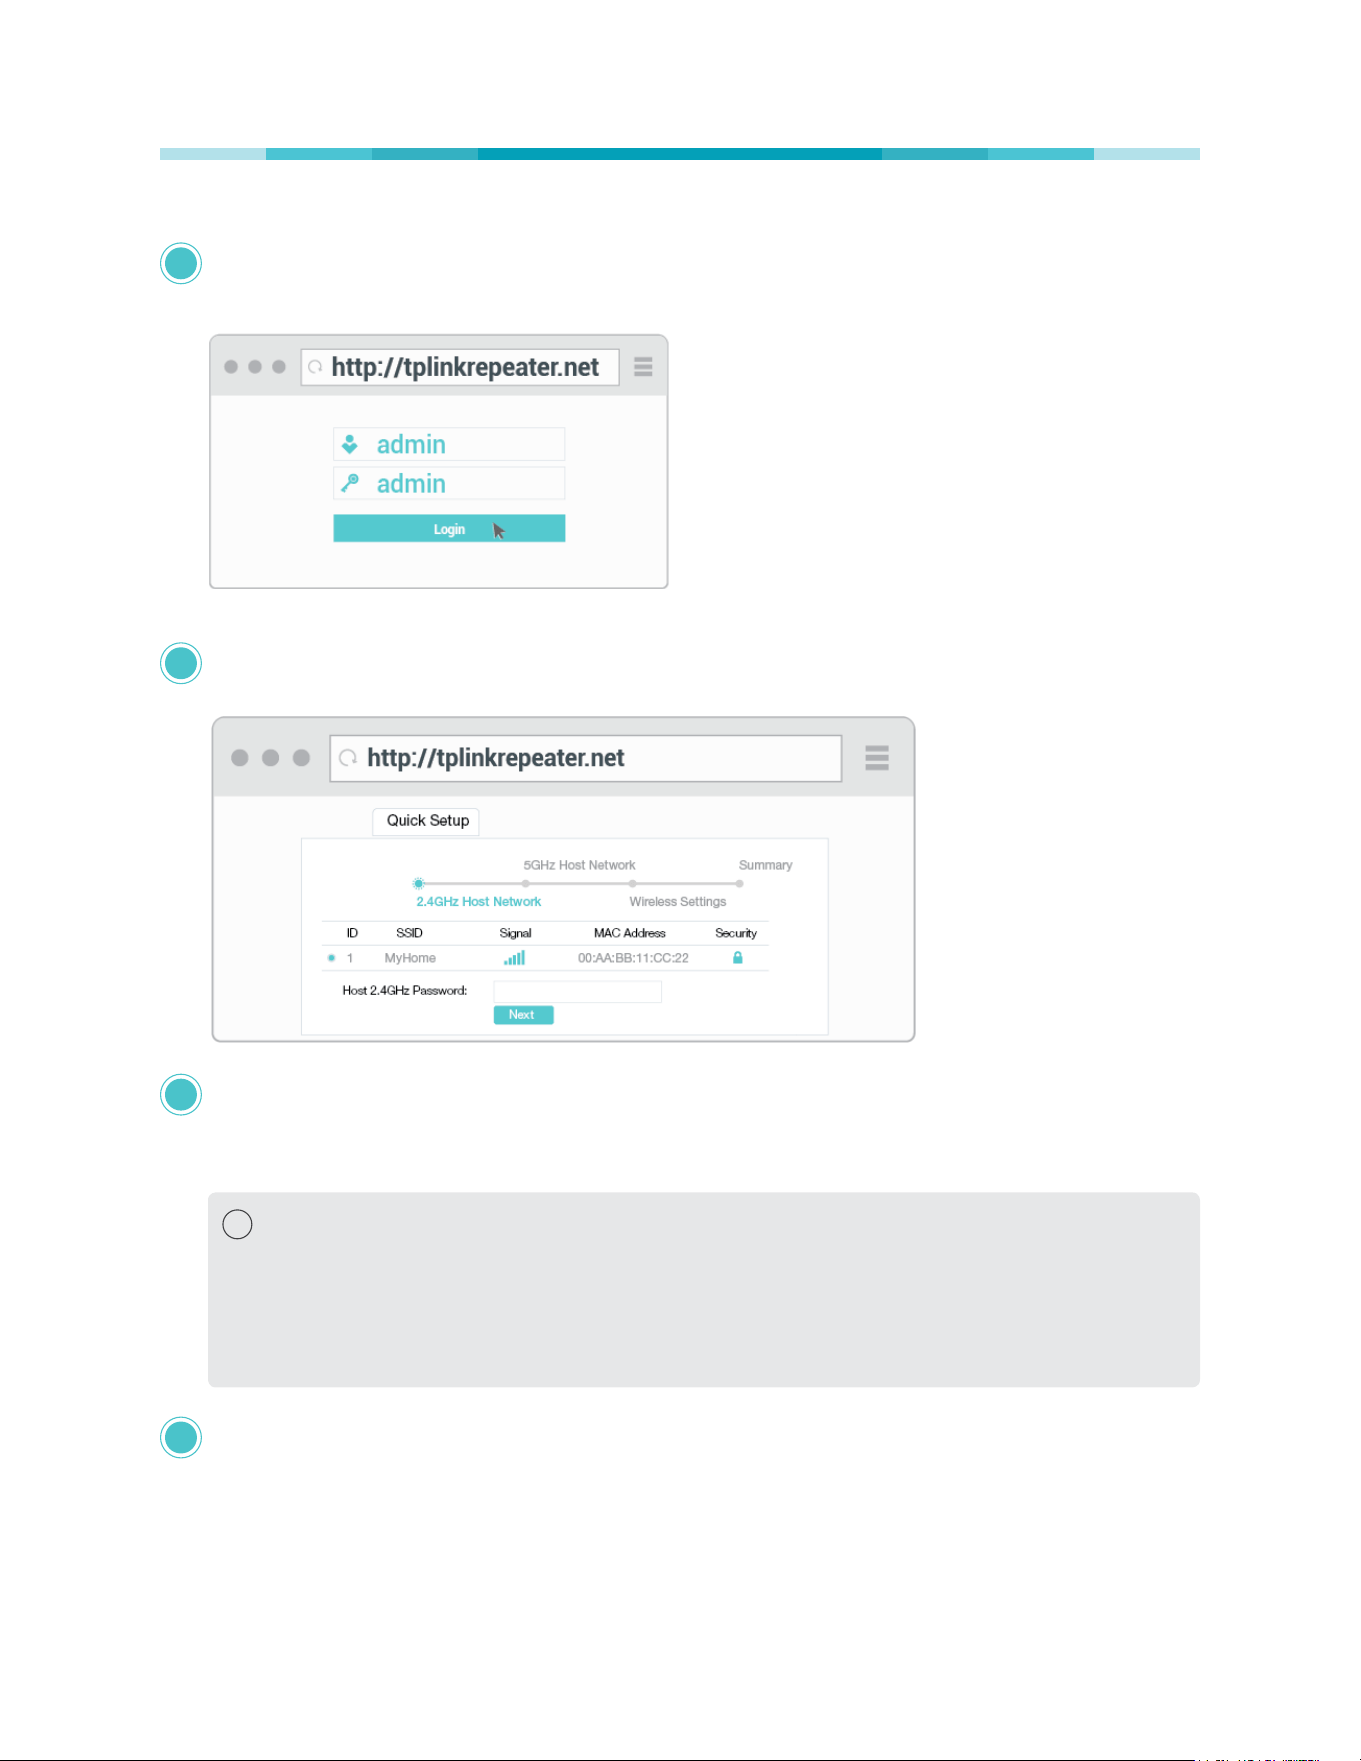
Launch a web browser and enter http://tplinkrepeater.net into the address eld. Then, enter admin
(all lowercase) for both username and password to log in.
Follow the Quick Setup wizard to extend your 2.4GHz and 5GHz Wi-Fi networks.
Relocate your Wi-Fi Extender+ to an outlet around the midpoint between your Wi-Fi router and
the Wi-Fi “dead” zone. Alternatively, use the Status LED on the extender or the Location Assistant
feature on the Kasa app to nd the optimal placement for your Wi-Fi Extender+.
! It is important that you wait until the Wi-Fi Extender+ is fully powered up, and all LED
Indicators stop blinking.
Keep in mind that other types of radio frequencies can interfere with the Wi-Fi signal
between your router and Wi-Fi Extender+. Avoid placing the extender near Bluetooth®
devices, cordless phones, microwave ovens, baby monitors, and motor-driven appliances.
Connect your Wi-Fi devices to the new extended network using the same password as the main
network.
Unless you customized the extended network names during the conguration, the extended
network names are your main network names (SSIDs) with _EXT or _2GEXT or _5GEXT as a sufx,
depending on whether the extender is connecting to the single-band or dual-band router. For
example:
3
4
5
6
www.tp-link.com
User’s Manual Wi-Fi Extender+
9
Main Router Main Router’s SSIDs Extended SSIDs
2.4GHz Single-Band MyHome
2.4GHz: MyHome_EXT
5GHz: MyHome_5GEXT
5GHz Single-Band MyHome
2.4GHz: MyHome_2GEXT
5GHz: MyHome_EXT
Dual-Band
MyHome_1
MyHome_2
2.4GHz: MyHome_1_EXT
5GHz: MyHome_2_EXT
Using Kasa with Wi-Fi Extender+
Once the Wi-Fi Extender+ is conneted to your Wi-Fi network, you can use the Kasa app on your mobile
devices or tablets to control, automate the Smart Plug and manage the extended network easily and
seamlessly. Please make sure that your mobile device or tablet is connected to the extended network
before any conguration.
If you want to control and manage the Wi-Fi Extender+ from outside of your home or ofce via an
internet connection, please enable the Remote Control within the Kasa app settings.
Kasa Account
While you don’t have to have a Kasa account to use your devices, signing up for an account provides
added functionality such as:
• Synchronization of settings and congurations to all your mobile devices.
• Ability to control and congure the devices from outside your home.
• Ability to customize your TP-Link Smart Home devices with “Scenes” for a truly automated
experience.
• Use of third-party services and products such as Amazon Echo.
Devices can only be associated with one Kasa account. To remove the association, turn off Remote
Control in the Kasa’s settings, or factory reset the device.
After creating your Kasa account, you will need to verify the email associated with your account by
clicking a link in an email that Kasa sends you. Until you verify the email, much of the above functionality
will not work.
Kasa Settings
Kasa’s Settings allows you to set your global preferences such as:
• Location and Time to set the location and time of where the Smart Home devices are located. You
can set your device’s location using your smartphone’s GPS function, or manually enter the latitude
and longitude coordinates.

www.tp-link.com
User’s Manual Wi-Fi Extender+
10
• Firmware Update to update your Smart Home devices when there is an update available. Refer to
Firmware Upgrade for instructions.
Location Assistant
After setup, the Status LED on the left side of the Wi-Fi Extender+ and the Kasa app will detect whether
the device’s signal strength is too strong or too weak. You can use either the Status LED or Location
Assistant to help you reposition the extender to an optimal location (if needed).
Please note that any time you relocate the Wi-Fi Extender+, make sure that you wait until the device is
fully powered up and all LED Indicators stop blinking after plugging the extender into a wall outlet. If the
Status LED is green, your Wi-Fi Extender+ is placed in an optimal location.
The Location Assistant can also be accessed anytime from the Device Settings page.
Home Automation with Integrated Smart Plug
The Wi-Fi Extender+ is equipped with a Smart Plug that lets you to control and automate your connected
lights and other household electronic devices via the Kasa app.
Scheduling
You can set up the Smart Plug’s schedule, which is made up of Events, to automate your connected
devices to work around your home and work schedules, such as setting the lights to come on at dusk
and turn off at sunrise.
You can create as many events as you like and edit them at anytime from the Schedule screen. To edit
a scheduled Event, simply tap the row for it. To delete it, you can swipe left on the row on an iOS device,
or long-press the row on an Android device. If you want to temporarily disable an Event, just turn off its
toggle from the Schedule screen. Please note that up to 32 events can be set on a Wi-Fi Extender+.
Note that if a timer overlaps an existing scheduled Event, that schedule will not run. However, timer will
be canceled when power is lost or interrupted, or at any time you turn ON/OFF the device manually using
Kasa or the physical ON/OFF switch. You may need to set a new timer if desired.
Creating Scenes
Take full advantage of your TP-Link Smart Home devices in your home with “Scenes”. A scene is a preset
group of Smart Devices (such as Wi-Fi Extender+, Smart Wi-Fi Plugs Mini and Smart Wi-Fi Switches)
that can be customized and controlled simultaneously at the touch of a button from your smartphone or
tablet to easily set your mood or t any special occasion. For example, set a customized “Movie Time” to
turn on the home theater system plugged into a Wi-Fi Extender+ and dim down the lights controlled by
the Smart Wi-Fi Switches in your Entertainment Room to 10% at the same time.
Please keep in mind that SCENES can only be set and controlled once you’re signed in to your Kasa
account. Note that you must have at least one Smart Device in order to create a scene.

www.tp-link.com
User’s Manual Wi-Fi Extender+
11
Conguring Wi-Fi Extender+ via a Web Browser
The Wi-Fi Extender+’s web-based interface lets you congure your extended network via a web browser
on your computer, mobile device, or tablet. Please make sure that you connect the smart device to the
extended network before any conguration.
Dashboard
Every time you log into the web-based interface, you will be taken to the visual dashboard (or control
panel) of your Wi-Fi Extender+. The dashboard provides an overview of your extended networks and
allows you to view the current status of the Wi-Fi Extender+, detailed information about the uplink
connection (the Router), and see who’s currently connected to your extended networks.
• Normal network connection status.
• The Wi-Fi Extender+ is not connected to the router.
www.tp-link.com
User’s Manual Wi-Fi Extender+
12
• The Wi-Fi Extender+ is connected to the router, but Internet is not available.
• The Wi-Fi Extender+ is partially connected to the router. Make sure the extender is set to obtain an
IP address automatically under Network > Network Settings.
Wi-Fi icon indicator for 2.4GHz and 5GHz networks:
Wi-Fi Icon Indication
A secure Wi-Fi connection.
A non-secure Wi-Fi connection.
No Wi-Fi connection.
Extending Another Wi-Fi Network
If you want to change the extender’s connection to a different Wi-Fi network, you can repeat the Quick
Setup or follow the steps below without using the Quick Setup.
1. Launch a web browser and enter http://tplinkrepeater.net into the URL eld, then log in using the
admin credentials.
2. Under the Settings tab, go to Wireless > Connect to Network.
www.tp-link.com
User’s Manual Wi-Fi Extender+
13
3. Enable the “Connect to router’s 2.4GHz Network“ checkbox to extend the 2.4GHz band of the main
(host) network.
4. Click to scan for available 2.4GHz networks near you.
5. Select the Wi-Fi network that you wish to extend from the list.
! If your Wi-Fi network doesn’t appear in the list, its SSID may be hidden, click the to close
the list and enter the SSID, Security, and Password of the main (host) network. These elds are
case-sensitive.
6. If the selected network is protected, enter the Wi-Fi password. Note that the Security of the selected
network will automatically populate.
7. If your router supports the 5GHz band, and you wish to extend the 5GHz network, repeat step 3 to 6.
8. Click to apply your settings.

www.tp-link.com
User’s Manual Wi-Fi Extender+
14
Extended Network Settings
You can customize and/or hide the wireless network name (SSID) to add extra security for your extended
networks. However, you cannot change the extender’s Wi-Fi security and password. You must use the
same Wi-Fi password of the main (host) network to connect your wireless devices to the extended
network. The steps to change the extended network’s SSID are as follows.
1. Launch a web browser and enter http://tplinkrepeater.net into the URL eld, then log in using the
admin credentials.
2. Under the Settings tab, go to Wireless > Extended Wi-Fi.
3. You can change the following Wi-Fi settings to secure your extended networks.
a. Extended 2.4GHz and Extended 5GHz: The extended network (2.4GHz) is enabled by default.
Deselect Enable if you do not want to use that extended network.
b. Extended 2.4GHz SSID and Extended 5GHz SSID: You can enter a new SSID or click
to use the same SSID as the main (host) network.
c. Hide SSID broadcast: Select this checkbox to hide the extender’s SSID from the Wi-Fi network
list.
4. Click to save the extended network settings.

www.tp-link.com
User’s Manual Wi-Fi Extender+
15
Wi-Fi Access Control
By default, the Access Control function is disabled, and any wireless devices can connect to the
extended networks through the SSID and Wi-Fi password. However, you can restrict Wi-Fi access to
specic devices on your extended networks using the Access Control function.
1. Launch a web browser and enter http://tplinkrepeater.net into the URL eld, then log in using the
admin credentials.
2. Under the Settings tab, go to Wireless > Access Control.
3. Toggle On to enable the Access Control function.
4. Under Access Mode, select Blacklist or Whitelist.
• Blacklist:The devices in this list are not allowed to connect to the extended network.
• Whitelist: Only the devices in this list are allowed to connect to the extended network.
5. Click .
Toaddoneormorewirelessdevices(clients)totheBlacklist:
1. In the Online Devices list, displaying all wireless devices that are currently connected to the
extended network.
• To block a device, click the (Block) icon on the row of the device. It will be added to the
Device in Blacklist.
• To block multiple devices, select the checkboxes of the devices and click
at the top-right of the listing. Those devices will be added to the Devices in Blacklist.
www.tp-link.com
User’s Manual Wi-Fi Extender+
16
ToaddadevicetotheBlacklistorWhitelistusingitsMACaddress:
1. Under the Devices in Blacklist or Devices in Whitelist, click .
2. Enter the DeviceName.
3. Enter the device’s MAC Address in hexadecimal format (0-9, a-f, A-F) separated by a dash (for
example, 00-FC-E9-98-7E-A0).
4. Click .
To modify the device’s name or its MAC address, or remove the device from the Blacklist or Whitelist,
click the (Edit) icon or the (Trash) icon on the row of the device.
To remove multiple devices, select the checkboxes of the devices and click at the top-right of
the listing.
www.tp-link.com
User’s Manual Wi-Fi Extender+
17
Changing the IP address
By default, the Wi-Fi Extender+ is congured to obtain its IP address automatically from your wireless
router or Access Point (AP) that it connects to. If the wireless router does not have a DHCP server or its
DHCP server is disabled, you can assign a static IP address to the extender.
! We do NOT recommend that you change the extender’s IP address unless you are an experienced
network administrator with strong knowledge of IP addressing, subnetting, and DHCP. Incorrect
conguration can cause performance and network connection issues.
To assign a static IP address:
1. Launch a web browser and enter http://tplinkrepeater.net into the URL eld, then log in using the
admin credentials.
2. Under the Settings tab, go to Network.
3. Under the Network Settings section, select Use the Following IP Address and enter the static IP
addresses in dotted-decimal notation into the following elds.
a. IP Address: The IP address to be assigned to the extender.
b. Subnet Mask: The subnet mask associated with the static IP address.
c. Default Gateway: The gateway address of your wireless router or Access Point.
4. Click
to apply your conguration.

www.tp-link.com
User’s Manual Wi-Fi Extender+
18
! You will be disconnected from the extended network upon changing the IP address. To access the
extender’s web-based interface, enter http://tpinkrepeater.net or the new assigned IP address, and
log in.
DHCP Client List
The DHCP Client List displays the following information of each DHCP client that is currently connected
to the extended networks. Use the Refresh button to update the client list.
• Client Name: The name of the DHCP client.
• MAC Address: The DHCP client’s MAC address.
• Assigned IP Address: The IP address that is allocated to the DHCP client by the DHCP server.
• Lease Time: The time duration that the IP address is leased to the DHCP client.
Wireless Adapter
The Range Extender can also be used as a wireless adapter to connect any Ethernet-only device, such
as a Blu-ray® player, game console, DVR, or Smart TV, to your Wi-Fi network.
Once the Wi-Fi Extender+ is successfully connected to your Wi-Fi networks, simply connect the
Ethernet-only device and the extender using an Ethernet cable.
By default, the wired device connecting to the extender’s LAN port automatically connects to the 5GHz
extended network. If you want the Ethernet-only device to connect to the 2.4GHz extended network,
follow the steps below.
1. Launch a web browser and enter http://tplinkrepeater.net into the URL eld, then log in using the
admin credentials.
2. Under the Settings tab, go to Network.
3. Scroll down to the Ethernet Trafc (Wired Network) section, and select the 2.4GHz option.
4. Click to apply your changes.
www.tp-link.com
User’s Manual Wi-Fi Extender+
19
Other Administrative Tools
The System Tools allow you to perform other administrative tasks, such as time settings, rmware
upgrade, backup and restore the Wi-Fi Extender+.
Time Settings
The Time Settings are very important for the time-based features, such as LED Control, System Log, and
Access Control, to work properly.
1. Launch a web browser and enter http://tplinkrepeater.net into the URL eld, then log in using the
admin credentials.
2. Under the Settings tab, go to System Tools > Time Settings.
3. Make sure the the current System Time is displayed correctly. If it is not, select the Time Zone
of where the Wi-Fi Extender+ is located. Then, enter the IP address or domain name of the NTP
(Network Time Protocol) Server to automatically synchronize the time with the timeservers that are
available on the Internet.
4. Click to apply your changes.
LED Control
The LED Indicator lights (2.4G, 5G, Status, Power, as well as the Smart Plug’s LED) can be turned ON or
OFF by pressing the physical LED button on the Wi-Fi Extender+, or you can set a specic schedule for
the LED Indicator lights to turn OFF at night and turn ON at dawn with Night Mode.
! Before enabling the Night Mode feature, make sure the extender’s time zone is set to your proper
time zone under Settings > System Tools > Time Settings.
1. Launch a web browser and enter http://tplinkrepeater.net into the URL eld, then log in using the
admin credentials.

www.tp-link.com
User’s Manual Wi-Fi Extender+
20
2. Under the Settings tab, go to System Tools > LED Control.
3. Select Night Mode to enable the Night Mode feature.
4. Under LED Off Time, select the time range (from and to) during which the LEDs will be off in 24-hour
time format.
5. Click to activate the Night Mode feature.
System Log
The System Log displays a list of the most recent activities (events) of the Wi-Fi Extender+. You can
dene which type of logs and/or the level of logs you want to view. You also have the ability to export the
system log as a text le to your computer.
1. Launch a web browser and enter http://tplinkrepeater.net into the URL eld, then log in using the
admin credentials.
2. Under the Settings tab, go to System Tools > System Log.
3. Under Log Filter, select the type of logs and/or the log level you want to view. “All” is the default
selection for displaying all log types and log levels.
• Click to update the system log.
• Click to permanently remove all system logs.
• Click (located at the end of the list) to export the system log as a text (*.txt) le to your
computer.

www.tp-link.com
User’s Manual Wi-Fi Extender+
21
Cloud Setting
Binding the Wi-Fi Extender+ to your Kasa account to enjoy the convenience of controlling the devices
plugged into the Smart Plug and managing your extended networks from anywhere and at any time
using the Kasa app.
1. Launch a web browser and enter http://tplinkrepeater.net into the URL eld, then log in using the
admin credentials.
2. Under the Settings tab, go to System Tools > Cloud Setting.
3. Enter your Kasa account email address and password.
4. Enter a descriptive name (an alias) for your Wi-Fi Extender+.
5. Click .
www.tp-link.com
User’s Manual Wi-Fi Extender+
22
Maintaining the Wi-Fi Extender+
Firmware Upgrade
To keep your Wi-Fi Extender+ or other Smart Home devices working at peak performance and up-to-
date with all the latest improvement or important xes, we recommend that you update the rmware
when updates are available. You can perform rmware upgrade on a computer or directly via the Kasa
app.
Toupgradermwareviaacomputer:
Before upgrading the rmware of the Wi-Fi Extender+, visit www.tp-link.com/support to search for and
download the latest rmware to your computer.
! IMPORTANT: To prevent upgrade failure, please note the following:
• Make sure that the latest rmware le you downloaded matches the Hardware Version as
displayed under the Settings > System Tools > Firmware Upgrade page.
• Make sure you have a stable connection (wired or wireless) between the Wi-Fi Extender+ and
the computer performing the rmware upgrade.
• Backup your current conguration from the Settings > System Tools > Backup & Restore page.
• Do NOT unplug the Wi-Fi Extender+ during the rmware upgrade.
1. Launch a web browser and enter http://tplinkrepeater.net into the URL eld, then log in using the
admin credentials.
2. Under the Settings tab, go to System Tools > Firmware Upgrade.
3. Click to locate and select the downloaded rmware le.
4. Click to start upgrading the rmware.
! The rmware upgrade takes a few minutes to complete, and the Wi-Fi Extender+ will automatically
reboot. Please DO NOT unplug the Wi-Fi Extender+ or interrupt the rmware upgrade or reboot
processes.
www.tp-link.com
User’s Manual Wi-Fi Extender+
23
BackupandRestore
It is highly recommended to backup your current congurations on a regular basis, before factory
resetting, or rmware upgrading. In the case of network failure or poor Wi-Fi performance, you will be
able to restore the Wi-Fi Extender+ to its previous state.
! Please DO NOT unplug the Wi-Fi Extender+ or interrupt the backup or restore process.
1. Connect your computer to the Wi-Fi Extender+ via a wired or wireless connection.
2. Launch a web browser and enter http://tplinkrepeater.net into the URL eld, then log in using the
admin credentials.
3. Under the Settings tab, go to SystemTools>Backup&Restore.
4. Under the Backup section, click to save a copy of your current conguration as a binary
(*.bin) le to your computer.
! Make sure you save the backup le in a safe location where you can retrieve it when needed.
TorestoretheWi-FiExtender+toitspreviousstate:
1. Under the Settings tab, go to SystemTools>Backup&Restore.
2. Under the Restore section, click to locate and select the saved binary (*.bin) le.
3. Click to start the restore process.
www.tp-link.com
User’s Manual Wi-Fi Extender+
24
! The restore process takes a few minutes to complete. DO NOT unplug the Wi-Fi Extender+
or interrupt the restore process. After reverting back to a previous state is nished, the Wi-Fi
Extender+ will automatically reboot.
Resetting
Resetting the Wi-Fi Exender+ can help you troubleshoot any issues that you may have. There are two
types of reset you can perform on your Wi-Fi Extender+, Soft Reset and Hard Reset.
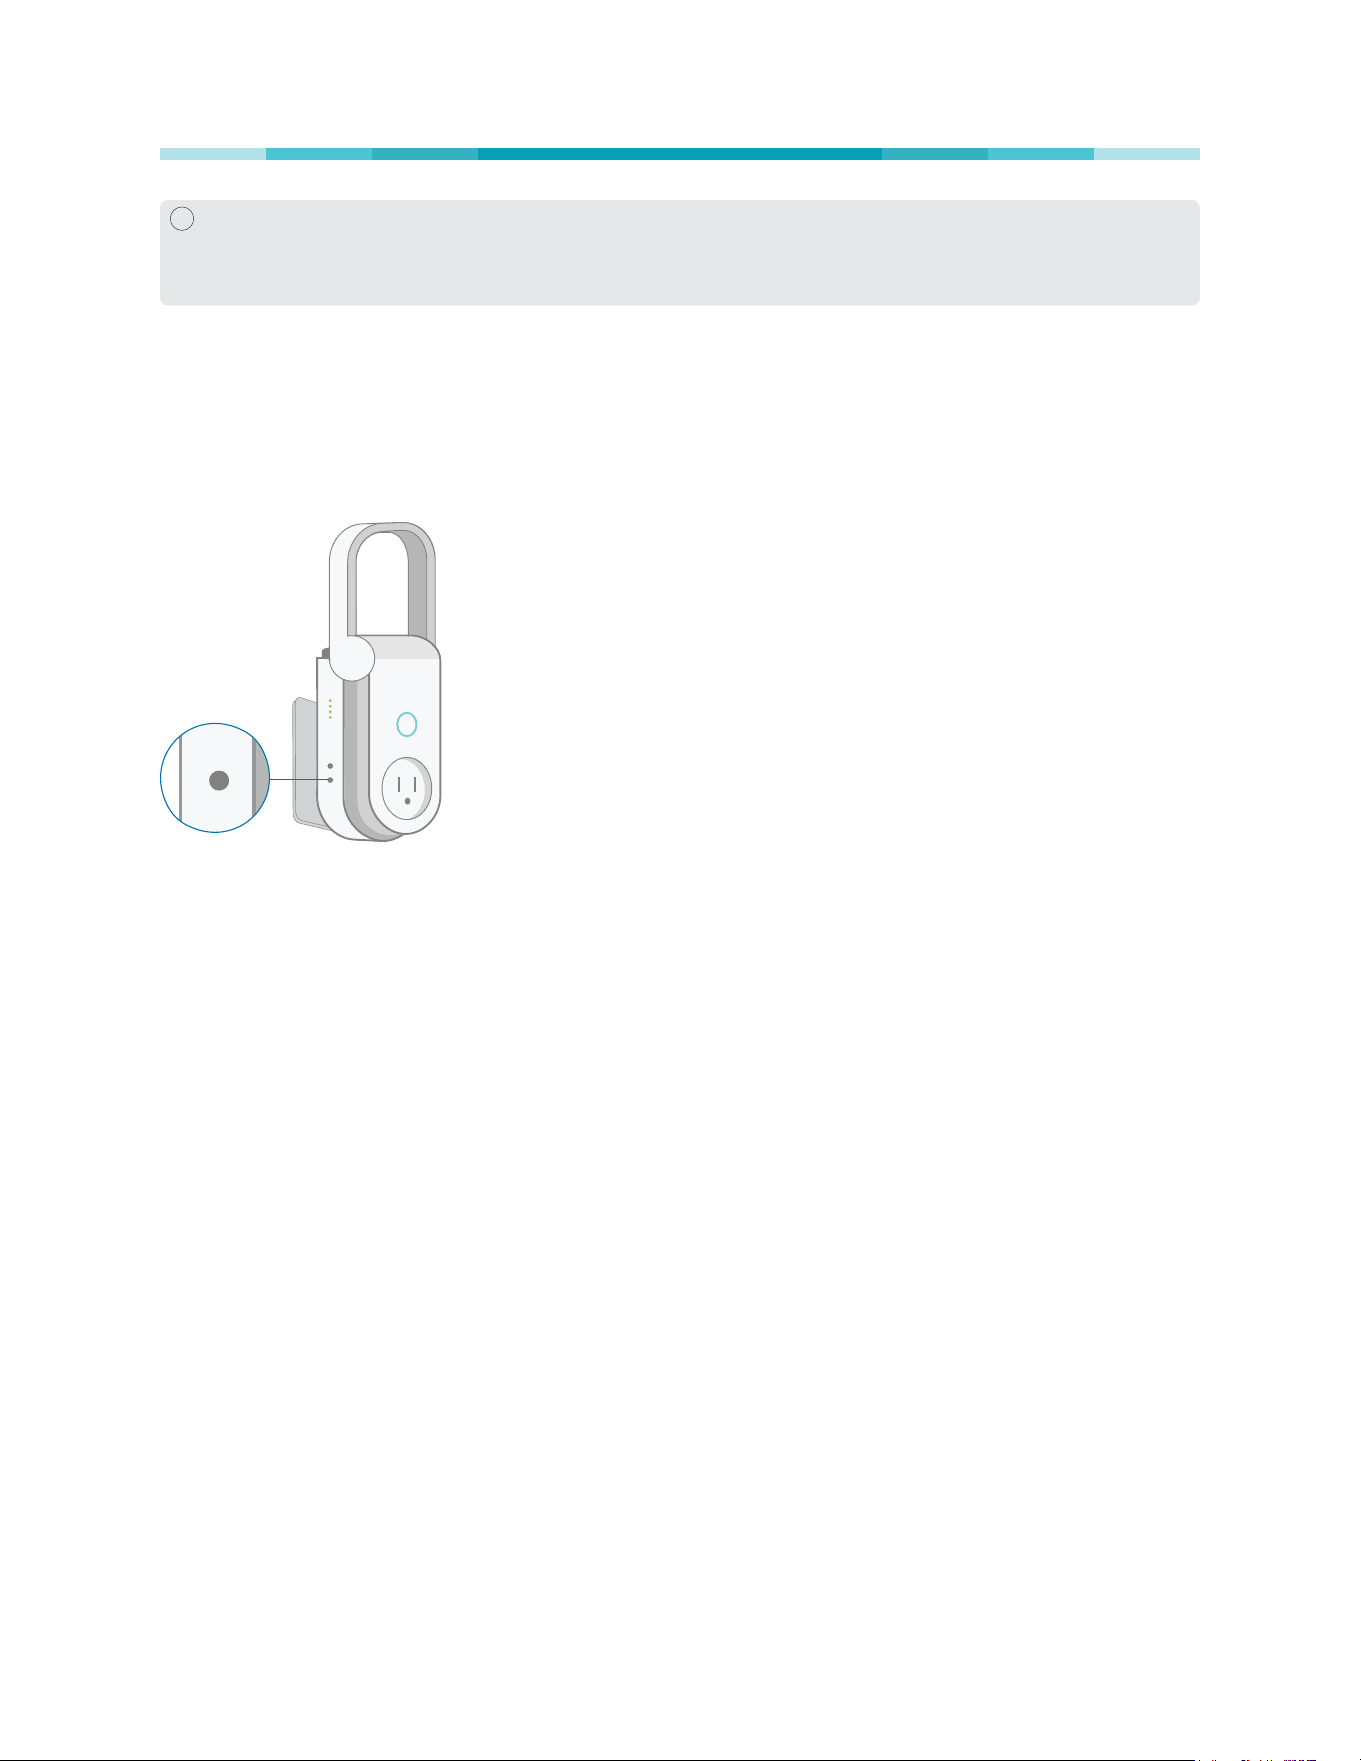
The Reset button is located on the left side of the Wi-Fi Extender+.
• Soft Reset
Press and hold the Reset button for about 5 seconds, or until the Status LED starts to flash amber
and green alternately to only reset the network settings without losing your current conguration
and initiate the app onboarding (SoftAP) process.
• Hard Reset (Also known as Factory Reset)
Press and hold the Reset button for about 10 seconds, or until the Status LED starts to flash amber
rapidly to reset the Wi-Fi Extender+ to its factory defaults. Note that factory resetting the Wi-Fi
Extender+ will erase all of your custom settings (such as network settings, schedules, and admin
account credentials) and return them to an out-of-box conguration.
Factory reset can also be done through the Wi-Fi Extender+’s web interface.
1. Launch a web browser and enter http://tplinkrepeater.net into the URL eld, then log in using the
admin credentials.
2. Under the Settings tab, go to SystemTools>Backup&Restore.
3. Under the Factory Default Restore section, click and conrm at the prompt.
www.tp-link.com
User’s Manual Wi-Fi Extender+
25
! The factory reset takes a few minutes to complete. DO NOT unplug the Wi-Fi Extender+
or interrupt the factory reset process. The Wi-Fi Extender+ will automatically reboot when
the factory reset is nished.
To log back into the Wi-Fi Extender+, enter the default credentials “admin” for both
username and password.

www.tp-link.com
User’s Manual Wi-Fi Extender+
26
Troubleshooting
Frequently Asked Questions
1. HowdoIrestoremyextender’scongurationtoitsfactorydefaultsettings?
There are two methods to factory reset the Wi-Fi Extender+. Keep in mind that factory resetting the
Wi-Fi Extender+ will erase all of your custom settings (such as network settings, schedules, and
admin account credentials) and return them to an out-of-box conguration.
• Via the Reset button
With the Wi-Fi Extender+ powered on, press and hold the Reset button for about 10 seconds, or
until all the Status LED starts to flash amber rapidly, then release the button.
• Via the extender’s web interface
Launch a browser and log in at http://www.tplinkrepeater.net. Under the Settings tab, go to
SystemTools>Backup&Restore. Then, click the FACTORY RESTORE button under Factory
Default Restore section.
2. Iforgotmypassword,whatshouldIdo?
There are two types of passwords: Wi-Fi password and admin password that is used to access the
extender’s web interface.
• Wi-Fi password
The Wi-Fi password to connect to your extended network is the same as your main (host)
network.
• Admin account password
The default Admin account’s username and password are “admin” (all lowercase).
3. WhatshouldIdowhentheStatusLEDisOFF?
• Check your network connectivity.
• Avoid placing the Wi-Fi Extender+ near potential sources of radio signal interference such as
microwave ovens, cordless phones, baby monitors, and motor-driven appliances.
• Soft reset the Wi-Fi Extender+ and repeat the app onboarding process.
• Factory reset the Wi-Fi Extender+ and try to add it to your network again.
4. WhatshouldIdoifthe2.4Gand5GLEDskeepflashinggreenorareOFF?
• When the 2.4G and 5G LEDs are flashing green, the Wi-Fi Extender+ is in the SoftAP mode, you
need to set up the extender using Kasa or its web-based user interface.
• If both of the LEDs are not illuminated, which means the Wi-Fi Extender+ is not connected to
your router, press and hold the Reset button for 5 seconds until the Status, 2.4G, and 5G LEDs
start to flash to initiate the SoftAP mode. Then, launch the Kasa app and add the extender again.

www.tp-link.com
User’s Manual Wi-Fi Extender+
27
5. HowtotroubleshootwhentheSoftAPprocessfails?
• Press and hold the Reset button for about 5 seconds or until the Status, 2.4G and 5G LEDs start
to flash, then release the button. When the Status, 2.4G and 5G LEDs are flashing green, follow
the Kasa app’s prompts to set up your Wi-Fi Extender+ again. Alternatively, you can set up the
Wi-Fi Extender+ using a web browser on your computer.
6. WhatshouldIdowhenIcannotaccesstheextender’swebinterfaceusingacomputer?
• Make sure that your mobile device or computer is connected to the extended network. If you
have not congured the Wi-Fi Extender+, connect to the default network name (SSID): TP-
LINK_2G_EXT_XXXX or TP-LINK_5G_EXT_XXXX.
• Make sure that your computer is set to obtain an IP address automatically (DHCP).
7. WhichdevicescanIplugintotheSmartPlug?
• You can plug in your electronic devices and small appliances, such as lamps, humidiers,
portable heaters, and fans.
8. WhatshouldIdowhentheplugged-indevicewon’trespondtoKasa’scommands?
• Make sure the device plugged into the Smart Plug is switched to ON.
• Check your network connectivity.
• Check the extender’s connection.
• Check if the 2.4G and 5G LEDs are lit green. If they are flashing green or off, reconnect the Wi-Fi
Extender+ to your Wi-Fi network.
• Restart your router and/or the Wi-Fi Extender+ by unplugging it and plugging it back in.
• Factory reset the Wi-Fi Extender+. Refer to the Troubleshooting #1.
9. HowdoIpairtheWi-FiExtender+withAmazonEcho?
Visit www.tp-link.com/en/faq-944.html or within the Kasa Help section for pairing instructions, then
you can interact with your plugged-in devices using voice recognition. For example, to command
Alexa to turn on the Wi-Fi Extender+ named “Bedroom Lights”, simply say, “Alexa, turn on Bedroom
Lights.”
Usage Tips
• Place your Wi-Fi Extender+ midway between your wireless router and the Wi-Fi “dead” zone.
• Avoid physical obstructions and radio interference in the surrounding area.
Support
If you encounter any issues with the Wi-Fi Extender+ or conguration, please visit
www.tp-link.com/support for web support and troubleshooting information.
User’s Manual Wi-Fi Extender+
FCC Statement
This equipment has been tested and found to comply with the limits for a Class B digital device, pursuant to part 15 of the FCC
Rules. These limits are designed to provide reasonable protection against harmful interference in a residential installation.
This equipment generates, uses and can radiate radio frequency energy and, if not installed and used in accordance with the
instructions, may cause harmful interference to radio communications. However, there is no guarantee that interference will not
occur in a particular installation. If this equipment does cause harmful interference to radio or television reception, which can be
determined by turning the equipment off and on, the user is encouraged to try to correct the interference by one or more of the
following measures:
• Reorient or relocate the receiving antenna.
• Increase the separation between the equipment and receiver.
• Connect the equipment into an outlet on a circuit different from that to which the receiver is connected.
• Consult the dealer or an experienced radio / TV technician for help.
This device complies with part 15 of the FCC Rules. Operation is subject to the following two conditions:
1) This device may not cause harmful interference.
2) This device must accept any interference received, including interference that may cause undesired operation.
Any changes or modications not expressly approved by the party responsible for compliance could void the user’s authority to
operate the equipment.
Note: The manufacturer is not responsible for any radio or TV interference caused by unauthorized modications to this
equipment. Such modications could void the user’s authority to operate the equipment.
FCC RF Radiation Exposure Statement
This equipment complies with FCC RF radiation exposure limits set forth for an uncontrolled environment. This device and its
antenna must not be co-located or operating in conjunction with any other antenna or transmitter.
“To comply with FCC RF exposure compliance requirements, this grant is applicable to only Mobile Congurations. The antennas
used for this transmitter must be installed to provide a separation distance of at least 20 cm from all persons and must not be
co-located or operating in conjunction with any other antenna or transmitter.”
CE Mark Warning
This is a class B product. In a domestic environment, this product may cause radio interference, in which case the user may be
required to take adequate measures.
RF Exposure Information
This device meets the EU requirements (1999/5/EC Article 3.1a) on the limitation of exposure of the general public to
electromagnetic elds by way of health protection.
Restricted to indoor use.

User’s Manual Wi-Fi Extender+
Canadian Compliance Statement
This device complies with Industry Canada license-exempt RSSs. Operation is subject to the following two conditions:
1) This device may not cause interference, and
2) This device must accept any interference, including interference that may cause undesired operation of the device.
Le présent appareil est conforme aux CNR d’Industrie Canada applicables aux appareils radio exempts de licence. L’exploitation
est autorisée aux deux conditions suivantes :
1) l’appareil ne doit pas produire de brouillage;
2) l’utilisateur de l’appareil doit accepter tout brouillage radioélectrique subi, meme si le brouillage est susceptible d’en
compromettre le fonctionnement.
Caution
The device for operation in the band 5150–5250 MHz is only for indoor use to reduce the potential for harmful interference to co-
channel mobile satellite systems.
The high-power radars are allocated as primary users (i.e. priority users) of the bands 5250-5350 MHz and 5650-5850 MHz and
that these radars could cause interference and/or damage to LE-LAN devices.
DFS (Dynamic Frequency Selection) products that operate in the bands 5250- 5350 MHz, 5470-5600MHz, and 5650-5725MHz.
Avertissement
Le dispositif fonctionnant dans la bande 5150-5250 MHz est réservé uniquement pour une utilisation à l’intérieur an de réduire
les risques de brouillage préjudiciable aux systèmes de satellites mobiles utilisant les mêmes canaux.
En outre, les utilisateurs devraient aussi être avisés que les utilisateurs de radars de haute puissance sont désignés utilisateurs
principaux (c.-à-d., qu’ils ont la priorité) pour les bandes 5250-5350 MHz et 5650-5850 MHz et que ces radars pourraient causer
du brouillage et/ou des dommages aux dispositifs LAN-EL.
Les produits utilisant la technique d’atténuation DFS (sélection dynamique des fréquences) sur les bandes 5250- 5350 MHz,
5470-5600MHz et 5650-5725MHz.
Radiation Exposure Statement
This equipment complies with IC radiation exposure limits set forth for an uncontrolled environment. This equipment should be
installed and operated with minimum distance 20cm between the radiator and your body.
Déclaration d’exposition aux radiations
Cet équipement est conforme aux limites d’exposition aux rayonnements IC établies pour un environnement non contrôlé. Cet
équipement doit être installé et utilisé avec un minimum de 20 cm de distance entre la source de rayonnement et votre corps.
Industry Canada Statement
CAN ICES-3 (B)/NMB-3(B)
User’s Manual Wi-Fi Extender+
NCC Notice
注意! 依據 低功率電波輻射性電機管理辦法
第十二條 經型式認證合格之低功率射頻電機,非經許可,公司、商號或使用者均不得擅自變更頻率、加大功率或變更原設計之特性或功
能。
第十四條 低功率射頻電機之使用不得影響飛航安全及干擾合法通行;經發現有干擾現象時,應立即停用,並改善至無干擾時方得繼續使
用。前項合法通信,指依電信規定作業之無線電信。低功率射頻電機需忍受合法通信或工業、科學以及醫療用電波輻射性電機設備之干
擾。
安全諮詢及注意事項
• 請使用原裝電源供應器或只能按照本產品注明的電源類型使用本產品。
• 清潔本產品之前請先拔掉電源線。請勿使用液體、噴霧清潔劑或濕布進行清潔。
• 注意防潮,請勿將水或其他液體潑灑到本產品上。
• 插槽與開口供通風使用,以確保本產品的操作可靠並防止過熱,請勿堵塞或覆蓋開口。
• 請勿將本產品置放於靠近熱源的地方。除非有正常的通風,否則不可放在密閉位置中。
• 請不要私自打開機殼,不要嘗試自行維修本產品,請由授權的專業人士進行此項工作。
Продукт сертифіковано згідно с правилами системи УкрСЕПРО на відповідність вимогам нормативних документів та
вимогам, що передбачені чинними законодавчими актами України.
Safety Information
• When product has a power button, the power button is one of the ways to shut off the product; when there is no power button,
the only way to completely shut off the power is to disconnect the product or the power adapter from the power source.
• Don’t disassemble the product, or make repairs yourself. You run the risk of electric shock and voiding the limited warranty. If
you need service, please contact us.
• Avoid water and wet locations.
User’s Manual Wi-Fi Extender+
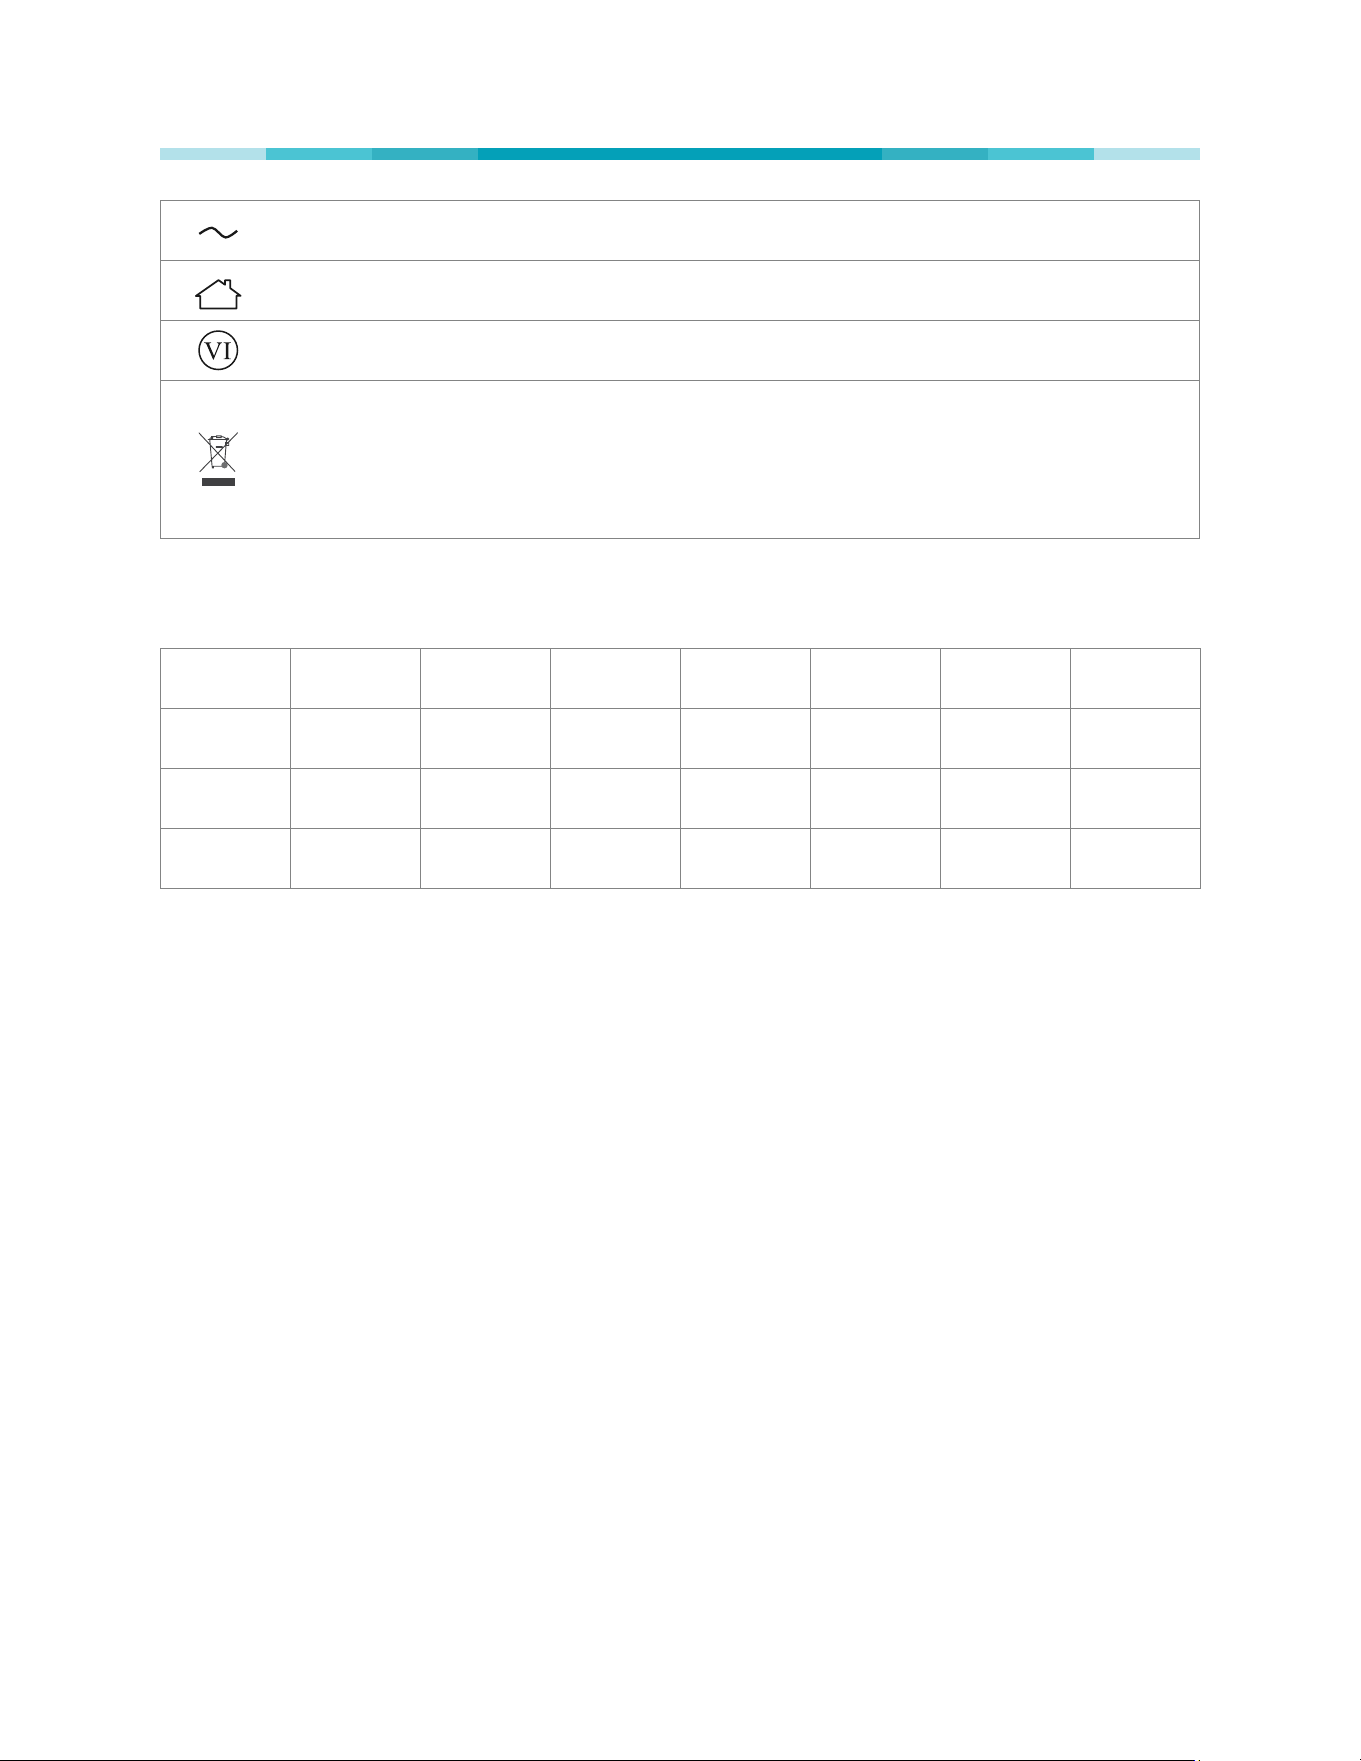
AC voltage
Indoor use only
Energy efciency Marking
RECYCLING
This product bears the selective sorting symbol for Waste electrical and electronic equipment (WEEE). This
means that this product must be handled pursuant to European directive 2012/19/EU in order to be recycled or
dismantled to minimize its impact on the environment.
User has the choice to give his product to a competent recycling organization or to the retailer when he buys a
new electrical or electronic equipment.
For EU/EFTA, this product can be used in the following countries:
AT BE BG CH CY CZ DE DK
EE ES FI FR GB GR HR HU
IE IS IT LI LT LU LV MT
NL NO PL PT RO SE SI SK