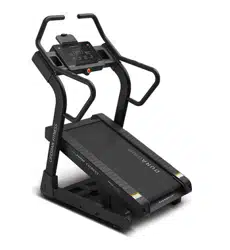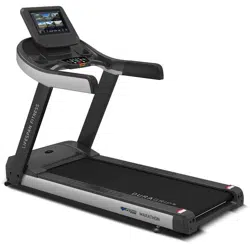

Everest 3 Ultra High
Incline Treadmill
USER MANUAL
Find the
Digital Manual
Online
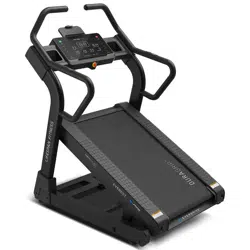
Product may vary slightly from the item pictured due to model upgrades.
Read all instructions carefully before using this product.
Retain this owner’s manual for future reference.
NOTE:
This manual should not be used to guide your purchasing decision. Your product, and the contents inside its carton, may vary
from what is listed in this manual. This manual may also be subject to updates or changes. Updated manuals are available
through our website at www.lifespanfitness.com.au

2
TABLE OF
CONTENTS
I. Important Safety Instructions . . . . . . . . . . . . . . . . . . . . . . . . . . . . . . . 03
II. Important Electrical Information . . . . . . . . . . . . . . . . . . . . . . . . . . . . 05
III. Important Operating Instructions . . . . . . . . . . . . . . . . . . . . . . . . . . . 06
IV. Parts List . . . . . . . . . . . . . . . . . . . . . . . . . . . . . . . . . . . . . . . . . . . . . . . . . . . . . 07
V. Exploded Diagram . . . . . . . . . . . . . . . . . . . . . . . . . . . . . . . . . . . . . . . . . . . 09
VI. Assembly Instructions . . . . . . . . . . . . . . . . . . . . . . . . . . . . . . . . . . . . . . . 10
VII. Operation Instructions . . . . . . . . . . . . . . . . . . . . . . . . . . . . . . . . . . . . . . 15
VIII. Exercise Guide . . . . . . . . . . . . . . . . . . . . . . . . . . . . . . . . . . . . . . . . . . . . . . . 20
IX. Maintenance Instructions . . . . . . . . . . . . . . . . . . . . . . . . . . . . . . . . . . . . 22
X. Replacing Motor Brushes . . . . . . . . . . . . . . . . . . . . . . . . . . . . . . . . . . . . . . 24
XI. Warranty . . . . . . . . . . . . . . . . . . . . . . . . . . . . . . . . . . . . . . . . . . . . . . . . . . . . . . 26
XII. Hand Pulse Technology . . . . . . . . . . . . . . . . . . . . . . . . . . . . . . . . . . . . . . .27
| TABLE OF CONTENTS

3IMPORTANT SAFETY INSTRUCTIONS |
I. IMPORTANT SAFETY
INSTRUCTIONS
WARNING: Read all instructions before using this treadmill.
It is important your treadmill receives regular maintenance to prolong its lifespan. Failing to
regularly maintain your treadmill may void your warranty.
DANGER
To reduce the risk of electric shock, disconnect your treadmill from the electrical outlet prior to
cleaning and/or service work.
DO NOT USE AN EXTENSION CORD:
DO NOT ATTEMPT TO DISABLE THE GROUNDED PLUG BY USING IMPROPER ADAPTERS OR IN ANY
WAY MODIFY THE CORD SET.
• Install the treadmill on a flat level surface with access to a 220-240 volt (50/60Hz), grounded outlet.
• Do not operate treadmill on deeply padded, plush or shag carpet. Damage to both carpet and
treadmill may result.
• Do not block the rear of the treadmill. Provide a minimum of 1 metre clearance between the rear of the
treadmill and any fixed object.
• Place your unit on a solid, level surface when in use.
• When running, make sure the plastic clip is fastened onto your clothing. It is for your safety, should
you fall or move too far back on the treadmill.
• Keep hands away from all moving parts.
• Never operate the treadmill if it has a damaged power cord or plug. When damaged, these must be
replaced by the manufacturer, service agent or similarly qualified persons in order to avoid a
hazard.
• Keep the cord away from heated surfaces.
• Do not operate where aerosol spray products are being used or where oxygen is being administered.
Sparks from the motor may ignite a highly gaseous environment.
• Never drop or insert any object into any openings.

4
• The treadmill is intended for in-home use only and is not suitable for commercial environments.
• To disconnect, turn all controls to the off setting, remove the safety key, and then remove the plug
from the outlet.
• The pulse sensors are not medical devices. Various factors, including the user’s movement, may
affect the accuracy of heart rate readings. The pulse sensors are intended only as exercise aids in
determining heart rate trends in general.
• Use the handrails provided; they are for your safety.
• Wear proper shoes. High heels, dress shoes, sandals or bare feet are not suitable for use on your
treadmill. Quality athletic shoes are recommended to avoid leg fatigue and injury.
• Before undertaking any type of exercise program, it is recommended that you consult a doctor.
• Health related injuries may result from incorrect or excessive training.
• This appliance is not intended for use by persons (including children) with limited physical, sensory
or mental capabilities, or lack of experience and knowledge, unless they have been given supervision
or instruction concerning use of the appliance by a person responsible for their safety.
• WARNING: Heart rate monitoring systems may be inaccurate. If you feel faint stop exercising
immediately.
• Children should not be allowed on or around the equipment, even when not in use.
• Children should be supervised to ensure that they do not play with this machine.
• Loose-fitting clothing or jewellery that could become an entanglement hazard should not be worn.
• Training shoes should be worn when using the equipment.
• Equipment must be used on a level and stable surface.
• All fixings should be checked before the equipment is used.
• All literature relating to the use of the equipment should be retained for future reference.
• Recommended operating temperature: 5-40°C.
| IMPORTANT SAFETY INSTRUCTIONS
Remove the safety key after use to prevent unauthorized
treadmill operation.

5IMPORTANT ELECTRICAL INFORMATION |
II. IMPORTANT ELECTRICAL
INFORMATION
1. Before starting any exercise program, consult with your physician or health professional.
2. Check all the bolts are securely locked.
3. Never put the treadmill in a humid area, or it will cause troubles.
4. We take no responsibility for any troubles or hurts due to above reasons.
5. Dress sport clothes and shoes before running.
6. Do not do exercise in 40 minutes after meal.
7. To prevent hurts, please warm up before exercise.
8. Consult with doctor before exercise if you have high blood pressure.
9. The treadmill is only used for adults.
10. Do not plug anything into any parts of this equipment, or it may be damaged.
11. Do not connect line to the middle of cable; do not lengthen cable or change the cable plug; do not
put anything heavy on cable or put the cable near heat source; forbid using socket with several
holes, these may cause fire or people may be hurt by the power.
12. Switch off the power when the equipment is not used. When the power is cut off, do not pull the
power line to keep the wire unbroken.
13. Pulse data may not be very accurate, so cannot be used for medical purpose. Over-exercise may
cause injury, even death. If you have a feeling of dizziness, sickness or other abnormal symptoms,
please stop training and consult a doctor immediately.
WARNING!

6 | IMPORTANT OPERATING INSTRUCTIONS
III. IMPORTANT OPERATING
INSTRUCTIONS
1. Plug the power cord of the treadmill directly into a dedicated grounded circuit. This product must be
grounded. If it has breakdown, grounding provides a path of least resistance for electric current to
reduce the risk of electric shock.
2. Position the treadmill on a clear, level surface. Do not place the treadmill on thick carpet as it may
interfere with proper ventilation. Do not place the treadmill near water or outdoors.
3. Position treadmill so that the wall plug is visible and accessible.
4. Never start the treadmill while you are standing on the walking belt. After turning the power on and
adjusting the speed control, there may be a pause before the walking belt begins to move, always
stand on the foot rails on the sides of the frame until the belt is moving.
5. Wear appropriate clothing when exercising on the treadmill. Do not wear long, loose fitting clothing
that may be caught in the treadmill. Always wear running or aerobic shoes with rubber soles.
6. Make sure the power supply is connected and the safety key is effective before using the treadmill.
Fit one side of the safety key on the treadmill and clip the other side on your clothes or belt, which
will enable you to pull off the safety lock promptly in an emergency.
7. Always unplug the power cord before removing the treadmill motor cover.
8. Make sure there is no less than 2*1m space behind the treadmill.
9. Keep children away from the treadmill during operation.
10. Always hold the handrails when initially walking or running on the treadmill, until you are
comfortable with the use of the treadmill.
11. Always attach the safety key rope to your clothing when using the treadmill. If the treadmill should
suddenly increase in speed due to an electronics failure or the speed being inadvertently increased,
the treadmill will come to a sudden stop when the safety key is disengaged from the console.
12. In case of any abnormality during the use process, please remove the safety key immediately,
grasping the handlebar and jumping onto the two edgings, then get off the treadmill after it stops.
13. When the treadmill is not being used, the power cord should be unplugged and the safety key
removed.
14. Put the safety key away where it can not be reached by the children.
15. Before starting any exercise program, consult with your physician or health professional. He or
she can help establish the exercise frequency, intensity (target heart zone) and time appropriate
for your particular age and condition. If you have any pain or tightness in your chest, an irregular
heartbeat, shortness of breath, feel faint or have any discomfort while you exercise, STOP! Consult
your physician before continuing.
16. If you observe any damage or wear on the mains plug or on any section of the mains lead then
please have them replaced immediately by a qualified electrician – do not attempt to change or
repair these yourself.
17. If the supply cord is damaged, it must be replaced by the manufacturer, its service agent or
similarly qualified persons in order to avoid a hazard.
18. Put your feet on the side rail before using the treadmill, and always attach the safety key rope to
your clothing. Hold the handle bar before the running belt moving well (feel the running speed by
your single foot before using it). To avoid losing balance, please slow down the speed to the lowest
or take off the safety lock. And hold the handle bar to jump to the side rails when emergency or the
safety key is not attached.

7ASSEMBLY INSTRUCTIONS |
IV. PARTS LIST
Key No. Description Qty.
1 Bottom frame 1
2 Main frame 1
3L/R Upright tube 1pr
4 Computer frame 1
5L/R Armrest 1pr.
6 Strengthen tube 1
7 Oil tube connection 1
8
Front roller
1
9
Rear roller
1
10
Main frame axle
2
11
Spacer φ38*φ25*39
2
12
Edgings pressing plate
8
13
Computer up cover
1
14
Computer bottom cover
1
15
Computer board
1
16
Water bottle
2
17
Front Handlebar end cap
4
18L/R
Edgings
1pr.
19
Front protective cover for
main frame
1
20
Rear protective cover
1
21
Motor cover
1
22
Roller cover
2
23
End cap
2
24L/R
Bottom frame protective cover
1pr.
25
Tablet holder bottom cover
1
26
Tablet holder top cover
1
27
Running board
1
28
Running belt
1
Key No. Description Qty.
29
Rubber cushion
4
30
Rubber pad
1
31
Belt
1
32
Spacer φ32*φ25*14
4
33
Tablet holder clip
1
34
Adjustable foot pad
4
35
Hole wire
3
36
Cushion
4
37
Oil hole plug
1
38
Roller
2
39
Plastic cushion
2
40
Inner-hex bolt M10*20
16
41
Hex bolt M10*65
1
42
Hex bolt M10*45
1
43
Hex bolt M10*60
2
44
Socket head cap bolt M8*18
4
45
Socket head cap bolt M10*70
2
46
Socket head cap bolt M10*65
2
47
Socket head cap bolt M8*25
4
48
Socket head cap bolt M8*20
2
49
Socket head cap bolt M6*15
2
50
Inner-hex flat head bolt M8*15
4
51
Inner-hex sunk bolt M6*30
2
52
Inner-hex sunk bolt M6*25
4
53
Cross sunk head screw M3*15
2
54
Cross pan head bolt M5*30
8
55
Phillips sunk tapping screw
ST4.0*16
2
56
Phillips screw M5*16
2

8 | ASSEMBLY INSTRUCTIONS
Key No. Description Qty.
57
Phillips screw M5*8
4
58
Phillips screw M4*8
6
59
Phillips tapping screw ST4*35
3
60
Phillips tapping screw ST4*16
38
61
Phillips tapping screw
ST4.0*12
4
62
Phillips tapping screw ST2.9*8
27
63
Phillips tapping screw
ST4.0*16
8
64
Phillips tapping screw ST2.9*6
8
65
Nylon nut M10
4
66
Hex thin nut M10
4
67
Hex nut M6
8
68
Hex nut M3
2
69
Serrated lock washerφ10*1.2
24
70
Serrated lock washerφ8*1.2
4
71
Flat washer φ8
6
72
Spring washer φ8
6
73
Computer
1
74
DC motor
1
75
Incline motor
1
76
Safety key
1
Key No. Description Qty.
77
Circuit breaker
1
78
Switch
1
79
Power socket
1
80
Rheostat
1
81
Inverter
1
82
Power wire
1
83
Computer upper wire
1
84
Computer middle wire
1
85
Computer middle and lower
wire
1
86
Computer lower wire
1
87
Socket head cap bolt M8*15
2
88
handle pulse upper wire
2
89
handle pulse lower wire
2
90
Shortcut key upper wire
2
91
Shortcut key lower wire
2
92
Filter (optional)
1
93
Loudspeaker (optional)
2
94
Amplifier board (optional)
1
95
USB/Audio jack (optional)
1
96
Fitshow Bluetooth (optional)
1
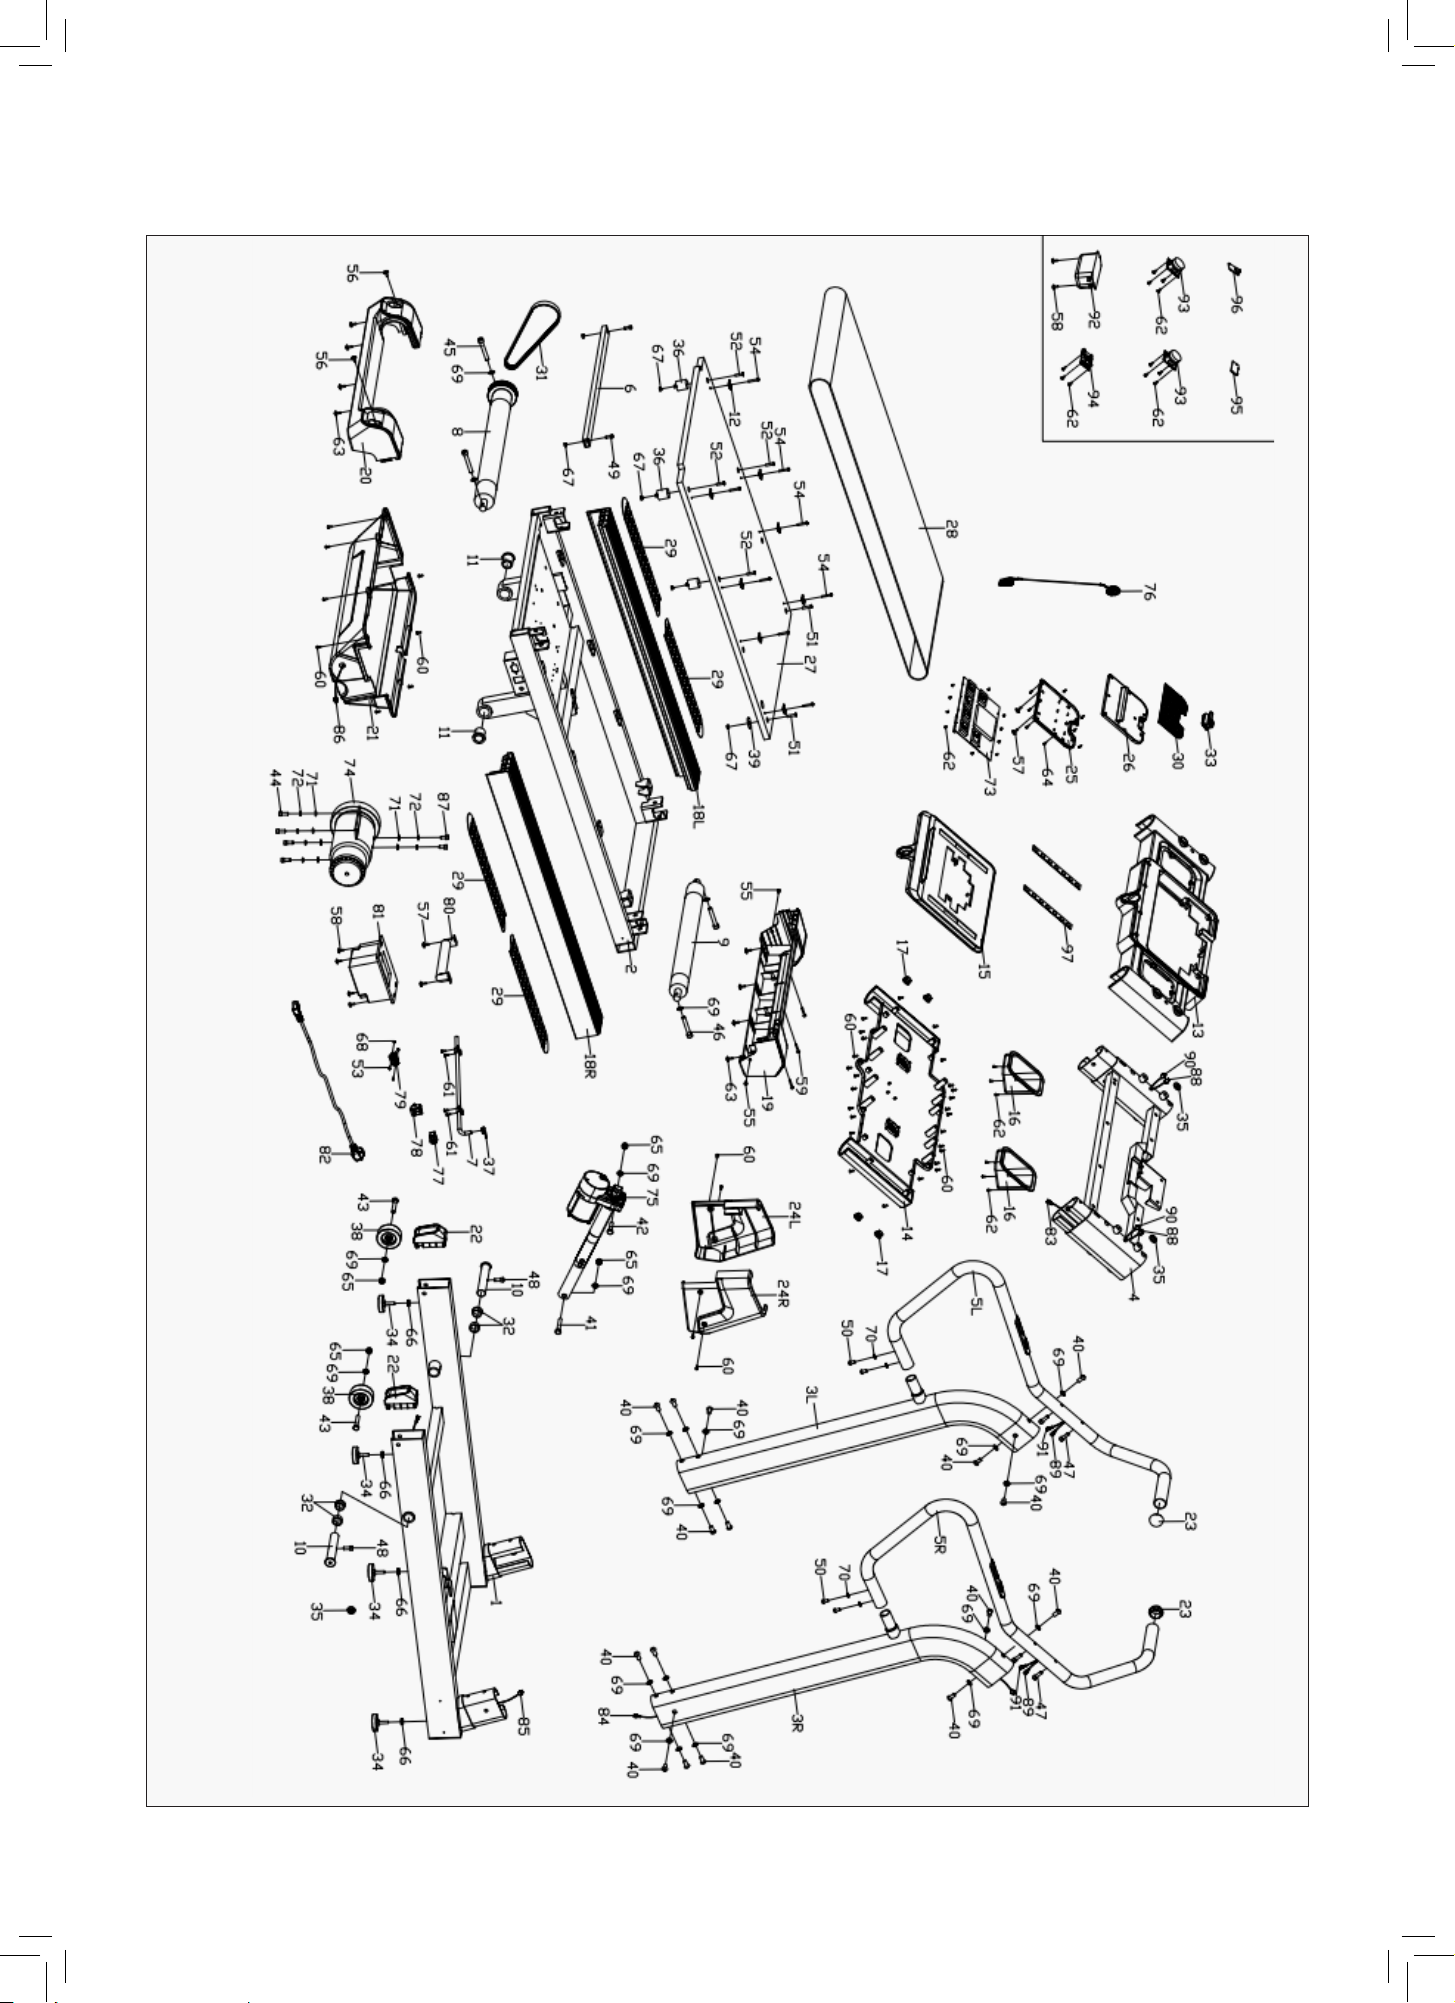
9EXPLODED DIAGRAM |
V. EXPLODED DIAGRAM
10 | ASSEMBLY INSTRUCTIONS
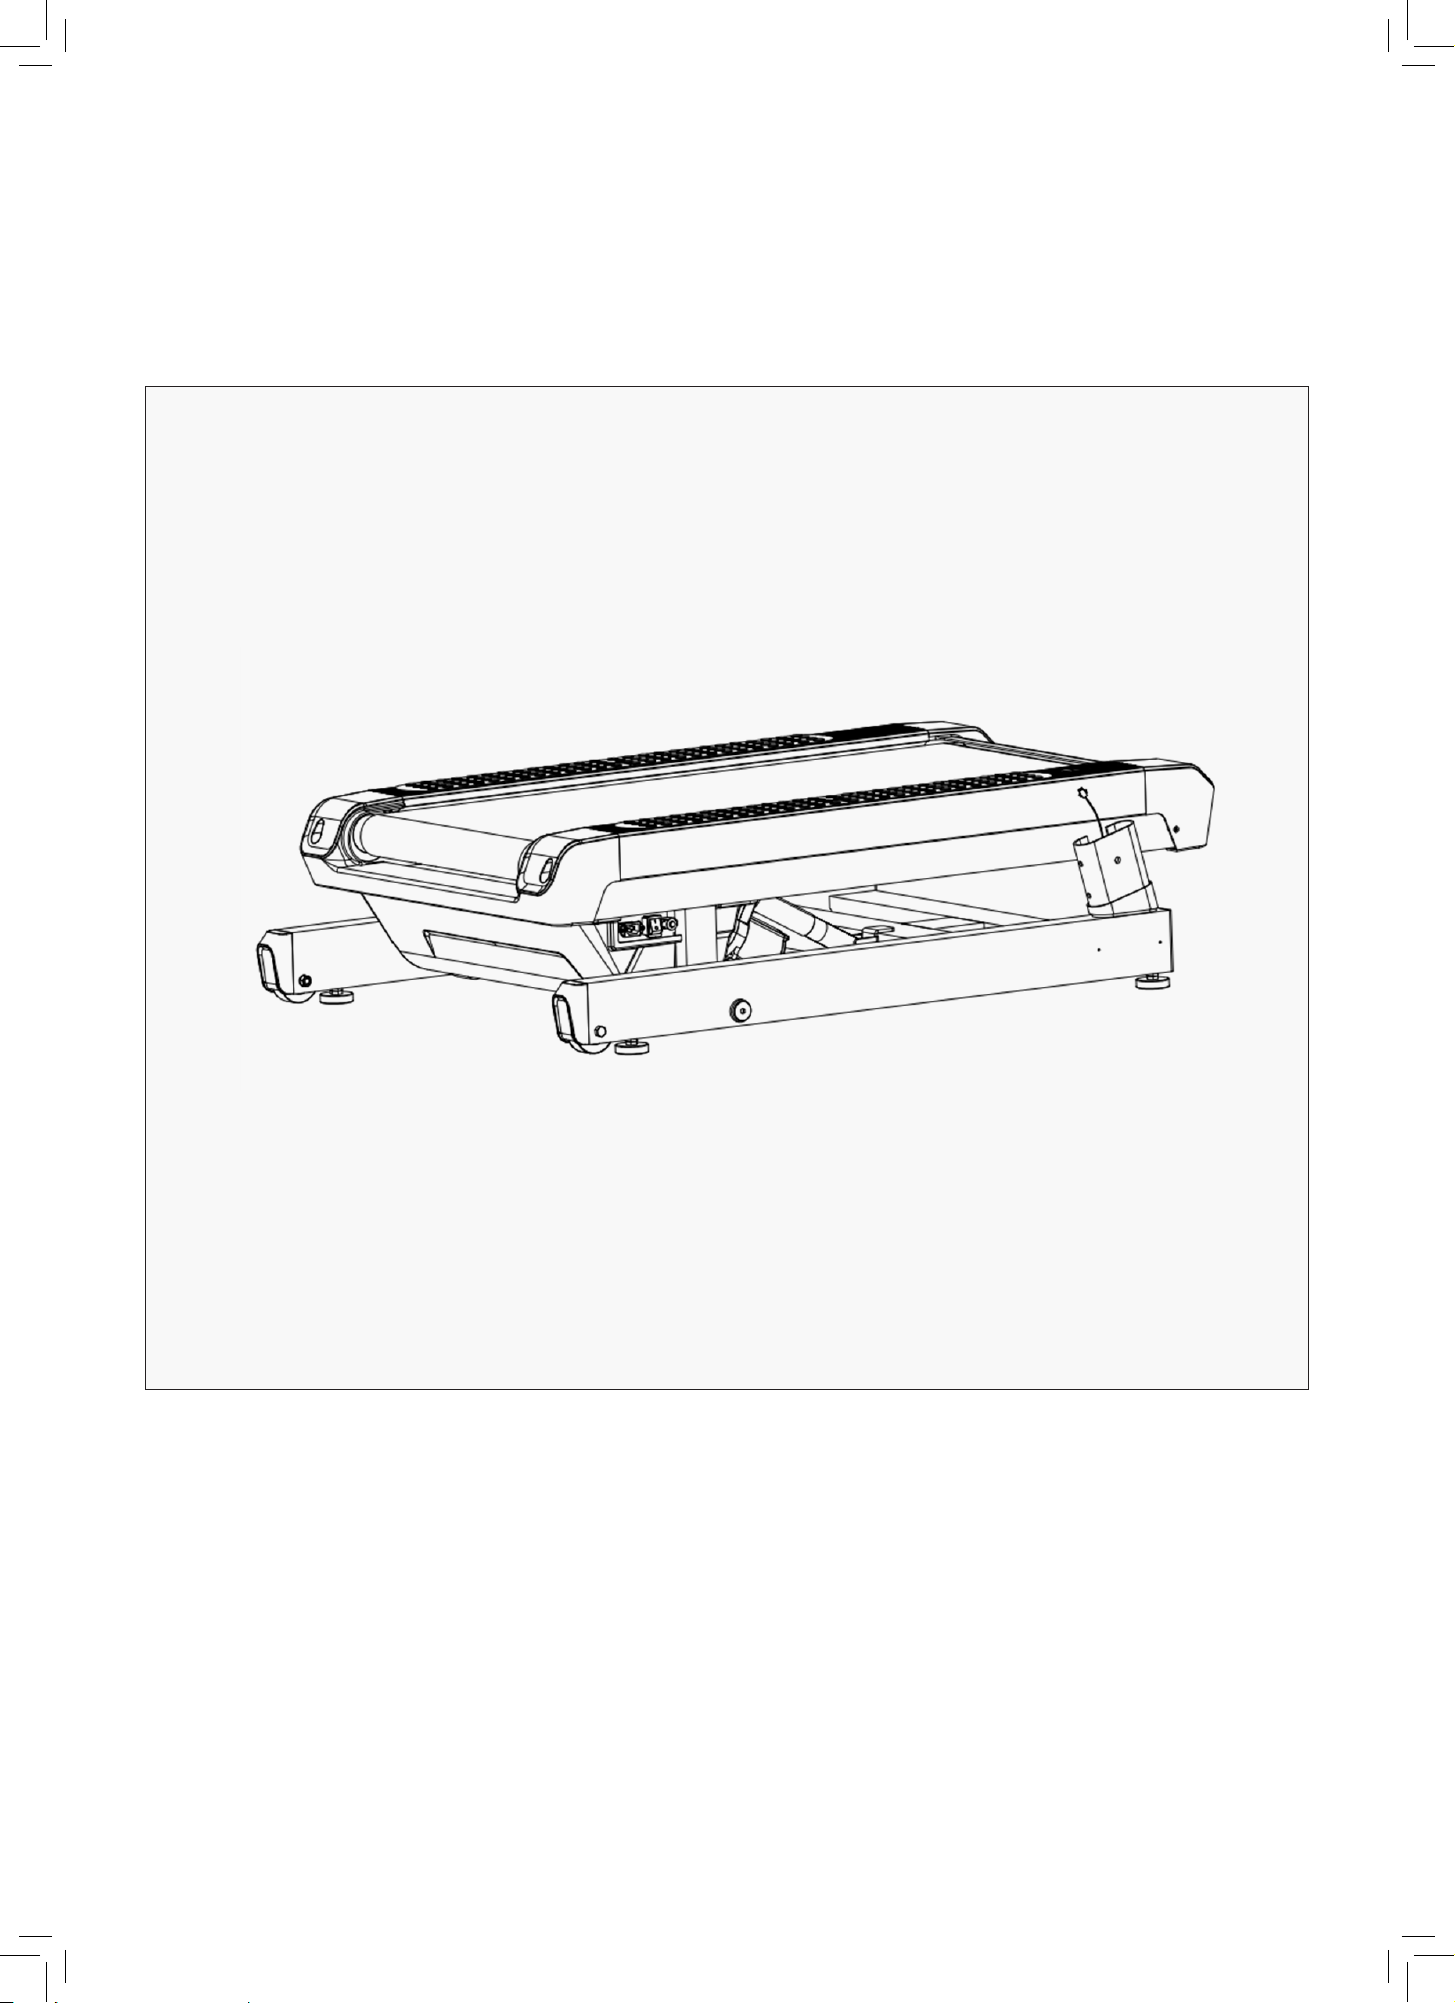
1. Open the package, take out the following parts and place the main frame flat on the ground.
Before assembly, ensure you have adequate space for step up. You may require a second person to
assist with assembly.
VI. ASSEMBLY INSTRUCTIONS
STEP 1
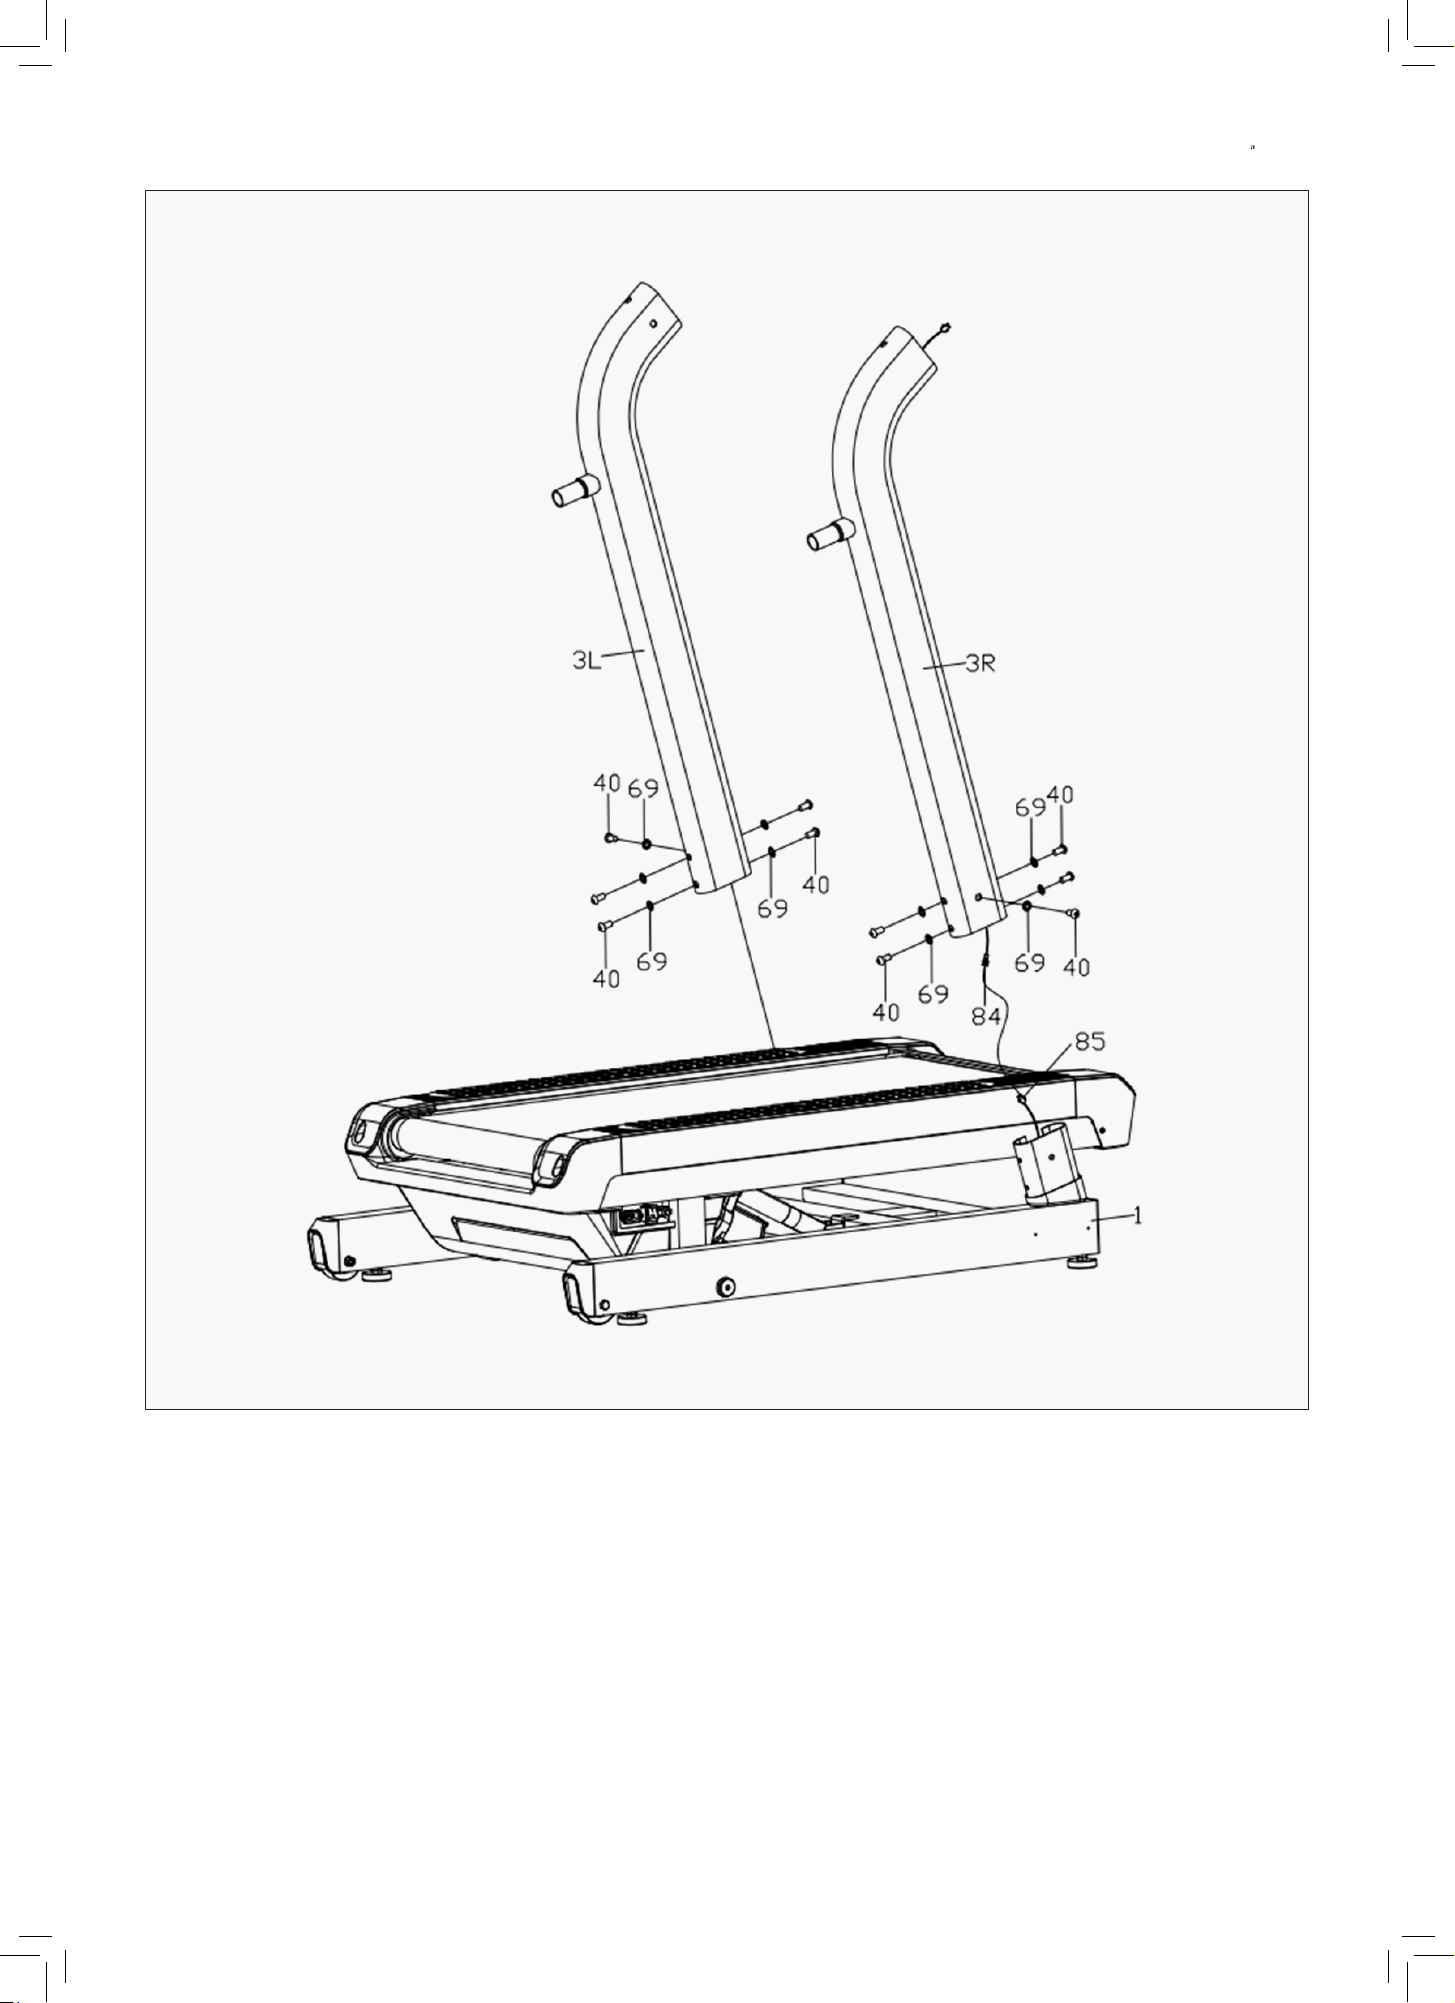
11ASSEMBLY INSTRUCTIONS |
1. Connect Computer middle wire (84) and Computer middle and lower wire (85.)
2. Pre assembly Upright tube (3L/R) to the bottom frame (1) with In ner hex bolt M10*20 (40) and
Serrated lock washer φ 10*1.2 (69).
NOTE: Do not clamp the wires. The Inner-hex bolt M10*20 (40) should not be locked yet.
STEP 2
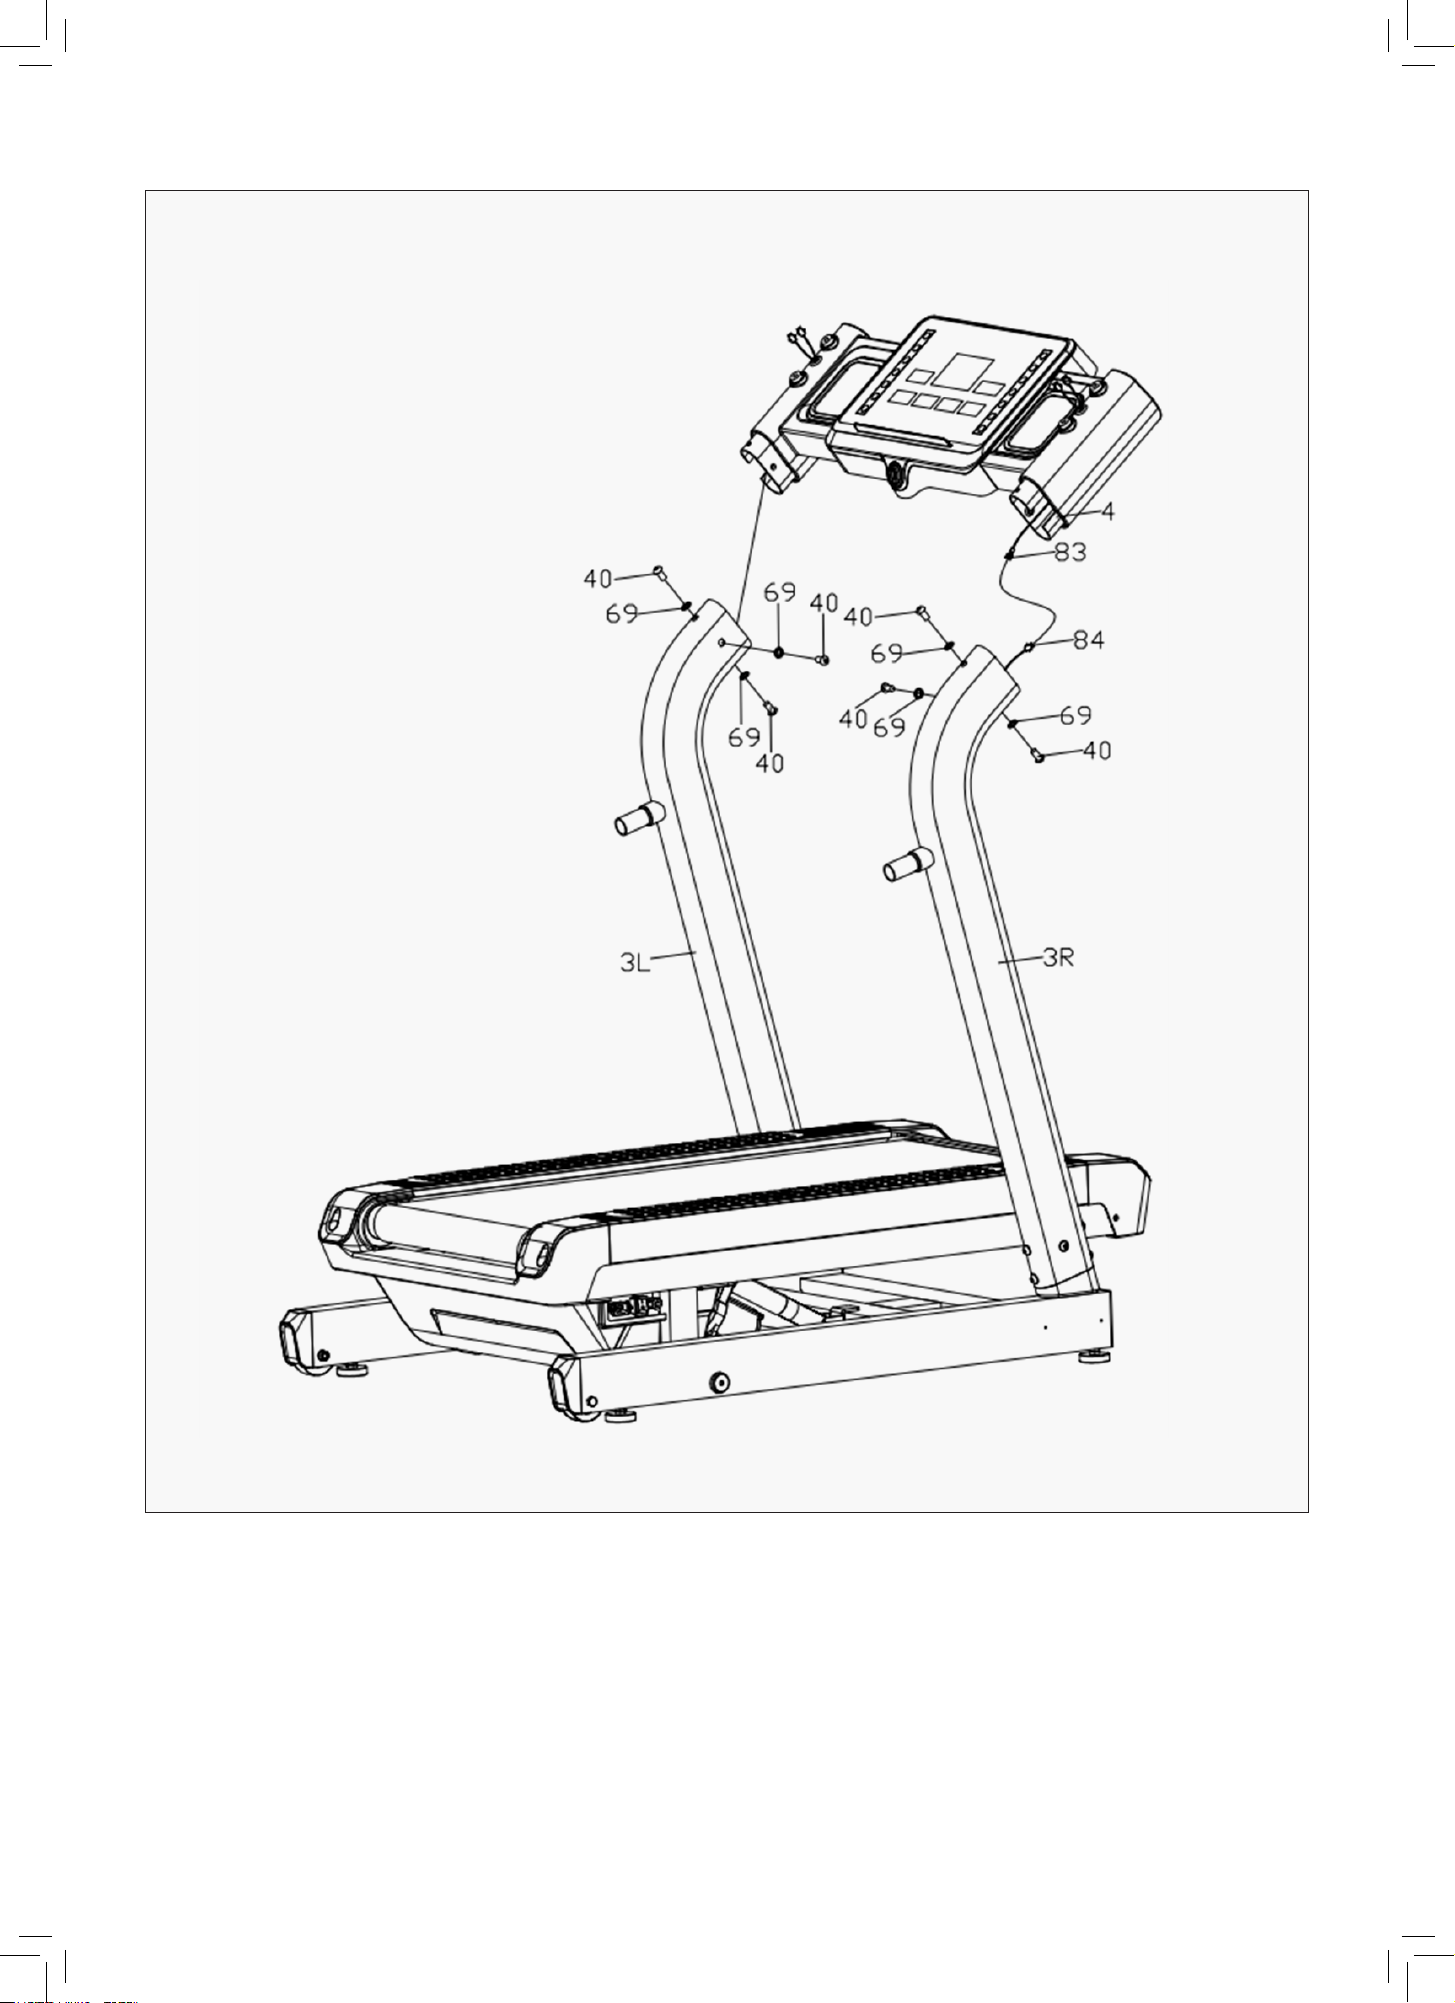
12 | ASSEMBLY INSTRUCTIONS
1. Connect Computer upper wire (83) and Computer middle wire (84).
2. Attach Computer frame (4) to Upright tube (3L/R) with Inner-hex bolt M1020 (40) and Serrated lock
washer φ101.2 (69). NOTE: Do not clamp the wires.
STEP 3
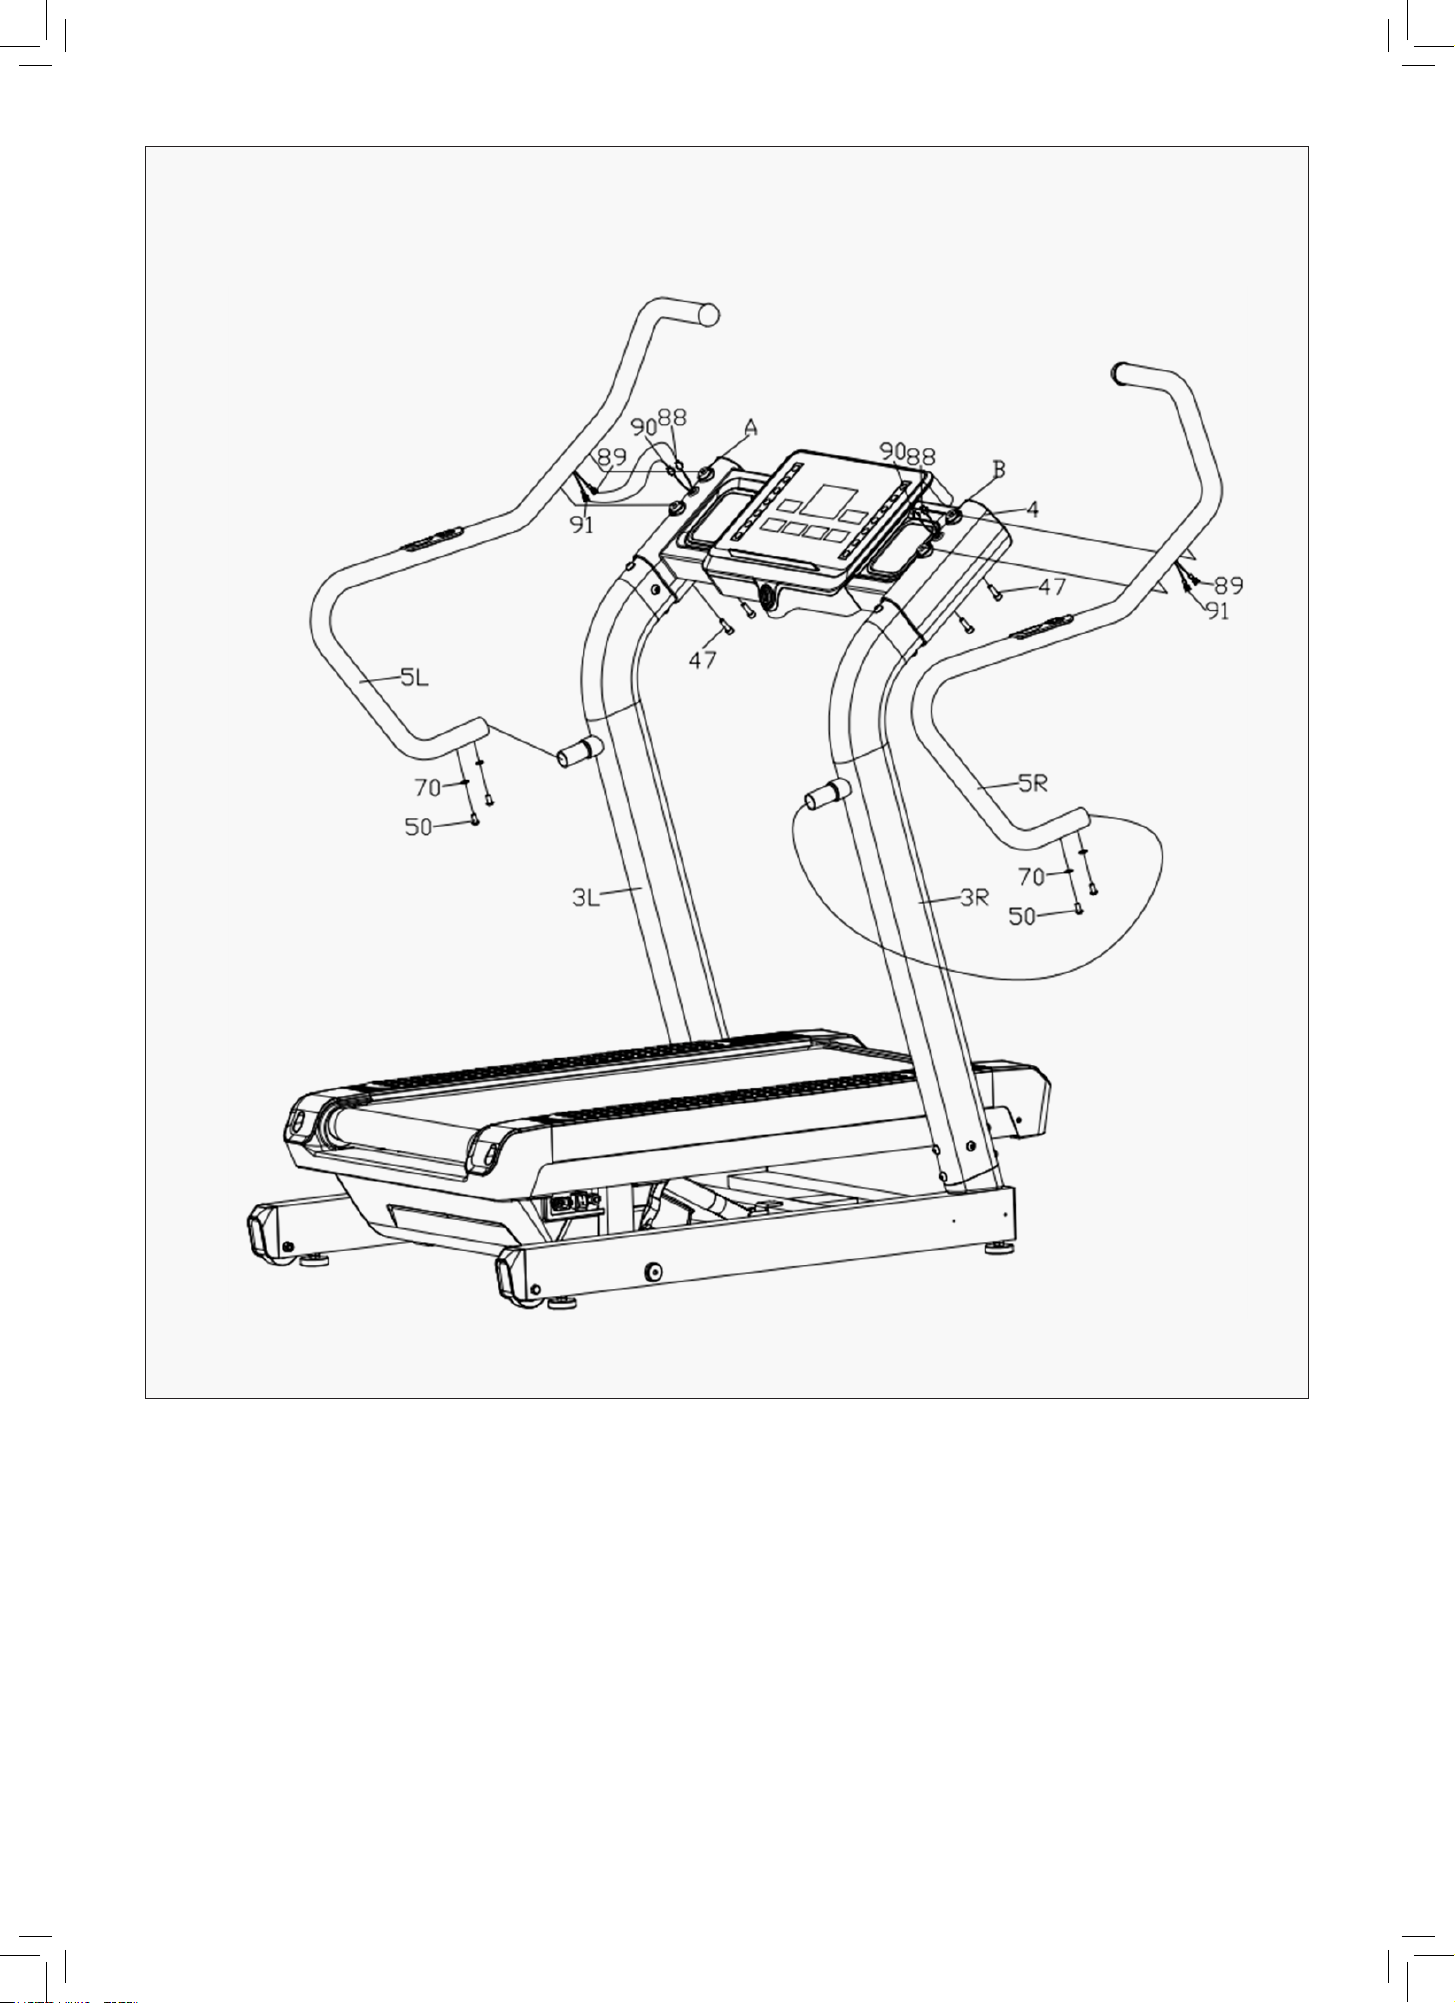
13ASSEMBLY INSTRUCTIONS |
1 Insert Armrest (5L/R) into the connecting tubes of Upright tube (3L/R).
2. Connect handle pulse upper wire (88) and lower wire (89), shortcut key upper wire (90) and lower wire
(91), and insert the connectors into the designated slots of Computer frame (4).
3. Align the holes on Armrest (5L/R) with holes A and B of Computer frame (4) and secure them using
Socket head cap bolt (47).
4. Secure Armrest (5L/R) to Upright tube (3L/R) using Inner-hex flat head bolt (50) and Serrated lock
washer φ8*1.2 (70).
STEP 4
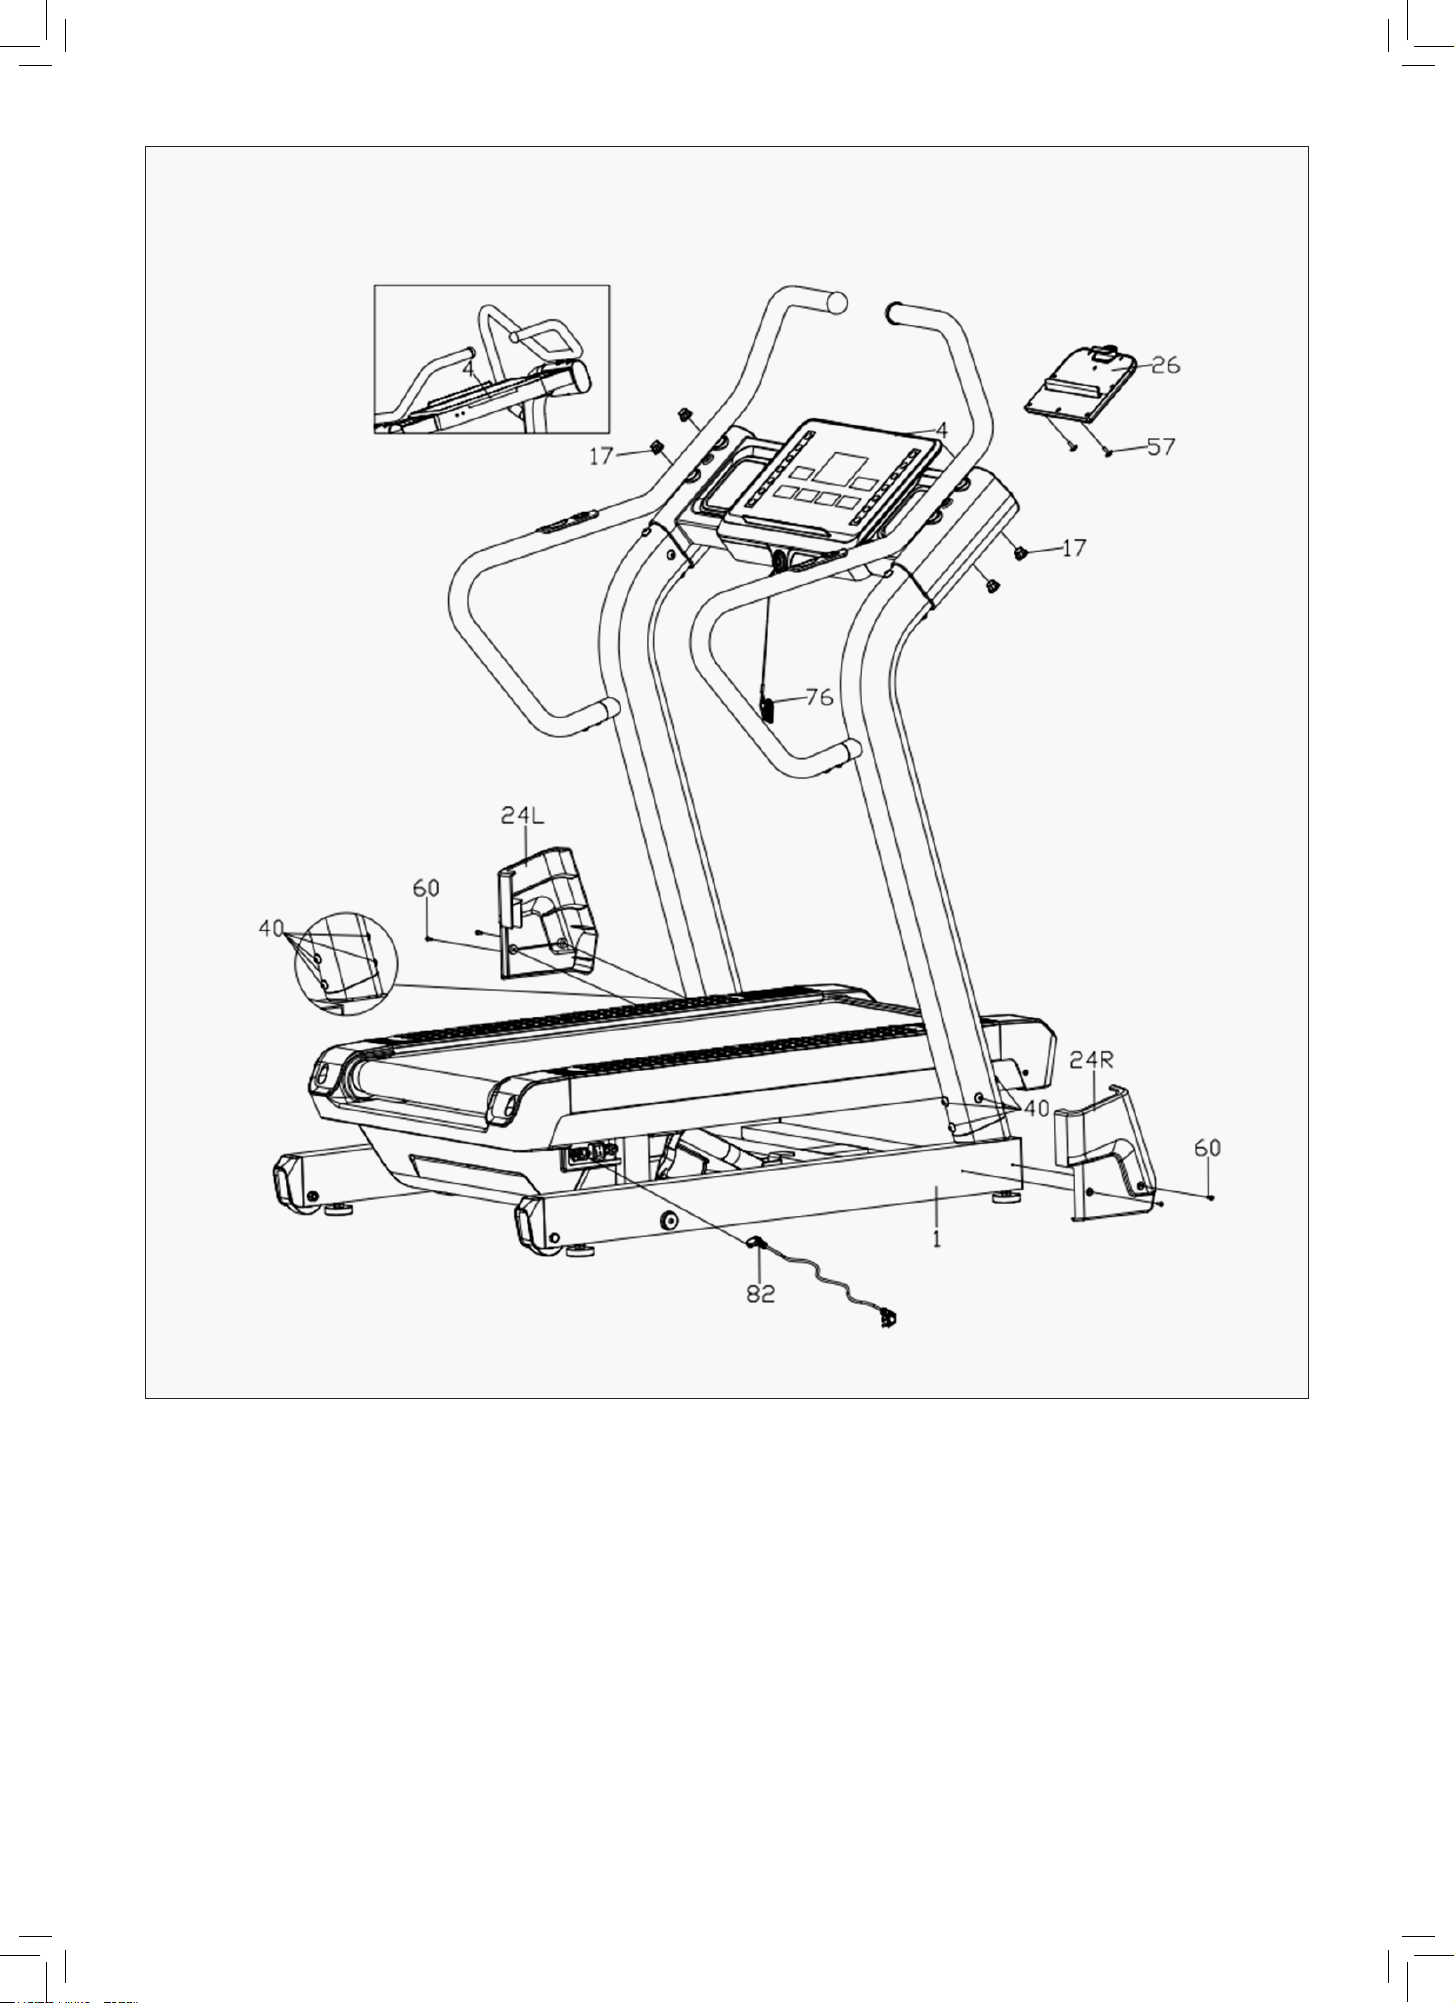
14 | ASSEMBLY INSTRUCTIONS
1. Tighten all the Inner-hex bolts (40) that were not locked earlier.
2. Insert I-pad up cover (26) into Computer frame (4) and secure it with Phillips screw M5*8 (57).
3. Attach Bottom frame protective cover (24L/R) to Bottom frame (1) using Phillips tapping screw ST4*16 (60).
4. Insert Front Handlebar end cap (17) onto Computer frame (4) and attach Safety key (76).
5. Connect one end of the power wire (82) to the treadmill and the other end to a power source. DO NOT
plug with other appliances or on a power board.
STEP 5

15OPERATIONS INSTRUCTIONS |
VII. OPERATION INSTRUCTIONS
1. LED Window Functions:
2. Function button:
Start, Stop, Program, Mode, Speed (+/-), Incline (+/-),
o Speed Shortcut Keys: 3, 5, 8 KM/H
o Incline Shortcut Keys: 0, 25, 50 levels
A. Point array window:
a) Standby or select the three inverted modes of time, distance and calories
b) Displays the speed dot matrix diagram when selecting the program
c) Display fat measurement mode and error
d) Display the runway and the number of laps, or the speed lift dot pattern.
B. Speed window: Displays the speed data, scope: 0.0-8.0KMH.
C. Time / step number window: Displays time data, scope: 0:00-99:59. Alternate display of steps during
runtime, scope: 0-9999.
D. Incline window: Display incline data, scope: 5-50 paragraph.
E. Program/ calorie window:
a) Displays the selected program serial number / calorie data. Program range: P01-P12φU01-U03
b) Displays the calorie data, the calorie range: 0.0-999.
F. Distance window: Displays distance data, scope: 0.00-99.9
G. Heart rate window: Showing heart rate data, heart rate range: 50-200 (For reference only, not as
medical data).
Window and Key Description:

16
3. Function key instructions:
o Program key: Press to cycle through programs (manual mode, P01-P12, U01-U03).
o Mode Key: Selects manual mode (normal, time, distance, calorie countdown).
o Start Key: Starts the motor.
o Stop/Pause Key: Stops the motor.
o Speed +/-: Adjusts speed.
o Incline +/-: Adjusts incline level.
o Speed Shortcut Keys: Directly sets speed.
o Incline Shortcut Keys: Directly sets incline level.
o View Total Mileage: Hold "Speed +" and "Speed -" for 3 seconds.
o Self-Test Mode: Hold "Incline +" and "Incline -" for 3 seconds.
1. Modes:
o Manual Mode: Normal, Time, Distance, Calorie countdown.
o 12 Fixed Programs (P01-P12).
o 3 Custom Programs (U01-U03).
2. Starting the Treadmill:
o Attach the safety lock.
o Press the Start key. The display will count down from 3-2-1 before the motor starts.
1. Entering Manual Mode:
o Power on to enter normal manual mode.
o Press Mode to select manual mode options.
2. Manual Mode Settings:
o Time Countdown: Set time range: 5:00-99:00 (default: 30:00).
o Distance Countdown: Set range: 0.50-99.9 KM.
o Calorie Countdown: Set range: 10.0-999 kcal.
2. Operation in Manual Mode:
o Press Start to begin at 1.0 KM/H.
o Adjust speed using Speed +/- keys.
o Adjust incline using Incline +/- keys.
o Press Stop to end session.
| OPERATIONS INSTRUCTIONS
Manual mode:
Fixed Program / Operation instructions:

17
PROGRAM TIME
Setup time / 20 = each segment of the running time
1 2 3 4 5 6 7 8 9 10 11 12 13 14 15 16 17 18 19 20
P01
SPEED 2 2 2 2 3 3 3 3 4 4 4 4 5 5 5 5 5 3 3 1
INCLINE 0 1 1 1 1 1 2 2 2 2 3 3 3 2 2 3 2 2 2 2
P02
SPEED 2 3 3 3 3 4 4 5 5 5 4 4 5 5 5 4 4 5 3 2
INCLINE 0 1 2 3 4 5 4 5 4 2 1 2 3 2 1 1 2 3 3 2
P03
SPEED 2 2 2 3 3 3 4 4 4 4 5 5 6 6 6 5 5 5 4 3
INCLINE 0 2 2 4 4 4 6 6 6 7 7 8 8 8 8 6 6 6 4 3
P04
SPEED 2 2 2 4 4 4 6 6 6 7 7 8 8 8 8 6 6 6 4 3
INCLINE 1 1 2 2 4 4 5 5 5 6 6 6 8 8 10 10 8 6 6 3
P05
SPEED 2 5 5 5 6 6 6 8 7 7 6 5 4 3 3 3 5 5 4 4
INCLINE 0 2 8 8 8 9 9 10 10 12 12 12 14 14 14 13 13 12 10 6
P06
SPEED 2 6 6 6 7 7 7 7 6 6 8 8 7 7 6 6 5 5 6 4
INCLINE 0 8 10 14 16 18
20 22 24 25 25 22 20
18 17 16 15 15 12 3
P07
SPEED 2 3 3 5 3 3 7 7 6 6 5 5 4 8 8 8 6 6 5 3
INCLINE 0 8 12 13 13 13 15 15 15 16 16 18 18
20 20 22 22 23 20
5
P08
SPEED 2 4 6 6 6 5 8 8 6 7 7 5 5 5 5 8 7 7 6 6
INCLINE 2 2 6 6 8 7 9 12 12 14 16
20 22 22
18 18 18 15 15 5
P09
SPEED 1 2 2 3 3 2 2 3 3 2 2 3 3 4 4 3 3 3 2 1
INCLINE
24 25 26 28 29 25 26 28 29 25 26 28 29 25 26 25 26 25 25 0
P10
SPEED 1 2 3 3 3 4 4 5 5 4 4 3 3 3 2 3 3 2 2 1
INCLINE
24 28 25 25 28 25 28 25 28 28 25 25 28 27 24 28 30 32 34 0
P11
SPEED 1 2 3 4 5 3 4 5 3 4 5 4 3 4 4 3 3 2 2 1
INCLINE
20 22 24 26 28 30 26 28 24 26 28 30 30 32 34 36 34 34 32 0
P12
SPEED 2 2 2 3 3 4 4 3 3 2 3 2 3 3 3 2 2 3 2 1
INCLINE
20 22 24 24 26 26 28 28 30 30 28 26 24 22 20 22 24 26 25 0
OPERATIONS INSTRUCTIONS |
1. Settings:
o Default time: 30 minutes (adjustable 5:00-99:00).
o Each program has 20 segments with pre-set speeds and inclines.
2. Operation:
o Press Start to begin the selected program.
o Speed and incline adjust automatically.
o Press Stop to halt the program.
Fixed Program Mode:

18 | OPERATIONS INSTRUCTIONS
1. User-Defined Settings (U01-U03):
o Select U01-U03 in standby mode.
o Configure speed and incline for each of the 20 segments.
o Settings are saved permanently until manually changed.
2. Starting a Custom Program:
o Select the custom program and press Start.
o If the safety key is removed, the treadmill stops immediately.
Power Saving Mode:
o The treadmill enters power-saving mode if inactive for 10 minutes.
MP3 & USB:
o Plays music when connected via MP3 or USB flashdrive.
Shutdown:
o Turn off the power switch at any time to shut down safely.
Important Safety Notes:
1. Ensure power supply and safety lock are functioning before use.
2. In case of an emergency, remove the safety lock.
3. Contact a dealer for repairs. Unauthorized repairs may damage the equipment.
Custom Programs:
Safety Lock Function:
Display Range of Various Parameters:
Set parameters
Initial value Set initial value Setting range Display range
TIME (minute: second) 0:00 10:00 5:00-99:00 0:00-99:59
SPEED (KM/H) 0.0 N/A N/A 0.5-8.0KMH
DIS (DISTANCE) 0:00—99:59 30:00 30:00 5:00---99:00
CAL (CALORIE) 0.00 1.00 0.50-99.9 0.00-99.9

19OPERATIONS INSTRUCTIONS |
Error
Possible Cause Solutions
E01 Communication failure Check cable connections.
E02 Voltage issue Ensure correct voltage.
E03 Sensor malfunction Check and reconnect sensors.
E04 Lift motor failure Reconnect or replace lift motor.
E05 Overcurrent Check motor and controller.
E06 Open circuit in motor Reconnect motor interface.
E10 Current surge Adjust controller settings.
Error Codes and Troubleshooting:
Calories Calculation:
Formula: 70.3 φ Speed (KM/H) φ Time (H) φ (1 + ?%)
Baseline: 70.3 calories per kilometer with zero incline.
20
VIII. EXERCISE GUIDE
PLEASE NOTE:
Before beginning any exercise program, consult your physician. This is important for individuals over
the age of 45 or with pre-existing health problems.
The pulse sensors are not medical devices. Various factors, including the user’s movement, may
affect the accuracy of heart rate readings. The pulse sensors are intended only as an exercise aid in
determining heart rate trends in general.
Exercising is a great way to control your weight, improve your fitness and reduce the effect of aging and
stress. The key to a healthy lifestyle is to make exercise a regular and enjoyable part of your everyday
life.
The condition of your heart and lungs and how efficient they are in delivering oxygen via your blood to
your muscles is an important factor to your fitness. Your muscles use this oxygen to provide enough
energy for daily activity. This is called aerobic activity. When you are fit, your heart will not have to work
so hard. It will pump a lot fewer times per minute, reducing strain on your heart.
So as you can see, the fitter you are, the healthier and greater you will feel.
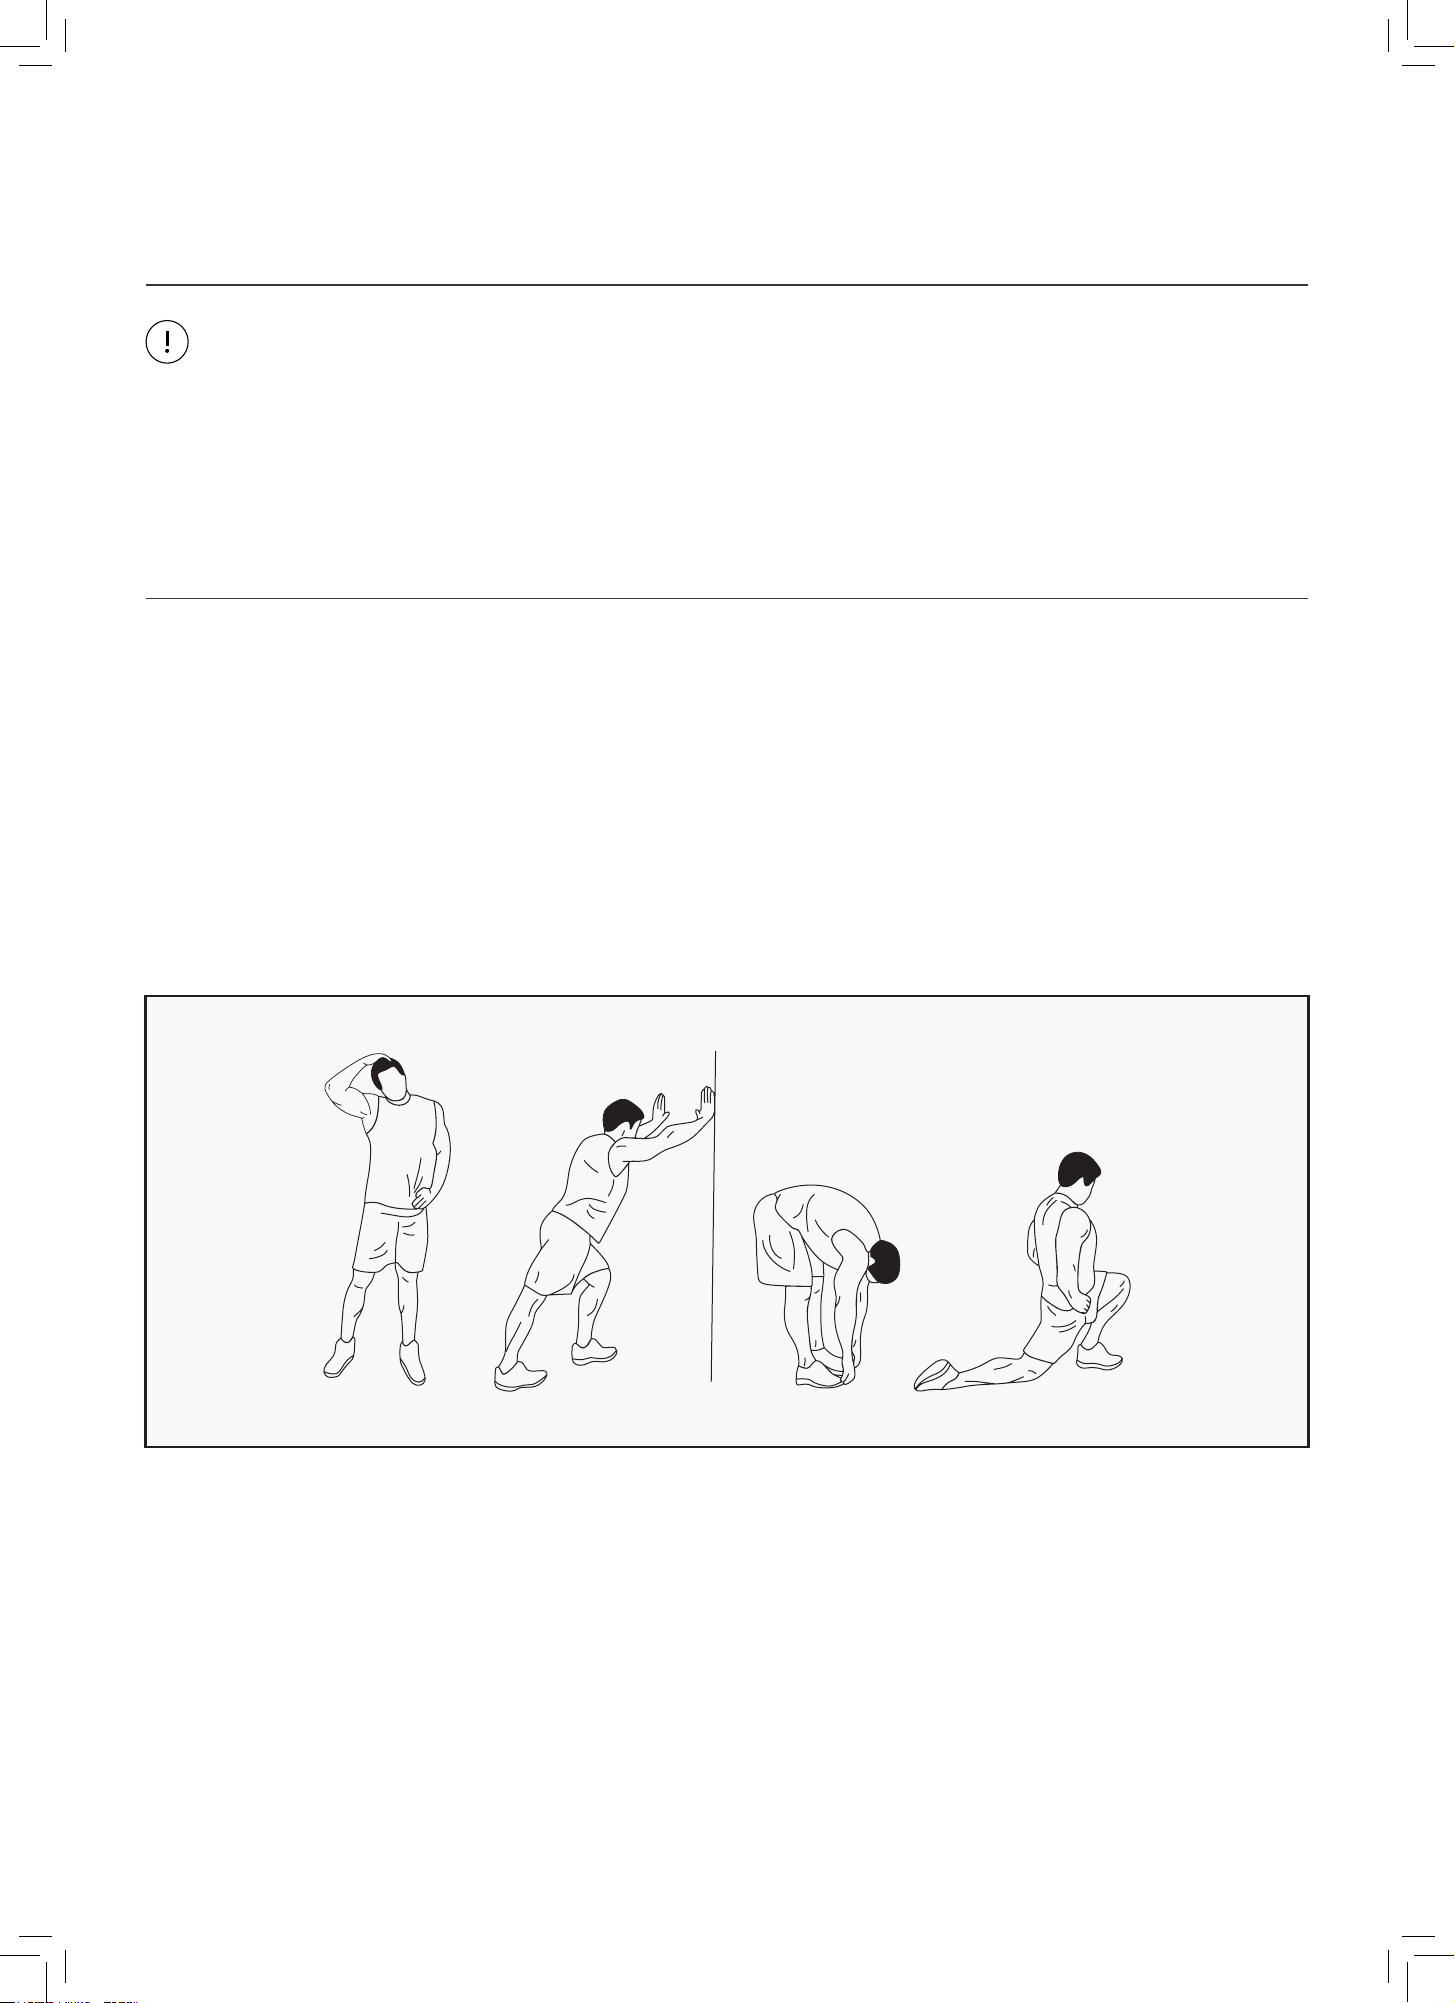
WARM UP
Start each workout with 5 to 10 minutes of stretching and some light exercises. A proper warm-up
increases your body temperature, heart rate and circulation in preparation for exercise. Ease into your
exercise.
After warming up, increase the intensity to your desired exercise program. Be sure to maintain your
intensity for maximum performance. Breathe regularly and deeply as you exercise.
| EXERCISE GUIDE

21
COOL DOWN
Finish each workout with a light jog or walk for at least 1 minute. Then complete 5 to 10 minutes of
stretching to cool down. This will increase the flexibility of your muscles and will help prevent post-
exercise problems.
WORKOUT GUIDELINES
This is how your pulse should behave during general fitness exercise. Remember to warm up and
cool down for a few minutes.
TARGET ZONE
MAXIMUM
85%
70%
COOL DOWN
AGE
HEART RATE
200
180
160
140
120
100
80
20 25 30 35 40 45 50 55 60 65 70 75
The most important factor here is the amount of effort you put in. The harder and longer you work, the
more calories you will burn.
EXERCISE GUIDE |
22
IX. MAINTENANCE INSTRUCTIONS
WARNING: always unplug the treadmill from the electrical outlet before cleaning or servicing the unit.
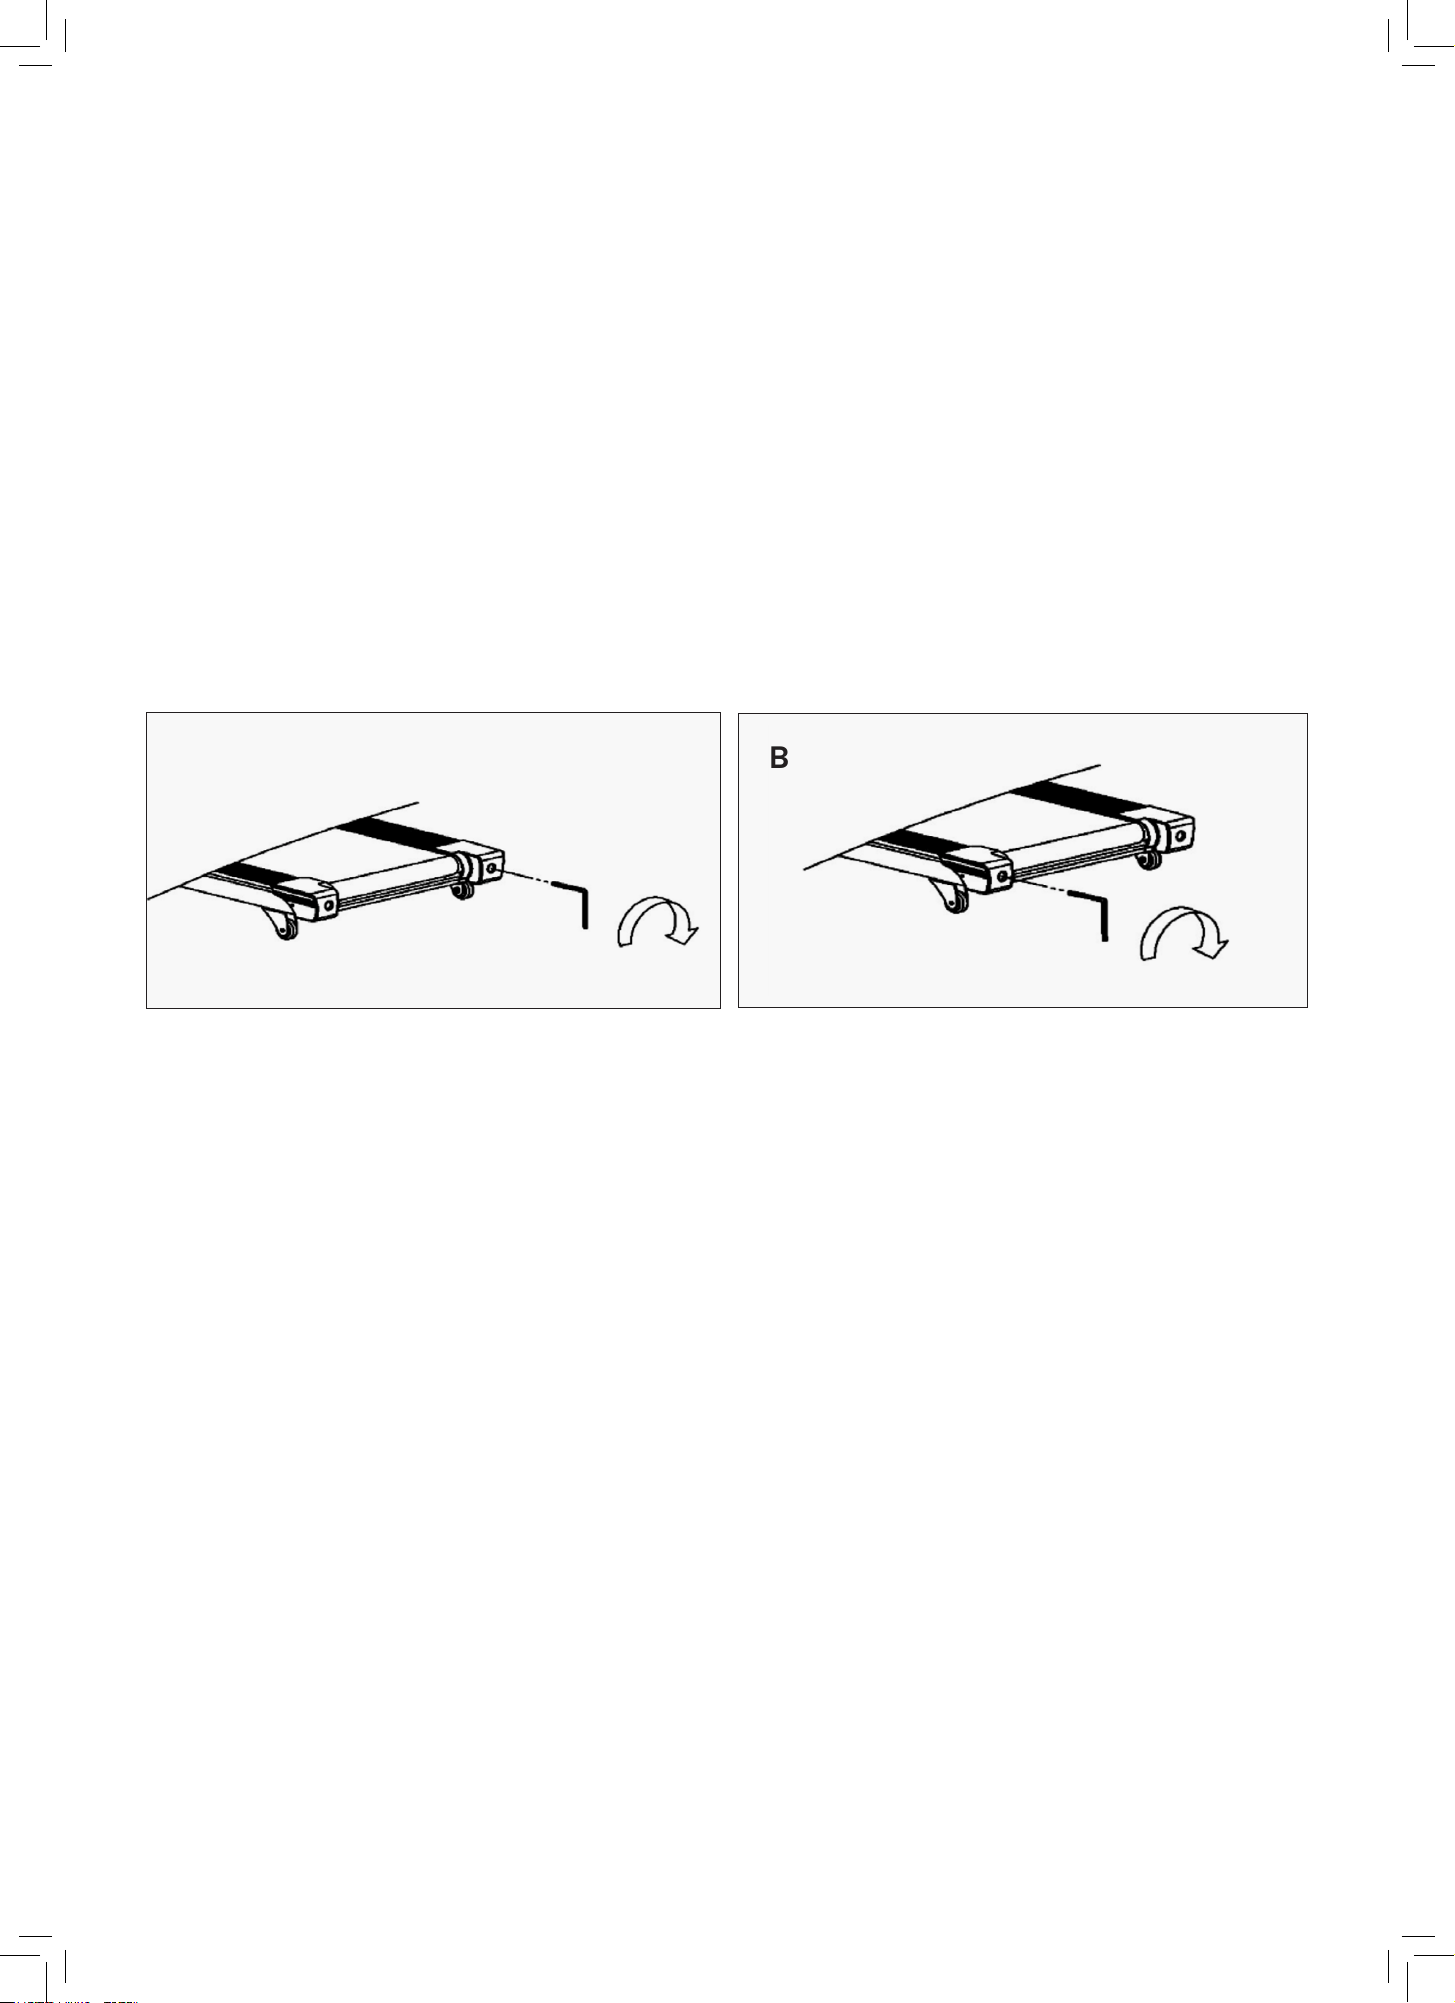
WALKING BELT CENTERING AND TENSION ADJUSTMENT
TENSIONING THE BELT
CLEANING
To center the belt:
1. Place the treadmill on a level surface.
2. Run the treadmill at 3.5 mph.
3. If the belt shifts right, turn the right adjusting bolt clockwise until centered.
4. If the belt shifts left, turn the left adjusting bolt clockwise until centered.
5. Ensure the belt has a 5mm gap from the side rails.
- If the belt slips, tighten the rear roller bolts 1/4 turn to the right.
- Re-test the treadmill and repeat if needed. Do not over-tighten.
- Keep the treadmill clean by dusting regularly.
- Clean the exposed deck on both sides of the walking belt.
- Use a damp cloth with mild soap for the belt. Do not let liquid enter the treadmill.
- Annually: Remove the motor cover and vacuum inside.
Video Tutorial Available at: http://youtu.be/TcuPbJ7KuxQ
Lifespan Fitness YouTube Channel: http://www.youtube.com/user/treadmillsvideos
If the belt has drifted to the LEFTIf the belt has drifted to the RIGHT
A B
| OPERATION GUIDE
23
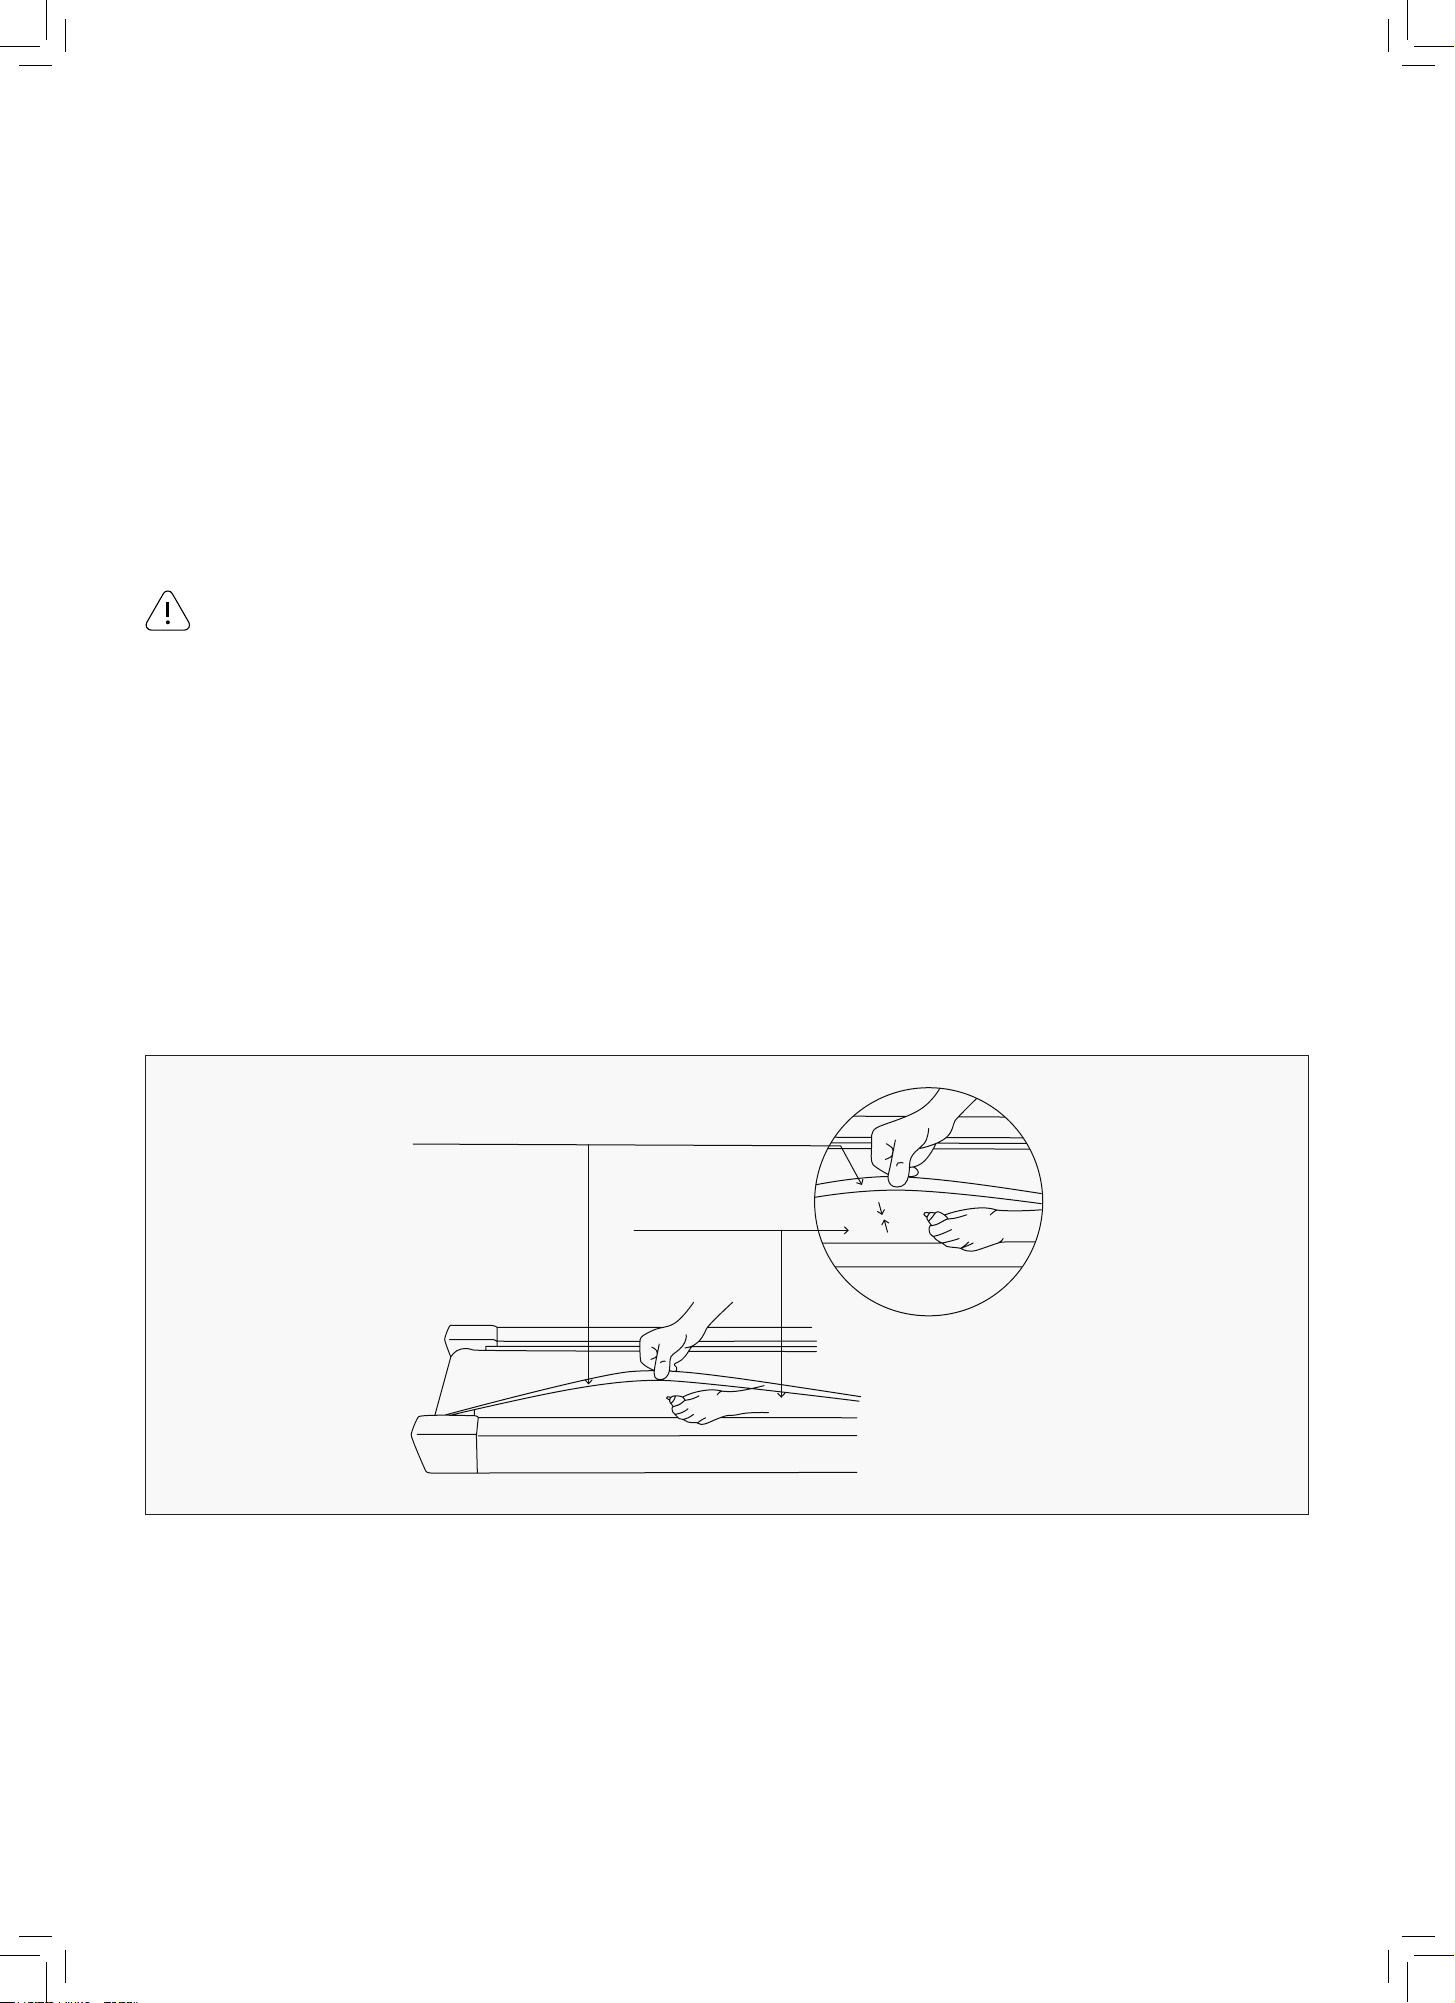
WALKING BELT AND DECK LUBRICATION
Running
Belt
Board
You will need to lubricate your treadmill before the first use.
Lubricating the running board and running belt is essential as the friction between the two affects the
life span and function of the treadmill, therefore it is suggested that the running board and belt be
inspected regularly.
1. Raise the belt up on one side and apply lubricant to the running deck. Use a rag to thoroughly wipe the
lubricant over the running deck. Repeat this process for the other side.
2. The moving parts should turn freely and quietly. Abnormality of moving parts will affect the safety of
the equipment. Inspect and tighten bolts regularly.
3. To better maintain the treadmill and prolong its lifespan, it is suggested that maintenance be done
on a regular basis.
Light user (less than 3 hours/ week) annually
Medium user (3-5 hours/ week) every six months
Heavy user (more than 5 hours/ week) every three months
Always unplug the treadmill from the electrical outlet before cleaning, lubricating or repairing the unit.
IMPORTANT NOTE:
RUNNING BELTS & TREADMILL LUBRICANT:
HOW TO LUBRICATE:
The following time table is recommended:
WARNING!
OPERATION GUIDE |
24
X. REPLACING MOTOR BRUSHES
After extended use, the motor brushes in your treadmill motor will wear down, and this can lead to motor failure.
It is important that you maintain your motor by replacing the brushes on either side of the motor when they are
worn down. We recommend that you check your motor every 1000 hours of usage.
IMPORTANT:
Before beginning the replacement of your motor brush, ensure that the treadmill is off and unplugged
from the electrical socket.
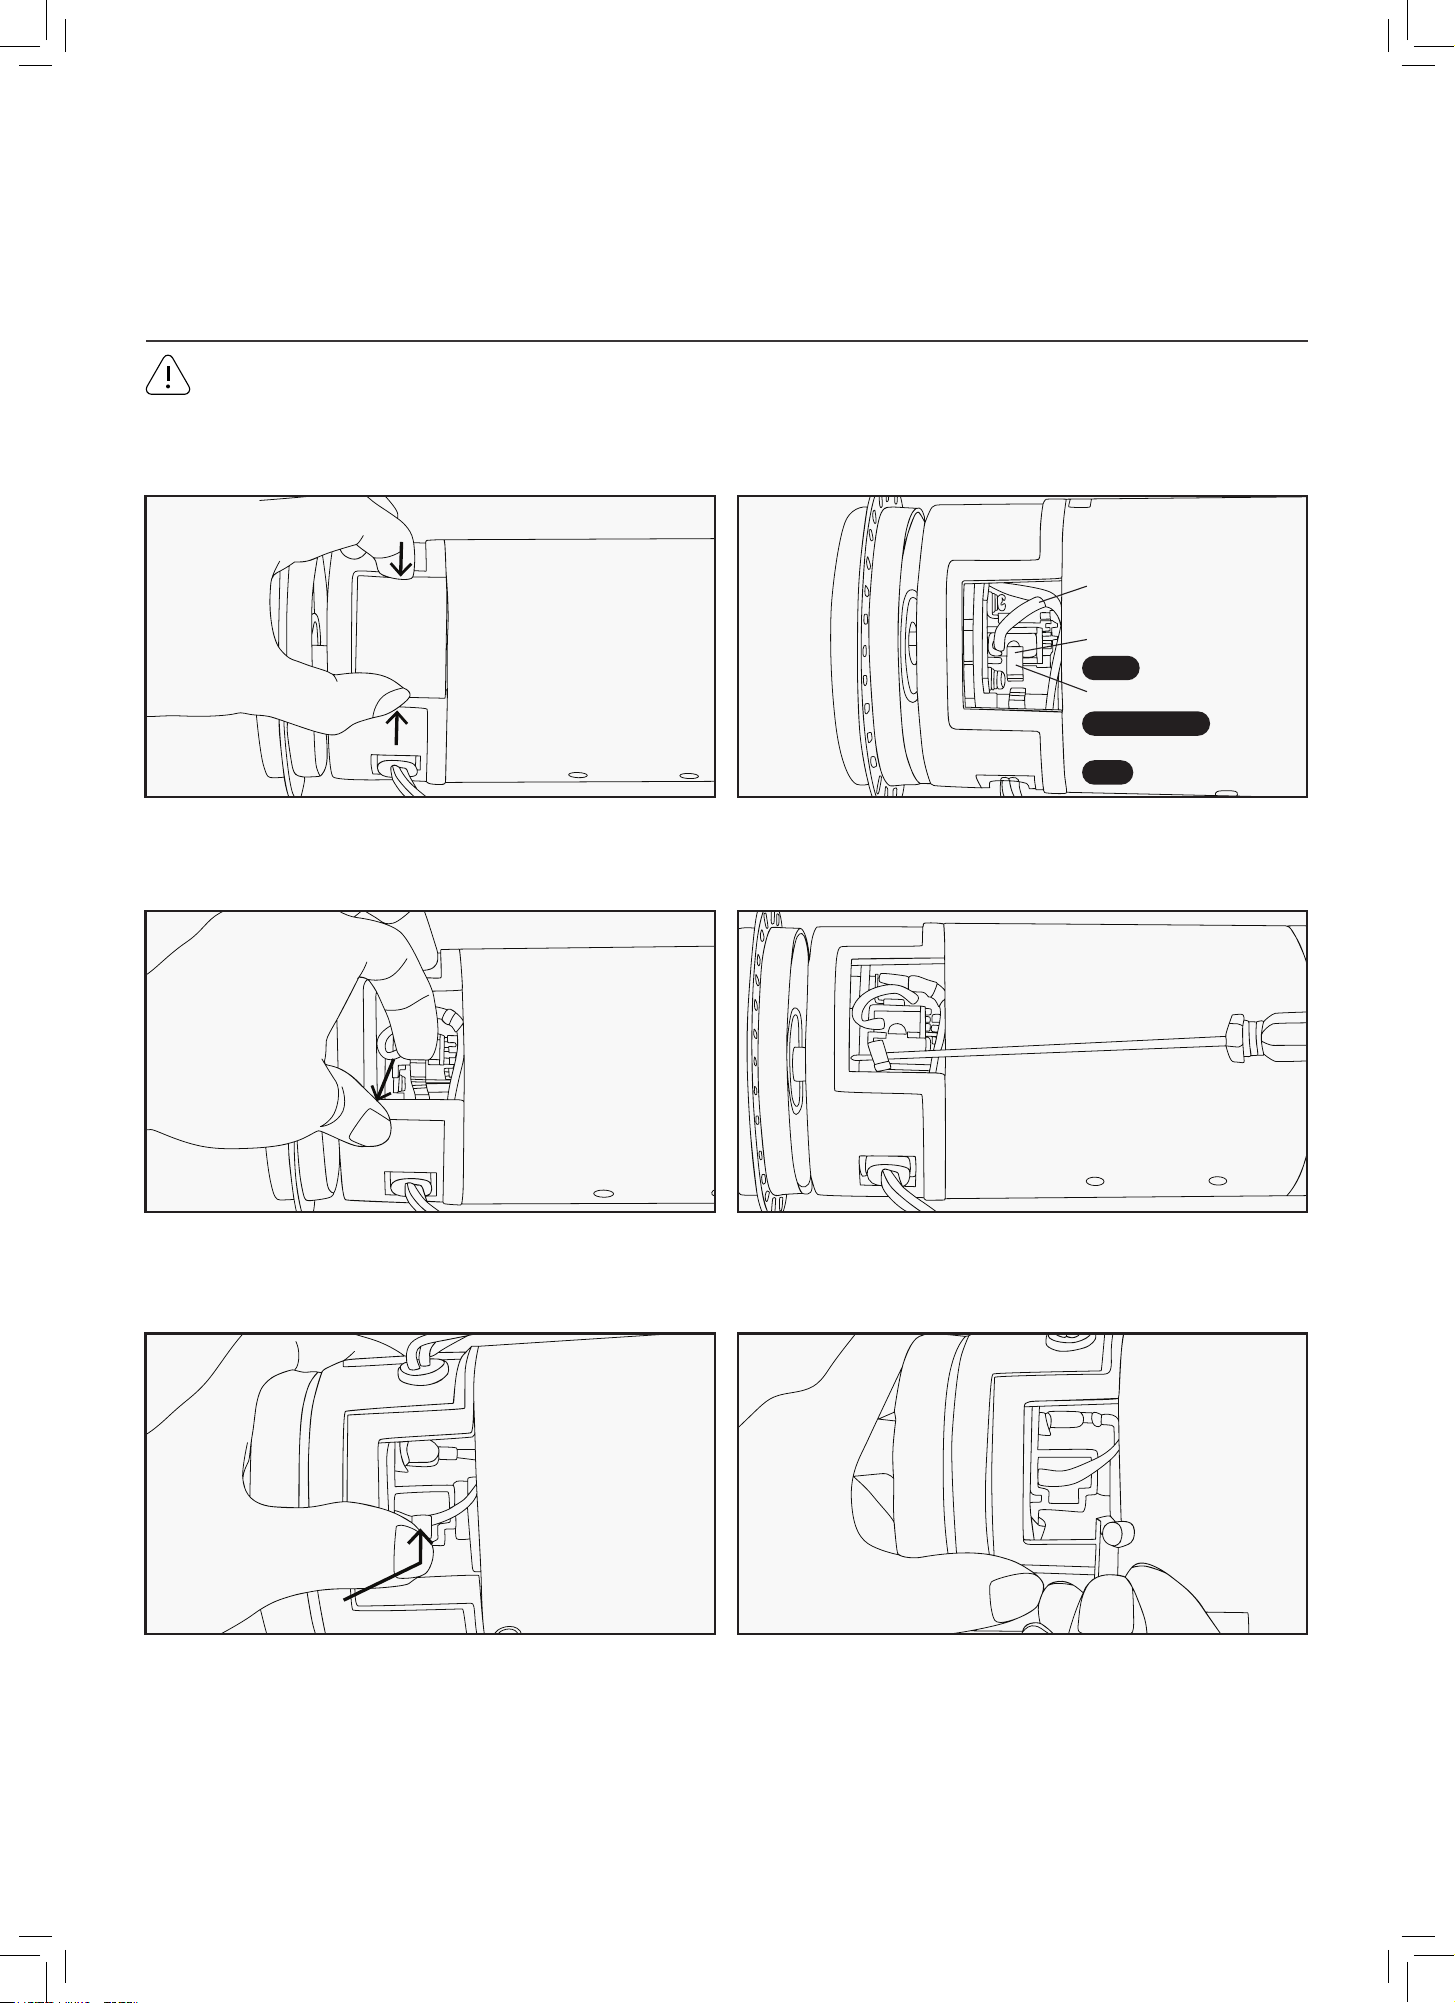
1. Remove the cover from the motor by
squeezing it from the sides.
2. You will find the motor brush held in with a
clip, with the lead plugged in.
Lead
Motor Brush
Clip
3. Pull the clip out from its position.
4a. Hold the clip out of the way with a screwdriver or similar
object. Keep the screwdriver in this position until step 9.
4b. Some treadmill motors may use a push clip instead.
In this case, gently push the clip inwards and then up to
release it from its latch.
4c. Remove the clip, noting the direction in which it
was originally placed, and put it safely aside.
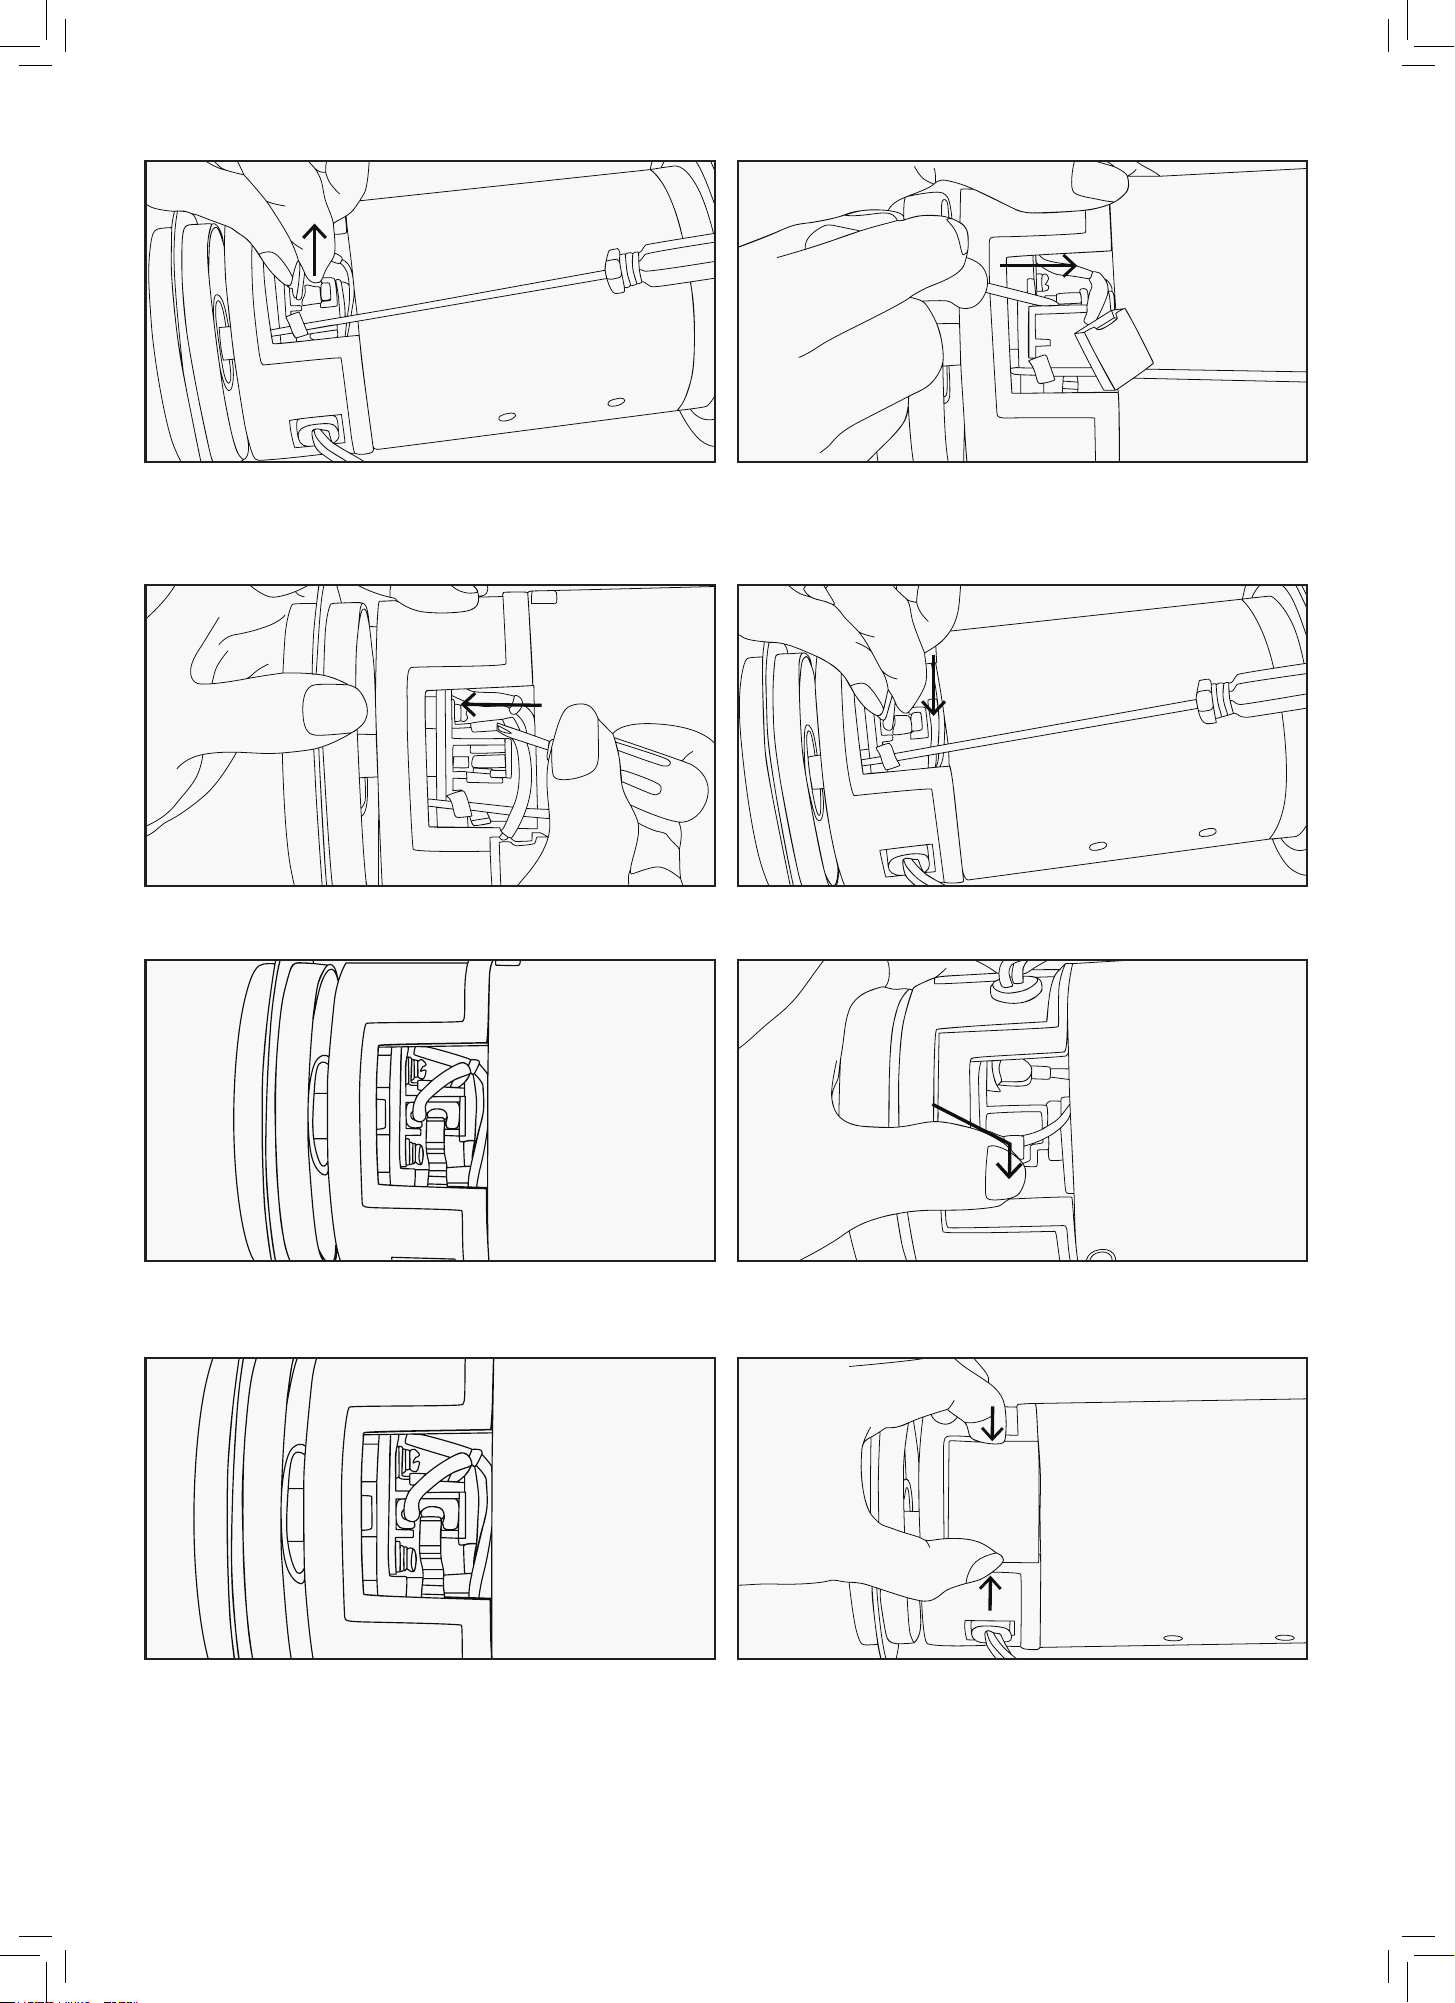
25
5. Slide the motor brush out from its slot. If the brush
is shorter than 1cm on the longest side, you will need
to replace both brushes.
6. Slide the motor brush lead off the terminal using
another small screwdriver or needle nosed pliers.
7. Plug the new motor brush lead into the terminal. 8. Slide the new motor brush into the slot.
9a. Release the clip back into its position. 9b. If your motor uses a push clip, replace the push clip by
pushing it inwards and then down so that it engages the catch.
10. Check that the motor brush is held firmly in place by the
clip, and that the lead is plugged securely onto the terminal.
11. Replace the motor cover. Repeat steps 1-15 for the
second brush located on the opposing side of the motor.
12. You have now successfully replaced the motor brushes. We also recommend that you remove any dirt and dust
from your treadmill motor fan using a vacuum cleaner before replacing the cover.

26
XI. WARRANTY
AUSTRALIAN CONSUMER LAW
Many of our products come with a guarantee or warranty from the manufacturer. In addition, they come
with guarantees that cannot be excluded under the Australian Consumer Law. You are entitled to a
replacement or refund for a major failure and compensation for any other reasonably foreseeable loss
or damage.
You are entitled to have the goods repaired or replaced if the goods fail to be of acceptable quality and
the failure does not amount to a major failure. Full details of your consumer rights may be found at
www.consumerlaw.gov.au.
Please visit our website to view our full warranty terms and conditions:
http://www.lifespanfitness.com.au/warranty-repairs
WARRANTY AND SUPPORT
Any claim against this warranty must be made through your original place of purchase.
Proof of purchase is required before a warranty claim may be processed.
If you have purchased this product from the Official Lifespan Fitness website, please visit
https://lifespanfitness.com.au/warranty-form
For support outside of warranty, if you wish to purchase replacement parts or request a repair or
service, please visit https://lifespanfitness.com.au/warranty-form and fill in our Repair/Service
Request Form or Parts Purchase Form.
Scan this QR code with your device to go to lifespanfitness.com.au/warranty-form
| WARRANTY

27
XII. HAND PULSE TECHNOLOGY
This product comes equipped with hand pulse sensors which are used to pick up tiny EKG/ECG signals
that run through the body when your heart beats. These electrical EKG/ECG signals are very small and
that they must be amplified 1000 times to make the signal useful for the computer to display your
pulse.
To ensure proper operation:
• The user must maintain good, consistent contact on all four sensors.
• The users skin cannot be too dry or too wet.
Other factors that could affect the reading:
• Change of grip on the sensors (during slow pace walking and up to running).
• Tightening of hand muscles will produce small electrical signal.
• Static electricity charges from the air or from walking on the treadmill.
EKG/ECG Sensors may filter through actual EKG/ECG signals and "Noise" factors that may affect the
reading. This will cause the pulse reading to be delayed and will take longer to update the display as the
heart rate changes. Too much noise will create an incorrect reading. Medical conditions or having no
electrical signal in the hands are other factors that may affect pulse readings as well.
These are limitations of hand pulse technology and even the most expensive systems (which can
cost upwards of $3,000) used in hospitals have the same problems. The difference is that a patient
in a hospital is not running on a treadmill. Hand pulse technology works well on stationary exercise
machines like bikes and even elliptical cross trainers but are not perfect on a treadmill. We offer
treadmills with a wireless heart rate receiver which may be a more accurate option.
To test if your hand pulse sensors are working up to specification, hold them while standing on the
sidestep rails, not walking, and see if the reading is more in line with what you would expect. This will
eliminate the movement and static electricity factors. If your hands are dry, then wet them slightly
(saliva works as a great conductor if this doesn’t bother you).
HAND PULSE TECHNOLOGY |

28
WWW.LIFESPANFITNESS.COM.AU