NERETVA
Coffee
Maker
NERETVA
Model No.:
PE3690U
INSTRUCTION
MANUAL
For
your
safety
and
continued
enjoyment
of
this
product,
always read the
instruction
manual
carefully
before using.

IMPORTANT
SAFEGUARDS
When
using
an
electrical
appliance,
basic
safety
precautions
should
always
be
followed,
including
the
following:
1.
Carefully
read all
instructions
before
operating
and
save
for
future
reference.
2.
Remove
any
packaging
material
and
stickers
before
using
the
appliance
for
the
first time.
3.
Do
not
place
the
product
near
the
edge
of
a
bench
or
table
during
operation.
Ensure
the
surface
is level, clean and
free
of
water
and
other
substances
.
4. Do not
let
the cord hang
over
the
edge
of
a
bench
or
table,
or
become
knotted.
Keep
away
from
hot
gas
or
electric
burner
,
or
where
it could
touch
a
heated
oven.
5.
This
appliance
should
not
be used by
children
or
individuals
with
certain
disabilities
,
unless
they
have
been
given
supervision
or
instruction
concerning
use
of
the
appliance
in a
safe
way
and
understand
the
hazards
involved.
6. Keep
the
appliance
and
accessories
clean.
Follow
the
cleaning
instructions
provided
in
this
book.
7.
This
appliance
is
recommended
for
household
use only. Do
not
use
this
appliance
for
other
than
its
intended
use. Do
not
use
outdoors.
Misuse
may
cause
injury
.
8. The use
of
accessory
which
is
not
recommended
by
manufacturer
may
cause
injury.
9.
Ensure
the
product
is
properly
assembled
before
first use.
10.
Ensure
the
portafilter
is
firmly
inserted
and
secured
into
the
group
head
before
starting
the
extraction.
Never
remove
the
portafilter
during
the
brewing
process.
11
. Do
not
use
the
appliance
when
the
water
tank
is empty.
-1-

NAME OF PARTS
12. Do
not
touch
hot
surfaces.When
operating
the
machine,
the metal
surfaces
are
liable
to
get
hot
during
use
.
13. Do
not
leave
the
product
unattended
when
in use.
14.
Switch
Off
the
machine
when
not
in
use.AIIow
the
product
to cool
down
before
moving
or
cleaning
any
parts
.
_&WARNING
Do
not
immerse
power
cord,
power
plug
or
appliance
in
water
or
any
other
liquid
.
FOR
HOUSEHOLD
USE ONLY
SAVE
THESE
INSTRUCTIONS
.
2-

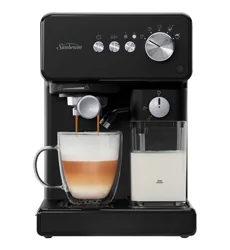
KNOW YOUR PRODUCT
1.
Cup warming area
2.
Water tank cover
3.
Removable water tank
4.
Steam knob
To
adjust the steam volume
5.
Steam indicator light
Illuminates to indicate that the steam function
is
selected.Light fiashes while machine
is
preheat
or the milk texturing.
6.
Housing
7.
360. swivel action steam wand
Adjusts to the perfect position for texturing
8.
Non-slip feet
9.
Coffee scoop
10. Handle
-3-
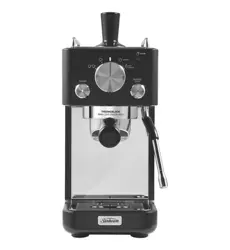
11.
Pressure gauge
Monitors espresso extraction pressure.
12. Power indicator light
Illuminates to indicate that the power switch
is
on.
Light fiashes while machine
is
preheat or after
using steam function.
13. Power on/off switch
14. Coffee on/off switch
15. Steam on/off switch
16. Group head
For easy positioning of the portafilter.
17. Removable drip tray
18. 2-cup filter basket
Already
fi
x
ed
on the portafilter
19.
51
mm
stainless steel portafilter
With commercial style spouts.

FIRST USE
1.
Remove
the
water
tank
and fill
with
potable
water
to
the
indicated
MAX
line
.
Replace
the
water
tank
onto
the
machine.
2.
Ensure
that
the
drip
tray
is
correctly
positioned
on
the
machine.
3.
Place
the
portafilter
into
the
group
head .Do
not
fill
the
filter
basket
with
any
ground
coffee.
4. Plug
the
power
cord into
the
socket
and turn
the
power
switch
on,
the
power
indicator
light
is on and flashes. The
machine
starts
to
preheat.
5. Turn
the
coffee
switch
on,let
about
half
the
tank
discharge
from the
portafilter
outlet.
6. Turn
the
coffee
switch
off, and turn
the
steam
knob
to the
max
position,
discharge
all
the
water
remaining
in
the
tank
from
the
steam
wand.
7. Turn
the
steam
knob
back
to
the
off
position
, then turn
the
power
switch
off.
The
machine
completes
its first use
cycle,now
is
ready
for use.
NOTE
The first use
cycle
is to rinse the
machine
and
prime
the
heating
system.
If
the
power
indicator
light
and
steam
indicator
light
flash
at
the
same
time
once
the
power
switch
on,
that
is
steam
knob
does
not
dial
to
the
off
position,please
close
it.
-
4-

COFFEE MAKING TIPS AND
INSTRUCTIONS
Heating
your
cup
or
glass
A
warm
cup
will
help
maintain
the
coffee's
optimal
temperature.
Preheat
your
cup by rinsing
with
hot
water
and
place
on
the
cup
warming
area.
Preheat
your
machine
•
Remove
the
water
tank
cover
and add
potable
water
to
the
water
tank,
filling to
the
MAX
marking
indicated.
• Plug
the
power
cord
into
the
socket
and turn
the
power
switch
on,the
power
indicator
light
is on and flashes.
• Turn
the
coffee
switch
on,the
water
pump
starts
working
.
Once
the
water
flowing
out
from
the
group
head
outlet,
turn
the
coffee
switch
off.
•
Wait
until
the
light
stop
flashing,
the
preheat
is
done.
THE GRIND
If
grinding
coffee beans,
the
grind
size
should
be fine
but
not
too
fine.
The
grind
size will
affect
the
rate
at
which
the
water
flows
through
the
ground
coffee
in
the
filter
basket
and
the
taste
of
the
espresso.
If
the
grind
is
too
fine
(looks
like
powder
and
feels
like
flour
when
rubbed
between
fingers), the
water
will
not
flow
through
the
coffee
even
when
under
pressure.
The
resulting
espresso
will be
OVER
EXTRACTED,
dark
in
color
and
bitter
in flavor.
If
the
grind
is too
coarse
the
water
will flow
through
the
ground
coffee in
the
filter
basket
too
quickly. The
resulting
espresso
will be
UNDER
EXTRACTED
and
lacking
in
color
and flavor.
-5-

COFFEE
MAKING
TIPS
AND
INSTRUCTIONS
COFFEE
DOSE
AND
TAMPING
•
Wipe
filter
basket
with
a
dry
cloth.
• Fill
the
filter
basket
with
ground
coffee.
• Tap
the
portafilter
several
times
to
distribute
the
coffee
evenly
in
the
filter
basket.
•
Wipe
excess
coffee from
the
rim
of
the
fi
lter
basket
to
ensure
a
proper
seal is
achieved
in
the
group
head.
EXTRACTING
ESPRESSO
•
Place
the
portafilter
underneath
the
group
head so
that
the
handle
is
aligned
with
the
INSERT
position
.
•
Insert
the
portafilter
into
the
group
head and
rotate
the
handle
towards
the
center
until
resistance
is felt.
•
Place
prewarmed
cup(s)
beneath
the
portafilter
and turn
the
coffee
switch
on.The
espresso
will
start
to flow.
•
When
reach
the
desired
volume
of
espresso,turn
the
coffee
switch
off.
•
Remove
the
portafilter
and
pour
out
the
coffee
residues
.
~
Danger
of
burns!
To
avoid
splashes
,
never
remove
the
portafilter
~while
the
appliance
is
delivering
coffee.
-6-

COFFEE MAKING TIPS AND INSTRUCTIONS
NOTE
The
flavor
of
your
coffee will
depend
on
many
factors,
such as the
type
of
coffee beans,
degree
of
roast,
freshness,
coarseness
or
fineness
of
the grind,
dose
of
ground
coffee, and
tamping
pressure
.
Experiment
by
adjusting
these
factors
just
one at a
time
to
achieve
the
taste
of
your
preference.
TEXTURING MILK
• Turn the steam
switch
on, the steam
indicator
light
is on and flashes.
The
machine
is
heating
to create steam.
• Wait until the
light
stop
flashing,turn
the steam knob and
release
some
steam first. Then
close
the steam knob.
•
Start
with fresh cold milk,fill the
milk
jug
to
between
the min and max
position
.
• Lift the steam wand and
insert
into the milk
jug
with the steam wand
tip 1-2cm
below
the
surface
of
the milk.
MILK
SHOULD
COVER
THIS PART
• Turn the steam knob to the
desired
setting
to begin
texturing,the
light
will flash while
texturing.
• Keep the steam wand tip
just
under
the
surface
of
the milk until the
milk is
spinning
clockwise,
producing
a
vortex
(whirlpool
effect).
The
milk
starts
to
increase
in
volume
and
take
on a
creamy
appearance
-7-

COFFEE MAKING
TIPS
AND INSTRUCTIONS
•
When
the milk has
doubled
in
volume,immerse
the steam wand
deeply
and
continue
heating
the milk.
• The milk is at the
suitable
temperature
(140-150°F)
when the
jug
is
hot to
touch,close
the
steam
knob and turn the steam
switch
off.
•
Remove
the steam wand from the milk
jug.
•
Wipe
the wand and tip with a clean
damp
cloth.
•
Lower
the steam wand to the down
position
and the steam wand will
automatically
purge.
NOTE
When the
machine
creates
steam,
a
pumping
noise
can be heard. This
is
normal
operation
.
-8-

CARE
AND
CLEANING
1.
Before
cleaning,
please cool down the
machine
.
2. Make sure the
power
switch,coffee
switch and steam
switch
are all
off, the
steam
knob is at off
position.Remove
the
power
cord from the
socket.
3.
The
drip
tray
should
be removed,
emptied
and
cleaned
after
each use
4. The
outer
housing
and cup
warming
tray
can be
cleaned
with a soft,
damp
cloth.
NOTE
Do not use
any
abrasive
cleaners
, pads
or
cloths
which can
scratch
the
surfaces
of
the
machine
.
Do not clean
any
of
the parts
or
accessories
in the
dishwasher.
WARNING
Do not
immerse
the
power
cord,
power
plug
or
machine
in
water
or
any
other
liquid.
CLEANING
THE FILTER
BASKETS
AND
PORTAFILTER
• The filter
baskets
and
portafilter
should be rinsed
under
hot
water
immediately
after
use to
remove
all
residual
coffee oils.
• If
any
of
the holes in the
filter
basket
become
blocked, use the pin to
unblock
the holes.
CLEANING
THE
STEAM
WAND
• The steam wand should
always
be
cleaned
after
texturing
milk.
Wipe
the steam wand with a
damp
cloth.
•
If
the hole in the tip
of
the
steam wand
become
blocked, it
may
reduce
frothing
performance.
Use the pin to
unblock
the
hole
.
• Purge the steam wand
after
cleaning.
-9-

CARE AND CLEANING
DESCALING
After
regular
use, hard
water
can
cause
mineral
build up in and on
many
of
the
inner
functioning
components,
reducing
the
brewing
flow,
brewing
temperature,
power
of
the
machine,
and
the
taste
of
the
espresso.
We
recommend
descaling
the
coffee
maker
about
every
200 coffees.
• Fill
the
water
tank
and add
the
descaling
agent
to
the
water
.
•
Undertake
the
processes
of
"FIRST
USE", to
start
the
descaling
for
the coffee
component
and
steam
component.
•
After
descaling,
remove
the
water
tank
and rinse
thoroughly
then
refill
with
fresh
water
.
•
Repeat
the
processes
of
"FIRST
USE"another
3
times
to
further
clean
the
machine
of
any
residue
of
the
cleaning
solution
thoroughly
.
-10-

TROUBLESHOOTING
PROBLEM
POSSIBLE
CAUSES
EASY
SOLUTION
Water tank
is
empty. Fill tank.
Water does not flow
Water tank is not fully inserted
Push water tank down completely
from the group head.
and locked into position.
to lock into place.
No hot water.
Machine needs to be descaled.
Perform descale cycle.
Water tank is empty
or
water level Fill tank.
Water doesn't come through
is below MIN.
(the machine makes loud noise).
Water tank is not fully inserted
Push water tank down completely
and locked into position. to lock into place.
Coffee is ground too coarsely.
Use slightly finer grid.
Espresso runs out too quickly.
Refer
to
'Coffee Dose and Tamping'
on
page
10
and 'extracion tip'
on
page
14
Not enough coffee
in
the filter Increase dose
of
coffee.
basket.
Coffee tamper too lightly. Tamp between or 15-20kg
of
pressure.
Portafilter not inserted Ensure portafilter is completely
Espresso runs out around
in
the group head correctly. inserted and rotated until
the edge of the portafilter.
resistance is felt.
There are coffee grounds around Clean excess coffee from the rim
the filter basket rim.
of
the filter basket to ensure a
proper seal
in
group head.
Too
much coffee
in
the filter Lower dose
of
coffee.
basket.
Cups not pre-heated.
Rinse cups under hot water outlet
and place on cup warming tray.
Coffee not hot enough.
Milk not hot enough Heat milk until base
of
the jug
( if making a cappuccion or becomes hot to touch.
latte
etc)
.
Machine needs to be decalcified.
Refer to "descaling".
No preheating was done Preheat your machine before
coffee making.
-
11-

TROUBLESHOOTING
PROBLEM
POSSIBLE
CAUSES
EASY
SOLUTION
Machine has not reached
Preheat the machine.
No
steam.
operating temperature.
Water tank
is
empty.
Fill tank.
Water tank
is
not fully inserted
Push water tank down completely
and locker into position.
to lock into place.
Machine needs to
be
decalcified.
Perform descale cycle.
Steam wand
is
blocked. Refer to 'Cleaning the Steam
Wand'
-
12-