
BATTERY-POWERED
PORTABLE TROWEL
MODEL NUMBER: eJXPT30
To reduce the risk of injury, the user must read and understand the Operator’s
Manual before using this product. Save these instructions for future reference.
Operation Manual
W
A
R
R
A
N
T
Y

2
Table of Contents
1. SAFETY INFORMATION
1.1 Operating Safety
1.2 Service Safety
1.3 Battery Safety
2. TECHNICAL PERFORMANCE
2.1 Trowel Familiarization
2.2 Guard Ring
2.3 Blade Pitch Control
2.4 ON/OFF Switch
2.5 Handle
2.6 Throttle Control
2.7 Gearbox
2.8 Combination Blades
2.9 Spider Plate and Trowel Arm
2.10 Battery
3. SPECIFICATIONS
3.1 Battery Portable Trowel Parts
3.2 Unpacking the Unit
4. OPERATION
4.1 Before Operation
4.2 Start Up
4.3 Connecting the Handles
4.4 Pitching the Blades
4.5 Floating Operation
4.6 Finishing Operation
5. CHARGING THE BATTERY
5.1 Warnings
5.2 How to Charge
5.3 While Charging
5.4 Installing the Battery
6. STORAGE AND CLEANING
7. ACCESSORY OPTIONS
7.1 Blades
7.2 Combo Blades
7.3 Finishing Blades (Optional)
7.4 Clip-On Float Blades (Optional)
7.5 Float Pans (Optional)
8. STORAGE
9. REPLACEMENT PARTS
10. TROUBLESHOOTING
11. MAINTENANCE RECORD
12. EQUIPMENT WARRANTY
13. SERVICE CENTERS
4
5
5
6
6
7
7
7
7
7
7
7
7
7
7
8
8
8
9
9
9
9
10
10
10
11
11
11
11
11
12
12
12
12
13
13
13
13
13
14
14
15
15
3
Register Your Equipment
Thank you for purchasing TOMAHAWK equipment! Your product is covered by the
TOMAHAWK Warranty policy, but in order to activate your warranty, we need you to register
your product. In addition to activating your equipment warranty, product registration will
grant you access to important product updates, streamlined customer service and more.
INCLUDED WITH YOUR REGISTRATION
☑ Equipment Warranty Activation
☑ Product Updates
☑ Streamlined Customer Service
☑ Exclusive Discounts and Sales
STEPS TO REGISTER YOUR EQUIPMENT
1. Visit www.tomahawk-power.com
2. Choose “Product Registration” at the bottom of the page
3. Enter your equipment’s serial number to get started
4. Provide all required information
5. Submit Registration
Equipment Resources
Tomahawk Customer Service doesn’t stop at checkout. We understand to keep a job-site
running smoothly - the proper equipment, spare parts, instruction manuals, and more are
needed at the drop of a hat. Visit www.tomahawk-power.com to gain access to the incredible
resources below.
How To Video Library
More of a visual person? Visit our Video Library for equipment
assembly instructions, troubleshooting tips, and more!
Found on each product listing or the Service Videos Page
Manual and Assembly Guide Library
Visit our Manual Library if you are looking for a lost
operations manual or a particular spare part?
Found on each product listing or the Tomahawk Manuals Page
Service Requests
In need of a quick fix or a service center referral? Submit a
Service Request and a Tomahawk Technician will respond
shortly to get you the help you need.
Choose “Service Request” at the bottom of www.tomahawk-power.com

This manual provides information and procedures to safely operate and maintain this
equipment. For your own safety and protection from injury, carefully read, understand and
observe the safety instructions described in this manual.
Keep this manual or a copy of it with the equipment. If you lose this manual or need an
additional copy, please contact Tomahawk Power LLC or visit www.tomahawk-power.com
This equipment is built with user safety in mind; however, it can present hazards if
improperly operated and serviced. Follow operating instructions carefully. If you have
questions about operating or servicing this equipment, contact Tomahawk Power.
The information contained in this manual is based on equipment’s production at the time of
publication. Tomahawk Power reserves the right to change any portion of this information
without notice.
No part of this publication may be reproduced in any form or by any means, electronic or
mechanical, including photocopying, without express written permission from
Tomahawk Power.
Any type of reproduction or distribution not authorized by Tomahawk Power represents an
infringement of valid copyrights and will be prosecuted. We expressly reserve the right to
make technical modifications, even without due notice, which aim at improving our
machines or their safety standards.
1. SAFETY INFORMATION
This manual contains DANGER, WARNING, CAUTION, and NOTE call-outs which must be
followed to reduce the possibility of personal injury, damage to the equipment, or
improper service.
This is the safety alert symbol. It is used to alert you to potential personal injury
hazards. Obey all safety messages that follow this symbol to avoid possible injury
or death.
DANGER indicates an imminently hazardous situation which, if not avoided, will
result in death or serious injury.
WARNING indicates a potentially hazardous situation which, if not avoided, could
result in death or serious injury.
CAUTION indicates a potentially hazardous situation which, if not avoided, may
result in minor or moderate injury.
DANGER
WARNING
CAUTION
4

5
CAUTION: Used without the safety alert symbol, CAUTION indicates a potentially hazardous
situation which, if not avoided, may result in property damage.
1.1 Operating Safety
Familiarity and proper training are required for the safe operation of equipment!
Equipment operated improperly or by untrained personnel can be dangerous! Read
the operating instructions contained in both this manual and the engine manual and
familiarize yourself with the location and proper use of all controls. Inexperienced operators
should receive instruction from someone familiar with the equipment before being allowed
to operate the machine.
1.1.1 NEVER allow anyone to operate this equipment without proper training. People
operating this equipment must be familiar with the risks and hazards associated with it.
1.1.2 NEVER use accessories or attachments that are not recommended by Tomahawk
Power. Damage to equipment and injury to the user may result.
1.1.3 NEVER leave machine running unattended.
1.1.4 ALWAYS be sure operator is familiar with proper safety precautions and operation
techniques before using machine.
1.1.5 ALWAYS wear ANSI Z87.1-approved safety goggles or safety glasses with side shields,
or when needed, a face shield. Use a dust mask in dusty work conditions. Also use non-skid
safety shoes, hardhat, gloves, dust collection systems, and hearing protection when
appropriate. This applies to all persons in the work area.
1.1.6 ALWAYS store equipment properly when it is not being used. Equipment should be
stored in a clean, dry location out of the reach of children.
1.1.7 ALWAYS operate machine with all safety devices and guards in place and in working
order. DO NOT modify or remove safety devices. DO NOT operate machine if any safety
devices or guards are missing or inoperative.
1.1.8 ALWAYS read, understand, and follow procedures in Operator's Manual before
attempting to operate equipment.
1.2 Service Safety
Poorly maintained equipment can become a safety hazard! In order for the
equipment to operate safely and properly over a long period of time, periodic
maintenance and occasional repairs are necessary.
1.2.1 DO NOT attempt to clean or service machine while it is running. Rotating parts can
cause severe injury.
1.2.2 ALWAYS replace worn or damaged components with spare parts designed and
recommended by Tomahawk Power.
1.2.3 ALWAYS keep machine clean and labels legible. Replace all missing and hard-to-read
labels. Labels provide important operating instructions and warn of dangers and hazards.
1.2.4 ALWAYS check for damaged parts before each use. Carefully check that the trowel will
operate properly and perform its intended function. Replace damaged or worn parts
immediately. Never operate the trowel with a damaged part.
WARNING
DANGER

6
1.2.5 ALWAYS inspect the machine prior to placing in storage and before re-use. Store the
trowel in a dry, secure place out of the reach of children when not in use.
Poorly maintained equipment can become a safety hazard! In order for the
equipment to operate safely and properly over a long period of time, periodic
maintenance and occasional repairs are necessary.
1.2.6 ALWAYS use only accessories that are recommended by the manufacturer for use with
the trowel. Accessories that may be suitable for one trowel may create a risk of injury when
used with the equipment.
1.2.7 ALWAYS keep blades clean when not in use and guards in place and in working order.
1.3 Battery Safety
1.3.1 NEVER store or charge battery in wet conditions.
1.3.2 NEVER make any adjustments to the tool if battery is connected.
1.3.3 NEVER interfere with the batteries integrity as this can cause injury and void warranty.
1.3.4 NEVER use or dispose battery in fire as this can cause it to explode. Check local codes
for more information on proper battery disposal.
1.3.5 NEVER use equipment if it has been damaged or modified as this can cause injury.
1.3.6 When not in use, ensure battery is stored in a dry place away from any flammable objects.
1.3.7 Allow battery to cool down aer each use to avoid burn injuries.
1.3.8 Only use the manufacturer’s designated battery with this machine. Use of any other
battery can damage unit and will void warranty.
1.3.9 Battery leakage may occur when operated in extreme temperature conditions. If
battery liquid contacts skin, wash immediately with water and soap, following with white
distilled vinegar or lemon juice to neutralize. If the liquid comes in contact with eyes, flush
out eyes with water for 10 minutes and seek medical attention immediately.
1.3.10 Have all servicing done by an approved TOMAHAWK® Technician or Service Center
with original replacement parts.
2. TECHNICAL PERFORMANCE
Make Flat Work Less Work with TOMAHAWK® Battery Portable Trowel – leaving laborious
hand-finishing tasks in the past! Easy to store, transport, and use, Tomahawk Portable
Trowels are a game-changer in concrete finishing. Weighing less than 60 lbs (27.2 kg)
assembly is a breeze – simply connect up to three handles matching your slab size. No need
to wait! The trowel’s compact, lightweight design allows concrete finishing up to 45 minutes
earlier, while you work up to 18 outside the form-work
WARNING

7
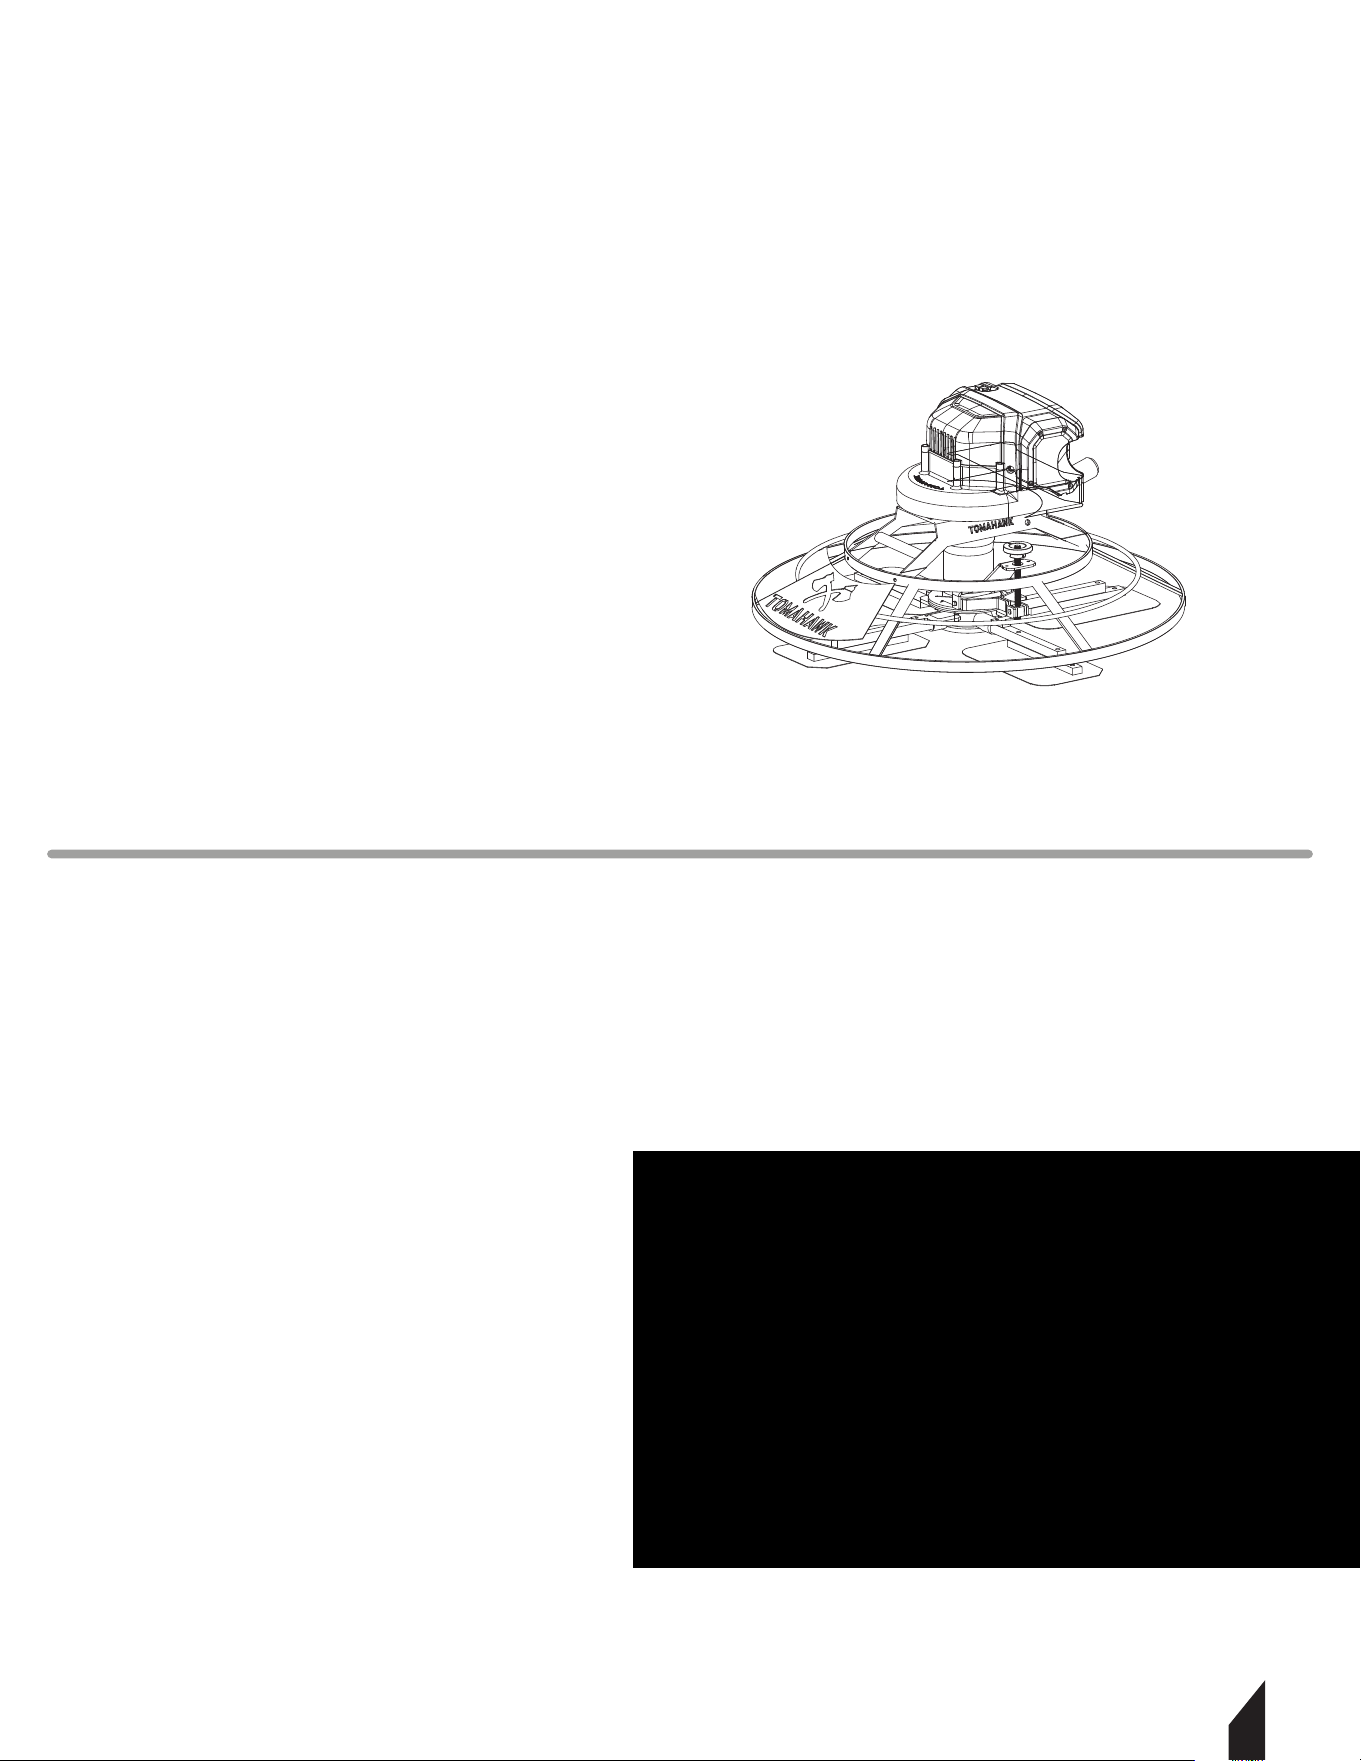
2.1 Trowel Familiarization
Tomahawk Battery Portable Trowel are designed for the floating and finishing of concrete
slabs, epoxy floors and more. Analyze your trowel and take notice of each component.
2.2 Guard Ring
Avoid placing your hands or feet within the guard ring while the engine is in operation.
Exercise caution when using the Tomahawk Battery Portable Trowel. Never operate with the
Tomahawk Battery Portable Trowel a damaged guard ring or wit the guard ring removed.
2.3 Blade Pitch Control
Rotate the handle in a clockwise direction to raise the blade pitch, and in a
counter-clockwise direction to lower it.
2.4 ON/OFF Switch
ON/OFF Switch is conveniently located for easy access.
2.5 Handle
The Tomahawk Battery Portable Trowel handle consists of multiple clip-together handles.
The number of handles joined together should be limited to four, as exceeding this limit will
result in reduced control of the unit. It is essential to adjust the handle length according to
the specific requirements of each job.
2.6 Throttle Control
Adjust the lever downward to increase the speed and upward to decrease it.
2.7 Gearbox
The gearbox transfers power from the battery to the spider. Ensure that no debris
accumulates on the gearbox and clean it regularly to prevent overheating.
2.8 Spider Plate and Trowel Arm
These components enable blade rotation and smooth operation. Aer each use, it is crucial
to clean and maintain the spider plates and trowel arms to prevent uneven blade wear on
the concrete surface.
2.9 Combination Blades
Concrete trowel combination blades are specialized tools used in concrete finishing and
smoothing processes. They typically consist of multiple blades attached to a trowel
machine or power trowel. These blades are designed to achieve a smooth and level
concrete surface by effectively troweling and finishing the concrete.
2.10 Battery
TOMAHAWK® 36V Lithium-Ion 7.5Ah batteries charge faster and work longer than standard
batteries, giving you superior performance. With a faster charge time, spend less time
waiting and more time working on the things that matter!
3. SPECIFICATIONS
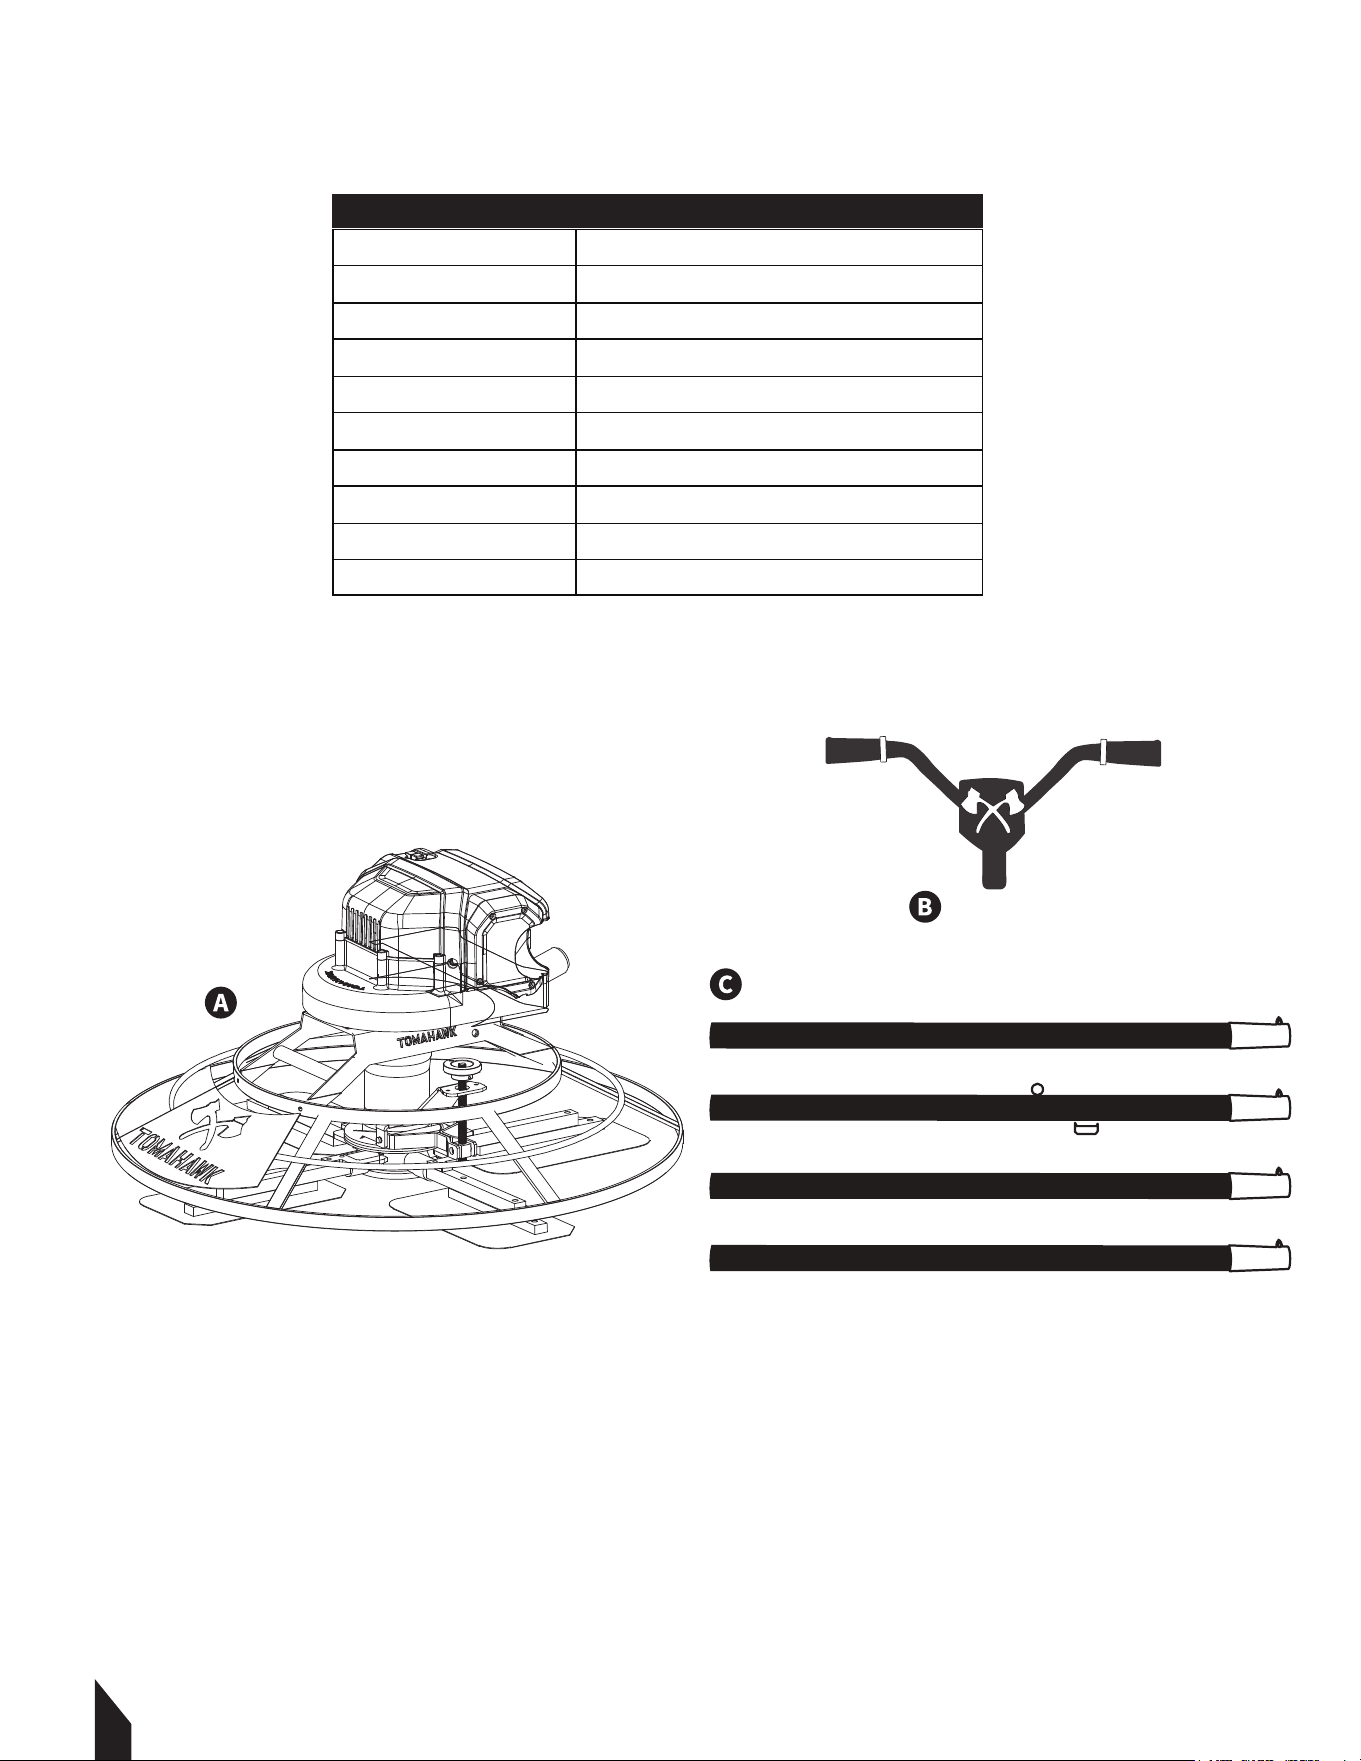
3.1 Battery Portable Trowel Parts
A) Trowel
B) Handles
C) Four Poles
3.2 Unpacking the Unit
Make sure to carefully remove all parts and accessories from the box. Ensure all parts listed
in the manual are in the box. Do not throw away the packaging or packing material until
you have inspected all parts and successfully operated the machine. Do not discard this
operations manual.
If any parts are missing or damaged, please contact TOMAHAWK® customer support by
email at support@tomahawk-power.com or call (866) 577-4476.
8
Motor
External rotor motor
Power
500W
Rotor diameter
64mm
Voltage
36V
Currency
7.5Ah
Charging time
2 hours
Battery time
40-60 minutes @ full load
Blade speed
60-65 RPM
Handle length
18ft (5.48 m)
Blade pitch
0-10°
eJXPT30 SPECIFICATIONS
4. OPERATION
4.1 Before Operation
Before using the Tomahawk Battery Portable Trowel , it is essential to perform a daily
inspection of the following parts:
- Blade condition and pitch control operation
- Proper assembly of handles
- Battery charge
4.2 Starting
4.2.1 Before installing the lithium battery, make sure it is fully charged. Open the battery
compartment door, insert the battery into its designated position, and then close the
compartment door securely.
FIGURE 1.
4.2.2 There are two bolts on the switch plate. First, remove the nut, and insert the bolt through
the hole in the handle. Then, add a flat washer and a spring washer, and tighten the nut. Use the
two 10mm wrenches from the tool bag to secure everything in place.
FIGURE 2.
4.2.3 The switch button has two positions: ON (I) and OFF (O). To start the machine, press the
switch to the "I" position. The machine will begin operating aer a delay of about 4 seconds. To
turn off the machine, the operator needs to move the joystick back to the switch position and
press the switch button to the "O" position.
FIGURE 3.
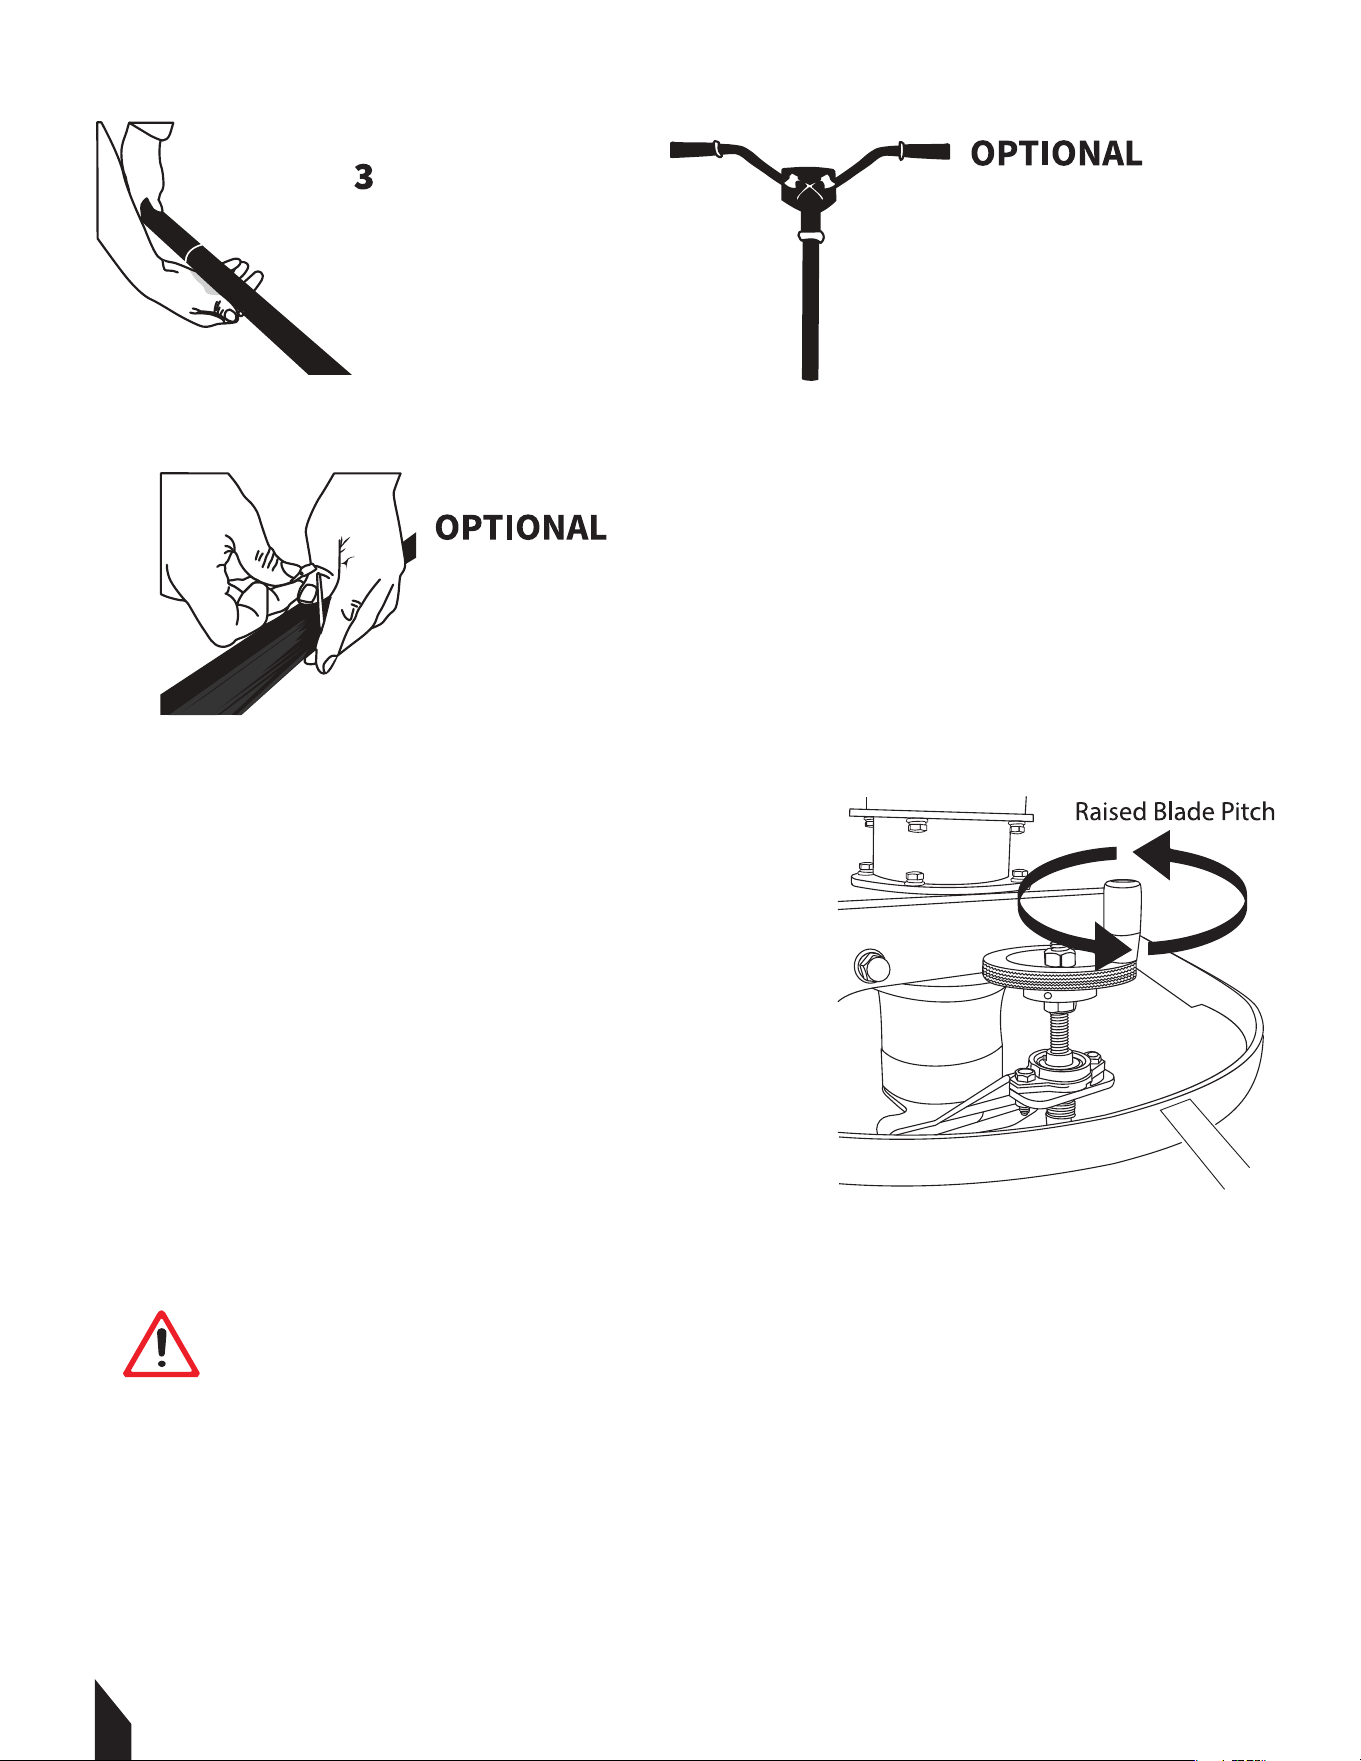
4.3 Connecting the Handles
The Tomahawk Battery Portable Trowel is compatible exclusively with Tomahawk
Clip-Together Handles.
9
9
Locate the handles
with the two holes
meant to attach the power
switch. Insert the silver end
of the handle, featuring the
push button locking pin,
into the handle slot of the
trowel. Ensure that it is
properly inserted and
locked into position.
Connect the power
switch by placing two
rubber washers over the
screws, then insert the
screws into the right side of
the pole.
FIGURE 1
FIGURE 2
FIGURE 3
ON
OFF
10
WARNING
Avoid allowing the machine to remain stationary in a single spot on
so concrete. Once the floating operation is finished, li the trowel
from the slab surface.
4.4 Pitching the Blades
4.4.1 To pitch the blades upwards, turn the handle
clockwise.
4.4.2 To lay the blades flat, turn the handle
counter-clockwise.
4.4.3 The trowel's pitch adjustment feature
enables swi and precise changes in the blade
angle, eliminating the need to switch blade types
during a job to accommodate different surface
conditions on the slab. This capability allows the
operator to work more efficiently, resulting in
faster progress and a superior finish on the slab.
FIGURE 4.
4.5 Floating Operation
For optimal floating performance, it is advisable to maintain the trowel blades in a level
position while operating between ½ to ¾ of the maximum speed. Each pass should overlap
the previous one by half the width of the trowel.
Connect the additional
4 clip-together poles
as needed. If this is your
first time using the machine,
Tomahawk suggests starting
with 1-2 poles until you are
comfortable operating the
machine.
Tie down the throttle cable
with a zip-]tie to prevent
damage or dragging.
The trowel’s handles add
extra operator stability &
comfort during operation,
however they are not
necessary to operate the
machine, if you choose to
use 1-2 poles.
FIGURE 4
11
To achieve the desired finish, an additional trowel pass may be necessary. For this pass, it is
recommended to use a crossover floating technique, adjusting the blade pitch slightly
higher and operate the trowel at approximately ¾ of the maximum speed. Once the floated
slab has adequately set, it is ready for the finishing process.
4.6 Finishing Operation
To achieve the desired concrete surface finish, the operator should make adjustments to the
blade pitch, taking into account the hardness or plasticity of the concrete. For wet or plastic
concrete, begin with the blades positioned flat or at a slight angle on the surface. As the
concrete adequately hardens, increase the blade pitch while considering the concrete
hardness and the desired finish. Regularly assess the achieved concrete finish and modify
the blade pitch accordingly. Generally, a greater blade pitch results in a smoother finish, but
excessive pitch can lead to accelerated blade wear.
To fix a hole or reduce a hump, move the trowel back and forth over the area. Additional
passes may be necessary to achieve the desired surface finish.
5. CHARGING THE BATTERY
5.1 Warnings
5.2 How to Charge
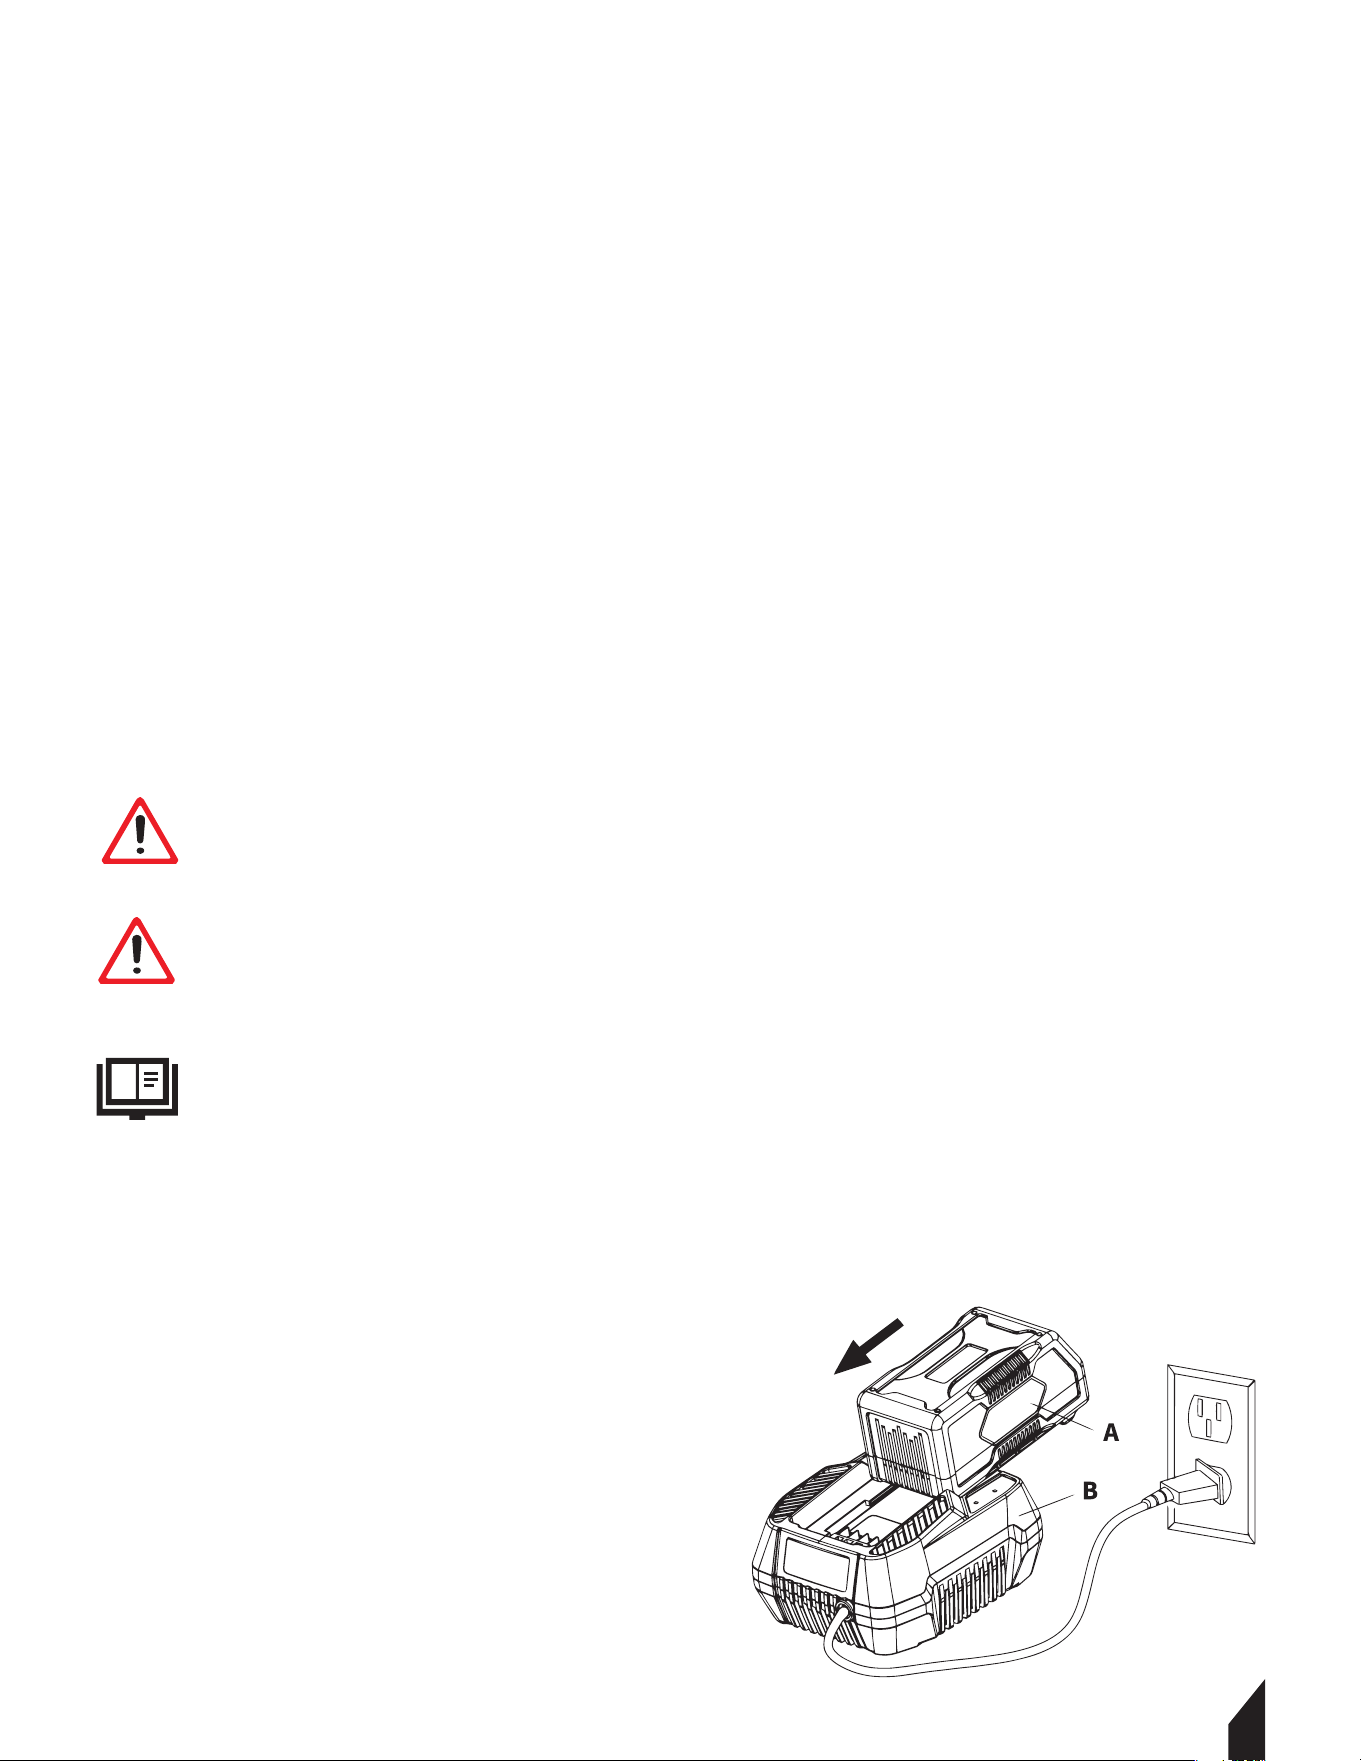
5.2.1 Remove the battery from the machine.
5.2.2 Plug the charger into a power outlet in
a dry location. FIGURE 5.
5.2.3 Align the tongue of the battery (A) with the
guides in the charging dock (B).
5.2.4 Slide the battery into the charger docking
station using the guides on the battery and
charger docking station.
FIGURE 5.
WARNING Do not insert any electrically conductive objects in the charging socket
or the battery may be damaged by a short circuit.
WARNING
WARNING - DANGER OF FIRE - A short circuit in the charging socket can lead to a
cable fire in the battery.
WARNING
The charger has a fully electronic voltage and current limitation function. This ensures
that a connected battery is always kept at the optimum state of charge. This prevents
overcharging of the battery. The battery is not fully charged on delivery. It is
recommended to fully charge the battery before operating the machine for the first time.
FIGURE 5
5.3 While Charging
5.3.1 The LED indicator on the charger lights up RED during charging.
5.3.2 The charging of the battery takes approximately 2 hours.
5.3.3 The LED indicator on the charger lights up green when finished charging.
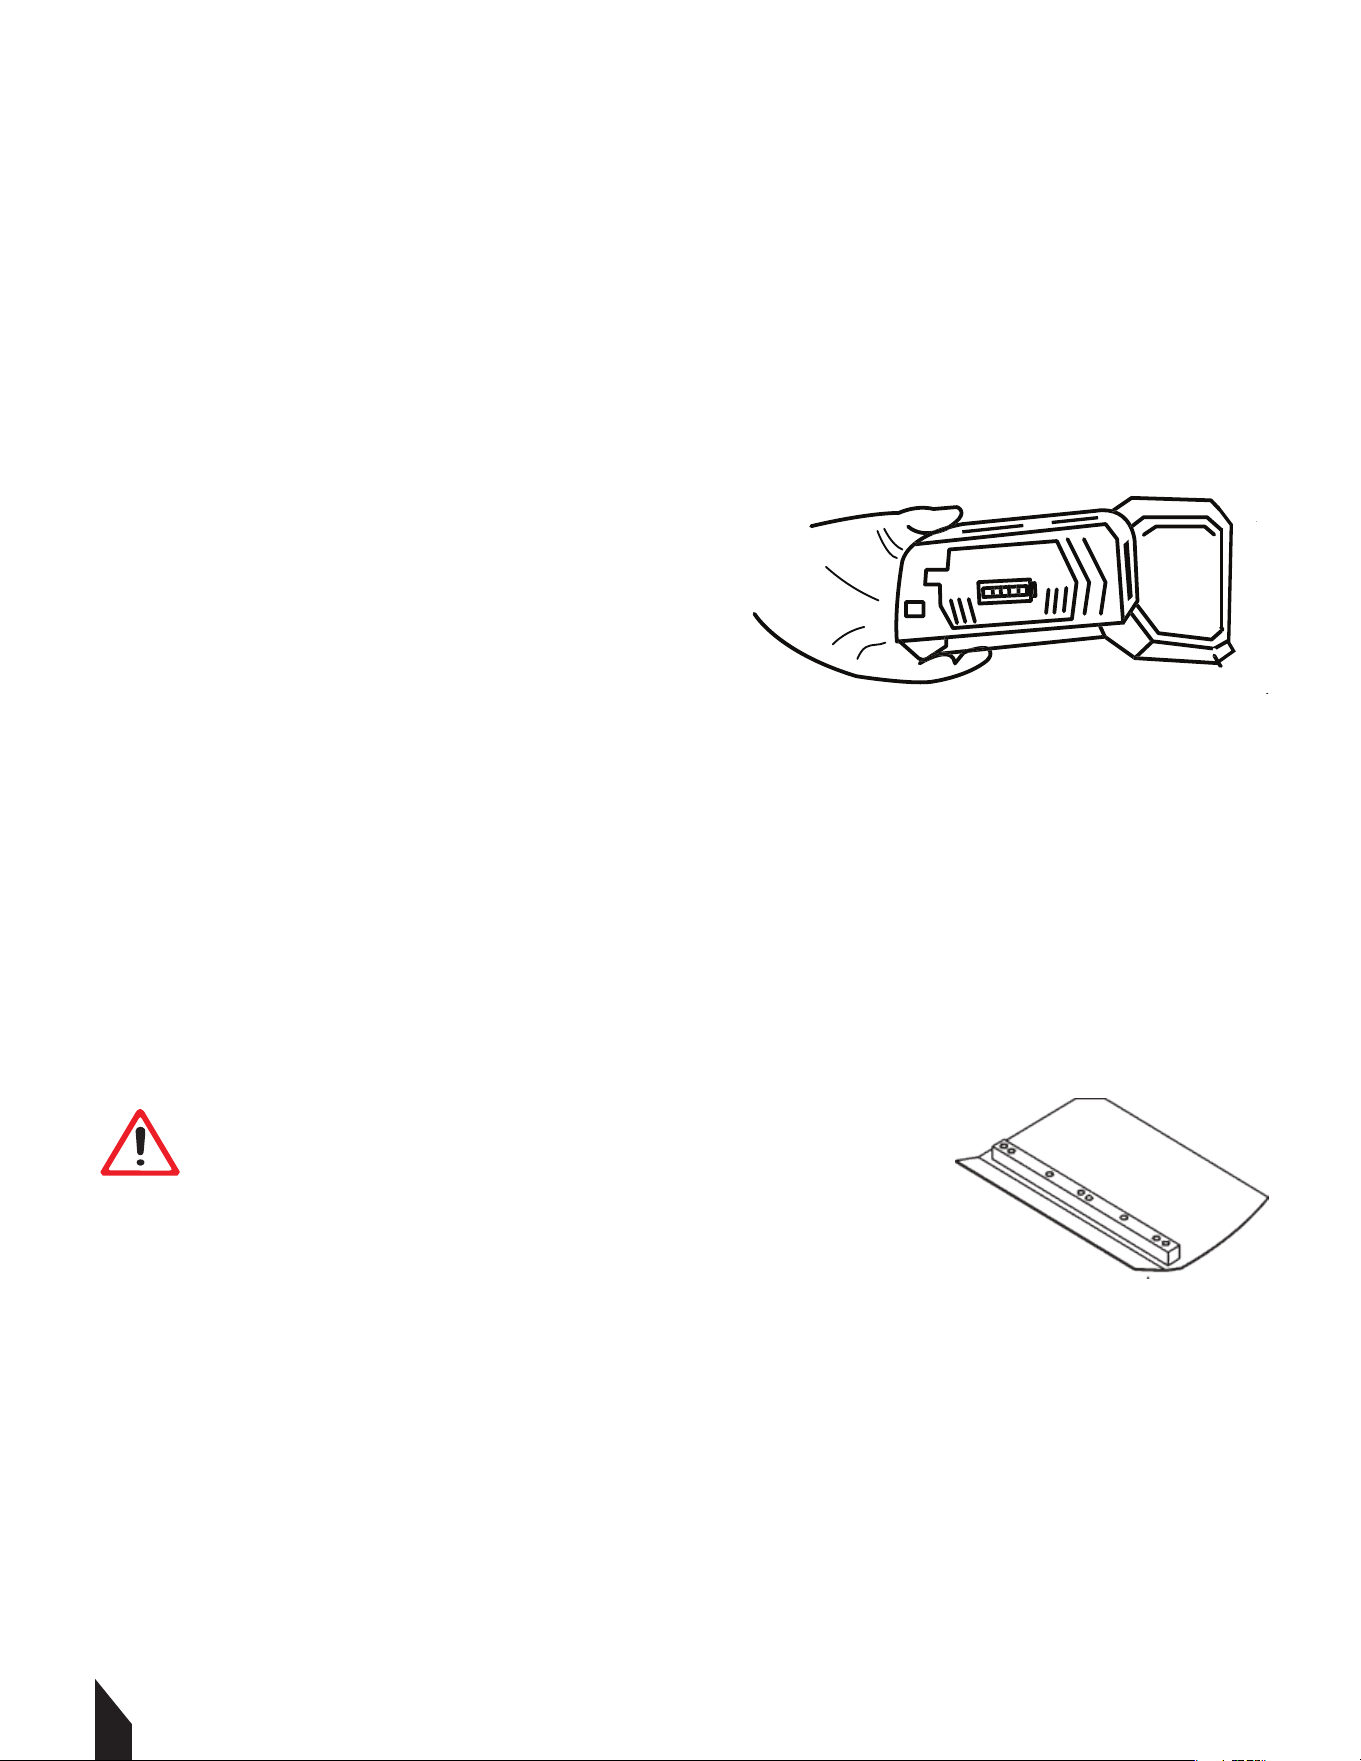
5.4 Installing the Battery
5.4.1 Open the door of the machine’s battery
compartment. FIGURE 6.
5.4.2 Align the tongue of the battery with the
guides in the battery compartment.
5.4.3 Grasp the machine firmly and slide the
battery into the compartment until the battery
release button locks into place. Close the
compartment door.
NOTE: Never force the battery pack.
It should slide and click into place.
6. STORAGE AND CLEANING
6.1 Cleaning
Keep the unit clean and free from concrete build up.
7. ACCESSORY OPTIONS
7.1 Blades
Blades are a vital part of finishing concrete. This Tomahawk
Trowel has been designed to finish concrete and is built to
stringent quality standards out of the finest trowel steel. If you
need replacement blades, consult your parts list in this
manual for part numbers and order them from the Tomahawk
website or your Tomahawk parts dealer.
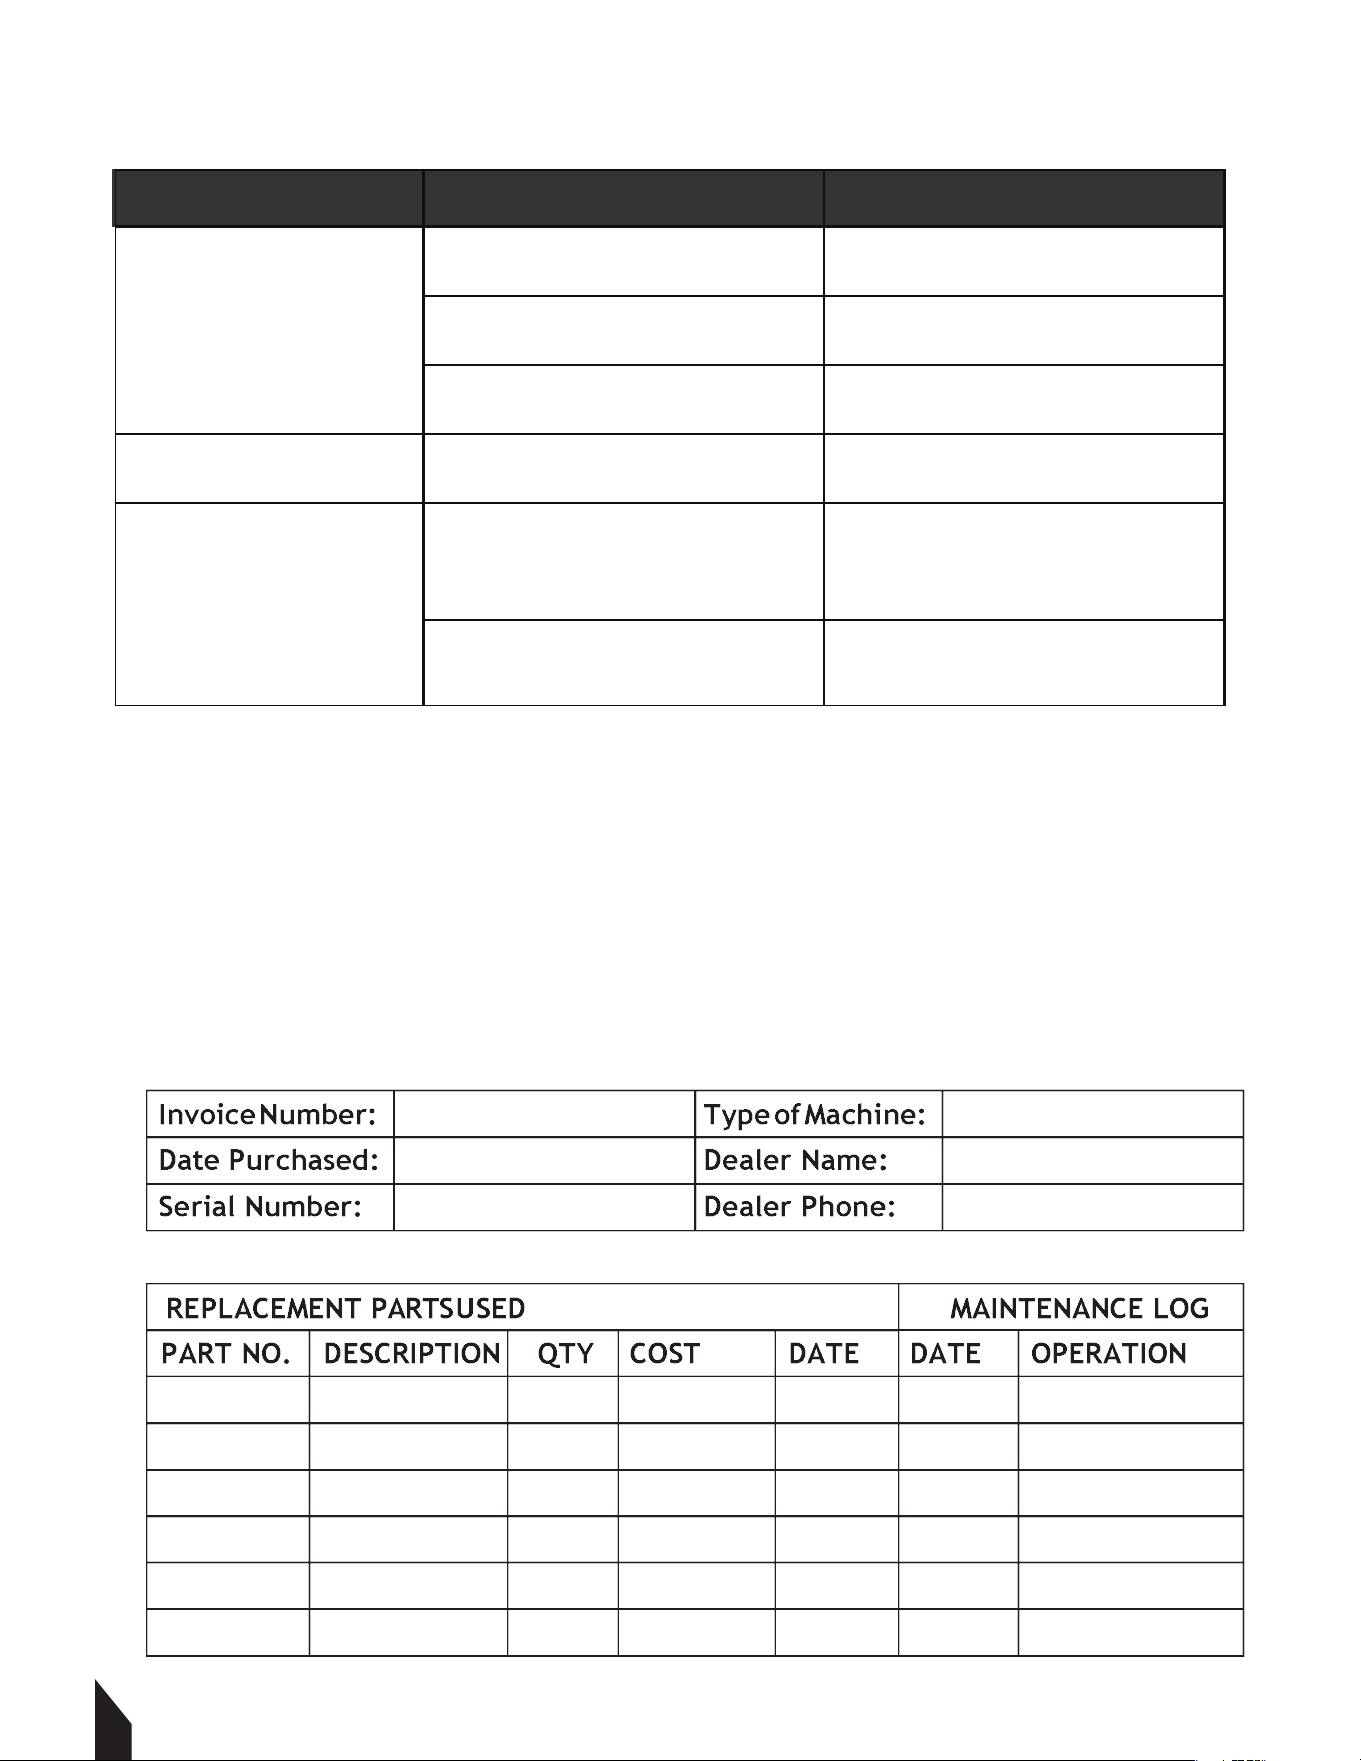
7.2 Combo Blades
This trowel was equipped with combination FLOAT/FINISH (Figure 7) blades as original
equipment. These blades have been designed for optimum performance in both the
floating and finishing operations. These blades are versatile and should take care of most
troweling needs.
12
NOTE
Blades should be changed when they fail to finish
concrete in a satisfactory manner.
FIGURE 7
FIGURE 6
8” x 11” Silver
Combo Blades

7.3 Finishing Blades (Optional)
These blades have been specifically designed for finish operations with this trowel. They will
provide a premium surface finishing capability from your trowel. They should only be used
aer the concrete has set to the point where the trowel
does not sink into the concrete when placed on it.
7.4 Clip-On Float Blades (Optional)
These blades will clip (Figure 8) on to an existing
installed blade, allowing your finisher to float on “wet”
concrete so that the troweling operation can begin as
early as possible. They are easily removable, so that
aer the floating operation, when the concrete is
sufficiently cured, they can be removed to expose the
finish blades for continued troweling.
7.5 Float Pans (Optional)
These round discs attach to the spiders and allow the machine to “float” on “wet” concrete.
The disc design allows early floating and easy movement from wet to dry areas. They are
also very effective in embedding large aggregates and surface hardeners.
8. STORAGE
Store in a Dry and Covered Area: Find a dry and well-ventilated storage area to protect the
engine from moisture and dust. Use a cover to shield it from direct sunlight and potential
damage.
Battery Maintenance: Remove it and store it separately in a cool, dry place. Regularly
charge the battery according to the manufacturer's instructions to maintain its health during
storage.
Periodic Inspection: While the engine is in storage, periodically inspect it for any signs of
damage, corrosion, or pests. This allows for early detection and timely maintenance if
required.
9. REPLACEMENT PARTS
9.1 For replacement parts and technical questions visit www.tomahawk-power.com or scan
the QR code on the front of this manual.
9.2 Not all equipment components are available for replacement. The illustrations within
this manual are a convenient reference to the location and position of parts in the assembly
sequence.
9.3 When ordering parts, the following may be required: equipment model number, serial
number/lot, date code, and description. The manufacturer reserves the right to make design
changes and/or improvements to equipment, parts, accessories, and manuals without
notice.
13
FIGURE 8
14
PROBLEM POSSIBLE CAUSES SOLUTION
Battery is not charged Charge battery
Battery is not securely attached Install battery correctly
Issue with power switch
Ensure power switch is positioned
correctly and not defective
Battery is low on charge Charge battery
Charger is not functioning
Ensure wires are connected
properly. Check that LED is
displaying green light
Lorem ipsum
Battery is damaged Replace battery
Unit will not start
Unit is not charging
Battery is not charging
10. TROUBLESHOOTING
11. MAINTENANCE RECORD
TOMAHAWK® tools are assembled with care and will provide years of service when properly
maintained. Preventative maintenance and routine service are essential to the long life of
your equipment. Adhere to reading through this manual thoroughly. You will find that you
can do some of the regular maintenance yourself. However, when in need of parts or major
service, be sure to contact a TOMAHAWK® Technician. For your convenience we have
provided this space to record relevant data and maintenance schedule about your
TOMAHAWK® equipment.

12. EQUIPMENT WARRANTY
Your new TOMAHAWK® equipment is warranted to the original purchaser for a period of
one-year (12 months) from the original date of purchase. The TOMAHAWK® warranty is
against defects in design, materials and workmanship.
The following are not covered under the warranty:
12.1 Damage caused by abuse, misuse, dropping or other similar damage caused by or as a
result of failure to follow assembly, operation or user maintenance instructions.
12.2 Alterations, additions or repairs carried out by persons other than TOMAHAWK® or their
recognized agents.
12.3 Transportation or shipment costs to and from TOMAHAWK® or their recognized agents,
for repair or assessment against a warranty claim, on any machine.
12.4 Materials and/or labor costs to renew, repair or replace components due to fair
wear and tear.
12.5 TOMAHAWK® and/or their recognized agents, directors, employees or insurers will not
be held liable for consequential or other damages, losses or expenses in connection with or
by reason of or the inability to use the machine for any purpose.
Warranty Claims
Before submitting any warranty claim, you will need to register
your new TOMAHAWK® equipment through
www.tomahawk-power.com.
Follow the steps on page 3 or scan this QR codes to complete
the equipment registration. Aer registration is complete,
all warranty claims should firstly be directed to TOMAHAWK®
through the online Service Request form found
at www.tomahawk-power.com/pages/service-request.
13. SERVICES CENTERS
Our service centers are equipped to handle your equipment maintenance and repair needs
efficiently. With a network of authorized local service locations , you can find expert
support and genuine parts needed to keep your equipment running smoothly. All locations
are listed on the webpage https://tomahawk-power.com/pages/find-a-service-center.

NEVER PUMP
NEVER LOSE PRESSURE
Lose the manual pump and gain the power to spray
or less while maintaining constant, adjustable pressure from 50-435 PSI with
your ideal concrete sealant, cure, top cast, form release, and more!
27
24
Item #: TCS6.5
6.5 GAL MOTORIZED
CONCRETE SPRAYER
www.tomahawk-power.com

24
Item #: TFS6H
6” EARLY ENTRY
GREEN CONCRETE SAW
www.tomahawk-power.com
CUT CONCRETE FASTER
Tomahawk Green Concrete Saws cut contraction joints up to 1-3/16th inches deep
- within the first 1-2 hours of finishing, to control stress cracking for the ultimate
concrete results! Powered by the concrete industry’s trusted Honda GX Series
Engines, maintain clean cuts, while keeping debris out!

Rammers
8 ft Hydraulic Steer, 35 HP Vanguard,
CVT Clutch, 180 RPM
10 ft Full Hydrostatic, 74 HP Hatz
Diesel
Part#:
TPT24H
TPT36H
TPT46H
Part#: JXPT30T
Part#:
TRT46V
TRT60V
2 ft Edger, Honda GX160, 0-28
o
Blade Pitch
3 ft, Honda GX160/GX270, 0-28
o
Blade Pitch
4 ft, Honda GX270/GX390, 0-28
o
Blade Pitch
HAVE QUESTIONS?
Contact us. We’re here to help!
Email us at [email protected]
Forward Plate Compactors
Reverse Plate Compactors
Part#:
TR68H
JX60H
eJX60H
TVSA-H
eTVSA
Part#:
Part#:
TPC80H
COMPACTION
Power Screeds
Porta-Trowels
Concrete Sprayers
Walk Behind Trowels
Ride on Trowels
Early Entry Saws
Part#:
6-16 ft Magnesium Blades
Honda GX35, Adjustable Handles
6-16 ft Magnesium Blades
36V/5 Ah Battery, Adjustable Handles
Part#:
TFS6H
TFS10H
Part#: TCS6.5
6" Blade Diameter, Blade Compatibility,
Honda GX120
10" Blade Diameter, Self Propelled,
Blade Compatibility, Honda GX270/GX390
CONCRETETROWELS
(866) 577-4476
TPC85H
TPC90H
TPC170H
TPC100H
TPC400H
Equipment Guide
3,000 lbs/sq ft, Honda, 21”x17” Plate
3,200 lbs/sq ft, Honda, 23”x17” Plate
3,400 lbs/sq ft, Honda, 22”x20” Plate
3,500 lbs/sq ft, Honda, 19”×14” Plate
7,000 lbs/sq ft, Honda, 28”x20” Plate
11,690 lbs/sq ft, Honda, 32”x22” Plate
Lightweight at 40 lbs
Adjustable 18 ft Extension Bull Float Poles
30" Diameter, 4-Blade Assembly
Adjustable Blade Pitch from 0-28
o
Adjustable from 0-450 PSI
Handles 30% + Solids,1.8 HP 2 Stroke Motor,
24" Brass Wand 0.5 GPM, Fan Nozzle Included,
Spray 15,000 ft
2
in10 Minutes
3,550 lbs/sq ft, Honda GX120
3,350 lbs/sq ft, Honda GX100
3,350 lbs/sq ft, Honda GXE2.0S
Items Listed Includes Combo Blades

10. TROUBLESHOOTING
11. MAINTENANCE RECORD
TOMAHAWK® tools are assembled with care and will provide years of service when properly
maintained. Preventative maintenance and routine service are essential to the long life of
your equipment. Adhere to reading through this manual thoroughly. You will find that you
can do some of the regular maintenance yourself. However, when in need of parts or major
service, be sure to contact a TOMAHAWK® Technician. For your convenience we have
provided this space to record relevant data and maintenance schedule about your
TOMAHAWK® equipment.
QUIET INVERTER SERIES
QUIET INVERTER SERIES
Welder GeneratorsPower Buggy
48V-20Ah Battery
Handles up to 8 cu ft or 660 lbs. Bucket Capacity
Hydraulic Bucket with 92
o
Tilt, 8 Hour Run Time
Snow Plow Attachment & Bucket Extender Available
Part#:
TGDR10
TSCP8
4,500 - 5,500 Watt Series
10,500 Watt Series
Concrete Scarifier
Floor Sweepers
Grinders and Scrapers
Part#: TSCAR-8H
Trash Water Pumps
Part#:
TW3H
TW4H
3" Pump, Honda GX270, 375 GPM,
Elevation: 89ft, Suction: 25ft
4" Pump, Honda GX390, 581 GPM,
Elevation: 92ft, Suction: 26ft
QUIET INVERTER SERIES
OUTDOOR POWER GENERATORSFLOORING
www.tomahawk-power.com
(866) 577-4476
ASSEMBLED IN THE
PARTS SOURCED GLOBALLY
USA
TG2000i
TG3000i
2,000 - 3,300 Watt Series
Equipment Guide
10" Disc, 120V, 1/32" Per Pass,
11 AMP, 1.5 HP, 1,725 RPM
8" Blade, 120V, 11 AMP, 3/4 HP,
1,725 RPM, Carpet & Tile Remover
Honda GX160 Engine, Scarifies 350 - 500ft
2
/hr
OSHA Compliant Vacuum Port
8" Carbide Tungsten Drum Kit, 1/8" Per Pass
38" Working Width, Triple Broom
System, 14.5 Gallon
30" Working Width, Battery Powered
Triple Broom System, 13.5 Gallon
120 Amp Welder, 60% Duty Cycle,
2000w, Includes Wheel Kit
210 Amp Welder, 60% Duty Cycle,
2000w, Includes Wheel Ki
t
4,500w Max / 3,800w Rated
5,500w Max / 5,000w Rated, 120/220V
Run Time 8 Hrs @ 50% Load
CARB Compliant, GFCI
TG4500i
TG5500i
10,500w Max / 8,500w Rated
Voltage Selector, 120/220V
Run Time 14.5hrs @ 25% Load
CARB Compliant,
GFCI, CO Detector
TG9000i
2,200w Max / 2,000w Rated
3,300w Max
/ 3,000w Rated,
120/220V, 30 AMP Twist Lock
Run Time 8 Hrs @ 50% Load
CARB Compliant, GFCI 120v
6010-7024 Rods Compatible
Part#: TBUGGY300e
Part#:
TWG120A
TWG210A
Part#:
TOS38
eTOS30
Assorted Blade Choices Assorted Blade Choices
Assorted Brush Choices

Tomahawk Power, LLC
San Diego, CA
Sales Support
(866) 577-4476
Equipment Support
(866) 577-4476
www.tomahawk-power.com
Tomahawk understands to keep a job-site running smoothly the proper equipment and
spare parts are needed at the drop of a hat. With same day shipping and faster
delivery times, count on Tomahawk to keep you powered throughout the day! With
long lasting parts and engines, Tomahawk equipment will be the star of your fleet for
years to come. Visit www.tomahawk-power.com to get started today!
Power Your World
FACEBOOK
facebook.com/TomahawkPowerUSA
YOUTUBE
youtube.com/TomahawkPower
INSTAGRAM
@tomahawkpower
Figure 4