

Technical Support and E-Warranty Certificate
www.vevor.com/support
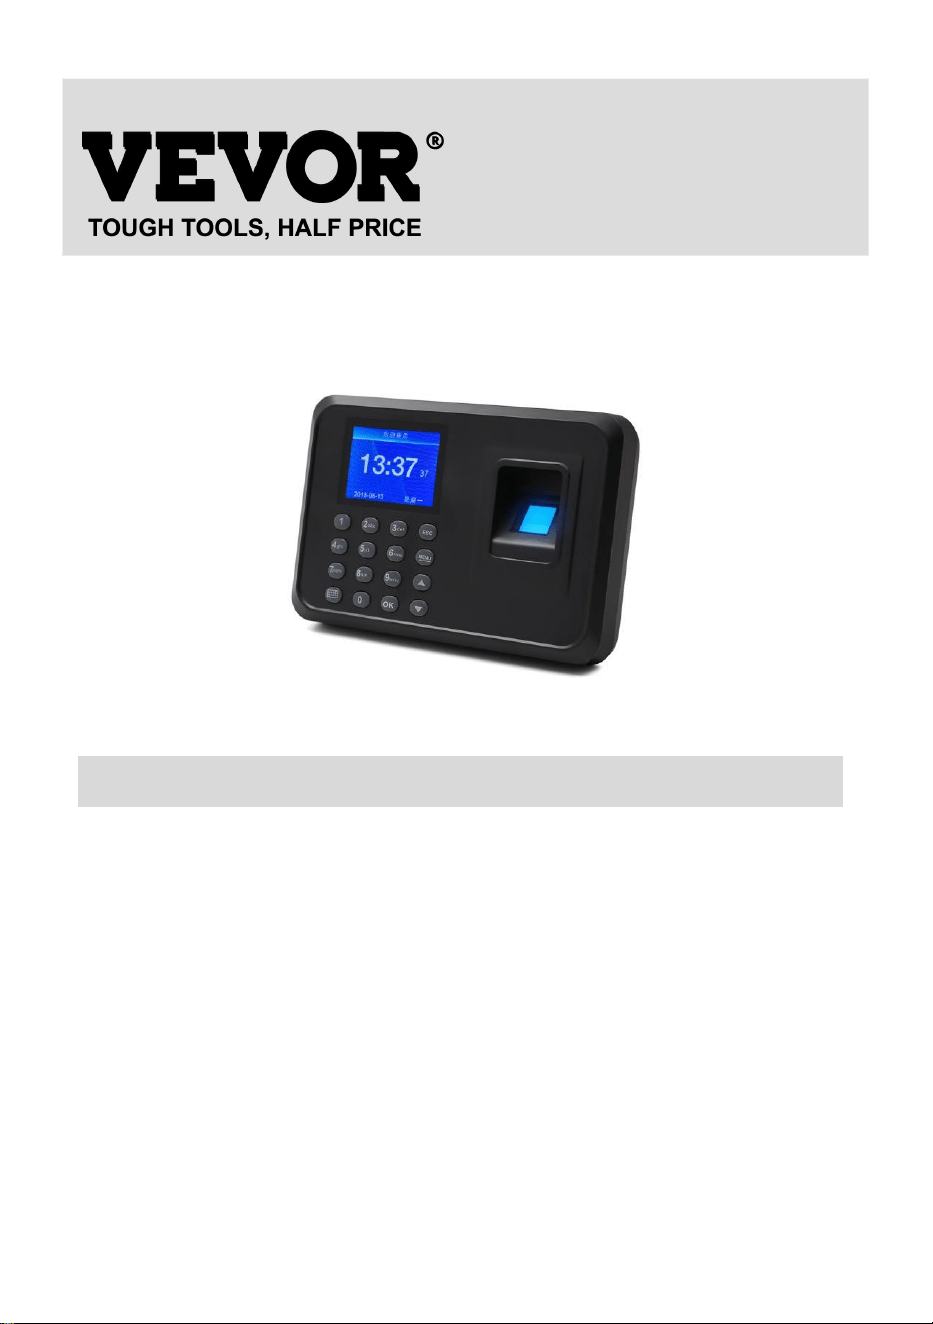
TIME CLOCK
USER MANUAL
MODEL:F01H
We continue to be committed to provide you tools with competitive price.
"Save Half", "Half Price" or any other similar expressions used by us only
represents an estimate of savings you might benefit from buying certain tools
with us compared to the major top brands and does not necessarily mean to cover
all categories of tools offered by us. You are kindly reminded to verify carefully
when you are placing an order with us if you are actually Saving
Half in comparison with the top major brands.


1
MODEL:F01H
NEED HELP? CONTACT US!
Have product questions? Need technical support? Please feel free to
contact us:
Technical Support and E-Warranty Certificate
www.vevor.com/support
This is the original instruction, please read all manual instructions
carefully before operating. VEVOR reserves a clear interpretation of our
user manual. The appearance of the product shall be subject to the
product you received. Please forgive us that we won't inform you again if
there are any technology or software updates on our product.
TIME CLOCK
2
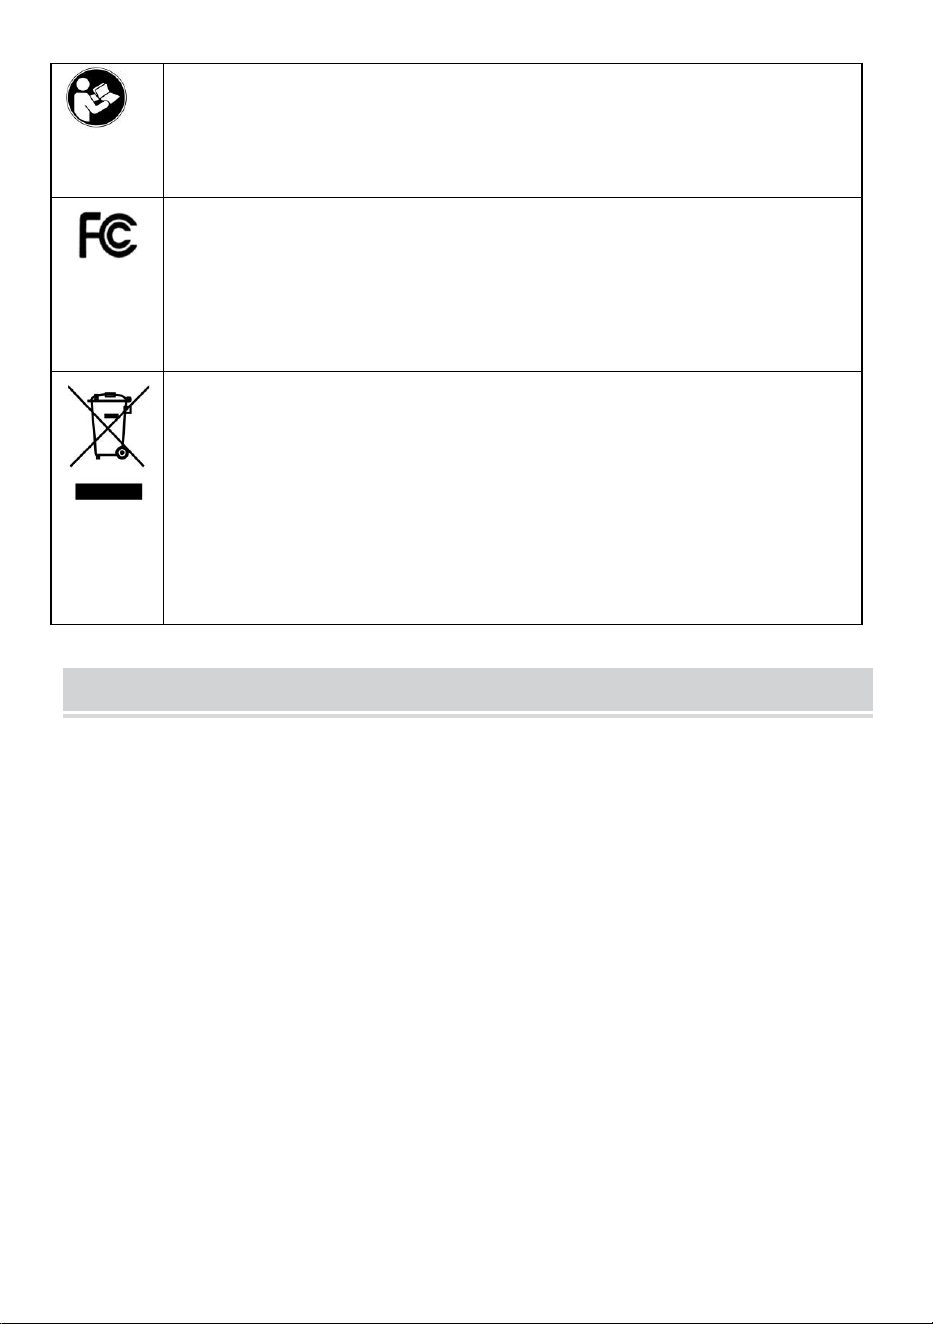
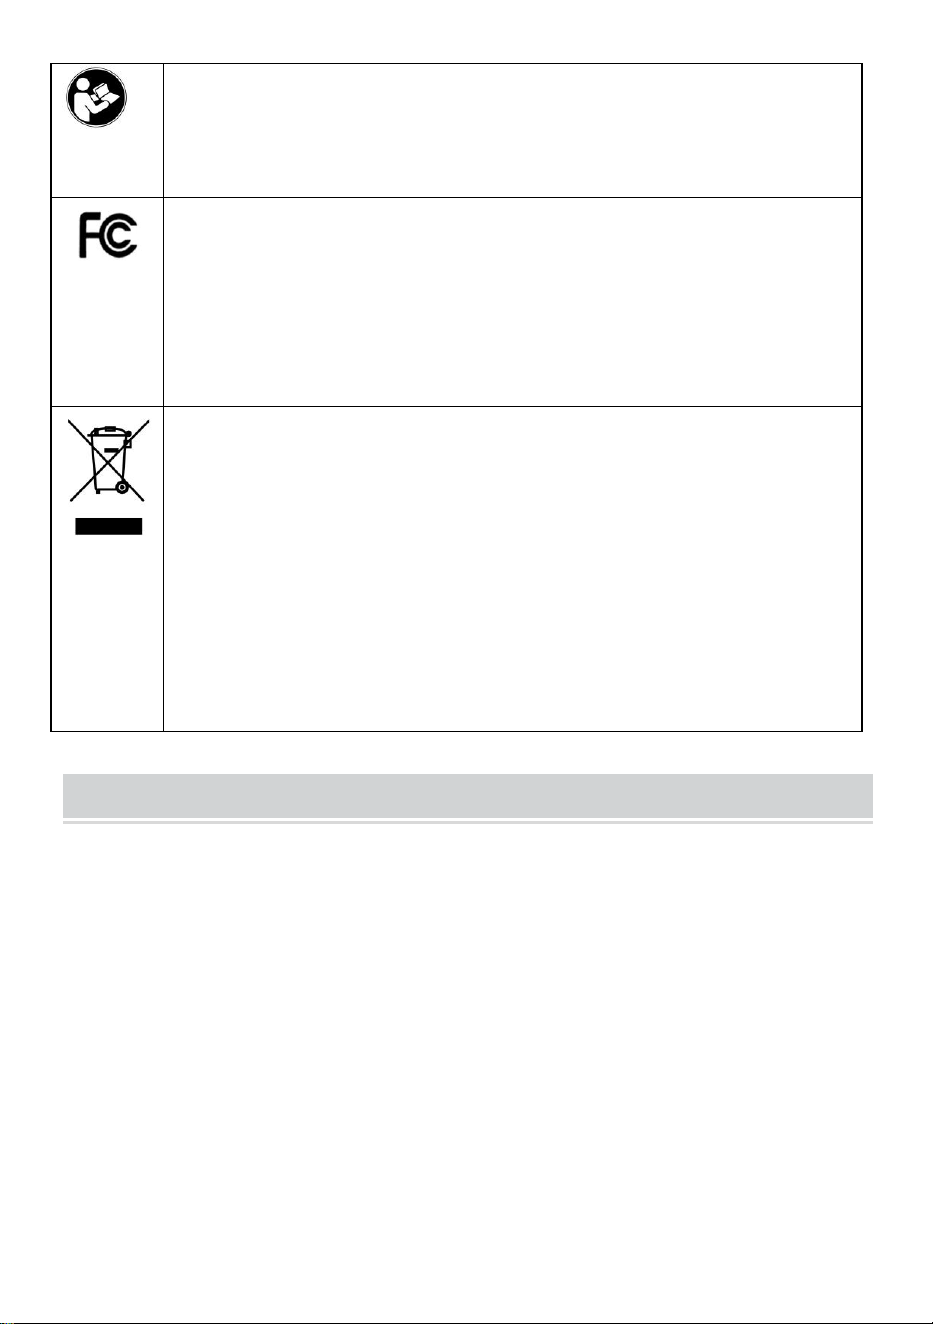
Warning-To reduce the risk of injury, user must read
instructions manual carefully.
This device complies with Part 15 of the FCC Rules. Operation is
subject to the following two conditions:(1)This device may not cause
harmful interference, and (2)this device must accept any interference
received, including interference that may cause undesired operation.
This product is subject to the provision of European Directive
2012/19/EC. The symbol showing a wheelie bin crossed through
indicates that the product requires separate refuse collection in the
European Union. This applies to the product and all accessories
marked with this symbol. Products marked as such may not be
discarded with normal domestic waste, but must be taken to a
collection point for recycling electrical and electronic devices
INSTALLATION CAUTIONS
1.Do not install machine in extremely bad temperature environment. Please Keep
the device work at the temperature of 0ºC-45ºC .
2.Do not install machine in a dirty or humid place. Please keep the device work in
a dry and clean environment for longer life time.
3.Keep the device far away from dust, water and fire. All the elements may lead to
short circuit and mainboard damage.
4.Do not try to repair machine at user end, just contact the retailer or wholesaler
for after-selling service under the warranty.
5.Do not install the machine outdoors.The machine is suggested to install at indoor
place for the data and device saftety.
6.Do data backup in regular time, Avoid unexpected happening situations of data
lost.
7.Use the matched Stable voltage power adapter in the default package unit, avoid
the machine be damaged because of current difference from other types of power
adapter.

3
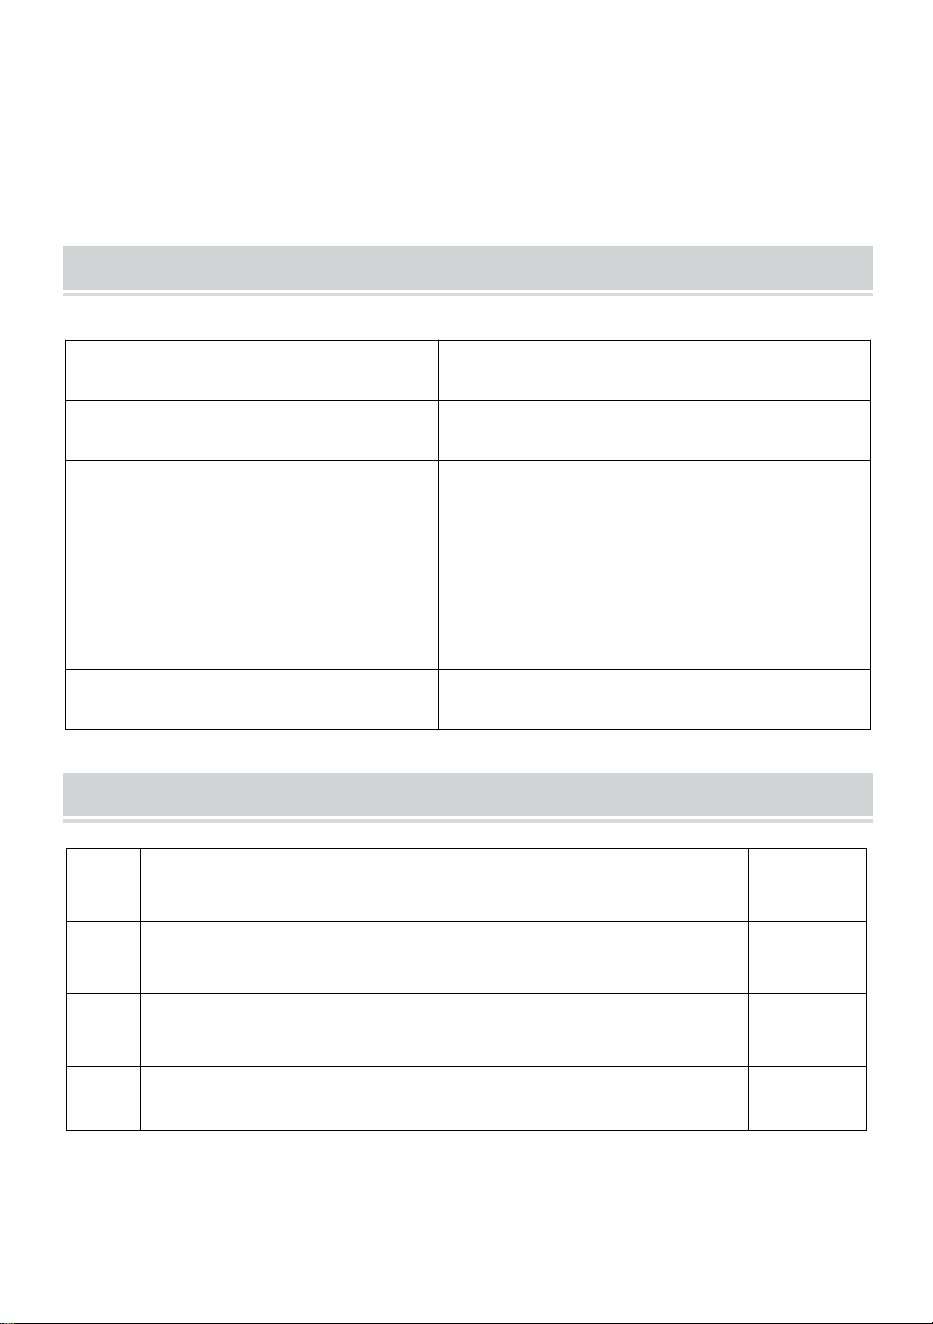
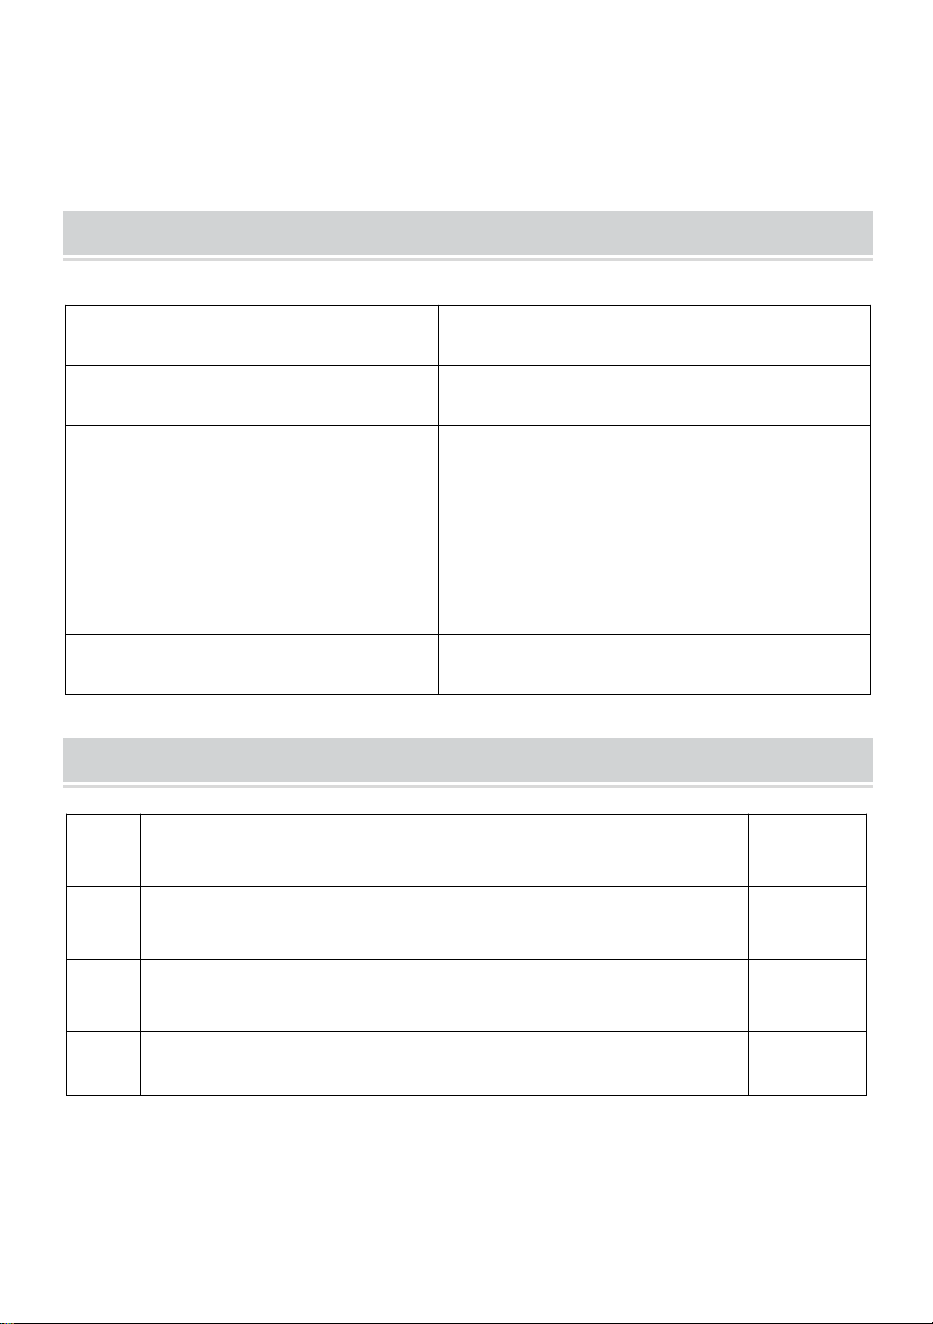
TECHNICAL PARAMETERS
PARTS LIST
Model
F01H
Working Power
DC5V 1A 5W
Language Selection
Supports 12 languages
(English, German, French, Spanish,
Italian, Russian, Dutch, Polish,
Swedish, Turkish, Portuguese,
Brazilian Portuguese)
Product Size
170*120*36mm
1
Adapter
1
2
Flash Drive
1
3
Self-tapping Screw
3
4
Plastic Expansion Sleeve
3

4
ASSEMBLY STEP
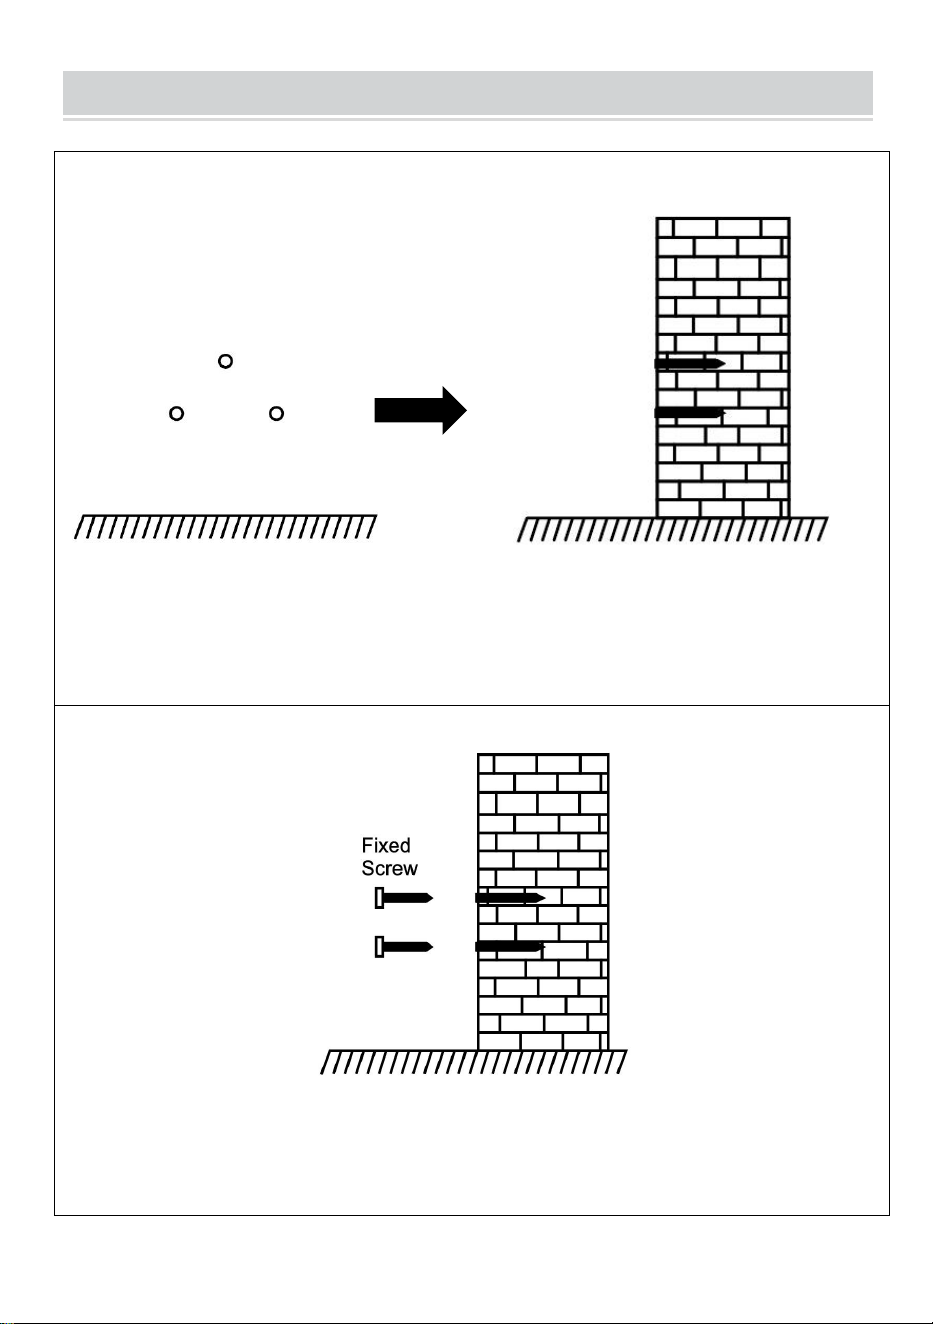
STEP 1
Disassemble rear hanging plate and attach it to the wall to select the
suitableinstallation position, and then make a mark.
Drilling on wall according to the marked position.
STEP 2
Fix the Self-tapping Screw on the wall.
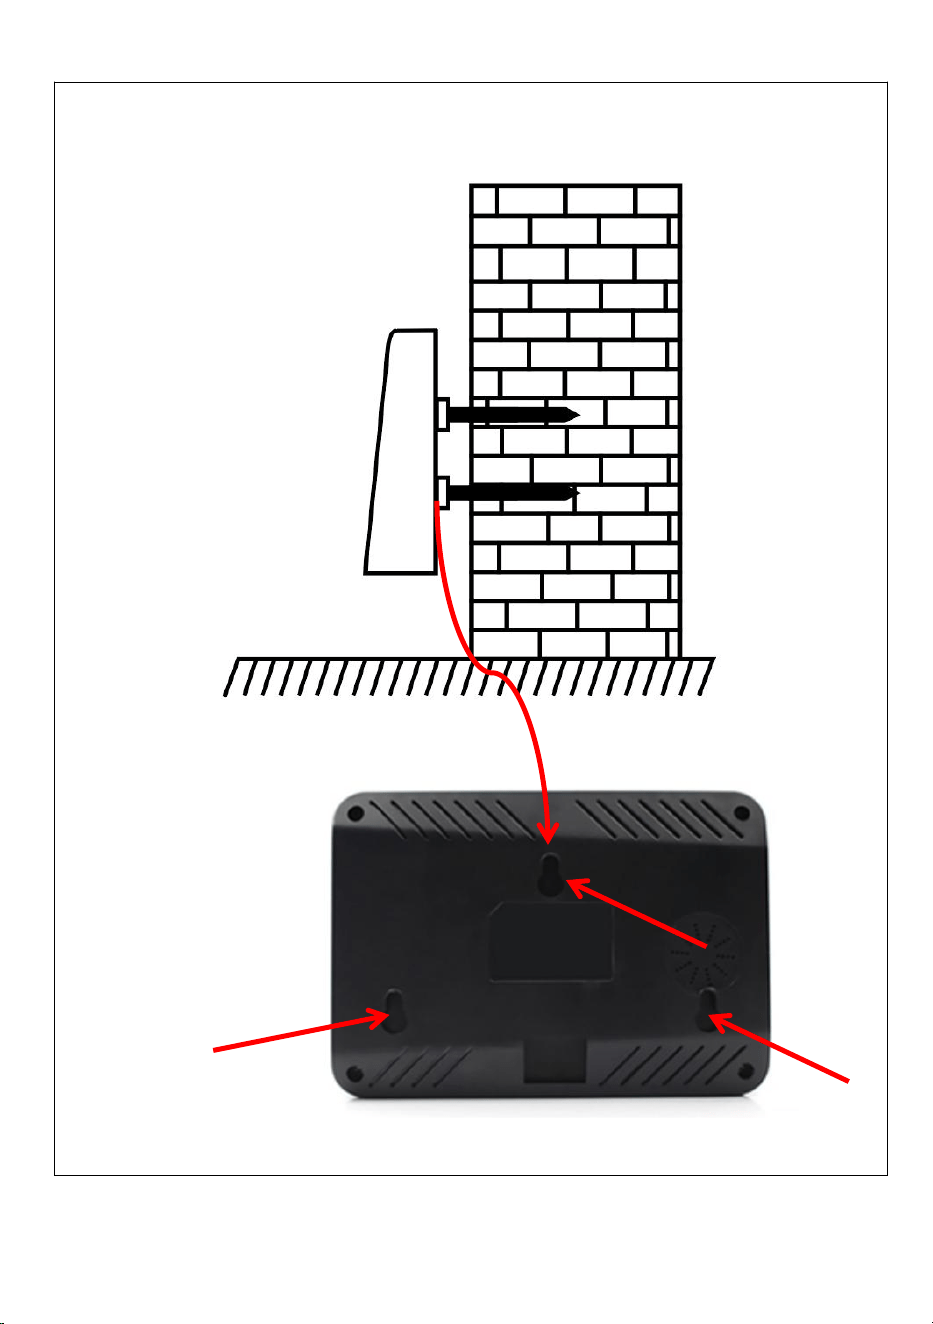
5
STEP 3
Install the device on the Self-tapping Screw and fix it, then power it up.
6
RECOMMENDED STEPS FOR INITIAL USE
Shift Setting →Department Setting→Employee Enroll→Attendance
Rules→Employee Attendance→View Attendance Report
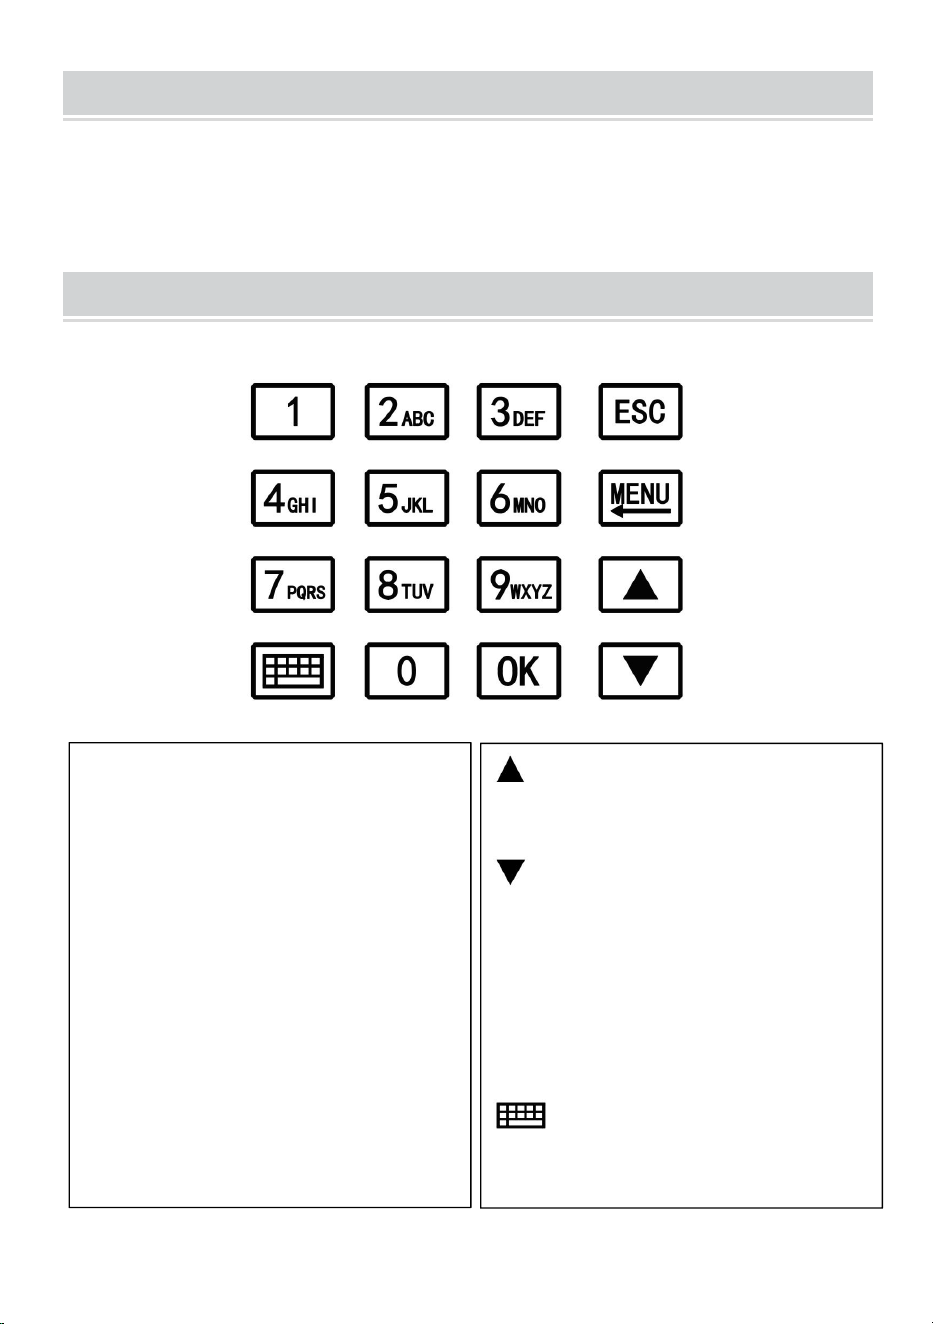
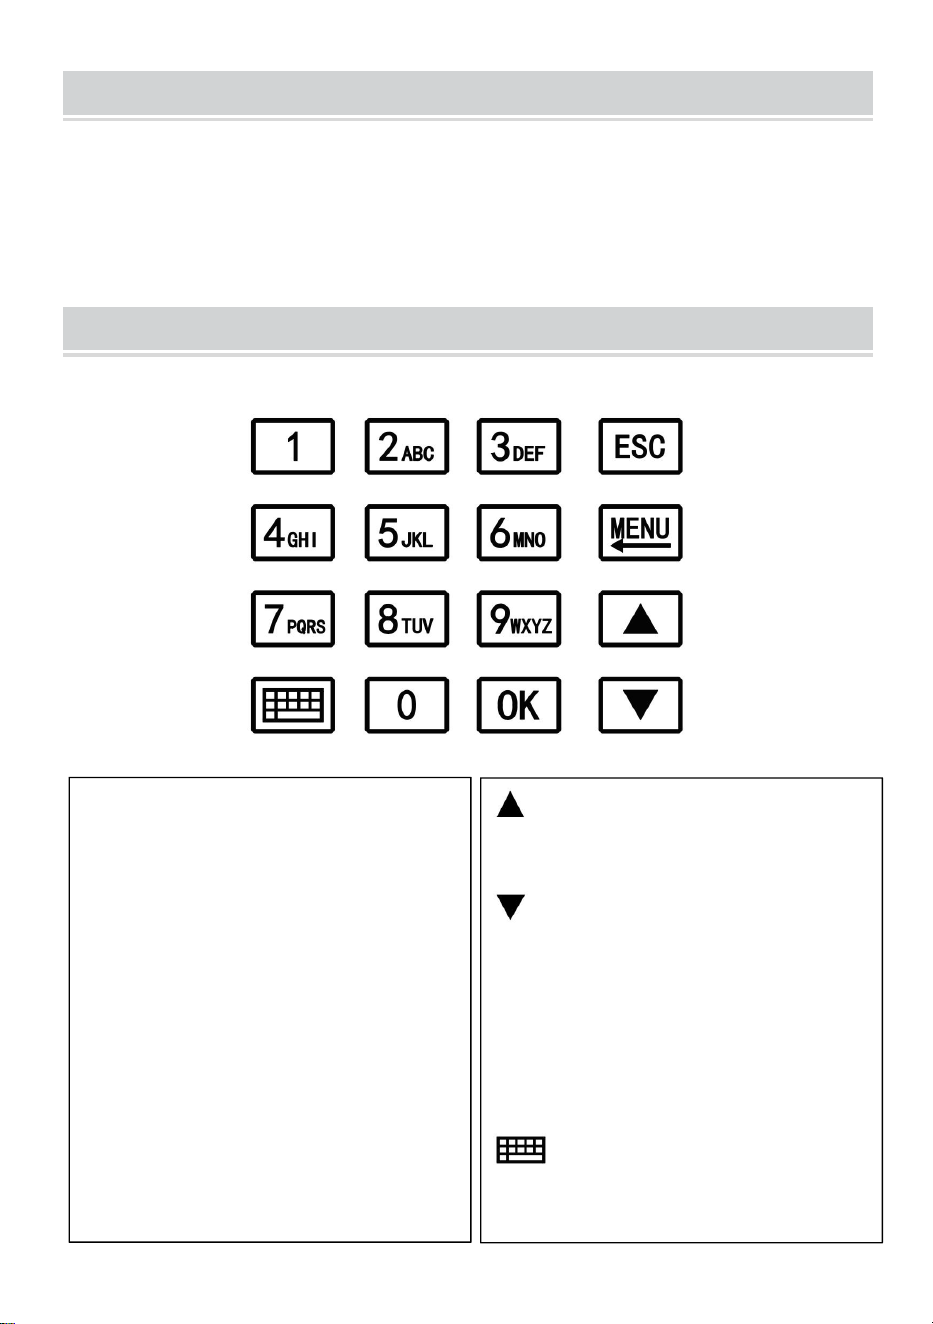
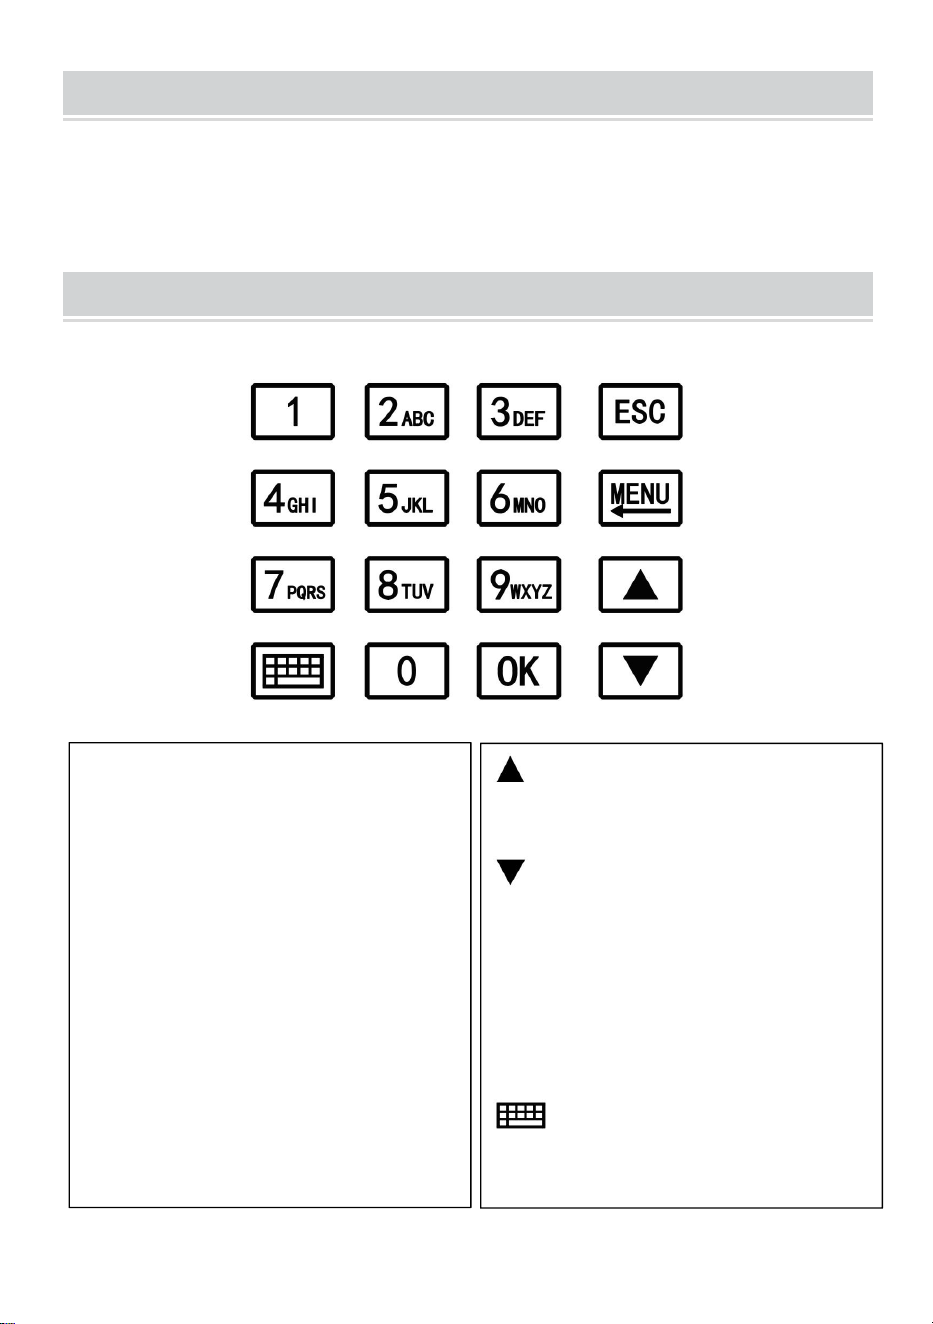
KEYPAD INSTRUCTIONS
MENU
Enter the menu (Functions as
the 'Delete' key during editing).
ESC
Cancel or exit the current
settings.
OK
Confirm the current settings.
Move the cursor up.
Move the cursor down.
0-9
Input numbers, English letters
or symbols.
Switch input method.
7
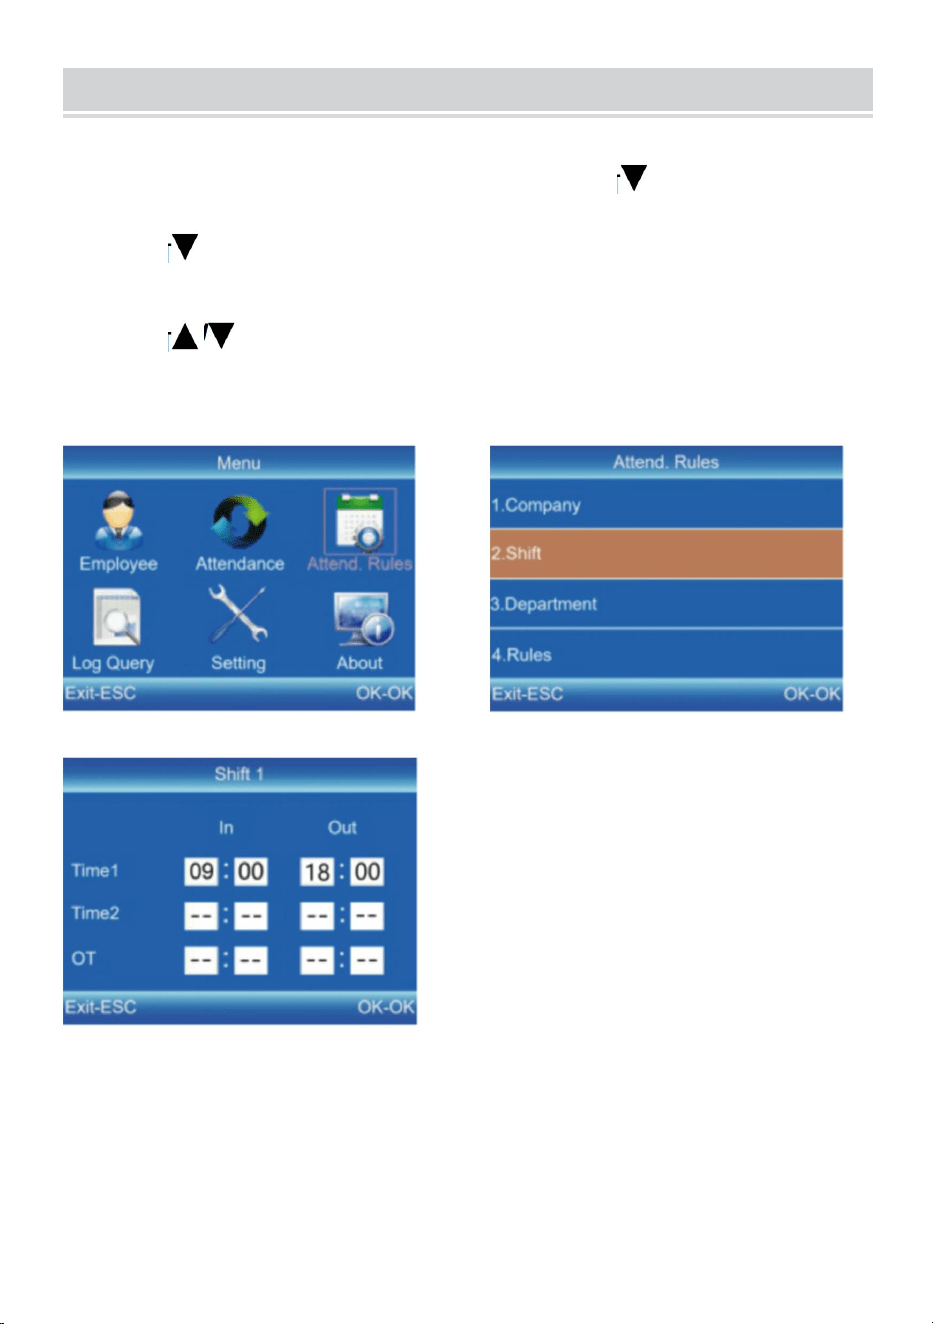
SHIFT SETTING
1) Press [MENU] to enter the main menu, press[ ]to select "Attend.
Rules"→"Shift".
2) Press[ ] to select the shift and press [OK] to enter
themodification interface.
3) Press[ / ] to move the cursor to a desired option and enter the
commute time.
Tips: After deleting everything in the entry box, it shows "--".
All shifts support the cross-day setting. The default setting is shift 1.
8
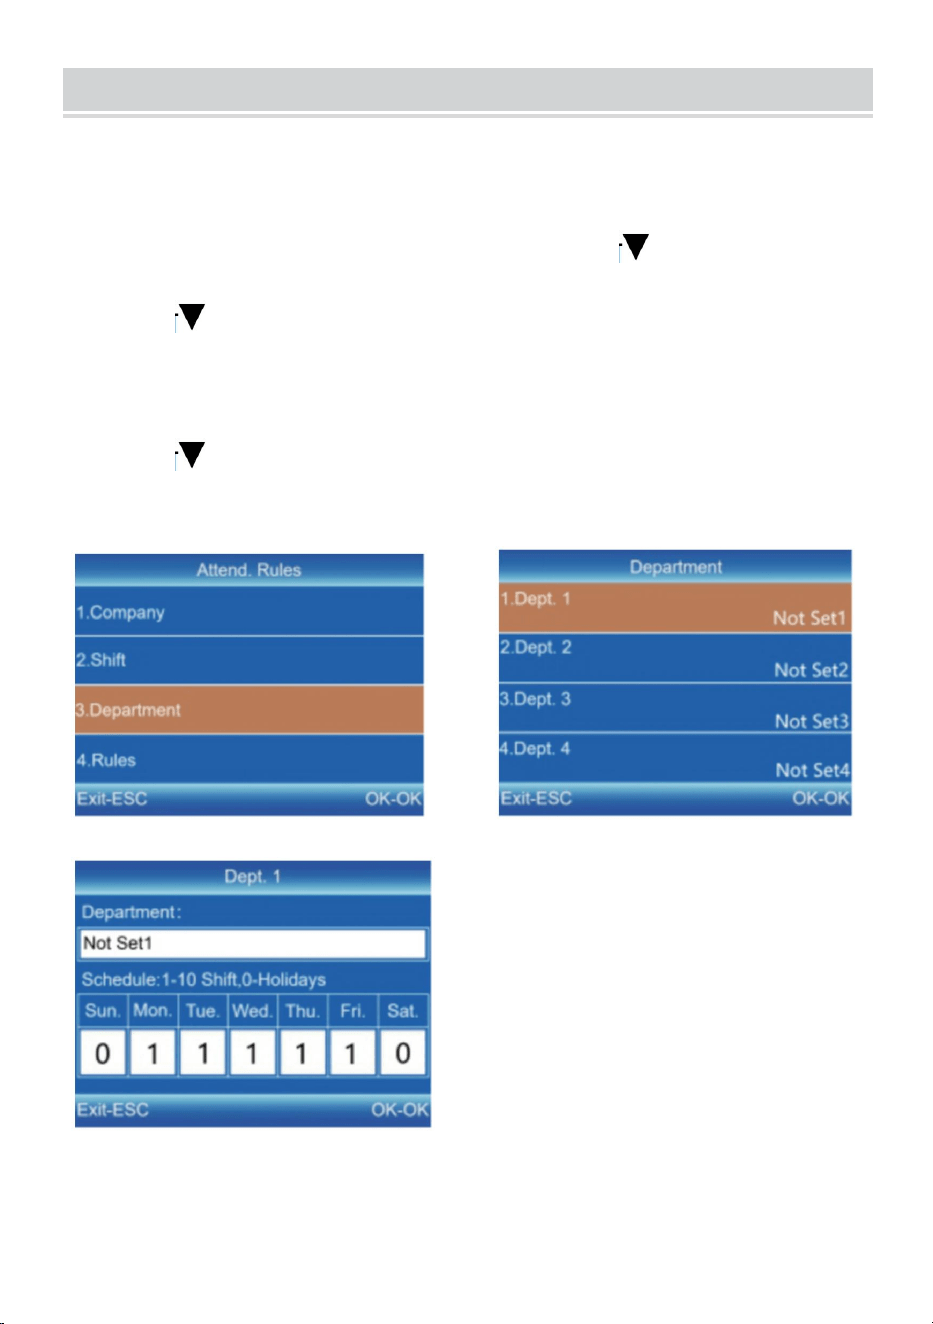
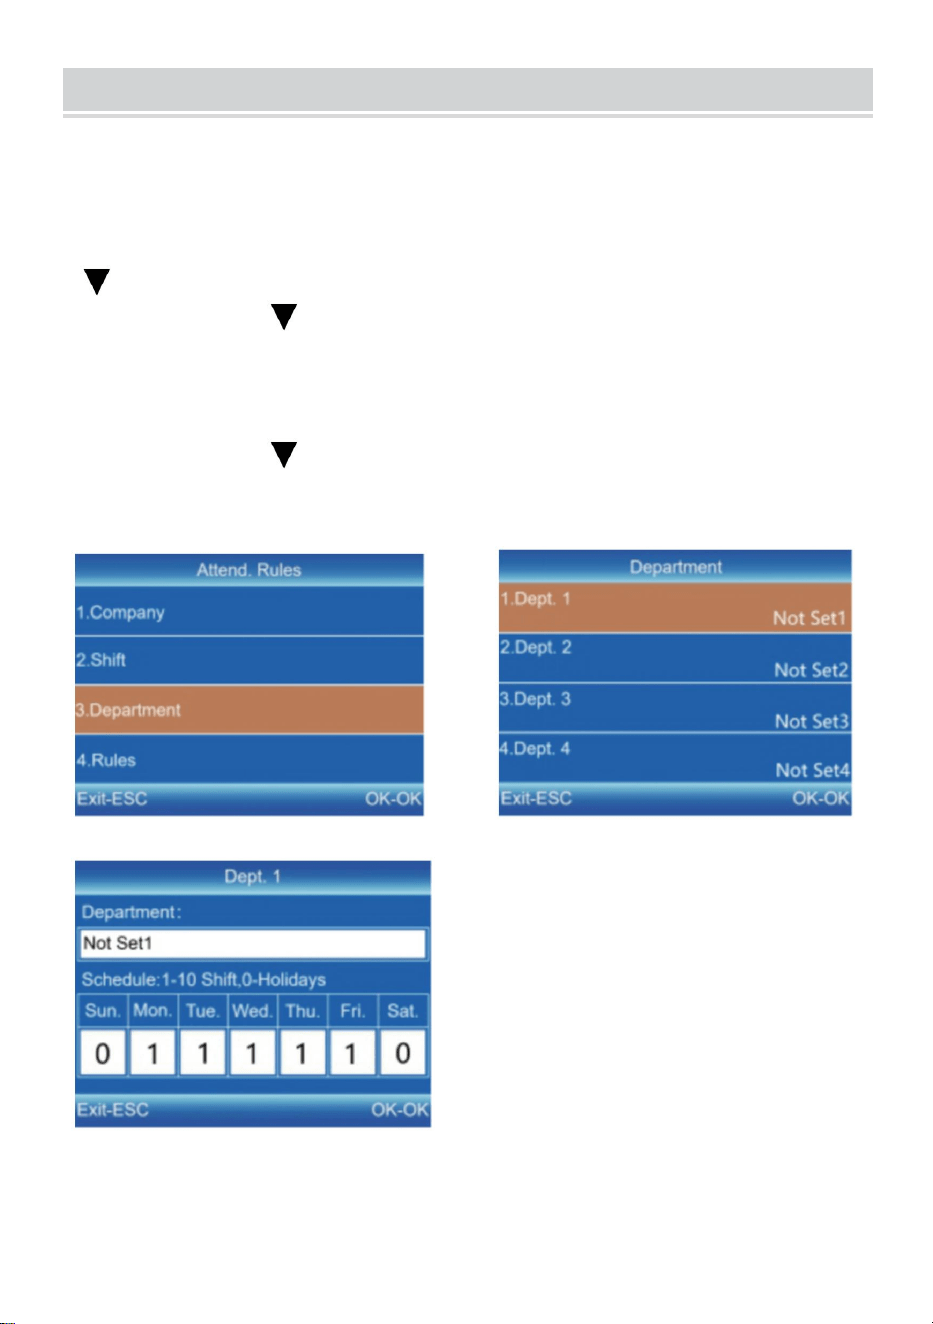
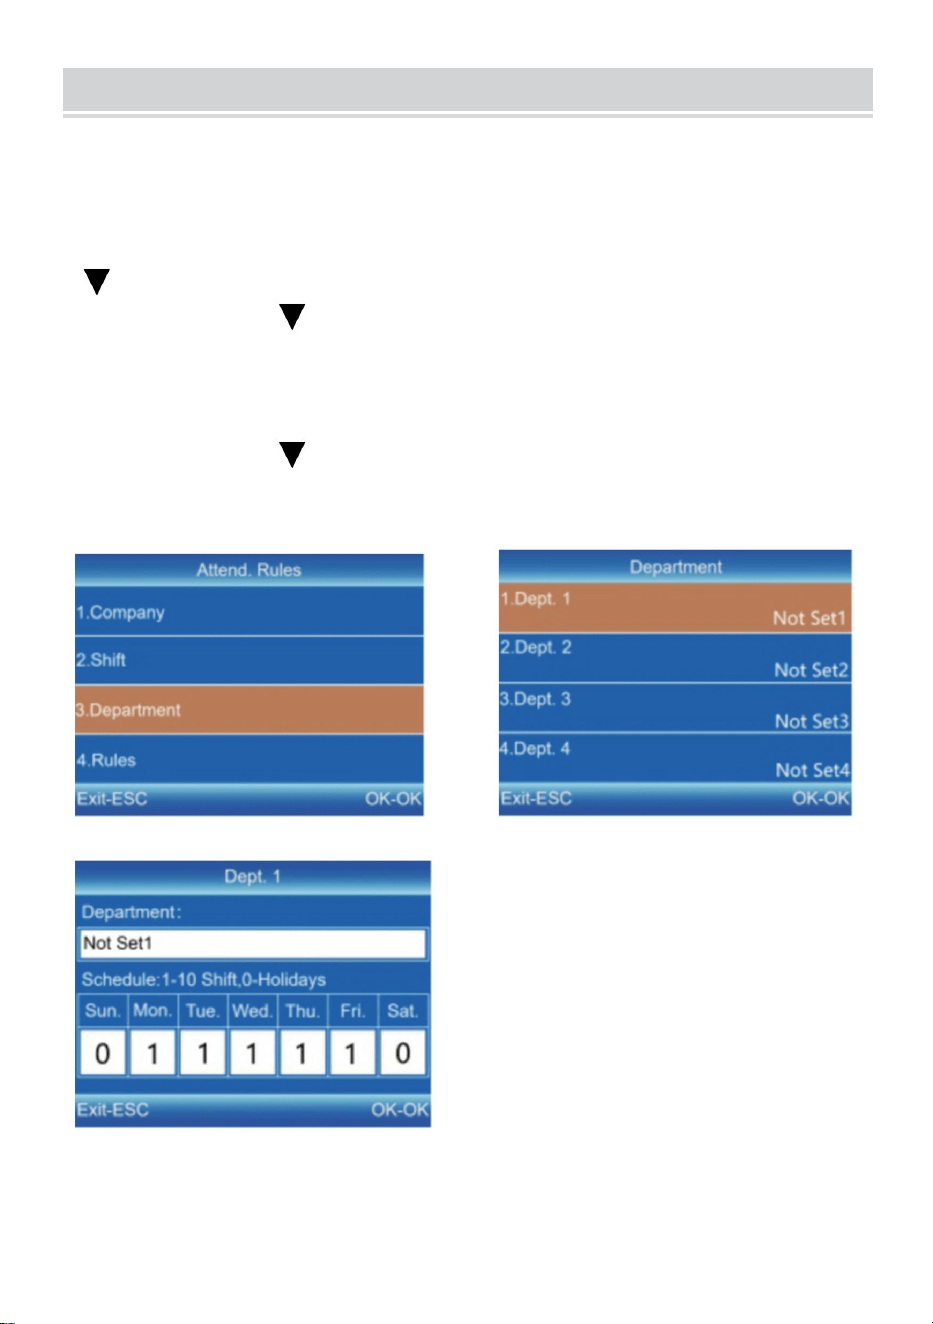
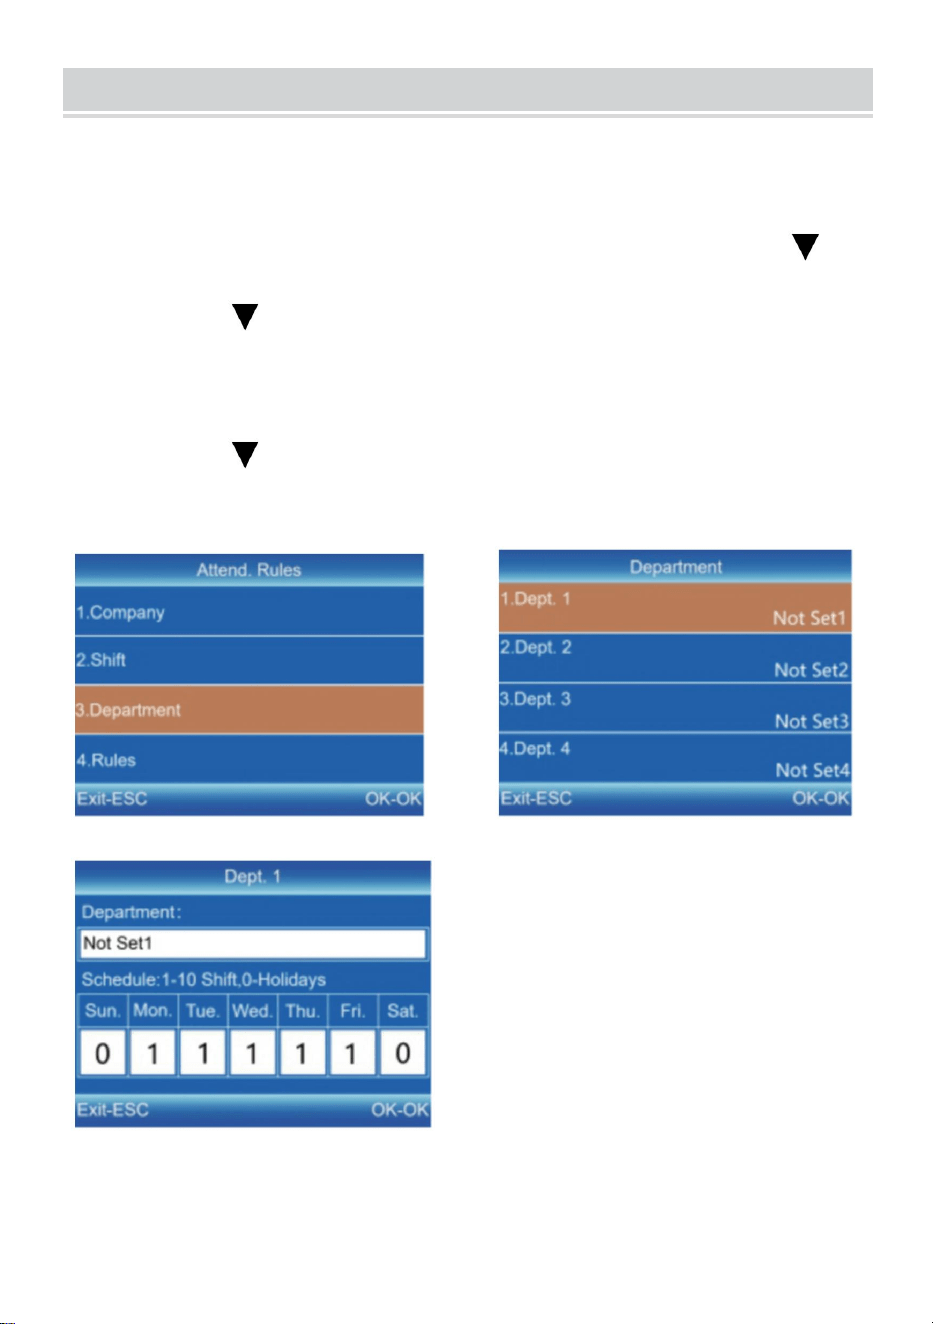
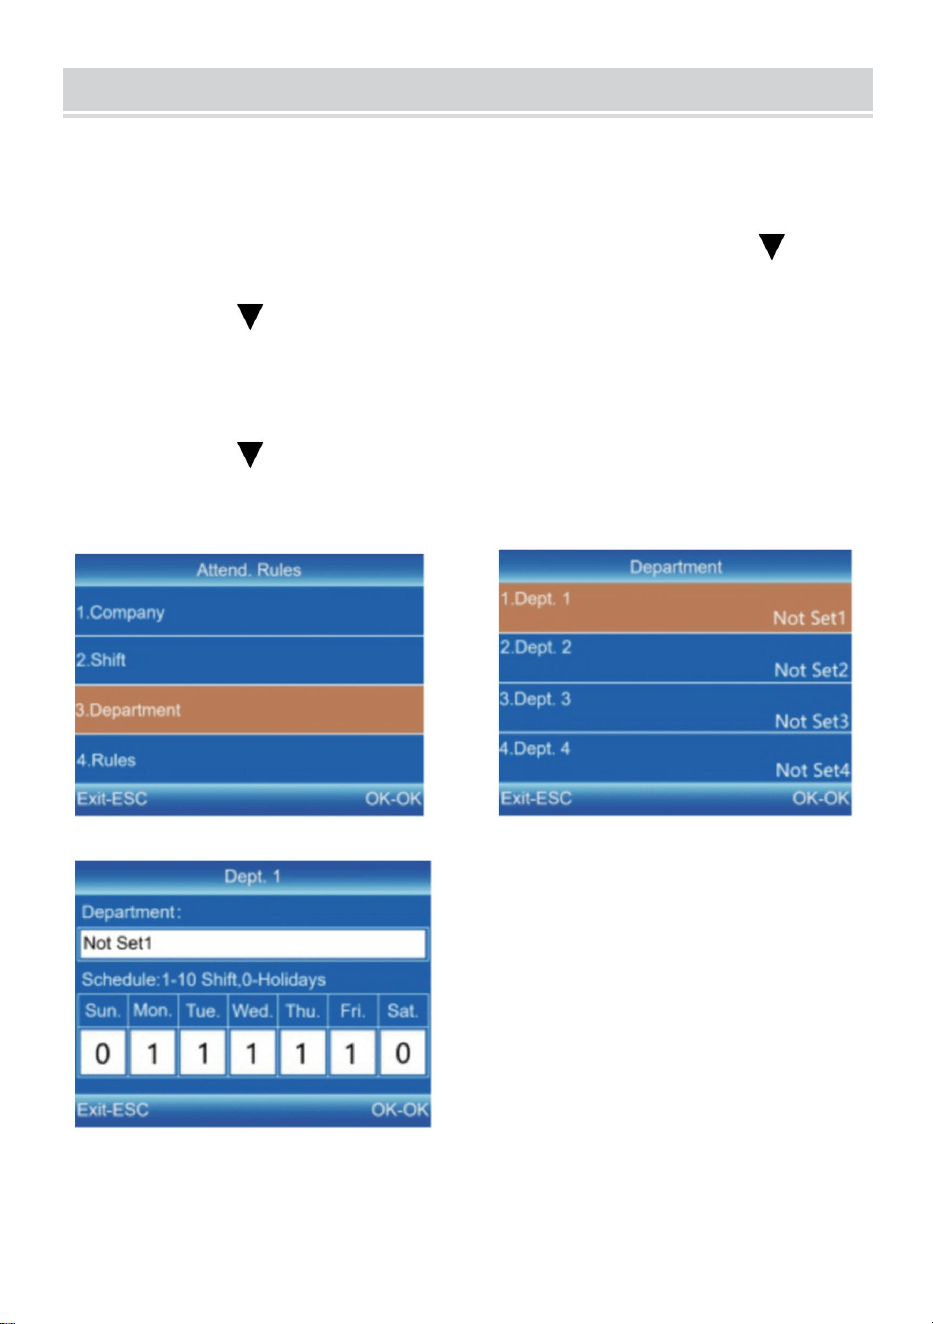
DEPARTMENT SETTING
Users can edit the department names (16 departments can be set at
most.).
1) Press [MENU] to enter the main menu. Press[ ] to select "Attend.
Rules"→"Department".
2) Press [ ] to select the department and press [OK] to enter the
modification interface.
3) Enter the department name in the entry box. Press [OK] to save the
name.
4) Press [ ] to move the cursor to a desired option and enter the
shift number.
9
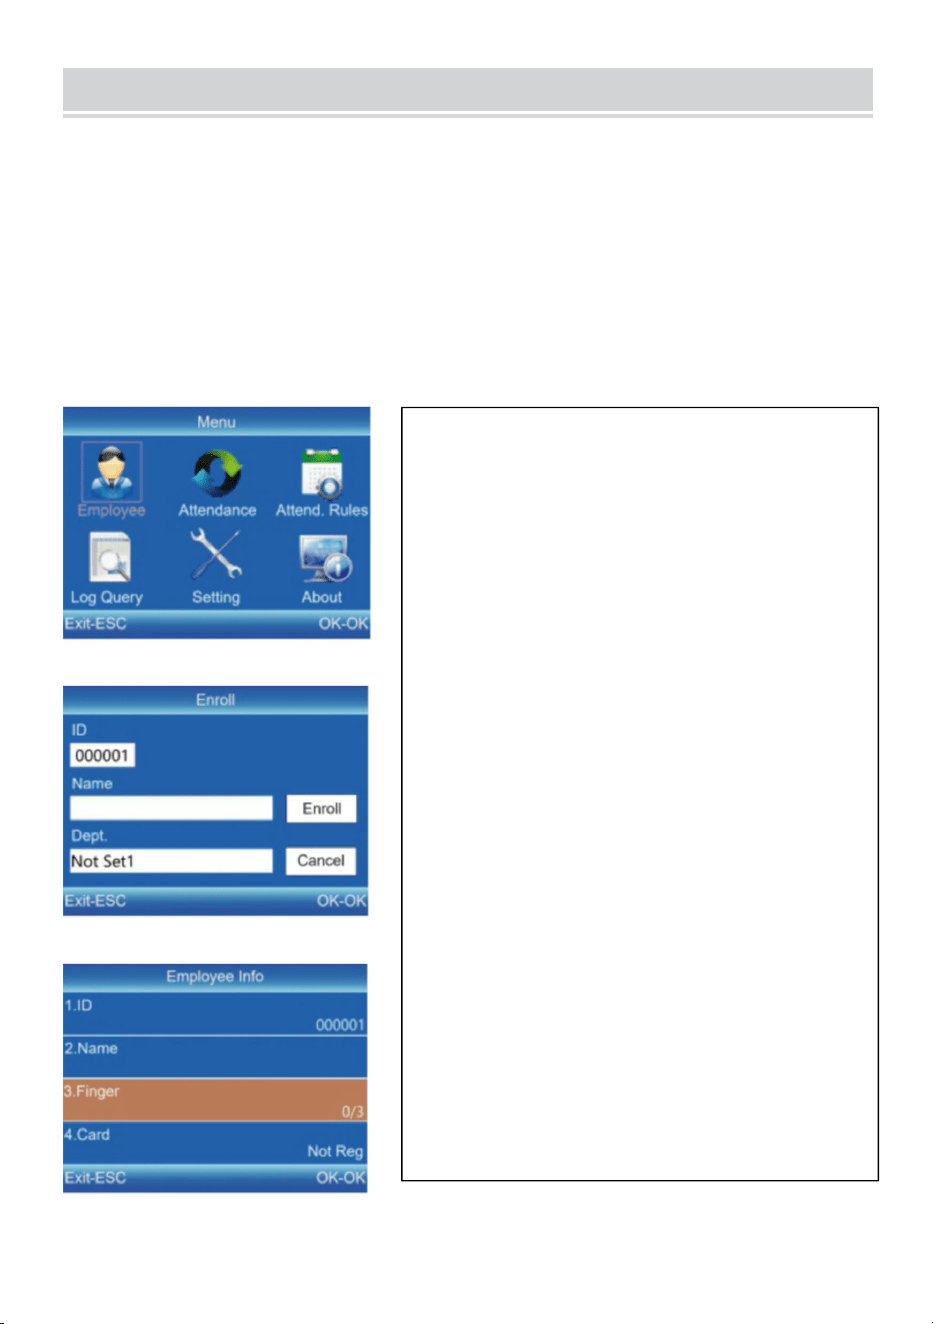
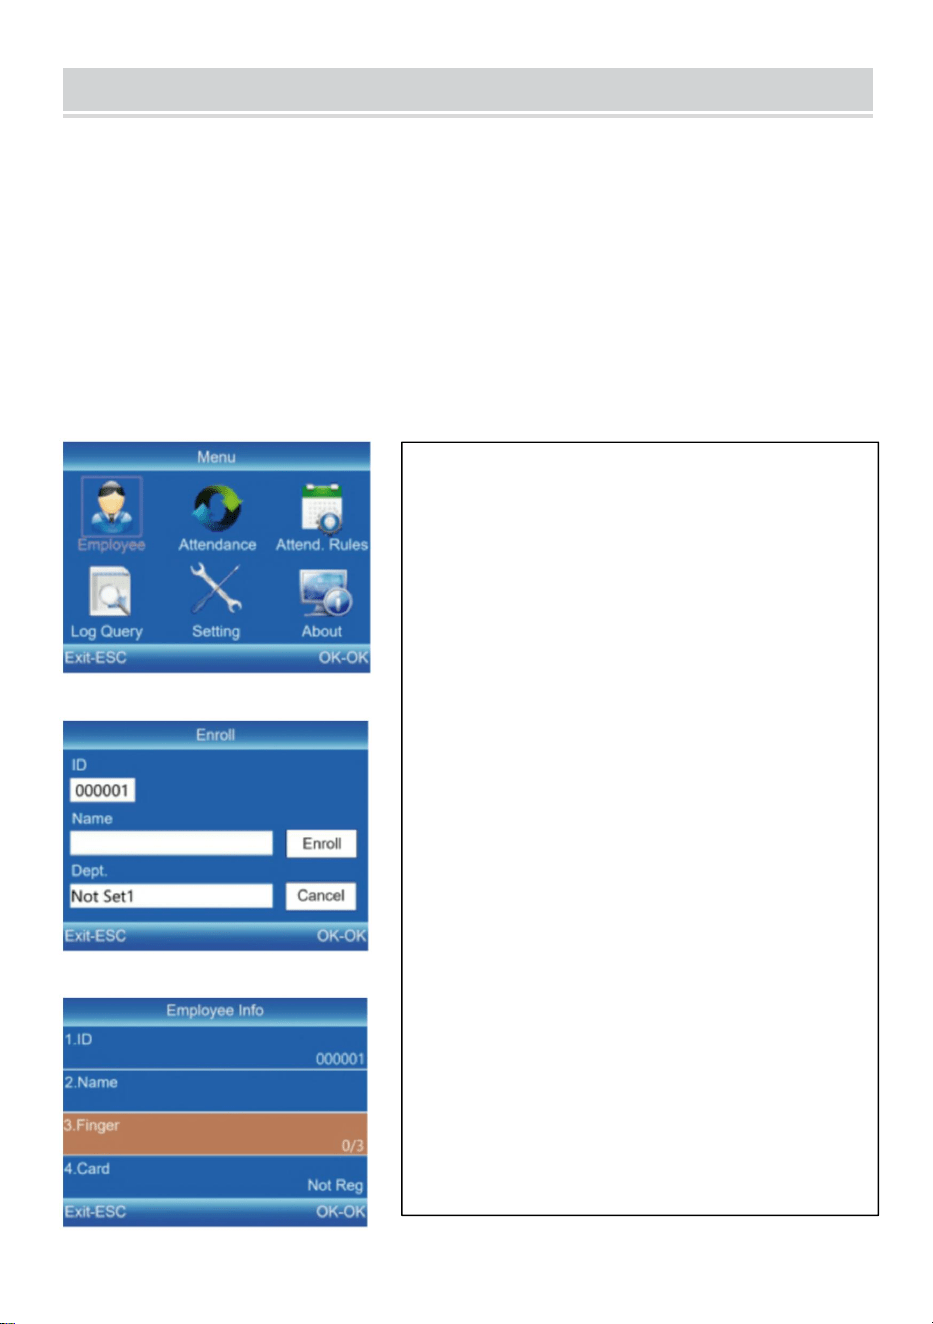
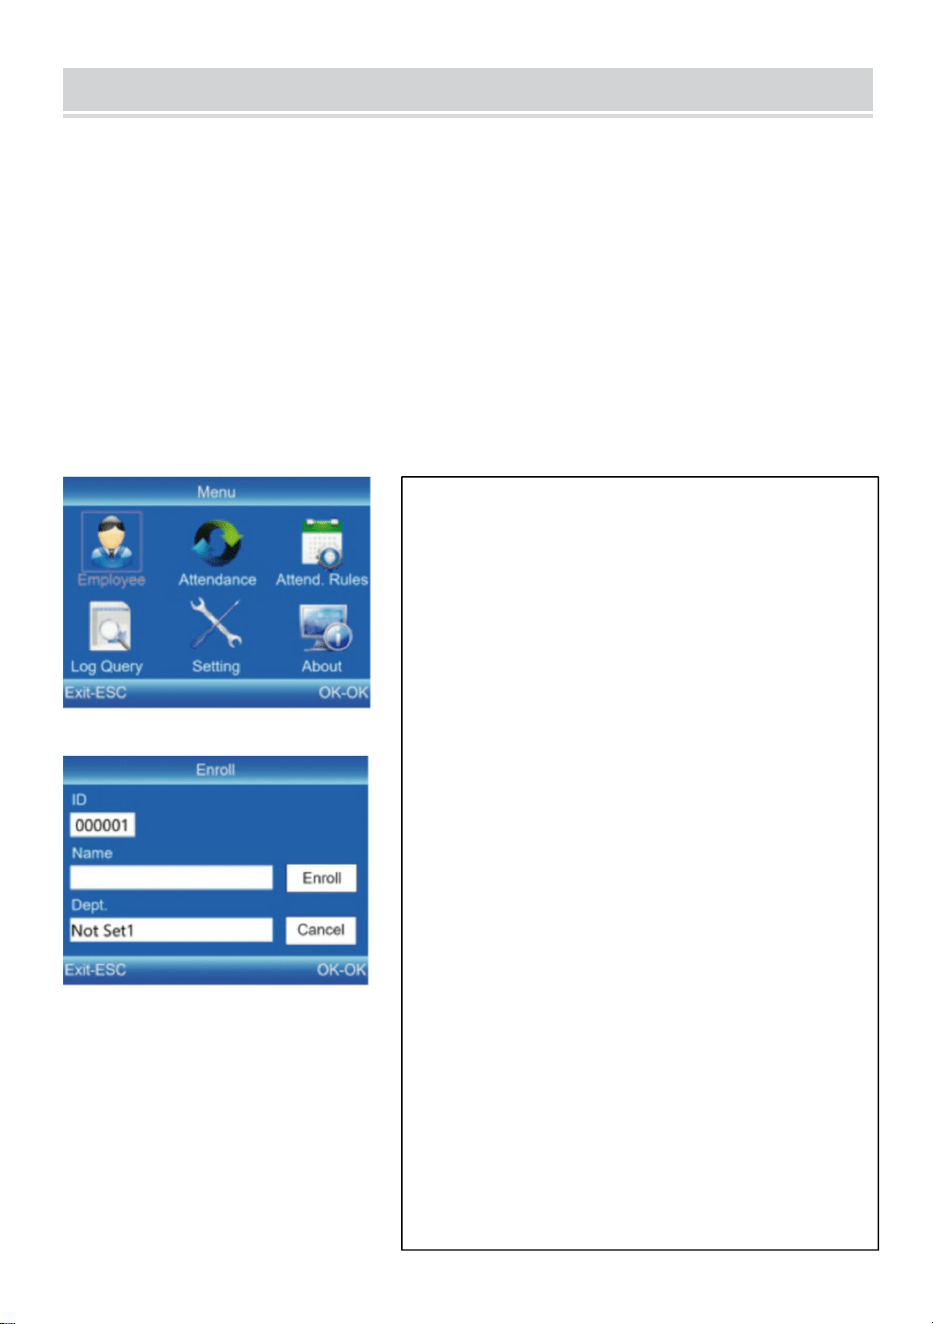
EMPLOYEE ENROLL
1) Press [MENU] to enter the main menu, press [V] to select “Employee”→
“Enroll”, and press [OK] to enter the interface of “Enroll”.
2) Input the ID, name and department, and select "Enroll” to enter the
interface of "Employee Info”.
3) Press [ESC] to save after setting the fingerprint, card number, password,
and authority as required.
ID:
Enter an employee ID. It supports only
numbers.
Name:
Enter a name. It supports a mix of
numbers, letters, and symbols.
Finger:
Enroll a fingerprint by press the collector
three times with the same finger.
Card (Optional):
Enroll a ID Card by swiping the card near
the reading area.
Password:
Enroll the password; It supports 1-6
digits of numbers.
Department:
Press [OK] to select a department from
the list.
Authority:
Press [OK] to select the authority
between Employee and Admin.
10
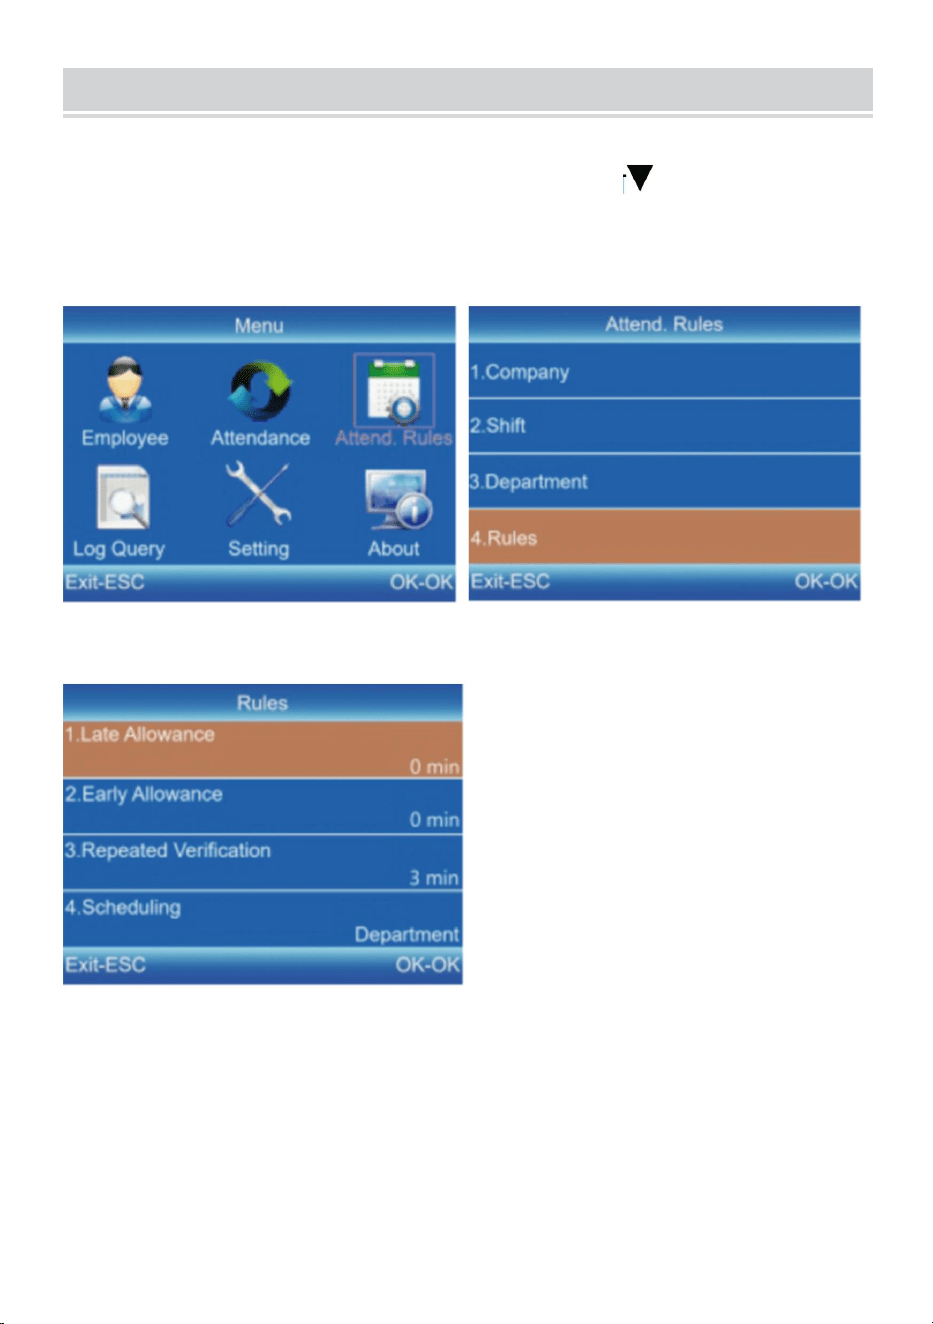
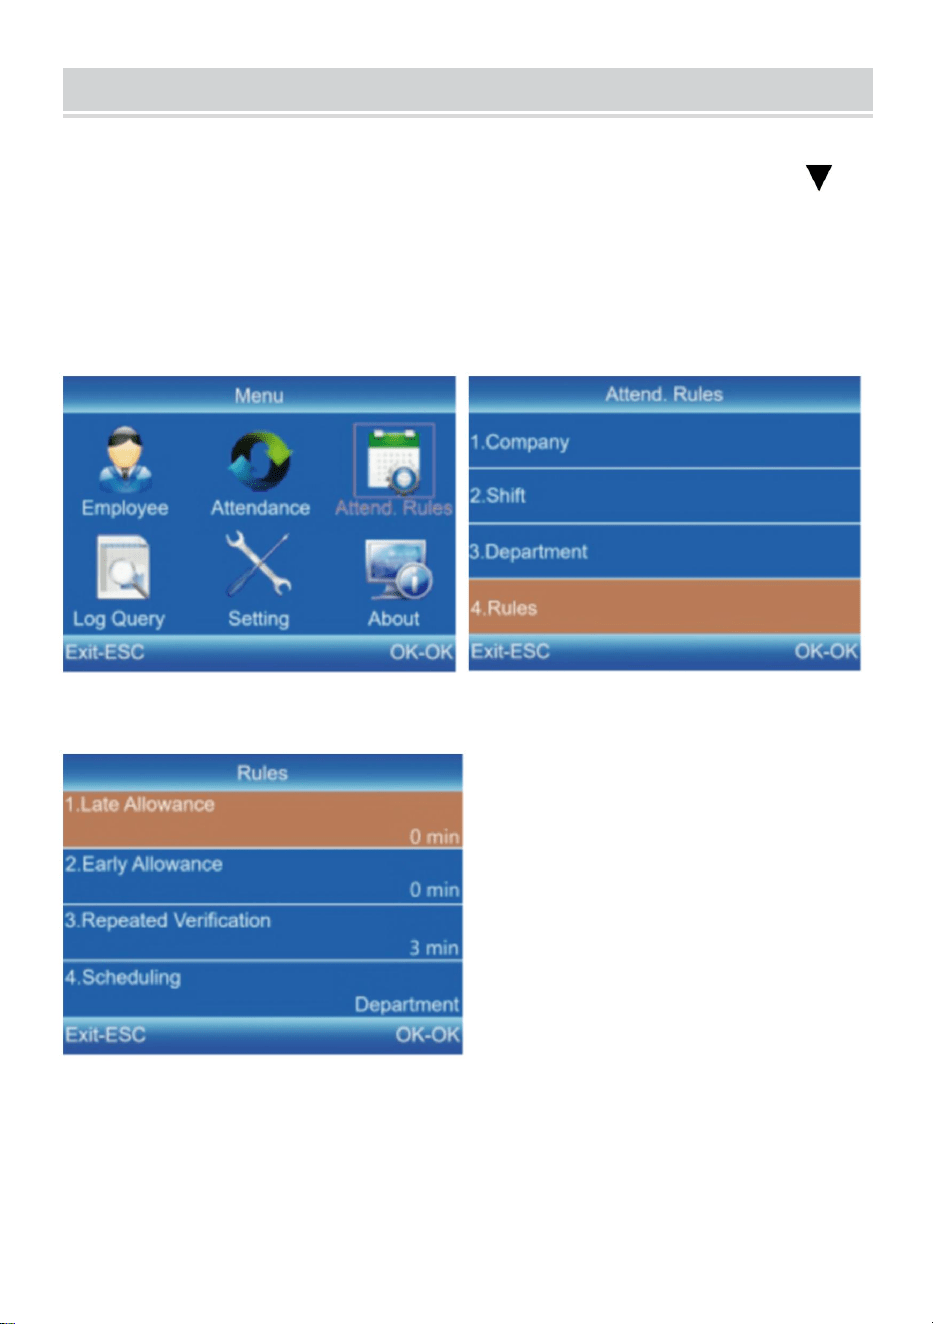
ATTENDANCE RULES
1) Press [MENU] to enter the main menu, press [ ] to select "Attend.
Rules"→ "Rules", and press [OK] to enterthe interface of "Rules".
2) Press [OK] to save the settings after setting the rules.
11
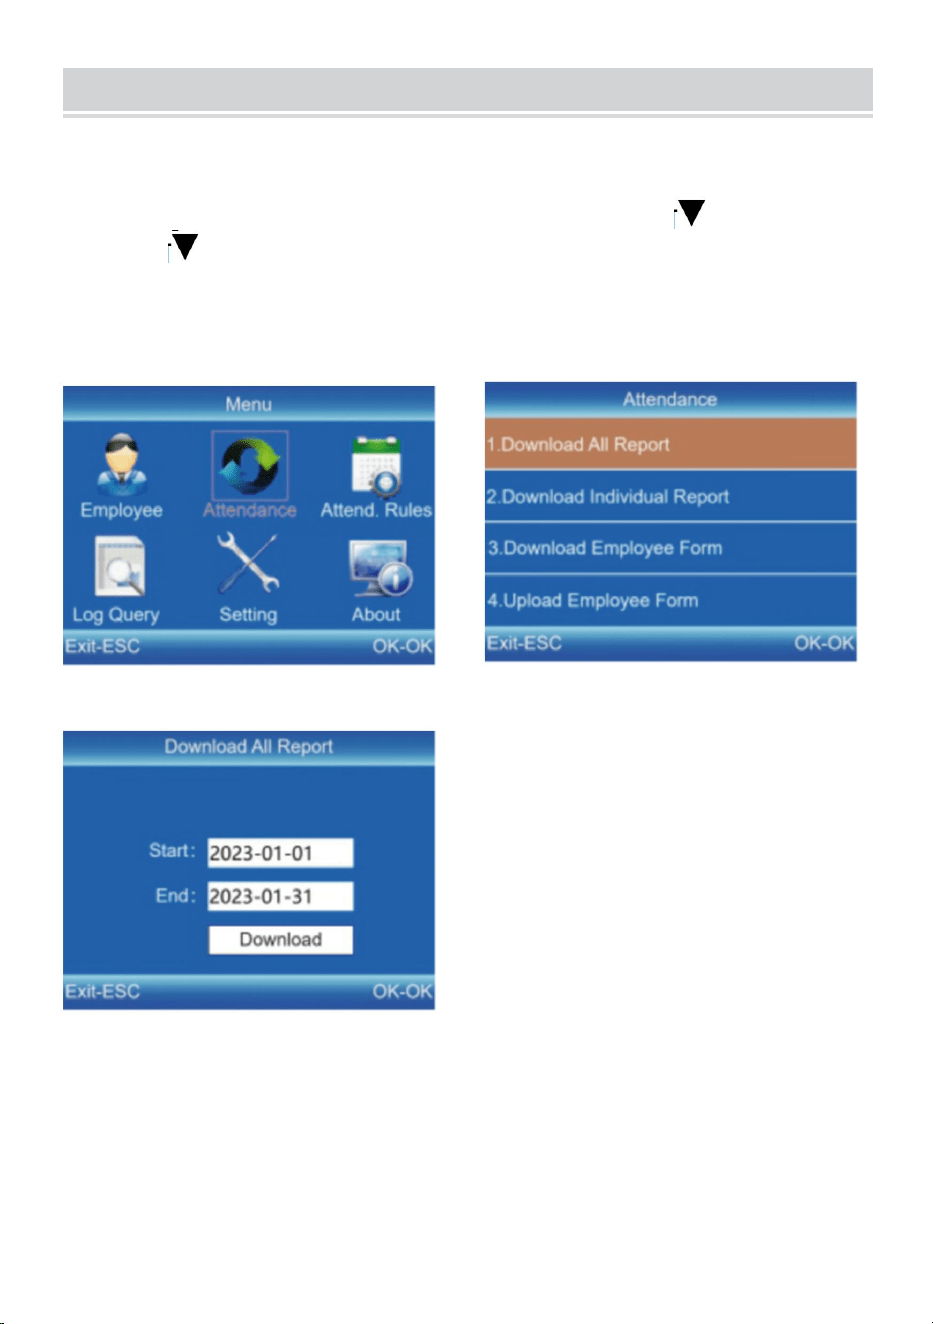
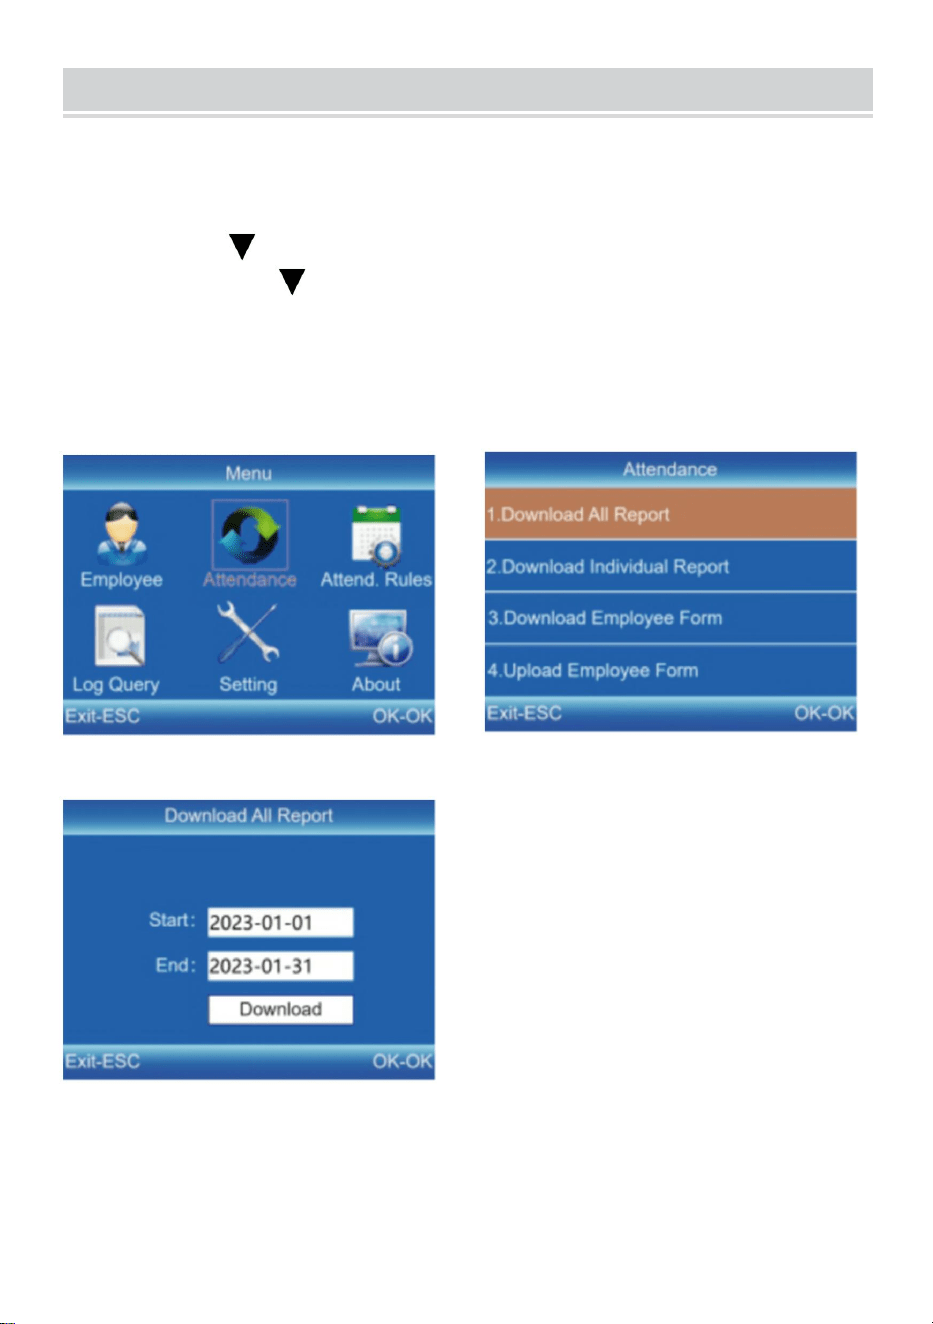
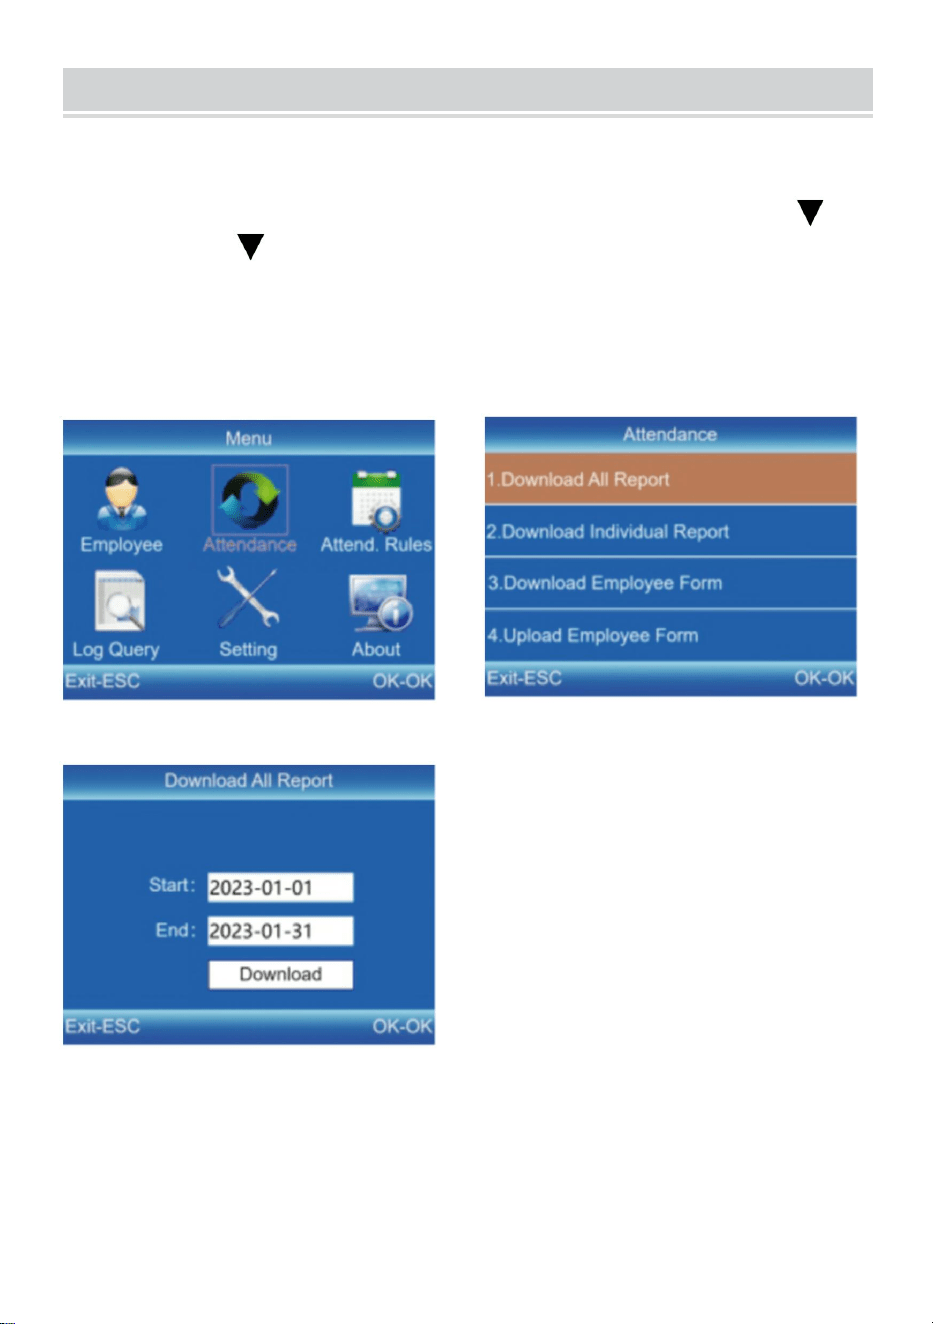
DOWNLOAD AND VIEW REPORTS
1) Insert the U disk into the USB interface of the device.
2) Press [MENU] to enter the main menu, and press [ ]
3) Press[ ] and[OK] to select the item to be downloaded.7] to
select "Attendance".
4) Enter the start and end dates then press [OK] to download.
Tips:The"Employee Form"enables the registration of employee
information,shift settings, and assigning shifts to employees. After
setup, it can be uploadedto the device via USB. Please use a U disk in
FAT32 format.

Manufacturer: Shanghaimuxinmuyeyouxiangongsi
Address: Shuangchenglu 803nong11hao1602A-1609shi, baoshanqu,
shanghai 200000 CN.
Imported to AUS: SIHAO PTY LTD. 1 ROKEVA STREETEASTWOOD
NSW 2122 Australia
Imported to USA: Sanven Technology Ltd. Suite 250, 9166 Anaheim
Place, Rancho Cucamonga, CA 91730
REP
EC
E-CrossStu GmbH
Mainzer Landstr.69, 60329 Frankfurt am Main.
REP
UK
YH CONSULTING LIMITED.
C/O YH Consulting Limited Office 147, Centurion
House, London Road, Staines-upon-Thames, Surrey,
TW18 4AX


Technique Assistance et certificat de garantie électronique
www.vevor.com/support
HORLOGE
MANUEL DE L'UTILISATEUR
MODÈLE: F01H
Nous continuons à nous engager à vous fournir des outils à des prix compétitifs.
"Économisez la moitié", "Moitié prix" ou toute autre expression similaire utilisée uniquement
par nous
représente une estimation des économies dont vous pourriez bénéficier en achetant
certains outils
avec nous par rapport aux grandes marques et ne signifie pas nécessairement couverture
toutes les catégories d'outils que nous proposons. Nous vous rappelons de bien vouloir
vérifier soigneusement
lorsque vous passez une commande chez nous si vous êtes réellement Économie
Moitié en comparaison avec les plus grandes marques.


1
MODÈLE: F01H
BESOIN D'AIDE? CONTACTEZ-NOUS!
Vous avez des questions sur les produits ? Besoin d'une assistance
technique ? N'hésitez pas à nous contacter:
Assistance technique et certificat de garantie électronique
www.vevor.com/support
Il s'agit des instructions originales, veuillez lire attentivement toutes les
instructions du manuel avant de l'utiliser. VEVOR se réserve une
interprétation claire de notre manuel d’utilisation. L'apparence du produit
dépend du produit que vous avez reçu. Veuillez nous pardonner que nous
ne vous informerons plus s'il y a des mises à jour technologiques ou
logicielles sur notre produit.
TIME CLOCK

2
Avertissement : Pour réduire le risque de blessure, l'utilisateur
doit lire attentivement le manuel d'instructions.
Cet appareil est conforme à la partie 15 des règles FCC. Son
fonctionnement est soumis aux deux conditions suivantes : (1) Cet
appareil ne doit pas provoquer d'interférences nuisibles et (2) cet
appareil doit accepter toute interférence reçue, y compris les
interférences susceptibles de provoquer un fonctionnement
indésirable.
Ce produit est soumis aux dispositions de la directive européenne
2012/19/CE. Le symbole représentant une poubelle barrée indique
que le produit nécessite une collecte sélective des déchets dans
l'Union européenne. Ceci s'applique au produit et à tous les
accessoires marqués de ce symbole. Les produits marqués comme
tels ne peuvent pas être jetés avec les ordures ménagères normales,
mais doivent être déposés dans un point de collecte pour le
recyclage des appareils électriques et électroniques.
INSTALLATION CAUTIONS
1. N'installez pas la machine à des températures extrêmement mauvaises
environnement. Veuillez garder l'appareil en état de marche température de
0ºC-45ºC.
2. N'installez pas la machine dans un endroit sale ou humide. S'il te plaît Gardez
l'appareil fonctionner dans un environnement sec et propre pendant durée de vie
plus longue.
3. Gardez l'appareil loin de la poussière, de l'eau et du feu. Tous les éléments
peuvent conduire à un court-circuit et à la carte mère dommage.
4. N'essayez pas de réparer la machine du côté de l'utilisateur, contactez
simplement le détaillant ou grossiste pour le service après-vente sous le garantie.
5. N'installez pas la machine à l'extérieur. La machine est suggéré d'installer à
l'intérieur pour les données et sécurité de l'appareil.
3
6. Faites une sauvegarde des données à temps régulier, évitez les imprévus
situations de perte de données qui se produisent.
7. Utilisez l'adaptateur secteur à tension stable correspondant dans l'unité
d'emballage par défaut, évitez que la machine ne soit endommagée en raison de
la différence de courant par rapport aux autres types d'alimentation.
adaptateur.
TECHNICAL PARAMETERS
PARTS LIST
Modèle
F01H
Puissance de travail
DC5V 1A5W
Sélection de la langue
Prend en charge 12 langues
( Anglais, allemand, français,
espagnol, italien, russe, néerlandais,
polonais, suédois, turc, portugais,
portugais brésilien )
Taille du produit
170*120*36mm
1
Adaptateur
1
2
Lecteur Flash
1
3
Vis autotaraudeuse
3
4
Manchon d' extension en plastique
3

4
ASSEMBLY STEP
ÉTAPE 1
Démontez la plaque de suspension arrière et fixez-la au mur pour sélectionner la
position d'installation appropriée, puis faites une marque.
Perçage sur mur selon la position marquée.
ÉTAPE 2
Fixez l' équipage S autotaraudeur au mur.

5
ÉTAPE 3
Installez l'appareil sur l' équipage autotaraudeur S et réparez-le, puis
mettez-le sous tension.
6
RECOMMENDED STEPS FOR INITIAL USE
Paramètres d'équipe → Paramètres du département → Inscription
des employés → Règles de présence → Présence des employés →
Afficher le rapport de présence
KEYPAD INSTRUCTIONS
MENU
Enter the menu (Functions as
the 'Delete' key during editing).
ESC
Cancel or exit the current
settings.
OK
Confirm the current settings.
Move the cursor up.
Move the cursor down.
0-9
Input numbers, English letters
or symbols.
Switch input method.

7
SHIFT SETTING
4) Appuyez sur [MENU] pour accéder au menu principal, appuyez sur
[ ]pour sélectionner « Attend. Rules » → « Shift ».
5) Appuyez sur [ ] pour sélectionner le décalage et appuyez sur
[OK] pour accéder à l'interface de modification.
6) Appuyez sur [ / ] pour déplacer le curseur sur l'option
souhaitée et saisir le temps de trajet.
Astuces : Après avoir tout supprimé dans la zone de saisie, "--"
s'affiche.
Tous les quarts de travail prennent en charge le paramètre de jour
croisé. Le paramètre par défaut est le décalage 1.
8
DEPARTMENT SETTING
Les utilisateurs peuvent modifier les noms des départements (16
départements peuvent être définis au maximum).
5) Appuyez sur [MENU] pour accéder au menu principal. Appuyez sur
[ ] pour sélectionner « Participer. Règles » → « Département ».
6) Appuyez sur [ ] pour sélectionner le département et appuyez
sur [OK] pour accéder à l'interface de modification.
7) Entrez le nom du département dans la zone de saisie. Appuyez sur
[OK] pour enregistrer le nom.
8) Appuyez sur [ ] pour déplacer le curseur sur l'option souhaitée
et entrez le numéro d'équipe.

9
EMPLOYEE ENROLL
4) Appuyez sur [MENU] pour accéder au menu principal, appuyez sur [V]
pour sélectionner « Employé » → « Inscription » et appuyez sur [OK] pour
accéder à l'interface de « Inscription ».
5) Saisissez l'ID, le nom et le service, puis sélectionnez « Inscrire » pour
accéder à l'interface « Informations sur les employés ».
6) Appuyez sur [ESC] pour enregistrer après avoir défini l'empreinte
digitale, le numéro de carte, le mot de passe et l'autorité selon les besoins.
ID:
Enter an employee ID. It supports only
numbers.
Name:
Enter a name. It supports a mix of
numbers, letters, and symbols.
Finger:
Enroll a fingerprint by press the collector
three times with the same finger.
Card (Optional):
Enroll a ID Card by swiping the card near
the reading area.
Password:
Enroll the password; It supports 1-6
digits of numbers.
Department:
Press [OK] to select a department from
the list.
Authority:
Press [OK] to select the authority
between Employee and Admin.

10
ATTENDANCE RULES
3) Appuyez sur [MENU] pour accéder au menu principal, appuyez sur
[ ] pour sélectionner « Attend. Règles » → « Règles », et appuyez
sur [OK] pour accéder à l'interface « Règles ».
4) Appuyez sur [OK] pour enregistrer les paramètres après avoir
défini les règles.

11
DOWNLOAD AND VIEW REPORTS
5) Insérez le disque U dans l'interface USB de l'appareil.
6) Appuyez sur [MENU] pour accéder au menu principal, puis
appuyez sur [ ]
7) Appuyez sur [ ] et [OK] pour sélectionner l'élément à
télécharger.7] pour sélectionner « Présence ».
8) Saisissez les dates de début et de fin puis appuyez sur [OK] pour
télécharger.
Conseils : Le « Formulaire d'employé » permet d'enregistrer les
informations sur les employés, les paramètres d'équipe et
l'attribution d'équipes aux employés. Après la configuration, il peut
être téléchargé sur l'appareil via USB. Veuillez utiliser un disque U au

12
format FAT32.

Fabricant : Shanghaimuxinmuyeyouxiangongsi
Adresse : Shuangchenglu 803nong11hao1602A-1609shi, baoshanqu,
Shanghai 200000 CN.
Importé en Australie : SIHAO PTY LTD. 1 ROKEVA STREETASTWOOD
NSW 2122 Australie
Importé aux États-Unis : Sanven Technology Ltd. Suite 250, 9166
Anaheim Place, Rancho Cucamonga, CA 91730
REP
EC
E-CrossStu GmbH
Mainzer Landstr.69, 60329 Frankfurt am Main.
REP
UK
YH CONSULTING LIMITED.
C/O YH Consulting Limited Office 147, Centurion
House, London Road, Staines-upon-Thames, Surrey,
TW18 4AX


Technisch Support und E-Garantie-Zertifikat
www.vevor.com/support
ZEIT UHR
BENUTZERHANDBUCH
MODELL:F01H
Wir sind weiterhin bestrebt, Ihnen Werkzeuge zu wettbewerbsfähigen Preisen anzubieten.
"Sparen Sie die Hälfte", "Halber Preis" oder andere ähnliche Ausdrücke, die wir nur
verwenden
stellt eine Schätzung der Einsparungen dar, die Sie durch den Kauf bestimmter Werkzeuge
erzielen können
mit uns im Vergleich zu den großen Top-Marken und bedeutet nicht unbedingt, Abdeckung
alle von uns angebotenen Werkzeugkategorien. Wir möchten Sie bitten, zu überprüfen
sorgfältig
wenn Sie bei uns eine Bestellung aufgeben, wenn Sie tatsächlich Speichern
Halb im Vergleich mit den Top-Großmarken.


1
MODELL:F01H
Brauchen Sie Hilfe? Kontaktieren Sie uns!
Sie haben Fragen zu unseren Produkten? Sie benötigen technischen
Support? Dann kontaktieren Sie uns gerne:
Technischer Support und E-Garantie-Zertifikat
www.vevor.com/support
Dies ist die Originalanleitung. Bitte lesen Sie alle Anweisungen sorgfältig
durch, bevor Sie das Gerät in Betrieb nehmen. VEVOR behält sich eine
klare Auslegung unserer Bedienungsanleitung vor. Das Erscheinungsbild
des Produkts richtet sich nach dem Produkt, das Sie erhalten haben. Bitte
verzeihen Sie uns, dass wir Sie nicht erneut informieren, wenn es
Technologie- oder Software-Updates für unser Produkt gibt .
TIME CLOCK
2
Warnung: Um das Verletzungsrisiko zu verringern, muss der
Benutzer die Bedienungsanleitung sorgfältig lesen.
Dieses Gerät entspricht Teil 15 der FCC-Bestimmungen. Der Betrieb
unterliegt den folgenden beiden Bedingungen: (1) Dieses Gerät darf
keine schädlichen Störungen verursachen und (2) dieses Gerät
muss alle empfangenen Störungen akzeptieren, einschließlich
Störungen, die einen unerwünschten Betrieb verursachen können.
Dieses Produkt unterliegt den Bestimmungen der europäischen
Richtlinie 2012/19/EU. Das Symbol einer durchgestrichenen
Mülltonne weist darauf hin, dass das Produkt in der Europäischen
Union einer getrennten Müllentsorgung unterliegt. Dies gilt für das
Produkt und alle mit diesem Symbol gekennzeichneten Zubehörteile.
So gekennzeichnete Produkte dürfen nicht im normalen Hausmüll
entsorgt werden, sondern müssen an einer Sammelstelle für das
Recycling von elektrischen und elektronischen Geräten abgegeben
werden.
INSTALLATION CAUTIONS
1. Installieren Sie die Maschine nicht bei extrem schlechten Temperaturen
Umgebung. Bitte halten Sie das Gerät in der Temperatur von 0ºC-45ºC.
2. Installieren Sie die Maschine nicht an einem schmutzigen oder feuchten Ort.
Bitte Bewahren Sie das Gerät in einer trockenen und sauberen Umgebung auf.
längere Lebensdauer.
3.Halten Sie das Gerät fern von Staub, Wasser und Feuer. Die Elemente können
zu Kurzschlüssen und zum Ausfall der Hauptplatine führen. Schaden.
4. Versuchen Sie nicht, die Maschine selbst zu reparieren, sondern kontaktieren
Sie einfach den Einzel- oder Großhändler für den Kundendienst unter Garantie.
5. Installieren Sie die Maschine nicht im Freien. Die Maschine ist Es wird
empfohlen, die Daten in Innenräumen zu installieren und Gerätesicherheit.
6. Führen Sie regelmäßig eine Datensicherung durch. Vermeiden Sie unerwartete
3
Es kommt vor, dass Daten verloren gehen.
7.Verwenden Sie das passende stabile Spannungsadapter in der
Standardverpackungseinheit, vermeiden Sie, dass die Maschine aufgrund von
Stromunterschieden zu anderen Stromarten beschädigt wird
Adapter.
TECHNICAL PARAMETERS
PARTS LIST
Modell
F01H
Arbeitsleistung
DC 5 V, 1 A, 5 W
Sprachauswahl
Unterstützt 12 Sprachen
( Englisch, Deutsch, Französisch,
Spanisch, Italienisch, Russisch,
Niederländisch, Polnisch,
Schwedisch, Türkisch, Portugiesisch,
Brasilianisches Portugiesisch )
Produktgröße
170*120*36 mm
1
Adapter
1
2
Flash Drive
1
3
Selbstschneidende S- Schraube
3
4
Kunststoff - Dehnhülse
3

4
ASSEMBLY STEP
SCHRITT 1
Demontieren Sie die hintere Aufhängeplatte und befestigen Sie sie an der Wand,
um die geeignete Installationsposition auszuwählen, und machen Sie
anschließend eine Markierung.
Bohren Sie entsprechend der markierten Position in die Wand.
SCHRITT 2
Befestigen Sie die selbstschneidende S- Schraube an der Wand.

5
SCHRITT 3
Installieren Sie das Gerät an der selbstschneidenden S- Schraube ,
befestigen Sie es und schalten Sie es ein.

6
RECOMMENDED STEPS FOR INITIAL USE
Schichteinstellung →Abteilungseinstellung
→Mitarbeiterregistrierung →Anwesenheitsregeln
→Mitarbeiteranwesenheit →Anwesenheitsbericht anzeigen
KEYPAD INSTRUCTIONS
MENU
Enter the menu (Functions as
the 'Delete' key during editing).
ESC
Cancel or exit the current
settings.
OK
Confirm the current settings.
Move the cursor up.
Move the cursor down.
0-9
Input numbers, English letters
or symbols.
Switch input method.

7
SHIFT SETTING
7) Drücken Sie [MENU], um das Hauptmenü aufzurufen, drücken Sie
[ ], um „Teilnahmeregeln“ → „Umschalten“ auszuwählen.
8) Drücken Sie [ ], um die Verschiebung auszuwählen, und
drücken Sie [OK], um das Änderungsmenü aufzurufen.
9) Drücken Sie [ / ], um den Cursor auf die gewünschte Option
zu bewegen und die Pendelzeit einzugeben.
Tipps: Nachdem Sie alles im Eingabefeld gelöscht haben, wird dort
„--“ angezeigt.
Alle Schichten unterstützen die tagesübergreifende Einstellung. Die
Standardeinstellung ist Schicht 1.
8
DEPARTMENT SETTING
Benutzer können die Abteilungsnamen bearbeiten (es können
maximal 16 Abteilungen festgelegt werden).
9) Drücken Sie [MENU], um das Hauptmenü aufzurufen. Drücken Sie
[ ], um „Teilnahmeregeln“→„Abteilung“ auszuwählen.
10) Drücken Sie [ ], um die Abteilung auszuwählen, und drücken
Sie [OK], um das Änderungsmenü aufzurufen.
11) Geben Sie den Abteilungsnamen in das Eingabefeld ein. Drücken
Sie [OK], um den Namen zu speichern.
12) Drücken Sie [ ], um den Cursor auf die gewünschte Option zu
bewegen und die Schichtnummer einzugeben.

9
EMPLOYEE ENROLL
7) Drücken Sie [MENU], um das Hauptmenü aufzurufen, drücken Sie [V],
um „Mitarbeiter“ → „Registrieren“ auszuwählen, und drücken Sie [OK], um
die Schnittstelle „Registrieren“ aufzurufen.
8) Geben Sie ID, Name und Abteilung ein und wählen Sie „Registrieren“,
um die Schnittstelle „Mitarbeiterinformationen“ aufzurufen.
9) Drücken Sie [ESC] zum Speichern, nachdem Sie Fingerabdruck,
Kartennummer, Passwort und Berechtigung nach Bedarf festgelegt haben.
ID:
Enter an employee ID. It supports only
numbers.
Name:
Enter a name. It supports a mix of
numbers, letters, and symbols.
Finger:
Enroll a fingerprint by press the collector
three times with the same finger.
Card (Optional):
Enroll a ID Card by swiping the card near
the reading area.
Password:
Enroll the password; It supports 1-6
digits of numbers.
Department:
Press [OK] to select a department from
the list.
Authority:
Press [OK] to select the authority
between Employee and Admin.

10
ATTENDANCE RULES
5) Drücken Sie [MENU], um das Hauptmenü aufzurufen, drücken Sie
[ ] , um „Teilnahmeregeln“ → „Regeln“ auszuwählen, und drücken
Sie [OK], um die Schnittstelle „Regeln“ aufzurufen.
6) Drücken Sie [OK], um die Einstellungen nach dem Festlegen der
Regeln zu speichern.
11
DOWNLOAD AND VIEW REPORTS
9) Stecken Sie die U-Disk in die USB-Schnittstelle des Geräts.
10) Drücken Sie [MENU], um das Hauptmenü aufzurufen, und
drücken Sie [ ]
11) Drücken Sie [ ] und [OK], um das herunterzuladende Element
auszuwählen.7], um „Anwesenheit“ auszuwählen.
12) Geben Sie das Start- und Enddatum ein und drücken Sie zum
Herunterladen auf [OK].
Tipps: Das „Mitarbeiterformular“ ermöglicht die Registrierung von
Mitarbeiterinformationen, Schichteinstellungen und die Zuweisung
von Schichten an Mitarbeiter. Nach der Einrichtung kann es per USB
auf das Gerät hochgeladen werden. Bitte verwenden Sie eine U-Disk

12
im FAT32-Format.

Hersteller: Shanghaimuxinmuyeyouxiangongsi
Adresse: Shuangchenglu 803nong11hao1602A-1609shi, baoshanqu,
Shanghai 200000 CN.
Nach AUS importiert: SIHAO PTY LTD. 1 ROKEVA
STREETEASTWOOD NSW 2122 Australien
Importiert in die USA: Sanven Technology Ltd. Suite 250, 9166 Anaheim
Place, Rancho Cucamonga, CA 91730
REP
EC
E-CrossStu GmbH
Mainzer Landstr.69, 60329 Frankfurt am Main.
REP
UK
YH CONSULTING LIMITED.
C/O YH Consulting Limited Office 147, Centurion
House, London Road, Staines-upon-Thames, Surrey,
TW18 4AX


Tecnico Supporto e certificato di garanzia elettronica
www.vevor.com/support
OROLOGIO
MANUALE D'USO
MODELLO: F01H
Continuiamo a impegnarci per fornirvi strumenti a prezzi competitivi.
"Risparmia la metà", "Metà prezzo" o qualsiasi altra espressione simile utilizzata solo da noi
rappresenta una stima del risparmio che potresti trarre dall'acquisto di determinati strumenti
con noi rispetto ai principali marchi più importanti e non significa necessariamente farlo
copertina
tutte le categorie di strumenti da noi offerti. Si ricorda gentilmente di verificare
accuratamente
quando effettui un ordine con noi, se lo sei effettivamente Salvataggio
Metà rispetto ai principali marchi.


1
MODELLO: F01H
HO BISOGNO DI AIUTO? CONTATTACI!
Hai domande sul prodotto? Hai bisogno di supporto tecnico? Non
esitate a contattarci:
Supporto tecnico e certificato di garanzia elettronica
www.vevor.com/support
Queste sono le istruzioni originali, leggere attentamente tutte le istruzioni
del manuale prima dell'uso. VEVOR si riserva una chiara interpretazione
del nostro manuale d'uso. L'aspetto del prodotto sarà soggetto al prodotto
ricevuto. Ti preghiamo di perdonarci se non ti informeremo più se sono
presenti aggiornamenti tecnologici o software sul nostro prodotto.
TIME CLOCK

2
Avvertenza: per ridurre il rischio di lesioni, l'utente deve
leggere attentamente il manuale di istruzioni.
Questo dispositivo è conforme alla Parte 15 delle norme FCC. Il
funzionamento è soggetto alle seguenti due condizioni: (1) Questo
dispositivo non può causare interferenze dannose e (2) questo
dispositivo deve accettare qualsiasi interferenza ricevuta, comprese
le interferenze che potrebbero causare un funzionamento
indesiderato.
Questo prodotto è soggetto alle disposizioni della Direttiva Europea
2012/19/CE. Il simbolo del bidone della spazzatura barrato indica
che nell'Unione Europea il prodotto richiede la raccolta differenziata
dei rifiuti. Ciò vale per il prodotto e tutti gli accessori contrassegnati
da questo simbolo. I prodotti contrassegnati come tali non possono
essere smaltiti con i normali rifiuti domestici, ma devono essere
portati in un punto di raccolta per il riciclaggio di dispositivi elettrici ed
elettronici
INSTALLATION CAUTIONS
1.Non installare la macchina a temperature estremamente sfavorevoli ambiente.
Si prega di mantenere il dispositivo funzionante temperatura di 0ºC-45ºC.
2.Non installare la macchina in un luogo sporco o umido. Per favore mantenere il
dispositivo in funzione in un ambiente asciutto e pulito durata di vita più lunga.
3.Tenere il dispositivo lontano da polvere, acqua e fuoco. Tutto gli elementi
potrebbero causare un cortocircuito e la scheda madre danno.
4. Non tentare di riparare la macchina presso l'utente, contattare semplicemente il
rivenditore o grossista per il servizio post-vendita ai sensi del garanzia.
5.Non installare la macchina all'aperto. La macchina è suggerito di installare in un
luogo interno per i dati e sicurezza del dispositivo.
6. Eseguire il backup dei dati a intervalli regolari, evitare imprevisti situazioni in cui
si verificano perdite di dati.
3
7.Utilizzare l'adattatore di alimentazione a tensione stabile abbinato nel pacchetto
predefinito, evitare che la macchina venga danneggiata a causa della differenza di
corrente rispetto ad altri tipi di alimentazione
adattatore.
TECHNICAL PARAMETERS
PARTS LIST
Modello
F01H
Potenza di lavoro
CC 5 V 1 A 5 W
Selezione della lingua
Supporta 12 lingue
( Inglese, tedesco, francese,
spagnolo, italiano, russo, olandese,
polacco, svedese, turco, portoghese,
portoghese brasiliano )
Taglia del prodotto
170*120*36mm
1
Adattatore
1
2
Flash Drive
1
3
Squadra S auto-tappante
3
4
Manicotto di espansione in plastica
3

4
ASSEMBLY STEP
PASSO 1
Smontare la piastra di sospensione posteriore e fissarla alla parete per selezionare
la posizione di installazione adatta, quindi tracciare un segno.
Foratura sul muro secondo la posizione segnata.
PASSO 2
Fissa la squadra S autofilettante sul muro.

5
PASSO 3
Installa il dispositivo sulla squadra S autofilettante e riparalo, quindi accendilo.

6
RECOMMENDED STEPS FOR INITIAL USE
Impostazione turno →Impostazione reparto→Iscrizione
dipendente→Regole di presenza→Presenza del
dipendente→Visualizza rapporto presenze
KEYPAD INSTRUCTIONS
MENU
Enter the menu (Functions as
the 'Delete' key during editing).
ESC
Cancel or exit the current
settings.
OK
Confirm the current settings.
Move the cursor up.
Move the cursor down.
0-9
Input numbers, English letters
or symbols.
Switch input method.

7
SHIFT SETTING
10) Premere [MENU] per accedere al menu principale, premere [ ]
per selezionare "Regole di partecipazione"→"Shift".
11) Premere [ ] per selezionare lo spostamento e premere [OK] per
accedere all'interfaccia di modifica.
12) Premere[ / ] per spostare il cursore sull'opzione desiderata
e inserire il tempo di percorrenza.
Suggerimenti: dopo aver eliminato tutto nella casella di immissione,
viene visualizzato "--".
Tutti i turni supportano l'impostazione su più giorni. L'impostazione
predefinita è turno 1.

8
DEPARTMENT SETTING
Gli utenti possono modificare i nomi dei dipartimenti (è possibile
impostare un massimo di 16 dipartimenti).
13) Premere [MENU] per accedere al menu principale. Premere [ ]
per selezionare "Regole di partecipazione"→"Dipartimento".
14) Premere [ ] per selezionare il reparto e premere [OK] per
accedere all'interfaccia di modifica.
15) Immettere il nome del dipartimento nella casella di immissione.
Premere [OK] per salvare il nome.
16) Premere [ ] per spostare il cursore sull'opzione desiderata e
immettere il numero del turno.

9
EMPLOYEE ENROLL
10) Premere [MENU] per accedere al menu principale, premere [V] per
selezionare "Dipendente" → "Iscriviti" e premere [OK] per accedere
all'interfaccia di "Iscriviti".
11) Inserisci l'ID, il nome e il dipartimento e seleziona "Iscriviti" per
accedere all'interfaccia "Informazioni sui dipendenti".
12) Premere [ESC] per salvare dopo aver impostato l'impronta digitale, il
numero della carta, la password e l'autorità come richiesto.
ID:
Enter an employee ID. It supports only
numbers.
Name:
Enter a name. It supports a mix of
numbers, letters, and symbols.
Finger:
Enroll a fingerprint by press the collector
three times with the same finger.
Card (Optional):
Enroll a ID Card by swiping the card near
the reading area.
Password:
Enroll the password; It supports 1-6
digits of numbers.
Department:
Press [OK] to select a department from
the list.
Authority:
Press [OK] to select the authority
between Employee and Admin.

10
ATTENDANCE RULES
7) Premere [MENU] per accedere al menu principale, premere [ ]
per selezionare "Regole di partecipazione" → "Regole" e premere
[OK] per accedere all'interfaccia "Regole".
8) Premere [OK] per salvare le impostazioni dopo aver impostato le
regole.

11
DOWNLOAD AND VIEW REPORTS
13) Inserire il disco U nell'interfaccia USB del dispositivo.
14) Premere [MENU] per accedere al menu principale, quindi premere
[ ]
15) Premere [ ] e [OK] per selezionare l'elemento da scaricare.7]
per selezionare "Partecipazione".
16) Immettere le date di inizio e fine, quindi premere [OK] per
scaricare.
Suggerimenti: il "Modulo dipendente" consente la registrazione delle
informazioni sui dipendenti, le impostazioni dei turni e l'assegnazione
dei turni ai dipendenti. Dopo la configurazione, può essere caricato
sul dispositivo tramite USB. Utilizzare un disco U in formato FAT32.

Produttore: Shanghaimuxinmuyeyouxiangongsi
Indirizzo: Shuangchenglu 803nong11hao1602A-1609shi, baoshanqu,
shanghai 200000 CN.
Importato in AUS: SIHAO PTY LTD. 1 ROKEVA STREETEASTWOOD
NSW 2122 Australia
Importato negli Stati Uniti: Sanven Technology Ltd. Suite 250, 9166
Anaheim Place, Rancho Cucamonga, CA 91730
REP
EC
E-CrossStu GmbH
Mainzer Landstr.69, 60329 Frankfurt am Main.
REP
UK
YH CONSULTING LIMITED.
C/O YH Consulting Limited Office 147, Centurion
House, London Road, Staines-upon-Thames, Surrey,
TW18 4AX


Técnico Certificado de soporte y garantía electrónica
www.vevor.com/support
RELOJ DE TIEMPO
MANUAL DE USUARIO
MODELO: F01H
Seguimos comprometidos a proporcionarle herramientas a precios competitivos.
"Ahorre a mitad de precio", "A mitad de precio" o cualquier otra expresión similar utilizada
únicamente por nosotros
representa una estimación de los ahorros que podría beneficiarse al comprar ciertas
herramientas
con nosotros en comparación con las principales marcas principales y no necesariamente
significa cubrir
todas las categorías de herramientas que ofrecemos. Se le recuerda amablemente verificar
con cuidado
cuando realiza un pedido con nosotros si realmente está Ahorro
Medio en comparación con las principales marcas.


1
MODELO: F01H
¿NECESITAS AYUDA? ¡CONTÁCTENOS!
¿Tiene preguntas sobre el producto? ¿Necesita soporte técnico?
Siéntete libre de contactarnos:
Soporte técnico y certificado de garantía electrónica
www.vevor.com/support
Estas son las instrucciones originales; lea atentamente todas las
instrucciones del manual antes de operar. VEVOR se reserva una
interpretación clara de nuestro manual de usuario. La apariencia del
producto estará sujeta al producto que recibió. Perdone que no le
informaremos nuevamente si hay actualizaciones de tecnología o
software en nuestro producto.
TIME CLOCK
2
Advertencia: para reducir el riesgo de lesiones, el usuario
debe leer atentamente el manual de instrucciones.
Este dispositivo cumple con la Parte 15 de las normas de la FCC. El
funcionamiento está sujeto a las dos condiciones siguientes: (1) Este
dispositivo no puede causar interferencias dañinas y (2) este
dispositivo debe aceptar cualquier interferencia recibida, incluidas
las interferencias que puedan causar un funcionamiento no
deseado.
Este producto está sujeto a las disposiciones de la Directiva Europea
2012/19/CE. El símbolo que muestra un contenedor con ruedas
tachado indica que el producto requiere recogida selectiva de basura
en la Unión Europea. Esto se aplica al producto y a todos los
accesorios marcados con este símbolo. Los productos marcados
como tales no podrán desecharse con la basura doméstica normal,
sino que deberán llevarse a un punto de recogida para el reciclaje de
aparatos eléctricos y electrónicos.
INSTALLATION CAUTIONS
1. No instale la máquina en temperaturas extremadamente malas. ambiente.
Mantenga el dispositivo funcionando a la Temperatura de 0ºC-45ºC.
2. No instale la máquina en un lugar sucio o húmedo. Por favor Mantenga el
dispositivo funcionando en un ambiente seco y limpio durante mayor tiempo de
vida.
3.Mantenga el dispositivo alejado del polvo, el agua y el fuego. Todo Los
elementos pueden provocar un cortocircuito y la placa base. daño.
4. No intente reparar la máquina por parte del usuario, simplemente comuníquese
con el minorista o mayorista para el servicio postventa bajo el garantía.
5. No instale la máquina al aire libre. La máquina está Se sugiere instalar en un
lugar interior para los datos y seguridad del dispositivo.
6.Haga una copia de seguridad de los datos a tiempo, evite imprevistos
3
situaciones de pérdida de datos.
7. Utilice el adaptador de corriente de voltaje estable correspondiente en la unidad
de paquete predeterminada, evite que la máquina se dañe debido a la diferencia
de corriente con otros tipos de energía.
adaptador.
TECHNICAL PARAMETERS
PARTS LIST
Modelo
F01H
Potencia de trabajo
CC 5 V 1 A 5 W.
Selección de idioma
Soporta 12 idiomas
( inglés, alemán, francés, español,
italiano, ruso, holandés, polaco,
sueco, turco, portugués, portugués
brasileño )
Tamaño del producto
170*120*36mm
1
Adaptador
1
2
Unidad flash
1
3
Tornillo penetrante
3
4
Manga de expansión de plástico
3

4
ASSEMBLY STEP
PASO 1
Desmonte la placa colgante trasera y fíjela a la pared para seleccionar la posición
de instalación adecuada y luego haga una marca.
Perforación en pared según la posición marcada.
PASO 2
Fije el equipo S autorroscante en la pared.

5
PASO 3
Instale el dispositivo en el equipo S autorroscante y arréglelo, luego
enciéndalo.

6
RECOMMENDED STEPS FOR INITIAL USE
Configuración de turno → Configuración de departamento →
Inscripción de empleados → Reglas de asistencia → Asistencia de
empleados → Ver informe de asistencia
KEYPAD INSTRUCTIONS
MENU
Enter the menu (Functions as
the 'Delete' key during editing).
ESC
Cancel or exit the current
settings.
OK
Confirm the current settings.
Move the cursor up.
Move the cursor down.
0-9
Input numbers, English letters
or symbols.
Switch input method.

7
SHIFT SETTING
13) Presione [MENÚ] para ingresar al menú principal, presione [ ]
para seleccionar "Reglas de asistencia" → "Turno".
14) Presione [ ] para seleccionar el turno y presione [OK] para
ingresar a la interfaz de modificación.
15) Presione [ / ] para mover el cursor a la opción deseada e
ingrese el tiempo de viaje.
Consejos: Después de eliminar todo lo que hay en el cuadro de
entrada, muestra "--".
Todos los turnos admiten la configuración de días cruzados. La
configuración predeterminada es el turno 1.

8
DEPARTMENT SETTING
Los usuarios pueden editar los nombres de los departamentos (se
pueden configurar 16 departamentos como máximo).
17) Presione [MENÚ] para ingresar al menú principal. Presione [ ]
para seleccionar "Reglas de asistencia" → "Departamento".
18) Presione [ ] para seleccionar el departamento y presione [OK]
para ingresar a la interfaz de modificación.
19) Ingrese el nombre del departamento en el cuadro de entrada.
Presione [OK] para guardar el nombre.
20) Presione [ ] para mover el cursor a la opción deseada e
ingrese el número de turno.

9
EMPLOYEE ENROLL
13) Presione [MENÚ] para ingresar al menú principal, presione [V] para
seleccionar “Empleado” → “Inscribir”, y presione [OK] para ingresar a la
interfaz de “Inscribir”.
14) Ingrese el ID, el nombre y el departamento, y seleccione "Inscribirse"
para ingresar a la interfaz de "Información del empleado".
15) Presione [ESC] para guardar después de configurar la huella digital, el
número de tarjeta, la contraseña y la autoridad según sea necesario.
ID:
Enter an employee ID. It supports only
numbers.
Name:
Enter a name. It supports a mix of
numbers, letters, and symbols.
Finger:
Enroll a fingerprint by press the collector
three times with the same finger.
Card (Optional):
Enroll a ID Card by swiping the card near
the reading area.
Password:
Enroll the password; It supports 1-6
digits of numbers.
Department:
Press [OK] to select a department from
the list.
Authority:
Press [OK] to select the authority
between Employee and Admin.

10
ATTENDANCE RULES
9) Presione [MENÚ] para ingresar al menú principal, presione [ ]
para seleccionar "Reglas de asistencia" → "Reglas" y presione [OK]
para ingresar a la interfaz de "Reglas".
10) Presione [OK] para guardar la configuración después de
configurar las reglas.

11
DOWNLOAD AND VIEW REPORTS
17) Inserte el disco U en la interfaz USB del dispositivo.
18) Presione [MENÚ] para ingresar al menú principal y presione [ ]
19) Presione [ ] y [OK] para seleccionar el elemento que desea
descargar.7] para seleccionar "Asistencia".
20) Ingrese las fechas de inicio y finalización y luego presione [OK]
para descargar.
Consejos: El "Formulario de empleado" permite registrar la
información de los empleados, configurar los turnos y asignar turnos
a los empleados. Después de la configuración, se puede cargar en el
dispositivo mediante USB. Utilice un disco U en formato FAT32.

Fabricante: Shanghaimuxinmuyeyouxiangongsi
Dirección: Shuangchenglu 803nong11hao1602A-1609shi, baoshanqu,
shanghai 200000 CN.
Importado a AUS: SIHAO PTY LTD. 1 ROKEVA STREETASTWOOD
NSW 2122 Australia
Importado a EE. UU.: Sanven Technology Ltd. Suite 250, 9166 Anaheim
Place, Rancho Cucamonga, CA 91730
REP
EC
E-CrossStu GmbH
Mainzer Landstr.69, 60329 Frankfurt am Main.
REP
UK
YH CONSULTING LIMITED.
C/O YH Consulting Limited Office 147, Centurion
House, London Road, Staines-upon-Thames, Surrey,
TW18 4AX


Techniczny Certyfikat wsparcia i e-gwarancji
www.vevor.com/support
ZEGAR
INSTRUKCJA OBSŁUGI
MODEL: F01H
Nadal dokładamy wszelkich starań, aby zapewnić Państwu narzędzia w konkurencyjnej
cenie.
„Zaoszczędź pół ceny”, „Zaoszczędź połowę ceny” lub inne podobne wyrażenia używane
wyłącznie przez nas
reprezentuje szacunkową oszczędność, jaką możesz zyskać kupując określone narzędzia
z nami w porównaniu z głównymi, najlepszymi markami i niekoniecznie to oznacza okładka
wszystkie kategorie oferowanych przez nas narzędzi. Przypominamy o weryfikacji ostrożnie
kiedy składasz u nas zamówienie, jeśli faktycznie tak jest Oszczędność
Połowa w porównaniu z czołowymi markami.


1
MODEL: F01H
POTRZEBUJĘ POMOCY? SKONTAKTUJ SIĘ Z NAMI!
Masz pytania dotyczące produktu? Potrzebujesz wsparcia
technicznego? Śmiało możesz się z nami skontaktować:
Wsparcie techniczne i certyfikat e-gwarancji
www.vevor.com/support
To jest oryginalna instrukcja. Przed przystąpieniem do obsługi prosimy o
dokładne zapoznanie się ze wszystkimi instrukcjami. VEVOR zastrzega
sobie jasną interpretację naszej instrukcji obsługi. Wygląd produktu
zależy od produktu, który otrzymałeś. Proszę wybaczyć nam, że nie
będziemy ponownie informować Państwa, jeśli pojawią się jakieś
aktualizacje technologii lub oprogramowania naszego produktu.
TIME CLOCK
2
Ostrzeżenie — aby zmniejszyć ryzyko obrażeń, użytkownik
musi uważnie przeczytać instrukcję obsługi.
To urządzenie jest zgodne z częścią 15 przepisów FCC. Działanie
podlega następującym dwóm warunkom: (1) to urządzenie nie może
powodować szkodliwych zakłóceń oraz (2) to urządzenie musi
akceptować wszelkie odbierane zakłócenia, w tym zakłócenia, które
mogą powodować niepożądane działanie.
Ten produkt podlega przepisom Dyrektywy Europejskiej 2012/19/EC.
Symbol przekreślonego kosza na śmieci oznacza, że produkt
wymaga selektywnej zbiórki śmieci na terenie Unii Europejskiej.
Dotyczy to produktu i wszystkich akcesoriów oznaczonych tym
symbolem. Produktów oznaczonych jako takie nie można wyrzucać
razem ze zwykłymi odpadami domowymi, lecz należy je oddać do
punktu zbiórki w celu recyklingu urządzeń elektrycznych i
elektronicznych
INSTALLATION CAUTIONS
1. Nie instaluj urządzenia w bardzo złej temperaturze środowisko. Proszę, aby
urządzenie działało w godz temperatura 0°C-45°C.
2. Nie instaluj urządzenia w brudnym lub wilgotnym miejscu. Proszę przechowuj
urządzenie w suchym i czystym środowisku dłuższy czas życia.
3. Trzymaj urządzenie z dala od kurzu, wody i ognia. Wszystko elementy mogą
doprowadzić do zwarcia i płyty głównej szkoda.
4. Nie próbuj naprawiać urządzenia po stronie użytkownika, po prostu skontaktuj
się z sprzedawcy detalicznego lub hurtownika w celu świadczenia usług
posprzedażnych w ramach Gwarancja.
5. Nie instaluj urządzenia na zewnątrz. Maszyna jest Sugerowano instalację w
pomieszczeniu w celu przechowywania danych i bezpieczeństwo urządzenia.
6. Wykonuj kopie zapasowe danych regularnie, unikaj nieoczekiwanych sytuacji
zdarzające się sytuacje utraty danych.
3
7. Użyj dopasowanego zasilacza o stabilnym napięciu w domyślnym opakowaniu,
aby uniknąć uszkodzenia maszyny z powodu różnicy prądu w stosunku do innych
rodzajów zasilania
adapter.
TECHNICAL PARAMETERS
PARTS LIST
Model
F01H
Moc robocza
DC5V 1A5W
Wybór języka
Obsługuje 12 języków
( Angielski, Niemiecki, Francuski,
Hiszpański, Włoski, Rosyjski,
Holenderski, Polski, Szwedzki,
Turecki, Portugalski, Portugalski
brazylijski )
Rozmiar produktu
170*120*36mm
1
Adapter
1
2
Pamiec przenosna
1
3
Samogwintujące śruby
3
4
Plastikowy kołnierz rozszerzający
3

4
ASSEMBLY STEP
KROK 1
Zdemontuj tylną płytkę do zawieszania i przymocuj ją do ściany, aby wybrać
odpowiednią pozycję montażową, a następnie wykonaj znak.
Wiercenie w ścianie zgodnie z zaznaczoną pozycją.
KROK 2
Napraw załogę Samogwintującego S na ścianie.

5
KROK 3
Zainstaluj urządzenie na załodze Self-tapping S i napraw je, a następnie włącz
zasilanie.

6
RECOMMENDED STEPS FOR INITIAL USE
Ustawienia zmiany → Ustawienia działu → Rejestracja pracowników
→ Zasady obecności → Obecność pracowników → Wyświetl raport
obecności
KEYPAD INSTRUCTIONS
MENU
Enter the menu (Functions as
the 'Delete' key during editing).
ESC
Cancel or exit the current
settings.
OK
Confirm the current settings.
Move the cursor up.
Move the cursor down.
0-9
Input numbers, English letters
or symbols.
Switch input method.

7
SHIFT SETTING
16) Naciśnij [MENU], aby wejść do menu głównego, naciśnij [ ],
aby wybrać „Zasady uczestnictwa” → „Shift”.
17) Naciśnij [ ], aby wybrać przesunięcie i naciśnij [OK] , aby wejść
do interfejsu modyfikacji.
18) Naciśnij [ / ], aby przesunąć kursor na żądaną opcję i
wprowadzić czas dojazdu.
Wskazówki: Po usunięciu wszystkiego w polu wprowadzania pojawi
się „--”.
Wszystkie zmiany obsługują ustawienie międzydniowe. Domyślnym
ustawieniem jest przesunięcie 1.
8
DEPARTMENT SETTING
Użytkownicy mogą edytować nazwy działów (można ustawić
maksymalnie 16 działów).
21) Naciśnij [MENU], aby wejść do menu głównego. Naciśnij [ ],
aby wybrać „Zasady obecności” → „Dział”.
22) Naciśnij [ ], aby wybrać dział i naciśnij [OK], aby wejść do
interfejsu modyfikacji.
23) Wpisz nazwę działu w polu wprowadzania. Naciśnij [OK], aby
zapisać nazwę.
24) Naciśnij [ ], aby przesunąć kursor na żądaną opcję i
wprowadzić numer zmiany.
9
EMPLOYEE ENROLL
16) Naciśnij [MENU], aby wejść do menu głównego, naciśnij [V], aby
wybrać „Pracownik” → „Zapisz” i naciśnij [OK], aby wejść do interfejsu
„Zapisz”.
17) Wprowadź identyfikator, nazwisko i dział, a następnie wybierz
„Zarejestruj”, aby wejść do interfejsu „Informacje o pracowniku”.
18) Naciśnij [ESC], aby zapisać po ustawieniu odcisku palca, numeru
karty, hasła i uprawnień, zgodnie z wymaganiami.
ID:
Enter an employee ID. It supports only
numbers.
Name:
Enter a name. It supports a mix of
numbers, letters, and symbols.
Finger:
Enroll a fingerprint by press the collector
three times with the same finger.
Card (Optional):
Enroll a ID Card by swiping the card near
the reading area.
Password:
Enroll the password; It supports 1-6
digits of numbers.
Department:
Press [OK] to select a department from
the list.
Authority:
Press [OK] to select the authority
between Employee and Admin.

10
ATTENDANCE RULES
11) Naciśnij [MENU], aby wejść do menu głównego, naciśnij [ ] ,
aby wybrać „Zasady uczestnictwa” → „Zasady” i naciśnij [OK], aby
wejść do interfejsu „Zasady”.
12) Naciśnij [OK], aby zapisać ustawienia po ustawieniu reguł.

11
DOWNLOAD AND VIEW REPORTS
21) Włóż dysk U do interfejsu USB urządzenia.
22) Naciśnij [MENU], aby wejść do menu głównego i naciśnij [ ]
23) Naciśnij [ ] i [OK], aby wybrać element do pobrania.7], aby
wybrać „Obecność”.
24) Wprowadź daty rozpoczęcia i zakończenia, a następnie naciśnij
przycisk [OK], aby pobrać.
Wskazówki: „Formularz pracownika” umożliwia rejestrację danych
pracowników, ustawienia zmian i przydzielanie zmian pracownikom.
Po skonfigurowaniu można go przesłać na urządzenie przez USB.
Użyj dysku U w formacie FAT32.

Producent: Shanghaimuxinmuyeyouxiangongsi
Adres: Shuangchenglu 803nong11hao1602A-1609shi, baoshanqu,
szanghaj 200000 CN.
Import do AUS: SIHAO PTY LTD. 1 ROKEVA STREETEASTWOOD NSW
2122 Australia
Import do USA: Sanven Technology Ltd. Suite 250, 9166 Anaheim Place,
Rancho Cucamonga, CA 91730
REP
EC
E-CrossStu GmbH
Mainzer Landstr.69, 60329 Frankfurt am Main.
REP
UK
YH CONSULTING LIMITED.
C/O YH Consulting Limited Office 147, Centurion
House, London Road, Staines-upon-Thames, Surrey,
TW18 4AX


Technisch Ondersteuning en e-garantiecertificaat
www.vevor.com/support
TIJDKLOK
HANDLEIDING
MODEL: F01H
We blijven ons inzetten om u gereedschap tegen een concurrerende prijs te bieden.
"Bespaar de helft", "Halve prijs" of andere soortgelijke uitdrukkingen die alleen door ons
worden gebruikt
vertegenwoordigt een schatting van de besparingen die u zou kunnen opleveren als u
bepaalde hulpmiddelen koopt
bij ons vergeleken met de grote topmerken en dat hoeft niet per se zo te zijn omslag
alle categorieën tools die door ons worden aangeboden. U wordt er vriendelijk aan
herinnerd om dit te verifiëren voorzichtig
wanneer u bij ons een bestelling plaatst, als u dat daadwerkelijk doet Besparing
Half in vergelijking met de belangrijkste grote merken.


1
MODEL: F01H
HULP NODIG? NEEM CONTACT MET ONS OP!
Heeft u productvragen? Technische ondersteuning nodig? Neem dan
gerust contact met ons op:
Technische ondersteuning en e-garantiecertificaat
www.vevor.com/support
Dit is de originele instructie. Lees alle instructies in de handleiding
zorgvuldig door voordat u ermee aan de slag gaat. VEVOR behoudt zich
een duidelijke interpretatie van onze gebruikershandleiding voor. Het
uiterlijk van het product is afhankelijk van het product dat u heeft
ontvangen. Vergeef ons alstublieft dat we u niet opnieuw informeren als er
technologie- of software-updates zijn voor ons product.
TIME CLOCK

2
Waarschuwing-Om het risico op letsel te verminderen, moet
de gebruiker de handleiding zorgvuldig lezen.
Dit apparaat voldoet aan Deel 15 van de FCC-regels. Het gebruik is
onderworpen aan de volgende twee voorwaarden: (1) Dit apparaat
mag geen schadelijke interferentie veroorzaken, en (2) dit apparaat
moet alle ontvangen interferentie accepteren, inclusief interferentie
die een ongewenste werking kan veroorzaken.
Dit product valt onder de bepalingen van de Europese richtlijn
2012/19/EG. Het symbool met een doorgestreepte afvalcontainer
geeft aan dat het product in de Europese Unie een aparte
afvalinzameling vereist. Dit geldt voor het product en alle
accessoires die met dit symbool zijn gemarkeerd. Producten die als
zodanig gemarkeerd zijn, mogen niet met het normale huisvuil
worden weggegooid, maar moeten naar een inzamelpunt voor
recycling van elektrische en elektronische apparaten worden
gebracht
INSTALLATION CAUTIONS
1. Installeer de machine niet bij extreem slechte temperaturen omgeving. Laat het
apparaat werken op de temperatuur van 0ºC-45ºC.
2. Installeer de machine niet op een vuile of vochtige plaats. Alsjeblieft houd het
apparaat in een droge en schone omgeving langere levensduur.
3.Houd het apparaat uit de buurt van stof, water en vuur. Alle de elementen
kunnen leiden tot kortsluiting en moederbord schade.
4. Probeer de machine niet aan de kant van de gebruiker te repareren, neem
gewoon contact op met de klantenservice detailhandelaar of groothandel voor
after-sales service onder de garantie.
5. Installeer de machine niet buitenshuis. De machine is dat wel stelde voor om op
een binnenplaats te installeren voor de gegevens en veiligheid van het apparaat.
6. Maak regelmatig een gegevensback-up, vermijd onverwacht voorkomende

3
situaties waarbij gegevens verloren gaan.
7. Gebruik de bijpassende stabiele spanningsadapter in de
standaardpakketeenheid, voorkom dat de machine beschadigd raakt vanwege het
huidige verschil met andere soorten stroom
adapter.
TECHNICAL PARAMETERS
PARTS LIST
Model
F01H
Werkkracht
DC5V 1A5W
Taal selectie
Ondersteunt 12 talen
( Engels, Duits, Frans, Spaans,
Italiaans, Russisch, Nederlands,
Pools, Zweeds, Turks, Portugees,
Braziliaans Portugees )
Product grootte
170*120*36mm
1
Adapter
1
2
USB - stick
1
3
Zelftappende S- crew
3
4
Kunststof uitzetmouw
3

4
ASSEMBLY STEP
STAP 1
Demonteer de achterste ophangplaat en bevestig deze aan de muur om de
geschikte installatiepositie te selecteren, en maak vervolgens een markering.
Boren in de muur volgens de gemarkeerde positie.
STAP 2
Bevestig de Zelftappende S- crew aan de muur.

5
STAP 3
Installeer het apparaat op de Self-tapping S- crew , repareer het en schakel het
vervolgens in.

6
RECOMMENDED STEPS FOR INITIAL USE
Ploeginstelling →Afdelingsinstelling →Inschrijving werknemer
→Aanwezigheidsregels →Aanwezigheid werknemer
→Aanwezigheidsrapport bekijken
KEYPAD INSTRUCTIONS
MENU
Enter the menu (Functions as
the 'Delete' key during editing).
ESC
Cancel or exit the current
settings.
OK
Confirm the current settings.
Move the cursor up.
Move the cursor down.
0-9
Input numbers, English letters
or symbols.
Switch input method.

7
SHIFT SETTING
19) Druk op [MENU] om naar het hoofdmenu te gaan, druk op [ ]
om "Aanwezigheidsregels" → "Shift" te selecteren.
20) Druk op [ ] om de ploeg te selecteren en druk op [OK] om de
wijzigingsinterface te openen.
21) Druk op [ / ] om de cursor naar de gewenste optie te
verplaatsen en de reistijd in te voeren.
Tips: Nadat alles in het invoervak is verwijderd, wordt "--"
weergegeven.
Alle diensten ondersteunen de dagoverschrijdende instelling. De
standaardinstelling is ploeg 1.

8
DEPARTMENT SETTING
Gebruikers kunnen de afdelingsnamen bewerken (er kunnen
maximaal 16 afdelingen worden ingesteld).
25) Druk op [MENU] om naar het hoofdmenu te gaan. Druk op [ ]
om "Aanwezigheidsregels" → "Afdeling" te selecteren.
26) Druk op [ ] om de afdeling te selecteren en druk op [OK] om
naar de wijzigingsinterface te gaan.
27) Voer de afdelingsnaam in het invoervak in. Druk op [OK] om de
naam op te slaan.
28) Druk op [ ] om de cursor naar de gewenste optie te verplaatsen
en voer het ploegnummer in.
9
EMPLOYEE ENROLL
19) Druk op [MENU] om naar het hoofdmenu te gaan, druk op [V] om
“Werknemer” → “Inschrijven” te selecteren, en druk op [OK] om naar de
interface van “Inschrijven” te gaan.
20) Voer de ID, naam en afdeling in en selecteer "Inschrijven" om naar de
interface van "Employee Info" te gaan.
21) Druk op [ESC] om op te slaan nadat u de vingerafdruk, het
kaartnummer, het wachtwoord en de bevoegdheid naar wens heeft
ingesteld.
ID:
Enter an employee ID. It supports only
numbers.
Name:
Enter a name. It supports a mix of
numbers, letters, and symbols.
Finger:
Enroll a fingerprint by press the collector
three times with the same finger.
Card (Optional):
Enroll a ID Card by swiping the card near
the reading area.
Password:
Enroll the password; It supports 1-6
digits of numbers.
Department:
Press [OK] to select a department from
the list.
Authority:
Press [OK] to select the authority
between Employee and Admin.

10
11
ATTENDANCE RULES
13) Druk op [MENU] om naar het hoofdmenu te gaan, druk op [ ]
om "Aanwezigheidsregels" → "Regels" te selecteren en druk op [OK]
om naar de interface van "Regels" te gaan.
14) Druk op [OK] om de instellingen op te slaan nadat u de regels
heeft ingesteld.

12
DOWNLOAD AND VIEW REPORTS
25) Plaats de U-schijf in de USB-interface van het apparaat.
26) Druk op [MENU] om naar het hoofdmenu te gaan en druk op [ ]
27) Druk op [ ] en [OK] om het item te selecteren dat u wilt
downloaden.7] om "Aanwezigheid" te selecteren.
28) Voer de begin- en einddatum in en druk vervolgens op [OK] om te
downloaden.
Tips: Met het "Werknemersformulier" kunt u werknemersinformatie
registreren, ploegeninstellingen instellen en ploegen aan
werknemers toewijzen. Na de installatie kan het via USB naar het
apparaat worden geüpload. Gebruik een U-schijf in FAT32-formaat.

Fabrikant: Shanghaimuxinmuyeyouxiangongsi
Adres: Shuangchenglu 803nong11hao1602A-1609shi, baoshanqu,
shanghai 200000 CN.
Geïmporteerd naar AUS: SIHAO PTY LTD. 1 ROKEVA
STREETEASTWOOD NSW 2122 Australië
Geïmporteerd naar de VS: Sanven Technology Ltd. Suite 250, 9166
Anaheim Place, Rancho Cucamonga, CA 91730
REP
EC
E-CrossStu GmbH
Mainzer Landstr.69, 60329 Frankfurt am Main.
REP
UK
YH CONSULTING LIMITED.
C/O YH Consulting Limited Office 147, Centurion
House, London Road, Staines-upon-Thames, Surrey,
TW18 4AX


Teknisk Support och e-garanticertifikat
www.vevor.com/support
TID KLOCKA
ANVÄNDARMANUAL
MODELL: F01H
Vi fortsätter att vara engagerade i att ge dig verktyg till konkurrenskraftiga priser.
"Spara hälften", "Halva priset" eller andra liknande uttryck som endast används av oss
representerar en uppskattning av besparingar du kan dra nytta av att köpa vissa verktyg
med oss jämfört med de stora toppmärkena och betyder inte nödvändigtvis att omslag
alla kategorier av verktyg som vi erbjuder. Du påminns vänligen om att verifiera försiktigt
när du gör en beställning hos oss om du faktiskt gör det Sparande
Halv i jämförelse med de främsta varumärkena.


1
MODELL: F01H
BEHÖVS HJÄLP? KONTAKTA OSS!
Har du produktfrågor? Behöver du teknisk support? Kontakta oss
gärna:
Teknisk support och e-garanticertifikat
www.vevor.com/support
Detta är den ursprungliga instruktionen, läs alla instruktioner noggrant
innan du använder den. VEVOR reserverar sig för en tydlig tolkning av vår
användarmanual. Utseendet på produkten är beroende av den produkt du
fått. Ursäkta oss att vi inte kommer att informera dig igen om det finns
någon teknik eller mjukvaruuppdateringar på vår produkt.
TIME CLOCK

2
Varning - För att minska risken för skada måste användaren
läsa instruktionerna noggrant.
Denna enhet uppfyller del 15 av FCC-reglerna. Driften är föremål för
följande två villkor: (1) Den här enheten får inte orsaka skadliga
störningar och (2) den här enheten måste acceptera alla mottagna
störningar, inklusive störningar som kan orsaka oönskad funktion.
Denna produkt omfattas av bestämmelserna i det europeiska
direktivet 2012/19/EC. Symbolen som visar en soptunna korsad
anger att produkten kräver separat sophämtning i EU. Detta gäller för
produkten och alla tillbehör märkta med denna symbol. Produkter
märkta som sådana får inte slängas tillsammans med vanligt
hushållsavfall, utan måste lämnas till en insamlingsplats för
återvinning av elektriska och elektroniska apparater
INSTALLATION CAUTIONS
1. Installera inte maskinen i extremt dålig temperatur miljö. Vänligen låt enheten
fungera på temperatur på 0ºC-45ºC.
2. Installera inte maskinen på en smutsig eller fuktig plats. Snälla du hålla enheten
arbeta i en torr och ren miljö för längre livslängd.
3.Håll enheten långt borta från damm, vatten och eld. Allt elementen kan leda till
kortslutning och moderkort skada.
4. Försök inte att reparera maskinen vid användarens slut, kontakta bara
återförsäljare eller grossist för efterförsäljningsservice enligt garanti.
5. Installera inte maskinen utomhus. Maskinen är föreslås att installera på
inomhus plats för data och enhetens säkerhet.
6. Gör säkerhetskopiering av data regelbundet, undvik oväntat inträffade
situationer med förlorad data.
7. Använd den matchade stabila spänningsadaptern i standardpaketet, undvik att
maskinen skadas på grund av strömskillnad från andra typer av ström
adapter.

3
TECHNICAL PARAMETERS
PARTS LIST
Modell
F01H
Arbetskraft
DC5V 1A5W
Språkval
Stöder 12 språk
( Engelska, tyska, franska, spanska,
italienska, ryska, holländska, polska,
svenska, turkiska, portugisiska,
brasiliansk portugisiska )
Produktstorlek
170*120*36mm
1
Adapter
1
2
USB - minne
1
3
Självgängande skruv
3
4
Utbyggnadshylsa i plast
3
4
ASSEMBLY STEP
STEG 1
Ta isär den bakre upphängningsplattan och fäst den på väggen för att välja lämplig
monteringsposition och gör sedan en markering.
Borrning på vägg enligt markerad position.
STEG 2
Fäst det självgängande S- teamet på väggen.

5
STEG 3
Installera enheten på Self-tapping S- teamet och fixa den och slå sedan på
den.
6
RECOMMENDED STEPS FOR INITIAL USE
Skiftinställning → Avdelningsinställning → Anställd registrera →
Närvaroregler → Anställd närvaro → Visa närvarorapport
KEYPAD INSTRUCTIONS
MENU
Enter the menu (Functions as
the 'Delete' key during editing).
ESC
Cancel or exit the current
settings.
OK
Confirm the current settings.
Move the cursor up.
Move the cursor down.
0-9
Input numbers, English letters
or symbols.
Switch input method.

7
SHIFT SETTING
22) Tryck på [MENU] för att gå in i huvudmenyn, tryck på [ ] för att
välja "Delta. Regler"→"Skift".
23) Tryck på [ ] för att välja växling och tryck på [OK] för att gå in i
modifieringsgränssnittet.
24) Tryck på [ / ] för att flytta markören till ett önskat alternativ
och ange pendlingstiden.
Tips: Efter att ha raderat allt i inmatningsrutan visas "--".
Alla skift stöder inställningen över dagar. Standardinställningen är
shift 1.
8
DEPARTMENT SETTING
Användare kan redigera avdelningsnamnen (max 16 avdelningar kan
ställas in).
29) Tryck på [MENU] för att öppna huvudmenyn. Tryck på [ ] för att
välja "Delta. Regler"→"Avdelning".
30) Tryck på [ ] för att välja avdelning och tryck på [OK] för att gå
in i modifieringsgränssnittet.
31) Ange avdelningens namn i inmatningsrutan. Tryck på [OK] för att
spara namnet.
32) Tryck på [ ] för att flytta markören till ett önskat alternativ och
ange skiftnumret.

9
EMPLOYEE ENROLL
22) Tryck på [MENU] för att gå in i huvudmenyn, tryck på [V] för att välja
“Anställd”→ “Registrera”, och tryck på [OK] för att gå in i gränssnittet för
“Registrera”.
23) Ange ID, namn och avdelning och välj "Registrera" för att gå in i
gränssnittet för "Anställd info".
24) Tryck på [ESC] för att spara efter att ha ställt in fingeravtryck,
kortnummer, lösenord och behörighet efter behov.
ID:
Enter an employee ID. It supports only
numbers.
Name:
Enter a name. It supports a mix of
numbers, letters, and symbols.
Finger:
Enroll a fingerprint by press the collector
three times with the same finger.
Card (Optional):
Enroll a ID Card by swiping the card near
the reading area.
Password:
Enroll the password; It supports 1-6
digits of numbers.
Department:
Press [OK] to select a department from
the list.
Authority:
Press [OK] to select the authority
between Employee and Admin.

10
ATTENDANCE RULES
15) Tryck på [MENU] för att gå in i huvudmenyn, tryck på [ ] för att
välja "Delta. Regler"→ "Regler", och tryck på [OK] för att gå in i
gränssnittet för "Regler".
16) Tryck på [OK] för att spara inställningarna efter att ha ställt in
reglerna.
11
DOWNLOAD AND VIEW REPORTS
29) Sätt i U-skivan i enhetens USB-gränssnitt.
30) Tryck på [MENU] för att gå in i huvudmenyn och tryck på [ ]
31) Tryck på [ ] och [OK] för att välja objektet som ska laddas ner.7]
för att välja "Närvaro".
32) Ange start- och slutdatum och tryck sedan på [OK] för att ladda
ner.
Tips: "Medarbetarformuläret" möjliggör registrering av
personalinformation, skiftinställningar och tilldelning av skift till
anställda. Efter installationen kan den laddas upp till enheten via USB.
Använd en U-disk i FAT32-format.

Tillverkare: Shanghaimuxinmuyeyouxiangongsi
Adress: Shuangchenglu 803nong11hao1602A-1609shi, baoshanqu,
shanghai 200000 CN.
Importerad till AUS: SIHAO PTY LTD. 1 ROKEVA STREETEASTWOOD
NSW 2122 Australien
Importerad till USA: Sanven Technology Ltd. Suite 250, 9166 Anaheim
Place, Rancho Cucamonga, CA 91730
REP
EC
E-CrossStu GmbH
Mainzer Landstr.69, 60329 Frankfurt am Main.
REP
UK
YH CONSULTING LIMITED.
C/O YH Consulting Limited Office 147, Centurion
House, London Road, Staines-upon-Thames, Surrey,
TW18 4AX