
200Wh Portable Power Generator
User Manual


CONTENTS
English···························1-10
Deutsch························11-20
Français·······················21-30
Español························41-50
Italiano·························31-40
日本語·························51-60
EN-1
Thank you for choosing Suaoki.
Please read this manual before use and follow its guidance. Keep this manual for
future reference.
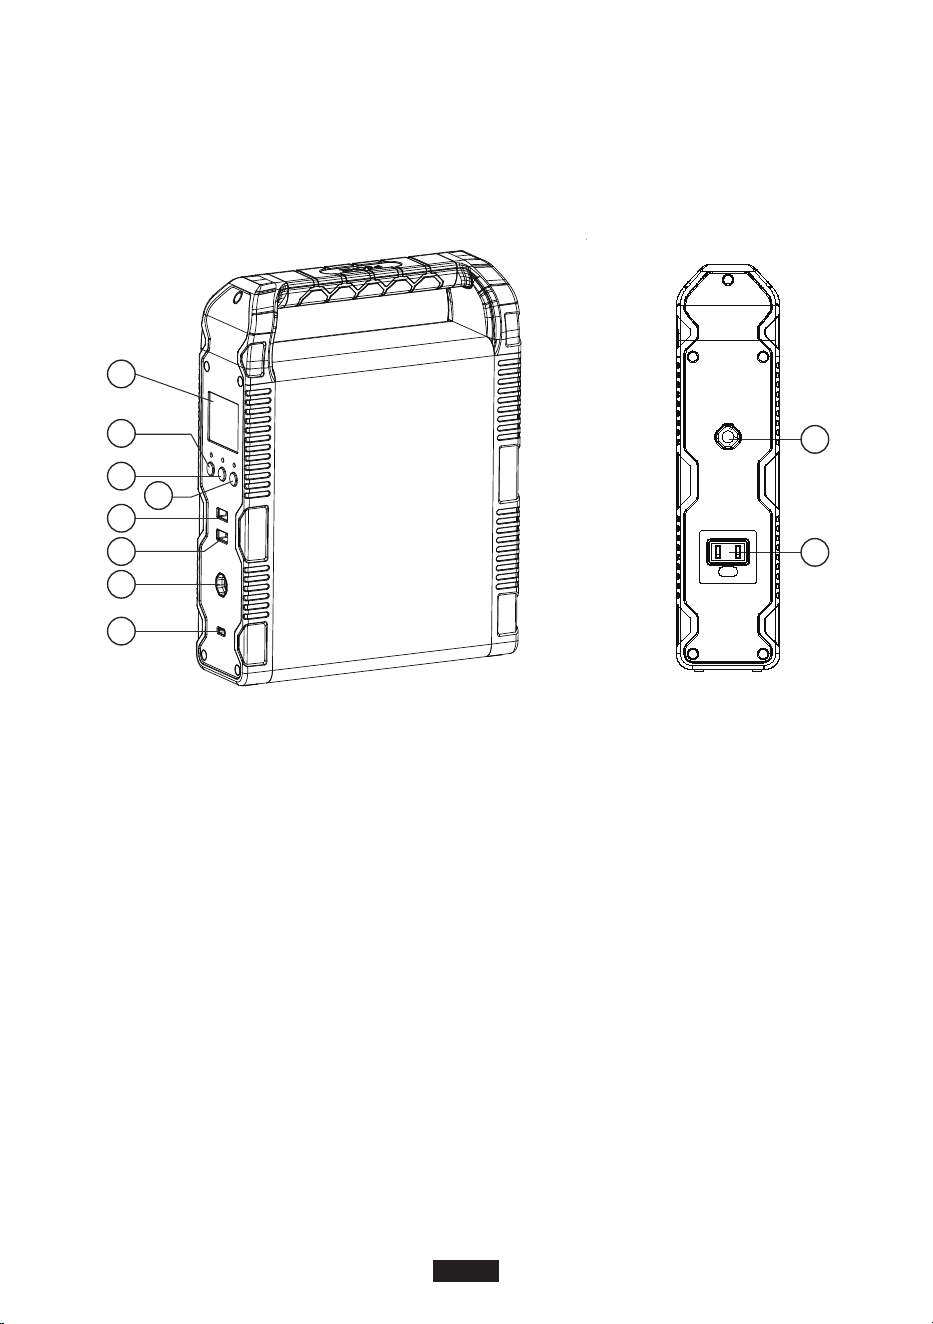
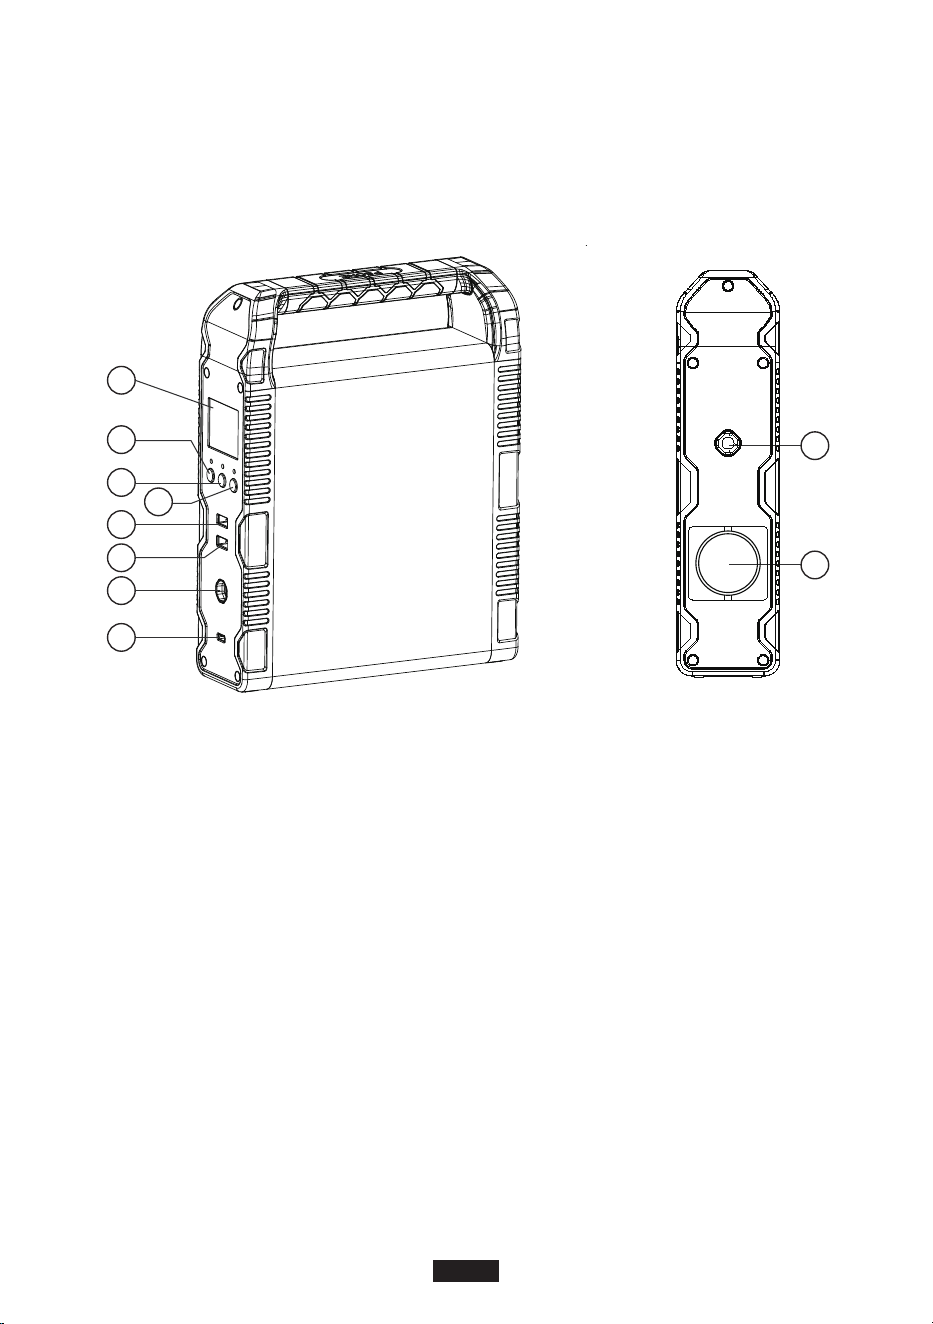
Product Overview
A
B
C
D
E
F
G
H
I
J
A. LCD screen
B. Power button
C. DC button
D. AC button
E. USB output port
F. QC3.0 output port
G. DC 12V output port
H. USB-C & PD2.0 output port
I. PV/ADAPTER input port
J. AC 120W output port
Warnings
1. Please read the warning section carefully before use. Follow the instructions and keep this
manual for future reference.
2. Avoid using this product when it is exposed to direct sunlight, rain or wet environment.
3. This product cannot be installed near radiator, oven or any other heat source.
4. Place the product in a stable and secured area.
5. Please use dry cloth to clean this product.
6. Please do not alter or disassemble this product.
7. Keep away from fire. If a fire hazard occurs, use dry powder fire extinguisher on this product.
Using water fire extinguisher on this product may lead to electric shock.
8. Operating temperature: 0°C-40°C; Operating humidity: 5%-90%
Cold Weather
Cold weather can influence battery capacity. In sub-zero temperature (<0°C), you may be able to
discharge the product, but you should not charge it. Otherwise, the battery of the product would
be greatly damaged and the capacity may not even be recovered.
1. Low temperature charging protection
When the product is charged at a temperature below 0°C, it will shut off and stop charging
itself automatically. The product will reboot and start charging itself when the temperature rise
to above 5°C .
2. Low temperature discharging protection
If the product is discharged at a temperature of -20°C, it will turn off output in 15 seconds. The
product will reboot and turn on output when the temperature rises to above -15°C.
Storage and Maintenance
1. Please fully charge the product before storage and charge it at least once every 3 months.
2. Store this product in a cool, dry, well-ventilate and well-spaced area. Keep the product away
from water, flammable gas, corrosive material, metal dust and salt. Storage temperature:
0°C-40°C.
3. Failure to use, store and maintain the product according to the instruction would void the
warranty.
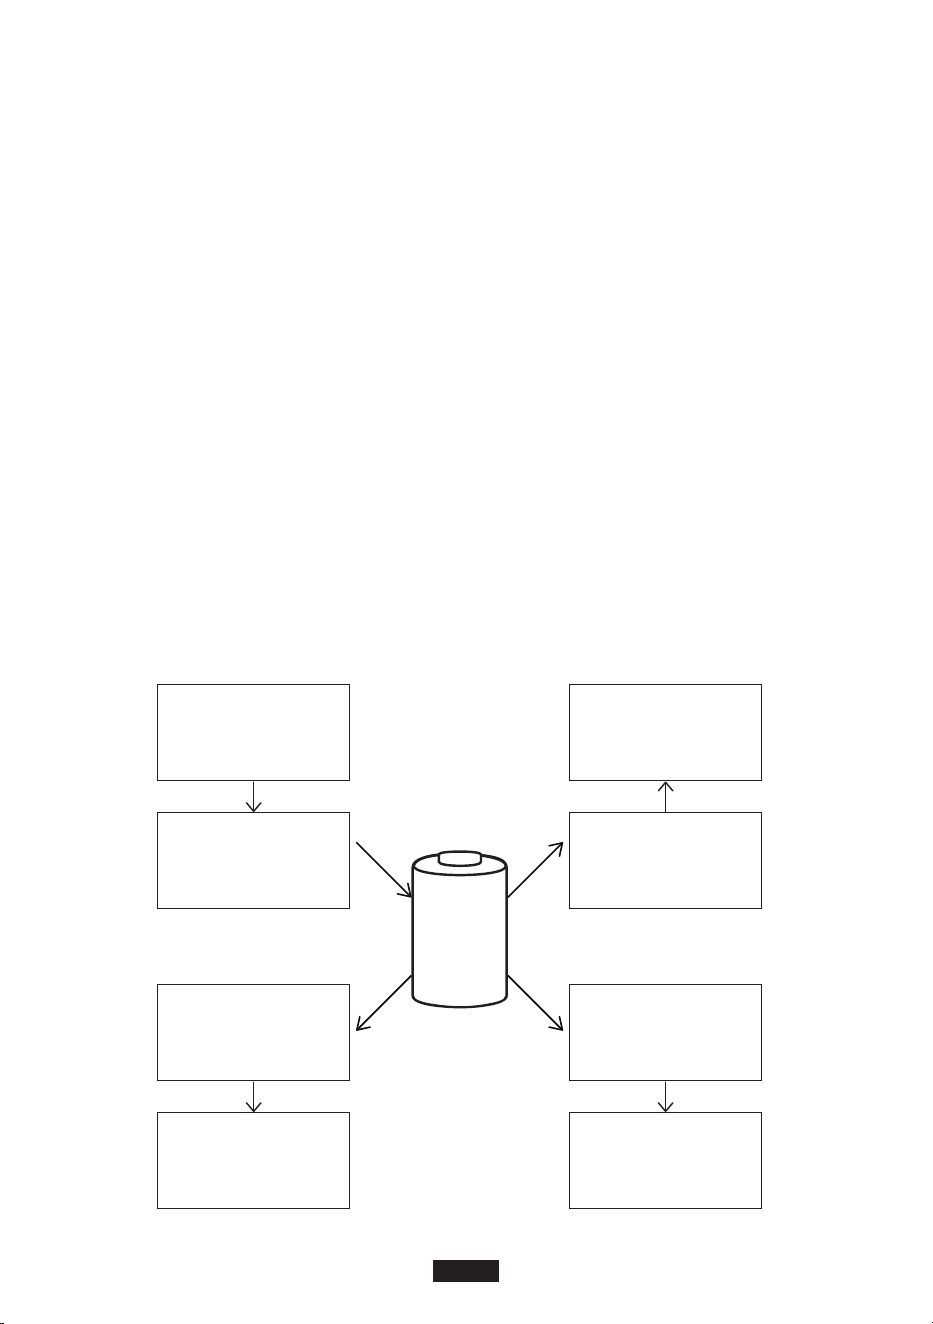
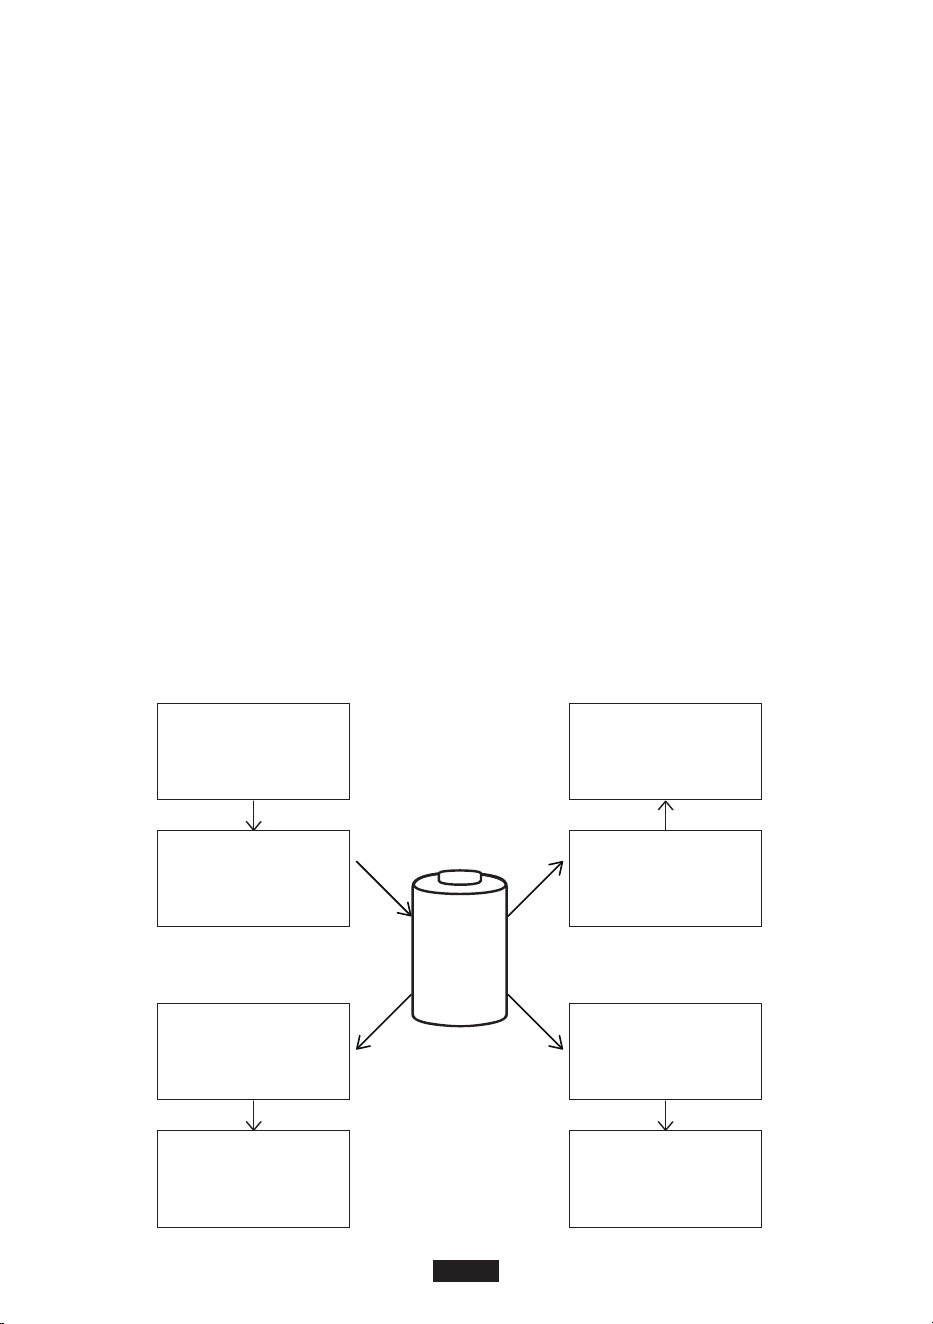
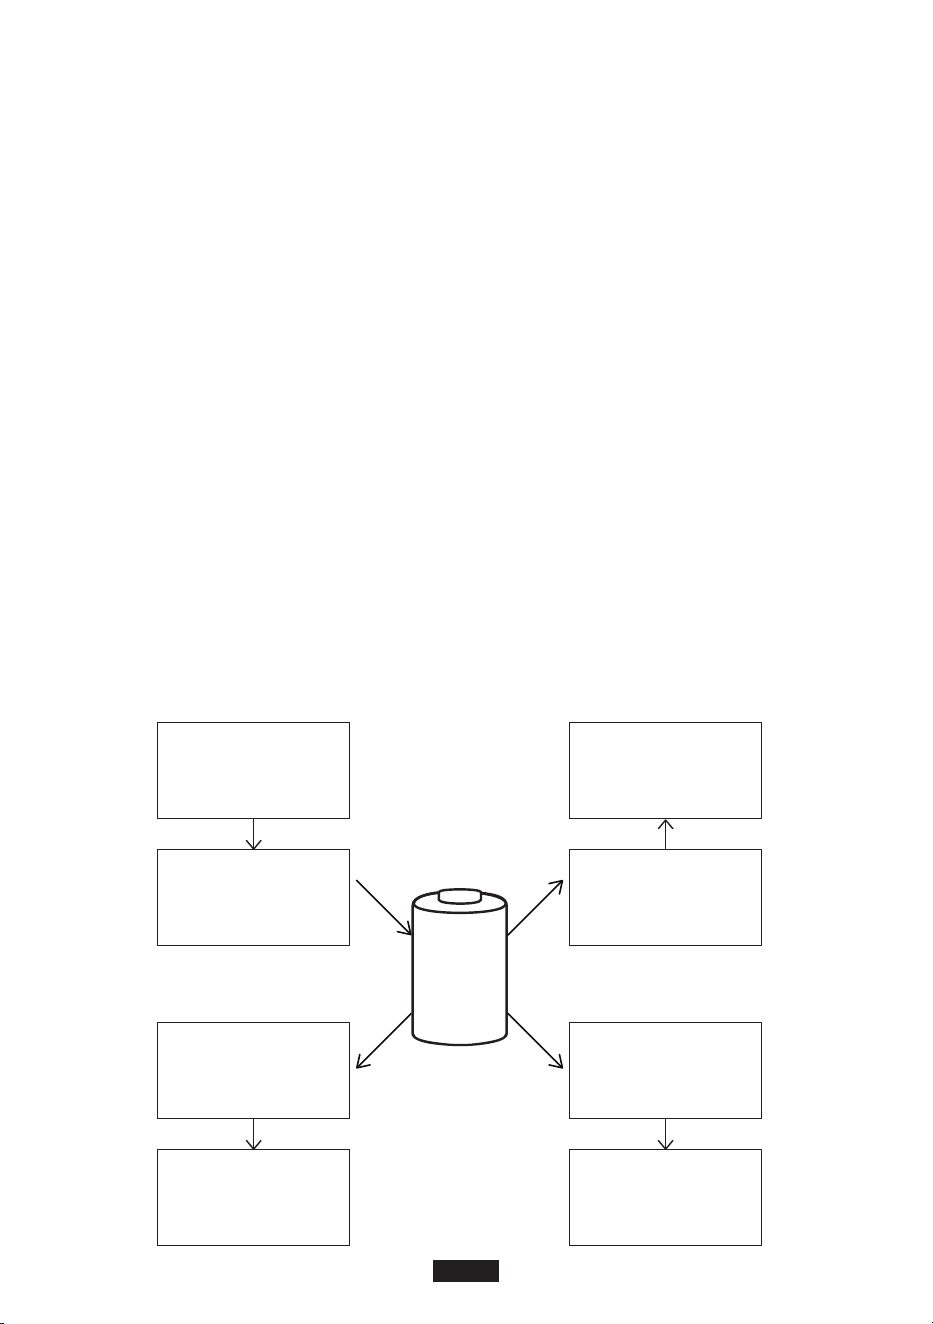
Photovoltaic Power Storage System
DC source /
Solar Panel
Battery
System
Charger
Controller
Inverter
AC Output
Small Appliance
(Low Power)
Cell Phone/
Tablet/Laptop
USB Output
12V/10A
Car electronics
EN-2
Unboxing
Before opening the parcel, please check whether if the parcel is damaged or not. If the product is
damaged during delivery or if any items went missing upon arrival, please contact Suaoki
customer service by sending an email to [email protected]. You should receive the following
items:
Product Overview
LCD Display
Item Number of item
Suaoki Portable Power Generator
AC adapter (with AC charging cable)
Cigarette lighter adapter (6530 to cigarette lighter)
Type-C cable
DC Power Cable (6.5x3.0mm Male to 5.5x2.1mm Female)
Solar Charging Cable
User manual
SUAOKI Thank you card
1
1
1
1
1
1
1
1
2
12
1 3
4
11
10
9
8
7
6
5
EN-3

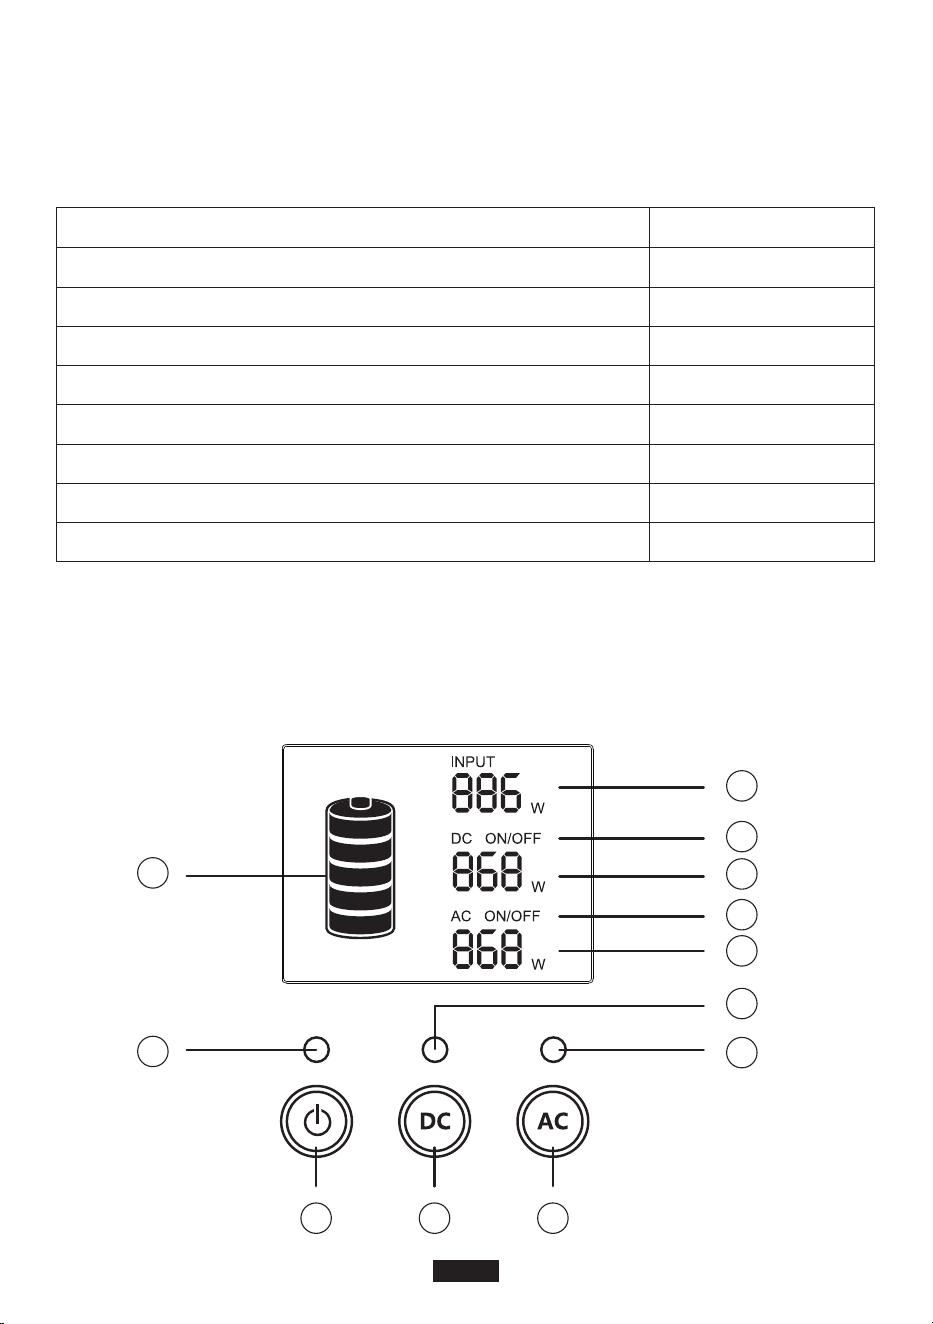
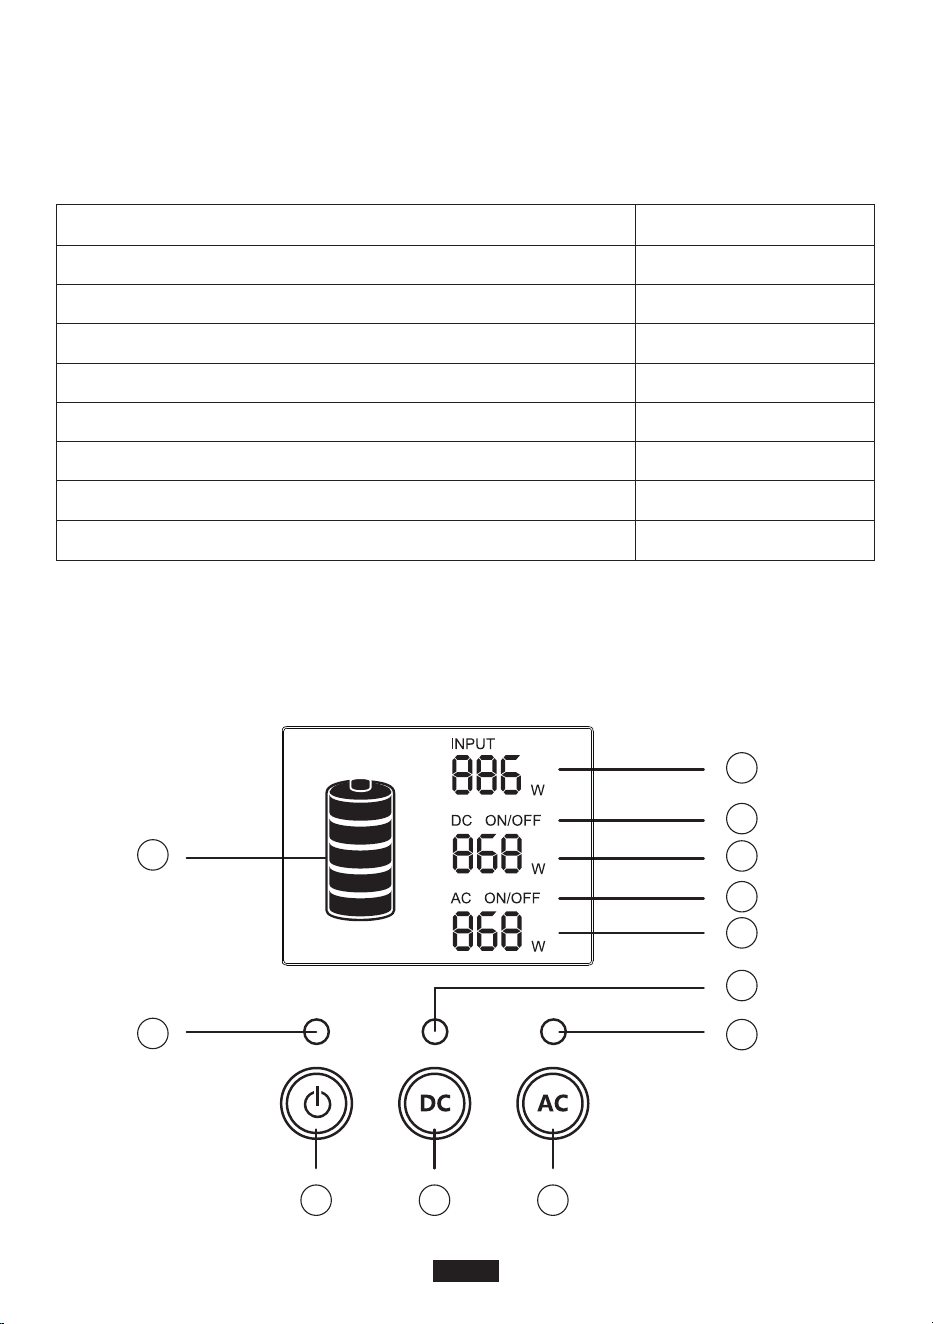
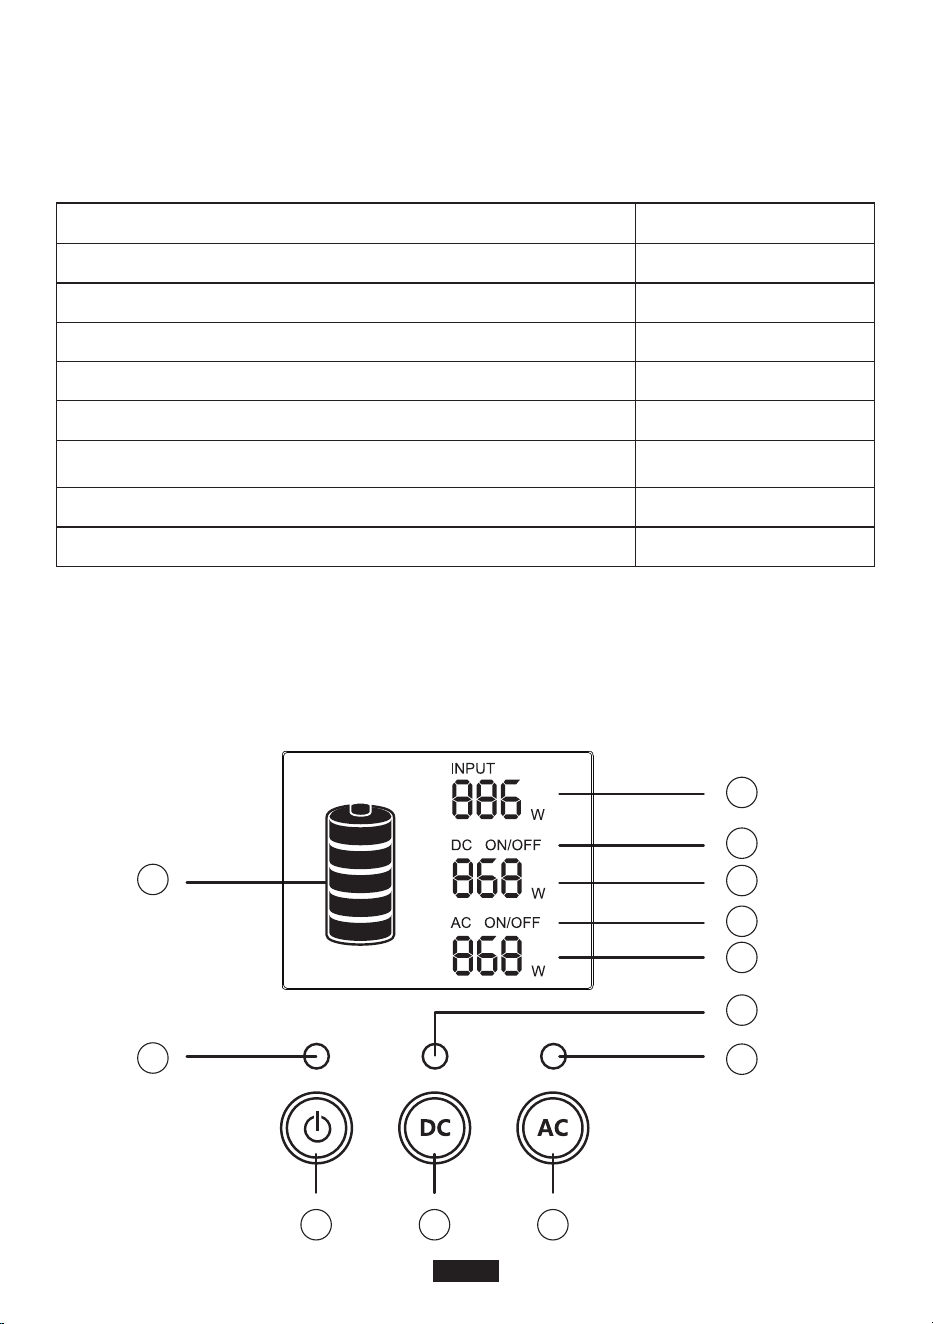
Note:
1. If the product malfunctions, error codes would be displayed on screen.
2. Backlight would be turned off by itself when the product remains idle for a certain period of
time. Click on a button to turn on the backlight.
Buttons explained
• Power Button
1) Power on: Long press the power button for over 2 seconds to turn on the product. The
corresponding indicator light would be on and the LCD screen would light up.
2) Power off: Long press the power button for over 2 seconds to turn off the product and the
LCD screen. The corresponding indicator light would be off.
• DC Button
1) Turn on DC output: Long press DC button for over 2 seconds to turn on DC output. The
corresponding indicator light would be on and ‘DC ON’ would be displayed at the LCD screen.
2) Turn off DC output: Long press DC button for over 2 seconds to turn off DC output. The
corresponding indicator light would be off and ‘DC OFF’ would be displayed at the LCD screen.
• AC Button
1) Turn on AC output: Long press AC button for over 2 seconds to turn on AC output. The
corresponding indicator light would be on and ‘AC ON’ would be displayed at the LCD screen.
2) Turn off AC output: Long press AC button for over 2 seconds to turn off AC output. The
corresponding indicator light would be off and ‘AC OFF’ would be displayed at the LCD
screen.
Note: When the product is not turned on, DC/AC output would be disabled. When the product is
turned on, DC/AC output is turned off by default. You need to long press POWER button to turn
on the product and then long press the DC/AC button to turn on output.
Operation Guidance
Attention:
1.The operating environment should meet our requirement.
2. Make sure that the air inlet/outlet is not blocked.
• How to charge the product
Note: Please fully charge the product before use.
There are 3 ways to charge the product, using AC adapter, solar charging cable or car charger. First,
you need to determine the input source and select a charger accordingly. Then, connect the charger
to the input port of the product to start charging. When the product is being charged, the battery icon
would flash on the LCD screen. When it is fully charged, the battery icon would stop flashing.
1. Power button
2. Power indicator light
3. DC button
4. DC output indicator light
5. AC button
6. AC output indicator light
7. AC output power
8. AC ON/OFF
9. DC output power
10. DC ON/OFF
11. Charging power
12. Battery status indicator
EN-4

A. Charge with Solar Charging Cable
1. Place your solar panel somewhere that it can receivedirect sunlight and abundant sunshine.
2. Make sure that the open-circuit voltage of the solar panel falls within 14-40V. The maximum
input power of this product is 60W.
3. Connect the solar panel and the product using solar charging cable. Make sure that the solar
charging cable is correctly connected, forming a solid contact with the input port of the
product.
4. The product comes with a built-in advanced control circuit. When the battery is fully charged, it
will stop charging itself automatically.
B. Charge with AC Adapter
To charge the product with AC adapter, insert one end of the adapter into wall outlet and insert
the other end to the input port of the product. When the product is being charged, you can
monitor the battery status by checking the battery icon on the LCD screen. The product comes
with a built-in advanced control circuit. When the battery is fully charged, it will stop charging
itself automatically.
C. Charge with Car Charger (not included)
Insert one end of the car charger to the car cigarette lighter receptacle and insert the other end to
the input port of the product. The battery icon will blink to indicate that the product is being
charged normally.
Note:
• You cannot fully charge the product when the car charger is connected to a 12V car battery,
but you can fully charge it when the car charger is connected to a 24V car battery.
• It is best to charge while your car engine is started.
• Q & A
Q1: How to check charging status?
The battery icon indicates the battery level of this product. The battery level is displayed in5
segments. Each segment indicates 20% of the battery capacity. When battery is being charged,
the icon would flash. When the battery is fully charged, the icon would stop flashing and all5
segmentswill be filled.
Q2: How to charge other electronic devices?
1. You need to know the working efficiency of your electronic devices. You can check the user
manual of your electronic device or search online for such information.
2. You need to check the power at each output port. For example, the power at AC output port is
provided by the built-in inverter of the product, whose maximum rated output power is 120W.
This means that if the power of connected electronic device is over 120W for a long period, the
inverter will shut down output.
Q3: What is Depth of Discharge (DOD)?
To prolong battery life, we set the DOD of this portable power generator to 90%, which means
only 90% of the battery capacity (200Wh) can be discharged. 10% of the energy is reserved so
that the battery will not be damaged due to over-discharge.
EN-5

E01
E02
E03
E10
Error codes Cause Solution
• 50Hz/60Hz Frequency Selection
Step 1: Press the power button, DC button and AC button at the same time. The LCD screen
would light up and display the current frequency (50Hz or 60Hz). Release the buttons
and move on to the next step.
Step 2: Long press DC button or AC button to select between 50Hz and 60Hz. The frequency
displayed on LCD would change accordingly.
Step 3: Once the desired frequency is selected, press AC and DC power button at the same time
to confirm the choice. When the setting is done, repeat Step 1 to check the current
frequency.
Note: If DC 12V output port is overloaded or short-circuited, BMS protection may be triggered.
As a result, the product will shut down and cannot be turned on. In this case, you need to charge
the product to activate it.
Trouble-shooting
Over-temperature protec-
tion (System)
Check whether the ambient temperature is
higher than 40°C. When the temperature cools
down, the output will be turned on again.
Over-voltage protection
(Battery)
Disconnect the product from power source to
stop charging and restart it.
Battery damage protection Contact Suaoki customer service.
SOC (state of charge)
protection
Charge the product in time and restart it after
fully charged.
E11
Battery low-voltage
protection
Charge the product in time and restart it after
fully charged.
E12
Inverter over-current
protection
Check whether the AC output port get
overloaded or short-circuited.
E14
Inverter short-circuit
protection
Check whether the AC output port get
overloaded or short circuited.
E16
Charging over-voltage
protection
Check whether the input voltage exceeds the
maximum input voltage.
E13
Inverter over-load protec-
tion
Check whether the AC output get overloaded,
please refer to the ‘Product Specifications’
section for overload capacity.
EN-6

AC
Output
Model
Output Specifications
S200
Battery Capacity 200Wh 200Wh
120 W
120 W
E17
E21
E22
E27
Charging low-temperature
protection
The temperature of the battery is too low.
Restore the battery by increasing its tempera-
ture.
12V10A output over-cur-
rent protection
Check whether the output port get overloaded
or short-circuited.
12V10A output over-load
protection
Check whether the output port get overloaded
or short-circuited.
Total output power
over-load protection
Reduce the load power.
E28
Charging over-temperature
protection
The unit is too hot. Cool down the product
before charging the product.
E29
Discharging over-tempera-
ture protection
The unit is too hot. Cool down the product
before discharging the product.
Product Specifications
Rated Output
Power
200 W (1s)
200 W (1s)
Peak Output
Power
110Vac
220-240Vac
Rated Output
Voltage
50/60Hz
50Hz
Rated
Frequency
1
1
Power Factor
<3%
<3%
THDV
EN-7

DC12V
output
USB-A1
Output
USB-A2
output
<8W
<10W
No-load Power
Consumption
125W≤Load<150W@10S;
150W≤Load<180W@5s;
180W≤Load<200W@1s;
125W≤Load<150W@10S;
150W≤Load<180W@5s;
180W≤Load<200W@1s;
Overload
capacity
90%
90%
Max Efficiency
(>70% load
power)
10~12.6V
10~12.6V
Output Voltage
Range
120W
120W
Rated Output
Power
Overload
Power/Current
Fast Charge
Supported
Device
Output Voltage
Range
Rated Output
Current
Overload
Current
The power is larger than
125W or the current is larger
than 11A
The power is larger than
125W or the current is larger
than 11A
BC1.2, Apple, Samsung BC1.2, Apple, Samsung
5V±0.25V 5V±0.25V
2.4A 2.4A
2.8-3.8A 2.8-3.8A
Communica-
tion Protocol
(fast charge)
Output Voltage
Range
Rated Output
Current
Overload
Current
QC3.0 QC3.0
5~12V (5V by default) 5~12V (5V by default)
5V2.5A、9V2A、12V1.5A 5V2.5A、9V2A、12V1.5A
2.8-3.8A 2.8-3.8A
EN-8

PV Input
Battery
USB-C
Output
PV Input
Rated Voltage
Rated Power (Wh)
Cell Type
Battery Model
Rated Capacity
11.1 V
200Wh
18000mAh
Li-ion
INR18650P
11.1 V
200Wh
18000mAh
Li-ion
INR18650P
Communica-
tion Protocol
(fast charge)
Output Voltage
Range
Rated Output
Current
Overload
Current
PD protocol (Max output: 45W) PD protocol (Max output: 45W)
5~20V (5V by default) 5~20V (5V by default)
(5~20)V/2.25A (5~20)V/2.25A
2.3-3A 2.3-3A
Input Voltage
Range
MTTP Voltage
Range
Max. Input
Voltage
MPPT
Efficiency
Max
Efficiency
Solar Charging
Mode
14~40 Vdc 14~40 Vdc
Max Input
Power
60 W 60 W
15-40 Vdc 15-40 Vdc
40 Vdc 40 Vdc
99.50% 99.50%
>90% >90%
MPPT MPPT
EN-9

General
Warranty
Our company provides customers with warranty of 12 months from the date of purchase.
Contact us
For any inquiries or comments concerning our products, please send an email to support@suao-
ki.com, and we will respond to you as soon as possible.
Configuration
Working Temperature
IP Rating
Working Condition
Dimensions
3S8P
0°C-40°C
3S8P
0°C-40°C
IP 21
Relative Humidity: 5%-90%
Temperature: 0-40°C
196mm*65mm*255mm
Net Weight 2.7 kg
EN-10
Vielen Dank für die Auswahl von Suaoki.
Bitte lesen Sie diese Bedienungsanleitung vor der Verwendung und befolgen Sie den Anweisun-
gen. Bewahren Sie diese Bedienungsanleitung auf
Zukunftsbezug.
Produktsübersicht
A. LCD Bildschirm
B. Ein- / Ausschalter
C. DC Taste
D. AC Taste
E. USB Ausgangsport
F. QC3.0 Ausgangsport
G. DC 12V Ausgangsport
H. USB-C & PD2.0 Ausgangsport
I. PV/ADAPTER Eingabeport
J. AC 120W Eingabeport
Warnungen
1. Bitte lesen Sie den Warnhinweis sorgfältig vor dem Gebrauch. Folgen Sie den Anweisungen
und bewahren Sie diese Anleitung zum späteren Nachschlagen auf.
2. Vermeiden Sie die Verwendung dieses Produkts, wenn es direkter Sonneneinstrahlung, Regen
oder feuchter Umgebung ausgesetzt ist.
3. Dieses Produkt kann nicht in der Nähe von Heizkörpern, Öfen oder anderen Wärmequellen
installiert werden.
4. Stellen Sie das Produkt in einen stabilen und gesicherten Bereich.
5. Bitte verwenden Sie ein trockenes Tuch, um dieses Produkt zu reinigen.
6. Bitte ändern oder zerlegen Sie dieses Produkt nicht.
7. Von Feuer fernhalten. Wenn eine Brandgefahr besteht, verwenden Sie einen Trockenpul-
ver-Feuerlöscher an diesem Produkt. Die Verwendung von Wasserfeuerlöschern an diesem
Produkt kann zu Stromschlägen führen.
8. Betriebstemperatur: 0°C-40°C; Luftfeuchtigkeit bei Betrieb: 5% -90%
A
B
C
D
E
F
G
H
I
J
DE-11

Kaltes Wetter
Kaltes Wetter kann die Batteriekapazität beeinflussen. Bei Temperaturen unter Null Grad (<0°C)
können Sie das Produkt zwar entladen, aber nicht aufladen. Andernfalls würde die Batterie des
Produkts stark beschädigt und die Kapazität könnte möglicherweise nicht wiederhergestellt
werden.
1. Niedrigtemperatur-Ladeschutz
Wenn das Produkt bei einer Temperatur unter 0°C geladen wird, schaltet es sich ab und stoppt
automatisch das Laden. Das Produkt startet neu und beginnt sich selbst zu laden, wenn die
Temperatur auf über 5°C ansteigt.
2. Tiefentladungsschutz
If the product is discharged at a temperature of -20°C, it will turn off output in 15 seconds. The
product will reboot and turn on output when the temperature rises to above -15°C.
Lagerung und Wartung
1. Bitte laden Sie das Produkt vor der Lagerung vollständig auf und laden Sie es mindestens
einmal alle 3 Monate auf.
2. Bewahren Sie dieses Produkt an einem kühlen, trockenen, gut belüfteten und gut zugängli-
chen Ort auf. Halten Sie das Produkt von Wasser, brennbaren Gasen, ätzenden Stoffen,
Metallstaub und Salz fern. Lagertemperatur: 0°C-40°C.
3. Wenn Sie das Produkt nicht gemäß den Anweisungen verwenden, lagern und warten, erlischt
die Garantie.
Photovoltaik-Energiespeichersystem
Gleichstromquelle /
Solar Panel
Batterie
System
Laderegler
Wechselrichter
AC-Ausgang
Kleines Gerät
(geringe Leistung)
Handy / T
ablet / Laptop
USB Ausgang
12V/10A
Autoelektronik
DE-12
Unboxing
Bevor Sie das Paket öffnen, überprüfen Sie bitte, ob das Paket beschädigt ist oder nicht. Wenn
das Produkt während der Lieferung beschädigt wird oder wenn Gegenstände bei der Ankunft
verloren gehen, wenden Sie sich bitte an den Kundendienst von Suaoki, indem Sie eine E-Mail an
[email protected] senden. Sie sollten die folgenden Elemente erhalten:
Produktsübersicht
LCD Bildschirm
Artikel Anzahl der Artikel
Suaoki Tragbarer Stromgenerator
Netzteil (mit AC-Ladekabel)
Zigarettenanzünder-Adapter (6530 zum Zigarettenanzünder)
Type-C Kabel
DC Stromkabel (6,5 x 3,0 mm Männlich bis 5,5 x 2,1 mm weiblich)
Solarladekabel
Bedienungsanleitung
SUAOKI Thank-you-Karte
1
1
1
1
1
1
1
1
2
12
1 3
4
11
10
9
8
7
6
5
DE-13

1. Ein- / Ausschalter
2. Kontrollleuchte
3. DC Taste
4. DC Ausgangskontrollleuchte
5. AC Taste
6. AC Ausgangskontrollleuchte
7. AC Ausgangsleistung
8. AC ON/OFF
9. DC Ausgangsleistung
10. DC ON/OFF
11. Ladeleistung
12. Batteriestatusanzeige
Hinweis:
1. Wenn das Produkt nicht funktioniert, werden Fehlercodes auf dem Bildschirm angezeigt.
2. Hintergrundbeleuchtung würde von selbst ausgeschaltet werden, wenn das Produkt für eine
bestimmte Zeit im Leerlauf bleibt. Klicken Sie auf eine Schaltfläche, um die Hintergrundbe-
leuchtung einzuschalten.
Erklärung der Taste
• Ein- / Ausschalter
1) Einschalter: Halten Sie den Netzschalter länger als 2 Sekunden gedrückt, um das Produkt
einzuschalten. Die entsprechende Anzeigeleuchte würde leuchten und der LCD-Bildschirm
würde aufleuchten.
2) Ausschalter: Halten Sie die Einschalttaste länger als 2 Sekunden gedrückt, um das Produkt
und den LCD-Bildschirm auszuschalten. Die entsprechende Anzeigeleuchte wäre ausges-
chaltet.
• DC Taste
1) DC-Ausgang einschalten: Halten Sie die DC-Taste länger als 2 Sekunden gedrückt, um den
DC-Ausgang einzuschalten. Die entsprechende Anzeigeleuchte würde leuchten und "DC ON"
würde auf dem LCD-Bildschirm angezeigt werden.
2) DC-Ausgang ausschalten: Halten Sie die DC-Taste länger als 2 Sekunden gedrückt, um den
DC-Ausgang auszuschalten. Die entsprechende Anzeigeleuchte würde ausgeschaltet sein
und "DC OFF" würde auf dem LCD-Bildschirm angezeigt werden.
• AC Taste
1) AC-Ausgang einschalten: Halten Sie die AC-Taste länger als 2 Sekunden gedrückt, um den
AC-Ausgang einzuschalten. Die entsprechende Anzeigeleuchte würde leuchten und "AC ON"
würde auf dem LCD-Bildschirm angezeigt werden.
2) AC-Ausgang ausschalten: Halten Sie die AC-Taste länger als 2 Sekunden gedrückt, um den
AC-Ausgang auszuschalten. Die entsprechende Anzeigeleuchte würde ausgeschaltet sein und
"AC OFF" würde auf dem LCD-Bildschirm angezeigt werden.
Hinweis: Wenn das Produkt nicht eingeschaltet ist, ist die DC / AC-Ausgabe deaktiviert. Wenn
das Produkt eingeschaltet ist, ist der DC / AC-Ausgang standardmäßig ausgeschaltet. Sie
müssen lange auf die POWER-Taste drücken, um das Gerät einzuschalten, und dann lange auf
die DC / AC-Taste drücken, um den Ausgang einzuschalten.
Bedienungshinweise
Achtung:
1. Die Betriebsumgebung sollte unsere Anforderung erfüllen.
2. Stellen Sie sicher, dass der Lufteinlass / -auslass nicht blockiert ist.
DE-14

• Wie kann man das Produkt aufladen?
Hinweis: Bitte laden Sie das Produkt vor der Verwendung vollständig auf.
Es gibt 3 Möglichkeiten, das Produkt zu laden, mit AC-Adapter, Solarladekabel oder Autolade-
gerät. Zuerst müssen Sie die Eingangsquelle bestimmen und entsprechend ein Ladegerät
auswählen. Schließen Sie dann das Ladegerät an den Eingangsanschluss des Geräts an, um
den Ladevorgang zu starten. Wenn das Produkt geladen wird, blinkt das Batteriesymbol auf dem
LCD-Bildschirm. Wenn es vollständig geladen ist, hört das Batteriesymbol auf zu blinken.
A. Laden Sie mit Solarladekabel
1. Platzieren Sie Ihr Solarpanel so, dass es direktes Sonnenlicht und reichlich Sonnenschein
erhalten kann.
2. Stellen Sie sicher, dass die Leerlaufspannung des Solarpanels innerhalb von 14-40 V liegt. Die
maximale Eingangsleistung dieses Produkts beträgt 60W.
3. Verbinden Sie das Solarpanel und das Produkt mit einem Solarladekabel. Stellen Sie sicher,
dass das Solarladekabel richtig angeschlossen ist und einen festen Kontakt zum Eingang des
Produkts herstellt.
4. Das Produkt wird mit einer integrierten erweiterten Steuerschaltung geliefert. Wenn der Akku
vollständig geladen ist, wird der Ladevorgang automatisch beendet.
B. Laden Sie mit Netzteil
Um das Produkt mit einem Netzadapter zu laden, stecken Sie ein Ende des Adapters in die
Steckdose und das andere Ende in den Eingangsanschluss des Produkts. Wenn das Produkt
geladen wird, können Sie den Batteriestatus überwachen, indem Sie das Batteriesymbol auf dem
LCD-Bildschirm überprüfen. Das Produkt wird mit einer integrierten erweiterten Steuerschaltung
geliefert. Wenn der Akku vollständig geladen ist, wird der Ladevorgang automatisch beendet.
C. Laden Sie mit dem Autoladegerät (nicht inklusive)
Stecken Sie ein Ende des Autoladegeräts in den Zigarettenanzünder des Fahrzeugs und das
andere Ende in den Eingangsanschluss des Produkts. Das Batteriesymbol blinkt, um anzuzei-
gen, dass das Produkt normal geladen wird.
Hinweis:
• Sie können das Produkt nicht vollständig aufladen, wenn das Autoladegerät an eine 12-V-Auto-
batterie angeschlossen ist. Sie können es jedoch vollständig aufladen, wenn das Autolade-
gerät an eine 24-V-Autobatterie angeschlossen ist.
• Es ist am besten zu laden, während der Motor gestartet wird.
• F & A
F1: Wie überprüft man den Ladezustand?
Das Batteriesymbol zeigt den Akkuladestand dieses Produkts an. Der Akkustand wird in 5
Segmenten angezeigt. Jedes Segment zeigt 20% der Batteriekapazität an. Wenn die Batterie
geladen wird, blinkt das Symbol. Wenn der Akku vollständig geladen ist, hört das Symbol auf zu
blinken und alle 5 Segmente werden gefüllt.
F2: Wie kann man andere elektronische Geräte aufladen?
1. Sie müssen die Arbeitseffizienz Ihrer elektronischen Geräte kennen. Sie können die
Bedienungsanleitung Ihres elektronischen Geräts einsehen oder online nach solchen Informa-
tionen suchen.
DE-15

2. Sie müssen die Stromversorgung an jedem Ausgang prüfen. Zum Beispiel wird die Leistung
am AC-Ausgangsanschluss durch den eingebauten Wechselrichter des Produkts bereit-
gestellt, dessen maximale Nennausgangsleistung 120 W beträgt. Dies bedeutet, dass, wenn
die Leistung des angeschlossenen elektronischen Geräts für längere Zeit über 120 W beträgt,
der Wechselrichter die Ausgabe herunterfährt.
F3: Was ist die tiefe Entladung (DOD)?
Um die Batterielebensdauer zu verlängern, stellen wir den DOD dieses tragbaren Stromgenera-
tors auf 90% ein, was bedeutet, dass nur 90% der Batteriekapazität (200 Wh) entladen werden
können. 10% der Energie ist reserviert, damit die Batterie nicht durch Überladung beschädigt
wird.
Fehlerbehebung
E01
E02
E03
E10
Fehlercodes Ursache Lösung
Übertemperaturschutz
(System)
Überprüfen Sie, ob die Umgebungstemperatur
höher als 40°C ist. Wenn die Temperatur
abkühlt, wird der Ausgang wieder einges-
chaltet.
Überspannungsschutz
(Batterie)
Trennen Sie das Produkt von der Stromquelle,
um den Ladevorgang zu beenden und neu zu
starten.
Schutz vor Batterieschaden
Kontaktieren Sie den Suaoki Kundendienst.
SOC (Ladezustand)
Schutz
Laden Sie das Produkt rechtzeitig auf und starten
Sie es nach dem vollständigen Laden neu.
E11
Batterie-Niederspannungs-
schutz
Laden Sie das Produkt rechtzeitig auf und starten
Sie es nach dem vollständigen Laden neu.
E12
Wechselrichter Überstrom-
schutz
Überprüfen Sie, ob der AC-Ausgang überlastet
oder kurzgeschlossen ist.
E14
Kurzschlussschutz des
Wechselrichters
Überprüfen Sie, ob der AC-Ausgang überlastet
oder kurzgeschlossen ist.
E16
Überspannungsschutz von
der Ladung
Überprüfen Sie, ob die Eingangsspannung die
maximale Eingangsspannung überschreitet.
E13
Überlastschutz des
Umrichters
Überprüfen Sie, ob der AC-Ausgang überlastet
wird. Informationen zur Überlastfähigkeit finden
Sie im Abschnitt "Produktspezifikationen".
DE-16

AC
Ausgang
Modell
Ausgabespezifikationen
S200
Batteriekapazität 200Wh 200Wh
120 W
120 W
E17
E21
E22
E27
Aufladen des Niedertem-
peraturschutzes
Die Temperatur der Batterie ist zu niedrig.
Stellen Sie die Batterie wieder her, indem Sie
die Temperatur erhöhen.
12V10A Ausgang
Überstromschutz
Überprüfen Sie, ob der Ausgangsport überlast-
et oder kurzgeschlossen ist.
12V10A Ausgang
Überlastschutz
Überprüfen Sie, ob der Ausgangsport überlast-
et oder kurzgeschlossen ist.
Überlastschutz für die
gesamte Ausgangsleistung
Reduzieren Sie die Lastleistung.
E28
Übertemperaturschutz von
der Ladung
Das Gerät ist zu heiß. Abkühlen Sie das
Produkt vor dem Laden des Produkts.
E29
Übertemperaturschutz
entladen
Das Gerät ist zu heiß. Abkühlen Sie das
Produkt vor dem Entladen des Produkts.
Produktsspezifikationen
Nennleistung
200 W (1s)
200 W (1s)
Spitzenleis-
tung
110Vac
220-240Vac
Nennaus-
gangsspannung
50/60Hz
50Hz
Nennfrequenz
1
1
Leistungsfaktor
<3%
<3%
THDV
DE-17

DC12V
Ausgang
USB-A1
Ausgang
USB-A2
Ausgang
<8W
<10W
Leerlauf-Strom-
verbrauch
125W≤Load<150W@10S;
150W≤Load<180W@5s;
180W≤Load<200W@1s;
125W≤Load<150W@10S;
150W≤Load<180W@5s;
180W≤Load<200W@1s;
Überlastbarkeit
90%
90%
Maximale
Effizienz (>
70% Lastkraft)
10~12.6V
10~12.6V
Ausgangsspan-
nungsbereich
120W
120W
Nennleistung
Überlastleis-
tung / Strom-
stärke
Schnelllade-
gerät unter-
stützt
Ausgangsspan-
nungsbereich
Nennaus-
gangsstrom
Überlast-
ungsstrom
Die Leistung ist größer als
125W oder der Strom ist
größer als 11A
Die Leistung ist größer als
125W oder der Strom ist
größer als 11A
BC1.2, Apple, Samsung BC1.2, Apple, Samsung
5V±0.25V 5V±0.25V
2.4A 2.4A
2.8-3.8A 2.8-3.8A
Kommunika-
tionsprotokoll
(Schnellladung)
Ausgangsspan-
nungsbereich
Nennaus-
gangsstrom
Überlast-
ungsstrom
QC3.0 QC3.0
5~12V (5V by default) 5~12V (5V by default)
5V2.5A、9V2A、12V1.5A 5V2.5A、9V2A、12V1.5A
2.8-3.8A 2.8-3.8A
DE-18

PV Eingang
Batterie
USB-C
Ausgang
PV
Eingang
Nennspannung
Nennleistung (Wh)
Zelltyp
Batteriemodell
Nennkapazität
11.1 V
200Wh
18000mAh
Li-ion
INR18650P
11.1 V
200Wh
18000mAh
Li-ion
INR18650P
Kommunika-
tionsprotokoll
(Schnellladung)
Ausgangsspan-
nungsbereich
Nennaus-
gangsstrom
Überlast-
ungsstrom
PD Protokoll
(Max Ausgang: 45W)
PD Protokoll
(Max Ausgang: 45W)
5~20V (standardmäßig 5V) 5~20V (standardmäßig 5V)
(5~20)V/2.25A (5~20)V/2.25A
2.3-3A 2.3-3A
Eingangsspan-
nungsbereich
MTTP-Span-
nungsbereich
Max.
Eingangsspan-
nung
MPPT-Effizienz
Maximale
Effizienz
Solarlademo-
dus
14~40 Vdc 14~40 Vdc
Max. Eingang-
sleistung
60 W 60 W
15-40 Vdc 15-40 Vdc
40 Vdc 40 Vdc
99.50% 99.50%
>90% >90%
MPPT MPPT
DE-19

Allgemeines
Aufbau
Arbeitstemperatur
IP-Bewertung
Arbeitsbedingung
Maße
3S8P
0°C-40°C
3S8P
0°C-40°C
IP 21
Relative Luftfeuchtigkeit: 5%-90%
Temperatur: 0-40°C
196mm*65mm*255mm
Nettogewicht 2.7 kg
Garantie
Wir bieten den Kunden eine Garantie von 12 Monaten ab Kaufdatum.
Kontaktieren Sie uns
Für Anfragen oder Kommentare zu unseren Produkten senden Sie bitte eine E-Mail an support@-
suaoki.com, und wir werden Ihnen so schnell wie möglich antworten.
DE-20

Merci d'avoir choisi Suaoki.
Veuillez lire ce manuel avant utilisation et suivez ses instructions. Gardez ce manuel pour
référence future.
Présentation du produit
A. Écran LCD
B. Bouton d'alimentation
C. Bouton DC
D. Bouton AC
E. Port de sortie USB
F. Port de sortie QC3.0
G. Port de sortie DC 12V
H. Port de sortie USB-C et PD2.0
I. Port d'entrée PV / ADAPTATEUR
J. Port de sortie AC 120W
Avertissements
1. Veuillez lire attentivement la section d'avertissement avant utilisation. Suivez les instructions et
conservez ce manuel pour référence ultérieure.
2. Évitez d'utiliser ce produit lorsqu'il est exposé à la lumière directe du soleil, à la pluie ou à un
environnement humide.
3. Ce produit ne peut pas être installé près du radiateur, du four ou de toute autre source de
chaleur.
4. Placez le produit dans un endroit stable et sécurisé.
5. Veuillez utiliser un chiffon sec pour nettoyer ce produit.
6. Veuillez ne pas modifier ou démonter ce produit.
7. Gardez loin du feu. En cas de risque d'incendie, utilisez un extincteur à poudre sèche sur ce
produit. L'utilisation d'un extincteur à l’eau sur ce produit peut entraîner un choc électrique.
8. Température de fonctionnement: 0°C à 40°C; Humidité de fonctionnement: 5% -90%
A
B
C
D
E
F
G
H
I
J
FR-21

Température froide
Le temps froid peut influencer la capacité de la batterie. En température inférieure à zéro (<0°C),
vous pourrez peut-être décharger le produit, mais vous ne devriez pas le charger. Sinon, la
batterie du produit serait fortement endommagée et la capacité pourrait même ne pas être
récupérée.
1. basse température de charge protection
Lorsque le produit est chargé à une température inférieure à 0°C, il s’arrête et arrête automa-
tiquement de se charger. Le produit redémarre et commence à se charger lorsque la tempéra-
ture dépasse 5°C.
2. basse température décharge la protection
Si le produit est déchargé à une température de -20°C, il s'éteindra en 15 secondes. Le produit
redémarre et active la sortie lorsque la température dépasse -15°C.
Stockage et maintenance
1. S'il vous plaît charger complètement le produit avant le stockage et le charger au moins une
fois tous les 3 mois.
2. Stockez ce produit dans un endroit frais, sec, bien ventilé et bien espacé. Tenir le produit à
l'écart de l'eau, des gaz inflammables, des matières corrosives, de la poussière de métal et du
sel. Température de stockage: 0°C à 40°C.
3. Ne pas utiliser, stocker et entretenir le produit conformément aux instructions annulerait la
garantie.
Système de stockage d'énergie photovoltaïque
Source DC /
Panneau solaire
Batterie
Système
Contrôleur
de chargeur
Sortie AC
Inverter
Petit appareil
(faible puissance)
Téléphone portable /
tablette /
ordinateur portable
Sortie USB
12V/10A
Voiture
électronique
FR-22
Déballage
Avant d'ouvrir le colis, veuillez vérifier si le colis est endommagé ou non. Si le produit est endom-
magé lors de la livraison ou si des articles ont disparu à votre arrivée, veuillez contacter le service
clientèle de Suaoki en envoyant un courrier électronique à l'adresse [email protected]. Vous
devriez recevoir les éléments suivants:
Présentation du produit
Affichage LCD
Article Nombre d'articles
Suaoki groupe électrogène portable
AC Adaptateur (avec câble de charge AC)
Adaptateur allume-cigare (6530 allume-cigare)
Câble de type C
Câble d'alimentation CC (6.5x3.0mm mâle à 5.5x2.1mm femelle)
Câble de charge solaire
Manuel de l’utilisateur
SUAOKI Merci carte
1
1
1
1
1
1
1
1
2
12
1 3
4
11
10
9
8
7
6
5
FR-23

1. Bouton d'alimentation
2. Voyant d'alimentation
3. Bouton DC
4. Voyant de sortie DC
5. Bouton AC
6. Voyant de sortie AC
7. Puissance de sortie AC
8. AC ON / OFF
9. Puissance de sortie DC
10. DC ON / OFF
11. puissance de charge
12. Indicateur d'état de la batterie
Remarque:
1. Si le produit ne fonctionne pas correctement, les codes d'erreur sont affichés à l'écran.
2. Le rétro-éclairage est désactivé par lui-même lorsque le produit reste inactif pendant un
certain temps. Cliquez sur un bouton pour activer le rétro-éclairage.
Boutons expliqués
• Bouton d'alimentation
1) Mise sous tension: appuyez longuement sur le bouton d’alimentation pendant plus de 2
secondes pour allumer le produit. Le voyant correspondant serait allumé et l'écran LCD
s'allumerait.
2) Mise hors tension: appuyez longuement sur le bouton d'alimentation pendant plus de 2
secondes pour éteindre le produit et l'écran LCD. Le voyant correspondant serait éteint.
• DC Bouton
1) Activez la sortie DC: appuyez longuement sur le bouton DC pendant plus de 2 secondes
pour activer la sortie DC. Le voyant correspondant serait allumé et «DC ON» serait affiché sur
l'écran LCD.
2) Désactivez la sortie DC: appuyez longuement sur le bouton DC pendant plus de 2 secondes
pour désactiver la sortie DC. Le voyant correspondant serait éteint et «DC OFF» serait affiché
sur l'écran LCD.
• AC Bouton
1) Activez la sortie AC: appuyez longuement sur le bouton AC pendant plus de 2 secondes
pour activer la sortie AC. Le voyant correspondant serait allumé et «AC ON» serait affiché sur
l'écran LCD.
2) Désactivez la sortie AC: appuyez longuement sur le bouton AC pendant plus de 2 secondes
pour désactiver la sortie AC. Le voyant correspondant serait éteint et «AC OFF» serait affiché
sur l'écran LCD.
Remarque: Lorsque le produit n’est pas allumé, la sortie DC / AC est désactivée. Lorsque le
produit est allumé, la sortie DC / AC est désactivée par défaut. Vous devez appuyer longuement
sur le bouton POWER pour allumer le produit, puis appuyer longuement sur le bouton DC / AC
pour activer la sortie.
Guide d'opération
Attention:
1. L'environnement d'exploitation doit répondre à nos exigences.
2. Assurez-vous que l'entrée / sortie d'air n'est pas bloquée.
FR-24

• Comment charger le produit
Remarque: Veuillez charger complètement le produit avant utilisation.
Il existe trois façons de charger le produit, à l'aide d'un adaptateur secteur, d'un câble de
recharge solaire ou d'un chargeur de voiture. Tout d'abord, vous devez déterminer la source
d'entrée et sélectionner un chargeur en conséquence. Ensuite, connectez le chargeur au port
d'entrée du produit pour commencer à charger. Lorsque le produit est en cours de chargement,
l'icône de la batterie clignote sur l'écran LCD. Lorsqu'il est complètement chargé, l'icône de la
batterie arrête de clignoter.
A. Charge avec câble de charge solaire
1. Placez votre panneau solaire quelque part où il peut recevoir la lumière directe du soleil et un
ensoleillement abondant.
2. Assurez-vous que la tension à vide du panneau solaire se situe entre 14 et 40V. La puissance
d'entrée maximale de ce produit est de 60W.
3. Connectez le panneau solaire et le produit à l'aide d'un câble de charge solaire. Assurez-vous
que le câble de charge solaire est correctement connecté, en formant un contact solide avec
le port d'entrée du produit.
4. Le produit est livré avec un circuit de contrôle avancé intégré. Lorsque la batterie est
complètement chargée, elle ne se recharge plus automatiquement.
B. Charge avec AC adaptateur
Pour charger le produit avec l'adaptateur secteur, insérez l'une des extrémités de l'adaptateur
dans la prise murale et insérez l'autre extrémité dans le port d'entrée du produit. Lorsque le
produit est en cours de chargement, vous pouvez surveiller l'état de la batterie en cochant l'icône
de la batterie sur l'écran LCD. Le produit est livré avec un circuit de contrôle avancé intégré.
Lorsque la batterie est complètement chargée, elle ne se recharge plus automatiquement.
C. Charge avec chargeur de voiture (non inclus)
Insérez une extrémité du chargeur de voiture dans la prise allume-cigare de la voiture et insérez
l'autre extrémité dans le port d'entrée du produit. L'icône de la batterie clignote pour indiquer que
le produit est chargé normalement.
Remarque:
• Vous ne pouvez pas charger complètement le produit lorsque le chargeur de voiture est
connecté à une batterie de voiture 12V, mais vous pouvez le charger complètement lorsque le
chargeur de voiture est connecté à une batterie de voiture 24V.
• Il est préférable de charger pendant que le moteur de votre voiture est démarré.
• Q & A
Q1: Comment vérifier l'état de charge?
L'icône de la batterie indique le niveau de batterie de ce produit. Le niveau de la batterie est
affiché en 5 segments. Chaque segment indique 20% de la capacité de la batterie. Lorsque la
batterie est en cours de chargement, l'icône clignote. Lorsque la batterie est complètement
chargée, l'icône cesse de clignoter et les 5 segments sont remplis.
Q2: Comment charger d'autres appareils électroniques?
1. Vous devez connaître l'efficacité de fonctionnement de vos appareils électroniques. Vous
pouvez consulter le manuel d'utilisation de votre appareil électronique ou rechercher en ligne
de telles informations.
FR-25

2. Vous devez vérifier l’alimentation de chaque port de sortie. Par exemple, l’alimentation au port
de sortie AC est fournie par l’onduleur intégré du produit, dont la puissance de sortie nominale
maximale est de 120 W. Cela signifie que si l’alimentation du dispositif électronique connecté
dépasse 120 W pendant une longue période, l’onduleur arrête la sortie.
Q3: Qu'est-ce que la profondeur de décharge (DOD)?
Pour prolonger la durée de vie de la batterie, nous définissons le DOD de ce générateur portable
à 90%, ce qui signifie que seuls 90% de la capacité de la batterie (200Wh) peuvent être
déchargés. 10% de l'énergie est réservée afin que la batterie ne soit pas endommagée par une
décharge excessive.
Dépannage
E01
E02
E03
E10
Codes d'erreur Cause Solution
Protection contre les
températures excessives
(système)
Vérifiez si la température ambiante est
supérieure à 40°C. Lorsque la température
refroidit, la sortie est réactivée.
Protection contre les
surtensions (batterie)
Débranchez le produit de la source d'alimenta-
tion pour arrêter le chargement et le redémar-
rer.
Protection contre les
dommages à la batterie
Contactez le service clientèle de Suaoki.
Protection SOC (état de
charge)
Chargez le produit à temps et redémarrez-le
complètement chargé.
E11
Protection basse tension
batterie
Chargez le produit à temps et redémarrez-le
complètement chargé.
E12
Protection contre les
surintensités de l'onduleur
Vérifiez si le port de sortie AC est surchargé ou
court-circuité.
E14
Protection contre les
courts-circuits de l'onduleur
Vérifiez si le port de sortie AC est surchargé ou
court-circuité.
E16
Protection contre les
surtensions
Vérifiez si la tension d'entrée dépasse la
tension d'entrée maximale.
E13
Protection contre les
surcharges de l'onduleur
Vérifiez si la sortie AC est surchargée, repor-
tez-vous à la section «Spécifications du produit»
pour connaître la capacité de surcharge.
FR-26

E17
E21
E22
E27
Protection à basse
températuret
La température de la batterie est trop basse.
Restaurer la batterie en augmentant sa
température.
Protection contre les
surintensités de sortie
12V10A
Vérifiez si le port de sortie est surchargé ou
court-circuité.
Protection de surcharge
de sortie 12V10A
Vérifiez si le port de sortie est surchargé ou
court-circuité.
Protection totale contre la
surcharge de puissance
Réduisez la puissance de charge.
E28
Protection contre la
surchauffe
L'appareil est trop chaud. Refroidissez le
produit avant de charger le produit.
E29
Protection contre la
surchauffe
L'appareil est trop chaud. Refroidissez le
produit avant de décharger le produit.
Sortie AC
Modèle
Output Specifications
S200
Capacité de la batterie 200Wh 200Wh
120 W
120 W
Spécifications du produit
Puissance de
sortie nominale
200 W (1s)
200 W (1s)
Puissance de
sortie maximale
110Vac
220-240Vac
Tension de sortie
nominale
50/60Hz
50Hz
Fréquence
nominale
1
1
Facteur de
puissance
<3%
<3%
THDV
FR-27

Sortie
DC12V
USB-A1
tSortie
USB-A2
Sortie
<8W
<10W
Consommation
électrique sans
charge
125W≤Load<150W@10S;
150W≤Load<180W@5s;
180W≤Load<200W@1s;
125W≤Load<150W@10S;
150W≤Load<180W@5s;
180W≤Load<200W@1s;
Capacité de
surcharge
90%
90%
Efficacité maxim-
ale (puissance de
charge> 70%)
10~12.6V
10~12.6V
Gamme de
tension de sortie
120W
120W
Puissance de
sortie nominale
Surcharge /
courant
Dispositif à
charge rapide
pris en charge
Gamme de
tension de sortie
Courant de
sortie nominal
Courant de
surcharge
La puissance est supérieure
à 125W ou le courant est
supérieur à 11A
La puissance est supérieure
à 125W ou le courant est
supérieur à 11A
BC1.2, Apple, Samsung BC1.2, Apple, Samsung
5V±0.25V 5V±0.25V
2.4A 2.4A
2.8-3.8A 2.8-3.8A
Protocole de
communication
(charge rapide)
Gamme de
tension de sortie
Courant de
sortie nominal
Courant de
surcharge
QC3.0 QC3.0
5~12V (5V by default) 5~12V (5V by default)
5V2.5A、9V2A、12V1.5A 5V2.5A、9V2A、12V1.5A
2.8-3.8A 2.8-3.8A
FR-28

PV Input
Batterie
USB-C S
Sortie
Entrée PV
Tension nominale
Puissance nominale (Wh)
Type de cellule
Modèle de batterie
Capacité nominale
11.1 V
200Wh
18000mAh
Li-ion
INR18650P
11.1 V
200Wh
18000mAh
Li-ion
INR18650P
Protocole de
communication
(charge rapide)
Gamme de
tension de sortie
Courant de
sortie nominal
Courant de
surcharge
Protocole PD
(sortie maximale: 45W)
Protocole PD
(sortie maximale: 45W)
5~20V (5V par défaut) 5~20V (5V par défaut)
(5~20)V/2.25A (5~20)V/2.25A
2.3-3A 2.3-3A
Plage de
tension d'entrée
Gamme de
tension MTTP
Max. Tension
d'entrée
Efficacité MPPT
Max Efficiency
Mode de
recharge solaire
14~40 Vdc 14~40 Vdc
Puissance d'en-
trée maximale
60 W 60 W
15-40 Vdc 15-40 Vdc
40 Vdc 40 Vdc
99.50% 99.50%
>90% >90%
MPPT MPPT
FR-29

General
Configuration
Température de
fonctionnement
Classification IP
Condition de travail
Dimensions
3S8P
0°C-40°C
3S8P
0°C-40°C
IP 21
Humidité relative: 5% -90%
Température: 0-40°C
196mm*65mm*255mm
Poids net 2.7 kg
Garantie
Notre société offre aux clients une garantie de 12 mois à compter de la date d'achat.
Contactez nous
Pour toute question ou commentaire concernant nos produits, veuillez envoyer un email à
[email protected], et nous vous répondrons dans les plus brefs délais.
FR-30

Grazie per aver scelto Suaoki.
Si prega di leggere questo manuale prima dell'uso e di seguire la sua guida. Conservare questo
manuale per riferimenti futuri.
Panoramica del Prodotto
A. LCD schermo
B. Pulsante di alimentazione
C. DC Pulsante
D. AC Pulsante
E. USB Porta di Uscita
F. QC3.0 Porta di Uscita
G. DC 12V Porta di Uscita
H. USB-C & PD2.0 Porta di Uscita
I. PV/ADAPTER Porta di Entrata
J. AC 120W Porta di Uscita
Avvertenze
1. Si prega di leggere attentamente la sezione di avvertenza prima dell'uso. Seguire le istruzioni e
conservare questo manuale per riferire in futuro.
2. Evitare di esporre il prodotto a luce solare diretta, pioggia o ambiente umido quando lo usa.
3. Questo prodotto non può essere installato vicino al radiatore, al forno o qualsiasi altra fonte di
calore.
4. Posizionare il prodotto in un'area stabile e protetta.
5. Si prega di utilizzare un panno asciutto per pulire questo prodotto.
6. Si prega di non modificare o smontare questo prodotto.
7. Stai lontano dal fuoco. In caso di pericolo di incendio, utilizzare estintori a polvere secca su
questo prodotto. L'uso di estintori a getto d'acqua su questo prodotto può causare scosse
elettriche.
8. Temperatura di funzionamento: 0°C-40°C; Umidità operativa: 5% -90%
A
B
C
D
E
F
G
H
I
J
IT-31
Tempo freddo
Il freddo può influenzare la capacità della batteria. Nella temperatura sotto zero (<0°C), è
possibile scaricare il prodotto, ma non caricarlo. In caso contrario, la batteria del prodotto si
danneggerebbe notevolmente e la capacità potrebbe non essere recuperata
1. Protezione di carica a bassa temperatura
Quando il prodotto viene caricato a una temperatura inferiore a 0°C, si spegne e si interrompe
automaticamente. Il prodotto si riavvierà e inizierà a caricarsi da solo quando la temperatura
salirà al di sopra di 5°C .
2. Protezione da scarica a bassa temperatura
Se il prodotto viene scaricato ad una temperatura di -20°C, disattiva l'uscita in 15 secondi. Il
prodotto si riavvierà e accenderà l'uscita quando la temperatura sale sopra a -15°C.
Conservazione e Mantenuzione
1. Si prega di caricare completamente il prodotto prima di conservarlo e ricaricarlo almeno una
volta ogni 3 mesi.
2. Conservare questo prodotto in un'area fresca, asciutta, ben ventilata e ben distanziata. Tenere
il prodotto lontano da acqua, gas infiammabili, materiali corrosivi, polvere metallica e sale.
Temperatura di conservazione: 0°C-40°C.
3. La mancata utilizzazione, conservazione e manutenzione del prodotto secondo le istruzioni
annullerebbe la garanzia.
Sistema di accumulo dell'energia fotovoltaico
DC Alimentazione /
Pannello Solare
Batteria
Sistema
Controllatore
di Carica
Uscita AC
Inverter
Piccolo apparecchio
(bassa potenza)
Telefono cellulare/
Tablet/Laptop
USB Output
12V/10A
Elettronica
per auto
IT-32
Confezione
Prima di aprire il pacco, si prega di controllare se il pacco è danneggiato o meno. Se il prodotto
è danneggiato durante la consegna o se qualche elemento è andato perso all'arrivo, si prega di
contattare il servizio clienti di Suaoki inviando una e-mail a [email protected]. Dovresti
ricevere i seguenti articoli:
Panoramica del Prodotto
LCD Display
Articolo Numero di Articolo
Suaoki Accumulatore di potenza portatile
AC adattatore (con cavo AC di ricarica)
Adattatore per accendisigari (6530 all'accendisigari)
Type-C cavo
Cavo di alimentazione DC
(6.5x3.0mm maschio a 5.5x2.1mm femmina)
Cavo di ricarica solare
Manuale utente
SUAOKI Scheda di ringraziamento
1
1
1
1
1
1
1
1
2
12
1 3
4
11
10
9
8
7
6
5
IT-33

1. Pulsante di alimentazione
2. Indicatore di alimentazione
3. DC pulsante
4. DC indicatore di uscita
5. AC pulsante
6. AC indicatore di uscita
7. AC potenza di uscita
8. AC ON/OFF
9. DC potenza di uscita
10. DC ON/OFF
11. Potenza di Ricarica
12. Indicatore di stato della batteria
Nota:
1. In caso di malfunzionamento del prodotto, i codici di errore verrebbero visualizzati sullo
schermo.
2. La retroilluminazione si spegnerebbe da sola quando il prodotto rimane inattivo per un certo
periodo di tempo. Clicca su un pulsante per accendere la retroilluminazione.
Pulsanti spiegati
• Pulsante di accensione
1) Attiva: premere a lungo il pulsante di accensione per oltre 2 secondi per accendere il prodot-
to. La spia corrispondente si accenderà e lo schermo LCD si illuminerà.
2) Spegnimento: premere a lungo il pulsante di accensione per oltre 2 secondi per spegnere il
prodotto e lo schermo LCD. L'indicatore luminoso corrispondente si spegnerebbe.
• DC Pulsante
1) Attiva l'uscita DC: Premi a lungo il pulsante DC per oltre 2 secondi per accendere l'uscita CC.
La spia corrispondente si accenderà e "DC ON" verrà visualizzato sullo schermo LCD.
2) Disattiva l'uscita DC: Premi a lungo il pulsante DC per oltre 2 secondi per disattivare l'uscita
DC. L'indicatore luminoso corrispondente si spegnerebbe e "DC OFF" verrebbe visualizzato
sullo schermo LCD.
• AC Pulsante
1) Attiva l'uscita AC: premi a lungo il pulsante AC per oltre 2 secondi per accendere l'uscita AC.
La spia corrispondente si accenderà e 'AC ON' verrebbe visualizzato sullo schermo LCD.
2) Disattiva l'uscita AC: premi a lungo il pulsante AC per oltre 2 secondi per spegnere l'uscita
AC. La spia corrispondente si spegnerebbe e "AC OFF" verrebbe visualizzato sullo schermo
LCD.
Nota: Quando il prodotto non è acceso, l'uscita DC / AC sarà disabilitata. Quando il prodotto è
acceso, l'uscita DC / AC è disattivata per impostazione predefinita. È necessario premere a lungo
il pulsante ACCENSIONE per accendere il prodotto e quindi premere a lungo il pulsante DC / AC
per accendere l'uscita.
Guida operativa
Attenzione:
1. L'ambiente operativo dovrebbe soddisfare i nostri requisiti.
2. Assicurarsi che l'ingresso / uscita dell'aria non sia bloccato.
IT-34

• Come ricaricare questo prodotto
Nota: caricare completamente il prodotto prima dell'uso.
Esistono 3 modi per caricare il prodotto, utilizzando l'adattatore CA, il cavo di ricarica solare o il
caricatore per auto. Innanzitutto, è necessario determinare la sorgente di ingresso e selezionare
un caricabatterie di conseguenza. Quindi, collegare il caricabatterie alla porta di ingresso del
prodotto per avviare la ricarica. Durante il caricamento del prodotto, l'icona della batteria
lampeggia sullo schermo LCD. Quando è completamente carico, l'icona della batteria smette di
lampeggiare.
A. Carica con cavo di ricarica solare
1. Posiziona il tuo pannello solare da qualche parte in modo che possa ricevere luce solare
diretta e abbondante luce solare.
2. Assicurarsi che la tensione a circuito aperto del pannello solare sia compresa tra 14 e 40 V. La
massima potenza in ingresso di questo prodotto è 60W.
3. Collegare il pannello solare e il prodotto tramite il cavo di ricarica solare. Assicurarsi che il cavo
di ricarica solare sia collegato correttamente, formando un solido contatto con la porta di
ingresso del prodotto.
4. Il prodotto è dotato di un circuito di controllo avanzato incorporato. Quando la batteria è
completamente carica, si fermerà automaticamente.
B. Carica con adattatore AC.
Per caricare il prodotto con un adattatore AC, inserire un'estremità dell'adattatore nella presa a
muro e inserire l'altra estremità nella porta di ingresso del prodotto. Quando il prodotto viene
caricato, è possibile monitorare lo stato della batteria controllando l'icona della batteria sullo
schermo LCD. Il prodotto è dotato di un circuito di controllo avanzato incorporato. Quando la
batteria è completamente carica, si fermerà automaticamente.
C. Carica con caricatore per auto (non incluso)
Inserire un'estremità del caricatore per auto nella presa per accendisigari dell'auto e inserire l'altra
estremità nella porta di ingresso del prodotto. L'icona della batteria lampeggia per indicare che il
prodotto viene caricato normalmente.
Nota:
• Non è possibile caricare completamente il prodotto quando il caricatore per auto è collegato a
una batteria da 12 V, ma è possibile caricarlo completamente quando il caricatore per auto è
collegato a una batteria per auto da 24 V.
• È meglio ricaricare mentre il motore della tua auto è avviato.
• Q & A
Q1: Come controllare lo stato di ricarica?
L'icona della batteria indica il livello della batteria di questo prodotto. Il livello della batteria è
visualizzato in 5 segmenti. Ogni segmento indica il 20% della capacità della batteria. Quando la
batteria è in carica, l'icona lampeggia. Quando la batteria è completamente carica, l'icona smette
di lampeggiare e tutti i 5 segmenti saranno riempiti.
IT-35

Q2: Come caricare altri dispositivi elettronici?
1. Devi conoscere l'efficienza lavorativa dei tuoi dispositivi elettronici. Puoi controllare il manuale
utente del tuo dispositivo elettronico o cercare online tali informazioni.
2. È necessario controllare l'alimentazione a ciascuna porta di uscita. Ad esempio, l'alimentazi-
one alla porta di uscita AC è fornita dall'inverter integrato del prodotto, la cui potenza massima
in uscita è di 120W. Ciò significa che se la potenza del dispositivo elettronico collegato supera
i 120 W per un lungo periodo, l'inverter interromperà l'uscita.
Q3: Che cos'è Depth of Discharge (DOD)?
Per prolungare la durata della batteria, impostiamo il DOD di questo generatore portatile al 90%,
il che significa che solo il 90% della capacità della batteria (200Wh) può essere scaricato. Il 10%
dell'energia è riservato in modo che la batteria non venga danneggiata a causa di un eccessivo
scaricamento.
Risoluzione dei problemi
E01
E02
E03
E10
Codici
di errore
Causa Soluzione
Protezione da sovratem-
peratura (sistema)
Controllare se la temperatura ambiente è
superiore a 40°C. Quando la temperatura si
raffredda, l'uscita verrà riattivata.
Protezione da sovratensi-
one (batteria)
Disconnettere il prodotto dalla fonte di
alimentazione per interrompere la ricarica e
riavviarlo.
Protezione da danni alla
batteria
Contattare il servizio clienti Suaoki.
Protezione SOC (stato di
carica)
Caricare il prodotto in tempo e riavviarlo dopo
averlo caricato completamente.
E11
Protezione a bassa
tensione della batteria
Caricare il prodotto in tempo e riavviarlo dopo
averlo caricato completamente.
E12
Protezione da sovracor-
rente dell'inverter
Verificare se la porta di uscita AC viene
sovraccaricata o cortocircuitata.
E14
Protezione da cortocircuito
dell'inverter
Controllare se la porta di uscita AC viene
sovraccaricata o cortocircuitata.
E16
Protezione di ricarica da
sovratensione
Verificare se la tensione di ingresso supera la
massima tensione di ingresso.
E13
Protezione da sovraccari-
co dell'inverter
Controllare se l'uscita AC è sovraccaricata, fare
riferimento alla sezione "Specifiche del prodotto"
per la capacità di sovraccarico.
IT-36

E17
E21
E22
E27
Protezione di ricarica a
bassa temperatura
La temperatura della batteria è troppo bassa.
Ripristinare la batteria aumentando la sua
temperatura.
Protezione da sovracor-
rente in uscita 12V10A
Controllare se la porta di uscita viene sovrac-
caricata o cortocircuitata.
Protezione da sovraccari-
co in uscita 12V10A
Controllare se la porta di uscita viene sovrac-
caricata o cortocircuitata.
Protezione da sovraccarico
di potenza totale in uscita
Ridurre la potenza del carico.
E28
Protezione di ricarica da
sovratemperatura
L'unità è troppo calda. Raffreddare il prodotto
prima di caricare il prodotto.
E29
Protezione di scarica da
sovratemperatura
L'unità è troppo calda. Raffreddare il prodotto
prima di scaricare il prodotto.
AC Uscita
Modello
Output Specifications
S200
Capacità Batteria 200Wh 200Wh
120 W
120 W
Specifiche del Prodotto
Potenza di
uscita nominale
200 W (1s)
200 W (1s)
Potenza di
uscita massima
110Vac
220-240Vac
Tensione di
uscita nominale
50/60Hz
50Hz
Frequenza
nominale
1
1
Fattore di
potenza
<3%
<3%
THDV
IT-37

DC12V
Uscita
USB-A1
Uscita
USB-A2
Uscita
<8W
<10W
Consumo
energetico a
vuoto
125W≤Load<150W@10S;
150W≤Load<180W@5s;
180W≤Load<200W@1s;
125W≤Load<150W@10S;
150W≤Load<180W@5s;
180W≤Load<200W@1s;
Capacità di
sovraccarico
90%
90%
Massima efficie-
nza (> 70% di
potenza di carico)
10~12.6V
10~12.6V
Gamma di
tensioni di uscita
120W
120W
Potenza di
uscita nominale
Sovraccarico di
alimentazione /
corrente
Dispositivo con
carica rapida
supportata
Gamma di
tensione di
uscita
Corrente
nominale di
uscita
Sovraccarico di
corrente
La potenza è superiore a 125
W o la corrente è maggiore di
11 A
La potenza è superiore a 125
W o la corrente è maggiore di
11 A
BC1.2, Apple, Samsung BC1.2, Apple, Samsung
5V±0.25V 5V±0.25V
2.4A 2.4A
2.8-3.8A 2.8-3.8A
Protocollo di
comunicazione
(ricarica rapida)
Gamma di
tensioni di uscita
Corrente
nominale di
uscita
Sovraccarico
di corrente
QC3.0 QC3.0
5~12V (5V per
impostazione predefinita)
5~12V (5V per
impostazione predefinita)
5V2.5A、9V2A、12V1.5A 5V2.5A、9V2A、12V1.5A
2.8-3.8A 2.8-3.8A
IT-38

PV Uscita
Batteria
USB-C
Uscita
PV Uscita
Tensione nominale
Potenza nominale (Wh)
Tipo di batteria
Modello di batteria
Capacità nominale
11.1 V
200Wh
18000mAh
Li-ion
INR18650P
11.1 V
200Wh
18000mAh
Li-ion
INR18650P
Protocollo di
comunicazione
(ricarica rapida)
Gamma di
tensioni di uscita
Corrente
nominale di
uscita
Sovraccarico
di corrente
Protocollo PD
(Uscita Massima: 45W)
Protocollo PD
(Uscita Massima: 45W)
5~20V (5V per
impostazione predefinita)
5~20V (5V per
impostazione predefinita)
(5~20)V/2.25A (5~20)V/2.25A
2.3-3A 2.3-3A
Gamma della
tensione di
entrata
MTTP gamma
di tensione
Massima
tensione di
uscita
MPPT
Efficienza
Max Efficienza
Modalità di
ricarica solare
14~40 Vdc 14~40 Vdc
Potenza massima
di entrata
60 W 60 W
15-40 Vdc 15-40 Vdc
40 Vdc 40 Vdc
99.50% 99.50%
>90% >90%
MPPT MPPT
IT-39
Generale
Configurazione
Temperatura di
funzionamento
IP Certificazione
Condizioni di lavoro
Dimensione
3S8P
0°C-40°C
3S8P
0°C-40°C
IP 21
Umidità relativa: 5%-90%
Temperatura: 0-40°C
196mm*65mm*255mm
Peso netto 2.7 kg
Garanzia
La nostra azienda offre ai clienti una garanzia di 12 mesi dalla data di acquisto.
Contattaci
Per qualsiasi domanda o commento riguardante i nostri prodotti, si prega di inviare una mail a
[email protected], e risponderemo al più presto possibile.
IT-40

Gracias por elegir Suaoki.
Por favor, lea este manual antes de utilizar y siga sus orientaciones. Guarde este manual para
referencia futura.
Descripción de productos
A. Pantalla LCD
B. Botón de encendido
C. Botón de DC
D. Botón de AC
E. Puerto de USB
F. Puerto de salida de QC 3.0
G. Puerto de salida de DC 12V
H. Puerto de salida de USB-C & PD2.0
I. Puerto de entrada de PV/ADAPTADOR
J. Puerto de salida de AC 120W
Precauciones
1. Por favor, lea esta sección de advertencias cuidadosamente antes de utilizar. Siga las instruc-
ciones y guarde este manual para referencia futura.
2. Evite la exposición directa de su dispositivo al sol o lluvia. Evite el uso en lugares húmedos.
3. Este aparato no se puede ser instalado acerca de radiatores, hornos u otras fuentes de calor.
4. Coloque este producto en una área estable y segura.
5. Limpie este producto con paño limpio.
6. No recomendamos que altere o desmonte este aparato.
7. Mantenga el producto alejado de fuego. Si sucede un incendio, usa extintores de polvo.
Utilizar extintores de tipo agua para este aparato puede causar descarga eléctrica.
8. Temperatura de operación: 0°C-40°C; Humedad de operación: 5%-90%
A
B
C
D
E
F
G
H
I
J
ES-41
Tiempo frío
El tiempo frío puede influenciar la capacidad de baterías. En temperaturas bajo cero (<0°C),
podía descargar el producto pero no debería cargarlo. De lo contrario, la batería del aparato va a
ser dañado en gran medida y la capacidad no se puede recuperar.
1. Protección de carga en temperaturas bajas
Si el producto está cargando bajo una temperatura debajo del 0°C, va a apagarse y dejar de
cargarse automáticamente. El producto va a reiniciar y recargarse cuando la temperatura
sube superior al 5°C.
2. Protección de descarga en temperaturas bajas
Si el producto está descargando bajo una temperatura del -20°C, va a apagar la salida dentro
de 15 segundos. Va a poder reiniciar y abrir la salida cuando la temperatura sube superior al
-15°C.
Almacenamiento y Mantenimiento
1. Le recomendamos que cargue este producto completamente antes de almacenarlo y por lo
menos lo cargue una vez cada 3 meses.
2. Guarde este producto en una área fresca, seca, bien ventilada y bien espaciada. Manténgalo
alejado de agua, gas inflamable, material corrosivo, polvo de metal y sal. Temperatura de
almacenamiento: 0°C-40°C.
3. La garantía se considerará anulada si sucede algún fallo debido a que el usuario no utiliza,
guarda o mantiene este producto según la instrucción.
Sistema de Almacenamiento de Energía Fotovoltaica
DC fuente /
Panel Solar
Batería
Sistema
Regulador
de Carga
Salida de
AC Inversor
Dispositivos
Pequeños
(Baja potencia)
Celular/
Tableta/Portátil
Puerto USB
12V/10A
Aparatos eléctricas
para automóvil
ES-42

Desempacar
Antes de desempacarlo, le rogamos que vertifique que el paquete sea completo. Si el producto
sufre algún daño durante el envío o desaparecen unos artículos cuando llega el paquete, le
aconsejamos que contacte a la atención al cliente de Suaoki vía [email protected]. Los
artículos que debería recibir son:
Resumen de producto
Pantalla LCD
Artículo Cantidad
Suaoki Batería Externa Portátil
AC adaptador(con cable AC para cargar)
Adaptador para encendedor de cigarillos
(6530 a encendedor de cigarillos)
Cable tipo-C
Cable de alimentación CC (6.5x3.0mm macho a 5.5x2.1mm hembra)
Cable de Carga Solar
Manual de usuario
SUAOKI Tarjeta de agradecimiento
1
1
1
1
1
1
1
1
2
12
1 3
4
11
10
9
8
7
6
5
ES-43

1. Botón de arranque
2. Luz indicadora de encendido
3. Botón DC
4. DC luz indicadora de salida
5. Botón AC
6. AC luz indicadora de salida
7. AC potencia de salida
8. AC ENCENDIDO/APAGADO
9. DC potencia de salida
10. DC ENCENDIDO/APAGADO
11. Potencia de carga
12. Indicador del estado de batería
Ojo:
1. Si el producto no funciona, códigos de error van a ser mostrados en la pantalla.
2. La luz negra va a apagarse mientras que el aparato mantiene inactivo durante un periodo de
tiempo. Haga clic en un botón para encender la luz negra.
Explicación de botóns
• Botón de arranque
1) Encendido: Mantenga pulsando el botón más de 2 segundos para encender el producto. La
luz de indicador correspondiente va a funcionar y la pantalla LCD va a iluminarse.
2) Apagado: Mantenga pulsando el botón más de 2 segundos para apagar el producto y la
pantalla LCD. La luz de indicador correspondiente estará apagada.
• Botón DC
1) Encender la salida de DC: Mantenga pulsando el botón DC más de 2 segundos para
encender la salida de DC. La luz de indicador correspondiente va a funcionar y ‘DC ON’ va a
ser mostrado en la pantalla LCD.
2) Apagar la salida de DC: Mantenga pulsando el botón DC más de 2 segundos para apagar la
salida de DC. La luz de indicador correspondiente va a funcionar y ‘DC OFF’ va a ser mostra-
do en la pantalla LCD.
• Botón AC
1) Encender la salida de AC: Mantenga pulsando el botón AC más de 2 segundos para
encender la salida de AC. La luz de indicador correspondiente va a funcionar y ‘AC ON’ va a
ser mostrado en la pantalla LCD.
2) Apagar la salida de AC: Mantenga pulsando el botón AC más de 2 segundos para apagar la
salida de AC. La luz de indicador correspondiente va a funcionar y ‘AC OFF’ va a ser mostra-
do en la pantalla LCD.
Ojo: Cuando el producto no está encendido, la salida de DC/AC no va a ser activa. Si el
producto está encendido y la salida de DC/AC está apagado por defecto, tiene que mantener
pulsando el botón POWER para encender el producto y mantener pulsando el botón DC/AC
para encender la salida.
Orientación de Funcionamiento
Atención:
1. El entorno operativo debe cumplir nuestros requisitos.
2. Debe asegurarse de que la entrada y la salida del aire no están bloqueado.
ES-44

• Cómo cargar el producto
Ojo: Por favor, cargue el producto completamente antes de usar.
Hay 3 medidas para cargar el producto: el adapdator AC, el cable de carga solar o el cargador
para coche. Primero, tiene que elegir la fuente de entrada y un cargador correspondiente.
Luego, conecte el cargador al puerto de entrada del producto. Cuando el producto está
cargando, el icono de la batería va a parpadear en la pantalla LCD. Al estar completamente
cargado, el icono de la batería va a parar de parpadear.
A. Cargar con Cable de Carga Solar
1. Coloque su panel solar en un lugar donde se puede recibir directa luz solar y abundante sol.
2. Debe asegurarse de que la tensión de circuito abierto del panel solar cae dentro de 14-40V. La
máxima corriente de entrada de este producto es 60W.
3. Conecte el panel solar con el cable de carga solar. Asegúrase de que el cable de carga solar
está conectado correctamente y puede crear un contacto sólido con el puerto de entrada del
producto.
4. El producto posee un avanzado circuito de control incorporado. Cuando la batería está
cargado completamente, va a parar de cargar automáticamente.
B. Cargar con Adapdator AC
Para cargar el producto con el adapdator AC, inserte un extremo del adapdator a la toma
eléctrica y el otro al puerto de entrada del producto. Cuando el producto está cargando, puede
vigilar el estado de batería según el icono de batería en la pantalla LCD. El producto posee un
avanzado circuito de control incorporado. Cuando la batería está cargado completamente, va a
parar de cargar automáticamente.
.
C. Cargar con Cargador para Coche (no incluído)
Inserte un extremo del cargador para coche al recipiente de encendedores de cigarillos en el
coche y el otro al puerto de entrada del producto. El icono de batería va a parpadear si el
producto está cargando correctamente.
Ojo:
• No puede cargar el producto completamente cuando el cargador para coche está conectado
a una batería del coche de 12V pero puede hacerlo si la batería es de 24V.
• Es mejor cargarlo cuando el motor de su coche está encendido.
• Q & A
Q1: ¿Cómo comprobar el estado de carga?
El icono de batería indica el nivel de batería de este producto. El nivel de batería consiste en 5
segmentos. Cada segmento indica 20% de la capacidad de batería. Cuando la batería está
cargando, el icono parpadeará. Si el proceso de carga cumple, el icono va a dejar de parpadear
y todos los 5 segmentos van a ser rellenados.
Q2: ¿Cómo cargar otros dispositivos eléctricos?
1. Debe saber la eficiencia de trabajo de sus dispositivos eléctricos. Puede consultar el manual
de usuario de su dispositivo o buscar en línea.
ES-45

2. Debe saber la potencia de cada puerto de salida. Por ejemplo, la potencia del puerto de
salida AC está proveído por el inversor incorporado del producto, cuyo potencia máxima del
motor es 120W, lo que significa que si la potencia del dispositivo eléctrico conectado mantiene
superior a 120W en un largo periodo de tiempo, el inversor va a apagar la salida.
Q3: ¿Qué es Profundidad de Descarga (PDD)?
Para prolongar la vida de batería, hemos colocado el PDD de este generador eléctrico portátil a
90%, lo que significa que solo 90% de la capacidad de batería (200Wh) puede ser descargado.
10% de la energía es reservada, por lo que la batería no va a ser dañada a causa de descarga
excesiva.
Resolución de problemas
E01
E02
E03
E10
Códigos
de error
Causa Solución
Protección por sobre
temperatura (Sistema)
Compruebe si la temperatura del ambiente es
superior a 40°C. Cuando la temperatura enfria,
la salida va a ser encendido otra vez.
Protección de sobre
voltaje (Batería)
Desconecte el producto desde la fuente de
energía para dejar de cargar y reactivarlo.
Protección de daño de
batería
Contacte a la atención del cliente de Suaoki.
Protección de EDC
(estado de carga)
Cargue el producto a tiempo y reactívelo
después de cargarlo completamente.
E11
Protección de bajo voltaje
(Batería)
Cargue el producto a tiempo a tiempo y
reactívelo después de cargarlo completamente.
E12
Protección de sobre
corriente inversor
Compruebe si el puerto de salida AC está
sobrecargado o cortocircuitado.
E14
Protección de cortocircuito
inversor
Compruebe si el puerto de salida AC está
sobrecargado o cortocircuitado.
E16
Protección de sobre
voltaje carga
Compruebe si el voltaje de entrada supera el
máximo voltaje de entrada.
E13
Protección de sobre carga
inversor
Compruebe si la salida AC está sobrecargado.
Por favor, haga referencia a la sección ‘Especifi-
cación del Producto’ por capacidad de sobre
carga.
ES-46
E17
E21
E22
E27
Protección de baja
temperatura carga
La temperatura de la batería es demasiado
baja. Restaure la batería por añadir su
temperatura.
Protección de sobre
corriente salida de 12V10A
Compruebe si el puerto de salida está
sobrecargado o cortocircuitado.
Protección de sobre carga
salida de 12V10A
Compruebe si el puerto de salida está
sobrecargado o cortocircuitado.
Protección de sobre carga
salida de total potencia
Reduzca la carga de energía.
E28
Protección de sobre
temperatura carga
La unidad es demasiado caliente. Enfrie el
producto antes de cargar el producto.
E29
Protección de sobre
temperatura descarga
La unidad es demasiado caliente. Enfrie el
producto antes de descargar el producto.
Salida AC
Modelo
Especificaciones de Salida
S200
Capacidad de Batería 200Wh 200Wh
120 W
120 W
Especificación de Productos
Potencia
Nominal de
Salida
200 W (1s)
200 W (1s)
Potencia de
Pico de Salida
110Vac
220-240Vac
Voltaje Nominal
de Salida
50/60Hz
50Hz
Frecuencia
Nominal
1
1
Factor de
Potencia
<3%
<3%
THDV
ES-47

Salida
DC12V
Salida
USB-A1
Salida
USB-A2
<8W
<10W
Consumo
Eléctrico en
Vacío Reducido
125W≤Load<150W@10S;
150W≤Load<180W@5s;
180W≤Load<200W@1s;
125W≤Load<150W@10S;
150W≤Load<180W@5s;
180W≤Load<200W@1s;
Capacidad de
Sobre Carga
90%
90%
Eficiencia
Máxima (>70%
potencia de carga
de energía)
10~12.6V
10~12.6V
Rango de
Tensión de
Salida
120W
120W
Potencia
Nominal de
Salida
Sobre Carga
Potencia
/Corriente
Aparato
Apoyado de
Carga Rápida
Rango de
Tensión de
Salida
Salida Nominal
Corriente
Corriente
Sobrecargado
La potencia es mayor que
125W o la corriente es
superior a 11A
La potencia es mayor que
125W o la corriente es
superior a 11A
BC1.2, Apple, Samsung BC1.2, Apple, Samsung
5V±0.25V 5V±0.25V
2.4A 2.4A
2.8-3.8A 2.8-3.8A
Protocolo de
Comunicación(-
Carga Rápida)
Rango de
Tensión de
Salida
Corriente
Nominal de
Salida
Corriente
Sobrecargado
QC3.0 QC3.0
5~12V (5V por defecto) 5~12V (5V por defecto)
5V2.5A、9V2A、12V1.5A 5V2.5A、9V2A、12V1.5A
2.8-3.8A 2.8-3.8A
ES-48

Entrada PV
Batería
Salida
USB-C
Entrada
PV
Tensión Nominal
Potencia Nominal (Wh)
Tipo Celular
Modelo de Batería
Capacidad Nominal
11.1 V
200Wh
18000mAh
Li-ion
INR18650P
11.1 V
200Wh
18000mAh
Li-ion
INR18650P
Protocolo de
Comunicación
(Carga Rápida)
Rango de
Tensión de
Salida
Corriente
Nominal de
Salida
Corriente
Sobrecargado
PD protocolo
(Salida máxima: 45W)
PD protocolo
(Salida máxima: 45W)
5~20V (5V por defecto) 5~20V (5V por defecto)
(5~20)V/2.25A (5~20)V/2.25A
2.3-3A 2.3-3A
Rango de
Tensión de
Entrada
Rango de
Tensión MTTP
Tensión Máxima
de entrada
Eficiencia
MPPT
Eficiencia
Máxima
Eficiencia
Máxima
14~40 Vdc 14~40 Vdc
Potencia Máxima
de Entrada
60 W 60 W
15-40 Vdc 15-40 Vdc
40 Vdc 40 Vdc
99.50% 99.50%
>90% >90%
MPPT MPPT
ES-49

General
Configuración
Temperatura de Trabajo
Calificación IP
Condición de Trabajo
Dimensiones
3S8P
0°C-40°C
3S8P
0°C-40°C
IP 21
Humedad Relativa: 5%-90%
Temperatura: 0-40°C
196mm*65mm*255mm
Peso Neto 2.7 kg
Garantía
Nuestra compañía ofrece a los clientes garantía de 12 meses válida desde la fecha de compra.
Contactar a nosotros
Si tiene consultas o sugerencias sobre nuestros productos, podía dirigirse a nuestro correo:
[email protected], y le responderemos antes posible.
ES-50

この度は、suaokiをお買い上げいただきありがとうございます。
ご使用前に必ずこの取扱説明書をよくお読みいただき、正しくお使いください。なお、お読みになっ
たあとは、お使いになる方がいつでも見られるところに必ず保管してください。
各部の名称
A
B
C
D
E
F
G
H
I
J
A.LCDディスプレイ
B.電源ボタン
C.DCボタン
D.ACボタン
E.USB出力ポート
F.QC3.0出力ポート
G.DC12V出力ポート
H.USB-C&PD2.0出力ポート
I.PV/ADAPTER入力ポート
J.AC120W出力ポート
警告
1.ご使用前に必ず警告内容をよくお読みいただき、正しくお使いください。なお、お読みになった
あとは、お使いになる方がいつでも見られるところに必ず保管してください。
2.直射日光の当たる場所や雨や湿気の多い場所での使用は避けてください。
3.ラジエーター、オーブン、その他の熱源の近くには設置しないでください。。
4.本製品を平らで安定した場所に置きます。
5.本製品が汚れた場合、乾いた布で拭いてください。
6.本製品を分解、または改造しないでください。
7.火から遠ざけてください。万が一火災が発生したら、本製品に粉末消火剤で消火してください。
水系消火器を使用した場合は感電の恐れがあります。
8.動作温度:0℃~40℃;動作湿度:5%~90%
JP-51

低温環境に対するご注意
低温環境はバッテリーの容量に影響します。もし、0度以下の環境で本製品をご使用になる場合、
ぜひ本製品を充電してはいけません。さもないと、リチウムイオンバッテリが破損され、バッテリの
容量が回復できない恐れがあります。
1.低温充電防止
本製品は低温充電防止機能がついています。0度以下の環境において、ポータブル
パワーサプライは自動的に充電を中止します。温度が5℃以上になったら、再度充電がスタート
します。
2.低温放電防止
本製品は低温放電防止機能がついています。環境の温度が-20℃以下になると、本
製品はACとDCアウトプットを中止します。それで、15秒以内に自動的に遮断します。温度が-15
℃以上になると、本製品はまた出力できるようになります。
保 管 及びメンテナンス
1.保管する前にフル充電し、3ヶ月に1回充電してください。
2.乾燥した、涼しい、換気の良い場所で、保管すること。水、可燃性ガス、腐食性物質、金属粉塵、塩
から離して保管してください。保存温度:0℃〜40℃。
3.指示に従って製品を使用、保管、および保守しないと、保証が無効になります。
太陽光発電システム
DC電源/ソー
ラーパネル
バッテリー
システム
充 電コントローラ
ACインバ
ーター出力
低パワー
家電製品
(低消費電力)
スマ ートフォン、コン
ピュータ、タブレット
USB出力
12V/10A
車載電気製品
JP-52
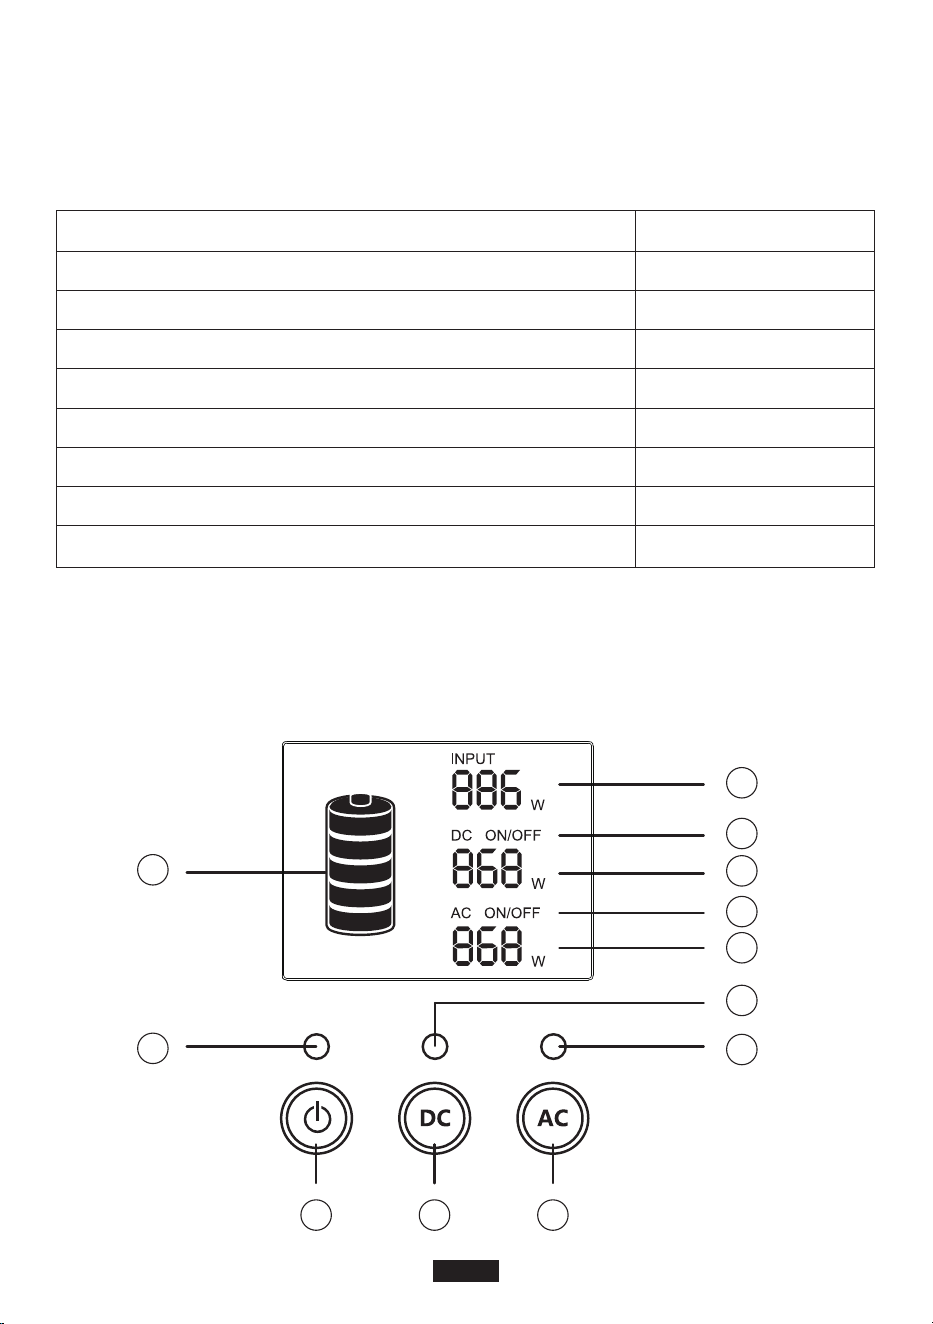
荷物の開封について
荷物を開封する前に、荷物が破損しているかどうかを確認してください。配送中に商品が破損した
場合や到着時に商品が紛失した場合は、メールでSuaokiのカスタマーサービス(メールアドレス:
[email protected])にご連絡ください。
パッケージ内容は下記とあります。
内容 数量
Suaoki ポータブル電源
ACアダプター(AC充電ケーブル付き)
シガーライターアダプター(シガレットライター6530)
タイプCケーブル
DC電源ケーブル(6.5x3.0mmオス〜5.5x2.1mmメス)
ソーラーチャージャーケーブル
ユーザーマニュアル
SUAOKIありがとうカード
1
1
1
1
1
1
1
1
製品概要
LCDディスプレイ
2
12
1 3
4
11
10
9
8
7
6
5
JP-53

ご注意
1.製品が誤動作すると、画面にエラーコードが表示されます。
2.製品が一定時間休眠状態になったら、バックライトは自動的にオフになります。ボタンをクリック
するとバックライトはオンにします。
ボタンの使い方
▪電源スイッチ
1)電源スイッチをオンにする:電源ボタンを2秒以上長押しすると、電源が入り、対応する表示ラン
プが点灯し、LCD画面が点灯します。
2)電源スイッチをオフにする:電源ボタンを2秒以上長押しすると、製品とLCD画面の電源が切れ
ます。対応する表示ランプが消灯します。
▪DCボタン
1)DCボタンをオンにする:DCボタンを2秒以上長押しすると、DC出力がオンになり、対応する表示
ランプが点灯し、LCD画面に「DCON」と表示されます。
2)DCボタンをオフにする:DCボタンを2秒以上長押しすると、DC出力がオフになります。対応する
表示ランプが消灯し、LCD画面に「DCOFF」が表示されます。
▪ACボタン
1)AC出力をオンにする:ACボタンを2秒以上長押しすると、AC出力がオンになり、対応する表示ラ
ンプが点灯し、LCD画面に「ACON」と表示されます。
2)ACボタンをオンにする:2秒以上ACボタンを長押しすると、AC出力がオフになります。対応する
表示ランプが消灯し、LCD画面に「ACOFF」が表示されます。
使い方
ご 注 意:
1.動作環境は当社の要件を満たす必要があります。
2.空気の出入口が塞がれていないことを確認します。
▪充電のしかた
ご 注 意: 使用前にフル充電してください。
製品の充電方法はACアダプター、ソーラーパネルまたはカーチャージャー三つあります。まず、入
力ソースとを決定し、それに応じて充電器を選択する必要があります。次に、充電器を製品の入力
ポートに接続して充電を開始します。製品が充電されると、バッテリーアイコンがLCD画面上で点滅
します。完全に充電されると、バッテリーアイコンの点滅が停止します。
1.電源ボタン
2.電源インジケーターライト
3.DCボタン
4.DC出力表示ランプ
5.ACボタン
6.AC出力表示ランプ
7.AC出力電力
8.ACオン/オフ
9.DC出力電力
10.DC ON/OFF
11.充電効率
12.バッテリ容量
JP-54

A.ソーラーパネルで充電する
1.お使いのソーラーパネルを直射日光と豊かなに最も多く当たる所に太陽電池パネルを置いてく
ださい。
2.ソーラーパネルの電圧が14〜40Vの範囲内にあることを確認お願いします。本製品の最大入力
電力は60Wです。
3.ソーラー充電ケーブルを使用してソーラーパネルと製品を接続します。ソーラー充電ケーブル
が正しく接続されていることを確認して、製品の入力ポートにしっかりと接続してください。
4.製品には高度な制御回路が内蔵されています。バッテリーが完全に充電されると、自動的に充電
が停止します。
B.ACアダプターで充電する
製品をACアダプタで充電するには、アダプタの一端を壁のコンセントに差し込み、もう一端を製品
の入力ポートに差し込みます。製品が充電されているときは、LCD画面のバッテリアイコンを確認し
てバッテリの状態を見えます。本製品には、高度な制御回路が内蔵されています。バッテリーが完
全に充電されると、自動的に充電が停止します。
C.カーチャージャーで充電する(含まれていない)
車の充電器の一端を車のシガレットライターのコンセントに差し込み、もう一端を製品の入力ポー
トに差し込みます。バッテリーのアイコンが点滅すると、製品が正常に充電されていることを示しま
す。
ご 注 意:
▪12V自動車のカーシガーソケットだと、ポータブルパワーサプライをフル充電できませんが、24
自動車だったらできます。
▪車のエンジンが始動している間は充電するのが一番良いです。
▪Q&A
Q1:充電状況を確認するには?
バッテリーアイコンは、この製品のバッテリー残量を示します。バッテリーレベルは5つのセグメン
トで表示されます。各セグメントは、バッテリ容量の20%を示します。バッテリーが充電されると、ア
イコンが点滅します。バッテリーが完全に充電されると、アイコンの点滅が止まり、5つのセグメン
トすべてが充電されます。
Q2:他の電子機器を充電する仕方
1.電子機器の作業効率を知る必要があります。電子機器のユーザーマニュアルを確認したり、オン
ラインでそのような情報を検索することができます。
2.各出力ポートの電源を確認する必要があります。例えば、AC出力ポートの電源は、最大定格出力
が120Wの内蔵インバータによって供給されます。つまり、接続された電子機器の電源が長時間
120Wを超えると、インバータは出力をシャットダウンします。
Q3:放電深度(DOD)とは何ですか?
バッテリ寿命を延ばすために、このポータブル電源のDODを90%に設定しました。これは、バッテ
リ容量(200Wh)の90%しか放電できないことを意味します。バッテリーが過放電によって損傷しな
いように、エネルギーの10%を保持します。
JP-55

▪50Hz/60Hz周波数選択
ス テップ 1: 電源ボタン、DCボタン、ACボタンを同時に押します。LCD画面が点灯し、現在の周波数
(50Hzまたは60Hz)が表示されます。ボタンを放して次のステップに進みます。
ス テップ 2: DCボタンまたはACボタンを長押しして、50Hzと60Hzの間で選択します。LCDに表示さ
れる周波数はそれに応じて変化します。
ス テップ 3: 希望の周波数が選択されたら、ACとDC電源ボタンを同時に押して選択を確定します。
設定が完了したら、手順1を繰り返して現在の周波数を確認します。
注:DC12V出力ポートが過負荷または短絡すると、BMS保護が起動されることがあります。その結
果、製品はシャットダウンされ、オンにすることはできません。
この場合、製品を充電して再起動する必要があります。
故障かな?と思ったら
E01
E02
E03
E10
エラーコード
症状 考えられる原因
過熱保護(システム)
周囲温度が40℃以上であることを確認してくだ
さい。温度が下がると、出力が再びオンになり
ます。
過電圧保護(バッテリ)
製品を電源から切り離して充電を停止し、再起
動してください。
バッテリーの損傷保護
Suaokiカスタマーサービスにお問い合わせくだ
さい。
SOC(充電状態)保護
製品を所定の時間内に充電し、完全に充電した
後に再起動してください。
E11
バッテリ低電圧保護
製品を一定の時間内に充電し、完全に充電した
後に再起動してください。
E12
インバータの過電流保護
AC出力ポートが過負荷または短絡していない
かどうかを確認してください。
E14
インバータの短絡保護
AC出力ポートに過負荷または短絡が発生して
いないかどうかを確認してください。
E16
充電過電圧保護
入力電圧が最大入力電圧を超えていないか確
認してください。
E13
インバータ過負荷保護
AC出力が過負荷になるかどうかを確認してくだ
さい。過負荷容量については、「製品仕様」を参照
してください。
JP-56

E17
E21
E22
E27
低温保護の充電
バッテリーの温度が低すぎます。バッテリの温
度を上げて元に戻します。
12V10A出力過電流保護
出力ポートに過負荷または短絡が発生してい
ないかどうかを確認します。
12V10A出力過負荷保護
出力ポートに過負荷または短絡が発生してい
ないかどうかを確認します。
総出力電力過負荷保護 負荷電力を減らしてください。
E28
過充電保護機能
内部パーツが熱すぎます。製品を充電する前に
冷却してください。
E29
放電過熱保護
内部パーツが熱すぎます。製品を放電する前に
製品を冷却してください。
AC出力
モデル
出力仕様
S200
バッテリー容量 200Wh 200Wh
120W
120W
製品仕様
定格出力電力
200W(1s)
200W(1s)
ピーク出力電力
110Vac
220-240Vac
定格出力電圧
50/60Hz
50Hz
定格周波数
1
1
力率
<3%
<3%
THDV
JP-57

DC12V
出力
USB-A1
出力
USB-A2
出力
<8W
<10W
無負荷消費
電力
125W≤負荷<150W@10S;
150W≤負荷<180W@5s;
180W≤負荷<200W@1s;
125W≤負荷<150W@10S;
150W≤負荷<180W@5s;
180W≤負荷<200W@1s;
過負荷容量
90%
90%
最大効率(>70
%負荷電力)
10〜12.6V
10〜12.6V
出力電圧範囲
120W
120W
定格出力電力
過負荷電力/
電流
高速充電対応
デバイス
出力電圧範囲
定格出力電流
過負荷電流
電力が125Wより大きいか、ま
たは電流が11Aより大きい
電力が125Wより大きいか、ま
たは電流が11Aより大きい
BC1.2,アップル、サムスン BC1.2,アップル、サムスン
5V±0.25V 5V±0.25V
2.4A 2.4A
2.8-3.8A 2.8-3.8A
出力電圧範囲
OutputVoltage
Range
定格出力電流
過負荷電流
QC3.0 QC3.0
5〜12V(既定値5V) 5〜12V(既定値5V)
5V2.5A、9V2A、12V1.5A 5V2.5A、9V2A、12V1.5A
2.8-3.8A 2.8-3.8A
JP-58

PV入力
バッテリー
USB-C
出力
PV入力
定格電圧
定格電力(Wh)
セルタイプ
バッテリモデル
定格出力
11.1V
200Wh
18000mAh
リチウムイオン
INR18650P
11.1V
200Wh
18000mAh
リチウムイオン
INR18650P
通信プロトコル
(高速充電)
出力電圧範囲
定格出力電流
過負荷電流
PDプロトコル
(最大出力:45W)
PDプロトコル
(最大出力:45W)
5〜20V(既定値5V) 5〜20V(既定値5V)
(5〜20)V/2.25A (5〜20)V/2.25A
2.3-3A 2.3-3A
入力電圧範囲
MTTP電圧範囲
最大入力電圧
MPPTの効率
最大効率
ソーラー充電モ
ード
14〜40Vdc 14〜40Vdc
最大入力電力
60W 60W
15-40Vdc 15-40Vdc
40Vdc 40Vdc
99.50% 99.50%
>90% >90%
MPPT MPPT
JP-59

ユニバーサル
構成
作業温度
IP格付け
作業条件
寸法
3S8P
0°C-40°C
3S8P
0°C-40°C
IP21
相対湿度:5%-90%
温度:0-40°C
196mm*65mm*255mm
正味重量 2.7kg
保証
当社は、購入日から12ヶ月の保証をお客様に提供します。
お問い合わせ
当社の製品に関するお問い合わせやご意見は、[email protected]まで電子メールでお送りくだ
さい。できるだけ早く対応いたします。
JP-60